

Page 1
Page 2

Page 3
User's Guide
Contents
Unpacking the Projector..................................................................................................................... 2
Meaning of Symbols............................................................................................................................ 2
Features .............................................................................................................................3
Before Using the Projector
Part Names and Functions .............................................................................................. 4
Front/Top.............................................................................................................................................. 4
Control panel........................................................................................................................................ 4
Rear....................................................................................................................................................... 5
Base ...................................................................................................................................................... 5
Remote Control.................................................................................................................................... 6
Installation .........................................................................................................................8
Installation method.............................................................................................................................. 8
Projection distance and screen size.................................................................................................. 8
Other installation methods ................................................................................................................. 9
Connecting Equipment
Connecting a Computer ................................................................................................. 10
Compatible computers...................................................................................................................... 10
Outputting images and audio from a computer.............................................................................. 11
Adjusting computer generated images ........................................................................................... 11
Configuration Menus
Menu operation............................................................................................................... 12
Function list .................................................................................................................... 13
Troubleshooting
When You Suspect a Problem....................................................................................... 16
Power indicator.................................................................................................................................. 16
Warning indicator .............................................................................................................................. 16
When the indicators provide no help............................................................................................... 17
Appendices
Projector Care ................................................................................................................. 20
Cleaning.............................................................................................................................................. 20
Replacing consumables.................................................................................................................... 21
Glossary .......................................................................................................................... 24
Supported Display Resolutions .................................................................................... 26
Optional Accessories ..................................................................................................... 28
Specifications ................................................................................................................. 29
Appearance ..................................................................................................................... 30
Index ................................................................................................................................ 31
1
Page 4

Unpacking the Projector
When you unpack the projector, make sure that you have all these components. If any of the
components are missing or incorrect, please contact the place of purchase.
Y Projector Y Remote control Y Power cable
For connecting the projector to a
wall outlet.
Y RGB SCART adapter
Use a commercially-available
SCART cable to make the
connections when projecting RGBvideo and component video images.
Some regions may not have the
RGB SCART adapter included as an
accessory.
Documentation
Y User's Guide (this guide)
Y Safety Instructions/World-Wide Warranty Terms
Y Quick Reference Guide
Y Rubber feet
Attach when installing the projector
upside down.
Meaning of Symbols
Indicates the possibility that people may be injured or the equipment may be damaged if these
c
symbols are ignored.
p
s
g
The terms "this unit" and "this projector" which appear in this manual may also refer to the accessories supplied with the
projector and other optional products.
2-
Indicates important related information or useful information and things you should know.
Indicates related topics and pages which contain more detailed information.
Provides terminology definitions. s "Glossary" P.24
Page 5

Features
fColour mode
Image quality can be selected according to the type of
scene. s "Selecting a colour mode" Quick Reference
Guide
fCompact and lightweight
fClear, vivid, images
The projector's high resolution and high luminance
achieves a legible display. Project sharp, detailed images,
even in bright places.
fEase of use
The projector's compact body is easy to carry.
Dimensions: 29.4(d) × 40.2(w) × 11.4(h) cm
Weight : approx. 3.6kg
fAuto setup
(Computer connections)
The projector analyses the signal of the computer to
which it is connected and automatically makes
adjustments to ensure optimal projection results.
s "Auto setup (Computer connections)" P.11
Various projector operations can be easily performed
using the included remote control, as follows:
• using the configuration menus
• recalling your favourite settings
• pausing projection
Features-3
Page 6
Before Using the Projector
Part Names and Functions
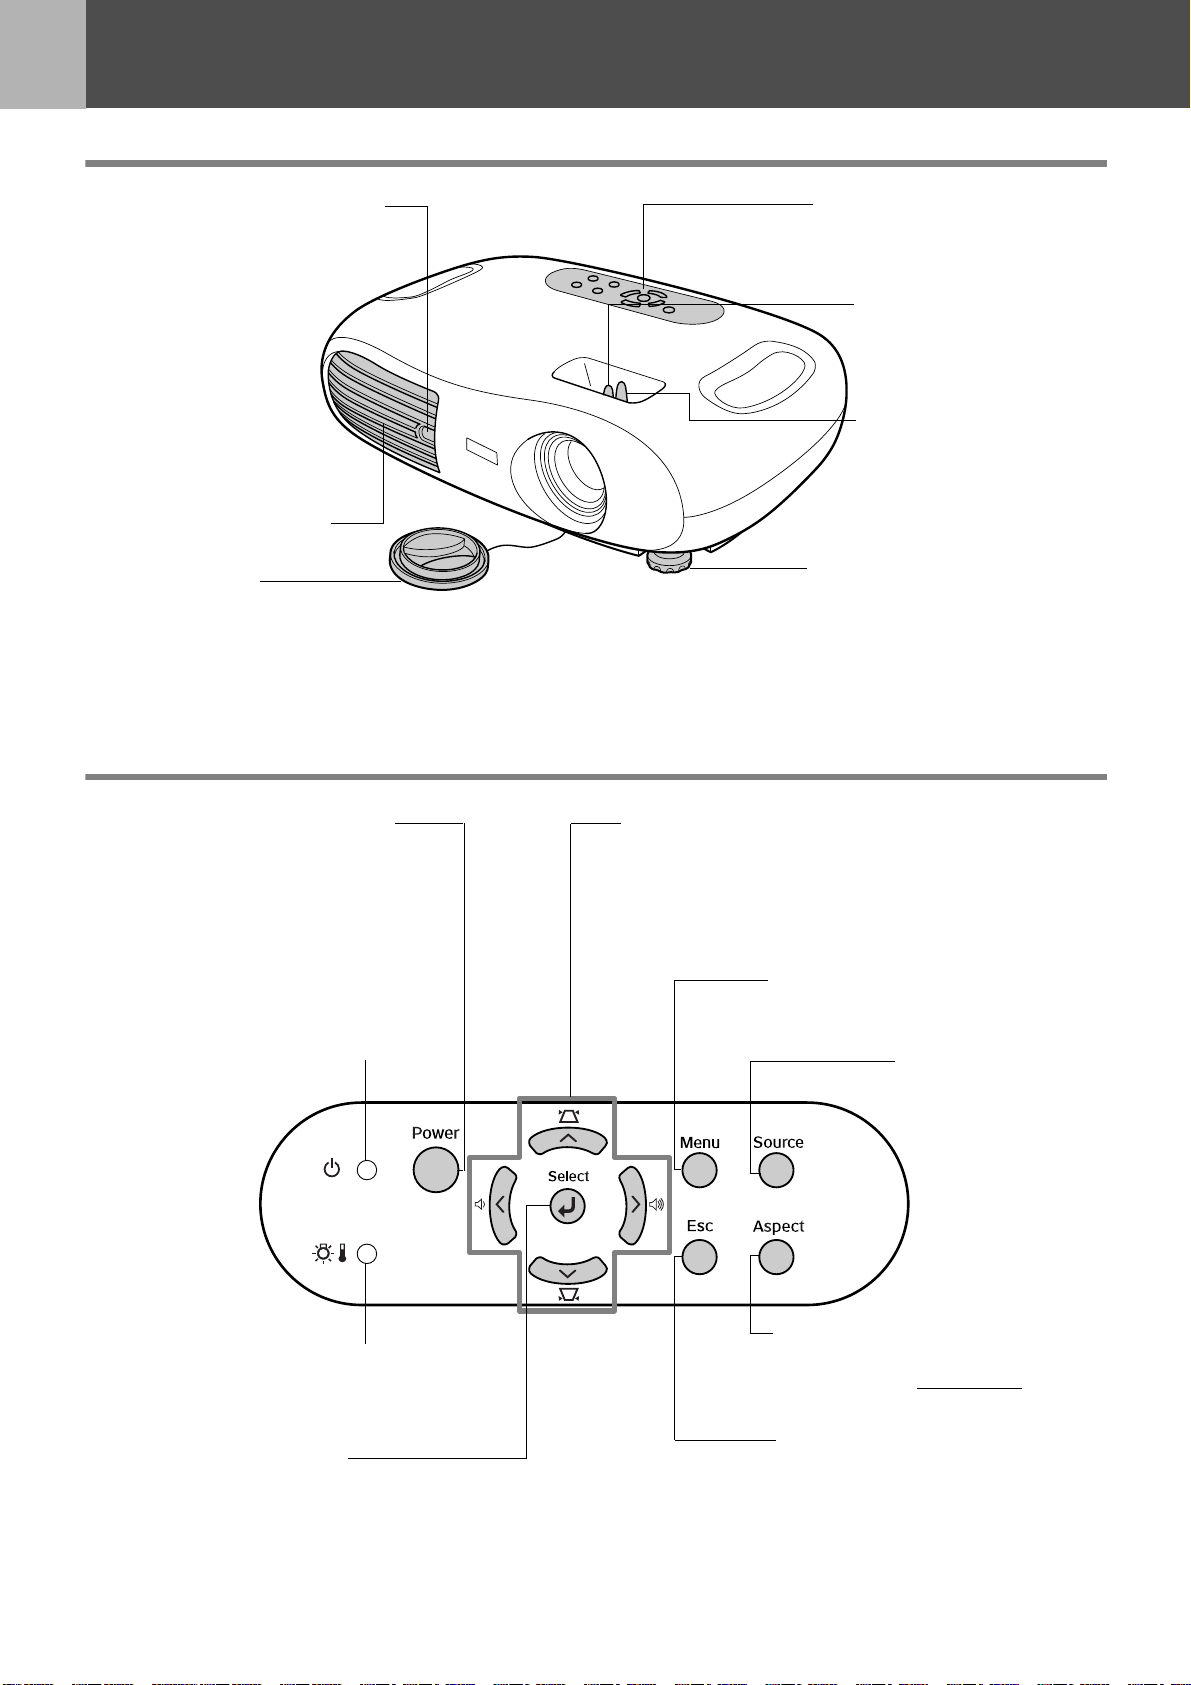
Front/Top
• remote control infrared
receiver s P. 7
Receives signals from the
remote control.
• ventilation outlet
• lens cover
Attach when not using the
projector to prevent the lens from becoming dirty or
damaged.
Control panel
• control panel s P. 4
• focus ring
s Quick Reference
Guide
Adjusts the image focus.
•zoom ring
s Quick Reference
Guide
Adjusts the size of the
projected image.
• front foot (left) s Quick
Reference Guide
Another front foot is located
on the right side.
Extend and retract to adjust
the projection angle.
• [Power] button s Quick
Reference Guide
Turns the projector on and off.
• Power indicator s P. 1 6
Flashes or lights in different colours
to indicate the operating status of
the projector.
• Warning indicator s P. 16
Flashes or lights in different colours
to alert you to problems with the
projector.
•[e] button s P. 1 2
Accepts a menu item or advances
to the next screen or menu when
viewing configuration menus.
•[u][d][l][r] buttons s P.12
•[w][v]: keystone correction buttons
s Quick Reference Guide
Press to correct keystone distortion in images.
•[a][b]: volume buttons
Adjusts the volume.
• [Menu] button s P. 1 2
Displays or hides the
configuration menus.
• [Source] button
s Quick
Reference Guide
Switches the input
source between the
Input A port, S-Video
port, Video port and
Input B port each
time the button is
pressed.
• [Aspect] button s Quick
Reference Guide
Changes the Aspect ratiog of
the projected image.
• [Esc] button s P. 1 2
Stops the current function.
Displays the previous screen or
menu when viewing
configuration menus.
4-Part Names and Functions
Page 7

Rear
Before Using the Projector
• Input B port s P.1 1
Inputs signals from a computer.
• Video port s Quick
Reference Guide
Inputs Composite Videog
signals to the projector.
Connect using an A/V cable.
• S-Video port s Quick
Reference Guide
Inputs S-Videog signals to the
projector.
Connect using an S-Video cable.
• Input A port s Quick
Reference Guide
Inputs Component Videog or
RGB-Video
g signals.
• remote control infrared
receiver s P. 7
Receives signals from the remote
control.
• speaker
• power inlet s Quick
Reference Guide
Connects the power cable.
• security lock s P. 2 4
• remote control holder s P. 7
Store the remote control in here when
not in use.
• Audio port s P.11,
Quick Reference Guide
Inputs audio signals to the projector. Connect using an A/V
cable, or a stereo RCA cable.
When using computer and video equipment alternately, swap
the cable or use an audio switch (commercially available).
Base
• Control (RS-232C) port
Connects the projector to a
computer using an RS-232C
cable. This port is for control use
and should not be used by the
customer.
• Ceiling mount fixing points
(3 points)
Install the optional ceiling mount
here when suspending the projector
from the ceiling.
• air filter (air intake vent)
s P.20, P.21
Prevents dust and other foreign
particles from being drawn into
the projector. Open the cover
when changing the air filter.
• lamp cover s P. 22
Open this cover when
replacing the lamp inside
the projector.
Part Names and Functions-5
Page 8
Before Using the Projector
Remote Control
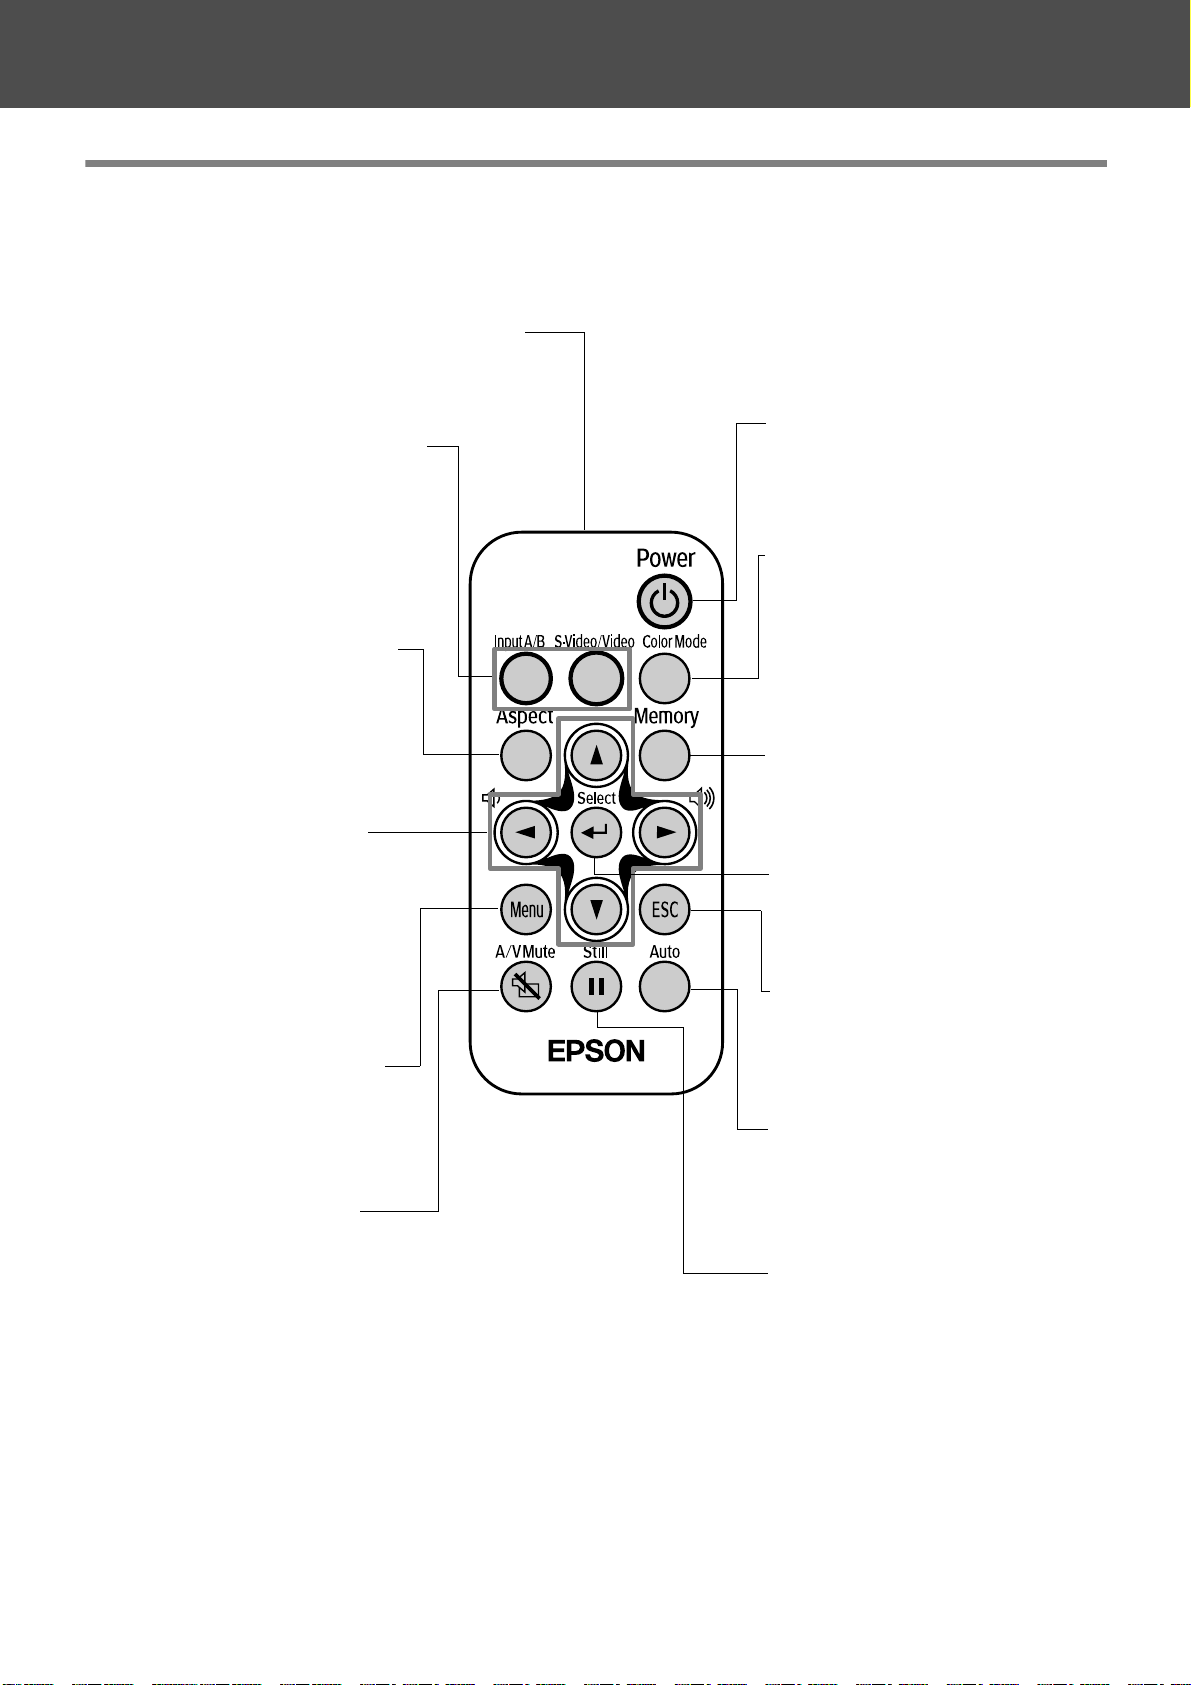
• remote control infrared transmitter
Transmits remote control signals.
• [Source] buttons
s Quick Reference Guide
[Input A/B]: Switches between the
signal source being input to the
Input A port, and the Input B port.
[S-Video/Video]: Switches between
the signal source being input to the
S-Video port and the Video port.
• [Aspect] button s Quick
Reference Guide
Changes the aspect ratio of the
projected image.
•[u][d][l][r] buttons
s P. 12
Selects menu items and setting
values.
•[a][b]: volume buttons
Adjusts the volume.
• [Menu] button s P.1 2
Displays or hides the
configuration menus.
• [A/V Mute] button
s Quick Reference Guide
Momentarily turns off the audio and
video.
• [Power] button
s Quick Reference Guide
Turns the projector on and off.
• [Color Mode] button
s Quick Reference Guide
Selects the colour mode. The
colour mode changes in the order
of Dynamic, Living Room, Theatre
and Theatre Black each time the
button is pressed.
• [Memory] button
s Quick Reference Guide
Recalls settings saved to memory
in the configuration menus.
•[e] button s P. 1 2
Accepts a menu item or advances
to the next screen or menu when
viewing configuration menus.
• [Esc] button s P. 12
Stops the current function.
Displays the previous screen or
menu when viewing configuration
menus.
• [Auto] button s P. 1 1
Automatically adjusts analog RGB
computer signals to their optimum
settings.
• [Still] button
s Quick Reference Guide
Keeps the current computer or
video image on the screen.
6-Part Names and Functions
Page 9
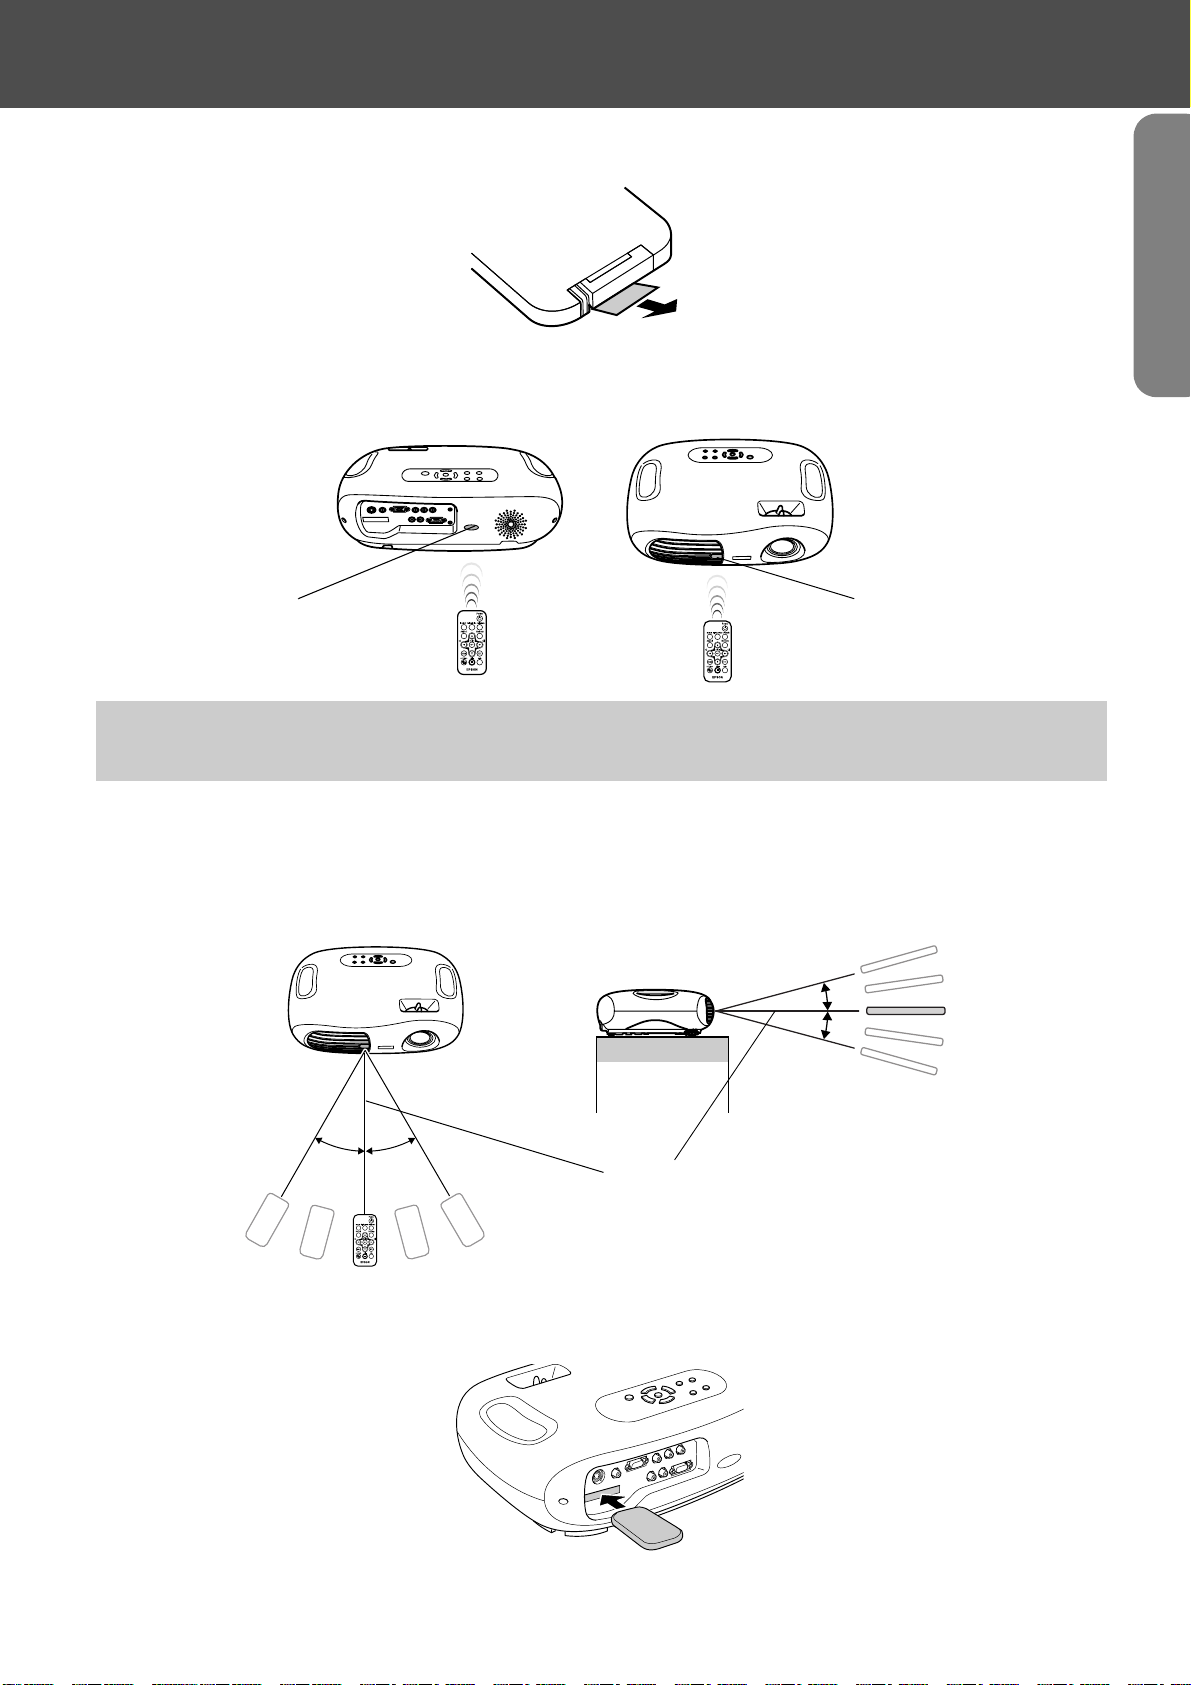
fBefore using the Remote Control
Remove the insulating tape.
fUsing the Remote Control
Operate the remote control by aiming it at the remote control infrared receiver on the projector.
Before Using the Projector
remote control
infrared receiver
If direct sunlight or fluorescent lighting hits the remote control infrared receiver, you may not be able to use the remote
control.
p
remote control
infrared receiver
fOperating range
Operable distance: Max. approx. 6m (20ft.)
(May be shorter depending on conditions.)
Operable angle : approx. 30° horizontally, 15° vertically
* The remote control infrared receiver on the back of the projector can also be used under the same conditions.
15°
15°
30° 30°
Max 6m
fStorage
When not using the remote control, please store it in the remote control holder on the projector.
Part Names and Functions-7
Page 10
Installation
Be sure to read the "Safety Instructions / World-Wide Warranty Terms" guide before installation.
c
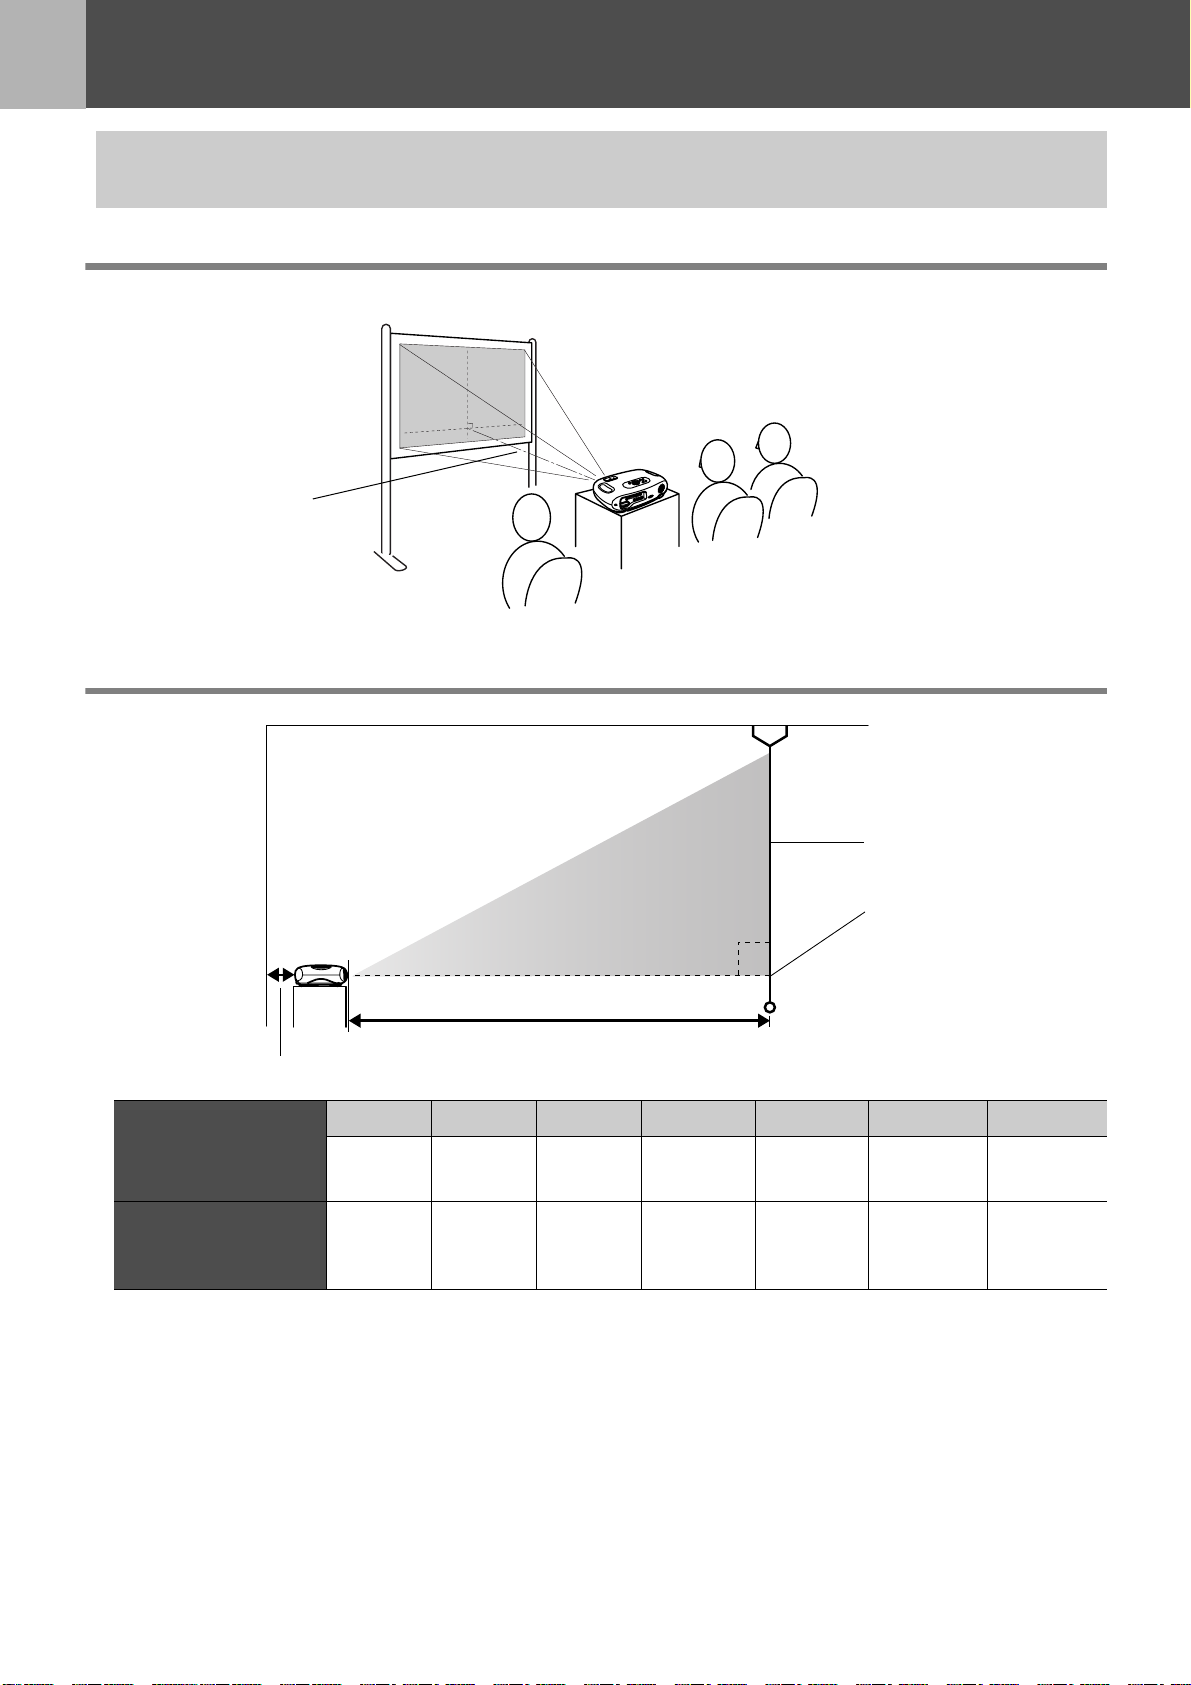
Installation method
Set up the projector so that it is at right angles to a screen.
Projection distance:
73-1165cm
Projection distance and screen size
Projection distance
20cm(7.9in.)or more
16:9 Screen size
cm
(ft.)
Projection distance
cm
(ft.)
30" 40" 60" 80" 100" 200" 300"
66 × 37
(2.1 × 1.2)
73 − 114
(2.4 − 3.7)
89 × 50
(2.8 × 1.6)
98 − 153
(3.2 − 5.0)
130 × 75
(4.2 × 2.4)
149 − 231
(4.9 − 7.6)
180 × 100
(5.7 × 3.2)
200 − 309
(6.6 − 10.1)
90°
220 × 120
(7.2 × 4.1)
251 − 387
(8.2 − 12.7)
Screen
Centre of lens
440 × 250
(14.4 × 8.2)
504 − 776
(16.5 − 25.5)
660 × 370
(21.6 × 12.1)
758 − 1165
(24.9 − 38.2)
The values should be used as a guide for setting the projector.
8-Installation
Page 11
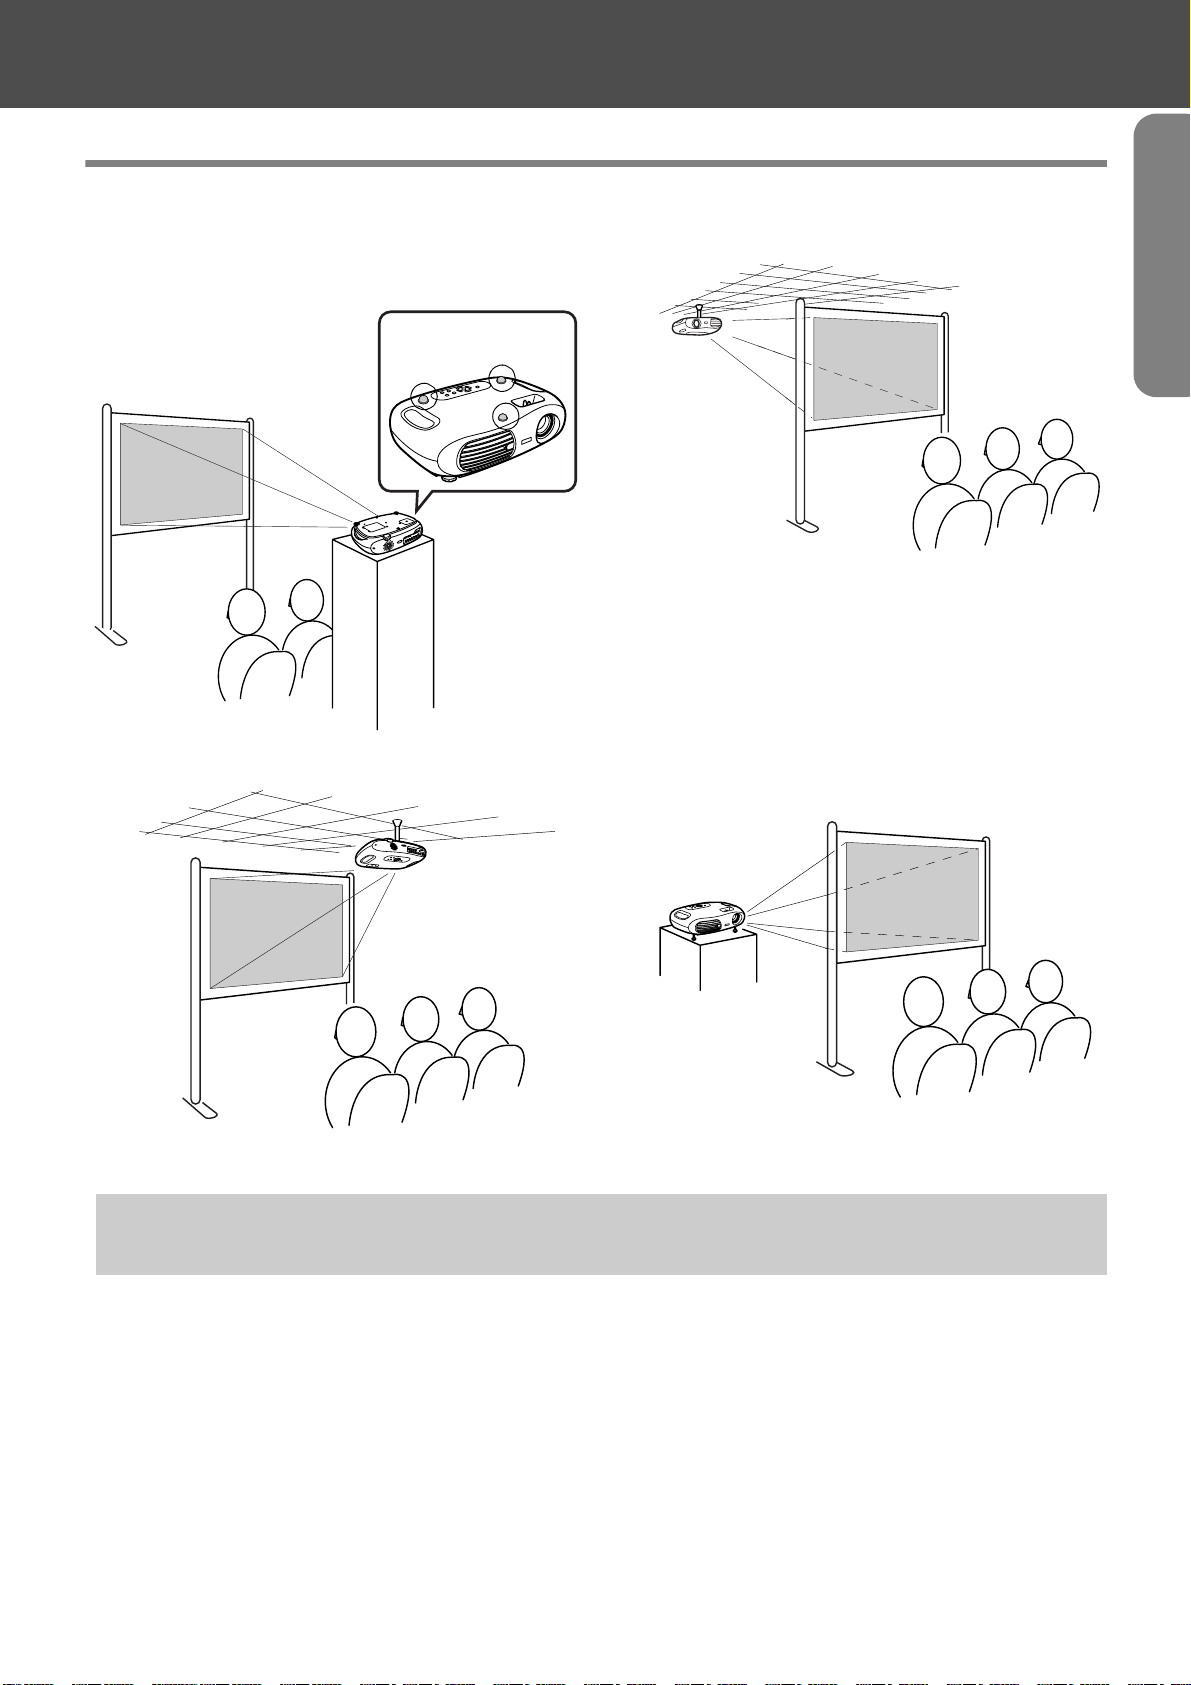
Other installation methods
Before Using the Projector
fProjecting when upside down
(Front/Ceiling)
Attach the enclosed rubber feet to prevent the operation
panel from contacting the surface on which it is placed.
Rubber feet
(Attach In 3 places)
fCeiling projection
fCeiling/Rear projection
(Using a translucent screen)
fRear projection
(Using a translucent screen)
*The optional ceiling mount is required when installing the projector from a ceiling. Please contact your dealer if you wish
to use this method, as special equipment is required for installation. s "Optional Accessories" P.28
When using rear projection, or projecting from a ceiling, select the appropriate mode in the "Setting" → "Screen" →
"Projection" configuration menu. s "Setting menu" P.14
p
Installation-9
Page 12
Connecting Equipment
Connecting a Computer
See the "Quick Reference Guide" for instructions on connecting to video equipment.
When connecting, be sure to:
• Turn off the power for both the projector and the computer.
c
Compatible computers
p
Damage may result if you try to make a connection when the power is switched on.
• Check the connector types.
Damage may result if you attempt to insert a connector into the incorrect port.
Condition 1: Check that the computer has an image output port, such as an RGB port, monitor
port or CRT port.
Some computers with an in-built monitor and some laptop computers may not be compatible. Please
refer to your computer manual for further details.
Condition 2: The display frequency and resolution of the computer must correspond to that of the
projector. s "Supported Display Resolutions" P.26
You may need to purchase a separate adapter depending on the shape of the computer's port. Refer to the documentation
provided with the computer for further details.
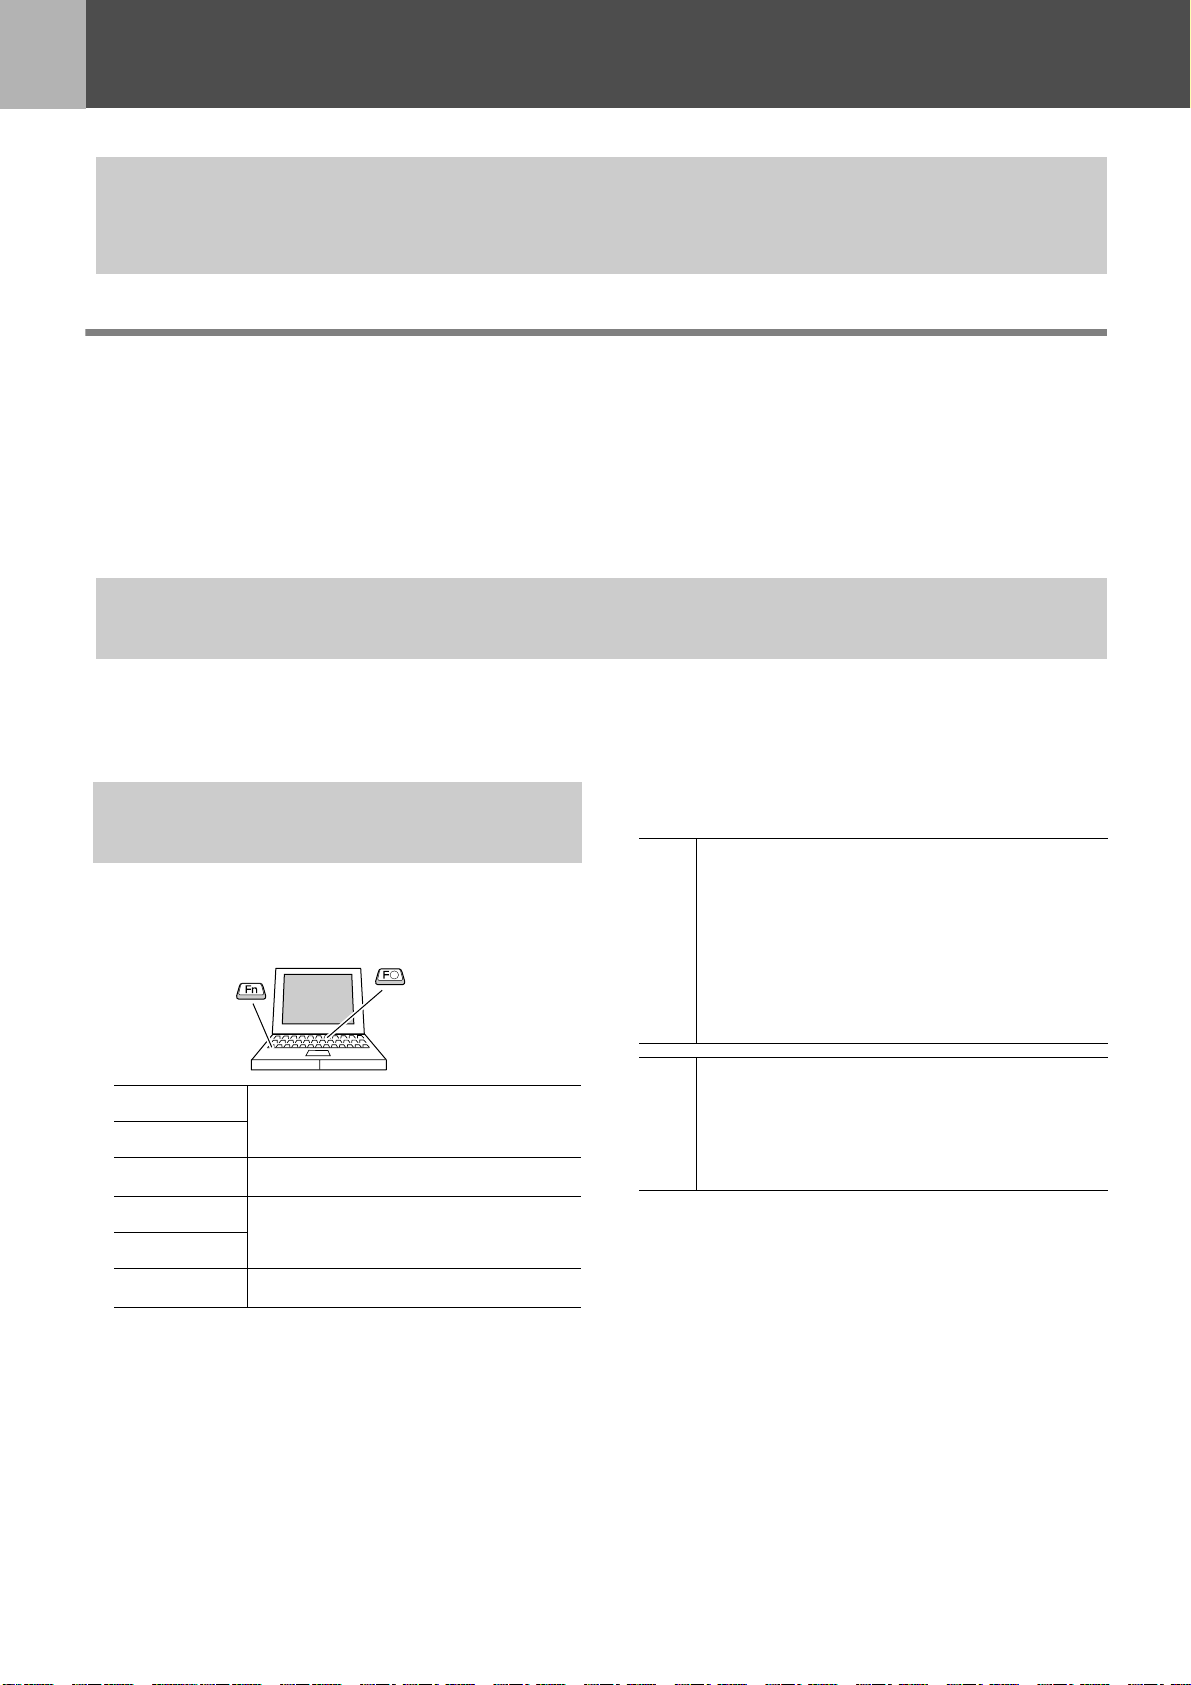
fLaptop connection
Setup examples
When using a laptop or a computer with an in-built
monitor, select external video output on the computer.
p
Windows:
Press and hold the [Fn] key, followed by the appropriate
function number key.
NEC
Panasonic
Tosh ib a
IBM
SONY
[Fn]+[F3]
[Fn]+[F5]
[Fn]+[F7]
Refer to your computer’s documentation for further
details.
Depending on your version of Windows, a dialog
box may appear to alert you that new display
hardware has been found. Follow the on-screen
instructions to proceed. If you have any
Win
problems, please contact the nearest address
provided in the "International Warranty
Conditions" section in the "Safety Instructions /
World-Wide Warranty Terms" guide.
• It may take a few moments until the computer
Win/
Mac
image is projected.
• Depending on the computer, the monitor may
go blank when using the external video output
on the computer.
Fujitsu
Macintosh:
After start up enable "Mirroring" in the Monitors Control
Panel.
[Fn]+[F10]
10-Connecting a Computer
Page 13

Outputting images and audio from a computer
Connecting Equipment
To monitor port To Input B
To audio out port
stereo mini jack
When using computer and video equipment alternately, swap the cable or use an audio switch.
p
Computer cable (optional)
stereo mini jack - 2RCA cable
(commercially available)
port
To Audio port
RCA jack
Adjusting computer generated images
fAuto setup (Computer connections)
The computer signal is analysed and the following settings are adjusted to ensure the optimum image quality.
• Tracking
• Position
•Sync.
g
g
• You can set Auto setup to off in the "Image" → "Auto Setup" configuration menu. (The default is ON) s "Image menu"
P. 1 3
• When Auto setup is set to off, press the [Auto] button on the remote control to perform auto setup.
p
• If you press the [Auto] button during Freeze operation, or when a configuration menu is being displayed, the display will
be halted and auto setup will take place.
Adjust the Tracking and Sync settings manually if Auto setup cannot be performed. ([Menu] button → "Image" → "Picture
Quality" → "Tracking", "Sync.") s "Image menu" P.13
Connecting a Computer-11
Page 14
Configuration Menus
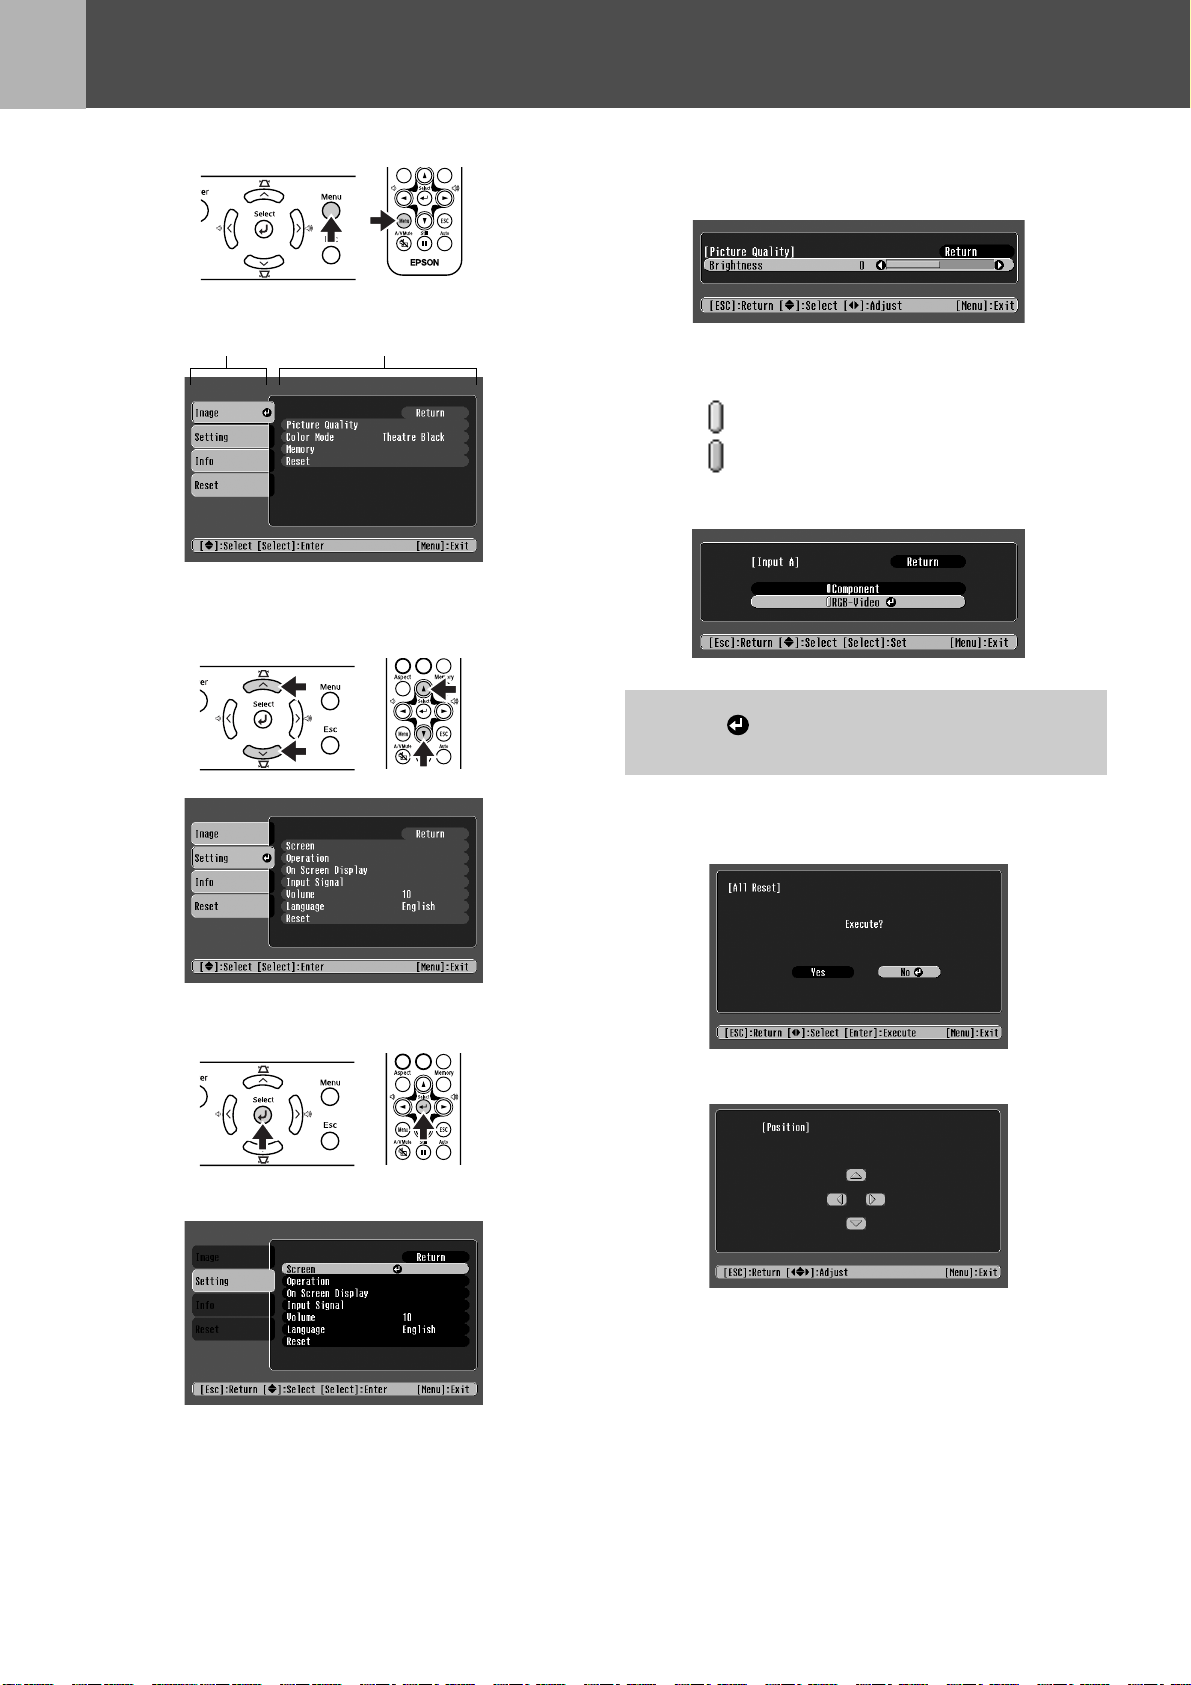
Menu operation
Press the [Menu] button.
1
The top configuration menu is displayed.
Top Menu
Press the [u] or [d] buttons to select
2
the Top Menu item.
Sub Menu
Settings can be changed in the
5
follwing ways:
(a)Press the [l] or [r] buttons to change the
setting values.
(b)Press the [u] or [d] buttons to select the
menu item.
Then press the [e] button.
(Green): Item currently set.
(Orange): Item currently selected.
Press the [e] button to confirm the
selection.
Press the [e] button.
3
A Sub Menu is displayed.
The mark is displayed after items which perform a
setting or lead to a sub menu.
p
(c)Press the [l] or [r] buttons to select the
value.
Then, press the [e] button.
(d)Press the [u] [d] [l] [r] buttons to move
the image display position.
Press the [u] or [d] buttons to select
4
the Sub Menu items, then press the
[e] button.
12-Menu operation
Set other items in the same way.
6
Press the [Esc] button to return to the previous
item or menu, or select "Return".
Press the [Menu] button to finish.
7
Page 15

Function list
fImage menu
• The functions in the "Image" Menu will be different according to the type of signal which is being input.
• When no signal is being input, only the settings for "Auto Setup" can be adjusted.
Video (Video/S-Videog/Component)
Sub menu Function
Picture
Quality
Brightness Adjusts the brightness of the image.
Contrast
Sharpness Adjusts the sharpness of the image.
Saturation
(Video only)
Tint
(Video only)
Color
Temperatureg
Flesh Tone Adjusts the green colour level.
Tracking
(RGB only)
Sync.
(RGB only)
g Adjusts the contrast of the image.
Adjusts the colour depth.
(Adjustment is only possible when Component Video
Adjusts the tint of the image.
Adjusts bright colours from a reddish tinge to a bluish tinge.
Lower colour temperature settings produce redder colours and softer colour tones.
Higher colour temperature settings produce bluer colours and sharper colour tones.
The intensity of green tones becomes stronger when the adjustment value is high as does
the intensity of red/purple tones become stronger when the adjustment value is low.
g
g
Adjusts the image when vertical stripes appear in the image.
Adjusts the image when flickering, fuzziness or interference occur in the image.
Flickering and fuzziness may also occur when the brightness, contrast, sharpness or
keystone correction settings are adjusted.
Best results can be obtained by adjusting the tracking before the sync.
RGB (RGB-Video/Analog RGB)
g or NTSC signals are being input)
Color Mode Corrects the vividness of the image colour. The settings can be saved separately for each
type of source (computer or video).
Select from 4 different quality settings depending on the type of scene.
• Dynamic: Best for projecting video games. Vivid image quality can be enjoyed even in
bright places.
•Living Room: Best for projecting sports, etc. TV style image quality can be projected,
even in the living room.
•Theatre: Best for watching movies with a generally bright feel. The range of colours
are expressed vividly without lowering the luminosity of the lamp.
• Theatre Black: Best for watching movies in a pitch black environment. The luminosity
of the lamp is dropped and colours are expressed more subtly.
Memory Saves image adjustment values. Select "Memory1" or "Memory2" and press the [e]
button to save the current settings. You can recall the saved settings by pressing the
[Memory] button.
Auto Setup
(RGB only)
Reset Resets all the adjustment values within the "Image" menu (except for "Memory") to their
ON: When the input source is switched to a computer signal, the projector automatically
adjusts the image to its optimal state.
OFF: Auto Setup is disabled.
default settings.
• Press the [e] button and select "Yes" on the confirmation screen which is displayed.
• Select "All Reset" to restore all menu settings, such as image and sound, to their default
settings. s "Reset menu" P.15
Function list-13
Page 16

Configuration Menus
fSetting menu
Sub menu Function
Screen Position Moves the image display position vertically and horizontally.
• Press the [e] button and adjust the display area on the Position adjustment screen which
is displayed.
Zoom
Caption
Keystone Corrects vertical keystone distortion in the image.
Projection • Front : Image is displayed, as is. No vertical/horizontal reversal performed.
Setup Level You can select one of two preset black levels.
Operation Sleep Mode Sets the energy saving option for when no signal is being input.
Child Lock Sets child lock to ON or OFF.
Adjustment is possible only when the Zoom aspect function has been selected.
• Vertical size : You can adjust the vertical size of the image.
• Zoom Position: You can adjust the vertical movement of the display position.
• The projected image changes when keystone correction is carried out.
• If the images become uneven in appearance after keystone correction has been carried
out, decrease the sharpness setting.
• Front/Ceiling: The image is displayed vertically reversed.
• Rear : The image is displayed horizontally reversed.
• Rear/Ceiling : The image is displayed vertically and horizontally reversed.
(When the image source is an NTSC Video/S-Video signal, or when the image source has
been set to Input A, "Component".)
• When a Sleep Mode interval has been set, the projector will enter Sleep Mode when no
operation has been carried out for the set time (5, 10 and 30 minutes). Projection will shut
down and the projector enters a standby state after cooling down. (The power indicator
lights orange).
• Projection starts again when the [Power] button is pressed on the projector's contol panel
or the remote control.
When child lock is set to "ON", the power will not come on unless you press and hold the
[Power] button on the control panel for at least 3 seconds. (The remote control functions as
normal.)
On Screen
Display
Input
Signal
Volume Adjusts the volume setting
Language Selects the language in which on-screen messages are displayed.
Reset Resets all the adjustment values within the "Setting" menu (except for "Child Lock",
Message When set to "OFF", messages such as "No Signal.", and the name of the selected input
source or colour mode will no longer be displayed. Warning messages such as "Replace the
lamp" will continue to be displayed.
Background
Color
Startup
Screen
Video
Signal
Input A You can switch between the sources connected to Input A.
Sets the background colour to black or blue.
Sets whether or not the "EPSON" logo will be displayed during projector startup.
Selects the colour system of the video signal being input.
(Changes in signal format will only be noticeable when the input source is Video/S-Video.)
• Component: YCbCr
• RGB-Video: SCART
• Press the [e] button and select the desired language from the list which is displayed.
"Input A" and "Language") to their default settings.
• Press the [e] button and select "Yes" on the confirmation screen which is displayed.
g/YPbPrg
g, Sync on Green
14-Function list
Page 17
Configuration Menus
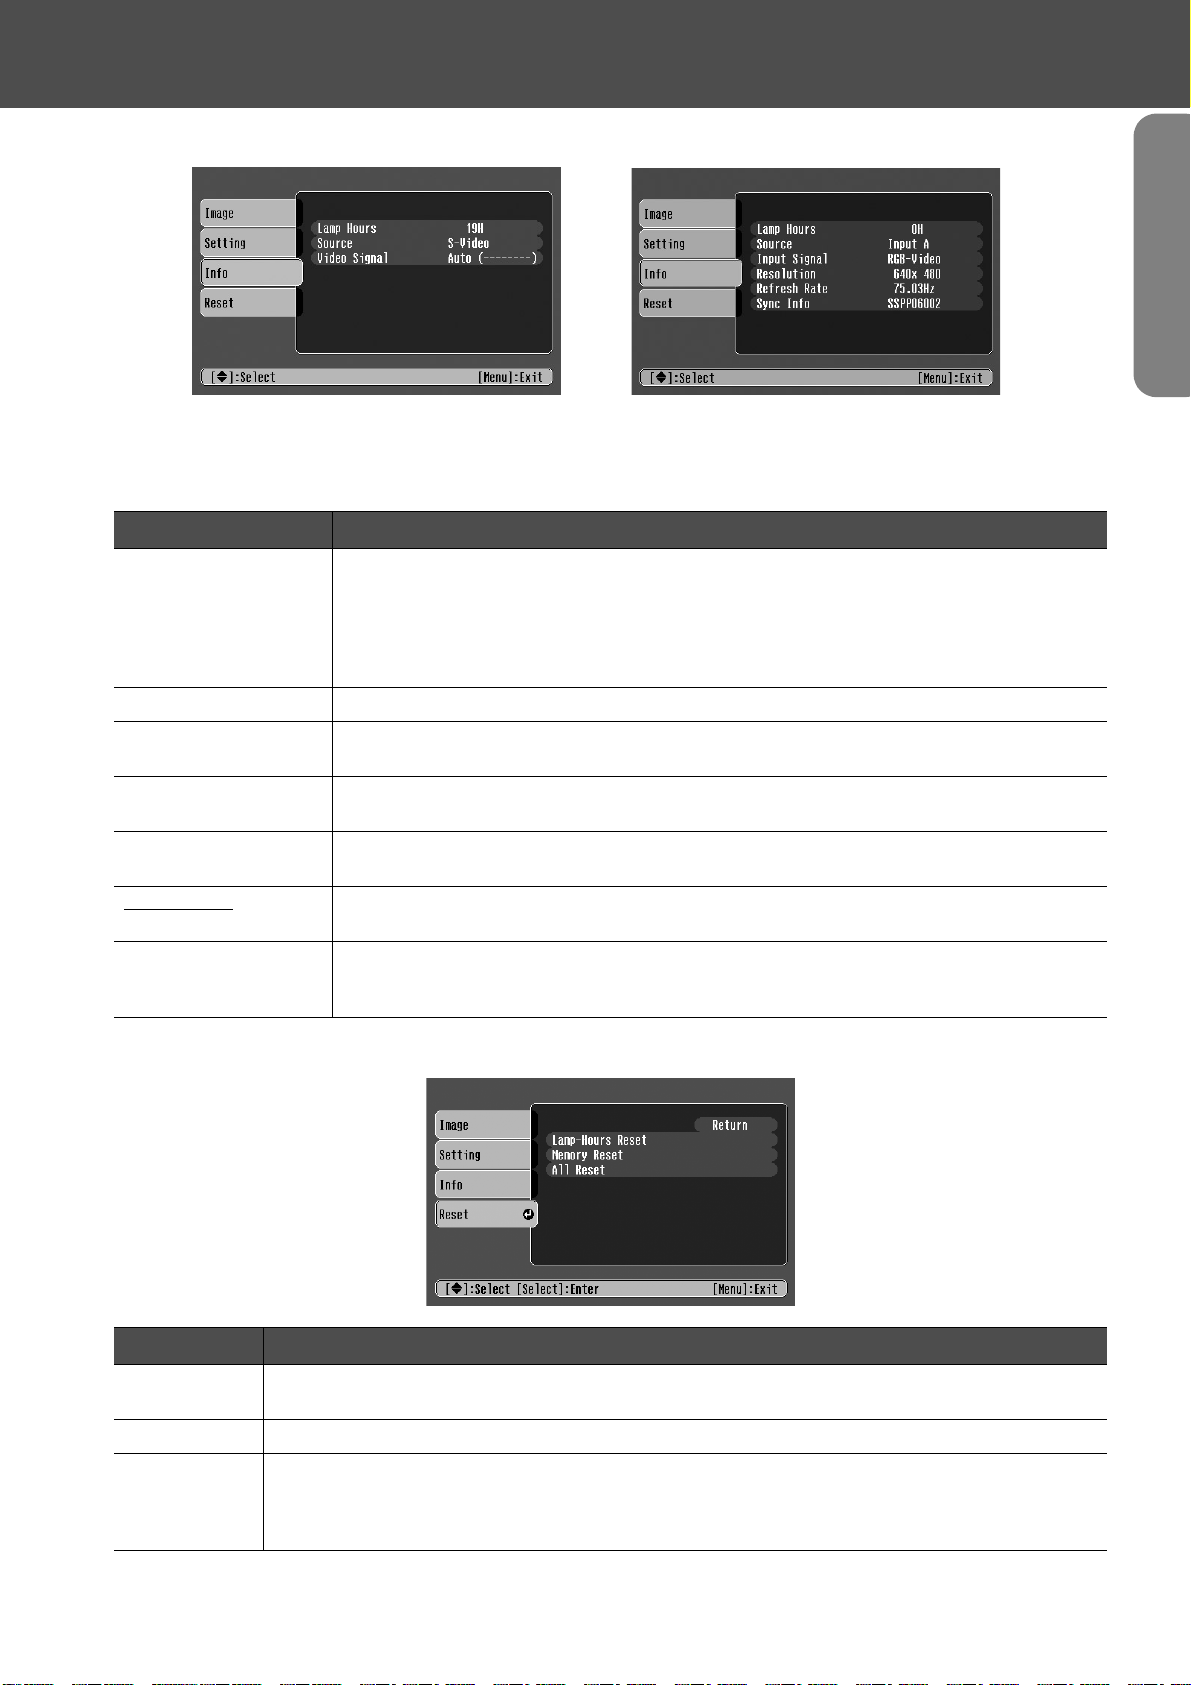
fInfo menu
Video/S-Video Input A/Input B
When component video is being input into the Input A port,
the Refresh Rate and Sync Info will not be displayed.
Sub menu Function
Lamp Hours Displays the cumulative lamp operating time. From 0 to 10 hours, 0H is displayed. After
10 hours, the usage time is displayed in hourly increments.
• When the accumulated usage time of the lamp reaches the appropriate time (*), a
warning will be displayed in red.
* If Theatre Black has been used continuously: About 2900 hours
If other modes have been used continuously: About 1900 hours
Source Displays the input source being projected.
Input Signal
(Input A/Input B only)
Video Signal
(Video/S-Video only)
Resolution
(Input A/Input B only)
Refresh Rate
(Input A/Input B only)
Sync Info
(Input A/Input B only)
g
Displays the input signal settings.
Displays the Video signal format.
Displays the input resolution.
(Does not appear when the input source is composite video or S-Video.)
Displays the refresh rate
(Does not appear when the input source is composite video or S-Video.)
Displays picture signal information.
In the event that you are having problems with your projector and need to contact an
EPSON dealer, please quote the information displayed on this screen.
fReset menu
Sub menu Function
Lamp-Hours
Reset
Memory Reset Resets all settings stored in Memory.
All Reset Resets all items in the configuration menus to their default settings.
Resets the lamp operating time. When this command is selected, the cumulative lamp operating
time is reset to the default value.
• Press the [e] button and select "Yes" on the confirmation screen which is displayed.
• Select "Reset" in an individual menu to reset only the settings for the items in that sub menu.
• "Memory", "Child Lock", "Input A", "Language" and "Lamp Hours" settings will not be reset.
Function list-15
Page 18

Troubleshooting
When You Suspect a Problem
First, check the indicators on the projector.
There are two indicators on the projector unit
Power indicator
which notify you of projector conditions.
Warning indicator
Power indicator
lit flashing •If the indicator is not lit, the power supply is not on.
Condition Cause/Remedy s
Orange
Orange
Green
Green
Standby state (Not abnormal)
The power cable should only be disconnected when the projector is in this state.
Press the [Power] button to start projection.
Cool-downg in progress (Not abnormal)
• Please wait. The cool-down period lasts about 20 seconds.
• The projector will beep twice to indicate that cool-down has completed.
• You cannot operate the [Power] button during the cool-down period. Press the power button
again after cool-down has finished.
Projection in progress (Not abnormal)
Warming-up (Not abnormal)
Please wait. Warming up takes about 40 seconds. When warming up is complete, the
indicator changes to steady green.
Reference
Quick
Guide
Warning indicator
lit flashing •Not lit under normal operating conditions.
Condition Cause/Remedy s
Red
Red
(0.5 second
interval)
Red
(1 second
interval)
Orange
High internal temperature (overheating)
The lamp turns off automatically and projection stops. Wait for about 5 minutes without operating
the projector. After about 5 minutes have passed, unplug the power cable and check the following:
• Make sure the air filter and ventilation outlet are clear and that the projector is not positioned
against a wall.
• If the air filter is dirty, it should be cleaned.
When the power cable is plugged back in, the projector will return to its previous state. Press the
[Power] button on the projector or on the remote control to turn it back on.
Lamp problem
• Disconnect the power cable from the electrical outlet. Remove the lamp and check that it is not
broken. If the lamp is not broken, re-install it. Reconnect the power cable and press the [Power]
button on the projector or the remote control to turn it back on.
• If the lamp is broken, please contact your dealer or the nearest address provided in the
"International Warranty Conditions" in the "Safety Instructions/World-Wide Warranty Terms"
guide (You will not be able to use the projector until the lamp is replaced).
• Check that the lamp and lamp cover are securely installed. If the lamp or lamp cover are not
securely installed, the lamp will not switch on.
Internal problem
Stop using the projector, disconnect the power cable from the electrical outlet and contact your
dealer or the nearest address provided in the "International Warranty Conditions" in the "Safety
Instructions/World-Wide Warranty Terms" guide.
High-speed cooling in progress
(This is not abnormal, but, if the temperature rises too high again, projection will stop
automatically.)
Set up the projector in a place which is well ventilated and ensure the air filter and ventilation
outlet are clear.
Clean the air filter.
P.8
P.20
P.22
P.8
P.20
16-When You Suspect a Problem
Page 19

• If problems with projection do occur, but the indicators do not show any abnormal conditions, please refer to the section
below, "When the indicators provide no help".
• If a condition occurs which is not listed in this table, please consult your dealer or contact the nearest address provided in
p
the "International Warranty Conditions" in the "Safety Instructions/World-Wide Warranty Terms" guide.
• If you follow the above steps and are still unable to correct the problem, please cease using the projector, unplug the
projector from the electrical outlet and request repairs from your dealer or nearest address provided in the "International
Warranty Conditions" in the "Safety Instructions/World-Wide Warranty Terms" guide.
When the indicators provide no help
fNo images appear (Nothing is displayed)
Troubleshooting
• Was the power turned off
and then straight back on
again?
• Has a Sleep Mode interval
(5, 10 or 30 minutes) been
set?
• Has the image brightness
been adjusted correctly?
• Is the projected image
completely black?
• Is an image signal being
input?
You cannot begin projecting again for at least a minute
after projection has been stopped, even if you press the
[Power] button on the control panel or remote control.
Allow the projector to cool-down completely before
projecting again.
When a Sleep Mode interval has been set, the lamp cuts
out after no operations have been carried out for the set
time (5, 10 or 30 minutes).
The power indicator lights orange at this time.
Adjust the brightness in the following way.
[Menu] button → "Image" → "Picture Quality" →
"Brightness".
Some images being displayed, including some screen
savers, may be completely black.
Check if a picture signal is being input.
Set the "Message" option to "ON" in the "Setting" →
"On Screen Display" → "Message" configuration menu, in
order to view the picture signal information.
fNo images appear (Messages are displayed)
• Is the input source
properly selected?
Press the [Source] button on the Control panel until the
correct input source is selected. For the remote control,
press the [Input A/B] button or the [S-Video/Video]
button.
"No Signal."
• Are the cables connected
properly?
• Has external video output
been selected on the
computer?
Check that the cables are securely connected.
Depending on the equipment you are using, some settings
may need to be made on the video equipment. Refer to the
User's guide of your video equipment.
When using a laptop or a PC with an in-built monitor,
select external video output on the computer.
s "Laptop connection" P.10
When You Suspect a Problem-17
Page 20

Troubleshooting
fImage is out of focus (unclear)
• The image is fuzzy
• Part of the image is
out of focus
• The whole image
is out of focus
• Is the projector at the
correct distance from the
screen?
• Is the lens dirty? s "Cleaning the lens" P.20
• Has condensation formed
on the lens?
• Has the focus been
correctly adjusted?
The optimum range for projection is 73-1165cm (2.4-
38.2ft.). Set the projector within this range.
s "Installation method" P.8
If the projector is suddenly taken from a cold environment
to a warm environment, condensation may form on the
surface of the lens, and this may cause the images to
appear fuzzy. Set the projector up in the room in which it
is to be used approximately one hour before use. If
condensation forms on the lens, turn off the power and
wait for the condensation to disappear.
Turn the focus ring to adjust the focus.
fImage is distorted / Image contains interference
• Is an extension cable
being used?
• Are the cables connected
correctly?
If using an extension cable, electrical interference may
affect the signals.
Check that the cables are securely connected.
Interference may occur if the cables are not connected
securely.
fOnly part of the image is displayed (large/small)
• Is the aspect ratio set
correctly?
• Has the "Position" been
adjusted correctly?
Press the [Aspect] button to change the aspect ratio.
s "Changing aspect ratio" Quick Reference Guide
Use the "Setting" → "Screen" → "Position"
configuration menu to correctly adjust the display
position.
fImage colours are poor, tinted green or tinted red/purple
• Does the lamp need
replacement?
• Adjust each of the settings
in the following menus.
[Menu] button → "Image"
→ "Picture Quality"
When the lamp is due for replacement, colours will
weaken and the image will become dark. Replace the lamp
when this is the case. s "Lamp replacement period" P.22
"Contrast", "Color Temperature"
"Saturation", "Tint", "Brightness"
• Are the cables connected
correctly?
18-When You Suspect a Problem
If cables connecting to component video equipment are
not connected securely, certain colours may not be
displayed.
Page 21

fImage is dark
Troubleshooting
• Does the lamp need
replacement?
• Adjust each of the settings
in the following menus.
[Menu] button → "Image"
→ "Picture Quality"
fNo sound can be heard
• Is the volume turned down
to the minimum setting?
• Is the audio source
connected correctly?
Is the connected video
•
equipment in playback
mode?
fThe remote control does not work
• Is direct sunlight or strong
light from fluorescent
lamps shining onto the
remote control infrared
receiver?
When the lamp is due for replacement, colours will
weaken and the image will become dark. Replace the lamp
when this is the case. s "Lamp replacement period" P.22
"Brightness", "Contrast"
Adjust the volume using the remote control or the control
panel.
Connect an audio cable from the equipment you are using
to the Audio port.
Turn on the power to the connected equipment and press
the play button.
s "Using the Remote Control" P.7
• Is the remote control too
far from the projector?
• When in use, is the remote
control infrared transmitter
facing the remote control
infrared receiver on the
projector?
• Has the battery insulating
tape been removed?
• Is the battery dead? s "Changing the battery" P.21
The operating distance for the remote control is
approximately 6m (20ft.).
The operating angle for the remote control is
approximately ±30½° horizontally and approximately
±15½° vertically.
Remove the insulating tape.
fThe power does not turn off (after the [Power] button is pressed)
• The power indicator
remains orange.
This projector is designed so that the Power indicator
remains lit even after the power has been turned off. The
Power indicator will switch off when the power cable is
disconnected from the electrical outlet.
fThe power will not turn on
• The power does not come
on, even when you press
the [Power] button on the
control panel.
Is the "Child Lock" set to "On"?
Press and hold the [Power] button for at least 3 seconds to
turn the power on.
When You Suspect a Problem-19
Page 22

Appendices
Projector Care
Be sure to read the separate "Safety Instructions/World-Wide Warranty Terms" before proceeding.
c
Cleaning
You should clean the projector if it becomes dirty or if the projected image starts to deteriorate.
fCleaning the air filter
If the air filter becomes clogged with dust, it can cause overheating and damage the projector.
Keeping the projector horizontal, use a vacuum cleaner to clean away the dust from the air filter.
If the air filter is difficult to clean or if it is broken,
it should be replaced. Contact your dealer for a new
p
air filter.
air filter
fCleaning the projector case
Clean the projector case by wiping it gently with a soft cloth.
If the projector is particularly dirty, moisten the cloth with water containing a small amount of (ph) neutral detergent, and
then firmly wring the cloth dry before using it to wipe the projector case. After you have done this, wipe the projector
another time with a soft, dry cloth.
Do not use volatile substances such as wax, alcohol
or thinner to clean the projector case. These can
cause the case to warp and make the surface coating
c
peel off.
fCleaning the lens
Use a commercially-available air blower, or lens cleaning paper to gently wipe the lens.
As the lens can be easily damaged, do not rub the
lens with harsh materials or subject the lens to
c
shocks.
20-Projector Care
Page 23

Replacing consumables
fReplacing the air filter
(Air filter: ELPAF04)
Replacing the air filter can also be performed when the projector is mounted to a ceiling.
Appendices
Turn off the projector power, wait for
1
the cool-down period to end, then
disconnect the power cable.
Cool-downg takes about 20 seconds.
Put your finger into the latch and lift
2
off the cover. Lift up the air filter to
remove it.
Replace the air filter with a new one.
3
Take out the old air filter and install the new
one. Please ensure there are no gaps
between the air filter and the plastic grill.
Replace the air filter cover.
4
First insert the tabs, and then press down on
the opposite side until it clicks into place.
fChanging the battery
(Replacement battery: 1 × CR2025 lithium battery)
Keep batteries away from children to avoid the risk of accidents.
If a child swallows the battery, contact your doctor immediately.
c
Remove the battery holder.
1
While pressing the catch of the battery holder
inwards, pull the battery holder out.
Remove the old battery and insert the
2
new one.
Check the position of the (+) mark inside the
battery holder to ensure that the battery is
inserted the correct way.
Dispose of used air filters properly in accordance with
your local regulations.
p
Replace the battery holder.
3
Press the battery holder in until it clicks.
Please dispose of used batteries in accordance with
local waste disposal regulations.
p
Projector Care-21
Page 24

Appendices
fLamp replacement period
• It is time to change the lamp when the "Replace the lamp" message appears
in the bottom left hand corner of the screen at the commencement of
projection and remains for 30 seconds.
• It is also time to change the lamp when the Warning indicator flashes red at
0.5 second intervals.
• The time when the replacement message appears varies depending on the colour mode which has been used.
If Theatre Black has been used continuously: About 2900 hours
p
If other modes have been used continuously: About 1900 hours
• When this message is displayed, please replace the lamp as quickly as possible.
• The lamp may explode if you continue to use it beyond the lamp replacement period.
• Some lamps may stop operating before the replacement message is displayed. It is recommended that you have a
replacement lamp ready in case this happens.
• Replacement lamps can be purchased at your nearest dealer.
fReplacing the lamp
(Spare lamp: ELPLP29)
• Wait until the lamp has cooled down sufficiently before opening the lamp cover. It takes a further one hour after the cool-
c
down period has finished for the lamp to be cool enough.
• When the lamp is broken, replace it with a new lamp, or contact your dealer for further advice. If replacing the lamp
yourself, be careful to avoid pieces of broken glass.
Turn off the projector and wait for the
1
cool-down period to end. (Approx. 20
seconds)
Remove the power cable and wait for the
lamp to cool down. (Approx. 1 hour)
Open the lamp cover.
2
Lift the lamp cover by putting your fingers in
the latches and lifting upwards.
Loosen the fixing screws holding the
3
lamp in place.
Remove the old lamp.
4
Install the new lamp.
5
Press the lamp until it clicks into place, then
tighten the two fixing screws.
Replace the lamp cover.
6
First insert the tabs, and then press down on
the opposite side until it clicks into place.
22-Projector Care
Page 25
Appendices
• Install the lamp securely. If the lamp cover is removed, the lamp turns off automatically as a safety precaution. The lamp
will not turn on if the lamp or the lamp cover is not installed correctly.
• After replacing the lamp, be sure to reset the lamp operating time.
p
• The lamp contains mercury. Dispose of used lamps properly in accordance with your local regulations.
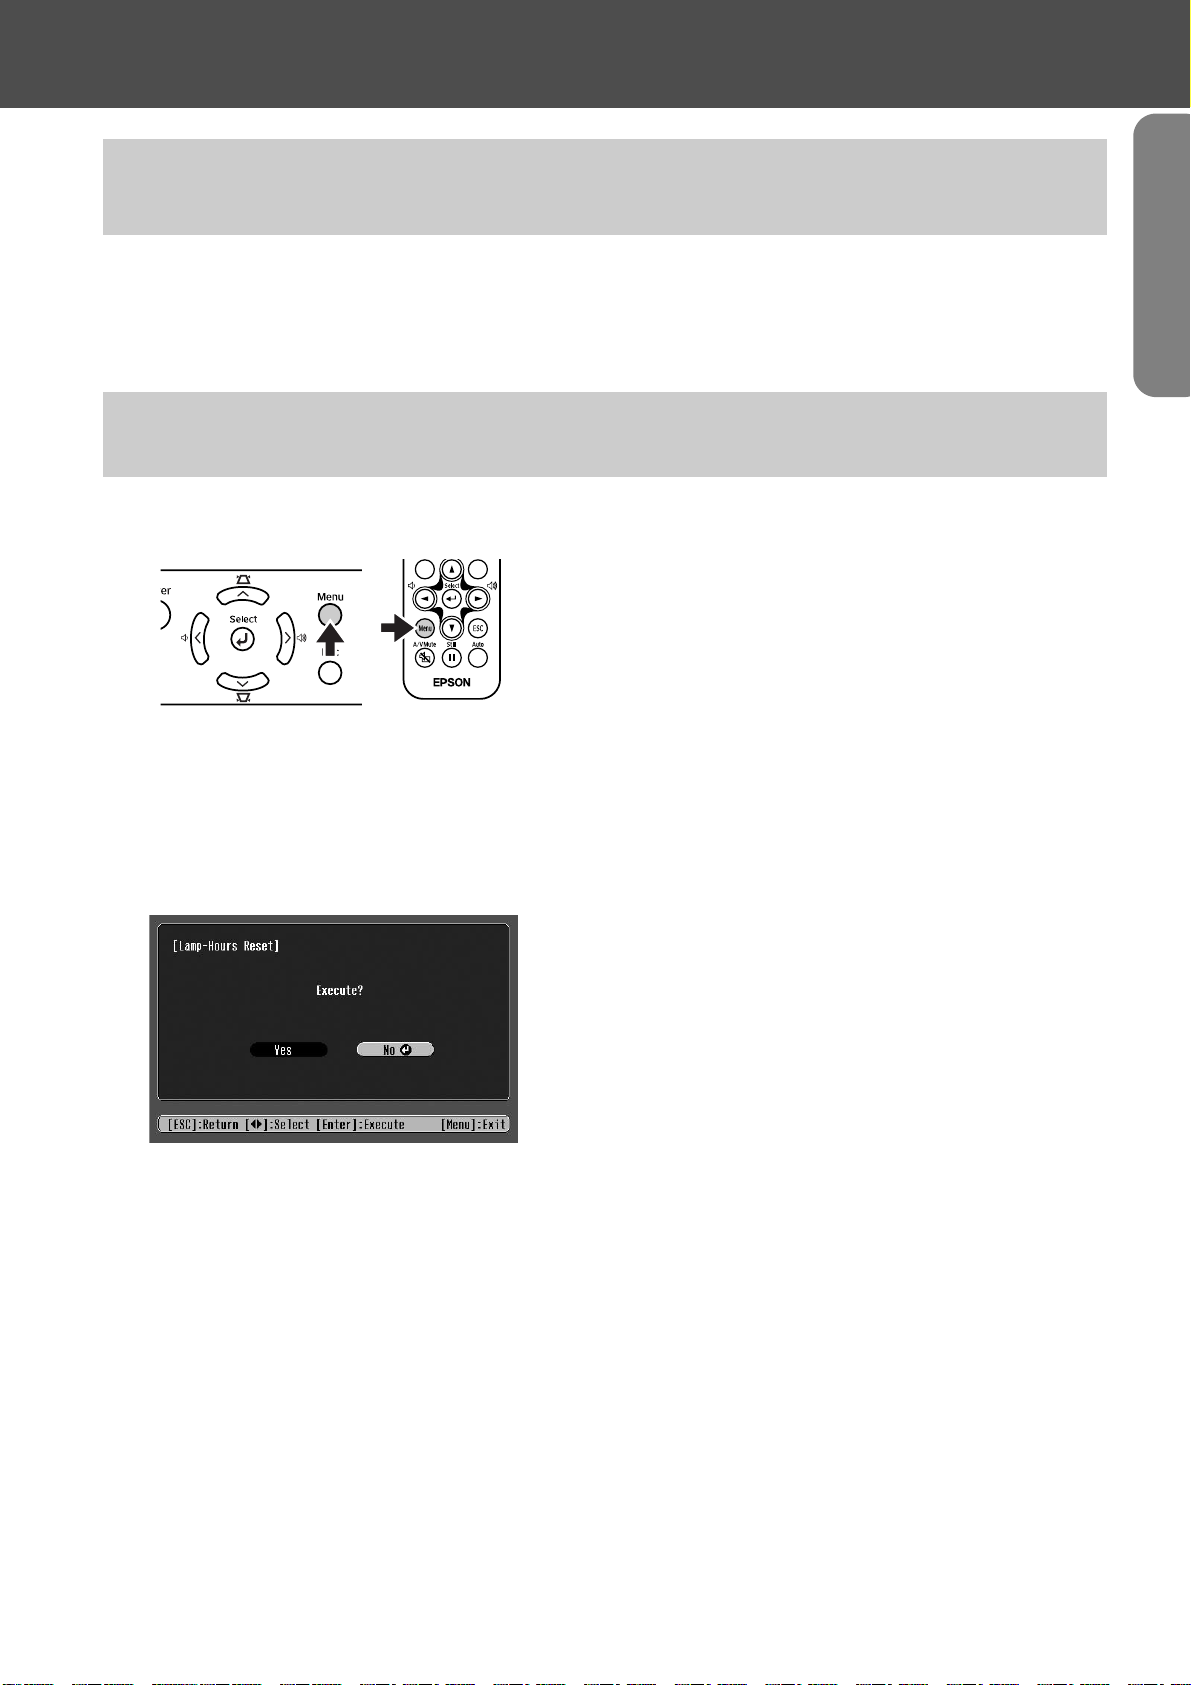
fResetting the lamp operating time
The projector has a built-in counter which keeps track of the lamp operating time and causes the replacement warning
message to be displayed when the cumulative operating time reaches a certain point. Therefore, the counter needs to be
reset from the configuration menu, after the lamp has been replaced with a new one.
Please do not reset the lamp operating time except when the lamp has been changed. Otherwise, the lamp operating time will
not be displayed correctly.
p
Turn on the power and press the
1
[Menu] button.
Select "Lamp-Hours Reset" from the
2
"Reset" menu, using the [u][d][e]
buttons.
Use the [l][r] buttons to select "Yes",
3
then press the [e] button.
The lamp operating time will be reset.
Projector Care-23
Page 26

Glossary
Complex terms used in this book, or terms not explained in the body of the text, will be briefly explained
here. For further explanation, please consult commercially available reference texts.
Aspect ratio The ratio between an image's length and its height. Images which have an aspect ratio of
16:9 are called Widescreen. The aspect ratio for standard images is 4:3.
Color Temperature The temperature of an object which is emitting light. When the colour temperature is high,
colours tend to take on a bluish tinge; when the colour temperature is low, colours tend to
take on a reddish tinge.
Component Video A type of video signal which has the video brightness and colour signal information
separated, in order to provide better image quality. In high-definition TV (HDTV), it refers
to images which consist of three independent signals: Y (luminance signal), and Pb and Pr
(colour difference signals).
Composite Video The standard home video signal (NTSC, PAL, SECAM) which has the video brightness and
colour signal information mixed together. Composite video consists of the carrier signal Y
(luminance signal) and the chroma (colour) signal, combined within the colour bar signal.
Contrast The relative brightness of the light and dark areas of an image can be increased or decreased
in order to make text and graphics stand out, or appear softer. Adjusting this particular
property of an image is called "contrast adjustment".
Cool-down The process used to cool down a projector lamp that is hot from use. Cool-down happens
automatically when the [Power] button is pressed on the projector or on the remote control
to turn the projector off. Do not unplug the projector power cable whilst it is cooling down.
If cool-down is interrupted, heat from the lamp gets trapped inside the projector, potentially
shortening the life of the lamp and causing projector failure.
Dolby digital An audio format developed by Dolby Laboratories. Normal stereo is a 2-channel format
which uses two speakers, whereas Dolby Digital is a 6-channel (5.1-channel) system which
adds a centre speaker, two rear speakers and a sub-woofer.
HDTV An abbreviation for High-Definition Television, it refers to high definition systems which
satisfy the following conditions.
• Vertical resolution of 750p or 1125i or greater
(p=Progressive scanning
• Screen aspect ratio of 16:9
• Dolby digital
Interlaced scanning Each screen is divided into fine horizontal lines which are displayed in sequence starting
from left to right and then from top to bottom. This method of image scanning, whereby
even numbered lines and odd numbered lines are displayed alternately, is called Interlaced
scanning.
Progressive
scanning
Refresh Rate The light-emitting element of a display maintains the same luminosity and colour for an
RGB-Video A term used to describe a video signal most commonly output to computer monitors. RGB
SCART A 21pin rectangular shaped connector for transmitting audio and video signals between TV,
A method of image scanning whereby the image data from a single image is scanned
sequentially from top to bottom to create a single image.
extremely short time. For this reason, the image must be scanned many times per second in
order to refresh the light-emitting element. The number of refresh operations per second is
called the "refresh rate", and is expressed in hertz (Hz).
video is made up of electrical pulses representing the intensities of the three primary colours
of light, red, green and blue. A fourth or fifth pulse carries timing information.
VTR and AV equipment. RGB, S-Video/Composite video and two audio channels can be
transmitted.
gl audio reception and playback (or output)
g, i=Interlaced scanningg)
SDTV An abbreviation for Standard Definition Television. It refers to standard television systems
which do not satisfy the conditions for High-Definition Television.
Security lock A device consisting of a projector case with a hole in it that a commercially-available theft-
prevention cable can be passed through in order to secure the device to a table or pillar. This
projector is compatible with the Microsaver Security System manufactured by Kensington.
Squeeze mode The method of compressing 16:9 Widescreen images and recording them on video software
as 4:3 images.
When projecting with Squeeze mode on, the images will return to their original 16:9 format.
24-Glossary
Page 27

Appendices
SVGA A type of video signal with a resolution of 800 (horizontal) × 600 (vertical) dots which is
used by IBM PC/AT-compatible computers.
S-Video A type of video signal which has the video brightness and colour signal information
separated, in order to provide better image quality. It refers to images which consist of two
independent signals: Y(luminance signal), and C (colour signal).
Sync.
(Synchronisation)
The signals output from computers have a specific frequency. Image quality will suffer if the
projector frequency and the computer frequency do not match. The process of matching the
phases of these signals (the relative position of the crests and troughs in the signal) is called
"synchronisation". If the signals are not synchronised, problems such as flickering,
blurriness and horizontal interference can occur.
Tracking The signals output from computers have a specific frequency. Image quality will suffer if the
projector frequency and the computer frequency do not match. The process of matching the
frequency of these signals (the number of crests in the signal) is called "tracking". If
tracking is not carried out correctly, wide vertical stripes will appear in the projected images.
VGA A type of video signal with a resolution of 640 (horizontal) × 480 (vertical) dots which is
used by IBM PC/AT-compatible computers.
XGA A type of video signal with a resolution of 1,024 (horizontal) × 768 (vertical) dots which is
used by IBM PC/AT-compatible computers.
YCbCr The carrier signal contained in the colour bar signal used in modern (NTSC) TV
transmissions. The name comes from the Y (luminance) signal and the CbCr (chroma
(colour)) signals.
YPbPr The carrier signal contained in the colour bar signal used in high-definition TV (HDTV)
transmissions. The name comes from the Y (luminance) signal and the PbPr (colour
difference) signals.
Glossary-25
Page 28

Supported Display Resolutions
fComponent Video
Signal Resolution
SDTVg(525i, 60Hz) 640 × 480
SDTV(625i, 50Hz) 768 × 576
SDTV(525p) 640 × 480
SDTV(625p) 768 × 576
HDTV
g(750p)
16:9
HDTV (1125i)
16:9
1280 × 720
1920 × 1080
fComposite Video/S-Video
Signal Resolution
Aspect mode
Normal Squeeze Zoom
640 × 480
(4:3 aspect)
640 × 480
(4:3 aspect)
640 × 480
(4:3 aspect)
640 × 480
(4:3 aspect)
854 × 480
(16:9 aspect)
854 × 480
(16:9 aspect)
--
--
Aspect mode
Normal Squeeze Zoom
TV (NTSC) 640 × 480
TV (PAL, SECAM) 768 × 576
fSCART (4RCA/RGB-Video)
Signal Resolution
SDTV (525i, 60Hz) 640 × 480
SDTV (625i, 50Hz) 768 × 576
SDTV (525p) 640 × 480
SDTV(625p) 768 × 576
640 × 480
(4:3 aspect)
640 × 480
(4:3 aspect)
Aspect mode
Normal Squeeze Zoom
640 × 480
(4:3 aspect)
640 × 480
(4:3 aspect)
640 × 480
(4:3 aspect)
640 × 480
(4:3 aspect)
26-Supported Display Resolutions
Page 29

fComputer (Analog RGB)
Appendices
Signal Resolution
EGA 640 × 350 854 × 468 - -
VGA
g60 640 × 480
VESA
72 / 75 / 85,iMac*
SVGA
g
56 / 60 / 72 / 75 / 85,iMac*
XGA
g
43i / 60 / 70 / 75 / 85,iMac*
MAC13" 640 × 480
MAC16" 832 × 624
MAC19" 1024 × 768
MAC21" 1152 × 870 636 × 480
SDTV(525i, 60Hz) 640 × 480
1024 × 768
640 × 480
800 × 600
Aspect mode
Normal Squeeze Zoom
640 × 480
(4:3 aspect)
640 × 480
(4:3 aspect)
640 × 480
(4:3 aspect)
640 × 480
(4:3 aspect)
640 × 480
(4:3 aspect)
640 × 480
(4:3 aspect)
640 × 480
(4:3 aspect)
640 × 480
(4:3 aspect)
SDTV(525p) 640 × 480
SDTV(625i, 50Hz) 768 × 576
SDTV(625p) 768 × 576
HDTV (750p)
16:9
HDTV (1125i)
16:9
1280 × 720
1920 × 1080
640 × 480
(4:3 aspect)
640 × 480
(4:3 aspect)
640 × 480
(4:3 aspect)
854 × 480
(16:9 aspect)
854 × 480
(16:9 aspect)
--
--
" " indicates the aspect modes available according to each signal.
The supported resolution is 854 × 480 (16:9 aspect).
* Connection is not possible if the equipment does not have a VGA output port.
It may be possible to project signals which are not listed in the above table. However, not all functions
may be supported with such signals.
Supported Display Resolutions-27
Page 30
Optional Accessories
The following optional accessories are available for purchase if required. This list of optional accessories
is current as of April 2004. Details of accessories are subject to change without notice.
Part number Part name Use
ELPLP29 Spare lamp Use as a replacement for spent lamps.
ELPAF04 Air filter Use as a replacement for spent air filters.
ELPST12 Remote controller Identical to the remote control provided with
the projector.
ELPSC06 50" Portable screen A compact screen which can be carried easily.
(4:3 aspect ratio)
ELPSC07 60" screen A portable roll type screen. (4:3 aspect ratio)
ELPSC11 60" wall hanging screen
ELPSC08 80" screen
ELPSC10 100" screen
ELPKC02 VGA-HD15 PC cable (1.8m/6ft.)
(for mini D-Sub 15pin/mini D-Sub 15pin)
ELPKC09 VGA-HD15 PC cable (3m/9.8ft.)
(for mini D-Sub 15pin/mini D-Sub 15pin)
ELPKC10 VGA-HD15 PC cable (20m/65.6ft.)
(for mini D-Sub 15pin/mini D-Sub 15pin)
ELPKC29 RGB SCART adapter (0.3m/0.98ft.)
(for RCA
ELPAP01 Mac adapter set Used to convert a Macintosh D-sub 15pin plug
ELPMB11 Ceiling mount* Use when installing the projector to a ceiling.
ELPFC03 Ceiling plate* Use when installing the projector to a high
ELPFP04 Pipe 370 (370mm silver)*
ELPFP05 Pipe 570 (570mm silver)*
ELPFP06 Pipe 770 (770mm silver)*
ELPKS51 Soft carring case Use this case if you need to carry the projector
× 4/SCART)
Use to connect the projector to a computer.
This is the same as the cable provided with
your projector.
into a mini D-sub 15 pin plug.
ceiling or a ceiling with veneer panels.
by hand.
* A special method of installation is required in order to suspend the projector from the ceiling. Please
contact your dealer if you require this installation method.
28-Optional Accessories
Page 31

Specifications
Product
name
Dimensions
Home Projector EMP-TW10H
402 (W) × 114 (H) × 294 (D) mm
(not including feet)
Panel Size 0.55 inches
Display
method
Polysilicon TFT active matrix
Resolution 409,920 (854 (W) × 480 (H) dots) × 3
Focus
adjustment
Zoom
adjustment
Lamp (light
source)
Max.audio
output
Manual
Manual (1:1.54)
UHE Lamp 130W, Model No.:ELPLP29
1W Monaural
Speaker 1
Power supply 100-240VAC 50/60Hz 2.3-1.0A
Operating
temperature
Storage
temperature
+5°C to +35°C (41°-95°F) (No condensation)
-10°C to +60°C (14°-140°F) (No condensation)
Weight Approx. 3.6kg
Input A port
SCART
Component 3RCA pin jack
1
Input B port 1
Connectors
S-Video port 1 Mini DIN 4pin
Video port 1 RCA pin jack
Audio port 1
Control (RS-232C) port 1
4RCA pin jack
Mini D-Sub
15pin(female)
RCA pin jack
× 2(L,R)
D-Sub 9
pin(male)
Safety
USA (100-120VAC)
UL60950 3
Canada (100-120VAC)
CSA C22.2 No.60950 (cUL)
European Community (200-240VAC)
The Low Voltage Directive (73/23/EEC)
IEC60950 3
+Amd.3, +Amd.4
EMC
USA (100-120VAC)
FCC 47CFR Part15B Class B (DoC)
Canada (100-120VAC)
ICES-003 Class B
European Community (200-240VAC)
The EMC Directive (89/336/EEC)
EN55022, 1998 Class B
EN55024, 1998
Australia/New Zealand (200-240VAC)
AS/NZS 3548:1995, A1:1997, A2:1997,
CISPR Pub.22:1993, A1:1995, A2:1996,
rd
Edition
rd
Edition, +Amd.1, +Amd.2,
IEC61000-4-2, IEC61000-4-3,
IEC61000-4-4, IEC61000-4-5,
IEC61000-4-6, IEC61000-4-8,
IEC61000-4-11,
IEC61000-3-2, IEC61000-3-3
Class B
Class B
Pixelworks DNXTM ICs are used in this Projector.
Specifications-29
Page 32

Appearance
114
8
Centre of projector
84
402
* Distance from centre of lens to ceiling mount
Centre of lens
60.9*
122
12
3-M4×8
294
80
30-Appearance
65 127 115
95
Page 33

Index
A
Air filter .................................................................... 5
Air intake vent ......................................................... 5
All Reset ................................................................ 15
Aspect ratio ....................................................... 4, 24
Audio port ................................................................ 5
Auto Setup ...................................................... 11, 13
B
Background Color ................................................. 14
Battery holder ........................................................ 21
Brightness ............................................................. 13
C
Ceiling ............................................................... 9, 14
Ceiling mount fixing points ...................................... 5
Changing the battery ............................................. 21
Child Lock ............................................................. 14
Cleaning the air filter ............................................. 20
Cleaning the lens .................................................. 20
Cleaning the projector case .................................. 20
Color Mode ........................................................... 13
Color Temperature ................................................ 13
Component Video ................................................... 5
Composite Video ..................................................... 5
Computer cable ..................................................... 11
Connecting a Computer ........................................ 10
Contrast ................................................................ 13
Control (RS-232C) port ........................................... 5
Control panel ........................................................... 4
Cool-down ............................................................. 16
F
Flesh Tone ............................................................ 13
Focus ring ............................................................... 4
Front foot ................................................................. 4
G
K
Keystone ................................................................14
L
Lamp cover ..............................................................5
Lamp Hours ...........................................................15
Lamp replacement period ......................................22
Lamp-Hours Reset ................................................15
Language ...............................................................14
Lens cover ...............................................................4
M
Memory ..................................................................13
Memory Reset .......................................................15
Message ................................................................14
N
Normal ...................................................................26
O
On Screen Display .................................................14
Operating range .......................................................7
Operating temperature ..........................................29
Operation ...............................................................14
Optional Accessories .............................................28
Overheating ...........................................................16
P
Part Names and Functions ......................................4
Picture Quality .......................................................13
Port ..........................................................................5
Position ..................................................................14
Power cable .............................................................2
Power indicator ..................................................4, 16
Power inlet ...............................................................5
Projection ...............................................................14
Glossary ................................................................ 24
H
HDTV .................................................................... 24
I
Image menu .......................................................... 13
Indicators .......................................................... 4, 16
Info menu .............................................................. 15
Input A ................................................................... 14
Input A port ............................................................. 5
Input B ................................................................... 11
Input B port ............................................................. 5
Input Signal ........................................................... 15
Installation ............................................................... 8
R
Remote Control .......................................................6
Remote control holder .............................................5
Remote control infrared receiver .........................4, 5
Remote control infrared transmitter .........................6
Replacing the air filter ............................................21
Replacing the lamp ................................................22
Reset menu ...........................................................15
RGB .......................................................................13
S
Saturation ..............................................................13
SCART ..................................................................24
Screen ...................................................................14
Screen size ..............................................................8
Index-31
Page 34

Security lock ............................................................ 5
Setting menu ......................................................... 14
Setup Level ........................................................... 14
Sharpness ............................................................. 13
Sleep Mode ........................................................... 14
Source ................................................................... 15
Speaker ................................................................... 5
Specifications ........................................................ 29
Squeeze ................................................................ 26
Startup Screen ...................................................... 14
Sub Menu .............................................................. 12
Supported Display ................................................. 26
S-Video port ............................................................ 5
Sync Info ............................................................... 15
Sync. ..................................................................... 13
T
Tint ........................................................................ 13
Top Menu .............................................................. 12
Tracking ................................................................ 13
Translucent screen ................................................. 9
V
Ventilation outlet ..................................................... 4
Video ..................................................................... 15
Video port ................................................................ 5
Video Signal (Info menu) ...................................... 15
Video Signal (Setting menu) ................................. 14
Volume .................................................................. 14
W
Warning indicator .............................................. 4, 16
When You Suspect a Problem .............................. 16
Y
YCbCr ............................................................. 14, 25
YPbPr .............................................................. 14, 25
Z
Zoom ..................................................................... 26
Zoom Caption ....................................................... 14
Zoom ring ................................................................ 4
32-Index
Page 35

Guide de l'utilisateur
Table des matières
Déballage du projecteur.................................................................................................................... 34
Signification des symboles .............................................................................................................. 34
Particularités ................................................................................................................... 35
Avant d'utiliser le projecteur
Noms et fonctions des différentes parties du projecteur ........................................... 36
Vue de l'avant/du dessus.................................................................................................................. 36
Panneau de commande..................................................................................................................... 36
Vue de l'arrière................................................................................................................................... 37
Vue du dessous ................................................................................................................................. 37
Télécommande................................................................................................................................... 38
Installation ....................................................................................................................... 40
Méthode d'installation....................................................................................................................... 40
Distance de projection et taille de l'écran ....................................................................................... 40
Autres méthodes d'installation ........................................................................................................ 41
Connexion du matériel
Connexion d'un ordinateur ............................................................................................ 42
Ordinateurs compatibles .................................................................................................................. 42
Production d'images et de son depuis un ordinateur.................................................................... 43
Réglage des images générées par ordinateur................................................................................ 43
Menus de configuration
Utilisation des menus..................................................................................................... 44
Liste des fonctions ......................................................................................................... 45
Dépannage
Lorsque vous suspectez un problème ......................................................................... 48
Voyant Power..................................................................................................................................... 48
Voyant d'avertissement..................................................................................................................... 48
Si les voyants n'indiquent rien d'utile ............................................................................................. 49
Annexes
Maintenance .................................................................................................................... 52
Nettoyage ........................................................................................................................................... 52
Remplacement des pièces de consommation courante................................................................ 53
Glossaire ......................................................................................................................... 56
Résolutions d'affichage prises en charge.................................................................... 58
Accessoires en option ................................................................................................... 60
Spécifications ................................................................................................................. 61
Apparence .......................................................................................................................62
Index ................................................................................................................................ 63
33
Page 36

Déballage du projecteur
Lorsque vous déballez le projecteur, vérifiez que vous disposez de tous les composants suivants. S'il
manque des composants ou si vous ne disposez ps des composants requis, contactez votre revendeur.
Y Projecteur Y Télécommande Y Cordon secteur
Permet de brancher le projecteur sur
une prise murale.
Y Adaptateur PÉRITEL RGB
Utilisez un câble PÉRITEL du
commerce pour réaliser ces
connexions afin de projecter des
images au format vidéo RVB ou au
format vidéo en composantes.
Documentation
Y Guide de l’utilisateur (le présent guide)
Y Consignes de sécurité/Conditions d'application de la garantie internationale
Y Guide de référence rapide
Y Pieds en caoutchouc
A fixer lorsque vous installez le
projecteur à l'envers.
Signification des symboles
c
p
Indique un risque de blessures ou d'endommagement de l'équipement si ces symboles sont ignorés.
Indique des informations importantes liées au point abordé ou utiles à savoir.
s
g
Les termes "cette unité" et "ce projecteur", qui apparaissent dans ce manuel, peuvent aussi renvoyer aux accessoires fournis
avec le projecteur et à d'autres produits disponibles en option.
34-
Indique les thèmes liés et les pages contenant des informations détaillées.
Donne des définitions terminologiques. s "Glossaire" P.56
Page 37

Particularités
fMode couleurs
Vous pouvez sélectionner la qualité de l'image selon
l'environnement de projection. s la section "Sélection
d'un mode couleurs" dans le Guide de référence rapide
fCompact et léger
fQualité d'image éblouissante
Grâce à un affichage haute résolution et une haute
brillance, le projecteur permet d'obtenir de belles images.
Projection d'images nettes et détaillées, y compris en
milieu ambiant éclairé.
fFacilité d'utilisation
Le projecteur, très compact, est facile à transporter.
Dimensions : 29,4 (P) × 40,2 (L) × 11,4 (H) cm
Poids : 3,6kg environ
fAjustement Auto
(connexion à un ordinateur)
Le projecteur analyse l'ID de signal provenant de
l'ordinateur auquel il est relié et effectue automatiquement
les réglages nécessaires pour obtenir la meilleure qualité
de projection possible. s "Ajustement Auto (connexions
ordinateur)" P.43
Les diverses fonctions du projecteur peuvent être utilisées
facilement avec la télécommande :
• à l'aide des menus de configuration
• rappel de vos réglages favoris
• arrêt sur image
Particularités-35
Page 38

Avant d'utiliser le projecteur
Noms et fonctions des différentes parties du projecteur
Vue de l'avant/du dessus
• récepteur infrarouge de
télécommande s P. 39
Reçoit les signaux de la
télécommande.
• grille de sortie d'air
• cache d'objectif
Mettez-le en place lorsque
vous n'utilisez pas le projecteur pour protéger l'objectif
de la poussière et des chocs.
Panneau de commande
• panneau de commande
s P. 3 6
• bague de mise au
point s Guide de
référence rapide
Permet d'effectuer la
mise au point de l'image.
• bague de zoom
s Guide de
référence rapide
Ajuste la taille de l'image
projetée.
• pied avant (gauche)
s Guide de référence rapide
Il y a un autre pied avant, du côté
droit.
Sortez et rentrez-les pour ajuster
l'angle de projection.
• Bouton [Power] s Guide
de référence rapide
Met le projecteur sous tension
ou hors tension.
• Voyant Power s P. 48
Clignote ou s'allume dans différentes
couleurs pour indiquer l'état de
fonctionnement du projecteur.
• Voyant d'avertissement s P. 4 8
Clignote ou s'allume dans différentes
couleurs pour vous prévenir de
problèmes affectant le projecteur.
• Bouton [e] s P. 4 4
Pour accepter un élément de menu
ou passer à l'écran ou au menu
suivant, lorsqu'un menu de
configuration est affiché.
• Boutons [u][d][l][r] s P. 44
•[w][v] : boutons de correction de la
déformation trapézoïdale s Guide de
référence rapide
Appuyez sur ces touches pour corriger la déformation
trapézoïdale des images.
•[a][b] : boutons de volume
Permettent de régler le volume.
• Bouton [Menu] s P. 44
Affiche ou masque les menus de
configuration.
• Bouton [Source]
s Guide de
référence rapide
Sélectionne tour à
tour la source
d'entrée reliée au
port Input A, au port
S-Video et Video et
au port Input B à
chaque pression de
la touche.
• Bouton [Aspect] s Guide
de référence rapide
Change le Rapport L/Hg de
l'image projetée.
• Bouton [Esc] s P.4 4
Sert à arrêter la fonction en cours.
Dans un menu de configuration,
cette touche a pour effet d'afficher
l'écran ou le menu précédent.
36-Noms et fonctions des différentes parties du projecteur
Page 39

Vue de l'arrière
Avant d'utiliser le projecteur
•Port Input B s P. 43
Reçoit les signaux provenant d'un
ordinateur.
• Port Video s Guide de
référence rapide
Fait entrer les signaux Vidéo
compositeg vers le projecteur.
Connexion avec un câble A/V.
• Port S-Video
s Guide de référence rapide
Fait entrer les signaux S-Vidéog vers
le projecteur.
Connexion avec un câble S-Video.
• Support de la télécommande
s P. 39
Rangez la télécommande ici lorsque vous ne
l'utilisez pas.
• Port Audio s P.43,
Guide de référence rapide
Fait entrer les signaux audio vers le projecteur. Connexion
avec un câble A/V ou un câble stéréo RCA.
Si vous utilisez alternativement un ordinateur et un
équipement vidéo, changez de câble ou utilisez un
commutateur audio (disponible dans le commerce).
•Port Input A s Guide de
référence rapide
Fait entrer les signaux Vidéo en
composantesg ou RVB-Vidéog.
• récepteur infrarouge de
télécommande s P. 3 9
Reçoit les signaux de la
télécommande.
• haut-parleur
• prise d'entrée du courant
secteur s Guide de
référence rapide
Pour brancher le cordon secteur.
• Verrouillage de sécurité
s P. 5 7
• Port Control (RS-232C)
Permet de raccorder le projecteur
à un ordinateur avec un câble RS232C. Ce port sert à effectuer des
tests de maintenance et n'a pas
lieu d'être utilisé par le client.
Vue du dessous
• Filtre à air (orifice d'entrée
d'air) s P.52, P.53
Empêche la poussière et les
corps étrangers d'être aspirés à
l'intérieur du projecteur. Ouvrez
le couvercle pour changer le
filtre à air.
• Trous de montage pour bride
(3 trous)
Pour suspendre le projecteur au
plafond, installez ici la bride de
montage en option.
• Couvercle de la
lampe s P. 54
Déposez ce couvercle
pour remplacer la lampe
à l'intérieur du projecteur.
Noms et fonctions des différentes parties du projecteur-37
Page 40

Avant d'utiliser le projecteur
Télécommande
• émetteur infrarouge de la télécommande
transmet les signaux de la télécommande.
• Touches [Source] s Guide
de référence rapide
[Input A/B] : commute sur le signal
source du port Input A, ou celui du
port Input B.
[S-Video/Video] : passe de la
source de signal au port S-Vidéo et
au port Vidéo.
• Touche [Aspect] s Guide
de référence rapide
Change le rapport largeur/
hauteur de l'image projetée.
•Touches [u][d][l][r]
s P. 44
Permet de sélectionner des
éléments de menu et des
valeurs de réglages.
•[a][b] : touches de volume
Permettent de régler le volume.
• Touche [Menu] s P. 44
Affiche ou masque les menus
de configuration.
• Touche [A/V Mute]
s Guide de référence rapide
Coupe temporairement le son et l'image.
• Touche [Power]
s Guide de référence rapide
Met le projecteur sous tension ou
hors tension.
• Touche [Color Mode]
s Guide de référence rapide
Permet de sélectionner le mode
couleur désiré. Les différents modes
couleur apparaissent tour à tour
dans l'ordre suivant à chaque
pression sur la touche : Dynamique,
Salle de séjour, Théâtre et Noir
théâtre.
• Touche [Memory]
s Guide de référence rapide
Rappelle les réglages enregistrés
en mémoire dans les menus de
configuration.
•Touche [e] s P. 44
Pour accepter un élément de menu
ou passer à l'écran ou au menu
suivant, lorsqu'un menu de
configuration est affiché.
• Touche [Esc] s P.4 4
Sert à arrêter la fonction en cours.
Dans un menu de configuration,
cette touche a pour effet d'afficher
l'écran ou le menu précédent.
• Touche [Auto] s P. 4 3
Ajuste automatiquement les signaux
RVB analogiques d'ordinateur sur
leurs réglages optimaux.
• Touche [Still]
s Guide de référence rapide
Permet de figer à l'écran l'image
projetée à partir d'un ordinateur ou
d'une autre source vidéo.
38-Noms et fonctions des différentes parties du projecteur
Page 41

fAvant d'utiliser la télécommande
Retirez la languette isolante.
fUtilisation de la télécommande
Dirigez la télécommande vers le récepteur infrarouge de télécommande du projecteur.
Avant d'utiliser le projecteur
récepteur infrarouge
de télécommande
Ne laissez pas la lumière directe du soleil ou d'un tube fluorescent frapper directement le récepteur infrarouge de
télécommande sous peine de ne pas pouvoir utiliser la télécommande.
p
récepteur infrarouge
de télécommande
fPortée
Portée : environ 6m. (parfois moins, selon les conditions.)
Angle d'utilisation: env. 30° horizontalement, 15° verticalement
* Le récepteur infrarouge de la télécommande, situé au dos du projecteur, peut aussi être utilisé dans les mêmes conditions.
15°
15°
30° 30°
environ 6m
fRangement
Lorsque vous n'utilisez pas la télécommande, rangez-la dans le support prévu dans le projecteur.
Noms et fonctions des différentes parties du projecteur-39
Page 42

Installation
Assurez-vous d'avoir lu le fascicule intitulé "Consignes de sécurité/Conditions d'application de la garantie internationale"
avant de procéder à l'installation.
c
Méthode d'installation
Installez le projecteur à angle droit avec l'écran.
Distance de projection :
73-1165 cm
Distance de projection et taille de l'écran
90°
Distance de projection
20 cm minimum
16:9 Taille de l'écran
cm
Distance de projection
cm
30" 40" 60" 80" 100" 200" 300"
66 × 37 89 × 50 130 × 75 180 × 100 220 × 120 440 × 250 660 × 370
73 − 114 98 − 153 149 − 231 200 − 309 251 − 387 504 − 776 758 − 1165
Ecran
Centre de l'objectif
Les valeurs doivent servir de guides pour installer le projecteur.
40-Installation
Page 43

Autres méthodes d'installation
Avant d'utiliser le projecteur
fProjection à l'envers
(Avant/Plafond)
Fixez les pieds en caoutchouc fournis pour empêcher le
panneau de fonctionnement d'entrer en contact avec la
surface sur laquelle il repose.
Pieds en caoutchouc
(à fixer en 3 endroits)
fProjection vers le plafond
fProjection du plafond/
Rétroprojection
(avec un écran translucide)
fProjection par l'arrière
(avec un écran translucide)
*La bride de montage optionnelle est nécessaire pour installer le projecteur au plafond. Veuillez contacter votre distributeur
si vous souhaitez utiliser cette méthode, car un équipement spécial est nécessaire pour l'installation. s "Accessoires en
option" P.60
Lorsque vous souhaitez utiliser la rétroprojection ou la projection à partir du plafond, sélectionnez le mode approprié dans le
menu de configuration "Réglage" → "Ecran" → "Projection". s "Menu Réglage" P.46
p
Installation-41
Page 44

Connexion du matériel
Connexion d'un ordinateur
Voir le "Guide de référence rapide" pour des instructions sur la connexion à un équipement vidéo.
Avant de brancher :
• Coupez le courant du projecteur et de l'ordinateur.
c
Ordinateurs compatibles
p
Vous risquez d'endommager le projecteur ou l'équipement vidéo si vous les branchez alors qu'ils sont sous tension.
• Vérifiez les types de connecteurs.
Vous risquez des endommagements si vous essayez d'insérer un connecteur dans le mauvais port.
Condition 1 : l'ordinateur doit avoir un port de sortie de signal vidéo, tel qu'un port RVB port, un
port moniteur ou un port CRT.
Certains ordinateurs portables et PC à moniteur intégré peuvent ne pas être compatibles. Veuillez
vous reporter au manuel de votre ordinateur pour en savoir plus.
Condition 2 :la fréquence et la résolution d'affichage de l'ordinateur doivent correspondre à celles
du projecteur. s "Résolutions d'affichage prises en charge" P.58
Il vous fera peut-être acheter un adaptateur séparé, selon la forme du port de votre ordinateur. Veuillez vous reporter au
manuel de votre ordinateur pour en savoir plus.
fConnexion d'un ordinateur portable
Exemples d'installation
S'il s'agit d'un ordinateur portable ou d'un ordinateur
à écran intégré, sélectionnez la sortie vidéo externe sur
p
l'ordinateur.
Windows :
Appuyez longuement sur la touche [Fn], puis sur la
touche numérique appropriée.
NEC
Panasonic
Tosh ib a
IBM
SONY
[Fn]+[F3]
[Fn]+[F5]
[Fn]+[F7]
Pour plus de détails sur la façon de procéder, reportezvous à la documentation fournie avec votre ordinateur.
Selon la version de Windows que vous utilisez,
une boîte de dialogue peut s'afficher pour vous
prévenir qu'un nouveau matériel d'affichage a été
détecté. Suivez les instructions à l'écran pour
continuer. En cas de problème, contactez le
Win
bureau le plus proche dont l'adresse est
mentionnée à la section "Conditions
d'application de la garantie internationale" du
guide "Consignes de sécurité / Conditions
d'application de la garantie internationale".
• La projection de l'image d'ordinateur peut
Win/
Mac
prendre quelques instants.
• Selon l'ordinateur, le moniteur peut devenir
vierge lorsque vous utilisez une sortie vidéo
externe sur l'ordinateur.
Fujitsu
Macintosh :
Après le démarrage, activez la fonction "Réflexion" dans
le tableau de bord Moniteurs.
[Fn]+[F10]
42-Connexion d'un ordinateur
Page 45

Connexion du matériel
Production d'images et de son depuis un ordinateur
vers le port de sortie audio
mini jack stéréo
Si vous utilisez alternativement un ordinateur et un équipement vidéo, changez de câble ou utilisez un commutateur audio.
p
vers le port moniteur
Câble d'ordinateur (optionnel)
câble 2RCA à fiche mini jack stéréo
(disponible dans le commerce)
Vers le port
Input B
vers le port
Audio
prise RCA
Réglage des images générées par ordinateur
fAjustement Auto (connexions ordinateur)
Le signal de l'ordinateur est analysé et les réglages suivants sont ajustés pour assurer une qualité d'image optimale.
• Alignement
• Position
•Sync.
g
g
• Vous pouvez régler l'option Ajustement Auto sur off dans le menu de configuration "Image" → "Ajustement Auto". (Le
réglage par défaut est ON) s "Menu Image" P.45
• Lorsque la fonction Ajustement Auto est désactivée, appuyez sur la touche [Auto] de la télécommande pour effectuer
p
Ajustez les réglages Alignement et Sync manuellement si la configuration automatique ne peut pas être effectuée. (Touche
[Menu] → "Image" → "Qualité d'image" → "Alignement", "Sync.") s "Menu Image" P.45
l'ajustement automatique.
• Si vous appuyez sur la touche [Auto] pendant la fonction Arrêt sur image ou lorsque le menu de configuration est affiché,
l'affichage est arrêté et la configuration automatique est lancée.
Connexion d'un ordinateur-43
Page 46

Menus de configuration
Utilisation des menus
Appuyez sur la touche [Menu].
1
Le menu principal de configuration s'affiche.
Menu principal
Appuyez sur la touche [u] ou [d] pour
2
sélectionner l'élément du menu
principal.
Sous-menu
Les réglages peuvent être modifiés
5
comme suit :
(a)Appuyez sur la touche [l] ou [r] pour
changer ces valeurs de réglage.
(b)Appuyez sur la touche [u] ou [d] pour
sélectionner l'élément de menu.
Appuyez sur la touche [e].
(vert) : élément actuellement réglé.
(orange) : élément actuellement
sélectionné.
Appuyez sur la touche [e] pour
confirmer la sélection.
Appuyez sur la touche [e].
3
Le sous-menu s'affiche.
Le repère s'affiche derrière chaque élément
servant à effectuer un réglage ou menant à un sous-
p
menu.
(c)Appuyez sur la touche [l] ou [r] pour
sélectionner la valeur.
Puis, appuyez sur la touche [e].
(d)Appuyez sur les touches [u] [d] [l] [r] pour
déplacer l'image.
Appuyez sur la touche [u] ou [d] pour
4
sélectionner les éléments du sousmenu, puis appuyez sur la touche [e].
44-Utilisation des menus
Réglez les autres éléments de la même
6
manière.
Appuyez sur la touche [Esc] pour retourner à
l'élément précédent ou au menu, ou
sélectionner "Retour".
Appuyez sur la touche [Menu] pour
7
terminer.
Page 47

Liste des fonctions
fMenu Image
• Les fonctions du menu "Image" diffèrent selon le type de signal entrant.
• En l'absence de signal entrant, seule la fonction "Ajustement Auto" peut être réglée.
Vidéo (Vidéo/S-Vidéog/Composantes)
RVB (RVB-Vidéo/RVB analogique)
Sous-menu Fonction
Qualité
d'image
Mode couleurs Permet de corriger la vivacité des couleurs de l'image. Les réglages peuvent être mémorisés
Mémoire Permet d'enregistrer les valeurs de réglage des images. Sélectionnez "Mémoire1" ou
Ajustement Auto
(RVB uniquement)
Réinit. Réinitialise toutes les valeurs de réglage du menu "Image" (sauf pour "Mémoire") à leurs
Luminosité Ajuste la luminosité de l'image.
Contraste
Netteté Ajuste la netteté de l'image.
Saturation
(Vidéo
uniquement)
Teinte
(Vidéo
uniquement)
Temp.
Couleurg
Couleur chair Ajuste le niveau de vert.
Alignement
(RVB
uniquement)
Sync.
(RVB
uniquement)
g Ajuste le contraste de l'image.
Permet d'ajuster l'intensité des couleurs.
(l'ajustement n'est possible que lorsque les signaux entrants sont de type Vidéo en
composantesg ou NTSC)
Ajuste la teinte de l'image.
Ajuste les couleurs lumineuses d'une teinte rouge vers une teinte bleue.
Des réglages plus faibles de la température des couleurs produisent des couleurs plus rouges et
des teintes plus douces.
Des réglages plus élevés de la température des couleurs produisent des couleurs plus bleues et
des teintes plus appuyées.
L'intensité des teintes vertes s'accentue lorsque la valeur de réglage est élevée et l'intensité
des teintes rouges/violettes devient plus prononcée lorsque la valeur de réglage est faible.
g
Ajuste l'image lorsque des bandes verticales apparaissent à l'image.
g
Permet d'ajuster l'image qui tremble, qui est floue ou brouillée.
L'image peut aussi trembler ou être floue lors du réglage de la luminosité, du contraste, de la
netteté ou de la déformation trapézoïdale.
Les meilleurs résultats sont obtenus en réglant l'alignement avant la synchronisation.
séparément pour chaque type de source (ordinateur ou vidéo).
Sélectionnez l'un des 4 réglages de qualité selon l'environnement.
• Dynamique : Le meilleur réglage pour projeter des jeux vidéo. Vous pouvez obtenir une
qualité d'image vive même dans des endroits lumineux.
• Salle de séjour: Le meilleur réglage pour la projection d'émissions sportives, etc. Vous
pouvez obtenir une qualité d'image TV, même dans la salle de séjour.
• Théâtre : Le meilleur réglage pour regarder des films généralement lumineux. Les
couleurs sont vivement exprimées sans pour autant diminuer la luminosité de la lampe.
• Noir théâtre : Le milleur réglage pour regarder des films dans un endroit sombre. La
luminosité de la lampe est réduite et les couleurs sont exprimées plus subtilement.
"Mémoire2", puis appuyez sur le bouton [e] pour enregistrer les réglages actuels. Vous
pouvez afficher les réglages enregistrés en appuyant sur le touche [Memory].
ON : lorsque la source d'entrée est commutée sur un signal d'ordinateur, le projecteur ajuste
automatiquement l'image de manière optimale.
OFF : l'Ajustement Auto est désactivé.
réglages par défaut.
• Appuyez sur la touche [e] et sélectionnez "Oui" à l'écran de confirmation qui s'affiche.
• Sélectionnez "Tout reinitialiser" pour restaurer tous les réglages de menu, comme l'image
et le son, à leurs réglages par défaut. s "Menu Réinit." P.47
Liste des fonctions-45
Page 48

Menus de configuration
fMenu Réglage
Sous-menu Fonction
Ecran Position Déplace la position de l'image verticalement et horizontalement.
• Appuyez sur la touche [e] et effectuez le réglage à l'écran d'ajustement de position de
l'image qui s'affiche.
Caption
zoom
Keystone Corrige la déformation trapézoïdale verticale de l'image.
Projection • Avant : L'image s'affiche comme telle. Aucune inversion verticale/
Niveau
D'Instal.
Fonctionnement Mise en
arrêt
différé
Controle
parental
Affichage sur
Message Lorsque cette option est sur "OFF", les messages tels que "Pas de Signal" et le nom de la
écran
Couleur de
fond
Ecran
démarrage
Signal entrée Signal
Vidéo
Input A Vous pouvez sélectionner tour à tour les sources connectées à Input A.
Volume Permet de régler le volume
Langue Sélectionne la langue dans laquelle les messages s'affichent.
Réinit.
Vous pouvez régler les valeurs uniquement après avoir sélectionné la fonction Aspect
zoom.
• Taille verticale : vous pouvez ajuster la taille verticale de l'image.
• Position de zoom: vous pouvez ajuster les déplacements verticaux de l'image.
• Lors de la correction de la déformation trapézoïdale, l'image projetée change de taille.
• Si les images restent déformées après la correction de la déformation trapézoïdale,
réduisez le réglage de la netteté.
horizontale n'a lieu.
• Avant/Plafond : L'image s'affiche inversée verticalement.
• Arrière : L'image s'affiche inversée horizontalement.
• Arrière/Plafond: L'image s'affiche inversée verticalement et horizontalement.
Vous pouvez sélectionner l'un des deux niveaux de noir prédéfinis.
Lorsque l'image source est un signal NTSC Video/S-Signal Video ou lorsqu'elle a été
définie sur Input A ("Component").
Permet de régler l'option d'économie d'énergie lorsque aucun signal n'entre.
• Lorsqu'un intervalle de Mise en arrêt différé a été réglé, le projecteur entre en mode de
Mise en arrêt lorsqu'aucune opération n'a été effectuée pendant la durée sélectionnée (5, 10
ou 30 minutes). La projection s'arrêt et le projecteur entre en mode veille après
refroidissement. (Le voyant Power s'allume à l'orange).
• La projection redémarre lorsque vous appuyez sur la touche [Power] du panneau de
commande du projecteur ou de la télécommande.
Active ou désactive le contrôle parental.
Lorsque le contrôle parental est activé, le projecteur n'est pas mis sous tension si vous
n'appuyez pas sur la touche [Power] du panneau de commande et que vous ne la maintenez
pas enfoncée pendant au moins 3 secondes. (La télécommande fonctionne normalement.)
source d'entrée ou du mode couleur sélectionné ne s'affichent plus. Les messages d'alerte
tels que "Remplacez la lampe SVP." continuent à s'afficher.
Règle la couleur d'arrière-plan sur le noir ou le bleu.
Cette option permet de choisir si le logo "EPSON" doit s'afficher pendant la procédure
de démarrage du projecteur.
Sélectionne le système de couleurs du signal vidéo entrant.
(Les modifications de format du signal sont visibles uniquement lorsque la source
d'entrée est de type Video/S-Video.)
• Component : YCbCr
g/YPbPrg
• RGB-Video : PÉRITELg, Sync. sur le vert
• Appuyez sur la touche [e] et sélectionnez la langue dans la liste qui s'affiche.
Réinitialise toutes les valeurs de réglage du menu "Réglage" (sauf pour "Controle parental",
"Input A" et "Langue") à leurs réglages par défaut.
• Appuyez sur la touche [e] et sélectionnez "Oui" à l'écran de confirmation qui s'affiche.
46-Liste des fonctions
Page 49

Menus de configuration
fMenu Information
Video/S-Video Input A/Input B
En présence d'un signal vidéo en composantes entrant dans le port
Input A, le taux de rafraîchissement et les infos sync ne sont pas
affichés.
Sous-menu Fonction
Durée de lampe Affiche la durée totale de fonctionnement de la lampe. Entre 0 et 10 heures, "0H" est
affiché. Au-delà de 10 heures, la durée d'utilisation est affichée par incréments d'une heure.
• Lorsque la durée cumulée d'utilisation de la lampe atteint la durée appropriée, un
message d'alerte s'affiche en rouge.
* Si Noir théâtre a été utilisé continuellement (environ 2900 heures)
Si d'autres modes ont été utilisés continuellement (environ 1900 heures)
Source Affiche la source entrée en cours de projection.
Signal entrée
(Input A/Input B
uniquement)
Signal Vidéo
(Video/S-Video
uniquement)
Résolution
(Input A/Input B
uniquement)
Taux rafraîchi.
(Input A/Input B
uniquement)
Info sync
(Input A/Input B
uniquement)
g
Affiche les réglage de signal d'entrée.
Affiche le format du signal vidéo.
Affiche la résolution d'entrée.
(ne s'affiche pas lorsque la source d'entrée est de type vidéo en composantes ou S-Vidéo.)
Affiche la cadence de rafraîchissement
(ne s'affiche pas lorsque la source d'entrée est de type vidéo en composantes ou S-Vidéo.)
Affiche des informations concernant le signal d'image.
Si vous avez des problèmes avec votre projecteur et que vous souhaitez contacter un
revendeur Epson, indiquez à votre interlocuteur les informations affichées à l'écran.
fMenu Réinit.
Sous-menu Fonction
Réinitial. durée lampe Remet à zéro la durée de fonctionnement de la lampe. Lorsque vous sélectionnez cette
option, la durée totale de fonctionnement de la lampe est remise à sa valeur par défaut.
Réinitiali. mémoire Réinitialise tous les réglages stockés en Mémoire.
Tout réinitialiser Remet à zéro tous les éléments des menus de configuration à leurs réglages par défaut.
• Appuyez sur la touche [e] et sélectionnez "Oui" à l'écran de confirmation qui s'affiche.
• Sélectionnez "Réinit." dans un menu individuel pour ne remettre à zéro que les réglages
correspondant aux éléments de ce sous-menu.
• Les réglages "Mémoire", "Controle parental", "Input A", "Langue" et "Durée de lampe"
ne sont pas remis à zéro.
Liste des fonctions-47
Page 50

Dépannage
Lorsque vous suspectez un problème
Vérifiez d'abord les voyants du projecteur.
Le projecteur est équipé de deux voyants qui
Voyant Power
vous informent de l'état de fonctionnement du
projecteur.
Voyant d'avertissement
Voyant Power
allumé clignotant • Si l'indicateur est éteint, l'alimentation secteur n'est pas mise.
Signification Cause/Solution s
Orange
Orange
Vert
Vert
Mode veille (Cecì n'est pas une erreur)
Ne débranchez le cordon secteur que lorsque le projecteur est dans cet état.
Appuyez sur la touche [Power] pour lancer la projection.
Refroidissementg en cours (Cecì n'est pas une erreur)
• Veuillez attendre. La période de refroidissement dure environ 20 secondes.
• Le projecteur émet deux bips et indique que le refroidissement est terminé.
• Il n'est pas possible de faire fonctionner la touche [Power] pendant le refroidissement.
Appuyez à nouveau sur la touche Power lorsque le refroidissement est terminé.
Projection en cours (Cecì n'est pas une erreur)
Préchauffage en cours (Cecì n'est pas une erreur)
Veuillez attendre. La durée du préchauffage est d'environ 40 secondes. Lorsque le
préchauffage est terminé, le voyant passe de vert clignotant à vert fixe.
Guide de
référence
rapide
Voyant d'avertissement
allumé clignotant • Non éclairé dans des conditions d'utilisation normales.
Signification Cause/Solution s
Rouge
Rouge
(intervalles de 0,5
seconde)
Rouge
(intervalles de 1
seconde)
Haute température interne (surchauffe)
La lampe s'éteint automatiquement et la projection s'arrête. Attendez environ 5 minutes sans
utiliser le projecteur. Après un délai d'environ 5 minutes, débranchez la fiche du cordon secteur,
puis vérifiez les points suivants :
• Veillez à ce que le filtre à air et la grille de sortie d'air soient suffisamment dégagés et que le
projecteur ne soit pas contre un mur.
• Si le filtre à air est sale, nettoyez-le.
Au moment où vous rebranchez la fiche du cordon secteur, le projecteur revient à son état
antérieur. Appuyez sur la touche [Power] du projecteur ou de la télécommande pour le
remettre en marche.
La lampe présente un problème
• Débranchez le cordon secteur de la prise de courant. Retirez la lampe du projecteur et vérifiez
si celle-ci n'est pas brisée. Si elle n'est pas brisée, réinstallez-la. Rebranchez ensuite le cordon
secteur et appuyez sur la touche [Power] du projecteur ou de la télécommande pour rallumer le
projecteur.
• Si la lampe est brisée, veuillez contacter votre distributeur ou le bureau le plus proche dont
l'adresse est donnée à la page "Conditions d'application de la garantie internationale" dans le
guide "Consignes de sécurité/Conditions d'application de la garantie internationale" (Aucune
projection n'est possible tant que la lampe n'a pas été remplacée).
• Assurez-vous de réinstaller la lampe correctement et de bien refermer le couvercle de la
lampe.
En cas de montage incorrect de la lampe ou de son couvercle, la lampe ne s'allumera pas.
Problème interne
Cessez d'utiliser votre projecteur, débranchez-le de sa prise de courant, puis adressez-vous à
votre distributeur ou au plus proche bureau dont l'adresse figure à la page "Conditions
d'application de la garantie internationale" dans le guide "Consignes de sécurité/Conditions
d'application de la garantie internationale".
P.40
P.52
P.54
48-Lorsque vous suspectez un problème
Page 51

Dépannage
Signification Cause/Solution s
Orange
• Si le projecteur ne fonctionne pas normalement alors que les voyants semblent indiquer que tout est normal, reportez-vous
à la section suivante intitulée "Si les voyants n'indiquent rien d'utile".
• Si un voyant apparaît dans un état qui ne figure pas dans le tableau, adressez-vous à votre distributeur local ou au bureau
p
le plus proche dont vous trouverez l'adresse à la page "Conditions d'application de la garantie internationale" dans le guide
"Consignes de sécurité/Conditions d'application de la garantie internationale".
• Si votre projecteur continue à surchauffer alors que vous avez vérifié les points ci-dessus, cessez d'utiliser le projecteur,
débranchez-le et faites-le réparer par votre distributeur ou le bureau le plus proche dont l'adresse est donnée à la page
"Conditions d'application de la garantie internationale" dans le guide "Consignes de sécurité/Conditions d'application de
la garantie internationale".
Refroidissement à haute vitesse en cours
(Il ne s'agit pas d'une anomalie, cependant si la température monte à nouveau excessivement, la
projection s'arrêtera automatiquement.)
Installez le projecteur dans un endroit bien ventilé, en veillant à ce que son filtre à air et sa grille
de sortie d'air soient suffisamment dégagés.
Nettoyez le filtre à air.
Si les voyants n'indiquent rien d'utile
fAucune image n'apparaît (aucun affichage)
P.40
P.52
• Tente-t-on d'éteindre puis de
rallumer immédiatement le
projecteur?
• Avez -vous réglé un intervalle
de Mise en arrêt différé (5, 10
ou 30 minutes)?
• Le réglage Luminosité de
l'image est-il correct?
• L'image projetée est-elle
entièrement noire?
• Y a-t-il un signal vidéo sur
une entrée du projecteur?
Vous ne pouvez pas commencer de nouvelle projection
pendant au moins une minute après la fin de la projection,
même si vous appuyez sur la touche [Power] du panneau de
commande ou de la télécommande Laissez le projecteur se
refroidir complètement avant de commencer une nouvelle
projection.
Lorsqu'un intervalle de Mise en arrêt différé a été réglé, la
lampe s'éteint au bout d'un moment (5, 10 ou 30 minutes,
selon le réglage), si aucune opération n'est effectuée.
Le voyant Power s'allume alors à l'orange.
Réglez la luminosité comme suit.
[Menu] touche → "Image" → "Qualité d'image" →
"Luminosité".
Certaines images sont noires, comme cela arrive souvent
avec les programmes économiseurs d'écran.
Vérifiez si un signal d'image entre.
Réglez l'option "Message" sur "ON" dans le menu de
configuration "Réglage" → "Affichage sur écran" →
"Message", pour afficher les informations concernant le
signal d'image.
fAucune image n'apparaît (mais les messages apparaissent)
• La source d'entrée est-elle
correctement sélectionnée?
• Les câbles sont-ils connectés
correctement?
"Pas de signal"
• La sortie vidéo externe a-telle été sélectionnée sur
l'ordinateur?
Appuyez sur la touche [Source] du panneau de commande
jusqu'à ce que la source d'entrée souhaitée soit
sélectionnée. Pour la télécommande, appuyez sur la touche
[Input A/B] ou la touche [S-Video/Video].
Vérifiez si les câbles sont correctement connectés.
En fonction de l'équipement utilisé, il est possible que vous
deviez régler certains paramètres sur le matériel vidéo.
Reportez-vous au guide de l'utilisateur de votre équipement
vidéo.
S'il s'agit d'un ordinateur portable ou d'un ordinateur à
écran intégré, sélectionnez la sortie vidéo externe sur
l'ordinateur.
s "Connexion d'un ordinateur portable" P.42
Lorsque vous suspectez un problème-49
Page 52

Dépannage
fL'image est floue (pas nette)
• L'image est floue
• Une partie de
l'image est floue
• L'image entière est
floue
• Le projecteur se trouve-t-il à
une distance correcte de
l'écran?
• L'objectif est-il sale?
• De la buée s'est-elle formée
sur l'objectif?
• La mise au point a-t-elle été
réglée correctement?
La distance de projection optimale est comprise entre 73 et
1 165 cm. Placez le projecteur à une distance comprise
entre ces limites. s "Méthode d'installation" P.40
s "Nettoyage de l'objectif" P.52
Sortir le projecteur d'un endroit froid pour le réchauffer
brusquement peut produire de la buée sur les lentilles de
l'objectif, ce qui peut rendre les images floues. Laissez le
projecteur se réchauffer doucement dans la pièce pendant
environ une heure avant de l'utiliser, afin qu'il puisse avoir
le temps d'atteindre la température ambiante. Si de la buée
s'est déjà formée sur les lentilles de l'objectif, éteignez le
projecteur et attendez que celle-ci s'évapore spontanément.
Tournez la bague de mise au point pour ajuster la netteté.
fL'image est déformée/L'image est brouillée
• Utilisez-vous un câble de
rallonge?
• Les câbles sont-ils
correctement connectés?
Avec un câble de rallonge, des interférences électriques
peuvent affecter les signaux.
Vérifiez si les câbles sont correctement connectés.
Des interférences peuvent se produire si les câbles ne sont
pas correctement connectés.
fSeule une partie de l'image apparaît (petite ou grande)
• Le réglage "Rapport L/H" a-til été sélectionné
correctement?
• Le réglage "Position" de
l'image est-il correct?
Appuyez sur la touche [Aspect] pour modifier le rapport
hauteur/largeur. s la section "Modification du rapport
largeur/hauteur" dans le Guide de référence rapide
Utilisez la commande "Réglage" → "Ecran" → "Position"
pour ajuster la position de l'image.
fLes couleurs de l'image sont médiocres, verdâtres ou rougeâtres
• La lampe a-t-elle besoin
d'être remplacée?
• Ajustez chaque réglage des
menus suivants.
[Menu] touche → "Image" →
"Qualité d'image"
• Les câbles sont-ils
correctement connectés?
Lorsque la lampe approche de sa fin de vie, les couleurs
perdent de leur fraîcheur et l'image s'assombrit
sensiblement. Remplacez la lampe si c'est le cas.
s "Périodicité de remplacement de la lampe" P.54
"Contraste", "Temp. Couleur"
"Saturation", "Teinte", "Luminosité"
Si les câbles reliés à l'équipement vidéo en composante ne
sont pas correctement connectés, certaines couleurs ne
peuvent pas être affichées.
50-Lorsque vous suspectez un problème
Page 53

fL'image est sombre
Dépannage
• La lampe a-t-elle besoin
d'être remplacée?
• Ajustez chaque réglage des
menus suivants.
[Menu] touche → "Image" →
"Qualité d'image"
Lorsque la lampe approche de sa fin de vie, les couleurs
perdent de leur fraîcheur et l'image s'assombrit
sensiblement. Remplacez la lampe si c'est le cas.
s "Périodicité de remplacement de la lampe" P.54
"Luminosité", "Contraste"
fPas de son
• Le volume a-t-il été réglé sur
le paramètre minimal?
• La source audio est-elle
connectée correctement?
• Is the connected Video
equipment in playback
mode?
Réglez le volume à l'aide de la télécommande ou du
panneau de commande.
Reliez l'équipement utilisé au port Audio avec un câble
audio.
Turn on the power to the connected equipment and press
the play button.
fLa télécommande ne fonctionne pas
• Le capteur infrarouge du
projecteur qui reçoit les
signaux de la télécommande
est-il exposé aux rayons
directs du soleil ou d'une
forte lampe fluorescente?
• La télécommande est-elle
trop éloignée du projecteur?
• Pointe-t-on l'émetteur
infrarouge de la
télécommande vers le
capteur infrarouge du
projecteur lors de l'utilisation
de la télécommande?
• La languette de plastique
isolante de la pile a-t-elle été
retirée?
• La pile est-elle usée?
s "Utilisation de la télécommande" P.39
La portée maximale de la télécommande est d'environ 6 m.
L'angle de fonctionnement de la télécommande est
d'environ ±30½° horizontalement et d'environ ±15½°
verticalement.
Retirez la languette isolante.
s "Remplacement de la pile" P.53
fImpossible d'arrêter le projecteur (en appuyant sur la touche
[Power])
• Le voyant Power reste à
l'orange.
Ce projecteur est conçu pour que le voyant Power reste
allumé après sa mise hors tension. Le voyant Power s'éteint
lorsque l'on débranche le cordon secteur.
fLe projecteur ne sera pas mis sous tension
• Le projecteur n'est pas mis
sous tension, même lorsque
vous appuyez sur la touche
[Power] du panneau de
commande.
Le contrôle parental est-il activé ?
Appuyez et maintenez enfoncée la touche [Power] pendant
au moins 3 secondes pour mettre le projecteur sous tension.
Lorsque vous suspectez un problème-51
Page 54

Annexes
Maintenance
Assurez-vous d'avoir lu le fascicule intitulé "Consignes de sécurité/Conditions d'application de la garantie internationale"
avant de poursuivre.
c
Nettoyage
Nettoyez votre projecteur s'il est devenu sale ou si la qualité des images projetées commence à se
dégrader.
fNettoyage du filtre à air
Un filtre à air bouché par une accumulation de poussière peut empêcher une bonne ventilation et provoquer une surchauffe
nuisible au projecteur.
En gardant le projecteur à l'horizontale, aspirez la poussière du filtre à air avec un aspirateur.
Si le filtre à air est difficile à nettoyer ou s'il est
cassé, remplacez-le. Contactez votre distributeur
p
pour obtenir un nouveau filtre à air.
filtre à air
fNettoyage de l'extérieur du projecteur
Nettoyez l'extérieur du projecteur en l'essuyant doucement avec un chiffon.
Si le projecteur est particulièrement sale, humidifiez votre chiffon avec de l'eau et une petite quantité d'un détergent au pH
neutre, en veillant à bien essorer votre chiffon avant de vous en servir pour essuyer l'extérieur du projecteur. Essuyez
ensuite à nouveau l'extérieur du projecteur avec un chiffon doux et sec.
N'utilisez pas de substance volatile telle que de la
cire, de l'alcool ou un solvant pour nettoyer
l'extérieur du projecteur. Ces matières pourraient
c
déformer la coque du projecteur ou dissoudre sa
couche de surface.
fNettoyage de l'objectif
Utilisez un pinceau soufflant du commerce ou bien du papier optique pour essuyer délicatement la lentille de l'objectif.
Ne frottez pas l'objectif avec un matériau abrasif, et
protégez-le des chocs, car il s'agit d'une pièce
c
fragile.
52-Maintenance
Page 55

Annexes
Remplacement des pièces de consommation courante
fRemplacement du filtre à air
(filtre à air : ELPAF04)
Le remplacement du filtre à air peut se faire même si le projecteur est fixé au plafond.
Eteignez le projecteur, attendez la fin
1
de la période de refroidissement et
débranchez le cordon secteur du
projecteur.
Refroidissementg prend environ 20 secondes.
Placez votre doigt dans le loquet et
2
soulevez le couvercle. Sortez le filtre à
air en le tirant vers le haut.
Remplacez le filtre à air par un filtre
3
neuf.
Retirez l'ancien filtre à air et installez à sa
place un filtre à air neuf. Il ne doit pas y avoir
d'espace entre le filtre à air et la grille en
plastique.
Replacez le couvercle du filtre à air.
4
Insérez d'abord les languettes, puis appuyez
sur le côté opposé jusqu'au déclic.
fRemplacement de la pile
(Pile de rechange: 1 × pile lithium CR2025)
Conservez les piles hors de portée des enfants pour éviter tout risque d'accidents.
Si un enfant avale une pile, rendez-vous chez votre médecin immédiatement.
c
Extrayez le tiroir porte-pile.
1
Poussez la languette du tiroir porte-pile vers
l'intérieur, puis sortez le tiroir porte-pile.
Retirez l'ancienne pile et remplacez-la
2
par une neuve.
Le côté (+) est marqué sur le porte-pile : veillez
à installer la nouvelle pile à l'endroit.
Observez la réglementation locale en vigueur
concernant les déchets lorsque vous jetez des filtre à air
p
usagés.
Remettez le tiroir porte-pile en place.
3
Enfoncez-le jusqu'au déclic.
Observez la réglementation locale en vigueur
concernant les déchets lorsque vous jetez des piles
p
usagées.
Maintenance-53
Page 56

Annexes
fPériodicité de remplacement de la lampe
• Il est temps de remplacer la lampe quand le message "Remplacez la lampe
SVP" s'affiche dans le coin inférieur gauche de l'écran au début de la
projection et pendant 30 secondes.
• Il est également temps de changer la lampe lorsque le voyant d'avertissement
clignote à une fréquence de 0,5 seconde.
• La date à laquelle le message invitant à remplacer la lampe apparaît varie selon le mode couleur utilisé.
Si Noir théâtre a été utilisé continuellement (environ 2900 heures)
p
Si d'autres modes ont été utilisés continuellement (environ 1900 heures)
• Lorsque le message est affiché, remplacez la lampe aussi vite que possible.
• Si vous continuez à utiliser la lampe au-delà de cette période, elle risque d'exploser.
• Certaines lampes s'arrêtent de fonctionner avant même l'apparition du message d'avertissement. Il est donc conseillé
d'avoir une lampe de remplacement au cas où cela arriverait.
• Vous pouvez acheter les lampes de remplacement chez le distributeur le plus proche.
fRemplacement de la lampe
(Lampe de remplacement : ELPLP29)
• Attendez que la lampe ait refroidi suffisamment avant d'ouvrir le couvercle de la lampe. Il faut compter une heure pour que
c
la lampe soit suffisamment froide.
• Lorsque la lampe est brisée, remplacez-la ou demandez l'avis de votre distributeur. Si vous remplacez vous-même la lampe,
prenez garde aux bouts de verre.
Eteignez le projecteur et attendez la fin
1
de la période de refroidissement.
(environ 20 secondes)
Débranchez le cordon secteur et attendez
que la lampe refroidisse. (environ 1 heure)
Ouvrez le couvercle de la lampe.
2
Soulevez le couvercle de la lampe en plaçant
vos doigts dans les loquets et en poussant vers
le haut.
Desserrez les vis de fixation qui
3
retiennent la lampe.
Retirez l'ancienne lampe.
4
Installez la nouvelle lampe.
5
Appuyez sur la lampe jusqu'au déclic, puis
vissez les deux vis de fixation.
Replacez le couvercle de la lampe.
6
Insérez d'abord les languettes, puis appuyez
sur le côté opposé jusqu'au déclic.
54-Maintenance
Page 57

• Installez correctement la lampe. Si vous retirez le couvercle de la lampe, celle-ci s'éteint automatiquement par mesure de
précaution. La lampe ne s'allume pas si elle ou son couvercle n'est pas installé(e) correctement.
• Après le remplacement de la lampe, assurez-vous de réinitialiser la durée de fonctionnement de la lampe.
p
• L’ampoule contient du mercure. Observez la réglementation locale en vigueur concernant les déchets lorsque vous jetez des
lampes.
fRemise à zéro du compteur d'heures d'utilisation de la lampe
Le projecteur intègre un compteur qui comptabilise les heures d'utilisation de la lampe. Lorsque ce temps d'utilisation
cumulé atteint une certaine valeur, le message d'avertissement suggérant de remplacer la lampe s'affiche à l'écran. Il est
donc important de remettre ce compteur à zéro dans le menu de configuration, à chaque fois que vous remplacez la lampe
par une lampe neuve.
Ne remettez pas ce compteur à zéro si vous n'avez pas changé la lampe. Sinon, la durée d'utilisation de la lampe affichée ne
sera pas correcte.
p
Mettez le projecteur sous tension et
1
appuyez sur la touche [Menu].
Annexes
Sélectionnez "Réinitial. durée lampe"
2
dans le menu "Réinit." avec les
touches [u][d][e].
Utilisez les touches [l][r] pour
3
sélectionner "Oui", puis appuyez sur la
touche [e].
Le nombre d'heures d'utilisation de la lampe
est alors remis à zéro.
Maintenance-55
Page 58

Glossaire
Ce glossaire contient les définitions des termes complexes utilisés dans ce manuel ou des termes qui ne
sont pas expliqués dans le corps du manuel. Il existe dans le commerce des publications contenant des
précisions supplémentaires sur ces sujets.
Alignement Les signaux émis par les ordinateurs ont une fréquence spécifique. L'image produite ne sera
pas de bonne qualité si la fréquence du projecteur ne coïncide pas avec la fréquence de
l'ordinateur. L'action d'aligner les phases de ces signaux (le nombre de crêtes et de creux
dans le signal) est appelée "alignement". Si l'alignement n'est pas bien effectué, de larges
bandes verticales apparaîtront sur les images projetées.
Balayage entrelacé Chaque écran est divisé en fines lignes horizontales qui s'affichent en séquence partant de la
gauche vers la droite et du haut vers le bas. Cette méthode de balayage de l'image, où les
lignes numérotées paires et les lignes numérotées impaires s'affichent alternativement,
s'appelle Entrelacement.
Balayage progressif Méthode de balayage d'image dans laquelle chaque image instantanée est entièrement
balayée de haut en bas pour former une image individuelle complète.
Contraste La différence entre les zones claires et les zones sombres d'une image peut être augmentée
ou diminuée pour faire ressortir ou au contraire adoucir du texte ou des images. C'est ce
réglage que l'on appelle "contraste".
Dolby digital Format audio développé par les laboratoires Dolby Laboratories. Alors que la stéréo
normale est un format à 2 voies qui requiert donc au moins deux haut-parleurs, le Dolby
numérique est un format à 6 voies (ou 5,1 voies) qui ajoute à ces deux haut-parleurs un hautparleur central, deux haut-parleurs arrière et un haut-parleur de basses (sub-woofer).
HDTV Abréviation de High-Definition Television se référant aux systèmes de haute définition
satisfaisant les conditions suivantes.
• Résolution verticale de 750p ou 1125i ou plus
(p=Balayage progressif
• Rapport largeur/hauteur de 16:9
• Dolby digitalgRéception et lecture (ou sortie) audio
Mode Squeeze Méthode de compression et d'enregistrement des images grand écran 16:9 sur un logiciel
vidéo en tant qu'images 4:3.
Lors de la projection en mode Squeeze, les images repassent à leur format initial 16:9.
PÉRITEL Un connecteur rectangulaire à 21 broches pour la transmission de signaux audio et vidéo
entre des équipements TV, VTR et AV. RVB, S-Vidéo/Vidéo en composantes et deux
canaux audio peuvent être transmis.
Rapport L/H Rapport entre la largeur de l'image et sa hauteur. Les images présentant un rapport L/H de
16:9 sont appelées "à grande largeur d'écran". Le rapport L/H des images standard est de
4:3.
Refroidissement Processus servant à refroidir la lampe du projecteur qui a chauffé pendant une projection.
Elle s'exécute automatiquement dès que l'on appuie sur la touche [Power] du panneau de
commande du projecteur ou de la télécommande pour éteindre le projecteur. Ne débranchez
pas le projecteur pendant la période de refroidissement. Si la période de refroidissement est
interrompue, la chaleur de la lampe est piégée à l'intérieur du projecteur, ce qui peut réduire
la durée de vie de la lampe et provoquer un dysfonctionnement du projecteur.
RVB-Vidéo Terme utilisé pour décrire un signal vidéo fréquemment émis vers les moniteurs
d'ordinateur. RVB-Vidéo est constitué d'impulsions électriques représentant les intensités
des trois couleurs primaires de la lumière (rouge, vert et bleu). Une quatrième ou une
cinquième impulsion transporte des informations sur la synchronisation.
g, i=Balayage entrelacég)
SDTV Abréviation de Standard Definition Television. Se réfère aux systèmes de télévision
standard qui ne satisfont pas aux conditions de télévision haute définition.
SVGA Type de signal vidéo présentant une résolution de 800 points (horizontaux) par × 600 points
(verticaux), utilisé par les ordinateurs compatibles IBM PC/AT.
Sync.
(Synchronisation)
Les signaux émis par les ordinateurs ont une fréquence spécifique. L'image produite ne sera
pas de bonne qualité si la fréquence du projecteur ne coïncide pas avec la fréquence de
l'ordinateur. L'action d'aligner les phases de ces signaux (la position relative des crêtes et
des creux dans le signal) est appelée "synchronisation". Si les signaux ne sont pas
synchronisés, l'image peut devenir tremblante, floue ou déformée horizontalement.
56-Glossaire
Page 59

Annexes
S-Vidéo Signal vidéo composé d'une composante de luminosité/luminance vidéo et de composantes
de couleurs fournies sous la forme de signaux distincts, de façon à fournir une meilleure
qualité d'image. Ces images sont donc formées à partir de deux signaux indépendants :
Y(signal de luminance) et C (signal de couleur).
Taux rafraîchi. Les points lumineux des écrans ne conservent une même luminosité et une même couleur
que pendant un temps très court. Pour cette raison, l'image doit être balayée de nombreuses
fois par seconde pour rafraîchir les points lumineux. Le nombre d'opérations de
rafraîchissement par seconde est appelée "taux ou cadence de rafraîchissement" et s'exprime
en hertz (Hz).
Temp. Couleur Température d'un objet émettant de la lumière. Si la température des couleurs est élevée,
celles-ci tendent à tirer vers le bleu. Si la température des couleurs est moins grande, cellesci tendent à tirer vers le rouge.
Verrouillage de
sécurité
Dispositif consistant en un trou pratiqué dans le boîtier du projecteur, dans lequel on passe
un câble antivol (non fourni) pour attacher le projecteur à une table ou à une poutre. Ce
projecteur est compatible avec le système Microsaver Security System fabriqué par
Kensington.
VGA Type de signal vidéo présentant une résolution de 640 points (horizontaux) par × 480 points
(verticaux), utilisé par les ordinateurs compatibles IBM PC/AT.
Vidéo composite Signal de vidéo standard (NTSC, PAL, SECAM) qui représente le mélange d'un signal de
luminosité et des signaux de couleurs. La vidéo composite consiste en un signal de porteuse
Y (signal de luminance) et un signal chromatique (couleur), combinés au signal de barre de
couleur.
Vidéo en
composantes
Signal vidéo composé d'une composante de luminosité/luminance vidéo et de composantes
de couleurs fournies sous la forme de signaux distincts, de façon à fournir une meilleure
qualité d'image. En mode TV haute définition (HDTV), il s'agit d'un signal d'image
composé en fait de trois signaux indépendants : Y (signal de luminance), Pb et Pr (signal en
différences de couleur).
XGA Type de signal vidéo présentant une résolution de 1024 points (horizontaux) par × 768
points (verticaux), utilisé par les ordinateurs compatibles IBM PC/AT.
YCbCr Signal de porteuse contenu dans le signal de mire en barres de couleurs utilisé dans la
diffusion moderne d'images de télévision (NTSC). Son nom se décompose en Y (signal de
luminance) et en CbCr (signaux chromatiques (de couleur)).
YPbPr Signal de porteuse contenu dans le signal de mire en barres de couleurs utilisé dans la
diffusion d'images de télévision haute définition (HDTV). Son nom se décompose en Y
(signal de luminance) et en PbPr (signal de différences de couleur).
Glossaire-57
Page 60
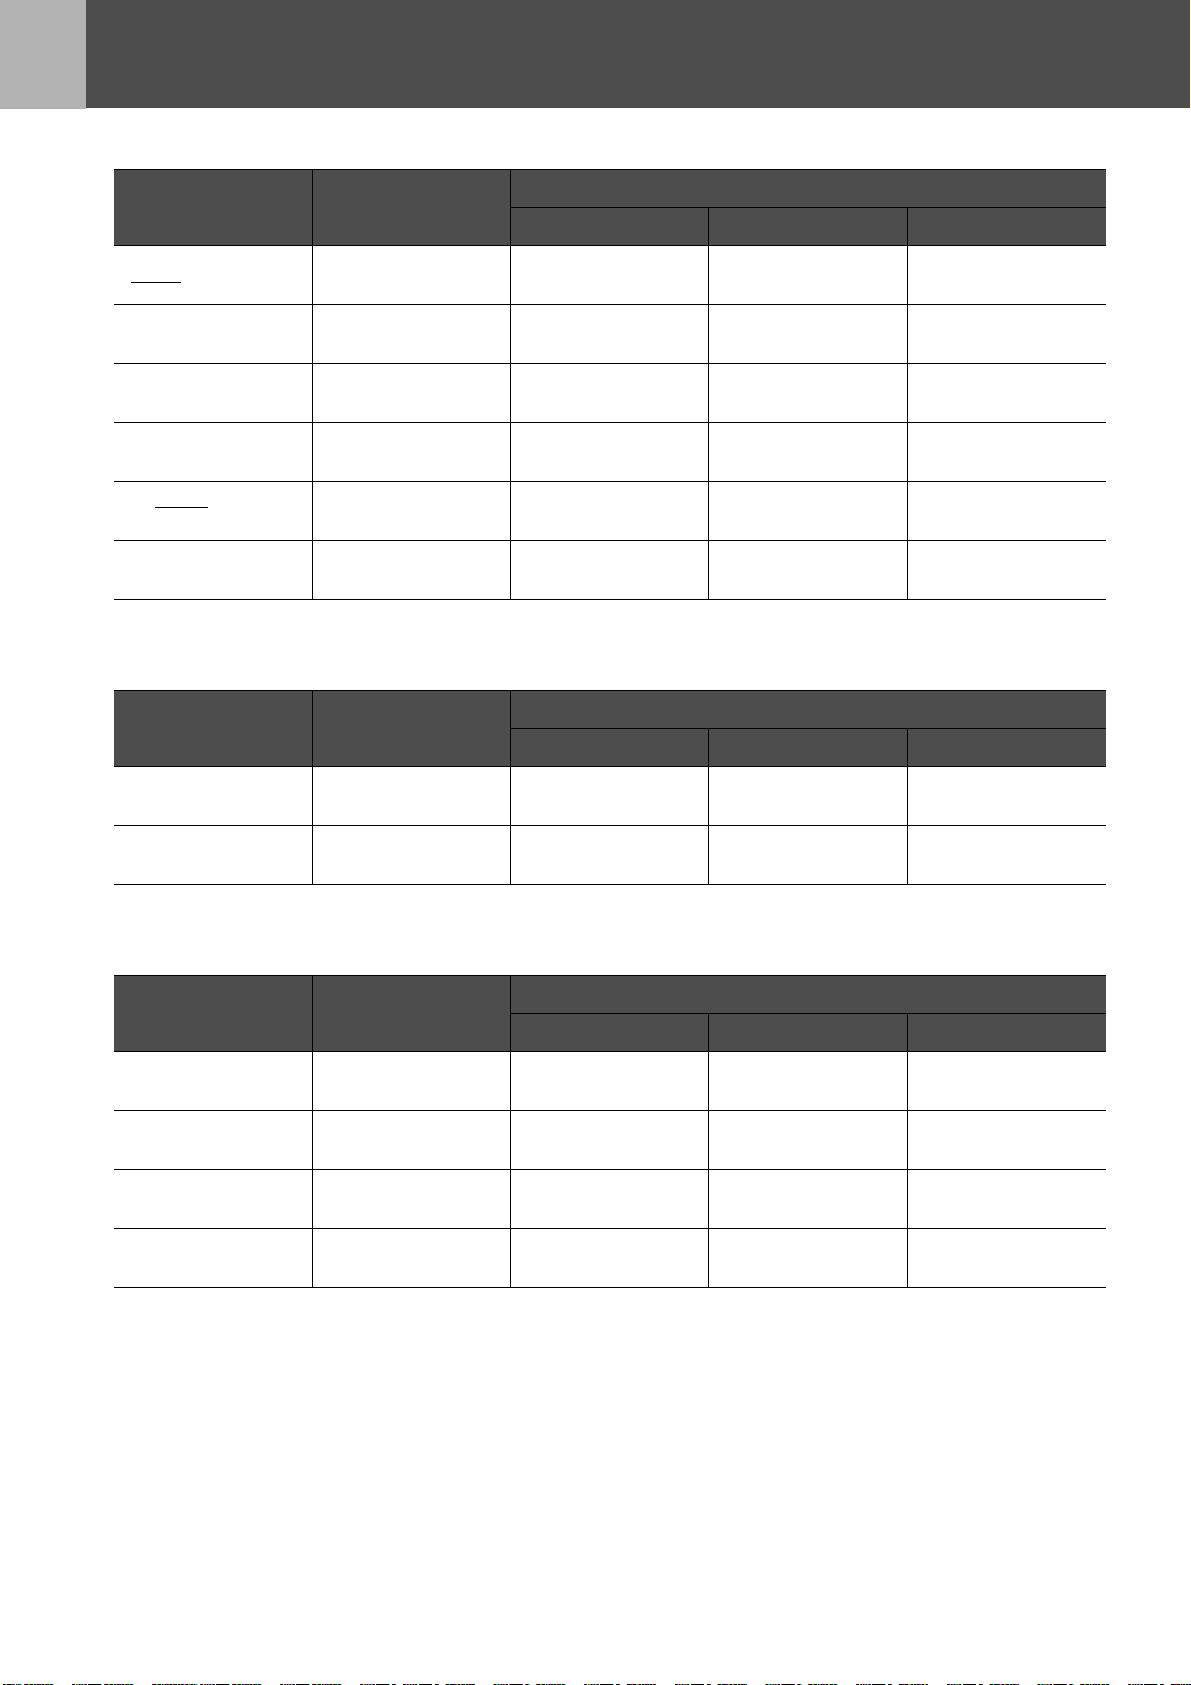
Résolutions d'affichage prises en charge
fVidéo en composantes
Signal Résolution
SDTVg(525i, 60 Hz) 640 × 480
SDTV (625i, 50 Hz) 768 × 576
SDTV (525p) 640 × 480
SDTV (625p) 768 × 576
HDTV
g(750p)
16:9
HDTV (1125i)
16:9
1280 × 720
1920 × 1080
fVidéo composite/S-Video
Signal Résolution
Mode Format
Normal Squeeze Zoom
640 × 480
(format 4:3)
640 × 480
(format 4:3)
640 × 480
(format 4:3)
640 × 480
(format 4:3)
854 × 480
(format 16:9)
854 × 480
(format 16:9)
XX
XX
XX
XX
--
--
Mode Format
Normal Squeeze Zoom
TV(NTSC) 640 × 480
TV(PAL, SECAM) 768 × 576
fPÉRITEL (4RCA/RGB-Video)
Signal Résolution
SDTV (525i, 60 Hz) 640 × 480
SDTV (625i, 50 Hz) 768 × 576
SDTV (525p) 640 × 480
SDTV (625p) 768 × 576
640 × 480
(format 4:3)
640 × 480
(format 4:3)
XX
XX
Mode Format
Normal Squeeze Zoom
640 × 480
(format 4:3)
640 × 480
(format 4:3)
640 × 480
(format 4:3)
640 × 480
(format 4:3)
XX
XX
XX
XX
58-Résolutions d'affichage prises en charge
Page 61

fOrdinateur (RVB analogique)
Annexes
Signal Résolution
EGA 640 × 350 854 × 468 - -
VGA
g60 640 × 480
VESA
72 / 75 / 85,iMac*
SVGA
g
56 / 60 / 72 / 75 / 85,iMac*
XGA
g
43i / 60 / 70 / 75 / 85,iMac*
MAC13" 640 × 480
MAC16" 832 × 624
MAC19" 1024 × 768
MAC21" 1152 × 870 636 × 480
SDTV (525i, 60 Hz) 640 × 480
640 × 480
800 × 600
1024 × 768
Mode Format
Normal Squeeze Zoom
640 × 480
(format 4:3)
640 × 480
(format 4:3)
640 × 480
(format 4:3)
640 × 480
(format 4:3)
640 × 480
(format 4:3)
640 × 480
(format 4:3)
640 × 480
(format 4:3)
640 × 480
(format 4:3)
SDTV (525p) 640 × 480
SDTV (625i, 50 Hz) 768 × 576
SDTV (625p) 768 × 576
HDTV (750p)
16:9
HDTV (1125i)
16:9
1280 × 720
1920 × 1080
640 × 480
(format 4:3)
640 × 480
(format 4:3)
640 × 480
(format 4:3)
854 × 480
(format 16:9)
854 × 480
(format 16:9)
--
--
" " indique les modes Format disponibles en fonction de chaque signal.
La résolution prise en charge est 854 × 480 (format 16:9).
*La connexion est impossible si l'équipement n'est pas doté d'un port de sortie VGA.
D'autres signaux non répertoriés dans le tableau ci-dessus peuvent parfois être projetés. Mais, toutes
les fonctions ne seront pas disponibles avec ces signaux.
Résolutions d'affichage prises en charge-59
Page 62

Accessoires en option
Les accessoires suivants sont disponibles en option. La liste des accessoires en option est valable à
partir d'avril 2004. Les détails des accessoires sont sujets à modification sans préavis.
Référence de
la pièce
ELPLP29 Lampe EMP Sert à remplacer les lampes usées.
ELPAF04 Filtre à air Sert à remplacer les filtres à air usés.
ELPST12 Télécommande Identique à la télécommande fournie avec le
ELPSC06 Ecran portable 50" Ecran compact facilement transportable.
ELPSC07 Ecran 60" Ecran portatif sur rouleau. (format 4:3)
ELPSC11 Ecran mural 60"
ELPSC08 Ecran 80"
ELPSC10 Ecran 100"
ELPKC02 Câble PC VGA-HD15 (1,8 m)
(pour les connecteurs mini D-Sub 15broches/
mini D-Sub 15broches)
ELPKC09 Câble PC VGA-HD15 (3m)
(pour les connecteurs mini D-Sub 15broches/
mini D-Sub 15broches)
ELPKC10 Câble PC VGA-HD15 (20 m)
(pour les connecteurs mini D-Sub 15broches/
mini D-Sub 15broches)
Désignation de la pièce Utilisation
projecteur.
(format 4:3)
Sert à relier le projecteur à un ordinateur.
ELPKC29 Câble adaptateur péritel (0,3 m)
(pour RCA
ELPAP01 Kit adaptateur Mac Sert à convertir une fiche 15broches Macintosh
ELPMB11 Fixation de plafond* Permet de fixer le projecteur à un plafond.
ELPFC03 Plaque de base montant pupitre* A utiliser pour suspendre le projecteur à un
ELPFP04 Système de rallonge 370 (370mm argent)*
ELPFP05 Système de rallonge 570 (570mm argent)*
ELPFP06 Système de rallonge 770 (770mm argent)*
ELPKS51 Etui souple Utilisez cet étui pour transporter le projecteur.
× 4/PÉRITEL)
Ceci est identique au projecteur fourni.
D-sub en fiche 15 broches mini D-sub.
haut plafond ou à un faux-plafond en
panneaux.
* Une procédure d'installation spéciale doit être respectée pour suspendre le projecteur au plafond.
Adressez-vous à votre distributeur si vous souhaitez réaliser ce type d'installation.
60-Accessoires en option
Page 63

Spécifications
Nom du
produit
Home Projector EMP-TW10H
Dimensions 402 (L) × 114 (H) × 294 (P) mm (sans les pieds)
Taille du
panneau
Méthode
d'affichage
0,55 pouce
Matrice active TFT au polysilicium
Résolution 409.920 (854 (W) × 480 (H) points) × 3
Réglage de la
mise au point
Réglage du
zoom
Manuel
Manuel (1:1,54)
Lampe
(source
Lampe UHE 130 watts, numéro modèle :ELPLP29
lumineuse)
Sortie audio
maximale
1W Mono
Haut-parleur 1
Courant
secteur
Température
en utilisation
Température
de stockage
100-240VAC 50/60Hz 2,3-1,0A
+5°C à +35°C (sans condensation)
-10°C à +60°C (sans condensation)
Poids Environ 3,6 kg
PÉRITEL
Port Input A
Component
Connecteur
RCA à 4 broches
1
Connecteur
RCA à 3 broches
Mini D-Sub 15
Port Input B 1
broches
(femelle)
Connecteurs
Port S-Video 1
Port Video 1
Mini DIN 4
broches
Connecteur
RCA à 1 broche
Connecteur
Port Audio 1
RCA à 1 broche
× 2(L,R)
Port Control (RS-232C) 1
D-Sub 9 broches
(mâle)
Safety
USA (100-120VAC)
UL60950 3
Canada (100-120VAC)
CSA C22.2 No.60950 (cUL)
European Community (200-240VAC)
The Low Voltage Directive (73/23/EEC)
IEC60950 3
+Amd.3, +Amd.4
EMC
USA (100-120VAC)
FCC 47CFR Part15B Class B (DoC)
Canada (100-120VAC)
ICES-003 Class B
European Community (200-240VAC)
The EMC Directive (89/336/EEC)
EN55022, 1998 Class B
EN55024, 1998
Australia/New Zealand (200-240VAC)
AS/NZS 3548:1995, A1:1997, A2:1997,
CISPR Pub.22:1993, A1:1995, A2:1996,
rd
Edition
rd
Edition, +Amd.1, +Amd.2,
IEC61000-4-2, IEC61000-4-3,
IEC61000-4-4, IEC61000-4-5,
IEC61000-4-6, IEC61000-4-8,
IEC61000-4-11,
IEC61000-3-2, IEC61000-3-3
Class B
Class B
Ce projecteur incorpore des circuits intégrés Pixelworks DNXTM.
Spécifications-61
Page 64

Apparence
114
8
Centre du projecteur
84
402
* Distance entre le centre de l'objectif et le trou de montage pour bride de suspension
Centre de l'objectif
60.9*
122
80
12
3-M4×8
294
62-Apparence
65 127 115
95
Page 65

Index
A
Accessoires en option ........................................... 60
Affichage pris en charge ....................................... 58
Affichage sur écran ............................................... 46
Ajustement Auto .............................................. 43, 45
Alignement ............................................................ 45
B
Bague de mise au point ........................................ 36
Bague de zoom ..................................................... 36
C
Câble d'ordinateur ................................................. 43
Cache d'objectif .................................................... 36
Caption zoom ........................................................ 46
Connexion d'un ordinateur .................................... 42
Contraste .............................................................. 45
Controle parental .................................................. 46
Cordon secteur ..................................................... 34
Couleur Chair ........................................................ 45
Couleur de fond .................................................... 46
Couvercle de la lampe .......................................... 37
D
Durée de lampe .................................................... 47
E
Ecran ..................................................................... 46
Ecran démarrage .................................................. 46
Ecran translucide .................................................. 41
Emetteur infrarouge de la télécommande ............. 38
K
Keystone ................................................................46
L
Langue ...................................................................46
Lorsque vous suspectez un problème ...................48
Luminosité .............................................................45
M
Mémoire .................................................................45
Menu Image ...........................................................45
Menu Information ...................................................47
Menu principal .......................................................44
Menu Réglage .......................................................46
Menu Réinit. ..........................................................47
Message ................................................................46
Mise en arrêt différé ...............................................46
Mode couleurs .......................................................45
N
Netteté ...................................................................45
Nettoyage de l'extérieur du projecteur ...................52
Nettoyage de l'objectif ...........................................52
Nettoyage du filtre à air .........................................52
Niveau D'Instal. .....................................................46
Noms et fonctions des différentes parties du
projecteur ...............................................................36
Normal ...................................................................58
O
Orifice d'entrée d'air ...............................................37
F
Filtre à air .............................................................. 37
Fonctionnement .................................................... 46
G
Glossaire ............................................................... 56
Grille de sortie d'air ............................................... 36
H
Haut-parleur .......................................................... 37
HDTV .................................................................... 56
I
Info sync ................................................................ 47
Input A ................................................................... 46
Input B ................................................................... 43
Installation ............................................................. 40
P
Panneau de commande ........................................36
Périodicité de remplacement de la lampe .............54
PÉRITEL ................................................................56
Pied avant ..............................................................36
Plafond ............................................................41, 46
Port ........................................................................37
Port Audio ..............................................................37
Port Control (RS-232C) .........................................37
Port Input A ............................................................37
Port Input B ............................................................37
Port S-Video ..........................................................37
Port Video ..............................................................37
Portée ....................................................................39
Porte-pile ...............................................................53
Position ..................................................................46
Prise d'entrée du courant secteur ..........................37
Projection ...............................................................46
Q
Qualité d'image ......................................................45
Index-63
Page 66

R
Rapport L/H ..................................................... 36, 56
Récepteur infrarouge de la télécommande ..... 36, 37
Refroidissement .................................................... 48
Réinitial. durée lampe ........................................... 47
Réinitiali. mémoire ................................................ 47
Remplacement de la lampe .................................. 54
Remplacement de la pile ...................................... 53
Remplacement du filtre à air ................................. 53
RVB ....................................................................... 45
S
Saturation .............................................................. 45
Signal entrée ......................................................... 47
Signal Vidéo (menu Informations) ......................... 47
Signal Vidéo (menu Réglage) ............................... 46
Source ................................................................... 47
Sous-menu ............................................................ 44
Spécifications ........................................................ 61
Squeeze ................................................................ 58
Support de la télécommande ................................ 37
surchauffe ............................................................. 48
Sync. ..................................................................... 45
T
Taille de l'écran ..................................................... 40
Teinte .................................................................... 45
Télécommande ..................................................... 38
Temp. Couleur ...................................................... 45
Température en utilisation .................................... 61
Tout réinitialiser ..................................................... 47
Trous de montage pour bride ................................ 37
V
Verrouillage de sécurité ........................................ 37
Vidéo ..................................................................... 47
Vidéo composite ................................................... 37
Vidéo en composantes ......................................... 37
Volume .................................................................. 46
Voyant d'avertissement ................................... 36, 48
Voyant Power .................................................. 36, 48
Voyants ........................................................... 36, 48
Y
YCbCr ............................................................. 46, 57
YPbPr .............................................................. 46, 57
Z
Zoom ..................................................................... 58
64-Index
Page 67
Bedienungsanleitung
Inhalt
Projektor auspacken ......................................................................................................................... 66
Bedeutung der Symbole ................................................................................................................... 66
Ausstattung .....................................................................................................................67
Vor der Inbetriebnahme des Projektors
Bezeichnung und Funktion der Teile............................................................................68
Vorderseite/Oberseite ....................................................................................................................... 68
Bedienfeld .......................................................................................................................................... 68
Hinterseite .......................................................................................................................................... 69
Unterseite ........................................................................................................................................... 69
Fernbedienung................................................................................................................................... 70
Aufstellung ...................................................................................................................... 72
Aufstellungsart .................................................................................................................................. 72
Projektionsabstand und Leinwandgröße ........................................................................................ 72
Andere Aufstellungsarten................................................................................................................. 73
Anschluss von Geräten
Anschluss eines Computers ......................................................................................... 74
Kompatible Computer ....................................................................................................................... 74
Bilder und Ton vom Computer ausgeben ....................................................................................... 75
Anpassen von computererzeugten Bildern .................................................................................... 75
Konfigurationsmenüs
Menübetrieb .................................................................................................................... 76
Funktionsliste ................................................................................................................. 77
Fehlerbehebung
Wenn Sie ein Problem vermuten ................................................................................... 80
Netzanzeige ....................................................................................................................................... 80
Warnlampe ......................................................................................................................................... 80
Wenn die Anzeigen keine Hilfe bieten ............................................................................................. 81
Anhänge
Projektorpflege ............................................................................................................... 84
Reinigung ........................................................................................................................................... 84
Wechseln der Lampe und der Fernbedienungsbatterie................................................................. 85
Glossar ............................................................................................................................ 88
Unterstützte Bildschirmauflösungen ............................................................................ 90
Sonderzubehör ............................................................................................................... 92
Technische Daten........................................................................................................... 93
Ansicht............................................................................................................................. 94
Stichwortverzeichnis...................................................................................................... 95
65
Page 68

Projektor auspacken
Beim Auspacken des Projektors darauf achten, dass alle folgenden Komponenten vorhanden sind. Falls
irgendwelche Komponenten fehlen oder falsch sind, wenden Sie sich bitte an die Verkaufsstelle.
Y Projektor Y Fernbedienung Y Netzkabel
Zum Anschluss des Projektors an
eine Steckdose.
Y RGB-SCART-Adapter
Verwenden Sie bei der Projektion
von RGB-Video und Component
Video-Bildern für den Anschluss
ein im Handel erhältliches SCARTKabel.
Dokumentation
Y Bedienungsanleitung (dieses Handbuch)
Y Sicherheitsanweisungen und weltweite Garantiebedingungen
Y Kurzanleitung
Y Gummifüße
Zum Anbringen, wenn der Projektor
mit der oberen Seite unten betrieben
wird.
Bedeutung der Symbole
c
p
Hinweis auf mögliche Verletzungsgefahr oder Geräteschäden bei Nichtbeachtung dieser Symbole.
Hinweis auf wichtige Zusatzinformationen oder andere nützliche Punkte, die Sie wissen sollten.
s
g
Wenn "Gerät" oder "Projektor" in dieser Bedienungsanleitung erscheint, kann damit auch Zubehör oder Sonderausstattung
bezeichnet werden.
66-
Hinweis auf verwandte Themen und Seiten mit ausführlicheren Informationen.
Es sind Terminologiedefinitionen vorhanden. s "Glossar" S.88
Page 69

Ausstattung
fFarbmodus
Die Bildqualität kann entsprechend der Art der
Umgebung ausgewählt werden. s "Auswahl eines
Farbmodus" Kurzanleitung
fKompakt und leicht
fKlare und leuchtende Bilder
Durch die hohe Auflösung und hohe Lichtintensität des
Projektors wird eine gut lesbare Anzeige erreicht. Scharfe,
detailgetreue Bildprojektion auch in hellen Umgebungen.
fBedienerfreundlichkeit
Das kompakte Projektorgehäuse ist einfach zu
transportieren.
Abmessungen: L x B x H = 29,4 × 40,2 × 11,4 cm
Gewicht : ca. 3,6kg
fAuto Setup
(Computeranschlüsse)
Der Projektor analysiert das Signal des angeschlossenen
Computers und stellt sich für eine optimale Projektion
automatisch ein. s "Auto Setup (Computeranschlüsse)"
S.75
Mit der mitgelieferten Fernbedienung können die
folgenden Projektorfunktionen ganz einfach gesteuert
werden:
• Verwendung der Konfigurationsmenüs
• Aufrufen der bevorzugten Einstellungen
• Anhalten der Projektion (Pause)
Ausstattung-67
Page 70

Vor der Inbetriebnahme des Projektors
Bezeichnung und Funktion der Teile
Vorderseite/Oberseite
• Infrarotempfänger der
Fernbedienung s S.71
Empfängt Signale von der
Fernbedienung.
• Ventilationsöffnung
• Objektivdeckel
Setzen Sie den Objektivdeckel
auf das Objektiv, wenn der Projektor nicht verwendet
wird, um das Objektiv vor Verschmutzung und
Beschädigung zu schützen.
Bedienfeld
• Bedienfeld s S.68
• Scharfeinstellring
s Kurzanleitung
Zur Einstellung der
Bildschärfe.
•Zoomring
s Kurzanleitung
Stellt die Größe des
projizierten Bildes ein.
• Vorderer Fuß (links)
s Kurzanleitung
Ein weiterer vorderer Gerätefuß
befindet sich auf der rechten Seite.
Verlängern oder verkürzen Sie die
Gerätefüße zur Einstellung des
Projektionswinkels.
• [Power] Taste
s Kurzanleitung
Zum Ein- und Ausschalten des
Projektors.
•Netzanzeige s S.80
Blinkt oder leuchtet in verschiedenen
Farben zur Anzeige des ProjektorBetriebsstatus.
• Warnlampe s S.80
Blinkt oder leuchtet in verschiedenen
Farben, um Sie auf Projektorprobleme
aufmerksam zu machen.
•[u][d][l][r] Tasten s S.76
•[w][v]: Tasten für Keystone Correction
s Kurzanleitung
Drücken Sie diese Tasten zur Korrektur der
Trapezverzerrung.
•[a][b]: Lautstärketasten
Zur Einstellung der Lautstärke.
• [Menu] Taste s S.76
Zum Ein- oder Ausblenden der
Konfigurationsmenüs.
• [Source] Taste
s Kurzanleitung
Schaltet die
Eingangsquelle
zwischen Anschluss
Input A, Anschluss SVideo, Anschluss
Video und Anschluss
Input B um, und zwar
jedes Mal, wenn die
Taste gedrückt wird.
• [Aspect] Taste
s Kurzanleitung
Ändert das Bildseitenverhältnisg
des projizierten Bildes.
•[e] Taste s S.76
Zur Übernahme eines
Menüpunktes oder zum
Weiterblättern eines Bildschirms/
Menüs im Konfigurationsmenü.
68-Bezeichnung und Funktion der Teile
• [Esc] Taste s S.76
Bricht die aktuelle Funktion ab.
Ruft in Konfigurationsmenüs den
vorhergehenden Bildschirm oder
das vorherige Menü auf.
Page 71

Hinterseite
Vor der Inbetriebnahme des Projektors
• Anschluss Input B s S.75
Eingangssignale vom Computer.
• Videoanschluss
s Kurzanleitung
Composite Videog
Eingangssignale des Projektors.
Anschluss mit einem A/V-Kabel.
• S-Videoanschluss
s Kurzanleitung
S-Videog Eingangssignale des
Projektors.
Anschluss mit einem S-Video-Kabel.
• Halter für Fernbedienung
s S.71
Die Fernbedienung bei Nichtgebrauch hier
aufbewahren.
• Audio-Buchses S.75,
Kurzanleitung
Eingangssignale des Projektors. Anschluss mit A/V- oder
Stereo-RCA-Kabel.
Wenn Sie Computer und Videogeräte abwechselnd
verwenden, tauschen Sie das Kabel oder setzen Sie
einen Audio-Umschalter ein (Im Handel erhältlich).
• Anschluss Input A
s Kurzanleitung
Inputs Component Videog oder
RGB-Video
g Signale.
• Infrarotempfänger der
Fernbedienung s S.71
Empfängt Signale von der
Fernbedienung.
• Lautsprecher
• Stromeingang
s Kurzanleitung
Anschluss des Netzkabels.
• Anti-Diebstahl-Vorrichtung
s S.88
• Control (RS-232C)
Anschluss
Zum Anschluss des Projektors an
einen Computer über ein RS232C-Kabel. Dieser Anschluss
dient der Geräteüberprüfung und
sollte vom Kunden nicht verwendet
werden.
Unterseite
• Luftfilter (Ansaugöffnung)
s S.84, S.85
Verhindert das Eindringen von Staub
und anderen Fremdkörpern in den
Projektor. Öffnen Sie zum Austausch
des Luftfilters die Abdeckung.
• Befestigungspunkte für die
Deckenhalterung (3 Punkte)
Zur Aufhängung des Projektors an der Decke
kann die als Sonderzubehör erhältliche
Deckenhalterung hier angebracht werden.
• Lampenabdeckung
s S.86
Öffnen Sie diese Abdeckung
zum Ersetzen der
Projektionslampe im
Projektor.
Bezeichnung und Funktion der Teile-69
Page 72

Vor der Inbetriebnahme des Projektors
Fernbedienung
• Infrarotsender der Fernbedienung
Sendet Fernbedienungssignale.
• [Source] Tasten
s Kurzanleitung
[Input A/B]: Schaltet zwischen den
Signalquelle um, die an Anschluss
Input A und Anschluss Input B
anliegen.
[S-Video/Video]: Schaltet zwischen
den Signalquellen an der S-Videound Videobuchse um.
• [Aspect] Taste
s Kurzanleitung
Ändert das Seitenverhältnis des
projizierten Bildes.
•[u][d][l][r] Tasten
s S.76
Zur Auswahl von Menüpunkten
und Einstellwerten.
•[a][b]: Lautstärketasten
Zur Einstellung der Lautstärke.
• [Power] Taste
s Kurzanleitung
Zum Ein- und Ausschalten des
Projektors.
• [Color Mode] Taste
s Kurzanleitung
Auswahl des Farbmodus. Der
Farbmodus ändert sich in der
Reihenfolge Dynamisch,
Wohnzimmer, Theater und KinoSchwarz, jedes Mal dann, wenn die
Taste gedrückt wird.
• [Memory] Taste
s Kurzanleitung
Ruft die Einstellungen aus dem
Speicher in die
Konfigurationsmenüs ab.
•[e] Taste s S.76
Zur Übernahme eines
Menüpunktes oder zum
Weiterblättern eines Bildschirms/
Menüs im Konfigurationsmenü.
• [Menu] Taste s S.76
Zum Ein- oder Ausblenden der
Konfigurationsmenüs.
• [A/V Mute] Taste
s Kurzanleitung
Vorübergehende Abschaltung der
Ton- und Bildwiedergabe.
• [Esc] Taste s S.76
Bricht die aktuelle Funktion ab.
Ruft in Konfigurationsmenüs den
vorhergehenden Bildschirm oder
das vorherige Menü auf.
• [Auto] Taste s S.75
Passt analoge RGBComputersignale automatisch an
ihre optimalen Einstellungen an.
• [Still] Taste
s Kurzanleitung
Standbildwiedergabe des
gegenwärtigen Computer- oder
Videobildes auf der Leinwand.
70-Bezeichnung und Funktion der Teile
Page 73

Vor der Inbetriebnahme des Projektors
fVor der Verwendung der Fernbedienung
Das Isolierband entfernen.
fVerwendung der Fernbedienung
Zur Bedienung des Projektors über die Fernbedienung, richten Sie diese auf den Infrarotempfänger am Projektor.
Infrarotempfänger
der Fernbedienung
Direkt auf den Infrarotempfänger der Fernbedienung einfallendes Sonnenlicht oder fluoreszierendes Licht kann die Funktion
der Fernbedienung stören.
p
Infrarotempfänger
der Fernbedienung
fReichweite
Reichweite : max. ca. 6 m (entsprechend den Betriebsbedingungen weniger)
Arbeitswinkel: ca. 30° horizontal, 15° vertikal
* Der Infrarot-Empfänger auf der Rückseite des Projektors kann unter denselben Bedingungen ebenfalls verwendet werden.
15°
15°
30° 30°
max. 6 m
fAufbewahrung
Bewahren Sie die Fernbedienung nach dem Gebrauch bitte im Fernbedienungshalter am Projektor auf.
Bezeichnung und Funktion der Teile-71
Page 74

Aufstellung
Lesen Sie vor der Aufstellung bitte die "Sicherheitsanweisungen und weltweiten Garantiebedingungen" aufmerksam durch.
c
Aufstellungsart
Stellen Sie den Projektor so auf, dass er im rechten Winkel zu einer Leinwand steht.
Projektionsabstand:
73-1165 cm
Projektionsabstand und Leinwandgröße
90°
Projektionsabstand
mindestens 20 cm
16:9
Leinwandgröße
cm
Projektionsabstand
cm
30" 40" 60" 80" 100" 200" 300"
66 × 37 89 × 50 130 × 75 180 × 100 220 × 120 440 × 250 660 × 370
73 − 114 98 − 153 149 − 231 200 − 309 251 − 387 504 − 776 758 − 1165
Bildschirm
Objektivmitte
Die Angaben sollten als Richtwerte für die Aufstellung des Projektors verwendet werden.
72-Aufstellung
Page 75

Andere Aufstellungsarten
Vor der Inbetriebnahme des Projektors
fProjektion, bei umgekehrt
aufgestelltem Gerät
(Vorderseite/Decke)
Die beliegenden Gummifüße anbringen, um zu
verhindern, dass das Bedienungsfeld die Oberfläche
berührt, auf der es platziert wird.
Gummifüße
(an drei Stellen anbringen)
fDecken/Rückprojektion
(mit einer lichtdurchlässigen Leinwand)
fDeckenprojektion
*Zur Aufhängung des Projektors an der Decke ist die optionale Deckenhalterung erforderlich. Da für diese Installation eine
spezielle Ausrüstung notwendig ist, wenden Sie sich bitte an Ihren Händler, wenn Sie diese Aufstellungsart wünschen.
s "Sonderzubehör" S.92
Bei der Rück-/Deckenprojektion muss der entsprechende Modus im Konfigurationsmenü unter "Einstellung" →
"Bildschirm" → "Projektion" eingestellt werden. s "Das Menü "Einstellung"" S.78
p
fRückprojektion
(mit einer lichtdurchlässigen Leinwand)
Aufstellung-73
Page 76

Anschluss von Geräten
Anschluss eines Computers
Zum Anschluss von Videogeräten siehe "Kurzanleitung".
Beim Anschließen folgendes beachten:
• Projektor und Computer ausschalten.
c
Kompatible Computer
p
Wenn die Geräte beim Anschließen eingeschaltet sind, können Beschädigungen auftreten.
• Achten Sie auf die Steckertypen.
Der Versuch, einen Stecker in die falsche Buchse zu stecken, kann zu Beschädigungen führen.
Zustand 1: Kontrollieren Sie, ob der Computer einen Bildausgang wie z. B. eine RGB-Buchse,
Monitor- oder CRT-Buchse hat.
Manche Computer mit eingebautem Monitor und Laptops sind möglicherweise nicht kompatibel.
Weitere Informationen dazu entnehmen Sie bitte Ihrem Computer-Handbuch.
Zustand 2: Die Displayfrequenz und Auflösung des Computers müssen der des Projektors
entsprechen. s "Unterstützte Bildschirmauflösungen" S.90
Je nach der Form der Computerbuchse kann es erforderlich sein, dass Sie einen separaten Adapter kaufen müssen. Weitere
Informationen dazu entnehmen Sie bitte der Dokumentation Ihres Computers.
fLaptop-Anschluss
Einstellungsbeispiele
Bei der Verwendung von Laptops oder Computern mit
eingebautem Monitor, aktivieren Sie am Computer den
p
externen Monitorausgang.
Windows:
Halten Sie die Taste [Fn] gedrückt und drücken Sie
anschließend die jeweilige Funktionstaste.
NEC
Panasonic
Tosh ib a
IBM
SONY
[Fn]+[F3]
[Fn]+[F5]
[Fn]+[F7]
Weitere Informationen dazu entnehmen Sie bitte Ihrer
Computer-Dokumentation.
Je nach Windowsversion kann ein Dialogfenster
erscheinen, das Sie darauf aufmerksam macht,
dass neue Hardware gefunden worden ist. Folgen
Sie den Anweisungen am Bildschirm. Falls
Win
Probleme auftreten, wenden Sie sich bitte an die
in "Internationale Garantiebedingungen" im
Abschnitt "Sicherheitsanweisungen und
weltweite Garantiebedingungen" genannte und
für Sie am nächsten liegende Adresse.
• Es kann einige Sekunden dauern, bis das
Win/
Mac
Computerbild projiziert wird.
• Abhängig vom Computer kann der Monitor
bei Verwendung des externen Videoausgangs
dunkel werden.
Fujitsu
Macintosh
Aktivieren Sie nach dem Start "Spiegeln” im Monitors
Control Panel.
[Fn]+[F10]
74-Anschluss eines Computers
Page 77

Bilder und Ton vom Computer ausgeben
Anschluss von Geräten
zum Monitorausgang
zum Audioausgang
Stereo-Minibuchse
Wenn Sie Computer und Videogeräte abwechselnd verwenden, tauschen Sie das Kabel oder setzen Sie einen Audio-Umschalter
ein.
p
Computerkabel (optional)
Stereo-Minibuchse – 2-pol. RCA-Kabel
(im Fachhandel erhältlich)
An Anschluss
Input B
zum
Audioanschluss
RCA-Buchse
Anpassen von computererzeugten Bildern
fAuto Setup (Computeranschlüsse)
Das Computersignal wird analysiert und die folgenden Werte werden zur optimalen Bildqualität eingestellt.
• Tracking
• Position
•Sync.
g
g
• Auto Setup kann im Menüpunkt "Bild" → im Konfigurationsmenü "Auto Setup" ausgeschaltet werden (OFF).
(Voreinstellung ist ON) s "Das Menü "Bild"" S.77
• Wenn Auto Setup deaktiviert ist (OFF), drücken Sie die Taste [Auto] auf der Fernbedienung, um den Auto Setup
p
Falls der Auto Setup nicht durchgeführt werden kann, stellen Sie die Werte für Tracking und Sync manuell ein. ([Menu]
Taste → "Bild" → "Bildqualität" → "Tracking", "Sync.") s "Das Menü "Bild"" S.77
durchzuführen.
• Wenn Sie die Taste [Auto] während der Standbildfunktion oder während der Anzeige eines Konfigurationsmenüs drücken,
wird die Bildwiedergabe angehalten und der Auto Setup durchgeführt.
Anschluss eines Computers-75
Page 78

Konfigurationsmenüs
Menübetrieb
Drücken Sie die Taste [Menu].
1
Das erste Konfigurationsmenü wird angezeigt.
Hauptmenü
Wählen Sie mit den Tasten [u] oder [d]
2
den ersten Menüpunkt.
Untermenü
Die Einstellungen können wie folgt
5
geändert werden:
(a)Drücken Sie die Taste [l] oder [r] zur
Änderung der Einstellwerte.
(b)Wählen Sie mit den Tasten [u] oder [d]
einen Menüpunkt.
Drücken Sie anschließend die Taste [e].
(grün) : aktuell eingestellter
Menüpunkt.
(orange): aktuell ausgewählter
Menüpunkt.
Drücken Sie zur Bestätigung der Auswahl
die Taste [e].
Drücken Sie die [e] Taste.
3
A Untermenü wird angezeigt.
Hinter Menüpunkten, die einer Einstellung dienen
oder zu einem Untermenü führen, wird das Zeichen
p
angezeigt.
(c)Wählen Sie mit den Tasten [l] oder [r]
einen Wert aus.
Drücken Sie anschließend die Taste [e].
(d) Mit den Tasten [u] [d] [l] [r] können Sie
die Bildposition bewegen.
Wählen Sie mit den Tasten [u] oder [d]
4
einen Menüpunkt im Untermenü und
drücken Sie anschließend die Taste
[e].
76-Menübetrieb
Stellen Sie andere Menüpunkte in
6
derselben Weise ein.
Drücken Sie die Taste [Esc], um zu einem
vorhergehenden Menüpunkt oder Menü
zurückzukehren, oder wählen Sie "Zurück".
Drücken Sie zum Abschluss die Taste
7
[Menu].
Page 79

Funktionsliste
fDas Menü "Bild"
• Die Funktionen im Menü "Bild" sind je nach Eingangssignal unterschiedlich.
• Wenn kein Eingangssignal vorhanden ist, können nur die Einstellungen für "Auto Setup" eingestellt werden.
Untermenü Funktion
Bildqualität
Farbmodus
Speicher
Auto Setup
(nur RGB)
Reset
Video (Video/S-Videog/Component)
Helligkeit Zur Anpassung der Bildhelligkeit.
Kontrast
Schärfe Zur Anpassung der Bildschärfe.
Sättigung
(nur Video)
Farbton
(nur Video)
g Zur Anpassung des Bildkonstrastes.
Zur Anpassung der Farbtiefe.
(Anpassungen sind nur möglich bei Component Videog oder NTSCEingangssignalen)
Zur Farbtonanpassung des Bildes.
Zur Anpassung heller Farben von einem rötlichen Ton zu einem bläulichen Ton.
Farbtemperatur
Hautfarbe
Trackingg
g
Niedrigere Farbtemperatureinstellungen erzeugen rötlichere Farben und weichere
Farbtöne.
Höhere Farbtemperatureinstellungen erzeugen bläulichere Farben und schärfere Farbtöne.
Passt die grüne Farbstufe an.
Die Intensität der grünen Farbtöne wird stärker, wenn der Einstellungswert hoch ist.
Ebenso werden die roten/violetten Farbtöne stärker, wenn der Einstellungswert niedrig ist.
Zur Anpassung des Bildes wenn vertikale Bildstreifen auftreten.
(nur RGB)
Sync.g
(nur RGB)
Zur Anpassung des Bildes wenn Flackern, Unschärfe oder Störungen im Bild auftreten.
Flackern und Unschärfe können auch beim Einstellen von Helligkeit, Kontrast, Schärfe
oder der Trapezkorrektur (Keystone) auftreten.
Die besten Ergebnisse werden erzielt, wenn das Tracking vor der Sychronisation (Sync.)
eingestellt wird.
Korrigiert die Leuchtkraft der projizierten Farben. Diese Einstellungen können für jede
Art von Bildquelle (Computer oder Video) separat gespeichert werden.
Sie können aus 4 verschiedenen Bildqualitäten entsprechend den Projektionsbedingungen
auswählen.
• Dynamisch: Beste Projektion von Videospielen. Die klare Bildqualität sorgt auch an
hellen Orten für gute Bilder.
• Wohnzimmer: Am besten geeignet für Sport usw. Fernsehartige Bildqualität kann
projiziert werden, auch im Wohnzimmer.
• Theater: Eignet sich am besten zum Ansehen von Filmen mit hellem Bild. Der ganze
Bereich der Farben wird klar dargestellt, ohne dass die Lichtstärke der Lampe verringert
wird.
• Kino-Schwarz: Eignet sich am besten, um Filme in einer völlig schwarzen Umgebung
anzusehen. Die Lichtstärke der Lampe wird abgesenkt und die Farben werden subtiler
dargestellt.
Speichert die Werte der Bildeinstellung. "Speicher1" oder "Speicher2" auswählen und die
Tast e [e] drücken, um die aktuellen Einstellungen zu speichern. Sie können die
gespeicherten Einstellungen abrufen, indem Sie die Taste [Memory] drücken.
ON: Wird die Eingangsquelle auf ein Computersignal umgeschaltet, passt der Projektor
das Bild automatisch auf den optimalen Zustand an.
OFF: Auto Setup ist deaktiviert.
Setzt alle Einstellwerte im Menü "Bild" (ausgenommen die Werte für "Speicher") auf die
Standardwerte zurück.
• Drücken Sie die Taste [e] und wählen Sie anschließend im angezeigten
Bestätigungsfenster "Ja".
• Wählen Sie "Reset total", um alle Menüeinstellungen für Bild und Ton auf ihre
Standardwerte zurückzusetzen. s "Das Menü "Reset"" S.79
RGB (RGB-Video/Analog-RGB)
Funktionsliste-77
Page 80

Konfigurationsmenüs
fDas Menü "Einstellung"
Untermenü Funktion
Bildschirm Position
Zoom Caption
Keystone
Projektion
Setup Pegel
Betrieb Sleep-Modus
Kindersicherung
Bildschirmanzeige Meldung
Hintergrundfarbe Zur Einstellung der Hintergrundfarbe auf schwarz oder blau.
Startbildschirm
Eingangssignal Video-Signal
Input A
Lautstärke Zur Einstellung der Lautstärke
Sprache
Reset
Zur Einstellung der vertikalen und horizontalen Lage des projizierten Bildes.
• Drücken Sie die Taste [e] und stellen Sie den Anzeigebereich auf dem
dargestellten Positionseinstellungsbildschirm ein.
Die Einstellung ist nur dann möglich, wenn die Funktion Zoom Seitenverhältnis
ausgewählt worden ist.
• Vertikale Größe: Sie können die vertikale Größe des Bildes einstellen.
• Zoomposition : Sie können die vertikale Position des Bildschirms einstellen.
Zur vertikalen Trapezkorrektur (Keystone) eines Bildes.
• Bei einer Trapezkorrektur ändert sich das projizierte Bild.
• Bei Ungleichmäßigkeiten des Bildes nach einer Trapezkorrektur können Sie die
Schärfe etwas nachstellen.
• Vorderseite : Das Bild wird so angezeigt, wie es ist. Es wird keine
• Vorderseite/Decke: Das Bild wird vertikal gespiegelt angezeigt.
• Hinterseite : Das Bild wird horizontal umgekehrt dargestellt.
• Hinterseite/Decke : Das Bild wird vertikal und horizontal umgekehrt dargestellt.
Sie können einen von zwei voreingestellten Schwarzpegeln auswählen.
(Wenn die Bildquelle ein NTSC-Video/S-Video-Signal ist oder wenn die
Bildquelle auf Input A, "Component" eingestellt worden ist.)
Zur Einstellung der Energiesparoption wenn kein Eingangssignal anliegt.
• Wurde ein Sleep-Modus-Intervall eingegeben, schaltet der Projektor in den
Sleep-Modus, wenn für die eingestellte Zeit (5, 10 und 30 Minuten) keine
Funktion mehr durchgeführt worden ist. Die Projektion wird beendet und der
Projektor schaltet nach der Abkühlzeit in den Bereitschaftsmodus. (Die
Netzanzeige leuchtet orangerot).
• Die Projektion startet wieder, wenn die Taste [Power] im Projektor-Bedienfeld
oder auf der Fernbedienung gedrückt wird.
Stellt die Kindersicherung auf ON oder OFF.
Wenn die Kindersicherung eingeschaltet ist, dann kann der Projektor nur
eingeschaltet werden, indem man im Bedienfeld die [Power] Taste 3 Sekunden lang
gedrückt hält. (Die Fernbedienung funktioniert normal.)
Bei Deaktivierung (AUS) werden Meldungen wie z. B. "Kein Signal", der Name
der aktiven Bildquelle oder der Farbmodus nicht mehr angezeigt. Warnmeldungen
wie "Lampe erneuern" erscheinen weiterhin.
Zur Einstellung, ob das Logo "EPSON" beim Einschalten des Projektors angezeigt
werden soll.
Zur Farbsystemauswahl des Video-Eingangssignals.
(Änderungen im Signalformat werden nur bei einer Video/S-Video-Bildquelle
bemerkt.)
Sie können zwischen den Quellen, die an Input A angeschlossen sind, umschalten.
• Component: YCbCrg/YPbPrg
• RGB-Video: SCART
Zur Auswahl der Sprache, in der Online-Meldungen angezeigt werden sollen.
• Drücken Sie die Taste [e] und wählen Sie anschließend die gewünschte Sprache
in der angezeigten Liste.
Setzt alle Einstellwerte im Menü "Einstellung" (ausgenommen die
"Kindersicherung", "Input A" und "Sprache") auf die Standardwerte zurück.
• Drücken Sie die Taste [e] und wählen Sie anschließend im angezeigten
Bestätigungsfenster "Ja".
vertikale/horizontale Umkehrung durchgeführt.
g, Sync on Green
78-Funktionsliste
Page 81

Konfigurationsmenüs
fDas Menü "Information"
Video/S-Video Input A/Input B
Wenn Component Video an Input A angelegt wird, werden
die Wiederholrate und Sync-Info nicht angezeigt.
Untermenü Funktion
Lampenstunden Zeigt die aufgelaufene Lampenbetriebszeit an. Bei einer Betriebszeit von 0 bis 10 Stunden
wird 0H angezeigt. Nach mehr als 10 Stunden wird die Betriebszeit in Stundeneinheiten
angezeigt.
• Wenn die Gesamtbetriebszeit der Lampe die entsprechenden Stunden (*) erreicht hat,
wird eine Warnung in roter Schrift angezeigt.
* Falls Kino-Schwarz fortlaufend verwendet worden ist: Etwa 2900 Stunden
Falls andere Betriebsarten fortlaufend verwendet worden sind: Etwa 1900 Stunden
Quelle Zeigt die Bildquelle des gerade projizierten Bildes an.
Eingangssignal
(nur Input A/Input B)
Video-Signal
(nur Video/S-Video)
Auflösung
(nur Input A/Input B)
Wiederholrate
(nur Input A/Input B)
Sync-Info
(nur Input A/Input B)
g
Zeigt die Einstellungen für das Eingangssignals an.
Zeigt das Videosignalformat an.
Anzeige der Auflösung des Eingangssignals.
(Erscheint nicht bei Composite Video- oder S-Video-Eingangsquellen.)
Anzeige der Wiederholrate
(Erscheint nicht bei Composite Video- oder S-Video-Eingangsquellen.)
Zeigt Bildsignalinformationen an.
Wenn Sie Probleme mit dem Projektor haben und sich an einen EPSON Händler wenden
müssen, halten Sie bitte die Information auf diesem Bildschirm bereit.
fDas Menü "Reset"
Untermenü Funktion
Reset
Lampenstunden
SpeicherRückstellung
Reset total Setzt alle Werte in den Konfigurationsmenüs auf ihre Standardwerte zurück.
Zum Zurücksetzen der Lampenbetriebszeit. Beim Auswählen dieses Befehls wird die
aufgelaufene Lampenbetriebszeit auf den Standardwert zurückgesetzt.
Setzt alle Einstellungen im Speicher zurück.
• Drücken Sie die Taste [e] und wählen Sie anschließend im angezeigten Bestätigungsfenster "Ja".
• Wählen Sie "Reset" in einem Untermenü, wenn Sie nur die Einstellungen für die Werte in
diesem Untermenü zurücksetzen möchten.
• Die Parameter für "Speicher", "Kindersicherung", "Input A", "Sprache" und "Lampenstunden"
werden nicht zurückgesetzt.
Funktionsliste-79
Page 82

Fehlerbehebung
Wenn Sie ein Problem vermuten
Überprüfen Sie zuerst die Anzeigen am Projektor.
Am Projektor befinden sich zwei Anzeigen, die
Netzanzeige
Sie über den Projektorzustand informieren.
Warnlampe
Netzanzeige
leuchtet blinkt •Leuchtet die Anzeige nicht, ist das Netz nicht eingeschaltet.
Bedingung Ursache/Abhilfe s
orange
orange
grün
grün
Standby-Zustand(nicht unnormal)
Das Netzkabel darf nur in diesem Projektorzustand getrennt werden.
Drücken Sie die Taste [Power], um mit der Projektion zu beginnen.
Abkühleng läuft (nicht unnormal)
• Bitte warten. Die Abkühlzeit beträgt ca. 20 Sekunden.
• Der Projektor piepst zweimal, um den Abschluss des Abkühlens anzuzeigen.
• Während der Abkühlung lässt sich die Taste [Power] nicht bedienen. Drücken Sie die
Taste Power nach dem Abkühlen erneut.
Projektion läuft (nicht unnormal)
Aufwärmen (nicht unnormal)
Bitte warten. Das Aufwärmen dauert ca. 40 Sekunden. Nach dem Aufwärmen leuchtet
die Anzeige im grünen Dauerlicht.
Kurzanleitung
Warnlampe
leuchtet blinkt •Leuchtet nicht unter normalen Bedingungen.
Bedingung Ursache/Abhilfe s
rot
rot
(Intervall 0,5 Sek.)
rot
(Intervall 1 Sek.)
Hohe interne Temperatur (Überhitzung)
Die Lampe wird automatisch ausgeschaltet und die Projektion unterbrochen. Warten Sie ca. 5
Minuten ohne den Projektor zu bedienen. Ziehen Sie nach ca. 5 Minuten den Netzstecker aus
der Steckdose und überprüfen Sie folgendes:
• Stellen Sie sicher, dass Luftfilter und Luftaustritt nicht behindert sind und dass der Projektor
nicht an einer Wand aufgestellt ist.
• Ein verschmutzter Luftfilter muss gereinigt werden.
Beim Wiederanschließen des Netzkabels wird der Projektor in den vorherigen Zustand
zurückgesetzt. Drücken Sie die Taste [Power] am Projektor oder auf der Fernbedienung, um
den Projektor wieder einzuschalten.
Defekte Lampe
• Ziehen Sie das Netzkabel aus der Steckdose. Bauen Sie die Lampe aus und kontrollieren
Sie, ob sie defekt ist. Wenn die Lampe nicht defekt ist, bauen Sie sie wieder ein. Schließen
Sie das Netzkabel wieder an und schalten Sie den Projektor mit der Taste [Power] am
Projektor oder auf der Fernbedienung wieder ein.
• Ist die Lampe defekt, wenden Sie sich bitte an Ihren Händler oder an die nächste unter
"Sicherheitsanweisungen und weltweite Garantiebedingungen" in der Anleitung
"Internationale Garantiebedingungen" angegebene Adresse (Solange die Lampe nicht
ersetzt ist, können Sie den Projektor nicht verwenden).
• Kontrollieren Sie, ob die Lampe und Lampenabdeckung richtig angebracht sind. Sind Lampe
und Lampenabdeckung nicht richtig installiert, kann die Lampe nicht eingeschaltet werden.
Interne Störung
Verwenden Sie den Projektor nicht mehr. Ziehen Sie das Netzkabel aus der Steckdose und
wenden Sie sich an Ihren Händler oder an die nächste unter "Sicherheitsanweisungen und
weltweite Garantiebedingungen" in der Anleitung "Internationale Garantiebedingungen"
angegebene Adresse.
S.72
S.84
S.86
80-Wenn Sie ein Problem vermuten
Page 83

Fehlerbehebung
Bedingung Ursache/Abhilfe s
orange
• Wenn bei der Projektion Probleme auftreten, die Anzeigen aber keine Störung signalisieren, wird auf den folgenden
Abschnitt "Wenn die Anzeigen keine Hilfe bieten" verwiesen.
• Tritt eine Bedingung auf, die nicht in dieser Tabelle aufgeführt ist, wenden Sie sich bitte an Ihren Händler oder an die
p
nächste unter "Sicherheitsanweisungen und weltweite Garantiebedingungen" in der Anleitung "Internationale
Garantiebedingungen" angegebene Adresse.
• Wenn Sie die o. g. Schritte befolgt haben, das Problem aber immer noch nicht beseitigen können, verwenden Sie den
Projektor bitte nicht mehr, ziehen den Netzstecker aus der Steckdose und wenden sich zwecks Reparatur an Ihren Händler
oder an die nächste unter "Sicherheitsanweisungen und weltweite Garantiebedingungen" in der Anleitung "Internationale
Garantiebedingungen" angegebene Adresse.
Rasches Abkühlen
(Kein abnormaler Zustand, aber wenn die Temperatur erneut zu hoch ansteigt, wird die
Projektion automatisch unterbrochen.)
Stellen Sie den Projektor an einem gut belüfteten Ort auf und achten Sie darauf, dass Luftfilter
und Luftaustritt nicht behindert sind.
Reinigen Sie den Luftfilter.
Wenn die Anzeigen keine Hilfe bieten
fKeine Bildwiedergabe (es wird nichts angezeigt)
S.72
S.84
• Wurde der Projektor ausund danach sofort wieder
eingeschaltet?
• Wurde ein Sleep-ModusIntervall (5, 10 oder 30
Min.) eingegeben?
• Wurde die Bildhelligkeit
richtig eingestellt?
• Ist das projizierte Bild
vollständig schwarz?
• Liegt ein Videosignal an? Überprüfen Sie, ob ein Bildsignal am Eingang anliegt.
Sie können frühsten eine Minute nach dem Beenden der
Projektion wieder projizieren, selbst wenn Sie die Taste
[Power] im Bedienfeld oder auf der Fernsteuerung
drücken. Lassen Sie den Projektor vollständig abkühlen,
bevor Sie erneut projizieren.
Wurde ein Sleep-Modus-Intervall eingegeben, schaltet die
Lampe nach der eingestellten Zeit (5, 10 oder 30 Min.)
aus.
Die Netzanzeige leuchtet dann orangefarben.
Helligkeit wie folgt einstellen.
[Menu] Taste → "Bild" → "Bildqualität" → "Helligkeit".
Manche angezeigte Bilder, auch Bildschirmschoner,
können ganz schwarz sein.
Stellen Sie im Konfigurationsmenü "Einstellung" →
"Bildschirmanzeige" → "Meldung" die Option "Meldung"
auf "AN", um die Bildsignalinformationen anzuzeigen.
fKeine Bildwiedergabe (Anzeige von Meldungen)
• Ist die Bildquelle richtig
ausgewählt?
Drücken Sie im Bedienfeld die Taste [Source], bis die
richtige Bildquelle eingestellt ist. Auf der Fernbedienung
drücken Sie die Taste [Input A/B] oder [S-Video/Video].
"Kein Signal."
• Sind die Kabel richtig
angeschlossen?
• Ist am Computer der
externe Videoausgang
aktiviert?
Überprüfen, ob die Kabel sicher angeschlossen sind.
Je nach verwendetem Gerät, müssen am Videogerät evtl.
einige Einstellungen vorgenommen werden. Siehe
Benutzerhandbuch Ihres Videogeräts.
Bei der Verwendung von Laptops oder PCs mit
eingebautem Monitor, aktivieren Sie am Computer den
externen Monitorausgang.
s "Laptop-Anschluss" S.74
Wenn Sie ein Problem vermuten-81
Page 84

Fehlerbehebung
fBild ist unscharf (nicht klar)
• Befindet sich der Projektor
im richtigen Abstand zur
Leinwand?
• Ist das Objektiv
verschmutzt?
• Das Bild ist
unscharf
• Das Bild ist
teilweise unscharf
• Das ganze Bild ist
unscharf
• Ist das Objektiv
beschlagen?
• Ist die Schärfe korrekt
eingestellt?
fDas Bild ist verzerrt/gestört
• Wird ein
Verlängerungskabel
verwendet?
• Sind die Kabel richtig
angeschlossen?
Die optimale Reichweite für die Projektion liegt zwischen
73 und 1165 cm. Stellen Sie den Projektor in diesem
Bereich auf. s "Aufstellungsart" S.72
s "Reinigen des Objektivs" S.84
Wenn der Projektor von einem kalten in einen warmen
Raum gebracht wird, kann das Objektiv beschlagen und
eine unscharfe Bildwiedergabe verursachen. Stellen Sie
den Projektor daher ca. eine Stunde vor dem Gebrauch in
dem Raum auf, in dem er verwendet werden soll. Wenn
sich Kondensat auf dem Objektiv gebildet hat, schalten Sie
den Projektor aus und warten Sie, bis es verdunstet ist.
Den Fokusring drehen, um den Fokus einzustellen.
Bei Verwendung eines Verlängerungskabels können die
Signale durch elektrische Störungen beeinträchtigt
werden.
Überprüfen, ob die Kabel sicher angeschlossen sind.
Interferenz kann auftreten, wenn die Kabel nicht sicher
angeschlossen sind.
fBild wird nur teilweise angezeigt (groß/klein)
• Ist das Bildseitenverhältnis
korrekt eingestellt?
• Ist die "Position" korrekt
eingestellt?
Die Taste [Aspect] drücken, um das Seitenverhältnis zu
ändern.s "Änderung des Seitenverhältnisses"
Kurzanleitung
Stellen Sie im Konfigurationsmenü "Einstellung" →
"Bildschirm" → "Position" die Displayposition richtig
ein.
fSchlechte Farbqualität, grün- oder rot/violett-stichig.
• Muss die Lampe ersetzt
werden?
• Jede Einstellung in den
folgenden Menüs anpassen.
[Menu] Taste → "Bild" →
"Bildqualität"
Wenn die Lampe ersetzt werden muss, werden die Farben
schwächer und das Bild wird dunkler. Ersetzen Sie in
diesem Fall die Lampe. s "Lampenaustauschperiode"
S.86
"Kontrast", "Farbtemperatur"
"Sättigung", "Farbton", "Helligkeit"
• Sind die Kabel richtig
angeschlossen?
82-Wenn Sie ein Problem vermuten
Falls die mit dem Component-Videogerät verbundenen
Kabel nicht fest angeschlossen sind, kann es sein, dass
gewisse Farben nicht angezeigt werden.
Page 85

fDunkles Bild
Fehlerbehebung
• Muss die Lampe ersetzt
werden?
• Jede Einstellung in den
folgenden Menüs anpassen.
[Menu] Taste → "Bild" →
"Bildqualität"
Wenn die Lampe ersetzt werden muss, werden die Farben
schwächer und das Bild wird dunkler. Ersetzen Sie in
diesem Fall die Lampe. s "Lampenaustauschperiode"
S.86
"Helligkeit", "Kontrast"
fKeine Tonwiedergabe
• Ist die Lautstärke auf den
Mindestwert eingestellt?
• Ist die Audioquelle richtig
angeschlossen?
• Ist das angeschlossene
Videogerät im WiedergabeModus?
Die Lautstärke mit der Fernbedienung oder dem
Bedienfeld einstellen.
Audiokabel vom verwendeten Gerät mit dem
Audioanschluss verbinden.
Schalten Sie das angeschlossene Gerät ein und drücken
Sie die Wiedergabetaste.
fDie Fernbedienung funktioniert nicht.
• Wird der Infrarotempfänger
von direktem Sonnenlicht
oder Leuchtstofflampen
gestört?
s "Verwendung der Fernbedienung" S.71
• Ist die Fernbedienung zu
weit vom Projektor entfernt?
• Wurde der
Fernbedienungssender
beim Betätigen der
Fernbedienung auf den
Fernbedienungsempfänger
am Projektor gerichtet?
• Wurde der Isolierstreifen
der Batterie entfernt?
• Ist die Batterie leer?
Die Reichweite der Fernbedienung beträgt ca. 6 m.
Der Arbeitswinkel der Fernbedienung beträgt ca. ±30½°
horizontal und ca. ±15½° vertikal.
Das Isolierband entfernen.
s "Auswechseln der Batterie" S.85
fDer Projektor kann nicht ausgeschaltet werden
(nach dem Drücken der Taste [Power]).
• Die Netzanzeige bleibt
orangefarben.
Bei diesem Projektor leuchtet die Netzanzeige auch nach
dem Ausschalten weiter. Die Netzanzeige erlischt, wenn
das Netzkabel aus der Steckdose gezogen wird.
fDer Projektor lässt sich nicht anschalten
• Der Projektor kann nicht
angeschaltet werden, selbst
wenn die [Power] Taste
gedrückt wird.
Ist die "Kindersicherung" auf "An" geschaltet?
Drücken und halten Sie die [Power] Taste mindestens 3
Sekunden lang, um den Projektor anzuschalten.
Wenn Sie ein Problem vermuten-83
Page 86

Anhänge
Projektorpflege
Bevor Sie fortfahren, lesen Sie bitte die separaten "Sicherheitsanweisungen/weltweiten Garantiebedingungen" sorgfältig
durch.
c
Reinigung
Bei einer Verschmutzung oder Bildverschlechterung muss der Projektor gereinigt werden.
fReinigen des Luftfilters
Ein verstopfter Luftfilter kann zu Überhitzung und Beschädigungen des Projektors führen.
Halten Sie den Projektor waagrecht und entfernen Sie mit einem Staubsauger den Staub vom Luftfilter.
Ein schwer zu reinigender oder zerstörter Luftfilter
muss ersetzt werden. Wenden Sie sich für einen
p
Ersatzfilter an Ihren zuständigen Fachhändler.
Luftfilter
fReinigen des Projektorgehäuses
Reinigen Sie das Projektorgehäuse mit einem weichen Tuch.
Bei starker Verschmutzung können Sie das Tuch zum Reinigen mit Wasser und einem neutralen Reinigungsmittel
anfeuchten. Sie müssen es jedoch gut auswringen, bevor Sie es zum Abwischen des Projektorgehäuses gebrauchen. Reiben
Sie das Gehäuse mit einem weichen Tuch trocken.
Reinigen Sie das Gehäuse nicht mit flüchtigen
Reinigungsmitteln, wie Wachs, Alkohol oder
Farbverdünner. Dadurch kann sich das Gehäuse
c
verformen und die Farbe kann abblättern.
fReinigen des Objektivs
Verwenden Sie zum Reinigen des Objektivs einen handelsüblichen Foto-Blasebalg oder Brillenreinigungstücher.
Reiben Sie das Objektiv nicht mit harten
Gegenständen ab und setzen Sie es keinen Stößen
c
aus, um Beschädigungen zu vermeiden.
84-Projektorpflege
Page 87

Wechseln der Lampe und der Fernbedienungsbatterie
fErsetzen des Luftfilters
(Luftfilter: ELPAF04)
Der Luftfilter kann auch ersetzt werden, wenn der Projektor an der Decke montiert ist.
Anhänge
Schalten Sie den Projektor aus, warten
1
Sie bis die Abkühlzeit abgelaufen ist
und ziehen Sie das Netzkabel ab.
Abkühleng Dauert etwa 20 Sekunden.
Legen Sie Ihren Finger in die
2
Verriegelung und heben Sie die
Abdeckung ab. Heben Sie den
Luftfilter an und entfernen Sie ihn.
Tauschen Sie den Luftfilter gegen
3
einen neuen aus.
Entfernen Sie den alten Filter und setzen Sie
den neuen Filter ein. Stellen Sie sicher, dass
zwischen Luftfilter und Plastikgitter keine
Lücken bleiben.
Bringen Sie die Luftfilterabdeckung
4
wieder an.
Setzen Sie zuerst die Zungen ein und drücken
Sie dann auf der gegenüberliegenden Seite
bis die Luftfilterabdeckung einrastet.
fAuswechseln der Batterie
(Ersatzbatterie: 1 × CR2025 Lithium-Batterie)
Bewahren Sie Batterien zur Vermeidung von Unfällen nicht in Reichweite von Kindern auf.
Wenn ein Kind die Batterie verschluckt, sofort einen Arzt aufsuchen.
c
Entfernen Sie den Batteriehalter.
1
Drücken Sie zum Herausziehen des
Batteriehalters die Lasche nach innen.
Ersetzen Sie die alte Batterie mit einer
2
neuen Batterie.
Überprüfen Sie die Markierung (+) im
Batteriehalter und stellen Sie sicher, dass die
Batterie richtig herum eingesetzt ist.
Entsorgen Sie verbrauchte Luftfilter entsprechend den
örtlichen Vorschriften.
p
Setzen Sie den Batteriehalter wieder
3
hinein.
Drücken Sie den Batteriehalter hinein, bis er
einklickt.
Entsorgen Sie verbrauchte Batterien entsprechend den
örtlichen Müllbeseitigungsvorschriften.
p
Projektorpflege-85
Page 88

Anhänge
fLampenaustauschperiode
• Die Lampe muss ausgetauscht werden, wenn die Meldung "Lampe erneuern"
zu Beginn der Projektion unten links im Bildschirm für 30 Sekunden anzeigt
wird.
• Die Lampe sollte ebenfalls ausgewechselt werden, wenn die Warnanzeige in
0,5-Sekunden-Intervallen blinkt.
• Die Zeit, zu der die Meldung Ersatz erscheint, hängt vom verwendeten Farbmodus ab.
Falls Kino-Schwarz fortlaufend verwendet worden ist: Etwa 2900 Stunden
p
Falls andere Betriebsarten fortlaufend verwendet worden sind: Etwa 1900 Stunden
• Ersetzen Sie die Lampe so rasch wie möglich, wenn diese Meldung angezeigt wird.
• Verwenden Sie die Lampe über die Lampenaustauschperiode hinaus, kann die Lampe explodieren.
• Manche Lampen arbeiten schon vor der Anzeige dieser Meldung nicht mehr. Deshalb wird empfohlen, immer eine
Ersatzlampe bereitzuhalten.
• Ersatzlampen können Sie bei Ihrem nächsten Fachhändler kaufen.
fAuswechseln der Lampe
(Ersatzlampe: ELPLP29)
• Entfernen Sie die Lampenabdeckung erst, wenn die Lampe ausreichend abgekühlt ist. Nach der Abkühlzeit wird zum
c
ausreichenden Abkühlen noch eine weitere Stunde benötigt.
• Ist die Lampe zerbrochen, ersetzen Sie sie mit einer neuen Lampe oder wenden Sie sich für weitere Unterstützung an Ihren
Fachhändler. Wenn Sie die Lampe selbst ersetzen, vermeiden Sie den Kontakt mit Glassplittern.
Schalten Sie den Projektor aus und
1
warten Sie bis die Abkühlzeit
abgelaufen ist (ca. 20 Sekunden).
Entfernen Sie das Netzkabel und warten Sie bis
die Lampe abgekühlt ist (ca. 1 Stunde).
Öffnen Sie die Lampenabdeckung.
2
Heben Sie die Lampenabdeckung an, indem
Sie Ihre Finger in die Verriegelungen legen und
die Abdeckung nach oben abheben.
Lösen Sie die Lampen-
3
Befestigungsschrauben.
Entfernen Sie die alte Lampe.
4
Setzen Sie die neue Lampe ein.
5
Drücken Sie die Lampe hinein bis sie einrastet
und ziehen Sie die Befestigungsschrauben
wieder fest.
Bringen Sie die Lampenabdeckung
6
wieder an.
Setzen Sie zuerst die Zungen ein und drücken
Sie dann auf der gegenüberliegenden Seite
bis die Luftfilterabdeckung einrastet.
86-Projektorpflege
Page 89

• Setzen Sie die Lampe richtig ein. Als Sicherheitsmaßnahme wird die Lampe beim Abnehmen der Lampenabdeckung
automatisch abgeschaltet. Bei nicht einwandfrei eingesetzter Lampe oder Lampenabdeckung kann die Lampe nicht
p
eingeschaltet werden.
• Achten Sie darauf, nach dem Auswechseln der Lampe die Lampenbetriebszeit zurückzusetzen.
• Die Lampe enthält Quecksilber. Entsorgen Sie verbrauchte Lampen entsprechend den örtlichen Vorschriften.
fZurücksetzen der Lampenbetriebszeit
Der Projektor ist mit einem Zähler für die Lampenbetriebszeit ausgerüstet, der beim Erreichen einer gewissen
Lampenbetriebszeit eine Warnmeldung auslöst. Deshalb muss der Zähler nach dem Ersetzen der Lampe im
Konfigurationsmenü zurückgestellt werden.
Stellen Sie die Lampenbetriebszeit nur nach dem Auswechseln der Lampe zurück. Andernfalls wird die Lampenbetriebszeit
nicht richtig angezeigt.
p
Schalten Sie den Projektor ein und
1
drücken Sie die Taste [Menu].
Anhänge
Wählen Sie mit den Tasten [u][d][e]
2
im Menü "Reset" den Befehl "Reset
Lampenstunden".
Wählen Sie mit den Tasten [l][r] "Ja"
3
und drücken Sie anschließend die
Taste [e].
Die Lampenbetriebszeit wird zurückgestellt.
Projektorpflege-87
Page 90

Glossar
Hier werden einige in dieser Anleitung verwendete Fachausdrücke oder Begriffe, die im Text nicht weiter
erläutert wurden, näher erklärt. Weitere Informationen können Sie der entsprechenden Fachliteratur
entnehmen.
Abkühlen Der Vorgang zum Abkühlen der Projektorlampe, die im Betrieb heiß geworden ist. Das
Abkühlen wird nach dem Ausschalten des Projektors durch Drücken der Taste [Power] am
Projektor oder auf der Fernbedienung automatisch gestartet. Ziehen Sie das Netzkabel
während des Abkühlens nicht aus der Steckdose. Wird das Abkühlen unterbrochen, bleiben
Projektorlampe und die inneren Teile heiß, was zur Verkürzung der Lampenlebensdauer und
zu Projektorstörungen führen kann.
Anti-DiebstahlVorrichtung
Bildseitenverhältnis Das Verhältnis von Bildbreite und Bildhöhe. Bilder mit einem Seitenverhältnis von 16:9
Component Video Eine Art von Videosignal, bei dem zur besseren Bildqualität die Helligkeits- und
Composite Video Das Standardvideosignal (NTSC, PAL, SECAM), bei dem Helligkeits- und Farbsignale
Dolby Digital Ein von Dolby Laboratories entwickeltes Tonformat. Ein normales Stereosignal ist für die
Farbtemperatur Die Temperatur eines Objektes, das Licht ausstrahlt. Bei hoher Farbtemperatur ist eine
HDTV Eine Abkürzung für Breitbildfernsehen. Damit sind Breitbildsysteme gemeint, die die
Das Projektorgehäuse enthält eine Vorrichtung zur Aufnahme eines handelsüblichen AntiDiebstahl-Schlosses, mit dem das Gerät an einem Tisch oder einer Säule gesichert werden
kann. Dieser Projektor ist mit dem von Kensington hergestellten Microsaver Security
System kompatibel.
werden als "Breitbild" bezeichnet. Das Seitenverhältnis für normale Bilder beträgt 4:3.
Farbsignale getrennt ist. Beim Breitbildfernsehen (HDTV) werden damit Bilder bezeichnet,
die aus drei unabhängigen Signalen bestehen: Y-Signal (Luminanz), Pb- und Pr-Signal
(Farbdifferenzsignale).
gemischt sind. Composite Video besteht aus den beiden im Farbbalkensignal kombinierten
Signalen: Trägersignal Y (Luminanz) und Chromasignal (Farbe).
Wiedergabe über zwei Lautsprecher in zwei Kanäle aufgeteilt. Dolby Digital ist ein 6Kanal-System (5.1-Kanal) in dem zusätzlich ein Mittenlautsprecher, zwei hintere
Lautsprecher und ein Subwoofer vorhanden sind.
bläuliche Farbtönung zu erkennen. Bei niedriger Farbtemperatur ist die Farbtönung rötlich.
folgenden Bedingungen erfüllen:
• Vertikale Auflösung von 750p oder 1125i oder höher
(p=Zeilensequente Abtastung
• Bildseitenverhältnis = 16:9
• Dolby Digital
gl Audioempfang und Wiedergabe (oder Ausgang)
g, i=Zeilensprung-Abtastungg)
Kontrast Die relative Helligkeit von hellen und dunklen Bildstellen kann erhöht oder verringert
werden, um Text und Grafik besser sichtbar zu machen oder weicher wiederzugeben. Diese
Bildeinstellung wird als "Kontrasteinstellung" bezeichnet.
RGB-Video Damit beschreibt man ein Videosignal, dass bei der Ausgabe an Computermonitore am
häufigsten verwendet wird. RGB-Video setzt sich aus elektrischen Impulsen zusammen, die
die Intensität der drei Primärfarben des Lichtes, nämlich rot, grün und blau, wiedergeben.
Ein vierter oder fünfter Impuls trägt die Timing-Information.
SCART Ein rechteckiger 21-Pin-Anschluss zur Übertragung von Audio- und Videosignalen
zwischen TV, VTR und AV-Geräten. RGB, S-Video/Composite-Video und zwei
Audiokanäle können übertragen werden.
SDTV Eine Abkürzung für normalzeiliges Fernsehen. Damit werden normale Fernsehsysteme
bezeichnet, welche die Bedingungen für das hochzeilige Fernsehen nicht erfüllen.
Squeeze-Modus
(Bilder)
SVGA Eine Art von Videosignal mit einer Auflösung von 800 (horizontal) × 600 (vertikal)
Die Methode, 16:9 Breitbild-Bilder zusammenzudrücken und sie auf Videosoftware als 4:3Bilder zu speichern.
Beim Projizieren mit aktivem Squeeze-Modus werden die Bilder wieder in ihrem
ursprünglichen 16:9-Format angezeigt.
Bildpunkten, das von IBM PC/AT-kompatiblen Computern verwendet wird.
88-Glossar
Page 91

Anhänge
Sync.
(Synchronisation)
Die Ausgangssignale von Computern haben eine bestimmte Frequenz. Wenn die
Projektorfrequenz nicht mit dieser Frequenz übereinstimmt, wird die Bildqualität
beeinträchtigt. Die Abstimmung der Signalphasen (relative Position der Signalspitzen) wird
als "Synchronisation" bezeichnet. Bei nicht synchronisierten Signalen können
Bildflimmern, ein verschwommenes Bild und horizontale Bildstörungen auftreten.
S-Video Eine Art von Videosignal, bei dem zur besseren Bildqualität die Helligkeits- und
Farbsignale getrennt ist. Damit werden Bilder bezeichnet, die aus zwei unabhängigen
Signalen aufgebaut sind: Y (Luminanzsignal) und C (Farbsignal).
Tracking Die Ausgangssignale von Computern haben eine bestimmte Frequenz. Wenn die
Projektorfrequenz nicht mit dieser Frequenz übereinstimmt, wird die Bildqualität
beeinträchtigt. Die Abstimmung der Frequenz dieser Signale (die Anzahl von Signalspitzen)
wird "Tracking" genannt. Bei nicht richtig eingestelltem Tracking können breite Streifen im
projizierten Bild auftreten.
VGA Eine Art von Videosignal mit einer Auflösung von 640 (horizontal) × 480 (vertikal)
Bildpunkten, das von IBM PC/AT-kompatiblen Computern verwendet wird.
Wiederholrate Das lichtaussendende Element eines Displays behält seine gleichmäßige Helligkeit und
Farbe nur für eine sehr kurze Zeit. Deshalb muss das Bild des Projektors zur Auffrischung
des lichtaussendenden Elements viele Male pro Sekunde abgetastet werden. Die Anzahl der
Auffrischungen pro Sekunde wird "Bildwiederholfrequenz" genannt und in Hertz (Hz)
berechnet.
XGA Eine Art von Videosignal mit einer Auflösung von 1.024 (horizontal) × 768 (vertikal)
Bildpunkten, das von IBM PC/AT-kompatiblen Computern verwendet wird.
YCbCr Ein Trägersignal im Farbbalkensignal zur modernen (NTSC) Fernsehübertragung. Die
Bezeichnung kommt von Y-Signal (Luminanz) und CbCr-Signal (Chroma (Farbe)).
YPbPr Ein Trägersignal im Farbbalkensignal zur Übertragung von Breitbild-Fernsehen (HDTV).
Die Bezeichnung kommt von Y-Signal (Luminanz) und PbPr-Signal (Farbdifferenz).
ZeilensprungAbtastung
Jeder Bildschirm ist in feine horizontale Linien aufgeteilt, die nacheinander von links nach
rechts und von oben nach unten anzeigt werden. Diese Methode der Bildabtastung, bei der
geradzahlige und ungeradzahlige Zeilen abwechselnd angezeigt werden, nennt man
Zeilensprungverfahren.
Zeilensequente
Abtastung
Ein Bildabtastverfahren bei dem die Bilddaten fortlaufend von oben nach unten abgetastet
werden.
Glossar-89
Page 92

Unterstützte Bildschirmauflösungen
fComponent Video
Signal Auflösung
SDTVg(525i, 60 Hz) 640 × 480
SDTV (625i, 50 Hz) 768 × 576
SDTV (525p) 640 × 480
SDTV(625p) 768 × 576
HDTV
g(750p)
16:9
HDTV (1125i)
16:9
1280 × 720
1920 × 1080
fComposite Video/S-Video
Signal Auflösung
Modus Seitenverhältnis
Normal Squeeze Zoom
640 × 480
(4:3 Seitenverhältnis)
640 × 480
(4:3 Seitenverhältnis)
640 × 480
(4:3 Seitenverhältnis)
640 × 480
(4:3 Seitenverhältnis)
854 × 480
(16:9 Seitenverhältnis)
854 × 480
(16:9 Seitenverhältnis)
--
--
Modus Seitenverhältnis
Normal Squeeze Zoom
TV(NTSC) 640 × 480
TV(PAL, SECAM) 768 × 576
fSCART (4RCA/RGB-Video)
Signal Auflösung
SDTV (525i, 60 Hz) 640 × 480
SDTV (625i, 50 Hz) 768 × 576
SDTV (525p) 640 × 480
SDTV(625p) 768 × 576
640 × 480
(4:3 Seitenverhältnis)
640 × 480
(4:3 Seitenverhältnis)
Modus Seitenverhältnis
Normal Squeeze Zoom
640 × 480
(4:3 Seitenverhältnis)
640 × 480
(4:3 Seitenverhältnis)
640 × 480
(4:3 Seitenverhältnis)
640 × 480
(4:3 Seitenverhältnis)
90-Unterstützte Bildschirmauflösungen
Page 93

fComputer (Analog-RGB)
Anhänge
Signal Auflösung
EGA 640 × 350 854 × 468 - -
VGA
g60 640 × 480
VESA
72 / 75 / 85,iMac*
SVGA
g
56 / 60 / 72 / 75 / 85,iMac*
XGA
g
43i / 60 / 70 / 75 / 85,iMac*
MAC13" 640 × 480
MAC16" 832 × 624
MAC19" 1024 × 768
MAC21" 1152 × 870 636 × 480
SDTV (525i, 60 Hz) 640 × 480
640 × 480
800 × 600
1024 × 768
Modus Seitenverhältnis
Normal Squeeze Zoom
640 × 480
(4:3 Seitenverhältnis)
640 × 480
(4:3 Seitenverhältnis)
640 × 480
(4:3 Seitenverhältnis)
640 × 480
(4:3 Seitenverhältnis)
640 × 480
(4:3 Seitenverhältnis)
640 × 480
(4:3 Seitenverhältnis)
640 × 480
(4:3 Seitenverhältnis)
640 × 480
(4:3 Seitenverhältnis)
SDTV (525p) 640 × 480
SDTV (625i, 50 Hz) 768 × 576
SDTV(625p) 768 × 576
HDTV (750p)
16:9
HDTV (1125i)
16:9
1280 × 720
1920 × 1080
640 × 480
(4:3 Seitenverhältnis)
640 × 480
(4:3 Seitenverhältnis)
640 × 480
(4:3 Seitenverhältnis)
854 × 480
(16:9
Seitenverhältnis)
854 × 480
(16:9
Seitenverhältnis)
--
--
" " zeigt abhängig vom Signal die verfügbaren Seitenverhältnis-Betriebsarten an.
Die unterstützte Auflösung beträgt 854 × 480 (16:9 Seitenverhältnis).
*Anschluss nicht möglich, wenn das Gerät nicht über eine VGA-Ausgangsbuchse verfügt.
Es ist möglich, dass sich auch Signale, die nicht in der vorstehenden Tabelle aufgeführt sind,
projizieren lassen. Allerdings werden bei solchen Signalen u. a. nicht alle Funktionen unterstützt.
Unterstützte Bildschirmauflösungen-91
Page 94

Sonderzubehör
Bei Bedarf ist das folgende Sonderzubehör erhältlich. Der Stand der Sonderzubehörliste ist April 2004.
Für das Sonderzubehör werden jegliche Änderungen vorbehalten.
Teilenummer Bezeichnung Verwendung
ELPLP29 Ersatzlampe Als Ersatz für verbrauchte Lampen.
ELPAF04 Luftfilter Als Ersatz für verbrauchte Luftfilter.
ELPST12 Fernbedienung Identisch mit der im Lieferumfang des
Projektors enthaltenen Fernbedienung.
ELPSC06 Mobile Leinwand 50" Eine kompakte Leinwand, die sich einfach
transportieren lässt. (Seitenverhältnis 4:3)
ELPSC07 Mobile Leinwand 60" Mobile Leinwand zum Aufrollen.
ELPSC11 60"-Bildschirm für Wandaufhängung
ELPSC08 Mobile Leinwand 80"
ELPSC10 Mobile Leinwand 100"
(Seitenverhältnis 4:3)
ELPKC02 VGA-HD15 PC-Videokabel (1,8 m)
(für 15-pol. Mini-D-Sub/15-pol. Mini-D-Sub)
ELPKC09 VGA-HD15 PC-Videokabel (3 m)
(für 15-pol. Mini-D-Sub/15-pol. Mini-D-Sub)
ELPKC10 VGA-HD15 PC-Videokabel (20 m)
(für 15-pol. Mini-D-Sub/15-pol. Mini-D-Sub)
ELPKC29 RGB SCART-Adapter (0,3 m)
(für RCA
ELPAP01 Mac-Adapter-Set Zur Konvertierung eines Macintosh 15-pol. D-
ELPMB11 Deckenhalterung* Zur Aufhängung des Projektors an der Decke.
ELPFC03 Grundplatte Deckenhalterung* Zur Aufhängung des Projektors an einer hohen
ELPFP04 370-mm-Rohrverlängerung (silber)*
ELPFP05 570-mm-Rohrverlängerung (silber)*
ELPFP06 770-mm-Rohrverlängerung (silber)*
ELPKS51 Weiche Tragetasche Verwenden Sie diese Tasche, wenn Sie den
× 4/SCART)
Für den Anschluss des Projektors an einen
Computer.
Entspricht dem Projektorzubehör.
Sub-Steckers in einen 15-pol. Mini-D-SubStecker.
Decke oder einer Furnierdecke.
Projektor von Hand transportieren müssen.
* Zur Aufhängung des Projektors an der Decke ist eine Spezialmontage erforderlich. Bitte wenden Sie
sich für diese Installationsart an Ihren Fachhändler.
92-Sonderzubehör
Page 95

Technische Daten
Bezeichnung Home Projector EMP-TW10H
Abmessungen
402 × 114 × 294 mm (B × H × T)
(ohne Füße)
Panelgröße 0,55 Zoll
Anzeigeart Polysilizium-TFT-Aktivmatrix
Auflösung 409.920 (854 (B) × 480 (H) Pixel) × 3
Bildschärfeneinstellung
manuell
Zoomeinstellung manuell (1:1,54)
Lampe (Lichtquelle) UHE-Lampe 130 W, Modell: ELPLP29
Max. Audioausgang
1W Mono
Lautsprecher 1
Stromversorgung
Betriebstemperatur
Lagertemperatur
100-240VAC 50/60Hz 2,3-1,0A
+5°C bis +35°C (keine Kondensation)
-10°C bis +60°C (keine Kondensation)
Gewicht ca. 3,6 kg
4RCA
Stiftbuchse
1
3RCA
Stiftbuchse
Input ABuchse
SCART
Component
Mini D-Sub
Input B-Buchse 1
15-pol.
(Buchse)
Anschlüsse
S-Video-Buchse 1
Mini DIN
4-pol.
Video-Buchse 1 RCA-Buchse
Audio-Buchse 1
Control (RS-232C) Buchse
RCA-Buchse
× 2 (L,R)
D-Sub 9-pol.
1
(Stecker)
Safety
USA (100-120VAC)
UL60950 3
Canada (100-120VAC)
CSA C22.2 No.60950 (cUL)
European Community (200-240VAC)
The Low Voltage Directive (73/23/EEC)
IEC60950 3
+Amd.3, +Amd.4
EMC
USA (100-120VAC)
FCC 47CFR Part15B Class B (DoC)
Canada (100-120VAC)
ICES-003 Class B
European Community (200-240VAC)
The EMC Directive (89/336/EEC)
EN55022, 1998 Class B
EN55024, 1998
Australia/New Zealand (200-240VAC)
AS/NZS 3548:1995, A1:1997, A2:1997,
CISPR Pub.22:1993, A1:1995, A2:1996,
rd
Edition
rd
Edition, +Amd.1, +Amd.2,
IEC61000-4-2, IEC61000-4-3,
IEC61000-4-4, IEC61000-4-5,
IEC61000-4-6, IEC61000-4-8,
IEC61000-4-11,
IEC61000-3-2, IEC61000-3-3
Class B
Class B
Pixelworks DNXTM IC werden in diesem Projektor verwendet.
Technische Daten-93
Page 96

Ansicht
114
8
Projektormitte
84
402
* Abstand zwischen Objektivmitte und Deckenhalterung
Objektivmitte
60.9*
122
80
12
3-M4×8
294
94-Ansicht
65 127 115
95
Page 97

Stichwortverzeichnis
A
Abkühlen ............................................................... 80
Ansaugöffnung ...................................................... 69
Anschluss eines Computers ................................. 74
Anschluss Input A ................................................. 69
Anschluss Input B ................................................. 69
Anti-Diebstahl-Vorrichtung .................................... 69
Anzeigen ......................................................... 68, 80
Audio-Buchse ........................................................ 69
Aufstellung ............................................................ 72
Auswechseln der Batterie ..................................... 85
Auswechseln der Lampe ....................................... 86
Auto Setup ...................................................... 75, 77
B
Batteriehalter ......................................................... 85
Bedienfeld ............................................................. 68
Befestigungspunkte für die Deckenhalterung ....... 69
Betrieb ................................................................... 78
Betriebstemperatur ............................................... 93
Bezeichnung und Funktion der Teile .................... 68
Bildqualität ............................................................ 77
Bildschirm ............................................................. 78
Bildschirmanzeige ................................................. 78
Bildseitenverhältnis ......................................... 68, 88
Buchse .................................................................. 69
C
Component Video ................................................. 69
Composite Video ................................................... 69
Computerkabel ...................................................... 75
Control (RS-232C) Anschluss ............................... 69
D
Das Menü „Bild“ .................................................... 77
Das Menü „Einstellung“ ......................................... 78
Das Menü „Information“ ........................................ 79
Das Menü „Reset“ ................................................. 79
Decke .............................................................. 73, 78
H
Halter für Fernbedienung .......................................69
Hauptmenü ............................................................76
Hautfarbe ...............................................................77
HDTV .....................................................................88
Helligkeit ................................................................77
Hintergrundfarbe ....................................................78
I
Infrarotempfänger der Fernbedienung .............68, 69
Infrarotsender der Fernbedienung .........................70
Input A ...................................................................78
Input B ...................................................................75
K
Keystone ................................................................78
Kindersicherung .....................................................78
Kontrast .................................................................77
L
Lampenabdeckung ................................................69
Lampenaustauschperiode .....................................86
Lampenstunden .....................................................79
Lautsprecher ..........................................................69
Lautstärke ..............................................................78
Leinwandgröße ......................................................72
Lichtdurchlässige Leinwand ..................................73
Luftfilter ..................................................................69
M
Meldung .................................................................78
N
Netzanzeige .....................................................68, 80
Netzeingangsbuchse .............................................69
Netzkabel ...............................................................66
Normal ...................................................................90
E
Eingangssignal ...................................................... 79
Ersetzen des Luftfilters ......................................... 85
F
Farbmodus ............................................................ 77
Farbtemperatur ..................................................... 77
Farbton .................................................................. 77
Fernbedienung ...................................................... 70
G
Glossar .................................................................. 88
O
Objektivdeckel .......................................................68
P
Position ..................................................................78
Projektion ...............................................................78
Q
Quelle ....................................................................79
R
Reichweite .............................................................71
Stichwortverzeichnis-95
Page 98

Reinigen des Luftfilters ......................................... 84
Reinigen des Objektivs ......................................... 84
Reinigen des Projektorgehäuses .......................... 84
Reset Lampenstunden .......................................... 79
Reset total ............................................................. 79
RGB ...................................................................... 77
S
Sättigung ............................................................... 77
SCART .................................................................. 88
Schärfe .................................................................. 77
Scharfeinstellring .................................................. 68
Setup Pegel .......................................................... 78
Sleep-Modus ......................................................... 78
Sonderzubehör ..................................................... 92
Speicher ................................................................ 77
Speicher-Rückstellung .......................................... 79
Sprache ................................................................. 78
Squeeze ................................................................ 90
Startbildschirm ...................................................... 78
S-Video-Buchse .................................................... 69
Sync. ..................................................................... 77
Sync-Info ............................................................... 79
T
Technische Daten ................................................. 93
Tracking ................................................................ 77
U
Überhitzung ........................................................... 80
Untermenü ............................................................ 76
Unterstützter Bildschirm ........................................ 90
V
Ventilationsöffnung ............................................... 68
Video ..................................................................... 79
Videobuchse ......................................................... 69
Video-Signal (Einstellungsmenü) .......................... 78
Video-Signal (Menü Information) .......................... 79
Vorderer Fuß ......................................................... 68
W
Warnlampe ...................................................... 68, 80
Wenn Sie ein Problem vermuten .......................... 80
Y
YCbCr ............................................................. 78, 89
YPbPr .............................................................. 78, 89
Z
Zoom ..................................................................... 90
Zoom Caption ....................................................... 78
Zoomring ............................................................... 68
96-Stichwortverzeichnis
Page 99

Page 100

 Loading...