

Page 1
Quick Reference Guide
Be sure to read the accompanying User's
Guide before using the projector.
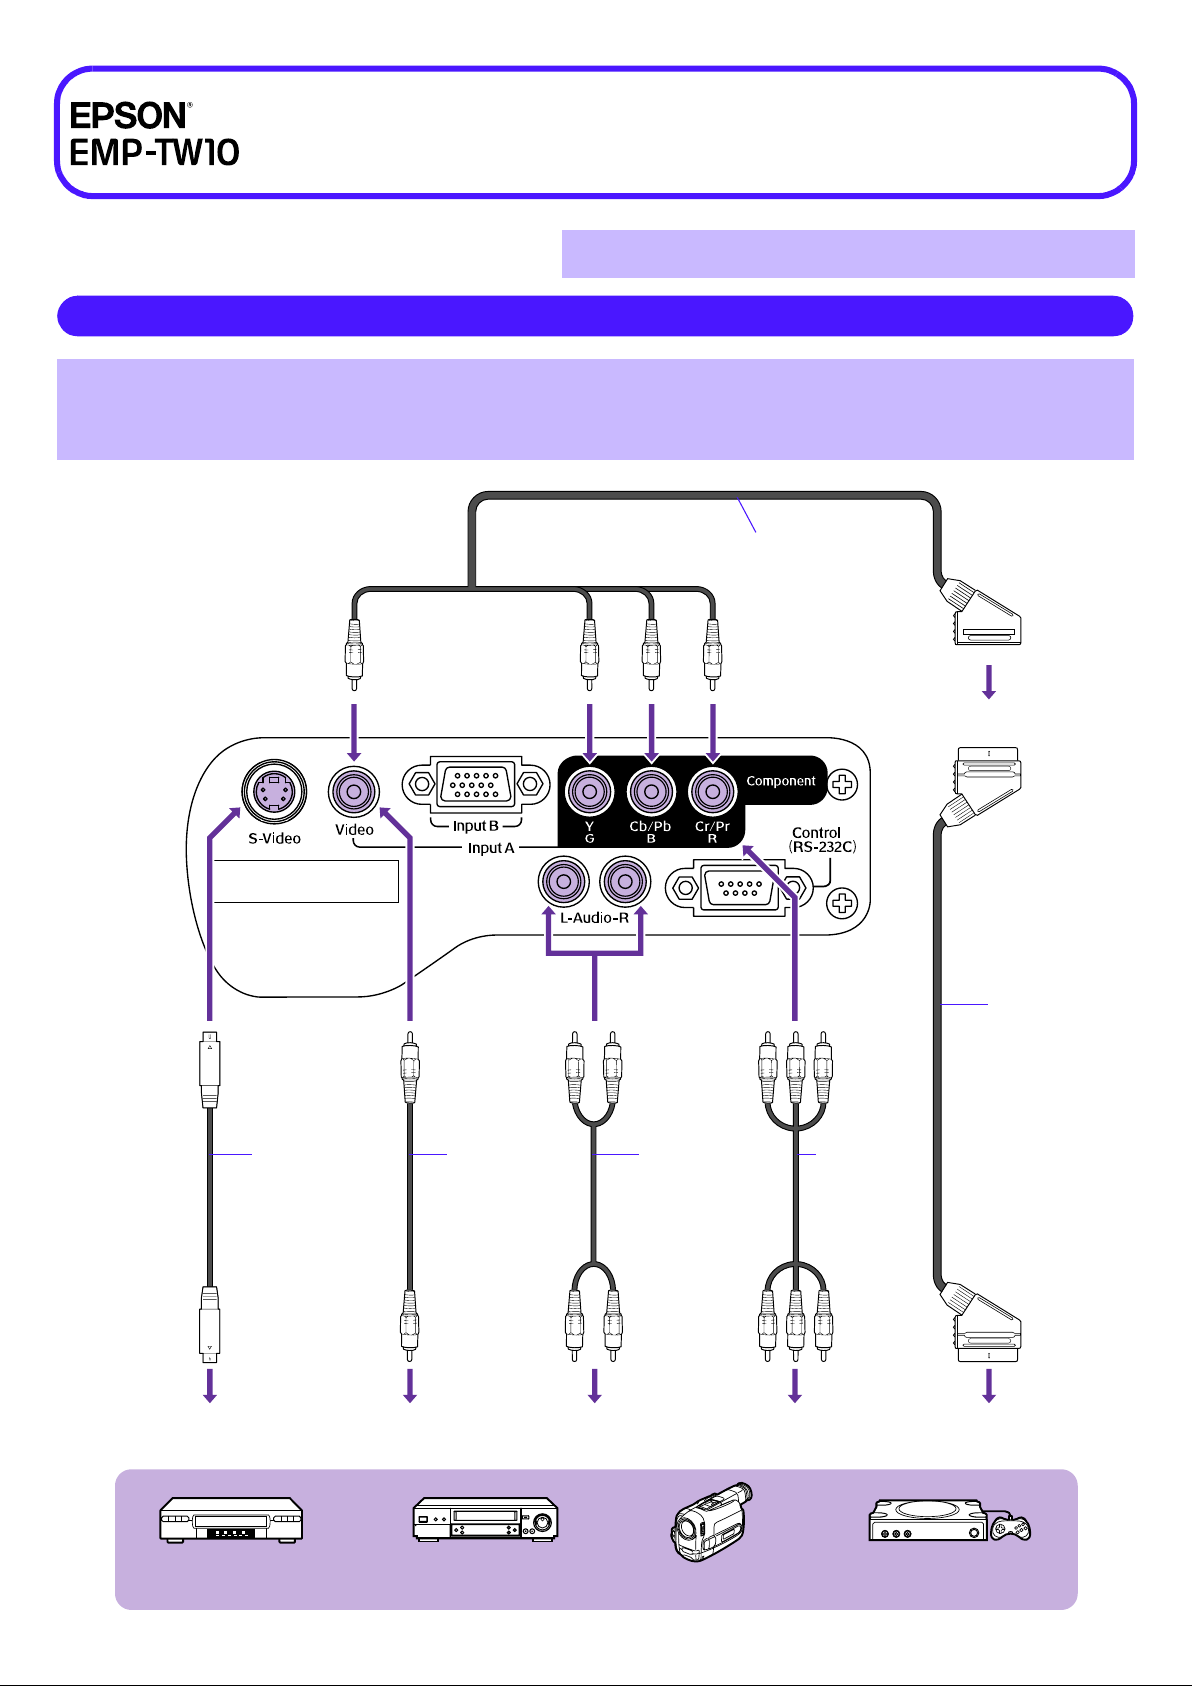
Connecting Video Equipment
When connecting, be sure to:
• Turn off the power for both the projector and the video equipment.
c
Damage may result if you try to make a connection when the power is switched on.
• Check the connector types.
Damage may result if you attempt to insert a connector into the incorrect port.
WARNING
Do not look into the lens while the projector's power is turned on.
RGB SCART adapter
(optional)
To SCART cable
SCART cable
(commercially
available)
S-Video cable
(commercially
available)
To S-Video out port To video out port To SCART out port
DVD VHS, S-VHS Video gameVideo camera
A/V cable
(yellow)
(commercially
available)
To audio out port
A/V cable
(white/red)
(commercially
available)
To component video out port
component
video cable
(commercially
available)
Page 2

Turning on the Projector
c
Turn off the power of the projector and the equipment you are connecting to.
Connect the video equipment.
Remove the lens cover.
Attach the power cable to the projector.
Insert the power plug into a wall socket.
The power indicator lights orange.
Turn on the power of the video equipment.
If connected to a video source, start playback.
Press the [Power] button.
The projector beeps and the power supply indicator begins to
blink green.
Wait until the power indicator lights green.
It takes about 40 seconds.
Selecting the Input Source
Select the images to be projected.
Projector Remote control
Play!
2
1
4
3
5
6
Power indicator
The input source changes whenever
the [Source] button is pressed.
* Switching between Input A RGB-Video and Component Video is
carried out in the “Setting” → “Input Signal” → “Input A”
configuration menu.
When set to Component Video, the projector automatically
determines whether a YCbCr or YPbPr signal is being input.
The input source changes whenever
the [Input A/B] button is pressed.
Turning off the Projector
Turn off the power to the video equipment.
Press the [Power] button.
A confirmation screen is displayed.
The input source changes whenever the
[S-Video/Video] button is pressed.
If two or more sources are connected, be sure to swap the
audio cables between the connected equipment, when
p
necessary.
Press the [Power] button again.
The power indicator begins to blink.
Wait until the power indicator lights orange.
Cool-down takes place. It takes about 20 seconds.
Unplug the projector from the outlet.
Do not remove the plug while the power indicator is blinking,
or this may damage the projector.
c
The confirmation screen disappears if anything other than
the [Power] button is pressed, or if nothing is pressed for 7
p
seconds.
Page 3
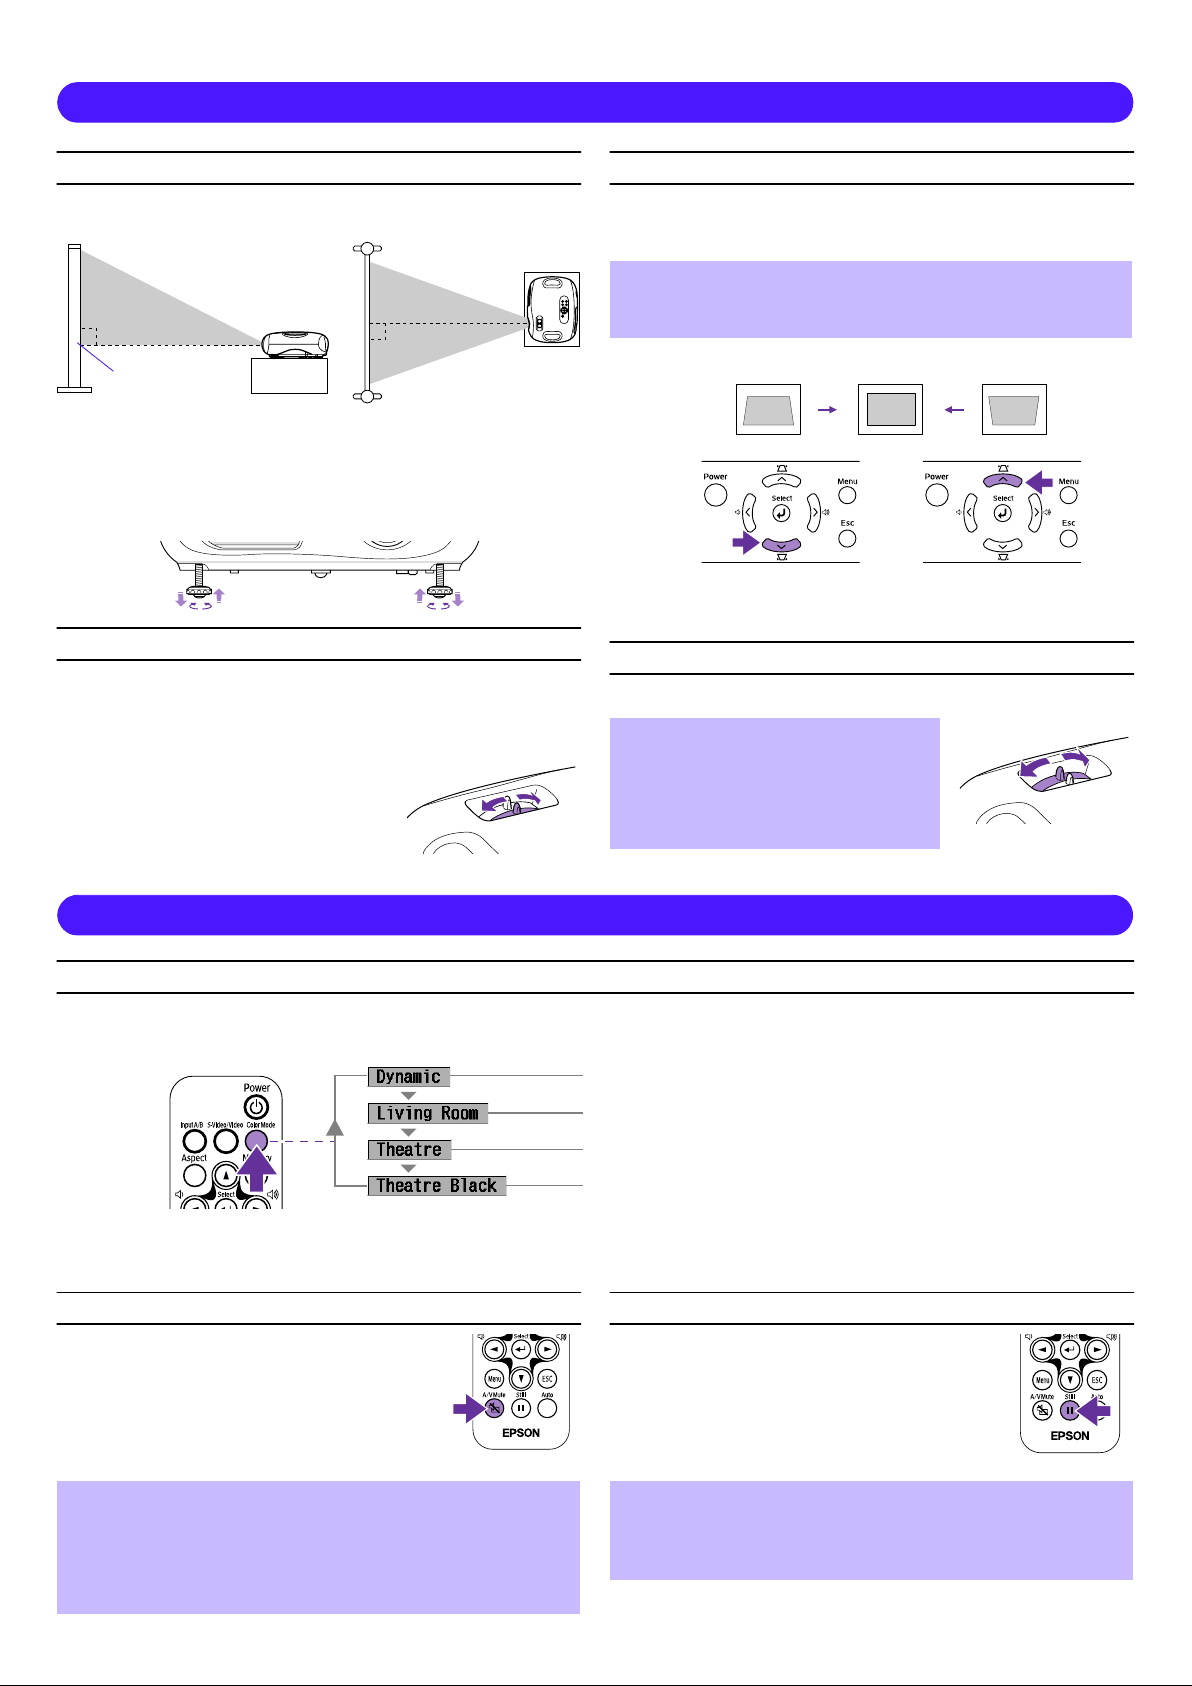
Adjusting the Display
Adjusting the projection angle
Set up the projector so that it is at right angles to a screen.
Seen from the side
Centre of lens
If it is not possible to set up the projector so that it is at right
angles to a screen, it can be set up at a slight vertical angle
instead. (Max 10°)
The height can be adjusted by turning the front feet on
either side.
Seen from above
Adjusting the projection size
The size of the projected image is basically determined by
the distance from the projector to the screen. s "Projection
distance and screen size" User's Guide
Turn the zoom ring to adjust the size
of the projected image.
The image can be enlarged up to 1.54
times its original size.
If you would like to enlarge the image
further, move the projector further away
from the screen.
Keystone
When the projector is not set at right angles to a screen, the
display distorts in the shape of a trapezoid. This distortion
can be corrected.
You can correct only vertical distor tion with this function.
Horizontal distortion cannot be corrected.
p
Press the [v] or [w] buttons.
Images can be corrected without distortion when the projector is
tilted to a maximum of ±15°.
Setting the focus
Turn the focus ring to adjust the image focus.
If the projector is positioned
outside the normal projecting
range of 73-1165 cm (2.4-38.2 ft.),
p
it may not be possible to obtain the
correct focus. If you have trouble
obtaining the correct focus, check
the projection distance.
Getting the Most Out of Your Home Theatre
Selecting a colour mode
There are four preset colour modes available for use.
Make a selection appropriate to the conditions in which you are projecting.
Best for projecting video games.
Best for projecting sports, etc.
Best for watching movies with a generally bright feel.
Best for watching movies in a pitch black environment.
The colour mode changes each time you press the [Color Mode] button on the remote control.
When Theatre or Theatre Black is selected, the EPSON cinema filter is automatically activated, adjusting the tone of the image to the
optimal settings for movies.
A/V Mute
Temporarily stops the image and sound.
Press the [A/V Mute] button on the remote
control.
The sound and image disappear.
Projection is resumed when you press the [A/V
Mute] button again or press the [Esc] button.
• The screen colour during A/V Mute can be set to black or
blue. The default setting is black. ([Menu] button
p
"Setting"
• When activated while projecting moving images, the sound
and image will continue to be played back by the source,
so it will not be possible to return to the point where A/V
Mute was activated.
→
"On Screen Display" → "Background Color")
→
Freeze
Pauses the projected images.
Press the [Still] button on the remote
control.
The projected image freezes.
To cancel, press the [Still] button again, or
press the [Esc] button.
• During Freeze, moving images will continue to be played
back by the source, so it will not be possible to return to
p
the point where Freeze was activated.
• Pressing the [Still] button also clears configuration
menus.
Page 4
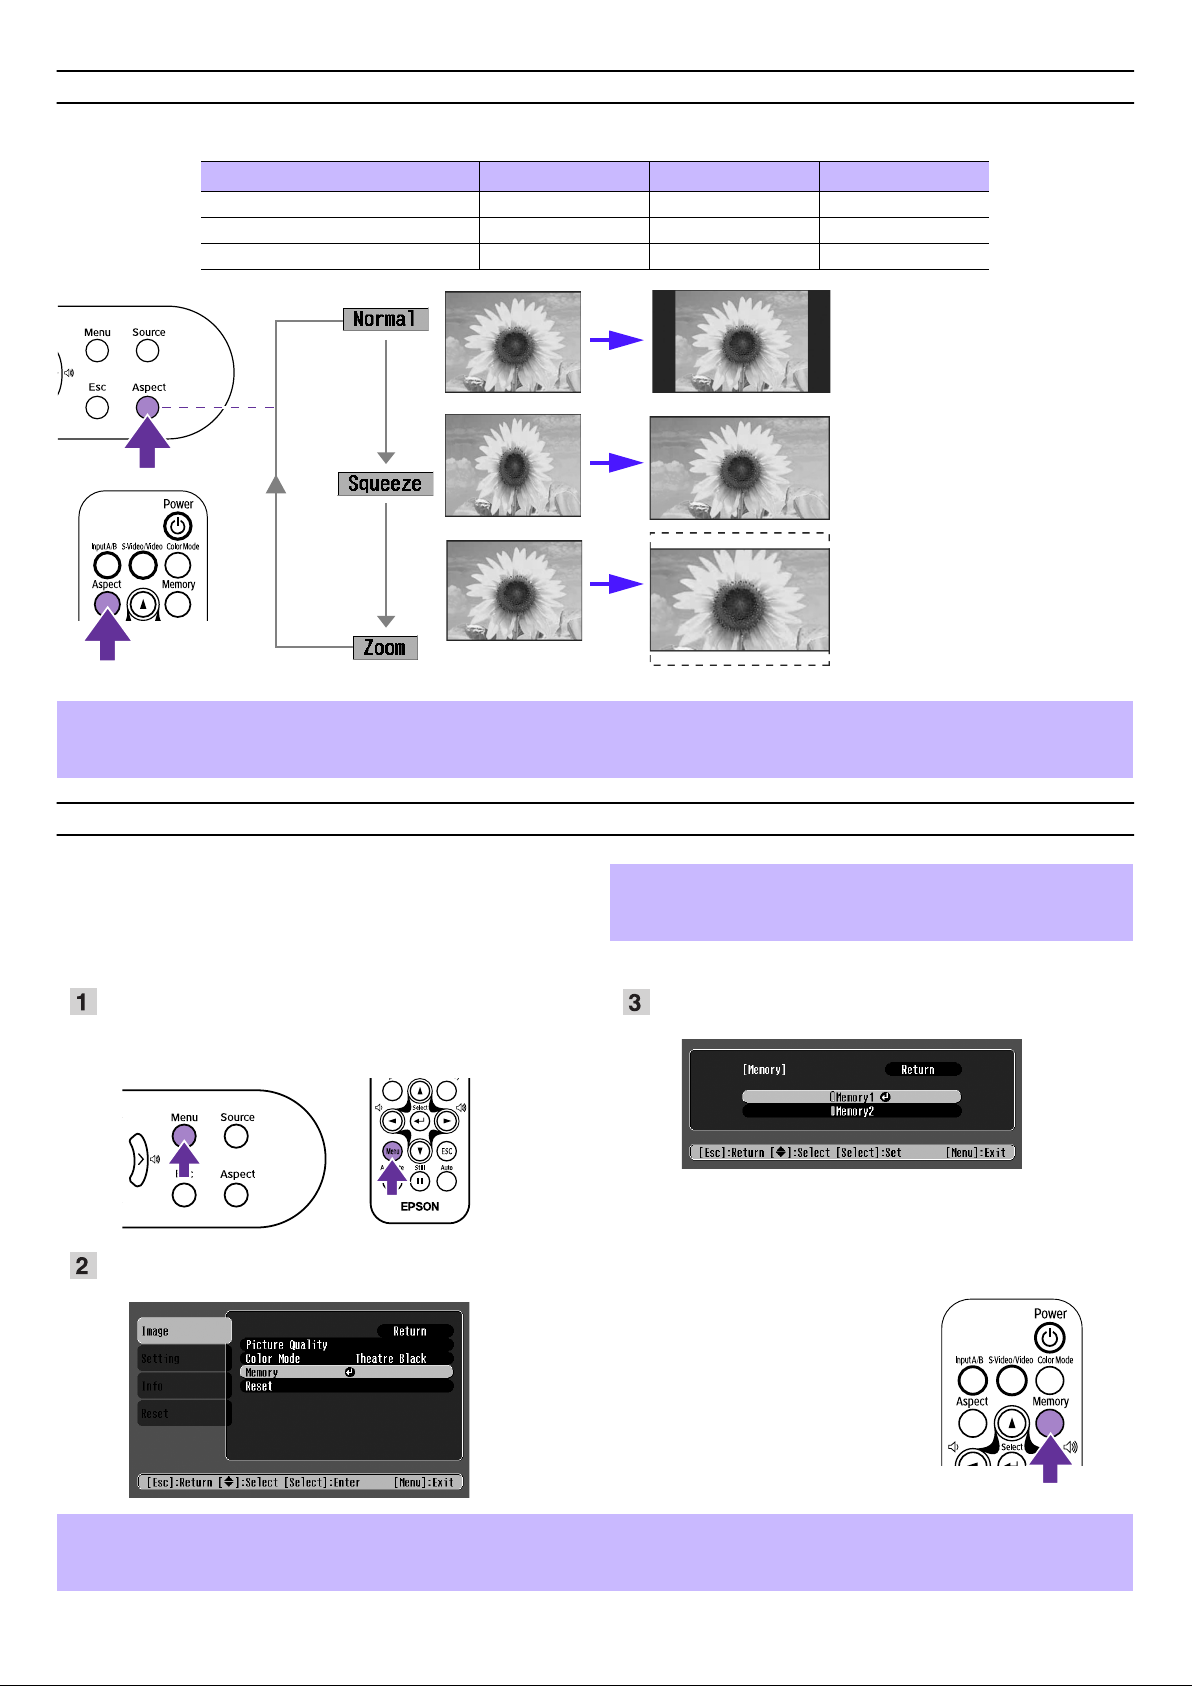
Changing aspect ratio
Three aspect ratio settings can be selected and applied to the projected image. However, the aspect ratio settings which can
be used differ according to the signal being input.
Video signal Normal Squeeze Zoom
SDTV (525i/p, 625i/p) XXX
TV (NTSC, PAL, SECAM) XXX
HDTV (750p, 1125i) X --
Images are projected preserving the
original aspect ratio.
If squeeze mode has also been set
on the connected equipment, such
as a DVD player, images are
projected in 16:9 (widescreen).
Images formatted to 4:3 will be
elongated in this mode.
Images output in 4:3 format are cut
at the top and bottom by a set
amount and resized to 16:9
(widescreen).
The aspect ratio changes in the following order each time you press the [Aspect] button.
The extent to which the image is cut and resized in Zoom mode can be controlled in the configuration menus. "Setting"→ "Screen"→
"Zoom Caption"s "Setting menu" User's Guide
p
Saving your preferred image settings (Memory)
You can save a maximum of 8 configuration menu
adjustment values to memory - 2 memories for each of the
four image sources (Input A: Component, Input A: RGBVideo, Input B and Video/S-Video).
f Saving Settings to Memory
Press the [Menu] button.
Set the adjustment values in the configuration menu as you
want them to be saved.
p
Select the Memory number (1 or 2) you want to save to
using the [u] [d] buttons, then press the [e] button.
The adjustment values which can be saved to memory are
Picture Quality (except for Tracking and Sync.), Color Mode,
and Aspect.
Select "Memory" from the "Image" menu and press the
[e] button.
p
Printed in China
03.xx-xxA (C01)
f Recalling Memory
When the image source you want
to recall the settings for is active,
press the [Memory] button on the
remote control to recall the saved
memory settings.
• If nothing has been saved to either memory 1 or 2, the message “No Entry” will be displayed.
• If you want to revise settings you have made, set the adjustment values as desired, then perform “Saving Settings to Memory”.
• When clearing the memory, the settings saved for all image sources will be reset. “Reset”
404616600 (E)
→
“Memory Reset”
 Loading...