

Page 1
Setup ....................................... 1
Connections ............................. 1
Projection Preparation and
Adjustments .............................. 3
Turning the Projector Off............ 8
Useful Functions ....................... 9
List of Configuration Menu
Commands ............................. 13
Reading the Indicators............. 14
Replacing the Lamp ................ 16
Contents of Manuals on the
Document CD-ROM ................18
Names and Functions of Main
Remote Control Buttons
..................................... Last page
Be sure to read the User's Guide
carefully before using
the projector.
WARNING
Do not look directly into the
projector's lens.
Quick Reference Guide
Page 2
Setup
Set up the projector so that the distance from the screen to the projector's lens is 86–1473 cm (2.8–
48.3 ft.). The shorter the distance between the two, the smaller the image will be, and the greater the
distance, the larger the image will be. Adjust the distance in accordance with the size of the screen.
User's Guide
"Screen Size and
Projection Distance"
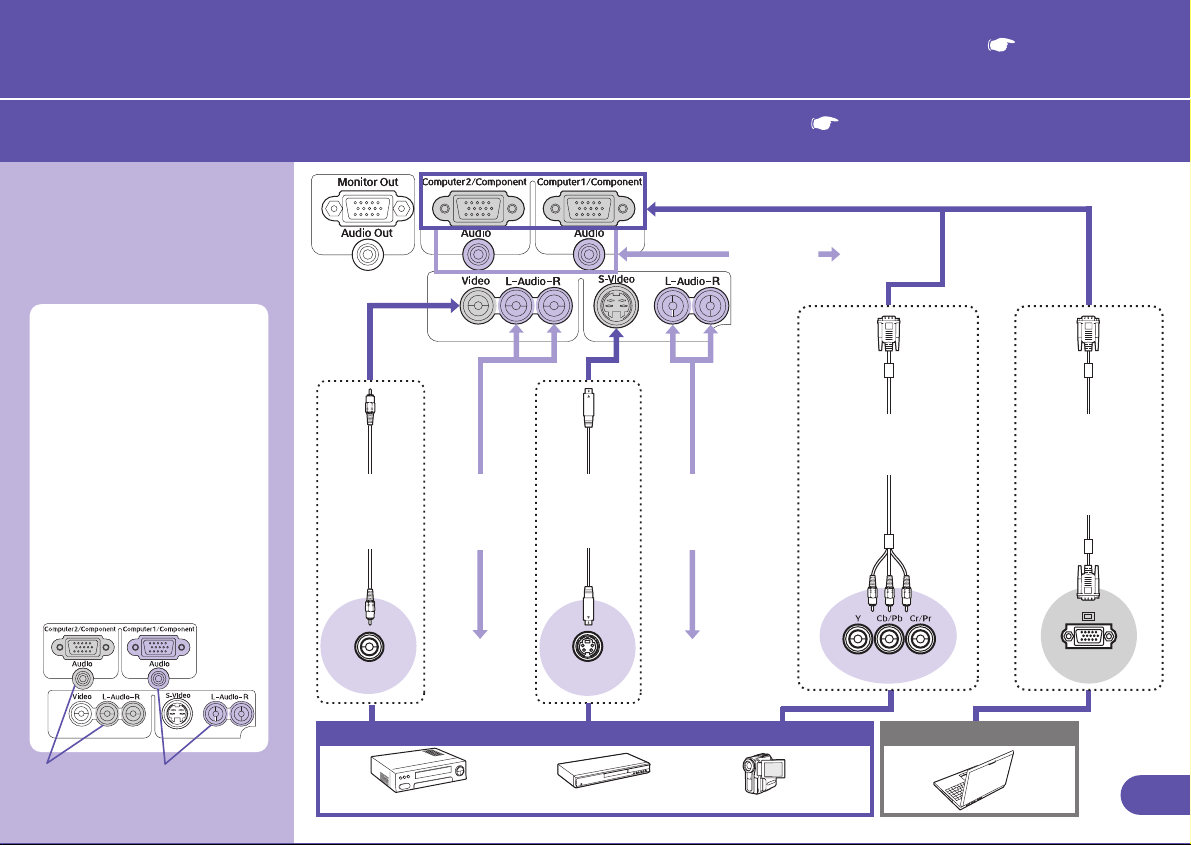
Connections
When connecting to
a computer or video
source
The [Audio] port to use is
the port that is in the same
box as the port being used
to input the image signals.
However, if component
video signals are being
input from a DVD player or
some other equipment to
the [Computer1 (or2)/
Component] port, you can
use either of the two types
of audio input ports shown
below depending on the
audio cable type you use.
Be sure to turn the power off for all components
before making any of the following connections.
Either the left or right port can be connected.
Mini plug
audio cable
(commercially-
available)
RCA video
cable
(commercially-
available)
Video
RCA audio
cable
(commercially-
available)
To audio
output port
S-Video
cable
(commercially-
available)
S-Video
RCA audio
cable
(commercially-
available)
To audio
output port
User's Guide "Connecting to a Computer"
"Connecting to a Video Source"
To audio
output port
Component
video cable
(optional)
Component
Computer cable or
VGA-HD15
PC cable
(accessory or
optional)
When connecting
to the [Computer2/
Component] port
When connecting
to the [Computer1/
Component] port
Video source such as DVD player, VHS video player, RGB converter or video distributor
* The port name may vary depending on the equipment being connected.
Computer
1
Page 3
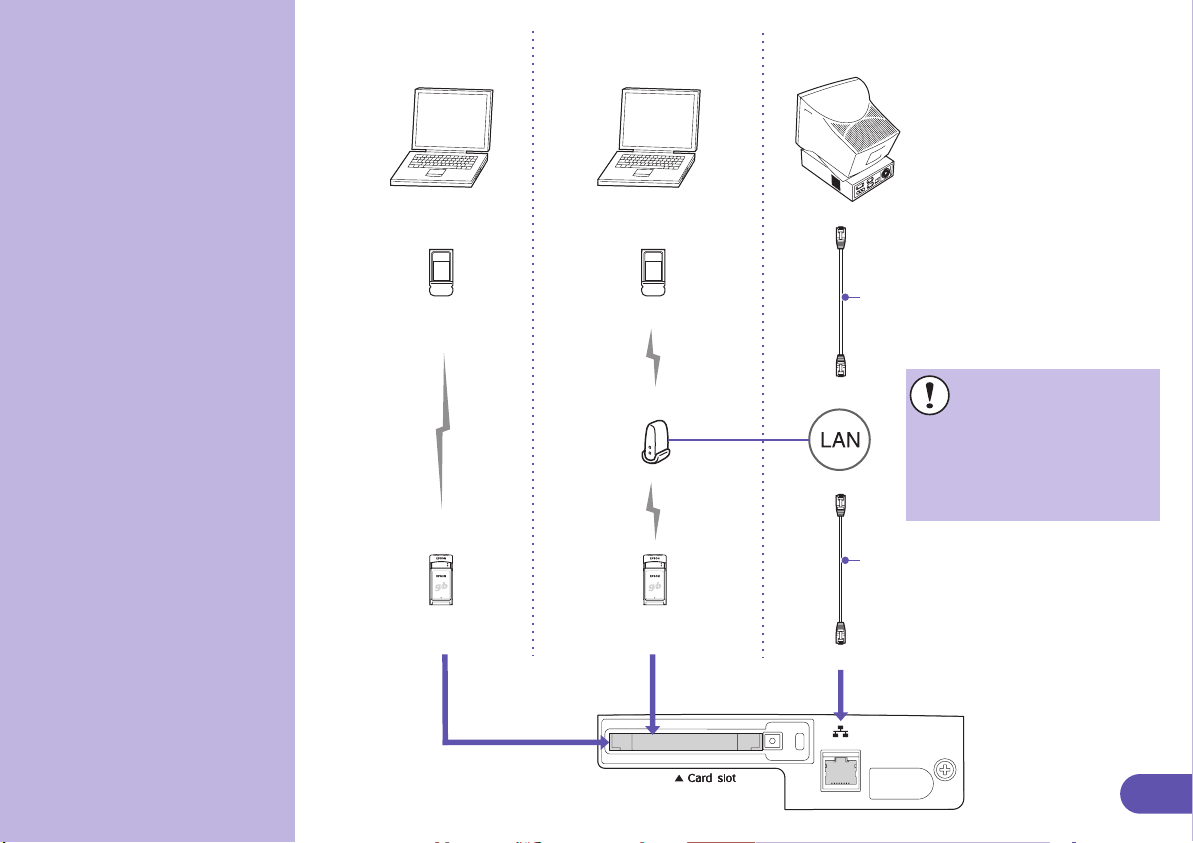
When connecting to
a computer via a
network
(EMP-835 only)
When connecting in
easy connect mode
When connecting in
access point mode
When connecting
using a wired LAN
Built-in
wireless
LAN
function or
wireless
LAN card
Wireless
LAN card
(accessory)
Built-in
wireless
LAN
function or
wireless
LAN card
Access
point
Wireless
LAN card
(accessory)
Network cable
(100baseTX or 10baseT)
To prevent the
possibility of
incorrect operation,
you should use a
Category 5 shielded
network cable.
Network cable
(100baseTX or 10baseT)
2
Page 4

Projector Preparation and Adjustments
Connect the power
cable to the
projector and to an
electrical outlet.
User's Guide "Turning the Projector On"
Press .
Simple!
When "Direct Power ON" is set
to "ON", the power will turn on
when the power cable is
connected, without the need to
press .
User's Guide
"List of Configuration Menu
Commands"
Place your fingers against the [ ] and [ ] on the lens cover
and press in while pulling the lens cover forward to remove it.
To use the remote control, set the
[R/C] switch to "ON".
A beep will sound and the Power indicator will switch to flashing green.
Power indicator
Flashing green (warm-up in progress/approx. 30 seconds)
→ Lit green
will not work while warm-up is in progress.
If Password Protect has been enabled, the password entry
screen will be displayed. Enter the password.
User's Guide "Preventing Theft (Password Protect)"
3
Page 5

Turn on the power for
the input source.
Simple!
Automatic focus will operate
when projection starts. You can
also switch the projector so that
Quick Setup is run.
User's Guide
"List of Configuration Menu
Commands"
Simple!
The projected images can be
easily adjusted to the optimum
images using only these buttons
on the control panel.
For video equipment, press the [Play] button.
When projection starts, the automatic focus
function will operate to automatically adjust the
focus of the projected images.
A screen such as the one shown left will appear
while adjustment is in progress, but this is normal.
(While automatic focus is running)
If necessary, press and zoom buttons to
make fine adjustments to the image size.
When Quick Setup is run, the images are adjusted
at a single touch so that they fit the screen area
exactly. p.7
Press .
If the desired images are not projected, press
once more.
If using the EMP-835 and the projector does not
switch to EasyMP, press .
4
Page 6
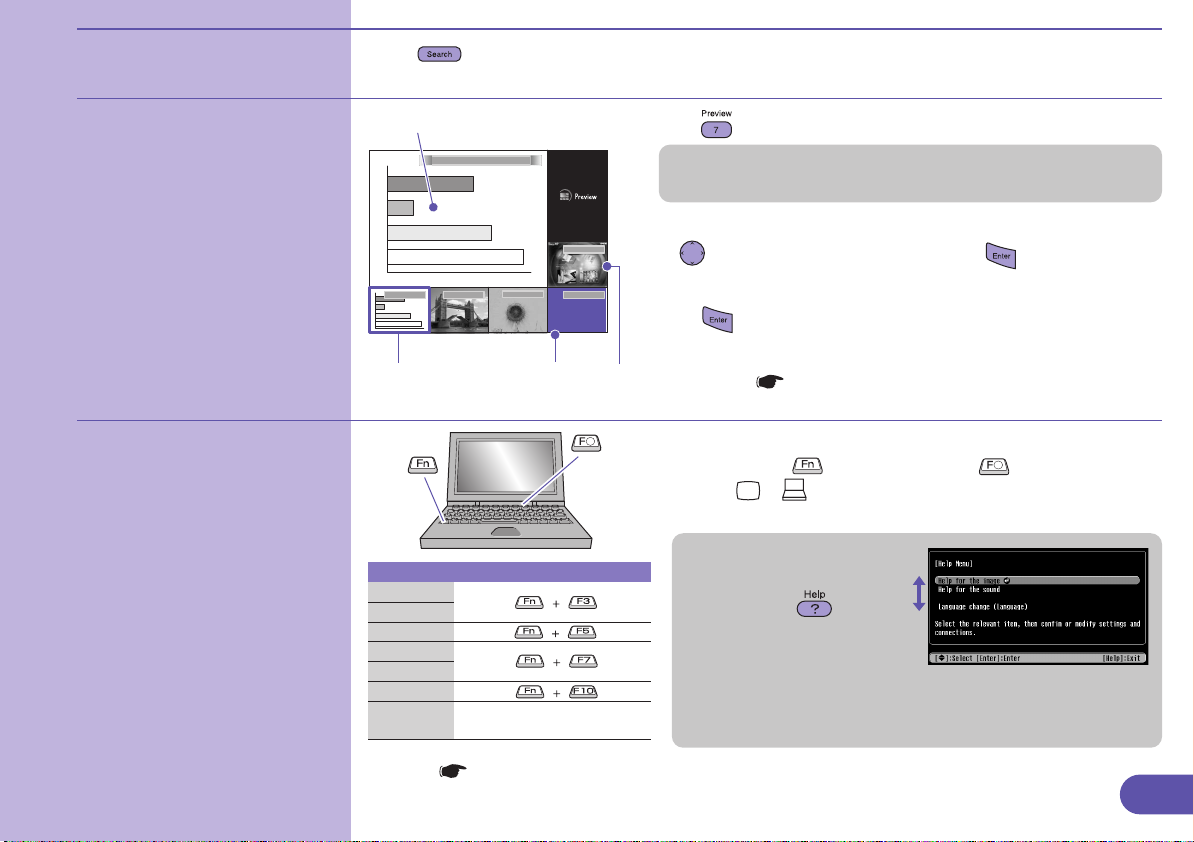
To switch using the
remote control...
Press .
To select images to be
projected while viewing
all images being input...
(Preview Function)
If the source does not
change to the laptop PC
connected by a
computer cable...
Active window
Computer (Analog-RGB)
ComputerComputer
Move the
cursor to the
desired image.
NEC
Panasonic
TOSHIBA
IBM
SONY
FUJITSU
Macintosh
If no signal is input,
the window will appear
blue.
Examples of changing output
Easy MP
S-Video
Set mirror setting or
display detection.
Video
EasyMP is only
displayed when using
the EMP-835.
1. Press .
If you use any buttons to switch the input source, the preview
window will close and the selected images will be projected.
2. To view details of the image, switch to the active window.
Tilt to select an image and then press .
3. Project the images in the active window.
Press .
User's Guide "Selecting an Image Source While
Viewing Projected Images (Preview Function)"
You may need to switch the output source on the computer.
Hold down the key and press the key (with a symbol
such as or on it).
Once the setting is changed, projection will start after a short period.
If images are not projected
even after carrying out the
above, press on the
remote control. Interactive
help will be displayed.
You can then answer the
questions to obtain the
optimum settings.
Computer documentation
5
Page 7

Adjusting projected
images
(If setting up the projector for
the first time or after moving
it)
Adjusting the projection angle
Foot adjust lever
While pulling the foot adjust lever, lift up the front of the
projector so that the front adjustable foot can extend. The Auto
"V-Keystone" function will operate when the projector is tilted.
To retract the front adjustable foot, gently push down on the
projector while pulling the foot adjust lever.
User's Guide
"Adjusting the Position and Size of the Projection Area"
If tilted horizontally, adjust using the left
and right rear adjustable feet.
Rear
adjustable
foot
Extend
Retract
If the height of the images is reduced after
vertical keystone correction, run Quick Setup
as described on the next page, or adjust the
height manually using the following procedure.
For adjustment using the configuration menus:
"Setting" - "Keystone" -"H/V-Keystone" "Horz./Vert./Height" - "Height"
User's Guide
"Manually Correcting Projection Area Distortion"
6
Page 8

Simple!
Focusing and keystone
correction will be complete after
is pressed.
You can also use this function
together with the Wall Shot
function.
User's Guide
"List of Configuration Menu
Commands"
Attractive images easily, at a single touch
The following adjustments are carried out automatically at a single touch.
Focus adjustment (Automatic Focus)
Keystone correction (Auto Quick Corner)
This automatically corrects distortion of the projection area that occurs when the projector is tilted,
so that images are projected at an aspect ratio of 4:3. If using a screen (4:3) for projection, this
function can be used so that the projection area exactly fits the size of the screen.
1. Press .
"The Quick Setup is in preparation." will be displayed.
If projecting onto a screen, whiteboard or blackboard,
adjust the projection area so that it fits within the
edges of the screen or board. Be sure to adjust so
that the top edge of the screen is inside the
projection area. If projecting onto a wall or other
Borders
surface, adjust the projection area to the desired
position and size.
Projection area
2. Press once more.
(While automatic focus
is running)
(While Auto Quick Corner
is running)
Adjustment of the projection area will start.
While the adjustment is in progress, the
screens left will be displayed to measure
conditions of the projection surface.
7
Page 9

The followings show how the projection area is adjusted by the Auto Quick Corner.
S
yyy
p
yyy
p43yyy
p
Before
*1 *2
After
When 3 or more sides
are detected
The Auto Quick Corner works properly by doing the following beforehand.
*1 When the "Projection" menu is set to "Front", adjust the projection area so that the top edge of the screen frame is inside the area.
*2 When the "Projection" menu is set to "Front/Ceiling", adjust the projection area so that the bottom edge of the screen frame is
inside the area.
Turning the Projector Off
Turn off the equipment that is connected to the projector.
Press twice to
turn the projector
power off.
Simple!
"Direct Power OFF" function
lets you turn the power off by a
circuit breaker or by
disconnecting the power cable
without pressing .
'
s
After using the projector, you can disconnect the power cable and move the
projector straight away.
When top and bottom sides, or
2 adjacent sides are detected
When the screen is
wider than the image
When no borders
are detected
User's Guide "Turning the Projector Off"
If the message "The projector is overheating. Clean or
replace the air filter and lower the room temperature."
appears during projection of images, press to turn the
power off and then clean or replace the air filters.
User's Guide "Cleaning the Air Filters and Air lntake
Vent" "Replacing the Air Filters"
Set the remote control [R/C] switch to "OFF" after use.
The battery life will be reduced if it is left "ON"
unnecessarily.
88
Page 10

Useful Functions
Projecting onto Black
Board or Wall
Wall Shot
Adjusts images to their natural colours
p.10
Indicating a Part of Image
to Explain
Pointer Wireless Mouse
p.11
Enlarging a Portion of Image
E-Zoom
Detailed diagrams, or small print are easily
viewable by enlarging them
p.11
Giving a Presentation
without a Mouse
p.12
Pausing Images and
Sound Momentarily
A/V Mute
Let attendances concentrate on your
conversation by stopping projection momentarily
Pause projection while switching files
p.10
Make clear which part of the image is explained,
or bring a part to everyone's attention
Control a mouse pointer from a place away
from the computer using the remote control
9
Page 11

If projecting onto a
blackboard or wall
Wall Shot function
This automatically adjusts the image colours so that natural colours can be obtained even when the
projection area is not white in colour or if the screen is near a bright place such as a window.
60
52
50
40
38
30
20
10
0
Sapporo Tokyo Nagoya Osaka Fukuoka NewYork ShangHai
January sales February sales Sales targets Total
Sapporo
50 48 38 136
Tokyo
23 19 52 94
Nagoya
11 18 29 58
Osaka
13 32 43 88
Fukuoka
24 22 36 82
NewYork
10 17 31 58
ShangHai
33 28 48 109
Total
164 184 277 625
Sales by branch for January–February period
43
29
60
January sales
February sales
Sales targets
50
48
40
36
31
30
20
10
0
Sales by branch for January–February period
60
52
50
40
38
30
20
10
0
Sapporo Tokyo Nagoya Osaka Fukuoka NewYork ShangHai
January sales February sales Sales targets Total
Sapporo
50 48 38 136
Tokyo
23 19 52 94
Nagoya
11 18 29 58
Osaka
13 32 43 88
Fukuoka
24 22 36 82
NewYork
10 17 31 58
ShangHai
33 28 48 109
Total
164 184 277 625
January sales
February sales
Sales targets
43
36
31
29
Temporarily turning off
images and sound
Sales by branch for January--February period
60
52
50
40
38
30
20
10
0
Sapporo Tokyo Nagoya Osaka Fukuoka NewYork ShangHai
January sales February sales Sales targets Total
Sapporo
50 48 38 136
Tokyo
23 19 52 94
Nagoya
11 18 29 58
Osaka
13 32 43 88
Fukuoka
24 22 36 82
NewYork
10 17 31 58
ShangHai
33 28 48 109
Total
164 184 277 625
60
January sales
February sales
Sales targets
50
48
43
40
36
31
30
29
20
10
0
60
50
48
40
30
20
10
0
1. Press .
The current status is displayed on the screen.
2. Press while the status is displayed to change it to "Wall Shot ON".
Colours in the order red → green → blue → black will be projected for
approximately five seconds, and then the corrected images will be displayed.
User's Guide "Projecting Easy-to-see Images Without a Screen (Wall Shot)"
When the projector's power is turned off, images will be projected next time with the status set to "Wall
Shot OFF". If projecting in the same location as before, press twice, you can project images using
the previous adjustment values without needing to repeat the measurements. The status will change in
the order "Wall Shot OFF" → "Wall Shot ON" → "Wall Shot Memory Call" each time is pressed.
A/V Mute function
Use this function when you would like to momentarily stop viewing the images being projected,
such as if you would like to talk briefly or to switch the file being projected.
Press .
The images and sound are turned off (A/V mute active).
Press once more.
The A/V mute is cancelled.
If you use this function when projecting moving images, the images and sound will still continue to be
played back by the source, and you cannot return to the point where the A/V mute function was activated.
The screen that is displayed while the A/V mute function is active can be set to a black or blue screen or
a user's logo using "Extended" - "Display" - "A/V Mute" in the configuration menu.
User's Guide "A/V Mute Function"
10
Page 12

Enlarging part of a
S
43
projected image
Sales by branch for January–February period
60
52
50
40
38
30
20
10
0
Sapporo Tokyo Nagoya Osaka Fukuoka NewYork ShangHai
January sales February sales Sales targets Total
Sapporo
50 48 38 136
Tokyo
23 19 52 94
Nagoya
11 18 29 58
Osaka
13 32 43 88
Fukuoka
24 22 36 82
NewYork
10 17 31 58
ShangHai
33 28 48 109
Total
164 184 277 625
Cross
60
January sales
February sales
Sales targets
50
48
43
40
36
31
30
29
20
10
0
Sapporo
Tokyo
Nagoya
Osaka
Fukuoka
NewYork
ShangHai
Total
January sales February sales
50 48
23 19
11 18
13 32
24 22
10 17
33 28
164 184
E-Zoom function
Use when you would like to enlarge part of a graph or table to view it.
1. Press .
A cursor (cross) will appear on the screen.
2. Move the cross to the area of the image that is to be enlarged.
Tilt .
3. To enlarge: Press .
To reduce the enlarged area size: Press .
Press to cancel.
User's Guide "E-Zoom Function"
Indicating part of an
image
Sales by branch for January–February period
60
52
50
40
38
30
20
10
0
Sapporo Tokyo Nagoya Osaka Fukuoka NewYork ShangHai
January sales Sales targets Total
February sales
Sapporo
50 48 38 136
Tokyo
23 19 52 94
Nagoya
11 18 29 58
Osaka
13 32 43 88
Fukuoka
24 22 36 82
NewYork
10 17 31 58
ShangHai
33 28 48 109
Total
164 184 277 625
60
January sales
February sales
Sales targets
50
48
40
36
31
30
29
20
10
0
Sales by branch for January–February period
60
52
50
40
38
30
20
10
0
Sapporo Tokyo Nagoya Osaka Fukuoka NewYork ShangHai
February sales
January sales Sales targets Total
Sapporo
50 48 38 136
Tokyo
23 19 52 94
Nagoya
11 18 29 58
Osaka
13 32 43 88
Fukuoka
24 22 36 82
NewYork
10 17 31 58
ShangHai
33 28 48 109
Total
164 184 277 625
Pointer function
You can use a pointer to indicate important parts of an image, or bring a part to everyone's attention.
60
January sales
February sales
Sales targets
50
48
43
40
36
31
30
29
20
10
0
You can use the "Setting" - "Pointer" setting in the configuration menu to set the type and
size and the movement speed for the pointer. User's Guide "Pointer Function"
1. Press .
A Pointer will be displayed.
2. Tilt to move the pointer.
Press to cancel. The pointer will disappear.
11
13
Page 13

Operating the mouse
pointer using the remote
control
Accessory
USB cable
Wireless mouse function
When computer images are being projected, you can use the accessory remote control to operate
the computer's mouse pointer.
Moving the mouse pointer Mouse clicks
Right clickLeft click
Double-click: Press twice in rapid succession.
Drag and drop
To use the wireless mouse function,
you need to connect the computer
using a USB cable in addition to the
computer cable.
Use the accessory USB cable to
connect the USB port of a computer
to the projector's [USB TypeB] port.
1. Hold down for approx. 1.5 seconds.
lights and drag and drop mode is
enabled.
2. Tilt to drag an item.
3. Press to drop the item.
You can also drag and drop in the same way
using .
The wireless mouse function may not work on some operating system versions or with
some functions.
User’s Guide
"Using the Remote Control to Operate the Mouse Pointer (Wireless Mouse Function)"
This is useful for displaying the previous or
next slide in a PowerPoint slideshow.
To previous slide
To next slide
12
Page 14

List of Configuration Menu Commands
User's Guide
"List of Configuration Menu Commands"
Main menu Sub-menu
Press to display the
configuration menu. The
configuration menu lets you make
settings such as startup operations
and brightness and tint
adjustments.
Image
During computer input
or EasyMP (EMP-835 only)
Color Mode
Brightness
Contrast
Sharpness
Color Adjustment
Reset
Signal
During computer input
Auto Setup
Resolution
Tracking
Sync.
Position
Preset
Computer1 Input
Computer2 Input
Reset
Info
During computer or
component video input
Lamp Hours (High Brightness)
Source
Input Signal
Resolution
Refresh Rate
Sync Info
(Low Brightness)
During component video input
During S-Video or composite video input
Color Mode
Brightness
Contrast
Color Intensity
Tint
Sharpness
Color Adjustment
Reset
During component
video input
Position
Progressive
Computer1 Input
Computer2 Input
Reset
During S-Video or
composite video input
Lamp Hours (High Brightness)
(Low Brightness)
Source
Video Signal
During S-Video or
composite video input
Position
Progressive
Video Signal
Reset
EasyMP
(EMP-835 only)
Lamp Hours (High Brightness)
(Low Brightness)
Source
Setting
Quick Setup
Keystone
Operation Lock
Pointer
Brightness Control
PinP Options
Audio
Reset
Extended
Display
User's Logo
Projector ID
Projection
Operation
Network
*
Standby Mode
COM Port
Language
Reset
Reset
All Reset
Lamp-Hours Reset
EMP-830 only
*
13
Page 15

Reading the Indicators
The projector is provided with indicators to notify
you of the projector operating status.
The following tables show what the indicators
mean and how to remedy the problems that
they indicate.
When the Power indicator is lit/flashing red
Red
Red
Red
Internal error
Red
Red
Red
Red
Fan related error/
Sensor error
Disconnect the power cable from the electrical outlet.
Then contact your dealer or the nearest address provided in the "International Warranty
Conditions" section of the Safety Instructions/World-Wide Warranty Terms booklet.
Check if the lamp is broken.
Disconnect the power plug from the electrical outlet and wait for the lamp to cool down
sufficiently (takes about one hour) before checking.
Problem/Warning
Indicates the
operating status of
the projector
Indicates the
lamp status
Indicates the internal
temperature status
User’s Guide "Reading the Indicators"
If all indicators are switched off,
check that the power cable is
connected correctly and that
power is being supplied normally.
lit
p.16
flashing
off
Lamp open error
Lamp timer failure
Lamp out
Lamp cover is open
If the lamp is
not broken
If the lamp is
broken
Replace the
lamp and
then turn the
power on.
Contact your local dealer for further advice.
If the lamp
still does not
turn on,
replace it with
a new lamp.
If the problem is still not solved after the lamp is
replaced, stop using the projector and disconnect
the power cable from the electrical outlet. Then
contact your dealer or the nearest address
provided in the "International Warranty Conditions"
section of the Safety Instructions/World-Wide
Warranty Terms booklet.
14
Page 16

Red
Red
Red
Orange
Internal
temperature
error
(overheating)
High-speed
cooling in
progress
The lamp will switch off automatically
and projection will stop.
Wait for approximately 5 minutes.
Then disconnect the power cable and
check the points to the right.
If you continue using the projector and
the temperature rises again, the lamp
will switch off automatically.
Check the points to the right.
If the projector
is close to a
wall, move it
away from the
wall.
Clean the air
filters if they are
blocked.
If the problem is not fixed, stop
using the projector and
disconnect the power plug from
the electrical outlet.
Then contact your dealer or the
nearest address provided in the
"International Warranty
Conditions" section of the
Safety Instructions/World-Wide
Warranty Terms booklet.
If the Lamp indicator is flashing orange
Orange
Lamp
replacement
notification
Warning
The lamp is near the end of its operating life. Replace the lamp with a new one as soon as possible.
If you continue to use the old lamp, the possibility that the lamp may break will increase.
Power Indicator is lit or flashing green or orange
Orange
Standby
condition
Green
Warm-up in
progress
Green
Projection in
progress
Press , and projection will soon start.
The warm-up time is approximately 30 seconds.
Do not unplug the power cable or turn off the breaker (direct power off) while warm-up is in
progress. Doing so may cause an early deterioration of the lamp. For the same reason, will
not work while warm-up is in progress.
Normal operation is in progress.
Normal
lit
lit
flashing
flashing
flashing
flashing
p.16
offlit
off
offlit
off
15
Page 17

Replacing the Lamp
User's Guide "Replacing the Lamp"
How to replace the lamp
Disconnect the
power cable.
Remove the lamp
cover at the side of
the projector.
Loosen the two lamp
fixing screws.
Hold the knob and
Use the screwdriver that is supplied with the spare lamp or your own cross head screwdriver.
Remove the cover when the projector has sufficiently cooled
down. It takes about one hour after the power is turned off for the
2
1
lamp to become sufficiently cool.
1
Loosen the lamp cover fixing screw.
2
Slide the lamp cover straight out, and then lift it up to
remove it.
pull out the old lamp.
16
Page 18

Install the new lamp.
Holding the lamp facing the correct way, insert the lamp
until it clicks into place then tighten the two fixing screws.
Slide the cover back to its original position and then tighten
the lamp cover fixing screw at the side of the projector.
Install the lamp
cover.
Resetting the lamp
operating time
• Install the lamp securely. If the lamp cover is removed, the lamp
turns off automatically as a safety precaution. Moreover, the lamp
will not turn on if the lamp or the lamp cover is not installed
correctly.
• This product includes a lamp component that contains mercury
(Hg). Please consult your state and local regurations regarding
disposal or recycling. Do not put in the trash.
Reset the lamp operating time as described in the following section.
After replacing the lamp, be sure to reset the lamp operating time from the configuration menu.
Do not reset the lamp operating time except after the lamp has been replaced. If you do, the lamp
operating time will no longer be displayed correctly.
1. Press .
The configuration menu is displayed.
2. Select "Reset" - "Lamp-Hours Reset" and press .
3. Select "Yes" then press .
The lamp operating time is reset.
19
17
Page 19

Contents of the Manuals on the Document CD-ROM
The manuals on the Document CD-ROM have the following contents.
User’s Guide
Features of the Projector
Before Using the Projector
Part Names and Functions
Before Using the Remote Control
Installation
Inserting and Removing Cards
(EMP-835 only)
Connecting to a Computer
Connecting an External Monitor
Network Cable Connections
Connecting to a Video Source
Playing Sound from Connected Equipment
Playing Sound from External Speakers
Connecting USB Devices (Digital Camera, Hard
Disk Drive or Memory Devices) (EMP-835 Only)
Basic Operations
Turning the Projector On
Turning the Projector Off
Adjusting the Volume
Preventing Theft (Password Protect)
Advanced Operations
Functions for Enhancing Projection
Adjusting Projected Images Manually
Configuration Menus
List of Configuration Menu Commands
Monitoring and Controlling Projectors
via a Network (for the EMP-830)
Troubleshooting
Using the Help
Problem Solving
Appendices
Maintenance
Saving a User's Logo
Optional Accessories and Consumables
Glossary
List of ESC/VP21 Commands
PJLink (EMP-835 only)
List of Supported Monitor Displays
Specifications
Appearance
EasyMP Operation Guide (EMP-835 Only)
Projecting Computer Images via a Network (Network Screen)
Using the Toolbar
If No Connected Projectors Appear
Security Countermeasures for Wireless LAN
Preparing a Presentation (Using EMP SlideMaker2)
Procedures for Making a Presentation without a Computer
Files that Can be Included in Scenarios
Creating a Scenario
Sending a Scenario
What Do You Do When
Showing the Presentation (Using the CardPlayer)
Files that Can be Projected by the CardPlayer
Using CardPlayer
Projecting Scenarios
Projecting Image and Movie Files
Setting Image and Movie Files Display Conditions and Operation Mode
Using a Computer to Set Up, Monitor and Control Projectors
Changing Settings Using a Web Browser (EasyWeb)
Using the Mail Notification Function to Report Problems
Management Using SNMP
EMP Monitor Operation Guide
What You Can Do With EMP Monitor
Operating Environment
Before Starting Operations
Registering Projectors for Monitoring
Registration Using Automatic Detection
Registration Using IP Address (Manual Registration)
Editing the Manually-Registered Projector List
Deleting a Projector from the Projector List
Main EMP Monitor Window
Button Functions
Understanding the Projector List
Displaying Detailed Information
If a Projector Cannot be Monitored or Controlled Using EMP Monitor
EMP NetworkManager Operation Guide (EMP-830 Only)
What You Can Do With EMP
NetworkManager
Operating Environment
Installation and Uninstallation
Before Operations
Starting the EMP NetworkManager
Projector Icons
Connecting to the Projector
Setting Network Parameters
Basic Network Settings
Setting the Mail Notification Function
Setting the SNMP
If the Required Projector is Not Displayed
Connection by Specifying an IP Address
Importing the List Registered by EMP Monitor
If a Problem Notification E-mail Message has
been Sent
18
Page 20

Names and Functions of the Main Remote Control Buttons
[
E-Zoom] buttons
[ ] : Enlarges the image without changing the projection area size.
[ ] : Reduces images that have been enlarged using [ ].
[
Page] buttons
[ ][ ] : Let you switch to the previous or next slide in a PowerPoint
slideshow while using the wireless mouse function or while
running Network Screen (EMP-835 only).
[
Enter( )] button
Accepts an item selection and displays the next level of menu.
When using the wireless mouse function, it works in the same way
as a left mouse click.
[
Menu] button
Displays or hides the configuration menu.
[
Search] button
Automatically searches for and projector input source.
[
Preview] button
Turns the preview function on or off.
[
Wall Shot] button
Automatically corrects the image colour when projecting onto a
blackboard or wall.
[
Quick Setup] button
Adjusts focus and corrects keystone distortion at a single touch.
[
Power] button
Turns the projector's power on or off.
[
R/C] switch
Turns the remote control's power on or off. The remote
control cannot be used unless it is set to "ON".
[
A/V Mute] button
Temporarily turns the image and sound off, or back on
if they are already off.
[ ]
button
Selects items and setting values while a configuration menu or
help is displayed. Moves the pointer when using the wireless
mouse function.
[
Pointer] button
Displays or hides the pointer.
[
Esc( )] button
Cancels the current function. Returns to a previous level while
a configuration menu or help is displayed.
When using the wireless mouse function, it works in the same
way as a right mouse click.
[
Help] button
Displays or hides the help.
User's Guide
"Part Names and Functions"
Printed in China
410352100E
05.XX-.XA(G04)
 Loading...