

Page 1

Operation Guide
Page 2

EasyMP Operation Guide
Contents
Preparing a Presentation (Using EMP SlideMaker2)
Files that Can be Included in Scenarios ........................................... 3
Creating and Sending a Scenario ..................................................... 4
Creating a Scenario ................................................................................5
Sending a Scenario ...............................................................................11
What Do You Do When ... ...................................................................13
Showing the Presentation (Using the CardPlayer)
Files that Can be Projected by the CardPlayer ............................... 19
Using the CardPlayer ...................................................................... 20
Starting the CardPlayer ........................................................................20
Closing CardPlayer ..............................................................................21
CardPlayer Basic Operation.................................................................22
Projecting Scenarios ....................................................................... 26
Playing a Scenario................................................................................26
Operation During a Presentation..........................................................27
Editing a Scenario ................................................................................28
Playing Graphics and Movie Files ................................................... 30
Playing Graphics and Movie Files .......................................................30
Playing all Graphics and Movie Files within a Folder in Order
(Slideshow)...........................................................................................31
Setting Display Conditions and Operation Mode ............................ 33
Advanced Operations
Setting, Monitoring and Controlling from a Computer ..................... 36
Changing Settings Using a Web Browser (EasyWeb)..........................36
Monitoring and Control Using EMP Monitor......................................41
Using the Mail Notification Function to Report Problems ..................47
Management Using SNMP...................................................................49
1
Page 3

Preparing a Presentation (Using EMP SlideMaker2)
Here, we will describe the methods for creating and sending
scenarios.
Files that Can be Included in Scenarios........................... 3
Creating and Sending a Scenario ..................................... 4
• Creating a Scenario................................................................... 5
• Sending a Scenario ................................................................. 11
• What Do You Do When ........................................................... 13
• Create a Scenario Easily.................................................................... 13
• To Verify the Scenario Projection Status on a Computer ................. 14
• Animation Settings ............................................................................ 15
Page 4
EasyMP Operation Guide
Files that Can be Included in Scenarios
Any of the following file types can be merged into a single file to create a scenario.
Ty pe
PowerPoint .ppt Microsoft PowerPoint 2000/2002
Graphics .bmp
Movie .mpg MPEG2-PS
Audio .wav PCM, 22.05/44.1/48.0kHz, 8/16bit
Tip :
•The following slide transition effects and animation settings on the PowerPoint
"Slideshow" menu are reflected in a scenario.
• Fly • Blinds • Box • Checkerboard • Crawl • Dissolve
• Peek • Random Bars • Spiral • Split • Stretch
• Strips • Swivel • Wipe • Zoom
Effects and animations other than those listed above can be placed using the "Cut"
command.
• In the event that the graphics and movie files in the table on the left are to be played
back as file units, they need not be made into scenarios. After saving the file to a
memory card, direct playback and projection with the CardPlayer function is possible
when the memory card is inserted into the projector. p.30
File Type
(Extension)
.jpg Any version. However, CMYK colour formats and
progressive formats cannot be played back.
If the movie exceeds a maximum size of 720 × 480,
or is not in the same form as a DVD (sequence
header arranged for each GOP) it cannot be played
back.
The reproducible audio format is MPEG-1 Layer 2.
Linear PCM and AC-3 audio cannot be played back.
It is recommended that memory cards used be of the
CompactFlash format, or a card type hard disk drive.
Correct reproduction may not be possible if using
memory cards other than those mentioned above.
Additionally, if a CompactFlash card with a slow
access speed is used, correct reproduction may not
be possible and the audio track may skip or cut out.
Depending on the contents, the screen or the sound
may be disturbed.
Notes
The following table indicates whether scenarios created by the included software of
other projectors can be opened by EMP SlideMaker2 of this projector.
Projector Software Can be opened
EMP-7850 EMP SlideMaker2 Ye s
EMP-8150/8150NL EMP Scenario No
EMP-715/505 EMP SlideMaker No
3
Page 5
EasyMP Operation Guide
Creating and Sending a Scenario
In this guide, a "scenario" refers to a combination of PowerPoint and graphics files
arranged in a projection order and saved as a single file. Scenarios are created with
EMP SlideMaker2.
Using EMP SlideMaker2, it is possible to easily and efficiently prepare presentation
material by extracting the necessary parts of files, and arranging them in order
without editing the original files.
PowerPoint File 1 PowerPoint File 2 PowerPoint File 3
Scenario File
The created scenario is sent to the memory card inserted in the computer. Insert the
memory card in the card slot of the projector and project the scenario using the
EasyMP CardPlayer mounted on the projector.
EMP SlideMaker2
Creating a Scenario p.5
On the Computer
Sending a Scenario p.11
Card Player
On the Projector
Projecting Scenarios p.26
4
Page 6
EasyMP Operation Guide
Creating and Sending a Scenario
Creating a Scenario
Verify the following points before creating a scenario.
The data that is combined to create a scenario, such as PowerPoint,
graphics and movie files, must be created in advance.
Only file types listed under "Files that Can be Included in Scenarios" can
be used. p.3
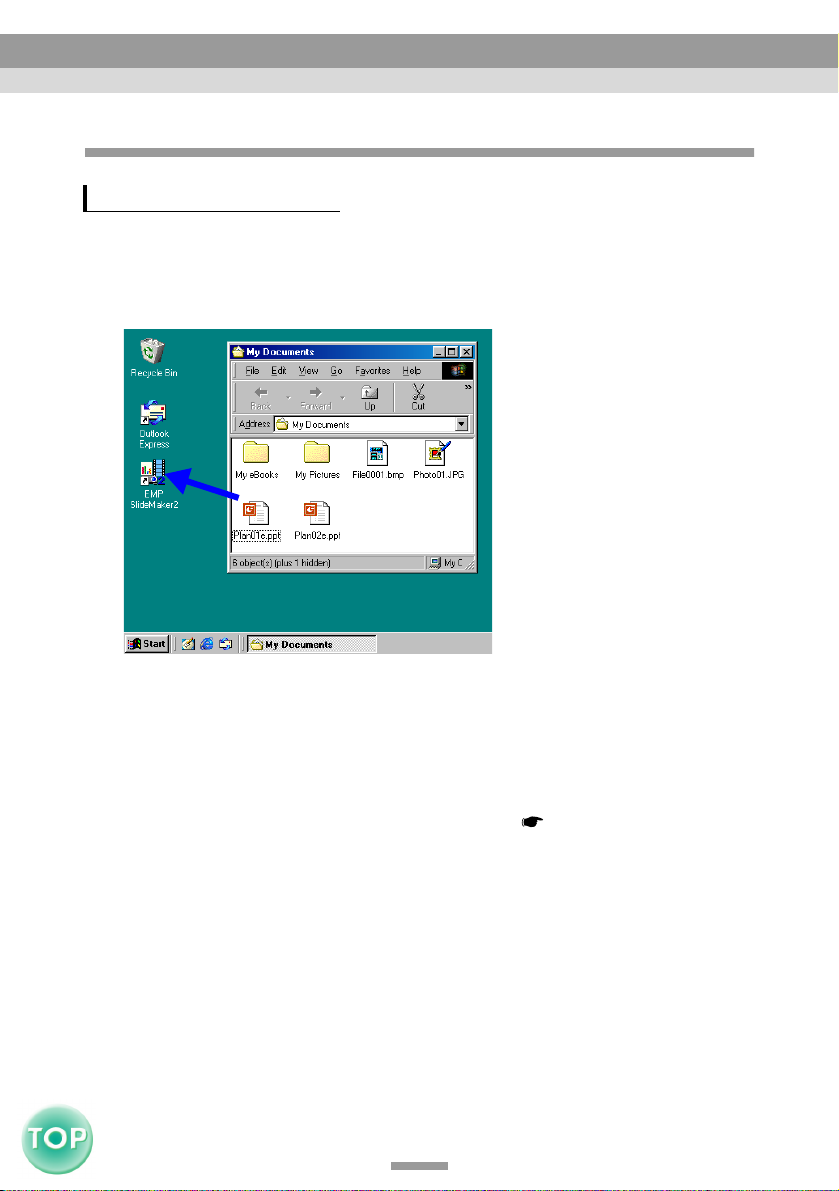
Start Windows on the computer, then select "Start" - "Programs" (or, "All
1
Programs") - "EPSON Projector" - "EMP SlideMaker2".
EMP SlideMaker2 starts, and the scenario properties are displayed.
Enter each of the items on the following table, then click the "OK" button.
2
5
Page 7
Creating and Sending a Scenario
EasyMP Operation Guide
Scenario
Name
Scenario
Folder
Configure
BGM
Background
Color
Image
Quality
This becomes the file name and scenario folder name of the
created scenario. This must be entered. Up to eight capital
letters and numbers can be entered. Keep this item and the
scenario folder directory in the next item to within a
maximum of 127 characters all told.
Specify where to create the scenario folder to be used whilst
creating the scenario. A scenario folder is created in the
directory specified here.
Click to select to play background music during scenario
playback. The audio file (WAVE format) selection screen is
displayed if this is selected. On this screen, select the file to be
used as the background music.
After selecting the audio file, play the file by clicking the " "
button on the right.
Stop playback by clicking the " " button.
Selects the background for graphic data in the scenario.
EMP SlideMaker2 changes each slide in a PowerPoint file to a
JPEG file and saves it. Use this item to select the image
quality to be used during conversion to JPEG files.
A characteristic of JPEG files is that, when the compression
ratio is high, image quality is worse than JPEG files of lower
compression. However, highly compressed files are smaller,
and take less time to project.
Using this setup item, the compression ratio grows
progressively higher going from "Highest image quality" to
"High Quality" and "Standard". Therefore, when "Highest
image quality" is selected, a high-quality, large JPEG file is
saved. When "Standard" is selected, the image quality is lower
than for the other settings, but the JPEG file is smaller.
If a JPEG file is included directly into a scenario, any of the
above image quality settings will become invalid for that
image, and the compression ratio of the original file is used.
Tip :
Previously set content can be modified by "File" - "Properties".
6
Page 8
Creating and Sending a Scenario
Select the files to use in the scenario.
3
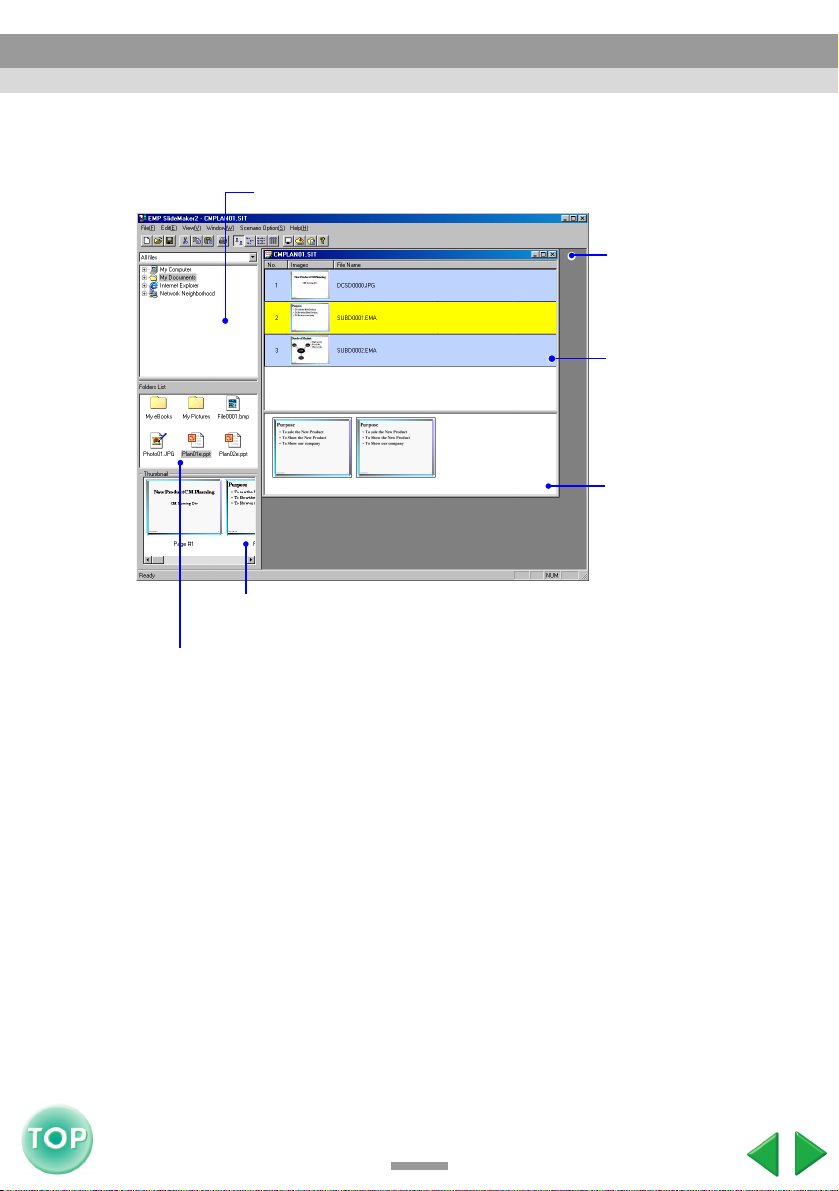
Folders Window
Thumbnails Window
Displays the contents of a clicked file in the Files window as a thumbnail.
EasyMP Operation Guide
Scenarios Window
This window is where
the work of building a
scenario is performed.
Cell
Each slide comprising
a scenario is called a
"cell".
Animation
Verification Window
Files Window
Displays the files in a folder selected in the Folders window.
In the Folders window, click the desired folder to display a list of the files
within the folder in the Files window.
For graphics files, click the file icon in the Files window to display the contents
of the file in the Thumbnails window.
For movie files, icons will be displayed in the Thumbnails window.
Double-click the file icon in the Files window to display the selected file in the
Scenarios window.
7
Page 9

EasyMP Operation Guide
Creating and Sending a Scenario
You can incorporate PowerPoint files in scenarios using the following two
methods.
• Incorporate all slides in a PowerPoint file
1. Double-click the desired PowerPoint file in the Files window.
2. Click "OK" after checking the message. The slideshow is performed
automatically. If you press the [Esc] key on the keyboard, the slideshow will
be terminated. In this case, only the slides which were shown are
incorporated into the scenario.
3. Click anywhere in the screen after completing the slideshow.
All slides contained in a file are displayed in the Scenarios window.
After a file is included in a scenario using the above procedure, the
animations set in PowerPoint are maintained. Therefore, the animations will
operate effectively during projection of the scenario using CardPlayer.
• Include only the necessary slides whilst referring to thumbnails
1. Click the file icon in the Files window.
2. Double-click the thumbnails to be included in the scenario.
The desired slide is displayed in the Scenarios window.
After a slide is included in a scenario using the above procedure, any
animations set in PowerPoint are disabled.
Slides using animation are displayed in the cell as ".EMA" in the Scenarios
window. Slides without animation are displayed in the cell as ".JPG" in the
Scenarios window. Clicking ".EMA" cells displays an Animation verification
window for each animation operation.
Tip :
• Thumbnails cannot be displayed if PowerPoint is not installed on the computer.
• Although animations can be set in the Properties screen of EMP SlideMaker2,
animations set in advance in PowerPoint will operate more smoothly when played in
the scenario. To set animations in PowerPoint slides, we recommend it be set within
PowerPoint. Use the Properties screen of EMP SlideMaker2, to include animation in a
graphic, or to include animation in a slide in a scenario without maintaining the
animation. p.15
• The following PowerPoint animations can be used in a scenario.
• Fly • Blinds • Box • Checkerboard • Crawl • Dissolve
• Peek • Random Bars • Spiral • Split • Stretch • Strips
• Swivel • Wipe • Zoom
Animations other than those above can be placed by the "Cut" command.
8
Page 10

Creating and Sending a Scenario
Finish the scenario by adding or deleting files and slides, or changing
4
their order.
The content displayed in the Scenarios window is projected from the beginning
when projected by the CardPlayer in the projector.
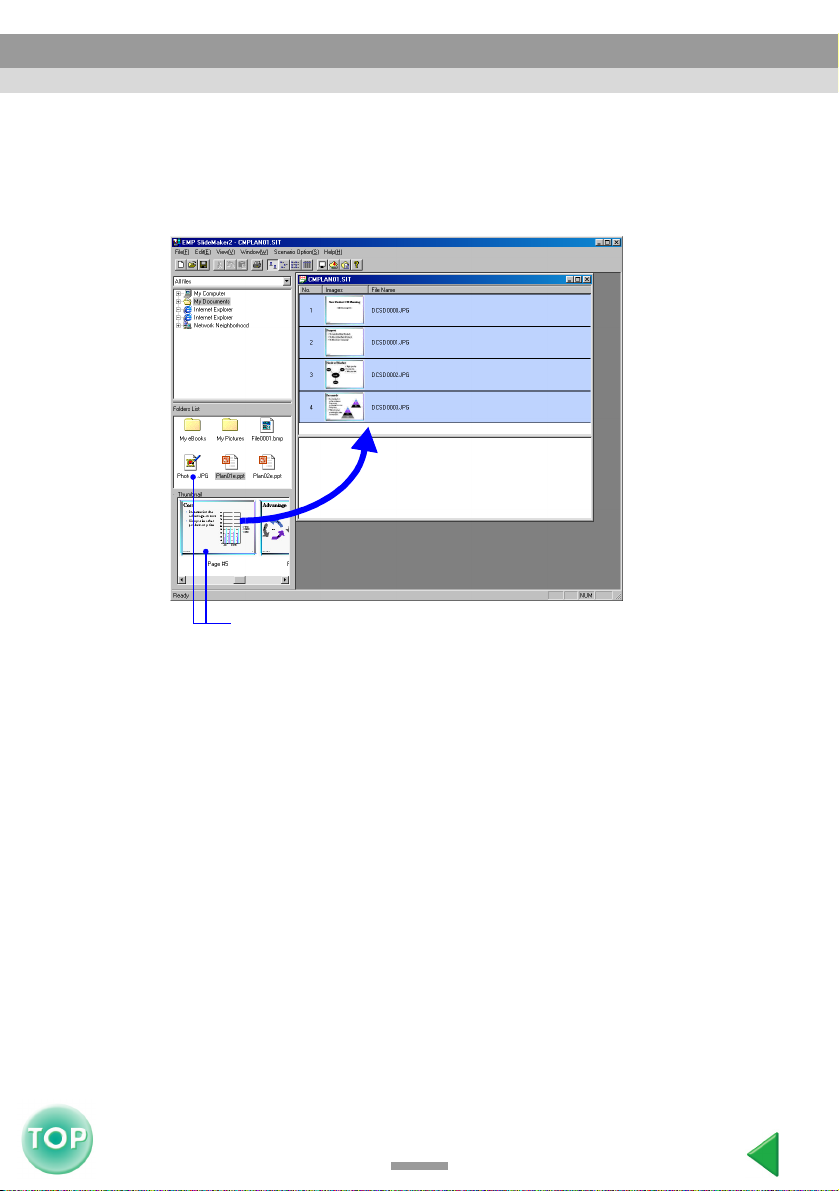
• To add files and slides:
Drag-and-drop a file displayed in the Files window or a PowerPoint slide
displayed in the Thumbnails window, to the desired location in the Scenarios
window.
• To add multiple slides:
Click the slides to be added in the Thumbnails window. All clicked slides are
selected. Clicking a selected slide a second time will release the selection.
After selecting all the slides to add, drag-and-drop one of the selected slides
to the desired location in the Scenarios window. The selected slides are all
added to the scenario.
• To add two or more graphic files:
While holding down the [Ctrl] key click on the icon of each file you
wish to add from the Files window, one by one. Each file you click on
is selected. To cancel the selection, click anywhere in the white area
outside of the file icons. To add all of the selected files, click on one of
the files and drag and drop it into the place you want to add the files in
the Scenario window. All of the selected files are added to the
scenario.
• To delete slides:
To delete, use the mouse to right-click on a cell to delete, and select "Cut" in
the displayed menu (shortcut menu).
EasyMP Operation Guide
9
Page 11
Creating and Sending a Scenario
• Changing the slide order:
Change by dragging-and-dropping the cells to move within the Scenarios
window, or display the shortcut menu and change by selecting "Cut" and then
"Paste".
EasyMP Operation Guide
It is possible to add the desired files and slides to the Scenarios
window using drag and drop.
Tip :
• See Help for the functions of each of the menus in EMP SlideMaker2.
• Use "Save" or "Save As" to save your scenario when you are still working on it.
However if you save the scenario to a memory card you will not be able to play it back
with EasyMP CardPlayer. Use "Send Scenario" when saving to a memory card.
10
Page 12
EasyMP Operation Guide
Creating and Sending a Scenario
Sending a Scenario
To project a created scenario using the projector, it is necessary to send the scenario
to the memory card using "Send Scenario" in EMP SlideMaker2.
Designate a memory card inserted into the card drive of the computer as the send
destination.
It is also possible to set automatic projection and continuous projection of a
scenario at projector startup. The automatic projection function is called "autorun".
Tip :
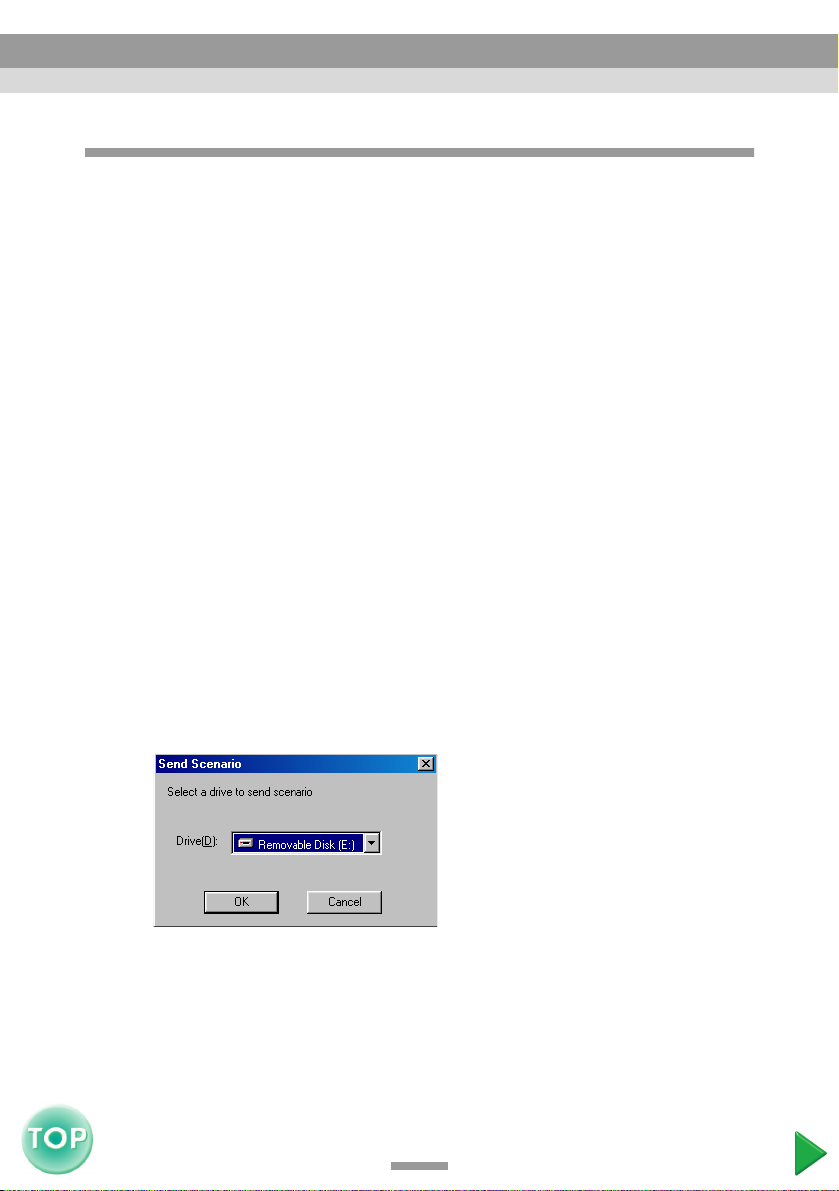
• When "Send Scenario" is performed, the scenario file is saved in the memory card
under the name "scenario name.sit". In addition, a folder with the same name as the
scenario is created and each screen is converted to graphics files and saved according
to the image quality settings.
• If you use "Send Scenario" without saving, a folder with the same name as the scenario
name and a "scenario name.sit" file are created in the scenario folder. Each screen is
converted to graphics files and saved in the created folder according to the image
quality settings.
After the scenario is complete, select "Scenario Option" - "Send
1
Scenario".
Insert into a card adapter if a card adapter is needed.
A dialogue box for designating the destination drive is displayed. Select
2
the drive where the memory card is inserted and click "OK".
A confirmation message is displayed. Click the "OK" button.
3
11
Page 13
Creating and Sending a Scenario
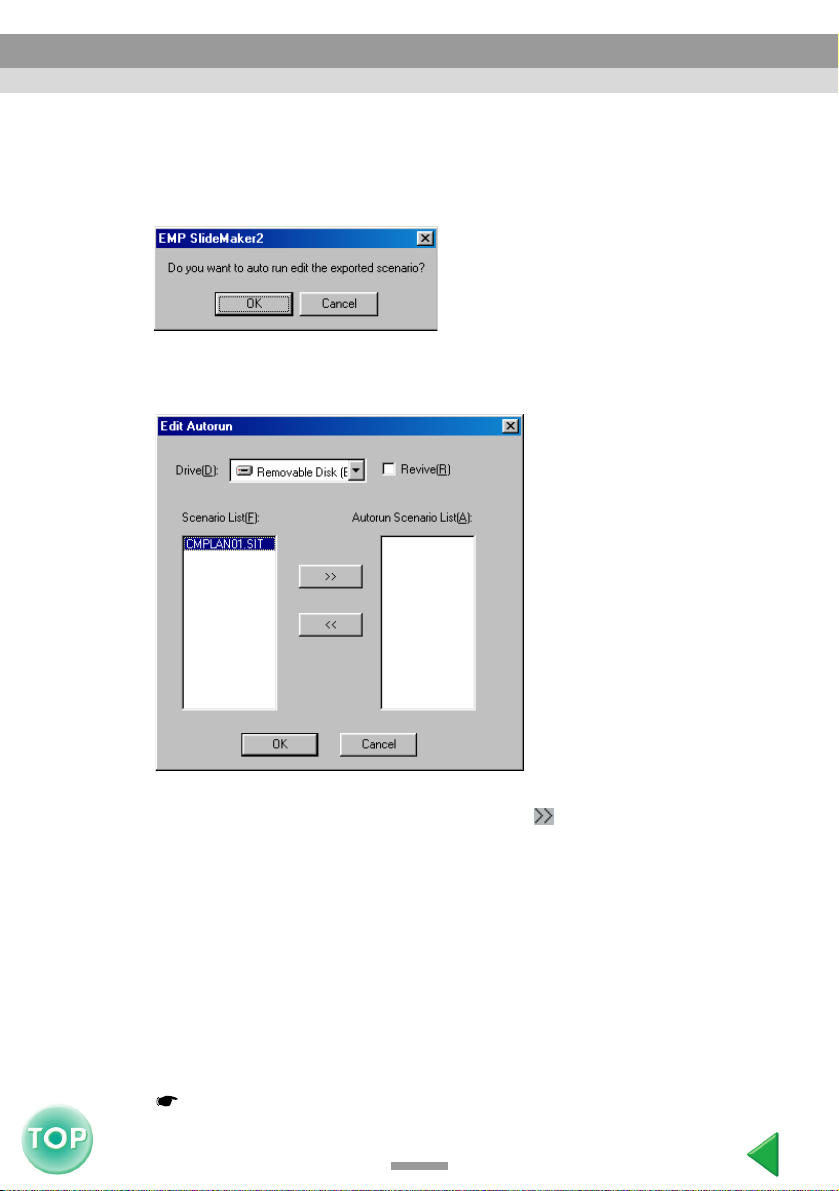
Upon completion of transfer, a message is displayed confirming whether
4
autorun setup is to be performed. To set up autorun or continuous play,
click the "OK" button and perform the following steps. To set nothing,
close out by clicking the "Cancel" button.
All scenario files within the memory card are displayed in the Scenario
5
List on the left.
EasyMP Operation Guide
In the case of automatic projection at projector power ON, click the desired
scenario name in the Scenario List, and click the " " button. The scenario is
displayed in the Autorun Scenario List on the right, and is set as an autorun file.
To automatically go back to the beginning once the scenario projection has
finished, select the desired scenario in the Scenario List and select "Revive".
Tip :
• Autorun can be set even if "Scenario Option" - "Edit Autorun" is selected.
• Autorun setting cannot be designated in the EasyMP CardPlayer.
• If there are two or more files set for autorun, they will be played back in order on the
Autorun Scenarios List.
Insert the memory card from the senario sending function in the
6
projector, and use CardPlayer on the projector to project the scenario.
p.26
12
Page 14
EasyMP Operation Guide
Creating and Sending a Scenario
What Do You Do When ...
Create a Scenario Easily
To turn a single PowerPoint file into a scenario, simply drag and drop the
PowerPoint file icon onto the EMP SlideMaker2 program icon on the desktop to
create a scenario.
Tip :
• Scenarios cannot be created in this way when EMP SlideMaker2 is running. Be sure to
close EMP SlideMaker2 first.
• The name "Scnxxxx" (xxxx are numbers) is given to the created scenario. The image
quality of the scenario is set to "Standard". The image quality can be changed in the
scenario settings dialogue box displayed by selecting "File" - "Properties". For details
concerning image quality, see "Creating a Scenario". p.5
• In the event that multiple PowerPoint files are selected and dragged-and-dropped onto
the EMP SlideMaker2 program icon, only the file whose icon is pointed at by the
mouse cursor will be made into a scenario.
• When easy scenario creation is performed, the scenario will be created from all the
slides in the PowerPoint file. If there are slides you do not wish to project, right-click
those cells and select "Inactive".
• The following PowerPoint animations can be used in a scenario.
• Fly • Blinds • Box • Checkerboard • Crawl • Dissolve
• Peek • Random Bars • Spiral • Split • Stretch
• Strips • Swivel • Wipe • Zoom
Animations other than those above can be placed by the "Cut" command.
13
Page 15
EasyMP Operation Guide
Creating and Sending a Scenario
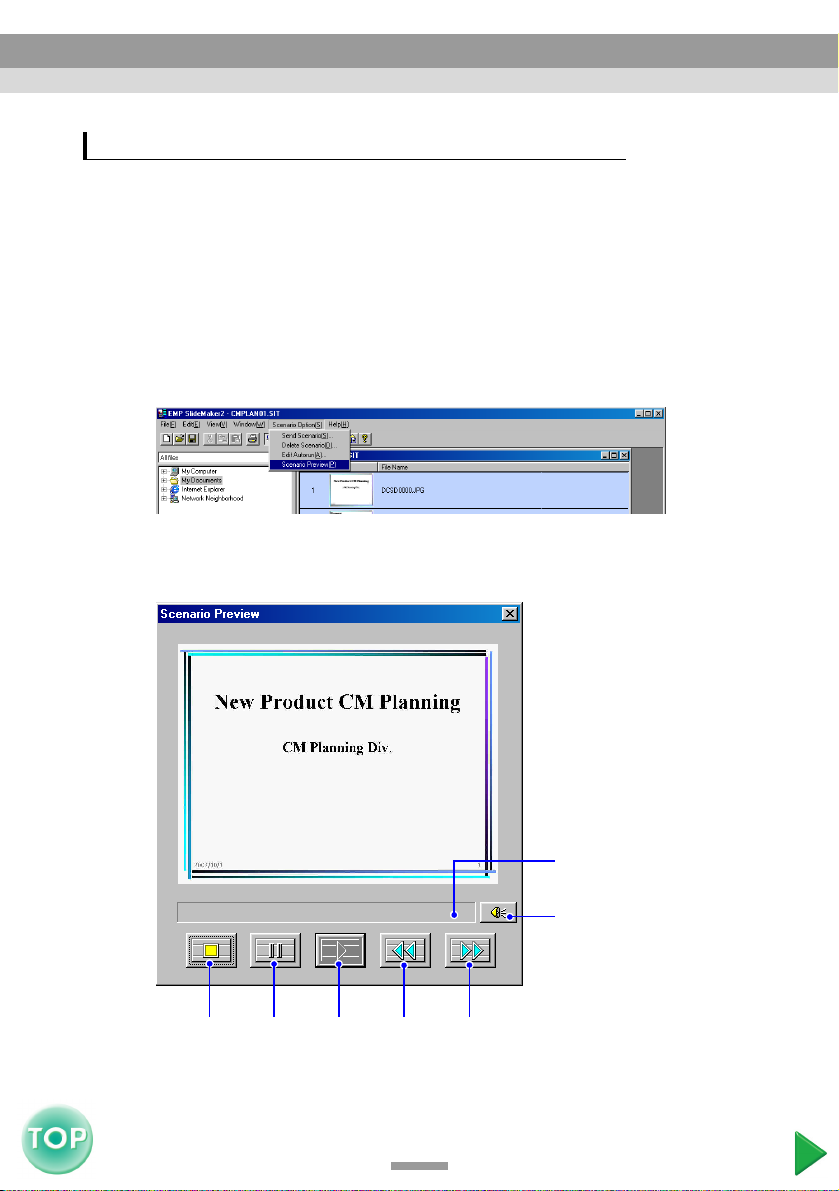
To Verify the Scenario Projection Status on a Computer
It is possible to verify on a computer how a created scenario will project when
played back on a projector by using the CardPlayer. All the structural elements of
the scenario such as graphics, animation, background music, etc. will be played.
Open the scenario to verify in EMP SlideMaker2.
1
Select "Scenario Option" - "Scenario Preview".
2
The Scenario Preview screen is displayed. Operate the scenario
3
referring to the following table.
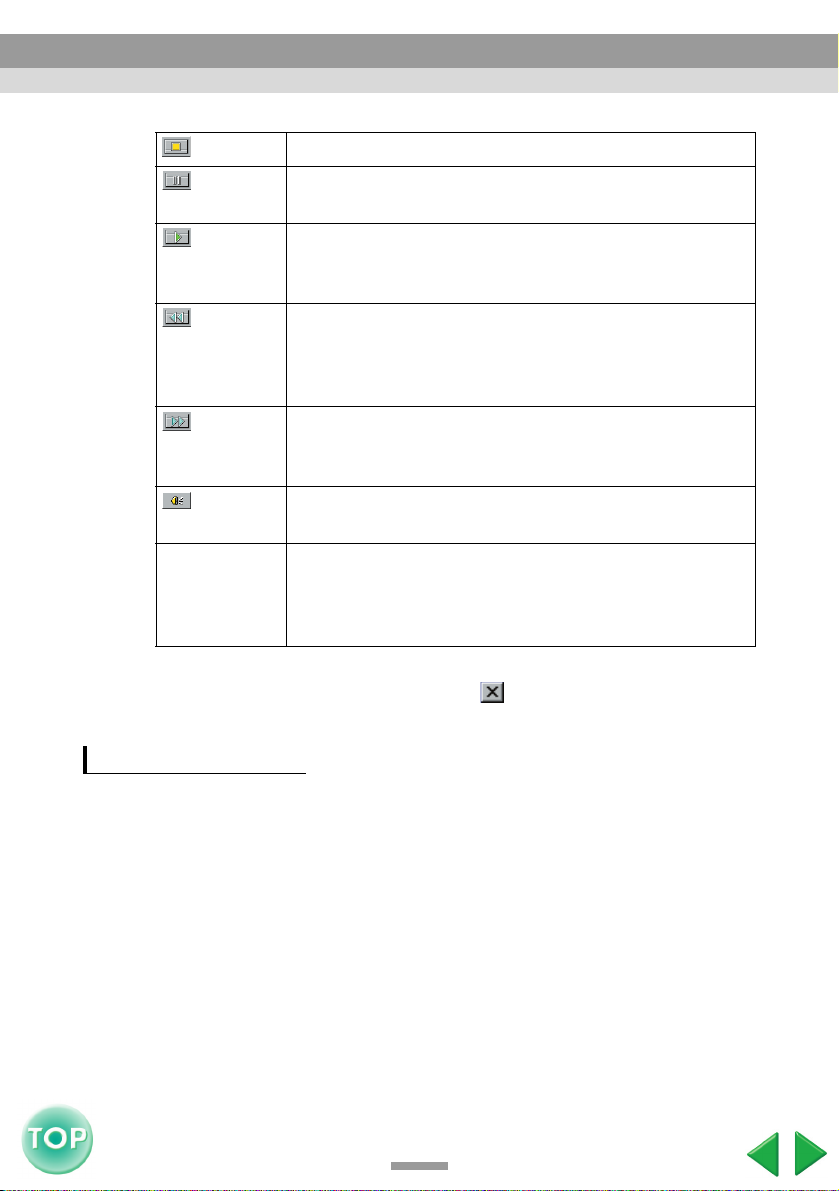
Pause
Play
Rewind
14
Status Bar
Vol ume
FFStop
Page 16
Creating and Sending a Scenario
Stop Stop play and return to the first slide.
Pause Temporarily stops the slides when "Automatically" is
selected for the scenario.
Play Starts the scenario preview. In addition, this restarts stopped
or paused scenarios. The following slide is displayed when
the scenario behavior is set to "On mouse click".
Rewind Returns the slide to the one previous to the currently
displayed slide or returns the screen previous to the
animation being executed. The animation effects are not
performed upon return.
EasyMP Operation Guide
Fast
Forward
(FF)
Volu m e Performs volume control. Sets the level of the background
Status Bar Displays the state of progress of the scenario on a bar. At
After verification is complete, click the " " button at the top right of the
4
screen to close the Scenario Preview screen.
Shows the next slide (one after the current slide) or shows
the screen after animation execution. At this time the
animation effects are not executed.
music.
first there is no bar display, and then the bar extends from
left to right as the scenario progresses. The scenario ends at
the rightward end of the bar.
Animation Settings
In EMP SlideMaker2, PowerPoint animation effects and similar effects can be set
for each cell in the scenario. It is possible to set and project projection times and
animations for each divided frame for slides with animations set in PowerPoint.
In this case, right-click the desired animation in the Animation verification
window, then click "Cell Properties".
Tip :
Include files for animations set in advance in PowerPoint to produce smoother
animation when playing the scenario. To set animations in PowerPoint slides, we
recommend these be set within PowerPoint. Use the method described here to set an
animation in an image file, or to set animation in a slide included in a scenario without
maintaining the animation.
15
Page 17

Creating and Sending a Scenario
Right-click the desired cell or animation, and select "Cell Properties".
1
To apply the same settings to multiple cells or animations, select multiple cells
by clicking whilst holding down the [Shift] key or the [Ctrl] key, and then right-
clicking to select "Cell Properties".
EasyMP Operation Guide
Cell
Animation
Displays the Properties screen. Set the items in the following table, then
2
click the "OK" button.
16
Page 18

Creating and Sending a Scenario
Advance You can set a transition time between 0 and 1800 seconds
when "Automatically" is selected. In manual operation,
switch by pressing the [Page down] or [Page up] buttons on
the remote control during projection.
Animation
Effects
Selects the effects during screen transition when changing
screens during projection.
Selects the "direction" for the selected animation.
The following are examples of the effects.
Slide In: Screen transition from a designated direction.
Box In: Screen transition from the inside.
EasyMP Operation Guide
17
Page 19

Showing the Presentation (Using the CardPlayer)
Here, we will describe how to project a scenario sent to a memory
card by EMP SlideMaker2, and how to project graphics and movie
files.
Files that Can be Projected by the CardPlayer .............. 19
Using the CardPlayer ....................................................... 20
• Starting the CardPlayer........................................................... 20
• Closing CardPlayer.................................................................. 21
• CardPlayer Basic Operation ................................................... 22
• Easy Menu Operation (Guide Mode) ................................................ 22
• Quick Mode Operation...................................................................... 24
• Rotating the Image............................................................................. 25
Projecting Scenarios ........................................................ 26
• Playing a Scenario................................................................... 26
• Operation During a Presentation ........................................... 27
• Editing a Scenario ................................................................... 28
Playing Graphics and Movie Files .................................. 30
• Playing Graphics and Movie Files.......................................... 30
• Playing all Graphics and Movie Files within a
Folder in Order (Slideshow).................................................... 31
Setting Display Conditions and Operation Mode .......... 33
Page 20

EasyMP Operation Guide
Files that Can be Projected by the CardPlayer
The following files can be projected using CardPlayer.
Ty p e
Scenario .sit These are scenario files created by sending scenarios.
Graphics .bmp Only 24-bit colour files can be played.
Movie .mpg MPEG2-PS.
File Type
(Extension)
Also plays audio (.wav) files set as BGM at the time of
scenario creation.
Scenarios created in EMP SlideMaker included with
the EMP-735 and the EMP-715/505 can also be
played.
.jpg Any version. However, projection is not possible for
CMYK colour formats, progressive formats, and items
with a resolution in excess of 2560 × 1920.
.png Projection is not possible for items with a resolution in
excess of 1024 × 768.
If the movie exceeds a maximum size of 720 × 480, or
is not in the same form as a DVD (sequence header
arranged for each GOP) it cannot be played back. The
reproducible audio format is MPEG-1 Layer 2. Linear
PCM and AC-3 audio cannot be played back. It is
recommended that memory cards used be of the
CompactFlash format, or a card type hard disk drive.
Correct reproduction may not be possible if using
memory cards other than those mentioned above.
Additionally, if a CompactFlash card with a slow
access speed is used, correct reproduction may not be
possible and the audio track may skip or cut out.
Depending on the contents, the screen or the sound
may be disturbed.
Notes
DPOF .mrk For DPOF version 1.10, only files named
AUTPLAYx.mrk (where x is a number between 0-9)
can be projected.
Tip :
• JPEG files with the extension ".jpeg" and MPEG files with the extension ".mpeg"
cannot be projected.
• Regarding projecting JPEG files, the image will not be projected clearly if compression
is set too high.
19
Page 21

EasyMP Operation Guide
Using the CardPlayer
Use the EasyMP "CardPlayer" to play scenarios, graphics and Movie files stored on
a memory card inserted in the projector. Here, we will explain how to use the
CardPlayer.
Starting the CardPlayer
Start the CardPlayer by using the following procedure.
Insert the memory card into the card slot of the projector.
1
Press the [Power] button on the remote control to turn the projector on.
2
Repeatedly press the [Comp/EasyMP] button on the remote control until
3
"EasyMP" displays at the top right of the image.
The CardPlayer will start and will display the contents of the memory card.
20
Page 22

EasyMP Operation Guide
Using the CardPlayer
Tip :
• If you want to stop playback, press the [ESC] button.
• If there is a scenario set as "autorun" in the memory card, that scenario will be given
priority and be played first.
• If the memory card is not inserted in the card slot on the projector, the following screen
is displayed. If the memory card is installed, the screen from step 3 displays.
• Depending on the JPEG file, some thumbnails may not appear. In this event, an file
icon is displayed.
Closing CardPlayer
Press the [ ] [ ] [ ] and [ ] button on the remote control up and
1
align the cursor with the "EJECT" button on the screen.
21
Page 23

Using the CardPlayer
Press the [Enter] button on the remote control.
2
CardPlayer shuts down and the following screen is displayed.
Remove the memory card from the card slot.
3
CardPlayer Basic Operation
CardPlayer has the following two operation modes:
EasyMP Operation Guide
• "Guide mode" : Displays the Easy Menu for file operation. Play files and set
options by selecting items in the Easy Menu.
• "Quick mode" : Plays files, opens folders, select slides to move during
scenario editing, and select the move destination by pressing
the [Enter] button on the remote control without using the
Easy Menu.
"Guide mode" is the initial setting.
See "Setting Display Conditions and Operation Mode" to set the operation mode.
p.33
See "Quick Mode Operation" for operation of the Quick mode. p.24
Easy Menu Operation (Guide Mode)
Here we will explain the procedures for playing scenarios and graphics using the
Easy Menu.
Press the [ ], [ ] [ ], or [ ] buttons on the remote control to position
1
the cursor on the file or folder you want to access.
If all the files or folders are not displayed on the current screen, press the [Page
Down] button on the remote control. The next page is similarly displayed by
placing the cursor on the "Next page" button and then pressing [Enter] button
22
Page 24

Using the CardPlayer
on the remote control. To return to the previous screen, press the [Page up]
button on the remote control, or position the cursor on the "Previous page"
button and press [Enter] button on the remote control.
Press the [Enter] button on the remote control.
2
This displays the Easy Menu.
EasyMP Operation Guide
Cursor
Easy Menu
Tip :
The operation mode will become "Quick mode" when a scenario or graphic and Movie is
played, or a folder opened, by pressing the [Enter] button. p.24
23
Page 25

EasyMP Operation Guide
Using the CardPlayer
The items displayed on the Easy Menu differ according to the selection.
When a Scenario is Selected
Play Scenario Plays the scenario. p.26
Edit Scenario Displays the edit scenario screen. p.28
Cancel Closes the Easy Menu without doing anything.
When a Graphics File is Selected
View Image Plays the graphic. p.30
Cancel Closes the Easy Menu without doing anything.
When a Movie File is Selected
Play Movie Plays the movie. p.30
Cancel Closes the Easy Menu without doing anything.
When a Folder is Selected
Open Folder Opens a folder and displays the files within the folder. Select
the folder icon in the upper left, press the [Enter] button, select
"Up one level" and then press the [Enter] button to return
control to the prior screen, before a folder was opened.
Play Slideshow Plays the graphics and/or movie files inside the folder in order.
p.31
Scenarios cannot be played back correctly during slideshow
reproduction. If you wish to play back a scenario, select the
scenario file and perform "Play Scenario"
Options Displays the options setting screen. Set display conditions and
operation mode for playing back slideshows in Card Player.
p.33
Cancel Closes the Easy Menu without doing anything.
Quick Mode Operation
In the quick mode you can execute the main functions directly by pressing [Enter]
on the remote control. Press the [ESC] button on the remote control to display the
Easy Menu, making it possible to execute other functions.
When Selecting Folders or Files
[Enter] Folder: Open
Scenarios, Graphics · Movie: Play
[ESC] Display Easy Menu
24
Page 26

EasyMP Operation Guide
Using the CardPlayer
Scenario Being Edited
[Enter] Select slides to move, select move destination
[ESC] Display Easy Menu
Rotating the Image
Images in JPEG format reproduced by CardPlayer can be rotated in 90 degree
increments. JPEG images reproduced during slideshow execution can also be
rotated. Rotate JPEG images in the following way.
Reproduce images or scenarios in JPEG format, or perform a slide
1
show.
For reproduction of JPEG format images, s "Playing Graphics and Movie
Files" p.30 .
For playing scenarios, s "Projecting Scenarios" p.26 .
For slideshows, s "Playing all Graphics and Movie Files within a Folder in
Order (Slideshow)" p.31 .
When a JPEG image is being reproduced, Press the [ ] [ ] button on
2
the remote control, to the left or right.
The screen rotates when the button is Pressed in a certain derection, as
follows.
Right
Left
Left
Right
25
LeftLeft
RightRight
Page 27

EasyMP Operation Guide
Projecting Scenarios
Here, we will describe the method for playing a scenario sent to a memory card,
operations during scenario playback, and editing a scenario.
Playing a Scenario
The scenario was sent to a memory card by the scenario sending function in EMP
SlideMaker2. p.11
Tip :
Autorun and continuous play can be set in the scenario. p.11
Start the CardPlayer. p.20
1
This displays the content of the inserted memory card.
Press the [ ], [ ], [ ], and [ ] buttons on the remote control to position
2
the cursor on the scenario folder that is to play.
Press the following buttons on the remote control depending on the
3
operation mode in use.
Guide mode : Press the [Enter] button to display the Easy Menu. Press the
[ ] and [ ] buttons, then select "Play Scenario" and press
the [Enter] button.
Quick mode : Press the [Enter] button.
26
Scenario files
Page 28

EasyMP Operation Guide
Projecting Scenarios
Play the scenario. If "Advance" is set to "Automaticaly", once play has
4
continued to the end, control returns to the file list screen. If "Revive" is
selected, the scenario will repeat from the beginning.
See "Operation During a Presentation" for how to operate the scenario when
"Advance" is set to "On mouse click" and how to cancel and stop.
Tip :
Change the projection order and display/hide settings in the edit scenario screen.
p.28
Operation During a Presentation
The following operations using the remote control are possible whilst playing a
scenario.
Screen
Switching
Stop Play The message "Do you want to quit playing the scenario?" is
The following functions of the projector can similarly be used when projecting a
scenario or graphics file with CardPlayer. For details concerning the various
functions, see the "Freeze", "A/V Mute", and "E-Zoom" in the EMP-735 User's
Guide.
• Freeze • A/V Mute • E-Zoom
Proceed to the next screen by pressing [Enter] or [Page down].
Return to the previous screen by pressing [Page up].
displayed when you press the [ESC] button. Close by selecting
the "Exit" button and pressing the [Enter] button. Continue play
by selecting the "Return" button and pressing the [Enter]
button.
27
Page 29

EasyMP Operation Guide
Projecting Scenarios
Editing a Scenario
You can change the projection order of slides and toggle display/hide for slides
within the scenarios on the memory card inserted in the projector.
Press the [ ], [ ], [ ], and [ ] buttons on the remote control to position
1
the cursor on the scenario to edit.
Press the following buttons on the remote control depending on the
2
operation mode in use.
Guide mode : Press the [Enter] button to display the Easy Menu. Select
"Edit Scenario" in the menu, and press the [Enter] button.
Quick mode : Press the [ESC] button to display the Easy Menu. Select "Edit
Scenario" in the menu, and press the [Enter] button.
This displays the edit scenario screen.
3
Position the cursor on the desired slide. Proceed with Step 4 to change the slide
order, and proceed with Step 6 to hide slides.
Press the following buttons on the remote control depending on the
4
operation mode in use.
Guide mode : Press the [Enter] button to display the Easy Menu. Select
"Move Files" in the menu, and press the [Enter] button.
Quick mode : Position the cursor on the slide to be moved and press the
[Enter] button.
Position the cursor on the destination and press the [Enter] button on
5
the remote control.
1. Select the slide to
be moved
2. Cursor selecting the
destination
28
Page 30

Projecting Scenarios
In order not to display a page, position the cursor on the desired slide,
6
and depending on the operation mode being used, press the following
buttons on the remote control .
Guide mode : Press the [Enter] button to display the Easy Menu. In the
Quick mode : Press the [ESC] button to display the Easy Menu. In the
EasyMP Operation Guide
menu, select "Show/Hide" and press the [Enter] button.
menu, select "Show/Hide" and press the [Enter] button.
Hide mark
To exit editing, press the [ ] button on the remote control, position the
7
cursor on the "OK" button, and press the [Enter] button on the remote
control.
The scenario is saved with the edited content, and the display returns to the file
list screen.
In order not to save the changes, position the cursor on the "Cancel" button and
press the [Enter] button on the remote control.
29
Page 31

EasyMP Operation Guide
Playing Graphics and Movie Files
There are two ways to view images saved on a memory card by using the
CardPlayer function.
• View graphics or movie files
This is a function for playing and projecting the contents of a graphics file.
• Ordered play of graphics and movie files within a folder (Slideshow)
This is a function for projecting the file contents within a folder, in order, one file
at a time.
Caution :
The memory card is accessed frequently when playing back movie files. If you remove
the memory card during this time, CardPlayer may not operate correctly.
Playing Graphics and Movie Files
Start the CardPlayer. p.20
1
This displays the content of the inserted memory card.
Press the [ ], [ ], [ ], and [ ] buttons on the remote control to position
2
the cursor on the file to play.
Press the following buttons on the remote control depending on the
3
operation mode in use.
Guide mode : Press the [Enter] button to display the Easy Menu. Select
"View Image" or "Play Movie" in the menu, and press the
[Enter] button.
Graphics file
Quick mode : Press the [Enter] button.
30
Page 32

Playing Graphics and Movie Files
Play the graphics or movie files. Pressing the [Enter] or [ESC] buttons
4
on the remote control returns the display to the file list screen.
Tip :
JPEG format images can be rotated during projection. p.24
EasyMP Operation Guide
Playing all Graphics and Movie Files within a Folder in Order (Slideshow)
You can project the graphics files in a folder one at a time, in order. This function is
called "Slideshow". Execute the slideshow by the following procedure.
Tip :
You can set display conditions such as continuous play, and transition effects. p.33
Start the CardPlayer. p.20
1
This displays the content of the inserted memory card.
Press the [ ], [ ], [ ], and [ ] buttons, to position the cursor on the
2
folder of the slideshow to perform.
31
Page 33

Playing Graphics and Movie Files
Press the following buttons on the remote control depending on the
3
operation mode in use.
Guide mode : Press the [Enter] button to display the Easy Menu. Select
"Play Slideshow" in the menu, and press the [Enter] button.
Quick mode : Press the [ESC] button to display the Easy Menu. Select
"Play Slideshow" in the menu, and press the [Enter] button.
This runs the slideshow, each of the graphics and movie files in the
4
folder is played, in order.
After play has continued to the end, control automatically returns to the file list
screen. The slideshow will repeat from the beginning once play has completed
when "Continuous Play" is "ON". p.33
Just as with a scenario, it is possible to proceed to the next screen, return to the
previous screen, or stop playback during projection of a slideshow.
"Operation During a Presentation" p.27
EasyMP Operation Guide
32
Page 34

EasyMP Operation Guide
Setting Display Conditions and Operation Mode
You can set the display conditions and operation mode for slideshow play. The
content for display conditions that can be set is: Continuous Play, Screen switching
time, Display order, Effect, and Mode switching.
Press the [ ], [ ], [ ], or [ ] buttons on the remote control to position
1
the cursor on the folder where display conditions are to be set.
Press the following buttons on the remote control depending on the
2
operation mode in use.
Guide mode : Press the [Enter] button to display the Easy Menu. Select
"Options" on the menu, and press the [Enter] button.
Quick mode : Press the [ESC] button to display the Easy Menu. Select
"Options" on the menu, and press the [Enter] button.
Set each of the items.
3
Enable settings by positioning the cursor on the desired item and pressing the
[Enter] button on the remote control.
Details for of the items are given below.
33
Page 35

Setting Display Conditions and Operation Mode
EasyMP Operation Guide
Continuous
Play
Screen
switching time
Display order Sets the order of the files to be displayed.
Effect This sets the effects to apply when displaying file
Mode
Switching
Position the cursor on the "OK" button by pressing the [ ] button on the
4
remote control, then press the [Enter] button.
The settings are applied.
If you do not wish to apply the settings, position the cursor on the "Cancel"
button and press the [Enter] button.
Indicates whether to perform the slideshow repetitively.
After the time designated here has elapsed, the next file is
displayed. If "No" is selected, the slideshow will proceed
to the next file when either the [Enter] or [Page Down]
key is pressed on the remote control.
content.
Switches the operation mode in CardPlayer.
The initial setting is "Guide mode".
See "Easy Menu Operation (Guide Mode)" ( p.22 )
for "Guide mode" operations. See "Quick Mode
Operation" ( p.24 ) for "Quick mode" operations.
34
Page 36

Advanced Operations
Here, we will describe how to manage the setting of a projector
connected to a computer on a network.
Setting, Monitoring and Controlling from a Computer . 36
• Changing Settings Using a Web Browser (EasyWeb).......... 36
• Displaying the EasyWeb ................................................................... 37
• Projector Setup .................................................................................. 38
• Projector Control ............................................................................... 40
• Monitoring and Control Using EMP Monitor......................... 41
• Using the Mail Notification Function to
Report Problems...................................................................... 47
• Mail Notification Settings ................................................................. 48
• If a Problem Notification is Sent by Mail.......................................... 48
• Management Using SNMP ...................................................... 49
Page 37

EasyMP Operation Guide
Setting, Monitoring and Controlling from a Computer
When a computer and the projector are connected by a wireless LAN or by a wired
LAN, the following projector setting changes and administration are possible from
the computer via the network.
• Setting network functions and controlling the projector using a Web
browser. (EasyWeb)
• Monitoring and controlling the projector using EMP Monitor. (During
access point mode or Wired LAN connection mode connection).
• Obtaining projector status and network settings, controlling the projector,
and messaging errors using SNMP
(During access point mode or Wired LAN connection mode connection).
Here we will explain the above three methods.
Changing Settings Using a Web Browser (EasyWeb)
You can setup and control the projector using the Web browser of a computer that is
connected to the projector via a network. Setup and control operations can be
performed remotely if this function is used.
Use Microsoft Internet Explorer 5.0 or later as the Web browser.
g and the SNMP manager program
Tip :
• Setup and control are possible using a Web browser if "Standby Mode" is "Network
ON" in the "Advanced" menu of the projector's configuration menu, even if the
projector is in standby mode (when the Power indicator is lit orange).
• If the Web browser you are using is set up to connect via a proxy server, the EasyWeb
cannot be displayed. Please set the browser so it does not use a proxy server, if you
wish to view this page.
36
Page 38

EasyMP Operation Guide
Setting, Monitoring and Controlling from a Computer
Displaying the EasyWeb
Display the browser page for setup and control by either of the following
procedures.
Using the EMP NS Connection Tools
Connects a computer to the projector via a network.
1
s"Connecting Using Easy Connect Mode " and "Connecting in Access
Point Mode or Wired LAN Connect Mode" in the EasyMP Setup Guide
Click the "Projector Operation URL Display" icon in the EMP NS
2
Connection toolbar.
The password input screen is displayed.
Enter the password then click "OK". If password has not been set, click
3
"OK" without entering anything.
This starts the Web browser and displays the EasyWeb
Projector
Setup
Projector
Control
Entering the IP Address of the Projector
When the projector’s Network advanced settings have been set to "Access point
mode", the projector’s IP address can be input by the following steps, and EasyWeb
can be opened.
Start the Web browser on the computer.
1
37
Page 39

EasyMP Operation Guide
Setting, Monitoring and Controlling from a Computer
Enter the IP address of the projector in the address input box of the Web
2
browser, and press the [Enter] key on the computer keyboard.
EasyWeb is displayed.
Projector Setup
It is possible to apply setup items in the configuration menu of the projector and the
Network advanced setting screen of the Network Screen. The settings are reflected
in the configuration menu and the Network advanced settings screen of the Network
Screen.
Configuration of Menu Items that can not be set by the Web Browser
All configuration menu items can be set with the exception of the following items.
• Registering a user’s logo in the "User’s Logo" menu
• "Advanced" - "Language", "Link21L"
• "About" - "Reset Lamp Timer"
•"Reset All"
The items available on each menu are the same as on the configuration menu of the
projector. s "Using the Configuration Menu Functions" in the User's Guide
38
Page 40

EasyMP Operation Guide
Setting, Monitoring and Controlling from a Computer
Network setup items that can be set by the Web browser
All Network Screen settings can be changed, however, the "MAC address" setting
will not be displayed.
Tip :
When connected to a wired LAN, "Wired LAN Settings" will not displayed.
The content of the various items is the same as that of the Network advanced setting
screen of Network Screen. s"Connecting Using Easy Connect Mode" and
"Connecting in Access Point Mode or Wired LAN Connection Mode" in the
EasyMP Setup Guide
The WEP encryption setting from the Web browser can be keyed in not only in
hexadecimal, but also in text. The method for setting the WEP encryption by keying
in text differs depending on the access point. For this reason, please check with the
administrator of the network you are joining. Then, please first select "Text 1" as the
input "Format" before attempting to setup the WEP encryption. Try "TEXT2" and
"TEXT3" if "TEXT1" does not provide proper encoding.
If "128bit" is selected in "WEP encryption", you can only select "0" as the Key ID.
If "40bit" is selected, you can select either "0", "1", "2", or "3".
39
Page 41

Setting, Monitoring and Controlling from a Computer
Projector Control
Projector control uses EasyRemote at the bottom of the EasyWeb.
The functions of each of the icons are explained below.
EasyMP Operation Guide
Comp/
EasyMP
S-Video/
Video
This switches between images from the Computer/Component Video
port and the EasyMP screen.
This switches the signal source being input from the S-Video port
and the Video port.
Freeze This pauses the image. However, audio does not stop. Click again to
release the pause. This is the same as the Freeze function on the
projector.
A/V mute This temporarily hides images and stops audio. Click again to
release. This is the same as the A/V Mute function on the projector.
Power This turns the projector power ON and OFF.
40
Page 42

EasyMP Operation Guide
Setting, Monitoring and Controlling from a Computer
Monitoring and Control Using EMP Monitor
When the projector and a computer are connected with the wireless LAN Access
point mode, or Wired LAN connection mode, EMP Monitor can be used to check
the statuses of multiple projectors that are connected to the network and to carry out
operations such as turning the power for the projectors on and off and changing the
signal sources, all using a single computer. If there are several projectors that have
been set up in different classrooms or meeting rooms, for instance, they can all be
started at once and monitored by a single operator.
Tip :
• A maximum of 64 projectors can be collectively monitored and controlled.
• Setup and control are possible using the EMP Monitor if "Standby Mode" is "Network
ON" in the "Advanced" menu of the projector's configuration menu, even if the
projector is in standby mode (when the power is off).
Check the following points before starting up EMP Monitor.
• EMP Monitor must be installed in the computer to be used for monitoring
and control. s"Installing EasyMP Software" in the EasyMP Setup Guide
• Configure the network settings to establish connections between the
projectors and the computer via Access point mode, or Wired LAN
connection mode. s "Connecting in Access Point Mode or Wired LAN
connection mode" in the EasyMP Setup Guide
• If using Windows 2000/NT4.0/XP, the computer must be started up in
Administrator mode.
In Windows, select "Start" - "Programs" (or, "All Programs") -"EPSON
1
Projector" - "EMP Monitor".
The EMP Monitor starts.
41
Page 43

Setting, Monitoring and Controlling from a Computer
Click the "Resister projector" button during initial start-up after installing
2
the EMP Monitor, or to register additional projectors. Continue with Step
8 if all projectors are registered.
Click the "Auto detect" button.
3
The names of the projectors currently connected to the network are displayed.
EasyMP Operation Guide
Tip :
The manual registration function is expedient if the IP address of the projector is known.
Pressing the "Manual registration" button displays the following Manually register
projector screen. Input the IP address and click the "Confirm" button. Click the "Add"
button after the projector name is displayed. This adds the projector name to the
Register projector screen.
42
Page 44

Setting, Monitoring and Controlling from a Computer
Select the projector to be monitored or controlled, then click the "Add"
4
button.
Selected Projector Name
Proceed with Step 4 if there are other projectors to monitor.
5
EasyMP Operation Guide
Add all the projectors to be monitored, and then click the "Close" button.
6
The display returns to the Register projector screen, and the added projector
names are displayed.
43
Page 45

Setting, Monitoring and Controlling from a Computer
Register all the selected projectors, and then click the "Close" button.
7
To deselect a projector registered for monitoring, select that projector, and
delete it by clicking the "Delete" button.
EasyMP Operation Guide
: Projectors Registered by the Manual Registration Function
: Projectors Registered by the Auto-detection Function
Tip :
If the IP addresses for projectors that have been registered using the manual
registration function have changed, you can select the Projector name and then click
"Edit" to change the IP address. The "Edit" button cannot be used for projectors
registered by the auto-detect function.
44
Page 46

Setting, Monitoring and Controlling from a Computer
The status of each of the respective registered projectors is displayed.
8
Once registered, the status of a registered projector will be displayed
automatically at subsequent startups of the EMP Monitor.
The display content is as shown in the following table.
Status The projector status is displayed as the following icons:
Power on, no error
EasyMP Operation Guide
Power on, error
Power off, no error
Power off, error
Network Error (The projector is not connected to the
network, the power cable is not plugged in, or
another error has occurred.)
Name This displays the projector names.
Video source This displays the selected video source.
Computer, Componento Video
S-Video
Vid eo
EasyMP
45
Page 47

Setting, Monitoring and Controlling from a Computer
Error data If an error is detected for a projector, the status will be
displayed as one of the following icons.
Lamp burnout warning
Replace the lamp.
the Lamp" in the User's Guide.
High-speed cooling in progress
Lamp problem
High internal temperature (overheating)
Internal problem
Fan error
Temperature sensor error
"Using the Indicators" in the User's Guide to
remedy problems.
It is possible to turn power ON/OFF and switch input sources for
9
registered projectors simultaneously. Select the projectors to be
controlled, and click the desired operation button.
To select all the registered projectors, click the "Select All" button.
Furthermore, just as in Windows file selection, it is possible to click the top of a
range, then click the bottom whilst pressing the [Shift] key on the keyboard to
select everything in between. Selection and deselection can be performed by
alternately clicking whilst pressing the [Ctrl] key.
See "Appendices - Replacing
EasyMP Operation Guide
46
Page 48

Setting, Monitoring and Controlling from a Computer
The buttons and their operation are shown below.
EasyMP Operation Guide
"View details"
button
Power ON Turns the projector power on.
Power OF F Turns the projector power off.
Computer This switches the video signal to a computer or
S-Video This switches the video signal to S-Video.
Video This switches the video signal to composite video.
EasyMP This switches the video signal to EasyMP.
To end, select "File" - "Close" or click the " " button.
10
This displays detailed information for the selected
projector.
component video.
Using the Mail Notification Function to Report Problems
If settings for the mail notification function have been made, notification messages
can be sent to a computer with a preset e-mail address to alert the operator at the
computer, that a problem or warning has occured with a projector, By using this
function, the operator can be notified of problems with projectors even at locations
that are removed from the projector.
• Up to a maximum of three notification destinations (addresses) can be recorded, and
notification messages can be sent to all three destinations at once.
• If a critical problem develops with a projector which causes it to suddenly stop
working, it may not be possible for the projector to send a message notifying an
operator of the problem.
• If "Standby Mode" in the projector's "Advanced1" menu is set to "Network ON",
monitoring can be carried out even when the projector is in standby mode (when the
power is off).
Before using the Mail Notification Function, check the following point.
• Network settings have been made to enable the computer and projector to
connect via Access point mode or Wired LAN connection mode.
s "Connecting in Access Point Mode or Wired LAN Connection Mode" in
the EasyMP Setup Guide
47
Page 49

EasyMP Operation Guide
Setting, Monitoring and Controlling from a Computer
Mail Notification Settings
Mail notification settings are made on the mail screen of the Network Screen
Access point mode advanced settings screen, or the Wired LAN connection
advanced settings screen. s "Connecting in Access Point Mode or Wired LAN
Connection Mode" in the EasyMP Setup Guide
If a Problem Notification is Sent by Mail
If an e-mail message with "EPSON Projector" in the subject line is sent to the IP
addresses that have been set as mail notification destinations, the message is a
notification message saying that there is a problem with the projector.
The following information will be contained in the body of the message.
Line 1 : The name of the projector where the problem has occurred
Line 2 : The IP address that has been set for the projector where the problem has
occurred
Line 3 : Details of the problem
The details of the problem are listed on separate lines. The following table shows
the details that are given in the message for each item.
Message*/Cause Remedy
Internal error "Using the Indicators" in the User’s Guide.
Fan related error
Sensor error
Lamp cover is open.
Lamp timer failure
Lamp out
Internal temperature
error
High-speed cooling in
progress
Lamp replacement
notification
No-signal
*A (+) or (–) will be appended to the start of the message.
(+): When a projector problem has occurred
(–): When a projector problem has been solved
No video signals are being input to the projector.
Check the connection status or check that the
power for the signal source is turned on.
48
Page 50

EasyMP Operation Guide
Setting, Monitoring and Controlling from a Computer
Management Using SNMP
When the projector and a computer are connected with the wireless LAN access
point mode or wired LAN connection mode, it is possible to perform projector
monitoring, control, and error messaging from the computer using SNMP
SNMP manager program.
For details, please contact one of the service offices provided in the catalog.
Tip :
• The administrative function using SNMP uses a SNMP management program. For this
reason, it should be used by a person familiar with networks, such as a network
administrator.
• The administrative function using SNMP can only be used when connected via wireless
LAN in Access point mode. It cannot be used on a wireless LAN in Easy connect mode.
and the
49
Page 51

EasyMP Operation Guide
All rights reserved. No part of this publication may be reproduced, stored in a
retrieval system, or transmitted in any form or by any means, electronic,
mechanical, photocopying, recording, or otherwise, without the prior written
permission of SEIKO EPSON CORPORATION. No patent liability is assumed
with respect to the use of the information contained herein. Neither is any
liability assumed for damages resulting from the use of the information
contained herein.
Neither SEIKO EPSON CORPORATION nor its affiliates shall be liable to the
purchaser of this product or third parties for damages, losses, costs, or expenses
incurred by purchaser or third parties as a result of: accident, misuse, or abuse
of this product or unauthorized modifications, repairs, or alterations to this
product, or (excluding the U.S.) failure to strictly comply with SEIKO EPSON
CORPORATION’s operating and maintenance instructions.
SEIKO EPSON CORPORATION shall not be liable against any damages or
problems arising from the use of any options or any consumable products other
than those designated as Original EPSON Products or EPSON Approved
Products by SEIKO EPSON CORPORATION.
General Notice:
EPSON is a registered trademark of SEIKO EPSON CORPORATION.
Macintosh, Mac, and iMac are registered trademarks of Apple Computer, Inc.
IBM is a registered trademark of International Business Machines Corporation.
Windows and Windows NT are trademarks of Microsoft Corporation in the
United States of America.
Dolby is registered trademarks of Dolby Laboratories.
Portions of this software are based in part on the work of the Independent JPEG
Group.
The freely available TIFF library written by Sam Leffler, Copyright © 19881997 Sam Leffler and Copyright © 1991-1997 Silicon Graphics, Inc., is used
for loading, drawing and writing the TIFF file.
Other product names used herein are also for identification purposes only and
may be trademarks of their respective owners. EPSON disclaims any and all
rights in those marks.
This product uses open source software.
Copyright © 2003 by SEIKO EPSON CORPORATION
 Loading...