

Page 1
Page 2

EasyMP Setup Guide
English
English
Page 3
Notations Used in This Guide
Caution :
Tip :
[(Button Name)]
When "this unit", or "projector" appears in the text of this guide, it may refer to
items which are accessories or optional equipment in addition to the main
projector unit itself.
Computer Instructions
In this edition, Windows procedures will be used to explain operations which
are common to both Macintosh and Windows. When the procedures differ they
will be explained individually.
Indicates procedures which may result in damage or
injury if sufficient care is not taken.
Indicates additional information and points which may be
useful to know regarding a topic.
Indicates pages where related information or more
detailed description is provided.
Indicates that an explanation of the underlined word or
words in front of this symbol appears in the glossary of
terms. See "Appendices: Glossary". p.82
Shows the buttons on the control panel projectors input
ports, or on the remote control.
Ex: [ESC]
Indicates that explanation continues on the next page.
Page 4

Contents
Functions .......................................................................................... 5
Projecting Computer Images via a Network (Network Screen) ............ 5
All-in-one Projector Management .........................................................6
Giving a Presentation Without a Computer (CardPlayer)......................7
Before Use
Operating Environment ................................................................... 10
System Requirements for EasyMP Software....................................... 10
Conditions for Connecting to Compatible Wireless LAN Cards
and Access Points..............................................................................11
Precautions Regarding the Use of the Included
Wireless LAN Card...........................................................................12
Inserting and Removing Cards ....................................................... 14
Installation ...........................................................................................14
Removal...............................................................................................15
Interpreting the Access Lamp..............................................................16
Installing EasyMP Software ............................................................ 17
Projecting Images from a Computer Communicating via
a Network (Network Screen)
English
Types of Network Connections ....................................................... 22
Connecting Using Easy Connect Mode .......................................... 23
Before Connecting...............................................................................23
Steps for Connecting Using Easy Connect Mode................................24
Using the Toolbars .......................................................................... 37
Icon Use and Actions........................................................................... 37
E-Zoom................................................................................................ 39
Basic Settings.......................................................................................40
Disconnecting from a Network Connection..................................... 42
Disconnecting at the Computer............................................................42
Disconnecting at the Projector.............................................................42
Connecting in Access Point Mode or
Wired LAN Connection Mode ...................................................... 43
Before Connecting...............................................................................43
Steps for Connecting in Access Point Mode or
Wired LAN Connection Mode..........................................................44
3
Page 5

Contents
What If the Projector You Want does not Appear?.......................... 60
Connecting in IP Connect Mode ......................................................... 60
Creating and Connecting to Groups .................................................... 65
Transmitting Encrypted Data ........................................................... 75
Appendices
Compatible PC Cards ..................................................................... 80
Compatible Memory Cards ................................................................. 80
Compatible Wired LAN Cards ............................................................ 80
Uninstalling EasyMP Software ........................................................ 81
Glossary .......................................................................................... 82
About Compliance Statement ......................................................... 84
Index ............................................................................................... 86
4
Page 6
Functions
EasyMP supplied with this unit is divided into the following two functions:
• Network Screen Function - connects to a network and projects images
from a computer.
• CardPlayer Function - projects files stored on a memory card in this
projector and allows a presentation to be shown without connecting to a
computer.
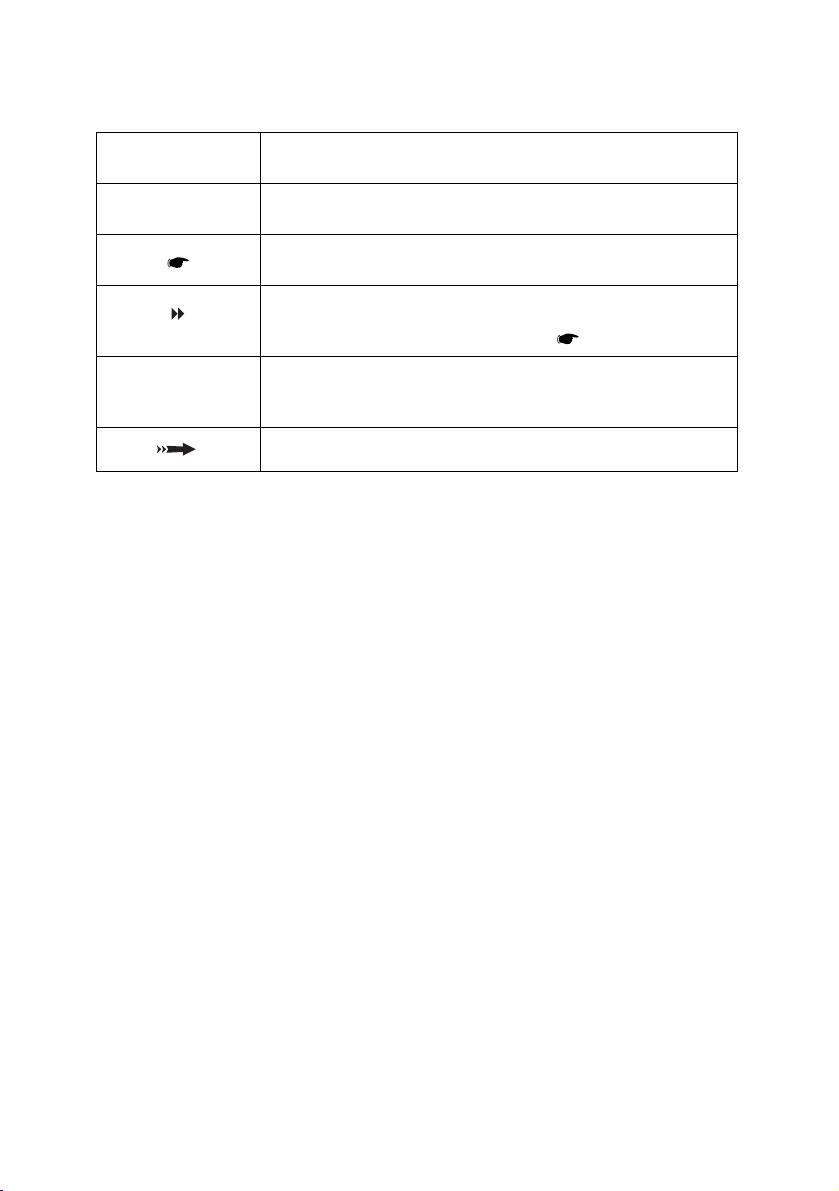
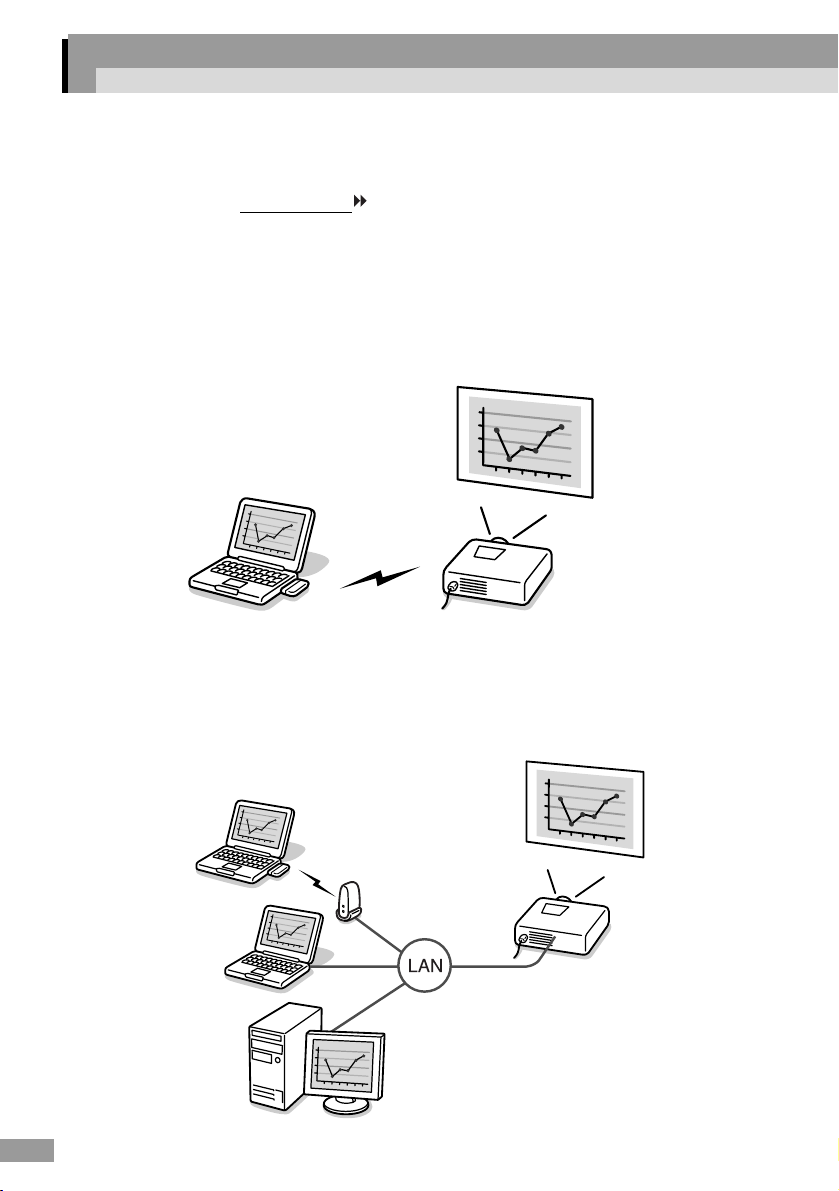
Projecting Computer Images via a Network (Network Screen)
If a projector equipped with Network Screen is connected to a network via a
wireless LAN, computer images can be projected without cables.
Additionally, if the projector is connected to a LAN, the images of a computer on
the network can also be projected.
Wireless Connection
English
5
Page 7
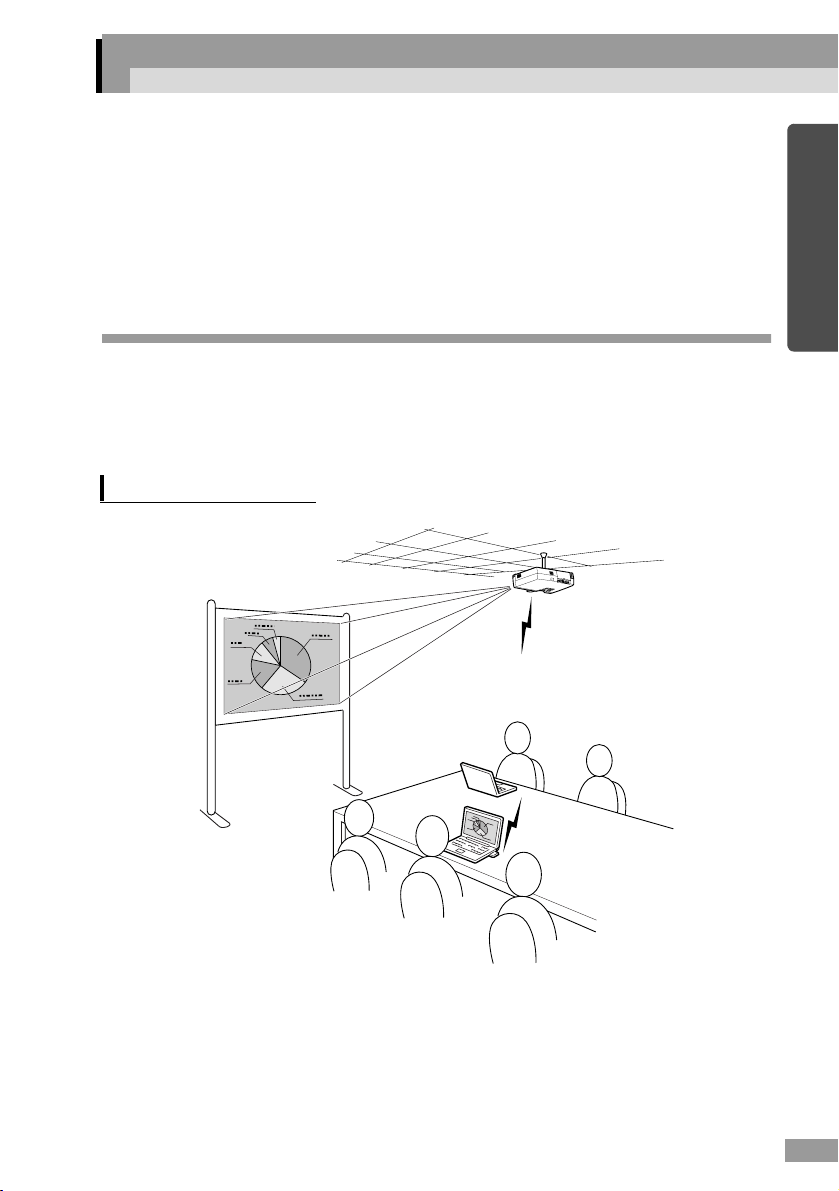
Functions
Wired LAN Connection
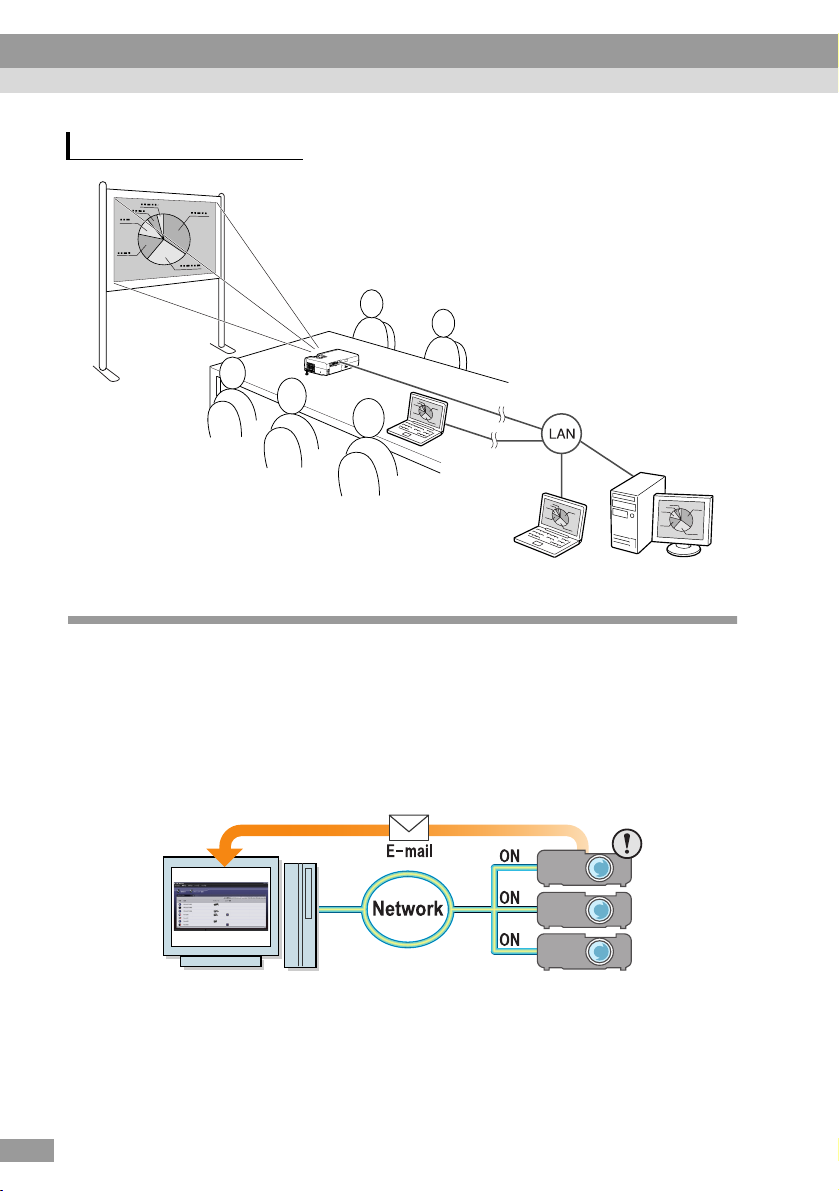
All-in-one Projector Management
If any errors occur with a projector, the projector can be made to notify the details
of these errors to a designated e-mail address.
In this way, projectors installed in remote locations can be monitored and controlled
from one place, saving time and energy.
If "EMP Monitor" is used, you can simultaneously turn the power to multiple
projectors on or off, and control multiple projectors connected to a network.
6
Page 8
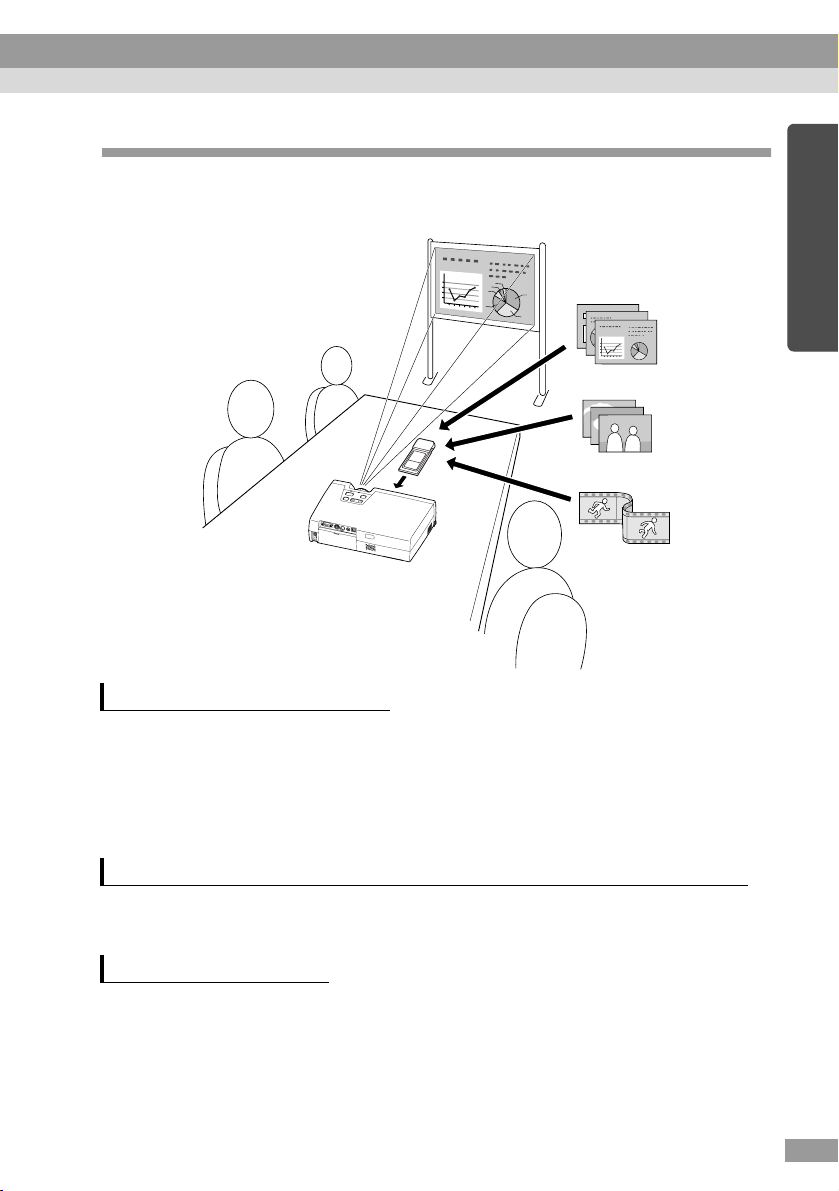
Giving a Presentation Without a Computer (CardPlayer)
By using CardPlayer, files saved to a memory card can be projected without using a
computer.
Scenario files
Graphic files
Movie files
Projecting a PowerPoint File
By using EMP SlideMaker2, the essential parts can be extracted from a Microsoft
PowerPoint file, rearranged to create a "scenario" and transmitted to a memory card.
As these transmitted scenarios are reproducible by Card Player, PowerPoint
presentations can be made at your destination by carrying just the projector and the
memory card on which the presentation is stored.
English
Projecting Photograph Data from a Digital Camera or Memory Card
In addition to being able to view the files saved on a memory card in a list, files can
be projected in order, one at a time, like a slideshow.
Projecting Movie Files
MPEG movies can also be projected. If a movie file recorded on a digital video
camera or downloaded from the internet is stored on a memory card, it can be
played back by CardPlayer in the same way as an graphic file. If sound has been
recorded with the MPEG movie, the sound will also be played back. A more
effective presentation can be performed using movie files.
7
Page 9

Page 10

Before Use
This chapter describes the preparation for connecting the projector
to a computer.
Operating Environment 10
• System Requirements for EasyMP Software...................... 10
• System Requirements for EMP NS Connection................... 10
• System Requirements for EMP SlideMaker2 ....................... 10
• System Requirements for EMP Monitor ............................... 11
• Conditions for Connecting to Compatible
Wireless LAN Cards and Access Points.............................. 11
• Precautions Regarding the Use of the Included
Wireless LAN Card............................................................... 12
• EM Safety Precautions......................................................... 12
• Frequency Precautions......................................................... 13
• International Travel Precautions........................................... 13
Inserting and Removing Cards 14
• Installation ............................................................................. 14
• Removal.................................................................................. 15
• Interpreting the Access Lamp.............................................. 16
• Interpreting the Card Slot Access Lamp............................... 16
• Interpreting the Wireless LAN Card Access Lamp ............... 16
Installing EasyMP Software 17
9
9
Page 11

Operating Environment
System Requirements for EasyMP Software
The "EasyMP Software CD-ROM" provided, contains the following three
programs.
• EMP NS Connection
Transmit images from computer to a projector via a network.
• EMP SlideMaker2
Create and transmit scenarios.
• EMP Monitor
Simultaneously monitor and control multiple projectors on a network.
The hardware requirements for each software program differs as follows.
System Requirements for EMP NS Connection
OS Windows 98/Me/2000/XP
Mac OS X10.2.4 or above
CPU Windows Minimum: Pentium III 500MHz (Recommended:
Pentium III 700MHz or higher)
Macintosh Minimum: Power PC G3 or greater
(Recommended: 500MHz or higher)
Memory Windows At least: 128MB (Recommended: 192MB or above)
Macintosh At least: 256MB
Available hard
disk space
Display At least VGA (640×480) resolution (Recommended: XGA
At least 20MB
(1024×768) resolution, 16-bit colour (Windows) or Thousands
(Macintosh))
System Requirements for EMP SlideMaker2
OS Windows 98/Me/2000/XP
CPU Minimum: Celeron 300MHz (Recommended: Celeron
400MHz or higher)
Memory Minimum: 64MB (Recommended: 128MB or above)
Available hard
disk space
Display At least SVGA (800×600) resolution (Recommended: XGA
* Macintosh is not supported.
10
At least 12MB
(1024×768) resolution or above)
*
Page 12

System Requirements for EMP Monitor
OS Windows 98 Second Edition/Me/NT 4.0 Workstation/2000
Professional/XP
CPU Minimum: Pentium MMX 166MHz (Recommended: Pentium
II 233MHz or higher)
Memory 64MB or more (128MB or more recommended)
Available hard
disk space
Display Minimum: XGA (1024×768) or higher resolution, 16-bit
* Macintosh is not supported.
At least 6MB
colour or higher
*
Conditions for Connecting to Compatible Wireless LAN Cards and Access Points
The included wireless LAN card can connect with the following Wi-Fi compliant
equipment.
• Wireless LAN cards
• Computers with internal wireless LAN functionality
• Access points
The enclosed wireless LAN card is designed to be used exclusively with this
projector. Our company will not be held responsible for any damage caused if the
LAN card is inserted into a computer.
English
11
Page 13
Operating Environment
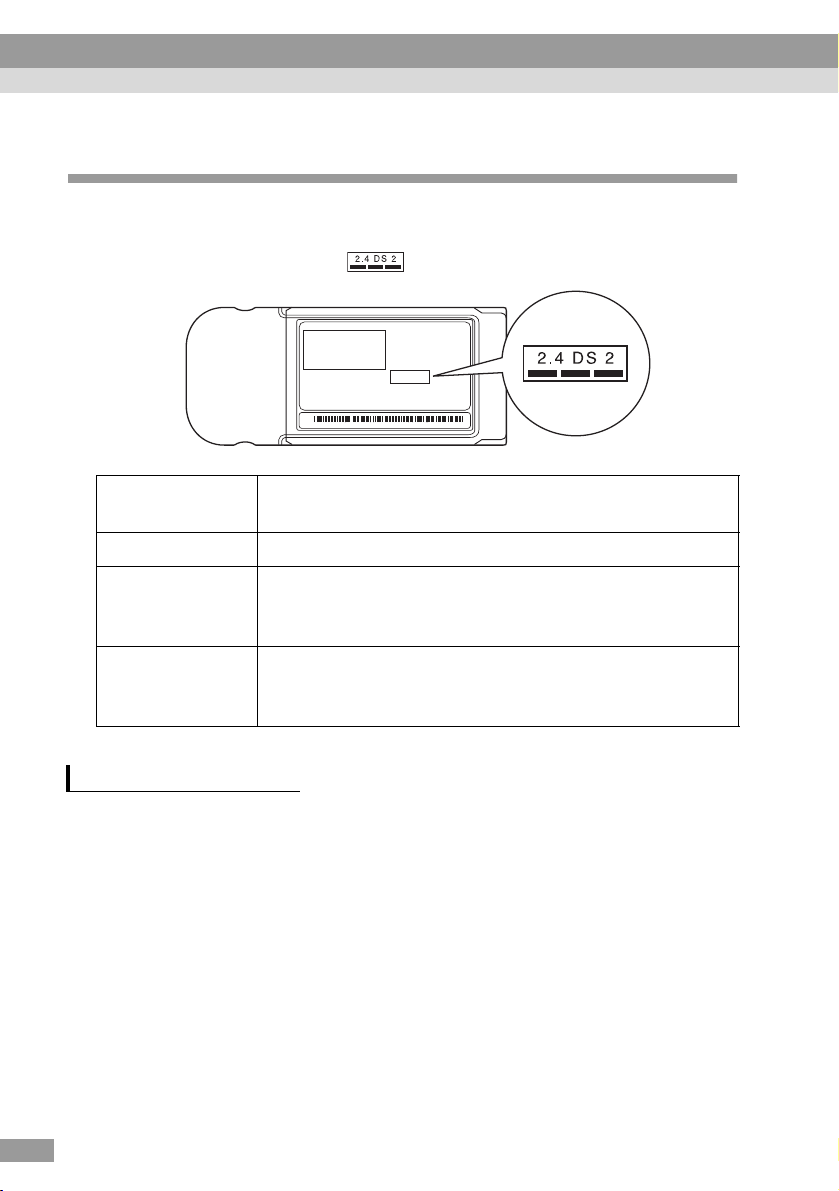
Precautions Regarding the Use of the Included Wireless LAN Card
Do not use a wireless LAN card other than the one provided with this
projector.
The meaning of the label below for the included LAN card is as follows.
Frequency
Range
Modulation HR/DSS-SS
Potential
Interference
Range
Can/Can not
change
frequency
2.4GHz band
Less than 20m
Uses all bands, and is capable of avoiding "licenced" as well
as "unlicenced" bands.
EM Safety Precautions
Be aware of the following points regarding the included wireless LAN card.
• May exert electromagnetic interference on, and cause malfunction of,
cardiac pacemakers. Before use, ensure that electromagnetic interference
does not occur.
• May exert electromagnetic interference on, and cause malfunction of,
sensitive medical equipment. Before use, ensure that electromagnetic
interference does not occur.
• Do not use near microwave ovens. Wireless communication may be
interrupted by electromagnetic interference generated by microwave
ovens.
• Use of this product on aircraft may be restricted in some countries. Use of
this product is based on due diligence with regard to regulations.
12
Page 14

Frequency Precautions
The frequency range which applies to the wireless LAN cards that can be used in
the projector is the 2.4GHz band. This wireless LAN card operates in the same
frequency bandwidth as industrial, scientific, and medical devices such as
microwave ovens and mobile unit identification (RF-ID) systems (licenced
premises radio stations and unlicenced specified low-power radio stations) used in
factory production lines.
Before using the wireless LAN card, check that there are not any radio stations for
mobile unit identification or specified low-power radio station premises nearby.
In the event that this wireless LAN card should interfere electromagnetically with
the premises of a radio station used for mobile unit recognition, cease use
immediately and stop generating the electromagnetic field.
Contact your nearest dealer or the address provided under "International Warranty
Conditions" in Safety Instructions/World-Wide Warranty Terms if this wireless LAN
card interferes electromagnetically with a special low-power radio station used for
mobile unit identification or causes similar problems.
International Travel Precautions
The wireless LAN card configuration is based on the specifications of the country
of purchase.
Because the wireless LAN card is designed to conform to the channel and
frequency limits of the country it is intended to be used in, please be cautious when
using it outside the country of purchage.
English
13
Page 15
Inserting and Removing Cards
Inserting and removing PC cards will be explained using the included wireless LAN
card provided as an example. When using a other PC cards or inserting or removing
a card in a PC card slot on a computer, refer to the documentation included with the
card.
Tip :
The following PC cards can be inserted in the card slot on this projector.
• Wireless LAN card (only available with the one included with this projector)
• Memory card
For detailed specifications regarding compatible cards, refer to "Compatible PC
Cards". p.80
• Wired LAN card
For details on compatible wired LAN cards, refer to "Compatible Wired LAN Cards".
p.80
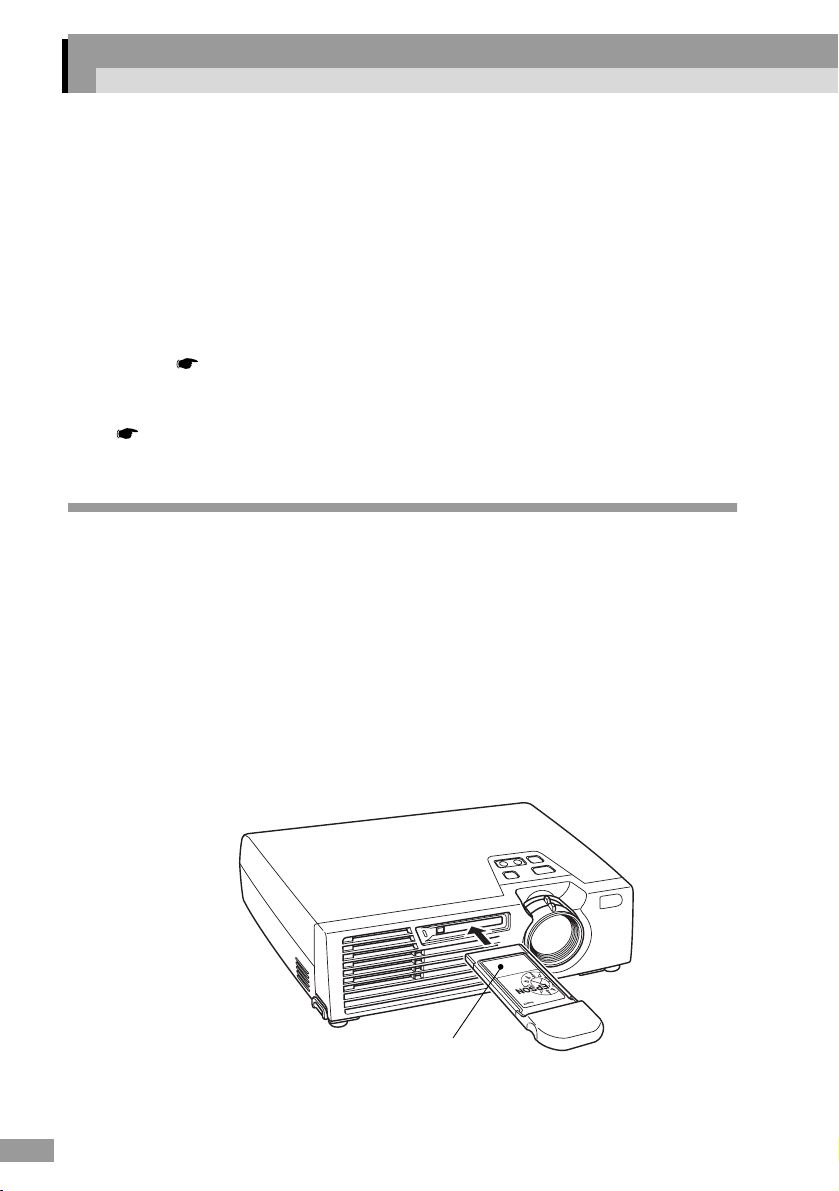
Installation
Caution :
• Insert the PC card facing the right way. Installing the device back to front or upside
down may cause failure or damage.
• Always remove the card before transporting the projector.
14
Hold the wireless LAN card with the face outwards and insert it into the
projector card slot.
Insert firmly into the slot until it is secure. Once the wireless LAN card has
been fully inserted in the card slot, the rear edge of the card will protrude from
the slot.
This side up
Page 16
Removal
Caution :
• Do not remove a PC card when the access lamp is lit green, when connected to a
network or when projecting a scenario. Improperly removing a PC card may result in
damage to the card or data destruction on a memory card.
• The PC card gets hot during and after projector use. Please handle the card carefully to
avoid personal injury or burns.
• When you wish to remove a memory card whilst using CardPlayer, be sure to close
CardPlayer before removal. CardPlayer may malfunction if a memory card is removed
without closing CardPlayer first. "Closing CardPlayer" in the EasyMP Operation
Guide
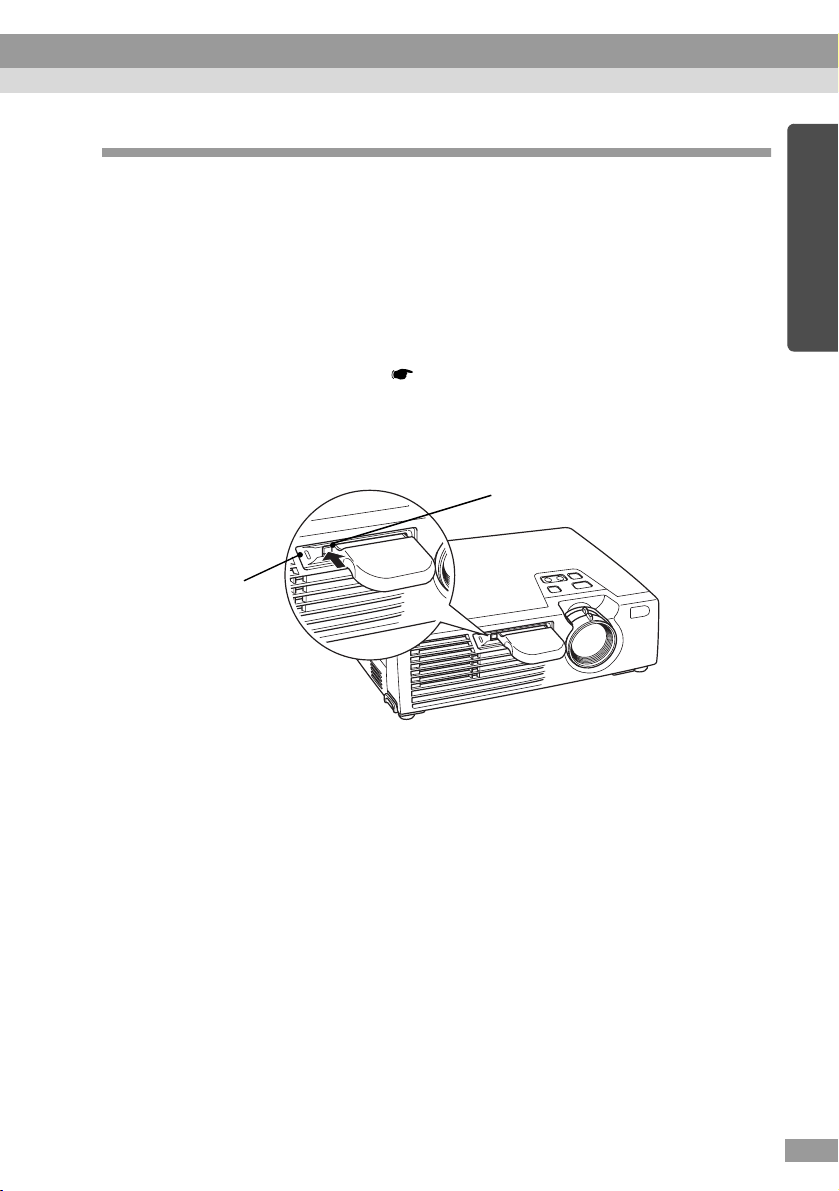
Press the eject button left of the card slot.
1
The eject button will pop out.
Eject button
Card slot
access lamp
English
Press the eject button again.
2
Enough of the wireless LAN card will be ejected so that you can grasp the edge
of the card and pull it straight out of the slot.
Caution :
Be sure to press the eject button back in to prevent it from being broken or damaged.
15
Page 17
Inserting and Removing Cards
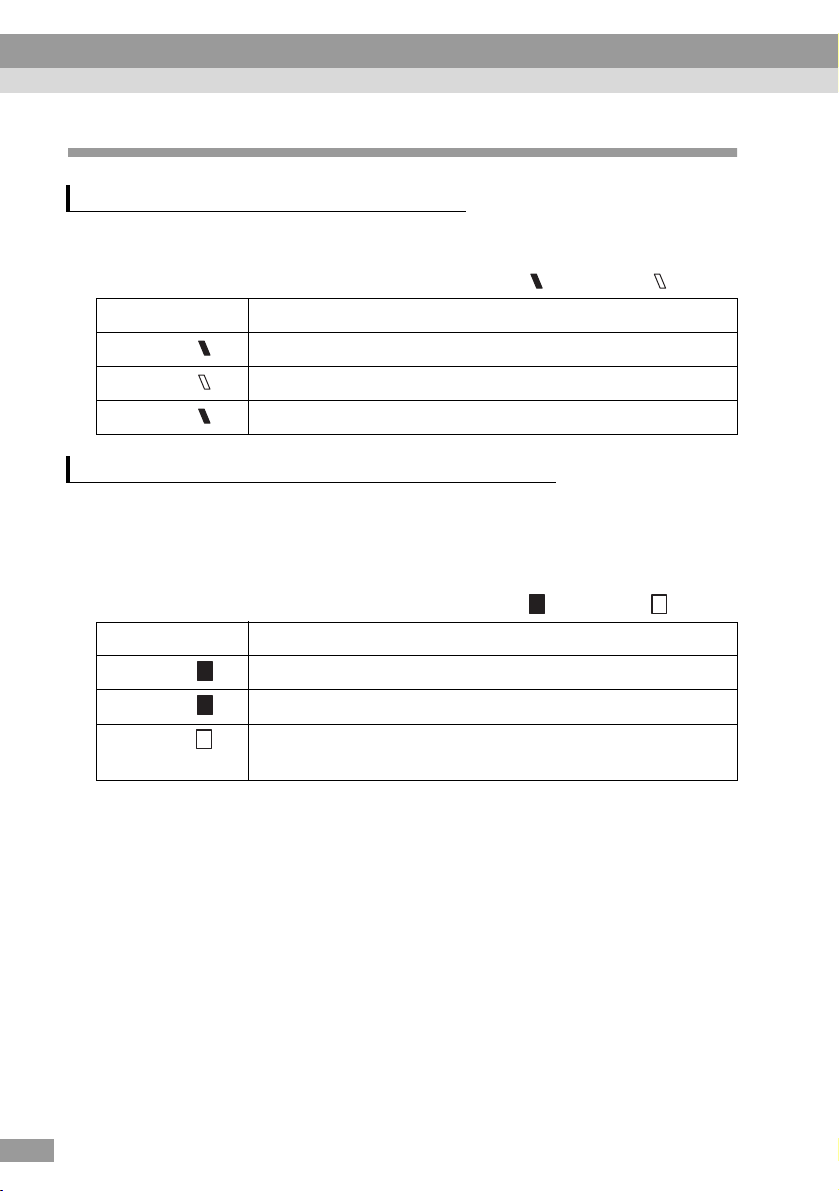
Interpreting the Access Lamp
Interpreting the Card Slot Access Lamp
The colour of the card slot access lamp indicates the access status of the memory
card as follows when the memory card is inserted.
: ON : OFF
State Access status
Green Data is being read from the memory card.
OFF Not accessing the memory card.
Red An error occurred whilst reading the memory card.
Interpreting the Wireless LAN Card Access Lamp
The card slot access lamp is not on when the wireless LAN card is inserted in the
card slot.
The communication status can be determined by the access lamp on the wireless
LAN card as follows.
: ON : OFF
State Communication status
Ye l l o w The wireless LAN card is ready for use.
16
Green Data is being transmitted.
OFF The projector is off or the wireless LAN card is not inserted
correctly.
For information about the wired LAN card access lamp(s), refer to the
documentation of the wired LAN card you are using.
Page 18
Installing EasyMP Software
Install "EMP NS Connection", "EMP SlideMaker2", and "EMP Monitor" from the
accessory "EasyMP Software CD-ROM" individually, or as needed.
When using Windows 2000/NT4.0/XP, only a user with administrator privileges can
install the software.
Before installation, close all other programs.
For Windows
Turn on the computer, and insert the "EasyMP Software CD-ROM" in
1
the CD drive.
The Setup program should start automatically.
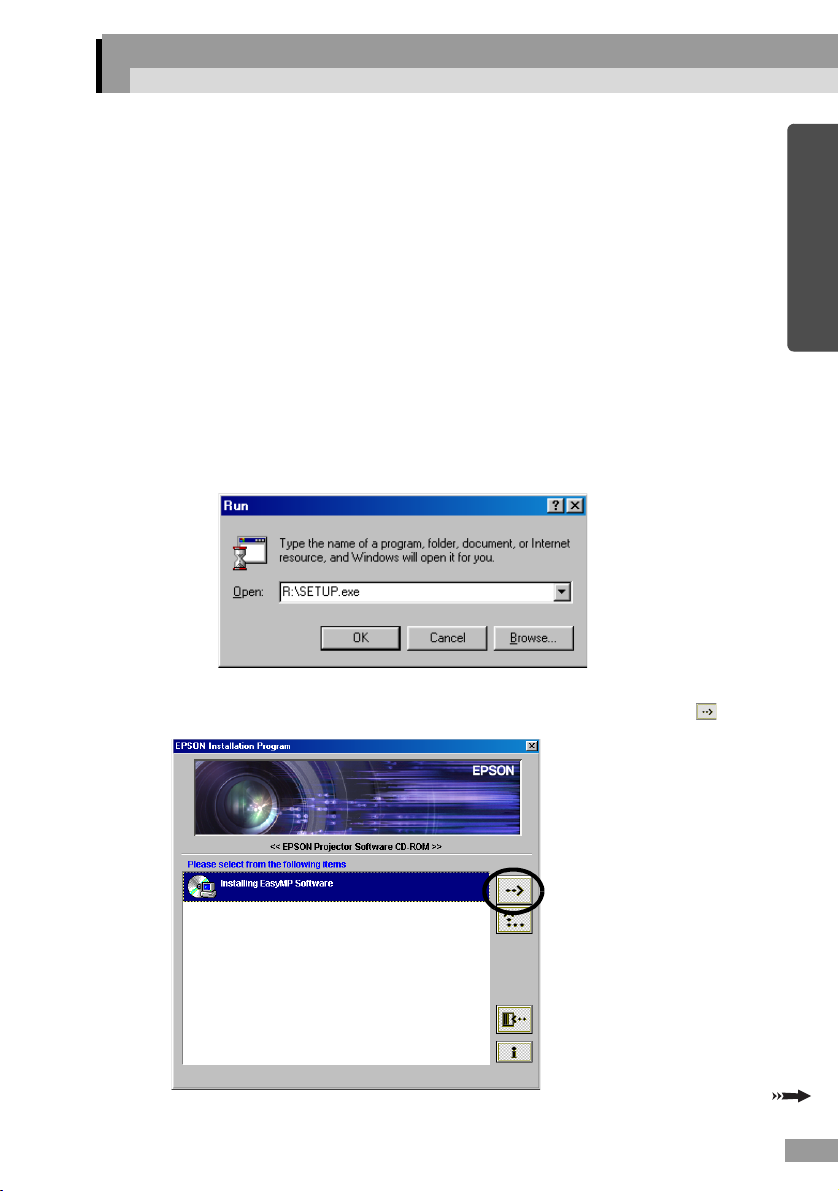
Tip :
If the Setup program does not start automatically, manually start the program by
selecting "Start"-"Run" to get the "Run" dialogue box. Specify the location of the setup
program by entering the "R(CD drive letter):\SETUP.exe" and then clicking "OK".
Verify that "Installing EasyMP Software" is selected, and click " ".
2
English
17
Page 19

Installing EasyMP Software
Select the names of the software products to install, then click " ".
3
Installation begins. Follow the instructions on the screen to continue
installation.
The software cannot all be installed at the same time.
Caution :
When installing EMP NS Connection in Windows 2000/XP, the following installation
confirmation window is displayed.
18
When prompted, please be sure to select, "Yes" (Windows 2000) or "Continue Anyway"
(Windows XP).
If you do not select "Yes" or "Continue Anyway", Network Screen will not operate
normally.
When the "EPSON GDI Monitor Driver" is being installed, the screen may go blank for
a moment, but this is not a problem. Please allow the installarion to continue.
Control will return to the screen in Step 3 once installation is complete.
4
To install another software application, select the name and click " ".
To finish, click " ".
Page 20
For Macintosh
Turn on the power of the computer then insert the include "EasyMP
1
Software CD-ROM".
A window will open containing the "EMP NS Connection" installer icon.
Double-click on the "EMP NS Connection" icon.
2
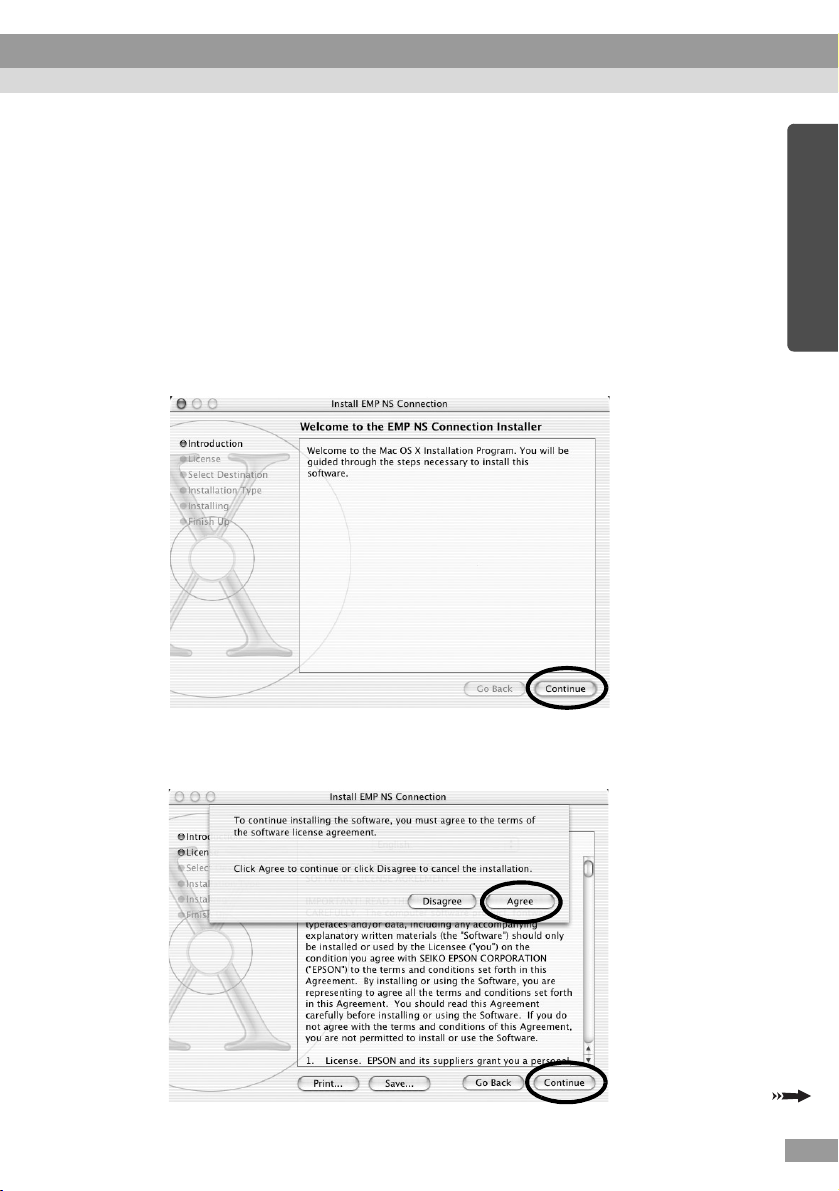
The contents of the installer are displayed.
Click on "Continue".
3
The software licensing agreement is displayed. Confirm the contents
4
then click on the "Continue" and "Agree", in that order.
English
19
Page 21
Installing EasyMP Software
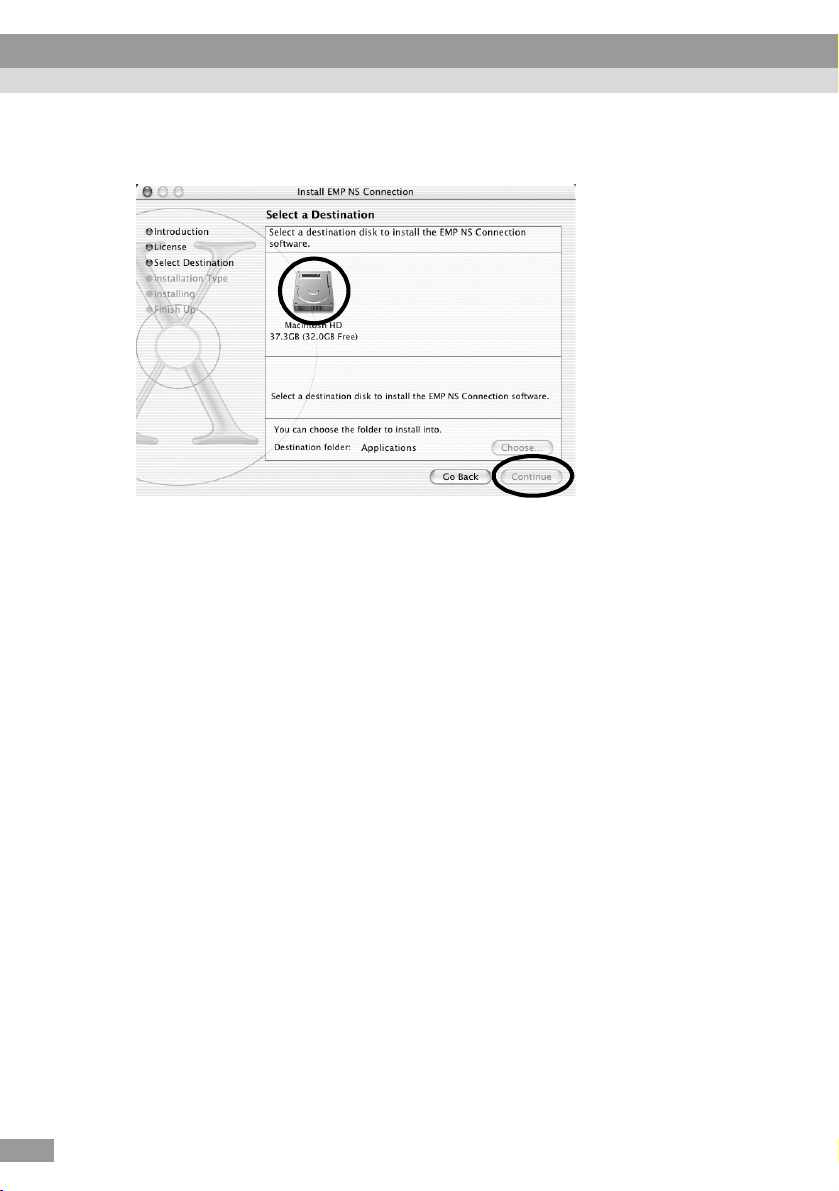
The installation selection screen opens.
5
Click on the destination drive then doubule-click on the "Continue".
Tip :
• After you click on the destination drive, if you click on "Choose...", you can select a
specific folder location to install to.
Click on "Install".
6
The installation completes.
20
Close the window.
7
Tip :
• Only EMP NS Connection can be installed on the Macintosh
Page 22

Projecting Images from a
Computer Communicating via a
Network (Network Screen)
Here, the procedures for connecting with and projecting from a
computer via a network, how to use the toolbar and the method for
terminating connection, are explained.
Types of Network Connections 22
Connecting Using Easy Connect Mode 23
• Before Connecting................................................................. 23
• Steps for Connecting Using Easy Connect Mode ............... 24
• Connection Settings on the Projector................................... 24
• Computer Connection Settings............................................. 30
• Connecting to a Computer.................................................... 31
• Connection Restrictions........................................................ 35
Using the Toolbars 37
• Icon Use and Actions ............................................................ 37
• E-Zoom................................................................................... 39
• Basic Settings......................................................................... 40
Disconnecting from a Network Connection 42
21
• Disconnecting at the Computer ........................................... 42
• Disconnecting at the Projector............................................. 42
Connecting in Access Point Mode or
Wired LAN Connection Mode 43
• Before Connecting................................................................. 43
• Steps for Connecting in Access Point Mode or
Wired LAN Connection Mode............................................. 44
• Connection Settings on the Projector................................... 44
• Connection Settings on the Computer.................................. 55
• Connecting to a Computer.................................................... 56
What If the Projector You Want does not Appear? 60
• Connecting in IP Connect Mode.......................................... 60
• Creating and Connecting to Groups ................................... 65
• Creating Groups ................................................................... 65
• Connecting to a Group.......................................................... 69
• Exporting Groups.................................................................. 72
• Importing Groups.................................................................. 73
Transmitting Encrypted Data 75
21
Page 23
Types of Network Connections
The connection between a computer and the projector via a network can be in one
of two forms.
• Connecting in Ad hoc mode
This is a method of peer to peer connection between a computer and a projector
using a wireless LAN card.
Communication takes place directly between the computer and projector, without
the use of an access point.
Making a connection is as simple as setting up a matching keyword or number on
both the projector and computer.
22
• Connecting in Infrastructure Mode
This is the method of using a wired LAN, or a wireless LAN card and an access
point to connect to a client/server based LAN system. The projector can be shared
from the computer linked to the LAN.
Page 24

Connecting Using Easy Connect Mode
This section describes the steps necessary to project images from a computer using
Easy connect mode, perform operations when projecting images, and to disconnect.
Perform the following steps prior to projecting images.
1. Set up the Easy connect mode settings on the projector.
2. Set up the connection on the computer.
3. Start EMP NS Connection on the computer, and connect to the network.
Once these settings have been established, future sessions can begin by just
connecting the devices. When connecting to a network for the first time or when
settings are changed, refer to "Connection Settings on the Projector" ( p.24 ). If
the projector and computer connection settings are already established, refer to
"Connecting to a Computer" ( p.31 ).
Before Connecting
Ensure that the following procedures have been carried out before connecting a
computer and projector via a network.
• Install EMP NS Connections on the computer you will be using. p.17
• Prepare the computer settings to use either a wireless LAN card or
internal wireless LAN functionality.
For Windows, set the WEP
the wireless LAN card installed in the computer, or the computer’s
documentation.
• For optimal performance, set the screen resolution of the computer you
are using to XGA or lower with a colour depth of 16bit (Windows) or
Thousands (Macintosh).
to OFF. For setup, see the documentation for
English
23
Page 25
Connecting Using Easy Connect Mode
Steps for Connecting Using Easy Connect Mode
Caution :
• Do not unplug the power cable when EasyMP is in use (screens are changing or the
access lamp on the wireless LAN card is lit green).
• Do not remove the wireless LAN card when the access lamp on the wireless LAN card is
lit green, or when connected to a network. Doing so may damage the wireless LAN card.
Connection Settings on the Projector
First, set up the Easy connect mode connection settings on this projector.
Connection settings are found on the Easy connect mode advanced settings screen
of the Network Screen.
Modify these connection settings using the remote control provided.
This step does not need to be performed if these settings have already been
established.
Insert the wireless LAN card into the card slot on this projector.
1
See "Installation" for details. p.14
Press the [Power] button on the remote control to turn on the projector.
2
24
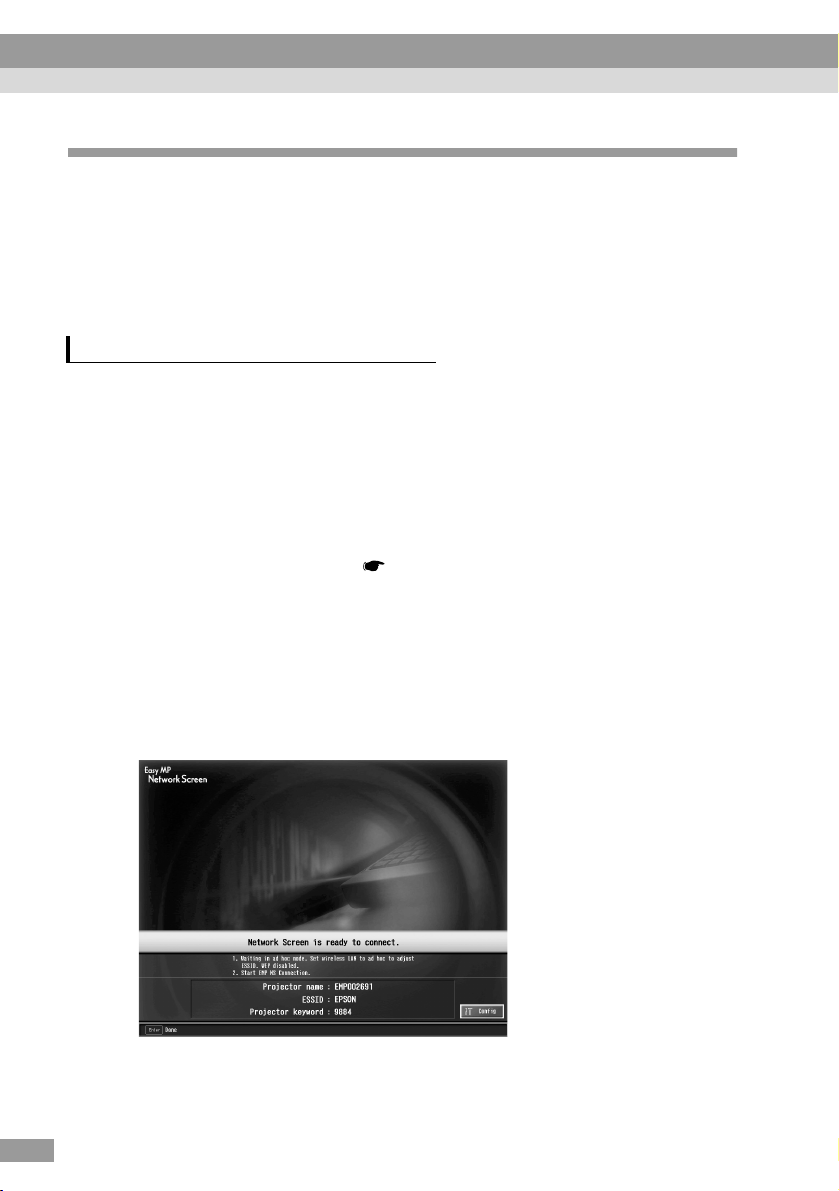
Press the [Comp/EasyMP] button on the remote control. "EasyMP" will
3
be displayed on the screen.
EasyMP starts and the following screen is displayed.
ESSID ad hoc mode screenshot
Page 26
Tip :
If the wireless LAN card is not inserted in the card slot on the projector, the following
screen is displayed. If a wireless LAN card is installed, the screen from Step 3 is
displayed.
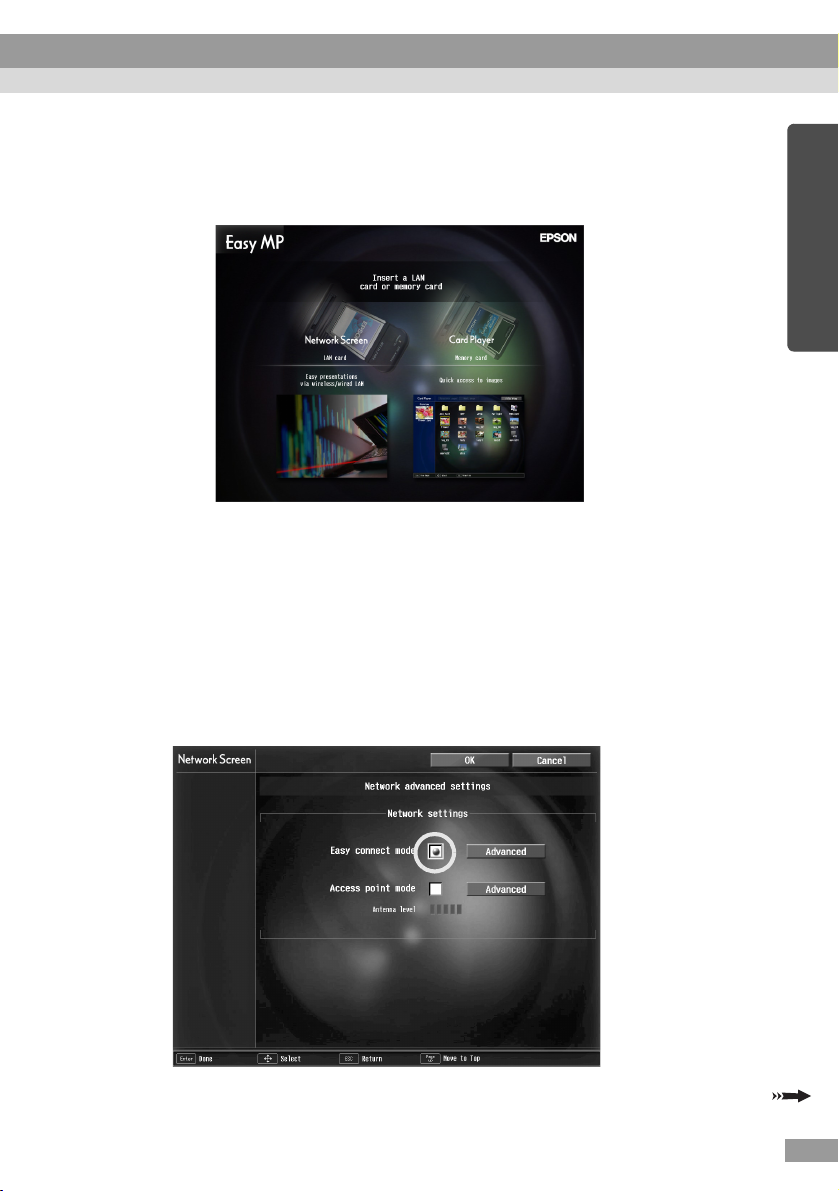
Ensure that the "Config" button at the lower right on the screen is
4
selected, and press the [Enter] button on the remote control.
The Network advanced settings screen is displayed.
Ensure that the cursor is positioned on "Easy connect mode", and press
5
the [Enter] button on the remote control.
This selects "Easy connect mode".
English
25
Page 27
Connecting Using Easy Connect Mode
Press the [ ] button on the remote control to the right, to move the
6
cursor to "Advanced", and press the [Enter] button.
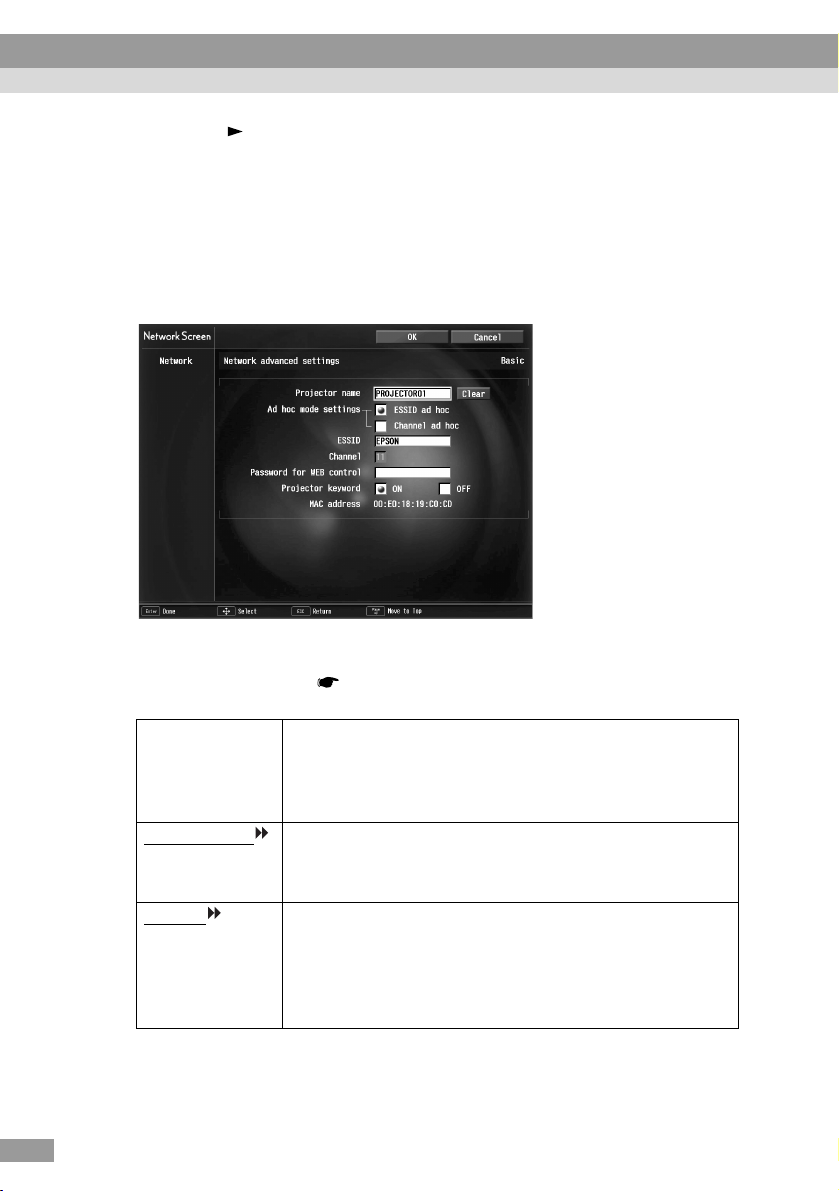
The Easy connect mode advanced settings screen is displayed.
Move the cursor to the selected item, and press the [Enter] button to set
7
that item.
The settings of each of the items is shown below.
26
Letters or numbers must be input depending on the item. See the "Entering
Letters and Numbers" ( p.28 ) for the letter and number input methods.
Projector name Enter a name for the projector. This name is used to
identify the projector when connected to the network.
Up to 16 single-byte alphanumeric characters can be
entered.
Ad hoc mode
settings
ESSID
Select either "ESSID ad hoc" or "Channel ad hoc"
(Windows only). Ensure the same mode is selected on the
connected computer.
Enter the ESSID. The initial value is "EPSON."
Up to 16 single-byte alphanumeric characters can be
entered.
Ensure that the same string is entered on the connected
computer.
Page 28

Channel
Password for
WEB control
Projector
keyword
Select the channel. The initial value is " 11."
From 1-14 channel numbers can be selected.
Be sure to enter the same channel number(s) on the
connected computer. (Windows only)
* Some channel numbers may be unavailable in some
countries. Channel numbers that are unavailable in the
country of purchase have been pre-configured so they
do not display.
When using EasyWeb, you will be asked to enter a
password when EMP Monitor is starting up. If a password
has not been setup, access can be mede by simply
pressing the computer [Enter] key when the password
entry screen is displayed.
Up to 8 single-byte alphanumeric characters are available.
If the projector keyword option is set to "ON", keyword
entry will be required to connect to the projector over a
wireless LAN. A keyword will be displayed on the screen
of the projector you are trying to connect to. Use this
function to prevent unintended or unauthorized access to
the projector during presentations, from other points on
the wireless LAN.
This option should normally be "ON".
*
English
MAC
address
* The item contents will be cleared if you select the "Clear" button on the
selected item and press [Enter] on the remote control.
Displays the wireless LAN card MAC address.
27
Page 29

Connecting Using Easy Connect Mode
Entering Letters and Numbers
Perform the following steps to enter letters and numbers.
1. Move the cursor to the item to input, and press the [Enter] button on the remote
control. The cursor turns green to indicate you are in input mode.
2. Select numbers or letters by pressing the [ ] button or the [ ] button. For the
projector name, ESSID, and WEB control password, characters are presented in
this order by pressing the [ ] button : A-Z → 0-9 → symbols → a-z → space.
Press the [ ] button to reverse the display order.
3. To input two or more numbers or letters, press the [ ] button on the remote
control. The first number or letter is selected and the cursor moves to the second
entry position. Select the second, and all the subsequent numbers and letters in
the same way as the first character.
4. After you have entered all the characters, press the [Enter] button on the remote
control to finalise the entry. The cursor will turn yellow.
When finished making setting changes, press the [Page up] button on
8
the remote control, and move the cursor to "OK". Press the [Enter]
button.
This applies the setting changes and returns to the Network advanced settings
screen.
28
Page 30
Press the [Page up] button on the remote control to move the cursor to
9
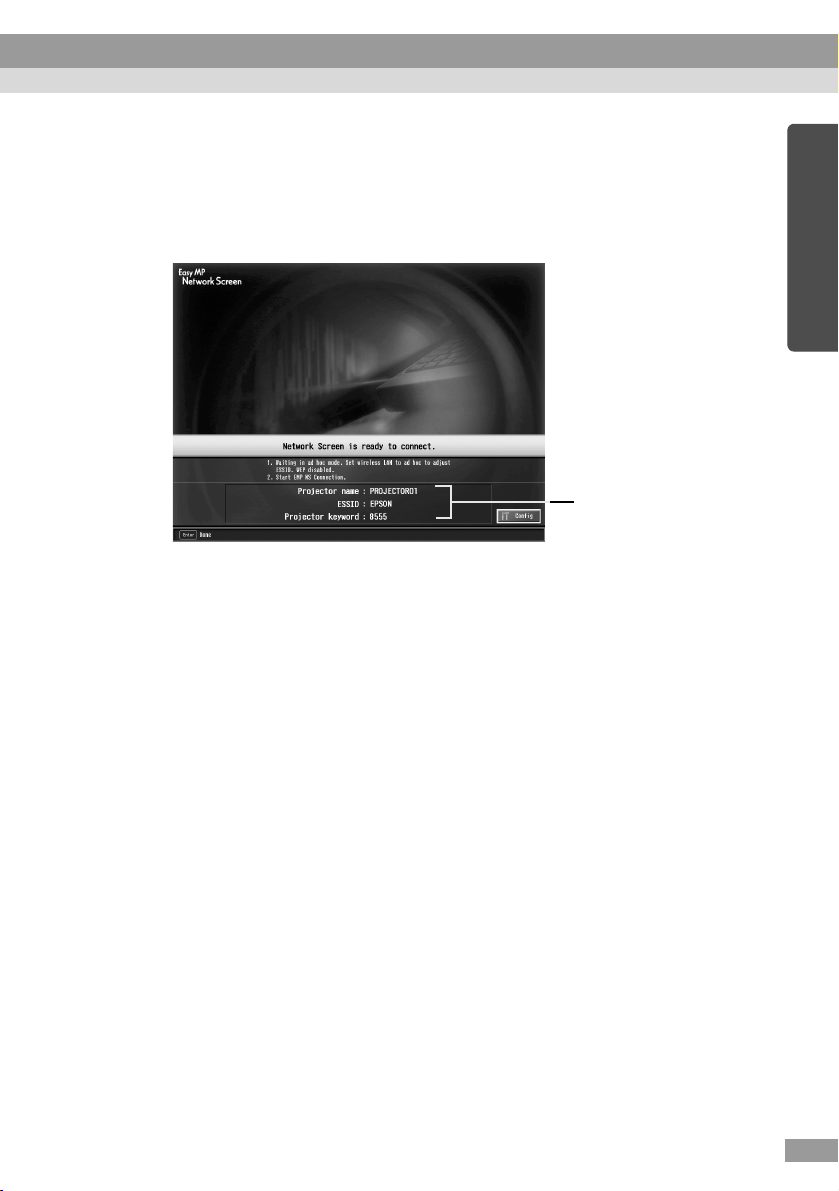
"OK", and press the [Enter] button.
This returns to the Connection Stand-by screen. The ESSID or channel number
that was set is displayed. If "Projector keyword" is "ON", the keyword is also
displayed.
The value is displayed here.
Tip :
The projector keyword changes each time the projector power is turned OFF and ON
again, and when the wireless LAN card is removed and reinstalled. When connecting to
a computer, check the projector keyword displayed in the Connection Stand-by screen
and enter that keyword. Connection is not possible using a previous keyword.
English
29
Page 31

Connecting Using Easy Connect Mode
Computer Connection Settings
For Windows
Computer connection setup is performed using the utility software provided with
the wireless LAN card. If using Windows XP, no utility is necessary to
communicate in ESSID ad hoc mode. Utility software is necessary to communicate
using channel ad hoc mode. If these settings are already established, this step need
not be performed.
Refer to the documentation for the wireless LAN card for instructions on how to use
the utility software.
If the projector has been set to "ESSID
hoc mode on the computer.
If the projector has been set to "Channel
hoc mode on the computer. Set to the same ESSID or channel shown on the
Connection Stand-by screen on the projector.
For Macintosh
The communication port settings will be explained here.
For advanced port settings (network settings) refer to your computer or AirPort
manual.
Select "System Preferences" then "Network" from the Apple Menu.
1
The Network Settings screen is displayed.
In "Port Configurations", check the port you wish to use then click "Apply
2
Now".
ad hoc", you must also select ESSID ad
ad hoc", you must also select channel ad
30
Check the port you wish to use.
Tip :
• When making "Location" settings, you can select the desired location and change all
the network settings one at a time.
Page 32

Close the window.
3
Tip :
• Select "System Preferences" then "Network" from the Apple Menu to make network
settings. Under "Network", check the box next to the port you wish to use. Uncheck the
other ports. If multiple ports are selected the projector may connect to an incorrect
network.
• For optional performance, set the screen resolution of the computer you are using to
XGA or lower with a color depth of Thousands.
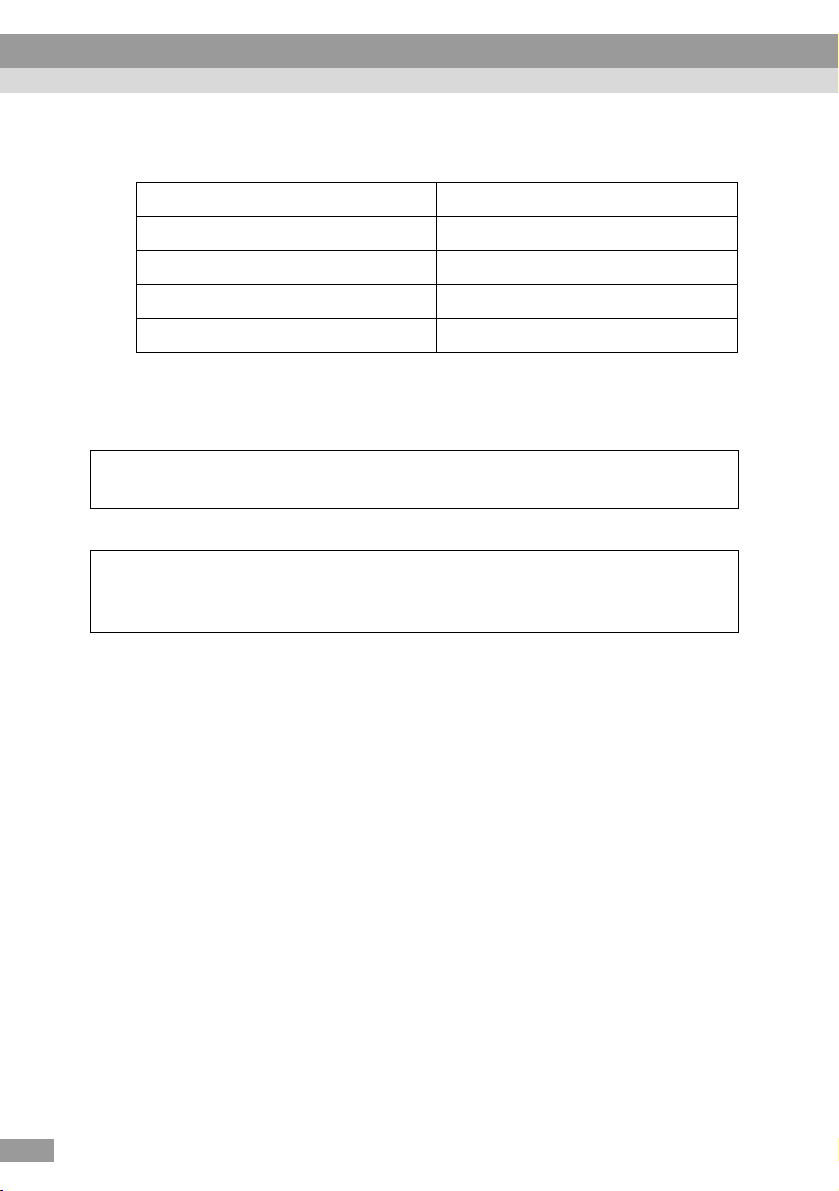
Click on the communication status icon in the top right corner of the screen and
ensure that the following is displayed.
AirPort:On
You can connect to
the wireless LAN
When the projector has been set to "ESSID ad hoc", click on the communication
status icon in the top right corner of the computer screen. Select the projector’s
ESSID name from the pull-down menu which is displayed.
Set to the same ESSID (network name) shown on the Connection Stand-by screen
on the projector.
English
Tip :
"Channel ad hoc" can only be used with Windows.
Connecting to a Computer
When finished applying the settings, run EMP NS Connection on the computer, and
establish a connection with the projector. Once these settings have been established,
future sessions can begin by just connecting the devices.
Tip :
For Windows
• Install the wireless LAN card in the computer before starting EMP NS Connection. The
wireless LAN card will not be recognised by the EMP NS Connection if the wireless
LAN card is installed after EMP NS Connection is started.
• Set the WEP
functionality.
• If you click on the " " icon of any EMP NS Connection screen, help will be displayed
with an explanation of the functions of that screen.
to OFF in either the wireless LAN card or for internal wireless LAN
31
Page 33

Connecting Using Easy Connect Mode
For Windows
1
select "Start" - "Programs" (or "All Programs") - "EPSON Projector" "EMP NS Connection".
EMP NS Connection starts.
Tip :
If EMP NS Connection is started while PowerPoint is also starting, the message
"Slideshow may not start without rebooting PowerPoint", will be displayed during
startup. If this occurs, close PowerPoint and restart it once EMP NS Connection has
finished starting.
For Macintosh
Double click on the "Applications" folder of the hard disk volume on
which EMP NS Connection was installed, then double click on the EMP
NS Connection icon. EMP NS Connection starts. Continue from step 3.
Tip :
If you selected a different derectory at the time of installation, first click on that folder
first, then double click on the EMP NS Connection icon.
The first time EMP NS Connection starts after installation, select the
2
wireless LAN card that will be used for the connection, and click "OK".
(Windows only)
32
Tip :
• In the event that the IP address has not been set in the projector's network settings,
the message, "Failed to obtain network adaptor infomation..." may be displayed. This
is because it takes time to determine the IP address, if the projector cannot connect to
the DHCP
Step 1.
• Once the network adapter in use has been selected in this Switch network screen, this
screen will not be displayed at subsequent EMP NS Connection startups. To change the
current network adapter, click the "Extension" button in the Projector selection screen
(screen in Step 3). Click the "Switch LAN" button on the Extention screen to display the
Switch network screen.
• When making "Location" settings, you can select the desired location and change all
the network settings one at a time.
server. Please wait about 60 seconds and then repeat the process from
Page 34

Select the check box for the name of the projector that you want to
3
connect, and then click the "Connect" button.
The projector name is shown in the projector’s Connection Stand-by screen.
The icon status meaning
differs according to colour
as follows.
Grey : Not connected
Orange : Connected to
another computer
Tip :
• In the event that a projector already connected to another computer is selected, the
previous connection is automatically terminated and the images of the newly connected
computer are projected.
• When multiple projectors are selected, one computer's display can be projected
simultaneously by up to a maximum of four projectors.
• Once the connection has been made, additional connections cannot be added.
Tip :
For M a ci n to sh
When you want to change the network you are using, please click the "Extension"
displayed on the screen. On the "Extension" screen which is displayed, click the "Set up
network" to display the computer's network settings screen. For instructions on how to
make settings, refer to the User's Guide of the computer you are using.
English
If the "Projector keyword" is set to "ON", enter the projector keyword
4
displayed on the Connection Stand-by screen on the projector, and click
"OK".
33
Page 35

Connecting Using Easy Connect Mode
A network connection is established between the computer and
5
projector, and the computer screens are projected by the projector.
Toolbar
The EMP NS Connection toolbar is displayed on the computer screen. Use the
toolbar to operate the projector, change options and settings, and disconnect
from the network. p.37
If the toolbar is in the way during a presentation, you can minimise it. You can
perform projector operations and setup using the remote control.
"Selecting the Projection Quality (Colour Mode Selection)" and "Basic
Operations" in the User’s Guide
"Adjusting the Screen Image" and the subsequent material, in the User’s
Guide to further adjust the projected images and perform other functions.
Tip :
• When projecting a PowerPoint file, you can skip to the next slide by pressing the [Page
down] button or return to the previous slide by pressing the [Page up] button.
• To connect to a different computer when changing presenters, start EMP NS
Connection on the selected computer and connect. The connection with the current
connected computer will be terminated automatically, and the next computer will be
connected.
34
Page 36

Connection Restrictions
When projecting images from a computer using the Network Screen, the following
requirements must be met. Please ensure that you meet these requirements.
Supported Resolution
Computer screen resolutions that can be projected are shown below. If the
resolution is on this list, the computer images may be directly projected. You cannot
connect to a computer with a resolution higher than UXGA.
• VGA (640×480)
• SVGA (800×600)
• XGA (1024×768)
• SXGA(1280×960)
• SXGA (1280×1024)
• SXGA + (1400×1050)
• UXGA (1600×1200)
If the computer resolution is higher than XGA, the following message is displayed.
For Windows
Image transfer slows if PC resolution is higher than XGA (1024 ×768 pxl.).
Do you want to continue?
For Macintosh
Image transfer performance will be affected if PC resolution is higher than XGA
(1024 ×768 pxl.) or images use more than 32 bits. Do you want to continue
connection?
English
If you click "Yes" or "OK", the connection is made, but display speed will be
slower.
If the following massage is displayed, connect after setting the resolution of the
computer to SXGA or less
Some projectors do not support SXGA. Reduce resolution and retry.
If a computer with a special screen size is used where the ratio of height - width is
not represented on the previous list, such as 1280 × 600, a screen resolution to
project images that matches the width dimension is selected from the seven choices.
In this case, the empty margins are black.
35
Page 37
Connecting Using Easy Connect Mode
Colour Depth
The number of colours on a computer screen that can be projected are shown below.
Windows Macintosh
8-bit colour (256 colours) -
16-bit colour Thousands (16-bit)
24-bit colour -
32-bit colour Millions (32-bit)
If 24·32 bit colour (Windows) or Millions (Macintosh) is used, the following
message is displayed.
For Windows
Image transfer slows if screen color is more than 24 bits.
NS Connection converts it to 16 bits. Do you want to continue?
For Macintosh
Image transfer performance will be affected if PC resolution is higher than XGA
(1024 ×768 pxl.) or images use more than 32 bits. Do you want to continue
connection?
If you click "Yes" or "OK", the connection is made, but performance will decrease.
Number of Connection Devices
A maximum of four projectors can be connected simultaneously to project images
from a single computer.
One projector cannot connect to multiple computers simultaneously.
Other
• If the transmission speed of the wireless LAN is low it may be difficult to
maintain a connection, or the connection may terminate unexpectedly.
• Audio is not transmitted.
• Animation does not play as smoothly as when played on a computer.
• Applications that use some functions of DirectX may not project correctly.
(Windows only)
• The entire screen image for an MS-DOS prompt screen cannot be
projected. (Windows only)
• Due to a limitation in the specifications of Mac OS X 10.2.x, displaying in
full screen mode may not be possible. For example, screens will not
display correctry when performing a slideshow using the Keynote
presentation software.
36
Page 38

Using the Toolbars
Icon Use and Actions
The following functions are displayed on a toolbar on the computer screen when
connected to a projector through a network.
[Windows]
12
12 13
The use and actions of icons are explained below.
1HelpDisplay EMP NS Connection help.
2 Connection
3Projector
4 Freeze Temporarily stops the image.
3
[Macintosh]
123 5 6 8791011
56
4
4
status
screen
operation
URL display
9
87
Click to toggle between displaying/hiding the
connection status screen. The icon for the currently
connected projector is displayed in green in the
connection status screen. You cannot change or add
connections.
EasyWeb is displayed.
"Setting, Monitoring and Controlling from a
Computer" in the EasyMP Operation Guide
For animations, the images on the computer continue
to play while projection is stopped. Play does not
resume from the point the images were frozen.
This is the same as the Freeze function on the
projector.
"Freeze Function" in the User’s Guide
10
11
12
English
13
37
Page 39

Using the Toolbars
5 A/V Mute This temporarily hides images.
For example, if you need to change files when
projecting computer images, and you do not want to
show this activity, A/V Mute will conveniently hide
the images from the audience. Bear in mind that
images on the computer continue to play even while
the animation is hidden. Play does not resume from
the point the images were hidden.
This is the same as the A/V Mute Function on the
projector.
"A/V Mute Function" in the User’s Guide
6E-ZOOMEnlarges the view of the image without changing the
projection size. Display the setting screen, and modify
the position and magnification. p.39
This is the same as the E-Zoom function on the
projector.
"E-Zoom Function" in the User’s Guide
7Basic
settings
Displays the setting screen to modify the brightness,
contrast and colour mode and perform keystone
correction. p.40
Brightness, contrast, and colour mode are the same
items as those set in the "Video" menu on the
configuration menu on the projector. "Video
Menu" in the User’s Guide
Keystone correction performs the same function as the
[Keystone] button on the projector. "Manually
Correcting Keystone Distortion" in the User’s Guide
8Switch
video
source
Toggles between the signals being input to the [SVideo] or [Video] ports at the rear of the projector.
Cannot be used when connecting to multiple
projectors. This is the same as the [S-Video/Video]
button on the projector control panel.
"Turning the Power On and Projecting Images" in
the User’s Guide
9Switch PC
source
Toggles between the signals being input to the
[Computer/Component Video] and [EasyMP]. Cannot
be used when connecting to multiple projectors.
"Turning the Power On and Projecting Images" in
the User’s Guide
10 Disconnect Ends the current network communication connection
between the projector and computer.
38
Page 40

11 Connection
status
indicator
Continuously flashes the top, middle, and bottom
indicators in sequence as long as the computer and
projector are connected through the network. This
light goes out when no connection is possible.
12 Exit This terminates the current network connection with
the projector, and closes EMP NS Connection.
13 Minimise This minimises the toolbar and displays it as a button.
E-Zoom
Clicking the "E-Zoom" icon displays the following setting screen allowing you to
modify the zoom magnification and position.
E-Zoom Position
Close
English
Cancel
Projector
E-Zoom This adjusts the E-Zoom magnification.
"+" button: enlarges
"-" button: reduces the effect of the zoom
This is the same as the [ ] button and the [ ] buttons on the
remote control.
Position This indicates the portion to be enlarged/reduced.
This is the same as the E-Zoom function on the projector to move
the cross and indicate the area to enlarge/reduce.
"E-Zoom Function" in the User’s Guide
Cancel This cancels E-Zoom and returns to the original display.
Projector This displays the name of the target projector.
If multiple projectors are connected, select the projector to
perform the E-Zoom operation.
Close This closes the screen.
39
Page 41

Using the Toolbars
Basic Settings
Clicking the "Basic settings" icon displays the following setting screen allowing
you to modify the brightness, contrast and colour mode and perform keystone
correction.
Brightness Keystone
Close
Contrast
Color Mode
Projector
Brightness This adjusts the brightness of the projected image.
"+" button: increases brightness
"-" button: decreases brightness
Keystone "+" button: narrows top edge
"-" button: narrows bottom edge
Has the same function as the [ ] button and the [ ] button on
the projector.
Contrast This adjusts the screen contrast.
"+" button: increases contrast
"-" button: decreases contrast
Color Mode The following five settings are available for you to get the best
from your selected images. Simply select the settings to project
the optimum quality of each image. The brightness of the
projected images will be affected differently by each mode.
Each time you click the "Color Mode" button, the following
settings are toggled in order.
Normal
GamesRGB
PresentationMeeting
Theatre
Projector This displays the name of the target projector. If multiple
projectors are connected, select the projector to which you want
to make basic setting changes.
40
Page 42

Close This closes the screen.
Tip :
• Using keystone correction will make the screen smaller.
• Try reducing sharpness to make any unevenness emphasised by keystone correction
less noticeable. "Video Menu" in the User’s Guide
• Keystone correction can also be applied from the configuration menu on the projector.
"Setting Menu" in the User’s Guide
• If during keystone correction, the screen gauge values stop changing, this means that
you have reached the limit of possible keystone correction. Ensure that this projector is
not placed beyond the permissible projection angle. "Manually Correcting
Keystone Distortion" in the User’s Guide
English
41
Page 43

Disconnecting from a Network Connection
The network connection between a computer and projector can be disconnected
either from the computer or from the projector.
Tip :
The display of the computer being projected is not saved by or stored at the projector.
When the connection is terminated by one of the following operations, all internal image
data is lost.
Disconnecting at the Computer
Click the "Disconnect" or "Exit" icons on the toolbar.
[Windows]
Disconnect[Macintosh]
Exit
Exit
Clicking the "Disconnect" icon closes only the network connection.
Clicking the "Exit" icon disconnects the network connection and closes EMP NS
Connection.
Tip :
If a computer is connected to multiple projectors and performs the disconnect operation,
the connections to all projectors will be broken.
Disconnecting at the Projector
Press the [ESC] button on the remote control.
1
The Exit menu is displayed.
Select the "Exit" button, and press the [Enter] button on the remote
2
control.
"Network Screen has been disconnected by the projector." is displayed on the
screen of the disconnected computer.
42
Page 44

Connecting in Access Point Mode or Wired LAN Connection Mode
In addition to the Easy Connect mode, there is also the Access point mode and
Wired LAN connection mode for connecting a computer to a projector via a
network.
Access point mode is a mode for connecting a projector to a computer through a
wireless LAN access point on an existing network system.
Wired LAN connection mode is a mode for connecting a projector to a computer via
wired network system. When a wired LAN card is set into the projector, a network
cable is used to connect with a computer participating in a network.
When using a computer connected through an access point, or a company's network
systems, under normal circumstances for both modes, the computer’s LAN settings
remain unaltered, and only the projector is set up.
In addition to being able to project computer images using the projector, you can
use EMP Monitor and Mail Notification Function to monitor the status of the
projector from a computer. "Monitoring and Control Using EMP Monitor" in
the EasyMP Operation Guide
Since the method of connection is almost the same, both Access point mode and
Wired LAN connection mode are explained together here.
English
Before Connecting
Ensure the following have been performed before connecting a computer and
projector to a network.
• Install EMP NS Connection on the computer you will be using. p.17
• Prepare the computer settings to use either a wireless LAN card or
internal wireless LAN functionality. For setup, see the documentation for
the wireless LAN card installed in the computer, or the computer’s
documentation.
• For optimal performance, set the screen resolution of the computer you
are using to XGA or lower with a colour depth of 16bit (Windows) or
Thousands (Macintosh).
43
Page 45

Connecting in Access Point Mode or Wired LAN Connection Mode
Steps for Connecting in Access Point Mode or Wired LAN Connection Mode
Caution :
• Do not unplug the power cable when EasyMP is in use (screens are changing or the
access lamp on the wireless LAN card is lit green).
• Do not remove the wireless LAN card when the access lamp on the wireless LAN card
is lit green, or when connected to a network. Doing so may damage the wireless LAN
card.
• For information about the Wired LAN card access lamp(s), refer to the documentation
of the Wired LAN card you are using.
Connection Settings on the Projector
First, set up the connection settings on the projector. Connection settings are found
on the Access point mode advanced settings screen or the Wired LAN connection
mode advanced settings screen of the Network Screen.
Modify these connection settings using the projector’s remote control.
If these settings are already established, this step need not be performed.
Tip :
Apply the following settings under the direction of the network systems administrator.
Insert the LAN card into the card slot on the projector.
1
See "Installation" for details. p.14
44
Press the [Power] button on the remote control to turn the projector on.
2
Page 46

Press the [EasyMP] button on the remote control. EasyMP will be
3
displayed on the screen. EasyMP starts and the following screen is
displayed.
ESSID ad hoc mode screenshot
Tip :
If the LAN card is not inserted in the card slot on the projector, the following screen is
displayed. Insert the LAN card in the card slot on the projector to display the screen for
Step 3.
English
Ensure that the "Config" button at the lower right of the screen is
4
selected, and press the [Enter] button on the remote control.
When a wireless LAN card is set, the Network advanced settings screen is
displayed. Proceed to Step 5.
When a wired LAN card is set, the wired LAN connection mode advanced
settings screen is displayed. Proceed to Step 7.
45
Page 47

Connecting in Access Point Mode or Wired LAN Connection Mode
Position the cursor on "Access point mode", and press the [Enter] button
5
on the remote control.
This selects "Access point mode".
Press the [ ] button on the remote control to the right to move the
6
cursor to "Advanced", and press the [Enter] button.
The Access point mode advanced settings screen is displayed.
46
Move the cursor to the selected item, and press the [Enter] button to set
7
that item.
Page 48

Establish settings enabling the projector to function on the network.
Settings are divided into four kinds, "Basic", "Mail", "SNMP" and "WEP".
"WEP" is not displayed in the Wired LAN connection mode advanced settings
screen.
Selections are described in the following table.
Letters or numbers must be input depending on the item. See the "Entering
Letters and Numbers" ( p.53 ) for the letter and number input methods.
Tip :
It is also possible to access the projector setup/control browser page using a Web
browser, and perform network setup on that page (EasyWeb). Using EasyWeb is more
convenient than entering characters on the remote control because a keyboard can be
used. "Changing Settings Using a Web Browser (EasyWeb)" in the EasyMP
Operation Guide
English
47
Page 49

Connecting in Access Point Mode or Wired LAN Connection Mode
Basic
Projector name Enter a name for the projector. This name is used to identify
the projector when connected to the network.
Up to 16 single-byte alphanumeric characters can be entered.
ESSID
Not displayed in the Wired LAN advanced settings screen.
Enter the ESSID. If the wireless LAN system used has an
ESSID, enter that value. The initial value is "EPSON."
Up to 16 single-byte alphanumeric characters can be entered.
Password for
WEB control
When using EasyWeb, you will be asked to enter a password
when EMP Monitor is starting up. If a password has not been
setup, access can be made by simply pressing the computer
[Enter] key when the password entry screen is displayed.
Up to 8 single-byte alphanumeric characters are available.
Projector
keyword
If the projector keyword option is set to "ON", keyword entry
will be required when connecting to the projector over a
network. Use this function to prevent unintended or
unauthorized access to the projector during presentations, from
other points on the wireless LAN.
This option should normally be "ON".
DHCP
Indicates DHCP use.
"ON": enables DHCP
"OFF": disables DHCP
48
Page 50

IP address Enter the IP address assigned to the projector.
Numbers between 0-255 can be input for each of the fields of
the address. However, the following IP addresses cannot be
used. 0.0.0.0, 127.x.x.x, 224.0.0.0-255.255.255.255 (where x
is a number between 0-255)
Subnet mask
Gateway
address
MAC address
* The item contents will be cleared if you select the "Clear" button on the selected
item and press [Enter] on the remote control.
Enter the subnet mask for the projector.
Numbers between 0-255 can be input for each of the fields of
the address. However, the following subnet masks cannot be
used. 1. x.x.x-254.x.x.x, 255.255.255.255 (where x is a
number between 0-255)
Enter the gateway IP address for this projector. Numbers
between 0-255 can be input for each of the fields of the
address. However, the following gateway addresses cannot
be used. 0.0.0.0, 127.x.x.x, 224.0.0.0-255.255.255.255
(where x is a number between 0-255)
Displays the LAN card MAC address.
English
49
Page 51

Connecting in Access Point Mode or Wired LAN Connection Mode
Mail
Mail Notification
Select "ON" to enable receipt of mail notification.
Settings
IP address of
SMTP server
Enter the IP address of the SMTP server for the projector to
use.
Numbers between 0-255 can be entered in the address field.
However, the following IP addresses cannot be used.
127.x.x.x, 224.0.0.0-255.255.255.255 (where x is a number
between 0-255.
Port Number Enter the SMTP server port number. The initial value is 25.
Numerical values from 1-65535 can be input.
Destination
address 1/2/3
A maximum of three destination email addresses can be
registered.
A maximum of 53 single-byte alphanumeric characters can
be input.
Setting a
Notification
Event
Selects the projector warnings/abnormalities to be notified
by mail. If the selected conditions occur with the projector,
the preset "Destination address" will be notified.
One or more of the following items can be selected.
• Internal error • Fan related error • Sensor error
• Lamp timer failure • Lamp out
• Lamp cover is open • Internal temperature error
• High-speed cooling in progress
• Lamp replacement notification
• No-signal
* The item contents will be cleared if you select the "Clear" button on the selected
item and press [Enter] on the remote control.
50
Page 52

SNMP
English
SNMP
address 1/2
* The item contents will be cleared if you select the "Clear" button on the selected
item and press [Enter] on the remote control.
trap IP
Enter the IP address of the computer notified of an SNMP
trap . If notification does not arrive at the IP address
designated by "SNMP trap IP address 1", notification is sent
to the IP address designated by "SMNP trap IP address 2".
Numbers between 0-255 can be input for each of the fields of
the address.
However, the following IP addresses cannot be used.
127.x.x.x, 224.0.0.0-255.255.255.255 (where x is a number
between 0-255).
51
Page 53

Connecting in Access Point Mode or Wired LAN Connection Mode
WEP
Will not be displayed during Wired LAN connection mode.
WEP
encryption
Sets whether or not WEP encryption will be used, and if used
sets the encryption type.
"OFF": disables WEP encryption
"128bit": enables 128bit WEP encryption
"40bit": enables 40bit WEP encryption
Format Sets the input system of the WEP encryption key.
"HEX": enables hexademical input
The method of setting up WEP encryption according to text
varies from access point to access point. Please check with
the administrator of the network you wish to use and first try
selecting "Text1". If that does not correctly setup the
encryption, try first using "Text2" and then"Text3".
Key ID Values can be entered when "WEP encryption" has been set
to "40bit". Choose the WEP encryption key ID from "0" "1"
"2" "3."
When "WEP encryption" has been set to"128bit" the value is
set to "0".
52
Page 54

Encryption key Sets the key used for WEP encryption.
Input a key according to directions of the Network
Administrator for the network you wish to connect to.
The input of characters differs depending on the "WEP
encryption" and "Format" settings, as follows.
For "128bit"-"HEX": Up to 26 single byte characters, from
0-9 and A-F
For "40bit"-"HEX": Up to 10 single byte characters, from 0-
9 and A-F
For "128bit"-"Text1/2/3": Up to 13 single byte English
characters
For "40bit"-"Text1/2/3": Up to 5 single byte English
characters
* The item contents will be cleared if you select the "Clear" button on the selected
item and press [Enter] on the remote control.
Entering Letters and Numbers
Perform the following steps to enter letters and numbers.
1. Move the cursor to the item to input, and press the [Enter] button on the remote
control. The cursor turns green to indicate you are in input mode.
2. Select numbers or letters by pressing the [ ] button or the [ ] button. For the
projector name, ESSID, and WEB control password, characters are presented in
this order by pressing the [ ] button : A-Z → 0-9 → symbols → a-z → space.
Press the [ ] button to reverse the display order.
3. To input two or more numbers or letters, press the [ ] button on the remote
control. The first number or letter is selected and the cursor moves to the second
entry position. Select the second, and all the subsequent numbers and letters in
the same way as the first character.
4. After you have entered all the characters, press the [Enter] button on the remote
control to finalise the entry. The cursor will turn yellow.
English
When finished making setting changes, press the [Page up] button on
8
the remote control, and move the cursor to "OK". Press the [Enter]
button.
This applies the setting changes and returns to the Network advanced settings
screen.
53
Page 55

Connecting in Access Point Mode or Wired LAN Connection Mode
Press the [Page up] button on the remote control to move the cursor to
9
"OK", and press the [Enter] button.
This returns to the Connection Stand-by screen and displays the set IP address.
If "Projector keyword" is "ON", the projector keyword is also displayed.
The value is displayed here.
Tip :
The projector keyword changes each time the projector power is turned OFF and ON
again, and when the LAN card is removed and reinstalled. When connecting to a
computer, make sure the projector keyword displayed in the Connection Stand-by screen
is entered. Connection is not possible using a previous keyword.
54
Page 56

Connection Settings on the Computer
For Windows
Computer connection setup is performed using the utility software provided with
the LAN card.
If these settings are already established, this step need not be performed.
Refer to the documentation for the LAN card for instructions on how to use the
utility software.
Establish settings enabling the computer to function on the network.
For Macintosh
The communication port settings will be explained here.
For advanced port settings (network settings) refer to your computer or AirPort
manual.
Select "System Preferences" then "Network" from the Apple Menu.
1
The Network Settings screen is displayed.
In "Port Configurations", check the port you wish to use then click "Apply
2
Now".
English
Check the port you wish to use.
Tip :
• When making "Location" settings, you can select the desired location and change all
the network settings one at a time.
Close the window.
3
55
Page 57
Connecting in Access Point Mode or Wired LAN Connection Mode
Tip :
• Select "System Preferences" then "Network" from the Apple Menu to make network
settings. Under "Network", check the box next to the port you wish to use. Uncheck the
other ports. If multiple ports are selected the projector may connect to an incorrect
network.
• For optional performance, set the screen resolution of the computer you are using to
XGA or lower with a color depth of Thousands.
Click on the communication status icon in the top right corner of the screen and
ensure that the following is displayed.
AirPort:On
You can connect to
the Wireless LAN
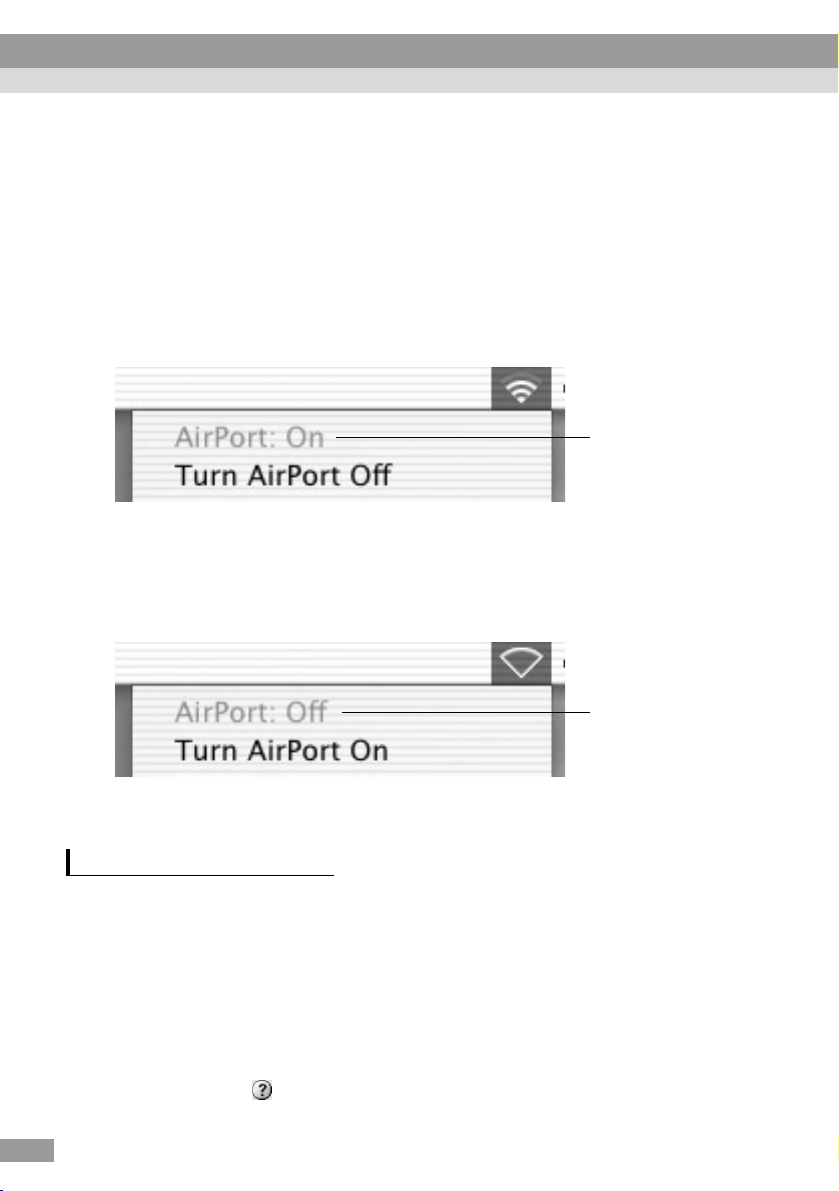
When using the Wired LAN Connection mode, be sure to click on the
communication status icon in the top right corner of the screen and ensure that the
follwing is displayed.
If "AirPort: Off" is not displayed, there is a possibility that you can connect to an
incorrect network
Tip :
To change modes, click on the icon and select "Turn Airport On" or "Turn Airport Off"
Connecting to a Computer
When finished applying the settings, run EMP NS Connection on the computer, and
establish a connection with the projector. Once these settings have been established,
future sessions can begin by just connecting the devices.
Tip :
For Win d ow s
• Install the LAN card in the computer before starting EMP NS Connection. The LAN
card will not be recognised by the EMP NS Connection if the LAN card is installed
after EMP NS Connection is started.
• If you click on the " " icon of any EMP NS Connection screen, help will be displayed
with an explanation of the functions of that screen.
56
AirPort:Off
You cannot connect
to the Wireless LAN
Page 58

For Windows
1
Start Windows on the computer, then select "Start" - "Programs" (or "All
Programs") - "EPSON Projector" - "EMP NS Connection".
EMP NS Connection starts.
Tip :
If EMP NS Connection is started while PowerPoint is also starting, the message
"Slideshow may not start without rebooting PowerPoint", will be displayed during
startup. If this occurs, close PowerPoint and restart it once EMP NS Connection has
finished starting.
For Macintosh
Double click on the "Applications" folder of the hard disk volume on
which EMP NS Connection was installed, then double click on the EMP
NS Connection icon. EMP NS Connection starts. Continue from step 3.
Tip :
If you selected a different directory at the time of installation, open that folder first, then
double-click on the EMP NS Connection icon.
The first time EMP NS Connection starts after installation. Select the
2
LAN card that will be used for the connection, and click "OK".
(Windows only)
English
Tip :
Once the current network adapter has been selected in this Switch network screen, this
screen will not be displayed at subsequent EMP NS Connection start-ups. To change the
current network adapter, click the “Extension” button in the Projector selection screen
(screen in Step 3). Clicking the "Switch LAN" button on the Extension screen displays
the Switch network screen.
57
Page 59

Connecting in Access Point Mode or Wired LAN Connection Mode
Select the name of the projector that you want to connect, and then click
3
the "Connect" button.
The projector name is shown in the projector’s Connection Stand-by screen.
The icon status meaning differs
according to colour as follows.
Grey: Not connected
Orange:Connected to another
computer
Tip :
• In the event that a projector already connected to another computer is selected, the
previous connection is terminated automatically and the images of the newly connected
computer are projected.
• When multiple projectors are selected, one computer’s display can be projected
simultaneously by up to a maximum of four projectors.
• Once the connection has been made, additional connections cannot be added.
58
If the "Projector keyword" is set to "ON" enter the projector keyword
4
displayed on the Connection Stand-by screen on the projector, and click
"OK".
Page 60

A network connection is established between the computer and
5
projector, and the computer screens are projected by the projector.
Toolbar
The EMP NS Connection toolbar is displayed on the computer screen. Use the
toolbar to operate the projector, change options and settings, and disconnect
from the network. p.37
If the toolbar is in the way during a presentation, you can minimise it. To
perform projector operations and setup using the remote control.
"Selecting the Projection Quality (Colour Mode Selection)" and "Basic
Operations" in the User’s Guide
There are a number of colour and resolution restrictions for projecting images
from a computer using Network Screen. For restriction details, refer to
"Connection Restrictions". p.35
"Adjusting the Screen Image" and the subsequent material, in the User’s
Guide to further adjust the projected images and perform other functions.
English
Tip :
• When projecting a PowerPoint files, you can skip to the next slide by pressing the [Page
down] button or return to the previous slide, by pressing the [Page up] button.
• To connect to a different computer in order to replace the presenter, start EMP NS
Connection on the selected computer and connect. The connection with the current
connected computer will be terminated automatically, and the next computer will be
connected.
59
Page 61

What If the Projector You Want does not Appear?
If the projector to which you want to connect does not appear on the projector
selection screen of EMP NS Connection, please check the following:
• If connecting with a wireless LAN, is the wireless LAN signal weak, or not
being received at all?
• Is the connection mode set up correctly?
• Are the subnets different ?
When using Easy connect mode:
• Are the computer and projector setup with the same ESSID (network
name)?
• Are the computer and projector setup to use the same channel
(Windows only)
In the event that you are connecting the projector on a network where the subnets
differ, you can use "IP connection mode" to establish a connection.
IP connection mode works by using the IP address
connection.
of the projector to establish a
Connecting in IP Connect Mode
Perform the following steps to connect using IP connection mode.
?
60
Tip :
• The projector name will not be displayed in the projector selection screen of EMP NS
Connection if the projector’s IP address and the computer’s IP address belong to a
different subnet.
• If you click on the " " icon of any EMP NS Connection screen, help will be displayed
with an explanation of the functions of that screen. (Windows only)
Caution :
• Do not unplug the power cable when EasyMP is in use (screens are changing or the
access lamp on the wireless LAN card slot is lit green).
• Do not remove the wireless LAN card when the access lamp on the wireless LAN card
is lit green, or when connected to a network. Doing so may damage the wireless LAN
card.
• For information about the Wired LAN card access lamp(s), refer to the documentation
of the wired LAN card you are using.
This performs a connection setup between the projector and computer
1
in Access point mode or Wired LAN connection mode. p.44
Page 62

For Windows
2
On the computer select "Start" - "Programs" (or "All Programs") "EPSON Projector" - "EMP NS Connection".
EMP NS Connection starts.
Tip :
If EMP NS Connection is started while PowerPoint is also starting, the message
"Slideshow may not start without rebooting PowerPoint", will be displayed during
startup. If this occurs, close PowerPoint and restart it once EMP NS Connection has
finished starting.
For Macintosh
Double click on the "Applications" folder of the hard disk volume on
which EMP NS Connection was installed, then double click on the EMP
NS Connection icon.
EMP NS Connection starts.
Tip :
If you selected a different directory at the time of a installation, open that folder first,
then double-click on the EMP NS Connection icon.
Click the "Extension" button on the next screen.
3
English
61
Page 63

What If the Projector You Want does not Appear?
This displays the Extension screen. Select "Use IP connect mode" and
4
then click the "OK" button.
The following screen is displayed. Click "IP connection" in the upper
5
right of the screen.
62
Page 64

Enter the "IP address" of the projector to which you want to connect,
6
and click the "Search" button.
The IP address appears under "Projector" and a searching icon is
7
displayed. If a projector is found, the projector name will be displayed
under "Projector". Repeat Step 6 to search for other projectors.
Any projectors found will appear under "Projector".
English
The projector's condition is
indicated by the colour and
appearance of its icons.
(Gray) : Not connected
(Orange): Connected to
: Search in progress
: Nothing was found during
another computer
searching
63
Page 65

What If the Projector You Want does not Appear?
Tip :
• A maximum of 16 projectors can be added. If you try to add 17 or more projectors,
projectors will be deleted starting with the one which was added first. A maximum of
four projectors can be connected at once.
• The next time EMP NS Connection is started, the same projector will not appear under
the "Projector" list. If you want the same projector to be displayed for future use,
create a group and register the target projector. p.65
Click on the check box belonging to the name of the projector you wish
8
to connect, then click the "Connect" button.
64
Tip :
• In the event that a projector already connected to another computer is selected, the
previous connection is terminated and the images of the newly connected computer are
projected.
• When multiple projectors are selected, one computer’s display can be projected
simultaneously by up to a maximum of four projectors.
• Once the connection has been made, additional connections cannot be added.
The projector and a computer are connected via a network and the computer screen
is projected.
Page 66

Creating and Connecting to Groups
In EMP NS Connection, a maximum of 16 projectors can be registered as a group.
If you frequently connect to a particular projector over a network, you can register it
easily and connect to it quickly by creating and registering it to a group.
For example, in an environment where numerous projectors in various branches are
connected over a network and you want to project from the projectors located in a
specific branch, register the projectors in that individual branch into a single group.
Once projectors have been registered to a group, they can be connected to by simply
selecting that group at the time of connection, saving the time and effort otherwise
required to search for and register the projectors.
Group information can be saved (exported) to a file and retrieved (imported). You
can connect to a target projector easily by importing the group you need to connect
to from a group which has been created and exported by the network administrator.
Tip :
If you click on the " " icon of any EMP NS Connection screen, help will be displayed
with an explanation of the functions of that screen. (Windows only)
Creating Groups
Perform the following steps to create a group.
Perform Steps 1-3 of "Connecting in IP Connect Mode" p.60
1
English
65
Page 67

What If the Projector You Want does not Appear?
The Extension screen is displayed. Select "Use IP connect mode" and
2
"Use Group List" by clicking on the check boxes, then click on the
"Advanced" button.
The Advanced screen is displayed. Click "New" to create a new group.
3
"New Group" is displayed as the "Connection group" and the "IP address" and
list of registered projectors disappear.
66
Tip :
• If changing a projector registered to an existing group, select a group name from the
"Connection group" list, then proceed to Step 5.
• If you click on the "New" button during creating or editing of a group, the message
"Group is not saved. Save? ", is displayed. If you click "Yes" the group you are working
on is saved. If you click "No" the group will be cancelled without being saved.
Page 68

Enter a group name under "Connection Group".
4
Enter the IP address of the projector you wish to register under "IP
5
address" and click the "Add>" button.
Numbers from 0-255 can be input into each field of an address.
English
Tip :
The addresses "0.0.0.0" and "255.255.255.255" cannot be used.
67
Page 69

What If the Projector You Want does not Appear?
The IP address is added to the list of registered projectors, and the
6
"Searching" icon is displayed. If a projector is found, the projector name
will be displayed on the list. Repeat Step 5 to register other projectors.
The registered projector is added to the list.
The projector's condition is indicated by the colour and appearance of its icons
(Gray) : Not connected
(Orange): Connected to another computer
: Search in progress
: Nothing was found during searching
Tip :
• A maximum of 16 projectors can be added. A maximum of four projectors can be
connected at once.
• To delete a projector from a list, select the projector then click on the "<Delete" button.
68
Click "OK" if you want to add all of the registered projectors to the list.
7
The message "Save group. OK?" will be displayed. Click the "Yes"
button.
The group is saved.
If you click "No" in response to the message screen, the group will not be
saved.
Tip :
The message "Same group name exists. Overwrite?" (Windows) or this group name
exists. Overwrite? (Macintosh) is displayed when editing and saving the existing group,
or, if a group of the same name as the group you are saving already exists. If you click
the "Yes" (Windows) or "ok" (Macintosh) button the group will be overwritten. If you
wish to save under a different name, click the "No" (Windows) or "cancel" (Macintosh)
button. Enter a new group name in the "Connection Group" list of the Advanced screen,
and click "OK".
Page 70

Click the "Close" button.
8
The Advanced screen is closed and the extension screen is displayed.
Tip :
To delete a group, select the projector from the "Connection group" list of the Advanced
screen, then click on the "Delete" button.
Connecting to a Group
Perform the following steps to connect with a projector registered to a group.
If you have created a group as described in "Creating Groups" and wish to connect
to it, please start with Step 3.
Perform Steps 1-3 of "Connecting in IP Connect Mode" p.60
1
The Extension screen is displayed. Select "Use IP connect mode" and
2
"Use Group List" by clicking on the check boxes, then click on the
"Advanced" button.
English
69
Page 71

What If the Projector You Want does not Appear?
From the "Connection Group" list, choose the group you want to
3
connect to, and click the "OK" button.
When the following screens are displayed, click on "IP Connection"
4
displayed in the upper right corner of the screen. If "IP connect mode" is
displayed in the upper left corner of the screen, please proceed to Step
5 without doing anything.
70
Page 72

The projectors registered into the group is displayed under "Projector".
5
Click on the check box belonging to the name of the projector you wish
to connect, then click the "Connect" button.
The projector name is displayed on the Connection Stand-by screen of the
projector.
The projector's condition is
indicated by the colour and
appearance of its icons.
(Gray) : Not connected
(Orange): Connected to
: Search in progress
: Nothing was found during
another computer
searching
Tip :
• In the event that a projector already connected to another computer is selected, the
previous connection is terminated automatically and the images of the newly connected
computer are projected.
• When multiple projectors are selected, one computer’s display can be projected
simultaneously by up to a maximum of four projectors.
• Once the connection has been made, additional connections cannot be added.
English
The projector and computer are connected via a network and the computer screen is
projected.
71
Page 73

What If the Projector You Want does not Appear?
Exporting Groups
Perform the following steps to export a group.
Tip :
• You can only export all the groups in the "Connection Group" list. You cannot export
specific groups.
• Before exporting a group, create and save at least one group. p.65
• You cannot export during the creation or editing of a group.
Perform Steps 1 and 2 of "Creating Groups". p.65
1
Click on the "Export" button.
2
72
Select the folder to export to on the screen that is displayed, then click
3
"OK".
The group belonging to specified file name is exported.
Tip :
• The extension of the exported file will be ".ini." (Windows) or ".prgp." (Macintosh)
• If a file of the same name as the specified file name is in the selected folder, the
message "The specified file exists. (Windows) or An item named "xxx.prgp" already
exists in this location. Do you want to replace it with the one you are saving?
(Macintosh) Overwrite?" is displayed. If you click the"Yes" (Windows) or "ok"
(Macintosh) button the file will be overwritten. (Windows) or An item named
"xxx.prgp" already exists in this location. Do you want to replace it with the one you
are saving? (Macintosh) If you wish to save under a different name, click "No"
(Windows) or "cancel" (Macintosh). Specify a different file name at Step 3, and click
the "OK" button.
Page 74

Importing Groups
Perform the following steps to import a group.
Tip :
You cannot import during the creation or editing of a group.
Perform Steps 1 and 2 of "Creating Groups". p.65
1
The Advanced screen is displayed. Click on the "Import" button.
2
English
73
Page 75

What If the Projector You Want does not Appear?
On the screen which is displayed, select the file you wish to import, then
3
click the "Open" button.
The group is imported and the name of the imported group is added to in the
"Connection group" list.
Tip :
• The extension of the exported file will be ".ini." (Windows) or ".prgp." (Macintosh)
• If a group with the same name as the one you are importing already exists in the
"Connection Group" list, the message, "Same group name exists. Overwrite?"
(Windows) or this group name exists. Overwrite? (Macintosh) is displayed. If you click
the "Yes" (Windows) or "Replace" (Macintosh) button the group in the "Connection
Group" list will be overwritten with the group you are importing. If you click "No"
(Windows) or "cancel" (Macintosh), nothing will be imported.
74
Perform Steps 3-5 of "Connecting to a Group" to connect with the projector
registered to the imported group. p.70
Page 76

Transmitting Encrypted Data
When projecting images from a computer connected to a projector over a network,
image data can be encrypted and transmitted. Encryption of data ensures security.
However, it reduces baud rates.
Perform the following steps to use encrypted transmission.
Tip :
• Do not unplug the power cable when EasyMP is in use (screens are changing or the
access lamp on the wireless LAN card is lit green).
• Do not remove the wireless LAN card when the access lamp on the wireless LAN card is
lit green, or when connected to a network. Doing so may damage the wireless LAN card.
• For information about the Wired LAN card access lamp(s), refer to the documentation
of the wired LAN card you are using.
This performs a connection setup between the projector and computer
1
in Access point mode. p.44
For Windows
2
On the computer select "Start" - "Programs" (or "All Programs") "EPSON Projector" - "EMP NS Connection".
EMP NS Connection starts.
Tip :
If EMP NS Connection is started while PowerPoint is also starting, the message
"Slideshow may not start without rebooting PowerPoint", will be displayed during
startup. If this occurs, close PowerPoint and restart it once EMP NS Connection has
finished starting.
For Macintosh
Double click on the “Applications” folder of the hard disk volume on
which EMP NS Connection was installed, then double click on the EMP
NS Connection icon.
EMP NS Connection starts.
English
Tip :
If you selected a different directory at the time of installtion, open that folder first, then
double-click on the EMP NS Connection icon.
75
Page 77

Transmitting Encrypted Data
Click the "Extension" button on the next screen.
3
This displays the Extension screen. Select "Use encrypted
4
communication", and then click the "OK" button.
76
Page 78

Select the name of the projector that you want to connect, and then click
5
the "Connect" button.
A network connection is established between the computer and projector, and
the computer screens are projected by the projector. Data transmitted between
the computer and projector is encrypted.
English
77
Page 79

Page 80

Appendices
This chapter describes a memory card that can be used on the
projector, and uninstalling the EasyMP Software. There is also an
index and a glossary of terms used in this guide.
Compatible PC Cards 80
• Compatible Memory Cards ................................................. 80
• Compatible Wired LAN Cards............................................ 80
Uninstalling EasyMP Software 81
Glossary 82
About Compliance Statement 84
Index 86
79
79
Page 81

Compatible PC Cards
Compatible Memory Cards
You can use the following memory cards (Type II) which adhere to the ATA
standard. FAT16/32 are recognised memory card formats.
• CompactFlash card (requires a PC card adapter)
• ATA Flash card
• Memory Stick (requires a PC card adapter)
• SmartMedia (requires a PC card adapter)
• SD/MMC card (requires a PC card adapter)
Compatible Wired LAN Cards
For details on the available wired LAN card, please visit the Web site
"http://www.epson.co.uk/".
80
Page 82

Uninstalling EasyMP Software
If you do not need the EasyMP Software, perform the following steps in Windows
to uninstall it.
For Windows
Go to "My Computer" - "Control Panel" - "Add/Remove Programs", select
the unnecessary program from the list, and click "Add/Remove" (Windows
XP: "Change/Remove").
Tip :
• "EMP NS Connection", "EMP SlideMaker2", and "EMP Monitor" cannot be uninstalled
simultaneously in a single operation. Each unneeded program must be uninstalled separately.
• After uninstalling "EMP SlideMaker2", the EMP SlideMaker2 folder will remain. If the
folder does not contain any necessary scenarios, it can be deleted.
For Macintosh
Select the hard disk volume on which EMP NS Connection was
installed,and then click on "Applications". Select and drag the EMP NS
Connection icon to the Trash.
Tip :
If you selected a different directory at the time of installtion, open that folder first, then
select the EMP NS Connection icon.
English
81
Page 83

Glossary
This is a glossary of terms used in this guide which were not explained within the
text or which may be difficult to understand. Use other commercially available
documentation for further details.
Ad hoc mode A method of wireless LAN connection that communicates with
wireless LAN clients without using an access point.
Channel Communication speeds will drop if there are too many devices
performing wireless communication using the same frequency.
If this is the case, interference from other wireless LANs can be
avoided by setting a different wireless channel for each wireless
LAN network.
DHCP Abbreviation of Dynamic Host Configuration Protocol. This
protocol automatically assigns an IP address to a computer
connected to a network.
ESSID ESS is an abbreviation of Extended Service Set. The ESSID is
an identification number for connecting with a counterpart on a
wireless LAN. Wireless communication is possible between
devices with corresponding ESSID numbers.
Use the ESSID for the network name which is displayed in the
Computer to Computer network on the Macintosh.
IP Address A series of numbers that identifies a device that is connected to
a network.
Gateway A server (router) for communicating across a network divided
according to subnet masks.
82
MAC address MAC is an abbreviation of Media Access Control. The MAC
address is an ID number unique to each network card. A unique
number is assigned to each network card. Data is transmitted
between cards (devices) based on this identification.
SNMP This is an abbreviation of Simple Network Management
Protocol. It is a protocol in a TCP/IP network for monitoring
and controlling communication devices on the network, such as
routers, computers, and terminals across the network.
sRGB This is an international standard addressing prescribed colour
spaces to simplify colour handling displayed in various
graphics devices in computer operating systems (OS) and on
the internet.
Subnet mask This is a number which defines, from the IP address, the
number of bits used in network addresses of assigned networks
(subnets).
Page 84

Tr ap A message transmitted to the SNMP Manager describing the
condition when the monitor detects a status change or an
abnormal condition.
Trap IP
address
WEP This is an abbreviation of Wired Equivalent Privacy. This is a
This is the IP address of the messaged computer used for error
notification in SNMP. Designate the IP address of the computer
to which error messages are sent in the trap IP address.
security method which encrypts data during transmission.
Data communication cannot be performed unless the sending
and receiving machines are registered with the same encryption
key by the WEP .
English
83
Page 85

About Compliance Statement
MODEL: TMW1008
FCC ID: NUSTMW1008
This device complies with Part 15 of the FCC Rules. Operation is subject to
following two conditions:
(1) this device may not cause harmful interference, and (2) this device must accept
any interference received, including interference that may cause undesired
operation.
1. Feature
Completely Covered Assembly is Designed to fully packaged in a PCMCIA Type II
extended cover set.
This equipment has been tested and found to comply with the limits for a Class B
Personal Computer and Peripheral, pursuant to Part 15 of the FCC Rules. These
limits are designed to provide reasonable protection against harmful interference in
a residential installation. This equipment generates, uses and can radiate radio
frequency energy and, if not installed and used in accordance with the instructions,
may cause harmful interference to radio communications.
However, there is no guarantee that interference will not occur in a particular
installation. If this equipment dose cause harmful interference to radio or television
reception, which can be determined by turning the equipment off and on, the user is
encouraged to try to correct the interference by one or more of the following
measures:
- Reorient or relocate the receiving antenna.
- Increase the separation between the equipment and receiver.
- Connect the equipment into an outlet on a circuit different from that to which the
receiver is connected.
- Consult the dealer or an experienced radio/TV technician for help.
This equipment has been tested to comply with the limits for a Class B personal
computer and peripheral, pursuant to Subpart B of Part 15 of FCC Rules. Only
peripherals (computer input/output devices, terminals, printers, etc.) certified (DoC)
or verified to comply with Class B limits may be attached to this equipment.
Operation with non-certified (DoC) or non-verified personal computer and/or
peripherals is likely to result in Interference to radio and TV reception. The
connection of a unshielded equipment interface cable to this Equipment will
invalidate the FCC Certification of this device and may cause interference levels
which Exceed the limits established by FCC for equipment.
84
Page 86

You are cautioned that changes or modifications not expressly approved by the party
responsible for compliance could void your authority to operate the equipment.
2. CAUTION
Exposure to Radio Frequency radiation Antenna shall be mounted in such a manner
to minimize the potential for human contact during normal operation. The antenna
should not be contacted during operation to avoid the possibility of exceeding the
FCC radio frequency exposure limites.
English
85
Page 87

Index
A
A/V Mute ....................................................38
Access Lamp...............................................16
Access point mode......................................43
Access points ..............................................11
Ad hoc mode settings..................................26
ATA Flash card............................................80
B
Basic (Network Screen)..............................48
Basic settings .........................................38,40
Brightness ...................................................40
C
Card slot......................................................14
CardPlayer ....................................................7
Channel .......................................................27
Channel ad hoc.......................................26,30
Color Mode.................................................40
Colour Depth...............................................36
CompactFlash card .....................................80
Connection Stand-by screen ..................29,54
Connection status screen.............................37
Contrast.......................................................40
D
Destination address.....................................50
DHCP..........................................................48
Disconnect ..................................................42
E
Easy connect mode .....................................23
EasyMP Software CD-ROM..................10,17
Electromagnetic interference ......................12
EMP Monitor ..............................................43
EMP NS Connection..............................31,56
Encryption...................................................75
Encryption Key...........................................53
Entering Letters and Numbers...............28,53
ESSID ....................................................26,48
ESSID ad hoc.........................................26,30
E-Zoom ..................................................38,39
F
Format.........................................................52
Freeze..........................................................37
Frequency....................................................12
G
Gateway ......................................................49
Groups.........................................................65
I
Installation ..................................................17
IP address....................................................49
IP connect mode..........................................60
K
Key ID.........................................................52
Keystone .....................................................40
M
MAC address .........................................27,49
Mail.............................................................50
Mail Notification Settings...........................50
Memory Stick .............................................80
Movie............................................................7
N
Network advanced settings ....................25,45
Network Screen......................................24,44
Number of Connection Devices..................36
P
Password for WEB control....................27,48
PC card...................................................14,80
Port Number................................................50
Projector keyword..................................27,48
86
Page 88

Projector name .......................................26,48
Projector operation URL display................37
S
SD/MMC card.............................................80
Setting a Notification Event........................50
SmartMedia.................................................80
SMTP ..........................................................50
SNMP..........................................................51
Subnet mask................................................49
Supported Resolution..................................35
Switch network screen................................57
Switch PC source........................................38
Switch video source....................................38
T
Trap IP address............................................51
U
Uninstalling.................................................81
Using the Toolbars ......................................37
W
English
WEP ............................................................52
WEP encryption..........................................52
Wi-Fi...........................................................11
Wired LAN connection mode.....................43
Wireless LAN card.................................11,14
Wireless LAN Card Conditions ..................11
87
Page 89

All rights reserved. No part of this publication may be reproduced, stored in a
retrieval system, or transmitted in any form or by any means, electronic,
mechanical, photocopying, recording, or otherwise, without the prior written
permission of SEIKO EPSON CORPORATION. No patent liability is assumed
with respect to the use of the information contained herein. Neither is any liability
assumed for damages resulting from the use of the information contained herein.
Neither SEIKO EPSON CORPORATION nor its affiliates shall be liable to the
purchaser of this product or third parties for damages, losses, costs, or expenses
incurred by purchaser or third parties as a result of: accident, misuse, or abuse of
this product or unauthorized modifications, repairs, or alterations to this product, or
(excluding the U.S.) failure to strictly comply with SEIKO EPSON
CORPORATION’s operating and maintenance instructions.
SEIKO EPSON CORPORATION shall not be liable against any damages or
problems arising from the use of any options or any consumable products other than
those designated as Original EPSON Products or EPSON Approved Products by
SEIKO EPSON CORPORATION.
General Notice:
EPSON is a registered trademark of SEIKO EPSON CORPORATION.
Macintosh, Mac, and iMac are registered trademarks of Apple Computer, Inc.
IBM is a registered trademark of International Business Machines Corporation.
Windows and Windows NT are trademarks of Microsoft Corporation in the United
States of America.
Dolby is registered trademarks of Dolby Laboratories.
Portions of this software are based in part on the work of the Independent JPEG
Group.
The freely available TIFF library written by Sam Leffler, Copyright © 1988-1997
Sam Leffler and Copyright © 1991-1997 Silicon Graphics, Inc., is used for loading,
drawing and writing the TIFF file.
Other product names used herein are also for identification purposes only and may
be trademarks of their respective owners. EPSON disclaims any and all rights in
those marks.
This product uses open source software.
Copyright © 2003 by SEIKO EPSON CORPORATION
Page 90

Guide de mise en route EasyMP
Français
Français
Page 91

Notations utilisées dans ce guide
Attention :
N. B. :
[(Nom de bouton)]
Dans ce guide, l’expression "cet équipement" ou le "projecteur" peut
occasionnellement faire référence à des accessoires ou équipements
disponibles en option et vendus séparément.
Instructions sur l'ordinateur
Dans cette édition, les procédures Windows sont utilisées pour expliquer les
opérations communes aux ordinateurs Macintosh et Windows. Lorsque les
procédures diffèrent, elles seront expliquées individuellement.
Signale les procédures qui, si elles ne sont pas respectées,
peuvent causer des blessures corporelles ou provoquer
des dommages matériels.
Informations supplémentaires qu'il peut être utile de
connaître sur le sujet.
Indique des pages qui contiennent des informations
connexes ou des descriptions plus détaillées.
Indique que l’explication du ou des mots soulignés devant
ce symbole se trouve dans le glossaire. Reportez-vous au
"Glossaire" dans les "Annexes". p.172
Illustre les boutons du panneau de commande ou de la
télécommande.
Ex : [ESC]
Indique que l'explication se poursuit à la page suivante.
Page 92

Table des matières
Fonctions......................................................................................... 93
Projection d'images de l'ordinateur via un réseau (écran Réseau)....... 93
Gestion d'un projecteur tout-en-un ...................................................... 94
Effectuer une présentation sans ordinateur
(CardPlayer (la visionneuse EasyMP)).............................................95
Préliminaire
Environnement d’exploitation .......................................................... 98
Système requis pour le logiciel EasyMP ............................................. 98
Conditions de raccordement à des cartes réseau sans
fil compatibles et des points d'accès .................................................99
Précautions d'utilisation de la carte réseau sans fil livrée.................. 100
Insertion et retrait de cartes.......................................................... 102
Installation .........................................................................................102
Retrait.................................................................................................103
Interprétation du témoin d'accès ........................................................104
Installation du logiciel EasyMP ..................................................... 105
Projection d'images depuis un ordinateur
Communication via un réseau (Network Screen)
Français
Types de connexions réseau......................................................... 110
Connexion en Mode de connexion facile ...................................... 111
Préparatifs ..........................................................................................111
Etablissement de la connexion en Mode de connexion facile ........... 112
Utilisation de la barre d’outils ........................................................ 125
Utilisation et rôle des icônes..............................................................125
E-Zoom..............................................................................................127
Paramètres de base.............................................................................128
Déconnexion d’une liaison réseau ................................................ 130
Déconnexion sur l’ordinateur ............................................................ 130
Déconnexion sur le projecteur........................................................... 130
Connexion en Mode point d'accès ou en
Mode connexion à un réseau câblé ........................................... 131
Préparatifs ..........................................................................................131
Connexion en Mode point d'accès ou en
Mode connexion à un réseau câblé.................................................132
91
Page 93

Que faire si le projecteur souhaité n'apparaît pas?.......................149
Connexion en Mode de connexion IP................................................ 149
Création et connexion à des groupes ................................................. 154
Transmission de données cryptées............................................... 165
Annexes
Cartes PC compatibles ................................................................. 170
Cartes mémoires compatibles............................................................ 170
Cartes réseau câblé compatibles ........................................................ 170
Désinstallation du logiciel EasyMP ............................................... 171
Glossaire ....................................................................................... 172
A propos de la déclaration de conformité...................................... 174
Index ............................................................................................. 176
92
Page 94

Fonctions
EasyMP livré avec cet équipement a les deux fonctions suivantes :
• Fonction Ecran Réseau - se connecte à un réseau et projette des images
à partir d'un ordinateur.
• Fonction "CardPlayer" (la visionneuse EasyMP) - projette les fichiers
stockés sur une carte mémoire insérée dans ce projecteur et permet de
réaliser une présentation sans connexion à un ordinateur.
Projection d'images de l'ordinateur via un réseau (écran Réseau)
Si un projecteur équipé d'un écran Réseau est connecté à un réseau par un réseau
sans fil, les images d'ordinateur peuvent être projetées sans câbles.
De même, si le projecteur est connecté à un réseau, les images d'un ordinateur du
réseau peuvent également être projetées.
Connecteur sans fil
Français
93
Page 95

Fonctions
Connexion à un réseau câblé
Gestion d'un projecteur tout-en-un
94
En cas d'erreurs sur un projecteur, ce projecteur peut être paramétré pour notifier
des informations sur ces erreurs à une adresse électronique désignée.
Les projecteurs installés dans des emplacements distants peuvent ainsi être
surveillés et contrôlés depuis un seul endroit, économisant ainsi du temps et de
l'énergie.
Si "EMP Monitor" est utilisé, vous pouvez simultanément mettre plusieurs
projecteurs sous et hors tension et contrôler plusieurs projecteurs connectés à un
réseau.
Page 96

Effectuer une présentation sans ordinateur (CardPlayer (la visionneuse EasyMP))
CardPlayer (la visionneuse EasyMP) permet de projeter les fichiers enregistrés sur
une carte mémoire sans l'aide d'un ordinateur.
Fichiers de scénario
Fichiers graphiques
Fichiers film
Français
Projection d'un fichier PowerPoint
EMP SlideMaker2 permet d'extraire les éléments essentiels d'un fichier Microsoft
PowerPoint, de les réorganiser pour créer un "scénario" et de les envoyer vers une
carte mémoire.
Comme CardPlayer est capable de reproduire ces scénarios envoyés, vous pouvez
créer une présentation PowerPoint sur le lieu de projection (il vous suffit pour cela
d'emmener uniquement le projecteur et la carte mémoire sur laquelle est enregistrée
la présentation).
95
Page 97

Fonctions
Projection d'images d'un appareil photo numérique ou d'une carte mémoire
Les fichiers enregistrés sur une carte mémoire peuvent être affichés dans une liste et
projetés dans l'ordre, un par un, comme un diaporama.
Projection de fichiers film
Les films MPEG peuvent également être projetés. Si un fichier film enregistré sur
un appareil photo numérique ou téléchargé sur Internet est enregistré sur une carte
mémoire, il peut être lu par CardPlayer tout comme un fichier graphique. Si le film
MPEG a été enregistré avec le son, il sera également lu avec le son. Un Effet
Présentation supplémentaire peut être obtenu à l'aide des fichiers film.
96
Page 98

Préliminaire
Ce chapitre explique comment connecter le projecteur à un
ordinateur.
Environnement d’exploitation 98
• Système requis pour le logiciel EasyMP ............................. 98
• Système requis pour EMP NS Connection........................... 98
• Système requis pour EMP SlideMaker2............................... 99
• Système requis pour EMP Monitor....................................... 99
• Conditions de raccordement à des cartes réseau sans
fil compatibles et des points d'accès .................................... 99
• Précautions d'utilisation de la carte
réseau sans fil livrée ............................................................ 100
• Précautions de sécurité EM................................................ 100
• Précautions sur les fréquences .......................................... 101
• Précautions lors de vols internationaux.............................. 101
Insertion et retrait de cartes 102
• Installation ........................................................................... 102
• Retrait .................................................................................. 103
• Interprétation du témoin d'accès....................................... 104
• Interprétation du témoin d'accès du
logement pour carte............................................................ 104
• Interprétation du témoin d'accès de la
carte réseau sans fil............................................................ 104
Installation du logiciel EasyMP 105
97
97
Page 99

Environnement d’exploitation
Système requis pour le logiciel EasyMP
Le "CD-ROM du logiciel EasyMP (EasyMP Software CD-ROM)" livré contient les
trois programmes suivants :
• EMP NS Connection
Transmettre des images d'un ordinateur à un projecteur via un réseau.
• EMP SlideMaker2
Crée et transfère des scénarios.
• EMP Monitor
Surveille et contrôle simultanément plusieurs projecteurs sur un réseau.
Les exigences matérielles de chaque logiciel sont différentes.
Système requis pour EMP NS Connection
Système
d'exploitation
Unité centrale Windows Minimum : Pentium III 500MHz (recommandation :
Mémoire Windows Au moins : 128 Mo (recommandation : 192 Mo ou
Espace libre sur
le disque dur
Affichage Au moins résolution VGA (640×480) (recommandation :
Windows 98/Me/2000/XP
Mac OS X10.2.4 ou supérieur
Pentium III 700MHz ou plus)
Macintosh Minimum : Power PC G3 ou supérieur
(recommandation : 500MHz ou plus)
plus)
Macintosh Au moins : 256 Mo
Au moins 20Mo
résolution XGA (1024×768), couleur 16 bits (Windows) ou
Milliers (Macintosh))
98
Page 100

Système requis pour EMP SlideMaker2
Système
d'exploitation
Unité centrale Minimum : Celeron 300MHz (recommandation : Celeron
Mémoire Minimum : 64Mo (recommandation : 128Mo ou plus)
Espace libre sur
le disque dur
Affichage Au moins résolution SVGA (800×600) (recommandation :
* les Macintosh ne sont pas pris en charge.
Windows 98/Me/2000/XP
400MHz ou plus)
Au moins 12 Mo
résolution XGA (1024×768) ou plus)
*
Système requis pour EMP Monitor
Système
d'exploitation
Unité centrale Minimum : Pentium MMX 166MHz (recommandation :
Mémoire 64Mo ou plus (recommandation : 128Mo ou plus)
Espace libre sur
le disque dur
Affichage Minimum : résolution XGA (1024×768) ou plus, couleur 16
* les Macintosh ne sont pas pris en charge.
Windows 98 Seconde Edition/Me/NT 4.0 Workstation/2000
Professionnel/XP
Pentium II 233MHz ou plus)
Au moins 6Mo
bits ou plus
*
Français
Conditions de raccordement à des cartes réseau sans fil compatibles et des points d'accès
La carte réseau sans fil incluse peut se connecter à l'équipement compatible Wi-Fi
suivant.
Cartes réseau sans fil
Ordinateurs dotés de la fonctionnalité réseau sans fil
Points d’accès
La carte réseau sans fil fournie doit être utilisée exclusivement avec ce projecteur.
Notre société ne saurait être tenue pour responsable de tout dommage survenu suite
à l’insertion de cette carte réseau dans un ordinateur.
99
 Loading...