

Page 1
Page 2

EasyMP Setup Guide
English
English
Page 3

Notations Used in This Guide
Caution :
Tip :
[(Button Name)]
When "projector" appears in the text of this guide, it may refer to items which
are accessories or optional equipment in addition to the main projector unit
itself.
Indicates procedures which may result in damage or injury if
sufficient care is not taken.
Indicates additional information and points which may be
useful to know regarding a topic.
Indicates pages where related information or more detailed
description is provided.
Indicates that an explanation of the underlined word or
words in front of this symbol appears in the glossary of
terms. See "Appendices: Glossary". p.62
Shows the buttons on the control panel or on the remote
control.
Ex: [ESC]
Page 4

Contents
Functions .......................................................................................... 5
Projecting Images Using a Wireless Computer Connection
(Network Screen) ................................................................................. 5
Monitoring Projector Errors with EMP Monitor and SNMP ................6
Using a Memory Card to Give a Presentation Without a Computer
(CardPlayer) .........................................................................................7
Software Overview............................................................................ 9
EasyMP Software Overview (Projector)................................................ 9
EasyMP Software Overview (Computer) ..............................................9
Before Use
Operating Environment ................................................................... 12
System Requirements for EasyMP Software....................................... 12
Conditions for Connecting to CompatibleWireless LAN Cards and
Access Points .....................................................................................14
Precautions Regarding the Use of the IncludedWireless LAN Card... 14
Inserting and Removing Cards ....................................................... 16
Installation ........................................................................................... 16
Removal...............................................................................................17
Interpreting the Access Lamp..............................................................18
Installing EasyMP Software ............................................................ 19
English
Projecting Images from a Computer Communicating
via a Network (Network Screen)
Types of Network Connections ....................................................... 22
Connecting Using Easy Connect Mode .......................................... 23
Before Connecting...............................................................................23
Steps for Connecting Using Easy Connect Mode................................24
Using the Toolbars .......................................................................... 35
Icon Use and Actions........................................................................... 35
E-Zoom................................................................................................ 37
Basic Settings.......................................................................................38
Disconnecting from a Network Connection..................................... 40
Disconnecting at the Computer............................................................40
Disconnecting at the Projector.............................................................40
3
Page 5

Contents
Connecting in Access Point Mode................................................... 41
Before Connecting............................................................................... 41
Connecting in Access Point Mode....................................................... 41
What If the Projector You Want does not Appear?.............................. 52
Transmitting Encrypted Data...............................................................56
Appendices
Compatible Memory Cards ............................................................. 60
Uninstalling EasyMP Software ........................................................ 61
Glossary .......................................................................................... 62
About Compliance Statement ......................................................... 64
Index ............................................................................................... 66
4
Page 6
Functions
EasyMP supplied with the projector has two main functions:
• Network Screen Function - uses a wireless connection to connect to a
network and project images from a computer
• CardPlayer Function - projects files stored on a memory card in this
projector and allows a presentation to be shown without connecting to a
computer.
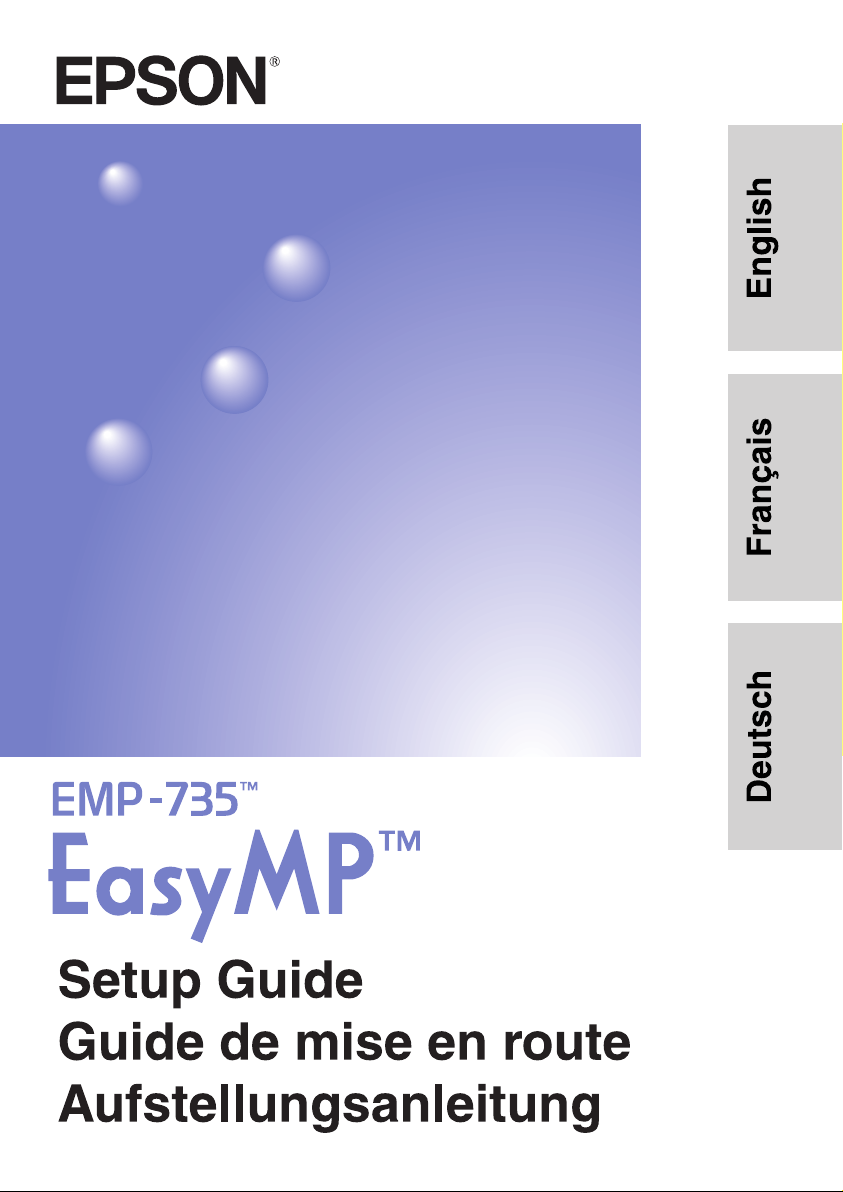
Projecting Images Using a Wireless Computer Connection
(Network Screen)
Have you ever tried to set up for a presentation where you had to fumble with cables
in the limited time between speakers or had to rearrange seating to connect a cable
that was just a little too short?
By setting up the wireless LAN card included with the projector, you can project
images from a computer that has a wireless LAN card or internal wireless LAN
functionality.
Easy Connection with a Wireless LAN
The two wireless LAN connection modes are "Easy connect mode
(ad hoc mode
Of the two, when using "Easy connect mode", connection is as simple as setting up
corresponding passwords or numbers on both the projector and computer.
Projectors and computers can not only be connected one-to-one, but one computer
can be connected to as many as four projectors. This way, projectors placed in
several classrooms or conference rooms can simultaneously project images from
one computer.
)" and "Access point mode (infrastructure mode)".
English
5
Page 7
Functions
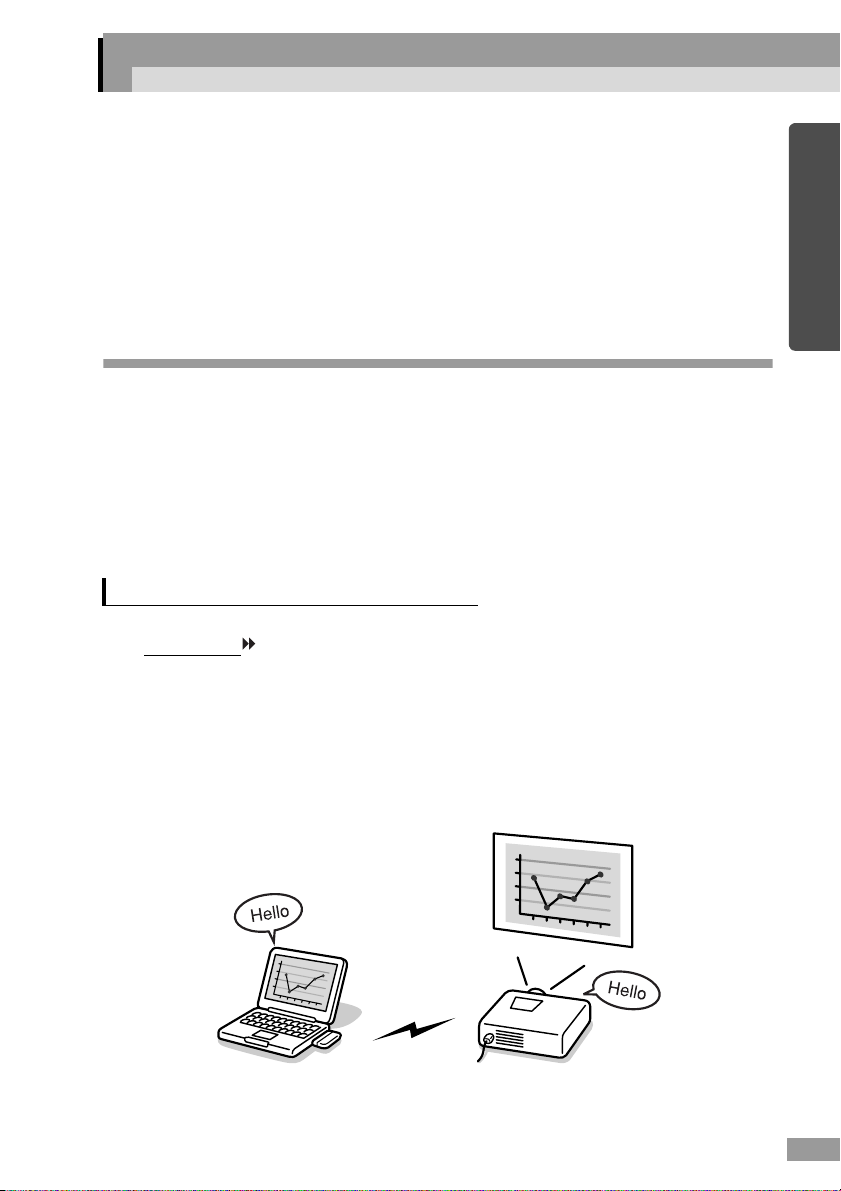
Connecting Via an Access Point in a Wireless LAN
If a wireless LAN system is already installed in an office, use the "Access point
mode" to share projectors from a participating computer via the company network.
Monitoring Projector Errors with EMP Monitor and SNMP
Using the "EMP Monitor" provided on the included CD-ROM, it is possible to
simultaneously monitor and control the projector from a computer, when using
"Access point mode" to connect to a computer on a wireless LAN. The monitoring
function monitors the error state, power status, and input status of the projector. The
control function performs simultaneous start-up, and image signal input switching
of multiple projectors. Using EMP monitor, it is possible for a single operator to
control the simultaneous starting and monitoring of projectors arranged in separate
classrooms or meeting rooms.
You can also use SNMP
computer. SNMP creates a notification message when an abnormal condition occurs
on a projector, and sends the notification to a computer identified by a pre-defined
IP address.
* In order to monitor a projector using SNMP, you need to first install SNMP
management software on the computer.
to monitor and control the status of projectors from a
6
Page 8
Using a Memory Card to Give a Presentation Without a
Computer (CardPlayer)
When a memory card containing image files, or a "scenario" made from PowerPoint
files, is set into the projector, its contents can be projected directly using the
CardPlayer function. Neither a computer, nor the application software are
necessary.
You can make your presentation with just this projector and a memory card, and not
be weighed down by other equipment.
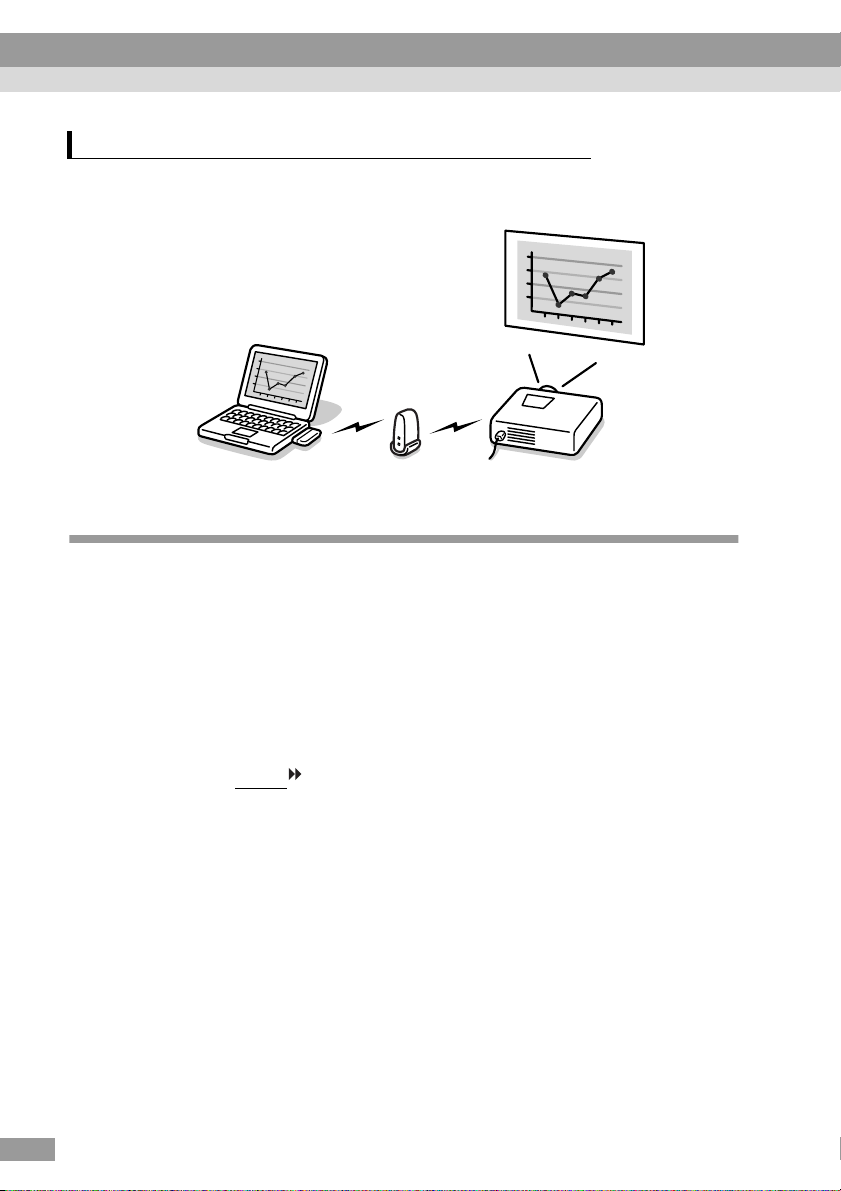
Projecting a PowerPoint file without a computer
Using "EMP SlideMaker2", which is provided on the CD-ROM, makes the
following operations simple.
• Extracting the selected slides from a PowerPoint file.
• Combine the selected slides from different PowerPoint files and save them
as one file.
This type of file is referred to as a "scenario" in this guide.
In addition to PowerPoint files, a scenario may contain JPEG, and BMP files.
See "Files that Can be Included in Scenarios" in the EasyMP Operation Guide.
PowerPoint
File 1
PowerPoint
File 2
PowerPoint
File 3
English
Scenario File
7
Page 9

Functions
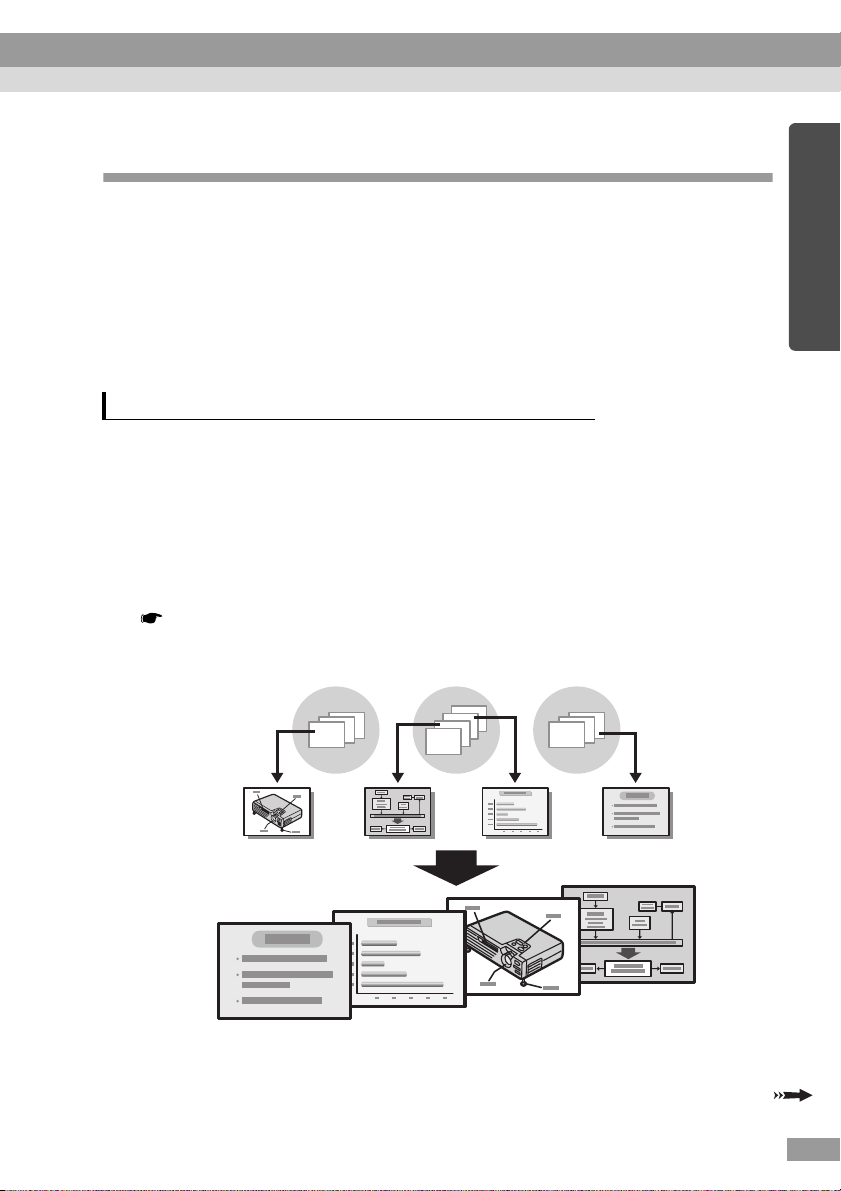
Using "EMP SlideMaker2", you can extract and rearrange the selected parts of your
presentation without editing the original files, and easily and efficiently create
presentation material tailored to suit your audience and needs.
Insert a memory card containing a scenario into the projector. Select the CardPlayer,
and use the scenario playing function to present the scenario.
Projecting Photograph Data from a Digital Camera
By storing pictures from a digital camera on a memory card, and inserting that
memory card into the projector, the photos can be projected directly using the
CardPlayer function. A computer is unnecessary because the projector can show
these images directly.
If graphics files are combined into folders, besides being able to view a file list, the
graphics files can be projected one-at-a-time in order as if showing photographic
slides.
See "Files that Can be Projected by the CardPlayer" in the EasyMP Operation
Guide.
8
Page 10

Software Overview
"Network Screen" and "CardPlayer" are already installed on the projector. These
applications are referred to as "EasyMP" in this manual.
Furthermore, "EMP NS Connection", "EMP SlideMaker2", and "EMP Monitor"
may be installed on a computer and are included amongst the software on the
"EasyMP Software CD-ROM".
Each of these programs is described below.
EasyMP Software Overview (Projector)
EasyMP supplied with this projector has the following functions.
Network Screen This function projects images from a computer
communicating via a network. Furthermore, this software
can be used to apply settings to a projector using a Web
browser, or to manage a projector using SNMP
CardPlayer This function is used to project scenario and graphics files
stored on a memory card inserted into a projector, and it is
used to edit scenarios.
EasyMP Software Overview (Computer)
English
.
The "EasyMP Software CD-ROM", which is included, contains the following three
programs to assist EasyMP. Individual program products can be selected and
installed as needed. For detailed installation information, refer to "Installing
EasyMP Software". p.19
EMP NS Connection This software is used to transmit images from computer to
a projector using a wireless LAN.
EMP SlideMaker2 This software is used to create and transmit scenarios.
EMP Monitor This software is used to simultaneously monitor and
control multiple projectors that are connected to a network.
9
Page 11

Page 12

Before Use
This chapter describes the preparation for connecting to a computer
via a wireless LAN using the wireless LAN card that is provided.
Operating Environment ................................................... 12
• System Requirements for EasyMP Software ........................ 12
• System Requirements for EMP NS Connection................................ 12
• System Requirements for EMP SlideMaker2.................................... 13
• System Requirements for EMP Monitor............................................ 13
• Conditions for Connecting to Compatible
Wireless LAN Cards and Access Points.............................. 14
• Precautions Regarding the Use of the Included
Wireless LAN Card................................................................. 14
• EM Safety Precautions....................................................................... 15
• Frequency Precautions....................................................................... 15
• International Travel Precautions........................................................ 15
Inserting and Removing Cards....................................... 16
• Installation................................................................................ 16
• Removal.................................................................................... 17
• Interpreting the Access Lamp................................................ 18
Installing EasyMP Software ............................................ 19
11
11
Page 13

Operating Environment
System Requirements for EasyMP Software
The "EasyMP Software CD-ROM" provided, contains the following programs.
• EMP NS Connection
Transmit images from computer to a projector using a wireless LAN.
• EMP SlideMaker2
Create and transmit scenarios.
• EMP Monitor
Simultaneously monitor and control multiple projectors connecting on a
network.
The hardware requirement for each software program is different as follows.
System Requirements for EMP NS Connection
OS Windows 98/Me/2000/XP
CPU Minimum: Pentium III 500MHz (Recommended: Pentium III
700MHz or higher)
Memory At least: 128MB (Recommended: 192MB or above)
Available hard
drive disk space
Display At least VGA (640×480) resolution (Recommended: XGA
* Macintosh is not supported.
At least 20MB
(1024×768) resolution, 16-bit colour)
*
12
Page 14
System Requirements for EMP SlideMaker2
OS Windows 98/Me/2000/XP
CPU Minimum: Celeron 300MHz (Recommended: Celeron
400MHz or higher)
Memory Minimum: 64MB (Recommended: 128MB or above)
Available hard
drive disk space
Display At least SVGA (800×600) resolution (Recommended: XGA
* Macintosh is not supported.
12MB
(1024×768) resolution or above)
*
System Requirements for EMP Monitor
OS Windows 95/98 Second Edition/Me/NT 4.0 Workstation/2000
Professional/XP
CPU Minimum: Pentium MMX 166MHz (Recommended: Pentium
II 233MHz or higher)
Memory 64MB or more (128MB or more recommended)
Available hard
drive disk space
Display Minimum: XGA (1024×768) or higher resolution, 16-bit colour
* Macintosh is not supported. Internet Explorer 3 or later must be used if Windows
95 is used.
At least 6MB
or higher
*
English
13
Page 15
Operating Environment
Conditions for Connecting to Compatible Wireless LAN Cards
and Access Points
When the included wireless LAN card is installed in the projector, you can connect
to the computers with internal wireless LAN functionality, wireless LAN card
installed in the computer and access point, providing they are all Wi-Fi compliant.
Please note: The enclosed wireless LAN card is designed to be used exclusively
with this projector. Our company will not be held responsible for any damage
caused if the LAN card is inserted into a computer.
Precautions Regarding the Use of the Included Wireless
LAN Card
Do not use a wireless LAN card other than the one provided with this
projector.
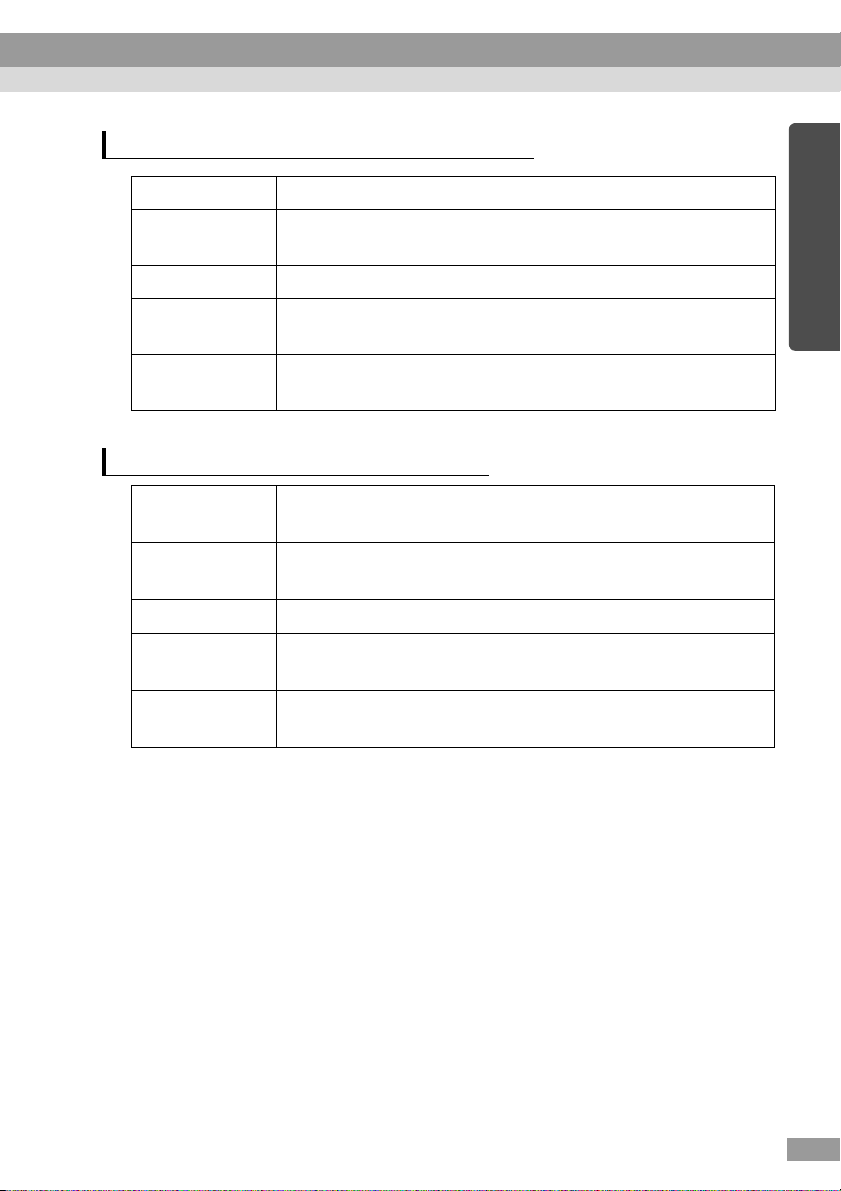
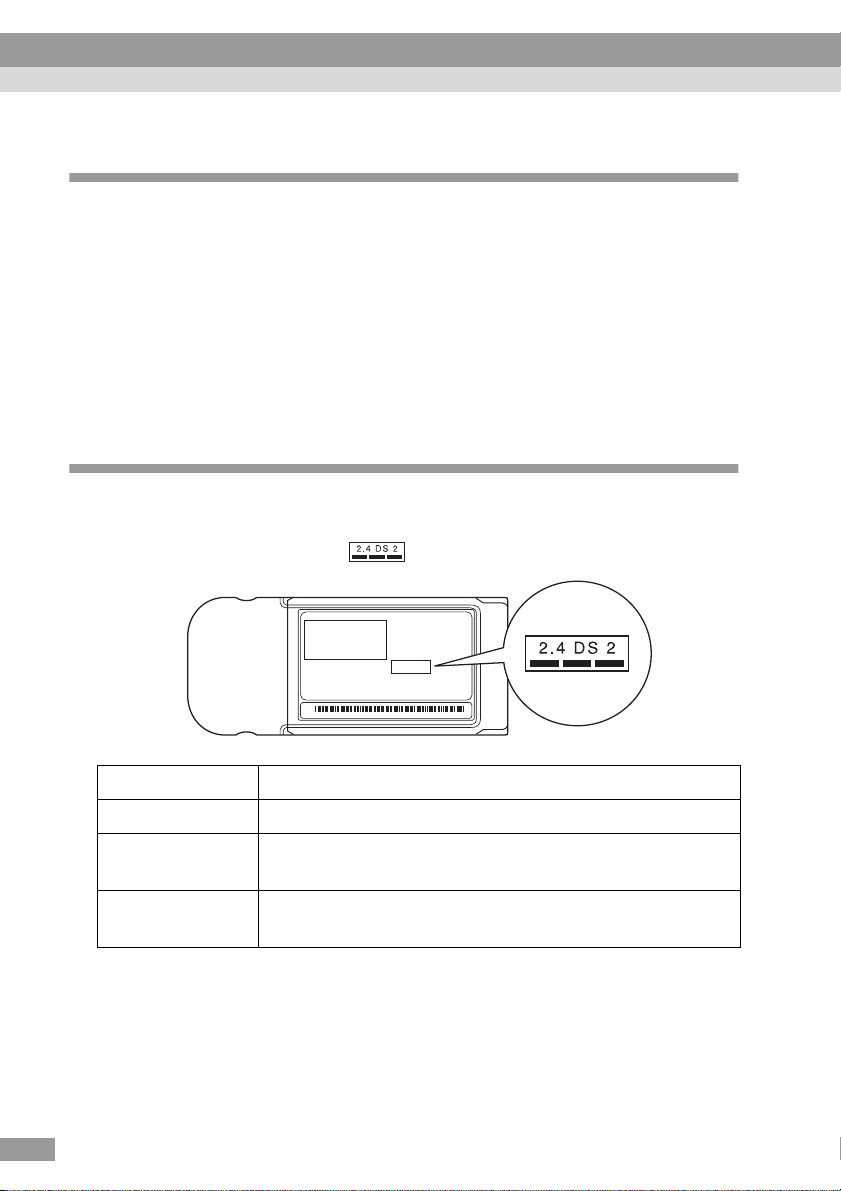
The meaning of the label below for the included LAN card is as follows.
14
Frequency Range 2.4GHz band
Modulation HR/DSS-SS
Potential
Interference Range
Can/Can not
change frequency
Less than 20m
Uses all bands, and is capable of avoiding "licenced" as well
as "unlicenced" bands.
Page 16

EM Safety Precautions
Be aware of the following points regarding the included wireless LAN card.
• May exert electromagnetic interference on, and cause malfunction of,
cardiac pacemakers. Before use, ensure that electromagnetic interference
does not occur.
• May exert electromagnetic interference on, and cause malfunction of,
sensitive medical equipment. Before use, ensure that electromagnetic
interference does not occur.
• Do not use near microwave ovens. Wireless communication may be
interrupted by electromagnetic interference generated by microwave
ovens.
• Use of this product on aircraft may be restricted in some countries. Use of
this product is based on due diligence with regard to regulations.
Frequency Precautions
The frequency range which applies to the wireless LAN cards that can be used in
the projector is the 2.4GHz band. This wireless LAN card operates in the same
frequency bandwidth as industrial, scientific, and medical devices such as
microwave ovens and mobile unit identification (RF-ID) systems (licenced
premises radio stations and unlicenced specified low-power radio stations) used in
factory production lines.
Before using the wireless LAN card, check that there are not any radio stations for
mobile unit identification or specified low-power radio station premises nearby.
In the event that this wireless LAN card should interfere electromagnetically with
the premises of a radio station used for mobile unit recognition, cease use
immediately and stop generating the electromagnetic field.
Contact your nearest dealer or the address provided under "International Warranty
Conditions" in Safety Instructions/World-Wide Warranty Terms if this wireless LAN
card interferes electromagnetically with a special low-power radio station used for
mobile unit identification or causes similar problems.
English
International Travel Precautions
The wireless LAN card configuration is based on the specifications of the country
of purchase.
Because the wireless LAN card is designed to conform to the channel
frequency limits of the country it is intended to be used in, it may infringe upon the
laws or regulations of other countries if used outside the country of purchase. If you
need to use it outside the country of purchase, purchase a new wireless LAN card
for that country. To purchase such a card, contact the address for the country of use,
provided in the "International Warranty Conditions" section of the Safety
Instructions/World-Wide Warranty Terms booklet.
and
15
Page 17
Inserting and Removing Cards
Inserting and removing PC cards will be explained using the included wireless LAN
card provided as an example. When using a commercial memory card, please refer
to the documentation included with the card. If inserting or removing a card in a PC
card slot on a computer, please refer to the documentation for the computer.
Tip :
The following PC cards can be inserted in the card slot on this projector.
• Wireless LAN card (only available with the one included with this projector)
• Memory card
For detailed specifications regarding compatible cards, refer to "Compatible Memory
Cards". p.60
• Wired LAN card
For details on the available wired LAN card, please visit the Web site
http://www.epson.co.uk/.
For Network settings, refer to "Connecting in Access Point Mode". p.41
Installation
Caution :
Insert the PC card facing the right way. Installing the device back to front or upside
down may cause failure or damage.
16
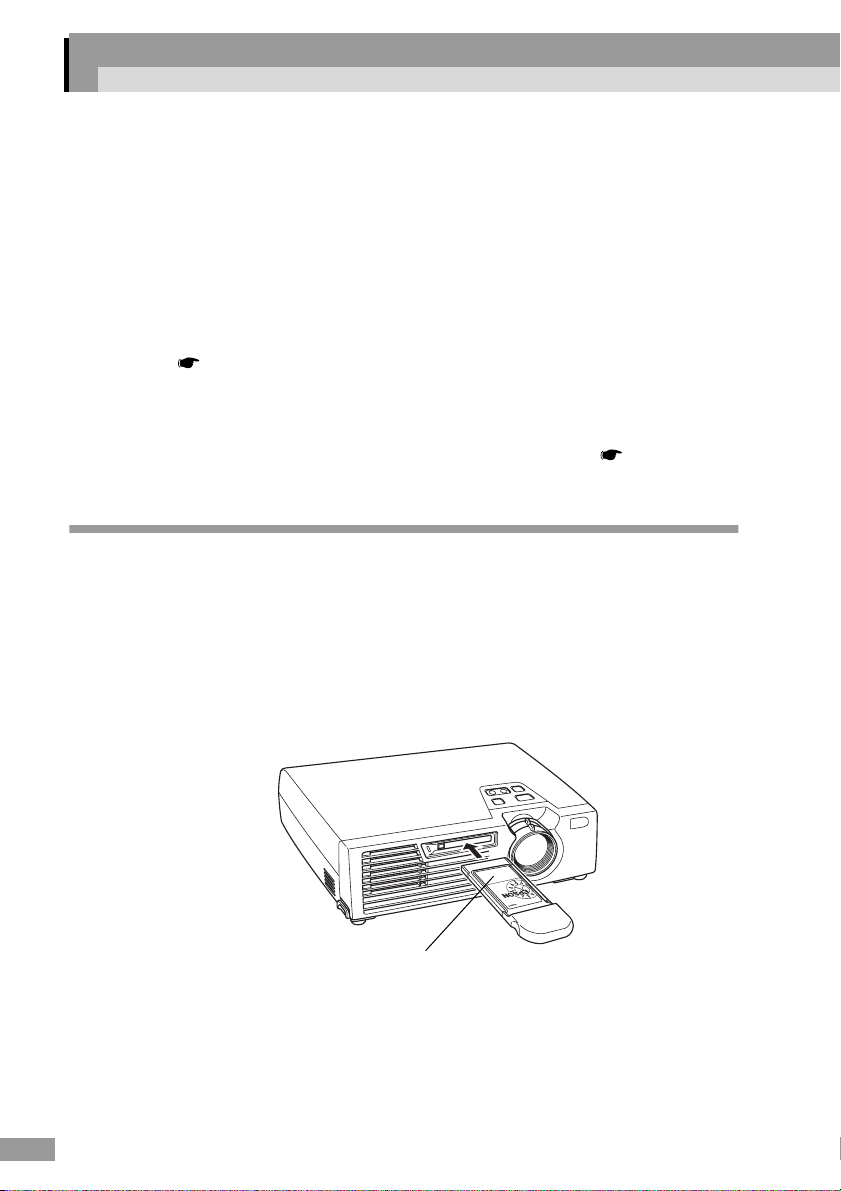
Hold the wireless LAN card with the face uppermost and insert it into the
projector card slot.
Insert firmly into the slot until it is secure.
This side up
Page 18
Once the wireless LAN card has been fully inserted in the card slot, the rear edge of
the card will protrude from the slot. When the card is properly seated, the
transmitter/receiver portion of the card protrudes from the slot.
Caution :
• Always remove the card before transporting the projector.
• Furthermore, when storing the projector in the included soft carrying case, be sure to
remove the card, and store the card in the carryall’s pocket.
Removal
Caution :
• Do not remove a PC card when the access lamp is lit green, when connected to a
network or when projecting a scenario. Improperly removing a PC card may result in
damage to the card or data destruction on a memory card.
• The PC card gets hot during and after projector use. Please handle the card carefully to
avoid personal injury or burns.
English
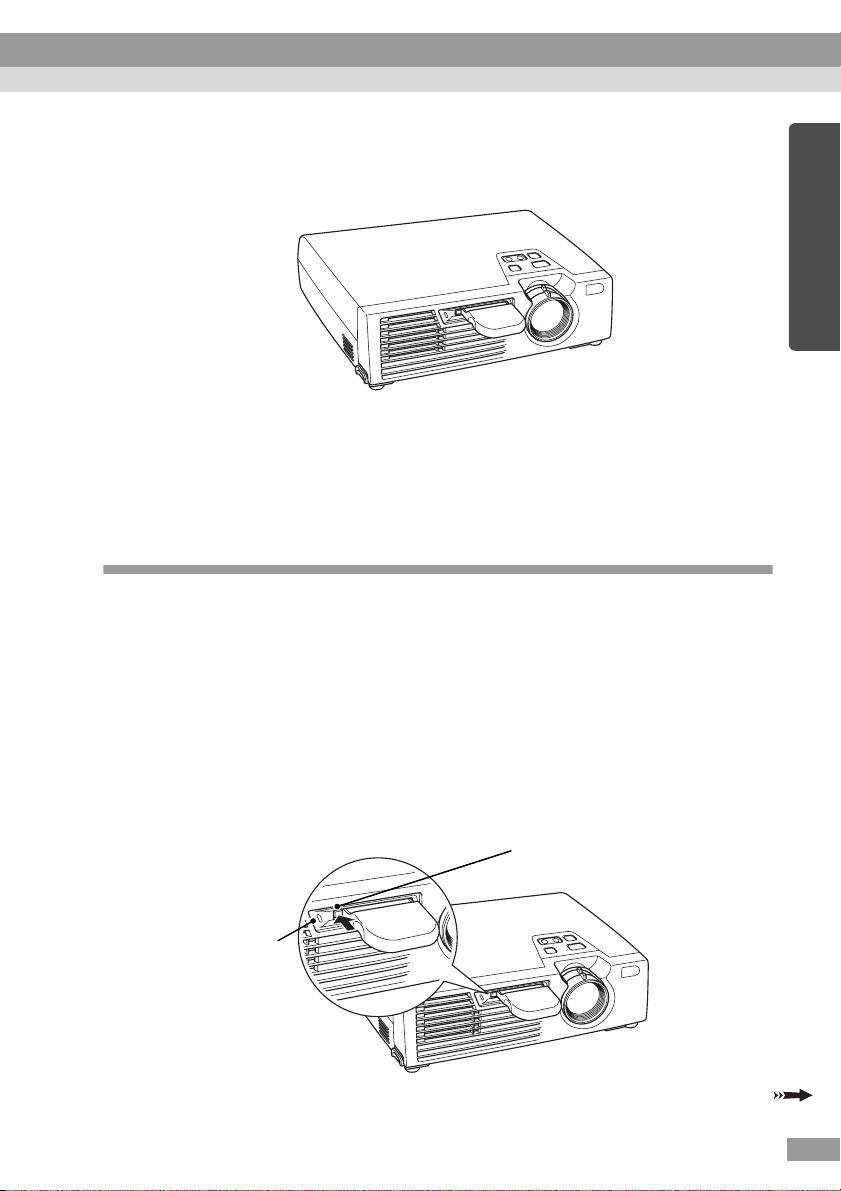
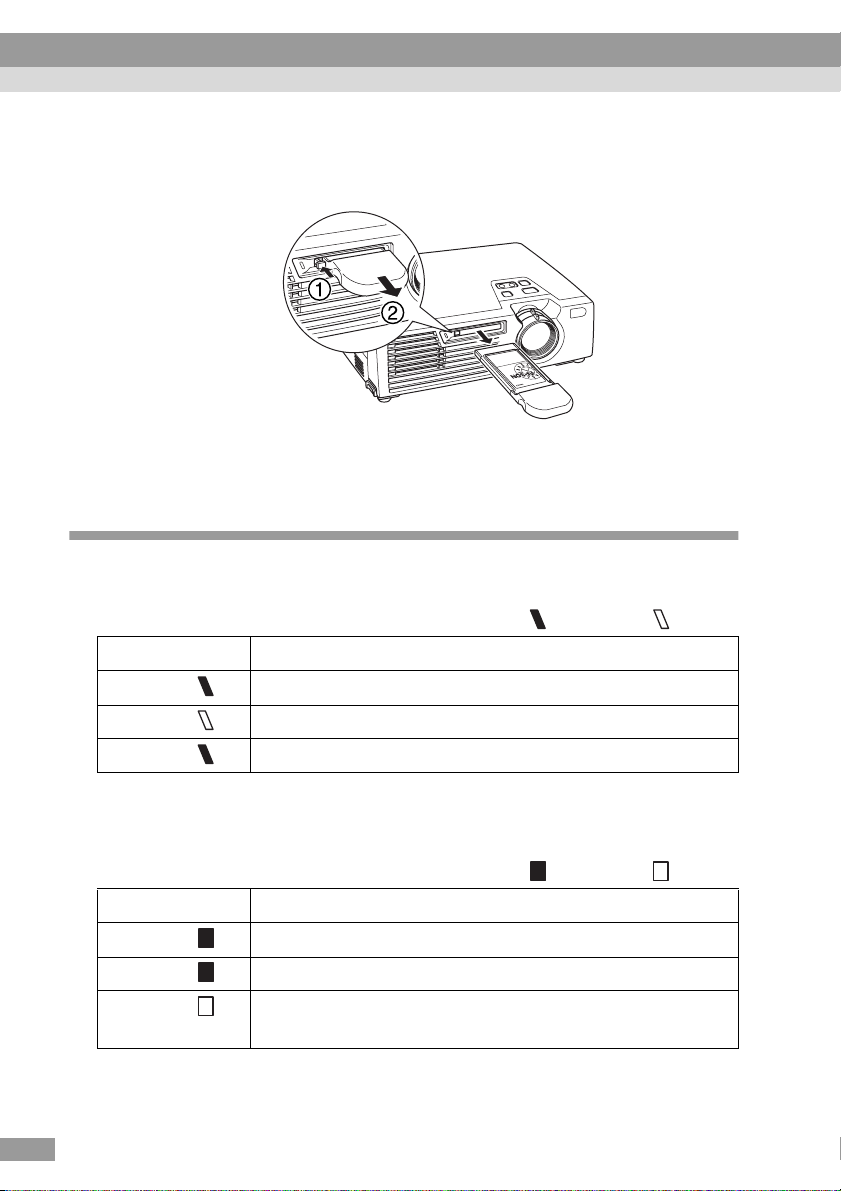
Press the eject button to the left of the card slot.
1
The eject button will pop out.
Card slot
access lamp
Eject button
17
Page 19
Inserting and Removing Cards
Press the eject button again.
2
Enough of the wireless LAN card will be ejected so that you can grasp the edge
of the card and pull it straight out of the slot.
Caution :
Be sure to press the eject button back in to prevent it from being broken or damaged.
Interpreting the Access Lamp
The colour of the card slot access lamp indicates the access status of the memory
card as follows when the memory card is inserted.
: ON : OFF
State Access status
Green Data is being read from the memory card.
18
OFF Not accessing the memory card.
Red An error occurred whilst reading the memory card.
The card slot access lamp is not on when the wireless LAN card is inserted in the
card slot. The communication status can be determined by the access lamp on the
wireless LAN card as follows.
: ON : OFF
State Communication status
Yellow The wireless LAN card is ready for use.
Green Data is being transmitted.
OFF The projector is off or the wireless LAN card is not inserted
correctly.
Page 20
Installing EasyMP Software
Install "EMP NS Connection", "EMP SlideMaker2", and "EMP Monitor" from the
accessory "EasyMP Software CD-ROM" individually, or as needed.
When using Windows 2000/NT4.0/XP, only a user with administrator privileges can
install the software.
Before installation, close all other programs.
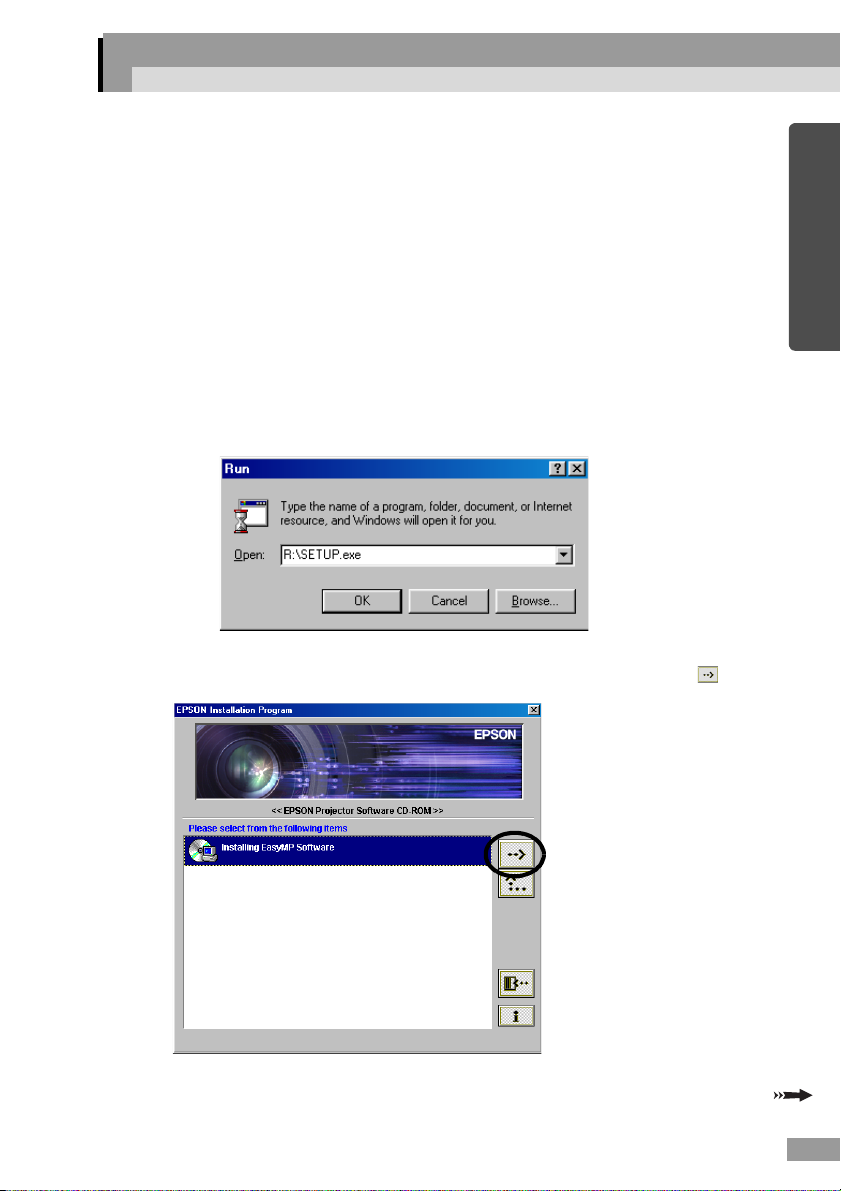
Turn on the computer, allow Windows to start, and insert the "EasyMP
1
Software CD-ROM" in the CD drive.
The Setup program should start automatically.
Tip :
If the Setup program does not start automatically, manually start the program by
selecting "Start"-"Run" to get the "Run" dialogue box. Specify the location of the setup
program by entering the "R(CD drive letter):\SETUP.exe" and then clicking "OK".
Verify that "Installing EasyMP Software" is selected, and click " ".
2
English
19
Page 21
Installing EasyMP Software
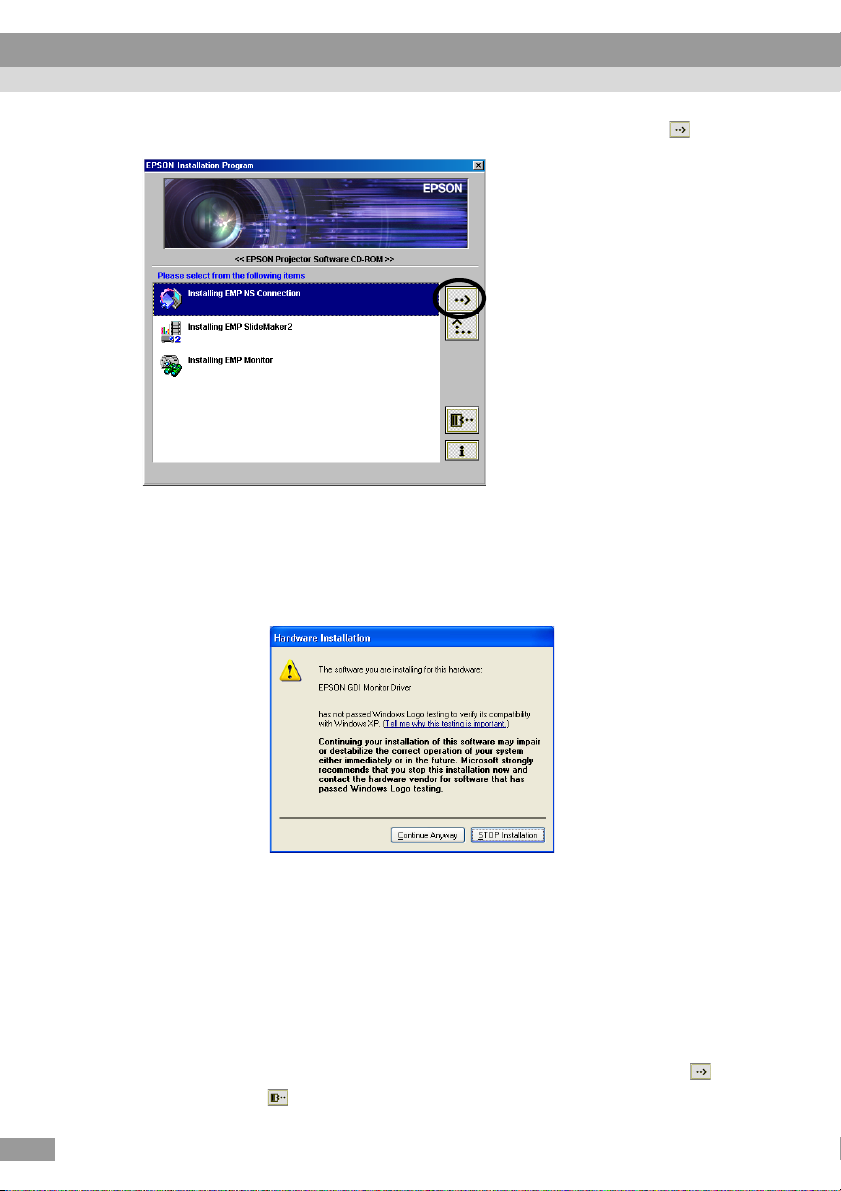
Select the names of the software products to install, then click " ".
3
Installation begins. Follow the instructions on the screen to continue
installation.
Caution :
When installing EMP NS Connection in Windows 2000/XP, the following installation
confirmation window is displayed.
20
When prompted, please be sure to select, "Yes" (Windows 2000) or "Continue Anyway"
(Windows XP).
If you do not select "Yes" or "Continue Anyway", Network Screen will not operate
normally.
When the "EPSON GDI Monitor Driver" is being installed, the screen may go blank for
a moment, but this is not a problem. Please allow the installarion to continue.
Control will return to the screen in Step 3 once installation is complete.
4
To install another software application, select the name and click " ".
To finish, click " ".
Page 22

Projecting Images from a
Computer Communicating via a
Network (Network Screen)
This chapter describes how to establish a wireless connection with
a computer, projection, use of toolbars, and connection termination
in Easy connect mode and Access point mode.
Types of Network Connections ....................................... 22
Connecting Using Easy Connect Mode ......................... 23
• Before Connecting .................................................................. 23
• Steps for Connecting Using Easy Connect Mode................ 24
Using the Toolbars ........................................................... 35
• Icon Use and Actions.............................................................. 35
• E-Zoom ..................................................................................... 37
• Basic Settings.......................................................................... 38
Disconnecting from a Network Connection................... 40
• Disconnecting at the Computer ............................................. 40
• Disconnecting at the Projector .............................................. 40
Connecting in Access Point Mode.................................. 41
• Before Connecting .................................................................. 41
• Connecting in Access Point Mode......................................... 41
• What If the Projector You Want does not Appear?............... 52
• Transmitting Encrypted Data.................................................. 56
21
21
Page 23

Types of Network Connections
The connection between a computer and the projector through a wireless LAN can
be in one of two forms.
• Easy connect mode
Allows communication between wireless terminal devices without using an
access point. There are two modes: "ESSID
hoc mode". Change mode settings on the projector using the Easy connect mode
advanced settings. Change mode settings on the computer using utility software
associated with the wireless LAN card. If using Windows XP, no utility is
necessary to communicate in ESSID ad hoc mode. Utility software is necessary to
communicate using channel ad hoc mode.
ad hoc mode " and "Channel ad
22
Tip :
Generally, connection is made using ESSID ad hoc mode. Some commercially available
wireless LAN cards for use with computers do not support ESSID ad hoc mode, but
support channel ad hoc mode. In this case, select channel ad hoc mode, in the Easy
connect mode advanced settings screen on the projector.
• Access point mode
Allows communication with a computer on a network through an access point,
such as your office wireless LAN system.
Page 24

Connecting Using Easy Connect Mode
This section describes the steps necessary to project images from a computer using
Easy connect mode, perform operations when projecting images, and to disconnect.
Perform the following steps prior to projecting images.
1. Set up the Easy connect mode settings on the projector.
2. Set up the connection on the computer.
3. Start EMP NS Connection on the computer, and connect to the network.
Once these settings have been established, future sessions can begin by just
connecting the devices. When connecting to a network for the first time or when
settings are changed, refer to "Connection Settings on the Projector" ( p.24 ). If
the projector and computer connection settings are already established, refer to
"Connecting to a Computer" ( p.30 ).
Before Connecting
Ensure that the following procedures have been carried out before connecting a
computer and projector via a network.
• Install EMP NS Connections on the computer you will be using. p.19
• Prepare the computer settings to use either a wireless LAN card or
internal wireless LAN functionality. Set the WEP
the documentation for the wireless LAN card installed in the computer, or
the computer’s documentation.
• The size of the projected image varies depending on the distance of the
projector from the screen. Decide where the projector should be placed to
allow the image to fit on the screen. See "Screen Size and Projection
Distance" in the EMP-735 User's Guide.
• For optimal performance, set the screen resolution of the computer you
are using to XGA or lower with a colour depth of 16bit.
to OFF. For setup, see
English
23
Page 25

Connecting Using Easy Connect Mode
Steps for Connecting Using Easy Connect Mode
Caution :
• Do not unplug the power cable when EasyMP is in use (screens are changing or the
access lamp on the wireless LAN card is lit green).
• Do not remove the wireless LAN card when the access lamp on the wireless LAN card
is lit green, or when connected to a network. Doing so may damage the wireless LAN
card.
Connection Settings on the Projector
First, set up the Easy connect mode connection settings on this projector.
Connection settings are found on the Access point mode advanced settings screen of
the Network Screen.
Modify these connection settings using the remote control provided.
This step does not need to be performed if these settings have already been
established.
Insert the wireless LAN card into the card slot on this projector.
1
See "Installation" for details. p.16
24
Press the [Power] button on the remote control to turn on the projector.
2
Repeatedly press the [Comp/EasyMP] button on the remote control until
3
"EasyMP" is displayed at the top right of the projection screen. EasyMP
will automatically start and display the following screen.
Page 26

Tip :
If the wireless LAN card is not inserted in the card slot on the projector, the following
screen is displayed. If a wireless LAN card is installed, the screen from Step 3 is
displayed.
Ensure that the "Config" button at the lower right on the screen is
4
selected, and press the [Enter] button on the remote control.
The Network advanced settings screen is displayed.
Ensure that the cursor is positioned on "Easy connect mode", and press
5
the [Enter] button on the remote control.
This selects "Easy connect mode".
English
25
Page 27

Connecting Using Easy Connect Mode
Press the [ ] button on the remote control to move the cursor to
6
"Advanced", and press the [Enter] button.
The Easy connect mode advanced settings screen is displayed.
Move the cursor to the selected item, and press the [Enter] button to set
7
that item.
The settings of each of the items is shown below.
26
Letters or numbers must be input depending on the item. See the "Entering
Letters and Numbers" ( p.28 ) for the letter and number input methods.
Projector name Enter a name for the projector. This name is used to
identify the projector when connected to the network.
Up to 16 single-byte alphanumeric characters can be
entered.
Select the "Clear" button and press the [Enter] button on
the remote control to clear the entered projector name.
Ad hoc mode
settings
ESSID
Select the ad hoc mode.
Select either "ESSID ad hoc" or "Channel ad hoc". Ensure
the same mode is selected on the connected computer.
Enter when "ESSID ad hoc" under "Ad hoc mode settings"
is selected.
Enter the ESSID used for ESSID ad hoc mode. The initial
value is "EPSON."
Enter up to 16 (single-byte) alphanumeric characters.
Ensure that the same string is entered on the connected
computer.
Page 28

Channel Enter under "Ad hoc mode settings" when "Channel ad
hoc"is selected.
Enter the channel used for channel ad hoc mode. The initial
value is " 11."
From 1-14 channel numbers can be selected.
Be sure to enter the same channel number(s) on the
connected computer.
* Some channel numbers may be unavailable in some
countries. Channel numbers that are unavailable in the
country of purchase have been pre-configured so they do
not display.
*
English
Password for
WEB control
Projector
keyword
MAC
address
Enter a password. If you enter a password, entry of that
password will be required when; opening the settings and
control browser page to change the projector settings via
network from a computer’s web browser, and when starting
EMP Monitor.
Up to 8 single-byte alphanumeric characters are available.
Select the "Clear" button, and press the [Enter] button on
the remote control to clear the entered password. The
password setting will be inactivated.
If the projector keyword option is set to "ON", keyword
entry will be required when using EMP NS Connection to
connect to the projector over a wireless LAN. A keyword
will be displayed on the screen of the projector you are
trying to connect to. Please check this keyword and enter it
into the computer you are trying to establish the connection
from. If the keyword is entered correctly, connection is
established and the projector will project the images shown
on the computer display. Use this function to prevent
unintended or unauthorized access to the projector during
presentations, from other points on the wireless LAN.
This option should normally be "ON". To disable this
option, select "OFF".
Displays the wireless LAN card MAC address.
27
Page 29

Connecting Using Easy Connect Mode
Entering Letters and Numbers
Perform the following steps to enter letters and numbers.
1. Move the cursor to the item to input, and press the [Enter] button on the remote
control. The cursor turns green to indicate you are in input mode.
2. Select numbers or letters by pressing the [ ] button or the [ ] button. Press and
hold the [ ] button or the [ ] button to perform rapid key repeat, this makes the
rapid selection of desired letters and numbers possible. For the projector name,
ESSID, and WEB control password, characters are presented in this order by
pressing the [ ] button : A-Z → 0-9 → symbols → a-z → space. Press the [ ]
button to reverse the display order.
3. To input two or more numbers or letters, press the [ ] button on the remote
control. The first number or letter is selected and the cursor moves to the second
entry position. Select the second, and all the subsequent numbers and letters in
the same way as the first character.
4. After you have entered all the characters, press the [Enter] button on the remote
control to finalise the entry. The cursor will turn yellow.
When finished making setting changes, press the [Page up] button on
8
the remote control, and move the cursor to "OK". Press the [Enter]
button.
This applies the setting changes and returns to the Network advanced settings
screen.
If you wish to cancel the change and return to the state before changes were
made, move the cursor to "Cancel" and press the [Enter] button.
28
Press the [Page up] button on the remote control to move the cursor to
9
"OK", and press the [Enter] button.
This returns to the Connection Stand-by screen. The ESSID or channel number
that was set is displayed. If "Projector keyword" is "ON", the keyword is also
displayed.
When "Cancel" is selected, all changes made in each mode, (including
advanced settings) are canceled, and the projector returns to its previous
conditions, before changes were made.
Page 30

The value is displayed here.
Tip :
The projector keyword changes each time the projector power is turned OFF and ON
again, and when the wireless LAN card is removed and reinstalled. When connecting to
a computer, check the projector keyword displayed in the Connection Stand-by screen
and enter that keyword. Connection is not possible using a previous keyword.
Computer Connection Settings
In this section we will address computer connection setup. Connection setup is
performed using the utility software provided with the wireless LAN card.
If these settings are already established, this step need not be performed.
Turn on the computer and start Windows.
1
Start up the wireless LAN card utility software.
2
Refer to the documentation for the wireless LAN card for instructions on how
to use the wireless LAN card utility software.
If Easy connect mode advanced settings on the projector indicate the "Ad hoc
mode settings" as "ESSID ad hoc", you must also select ESSID ad hoc
mode on the computer. Set to the same ESSID shown on the Connection Standby screen on the projector.
If Easy connect mode advanced settings on the projector indicate the "Ad hoc
mode settings" as "Channel
mode on the computer. Set to the same channel shown on the Connection
Stand-by screen on the projector.
ad hoc", you must also select channel ad hoc
English
29
Page 31

Connecting Using Easy Connect Mode
Connecting to a Computer
When finished applying the settings, run EMP NS Connection on the computer, and
establish a connection with the projector. Once these settings have been established,
future sessions can begin by just connecting the devices.
Tip :
• Install the wireless LAN card in the computer before starting EMP NS Connection. The
wireless LAN card will not be recognised by the EMP NS Connection if the wireless
LAN card is installed after EMP NS Connection is started.
• Set the WEP
functionality.
In Windows, select "Start" - "Programs" (or "All Programs") - "EMP NS
1
Connection" - "EMP NS Connection".
EMP NS Connection starts.
The following Switch network screen is displayed upon initial start-up
2
after installing EMP NS Connection. Proceed with Step 4 if the Switch
network screen is not displayed.
to OFF in either the wireless LAN card or for internal wireless LAN
30
Tip :
In the event that the IP address has not been set in the projector's network settings, the
message, "There is no network adapter" may be displayed. This is because it takes time
to determine the IP address, if the projector cannot connect to the DHCP
Please wait about 30 seconds and then repeat the process from Step 1.
server.
Page 32

Select the wireless LAN card that will be used for the connection, and
3
click "OK" to close the Switch network screen.
Tip :
Once the network adapter in use has been selected in this Switch network screen, this
screen will not be displayed at subsequent EMP NS Connection startups. To change the
current network adapter, click the "Option" button in the Projector selection screen
(screen in Step 4). Click the "Switch LAN" button on the Option screen to display the
Switch network screen.
Select the check box for the name of the projector that you want to
4
connect, and then click the "Connect" button.
The projector name is shown in the projector’s Connection Stand-by screen.
English
The icon status meaning differs
according to colour as follows.
Grey: Not connected
Orange: Connected to another
computer
31
Page 33

Connecting Using Easy Connect Mode
Tip :
• In the event that a projector already connected to another computer is selected, the
previous connection is terminated and the images of the newly connected computer are
projected.
• When multiple projectors are selected, one computer's display can be projected
simultaneously by up to a maximum of four projectors.
• Once the connection has been made, additional connections cannot be added.
If the "Projector keyword" is set to "ON" in the Easy connect mode
5
advanced settings screen on the projector, a projector keyword entry
screen similar to the following is displayed. Enter the projector keyword
displayed on the Connection Stand-by screen on the projector, and click
"OK".
32
A network connection is established between the computer and
6
projector, and the computer screens are projected by the projector.
Toolbar
Page 34

The EMP NS Connection toolbar is displayed on the computer screen. Use the
toolbar to operate the projector, change options and settings, and disconnect
from the network. p.35
If the toolbar is in the way during a presentation, you can minimise it. You can
perform projector operations and setup using the remote control. See
"Selecting the Colour Mode" and "Advanced Operations" in the EMP-735
User's Guide.
See "Adjusting the Screen Image" and the subsequent material, in the EMP-
735 User's Guide to further adjust the projected images and perform other
functions.
Tip :
To connect to a different computer when changing presenters, start EMP NS Connection
on the selected computer and connect. The connection with the current connected
computer will be terminated , and the next computer will be connected.
Connection Restrictions
When projecting images from a computer using the Network Screen, the following
requirements must be met. Please ensure that you meet these requirements.
Supported Resolution
Computer screen resolutions that can be projected are shown below. If the
resolution is on this list, the computer images may be directly projected. You cannot
connect to a computer with a resolution higher than SXGA.
• VGA (640×480)
• SVGA (800×600)
• XGA (1024×768)
• SXGA(1280×960)
• SXGA (1280×1024)
If the computer resolution is higher than XGA, the following message is displayed
when projecting: "Image transfer performance will be affected if PC resolution is
higher than XGA (1024 × 768 pxl.) or images use more than 24 bits. Do you want
to continue connection?". If you click "Yes", the connection is made, but display
speed will be slower.
If a computer with a special screen size is used where the ratio of height - width is
not represented on the previous list, such as 1280 × 600, a screen resolution to
project images that matches the width dimension is selected from the five choices.
In this case, the empty margins are black.
English
33
Page 35

Connecting Using Easy Connect Mode
Colour Depth
The number of colours on a computer screen that can be projected are shown below.
• 8-bit colour (256 colours)
• 16-bit colour
• 24-bit colour
• 32-bit colour
If 24 bit or 32 bit colour is used, the following message is displayed when
projecting: "Image transfer performance will be affected if PC resolution is higher
than XGA (1024 × 768 pxl.) or images use more than 24 bits. Do you want to
continue connection?" If you click "Yes", the connection is made, but display speed
will be slower.
Number of Connection Devices
A maximum of four projectors can be connected simultaneously to project images
from a single computer.
One projector cannot connect to multiple computers simultaneously.
Other
Audio is not transmitted.
Animation does not play as smoothly as when played on a computer.
Applications that use some functions of DirectX may not project correctly.
The entire screen image for an MS-DOS prompt screen cannot be projected.
34
Page 36

Using the Toolbars
Icon Use and Actions
EMP NS Connection functions are displayed on a toolbar on the computer screen
when connected to a projector through a network.
Projector operation
URL display
Help
Connection
status screen
A/V Mute
Freeze
Basic settings
Switch PC source
Switch video
source
E-ZOOM
The use and actions of icons are explained below.
Help Display EMP NS Connection help.
Connection
status screen
Click to toggle between displaying/hiding the connection
status screen. The icon for the currently connected
projector is displayed in green in the connection status
screen. You can only check the condition of the connected
projector. You cannot change or add connections.
Projector
operation
URL display
Start the Web browser to display the projector setting and
control browser page.
See "Setting, Monitoring and Controlling from a
Computer" in the EasyMP Operation Guide
Freeze Temporarily stops the image.
With animation, the images on the computer continue to
play while projection is stopped. Play does not resume
from the point the images were frozen.
This is the same as Freeze function on the projector.
See "Freeze" in the EMP-735 User's Guide.
Exit
English
Minimise
Connection status indicator
Disconnect
35
Page 37

Using the Toolbars
A/V Mute This temporarily hides images.
E-ZOOM Enlarges the view of the image without changing the
For example, if you need to change files when projecting
computer images, and you do not want to show this
activity, A/V Mute will conveniently hide the images from
the audience. Bear in mind that images on the computer
continue to play even while the animation is hidden. Play
does not resume from the point the images were hidden.
This is the same as the A/V Mute Function on the
projector.
See "A/V Mute" in the EMP-735 User's Guide.
projection size. Display the setting screen, and modify the
position and magnification. p.37
This is the same as the E-Zoom function on the projector.
See "E-Zoom" in the EMP-735 User's Guide.
Basic
settings
Switch video
source
Switch PC
source
Displays the setting screen to modify the brightness,
contrast and colour mode and perform keystone correction.
p.38
Brightness, contrast, and colour mode are the same items
as those set in the "Video" menu on the configuration
menu on the projector. See "Video Menu" in the EMP-
735 User's Guide.
Keystone correction performs the same function as the
[Keystone] button on the projector. See "Manually
Correcting Keystone Distortion" in the EMP-735 User's
Guide.
Each time the icon is clicked, the input signal projected by
the projector switches between images from the Video port
and S-Video port at the rear of the projector.
This is the same as the [S-Video/Video] button on the
remote control.
See "Turning On the Power and Projecting Images" in
the EMP-735 User's Guide.
Toggles between computer connected with computer
cable, component video, and computer connected via
wireless LAN for the input signal that the projector is
projecting.
This is the same as the [Comp/EasyMP] button on the
remote control.
See "Turning On the Power and Projecting Images" in
the EMP-735 User's Guide.
36
Page 38

Disconnect Ends the current network communication connection
between the projector and computer.
Connection
status
indicator
Continuously flashes the top, middle, and bottom
indicators in sequence as long as the computer and
projector are connected through the network. This light
goes out when no connection is possible.
Exit This terminates the current network connection with the
projector, and closes EMP NS Connection.
Minimise This minimises the toolbar and displays it as a button in the
Windows taskbar.
E-Zoom
Clicking the "E-Zoom" icon displays the following setting screen allowing you to
modify the zoom magnification and position.
E-Zoom Position
Close
English
Cancel
Projector
E-Zoom This adjusts the E-Zoom magnification. Click the "+" button to
enlarge. Click the "-" button to reduce the effect of the zoom.
This is the same as the [ ] and [ ] buttons on the remote
control.
Posit ion This indicates the portion to be enlarged/reduced.
Click each of the buttons below to move in the indicated direction.
" " button: Move up
" " button: Move right
" " button: Move down
" " button: Move left
This is the same as the E-Zoom function on the projector to move
the cross and indicate the area to enlarge/reduce. See "EZoom" in the EMP-735 User's Guide.
37
Page 39

Using the Toolbars
Cancel This cancels E-Zoom and returns to the original display.
Projector This displays the name of the target projector.
If multiple projectors are connected, select the projector to
perform the E-Zoom operation.
Close This closes the screen.
Basic Settings
Clicking the "Basic settings" icon displays the following setting screen allowing
you to modify the brightness, contrast and colour mode and perform keystone
correction.
Brightness Keystone
Close
38
Contrast
Color Mode
Projector
Brightness This adjusts the brightness of the projected image. Click the "+"
button to increase brightness, and click the "-" button to reduce
brightness.
Keystone The projector is provided with an automatic keystone correction
function to detect slant in the top and bottom of a projected
image, and perform automatic keystone correction. Use this
function to perform further correction to an image modified by
automatic keystone correction. Click the "+" button to narrow
the top edge of a projected image, and click the "-" button to
narrow the bottom edge.
Contrast This adjusts the screen contrast. Click the "+" button to increase
contrast, and click the "-" button to reduce contrast.
Page 40

Color Mode The following six settings are available for you to get the best
from your selected images. Simply select the settings to project
the optimum quality of each image. The brightness of the
projected images will be affected differently by each mode.
Each time you click the "Color Mode" button, the following
settings are toggled in order.
sRGB : Colours are set in accordance with the sRGB colour
standard. If the connected device has an sRGB mode,
set both the projector and the connected device to
sRGB to use this mode .
Normal : Enhances brightness for presentations in a relatively
bright room.
Meeting : Improves the "crispness" of the image without
changing the colours.
Presentation : For presentations in a relatively dark room.
Theatre : Optimised for movies using natural colour tones.
Game : Emphasises brightness for games in a relatively bright
room.
Projector This displays the name of the target projector. If multiple
projectors are connected, select the projector to which you want
to make basic setting changes.
Close This closes the screen.
English
Tip :
• Using keystone correction will make the screen smaller.
• Try reducing sharpness to make any unevenness emphasised by keystone correction
less noticeable. See "Video Menu" in the EMP-735 User's Guide.
• Keystone correction can also be applied from the configuration menu on the projector.
See "Setting Menu" in the EMP-735 User's Guide.
• If during keystone correction, the screen gauge values stop changing, this means that
you have reached the limit of possible keystone correction. Ensure that this projector is
not placed beyond the permissible projection angle. See "Adjusting the Image
Angle and Automatic Keystone Correction Function" in the EMP-735 User's Guide.
39
Page 41

Disconnecting from a Network Connection
The network connection between a computer and projector can be disconnected
either from the computer or from the projector.
Tip :
The display of the computer being projected is not saved by or stored at the projector.
When the connection is terminated by one of the following operations, all internal image
data is lost.
Disconnecting at the Computer
Click the "Disconnect" or "Exit" icons on the EMP NS Connection toolbar.
Exit
Disconnect
Clicking the "Disconnect" icon closes only the network connection.
Clicking the "Exit" icon disconnects the network connection and closes EMP NS
Connection.
Tip :
If a computer is connected to multiple projectors and performs the disconnect operation,
the connections to all projectors will be broken.
Disconnecting at the Projector
Press the [ESC] button on the remote control.
1
The Exit menu displays.
Select the "Exit" button, and press the [Enter] button on the remote
2
control.
"Network Screen has been disconnected by the projector." is displayed on the
screen of the disconnected computer.
40
Page 42

Connecting in Access Point Mode
In addition to the Easy Connect mode, there is also the Access point mode for
connecting a computer to a projector via a network.
Access point mode is a mode for connecting a projector to a computer through a
wireless LAN access point on an existing network system. When using a computer
connected through an access point, under normal circumstances, the computer’s
wireless LAN settings remain unaltered, and only the projector is set up.
In addition to being able to project computer images using the projector, you can
use EMP Monitor and SNMP
from a computer. See"Monitoring and Control Using EMP Monitor" and
"Management Using SNMP" in the EasyMP Operation Guide.
Before Connecting
Ensure the following have been performed before connecting a computer and
projector to a network.
• Install EMP NS Connection on the computer you will be using. p.19
• Prepare the computer settings to use either a wireless LAN card or
internal wireless LAN functionality. For setup, see the documentation for
the wireless LAN card installed in the computer, or the computer’s
documentation.
• The size of the projected image varies depending on the distance of the
projector from the screen. Decide on the projector placement so that the
image matches the screen size. See "Screen Size and Projection
Distance" in the EMP-735 User's Guide.
• For optimal performance, set the screen resolution of the computer you
are using to XGA or lower with a colour depth of 16bit.
to monitor and control the status of the projector
English
Connecting in Access Point Mode
Caution :
• Do not unplug the power cable when EasyMP is in use (screens are changing or the
access lamp on the wireless LAN card is lit green).
• Do not remove the wireless LAN card when the access lamp on the wireless LAN card
is lit green, or when connected to a network. Doing so may damage the wireless LAN
card.
41
Page 43

Connecting in Access Point Mode
Connection Settings on the Projector
First, set up the connection settings on the projector. Connection settings are found
on the Access point mode advanced settings screen of the Network Screen.
Modify these connection settings using the projector’s remote control.
If these settings are already established, this step need not be performed.
Tip :
Apply the following settings under the direction of the network systems administrator.
Insert the wireless LAN card into the card slot on the projector.
1
See "Installation" for details. p.16
Press the [Power] button on the remote control to turn the projector on.
2
Repeatedly press the [Comp/EasyMP] button on the remote control until
3
"EasyMP" is displayed at the top right of the projection screen. EasyMP
will start and display the following screen.
42
Page 44

Tip :
If the wireless LAN card is not inserted in the card slot on the projector, the following screen
is displayed. Insert the wireless LAN card in the card slot on the projector to display the
screen for Step 3.
Ensure that the "Config" button at the lower right on the screen is
4
selected, and press the [Enter] button on the remote control.
The Network advanced settings screen is displayed.
Position the cursor on "Access point mode", and press the [Enter] button
5
on the remote control.
This selects "Access point mode".
English
43
Page 45

Connecting in Access Point Mode
Press the [ ] button on the remote control to move the cursor to
6
"Advanced", and press the [Enter] button.
The Access point mode advanced settings screen is displayed.
Move the cursor to the selected item, and press the [Enter] button to set
7
that item.
Establish settings enabling the projector to function on the network.
Selections are described below.
44
Letters or numbers must be input depending on the item. See the "Entering
Letters and Numbers" ( p.47 ) for the letter and number input methods.
Tip :
It is also possible to access the projector setup/control browser page using a Web
browser, and perform network setup on that page. This method is more convenient than
entering characters on the remote control because a keyboard can be used.
"Changing Settings Using a Web Browser" in the EasyMP Operation Guide.
To access the projector setup/control browser page connect in the Easy connect mode,
and click the "Projector operation URL display" icon on the toolbar.
Projector name Enter a name for the projector. This name is used to identify
the projector when connected to the network.
Up to 16 single-byte alphanumeric characters can be entered.
Select the "Clear" button, and press the [Enter] button on the
remote control to clear the entered projector name.
Page 46

ESSID Enter the ESSID used to connect. If the wireless LAN system
used has an ESSID, enter that value. The initial value is
"EPSON."
Up to 16 single-byte alphanumeric characters can be entered.
WEP
(HEX)
Password for
WEB control
Projector keyword If the projector keyword option is set to "ON", keyword entry
Key
Enter the key used for WEP encryption. Input a key as
directed by the network administrator of the wireless LAN
system where the projector is added.
Up to 26 single-byte alphanumeric characters can be entered.
Input the key in hexadecimal. The characters allowed are
therefore 0-9 and A-F. For 10 character input use 64(40)-bit
length, and for 26 character input use 128(104)-bit for the
key data. Character counts other than 10 or 26 characters will
not be encrypted. Further, the Key ID value is pre-set to "0".
To enter a value other than hexadecimal or, to set the Key ID
to a value other than "0", access the projector setup broeser
page on the Web browser, and enter the value on that page.
See "Setting, Monitoring and Controlling from a
Computer" in the EasyMP Operation Guide.
Select the "Clear" button, and press the [Enter] button on the
remote control to clear the entered key. Encryption will not
take place.
Enter a password. If you enter a password, entry of that
password will be required when; changing the projector
settings via a network from a computer’s Web browser,
opening the settings and control browser page, and when
starting EMP Monitor.
Up to 8 single-byte alphanumeric characters are available.
Select the "Clear" button, and press the [Enter] button on the
remote control to clear the entered password. The password
setting will be inactivated.
will be required when using EMP NS Connection to connect to
the projector over a wireless LAN. A keyword will be displayed
on the screen of the projector you are trying to connect to.
Please check this keyword and enter it into the computer you are
trying to establish the connection from. If the keyword is entered
correctly, connection is established and the projector will project
the images shown on the computer display. Use this function to
prevent unintended or unauthorized access to the projector
during presentations, from other points on the wireless LAN.
This option should normally be "ON". To disable this option,
select "OFF".
English
45
Page 47

Connecting in Access Point Mode
DHCP
Indicates DHCP use.
Set "ON" to use DHCP.
Set "OFF" to not use DHCP.
IP address This can be entered when "OFF" is selected in "DHCP".
Enter the IP address assigned to the projector.
Numbers between 0-255 can be selected for each of the fields
of the address.
Subnet mask
This can be entered when "OFF" is selected in "DHCP".
Enter the subnet mask for the projector.
Numbers between 0-255 can be selected for each of the fields
of the address.
Gateway
address
This can be entered when "OFF" is selected in "DHCP".
Enter the gateway IP address for this projector. Numbers
between 0-255 can be selected for each of the fields of the
address.
SNMP
trap IP
address 1
Enter the IP address of the computer notified of an SNMP
trap . Numbers between 0-255 can be selected for each of
the fields of the address.
Select the "Clear" button, and press the [Enter] button on the
remote control to clear the entered trap IP address.
SNMP trap IP
address 2
Enter the IP address of the computer notified of an SNMP
trap. If notification does not arrive at the IP address
designated by " SNMP trap IP address 1", notification is sent
to this IP address. Numbers between 0-255 can be selected
for each of the fields of the address.
Select the "Clear" button, and press the [Enter] button on the
remote control to clear the entered trap IP address.
MAC address
Displays the wireless LAN card MAC address.
46
Page 48

Entering Letters and Numbers
Perform the following steps to enter letters and numbers.
1. Move the cursor to the item to input, and press the [Enter] button on the remote
control. The cursor turns green to indicate you are in input mode.
2. Select numbers or letters by pressing the [ ] button or the [ ] button on the
remote control. Press and hold the [ ] button or the [ ] button to perform rapid
key repeat, this makes the rapid selection of chosen letters and numbers possible.
For the projector name, ESSID, and WEB control password, characters are
presented in this order by pressing the [ ] button : A-Z → 0-9 → symbols → a-
z → space. Press the [ ] button to reverse the display order.
3. To input two or more numbers or characters, press the [ ] button on the remote
control. The first number or character is selected and the cursor moves to the
position of the second character entry. Select the second, and all the subsequent
numbers and letters in the same way as the first character.
4. After you have entered all the characters, press the [Enter] button on the remote
control to finalise the entry. The cursor will turn yellow.
When finished making setting changes, press the [Page up] button on
8
the remote control, and move the cursor to "OK". Press the [Enter]
button.
This applies the setting changes and returns to the Network advanced settings
screen.
If you wish to cancel the change and return to the state before changes were
made, move the cursor to "Cancel" and press the [Enter] button.
English
Press the [Page up] button on the remote control to move the cursor to
9
"OK", and press the [Enter] button.
This returns to the Connection Stand-by screen and displays the set IP address.
If "Projector keyword" is "ON", the projector keyword is also displayed.
When "Cancel" is selected, all changes made in each mode, (including
advanced settings) are canceled, and the projector returns to its previous
conditions, before changes were made.
47
Page 49

Connecting in Access Point Mode
The value is displayed here.
Tip :
The projector keyword changes each time the projector power is turned OFF and ON
again, and when the wireless LAN card is removed and reinstalled. When connecting to
a computer, make sure the projector keyword displayed in the Connection Stand-by
screen is entered. Connection is not possible using a previous keyword.
Connection Settings on the Computer
In this section we will address the computer connection setup. Connection setup is
performed using the utility software provided with the wireless LAN card.
If these settings are already established, this step need not be performed.
Turn on the computer and start Windows.
1
Start up the wireless LAN card utility software.
2
Refer to the documentation for the wireless LAN card for instructions on how
to use the wireless LAN card utility software.
Establish settings enabling the computer to function on the network.
Connecting to a Computer
When finished applying the settings, run EMP NS Connection on the computer, and
establish a connection with the projector. Once these settings have been established,
future sessions can begin by just connecting the devices.
Tip :
Install the wireless LAN card in the computer before starting EMP NS Connection. The
wireless LAN card will not be recognised by the EMP NS Connection if the wireless LAN
card is installed after EMP NS Connection is started.
48
Page 50

Start Windows on the computer, then select "Start" - "Programs" (or "All
1
Programs") - "EMP NS Connection" - "EMP NS Connection".
EMP NS Connection starts.
The following Switch network screen is displayed the first time EMP NS
2
Connection starts after installation. Proceed with Step 4 if the Switch
network screen is not displayed.
Select the wireless LAN card that will be used for the connection, and
3
click "OK" to close the Switch network screen.
English
Tip :
Once the current network adapter has been selected in this Switch network screen, this
screen will not be displayed at subsequent EMP NS Connection start-ups. To change the
current network adapter, click the “Option” button in the Projector selection screen
(screen in Step 4). Clicking the "Switch LAN" button on the Option screen displays the
Switch network screen.
49
Page 51

Connecting in Access Point Mode
Select the name of the projector that you want to connect, and then click
4
the "Connect" button.
The projector name is shown in the projector’s Connection Stand-by screen.
The icon status meaning differs
according to colour as follows.
Grey: Not connected
Orange:Connected to another
computer
Tip :
• In the event that a projector already connected to another computer is selected, the
previous connection is terminated and the images of the newly connected computer are
projected.
• When multiple projectors are selected, one computer’s display can be projected
simultaneously by up to a maximum of four projectors.
• Once the connection has been made, additional connections cannot be added.
50
If the "Projector keyword" is set to "ON" in the Access point mode
5
advanced settings screen on the projector, a projector keyword entry
screen similar to the following is displayed. Enter the projector keyword
displayed on the Connection Stand-by screen on the projector, and click
"OK".
Page 52

A network connection is established between the computer and
6
projector, and the computer screens are projected by the projector.
Toolbar
The EMP NS Connection toolbar is displayed on the computer screen. Use the
toolbar to operate the projector, change options and settings, and disconnect
from the network. p.35
If the toolbar is in the way during a presentation, you can minimise it. To
perform projector operations and setup using the remote control. See
"Selecting the Colour Mode" and "Advanced Operations" in the EMP-735
User's Guide.
There are a number of colour and resolution restrictions for projecting images
from a computer using Network Screen. For restriction details, refer to
"Connection Restrictions". p.33
See "Adjusting the Screen Image" and the subsequent material, in the
EMP-735 User's Guide to further adjust the projected images and perform
other functions.
English
Tip :
To connect to a different computer in order to replace the presenter, start EMP NS
Connection on the selected computer and connect. The connection with the current
connected computer will be terminated , and the next computer will be connected.
51
Page 53

Connecting in Access Point Mode
What If the Projector You Want does not Appear?
If the projector to which you want to connect does not appear on the projector
selection screen of EMP NS Connection, please check the following:
• Is the wireless LAN signal weak, or not being received at all?
• Is the connection mode set up correctly?
• Are the subnets different ?
When using Easy connect mode:
• Are the computer and projector setup with the same ESSID
• Are the computer and projector setup to use the same channel?
In the event that you are connecting the projector on a network where the subnets
differ, you can use "IP connect mode" to establish a connection.
IP connection mode works by using the IP address of the projector to establish a
connection.
Perform the following steps to connect using IP connection mode.
Tip :
The projector name will not be displayed in the projector selection screen of EMP NS
Connection if the projector’s IP address and the computer’s IP address belong to a
different subnet.
Caution :
• Do not unplug the power cable when EasyMP is in use (screens are changing or the
access lamp on the wireless LAN card slot is lit green).
• Do not remove the wireless LAN card when the access lamp on the wireless LAN card
is lit green, or when connected to a network. Doing so may damage the wireless LAN
card.
?
52
This performs a connection setup between the projector and computer
1
in Access point mode. p.24
On the computer select "Start" - "Programs" (or "All Programs") - "EMP
2
NS Connection" - "EMP NS Connection".
EMP NS Connection starts.
Page 54

Click the "Option" button on the next screen.
3
This displays the Option screen. Select "Use IP connect mode" and
4
then click the "OK" button.
English
53
Page 55

Connecting in Access Point Mode
The following screen is displayed. Click "IP connection" in the upper
5
right of the screen.
Enter the "IP address" of the projector to which you want to connect,
6
and click the "Search" button.
54
Page 56

If the projector’s name appears in the "Searching result", click the
7
"Connect" button.
The projector’s name is shown in the projector’s Connection Stand-by screen.
Verify that the projector name shown in the Connection Stand-by screen of the
projector is the same as the projector name shown in the "Searching result".
A network connection is established between the computer and projector, and
the computer screens are projected by the projector.
Tip :
The IP address indicated here is maintained even if the network connection is terminated
or if computer power is shut off. This address will be displayed under "IP address" at the
next startup of EMP NS Connection when in the IP connect mode.
English
55
Page 57

Connecting in Access Point Mode
Transmitting Encrypted Data
When projecting images from a computer connected to a projector over a network,
image data can be encrypted and transmitted. Encryption of data ensures security.
However, it reduces baud rates.
Perform the following steps to use encrypted transmission.
Tip :
• Do not unplug the power cable when EasyMP is in use (screens are changing or the
access lamp on the wireless LAN card is lit green).
• Do not remove the wireless LAN card when the access lamp on the wireless LAN card
is lit green, or when connected to a network. Doing so may damage the wireless LAN
card.
This performs a connection setup between the projector and computer
1
in Access point mode. p.24
On the computer select "Start" - "Programs" (or "All Programs") - "EMP
2
NS Connection" - "EMP NS Connection".
EMP NS Connection starts.
56
Click the "Option" button on the next screen.
3
Page 58

This displays the Option screen. Select "Use encrypted
4
communication", and then click the "OK" button.
Select the name of the projector that you want to connect, and then click
5
the "Connect" button.
English
A network connection is established between the computer and projector, and
the computer screens are projected by the projector. Data transmitted between
the computer and projector is encrypted.
57
Page 59

Page 60

Appendices
This chapter describes a memory card that can be used on the
projector, and uninstalling the EasyMP Software. There is also an
index and a glossary of terms used in this guide.
Compatible Memory Cards .............................................. 60
Uninstalling EasyMP Software ........................................ 61
Glossary ............................................................................ 62
About Compliance Statement ......................................... 64
Index .................................................................................. 66
59
59
Page 61

Compatible Memory Cards
You can use the following memory cards (Type II) which adhere to the ATA
standard.
FAT16/32 are recognised memory card formats.
• CompactFlash card (requires a PC card adapter)
• ATA Flash card
• Memory Stick (requires a PC card adapter)
• SmartMedia (requires a PC card adapter)
• SD/MMC card (requires a PC card adapter)
60
Page 62

Uninstalling EasyMP Software
If you do not need the EasyMP Software, perform the following steps in Windows
to uninstall it.
Go to "My Computer" - "Control Panel" - "Add/Remove Programs", select
the unnecessary program from the list, and click "Add/Remove" (Windows
XP: "Change/Remove").
Tip :
• "EMP NS Connection", "EMP SlideMaker2", and "EMP Monitor" cannot be uninstalled
simultaneously in a single operation. Each unneeded program must be uninstalled separately.
• After uninstalling "EMP SlideMaker2", the EMP SlideMaker2 folder will remain. If the
folder does not contain any necessary scenarios, it can be deleted.
English
61
Page 63

Glossary
This is a glossary of terms used in this guide which were not explained within the
text or which may be difficult to understand. Use other commercially available
documentation for further details.
Ad hoc mode A method of wireless LAN connection that communicates with
wireless LAN clients without using an access point.
Channel Communication speeds will drop if there are too many devices
performing wireless communication using the same frequency.
If this is the case, interference from other wireless LANs can be
avoided by setting a different wireless channel for each wireless
LAN network.
DHCP Abbreviation of Dynamic Host Configuration Protocol. This
protocol automatically assigns an IP address to a computer
connected to a network.
ESSID ESS is an abbreviation of Extended Service Set. The ESSID is
an identification number for connecting with a counterpart on a
wireless LAN. Wireless communication is possible between
devices with corresponding ESSID numbers.
Gateway A server (router) for communicating across a network divided
according to subnet masks.
MAC address MAC is an abbreviation of Media Access Control. The MAC
address is an ID number unique to each network card. A unique
number is assigned to each network card. Data is transmitted
between cards (devices) based on this identification.
62
SNMP This is an abbreviation of Simple Network Management
Protocol. It is a protocol in a TCP/IP network for monitoring
and controlling communication devices on the network, such as
routers, computers, and terminals across the network.
sRGB This is an international standard addressing prescribed colour
spaces to simplify colour handling displayed in various
graphics devices in computer operating systems (OS) and on
the internet.
Subnet mask This is a number which defines, from the IP address, the
number of bits used in network addresses of assigned networks
(subnets).
Tr ap A message transmitted to the SNMP Manager describing the
condition when the monitor detects a status change or an
abnormal condition.
Page 64

Trap IP
address
WEP This is an abbreviation of Wired Equivalent Privacy. This is a
This is the IP address of the messaged computer used for error
notification in SNMP. Designate the IP address of the computer
to which error messages are sent in the trap IP address.
security method which encrypts data during transmission.
Data communication cannot be performed unless the sending
and receiving machines are registered with the same encryption
key by the WEP .
English
63
Page 65

About Compliance Statement
MODEL: TMW1008
FCC ID: NUSTMW1008
This device complies with Part 15 of the FCC Rules. Operation is subject to
following two conditions:
(1) this device may not cause harmful interference. and (2) this device must accept
any interference received, including interference that may cause undesired
operation.
1. Feature
Completely Covered Assembly is Designed to fully packaged in a PCMCIA Type II
extended cover set.
This equipment has been tested and found to comply with the limits for a Class B
Personal Computer and Peripheral, pursuant to Part 15 of the FCC Rules. These
limits are designed to provide reasonable protection against harmful interference in
a residential installation. This equipment generates, uses and can radiate radio
frequency energy and, if not installed and used in accordance with the instructions,
may cause harmful interference to radio communications.
However, there is no guarantee that interference will not occur in a particular
installation. If this equipment dose cause harmful interference to radio or television
reception, which can be determined by turning the equipment off and on, the user is
encouraged to try to correct the interference by one or more of the following
measures:
- Reorient or relocate the receiving antenna.
- Increase the separation between the equipment and receiver.
- Connect the equipment into an outlet on a circuit different from that to which the
receiver is connected.
- Consult the dealer or an experienced radio/TV technician for help.
This equipment has been tested to comply with the limits for a Class B personal
computer and peripheral, pursuant to Subpart B of Part 15 of FCC Rules. Only
peripherals(computer input/output devices, terminals, printers, etc.) certified (DoC)
or verified to comply with Class B limits may be attached to this equipment.
Operation with non-certified (DoC) or non-verified personal computer and/or
peripherals is likely to result in Interference to radio and TV reception. The
connection of a unshielded equipment interface cable to this Equipment will
invalidate the FCC Certification of this device and may cause interference levels
which Exceed the limits established by FCC for equipment.
64
Page 66

You are cautioned that changes or modifications not expressly approved by the
party responsible for compliance could void your authority to operate the
equipment.
2. CAUTION
Exposure to Radio Frequency radiation Antenna shall be mounted in such a manner
to minimize the potential for human contact during normal operation. The antenna
should not be contacted during operation to avoid the possibility of exceeding the
FCC radio frequency exposure limites.
English
65
Page 67

Index
A
A/V Mute ............................................36
Access Lamp .......................................18
Access point ........................................14
Access point mode .........................22, 41
Ad hoc mode settings ............................26
ATA Flash card.....................................60
B
Basic settings ................................ 36, 38
Brightness ...........................................38
C
Card slot..............................................16
CardPlayer........................................ 7, 9
Channel........................................15, 27
Channel ad hoc..............................26, 29
Color Mode .........................................39
Colour Depth .......................................34
CompactFlash card................................60
Connection Stand-by screen............. 28, 47
Connection status screen ........................35
Contrast ..............................................38
D
DHCP.................................................46
Disconnect...........................................40
E
Easy connect mode ........................22, 23
EasyMP Software CD-ROM ........9, 12, 19
Electromagnetic interference ..................15
EMP Monitor..............................6, 9, 41
EMP NS Connection ..................9, 30, 48
EMP SlideMaker2..............................8, 9
Encryption...........................................56
Entering Letters and Numbers..........28, 47
ESSID ...................................22, 26, 45
ESSID ad hoc................................26, 29
E-Zoom........................................36, 37
F
Freeze ................................................ 35
Frequency........................................... 14
G
Game ................................................. 39
Gateway ............................................. 46
I
Installation.......................................... 19
IP address ...........................................46
IP connect mode .................................. 52
K
Key ID ............................................... 45
Keystone ............................................ 38
M
MAC address ................................27, 46
Meeting..............................................39
Memory card.......................................16
Memory Stick...................................... 60
N
Network advanced settings ..............25, 43
Network Screen ........................ 9, 24, 42
Normal............................................... 39
Number of Connection Devices .............. 34
P
Password for WEB control ..............27, 45
PC card ........................................16, 60
Presentation ........................................ 39
Projector keyword ..........................27, 46
Projector name ..............................26, 44
Projector operation URL display............. 35
S
Scenario ............................................... 7
66
Page 68

SD/MMC card..................................... 60
SmartMedia ........................................ 60
SNMP............................................6, 41
SNMP trap IP address........................... 46
sRGB................................................. 39
Subnet mask........................................ 46
Supported Resolution............................ 33
Switch network screen....................30, 49
Switch PC source................................. 36
Switch video source ............................. 36
T
Theatre............................................... 39
Trap IP address.................................... 46
U
Uninstalling ........................................ 61
Using the Toolbars ............................... 35
W
WEP key (HEX) .................................. 45
Wi-Fi ................................................. 14
Wireless LAN card.........................14, 16
Wireless LAN Card Conditions .............. 14
English
67
Page 69

 Loading...