

Page 1
Page 2

Important Information
Please read the following important information about your
projector.
Important Safety Information
Warning:
switched on as the bright light can damage your eyes. Never let
children look into the lens when it is on.
Warning:
lamp and filter covers. Dangerous electrical voltages inside
the projector can cause severe injury. Except as specifically
directed in this Owner’s Manual, do not attempt to service
this product yourself. Refer all servicing to qualified service
personnel.
Warning:
and optional parts out of the reach of children. Children
covering their heads with bags may result in death by
suffocation. Be particularly careful around small children.
Caution:
bulb with your bare hands. The invisible residue left by the oil
on your hands may be shorten the bulb life. Use a cloth or
gloves to handle the new bulb.
Never look into the projector lens when the lamp is
Never open any covers on the projector except the
Keep the plastic bags for the projector, accessories
When you replace the lamp, never touch the new
Page 3
EMP-7300/7200/5300
Q
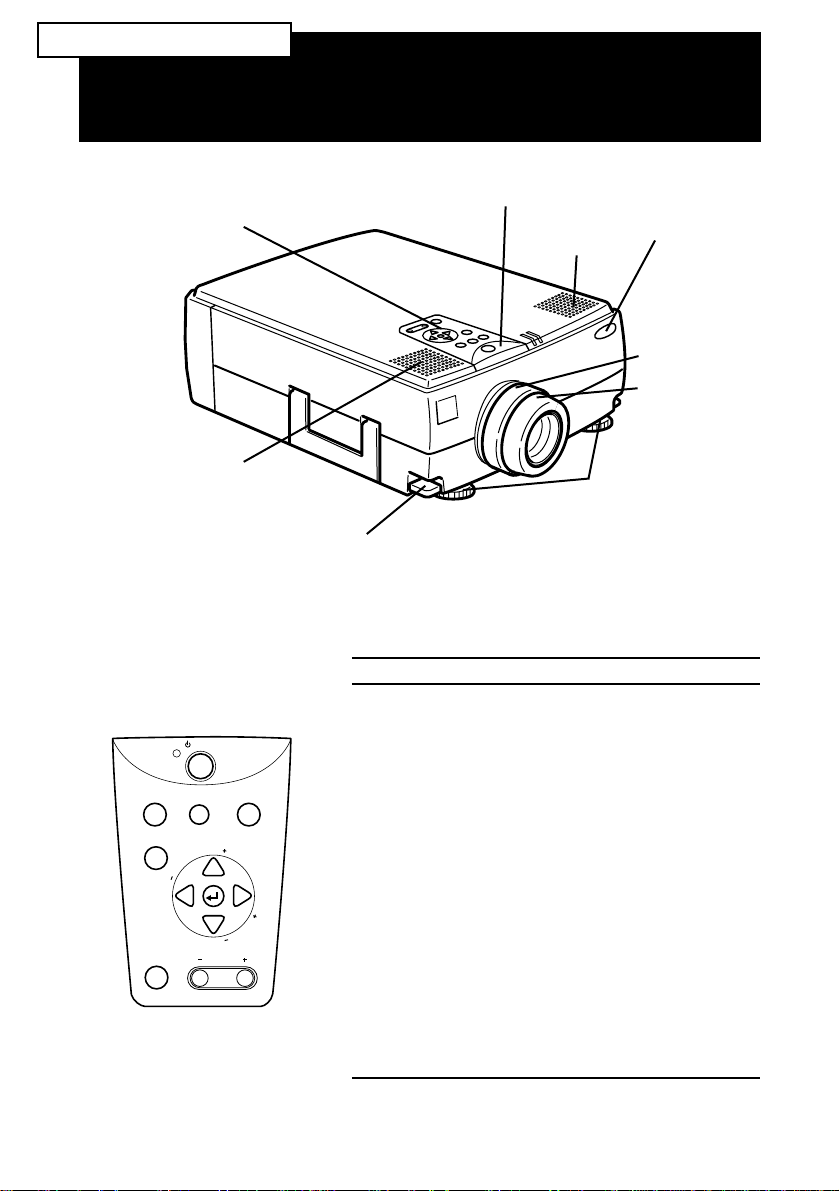
operation panel
speaker
Power
Resize
Menu
Mute
Operation Panel
n
c
y
.
S
g
n
i
k
c
a
r
T
S
.
y
c
n
Volume
UICK
foot adjuster lever
Button Function
Power Starts or stops projection.
Source Switches to Computer 1 , Computer 2, or
Menu Displays or hides the menu.
BlankSource
T
r
a
c
k
i
n
g
Up, down arrows
(Sync+/Sync-)
Left, right
arrows(tracking-/
tracking+)
Enter key Registers a menu selection.
Resize Switches the display dot mode and resize
Mute Cuts off audio.
– Volume + Adjusts the volume.
S
TART
operation indicator
speaker
front foot
Video.
Synchronizes the computer’s graphic signal.
Use these buttons to adjust an overall image
that is fuzzy or streaked, or to select menu
items during menu opera tions.
Matches the projector’s internal clock to
various computer graphic signals (tracking
adjustment).
Use these buttons to adjust an image with
vertical fuzzy lines, or to change numeric
settings during menu opera tions.
mode (for VGA, SVGA, and SXGA input).
remoto
control
reciver
zoom ring
focus ring
Page 4
EMP-7300/7200/5300
Source
Menu
Effects
3
2
1
Blank
Resize
Custom
Freeze
Mute
- Volume +
Power
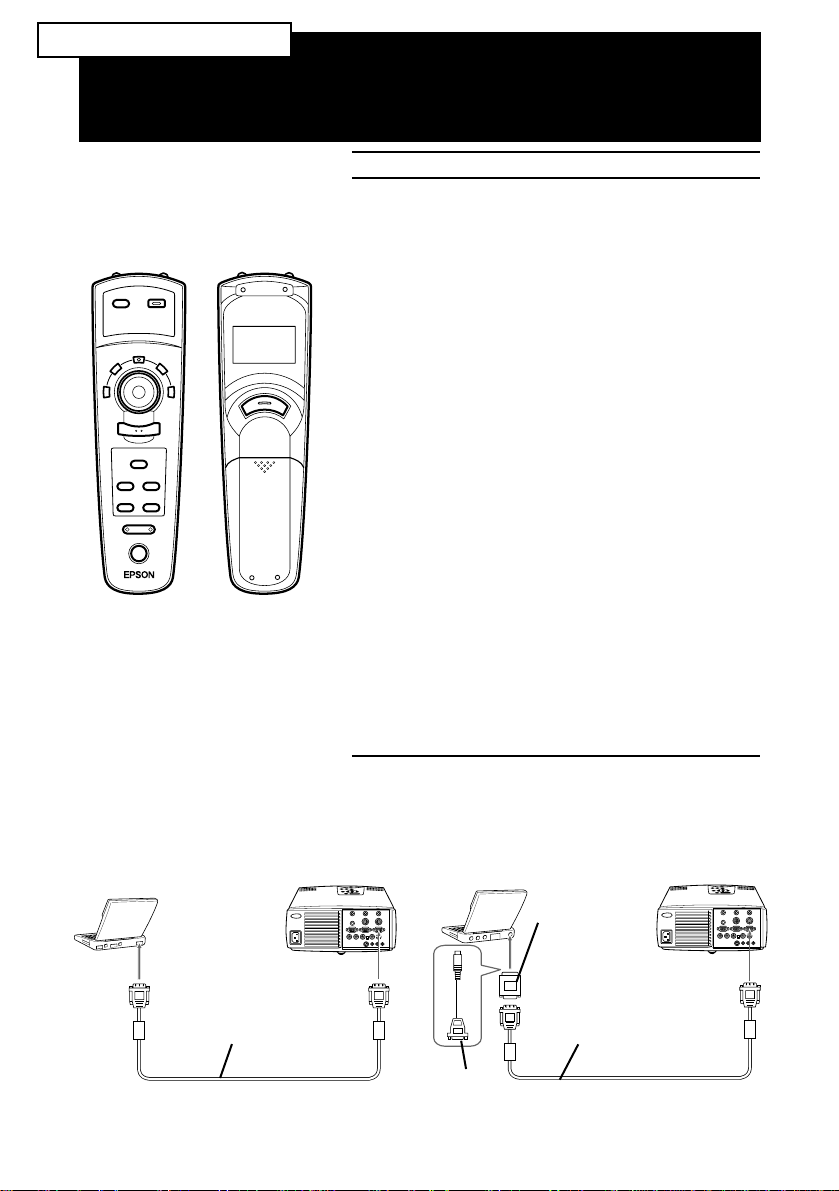
Remote control
Q
4
5
UICK
Button Function
Menu Displays or hides the menu.
Source Switches to Computer 1 , Computer 2*, or
Pointer button Use the pointer button to navigate the menus
Effects buttons Use to display special effects in conjunction
Top multi-purpose button
Bottom multi-purpose button
Blank Clears the screen of special effects and
Resize Switches the display dot mode and resize
Custom Use to assign functions to the Effects keys
Freeze Keeps the current computer or video image
Mute Cuts off audio.
– Volume + Adjusts the volume.
Power Starts or stops the projector.
S
TART
Video.
or use the remote as a mouse pointer when
the projector is connected to the computer
with all cables came with the EMP-7300/
7200/5300.
with the projector software.
Acts as a right mouse click, registers a menu
selection, and selects other custom
functions.
Acts as a left mouse click, registers a menu
selection, and selects other custom
functions.
switches to a black, a blue or user logo
display.
mode (for VGA, SVGA and SXGA input).
using the projector software.
on the screen.
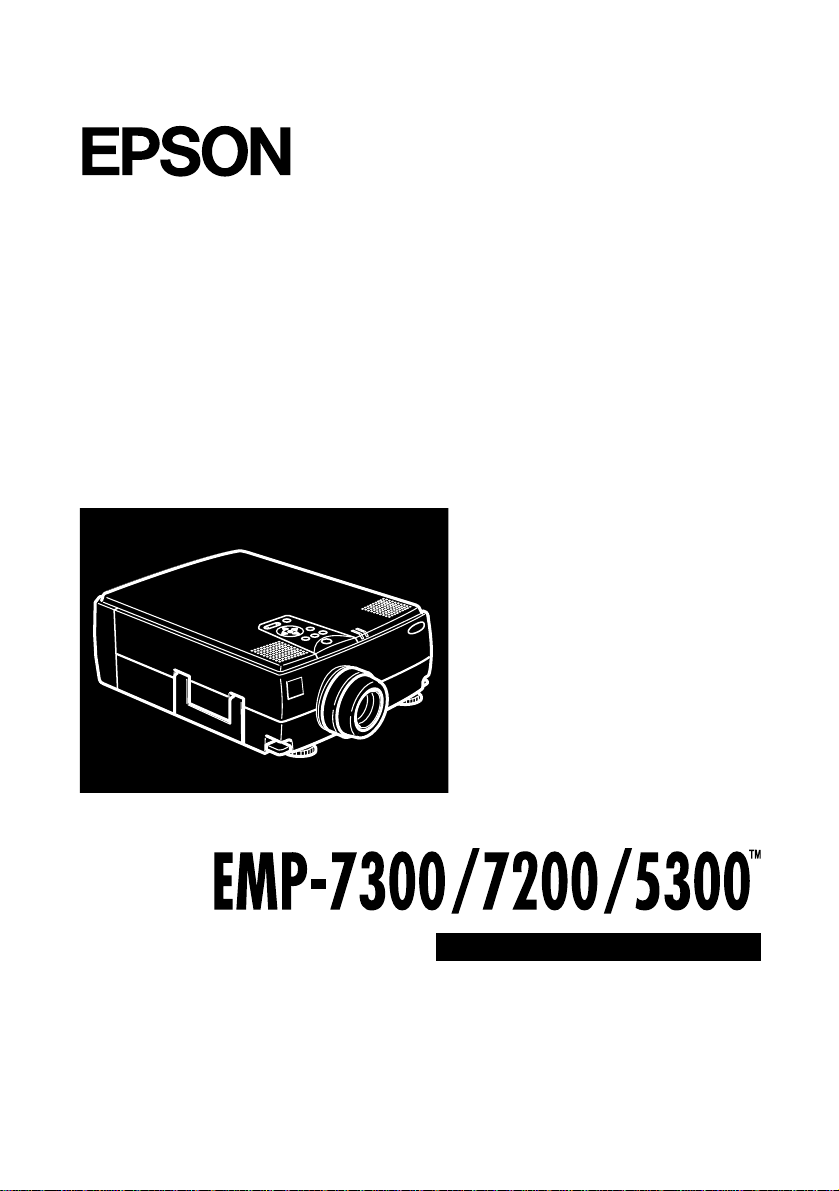
Connecting to
a PC laptop computer
Computer cable
Connecting to
a Macintosh PowerBook
MAC
desktop
adapter
Computer cable
Video
cable
adapter
Page 5
®
DATA/VIDEO PROJECTOR
Owner’s Manual
Page 6

All rights reserved. No part of this publication may be reproduced, stored in a
retrieval system, or transmitted in any form or by any means, electronic,
mechanical, photocopying, recording, or otherwise, without the prior written
permission of SEIKO EPSON CORPORATION. No patent liability is
assumed with respect to the use of the information contained herein. Neither
is any liability assumed for damages resulting from the use of the information
contained herein.
Neither SEIKO EPSON CORPORATION nor its affiliates shall be liable to
the purchaser of this product or third parties for damages, losses, costs, or
expenses incurred by purchaser or third parties as a result of: accident, misuse,
or abuse of this product or unauthorized modifications, repairs, or alterations
to this product, or (excluding the U.S.) failure to strictly comply with SEIKO
EPSON CORPORATION’s operating and maintenance instructions.
SEIKO EPSON CORPORATION shall not be liable against any damages or
problems arising from the use of any options or any consumable products
other than those designated as Original EPSON Products or EPSON
Approved Products by SEIKO EPSON CORPORATION.
EPSON is a registered trademark and PowerLite is a trademark of SEIKO
EPSON CORPORATION.
General Notice: The following trademarks and registered trademarks are the
property of their respective owners and are used in this publication for
identification purposes only.
• EPSON/Seiko Epson Corp.
• Macintosh, Macintosh OS System 7, Macintosh OS System 7.5,
PowerBook, Quadra, Centris, Power Mac/Apple Computer Corp.
• IBM/International Business Machines, Inc.
• Windows 3.x, Windows 95, Windows NT4.0, WindowsNT3.51/
Microsoft Corp.
Other product names used herein are also for identification purposes only and
may be trademarks of their respective owners. EPSON disclaims any and all
rights in those marks.
Adobe, Acrobat Reader/Adobe Systems Incorporated.
Page 7

■
■
■
■
■
■
■
■
■
■
■
■
■
Contents
Contents iii
Introduction vii
Getting the Most Out of Your Projector................................ix
Remote control ..........................................................................ix
Sleep mode.................................................................................ix
Control Panel.............................................................................ix
Optional Accessories....................................................................x
About This Manual................................................................xi
Safety Instructions................................................................xii
Where to Get Help.............................................................. xiv
World Wide Web site.................................................................xv
Transporting your projector.......................................................xv
■
■
Installation 1
Unpacking the Projector.........................................................2
Additional Items......................................................................... 3
Setting Up the Projector.........................................................4
Connecting to a Computer.....................................................7
Connecting to a PC desktop computer ....................................... 8
Connecting to a PC laptop computer........................................ 12
Connecting to a Macintosh desktop computer.......................... 16
Connecting to a Macintosh PowerBook.................................... 20
Connecting to a Video Source.................................................. 24
Connecting to an External Speaker or PA System..................26
■ ■ ■ ■ ■
iii
Page 8

Connecting to a Workstation
(only available for the EMP-7300/7200)..............................28
Using the Projector 29
Turning the Equipment On and Off.....................................31
Turning the Projector On and Off............................................ 31
Sleep Mode.............................................................................. 32
Focusing and Positioning the Screen Image ..........................33
Resize Button........................................................................... 35
Controlling the Projector......................................................36
Using the Remote Control....................................................... 37
Using the Control Panel........................................................... 39
Projector Status Indicators....................................................41
Operation Indicator.................................................................. 41
Lamp Indicator......................................................................... 42
Temperature Indicator.............................................................. 42
■ ■ ■ ■
Using the Projector Menus 43
Accessing the Main Menu.....................................................44
Changing a Menu Setting.....................................................44
Menu Options......................................................................47
Video Menu (Image source = Computer) ................................. 47
Video Menu (Image source = Video)........................................ 50
Audio Menu............................................................................. 51
Options Menu.......................................................................... 52
Custom Menu.......................................................................... 54
About Menu............................................................................. 57
RESET ALL Menu................................................................... 57
Using the Projector Software 59
Presentation support function................................................... 60
Projector setting function......................................................... 60
System requirements................................................................. 60
Projector Software CD-ROM ...............................................62
Connecting the Cables..........................................................63
Connecting to your PC ............................................................63
Contents
iv
Page 9

Connecting to your Macintosh................................................. 64
Installing the Projector Software on Your PC........................65
Installing ELP Link III V2.0 on your PC.................................. 67
Installing the Projector Software on Your Macintosh.............69
Accessing the Projector Software...........................................71
For Windows 95 and NT 4.0 users ........................................... 71
For Windows 3.1 and NT 3.51 users ........................................ 71
For Macintosh users .................................................................72
Installing or Accessing the Projector Software on the
CD-ROM Directly................................................................73
For Windows users ................................................................... 73
For Macintosh users .................................................................74
Maintenance 75
Cleaning the Lens.................................................................76
Cleaning the Projector Case..................................................76
Cleaning the Air Filter..........................................................77
Replacing the Lamp..............................................................78
Troubleshooting 81
Problems with the Projector..................................................82
Problems with the Image or Sound.......................................84
Technical Specifications 87
Supported Monitor Displays.................................................89
Monitor and Computer In 1/2 connector pin assignments ...91
Glossary 93
Index 95
■ ■ ■ ■ ■
v
Page 10

■ ■ ■ ■
vi
Contents
Page 11

■
■
■
■
■
■
Introduction
T
he compact, lightweight EPSON EMP-7300/7200/5300
Projector allows you to project XGA, full-color images and
video onto a large screen for presentations. The projector can
connect simultaneously to two image sources: one PC or
Apple® Macintosh® computer image sources plus one video
source such as a video tape deck, camcorder, or digital
camera. Audio can also be connected for each image source.
Images are displayed in true XGA full color (16,670,000
colors) at a resolution of 1024 x 768 pixels. The projector
produces bright images that can be easily seen in rooms with
enough light to take notes. Audio can be produced from the
projector’s 1W+1W stereo, which employ a built-in SRS 3D
sound® for output that is rich and powerful. An external
speaker can also be connected when further amplification is
required.
■
■
■
■
■
■
■
■
■
A totally new AVTSS™ (Automatic Video Tracking and
Synchronization Sensing, patent pending) provides automatic
set-up of image from a computer.
The projector can be controlled using a hand-held remote
control unit, with menus being provided for image source
switching and image adjustment. The remote control can also
be used as a wireless mouse to control mouse operations on
the computer screen during presentations. The projector
software provides a number of add-on features that are
designed to make presentations more effective.
■ ■ ■ ■ ■
vii
Page 12

The projector also features a new patented BIS CUIT
(Balanced Image Size Conversion UnIT) chip which supports
XGA computer output, as well as VGA and SXGA output.
Whichever type of computer output is used, the result is a
full-size video image of outstanding clarity.
The EMP-7300/7200/5300 Projector supports IBMcompatible PCs and laptops, as well as Apple® Macintosh®,
Power Macintosh and PowerBook computers. The video
source can be NTSC, PAL or SECAM in composite video, SVideo format.
■ ■ ■ ■
viii
Introduction
Page 13

Getting the Most Out of Your Projector
The projector comes with a full set of features that allow you
to control the settings for the image display, video and audio.
To get the most out of your projector read this section for a
quick summary of the important features.
Remote control
The buttons on the remote control allow you to turn the
projector on and off, an provide direct access to auto set-up,
blank, freeze, volume, mute and image source switching.
Remote control buttons can also be used for custom functions
and to access the projector’s menu system. The remote
control can even be used instead of your computer’s mouse to
control your computer.
Sleep mode
The sleep mode conserves electricity by automatically turning
off the lamp if the projector does not receive video input
signal for specified period (default is 30 minutes). In the sleep
mode, the projector remains on but the lamp is turned off,
conserving electricity, cooling the projector and extending the
life of the lamp.
Use the Power button to turn the projector on and off.
Control Panel
The control panel buttons on the projector duplicate the
remote control buttons and let you perform additional
functions, such as adjusting the tracking and sync for
computer images.
Getting the Most Out of Your Projector
■ ■ ■ ■ ■
ix
Page 14

Optional Accessories
To enhance your use of the projector, EPSON provides the
following accessories:
• Spare lamp ELPLP05
• Computer cable ELPKC02
• Multi View ELPDC01
• Mac Adaptor Set ELPAP01
• Ceiling Mount ELPMB02
• Ceiling Plate ELPFC01
• Flange ELPFL01
• Pipe 370 ELPFP01
• Pipe 570 ELPFP02
• Pipe 770 ELPFP03
• Soft Carrying Case ELPKS10
• Hard Travel Case ELPKS09
• Hard Travel Case ELPKS12
■ ■ ■ ■
Introduction
x
• Long Throw Zoom Lens ELPLL01
You can purchase these accessories from your EMP-7300/
7200/5300 dealer.
Page 15

About This Manual
Chapter 1, “Installation”, gives step-by-step instructions on
how to set-up the projector and connect it to your computer,
video source, or other external speaker or PA system. Read
the installation procedures that apply to your environment.
Chapter 2, “Using the Projector”, tells you how to switch the
projector on/off and control simple projector settings.
Chapter 3, “Using the Menus”, describes how to use the
menus to adjust the color and image settings, change the
display of the projected image and modify audio settings such
as bass and treble.
Chapter 4, “Using the Projector Software”, describes how to
use the projector software which supports the presentation
function and controls the projector with the computer you
connected.
Chapter 5, “Maintenance”, describes how to maintain the
projector.
Chapter 6, “Troubleshooting”, tells you how to interpret the
projector’s indicator lights and gives helpful information for
avoiding errors, optimizing image quality and solving
problems.
Chapter 7, “Technical Specifications,” lists the technical
specifications for your EMP-7300/7200/5300 projector.
About This Manual
■ ■ ■ ■ ■
xi
Page 16

Safety Instructions
Always follow these safety instructions when setting up and
using the projector:
1. Do not place the projector on an unstable trolley, stand or
table.
2. Do not use the projector near water or sources of heat.
3. Use attachments only as recommended.
4. Use the type of power source indicated on the projector.
If you are not sure of the type of power available, consult
your dealer or local electricity company.
5. Place the projector near a wall outlet where the plug can
be easily unplugged.
6. Insert the projector’s three-pin earthed plug into a
properly earthed socket. If you have a two-pin socket,
contact an electrician to replace it. Do not handle the plug
with wet hands.
7. Always take the following precautions when handling the
plug. Failure to do so may result in sparks or fire.
■ ■ ■ ■
xii
• Ensure the plug is free of dust before inserting it into a
socket.
• Ensure that the plug is inserted into the socket securely.
8. Do not overload wall sockets, extension leads or multiway plug boards as this may cause fire or electric shock.
9. Do not place the projector where the cord can be stepped
on as this may result in fraying or damage to the lead or
the plug.
10.Unplug the projector from the wall socket before
cleaning. Use a damp cloth for cleaning. Do not use liquid
or aerosol cleaners.
Introduction
Page 17

11.Do not block the slots and openings in the projector case.
They provide ventilation and prevent the projector from
overheating. Do not place the projector on a sofa, rug or
other soft surface or in a built-in installation unless proper
ventilation is provided.
12.Never push objects of any kind through cabinet slots.
Never allow liquid of any kind to spill into the projector.
13.Except as specifically instructed in this Owner’s Manual,
do not attempt to service this product yourself. Opening
or removing covers may expose you to dangerous voltages
and other hazards. Refer all servicing to qualified service
personnel.
14.Unplug the projector during thunder storms or if it is not
going to be used for an extended period. Do not place the
projector or remote control on top of heat-emitting
equipment or heated objects such as a car, etc.
15.Do not place the projector and remote control on top of
heat-producing equipment or in a heated place, such as a
car.
16.In the following situations unplug the projector from the
wall outlet and refer servicing to qualified service
personnel:
• If the power cable or plug becomes damaged or frayed.
• If liquid has been spilled into it or it has been exposed
to rain or water.
• If it does not operate normally when the operating
instructions are followed or if it exhibits a clear change
in performance indicating the need for servicing.
• If it has been dropped or the cabinet has been damaged.
Safety Instructions
■ ■ ■ ■ ■
xiii
Page 18

Where to Get Help
SEIKO EPSON CORPORATION provides local customer
support and service through a nationwide network of
authorized EPSON dealers and Service Centres.
• Fax-on-Demand access to EPSON’s technical information
library
• Literature on current and new products
• The location of your nearest Authorized EPSON Reseller
or Customer Care Center
• Technical information on installation, configuration, and
operation of EPSON products
• Customer relations
For inquiries please contact the appropriate representative
listed in the section entitled “After sales service contact
addresses” at the end of this manual.
When you call for technical assistance, be ready to identify
your system and its configuration.
If you need help with any software program you are using,
please refer to the documentation that came with the
programs for technical support.
■ ■ ■ ■
xiv
Introduction
Page 19

World Wide Web site
If you are connected to the Internet and have a Web browser,
you can access EPSON’s World Wide Web site at http://
www. epson. com. EPSON’s home page links users to What’s
New, EPSON Products, EPSON Connection, Corporate Info
and EPSON Contacts. Link to the EPSON Connection for
the latest drivers and FAQ’s (Frequently Asked Questions)
and the EPSON Chart area. To get in touch with EPSON
around the world, EPSON Contacts includes Contact
Information for local EPSON subsidiaries.
Transporting your projector
The projector contains many glass parts and precision parts.
To prevent shock damages while transporting, handle as the
following.
When transport to maker due to troubleshooting
• Use the original packing.
• If you don’t have the original packaging use the equivalent,
put cushioning around the projector.
When frequently transport for business use
• First, put the projector in a hard travel case (optional
accessories : ELPKS09), then pack it in a firm box, using
cushioning. Be sure to ask to the delivery company that
treats a precision device.
• EPSON shall not be liable against any damages arose
during the transportation.
When carry by hands
• Use a hard travel case (optional accessories : ELPKS12) or a
soft carrying case (optional accessorise : ELPKS10).
Where to Get Help
■ ■ ■ ■ ■
xv
Page 20

When traveling by an airplane
• Bring the projector with you when traveling by an airplane.
• When transporting the projector as baggage on an aircraft,
first put the projector in a hard travel case (ELPKS09) to
avoid any dameges.
■ ■ ■ ■
xvi
Introduction
Page 21

■ ■ ■ ■ ■ ■ ■ ■ ■ ■ ■ ■ ■ ■ ■
1
Installation
This chapter tells you how to unpack and set up your
projector and connect it to other equipment. The projector
must be connected to a computer or a video source such as a
video tape deck, camcorder, digital camera or laser disk player.
For example, you may want to connect the projector to both
your computer and a video source, or set up the projector for
one or more of the following:
• Connect the mouse cable to use the remote control as a
wireless mouse.
• Provide audio for one or both image sources. The audio
source can be the computer, video source, or another
device such as a stereo.
• Connect to an external speaker or PA system to amplify the
audio.
■ ■ ■ ■ ■
1
Page 22

Unpacking the Projector
When you unpack the projector, make sure you have all these
components:
• Projector
• Remote control
• 2 AA batteries
• Power cord
• Computer cable
• Audio cable
• Video/ audio cable
• MAC Desktop adapter
• MAC Monitor adapter
• Main cable
• PS/2 mouse cable
• Serial mouse cable
• MAC mouse cable
■ ■ ■ ■
2
• PC serial cable
• MAC serial cable
• Projector Software
All of the above items may not be required for your particular
computer system
Save all packaging materials in case you need to ship the
projector in the future. It should always be transported in its
original packaging or the equivalent.
Installation
Page 23

Additional Items
The following items may also be required, depending upon
how you plan to use the projector.
• S-Video cable for S-Video signal input
A separate cable is required for each video source.
• Macintosh PowerBook output cable
This cable is normally provided with PowerBook models with
video output capabilities. Contact your Macintosh dealer if
you need to purchase one.
• Special connector, cable or components for connecting the
mouse cable to your computer
These items should be available from your computer dealer.
Note that the mouse cable cannot be used with a computer
that does not have a mouse connector.
♦
♦
Note:
The hole on the right side of the projector accepts the
connection of the Kensington MicroSaver anti-theft device,
which can be purchased at your local computer dealer.
CAUTION:
Use of Projector parts of options, such as cables, other
than the ones originally enclosed in the product package or
designated by Seiko EPSON in the product manual may vioate
the EPSON confirmed quality level and may violate the legal
requirements defined by EC Directives such as EMC directives of
the CE Marking.
Seiko EPSON recommends the use of the original or designated
articles with all products. Customers should be aware that the
use of non-recommended products may damege the product,
cause the product, cause the product and connected peripherals
to malfunction, compromise safety features and or may
invalidate the product warranty.
Unpacking the Projector
■ ■ ■ ■ ■
3
Page 24

Setting Up the Projector
1. Place the projector on a sturdy, level surface within five
feet of the computer or video source.
♦
Caution:
Do not hold the projector by the lens. This can damage
the lens.
2. Place the projector the correct distance from the screen.
The distance between the projector and the screen
determines the actual image size. Use the general
guidelines below to determine the correct distance.
The distance above is a standard. Adjust to the correct
distance as referring to the guidelines.
■ ■ ■ ■
4
Installation
Page 25

Screen size Horizontal distance from projector to screen
300 inches (610x460cm)488.2 inches (12.4 m) ~ 653.5 inches (16.6 m)
200 inches (410x300cm) 326.7 inches (8.3 m) ~ 433.0 inches (11.0 m)
100 inches (200x150cm) 161.4 inches (4.1 m) ~ 216.5 inches (5.5 m)
80 inches (160x120cm) 130.0 inches (3.3 m) ~ 169.2 inches (4.3 m)
60 inches (120x90cm) 98.4 inches (2.5 m) ~ 125.9 inches (3.2 m)
40 inches (81x61cm) 63.0 inches (1.6 m) ~ 82.6 inches (2.1 m)
30 inches (61x46cm) 47.2 inches (1.2 m) ~ 63.0 inches (1.6 m)
23 inches (47x35cm) 47.2 inches (1.2 m)
3. Turn the projector so that the lens is at right angles to the
screen. If the projector is not angled correctly the screen
image will be crooked.
4. Connect one end of the power cable to the projector’s
power connector. Connect the other end to an earthed
electrical socket.
The projector should be in sleep mode, indicated by an
orange power indicator.
♦
Warning:
Never look into the lens when the projector is on.
There is a risk that the projector might come on suddenly even
though it is not in use. The light from the lamp can damage your
eyes. It is especially important that children should not be
allowed to look into the lens.
Setting Up the Projector
■ ■ ■ ■ ■
5
Page 26
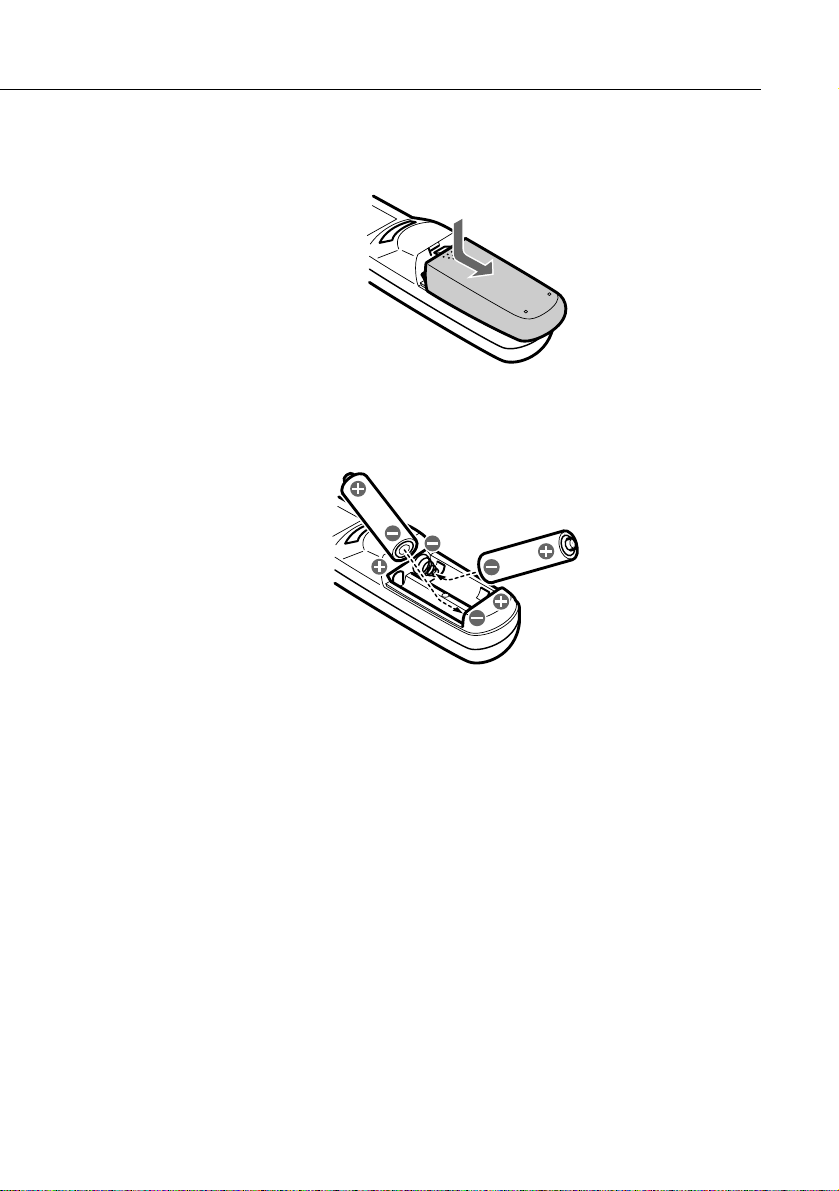
5. To insert the batteries in the remote control device, slide
off the battery compartment cover as shown below.
6. Insert the two AA batteries included with the projector.
Make sure the polarity of the batteries is correct.
7. Replace the battery compartment cover.
■ ■ ■ ■
6
Installation
Page 27

When replacing batteries, take the following precautions:
• Do not recharge used batteries or expose batteries to fire or
water.
• Replace batteries as soon as they run out. If the batteries
leak, wipe away the fluid with a soft cloth. If battery fluid
gets onto your hands wash them immediately.
• Remove the batteries if you will not be using the projector
for a long period.
Connecting to a Computer
You can connect the projector to a computer capable of
SVGA, VGA, SXGA, and XGA output. Resizing is supported
for VGA, SVGA and SXGA output. Below a list may be found
of the types of computers supported by this projector.
• IBM desktop PC or compatible
• IBM laptop or compatible
• Apple Macintosh desktop computer, including Macintosh
Quadra®, Macintosh Centris®, and Power Macintosh
• Any Apple PowerBook with video-out capability, including
all 160, 165, 180 and 500 series PowerBooks
See the section that applies to your computer.
Connecting to a Computer
■ ■ ■ ■ ■
7
Page 28
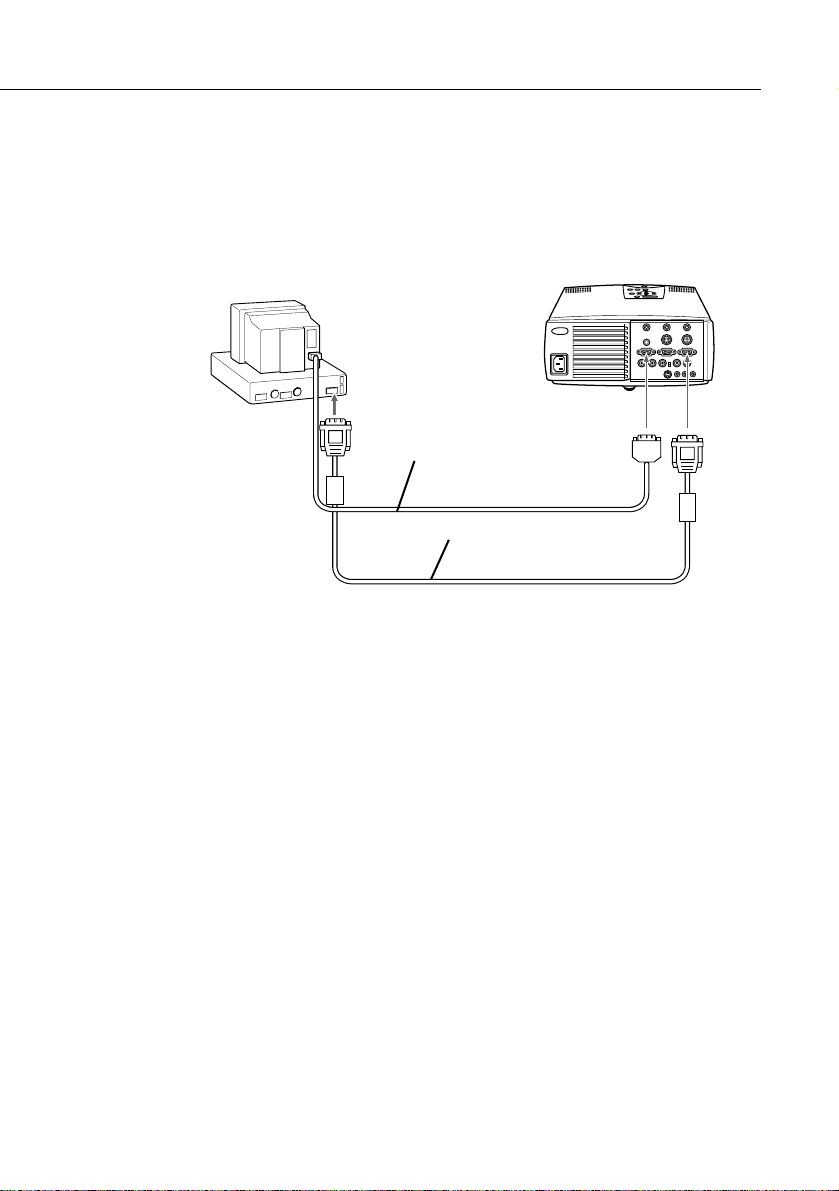
Connecting to a PC desktop computer
Before beginning, make sure that the projector and computer
are both turned off.
1. Connect the computer cable.
Monitor cable
Computer cable
■ ■ ■ ■
♦
8
Note:
manual for the location of the ports needed to connect your EMP
-7300/7200/5300 projector.
Installation
Computer configurations vary. See your computer
a. Connect either end of the computer cable to the
projector’s Computer 1 port. The Computer 2 port is
used when connecting a second computer.
b. Disconnect the monitor cable from the computer and
connect it to the other end of the computer cable.
Page 29
c. If necessary, connect the monitor cable of the
computer monitor to the projector’s Computer out.
d. Tighten the screws on all connectors.
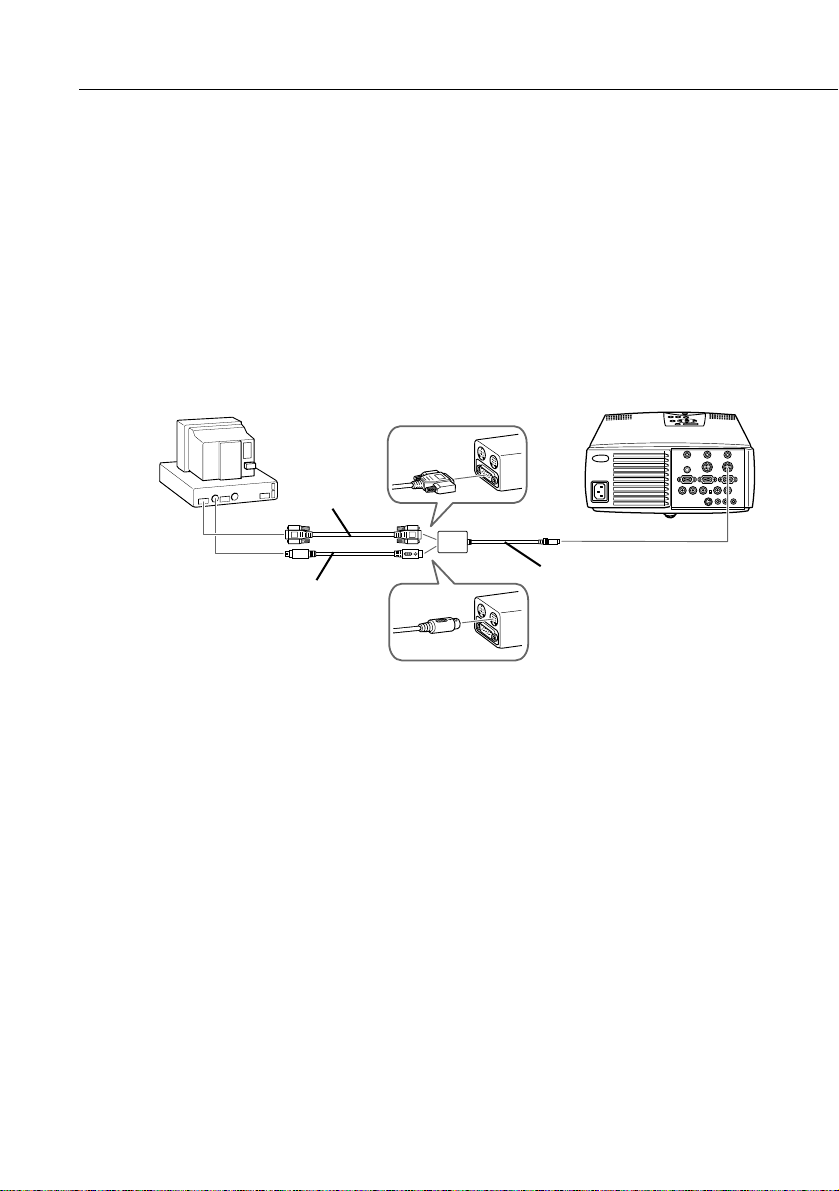
2. Connect the main cable. The main cable connects the
mouse cable (needed to use the remote control as a
mouse) and serial cable (needed to use the projector
software and the Effects buttons on the remote control)
from your computer to the projector.
serial cable
main cable
mouse cable
Connecting to a Computer
■ ■ ■ ■ ■
9
Page 30

a. Connect the small end of the main cable to the
projector’s Mouse/Com 1 port. The Mouse/Com 2
port is used when you are connecting a second
computer.
b. Connect the PS/2 mouse cable (9-pin) to the mouse
terminal on the large end of the main cable.
c. Disconnect the computer’s mouse cable from the
mouse port on the back of your computer and connect
the mouse connector (6-pin) of the PS/2 mouse
cable to the mouse port.
d. If your system uses a serial mouse, use the serial mouse
cable instead of the PS/2 mouse cable.
e. If you are planning to use the projector software,
connect either end of a PC serial cable to the PC serial
terminal on the large end of the main cable.
■ ■ ■ ■
♦
10
Note:
system does not have two serial ports.
Installation
You will not be able to use the projector software if your
f. Connect the other end of the PC serial cable to the
serial port on the back of your computer.
g. Tighten all connector screws to ensure secure
connections.
Page 31

3. Connect the audio cable if needed.
Audio cable
a. Connect one end of the audio cable to the Audio 1
jack on the projector. (Use the Audio 2 jack if you are
connecting a second computer).
b. Connect the other end of the audio cable to the audio
out port on a sound card in the computer.
Connecting to a Computer
■ ■ ■ ■ ■
11
Page 32

Connecting to a PC laptop computer
Before beginning, make sure that the projector and computer
are both turned off.
1. Connect the computer cable.
Computer cable
■ ■ ■ ■
♦
12
Note:
for the location of the ports needed to connect your EMP-7300/
7200/5300 projector.
Installation
Laptop configurations vary. See your computer manual
a. Connect either end of the computer cable to the
projectors Computer 1 port. The Computer 2 port is
used when connecting a second computer.
b. Connect the other end of the computer cable to the
laptop’s video (monitor) port.
c. Tighten the screws on all connectors to make sure they
are fastened securely.
Page 33

2. Connect the main cable. The main cable connects the
mouse cable (needed to use the remote control as a
mouse) and serial cable (needed to use the projector
software and the Effects buttons on the remote control) to
the projector.
serial cable
mouse cable
main cable
a. Connect the small end of the main cable to the
projector’s Mouse/Com 1 port. The Mouse/Com 2
port is used when you are connecting a second
computer.
b. Connect the PS/2 mouse cable (9-pin) to the mouse
terminal on the large end of the main cable.
c. Disconnect the computer’s mouse cable from the
mouse port on the back of the computer and connect
the mouse connector of the PS/2 mouse cable (6-pin)
to the mouse port on the back of your laptop.
d. If your system uses a serial mouse, use the serial mouse
cable instead of the PS/2 mouse cable.
Connecting to a Computer
■ ■ ■ ■ ■
13
Page 34

e. If you are planning to use the projector software,
connect either end of a PC serial cable to the PC
SERIAL terminal on the large end of the main cable.
f. Connect the other end of the PC serial cable to the
serial port on the back of your laptop.
♦
Note:
You will not be able to use the projector software if your
system does not have two serial ports.
g. Tighten all connector screws to ensure secure
connections.
h. Configure your laptop to work with an external
mouse.
■ ■ ■ ■
14
Installation
Page 35

■
3. Connect the audio cable.
Audio cable
a. Connect one end of the audio cable to the Audio 1
jack on the projector. (Use the Audio 2 jack if you are
connecting a second computer).
b. Connect the other end of the audio cable to your
laptop.
Connecting to a Computer
■ ■ ■ ■ ■
15
Page 36

Connecting to a Macintosh desktop
computer
Before beginning, make sure that the projector and computer
are both turned off.
1. Connect the computer cables.
Video
cable
adapter
MAC monitor
MAC
desktop
adapter
Monitor cable
Computer cable
adapter
■ ■ ■ ■
♦
16
Note:
computer manual for the location of the ports needed to connect
your EMP-7300/7200/5300 projector.
Installation
Macintosh computer configurations vary. See your
a. Connect either end of the computer cable to the
projector’s Computer 1 port. The Computer 2 port is
used when connecting a second computer.
b. Set the DIP switches of the Mac desktop adapter in
accordance with the resolutions you want to use (i.e.
16” mode).
c. Connect either end of the computer cable to the small
terminal of the desktop adapter.
d. Disconnect the monitor cable from the computer and
connect it to the large terminal (D-sub 15 pin) of the
desktop adapter.
Page 37

e. Tighten fixed screws for the desktop adapter.
f. If necessary, attach the Mac monitor adapter to the
monitor cable and connect the cable with the adapter
to the projector’s Computer out.
Connecting to a Computer
■ ■ ■ ■ ■
17
Page 38

2. Connect the main cable. The main cable connects the
mouse cable (needed to use the remote control as a
mouse) and serial cable (needed to use the projector
software) from your Macintosh to the projector.
MAC serial
cable
MAC mouse cable
Main cable
a. Connect the small end of the main cable to the
projector’s Mouse/Com 1 port. The Mouse/Com 2
port is used when you are connecting a second
computer.
b. Connect the MAC mouse cable (9-pin) to the mouse
terminal on the other end of the main cable.
c. Disconnect the mouse cable from the Mouse port of
the Macintosh and connect the mouse connector of
the MAC mouse cable to it.
d. If you are planning to use the projector software,
connect either end of a MAC serial cable to the MAC
serial terminal at the large end of the main cable.
Connect the other end of the MAC serial cable to the
printer port or modem port on the back of your
Macintosh.
■ ■ ■ ■
18
Installation
Page 39

3. Connect the audio cable.
Audio cable
a. Connect one end of the audio cable to the Audio 1
jack on the projector. (Use the Audio 2 jack if you are
connecting a second computer.)
b. Connect the other end of the audio cable to your
computer.
Connecting to a Computer
■ ■ ■ ■ ■
19
Page 40

Connecting to a Macintosh PowerBook
Remember that you can only use a PowerBook model that
have video-out capability. See page 7 for more information.
Before beginning, make sure that the projector and
PowerBook are both turned off.
1. Connect the computer cable.
MAC
desktop
adapter
Computer cable
Video
cable
adapter
■ ■ ■ ■
♦
20
Note:
manual for the location of the ports needed to connect your EMP
-7300/7200/5300 projector.
Installation
PowerBook configurations vary. See your computer
a. Connect the other end of the computer cable to the
projector’s Computer 1 port. The Computer 2 port is
used when connecting a second computer.
b. Set the DIP switches of the MAC desktop adapter in
accordance with the resolutions you want to use (i.e.
16” mode).
c. Connect an adapter (which came with the computer or
your own) such as a converter for a D-Sub 15 terminal
to the video output port of your PowerBook.
Page 41

d. Connect the big connector (D-Sub15) of the MAC
desktop adapter to the video output port converted in
step c.
e. Connect either end of the computer cable to the small
connector (D-Sub 15 Mini) of the MAC desktop
adapter which you connected in the previous steps.
f. Tighten the fixed screws for the MAC desktop adapter
and the converter.
Connecting to a Computer
■ ■ ■ ■ ■
21
Page 42

2. Connect the main cable. The main cable connects the
mouse cable (needed to use the remote control as a
mouse) and serial cable (needed to use the projector
software) to the projector.
MAC serial
cable
MAC mouse cable
Main cable
a. Connect the small end of the main cable to the
projector’s Mouse/Com 1 port. The Mouse/Com 2
port is used when connecting a second computer.
b. Connect the MAC mouse cable (9-pin) to the
MOUSE terminal on the large end of the main cable.
c. Disconnect the mouse from the computer port, and
connect the MAC mouse cable (4-pin) to this port.
d. If you are planning to use the projector software,
connect either end of a MAC serial cable to the MAC
SERIAL terminal on the large end of the main cable.
Connect the other end of the MAC serial cable to the
Printer port or Modem port on the back of your
PowerBook.
e. Tighten the screws on all connectors to make sure they
are fastened securely.
■ ■ ■ ■
22
Installation
Page 43

3. Connect the audio cable.
Audio cable
a. Connect one end of the audio cable to the Audio 1
jack on the projector. (Use the Audio 2 jack if you are
connecting a second computer.)
b. Connect the other end of the audio cable to your
computer.
Connecting to a Computer
■ ■ ■ ■ ■
23
Page 44

Connecting to a Video Source
You can use this connection procedure to connect a video
tape deck, a camcorder, a laser disc player or any other
compatible video image source to the projector. The
projector can receive composite video or S-Video signals. If
your video source has a one-pin RCA video jack you have a
composite video. If your video source has a four-pin video
jack, you have a S-Video. If your video source has a three-pin
video jack, you have a component video (Y/Video, C/R-Y,
and B-Y).
♦
Note:
The projector is not compatible with a cable TV-style F
connector.
You can connect to both a S-Video and a composite video
source at the same time. However, the projector automatically
selects the S-Video source. To display the composite video,
you must disconnect the S-Video source.
The projector supports NTSC, PAL and SECAM video
formats. By default, it automatically detects and identifies the
video format. However, you can set it to detect a single
broadcast format. (See “Video menu” in Chapter 3.) Note
that the projector will then be able to detect only one type of
video signal.
The type of cable you need to connect the video source to the
projector depends on whether you have a composite video, SVideo or a component video (Y/Video, C/R-Y, and B-Y).
For composite video, use the video/ audio cable supplied
with the projector. For S-Video, use the S-Video cable and
audio cable supplied with your video device or obtain one
from your computer dealer. For a component video (Y/
Video, C/R-Y, and B-Y), use the BNC type cable came with
your video source.
■ ■ ■ ■
24
Installation
Page 45

To connect a video source to the projector:
1. Switch off the projector and video source if they are on.
2. If your composite video uses an RCA-type composite
video connector, you will need the audio/video cable
supplied with the EMP-7300/7200/5300. If your video
uses a S-Video or BNC type connector, you will need to
provide YOUR OWN S-Video or BNC type cable, or use
the S-Video or BNC type cable that came with your video
source.
3. For composite video, connect the yellow RCA plug at one
end of the video/audio cable to the projector’s Video
jack. Connect the other yellow RCA plug to the video-out
jack on the video source.
A/V cable
4. Connect the other plugs on the audio/visual cable to the
Audio jacks of the projector: insert the white plug into the
L jack and the red plug into the R jack. Connect the plug
at the other end of the audio/visual cable to the audio
output jacks of the video source.
Connecting to a Computer
■ ■ ■ ■ ■
25
Page 46

5. For S-Video, insert one end of the S-Video cable into the
projector’s S-Video jack. Insert the other end in the SVideo Out jack on your S-Video source.
S-Video cable
6. For G Sync-Video (BNC typy), insert the end of the G
Sync-Video cable into the projector’s R/R-Y, G/Y and
B/B-Y jack. Insert the other end in the jack on your G
Sync-Video source.
Connecting to an External Speaker or
■ ■ ■ ■
PA System
Though the projector’s internal speakers are enough for most
small-size or medium-size rooms, an external speaker can be
connected to achieve the best results for large room
presentations.
A commercially available RCA-to-3.5 mm stereo mini audio
cable or 3.5 mm stereo mini audio cable is required to
connect the projector’s 3.5 mm stereo mini jack to an external
speaker or a PA system. These items can be obtained from
your computer dealer.
1. Check to ensure that both the projector and all sources are
turned off.
Installation
26
Page 47

2. Connect the cable’s 3.5 mm stereo mini-plug to the
projector’s Audio Out jack.
RCA/3.5 mm cable
3. Connect the other end of the cable to the external speaker
or PA system.Ensure you to connect the red RCA plug to
the right channel and the white RCA plug to the left
channel.
Connecting to an External Speaker or PA System
■ ■ ■ ■ ■
27
Page 48

Connecting to a Workstation
(only available for the EMP-7300/7200)
You can not use any kind of workstations. Before connecting,
make sure the type of your workstation. If you are not sure of
the type of workstation, consult your dealer or local
workstation company.
The following workstations are available:
• If your workstation output is 13W3, use a
13W3(male)↔HD D-Sub15(male) cable.
(Epson recommended, MS8158CA (1.8m) 6ft,
MS8128CA (0.9m) 3ft)
■ ■ ■ ■
♦
28
• If your workstation output is 5BNC, use a
* You need to turn the Computer2/5BNC switch on the back of the projector to
Note:
the section of "Connecting to a Computer" to connect.
Installation
5BNC(male)↔HD D-Sub15(male) cable
(Epson recommended, MS8102CA (1.8m) 6ft)
5BNC.
If your computer contains the workstation function, refer
Page 49

■ ■ ■ ■ ■ ■ ■ ■ ■ ■ ■ ■ ■ ■ ■
2
Using the Projector
This chapter provides the following information about using
your projector:
• Turning equipment on and off
• Adjusting the screen image
• Controlling the projector
• Checking the status of the projector
■ ■ ■ ■ ■
29
Page 50

The illustration below identifies the parts of your projector.
operation indicator
operation panel
speaker
remoto
control
reciver
zoom ring
focus ring
speaker
front foot
foot adjuster lever
■ ■ ■ ■
Using the Projector
30
Page 51

Turning the Equipment On and Off
Always turn on the projector and its attached equipment in
the following order.
1. Video source
2. Audio source (if different than computer or video source)
3. Projector
4. External speaker or PA system
5. Computer
Turning the Projector On and Off
1. Remove the projector lens cap.
2. Press the Power button on the remote control or control
panel. The green power indicator comes on.
If computer or video equipment is attached, the computer or
video signal is projected.
Allow about 30 seconds for full illumination.
♦
Warning:
damage your eyes. It is especially important that children are not
allowed to look into the lens.
Never look into the lens when the lamp is on. This can
Turning the Equipment On and Off
■ ■ ■ ■ ■
31
Page 52

Reverse the order shown above to turn off the projector and
other equipment. After you press the Power button to turn
off the projector, the fan will remain on and the operation
indicator will flash orange for about one minute as the
projector cools.
operation indicator
The indicator stops blinking (and remains lit in orange) when
the cooling operation is complete.
■ ■ ■ ■
♦
Note:
on while the power indicator is flashing green. Before pressing
the Power button again, wait until the lamp has cooled and the
operation indicator is orange.
Sleep Mode
Sleep mode conserves electricity by automatically turning off
the lamp after the projector has not been used for 30 minutes.
In sleep mode, the projector’s operation indicator is orange
and only a minimum amount of the projector’s circuitry
remains on. This conserves electricity, cools the projector, and
extends the life of the lamp. When the projector is in sleep
mode, you can press the Power button to start projecting
images, or you can unplug the projector’s power cord.
Using the Projector
32
The projector is designed so that it cannot be turned back
Page 53

Focusing and Positioning the Screen Image
After an image appears on the screen, check to see if it is in
focus and whether it fits properly on the screen.
zoom ring
focus ring
• To adjust the focus of the image, rotate the focus ring,
which is the outer ring on the projector’s lens.
• To adjust the size of the image, rotate the inner zoom ring.
Rotate the zoom ring clockwise to make the image larger,
and counterclockwise to make it smaller.
Focusing and Positioning the Screen Image
■ ■ ■ ■ ■
33
Page 54

If you need to raise or lower the image on the screen, extend
or retract the two feet at the bottom of the projector as
follows.
1. Stand behind the projector and support the front of it
while you lift the foot adjuster lever located above the feet.
This unlocks the feet so they can move up and down
freely. Do not let the projector drop.
■ ■ ■ ■
♦
Using the Projector
34
Caution:
Do not hold the projector by the lens as you may
damage it.
2. While lifting the foot adjuster lever, raise or lower the
projector until the screen image is positioned correctly.
3. Release the lever to lock the feet in their new position.
4. To fine-tune the height of the projector, turn the feet
clockwise to raise the height or anti-clockwise to lower it.
Page 55

Resize Button
The Resize button allows you to select the projection screen
mode for certain types of image input signals from a
computer.
EMP-7300/7200
With images up to XGA size(1024x768 pixels), you can
choose from two projection methods. Either display the
image in the center of the projection area(Window display) or
display the image full size(Resize display).
You can also choose from two projection methods with
images greater than XGA size. Either project a portion of the
image or project the entire image in a compressed format.
The projector automatically reduces the image size to the
projector's maximum resolution. The Resize button cannot
be used with XGA
EMP-5300
With images up to SVGA(800x600 pixels), you can choose
from two projection methods. Either display the image in the
center of the projection area(Window display) or display the
image full size(Resize display).
You can also choose from two projection methods with
images greater than SVGA size. Either project a portion of the
image or project the entire image in a compressed format.
The projector automatically reduces the image size to the
projector's maximum resolution. The Resize button cannot
be used with SVGA.
Focusing and Positioning the Screen Image
■ ■ ■ ■ ■
35
Page 56

Controlling the Projector
Normally you control the projector using the remote control.
The buttons on the remote control allow you to do the
following:
• Switch power on and off.
• Auto-set-up of the computer image screen.
• Switch between input images (Computer 1, Computer 2,
video-computer).
• Access menu for adjustment of image, audio, video, and
display settings.
• Control resizing.
• Control display freeze.
• Control display blanking.
• Adjust and mute audio output.
• Control custom functions.
• Move the pointer.
■ ■ ■ ■
Using the Projector
36
Page 57

Using the Remote Control
Source
Menu
pointer button
Effects
3
4
2
1
5
bottom
top
multi-purpose
button
Freeze
Resize
Blank
Custom
Mute
- Volume +
Power
multi-purpose
button
Remote control
When using the remote control, always point it towards the
remote control receivers located at the front and at the back
of the projector.
To be able to use the remote control as a cordless mouse
connect the projector to your computer with all cables came
with the EMP-7300/7200/5300.
To use the remote control, always point it towards the remote
control receivers located at the front of the projector.
You can use the remote control up to 10 metres (33 feet)
from the projector.
♦
Note:
The projector may not respond to remote control
commands in these conditions: ambient light is too bright; a
certain type of fluorescent light is present; a strong light source
(such as direct sunlight) shines into the infrared receiver; or
other equipment emitting infrared energy is present (such as a
radiant room heater). Remove these conditions to use the remote
control or control the projector from a computer.
Controlling the Projector
■ ■ ■ ■ ■
37
Page 58

In addition to the remote control, you can also control the
projector by using the buttons on the projector’s operation
panel located on top of the projector.
This table summarizes the functions on the remote control.
Button Function
Menu Displays or hides the menu.
Source Switches to Computer 1 , Computer 2*, or Video.
Pointer button Use the pointer button to navigate the menus or use
the remote as a mouse pointer when the projector is
connected to the computer with all cables came with
the EMP-7300/7200/5300.
Effects buttons Use to display special effects in conjunction with the
projector software.
Top multi-purpose button
Bottom multi-purpose button
Blank Clears the screen of special effects and switches to a
Resize Switches the display dot mode and resize mode (for
Custom Use to assign functions to the Effects keys using the
Freeze Keeps the current computer or video image on the
Mute Cuts off audio.
– Volume + Adjusts the volume.
Power Starts or stops the projector.
* When the computer 2/5 BNC switch on the back of the projector is turned to 5
BNC, the source is switch to 5 BNC.
Acts as a right mouse click, registers a menu selection,
and selects other custom functions.
Acts as a left mouse click, registers a menu selection,
and selects other custom functions.
black, a blue or user logo display.
VGA, SVGA and SXGA input).
projector software.
screen.
■ ■ ■ ■
Using the Projector
38
Page 59

Using the Control Panel
Power
Menu
Mute
Resize
g
n
i
k
c
a
r
T
y
S
S
y
Volume
BlankSource
n
c
.
T
r
a
c
k
i
n
g
.
c
n
Enter button
Operation Panel
You can use the control panel to control the printer instead of
the remote control. However, you can program and access the
custom features only when you are using the remote control.
Controlling the Projector
■ ■ ■ ■ ■
39
Page 60

The following table summarizes the functions on the control
panel.
Button Function
Power Starts or stops projection.
Source Switches to Computer 1 , Computer 2*, or Video.
Menu Displays or hides the menu.
Up, down arrows
(Sync+/Sync-)
Synchronizes the computer’s graphic signal.
Use these buttons to adjust an overall image that is
fuzzy or streaked, or to select menu items during
menu opera tions.
Left, right
arrows(tracking-/
tracking+)
Matches the projector’s internal clock to various
computer graphic signals (tracking adjustment).
Use these buttons to adjust an image with vertical
fuzzy lines, or to change numeric settings during menu
opera tions.
Enter key Registers a menu selection.
Resize Switches the display dot mode and resize mode (for
VGA, SVGA, and SXGA input).
Mute Cuts off audio.
– Volume + Adjusts the volume.
* When the computer 2/5 BNC switch on the back of the projector is turned to 5
BNC, the source is switch to 5 BNC.
■ ■ ■ ■
Using the Projector
40
Page 61

Projector Status Indicators
The power and lamp indicators at the top of the projector tell
you the projector’s operating status.
Temperature Indicator
Lamp Indicator
Operation Indicator
♦
Caution:
A red indicator warns you if a serious problem occurs.
See Chapter 6, “Troubleshooting,” for what to do if a warning
light comes on.
Operation Indicator
Displays machine condition.
Color Status Meaning
Orange Lit Sleep mode.
Green Flashing Projection lamp is warming up for 30 sec..
Green Lit The projector is projecting and providing
Orange Flashing Projection lamp is off, the projector is
- Off The projector has internal projector prob-
After that, the indicator will turn to lit to
start projecting.
the maximum of brightness.
cooling down for one minute. While
cooling, operations can not work.
lem and turned off.
Projector Status Indicators
■ ■ ■ ■ ■
41
Page 62

Lamp Indicator
Displays lamp condition.
This indicator is off when the projector is in a normal
condition.
Color Status Meaning
- Off The projector is in a normal condition.
Orange and
Red
Red Lit Projection lamp has reached the end of its
Red Flashing The projector has lamp or other problems
Flashing Projection lamp is reaching the end of its
life and should be replaced with a new
one.
life and will not longer project images.
Replace the projection lamp with a new
one.
around the lamp. Contact your nearest
service provider.
Temperature Indicator
Displays the internal temperature condition.
This indicator is off when the projector is in a normal
condition.
Color Status Meaning
- Off The projector is in a normal condition.
Orange Flashing The projector is in a hot condition.
Red Lit The projector is too hot and turned off.
■ ■ ■ ■
Using the Projector
42
Red Flashing The projector has a cooling fan or
temperature sensor problem. Contact
your nearest service provider.
Page 63

■ ■ ■ ■ ■ ■ ■ ■ ■ ■ ■ ■ ■ ■ ■
3
Using the Projector Menus
• The seven projector menus enable you to control your
projector.
• The Computer menu controls the computer image, such as
brightness and contrast, when the computer is the image
source.
• The Video menu controls the video image, such as
brightness and color saturation, when the image source is
video, such as a VCR.
• The Audio menu controls audio features, such as the
volume level, tone setting, and 3D sound.
• The Options menu enables you to set various projector
options.
• The Custom menu assigns functions to the remote
control’s Custom button.
• The About Menu displays lamp hours, frequency and etc..
• The Reset All menu returns all settings to their factory
defaults.
■ ■ ■ ■ ■
43
Page 64

Accessing the Main Menu
The projector menus can be accessed using either the
projector control panel or remote control.
To display the Main menu, press the Menu button. The Main
menu appears:
Press the Menu button again to hide the menu.
Changing a Menu Setting
To change a menu setting:
1. Press the Menu button on the control panel or remote
control to display the Main menu.
■ ■ ■ ■
Using the Projector Menus
44
Page 65

2. Press the up or down arrows (control panel) or press the
top or bottom of the pointer button (remote) to scroll
through the menu choices.
Menu
Mute
Power
BlankSource
Resize
n
c
y
.
S
S
y
n
Volume
T
r
a
c
k
up and down
i
n
g
.
c
buttons
g
n
i
k
c
a
r
T
pointer button
Source
Menu
Effects
3
4
2
Resize
Freeze
5
Blank
Custom
Mute
- Volume +
Power
1
Changing a Menu Setting
■ ■ ■ ■ ■
45
Page 66

3. Press either the Enter button (control panel) or the top or
bottom multi-purpose button (remote) to display a
submenu.
Power
Source
Menu
BlankSource
Resize
Menu
g
n
i
k
c
a
r
T
Mute
Enter button
S
S
n
y
y
n
Volume
c
.
T
r
a
c
k
i
n
g
.
c
top
multi-purpose
button
bottom
Effects
3
4
2
Resize
Freeze
5
Blank
Custom
Mute
- Volume +
Power
1
multi-purpose
button
A sub-menu such as the following appears.
■ ■ ■ ■
♦
Note:
source is Computer or Video.
Using the Projector Menus
46
Sub-menus differ, depending on if the current image
Page 67

4. Press the up or down arrows (control panel) or the top or
bottom of the pointer button (remote) to scroll through
the menu choices.
5. Press either the left or right arrow buttons (control panel)
or the right or left sides of the pointer button (remote) to
change the setting.
6. When you are finished changing settings, press the Menu
button again to hide the menu, or press Enter to go back
to the Main menu. The changes are saved automatically.
Menu Options
The following menus are described in this section:
• Video menu (Image source = Computer)
• Video menu (Image source = Video)
• Audio menu
• Options menu
• Custom menu
• About menu
• Reset All menu
Video Menu (Image source = Computer)
The Video menu enables you make adjustments to the
projected image. The following options are available when the
image source is Computer.
♦
Note:
image source on the projector must be set to Computer for you to
access these menu options.
The computer must be connected and operating, and the
Menu Options
■ ■ ■ ■ ■
47
Page 68

Menu item Description
Brightness Lightens or darkens the overall image. Increase
brightness to make the image lighter, or decrease it to
make the image darker.
Contrast Adjusts the relative difference between light and dark
areas. Increase contrast to make light areas lighter
and dark areas darker, or decrease it to lessen the
difference between the light areas and dark areas of
the image.
Sync Synchronizes with the tracking signal sent from the
computer. Adjust this setting whenever the overall
image is fuzzy or to remove streaks from the image.
Tracking Matches the projector’s internal clock to various
computer graphic signals. Adjust this setting to remove
vertical fuzzy lines from the image.
Color Adjusts the color balance of the input source.
Select this item and then press a Click button or the
<Enter> button to enter the color adjustment mode.
While in the color adjustment mode, use the pointing
button or the <Up> and <Down> button to select a
color. Next, use the pointing button or <Left> and
<Right> buttons to adjust the selected color.
Increasing a color’s setting makes that color more
intense on the screen, while a lower setting makes the
color less intense.
After you are finished, press a Click button or the
<Enter> button to return to the Computer Menu.
■ ■ ■ ■
Position Select this item and then press a Click button or the
Using the Projector Menus
48
<Enter> button to enter the screen position adjustment
mode. While in the screen position adjustment mode,
use the pointing button or the <Up>, <Down>, <Left>
and <Right> buttons to move the screen position in the
corresponding direction. After you are finished, press a
Click button or the <Enter> button to return to the
Computer Menu.
Page 69

Menu item Description
Auto Pressing AUTO automatically adjusts the computer
input signal to the current projector settings. Press the
AUTO button while the image fills the entire screen of
your computer, like a Windows screen. Certain
computer input signals may not be totally compatible
with AUTO button settings. In such cases, use the
menus to make additional adjustments.
Reset Returns all Computer Menu items to their factory
defaults. Select this item and then press a Click button
or the <Enter> button to display the confirmation
screen.
Next, select Yes and then press a Click button or the
<Enter> button to reset the Computer Menu items. If
you change your mind, select No and then press a
Click button or the <Enter> button to clear the
confirmation screen without changing any settings.
Menu Options
■ ■ ■ ■ ■
49
Page 70

Video Menu (Image source = Video)
The Video menu enables you make adjustments to the
projected image. The following options are available when the
image source is Video.
♦
Note:
The video source (such as a VCR or camcorder) must be
connected and operating, and the image source on the projector
must be set to Video for you to access these menu options.
Menu item Description
Brightness Lightens or darkens the overall image. Increase
brightness to make the image lighter, or decrease it to
make the image darker.
Contrast Adjusts the relative difference between light and dark
areas. Increase contrast to make light areas lighter
and dark areas darker, or decrease it to lessen the
difference between the light areas and dark areas of
the image.
Sharpness Adjusts screen sharpness.
Increase sharpness to make screen images more
sharp, or decrease it to make the images less sharp.
Saturation Adjusts color density. Increase color density to make
colors darker and more opaque, or decrease it to make
colors lighter and less opaque.
Tint (NTSC only) Adjust the red-green balance of the screen. Increase
tint to add more green, or decrease it to add more red.
Auto Specifies the video signal system. Normally this signal
system setting should be left at AUTO for automatic
detection of the video signal system. If automatic
selection is not possible for some reason, use this
menu to manually specify NTSC, NTSC 4.43, PAL,
MPAL, NPAL, PAL (60Hz) or SECAM.
■ ■ ■ ■
Using the Projector Menus
50
Page 71

Menu item Description
Reset Returns all Video Menu items to their factory defaults.
Audio Menu
The Audio menu enables you make adjustments related to
audio.
Menu item Description
Volume Adjusts the volume level for the speakers and audio-
Treble Adjusts the treble tone.
Bass Adjusts the bass tone.
3D Sound Adjusts sound effects from 1 to 6 value. Increasing
Select this item and then press a Click button or the
<Enter> button to display the confirmation screen.
Next, select Yes and then press a Click button or the
<Enter> button to reset the Video Menu items. If you
change your mind, select No and then press a Click
button or the <Enter> button to clear the confirmation
screen without changing any settings.
out terminal. Increase the audio volume to raise the
volume, or decrease it to lower the volume.
number, the sound effects gets enhanced.
Reset Returns all Audio menu items to their initial factory
defaults. Select this item and then press the Enter
button (control panel) or either multi-purpose button
(remote) to display the confirmation screen.
Next, select Yes and then press the Enter button
(control panel) or a multi-purpose button (remote) to
reset the Audio menu.
If you change your mind, select No and then press a
multi- purpose button (remote) or the Enter button
(control panel) to clear the confirmation screen without
changing any settings.
Menu Options
■ ■ ■ ■ ■
51
Page 72

Options Menu
The Options menu enables you to adjust basic settings that
normally do not need changing.
Menu item Description
Prompt Temporarily displays a prompt on the projector screen
Color Temp. Adjusts the whiteness of the screen. The H setting
Rear Proj. Mirrors the projected images horizontally (left-right).
to identify which source (computer or video) is
providing the image.
provides a cold white, M standard white, L a warm
white, and U sets sub-brightness R, B.
Selecting the User item and pressing a Click button or
the <Enter> button displays a screen for more precise
color temperature setting. Use the pointing button or
the <Up> and <Down> buttons to select the color you
want to adjust, and then use the pointing button of the
<Left> and <Right> buttons to change the selected
value. A high color temperature value enhances the
selected color within the overall image, while a lower
value weakens the color. Press a Click button or the
<Enter> button to clear the setting screen and return to
the Option Menu.
Selecting ON turns mirroring on, while OFF turns it off
(for a normal image). Turn this option on when
projecting from behind onto a transparent screen being
viewed from the opposite side.
■ ■ ■ ■
Ceiling Mirrors the projected images vertically (top-bottom)
Blank Selects what should be projected when the projector’s
Using the Projector Menus
52
and horizontally (left-right). Selecting ON turns
mirroring on, while OFF turns it off (for a normal
image). Turn this option on when hanging the projector
upside-down from the ceiling.
Blank button is pressed to blank the screen. You can
select either a black screen, a blue screen or a user
logo. A user logo can be created using the projector
software that comes with the projector.
Page 73

Menu item Description
View Change Specifies the view change to use when the input
source is changed.
OFF: No visual effects, simply cut to new source.
Diagonal : Original source screen shrinks from upper
left to lower right, and new source screen
expands from upper left to lower right.
Left
→ Right :Original source screen shrinks from left
to right, and new source screen
expands from left to right.
Fade : Original source screen shrinks from outside in,
and new source screen expands from inside
out.
Language Selects the menu language in the sequence:
Japanese, English, German, French, Italian, Spanish
and Portuguese.
Mouse /COM Locks and unlocks the Mouse/Com port.
Select 1 to assign the wireless mouse control to the
computer connected to the Mouse/Com 1 port. The
wireless mouse controls the computer connected to
Mouse/Com 1 only if the input source is switched to
Computer 2.
Select 2 to assign the wireless mouse control to the
computer connected to the Mouse/Com 2 port.
Selecting 1
switch wireless mouse control whenever the input
source computer is changed.
BNC Specifies input image signal mode. User can select
either RGB or R-Y,Y,B-Y.
Reset Returns all Option Menu items to their factory defaults.
Select this item and then press a Click button or the
<Enter> button to display the confirmation screen.
Next, select Yes and then press a Click button or the
<Enter> button to reset the Option Menu items. If you
change your mind, select No and then press a Clock
button of the <Enter> button to clear the confirmation
screen without changing any settings.
→2 tells the projector to automatically
Menu Options
■ ■ ■ ■ ■
53
Page 74

Custom Menu
The Custom menu allows you to select special features such as
zoom, preview, or strobe effects. Unlike the other menus,
which use the Enter button to select a menu option, the
Custom menu requires that you use the Custom button to
select a Custom menu option.
The Custom button is located on the lower part of the remote
control.
To open the Custom menu, press the top multi-purpose
button or select CUSTOM from the Main menu. ZOOM is
highlighted and the words PRESENT SET are displayed after
it. Refer to the table below for a description of the various
zoom functions.
To change PREVIEW or STROBE settings, select the
function you want, then press the top multi-purpose button.
The Custom menu functions are:
Menu item Function Description
Zoom Press the bottom multi-purpose button
then check if the value next to the Zoom
menu is New Set or Present Set. If the
value is New Set, press the bottom multipurpose button to toggle the value.
■ ■ ■ ■
Using the Projector Menus
54
Press the Custom button to access the
Zoom function. An indicator appears in
the lower right of the screen while the
zoom function is on. Zoom remains on
until you press the Custom button again.
The following remote control functions are
available while the zoom function is on:
Zoom In Each press of the remote control’s bottom
multi-purpose button zooms in on the
center of the displayed image, enlarging it
+0.25 times.
Page 75

Menu item Function Description
Zoom Out Each press of the remote control’s top
multi-purpose button zooms out on the
center of the displayed image, reducing it
+0.25 times.
Zoom Screen
Shift
Press the pointer button to zoom in on a
portion of the enlarged display. You can
move the image up, down, left, right, and
diagonally to closely view any part of the
display.
Preview Press the bottom multi-purpose button
then check if the value next to the Preview
menu is New Set or Present Set. If the
value is New Set, press the bottom multipurpose button to toggle the value.
Press the Custom button to turn on the
Preview function. The preview function
remains on until you press the Custom
button again, select an input source with
the pointer button, or press the remote
control’s bottom multi-purpose button.
Strobe Press the bottom multi-purpose button
then check if the value next to the Strobe
menu is New Set or Present Set. If the
value is New Set, press the bottom multipurpose button to toggle the value.
Press the Custom button to turn on the
strobe function. The strobe function
remains on until you press the Custom
button again. The screen is divided into
four quadrants, each of which shows the
image from the current input source.
Menu Options
■ ■ ■ ■ ■
55
Page 76

Menu item Function Description
Number of
Frames, Time
Press the top multi-purpose button while
the strobe effect is running to display a
screen specifying the number of frames
flashed and the time interval between
them. You can specify the number of
frames as 4, 9, or 16, and the time interval
from 0.1 to 1 second in 0.1 second
increments.
Press the top multi-purpose button again
to clear the setting screen.
■ ■ ■ ■
Using the Projector Menus
56
Page 77

About Menu
The About menu displays the following information about
your projector.
H/V Freq. Displays H/V frequency of the current computer.
COMPUTER2 /
5BNC
LAMP Displays the number of hours the current projector
Switches between computer2 and 5BNC.
lamp has been used. The color of this display turns red
when the projector lamp is near the end of its normal
life. When this happens, replace the projector lamp
with a new one as soon as possible.
RESET ALL Menu
Executing this command resets the settings in all menus to
their factory defaults.
While executing this command, the OSD menu disappears
from a screen and "RESET ALL" will be flashing on the
center of the screen.
Select this item and then press a Click button or the <Enter>
button to display the confirmation screen.
Next, select Yes and then press a Click button or the <Enter>
button to reset all menu items.
If you change your mind, select No and then press a Click
button or the <Enter> button to clear the confirmation screen
without changing any settings.
Menu Options
■ ■ ■ ■ ■
57
Page 78

■ ■ ■ ■
Using the Projector Menus
58
Page 79

■ ■ ■ ■ ■ ■ ■ ■ ■ ■ ■ ■ ■ ■ ■
4
Using the Projector Software
The Link Set package includes materials necessary to use the
ELP Link III V2.0 utility. This utility runs on your computer
to control projector features and to configure buttons on the
remote control. ELP Link III V2.0 has two functions related
to your EPSON projector.
■ ■ ■ ■ ■
59
Page 80

Presentation support function
The presentation support function allows you to perform realtime presentation effectively by a remote control shipped with
the projector.
Projector setting function
The projector setting function allows you to control the
projector from your computer.
■ ■ ■ ■
Note:
♦
See the ELP Link III V2.0 demonstration included in the
Projector Software CD-ROM.
System requirements
To use the ELP Link III V2.0 utility and to look at the PDF
User’s Guide and demonstration, the following system
requirements must be met.
Using the Projector Software
60
Page 81

Using a PC
• IBM compatible PC with Pentium or higher processor
• Microsoft Windows 95 or Windows NT 4.0, 3.51, or
Windows 3.1
• At least 16MB of RAM for ELP Link III V2.0 to work
• 16MB to be added for Acrobat Reader to work)
• At least 2MB of free hard disk space for ELP Link III V2.0
installation (8MB to be added for Acrobat Reader and 3MB
for User’s Guide installation, 8MB for the ELP Link III
V2.0 demonstration)
• Double-speed CD-ROM drive (Quad-speed or faster
recommended)
• VGA or better monitor
Using a Macintosh
• 68000 series or PowerPC processor
• System 7.5 or later
• At least 16MB of RAM for ELP Link III V2.0 to work
• 6MB to be added for Acrobat Reader to work)
• At least 2MB of free hard disk space for ELP Link III V2.0
installation (8MB to be added for Acrobat Reader and 3MB
for User’s Guide installation, 8MB for the ELP Link III
V2.0 demonstration).
• Double-speed CD-ROM drive (Quad-speed or faster
recommended)
• Color monitor, 640 x 480 screen resolution (832 x 624 or
higher recommended), and 256 colors (32,000 colors or
more recommended)
■ ■ ■ ■ ■
61
Page 82

Projector Software CD-ROM
The following software is enclosed.
ELP Link III V2.0 utility
Offers a lot of advantages to your presentation in using a
cursor, bar, or stamps with the remote control shipped with
your projector. And you can control the brightness and size of
the screen, and the sound from your computer.
ELP Link III V2.0 User’s Guide
Provides you with detailed information and instructions to
use ELP Link III V2.0. The User’s Guide is provided in a
PDF (Portable Document Format) file. To read this manual,
Adobe Acrobat Reader must be installed.
■ ■ ■ ■
♦
Note:
Adobe Acrobat Reader
Acrobat Reader is the program provided by Adobe Systems
Incorporated that you need to read PDF files. To install
Acrobat Reader, always see the license agreement and follow
the instructions. For more information about Acrobat Reader,
see Online Help or Adobe’s home page.
(http://www.adobe.com)
♦
Note:
ELP Link III V2.0 Demonstration
Shows examples using the ELP Link III V2.0 utility. This
program is not installed on the hard drive. To view this
demonstration, insert the CD-ROM in the CD-ROM drive.
Then click the View Demonstration button in the Install
Program main window. See page 71.
Using the Projector Software
62
A Portuguese User’s Guide is not provided.
There is no Portuguese version of Adobe Acrobat Reader.
Page 83

Connecting the Cables
When you are using the following EPSON projector, follow
the instructions below. If not, please see the User’s Guide
packed with your projector.
♦
Caution:
Before connecting the cables to your computer, make
sure that the computer and projector are turned off and
unplugged from any power source; otherwise damage may occur.
Connecting to your PC
Using the PS/2 mouse
connect to the
PS/2 mouse port
connect to the
serial port
PC serial cable
PS/2 mouse cable
connect to
Mouse/Com
Connecting the Cables
■ ■ ■ ■ ■
63
Page 84

Using the serial mouse
connect to the
serial port
connect to the
printer port or
modem port
PC serial cable
PC serial mouse cable
Connecting to your Macintosh
connect to the
ADB port
connect to the
printer port or
modem port
Mac serial cable
Mac mouse cable
connect to
Mouse/Com
connect to
Mouse/Com
■ ■ ■ ■
Using the Projector Software
64
Page 85

Installing the Projector Software on Your PC
After connecting the projector to your PC, install the
Windows-based projector software as described below.
1. Turn on the computer and start Windows.
2. Insert the EPSON Projector Software CD-ROM into the
CD-ROM drive. The following dialog box appears.
♦
Note:
If the dialog box does not appear, follow the steps below.
For Windows 95 or NT 4.0 users:
Double-click the My Computer icon, then double-click the
CD-ROM drive icon. Double-click Setup.exe.
For Windows 3.1 or NT 3.51 users:
Open the File Manager, then double-click CD-ROM drive.
Double-click Setup.exe.
3. Select language from the list box. Then click OK.
Installing the Projector Software on Your PC
■ ■ ■ ■ ■
65
Page 86

4. When you see the following dialog box, click the Install
ELP Link III V2.0 button.
To view the ELP Link III V2.0
demonstration, click the View
Demonstration button.
5. When you see the following dialog box, select items you
wish to install. Then click Install.
■ ■ ■ ■
6. The setup program starts the installation procedure for
each software component. Follow the on-screen
instructions.
Using the Projector Software
66
Page 87

Installing ELP Link III V2.0 on your PC
For Macintosh users:
ELP Link III V2.0 installs directly from the setup program
main window; there is no separate installation program.
The ELP Link III V2.0 installation program starts with the
following dialog box. Follow the steps below.
♦
Note:
The dialog boxes used here are for Windows 95. Dialog
boxes may differ depending on your platform.
1. Click Next. Then read the license agreement. If you agree
with it, click Yes.
Installing the Projector Software on Your PC
■ ■ ■ ■ ■
67
Page 88

2. A dialog box appears. Read the information, then click
Next.
3. Choose a Destination Folder. Your software will be
installed into this folder. Click Next.
■ ■ ■ ■
4. Follow the on-screen instructions. When the installation is
complete, click Finish.
Using the Projector Software
68
Page 89

Installing the Projector Software on
Your Macintosh
After connecting the projector to your Macintosh, install the
Macintosh-based projector software as described below.
1. Turn on your Macintosh, then insert the EPSON
Projector Software CD-ROM in the CD-ROM drive.
2. Double-click the Installer icon. The following dialog box
appears.
3. Select language from the pop-up menu. Then click OK.
4. When you see the following dialog box, click the Install
ELP Link III V2.0 button.
To view the ELP Link III V2.0
demonstration, click the View
Demonstration button.
Installing the Projector Software on Your Macintosh
■ ■ ■ ■ ■
69
Page 90

5. Read the license agreement. If you agree with it, click
Accept.
6. The following dialog box appears. If you want to install all
of the software components contained on your projector
software CD-ROM, make sure the disk where you want to
install the software is displayed in the Install Location box,
then click Install.
■ ■ ■ ■
♦
Note:
the pop-up menu and select the software you want to install.
7. The setup program starts the installation procedure for
each software component. Follow the on-screen
instructions.
Using the Projector Software
70
If you are low on disk space, select Custom Install from
Page 91

Accessing the Projector Software
To access the EPSON projector software, follow the steps
below.
For Windows 95 and NT 4.0 users
ELP Link III V2.0
Click Start, point to Programs, and ELPLink3, then select
ELPLink3.
User’s Guide
Click Start, point to Programs, and ELPLink3, then select
User’s Guide.
♦
Note:
Make sure that Acrobat Reader is installed on your PC
before accessing the User’s Guide.
Demonstration
Insert the CD-ROM into the CD-ROM drive and click the
View Demonstration button in the Install Program main
window.
For Windows 3.1 and NT 3.51 users
ELP Link III V2.0
Open the Program Manager and double-click the ELPLink3
group. Then double-click the ELP Link III V2.0 icon.
Accessing the Projector Software
■ ■ ■ ■ ■
71
Page 92

User’s Guide
Open the Program Manager and double-click the ELPLink3
group. Then double-click the User’s Guide icon.
♦
Note:
before accessing the User’s Guide.
Make sure that Acrobat Reader is installed on your PC
Demonstration
Insert the CD-ROM into the CD-ROM drive and click the
View Demonstration button in the Install Program main
window.
For Macintosh users
ELP Link III V2.0
Open the ELPLink3 folder, then double-click the ELP Link 3
icon.
User’s Guide
Open the ELPLink3 folder, then double-click the User’s
Guide icon.
♦
Note:
Make sure that Acrobat Reader is installed on your
Macintosh before accessing the User’s Guide.
■ ■ ■ ■
Demonstration
Insert the CD-ROM into the CD-ROM drive and click the
View Demonstration button in the Install Program main
window.
Using the Projector Software
72
Page 93

Installing or Accessing the Projector
Software on the CD-ROM Directly
When you install or access the software on the CD-ROM
directly, follow the instructions below.
For Windows users
ELP Link III V2.0
Open the DATA folder, then the ENGLISH folder. Open the
ELPLink3 folder, then your OS folder. Double-click SETUP.
EXE.
Acrobat Reader
Open the DATA folder, then the ENGLISH folder and AR
folder. Then open the WIN31 folder and double-click
AR16E301.EXE (for Windows 3.1), or WIN95 folder and
double-click AR32E301.EXE (for Windows 95), or WINNT
folder and double-click AR32E301.EXE (for Windows NT).
User’s Guide (PDF)
Open the DATA folder, then the ENGLISH folder. Then
open the PDF_File folder and double-click SETUP. EXE.
Demonstration
Open the DATA folder, then the DEMO folder. Then open
the WIN16 folder, and double-click D_ELP31.EXE for
Windows 3.1 or NT3.51. Or open the WIN32, and doubleclick D_ELP95.EXE for Windows 95 or NT 4.0.
Installing or Accessing the Projector Software on the CD-ROM Directly
■ ■ ■ ■ ■
73
Page 94

For Macintosh users
ELP Link III V2.0
Open the DATA folder, then the English folder. Copy the
ELPLink3 folder to your hard disk.
Acrobat Reader
Open the DATA folder, then the English folder. Open the
PDF_FILE folder, then the AR folder. Double-click the
Reader 3.01 Installer icon.
User’s Guide (PDF)
Open the DATA folder, then the English folder. Open the
PDF_FILE folder, then copy the User’s Guide file to your
hard disk.
Demonstration
Open the DATA folder, then the DEMO folder. Double-click
the D_ELP icon.
■ ■ ■ ■
Using the Projector Software
74
Page 95

■ ■ ■ ■ ■ ■ ■ ■ ■ ■ ■ ■ ■ ■ ■
5
Maintenance
The projector needs little maintenance. You should keep the
lens clean because any dirt or stains will appear on the screen.
You will also need to clean the air filter located at the bottom
of the projector periodically. It is important to keep the air
filter clean because a clogged air filter prevents proper
ventilation which is necessary to cool the projector and
prevent it from overheating.
The only parts you should replace yourself are the lamp and
the air filter. If any other parts need replacing, contact your
EMP-7300/7200/5300 dealer or qualified service personnel.
When cleaning any part of the projector, always switch off and
unplug the projector first.
♦
Warning:
the lamp and filter covers. Dangerous electrical voltages inside
the projector can cause severe injury. Except as specifically
indicated in this Owner’s Manual, do not attempt to service this
product yourself. Refer all servicing to qualified service
personnel.
Never open any of the covers on the projector except
■ ■ ■ ■ ■
75
Page 96

Cleaning the Lens
Clean the lens whenever you notice dirt or dust on the
surface. Wipe the lens surface gently with a soft, dry, lint-free
cloth.
To remove dirt or stains on the lens, moisten a soft cloth with
water and a neutral detergent and gently wipe the lens surface.
Cleaning the Projector Case
To clean the projector case, first unplug the power cable. To
remove dirt or dust, wipe the casing with a soft, dry, lint-free
cloth. To remove stubborn dirt or stains, moisten a soft cloth
with water and a neutral detergent. Then wipe the casing.
Do not use alcohol, benzene, thinners or other chemical
detergents as these can cause the casing to warp.
■ ■ ■ ■
76
Maintenance
Page 97

Cleaning the Air Filter
The air filter, which is located at the bottom of the projector,
should be cleaned after every 100 hours of use. If it is not
cleaned periodically, it can become clogged with dust and
prevent the projector from being ventilated properly. This can
cause overheating and damage the projector.
To clean the air filter:
1. Switch the projector off and unplug the power cable from
the wall socket.
2. Stand the projector with the handle at the top so that the
filter is easily accessible.
♦
Caution:
Stand the projector with the handle at the top to
prevent dust from entering the projector.
3. Lift the stopper of the filter cover with your fingers.
2
1
Cleaning the Air Filter
■ ■ ■ ■ ■
77
Page 98

4. The air filter is attached to the inside of the projector. To
clean the filter you are advised to use a small vacuum
cleaner designed for computers and other office
equipment. If you do not have one, use a dry, lint-free
cloth.
If the dirt is difficult to remove or if the filter is torn,
replace it.
An air filter come with replacement lamps.
Contact your EMP-7300/7200/5300 dealer or call an
EPSON Service Centre.
Be sure to request part number. (ELPLP05)
5. Replace the filter cover.
6. Plug the power cable back into the wall socket.
Replacing the Lamp
The projector lamp typically lasts for about 2000 hours of use.
It is time to replace the lamp when:
• The projected image gets darker or starts to deteriorate.
• The projection lamp indicator (orange and red, flashing
alternately) is red.
■ ■ ■ ■
♦
78
• The message “LAMP REPLACE” appears on the screen
when the projector lamp comes on.
Contact your local EPSON dealer for a replacement lamp.Use
only replacement lamp part number. (ELPLP05)
Warning:
1. Turn off the projector and unplug the power cable.
2. Turn the projector over so you can access the lamp cover.
Maintenance
Let the lamp cool before replacing it.
Page 99

3. Use a screwdriver, coin, or similar object to loosen the
two retaining screws on the lamp cover. When the screws
are loose, lift off the lamp cover. (You cannot remove
these screws.)
2
1
4. Use a screwdriver, coin, or similar object to loosen the
two screws holding the lamp in position. (You cannot
remove these screws.)
5. Lift up the handle and pull out the lamp.
2
1
■ ■ ■ ■ ■
Replacing the Lamp
79
Page 100

6. Gently insert the new lamp by lowering it into position.
Make sure it is inserted securely.
7. Tighten the screws you loosened in step 4.
8. Replace the lamp cover and tighten the cover screws.
(Make sure the lamp cover is securely fastened. The
projector turns itself off if the lamp cover is open.)
■ ■ ■ ■
80
Maintenance
 Loading...