


DS-510
Table of contents
 Loading...
DS-510 User's Guide


Contents
DS-510 User's Guide ................................................................................................................................... 7
Scanner Basics............................................................................................................................................ 8
Placing Originals on the Scanner ............................................................................................................ 14
Using the Network Interface Unit ............................................................................................................. 29
Scanner Parts Locations ...................................................................................................................... 8
Scanner Parts.................................................................................................................................. 8
Scanner Buttons and Lights........................................................................................................... 10
Page Separation Lever.................................................................................................................. 11
User Replaceable Epson Scanner Parts ............................................................................................ 12
Changing the Power Off and Sleep Timer Settings ............................................................................ 13
Loading Originals in the Input Tray..................................................................................................... 14
Original Document Loading Capacity ............................................................................................ 17
Loading Plastic Cards in the Input Tray.............................................................................................. 19
Card Loading Capacity .................................................................................................................. 22
Loading Special Documents............................................................................................................... 23
Large or Thick Original Loading Capacity...................................................................................... 28
Network Interface Unit Parts............................................................................................................... 29
Connecting the Network Interface Unit............................................................................................... 30
Setting Up Network Scanning ............................................................................................................ 30
Scanning to Network Computers from the Network Interface Unit - Windows .................................... 32
Scanning .................................................................................................................................................... 33
Starting a Scan from a Scanner Button .............................................................................................. 33
Assigning Start Button Settings or Scan Jobs................................................................................ 33
Scanning with Document Capture Pro and Document Capture.......................................................... 34
Scanning with Epson Scan................................................................................................................. 37
Available Image Adjustments ........................................................................................................ 39
Scanning Special Projects.................................................................................................................. 40
Scanning Two Originals onto One Sheet (Stitching Images) ......................................................... 40
Scanning Multi-Page Originals as Separate Files - Windows ........................................................ 43
Convert Scanned Documents to Editable Text (OCR)................................................................... 45
3

Scanning Using OCR - Windows .............................................................................................. 45
Scanning Using OCR - OS X .................................................................................................... 47
Scanning to a SharePoint Server or Cloud Service ....................................................................... 48
Cleaning and Transporting Your Scanner............................................................................................... 51
Cleaning Your Scanner ...................................................................................................................... 51
Cleaning Inside Your Scanner............................................................................................................ 51
Checking the Scanner Roller Counter ................................................................................................ 54
Replacing the Scanner Rollers........................................................................................................... 55
Resetting the Scanner Roller Counter ........................................................................................... 61
Transporting Your Scanner ................................................................................................................ 62
Solving Problems ...................................................................................................................................... 63
Scanner Light Status .......................................................................................................................... 63
Solving Scanning Problems ............................................................................................................... 64
Scanner Does Not Turn On or Turns Off Unexpectedly................................................................. 65
Scanner Button Does Not Work as Expected ................................................................................ 65
Scanning Software Does Not Operate Correctly ........................................................................... 65
Cannot Start Epson Scan .............................................................................................................. 66
Original Feeds Incorrectly in Scanner............................................................................................ 66
Original Jams in Scanner............................................................................................................... 67
Scanning is Slow ........................................................................................................................... 69
Solving Network Interface Unit Problems ........................................................................................... 70
Solving Scanned Image Quality Problems ......................................................................................... 70
Back of Original Image Appears in Scanned Image ...................................................................... 71
Scanned Characters are Blurry ..................................................................................................... 71
Characters are not Recognized During Conversion to Editable Text (OCR) ................................. 71
Ripple Patterns Appear in an Image .............................................................................................. 72
Spots or Lines Appear in All Scanned Images............................................................................... 72
Scanned Image Edges are Cropped ............................................................................................. 74
When to Uninstall Your Scanner Software ......................................................................................... 74
Uninstalling Scanner Software - Windows..................................................................................... 74
Uninstalling Scanner Software - OS X ........................................................................................... 75
Where to Get Help.............................................................................................................................. 76
4

Technical Specifications .......................................................................................................................... 77
Windows System Requirements ........................................................................................................ 77
Mac System Requirements ................................................................................................................ 77
General Specifications ....................................................................................................................... 78
Dimension Specifications ................................................................................................................... 79
Electrical Specifications ..................................................................................................................... 79
Environmental Specifications ............................................................................................................. 80
USB Interface Specifications.............................................................................................................. 80
Safety and Approvals Specifications .................................................................................................. 80
Notices ....................................................................................................................................................... 82
Important Safety Instructions.............................................................................................................. 82
Restrictions on Copying ..................................................................................................................... 84
Default Delay Times for Power Management for Epson Products ...................................................... 84
Trademarks........................................................................................................................................ 84
Copyright Notice................................................................................................................................. 85
libTIFF Software Acknowledgment................................................................................................ 85
libjpeg-turbo................................................................................................................................... 86
A Note Concerning Responsible Use of Copyrighted Materials..................................................... 87
Copyright Attribution...................................................................................................................... 87
5


DS-510 User's Guide
Welcome to the DS-510 User's Guide.
For a printable PDF copy of this guide, click here.
7
Scanner Basics
See these sections to learn about the basic features of your scanner.
Scanner Parts Locations
User Replaceable Epson Scanner Parts
Changing the Power Off and Sleep Timer Settings
Scanner Parts Locations
See these sections to identify the parts on your scanner.
Scanner Parts
Scanner Buttons and Lights
Page Separation Lever
Parent topic: Scanner Basics
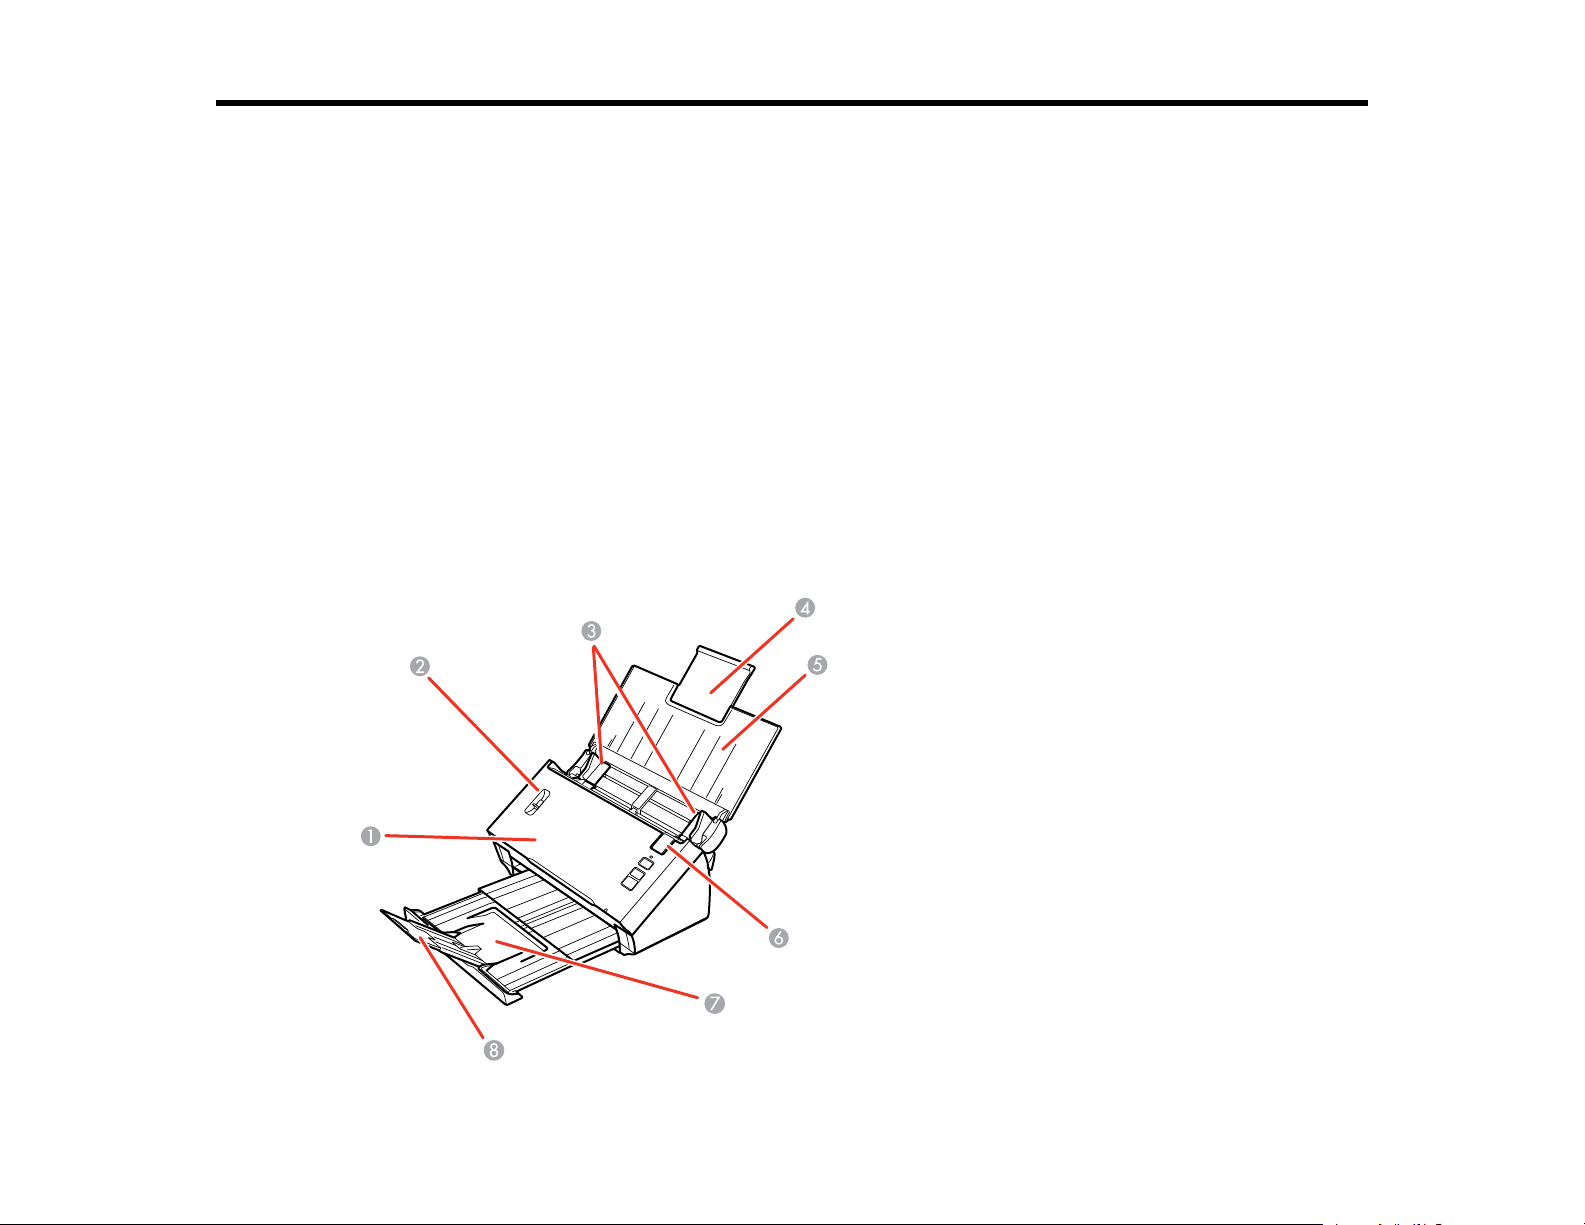
Scanner Parts
8
1 Scanner cover
2 Page separation lever
3 Edge guides
4 Input tray extension
5 Input tray
6 Cover open lever
7 Output tray
8 Output tray extension
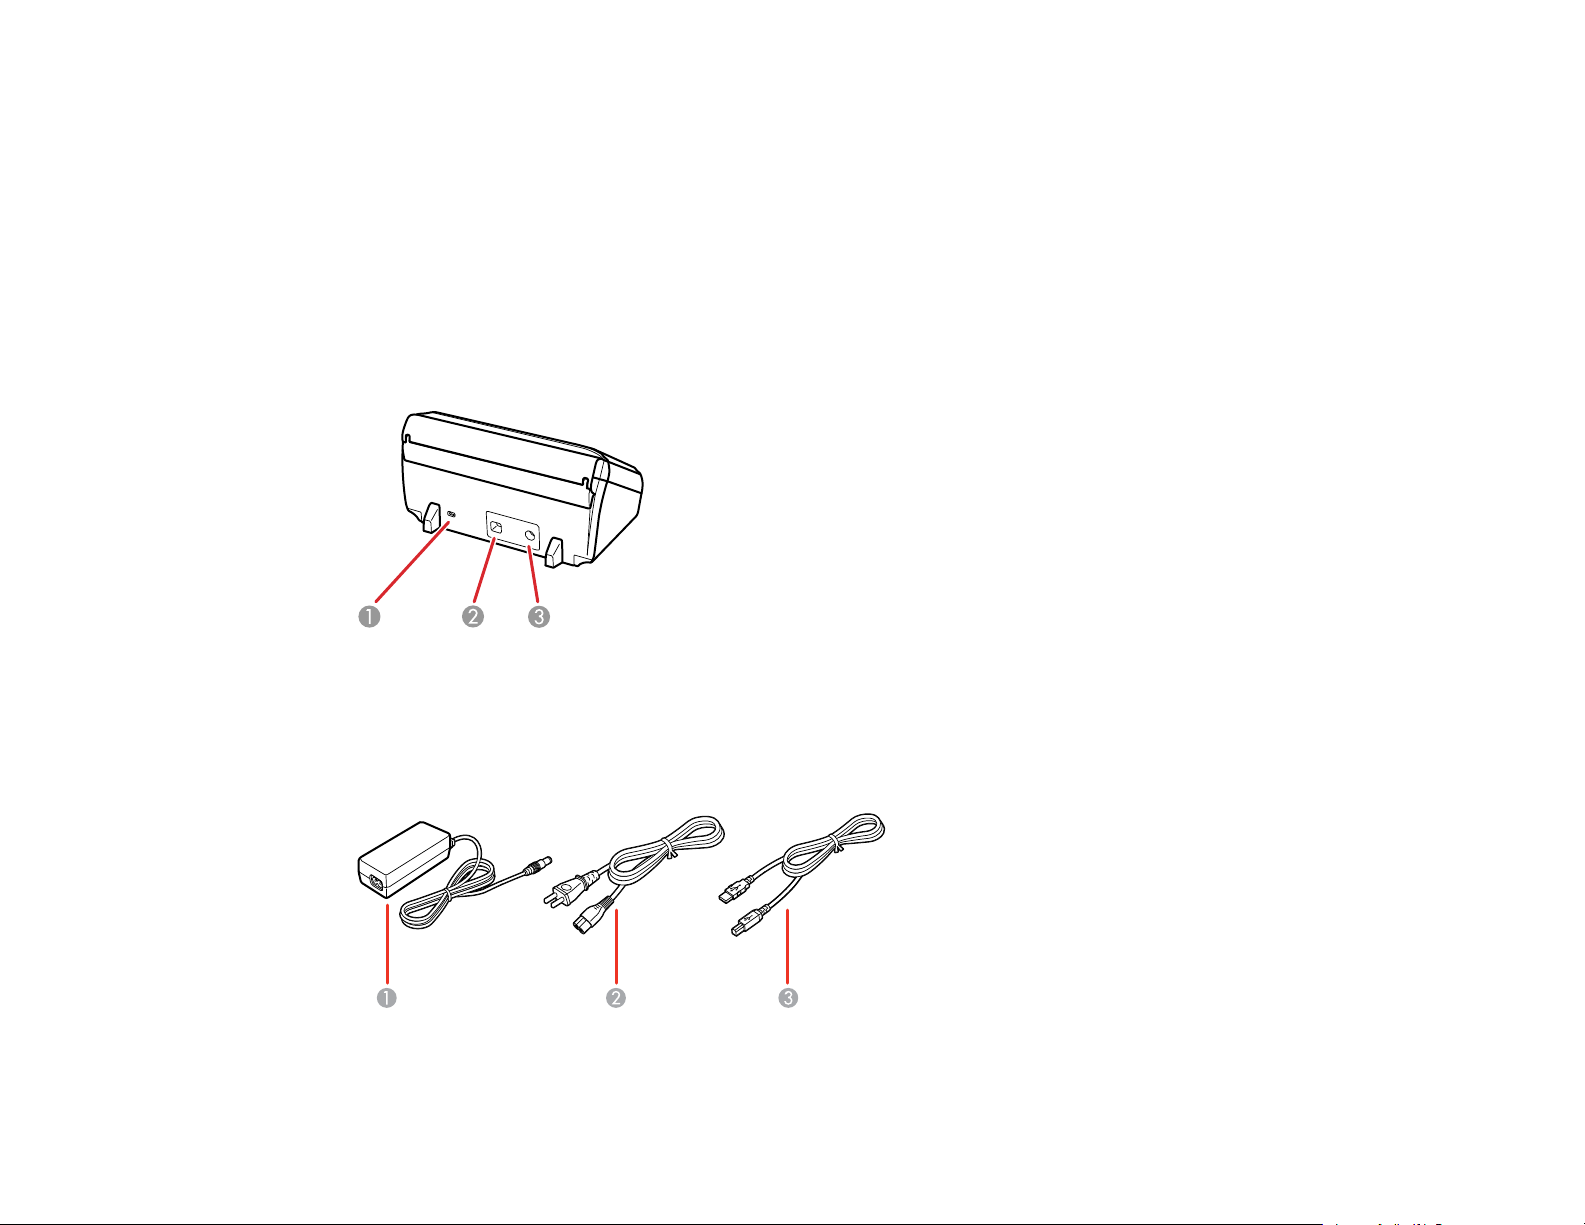
1 Kensington security slot
2 USB port
3 Power inlet
9
1 AC adapter
2 Power cord
3 USB cable
Parent topic: Scanner Parts Locations
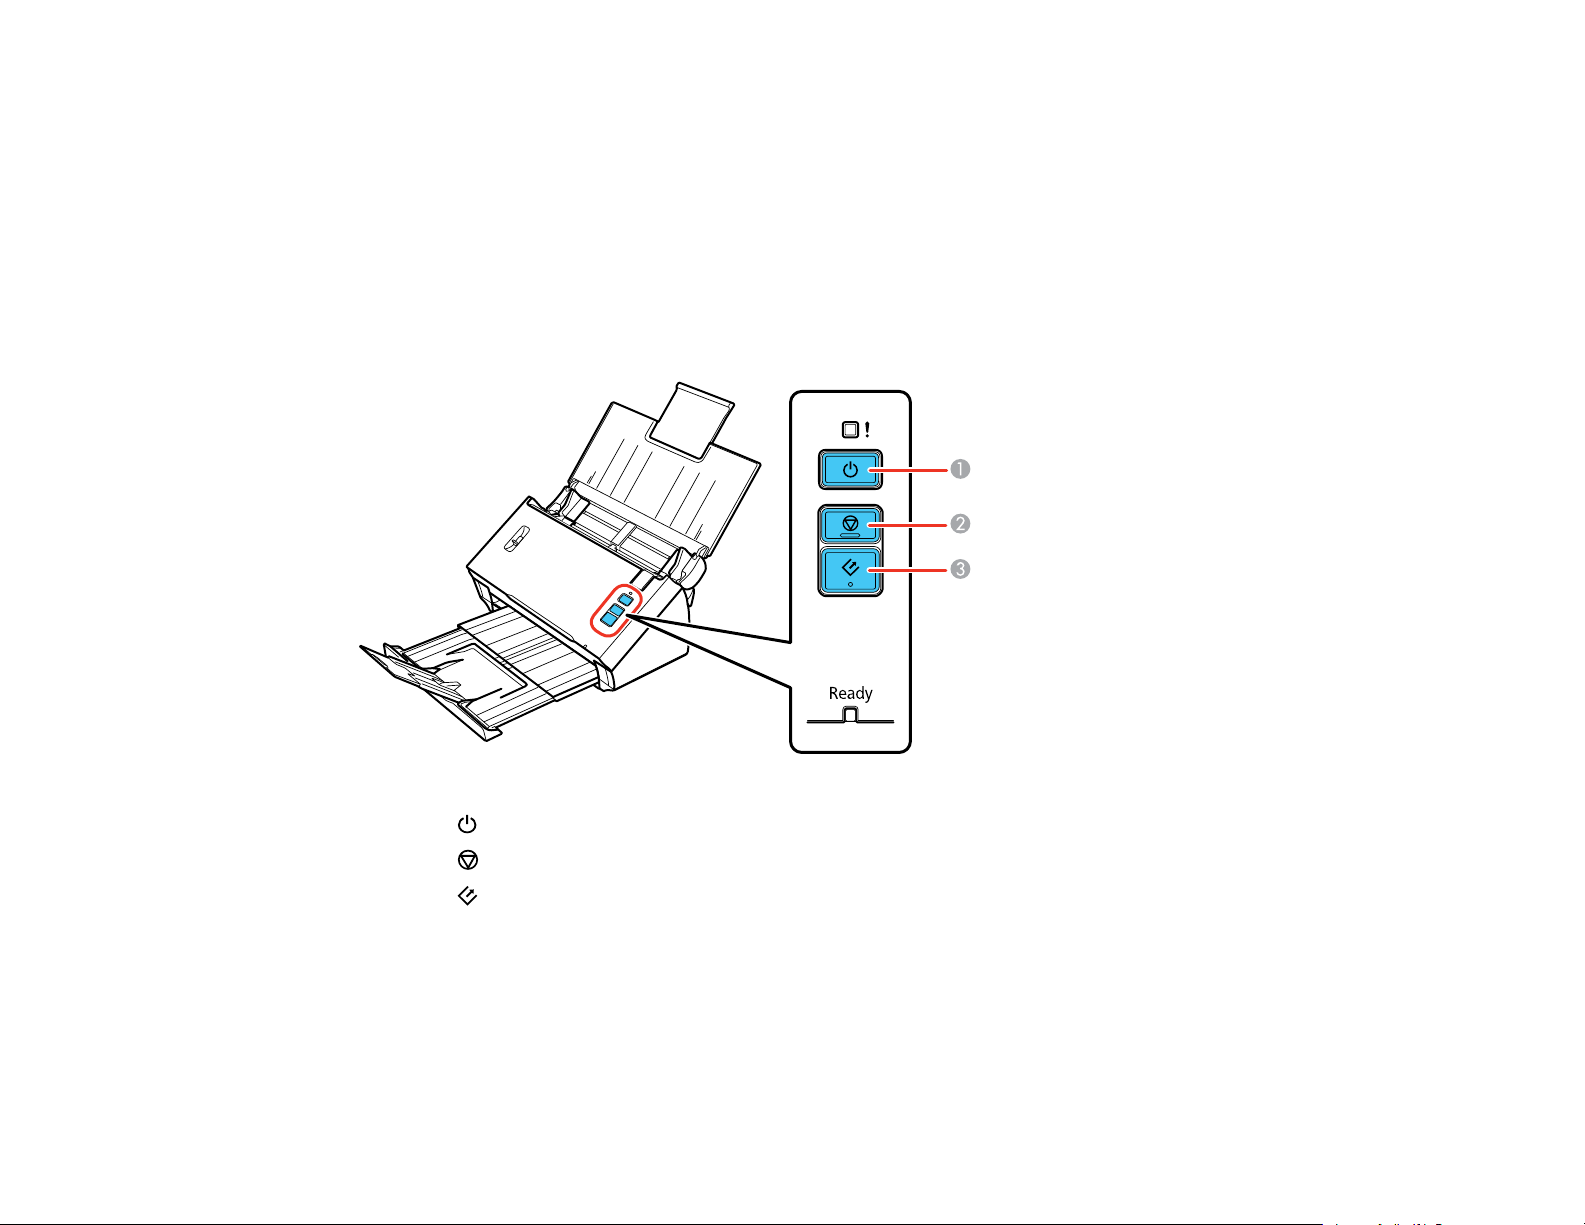
Scanner Buttons and Lights
Buttons
1
The power button
2
The stop button
3 The start button
10
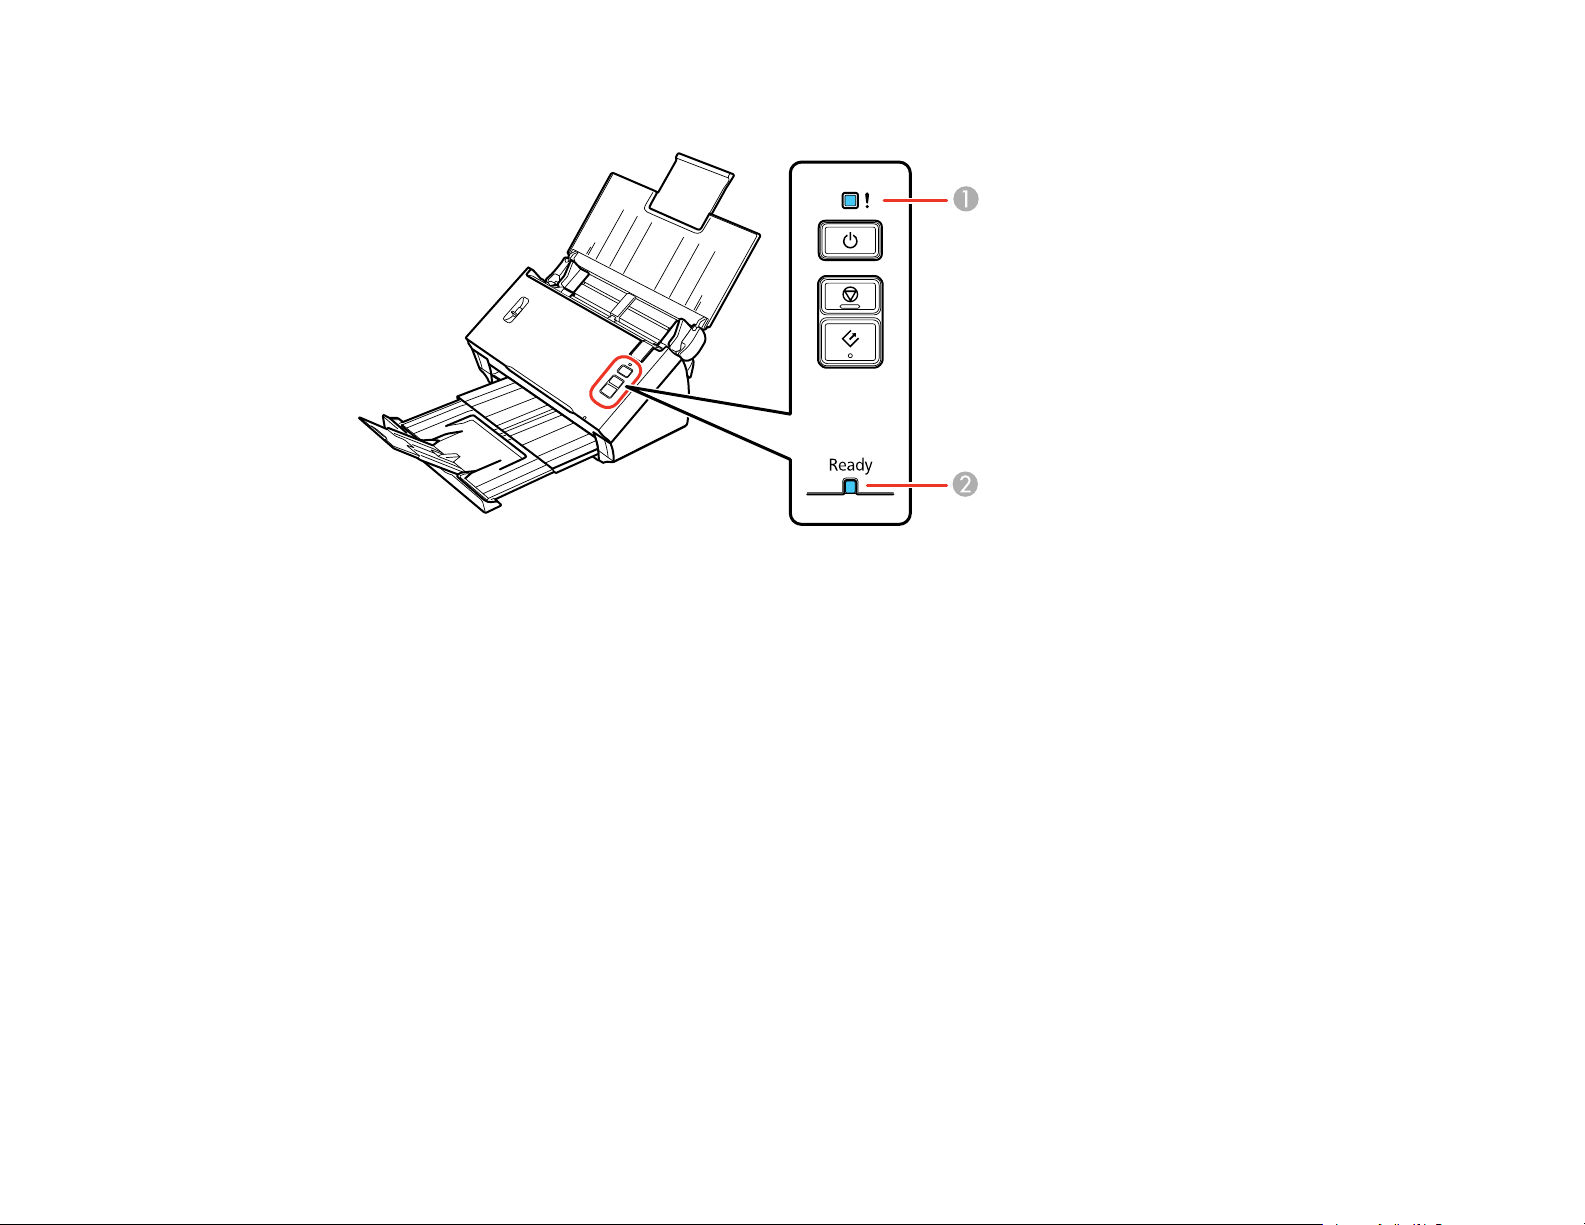
Lights
1 The ! error light
2 The Ready light
Parent topic: Scanner Parts Locations
Page Separation Lever
You can scan plastic cards, folded documents, envelopes, or any document that requires an optional
carrier sheet by adjusting the position of the page separation lever.
11

Move the separation lever to this position only when scanning plastic cards, folded documents,
envelopes, or any document that requires an optional carrier sheet.
Leave the separation lever in this position when scanning standard single- or multiple-page
documents to prevent paper jams.
Parent topic: Scanner Parts Locations
Related tasks
Loading Originals in the Input Tray
Loading Plastic Cards in the Input Tray
Loading Special Documents
User Replaceable Epson Scanner Parts
You can purchase genuine Epson accessories at epson.com (U.S. sales) or epson.ca (Canadian sales).
You can also purchase accessories from an Epson authorized reseller. To find the nearest one, call 800GO-EPSON (800-463-7766).
Part Part number
Network interface unit B12B808441
Carrier sheet B12B813431
12
Part Part number
Roller assembly kit B12B813561
Parent topic: Scanner Basics
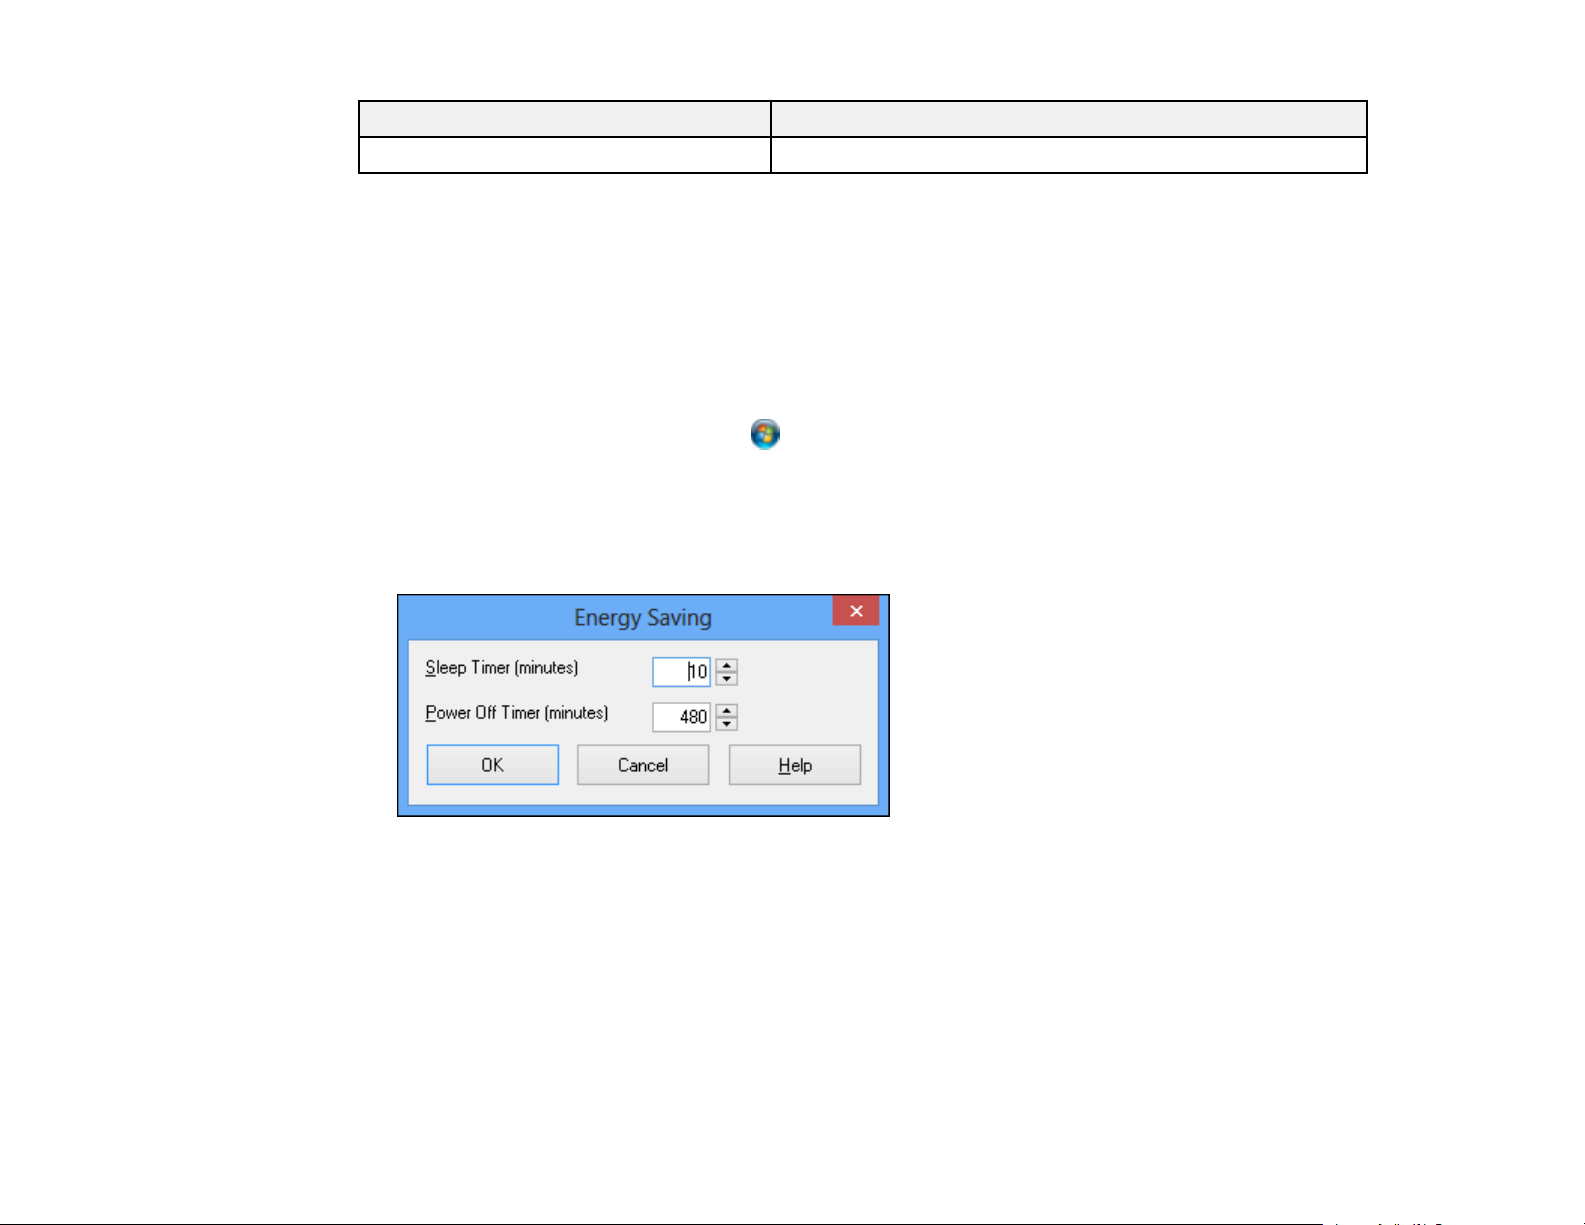
Changing the Power Off and Sleep Timer Settings
You can use the Epson Scan Settings utility to change the time period before the scanner enters sleep
mode and turns off automatically.
1. Do one of the following to access the Epson Scan Settings utility:
• Windows 8.x: Navigate to the Apps screen and select EPSON Scan Settings.
• Windows (other versions): Click or Start, and select All Programs or Programs. Select
Epson, then EPSON Scan, then click EPSON Scan Settings.
• OS X: Open the Applications folder, then open the Epson Software folder and double-click the
EPSON Scan Settings icon.
2. Click Energy Saving.
3. Enter the time period you want before the scanner goes to sleep as the Sleep Timer setting.
4. Enter the time period you want before the scanner turns off automatically as the Power Off Timer
setting.
5. Click OK.
Parent topic: Scanner Basics
13
Placing Originals on the Scanner
Follow the instructions here to place your originals on the scanner.
Caution: Do not place anything on top of your scanner or use its cover as a writing surface to avoid
damaging it.
Loading Originals in the Input Tray
Loading Plastic Cards in the Input Tray
Loading Special Documents
Loading Originals in the Input Tray
You can load originals that meet the document specifications in the input tray.
Caution: Do not load photos, or valuable original documents or artwork, directly into the input tray. This
may wrinkle or damage the original. Load these originals using an optional carrier sheet.
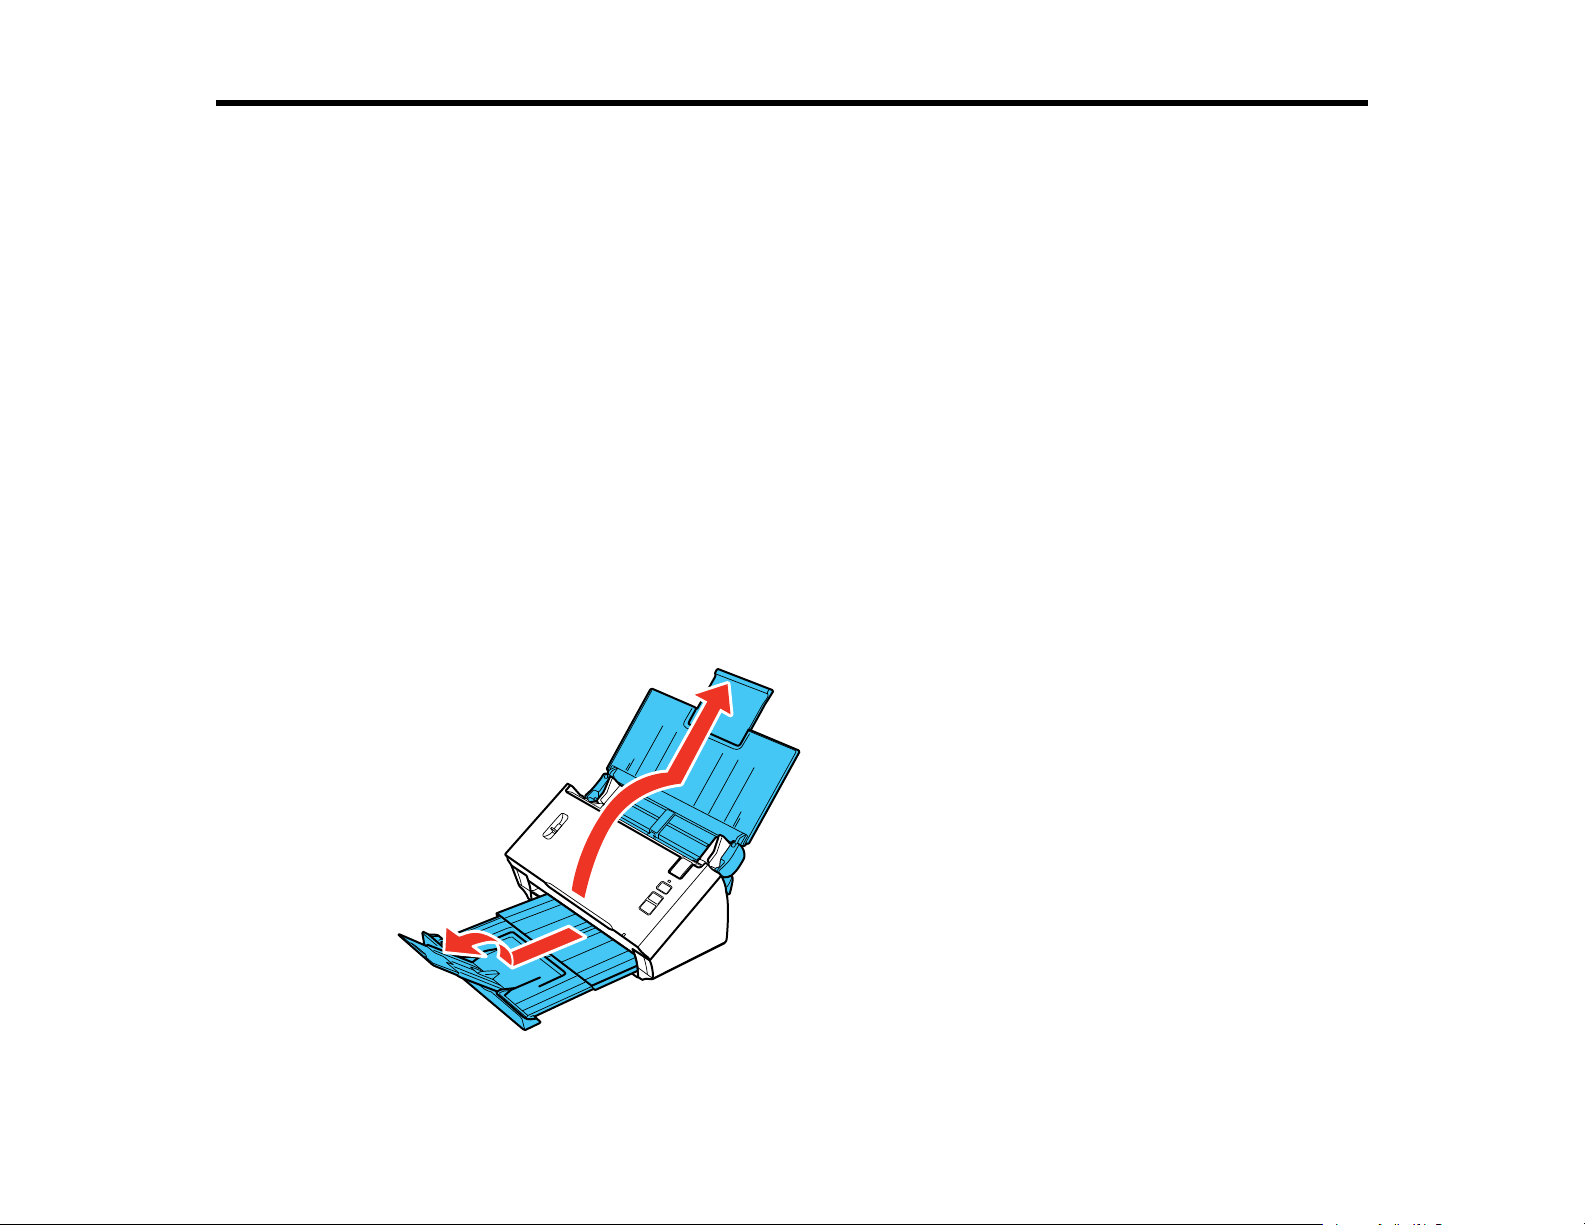
1. Open the input tray and pull up its extension.
2. Pull out the output tray and open its extension.
14
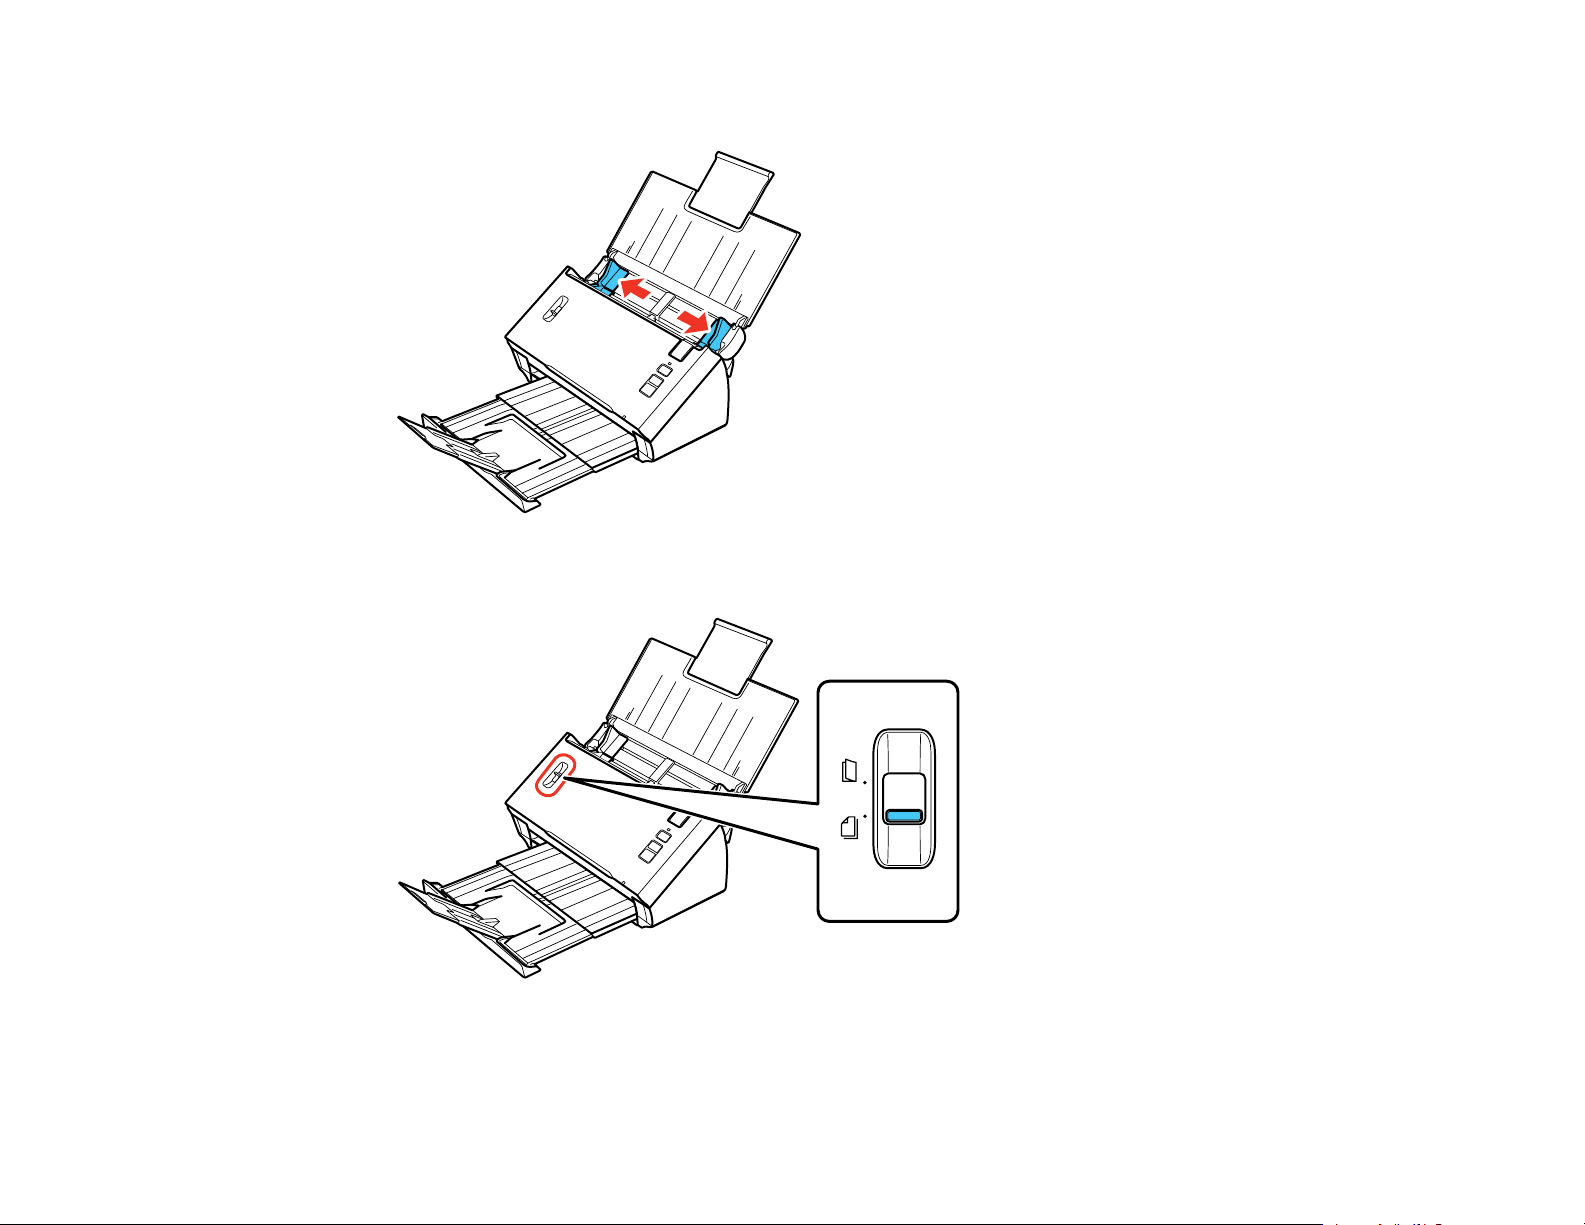
3. Slide the input tray edge guides all the way out.
4. Check to make sure that the page separation lever is in the position shown here.
Note: To prevent paper jams, keep the lever in this position for most types of documents.
15
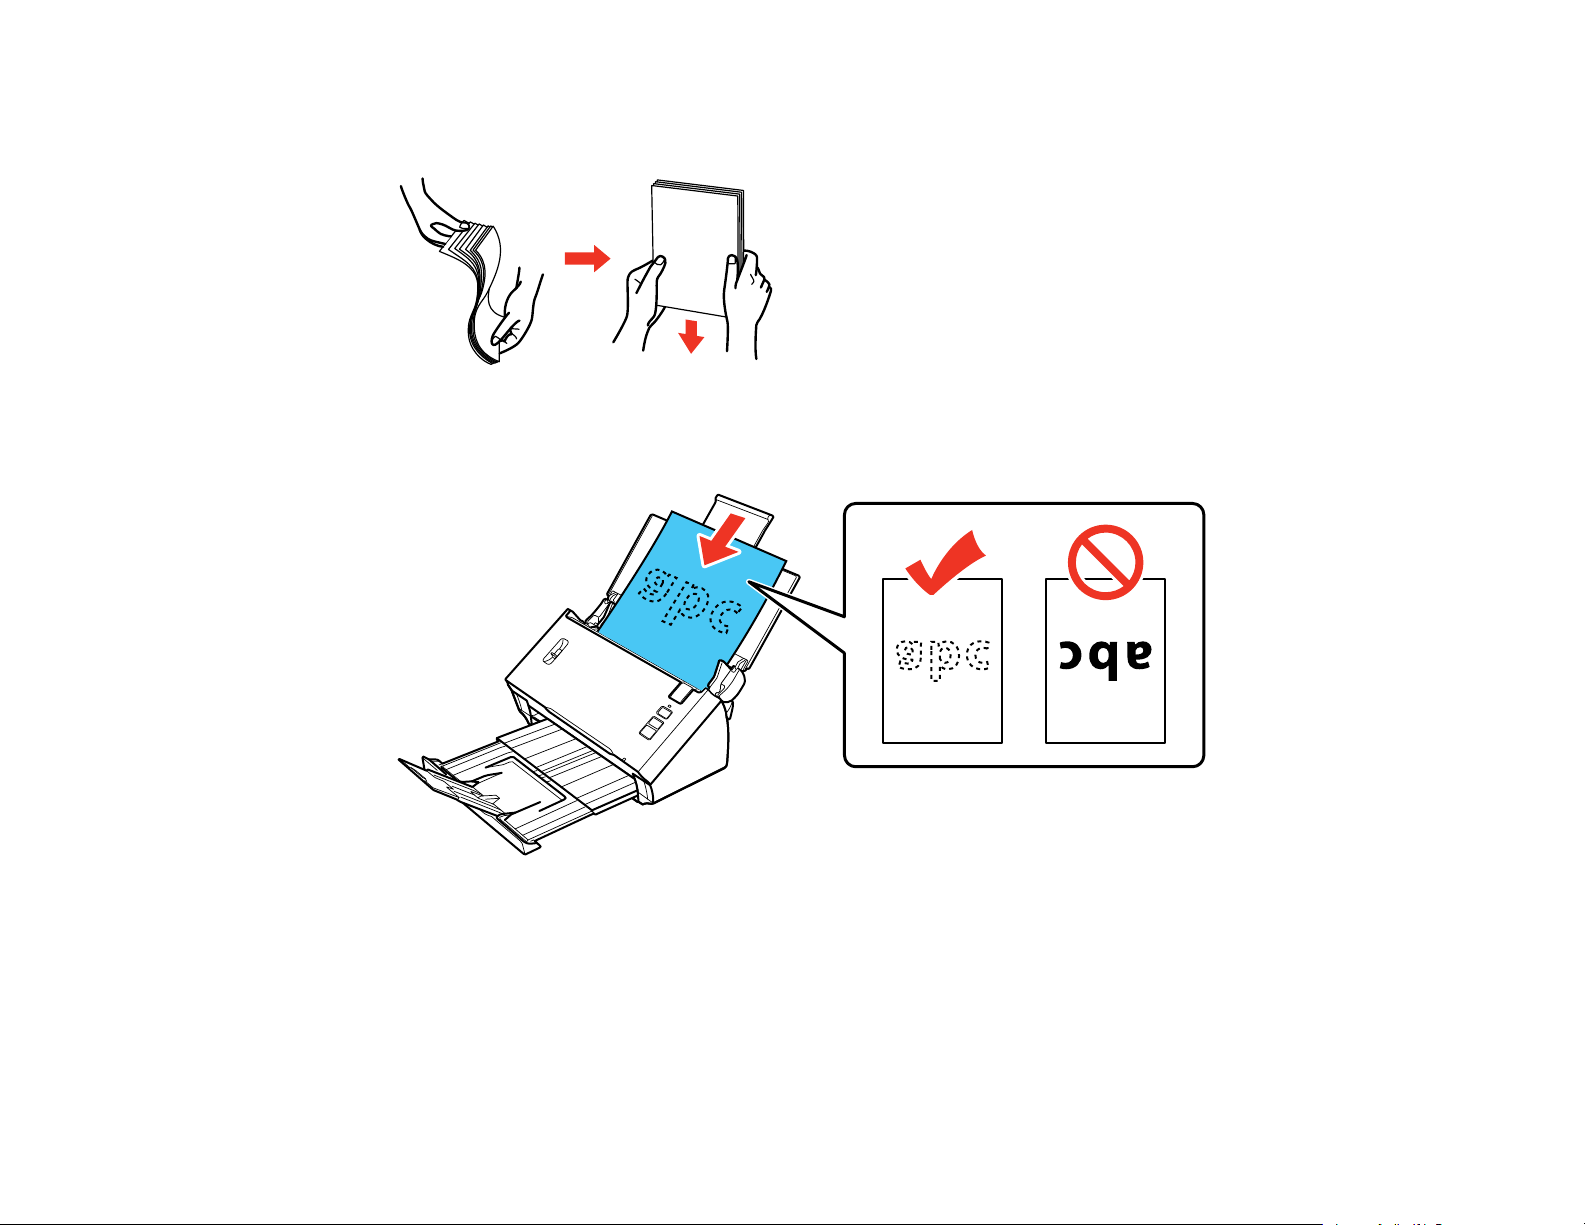
5. If you are loading a multi-page document, fan your stack of originals and tap them gently on a flat
surface to even the edges.
6. Slide your originals into the input tray as shown until they meet resistance. Make sure the printed
side is face down and top edge first.
Note: If you are loading a paper business card, load it horizontally.
16
7. Slide the edge guides against the edges of the original.
Original Document Loading Capacity
Parent topic: Placing Originals on the Scanner
Related references
Page Separation Lever
Related topics
Scanning
Original Document Loading Capacity
You can load original documents that meet these specifications in your scanner.
17

Paper size Paper weight Paper type Loading capacity
Letter (8.5 × 11 inches 13 to 35 lb (50 Plain paper 13 lb (50 g/m²): 70 sheets
[216 × 279 mm]) to 130 g/m²)
A4 (8.3 × 11.7 inches
[210 × 297 mm])
Legal (8.5 × 14 inches
[216 × 357 mm])
Fine paper 21 lb (80 g/m²): 50 sheets
Recycled paper 35 lb (130 g/m²): 30 sheets
Loading capacity may vary
depending on the paper type.
A5 (5.8 × 8.2 inches
[148 × 210 mm])
A6 (4.1 × 5.8 inches
[105 × 148 mm])
B5 (7.2 × 10.1 inches
[182 × 257 mm])
Business cards Up to 56 lb Paper business 15 cards loaded horizontally
(210 g/m²) cards
Note: You can load original documents of different sizes, up to this size: Letter (8.5 × 11 inches
[216 × 279 mm]). However, do not load different-sized large or thick originals, or valuable original
documents or artwork.
Caution: Do not load the following types of originals in the scanner, or they may be damaged or may
damage the scanner:
• Thermal paper
• Coated paper
• Originals with uneven surfaces, such as embossed documents
• Photos
• Originals with wet ink
• Ripped, curled, or wrinkled originals
• Originals containing staples or paper clips
• Originals with holes, other than standard hole-punched originals
• Originals that are bound
• Originals with carbon paper backing
18
• Transparencies
• Glossy originals
Parent topic: Loading Originals in the Input Tray
Loading Plastic Cards in the Input Tray
You can load plastic cards that meet the card specifications in the input tray.
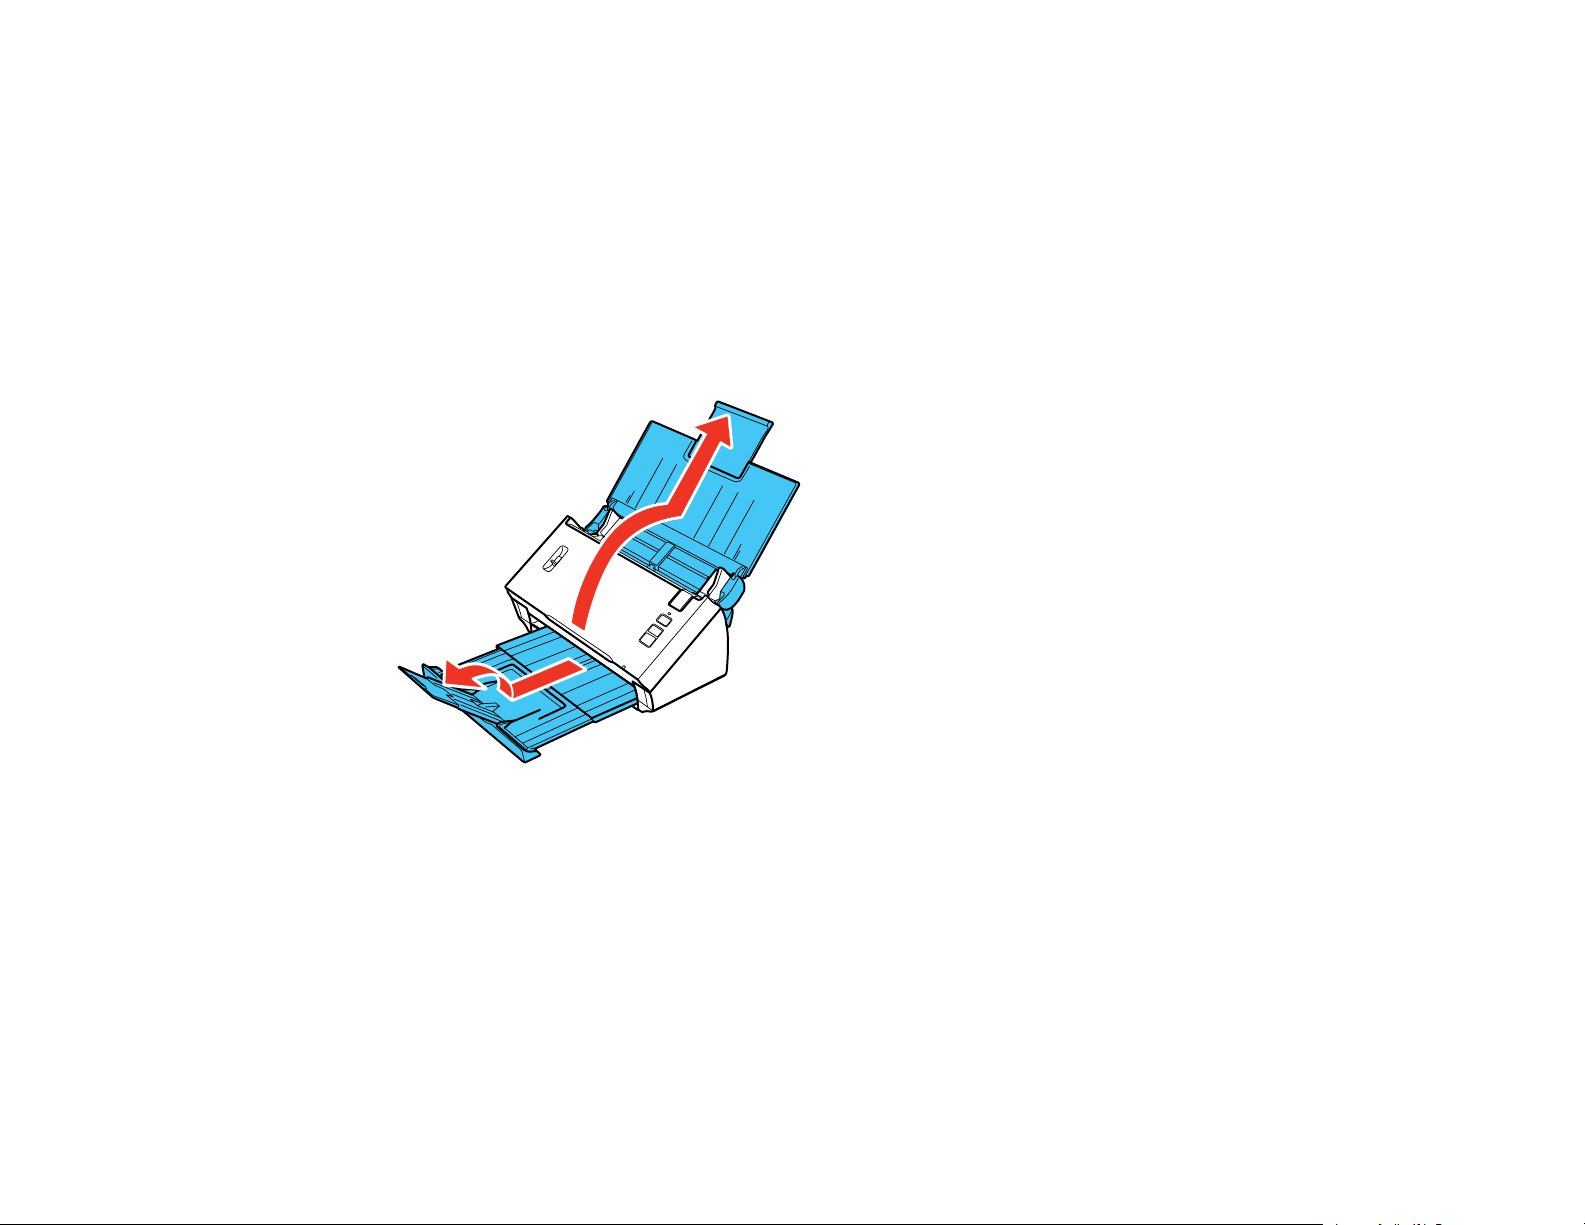
1. Open the input tray and pull up its extension.
2. Pull out the output tray and open its extension.
19
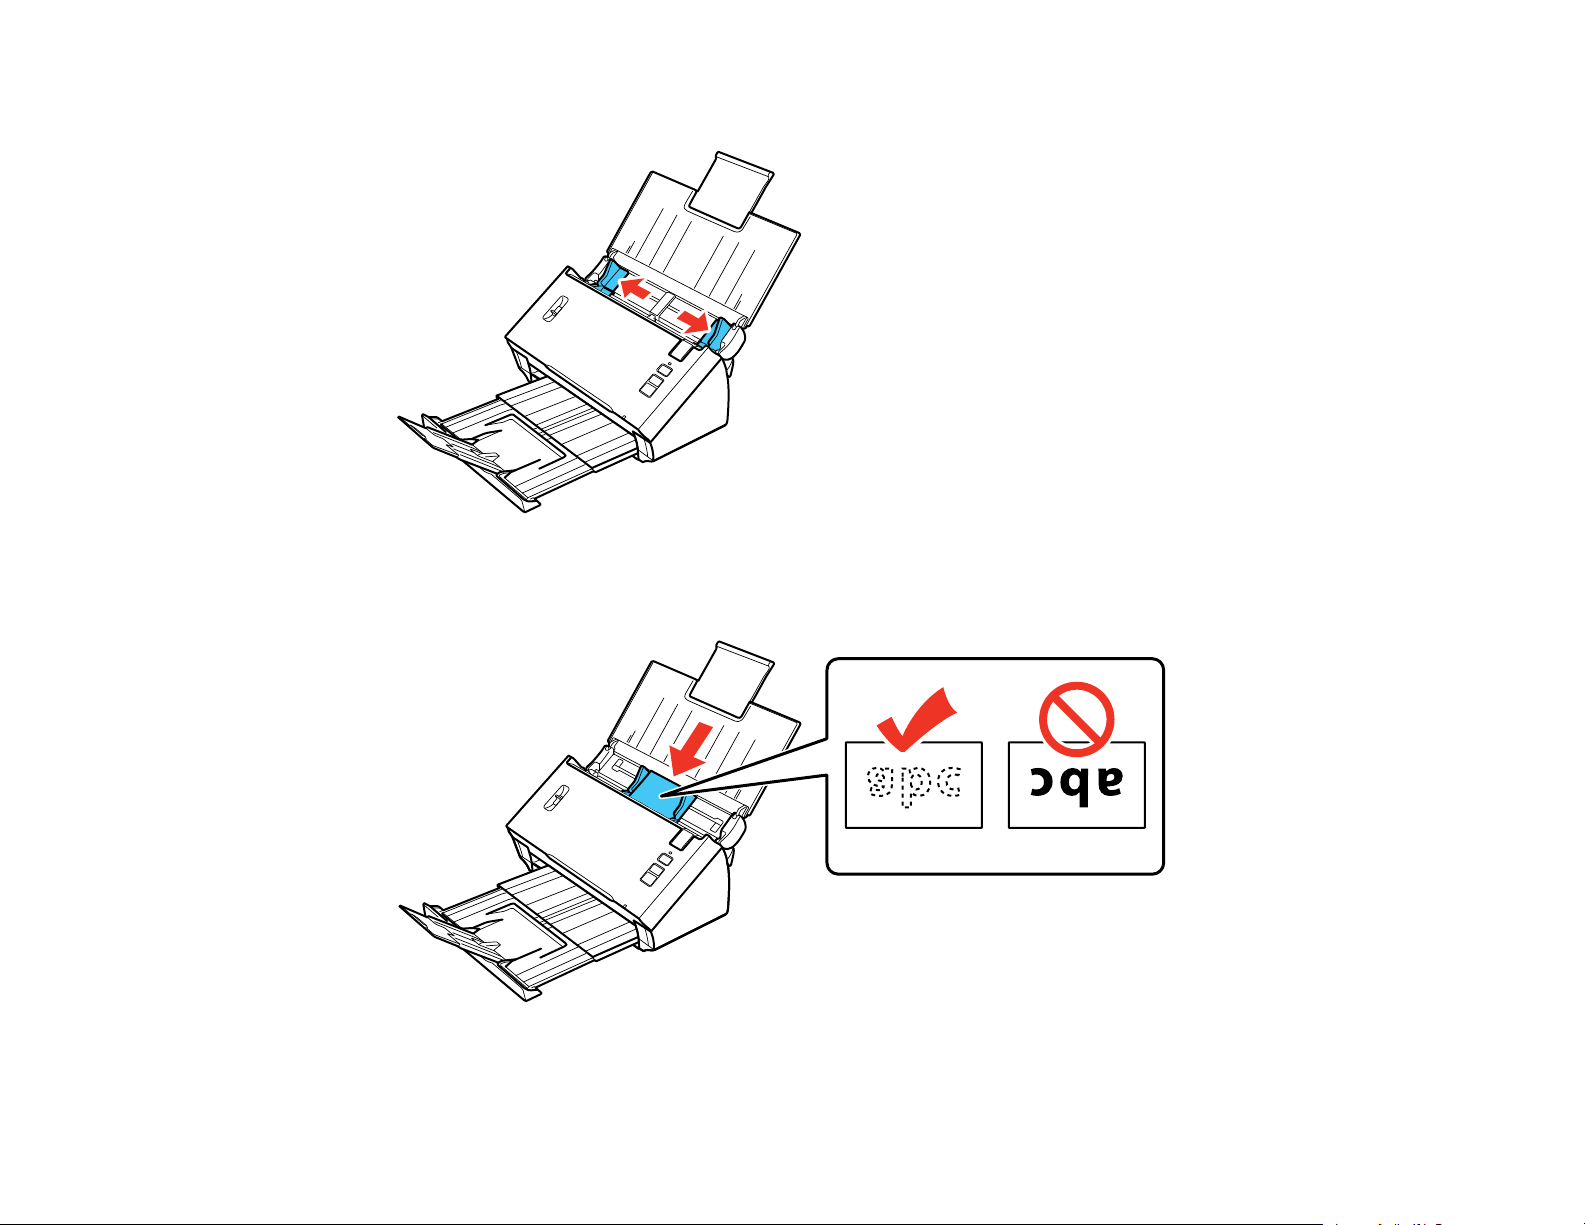
3. Slide the input tray edge guides all the way outward.
4. Load one plastic card horizontally in the input tray as shown, sliding it in until it meets resistance.
Make sure the printed side is facedown with the top edge first.
Note: Do not load a plastic card vertically.
20
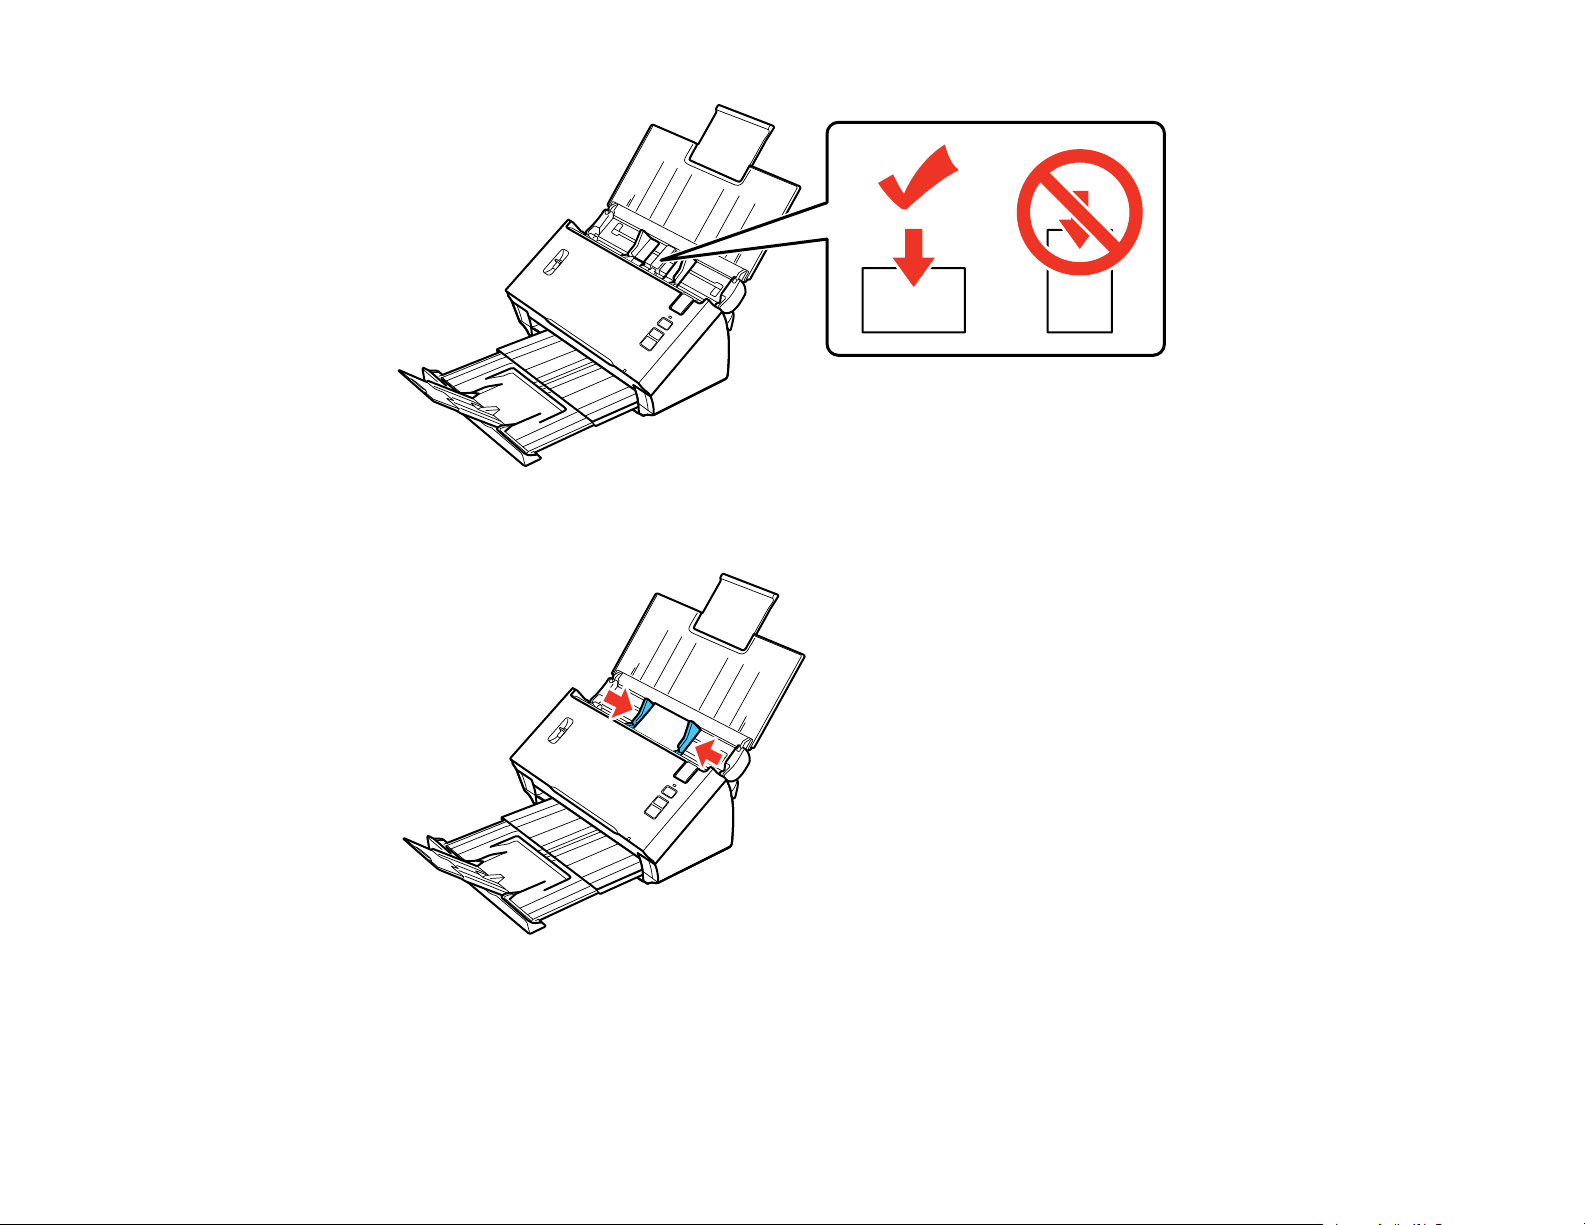
5. Slide the edge guides against the edges of the plastic card.
21
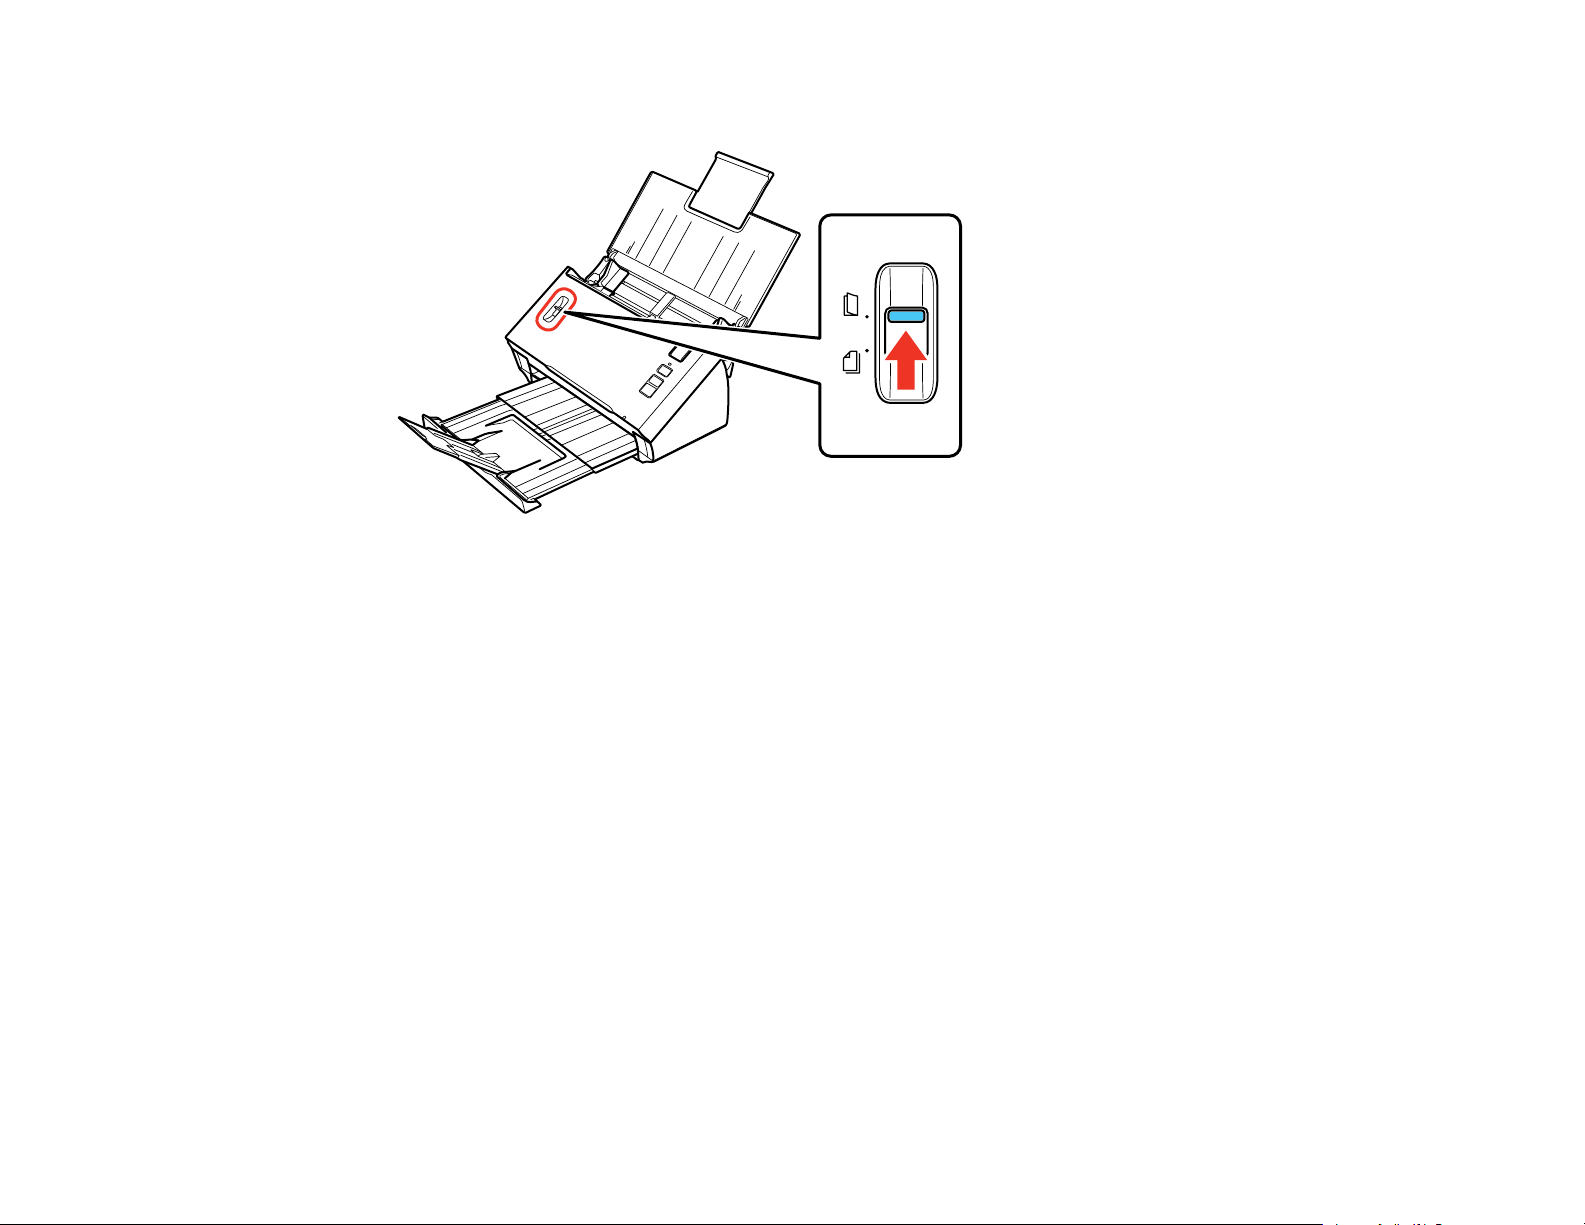
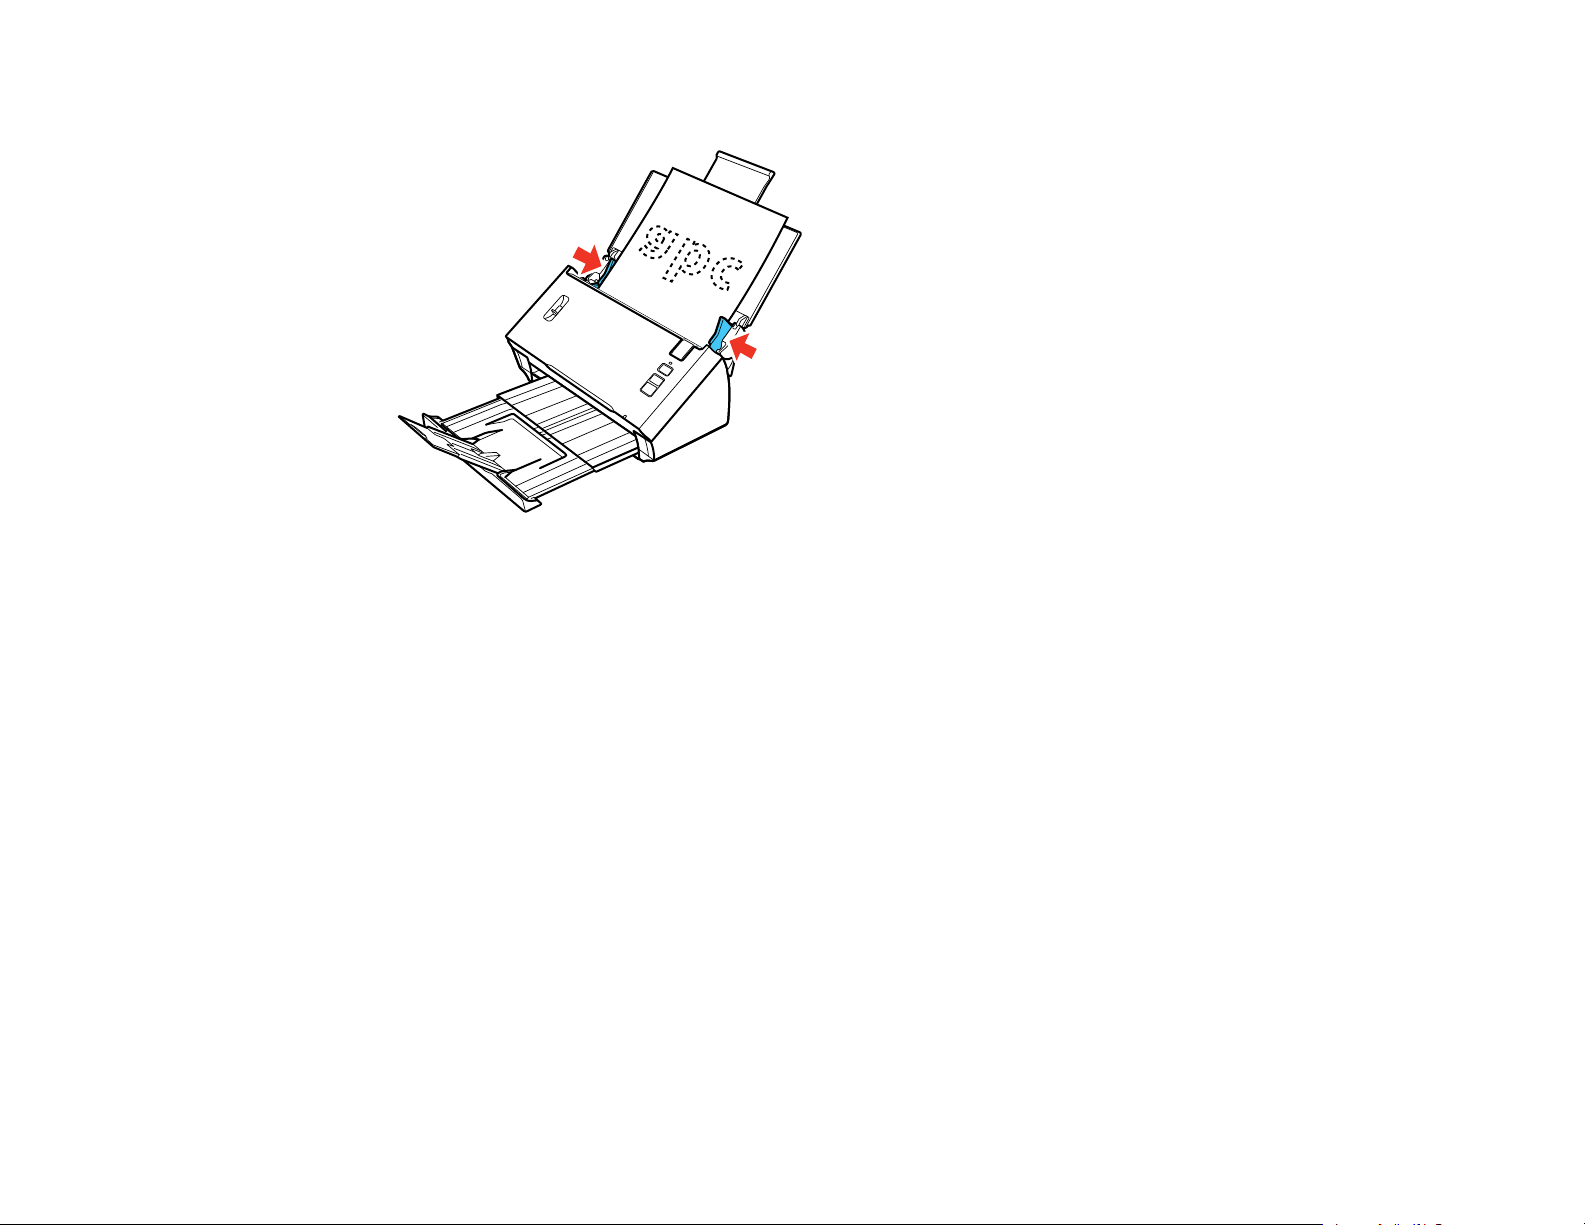
6. Set the page separation lever to the position shown here.
Note: To prevent paper jams, make sure to set the separation lever back to its original position when
scanning standard single- or multi-page documents.
Card Loading Capacity
Parent topic: Placing Originals on the Scanner
Related references
Page Separation Lever
Related topics
Scanning
Card Loading Capacity
You can load original cards that meet these specifications in your scanner.
Type Plastic cards, including embossed cards (ISO7810 compliant)
Size 2.1 × 3.3 inches (56 × 85.6 mm)
Thickness Up to 0.05 inch (1.24 mm) thick, including any embossing
Loading capacity 1 card at a time
22
Loading direction Horizontal
Note: Plastic cards with glossy surfaces may not scan properly.
Parent topic: Loading Plastic Cards in the Input Tray
Loading Special Documents
You can load a single envelope or large, thick, or folded original in the input tray. Make sure the original
meets the specifications for special originals before loading it.
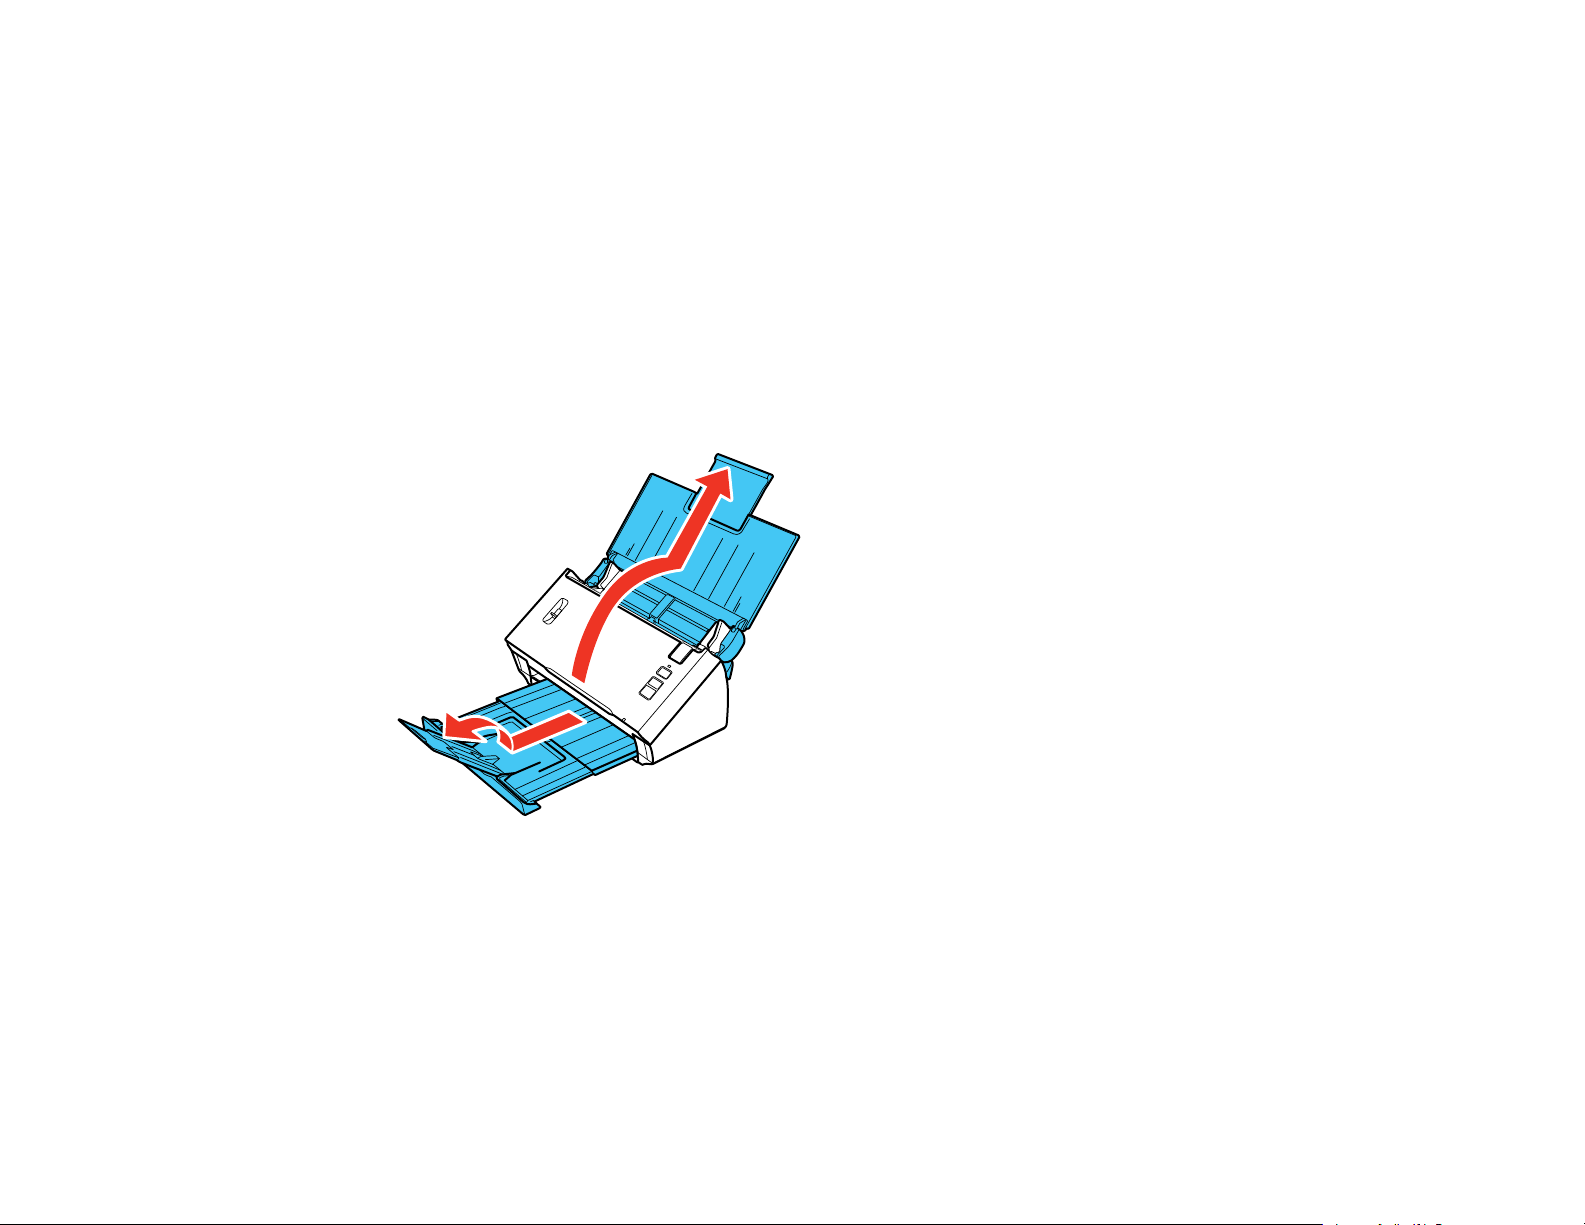
1. Open the input tray and pull up its extension.
2. Pull out the output tray and open its extension.
23
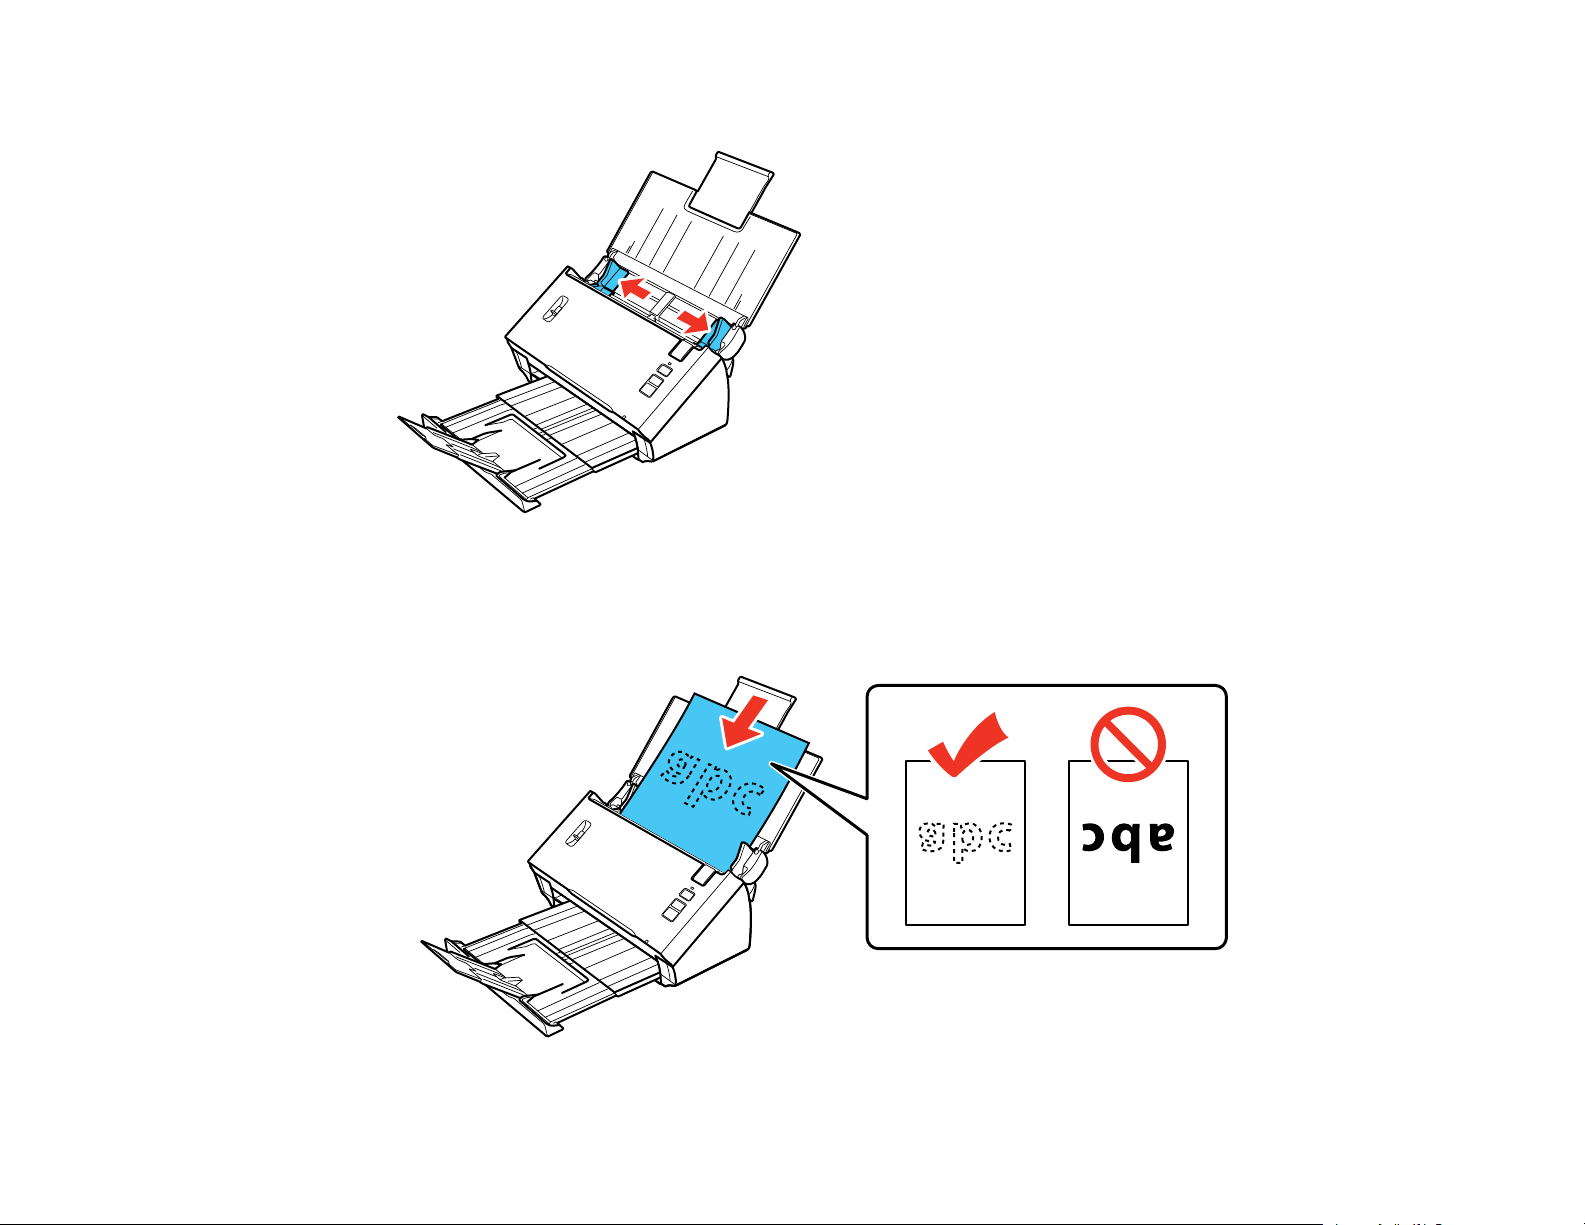
3. Slide the input tray edge guides all the way out.
4. Do one of the following to load your original:
• Load a large or thick original or an envelope in the input tray as shown. Make sure the printed side
is facedown with the top edge first.
24
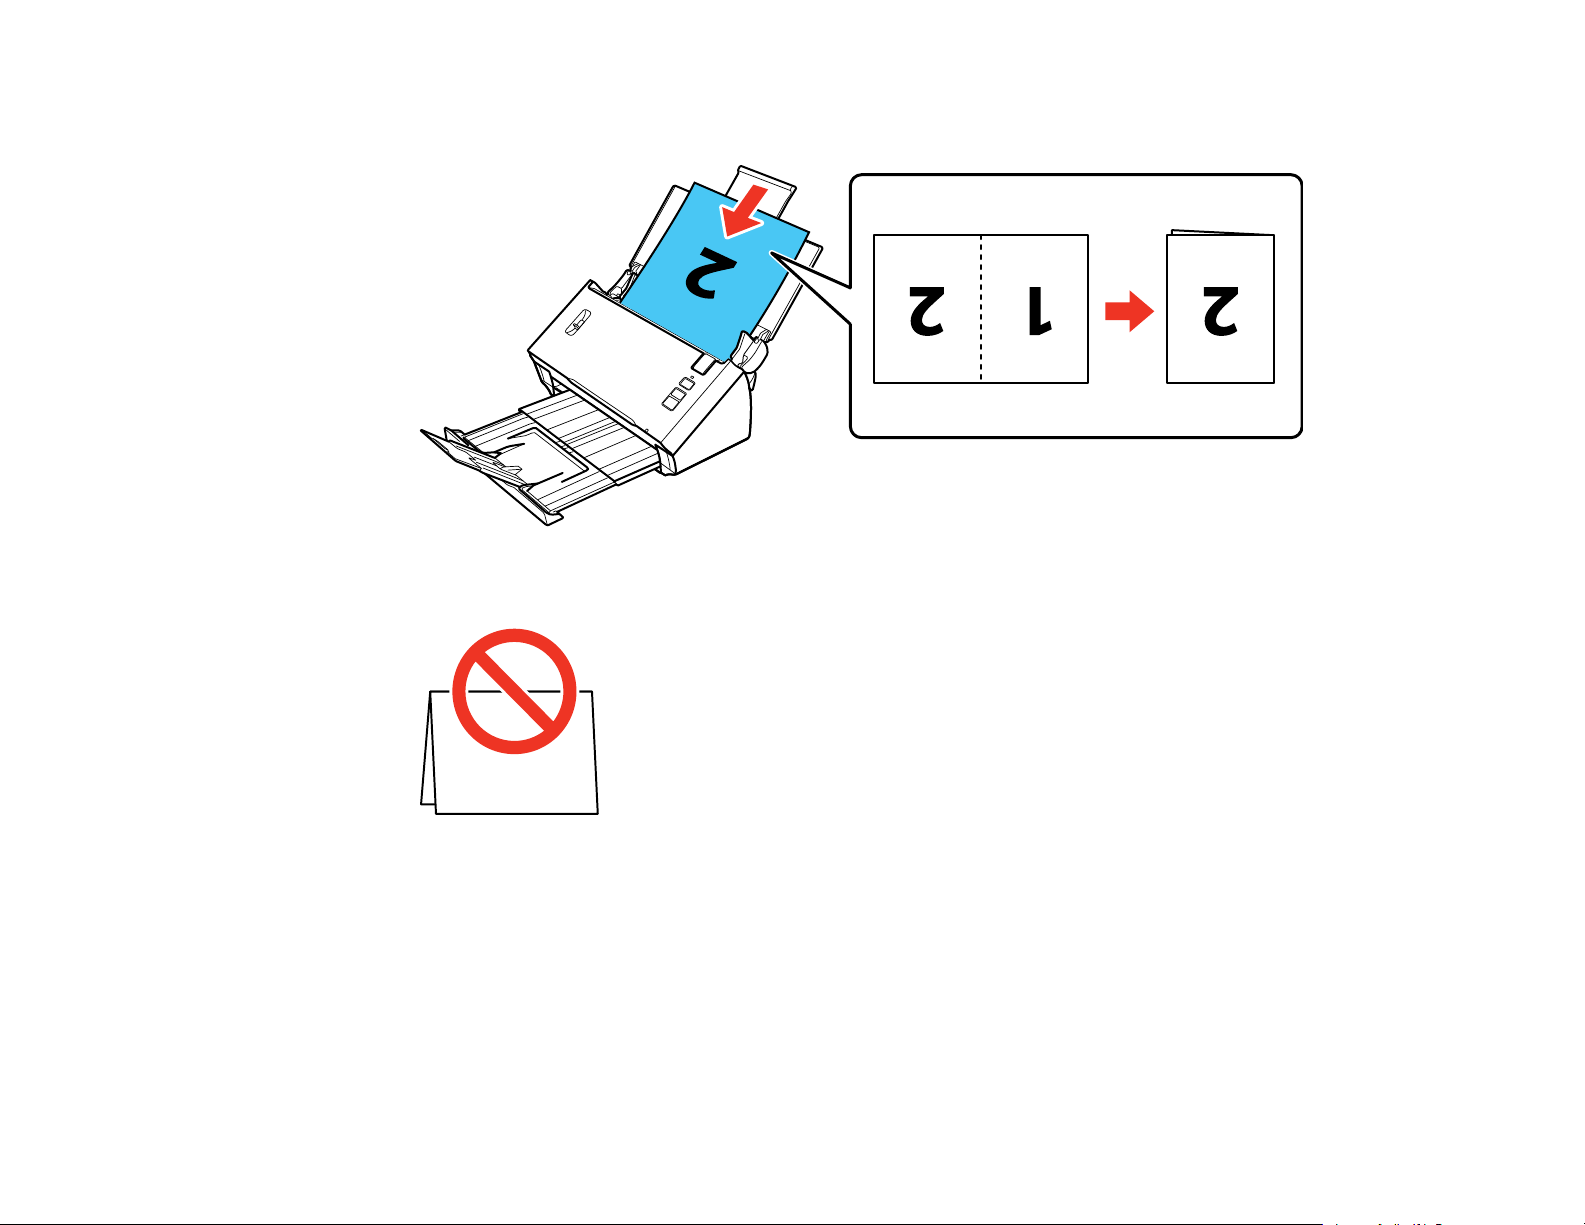
• For a folded original, fold and load the original as shown.
Caution: Do not load the document with the open side facing down.
• For a photo or an irregularly-shaped original, use an optional carrier sheet to load the document.
Do the following to load the document into the carrier sheet:
• If the original is smaller than the carrier sheet, insert it in the center of the sheet with the printed
side facedown and the top facing the arrow on the sheet.
25
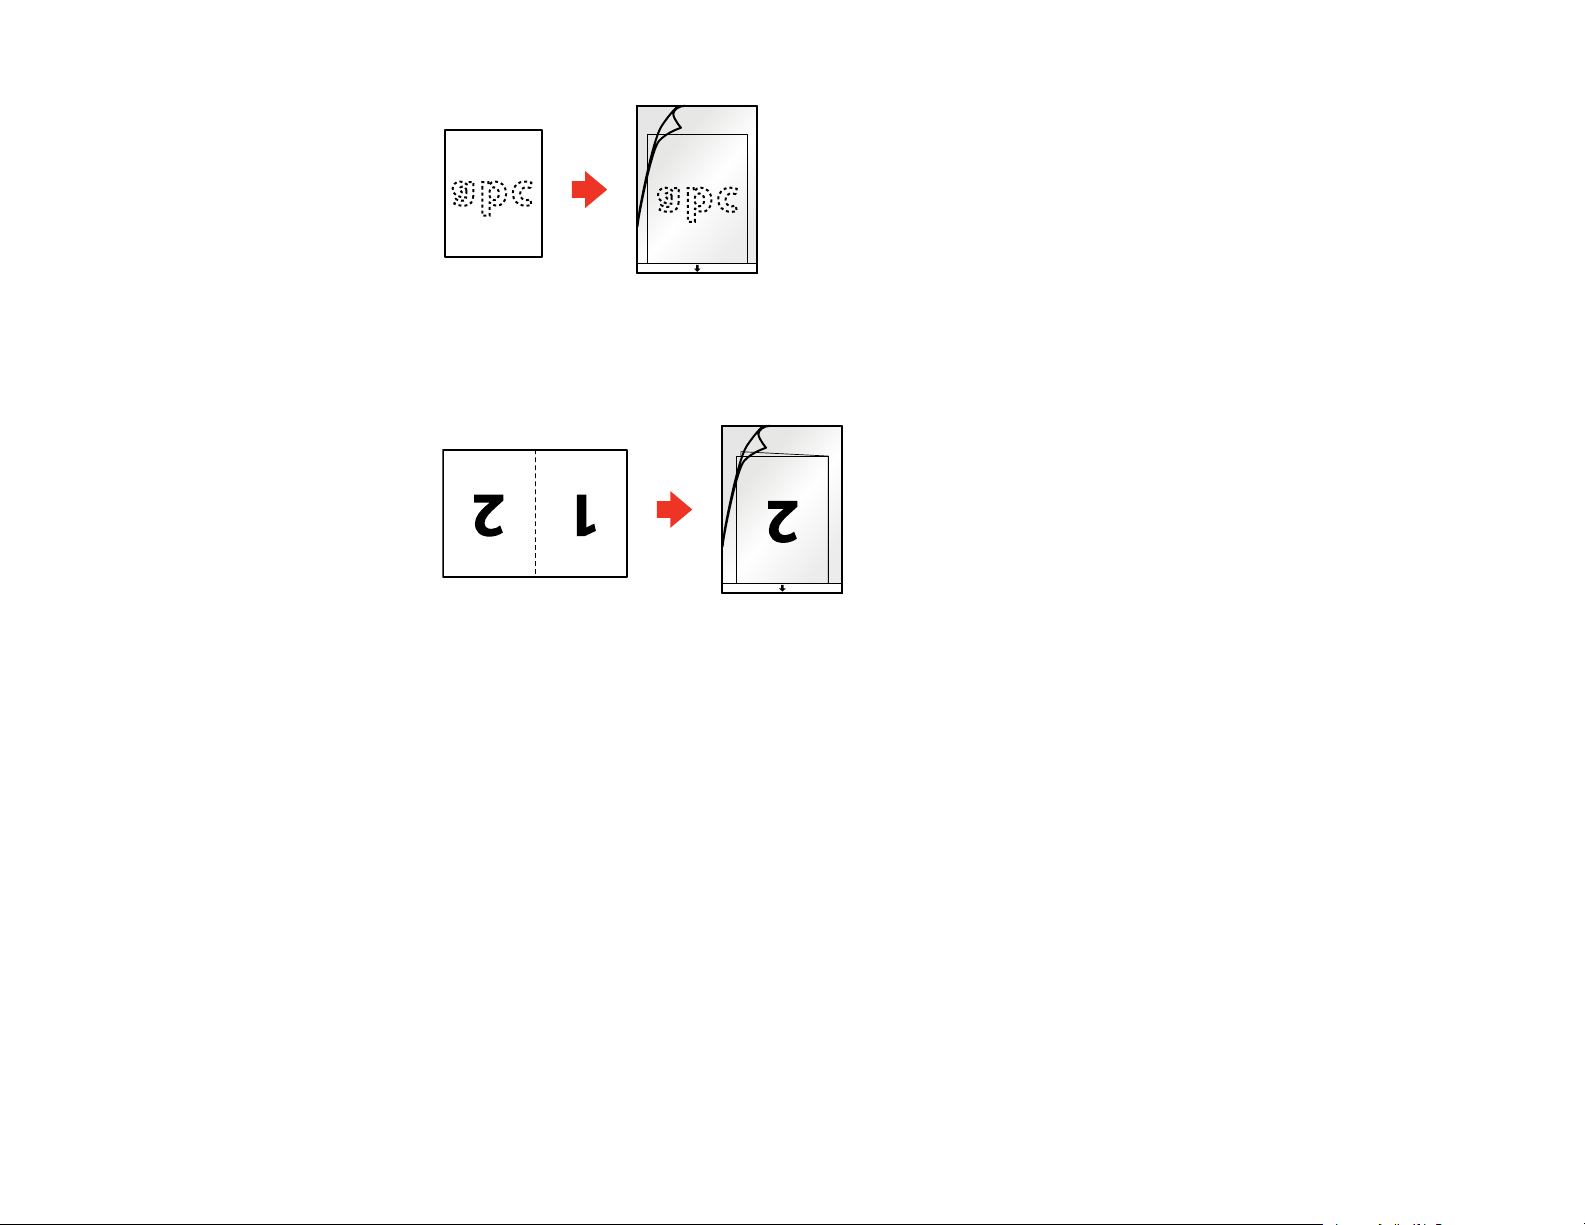
• If the original is larger than the carrier sheet, fold it in half with the sides to be scanned facing
out. Position the right side of the original at the front of the sheet with the top facing the arrow on
the sheet.
5. Slide the original into the scanner until it meets resistance.
26
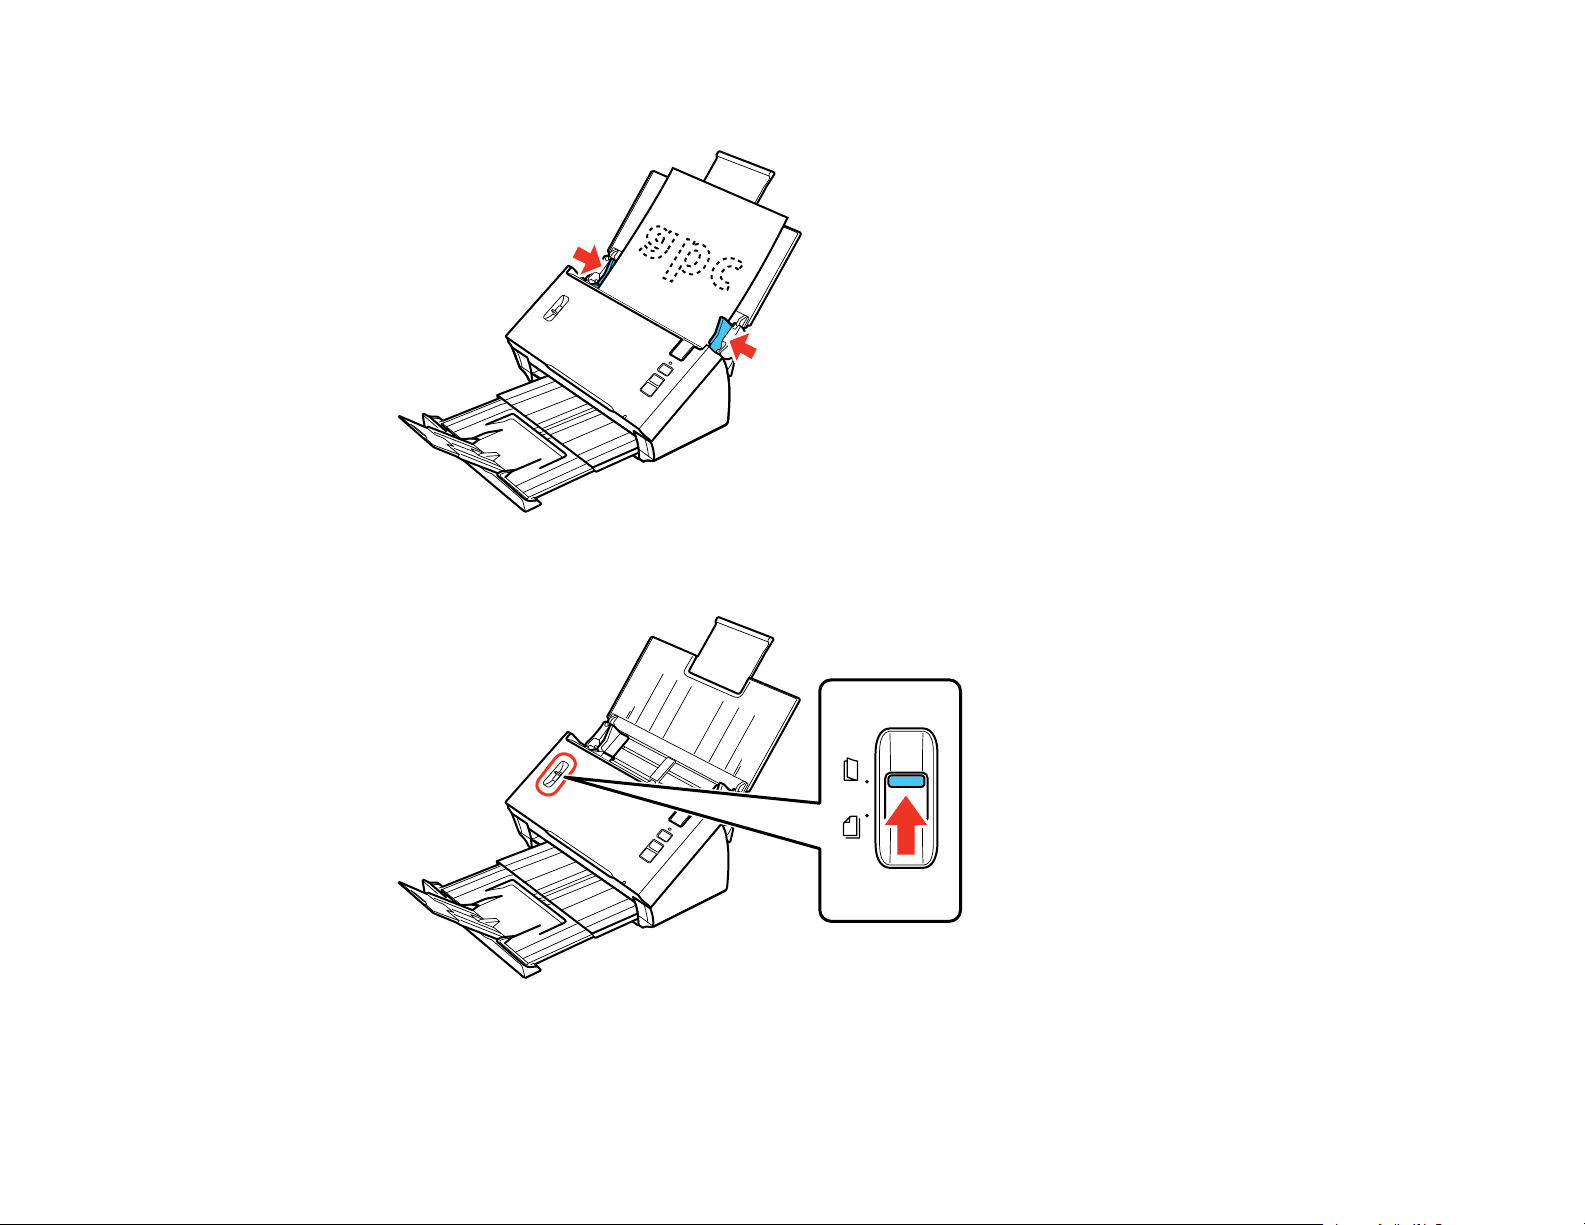
6. Slide the edge guides against the edges of the sheet.
7. Set the page separation lever to the position shown here.
Note: To prevent paper jams, make sure to set the separation lever back to its original position when
scanning standard single- or multi-page documents.
27
Loading...