

Page 1

B 6132 900.017-00/1107
BioPhotometer plus
Operating manual
Page 2

Copyright© 2007 Eppendorf AG, Hamburg. No part of this publication may be reproduced without the
prior permission of the copyright owner.
Trademarks
eppendorf and UVette are registered trademarks of Eppendorf AG, Hamburg, Germany.
Cy is a registered trademark of GE Healthcare UK Ltd., Buckinghamshire, UK.
Alexa Fluor is a registered trademark of Molecular Probes Inc., Eugene OR, USA.
LabelGuard is a trademark of Implen GmbH, München, Germany.
Registered trademarks are not marked in all cases with ™ or ® in this manual.
6132 900.017-02/032012
Page 3

345
Page 4

Page 5

Table of contents
BioPhotometer plus — Operating manual
Table of contents
1 User instructions . . . . . . . . . . . . . . . . . . . . . . . . . . . . . . . . . . . . . . . . . . . . . . . . . . . . . . . . . . . . . . . . . . . . . . . . . . . . 7
1.1 Using this manual . . . . . . . . . . . . . . . . . . . . . . . . . . . . . . . . . . . . . . . . . . . . . . . . . . . . . . . . . . . . . . . . . . . . . . . 7
1.2 Warning signs and hazard icons. . . . . . . . . . . . . . . . . . . . . . . . . . . . . . . . . . . . . . . . . . . . . . . . . . . . . . . . . . . . 7
1.3 Symbols used. . . . . . . . . . . . . . . . . . . . . . . . . . . . . . . . . . . . . . . . . . . . . . . . . . . . . . . . . . . . . . . . . . . . . . . . . . 7
1.4 Abbreviations used. . . . . . . . . . . . . . . . . . . . . . . . . . . . . . . . . . . . . . . . . . . . . . . . . . . . . . . . . . . . . . . . . . . . . . 7
2 Product description. . . . . . . . . . . . . . . . . . . . . . . . . . . . . . . . . . . . . . . . . . . . . . . . . . . . . . . . . . . . . . . . . . . . . . . . . . 8
2.1 Main illustration. . . . . . . . . . . . . . . . . . . . . . . . . . . . . . . . . . . . . . . . . . . . . . . . . . . . . . . . . . . . . . . . . . . . . . . . . 8
2.2 Delivery package . . . . . . . . . . . . . . . . . . . . . . . . . . . . . . . . . . . . . . . . . . . . . . . . . . . . . . . . . . . . . . . . . . . . . . . 8
2.3 Features . . . . . . . . . . . . . . . . . . . . . . . . . . . . . . . . . . . . . . . . . . . . . . . . . . . . . . . . . . . . . . . . . . . . . . . . . . . . . . 8
3 Safety . . . . . . . . . . . . . . . . . . . . . . . . . . . . . . . . . . . . . . . . . . . . . . . . . . . . . . . . . . . . . . . . . . . . . . . . . . . . . . . . . . . . 10
3.1 Intended use. . . . . . . . . . . . . . . . . . . . . . . . . . . . . . . . . . . . . . . . . . . . . . . . . . . . . . . . . . . . . . . . . . . . . . . . . . 10
3.2 Warnings for intended use . . . . . . . . . . . . . . . . . . . . . . . . . . . . . . . . . . . . . . . . . . . . . . . . . . . . . . . . . . . . . . . 10
3.3 Application limits. . . . . . . . . . . . . . . . . . . . . . . . . . . . . . . . . . . . . . . . . . . . . . . . . . . . . . . . . . . . . . . . . . . . . . . 12
3.4 Note on product liability . . . . . . . . . . . . . . . . . . . . . . . . . . . . . . . . . . . . . . . . . . . . . . . . . . . . . . . . . . . . . . . . . 12
4 Installation . . . . . . . . . . . . . . . . . . . . . . . . . . . . . . . . . . . . . . . . . . . . . . . . . . . . . . . . . . . . . . . . . . . . . . . . . . . . . . . . 13
4.1 Preparing installation . . . . . . . . . . . . . . . . . . . . . . . . . . . . . . . . . . . . . . . . . . . . . . . . . . . . . . . . . . . . . . . . . . . 13
4.2 Selecting location . . . . . . . . . . . . . . . . . . . . . . . . . . . . . . . . . . . . . . . . . . . . . . . . . . . . . . . . . . . . . . . . . . . . . . 13
4.3 Connect device to the main power supply . . . . . . . . . . . . . . . . . . . . . . . . . . . . . . . . . . . . . . . . . . . . . . . . . . . 13
4.4 Cuvettes . . . . . . . . . . . . . . . . . . . . . . . . . . . . . . . . . . . . . . . . . . . . . . . . . . . . . . . . . . . . . . . . . . . . . . . . . . . . . 13
4.5 Connect printer. . . . . . . . . . . . . . . . . . . . . . . . . . . . . . . . . . . . . . . . . . . . . . . . . . . . . . . . . . . . . . . . . . . . . . . . 14
Operating manual
EN
Operating manual
5 Operation . . . . . . . . . . . . . . . . . . . . . . . . . . . . . . . . . . . . . . . . . . . . . . . . . . . . . . . . . . . . . . . . . . . . . . . . . . . . . . . . . 15
5.1 Overview of operating controls. . . . . . . . . . . . . . . . . . . . . . . . . . . . . . . . . . . . . . . . . . . . . . . . . . . . . . . . . . . . 15
5.2 Methods . . . . . . . . . . . . . . . . . . . . . . . . . . . . . . . . . . . . . . . . . . . . . . . . . . . . . . . . . . . . . . . . . . . . . . . . . . . . . 16
5.3 Summary of the measuring procedure . . . . . . . . . . . . . . . . . . . . . . . . . . . . . . . . . . . . . . . . . . . . . . . . . . . . . . 17
5.3.1 Prepare measurement . . . . . . . . . . . . . . . . . . . . . . . . . . . . . . . . . . . . . . . . . . . . . . . . . . . . . . . . . . . 17
5.3.2 Select the method. . . . . . . . . . . . . . . . . . . . . . . . . . . . . . . . . . . . . . . . . . . . . . . . . . . . . . . . . . . . . . . 17
5.3.3 Measure . . . . . . . . . . . . . . . . . . . . . . . . . . . . . . . . . . . . . . . . . . . . . . . . . . . . . . . . . . . . . . . . . . . . . . 18
5.3.4 Finalize the method. . . . . . . . . . . . . . . . . . . . . . . . . . . . . . . . . . . . . . . . . . . . . . . . . . . . . . . . . . . . . . 19
5.4 Nucleic acids . . . . . . . . . . . . . . . . . . . . . . . . . . . . . . . . . . . . . . . . . . . . . . . . . . . . . . . . . . . . . . . . . . . . . . . . . 19
5.5 Proteins. . . . . . . . . . . . . . . . . . . . . . . . . . . . . . . . . . . . . . . . . . . . . . . . . . . . . . . . . . . . . . . . . . . . . . . . . . . . . . 20
5.5.1 Protein 280 nm . . . . . . . . . . . . . . . . . . . . . . . . . . . . . . . . . . . . . . . . . . . . . . . . . . . . . . . . . . . . . . . . . 20
5.5.2 Protein after adding reagent (Bradford, BCA, Lowry) . . . . . . . . . . . . . . . . . . . . . . . . . . . . . . . . . . . . 20
5.6 Methods with evaluation via standards. . . . . . . . . . . . . . . . . . . . . . . . . . . . . . . . . . . . . . . . . . . . . . . . . . . . . . 21
5.7 OD 600 . . . . . . . . . . . . . . . . . . . . . . . . . . . . . . . . . . . . . . . . . . . . . . . . . . . . . . . . . . . . . . . . . . . . . . . . . . . . . . 22
5.8 Dye-labeled biomolecules ("dye methods") . . . . . . . . . . . . . . . . . . . . . . . . . . . . . . . . . . . . . . . . . . . . . . . . . . 22
5.8.1 Method group "dye 550" . . . . . . . . . . . . . . . . . . . . . . . . . . . . . . . . . . . . . . . . . . . . . . . . . . . . . . . . . . 22
5.8.2 Method group "dye 650" . . . . . . . . . . . . . . . . . . . . . . . . . . . . . . . . . . . . . . . . . . . . . . . . . . . . . . . . . . 22
5.8.3 Frequency of incorporation "FOI" . . . . . . . . . . . . . . . . . . . . . . . . . . . . . . . . . . . . . . . . . . . . . . . . . . . 23
5.8.4 Correction factors . . . . . . . . . . . . . . . . . . . . . . . . . . . . . . . . . . . . . . . . . . . . . . . . . . . . . . . . . . . . . . . 23
5.8.5 Measuring procedure and result display . . . . . . . . . . . . . . . . . . . . . . . . . . . . . . . . . . . . . . . . . . . . . . 23
5.9 Methods for 340, 405 and 490 nm . . . . . . . . . . . . . . . . . . . . . . . . . . . . . . . . . . . . . . . . . . . . . . . . . . . . . . . . . 24
5.10 Dilution . . . . . . . . . . . . . . . . . . . . . . . . . . . . . . . . . . . . . . . . . . . . . . . . . . . . . . . . . . . . . . . . . . . . . . . . . . . . . . 24
5.11 Sample number . . . . . . . . . . . . . . . . . . . . . . . . . . . . . . . . . . . . . . . . . . . . . . . . . . . . . . . . . . . . . . . . . . . . . . . 25
6 Parameter and functions. . . . . . . . . . . . . . . . . . . . . . . . . . . . . . . . . . . . . . . . . . . . . . . . . . . . . . . . . . . . . . . . . . . . . 26
6.1 Parameter. . . . . . . . . . . . . . . . . . . . . . . . . . . . . . . . . . . . . . . . . . . . . . . . . . . . . . . . . . . . . . . . . . . . . . . . . . . . 26
6.1.1 View, change and store the parameters of a method . . . . . . . . . . . . . . . . . . . . . . . . . . . . . . . . . . . . 26
6.1.2 Summary and description of parameters . . . . . . . . . . . . . . . . . . . . . . . . . . . . . . . . . . . . . . . . . . . . . 26
6.1.3 Parameters preprogrammed ex factory. . . . . . . . . . . . . . . . . . . . . . . . . . . . . . . . . . . . . . . . . . . . . . . 28
6.2 Functions . . . . . . . . . . . . . . . . . . . . . . . . . . . . . . . . . . . . . . . . . . . . . . . . . . . . . . . . . . . . . . . . . . . . . . . . . . . . 31
Page 6

EN
Operating manual
BioPhotometer plus — Operating manual
Table of contents
7 Maintenance . . . . . . . . . . . . . . . . . . . . . . . . . . . . . . . . . . . . . . . . . . . . . . . . . . . . . . . . . . . . . . . . . . . . . . . . . . . . . . . 32
7.1 Cleaning . . . . . . . . . . . . . . . . . . . . . . . . . . . . . . . . . . . . . . . . . . . . . . . . . . . . . . . . . . . . . . . . . . . . . . . . . . . . . 32
7.1.1 Cleaning the cuvette shaft cover. . . . . . . . . . . . . . . . . . . . . . . . . . . . . . . . . . . . . . . . . . . . . . . . . . . . 32
7.2 Disinfection / Decontamination . . . . . . . . . . . . . . . . . . . . . . . . . . . . . . . . . . . . . . . . . . . . . . . . . . . . . . . . . . . . 33
7.3 Decontaminating before shipping . . . . . . . . . . . . . . . . . . . . . . . . . . . . . . . . . . . . . . . . . . . . . . . . . . . . . . . . . . 33
7.4 Replacing fuses . . . . . . . . . . . . . . . . . . . . . . . . . . . . . . . . . . . . . . . . . . . . . . . . . . . . . . . . . . . . . . . . . . . . . . . 33
7.5 Check photometer . . . . . . . . . . . . . . . . . . . . . . . . . . . . . . . . . . . . . . . . . . . . . . . . . . . . . . . . . . . . . . . . . . . . . 34
7.5.1 Test procedure . . . . . . . . . . . . . . . . . . . . . . . . . . . . . . . . . . . . . . . . . . . . . . . . . . . . . . . . . . . . . . . . . 35
8 Troubleshooting. . . . . . . . . . . . . . . . . . . . . . . . . . . . . . . . . . . . . . . . . . . . . . . . . . . . . . . . . . . . . . . . . . . . . . . . . . . . 36
8.1 Result flags. . . . . . . . . . . . . . . . . . . . . . . . . . . . . . . . . . . . . . . . . . . . . . . . . . . . . . . . . . . . . . . . . . . . . . . . . . . 36
8.2 Error messages . . . . . . . . . . . . . . . . . . . . . . . . . . . . . . . . . . . . . . . . . . . . . . . . . . . . . . . . . . . . . . . . . . . . . . . 37
8.3 General errors . . . . . . . . . . . . . . . . . . . . . . . . . . . . . . . . . . . . . . . . . . . . . . . . . . . . . . . . . . . . . . . . . . . . . . . . 38
9 Transport, storage and disposal . . . . . . . . . . . . . . . . . . . . . . . . . . . . . . . . . . . . . . . . . . . . . . . . . . . . . . . . . . . . . . 39
9.1 Transport . . . . . . . . . . . . . . . . . . . . . . . . . . . . . . . . . . . . . . . . . . . . . . . . . . . . . . . . . . . . . . . . . . . . . . . . . . . . 39
9.2 Storage. . . . . . . . . . . . . . . . . . . . . . . . . . . . . . . . . . . . . . . . . . . . . . . . . . . . . . . . . . . . . . . . . . . . . . . . . . . . . . 39
9.3 Disposal . . . . . . . . . . . . . . . . . . . . . . . . . . . . . . . . . . . . . . . . . . . . . . . . . . . . . . . . . . . . . . . . . . . . . . . . . . . . . 39
10 Technical data . . . . . . . . . . . . . . . . . . . . . . . . . . . . . . . . . . . . . . . . . . . . . . . . . . . . . . . . . . . . . . . . . . . . . . . . . . . . . 40
10.1 Power supply . . . . . . . . . . . . . . . . . . . . . . . . . . . . . . . . . . . . . . . . . . . . . . . . . . . . . . . . . . . . . . . . . . . . . . . . . 40
10.2 Ambient conditions . . . . . . . . . . . . . . . . . . . . . . . . . . . . . . . . . . . . . . . . . . . . . . . . . . . . . . . . . . . . . . . . . . . . . 40
10.3 Weight / dimensions . . . . . . . . . . . . . . . . . . . . . . . . . . . . . . . . . . . . . . . . . . . . . . . . . . . . . . . . . . . . . . . . . . . . 40
10.4 Interfaces . . . . . . . . . . . . . . . . . . . . . . . . . . . . . . . . . . . . . . . . . . . . . . . . . . . . . . . . . . . . . . . . . . . . . . . . . . . . 40
10.5 Photometer. . . . . . . . . . . . . . . . . . . . . . . . . . . . . . . . . . . . . . . . . . . . . . . . . . . . . . . . . . . . . . . . . . . . . . . . . . . 41
10.6 Other technical parameters . . . . . . . . . . . . . . . . . . . . . . . . . . . . . . . . . . . . . . . . . . . . . . . . . . . . . . . . . . . . . . 41
10.7 Application parameters. . . . . . . . . . . . . . . . . . . . . . . . . . . . . . . . . . . . . . . . . . . . . . . . . . . . . . . . . . . . . . . . . . 42
11 Evaluation procedure . . . . . . . . . . . . . . . . . . . . . . . . . . . . . . . . . . . . . . . . . . . . . . . . . . . . . . . . . . . . . . . . . . . . . . . 43
11.1 Evaluation with factor . . . . . . . . . . . . . . . . . . . . . . . . . . . . . . . . . . . . . . . . . . . . . . . . . . . . . . . . . . . . . . . . . . . 43
11.2 Evaluation using standards. . . . . . . . . . . . . . . . . . . . . . . . . . . . . . . . . . . . . . . . . . . . . . . . . . . . . . . . . . . . . . . 43
11.2.1 Single point calibration . . . . . . . . . . . . . . . . . . . . . . . . . . . . . . . . . . . . . . . . . . . . . . . . . . . . . . . . . . . 43
11.2.2 Multi-point calibration: calibration line . . . . . . . . . . . . . . . . . . . . . . . . . . . . . . . . . . . . . . . . . . . . . . . . 44
11.2.3 Multi-point calibration: Calibration curve . . . . . . . . . . . . . . . . . . . . . . . . . . . . . . . . . . . . . . . . . . . . . . 44
11.3 Dilution . . . . . . . . . . . . . . . . . . . . . . . . . . . . . . . . . . . . . . . . . . . . . . . . . . . . . . . . . . . . . . . . . . . . . . . . . . . . . . 44
11.4 Special evaluation procedures for the dye methods . . . . . . . . . . . . . . . . . . . . . . . . . . . . . . . . . . . . . . . . . . . . 45
11.4.1 Calculating the factor for the dye from the absorbance coefficient . . . . . . . . . . . . . . . . . . . . . . . . . . 45
11.4.2 Calculation of the FOI . . . . . . . . . . . . . . . . . . . . . . . . . . . . . . . . . . . . . . . . . . . . . . . . . . . . . . . . . . . . 45
11.5 Special evaluation procedures for nucleic acids and protein UV . . . . . . . . . . . . . . . . . . . . . . . . . . . . . . . . . . 46
11.5.1 Correction A
11.5.2 Correction A
11.5.3 Conversion into molar concentrations and nucleic acid amounts . . . . . . . . . . . . . . . . . . . . . . . . . . . 46
12 Ordering information. . . . . . . . . . . . . . . . . . . . . . . . . . . . . . . . . . . . . . . . . . . . . . . . . . . . . . . . . . . . . . . . . . . . . . . . 48
. . . . . . . . . . . . . . . . . . . . . . . . . . . . . . . . . . . . . . . . . . . . . . . . . . . . . . . . . . . . . . . . . 46
340
. . . . . . . . . . . . . . . . . . . . . . . . . . . . . . . . . . . . . . . . . . . . . . . . . . . . . . . . . . . . . . 46
550/650
6
Page 7
BioPhotometer plus — Operating manual
1 User instructions
1 User instructions
1.1 Using this manual
Before using the device for the first time, please read this operating manual.
Please view this operating manual as part of the product and keep it somewhere easily
accessible.
If this manual is lost, please request another one. The current version can be found on our
website, www.eppendorf.com (International) or www.eppendorfna.com (North America).
1.2 Warning signs and hazard icons
Depiction Meaning
DANGER
Risk of electric shock with potential for severe injury or death as a consequence.
DANGER
Risk of explosion with potential for severe injury or death as a consequence.
EN
Operating manual
1.3 Symbols used
Depiction Meaning
1.
2.
•
(example)
Text Terms used in the device display.
DANGER
Biohazard with potential for risk to health or death as a consequence.
WARNING
Warning of potential injury or health risk.
CAUTION
Refers to risk of damage to property.
Refers to particularly useful information and tips.
You are requested to perform an action.
Perform these actions in the sequence described.
List.
Press this key to perform the action described.
1.4 Abbreviations used
DNA Deoxyribonucleic acid
dsDNA double stranded DNA
Dye methods Group of methods via the keys dye 550 and dye 650
A Absorbance
FOI Frequency of Incorporation: measure for the number of dye molecules related to the number of
nucleotides in dye-labeled biomolecules
M mol/l (molar)
OD600 Optical density for wave length 600 nm
RNA Ribonucleic acid
ssDNA Single stranded DNA
UV Ultraviolet radiation
VK Coefficient of variation (standard deviation / mean), in percentages
7
Page 8
EN
Operating manual
BioPhotometer plus — Operating manual
2 Product description
2 Product description
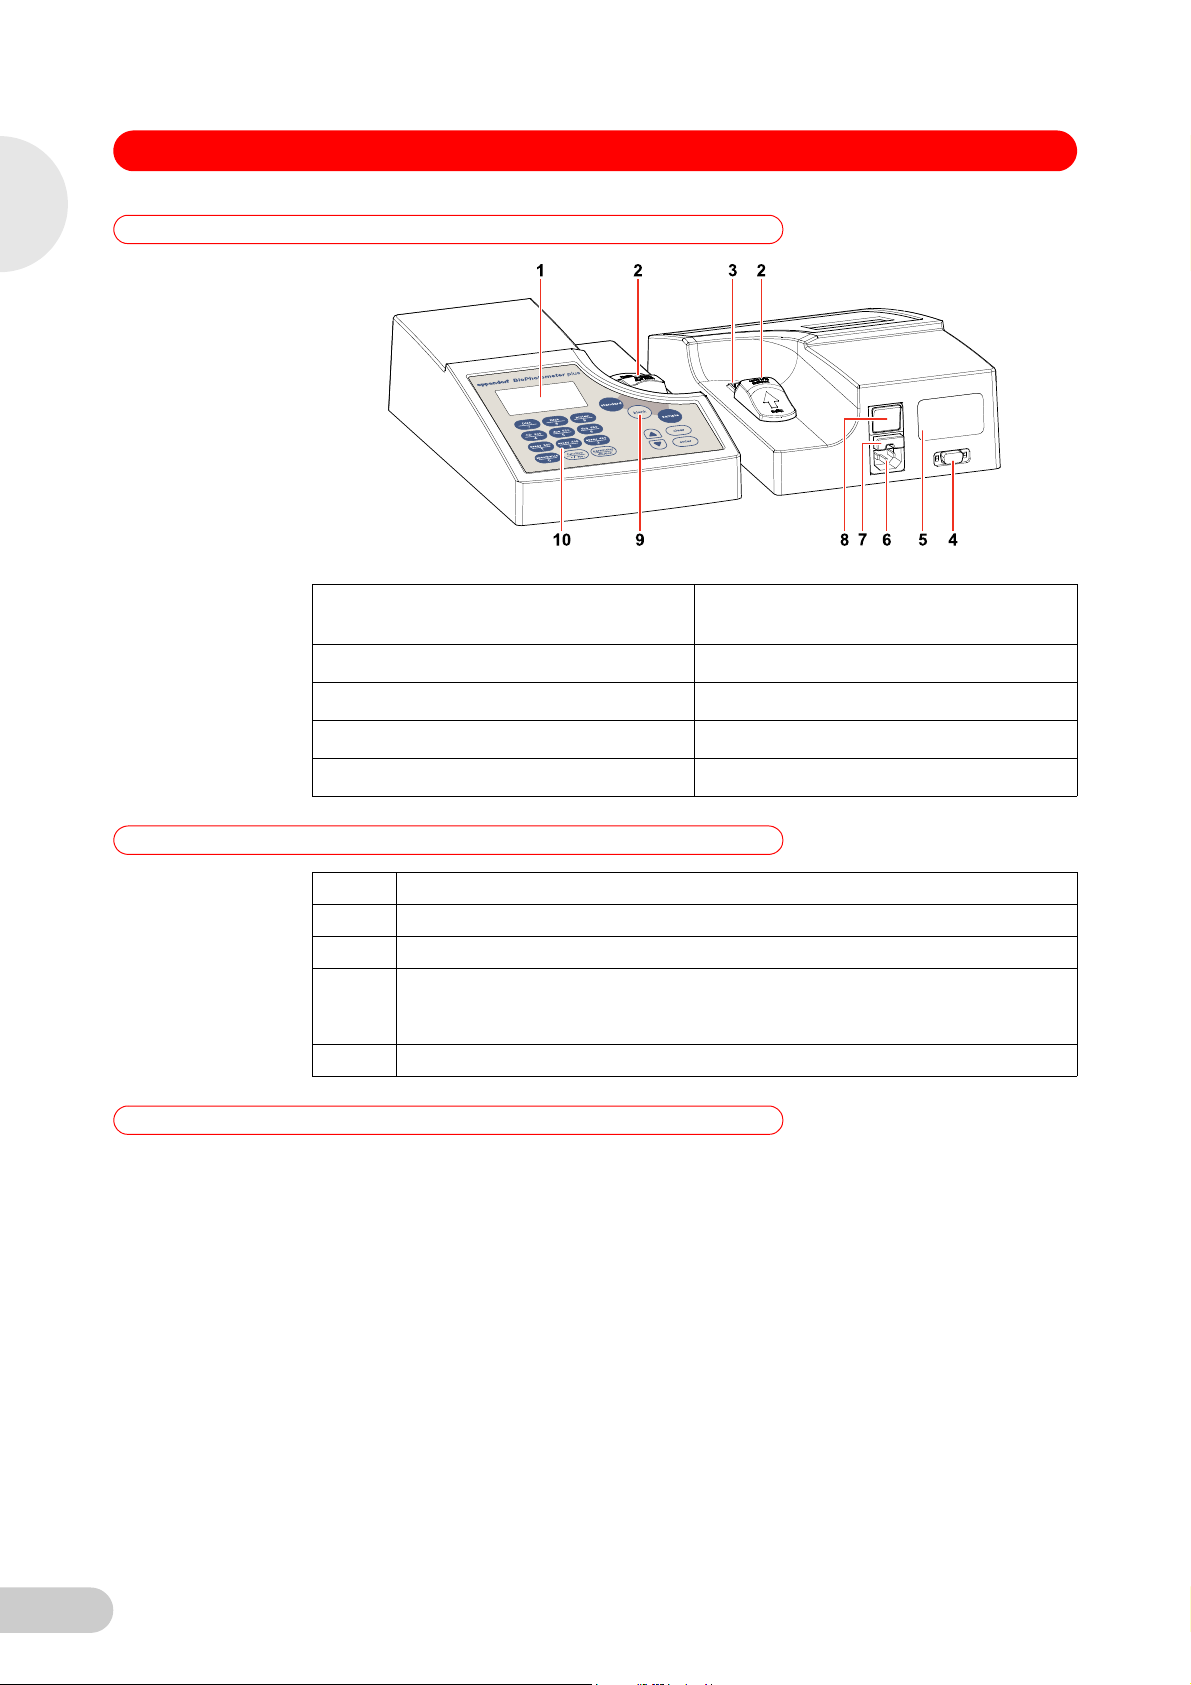
2.1 Main illustration
Abb. 1: Front and rear view
Fig. 1: Front and rear view
1 Device display 2 Cuvette shaft cover
Slide back or forward to open or close.
3 Cuvette shaft 4 Connection RS-232
5 ID plate 6 Mains connection socket
7 Fuse holder 8 Mains switch
9 Measuring keys 10 Keyboard
2.2 Delivery package
Number Description
1 BioPhotometer plus
1 Power cable
2 UVette
Original Eppendorf plastic cuvette, individually wrapped, for direct use in the
BioPhotometer, certified RNase, DNA and protein free
1 BioPhotometer plus operating instructions, multilingual,
2.3 Features
Cuvette photometer The BioPhotometer plus is a cuvette photometer for the fast, simple and comfortable
measurement of the most important methods in the molecular biology and biochemistry research
laboratory. It can also be used for the main photometric methods in cell biology.
Method programs Method programs for calculating the concentration of nucleic acids, proteins and dye-labeled
nucleic acids and proteins as well as the method "OD600" for calculating the bacteria density
through measuring turbidity are already preprogrammed. However, you can modify those in many
parameters. Other methods for calculating the concentration for 340, 405 and 490 nm can be
freely programmed. The method "absorbance" is used for the fast absorbance measurement with
any of 9 available wavelengths without further evaluation.
Method programs are combined into groups which you can open quickly via fixed keys.
Cuvettes You can use standard rectangular glass or plastic cuvettes with optical transparency for the
respective measuring wavelength. With the Eppendorf UVette you can also measure nucleic
acids and proteins in the UV range using a plastic cuvette. A cover protects the cuvette shaft
against dust and other contamination if the photometer is not in use. To open the cuvette shaft it
is moved back, to cover it after completing the measurements it is moved forward.
Measuring keys After opening a method the device is immediately ready for measuring. A measurement is started
with one of the 3 round measuring keys.
8
Page 9

BioPhotometer plus — Operating manual
2 Product description
Evaluation The BioPhotometer plus converts the measured absorbance values into concentration results.
Dependent on the method the results can be calculated via fixed factors, standards, or curve
calibration. In addition to the results the device also displays the absorbance values and some
other important details, e.g. the common absorbance quotients for nucleic acid calculations.
Sample dilutions can also be included in the evaluation. Other special evaluation procedures are
provided for specific method groups. For example, when calculating the concentration of dyed
nucleic acids the frequency of incorporation related to the amount of nucleic acid can also be
calculated.
Output The BioPhotometer plus outputs the results via the device display and via a printer available from
Eppendorf.
EN
Operating manual
9
Page 10
EN
BioPhotometer plus — Operating manual
3 Safety
3Safety
3.1 Intended use
The intended area of use for the BioPhotometer plus is the research laboratory in molecular
biology, biochemistry and cell biology. The device may only be operated by trained specialist
staff.
The BioPhotometer plus is used to perform photometric measurements to quantify biomolecules
as well as to perform turbidity measurements of microbiological cultures in routine laboratories.
Due to the specific examination of selected parameters, the device serves to monitor laboratory
processes. Use only Eppendorf accessories or accessories recommended by Eppendorf AG.
3.2 Warnings for intended use
Operating manual
DANGER!
DANGER!
DANGER!
DANGER!
Danger! Electric shock from damage to device/power cable.
Only switch on the device if the device and the power cable are undamaged.
Only use devices that have been properly installed or repaired.
Danger! Electric shock as a result of penetration of liquid.
Switch off the device and disconnect it from the power supply before starting cleaning or
disinfecting.
Do not allow any liquids to penetrate the inside of the housing.
Do not disinfect by means of spraying.
Only reconnect the device to the power supply once it is completely dry.
Danger! Electric shock.
Switch off the device and disconnect the power plug before opening the device to replace the
fuses. These tasks may only be performed by appropriately trained staff.
Risk of explosion!
Do not operate the device in rooms where work is being carried out with explosive
substances.
Do not use this device to process any explosive, radioactive or highly reactive substances.
Do not use this device to process any substances, which could create an explosive
atmosphere.
10
DANGER!
WARNING!
WARNING!
Risk when handling toxic or radioactively-marked liquids or pathogenic germs.
Follow national regulations governing the handling of these substances.
For complete instructions regarding the handling of germs or biological material of risk group
II or higher, please refer to the "Laboratory Biosafety Manual" (Source: World Health
Organization, current edition of the Laboratory Biosafety Manual).
Warning! Damage to health from chemicals.
Hazardous chemicals cause burns and other health hazards.
Follow the instructions for use provided by the manufacturers of reagents and other
chemicals.
Warning! Poor safety due to incorrect accessories.
The use of accessories and spare parts other than those recommended by Eppendorf may
impair the safety, function and precision of the device. Eppendorf accepts no warranty or liability
for damage caused by third-party parts or incorrect use.
Use only original accessories recommended by Eppendorf.
Page 11
3 Safety
WARNING!
BioPhotometer plus — Operating manual
Warning! Risk to health from contaminated device
Perform decontamination before storing or dispatching the device and/or its accessories.
EN
Operating manual
CAUTION!
CAUTION!
CAUTION!
CAUTION!
CAUTION!
Caution when using aggressive chemicals.
Aggressive chemicals may damage both the device and its accessories.
Do not use any aggressive chemicals on the device or its accessories, such as strong and
weak alkalis, strong and weak acids, acetone, formaldehyde, chlorinated hydrocarbons or
phenol.
If the device becomes contaminated with aggressive chemicals, clean it immediately with a
neutral cleaning agent.
Caution! Corrosion from aggressive cleaning agents and disinfectants.
Do not use corrosive cleaning agents, aggressive solvents or abrasive polishes.
Do not incubate the accessories in aggressive cleaning agents or disinfectants for prolonged
periods.
Caution! Damage to electronic components from condensation.
After moving the device from a cooler environment (e.g., cool room or outdoors), wait at least
an hour before connecting it to the mains power supply.
Caution! Function may be impaired by mechanical damage.
After a mechancial damage to the device ensure by means of an inspection that the
measuring and evaluation functions of the device function correctly.
Caution! Damage due to overheating.
Do not place the device close to sources of heat (e.g., radiator, drying cabinet).
Do not expose the device to direct sunlight.
Allow air to circulate freely by leaving at least 5 cm to adjoining devices or to the wall and
keep the underside of the device free.
CAUTION!
CAUTION!
CAUTION!
Caution! Material damage from incorrect use.
Only use the product for its intended purpose as described in the operating manual.
Ensure adequate material resistance when using chemical substances.
In cases of doubt, contact the product manufacturer.
Caution! Poor safety due to missing operating manual.
When passing on the device, always enclose the operating manual.
If you lose the operating manual, request a replacement. The current version of the
operationg manual and the safety instructions can also be found on our website
www.eppendorf.com.
Caution! Damage as a result of incorrect packing.
Eppendorf accepts no warranty or liability for damage caused by incorrect packing.
Only dispatch the device in the original packaging provided for carriage.
11
Page 12
EN
BioPhotometer plus — Operating manual
3 Safety
Operating manual
CAUTION!
Caution! Damage from improper cleaning of the cuvette shaft.
Only clean the cuvette shaft using a moist cotton swab.(see Cleaning on page 32)
Do not allow any liquid to enter the cuvette shaft.
Do not reach with your fingers into the cuvette shaft.
CAUTION!
Caution! Faulty measurement due to device confusion.
If you use the devices Biophotometer 6131 and BioPhotometer plus 6132 in your laboratory,
note the different method designations on the keys.
3.3 Application limits
Risk of explosion!
Do not operate the device in rooms where work is being carried out with explosive
DANGER!
substances.
Do not use this device to process any explosive, radioactive or highly reactive substances.
Do not use this device to process any substances, which could create an explosive
atmosphere.
3.4 Note on product liability
In the following cases, the protection provided in the device may be impaired: Liability for the
function of the device passes to the operator if:
• the device is not used in accordance with the operating manual.
• the device is used outside the sphere of application described here.
• the device is used with accessories and consumables (e.g. tubes and plates), which are not
recommended by Eppendorf AG.
• the device is maintained or repaired by persons not authorized by Eppendorf.
• the owner has made unauthorized modifications to the device.
12
Page 13
4 Installation
4 Installation
4.1 Preparing installation
Keep the transport carton and the packing material for subsequent safe transport or storage.
Check the completeness of delivery based on the details of the scope of delivery (see
Delivery package on page 8).
Check all parts for any transport damage.
4.2 Selecting location
Select the location for the BioPhotometer plus in accordance with the following criteria:
• 2 power sockets with ground conductor for the BioPhotometer plus and the printer.
• Solid laboratory bench with horizontal work surface
Space requirement of the device: 40 cm (with printer: 65 cm) width, 50 cm depth.
• Temperature: 15 to 35 °C. Avoid direct sunlight.
• Humidity: 25 to 75 % relative humidity.
• Atmospheric pressure: 70 to 106 kPa.
BioPhotometer plus — Operating manual
EN
Operating manual
4.3 Connect device to the main power supply
1. Place the BioPhotometer plus onto a suitable work surface.
2. Ensure that the mains voltage and frequency match the details for the range of mains
voltages and frequencies on the device nameplate.
3. Connect the device to the power supply and switch it on from the mains power switch 8 (Fig. 1
on p. 8).
4. Remove the protective film from the device display.
4.4 Cuvettes
You can insert standard rectangular glass or plastic cuvettes into the cuvette shaft (outside
diameter 12.5 mm x 12.5 mm). The optical path height must be 8.5 mm above the cuvette base
and the total cuvette height must be at least 36 mm. The light beam in the cuvette is 1.0 mm wide
and 1.5 mm high.
The cuvettes must be optically transparent for the respective measuring wavelength. For
measurements in the UV range Eppendorf provides a plastic cuvette called UVette which is
transparent from wavelengths above 220 nm and therefore also suitable for the measurement of
nucleic acids.
Abb. 2: Overview of different cuvette types
Fig. 2: Overview of different cuvette types
13
Page 14

EN
Operating manual
BioPhotometer plus — Operating manual
4 Installation
4.5 Connect printer
You can connect the Eppendorf thermal printer to the serial interface RS-232 C of the photometer
(see Ordering information on page 48).
1. Connect the printer cable to the serial printer port 4 of the photometer and tighten the locking
screws.
2. Connect the printer cable to the printer and also tighten the locking screws.
3. Connect the printer to the power supply using the plug-in power unit supplied (printer
accessory) and switch it on.
4. Check the printer settings in accordance with the following table and make corrections where
necessary.
Information about modifying printer settings can be found in the operating manual for the
printer.
Tab. 1: Setting the DIP SW for the thermal printer
DIP SW-1 Meaning
1 (OFF) Input = Serial
2 (ON) Printing Speed = High
3 (ON) Auto Loading = ON
4 (OFF) Auto LF = OFF
5 (ON) Setting Command = Enable
6 (OFF) Printing
7 (ON) Density
8 (ON) = 100%
DIP SW-2 Meaning
1 (ON) Printing Columns = 40
2 (ON) User Font Back-up = ON
3 (ON) Character Select = Normal
4 (ON) Zero = Normal
5 (ON) International
6 (ON) Character
7 (ON) Set
8 (OFF) = U.S.A.
DIP SW-3 Meaning
1 (ON) Data Length = 8 bits
2 (ON) Parity Setting = NO
3 (ON) Parity Condition = Odd
4 (OFF) Busy Control = XON/XOFF
5 (OFF) Baud
6 (ON) Rate
7 (ON) Select
8 (ON) = 9600 bps
14
Page 15
BioPhotometer plus — Operating manual
5 Operation
5 Operation
5.1 Overview of operating controls
Abb. 3: Control panel of the BioPhotometer plus.
Fig. 3: Control panel of the BioPhotometer plus.
EN
Operating manual
Key Function
Oval blue keys, e.g.:
• In the method selection: select method group.
• When entering values: enter digits.
Circular keys
Start standard measurement.
Start blank measurement.
Start sample measurement.
Oval transparent keys
• In the method selection: open parameter list.
• During the measurement procedure: enter sample dilution.
• In the method selection: open function list.
• During the measuring procedure: modify sample number.
• When entering digits: enter decimal point.
• Confirm entry or selection.
• Open selected method or function.
Cursor keys
Delete entry
Move cursor up or down in the device display.
15
Page 16

EN
Operating manual
BioPhotometer plus — Operating manual
5 Operation
5.2 Methods
The following methods are available and already preprogrammed ex factory. You can modify
most parameters and save them as a modified method (see Parameter on page 26).
Method group Method Explanation Wavelength
DNA dsDNA Calculating the concentration of DNA with
ssDNA
OLIGO DNA
RNA RNA Analogous to method group DNA. As method group DNA.
OLIGO RNA
Protein BCA Calculating the concentration of proteins after
BCA MICRO
BRADFORD 595 nm
BRADFORD MICRO
LOWRY 595 nm
LOWRY MICRO
PROTEIN 280 nm Calculating the concentration of proteins with
OD600 OD600 Turbidity measurement to determine the
dye 550 DYE 550-dsDNA For dye-labeled biomolecules: calculating the
DYE 550-ssDNA
DYE 550-RNA
DYE 550-OLIGO
DYE 550-PROTEIN
dye 650 DYE 650-dsDNA Analogous to method group "dye 550". DNA/RNA/OLIGO: see method
DYE 650-ssDNA
DYE 650-RNA
DYE 650-OLIGO
DYE 650-PROTEIN
assay 340 ASSAY 340/1 Calculating the concentration by measuring at
ASSAY 340/2
ASSAY 340/3
assay 405 ASSAY 405/1 Analogous to method group "assay 340". 405 nm
ASSAY 405/2
ASSAY 405/3
assay 490 ASSAY 490/1 Analogous to method group "assay 340". 490 nm
ASSAY 490/2
ASSAY 490/3
ABSORBANCE ABSORBANCE Rapid absorbance measurement after
evaluation via factor. The methods differ
mainly in the preprogrammed factor.
adding reagent. The methods are
preprogrammed with the evaluation procedure
calibration curve. Number and target
concentration of the standards can be
modified.
evaluation via factor.
bacteria density.
concentration of the molecule (nucleic acid or
protein) and the dye in a single measuring
procedure. The frequency of incorporation of
the dye in the biomolecule is also determined.
340 nm. The evaluation procedures can be
freely programmed. As a sample the methods
are already preprogrammed with the following
evaluation procedures:
340/1: evaluation via factor
340/2: evaluation via a standard.
340/3: evaluation via calibration curve with 6
standards.
selecting the wavelength.
Measuring wavelength: 260 nm
Secondary wavelengths to check
for purity: 230, 280, 340 nm
550 nm
Measuring wavelength: 280 nm
Secondary wavelengths to check
for purity: 260, 340 nm
595 nm
DNA/RNA/OLIGO: see method
groups DNA and RNA
PROTEIN: see method
PROTEIN 280 nm
Measuring wavelength for the
dye: 550 nm
groups DNA and RNA
PROTEIN: see method
PROTEIN 280 nm
Measuring wavelength for the
dye: 650 nm
340 nm
230, 260, 280, 340, 405, 490,
550, 595, 650 nm
16
Page 17

BioPhotometer plus — Operating manual
5 Operation
5.3 Summary of the measuring procedure
This section contains a summary of the key steps of a measuring procedure.
5.3.1 Prepare measurement
1. Switch on the device and, if necessary, the printer also.
The device is immediately ready for measuring after being switched on.
2. Have the cuvettes for the measurements available. When selecting the cuvettes observe the
respective instructions (see Cuvettes on page 13).
3. Provide the measuring solutions for measuring the blanks and, if necessary, the standards
and samples.
Measuring solutions for standards and samples with lower absorbances than 0.02 to 0.03 A
(this range corresponds e.g. to a dsDNA concentration of 1.0 to 1.5 μg/ml) should not be
used. Whilst the detection level of the photometer is well below these values, the effect of
interferences from the measuring solutions (particles, bubbles, turbidity) on the reliability of
the results is very high for these low absorbances.
EN
Operating manual
4. Slide the cover of the cuvette shaft back to open the cuvette shaft.
5.3.2 Select the method
1. Using a key select the method group.
2. Using the cursor keys select the desired method.
Before opening the method you should check the parameters of the desired method and correct
Hint!
Hint!
them, if necessary (see Parameter on page 26).
3. Open the selected method using the Enter key.
The displayed factor defined in the method parameters always relates to an optical path length of
10 mm. However, for calculating the result the device automatically takes into account the optical
path length defined in the method parameters. Therefore, you do not need to modify the factor in
the method parameters for other optical path lengths.
In the device display you see a list of methods provided in the selected group.
The startup screen of the method is displayed:
• Top: method name and programmed optical path
length of the cuvette.
• Center: programmed evaluation (e.g. factor or
information about the evaluation with standards).
• Bottom: keys for the next measurement. The keys
are not shown if there is insufficient space to display
them, but they can be made visible using the Enter
key in this case.
17
Page 18

EN
Operating manual
5 Operation
5.3.3 Measure
Hint!
BioPhotometer plus — Operating manual
Check for each measurement:
• Is there enough measuring solution in the cuvette? The light path height of the BioPhotometer
plus is 8.5 mm. The height of the light beam in the cuvette is 1.5 mm.
• Is the measuring solution free from particles and bubbles?
• Is the measuring surface of the cuvette free from contamination due to dust or finger prints
and free from scratches?
• When inserting the cuvette press it all the way down against a slight resistance.
• Is the cuvette positioned correctly? The optical surface of the cuvette must point towards the
direction of the light path. The direction of the light path in the BioPhotometer plus is indicated
by an arrow on the blue cuvette shaft cover.
• For plastic cuvettes: How many consecutive measurements can be reliably carried out in the
cuvette?
• Carry out a blank measurement for each cuvette before any sample or standard
measurement to compensate for the cuvette blank in addition to the reagent blank value.
• Check whether the measured absorbance values exceed the upper limit of the photometric
measuring range. Discard the measuring result in this case. The upper limit of the
photometric measuring range not only depends on the wavelength (see Photometer on
page 41) but also on the cuvette blank. Ultramicro cuvettes with a small aperture such as
"TrayCell" (Hellma) or "LabelGuard" (Implen) may have a cuvette blank of up to A = 1. The
available photometric measuring range is reduced by this amount. You can estimate the
cuvette blank if you measure a water-filled cuvette as a sample against the empty cuvette
shaft as a blank.
• Remove the measuring solution completely after measurement before filling the next
measuring solution in order to minimise carry-over. If a carry-over between samples is
expected due to the high concentration differences then flush the cuvette between
measurements.
• With temperature differences between the lamp and the environment photometric drift may
occur. Therefore a device being brought in from a colder environment should first reach the
ambient temperature. Alternatively you can bring the lamp to the right temperature by carrying
out a few measurements. In long series of measurements or in measurements over a long
period of time carry out a new blank measurement.
1. Open the cuvette shaft by sliding the blue cover back.
blank 2. Fill the cuvette with blank solution and insert the filled cuvette into the cuvette shaft.
3. Press the blank key.
• Top: method name and display of the sample type
(here: "BLANK")
• Center: result (for blank: 0.000 A)
Blank results remain stored as long as the method remains open. However, we recommend to
Hint!
Standards
(optional)
Samples 5. Fill the cuvette with sample solution and press the sample key.
check the blank at regular intervals of e.g. one hour. To do so carry out a measurement with the
blank solution as sample. If the measuring result differs significantly from 0 a new blank
measurement must be carried out.
4. Only for methods with standard evaluation: Measure the required standards consecutively if
you want to carry out a new calibration (see Methods with evaluation via standards on
page 21).
18
Page 19

5 Operation
5.3.4 Finalize the method
1. Press one of the method group keys to return to the method selection and open the next
2. After all measurements are complete switch off the device.
3. Slide the cuvette shaft cover forward to protect the shaft against contamination.
5.4 Nucleic acids
The methods provided in the method groups "DNA" and "RNA" differ mainly in the
preprogrammed factor.
Additionally, for the methods "OLIGO DNA" and "OLIGO RNA" the selection of the parameter
"MOL. UNIT" (molar concentration unit) differs from that of other nucleic acid methods. This
parameter is only required for special conversions described at the end of this section.
As optical path length of the cuvette the value "10 mm" has been preprogrammed. If you modify
the value the modified optical path length is taken into account by the device when calculating the
results. Therefore you do not need to change the factor for the evaluation.
Results display
BioPhotometer plus — Operating manual
method, if necessary.
EN
Operating manual
Top: method name and sample number
Center: result and unit
Bottom left: absorbance quotient ("ratios")
Bottom right: absorbance results
In addition to the concentration result and the absorbance at measuring wavelength 260 nm the
absorbances at 3 additional wavelengths and the quotients 260/280 and 260/230 are displayed
as an indication for the purity of the measured nucleic acid sample. The absorbance at 340 nm
should be near zero for pure samples.
Turbid measuring solutions have raised absorbances at all measuring wavelengths distorting the
measuring result. You can partially correct this by enabling the parameter "CORRECTION A
The absorbance value for 340 nm is then highlighted in the display with the cursor to indicate that
the correction is enabled.
The last measured concentration result can be converted into molar concentrations and/ or
nucleic acid amounts (mass unit or molar unit) if desired:
Top: input of the total amount of the sample
Bottom: input of the base pairs (for single strand
nucleic acid: the bases) or molar mass. One of the
two entries suffices.
All entries must be confirmed using the Enter key.
Display of the calculated results for the molar
concentration and the sample amounts in the total
amount.
340
".
19
Page 20

EN
Operating manual
BioPhotometer plus — Operating manual
5 Operation
5.5 Proteins
You can measure the protein concentrations directly by measuring in the UV range at 280 nm or
after adding reagent in the VIS range.
5.5.1 Protein 280 nm
The measurements can be evaluated via a factor entered into the parameters or via a single point
calibration (measuring a standard).
• Factor: This evaluation mode is preprogrammed ex factory. However, you still have to enter
the factor before the first measurement.
If you modify the parameter "CUVETTE" (preprogrammed to 10 mm) the modified thickness
of the layer will be taken into account by the device when calculating the results. This means
you do not need to adjust the factor for evaluation but have to provide the input for an optical
path length of 10 mm.
• Standard: Alternatively you can program the evaluation mode "Standard" ("STD") (see
Methods with evaluation via standards on page 21).
Results display
Top: method name and sample number
Center: result and unit
Bottom right: absorbance results
In addition to the concentration result and the absorbance at measuring wavelength 280 nm the
absorbances at 2 additional wavelengths are displayed as an indication for the purity of the
measured protein sample. The absorbance at 340 nm should be near zero for pure samples.
Tubid measuring solutions have raised absorbances at all measuring wavelengths distorting the
measuring result. You can partially correct the distortion by enabling the parameter
"CORRECTION A
5.5.2 Protein after adding reagent (Bradford, BCA, Lowry)
You can evaluate these methods via factor or calibration (standard measurement).
340
".
• Factor: If you evaluate via factor you must take into account when making the entry that the
factor is adjusted to the selected result unit.
If you modify the parameter "CUVETTE" the modified optical path length is, however, taken
into account by the device when calculating the results. This means you do not need to adjust
the factor for evaluation but have to provide the input for an optical path length of 10 mm.
• Standard: For evaluation via calibration you can program up to 10 different standards for
these methods. The procedure for calibration is described in the next chapter (see Methods
with evaluation via standards on page 21).
20
Page 21

BioPhotometer plus — Operating manual
5 Operation
5.6 Methods with evaluation via standards
For the following methods you can define an evaluation via calibration (measuring of standards)
in the parameters:
• PROTEIN 280nm (here only calibration with one standard is possible)
• BRADFORD, BRADFORD micro, BCA, BCA micro, LOWRY, LOWRY micro
• Methods via the keys "assays 340 / 405 / 490"
You can program up to 10 standards each in single up to triple measurement. For evaluation with
several standards you can choose between the procedures "Linear regression" (for calibration
lines) and "Non-linear regression" (for calibration curves). Dependent on the number of
programmed standards the following applies:
Evaluation procedure Number of standards
Calculation of a factor 1
Linear regression 2 to 10 standards
Non-linear regression for single measurement: 5 to 10 standards
EN
Operating manual
for double or triple measurement: 4 to 10 standards
Measuring procedure
Standard measurements remain stored for an unlimited period of time after a valid calibration
until they are overwritten with a new calibration. Exception: If method parameters are modified
the calibration is deleted.
After opening a method (in the example the method "BRADFORD") you see the following device
display:
The values marked "XXX" depend on the standard concentrations which you have programmed
Hint!
in the method parameters.
Because a calibration has already been stored in this
example, the measuring keys provided include "sample" in
addition to "standard" and "blank".
Carry out a blank measurement.
Measure the first standard (in this example only as single
measurement).
Measure the other standards as prompted in the bottom
area of the device display.
After completing all standard measurements the calibration
has been evaluated and stored.
When measuring more than 2 standard samples a CV
value is displayed for the calculated regression. If the
calculated CV value exceeds 10% you are prompted for
approval before saving. Sample measurements are
evaluated using the last valid calibration.
After saving the calibration you can continue with a sample measurement.
In the function list (see Functions on page 31) you can view and print the stored calibration data.
21
Page 22

EN
Operating manual
BioPhotometer plus — Operating manual
5 Operation
5.7 OD 600
With method "OD 600" you can measure the bacteria density via a turbidity measurement at
approx. 600 nm. Because this is a stray-light measurement the result depends on the geometry
of the light path which can differ for the photometers by different manufacturers.
The exact measurement wavelength for the BioPhotometer plus is 595 nm. Measurements with
suspensions of E. coli bacteria (absorbance range: approx. 0.1 to 0.3 E) showed at 600 nm about
1 to 2 % higher absorbance values than at 595 nm. You can program a corresponding correction
factor in the parameters.
Results display
Top: method name and sample number
Center: result.
Bottom right: measured absorbance.
5.8 Dye-labeled biomolecules ("dye methods")
The preprogrammed methods for the keys dye 550 and dye 650 contain measuring procedures
for dye-labeled biomolecules. During these measuring procedures both the biomolecule (nucleic
acid or protein) and the dye are measured at different wavelenghts and their concentrations are
determined. In addition the frequency of incorporation (concentration ratio between dye and
biomolecule) is calculated.
5.8.1 Method group "dye 550"
The dye is measured at 550 nm, the nucleic acid at 260 nm and the proteins at 280 nm (see
Methods on page 16). A selection of 4 dyes is available in the method parameters:
• CY 3
• ALEXA 546
• ALEXA 555
• DYE 550
The first 3 dyes are used more frequently in the laboratory, the last dye (DYE 550) is a
spaceholder for other dyes.
For every dye you have to program the following corresponding data in the parameters. For the
Cy and Alexa dyes values have already been preprogrammed but can be modified:
• Absorbance coefficient in the unit cm
converting the absorbance into concentration related to a cuvette optical path length of 10
mm and displays this on the start-up screen after opening the method.
• Optional: factors for the correction calculation "CORR: A
The parameters for the nucleic acid or protein component mainly match the parameters of the
method group DNA and RNA and for the method Protein 280 nm.
-1·M-1
. The device uses this to calculate the factor for
" (see below for explanation).
550
5.8.2 Method group "dye 650"
22
The dye is measured at 650 nm. A selection of 3 dyes is available:
• CY 5
• ALEXA 647
• DYE 650
The additional explanations found under method group "dye 550" apply accordingly.
Page 23

BioPhotometer plus — Operating manual
5 Operation
5.8.3 Frequency of incorporation "FOI"
The FOI is a measure for the concentration of the dye relative to the concentration of the nucleic
acid. It is not provided for protein methods. For calculating the FOI you can select between 2 units
in the method parameters:
• "MOLECULE DYE / kb": dye molecules per 1000 nucleotides.
• "pmole/μg DNA": pmole dye per μg nucleic acid.
The formulae for calculating the FOI can be found separately (see Calculation of the FOI on
page 45).
5.8.4 Correction factors
In addition to the options for turbidity correction described (parameter "CORRECTION A
(see Nucleic acids on page 19) the affect of the dye on the measurement of the nucleic acid or
the protein can also be corrected for the "DYE methods". If the degree to which the dye absorbs
light is known also for the measuring wavelengths of the biomolecule (260 and 280 nm), then a
correction can be made in the parameter "CORRECTION
you can enter a correction factor for 260 and 280 nm. E.g. for Cy 3 the preprogrammed values
are:
• 0.04 for "CORR.A
• 0.05 for "CORR.A
The use of these factors for the calculation of concentration and ratio of the biomolecule is
described elsewhere (see Correction A
550
550
: F
: F
260
260
EN
Operating manual
")
340
550 (or 650)
"
"
on page 46).
550/650
". If you enable this parameter
5.8.5 Measuring procedure and result display
After calling the method you will see the following display (example: "DYE 550 - ssDNA"):
Top: method name and cuvette selected in the parameters.
Center: programmed values for the calculation of the DNA
and dye concentrations: factor for ssDNA and absorbance
coefficient for the dye. In addition the factor calculated from
the absorbance coefficient related to a cuvette optical path
length of 10 mm will be displayed.
Bottom: measuring key for the next measurement.
Carry out a blank measurement.
Carry out a sample measurement.
Top: method name and sample number
Center: result for DNA and dye.
Bottom: result for the frequency of incorporation.
23
Page 24

EN
BioPhotometer plus — Operating manual
5 Operation
As with the nucleic acid measurement without dye measurement (see Nucleic acids on page 19)
you can use the cursor keys to access additional details of the result (absorbance value and ratio
260/280) and to carry out conversions for further results:
After entering the total volume of a sample: Total amount of the nucleic acid (mass in μg)
and the dye (in pmole).
After entering the bases or molecular mass: Molar concentration of the nucleic acid.
If the total amount of the sample has also
been entered: total amount of the nucleic acid
(in pmole).
Operating manual
When displaying the absorbance values the values for 340 nm or for 550 (or 650) nm are
highlighted with the cursor if "CORRECTION A
enabled.
5.9 Methods for 340, 405 and 490 nm
3 method locations are provided for each wavelength. The following evaluation procedures have
been preprogrammed as samples. However, you can adjust these procedures at any time:
Example: "assay 340"
• ASSAY 340/1: Evaluation via factor
• ASSAY 340/2: Evaluation via single point calibration
• ASSAY 340/3: Evaluation via curve calibration
The following applies to evaluation via factor:
• If you modify the parameter "CUVETTE" (preprogrammed to 10 mm) the modified thickness
of the layer will be taken into account by the device when calculating the results. This means
you do not need to adjust the factor for evaluation but have to provide the input for an optical
path length of 10 mm.
• When entering the factor ensure that it has been adjusted for the selected unit of results.
5.10 Dilution
You can enter sample dilutions before a measurement using the parameter/dilution key. The
dilution factor will then be automatically taken into account when calculating the results.
For the following example the method has already been called and a blank been measured:
" or "CORRECTION A
340
550 (or 650)
" has been
24
1. Open the dilution input using the parameter/dilution
key.
2. Enter the volumes of the sample and the dilution
buffer ("diluent") and confirm each entry with enter.
This brings you back to the measuring procedure and
you can start a sample measurement.
Page 25

5 Operation
BioPhotometer plus — Operating manual
EN
3. Start a sample measurement using the sample key.
Operating manual
4. The result is calculated taking into account the sample
dilution entered.
The dilution is retained for calculating all subsequent sample results until it is overwritten. To
delete the dilution enter "0" for both "SAMPLE" and "DILUENT" or delete the values using the
keys clear and enter.
5.11 Sample number
The device display for measuring results contains the sample number at the top right. It is
counted separately continuously for every method and reset to "1" when a new method is
opened.
You can modify the sample number before a measurement.
For the following example 5 samples were already measured:
1. Open the sample number input using the
function/·/No. key.
2. Enter the desired sample number for the next sample
(here "3") and confirm the entry with Enter.
This brings you back to the measuring procedure and
you can start a sample measurement.
3. Start a sample measurement using the sample key.
4. The sample result is allocated the sample number "3".
All other samples are incremented continuously.
25
Page 26

EN
Operating manual
BioPhotometer plus — Operating manual
6 Parameter and functions
6 Parameter and functions
6.1 Parameter
The methods of the BioPhotometer plus as well as the corresponding parameters have already
been preprogrammed ex factory. You can modify these parameters.
6.1.1 View, change and store the parameters of a method
1. Select the desired method group using the corresponding method key.
2. Using the cursor keys select the desired method.
3. Using parameter/dilution open the parameters for this method.
4. Scroll through the parameter list with the cursor keys.
5. Modify the parameters, if necessary, and confirm the changes using Enter.
There are two kinds of parameter entries:
• Selection parameters: selection via cursor keys.
• Numerical values: input via number keys.
Each parameter entered is only saved after confirmation using the Enter key.
Hint!
6. Exit the parameter list by pressing parameter/dilution again.
You return to the method selection.
6.1.2 Summary and description of parameters
Parameter Entry Explanation
Cuvette Selection:
10, 5, 2, 1 or 0.2 mm
Unit Selection:
Different units dependent on
the method.
MOL. Unit Selection:
Different units dependent on
the method.
CALCULATION Selection:
• STD
• FACTOR
Optical optical path length of the cuvette. The factor for
converting the absorbance into the concentration is
corrected accordingly internally.
Result unit for the method.
In some methods this selection is missing because a unit
has been preprogrammed permanently.
Molar unit, only for the nucleic acid methods: for the
conversion of concentration units into molar concentrations.
Evaluation procedure for calculating the sample
concentration:
• with fixed factor
• with standards (calibration)
Factor Numerical input (5 digits) Factor for converting absorbance into concentration. The
number of digits after the decimal point of the factor
determines the number of digits after the decimal point for
the result.
The factor must be entered for a cuvette optical path length
of 10 mm.
STD NUMBER 1-10 Numerical input (1 to 10) Number of standards with different concentrations used for
the calibration.
STD MEASUREMENT Selection:
1x, 2x or 3x
Repeated measurements of standards.
26
Page 27

BioPhotometer plus — Operating manual
6 Parameter and functions
Parameter Entry Explanation
REGRESSION Selection:
Linear and non-linear
regression
STD 1 to STD 10 Numerical input (numbers and
decimal point, 5 digits)
CORRECTION Selection:
• NO CORRECTION
• CORRECTION A
• CORRECTION A
CY3 (or Cy5)
ALEXA .....
ABS.COEFF. Numerical input (6 digits) For "Dye methods": input of the absorbance coefficient for
CORRECTION
A
550 (650)
CORRECTION
A
550 (650)
CALCULATION FOI Selection:
: F
: F
260
260
Selection For "Dye methods": selection of the dye (see Dye-labeled
Numerical input (5 digits) Only if in "Dye methods" the parameter
340
550 (or 650)
• MOLECULE DYE / kb
• pmole/μg DNA (or RNA)
Evaluation procedure of the multi-point calibration.
• Linear regression is possible for:
2 to 10 standards
• Non-linear regression is possible for:
(single measurement:) 5 to 10 standards
(double or triple measurement:) 4 to 10 standards.
Nominal concentration for each standard. Unit as entered in
the parameter display 1.
The number of digits after the decimal point in the nominal
concentration of the first standard determines the number of
digits after the decimal point in the result. The
concentrations must be entered in ascending order.
CORRECTION A
Can be used for the partial correction of the effect of minor
turbidity in the measuring solution: The absorbance
measured at 340 nm is subtracted from the absorbance
results at 230, 260 and 280 nm prior to subsequent
evaluation.
CORRECTION A
Can be used for the "Dye methods" to correct the effect of
the dye on the measuring absorbances of the biomolecule
(nucleic acid or protein): The absorbance of the dye
measured at 550 (or 650) nm is multiplied with a correction
factor for 260 or 280 nm. The result is subtracted from the
absorbances of the biomolecule at 260 or 280 nm prior to
subsequent evaluation for the biomolecule (see Dye-labeled
biomolecules ("dye methods") on page 22). The correction
factors are entered further down in the parameter list after
selecting the dye.
biomolecules ("dye methods") on page 22).
the selected dye in the unit "cm
CORRECTION A
Entry of the correction factors for taking into account the
effect of the dye on the measurement absorbances of the
biomolecule (see description of the parameter
CORRECTION A
For "Dye methods": selection of the procedure for calculating
the frequency of incorporation (see Dye-labeled
biomolecules ("dye methods") on page 22).
340
550 (or 650)
550 (or 650)
550 (or 650)
-1·M-1
".
has been enabled:
above).
EN
Operating manual
27
Page 28

EN
Operating manual
BioPhotometer plus — Operating manual
6 Parameter and functions
6.1.3 Parameters preprogrammed ex factory
Nucleic acids and OD 600
Parameter dsDNA ssDNA OLIGO DNA RNA OLIGO RNA OD 600
CUVETTE 10 mm 10 mm 10 mm 10 mm 10 mm 10 mm
UNIT μg/mL μg/mL μg/mL μg/mL μg/mL
MOL. UNIT pmol/mL pmol/mL pmol/μL pmol/mL pmol/μL
FACTOR 50.0 37.0 30.0 40.0 30.0 1.000
CORRECTION NO
CORRECTION
Proteins
NO
CORRECTION
NO
CORRECTION
NO
CORRECTION
NO
CORRECTION
Parameter BRADFORD BRADFORD
micro
CUVETTE 10 mm 10 mm 10 mm 10 mm 10 mm 10 mm 10 mm
UNIT μg/mL μg/mL μg/mL μg/mL μg/mL μg/mL mg/ml
CORRECTION NO COR-
CALCULATION STD STD STD STD STD STD Factor
FACTOR ----STD NUMBER
1-10
STD
MEASUREMENT
REGRESSION NON-
STD 1 100 1.00 25 0.50 100 1.00
STD 2 250 2.5 125 2 250 2.5
STD 3 500 5 250 5 500 5
STD 4 750 10 500 10 750 10
STD 5 1000 15 750 20 1000 15
STD 6 1500 25 1000 1500 25
STD 7 1500
STD 8 2000
668566
1x 1x 1x 1x 1x 1x
NON-
LINEAR
LINEAR
BCA BCA micro LOWRY LOWRY
micro
NON-
LINEAR
NON-
LINEAR
NON-
LINEAR
NON-
LINEAR
PROTEIN
280 nm
(no entry,
programmed
permanently)
RECTION
28
Page 29

BioPhotometer plus — Operating manual
6 Parameter and functions
Method group "dye 550"
Parameter DYE 550-dsDNA DYE 550-ssDNA DYE 550-RNA DYE 550-OLIGO DYE
550-PROTEIN
CUVETTE 10 mm 10 mm 10 mm 10 mm 10 mm
Unit
(only for nucleic
acid)
MOL. UNIT
(for nucleic acid)
FACTOR
(for nucleic acid or
protein)
CORRECTION NO
Dye selection CY3 CY3 CY3 CY3 CY3
ABS.COEFF. (for Cy3: )
CALCULATION
FOI
μg/mL μg/mL μg/mL μg/mL mg/mL
(protein: no entry,
programmed
permanently)
pmol/mL pmol/mL pmol/mL pmol/μL
50.0 37.0 40.0 30.0 -----
CORRECTION
150000
MOLECULES
DYE / kb
NO
CORRECTION
(for Cy3: )
150000
MOLECULES
DYE / kb
NO
CORRECTION
(for Cy3: )
150000
MOLECULES
DYE / kb
NO
CORRECTION
(for Cy3: )
150000
MOLECULES
DYE / kb
NO
CORRECTION
(for Cy3: )
150000
EN
Operating manual
The unit for the dye is defined permanently with "pmol/μl" and can therefore not be programmed
in the parameters.
For the various dyes the following dye-specific values have been preprogrammed as absorbance
coefficients and correction factors (for the parameter CORRECTION A
Parameter CY3 ALEXA546 ALEXA555 DYE550
ABS.COEFF. 150000 ------ 150000 -----CORRECTION A
F
260
CORRECTION A
F
280
Parameter CY5 ALEXA647 DYE650
ABS.COEFF. 250000 239000 -----CORRECTION A
CORRECTION A
:
0.04 0.0 0.04 0.0
550
:
0.05 0.0 0.04 0.0
550
The values for ALEXA546 were not known at the time of writing this manual; please contact the
manufacturer (Invitrogen) with regard to these values.
Method group "dye 650"
The parameters correspond mainly to those of method group "dye 550". As preselection for the
dye Cy 5 has been programmed. For the dye-specific values the following applies:
650
650
: F
: F
0.0 0.0 0.0
260
0.05 0.03 0.0
280
550
):
29
Page 30

EN
Operating manual
BioPhotometer plus — Operating manual
6 Parameter and functions
assay 340
Parameter ASSAY 340/1 ASSAY 340/2 ASSAY 340/3
CUVETTE 10 mm 10 mm 10 mm
UNIT μg/mL μg/mL μg/mL
CALCULATION Factor STD STD
FACTOR ----STD NUMBER 1-10 1 6
STD MEASUREMENT 2x 1x
REGRESSION NON-LINEAR
STD 1 ----- ----STD 2 ----STD 3 ----STD 4 ----STD 5 ----STD 6 -----
assay 405 and assay 490
The parameters correspond to those of method group "assay340".
ABSORBANCE
You can define the wavelength directly in the start-up screen of the method. If you open the
parameter list you are provided with the cuvette optical path length and unit for information only.
However, neither parameter can be modified in this method. Unlike with other methods there is no
automatic conversion to a different cuvette optical path length in this case.
30
Page 31

BioPhotometer plus — Operating manual
6 Parameter and functions
6.2 Functions
1. In the method selection press the key function/·/No..
A list of general device functions will open. In the method procedure or parameter mode this
key has a different function (entering the sample number or entering a decimal point when
inputting values).
2. In this function list and any sub-lists (e.g. results list) select the desired function like in the
parameter list (see View, change and store the parameters of a method on page 26) using the
cursor keys and open it with the Enter key.
3. Press the function/·/No. key again to return from a sublevel of the functions (e.g. opening
stored results in the function "RESULTS") to the next higher level in the function list and finally
back to the method selection.
Tab. 2: Summary and description of functions
Function Explanation
RESULTS Display of the last 100 results (the result measured last is shown first).
For results with information about more than one device display (detailed information
for nucleic acids and "dye methods") you can access the detailed displays via the
cursor keys.
Print the selected result using the Enter key.
STANDARDS Display of the stored calibration data for methods with evaluation via standards.
In this list you can also scroll using the cursor keys until you see the calibration data of
the desired method in the device display.
PRECISION MEASUREMENT Measurement and precision calculation of 10 consecutive measured values of a
sample. The method program of the last opened method is used.
PHOTOMETER TEST
NEW MEASUREMENT
LAST MEASUREMENT
SPRACHE DEUTSCH
LANGUAGE ENGLISH
LANGUAGE U.S.ENGL
LANGUE FRANCAISE
DATE Date input. Save using Enter.
Time Time input. Save using Enter.
Printer Printer selection:
SERVICE The function is only available to Eppendorf Service.
Checking the photometer using a filter kit from Eppendorf (see Check photometer on
page 34).
You can start a new check (NEW MEASUREMENT) or open the results of the last
check (LAST MEASUREMENT).
Selection of the language version.
"ENGLISH" and "U.S.ENGLISH" differ in their date format.
• DPU 414: Connection of the Eppendorf thermal printer.
• SERIAL: Connection of a different printer. In this case certain printer requirements
must be met. Contact your Eppendorf partner for details.
EN
Operating manual
31
Page 32

EN
7 Maintenance
7 Maintenance
7.1 Cleaning
Danger! Electric shock as a result of penetration of liquid.
Switch off the device and disconnect it from the power supply before starting cleaning or
DANGER!
Do not allow any liquids to penetrate the inside of the housing.
Do not disinfect by means of spraying.
Only reconnect the device to the power supply once it is completely dry.
BioPhotometer plus — Operating manual
disinfecting.
Operating manual
CAUTION!
Caution! Corrosion from aggressive cleaning agents and disinfectants.
Do not use corrosive cleaning agents, aggressive solvents or abrasive polishes.
Do not incubate the accessories in aggressive cleaning agents or disinfectants for prolonged
periods.
1. Switch off the device and disconnect the power plug.
2. Wipe down the surfaces with a cloth you have moistened with a mild cleaning agent.
3. Only clean the cuvette shaft using a moist lint-free cotton swab. Prevent liquid from entering
the cuvette shaft.
7.1.1 Cleaning the cuvette shaft cover
If you not only want to clean the directly accessible surface of the cuvette shaft cover, you can
remove the cover.
32
1. Slide the cover fully forward.
2. Gently pull the cover upwards near the front and then slowly push it to the back.
After a few millimeters you can lift the cover completely.
3. Clean the cover and the cover holder with a cloth or a lint-free cotton swab wetted with a mild
detergent.
4. Replace the cover on the cover holder as shown here.
The button of the cover holder fits exactly into the circular enlarged recess at the bottom of the
cover.
If the photometer is not in use slide the blue cover over the cuvette shaft to protect it against dust
Hint!
and other contamination.
Page 33

BioPhotometer plus — Operating manual
7 Maintenance
7.2 Disinfection / Decontamination
EN
Danger! Electric shock as a result of penetration of liquid.
Switch off the device and disconnect it from the power supply before starting cleaning or
DANGER!
disinfecting.
Do not allow any liquids to penetrate the inside of the housing.
Do not disinfect by means of spraying.
Only reconnect the device to the power supply once it is completely dry.
1. Switch off the device and disconnect the power plug.
2. Prior to disinfection clean the device using a mild detergent as described above
(see Cleaning on page 32).
3. Select a disinfecting method which meets the legal regulations and guidelines applicable to
your area of application.
4. For example, use alcohol (ethanol, isopropanol) or disinfectants containing alcohol.
5. Wipe down the surfaces with a cloth you have moistened in disinfectant.
6. If the cuvette shaft needs to be removed for disinfection proceed for removal and assembly as
described in the section on Cleaning (see Cleaning the cuvette shaft cover on page 32).
7. The removed cuvette shaft cover can be disinfected by spray disinfection.
7.3 Decontaminating before shipping
If you are shipping the device to the authorized Technical Service for repairs or to your authorized
dealer for disposal please note the following:
Operating manual
Warning! Risk to health from contaminated device
1. Follow the instructions in the decontamination certificate. It is available in PDF format on our
WARNING!
2. Decontaminate all the parts you want to dispatch.
3. Enclose the fully-completed decontamination certificate for returned goods (incl. the serial
7.4 Replacing fuses
Danger! Electric shock.
Switch off the device and disconnect the power plug before opening the device to replace the
DANGER!
1. Switch off the device and disconnect the power plug.
2. The fuse holder is above the mains connection 7 (see Fig. 1 on page 8). Press the small
3. Replace the fuses (see order information in the operating manual).
4. Push the fuse holder back into its retainer until the notch lever engages.
5. Reconnect the power plug.
homepage (www.eppendorf.com/decontamination)
number of the device) with the shipment.
fuses. These tasks may only be performed by appropriately trained staff.
spring-loaded notch lever at the underside of the fuse holder and pull out the holder.
.
33
Page 34

EN
Operating manual
BioPhotometer plus — Operating manual
7 Maintenance
7.5 Check photometer
To check the photometric accuracy and the accuracy of the wavelength Eppendorf offers a filter
kit (secondary UV-VIS filter). The kit contains three filters ("sample A1", "sample A2" and "sample
A3") to check the photometric acccuracy and two filters ("sample 260 nm" and "sample 280 nm")
to check the accuracy of the wavelength. The absorbances of the filters are measured against a
blank filter ("blank A0"). In addition to information about the accuracy you are also provided with
information about the precision: from the 10 measurements each per wavelength the CV value is
calculated in addition to the mean value.
To perform a blank measurement, firstly blank filters are inserted like cuvettes into the cuvette
shaft followed by the test filters. The absorbance values measured for the test filters are
compared to the permitted value range. The limit values for the permitted range for the individual
filters are printed in a table in the lid of the filter box (see in table: "X.XXX – X.XXX E").
Tab. 3: Inside lid of the filter box (sample)
34
Page 35

7 Maintenance
7.5.1 Test procedure
BioPhotometer plus — Operating manual
EN
• Carry out test at approx. 20°C.
Hint!
• Remove filter only briefly from the filter box and protect against contamination or damage to
the filter surface.
Operating manual
• Protect filter against dust, heat, liquids and aggressive vapors.
• Always insert the filter with the sticker containing the filter designation facing the user
(towards the recipient).
1. Open the function PHOTOMETER TEST / NEW MEASUREMENT.
2. Select the test filter and confirm the selection with "Enter".
3. "SAMPLE 260" or "SAMPLE 280" for measuring the accuracy of the wavelength for 260 or
280 nm.
4. "SAMPLE A1", "SAMPLE A2" or "SAMPLE A3" for measuring the photometric accuracy at
230, 260, 280, 340, 405, 490, 550, 595 and 650 nm.
5. Follow the instructions on the device display for measuring the blank ("A0") and the test filter.
The device carries out 10 measurements each and then displays the mean value and the CV
value for the measured absorbance at the respective wavelengths.
6. Press "Enter" in accordance with the instructions on the device display to have the values
displayed and then printed - provided a printer is connected.
7. Compare the mean values and the CV values to the permitted ranges in the table supplied.
If the measured values do not match the permitted value range please contact Eppendorf
Service. The filter should be recalibrated by Eppendorf after 2 years.
35
Page 36

EN
Operating manual
BioPhotometer plus — Operating manual
8 Troubleshooting
8 Troubleshooting
8.1 Result flags
Result flags Possible cause Remedy
0.015 A
0.015 A
or
0.015 A
++++++ The measured absorbance is above A = 3.
------ (Instead of a value for the ratio:)
¶ Only for nucleic acid methods and
340
550
650
"PROTEIN 280 nm":
The marking '¶' of the A
the absorbance values for 230, 260 and 280
nm are corrected with the absorbance for 340
nm (parameter "CORRECTION A
enabled).
Only for method groups "Dye 550" and
"Dye 650":
The marking '¶' of the A
value indicates that the absorbance values for
260 and 280 nm are corrected with the
absorbance for 550 or 650 nm (parameter
"CORRECTION
Ratio cannot be calculated because one of the
absorbance values used for the calculation is
A = 0 or A > 3.
550 (or 650)
value indicates that
340
value or the A
550
" is enabled).
340
" is
None. The flag is only for information.
None. The flag is only for information.
650
Dilute sample.
Check cuvette volume (light path
height is 8.5 mm).
Clean cuvette shaft (see Cleaning
on page 32) and insert cuvette the
right way round: measuring
surface towards the light path. The
direction of the light path is
indicated on the blue cuvette shaft
cover by an arrow.
Use cuvette from a material which
is optically transparent for light of
the measuring wavelength (for
measurements in UV e.g.:
Eppendorf UVette).
Repeat measurement, if necessary
with a diluted sample.
36
Page 37

BioPhotometer plus — Operating manual
8 Troubleshooting
8.2 Error messages
Device displays with error messages can be exited using Enter.
If certain parameters are programmed incompletely or incorrectly the icon for the parameter key
is shown in the display. In these cases press the parameter/dilution key instead. This brings you
directly to the parameter list to correct the error.
Error text Explanation / cause Remedy
(Parameter) PLEASE
PROGRAM
e.g.: FACTOR PLEASE
PROGRAM
MEASURE BLANK FIRST No blank has been stored for the method
MEASURE STANDARD FIRST No calibration has been stored for the method
NO STD METHOD The key standard has been pressed although
OUTSIDE OF CALIBRATION Only for non-linear calibration evaluation:
MEASURED VALUES NOT
MONOTONIC
CALIBRATION CURVE IS NOT
MONOTONIC
PROGRAM STANDARDS
INCREASING
CV IS GREATER THAN 10% When calculating the calibration the "CV" is
CALIBRATION NOT OK! The measured standard absorbances do not
MEASURED VALUES NOT
PLAUSIBLE
INVALID INPUT When entering a sample number:
MEASURING MODULE FAULT
1 (or 2 or 3)
Method parameter has not been programmed
correctly or is incomplete.
opened.
opened.
no calibration evaluation has been
programmed for the method.
The measured sample absorbance is outside
the absorbance range of the standard.
For multi-point calibration:
The absorbance values of the standard do not
result in a monotonic increasing or decreasing
order.
The calibration curve is not monotonic
increasing or decreasing or does have a
reversal point.
For multi-point calibration the target
concentration of the standards has not been
programmed in increasing order.
greater than 10%.
result in a valid calibration evaluation.
Value cannot be displayed; potential causes
when measuring with standards:
• Standard for single point calibration has the
absorbance "0"
• Calculated factor for single point calibration
is too great to be displayed.
• Polynome for multi-point calibration cannot
be displayed with the measured
absorbance values.
The number "0" was entered
Technical error messages.
Check and correct parameter (see
Parameter on page 26).
Measure blank.
Measure standards to save a valid
calibration.
Program evaluation with standards
in the measuring parameters or
measure the method again without
standards.
Only measure samples which are
within the calibration range. For
too highly concentrated samples:
dilute samples.
Check standards and measure
again in the correct order
(increasing concentration).
Check standards, if necessary
prepare again and re-measure.
Program target concentration of
the standards in increasing order.
Check standards, if necessary
prepare again and re-measure.
Check standards and measure
again.
For measurements with standards:
check measured absorbances; if
necessary, prepare standards
again and re-measure.
Enter sample number between 1
and 999.
Contact Eppendorf Service.
EN
Operating manual
37
Page 38

EN
Operating manual
BioPhotometer plus — Operating manual
8 Troubleshooting
8.3 General errors
Fault Possible cause Remedy
Measuring results are
imprecise.
Measuring results incorrect.
• Shelf life of reagent solution
exceeded.
• Reagent not prepared
correctly.
Ensure that the reagent is still within its shelf life
and properly prepared.
Use clean demineralized water of adequate
quality for preparation if required.
• Pipetting incorrect. Ensure that the pipette is calibrated and that
pipetting is being performed correctly.
• Incubation procedure before
measurement is incorrect.
If the method procedure requires incubation
before the measurement, ensure that the
temperature and time for incubation are correctly
observed.
• Cuvette dirty. Clean and rinse the cuvette. When changing
cuvette, ensure that the optical surface of the
cuvette remains clean and has not come into
contact with fingers.
If the optical surface of the cuvette is soiled with
fingerprints, clean it by wiping with a lint-free
laboratory cloth soaked in alcohol.
• Cuvette not completely full of
measuring solution without
bubbles.
Ensure that the necessary minimum volume of
the cuvette for a measurement is reached and
there are no bubbles in the measuring solution.
• Measuring solution turbid. Centrifuge turbid measuring solutions containing
particles and use the clear supernatant.
• Photometer drifting. Contact Eppendorf Service.
• Method wrongly programmed. Ensure that the method parameters are entered
correctly.
• Standard solution not
prepared correctly.
Ensure that the correct standard is used and that
the measuring solution for the standard is
prepared correctly.
• Reagent absorbance drifting. (With unstable reagent absorbance and
end-point methods): when measuring a long
series of samples, do not measure the reagent
blank only at the beginning of the series, but
also during the series of samples. If the reagent
blank drifts significantly, the reagent is
unsuitable for fault-free measurements and must
be replaced with new reagent.
Other possible causes can be
found under "Measuring results
imprecise".
Other possible remedies can be found under
"Measuring results imprecise".
38
Page 39

BioPhotometer plus — Operating manual
9 Transport, storage and disposal
9 Transport, storage and disposal
9.1 Transport
Only transport the device in the original packaging.
EN
9.2 Storage
9.3 Disposal
Air temperature Rel. humidity Air pressure
General transportation -25 to 60°C 10 to 95% 30 to 106 kPa
Air freight -40 to 55 °C 10 to 95% 30 to 106kPa
Air temperature Rel. humidity Air pressure
in transport packaging -25 to 55°C 25 to 75% 70 to 106 kPa
without transport
packaging
In the event of disposing of the product, please observe the applicable legal regulations.
Information on the disposal of electrical and electronic devices in the European
Community
The disposal of electrical devices is regulated within the European Community by national
regulations based on EU Directive 2002/96/EC pertaining to waste electrical and electronic
equipment (WEEE).
In accordance with this, any devices delivered after 13/08/2005 on a business-to-business basis,
which includes this product, may no longer be disposed of in household waste. To document this
they have been marked with the following identification:
-5 to 45°C 25 to 75% 70 to 106 kPa
Operating manual
Because disposal regulations may differ from one country to another within the EU please
contact your supplier if necessary.
39
Page 40

EN
Operating manual
BioPhotometer plus — Operating manual
10 Technical data
10 Technical data
10.1 Power supply
Power supply 100 to 240 V ± 10 % / 50 to 60 Hz ± 5 %
Overvoltage category IEC 61010-1 category II
Degree of contamination: IEC 61010-1 category II
Power consumption approx. 20 W during operation,
approx. 10 W in standby mode
Permitted mains interruption approx. 10 ms at 90 V
approx. 20 ms at 220 V
Fuses T 1A/250 V, 5 mm x 20 mm (2 off)
10.2 Ambient conditions
Operation Ambient temperature: 15 to 35 °C
Rel. humidity: 15 to 70%
Atmospheric pressure: 86 to 106 kPa
Storage Ambient temperature: -25 to 70 °C
Rel. humidity: 15 to 70%
Atmospheric pressure: 30 to 106 kPa
Not tropicalized.
Protect against direct sunlight.
10.3 Weight / dimensions
Weight 3 kg (packaged: 4.8 kg)
Dimensions Width: 200 mm (packaged: 290 mm)
Space required Width: 400 mm (or 650 mm including printer)
10.4 Interfaces
Interface for printer and PC serial RS-232
The printer to be connected must meet the requirements of EN 60950 or UL 1950.
Depth: 320 mm (packaged: 430 mm)
Height: 100 mm (packaged: 200 mm)
Depth: 500 mm
40
Page 41

10 Technical data
10.5 Photometer
Measuring principle Absorption single beam photometer with reference
Light source Xenon flash light
Monochromator Holographic concave grating
Beam receiver Silicon photo diodes
Wavelengths 230, 260, 280, 340, 405, 490, 550, 595, 650 nm
Wavelength selection Dependent on method, controlled by program
Spectral bandwidth 5 nm at 230 to 340 nm
Systematic wavelength error ± 1 nm at 230 to 280 nm
Photometric measuring range Quartz glass cuvette:
Reading accuracy ΔA = 0.001
Random photometric error 0.002 at A = 0
Systematic photometric error ± 1% at A = 1
Stray light component < 0.05 %
BioPhotometer plus — Operating manual
beam and several fixed wavelenghts
7 nm at 405 to 650 nm
± 2 nm at 340 to 650 nm
• A = 0 to 3, except:
• A = 0 to 2 at 340 nm
• Only for dye methods:
A = 0 to 2 at 550/650 nm
UVette (Eppendorf):
• A = 0 to 2.5 at 230 nm
• A = 0 to 2.6 at 260 nm
• A = 0 to 2.8 at 280 nm
• Other values see quartz glass cuvette
0.005 at A = 1
EN
Operating manual
10.6 Other technical parameters
Cuvette material For DNA, RNA, Oligo, Protein UV, Assay 340:
Cuvette shaft 12.5 mm x 12,5 mm, not temperature-controlled
Overall cuvette height Min. 36 mm
Height of the light beam in the cuvette 8.5mm
Light beam in the cuvette Width: 1 mm
Keyboard 19 foil keys
Display Illuminated graphic display, 33 mm x 60 mm
Operator guidance language English, French, German
Result output Via display and printer:
Standards and regulations According to VDE, CE, IEC 1010-1
Quartz glass or UV transparent plastic
(UVette by Eppendorf)
For OD600, Bradford, Lowry, BCA, Assay 405,
Assay 490:
Glass or plastic
Height: 1.5 mm
Absorbance, concentration, ratio, FOI
41
Page 42

EN
Operating manual
BioPhotometer plus — Operating manual
10 Technical data
10.7 Application parameters
Method memory 32 preprogrammed, modifiable method
programs
Measuring methods End point against blank
Dye methods: parallel measurement of
biomolecule and dye label
Method-dependent evaluation absorbance
concentration via factor
concentration via calibration with 1 to 10
standards:
• single point calibration (1 standard)
• linear regression (2 to 10 standards)
• non-linear regression (polynome of 3rd
degree; 4 or 5 to 10 standards
(see Evaluation procedure on page 43)).
• 1x, 2x or 3x measurement
for nucleic acids:
• ratio 260/280
• ratio 260/230
• molar concentration
• total yield
for dye methods:
• FOI (frequency of incorporation;
marking density)
Calibration memory For all calibration methods
Measured value memory For 100 results with abosrbance and ratio
values, sample number, sample dilution, date
and time
42
Page 43

BioPhotometer plus — Operating manual
11 Evaluation procedure
11 Evaluation procedure
Hint!
This chapter describes the available evaluation procedures in the method programs (see
Parameter on page 26) and the calculation of a dilution by the device software.
When comparing the measuring results to those of other photometers / spectrometers note that
the values may depend on the bandwidths of the devices. In the following cases the differences
may be significant:
• The absorbance spectrum shows a narrow peak in the measurement wavelength.
• The measurement is carried out not at the maximum but at the edge of a peak.
You should therefore check the accuracy of the method by measuring standards.
11.1 Evaluation with factor
C = calculated concentration
A = measured absorbance
F = factor
The factor is programmed in the parameter list and can be modified. For the dye methods the
factor for calculating the dye component is calculated from the absorbance coefficient of the
device.
The factor always relates to the cuvette optical path length of 10 mm. If you change the parameter
CUVETTE the modification is taken into account by the device when calculating the results.
Therefore you do not need to change the factor for the evaluation.
If, on the other hand, you modify the concentration unit, you have to ensure that the factor is
adjusted for the selected unit.
EN
Operating manual
11.2 Evaluation using standards
11.2.1 Single point calibration
F = calculated factor
C
= nominal concentration of the standard
S
A
= measured absorbance of the standard
S
The nominal concentration is programmed in the parameter list and can be modified.
If multiple measurement (2x, 3x) has been programmed for the standard, then the evaluation
from the measured absorbances takes place via linear regression taking into account the zero
value. After calculating the regression a CV value (coefficient of variation with a unit of %) is
formed as measure for the scattering of the measured values. If the CV is greater than 10% it will
be displayed. In this case the calibration will only be stored after confirmation.
The calculation of the sample concentration takes place using the calculated factor:
43
Page 44

EN
Operating manual
BioPhotometer plus — Operating manual
11 Evaluation procedure
11.2.2 Multi-point calibration: calibration line
For the evaluation via a calibration line the selection "LINEAR" is programmed in the parameter
"REGRESSION".
From 2 to 10 standards which can be measured once, twice or three times, a linear equation is
calculated via linear regression (concentration as function of absorbance):
a
= Interface of the calibration line with the concentration axis ("offset": concentration of a
0
sample with absorbance 0)
a1 = slope of the calibration line ("factor")
After calculating the regression the device forms a CV value (see above) as measure for the
scattering of the measured values around the calibration line (exception: two point calibration with
single measurement of both standards). If the CV is greater than 10% it will be displayed. In this
case the calibration will only be stored after confirmation. For more than 2 standards the CV
value is always displayed (even for a value below 10%).
In the function list the calibration data can be printed.
11.2.3 Multi-point calibration: Calibration curve
For the evaluation via a calibration curve the selection "NON-LINEAR" is programmed in the
parameter "REGRESSION".
From 5 to 10 standards measured once, or 4 to 10 standards measured twice or three times, an
equation for the third degree polynome (concentration as function of absorbance) is calculated
via a non-linear regression.
a = coefficients (the coefficients are defined using the method of smallest squares)
After calculating the regression the device forms a CV value as measure for the scattering of the
measured values around the calibration line (see above). If the CV exceeds 10% the calibration is
only stored after confirmation.
The details above about the CV value and printing the calibration data apply accordingly.
11.3 Dilution
Dilutions entered into the method procedure are taken into account when calculating the results:
C
V
V
= result converted using the dilution factor
Dil, corr
= volume of the sample in the measuring solution
P
= volume of the diluent in the measuring solution
Dil
44
Page 45

BioPhotometer plus — Operating manual
11 Evaluation procedure
11.4 Special evaluation procedures for the dye methods
EN
11.4.1 Calculating the factor for the dye from the absorbance coefficient
In the dye methods a factor is calculated for the dye from the absorbance coefficient entered in
the parameters and is displayed in the startup screen of the method procedure.
The factor is calculated as follows:
F
= factor for the dye with automatic allowance for the cuvette optical path length
d, Dye
ε
= absorbance coefficient for the dye programmed in the method parameters; unit: cm-1M
Dye
d = cuvette optical path length, unit: cm
11.4.2 Calculation of the FOI
As a value for the ratio of dye molecules to the number of nucleotides in the nucleic acid the
frequency of incorporation (FOI) is calculated and displayed for the dye methods. The calculation
can be selected for two different result units:
Unit DYE MOLECULE DYE / kb
Unit pmole/μg DNA (or RNA)
Operating manual
-1
= measured absorbance of the dye at 550 or 650 nm
A
X50
ε
= absorbance coefficient for the dye, unit: cm-1M
Dye
MMnt = average molecular mass of the nucleotides; unit: g/mol; for dsDNA/ssDNA/Oligo DNA:
325; for RNA / Oligo RNA: 337
A
= measured absorbance of the nucleic acid
260
F = factor for calculating the nucleic acid programmed in the method parameters. The factor
relates to the cuvette optical path length of 10 mm and does not need modifying if the parameter
CUVETTE is modified.
-1
45
Page 46

EN
BioPhotometer plus — Operating manual
11 Evaluation procedure
11.5 Special evaluation procedures for nucleic acids and protein UV
This section relates to the evaluation of nucleic acids or proteins in the methods dsDNA, ssDNA,
Oligo DNA, RNA, Oligo RNA, Protein UV and the corresponding biomolecule components in the
dye methods.
Operating manual
11.5.1 Correction A
11.5.2 Correction A
340
Application: Partial correction of distortions of absorbance due to turbidity in the measuring
solution.
The application of the evaluation procedure can be activated in the parameter list of the method.
= calculated corrected absorbance at a wavelength of 230, 260 and 280 nm
A
X, corr
A
= measured absorbance at a wavelength of 230, 260 and 280 nm
X
A
= measured absorbance at a wavelength of 340 nm
340
550/650
Application: Correction of the effect of the dye absorbance on the nucleic acid or protein
absorbance at 260 and 280 nm.
The application of the evaluation procedure can be activated in the parameter list of the method.
= calculated corrected absorbance at a wavelength of 260 and 280 nm
A
X, corr
A
= measured absorbance at a wavelength of 260 and 280 nm
X
KF
= correction factor for the wavelength 260 or 280 nm (the two correction factors for 260 and
X
for 280 nm are programmed in the parameter list of the method)
A
= measured absorbance at a wavelength of 550 (or 650) nm
X50
The absorbance values displayed in the results are the directly measured, not the corrected
Hint!
absorbance values.
11.5.3 Conversion into molar concentrations and nucleic acid amounts
The conversion can only be applied to nucleic acids and dye methods with nucleic acids as
biomolecule component.
Calculation of amount
Application: Calculation of the amount (mass) of nucleic acid or nucleic acid dye conjugate in the
whole sample volume.
M = calculated total amount (mass) of the nucleic acid or the conjugate in the sample tube
C = calculated concentration of the nucleic acid or the conjugate
V
= volume of the sample in the sample tube; entered by the user in the third screen of the
P, t o t al
result display (see Nucleic acids on page 19).
46
Page 47

BioPhotometer plus — Operating manual
11 Evaluation procedure
Calculation of the molar concentration
Application: calculation of the molar concentration of the nucleic acid from the mass
concentration and relative molar mass. The molar mass is either entered directly or calculated by
the device from the entered figure of the bases or base pairs per nucleic acid molecule.
C
= calculated molar concentration of the nucleic acid; the unit for the molar concentration is
Mol
programmed in the parameter list of the method; dependent on the programmed unit the formula
above is adjusted automatically.
C = mass concentration of the nucleic acid in ng/μl or μg/ml, from the measured absorbance the
device calculates the concentration result and displays it on the results screen
MM = relative molar mass in kDa
If in the third results screen the number of bases or base pairs per nucleic acid molecule has
been entered instead of the relative molar mass, then the molar mass is calculated from the
number of bases (or pairs):
For dsDNA:
EN
Operating manual
For ssDNA, RNA, Oligo:
MM = calculated relative molar mass in kDa
bp = entered number of base pairs per molecule
b = entered number of bases per molecule
47
Page 48

BioPhotometer plus — Operating manual
12 Ordering information
EN
Operating manual
12 Ordering information
Order No.
(International)
6132 000.008
6132 000.016
6131 928.007 952010221
6131 011.006
6131 010.000
0013 021.566 952010409
0030 106.300 952010051
0030 106.318 952010069
4308 078.006 940001102
Order No. (North
America)
952000006
952010140
Description
BioPhotometer plus
230 V / 50-60 Hz, power plug Europe, more types of mains connection available
120 V / 50-60 Hz, power plug North America
Secondary UV-VIS-Filter
Test filter set for checking photometric accuracy und wavelength accuracy
(according to NIST)
Thermal Printer DPU 414
incl. power supply and printer cable
230 V
115 V
Thermo paper
5 rolls
®
UVette
individually packaged single cuvettes, directly usable with BioPhotometer,
certified RNase-, DNA- and protein-free
80 cuvettes
UVette® routine pack
Eppendorf Quality purity level, reclosable box
200 cuvettes
Cuvette stand
for 16 cuvettes
48
Page 49

Page 50

Page 51

In touch with life
Your local distributor: www .eppendorf.com/worldwide
Eppendorf AG · 22331 Hamburg · Germany · Tel: +49 40 53801-0 · Fax: +49 40 538 01-556 · E-mail: eppendorf@eppendorf.com
Eppendorf North America, Inc. · 102 Motor Parkway · Hauppauge, N.Y. 11788-5178 · USA
Tel: +1 516 334 7500 · Toll free phone: +1 800-645-3050 · Fax: +1 516 334 7506 · E-mail: info@eppendorf.com
Application Support Europe: Tel: +49 1803 666 789 (Preis je nach Tarif im Ausland; 9 ct/min aus dem dt. Festnetz; Mobilfunkhöchstpreis 42 ct/min)
support@eppendorf.com
North America: Tel: +1 800 645 3050 · E-mail: techserv@eppendorf.com
Asia Pacific: Tel: +60 3 8023 6869 · E-mail: support_asiapacific@eppendorf.com
 Loading...