

Page 1

Op
eratin
g M
l
anua
10/08
BioPhotometer Data Transfer Software
Operating Manual
Page 2

BioPhotometer Data Transfer Software — Operating Manual
Copyright
©
2008 Eppendorf AG, Hamburg. No part of this publication may be reproduced without
the prior permission of the copyright owner.
Trademarks
eppendorf® is a registered trademark of Eppendorf AG, Hamburg, Germany.
Microsoft®, Microsoft Office®, Excel®, Windows XP® and Windows Vista® are registered
trademarks of Microsoft Corp., Redmond, USA.
Trademarks are not marked in all cases with ™ or ® in this manual.
10/08
Page 3

BioPhotometer Data Transfer Software — Operating Manual
Table of contents
Table of contents
1 User instructions . . . . . . . . . . . . . . . . . . . . . . . . . . . . . . . . . . . . . . . . . . . . . . . . . . . . . . . . . . . . . . . . . . . . . . . . . . . . 5
1.1 Using this manual . . . . . . . . . . . . . . . . . . . . . . . . . . . . . . . . . . . . . . . . . . . . . . . . . . . . . . . . . . . . . . . . . . . . . . . 5
2 Product description. . . . . . . . . . . . . . . . . . . . . . . . . . . . . . . . . . . . . . . . . . . . . . . . . . . . . . . . . . . . . . . . . . . . . . . . . . 6
2.1 Features . . . . . . . . . . . . . . . . . . . . . . . . . . . . . . . . . . . . . . . . . . . . . . . . . . . . . . . . . . . . . . . . . . . . . . . . . . . . . . 6
2.2 Delivery package . . . . . . . . . . . . . . . . . . . . . . . . . . . . . . . . . . . . . . . . . . . . . . . . . . . . . . . . . . . . . . . . . . . . . . . 6
2.3 System requirements . . . . . . . . . . . . . . . . . . . . . . . . . . . . . . . . . . . . . . . . . . . . . . . . . . . . . . . . . . . . . . . . . . . . 6
3 Safety . . . . . . . . . . . . . . . . . . . . . . . . . . . . . . . . . . . . . . . . . . . . . . . . . . . . . . . . . . . . . . . . . . . . . . . . . . . . . . . . . . . . . 7
3.1 Intended use. . . . . . . . . . . . . . . . . . . . . . . . . . . . . . . . . . . . . . . . . . . . . . . . . . . . . . . . . . . . . . . . . . . . . . . . . . . 7
4 Installation . . . . . . . . . . . . . . . . . . . . . . . . . . . . . . . . . . . . . . . . . . . . . . . . . . . . . . . . . . . . . . . . . . . . . . . . . . . . . . . . . 8
4.1 Preparing installation . . . . . . . . . . . . . . . . . . . . . . . . . . . . . . . . . . . . . . . . . . . . . . . . . . . . . . . . . . . . . . . . . . . . 8
4.1.1 PC with serial interface . . . . . . . . . . . . . . . . . . . . . . . . . . . . . . . . . . . . . . . . . . . . . . . . . . . . . . . . . . . . 8
4.1.2 PC with USB-RS232 adapter . . . . . . . . . . . . . . . . . . . . . . . . . . . . . . . . . . . . . . . . . . . . . . . . . . . . . . . 8
4.2 Install software . . . . . . . . . . . . . . . . . . . . . . . . . . . . . . . . . . . . . . . . . . . . . . . . . . . . . . . . . . . . . . . . . . . . . . . . . 8
5 Short Instructions . . . . . . . . . . . . . . . . . . . . . . . . . . . . . . . . . . . . . . . . . . . . . . . . . . . . . . . . . . . . . . . . . . . . . . . . . . . 9
6 Operation . . . . . . . . . . . . . . . . . . . . . . . . . . . . . . . . . . . . . . . . . . . . . . . . . . . . . . . . . . . . . . . . . . . . . . . . . . . . . . . . . 10
6.1 Work area . . . . . . . . . . . . . . . . . . . . . . . . . . . . . . . . . . . . . . . . . . . . . . . . . . . . . . . . . . . . . . . . . . . . . . . . . . . . 10
6.2 Archive area . . . . . . . . . . . . . . . . . . . . . . . . . . . . . . . . . . . . . . . . . . . . . . . . . . . . . . . . . . . . . . . . . . . . . . . . . . 11
6.3 Symbol bar . . . . . . . . . . . . . . . . . . . . . . . . . . . . . . . . . . . . . . . . . . . . . . . . . . . . . . . . . . . . . . . . . . . . . . . . . . . 12
6.4 Menu bar . . . . . . . . . . . . . . . . . . . . . . . . . . . . . . . . . . . . . . . . . . . . . . . . . . . . . . . . . . . . . . . . . . . . . . . . . . . . 13
6.4.1 File . . . . . . . . . . . . . . . . . . . . . . . . . . . . . . . . . . . . . . . . . . . . . . . . . . . . . . . . . . . . . . . . . . . . . . . . . . 13
6.4.2 Archive . . . . . . . . . . . . . . . . . . . . . . . . . . . . . . . . . . . . . . . . . . . . . . . . . . . . . . . . . . . . . . . . . . . . . . . 13
6.4.3 View . . . . . . . . . . . . . . . . . . . . . . . . . . . . . . . . . . . . . . . . . . . . . . . . . . . . . . . . . . . . . . . . . . . . . . . . . 13
6.4.4 Account . . . . . . . . . . . . . . . . . . . . . . . . . . . . . . . . . . . . . . . . . . . . . . . . . . . . . . . . . . . . . . . . . . . . . . . 13
6.4.5 Help. . . . . . . . . . . . . . . . . . . . . . . . . . . . . . . . . . . . . . . . . . . . . . . . . . . . . . . . . . . . . . . . . . . . . . . . . . 13
6.5 Start and exit software . . . . . . . . . . . . . . . . . . . . . . . . . . . . . . . . . . . . . . . . . . . . . . . . . . . . . . . . . . . . . . . . . . 14
6.5.1 Start software . . . . . . . . . . . . . . . . . . . . . . . . . . . . . . . . . . . . . . . . . . . . . . . . . . . . . . . . . . . . . . . . . . 14
6.5.2 Exit software . . . . . . . . . . . . . . . . . . . . . . . . . . . . . . . . . . . . . . . . . . . . . . . . . . . . . . . . . . . . . . . . . . . 14
6.6 Gather data. . . . . . . . . . . . . . . . . . . . . . . . . . . . . . . . . . . . . . . . . . . . . . . . . . . . . . . . . . . . . . . . . . . . . . . . . . . 14
6.6.1 Optional settings prior to saving data . . . . . . . . . . . . . . . . . . . . . . . . . . . . . . . . . . . . . . . . . . . . . . . . 14
6.6.2 Gather data simultaneously for measurement at the BioPhotometer plus.. . . . . . . . . . . . . . . . . . . . 15
6.6.3 Transfer data from the results memory to the BioPhotometer plus . . . . . . . . . . . . . . . . . . . . . . . . . . 15
6.6.4 Interrupt data acquisition. . . . . . . . . . . . . . . . . . . . . . . . . . . . . . . . . . . . . . . . . . . . . . . . . . . . . . . . . . 16
6.7 Display files. . . . . . . . . . . . . . . . . . . . . . . . . . . . . . . . . . . . . . . . . . . . . . . . . . . . . . . . . . . . . . . . . . . . . . . . . . . 16
6.7.1 Work area . . . . . . . . . . . . . . . . . . . . . . . . . . . . . . . . . . . . . . . . . . . . . . . . . . . . . . . . . . . . . . . . . . . . . 16
6.7.2 Archive area . . . . . . . . . . . . . . . . . . . . . . . . . . . . . . . . . . . . . . . . . . . . . . . . . . . . . . . . . . . . . . . . . . . 19
6.8 Export data . . . . . . . . . . . . . . . . . . . . . . . . . . . . . . . . . . . . . . . . . . . . . . . . . . . . . . . . . . . . . . . . . . . . . . . . . . . 20
6.8.1 CSV Export from the Work area . . . . . . . . . . . . . . . . . . . . . . . . . . . . . . . . . . . . . . . . . . . . . . . . . . . . 20
6.8.2 CSV Export from the Archive area . . . . . . . . . . . . . . . . . . . . . . . . . . . . . . . . . . . . . . . . . . . . . . . . . . 21
6.8.3 CSV Export of calibration data . . . . . . . . . . . . . . . . . . . . . . . . . . . . . . . . . . . . . . . . . . . . . . . . . . . . . 22
6.8.4 Excel Export . . . . . . . . . . . . . . . . . . . . . . . . . . . . . . . . . . . . . . . . . . . . . . . . . . . . . . . . . . . . . . . . . . . 23
6.8.5 Copy . . . . . . . . . . . . . . . . . . . . . . . . . . . . . . . . . . . . . . . . . . . . . . . . . . . . . . . . . . . . . . . . . . . . . . . . . 23
6.9 Create and open archives. . . . . . . . . . . . . . . . . . . . . . . . . . . . . . . . . . . . . . . . . . . . . . . . . . . . . . . . . . . . . . . . 24
6.9.1 Create archive file . . . . . . . . . . . . . . . . . . . . . . . . . . . . . . . . . . . . . . . . . . . . . . . . . . . . . . . . . . . . . . . 24
6.9.2 Open closed archive file . . . . . . . . . . . . . . . . . . . . . . . . . . . . . . . . . . . . . . . . . . . . . . . . . . . . . . . . . . 25
Table of contents
3
Page 4

BioPhotometer Data Transfer Software — Operating Manual
Table of contents
7 Further functions . . . . . . . . . . . . . . . . . . . . . . . . . . . . . . . . . . . . . . . . . . . . . . . . . . . . . . . . . . . . . . . . . . . . . . . . . . . 26
7.1 COM Port setting . . . . . . . . . . . . . . . . . . . . . . . . . . . . . . . . . . . . . . . . . . . . . . . . . . . . . . . . . . . . . . . . . . . . . . 26
7.1.1 Manual setting. . . . . . . . . . . . . . . . . . . . . . . . . . . . . . . . . . . . . . . . . . . . . . . . . . . . . . . . . . . . . . . . . . 26
7.2 User administration. . . . . . . . . . . . . . . . . . . . . . . . . . . . . . . . . . . . . . . . . . . . . . . . . . . . . . . . . . . . . . . . . . . . . 27
7.2.1 Activate user administration . . . . . . . . . . . . . . . . . . . . . . . . . . . . . . . . . . . . . . . . . . . . . . . . . . . . . . . 28
7.2.2 Structure user administration . . . . . . . . . . . . . . . . . . . . . . . . . . . . . . . . . . . . . . . . . . . . . . . . . . . . . . 29
7.2.3 User . . . . . . . . . . . . . . . . . . . . . . . . . . . . . . . . . . . . . . . . . . . . . . . . . . . . . . . . . . . . . . . . . . . . . . . . . 30
7.2.4 Change password . . . . . . . . . . . . . . . . . . . . . . . . . . . . . . . . . . . . . . . . . . . . . . . . . . . . . . . . . . . . . . . 30
7.2.5 Create, edit and delete user . . . . . . . . . . . . . . . . . . . . . . . . . . . . . . . . . . . . . . . . . . . . . . . . . . . . . . . 30
Table of contents
8 Troubleshooting. . . . . . . . . . . . . . . . . . . . . . . . . . . . . . . . . . . . . . . . . . . . . . . . . . . . . . . . . . . . . . . . . . . . . . . . . . . . 32
8.1 General errors . . . . . . . . . . . . . . . . . . . . . . . . . . . . . . . . . . . . . . . . . . . . . . . . . . . . . . . . . . . . . . . . . . . . . . . . 32
8.2 Error messages . . . . . . . . . . . . . . . . . . . . . . . . . . . . . . . . . . . . . . . . . . . . . . . . . . . . . . . . . . . . . . . . . . . . . . . 33
8.2.1 User administration . . . . . . . . . . . . . . . . . . . . . . . . . . . . . . . . . . . . . . . . . . . . . . . . . . . . . . . . . . . . . . 33
8.2.2 Print. . . . . . . . . . . . . . . . . . . . . . . . . . . . . . . . . . . . . . . . . . . . . . . . . . . . . . . . . . . . . . . . . . . . . . . . . . 33
8.2.3 Connection to BioPhotometer plus . . . . . . . . . . . . . . . . . . . . . . . . . . . . . . . . . . . . . . . . . . . . . . . . . . 34
8.2.4 Select archive files . . . . . . . . . . . . . . . . . . . . . . . . . . . . . . . . . . . . . . . . . . . . . . . . . . . . . . . . . . . . . . 34
4
Page 5

BioPhotometer Data Transfer Software — Operating Manual
1 User instructions
1 User instructions
1.1 Using this manual
This manual describes the application of the BioPhotometer Data Transfer Software in
combination with the BioPhotometer plus. It also applies to the BioPhotometer.
Please read this operating manual thoroughly before using the software for the first time.
For the operation of the BioPhotometer plus or the BioPhotometer please read the operating
manual accompanying the device.
Please view this CD with the operating manual as part of the product and keep it somewhere
easily accessible.
1
User instructions
5
Page 6

2
BioPhotometer Data Transfer Software — Operating Manual
2 Product description
2 Product description
2.1 Features
The BioPhotometer Data Transfer Software is a PC software for measurement data transfer from
BioPhotometer plus to the PC.
The received data can be saved in CSV format, opened and edited with calculation programs.
The data in CSV format is directly opened in Excel on a PC with Microsoft Office version 2000 or
higher.
With the BioPhotometer Data Transfer Software routine application results can be displayed
simply, archived and printed.
The BioPhotometer Data Transfer Software can only be connected to one BioPhotometer plus or
Hint!
2.2 Delivery package
one BioPhotometer.
Order No.
(International)
6132 854.007 952000500
Order No.
(North America)
Description
BioPhotometer Data Transfer Software
incl. null modem cable and CD with software and operating
manual
2.3 System requirements
Product description
Hardware
• Pentium III 1.0 GHz or higher
• > 1 GByte RAM free main memory
• Serial interface (RS232)
Alternatively: at least one USB Port to use a USB-RS232 adapter
• CD-ROM drive
Software
• Microsoft Windows XP SP2 or Windows Vista
• Microsoft .NET Framework 2.0
• Optional: Microsoft Office version 2000 or higher
BioPhotometer plus
• The menu language of the Biophotometer plus is set as LANGUAGE ENGLISH or
LANGUAGE U.S.ENGL.
6
Page 7
3 Safety
3Safety
3.1 Intended use
Hint!
BioPhotometer Data Transfer Software — Operating Manual
The BioPhotometer Data Transfer Software is an accessory to the BioPhotometer and
BioPhotometer plus devices.
The BioPhotometer Data Transfer Software is a PC software which exclusively serves to transfer
measurement data from BioPhotometer and BioPhotometer plus to the PC.
The received data can be saved in CSV format, opened and edited with calculation programs.
The data in CSV format is directly opened in Excel on a PC with Microsoft Office version 2000 or
higher.
The BioPhotometer Data Transfer Software serves to display routine application results simply, to
archive and print them. It is not intended for work in the regulated area.
The BioPhotometer Data Transfer Software can only be connected to one BioPhotometer plus or
one BioPhotometer.
For a description of the intended use of the BioPhotometer and BioPhotometer plus devices
please read the respective operating manuals.
3
Safety
7
Page 8

BioPhotometer Data Transfer Software — Operating Manual
4 Installation
4 Installation
4.1 Preparing installation
4.1.1 PC with serial interface
1. Connect BioPhotometer plus via the provided null modem cable to the serial interface of the
PC (see operating manual BioPhotometer plus).
2. Tighten the fastening screws of the null modem cable at BioPhotometer plus and also at the
PC in order to avoid any interruption of the connection.
4.1.2 PC with USB-RS232 adapter
1. Connect the USB-RS232 adapter to the USB-Port of the PC.
The computer detects new hardware. If applicable, a message box opens for the installation
of e.g. driver components. Follow the instructions step by step.
2. Connect the BioPhotometer plus via the provided null modem cable to the plug connection of
the adapters.
3. Tighten the fastening screws of the null modem cable at BioPhotometer plus and also at the
adapter in order to avoid any interruption of the connection.
4
Installation
4.2 Install software
Hint!
Hint!
For the installation of the BioPhotometer Data Transfer Software the BioPhotometer plus must
not be connected.
In order to install the BioPhotometer Data Transfer Software onto your PC proceed as follows:
1. Make sure that all programs are exited.
2. Put the BioPhotometer Data Transfer Software CD into the CD drive of your PC.
If the autostart function is active on your PC installation starts automatically.
3. If the installation does not start automatically start the file Setup.exe from the CD.
You are guided step by step through the installation.
Other programs can interrupt the automatic installation of the BioPhotometer Data Transfer
Software. In such a case restart the installation with the file Setup.exe from the CD.
The installation is successful if the shortcut to the software appears on the desktop:
8
Page 9
BioPhotometer Data Transfer Software — Operating Manual
5 Short Instructions
5 Short Instructions
Requirement
• BioPhotometer plus is connected to the PC with the provided null modem cable.
• The set menu language of the Biophotometer plus is LANGUAGE ENGLISH or
LANGUAGE U.S.ENGL. It may lead to faulty data transfer with a different language setting.
• The software is installed.
1. Switch the BioPhotometer plus on.
2. Start the BioPhotometer Data Transfer Software via the shortcut on the desktop.
The connected BioPhotometer plus is displayed by a corresponding message, e.g. Connected
device: BioPhotometer plus 6132 found at COM1.
3. Select a method at the BioPhotometer plus and start the measurement.
The data is automatically transferred during the measurement and is displayed in the section
Data Output of the Work area in the format of a device print.
4. For the results display in table format select the rider Samples in the Work area. With Methods
with calibrations the rider appears additionally Calibrations in which the calibration results are
displayed in table format.
You can print these formats directly via the icon Print or by selecting the corresponding
print options with Print in the menu File.
5. You have two possibilities to export data from the areas Samples or Calibrations:
1. Excel Export
Click on the icon Excel Export .
A dialog window opens. After entering the file name and path the data is saved as CSV
file and automatically opened with Excel.
2. CSV Export
Click on the icon CSV Export .
A dialog window opens. After entering the file name and path the data is saved as CSV
file. The data can be opened with a calculation program.
You can also save new measurement data in an existing CSV file. The new data is
automatically inserted at the end of the table.
6. Exit the BioPhotometer Data Transfer Software with the menu File/ Exit.
4
Installation
9
Page 10
6
Operation
BioPhotometer Data Transfer Software — Operating Manual
6 Operation
6 Operation
6.1 Work area
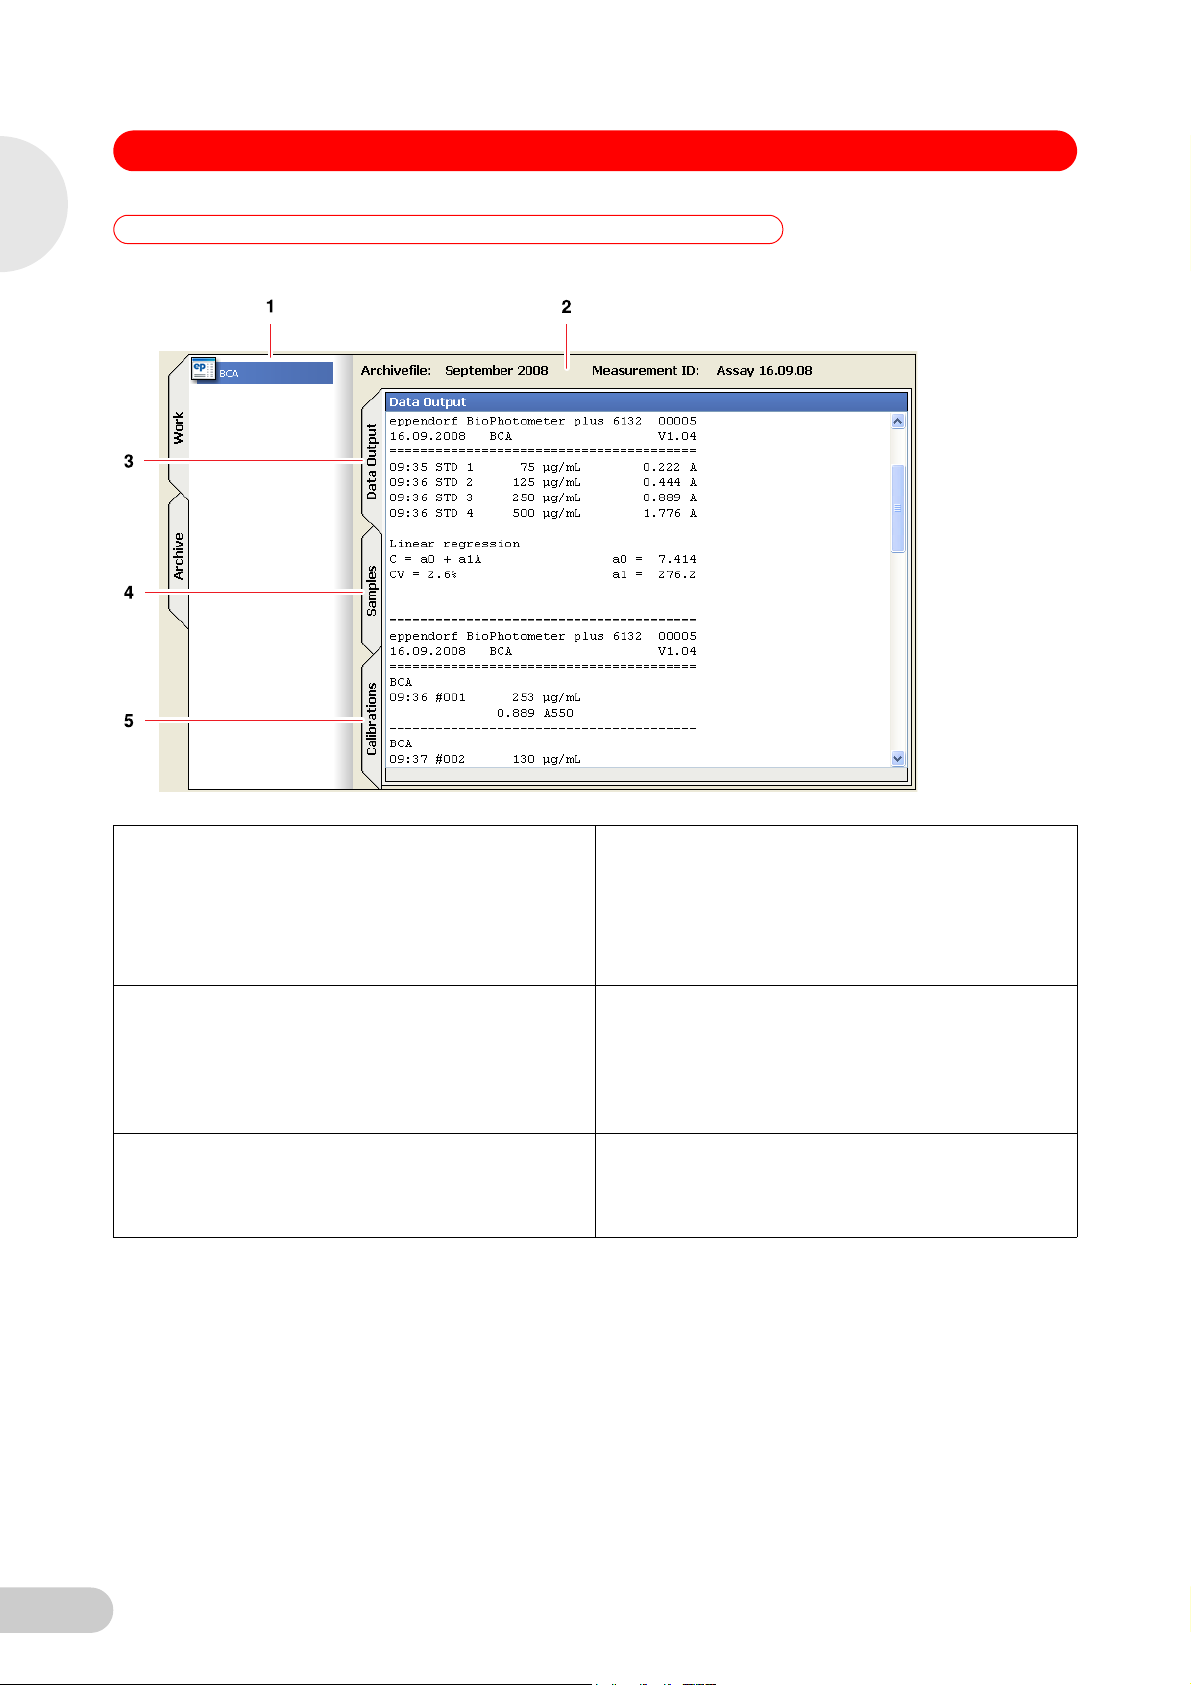
The Work area is divided into various sections:
Abb. 1: Work area
Fig. 1: Work area
1 Method List
Contains all transferred methods after starting the
software.
3 Data Output
Display of the data parallel to the measurement
procedure at the BioPhotometer plus. The display and
order of the data corresponds to the display of the
BioPhotometer plus and the corresponding device
print.
5 Calibrations
Display of the calibration data in table format. This
area only appears if data with calibration was
transferred.
2 File information
Archive file: name of the current archive file where the
recorded measurement data is saved.
Measurement ID: Identification code under which the
transferred measurement data are filed. The entry is
optional.
4 Samples
Display of the data in table format parallel to the
measurement procedure at the BioPhotometer plus.
The data does not differ as regards to contents form
Data Output. The order of the data corresponds to the
display of BioPhotometer plus.
10
Page 11
6 Operation
6.2 Archive area
BioPhotometer Data Transfer Software — Operating Manual
6
Abb. 2: Archive area
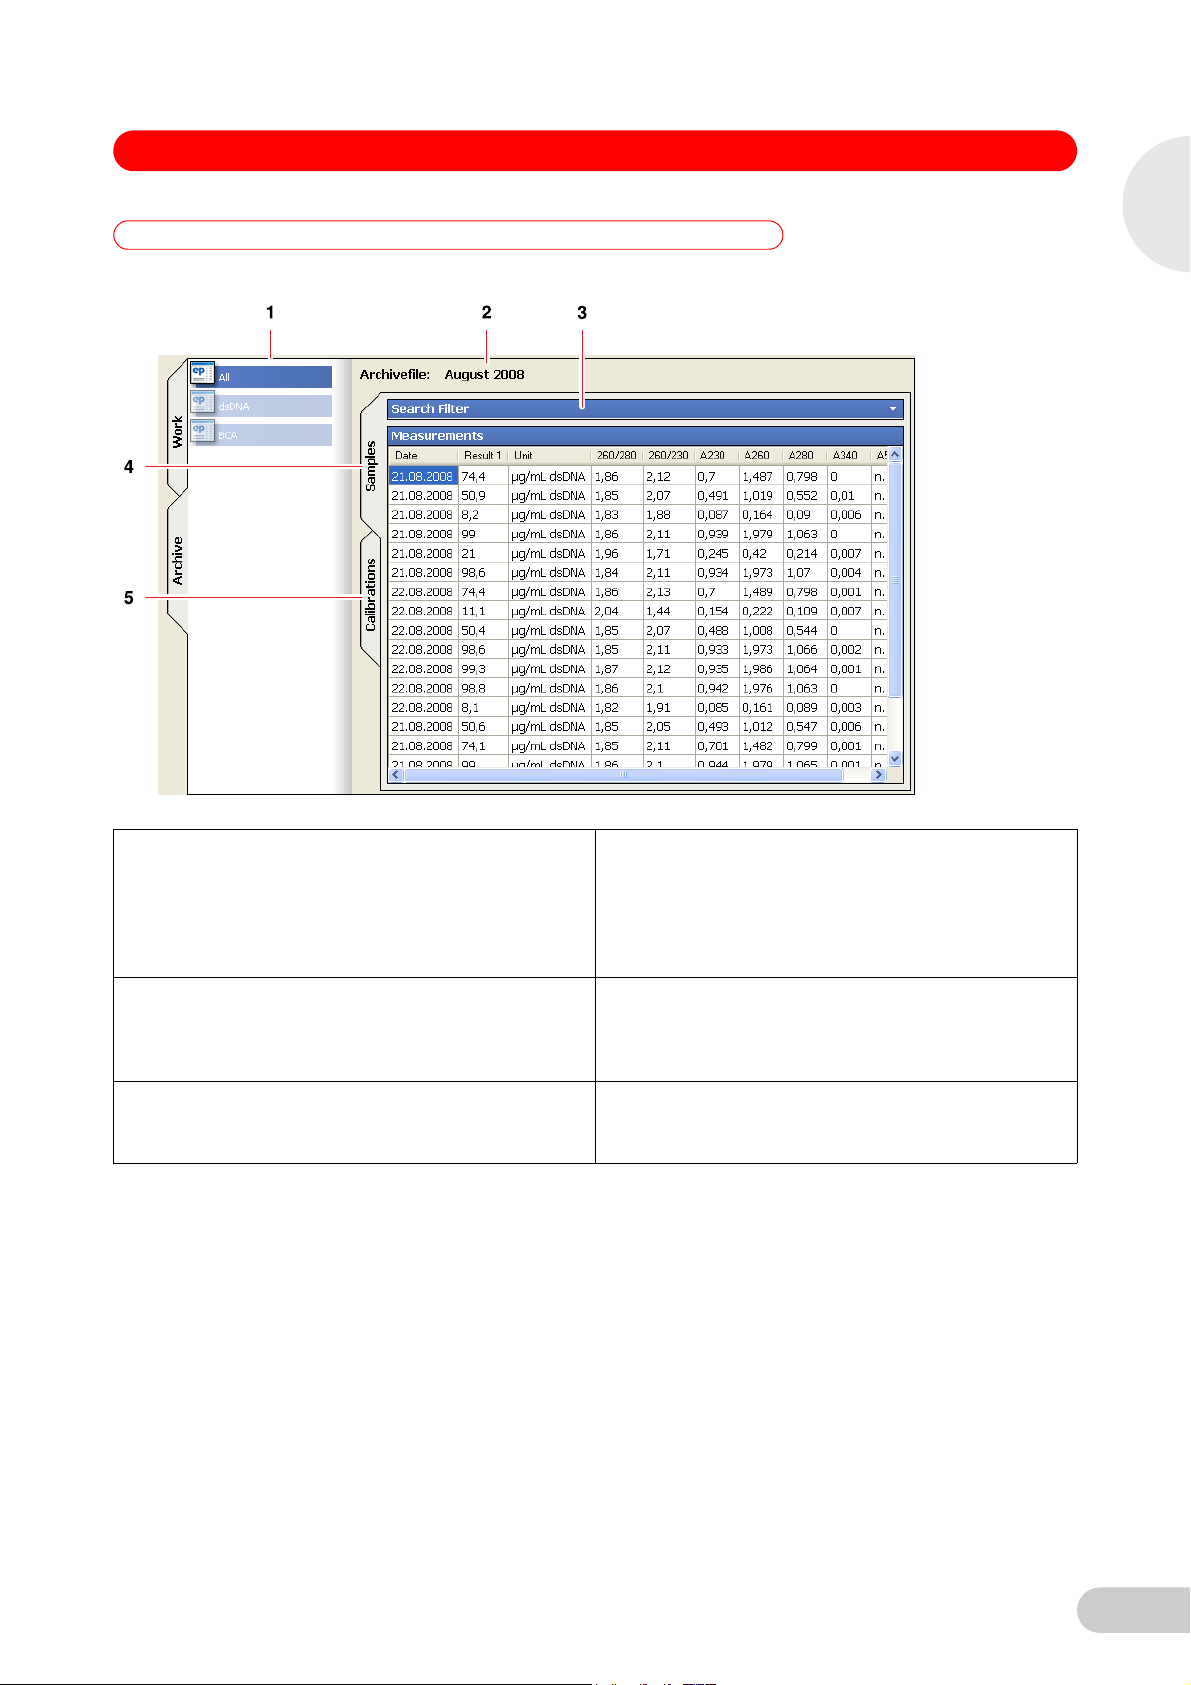
The Archive area is subdivided into various sections:
Fig. 2: Archive area
1 Method List
Displays all methods where measurement data has
been transferred into the open archive file. All:
Contains all measurement data of the different
methods in chronological order. The results are not
sorted according to methods.
Operation
2 File information
Archive file: Name of the opened archive file.
3 Search Filter
Search for measurement results within one method.
Date, User (for active user administration), ID (if
entered) and Device can be defined as filter.
5 Calibrations
Display of the calibration results of a method in table
format in chronological order.
4 Samples
Display of the measurement results of a method in
table format in chronological order.
11
Page 12

6
Operation
6 Operation
6.3 Symbol bar
BioPhotometer Data Transfer Software — Operating Manual
The following functions are available:
Print Print data in opened format.
Excel Export Save data as CSV file and open automatically in
Excel.
CSV Export Save data as CSV file. (see p. 20)
Connect Establish connection between software and
BioPhotometer plus or continue with recording
measurement data.
Disconnect Disconnect connection between software and
BioPhotometer plus and stop recording
measurement data.
(see p. 23)
(see p. 16)
Copy Copy Data of a table. (see p. 23)
ID Enter identification code. (see p. 14)
Log-off Log-off user and, if necessary, log-in different user
(only with active user administration).
12
Page 13

6 Operation
6.4 Menu bar
6.4.1 File
BioPhotometer Data Transfer Software — Operating Manual
6
The menu bar consists of the following menus:
Operation
Connect Establish connection between software and
BioPhotometer plus or continue with recording
measurement data.
6.4.2 Archive
6.4.3 View
Disconnect Disconnect connection between software and
BioPhotometer plus and stop recording
measurement data.
Copy Copy Data of a table. (see p. 23)
Print Select print option and then print.
CSV Export Save data as CSV file. (see p. 20)
Excel Export Save data as CSV file and open automatically in
Excel.
Settings Manual COM Port setting and activate user
administration. Define settings.
Exit Exit software.
New Archive file Create new archive file and save. (see p. 24)
Open Archive Open closed archive file.
Work Open Work area. (see p. 10)
(see p. 16)
(see p. 23)
(see p. 26)
6.4.4 Account
6.4.5 Help
Archive Open Archive area. (see p. 11)
Select Columns Select columns of the table formats Samples and
Calibrations.
This menu only appears with active user administration (see p. 27).
Change
password...
Log-off Log-off user and, if necessary, log-in different user.
Contents Includes operating manual.
About Name and version of the software.
Change password of the currently logged-in user. (see p. 30)
(see p. 18)
13
Page 14

6
BioPhotometer Data Transfer Software — Operating Manual
6 Operation
6.5 Start and exit software
6.5.1 Start software
Start the BioPhotometer Data Transfer Software via the shortcut on the desktop.
You are directed to the area Data Output of the Work area.
Operation
6.5.2 Exit software
6.6.1 Optional settings prior to saving data
1. Select Exit in the Menu File.
2. Confirm the following query with Yes.
6.6 Gather data
There are two possibilities to transfer data with the BioPhotometer Data Transfer Software from
BioPhotometer plus to the PC.
1. Gather data simultaneously for measurement at BioPhotometer plus.
2. Transfer data from the results memory of BioPhotometer plus to the PC.
Requirement
• The BioPhotometer plus is connected to the PC via the provided null modem cable.
• The BioPhotometer plus is switched on and LANGUAGE ENGLISH or LANGUAGE U.S.ENGL is
set as the menu language. With a different language setting it may result in faulty data
transfer.
• The software is started.
• The software has established a connection to BioPhotometer plus if the following example
message is displayed in the Data Output in the Work area:
Connected device: BioPhotometer plus 6132 found at COM1.
Create archive file
Creating a new archive file is described separately(see Create archive file on page 24).
The preset name of the archive file is ResultData. You can use it or prior to recording the first
Hint!
measurement data create a new archive file.
Measurement ID: assign identification code
Identification codes of up to 20 digits can be assigned to a measurement series or also individual
measurements:
1. Click on the icon in the function strip.
An input window opens:
2. Enter the identification code
14
Page 15

6 Operation
BioPhotometer Data Transfer Software — Operating Manual
6
3. Confirm your entry with OK.
The input window is closed. The assigned identification code for the following measurement
is shown In ID in the information field of the Work area.
Operation
ID-allocation remains active for all successive measurements until one of the following conditions
applies:
• ID is changed manually with the icon.
• The method is changed.
• The user is changed (only with active user administration).
• The software is exited.
During a method change the following query appears. An ID can be used for different methods.
6.6.2 Gather data simultaneously for measurement at the BioPhotometer plus.
Requirement
The desired method was not yet called at the BioPhotometer plus.
Select at the BioPhotometer plus the corresponding method and start with your measurement
at BioPhotometer plus.
The measured data is automatically transferred and displayed in the Work area. There data can
be displayed in DataOutput or as a table under Samples. (see Display files on page 16).
For the correct transfer of all information from measurement series you must call the method at
Hint!
6.6.3 Transfer data from the results memory to the BioPhotometer plus
BioPhotometer plus before transferring data of the first measurement result.If alternatively the
data transfer is started during measurement series it leads to a faulty display of the date.
1. Select the corresponding measurement result in the BioPhotometer plus results memory.
2. Press Enter on the BioPhotometer plus in order to transfer the measurement result.
The data is transferred and the date is marked with an * in the area Samples and Calibrations
(as well as in the Work area and in the Archive area).
15
Page 16

6
Operation
BioPhotometer Data Transfer Software — Operating Manual
6 Operation
6.6.4 Interrupt data acquisition
During an interruption of the connection between PC and BioPhotometer the method list and the
Hint!
6.7 Display files
6.7.1 Work area
area Samples in the Work area are emptied. The measurement data is saved in the Archive area
in the corresponding archive file and can be called there.
The measurement data still remains in the area Data Output. The area Data Output is only
emptied after exiting the software.
Interrupt the data acquisition with the icon or select Disconnect in the menu File.
You can carry out measurements at the BioPhotometer plus without transferring the data.
Restart the data acquisition via the icon or select Connect in the menu File.
The structure of the Work area is described separately(see Work area on page 10).
Data Output
Via the rider Data Output you are directed to the corresponding measurement data display:
Abb. 3: Work area: Data Output
Fig. 3: Work area: Data Output
• Data in this format can be printed via the icon .
• Data cannot be exported in the Data Output area.
• The format Data Output is not filed in the Archive area.
16
Page 17

6 Operation
BioPhotometer Data Transfer Software — Operating Manual
Table format samples
Via the rider Samples you are directed to the corresponding measurement data display:
Abb. 4: Work area: Samples
6
Operation
Fig. 4: Work area: Samples
• Print data in this format via the icon .
Print options can be set via Print in the Menu Set file.
• Export data via the icon (see CSV Export from the Work area on page 20) and
(see Excel Export on page 23).
• Insert data with the icon into other applications (e.g. word processing programs)(see Copy
on page 23).
Table format Calibrations
Via the rider Calibrations you are directed to the corresponding display of calibration data:
Abb. 5: Work area: Calibrations
Fig. 5: Work area: Calibrations
17
Page 18

6
Operation
BioPhotometer Data Transfer Software — Operating Manual
6 Operation
Show and hide columns
You can show and hide columns of table formats Samples and Calibrations. Proceed as follows:
1. Select Select Columns in the menu View or click with the right mouse button onto a column
title and select Select Columns.
The following window opens:
In Show columns all existing column designations are displayed . The software displays the
method-specific column automatically.
2. With the keys < and > move individual columns and with the keys << and >> all columns from
the area Show columns into Hide columns and vice versa.
3. Exit the window with OK or Cancel.
The selected columns are displayed. This setting is saved in Archive. The setting remains
until a user changes it or the software is exited.
For active user administration the setting of the columns remains for every individual user
even after exiting the software.
The transferred data is saved in this format and filed in the current archive file.
18
Page 19

6 Operation
6.7.2 Archive area
BioPhotometer Data Transfer Software — Operating Manual
All transferred measurement data is displayed in table format.
The folder All in the method list includes all measurement data in chronological order irrespective
of methods.
The selection of the displayed area occurs via the rider Samples and Calibrations.
Abb. 6: Archive area: Samples
6
Operation
Fig. 6: Archive area: Samples
Abb. 7: Archive area: Calibrations
Fig. 7: Archive area: Calibrations
Save, file, print, export and copy function as in the Work area (see Work area on page 16).
19
Page 20

6
Operation
BioPhotometer Data Transfer Software — Operating Manual
6 Operation
6.8 Export data
Data can only be exported in table format.
There are three ways to export:
• CSV Export for calculation program
• Excel Export for the calculation program Microsoft Excel
• Copy via the Windows clipboard
With CSV Export or Excel Export the data is automatically saved onto the hard drive under
Hint!
6.8.1 CSV Export from the Work area
Programs/Eppendorf/BioPhotometer.
Select the method
Select the corresponding method from the method list.
All recorded measurement data of the selected method and the method-specific information
is displayed in table format under Samples.
For methods with a calibration the export is described separately(see CSV Export of
calibration data on page 22).
Select data
If necessary hide columns which you do not wish to export(see Show and hide columns on
page 18).
Export data
1. Click on the icon or select CSV Export in the menu File.
The following window opens:
20
2. Enter a file name.
3. Check the default path.
4. Confirm your entries with Save.
Yo can also select an already existing CSV file and export the data. The new data is inserted at
Hint!
the end of the table.
You can open the exported data with a calculation program and edit it.
Page 21

BioPhotometer Data Transfer Software — Operating Manual
6 Operation
6.8.2 CSV Export from the Archive area
Select the method
Select the corresponding method from the method list.
Select measurement data
You can filter measurement results from one method for specific criteria. To do this you need to
use one or various filters.
Proceed as follows:
1. Click on Search Filter.
The following window opens:
6
Operation
Filter for date
• Start: activate and select start date.
• End: activate and select end date.
Filter for user (only with active user administration)
• User: select user
Filter for device type
• Device: select device type
Filter for identification code:
• ID: select identification code
2. With reset you deactivate the adjusted filter.
3. Confirm your entries with Apply.
The searched measurement results are displayed:
21
Page 22

6
Operation
BioPhotometer Data Transfer Software — Operating Manual
6 Operation
Filter for units
1. Click with the right mouse button onto a column title Unit.
The following selection window opens:
2. Select Apply Unit Filter.
The following dialog window opens:
3. Select the corresponding unit and method from the list. Confirm the entry with OK.
The window shuts down and only the filtered measurement results are displayed.
4. In order to deactivate the filter with the right mouse button go to the respective column Unit.
The following selection window opens:
5. Deactivate the filter with Reset Unit Filter.
Further process sequence of CSV Exports as mentioned above (see p. 20).
6.8.3 CSV Export of calibration data
When transferring data of a method with calibration, the calibration data is filed under Calibrations
and the measurement data under Samples in the Work area and Archive area.
There is no automatic allocation of measurement and calibration data.
Hint!
You can filter the calibration data in the archive with the Search Filter(see CSV Export from the
Archive area on page 21).
1. Select from the method list the corresponding method with the calibration.
2. Open the method-specific calibration with the rider Calibrations.
All acquired calibrations of the selected methods are displayed in chronological order
22
3. Ensure the correct allocation of measurement results and calibration.
4. For one method various calibrations can be listed in the table format Calibrations.
5. Select the calibration which is correct for your measurement results.
(see p. 20)Further process sequence of CSV Exports as mentioned above.
Page 23

6 Operation
6.8.4 Excel Export
BioPhotometer Data Transfer Software — Operating Manual
Requirement
In Excel the list and decimal separator must be adopted automatically from the country setting of
the Windows operating system. This is a standard setting in Excel.
With Excel Export data is saved as a CSV file and automatically opened with Excel. The
procedure corresponds to the above-mentioned CSV Export.
1. Click on the icon or select Excel Export in the Menu File.
The following dialog window opens:
6
Operation
6.8.5 Copy
2. Check the default path.
3. Enter a file name.
4. Confirm the entry with Save.
The created CSV file is automatically opened in Excel.
Data of a table is copied into the Windows clipboard and can be pasted and edited into other
applications (e.g. text processing programs).
1. Mark the area to be copied with the mouse. You can also select individual columns or rows
with the key [Ctrl].
The selected area is highlighted in blue.
2. Click on the icon or select Copy in the menu File.
3. Paste the data into the desired application.
23
Page 24

6
BioPhotometer Data Transfer Software — Operating Manual
6 Operation
6.9 Create and open archives
With the Data Transfer Software measurements can be archived. Transferred measurement data
is automatically saved in table format in the current archive file.
Closed archive files can be opened in the Archive area. The measurement data can be exported
and printed.
Operation
6.9.1 Create archive file
You can create new archive files in regular intervals.
The preset archive file is ResultData. You can rename the file before recording measurement
data for the first time.
If a new archive file is created the previously used file is closed. You cannot save in closed files. If
Hint!
you do not choose a different path, the newly created file is automatically saved onto the hard
drive under Programs/Eppendorf/BioPhotometer.
Proceed as follows:
1. Select New Archive file in the Menu Archive.
The following dialog window opens:
24
2. Check the default path.
3. Enter a file name. The file type is XML and cannot be changed.
Make sure that the ending of the file name is .xml. Entering a file name without this ending is not
Hint!
accepted.
4. Confirm your entries with Save.
The dialog window is closed. The assigned name for the current archive file is shown in Archive
file in the information field of the Work area.
Page 25

BioPhotometer Data Transfer Software — Operating Manual
6 Operation
6.9.2 Open closed archive file
1. Select Open Archive file in the Menu Archive.
The following dialog window is opened:
6
Operation
2. Check the default folder.
3. Select the corresponding archive file and confirm your entry with Open.
The archive file is opened in the Archive area. You can export or print the existing measurement
data.
25
Page 26

7
BioPhotometer Data Transfer Software — Operating Manual
7 Further functions
7 Further functions
7.1 COM Port setting
The standard setting of the software is designed to automatically scan for the COM Port interface
after the device and software are switched on. As soon as the software finds the corresponding
COM Port with the switched-on BioPhotometer plus, a message appears under Data Output:
Connected Device: BioPhotometer plus found at COM 1
Alternatively, you can set the COM Port manually. In this case only this COM Port is checked for
a switched-on BioPhotometer plus.
7.1.1 Manual setting
Proceed as follows:
1. Settings in the Menu Select file.
The following window opens:
Further functions
26
2. Activate the manual entry in the area Devices: Manual device configuration
Page 27

BioPhotometer Data Transfer Software — Operating Manual
7 Further functions
The input window is activated:
7
Further functions
3. Device ID: Enter device-ID e.g. serial number of BioPhotometer plus (optional entry).
4. Device type: select the appropriate device type.
5. Port: select COM Port of the PC.
If do not know at which COM Port the BioPhotometer plus is located, you can search for it with
Hint!
Scan.
6. Press Save and close the window with OK .
7.2 User administration
The user administration can be optionally activated. The standard setting of the software is not
Hint!
designed for user administration.
Additional functions with active user administration
• The software is only opened by the log-in of registered users.
• Column selection or display in table format is saved individually for every user.
• Transferred measurement data is assigned to the logged-in user. The filter User is activated in
the archive in the area Search Filter (see CSV Export from the Archive area on page 21).
27
Page 28

BioPhotometer Data Transfer Software — Operating Manual
7 Further functions
7.2.1 Activate user administration
An administrator is authorised to activate or deactivate the user administration.
The first activation is carried out by the standard administrator.
7
Further functions
The activation of the user administration by the standard administrator should be carried out by a
Hint!
future administrator.
1. Select Settings in the menu File.
The following window opens:
28
2. Select the rider User.
The following message box appears:
3. Confirm with OK.
A log-in window appears:
Page 29

BioPhotometer Data Transfer Software — Operating Manual
7 Further functions
4. Enter the following data:
Username: admin
Password: administrator
5. Select again the rider User.
6. Activate the user administration by the activation of User management.
A green checkmark appears in a box and the user administration is activated.
7
The standard administrator cannot be deleted. To prevent misuse immediately change the preset
Hint!
7.2.2 Structure user administration
password after log-in. (see Create, edit and delete user on page 30)
Only users with administrator rights have access to the user administration.
The user administration is divided into two areas:
Further functions
Account Overview
Displays the list of users and their status.
Edit Account
In this area new users are created or existing users edited.
29
Page 30

7
BioPhotometer Data Transfer Software — Operating Manual
7 Further functions
7.2.3 User
There are two user types with different rights:
Administrator
• can activate and deactivate the user administration
• can create, edit and delete users
• can change his/her own password
• can operate in all areas of the software
• can define personal settings in the Work and Archive area
User
• can change his/her own password
• can operate in all areas of the software except for the user administration
• can define personal settings in the Work and Archive area
Further functions
7.2.4 Change password
The logged-in user can change his own password.
1. Select Change Password... in the menu Account.
The following input window appears:
2. Enter the current password in the line Current Password.
3. In the line New Password enter the new password and confirm your new password by
reentering it into the line Retype Password.
4. Confirm your password change with OK or cancel the change with Cancel.
If the new password in the lines New Password and Retype Password corresponds, the window is
closed and the password was successfully changed.
7.2.5 Create, edit and delete user
Only an administrator can create, edit and delete a user.
30
Create user
1. Select Settings in the menu File.
2. Select Add in the area Edit Account in order to create a new user.
3. In Username enter the name of the new user.
4. If desired, enter under Password and Retype Password a password.
The entry of the password is optional.
Hint!
5. Define the rights of the user under Group.
6. You can add additional information under Comment.
Page 31

BioPhotometer Data Transfer Software — Operating Manual
7 Further functions
7. Save your entries with Save.
The newly created user appears in the list Account Overview.
8. Exit the user administration with OK.
Under Account Overview the users are first sorted according to rights and then alphabetically
according to user name. The Standard administrator is always listed as the first user.
7
Further functions
Edit user data
1. Select Settings in the Menu File.
2. Select from Overview Account the corresponding user.
3. In the area Edit Account change the corresponding user data.
4. Save your entries with Save.
5. Exit with OK the user administration.
Delete user
1. Select Settings in the Menu File.
2. Select from Account Overview the corresponding user.
3. Select Delete in the area Edit Account.
The following message box appears:
4. Confirm with Yes.
The user is no longer in the list Account Overview.
31
Page 32

8
BioPhotometer Data Transfer Software — Operating Manual
8 Troubleshooting
8 Troubleshooting
8.1 General errors
Symptom / message Cause Remedy
Measurement data is not transmitted. No connection between
BioPhotometer plus and PC via the
null modem cable.
Measurement data is not transmitted. BioPhotometer plus with manual COM
Port setting connected to wrong COM
Port.
Measurement data is transmitted
without date specification.
The transmission of the measurement
data was not correct. The
transmission was from an already
opened and measured method with
BioPhotometer plus.
Check the connection between
BioPhotometer plus and PC.
When using a USB adapter check
the safe connection between USB
adapter and null modem cable.
Check the manually set COM Port
with Scan.
You can transfer the measurement
from the results memory of
BioPhotometer plus. The
measurement results are then
assigned to a date.
• Measurement data from the results
memory of the BioPhotometer plus
is not transferred.
• Measurement data is correctly
Troubleshooting
displayed in the Data Output but not
completely transferred into table
formats Samples or Calibrations.
Wrong language setting for
BioPhotometer plus.
1. Set the menu language English or
US-English for BioPhotometer
plus.
2. Retransfer the measurement data
again from BioPhotometer plus
results memory.
• Measurement data from
BioPhotometer plus results memory
is not completely displayed in the
table formats Samples or
Calibrations.
Export of data via the function Excel
Export not correct. Data is e. g.
displayed in one column in Excel.
Software slows down. For example,
calling the archive file takes long.
Software cannot be installed. PC requirements are not met.
Wrong setting of the list and/or
decimal separator in Excel.
• There is a lot of measurement data
in the archive file.
• The memory is busy.
Set the list and decimal separator
in Excel so that both are
automatically adopted from the
country setting of the Windows
operating system.
Create a new archive file.
Check the available free memory.
If necessary, specify a new
memory location.
Check the operating system of
your PC.
You need Windows XP SP 2 or
Windows Vista.
Check the existing .NET
Framework of your PC. Minimum
requirement is .NET Framework
2.0.
Software cannot be installed. Other programs disrupt the
installation.
Software cannot be installed. Installation CD is damaged.
32
Restart the installation by starting
Setup.exe of the CD.
Contact our Application Support
(contact address: see back of this
manual).
Page 33

BioPhotometer Data Transfer Software — Operating Manual
8 Troubleshooting
8.2 Error messages
8.2.1 User administration
Symptom / message Cause Remedy
Invalid or empty user name An invalid or no user name were entered. Enter a valid user name.
Current Password
incorrect. Please enter
correct password.
You do not have
administrator rights.
Please log-in as
administrator
A wrong password was entered during log-in.
When attempting to activate the user
administration it was established that the user
has no administrator rights. Only an
administrator can activate the user
administration.
Enter the correct password.
If you forgot the password, contact your
administrator.
Log-in as administrator.
If you have no administrator rights,
contact your administrator.
8
Troubleshooting
Unknown user or
password. Please retry.
During log-in either a wrong password or a
wrong user name was entered.
Enter the correct user name.
Enter the correct password.
If you forgot the password or user name,
contact your administrator.
The retyped password
does not match the new
password.
User <user name> already
exists. Please select a
different user name.
8.2.2 Print
Symptom / message Cause Remedy
There is no data in output
list!
There is no data in sample
list!
There is no data in
calibration list!
An error occurred while
printing
The entered user name for a new user
already exists. User names can only be
assigned once.
You cannot print empty lists.
In the Work area Samples and Calibrations
are emptied after disconnecting the
connection with Disconnect. Data Output is
emptied after exiting the software. The data is
no longer available in this format.
Printer is not connected or not available.
When creating a user or changing the
password, the password was not correctly
reentered.
Enter the new password in the password field
and retype password.
Enter a different user name.
Print the desired data from the Archive
area.
Check the status of the printer.
33
Page 34

BioPhotometer Data Transfer Software — Operating Manual
8 Troubleshooting
8.2.3 Connection to BioPhotometer plus
Symptom / message Cause Remedy
8
No device connected or
No connection to device
No device connected or
No connection to device
BioPhotometer plus is not switched on. Switch BioPhotometer plus on.
No connection between BioPhotometer plus
and PC via the null modem cable.
Check the connection between
BioPhotometer plus and PC.
When using a USB adapter check the
safe connection between USB adapter
and null modem cable.
No device connected or
No connection to device
No Device found With the Scan for devices, with manual COM
BioPhotometer plus with manual COM Port
setting connected to wrong COM Port.
Port setting, no device was found.
Check the manually set COM Port with
Scan.
Switch BioPhotometer plus on.
Check the connection between
BioPhotometer plus and PC.
When using a USB adapter check the
safe connection between USB adapter
and null modem cable.
Troubleshooting
8.2.4 Select archive files
Symptom / message Cause Remedy
Not enough free disk space
for archive file on drive
<Drive>.
This file is reserved. Please
select another file.
This file already exists.
Please select a new file
name.
Error opening archive
<archive name>.
The target drive has no sufficient memory
space.
To save a file the Config or User-XML file was
selected. These files are write-protected.
Existing files cannot be selected as archive
files.
The selected archive file cannot be opened.
Select a different target drive with at least
10 KByte for saving.
Select a different XML file or create a new
XML file to save your data.
Create an archive file under a new name.
Check the archive file. An empty archive
file or alien XML file cannot be opened by
the software.
34
Page 35

Eppendorf offices
AUSTRALIA & NEW ZEALAND
Eppendorf South Pacific Pty. Ltd.
Phone: +61 2 9889 5000
Fax: +61 2 9889 5111
E-mail: Info@eppendorf.com.au
Internet: www.eppendorf.com.au
CANADA
Eppendorf Canada Ltd.
Phone: +1 905 826 5525
Fax: +1 905 826 5424
E-mail: canada@eppendorf.com
Internet: www.eppendorfna.com
FRANCE
Eppendorf France S.A.R.L.
Phone: +33 1 30 15 67 40
Fax: +33 1 30 15 67 45
E-mail: eppendorf@eppendorf.fr
Internet: www.eppendorf.fr
AUSTRIA
Eppendorf Austria
Phone: +43 1 29017560
Fax: +43 1 290175620
E-mail: office@eppendorf.at
Internet: www.eppendorf.at
CHINA
Eppendorf China Ltd.
Phone: +86 21 68760880
Fax: +86 21 50815371
E-mail: market.info@eppendorf.cn
Internet: www.eppendorf.cn
GERMANY
Eppendorf Vertrieb
Deutschland GmbH
Phone: +49 2232 418-0
Fax: +49 2232 418-155
E-mail: vertrieb@eppendorf.de
Internet: www.eppendorf.de
BRAZIL
Eppendorf do Brasil Ltda.
Phone: +55 11 30 95 93 44
Fax: +55 11 30 95 93 40
E-mail: eppendorf@eppendorf.com.br
Internet: www.eppendorf.com.br
CZECH REP. & SLOVAKIA
Eppendorf Czech & Slovakia s.r.o.
Phone: +420 323 605 454
Fax: +420 323 605 454
E-mail: eppendorf@eppendorf.cz
Internet: www.eppendorf.cz /
www.eppendorf.sk
INDIA
Eppendorf India Limited
Phone: +91 44 42 11 13 14
Fax: +91 44 42 18 74 05
E-mail: info@eppendorf.co.in
Internet: www.eppendorf.co.in
ITALY
Eppendorf s.r.l.
Phone: +390 2 55 404 1
Fax: +390 2 58 013 438
E-mail: eppendorf@eppendorf.it
Internet: www.eppendorf.it
SOUTH & SOUTHEAST ASIA
Eppendorf Asia Pacific Sdn. Bhd.
Phone: +60 3 8023 2769
Fax: +60 3 8023 3720
E-mail:
eppendorf@eppendorf.com.my
Internet: www.eppendorf.com.my
UNITED KINGDOM
Eppendorf UK Limited
Phone: +44 1223 200 440
Fax: +44 1223 200 441
E-mail: sales@eppendorf.co.uk
Internet: www.eppendorf.co.uk
JAPAN
Eppendorf Co. Ltd.
Phone: +81 3 5825 2363
Fax: +81 3 5825 2365
E-mail: info@eppendorf.jp
Internet: www.eppendorf.jp
SPAIN
Eppendorf Ibérica S.L.U.
Phone: +34 91 651 76 94
Fax: +34 91 651 81 44
E-mail: iberica@eppendorf.es
Internet: www.eppendorf.es
USA
Eppendorf North America, Inc.
Phone: +1 516 334 7500
Fax: +1 516 334 7506
E-mail: info@eppendorf.com
Internet: www.eppendorfna.com
NORDIC
Eppendorf Nordic Aps
Phone: +45 70 22 2970
Fax: +45 45 76 7370
E-mail: nordic@eppendorf.dk
Internet: www.eppendorf.dk
SWITZERLAND
Vaudaux-Eppendorf AG
Phone: +41 61 482 1414
Fax: +41 61 482 1419
E-mail: vaudaux@vaudaux.ch
Internet: www.eppendorf.ch
OTHER COUNTRIES
Internet: www.eppendorf.com/
worldwide
Page 36

Your local distributor: www.eppendorf.com/worldwide
Eppendorf AG · 22331 Hamburg · Germany · Tel: +49 40 538 01-0 · Fax: +49 40 538 01-556 · E-Mail: eppendorf@eppendorf.com
Eppendorf North America, Inc. · One Cantiague Road · P.O. Box 1019 · Westbury, N.Y. 11590-0207 · USA
Tel: +1 516 334 7500 · Toll free phone: +1 800 645 3050 · Fax: +1 516 334 7506 · E-Mail: info@eppendorf.com
Application Support
Europe, International: Tel: +49 1803 666 789 · E-Mail: support@eppendorf.com
North America: Tel: +1 800 645 3050 ext. 2258 · E-Mail: support_na@eppendorf.com
Asia Pacific: Tel: +60 3 8023 6869 · E-Mail: support_asiapacific@eppendorf.com
 Loading...