

Page 1
nual
6
E
Register your instrument!
www.eppendorf.com/myeppendorf
N)
manual
®
epMotion
96
Operating manual
Page 2

Copyright© 2014 Eppendorf AG. All rights reserved, including graphics and images. No part of this
publication may be reproduced without the prior permission of the copyright owner.
Eppendorf
Apple iPod touch
epMotion
®
and the Eppendorf logo are registered trademarks of Eppendorf AG, Hamburg, Germany.
®
is a registered trademark of Apple Inc., Cupertino, USA.
®
is a registered trademark of Eppendorf AG, Hamburg, Germany.
Registered trademarks and protected trademarks are not marked in all cases with
®
or ™ in this manual.
5069 900.056-00/072014
Page 3

Table of contents
epMotion
English (EN)
®
96
Table of contents
1 Operating instructions . . . . . . . . . . . . . . . . . . . . . . . . . . . . . . . . . . . . . . . . . . . . . . . . . . . . . . . . . . . . . . 7
1.1 Using this manual . . . . . . . . . . . . . . . . . . . . . . . . . . . . . . . . . . . . . . . . . . . . . . . . . . . . . . . . . . . . . 7
1.2 Danger symbols and danger levels . . . . . . . . . . . . . . . . . . . . . . . . . . . . . . . . . . . . . . . . . . . . . . . . 7
1.2.1 Danger symbols . . . . . . . . . . . . . . . . . . . . . . . . . . . . . . . . . . . . . . . . . . . . . . . . . . . . . . . 7
1.2.2 Danger levels. . . . . . . . . . . . . . . . . . . . . . . . . . . . . . . . . . . . . . . . . . . . . . . . . . . . . . . . . . 7
1.3 Symbols used . . . . . . . . . . . . . . . . . . . . . . . . . . . . . . . . . . . . . . . . . . . . . . . . . . . . . . . . . . . . . . . . 7
2 Product description . . . . . . . . . . . . . . . . . . . . . . . . . . . . . . . . . . . . . . . . . . . . . . . . . . . . . . . . . . . . . . . . 9
2.1 Delivery package. . . . . . . . . . . . . . . . . . . . . . . . . . . . . . . . . . . . . . . . . . . . . . . . . . . . . . . . . . . . . . 9
2.2 Features. . . . . . . . . . . . . . . . . . . . . . . . . . . . . . . . . . . . . . . . . . . . . . . . . . . . . . . . . . . . . . . . . . . . . 9
2.3 Main illustration . . . . . . . . . . . . . . . . . . . . . . . . . . . . . . . . . . . . . . . . . . . . . . . . . . . . . . . . . . . . . 10
2.3.1 Docking station . . . . . . . . . . . . . . . . . . . . . . . . . . . . . . . . . . . . . . . . . . . . . . . . . . . . . . . 11
2.3.2 Lifting table and adapter . . . . . . . . . . . . . . . . . . . . . . . . . . . . . . . . . . . . . . . . . . . . . . . . 12
2.3.3 Loading frame . . . . . . . . . . . . . . . . . . . . . . . . . . . . . . . . . . . . . . . . . . . . . . . . . . . . . . . . 13
2.4 Recommended pipette tips . . . . . . . . . . . . . . . . . . . . . . . . . . . . . . . . . . . . . . . . . . . . . . . . . . . . . 14
2.5 Recommended plates . . . . . . . . . . . . . . . . . . . . . . . . . . . . . . . . . . . . . . . . . . . . . . . . . . . . . . . . . 14
2.6 Name plate . . . . . . . . . . . . . . . . . . . . . . . . . . . . . . . . . . . . . . . . . . . . . . . . . . . . . . . . . . . . . . . . . 15
2.6.1 Network name . . . . . . . . . . . . . . . . . . . . . . . . . . . . . . . . . . . . . . . . . . . . . . . . . . . . . . . . 15
3
3 Safety. . . . . . . . . . . . . . . . . . . . . . . . . . . . . . . . . . . . . . . . . . . . . . . . . . . . . . . . . . . . . . . . . . . . . . . . . . . 17
3.1 Intended use . . . . . . . . . . . . . . . . . . . . . . . . . . . . . . . . . . . . . . . . . . . . . . . . . . . . . . . . . . . . . . . . 17
3.2 Warnings for intended use . . . . . . . . . . . . . . . . . . . . . . . . . . . . . . . . . . . . . . . . . . . . . . . . . . . . . 17
3.3 Warning signs on the device. . . . . . . . . . . . . . . . . . . . . . . . . . . . . . . . . . . . . . . . . . . . . . . . . . . . 18
3.4 User profile . . . . . . . . . . . . . . . . . . . . . . . . . . . . . . . . . . . . . . . . . . . . . . . . . . . . . . . . . . . . . . . . . 18
3.5 Information on product liability . . . . . . . . . . . . . . . . . . . . . . . . . . . . . . . . . . . . . . . . . . . . . . . . . 18
4 Installation . . . . . . . . . . . . . . . . . . . . . . . . . . . . . . . . . . . . . . . . . . . . . . . . . . . . . . . . . . . . . . . . . . . . . . 19
4.1 Preparing installation . . . . . . . . . . . . . . . . . . . . . . . . . . . . . . . . . . . . . . . . . . . . . . . . . . . . . . . . . 19
4.1.1 Complaints about damages . . . . . . . . . . . . . . . . . . . . . . . . . . . . . . . . . . . . . . . . . . . . . . 19
4.1.2 Incomplete delivery. . . . . . . . . . . . . . . . . . . . . . . . . . . . . . . . . . . . . . . . . . . . . . . . . . . . 19
4.2 Selecting the location . . . . . . . . . . . . . . . . . . . . . . . . . . . . . . . . . . . . . . . . . . . . . . . . . . . . . . . . . 19
4.3 Connecting the device. . . . . . . . . . . . . . . . . . . . . . . . . . . . . . . . . . . . . . . . . . . . . . . . . . . . . . . . . 20
4.4 Installing the software. . . . . . . . . . . . . . . . . . . . . . . . . . . . . . . . . . . . . . . . . . . . . . . . . . . . . . . . . 20
4.5 Setting up the iPod . . . . . . . . . . . . . . . . . . . . . . . . . . . . . . . . . . . . . . . . . . . . . . . . . . . . . . . . . . . 21
4.5.1 Activating the wireless connection . . . . . . . . . . . . . . . . . . . . . . . . . . . . . . . . . . . . . . . . 21
4.5.2 Configuring the network . . . . . . . . . . . . . . . . . . . . . . . . . . . . . . . . . . . . . . . . . . . . . . . . 22
4.5.3 Deactivating the automatic display deactivation . . . . . . . . . . . . . . . . . . . . . . . . . . . . . 23
4.6 Placing the iPod into the docking station . . . . . . . . . . . . . . . . . . . . . . . . . . . . . . . . . . . . . . . . . . 24
5 Software . . . . . . . . . . . . . . . . . . . . . . . . . . . . . . . . . . . . . . . . . . . . . . . . . . . . . . . . . . . . . . . . . . . . . . . . 25
5.1 Touchscreen . . . . . . . . . . . . . . . . . . . . . . . . . . . . . . . . . . . . . . . . . . . . . . . . . . . . . . . . . . . . . . . . 25
5.1.1 Layout of the touchscreen . . . . . . . . . . . . . . . . . . . . . . . . . . . . . . . . . . . . . . . . . . . . . . . 25
5.2 Overview of the operating modes . . . . . . . . . . . . . . . . . . . . . . . . . . . . . . . . . . . . . . . . . . . . . . . . 26
5.2.1 Selecting the operating mode . . . . . . . . . . . . . . . . . . . . . . . . . . . . . . . . . . . . . . . . . . . . 26
5.3 Operating the software . . . . . . . . . . . . . . . . . . . . . . . . . . . . . . . . . . . . . . . . . . . . . . . . . . . . . . . . 27
5.3.1 Entering or changing parameters . . . . . . . . . . . . . . . . . . . . . . . . . . . . . . . . . . . . . . . . . 28
5.3.2 Saving the parameter profile. . . . . . . . . . . . . . . . . . . . . . . . . . . . . . . . . . . . . . . . . . . . . 28
Page 4

Table of contents
®
4
epMotion
96
English (EN)
6 Operation . . . . . . . . . . . . . . . . . . . . . . . . . . . . . . . . . . . . . . . . . . . . . . . . . . . . . . . . . . . . . . . . . . . . . . . 29
6.1 Switching the device on and off . . . . . . . . . . . . . . . . . . . . . . . . . . . . . . . . . . . . . . . . . . . . . . . . . 29
6.1.1 Switching the device on . . . . . . . . . . . . . . . . . . . . . . . . . . . . . . . . . . . . . . . . . . . . . . . . 29
6.1.2 Switching the device off . . . . . . . . . . . . . . . . . . . . . . . . . . . . . . . . . . . . . . . . . . . . . . . . 29
6.2 Starting the software. . . . . . . . . . . . . . . . . . . . . . . . . . . . . . . . . . . . . . . . . . . . . . . . . . . . . . . . . . 30
6.2.1 Starting the software . . . . . . . . . . . . . . . . . . . . . . . . . . . . . . . . . . . . . . . . . . . . . . . . . . . 30
6.2.2 Quitting the software. . . . . . . . . . . . . . . . . . . . . . . . . . . . . . . . . . . . . . . . . . . . . . . . . . . 31
6.2.3 Starting the simulation mode . . . . . . . . . . . . . . . . . . . . . . . . . . . . . . . . . . . . . . . . . . . . 31
6.2.4 Exiting the simulation mode . . . . . . . . . . . . . . . . . . . . . . . . . . . . . . . . . . . . . . . . . . . . . 33
6.3 Inserting pipette tips. . . . . . . . . . . . . . . . . . . . . . . . . . . . . . . . . . . . . . . . . . . . . . . . . . . . . . . . . . 33
6.4 Moving the lifting table. . . . . . . . . . . . . . . . . . . . . . . . . . . . . . . . . . . . . . . . . . . . . . . . . . . . . . . . 34
6.4.1 Moving the lifting table into working position . . . . . . . . . . . . . . . . . . . . . . . . . . . . . . . 34
6.4.2 Moving the lifting table into basic position. . . . . . . . . . . . . . . . . . . . . . . . . . . . . . . . . . 35
6.4.3 Setting the stop for the lifting table . . . . . . . . . . . . . . . . . . . . . . . . . . . . . . . . . . . . . . . 35
6.5 Aspirating liquid . . . . . . . . . . . . . . . . . . . . . . . . . . . . . . . . . . . . . . . . . . . . . . . . . . . . . . . . . . . . . 35
6.6 Dispensing liquid . . . . . . . . . . . . . . . . . . . . . . . . . . . . . . . . . . . . . . . . . . . . . . . . . . . . . . . . . . . . 36
6.6.1 Blow out – Dispensing residual liquid . . . . . . . . . . . . . . . . . . . . . . . . . . . . . . . . . . . . . 36
6.6.2 Empty – Completely dispensing liquid . . . . . . . . . . . . . . . . . . . . . . . . . . . . . . . . . . . . . 36
6.7 Inserting the plate . . . . . . . . . . . . . . . . . . . . . . . . . . . . . . . . . . . . . . . . . . . . . . . . . . . . . . . . . . . . 37
6.7.1 Inserting a 96-well plate . . . . . . . . . . . . . . . . . . . . . . . . . . . . . . . . . . . . . . . . . . . . . . . . 37
6.7.2 Filling the 96-well plate. . . . . . . . . . . . . . . . . . . . . . . . . . . . . . . . . . . . . . . . . . . . . . . . . 37
6.7.3 Inserting a 384-well plate . . . . . . . . . . . . . . . . . . . . . . . . . . . . . . . . . . . . . . . . . . . . . . . 38
6.7.4 Filling the 384-well plate. . . . . . . . . . . . . . . . . . . . . . . . . . . . . . . . . . . . . . . . . . . . . . . . 38
6.8 Mode Pipette – Dispensing liquid . . . . . . . . . . . . . . . . . . . . . . . . . . . . . . . . . . . . . . . . . . . . . . . . 40
6.8.1 Aspirating liquid . . . . . . . . . . . . . . . . . . . . . . . . . . . . . . . . . . . . . . . . . . . . . . . . . . . . . . 40
6.8.2 Dispensing liquid . . . . . . . . . . . . . . . . . . . . . . . . . . . . . . . . . . . . . . . . . . . . . . . . . . . . . 40
6.9 Mode Multidispense – Muliple dispensing of liquid. . . . . . . . . . . . . . . . . . . . . . . . . . . . . . . . . . 41
6.9.1 Aspirating liquid . . . . . . . . . . . . . . . . . . . . . . . . . . . . . . . . . . . . . . . . . . . . . . . . . . . . . . 41
6.9.2 Dispensing liquid . . . . . . . . . . . . . . . . . . . . . . . . . . . . . . . . . . . . . . . . . . . . . . . . . . . . . 42
6.9.3 Semiautomatically dispensing liquid . . . . . . . . . . . . . . . . . . . . . . . . . . . . . . . . . . . . . . 42
6.10 Mode Pipette and Mix – Dispensing and mixing liquid . . . . . . . . . . . . . . . . . . . . . . . . . . . . . . . 43
6.10.1 Aspirating liquid . . . . . . . . . . . . . . . . . . . . . . . . . . . . . . . . . . . . . . . . . . . . . . . . . . . . . . 43
6.10.2 Dispensing and mixing liquid . . . . . . . . . . . . . . . . . . . . . . . . . . . . . . . . . . . . . . . . . . . . 44
6.11 Mode Manual Pipette – Dispensing liquid manually . . . . . . . . . . . . . . . . . . . . . . . . . . . . . . . . . 44
6.11.1 Aspirating liquid . . . . . . . . . . . . . . . . . . . . . . . . . . . . . . . . . . . . . . . . . . . . . . . . . . . . . . 45
6.11.2 Dispensing liquid . . . . . . . . . . . . . . . . . . . . . . . . . . . . . . . . . . . . . . . . . . . . . . . . . . . . . 45
6.12 Mode Dilute and Mix – Mixing liquid . . . . . . . . . . . . . . . . . . . . . . . . . . . . . . . . . . . . . . . . . . . . . 46
6.12.1 Aspirating liquid . . . . . . . . . . . . . . . . . . . . . . . . . . . . . . . . . . . . . . . . . . . . . . . . . . . . . . 47
6.12.2 Diluting and mixing liquids. . . . . . . . . . . . . . . . . . . . . . . . . . . . . . . . . . . . . . . . . . . . . . 47
6.13 Mode Multiaspirate – Multiple aspiration of liquid. . . . . . . . . . . . . . . . . . . . . . . . . . . . . . . . . . . 48
6.13.1 Aspirating liquid . . . . . . . . . . . . . . . . . . . . . . . . . . . . . . . . . . . . . . . . . . . . . . . . . . . . . . 48
6.13.2 Dispensing liquid . . . . . . . . . . . . . . . . . . . . . . . . . . . . . . . . . . . . . . . . . . . . . . . . . . . . . 49
6.14 Mode Run Program – Creating and storing a program sequence . . . . . . . . . . . . . . . . . . . . . . . 49
6.14.1 Creating and storing a program sequence . . . . . . . . . . . . . . . . . . . . . . . . . . . . . . . . . . 50
6.14.2 Editing the program sequence – Adding a mode at the end . . . . . . . . . . . . . . . . . . . . 50
6.14.3 Editing the program sequence – Inserting a mode. . . . . . . . . . . . . . . . . . . . . . . . . . . . 51
6.14.4 Editing the program sequence – Changing the parameters of a mode . . . . . . . . . . . . 51
6.14.5 Changing the order within a program sequence . . . . . . . . . . . . . . . . . . . . . . . . . . . . . 52
6.14.6 Deleting a mode from the program sequence . . . . . . . . . . . . . . . . . . . . . . . . . . . . . . . 52
6.14.7 Selecting and running a program sequence . . . . . . . . . . . . . . . . . . . . . . . . . . . . . . . . . 53
Page 5

Table of contents
®
epMotion
96
English (EN)
6.15 Mode Settings – Setting the setting the system properties . . . . . . . . . . . . . . . . . . . . . . . . . . . . 54
6.15.1 Device settings . . . . . . . . . . . . . . . . . . . . . . . . . . . . . . . . . . . . . . . . . . . . . . . . . . . . . . . 55
6.15.2 Set the pipetting properties . . . . . . . . . . . . . . . . . . . . . . . . . . . . . . . . . . . . . . . . . . . . . 56
6.15.3 Liquid Types – Setting the liquid properties. . . . . . . . . . . . . . . . . . . . . . . . . . . . . . . . . 56
6.15.4 Creating a liquid type . . . . . . . . . . . . . . . . . . . . . . . . . . . . . . . . . . . . . . . . . . . . . . . . . . 57
6.15.5 Changing the liquid type . . . . . . . . . . . . . . . . . . . . . . . . . . . . . . . . . . . . . . . . . . . . . . . . 58
6.15.6 Applying liquid types . . . . . . . . . . . . . . . . . . . . . . . . . . . . . . . . . . . . . . . . . . . . . . . . . . 60
6.15.7 Deleting a liquid type . . . . . . . . . . . . . . . . . . . . . . . . . . . . . . . . . . . . . . . . . . . . . . . . . . 61
6.16 Updating the software. . . . . . . . . . . . . . . . . . . . . . . . . . . . . . . . . . . . . . . . . . . . . . . . . . . . . . . . . 62
7 Troubleshooting . . . . . . . . . . . . . . . . . . . . . . . . . . . . . . . . . . . . . . . . . . . . . . . . . . . . . . . . . . . . . . . . . . 63
7.1 General errors . . . . . . . . . . . . . . . . . . . . . . . . . . . . . . . . . . . . . . . . . . . . . . . . . . . . . . . . . . . . . . . 63
7.1.1 Pipette tips . . . . . . . . . . . . . . . . . . . . . . . . . . . . . . . . . . . . . . . . . . . . . . . . . . . . . . . . . . 63
7.1.2 Wireless connection . . . . . . . . . . . . . . . . . . . . . . . . . . . . . . . . . . . . . . . . . . . . . . . . . . . 63
7.1.3 Liquid volume . . . . . . . . . . . . . . . . . . . . . . . . . . . . . . . . . . . . . . . . . . . . . . . . . . . . . . . . 64
7.1.4 File names . . . . . . . . . . . . . . . . . . . . . . . . . . . . . . . . . . . . . . . . . . . . . . . . . . . . . . . . . . . 64
7.1.5 Sensors . . . . . . . . . . . . . . . . . . . . . . . . . . . . . . . . . . . . . . . . . . . . . . . . . . . . . . . . . . . . . 64
5
8 Maintenance . . . . . . . . . . . . . . . . . . . . . . . . . . . . . . . . . . . . . . . . . . . . . . . . . . . . . . . . . . . . . . . . . . . . . 65
8.1 Replacing fuses . . . . . . . . . . . . . . . . . . . . . . . . . . . . . . . . . . . . . . . . . . . . . . . . . . . . . . . . . . . . . . 65
8.2 Cleaning . . . . . . . . . . . . . . . . . . . . . . . . . . . . . . . . . . . . . . . . . . . . . . . . . . . . . . . . . . . . . . . . . . . 65
8.3 Disinfection/Decontamination. . . . . . . . . . . . . . . . . . . . . . . . . . . . . . . . . . . . . . . . . . . . . . . . . . . 66
8.4 Service and maintenance . . . . . . . . . . . . . . . . . . . . . . . . . . . . . . . . . . . . . . . . . . . . . . . . . . . . . . 66
9 Technical data. . . . . . . . . . . . . . . . . . . . . . . . . . . . . . . . . . . . . . . . . . . . . . . . . . . . . . . . . . . . . . . . . . . . 67
9.1 Weight/dimensions . . . . . . . . . . . . . . . . . . . . . . . . . . . . . . . . . . . . . . . . . . . . . . . . . . . . . . . . . . . 67
9.2 Interfaces. . . . . . . . . . . . . . . . . . . . . . . . . . . . . . . . . . . . . . . . . . . . . . . . . . . . . . . . . . . . . . . . . . . 67
9.3 Power supply. . . . . . . . . . . . . . . . . . . . . . . . . . . . . . . . . . . . . . . . . . . . . . . . . . . . . . . . . . . . . . . . 67
9.4 Test conditions . . . . . . . . . . . . . . . . . . . . . . . . . . . . . . . . . . . . . . . . . . . . . . . . . . . . . . . . . . . . . . 67
9.5 Ambient conditions . . . . . . . . . . . . . . . . . . . . . . . . . . . . . . . . . . . . . . . . . . . . . . . . . . . . . . . . . . . 67
10 Transport, storage and disposal . . . . . . . . . . . . . . . . . . . . . . . . . . . . . . . . . . . . . . . . . . . . . . . . . . . . . 69
10.1 Storage . . . . . . . . . . . . . . . . . . . . . . . . . . . . . . . . . . . . . . . . . . . . . . . . . . . . . . . . . . . . . . . . . . . . 69
10.2 Decontamination before shipment . . . . . . . . . . . . . . . . . . . . . . . . . . . . . . . . . . . . . . . . . . . . . . . 69
10.3 Transport. . . . . . . . . . . . . . . . . . . . . . . . . . . . . . . . . . . . . . . . . . . . . . . . . . . . . . . . . . . . . . . . . . . 69
10.4 Disposal. . . . . . . . . . . . . . . . . . . . . . . . . . . . . . . . . . . . . . . . . . . . . . . . . . . . . . . . . . . . . . . . . . . . 70
11 Ordering information . . . . . . . . . . . . . . . . . . . . . . . . . . . . . . . . . . . . . . . . . . . . . . . . . . . . . . . . . . . . . . 71
11.1 Accessories . . . . . . . . . . . . . . . . . . . . . . . . . . . . . . . . . . . . . . . . . . . . . . . . . . . . . . . . . . . . . . . . . 71
11.2 Pipette tips . . . . . . . . . . . . . . . . . . . . . . . . . . . . . . . . . . . . . . . . . . . . . . . . . . . . . . . . . . . . . . . . . 71
11.2.1 50 μL . . . . . . . . . . . . . . . . . . . . . . . . . . . . . . . . . . . . . . . . . . . . . . . . . . . . . . . . . . . . . . . 71
11.2.2 300 μL . . . . . . . . . . . . . . . . . . . . . . . . . . . . . . . . . . . . . . . . . . . . . . . . . . . . . . . . . . . . . . 71
Certificates . . . . . . . . . . . . . . . . . . . . . . . . . . . . . . . . . . . . . . . . . . . . . . . . . . . . . . . . . . . . . . . . . . . . . . 73
Page 6

Table of contents
epMotion
6
English (EN)
®
96
Page 7
Operating instructions
epMotion
English (EN)
®
1 Operating instructions
1.1 Using this manual
Read this operating manual completely before using the device for the first time. Also observe the
instructions for use of the accessories.
This operating manual is part of the product. Thus, it must always be easily accessible.
Enclose this operating manual when transferring the device to third parties.
You will find the current version of the operating manual for all available languages on our webpage
under www.eppendorf.com
.
1.2 Danger symbols and danger levels
The safety instructions of this operating manual indicate the following danger symbols and danger levels:
96
7
1.2.1 Danger symbols
Biohazard Electric shock
Crushing Hazard point
Material damage
1.2.2 Danger levels
DANGER Will lead to severe injuries or death.
WARN ING May lead to severe injuries or death.
CAUTION May lead to light to moderate injuries.
NOTICE May lead to material damage.
1.3 Symbols used
Depiction Meaning
1.
2.
Actions in the specified order
Actions without a specified order
• List
Text Display text or software text
Additional information
Page 8

Operating instructions
epMotion
8
English (EN)
®
96
Page 9

2 Product description
2.1 Delivery package
Number Description
1epMotion 96
1Loading frame
1 Adapter for 384-well plate
1Mains/power cord
1 Operating manual
1 Tool for docking station
1Certificate of quality
2.2 Features
Product description
epMotion
English (EN)
®
96
9
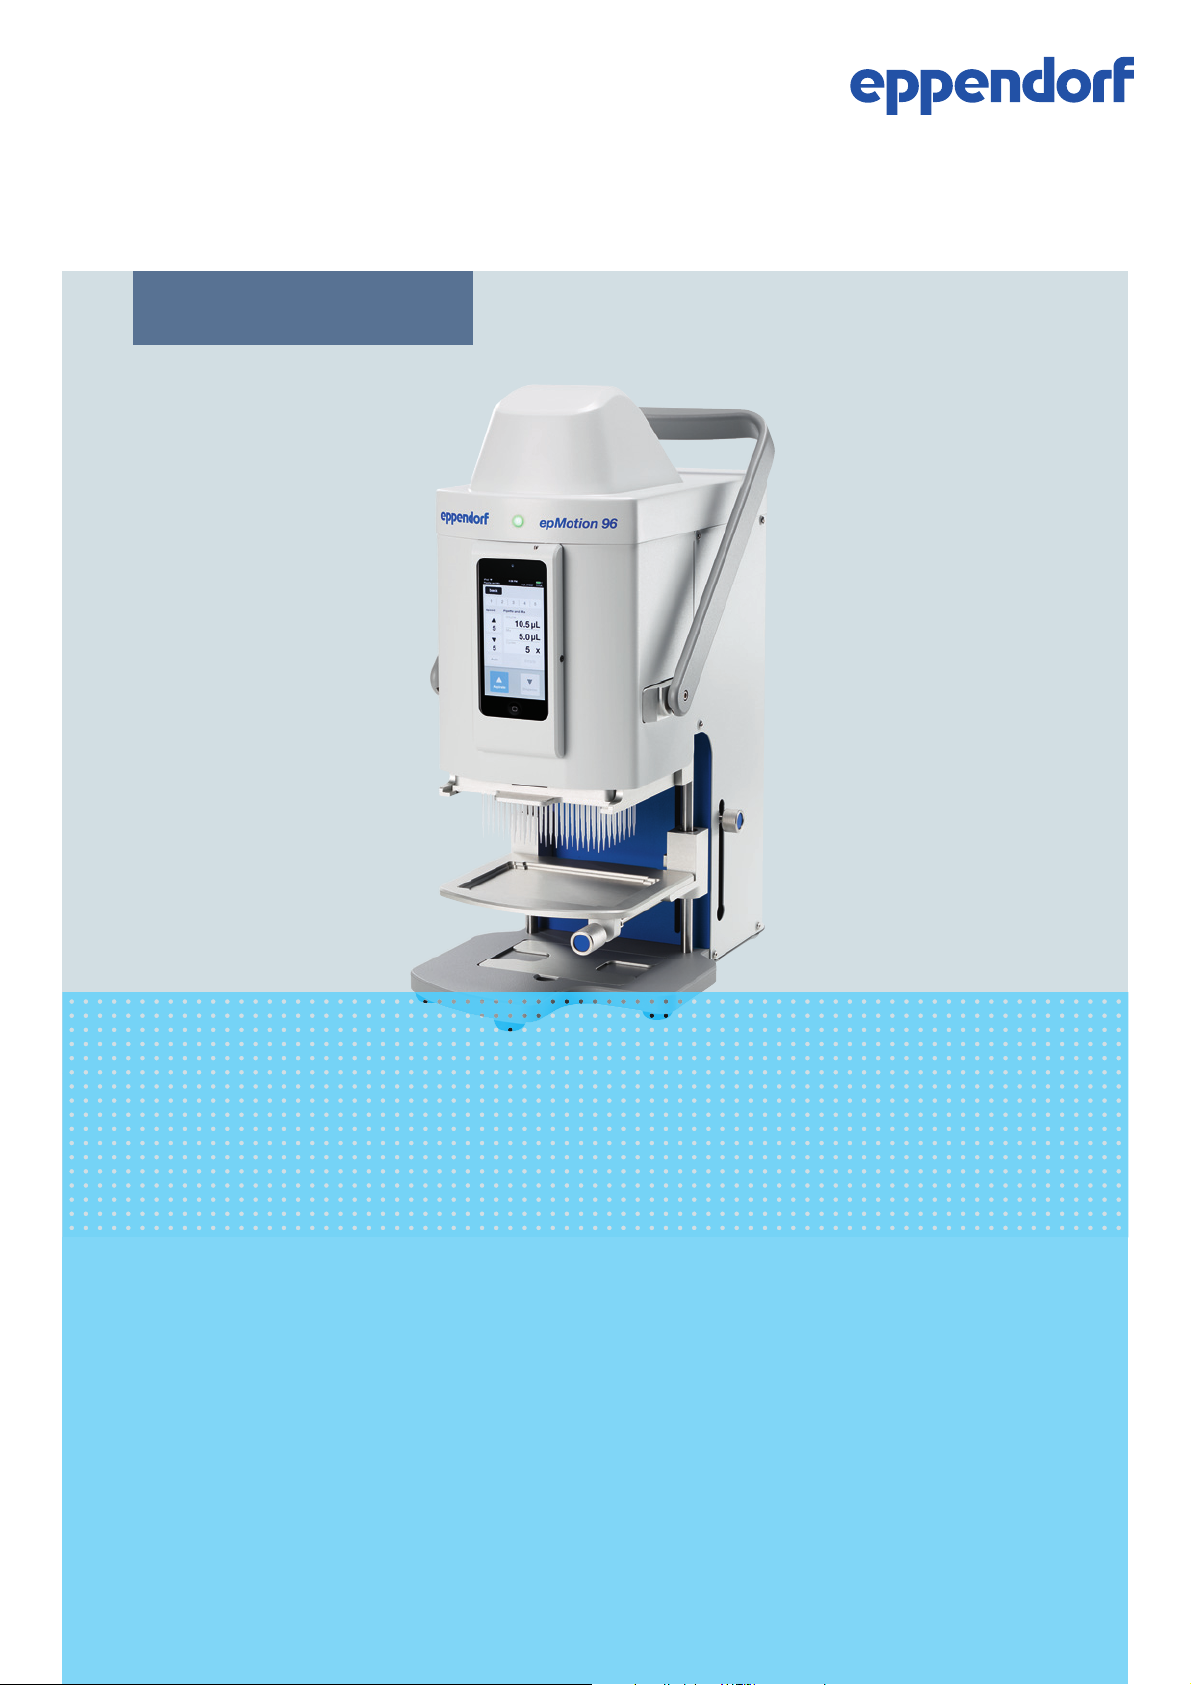
The epMotion 96 is a semi-automatic pipetting device for aspirating, dispensing or mixing liquids. The
pipetting device has 96 single channels for pipette tips. This allows filling a 96-well plate in one step or a
384-well plate in four steps. The plates must be positioned manually.
A software is used to set, control and monitor the aspiration and dispensing of the liquids. The software is
installed on a commercially available Apple iPod touch.
The iPod touch is not included in the delivery of the epMotion 96.
The iPod touch communicates with the pipetting device via a wireless connection. The wireless connection
does not require the iPod to be placed inside the docking station. The docking station is only used for
charging the iPod touch.
Page 10
10
10
11
8
7
9
6
5
2
1
3
4
Product description
®
epMotion
96
English (EN)
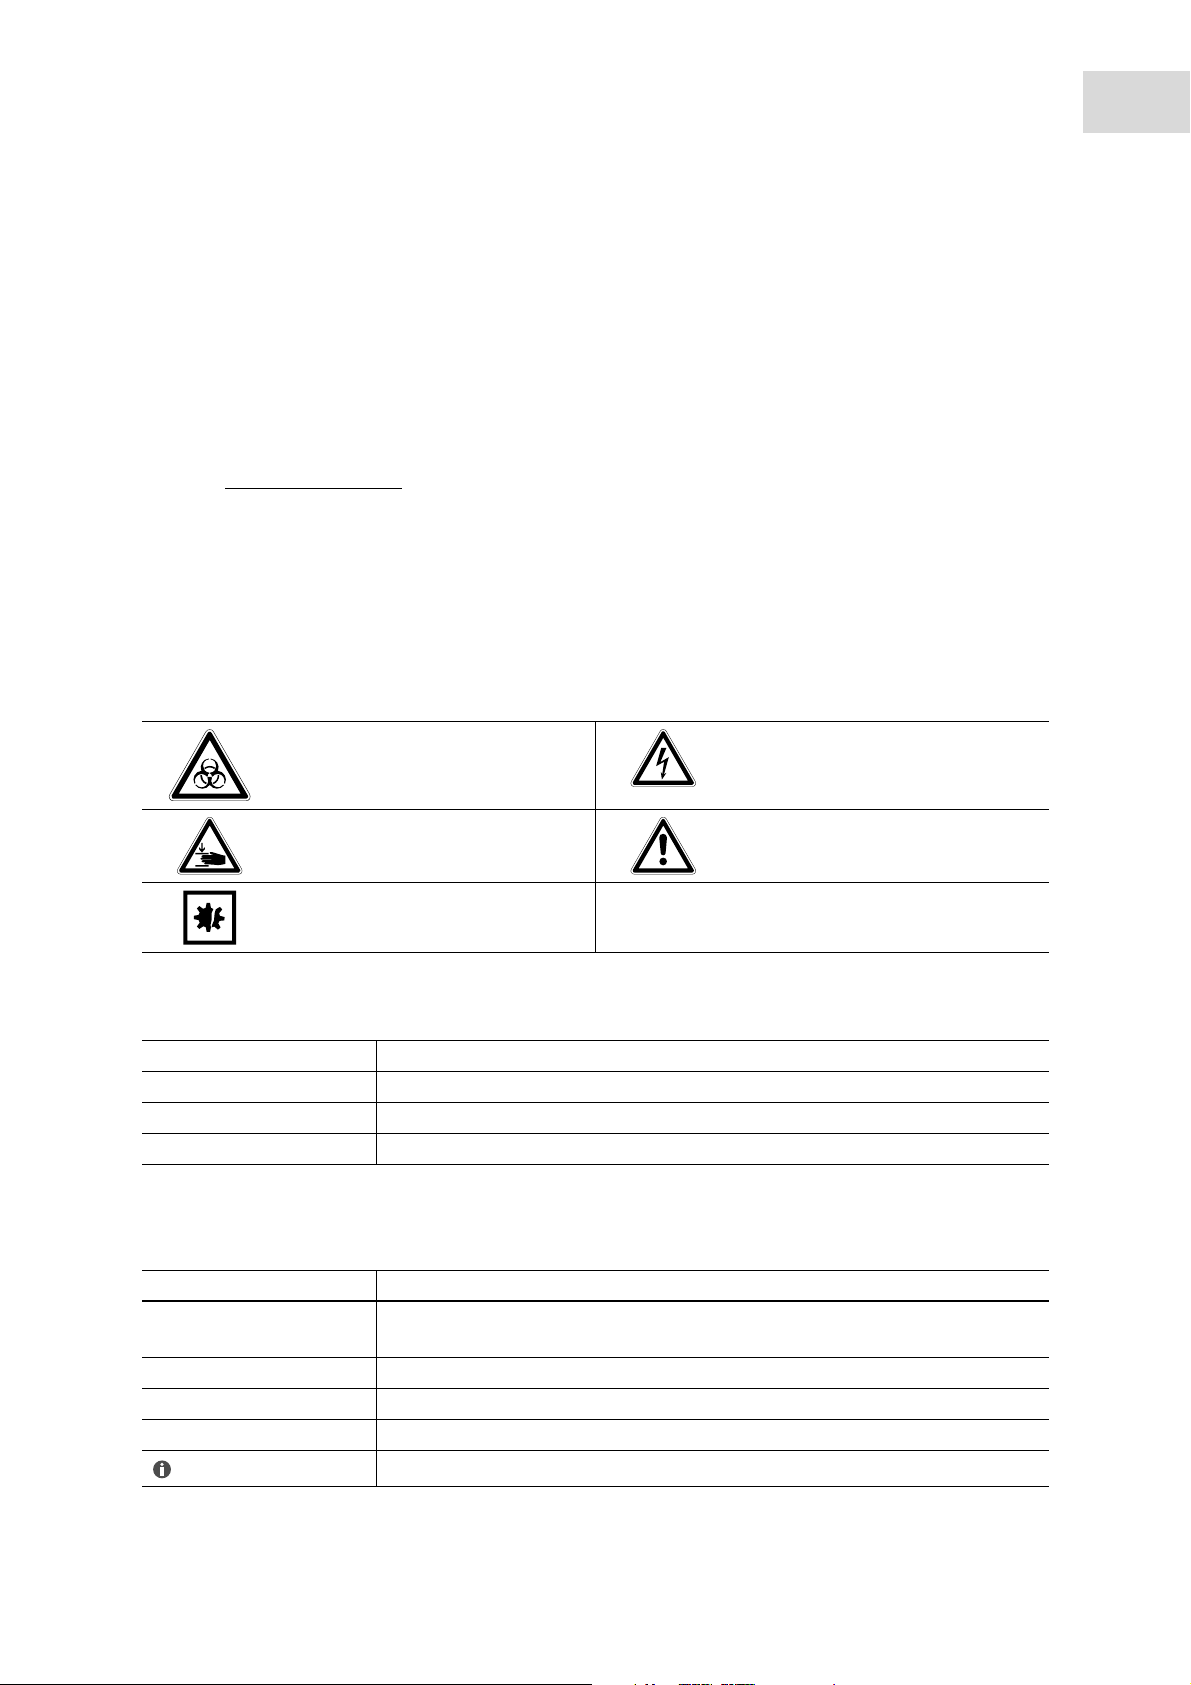
2.3 Main illustration
Abb. 2-1: Front and rear view
Fig. 2-1: Front and rear view
1 Status lamp
Green – pipetting device is activated
Blue – pipetting device is in operation
Red – pipetting device has stopped, awaits
confirmation
2Docking station
For Apple iPod touch
3 Lifting table
4Base
With adapter for 384-well plate
7 Locking handle
Fix the stop for lifting table
Fix the stop for the automatic dosing unit
8 Mains/power connection
With bracket for micro fuses
9Lever
Locking or unlocking loading frame with
pipette tips
10 Mains switch On/Off
11 Name plate
5Loading frame
Bracket for tray with epT.I.P.S Motion Reloads
6 Locking handle
Fix the lifting table in working position
Page 11
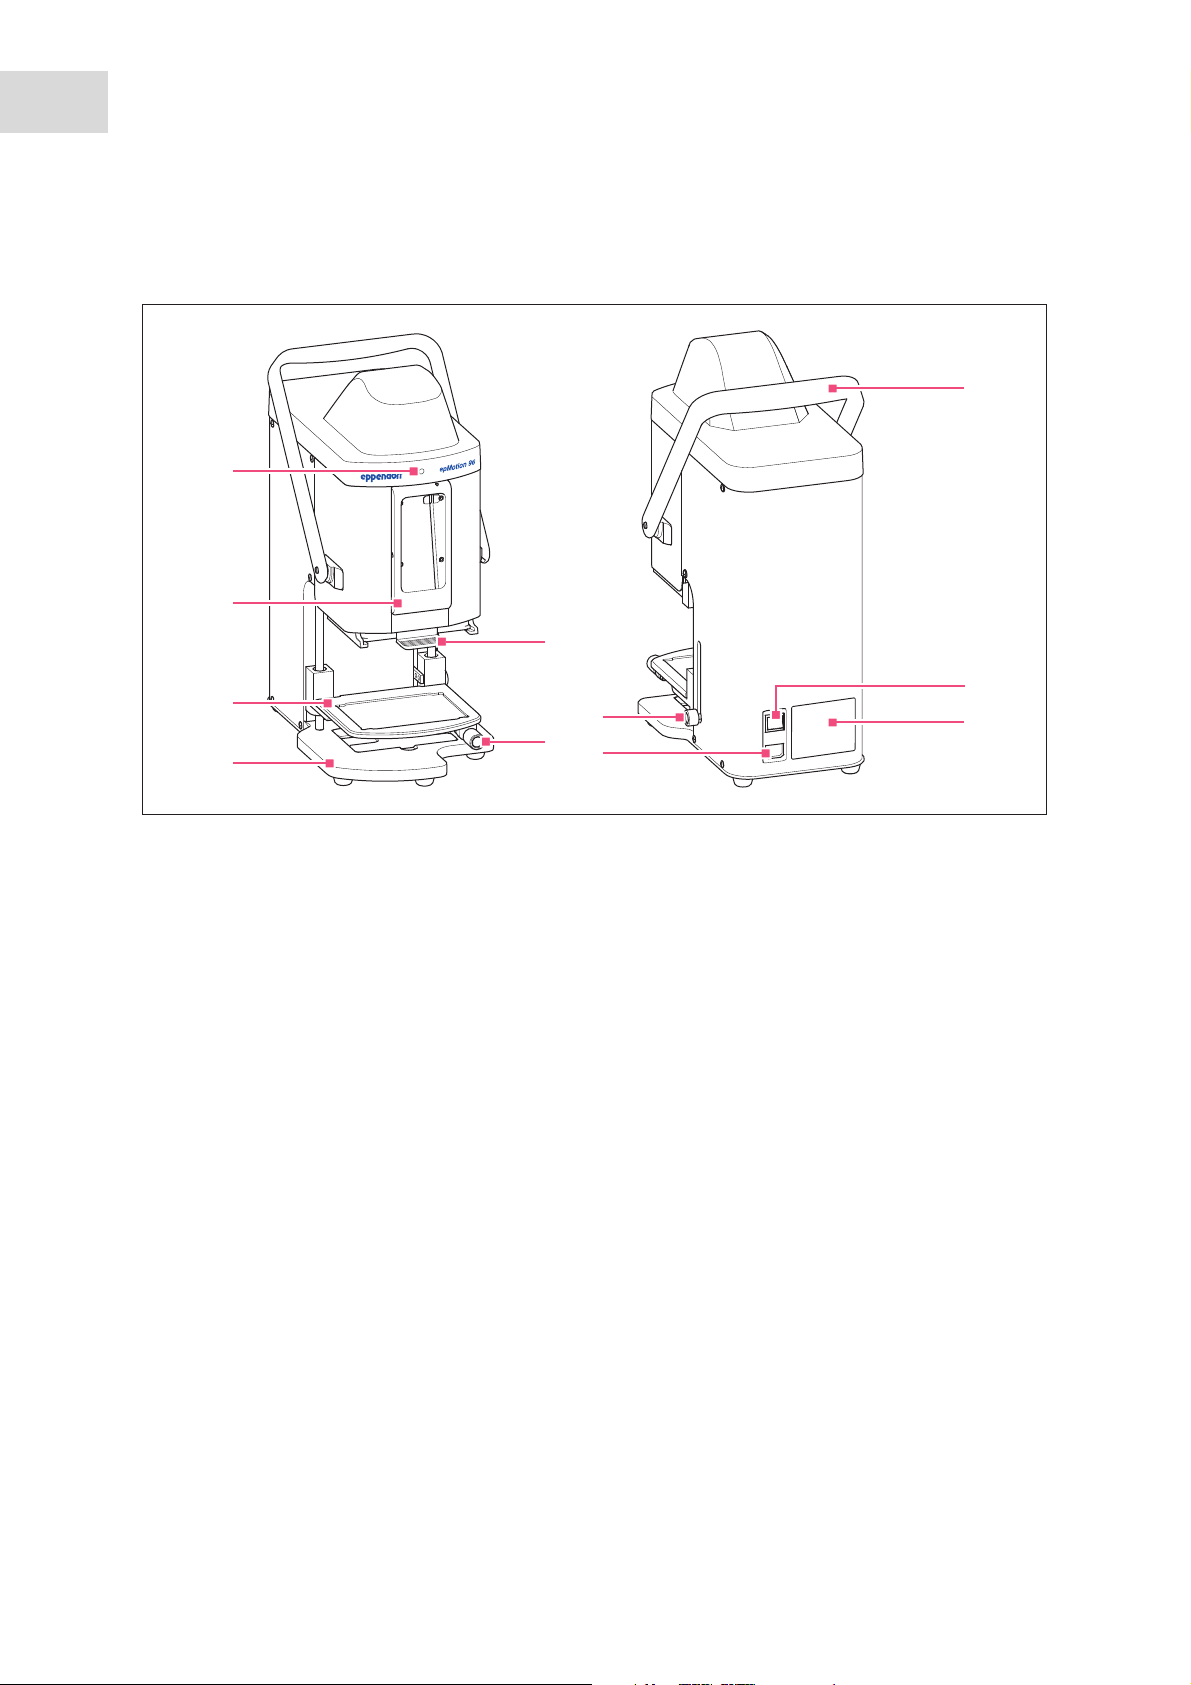
2.3.1 Docking station
3
1
2
Abb. 2-2: Docking statio n with frame
Product description
®
epMotion
96
English (EN)
11
Fig. 2-2: Docking station with frame
1Border
2 Connector for iPod touch
For model numbers A1421 or A1509
3 Switch (on/off) and standby
Page 12
12
1
2
3
4
5
Product description
®
epMotion
96
English (EN)
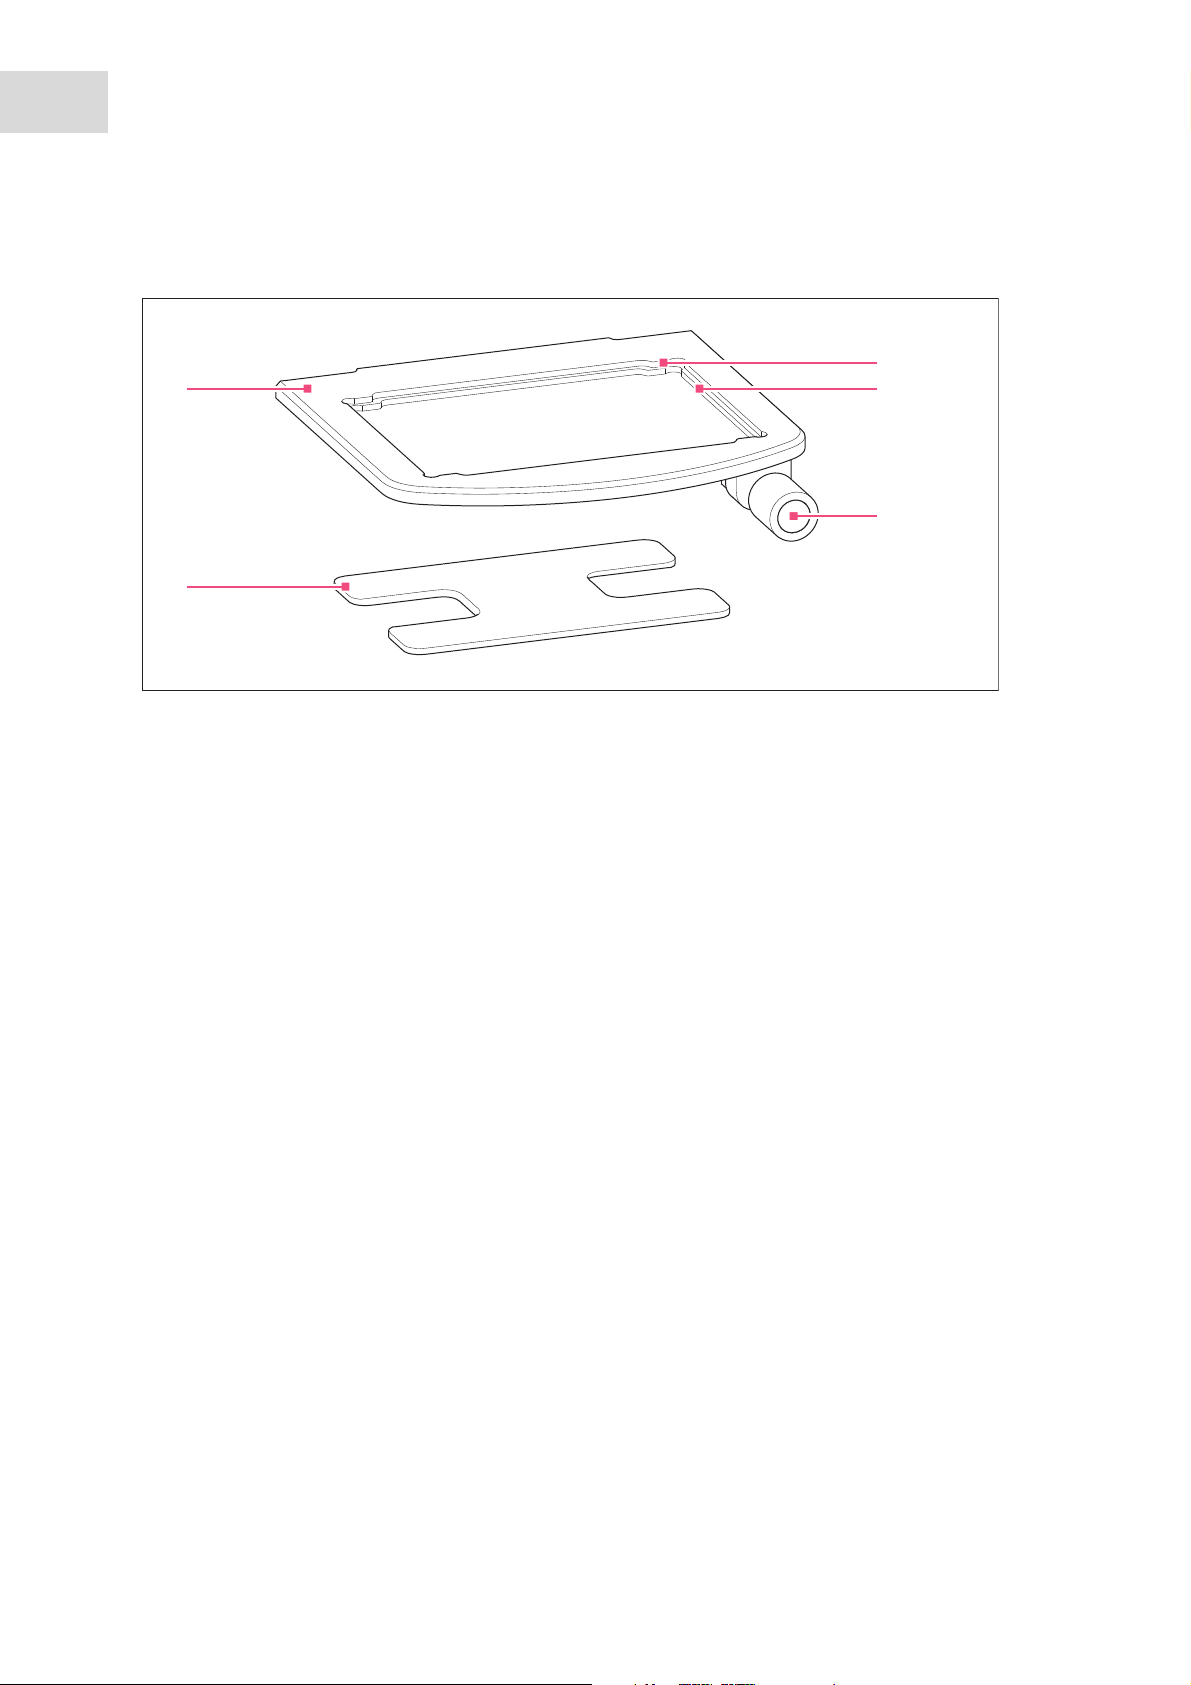
2.3.2 Lifting table and adapter
Abb. 2-3: Lifting table and adapter
Fig. 2-3: Lifting table and adapter
1 Lifting table
2 Adapter for 384-well plate
3 Recess for 384-well plate
4 Recess for 96-well plate
5 Locking handle
Page 13
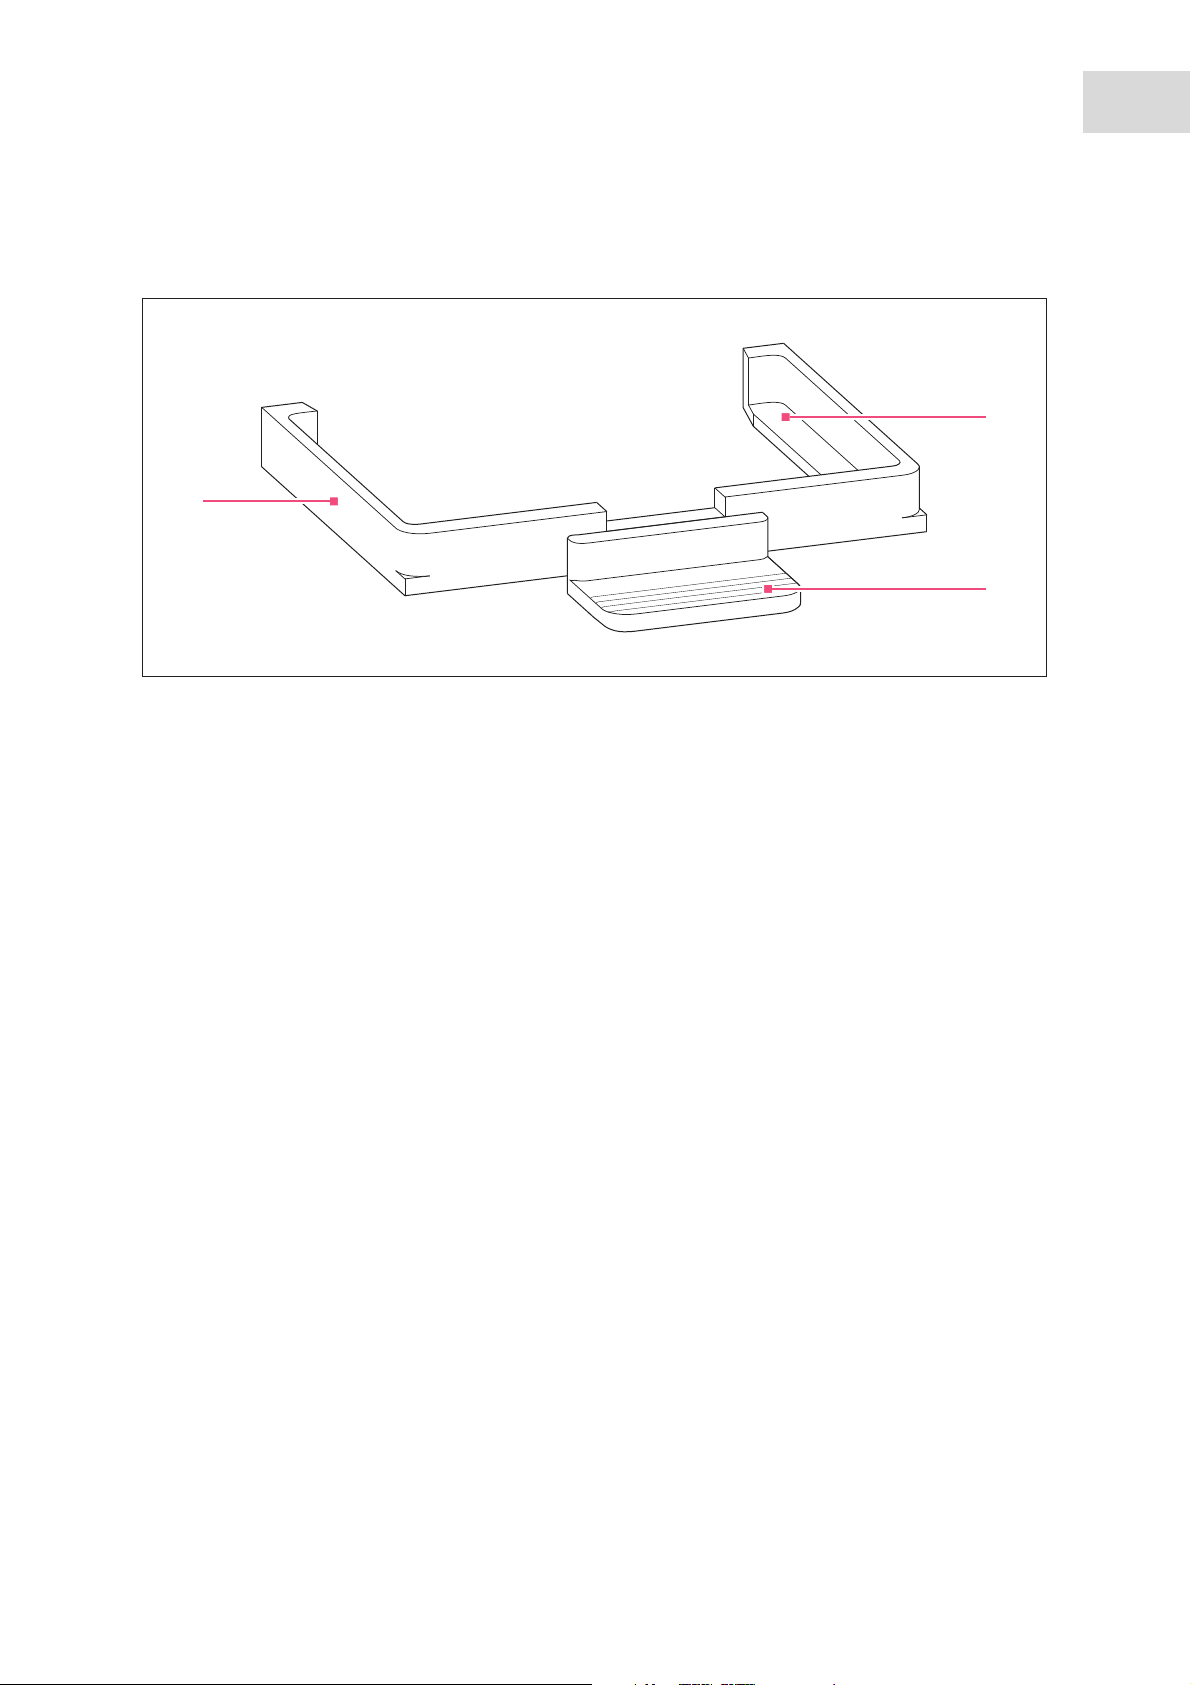
2.3.3 Loading frame
3
2
1
Abb. 2-4: Loading frame
Product description
®
epMotion
96
English (EN)
13
Fig. 2-4: Loading frame
1Loading frame
2 Support for tray with pipette tips (epT.I.P.S
Motion Reloads)
3Handle
Page 14
14
Product description
epMotion
English (EN)
®
96
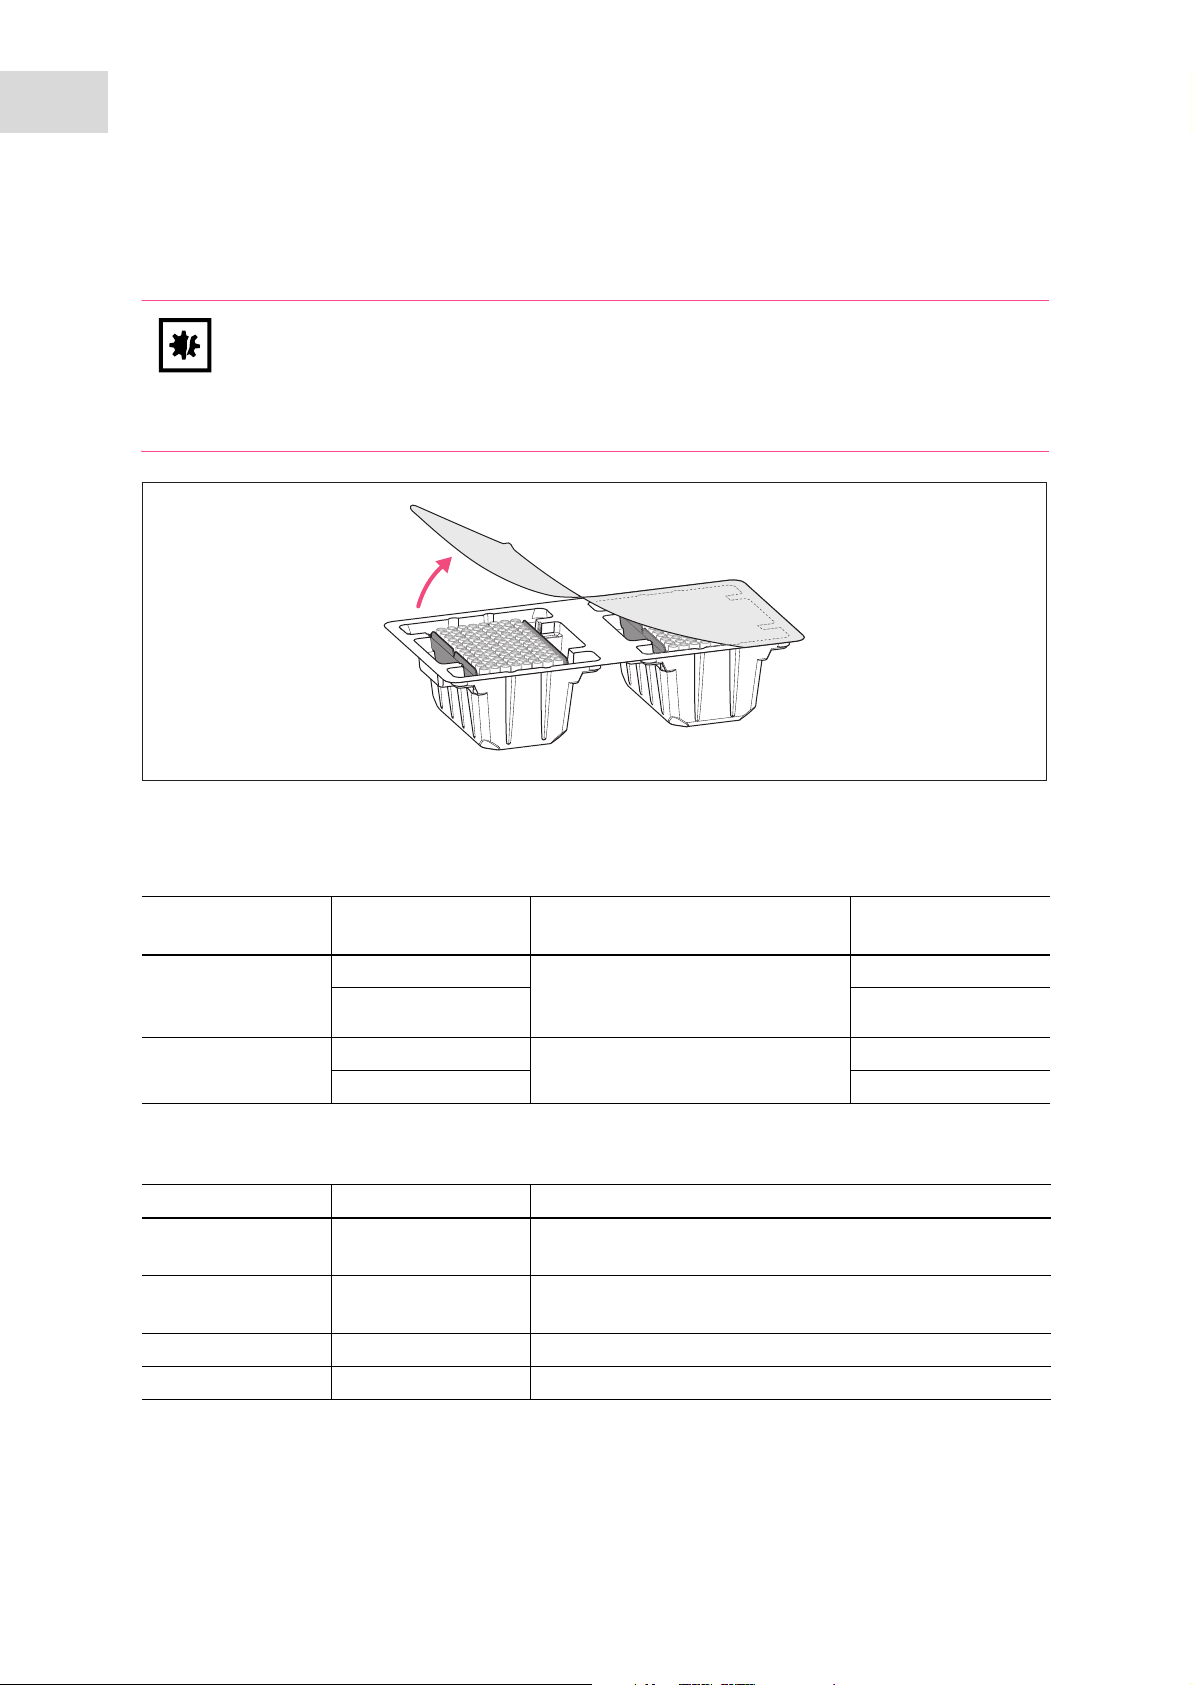
2.4 Recommended pipette tips
NOTICE! Dispensing error due to incorrect handling of pipette tips.
Tips become deformed and change size during autoclaving.
Do not autoclave the pipette tips. Use tips with the sterile specification, if required.
Do not stack any racks that contain pipette tips.
We recommend using epT.I.P.S Motion Reloads. The pipette tips are available with various degrees of
purity, with and without filters.
Pipette tip Sizes Use Plate depth for liquid
aspiration
epT.I.P.S Motion
Filter Reloads
epT.I.P.S Motion
Reloads
50 μL Liquids that require the pipette to
300 μL max. 34 mm
50 μL Liquids without any special risks. max. 37 mm
300 μL max. 34 mm
be protected from contamination by
aerosols.
max. 37 mm
2.5 Recommended plates
Plate Size Use
Microplate 96 or 384 wells Supplying and aspirating liquids (e.g. assays for plate
reader)
Deepwell plate 96 or 384 wells Supplying and aspirating liquids (e.g. for culturing
organisms or cell cultures)
PCR plate 96 or 384 wells Supplying and aspirating liquids (e.g. for PCR applications)
Reservoir 1, 8, or 12 chambers Supplying liquids
Page 15

2.6 Name plate
U
L
LISTED 7F06
Eppendorf AG
22331 Hamburg
Fuse
100-240V 50-60 Hz
Seriennr.:
Serial no:
LABORATORY EQUIPMENT
Made in
USA
W
A
1
2
3
4
5
6
7
8
10
9
WiFiSSID:
114005008
access code
1
2
Abb. 2-5: Name plate
Fig. 2-5: Name plate
Product description
®
epMotion
96
English (EN)
15
1 Manufacturer
2 Device type
3Voltage
4Micro fuse
5Frequency
6 Markings and approvals
7 Address of manufacturer
8 Serial number
9Power consumption
10 Current consumption
2.6.1 Network name
Abb. 2-6: Sticker networ k name
Fig. 2-6: Sticker network name
1 Network name 2 Access code
Page 16

16
Product description
®
epMotion
96
English (EN)
Page 17

Safety
®
epMotion
English (EN)
96
3Safety
3.1 Intended use
The semi-automatic pipetting system (including equipment, accessories, consumables and software) is
designed for use in laboratories for research and development, for industrial and routine work as well as for
training and education. Areas of application include, among others, life sciences, biotechnology, chemistry
and clinical research.
The semi-automatic pipetting system epMotion 96 is designed for performing and monitoring
contamination-free, precise and volume-controlled transfer of liquids, as well as for controlling the
automatic mixing of fluids for contamination-free, precise and accurate measurement and transfer of
liquids. The semi-automatic pipetting system epMotion 96 has a volume range of 0.5 μl to 300 μl.
The pipetting system complies with the requirements of the EU directives and standards listed in the
Declaration of Conformity. This product is not approved by the FDA.
The pipetting system is intended exclusively for indoor use and may only be operated by qualified
personnel with appropriate training.
17
3.2 Warnings for intended use
WARNING! Damages to health due to infectious liquids and pathogenic germs.
When handling infectious liquids and pathogenic germs, observe the national regulations,
the biological security level of your laboratory, the material safety data sheets, and the
manufacturer's application notes.
Wear personal protective equipment.
For full instructions regarding the handling of germs or biological material of risk group II
or higher, please refer to the "Laboratory Biosafety Manual" (Source: World Health
Organization, current edition of the Laboratory Biosafety Manual).
CAUTION! Poor safety due to incorrect accessories and spare parts.
The use of accessories and spare parts other than those recommended by Eppendorf may
impair the safety, functioning and precision of the device. Eppendorf cannot be held liable or
accept any liability for damage resulting from the use of incorrect or non-recommended
accessories and spare parts, or from the improper use of such equipment.
Only use accessories and original spare parts recommended by Eppendorf.
NOTICE! Spilled liquid can cause damage to the device.
Switch the device off.
Unplug the mains/power plug.
Collect the spilled liquid. Observe the specifications for the liquid in the material safety
data sheets.
Page 18

18
Safety
epMotion
English (EN)
®
96
3.3 Warning signs on the device
Warning symbol Meaning
Read the operating manual
3.4 User profile
The device and accessories may only be operated by trained and skilled personnel.
Before using the device, read the operating manual carefully and familiarize yourself with the device's
mode of operation.
3.5 Information on product liability
In the following cases, the designated protection of the device may be compromised. Liability for any
resulting property damage or personal injury is then transferred to the operator:
• The device is not used in accordance with the operating manual.
• The device is used outside of its intended use.
• The device is used with accessories or consumables which are not recommended by Eppendorf.
• The device is maintained or repaired by people not authorized by Eppendorf.
• The user makes unauthorized changes to the device.
Page 19

4 Installation
4.1 Preparing installation
CAUTION! Risk of injury due to lifting and carrying heavy loads
The device is heavy. Lifting and carrying the device can lead to back injuries.
Transport and lift the device with an adequate number of helpers only.
Use a transport aid to transport the device.
Keep the packaging and the transport securing devices for later transport or storage.
Do not operate the device if there is visible damage to the device itself and/or to its packaging.
1. Check the packaging for damage.
2. Carefully remove the device from the packaging.
3. Check that everything is included in the delivery.
4. Check the device for damage.
Installation
epMotion
English (EN)
®
96
19
4.1.1 Complaints about damages
Contact customer service.
4.1.2 Incomplete delivery
Contact customer service.
4.2 Selecting the location
Select the device location according to the following criteria:
• Suitable power connection in accordance with the name plate.
• A bench with a horizontal and even work surface which is designed to support the weight of the device.
• A mat or table that is cushioned against vibrations.
• The location is protected from direct sunlight and drafts.
The mains/power switch and cutting unit of the mains/power line must be easily accessible
during operation (e.g, residual current circuit breaker).
Page 20
20
Installation
epMotion
English (EN)
®
96
4.3 Connecting the device
WARNING! Risk from incorrect supply voltage
Only connect the device to voltage sources which correspond to the electrical
requirements on the name plate.
Only use sockets with a protective earth (PE) conductor and suitable power cable.
WARNING! Electric shock due to damage to device or mains cable.
Only switch on the device if the device and mains cable are undamaged.
Only use devices that have been properly installed or repaired.
In case of danger, disconnect the device from the mains supply by pulling the power plug
from the device or the mains socket or, by using the isolating device intended for this
purpose (e.g., emergency stop switch in the laboratory).
NOTICE! Damage to electronic components due to condensation.
Condensate can form in the device after it has been moved from a cool environment to a
warmer environment.
After installing the device, wait at least for 12 h. Only then connect the device to the mains.
Prerequisites
• The device is switched off.
• Electrical connection data according to the name plate.
Plug in the power cable supplied with the device.
4.4 Installing the software
The epMotion 96 software can be installed directly via the iPod. To do this, the iPod needs to be connected
to the internet using a wireless connection. Alternatively, the software may be installed using a USB
connection with the computer and the program iTunes.
Prerequisites
• Apple iPod touch with the model number A1421 or A1509 is available.
• iOS 7.0 or higher is installed on the device.
• Apple Store account is available.
• An internet connection is established.
Page 21
epMotion
English (EN)
1. Open the App Store.
2. Tap “epMotion 96“ into the search field.
3. Select free download.
4. Select installation.
5. Enter the Apple ID keyword.
The epMotion 96 icon is shown on the display.
Installation
®
96
21
4.5 Setting up the iPod
4.5.1 Activating the wireless connection
Prerequisites
• The device is switched on.
• Network name (see label with network location).
1. Open the Settings window.
2. Select Wi-Fi.
3. Tap the Wi-Fi switch and move it to the right.
The switch is now displayed in green.
The wireless connection is activated.
The available networks are displayed.
4. Select the network name of the pipetting device.
5. In order to close the Settings menu, tap on the
Home button.
Page 22

22
Installation
®
epMotion
96
English (EN)
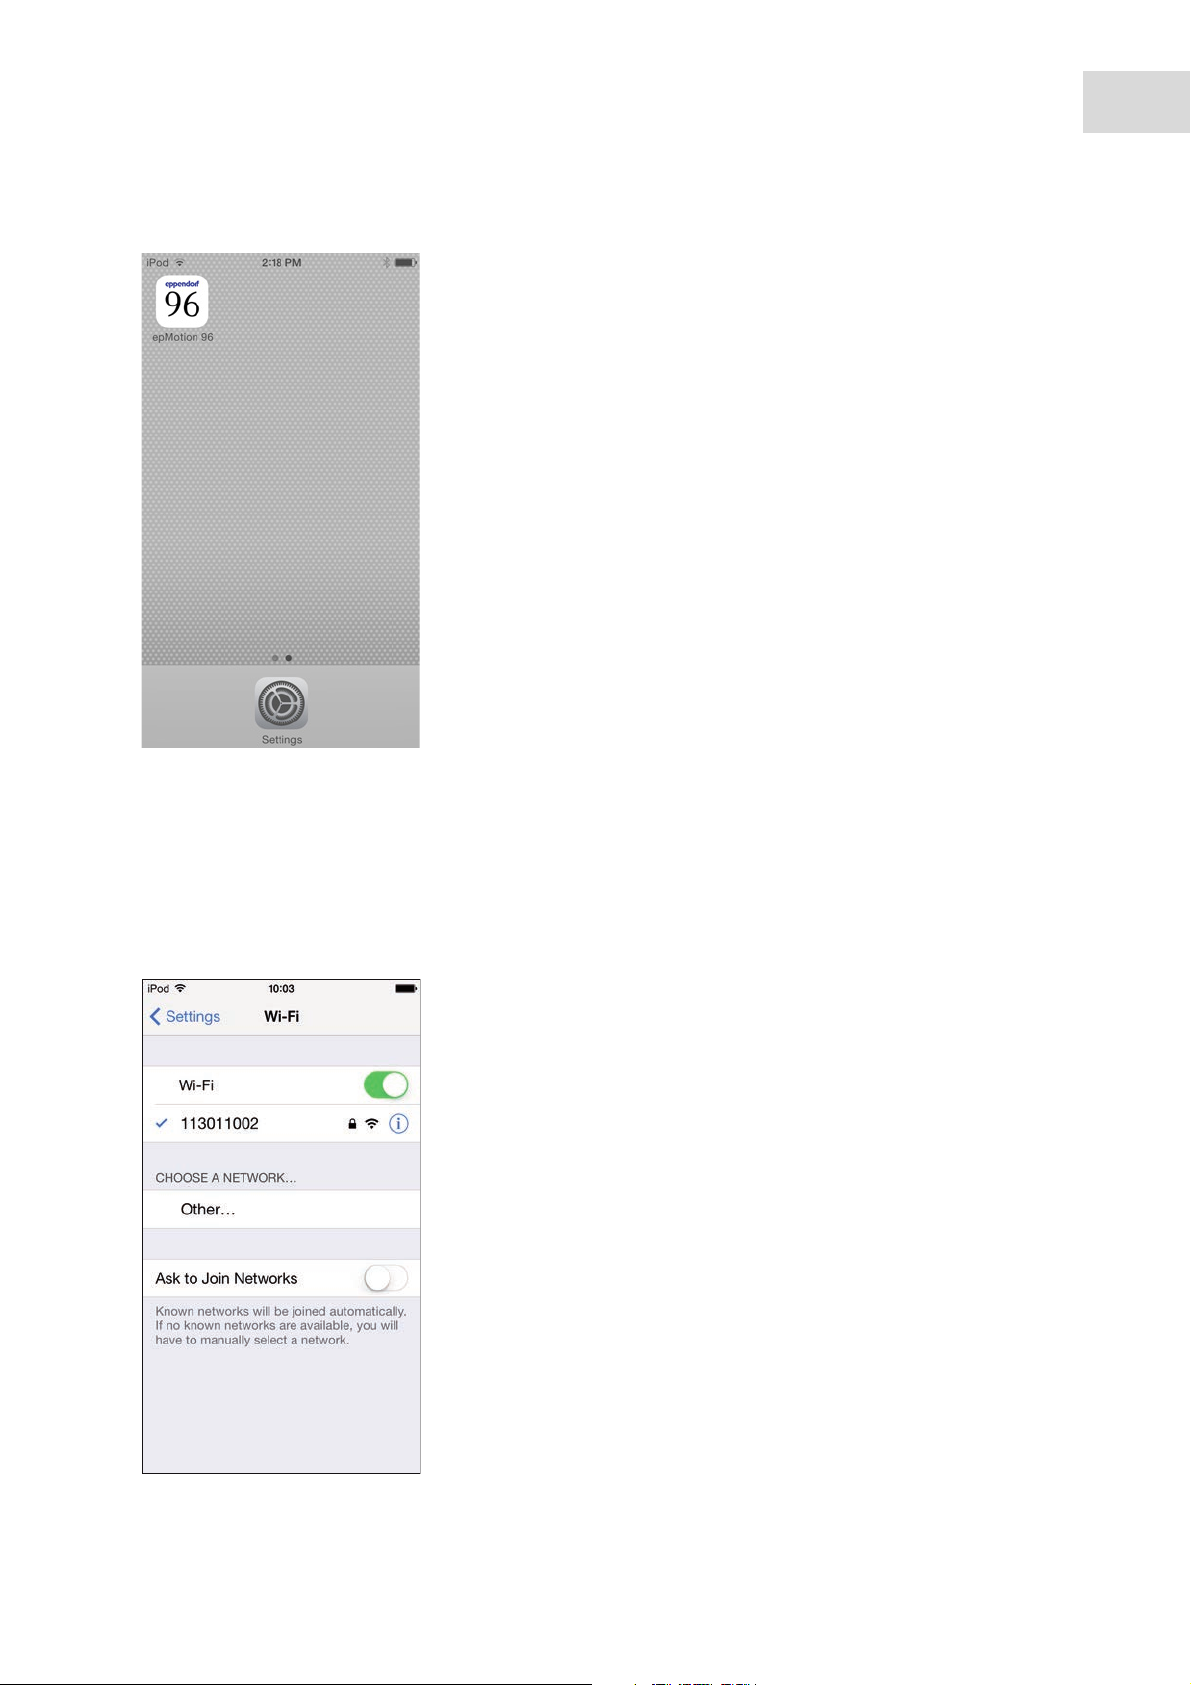
4.5.2 Configuring the network
Prerequisites
• Network name (see label with network location).
• Wireless is activated.
1. Open the Settings window.
2. Select the network for the pipetting device.
3. Select DHCP mode.
The network data are set automatically.
4. Enter the last 5 digits of the network name as the
password.
The status bar indicates the wireless connection.
The network connection is established
automatically.
Page 23

Installation
epMotion
®
English (EN)
4.5.3 Deactivating the automatic display deactivation
The iPod automatically switches off the display. This function can be deactivated for operating the device.
1. Open the Settings window.
2. Select General.
3. Select Auto-Lock and choose the setting Never.
96
23
Page 24

24
Installation
epMotion
English (EN)
®
96
4.6 Placing the iPod into the docking station
No tools are required to place the iPod into the docking station. Once placed into the docking station, the
iPod’s battery is charged. Data is transmitted using a wireless connection.
1. Pull off the frame.
2. Insert the iPod straight from the top and push it
onto the connector.
3. Attach the frame.
Page 25

Software
6
7
10
8
9
1
4
3
5
2
®
epMotion
96
English (EN)
5 Software
5.1 Touchscreen
Selecting a mode, setting parameters and executing functions is done via the touchscreen. Set parameters
are displayed in the corresponding status fields.
5.1.1 Layout of the touchscreen
Abb. 5-1: Arrangement of the touchscreen – example: Pipette mode
25
Fig. 5-1: Arrangement of the touchscreen – example: Pipette mode
1 Selection of the previous view
2 Speed for liquid aspiration
Levels 1 – 9
3 Speed for liquid dispensing
Levels 1 – 9
4 Function for pipetting automatically
5 Aspirate button
Aspirating liquid
6 Status bar
Wireless connection, time, battery life
Operating mode, size of the pipette tips, current
volume
7 Stored parameter profile
Profiles 1 – 5
8 Parameter
9 Empty button
Empty pipette tips
10 Dispense button
Dispensing liquid
Page 26

26
Software
®
epMotion
96
English (EN)
5.2 Overview of the operating modes
Screen with the operating mode selection.
Abb. 5-2: Operating modes
Fig. 5-2: Operating modes
Operating modes
• Pipette – aspirating liquid in one step and dispensing liquid in one step.
• Multidispense – aspirating liquid in several steps and dispensing liquid in several steps.
• Pipette and Mix – dispensing liquid and mixing it subsequently.
• Manual Pipette – manually determining the liquid volume for aspirating and dispending.
• Dilute and Mix – aspirating concentrated liquid and diluent and mixing them while dispensing.
• Multiaspirate – aspirating liquid in several steps and dispensing liquid in one step.
• Run Program – selecting and running pre-defined program.
• Settings – setting the system properties.
5.2.1 Selecting the operating mode
1. Tap on the mode selection and scroll through the list.
2. Confirm the mode with OK.
The screen of the selected mode is displayed.
Page 27

5.3 Operating the software
4
5
1
2
3
Software
epMotion
English (EN)
®
96
27
1 back button
Unpressed button
2 Auto button
Inactive button
3 Aspirate button
Unpressed button
4 ParameterVolume
Editable parameter
5 Dispense button
Actuated button
Page 28

28
Software
epMotion
English (EN)
®
96
5.3.1 Entering or changing parameters
It is possible to change parameters using the iPod keypad.
1. Touch the parameter and hold it.
2. Change the parameter value.
3. Click on a blank section of the display to accept
The key pad will fade in.
the value.
5.3.2 Saving the parameter profile
Several parameter profiles can be created and stored in each mode.
1. Select the mode.
2. Set the parameters for the mode.
3. Select the desired number for the parameter
profile and hold it.
4. Confirm the prompt with Yes.
The parameter profile will be saved.
The number with the stored parameter profile is
displayed in black.
Page 29

6 Operation
WARNING! Electric shock due to damage to device or mains cable.
Only switch on the device if the device and mains cable are undamaged.
Only use devices that have been properly installed or repaired.
In case of danger, disconnect the device from the mains supply by pulling the power plug
from the device or the mains socket or, by using the isolating device intended for this
purpose (e.g., emergency stop switch in the laboratory).
6.1 Switching the device on and off
WARNING! Electric shock due to damage to device or mains cable.
Operation
epMotion
English (EN)
®
96
29
Only switch on the device if the device and mains cable are undamaged.
Only use devices that have been properly installed or repaired.
In case of danger, disconnect the device from the mains supply by pulling the power plug
from the device or the mains socket or, by using the isolating device intended for this
purpose (e.g., emergency stop switch in the laboratory).
6.1.1 Switching the device on
Prerequisites
• There are no pipette tips in the device.
1. Switch on the device at the mains power switch.
The device performs a self test.
The device is ready for operation, if the status light is green.
The iPod touch is charged.
6.1.2 Switching the device off
1. Switch off the device at the mains power switch.
2. Switch off the iPod touch.
All device components and the docking station are switched off.
Page 30

30
Operation
epMotion
English (EN)
®
96
6.2 Starting the software
6.2.1 Starting the software
Prerequisites
• epMotion 96 software is installed.
1. Tap on the epMotion 96 icon.
2. Confirm the start screen with OK.
The operating mode selection is displayed.
Page 31

6.2.2 Quitting the software
It is not possible to exit the software directly using a button.
1. Tap twice on the Home button of the iPods.
2. Tap on the software screen and swipe it upwards
out of the window.
The software is exited.
Operation
epMotion
English (EN)
®
96
31
6.2.3 Starting the simulation mode
Prerequisites
• The device is switched off.
1. Tap on the epMotion 96 icon.
Page 32

32
Operation
epMotion
®
English (EN)
96
2. Confirm the error message with OK.
3. Confirm the error message with OK.
The Simulation Mode mode is displayed.
All functions and modes are executable and can
be operated.
There is no wireless connection.
No data is transferred to the pipetting device.
Page 33

6.2.4 Exiting the simulation mode
Operation
epMotion
English (EN)
1. Tap twice on the Home button of the iPods.
2. Swipe the software screen upwards out of the
window.
The simulation mode is exited.
The software is exited.
®
96
33
6.3 Inserting pipette tips
NOTICE! Dispensing error due to incorrect handling of pipette tips.
Tips become deformed and change size during autoclaving.
Do not autoclave the pipette tips. Use tips with the sterile specification, if required.
Do not stack any racks that contain pipette tips.
NOTICE! Damage to the device due to incorrectly equipped trays.
The device detects the tip size using the coding of the trays. Incorrectly equipping the trays
can cause contamination of pipetting head.
Only use trays that were equipped by the manufacturer.
Do not equip the trays manually.
When ejecting the pipette tips, liquid can drip from the pipette tips.
Make sure that the pipette tips are completely empty before replacing them.
Page 34

34
Operation
epMotion
English (EN)
Prerequisites
• The lifting table is in the basic position.
• Pipette tips (epT.I.P.S Motion Reloads) are available.
®
96
1. Pull the lever of the pipetting device to the front.
2. Pull out the loading frame.
3. Insert the tray with pipette tips into the loading
frame.
The notch on the tray must point in the direction
of the loading frame handle.
4. Insert the loading frame into the pipetting device.
5. Push the lever of the pipetting device backwards.
The pipette tips are attached and locked.
The status bar of the software indicates the
volume of the pipette tips.
6.4 Moving the lifting table
6.4.1 Moving the lifting table into working position
Prerequisites
• The pipette tips are attached.
1. Loosen the locking handle.
2. Move the lifting table upwards into working
position.
3. Tighten the locking handle.
Liquid can be aspired.
Liquid can be dispensed.
Stop can be set.
Page 35

6.4.2 Moving the lifting table into basic position
1. Hold the lifting table and loosen the locking
handle.
2. Move the lifting table into the basic position.
Source vessel or destination vessel can be
replaced.
Pipette tips can be inserted.
6.4.3 Setting the stop for the lifting table
Operation
epMotion
English (EN)
®
96
35
The stop defines the end position of the lifting table in the working position. It makes sense to use the stop
when filling several plates.
Prerequisites
• The stop is in the basic position.
1. Move the lifting table into working position.
2. Tighten the locking handle on the lifting table.
3. Tighten the locking handle for the stop.
The working position is fixed.
6.5 Aspirating liquid
Prerequisites
• The device is switched on.
• The software has been started.
• The pipette tips are attached.
1. Put the source vessel onto the lifting table.
2. Select the operating mode.
3. Set the aspiration volume.
4. Set the parameters.
5. Move the lifting table into the working position until the pipette tips are immersed in the liquid.
Page 36

36
Operation
epMotion
English (EN)
6. Tighten the locking handle on the lifting table.
7. Press Aspirate.
®
96
Liquid is aspirated.
Destination vessel can be filled.
6.6 Dispensing liquid
Prerequisites
• The lifting table is in the basic position.
• Destination vessel is available.
1. Put the destination vessel onto the lifting table.
2. Set the parameters.
3. Loosen the locking handle on the lifting table.
4. Move the lifting table into the working position until the openings of the pipette tips are positioned
below the rim of the vessel.
5. Tighten the locking handle on the lifting table.
6. Press the Dispense button.
7. Loosen the locking handle.
8. Move the lifting table upwards until the pipette tips are immersed in the liquid.
Adherent liquid droplets are stripped off.
9. Move the lifting table into basic position.
6.6.1 Blow out – Dispensing residual liquid
Prerequisites
• Blow out button is active (is displayed instead of Dispense).
• Destination vessel is available.
1. Move the lifting table to the operating position and fix it using the locking handle.
2. Press the Blow out button.
3. Strip off liquid droplets at the pipette tips.
4. Move the lifting table into basic position.
5. Confirm the query with OK.
Pipette tips are emptied.
6.6.2 Empty – Completely dispensing liquid
1. Move the lifting table to the operating position and fix it using the locking handle.
2. Press the Empty button.
Pipette tips are emptied entirely.
Page 37

6.7 Inserting the plate
1234 56789101112
A
B
C
D
E
F
G
H
6.7.1 Inserting a 96-well plate
Prerequisites
• The lifting table is in the basic position.
• Adapter for 384-well plate is located in the base.
Operation
epMotion
English (EN)
1. Insert the 96-well plate into the lifting table.
®
96
37
6.7.2 Filling the 96-well plate
A 96-well plate can be filled in one step.
1. Move the lifting table into working position.
2. Tighten the locking handle.
3. Select the operating mode und fill the plate.
Page 38

38
1 2 3 4 5 6 7 8 9 10 11 12 13 14 15 16 17 18 19 20 21 22 23 24
A
B
C
D
E
F
G
H
I
J
K
L
M
N
O
P
1 2 3 4 5 6 7 8 9 10 11 12 13 14 15 16 17 18 19 20 21 22 23 24
A
B
C
D
E
F
G
H
I
J
K
L
M
N
O
P
Operation
®
epMotion
96
English (EN)
6.7.3 Inserting a 384-well plate
Prerequisites
• The lifting table is in the basic position.
6.7.4 Filling the 384-well plate
1. Lift the lifting table and take the adapter out of
the base.
2. Insert the adapter into the lifting table.
3. Insert the 384-well plate in the lower right-hand
corner.
Fill the plate beginning with well A1.
In order to fill a 384-well plate completely, the plate must be positioned consecutively in each corner of the
lifting table.
1. Place the 384-well plate in the bottom right
position.
2. Move the lifting table into working position.
Every second row and every second well in the
series starting at A1 is filled.
3. Move the lifting table into basic position.
4. Place the 384-well plate in the bottom left
position.
5. Move the lifting table into working position.
Every second row and every second well in the
series starting at A2 is filled.
Page 39

Operation
1 2 3 4 5 6 7 8 9 10 11 12 13 14 15 16 17 18 19 20 21 22 23 24
A
B
C
D
E
F
G
H
I
J
K
L
M
N
O
P
1 2 3 4 5 6 7 8 9 10 11 12 13 14 15 16 17 18 19 20 21 22 23 24
A
B
C
D
E
F
G
H
I
J
K
L
M
N
O
P
epMotion
®
English (EN)
6. Move the lifting table into basic position.
7. Place the 384-well plate in the top left position.
8. Move the lifting table into working position.
Every second row and every second well in the
series starting at B2 is filled.
9. Move the lifting table into basic position.
10.Place the 384-well plate in the top right position.
11.Move the lifting table into working position.
Every second row and every second well in the
series starting at B1 is filled.
All wells are now filled.
96
39
Page 40

40
Operation
®
epMotion
96
English (EN)
6.8 Mode Pipette – Dispensing liquid
Aspirating liquid in one step and dispensing liquid in one step.
Abb. 6-1: Mode Pipette
Fig. 6-1: Mode Pipette
Parameter Value Range of values
Speed aspirate Setting the speed of the liquid aspiration. 1 – 9
Speed dispense Setting the speed of the liquid dispensing. 1 – 9
Volume Setting the aspiration volume in μL. 0.5 – 300 (increment of 0.1)
6.8.1 Aspirating liquid
Prerequisites
• Source vessel is available.
1. Put the source vessel onto the lifting table and move the lifting table into working position.
2. Set the aspiration volumes and the speed levels.
3. Press Aspirate.
6.8.2 Dispensing liquid
Prerequisites
• Liquid has been aspirated.
• Destination vessel is available.
1. Put the destination vessel onto the lifting table and move the lifting table into working position.
2. Press Dispense.
Page 41

Operation
epMotion
English (EN)
6.9 Mode Multidispense – Muliple dispensing of liquid
Aspirating liquid in one step and dispensing liquid in several steps. The Auto function activates the
automatic dispensing of liquids.
Abb. 6-2: Mode Multidispense
®
96
41
Fig. 6-2: Mode Multidispense
Parameter Value Range of values
Speed aspirate Setting the speed of the liquid aspiration. 1 – 9
Speed dispense Setting the speed of the liquid dispensing. 1 – 9
Dispense Volume Setting the dispensing volume in μL. 0.5 – 300 (increment of 0.1)
Dispense Steps Setting the number of steps for dispensing. 1 – 99
6.9.1 Aspirating liquid
Prerequisites
• Source vessel is available.
1. Put the source vessel onto the lifting table and move the lifting table into working position.
2. Set the dispensing volume and the number of steps for dispensing.
3. Set the speed levels.
4. Press Aspirate.
Page 42

42
Operation
epMotion
English (EN)
®
96
6.9.2 Dispensing liquid
Prerequisites
• Liquid has been aspirated.
• Destination vessels are available.
1. Put the destination vessel onto the lifting table and move the lifting table into working position.
2. Press Dispense.
3. Change or reposition the destination vessel.
6.9.3 Semiautomatically dispensing liquid
It is advisable to use the Auto function when filling a single 384-well plate or several 96-well plates in
succession.
1. Press the Auto button.
2. Set the dispensing volume.
3. Set the number of steps for dispensing.
4. Aspirate liquid from a source vessel
5. Put the destination vessel onto the lifting table.
6. Move the lifting table into working position and tighten the locking handle.
7. Tighten the locking handle for the stop.
8. Move the lifting table into basic position.
9. Change or reposition the destination vessel.
10.Move the lifting table against the stop and keep it in this position until the dispensing of the liquid is
initiated.
The number of the remaining dispensing steps is displayed.
Page 43

6.10 Mode Pipette and Mix – Dispensing and mixing liquid
Aspirating liquid in one step, dispensing liquid in one step and mixing liquid automatically.
Abb. 6-3: Mode Pipette and Mix
Operation
epMotion
English (EN)
®
96
43
Fig. 6-3: Mode Pipette and Mix
Parameter Value Range of values
Speed aspirate Set the speed of the liquid aspiration. 1 – 9
Speed dispense Set the speed of the liquid dispensing. 1 – 9
Volume Set the aspiration volume in μL. 0.5 – 300 (increment of 0.1)
Mix Set the mixing volume in μL. 0.5 – 300 (increment of 0.1)
Cycles Set the number of mixing cycles. 1 – 99
6.10.1 Aspirating liquid
Prerequisites
• Source vessel is available.
1. Put the destination vessel onto the lifting table and move the lifting table into working position.
2. Set the aspiration volumes and the speed levels.
3. Press Aspirate.
Page 44

44
Operation
®
epMotion
96
English (EN)
6.10.2 Dispensing and mixing liquid
Prerequisites
• Liquid has been aspirated.
• Destination vessel is available.
1. Put the destination vessel onto the lifting table and move the lifting table into working position.
2. Set the mixing volume for the mixing cycles.
3. Press Dispense.
The set liquid volume is dispensed.
The mixing volume is automatically aspirated and dispensed.
6.11 Mode Manual Pipette – Dispensing liquid manually
Manually determining the liquid volume for aspirating and dispending.
Abb. 6-4: Mode Manual Pipette
Fig. 6-4: Mode Manual Pipette
Parameter Value Range of values
Speed aspirate Setting the speed of the liquid aspiration. 1 – 9
Speed dispense Setting the speed of the liquid dispensing. 1 – 9
Max. Aspiration Volume Setting the dispensing volume in μL. 0.5 – 300 (increment of 0.1)
Current Volume Current volume is displayed. 0 – 300
Page 45

6.11.1 Aspirating liquid
Prerequisites
• Source vessel is available.
1. Put the source vessel onto the lifting table and move the lifting table into working position.
2. Set the aspiration volumes and the speed levels.
3. Keep the Aspirate key pressed.
Liquid is aspirated until the Aspirate key is released or the set aspiration volume is reached.
6.11.2 Dispensing liquid
Prerequisites
• Liquid has been aspirated.
• Destination vessel is available.
Operation
epMotion
English (EN)
®
96
45
1. Put the destination vessel onto the lifting table and move the lifting table into working position.
2. Keep the Dispense key pressed.
Liquid is dispensed until the Dispense key is released or the liquid volume is exhausted.
Page 46

46
Operation
®
epMotion
96
English (EN)
6.12 Mode Dilute and Mix – Mixing liquid
The application is suitable for diluting samples and reagents using an appropriate dilution solution.
Aspirate the concentrated liquid, aspirate diluent and mix while dispensing.
Abb. 6-5: Mode Dilute and Mix
Fig. 6-5: Mode Dilute and Mix
Parameter Value Range of values
Speed aspirate Setting the speed of the liquid aspiration. 1 – 9
Speed dispense Setting the speed of the liquid dispensing. 1 – 9
Diluent Vol. Setting the aspiration volume for the diluent in
0.5 – 300 (increment of 0.1)
μL.
Air Gap Vol. Setting the volume of the air gap in μL. 0.5 – 300 (increment of 0.1)
Concentrate Vol. Setting the aspiration volume of the concentrate
0.5 – 300 (increment of 0.1)
in μL.
Mix vol. Setting the mixing volume in μL. 0.5 – 300 (increment of 0.1)
Mix Cycles Setting the number of mixing cycles. 1 – 99
Page 47

Operation
epMotion
English (EN)
6.12.1 Aspirating liquid
Prerequisites
• Source vessel is available.
1. Set the speed levels.
2. Set the liquid volume for the dilution solution.
3. Set the volume for the air gap.
4. Set the liquid volume for the concentrate.
5. Put the source vessel with the dilution solution onto the lifting table and move the lifting table into
working position.
6. Press Aspirate.
Dilution solution is aspirated.
7. Move the lifting table into basic position.
8. Press Aspirate.
Air gap is aspirated.
®
96
47
9. Put the source vessel with the concentrate onto the lifting table and move the lifting table into working
position.
10.Press Aspirate.
Concentrate is aspirated.
Target vessel can be filled.
6.12.2 Diluting and mixing liquids
Prerequisites
• Liquids and air gaps are aspirated.
• Destination vessel is available.
1. Put the destination vessel onto the lifting table and move the lifting table into working position.
2. Set the number of mixing cycles.
3. Press Dispense.
Liquids are dispensed and mixed automatically.
Page 48

48
Operation
®
epMotion
96
English (EN)
6.13 Mode Multiaspirate – Multiple aspiration of liquid
Aspirating liquid in several steps and dispensing liquid in one step.
Abb. 6-6: Mode Multiaspirate
Fig. 6-6: Mode Multiaspirate
Parameter Value Range of values
Speed aspirate Setting the speed of the liquid aspiration. 1 – 9
Speed dispense Setting the speed of the liquid dispensing. 1 – 9
Aspiration Volume Setting the aspiration volume in μL. 0.5 – 300 (increment of 0.1)
Steps Setting the number of aspiration steps. 1 – 99
6.13.1 Aspirating liquid
Prerequisites
• Source vessel is available.
1. Put the source vessel onto the lifting table and move the lifting table into working position.
2. Set the aspiration volumes and the speed levels.
3. Set the number of aspiration steps.
4. Press Aspirate.
5. Change or reposition the source vessel.
Page 49

Operation
®
epMotion
96
English (EN)
6.13.2 Dispensing liquid
Prerequisites
• Liquid has been aspirated.
• Destination vessel is available.
1. Put the destination vessel onto the lifting table and move the lifting table into working position.
2. Press Dispense.
6.14 Mode Run Program – Creating and storing a program sequence
Several operating modes can be selected, configured and stored to be run as a program sequence. Use the
mode in order to run pre-definded operations.
Abb. 6-7: Mode Run Program
49
Fig. 6-7: Mode Run Program
Parameter Value
Delete Deleting the selected program.
Copy Copying the selected program.
New Creating a new program.
Select Opening the selected program.
Page 50

50
Operation
epMotion
English (EN)
®
96
6.14.1 Creating and storing a program sequence
1. Press New.
2. Enter the program name.
3. Add modes.
4. Press Save.
The program editor is opened.
The program sequence is stored.
6.14.2 Editing the program sequence – Adding a mode at the end
1. Press Add.
2. Select a mode and confirm with Select.
3. Choose the parameters for the selected mode and
confirm with back.
4. Press Save.
The program sequence is stored.
Page 51

6.14.3 Editing the program sequence – Inserting a mode
1. Select the mode ahead of which the new mode
shall be inserted.
2. Press Insert.
3. Select a mode and confirm with Select.
4. Choose the parameters for the selected mode and
confirm with back.
5. Press Save.
The program sequence is stored.
Operation
epMotion
English (EN)
®
96
51
6.14.4 Editing the program sequence – Changing the parameters of a mode
1. Select a mode and keep the selected entry pressed.
The parameter view of the mode is displayed.
2. Change the parameters.
3. To change the parameters of the previous or the next mode, press Previous or Next.
4. Tap on the back button to return to the program list view.
5. Press Save.
The program sequence is stored.
Page 52

52
Operation
epMotion
English (EN)
®
96
6.14.5 Changing the order within a program sequence
1. Select the mode in the program sequence and
and tap on it twice.
2. Select the mode and use the tag to the right of the
program sequence to move it up or down.
3. Press Edit done.
4. Press Save.
The program sequence is stored.
6.14.6 Deleting a mode from the program sequence
1. Select the mode in the program sequence and
and tap on it twice.
2. Select a mode and tap on the icon on the left.
3. Press Delete.
4. Press Edit done.
5. Press Save.
The program sequence is stored.
Page 53

6.14.7 Selecting and running a program sequence
1. Select a stored program and confirm with Select.
2. Start the program sequence by tapping on Run.
The program sequence is initiated with the first
operating mode that is stored.
The number of steps in the program is displayed.
3. Press Next Step to start the next step in the
program.
Operation
epMotion
English (EN)
®
96
53
Page 54

54
Operation
®
epMotion
96
English (EN)
6.15 Mode Settings – Setting the setting the system properties
Setting the device and software properties.
Abb. 6-8: Mode Settings
Fig. 6-8: Mode Settings
Parameter Value
Device Settings Displaying device information and setting device properties.
Pipetting Settings Setting pipetting properties.
Liquid Types Adjusting the pipetting to the liquid properties.
Page 55

6.15.1 Device settings
Abb. 6-9: Device Settings
Operation
epMotion
English (EN)
®
96
55
Fig. 6-9: Device Settings
Parameter Value
Model Displaying the model designation.
WiFi name Displaying the network name.
Parameter Value Range of values
Tap Sound De-/activating the acoustic feedback for tapping
On/Off
on a button.
Page 56

56
Operation
®
epMotion
96
English (EN)
6.15.2 Set the pipetting properties
Abb. 6-10: Pipetting Settings
Fig. 6-10: Pipetting Settings
Parameter Value Pipette tips Default settings
Reverse stroke (μL) Setting the additional volume for the
liquid aspiration in μL.
Remaining stroke (μL) Setting the residual volume in μL for
liquid aspiration in Multidispense mode.
Blow-out (uL) Setting the air volume in μL for
dispensing the residual liquid.
Piston Pause (s) Setting the delay time between pipetting
50 μL 3 μL
300 μL 12 μL
50 μL 4 μL
300 μL 12 μL
50 μL 15 μL
300 μL 20 μL
–1 s
operations in seconds.
Auto Delay (s) Setting the delay time for automatic
–1 s
liquid dispensing in seconds
(Multidispense mode).
6.15.3 Liquid Types – Setting the liquid properties
The liquid properties allow adjusting the pipetting to liquids with densities or vapour pressures that differ
sigificantly from those of water. The preset Standard is used for verifying the device and is suitable for
water and diluted aqueous solutions.
Page 57

Abb. 6-11: Liquid Types
Operation
epMotion
English (EN)
®
96
57
Fig. 6-11: Liquid Types
6.15.4 Creating a liquid type
1. Select a liquid type and press Copy.
2. Enter a name for the liquid type.
3. Confirm the entry with OK.
The liquid type is stored.
Page 58

58
Operation
®
epMotion
96
English (EN)
6.15.5 Changing the liquid type
Liquid properties are defined for individual pipette tip sizes. Calibration values may be entered for a
maximum of 5 different volume ranges. The higher the calibration value, the greater the piston stroke per
microliter of the set pipetting volume.
The calibration values of the liquids must be determined empirically. This can be done using a
gravimetric comparison measurement, for example.
It is not possible to change the Standard liquid type.
1. Select a liquid type and confirm with Select.
The system opens the Liquid Type Editor.
Page 59

Operation
epMotion
English (EN)
2. Set the pipette tip size using the slide switch.
®
96
59
Changing the volume range or the calibration value
Deleting a volume range
Creating a new volume range
Adding a volume range
3. Select an entry and keep it pressed.
4. Enter the values using the on-screen keyboard.
5. Tap twice on the volume entry.
6. Tap on the Delete icon and confirm with Delete.
7. Press Edit done.
8. Press Add.
9. Selecting an entry
10.Press Insert.
The new volume range is inserted above the
marked volume range.
11.Repeat the procedure for additional pipetting tip
sizes.
12.Press Save.
The liquid type is stored.
Page 60

60
Operation
®
epMotion
96
English (EN)
6.15.6 Applying liquid types
It is not possible to change the Standard liquid type.
1. Select a liquid type and confirm with Select.
The system opens the Liquid Type Editor.
2. Press Apply.
The device applies the properties of the liquid
type for all subsequent pipetting operations with
all pipetting sizes. The properties are maintained
after the device is switched off.
Page 61

6.15.7 Deleting a liquid type
It is not possible to delete the Standard liquid type.
Operation
epMotion
English (EN)
1. Select a liquid type and confirm with Select.
2. Press Delete.
3. Confirm deletion.
Liquid type is deleted.
®
96
61
Page 62

62
Operation
epMotion
English (EN)
®
96
6.16 Updating the software
The software is updated directly via the App-Store.
Page 63

7 Troubleshooting
7.1 General errors
7.1.1 Pipette tips
Problem Cause Solution
Liquid is dripping from
the pipette tips.
Pipette tips are not
recognized.
• Wrong pipette tips.
• Pipette tips do not fit the tip cones
properly.
• O-rings are damaged.
• Tray with pipette tips has been
rotated by 180°.
Check the pipette tips.
Insert epT.I.P.S Motion Reloads 50
μL or 300 μL.
Unlock the pipette tips.
Check the interspace.
Remove any foreign matter.
Lock the pipette tips.
Contact the authorized service.
Insert the tray with the notch
pointing towards the handle of the
loading frame.
Troubleshooting
epMotion
English (EN)
®
96
63
7.1.2 Wireless connection
Problem Cause Solution
Connection error • The device is switched off.
• No wireless connection.
• Wireless connection is not
configured correctly.
• No wireless connection.
• The distance between the iPod and
the device is too large.
Switch the device on.
Shut down and restart the software.
Open Settings on the iPod.
Activate Wi-Fi.
Shut down and restart the software.
Open Settings on the iPod.
Open Wi-Fi and verify the network
settings.
Shut down and restart the software.
Place the iPod closer to the device
or put it into the docking station.
Page 64

64
Trou bleshooting
epMotion
English (EN)
®
96
7.1.3 Liquid volume
Problem Cause Solution
Pipetting volume is
larger than ...
No tips installed • No pipette tips inserted.
• Set liquid volume is too high.
• Pipette tips are too small.
• Pipette tips not recognized.
• Pipette tips were not properly
locked.
Reduce the liquid volume.
Insert pipette tips with 50μL or
300μL capacity.
Insert epT.I.P.S Motion Reloads 50
μL or 300 μL.
Push the lever all the way back.
7.1.4 File names
Problem Cause Solution
File name to long • File name is too long.
• Program cannot be saved.
File name already exists • File name is already used.
• Program cannot be saved.
Choose a file name with a
maximum of 21 characters.
Choose a different file name.
7.1.5 Sensors
Problem Cause Solution
Lower sensor triggered • Sensor for the piston movement
was triggered.
Upper sensor triggered • Device error.
• Sensor for the piston movement
was triggered.
Switch the device off and back on
again.
If the error persists, please contact
the authorized service.
Switch the device off and back on
again.
If the error persists, please contact
the authorized service.
Page 65

Maintenance
epMotion
English (EN)
8 Maintenance
8.1 Replacing fuses
DANGER! Electric shock.
Switch off the device and disconnect the power plug before starting maintenance or
cleaning work.
The fuse holder is located between the mains connection socket and the mains power switch. The fuses
may only be replaced with the same type of fuse.
1. Disconnect the mains plug.
2. Pull the fuse holder out completely.
3. Replace the defective fuse.
4. Insert the fuse holder.
®
96
65
8.2 Cleaning
DANGER! Electric shock as a result of penetration of liquid.
Switch off the device and disconnect the power plug before starting cleaning or
disinfection work.
Do not allow any liquids to penetrate the inside of the housing.
Do not spray clean/spray disinfect the housing.
Only plug the device back in if it is completely dry, both inside and outside.
NOTICE! Damage from the use of aggressive chemicals.
Do not use any aggressive chemicals on the device or its accessories, such as strong and
weak bases, strong acids, acetone, formaldehyde, halogenated hydrocarbons or phenol.
If the device has been contaminated by aggressive chemicals, immediately clean it by
means of a mild cleaning agent.
Clean the device at least every 4 weeks
1. Wipe the painted parts and the aluminum surfaces with a cloth and mild detergent.
2. Polish with a dry cloth.
Page 66

66
Maintenance
epMotion
English (EN)
®
96
8.3 Disinfection/Decontamination
DANGER! Electric shock as a result of penetration of liquid.
Switch off the device and disconnect the power plug before starting cleaning or
disinfection work.
Do not allow any liquids to penetrate the inside of the housing.
Do not spray clean/spray disinfect the housing.
Only plug the device back in if it is completely dry, both inside and outside.
1. Switch off the device and disconnect it from the mains/power line.
2. Remove all cables and accessories from the device.
3. Clean the device with a mild cleaning agent before disinfection.
4. Choose a disinfection method that corresponds to the legal regulations and guidelines in effect for your
range of application.
For example, use alcohol (ethanol, isopropanol) or alcohol-based disinfectants.
5. Wipe the surfaces with a lintfree cloth which is moisturized with a disinfectant.
6. Disinfect all parts that will be sent in with the device.
8.4 Service and maintenance
The Eppendorf AG service team is available to service and certify your device.
Eppendorf AG recommends annual servicing of the device.
Service provisions:
• Service
• Operational qualification (OQ) according to manufacturer's specifications
• Electrical safety testing according to country-specific regulations
•Software update
Information on the services offered can be found on our webpage: www.eppendorf.com/epservices
.
Page 67

9 Technical data
Volume
Volume range 0.5 μL – 300 μL
9.1 Weight/dimensions
Width 224 mm
Depth 344 mm
Height 570 mm
Weight ~20 kg
9.2 Interfaces
Technical data
epMotion
English (EN)
®
96
67
Docking station Apple Lightning compatible connection
9.3 Power supply
Voltage 100 V – 240 V, AC
Frequency 50 Hz – 60 Hz
Power consumption 175 W
Protection class I
Overvoltage category II
Micro fuse F 3 A/250 V
9.4 Test conditions
The device is tested in accordance with ISO 8655 under specific test conditions at Eppendorf AG.
These test conditions are available upon request.
9.5 Ambient conditions
Ambience Only for use indoors.
Ambient temperature 15 °C – 35 °C
Relative humidity 55 % – 75 %, non-condensing.
Atmospheric pressure 860 hPa – 1060 hPa
Page 68

68
Technical data
®
epMotion
96
English (EN)
Page 69

Transport, storage and disposal
epMotion
English (EN)
®
10 Transport, storage and disposal
10.1 Storage
Air temperature Relative humidity Atmospheric pressure
In transport packaging -20 °C – +70 °C 10 % – 80 % 300 hPa – 1060 hPa
Without transport
packaging
-20 °C – +70 °C 10 % – 80 % –
10.2 Decontamination before shipment
If you are shipping the device to the authorized Technical Service for repairs or to your authorized dealer
for disposal please note the following:
96
69
WARNING! Risk to health from contaminated device
1. Follow the instructions in the decontamination certificate. You find it as a PDF file on our
website (www.eppendorf.com/decontamination
2. Decontaminate all the parts you would like to dispatch.
3. Include the fully completed decontamination certificate in the package.
).
10.3 Transport
Air temperature Relative humidity Atmospheric pressure
General transport -20 °C – +70 °C 10 % – 80 % 300 hPa – 1060 hPa
CAUTION! Risk of injury due to lifting and carrying heavy loads
The device is heavy. Lifting and carrying the device can lead to back injuries.
Transport and lift the device with an adequate number of helpers only.
Use a transport aid to transport the device.
Carry out the following steps before transport:
1. Remove pipette tips
2. Remove the loading frame and the adapter and pack them separately.
3. Pack the pipetting device in the original packaging.
Page 70

70
Transport, storage and disposal
epMotion
English (EN)
®
96
10.4 Disposal
In case the product is to be disposed of, the relevant legal regulations are to be observed.
Information on the disposal of electrical and electronic devices in the European Community:
Within the European Community, the disposal of electrical devices is regulated by national regulations
based on EU Directive 2012/19/EU pertaining to waste electrical and electronic equipment (WEEE).
According to these regulations, any devices supplied after August 13, 2005, in the business-to-business
sphere, to which this product is assigned, may no longer be disposed of in municipal or domestic waste. To
document this, they have been marked with the following identification:
Because disposal regulations may differ from one country to another within the EU, please contact your
supplier if necessary.
In Germany, this is mandatory from March 23, 2006. From this date, the manufacturer has to offer a
suitable method of return for all devices supplied after August 13, 2005. For all devices supplied before
August 13, 2005, the last user is responsible for the correct disposal.
Page 71

11 Ordering information
11.1 Accessories
Ordering information
epMotion
English (EN)
®
96
71
Order no.
(International)
5075 787.008 960002199 for PCR plates, 96 wells, skirted
5075 788.004 960002202 for PCR plates, 384 wells, skirted
5075 766.000 960002083 for use with vessels 0.2 mL or 77 PCR tubes 0.5 mL
5075 767.007 960002091 Thermoblock
Order no. (North
America)
Description
Thermoadapter
Thermoblock
PCR 96
PCR 384
11.2 Pipette tips
11.2.1 50 μL
Order no.
(International)
0030 014.529 0030014529 PCR clean and Sterile
0030 014.430 0030014430 PCR clean
0030 014.421 0030014421 Eppendorf Quality
Order no. (North
America)
Description
epT.I.P.S. Motion Filter Reloads 50 µL
12 × 2 trays with 96 tips each
epT.I.P.S. Motion Reloads 50 µL
12 × 2 trays with 96 tips each
11.2.2 300 μL
Order no.
(International)
0030 014.537 0030014537 PCR clean and Sterile
0030 014.472 0030014472 PCR clean
0030 014.464 0030014464 Eppendorf Quality
Order no. (North
America)
Description
epT.I.P.S. Motion Filter Reloads 300 µL
12 × 2 trays with 96 tips each
epT.I.P.S. Motion Reloads 300 µL
12 × 2 trays with 96 tips each
Page 72

72
Ordering information
®
epMotion
96
English (EN)
Page 73

C
ert
ifi
cates
Page 74

Page 75

Page 76

Evaluate your manual
Give us your feedback.
www.eppendorf.com/manualfeedback
Your local distributor: www.eppendorf.com/contact
Eppendorf AG · 22331 Hamburg · Germany
eppendorf@eppendorf.com · www.eppendorf.com
 Loading...