Endress+Hauser FMD71 Specifications
TI01033P/00/EN/06.17
71376031
Products Solutions Services
Technical Information
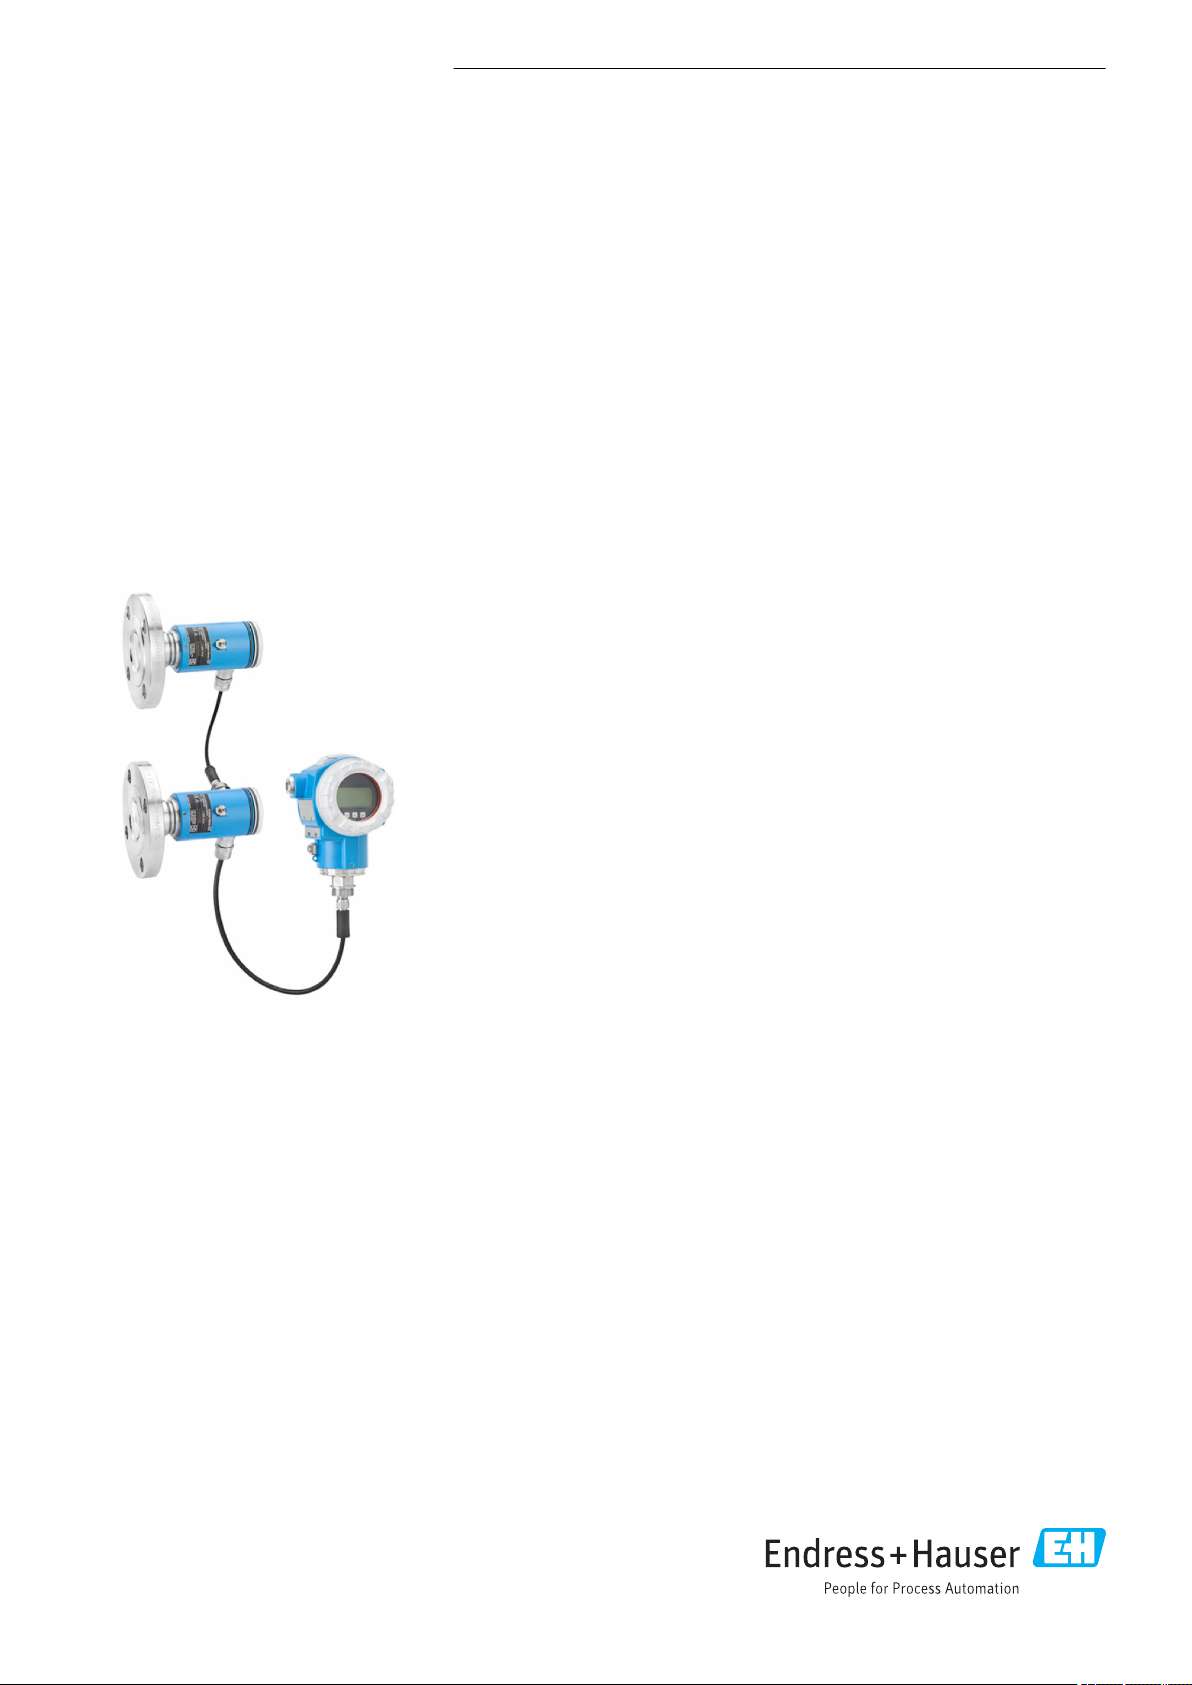
Deltabar FMD71, FMD72
Level measurement with electronic differential
pressure
Electronic differential pressure transmitter with
ceramic and metal sensors
Application
The Deltabar FMD71/FMD72 is used to measure the differential pressure or level,
volume or mass of liquids in pressurized or vacuum vessels
Your benefits
The electronic differential pressure system eliminates traditional mechanical
issues resulting in greater process availability and reliability
• Safety risks are minimized with the electronic differential pressure system
architecture and design
• Lowest total cost of ownership due to reduced installation time, maintenance,
downtime and spare requirements, downtime and spare requirements.
• Multivariable level measurement: HART-based differential pressure, head pressure
and sensor temperatures from one system
• Continuous health indication of the entire system via HART-based diagnostic
• High reproducibility and long-term stability
• Overload-resistant and function-monitored

Table of contents
Deltabar FMD71, FMD72
Document information ....................... 4
Document function ............................ 4
Symbols used ................................ 4
Documentation ............................... 5
Terms and abbreviations ........................ 7
Turn down calculation .......................... 8
Registered trademarks .......................... 8
Function and system design ................... 9
Measuring principle - electronic differential pressure
measurement ................................ 9
Measuring system ............................ 10
Device selection .............................. 10
Product design .............................. 11
System integration ........................... 11
Input .................................... 12
Measured variable ............................ 12
FMD71: measuring range of individual sensors ......... 12
FMD72: measuring range of individual sensors ......... 13
Output .................................. 14
Output Signal ............................... 14
Signal range 4 to 20 mA ........................ 14
Signal on alarm 4 to 20 mA ...................... 14
Maximum load .............................. 14
Dead time, Time constant ....................... 15
Dynamic behavior, current output .................. 15
Dynamic behavior, HART ....................... 15
Damping .................................. 15
alarm current setting .......................... 15
Firmware version ............................ 15
Protocol-specific data .......................... 16
Power supply ............................. 17
Terminals ................................. 17
Terminal assignment .......................... 17
Supply voltage .............................. 17
Cable entries ............................... 18
Cable specification for transmitter connection .......... 18
Residual ripple .............................. 18
Influence of power supply ....................... 18
Overvoltage protection ......................... 18
Performance characteristics of ceramic process
isolating diaphragm ........................ 19
Reference operating conditions ................... 19
Influence of the installation position depending on sensor . 19
Resolution ................................. 19
Vibration effects ............................. 19
Application limits ............................ 19
Reference accuracy ........................... 20
Thermal change in the zero output and the output span ... 20
Total performance ............................ 21
Long-term stability ........................... 21
Total error ................................. 22
Warm-up period ............................. 22
Performance characteristics of metallic process
isolating diaphragm ........................ 23
Reference operating conditions ................... 23
Influence of the installation position depending on sensor . 23
Resolution ................................. 23
Vibration effects ............................. 23
Application limits ............................ 23
Reference accuracy ........................... 24
Thermal change of the zero output and the output span ... 24
Total performance ........................... 25
Long-term stability ........................... 25
Total error ................................. 25
Warm-up period ............................. 25
Installation ............................... 26
Mounting location ............................ 26
Orientation ................................ 26
General installation instructions ................... 26
Thermal insulation - FMD71 high-temperature version ... 26
Installing the sensor modules .................... 27
Mounting sensor modules with PVDF installation
coupling .................................. 27
Installing the transmitter ....................... 27
Sensor and transmitter cable ..................... 28
Environment .............................. 29
Ambient temperature range ..................... 29
Storage temperature range ...................... 29
Climate class ............................... 29
Degree of protection .......................... 29
Vibration resistance ........................... 29
Electromagnetic compatibility .................... 29
Process .................................. 30
Process temperature range for devices with ceramic
process isolating diaphragm FMD71 ................ 30
Process temperature range for devices with metallic
process isolating diaphragm FMD72 ................ 31
Pressure specifications ......................... 31
Mechanical construction .................... 32
Device height ............................... 32
T14 transmitter housing (optional display on the side) .... 33
T17 transmitter housing (optional display on the side) .... 33
Sensor housing .............................. 34
Selecting the electrical connection ................. 34
FMD71 process connections, internal process isolating
diaphragm ................................. 35
FMD71 process connections, internal process isolating
diaphragm ................................. 36
FMD71 process connections, internal process isolating
diaphragm ................................. 37
FMD71 process connections, flush-mounted process
isolating diaphragm ........................... 38
FMD71 process connections, flush-mounted process
isolating diaphragm ........................... 39
FMD71 process connections, flush-mounted process
isolating diaphragm ........................... 40
2 Endress+Hauser

Deltabar FMD71, FMD72
FMD71 process connections, flush-mounted process
isolating diaphragm ........................... 41
FMD71 process connections, flush-mounted process
isolating diaphragm ........................... 44
FMD71 process connections, flush-mounted process
isolating diaphragm ........................... 45
FMD71 process connections, flush-mounted process
isolating diaphragm ........................... 46
FMD72 process connections, internal process isolating
diaphragm ................................. 47
FMD72 process connections, internal process isolating
diaphragm ................................. 48
FMD72 process connections, flush-mounted process
isolating diaphragm ........................... 49
FMD72 process connections, flush-mounted process
isolating diaphragm ........................... 50
FMD72 process connections, flush-mounted process
isolating diaphragm ........................... 51
FMD72 process connections, flush-mounted process
isolating diaphragm ........................... 52
FMD72 process connections, flush-mounted process
isolating diaphragm ........................... 53
Wall and pipe mounting with mounting bracket ........ 56
Materials in contact with process .................. 57
Materials not in contact with process ............... 58
Operability ............................... 62
Operation concept ............................ 62
Local operation .............................. 62
Operating languages .......................... 64
Certificates and approvals ................... 65
CE approval ................................ 65
RoHS ..................................... 65
RCM-Tick marking ............................ 65
Ex approvals ................................ 65
Suitability for hygienic processes .................. 65
Pressure Equipment Directive 2014/68/EU (PED) ....... 65
Manufacturer declaration ....................... 66
Other standards and guidelines ................... 66
CRN approvals .............................. 67
Classification of process sealing between electrical
systems and (flammable or combustible) process fluids in
accordance with ANSI/ISA 12.27.01 ................ 67
Calibration unit .............................. 67
Calibration ................................. 67
Inspection certificates .......................... 68
Ordering information ....................... 69
Scope of delivery ............................. 69
Measuring point (TAG) ......................... 69
Supplementary documentation ............... 70
Field of Activities ............................ 70
Technical Information ......................... 70
Operating Instructions ......................... 70
Brief Operating Instructions ..................... 70
Safety Instructions (XA) ........................ 70
Registered trademarks ...................... 71
HARTâ ................................... 71
Endress+Hauser 3
Document information
DANGER
WARNING
CAUTION
NOTICE
A
Deltabar FMD71, FMD72
Document function
The document contains all the technical data on the device and provides an overview of the
accessories and other products that can be ordered for the device.
Symbols used Safety symbols
Symbol Meaning
Electrical symbols
Symbol Meaning
DANGER!
This symbol alerts you to a dangerous situation. Failure to avoid this situation will
result in serious or fatal injury.
WARNING!
This symbol alerts you to a dangerous situation. Failure to avoid this situation can
result in serious or fatal injury.
CAUTION!
This symbol alerts you to a dangerous situation. Failure to avoid this situation can
result in minor or medium injury.
NOTE!
This symbol contains information on procedures and other facts which do not result in
personal injury.
Direct current
Alternating current
Direct current and alternating current
Ground connection
A grounded terminal which, as far as the operator is concerned, is grounded via a
grounding system.
Protective Earth (PE)
A terminal which must be connected to ground prior to establishing any other
connections.
The ground terminals are situated inside and outside the device:
• Inner ground terminal: Connects the protectiv earth to the mains supply.
• Outer ground terminal: Connects the device to the plant grounding system.
Symbols for certain types of information
Symbol Meaning
Permitted
Procedures, processes or actions that are permitted.
Preferred
Procedures, processes or actions that are preferred.
Forbidden
Procedures, processes or actions that are forbidden.
Tip
Indicates additional information.
Reference to documentation
Reference to page
4 Endress+Hauser
Deltabar FMD71, FMD72
,…,
1.
2.
3.
Symbol Meaning
Reference to graphic
Visual inspection
Symbols in graphics
Symbol Meaning
1, 2, 3 ... Item numbers
Series of steps
A, B, C, ... Views
A-A, B-B, C-C, ... Sections
Documentation
The document types listed are available:
In the Download Area of the Endress+Hauser Internet site: www.endress.com → Download
Brief Operating Instructions (KA): getting the 1st measured value quickly
KA01105P:
The Brief Operating Instructions contain all the essential information from incoming acceptance to
initial commissioning.
Operating Instructions (BA): your comprehensive reference
BA01044P:
These Operating Instructions contain all the information that is required in various phases of the life
cycle of the device: from product identification, incoming acceptance and storage, to mounting,
connection, operation and commissioning through to troubleshooting, maintenance and disposal.
Description of Device Parameters (GP): reference for your parameters
GP01013P:
The document provides a detailed explanation of each individual parameter in the operating menu.
The description is aimed at those who work with the device over the entire life cycle and perform
specific configurations.
Safety Instructions (XA)
Safety Instructions (XA) are supplied with the device depending on the approval. These instructions
are an integral part of the Operating Instructions.
Device Directive Documentation Option
FMD71, FMD72 ATEX II 1/2G Ex ia IIC T6 Ga/Gb XA00619P BA
FMD71, FMD72 ATEX II 1/2G Ex d [ia] IIC T6 Ga/Gb XA00620P BC
FMD71, FMD72 ATEX II 3G Ex nA IIC T6 GC XA00621P BD
FMD71, FMD72 IEC Ex ia IIC T6 Ga/Gb XA00622P IA
FMD71, FMD72 IEC Ex d [ia] IIC T6 Ga/Gb XA00623P IB
FMD71, FMD72 CSA General Purpose - CD
FMD71, FMD72 NEPSI Ex ia IIC T4/T6 Ga/Gb XA01352P NA
FMD71, FMD72 NEPSI Ex d [ia] IIC T4/T6 Ga/Gb XA01353P NB
FMD71, FMD72 INMETRO Ex ia IIC T6...T4 Ga/Gb XA01378P MA
FMD71, FMD72 INMETRO Ex d [ia] IIC T6...T4 Ga/Gb XA01379P MC
FMD71, FMD72 EAC Ga/Gb Ex ia IIC T6...T4 XA01594P GA
FMD71, FMD72 EAC Ga/Gb Ex d [ia] IIC T6...T4 X XA01595P GB
1)
Endress+Hauser 5
Deltabar FMD71, FMD72
Device Directive Documentation Option
FMD71 FM C/US IS Cl.I Div.1 Gr.A-D, AEx ia, Zone 0,1,2 XA00628P FA
FMD71 FM C/US XP AIS Cl.I Div.1 Gr.A-D, Exd [ia] Zone 0,1,2 XA00629P FB
FMD71 CSA C/US XP Cl.I Div.1 Gr.A-D, Ex d [ia], Zone 0,1,2 XA00631P CB
FMD71 FM C/US NI Cl.I Div.2 Gr.A-D, Zone 2 XA00668P FD
FMD71 CSA C/US NI, Cl.I Div. 2, Gr.A-D Cl.I, Zone 2, IIC XA00670P CC
FMD71 CSA C/US IS Cl.I Div.1 Gr.A-D, Ex ia Zone 0,1,2 XA00630P CA
FMD72 CSA C/US IS Cl.I Div.1 Gr.A-D, Ex ia Zone 0,1,2 XA00626P CA
FMD72 CSA C/US XP Cl.I Div.1 Gr.A-D, Ex d [ia], Zone 0,1,2 XA00627P CB
FMD72 CSA C/US NI, Cl.I Div.2 Gr.A-D, Zone 2 XA00671P CC
FMD72 FM C/US IS Cl.I Div.1 Gr.A-D, AEx ia, Zone 0,1,2 XA00624P FA
FMD72 FM C/US XP AIS Cl.I Div.1 Gr.A-D, Exd [ia] Zone 0,1,2 XA00625P FB
FMD72 FM C/US NI Cl.I Div.2 Gr.A-D, Zone 2 XA00669P FD
1) Product Configurator order code for "Approval"
The nameplate provides information on the Safety Instructions (XA) that are relevant for the
device.
1)
6 Endress+Hauser
Deltabar FMD71, FMD72
URL OPLMWP
LRL
0
p
LRV
URV
1
2
3
4
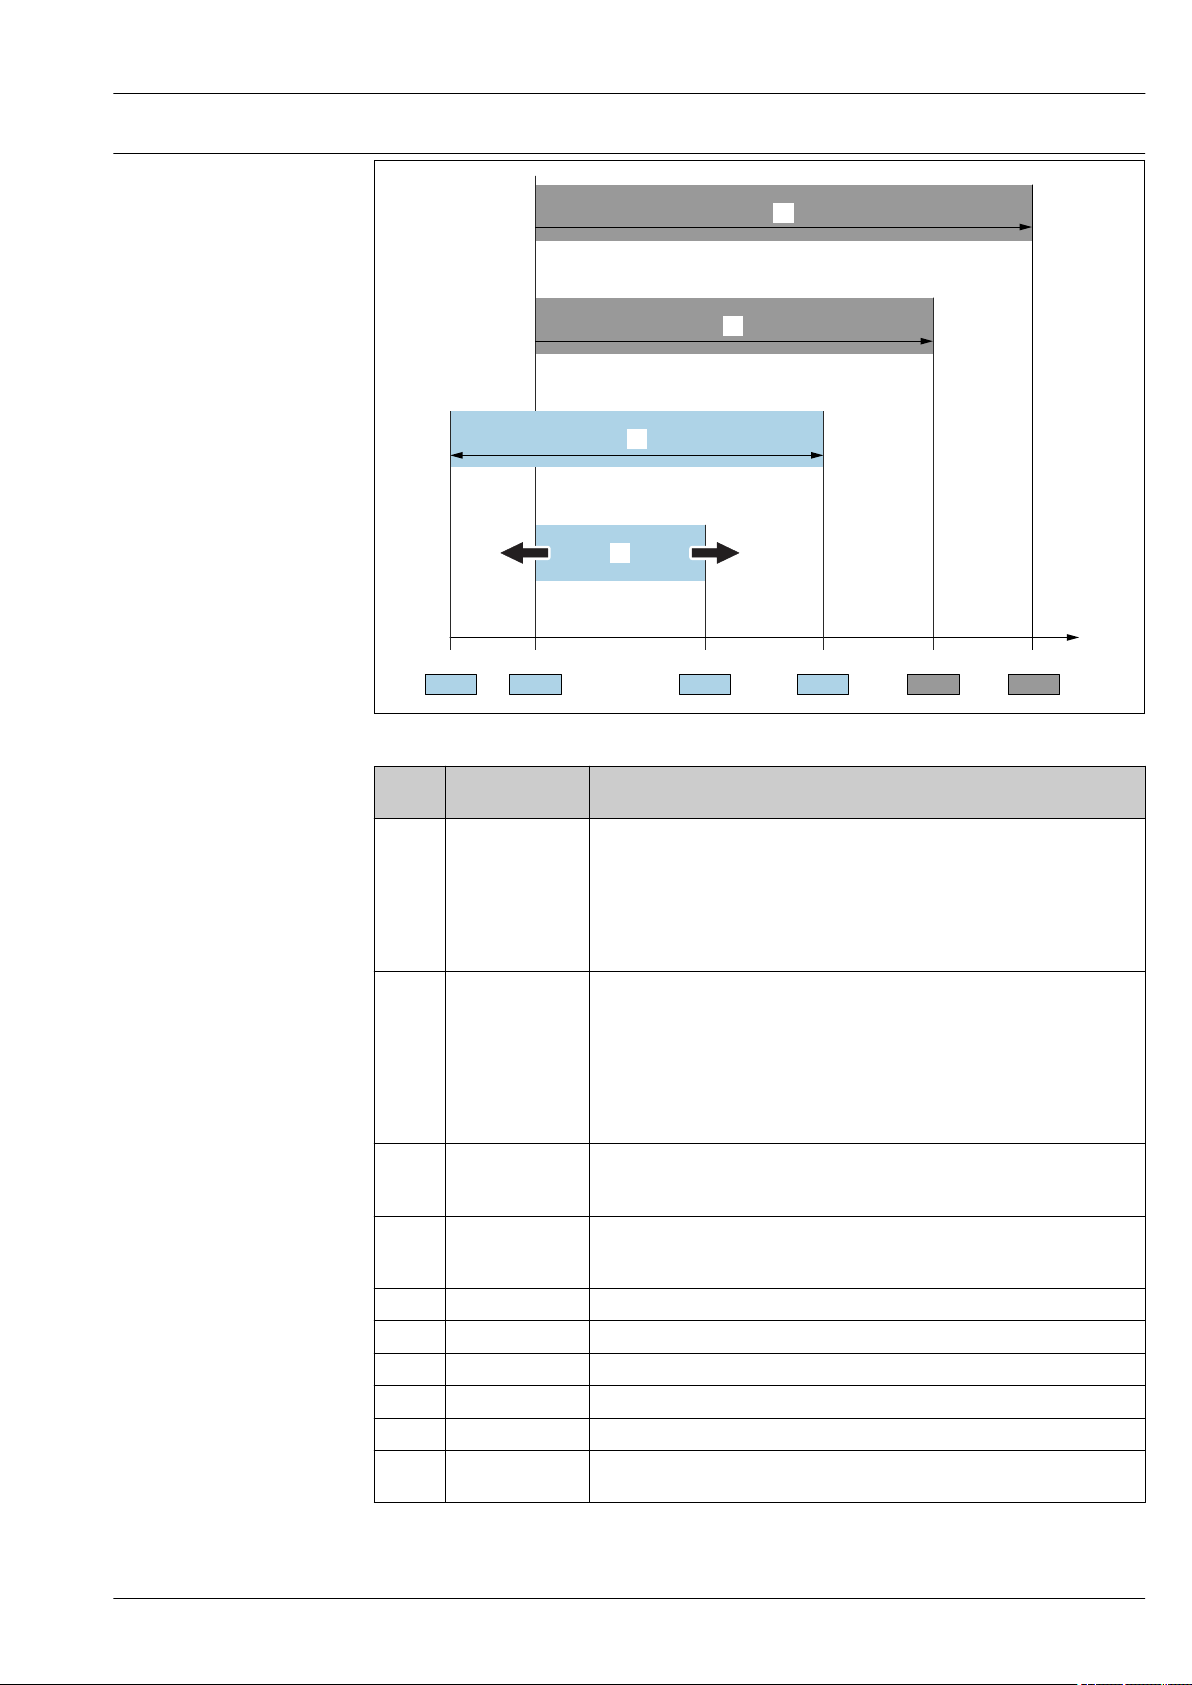
Terms and abbreviations
A0029505
Position Term/
abbreviation
1 OPL The OPL (over pressure limit = sensor overload limit) for the measuring device
2 MWP The MWP (maximum working pressure) for the sensors depends on the lowest-
3 Maximum sensor
measuring range
4 Calibrated/
adjusted span
p - Pressure
- LRL Lower range limit
- URL Upper range limit
- LRV Lower range value
- URV Upper range value
- TD (Turn down) Turn down
Explanation
depends on the lowest-rated element, with regard to pressure, of the selected
components, i.e. the process connection has to be taken into consideration in
addition to the measuring cell. Also observe pressure-temperature dependency.
For the relevant standards and additional notes, see the "Pressure specifications"
section → 31.
The OPL may only be applied for a limited period of time.
rated element, with regard to pressure, of the selected components, i.e. the
process connection has to be taken into consideration in addition to the
measuring cell. Also observe pressure-temperature dependency. For the
relevant standards and additional notes, see the "Pressure specifications" section
→ 31.
The MWP may be applied at the device for an unlimited period.
The MWP can also be found on the nameplate.
Span between LRL and URL
This sensor measuring range is equivalent to the maximum calibratable/
adjustable span.
Span between LRV and URV
Factory setting: 0 to URL
Other calibrated spans can be ordered as customized spans.
Example - see the following section.
Endress+Hauser 7

Turn down calculation
LRV
URLURV
LRL
1 = 2
3
1 Calibrated/adjusted span
2 Zero point-based span
3 URL sensor
Example
• Sensor:10 bar (150 psi)
• Upper range value (URL) = 10 bar (150 psi)
Turn down (TD):
Deltabar FMD71, FMD72
A0029545
• Calibrated/adjusted span: 0 to 5 bar (0 to 75 psi)
• Lower range value (LRV) = 0 bar (0 psi)
• Upper range value (URV) = 5 bar (75 psi)
TD =
TD =
In this example, the TD is 2:1.
This span is based on the zero point.
Registered trademarks HART®
Registered trademark of the FieldComm Group, Austin, USA
URL
|URV - LRV|
10 bar (150 psi)
= 2
|5 bar (75 psi) - 0 bar (0 psi)|
8 Endress+Hauser
Deltabar FMD71, FMD72
1
2
3
4
p
p
1
3
4
2
Function and system design
Measuring principle electronic differential
pressure measurement
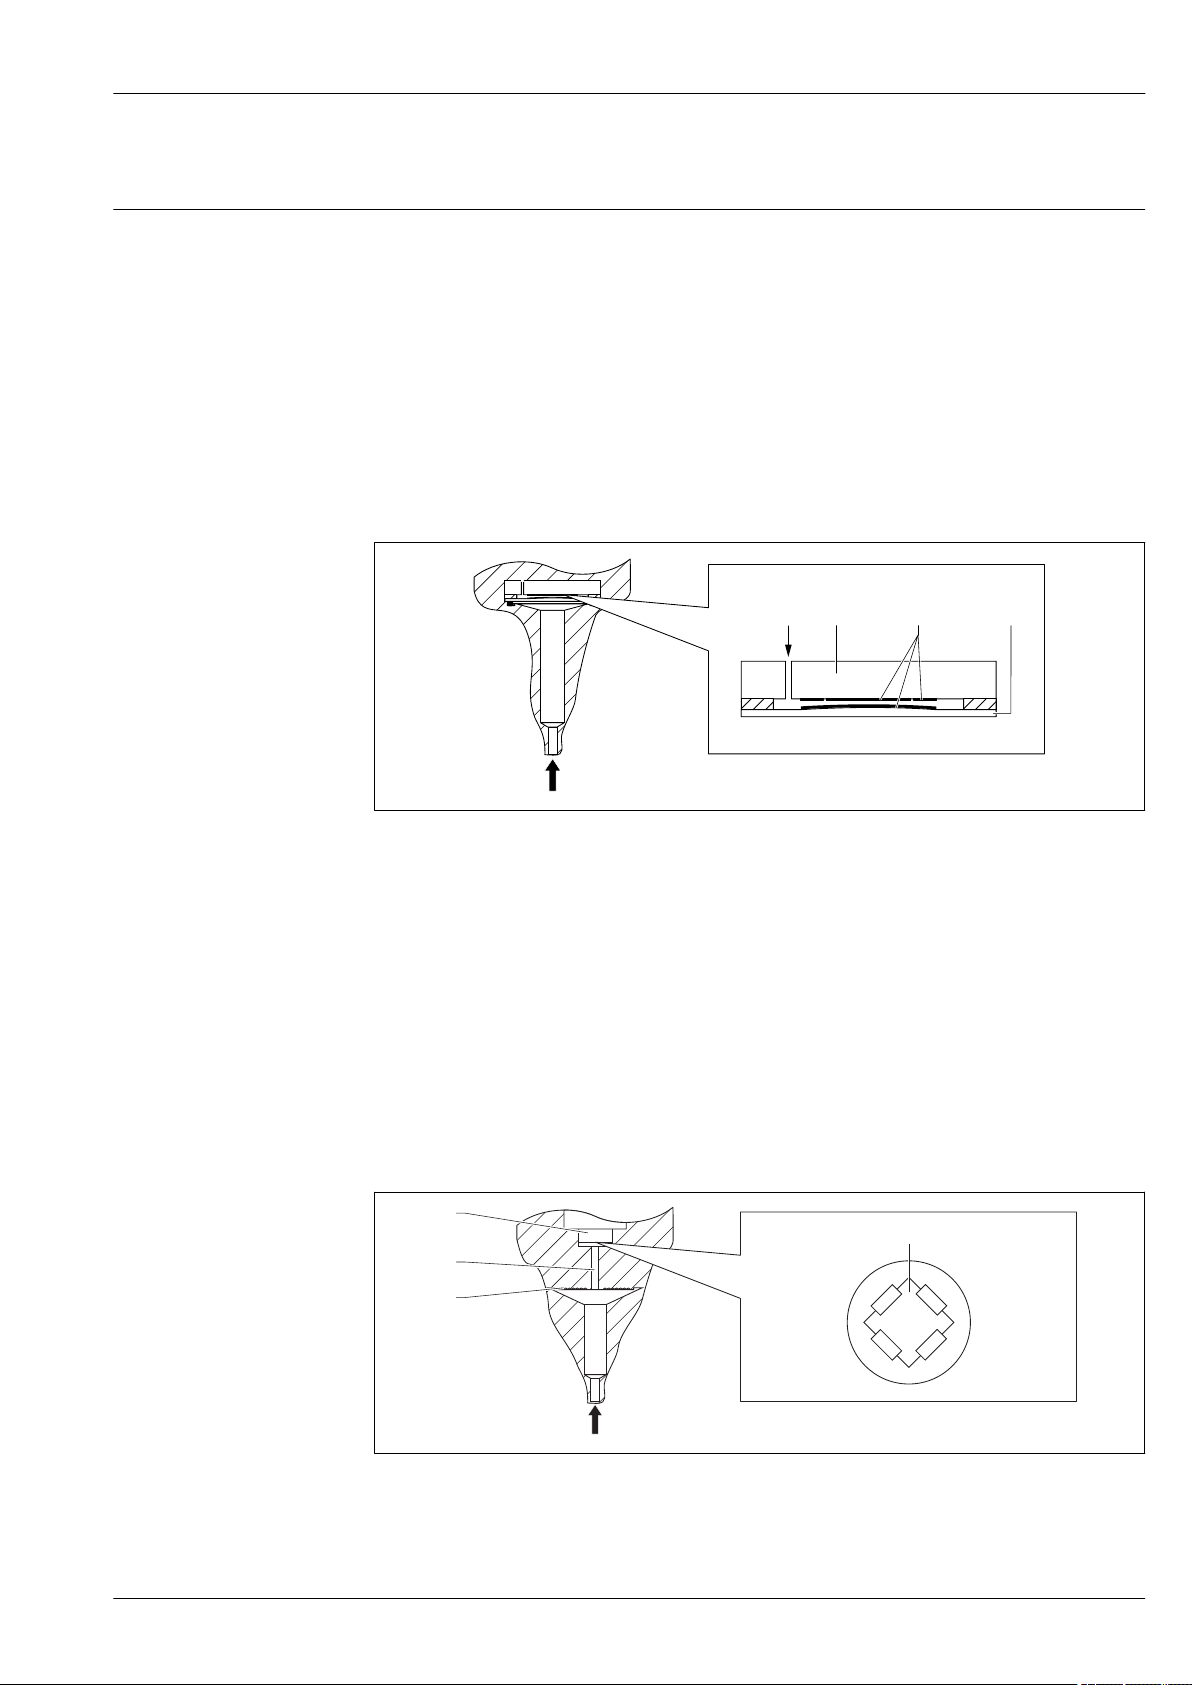
FMD71 - Devices with ceramic process isolating diaphragm (Ceraphire®)
The ceramic sensor is an oil-free sensor, i.e. the process pressure acts directly on the robust ceramic
process isolating diaphragm and causes it to deflect. A pressure-dependent change in capacitance is
measured at the electrodes of the ceramic substrate and the process isolating diaphragm. The
measuring range is determined by the thickness of the ceramic process isolating diaphragm.
Advantages:
• Guaranteed overload resistance up to 40 times the nominal pressure
• The ultrapure 99.9% ceramic (Ceraphire®, see also "www.endress.com/ceraphire") ensures:
– Extremely high chemical durability
– Less relaxation
– High mechanical durability
• Can be used in absolute vacuums up to 150 °C (302 °F)
• Small measuring ranges
A0020465
1 Air pressure (relative pressure sensors)
2 Ceramic substrate
3 Electrodes
4 Ceramic process isolating diaphragm
FMD72 - Devices with metal process isolating diaphragm
The process pressure deflects the metal process isolating diaphragm of the sensor and a fill fluid
transfers the pressure to a Wheatstone bridge (semiconductor technology). The pressure-dependent
change in the bridge output voltage is measured and evaluated.
Advantages:
• Can be used for process pressures up to 40 bar (600 psi)
• Fully welded process isolating diaphragm
• Small, flush-mounted process connections
• Significantly reduced thermal effect e.g. compared to diaphragm seal systems with capillaries
1 Silicon measuring element, substrate
2 Wheatstone bridge
3 Channel with fill fluid
4 Metal process isolating diaphragm
A0016448
Endress+Hauser 9

Deltabar FMD71, FMD72
Measuring system
Device selection Field of application
The FMD71/FMD72 consists of 2 sensor modules and one transmitter. One sensor module measures
the hydrostatic pressure (high pressure) and the other one the head pressure (low pressure). The
level (electronic differential pressure) is calculated in the transmitter using these two digital values.
• Level
• Differential pressure
Process connections
• Thread
• EN and ASME flanges
• Flush-mounted hygienic connections
Measuring ranges (differential pressure)
FMD71:
from –100 to +100 mbar (–1.5 to +1.5 psi)
to –1 to +40 bar (–15 to +600 psi)
FMD72:
from –400 to +400 mbar (–6 to +6 psi)
to –1 to +40 bar (–15 to +600 psi)
MWP (depends on the lowest-rated element, with regard to pressure, of the selected
components)
FMD71:
to 60 bar (900 psi)
FMD72:
to 160 bar (2 400 psi)
Process temperature limits
FMD71:
• Thread / Flanges:
–25 to +125 °C (–13 to +257 °F)/150 °C (302 °F)
• Hygienic process connections:
–25 to +130 °C (–13 to +266 °F) , 150 °C (302 °F) for max. 1 hour
FMD72:
• Process connections with internal process isolating diaphragm:
–40 to +125 °C (–40 to +257 °F)
• Process connections with flush-mounted process isolating diaphragm:
–40 to +100 °C (–40 to +212 °F)
• Hygienic process connections with flush-mounted process isolating diaphragm:
–40 to +130 °C (–40 to +266 °F) , 150 °C (302 °F) for max. 1 hour
• Higher process temperature limits available on request (up to +250 °C (480 °F))
Ambient temperature range
–40 to +80 °C (–40 to +176 °F)
Reference accuracy of the individual sensors
• Up to ±0.075% of the set span
• PLATINUM version: up to ±0.05 % of the set span
Supply voltage
• Version for non-hazardous areas: 12 (13) to 45 V DC
• Ex ia: 12 (13) to 30 V DC
Output
4 to 20 mA with superimposed HART protocol
10 Endress+Hauser
Deltabar FMD71, FMD72
LP 1
HP
p1
p2
P = p2
LP
P = p1 + p2
HP
Options
• NACE-compliant materials
• Software pre-configurations
Product design
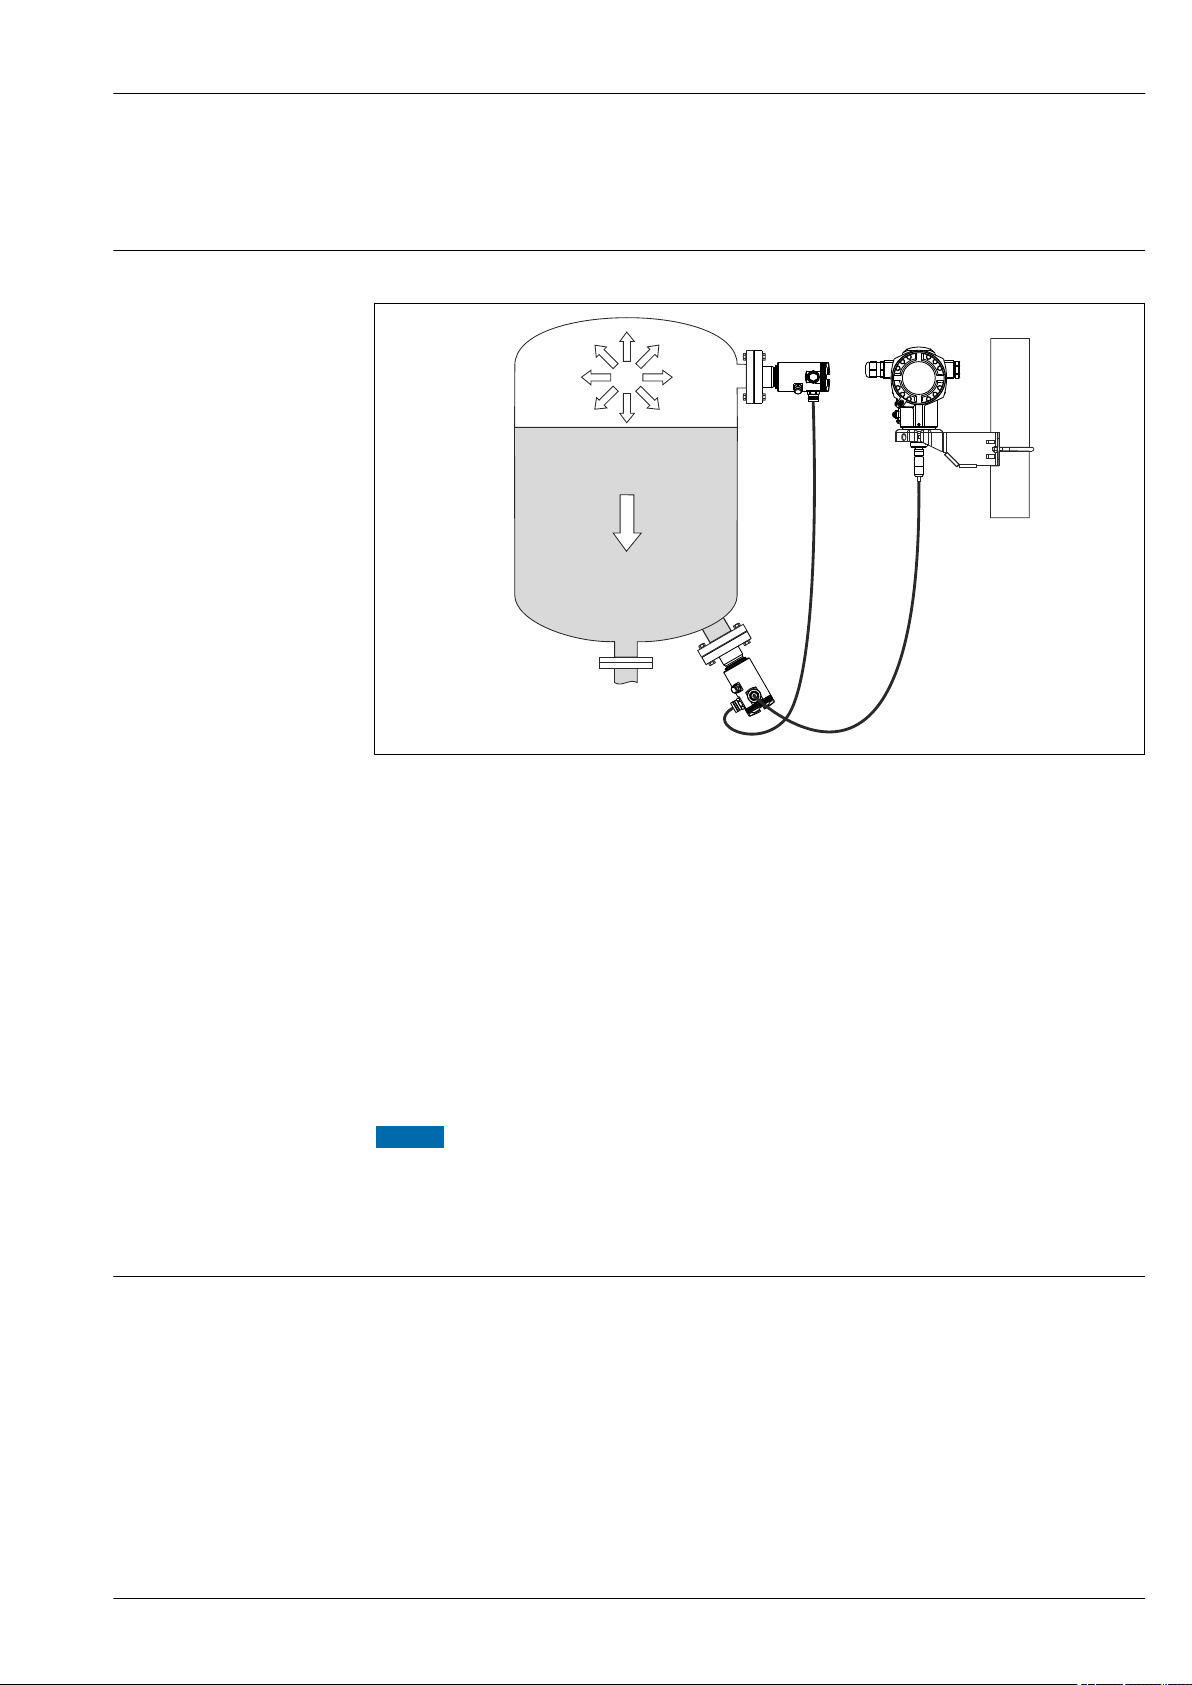
Level measurement (level, volume and mass) with Deltabar:
A0016449
LP Sensor module LP (low pressure)
HP Sensor module HP (high pressure)
p2 Head pressure
p1 Hydrostatic pressure
1 Transmitter
System integration
The FMD71/FMD72 is best suited to level measurement in vessels with pressure overlay or in
vacuum vessels and tanks, high distillation columns and other vessels with changing ambient
temperatures.
The sensor module HP is mounted on the lower measuring connection and the sensor module LP is
mounted above the maximum level. The transmitter can be mounted on pipes or walls with the
mounting bracket.
The sensor signal is transmitted digitally. In addition, sensor temperatures and the individual process
pressures present at the respective sensor modules can be individually evaluated and transmitted.
NOTICE
Incorrect sizing/order of sensor modules
In a closed system, please note that the sensor module is affected by the superimposed head
‣
pressure (p2) in addition to the hydrostatic pressure (p1). This must be taken into account when
sizing the sensor module on the high-pressure side (HP).
The device can be given a tag name (max. 8 alphanumeric characters).
Measuring point (TAG), see additional specifications.: Product Configurator order code for
"Identification", option "Z1"
Endress+Hauser 11
Input
Measured variable Measured process variables
• Pressure HP and Pressure LP
• Sensor temperature HP and sensor temperature LP
• Transmitter temperature
Calculated process variables
• Differential pressure
• Level (level, volume or mass)
Deltabar FMD71, FMD72
FMD71: measuring range of
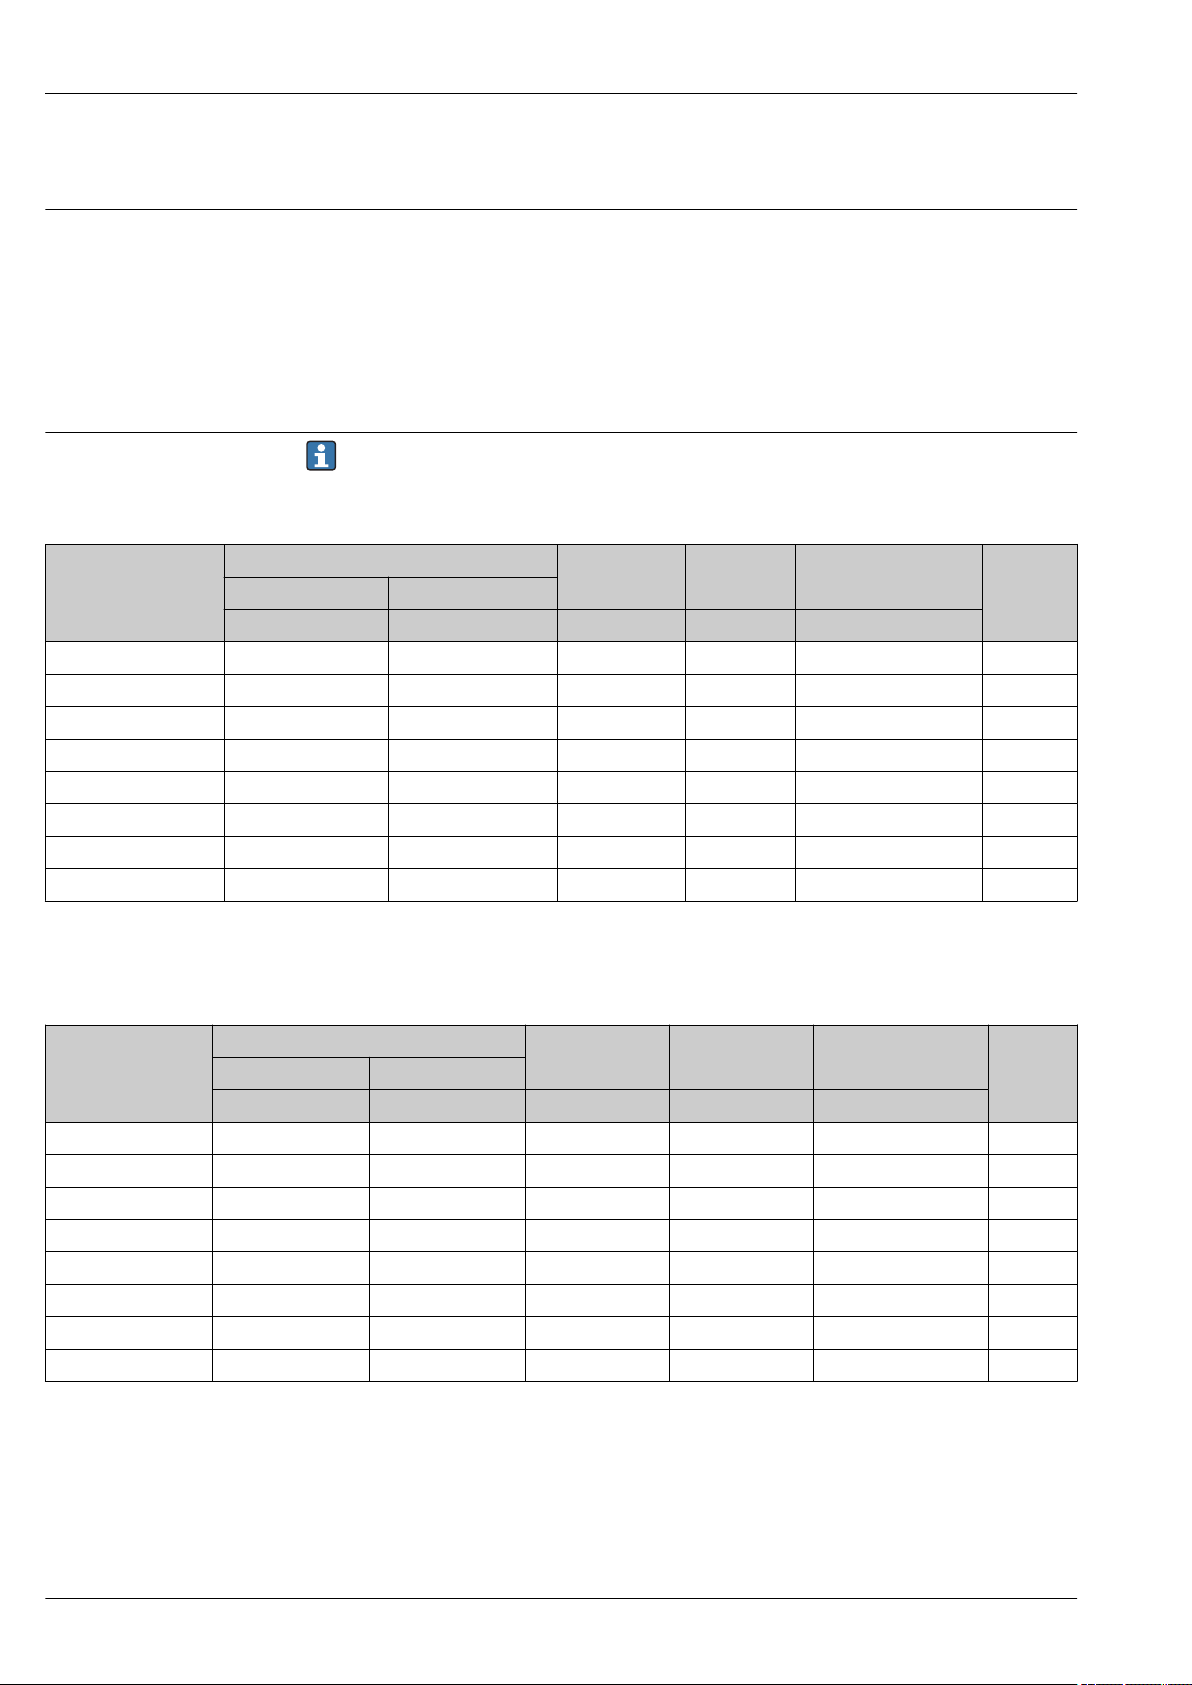
The maximum span of the differential pressure corresponds to the URL of the HP sensor.
individual sensors
Gauge pressure
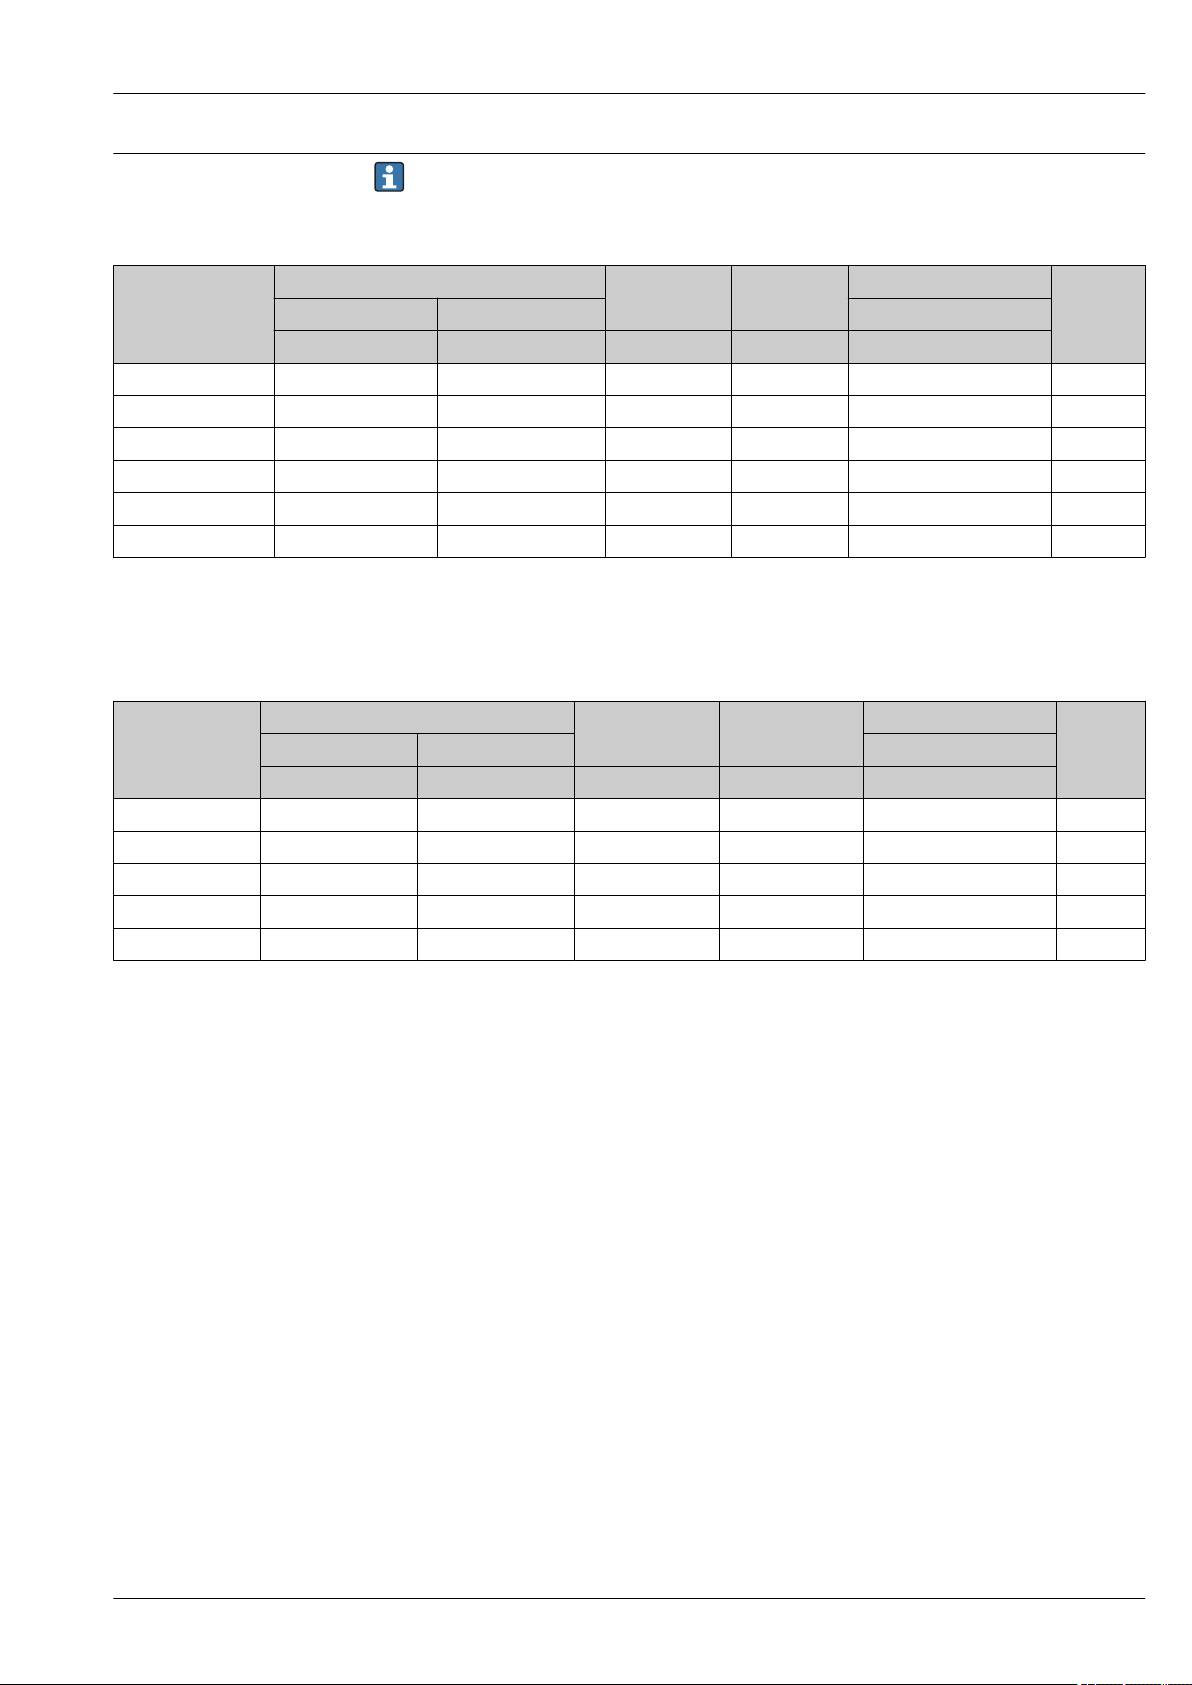
Sensor Maximum sensor measuring range MWP OPL Vacuum resistance Option
lower (LRL) upper (URL)
[bar (psi)] [bar (psi)] [bar (psi)] [bar (psi)] [bar
abs
(psi
abs
)]
100 mbar (1.5 psi) –0.1 (–1.5) +0.1 (+1.5) 2.7 (40.5) 4 (60) 0.7 (10.5) 1C
250 mbar (4 psi) –0.25 (–4) +0.25 (+4) 3.3 (49.5) 5 (75) 0.5 (7.5) 1E
400 mbar (6 psi) –0.4 (–6) +0.4 (+6) 5.3 (79.5) 8 (120) 0 1F
1 bar (15 psi) –1 (–15) +1 (+15) 6.7 (100.5) 10 (150) 0 1H
2 bar (30 psi) –1 (–15) +2 (+30) 12 (180) 18 (270) 0 1K
4 bar (60 psi) –1 (–15) +4 (+60) 16.7 (250.5) 25 (375) 0 1M
10 bar (150 psi) –1 (–15) +10 (+150) 26.7 (400.5) 40 (600) 0 1P
40 bar (600 psi) –1 (–15) +40 (+600) 40 (600) 60 (900) 0 1S
1) Product Configurator order code for "Sensor range"
Absolute pressure
1)
Sensor Maximum sensor measuring range MWP OPL Vacuum resistance Option
lower (LRL) upper (URL)
[bar
(psi
abs
)] [bar
abs
abs
(psi
)] [bar
abs
abs
(psi
)] [bar
abs
abs
(psi
)] [bar
abs
abs
(psi
abs
)]
100 mbar (1.5 psi) 0 +0.1 (+1.5) 2.7 (40.5) 4 (60) 0 2C
250 mbar (4 psi) 0 +0.25 (+4) 3.3 (49.5) 5 (75) 0 2E
400 mbar (6 psi) 0 +0.4 (+6) 5.3 (79.5) 8 (120) 0 2F
1 bar (15 psi) 0 +1 (+15) 6.7 (100.5) 10 (150) 0 2H
2 bar (30 psi) 0 +2 (+30) 12 (180) 18 (270) 0 2K
4 bar (60 psi) 0 +4 (+60) 16.7 (250.5) 25 (375) 0 2M
10 bar (150 psi) 0 +10 (+150) 26.7 (400.5) 40 (600) 0 2P
40 bar (600 psi) 0 +40 (+600) 40 (600) 60 (900) 0 2S
1) Product Configurator order code for "Sensor range"
1)
12 Endress+Hauser
Deltabar FMD71, FMD72
FMD72: measuring range of
The maximum span of the differential pressure corresponds to the URL of the HP sensor.
individual sensors
Gauge pressure
abs
1)
Option
)]
Sensor Maximum sensor measuring range MWP OPL Vacuum resistance
lower (LRL) upper (URL) silicone oil
[bar (psi)] [bar (psi)] [bar (psi)] [bar (psi)] [bar
abs
(psi
400 mbar (6 psi) –0.4 (–6) +0.4 (+6) 4 (60) 6 (90) 0.01 (0.15) 1F
1 bar (15 psi) –1 (–15) +1 (+15) 6.7 (100) 10 (150) 0.01 (0.15) 1H
2 bar (30 psi) –1 (–15) +2 (+30) 13.3 (200) 20 (300) 0.01 (0.15) 1K
4 bar (60 psi) –1 (–15) +4 (+60) 18.7 (280.5) 28 (420) 0.01 (0.15) 1M
10 bar (150 psi) –1 (–15) +10 (+150) 26.7 (400.5) 40 (600) 0.01 (0.15) 1P
40 bar (600 psi) –1 (–15) +40 (+600) 100 (1500) 160 (2400) 0.01 (0.15) 1S
1) The vacuum resistance applies for the measuring cell under reference operating conditions. (see "Reference operating conditions" section)
2) Product Configurator order code for "Sensor range"
Absolute pressure
abs
1)
Option
)]
Sensor Maximum sensor measuring range MWP OPL Vacuum resistance
lower (LRL) upper (URL) silicone oil
[bar
(psi
abs
)] [bar
abs
abs
(psi
)] [bar
abs
abs
(psi
)] [bar
abs
abs
(psi
)] [bar
abs
abs
(psi
1 bar (15 psi) 0 +1 (+15) 6.7 (100) 10 (150) 0.01 (0.15) 2H
2 bar (30 psi) 0 +2 (+30) 13.3 (200) 20 (300) 0.01 (0.15) 2K
4 bar (60 psi) 0 +4 (+60) 18.7 (280.5) 28 (420) 0.01 (0.15) 2M
10 bar (150 psi) 0 +10 (+150) 26.7 (400.5) 40 (600) 0.01 (0.15) 2P
40 bar (600 psi) 0 +40 (+600) 100 (1500) 160 (2400) 0.01 (0.15) 2S
2)
2)
1) The vacuum resistance applies for the measuring cell under reference operating conditions. (see "Reference operating conditions" section)
2) Product Configurator order code for "Sensor range"
Endress+Hauser 13
Output
on on
off off
damp.
damp.
Display Display
Sensor Sensor
HART HART
R R
FIELD COMMUNICATION PROTOCOL FIELD COMMUNICATION PROTOCOL
SW /min
SW /min
E
+
–
E
+
–
U – 12 V
U – 13 V
R
L
max
23 mA
23 mA
£
30
20
12
U
[V]
40 45
1217
1435
783
348
[ ]W
[ ]W
R
L
max
R
L
max
30
20
13
40 45
1174
1391
739
304
Test
Test
£
3
A B
1
3
2
1
2
R
L
max
U
[V]
Deltabar FMD71, FMD72
Output Signal
Software operation Internal + LCD External
Order code option
2)
4 to 20 mA with superimposed digital communication protocol HART 6.0, 2-wire
1)
+ LCD Internal
4 5 8
1) In the case of the T17 transmitter housing, the operating keys are always arranged internally on the electronic insert.
2) Product Configurator order code for "Display, operation:"
Signal range 4 to 20 mA
Signal on alarm 4 to 20 mA
3.8 mA to 20.5 mA
As per NAMUR NE43
• Max. alarm: (factory setting: 22 mA) can be set from 21 to 23 mA
• Hold measured value: last measured value is held
• Min. alarm: 3.6 mA
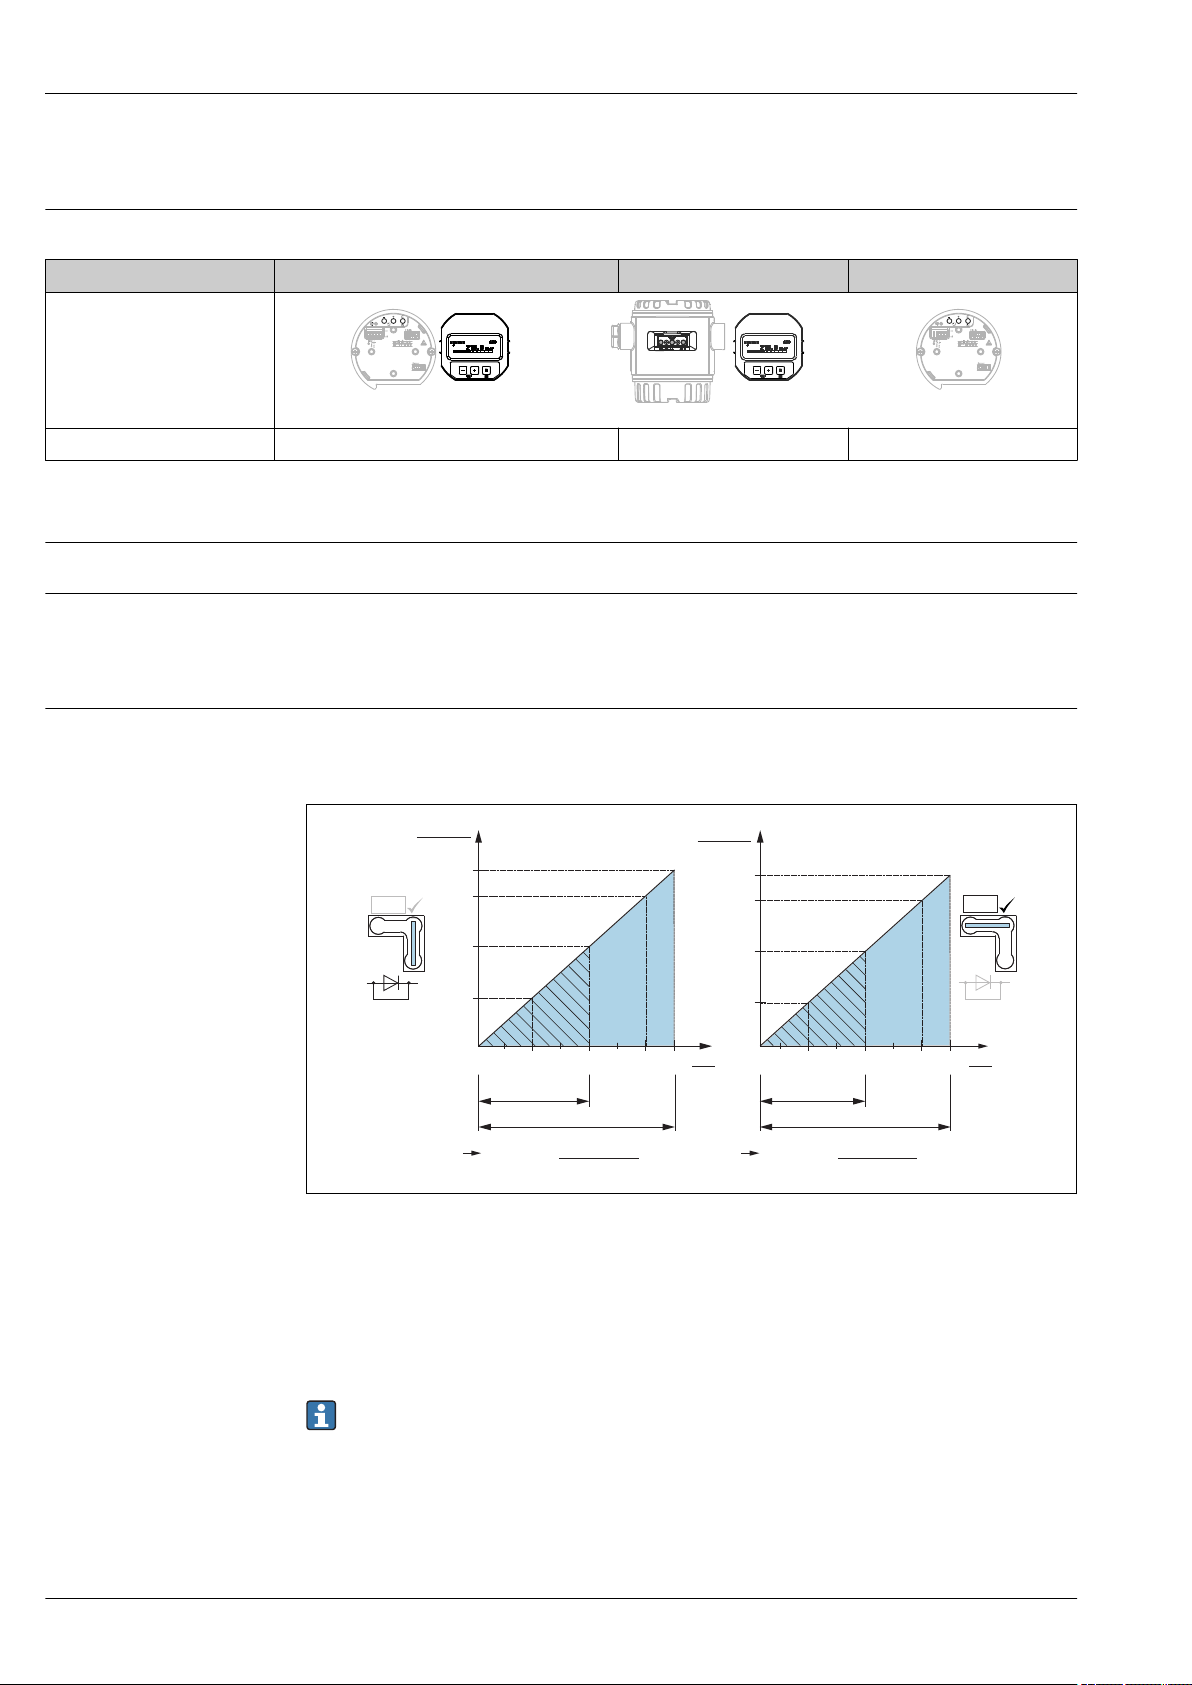
Maximum load
In order to guarantee sufficient terminal voltage in two-wire devices, a maximum load resistance R
(including line resistance) must not be exceeded depending on the supply voltage U0 of the supply
unit. In the following load diagrams, observe the position of the jumper and the explosion protection:
A0021280
A Jumper for 4 to 20 mA test signal set to "Non-test" position
B Jumper for 4 to 20 mA test signal set to "Test" position
1 Power supply for II 1/2 G Ex ia, FM IS, CSA IS
2 Power supply for devices for the non-hazardous area, 2 G Ex d, 3 G Ex nA, FM XP, FM NI, CSA XP, CSA dust
ignition-proof
3 R
U Supply voltage
maximum load resistance
Lmax
When operating via a handheld terminal or via a PC with an operating program, a minimum
communication resistance of 250 Ω must be taken into account.
14 Endress+Hauser
A0017533
Deltabar FMD71, FMD72
I
63 %
100 %
t
t1t
2
90 %
t
3
Dead time, Time constant
Dynamic behavior, current output
Dynamic behavior, HART
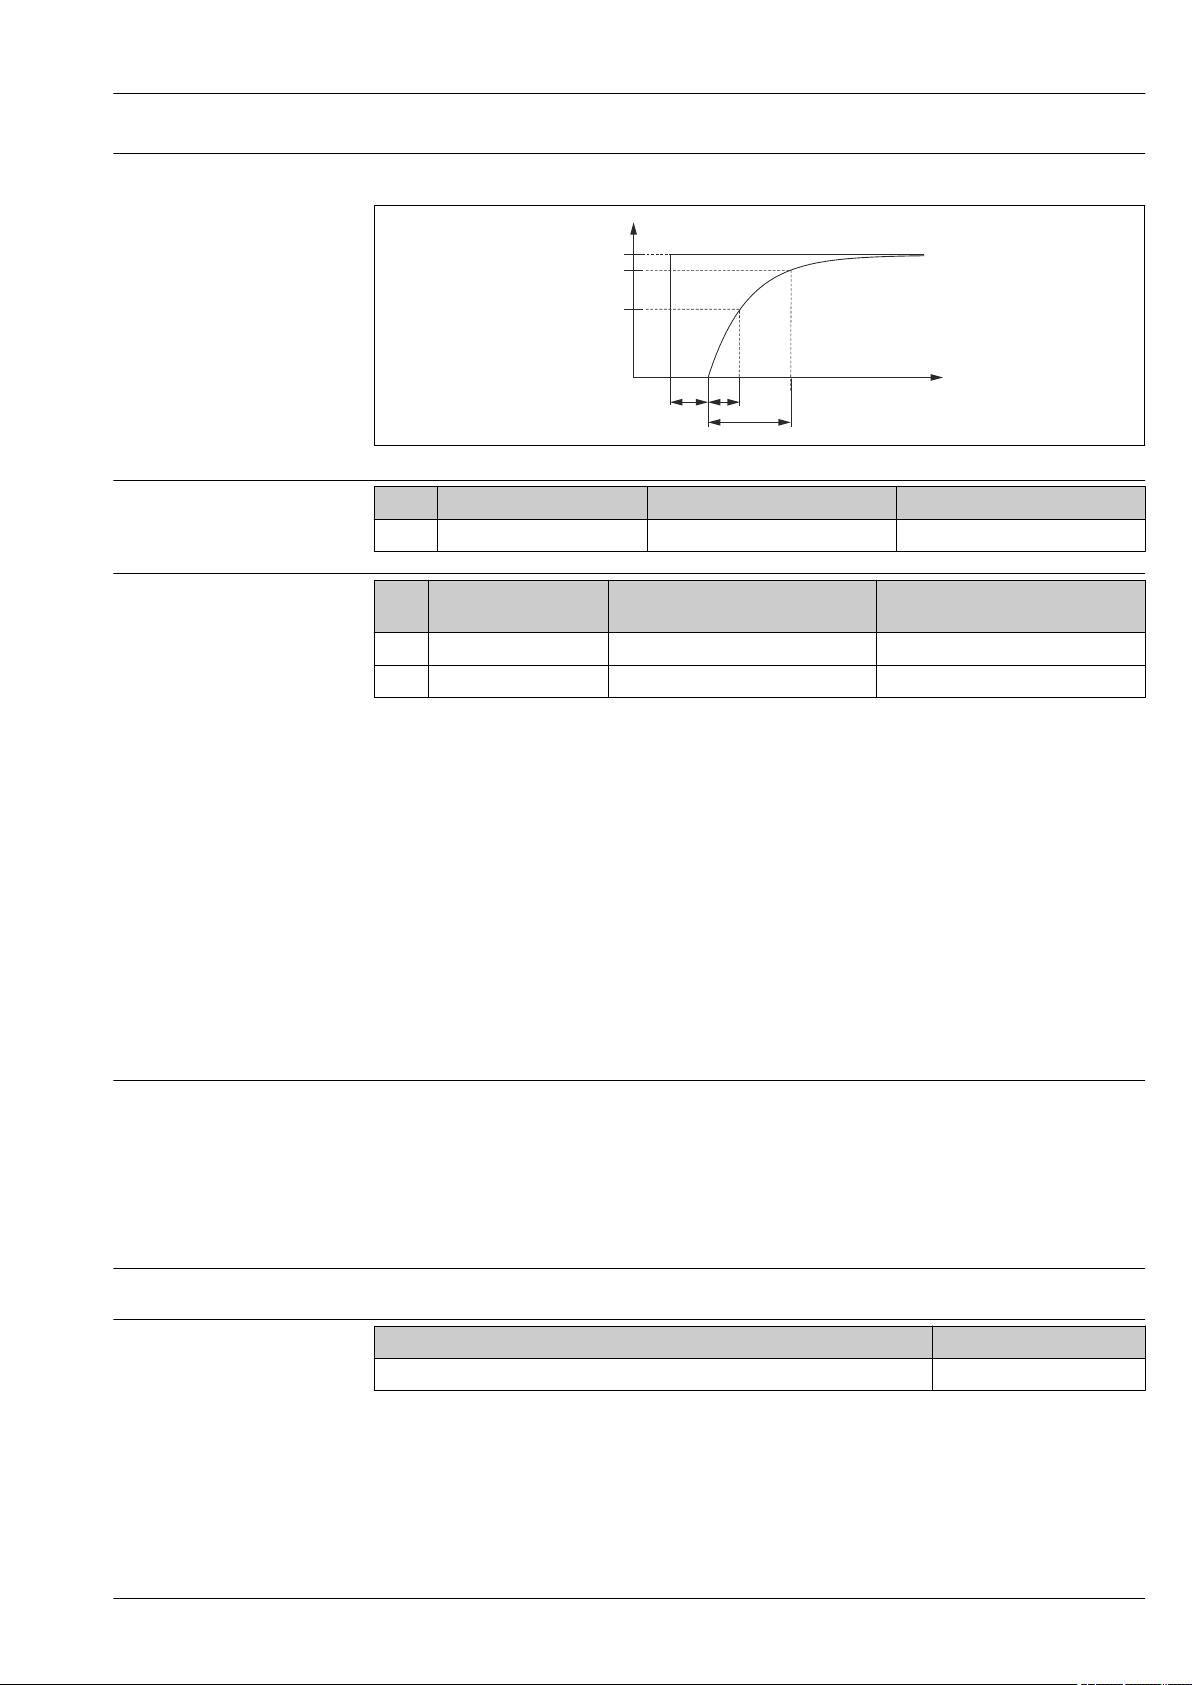
Presentation of the dead time and the time constant:
A0019786
Dead time (t1) [ms] Time constant (T63), t
max. 120 120 280
Dead time (t1) [ms] Dead time (t1) [ms] +
Time constant T63 (= t2) [ms]
min. 280 400 560
max. 1100 1220 1380
2
Time constant (T90), t
Dead time (t1) [ms] +
Time constant T90 (= t3) [ms]
3
Reading cycle
• Acyclic: max. 3/s, typical 1/s (depends on command # and number of preambles)
• Cyclic (Burst): max. 3/s, typical 2/s
The Deltabar FMD71/FMD72 offers BURST MODE functionality for cyclical value transmission via
the HART communication protocol.
Damping
alarm current setting
Firmware version
Cycle time (update time)
Cyclic (burst): min. 300 ms
Response time
• Acyclic: min. 330 ms, typically 590 ms (depending on command # and number of preambles)
• Cyclic (burst): min. 160 ms, typically 350 ms (depending on command # and number of
preambles)
A damping affects all outputs (output signal, display):
• Via onsite display, handheld terminal or PC with operating program, continuous from 0 to 999 s
• Via DIP switch on the electronic insert, switch position "on" = set value and "off"
• Factory setting: 2 s
Damping can be switched on or off using a switch on the electronic insert. If the switch is on, the
time constant can be set via a parameter in the menu and if the switch is off, the output signal is not
damped (time constant = 0.0).
Adjusted min. alarm current: Product configurator order code for "Service", option "IA"
Description Option
01.00.zz, HART, DevRev01 78
1) Product Configurator, order code for "Firmware version"
1)
Endress+Hauser 15

Deltabar FMD71, FMD72
Protocol-specific data
Manufacturer ID 17 (0x11)
Device type ID 39 (0x27)
HART specification 6.0
Device description files (DTM, DD) Information and files can be found:
• www.endress.com
• www.fieldcommgroup.org
HART device variables Measured values for PV (primary variable)
• Differential pressure
• Level linear (before lin.)
• Level after linearization table
Measured values for SV, TV, QV (second, third and fourth variable)
• Measured differential pressure
• Corrected pressure
• Measured pressure HP
• Sensor pressure HP
• Sensor temperature HP
• Measured pressure LP
• Sensor pressure LP
• Sensor temperature LP
• Level before linearization
• Tank content
• Electronic temperature
Supported functions • Burst mode
• Additional transmitter status
16 Endress+Hauser
Deltabar FMD71, FMD72
4... 20mA
Test
Test
Test
4... 20mA Test
1
8
6
7
2
3
4
5
Power supply
WARNING
L
Electrical safety is compromised by an incorrect connection!
In accordance with IEC/EN61010 a separate circuit breaker must be provided for the device .
‣
When using the measuring device in hazardous areas, installation must comply with the
‣
corresponding national standards and regulations and the Safety Instructions or Installation or
Control Drawings.
All explosion protection data are given in separate documentation which is available upon
‣
request. The Ex documentation is supplied as standard with all devices approved for use in
explosion hazardous areas.
Devices with integrated overvoltage protection must be grounded.
‣
Protective circuits against reverse polarity, HF influences and overvoltage peaks are integrated.
‣
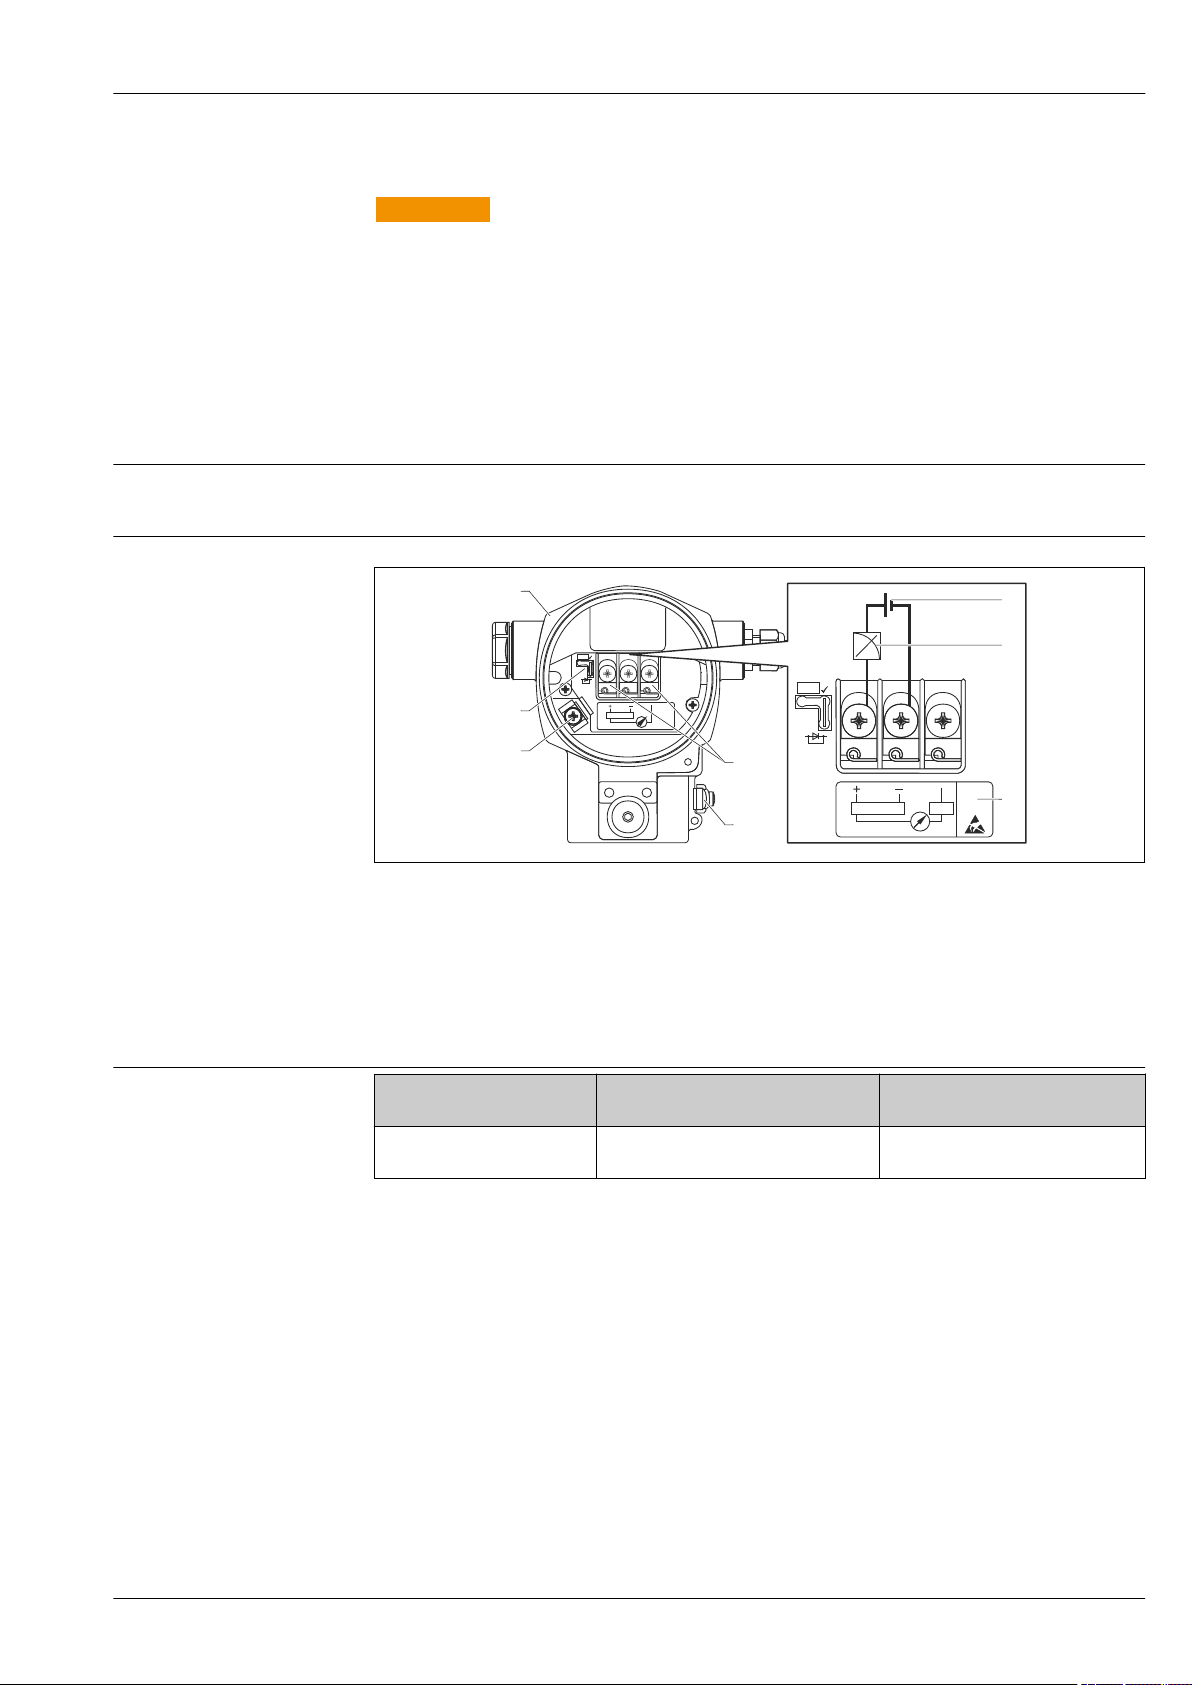
Terminals
Terminal assignment
• Supply voltage and internal ground terminal: 0.5 to 2.5 mm2 (20 to 14 AWG)
• External ground terminal: 0.5 to 4 mm2 (20 to 12 AWG)
A0019989
1 Housing
2 Supply voltage
3 4 to 20 mA
4 Devices with integrated overvoltage protection are labeled "OVP" (overvoltage protection) here.
5 External ground terminal
6 4 to 20 mA test signal between positive and test terminal
7 Internal ground terminal, minimum supply voltage = 12 V DC, jumper is set as illustrated in the diagram.
8 Jumper for 4 to 20 mA test signal
Supply voltage
Electronic version Jumper for 4 to 20 mA test signal in
"Test" position (delivery status)
4 to 20 mA HART, version for
non-hazardous areas
13 to 45 V DC 12 to 45 V DC
Jumper for 4 to 20 mA test signal
in "Non-test" position
Measuring a 4 to 20 mA test signal
A 4 to 20 mA test signal may be measured via the positive and test terminal without interrupting
the measurement. The minimum supply voltage of the device can be reduced by simply changing the
position of the jumper. As a result, operation is also possible with a lower supply voltage. To keep the
measured error below 0.1 %, the current measuring device should exhibit an internal resistance of
<0.7Ω. Observe the position of the jumper in accordance with the following table.
Endress+Hauser 17
Deltabar FMD71, FMD72
Test
Test
Cable entries
Cable specification for transmitter connection
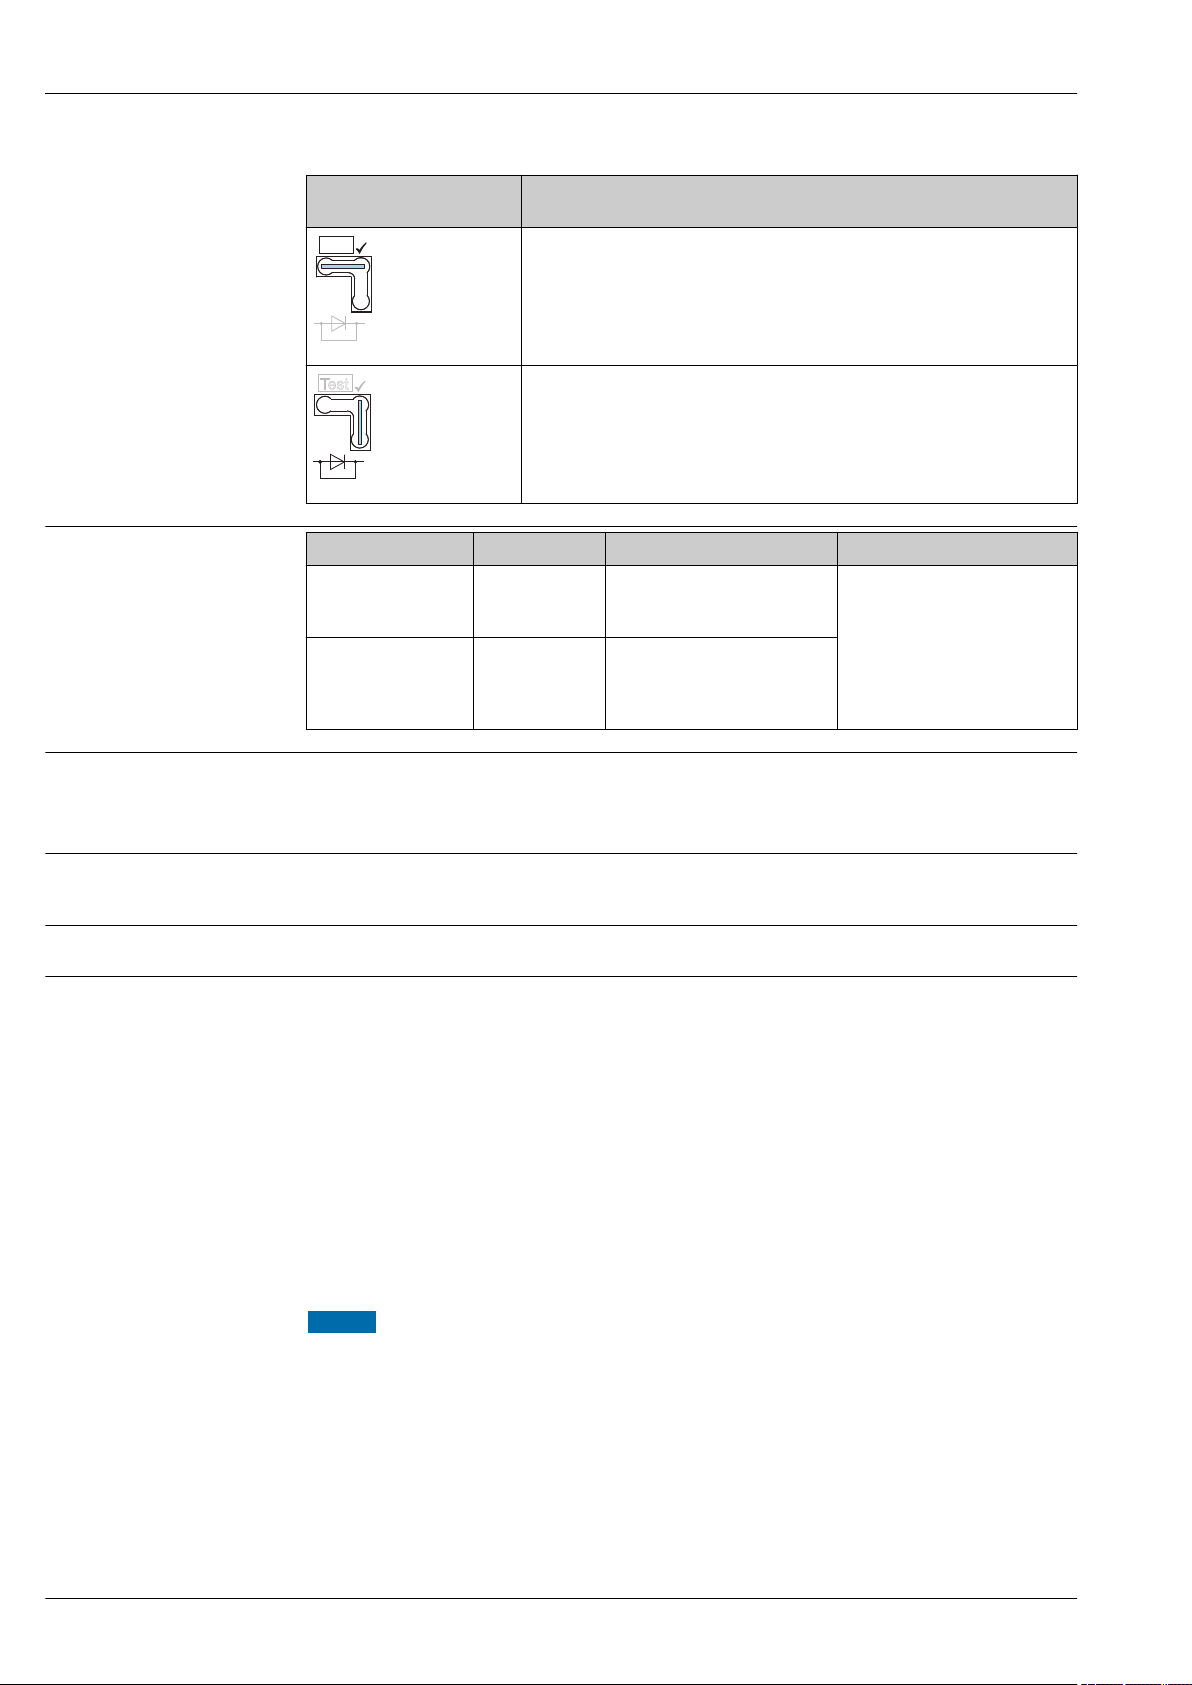
Jumper position for test
signal
Explosion protection Cable gland Permitted cable diameter Permitted wire cross-sections
• Standard
• Ex ia
• Ex ic
• Ex tD
• Ex nA
• FM approval
• CSA approval
Description
• Measurement of 4 to 20 mA test signal via the positive and test terminal:
possible. (Thus, the output current can be measured without interruption via
the diode.)
• Delivery status
• Minimum supply voltage: 13 V DC
A0019992
• Measurement of 4 to 20 mA test signal via positive and test terminal: not
possible.
• Minimum supply voltage: 12 V DC
A0019993
Plastic M20x1.5 5 to 10 mm (0.2 to 0.39 in) 0.5 to 2.5 mm2 (20 to 14 AWG)
Metal M20 x 1.5 7 to 10.5 mm (0.28 to 0.41 in)
• Endress+Hauser recommends using twisted, shielded two-wire cables.
• Terminals for core cross-sections 0.5 to 2.5 mm2 (20 to 14 AWG)
• The cable outer diameter depends on the cable entry used.
Residual ripple
Without influence on 4 to 20 mA signal up to ±5 % residual ripple within the permitted voltage
range [according to HART hardware specification HCF_SPEC-54 (DIN IEC 60381-1)]
Influence of power supply
≤0.0006 % of URL/1 V
Overvoltage protection Standard version
The standard version of the pressure instruments does not contain any special elements to protect
against overvoltage ("wire to ground"). Nevertheless the requirements of the applicable EMC
standard EN 61000-4-5 (testing voltage 1kV EMC wire/ground) are met.
Optional overvoltage protection
Devices showing version "NA" in feature 610 "Accessory Mounted" in the order code are equipped
with overvoltage protection.
• Overvoltage protection:
– Nominal functioning DC voltage: 600 V
– Nominal discharge current: 10 kA
• Surge current check î = 20 kA satisfied as per DIN EN 60079-14: 8/20 μs
• Arrester AC current check I = 10 A satisfied
NOTICE
Device could be destroyed!
Devices with integrated overvoltage protection must be grounded.
‣
18 Endress+Hauser
Deltabar FMD71, FMD72
90°
90°
C
A
B
Performance characteristics of ceramic process isolating diaphragm
Reference operating conditions
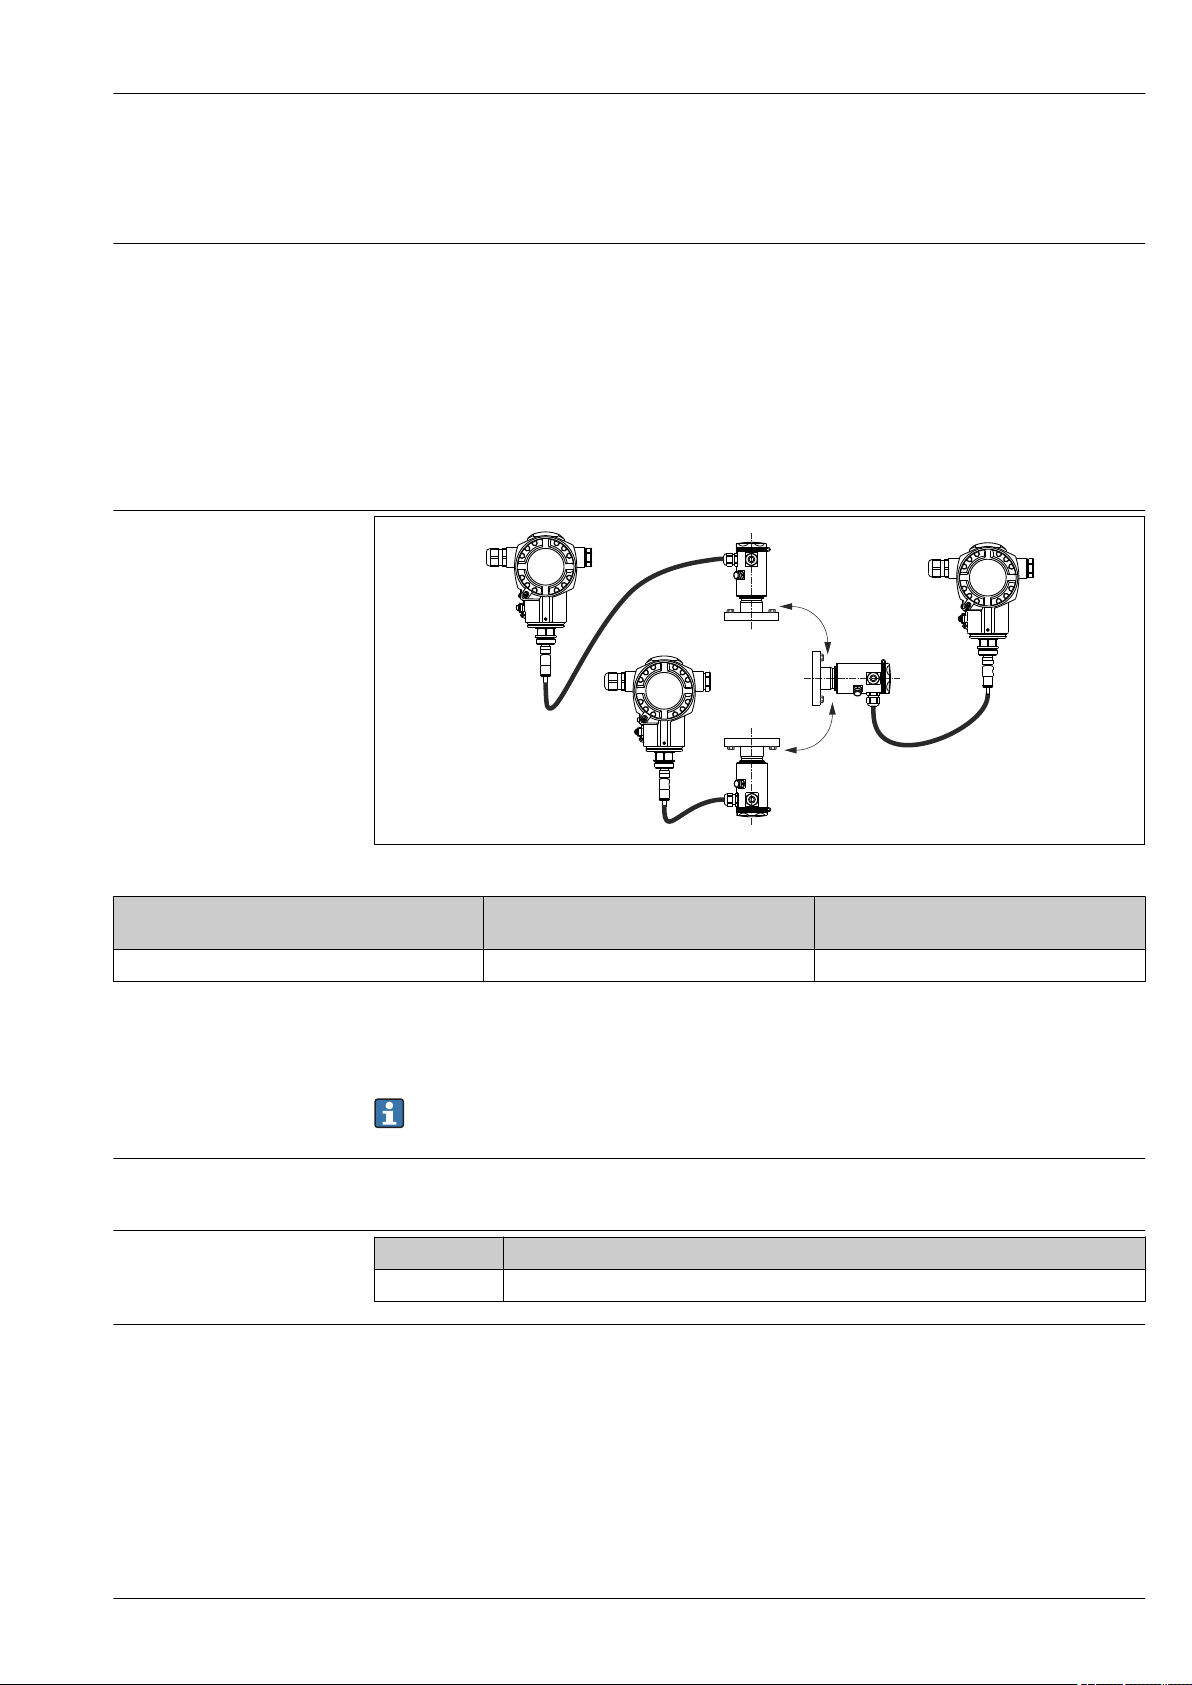
Influence of the installation position depending on sensor
• As per IEC 60770
• Ambient temperature TA = constant, in the range of:+21 to +33 °C (+70 to +91 °F)
•
Humidity j= constant, in the range of: 5 to 80 % RH
• Ambient pressure pA = constant, in the range of:860 to 1 060 mbar (12.47 to 15.37 psi)
• Position of measuring cell = constant, in range: horizontal ±1° (see also "Influence of the
installation position" section → 19)
• Input of Lo Trim Sensor and Hi Trim Sensor for lower range value and upper range value
• Zero based span
• Material of process isolating diaphragm: Al2O3 (aluminum-oxide ceramic, Ceraphire®)
• Supply voltage: 24 V DC ±3 V DC
• Load with HART: 250 Ω
Process isolating diaphragm axis is horizontal (A) Process isolating diaphragm pointing
upwards (B)
Calibration position, no measuring error < +0.2 mbar (+0.003 psi) < –0.2 mbar (–0.003 psi)
This effect can be corrected using the function to adjust the position (position adjustment) for the
differential pressure. Additional position adjustments for individual pressure signals are not
available.
A position-dependent zero shift can be corrected on the device.
Resolution
Vibration effects
Application limits
• Current output: 1 μA
• Display: can be set (factory setting: presentation of the maximum accuracy of the transmitter)
Test standard Vibration effects
IEC 61298-3 ≤ Reference accuracy up to 10 to 60 Hz: ±0.35 mm (±0.01 in); 60 to 500 Hz: 2 g
A high ratio between the level and head pressure or between the differential pressure and static
pressure can result in large measured errors. A maximum ratio of 1:10 is recommended. For
calculation purposes, please use the free "Applicator" calculation tool, which is available online at
"www.endress.com/applicator" or on CD-ROM.
Process isolating diaphragm pointing
downwards (C)
A0016465
Endress+Hauser 19

Deltabar FMD71, FMD72
A
Diff
HP HP
2
(A URL )
+=
.
LP LP
2
(A URL )
.
100 100
A [%]
P
100
.
Diff
Diff
=
A
Diff
T
Diff
HP HP
2
(T URL )
+=
.
LP LP
2
(T URL )
.
100 100
T [%]
P
100
.
Diff
Diff
=
T
Diff
Reference accuracy
The reference accuracy contains the non-linearity [DIN EN 61298-2 3.11] including the pressure
hysteresis [DIN EN 61298-23.13] and non-repeatability [DIN EN 61298-2 3.11] in accordance with
the limit point method as per [DIN EN 60770].
Measuring cell Sensor Reference accuracy (A)
[%URL for every sensor]
Standard Platinum
100 mbar (1.5 psi) Gauge pressure A =
250 mbar (3.75 psi) Gauge pressure A =
400 mbar (6 psi) Gauge pressure A =
1 bar (15 psi)
2 bar (30 psi)
4 bar (60 psi)
10 bar (150 psi)
40 bar (600 psi)
1) For hygienic process connections
Gauge pressure/ Absolute pressure A =
A =
A =
A =
A =
±0.075
±0.15
±0.075
±0.15
±0.075
±0.15
±0.075
±0.15
- Calculation (mbar, bar or psi):
1)
-
1)
-
1)
A = ±0.05
1)
Ordering Information
Description Option
Platinum D
Standard G
±0.075
Calculated reference accuracy (A
of the differential pressure
Percentage calculation of URL dP:
1)
1)
Diff
)
A0016468
A0016469
1) Product Configurator order code for "Reference accuracy"
Thermal change in the zero output and the output span Standard version
Measuring cell –10 °C (+14 °F)to ≤
+60 °C (+140 °F)
% of the set span for every sensor
100 mbar (1.5 psi)
250 mbar (4 psi)
400 mbar (6 psi)
1 bar (15 psi)
2 bar (30 psi)
4 bar (60 psi)
10 bar (150 psi)
40 bar (600 psi)
T
= ±0.176 T
total
T
= ±0.092 T
total
–20 to –10 °C (–4 to +14 °F)
> +60 to +125 °C (+140 to +257 °F)
= ±0.276 Calculation (mbar, bar or psi):
total
= ±0.250
total
Calculated thermal change (T
of the differential pressure
Percentage calculation of URL dP:
Diff
)
A0016474
A0016475
20 Endress+Hauser

Deltabar FMD71, FMD72
T
Diff
HP HP
2
(T URL )
+=
.
LP LP
2
(T URL )
.
100 100
T [%]
P
100
.
Diff
Diff
=
T
Diff
TP
Diff
HP HP
2
(TP URL )
+=
.
LP LP
2
(TP URL )
.
100 100
TP [%]
P
100
.
Diff
Diff
=
TP
Diff
L
Diff
HP HP
2
(L
100 100
URL )
+=
.
LP LP
2
(L URL )
.
High temperature version and hygienic version
Measuring cell Sensor –10 °C (+14 °F)to ≤
+60 °C (+140 °F)
% of the set span for every sensor
100 mbar (1.5 psi)
250 mbar (4 psi)
400 mbar (6 psi)
1 bar (15 psi)
2 bar (30 psi)
4 bar (60 psi)
10 bar (150 psi)
40 bar (600 psi)
1 bar (15 psi)
2 bar (30 psi)
4 bar (60 psi)
10 bar (150 psi)
40 bar (600 psi) Absolute
1) For hygienic process connections
Total performance
Gauge
pressure
Gauge
pressure
Absolute
pressure
pressure
T
= ±0.176
T
T
T
T
T
T
T
total
Total
total
total
total
total
total
total
= ±0.352
= ±0.092
= ±0.184
= ±0.092
= ±0.184
= ±0.092
= ±0.184
1)
1)
1)
1)
The "Total performance" specification comprises the non-linearity including hysteresis, nonreproducibility as well as the thermal change in the zero point. All specifications apply to the
temperature range –10 to +60 °C (+14 to +140 °F).
>
+60 to +150 °C
(140 to +302 °F)
T = ±0.75
T = ±1.25
T = ±0.5
T = ±0.75
T = ±0.75
T = ±1.25
T = ±0.5
T = ±0.75
1)
1)
1)
1)
Calculated thermal change (T
of the differential pressure
Calculation (mbar, bar or psi):
Percentage calculation of URL dP:
Diff
)
A0016474
A0016475
Measuring cell % of URL for every
sensor - standard
version
100 mbar (1.5 psi)
250 mbar (4 psi)
400 mbar (6 psi)
1 bar (15 psi)
2 bar (30 psi)
4 bar (60 psi)
10 bar (150 psi)
40 bar (600 psi)
TP = ±0.2 TP = ±0.46 TP = ±0.575 Calculation (mbar, bar or psi):
TP = ±0.15 TP = ±0.46 TP = ±0.5
% of URL for every
sensor - hightemperature version
% of URL for every
sensor - hygienic
version
Calculated total performance (TP
of the differential pressure
Percentage calculation of URL dP:
The "Applicator Sizing Electronic dp" selection tool, available free of charge on the Endress
+Hauser web site (www.endress.com/applicator), enables detailed calculations for your
respective applications.
Long-term stability
Measuring ranges Sensor Standard version Calculated long-term stability (L
100 mbar (1.5 psi)
250 mbar (4 psi)
400 mbar (6 psi)
Gauge pressure L = ±0.1
Absolute pressure L = ±0.3
'
1 year 10 years
% of URL for every sensor
L = ±0.2
L = ±0.25
1)
L = ±0.45
L = ±0.55
of the differential pressure
Calculation (mbar, bar or psi):
1)
1)
Diff
)
Diff
A0016470
A0016471
)
A0016463
Percentage calculation of URL dP/year:
Endress+Hauser 21

Deltabar FMD71, FMD72
L [%]
P
100
.
Diff
Diff
=
L
Diff
TE
Diff
HP HP
2
(TE URL )
+=
.
LP LP
2
(TE URL )
.
100 100
TE [%]
P
100
.
Diff
Diff
=
TE
Diff
Measuring ranges Sensor Standard version Calculated long-term stability (L
of the differential pressure
1 bar (15 psi)
2 bar (30 psi)
4 bar (60 psi)
10 bar (150 psi)
40 bar (600 psi)
1) For hygienic process connections
Gauge pressure L = ±0.05
Absolute pressure L = ±0.3
Total error
1 year 10 years
% of URL for every sensor
L = ±0.2
L = ±0.1
1)
The total error comprises the total performance and long-term stability. All specifications apply to
the temperature range –10 to +60 °C (+14 to +140 °F).
Measuring cell % of URL for every
sensor - standard
version
100 mbar (1.5 psi)
250 mbar (4 psi)
400 mbar (6 psi)
1 bar (15 psi)
2 bar (30 psi)
4 bar (60 psi)
10 bar (150 psi)
40 bar (600 psi)
TE = ±0.25 TE = ±0.51 TE = ±0.925 Calculation (mbar, bar or psi):
TE = ±0.2 TE = ±0.51 TE = ±0.7
% of URL for every
sensor - hightemperature version
% of URL for every
sensor - hygienic
version
Calculated total error (TE
of the differential pressure
Percentage calculation of URL dP:
Diff
Diff
)
A0016464
)
A0016472
Warm-up period
A0016473
4 to 20 mA HART: < 10 s
22 Endress+Hauser
 Loading...