

Page 1
Operating Instructions
Field Xpert SFX100
Device configurator
Field Xpert
BA00060S/04/en/14.12
Version 1.07.xx/1.01.xx
71188608
F5
OK
F1
F4
F2
F3
Page 2

Page 3

Field Xpert SFX100 Table of Contents
Table of Contents
Table of contents . . . . . . . . . . . . . . . . . . . . . . . . . . . 1
Revision history . . . . . . . . . . . . . . . . . . . . . . . . . . . . 3
Registered trademarks . . . . . . . . . . . . . . . . . . . . . . . 3
1 Safety . . . . . . . . . . . . . . . . . . . . . . . . . . 4
1.1 Designated use . . . . . . . . . . . . . . . . . . . . . . . . . . . . 4
1.2 Commissioning and operation . . . . . . . . . . . . . . . . . 4
1.3 Operational safety . . . . . . . . . . . . . . . . . . . . . . . . . . 4
1.4 Declaration of conformity . . . . . . . . . . . . . . . . . . . . 4
1.5 Technical improvement . . . . . . . . . . . . . . . . . . . . . . 4
1.6 Conventions and icons . . . . . . . . . . . . . . . . . . . . . . 5
2 Identification . . . . . . . . . . . . . . . . . . . . 6
2.1 Unpacking . . . . . . . . . . . . . . . . . . . . . . . . . . . . . . . . 6
2.1.1 Visual inspection . . . . . . . . . . . . . . . . . . . . . 6
2.1.2 Scope of delivery . . . . . . . . . . . . . . . . . . . . . 6
2.1.3 Storage and transport . . . . . . . . . . . . . . . . . . 6
2.2 Device name and serial number . . . . . . . . . . . . . . . . 7
3 Function and System Design . . . . . . . . 8
3.1 Function . . . . . . . . . . . . . . . . . . . . . . . . . . . . . . . . . 8
3.2 Connecting to HART devices . . . . . . . . . . . . . . . . . . 9
3.2.1 VIATOR Bluetooth modem . . . . . . . . . . . . . 9
3.2.2 WiFi – HART point-to-point connection
via Fieldgate . . . . . . . . . . . . . . . . . . . . . . . 10
3.2.3 WiFi – HART multidrop connection
via Fieldgate . . . . . . . . . . . . . . . . . . . . . . . 10
3.2.4 WiFi – HART multiplexer connection
via Fieldgate . . . . . . . . . . . . . . . . . . . . . . . 11
3.3 Connecting to FOUNDATION fieldbus devices . . . 12
3.3.1 FFblue Bluetooth modem . . . . . . . . . . . . . 12
3.3.2 WiFi – FOUNDATION fieldbus
connection via gateway . . . . . . . . . . . . . . . 12
4.3 Fieldgate FXA520 . . . . . . . . . . . . . . . . . . . . . . . . . 18
4.3.1 Overview . . . . . . . . . . . . . . . . . . . . . . . . . 18
4.3.2 Fieldgate Ports and IP addresses . . . . . . . . . 18
4.4 FFblue Bluetooth modem . . . . . . . . . . . . . . . . . . . . 19
4.4.1 Overview . . . . . . . . . . . . . . . . . . . . . . . . . 19
4.4.2 Power/batteries . . . . . . . . . . . . . . . . . . . . . 20
4.4.3 LED status . . . . . . . . . . . . . . . . . . . . . . . . . 20
4.5 SFC162 gateway . . . . . . . . . . . . . . . . . . . . . . . . . . 21
4.5.1 Overview . . . . . . . . . . . . . . . . . . . . . . . . . 21
4.5.2 SFC162 IP address and operating mode . . . 21
5 Commissioning Field Xpert . . . . . . . 22
5.1 Getting Started . . . . . . . . . . . . . . . . . . . . . . . . . . . 22
5.1.1 Connections . . . . . . . . . . . . . . . . . . . . . . . 22
5.1.2 Power up . . . . . . . . . . . . . . . . . . . . . . . . . . 22
5.1.3 Connect to the modem . . . . . . . . . . . . . . . 23
5.1.4 Synchronize the DD library (DD updates) . . 24
5.1.5 Update your personal licence details . . . . . . 25
5.2 Installing and configuring a Bluetooth modem . . . . 26
5.2.1 Switch on Field Xpert Bluetooth . . . . . . . . . 26
5.2.2 Add a VIATOR Bluetooth modem (HART) . 27
5.2.3 Add a FFblue Bluetooth modem
(FOUNDATION fieldbus) . . . . . . . . . . . . . . 31
5.3 Installing and configuring a WiFi access point . . . . . 35
5.3.1 Connecting Field Xpert to the
WiFi access point . . . . . . . . . . . . . . . . . . . . 35
5.3.2 Adding a Fieldgate FXA520 for
HART communication . . . . . . . . . . . . . . . . 39
5.3.3 Adding a SFC162 gateway for
FOUNDATION fieldbus communication . . 43
5.4 Optimizing battery use . . . . . . . . . . . . . . . . . . . . . . 46
5.4.1 Backlight . . . . . . . . . . . . . . . . . . . . . . . . . . 46
5.4.2 Power saving . . . . . . . . . . . . . . . . . . . . . . . 48
5.5 Paired devices . . . . . . . . . . . . . . . . . . . . . . . . . . . . 50
5.6 Additional Software . . . . . . . . . . . . . . . . . . . . . . . . 51
4 Operability . . . . . . . . . . . . . . . . . . . . 13
4.1 Field Xpert PDA . . . . . . . . . . . . . . . . . . . . . . . . . . 13
4.1.1 Overview . . . . . . . . . . . . . . . . . . . . . . . . . 13
4.1.2 Charging the Field Xpert battery . . . . . . . . 14
4.1.3 Switching on and off . . . . . . . . . . . . . . . . . 14
4.1.4 Battery life . . . . . . . . . . . . . . . . . . . . . . . . 14
4.1.5 Long-term data storage . . . . . . . . . . . . . . . 15
4.1.6 Backlight for display . . . . . . . . . . . . . . . . . 15
4.1.7 Bluetooth transmission range . . . . . . . . . . . 15
4.1.8 USB interface box . . . . . . . . . . . . . . . . . . . 15
4.2 VIATOR Bluetooth modem . . . . . . . . . . . . . . . . . . 16
4.2.1 Overview . . . . . . . . . . . . . . . . . . . . . . . . . 16
4.2.2 Batteries . . . . . . . . . . . . . . . . . . . . . . . . . . 17
4.2.3 On/off button . . . . . . . . . . . . . . . . . . . . . . 17
4.2.4 LED status (power indicator) . . . . . . . . . . . 17
4.2.5 Undervoltage lockout . . . . . . . . . . . . . . . . 17
4.2.6 Inactivity power off . . . . . . . . . . . . . . . . . . 17
Endress+Hauser 1
6 Operating Device Xpert . . . . . . . . . . 52
6.1 Connecting to a HART device . . . . . . . . . . . . . . . . 52
6.2 Connecting to a FOUNDATION fieldbus device . . . 54
6.2.1 Generate a live list . . . . . . . . . . . . . . . . . . . 54
6.2.2 Setting a tag and device address . . . . . . . . . 56
6.2.3 Setting a BOF Class . . . . . . . . . . . . . . . . . . 58
6.2.4 Generate a block and parameter list . . . . . . 59
6.2.5 Change the block target mode . . . . . . . . . . 60
6.2.6 Enable function block viewing . . . . . . . . . . 61
6.3 Parameterization of devices . . . . . . . . . . . . . . . . . . 63
6.3.1 Parameter folder tree . . . . . . . . . . . . . . . . . 63
6.3.2 Parameter folders . . . . . . . . . . . . . . . . . . . . 64
6.3.3 Device diagnosis . . . . . . . . . . . . . . . . . . . . 65
6.4 Envelope curve . . . . . . . . . . . . . . . . . . . . . . . . . . . 66
6.5 Favorites folder . . . . . . . . . . . . . . . . . . . . . . . . . . . 68
6.6 Upload/Compare function . . . . . . . . . . . . . . . . . . . 70
6.6.1 Upload . . . . . . . . . . . . . . . . . . . . . . . . . . . 70
6.6.2 Compare . . . . . . . . . . . . . . . . . . . . . . . . . . 71
Page 4

Index Field Xpert SFX100
6.7 Device and Block Reports . . . . . . . . . . . . . . . . . . . 74
6.7.1 Create Device Report (Device Xpert HART) 74
6.7.2 Create Block Report (Device Xpert FF) . . . 75
6.7.3 View reports on PDA . . . . . . . . . . . . . . . . 76
6.7.4 Backup/Copy reports and images . . . . . . . 78
6.7.5 View report on PC/laptop . . . . . . . . . . . . 78
6.8 Additional functions . . . . . . . . . . . . . . . . . . . . . . . 79
6.8.1 Search function . . . . . . . . . . . . . . . . . . . . 79
6.8.2 Application help . . . . . . . . . . . . . . . . . . . . 81
6.8.3 Device information (HART) . . . . . . . . . . . 82
6.8.4 Device information and block properties
(FF) . . . . . . . . . . . . . . . . . . . . . . . . . . . . . 83
6.8.5 Device Description information . . . . . . . . . 84
6.8.6 Generic DD . . . . . . . . . . . . . . . . . . . . . . . 84
6.9 Configuration menu . . . . . . . . . . . . . . . . . . . . . . . 85
6.9.1 Connection . . . . . . . . . . . . . . . . . . . . . . . 85
6.9.2 HTTP Proxy . . . . . . . . . . . . . . . . . . . . . . . 86
6.9.3 Device library . . . . . . . . . . . . . . . . . . . . . . 86
6.9.4 Paths . . . . . . . . . . . . . . . . . . . . . . . . . . . . 87
6.9.5 Options . . . . . . . . . . . . . . . . . . . . . . . . . . 87
6.9.6 Modem . . . . . . . . . . . . . . . . . . . . . . . . . . 87
7 Troubleshooting . . . . . . . . . . . . . . . . 88
7.1 Field Xpert . . . . . . . . . . . . . . . . . . . . . . . . . . . . . . 88
7.1.1 Soft Reset . . . . . . . . . . . . . . . . . . . . . . . . . 88
7.1.2 Hard Reset . . . . . . . . . . . . . . . . . . . . . . . . 89
7.1.3 Clean Reset . . . . . . . . . . . . . . . . . . . . . . . 90
7.1.4 Reinstalling Device Xpert . . . . . . . . . . . . . 91
7.2 Connection problems . . . . . . . . . . . . . . . . . . . . . . 97
7.3 Software problems . . . . . . . . . . . . . . . . . . . . . . . . 98
7.4 DD updates . . . . . . . . . . . . . . . . . . . . . . . . . . . . . 98
8 Spare Parts and Accessories . . . . . . . 99
Index . . . . . . . . . . . . . . . . . . . . . . . . 100
2 Endress+Hauser
Page 5

Field Xpert
Revision history
Product
version
1.00.xx
1.00.xx
1.01.xx
1.01.xx
1.06.xx
1.06.xx
1.00.xx
1.07.xx
1.01.xx
1)
Device Xpert HART, 2) Device Xpert FOUNDATION fieldbus
Manual Changes Comments
1)
BA060S/04/en/01.08 Original
1)
BA060S/04/en/01.09 General Updated, improved and restructured
1)
BA060S/04/en/04.09 New function Special function: upload/download
1)
BA060S/04/en/09.09 New function Special function: generic DD
1)
BA060S/04/en/03.10 Download Download currently not supported
1)
BA00060S/04/en/13.11 General New manual structure with additional descriptions
2)
HART FXA520 architecture added
1)
BA00060S/04/en/14.12 General Alignment of HART and FOUNDATION fieldbus
2)
FOUNDATION fieldbus FOUNDATION fieldbus added
of Field Xpert and Device Xpert functions
Renumbered according to new corporate rules
GUIs with new user promps to simplify use
Registered trademarks
PROFIBUS
Registered trademark of PROFIBUS user organization, Karlsruhe Germany
FOUNDATION
Registered trademark of Fieldbus Foundation, Austin, TX 78759, USA
HART
Registered trademark of HART Communication Foundation, Houston, USA
ActiveSync
Windows Vista
registered trademarks of the Microsoft Corporation.
MACTek
Registered trademark of the MACTek Corporation, Ohio, USA
VIATOR
Registered trademark of the MACTek Corporation, Ohio, USA
Bluetooth
Registered trademark of Bluetooth SIG, Inc, Washington, USA
Acrobat Reader
®
TM
Fieldbus
®
®
, Microsoft®, Windows®, Windows Mobile® 5.0, Windows 2000®, Windows XP®,
®
, Windows 7®, Windows Explorer®, Internet Explorer® and the Microsoft logo are
®
®
®
®
is a registered trademark of Adobe Systems Incorporated.
All other brand names and product names are trademarks or registered trademarks of the respective
companies and organizations.
Endress+Hauser 3
Page 6

1Safety Field Xpert
1Safety
1.1 Designated use
Field Xpert is an industrial PDA with integrated 3.5" touchscreen based on Windows Mobile. It
offers wireless communication via Bluetooth or WiFi interfaces. The Bluetooth interface can be used
in combination with a HART or FOUNDATION fieldbus modem to connect directly to HART or
FOUNDATION fieldbus H1 devices. The WiFi interface can be used to connect with HART or
FOUNDATION fieldbus devices via a gateway, e.g. Endress+Hauser Fieldgate FXA520 for HART or
SFC162 gateway for FOUNDATION fieldbus. Field Xpert also works as a stand-alone device for
asset management applications. It may be used only for the purposes described in these Operating
Instructions and only in conjunction with third-party devices and components recommended or
approved by Endress+Hauser.
1.2 Commissioning and operation
To ensure that the product operates correctly and safely, Field Xpert must be transported, stored,
connected, operated and maintained in accordance with the instructions in this manual. Personnel
must be authorized and have the necessary qualifications.
1.3 Operational safety
Operating environment Field Xpert meets the requirements of the EU guidelines for the various operating environments in
which it is designed to operate. The permitted operating conditions must be observed, see also Field
Xpert CD-ROM (folder Documentation\Field Xpert\Safety Instructions)
Hazardous areas • The non-Ex version of Field Xpert may not be operated in explosion hazardous areas
• The Ex version (ATEX) of Field Xpert may be operated hazardous areas, Zone 1
• The VIATOR Bluetooth modem is ATEX, FM and IS certified and may be operated hazardous
areas, Zone 1
• The Softing FFblue Bluetooth modem is ATEX certified and may be operated hazardous areas,
Zone 1
• Once a modem has been used in a non-Ex installation, it should never be used in an
Ex installation, as there is a danger that the protective circuits have been inadvertently
overloaded and no longer function correctly.
Repair Do not open the Field Xpert housing. It does not contain any parts which the user needs to service
or repair. In the event of a fault or defect, please return the Field Xpert to Endress+Hauser. Opening
the Field Xpert invalidates the guarantee and Ex approval. The VIATOR Bluetooth and FFblue
modem may be opened in order to replace the batteries, as described in this manual.
1.4 Declaration of conformity
A CE declaration of conformity has been issued for the Ex and non-Ex versions. The relevant
documents can be found here:
Field Xpert CD-ROM (folder: Documentation\Field Xpert\Confirmations)
1.5 Technical improvement
Endress+Hauser reserves the right to make technical improvements hardware and software at any
time and without prior notification. If such improvements do not affect the operation of the device,
they are not documented. If the improvements affect operation, a new version of the Operating
Instructions will be issued.
4 Endress+Hauser
Page 7
Field Xpert 1Safety
1.6 Conventions and icons
In order to highlight safety relevant or alternative operating procedures in the manual, the following
conventions have been used, each indicated by a corresponding icon in the margin.
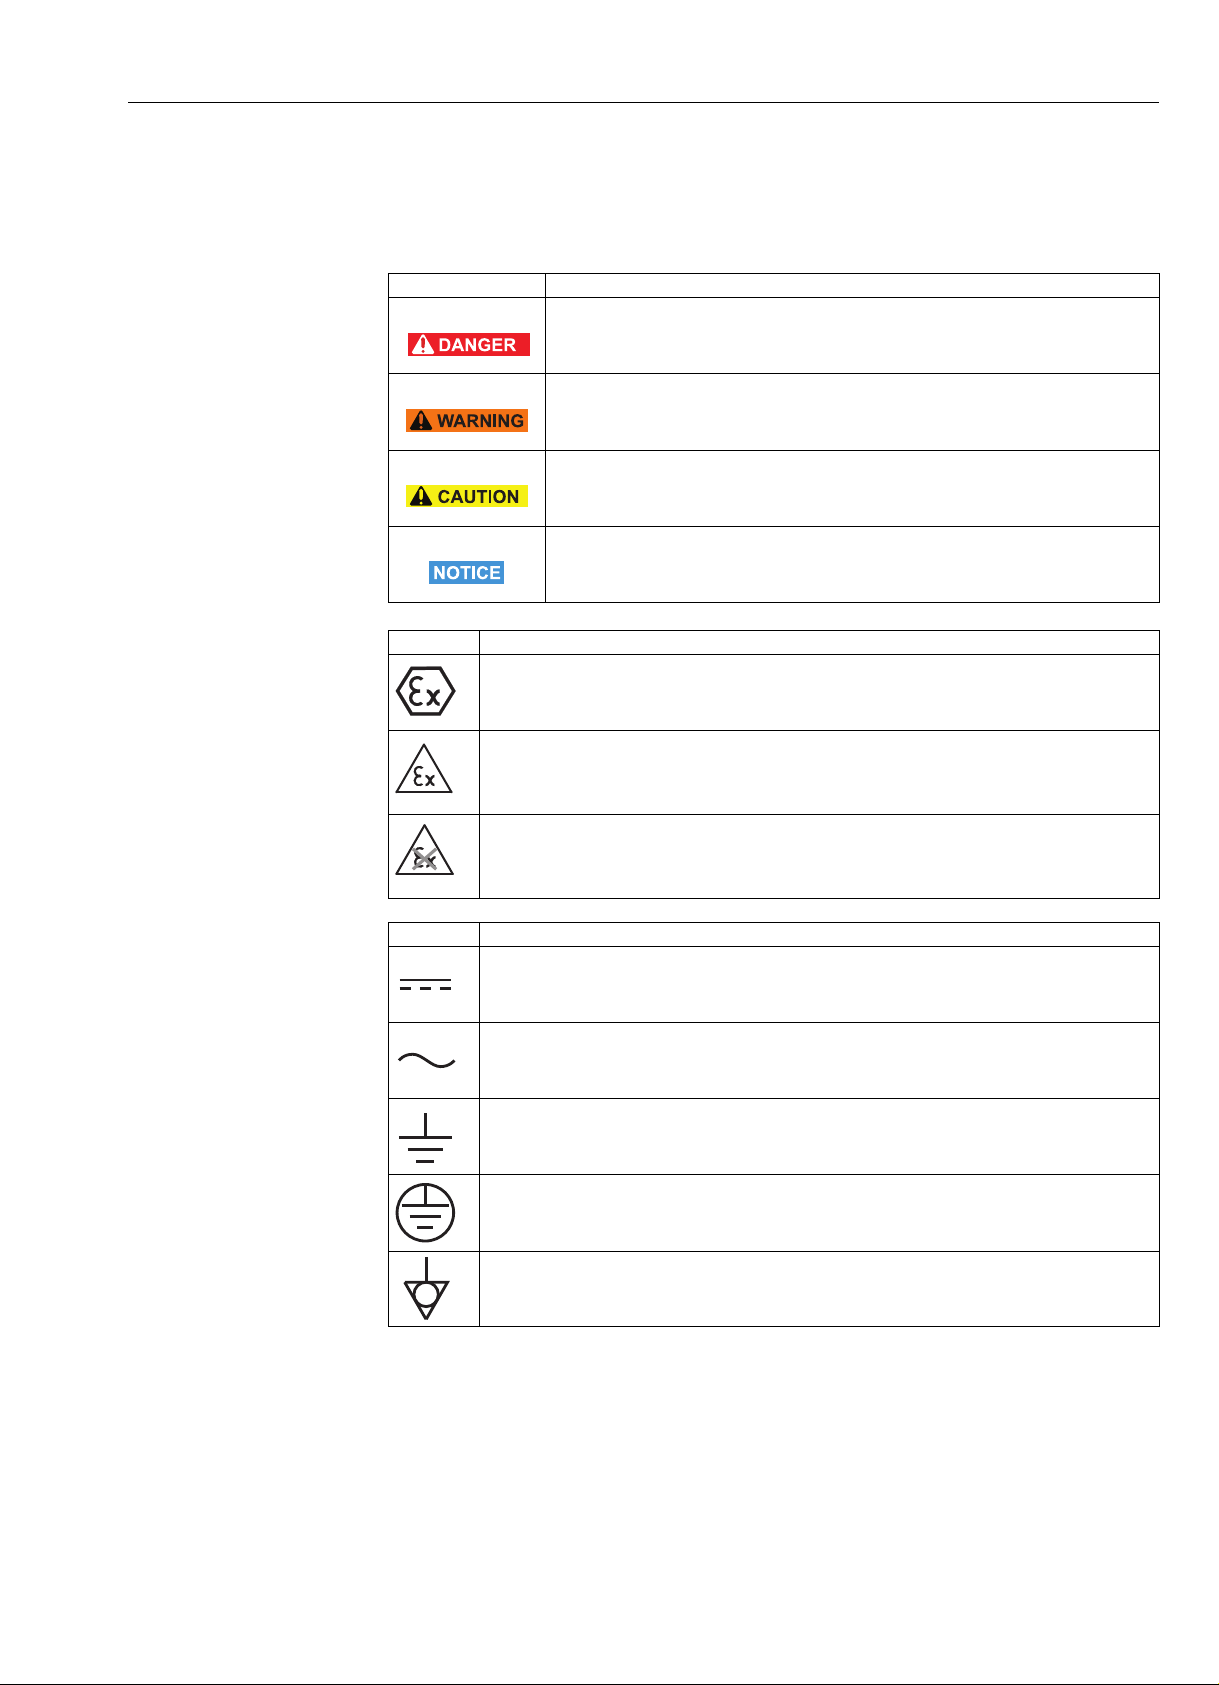
Safety conventions
Explosion protection
Icon Meaning
DANGER!
This symbol alerts you to a dangerous situation. Failure to avoid this situation will result in
serious or fatal injury.
WARNING!
This symbol alerts you to a dangerous situation. Failure to avoid this situation can result in
serious or fatal injury.
CAUTION!
This symbol alerts you to a dangerous situation. Failure to avoid this situation can result in minor
or medium injury.
NOTE!
This symbol contains information on procedures and other facts which do not result in personal
injury.
Symbol Meaning
Explosion-proof equipment which has undergone type examination
If this symbol is on the nameplate of the device, the device can be installed in accordance with the approval
in a hazardous or non-hazardous area.
Hazardous areas
This symbol is used in the drawings in these Operating Instructions to indicate a hazardous area.
– Devices located in hazardous areas or the wiring for such devices must have the relevant explosion pro-
tection.
Safe area (non-hazardous area)
This symbol is used in the drawings in these Operating Instructions to indicate a non-hazardous area.
– Devices located in non-hazardous areas must also be certified if connecting cables enter the hazardous
area.
Electrical symbols
Symbol Meaning
DC
A terminal at which DC is present or through which DC flows.
AC
A terminal at which (sine-wave) AC is present or through which AC flows.
Ground connection
A grounded terminal which, from the user's point of view, is already grounded by means of a grounding system.
Protective ground connection
A terminal which must be grounded before making any other connections can be made.
Equipotential connection
A connection which must be connected to the grounding system of the plant. This may be, for example, an
equipotential line or star grounding system, depending on national or company procedures.
Endress+Hauser 5
Page 8

2 Identification Field Xpert
2 Identification
2.1 Unpacking
2.1.1 Visual inspection
When unpacking:
• Check the packaging for visible damage arising from transportation.
• To avoid damage, remove the packaging with care.
• Retain the original packaging in case the Field Xpert needs to be transported again.
• Retain the accompanying documents also.
If you find that the contents are damaged, do not put the device into operation. In this case, please
contact your Endress+Hauser Sales Center. Return the device to us, if possible in the original
packaging.
2.1.2 Scope of delivery
Before commencing commissioning, please check that the delivery is complete and undamaged.
The delivery comprises:
• Field Xpert PDA including Device Xpert software of choice
• Power unit (charger) LG x10
• Two stylus pens (on back of Field Xpert)
• Operating Instructions including Getting Started and safety instructions
• Field Xpert CD-ROM incl. application software and documentation
Optional:
• VIATOR Bluetooth modem for use with HART field devices including 3 x AAA alkaline batteries
and documentation
• FFblue Bluetooth modem for use with FOUNDATION fieldbus devices including 2x AA
alkaline batteries
• USB x11 interface kit (one box, two cables)
• Leather case with strap and one stylus pen
• Docking station
and documentation
2.1.3 Storage and transport
Although Field Xpert is of robust construction, some of its components can be sensitive to strong
vibrations and shocks. For this reason, the Field Xpert must be protected against excessive
mechanical loads of this kind.
6 Endress+Hauser
Page 9
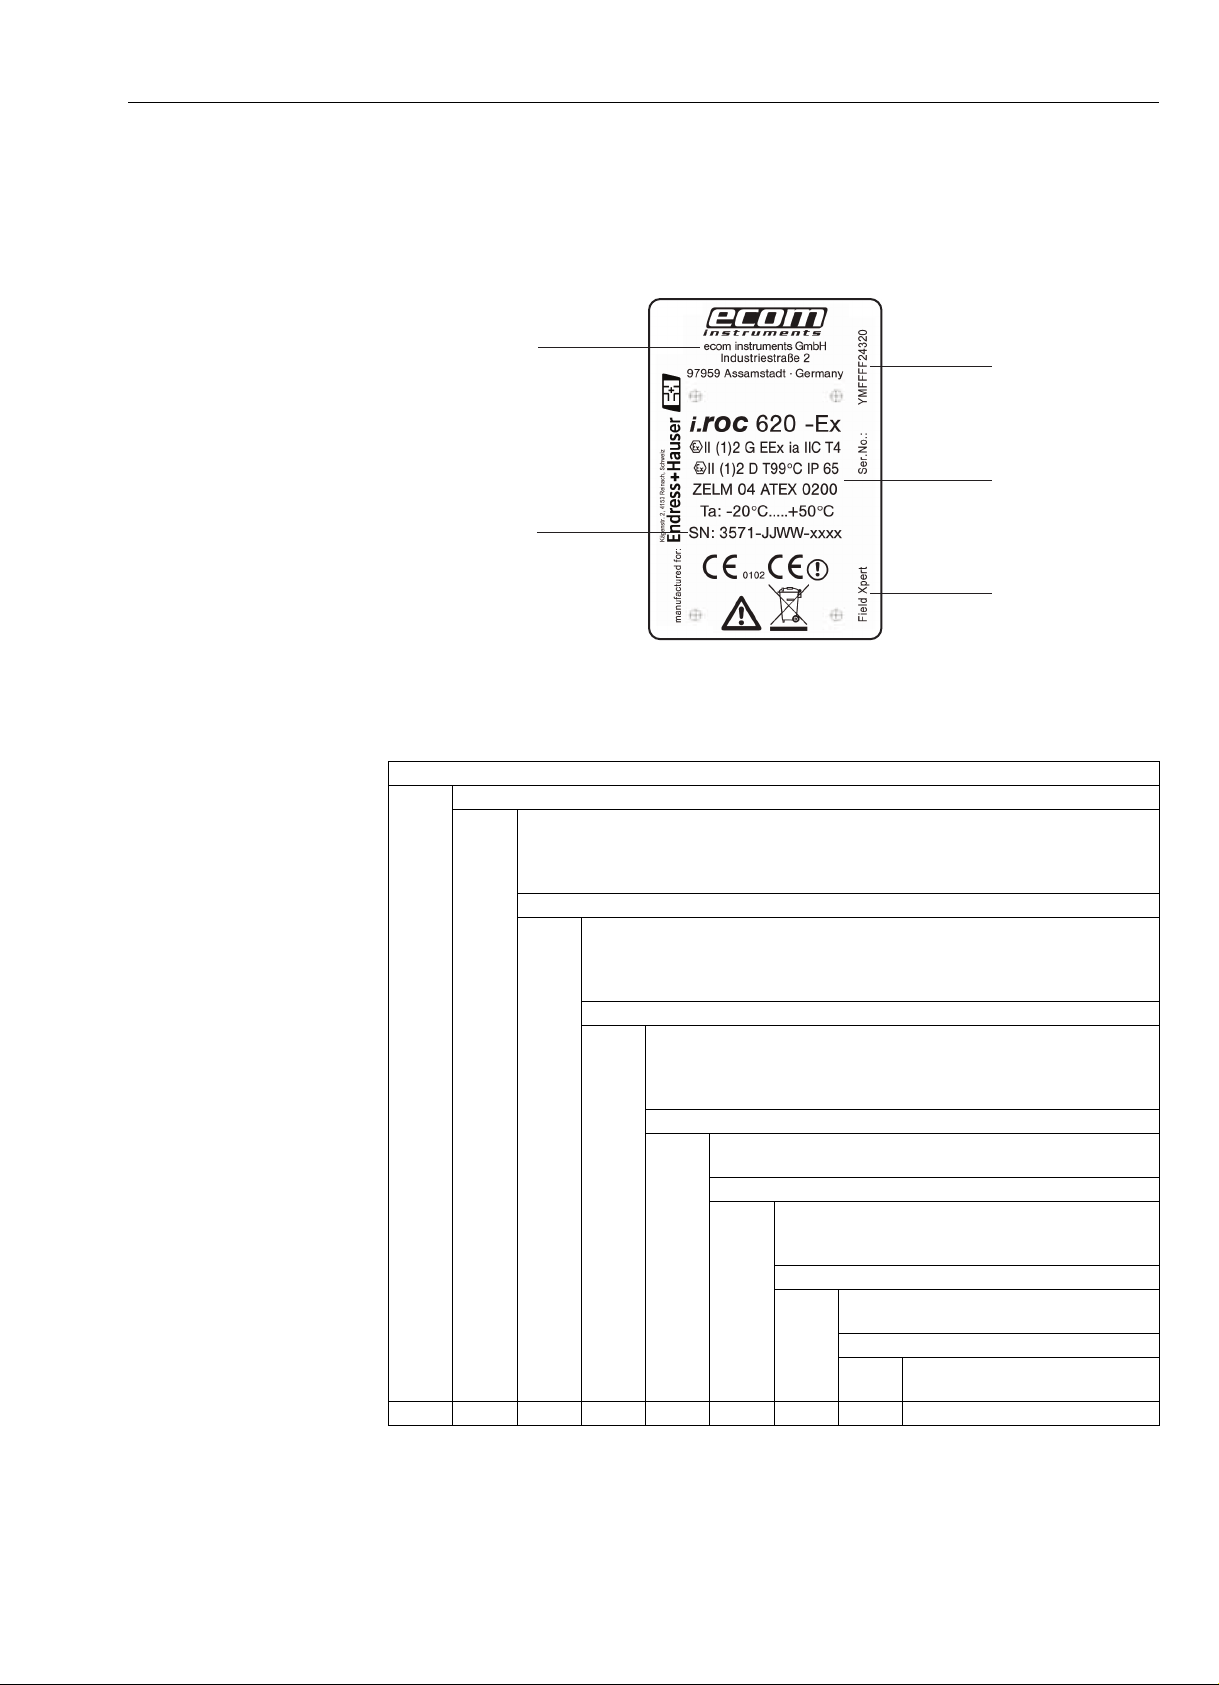
Field Xpert 2 Identification
PDA
manufacturer
Endress+Hauser
Serial number
Endress+Hauser
Device name
Information on
Ex rating
PDA
manufacturer’s
serial number
2.2 Device name and serial number
The Endress+Hauser device name (Field Xpert) and serial number are to be found on the nameplate,
which is attached to the rear of the housing.
The device type can be derived from the product code as follows:
SFX100 Field Xpert
Approval
A
B
X
Y
SFX100-
Non-hazardous area
ATEX Zone 1/21
Without PDA
Special version, to be specified
Application Software
A1
A2
A3
XX
Device Xpert HART
Device Xpert FF
Device Xpert HART + FF
Not used
Communication Interface
F1
HF
H1
XX
FFblue - Bluetooth Interface for FF protocol
VIATOR + FFblue - Bluetooth Interface for HART and FF protocol
VIATOR - Bluetooth Interface for HART protocol
not used
Device Xpert and Operating System Language
1
2
English
German
Software Update Service
A
X
Selected: Device Xpert Software Update Service SFX101
see Chapter 7.4
not used
USB Data Transmission Set
A
X
Selected (if no IR available)
not used
Leather Carry Case
A
X
Selected
not used
Endress+Hauser 7
Page 10
3 Function and System Design Field Xpert
3 Function and System Design
3.1 Function
Field Xpert from Endress+Hauser is a high-performance industrial PDA based on Windows Mobile,
with compact external dimensions, an integrated WLAN, USB, Bluetooth and infrared connection.
This allows it to be connected to HART and/or FOUNDATION fieldbus devices via a modem or
gateway. With a range of Ex approvals, Field Xpert meets the needs and requirements of the process
industry for applications inside and outside hazardous areas.
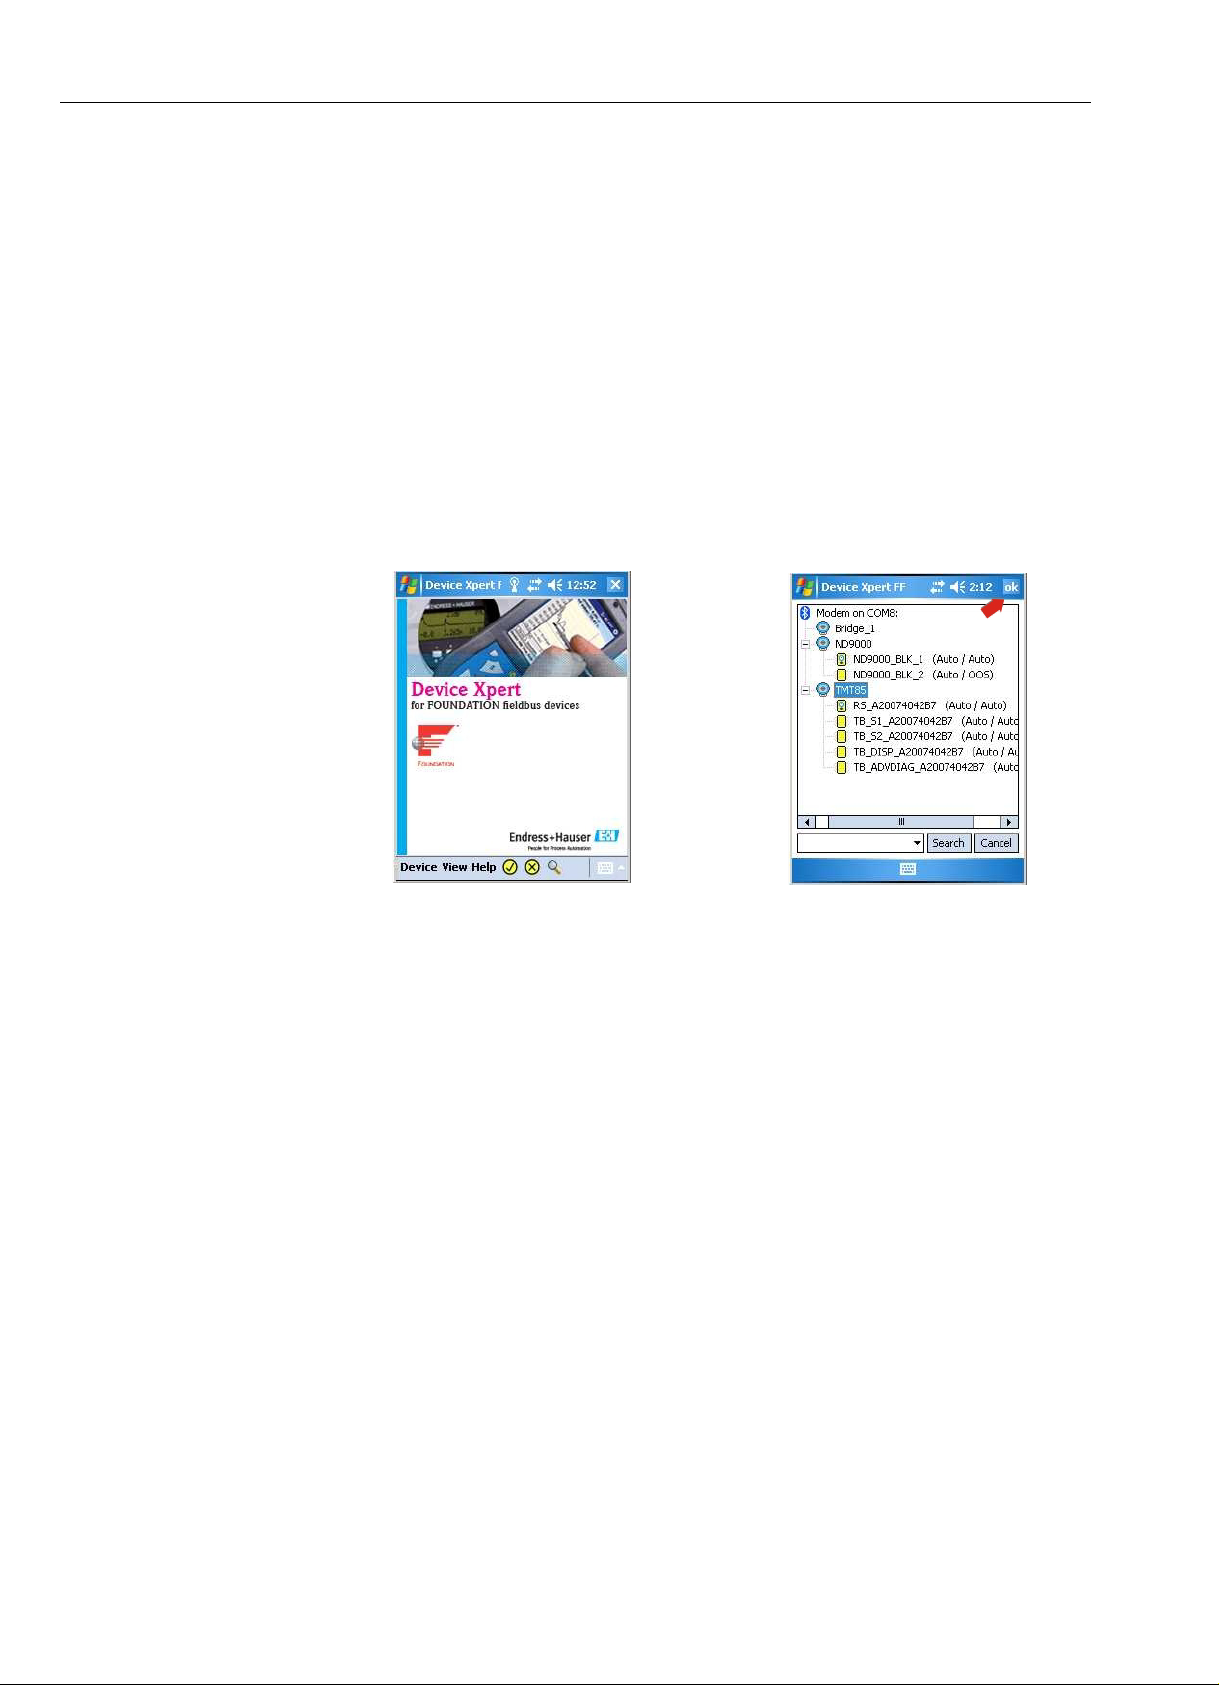
Once the Field Xpert hardware and the Device Expert software are communicating with a device,
it can be parameterized. Depending upon the system architecture, only one device may be seen, e.g.
in HART point-to-point or all the devices connected to the segment, e.g. in FOUNDATION fieldbus
applications.
Fig. 3-1: Device Xpert FOUNDATION fieldbus start page and live list of connected devices
Other functions Other functions, described in more detail in Chapter 6 are:
• Device Description (DD) updates
• Envelope curve
• Favorites folder
• Search function
• Device diagnosis
• Upload/Compare function
• Device Report (XML)
• Application help
• Generic DD
8 Endress+Hauser
Page 11
Field Xpert 3 Function and System Design
F5
F1
F2
F3
F4
OK
Field Xpert
+
-
+
-
HART device
Transmitter
power supply
e.g. RMA42
Status
Power
Load resistor
250 - 1100 Ohm
F5
F1
F2
F3
F4
OK
Field Xpert
Transmitter
power supply
RMA421
RMA422
RNS221
RN221
–
+
HART device
Status
Power
3.2 Connecting to HART devices
Caution!
• Proof of intrinsic safety must be checked when additional devices are introduced into a loop.
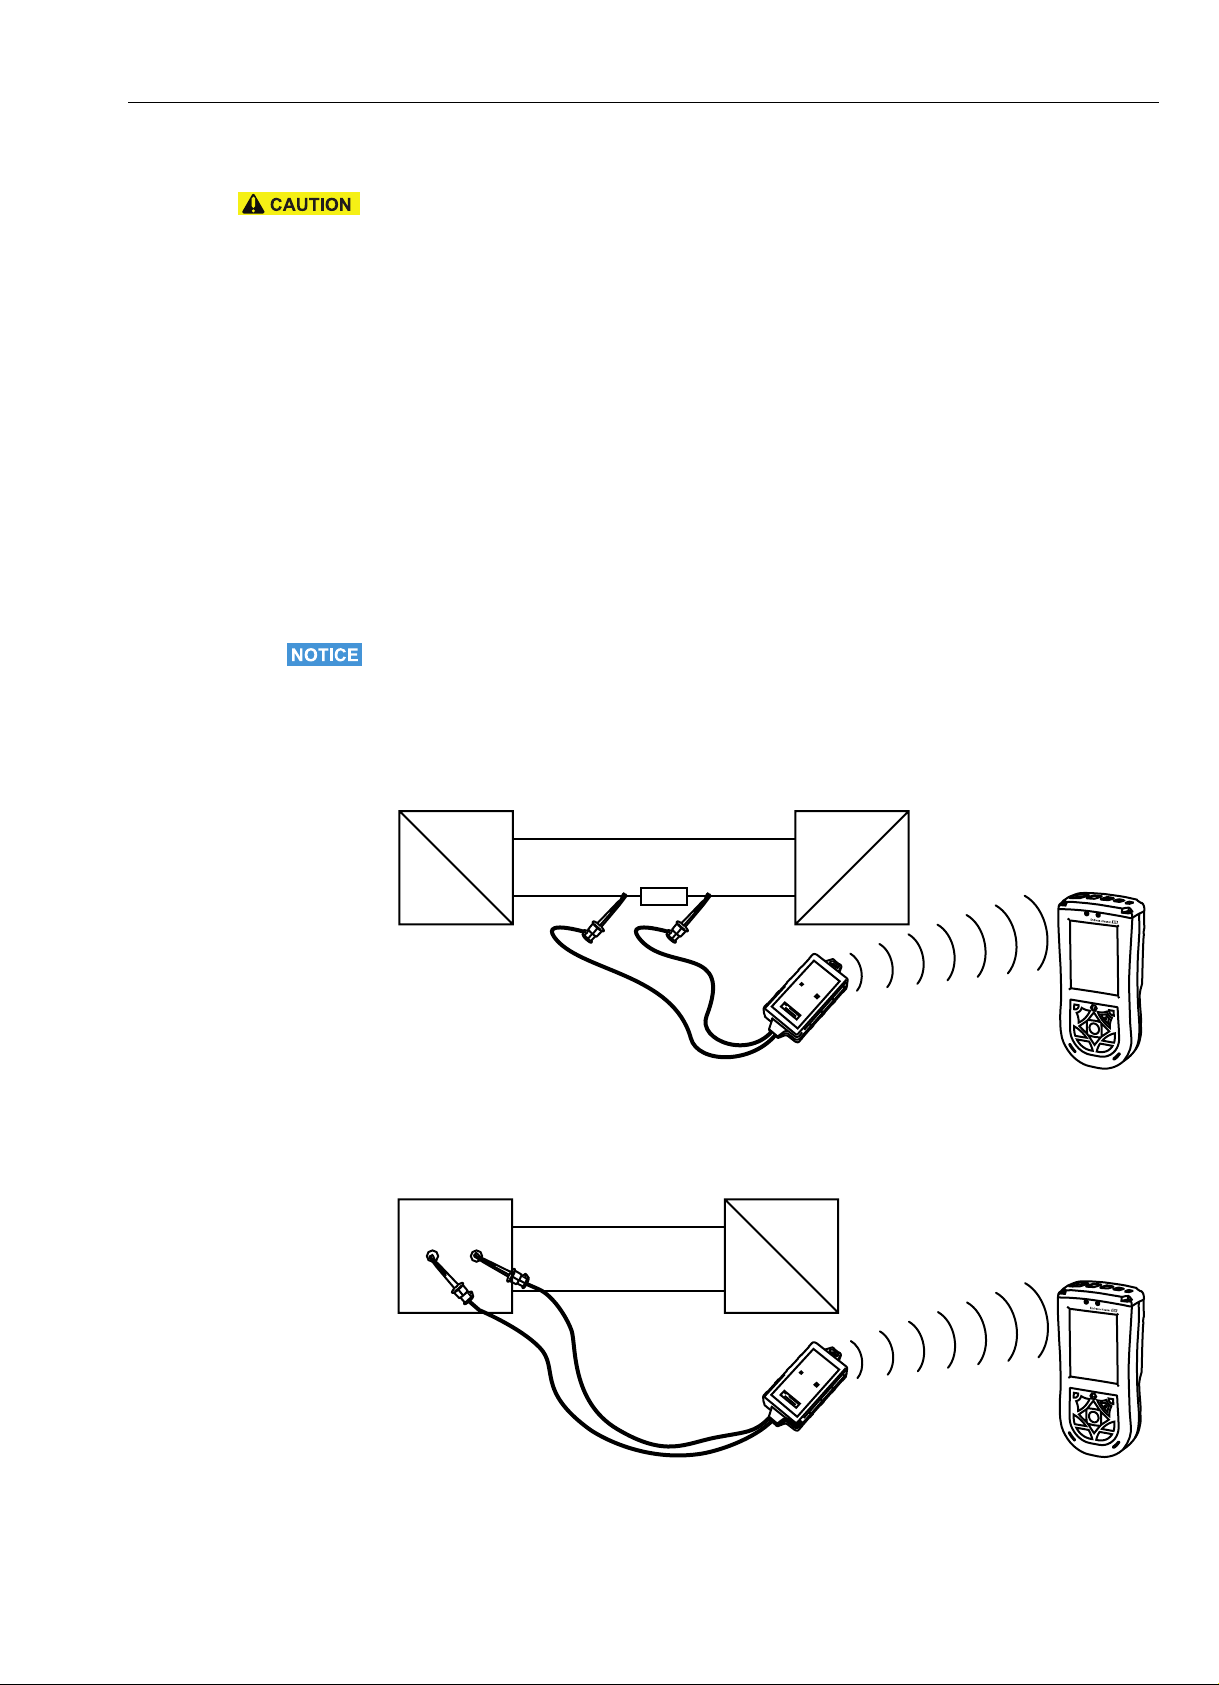
3.2.1 VIATOR Bluetooth modem
The VIATOR Bluetooth modem allows point-to-point connections to be made with a HART device.
There are two possibilities of making it:
• For a normal transmitter power supply, e.g. RMA42, via a 270 load resistor (250 – 1100
) connected into the loop as shown in Fig. 3-2
• With a transmitter power supply with built-in HART communication resistor, via the two
HART communication sockets on the front panel as shown in Fig. 3-3. Suitable HART
transmitter power supplies are:
– RNS221, RMA422, for non-Ex applications
– RN221, RMA421 for Ex and non-Ex applications
The connection between the Field Xpert and the modem is wireless (Bluetooth).
Notice!
• The modem is certified for use in hazardous areas, Zone 1. Once a modem has been used in a
non-Ex installation, it should never be used in an Ex installation, as there is a danger that the
protective circuits have been inadvertently overloaded and no longer function correctly.
Connection via a load
resistor
Connection via HART
communication sockets
Fig. 3-2: Connection via load resistor
Fig. 3-3: Connection via a transmitter power supply with HART communication sockets (internal load resistor)
Endress+Hauser 9
Page 12
3 Function and System Design Field Xpert
-
.
Fieldgate
FXA520
Fieldgate
FXA520
ENDRESS+HAUSER
RN 221N
ENDRESS+HAUSER
RN 221N
e.g. 2 x RN221N-B …
e.g. RNS221
SCADA visualization
F5
F1
F2
F3
F4
OK
WiFi
access
point
Field Xpert
Ethernet
FXN520
Multidrop
Connector
Fieldgate
FXA520
.
up to 8 devices
device address: 03 02 01
channel 1 channel 2
supply
voltage
24 VDC
up to 8 devices
SCADA visualization
F5
F1
F2
F3
F4
OK
Field Xpert
Ethernet
WiFi
access
point
09 10
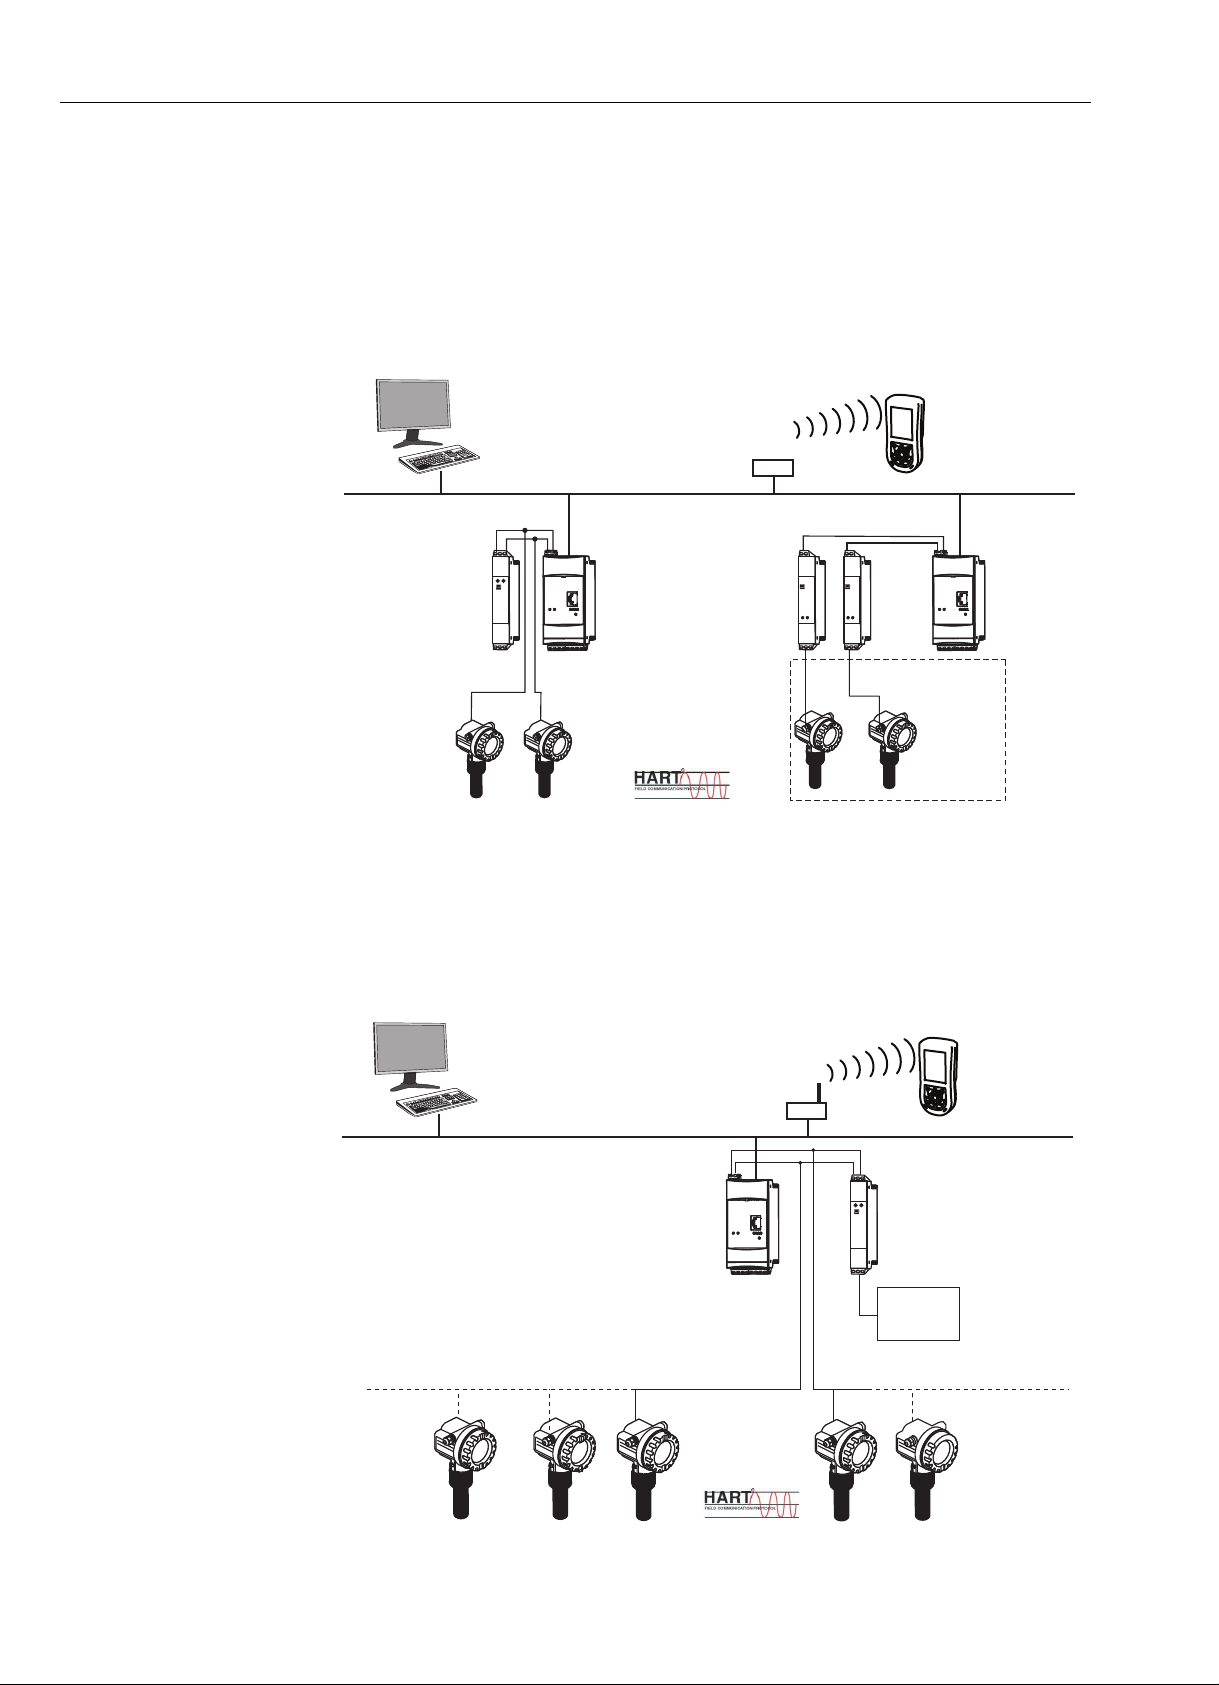
3.2.2 WiFi – HART point-to-point connection via Fieldgate
Two HART devices can be connected directly to the input channels of the Fieldgate FXA520. If the
appropriate version of Fieldgate was ordered, the devices can be used in hazardous areas. The inputs
meet the requirements of SIL 2 for 4 to 20 mA loops (IEC 61508). Fig. 3-4 shows the equipment
architecture, whereby the Field Xpert communicates with the Fieldgate via a WiFi access point and
the Fieldgates are powered by RN221 or RN221N-B transmitter power supplies.
Fig. 3-4: Equipment architecture for HART point-to-point connection
3.2.3 WiFi – HART multidrop connection via Fieldgate
With the FXN520 multidrop module, up to 2x 8 HART devices operating in a non-hazardous area,
can be connected to the Fieldgate. Fig. 3-5 shows the equipment architecture.
Fig. 3-5: Equipment architecture for HART multidrop connection
10 Endress + Hauser
Page 13
Field Xpert 3 Function and System Design
RS-485
Master Master
e.g.
RNS221
RS-485
Fieldgate
FXA520
.
maximum 15 devices
HART-Multiplexer
e.g. Pepperl + Fuchs
KFD2-HMM-16
HART-Multiplexer
e.g. Pepperl + Fuchs
KFD2-HMM-16
maximum 15 devices
e.g.
RN221N-B
-
SCADA visualization
F5
F1
F2
F3
F4
OK
WiFi
access
point
Field Xpert
Ethernet
15 1602 01
3.2.4 WiFi – HART multiplexer connection via Fieldgate
Fig. 3-6 shows the equipment architecture for an HART multiplexer connection. The RS-485
interface for Fieldgate FXA520 can be used for connecting up to two HART multiplexers, e.g. the
KFD2-HMM-16 from Pepperl+Fuchs. Up to 30 HART devices can be connected in this way. If the
devices are used in a safe area, the RNS221 transmitter power supply can be used to power two
devices. Ex devices can also be installed in hazardous areas. In this case, the signal must be
connected to the safe side of a RN221N-B transmitter power supply.
Fig. 3-6: Equipment architecture for HART multiplexer connection
Endress+Hauser 11
Page 14
3 Function and System Design Field Xpert
F5
F1
F2
F3
F4
OK
Field Xpert
Controller
with fieldbus power
conditioner
FFBlue
FOUNDAT
ION fieldbu
s
FF/H1 Bluet
ooth
Status
Tr
affic
SFC162 Visitor
with
power supply
SCADA visualization
F5
F1
F2
F3
F4
OK
WiFi
access
point
Field Xpert
Ethernet
ON
RS-232
ETH
FOUNDATION fieldbus H1
Controller
Channel 1...4
.
3.3 Connecting to FOUNDATION fieldbus devices
Caution!
• Proof of intrinsic safety must be checked when additional devices are introduced into a loop.
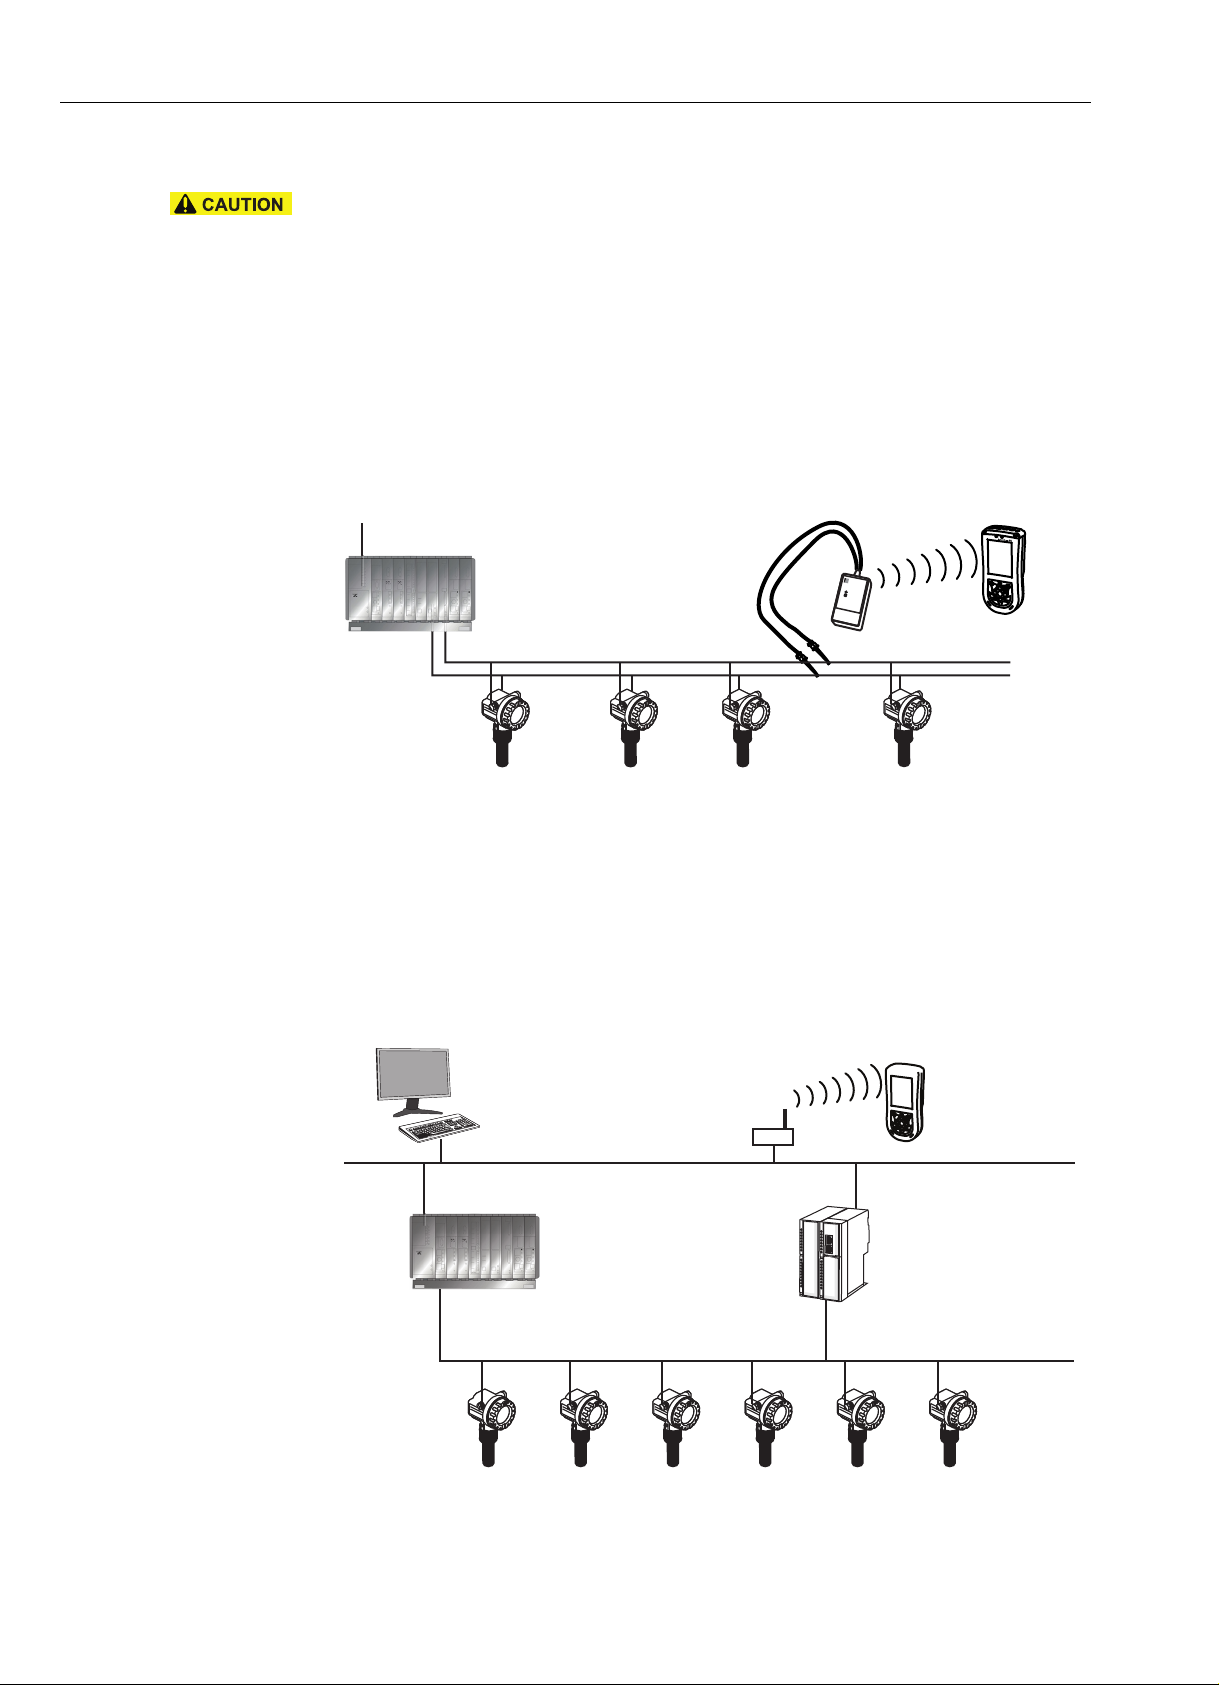
3.3.1 FFblue Bluetooth modem
Field Xpert communicates with a FOUNDATION fieldbus device via the FFblue Bluetooth modem.
The connection between the Field Xpert and the modem is wireless. The modem can be connected
at any point on the H1 fieldbus segment, or directly to the fieldbus terminals of the device itself. The
modem can also be used in explosion hazardous areas, provided that the Field Xpert used with it is
also certified for Ex applications.
Fig. 3-7: Connection of FFblue modem to FOUNDATION fieldbus H1 segment
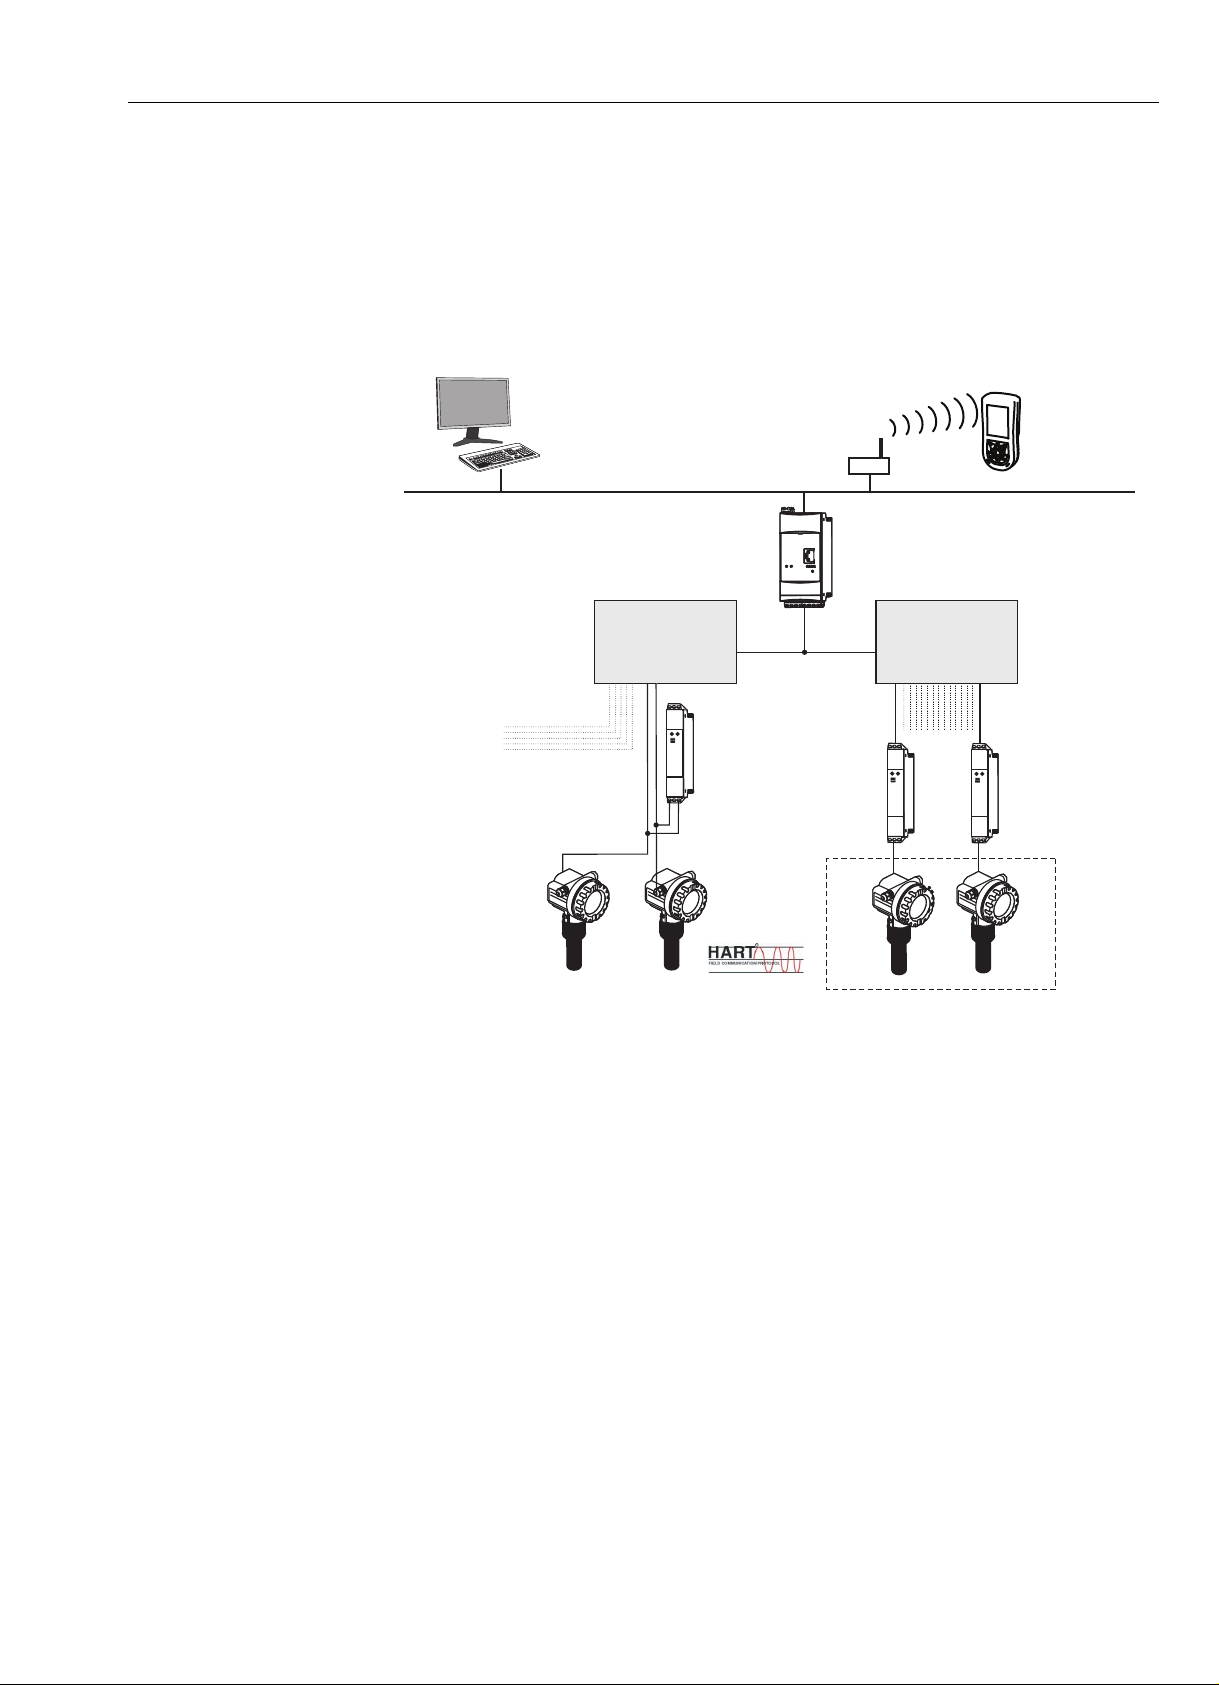
3.3.2 WiFi – FOUNDATION fieldbus connection via gateway
Fig. 3-8 shows the equipment architecture, whereby the Field Xpert communicates with the
SFC162 gateway via a WiFi access point. The SFC162 gateway is connected in parallel to the
controller. it has four channels, each of which may be connected to a different FOUNDATION
fieldbus H1 segment.
Fig. 3-8: Equipment architecture for FOUNDATION fieldbus network (Non-Ex)
12 Endress + Hauser
Page 15
Field Xpert 4 Operability
F5
F1
F2
F3
F4
OK
Field Xpert
10 11 12 13 14 151 2 3
4 165697
8
9
4 Operability
4.1 Field Xpert PDA
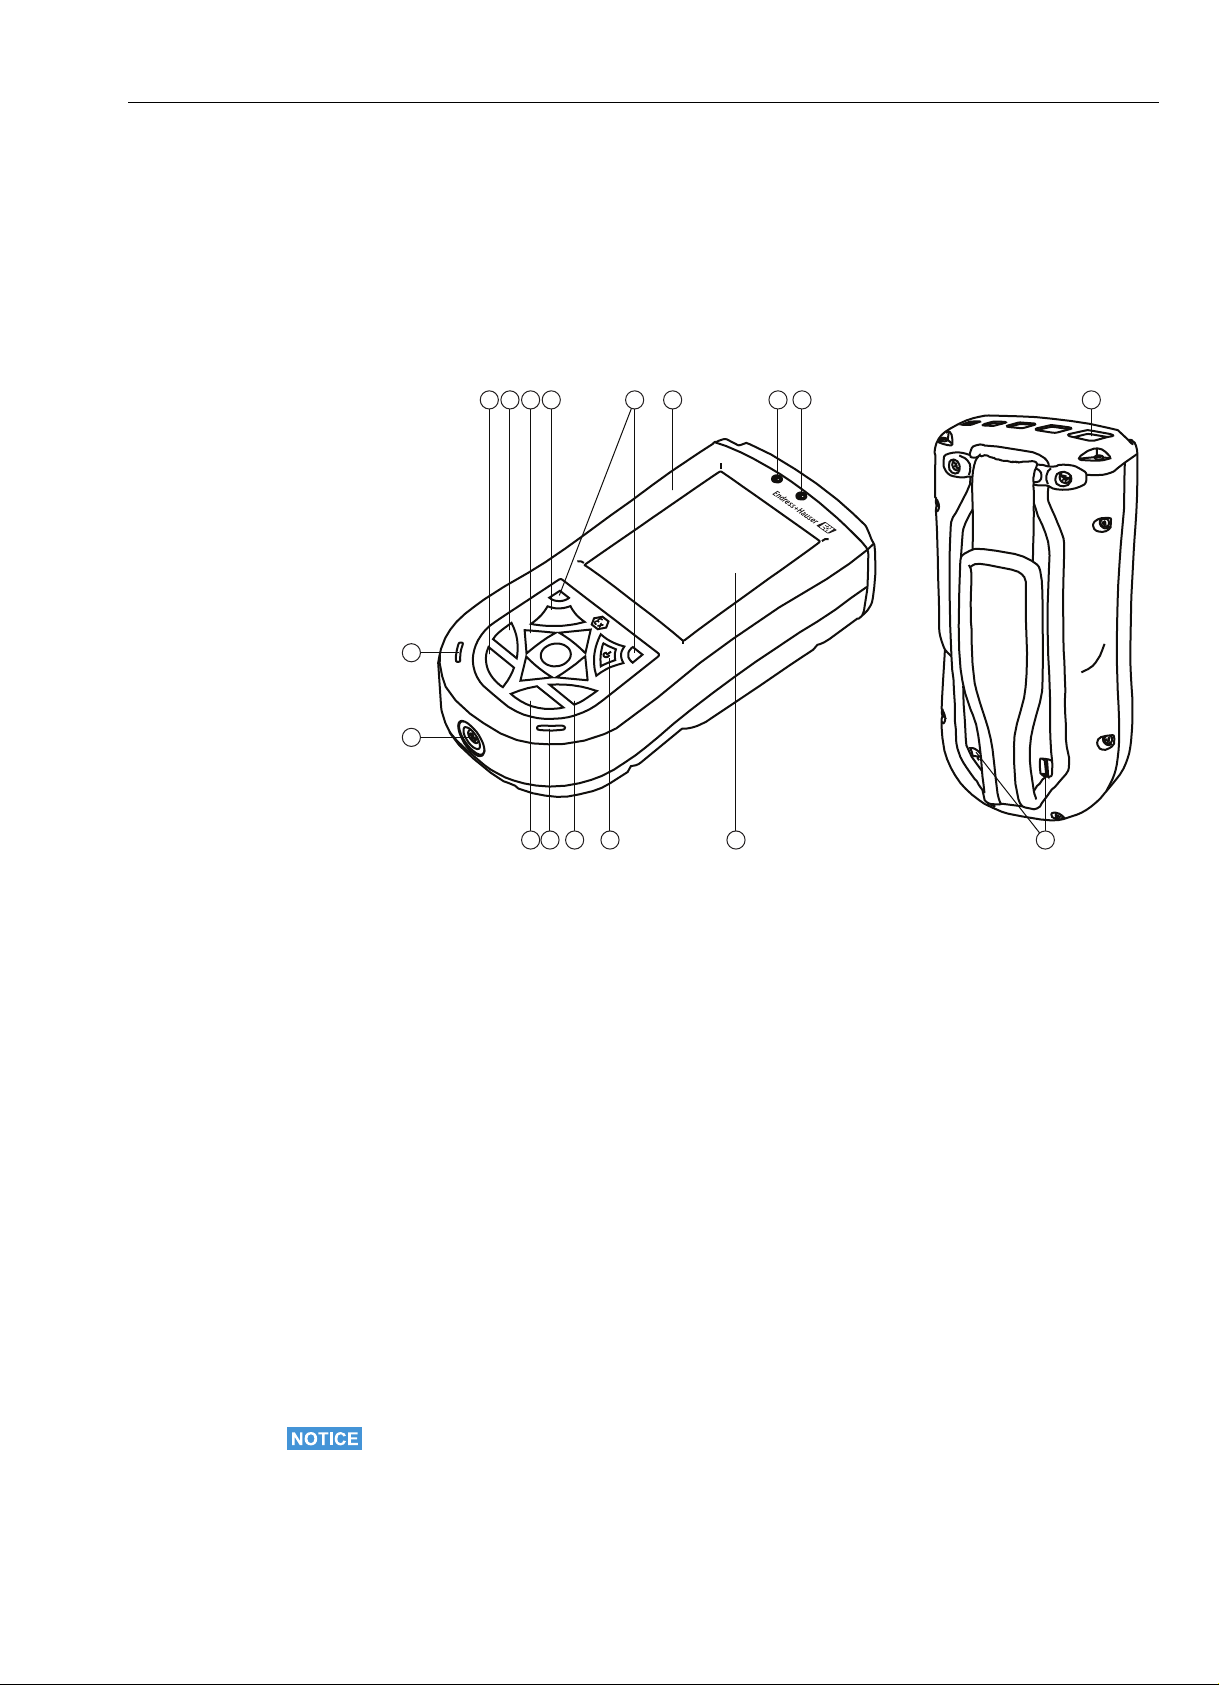
4.1.1 Overview
Fig. 4-1: Front and back panel components
1 Housing 9 Loudspeaker and microphone
2 Wireless/LED display
Off = WiFi and Bluetooth inactive
Blue flashing = WiFi and/or Bluetooth active
Green flashing = event display
3Charge LED
Off = not charging
Red flashing = charging
Red constant = charging complete
4 Touchscreen 12 5-way navigation key, scroll through lists or press to
5 On/off button 13 F5 key (unassigned)
6 F4 key (HP: iTask)
Manages tasks currently running and serves as central
switch for
Hold F4 key (HP: Today)
Launches your "desktop"
7 F3 key (HP: Messaging)
Opens or closes the touchscreen keyboard
Hold F3 key (unassigned
8 5-pin network and power connection with USB
connector (active only when charger is connected )
starting/closing programs
Notice!
• The standard key assignment can be adjusted manually in the Field Xpert Start menu under
Setting=>Personal=>Keys. Assign any function or program from the picklist to each key and
when finished, tap on OK in the top right-hand corner.
10 F2 key (unassigned)
Hold F2 key (unassigned)
11 F1 key (unassigned)
Hold F1 key
For landscape or portrait view, press for min. 2 sec
select (joystick function)
14 2 reset keys for soft reset
15 IrDa infrared connection
16 Stylus pen holder
Endress+Hauser 13
Page 16
4 Operability Field Xpert
F5
F1
F2
F3
F4
OK
Field Xpert
F5
F1
F2
F3
F4
OK
Field Xpert
1
1
2
3
3
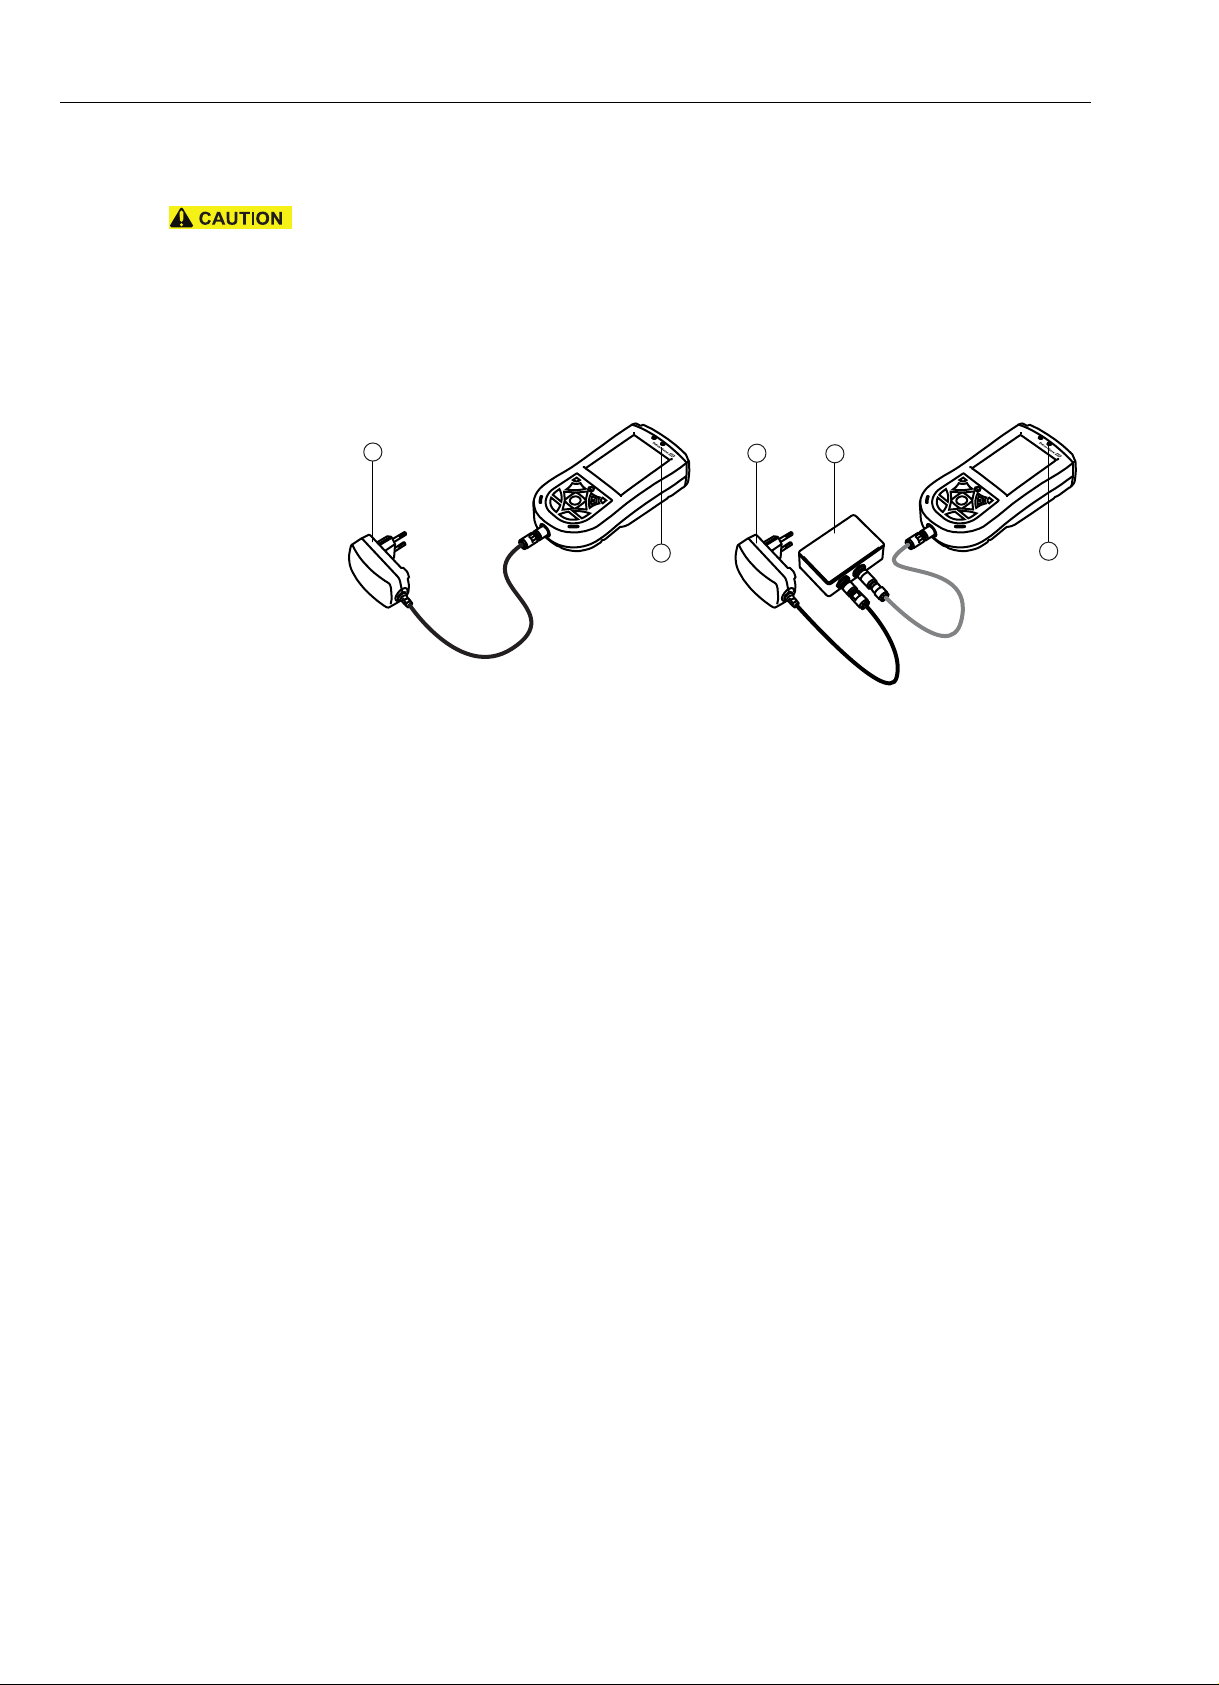
4.1.2 Charging the Field Xpert battery
Caution!
• Always connect the Field Xpert to the USB interface before you plug in the charger.
A failure to do so may cause damage to the device.
1 Charge the Field Xpert batteries
– The batteries can be charged directly or through the USB interface, see Fig. 4-2
– When charging for the first time through the USB interface do not connect to the computer:
Fig. 4-2: Charging using a charger or USB interface box
1 Charger 3 Charge LED
2 USB interface
2 Wait until the batteries have been fully charged (indicated by a constant red Charge LED).
4.1.3 Switching on and off
The on/off button switches both the Field Xpert and the backlight on and off. The length of time
the button is pressed determines the function. The Field Xpert remembers the last backlight setting
when it is switched off.
Field Xpert • Switch the Field Xpert on by briefly pressing the on/off button (< 3 seconds)
• Switch the Field Xpert off by briefly pressing the on/off button (< 3 seconds)
Backlight • Switch on the Field Xpert backlight by pressing the on/off button until the display lights
• Switch off the Field Xpert backlight by pressing the on/off button until the display darkens
4.1.4 Battery life
The battery life of a Field Xpert depends greatly on how it is used.
• The Ex version (ATEX) of Field Xpert has an average battery life of 12 to 39 hours.
• The non-Ex version of Field Xpert has an average battery life of 9 to 27 hours
The actual life depends upon the type of Bluetooth, WLAN and infrared usage as well as the
intensity of data transmission and the screen brightness.
If the battery becomes completely exhausted, any unsaved data will be lost.
14 Endress + Hauser
Page 17
Field Xpert 4 Operability
F5
F1
F2
F3
F4
OK
Field Xpert
1 2 3
4
4.1.5 Long-term data storage
Field Xpert is like any other computer in that important data must be stored regularly to the device
memory or the SD card. Unsaved data is also retained, provided the battery is still charged. If the
device is switched off for long periods, unsaved data will be retained for:
• approx. 69 days for the Ex version
• approx. 48 days for the Non-Ex version
If the battery does become exhausted, any unsaved data will be lost. After recharging and switching
on, Windows Mobile restarts in a predetermined sequence. All data and/or programs stored on the
SD card or to the device memory remain accessible.
4.1.6 Backlight for display
The use of the backlight will shorten the operating time of the battery considerably. Therefore, it is
recommended that the backlight is set up to switch off after a short period of idleness (to switch it
back on again, press any key or tap on the display) and that the brightness is not at the to the highest
setting. You can make the necessary settings in the Start menu under Setting => System =>
Backlight, see Chapter 5.4.1.
4.1.7 Bluetooth transmission range
The Field Xpert is equipped with a Class 2 Bluetooth adapter, which limits the range to maximum
10 meters. The range can be reduced by interference from other nearby devices transmitting in the
2.4 Ghz ISM band. Sources of interference may include cordless telephones, wireless networking
devices and also microwave ovens. In certain circumstances, reception interference may cause a
Bluetooth connection to be terminated completely, making it necessary to reconnect to the HART
or FOUNDATION fieldbus network.
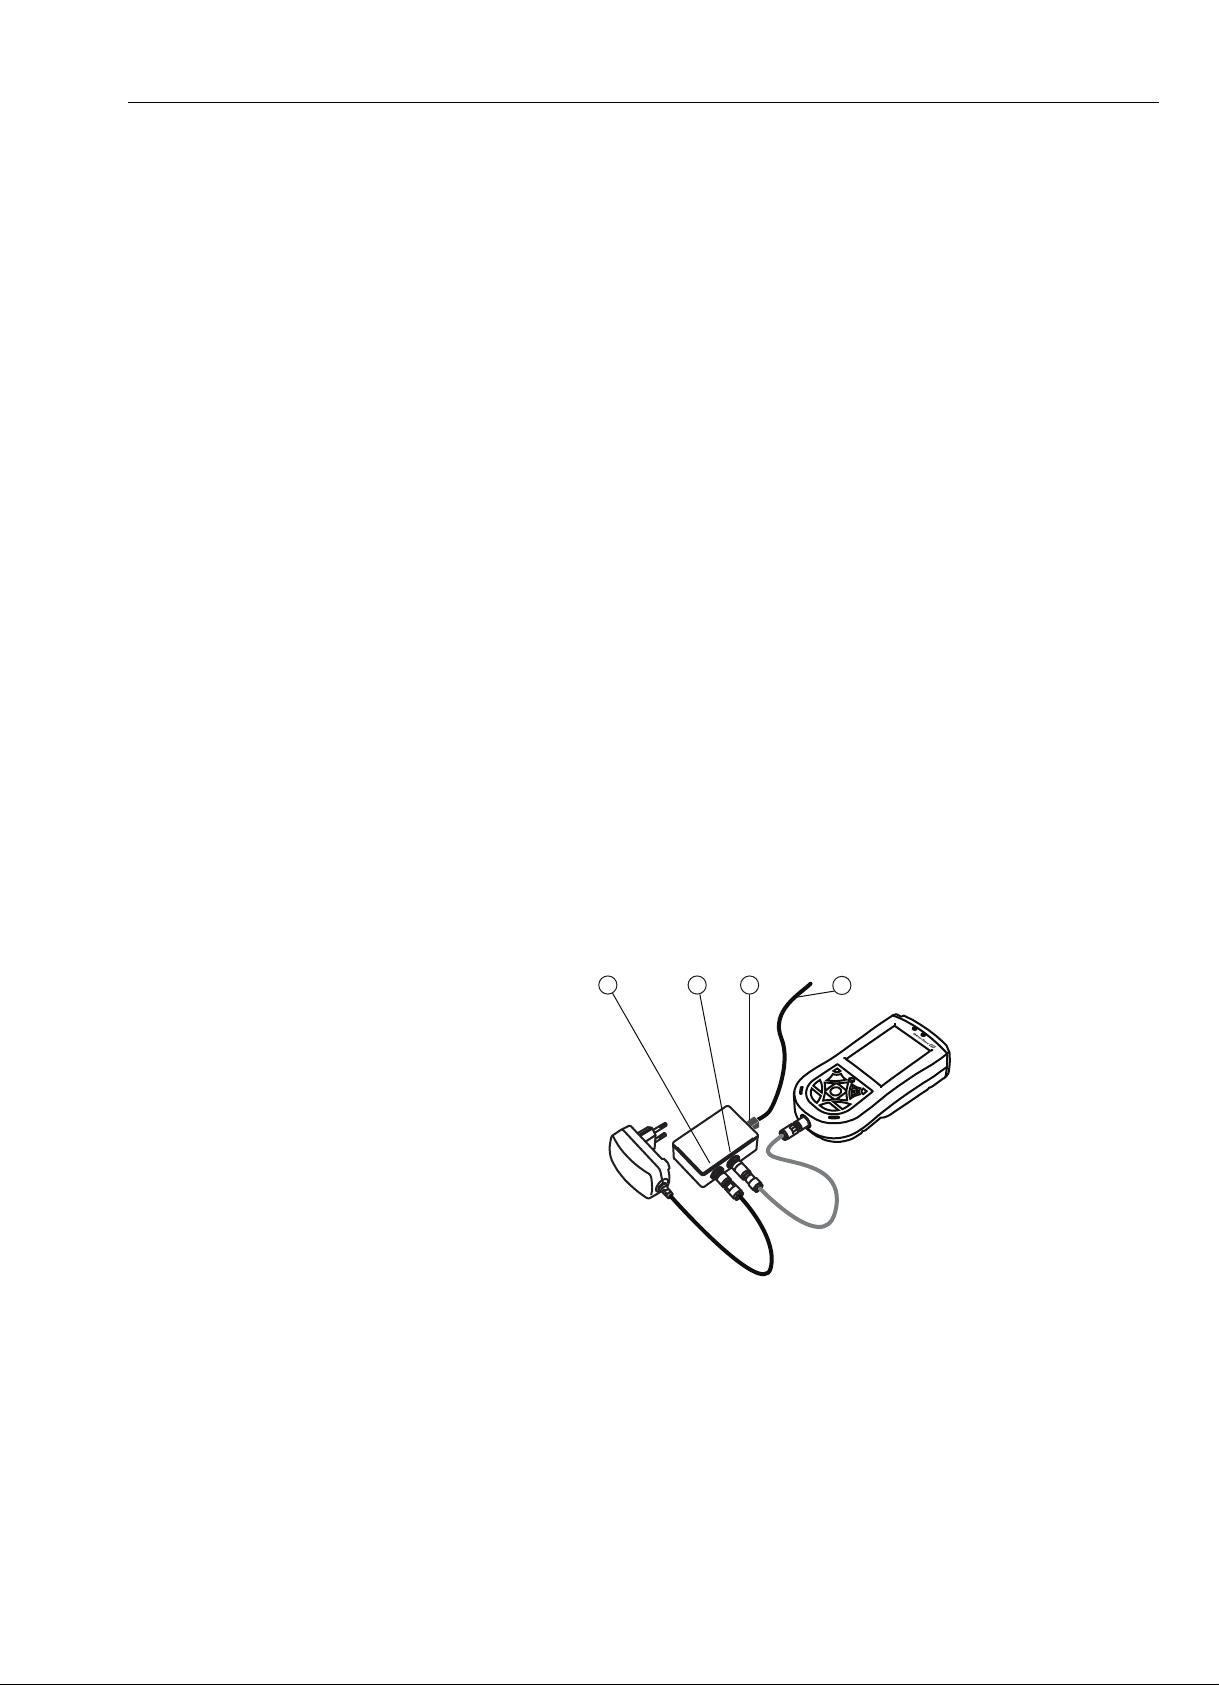
4.1.8 USB interface box
The optional USB interface box allows Field Xpert to be connected to a computer via its USB port.
Fig. 4-3: USB interface box
1 Connection to charger 3 USB interface to computer
2 USB interface to Field Xpert 4 Connection to Laptop/PC
Endress+Hauser 15
Page 18
4 Operability Field Xpert
1 2 6 7
3
5
4
Status
Power
4.2 VIATOR Bluetooth modem
The VIATOR Bluetooth modem is a point-to-point interface for temporary connection to HARTenabled field devices for configuration purposes. It is approved for hazardous areas and operates for
approx. 20 hours when powered by replaceable batteries. Field Xpert and the modem communicate
with each other via Bluetooth, with the modem connected via cable to the HART field device.
The VIATOR Bluetooth modem incorporates a Class 1 Bluetooth radio with a range of up to
100 meters. The Field Xpert is equipped with a Class 2 Bluetooth adapter, which limits the range
to maximum 10 meters, see also Chapter 4.1.7.
Notice!
• The modem is certified for use in hazardous areas, Zone 1. Once a modem has been used in a
non-Ex installation, it should never be used in an Ex installation, as there is a danger that the
protective circuits have been inadvertently overloaded and no longer function correctly.
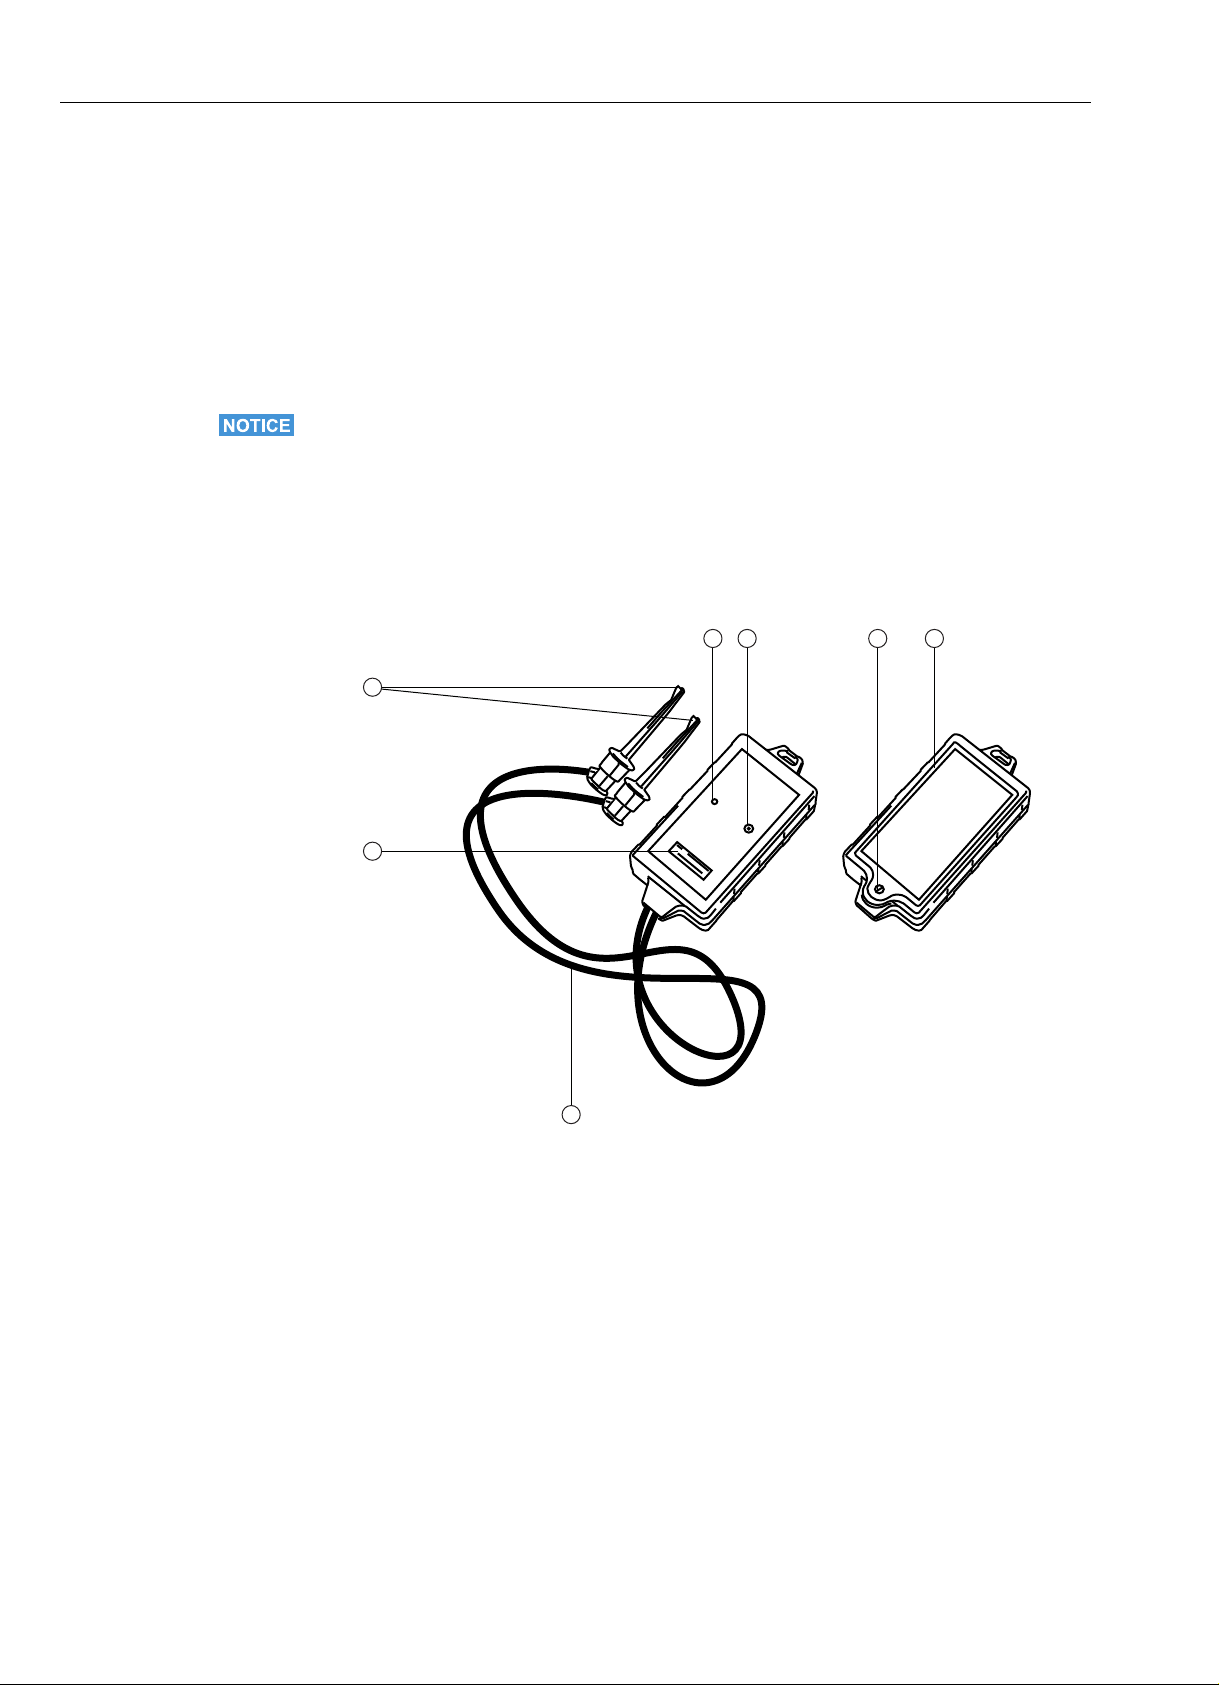
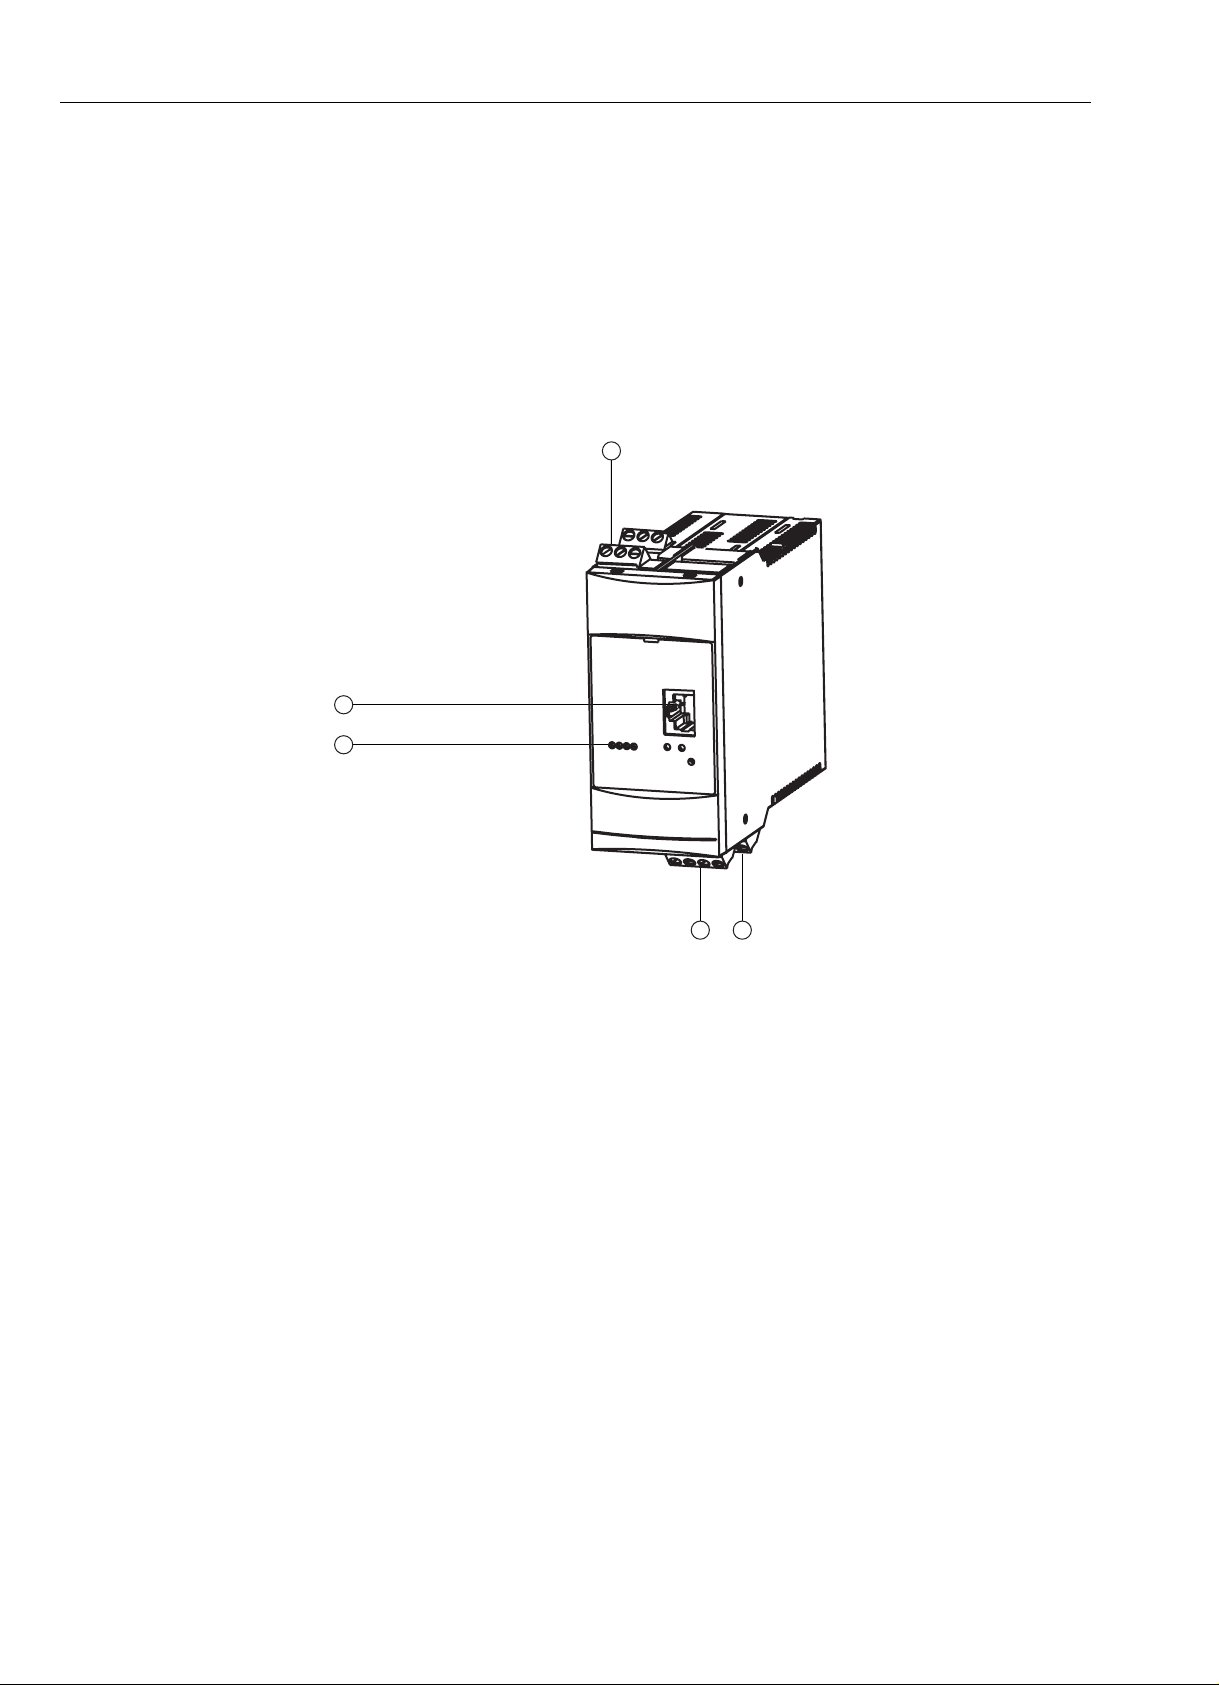
4.2.1 Overview
Fig. 4-4: Modem with connecting cables
1 Status LED 5 Terminals
2 On/off button 6 Locking screw for battery compartment
3 Connecting cable 7 Battery compartment
4 Serial number and MAC address
16 Endress + Hauser
Page 19

Field Xpert 4 Operability
4.2.2 Batteries
The VIATOR Bluetooth modem requires three AAA alkaline batteries, which are included in the
scope of delivery. Insert them into the Bluetooth modem, making sure that the polarities are correct.
Replace the lid and secure the battery compartment by tightening the screw.
Notice!
• To save battery power, we recommend that you switch off the modem when it is not in use.
4.2.3 On/off button
Switch on the modem by briefly pressing the on/off button. This action is confirmed by a constant
green LED followed by a flashing green LED. Switching on the modem automatically activates the
Bluetooth function.
Switch off the modem by pressing the on/off button for approx. 2 seconds. A constant green LED
will illuminate while you press, indicating that the device is being switched off. The LED and the
device are then switched off.
4.2.4 LED status (power indicator)
When you switch on the modem or press the on/off button briefly while the modem is switched
on, the percentage amount of charge remaining in the batteries will be indicated:
• 4 flashes = 80% or more of battery power remaining
3 flashes = 50% or more of battery power remaining
2 flashes = 30% or more of battery power remaining
1 flash = 10% or more of battery power remaining
0 flashes = less than 10% of battery power remaining
At less than 10%, we recommend that you replace the batteries immediately.
4.2.5 Undervoltage lockout
As soon as the battery voltage drops below the shutdown voltage of 2.8 V, the modem immediately
powers itself off. The batteries must be replaced.
Notice!
• If the modem switches off automatically, please ensure that the last actions performed are
transmitted to the field device again once the batteries have been replaced.
4.2.6 Inactivity power off
After 30 minutes of inactivity (no Bluetooth connection), the VIATOR Bluetooth modem switches
itself off automatically in order to conserve battery life. To reactivate the modem, you must press
the on/off button again.
Notice!
• This setting can be adjusted manually. To do this, you can download software (VIATOR CheckBT
software) free of charge from the web site of the modem manufacturer MACTek
(www.mactekcorp.com/products.htm)
Endress+Hauser 17
Page 20
4 Operability Field Xpert
4 5
3
2
1
4.3 Fieldgate FXA520
The Fieldgate FXA520 is a HART gateway with an integrated web server for the remote acquisition
of data from HART devices. These can be connected either directly via the HART multidrop
connector of Fieldgate FXN520 or via a HART multiplexer. The Fieldgate communicates with the
host computer via Ethernet. A connection between the FXA520 and the Field Xpert is established
by accessing an Ethernet WiFi access point.
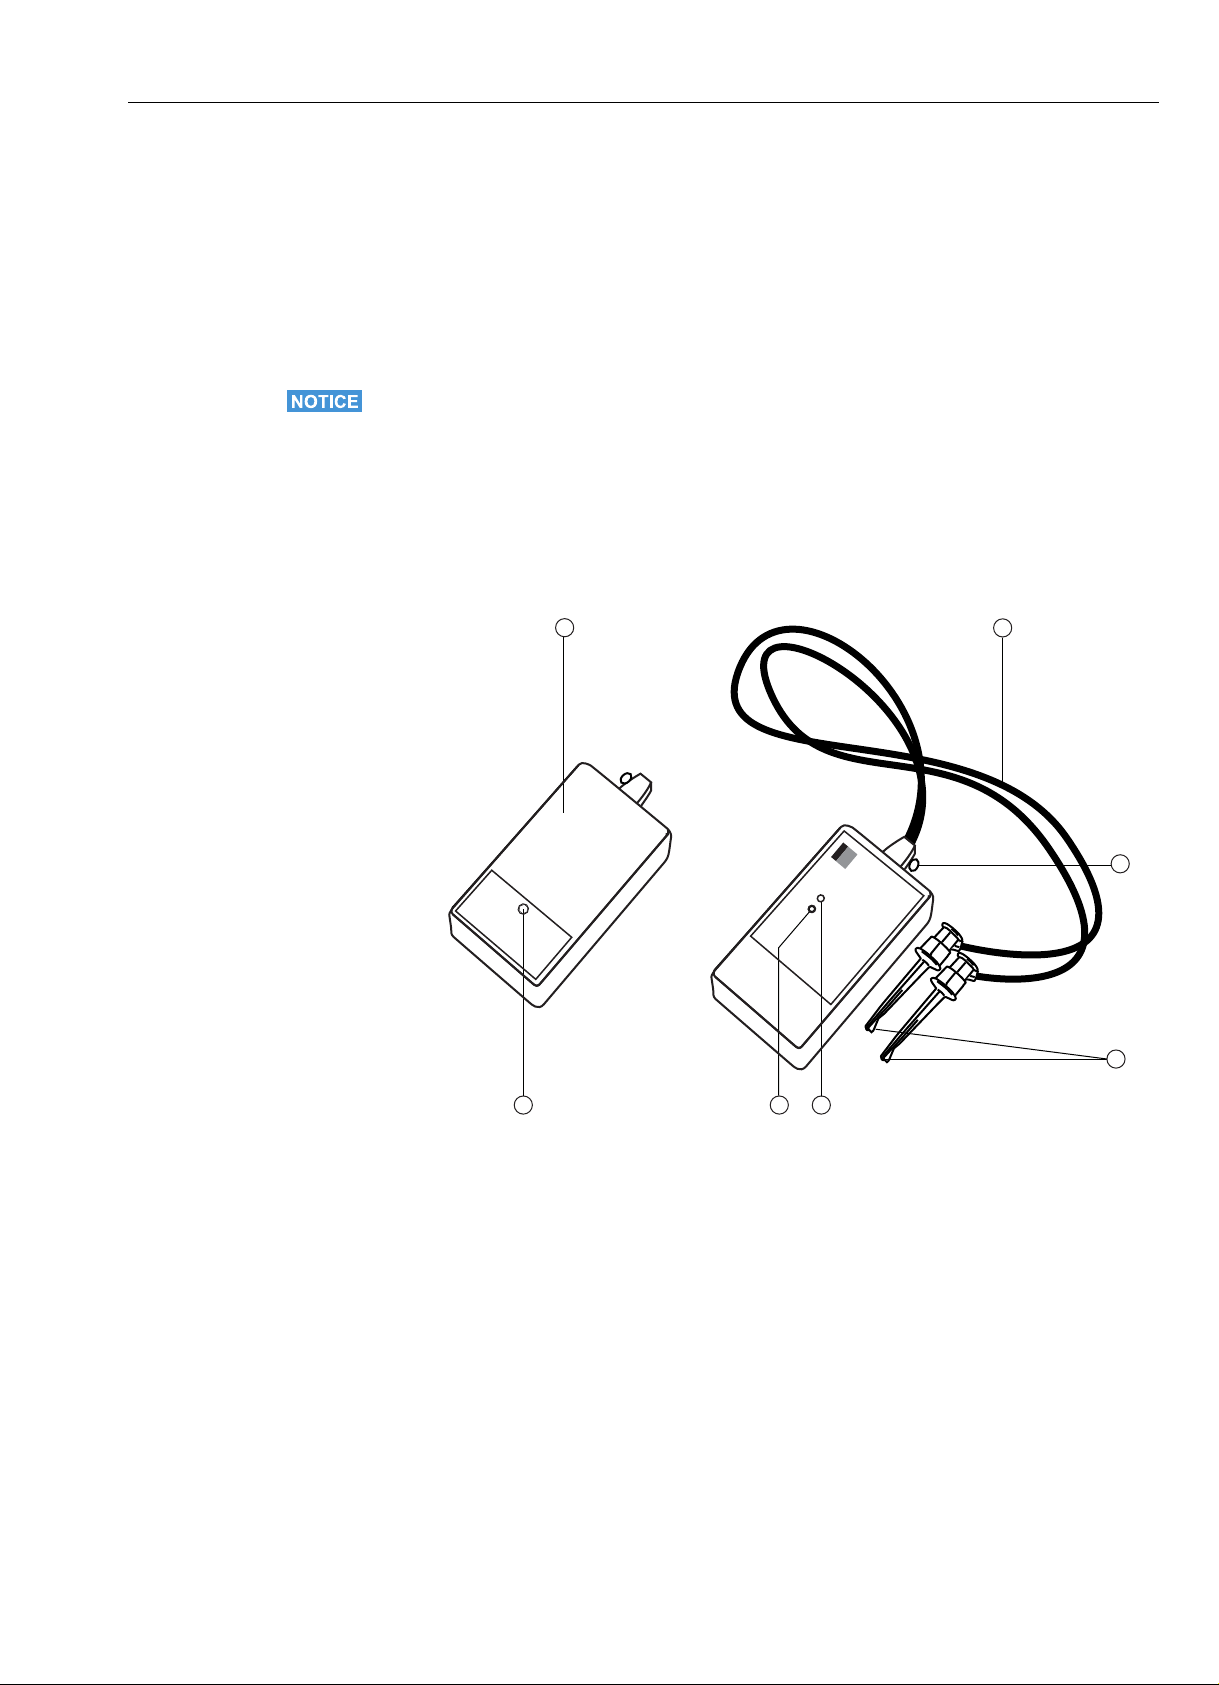
4.3.1 Overview
Fig. 4-5: Fieldgate FXA520
1 Status LEDs 4 Power supply/4–20 mA terminals
2 Ethernet socket 5 RS-485 terminals
3 HART terminals
Full instructions on wiring and setting up Fieldgate FXA520 can be taken from Operating
Instructions BA00051S/04/en.
4.3.2 Fieldgate Ports and IP addresses
During the configuration of the Fieldgate WiFi connection in the Field Xpert you will require the
following information:
• Fieldgate FXA520 IP address (default 192.168.252.1)
• Fieldgate FXA520 subnet mask (default = 255.255.255.0)
• Fieldgate Web Server Port Number (default = 80)
• Fieldgate Pass-through HART Port Number (default = 3222)
It is normal that the IP address and subnet mask are changed to addresses assigned by your system
administrator when Fieldgate FXA520 is installed in a control network. The access ports may also
differ. Provided you know the IP address of the Fieldgate, however, you can use a Web browser to
view the Fieldgate setup in the Settings=>Network menus Ethernet Setup and Miscellaneous
Server Setup.
18 Endress + Hauser
Page 21
Field Xpert 4 Operability
217
3
6
5
4
FFblue
FOUNDATION fieldbus
FF/H1 Bluetooth
Status
Traffic
softing
FFblue/HW#EX Vx.xx
S# 110200034
FFblue-00034
Auth: 1234
FF Device ID
1E6D114003_FFblue_SN__104902688
4.4 FFblue Bluetooth modem
The FFblue Bluetooth modem is an interface for temporary connection to a FOUNDATION fieldbus
H1 segment. Field Xpert and the modem communicate with each other via Bluetooth, with the
modem connected via cable to the H1 network.
The FFblue Bluetooth modem incorporates a Class 2 Bluetooth radio with a range of up to
10 meters. The Field Xpert is equipped with a Class 2 Bluetooth adapter, which limits the range to
maximum 10 meters, see also Chapter 4.1.7.
Notice!
• The modem is certified for use in hazardous areas, Zone 1. Once a modem has been used in a
non-Ex installation, it should never be used in an Ex installation, as there is a danger that the
protective circuits have been inadvertently overloaded and no longer function correctly.
4.4.1 Overview
Fig. 4-6: Modem with connecting cables
1 Traffic LED 5 Connecting cable
2 Status LED 6 Nameplate with device information
3 Terminals 7 Locking screw for battery compartment
4 Securing loop
Endress+Hauser 19
Page 22

4 Operability Field Xpert
4.4.2 Power/batteries
The FFblue modem takes the power for the communication interface from the FOUNDATION
fieldbus H1 segment to which it is connected. The modem switches on automatically when a
voltage is detected across its terminals.
The Bluetooth transmitter, however, requires two AA alkaline batteries, which are included in the
scope of delivery. Insert them into the Bluetooth modem, making sure that the polarities are correct.
Replace the lid and secure the battery compartment by tightening the screw.
4.4.3 LED status
The FFblue modem has two LEDs which indicate the state of communication and battery status.
Their significance is shown in the table below.
LED combinations
Status LED Traffic LED Significance Remarks
on, red on, red Power on Indicates start up of FFblue
on, red on, red Flash CRC error,
on, green on, red Bluetooth in power down
Battery OK
on, green off Bluetooth ON but no
on, green on, blue Bluetooth active(connected) Serial connection with FFblue modem is established, but no
on, green flashing, blue Bluetooth traffic Serial connection with FFblue modem is established, serial
0.5 Hz, green according to
Bluetooth
connection
state
5 Hz, green according to
Bluetooth
connection
state
Battery Low
1 Hz, red on, red Bluetooth in power down
1 Hz, red off Bluetooth ON, but no active
1 Hz, red on, blue Bluetooth active (connected) Serial connection with FFblue modem is established, but no
1 Hz, red 1 Hz, blue Bluetooth traffic H1 bus status not indicated as information about battery
Battery Empty
red off Battery empty Bluetooth interface cannot be used
SW Exception
mode
connection
Acting as H1 Linkmaster Indicates that device is in the token ring, but not as LAS
Acting as H1 LAS Indicates that device is in the token ring, acts as LAS and
mode
connection
If red, red persists:
No runnable firmware is available or a fatal error situation
has been detected in the FFblue modem firmware.
This state is assumed after 5 minutes, if no active Bluetooth
connection is available, in order to save the battery. It is
necessary to powercycle the FFblue modem to swich on
the Bluetooth again (disconnect/reconnect terminal)
Bluetooth module is switched on, wait for serial connection
traffic
messages are being transferred.
Note that in order to save Bluetooth battery the traffic LED
is switched on only 20% of the blink interval
and battery state is OK.
The traffic LED is displayed as indicated above when
battery state is OK.
battery state is OK.
The traffic LED is displayed as indicated above when
battery state is Battery state OK.
Operation would be possible, but powercycle of modem is
necessary to switch on Bluetooth module (disconnect/
connect terminal)
Bluetooth module is switched on, wait for serial connection
traffic
state is more important
20 Endress + Hauser
Page 23
Field Xpert 4 Operability
ON
RS-232 TX
ETH LNK
ETH TX
FF H1 - 1
FF H1 - 2
FF H1 - 3
FF H1 - 4
STDBY
ControlCare SFC162
RS-232
ETH
FRC
HLD
RUN FAIL
1
2
4
3
4.5 SFC162 gateway
The SFC162 gateway is a FOUNDATION fieldbus linking device with an integrated web server
which can be used as a gateway in visitor mode to a FOUNDATION fieldbus H1 network. A
connection between the SFC162 and the Field Xpert is established by accessing an Ethernet WiFi
access point.
4.5.1 Overview
Fig. 4-7: ControlCare SFC162 gateway
1 Ethernet socket 3 FF H1 traffic LEDs
2 Status LEDs 4 FF H1/24V supply terminals (hidden)
Full instructions on wiring and setting up the SFC162 module can be taken from Operating
Instructions BA00021S/04/en and BA00069S/04/en.
4.5.2 SFC162 IP address and operating mode
During the configuration of the WiFi connection in the Field Xpert you will require the following
information for the SFC162 gateway:
• SFC162 IP address (default 192.168.164.100)
• SFC162 subnet mask (default = 255.255.255.0)
When the SFC162 is installed in a control network, change the IP address and subnet mask to the
addresses assigned by your system administrator.
In addition, the SFC162 must be set to operate in visitor mode. This is done by calling up the
SFC162 Web Server by entering its IP address in your Web browser. When the SFC162 web server
opens, proceed as described in Chapter 3.1.3 of the Operating Manual BA00069S/04/en.
Endress+Hauser 21
Page 24

5 Commissioning Field Xpert Field Xpert
5 Commissioning Field Xpert
5.1 Getting Started
5.1.1 Connections
Bluetooth connections Before Field Xpert can be used to configure HART or FOUNDATION fieldbus devices it must be
commissioned. What exactly must be done depends upon the type of connection that is in use and
the license that has been purchased. In general:
• a Bluetooth connection for HART has already been configured and installed in Field Xpert by
Endress+Hauser prior to delivery if a HART or HART plus FOUNDATION Fieldbus Device
Xpert license has been purchased
• a Bluetooth connection for FOUNDATION fieldbus has already been configured and installed
in Field Xpert by Endress+Hauser prior to delivery if a FOUNDATION fieldbus or HART plus
FOUNDATION Fieldbus Device Xpert license has been purchased
• a WiFi connection must always be configured and installed by the user
The user may also need to configure and install a Bluetooth connection if the license is upgraded or
if the modem needs to be reconfigured following a Field Xpert clean reset. This procedure is
described in Chapters 5.2.
WiFi connections If a WiFi connection to a Fieldgate FXA520 (HART) or SFC162 gateway (FOUNDATION fieldbus)
is to be used, then the connection must be set up before the associated Device Xpert software can
be used. The set-up procedure is described in Chapter 5.3.
5.1.2 Power up
1 Charge the Field Xpert batteries as described in Chapter 4.1.2
– The batteries can be charged directly or through the USB interface, see Fig. 3-2
– First plug in the charger followed by the Field Xpert and the USB connector
– Wait until the batteries have been fully charged (indicated by a constant red Charge LED)
2 Check that the Bluetooth modem is ready for use
– For the VIATOR and FFblue Bluetooth modem, insert the batteries into the battery
compartment, see Chapter 4.2.2 or Chapter 4.4.2
– Switch on the VIATOR modem (status LED flashes)
– Connect the FFblue Bluetooth modem to the fieldbus and check that the status LED is
green
Notice!
• The VIATOR HART modem switches off if there is no traffic for 30 minutes, and must be switched
on again to reactivate it
• The FFblue modem switches off if there is no traffic for 5 minutes and must be reconnected to
the bus to switch it on again
3 If you are using the Fieldgate FXA520 or SFC162 gateway, check that the devices are powered
up and that the network is up and running
4Switch on Field Xpert
(switches on automatically when the USB connector is inserted into the computer)
22 Endress + Hauser
Page 25
Field Xpert 5 Commissioning Field Xpert
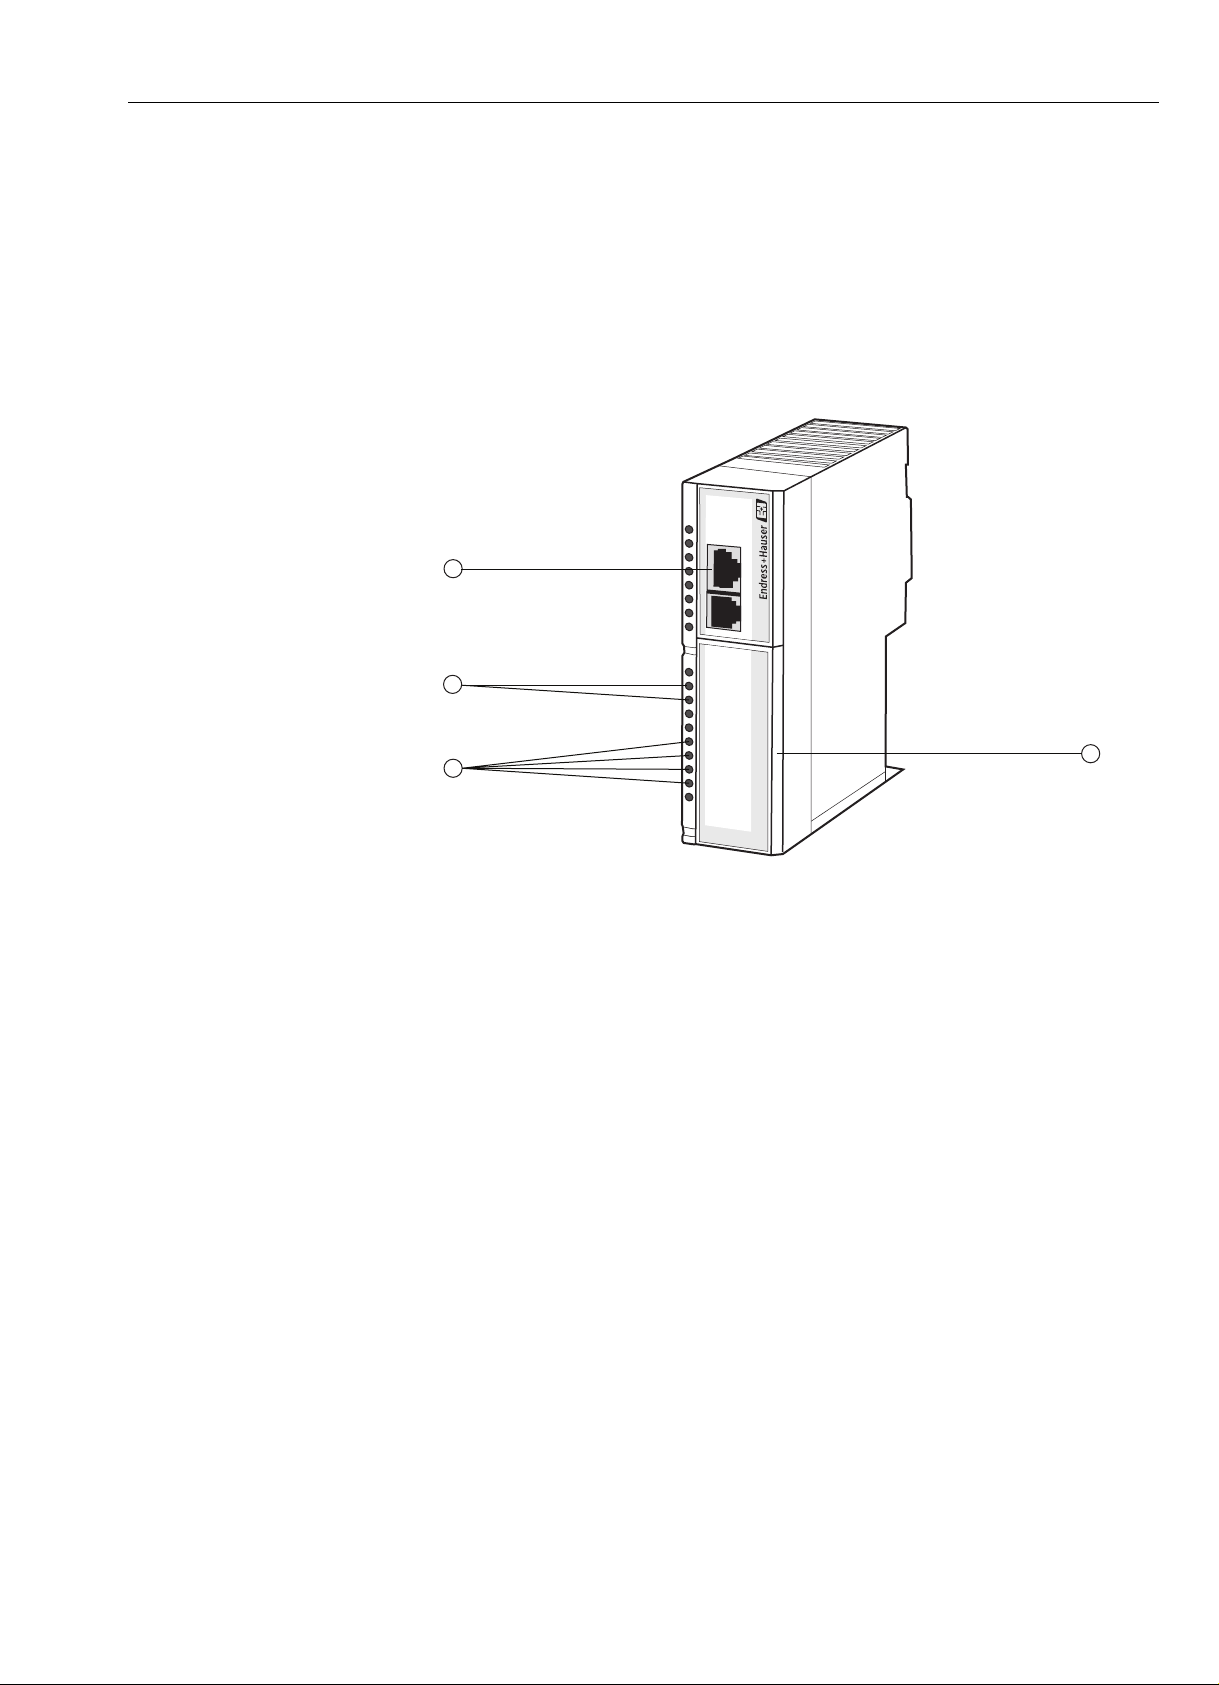
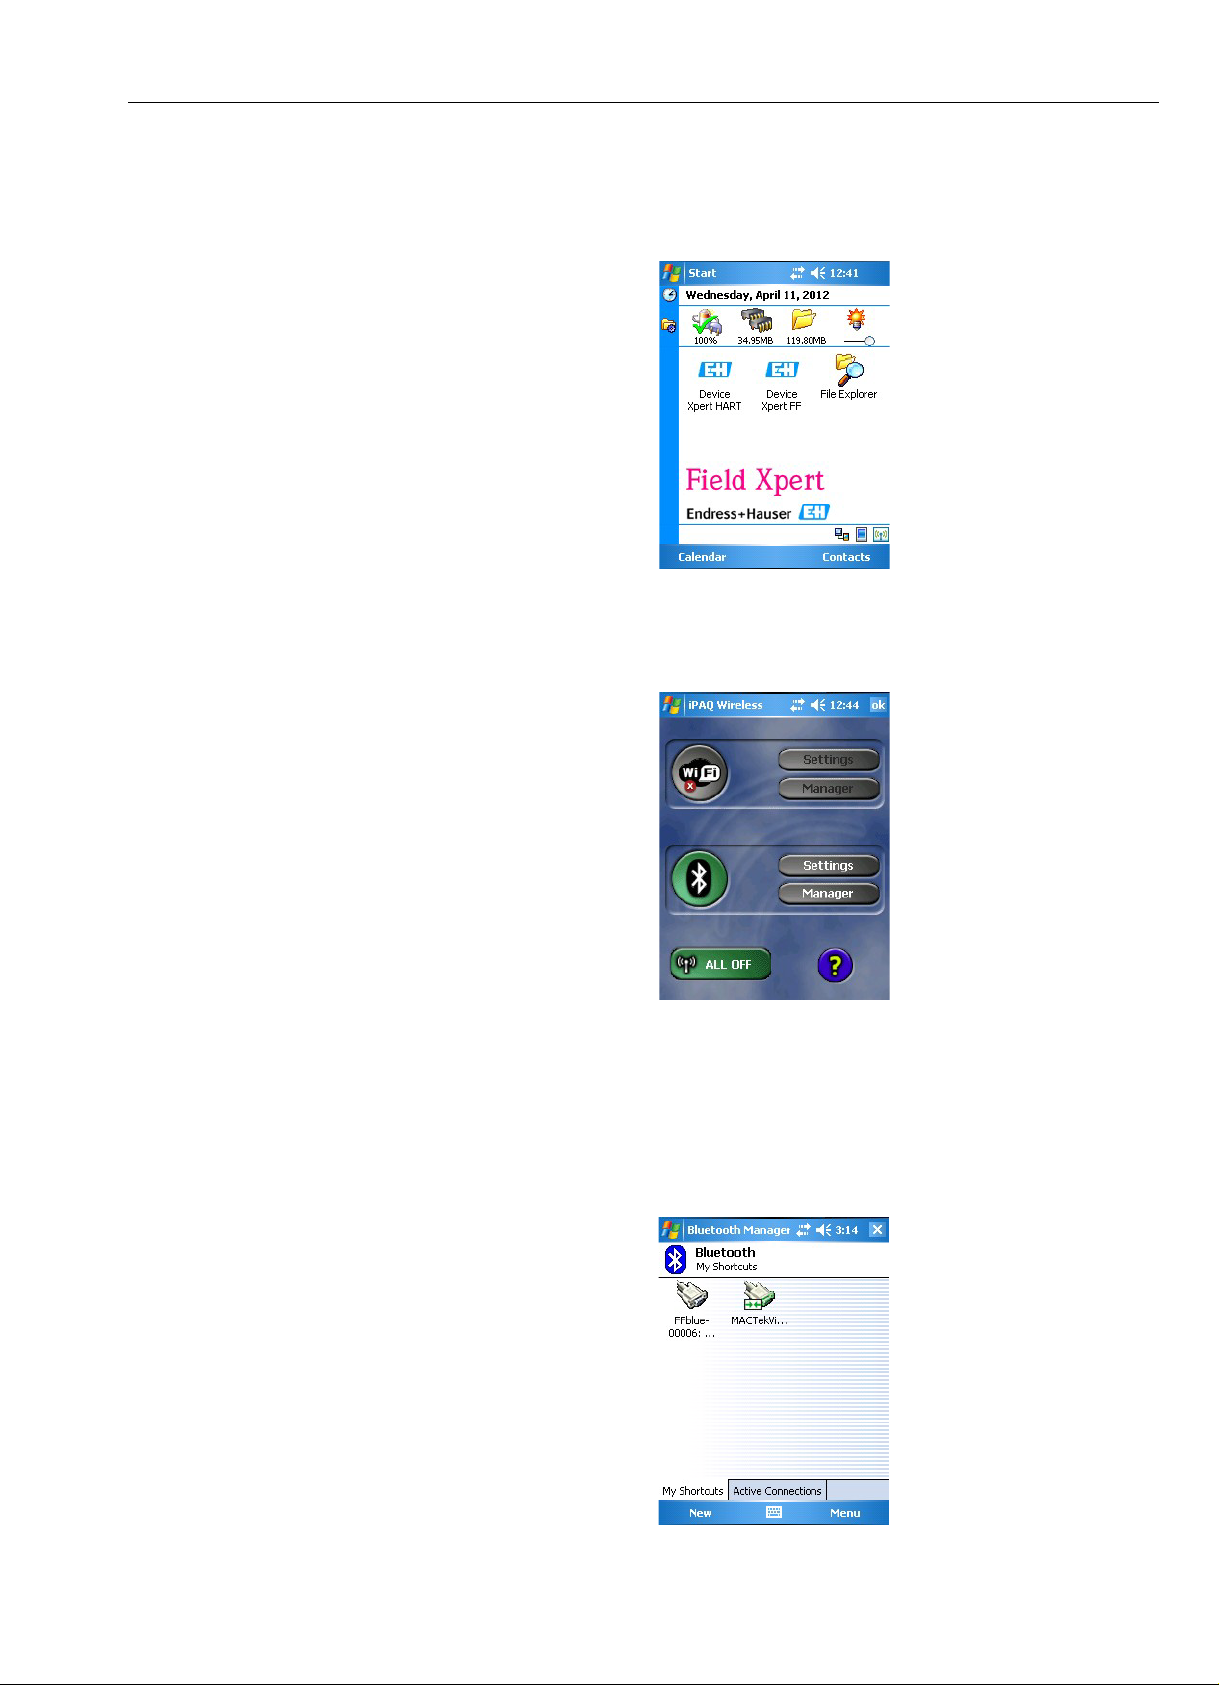
5.1.3 Connect to the modem
1 When powered up, the Field Xpert start screen is shown
2 Tap Start => iPAQ Wireless to open the wireless connection
– Tap on WiFi or Bluetooth, according to your mode of connection
3 Tap the appropriate Manager button to open the shortcuts
– Double tap on the connection you would like to use (in the example Bluetooth)
(the dialog may show a list or icons, depending upon the setting in Menu=>View As)
– The first time you use a Bluetooth connection you will be asked for a pass key
(mactek for VIATOR modem or 1234 for FFblue modem)
– The chosen connection goes green
Endress+Hauser 23
Page 26
5 Commissioning Field Xpert Field Xpert
5.1.4 Synchronize the DD library (DD updates)
Device Xpert is supplied with the latest set of HART and/or FOUNDATION fieldbus device
descriptions (DDs) available at the time of factory configuration. For a period of 60 days after this
time or longer if an optional DD updating licence has been purchased, Device Xpert will connect to
the Endress+Hauser Field Xpert - Device Expert DD Update Server, where the latest DD libraries
are available. Device Xpert automatically detects whether a valid licence is available, e.g. if
purchased at a later date or updated. It is recommended that the library is sychronized during the
initial setup of the device, then at regular intervals thereafter (if DD updates are licenced).
Updating the DDs in
Device Xpert
To update your DD device library, the Field Xpert must be connected to the internet. This can be
done either:
• directly via a WiFi connection or
• via a USB or Bluetooth connection with your laptop/PC.
To activate the license via a Bluetooth or USB connection, you will need ActiveSync Version 4.5 of
higher (Windows XP) or Windows Mobile Device Center (Windows 7). Please check if ActiveSync
or Windows Mobile Device Center is installed on your PC. If not, download ActiveSync or
Windows Mobile Device Center from the Microsoft web site and install the software package.
Depending on the type of connection you have selected, connect the USB cable to your Field Xpert
and a free USB port on your PC or activate the Bluetooth interfaces at the PC and Field Xpert.
The following steps are independent of the connection type and therefore apply equally to all of the
internet connections described above.
1 Start ActiveSync/Windows Mobile Device Center
2 If Field Xpert is to access Internet via a proxy server, enter the appropriate server parameters,
see Chapter 6.9.3
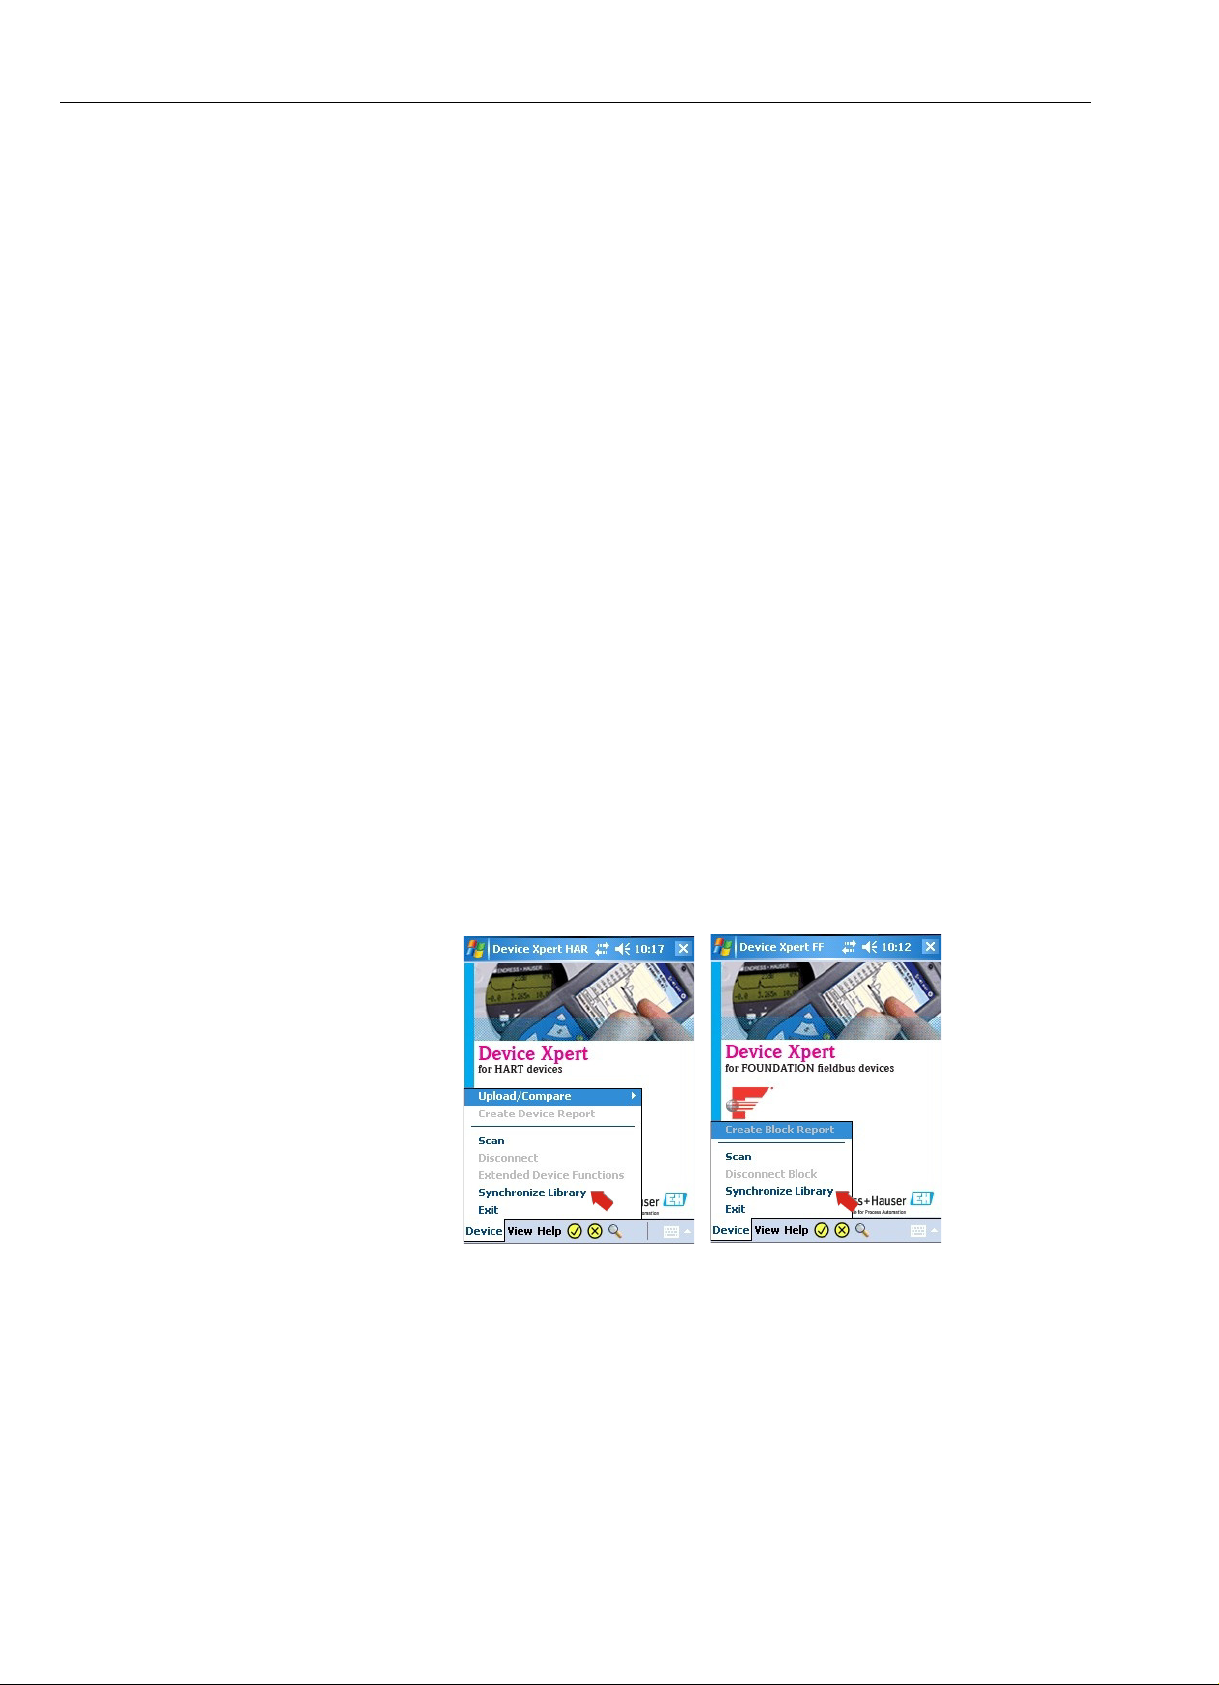
3 Start Device Xpert and select Device=>Synchronize Library.
4 Synchronization starts and Device Xperts checks automatically if there are new DDs
– If there have been no updates since your last connection, a message will be displayed
5 Confirm the synchronization by Tapping on Yes
– The download starts automatically
6 After download, you are ready to use the new device descriptions, see Chapter 6
24 Endress + Hauser
Page 27
Field Xpert 5 Commissioning Field Xpert
5.1.5 Update your personal licence details
Field Xpert is delivered with a licence filled with factory default values for name and e-mail. We
suggest that you fill in your company or name and contact e-mail address.
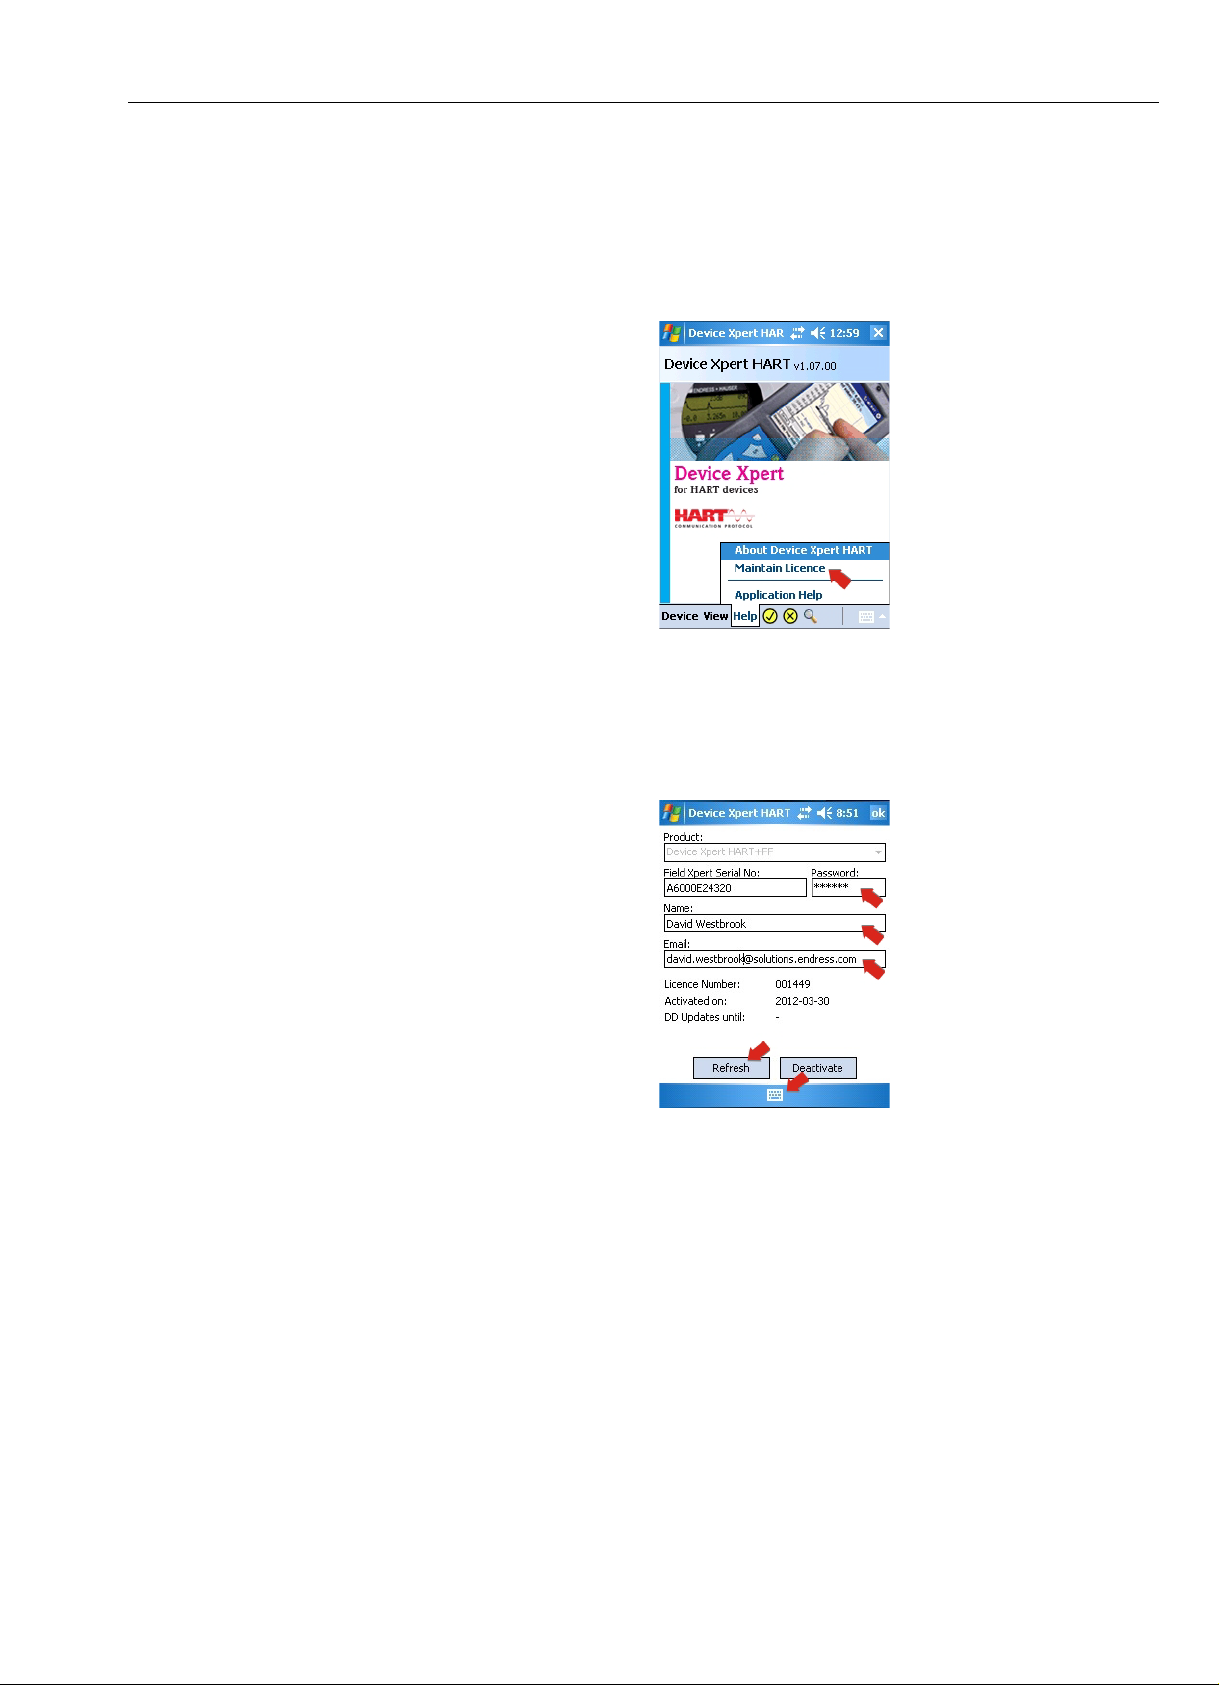
1 From Device Xpert HART or Device Xpert FF select Help=>Maintain Licence
2 Tap on the keyboard at the bottom of the dialog and fill in your contact details
– Enter company/name and e-mail address
– Enter your password, to be found on the rear of the CD-ROM supplied
–Tap on Refresh to confirm the changes
3 The licence information is shown at the at the top and bottom of the screen
– Product: software package licenced on the Field Xpert
– Device Xpert Software Licence Number
– Activated on: date on which the licence was activated
– DD Updates until: last date at which updates can be downloaded, see Chapter 5.1.4
Endress+Hauser 25
Page 28

5 Commissioning Field Xpert Field Xpert
5.2 Installing and configuring a Bluetooth modem
Notice!
• The Bluetooth modem has already been configured and installed in Field Xpert by
Endress+Hauser prior to delivery. You must follow the instructions in this section only if you need
to reconfigure the modem following a Field Xpert e.g. clean reset or if you want to add a second
Bluetooth modem.
5.2.1 Switch on Field Xpert Bluetooth
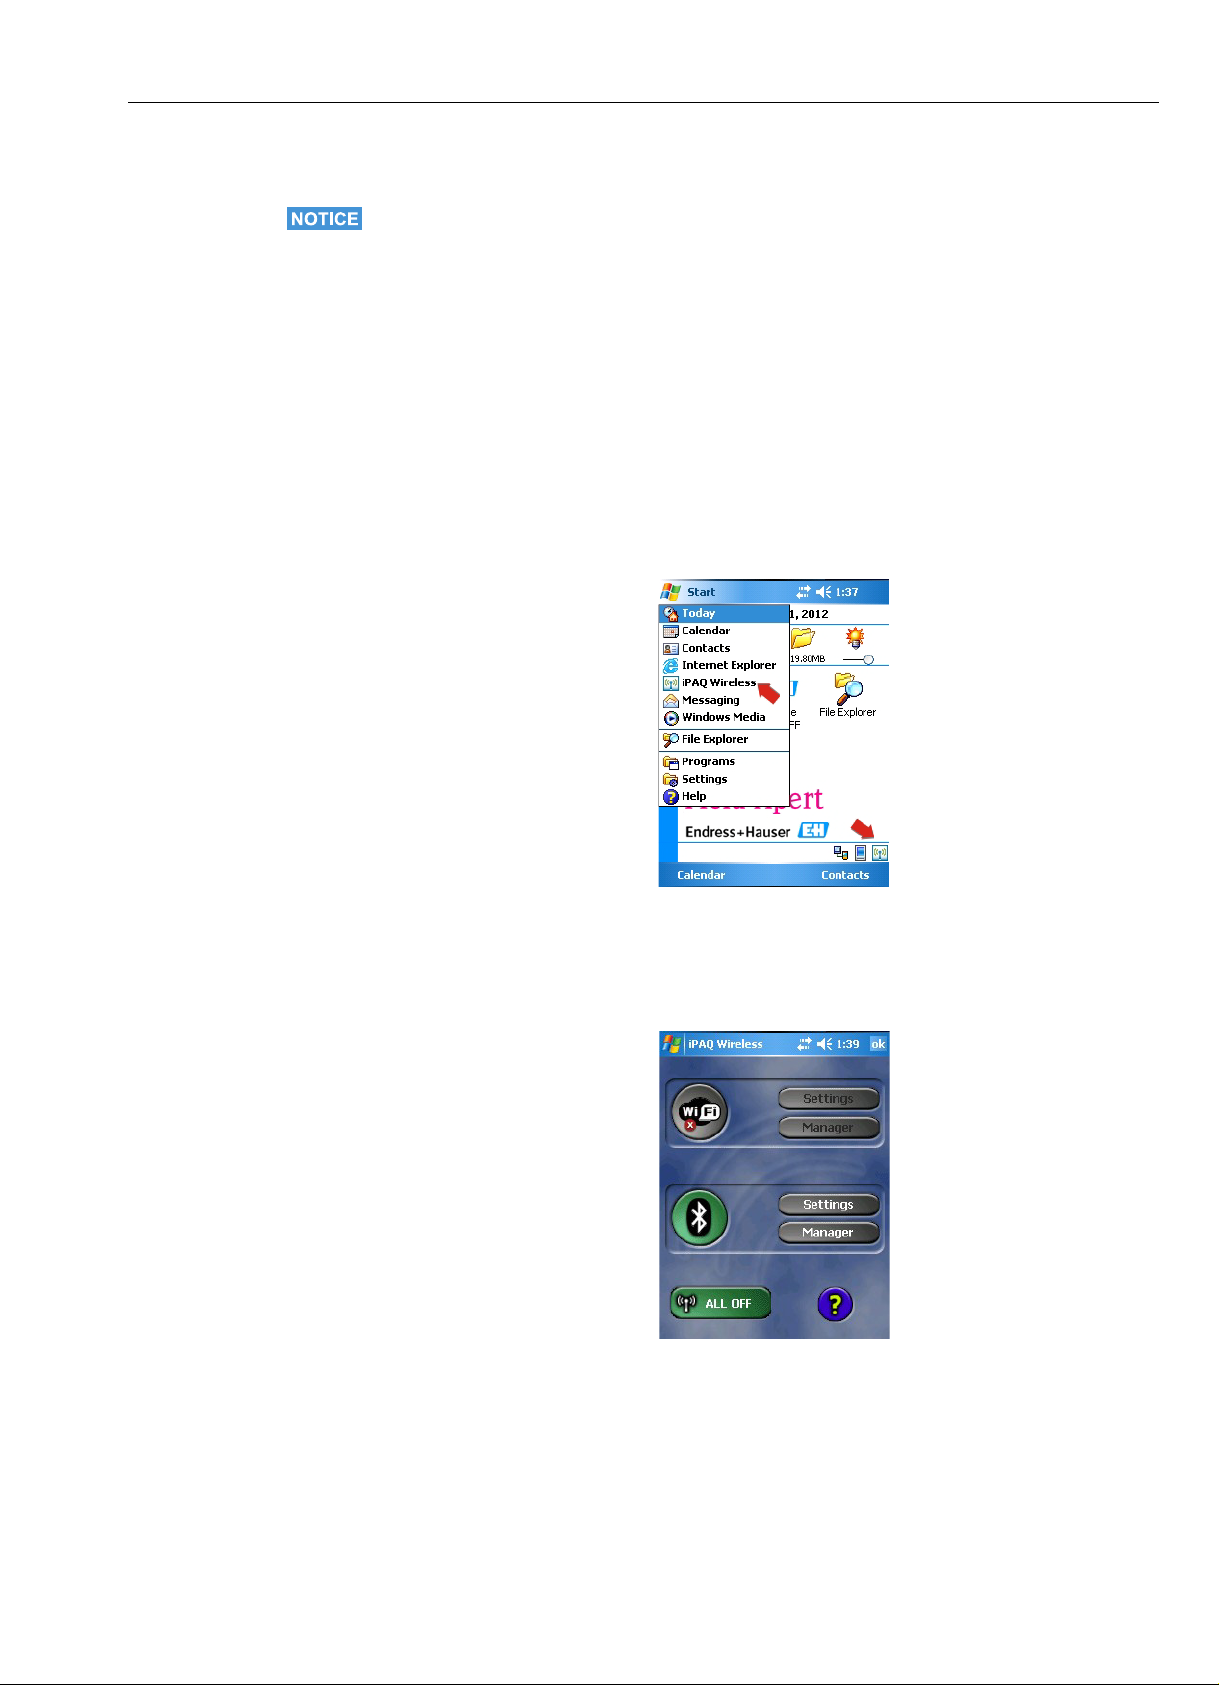
1 Switch on the Field Xpert by briefly pressing the on/off button.
2 Open the iPAQ Wireless dialog via Start=>iPAQ Wireless
3Tap on the Bluetooth button to switch on Bluetooth. A change in the color of the icon (green)
indicates that it is activated.
– The lefthand Field Xpert LED over the display flashes blue to confirm the activation.
26 Endress + Hauser
Page 29
Field Xpert 5 Commissioning Field Xpert
5.2.2 Add a VIATOR Bluetooth modem (HART)
Notice!
• The VIATOR Bluetooth modem has a standard Bluetooth device name, "MACTekVIATORXXXX",
where "XXXX" represents the last four hexadecimal digits of the device's Bluetooth MAC address.
The Bluetooth MAC address can be found above the serial number on the front label of the
modem.
1 Switch on the Field Xpert by briefly pressing the on/off button
2 Switch on the modem by briefly pressing the on/off button.
– Switching on the modem automatically activates the Bluetooth function of the modem
– If the modem LED does not respond in this way, please see Section "4.1.4 LED status".
3Open the iPAQ Wireless dialog (Start=>iPAQ Wireless) or
choose the symbol in the lower right hand corner
4 If not already switched on, tap on the Bluetooth button in order to switch on Bluetooth
communication
– The icon first turns green
Endress+Hauser 27
Page 30
5 Commissioning Field Xpert Field Xpert
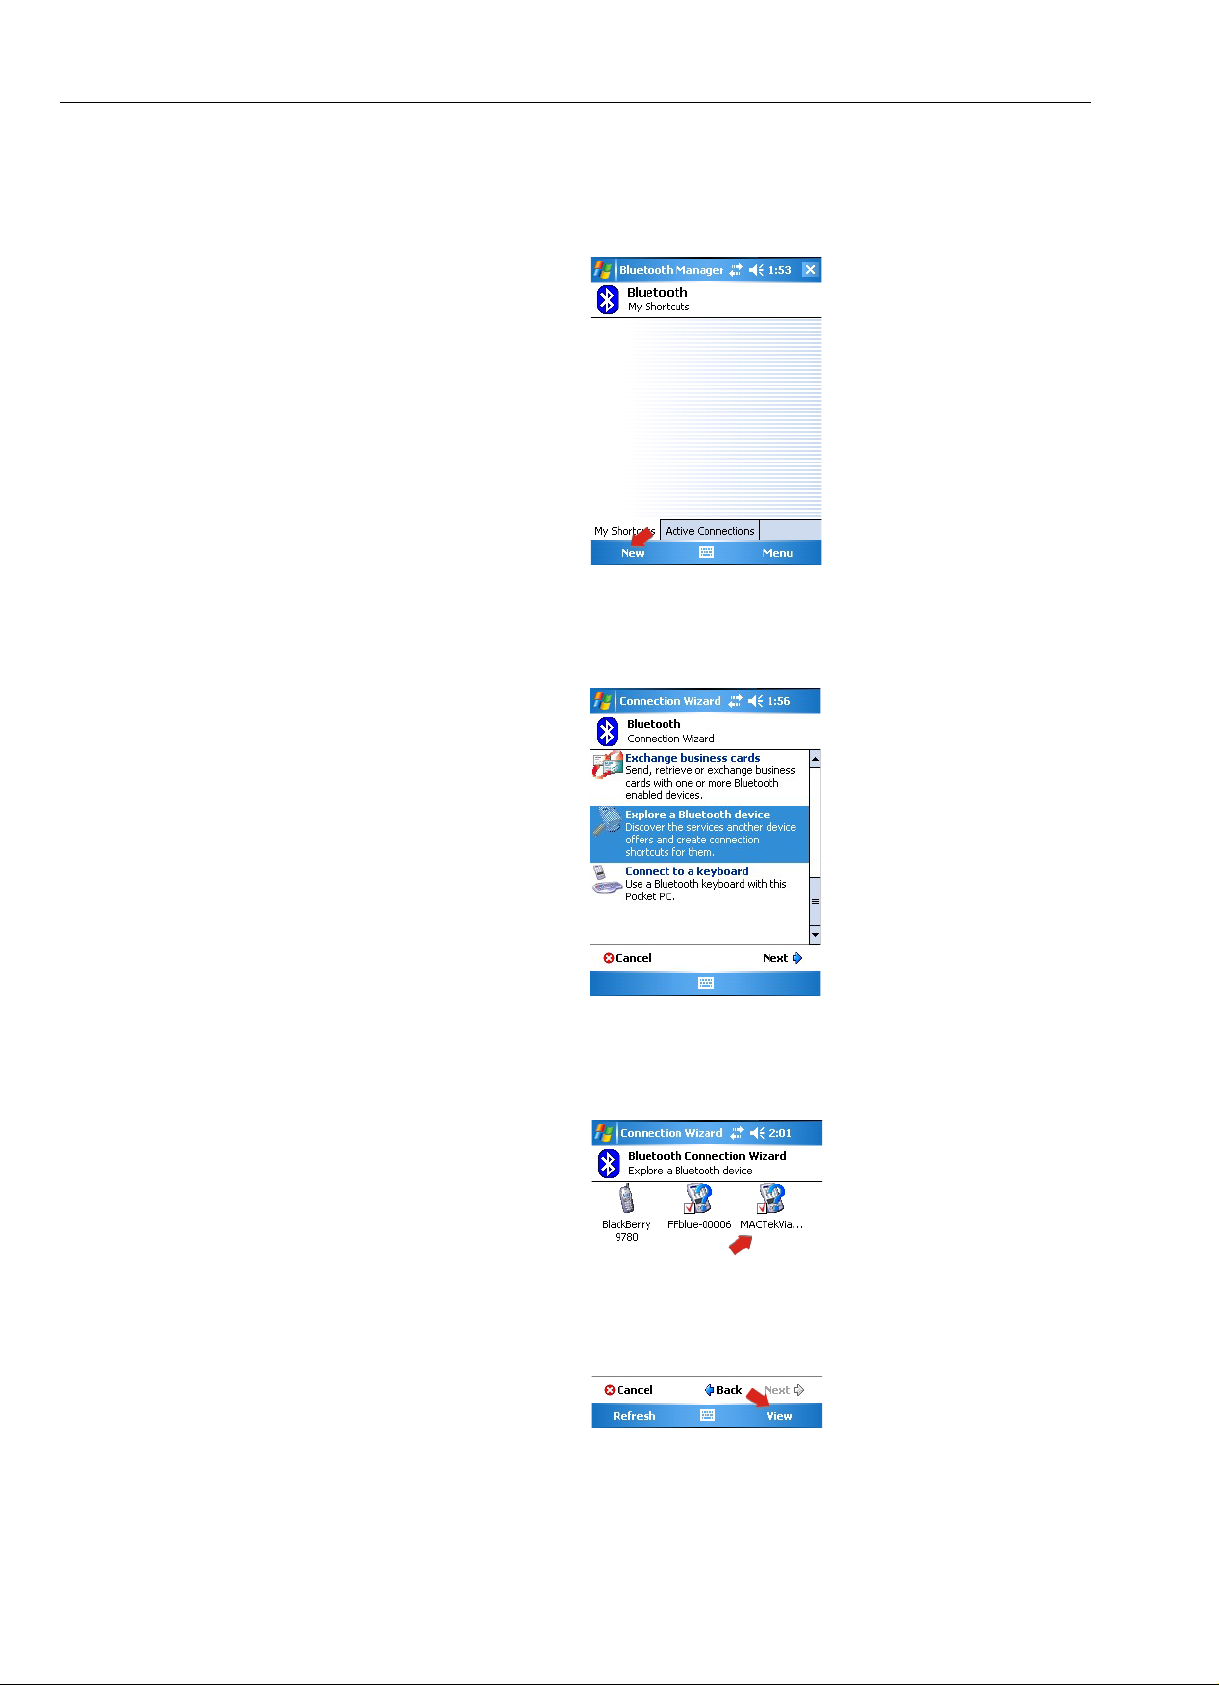
5 Select the Bluetooth Manager by tapping on the Manager button
– The shortcut screen for the Bluetooth interface appears
– Create a new connection by selecting New.
6The Connections Wizard page is displayed
– Scroll down and select the menu Explore a Bluetooth device
7 The Explore a Bluetooth device window appears showing all available Bluetooth devices
–Tap on MACTekVia... (MACTek Viator Bluetooth modem)
Note: To see more details tap on View => List
28 Endress + Hauser
Page 31

Field Xpert 5 Commissioning Field Xpert
8 The configuration window appears
–Under Service Selection, select SPP and tap on Next
9 In the next window, tap on Finish
10 The modem is now available in My Shortcuts
– To proceed, double tap on the modem icon
Endress+Hauser 29
Page 32

5 Commissioning Field Xpert Field Xpert
11 The first time you set up a connection with the Bluetooth modem, you will need a PIN code.
The PIN code is mactek (all lower case)
–Tap on Enter after typing in the code
12 On successful connection, the MACTek icon shows two green arrows
13 Tap on "X" and then OK in the upper righthand corner to return to the start screen.
30 Endress + Hauser
Page 33

Field Xpert 5 Commissioning Field Xpert
5.2.3 Add a FFblue Bluetooth modem (FOUNDATION fieldbus)
Notice!
• The FFblue Bluetooth modem has a standard FOUNDATION fieldbus ID which can be found on
the nameplate at the rear of the device.
• The modem must be connected to the FOUNDATION fieldbus H1 bus or e.g. a 9 V battery
1 Switch on the Field Xpert by briefly pressing the on/off button
2 Check that the FFBlue Bluetooth modem is switched on
– If necessary, connect the modem to the bus again
3Open the iPAQ Wireless function (Start=>iPAQ Wireless) or
choose the symbol in the lower right hand corner
4Tap on the Bluetooth button in order to switch on Bluetooth communication
– The icon first turns green
Endress+Hauser 31
Page 34

5 Commissioning Field Xpert Field Xpert
5Tap On the Bluetooth Manager button
–The My Shortcuts page appears
– Create a new connection by selecting New.
6The Connections Wizard page is displayed
– Scroll down and select the menu Explore a Bluetooth device
7 The Explore a window appears showing all available Bluetooth devices
– If you prefer an icon to a list entry, tap on View As=> Icons
Note: if the modem is not found the first time, Tap Refresh
8 To proceed, tap on FFblue-xxxxx (FFblue Bluetooth modem)
32 Endress + Hauser
Page 35

Field Xpert 5 Commissioning Field Xpert
9 The first time you set up a connection with the FOUNDATION fieldbus Bluetooth modem, you
will need a PIN code. The PIN code is 1234 (see back of modem)
–Tap on Enter after typing in the code
10 The configuration window appears
–Under Service Selection, select Bluetooth Serial Port
– If required, check the Security check box
–Tap on Next to proceed
11 In the next window, tap on Finish
Endress+Hauser 33
Page 36

5 Commissioning Field Xpert Field Xpert
12 The modem is now available in My Shortcuts
– Double tap on FFblue-xxxxx icon to connect to the modem
– On successful connection, the FFblue Modem icon shows two green arrows
13 A double tap on a connected modem indicates the connection properties
14 Tap on OK, "X" and then OK in the upper righthand corner to return to the start screen.
34 Endress + Hauser
Page 37

Field Xpert 5 Commissioning Field Xpert
5.3 Installing and configuring a WiFi access point
Notice!
• It is not possible to establish a WiFi connection when Field Xpert is connected via USB to
ActiveSync or Windows Mobile Device Center.
5.3.1 Connecting Field Xpert to the WiFi access point
1 Switch on the Field Xpert by briefly pressing the on/off button.
and navigate to the Field Xpert start page
1Open the iPAQ Wireless function (Start=>iPAQ Wireless) or
choose the symbol in the lower right hand corner
2Tap on the WiFi button in order to activate WiFi communication
– The icon first turns yellow
Endress+Hauser 35
Page 38

5 Commissioning Field Xpert Field Xpert
3Tap on the WiFi Settings button
– The first time WiFi is set up, all available WLAN networks are displayed
otherwise the Configure Network Adapter page appears – go to Step 7
4 Select the desired network (in our case FX) and tap on it.
–The Configure Wireless Network page opens at the General Tab
– Select the connection "Work"
5Tap on the Network key tab
– Select the type of encryption you use and enter your network key.
The encryption type and network key can be obtained from your network administrator
36 Endress + Hauser
Page 39

Field Xpert 5 Commissioning Field Xpert
6Tap on OK in the upper right-hand corner, the Wireless connections are shown again
– Select the tab Network Adapters
7In the Network Adapters tab
– Select Work then tap on "HP iPAQ Wi-Fi Adapter"
8 In the new page which appears
–Tap on Use server-assigned IP address if your WiFi access point has a DHCP server
–Tap on Use specific IP address if this is not the case
– Enter the IP address and subnet mask of the WiFi access point.
– The IP address assigned must be in the same subnet as the FXA520, see Chapter 5.3.2
or SFC162, see Chapter 5.3.3
Endress+Hauser 37
Page 40

5 Commissioning Field Xpert Field Xpert
9Tap on OK three times until you have reached the iPAQ Wireless main menu again.
–Tap on the WiFi button in order to deactivate WiFi communication
10 Tap on the WiFi button in order to activate WiFi communication
– If connection to the network is successful, the color of the WiFi icon changes to green.
– Close the menu by selecting OK
38 Endress + Hauser
Page 41

Field Xpert 5 Commissioning Field Xpert
5.3.2 Adding a Fieldgate FXA520 for HART communication
Notice!
• Before you add a Fieldgate FXA520, check that its IP address is in the same range as the
WiFi access point and that both a Subnet IP and a Gateway IP have been set
• You will also need the HART Pass Through Port Number, the User name and Password
1 From the Field Xpert start page tap on the Device Xpert HART icon
2 From the Device Xpert HART start page select Device => Scan
3In the Initiate Device Scan page, select Connections
Endress+Hauser 39
Page 42

5 Commissioning Field Xpert Field Xpert
4In the Connections page tap on the icon Add Connection
5In the Add Connection page:
– Enter a name for the new connection
– Tap on the Fieldgate FXA520 check box
– If necessary change the scan range
–Tap on the Communications tab
6In the Communications page:
– Enter the IP address of the Fieldgate FXA520
– Enter the HART Pass Through Port Number of the Fieldgate FXA520 (default: 3222)
– Enter the Username and Password of the Fieldgate FXA520 (default: super, super)
–Tap on the HART tab
40 Endress + Hauser
Page 43

Field Xpert 5 Commissioning Field Xpert
7In the HART page:
–Uncheck the Remember Scan List box, if you do not want the Device Xpert to store
the last scan
–Tap on OK to return to the connections page
8 In the connection page,
– Tap on the Fieldgate FXA520 icon which has now been added to the page
9 Field Xpert scans the HART network and displays the devices connected to the FXA520
– Tap on a device tag to open the associated device parameter view
Endress+Hauser 41
Page 44

5 Commissioning Field Xpert Field Xpert
10 All the blocks from the device are loaded and presented in a tree
11 You are now ready to configure the device as described in Chapter 6.3
42 Endress + Hauser
Page 45

Field Xpert 5 Commissioning Field Xpert
5.3.3 Adding a SFC162 gateway for FOUNDATION fieldbus
communication
1 From the Field Xpert start page tap on the Device Xpert FF icon
2 From the Device Xpert FF start page select Device => Scan
3In the Initiate Device Scan page, select Connections
Endress+Hauser 43
Page 46

5 Commissioning Field Xpert Field Xpert
4In the Connections page tap on the icon Add Connection
5In the Add Connection page:
– Enter a name for the new connection
–Tap on the Linking Device check box
–Tap on the Communications tab
6In the Communications page:
– Enter the IP address of the linking device as Host
–Tap on OK to return to the Connections page
– The linking device is now available as a connection
44 Endress + Hauser
Page 47

Field Xpert 5 Commissioning Field Xpert
7In the Connection page:
–Tap on the Linking Device icon which has now been added to the page
8 Field Xpert scans the FF network, finds the linking device and displays the devices connected
to it
9 You are now ready to configure the device as described in Chapter 6.3.
Endress+Hauser 45
Page 48

5 Commissioning Field Xpert Field Xpert
5.4 Optimizing battery use
5.4.1 Backlight
1 To change the backlight setting Tap the Windows icon and select Settings
2In the Settings menu and System tab tap on the Backlight icon
3In the Backlight page open the Battery Power tag
– Uncheck the box to switch off the battery save feature
46 Endress + Hauser
Page 49

Field Xpert 5 Commissioning Field Xpert
4 Select the External Power tab to do configure the backlight settings when the charger is in
use
– Uncheck the box to switch off the battery save feature when used with external power
5 Select the Brightness tab to regulate the brightness of the display for operation with battery
and/or external power
6Tap on OK, then "X" to return to the start screen
Endress+Hauser 47
Page 50

5 Commissioning Field Xpert Field Xpert
5.4.2 Power saving
1 To change the power saving Tap the Windows icon and select Settings
2In the Settings menu and System tab, tap on the Power icon
3 Select the Main tab to see the current status of the main and backup battery
48 Endress + Hauser
Page 51

Field Xpert 5 Commissioning Field Xpert
4 Select the Standby tab to view the remaining battery life
5 Select the Advance tab to configure the length of the inactive time period for switch off of the
device
6 Select the USB Charging tab to configure the charging of the device via a USB connection
7Tap on OK, then "X" to return to the start screen
Endress+Hauser 49
Page 52

5 Commissioning Field Xpert Field Xpert
5.5 Paired devices
The modems paired to the Field Xpert’s Bluetooth inteface can be viewed in the iPAQ Wireless
dialog by selecting Manager=>Menu=>Paired devices
A dialog opens displaying the modems
– Add allows another modem to be paired with the Field Xpert
– Delete deletes the selected device
50 Endress + Hauser
Page 53

Field Xpert 5 Commissioning Field Xpert
5.6 Additional Software
Field Xpert has the following additional software installed on delivery:
• Calendar: Appointment management
• Contacts: Phone numbers, address
• Outlook E-mail: Mailing program
• Excel Mobile: Spreadsheet for tabular calculations
• Calculator: Simple arithmetic functions
• Word Mobile: Word processing
• Note:s Simple notepad
• Tasks: Description, prioritization, scheduling and alarming of tasks
Endress+Hauser 51
Page 54

6Operating Device Xpert Field Xpert
6 Operating Device Xpert
The Device Xpert configuration software from Endress+Hauser supports the Field Xpert as a
complete HART and FOUNDATION fieldbus communicator for industrial applications.
Notice!
• If you are using the Ethernet gateway FXA520 (HART) or SFC162 (FOUNDATION fieldbus) to
connect to your devices via WiFi, the connections must have been set up prior to using Device
Xpert, see Chapter 5.3
6.1 Connecting to a HART device
Device Xpert HART is configuration software for device commissioning, diagnosis and maintenance
of HART devices that are registered at the HART Communication Foundation. It is available in
English and German language. Device Xpert HART enables automatic scanning of the HART
network as well as quick and easy configuration and diagnosis of the available devices.
1 Check that your Field Xpert is switched on and has an active Bluetooth or WiFi connection,
see Chapter 5.1.3
2 Start the Device Xpert HART software by tapping on its icon on the Field Xpert start screen
3 From the Device Xpert HART start screen select Device => Scan
52 Endress + Hauser
Page 55

Field Xpert 6Operating Device Xpert
4In the Initate Device Scan menu
– Check that the Connection is set to the correct modem or gateway
–Opening the Connections tab and tapping on an icon changes the connection
– By default the address range is 0 to 0, which corresponds to a 4–20 mA/HART signal
– For HART multidrop, set the address range to cover all HART polling addresses used.
–Tap on the Scan button
– If you have not set up Field Xpert as described in Chapter 5.1.3
or you have setup two or more Blutooth HART modems,
you will be asked to select a modem before the scan starts.
5 Device Xpert now searches the connected network for HART devices and automatically
assigns the appropriate device driver (DD) to the connected devices
– For 4–20 mA/HART the parametrization overview page is shown, see Step 6
– For HART multidrop or Fieldgate FXA520, several devices may be found
6 Tap on a device name to open the parametrization overview page:
Endress+Hauser 53
Page 56

6Operating Device Xpert Field Xpert
6.2 Connecting to a FOUNDATION fieldbus device
Device Xpert FF configuration is software for device commissioning, diagnosis and maintenance. It
is available in English and supports FOUNDATION fieldbus devices that are registered at the
Fieldbus Foundation. Device Xpert FF enables automatic scanning of the FOUNDATION fieldbus
network as well as quick and easy configuration and diagnosis of the available devices
6.2.1 Generate a live list
1 Check that your Field Xpert is switched on and has an active Bluetooth or WiFi connection,
see Chapter 5.1.3
2 Start the Device Xpert FF software and select Device => Scan
3In the Initate device Scan menu
– Check that the Connection is set to the correct modem or gateway
–Opening the Connections tab and tapping on an icon changes the connection
–Tap the Scan button
– If you have not set up Field Xpert as described in Chapter 5.1.3, you may have to select
a modem before the scan starts.
54 Endress + Hauser
Page 57

Field Xpert 6Operating Device Xpert
4 Device Xpert now searches the connected network for FOUNDATION fieldbus devices and
publishes a live list
– Example via SFC162 gateway left, via FFblue modem right
– For uncommissioned devices, the device name and identifier normally appears
5 For commissioned devices, a block and parameter list can now be generated as described in
Chapter 6.2.4
– For uncommissioned devices, continue with Chapter 6.2.23.
Endress+Hauser 55
Page 58

6Operating Device Xpert Field Xpert
6.2.2 Setting a tag and device address
Notice!
• This function is primarily for commissioning of individual devices which are connected point-topoint with a modem or gateway, i.e. test bench operation.
• Device Xpert identifies commissioned devices and deactivates the corresponding menu items
1 Tap and hold on a device
– In the context menu that appears: Tap on Tag/Address=> Set Tag
2 Enter the tag, Tap OK to register the change
–Tap on OK to acknowledge the message that appears:
– The new tag is displayed in the tree
56 Endress + Hauser
Page 59

Field Xpert 6Operating Device Xpert
3 Tap and hold on a device
– In the context menu that appears: Tap on Tag/Address=> Set Address
4 Select the address from the drop-down menu, enter it or use the slider
– Tap on the checkbox Decimal to change from hexadecimal to decimal addresses
– Addresses from 0x10 (16) to 0x13 (19) are reserved for Bridges
Addresses from 0x14 (20) to 0xF7 (247) are reserved for field devices, whereby any
device with BOF Class "Link Master" should have a lower address than a device with
BOF Class "Basic"
A compact address range accelerates the scanning of the segment
–Tap on OK to register the change and download the address to the device (takes time)
Endress+Hauser 57
Page 60

6Operating Device Xpert Field Xpert
6.2.3 Setting a BOF Class
If the device is to be assigned link master functionality, the BOF Class can now be changed to "Link
Master". Normally only one field device in an H1 segment will be allocated this functionality. Not
all devices support Link master functionality.
1 Tap and hold on the device
– In the context menu that appears: tap on BOF Class => Set Link Master
2 In the dialog that now appears, tap on OK, to confirm the change
3 Tap and hold on the device
– In the context menu that appears: Tap on Restart Device
– In the dialog that now appears, tap on OK, to confirm the restart
– When the device has restarted the "Link Master" functionality is activated
58 Endress + Hauser
Page 61

Field Xpert 6Operating Device Xpert
6.2.4 Generate a block and parameter list
1 In the live list, tap and hold on a device to open the context menu
– Select Fetch Block List to load all the blocks from the selected device
Alternatively, tap on a device and Tap OK, the blocks are loaded in the scan page
2 Now tap on the block you wish to open
– The block opens: if necessary open the tree to show the menu items
– To return to the block list tap on Device => Disconnect Block
Notice!
• Depending on device DD, it is possible that not all input parameters are visible in their own
block. The block "Parameters", however, contains all the parameters in the device not
contained in menu items.
Endress+Hauser 59
Page 62

6Operating Device Xpert Field Xpert
6.2.5 Change the block target mode
In general, the parameters of a FOUNDATION fieldbus transducer block can only be changed when
the block is out of service (OOS). Depending on how you have chosen to generate your parameter
list, this can be done from the live list, the block list or the parameter list. After all parameters have
been changed and downloaded, the block target mode must be set to Auto again.
1 All blocks in the selected device can be put out of service by putting the resource block out of
service in the live list
– From the live list tap and hold on the resource block and select Set Target Mode
from the context menu
– Alternatively, from the block list tap on OOS in the block mode header
2 In the page which appears:
– Remove the tick from Auto and tick OOS
–Tap on OK in the top righthand corner to execute the change
3 An individual block can be put out of service in the same manner as above by selecting the
block in the live list
– Tap and hold on the block and select Set Target Mode from the context menu or
from the block list tap on OOS in the block mode header
– In the page which appears, see Step 2, remove the tick from Auto and tick OOS
–Tap on OK in the top righthand corner to execute the change
60 Endress + Hauser
Page 63

Field Xpert 6Operating Device Xpert
4 If supported, an individual block can also be put out of service in the parameter list
– Open the parameter group Process (name may differ according to device) or Parameters
– In the parameter list, open the Block Mode=>Target parameter
– Set the value to OOS
– Tap on the yellow arrow and if necessary confirm with Yes to execute the change
5 Put the blocks back into operation as in Steps 1 to 4 above, but select the option Auto
6.2.6 Enable function block viewing
Normally Device Xpert is not used to configure function blocks: this task is done in the engineering
software for the DCS in use. For this reason, the default setting for Device Xpert is to hide the
corresponding information. If you wish to see the function blocks in the block list, they can be
enabled as follows.
1 From the Device Xpert start page select View => Configuration
Endress+Hauser 61
Page 64

6Operating Device Xpert Field Xpert
2 Scroll to the Options tab using the arrows in the corner of the Configuration dialog.
3Tap on the Options tab
– Tap on the check box Enable Function Blocks to enable viewing
–Tap on OK to confirm the setting and close the dialog
4 The function blocks will now appear in the block list.
– If you activate this function after you have already fetched the function blocks of a device,
you will have to repeat the Fetch Function Block command, see Chapter 6.2.4
62 Endress + Hauser
Page 65

Field Xpert 6Operating Device Xpert
6.3 Parameterization of devices
Notice!
• FOUNDATION fieldbus blocks must be put out of service (Target Mode = OOS) before any
parameter changes can be downloaded to the device, see Chapter 6.2.5.
The parameters offered by a device depend upon its manufacturer, type and function. For this reason
it is not possible to describe how a particular device is parameterized in order that it functions
properly - here the user is referred to the device’s operating manual. It should also noted that not
all the functions described in this chapter are available in all devices.
6.3.1 Parameter folder tree
All parameterization starts at the parameter folder tree (HART, left) or block folder tree
(FOUNDATION fieldbus, right) which is read from the Device Description (DD) of the device. The
table below lists the most important features of the parameter tree page:
Item Function Remarks
1 Tag name • HART: Tag name read from the connected device
2 Header bar For HART devices (as shown left)
3 Parameter group folder • Tap on the node to open the folder and display the associated parameters,
4 Expansion/contraction point • "+" expands the tree to show the parameters beneath the node
5 Customized parameter folder Folder in which a customized view of the device parameters can be stored
6 Connection status Status indicating whether the device is online or offline
7 Keyboard • Tap on the icon to show the keyboard
8 Search • Tap on the icon to open the search function
• FOUNDATION fieldbus: Block name
• Loop current (in the example the device is HART multidrop = 4 mA)
• Primary value (in the example temperature)
For FOUNDATION fieldbus devices (as shown right)
• Primary value (in the example pressure)
• Block target mode (permitted in black, actual with green background)
see Chapter 6.3.2
• For FOUNDATION fieldbus, if the input parameters are not available in
their own subblock, the block "Parameters" contains all said parameters for
the block.
• "–" contracts the tree to hide the parameters beneath the node
• Tap on the icon when the keyboard is active to hide it again
The header bar of the parameter tree can be hidden/displayed by selecting View=>Header Bar.
Endress+Hauser 63
Page 66

6Operating Device Xpert Field Xpert
6.3.2 Parameter folders
The parameter folders group together input and output parameters associated with particular device
functions. The table below lists the most important features of the parameter tree page:
Item Function Remarks
1 Horizontal navigation Indicates the current position in the navigation tree
• A tap on the higher level closes the current level and moves upwards
2 Vertical navigation Navigates between parameter group folders
3 Device parameter Current value of a device parameter
4 Device parameter name Designation of parameter, select to open context menu, see below
5 Parameter help available Yellow triangle indicates that the parameter has an online help, see above
6 Confirm updates Transfers all updates made in the folder to the field device
7 Discard updates • After confirmation with YES, discards all updates made since last edit
8 Parameter context menu See Item 4
• Arrow up: moves to and opens the parameter group folder above
• Arrow down: moves to and opens the parameter group folder below
• Tap on the parameter to change the setting
– Normal parameters can be changed
– Grey parameters are read only and cannot be changed
– Red parameters have not been accepted by the field device
• Normal parameters can be changed
• Bold parameters have been changed in this session
• Grey parameters are read only and cannot be changed
Tap and hold parameter to open the context menu for the parameter
• Display Help: display the help text for the parameter
• Show Valid Range: Display the range of valid parameter values
• Refresh Value: causes the value to be read from the device again
• Refresh Group: causes the parameter group to be read from the device again
• Refresh Vars On/Off: Toggles the automatic refresh of the selected value
• Display Error: displays a parameter error
• My <Device> or My Block: Adds the selected parameter to be added to the
customized parameter folder
– Select my device – a submenu "Add" appears
– Select Add
• Changes according to parameter properties
64 Endress + Hauser
Page 67

Field Xpert 6Operating Device Xpert
6.3.3 Device diagnosis
Device Xpert offers a range of device status and diagnostic information, which are provided by the
device description.
1 For HART devices, the presence of an error is indicated by a yellow triangle in the header
– A tap on the triangle displays the diagnosis information
2 For FOUNDATION fieldbus (and HART) select View=>Block Status (Device Status)
3 Parameters in the parameter list which are permanently displayed in red have an error
– Open the parameter error description by tap and hold on the parameter name and
selection of Display Error
– A text box with a description of the error appears
Endress+Hauser 65
Page 68

6Operating Device Xpert Field Xpert
6.4 Envelope curve
Device Xpert provides an envelope curve display for all Endress+Hauser time-of-flight level
transmitters using the HART protocol. It is added as an Envelope Curve parameter group in the
parameter group tree. For a full description of the functions, the user is referred to the operating
instructions of the connected device.
1 From the device parameter group tree tap on Envelope Curve
2 In the parameter page set the parameters as required
(see operating instructions of connected device)
Parameter Significance
Curve Type Determines the type of curve to be sampled
Start Curve Value Value in meters from the probe head, at which the envelope sampling
End Curve Value Value in meters from the probe head, at which the envelope sampling
Sample Resolution Determines the resolution of the curve
Execute Curve Tapping on Execute starts the sampling process
• Envelope
•FAC
•MAP
• Envelope + FAC
should start
should end
•Low
•Low-Medium
•Medium
• Medium-High
•High
66 Endress + Hauser
Page 69

Field Xpert 6Operating Device Xpert
3 When the parameters have been changed, download them to the device by Tapping on the
yellow tick at the bottom of the page
– Confirm the download with Yes
4Tap Execute to start the sampling
– If necessary, confirm that the Device Xpert will wait for any pending updates with Yes
– The envelope curve is sampled and displayed
(depending on resolution may take several minutes)
5 Tap and hold on the graph opens a context menu that allows the user to
– Change the presentation (FAC, Envelope)
– Hide the display legend or move it to a bottom left (or top left)
– Have a Zoom View/Small View of the envelope curve
– Close the envelope curve (Close Graph)
Endress+Hauser 67
Page 70

6Operating Device Xpert Field Xpert
6.5 Favorites folder
In every device description there is a Favorites folder with the name My <device name> (HART)
or My Block (FOUNDATION fieldbus). Here you can put all of the parameters which you would
like to have immediately to hand. It is also possible to group the parameters in different subfolders.
Adding a folder 1 Tap and hold on the My <device name>/My Block folder to open the context menu
2Tap on Add Folder to open the Enter Folder Name page
3 Enter the name and Tap on OK to add the subfolder to My <device name>/My Block
68 Endress + Hauser
Page 71

Field Xpert 6Operating Device Xpert
Adding parameters 4 Open the parameter group folder containing the parameter that you want to add
– Tap and hold on the parameter name you want to store until the context menu appears
– Select My <device name>/My block then Add or <Subfolder>=>Add
– Confirm with OK
– The parameter is added to the My <device name>/My Block folder or the subfolder
5 Display the parameters by opening the My <device name>/My block folder or subfolder
6 Parameters can be removed from the My <device name>/My Block folder by calling the
parameter context menu by tap and hold and selecting Remove from "My <device name>/
My Block" or Remove from "<Subfolder>"
Endress+Hauser 69
Page 72

6Operating Device Xpert Field Xpert
6.6 Upload/Compare function
The Upload/Compare function enables HART device configurations to be saved in the form of an
upload image in the Field Xpert. Using such an image, the current device configuration can be easily
compared with and verified against previous device configurations.
6.6.1 Upload
1 Upload the current image of the connected device by selecting Device=>Upload/Compare
– Select Device Image Upload
–Answer Yes to the device requery message which now appears
2 In the page which now appears enter the file storage information:
– Default file name is tag, date and time of day (can be changed)
–Tap on OK to store
3 Field Xpert uploads the current device configuration and stores it as an .img file at the
location \SD Card\IMAGES:
– A successful upload is indicated by a corresponding message.
–Tap on OK to confirm
70 Endress + Hauser
Page 73

Field Xpert 6Operating Device Xpert
6.6.2 Compare
1 Open the upload image file with which you want to compare the current device configuration
by selecting Device=>Upload/Compare
– Select Open Upload Image
2In the Open page which now appears
– Tap on the file you wish to open
– If the file name cannot be read, press the F1 key for a period to landscape display mode
(Press the F1 key for a long period to return to portrait display mode)
– The column width can be adjusted by dragging the cursor over the separating line (as Excel)
3 The image file is opened in a new tab
– Previous parameter settings can be seen by navigating through the parameter groups
Endress+Hauser 71
Page 74

6Operating Device Xpert Field Xpert
4 To compare the online configuration against the previously stored image, select
Device=>Upload/Compare
– Select Compare (only possible if image tab is selected)
–Answer Yes to the device requery messages which now appear
5 After comparison, a compare message informs of changes
6Tap on OK to display the compare parameter tree
– Parameter groups and parameters with differences are highlighted in red
Notice!
• The compare function does not differ between dynamic (output) and static parameters, so that it
is normal to find differences between parameter groups
72 Endress + Hauser
Page 75

Field Xpert 6Operating Device Xpert
7 Tap on a highlighted folder to see the changes in detail
8 Tap and hold on a highlighted parameter to see the online configuration value
– Reset Comparison Results removes the highlighed comparison results
9 Close the image by selecting Device=>Upload/Compare=>Close
Endress+Hauser 73
Page 76

6Operating Device Xpert Field Xpert
6.7 Device and Block Reports
6.7.1 Create Device Report (Device Xpert HART)
For documentation purposes, you can create a report of the online device configuration and save it
on your PDA.
1 To create a report of the device configuration select Device=>Create Device Report
– Answer Yes to the query which now appears and wait until the Save as page appears
2 In the page which now appears enter the file name
– Default file name is tag, date and time of day (can be changed)
–Tap on OK to store
3 Field Xpert stores the current device configuration as an XML file with XSL style sheet at the
location \SD Card\REPORTS
– A successful save is indicated by a corresponding message
–Tap on OK to confirm
4 The Device Report can be viewed with the PDA (web browser) or can be imported into
Microsoft Excel.
74 Endress + Hauser
Page 77

Field Xpert 6Operating Device Xpert
6.7.2 Create Block Report (Device Xpert FF)
For documentation purposes, you can create a report of the online FOUNDATION fieldbus block
configuration and save it as an XML file on your PDA.
1 To create a report of the block configuration select Device=>Create Block Report
when the block you require is connected
– Answer Yes to the query which now appears and wait until the Save as page appears
2 In the page which now appears enter the file name
– Default file name is tag, date and time of day (can be changed)
–Tap on OK to store
3 Field Xpert stores the current device configuration as an XML file with XSL style sheet at the
location \SD Card\REPORTS
– A successful save is indicated by a corresponding message
–Tap on OK to confirm
4 The Device Report can be viewed with the PDA (web browser) or can be imported into
Microsoft Excel.
Endress+Hauser 75
Page 78

6Operating Device Xpert Field Xpert
6.7.3 View reports on PDA
1Tap on File Explorer in the start screen
2 Navigate to chosen subfolder, e.g. My Device => SD card => REPORTS
– Tap on the folder name
3 In the folder tap on the desired report
– If the file name cannot be read, press the F1 key for a long period to landscape display mode
(Press the F1 key for a period to return to portrait display mode)
76 Endress + Hauser
Page 79

Field Xpert 6Operating Device Xpert
4 The XML report (HART left, FOUNDATION fieldbus right) is displayed with Windows Internet
Explorer using the style sheet (here shown in landscape mode and smallest font)
– Scroll down to see more information
Endress+Hauser 77
Page 80

6Operating Device Xpert Field Xpert
6.7.4 Backup/Copy reports and images
By using an ActiveSync or Windows Mobile Device Center connection from Field Xpert to your PC
or laptop, it is possible to view and back up device reports and images.
1 Make sure that the ActiveSync or Windows Mobile Device Center connection is up and
running
2 Start Windows Explorer on the PC or Laptop
3 Navigate to the SD-card in the Mobile Device folder
4 The device configuration images and device reports are to be found in the IMAGES and
REPORTS folders
5 Copy the desired files including the XSL style sheet to the PC or laptop in a separate folder
6.7.5 View report on PC/laptop
The reports can be viewed by opening the required report file using the Internet Explorer. Note that
the style sheet needs to be in the same folder as the report.
78 Endress + Hauser
Page 81

Field Xpert 6Operating Device Xpert
6.8 Additional functions
6.8.1 Search function
If the position of a specific parameter or special function in the device description is unknown, it
can be found by using the integrated search function.
1 Select the magnifying glass icon in the lower menu bar
2 In the search page, enter the parameter name you wish to search for (or part of it) into the text
field and then tap on Search
3 You will be provided with a list of all parameters containing your search term.
Endress+Hauser 79
Page 82

6Operating Device Xpert Field Xpert
4 Tap on the parameter to jump to the parameter folder
– The parameter searched for is highlighted in yellow
5 Tap on the magnifying glass to return to the search list, see Step 3
6 To delete the search result, tap and hold on a parameter
– In the context menu tap on Clear Search Results
7 The parameters are displayed as normal:
80 Endress + Hauser
Page 83

Field Xpert 6Operating Device Xpert
6.8.2 Application help
Device Xpert possesses an application help in which detailed information is available.
1 Open the application help by selecting Help=>Application Help
2 The list of topics appears
– Tap on the topic you require
3Tap on Contents or Search to look for individual subjects or specific words
Endress+Hauser 81
Page 84

6Operating Device Xpert Field Xpert
6.8.3 Device information (HART)
Device Xpert HART offers an overview of the device information
1 To open a device information page:
– Tap and hold on the device line and select Device Information from the context window
–or select View=>Device Information from the main menu
2 The device information is displayed
3 Close the Device Information page with OK
82 Endress + Hauser
Page 85

Field Xpert 6Operating Device Xpert
6.8.4 Device information and block properties (FF)
Device Xpert FF offers an overview of the device information and block properties
1 To open a device or block properties page:
– Tap and hold on the device or block line
– Select Device Information or Properties from the context window
2 The device information or block properties are displayed
– Example: device left, block right
3 Close the Device Information or Properties page with OK
Endress+Hauser 83
Page 86

6Operating Device Xpert Field Xpert
6.8.5 Device Description information
Information on the device descriptions held by the device can be obtained as follows:
1 In the block list, tap on View => Device Description Info
2 The device description information for the device online is displayed
3Tap on OK to close the dialog
6.8.6 Generic DD
Device Xpert HART supports the HART Generic DD. This feature ensures that Field Xpert user can
perform a b asic configuration of a HART Device, even when the specific Device Description is not
available in Field Xpert.
1 Open Device Xpert and open the Scan page with Device=>Scan
2 In the Scan menu tap on Scan
3 When the device has been found, tap on its name
4 If Field Xpert is unable to find a registered DD, it will automatically load the Generic DD
– Confirm possible messages with Yes or OK
84 Endress + Hauser
Page 87

Field Xpert 6Operating Device Xpert
6.9 Configuration menu
Device Xpert HART and Device Xpert FOUNDATION fieldbus have a configuration menu, under
which all configuration dialogs are grouped. Some are called during commissioning and some offer
additional options or device information. The menu is called by selecting View => Configuration.
The Configuration dialog has a number of tabs which can be selected by tapping directly on them.
The arrows on the bottom righthand side allow navigation to hidden tabs.
6.9.1 Connection
The Connection dialog shows the connections that are available for Device Xpert (HART left,
FOUNDATION fieldbus right). Tapping on Add Connection allows a new connection to be set up,
see Chapters 5.2.2, 5.2.3 and 5.3.2, 5.3.3 respectively.
Endress+Hauser 85
Page 88

6Operating Device Xpert Field Xpert
6.9.2 HTTP Proxy
The HTTP Proxy dialog is required if Field Xpert is to access Internet via a proxy server.
1 Activate the dialog by tapping on the checkbox Activate HTTP Proxy
2 Enter the data required for your proxy
3Tap on Test the proxy settings to check that Internet can be accessed
6.9.3 Device library
The Device library dialog shows a list of all the DDs (HART or FOUNDATION fieldbus) supported
by Device Xpert. The tree can be opened out to reveal the device names and DD versions.
Tap and hold on any folder to get additional informatioin via the context menu.
86 Endress + Hauser
Page 89

Field Xpert 6Operating Device Xpert
6.9.4 Paths
The Paths dialog displays the paths where the Device Xpert program and DDs are stored. It also
controls the logging function for Field Xpert. When activated, the logs are to be found in
\Programs\DeviceXpert\en_log_hart.txt or en_log_ff.txt.
6.9.5 Options
The Options dialog controls the various Device Xpert functions, e.g. whether "My <Device>/My
Block appears in the device or block list of a HART or FOUNDATION fieldbus device.
6.9.6 Modem
The Modem dialog lists the Bluetooth modems that are currently paired with Field Xpert and allows
the default modem for the current application to be selected.
Endress+Hauser 87
Page 90

7 Troubleshooting Field Xpert
F5
F1
F2
F3
F4
OK
Field Xpert
1
7 Troubleshooting
We expect our hardware and software products to function without any problems. Nonetheless, we
are unable to provide a 100% guarantee that this will be the case. For this reason, here are some
tips and solutions for dealing with possible faults.
7.1 Field Xpert
Some of problems may be resolved by switching the Field Xpert on and off. If this does not work,
please proceed in accordance with the following examples.
7.1.1 Soft Reset
Abb. 7-1: Soft reset of the Field Xpert
1 Soft reset keys
A soft reset stops all applications which are currently running but does not delete any programs or
saved data. Before carrying out a soft reset, please make sure that you save all unsaved data in any
of the applications currently running.
To perform a soft reset:
1 Press both reset keys on the keyboard simultaneously
2 Field Xpert carries out a restart and returns to the start screen
A soft reset can be helpful if, for example, the DD device library can not be found. This is stored on
the SD card, and if the SD card has not been read, the DD library will not be available. Following a
soft reset, the SD card is readable again.
88 Endress + Hauser
Page 91

Field Xpert 7Troubleshooting
F5
F1
F2
F3
F4
OK
Field Xpert
1 2
7.1.2 Hard Reset
Fig. 7-2: Hard reset of Field Xpert
1 Additional keys F1, F4 for hard reset 2 Soft reset keys
A Hard Reset stops all running applications, but does not erase any programs or saved data.
Additional to a soft reset, all hardware registers will be erased. A hard reset will also ensure that the
device will operate in the same way if the battery was completely discharged.
To perform a hard reset:
1 Press and hold down the F1 and F4 buttons
2 While holding down these buttons, press the soft reset buttons for about two seconds
3 When screen begins to fade, release the F1 and F4 buttons and then release the soft reset
buttons
– To reset the hardware registers, the battery automatically disconnects for a short periode
– The Pocket PC resets
Endress+Hauser 89
Page 92

7 Troubleshooting Field Xpert
F5
F1
F2
F3
F4
OK
Field Xpert
1 2
7.1.3 Clean Reset
Fig. 7-3: Clean reset of Field Xpert
1 Additional keys F1, F3, on/off
for clean reset
2 Soft reset keys
A Clean Reset clears all user-installed settings, applications and data from the device memory. It
does not affect the SD card data.
Notice!
• Ensure that all data are saved on the SD card or an external PC before carrying out a clean reset
on your Field Xpert.
To perform a clean reset:
1 Press F1, F3 and the on/off button simultaneously: while pressing these keys, also press the
two soft reset keys.
2 Press all five keys until the screen reappears with text "Formatting PS" in lower left corner
(the screen fades and Field Xpert reboots before this happens)
3 Now release all keys: Field Xpert has been completely reset
4 The AutoInstallation tool now starts automatically. Do not touch any keys until the Field Xpert
beeps, performs a soft reset and the Windows Mobile screen appears.
5 Follow the instructions on the display until the "i.roc" screen appears
6 Now reinstall the Device Xpert software
90 Endress + Hauser
Page 93

Field Xpert 7Troubleshooting
7.1.4 Reinstalling Device Xpert
Notice:
• For reinstallation your Laptop/PC must be linked to Internet via ActiveSync or Windows Mobile
Device Center. One of these applications must be installed and connected before proceeding.
Device Xpert installation files are on the SD card of Field Xpert. After a clean reset, they must be
reinstalled in Field Xpert’s device memory and licensed again.
1 From the i.roc start screen, tap on Start=>Programs
2Tap on the File Explorer icon
3 Navigate to the SD card: My Documents=>SD Card
–Tap on SD Card
Endress+Hauser 91
Page 94

7 Troubleshooting Field Xpert
4 Tap on folder 2577, then folder E+H, then E+H_Setup
5 After a few seconds, the installation starts
– In the Choose Device Xpert page enter the index for your software package you ordered
initially, e.g. 3
–Tap on OK
6 Now enter the 11-character serial number of your Field Xpert (on rear of device)
–Tap on OK
92 Endress + Hauser
Page 95

Field Xpert 7Troubleshooting
7 Now enter your 5-digit Field Xpert password (on rear of CD-ROM)
–Tap on OK
8 Now select the language to be used by Field Xpert (as operating system in use)
–Tap on OK
9 Select whether Field Xpert is to work with a proxy server to have Internat access to the
software licencing server
– Enter the data of the proxy server
Endress+Hauser 93
Page 96

7 Troubleshooting Field Xpert
10 Field Xpert asks the user to check the data
–Tap on OK to confirm the message
–Tap Yes to confirm when the data are OK
– Tapping No causes the installation to be cancelled: the File Explorer screen appears (Step 4)
11 The Field Xpert auto installation program starts
– Do not do anything with Field Xpert until you are prompted to do so
12 If HART or HART+FF was selected at Step 5, the Power on HART Modem message appears
– Switch on the corresponding modem, then tap on OK to continue
– If you selected FF only go to Step 15
94 Endress + Hauser
Page 97

Field Xpert 7Troubleshooting
13 Tap on OK to confirm the message, then tap on the modem to be used
14 Tap on OK to confirm the message, then double tap on the modem to be used
– The modem is paired with Field Xpert and two green arrows appear in the icon
15 If you selected FF or HART+FF at Step 5, the procedure is or continues as follows
– The Power on FF Modem message appears
– Switch on the corresponding modem, then tap on OK to continue
Endress+Hauser 95
Page 98

7 Troubleshooting Field Xpert
16 Tap on OK to confirm the message, then tap the modem to be used
17 Tap on OK to confirm the message, then tap the modem to be used
– The modem is paired with Field Xpert
18 The installation is now complete
–Tap on OK to restart Field Xpert and open the start screen
96 Endress + Hauser
Page 99

Field Xpert 7Troubleshooting
7.2 Connection problems
All types of connection (Bluetooth modem, FXA520 and SFC162) should function without any
faults or interruptions. If you notice any communication failures (values in the DD are colored red),
please check your connections as shown below.
Fault Cause/Remedy
VIATOR Bluetooth modem does
not connect
FFblue Bluetooth modem does
not connect
Fieldgate FXA520 does not
connect
SFC162 gateway does not
connect
USB connection of Field Xpert to
a PC does not work
Communication error
• Modem or Field Xpert Bluetooth communication not switched on
• Batteries flat (<10%), see Chapter 4.2.4 - exchange batteries
• Communication stalled: Switch off Field Xpert and the modem, wait 10
seconds, switch on the modem, wait 10 seconds, switch on Field Xpert
Communication settings incorrect
• Check that the VIATOR modem has been selected, see Chapter 6.1
• Check that the modem has been correctly configured, see Chapter 5.2.2
• Check that the modem has been selected as deefualt modem, see Chapter 6.9.7
Communication error
• Modem or Field Xpert Bluetooth communication not switched on
– Modem sleeps if there is no traffic over a specific period (5 min)
– To awaken, disconnect from fieldbus, then reconnect to fieldbus
• Batteries flat (<10%), see Chapter 4.4.3 - exchange batteries
• Communication stalled: Switch off Field Xpert and disconnect the modem, wait
10 seconds, reconnect the modem, wait 10 seconds, switch on Field Xpert
Communication settings incorrect
• Check that the FFblue modem has been selected, see Chapter 6.2
• Check that the modem has been correctly configured, see Chapter 5.2.3
• Check that the modem has been selected as deefualt modem, see Chapter 6.9.7
Communication error
• Fieldgate FXA520 or Field Xpert WiFi communication not switched on
• Communication stalled: Switch off Field Xpert and the FXA520, wait 10
seconds, switch on the FXA520, wait 10 seconds, switch on Field Xpert
Field Xpert communication settings incorrect
• Check that Fieldgate FXA520 has been selected
• Check that Fieldgate FXA520 has been correctly configured, see Chapter 5.3.2
Fieldgate FXA520 communication settings incorrect
• Check that the Ethernet network addresses have been correctly set up
For more information see the operating instructions of Fieldgate FXA520
Communication error
• SFC162 gateway or Field Xpert WiFi communication not switched on
• Communication stalled: Switch off Field Xpert and the SFC162, wait 10
seconds, switch on the SFC162, wait 10 seconds, switch on Field Xpert
Field Xpert communication settings incorrect
• Check that SFC162 gateway has been selected
• Check that SFC162 gateway has been correctly configured, see Chapter 5.3.3
SFC162 gateway communication settings incorrect
• Check that the SFC162 is operating as visitor
• Check that the Ethernet network addresses have been correctly set up
For more information see the operating instructions of SFC162 gateway
ActiveSync connection lost
• Disconnect and reconnect USB port
•Restart PC
WiFi connection operating in parallel
• Set up ActiveSync to accept a parallel wireless connection
• If necessary consult your IT specialist
Endress+Hauser 97
Page 100

7 Troubleshooting Field Xpert
7.3 Software problems
Fault Cause/Remedy
Device Xpert freezes Software error
• No software error - function requires time to complete
• Communication stalled: Switch off Field Xpert and the modem/gateway, wait
10 seconds, switch on the modem/gateway, wait 10 seconds, switch on
Field Xpert
• Device Xpert crash: perform a soft reset, see Chapter 7.1.1
Communication settings incorrect
• Check that a modem is paired and ready to use, see Chapter 5.2.2/5.2.3
All values in parameter list go red Communication interrupted
Changes to FOUNDATION
fieldbus parameters cannot be
downloaded
Dynamic variables do not update Normal operation
• Check the modem/gateway, see Chapter 7.2
Operator error
• Set the Block Target Mode to OOS and try again, see Chapter 6.2.3
• To maintain a low level of communication on the HART protocol, dynamic
variables as per the initial setting are not updated. You can change these
manually:
–Select View=>Configuration=>Options
–Select Poll all Dynamic every X seconds, and enter the desired number of
seconds
–Select OK to close and confirm.
7.4 DD updates
If it becomes necessary to synchronize the DD library, e.g. there are new devices on the market,
this can done by using the DD update service with the order number SFX101 provided by your local
Endress+Hauser Sales Center. You will requested to give the Endress+Hauser serial number of Field
Xpert.
The DD Update Service will be enabled for specific Field Xpert, so that the user can synchronize the
library as described in Chapter 5.1.4.
The product code is as follows:
Device Xpert - Software Update Service SFX101
Serial Number of Field Xpert
ANExisting licence, SNR xxxxxx24320
New licence, order code SFX100-xxxxxxxxx
Software Update Service - Duration
121 year
2 years
SFX101-
98 Endress + Hauser
 Loading...