

Page 1
FEC 22
d Betriebsanleitung
e Operating Instructions
f Instructions de mise en service
Hauser
+
Endress
The Power of Know How
BA 160F/00/a3/04.03
016904-0000
Page 2

d Deutsch Seite 3…21
e English Page 23…41
f Francais Page 43…61
Page 3
Elektronikeinsatz
FEC22
Betriebsanleitung
Hauser+Endress
ThePowerofKnowHow
BA160F/00/de/04.03
016904-0000
Page 4
Kurzanleitung
Diese Kurzanleitung ermöglicht dem Fachpersonal den schnellen Standardabgleich.
Warnung!
Diese Kurzanleitung darf nur von Fachpersonal verwendet werden, das die Betriebsanleitung BA 160 gelesen und verstanden hat.
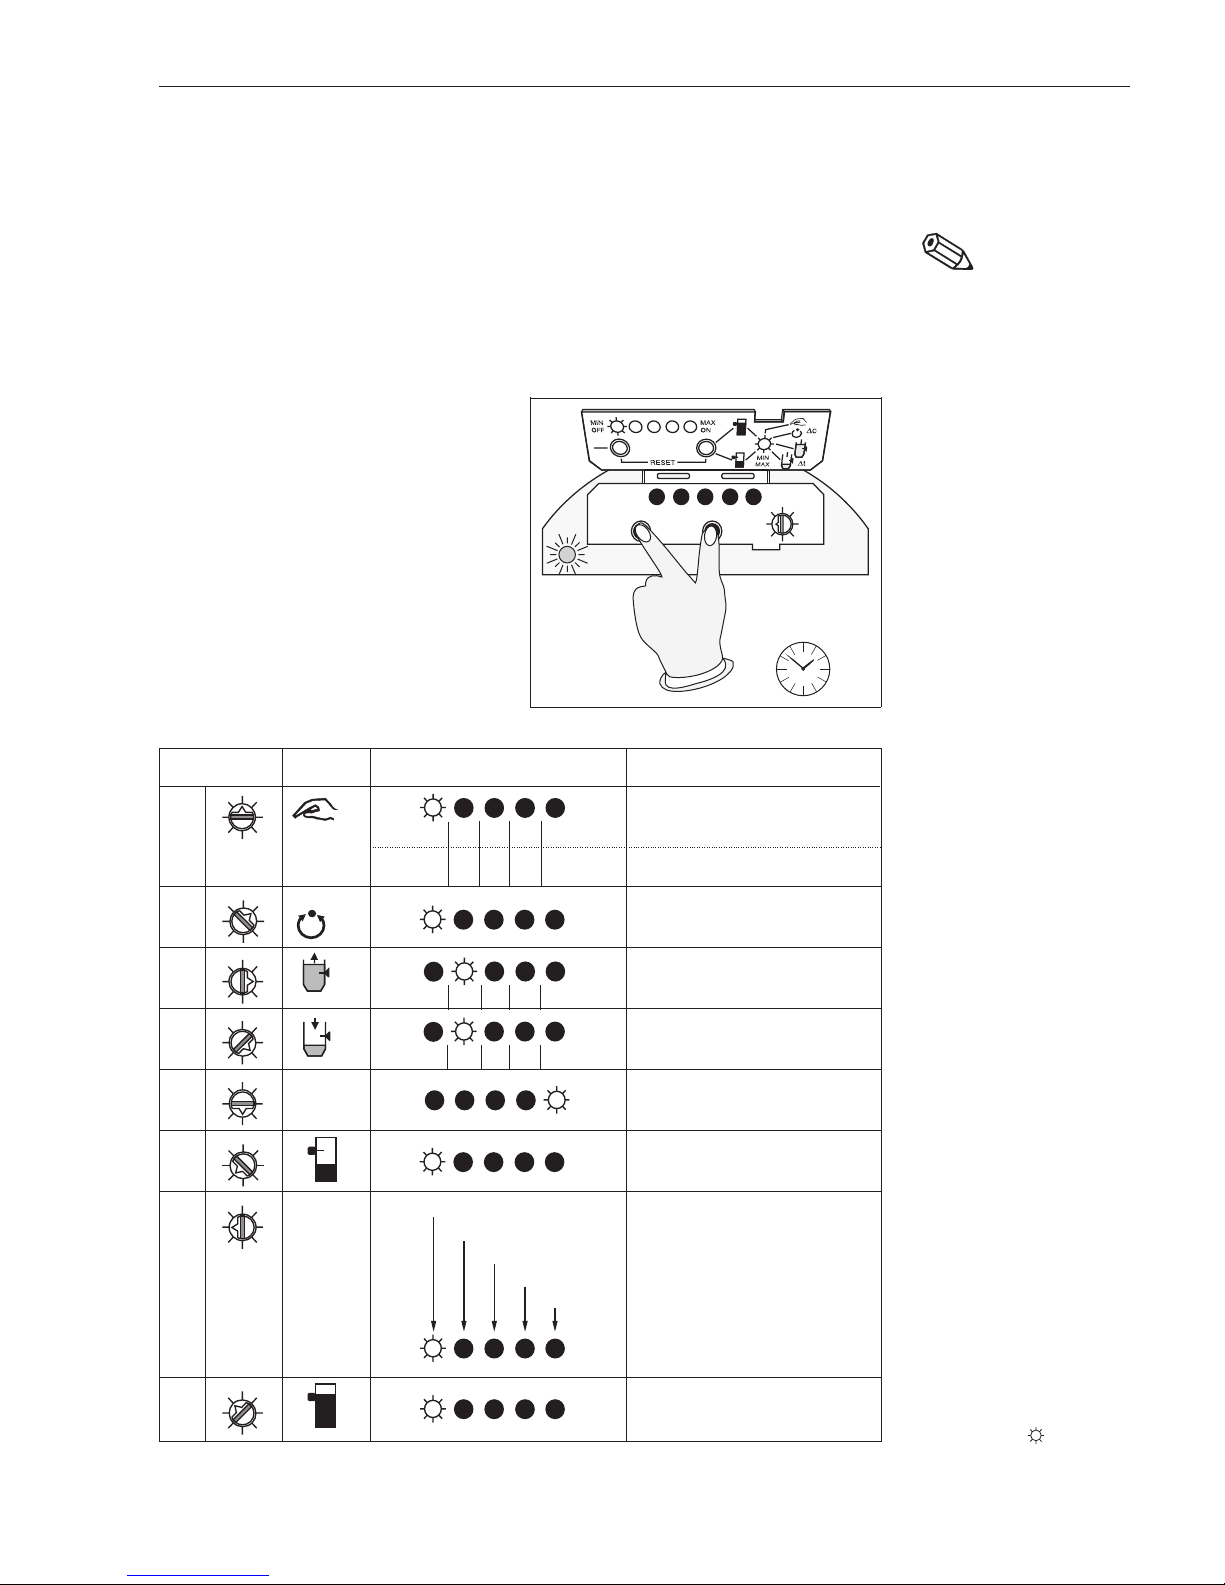
Reset
Abgleich unbedeckt
oder / und
Abgleich bedeckt
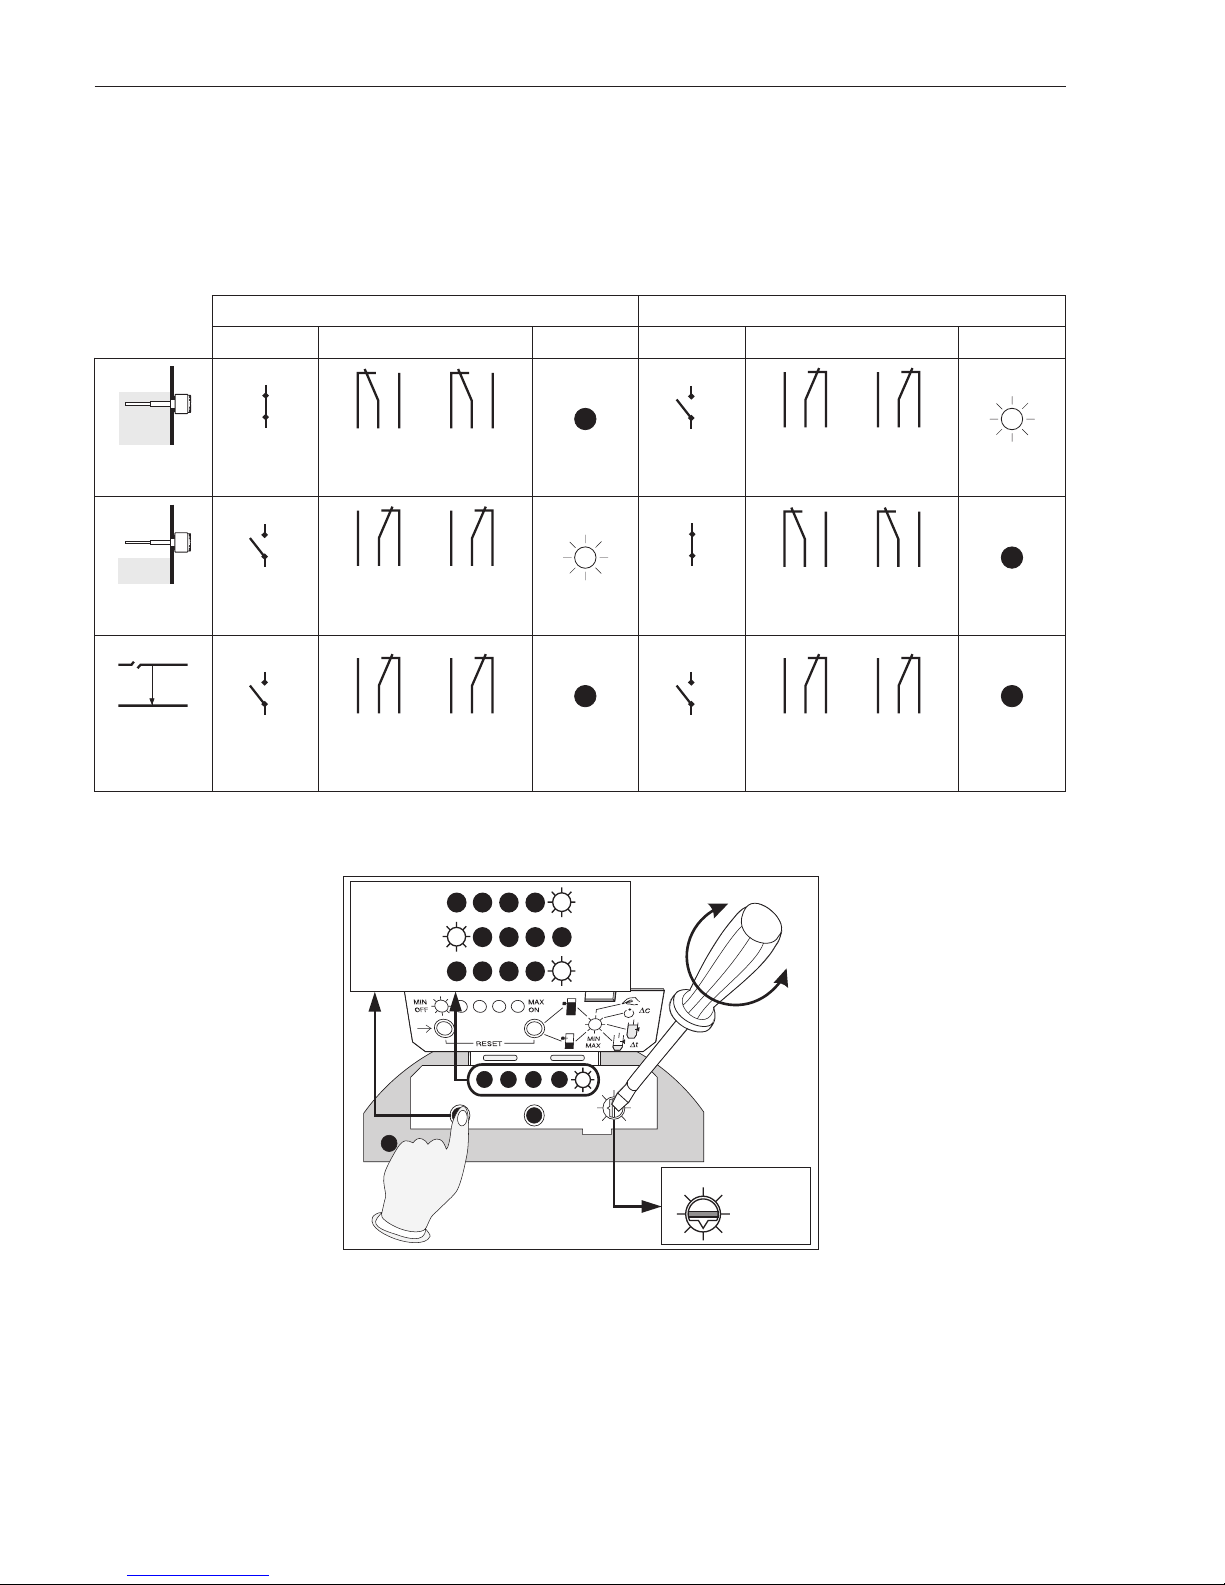
Übersichtstabelle
Warnung!
7
3
1
ONOFF
ONOFF
7
3
1
1
3
7
2
1
3
2s
5s
Seite 11
Seite 12
Seite 12
BA160Y02
Kurzanleitung
MAXMIN
OFF ON
OFF ON
OFF ON
dC
MIN
MAX
MIN
MAX
∆c∆
c
∆c∆c
∆c∆c
2pF
4pF
<4pF4-8pF8-16pF16-32pF>32
pF
32 pF16 pF8pF
∆t∆t
∆c∆
c
∆t∆t
∆t∆t
0,5 s 1,5 s 20 s12 s6s
∆t∆t
0,5 s 1,5 s 20 s12 s6s
1
3
7
7
7
7
7
7
7
3
3
3
3
3
3
1
1
1
1
1
1
1
2
3
4
5
6
8
7
3
1
1
7
dC < -4 pF
dC > 4 pF
-4 pF < dC < -2 pF
2 pF < dC < 4 pF
-2 pF < dC < +2 pF
Schalterstellung Symbol Bedeutung
linke Taste
Manuelle Schaltpunktverschiebung
Kapitel 6.1 / Seite13
Kapitel 6.2 / Seite15
Kapitel 6.2 / Seite14
Kapitel 6.4 / Seite16
Kapitel 6.4 / Seite16
Kapitel 6.3 / Seite16
Kapitel 6.5 / Seite17
Kapitel 5.2 / Seite12
Kapitel 5.4 / Seite12
Kapitel 5.3 / Seite12
Kapitel 5.4 / Seite12
Anzeige:aktueller Schaltpunkt-
abstand C∆
linke Taste Schaltpunktoptimierung
Schaltverzögerung bei Bedeckung
Schaltverzögerung bei Freiwerden
Minimum-/Maximum-Sicherheit
Abgleich unbedeckt
Abgleich bedeckt
Service-Modus
linke Taste
linke Taste
linke Taste
Anzeige
rechte Taste
2s
rechte Taste
2s
Zusätzliche Information unter:
= Werkswert / Wertzuordnungüber ...
Elektronikeinsatz FEC 22
4 Endress+Hauser
Page 5

Sicherheitshinweise
Bestimmungsgemäße
Verwendung
Der Elektronikeinsatz FEC 22 mit einer Multicap- oder Multicap-T-Sonde darf nur als
Füllstandgrenzschalter verwendet werden. Er ist nach dem Stand der Technik betriebssicher gebaut und berücksichtigt die einschlägigen Vorschriften. Wenn er jedoch unsachgemäß oder nicht bestimmungsgemäß eingesetzt wird, können von ihm
Gefahren ausgehen.
Für Schäden aus unsachgemäßen oder nicht bestimmungsgemäßen Verwendung haftet der Hersteller nicht. Veränderungen und Reparaturen am Gerät dürfen nur vorgenommen werden, wenn dies die Betriebsanleitung ausdrücklich zuläßt. Beschädigte
Geräte, von denen eine Gefährdung ausgehen könnte, dürfen nicht in Betrieb genommen werden und sind als defekt zu kennzeichnen.
Einsatz im Ex-BereichBeim Einsatz des Meßsystems in explosionsgefährdeten Bereichen sind zusätzlich
die entsprechenden nationalen Bestimmungen und die in den Zertifikaten aufgeführeten meßtechnischen und sicherheitstechnischen Auflagen an die Meßstellen einzuhalten.
Montage,
Inbetriebnahme
undWartung
Montage, elektrischer Anschluß, Inbetriebnahme und Wartung dieses Gerätes darf
nur durch ausgebildetes Fachpersonal erfolgen, das vom Anlagenbetreiber dazu autorisiert wurde. Das Fachpersonal muß diese Bedienungsanleitung gelesen und verstanden haben und die Anweisungen befolgen.
BedienungDas Gerät darf nur durch Personal bedient werden, das vom Anlagenbetreiber autori-
siert und eingewiesen wurde. Die Anweisungen in dieser Betriebsanleitung sind zu befolgen.
Inhaltsverzeichnis
Sicherheitshinweise . . . . . . . . . . 5
1 Einleitung . . . . . . . . . . . . . . 7
1.1 Einsatzbereich . . . . . . . . . . . 7
1.2 Funktionsprinzip . . . . . . . . . . . 7
1.3 Meßeinrichtung . . . . . . . . . . . 7
2 Einbau . . . . . . . . . . . . . . . . 8
3 Elektrischer Anschluß . . . . . . . . . 8
4 Bedienung . . . . . . . . . . . . . . 9
4.1 Bedienelemente . . . . . . . . . . . 10
4.2 Anzeigeelemente . . . . . . . . . . 10
5 Inbetriebnahme . . . . . . . . . . . . 11
5.1 Rücksetzen auf Werkseinstellung (Reset) . 11
5.2 Abgleich unbedeckt . . . . . . . . . 12
5.3 Abgleich bedeckt . . . . . . . . . . 12
5.4 Abgleich unbedeckt und bedeckt . . . . 13
6 Weitere Einstellungen . . . . . . . . . 13
6.1 Manuelle Schaltpunktverschiebung . . . 13
6.2 Schaltpunktoptimierung . . . . . . . . 14
6.3 Minimum-/Maximum-Sicherheit . . . . . 16
6.4 Schaltverzögerung . . . . . . . . . . 16
6.5 Service-Modus . . . . . . . . . . . 17
7 Fehlersuche und -beseitigung . . . . . . 18
8 Austausch eines Elektronikeinsatzes . . . 18
9 Reparatur . . . . . . . . . . . . . . . 19
10 Entsorgung . . . . . . . . . . . . . . 19
11 Technische Daten . . . . . . . . . . . 19
Index . . . . . . . . . . . . . . . . . 21
InhaltsverzeichnisElektronikeinsatz FEC 22
Endress+Hauser 5
Page 6
Sicherheitsrelevante Hinweise
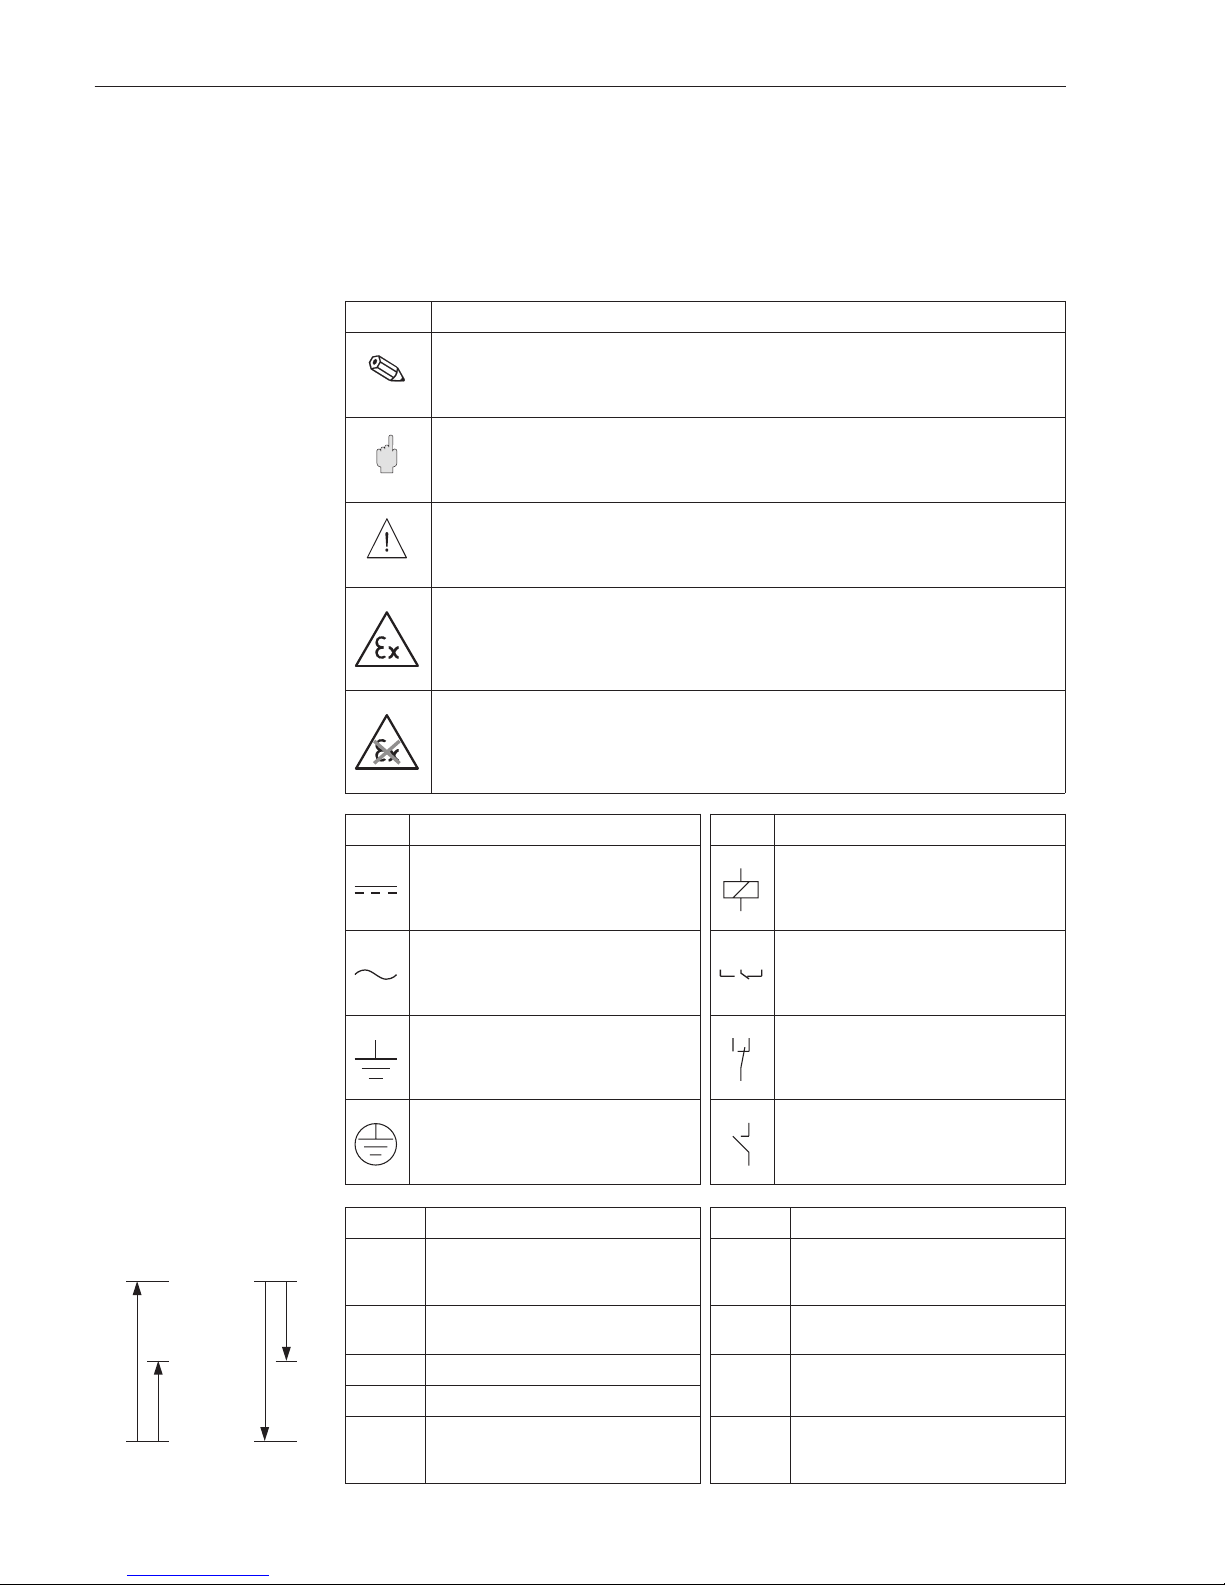
Um sicherheitsrelevante oder alternative Vorgänge hervorzuheben, haben wir die folgenden Sicherheitshinweise festgelegt, wobei jeder Hinweis durch ein entsprechendes Piktogramm gekennzeichnet wird.
Sicherheitshinweise
Zündschutzart
Elektrische Symbole
Weitere Symbole
Symbol Bedeutung
Hinweis!
Hinweis deutet auf Aktivitäten oder Vorgänge hin, die - wenn sie nicht ordnungsgemäß
durchgeführt werden - einen indirekten Einfluß auf den Betrieb haben oder eine
unvorhergesehene Gerätereaktion auslösen können.
Achtung!
Achtung deutet auf Aktivitäten oder Vorgänge hin, die - wenn sie nicht ordnungsgemäß
durchgeführt werden - zu Verletzungen von Personen oder zu fehlerhaften Betrieb des
Gerätes führen können.
Warnung!
Warnung deutet auf Aktivitäten oder Vorgänge hin, die - wenn sie nicht ordnunggemäß
durchgeführt werden - zu ernsthaften Verletzungen von Personen, zu einem
Sicherheitsrisiko oder zur Zerstörung des Gerätes führen
Explosionsgefährdeter Bereich
Dieses Symbol kennzeichnet in den Zeichnungen dieser Bedienungsanleitung den
explosionsgefährdeten Bereich.
– Geräte, die sich im explosionsgefährdeten Bereich befinden oder Leitungen für solche
Geräte müssen eine entsprechende Zündschutzart haben.
Sicherer Bereich (nicht explosionsgefährdeter Bereich)
Dieses Symbol kennzeichnet in den Zeichnungen dieser Betriebsanleitung den nicht
explosionsgefährdeten Bereich.
– Geräte im nicht explosionsgefährdeten Bereich müssen auch Zertifiziert sein, wenn
Anschlußleitungen in den explosionsgefährdeten Bereich führen.
Hinweis!
Achtung!
Warnung!
Sicherheitshinweise
Symbol
Bedeutung
Symbol
Bedeutung
Gleichstrom
Eine Klemme, an der Gleichspannung
anliegt oder durch die Gleichstrom fließt.
Elektromechanischer Antrieb
Kennzeichnet die Klemme, an die eine
externe Last (z.B. Relais, SPS )
angeschlossen wird.
Wechselstrom
Eine Klemme, an der (sinusförmige)
Wechselspannung anliegt oder durch
die Wechselstrom fließt.
Wechsler (Umschaltglied)
Kennzeichnet die Klemmen für einen
Relaisausgang.
Erdanschluß
Eine geerdete Klemme, die vom
Gesichtspunkt des Benutzers schon
über ein Erdungssystem geerdet ist.
Wechsler (Umschaltglied)
Kennzeichnet die Leuchtdiode für den
Schaltzustand der Relais in der
Wechselstromausführung
Schutzleiteranschluß
Eine Klemme, die geerdet werden muß,
bevor andere Anschlüsse hergestellt
werden dürfen.
Schließer (Einschaltglied)
Kennzeichnet die Leuchtdiode für den
Schaltzustand des Schaltausgangs in
der Gleichstromausführung
Symbol Definition
Symbol Definition
C
L
unterer Abgleichpunkt (Leerkapazität) dC
Abweichung der aktuell vom Gerät
gemessenen Kapazität vom
eingestellten Schaltpunkt C
S
C
H
oberer Abgleichpunkt (Kapazität bei
Bedeckung)
LED Leuchtdiode
∆C Schaltpunktabstand
DC-PNP
Gleichstromausführung mit
PNP-Ausgang
C
S
Schaltpunkt (Schaltpunktkapazität)
C
X
Gemessene Kapazitätsänderung,
bezogen auf den unteren ① oder
oberen ② Abgleichwert: C
X
= 2 x ∆C
AC-DPDT
Wechselstromausführung mit zwei
gleichgeschalteten Umschaltkontakten (DPDT)
C
H
C
L
C
S
∆C
∆C
C
H
C
L
C
X
C
X
C
S
①
②
Elektronikeinsatz FEC 22
6 Endress+Hauser
Page 7
1 Einleitung
1.1 Einsatzbereich
Der Elektronikeinsatz FEC 22 und eine Sonde des Multicap-Baukastens bilden den
kompakten Füllstandgrenzschalter für die Grenzstanddetektion in Füllgütern.
Da der Elektronikeinsaz FEC 22 eine komplette (mikroprozessorgesteuerte)
Grenzschaltelektronik beinhaltet, benötigt er keine zusätzlichen Auswertegeräte.
Den Elektronikeinsatz FEC 22 gibt es in zwei Ausführungen:
• Wechselstromausführung mit zwei gleichgeschalteten Umschaltkontakten (DPDT)
• Gleichstromausführug mit PNP-Ausgang
Mit diesen beiden Varianten ist eine optimale Anpassung an verschiedene Meßaufgaben möglich.
1.2 Funktionsprinzip
GrenzstanddetektionBeim kapazitiven Verfahren bildet die Sonde und Behälterwand einen Kondensator.
Im Raum zwischen der Sonde und Behälterwand befindet sich je nach Füllstand des
Behälters entweder Luft (leerer Behälter) oder Füllgut (voller Behälter). Bei leerem Behälter ist die Anfangskapazität deutlich kleiner als die bei vollem Behälter erreichte
maximale Endkapazität, die von der Dielektrizitätskonstante des Füllguts abhängig ist.
Diese Kapazitätsänderung zwischen der Anfangskapazität und der Endkapazität führt
bei einer entsprechenden Einstellung zum Schalten des Füllstandgrenzschalters.
Aktive
Ansatzkompensation
Die im Elektronikeinsatz FEC 22 integrierte Schaltung für die aktive Ansatzkompensation und eine kapazitive Grenzstandsonde mit aktiver Ansatzkompensation bieten die
Problemlösung beim Einsatz in hochviskosen und auskristallisierenden Flüssigkeiten.
Da diese Medien zur starker Ansatzbildung an der Sonde neigen, ist die aktive Ansatzkompensation eine Lösung, die ohne Wartungsaufwand sicher funktioniert. Für
extreme Ansatzbildung und ungünstige Einbauverhältnisse können die Maßnahmen
Abschirmung und aktive Ansatzkompensation kombiniert werden.
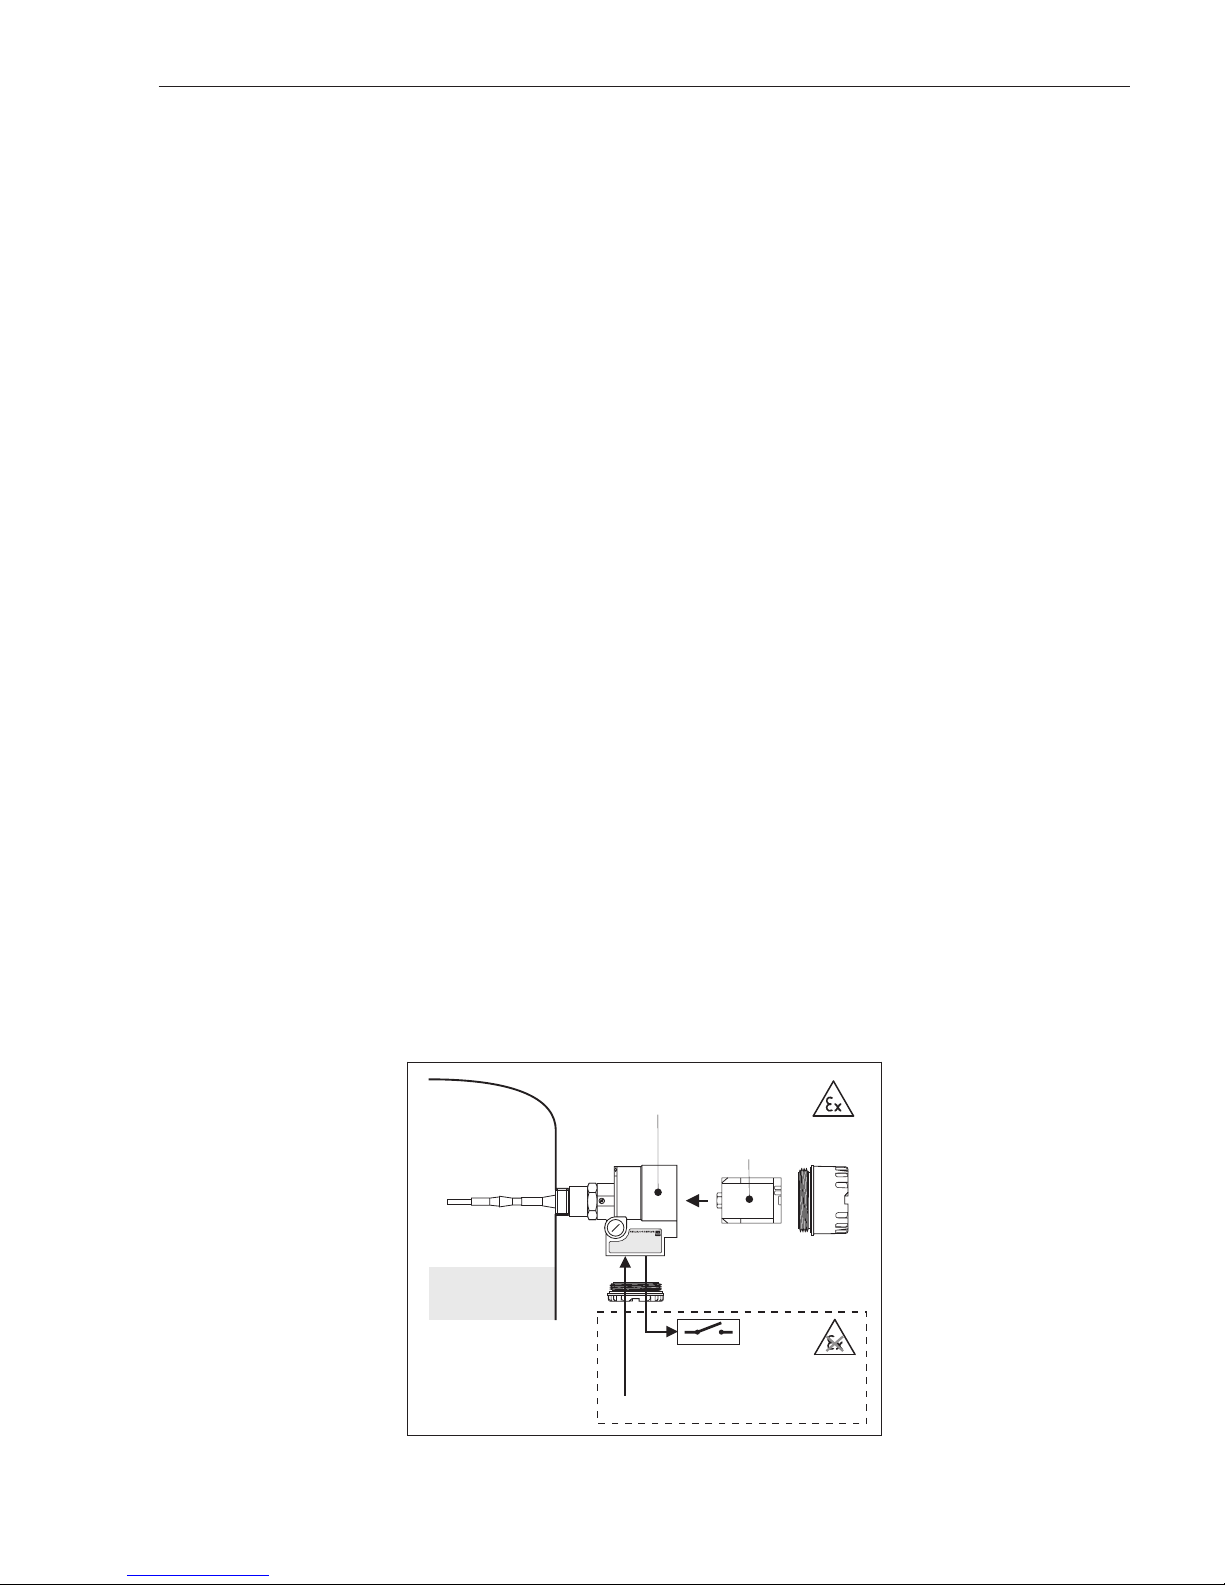
1.3 Meßeinrichtung
Der Elektronikeinsatz FEC 22 beinhaltet eine komplette Grenzschaltelektronik.
Die gesamte Meßeinrichtung besteht daher nur aus:
• dem Elektronikeinsatz
FEC 22
• einer Multicap-T- oder
Multicap-Sonde
• einer Spannungsquelle
und
• den angeschlossenen
Signalgebern, Schaltgeräten, Steuerungen (z.B.
Lampen, Hupen, Relais,
SPS, Prozeßleitsystemen
usw.)
U
Multicap-T- oder
Multicap-Sonde
FEC 22
Spannungsversorgung
Auswertekontakt
(Relais oder PNP)
BA160Y11
Abb.1.1
Meßeinrichtung
Elektronikeinsatz FEC 22 1 Einleitung
Endress+Hauser 7
Page 8
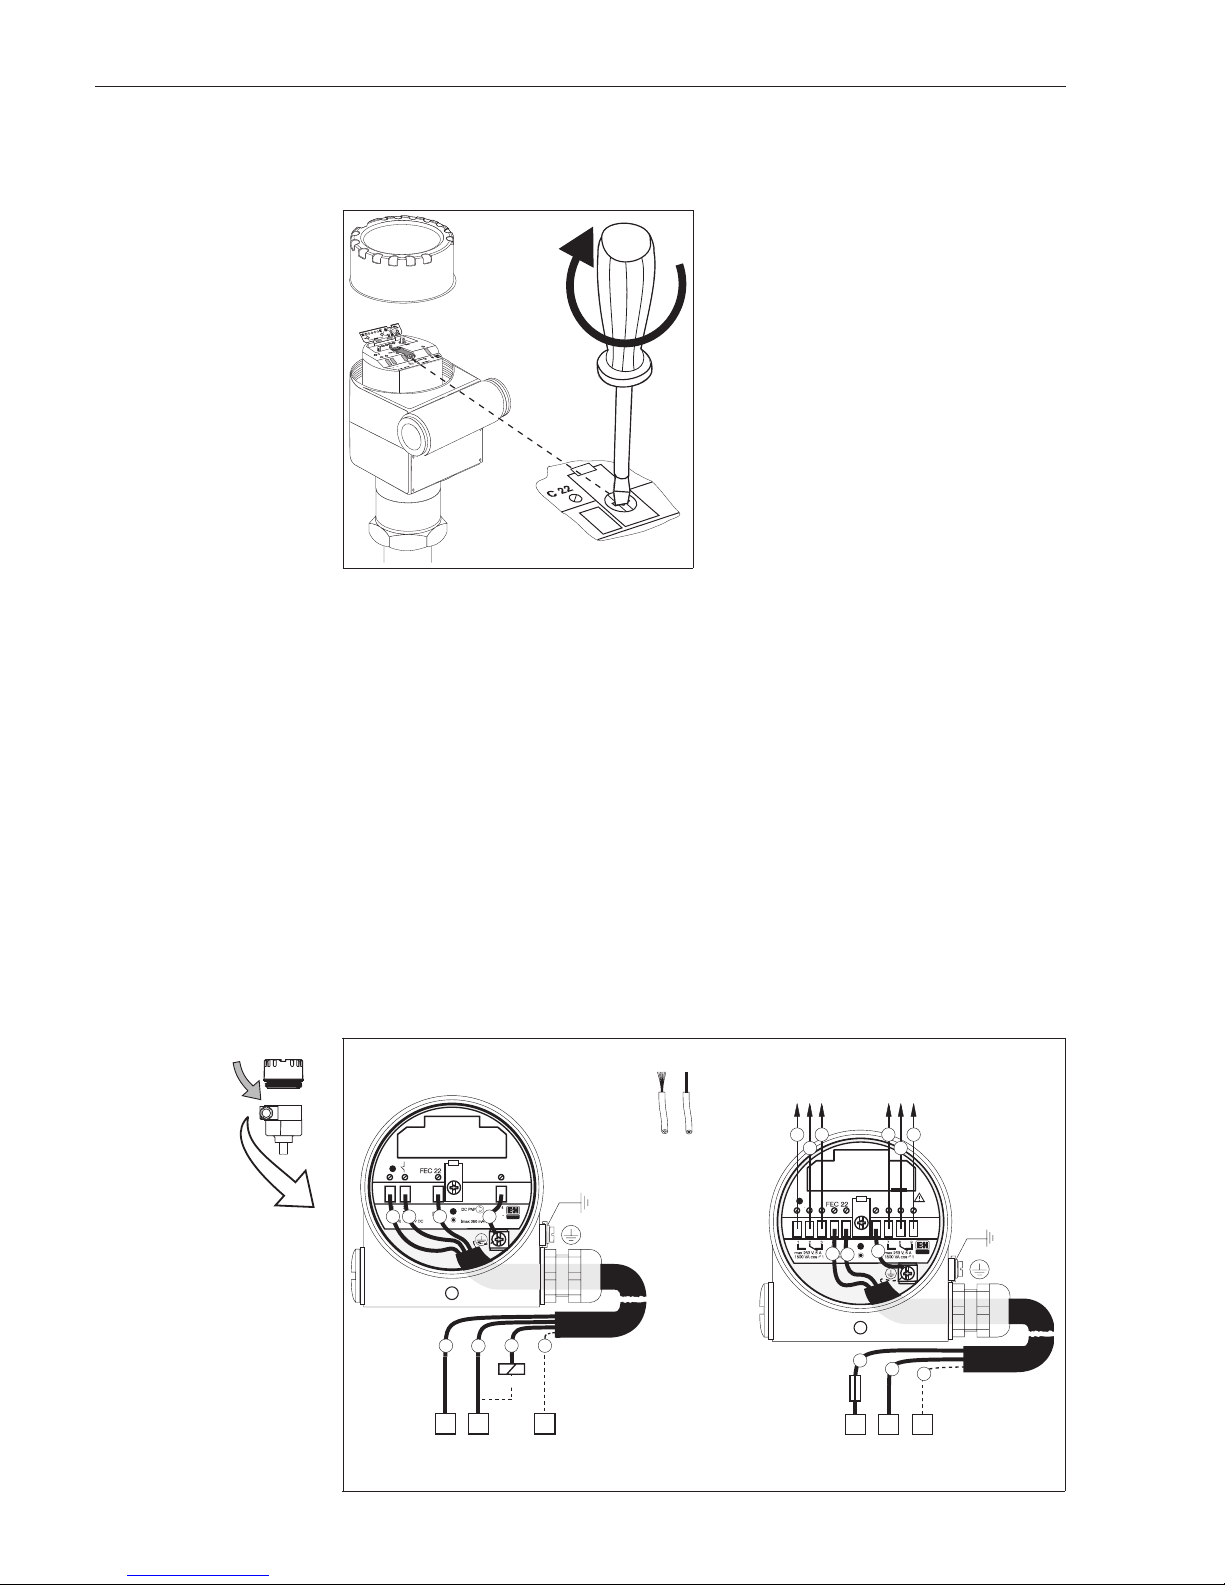
2 Einbau
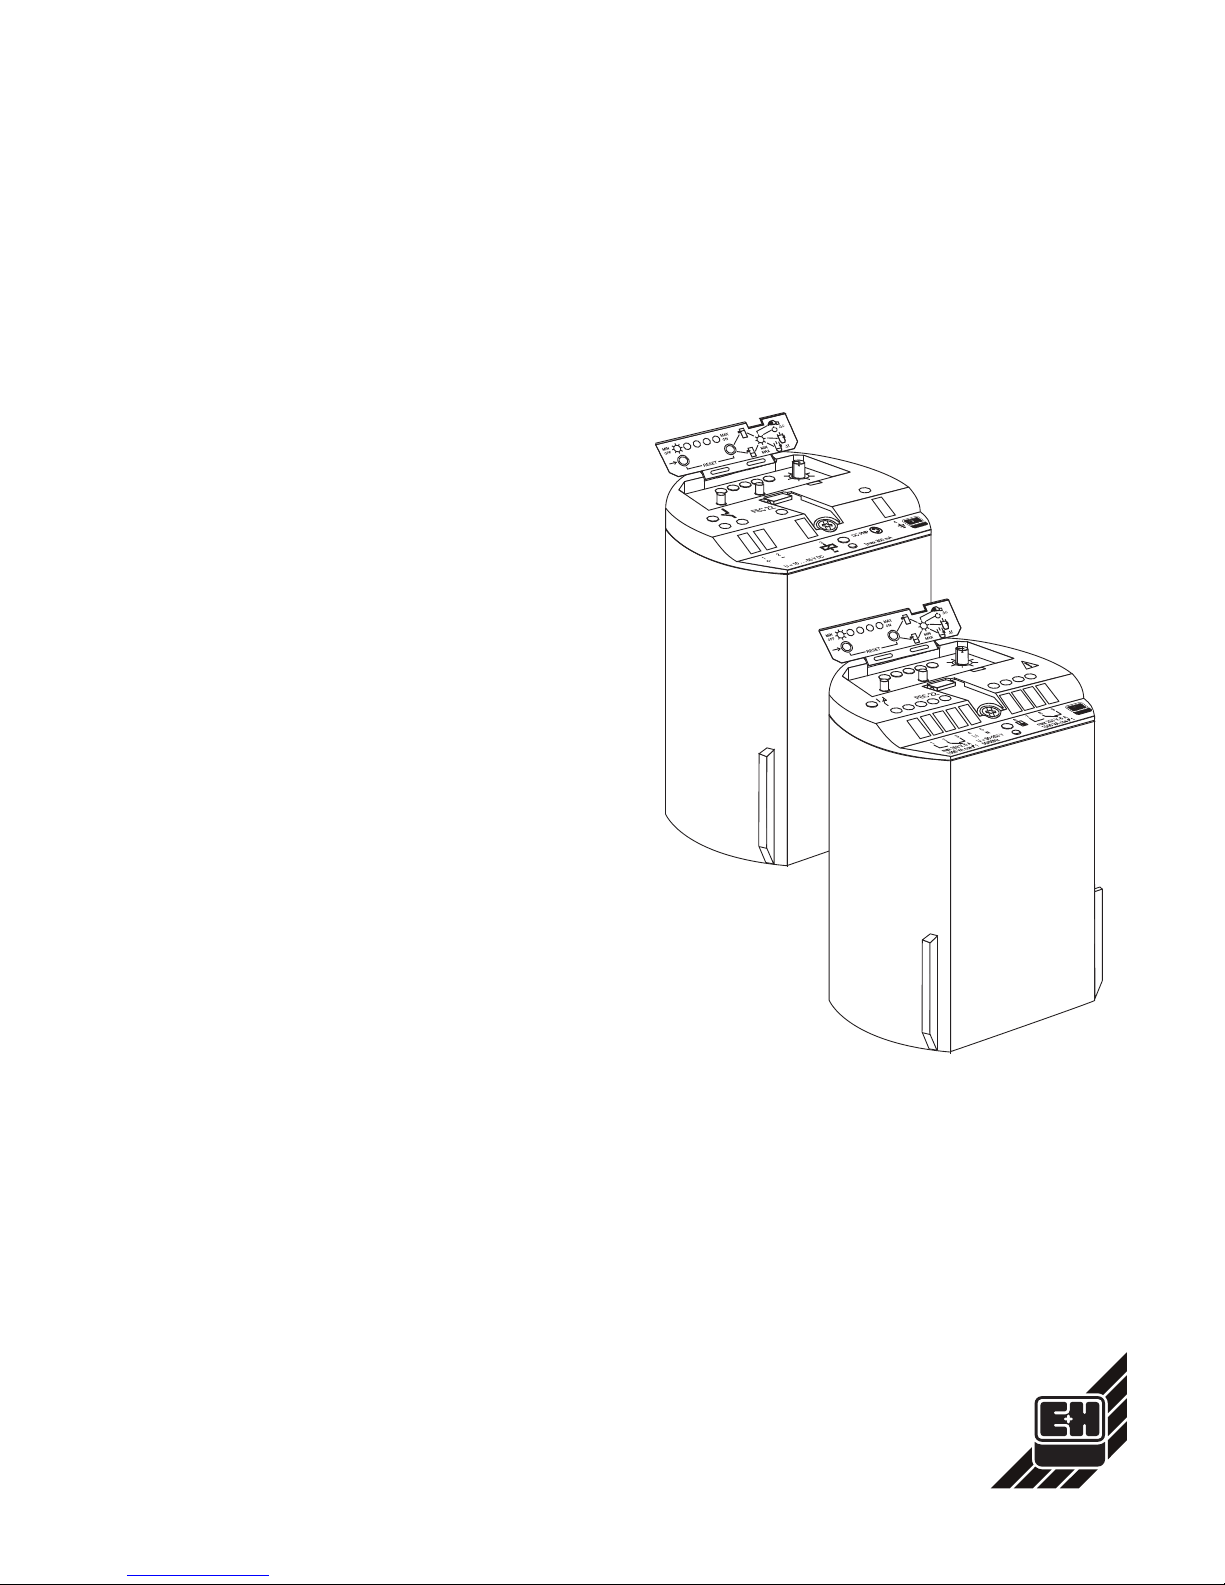
Der Elektronikeinsatz FEC 22 kann nur in
die Gehäusetypen F6 (aus Aluminium),
F10 (aus Kunststoff) und T3 (aus Aluminium mit separatem Anschlußraum) der
Multicap-T- und Multicap-Sonden eingebaut werden. Alle Gehäusetypen mit hohem Deckel (siehe Abb. 3.1 und 3.2).
Ablauf
• Drehen Sie den Gehäusedeckel auf.
• Stecken Sie den Elektronikeinsatz
FEC 22 im Gehäuse in die dafür vorgesehene Buchse.
• Drehen Sie mit einem Schraubendreher
die Befestigungsschraube am Elektronikeinsatz FEC 22 fest
3 Elektrischer Anschluß
Allgemeine Hinweise Vor dem Anschluß bitte folgendes beachten:
• Die Versorgungsspannung muß mit der Angabe auf dem Elektronikeinsatz überein-
stimmen.
• Versorgungsspannung ausschalten, bevor Sie das Gerät anschließen.
Ex-Bereich Beim Einsatz im explosionsgefährdeten Bereich sind die entsprechenden nationalen
Normen und die Angaben in den Zertifikaten einzuhalten. Hierzu siehe die entsprechenden Dokumentationen für Sonden.
Anschluß Führen Sie die Speiseleitung durch die Kabeleinführung am Sondengehäuse.
Klemmen Sie die Kabel gemäß Anschlußbild an. Je nach Ausführung des Elektronikeinsatzes und dem Gehäusetyp gibt es unterschiedliche Anzahl von Anschlußklemmen (siehe Anschlußbilder).
BA160Y21
Abb.2.1
Einbau im Sondengehäuse
1
1
+
PE
R
-
2
3
2
(+)
4
3
-
4
44556
PE
N
1A
L1
123 789
5
4
6
max.2,5 mm²
U=:10 V… 55V
(Ground)
R = externe Last
(Ground)
U~:90 V… 253V
50/60 Hz
Relaisausgang 1 Relaisausgang 2
Gleichstromausführung Wechselstromausführung
BA160Y31
Abb.3.1
Elektrischer Anschluß
im Sondengehäuseaus
Aluminium TypF6 oder
KunststoffTypF10
2 Einbau Elektronikeinsatz FEC 22
8 Endress+Hauser
Page 9
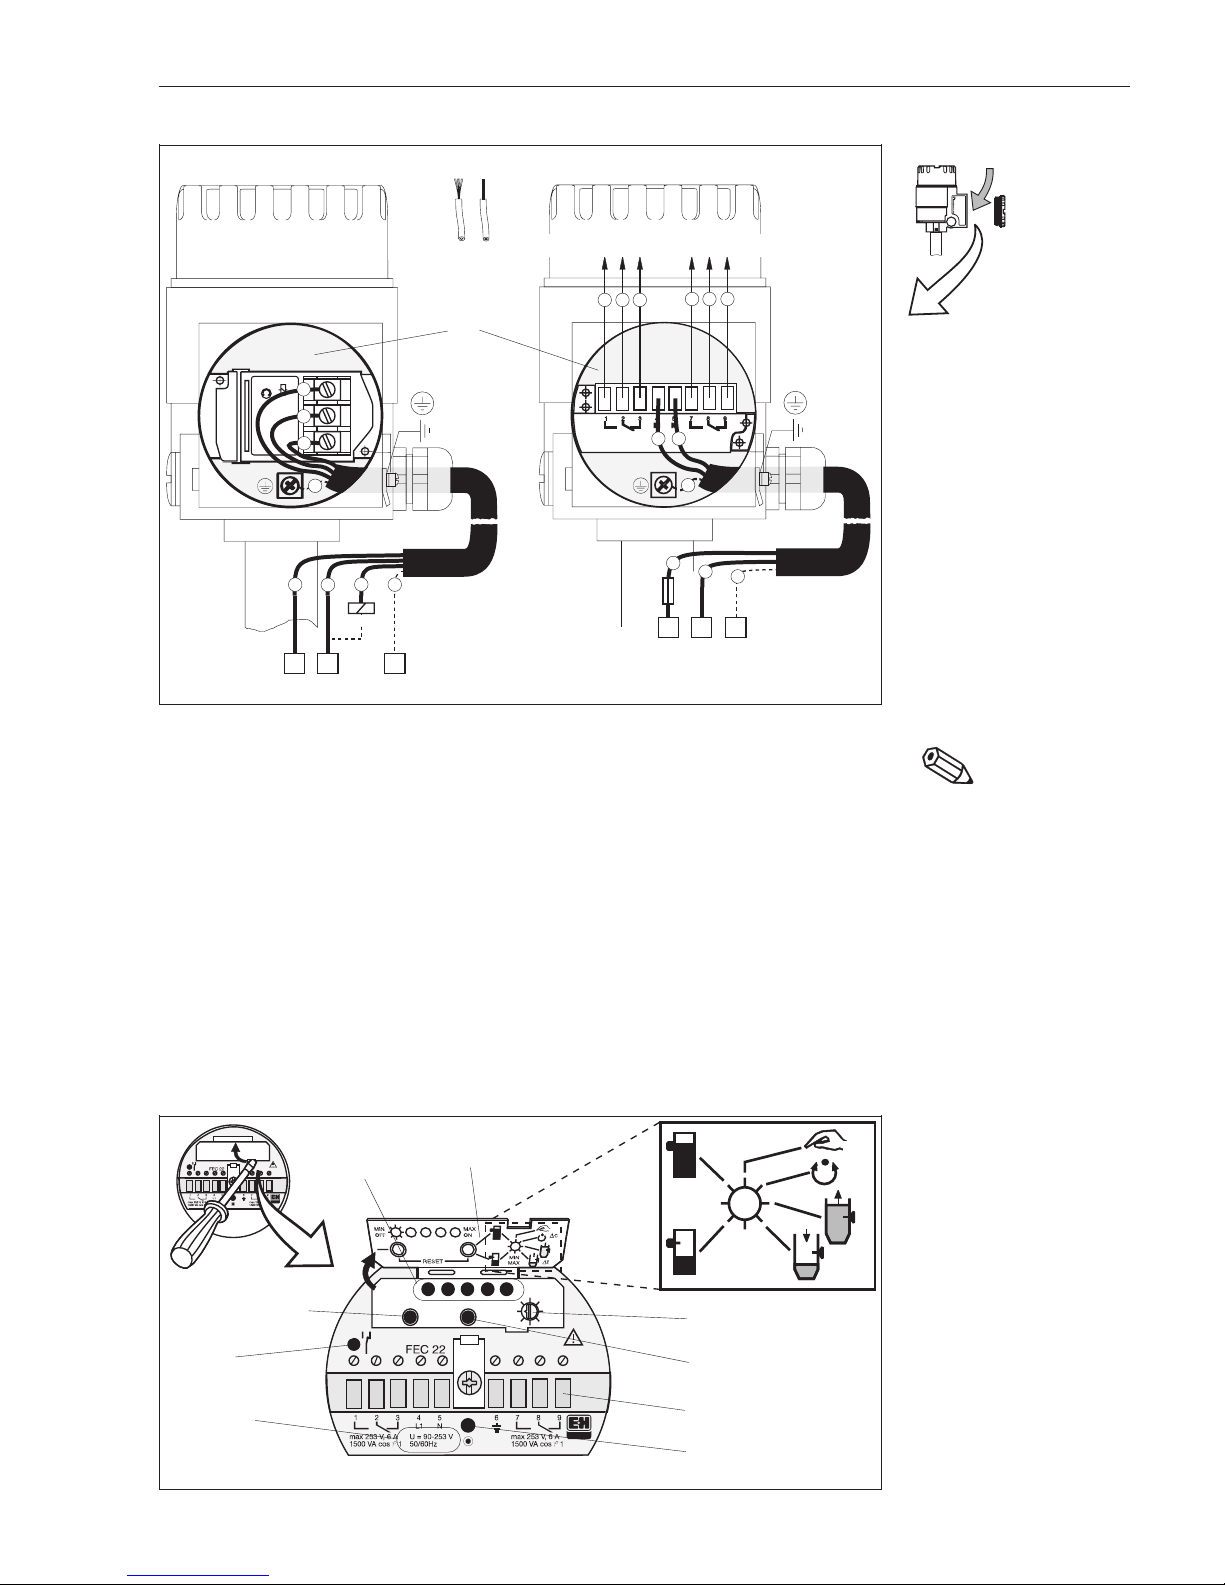
Hinweis!
Sorgen Sie nach dem Anschluß dafür, daß der Deckel fest zugeschraubt und die Kabeldurchführung des Sondengehäuses dicht ist.
4 Bedienung
Dieses Kapitel beschreibt die Bedienung des Elektronikeinsatzes FEC 22 am Einsatzort. Ein Teil der Anzeigeelemente und die Bedienelemente des Elektronikeinsatzes
sind durch eine Abdeckklappe geschützt. Durch einen schlitzförmigen Ausschnitt läßt
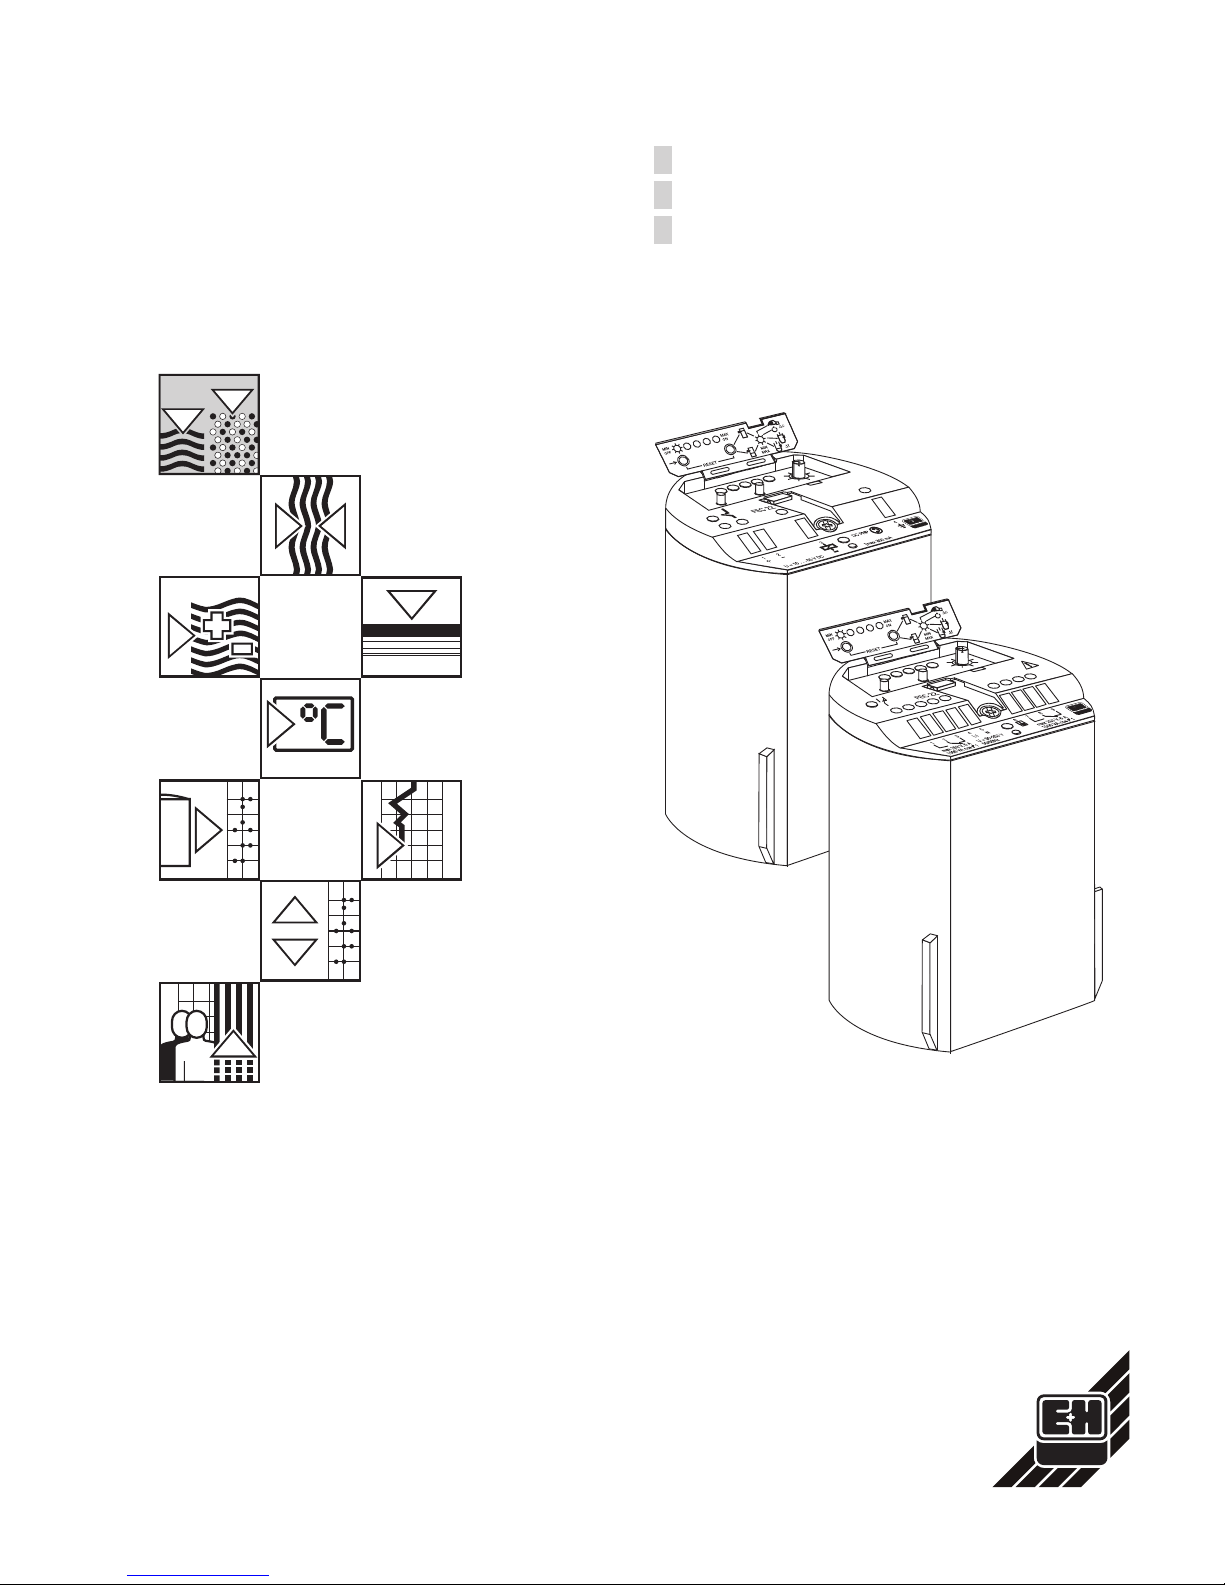
sich die Abdeckklappe mit einem kleinen Schraubendreher aufklappen. Die Innenseite der Abdeckklappe ist mit Symbolen bedruckt, die als Kurzanleitung dienen (Erläuterung siehe Tabelle 5.1)
Hinweis!
U:10…55 VDC Imax 350mA
PNP
1
2
3
+
-
-
1
1
+
PE
R
-
2
3
2
(+)
3
-
4
5
4
4
5
6
PE
1A
L1
N
789
3
21
4
6
max.2,5 mm²
(Ground)
U=:10 V… 55V
(Ground)
R =externe Last
U~:90 V… 253V
50/60 Hz
Relaisausgang 1 Relaisausgang 2
Gleichstromausführung Wechselstromausführung
Anschlußraum
BA160Y32
Abb.3.2
Elektrischer Anschluß
im Sondengehäuseaus
AluminiumTypT3 mit
separatem Anschlußraum
MIN
MAX
MIN
MAX
∆t∆t
∆c∆
c
Abdeckklappe
mit Kurzanleitung
Angabe:
Versorgungsspannung
Grüne LED:
Betriebsbereitschaft
Rote LED:
Schaltzustand
LinkeTaste:
z.B.Wertzuordnung
Rechte Taste:
z.B.Abgleich
LED-Reihe
Drehschalter
Anschlußklemmen
BA160Y40
Abb.4.1
Anordnung der Anzeigeund Bedienelemente
Elektronikeinsatz FEC 22 4 Bedienung
Endress+Hauser 9
Page 10
4.1 Bedienelemente
Unter der Abdeckklappe befinden sich zwei Tasten und ein Drehschalter.
Bedientasten Mit der linken Taste können, je nach Drehschalterstellung, die einzelnen Funktionen
ein- oder ausgeschaltet werden oder die entsprechenden Werte der jeweiligen Funktion zugeordnet werden (siehe Tabelle 5.1).
Mit der rechten Taste können Sie, je nach Drehschalterstellung den Abgleich unbedeckt oder bedeckt durchführen.
Drehschalter Mit dem Drehschalter sind 8 Einstellungen möglich. In der Tabelle 5.1 sind die in der
unter der Abdeckklappe gezeigten Kurzanleitung verwendeten Symbole, deren Bedeutung und zugehörige Schalterstellung aufgelistet.
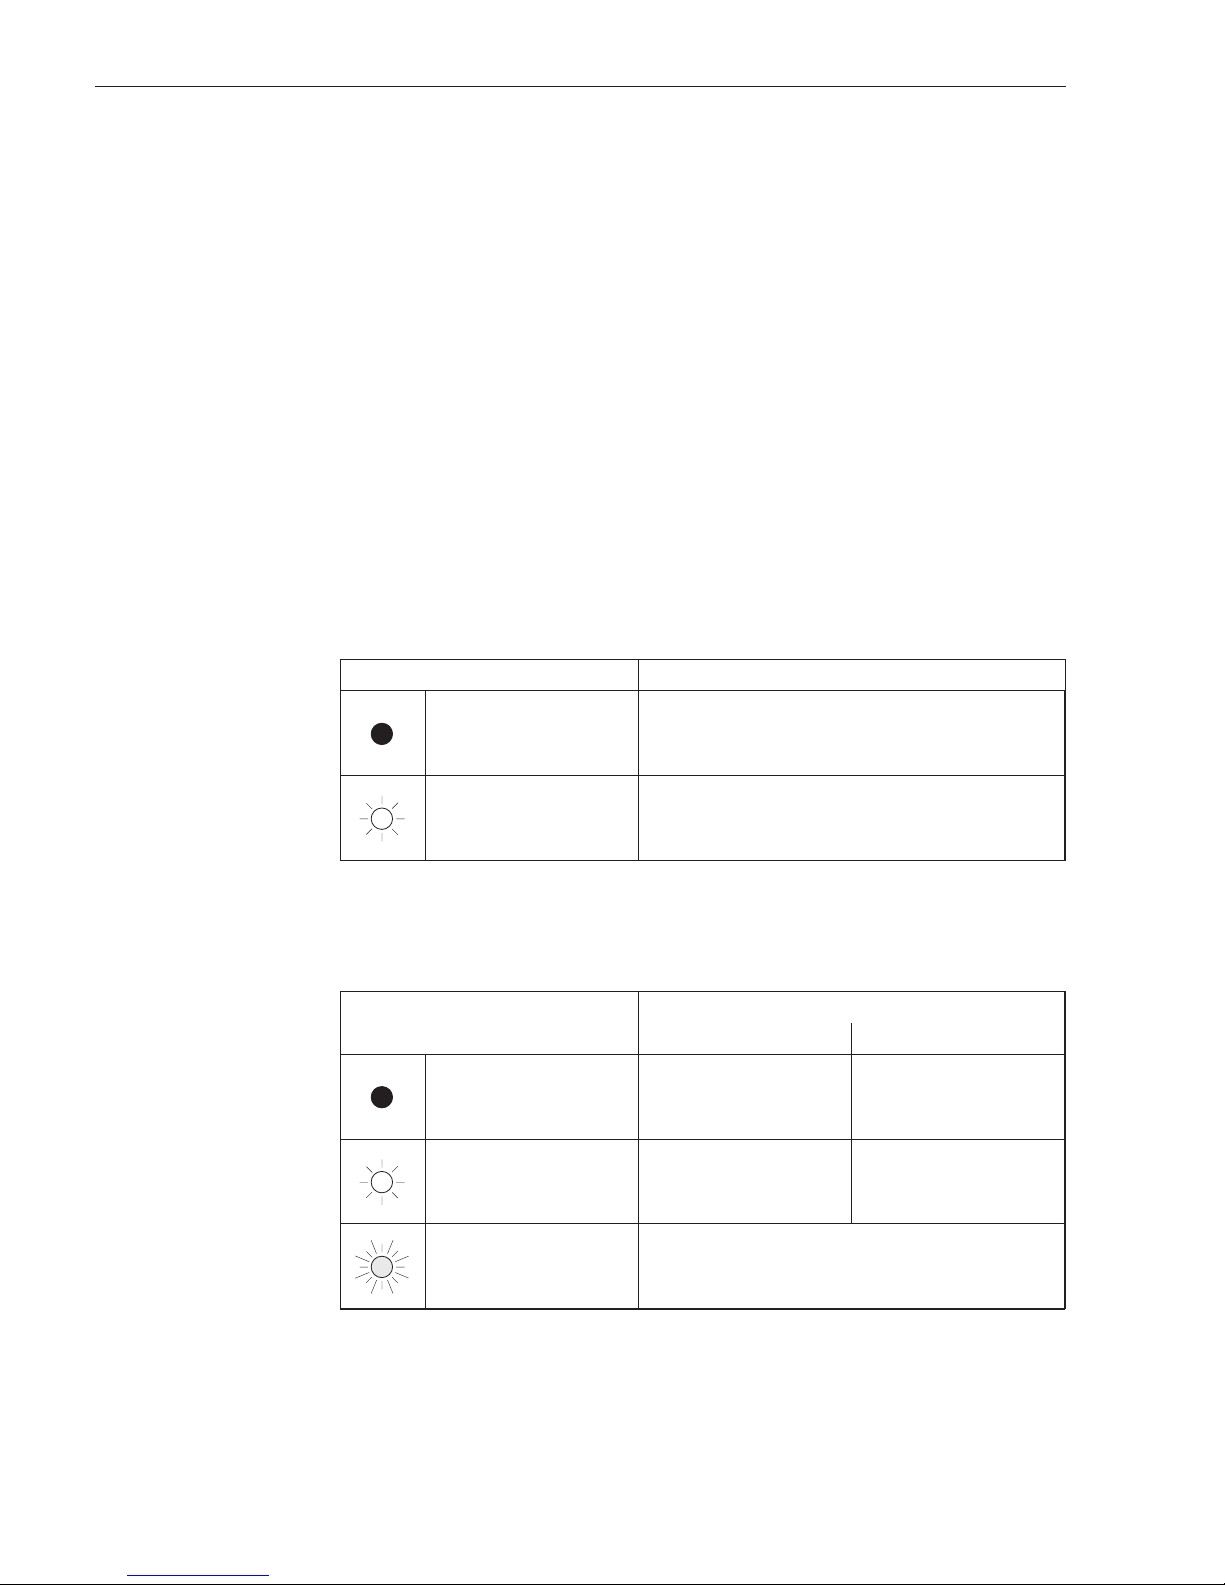
4.2 Anzeigeelemente
LED-Reihe Unter der Abdeckklappe befindet sich eine LED-Reihe bestehend aus 5 LEDs. Mit die-
ser LED-Reihe werden die Einstellungen des Gerätes angezeigt (siehe Tabelle 5.1).
Grüne LED Die grüne LED zeigt die Betriebsbereitschaft an.
Rote LED Die rote LED zeigt den jeweiligen Schaltzustand an (siehe auch Tabelle 6.1 / Seite 16).
Schaltzustand Funktion
Grüne LED leuchtet nicht
Die Versorgungsspannung ist ausgefallen
oder ausgeschaltet.
Grüne LED leuchtet
Die Versorgungsspannung ist eingeschaltet.
Das Gerät ist betriebsbereit.
Tabelle 4.1
Funktion dergrünen LED
Schaltzustand
Funktion
Gleichstromausführung Wechselstromausführung
Rote LED leuchtet nicht
Schaltausgang ist durchgeschaltet oder
die Versorgungsspannung
ist ausgefallen.
Relais sind angezogen
oder
die Versorgungsspannung
ist ausgefallen.
Rote LED leuchtet Schaltausgang ist gesperrt. Relais sind abgefallen.
Rote LED blinkt
RESET durchgeführt = alle Parameter sind auf die
Werkseinstellungen gesetzt.
Es wurde kein Abgleich durchgeführt.
Gerät arbeitet noch nicht als Grenzschalter.
Tabelle 4.2
Funktion derroten LED
4 Bedienung Elektronikeinsatz FEC 22
10 Endress+Hauser
Page 11
5 Inbetriebnahme
Hinweis!
Nach jeder Abgleichprozedur (siehe Kapitel 5.2 bis 5.4) ist das Gerät betriebsbereit.
Für größtmögliche Betriebssicherheit in kritischen Applikationen empfiehlt sich
der Abgleich unbedeckt und bedeckt (siehe Kapitel 5.4).
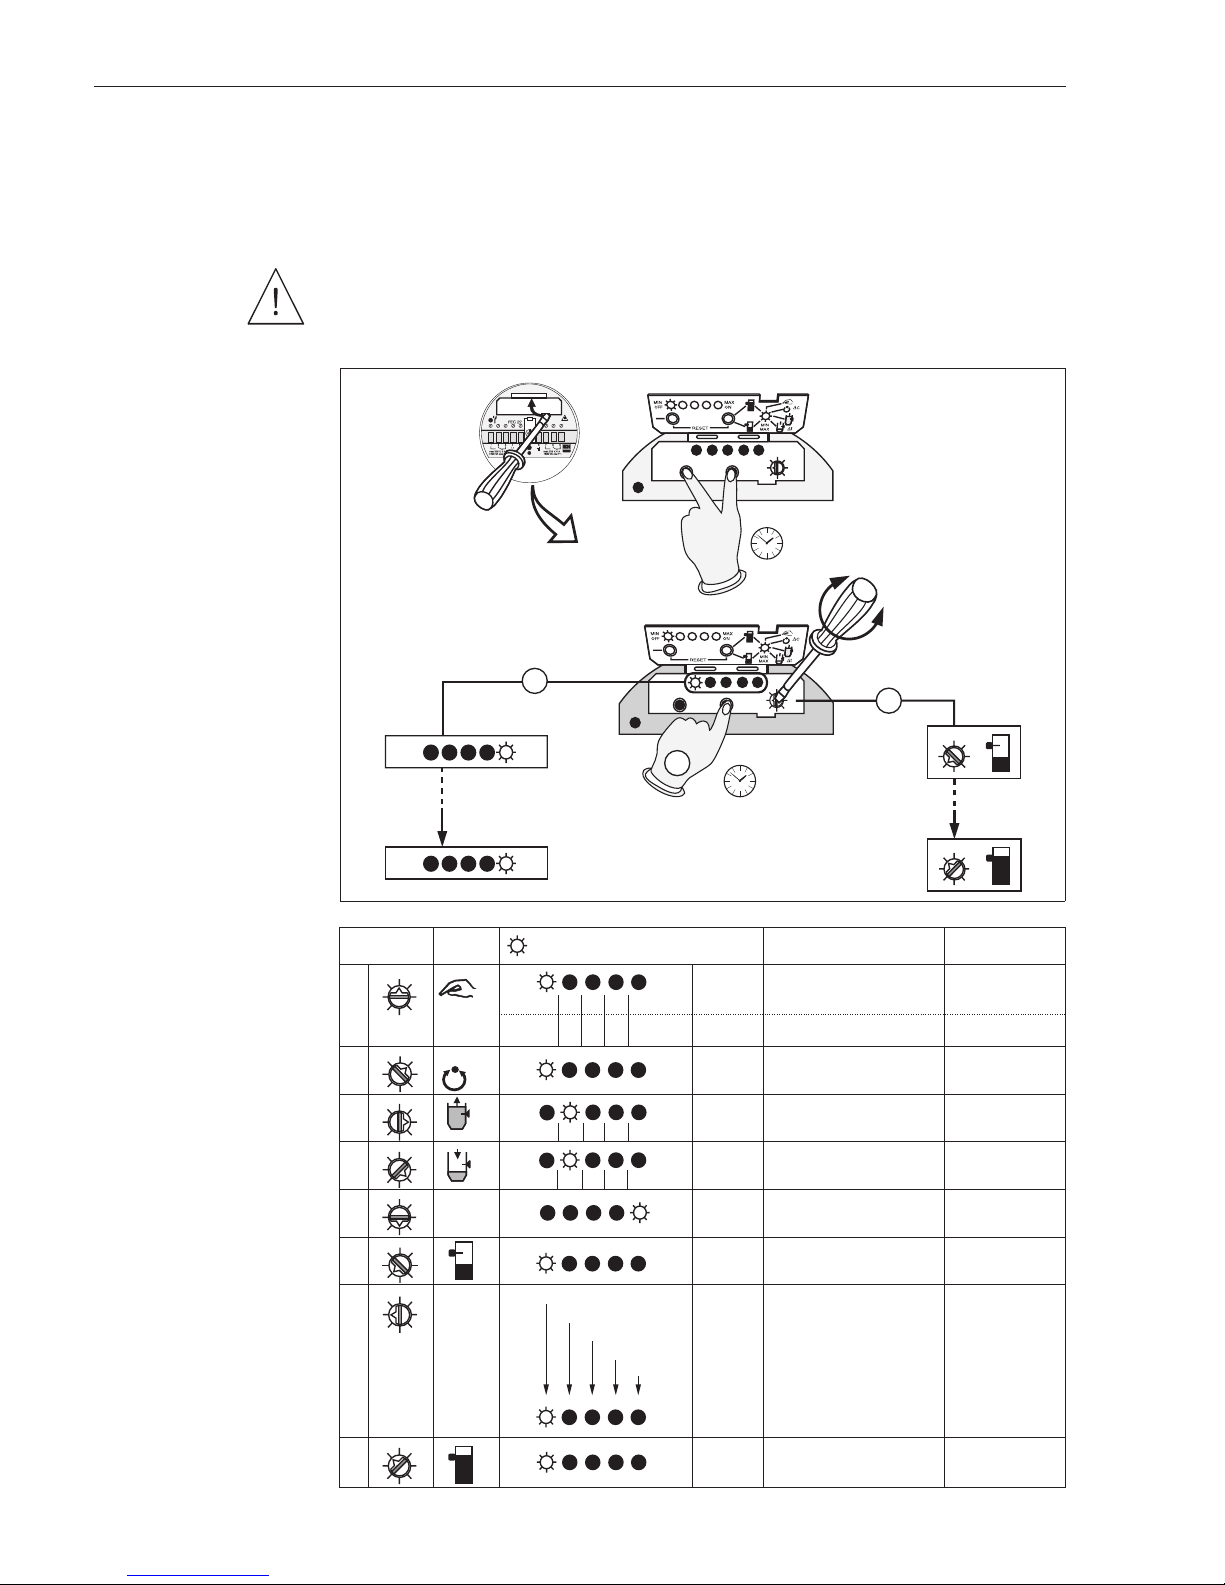
5.1 Rücksetzen auf Werkseinstellung (Reset)
Mit einem Reset werden alle Einstellungen am Gerät rückgängig gemacht.
Es gelten wieder die Werkseinstellungen
(siehe Tabelle 5.1).
Ablauf
• Drücken Sie gleichzeitig die beiden
Tasten 5 s lang.
• Die rote LED blinkt, die Relais sind
abgefallen (Wechselstromausführung)
oder der Schaltausgang ist gesperrt
(Gleichstromausführung).
Hinweis!
5s
BA160Y51
Abb.5.1
Rücksetzen auf
Werkseinstellungen
MAXMIN
OFF
dC
ON
OFF ON
OFF ON
MIN
MAX
MIN
MAX
∆c∆c
∆c∆c
∆c∆c
2pF
<4
pF
4 pF
4-8
pF
32 pF
>32
pF
16 pF
16-32
pF
8 pF
8-16
pF
∆t∆t
∆c∆c
∆t∆t
∆t∆t
0,5 s 1,5 s 20 s12 s6 s
∆t∆t
0,5 s 1,5 s 20 s12 s6 s
1
3
7
7
7
7
7
7
7
7
3
3
3
3
3
3
3
1
1
1
1
1
1
1
1
2
3
4
5
6
7
8
dC < -4 pF
dC > 4 pF
-4 pF < dC < -2 pF
2 pF < dC < 4 pF
-2 pF < dC < +2 pF
Schalterstellung
Symbol
Wertzuordnung
Bedeutung
Manuelle Schaltpunktverschiebung
Schaltpunktoptimierung
Schaltverzögerung bei Bedeckung
Schaltverzögerung bei Freiwerden
Minimum-/Maximum-Sicherheit
Abgleich bedeckt
Abgleich unbedeckt
Anzeige:aktueller Schaltpunkt-
abstand ∆C
Service-Modus
Tabelle 5.1
Funktionstabelle mit Wertzuordnung der LED-Reihe
und Werkswerten
Elektronikeinsatz FEC 22 5 Inbetriebnahme
Endress+Hauser 11
Page 12
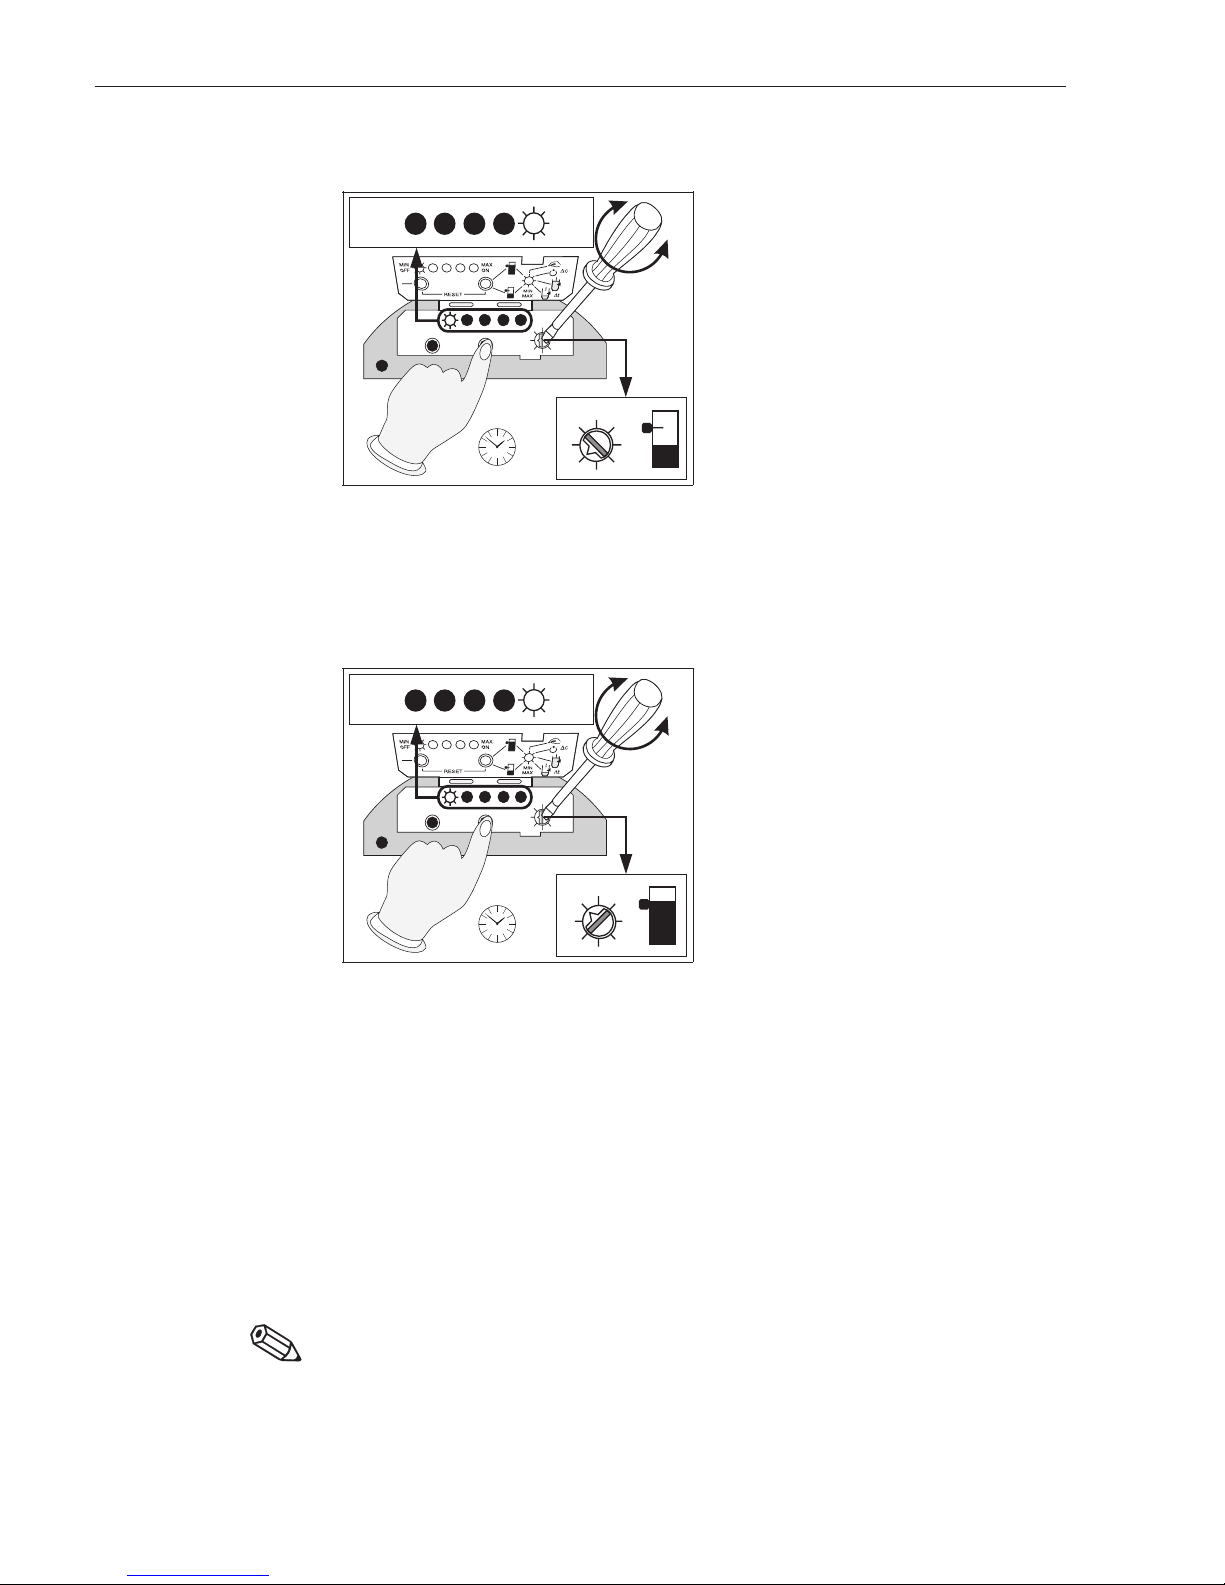
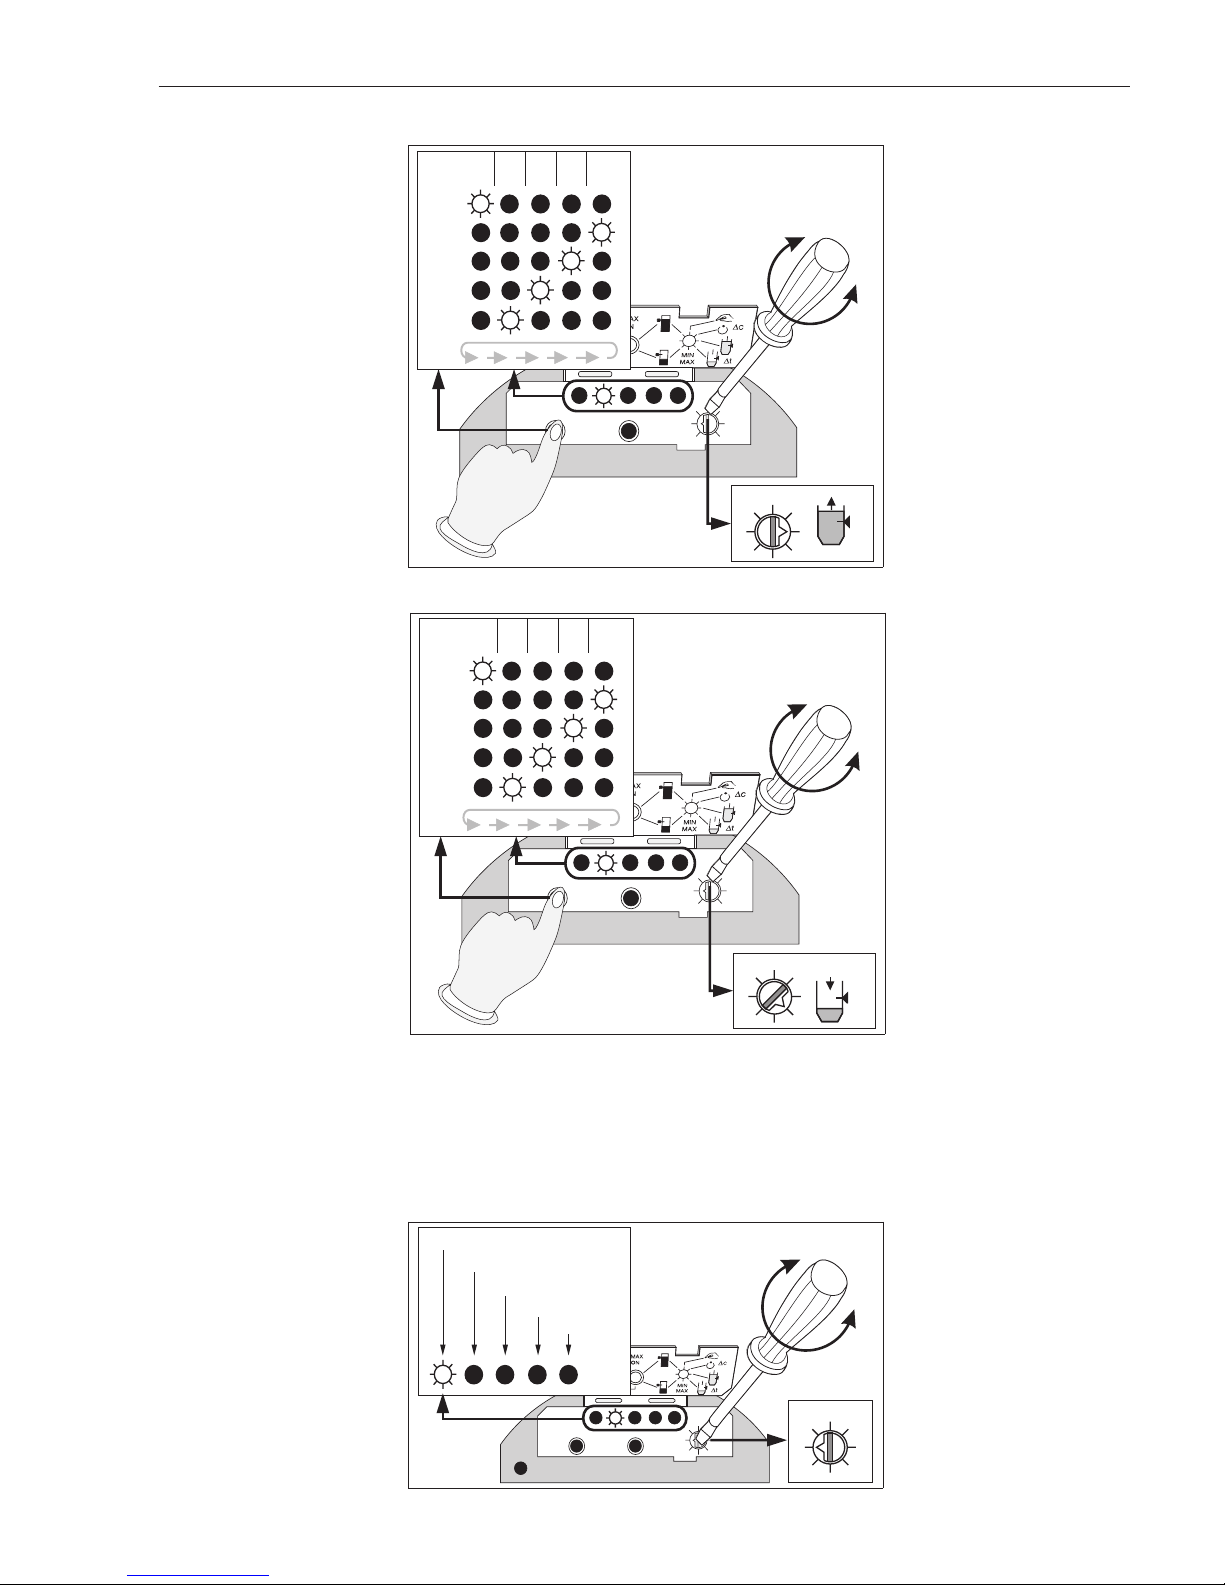
5.2 Abgleich unbedeckt
Ablauf
• Zum Abgleich einer unbedeckten
Sonde drehen Sie den Schalter in
die Position 6.
• Im Auslieferungszustand bzw. nach
einem Reset leuchtet die äußere linke
LED in der LED-Reihe:
kein Abgleich
durchgeführt.
• Drücken Sie die rechte Taste 2 s lang.
• Die äußere rechte LED in der LED-Rei-
he leuchtet. Der Abgleich wurde akzeptiert und gespeichert.
• Das Gerät ist betriebsbereit.
Nach einem Abgleich bei unbedeckter Sonde wird die Leerkapazität (C
L
) gespei-
chert. Der Schaltpunkt C
S
wird dann durch die Schaltschwelle ∆C (Werkswert = 2 pF)
mit C
S=CL
+ ∆C festgelegt.
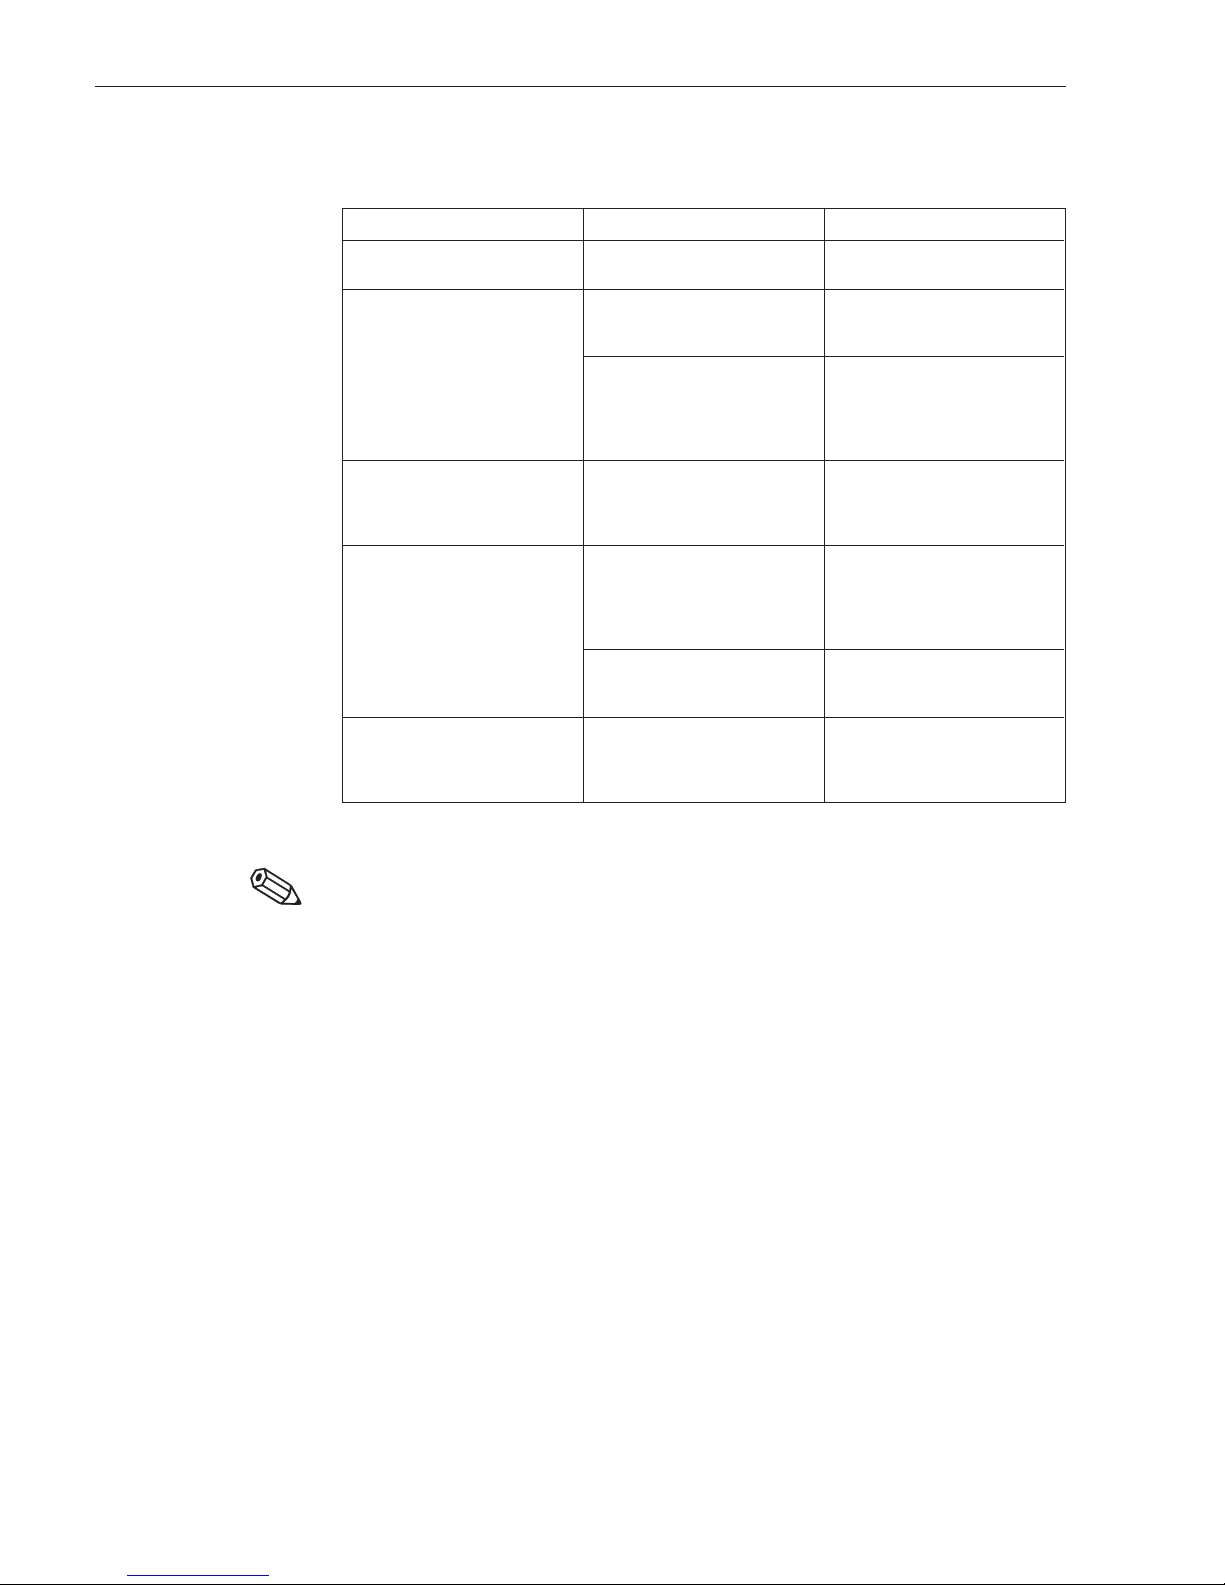
5.3 Abgleich bedeckt
Ablauf
• Zum Abgleich einer bedeckten
Sonde drehen Sie den Schalter in
die Position 8.
• Im Auslieferungszustand bzw. nach ei-
nem Reset leuchtet die äußere linke
LED in der LED-Reihe:
kein Abgleich
durchgeführt.
• Drücken Sie die rechte Taste 2 s lang.
• Die äußere rechte LED in der LED-Rei-
he leuchtet. Der Abgleich wurde akzeptiert und gespeichert
• Das Gerät ist betriebsbereit.
Nach einem Abgleich bei bedeckter Sonde wird die Kapazität bei Bedeckung (C
H
)
gespeichert. Der Schaltpunkt C
S
wird dann durch die Schaltschwelle ∆C
(Werkswert = 2 pF) mit C
S=CH
- ∆C festgelegt.
5.4 Abgleich unbedeckt und bedeckt
Um die größtmögliche Betriebssicherheit zu erreichen, sollte ein Abgleich sowohl bei
bedeckter als auch unbedeckter Sonde durchgeführt werden. Ein Abgleich unbedeckt bzw. ein Abgleich bedeckt kann zu jeder Zeit durch den Abgleich bedeckt bzw.
Abgleich unbedeckt ergänzt werden. Wird ein Abgleich unbedeckt und bedeckt
durchgeführt, so wird der aktueller Schaltpunkt in die Mitte zwischen die beiden Abgleichpunkte gelegt. Der Schaltpunkt wird mit C
S
= 0,5 x (CL+CH) festgelegt.
Abgleich unbedeckt und bedeckt durchführen siehe vorherige Kapitel 5.2 und 5.3.
Hinweis!
Nach einem Abgleich unbedeckt und bedeckt kann die Schaltpunktoptimierung nicht
mehr eingeschaltet werden. Falls sie eingeschaltet ist und Sie einen zweiten Abgleich
durchführen, so wird die Schaltpunktoptimierung automatisch abgeschaltet.
Hinweis!
1
3
7
7
3
1
2s
ONOFF
BA160Y53
Abb.5.2
Abgleich unbedeckt
1
3
7
2s
ONOFF
7
3
1
BA160Y54
Abb.5.3
Abgleich bedeckt
5 Inbetriebnahme Elektronikeinsatz FEC 22
12 Endress+Hauser
Page 13
6 Weitere Einstellungen
Dieses Kapitel beschreibt die weiteren Einstellungen, die nach Inbetriebnahme und
Abgleich vorgenommen werden können.
6.1 Manuelle Schaltpunktverschiebung
FunktionDamit der Grenzschalter später auch bei einer Verschmutzung der Sonde zuverlässig
schaltet, haben Sie die Möglichkeit, nach einem erfolgten Abgleich (unbedeckt oder
bedeckt) den Schaltpunktabstand ∆C (Werkswert=2 pF) manuell auf 4 pF, 8 pF, 16 pF
oder 32 pF zu verschieben.
Nach einem Abgleich bei unbedeckter Sonde ändert sich die Schaltpunktkapazität
um den entsprechenden ∆C-Wert in Richtung größere Kapazität: C
S=CL
+ ∆C.
Nach einem Abgleich bei bedeckter Sonde ändert sich die Schaltpunktkapazität um
den entsprechenden ∆C-Wert in Richtung kleinere Kapazität: C
S=CH
- ∆C.
Ablauf
• Nach erfolgtem Ab-
gleich (unbedeckt oder
bedeckt) drehen Sie den
Schalter in die Position 1
(Werkswert: ∆C = 2pF).
• Drücken Sie die linke Ta-
ste so oft bis die entsprechende LED in der LEDReihe für den gewünschten ∆C-Wert leuchtet.
Die Schaltpunktkapazität
C
S
wird dann um den
eingestellten ∆C-Wert
verschoben.
Hinweis!
Eine Erhöhung des Schaltpunktabstandes ∆C bewirkt eine Verminderung der Empfindlichkeit der Meßeinrichtung. Nach einem erfolgten Abgleich unbedeckt und bedeckt (siehe Kapitel 5.4) wird der Schaltpunktabstand durch die beiden Abgleiche
vorgegeben und kann nicht verändert werden.
Hinweis!
1
3
7
∆C∆C
1x
0x
2x
4x
3x
2pF4pF
32 pF
16 pF
8pF
=
∆c∆c
7
1
3
BA160Y61
Abb.6.1
Manuelle Schaltpunktverschiebung
Elektronikeinsatz FEC 22 6 Weitere Einstellungen
Endress+Hauser 13
Page 14

6.2 Schaltpunktoptimierung
Funktion Neben der manueller Möglichkeit zur Festlegung des Schaltpunktes (siehe Kapitel 6.1)
nach einem unbedeckten oder bedeckten Abgleich (siehe Kapitel 5.2, 5.3 und 5.4)
bietet der Elektronikeinsatz FEC 22 auch die Möglichkeit zur automatischen Anpassung des Schaltpunktes an das Füllgut.
Achtung!
Die Schaltpunktoptimierung funktioniert nur bei waagerecht eingebauter Sonde.
Nach einem durchgeführten Abgleich unbedeckt oder bedeckt können Sie die Schaltpunktoptimierung einschalten. Dieses Verfahren der Schaltpunktoptimierung ist vergleichbar mit dem gemeinsamen Abgleich unbedeckt und bedeckt. Der Vorteil liegt
darin, daß der zweiter Abgleichpunkt nicht extra angefahren werden muß.
Die Auswerteelektronik berechnet dabei den Schaltpunkt und legt ihn in die Mitte zwischen Leerkapazität (C
L
) und Kapazität bei Bedeckung (CH). Dadurch wird der
Störabstand optimiert. Fehlfunktionen aufgrund von Kapazitätsänderungen durch Ansatz an der Sonde oder durch Veränderungen in den Eigenschaften des Mediums
(Leitfähigkeit, Dielektrizitätskonstante) werde minimiert.
Schaltpunktoptimierung
nach Abgleich unbedeckt
Nach dem durchgeführten Abgleich unbedeckt ist die Leerkapazität C
L
fest gespeichert. Bei Bedeckung der Sonde ermittelt der Elektronikeinsatz FEC 22 automatisch
die Kapazität bei Bedeckung C
H
. Der Schaltpunkt CSwird dann in die Mitte zwischen
Leerkapazität C
L
und Kapazität bei Bedeckung CHgelegt. Sollte sich nun aufgrund
geänderter Eigenschaften des Mediums die Kapazität bei Bedeckung C
H
ändern, so
wird dieser Wert aktualisiert und der Schaltpunkt C
S
entsprechend nachgeführt.
Schaltpunktoptimierung
nach Abgleich bedeckt
Nach dem durchgeführten Abgleich bedeckt ist die Kapazität bei Bedeckung C
H
fest
gespeichert. Bei Freiwerden der Sonde ermittelt der Elektronikeinsatz FEC 22 automatisch die Leerkapazität C
L
. Der Schaltpunkt CSwird dann in die Mitte zwischen Ka-
pazität bei Bedeckung C
H
und Leerkapazität CLgelegt. Sollte sich nun aufgrund geänderter Eigenschaften des Mediums bzw. bei Ansatzbildung an der Sonde die Kapazität beim Freiwerden der Sonde C
L
ändern, so wird dieser Wert aktualisiert und der
Schaltpunkt C
S
entsprechend nachgeführt.
Schaltpunktabstand ∆C
für die Schaltpunktoptimierung
Die Schaltpunktoptimierung kann auch mit einem anderen ∆C-Wert als mit dem voreingestelltem ∆C = 2 pF gestartet werden. Wurde der ∆C-Wert zuvor manuell auf 4 pF
eingestellt, so findet eine Anpassung erst dann statt, wenn die Kapazitätsänderung CX
(siehe Seite 6) größer als 2 x ∆C = 8 pF ist. Beim Abschalten der Schaltpunktoptimierung wird die zuletzt ermittelte Schaltpunktkapazität C
S
beibehalten und der aktueller
Schaltpunktabstand ∆C auf der LED-Reihe (Drehschalter in Position 1) angezeigt.
Eine manuelle Veränderung ist danach möglich.
Reinigung des Behälters Achtung!
Wird der Behälter und damit die Sonde bei eingeschalteter Schaltpunktoptimierung
z.B. einer CIP-Reinigung unterzogen, so wird der Schaltpunkt an das Reinigungsmedium angepaßt, sofern das Medium eine größere Kapazitätsänderung als das Meßmedium erzeugt. Dies könnte zur späteren Fehlmessung der Meßeinrichtung führen. In diesem Fall ist von der Benutzung der Funktion Schaltpunktoptimierung abzusehen.
Achtung!
Achtung!
6 Weitere Einstellungen Elektronikeinsatz FEC 22
14 Endress+Hauser
Page 15
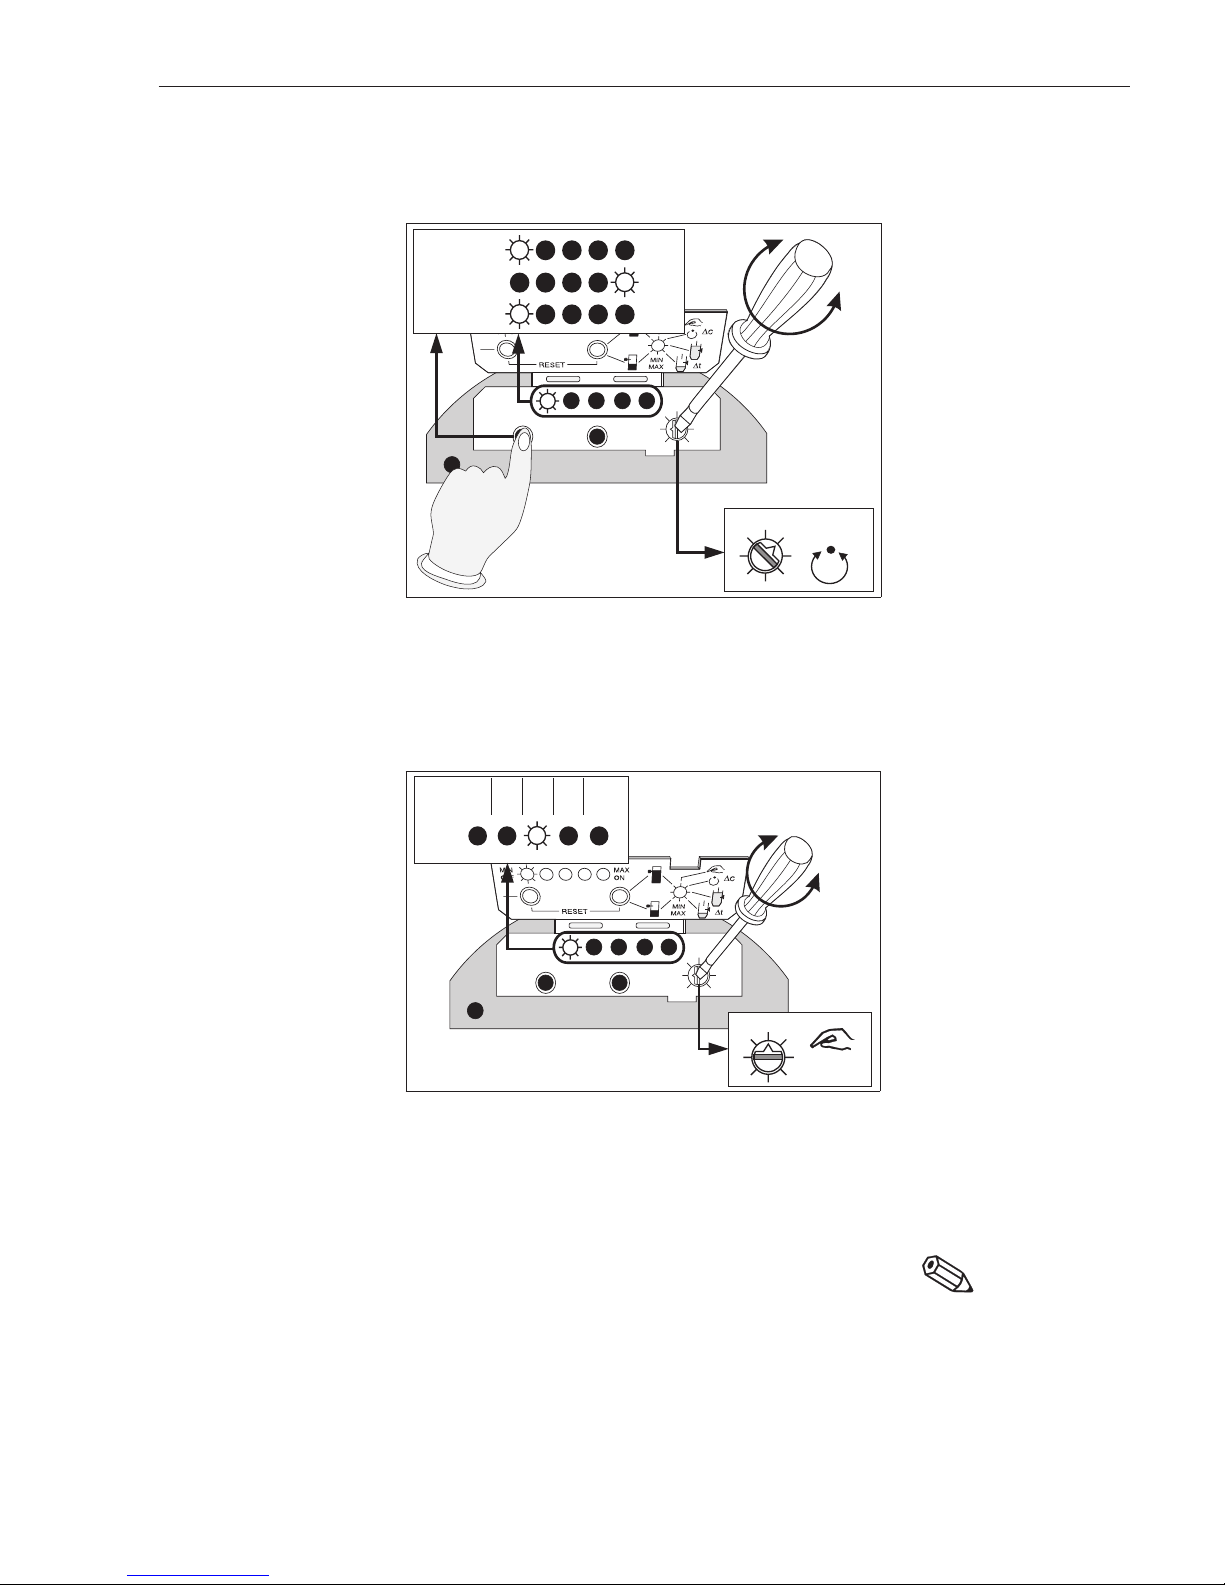
Die Schaltpunktoptimierung wird mit Hilfe der Bedienelemente am Elektronikeinsatz
FEC 22 ein- bzw. ausgeschaltet.
Ablauf
• Drehen Sie den Schalter
in die Position 2.
• Im Auslieferungszustand
bzw. nach einem Reset
leuchtet die äußere linke
LED in der LED-Reihe:
Schaltpunktoptimierung
ausgeschaltet.
• Drücken Sie die linke
Taste.
• Die äußere rechte LED in
der LED-Reihe leuchtet:
Schaltpunktoptimierung
eingeschaltet.
Schaltpunktoptimierung
ausschalten
Die Schaltpunktoptimierung kann ausgeschaltet werden (Ablauf siehe Abb. 6.2).
Der Elektonikeinsatz FEC 22 arbeitet dann mit der gespeicherten Kapazität (Leerkapazität C
L
oder Kapazität bei Bedeckung CH) und der ermittelten Schaltpunktkapazität
C
S
ohne deren Veränderung weiter.
Aktueller
Schaltpunktabstand ∆CAblauf
• Drehen Sie den Schalter
in die Position 1.
• Der aktueller Schaltpunktabstand ∆C ist an
der LED-Reihe ablesbar
(Wertzuordnung siehe
Abb. 6.3).
Hinweis!
Die Anzeige des aktuellen Schaltpunktabstandes ∆C (Drehschalter in Position 1) ist
nur möglich, wenn:
• beide Abgleiche (unbedeckt und bedeckt) durchgeführt wurden
∆C = 0,5 x (C
H
- CL)
• ein Abgleich unbedeckt durchgeführt wurde und die Schaltpunktoptimierung eingeschaltet ist ∆C = C
S
- C
L
• ein Abgleich bedeckt durchgeführt wurde und die Schaltpunktoptimierung eingeschaltet ist ∆C = C
H
- C
S
Hinweis!
1
3
7
7
3
1
∆c∆
c
ONOFF
ON
ON
OFF
OFF
1x
2x
0x
BA160Y62
Schaltpunktoptimierung
einschalten
Abb.6.2
Schaltpunktoptimierung
einschalten
1
3
7
∆c∆c
7
1
3
∆C∆C
<4pF4-8
pF
>32
pF
16-32
pF
8-16
pF
=
BA160Y63
Abb.6.3
Anzeige des aktuellen Schaltpunktabstandes
∆
C
Elektronikeinsatz FEC 22 6 Weitere Einstellungen
Endress+Hauser 15
Page 16
6.3 Minimum-/Maximum-Sicherheit
Funktion Mit der eingebauten Umschaltmöglichkeit für Minimum-/Maximum-Sicherheit können
Sie den Elektronikeinsatz FEC 22 für jeden Anwendungsfall in den erforderlichen Sicherheitsbetrieb umschalten.
Einstellung
Ablauf
• Drehen Sie den Schalter
in die Position 5.
• Im Auslieferungszustand
bzw. nach einem Reset
leuchtet die äußere rechte
LED in der LED-Reihe:
Maximum-Sicherheit
eingeschaltet.
• Durch Drücken der lin-
ken Taste können Sie
zwischen der Minimumund Maximum-Sicherheit
umschalten.
• Die jeweilige Einstellung
ist an der LED-Reihe ablesbar.
6.4 Schaltverzögerung
Mit der Schaltverzögerungsart können Sie wählen, mit welcher Verzögerungszeit
(Werkswert = 1,5 s) der Elektronikeinsatz schalten soll, wenn die Sonde vom Füllgut
bedeckt oder frei wird.
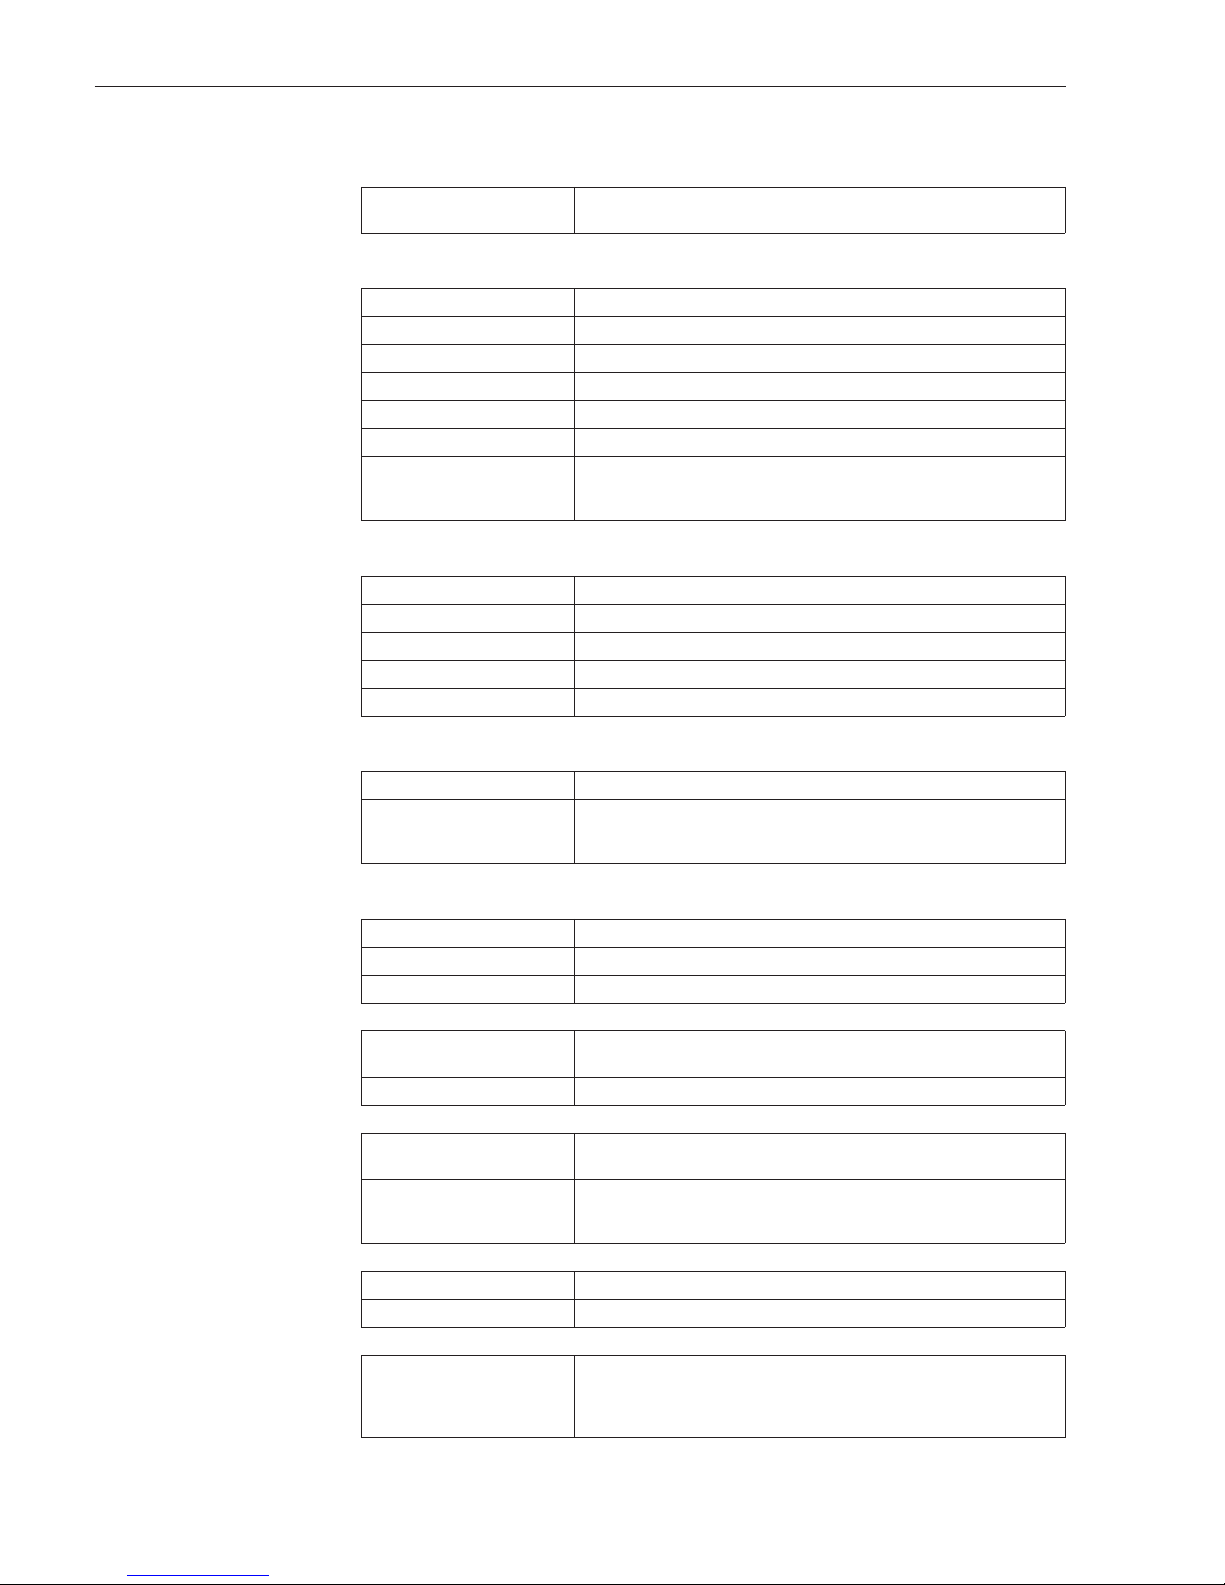
Minimum-Sicherheit Maximum-Sicherheit
DC-PNP AC-DPDT Rote LED DC-PNP AC-DPDT Rote LED
Sonde
bedeckt
durch-
geschaltet
Relais angezogen gesperrt Relais abgefallen
Sonde
unbedeckt
gesperrt Relais abgefallen durch-
geschaltet
Relais angezogen
Versorgungs-
spannung
ausgefallen
gesperrt Relais abgefallen gesperrt Relais abgefallen
Tabelle 6.1
1(+)
3
1 2 3 7 8 9
3
1(+)
1 2 3
7 8 9
3
1(+)
1 2 3
7 8 9
1(+)
3
1 2 3 7 8 9
U0V
3
1(+)
1 2 3
7 8 9
3
1(+)
1 2 3
7 8 9
1
3
7
MAXMIN
MAX
MAX
MIN
MIN
1x
2x
0x
7
3
1
MIN
MAX
MIN
MAX
BA160Y66
Abb.6.4
Einstellung Minimum-/MaximumSicherheit
6 Weitere Einstellungen Elektronikeinsatz FEC 22
16 Endress+Hauser
Page 17
Ablauf
• Drehen Sie den Schalter
in die Position 3.
• Im Auslieferungzustand
bzw. nach einem Reset
leuchtet die zweite LED
von links in der LED-Reihe:
Verzögerungszeit
∆t = 1,5 s.
• Drücken Sie die linke Ta-
ste so oft, bis die gewünschte Verzögerungszeit eingestellt ist und die
entsprechende LED in
der LED-Reihe leuchtet
(Wertzuordnung siehe
Abb. 6.5).
Ablauf
• Drehen Sie den Schalter
in die Position 4.
• Im Auslieferungszustand
bzw. nach einem Reset
leuchtet die zweite LED
von links in der LED-Reihe:
Verzögerungszeit
∆t = 1,5 s.
• Drücken Sie die linke Ta-
ste so oft, bis die gewünschte Verzögerungszeit eingestellt ist und die
entsprechende LED in
der LED-Reihe leuchtet
(Wertzuordnung siehe
Abb. 6.6).
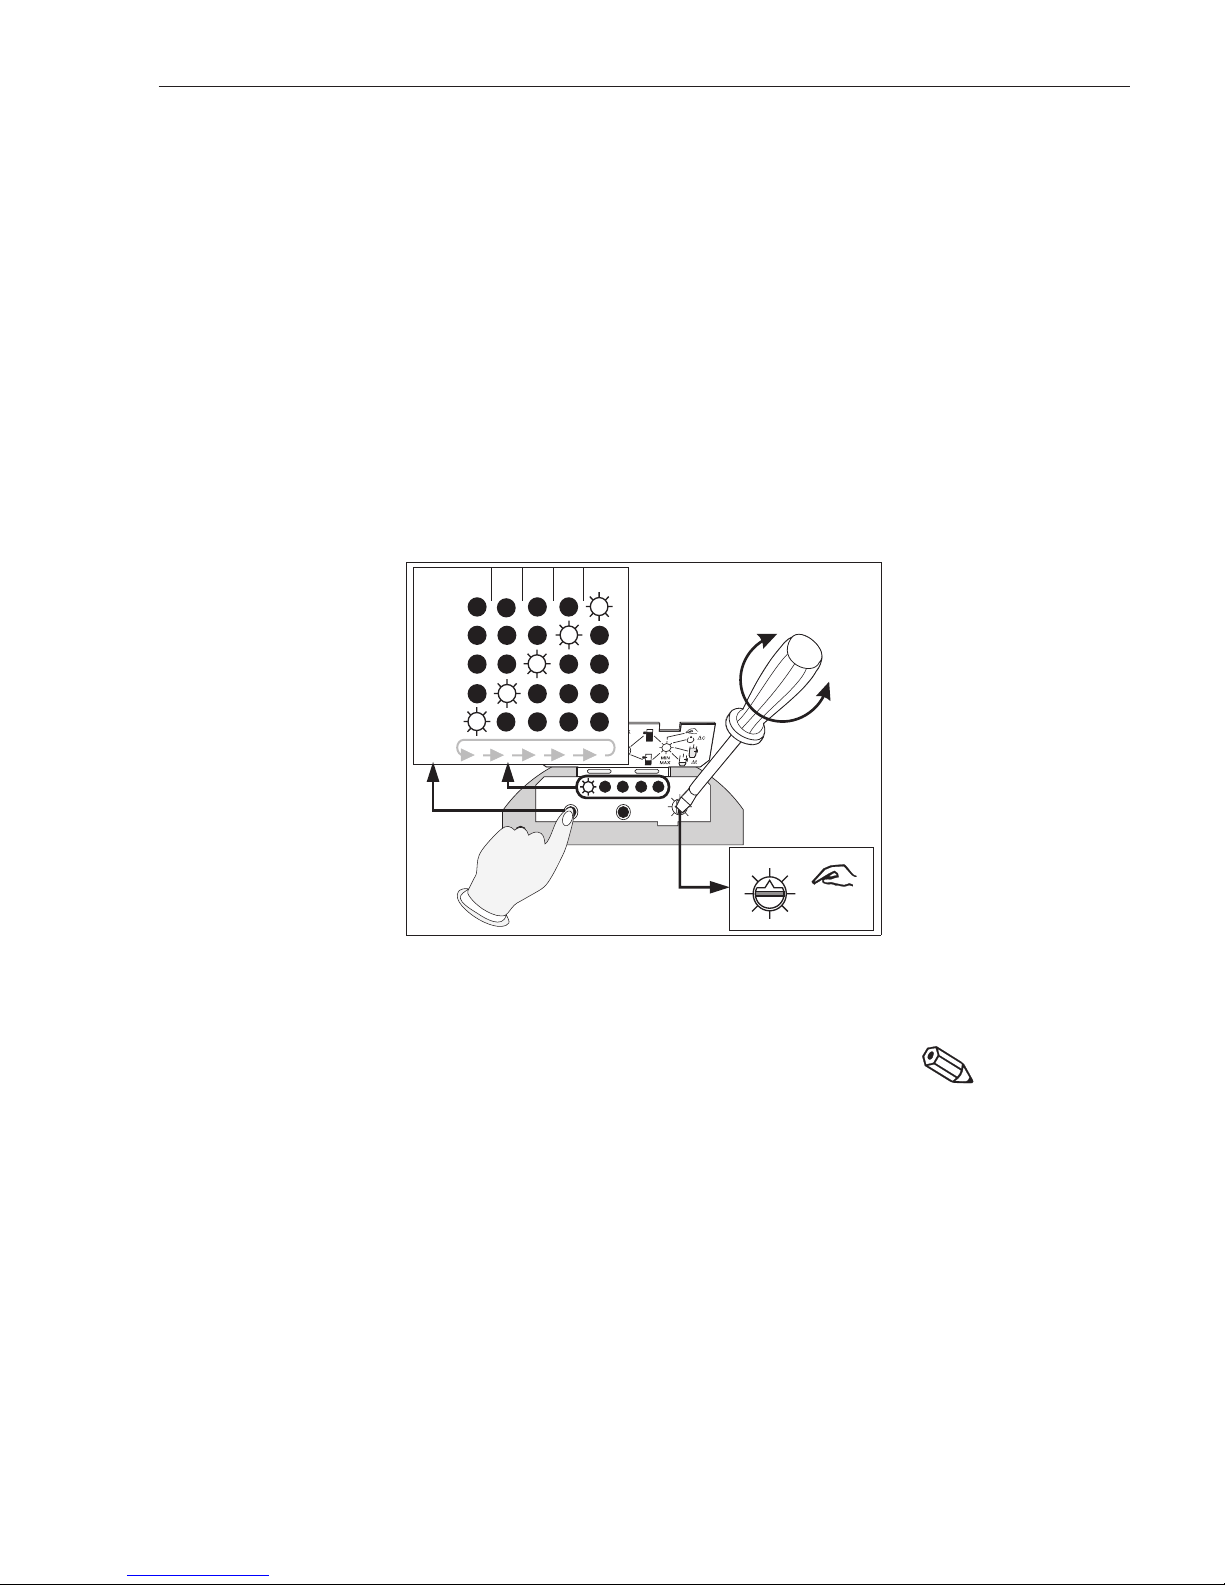
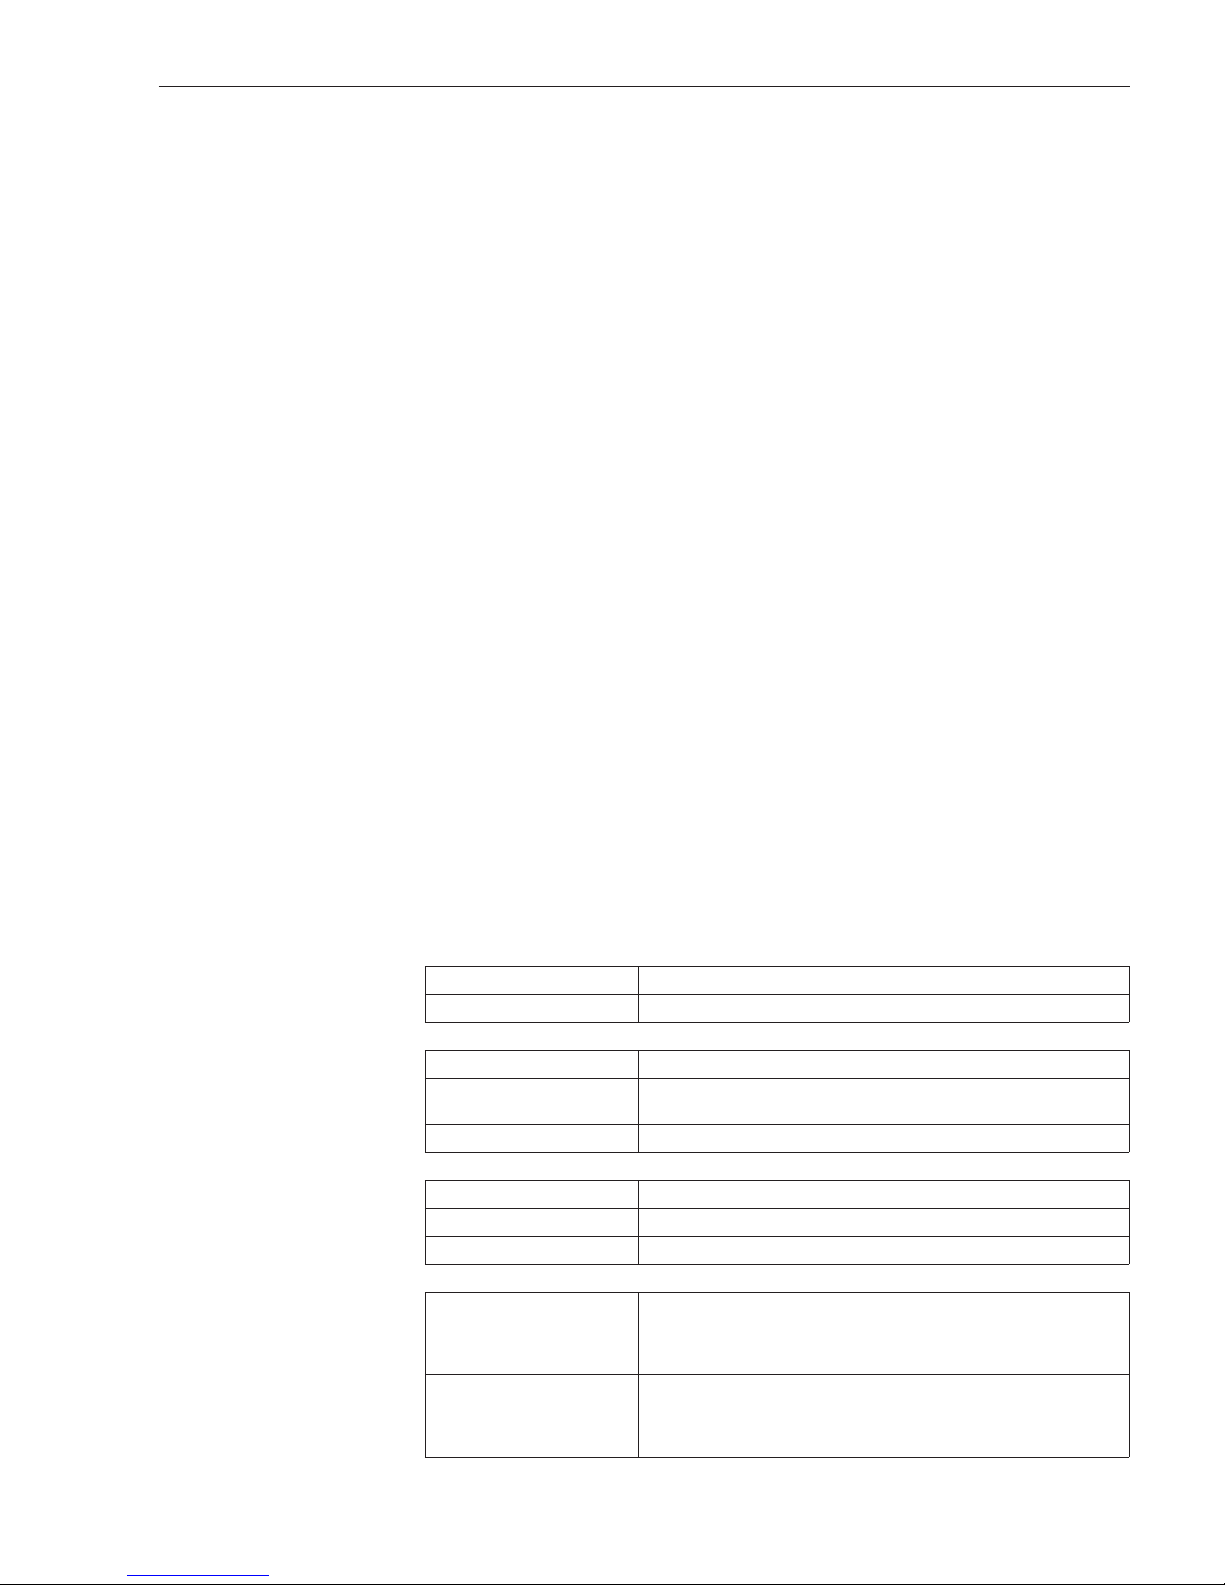
6.5 Service-Modus
In diesem Modus wird die Abweichung dC der aktuell vom Gerät gemessenen Kapazität vom eingestellten Schaltpunkt C
S
an der LED-Reihe angezeigt.
Ablauf
• Drehen Sie den Schalter
in die Position 7.
• An der LED-Reihe können
Sie die Abweichung dC
vom eingestellten Schaltpunkt ablesen (Wertzuordnung siehe Abb. 6.7).
1
3
7
1x
0x
2x
4x
3x
=
∆t∆t
0,5 s
1,5 s
20 s12 s6s
∆t
73
1
BA160Y67
Schaltverzögerung
bei Bedeckung
Abb.6.5
Zeiteinstellung für die Schaltverzögerung bei Bedeckung der
Sonde
1
3
7
1x
0x
2x
4x
3x
=
∆t∆t
0,5 s
1,5 s
20 s12 s6s
7
3
1
∆t
BA160Y68
Schaltverzögerung
bei Freiwerden
Abb.6.6
Zeiteinstellung für die Schaltverzögerung bei Freiwerden der
Sonde
1
3
7
dC
dC < -4 pF
dC > 4 pF
-4 pF < dC <-2 pF
2 pF < dC <4 pF
-2 pF < dC <+2 pF
3
1
7
BA160Y69
Abb.6.7
Anzeige der Abweichung dC
vom eingestellten Schaltpunkt
Elektronikeinsatz FEC 22 6 Weitere Einstellungen
Endress+Hauser 17
Page 18
7 Fehlersuche und -beseitigung
Hinweis!
Treten außer diesen Fehlermeldungen weitere auf oder läßt sich der Fehler nicht beheben: Angaben in dieser Betriebsanleitung beachten oder E+H anrufen.
8 Austausch eines Elektronikeinsatzes
Soll der Elektronikeinsatz ausgetauscht werden gehen Sie folgendermaßen vor:
Ausbau • Schalten Sie alle zum Elektronikeinsatz führenden Spannungen ab.
• Lösen Sie die elektrischen Verbindungen am Elektronikeinsatz.
• Lösen Sie die Befestigungsschraube am Elektonikeinsatz.
• Ziehen Sie den Elektronikeinsatz aus dem Sondengehäuse.
Einbau • Bevor Sie einen neuen Elektronikeinsatz einbauen, überprüfen Sie, ob die Angabe
auf dem Elektronikeinsatz mit der Versorgungsspannung übereinstimmt.
• Stecken Sie den neuen Elektronikeinsatz in die Buchse im Gehäuse.
• Drehen Sie die Befestigungsschraube am Elektronikeinsatz fest.
• Schließen Sie die Leitungen an.
Einstellung • Schalten Sie die Versorgungsspannung ein.
• Führen Sie ein Reset durch. Nehmen Sie die gewünschten Einstellungen vor
(siehe Kapitel 5 und Kapitel 6).
Hinweis!
Fehlerdiagnose Ursache Maßnahme
Grüne und rote LED leuchtet
nicht
Versorgungsspannung ist ausgefallen oder nicht eingeschaltet
Elektrischen Anschluß
überprüfen.
Rote LED blinkt Kein Abgleich durchgeführt.
Gerät arbeitet noch nicht als
Grenzschalter.
Abgleich vornehmen.
Reset durchgeführt = alle
Parameter auf die
Werkseinstellungen gesetzt.
Gerät arbeitet noch nicht als
Grenzschalter.
Abgleich vornehmen.
Rote LED leuchtet Wechselstromausführung:
Relais sind abgefallen.
Gleichstromausführung:
Schaltausgang ist gesperrt.
LED-Reihe leuchtet nicht Zur Verringerung des
Dauerstromverbrauchs wird die
LED-Reihe ca. 10 min nach der
letzten Eingabe abgeschaltet.
LED-Reihe wieder aktiviert
durch Betätigung des
Drehschalters oder einer der
beiden Tasten. Dadurch entsteht keine Parameteränderung.
Versorgungsspannung ist
ausgefallen. Grüne LED leuchtet
nicht.
Elektrischen Anschluß
überprüfen.
Einschalten der
Schaltpunktoptimierung ist nicht
möglich.
Beide Abgleiche wurden bereits
durchgeführt.
1. Reset vornehmen
2. Einen Abgleich vornehmen.
3. Schaltpunktoptimierung
einschalten.
Tabelle 7.1
Fehlersuche und -beseitigung
7 Fehlersuche und -beseitigung Elektronikeinsatz FEC 22
18 Endress+Hauser
Page 19
9 Reparatur
ElektronikeinsatzFalls Sie den Elektronikeinsatz FEC 22 zur Reparatur an Endress+Hauser zurücksen-
den, legen Sie bitte einen Zettel mit folgenden Informationen bei:
• Eine exakte Beschreibung der Anwendung.
• Die chemischen und physikalischen Eigenschaften des Produkts.
• Eine kurze Beschreibung des aufgetretenen Fehlers.
SondeBevor Sie eine Sonde mit dem eingebauten Elektronikeinsatz FEC 22 zur Reparatur
zurücksenden, ergreifen Sie bitte folgende Maßnahmen:
• Entfernen Sie bitte alle anhaftenden Füllgutreste. Das ist besonders wichtig,
wenn das Füllgut gesundheitsgefährdend ist, z.B. ätzend, giftig, krebserregend,
radioaktiv usw.
• Wir müssen Sie bitten, von einer Rücksendung abzusehen, wenn es Ihnen nicht
möglich ist, gesundheitsgefährdendes Füllgut vollständig zu entfernen, weil es z.B.
in Ritzen eingedrungen oder durch Kunststoff diffundiert sein kann.
10 Entsorgung
VerpackungSämtliche Verkaufs- und Transportverpackungen von Endress+Hauser entsprechen
den Vorgaben der deutschen Verpackungsverordnung hinsichtlich Wiederverwendung und Wiederverwertung (Recycling).
GerätEndress+Hauser ist bereit, zur Entsorgung anstehende Geräte aus E+H-Produktion
gegen eine geringe Gebühr im Rahmen der deutschen Elektronikschrottverordnung
zurückzunehmen und zu verwerten. Lieferung frei Endress+Hauser, Hauptstr 1,
79689 Maulburg, Deutschland.
11 Technische Daten
Allgemeine Angaben
Hersteller Endress+Hauser GmbH+Co.
Gerätebezeichnung Elektronikeinsatz FEC 22
Arbeitsweise und Systemaufbau
Meßprinzip Kapazitiv
Signalübertragung Wechselstromausführung: 2 parallel geschaltete Relais (DPDT)
Gleichstromausführung: Schalten der Last über Transistor
Galvanische Trennung Zwischen Meßstromkreis und Versorgungsstromkreis
Eingang
Meßgröße Füllhöhe (Grenzstand)
Meßbereiche Für Leermeldung (unbedeckte Sonde) 10 pF…350 pF
Arbeitsfrequenz 500 kHz
Ausgang
Wechselstromausführung Zwei potentialfreie Umschaltkontakte (DPDT), belastbar:
- bei Wechselstrom 253 V, 6 A max., P~max. 1500 VA, cos ϕ =1
- bei Gleichstrom: 30 V, 6 A max.
125 V, 0,2 A max.
Gleichstromausführung Stromaufnahme ca. 18 mA bei 24 V:
- Laststrom bis 350 mA dauernd, max. 55 V, mit Überlast- und
Verpolungsschutz
- Reststrom im gesperrten Zustand kleiner 10 µA
Elektronikeinsatz FEC 22 9 Reparatur
Endress+Hauser 19
Page 20
Einsatzbedingungen Einbaubedingungen
Einbauhinweise Einbaulage beliebig. Einbau nur möglich in Gehäusetypen F6, F10
oder T3 (mit hohem Deckel) der Multicap-T oder Multicap-Sonden.
Umgebungsbedingungen
Umgebungstemperatur -40 °C…+70 °C
Umgebungstemperaturgrenze -40 °C…+80 °C
Lagerungstemperatur -40 °C…+85 °C
Klimaklasse Klimaschutz nach IEC 68, Teil 2…38, nach Bild 2a
Schutzart IP 20
Schwingungsfestigkeit Nach IEC 68 Teil 2-6, 10…55 Hz, 0,15 mm, x,y,z
Elektromagnetische
Verträglichkeit
Störaussendung nach EN 61326; Betriebsmittel der Klasse B
Störfestigkeit nach EN 61326; Anhang A (Industriebereich) und
NAMUR-Empfehlung NE 21 (EMV).
Konstruktiver Aufbau Gehäusebauform
Bauform Kompaktgerät
Abmessungen 103 mm x 67 mm x 49 mm
Gewicht 0,3 kg
Werkstoff Kunststoff
Elektrischer Anschluß Siehe Kapitel 3, Seite 8-9
Anzeige- und Bedienoberfläche Außerhalb der Abdeckklappe angeordnet
Leuchtdiode Grün Betriebsbereitschaft
Leuchtdiode Rot Schaltzustand:
Wechselstromausführung (Relais sind abgefallen)
Gleichstromausführung (Schaltausgang ist gesperrt)
Unter der Abdeckklappe angeordnet
5 Leuchtdioden Anzeige der Abstufungen mit Wertzuordnung
2 Tasten Abgleich / Wertzuordnung
Drehschalter Erlaubt die Wahl von 8 Einstellungen (siehe Seite 11)
Hilfsenergie
Wechselstromausführung Wechselspannung 90 V…253 V, 50/60 Hz, Stromaufnahme ca. 10 mA
bei 230 V
Gleichstromausführung Dreidraht-Gleichstromanschluß PNP, Gleichspannung 10 V…55 V
Zertifikate und Zulassungen
Zertifikate EG-Baumusterprüfbescheinigung
KEMA 99 ATEX 3122, XA 060F/00/a3
CE-Zeichen Das Gerät erfüllt die gesetzlichen Anforderungen aus den
EG-Richtlinien. Endress+Hauser bestätigt die erfolgreiche Prüfung des
Gerätes mit der Anbringung des CE-Zeichens.
Bestellinformation
Bestell-Nr.: 942299-0000 FEC 22 in Wechselstromausführung
Bestell-Nr.: 942299-1000 FEC 22 in Gleichstromausführung
Normen, Richtlinien
Ergänzende Dokumentation Multicap T DC .. TE. Sonde, TI 240F/00/de
Multicap T DC .. TA. Sonde, TI 239F/00/de
Multicap DC .. E. Sonde, TI 242F/00/de
Multicap DC .. A. Sonde, TI 243F/00/de
11 Technische Daten Elektronikeinsatz FEC 22
20 Endress+Hauser
Page 21

Index
A
Abgleich bedeckt . . . . . . . . . . . . . 12
Abgleich unbedeckt . . . . . . . . . . . . 12
Abgleich unbedeckt und bedeckt . . . . . . . 12
Aktive Ansatzkompensation . . . . . . . . . 7
Anzeige- und Bedienelemente . . . . . . . . 9
Anzeigeelemente . . . . . . . . . . . . . 10
Austausch eines Elektronikeinsatzes . . . . . . 18
B
Bedienelemente . . . . . . . . . . . . . . 10
Bedientasten . . . . . . . . . . . . . . . 10
Bedienung . . . . . . . . . . . . . . . 9, 10
Bestimmungsgemäße Verwendung . . . . . . 5
Betriebsbereitschaft . . . . . . . . . . . . 10
D
Drehschalterstellungen . . . . . . . . . . . 10
E
Einbau im Sondengehäuse . . . . . . . . . . 8
Einsatzbereich . . . . . . . . . . . . . . 7
Elektrische Symbole . . . . . . . . . . . . 6
Elektrischer Anschluß . . . . . . . . . . . . 8
Gleichstromausführung im F6/F10-Gehäuse . . 8
Gleichstromausführung im T3-Gehäuse . . . . 9
Wechselstromausführung im F6/F10-Gehäuse . 8
Wechselstromausführung im T3-Gehäuse . . . 9
Entsorgung . . . . . . . . . . . . . . . . 19
F
Fehlerdiagnose . . . . . . . . . . . . . . 18
Funktionsprinzip . . . . . . . . . . . . . . 7
G
Grenzstanddetektion . . . . . . . . . . . . 7
Grüne LED . . . . . . . . . . . . . . . . 10
I
Inbetriebnahme . . . . . . . . . . . . 11, 12
K
Kapazität bei Bedeckung . . . . . . . 6, 12, 14
Kurzanleitung . . . . . . . . . . . . . . . 4
L
LED-Reihe . . . . . . . . . . . . . . . . 10
Leerkapazität . . . . . . . . . . . . 6, 12, 14
M
Manuelle Schaltpunktverschiebung . . . . . . 13
Maximum-Sicherheit . . . . . . . . . . . . 16
Meßeinrichtung . . . . . . . . . . . . . . 7
Minimum-Sicherheit . . . . . . . . . . . . . 16
R
Relais abgefallen . . . . . . . . . . . . . . 16
Relais angezogen . . . . . . . . . . . . . 16
Reparatur . . . . . . . . . . . . . . . . 19
Reset . . . . . . . . . . . . . . . . . . 11
Rote LED . . . . . . . . . . . . . . . . . 10
S
Schaltausgang geschaltet . . . . . . . . . . 16
Schaltausgang gesperrt . . . . . . . . . . . 16
Schaltpunktabstand ∆C..........6, 14
Schaltpunktoptimierung . . . . . . . . . . . 14
Schaltpunktoptimierung ausschalten . . . . . . 15
Schaltpunktoptimierung einschalten . . . . . . 15
Schaltpunktoptimierung nach Abgleich bedeckt . 14
Schaltpunktoptimierung nach Abgleich unbedeckt 14
Schaltverzögerung . . . . . . . . . . . . . 16
Schaltverzögerung bei Bedeckung . . . . . . . 17
Schaltverzögerung bei Freiwerden . . . . . . . 17
Schaltzustand . . . . . . . . . . . . . . . 10
Service-Modus . . . . . . . . . . . . . . 17
Sicherheitshinweise . . . . . . . . . . . . 5, 6
T
Technische Daten . . . . . . . . . . . 19, 20
V
Verzögerungszeit . . . . . . . . . . . . . . 17
W
Weitere Einstellungen . . . . . . 13, 14, 15, 16, 17
Weitere Symbole . . . . . . . . . . . . . . 6
Wertzuordnung . . . . . . . . . . . . . . 11
Z
Zündschutzart . . . . . . . . . . . . . . . 6
Elektronikeinsatz FEC 22 Index
Endress+Hauser 21
Page 22

Page 23

Electronic insert
FEC 22
Operating Instructions
Hauser+Endress
The Po werof Know How
BA160F/00/en/04.03
016904-0000
Page 24

Quick Guide
This Quick Guide enables trained personnel to quickly carry out the standard
calibration procedure.
Warning!
This Quick Guide may only be used by trained personnel who have read and are
thoroughly familiar with the BA 160 Operating Instructions.
Reset
Calibration when probe
uncovered
or / and
Calibration when probe
covered
Summary
Warning!
7
3
1
ONOFF
ONOFF
7
3
1
1
3
7
2
1
3
2s
5s
Page 31
Page 32
Page 32
BA160Y02
Quick Guide
MAXMIN
OFF ON
OFF ON
OFF ON
dC
MIN
MAX
MIN
MAX
∆c∆
c
∆c∆c
∆c∆c
2pF
4pF
<4pF4-8pF8-16pF16-32pF>32
pF
32 pF16 pF8pF
∆t∆t
∆c∆
c
∆t∆t
∆t∆t
0,5 s 1,5 s 20 s12 s6s
∆t∆t
0,5 s 1,5 s 20 s12 s6s
1
3
7
7
7
7
7
7
7
3
3
3
3
3
3
1
1
1
1
1
1
1
2
3
4
5
6
8
7
3
1
1
7
dC < -4 pF
dC > 4 pF
-4 pF < dC < -2 pF
2 pF < dC < 4 pF
-2 pF < dC < +2 pF
Switch position Symbol Meaning
left key
Manual switchpoint adjustment
Section 6.1 / Page 33
Section 6.2 / Page 35
Section 6.2 / Page 34
Section 6.4 / Page 36
Section 6.4 / Page 36
Section 6.3 / Page 36
Section 6.5 / Page 37
Section 5.2 / Page 32
Section 5.4 / Page 32
Section 5.3 / Page 32
Section 5.4 / Page 32
Display: actualswitchpoint
difference C∆
left key Switchpoint optimisation
Switching delay when probe
covered
Switching delay when probe
uncovered
Minimum/maximum fail-safe
Calibration when probe uncovered
Calibration when probe covered
Service mode
left key
left key
left key
Display
rightkey
2s
rightkey
2s
Extra information
under:
= Factory-set values / assigned values: ...
Elektronic insert FEC 22
24 Endress+Hauser
Page 25

Notes on Safety
Approved UsageThe FEC 22 electronic insert is intended for use as a limit switch in combination with
the Multicap or Multicap T probe. It has been designed to operate safely in
accordance with current technical standards. If installed incorrectly or used for
applications for which it is not intended, however, it is possible that application-related
dangers may arise.
The manufacturer accepts no responsibility for any damage arising from incorrect
use. Changes or modifications to the equipment which are not expressly approved in
this manual or by the bodies responsible for compliance may void the user’s authority
to operate the equipment. Damaged equipment which may present a hazard must not
be operated and is to be marked as defective.
Explosion hazardous
areas
When using the measuring system in explosion hazardous areas all local regulations
and conditions related to measurement and safety of the measuring points must be
observed. These conditions are stated in the certificates.
Installation,
commissioning
and maintenance
Installation, electrical connections, commissioning and maintenance of this instrument
may only be carried out by trained personnel authorised by the operator of the facility.
Personnel must read and be thoroughly familiar with these Operating Instructions
before carrying them out.
OperationThe instrument may only be operated by personnel who are authorised and trained by
the operator of the facility. All instructions in this manual must be observed.
Table of Contents
Notes on Safety . . . . . . . . . . . . 25
1 Introduction . . . . . . . . . . . . . . 27
1.1 Field of Application . . . . . . . . . . 27
1.2 Measurement principle . . . . . . . . 27
1.3 Measuring system . . . . . . . . . . 27
2 Mounting . . . . . . . . . . . . . . . 28
3 Electrical Connection . . . . . . . . . . 28
4 Operation . . . . . . . . . . . . . . . 29
4.1 Operating elements . . . . . . . . . 30
4.2 Display elements . . . . . . . . . . 30
5 Commissioning . . . . . . . . . . . . 31
5.1 Reset to factory-set values (reset) . . . . 31
5.2 Calibration when free . . . . . . . . . 32
5.3 Calibration when covered . . . . . . . 32
5.4 Calibration when free and covered . . . 32
6 Additional Settings . . . . . . . . . . . 33
6.1 Manual switchpoint adjustment . . . . . 33
6.2 Switchpoint optimisation . . . . . . . . 34
6.3 Minimum/maximum fail-safe mode . . . . 36
6.4 Switching delay . . . . . . . . . . . 36
6.5 Service mode . . . . . . . . . . . . 37
7 Trouble-Shooting and Remedies . . . . . 38
8 Replacing an Electronic Insert . . . . . . 38
9 Repairs . . . . . . . . . . . . . . . . 39
10 Waste Disposal . . . . . . . . . . . . . 39
11 Technical Data . . . . . . . . . . . . . 39
Index . . . . . . . . . . . . . . . . . 41
Table of Contents
Elektronic insert FEC 22
Endress+Hauser 25
Page 26

Safety Conventions
In order to highlight safety-relevant or alternative operating procedures in the manual,
the following conventions have been used, each indicated by a corresponding icon in
the margin.
Safety conventions
Explosion protection
Electrical symbols
Other symbols
Symbol Meaning
Note!
A note highlights actions or procedures which, if not performed correctly, may indirectly
affect operation or may lead to an instrument response which is not planned.
Caution!
Caution highlights actions or procedures which, if not performed correctly, may lead to
personal injury or incorrect function of the instrument.
Warning!
A warning highlights actions or procedures which, if not performed correctly, will lead to
personal injury, a safety hazard or destruction of the instrument
Explosion hazardous area
Symbol used in drawings to indicate explosion hazardous areas.
– Devices located in and wiring entering areas with the designation “explosion hazardous
areas” must conform with the stated type of protection.
Safe area (non-explosion hazardous area)
Symbol used in drawings to indicate, if necessary, non-explosion hazardous areas.
– Devices located in safe areas still require a certificate if their outputs
run into explosion hazardous areas.
Note!
Caution!
Warning!
Safety conventions
Symbol
Meaning
Symbol
Meaning
Direct voltage
A terminal to which or from which a
direct current or voltage may be
applied or supplied.
Electromechanical device
Identifies terminals to which an external
load (e.g. relays, PLC ) is connected.
Alternating voltage
A terminal to which or from which an
alternating (sine-wave) current or
voltage may be applied or supplied.
Change-over contact
Indicates terminals for a relay output.
Grounded terminal
A grounded terminal, which as far as
the operator is concerned, is already
grounded by means of an earth
grounding system.
Change-over contact (Switch)
Indicates the LED showing the
switching status of the relay in the AC
version
Protective grounding (earth) terminal
A terminal which must be connected to
earth ground prior to making any other
connection to the equipment.
Make contact(No contact)
Indicates the LED showing the
switching status of the output in the DC
version
Symbol Definition
Symbol Definition
C
L
Lower calibration point (capacitance
when empty)
dC
Deviation of actual capacitance
measured by the instrument from the
set switchpoint C
S
C
H
Upper calibration point (capacitance
when covered)
LED LED
∆C Switchpoint difference
DC-PNP DC version with PNP output
C
S
Switchpoint (switchpoint capacitance)
C
X
Measured change in capacitance,
from lower ① or upper ② calibration
value: C
X
=2x∆C
AC-DPDT
AC version with two change-over
contacts connected in series (DPDT)
C
H
C
L
C
S
∆C
∆C
C
H
C
L
C
X
C
X
C
S
①
②
Elektronic insert FEC 22
26 Endress+Hauser
Page 27

1 Introduction
1.1 Field of Application
The FEC 22 electronic insert is designed as a compact limit switch to be used with the
modular family of Multicap probes for limit detection of materials.
It contains all the (microprocessor-controlled) electronics necessary for limit detection
and does not require an external switching unit.
The insert is available in two versions:
• AC version with two changeover contacts (DPDT)
• DC version with PNP output
These two versions ensure that it can be used in a wide variety of applications.
1.2 Measurement principle
Limit detectionThis limit detection system is based on the capacitive principle, where the probe and
vessel wall together form a capacitor. The area between the probe and vessel wall is
either filled with air (vessel empty) or the material to be measured (vessel full)
according to the product level. The initial capacitance of an empty vessel is much
smaller than that of a full vessel, the maximum capacitance being a function of the
dielectric constant of the material. This change in capacitance between the initial and
final capacitance values activates the limit switch at a preset level.
Active build-up
compensation
The FEC 22 can also be used with probes with active build-up compensation for the
measurement of liquids which have a high viscosity or tend to form crystals.
Since these media have a strong tendency to form build up on the probe, this
combination provides a reliable, maintenance-free measurement.
If extreme build-up occurs or the probe must be mounted in an unfavorable position,
a probe with screening and active build-up compensation can be used.
1.3 Measuring system
The FEC 22 electronic insert contains all the electronics for limit switching.
A complete measuring system comprises:
• FEC 22 electronic insert
• Multicap T or Multicap
probe
• power supply
• any additional signal
transmitters, switching
units, control systems
(e.g. lamps, horns,
relays, PLC, process
control systems, etc.)
U
Multicap T or
Multicap probe
FEC 22
power supply
contact
(relay or PNP)
BA160Y11
Fig.1.1
Measuring system
Elektronic insert FEC 22 1 Introduction
Endress+Hauser 27
Page 28

2 Mounting
The FEC 22 can only be mounted
in housings F6 (aluminium housing),
F10 (plastic housing) and T3 (aluminium
housing with separate connection
compartment) of the Multicap and
Multicap T probes. All housings must
have a raised cover (see Fig. 3.1 and
Fig. 3.2).
Procedure
• Unscrew the housing cover.
• Plug the FEC 22
into the slot provided in the housing.
• Tighten the mounting screw on the
FEC 22 with a screwdriver.
3 Electrical Connection
General information Please note the following before connecting up:
• The power supply rating must correspond to that shown on the electronic insert.
• Turn off the power supply before connecting up.
Explosion hazardous
areas
When operated in an explosion hazardous area, observe the specifications on the
certificates as well as any local regulations. Refer to the appropriate documentation
supplied with the probes.
Connection Insert the power supply cable through the cable gland on the probe housing.
Connect the cable as shown in the wiring diagram. The number of terminals differs
depending on the electronic insert and type of housing.
BA160Y21
Fig.2.1
Mounting in the probe housing
1
1
+
PE
R
-
2
3
2
(+)
4
3
-
4
44556
PE
N
1A
L1
123 789
5
4
6
max.2.5 mm²
U=:10 V… 55V
(Ground)
R = external load
(Ground)
U~:90 V… 253V
50/60 Hz
Relay output 1 Relay output 2
DC version AC version
BA160Y31
Fig.3.1
Electrical connection inan
F6 aluminiumhousing or
F10 plastic housing
2 Mounting Elektronic insert FEC 22
28 Endress+Hauser
Page 29

Note!
After wiring up ensure that the cover is screwed down tightly and that the cable entry
to the housing is air-tight.
4 Operation
This section describes how to operate the FEC 22 in the field. One section of the
display elements as well as the operating elements of the electronic insert are
protected by a cover. This can be raised by inserting a small screwdriver into a
recess in it. The inside of the cover has symbols to serve as a quick guide (see Table 5.1
for explanation)
Note!
U:10…55 VDC Imax 350mA
PNP
1
2
3
+
-
-
1
1
+
PE
R
-
2
3
2
(+)
3
-
4
5
4
4
5
6
PE
1A
L1
N
789
3
21
4
6
max.2.5 mm²
(Ground)
U=:10 V… 55V
(Ground)
R =external load
U~:90 V… 253V
50/60 Hz
Relay output 1 Relay output 2
DC version AC version
connection
compartment
BA160Y32
Fig.3.2
Electrical connection inthe
T3 aluminium housing with
separate connection area
MIN
MAX
MIN
MAX
∆t∆t
∆c∆
c
protective cover
with quick guide
Specifications:
power
supply
green LED:
stand-by
red LED:
switching status
left key:
e.g.assigning values
right key:
e.g.calibration
LED chain
rotary switch
terminals
BA160Y40
Fig.4.1
Operating and display
elements
Elektronic insert FEC 22 4 Operation
Endress+Hauser 29
Page 30

4.1 Operating elements
The protective cover houses two keys and a rotary switch.
Keys Depending on the position of the rotary switch, the left key switches the individual
functions on or off or assigns values to a particular function (see Table 5.1).
Depending on the position of the rotary switch, the right key carries out the
calibrations when the probe is uncovered or covered.
Rotary switch The rotary switch has eight positions. The symbols on the inside of the protective
cover serve as a quick guide and are also given in Table 5.1 along with their
meanings and switch positions.
4.2 Display elements
LED chain The protective cover houses a chain of 5 LEDs. This chain shows the settings of the
instrument (see Table 5.1).
Green LED The green LED indicates stand-by.
Red LED The red LED indicates the switching status (seeTable 6.1/Page 36).
Switching status Function
Green LED does not light up Power supply failure or switched off.
Green LED lights up
The power supply is switched on.
The instrument is on stand-by.
Table 4.1
Function of thegreen LED
Switching status
Function
DC version AC version
Red LED does not light up
Switching output is
connected or power supply
failure.
Relays energised or
power supply failure.
Red LED lights up Switching output is blocked. Relays de-energised.
Red LED flashes
RESET carried out = all parameters are set to factory values.
No calibration carried out.
Instrument not operating as limit switch.
Table 4.2
Function of thered LED
4 Operation Elektronic insert FEC 22
30 Endress+Hauser
Page 31

5 Commissioning
Note!
The instrument is on stand-by after each calibration procedure (see Section 5.2 to 5.4).
A calibration with both uncovered and covered probe is recommended for critical
applications to ensure maximum operational safety (see Section 5.4).
5.1 Reset to factory settings (Reset)
All settings on the instrument are
cancelled with a reset.
All factory settings are again used
(see Table 5.1).
Procedure
• Press both keys simultaneously for 5 s.
• The red LED flashes, the relays are
de-energised (AC version)
or the switching output is blocked
(DC version).
5s
BA160Y51
Fig.5.1
Resetting tofactory values
MAXMIN
OFF
dC
ON
OFF ON
OFF ON
MIN
MAX
MIN
MAX
∆c∆c
∆c∆c
∆c∆c
2pF
<4
pF
4 pF
4-8
pF
32 pF
>32
pF
16 pF
16-32
pF
8 pF
8-16
pF
∆t∆t
∆c∆c
∆t∆t
∆t∆t
0,5 s 1,5 s 20 s12 s6 s
∆t∆t
0,5 s 1,5 s 20 s12 s6 s
1
3
7
7
7
7
7
7
7
7
3
3
3
3
3
3
3
1
1
1
1
1
1
1
1
2
3
4
5
6
7
8
dC < -4 pF
dC > 4 pF
-4 pF < dC < -2 pF
2 pF < dC < 4 pF
-2 pF < dC < +2 pF
Switch position
Symbol
Assigning values
Meaning
Manual switch point adjustment
Switch point optimisation
Switching delay when probe
covered
Switching delay when probe
uncovered
Minimum/maximum fail-safe
Calibration when probe covered
Calibration when probe uncovered
Display:actual switch point
difference ∆C
Service mode
Table 5.1
Table of functions with assigned
values to the LED chain and
factory-set values
Elektronic insert FEC 22 5 Commissioning
Endress+Hauser 31
Page 32

5.2 Calibration when probe uncovered
Procedure
• To calibrate an uncovered probe, turn
the rotary switch to Position 6.
• When first delivered or after a reset the
extreme left LED in the chain lights up:
no calibration carried out.
• Press the right key for 2 s.
• The extreme right LED in the chain
lights up. The calibration has been
acknowledged and stored.
• The instrument is now on stand-by.
After a calibration with an uncovered probe the capacitance when empty (C
L
)isstored.
The switch point C
S
is then determined by the threshold value ∆C (factory-set
value = 2 pF) with C
S=CL
+ ∆C.
5.3 Calibration when probe covered
Procedure
• To calibrate a covered probe turn the
rotary switch to Position 8.
• When first delivered or after a reset the
extreme left LED in the chain lights up:
no calibration carried out.
• Press the right key for 2 s.
• The extreme right LED in the chain
lights up. The calibration has been
acknowledged and stored
• The instrument is now on stand-by.
After calibration with a covered probe the capacitance when probe covered (C
H
) is
stored. The switch point C
S
is then determined by the threshold value ∆C (factory-set
value = 2 pF) with C
S=CH
- ∆C.
5.4 Calibration when probe uncovered and covered
A calibration with both uncovered and covered probe is recommended to ensure
maximum operational safety. An uncovered or covered probe calibration can always
be supplemented at a later date by an appropriate covered or uncovered probe
calibration. When both calibrations are carried out, the current switch point will be
placed halfway between the two calibration points. The switch point is specified by
C
S
= 0.5 x (CL+CH). See Section 5.2 and 5.3 for carrying out a calibration with both
uncovered and covered probe.
Note!
Switch point optimisation can no longer be activated when both an uncovered and
covered calibration has been carried out. Should it be active when a supplementary
calibration is to be carried out, then the function is automatically switched off.
Note!
1
3
7
7
3
1
2s
ONOFF
BA160Y53
Fig.5.2
Calibration when probe
uncovered
1
3
7
2s
ONOFF
7
3
1
BA160Y54
Fig.5.3
Calibration when probe
covered
5 Commissioning Elektronic insert FEC 22
32 Endress+Hauser
Page 33

6 Additional Settings
This section describes additional settings which can be carried out after
commissioning and calibration.
6.1 Manual switch point adjustment
FunctionAfter one calibration (probe uncovered or probe covered), the switch point difference
∆C (factory-set value=2 pF) can then be adjusted manually to 4 pF, 8 pF, 16 pF or 32 pF
so that switch point still operates reliably even when the probe is encrusted.
After calibration with an uncovered probe, the switch point capacitance then
increases by ∆C resulting in the higher capacitance: C
S=CL
+ ∆C. After calibration
with a covered probe, the switch point capacitance then decreases by ∆C resulting in
the lower capacitance: C
S=CH
- ∆C.
Procedure
• After calibration (probe
uncovered or probe
covered) turn the rotary
switch to Position 1
(factory-set value:
∆C = 2pF).
• Press the left key
repeatedly until the
appropriate LED in the
chain lights up at the
required value of ∆C.
The switch point
capacitance C
S
is then
adjusted by the value ∆C.
Note!
Increasing the switch point difference ∆C leads to a reduction in the sensitivity
of the measuring system. After a calibration with both uncovered and covered probe
(see Section 5.4), the switch point difference is determined by the two calibrations
and cannot be altered.
Note!
1
3
7
∆C∆C
1x
0x
2x
4x
3x
2pF4pF
32 pF
16 pF
8pF
=
∆c∆c
7
1
3
BA160Y61
Fig.6.1
Manual switch point adjustment
Elektronic insert FEC 22 6 Additional Settings
Endress+Hauser 33
Page 34

6.2 Switch point optimisation
Function After a calibration with uncovered or covered probe (see Section 5.2, 5.3 and 5.4)
the switch point of the FEC 22 can be set either manually (see Section 6.1) or
automatically to adjust to the material being measured.
Caution!
Switch point optimisation operates only with horizontal probes.
Switch point optimisation can be activated after an uncovered or covered probe
calibration has been carried out. The procedure for switch point optimisation is similar
to that for the simultaneous uncovered and covered probe calibrations. The
advantage of this procedure is that the second calibration point does not have to be
determined.
The evaluation electronics calculates the switch point and places it halfway between
the capacitance when empty (C
L
) and the capacitance with probe covered (CH).
This optimises the signal-to-noise ratio. Error functions caused by changes in
capacitance due to build-up on the probe or to properties of the material
(conductivity, dielectric constant) are thus minimised.
Switch point
optimisation after
calibration with probe
uncovered
After carrying out a calibration with probe uncovered, the capacitance when empty
C
L
is permanently stored. When the probe is covered, the FEC 22 automatically
determines the capacitance with probe covered C
H
. The switch point CSis then
placed halfway between the capacitance when empty C
L
and capacitance when
probe covered C
H
. If the properties of the medium alter and cause a change in the
capacitance C
H
when covering the probe, then this value is updated and the switch
point C
S
adjusted accordingly.
Switch point
optimisation after
calibration with probe
covered
After carrying out a calibration with probe covered, the capacitance with probe
covered C
H
is permanently stored. When the probe is uncovered, the FEC 22
electronic insert automatically determines the empty capacitance C
L
. The switch point
C
S
is then placed halfway between the capacitance when probe covered CHand the
capacitance when probe uncovered C
L
. If the properties of the medium alter and
cause a change in the capacitance C
L
when uncovering the probe, then this value is
updated and the switch point C
S
adjusted accordingly.
Switch point difference
∆C for switch point
optimisation
Switch point optimisation can also be activated with another ∆C value besides the
preset value ∆C = 2 pF. If the ∆C value was previously set manually to 4 pF,
then it is adjusted only when the change in capacitance C
X
(see Page 26) is larger
than 2 x ∆C = 8 pF. When de-activating the switch point optimisation, the last
calculated switch point capacitance C
S
is held and the current switch point difference
∆C is shown on the LED chain (rotary switch in Position 1). Changes can then be
made manually.
Cleaning the vessel Caution!
If the vessel and probe are to be cleaned, e.g. CIP, with the switch point optimisation
switched on, then the switch point adjusts to the cleaning solution, provided that it
produces a larger change in capacitance than the process medium. This might
otherwise lead to faulty measurements. In this case switch point optimisation is not
recommended.
Caution!
Caution!
6 Additional Settings Elektronic insert FEC 22
34 Endress+Hauser
Page 35

Switch point optimisation is switched on or off using the operating elements on
the FEC 22.
Procedure
• Turn the rotary switch to
Position 2.
• When first delivered or
after a reset the extreme
left LED in the chain
lights up:
switch point
optimisation
de-activated.
• Press the right key.
• The extreme right LED in
the chain lights up:
switch point optimisation
activated.
Deactivating switch
point optimisation
Switch point optimisation can be de-activated (Procedure see Fig. 6.2).
The FEC 22 then operates with the capacitance stored in its memory (capacitance
when empty C
L
or capacitance when probe covered CH) and the calculated switch
point capacitance C
S
. The latter is no longer changed.
Current switch point
difference ∆CProcedure
• Turn the rotary switch to
Position 1.
• The current switch point
difference ∆C can be
read off on the LED
chain (Assigning values
see Fig. 6.3).
Note!
The current switch point difference ∆C (rotary switch in Position 1) can only be
displayed if:
• both calibrations (probe uncovered and probe covered) have been carried out
∆C = 0.5 x (C
H
- CL)
• a calibration when probe uncovered has been carried out and switch point
optimisation activated
∆C = C
S-CL
• a calibration when probe covered has been carried out and switch point
optimisation activated ∆C = C
H
- C
S
Note!
1
3
7
7
3
1
∆c∆
c
ONOFF
ON
ON
OFF
OFF
1x
2x
0x
BA160Y62
Activating switchpoint
optimisation
Fig.6.2
Activating switch point
optimisation
1
3
7
∆c∆c
7
1
3
∆C∆C
<4pF4-8
pF
>32
pF
16-32
pF
8-16
pF
=
BA160Y63
Fig.6.3
Display of current switch point
difference
∆
C
Elektronic insert FEC 22 6 Additional Settings
Endress+Hauser 35
Page 36

6.3 Minimum/maximum fail-safe mode
Function By using the minimum/maximum fail-safe switching feature, the FEC 22 can be used
in all applications where a fail-safe function is required.
Setting
Procedure
• Turn the rotary switch to
Position 5.
• When first delivered or
after a reset the extreme
right LED in the chain
lights up:
maximum
fail-safe activated.
• Minimum and maximum
fail-safe mode can be
toggled by pressing the
left key.
• The setting can be read
off on the LED chain.
6.4 Switching delay
This function enables the switching delay time to be altered (factory-set value = 1.5 s)
so that the electronic insert can switch accordingly when the probe is covered or
uncovered.
Minimum fail-safe Maximum fail-safe
DC-PNP AC-DPDT Red LED DC-PNP AC-DPDT Red LED
Probe
covered
connected
relays energised blocked relays de-energised
Probe
uncovered
blocked relays de-energised
connected
relays energised
Power supply
failure
blocked
relays de-energised
blocked
relays de-energised
Table 6.1
1(+)
3
1 2 3 7 8 9
3
1(+)
1 2 3
7 8 9
3
1(+)
1 2 3
7 8 9
1(+)
3
1 2 3 7 8 9
U0V
3
1(+)
1 2 3
7 8 9
3
1(+)
1 2 3
7 8 9
1
3
7
MAXMIN
MAX
MAX
MIN
MIN
1x
2x
0x
7
3
1
MIN
MAX
MIN
MAX
BA160Y66
Fig.6.4
Minimum/maximum fail-safe
6 Additional Settings Elektronic insert FEC 22
36 Endress+Hauser
Page 37

Procedure
• Turn the rotary switch to
Position 3.
• When first delivered or
after a reset the LED
second from the left in
the chain lights up:
delay time∆t = 1.5 s.
• Press the left key
repeatedly until the
appropriate LED in the
chain lights up at the
delay time required
(Assigning values see
Fig. 6.5).
Procedure
• Turn the rotary switch to
Position 4.
• When first delivered or
after a reset the LED
second from the left in
the chain lights up:
delay time∆t = 1.5 s.
• Press the left key
repeatedly until the
appropriate LED in the
chain lights up at the
delay time required
(Assigning values see
Fig. 6.6).
6.5 Service mode
In this mode the deviation dC of the current capacitance measured by the instrument
from the set switch point C
S
is shown on the LED chain.
Procedure
• Turn the rotary switch to
Position 7.
• The deviation dC from
the set switch point can
be read off on the LED
chain (Assigning values
see Fig. 6.7).
1
3
7
1x
0x
2x
4x
3x
=
∆t∆t
0,5 s
1,5 s
20 s12 s6s
∆t
73
1
BA160Y67
Switching delay
when covered
Fig.6.5
Adjusting thetime forswitching
delay when probe is covered
1
3
7
1x
0x
2x
4x
3x
=
∆t∆t
0,5 s
1,5 s
20 s12 s6s
7
3
1
∆t
BA160Y68
Switching delay
when uncovered
Fig.6.6
Adjusting thetime for switching
delay when probe is uncovered
1
3
7
dC
dC < -4 pF
dC > 4 pF
-4 pF < dC <-2 pF
2 pF < dC <4 pF
-2 pF < dC <+2 pF
3
1
7
BA160Y69
Fig.6.7
Display of deviation dC
from set switch point
Elektronic insert FEC 22 6 Additional Settings
Endress+Hauser 37
Page 38

7 Trouble-Shooting and Remedies
Note!
If additional error messages occur or the error cannot be remedied: refer to the
Operating Instructions or contact E+H.
8 Replacing an Electronic Insert
If the electronic insert is to be replaced then the following procedure should be
carried out:
Removal • Switch off all power supply to the electronic insert.
• Remove all electric connections to the electronic insert.
• Unscrew the mounting screw of the electronic insert.
• Remove the electronic insert from the probe housing.
Insertion • Check that the specifications on the electronic insert agree with the power supply
rating before inserting the electronic insert.
• Plug the new electronic insert into the slot in the housing.
• Screw down the mounting screw on the electronic insert securely.
• Connect cabling.
Calibration • Switch on the power supply.
• Carry out a reset and then recalibrate using the settings required
(see Section 5 and 6).
Note!
Error diagnosis Cause Remedy
Green and red LED do not light up Power supply failure or is not
switched on
Check electrical connections.
Red LED flashes No calibration carried out.
Instrument does not operate as
limit switch.
Carry out calibration.
Reset carried out = all
parameters set to factory
values. Instrument does not
operate as limit switch.
Carry out calibration.
Red LED lights up AC version:
relay de-energised.
DC version:
switching output blocked.
LED chain does not light up To minimise consumption LED
chain switches off approx. 10
min after last entry.
LED chain reactivated by
turning the rotary switch or
pressing one or both keys. This
ensures no parameters are
altered.
Power supply failure. Green LED
does not light.
Check electrical connections.
Switch point optimisation
cannot be activated.
Both calibrations have already
been carried out.
1. Carry out reset
2. Carry out a calibration.
3. Activate switch point
optimisation.
Table 7.1
Trouble-Shooting and Remedies
7 Trouble-Shooting and Remedies Elektronic insert FEC 22
38 Endress+Hauser
Page 39

9 Repairs
Electronic insertShould the FEC 22 electronic insert need to be repaired by Endress+Hauser, please
send it with a note containing the following information:
• An exact description of the application for which it was used.
• The chemical and physical properties of the product measured.
• A short description of the fault.
ProbeSpecial precautions must be observed when sending the probe and its FEC 22 for
repair:
• Remove all traces of product. This is particularly important if the product can impair
health, i.e. corrosive, poisonous, carcinogenic, radioactive etc..
• If the last traces of dangerous products cannot be removed, e.g. product has
penetrated into fissures or diffused into plastic parts, we kindly ask you not to send
the probe for repair.
10 Waste Disposal
PackagingAll sales and transport packaging from Endress+Hauser is produced in conformance
to the regulations governing packing for reuse and recycling.
InstrumentsFor a small charge, Endress+Hauser will accept and recycle any instruments
manufactured in its own E+H production program. These will then be disposed of
according to the German regulations covering the disposal of electronics. Delivery to
Endress+Hauser, Hauptstr 1,
79689 Maulburg, Germany.
11 Technical Data
General specifications
Manufacturer Endress+Hauser GmbH+Co.
Designation FEC 22 electronic insert
Operation and system design
Measuring principle Capacitive
Signal processing AC version: 2 relays connected in parallel (DPDT)
DC version: Load switching via transistor
Electrical isolation Between measuring loop and power supply loop
Input
Measured variable Level (limit)
Range of capacitance For empty detection (uncovered probe) 10 pF…350 pF
Operating frequency 500 kHz
Output
AC version Two change-over contacts (DPDT), to withstand load:
- AC 253 V, 6 A max., P~max. 1500 VA, cos ϕ= 1
- DC: 30 V, 6 A max.
125 V, 0.2 A max.
DC version Consumption approx. 18 mA at 24 V:
- Load current up to 350 mA continuous, max. 55 V, with overload and
reverse current protection
- Residual current when blocked less than 10 µA
Elektronic insert FEC 22 9 Repairs
Endress+Hauser 39
Page 40

Operating conditions Installation
Mounting In any orientation. Mounting only in housings F6, F10 or T3
(with raised cover) of Multicap T or Multicap probes.
Environmental conditions
Ambient temperature range -40 °C…+70 °C
Limiting temperature range -40 °C…+80 °C
Storage temperature range -40 °C…+85 °C
Climatic class Climatic protection to IEC 68, Part 2…38, Fig. 2a
Ingress protection IP 20
Vibration resistance To IEC 68 Part 2-6, 10…55 Hz, 0.15 mm, x,y,z
Electromagnetic compatibility Interference Emission to EN 61326; Electrical Equipment Class B
Interference Immunity to EN 61326; Annex A (Industrial) and
NAMUR Recommendation NE 21 (EMC).
Mechanical construction Housing
Design Compact instrument
Dimensions 103 mm x 67 mm x 49 mm
Weight 0.3 kg
Material Plastic
Electrical connection See Section 3, Page 28-29
User interface Outside the protective cover
Green LED Stand-by
Red LED Switching status:
AC version (relays de-energised)
DC version (switching output blocked)
Under the protective cover
5 LEDs Display of gradations with values
2 keys Calibration / assigning values
Rotary switch For selecting 8 different settings (see Page 31)
Power supply
AC version AC 90 …253 V, 50/60 Hz, current consumption approx. 10 mA at 230 V
DC version Three-wire DC connection PNP, DC 10 V…55 V
Certificates and approvals
Certificates EC-Type-examination certificate
KEMA 99 ATEX 3122, XA 060F/00/a3
CE Mark By attaching the CE Mark, Endress+Hauser confirms that the
electronic insert FEC 22 fulfils all legal requirements of the relevant EC
directives.
Ordering
Order No.: 942299-0000 FEC 22 in AC version
Order No.: 942299-1000 FEC 22 in DC version
Standards, guidelines
Supplementary
Documentation
Multicap T DC .. TE. probe, TI 240F/00/en
Multicap T DC .. TA. probe, TI 239F/00/en
Multicap DC .. E. probe, TI 242F/00/en
Multicap DC .. A. probe, TI 243F/00/en
11 Technical Data Elektronic insert FEC 22
40 Endress+Hauser
Page 41

Index
A
Activating switchpoint optimisation . . . . . . 35
Active build-up compensation . . . . . . . . 27
Additional settings . . . . . . . 33, 34, 35, 36, 37
Approved usage . . . . . . . . . . . . . . 25
Assigning values . . . . . . . . . . . . . . 31
C
Calibration when probe covered . . . . . . . 32
Calibration when probe uncovered . . . . . . 32
Calibration when probe uncovered and covered . 32
Capacitance when covered . . . . . . 26, 32, 34
Capacitance when empty . . . . . . . 26, 32, 34
Commissioning . . . . . . . . . . . . 31, 32
D
Delay time . . . . . . . . . . . . . . . . 37
Display elements . . . . . . . . . . . . . 30
E
Electrical connection . . . . . . . . . . . . 28
AC version in F6/F10 housing . . . . . . . . 28
AC version in the T3 housing . . . . . . . . 29
DC version in F6/F10 housing . . . . . . . . 28
DC version in the T3 housing . . . . . . . . 29
Electrical symbols . . . . . . . . . . . . . 26
Error diagnosis . . . . . . . . . . . . . . 38
Explosion protection . . . . . . . . . . . . 26
F
Field of Application . . . . . . . . . . . . . 27
G
GreenLED................ 30
K
Keys . . . . . . . . . . . . . . . . . . 30
L
LED chain . . . . . . . . . . . . . . . . 30
Limit Detection . . . . . . . . . . . . . . 27
M
Manual switchpoint adjustment . . . . . . . . 33
Maximum fail-safe . . . . . . . . . . . . . 36
Measurement principle . . . . . . . . . . . 27
Measuring system . . . . . . . . . . . . . 27
Minimum fail-safe . . . . . . . . . . . . . 36
Mounting in the probe housing . . . . . . . . 28
N
Notes on safety . . . . . . . . . . . . . . 25
O
Operating and display elements . . . . . . . . 29
Operating elements . . . . . . . . . . . . . 30
Operation . . . . . . . . . . . . . . . 29, 30
Other symbols . . . . . . . . . . . . . . . 26
R
RedLED.................30
Relays de-energised . . . . . . . . . . . . 36
Relays energised . . . . . . . . . . . . . . 36
Repairs . . . . . . . . . . . . . . . . . 39
Replacing an electronic insert . . . . . . . . . 38
Reset . . . . . . . . . . . . . . . . . . 31
Rotary switch positions . . . . . . . . . . . 30
S
Safety conventions . . . . . . . . . . . . . 26
Service mode . . . . . . . . . . . . . . . 37
Stand-by . . . . . . . . . . . . . . . . . 30
Switching delay . . . . . . . . . . . . . . 36
Switching delay when covered . . . . . . . . 37
Switching delay when uncovered . . . . . . . 37
Switching output blocked . . . . . . . . . . 36
Switching output connected . . . . . . . . . 36
Switching status . . . . . . . . . . . . . . 30
Switch point difference ∆C . . . . . . . . 26, 34
Switch point optimisation . . . . . . . . . . . 34
Switch point optimisation after calibration when
covered . . . . . . . . . . . . . . . . . 34
Switch point optimisation after calibration when
uncovered . . . . . . . . . . . . . . . . 34
Switch point optimisation, de-activating . . . . . 35
T
Technical data . . . . . . . . . . . . . 39, 40
W
Waste disposal . . . . . . . . . . . . . . 39
Electronic insert FEC 22 Index
Endress+Hauser 41
Page 42

Page 43

Electronique
FEC 22
Instructions de mise en service
Hauser+Endress
The Po werof Know How
BA160F/00/fr/04.03
016904-0000
Page 44

Instructions en bref
Ces instructions permettent une mise en service rapide par un personnel spécialisé
Avertissement
Ces instructions s’adressent uniquement au personnel qui a entièrement lu et compris
le manuel de mise en service BA 160F.
Reset
Etalonnage sonde
découverte
et/ou
Etalonnage sonde
recouverte
Tableau
Avertissement!
7
3
1
ONOFF
ONOFF
7
3
1
1
3
7
2
1
3
2s
5s
page 51
page 52
page 52
BA160Y02
Instructions en bref
MAXMIN
OFF ON
OFF ON
OFF ON
dC
MIN
MAX
MIN
MAX
∆c∆
c
∆c∆c
∆c∆c
2pF
4pF
<4pF4-8pF8-16pF16-32pF>32
pF
32 pF16 pF8pF
∆t∆t
∆c∆
c
∆t∆t
∆t∆t
0,5 s 1,5 s 20 s12 s6s
∆t∆t
0,5 s 1,5 s 20 s12 s6s
1
3
7
7
7
7
7
7
7
3
3
3
3
3
3
1
1
1
1
1
1
1
2
3
4
5
6
8
7
3
1
1
7
dC < -4 pF
dC > 4 pF
-4 pF < dC < -2 pF
2 pF < dC < 4 pF
-2 pF < dC < +2 pF
Position
commutateur
Symbole Signification
touche
gauche
touche
gauche
touche
gauche
touche
gauche
touche
gauche
Décalage manuel du point
de commutation
section 6.1 / p.53
section 6.2 / p.55
section 6.2 / p.54
section 6.4 / p.56
section 6.4 / p.56
section 6.3 / p.56
section 6.5 / p.57
section 5.2 / p.52
section 5.4 / p.52
section 5.3 / p.52
section 5.4 / p.52
Affichage: décalage actuel,
point de commutation C∆
Optimisation du point
de commutation
Temporisationde commutation
au recouvrement
Temporisationde commutation
au découvrement
Sécurité min. ou max.
Etalonnage sonde découverte
Etalonnage sonde recouverte
Mode maintenanceaffichage
touche
droite 2 s
touche
droite 2 s
Informations
complémentaires:
= Réglagepardéfaut/attributionvaleur avec...
Electronique FEC 22
44 Endress+Hauser
Page 45

Conseils de sécurité
Utilisation conforme
à l’objet
L’électronique FEC 22 doit uniquement être utilisée avec une sonde Multicap ou
Multicap T pour la détection de niveau. Elle a été construite selon les derniers acquis
en technique de sécurité et conformément aux directives CE en vigueur. Cependant,
une utilisation non conforme à l’objet ou aux consignes peut engendrer des situations
dangereuses, pour lesquelles Endress + Hauser ne saurait être tenu pour
responsable. Seules les modifications et réparations de l’appareil expressément
signalées dans cette notice sont autorisées. Les appareils endommagés doivent être
mis hors service et signalés comme tel.
Zone explosibleSi le système de mesure est utilisé en zone explosible, tenir compte des normes
nationales afférentes et des instructions figurant dans les certificats.
Montage et mise en
service
Le montage, le raccordement électrique, la mise en service, l’exploitation et la
maintenance de l’ensemble de mesure ne doivent être effectués que par du
personnel qualifié et autorisé, qui aura préalablement lu et compris la présente notice.
UtilisationLa manipulation de ce matériel ne peut être effectuée que par du personnel qualifié,
instruit et autorisé par l’exploitant de l’installation. Les directives de cette notice
doivent être respectées.
Sommaire
Conseils de sécurité . . . . . . . . . . 45
1 Introduction . . . . . . . . . . . . . . 47
1.1 Domaine d’application . . . . . . . . 47
1.2 Principe de fonctionnement . . . . . . 47
1.3 Ensemble de mesure . . . . . . . . . 47
2 Montage . . . . . . . . . . . . . . . 48
3 Raccordement électrique . . . . . . . . 48
4 Utilisation . . . . . . . . . . . . . . 49
4.1 Eléments de commande . . . . . . . . 50
4.2 Eléments d’affichage . . . . . . . . . 50
5 Mise en service . . . . . . . . . . . . 51
5.1 Retour aux valeurs par défaut (reset) . . . 51
5.2 Etalonnage avec sonde découverte . . . 52
5.3 Etalonnage avec sonde recouverte . . . 52
5.4 Etalonnage sonde recouverte et découverte 52
6 Autres réglages . . . . . . . . . . . . 53
6.1 Décalage manuel du point zéro . . . . . 53
6.2 Optimisation du point de commutation . . 54
6.3 Sécurité de fonctionnement minimum ou
maximum . . . . . . . . . . . . . . 56
6.4 Temporisation à la commutation . . . . . 56
6.5 Mode de maintenance . . . . . . . . 57
7 Recherche et suppression des défauts . . . 58
8 Remplacement d’une électronique . . . . 58
9 Réparations . . . . . . . . . . . . . . 59
10 Caractéristiques techniques . . . . . . . 59
Index . . . . . . . . . . . . . . . . . 61
SommaireElectronique FEC 22
Endress+Hauser 45
Page 46

Conseils de sécurité
Afin de mettre la nature des différentes opérations en évidence, une convention a été
établie à l’aide des symboles situés en marge du texte.
Conseils de sécurité
Protection
antidéflagrante
Symboles électriques
Autres symboles
Symbole Signification
Remarque!
Ce symbole signale les actions ou procédures susceptibles de perturber indirectement le
fonctionnement des appareils ou de générer des réactions imprévues si elles n’ont pas été
menées correctement.
Attention!
Ce symbole signale les actions ou les procédures qui risquent d’entraîner des dommages
corporels ou des dysfonctionnements d’appareils si elles n’ont pas été menées
correctement.
Avertissement!
Ce symbole signale les actions ou les procédures qui risquent d’entraîner de sérieux
dommages corporels ou des dégâts d’appareil irréparables.
Zone explosible
Ce symbole représente dans les schémas la zone explosible.
– Les appareils qui se situent dans cette zone ou leurs câbles doivent avoir
la protection antidéflagrante adéquate.
Zone sûre (zone non explosible)
Ce symbole représente dans les schémas la zone non explosible.
– Les appareils qui se situent dans cette zone doivent être également être certifiés
si des circuits qui leur sont raccordés pénètrent en zone explosible.
Remarque!
Attention!
Avertissement!
Conseils de sécurité
Symbole
Signification
Symbole
Signification
Courant continu
Borne à laquelle est appliquée une
tension continue ou traversée par un
courant continu.
Commande électro-mécanique
Désigne la borne permettant le
raccordement d’une charge externe
(par ex. relais, API).
Courant alternatif
Borne à laquelle est appliquée une
tension alternative (sinusoïdale) ou
traversée par une tension alternative.
Contact inverseur
Désigne les bornes pour une sortie
relais.
Raccordement de terre
Borne, qui du point de vue de
l’utilisateur est déjà mise à la terre.
Contact inverseur
Désigne la diode de l’état de
commutation du relais en version
courant alternatif.
Terre
Borne à mettre à la terre avant tout
autre raccordement.
Contact defermeture
Désigne la diode de l’état de
commutation du relais en version
courant continu
Symbole
Définition
Symbole
Définition
C
L
Point d’étalonnage inférieur (capacité
au découvrement)
dC
Ecart entre la capacité mesurée par
l’appareil et le point de commutation
C
S
réglé
C
H
Point d’étalonnage supérieur
(capacité au recouvrement)
DEL Diode électroluminescente
∆C Ecart point de commutation
DC-PNP
Version courant continue avec sortie
PNP
C
S
Point de commutation (capacité)
C
X
Variation de capacité mesurée,
par rapport à la valeur de réglage
① inférieure ou ② supérieure:
C
X
= 2 x ∆C
AC-DPDT
Version courant alternatif avec deux
contacts inverseurs en parallèle
(DPDT).
C
H
C
L
C
S
∆C
∆C
C
H
C
L
C
X
C
X
C
S
①
②
Electronique FEC 22
46 Endress+Hauser
Page 47

1 Introduction
1.1 Domaine d’application
L’électronique FEC 22 reliée à une sonde de la famille Multicap constitue un appareil
compact pour la détection de niveau de produits divers. Le module piloté par
microprocesseur contient tous les éléments électroniques nécessaires à la détection
de niveau et ne nécessite pas de transmetteur complémentaire.
L’électronique FEC 22 existe en deux versions :
• Version courant alternatif avec deux contacts inverseurs en parallèle (DPDT)
• Version courant continu avec sortie PNP
1.2 Principe de fonctionnement
Détection de seuilLa sonde capacitive et la paroi du réservoir forment un condensateur électrique.
L’espace entre la sonde et la paroi est occupé soit par de l’air (réservoir vide), soit
par du produit (réservoir plein). Lorsque le réservoir est vide, la capacité initiale est
nettement plus faible que la capacité maximale mesurée atteinte lorsque le réservoir
est plein, et fonction également du coefficient diélectrique du produit. Cette variation
de capacité entre vide et plein conduit, après un réglage adéquat, à la commutation
de la sortie signalisation de niveau.
Compensation active
de colmatage
L’ensemble constitué d’une sonde capacitive avec compensation active de
colmatage (blindage actif) et de l’électronique FEC 22 offre la solution idéale pour une
détection très fiable, et ne nécessitant pas d’entretien, des liquides qui colmatent ou
cristallisent fortement, et ceci sans entretien. Pour les cas de colmatage extrême et
de conditions d’implantation défavorables, il est possible de combiner blindage
passif et blindage actif.
1.3 Ensemble de mesure
Le module FEC 22 comporte une électronique complète. De ce fait, l’ensemble de
mesure se limite aux éléments suivants :
• électronique FEC 22
• sonde Multicap ou
Multicap T
• source de tension
• dispositifs de
signalisation raccordés,
par ex. lampes, klaxons,
relais, API, SNCC, etc.
U
Sonde Multicap T
ou Multicap
FEC 22
Tension d’alimentation
Contact (relais
ou PNP)
BA160Y11
Fig.1.1
Ensemble de mesure
Electronique FEC 22 1 Introduction
Endress+Hauser 47
Page 48

2 Montage
L’électronique FEC 22 ne peut être
montée que dans les boîtiers type F6,
F10 et T3 (avec couvercle surélevé) des
sondes Multicap T et Multicap.
Procédure
• Dévisser le couvercle.
• Enficher l’électronique FEC 22 dans le
boîtier, sur le connecteur prévu à cet
effet.
• Serrer la vis de fixation de
l’électronique FEC 22.
3 Raccordement électrique
Remarques générales Avant d’effectuer le raccordement, observer les points suivants :
• la tension d’alimentation doit concorder avec les indications figurant sur
l’électronique
• interrompre l’alimentation avant de brancher l’appareil.
Zone Ex En cas d’utilisation en zone Ex, tenir compte des normes nationales en vigueur et des
indications figurant dans les certificats. Voir à ce propos la documentation relative aux
sondes.
Raccordement Faire passer le câble d’alimention à travers l’entrée de câble du boîtier de sonde et le
raccorder aux bornes conformément au schéma ci-dessous. Le nombre de bornes
varie en fonction de la version de l’électronique et du type de boîtier (voir schémas de
raccordement).
BA160Y21
Fig.2.1
Montage dans le boîtier de la
sonde
1
1
+
PE
R
-
2
3
2
(+)
4
3
-
4
44556
PE
N
1A
L1
123 789
5
4
6
max.2,5 mm²
U=:10 V… 55V
(Ground)
R = chargeexterne
(Ground)
U~:90 V… 253V
50/60 Hz
Sortie relais 1 Sortierelais 2
Versioncourant continu Versioncourant alternatif
BA160Y31
Fig.3.1
Raccordement électrique
dans leboîtier de sonde en
aluminium typeF6 ou
synthétique type F10
2 Montage Electronique FEC 22
48 Endress+Hauser
Page 49

Remarque!
Après le raccordement, s’assurer que le couvercle est correctement vissé et que les
entrées de câble du boîtier de sonde sont étanches.
4 Utilisation
Ce chapitre décrit l’utilisation de l’électronique FEC 22 sur site. Une partie des
éléments d’affichage et de commande se trouve sous un cache de protection que l’on
soulève avec un tournevis. Sur la face intérieure du cache se trouvent les symboles
d’instructions de mise en service rapide (voir explications section 5.1).
Remarque!
U:10…55 VDC Imax 350mA
PNP
1
2
3
+
-
-
1
1
+
PE
R
-
2
3
2
(+)
3
-
4
5
4
4
5
6
PE
1A
L1
N
789
3
21
4
6
max.2,5 mm²
(Ground)
U=:10 V… 55V
(Ground)
R =charge externe
U~:90 V… 253V
50/60 Hz
Sortie relais 1 Sortierelais 2
Version courantcontinu Version courantalternatif
Compartiment de
raccordement
BA160Y32
Fig.3.2
Raccordement électriquedans le
boîtier desonde en aluminium
typeT3 avec compartimentde
raccordement séparé
MIN
MAX
MIN
MAX
∆t∆t
∆c∆
c
Capot rabattable
Indication:
tension
d’alimentation
DEL verte: témoin de
fonctionnement
DEL rouge:
état de commutation
Touche de gauche:
par ex.attribution de
valeur
Touche de droite: parex.
étalonnage
Rangée de DEL
Sélecteur
Bornes de raccordement
BA160Y40
Fig.4.1
Emplacement des éléments
d’affichage et decommande
Electronique FEC 22 4 Utilisation
Endress+Hauser 49
Page 50

4.1 Eléments de commande
Sous le cache se trouvent deux touches et un sélecteur rotatif.
Touches de commandes En fonction de la position du sélecteur, la touche de gauche permet d’activer ou de
désactiver les diverses fonctions ou d’attribuer les valeurs correspondant aux
fonctions (voir tableau 5.1).
La touche de droite permet, selon la position du sélecteur, d’effectuer un étalonnage
avec sonde recouverte ou découverte.
Sélecteur Le sélecteur rotatif possèce 8 positions. Le tableau 5.1 répertorie les symboles qui
figurent sur l’envers du cache de protection, ainsi que leur signification et les
positions du sélecteur rotatif qui leur correspondent.
4.2 Eléments d’affichage
Rangée de DEL Sous le cache se trouve une rangée de 5 DEL qui indiquent les réglages de l’appareil
(voir tableau 5.1).
DEL verte La DEL verte est le témoin de fonctionnement.
DEL rouge La DEL rouge affiche l’état de commutation.
Etat de commutation Fonction
DEL verte éteinte Coupure de courant ou appareil hors tension.
DEL verte allumée Appareil sous tension, prêt à l’emploi.
Tableau 4.1:
Fonction de la touche verte
Etat de commutation
Fonction
Version courant continu Version courant alternatif
DEL rouge éteinte
Sortie passante ou coupure
de courant
Relais attirés ou coupure de
courant
DEL rouge allumée Sortie bloquée Relais retombés
DEL clignote
RESET = retour aux valeurs par défaut
Aucun étalonnage n’a été effectué.
L’appareil ne fonctionne pas encore en détecteur.
Tableau 4.2
Fonction de la DEL rouge
4 Utilisation Electronique FEC 22
50 Endress+Hauser
Page 51

5 Mise en service
Remarque!
L’appareil est disponible après chaque étalonnage (voir sections 5.2 à 5.4). Pour un
maximum de sécurité dans les applications difficiles, il est conseillé de faire un
étalonnage avec sonde couverte et découverte (voir section 5.4).
5.1 Retour aux valeurs par défaut (reset)
Un reset rétablit les valeurs réglées en
par défaut (voir tableau 5.1).
Procédure
• Appuyer simultanément sur les deux
touches durant 5 s.
• La DEL rouge clignote, les relais
retombent (version courant alternatif)
ou la sortie commutation est bloquée
(version courant continu).
Remarque!
5s
BA160Y51
Fig.5.1
Retour auxvaleurs pardéfaut
MAXMIN
OFF
dC
ON
OFF ON
OFF ON
MIN
MAX
MIN
MAX
∆c∆c
∆c∆c
∆c∆c
2pF
<4
pF
4 pF
4-8
pF
32 pF
>32
pF
16 pF
16-32
pF
8 pF
8-16
pF
∆t∆t
∆c∆c
∆t∆t
∆t∆t
0,5 s 1,5 s 20 s12 s6 s
∆t∆t
0,5 s 1,5 s 20 s12 s6 s
1
3
7
7
7
7
7
7
7
7
3
3
3
3
3
3
3
1
1
1
1
1
1
1
1
2
3
4
5
6
7
8
dC < -4 pF
dC > 4 pF
-4 pF < dC < -2 pF
2 pF < dC < 4 pF
-2 pF < dC < +2 pF
Positionsélecteur Symbole
Attribution de valeur
Signification
Décalage manueldu point de
commutation
Optimisation du point de
commutation
Temporisation de la commutation
au recouvrement
Temporisation de lacommutation
au découvrement
Sécurité min.ou max.
Etalonnage sonde recouverte
Etalonnage sonde découverte
Affichage:décalage actuel du point
de commutation en cours, ∆C
Mode maintenance
Tableau 5.1
Tableau des fonctionsde
la rangéede DEL et réglages
par défaut avec attribution des
valeurs
Electronique FEC 22 5 Mise en service
Endress+Hauser 51
Page 52

5.2 Etalonnage avec sonde découverte
Procédure
• Mettre le sélecteur en position 6, pour
l’étalonnage d’une sonde découverte.
• A la livraison, ou après reset, la DEL
entièrement à gauche clignote:
pas
d’étalonnage effectué.
• Appuyer sur la touche de droite
durant 2 s
• La DEL entièrement à droite clignote.
L’étalonnage a été accepté et
mémorisé.
• L’appareil est prêt à fonctionner.
Après un étalonnage avec sonde découverte, la capacité de réservoir vide (C
L
) est
mémorisée. Le point de commutation C
S
est défini par le seuil de commutation ∆C
(valeur par défaut = 2 pF) avec C
S=CL
+ ∆C.
5.3 Etalonnage avec sonde recouverte
Procédure
• Mettre le sélecteur en position 8 pour
l’étalonnage d’une sonde recouverte.
• A la livraison, ou après un reset, la DEL
entièrement à gauche clignote:
pas
d’étalonnage effectué.
• Appuyer sur la touche de droite
durant 2 s
• La DEL entièrement à droite clignote.
L’étalonnage a été pris en compte et
mémorisé.
• L’appareil est prêt à fonctionner.
Après un étalonnage avec sonde recouverte, la capacité au recouvrement (C
H
) est
mémorisée. Le point de commutation C
S
est défini par le seuil de commutation ∆C
(valeur par défaut = 2 pF) avec C
S=CH
- ∆C.
5.4 Etalonnage sonde recouverte et découverte
Pour un maximum de sécurité, il est recommandé d’effectuer les étalonnages sonde
recouverte et découverte, dans un ordre quelconque. Un étalonnage sonde
découverte peut être complété à tout moment par un étalonnage sonde recouverte, et
inversement. Le point de commutation est placé à mi-distance entre les deux points
de réglage. Il est défini par: C
S
= 0,5 x (CL+CH). Pour effectuer cet étalonnage,
suivre les instructions des sections 5.2 et 5.3.
Remarque!
L’optimisation du point de commutation ne peut être activée après un étalonnage
découvert et recouvert. Le cas échéant, elle est automatiquement désactivée lors du
2ème étalonnage.
Remarque!
1
3
7
7
3
1
2s
ONOFF
BA160Y53
Fig.5.2
Etalonnage avecsonde
découverte
1
3
7
2s
ONOFF
7
3
1
BA160Y54
Fig.5.3
Etalonnage avec sonde
recouverte
5 Mise en service Electronique FEC 22
52 Endress+Hauser
Page 53

6 Autres réglages
Ce chapitre décrit les autres réglages qui peuvent être effectués après la mise en
service et l’étalonnage.
6.1 Décalage manuel du point zéro
FonctionAfin que le détecteur commute avec fiabilité, même lorsque la sonde est encrassée, il
est possible de régler manuellement le décalage du point de commutation ∆C (valeur
par défaut = 2 pF) sur 4 pF, 8 pF, 16 pF ou 32 pF après un étalonnage.
Après un étalonnage avec sonde découverte, la capacité du point de commutation
augmente de la valeur ∆C: C
S=CL
+ ∆C.
Après un étalonnage avec sonde recouverte, la capacité du point de commutation
diminue de la valeur ∆C: C
S=CH
- ∆C.
Procédure
• Après l’étalonnage
(sonde découverte ou
recouverte), tourner le
sélecteur en position 1
(valeur par défaut:
∆C = 2 pF).
• Appuyer sur la touche
de gauche jusqu’à ce
que la DEL
correspondant à la
valeur ∆C souhaitée
s’allume.
La capacité du point de
commutation C
S
est
alors décalée de la
valeur ∆C réglée.
Remarque!
Une augmentation de l’écart du point de commutation ∆C a pour effet de diminuer la
sensibilité de l’ensemble de mesure. Après l’étalonnage avec sonde recouverte et
découverte (voir section 5.4), l’écart du point de commutation est défini par les deux
étalonnages et ne peut être modifié.
Remarque!
1
3
7
∆C∆C
1x
0x
2x
4x
3x
2pF4pF
32 pF
16 pF
8pF
=
∆c∆
c
7
1
3
BA160Y61
Fig.6.1
Décalage manueldu point
de commutation
Electronique FEC 22 6 Autres réglages
Endress+Hauser 53
Page 54

6.2 Optimisation du point de commutation
Fonction En plus du réglage manuel du point de commutation (voir section 6.1) après un
étalonnage avec sonde découverte ou recouverte (voir sections 5.2, 5.3 et 5.4),
l’électronique FEC 22 offre également la possibilité d’une adaptation automatique du
point de commutation au produit.
Attention!
L’optimisation du point de commutation ne fonctionne que pour une sonde montée
horizontalement.
L’optimisation peut être activée après l’étalonnage avec sonde couverte ou
découverte. Cette procédure peut être comparée à l’étalonnage avec les deux états
découvert et recouvert de sonde. Elle a cependant l’avantage d’éviter l’étalonnage
du 2ème point.
L’électronique calcule le point de commutation et le place à mi-distance entre la
capacité vide (C
L
) et la capacité au recouvrement (CH), ce qui permet d’optimiser
l’écart et de limiter des erreurs de fonctionnement dues aux variations de capacité
générées par un colmatage sur la sonde ou des modifications des caractéristiques
du produit (conductivité, constante diélectrique).
Optimisation du point de
commutation après
étalonnage avec sonde
découverte
La capacité de la cuve vide C
L
est mémorisée après l’étalonnage avec sonde
découverte. Au recouvrement de la sonde, l’électronique définit automatiquement la
capacité de la cuve pleine C
H
. Le point de commutation CSest ensuite placé à
mi-distance entre la capacité cuve vide C
L
et la capacité au recouvrement CH.
Si une modification des caractéristiques du produit mesuré entraîne une variation de
la capacité au recouvrement C
H
, cette valeur est actualisée et le point de
commutation C
S
est ajusté en conséquence.
Optimisation du point de
commutation après
étalonnage avec sonde
recouverte
La capacité de la cuve pleine C
H
est mémorisée après l’étalonnage avec sonde
recouverte. Au découvrement de la sonde, l’électronique définit automatiquement la
capacité de la cuve vide C
L
. Le point de commutation CSest ensuite placé au milieu
entre la capacité cuve vide C
L
et la capacité au recouvrement CH. Si une modification
des caractéristiques du produit mesuré entraîne une variation de la capacité au
découvrement C
H
, cette valeur est actualisée et le point de commutation CSest
ajusté en conséquence.
Ecart du point de
commutation ∆C pour
l’optimisation du point
de commutation
Il est également possible de commencer l’optimisation du point de commutation par
une valeur ∆C différente de la valeur préréglée ∆C = 2 pF. Si la valeur a été
auparavant réglée manuellement sur 4 pF, la correction n’a lieu que si la variation de
la capacité C
X
(voir p. 46) est supérieure à 2 x ∆C = 8 pF. A la désactivation de
l’optimisation, la capacité C
S
déterminée en dernier est conservée et le dernier
décalage du point de commutation ∆C est signalé dans la rangée de DEL (sélecteur
en position 1). Une modification manuelle est possible par la suite.
Nettoyage du réservoir Attention!
Si le réservoir, et par là-même la sonde avec optimisation du point de commutation
active, est soumis à un nettoyage NEP, le point de commutation est adapté au produit
de nettoyage dans la mesure où le produit génère une variation de capacité
supérieure au produit mesuré. Ceci est susceptible de provoquer ultérieurement un
fonctionnement erroné de l’installation.
Attention!
Attention!
6 Autres réglages Electronique FEC 22
54 Endress+Hauser
Page 55

L’optimisation du pont de commutation est activée ou désactivée avec les éléments
de commande sur l’électronique FEC 22.
Procédure
• Tourner le sélecteur en
position 2.
• A la livraison ou après
un reset, la DEL
entièrement à gauche
est allumée:
optimisation
désactivée.
• Appuyer sur la touche
de gauche.
• La DEL entièrement à
droite DEL est allumée:
optimisation activée.
Désactivation de
l’optimisation
L’optimisation peut être désactivée (procédure, voir section 6.2). L’électronique FEC 22
fonctionne avec la capacité mémorisée (capacité cuve vide C
L
ou capacité sonde
recouverte C
H
) et la capacité du point de commutation déterminée CSsans
modification.
Procédure
• Tourner le sélecteur en
position 1.
• La valeur ∆C est lisible
sur la rangée de DEL
(attribution de valeur,
voir fig. 6.3).
Remarque!
La valeur courante ∆C (sélecteur en position 1) ne peut être affichée dans les
conditions suivantes :
• les deux étalonnages (sonde découverte et recouverte) ont été effectués
∆C = 0,5 x (C
H
- CL)
• un étalonnage a été effectué avec sonde découverte et l’optimisation du point de
commutation a été activée ∆C=C
S-CL
• un étalonnage a été effectué avec sonde recouverte et l’optimisation du point de
commutation a été activée ∆C=C
H
- C
S
Remarque!
1
3
7
7
3
1
∆c∆
c
ONOFF
ON
ON
OFF
OFF
1x
2x
0x
BA160Y62
Activation de
l’optimisation
Fig.6.2
Activation de l’optimisation
1
3
7
∆c∆c
7
1
3
∆C∆C
<4pF4-8
pF
>32
pF
16-32
pF
8-16
pF
=
BA160Y63
Ecart courant du point
de commutation ∆C
Fig.6.3
Affichage de l’écart courant du
point de commutation
∆
C
Electronique FEC 22 6 Autres réglages
Endress+Hauser 55
Page 56

6.3 Sécurité de fonctionnement minimum ou maximum
Fonctionnement La commutation intégrée pour la sécurité de fonctionnement minimum ou maximum
permet de sélectionner le mode de sécurité pour chaque cas d’application.
Procédure
• Tourner le sélecteur en
position 5.
• A la livraison ou après
un reset, la DEL
entièrement à droite
est allumée:
sécurité
maximum active.
• L’appui sur la touche de
gauche permet de
choisir la sécurité
minimum ou maximum.
• Le réglage est indiqué
par la rangée de DEL.
6.4 Temporisation à la commutation
Cette fonction permet de choisir la durée de temporisation de la commutation au
recouvrement et au découvrement de la sonde (réglage usine = 1,5 s).
Sécurité minimum Sécurité maximum
DC-PNP AC-DPDT DEL rouge DC-PNP AC-DPDT DEL rouge
Sonde
recouverte
Sortie
passante
Relais attirés Sortie
bloquée
Relais retombés
Sonde
découverte
Sortie
bloquée
Relais retombés Sortie
passante
Relais attirés
Pas de
tension
d’alimentation
Sortie
bloquée
Relais retombés Sortie
bloquée
Relais retombés
Tableau 6.1
1(+)
3
1 2 3 7 8 9
3
1(+)
1 2 3
7 8 9
3
1(+)
1 2 3
7 8 9
1(+)
3
1 2 3 7 8 9
U0V
3
1(+)
1 2 3
7 8 9
3
1(+)
1 2 3
7 8 9
1
3
7
MAXMIN
MAX
MAX
MIN
MIN
1x
2x
0x
7
3
1
MIN
MAX
MIN
MAX
BA160Y66
Réglage
Fig.6.4
Réglage de la sécurité min./max.
6 Autres réglages Electronique FEC 22
56 Endress+Hauser
Page 57

Procédure
• Tourner le sélecteur en
position 3.
• A la livraison ou après
un reset, la deuxième
DEL de gauche est
allumée:
durée de
temporisation
∆
t = 1,5 s
• Appuyer sur la touche
de gauche autant de fois
que nécessaire, jusqu’à
ce que la durée
souhaitée soit réglée et
la DEL correspondante
allumée (attribution des
valeurs, voir section 6.5).
Procédure
• Tourner le sélecteur en
position 4.
• A la livraison ou après un
reset, la deuxième DEL
de gauche est allumée:
durée de temporisation
∆
t = 1,5 s
• Appuyer sur la touche de
gauche autant de fois
que nécessaire, jusqu’à
ce que la durée
souhaitée soit réglée et
la DEL correspondante
allumée (attribution des
valeurs, voir section 6.6).
6.5 Mode de maintenance
Dans ce mode, la rangée de DEL indique l’écart dC entre la capacité mesurée par
l’appareil et le point de commutation C
S
.
Procédure
• Tourner le sélecteur en
position 7.
• La rangée de DEL
indique l’écart dC par
rapport au point de
commutation réglé
(attribution de valeur,
voir section 6.7).
1
3
7
1x
0x
2x
4x
3x
=
∆t∆t
0,5 s
1,5 s
20 s12 s6s
∆t
73
1
BA160Y67
Temporisation au
recouvrement
Fig.6.5
Réglage de ladurée de
temporisation au recouvrement
de la sonde.
1
3
7
1x
0x
2x
4x
3x
=
∆t∆t
0,5 s
1,5 s
20 s12 s6s
7
3
1
∆t
BA160Y68
Temporisation au
découvrement
Fig.6.6
Réglage dela durée de
temporisation au recouvrement
de la sonde.
1
3
7
dC
dC < -4 pF
dC > 4 pF
-4 pF < dC <-2 pF
2 pF < dC <4 pF
-2 pF < dC <+2 pF
3
1
7
BA160Y69
Fig.6.7
Affichage de l’écart dC par
rapport au point de commutation
réglé
Electronique FEC 22 6 Autres réglages
Endress+Hauser 57
Page 58

7 Recherche et suppression des défauts
Remarque!
Contacter E+H si d’autres erreurs non répertoriées ici se produisent, ou s’il est
impossible de les supprimer.
8 Remplacement d’une électronique
Voici la procédure à suivre pour le remplacement d’une électronique:
Démontage • Mettre hors tension toutes les liaisons électriques.
• Débrancher les liaisons électriques de l’électronique.
• Desserrer la vis de fixation de l’électronique.
• Extraire l’électronique du boîtier de sonde.
Montage • Avant de monter le nouveau module, comparer ses caractéristiques électriques à
celles du site (tension d’alimentation).
• Enficher le nouveau module dans le connecteur du boîtier.
• Serrer la vis de fixation de l’électronique.
• Raccorder les câbles.
Réglage • Mettre sous tension.
• Faire un reset, effectuer les réglages (voir chapitres 5 et 6)
Remarque!
Diagnostic Cause Remède
Aucune DEL allumée Coupure ou absence de tension. Vérifier le raccordement
électrique.
DEL rouge clignote Aucun étalonnage n’a été
effectuéFaire l’étalonnage.
Faire l’étalonnage.
Reset = rétablissement des
valeurs réglées en par défaut.
L’appareil ne fonctionne pas
encore en détecteur.
Faire l’étalonnage.
DEL rouge allumée Version courant alternatif:
relais retombés.
Version courant continu:
sortie bloquée.
Rangée de DEL éteinte Pour diminuer la consommation
de courant continu, la rangée
de DEL est désactivée env.
10 minutes après la dernière
entrée.
La rangée de DEL est activée
dès l’action sur le sélecteur ou
sur l’une des touches.
Ceci n’influence pas le réglage
des paramètres.
Pas de tension d’alimentation.
DEL verte éteinte.
Vérifier le raccordement
électrique.
Activation de l’optimisation du
point de commutation
impossible.
Les deux étalonnages ont déjà
été effectués.
1. Faire le reset.
2. Faire un étalonnage.
3. Activer l’optimisation du point
de commutation.
Tableau 7.1
Recherche et suppression des
défauts
7 Recherche et suppression des défauts Electronique FEC 22
58 Endress+Hauser
Page 59

9 Réparations
ElectroniquePour toute électronique FEC 22 renvoyée à Endress+Hauser pour réparations, prière
de joindre une feuille comportant les informations suivantes:
• description exacte de l’application
• caractéristiques physico-chimiques du produit
• brève description du défaut constaté
SondeAvant de retourner une sonde avec électronique FEC à Endress+Hauser pour
réparations, veuillez prendre les mesures suivantes:
• Enlever entièrement tous les résidus de produit. Ceci est particulièrement important
lorsque le produit est dangereux pour la santé, par ex. corrosif, toxique,
cancérigène, radioactif, etc.
• Nous vous demandons instamment de renoncer à un envoi s’il est impossible de
supprimer entièrement tous les produits dangereux, notamment s’ils ont diffusé à
travers la matière synthétique, ou pénétré dans des fissures.
10 Caractéristiques techniques
Indications générales
Constructeur Endress+Hauser
Type d’appareil Electronique FEC 22
Mode de fonctionnement
Principe de mesure capacitif
Traitement du signal Version courant alternatif: 2 relais branchés en parallèle (DPDT)
Version courant continu: commutation de la charge par transistor
Séparation galvanique entre circuit de mesure et circuit d’alimentation
Entrée
Grandeur de mesure Hauteur de remplissage (seuil)
Plage de capacité pour signalisation réservoir vide (sonde découverte) 10 pF...350 pF
Fréquence de service 500 kHz
Sortie
Version courant alternatif deux contacts inverseurs (DPDT), charges possibles :
- courant alternatif: 253 V, 6 A max., P~max. 1500 VA, cos ϕ= 1
- courant continu: 30 V, 6 A max.
125 V, 0,2 A max.
Version courant continu consommation de courant env. 18 mA pour 24 V:
- courant de charge max. 350 mA en continu, max. 55 V, avec
protection contre les surcharges et les inversions de polarité
- courant résiduel à l’état bloqué 10 µA
Electronique FEC 22 9 Réparations
Endress+Hauser 59
Page 60

Conditions d’utilisation Conseils de montage
Conseils de montage Implantation quelconque. Montage uniquement possible avec boîtier
type F6, F10 ou T3 (avec couvercle surélevé) des sondes Multicap ou
Multicap T.
Conditions ambiantes
Température ambiante
nominale
-40 °C…+70 °C
Température ambiante limite -40 °C…+80 °C
Température ambiante de
stockage
-40 °C…+85 °C
Classe climatique Protection climatique selon IEC 68, partie 2...38, selon fig. 2a
Indice de protection IP 20
Tenue aux vibrations Selon IEC 68 partie 2-6, 10...55 Hz, 0,15 mm, x, y, z
Compatibilité
électromagnétique
Emissivité perturbatrice selon EN 61326; matériel électrique de classe B
Immunité selon EN 61326; additif A (domaine industriel) et
recommandation NAMUR NE 21 (CEM).
Construction Boîtier
Type boîtier Appareil compact
Dimensions 103 mm x 67 mm x 49 mm
Poids 0,3 kg
Matériau Matière synthétique
Raccordement électrique Voir chapitre 3, p. 48-49
Affichage et éléments de réglage en dehors du cache
DEL verte Témoin de fonctionnement
DEL rouge Etat de commutation:
Version courant alternatif (relais retombés)
Version courant continu (sortie bloquée)
sous le cache
5 DEL Affichage des paliers avec attribution des valeurs
2 touches Etalonnage/attribution de valeurs
Commutateur rotatif Sélection de 8 réglages (voir p. 51)
Alimentation
Version AC Tension alternative 90 V...253 V, 50/60 Hz, consommation de courant
env. 10 mA à 230 V
Version DC Raccordement 3 fils PNP, tension continue 10...55 V
Certificats
Certificats Numéro de l'attestation d'examen CE de type:
KEMA 99 ATEX 3122, XA 060F/00/a3
Sigle CE Par l’apposition du sigle CE, Endress+Hauser certifie que
l’électronique FEC 22 répond aux exigences des directives de la CE.
Commande
Réf. cde 942299-0000 FEC en version courant alternatif
Réf. cde 942299-1000 FEC en version courant continu
Normes et directives
Documentation
complémentaire
Sonde Multicap T DC .. TE., TI 240F
Sonde Multicap T DC .. TA., TI 239F
Sonde Multicap DC .. E., TI 242F
Sonde Multicap DC .. A., TI 243F
10 Caractéristiques techniques Electronique FEC 22
60 Endress+Hauser
Page 61

Index
A
Activation de l’optimisation . . . . . . . . . . 55
Attribution de valeur . . . . . . . . . . . . 51
Autres réglages . . . . . . . . 53, 54, 55, 56, 57
Autres symboles . . . . . . . . . . . . . . 46
C
Caractéristiques techniques . . . . . . . 59, 60
Capacité au recouvrement . . . . . . . 46, 52, 54
Capacité au découvrement . . . . . . 46, 52, 54
Compensation active de colmatage . . . . . . 47
Conseils de sécurité . . . . . . . . . . 45, 46
D
Décalage manuel du point zéro . . . . . . . . 53
DEL rouge . . . . . . . . . . . . . . . . 50
DEL verte . . . . . . . . . . . . . . . . 50
Désactivation de l’optimisation . . . . . . . . 55
Détection de seuil . . . . . . . . . . . . . 47
Diagnostic . . . . . . . . . . . . . . . . 58
Domaine d’application . . . . . . . . . . . 47
E
Ecart point de commutation ∆C . . . . . 46, 54, 55
Eléments d’affichage . . . . . . . . . . . . 50
Eléments de commande . . . . . . . . . . . 50
Ensemble de mesure . . . . . . . . . . . . 47
Etalonnage avec sonde découverte . . . . . . 52
Etalonnage avec sonde recouverte . . . . . . 52
Etalonnage sonde recouverte et découverte . . . 52
Etat de commutation . . . . . . . . . . . . 50
I
Instructions en bref . . . . . . . . . . . . . 44
M
Mise en service . . . . . . . . . . . . 51, 52
Mode de maintenance . . . . . . . . . . . 57
Montage dans le boîtier de la sonde . . . . . . 48
N
Nettoyage du réservoir . . . . . . . . . . . 54
O
Optimisation du point de commutation . . . . . 54
Optimisation du point de commutation après
étalonnage avec sond découverte . . . . . . . 54
Optimisation du point de commutation après
étalonnage avec sond recouverte . . . . . . . 54
P
Principe de fonctionnement . . . . . . . . . 47
R
Raccordement électrique . . . . . . . . . . 48
Version courant alternatif (type F6/F10) . . . . 48
Version courant alternatif (type T3) . . . . . . 49
Version courant continu (type F6/F10) . . . . . 48
Version courant continu (type T3) . . . . . . 49
Rangée de DEL . . . . . . . . . . . . . . 50
Recherche et suppression des défauts . . . . . 58
Relais attirés . . . . . . . . . . . . . . . 56
Relais retombés . . . . . . . . . . . . . . 56
Remplacement d’une électronique . . . . . . . 58
Réparations . . . . . . . . . . . . . . . . 59
Reset . . . . . . . . . . . . . . . . . . 51
S
Sécurité maximum . . . . . . . . . . . . . 56
Sécurité minimum . . . . . . . . . . . . . 56
Sécurité de fonctionnement minimum ou maximum 56
Sélecteur . . . . . . . . . . . . . . . . . 50
Sortie bloquée . . . . . . . . . . . . . . . 56
Sortie passante . . . . . . . . . . . . . . 56
Symboles électriques . . . . . . . . . . . . 46
T
Temporisation à la commutation . . . . . . . . 56
Temporisation au découvrement . . . . . . . . 57
Temporisation au recouvrement . . . . . . . . 57
Touches de commandes . . . . . . . . . . . 50
U
Utilisation . . . . . . . . . . . . . . . 49, 50
Utilisation conforme à l’objet . . . . . . . . . 45
Electronique FEC 22 Index
Endress+Hauser 61
Page 62

Page 63

Page 64

Europe
Austria
❑ Endress+Hauser Ges.m.b.H.
Wien
Tel. (01) 880 56-0,Fax (01) 8 8056-335
Belarus
Belorgsintez
Minsk
Tel. (017) 2 5084 73, Fax (01 7) 2 5085 83
Belgium / Luxembourg
❑ Endress+Hauser N.V.
Brussels
Tel. (02) 248 0600, Fax (02) 248 0553
Bulgaria
Intertech-Automation
Sofia
Tel. (02) 9627152,Fax (02) 9621471
Croatia
❑ Endress+Hauser GmbH+Co.
Zagreb
Tel. (01) 663 7785, Fax (01) 663 7823
Cyprus
I+G Electrical Services Co.Ltd.
Nicosia
Tel. (02) 4847 88, Fax (02) 4846 90
Czech Republic
❑ Endress+Hauser Czech s.r.o.
Praha
Tel. (02) 6678 4200, Fax (0 26) 667841 79
Denmark
❑ Endress+Hauser A/S
Søborg
Tel. (70) 1311 32, Fax (70) 1321 33
Estonia
Elvi-Aqua
Ta r t u
Tel. (7) 4416 38,Fax (7) 4415 82
Finland
❑ Metso Endress+Hauser Oy
Helsinki
Tel. (204) 831 60, Fa x (2 04) 831 61
France
❑ Endress+Hauser S.A.
Huningue
Tel. (389) 69 6768, Fax (389) 69 4802
Germany
❑ Endress+Hauser
Messtechnik GmbH+Co.KG
Weil am Rhein
Tel. (076 21) 975-01, Fax (076 21) 975-5 55
Great Britain
❑ Endress+Hauser Ltd.
Manchester
Tel. (0161) 2 8650 00, Fax (01 61) 998 1841
Greece
I & G Building Services Automation S.A.
Athens
Tel. (01) 924 1500, Fax (01) 922 1714
Hungary
❑ Endress+Hauser Magyarország
Budapest
Tel. (01) 4120421,Fax (01 ) 41 20 42 4
Iceland
Sindra-Stál hf
Reykjavik
Tel. 5750000, Fax 5750010
Ireland
❑ Flomeaco Endress+Hauser Ltd.
Clane
Tel. (045) 86 8615, Fax (045) 86 8182
Italy
❑ Endress+Hauser S.p.A.
Cernusco s/N Milano
Tel. (02) 921 92-1,Fax (02) 9 2192-362
Latvia
Elekoms Ltd.
Riga
Tel. (07) 336444,Fax (07) 312894
Lithuania
UAB “Agava”
Kaunas
Tel. (03) 7202410,Fax (03) 7207414
Netherlands
❑ Endress+Hauser B.V.
Naarden
Tel. (035) 6 9586 11, Fax (035) 6 9588 25
Norway
❑ Endress+Hauser A/S
Lierskogen
Tel. (032) 85 9850, Fax (0 32) 8598 51
Poland
❑ Endress+Hauser Polska Sp.z o.o.
Wroclaw
Tel. (071) 7803700, Fax (071) 7803700
Portugal
❑ Endress+Hauser Lda.
Cacem
Tel. (219) 4267290Fax (219) 4267299
Romania
Romconseng S.R.L.
Bucharest
Tel. (01) 4101634,Fax (01)4112501
Russia
❑ Endress+Hauser GmbH+Co
Moscow
Tel. (095) 1 5875 64, Fax (095) 7846391
Slovak Republic
Transcom Technik s.r.o.
Bratislava
Tel. (2) 4488 86 90, Fax (2) 44 8871 12
Slovenia
❑ Endress+Hauser D.O.O.
Ljubljana
Tel. (01) 5192217, Fax(01) 5192298
Spain
❑ Endress+Hauser S.A.
Sant Just Desvern
Tel. (93) 4803366,Fax (93)4733839
Sweden
❑ Endress+Hauser AB
Sollentuna
Tel. (08) 5551 1600, Fax (08) 5551 1655
Switzerland
❑ Endress+Hauser Metso AG
Reinach/BL 1
Tel. (061) 7 1575 75, Fax (061) 7 1116 50
Tur ke y
Intek Endüstriyel Ölcü ve
Levent/Istanbul
Tel. (0212) 2 751355, Fax (0212) 2 6627 75
Ukraine
Photonika GmbH
Kiev
Tel. (44) 268 8102,Fax (44) 269 0805
Yugoslavia Rep.
Meris d.o.o.
Beograd
Tel. (11) 444 12966,Fax (11) 3085778
Africa
Algeria
Symes Systemes et mesures
Annaba
Tel. (38) 883003,Fax (38) 883002
Egypt
Anasia Egypt For Trading S.A.E.
Heliopolis/Cairo
Tel. (02) 2684159,Fax (02) 2684169
Morocco
Oussama S.A.
Casablanca
Tel. (02) 22241338, Fax (02) 2402657
South Africa
❑ Endress+Hauser Pty.Ltd.
Sandton
Tel. (011) 2 6280 00, Fa x (0 11) 262 8062
Tunisia
Controle, Maintenance et Regulation
Tunis
Tel. (01) 7930 77, Fax (01) 7885 95
America
Argentina
❑ Endress+Hauser Argentina S.A.
Buenos Aires
Tel. (11) 45227970, Fax (11) 45227909
Bolivia
Tritec S.R.L.
Cochabamba
Tel. (04) 4256993, Fax (0 4) 4250981
Brazil
❑ Samson Endress+Hauser Ltda.
Sao Paulo
Tel.(011)50313455,Fax (011) 50313067
Canada
❑ Endress+Hauser Ltd.
Burlington, Ontario
Tel. (905) 6 8192 92, Fax (9 05) 681 9444
Chile
❑ Endress+Hauser Chile Ltd.
Santiago
Tel. (02) 321-3009, F ax (02) 321-3025
Colombia
Colsein Ltda.
Bogota D.C.
Tel. (01) 236 7659, Fax (01) 610 4186
Costa Rica
EURO-TEC S.A.
San Jose
Tel. 2202808,Fax 2961542
Ecuador
Insetec Cia. Ltda.
Quito
Tel. (02) 226 9148, Fax (02) 24618 33
Guatemala
Automatizacion Y Control Industrial S.A.
Ciudad de Guatemala, C.A.
Tel. (03) 34 5985, Fax (03) 3274 31
Mexico
❑ Endress+Hauser S.A. de C.V.
Mexico, D.F
Tel. (5) 55568-2407, Fax (5) 55568-7459
Paraguay
Incoel S.R.L.
Asuncion
Tel. (021) 21 3989, Fax (021) 22 6583
Peru
Process Control S.A.
Lima
Tel. (2) 610515,Fax (2) 612978
USA
❑ Endress+Hauser Inc.
Greenwood, Indiana
Tel. (317) 5 35-7138, Fax (317) 5 35-8498
Venezuela
Controval C.A.
Caracas
Tel. (02) 944 0966, Fax (02) 944 4554
Asia
Azerbaijan
Modcon Systems
Baku
Tel. (12) 929859,Fax (12) 929859
China
❑ Endress+Hauser Shanghai
Instrumentation Co.Ltd.
Shanghai
Tel.(021)54902300,Fax (021) 54902303
❑ Endress+Hauser Beijin
Instrumentation Co.Ltd.
Beijing
Tel. (010) 65882468, Fax:(010) 65881725
Hong Kong
❑ Endress+Hauser H.K. Ltd.
Hong Kong
Tel. 85225283120,Fax 85228654171
India
❑ Endress+Hauser (India) Pvt. Ltd.
Mumbai
Tel. (022) 8 5214 58, Fax (0 22) 852 1927
Indonesia
PT Grama Bazita
Jakarta
Tel. (21) 795 5083, Fax (21) 797 5089
Japan
❑ Sakura Endress Co. Ltd.
Tokyo
Tel. (0422) 54 0611, Fax (0422) 5502 75
Malaysia
❑ Endress+Hauser (M) Sdn. Bhd.
Shah Alam, Selangor Darul Ehsan
Tel. (03) 78464848, Fax (03) 78468800
Pakistan
Speedy Automation
Karachi
Tel. (021) 7 7229 53, Fax (0 21) 773 6884
Philippines
❑ Endress+Hauser Inc.
Pasig City, Metro Manila
Tel. (2) 6381871, Fax (2) 6388042
Singapore
❑ Endress+Hauser (S.E.A.) Pte., Ltd.
Singapore
Tel. (6 5) 6682 22, Fax (65) 6668 48
South Korea
❑ Endress+Hauser (Korea) Co., Ltd.
Seoul
Tel. (02) 658 7200, Fax (02) 659 2838
Taiwan
Kingjarl Corporation
Taipei
Tel. (02) 2718 3938, Fax (02) 2713 4190
Thailand
❑ Endress+Hauser Ltd.
Bangkok
Tel. (2) 996 7811-20, Fax (2) 996 7810
Uzbekistan
Im Mexatronoka EST
Tashkent
Tel. (71) 1167316, Fax (71) 1167316
Vietnam
Tan Viet Bao Co. Ltd.
Ho Chi Minh City
Tel. (08) 833 5225, Fax (08) 833 5227
Iran
PATSA Industy
Tehran
Tel. (021) 8726869, Fax(021) 8747761
Israel
Instrumetrics Industrial Control Ltd.
Netanya
Tel. (09) 835 7090, Fax (09) 835 0619
Jordan
A.P. Parpas Engineering S.A.
Amman
Tel. (06) 5539283, Fax (06) 5539205
Kingdom of Saudi Arabia
Anasia Ind. Agencies
Jeddah
Tel. (02) 671 0014, Fax (02) 672 5929
Lebanon
Network Engineering
Jbeil
Tel. (3) 9440 80, Fax (9) 5480 38
Sultanate of Oman
Mustafa Sultan Science & Industry Co.L.L.C.
Ruwi
Tel. 6020 09, Fax 60 7066
United Arab Emirates
Descon Trading EST.
Dubai
Tel. (04) 265 3651, Fax (04) 265 3264
Australia + New Zealand
Australia
❑ Endress+Hauser PTY. Ltd.
Sydney
Tel. (02) 88777000, Fax (02) 88777099
New Zealand
EMC Industrial Group Limited
Auckland
Tel. (09) 415 5110, Fax (09) 415 5115
All other countries
❑ Endress+Hauser GmbH+Co.KG
Instruments International
Weil am Rhein
Germany
Tel. (076 21) 975-02, Fax (076 21) 975-345
BA 160F/00/a3/04.03
016904-0000
CCS/CV5
05.02/PT❑ Members of the Endress+Hauser group
Hauser+Endress
The Power of Know How
http://www.endress.com
0
16904- 0000
 Loading...