

Page 1
WS9641-manual 0-0-0-K
WS9641IT
GARANCIJSKA IZJAVA
1. Garancijski rok se prične z dnevom prodaje in velja 24 mesecev.
2.
EMOS SI d.o.o. jamči kupcu, da bo v garancijskem roku na lastne stroške odpravil vse pomanjkljivosti na
aparatu zaradi tovarniške napake v materialu ali izdelavi.
3. Za čas popravila se garanjcijski rok podaljša.
4. Če aparat ni popravljen v roku 45 dni od dneva prijave okvare, lahko prizadeta stranka zahteva novega ali
vračilo plačanega zneska.
5. Garancija preneha, če je okvara nastala zaradi:
- nestrokovnega - nepooblaščenega servisa
- predelava brez odobritve proizvajalca
- neupoštevanje navodil za uporabo aparata.
6. Naravna obraba aparata je izključena iz garancijske obveznosti. Isto velja tudi za poškodbe zaradi nepravilne
uporabe ali preobremenitve
NAVODILA ZA REKLAMACIJSKI POSTOPEK
Lastnik uveljavlja garancijski zahtevek tako, da ugotovljeno okvaro prijavi pooblaščeni delavnici (EMOS SI d.o.o.,
Kidričeva 38, 3000 Celje) pisno ali ustno. Kupec je odgovoren, če s prepozno prijavo povzroči škodo na aparatu.
Po izteku garancijskega roka preneha pravica do uveljavljenja garancijskega zahtevka. Priložen mora biti potrjen
garancijski list z original potrjenim računom.
EMOS SI d.o.o. se obvezuje, da bo aparat zamenjal z novim, če ta v tem garancijskem roku ne bi deloval brezhibno.
ZNAMKA: BREZŽIČNI TERMOMETER
TIP:
DATUM PRODAJE:
Servis: EMOS SI d.o.o., Kidričeva 38, 3000 Celje, Slovenija, Tel: + 386 (0) 3 42 42 420
WS-9641IT
SET
+
MIN/MAX
ICE ALARM
WS9641IT
GB
WIRELESS 868 MHz WEATHER STATION
EMOS spol. s r. o.
CZ
BEZDRÁTOVÝ TEPLOMĚR
BEZDRÔTOVÝ TEPLOMER
SK
TERMOMETR BEZPRZEWODOWY
PL
H
VEZETÉK NÉLKÜLI HŐMÉRŐ
SLO
24
BREZŽIČNI TERMOMETER
D
DRAHTLOSES THERMOMETER
UA
БЕЗДРОТОВИЙ ТЕРМОМЕТР
RO
TERMOMETRU FĂRĂ FIR WS-9641IT
www.emos.cz
Page 2
WS9641-manual 0-0-0-K
WIRELESS 868 MHz WEATHER STATION
GB
Introduction
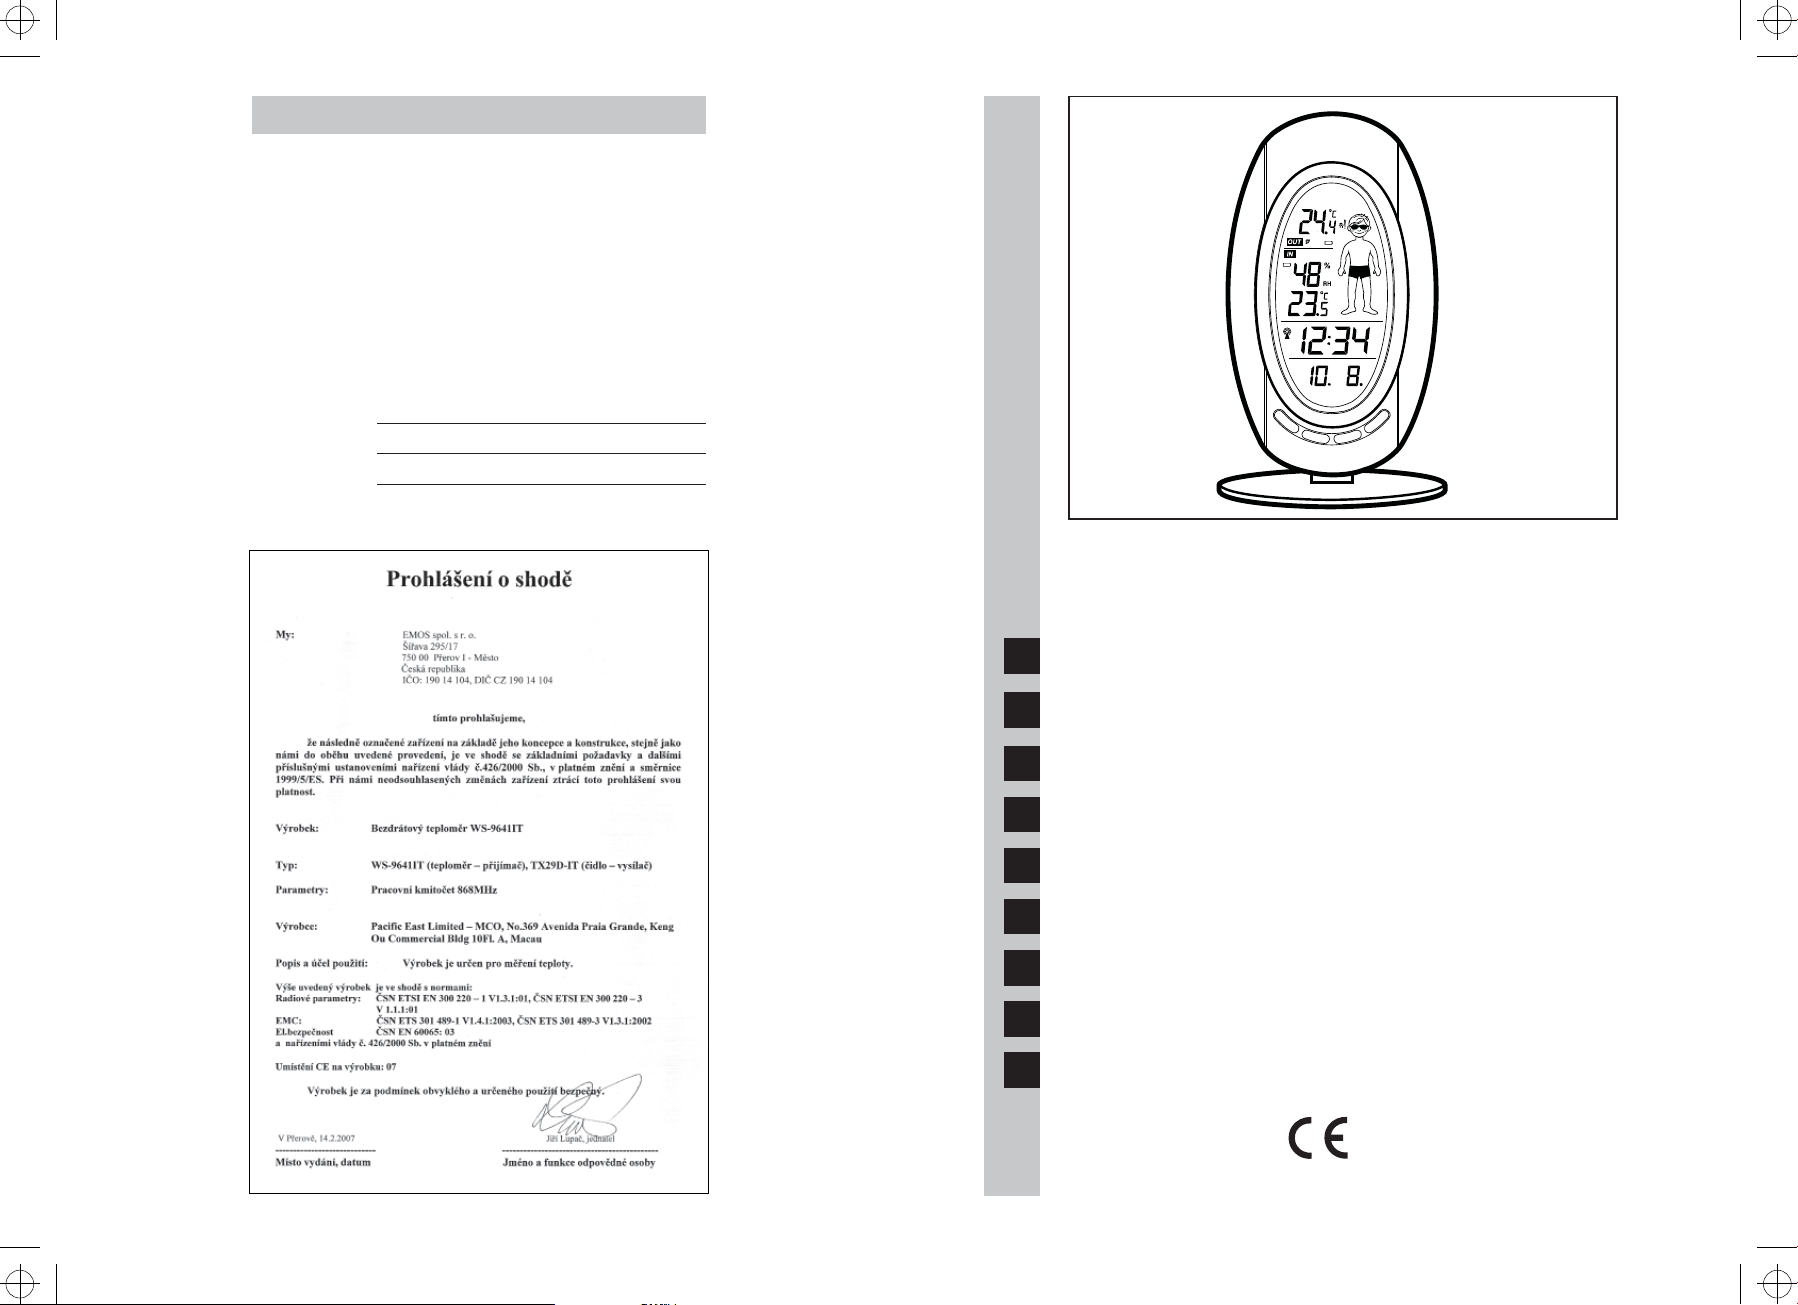
Congratulations on purchasing this Weather Station with wireless 868MHz transmission. It not only displays the indoor temperature and humidity but also receives the outdoor temperature.
It is further acting as a DCF-77 radio controlled clock. With the totally 8 different weather icons featured by “Weather man”, users can easily observe the current weather condition. And
this innovative product is ideal for use in the home or office.
Features
The Weather Station
• DCF Radio controlled time with manual setting options
• Calendar, hour, minute and second display
• Time zone option -12 to 12 hours
• Wireless transmission at 868 MHz
• Outdoor signal reception intervals at 4-second
• Display one of the 8 easy-to-read Temperature condition icons featured by Weather man
• Temperature display in Fahrenheit (°F) or Celsius (°C) selectable
• Indoor and Outdoor temperature display with MIN/MAX recording
• All MIN/MAX recordings can be reset
• Low battery indicator
• Wall hanging or free standing
The Outdoor Temperature Transmitter
• Remote transmission of outdoor temperature to Weather Station by 868 MHz
• Weather-resistant casing
• Wall mounting case
• Mount in a sheltered place. Avoid direct rain and sunshine
Specifications
Temperature measuring range:
Indoor -9.9°C to +59.9°C with 0.1°C resolution
Accuracy of measurement -9,9°C to 40 °C ±1,5 °C; 40°C to 59,9°C ±2 °C
(“OF.L” displayed if outside this range)
Outdoor (Remote sensor) -39.9°C to +59.9°C with 0.1°C resolution
Accuracy of measurement -39,9°C to -5°C ±2 °C; -5°C to 40°C ±1,5 °C;
40°C to 59,9°C +/- 2 °C
(“OF.L” displayed if outside this range)
Relative humidity measuring range:
Indoor 1% to 99% with 1% resolution
(displays “- -” when outside this range)
Indoor temperature checking interval
Indoor humidity checking interval
Outdoor data reception approximately every 4 seconds
Transmission: up to 100m in open area without disturbance
Power supply: Weather Station 2 x AA, IEC, LR6, 1.5V
Temperature Transmitter 2 x AA, IEC, LR6 1.5V
Battery life cycle (Alkaline batteries recommended)
Weather Station Approximately 24 months
Temperature Transmitter Approximately 24 months
Dimensions (L x W x H) Weather Station 92 x 30.7 x 160mm
Temperature Transmitter 38.2 x 21.2 x 128.3mm
LCD screen and settings
For easy viewing, the LCD screen is divided into 3 sections displaying the information for
time and indoor data, weather forecast, and outdoor data.
Section 1 - OUTDOOR TEMPERATURE
• Display the current outdoor temperature
• Ice alarm icon
• A signal reception symbol will be shown indicating that outdoor temperature signal is
received.
• Transmitter low battery icon
• By pressing the MIN/ MAX key, display the stored MIN/MAX outdoor temperature, with
simultaneous display of MIN/ MAX icon.
Section 2 - INDOOR DATA AND TEMPERATURE ICON
(FEATURED BY WEATHER MAN)
• Display indoor temperature and indoor humidity
• The current temperature condition is displayed in form of one of eight icons, featured
by Weather man, which change in appearance according to the current outdoor
temperature.
• Format of the weather man icons refers to the below clause “Weather man Icon”
• Receiver low battery icon
Section 3 - TIME AND CALENDAR
• Time display
• Display “Calendar” or “Second”
• In normal mode, display the time and calendar.
• A signal reception symbol is shown indicating that Atomic time (DCF time) signal is
received.
Function keys
The Weather Station has four easy to use function keys.
SET key (Manual Setting) – Press to enter the setting mode for the following functions:
Time zone, Manual time, Year, Month, Date, Weekday
and °C/°F settings.
every 17 seconds
every 17 seconds
MIN/ MAX key – To toggle between the maximum/ minimum outdoor
temperature and maximum/ minimum indoor
temperature data
– Press to reset at the maximum or minimum temperature
records of the indoor and the outdoor channel (will reset
all records to current level)
– Press to exit the setting mode
+ key – To make adjustment for various settings
– In normal display, press to toggle between the display of
the calendar and second of time in the time display of LCD
ICE ALARM key – To activate / deactivate the Ice Alarm (alarm will be
triggered once the outdoor temperature has dropped to
4°C (39.2°F))
– To exit from the manual setting mode
Setting up
1. First, insert the batteries into the Temperature transmitter. (see “Install and replace
batteries in the Temperature transmitter“).
2. Immediately after and within 30 seconds, insert the batteries into Weather Station
(see “Install and replace batteries in the Weather Station”). Once the batteries are in
place, all segments of the LCD will light up briefly. Following the time as 0:00 and the
“weather man” icon and indoor temperature and humidity will be displayed. If these are
not displayed after 60 seconds, remove the batteries and wait for at least 10 seconds
before reinserting them.
3. Af ter inserting the batteries into the transmitter, the Weather Station will start receiving
data from the transmitter. The outdoor temperature and the signal reception icon should
then be displayed on the Weather Station. If this does not happen after 5 minutes, the
batteries will need to be removed from both units and reset from step 1.
4. In order to ensure sufficient 868 MHz transmission there should be no more than 330
feet (100 meters) between the final position of the Weather Station and the transmitter
(see notes on “Mounting” and “868 MHz Reception”).
When the outdoor signal is successfully received by the Weather Station, this icon will
be switched on. (If not successful, the icon will not be shown in LCD) So user can easily
see whether the last reception was successful (icon on) or not (icon off). On the other
hand, the short blinking of the icon shows that a reception is currently taking place.
5. Once the remote temperature has been received and displayed on the Weather Station,
the DCF time (radio controlled time) code reception is automatically started. This takes
typically between 3-5 minutes in good conditions.
Note:
• The Weather Station will receive one outdoor transmitter only.
• If after 10 minutes, the Atomic time (DCF time) signal has not been received, press the
SET key to manually enter a time initially.
• Daily DCF reception is done at 02:00 and 03:00 every day. If the reception at 03:00
is not successful, then at 04:00 and 05:00 and 06:00 there are other tries, until one
is successful. If the reception at 06:00 is still not successful, then the next try takes
place at 02:00 next day. If reception is successful, the received time will override the
manually set time. The date is also updated with the received time. (Please refer also
to notes on “DCF Reception” and “Manual Time Setting”)
Battery installation
Install and replace batteries in the weather station
The Weather Station uses 2 x AA, IEC LR6, 1.5V Alkaline batteries. To install and replace
the batteries, please follow the steps below:
1. Remove the cover at the back of the Weather Station.
2. Insert batteries observing the correct polarity (see marking).
3. Replace compartment cover.
Install and replace batteries in the temperature transmitter
The temperature transmitter uses 2 x AA, IEC LR6, 1.5V Alkaline battery. To install and
replace the batteries, please follow the steps below:
1. Remove the battery compartment cover.
2. Insert the batteries, observing the correct polarity (see marking).
3. Replace the battery cover on the unit.
Note: In the event of changing batteries in any of the units, all units need to be reset by
following the setting up procedures. This is because a random security code is assigned
by the transmitter at start-up and this code must be received and stored by the Weather
Station in the first 3 minutes of power being supplied to it
Battery change
It is recommended to replace the batteries in all units regularly to ensure optimum accuracy
of these units (Battery life see Specifications below).
Please participate in the preservation of the environment. Return used batteries to an
authorized depot.
868 MHz Reception
The Weather Station should receive the temperature data within 5 minutes after set-up. If the
temperature data is not received 5 minutes after setting up (not successfully continuously,
2
Semnificaţia figurii băiatului îmbrăcat conform condiţiilor actuale de temperatură. Apare
în opt variante diferite.
23
EMOS spol. s r. o.
Page 3

WS9641-manual 0-0-0-K
Reglarea orei
Dacă din cauza distanţei sau a influenţelor perturbatoare eşuează reglarea automată a orei,
reglaţi ceasul manual. După reglarea manuală ora va fi controlată de cristalul încorporat.
Şi după reglarea manuală a orei termometrul va detecta automat la fiecare oră exactă
semnalul DCF. Ceasul este presetat pentru afişarea ciclului de 24 de ore.
După intrarea în regimul de reglare a timpului (punctul 3 Reglarea fusului orar) clipeşte
poziţia indicaţiei orei.
1. Cu butonul + setaţi ora solicitată.
2. Cu butonul SET treceţi la reglarea minutelor – clipeşte poziţia minutelor.
3. Cu butonul + setaţi munutele solicitate.
4. Cu butonul SET confirmaţi opţiunea, treceţi la reglarea calendarului.
Reglarea calendarului
Data de pornire a calendarului este 2006, 1. 1. şi MO. După receptarea semnalului
DCF calendarul se reglează automat. Dacă reglarea automată eşuează, se poate folosi
reglarea manuală.
1. Cu butonul + reglaţi valoarea solicitată a anului (în intervalul de la 2000 la 2029).
2. Cu butonul SET treceţi la reglarea lunii – clipeşte indicaţia lunii.
3. Apăsând repetat butonul + setaţi luna solicitată.
4. Cu butonul SET treceţi la reglarea datei – clipeţte indicaţia datei.
5. Apăsând repetat butonul + setaţi data solicitată.
6. Cu butonul SET treceţi la reglarea zilei săptămânii.
7. Cu butonul + reglaţi ziua săptămânii în ordinea de luni (MO) până duminică (SU).
8. Cu butonul SET treceţi la opţiunea °C/°F cu ajutorul butonului + selectaţi unitatea
solicitată a unităţii de măsurare a temperaturii. Cu butonul SET confirmaţi unitatea de
temperatură – concomitent încheiaţi reglarea calendarului.
Afişarea temperaturii exterioare minime şi maxime
1. Apăsaţi butonul MIN/MAX în regim normal – se afişează valoarea temperaturii minime
şi timpul înregistrării acesteia.
valoarea temperaturii minime
date exterioare
simbolul temperaturii
minime
timpul înregistrării
2. Apăsaţi butonul MIN/MAX a doua oară – se afişează valoarea temperaturii maxime şi
timpul înregistrării acesteia.
3. Printr-o altă apăsare a butonului MIN/MAX se afişează valoarea temperaturii minime/
maxime interioare şi timpul înregiastrării acesteia.
date interioare
simbolul temperaturii
maxime
timpul înregistrării
Afişarea temperaturii minime şi maxime interioare
1. În regim normal apăsaţi de trei ori butonul MIN/MAX – pe ecran se afişează valoarea
temperaturii minime interioare şi timpul înregistrării acesteia.
2. Printr-o altă apăsare a butonului MIN/MAX se afişează valoarea temperaturii interioare
maxime şi timpul înregistrării acesteia.
3. Apăsând din nou butonul MIN/MAX intraţi în regim normal de afişare.
valoarea temperaturii
maxime
Ştergerea înregistrării valorilor maxime şi minime
ale temperaturii interioare şi exterioare
1. În regim normal apăsaţi butonul MIN/MAX – intraţi în regimul afişării valorilor min/
max.
2. Ţineţi butonul MIN/MAX timp de 2 secunde – ştergeţi toate datele temperaturii minime
şi maxime ale temperaturii interioare şi exterioare şi momentelor înregistrării.
Înregistrările interioare şi exterioare vor fi şterse concomitent.
Avertizare asupra poleiului
Termometrul este dotat cu posibilatatea avertizării privind apariţia poleiului. Funcţia se
poate activa sau dezactiva.
• Cu butonul ICE ALARM activaţi avertizarea privind poleiul – în partea de sus a ecranului
apare simbolul unei fulgi de zăpadă – funcţia este activă. Dacă temperatura scade
sub 4 °C (39,2 °F), începe să sune semnalul alarmei şi icoana fulgii va clipi. Durata
semnalului sonor este de 1,5 minute.
Întârzierea avertizătii asupra poleiului
Pentru a se evita declanşarea deasă a semnalului sonor de avertizare asupra poleiului în
cazul fluctuaţiei temperaturii exterioare în jurul valorii de 4 °C, se poate folosi întârzierea
acestei funcţii.
Dacă temperatura scade sub valoarea de 4 °C, se produce declanşarea (dacă funcţia
este activă).
– Întârzierea este reglată la 1 °C (1,8°F). Dacă temperatura creşte de ex. la 4,6 °C şi apoi
scade sub 4 °C, indicaţia temperaturii va clipi, dar alarma sonoră nu va fi declanşată.
– Cu o întîrziere de 1 °C temperatura trebuie să crească la 5°C (41°F) şi apoi să scadă
sub 4°C, pentru a se ajunge la declanşarea semnalului sonor.
După declanşarea semnalului sonor de avertizare asupra poleiului la temperatura între
4 şi 5°C va clipi şi simbolul.
Amplasarea
Termometrul
Poate fi aşezat pe un suport, de ex. masă, sau ancorat pe perete.
Pentru ancorarea pe perete alegeţi locul potrivit, ferit de influenţa directă a luminii şi
căldurii solare. Înaintea ancorării pe perete verificaţi dacă veţi avea o transmisie bună
între termometru şi senzor.
1. Folosiţi un şurub potrivit cu cap ce depăşeşte 5 mm (nu este livrat cu produs).
2. Îndepăr taţi stativul de pe corpul termometrului şi ancoraţi termometrul. Verificaţi dacă
este bine asigurat împotriva căderii.
Senzorul fără fir
Este livrat cu stativ universal şi suport de perete. Fixaţi suportul pe perete cu ajutorul a
două şuruburi livrate.
Folosirea stativului Poziţia corectă de montare a senzorului pe perete.
Montarea pe perete
Înainte de fixarea senzorului pe perete verificaţi dacă este capabil să comunice fără probleme cu termometru. Dacă semnalul nu a fost receptat, apropiaţi senzorul de termometru.
1. Fixaţi suportul pe perete cu ajutorul şiruburilor.
2. Rabataţi supor tul în senzorul fără fir conform imaginii. Fiţi atenţi să nu aşezaţi senzorul
invers. În poziţie inversă ar putea intra apa în senzor prin orificiile de aerisire din partea
de jos şi s-ar putea deteriora circuitele electrice din interior.
Întreţinerea
• Nu amplasaţi termometrul în locurile expuse la vibraţii şi zguduituri, care pot cauza
deteriorarea aparatului.
• Evitaţi mediul în care ceasul ar fi expus schimbărilor bruşte de temperatură, radiaţiilor
solare directe, gerului extrem şi umidităţii, care pot duce la scăderea preciziei detectării.
• La curăţarea ecranului LCD şi a capacului aparatului folosiţi doar cârpă moale şi umedă.
Nu folosiţi diluanţi şi detergenţi.
• Nu scufundaţi termometrul nici senzorul în apă sau în alte lichide.
• Nu efectuaţi singuri nici un fel de reparaţii. La deteriorare sau defecţiuni ale produsului,
predaţi-l spre reparaţie la magazinul în care a fost cumpărat.
• Scoateţi din aparat bateriile descărcate – ar putea să curgă şi să deterioreze aparatul.
Schimbarea bateriilor
Folosiţi doar baterii noi de tipul indicat..
Bateriile uzate le predaţi la locul destinat colectării bateriilor uzate.
Emos soc. cu r.l. declară, că WS-9641IT este în conformitate cu cerinţele de bază şi alte
prevederi corespunzătoare ale directivei 1999/5/ES. Aparatul poate fi utilizat liber în UE.
Declaraţia de conformitate este parte integrantă a instrucţiunilor sau se poate găsi pe
paginile www.emos.cz
Aparatul poate fi utilizat pe baza autorizaţiei generale.
the outdoor display shows “- - -”), please check the following points:
1. The distance of the Weather Station or transmitter should be at least 1.5 to 2 m away
from any interfering sources such as computer monitors or TV sets.
2. Avoid positioning the Weather Station onto or in the immediate proximity of metal
window frames.
3. Using other electrical products such as headphones or speakers operating on the same
signal frequency (868MHz) may prevent correct signal transmission and reception.
4. Neighbors using electrical devices operating on the 868MHz signal frequency can also
cause interference.
Note: When the 868MHz signal is received correctly, do not re-open the battery cover of
either the transmitter or Weather Station, as the batteries may spring free from the contacts
and force a false reset. Should this happen accidentally then reset all units (see Setting up
above) otherwise transmission problems may occur.
The transmission range is about 100 m (330 ft.) from the transmitter to the Weather Station
(in open space). However, this depends on the surrounding environment and interference
levels. If no reception is possible despite the observation of these factors, all system units
have to be reset (see Setting up).
DCF-77 radio controlled time
The time base for the radio controlled time is a Cesium Atomic Clock operated by the
Physikalisch Technische Bundesanstalt Braunschweig which has a time deviation of less
than one second in one million years. The time is coded and transmitted from Mainflingen
near Frankfurt via frequency signal DCF-77 (77.5 kHz) and has a transmitting range of
approximately 1,500 km. Your radio-controlled Weather Station receives this signal and
converts it to show the precise time in summer or wintertime. The quality of the reception
depends greatly on the geographic location. In normal cases, there should be no reception
problems within a 1,500 km radius around Frankfurt.
Once the outdoor temperature is displayed on the Weather Station after initial set-up,
the DCF tower icon in the clock display will start flashing in the upper left corner. This
indicates that the clock has detected that there is a radio signal present and is trying to
receive it. When the time code is received, the DCF tower becomes permanently lit and
the time will be displayed.
If the tower icon flashes, but does not set the time or the DCF tower does not appear at
all, then please take note of the following:
• Recommended distance to any interfering sources like computer monitors or TV sets
is a minimum of 1.5 - 2 metres.
• Within ferro-concrete rooms (basements, superstructures), the received signal is
naturally weakened. In extreme cases, please place the unit close to a window and/
or point its front or back towards the Frankfurt transmitter.
Manual settings
The following manual settings can be done in the setting mode:
• Time zone setting
• Manual time setting
• Calendar setting
• °C/ °F setting
Press and hold the SET key for about 3 seconds to advance to the setting mode:
Time zone setting
The time zone default of the Weather Station is “0 hour”. To change to another time zone:
1. Press and hold the SET key for about 3 seconds to enter the time zone setting (flashing).
2. Using the + key, set the time zone. The range runs between 12 to -12 hr, in consecutive
1hour intervals.
3. Press the SET key to confirm and enter the “Manual Time Setting” or exit the setting
mode by pressing the MIN/MAX key
Manual time setting
In case the Weather Station is not able to detect the Atomic time (DCF) signal (disturbances,
transmitting distance, etc.), the time can be manually set. The clock will then work as a
normal Quartz clock.
To set the clock:
1. The hour digits start flashing in the time display section.
2. Use the + key to adjust the hours and then press SET key to go to the minute setting.
3. The minute will be flashing. Press the + key to just the minutes.
4. Confirm with the SET key and enter the “Calendar Setting” or exit the setting mode by
pressing the MIN/MAX key
Note:
• The unit will still try to receive the signal at each full hour despite it being manually set.
When it does receive the signal, it will change the manually set time into the received time.
• The time format is fixed to “24-hr” time display.
Calendar setting
The date default of the Weather Station is 1. 1. of the year 2006 after initial set-up. Once
the radio-controlled time signals are received, the date is automatically updated. However,
if the signals are not received, the date can also be set manually.
1. Using the + key, set the year required. The range runs from 2000 to 2029 (default is
2006).
2. Press the SET key to enter the month setting mode.
3. The month digit will be flashing. Press the + key to set the month and then press the
SET key to go to the date setting.
4. The date digit will be flashing. Press the + key to set the date.
5. Confirm with the SET key and set the weekday.
6. Press + key to select the weekday, “MO”, TU”, “WE” etc.
7. Confirm with SET key and enter the “°C/°F TEMPERATURE UNIT SETTING” or exit the
setting mode by pressing the MIN/MAX key.
°C/°F temperature unit setting
The default temperature reading is set to °C (Fahrenheit). To select °F (Celsius):
1. The “°F/ °C” will be flashing, use the + key to toggle between “°F” and “°C”.
2. Once the desired temperature unit has been chosen, confirm with the SET to exit the
setting mode.
Display of outdoor minimum and maximum records
1. In normal display mode, Press the MIN/MAX button once, the outdoor MIN temperature
and the time and date of recording this temperature will be displayed.
Min outdoor temperature
Outdoor data icon
Minimum icon
Time of record
2. Press the MIN/MAX button once more, the outdoor max temperature and the time and
date of recording this temperature will be displayed.
3. Press the MIN/ MAX button once more to advance to the indoor MIN/ MAX display.
Display of indoor minimum and maximum records
1. In normal display mode, press the MIN/ MAX key three times, the minimum indoor
temperature will be shown in LCD. Also the time and date of recording this temperature
will be displayed.
2. Then press the MIN/MAX button one more time, the maximum indoor temperature will
be shown in LCD. Also the time and date of recording this temperature will be displayed.
3. Press the MIN/ MAX button once more to go back to the normal display.
Indoor data icon Maximum icon
Max indoor temperature
Time of record
Resetting the indoor and outdoor
minimum and maximum records
1. In normal display mode, press the MIN/ MAX button to advance to the MIN/MAX records
display.
2. Press and hold the MIN/MAX key for about 2 seconds, this will reset all the indoor and
outdoor MIN and MAX temperature records to the current temperature and time.
Note: The indoor and outdoor records will be reset at the same time.
ICE ALARM (Alarm at 4°C)
This Weather Station has a unique Ice Alarm feature. User may choose to turn it On or Off.
User may press the Ice Alarm key to activate the alarm (the Ice Alarm icon will then be
displayed to indicate that the alarm is “on”). After the alarm is switched on, and the
measured outdoor temperature has dropped below 4°C (39.2°F), the Ice Alarm will be
triggered. The alarm will then sound and the Ice Alarm icon will be blinking on the LCD.
The alarm duration will be about 1.5 minutes.
Hysteresis of ICE ALARM
To compensate for the fluctuation of the measured outdoor temperature, which may cause
the Ice Alarm to sound constantly if the measured reading is close to 4°C (39.2°F), a
hysteresis function has been implemented for the alarm.
If the current temperature value drops to 4°C (39.2°F), the ice alarm will be activated (if
the alarm has been enabled).
Since the preset hysteresis is 1°C (1.8°F). If the temperature rises back to 4.6°C (40.3°F)
and thereafter again drops to below 4°C (39.2°F), the data will be blinking, but no alarm
will be activated.
With the pre-set hysteresis of 1°C (1.8°F), it has to rise back to above 5°C (41°F) and drop
below 4°C (39.2°F) to trigger the alarm again.
Note: After the alarm is triggered, the alarming icon will still blink when the temp is still
between 4 to 5 °C (39.2 to 41°F).
EMOS spol. s r. o.
22
3
Page 4

WS9641-manual 0-0-0-K
Mounting
POSITIONING THE WEATHER STATION:
The Weather Station has been designed to be hung onto wall or free standing.
To wall mount
Choose a sheltered place. Avoid direct rain and sunshine. Before wall mounting, please
check that the outdoor temperature values can be received from the desired locations.
1. Fix a screw (not supplied) into the desired wall, leaving the head extended out the by
about 5mm.
2. Remove the stand from the Weather Station by pulling it away from the base and hang
the station onto the screw. Make sure that it locks into place before releasing.
Free standing
With the stand, the Weather Station can be placed onto any flat surface.
POSITIONING THE TEMPERATURE TRANSMITTER:
The transmitter is supplied with a holder that may be attached to a wall with the two screws
supplied. The transmitter can also be position on a flat surface by securing the stand to
the bottom to the transmitter.
To wall mount:
1. Secure the bracket onto a desired wall using the screws and plastic anchors.
2. Clip the transmitter onto the bracket.
Note: Before permanently fixing the transmitter wall base, place all units in the desired
locations to check that the outdoor temperature reading is receivable. In event that the
signal is not received, relocate the transmitters or move them slightly as this may help
the signal reception.
Care and maintenance
• Extreme temperatures, vibration and shock should be avoided as these may cause
damage to the unit and give inaccurate forecasts and readings.
• When cleaning the display and casings, use a soft damp cloth only. Do not use solvents
or scouring agents as they may mark the LCD and casings.
• Do not submerge the unit in water.
• Immediately remove all low powered batteries to avoid leakage and damage. Replace
only with new batteries of the recommended type.
• Do not make any repair attempts to the unit. Return them to their original point of
purchase for repair by a qualified engineer. Opening and tampering with the unit may
invalidate their guarantee.
• Do not expose the units to extreme and sudden temperature changes, this may
lead to rapid changes in forecasts and readings and thereby reduce their accuracy.
Battery Change
• For optimum display accuracy the batteries should be replaced at least once a year or
when the display becomes dim and hazy.
• Immediately remove all low powered batteries to avoid leakage and following damage of
the weather station. Replace only with new batteries of the recommended type.
Battery Disposal
Batteries are not to be disposed with general house waste. The user is obliged by law to
return used up batteries. Old batteries can be disposed of at the public waste collection
points of your community as well as at any place selling batteries of the concerned type.
Batteries can further be returned free of charge to any Profectis Service Point as well as
the Quelle Dispatch Department.
CZ
BEZDRÁTOVÝ TEPLOMĚR WS-9641IT
Bezdrátový teploměr zobrazuje venkovní teplotu z venkovního čidla (pomocí signálu na frekvenci 868 MHz), vnitřní teplotu a vlhkost, hodiny řízené DCF signálem, datum a počasí pomocí
8 variant ikony chlapce v oblečení podle aktuálních teplotních podmínek.
Popis stanice
• hodiny řízené DCF signálem s možností ručního nastavení
• datum, hodiny, minuty a sekundy, časová pásma -12 hod až +12 hod
• bezdrátový přenos signálu z venkovního čidla na frekvenci 868 MHz
• ikona chlapce v 8 variantách oblečení podle aktuálních teplotních podmínek
• nastavení teploty ve °C nebo °F
• záznam min. a max. teploty (vnitřní a venkovní)
• možnost vymazání záznamu min. a max. teploty
• zobrazení stavu baterií
• možnost postavení na stojan nebo zavěšení na stěnu
These markings are attached to batteries containing hazardous substances:
Pb = Battery containing Lead
Cd = Battery containing Cadmium
Hg = Battery containing Mercury
Contribute to the preservation of the environment!
Do not simply throw away any product but introduce it to proper recycling.
Caution
Batteries must not be exposed to excessive temperatures such as direct sunshine, fire and
the like. Also dry batteries must not be recharged.
Keep batteries away from children since batteries are easily swallowed. In case a battery
has been swallowed get medical attention immediately.
Notes on the preservation of the environment
This product must at the end of its life time not be disposed of with the general house
rubbish but has to be taken to an official electrical and electronic waste dumping ground
for recycling. This is indicated by the symbol on the product, in the operation manual or
on the packaging.
The materials are reusable according to their markings. By reuse, recycling or other forms of
utilising old equipment you are assisting considerably in the preservation of the environment.
Please contact your local authorities to retrieve the addresses of legal dumping grounds
with selective collection.
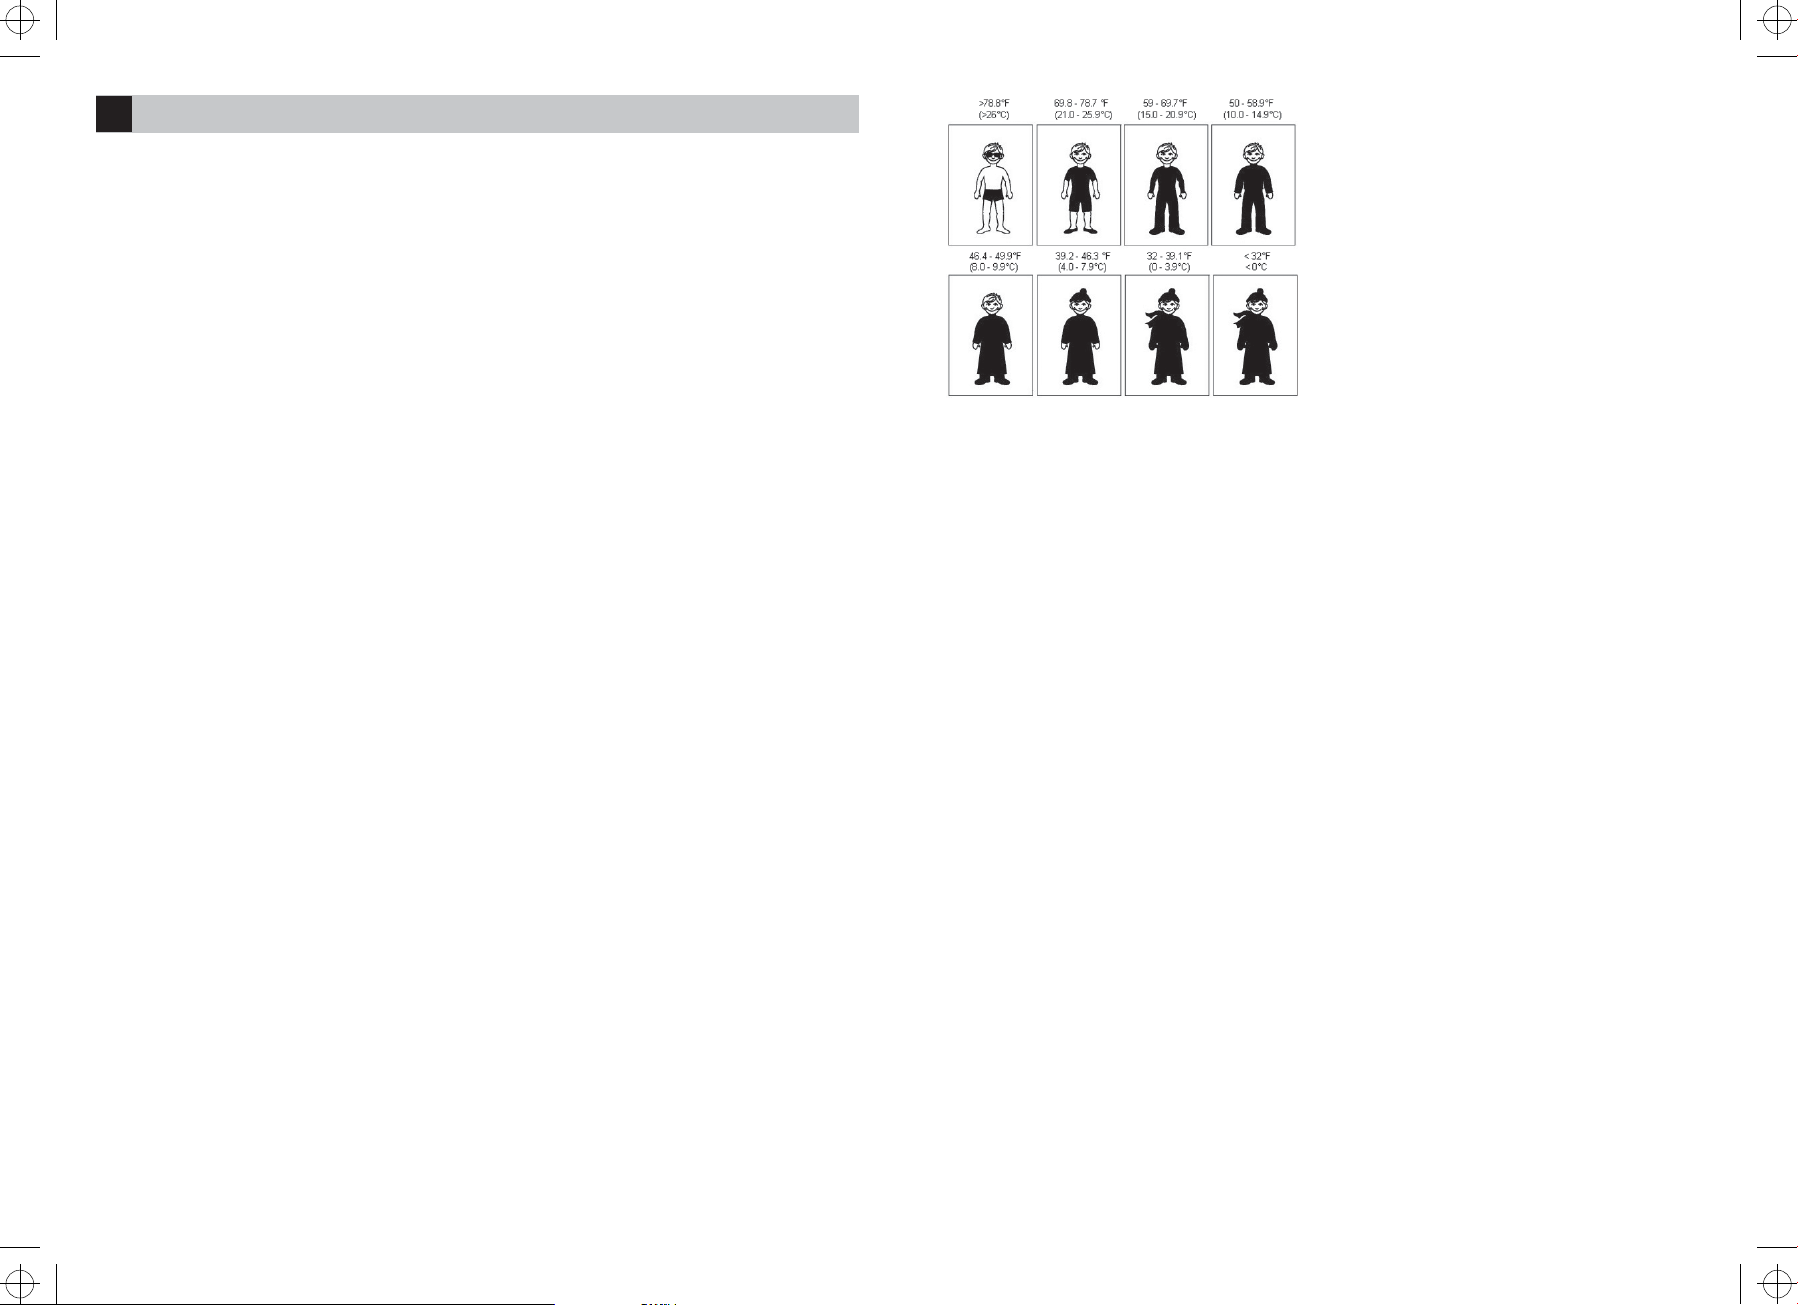
Weather man icon (Temperature condition icons)
One of the 8 different temperature icons (featured by weather man with different clothing) is
displayed in the centre of LCD, which indicates the different temperature conditions due to
the current outdoor temperature (temperature value detected by the outdoor transmitter):
Hereby, Emos spol. s r. o., declares that this WS-9641IT in compliance with the essential
requirements and other relevants provisions of Directive 1995/5/EC. Declaration of
conformity is enclosed in manual or web sites www.emos.eu.
GB: WEATHER MAN ICON (Temperature condition icons):
CZ: Význam ikon postavy chlapce v oblečení podle aktuálních teplotních podmínek.
Objevuje se v osmi různých variantách:
Venkovní bezdrátové čidlo
• dosah až 100 m ve volném prostoru (v zastavěných prostorech a místech s rušením
může rapidně klesnout)
• kryt odolný povětrnostním vlivům
• čidlo umístěte na místo chráněné před přímým slunečním zářením a deštěm
Technické parametry
Teplotní rozsahy
Venkovní teplota (čidlo) -39,9 °C až +59,9 °C
Přesnost měření -39,9°C až -5°C ±2°C; -5°C až +40°C ±1,5°C;
40°C až 59,9°C ±2°C
(zobrazení OF.L – mimo rozsah měření)
4
RO
TERMOMETRU FĂRĂ FIR WS-9641IT
Termometrul fără fir WS-9641IT afişează temperatura exterioară din senzorul extern (cu ajutorul semnalului pe frecvenţa de 868 MHz), temperatura şi umiditatea interioară, ceasul dirijat
prin semnalul DCF, data şi starea vremii cu ajutorul a 8 variante ale figurii băiatului îmbrăcat după condiţiile actuale de temperatură.
Descrierea staţiei
• ceas dirijat prin semnalul DCF, cu posibilitatea reglării manuale
• data, ora, minute şi secunde, fusul orar – 12 ore la + 12 ore
• transmisia fără fir a semnalului din senzorul extern pe frecvenţa 868 MHz
• figura băiatului îmbrăcat în 8 variante după condiţiile actuale de temperatură
• afişarea temperaturii în °C sau °F
• consemnarea temperaturii min. şi max. (interne şi externe)
• posibiltatea ştergerii memoriei temperaturii min. şi max.
• afişarea stării bateriilor
• posibilitatea aşezării pe stativ sau ancorarea pe perete
Senzor fără fir extern
• Raza de acţiune până la 100 m în teren deschis (în spaţii construite şi zone cu interferenţă poate să scadă rapid)
• capac rezistent la influenţe atmosferice
• amplasaţi senzorul la loc ferit de ploaie şi radiaţii solare directe
Parametri tehnici
Intervale de temperatură
Temperatura exterioară (senzor)
Precizia măsurării -39,9°C la -5°C ±2°C; -5°C la +40°C
±1,5°C; 40°C la 59,9°C ±2°C
(afişarea OF.L – în afara intervalului de măsurare)
Temperatura interioară -9,9 °C la 59,9 °C
Precizia măsurării -9,9°C la 40°C ±1,5°C; 40°C la 59,9°C
±2°C (afişarea OF.L – în afara intervalului de măsurare)
Umiditate relativă 1% la 99% cu diferenţiere de 1%
(afişarea OF.L – în afara intervalului de măsurare)
Receptarea datelor din senzor aproximativ la fiecare 4 secunde
Măsurarea temp. şi umidităţii
interioare la fiecare 17 secunde
Alimentarea 2 x AA, IEC, LR6, 1,5V (termometru şi senzor)
Recomandăm baterii alcaline - fiabilitatea poate
să atingă şi 24 luni
Dimensiuni Termometru 92 x 30,7 x 160 mm
Senzor 38,2 x 21,2 x 128,3 mm
Ecranul LCD şi reglarea
Pentru simplificarea vizualizării datelor ecranul este împărţit în trei părţi:
Partea 1 – temperatura exterioară (OUT)
– afişarea temperaturii exterioare actuale
– indicatorul activării alermei de avertizare asupra poleiului
– Icoana ))) afişează starea actuală a receptării semnalului din senzorul fără fir
– semnalizarea bateriei slabe în senzorul fără fir
– Prin apăsarea butonului MIN/MAX se afişează valoarea înregistrată a temperaturii
minime şi maxime şi concomitent indicaţia MIN sau MAX.
Partea 2 – temperatura şi umiditatea interioară (IN)
– afişarea temperaturii interioare şi a umidităţii relative interioare
– afişarera condiţiilor actuale de temperatură cu ajutorul figurii băiatului în opt variante
de îmbrăcăminte după condiţiile actuale de temperatură
– baterii slabe în ternometru
Partea 3 – ora şi data
– în regim normal se afişează ora şi data
– se poate afişa data, ziua şi secundele
– simbolul receptării semnalului DCF (dacă clipeşte, are loc receptarea). După receptarea
cu succes a semnalului din senzor, pe ecran se afiţează permanent simbolul ))). Dacă
nu se afişează, receptarea a eşuat.
4 butoane pe termometru
SET (reglare manuală) – comutarea între regime independente: fusul orar, ora,
anul, luna, data ziua şi °C/°F.
+ (plus) – setarea datelor concrete
– în regim normal comutarea între dată, zi şi secunde.
MIN/MAX – controlul temperaturii interioare şi exterioare minime
şi maxime (se afişează şi timpul înregistrării).
– ţinând butonul, ştergeţi aceste valori.
– cu altă apăsare intraţi în regimul de vizualizare.
ICE ALARM – activarea (dezactivarea) avertizării asupra poleiului,
dacă temperatura exterioară scade sub 4°C).
După activarea avertizării, pe ecran apar date privind
temperatura exterioară şi apare simbolul unei fulgi
de zăpadă cu semnul exclamării.
Reglarea
1. Introduceţi bateriile în senzorul exterior (vezi Introducerea şi înlocuirea bateriilor).
2. În 30 secunde introduceţi bateriile în termometru (vezi capitolul Introducerea şi
înlocuirea bateriilor). După introducerea bateriilor pe ecran apar pentru o clipă toate
datele şi termometrul piuie scurt. Pe ecran apare indicaţia orei 0.00, figura băiatului,
-39,9 °C la +59,9 °C
temperatura şi umiditatea interioară. Dacă datele nu apar în 60 de secunde, scoateţi
bateriile şi după 10 secunde le introduceţi din nou.
Important: este necesară respectarea ordinii introducerii bateriilor – mai întâi în senzor
şi apoi în termometru!
Introducerea şi înlocuirea bateriilor
La introducerea sau înlocuirea bateriilor în senzor şi termometru procedaţi în modul următor:
1. Îndepărtaţi capacul spaţiului bateriilor.
2. Introduceţi bateriile, respectaţi polaritatea corectă a bateriilor introduse conform indicaţiei
pe fundul spaţiului bateriilor.
3. Închideţi capacul spaţiului bateriilor.
Important: În cazul înlocuirii bateriilor în termometru sau senzor este necesară resetarea
(anularea) întergii garnituri. La pornire este atribuit de către emiţătorul senzorului un
cod de securitate fortuit, care trebuie receptat în timpul primelor trei minute de la
începutul emiterii şi salvat în receptorul termometrului!
Receptarea semnalului senzorului pe frecvenţa 868 MHz
După introducerea bateriilor în senzorul fără fir extern şi în termometru începe receptarea
datelor. Termometrul receptează date dintr-un singur senzor fără fir extern . Temperatura
exterioară se afişează în partea de sus a ecranului cu simbolul ))). Termometru ar trebui să
recepteze date privind temperatura în 5 minute de la introducerea bateriilor. Dacă datele
privind temperatura exterioară nu se afişează în 5 minute, scoateţi bateriile din termometru
şi senzor şi repetaţi procedeul din capitolul Reglarea.
Dacă în 5 minute nu se ajunge la afişarea temperaturii exterioare şi pe ecran apare --.-,
controlaţi:
1. dacă distanţa dintre senzor sau termometru şi sursele de interferenţă ca monitoare,
calculatoare, televizoare şi alte aparate electrice este de 1,5 m la 2 m.
2. dacă senzorul fără fir nu este amplasat pe construcţie metalică, ca tocul ferestrei,
parapet de tablă etc.
3. preveniţi interferenţe nedorite, eliminînd produsele care funcţionează pe aceeaşi
frecvenţă.
Notă: După receptarea semnalului pe 868 MHz din senzorul fără fir nu deschideţi spaţiul
pentru baterii. S-ar putea ajunge la eliberarea bateriilor şi, ca urmare, la pornirea staţiei.
La resetare accidentală scoateţi şi introduceţi bateriile din termometru şi senzor conform
instrucţiunilor. Altfel s-ar putea ivi probleme la transmisie.
Raza de acţiune a transmisiei în spaţiu deschis este de 100 m, dar este influenţată marcant
de mediul înconjurător şi interferenţe. În spaţiu construit ar putea să scadă, dependent de
materialele de construcţie folosite, până la câţiva metri.
Receptarea semnalului radio DCF
După afişarea datelor privind temperatura exterioară începe detectarea automată a
semnalului DCF penmtru reglarea ceasului. Acest proces este indicat de clipirea antenei în
stânga sus deasupra indicaţiei orei. După receptarea cu succes a semnalului DCF pe ecran
se afişează permanent simbolul receptării semnalului DCF şi se reglează ora. În condiţii
normale receptarea semnalului DCF durează de la 3 la 5 minute. Dacă semnalul DCF nu
este receptat în 10 minute, ora poate fi reglată manual cu butonu SET.
Reglarea orei are loc zilnic între ora 02.00 şi 03.00. Dacă ceasul nu este reglat până la
ora 03.00, semnalul este dedectat automat din nou la ora 04.00, 05.00 şi 06.00. La
eşuarea detectării la ora 06.00, reglarea continuă a doua zi la ora 02.00. Receptarea
cu secces a semnalului DCF corectează timpul reglat manual. Concomitent cu ora se
actualizează şi data.
Ceasul dirijat de semnalul radio DCF-77
Sursa emiţătorului semnalului DCF este ceasul atomic din Physikalisch Technische Bundesanstalt Braunschweig. Abaterea lui medie este de o secundă la un milioan de ani. Semnalul
DCF este codat şi difuzat pe frecvenţa 77,5 kHz din Mainflingen, în apropiere de Frankfurt
pe Mein în Germania. Raza de acţiune este de aproximativ 1500 km în jurul emiţătorului.
Ceasul din termometru receptează semnalul şi reglează ora exactă de vară sau de iarnă.
Calitatea semnalului depinde de poziţia geografică. Dacă semnalul este receptat pe raza
dată de 1500 km de Frankfurt, nu ar trebui să apară dificultăţi.
Dacă a avut loc receptarea semnalului, dar icoana clipeşte, atunci:
– mutaţi termometrul din apropierea surselor interferenţei electromagnetice, cum sunt
ecranele calculatoarelor sau televizoare. Distanţa recomandată este de 1,5 la 2 m.
– amplasaţi termometrul cât mai aproape de fereastră şi cu orientare spre Frankfurt,
locaţia emiţătorului – receptarea poate fi perturbată de materiale de construcţie ca
beton armat sau prin amplasarea de ex. în încăperi din subsol.
– uneori receptarea semnalului nu este posibilă la poalele munţilor sau dealurilor – nu
este o deficienţă a termometrului.
Reglarea manuală
Manual se pot regla următoarele date:
- fusul orar → ora → calendarul → opţiunea °C/°F
Ţineţi butonul SET timp de 3 secunde – intraţi în regimul de reglare a fusului:
Reglarea fusului orar
În mod standard este reglat la ora 0. La modificare procedaţi în felul următor:
1. Ţineţi butonul SET timp de 3 secunde – intraţi în regimul de reglare (clipeşte indicaţia 0h).
2. Cu butonul + setaţi fusul orar de la +12ore la -12ore pe câte 1 oră.
3. Printr-o altă apăsare a butonului SET intraţi în regimul de reglare a orei. Dacă în timp
de 3 secunde nu apăsaţi nici un buton, vă întoarceţi automat în regim normal.
21
EMOS spol. s r. o.
Page 5

WS9641-manual 0-0-0-K
Зображення мінімальної та максимальної
зовнішньої температури
1. Натисніть кнопку MIN/MAX у нормальному режимі – зобразяться дані
мінімальної температури та часу, коли було це записано.
Дані мінімальної
температури
зовнішня дата
іконки мінімальної
температури
час запису
2. Натисніть кнопку MIN/MAX другий раз – зобразяться дані про
максимальну температуру та час, коли було записано.
3. Наступним натисненням кнопки MIN/MAX зобразите дані про
мінімальну та максимальну
записана.
внутрішня дата
іконка максимальної
температури
внутрішню температуру та час, коли була
дані максимальної
температури
час запису
Зображення мінімальної та максимальної
внутрішньої температури
1. У нормальному режимі три рази натисніть кнопку MIN/MAX – на дисплеї
зобразяться дані мінімальної внутрішньої температури та час запису.
2. Знову натиснувши на кнопку MIN/MAX зобразяться дані про
максимальну внутрішню температуру та час, коли було записано.
3. Знову натиснувши на кнопку MIN/MAX ввійдете у нормальний режим
зображення.
Стиранням запису мінімальних та максимальних
параметрів для внутрішньої та зовнішньої
температури
1. У нормальному режимі, натисніть на кнопку MIN/MAX – ввійдете у
зображення min/max запису.
2. Тримаючи кнопку MIN/MAX протягом 2 секунд – стрете всі дані
мінімальної та максимальної внутрішньої та зовнішньої температури
відповіднного часу.
Внутрішні та зовнішні записи будуть стерті одночасно.
Попередження про наморозь
Термометр обладнаний так, що може попередити про голольод. Функцію
можливо включити та виключити.
• Кнопкою ICE ALARM включите попередження про наморозь – у верхній
частині дисплея появиться іконка сніжинки – функція активована.
Якщо температура знизиться під 4 °C (39,2 °F), включиться
попереджувальний звуковий сигнал та іконка сніжинка буде мигати.
Тривання звукового сигнаду 1,5 хвилин.
Затримка попередження про наморозь
Для того, щоб уникнути частому включенню звукового сигналу
попередження про наморозь, чи зміни зовнішньої температури близько
4 ° С, для цієї функції використовується запізнення.
Якщо температура знизиться під параметр 4 ° С, включиться (якщо
функція активована).
– Затримка налаштована на 1 °C (1,8°F). Якщо температура наприклад
піднімається на 4,6 °C тa потім опускається під 4 °C, будуть дані
температури мигати, але звуковий
сигнал не буде активовано.
– - Із затримкою приблизно на 1 ° С, мусить температура підвищитися
на 5°C (41°F) тa потім опуститися під 4°C, щоб включився звуковий
сигнал.
Після включення звукового сигналу про попередження про наморозь
буде при температурі між 4 до 5°C також мигати іконка.
Розташування
Термометр
Поставлений може бути на підставку, напр. стіл чи повішений на стіну.
Щоб помістити на стіну необхідно вибрати місце, де немає впливу пряме
сонячне проміння та ізлучаюче тепло. Перед тим як повісити на стіну,
провірте чи будете мати добрий сигнал між термометром та датчиком.
1. Використовуйте відповідні гвинти з головками більшими ніж
входить у комплект).
2. Зніміть підставку з тіла термометра та термометр повісьте.
Переконайтеся, чи термометр достатньо забезпечений від падіння.
Бездротовий датчик
Поставляється з універсальною підставкою та настінним кріпленням.
Кріплення укрітіть на стіну за допомогою двох гвинтів, що знаходяться
в поставці.
Використання підставки Правильна положення установки
датчика на стіні
Монтаж на стіні
Перед тим як умістити датчик на стіні, провірте, чи може безпосередньо
працювати з термометром. Якщо сигнал небув прийнятий, поставте дітчик
ближче до термометра.
1. Упевніть кріплення на стіну за допомогою гвинтів.
2. Закрийте кріплення до бездротового датчика згідно малюнка. Будьте
обережні, щоб не дати датчик навпаки. Якщо навпаки даний датчик,
може попасти вода через отвори для повітря у нижній частині та могла б
пошкодитися електроника всередині.
Догляд та обслуговування
• Ні термометр ні датчик не розташовуйте в місця схильні до вібраці та
трасіння, тому що можуть запричинити пошкодження пристрою.
• Уникайте середовищу, з різкими змінами температури, другими
словами прямому сонячному промінню, надзвичайному холоду
та вологості, і умовам, які можуть привести до зниження точності
вимірювання.
• Для чищення РК-дисплея та кришки пристрою, використовуйте тільки
м,ягку вологу ганчірку. Не користуйтеся розчинниками та миючими
засобами.
• Ні годинник ні датчик не занурюйте у воду та в іншу рідину.
Самі не ремонтуйте прилад. При пошкодженні чи ваді виробу здайте його
для ремонту у магазин, в якому пристрій придбали.
• Негайно відстороніть з пристрою всі розряджені батареї, цим
запобіжите їхньому витіканню та пошкодженню пристрою.
Вимінювання батареї
Використовуйте тільки нові батареї, указаного типу.
Використані батареї поверніть на місця призначені для збору використаних
батарей.
Товариство Emos spol.s r.o. повідомляє, що WS-9641IT знаходиться у згоді з
основними вимогами та іншими відповідними постановленнями директиви
1999/5/ЕС. Приладом можливо вільно користуватися в ЄС. Повідомлення
про згоду, являється частиною інструкції чи її можливо знайти на сайтових
сторінках www.emos.cz
Приладом можливо користуватися на підсталі загальних правил
20
5 мм (не
Vnitřní teplota -9,9 °C až 59,9 °C
Přesnost měření -9,9°C až 40°C ±1,5°C; 40°C až 59,9°C ±2°C
(zobrazení OF.L – mimo rozsah měření)
Relativní vlhkost 1% až 99% s rozlišením 1%
(zobrazení OF.L – mimo rozsah měření)
Příjem dat z čidla přibližně každé 4 sekundy
Měření vnitřní teploty a vlhkosti každých 17 sekund
Napájení 2 x AA, IEC, LR6, 1,5V (teploměr i čidlo)
Doporučujeme alkalické baterie – životnost může
dosáhnout až 24 měsíců.
Rozměry Teploměr 92 x 30,7 x 160 mm
Čidlo 38,2 x 21,2 x 128,3 mm
LCD displej a nastavení
Pro přehledné prohlížení údajů je displej rozdělen na tři části:
Část 1 – venkovní teplota (OUT)
– zobrazení aktuální venkovní teploty
– indikace zapnutí varování před námrazou
)
)
– Ikona
) zobrazí aktuální stav příjmu signálu z bezdrátového čidla.
– zobrazení slabé baterie v bezdrátovém čidle
– stisk tlačítka MIN/MAX zobrazí uloženou minimální a maximální teplotu a současně i
ikonu MIN nebo MAX.
Část 2 – vnitřní teplota a vlhkost (IN)
– zobrazení vnitřní teploty a vnitřní relativní vlhkosti
– zobrazení aktuálních teplotních podmínek pomocí postavy chlapce v osmi variantách
oblečení dle aktuálních teplotních podmínek.
– slabé baterie v teploměru
Ćást 3 – hodiny a datum
– v normálním režimu zobrazuje hodiny a datum
– lze zobrazit datum, den a sekundy
– ikona příjmu DCF signálu (bliká-li, příjem probíhá. Po úspěšném přijetí signálu z čidla
se na displeji trvale zobrazí ikona
4 tlačítka na teploměru
SET (ruční nastavení) – přepínání jednotlivých režimů: časové pásmo, hodiny,
rok, měsíc, datum, den a °C/°F.
+ (plus) – nastavování jednotlivých údajů
– v normálním režimu přepínání mezi datem, dnem
a sekundami.
MIN/MAX – prohlížení minimální a maximální teploty pro vnitřní
a venkovní teplotu (zobrazí i čas záznamu).
– podržení tlačítka vynuluje tyto hodnoty.
– dalším stiskem tlačítka výstup z režimu prohlížení.
ICE ALARM – zapnutí (vypnutí) varování před námrazou, pokud
venkovní teplota poklesne pod 4°C). Při zapnutí
varování se na displeji nahoře vedle údaje o venkovní
teplotě objeví symbol sněhové vločky s vykřičníkem.
Nastavení
1. Vložte baterie do venkovního bezdrátového čidla (viz Vložení a výměna baterií).
2. Do 30 sekund vložte baterie do teploměru (viz kapitola Vložení a výměna baterií). Po
vložení se na okamžik zobrazí všechny údaje na displeji a teploměr krátce pípne. Na
displeji se objeví údaj času 0.00, ikona chlapce a vnitřní teplota s vlhkostí. Pokud se
údaje neobjeví do 60 sekund, vyjměte baterie a po 10 sekundách opět vložte.
Důležité: je nutno dodržet pořadí vkládání baterií – nejdříve do čidla a potom do
teploměru!
Vložení a výměna baterií
Při vkládání nebo výměně baterií v čidle i v teploměru postupujte následovně:
1. Sejměte kryt bateriového prostoru.
2. Vložte baterie, dbejte na správnou polaritu vkládaných baterií podle vyznačení na dně
bateriového prostoru.
3. Zavřete kryt bateriového prostoru.
Důležité: V případě výměny baterií v teploměru nebo v čidle je nutné provést reset
(vynulování) u celé soupravy. Při spuštění je totiž vysílačem čidla přiřazený náhodný
bezpečnostní kód, a tento kód musí být v průběhu třech minut od začátku vysílání
přijatý a uložený v přijímači teploměru!
Příjem signálu čidla na frekvenci 868 MHz
Po vložení baterií do venkovního bezdrátového čidla a teploměru začne přijímání dat.
Teploměr přijímá údaje jen z jednoho venkovního bezdrátového čidla. Venkovní teplota
se zobrazí v horní části displeje teploměru s ikonou
teplotě do 5 minut po vložení baterií.
Nezobrazí-li se údaje venkovní teploty do 5 minut, vyjměte baterie z čidla i teploměru a
zopakujte postup dle bodu Nastavení.
Pokud se během 5 minut venkovní teplot nezobrazí a na displeji se objeví --.-, zkontrolujte:
– zda je vzdálenost bezdrátového čidla a teploměru 1,5 m až 2 m od zdrojů rušení jako
jsou počítače, monitory, televizory a jiné elektrospotřebiče.
– zda není čidlo umístěno na kovové konstrukci jako je okenní rám, plechový parapet apod.
– předejděte nežádoucím interferencím vyloučením výrobků pracujících na stejné frek-
venci (868 MHz).
Poznámka: Po přijetí signálu z čidla neotvírejte kryt bateriového prostoru. Mohlo by dojít
k uvolnění baterií a následnému spuštění stanice. Při náhodném vynulování vyjměte a
)
)
). Nezobrazí-li se, byl příjem neúspěšný.
)
)
). Teploměr by měl přijmout data o
vložte baterie dle návodu v teploměru a čidle. Jinak mohou nastat problémy při přenosu.
Dosah vysílání v otevřeném prostoru je 100 m. Dosah je výrazně ovlivněn okolním prostředím
V zastavěném prostoru může klesnout až na několik metrů.
a rušením.
Příjem radiového signálu DCF
Po zobrazení údaje o venkovní teplotě začne automaticky vyhledávání DCF signálu pro
nastavení hodin. Tento proces znázorňuje blikající anténa vlevo nahoře od údaje hodin.
Po úspěšném příjmu DCF signálu se trvale zobrazí ikona příjmu DCF a nastaví se čas. Za
optimálních podmínek se příjem uskuteční během 3 až 5 minut. Pokud příjem DCF signálu
neproběhl do 10 minut, lze čas nastavit ručně tlačítkem SET.
K seřizování času dochází každý den mezi 02.00 a 03.00 hod. Není-li čas seřízen do
03.00 hod, je signál automaticky vyhledáván opět ve 04.00, 05.00 a 06.00 hod. Při
selhání vyhledání v 06.00 hod bude nastavení pokračovat příští den v 02.00 hod. Úspěšný
příjem signálu DCF přepíše ručně nastavený čas. Současně s časem se aktualizuje datum.
Hodiny řízené radiovým signálem DCF-77
Zdrojem vysílače DCF signálu jsou atomové hodiny v Physikalisch Technische Bundesanstalt
Braunschweig. Jejich odchylka je jedna sekunda za milion let. DCF signál je zakódován a
vysílán na frekvenci 77,5 MHz z Mainflingenu poblíž Frankfurtu nad Mohanem v Německu.
Dosah je přibližně 1500 km v okruhu od vysílače. Hodiny v teploměru přijmou signál a nastaví
přesný letní nebo zimní čas. Kvalita příjmu závisí na geografické poloze. Pokud je signál
přijímán v daném dosahu 1500 km od Frankfurtu, neměly by nastat potíže.
Pokud příjem DCF signálu proběhl, ale ikona bliká:
– přemístěte teploměr z blízkosti zdrojů elektromagnetických interferencí jako jsou
počítačové monitory nebo televizory. Doporučená vzdálenost je 1,5 až 2 m.
– umístěte teploměr co nejblíže oknu a směrem k Frankfurtu, místu vysílače – příjem
může být odstíněn stavebními materiály jako je železobeton nebo umístěním např. v
suterénní místnosti.
– příjem DCF signálu někdy není možný v úpatí hor nebo kopců – nejedná se o chybu
teploměru.
Ruční nastavování
Ručně lze nastavit následující údaje:
- časové pásmo → čas → kalendář → volba °C/°F
Podržte tlačítko SET po dobu 3 sekund – vstoupíte do režimu nastavení pásma:
Nastavení časového pásma
Standardně je nastaveno na 0 hodin. Při změně nastavení postupujte takto:
1. Podržte tlačítko SET po dobu 3 sekund – vstoupíte do režimu nastavení (bliká údaj 0h).
2. Tlačítkem + nastavte časové pásmo od +12hod až do -12hod po 1 hodině
3. Dalším stiskem tlačítka SET vstupte do režimu nastavení času. Pokud během 3 sekund
nestisknete žádné tlačítko, nastavení se automaticky přepne do normálního režimu.
Nastavení hodin
Pokud kvůli vzdálenosti nebo rušivým vlivům selže automatické nastavení času, nastavte
hodiny ručně. Po ručním nastavení budou hodiny řízeny vestavěným krystalem. I po ručním
nastavení hodin bude teploměr automaticky v každou celou hodinu vyhledávat DCF signál.
Hodiny jsou přednastaveny pro 24 hod zobrazení.
1. Po vstupu do režimu nastavení času (bod 3 Nastavení časového pásma) bliká pozice
údaje hodin. Tlačítkem + nastavte požadovanou hodinu.
2. Stiskem tlačítka SET přejděte k nastavení minut – bliká pozice údaje minut.
3. Tlačítkem + nastavte požadovanou minutu.
4. Potvrďte tlačítkem SET, vstoupíte do nastavení kalendáře.
Nastavení kalendáře
Výchozí datum kalendáře je 2006, 1. 1. a MO. Po příjmu DCF signálu se kalendář nastaví
automaticky. Pokud automatické nastavení selže, lze použít ruční nastavení.
1. Tlačítkem + nastavte požadovaný údaj roku (v rozpětí 2000 až 2029).
2. Tlačítkem SET přejděte do nastavení měsíce – bliká údaj měsíce.
3. Stisky tlačítka + nastavte požadovaný měsíc.
4. Tlačítkem SET přejdete do nastavení data – bliká údaj data.
5. Stisky tlačítka + nastavte požadované datum.
6. Tlačítkem SET přejdete do nastavení dne v týdnu.
7. Tlačítkem + nastavte den v týdnu v pořadí pondělí (MO) až neděle (SU).
8. Tlačítkem SET přejděte do nastavení °C/°F a pomocí tlačítka + vyberte vhodnou
jednotku pro teplotu. Tlačítkem SET potvrďte jednotku teploty – zároveň ukončíte
nastavení kalendáře.
Zobrazení minimální a maximální venkovní teploty
1. Stiskněte tlačítko MIN/MAX v normálním režimu – zobrazí se údaj minimální teploty a
čas, kdy byl zaznamenán.
údaj minimální teploty
venkovní data
ikona minimální teploty
čas záznamu
5
EMOS spol. s r. o.
Page 6

WS9641-manual 0-0-0-K
2. Stiskněte tlačítko MIN/MAX podruhé – zobrazí se údaj pro maximální teplotu a čas,
kdy byl zaznamenán.
3. Dalším stiskem tlačítka MIN/MAX zobrazte údaj pro minimální/maximální vnitřní teplotu
a čas, kdy byl zaznamenán.
Zobrazení minimální a maximální vnitřní teploty
1. Pokud jste v normálním režimu, třikrát stiskněte tlačítko MIN/MAX – na displeji se
zobrazí údaj minimální vnitřní teploty a čas záznamu.
2. Dalším stiskem tlačítka MIN/MAX zobrazte údaj pro maximální vnitřní teplotu a čas,
kdy byl zaznamenán.
3. Dalším stiskem tlačítka MIN/MAX vstupte do normálního režimu zobrazení.
vnitřní data údaj maximální teploty
ikona maximální teploty
čas záznamu
Vymazání záznamu min a max hodnoty
pro vnitřní a venkovní teplotu
1. Tlačítkem MIN/MAX vstupte v normálním režimu do zobrazení min/max záznamů.
2. Přidržte tlačítko MIN/MAX po dobu 2 sekund - vymažete všechny údaje min a max
vnitřní a venkovní teploty a odpovídajících časů.
Vnitřní a venkovní záznamy budou smazány současně.
Varování před námrazou
Tlačítkem ICE ALARM zapněte varování před námrazou - v horní části displeje se objeví
ikona sněhové vločky. Jestliže teplota klesne pod 4 °C (39,2 °F), spustí se varovný
zvukový signál a ikona vločky bude blikat. Délka zvukového signálu je 1,5 minuty.
Zpoždění varování před námrazou
Aby se zabránilo častému spouštění zvukového signálu varování před námrazou v případě
kolísání venkovní teploty okolo 4 °C, je pro tuto funkci použito zpoždění.
Klesne-li teplota pod hodnotu 4 °C, dojde ke spuštění (je-li funkce aktivní).
– Zpoždění je nastaveno na 1 °C (1,8°F). Vzroste-li teplota například na 4,6 °C a následně
klesne pod 4 °C, bude údaj teploty blikat, ale zvukový alarm nebude aktivován.
– Se zpožděním o 1 °C musí teplota vzrůst na 5°C (41°F) a pak klesnout pod 4°C, aby
došlo ke spuštění zvukového signálu.
Po spuštění zvukového signálu bude při teplotě mezi 4 až 5°C blikat i ikona.
Umístění
Teploměr
Může být postaven na podložku, např. stůl, nebo zavěšen na zeď.
BEZDRÔTOVÝ TEPLOMER WS-9641IT
SK
Bezdrôtový teplomer zobrazuje vonkajšiu teplotu (z vonkajšieho čidla pomocou frekvencie 868 MHz), vnútornú teplotu a vlhkosť, hodiny riadené DCF signálom, dátum a aktuálne počasie
pomocou 8 variant ikony chlapca, v oblečení podľa aktuálnych teplotných podmienok.
Popis stanice
• hodiny riadené DCF signálom s možnosťou ručného nastavenia
• zobrazenie dátumu, hodín, minút a sekúnd
• časové pásma -12 hod až +12 hod
• bezdrôtový prenos signálu z vonkajšieho čidla na frekvencii 868 MHz
• signál z vonkajšieho čidla je prijímaný každé 4 sekundy
• 8 variant ikony chlapca v oblečení podľa aktuálnych teplotných podmienok
• nastavenie teploty v °C nebo °F
• záznam min. a max. teploty (vnútornej a vonkajšej)
• možnosť vymazania záznamu min. a max. teploty
• zobrazenie stavu batérií
• možnosť postavenia na stojan alebo zavesenie na stenu
Vonkajšie bezdrôtové čidlo
• prenos signálu prebieha na frekvencii 868 MHz
• dosah až 100 m vo voľnom priestore (v zastavaných priestoroch a miestach s rušením
môže rapídne klesnúť)
• kryt odolný poveternostným vplyvom
• čidlo namontujte na miesto chránené pred priamym slnečným žiarením a dažďom
Technické parametre
Teplotné rozsahy
K umístění na zeď vyberte vhodné místo, kde není vliv přímého slunečního světla a
sálajícího tepla. Před připevněním na zeď vyzkoušejte, zda budete mít dobrý příjem mezi
teploměrem a čidlem.
1. Použijte vhodný šroubek s hlavičkou přesahující cca 5 mm (není součástí dodávky).
2. Sundejte stojánek z těla teploměru a teploměr pověste. Ujistěte se, zda je teploměr
dostatečně zajištěn proti pádu.
Bezdrátové čidlo
Je dodáváno s univerzálním stojánkem a držákem na zeď. Držák připevněte na zeď pomocí
dvou dodávaných šroubků.
Použití stojánku Správná poloha
montáže čidla na zeď
Montáž na zeď
Než čidlo připevníte na zeď, ověřte, zda je schopno bezproblémově komunikovat s teploměrem. (Pokud signál nebyl přijat, přesuňte čidlo blíže k teploměru.)
1. Přimontujte držák na zeď pomocí šroubků.
2. Zaklapněte držák do bezdrátového čidla dle obrázku. Dejte pozor, abyste nedali čidlo
obráceně. V obrácené poloze by se do čidla mohla dostat voda vstupy pro vzduch ve
spodní části, a mohlo by dojít k poškození elektroniky uvnitř.
Péče a údržba
• Neumísťujte teploměr ani čidlo do míst, náchylným k vibracím a otřesům, jež by mohly
způsobit poškození přístroje.
• Vyhněte se prostředí s náhlými změnami teploty, resp. přímým slunečním svitem,
extrémním chladem a vlhkem a podmínkám, které mohou vést ke snížení přesnosti
snímání.
• Při čištění LCD displeje a krytu přístroje používejte jen měkký, vlhký hadřík. Nepoužívejte
rozpouštědla ani čistící přípravky.
• Neponořujte teploměr ani čidlo do vody ani jiných kapalin.
• Neprovádějte jakékoliv opravy sami. Při poškození nebo vadě výrobku jej předejte k
opravě do prodejny, kde jste přístroj zakoupili.
• Odstraňte vybité baterie z přístroje – mohly by vytéct a poškodit přístroj.
Výměna baterií
Používejte jen nové baterie uvedeného typu.
Použité baterie odevzdejte na místě určeném pro sběr použitých baterií.
Emos spol.s r.o. prohlašuje, že WS-9641IT je ve shodě se základními požadavky a dalšími
příslušnými ustanoveními směrnice 1999/5/ES. Zařízení lze volně provozovat v EU. Prohlášení o shodě je součástí návodu nebo je lze najít na webových stránkách www.emos.eu
Výrobek lze provozovat na základě všeobecného oprávnění č. VO-R/10/09.2010-11.
Vnútorná teplota -9,9 °C až 59,9 °C
Presnosť meraní -9,9°C až 40°C ±1,5°C; 40°C až 59,9°C ±2°C
(zobrazení OF.L – mimo rozsah merania)
Vonkajšia teplota (čidlo) -39.9 °C až +59.9 °C s rozlíšením 0,1 °C
Presnosť meraní -39,9°C až -5°C +/-2°C; -5°C až 40°C +/-1,5°C;
40°C až 59,9°C +/-2°C
(zobrazení OF.L – mimo rozsah merania)
Relatívna vlhkosť 1% až 99% s rozlíšením 1%
(zobrazení OF.L – mimo rozsah merania)
Príjem vonkajších dát približne každé 4 sekundy
Perióda meraní vnútornej teploty a vlhkosti každých 17 sekúnd
Napájanie 2 x AA, IEC, LR6, 1,5 V (teplomer i čidlo)
Doporučujú sa alkalické batérie. Potom životnosť
batérií môže dosiahnuť až 24 mesiacov.
Rozmery Teplomer 92 x 30,7 x 160 mm
Čidlo 38,2 x 21,2 x 128,3 mm
Popis LCD displeje a nastavení
Pre prehľadné prezeranie údajov je displej rozdelený na tri časti a to pre zobrazenie času
a vnútornej teploty, predpoveď počasia a vonkajšej teploty.
Časť 1 – vonkajšia teplota (OUT)
– zobrazuje aktuálnu vonkajšiu teplotu
6
4 кнопки на термометру
SET (ручне налаштування) – перемикання окремих режимів: часовий пояс,
години, рік, місяць, дата, день тa °C/°F.
+ (плюс) – налаштування окремих даних
– у нормальному режимі перемикання між
датою, днем та секундами.
MIN/MAX – перегляд мінімальної та максимальної
температури для внутрішньої та
зовнішньої температури (зобразить і час
запису)
– притримавши кнопку скиньте ці параметри.
– слідуючим натиском кнопки вихід з режиму
перегляду.
ICE ALARM – вмиканні (вимиканні) попередження про
паморозь, якщо зовнішня температура
знизиться під 4°C). При вмиканні
попередження на диспелї вверху біля даних
прo зовнішню температуру появится символ
сніжинки із знаком оклику.
Налаштування
1. Вложіть батерії у зовнішній бездротовий датчик (см. Ввоження та
вимінювання батареї).
2. До 30 секунд вложіть батареї у термометр (див. пункт Вкладання та
вимінювання батареї). Після вкладання на декілька хвилин появляться
всі дані на дисплеї та термометр подасть короткий звуковий сигнал.
На дисплеї зобразяться дані часу 0.00, іконка хлопця тa внутрішня
температура з вологісттю. Якщо дані не появляться до 60 секунд,
вийміть батареї та після 10 секунд знову вложіть..
Важливо: потрібно дотримувати послідовність вложення батареї–
спочатку у датчик a потім у термометр!
Вложення та вимінювання батареї
При вкладанні чи вимінюванні батареї у датчику та в термометру дійте
слідуючим способом:
1. Зніміть кришку батарейного відсіку.
2. Вложіть батареї, переконайтеся, щоб полярність вкладених батарей
була правильна як зазначено на дні батарейного відсіку.
3. Закрийте кришку батарейового простору.
Важливо: У випадку вимінювання батареї у термометру чи датчику
необхідно провести повторний запуск (скинути) цілого комплекту. При
вмиканні передавач датчика підключений випадковий безпечний код,
який повинен бути протягом трьох хвилин від початку передачі прийнятий
та вложений у приймач термометра!
Прийняття сигналу датчика на частоті 868 MГц
Після вложення батареї в зовнішній бездротовий датчик та термометр,
почнуть прийматися дати. Термометр приймає дані тільки з одного
зовнішнього бездротового датчика. Зовнішня температура зобразиться
у верхній частині дисплея термометра з іконкою))). Термометр мав би
прийняти дані про температуру до 5 хвилин після вложення батареї.
Якщо дані зовнішньої температури до 5 хвилин не зобразяться, вийміть
батареї датчика і термометра та повторіть дії згідно пункту Налаштування.
Якщо на протязі 5 хвилин непоявиться зображення зовнішньої температури
та на дисплеї зобразиться --.-, зконтролюйте:
– чи бездротовий датчик та термометр знаходяться на віддалі 1,5 м до
2 м від джерела перешкод таких як:комп,ютери, монітори, телевізори
та інш. електроприлади.
– чи бездротовтий датчик не знаходиться на залізній конструкції такій
як рама вікна, бляшане підвіконня та інші.
– Запобігайте небажаним перешкодам за винятком виробів, що
працюють на тій же частоті.!
Помітка: Після прийому сигналу 868 MГц з бездротового датчика не
відкривайте кришку батарейного відсіку. Це може викликати вивільнення
батареї і послідуюче вмикання прийтрою. При випадковому скиданні
вийміть та вложіть батареї у термомерті і датчику, згідно інструкції. У
іншому випадку можуть виникнути проблеми під час передачі. Досяжність
передачі у відкритому просторі буде 100 , але виразно знаходиться під
впливом навколишнього середовища та перешкод. У забудованому просторі
може знизитися, в залежності від використаного будівельного матеріалу
навіть на декілька метрів.
Прийом радіосигналу DCF
Після зображення даних про зовнішню температуру, почнеться
автоматичне шукання DCF сигналу для налаштування годин. Цей процес
показує мигаюча антена в лівому верхньому кутку годинника.. Після
успішного отримання DCF сигналу постійно зображується іконка отримання
DCF та налаштується час. В оптимальних умовах прийом здійсниться на
протязі 3 – 5 хвилин. Якщо прийняття DCF сигналу не відбувається протягом
10 хвилин, ви можете вручну налаштувати час, кнопкою SET.
Час оновлення відбувається щодня між 02:00 та 3:00 год. Якщо час не
налаштований до 03:00 годин, сигнал автоматично шукає знову в 04:00,
05:00 та 6:00 год. Якщо не здійснилося шукання в 06.00 продовжуйте
налаштування наступного дня о 2:00 год. Успішний прийом сигналу DCF
перезаписує вручну встановлений час. Одночасно з часом актуалізується
дата.
Годинник керований радіосигналом DCF-77
Джерелом передавача DCF сигналу атомний годинник у Physikalisch
Technische Bundesanstalt Braunschweig. Їхнє відхилення , одна секунда
за мільйон років. DCF сигнал кодується і передається на частоті 77,5
МГц з Mainfl ingen недалеко від Франкфурту над Майном в Німеччині.
Досяжність приблизно становить 1500 км в радіусі від передавача.
Годинник та термометр приймуть сигнал та налаштують точний літній
чи зимовий час. Якість прийому залежить від географічного положення.
Якщо сигнал буде отриманий в даних межах 1500 км від Франкфурта, не
мали б виникнути проблеми.
Якщо приймання DCF сигналу відбулося, та све ж іконка мигає, потім:
– перемістіть термометр від джерела електромагнітних інтерференцій,
таких як як комп'ютерні монітори чи телевізори. Рекомендована
відстань від 1,5 до 2 м.
– помістіть термометр чим ближче до вікна і в напрямку Франкфурта
місця передавача – приймання можуть затінювати будівельні
матеріали, зокрема залізобетон або розміщення напр. у підвальному
приміщені.
– інколи не можливо прийняття сигналу у передгір'ях гор або горбів, у
цьому випадку не може говоритися про помилку термометра
Ручне налаштування
Вручну можливо налаштувати слідуючі дані:
- часовий пояс → час → календар → вибір °C/°F
Тримати кнопку SET на протяз 3 секунд – увійдете у режим налаштування
поясу:
Налаштування часового пояса
Стандартом налаштовано на 0 годин. При зміні налаштування робіть
слідуюче:
1. Тримайте кнопку SET на протязі 3 секунд – ввійдете у режим
налаштування (мигають дані 0h).
2. Кнопкою + налаштуєте часовий пояс від +12год аж до -12 год. по 1
годині..
3. Слідуючим натиском кнопки SET ввійдете у режим налаштування часу.
Якщо на протязі 3 секунд не натиснете жодну кнопку, налаштування
автоматично
Налаштування годинника
Якщо із-за відстані або заважаючим впливам не вдається встановити
автоматично налаштований
час, установіть годинник вручну. Після ручного налаштування годинник
буде керований вставленим кристалом. І після ручного налаштування
годин автоматично буде термометр кожну цілу годину шукати DCF сигнал.
Годинник запрограмований наперед про 24 годинове зображення.
Після входу у режим налаштування часу (пункт 3 Налаштування часового
пояса) мигає позиція дані годин.
1. Кнопкою + налаштуйте вимагану годину.
2. Кнопкою SET перейдіть у налаштування хвилин – мигає позиція
хвилин.
3. Кнопкою + налаштуйте потрібні хвилини.
4. Кнопкою SET вибір підтвердіть, та ввійдете у режим налаштування
каландаря.
Налаштування календаря
Вихідна дата календаря - 2006, 1. 1. та МО. Після отримання DCF сигналу,
календар налаштується автоматично.
Якщо автоматичне налаштування не працює, можете використати ручне
налаштування.
1. Кнопкою + налаштуйте дані року (в діапазоні від 2000 до 2029).
2. Кнопкою SET перейдете у налаштування місяця – мигають дані
мясяця.
3. Натиском кнопки + налаштуйте необхідний місяць.
4. Кнопкою SET перейдіть у налаштування дати– мигає потрібна дати.
5. Натиском кнопки + налаштуйте вимагану дату.
6. Кнопкою SET перейдіть до налаштування дня в тижні.
7. Кнопкою + налаштуйте день у тижні по порядку від понеділка (MO) по
неділю (SU).
8. Кнопкою SET перейдете до налаштування °C/°F а за допомогою
кнопки + виберете відповідну одиницю для температури. Кнопкою
SET підтвердіть одиницю температури – одночасно закінчите
налаштування календаря.
19
перемкнеться у нормальний режим.
EMOS spol. s r. o.
Page 7

WS9641-manual 0-0-0-K
Passen Sie auf, dass Sie den Sensor nicht umgekehrt positionieren. In der verkehrten
Lage könnte durch die Luftschlitze im Unterteil Wasser rein gelangen und es könnte
zur Beschädigung der darin befindlichen Elektronik kommen.
Wartung und Pflege
• Platzieren Sie die Uhr nicht an vibrations- und erschütterungsanfällige Stellen - sie
können die Gerätbeschädigung bewirken.
• Vermeiden Sie eine solche Umgebung, wo die Uhr den plötzlichen Temperaturänderungen, den direkten Sonnenstrahlen, der extremen Kälte und Feuchtigkeit sowie
solchen Bedingungen ausgesetzt würden, die zu heftigen die Abtastungsgenauigkeit
mindernden Temperaturänderungen führen können.
• Benutzen Sie zur Reinigung des LCD-Displays und des Gehäuses ein weiches, feuchtes
Tuch. Verwenden Sie weder Lösemittel noch Reinigungspräparate.
• Tauchen Sie die Uhr weder ins Wasser noch in sonstige Flüssigkeiten ein.
• Führen Sie selbst keine Reparaturen durch. Übergeben Sie das Produkt bei einer
Beschädigung oder einem Mangel am Produkt zur Reparatur in der Verkaufsstelle, in
der Sie das Gerät gekauft haben.
Entfernen Sie entladene Batterien - diese könnten nämlich auslaufen und das Gerät
beschädigen.
Batteriewechsel
Verwenden Sie nur neue Batterien der oben genannten Art.
Geben Sie gebrauchte Batterien an der dafür vorgesehenen Sammelstelle ab.
Die Gesellschaft Emos spol.s r.o. erklärt, dass WS-9641IT im Einklang mit den grundlegenden Anforderungen und weiteren Bestimmungen der Richtlinie 1999/5/ES steht.
Die Einrichtung kann in der EU frei betrieben werden. Die Konformitätserklärung bildet
einen Bestandteil der Bedienungsanweisung oder man kann sie auf den Webseiten unter
www.emos.cz finden.
Die Anlage kann aufgrund der allgemeinen Berechtigung betrieben werden.
БЕЗДРОТОВИЙ ТЕРМОМЕТР WS-9641IT
UA
Бездротовий термометрWS-9641IT зображує зовнішню температуру із зовнішнього датчика (за допомогою сигналу на частоті 868 MГц), внутрішню
температуру тa вологість, годинник керований DCF сігналом, дату та погоду за допомогою іконок хлопця одітого 8-ми варіантами.
Описання пристрою
• годинник керуючий DCF сігналом з можливісттю ручного налаштування.
• дата, години, хвилини тa секунди, часовий пояс -12 год до +12 год
• бездротова передача сигналу із зовнішнього датчика на частоті 868 MГц
• іконка хлопця одітого 8-ми варіантами в залежності від актуальних
температурних умов
• налаштування температури у °C або °F
• запис мін. тa макс. температури (внутрішня та зовнішня)
• можливість стирання запису мін. тa макс. температури
• зображення стану батареї
• можливість поставлення на підставку або повішення на стіну
Зовнішній бездротовий датчик
• Досяжність навіть 100 м у вільному просторі (у забудованих просторах
та місцях з перешкодою може швидко понизитися)
• кришка стійка щодо повітряних впливів
• помістіть датчик на місце, де буде під охороною від прямого
сонячного проміння та дощу
Технічні параметри
Межі температури:
Зовнішня температура (датчик) від-39,9 °C до +59,9 °C
Точність вимірювання від-39,9°C до -5°C ±2°C; від-5°C до
+40°C ±1,5°C; від40°C до 59,9°C ±2°C
(зображені OF.L – помимо межі
вимірювання)
Внутрішня температура від-9,9 °C до 59,9 °C
Точність вимірювання від-9,9°C до 40°C ±1,5°C; від
40°C до 59,9°C ±2°C
(зображені OF.L – помимо межі
вимірювання)
Відносна вологість від 1% до 99% з різницею 1%
(зображені OF.L – помимо межі
вимірювання)
Приймання дат з датчика приблизно кожних 4 секунди
D: Bedeutung der Ikonen des je nach aktuellen Temperaturbedingungen angezogenen
Jungen. Er ist in acht verschiedenen Varianten zu sehen:
UA: Значення іконок хлопця у різній одежі згідно актуальних
температурних умов. Появляється у вісьми різних варіфантах:
Вимірювання внутрішньої
температури та вологості кожних 17 секунд
Живлення 2 x AA, IEC, LR6, 1,5V (термометр та датчик)
Радимо лужні батареї– строк
експлуатації може досягнути навіть
24 місяці.
Розміри Термрметр 92 x 30,7 x 160 мм
Датчик 38,2 x 21,2 x 128,3 мм
LCD дисплей та налаштування
Із-за перегляду даних дисплей розділений на три частини:
Частина 1 – зовнішня температура (OUT)
– зображення актуальної зовнішньої температури
– індикація вмикання попередження від морозів
– Іконка ))) відображає актуальний стан приймання сигналу з
бездротового датчика
– зображення слабкої батареї у бездротовому датчику.
– Натисненням кнопки MIN/MAX зобразиться вкладена мінімальна та
максимальна температура і одночасно іконки MIN або MAX.
Частина 2 – внутрішня температура та вологість (IN)
– зображення внутрішньої температури тa внутрішньої відностної
вологості
– зображення актуальних температурних умов за допаомогою постаті
хлопця одітого вісьми варіантами згідно актуальних температурних
умов
– слабкі батареї в термометру
Частина 3 – години та дата
– у нормальному режимі зображує годину та дату
– можливо зобразити дату, день та секунди
– іконка прийняття DCF сігналу (якщо мигає, відбувається прийняття.
Після успішного прийняття сигналу з датчика, на дисплеї постійно
зобразиться іконка))). Якщо не зобразиться, сигнал був прийнятий
неуспішно.
18
– indikácia zapnutia varovania pred námrazou
)
)
– ikona
) zobrazí aktuálny stav príjmu signálu z bezdrôtového čidla.
– slabé batérie v bezdrôtovom čidle
– stlačením tlačítka MIN/MAX sa zobrazí uložená minimálna a maximálna teplota a
súčasne sa zobrazia i ikony min alebo max.
Časť 2 – vnútorná teplota a vlhkosť (IN)
– zobrazuje vnútornú teplotu a vlhkosť
– aktuálne teplotné podmienky sú zobrazené pomocou postavy chlapca oblečeného
podľa aktuálnych teplotných podmienok v ôsmych variantách.
– slabé batérie v teplomery
Časť 3 – hodiny a dátum
– ikona príjmu DCF signálu
– hodiny
– dátum, deň a sekundy
Popis a význam tlačítok
Teplomer sa ovláda pomocou 4 tlačítok:
SET (ručné nastavenie) – Stlačením tlačítka prepínate v jednotlivých režimoch:
časové pásmo, hodiny, rok, mesiac, dátum, deň a °C/°F.
Tlačítko MIN/MAX – Umožňuje prezeranie minimálnej a maximálnej teploty
pre vnútornú a vonkajšiu teplotu (zobrazí i čas záznamu).
– Podržaním tlačítka dôjde k vynulovaniu týchto hodnôt.
– Ďalším stlačením tlačítka vystúpite z režimu prezerania.
Tlačítko + – Slúži pre rôzne nastavenie jednotlivých údajov.
– V normálnom režime zobrazenia možno prepnúť medzi
dátumom, dňom a sekundami.
Tlačítko ICE ALARM – zapína a vypína varovanie pred námrazou (varovanie sa
spustí pokiaľ vonkajšia teplota klesne pod 4°C). Na
displeji hore vedľa údaja o vonkajšej teplote sa objaví
symbol snehovej vločky s výkričníkom pri zapnutí varovania.
Nastavenie
1. Najskôr vložte batérie do vonkajšieho bezdrôtového čidla (viď. kapitola Vloženie a
výmena batérií vo vonkajšom bezdrôtovom čidle).
2. Do 30 sekúnd vložte batérie i do teplomera (viď. kapitola Vloženie a výmena batérií
v teplomery). Po vložení sa na okamžik zobrazia všetky údaje na displeji a teplomer
krátko pípne. Potom sa na displeji objaví údaj času 0.00, ikona chlapca a vnútorná
teplota s vlhkosťou. Pokiaľ sa tieto údaje neobjavia do 60 sekúnd, tak vyberte batérie.
Počkajte 10 sekúnd a opäť vložte.
Poznámka: Je dôležité dodržať poradie vkladania batérií a to najskôr do čidla a potom
do teplomera
Vloženie a výmena batérií
Vloženie alebo výmenu batérií vykonajte podľa nasledujúcich krokov:
1. Zložte kryt batériového priestoru.
2. Vložte batérie a dbajte na správnu polaritu vkladaných batérií podľa vyznačenia na dne
batériového priestoru.
3. Zavrite kryt batériového priestoru.
Dôležité: V prípade výmeny batérií v teplomere alebo v čidle je nutné vykonať reset
(vynulovanie) u celej súpravy. Je to preto, že pri spustení je vysielačom čidla priradený
náhodný bezpečnostný kód, a tento kód musí byť v priebehu troch minút od začiatku
vysielania prijatý a uložený v prijímači teplomera.
Doporučuje sa meniť batérie v teplomeru i čidle pravidelne pre zaistenie bezproblémového
chodu. Použité batérie odovzdajte na mieste určenom pre zber použitých batérií.
Príjem 868 MHz
Po vložení batérii do vonkajšieho bezdrôtového čidla a teplomeru začne príjem dát. Teplomer
prijíma údaje len z jedného vonkajšieho bezdrôtového čidla. Blikanie ikony znamená práve
prebiehajúci príjem. Vonkajšia teplota sa trvale zobrazí v horní časti displeja teplomeru s
ikonou ))). Pokiaľ je príjem neúspešný, ikona sa nezobrazí. Teplomer by mal prijať data o
teplote behom 5 minút po vložení batérií.
Ak nedôjde do 5 minút k zobrazeniu údajov vonkajšej teploty, musia sa vybrať batérie z
čidla i teplomera a zopakovať postup podľa bodu 1. Nastavenie.
Môže sa stáť, že behom 5 minút nedôjde k zobrazeniu vonkajšej teploty a na displeji sa
objaví --.-. Skontrolujte preto prosím nasledujúce:
1. Vzdialenosť bezdrôtového čidla a teplomera by mala byť 1,5 m až 2 m od zdroja rušenia
ako sú počítače, monitory, televízory a iné elektrospotrebiče.
2. Vyhnite sa umiestneniu bezdrôtového čidla na kovové konštrukcie ako sú okenné rámy,
plechové parapety apod.
3. Vylúčením výrobkov pracujúcich na rovnakej frekvencii (868 MHz) predídete nežiaducim
interferenciám.
Poznámka: Po prijatí signálu 868 MHz z bezdrôtového čidla neotvárajte kryt batériového
priestoru. Mohlo by dôjsť k uvoľneniu batérii a následnému spusteniu stanice. Pri náhodnom
vynulovaní vyberte a vložte batérie podľa návodu v teplomere a čidle. Inak môžu nastať
problémy pri prenose. Dosah vysielania je 100 m v otvorenom priestore. Dosah je výrazne
ovplyvnený okolitým prostredím a rušením. (v zastavanom priestore môže rapídne klesnúť v
závislosti na použitom stavebnom materiáli až na niekoľko metrov). Ak ne je možný príjem,
vyberte a vložte batérie podľa návodu v teplomere a čidle.
Príjem DCF signálu
Po príjme a zobrazení údajov o vonkajšej teplote sa automaticky zaháji vyhľadávanie DCF
signálu pre nastavenie hodín. Tento proces je znázornený blikajúcou anténou vľavo hore
od údaja hodín. Po úspešnom príjmu DCF signálu sa trvalo zobrazí ikona príjmu DCF a
nastaví sa čas. Príjem za ideálnych podmienok
prebehne do 3 až 5 minút. Pokiaľ príjem
DCF signálu neprebehol do 10 minút, je možné čas nastaviť ručne pomocou tlačítka SET.
Každý deň medzi 02.00 a 03.00 hod dôjde k nastaveniu času. Ak nedôjde k nastaveniu
času o 03.00 hod, je automaticky pokračované vo vyhľadávaní signálu v 04.00, 05.00
a 06.00 hod až je nastavenie uskutočnené. Pri zlyhaní vyhľadávania v 06.00 hod bude
nastavenie pokračovať nasledujúci deň v 02.00 hod. Úspešný príjem signálu DCF prepíše
ručne nastavený čas. Úspešný príjem signálu DCF prepíše ručne nastavený čas. Dátum
sa aktualizuje súčasne s časom.
Hodiny riadené rádiovým signálom DCF-77
Zdrojom pre vysielač DCF signálu sú atómové hodiny v Physikalisch Technische Bundesanstalt Braunschweig a ich odchýlka je jedna sekunda za milión rokov. DCF signál je
zakódovaný a vysielaný na frekvencii 77,5 MHz z Mainflingenu blízko Frankfurtu nad Rýnom
v Nemecku. Dosah je približne 1500 km v okruhu od vysielača. Hodiny v teplomery príjmu
tento signál a nastavia presný čas, či sa jedná o letný alebo zimný čas. Kvalita príjmu závisí
na geografickej polohe. Pokiaľ sa príjem signálu uskutoční v danom dosahu 1500 km od
Frankfurtu, tak by nemali nastať problémy.
Príjem DCF signálu prebehol, ale ikona bliká:
– Odstráňte teplomer z blízkosti zdrojov elektromagnetických interferencií ako sú počí-
tačové monitory alebo televízory. Doporučená vzdialenosť je 1,5 až 2 metre.
– Príjem klesá vďaka vplyvu stavebných materiálov ako je železobetónová konštrukcia
alebo suterénna miestnosť. Pre dobrý príjem signálu umiestnite teplomer čo najbližšie
okna a smerom k vysielači, ktorý je vo Frankfurte.
– Príjem DCF signálu je niekedy nemožný v úpätí hôr alebo kopcov a nejedná sa o chybu
teplomera.
Ručné nastavenie
Ručne možno nastaviť nasledujúce údaje:
– časové pásmo
– čas
– kalendár
– voľba °C/°F
Podržte tlačítko SET po dobu 3 sekúnd a vstúpite do režimu nastavenia:
Nastavenie časového pásma
Štandardne je časové pásmo nastavené na 0 hodín. Pre zmenu nastavenia postupujte takto:
1. Podržte tlačítko SET po dobu 3 sekúnd a vstúpite do režimu nastavenia (bliká údaj 0h).
2. Tlačítkom + môžete nastaviť časové pásmo od +12hod až do -12hod po 1 hodine
3. Ďalším stlačením tlačítka SET sa dostanete do nastavenia času.
Poznámka: Nastavenie sa automaticky prepne do normálneho režimu, keď behom 3
sekúnd nestlačíte žiadne tlačítko.
Nastavenie hodín
Ruční nastavenie času je možné v prípade, keď zlyhá automatické nastavenie času z dôvodu
rušenia, vzdialenosti apod. Hodiny budú riadené vstavaným kryštálom.
1. Po druhom stlačení tlačítka SET bliká pozícia údaj hodín. Tlačítkom + nastavte požadovaný údaj hodín.
2. Stlačením tlačítka SET, prejdete k nastaveniu minút – bliká pozícia údaju minút.
3. Pomocou tlačítka + nastavte požadovaný údaj minút.
4. Potvrďte tlačítkom SET a vstúpite do nastavenia kalendára.
Poznámka: Teplomer i po nastavení hodín ručne bude automaticky v každú celú hodinu
vyhľadávať DCF signál.
Hodiny sú prednastavené pre 24 hod zobrazení.
Nastavenie kalendára
Východzi údaj pre kalendár je 2006, 1.1. a MO. Po príjmu DCF signálu sa kalendár nastaví
automaticky. Ak zlyhá automatické nastavenie, je možné použiť ručné nastavenie.
1. Pomocou tlačítka + nastavte požadovaný údaj roku (rozpätie 2000 až 2029).
2. Stlačením tlačítka SET prejdete do nastavenia mesiaca.
3. Teraz bliká údaj mesiaca. Stlačením tlačítka + nastavíte požadovaný údaj mesiaca.
Stlačením tlačítka SET prejdete do nastavenia dátumu.
4. Bliká údaj dátum. Stlačením tlačítka + nastavíte požadovaný údaj dátumu.
5. Stlačením tlačítka SET prejdete do nastavenia dňa v týždni.
6. Pomocou tlačítka + nastavte požadovaný deň v týždni v poradí MO - pondelok až SU nedeľa.
7. Stlačením tlačítka SET prejdete do nastavenia °C/°F a pomocou tlačítka + vyberiete
vhodnú jednotku pre teplotu. Tlačítkom SET potvrdíte jednotku teploty a zároveň
ukončíte nastavenie kalendára.
Zobrazenie min a max teploty
1. V normálnom režime stlačte tlačítko MIN/MAX a zobrazí sa údaj pre minimálnu teplotu
a čas, kedy bol zaznamenaný.
údaj minimálnej teploty
vonkajšie data
ikona minimálnej teploty
čas záznamu
7
EMOS spol. s r. o.
Page 8

WS9641-manual 0-0-0-K
2. Ďalším stlačením tlačítka MIN/MAX sa zobrazí údaj pre maximálnu teplotu a čas, kedy
bol zaznamenaný.
3. Ďalším stlačením tlačítka MIN/MAX sa zobrazí údaj pre minimálnu/maximálnu vnútornú
teplotu a čas, kedy bol zaznamenaný.
Zobrazenie minima a maxima pre záznam vnútornej teploty
1. V normálnom režime trikrát stlačte tlačítko MIN/MAX a na displeji sa zobrazí minimálna
vnútorná teplota a zároveň sa ukáže čas záznamu.
2. Ďalším stlačením tlačítka MIN/MAX sa zobrazí údaj pre maximálnu vnútornú teplotu
a čas, kedy bol zaznamenaný.
vnútorné data údaj maximálnej teploty
ikona maximálnej teploty
čas záznamu
3. Ďalším stlačením tlačítka MIN/MAX sa dostanete do normálneho režimu zobrazenia.
Vymazanie záznamu min a max hodnoty
pre vnútornú a vonkajšiu teplotu
1. V normálnom režime stlačte tlačítko MIN/MAX a vstúpite do zobrazenia min/max
záznamov.
2. Pridržaním tlačítka MIN/MAX po dobu 2 sekúnd dôjde k vymazaniu všetkých údajov
min a max vnútornej a vonkajšej teploty a odpovedajúcich časov.
Poznámka:
Varovanie pred námrazou
Teplomer je vybavený možnosťou varovať pred tvorbou námrazy. Užívateľ si môže funkciu
zapnúť alebo vypnúť.
Užívateľ zapne varovanie pred námrazou pomocou tlačítka ICE ALARM. V hornej časti
displeja sa objaví ikona snehovej vločky a funkcia je aktívna. Ak teplota klesne pod 4 °C
(39,2 °C), spustí sa varovný zvukový signál a ikona vločky bude blikať. Dĺžka zvukového
signálu je 1,5 minúty.
Oneskorenie varovania pred námrazou
Aby sa zabránilo častému spúšťaniu zvukového signálu varovania pred námrazou v prípade kolísania vonkajšej teploty okolo 4 °C, tak je pre túto funkciu použité oneskorenie.
Ak dosiahne teplota hodnoty 4 °C, dôjde ku spusteniu (funkcia musí byť aktívna).
Oneskorenie je nastavené na 1 °C (1,8°F). Ak vzrastie teplota späť na 4,6 °C a potom opäť
klesne pod 4 °C, údaj teploty bude blikať, ale zvukový alarm nebude aktivovaný.
S oneskorením od 1 °C musí teplota vzrásť na 5°C (41°F) a potom klesnúť pod 4°C, aby
došlo ku spusteniu zvukového signálu.
Poznámka: Po spustení zvukového signálu pred námrazou bude blikať i ikona pri teplote
medzi 4 až 5°C.
Umiestnenie
Teplomer je navrhnutý tak, aby sa mohol postaviť na stôl alebo zavesiť na stenu.
Umiestnenie na stenu
Vyberte vhodné miesto, kde nie je vplyv priameho slnečného svetla a sálajúceho tepla.
Pred pripevnením na stenu najskôr vyskúšajte, či budete mať dobrý príjem medzi teplomerom a čidlom.
1. Použite vhodnú skrutku (nie je súčasťou dodávky) a hlavička skrutky musí presahovať
2. Zložte stojanček z tela teplomera a teplomer zaveste. Uistite sa, či je teplomer dosta-
Umiestnenie bezdrôtového čidla
Čidlo je dodávané s držiakom na stenu alebo stojančekom a ten je univerzálny. Držiak sa
pripevní na stenu pomocou dvoch dodávaných skrutiek.
Vnútorné a vonkajšie záznamy budú zmazané súčasne.
cca 5 mm.
točne zaistený proti pádu.
Použití stojančeku Správna poloha
montáže čidla na stenu
Montáž na stenu. Držiak bezpečne primontujte na stenu pomocou skrutiek.
Potom zaklapnite bezdrôtové čidlo do držiaku podľa obrázku. Pozor na to, aby ste nedali
čidlo obrátene. V spodnej časti sú vstupy pre vzduch, a do čidla by sa v obrátenej polohe
mohla dostať voda. V dôsledku toho by sa poškodila elektronika vnútri.
Poznámka: Než čidlo pripevníte na stenu, overte si, či je schopne bezproblémovo komunikovať s teplomerom. V prípade, že signál nebol prijatý, presuňte pre lepší príjem čidlo
bližšie k teplomeru.
Starostlivosť a údržba
• Vyhnite sa umiestneniu častí v miestach náchylných k vibráciám a otrasom, ktoré môžu
spôsobiť poškodenie prístroja
• Vyhnite sa prostrediu, kde budú časti vystavené náhlym zmenám teploty, resp. priamemu slnečnému svitu, extrémnemu chladu a vlhku a podmienkam, ktoré môžu viesť k
prudkým zmenám teploty, ktoré znížia presnosť snímania.
• Pri čistení LCD displeje a krytu prístroja používajte len mäkkú, vlhkú handričku. Nepoužívajte rozpúšťadlá ani čistiace prípravky.
• Žiadnu z častí neponárajte do vody ani iných kvapalín.
• Bezodkladne odstráňte z prístroja všetky vybité batérie, zabránite tak ich vytečeniu a
poškodeniu prístroja. Používajte len nové batérie uvedeného typu.
• Sami nevykonávajte na žiadnych častiach akékoľvek opravy. Pri poškodení alebo poruche
výrobku ho odovzdajte k oprave do predajne, kde ste prístroj zakúpili.
Emos Sk s.r.o. týmto vyhlasuje, že WS-9641IT spĺňa základné požiadavky a všetky
príslušné ustanovenia smernice 1999/5/ES. Prehlásenie o zhode k tomuto produktu
nájdete na www.emos.eu
Tento produkt možno používať v krajinách EU. Výrobok sa môže prevádzkovať na základe
všeobecného povolenia.
SK: Význam ikon - postava chlapca oblečeného podľa aktuálnych teplotných podmienok
sa objavuje v ôsmych rôznych krokoch.
PL: ZNACZENIE IKON – sylwetka chłopca ubranego zgodnie z aktualną temperaturą
pojawia się w ośmiu różnych krokach.
wie Computermonitore oder Fernseher woandershin zu verlagern. Der empfohlene
Abstand beträgt 1,5 bis 2 m.
– ist das Thermometer möglichst nahe ans Fenster in Richtung Frankfurt, den Sendeort,
zu platzieren - der Empfang kann durch Bauwerkstoffe wie Stahlbeton oder durch die
Unterbringung z.B. im Kellerraum abgeschattet sein.
– ist der Signalempfang am Fuße der Berge oder Hügel manchmal unmöglich - es handelt
sich um keinen Thermometerfehler.
Handeinstellung
Per Hand können folgende Angaben eingestellt werden:
- Zeitzone → Uhrzeit → Kalender → Wahl °C/°F
Halten Sie die SET-Taste 3 Sekunden lang gedrückt – Sie gelangen in den Zoneneinstellmodus:
Zeitzoneneinstellung
Standardmäßig ist sie auf 0 Uhr eingestellt. Gehen Sie bei der Änderung der Einstellung
folgendermaßen vor:
1. Halten Sie die SET-Taste 3 Sekunden lang gedrückt – Sie gelangen in den Einstellmodus
(es blinkt die Angabe 0 Uhr).
2. Stellen Sie mit der Taste + stundenweise die Zeitzone von + 12 bis zu -12 Uhr.
3. Wechseln Sie durch die nächste Betätigung der SET-Taste in den Modus der Uhrzeiteinstellung. Wenn Sie innerhalb von 3 Sekunden keine Taste drücken, wechselt die
Einstellung automatisch in den Normalmodus.
Uhrzeiteinstellung
Falls die automatische Uhrzeiteinstellung wegen der Entfernung oder störenden Einflüssen
versagt, stellen Sie die Uhr par Hand ein. Nach der manuellen Einstellung wird die Uhr
durch einen eingebauten Kristall gesteuert. Auch nach der manuellen Einstellung der Uhr
wird das Thermometer zu jeder vollen Stunde die Suche nach dem DCF-Signal starten. Die
Uhr ist für die 24-Uhr-Anzeige voreingestellt.
Nach dem Wechsel in den Uhrzeiteinstellmodus (Punkt 3 „Einstellung der Zeitzone“) blinkt
die Position der Stundenanzeige.
1. Stellen Sie mit der Taste + die erwünschte Stunde ein.
2. Wechseln Sie mit der SET-Taste zur Minuteneinstellung – es blinkt die Minutenposition.
3. Stellen Sie mit der Taste + die erwünschte Minute ein.
4. Quittieren Sie mit der SET-Taste die Wahl, Sie gelangen in die Kalendereinstellung.
Kalendereinstellung
Das Ausgangsdatum des Kalenders ist 2006, 1.1. und MO (Montag). Nach dem Empfang des
DCF-Signals wird der Kalender automatisch eingestellt. Sollte die automatische Einstellung
versagen, kann die Handeinstellung benutzt werden.
1. Stellen Sie mit der Taste + die erwünschte Jahresanzeige (im Bereich 2000 bis 2029)
ein.
2. Wechseln Sie mit der SET-Taste in die Monateinstellung - es blinkt die Monatanzeige.
3. Stellen Sie durch das wiederholte Drücken der Taste + den erwünschten Monat ein.
4. Wechseln Sie durch die Betätigung der SET-Taste in die Datumseinstellung – es blinkt
die Datumsanzeige.
5. Stellen Sie mit der Taste + das erwünschte Datum ein.
6. Wechseln Sie mit der SET-Taste in die Wochentageinstellung.
7. Stellen Sie mit der Taste + den Wochentag in der Reihenfolge Montag (MO) bis Sonntag
(SU) ein.
8. Wechseln Sie durch die Betätigung der SET-Taste in die °C/°F Einstellung und wählen
Sie mittels der Taste + die zutreffende Temperatureinheit. Quittieren Sie mit der SET-
-Taste die Temperatureinheit - zugleich beenden Sie die Kalendereinstellung.
Anzeige der Mindest- und Höchstaußentemperatur
1. Drücken Sie die MIN/MAX-Taste im Normalmodus – es erscheinen die Anzeige der
Mindesttemperatur und die Zeit, wann sie aufgezeichnet wurde.
Mindesttemperaturanzeige
Außendaten
Mindesttemperaturikone
Aufzeichnungszeit
Innendaten
Höchsttemperaturikone
Zeit der Aufzeichnung
Höchsttemperaturanzeige
Löschung der Aufzeichnung der Mindest- und höchstwerte für die Innen- und Außentemperatur
1. Drücken Sie im Normalmodus die MIN/MAX-Taste – Sie gelangen in die Anzeige der
Mindest-/Höchstaufzeichnungen.
2. Halten Sie die MIN/MAX-Taste zwei Sekunden lang gedrückt – löschen Sie alle Daten
der minimalen und maximalen Innen- und Außentemperatur der jeweiligen Zeiten.
Die Innen- und Außenaufzeichnungen werden gleichzeitig gelöscht.
Warnung vor der Vereisung
Das Thermometer ist durch die Möglichkeit ausgestattet, vor der Eisglättebildung zu warnen.
Die Funktion kann ein- oder ausgeschaltet werden.
• Schalten Sie durch die Betätigung der ICE ALARM-Taste die Warnung vor der Vereisung
- im Displayoberteil erscheint die Ikone einer Schneeflocke - die Funktion ist aktiv. Sollte
die Temperatur unter 4 °C (39,2 °F) sinken, löst sich ein akustisches Warnsignal aus
und die Schneeflockenikone blinkt. Die Dauer des akustischen Signals beträgt 1,5
Minute.
Verzögerung der Warnung vor der Vereisung
Um eine häufige Auslösung des akustischen Signals der Warnung vor der Vereisung im
Fall der Temperaturschwankung um 4°C zu vermeiden, wird für diese Funktion eine
Verzögerung verwendet.
Sollte die Temperatur unter den Wert von 4°C sinken, kommt es zur Auslösung (wenn
die Funktion aktiv ist).
– Die Verzögerung ist auf 1 °C (1,8°F) eingestellt. Sollte die Temperatur zum Beispiel
auf 4,6°C steigen und anschließend unter 4 °C sinken, wird die Temperaturanzeige
blinken, aber das akustische Alarm wird nicht aktiviert.
– Mit der Verzögerung um 1°C muss die Temperatur auf 5°C (41°F) steigen und dann
unter 4°C sinken, damit das akustische Signal ausgelöst werden kann.
Nach der Auslösung des akustischen Signals vor der Vereisung wird bei der Temperatur
zwischen 4 bis 5°C auch die Ikone blinken.
Platzierung
Thermometer
Es kann auf eine Unterlage, z.B. auf den Tisch, gestellt oder an die Wand gehängt werden.
Wählen Sie zur Anbringung an die Wand eine geeignete Stelle, wo es keinen Einfluss
der direkten Sonnenstrahlen und der ausstrahlenden Wärme gibt. Probieren Sie vor der
Anbringung an die Wand, ob ein guter Empfang zwischen dem Thermometer und dem
Sensor bestehen wird.
1. Verwenden Sie eine geeignete Schraube mit einem Kopf, der ca. 5 mm überragt (kein
Bestandteil der Lieferung.
2. Entfernen Sie den Ständer aus dem Thermometergehäuse und hängen Sie das Thermometer auf. Vergewissern Sie sich, ob das Thermomesser gegen Absturz ausreichend
gesichert ist.
Drahtloser Sensor
Er wird mit einem Universalständer und einer Wandhalterung geliefert. Befestigen Sie die
Halterung mittels der zwei mitgelieferten Schrauben an die Wand.
Verwendung des Ständers Korrekte Lage der Sensormontage an die Wand
EMOS spol. s r. o.
2. Drücken Sie die MIN/MAX-Taste zum zweiten Mal – es erscheint die Anzeige der
Mindesttemperatur und die Zeit, wann sie aufgezeichnet wurde.
3. Aktivieren Sie durch die nächste Betätigung der MIN/MAX-Taste die Anzeige der
Mindest-/Höchstinnentemperatur und die Zeit, wann sie aufgezeichnet wurde.
Anzeige der Mindest- und Höchstinnentemperatur
1. Drücken Sie im Normalmodus dreimal die MIN/MAX-Taste – auf dem Display erscheinen
die Anzeige der Mindestinnentemperatur und die Zeit, wann sie aufgezeichnet wurde.
2. Zeigen Sie durch die nächste Betätigung der MIN/MAX-Taste die Angabe für die
Höchstinnentemperatur und die Zeit, wann sie aufgezeichnet wurde.
3. Durch die nächste Betätigung der MIN/MAX-Taste gelangen Sie in den Normalmodus
der Anzeige bzw. Abbildung.
8
Montage an die Wand
Bevor Sie den Sensor an die Wand anbringen, überprüfen Sie, ob er imstande ist, mit dem
Thermometer problemlos zu kommunizieren. Sofern das Signal nicht empfangen wurde,
verlagern Sie den Sensor näher zum Thermometer.
1. Bringen Sie die Halterung mittels der Schrauben an die Wand an.
2. Klappen Sie die Halterung in den drahtlosen Sensor entsprechend der Abbildung.
17
Page 9

WS9641-manual 0-0-0-K
D
DRAHTLOSES THERMOMETER WS-9641IT
Das drahtlose Thermometer WS-9641IT zeigt die Außentemperatur aus dem Außensensor (mittels des Signals auf der Frequenz 868 MHz), die Innentemperatur und -feuchtigkeit, die
durch das DCF-Signal gesteuerte Uhrzeit, das Datum und das Wetter durch 8 Varianten der Ikone eines je nach Wärmebedingungen angezogenen Jungen an.
Stationsbeschreibung
• Durch das DCF-Signal gesteuerte Uhr mit der Möglichkeit der manuellen Einstellung
• Datum, Stunden, Minuten und Sekunden, Zeitzonen -12 Stunden bis + 12 Stunden
• drahtlose Signalübertragung aus dem Außensensor auf der Frequenz 868 MHz
• Ikone eines je nach aktuellen Wärmebedingungen angezogenen Jungen in 8 Anzugsvarianten
• Temperatureinstellung in °C oder °F
• Aufzeichnung der Mindest- und Höchsttemperatur (Innen- und Außentemperatur)
• Löschmöglichkeit der Aufzeichnung der Mindest- und Höchsttemperatur
• Anzeige des Batteriezustands
• Möglichkeit der Aufstellung auf den Ständer oder der Aufhängung an die Wand
Drahtloser Außensensor
• Reichweite bis zu 100 m im freien Raum (in verbauten Räumen und Stellen bzw. Orten
mit Störung kann die Reichweite markant sinken)
• Gegen Witterungseinflüsse beständiges Gehäuse
• Platzieren Sie den Sensor an eine vor den direkten Sonnenstrahlen und dem Regen
geschützte Stelle
Technische Parameter
Wärmebereiche
Außentemperatur (Sensor) -39,9 °C bis +59,9 °C
Messgenauigkeit -39,9°C bis -5°C ±2°C; -5°C bis +40°C ±1,5°C;
40°C bis 59,9°C ±2°C
(Anzeige OF.L – außerhalb des Messbereichs)
Innentemperatur -9,9 °C bis 59,9 °C
Messgenauigkeit -9,9°C bis 40°C ±1,5°C; 40°C bis 59,9°C ±2°C
(Anzeige OF.L – außerhalb des Messbereichs)
Relativfeuchtigkeit 1% bis 99% mit Auflösung 1%
(Anzeige OF.L – außerhalb des Messbereichs)
Datenempfang aus dem Sensor
Messung der Innentemperatur
und -feuchtigkeit alle 17 Sekunden
Speisung 2 x AA, IEC, LR6, 1,5V (Thermomesser sowie Sensor)
Wir empfehlen alkalische Batterien - die Lebensdauer
kann bis zu 24 Monaten dauern.
Abmessungen Thermometer 92 x 30,7 x 160 mm
Sensor 38,2 x 21,2 x 128,3 mm
LCD-Display und Einstellung
Der Übersichtlichkeit halber ist das Display für die Anzeige der Angaben in drei Teile
aufgeteilt:
Teil 1 – Außentemperatur (OUT)
– Anzeige der aktuellen Außentemperatur
– Anzeige der Einschaltung der Warnung vor der Vereisung
– die Ikone ))) zeigt den aktuellen Signalempfangsstand aus dem drahtlosen Sensor an.
– anzeige der Schwachbatterie im drahtlosen Sensor
– die Betätigung der MIN/MAX-Taste zeigt die gespeicherte Mindest- und Höchsttempe-
ratur und gleichzeitig die MIN- oder MAX-Ikone.
Teil 2 – Innentemperatur und -feuchtigkeit (IN)
– Anzeige der Innentemperatur und -relativfeuchtigkeit
– Anzeige der aktuellen Temperaturbedingungen mittels der Figürchen eines jungen in
acht Anzugsvarianten den aktuellen Temperaturbedingungen gemäß
– schwache Batterien im Thermometer
Teil 3 – Uhrzeit und Datum
– im Normalmodus werden die Uhrzeit und das Datum angezeigt
– auch das Datum, der Tag und die Sekunden können angezeigt werden
– Empfangsikone des DCF-Signals (wenn sie blinkt, findet der Empfang statt. Nach
dem erfolgreichen Signalempfang aus dem Sensor wird auf dem Display die Ikone )))
dauerhart angezeigt. Wenn sie nicht erscheint, war der Empfang nicht erfolgreich.
4 Tasten auf dem Thermometer
SET
(manuelle Einstellung)
Jahr, Monat, Datum, Tag und °C/°F.
+ (plus) – Einstellung der einzelnen Daten
– im Normalmodus der Umschaltung zwischen dem Datum,
dem Tag und den Sekunden.
MIN/MAX – Anzeige der Mindest- und Höchsttemperatur für die
Innen- und Außentemperatur (auch die Zeit
der Aufzeichnung wird angezeigt).
– Das Halten der Taste führt das Rücksetzen dieser Werte
durch.
– Durch die nächste Betätigung der Taste erfolgt der
Ausgang aus dem Schau-Modus.
ICE ALARM – Einschalten (Ausschalten) der Warnung vor der Vereisung,
wenn die Außentemperatur unter 4°C sinkt.
Vor der Einschaltung der Warnung wird auf dem Display
ungefähr alle 4 Sekunden
– Umschaltung der einzelnen Modi: Zeitzone, Uhrzeit,
oben neben der Außentemperaturanzeige das Symbol
einer Schneeflocke mit Ausrufezeichen angezeigt.
Einstellung
1. Legen Sie in den drahtlosen Freiluft- bzw. Außensensor Batterien hinein (siehe Batteriehineinlegen und -wechsel).
2. Legen Sie innerhalb von 30 Sekunden Batterien ins Thermometer hinein (siehe Batteriehineinlegen und -wechsel). Nach dem Hineinlegen werden für einen Augenblick alle
Displayangaben angezeigt und das Thermometer piepst einmal kurz. Auf dem Display
erscheinen die Zeitanzeige 0:00, die Ikone eines Jungen und die Innentemperatur
inkl. der Feuchtigkeit. Sollten die erwünschten Anzeigen innerhalb von 60 Sekunden
nicht erscheinen, wechseln Sie Batterien und legen nach 10 Sekunden neue Batterien
hinein.
Wichtig: Die Reihenfolge beim Hineinlegen der Batterien ist einzuhalten - zuerst in den
Sensor und dann ins Thermometer!
Batteriehineinlegen und -wechsel
Gehen Sie beim Batteriehineinlegen oder -wechsel im Sensor sowie im Thermometer
folgendermaßen vor:
1. Den Batteriefachdeckel abnehmen.
2. Batterien hineinlegen, auf die richtige Polarität der hineingelegten Batterien anhand
der Markierung auf dem Boden des Batteriefachs achten.
3. Den Batteriefachdeckel schließen.
Wichtig: Beim Batteriewechsel im Thermometer oder im Sensor ist das Rücksetzen
(Reset) beim gesamten Satz durchzuführen. Beim Einschalten wird nämlich durch
den Sender des Sensors ein Sicherheitszufallscode zugeteilt, der innerhalb von drei
Minuten ab dem Anfang der Sendung empfangen und im Empfänger des Thermometers
gespeichert werden muss!
Empfang des Sensorsignals auf der Frequenz 868 MHz
Nach dem Hineinlegen der Batterien in den drahtlosen Außensensor und das Thermometer
startet der Datenempfang. Das Thermometer empfängt Daten nur von einem drahtlosen
Außensensor. Die Außentemperatur wird im oberen Teil des Thermometerdisplays durch
die Ikone ))) angezeigt. Das Thermometer soll die Temperaturdaten innerhalb von 5 Minuten
nach dem Hineinlegen der Batterien empfangen. Sollten die Außentemperaturanzeigen
innerhalb von 5 Minuten nicht erscheinen, nehmen Sie Batterien aus dem Sensor sowie dem
Thermometer heraus und wiederholen Sie den Vorgang anhand des Punkts „Einstellung“.
Kommt es innerhalb von 5 Minuten zu keiner Anzeige der Außentemperatur und auf dem
Display --.- erscheint, überprüfen Sie:
– ob der Abstand des drahtlosen Sensors und des Thermometers 1,5 m bis 2 m von
Störquellen wie Computer, Monitore, Fernsehgeräte und andere Elektroverbraucher
beträgt.
– ob der drahtlose Sensor auf einer Metallkonstruktion nicht platziert bzw. angebracht
ist, wie Fensterrahmen, Blechbrüstung usw.
– Vermeiden Sie unerwünschte Interferenzen durch den Ausschluss der auf derselben
Frequenz arbeitenden Produkte.
Anmerkung: Nach dem Empfang des Signals von 868 MHz aus dem drahtlosen Sensor
das Batteriefachdeckel nicht öffnen. Es könnte zur Lockerung der Batterien und der
anschließenden Einschaltung der Station kommen. Beim zufälligen Rücksetzen Batterien
im Thermometer und im Sensor anhand der Bedienungsanweisung herausnehmen und
hineinlegen. Sonst können Übertragungsprobleme eintreten.
Die Sendereichweite im offenen Raum beträgt 100 m, aber sie ist durch die Umgebung und
die fremde Störung beträchtlich beeinflusst. Im verbauten Raum kann sie in Abhängigkeit
vom verwendeten Baumaterial bis zu ein paar Metern sinken.
Empfang des DCF-Radiosignals
Nach der Anzeige der Außentemperaturdaten startet automatisch die Suche nach dem
DCF-Signal zwecks der Uhrzeiteinstellung. Dieser Prozess wird durch die blinkende Antenne
oben links von der Stundenanzeige dargestellt. Nach dem erfolgreichen Empfang des
DCF-Signals wird die Ikone des DCF-Empfangs angezeigt und die Zeit eingestellt. Unter
optimalen Bedingungen erfolgt der Empfang innerhalb von 3 bis 5 Minuten. Ist der Empfang
des DCF-Signals innerhalb von 10 Minuten nicht erfolgt, kann man die Uhrzeit durch die
SET-Taste manuell einstellen.
Zur Uhrzeiteinstellung kommt es jeden Tag zwischen 02:00 und 03:00 Uhr. Wenn die Zeit
bis 3:00 nicht eingestellt ist, wird nach dem Signal erneut um 04:00, 05:00 und 06:00 automatisch gesucht. Beim Versagen der Suche um 06:00 Uhr wird die Einstellung am nächsten
Tag um 02:00 Uhr fortgesetzt. Der erfolgreiche Empfang des DCF-Signals überschreibt die
manuell eingestellte Uhrzeit. Gleichzeitig mit der Uhrzeit wird auch das Datum aktualisiert.
Durch das DCF-77 Radiosignal gesteuerte Uhr
Die Quelle des Senders des DCF-Signals ist die Atomuhr in der Physikalisch-Technischen
Bundesanstalt Braunschweig. Ihre Abweichung beträgt eine Sekunde in eine Million Jahren.
Das DCF-Signal ist verschlüsselt und auf der Frequenz 77,5 MHz aus Mainflingen in der
Nähe von Frankfurt am Main in Deutschland gesendet. Die Reichweite ist ungefähr 1500
km im Umkreis vom Sender. Die Uhr im Thermometer empfängt das Signal und stellt die
genaue Sommer- oder Winterzeit ein. Die Qualität hängt von der geographischen Lage
ab. Wenn das Signal innerhalb des vorliegenden Bereichs von 1500 km von Frankfurt
empfangen wird, sollten keine Schwierigkeiten eintreten.
Wenn der DCF-Empfang verlaufen ist, aber die Ikone blinkt, dann:
– ist das Thermometer von der Nähe der Quellen der elektromagnetischen Interferenzen
16
TERMOMETR BEZPRZEWODOWY typ WS-9641IT
PL
Dziękujemy Państwu za zakup naszego termometru bezprzewodowego. Został on skonstruowany zgodnie
z najnowszymi osiągnięciami techniki i technologii. Termometr bezprzewodowy wyświetla temperaturę zewnętrzną wykorzystując transmisję radiową na częstotliwości 868 MHz, temperaturę
wewnętrzną i wilgotność, zegar sterowany sygnałem radiowym, datę i aktualny stan pogody symbolizowany ikoną chłopca ubranego odpowiednio do niej w 8 krokach.
Prosimy o staranne zapoznanie się z niniejszą instrukcją co umożliwi pełne wykorzystanie funkcji tego urządzenia.
Parametry techniczne
Zakresy temperatur
Pomiar temperatury wewnętrznej: -9,9°C do + 59,9°C
Dokładność pomiaru: -9,9°C do + 40°C ± 1,5°C
40°C do + 59,9°C ± 2°C (komunikat OF.L
- przekroczenie zakresu pomiarowego)
Pomiar temperatury zewnętrznej: -39,9°C do +59,9°C
Dokładność pomiaru: -39,9°C do - 5°C ± 2°C
-5°C do + 40°C ± 1,5°C
40°C do + 59,9°C ± 2°C (komunikat OF.L
- przekroczenie zakresu pomiarowego)
Wilgotność względna: 1% do 99% z rozdzielczością 1% (komunikat
- przekroczenie zakresu pomiarowego)
Okres pomiaru temperatury wewnętrznej i wilgotności - co 17 sekund
Odbiór danych zewnętrznych: co około 4 sekundy
Zasięg transmisji: do 100 m w otwartej przestrzeni
Zasilanie: Termometr 2 x AA, IEC, LR6, 1.5V
Czujnik 2 x AA, IEC, LR6, 1.5V
Zaleca się baterie alkaliczne. Czas eksploatacji
baterii osiąga nawet 24 miesiące.
Wymiary: Termometr 92 x 30.7 x 160 mm
Czujnik 38.2 x 21.2 x 128.3 mm
Opis jednostki centralnej
Opis i funkcje przycisków:
SET (ustawianie ręcze) wybór strefy czasowej, godziny, roku, miesięcy, daty,
dnia oraz °C/°F.
MIN/MAX przeglądanie maksymalnej i minimalnej temperatury
wew. i zew. z datą zapisu; dłuższe przytrzymanie spowoduje
wyzerowanie tych wartości; ponowne naciśnięcie
przycisku powoduje wyjście z trybu przeglądania
+ ręczne ustawianie poszczególnych danych
w normalnym trybie wyświetlania można przełączać
pomiędzy datą, dniem i sekundami.
ICE ALARM włącza/wyłącza sygnał ostrzegający przed oblodzeniem
(sygnał ostrzegawczy włączy się, jeżeli temperatura
zewnętrzna spadnie poniżej 4°C). Na wyświetlaczu
w górze obok temperatury zewnętrznej pojawi się symbol
śnieżynki z wykrzyknikiem w czasie sygnału
ostrzegawczego.
Wygląd wyświetlacza LCD
Wyładowane baterie w czujniku bezprzewodowym
Temperatura zewnętrzna
Sygnalizacja włączenia ostrzeżenia przed gołoledzią
Ikona odbierania sygnału z czujnika zewnętrznego
Sylwetka chłopca ubranego zgodnie z panującą temperaturą
Wyładowane baterie w termometrze
Temperatura wewnętrzna
Wilgotność wewnętrzna
Ikona odbierania sygnału DCF
Godzina
Data, dzień i sekundy
Uruchomienie i ustawinie czujnika
1. W pierwszej kolejności wkładamy baterie do czujnika. Do zasilania stosuje się baterie
alkaliczne 2 x AA, IEC LR6, 1.5V
2. Zdejmujemy pokrywę pojemnika na baterie i wkładamy baterie zwracając uwagę na
ich poprawną polaryzację zgodną z oznaczeniem na dnie pojemnika.
3. Zamykamy pokrywę pojemnika na baterie.
Uruchomienie i ustawinie jednostki centralnej
1. Przed upływem 30 sekund od uruchomienia czujnika wkładamy również baterie do
termometru.
2. Do zasilania termometru stosuje się baterie alkaliczne 2 x AA, IEC LR6, 1,5V.
3. Zdejmujemy pokrywę pojemnika na baterie i wkładamy baterie zwracając uwagę na
ich poprawną polaryzację zgodną z oznaczeniem na dnie pojemnika.
4. Zamykamy pokrywę pojemnika na baterie.
5. Po włożeniu baterii na chwilę zaświecą się na wyświetlaczu wszystkie dane i termometr
wyda krótkie „piknięcie“.
6. Następnie pojawi się czas 0.00, ikona chłopca oraz temperatura wewnętrzna i wilgotność; jeżeli powyższe dane nie zostaną wyświetlone w czasie do 60 sekund, należy
wyjąć baterie; po odczekaniu 10 sekund ponownie wkładamy baterie.
7. Termometr zacznie odbierać dane transmitowane z czujnika. Temperatura zewnętrzna
pojawi się w górnej części wyświetlacza z ikoną ))); jeżeli w czasie 5 minut nie pojawi
się odczyt temperatury zewnętrznej, należy wyjąć baterie z czujnika i termometru a
następnie powtórzyć procedurę według punktu 1.
8. Do poprawnej transmisji sygnału o częstotliwości 868 MHz jest wymagane zapewnienie
maksymalnej odległości miedzy czujnikiem a termometrem do 100 m na otwartej przestrzeni (w zastawionym różnymi przedmiotami pomieszczeniu zasięg może gwałtownie
zmaleć nawet do kilku metrów, również w zależności od zastosowanych materiałów
budowlanych). Szczegóły patrz rozdział: Zamocowanie i odbiór sygnału o częstotliwości
868 MHz.
9. Po odebraniu sygnału i wyświetleniu temperatury zewnętrznej automatycznie rozpocznie się poszukiwanie sygnału DCF niezbędnego do ustawienia zegara. W idealnych
warunkach zajmuje to od 3 do 5 minut.
Uwaga:
1. Termometr odbiera sygnał tylko z jednego zewnętrznego bezprzewodowego czujnika
temperatury; jeżeli sygnał DCF nie został odebrany w czasie do 10 minut, zegar można
ustawić ręcznie za pomocą przycisku SET.
2. Każdego dnia pomiędzy godziną 02.00 i 03.00 ma miejsce synchronizacja czasu.
Jeżeli czas nie zostanie zsynchronizowany do godziny 03.00, to procedura ta będzie
powtarzana o godz. 04.00, 05.00 i 06.00 aż do poprawnego jej wykonania. Przy braku
synchronizacji nawet o godz. 06.00 ustawianie będzie kontynuowane w następnym dniu
o godz. 02.00. Poprawnie odebrany sygnał DCF wprowadzi zmianę ręcznie ustawionego
czasu. Data jest aktualizowana jednocześnie z czasem.
3. W przypadku wymiany baterii w termometrze lub w czujniku należy wykonać reset (wyzerowanie ) całego zestawu. Powodem tej operacji jest to, że zmienny kod bezpieczeństwa
jest wysyłany z nadajnika po jego włączeniu i musi zostać odebrany i zapamiętany przez
termometr w ciągu trzech minut od początku transmisji!
4. Żeby zapewnić bezproblemową pracę termometru i czujnika zaleca się okresowo
wymieniać w nich baterie.
Zegar sterowany sygnałem radiowym DCF-77
Sygnał DCF jest kodowany i nadawany na częstotliwości 77,5 MHz z Mainflingen w pobliżu
Frankfurtu. Zasięg wynosi około 1500 km wokół nadajnika. Zegar w termometrze odbiera
ten sygnał i ustawia dokładny czas zarówno letni, jak i zimowy. Jakość odbioru zależy
od położenia geograficznego. Jeżeli sygnał ma być odbierany w promieniu 1500 km od
Frankfurtu, to nie powinny występować żadne problemy.
Termometr po wyświetleniu temperatury zewnętrznej rozpoczyna odbieranie sygnału DCF.
Ten fakt pokazuje mrugająca ikona anteny w górnej części wyświetlacza, na lewo od
pozycji godzin. Po prawidłowym przyjęciu sygnału DCF na stałe zapali się ikona sygnału
DCF i zostanie ustawiony czas.
Jeżeli został odebrany sygnał DCF, ale ikona nadal mruga:
1. Termometr jest umieszczony zbyt blisko źródła zakłóceń elektromagnetycznych, jak
na przykład monitor komputerowy lub telewizor. Zalecana odległość wynosi 1,5 do 2
metrów.
2. Odbiór słabnie ze względu na obecność budowlanych konstrukcji żelbetowych lub
umieszczenie odbiornika w piwnicy. Żeby dobrze odbierać sygnał należy umieścić
termometr jak najbliżej okna.
3. Odbiór sygnału DCF jest czasami niemożliwy u podnóża gór lub wzniesień i nie jest to
wadą termometru.
Ustawianie ręczne
1. Ręcznie można ustawić następujące dane: strefę czasową, czas, kalendarz oraz dokonać
wyboru pomiędzy °C i °F.
2. Naciskamy przycisk SET na czas dłuższy od 3 sekund i wchodzimy kolejno do trybu
ustawiania (kolejne ustawienia zatwierdzamy zawsze przez naciśnięcie SET):
• strefy czasowej, która standardowo ustawiona jest na 0 godzin
Przyciskiem + można ustawić strefę czasową od +12 godz. do –12 godz. w odstępach 1
godziny; zatwierdzamy przyciskiem SET,
Uwaga: Ustawienia powrócą automatycznie do normalnego trybu, jeżeli podczas 3 sekund
nie zostanie naciśnięty żaden przycisk.
• czasu
Ręczne ustawianie czasu jest możliwe w przypadku, gdy jego automatyczne ustawianie
nie działa z powodu zakłóceń, odległości itp. Zegar jest synchronizowany wbudowanym
kryształem kwarcu.
1. Za pomocą przycisku + wprowadzamy odpowiednią godzinę i ponownie naciskając
przycisk SET, przechodzimy do ustawienia minut. Zatwierdzamy to naciskając przycisk SET
i przechodzimy do ustawiania kalendarza.
2. Termometr nawet po ręcznym ustawieniu zegara będzie co godzinę automatycznie starał
się odebrać sygnał DCF. Zegar jest wstępnie ustawiony w trybie 24 godzinnym.
• kalendarza
1. Wyjściową datą dla kalendarza jest 2006, 1.1. i MO. Po odebraniu sygnału DCF kalendarz ustawi się automatycznie. Jeżeli automatyczne ustawianie nie powiedzie się,
można je przeprowadzić ręcznie.
9
EMOS spol. s r. o.
Page 10

WS9641-manual 0-0-0-K
2. Za pomocą przycisku + wprowadzamy odpowiedni rok (zakres od 2000 do 2029), a
następnie za pomocą SET przechodzimy kolejno do ustawienia miesiąca, daty, dni w
tygodniu (w kolejności od MO – poniedziałek do SU – niedziela),
• °C/°F
Za pomocą przycisku + wybieramy właściwą jednostkę do pomiaru temperatury. Przyciskiem
SET zatwierdzamy wybraną jednostkę do pomiaru temperatury i jednocześnie kończymy
ustawianie kalendarza.
Przedstawianie temperatury i wilgotności
Dane o temperaturze wewnętrznej i wilgotności są przedstawiane w drugiej części
wyświetlacza.
Dane o temperaturze zewnętrznej są przedstawiane w pierwszej części wyświetlacza.
Przedstawienie min. i maks. temperatury
1. W normalnym trybie pracy naciskamy przycisk MIN/MAX i pojawia się informacja
zawierająca minimalną temperaturę i czas, gdy była ona zmierzona.
Min temperatura zewnętrzna
venkovní data
ikona minimální teploty
Czas pomiaru
2. Ponowne naciśnięcie przycisku MIN/MAX spowoduje wyświetlenie informacji o maksymalnej temperaturze zewnętrznej i czasie, gdy była ona zmierzona.
3. Ponowne naciśnięcie przycisku MIN/MAX spowoduje wyświetlenie informacji o minimalnej/maksymalnej temperaturze wewnętrznej i czasie, w którym była ona zmierzona.
Przedstawienie minimum i maksimum zapamiętanej
temperatury wewnętrznej
1. W normalnym trybie trzy razy naciskamy przycisk MIN/MAX a na wyświetlaczu pojawia się
minimalna temperatura zewnętrzna i czas, w którym była zapamiętana.
Ikona danych wewnętrznych Ikona maximum
Max temperatura
Czas pomiaru
2. Ponowne naciśnięcie przycisku MIN/MAX spowoduje wyświetlenie danych o maksymalnej temperaturze wewnętrznej i czasie, w którym została zmierzona.
3. Kolejne naciśnięcie przycisku MIN/MAX spowoduje przejście do normalnego trybu
pracy.
Kasowanie zapamiętanej min. i maks. wartości
temperatury wewnętrznej i zewnętrznej
1. W trybie normalnym naciskamy przycisk MIN/MAX i przechodzimy do przeglądania
zapisu min/maks temperatur.
2. Przytrzymanie przycisku MIN/MAX przez ponad 2 sekundy powoduje skasowanie wszystkich danych o min. i maks. temperaturze wewnętrznej i zewnętrznej oraz przypisanych
do nich czasów.
Zapisy dotyczące temperatury wewnętrznej i zewnętrznej zostaną skasowane jednoc-
ześnie.
Ostrzeżenie przed gołoledzią.
1. Termometr posiada możliwość ostrzegania przed możliwością powstania gołoledzi.
Użytkownik ma możliwość włączania i wyłączania tej funkcji.
2. Aby włączyć funkcję ostrzeżenia przed gołoledzią przyciskamy ICE ALARM. W górnej
części wyświetlacza pojawia się ikona symbolizująca płatek śniegu i funkcja staje
się aktywna. Jeżeli temperatura ospadnie poniżej 4 °C (39,2 °F), zostanie włączony
dźwiękowy sygnał ostrzegawczy a ikona śnieżynki zacznie migać. Długość sygnału
dźwiękowego wynosi 1,5 minuty.
Opóźnienie ostrzeżenia przed oblodzeniem
Aby ograniczyć częstotliwość włączania się sygnału ostrzegającego przed oblodzeniem w
przypadku wahania się temperatury zewnętrznej w okolicy 4 °C, zastosowano opóźnienie
działania tej funkcji.
Jeżeli temperatura opadnie do 4 °C, nastąpi włączenie (funkcja musi być aktywna).
Opóźnienie jest ustawione na 1°C (1,8°F). Jeżeli temperatura wzrośnie z powrotem do
4,6 °C a następnie spadnie poniżej 4°C, pozycja temperatury zacznie migać, ale sygnał
dźwiękowy nie będzie włączony.
Przy opóźnieniu wynoszącym 1°C temperatura musi wzrosnąć do 5°C (41°F) a następnie
spaść poniżej 4°C, żeby sygnał dźwiękowy został uruchomiony.
Uwaga:
Po włączeniu sygnału ostrzegającego przed oblodzeniem ikona będzie migać przy temperaturach z przedziału 4 do 5°C.
Odbiór transmisji na częstotliwości 868 MHz
Termometr powinien odebrać dane o temperaturze w czasie 5 minut po włożeniu baterii.
Może się zdarzyć, że w czasie 5 minut nie zostanie wyświetlona temperatura zewnętrzna
a na wyświetlaczu pojawi się --.-. Prosimy wtedy kolejno sprawdzić:
1. Odległość czujnika bezprzewodowego i termometru od źródeł zakłóceń takich jak
komputery, monitory, telewizory i inne odbiorniki energii elektrycznej powinna wynosić
co najmniej 1,5 do 2 m.
2. Należy unikać lokalizacji czujnika bezprzewodowego na konstrukcji metalowej takiej
jak ramy okienne, parapety blaszane itp.
3. Wyeliminować urządzenia pracujące na podobnej częstotliwości (868 MHz) aby zapobiec
możliwym interferencjom.
Uwaga: Po odebraniu sygnału 868 MHz z czujnika bezprzewodowego nie należy otwierać
pojemnika na baterie. Po przypadkowym wypadnięciu baterii nastąpiłoby później ponowne
uruchomienie stacji. W razie skasowania należy wyjąć i włożyć baterie w stacji i czujniku
zgodnie z instrukcją. W przeciwnym razie mogą powstać problemy z transmisją. Zasięg nadajnika wynosi 100 m na otwartej przestrzeni. Zasięg jest mocno uzależniony od warunków
środowiskowych i zakłóceń. Jeżeli nie udało się uzyskać odbioru, należy wyjąć i włożyć baterie
w stacji i czujniku zgodnie z instrukcją.
Lokalizacja
Termometr jest zaprojektowany tak, żeby można go było postawić na stole lub powiesić
na ścianie.
Umieszczenie na ścianie
Wybieramy odpowiednie miejsce, gdzie nie oddziaływuje bezpośrednio światło słoneczne i
nie ma gwałtownych zmian temperatury. Przed umocowaniem należy sprawdzić, czy w tym
miejscu termometr będzie dobrze odbierał sygnał z czujnika.
1. Należy zastosować odpowiedni wkręt (nie jest w komplecie) o średnicy przekraczającej
5 mm.
2. Odłączamy podstawkę od termometru i przymocowujemy go do ściany. Sprawdzamy,
czy termometr jest dobrze zabezpieczony przed upadkiem.
Lokalizacja czujnika bezprzewodowego
Czujnik jest dostarczany z uchwytem do ściany lub uniwersalną podstawką. Uchwyt przykręca
się do ściany za pomocą dwóch załączonych wkrętów.
Wykorzestanie podstawki Prawidłowe położenie czujnika na ścianie
Montaż na ścianie
Uchwyt starannie przykręcamy do ściany za pomocą wkrętów.
Następnie wkładamy czujnik bezprzewodowy w uchwyt zgodnie z rysunkiem. Zwracamy
uwagę, żeby nie zawiesić czujnika odwrotnie. W dolnej części znajdują sie otwory umożliwiające dopływ powietrza, a do czujnika w odwrotnym położeniu mogłaby przedostać się
woda. Spowodowałoby to uszkodzenie wewnętrznych części elektronicznych.
Uwaga:
Przed przymocowaniem czujnika do ściany należy sprawdzić, czy jego komunikacja z
termometrem przebiega bez zakłóceń. Jeżeli sygnał nie będzie odbierany, czujnik należy
zbliżyć do termometru.
Konserwacja
1. Należy unikać lokalizacji w miejscach narażonych na wstrząsy i wibracje, które mogą
uszkodzić urządzenie
2. Należy unikać lokalizacji w miejscach narażonych na nagłe zmiany temperatury,
ewentualnie bezpośrednie oświetlenie słoneczne, ekstremalne zimno i wilgoć oraz
10
1. S pomočjo tipke + nastavite želen podatek (razpon je od 2000 do 2029).
2. S pritiskom tipke SET boste sprožili nastavljanje meseca.
3. Sedaj utripa podatek o mesecu. S pritiskom tipke + nastavite željen podatek. S pritiskom
tipke SET boste sprožili nastavljanje datuma.
4. Sedaj utripa podatek o datumu. S pritiskom tipke + nastavite željen podatek o datumu.
5. S pritiskom tipke SET boste sprožili nastavljanje dneva v tednu.
6. S pomočjo tipke + nastavite željen dan v tednu v zaporedju od MO - ponedeljek do
SU - nedelja.
7. S pritiskom tipke SET boste sprožili nastavljanje °C/°F ter s pomočjo tipke + lahko
izberete ustrezno enoto temperature. S tipko SET boste potrdili enoto temperature,
obenem pa dokončate nastavljanje koledarja.
Prikazovanje min. in maks. temperature
1. V navadnem načinu pritisnite tipko MIN/MAKS. Prikaže se podatek o minimalni tempe-
raturi in ura zapisa te temperature.
podatek o minimalni
temperaturi
ikona, ki prikazuje
zunanje podatke
ikona minimalne temperature
čas zapisa
2. Z naslednjim pritiskom tipke MIN/MAKS se prikaže podatek o maksimalni temperaturi
in ura zapisa te temperature.
3. Z naslednjim pritiskom tipke MIN/MAKS se prikaže podatek o minimalni/maksimalni
notranji temperaturi in ura zapisa te temperature.
Prikazovanje minimuma in maksimuma
za zapisovanje notranje temperature
1. V navadnem načinu trikrat pritisnite tipko MIN/MAKS. Na zaslonu se prikaže minimalna
notranja temperatura, hkrati pa tudi čas zapisa.
2. Z naslednjim pritiskom tipke MIN/MAKS se prikaže podatek o maksimalni notranji
temperaturi in čas zapisa te temperature.
ikona, ki prikazuje podatek o maksimalni
notranje podatke temperaturi
ikona maksimalne temperature
čas zapisa
3. Z naslednjim pritiskom tipke MIN/MAKS boste sprožili navaden način prikazovanja.
Brisanje zapisa min. in maks. vrednosti notranje
in zunanje temperature
1. V navadnem načinu pritisnite tipko MIN/MAKS. Tako boste sprožili prikazovanje zapisov
o min./maks vrednostih.
2. S pritiskom tipke MIN/MAKS 2 sekundi se izbrišejo vsi podatki o min. in maks. vrednostih
notranje ter zunanje temperature in ustreznih časov.
Opomba: Notranje in zunanje vrednosti se izbrišejo istočasno.
Opozorilo na poledico
Termometer je opremljen z možnostjo opozarjanja na nastanek poledice. Uporabnik to
funkcijo lahko vklopi ali izklopi.
Uporabnik vklopi opozorilo na poledico s pomočjo tipke ICE ALARM. V zgornjem delu zaslona
se prikaže ikona snežinke, kar pomeni, da je funkcija aktivna. Če se temperatura spusti
pod 4 °C (39,2 °F), se oglasi opozorilni zvočni signal in ikona snežinke začne utripati. Čas
trajanja zvočnega signala je 1,5 minute.
Zamuda opozorila na poledico
Da se izognete pogostemu aktiviranju zvočnega signala, ki opozarja na poledico, v primeru
nihanja zunanje temperature okrog 4 °C, se za to funkcijo uporablja zamuda. Če temperatura
doseže vrednost 4 °C, pride do aktiviranja (funkcija mora biti aktivna).
Zamuda je nastavljena na 1 °C (1,8 °F). Če se temperatura vrne na 4,6 °C in se nato ponovno spusti pod 4 °C, bo podatek temperature utripal, vendar se zvočni alarm ne bo aktiviral.
Z zamudo od 1 °C naprej mora temperatura narasti na 5 °C (41 °F) in se potem spustiti
pod 4 °C, če želite, da se zvočni signal aktivira.
Opomba: Po zagonu zvočnega signala, ki opozarja na poledico, bo ikona utripala tudi pri
temperaturah med 4 in 5 °C.
Sprejemanje 868 MHz
Termometer naj bi sprejel podatke o temperaturi v 5 minutah od vložitve baterij. Lahko se
zgodi, da v 5 minutah ne pride do prikaza zunanje temperature in na zaslonu se prikaže
--.-. Zato prosimo, da preverite, ali so izpolnjeni naslednji pogoji:
1. Razdalja brezžičnega tipala in termometra naj bi znašala od 1,5 m do 2 m od virov
motenj, kot so računalniki, zasloni, televizorji in drugi električni aparati.
2. Izognite se namestitvi brezžičnega tipala na kovinskih konstrukcijah, kot so okenski
okviri, pločevine pod okni itd.
3. Z izključitvijo izdelkov, ki delujejo na isti frekvenci (868 MHz), se boste izognili nezaželenim interferencam.
Po sprejemu signala 868 MHz iz brezžičnega tipala ne odpirajte pokrova predalčka za
baterije. V nasprotnem primeru se baterije lahko sprostijo in bi lahko prišlo do dodatnega
zagona postaje. Pri naključnem izbrisu odstranite in vložite baterije v skladu z navodili v
termometru in tipalu. V nasprotnem primeru se lahko pojavijo težave pri prenosu. Doseg
oddajanja je 100 m v neoviranem prostoru. Na doseg vpliva okolje in morebitne motnje. Če
sprejem ni mogoč, odstranite in vložite baterije v skladu z navodili v termometru in tipalu.
Namestitev
Termometer
Termometer je zasnovan tako, da se lahko namesti na mizo ali obesi na steno.
Namestitev na steno
Izberite ustrezno mesto, k ni pod vplivom neposrednega sončnega sevanja ali žareče
toplote. Pred pritrditvijo na steno najprej preverite, ali boste imeli dober sprejem med
termometrom in tipalom.
1. Uporabite primeren vijak (ni sestavni del dobave). Glavica vijaka mora izstopati za
približno 5 mm.
2. Snemite stojalo s telesa termometra in termometer obesite. Prepričajte se, ali je
termometer dovolj zavarovan pred padcem.
Namestitev brezžičnega tipala
Tipalo se dobavlja skupaj z držalom za na steno ali stojalom, ki je univerzalno. Držalo se
pritrdi na steno s pomočjo dveh vijakov, ki sta sestavni del dobave.
Uporaba stojala Pravilna montaža tipala na steno
Montaža na steno
Držalo varno namestite na steno s pomočjo vijakov.
Nato potisnite brezžično tipalo v držalo tako, kot je prikazano na sliki. Pazite, da tipala ne
bi namestili nepravilno. V spodnjem delu so vhodi za zrak. Če bi bilo tipalo v nepravilnem
položaju, bi vanj lahko prodrla voda, ki bi lahko povzročila poškodovanje elektronike v
notranjosti tipala.
Opomba: Preden boste tipalo namestili na steno, preverite, ali lahko brez težav komunicira
s termometrom. Če signal ni bil sprejet, tipalo premaknite zaradi boljšega sprejemanja
signala bliže k termometru.
Oskrba in vzdrževanje
Izognite se namestitvi sestavnih delov na mestih, ki so izpostavljena vibracijam in tresljajem,
ki lahko povzročijo poškodovanje aparata.
Izognite se okolju, v katerem bodo sestavni deli izpostavljeni naglim spremembam temperature oz.
neposrednemu sončnemu sevanju, ekstremnemu hladu in vlagi ter pogojem, ki lahko povzročijo
naglo spremembo temperature, ki zniža natančnost merjenja.
Pri čiščenju zaslona LCD in pokrova aparata uporabljajte samo mehko navlaženo krpico.
Ne uporabljajte topil niti detergentov.
Sestavnih delov ne potapljajte v vodo niti v druge tekočine.
Iz aparata nemudoma odstranite vse izpraznjene baterije, saj boste tako preprečili njihovo
iztekanje ter poškodovanje aparata. Uporabljajte samo nove baterije predpisanega tipa.
Sami ne izvajajte nobenih popravil na sestavnih delih aparata. Pri poškodovanju ali okvari
oddajte izdelek v popravilo v trgovino, v kateri ste ga nabavili.
Emos spol.s r.o. s tem izjavlja, da je ta WS-9641IT vusklajen z osnovnimi zahtevami in
drugimi pripadajočimi regulativi smernice 1999/5/ES.
Napravo je možno prosto sprovajati v EU.
Izjava o skladnosti je sestavni del navodila ali pa jo najdete na spletnih straneh www.emos.cz
15
EMOS spol. s r. o.
Page 11

WS9641-manual 0-0-0-K
Tipalo: od -39,9°C do +59,9°C
Natančnost meritve -39,9°C do -5°C ±2°C
-5°C do 40°C ±1,5°C
40°C do 59,9°C ±2°C
(prikaz OF.L - izven obsega merjenja)
Relativna vlaga: od 1 % do 99 % z ločljivostjo 1 %
(prikaz – izven obsega merjenja)
Perioda merjenja notranje temperature in vlage: vsakih 17 sekund
Sprejemanje zunanjih podatkov: približno vsake 4 sekunde
Napajanje Termometer: 2 x AA, IEC, LR6, 1.5 V
Tipalo: 2 x AA, IEC, LR6, 1.5 V
Priporočamo alkalne baterije, ki imajo življenjsko
dobo vsaj 24 mesecev.
Mere Termometer: 92 x 30.7 x 160 mm
Tipalo: 38.2 x 21.2 x 128.3 mm
Opis zaslona LCD in nastavitev
- izpraznjene baterije v brezžičnem tipalu
- zunanja temperatura
- indikacija vklopa opozorila na poledico
- ikona sprejemanja signala iz zunanjega tipala
- postava fantka, oblečenega v skladu s temperaturo
- izpraznjene baterije v termometru
- notranja temperatura
- notranja vlaga
- ikona sprejemanja signala DCF
- ura
- datum, dan in sekunde
Po uspešnem sprejemu signala iz brezžičnega tipala se na zaslonu trajno prikaže ikona ))).
Če sprejem ni uspešen, se ikona ne prikaže. Utripanje ikone pomeni postopek sprejemanja.
Zaradi preglednega ugotavljanja podatkov je zaslon razdeljen v tri dele, in to za prikazovanje
časa in notranje temperature, vremenske napovedi ter zunanje temperature.
Del 1 – zunanja temperatura
- Prikazuje trenutno zunanjo temperaturo.
- Po pritisku tipke MIN/MAKS se prikaže shranjena minimalna in maksimalna temperatura, hkrati pa se prikažejo tudi ikone min. ali maks.
- Ikona ))) prikazuje aktualno stanje sprejemanja signala brezžičnega tipala.
Del 2 – notranja temperatura in vlaga
- Prikazuje notranjo temperaturo in vlago ter postavo fantka, oblečenega v skladu s
temperaturo.
- Aktualne toplotne pogoje prikazuje postava fantka, oblečenega v osmih različicah v
skladu s trenutno temperaturo.
Opis in pomen tipk
Termometer se upravlja s pomočjo 4 tipk
SET (ročna nastavitev) - S pritiskom tipke se premikate med posameznimi načini:
časovni pas, ura, leto, mesec, datum, dan in °C/°F.
MIN/MAKS - Omogoča ugotavljanje minimalne in maksimalne zunanje
ter notranje temperature (prikazuje tudi čas zapisa).
- Če držite to tipko pritisnjeno, se shranjene vrednosti
izbrišejo.
- Z naslednjim pritiskom na tipko boste izstopili iz načina
pregledovanja.
Tipka + - Je namenjena za različne nastavitve posameznih podatkov.
- V navadnem načinu prikazovanja lahko preklapljate
med datumom, dnevom in sekundami.
ICE ALARM - Vklopi in izklopi opozorilo na poledico (opozorilo se
prikaže, če se zunanja temperatura spusti pod
4 °C). Na zaslonu zgoraj, zraven podatka o zunanji
temperaturi, se ob vklopu opozorila pojavi simbol
snežinke s klicajem.
Nastavitev
1. Najprej vložite baterije v zunanje brezžično tipalo (glej poglavje Vložitev in zamenjava
baterij v zunanjem brezžičnem tipalu).
2. V 30 sekundah vložite baterije tudi v termometer (glej poglavje Vložitev in zamenjava
baterij v termometru). Po vložitvi se za trenutek prikažejo vsi podatki na zaslonu in
termometer se oglasi s kratkim signalom. Potem se na zaslonu prikaže časovni podatek
0.00, ikona fantka in notranja temperatura z vlago. Če se navedeni podatki ne prikažejo
v 60 sekundah, baterije odstranite. Počakajte 10 sekund in jih ponovno vložite.
3. Po vložitvi baterij v zunanje brezžično tipalo začne termometer sprejemati podatke.
Zunanja temperatura se prikaže v zgornjem delu zaslona termometra z ikono ))). Če
se v 5 minutah ne prikaže podatek o zunanji temperaturi, se mora baterija odstraniti
iz tipala in termometra in je potrebno ponoviti postopek, ki je opisan pod točko 1.
4. Za pravilen prenos signala na frekvenci 868 MHz naj ne bi bila razdalja med tipalom
in termometerom v odprtem prostoru večja kot 100 m (v zazidanem prostoru se lahko
precej zniža glede na uporabljen gradbeni material in lahko znaša le nekaj metrov).
Podrobnosti glej v poglavju Pritrditev in sprejem na frekvenci 868 MHz.
5. Po sprejemu in prikazu podatka o zunanji temperaturi se samodejno začne iskanje
signala DCF za nastavitev ure. Pri idealnih pogojih traja to sprejemanje od 3 do 5 minut.
- Termometer sprejema podatke le iz enega zunanjega brezžičnega tipala.
- Če se sprejem signala DCF ni uresničil v 10 minutah, se ura lahko nastavi ročno s
pomočjo tipke SET.
- Vsak dan med 02.00 in 03.00 uro se usklajuje čas. Če do uskladitve časa ne pride
ob 03.00 uri, se samodejno nadaljuje iskanje signala tudi ob 04.00, 05.00 in 06.00
uri, vse do uresničitve nastavitve. Če iskanje signala ne uspe tudi ob 06.00 uri, se bo
usklajevanje časa nadaljevalo naslednji dan ob 02.00 uri. Uspešen sprejem signala DCF
prepiše čas, ki je bil nastavljen ročno. Datum se posodablja hkrati s časom. Dodatne
informacije boste našli v poglavju Sprejemanje signala DCF in Ročna nastavitev časa.
Vložitev baterij
Vložitev in zamenjava baterij v termometru:
Termometer uporablja za napajanje 2 alkalni bateriji AA, IEC LR6, 1,5 V. Vložitev ali zamenjavo baterij izvedite v skladu z naslednjim postopkom:
1. Snemite pokrov predalčka za baterije.
2. Vložite baterije ob upoštevanju polarnosti vloženih baterij v skladu z oznako na dnu
predalčka za baterije.
3. Zaprite pokrov predalčka za baterije.
Vložitev in zamenjava baterij v zunanjem brezžičnem tipalu
Zunanje brezžično tipalo uporablja za napajanje 2 alkalni bateriji AA, IEC LR6, 1.5 V. Vložitev
ali zamenjavo baterij izvedite v skladu z naslednjim postopkom:
1. Snemite pokrov predalčka za baterije.
2. Vložite baterije ob upoštevanju polarnosti vloženih baterij v skladu z oznako na dnu
predalčka za baterije.
3. Zaprite pokrov predalčka za baterije.
Pomembna opomba: V primeru zamenjave baterij v termometru ali tipalu je treba resetirati
(izbrisati) ves sklop. Razlog za to operacijo je, da pri zagonu oddajnik dodeli naključno
varnostno kodo, ki mora biti sprejeta in shranjena v sprejemniku termometra v treh
minutah od začetka oddajanja!
Zamenjava baterij
Priporoča se redna menjava baterij tako v termometru kot tudi v tipalu, saj boste tako zagotovili neovirano obratovanje sklopa. Porabljene baterije oddajte na mestu, ki je namenjeno
za zbiranje porabljenih baterij.
Ura, krmiljena z radijskim signalom DCF-77
Vir oddajnika signala DCF je atomska ura v inštitutu Physikalisch Technische Bundesanstalt
Braunschweig. Njeno odstopanje je ena sekunda na milijon let. Signal DCF je kodiran in
se oddaja na frekvenci 77,5 MHz iz Mainflingena v bližini Frankfurta v Nemčiji. Doseg je
približno 1500 km v krogu, ki obdaja oddajnik. Ura v termometru sprejme ta signal in nastavi
točen čas, ne glede na to, ali gre za poletni ali zimski čas. Kakovost sprejema je odvisna
od geografske lege. Če se sprejem signala uresniči v dosegu do 1500 km od Frankfurta,
ne bi smele nastati težave.
Po prikazu zunanje temperature začne termometer sprejemati signal DCF. Ta postopek
prikazuje utripajoča antena levo zgoraj, nad podatkom o uri. Po uspešnem sprejemu signala
DCF se trajno prikaže ikona sprejemanja signala DCF in se nastavi ura.
Sprejem signala DCF se je uresničil, vendar ikona utripa:
- Termometra ne nameščajte v bližini virov elektromagnetnih interferenc, kot so
računalniški zasloni ali televizorji. Priporočena razdalja znaša od 1,5 do 2 metra.
- Sprejemanje se zmanjšuje pod vplivom gradbenih materialov, kot so železobetonske
konstrukcije, ali v suterenskih prostorih. Zaradi dobrega sprejemanja signala termometer namestite čim bližje oknu ter v smeri oddajnika v Frankfurtu.
- Sprejemanje signala DCF včasih ni mogoče ob vznožju gora ali hribov, kar pa ni napaka
termometra.
Ročna nastavitev
Ročno lahko nastavite naslednje podatke:
- časovni pas → ročna nastavitev časa → nastavitev koledarja → izbira °C/°F
3 sekunde držite pritisnjeno tipko SET, nato vstopite v način nastavitve:
Nastavitev časovnega pasu
Standardno je časovni pas nastavljen na 0 ur. Če želite spremeniti nastavitev:
1. 3 sekunde držite pritisnjeno tipko SET, nato boste vstopili v način nastavitve (utripa
podatek 0 h).
2. S tipko + lahko nastavite časovni pas od +12 do -12 ur, in to stopenjsko po 1 uri.
3. Z naslednjim pritiskom tipke SET boste dosegli nastavljanje časa.
Opomba: Nastavitev se samodejno preklopi v navadni način, če v 3 sekundah ne boste
pritisnili nobene tipke.
Nastavitev ure
Ročna nastavitev ure je možna v primeru, če ne uspe samodejna nastavitev časa zaradi
motenj, razdalje itd. Uro bo krmilil vgrajeni kristal. Termometer bo tudi po ročni nastavitvi
ure vsako uro samodejno iskal signal DCF. Ura je predhodno nastavljena za prikazovanje
v obliki 24 ur.
1. Utripa postavka ur.
2. S pomočjo tipke + nastavite željen podatek. Nato boste s pritiskom tipke SET sprožili
nastavljanje minut.
3. Utripa postavka minut. S pomočjo tipke + nastavite željen podatek.
4. S tipko SET potrdite nastavitev in sprožite nastavljanje koledarja.
Nastavitev koledarja
Izhodiščni podatek za koledar je 2006, 1.1. in MO. Po sprejemu signala DCF se koledar
samodejno nastavi. Če ne uspe samodejna nastavitev, se lahko uporabi ročna nastavitev.
14
warunki, w których występują gwałtowne zmiany temperatury powodujące obniżenie
dokładności pomiaru.
3. Do czyszczenia wyświetlacza LCD i obudowy urządzenia używamy tylko miękką wilgotną
szmatkę. Nie stosuje się rozpuszczalników ani środków czyszczących.
4. Żadnej części nie zanurzamy do wody ani do innej cieczy.
5. Bezzwłocznie usuwamy z przyrządu wyładowane baterie, żeby zapobiec skutkom ich
wylania i uszkodzenia przyrządu. Stosować tylko nowe baterie zalecanego typu.
6. We własnym zakresie nie należy wykonywać żadnych napraw. Uszkodzony lub wadliwy
przyrząd należy zwrócić do naprawy w sklepie, w którym został zakupiony.
Emos spol. s r.o. deklaruje, że WS-9641IT jest zgodny z podstawowymi wymaganiami oraz
późniejszymi postanowieniami dyrektywy 1999/5/ES.
VEZETÉK NÉLKÜLI HŐMÉRŐ WS-9641IT
H
A vezeték nélküli hőmérő kiábrázolja a kültéri (kültéri egységből 868 MHz átvitel) és a beltéri hőmérsékletet és nedvességtartalmat, DCF jellel vezérelt óra, dátum és aktuális időjárást a
fiúikon segítségével ábrázolja, mely öt lépésben különbözően van felöltözve.
- DCF jellel vezérelt óra, kézi beállítás lehetőségével
- óra, perc és másodperc ábrázolása, dátum
- időzónák -12órától 12óráig
- vezeték nélküli átvitel 868MHz frekvencián
- a jel vétele a kültéri érzékelőből 4 másodpercenként
- fiúikon, aki öt lépésben különbözően van felöltözve a hőmérséklettől függően
- hőmérséklet beállítása °C vagy °F
- min. és max. hőmérséklet jelzés (beltéri, kültéri)
- min. és max. hőmérséklet jelzés törlésének lehetősége
- lemerült elemjelzés
- állványra állítás vagy felfüggesztés lehetősége
Kültéri vezeték nélküli érzékelő
- A jel sugárzása 868 MHz frekvencián folyik.
- Időjárási viszonyoknak ellenálló fedél.
- Az érzékelőt szerelje közvetlen napsugárzástól és esőtől védett helyre.
Műszaki paraméterek
Hőmérséklet méréstartomány
Benti hőmérséklet -9,9°C-tól + 59,9°C-ig
Mérési pontosság -9,9°C až 40°C ±1,5°C
40°C až 59,9°C ±2°C
(OF.L ábrázolás - méréstartományon kívül)
Érzékelő -39,9°C-tól +59,9°C-ig
Mérési pontosság: -39,9°C až -5°C ±2°C
-5°C až 40°C ±1°C
40°C až 59,9°C ±2°C
(OF.L ábrázolás - méréstartományon kívül)
Relatív nedvességtartalom 1%-tól 99%-ig 1%-os felismeréssel
(ábrázolás OF.L- méréstartományon kívül)
A beltéri hőmérséklet és nedvességtartalom mérésperiódusa 17 másodpercenként
A kültéri adatok vétele körölbelül 4 másodpercenként
Sugárzás 100 m-ig nyitott térségben
Táplálás Hőmérő: 2 x AA, IEC, LR6, 1.5V
Érzékelő 2 x AA, IEC, LR6, 1.5V
Álkáli elemek javasoltak. Ekkor az elemek élettartama elérheti a 24 hónapot is.
Méretek Hőmérő 92 x 30.7 x 160 mm
Érzékelő 38.2 x 21.2 x 128.3 mm
Beállítás
1. Először helyezze az elemet a kültéri vezeték nélküli érzékelőbe (lásd Az elemek behelyezése és cseréje a kültéri vezeték nélküli érzékelőben fejezetet).
2. 30 másodpercen belül helyezze be az elemeket a hőmérőbe is (lásd Az elemek behelyezése és cseréje a hőmérőben fejezetet). A behelyezés után egy pillanatra megjelenik
az összes adat a kijelzőn és a hőmérő röviden sípol. Ezután a kijelzőn megjelenik az
idő-adat 0.00, a fiúikon és a beltéri hőmérséklettel és nedvességtartalommal. Ha ezek
az adatok nem jelennének meg 60 másodpercen belül, akkor vegye ki az elemeket.
Várjon 10 másodpercig és ismét helyezze őket vissza.
Megj. Fontos a elemek elhelyezési sorrend betartása, érzékelő, hőmérő
3. Az elemek a kültéri vezeték nélküli érzékelőbe történt behelyezésüket követően a
hőmérő megkezdi az adatok vételét. A kültéri hőmérséklet a hőmérő kijelzőjének fenti
részében jelenik meg a ))) ikonnal. Ha a kültéri hőmérséklet adat jelzése nem történik
meg 5 percen belül, ki kell emelni az elemet a hőmérőből és érzékelőből is és az 1-es
pont szerint a folyamatot meg kell ismételni.
4. A hibátlan jel sugár zás érdekében a 868 MHz frekvencián az érzékelő és hőmérő között
a távolságnak nem szabad túllépni a 100 m távolságot nyitott térségben (beépített
térségben jelentősen csökkenhet az alkalmazott építőanyagtól függően egészen néhány
méterre). Részleteket lásd a Rögzítés és vétel a 868 MHz frekvencián című fejezetet.
5. A kültéri hőmérséklet adatának vétele és ábrazolása után automatikusan megkezdődik
a DCF jel keresése az óra beállításához. Ideális feltételek mellett ez 3-tól 5 percig tarthat.
Urządzenie jest dopuszczone do obrotu w UE. Deklaracja zgodności jest częścią instrukcji
lub znajduje się na stronie internetowej www.emos.cz
Zgodnie z przepisami Ustawy z dnia 29 lipca 2005 r. o ZSEiE zabronione jest
umieszczanie łącznie z innymi odpadami zużytego sprzętu oznakowa-nego
symbolem przekreślonego kosza. Użytkownik, chcąc pozbyć się sprzętu
elektronicznego i elektrycznego, jest zobowiązany do oddania go do punktu
zbierania zużytego sprzętu.
W sprzęcie nie znajdują się składniki niebezpieczne, które mają szczegól-nie
negatywny wpływ na środowisko i zdrowie ludzi.
Masa sprzętu: 154 g
Megjegyzés:
- A hőmérő csak egy kültéri vezeték nélküli érzékelőből fogadja az adatokat.
- Ha a DCF jel vétele nem folyt le 10 percen belül, az idő beállítható manuálisan a SET
nyomógomb segítségével.
- Minden nap 02.00 és 03.00 óra között végbe megy az idő beállítása. Ha nem következne
be az idő beállítása 03.00 órakor, automatikusan foyltatódik a szignál keresése 04.00,
05.00 és 06.00 órakor, egészen addig, míg a beállítás meg nem történt. A keresés
meghiúsulása esetén 06.00 órakor a beállítás folytatódik másnap 02.00 órakor. A
sikeres DCF jel vétel a manuálisan beállított időt átírja. A dátum az idővel egyidejűleg
aktualizálódik. Az összefüggő információk a DCF jel vétele és az idő manuális beállítása
fejezetben találhatók.
Az elemek behelyezése
Az elemek behelyezése és cseréje a hőmérőben:
Táp ellátás a hőmérő 2 x AA, IEC LR6, 1,5V alkáli elemeket használ. Az elemek behelyezését
vagy cseréjét az alábbi lépéseket követve végezze:
1. Emelje le az elemtér fedelét.
2. Helyezze be az elemeket és ügyeljen a behelyezett elemek megfelelő polaritására az
elemtér alján levő jelölés szerint.
3. Zárja le az elemtér fedelét.
Az elemek behelyezése és cseréje a kinti vezeték nélküli érzékelőben
A kinti vezeték nélküli érzékelő táplálásra 2 x AA, IEC LR6, 1.5V alkálikus elemeket használ.
Az elemek behelyezését vagy cseréjét az alábbi lépéseket követve végezze:
1. Emelje le az elemtér fedelét.
2. Helyezze be az elemeket és ügyeljen a behelyezett elemek megfelelő polaritására az
elemtér alján levő jelölés szerint.
3. Zárja le az elemtér fedelét.
Fontos megjegyzés
A hőmérőben vagy az érzékelőben történő elemcsere esetén el kell végezni az egész
rendszer reszetállását (törlését). Ezen művelet oka az, hogy a véletlenszerű biztonsági kód
a sugárzó által van megadva indításkor és ebben a kódban kell fogadni és elmenteni a
hőmérő vevőjében a sugárzás megkezdésétől három percen belül!
Elemek cseréje
Javasolt a hőmérőben és az érzékelőben egyaránt az elemeket rendszeresen cserélni a
problémamentes működés érdekében. A használt elemeket adja le a használt elemek
átvevőhelyén.
A nyomógombok leírása és értelmezése
Hőmérő
A hőmérőt 4 nyomógomb által lehet vezérelni
SET nyomógomb (manuális beállítás)
- A nyomógomb megnyomásával az egyes módok kapcsolhatók át: időzóna, óra, év,
hónap, dátum, nap és °C/°F.
- Normál módban átkapcsolás dátum,nap és másodpercek között
MIN/MAX nyomógomb
- Lehetővé teszi a minimális és maximális hőmérséklet megtekintését a beltéri és kültéri
hőmérsékletnél (kijelzi a mérés idejét is).
- A nyomógomb lenyomva tartásával kitörlődnek ezek az értékek.
- A nyomógomb további megnyomásával kilép a lapozás módból.
+ nyomógomb
- Az egyes adatok különböző beállítására szolgál.
- Az ábrázolás normális módban át lehet kapcsolni a dátum, nap és másodpercek között.
ICE ALARM nyomógomb
- Bekapcsolja és kikapcsolja a fagyveszély riasztást (a riasztás bekapcsol ha a kültéri
hőmérséklet 4°C alá csökken). A kijelzőn fenn a kültéri hőmérsékleti adat mellett
megjelenik a hópihe szimbóluma felkiáltó jellel amikor a riasztasztás bekapcsol.
Az LCD kijelző leírása és beállítása:
- lemerült elem a vezeték nélküli érzékelőben
11
EMOS spol. s r. o.
Page 12

WS9641-manual 0-0-0-K
- kültéri hőmérséklet
- fagyveszély riasztás bekapcsolásának indikációja
- a jel vétele a kültéri érzékelőből ikon
- fiú alak, aki az időjárási viszonyoknak megfelelően van öltözve
- lemerült elem a hőmérőben
- beltéri hőmérséklet
- beltéri nedvességtartalom
- DCF jel vételének ikonja
- óra
- dátum, nap és másodpercek
A jel sikeres vétele után a vezeték nélküli érzékelőből a kijelzőn állandó jelleggel megjelenik a ))) ikon. Ha a vétel sikertelen, az ikon nem jelenik meg. Az ikon villogása a jelenlegi
vétel folyamatát jelenti.
Az adatok áttekinthetősége miatt a kijelző három részre van felosztva éspedig az idő
és beltéri hőmérséklet, az időjárás előrejelzés és a kültéri hőmérséklet ábrázolására.
1. rész – kültéri hőmérséklet
- Az aktuális kültéri hőmérsékletet ábrázolja
- A MIN/MAX nyomógomb megnyomása után a minimális és maximális elmentett
hőmérséklet meg jelenik, és egyúttal megjelennek a min vagy max ikonok.
- A ))) ikon a jel vétel aktuális állapotát ábrázolja a vezeték nélküli érzékelőből.
2. rész – beltéri hőmérséklet és nedvességtartalom
- A beltéri hőmérsékletet és nedvességtartalmat ábrázolja és a fiú alakot, aki az időjárási
viszonyoknak megfelelően van öltözve.
- Az aktuális hőmérsékleti viszonyok a fiú alakjával vannak kiábrázolva, aki az időjárási
viszonyoknak megfelelően van öltözve nyolc lépésben.
3.rész – óra és dátum
Normál módban az idő és a dátum van ábrázolva
DCF-77 rádió jellel vezérelt óra
A DCF jel sugárzási forrása az atom óra a Physikalisch Technische Bundesanstalt
Braunschweigban és ennek eltérése egy másodpercet tesz ki egymillió év alatt. A DCF jel
kódolva van és 77,5 MHz frekvencián van sugározva Mainflingenből Frankfurt közeléből
Németországból. A hatótávolság körülbelül 1500 km a sugárzótól mért körzetben. Az óra a
hőmérőben fogadja ezt a jelt és beállítja a pontos időt, akár nyári időszámításról, akár téli
időszámításról legyen is szó. A vétel minősége függ a földrajzi helyzettől. Ha a szignál vétele
az adott körzetben 1500 km-rre Frankfurttól valósul meg, akkor nem valószínű a vételhiba.
A hőmérő a kültéri hőmérséklet megjelenése után fogadni kezdi a DCF jelt. Ez a folyamat
jelezve van a villogó antenna által balra fenn az óra adatától. A DCF jel sikeres fogadása
után állandó jelleggel ábrázolva van a DCF vétel ikonja és az idő be van állítva.
A DCF jel vétele végbe ment, de az ikon villog:
- Ne helyezze a hőmérőt elektromágneses interferencia források közelébe mint a
számítógépes monitorok vagy televíziók. A javasolt távolság 1,5-től 2 méterig terjed.
- A vétel az építőanyagok, mint a vasbeton konstrukció vagy alagsori helyiségek befolyásának köszönhetően csökken. A jel jó vétele érdekében helyezze a hőmérőt az ablakhoz
a lehető legközelebb és a sugárzó irányába, amely Frankfurtban van.
- A DCF jel vétele néha nem lehetséges a hegyláb vagy dombok alatt és ez nem a hőmérő
hibáját jelenti.
Kézi beállítás
Kézileg a következő adatok állíthatók be:
- Időzóna
- idő
- naptár beállítása
- °C/°F választása
A SET nyomógombot tartsa 3 másodpercnyi időre lenyomva és belép a beállítás rezsimbe:
Az időzóna beállítása
Standard módon az időzóna 0 órára van beállítva. A beállítás megváltoztatására járjon
el a következő képpen:
1. Tartsa a SET nyomógombot 3 másodpercnyi időre lenyomva és belép a beállítás
rezsimébe (villog a 0ó adat).
2. A + nyomógombbal beállíhatja az időzónát +12órától egészen -12óráig 1 óránként
3. A SET nyomógomb további megnyomásával bejut az idő beállításába.
Megjegyzés: A beállítás automatikusan átkapcsol normális rezsimbe, ha 3 másodpercen
belül nem nyom meg semmilyen nyomógombot.
Az óra beállítása
Az óra kézi beállítása abban az esetben lehetséges, ha az automatikus időbeállítás csődöt
mond zavarás, távolság stb. miatt. Az óra a beépített kvarc által lesz vezérelve.
1. A SET gomb második megnyomása után villog az óra adat pozíció.
2. A + nyomógomb segítségével állítsa be a megkívánt óra adatot és ezután a SET
nyomógomb megnyomásával áttér a percek beállítására.
3. Villog a perc adat pozíció. A + nyomógomb segítségével állísa be a megkívánt perc
adatot.
4. Erősítse meg a SET nyomógombbal és áttér a naptár beállítására.
Megjegyzés
A hőmérő a kézi beállítás után is minden kerek órában automatikusan keresi a DCF jelet.
Az óra 24 órás ábrázolásra van előre beállítva.
A naptár beállítása
A kiinduló adat a naptárban 2006.1.1-je és MO (hétfő). A DCF jel vétele után a naptár
automatikusan lesz beállítva. Ha az automatikus beállítás meghiúsul, alkalmazható a
kézi beállítás is.
1. A + nyomógomb segítségével állítsa be a megkívánt év adatot (az időtartomány 2000-től
2029-ig terjed).
2. A SET nyomógomb megnyomásával áttér a hónap beállítására.
3. Most a hónap adat villog. A + nyomógomb segítségével beállítja a megkívánt hónap
adatot. A SET nyomógomb megnyomásával áttér a dátum beállítására.
4. A dátum adat villog. A + nyomógomb segítségével beállítja a megkívánt dátum adatot.
5. A nyomógomb megnyomásával áttér a hét napja beállítására.
6. A + nyomógomb segítségével állítsa be a megkívánt napot a hét folyamán MO –hétfőtől
SU – vasárnapig sorrendben.
7. A SET nyomógomb megnyomásával áttér a °C/°F beállításra és a + nyomógomb
segítségével kiválasztja a hőmérséklet megfelelő egységét. A SET nyomógombbal
megerősíti a hőmérséklet egységet és egyúttal befejezi a naptár beállítását.
A beltéri hőmérséklet és nedvességtartalom ábrázolása
A beltéri hőmérséklet és nedvességtartalom adatai a kijelző második részében jelennek
meg.
A kültéri hőmérséklet ábrázolása a kijelzőn
A kültéri hőmérsékleti adatok a kijelző első részében vannak ábrázolva.
A min és max hőmérséklet ábrázolása
1. Normális rezsimben nyomja meg a MIN/MAX nyomógombot és megjelenik a minimális
hőmérséklet adata és az idő adata, amikor ez mérve volt.
2. A MIN/MAX nyomógomb további megnyomásával megjelenik az adat a maximális
hőmérsékletről és időről, amikor ez mérve volt.
minimális adata
a kültéri adatokat
ábrázoló ikon
a minimális hőmérséklet
ikonja
a mérés időpontja
3. A MIN/MAX nyomógomb további megnyomásával megjelenik az adat a minimális/
maximális beltéri hőmérsékletről és időről, amikor ez mérve volt.
a hőmérséklet
A beltéri hőmérséklet mért minimum és maximum
értékének megjelenítése
1. Normális rezsimben nyomja meg háromszor a MIN/MAX nyomógombot és megjelenik
a minimális beltéri hőmérséklet adata és egyúttal megjelenik a mérés idejének adata.
2. A MIN/MAX nyomógomb további megnyomásával megjelenik az adat a maximális
beltéri hőmérsékletről és időről, amikor ez mérve volt.
a beltéri adatokat a hőmérséklet
ábrázoló ikon maximális adata
a maximális
hőmérséklet ikonja
a mérés időpontja
3. A MIN/MAX A MIN/MAX nyomógomb további megnyomásával a normális ábrázolási
rezsimbe tér át.
A beltéri és kültéri hőmérséklet min és max jegyzett
értékének törlése
1. Normális rezsimben nyomja meg a MIN/MAX nyomógombot és áttér a min/max
jegyzett értékek ábrázolására.
2. Ha MIN/MAX nyomógombot 2 másodpercig lenyomva tartja, minden beltéri és kültéri
hőmérsékleti adat min és max értékei és a megfelelő időpontok törölve lesznek.
Megjegyzés: A beltéri és kültéri feljegyzések egyidejűleg lesznek törölve.
Fagyveszélyriasztás
A hőmérő fagyveszélyriasztó lehetőséggel van ellátva. A felhasználó ezt a funkciót bekapcsolhatja, vagy kikapcsolhatja.
A felhasználó a fagyveszélyriasztót bekapcsolhatja az ICE ALARM nyomógomb segítségével.
A kijelző felső részében megjelenik a hópihe ikonja és a funkció aktív. Ha a hőmérséklet 4
°C (39 °F) alá csökken, bekapcsol a riasztó hangjelzés és a hópihe ikonja villogni kezd.
A hangjelzés időhossza 1,5 perc.
12
A fagyveszély riasztás késleltetése
A hangjelzés gyakori bekapcsolásának megakadályozásának érdekében a kültéri hőmérséklet 4 °C körüli ingadozása esetén ez a késleltetési funkció van alkalmazva.
Ha a hőmérséklet eléri a 4 °C-ot, beáll az indítás (a funkciónak aktívnak kell lennie).
A késleltetés 1 °C-ra (1,8°F) van beállítva. Ha a hőmérséklet ismét emelkedik 4,6 °C-ra és
ezután ismételten 4 °C alá csökken, a hőmérséklet adat villogni kezd, de a hangjelzéses
riasztás nem aktiválódik.
Az 1 °C-os késleltetéssel a hőmérsékletnek 5°C-ra (41°F) kell emelkedni és ezt követően
4°C alá kell csökkennie ahhoz, hogy a hangriasztás beinduljon.
Megjegyzés: A fagyveszély riasztás hangjelzésének indítását követően az ikon is villogni
fog a 4-től 5°C-ig terjedő hőmérsékletnél.
Vétel 868 MHz
A hőmérő az adatokat az elemek behelyezését követően 5 percen belül kellene hogy fogadja.
Előfordulhat, hogy az 5 perc leforgása alatt nem áll be a kinti hőmérséklet ábrázolása és a
kijelzőn megjelenik a --.- jel. Ellenőrizze ezért kérem a következőket:
1. A vezeték nélküli érzékelő és hőmérő távolságának 1,5 m-től 2 m-ig kellene lennie a
zavaró forrásoktól mint a számítógépek, monitorok, televíziók és egyébb elektromos
fogyasztók.
2. Kerülje a vezeték nélküli érzékelő elhelyezését a fém konstrukciókra, mint az ablakkeretek, pléh perem stb.
3. A nem kívánt interferenciát megelőzheti az azonos frekvencián (868 MHz) működő
termékek kizárásával.
Megjegyzés:
A 868 MHz jel vétele után a vezeték nélküli érzékelőből ne nyissa ki az elemtér fedelét.
Kilazulhatna az elem és ezután az állomás beindulhat. A véletlenszerű kitörlés esetén vegye
ki és ismét helyezze be az elemeket a hőmérő és érzékelő használati utasítását követve.
Különben vételhibák állhatnak be. A sugárzás hatótávolsága 100 m nyitott térségben. A
hatótávolságot jelentősen befolyásolja a körülötte lévő környezet és a zavarás. Ha nem
lehetséges a vétel, vegye ki és helyezze be az elemeket a hőmérő és érzékelő használati
utasítását követve.
Elhelyezés
Hőmérő
Úgy van tervezve, hogy asztalra állítható vagy falra akasztható legyen.
Falra erősítés
Válassza ki a megfelelő helyet, ahol nem lesz közvetlen napsütés és sugárzott hő hatása
alatt. A falra erősítés előtt először próbálja ki, hogy a hőmérő és az érzékelő között jó
vétel lesz-e.
1. Használjon megfelelő csavart (nem tartozék) és a csavarfejnek cca 5 mm-re túl kell
nyúlni.
2. Vegye le az állványt a hőmérő testről, és a hőmérőt akassza falra. Bizonyosodjon meg
róla, hogy a hőmérő elégségesen biztosítva van a leesés ellen.
A vezeték nélküli érzékelő elhelyezése
Az érzékelő a falra akasztáshoz szükséges tartóval vagy állvánnyal van szállítva, ami
univerzális. A tartó a falra van erősítve két hozzáadott csavar segítségével.
Állvány használata Az érzékelő megfelelő helyzete falra szerelésnél
BREZŽIČNI TERMOMETER WS-9641IT
SLO
Brezžični termometer prikazuje zunanjo temperaturo na frekvenci 868 MHz, notranjo temperaturo, vlažnost, uro, ki ga krmili signal DCF, datum in aktualno vreme z ikono fantka, ki se
različno oblači v 8 različicah.
Opis postaje
- ura, krmiljena s signalom DCF, z možnostjo ročnega nastavljanja
- prikazovanje ur, minut in sekund
- datum
- časovni pasovi od -12. do +12. ure
- brezžični prenos na frekvenci 868 MHz
- signal iz zunanjega tipala se sprejema vsake 4 sekunde
- ikona fantka, ki se v petih različicah različno oblači glede na temperaturo
- nastavitev temperature v °C ali °F
- zapisovanje min. in maks. temperature (notranje in zunanje)
- možnost brisanja podatkov o min. in maks. temperaturi
- prikazovanje izpraznjenih baterij
- možnost postavitve na stojalo ali obešanja
Falra erősítés
A tartót a csavarok segítségével biztonságosan szerelje fel a falra.
Ezután kattintsa be a vezeték nélküli érzékelőt az ábra szerint. Vigyázzon arra, hogy
az érzékelőt ne tegye fordítva. Az alsó részben nyílások vannak a levegő részére, és az
érzékelőbe fordított helyzetben víz kerülhetne. Ennek következtében károsodhatna a
benn lévő elektronika.
Megjegyzés:
Mielőtt az érzékelőt a falra erősítené, győződjön meg afelől, hogy képes-e probléma
mentesen kommunikálni a hőmérővel. Az esetben, ha a jel vétele nem történt meg, tolja
az érzékelőt a jobb vétel érdekében közelebbre a hőmérőhöz.
Gondoskodás és karbantartás
Kerülje az egyes részek elhelyezését vibrációra és rezgésre hajlamos helyekre, ami a
készüléket károsíthatná.
Kerülje az olyan környezetet, ahol az egyes részek hirtelen hőmérsékletváltozásoknak
vannak kitéve, illetve a közvetlen napsugárzásnak, extrém hidegnek és nedvességnek
és olyan feltételeknek, amelyek hirtelen hőmérsékletváltozásokhoz vezethetnek, mert ez
csökkenti az érzékelés pontosságát.
Az LCD kijelző és a készülék fedőjének tisztítása alkalmával csak puha, nedves ruhát
használjon. Ne használjon oldószereket se tisztítószereket.
Semmilyen részét ne merítse vízbe sem egyébb folyadékba.
A készülékből késedelem nélkül távolítsa el a lemerült elemeket, megelőzi így ezeknek
kifolyását és a készülék károsodását. Csakis új és feltüntetett típusú elemeket használjon.
Egymaga ne végezzen semmiféle javítást a készülék egyik részén sem. A terméket károsodása vagy hibája esetén adja át javításra az üzletbe, ahol a készüléket megvásárolta.
Gyártó kijelti hogy a termék WS-9641IT megfelel az alap feltételeknek és a többi feltételeknek 1999/5/ES szabványok szerint.
E kijelentés megtalálható a használati utasításon vagy az www.emos.cz oldalakon.
H: Az ikonok értelmezése – a fiú alakja, aki az aktuális időjárási viszonyoknak megfe-
lelően van felöltözve nyolc különböző lépésekben jelenik meg.
SLO: Pomen ikon - postava fantka, oblečenega v skladu s trenutno temperaturo, se
prikazuje v osmih različicah.
Zunanje brezžično tipalo
- Signal se prenaša na frekvenci 868 MHz.
- Doseg vse do 100 m v neoviranem prostoru (v zazidanih prostorih in mestih z motnjami
se doseg lahko precej zniža).
- Pokrov je odporen proti vremenskim vplivom.
- Tipalo montirajte na mesto, ki je zaščiteno pred neposrednim sončnim sevanjem in
dežjem.
Tehnični parametri
Toplotni obsegi
Notranja temperatura od -9,9°C do +59,9°C
Natančnost meritve -9,9°C do 40°C ±1,5°C
40°C do 59,9°C ±2°C
(prikaz OF.L - izven obsega merjenja)
13
EMOS spol. s r. o.
 Loading...