

Page 1

English
Read this manual before installation and use.
SET TOP BOX
Digital receiver
OWNER'S MANUAL
BEN
150HD
BEN150 HD
Page 2
TO REDUCE THE RISK OF FIRE AND ELECTRIC SHOCK, DO NOT EXPOSE THIS UNIT TO RAIN OR
MOISTURE.
IMPORTANT SAFE GUARD S
: To red uce the
risk of fir e an d electric s hoc k, do
not rem ove the cover (or back pane l)
of the u nit . Re fer servici ng t o qualified ser vice person nel .
The light ning f lash w ith ar row he ad sy mbol , wit hin an equil atera l
tri angle , is in tende d to al ert th e user to the pre senc e of u ninsula ted
"da ngero us vol tage" withi n the p roduc t's en closu re tha t may b e of
suf ficie nt mag nitud e to co nstit ute a r isk of electric shoc k.
The excla matio n poin t with in an e quila teral triangl e is i nten ded t o
ale rt the user t o the p resen ce of i mpor tant opera tion a nd ser vicin g
ins truct ions i n the l itera ture a ccomp anyin g the a pplia nce.
WAR NING: TO RED UCE TH E RISK OF FI RE OR ELEC TRIC S HOCK, DO
NOT EXPOS E THIS APPLI ANCE T O RAIN OR MOI STUR E.
CAU TION: TO PRE VENT E LECTR IC SHO CK, MA TCH WI DE BLADE OF
PLU G TO WI DE SLO T AND F ULLY I NSERT .
In addi tio n to the careful att ention d evo ted to quali ty s tandards
in the m anu fac turing of yo ur s et-top b ox, safety is a m ajo r factor
in the d esi gn o f every inst rum ent. How eve r, safety is you r
respon sib ili ty, too. Thi s sh eet lists im por tant inf orm ation that w ill
help as sur e yo ur enjoymen t an d proper use of the set-t op b ox
and its acc ess ories. Plea se r ead them car efully befo re i nstalling
and ope rat ing your set-to p bo x.
Installat ion
10.
11.
11a .
12.
13.
14.
15.
16.
17.
18.
19.
20.
21.
22.
CAUTION
The appar atus s hall n ot be e xpose d to dr ippi ng or s plash ing, a nd no
obj ects f illed with l iquid s, suc h as va ses, s hall be pla ced on the ap parat us.
SAFETY INFORMATION
1.
2.
3.
4
.
5.
6.
7.
8.
9.
Rea d and F ollow Instr uctio ns- All th e saf ety and op erat ion i nstru ction s
sho uld be read b efore the set-t op bo x is opera ted. Foll ow all opera ting
ins truct ions.
Ret ain In struc tions - The s afety and opera ting inst ruction s shou ld be
ret ained for fu ture r efere nce.
Hee d all W arnin gs-Co mply w ith all wa rnin gs on the set-t op box and
ope ratin g inst ructi ons.
Pow er - Th is set -top box i s sup plie d wit h a DC powe r. To prev ent
ele ctric shock , ensu re the adaptor i s ins erted corre ctly i nto
the power outle t.
Pow er Sou rces- This s et-to p box shou ld on ly be oper ated with the
rat ting s pecif ied on the label on th e back pan el of the set- top b ox.
If y ou are not sure o f the typ e of powe r sup ply t o your home o r off ice,
ple ase co nsult your s et-to p box deal er or e lectr ician . For s et-to p boxe s
int ended to ope rate f rom batte ry po wer, or ot her s ourc es, re fer to the
ope ratin g inst ructi ons.
Ove rload ing- D o not o verlo ad wall ou tlet s or exte nsio n cor ds as t his can
res ult in a risk of fire or e lectric shoc k. Ov erloade d AC o utle ts, exte nsio n
cor ds, fr ayed p ower c ords, damaged o r cra cked wir e insu latio n, and
bro ken pl ugs ar e dang erous , They may re sult in a shoc k or f ire hazard .
Per iodic ally e xamin e the c ord, and i f its a ppear ance i ndica te dam age or
det erior ated i nsula tion, have i t replace d by y our servi ce te chni cian.
Pow er-Co rd Pro tecti on- Po wer-s upply cords should be ro uted so th at
the y are n ot lik ely to be w alke d on o r dam aged by items plac ed up on or
aga inst t hem, p aying parti cular attentio n to t he point w here they exit
fro m the s et-to p box.
Ven tilat ion- S lots a nd ope nings in the cas e are p rovid ed for ventilat ion
to e nsure relia ble op erati on of the s et-t op box and to pr otec t it fr om
ove rheat ing. T hese o penin gs mus t not be bl ocke d or cover ed. T he
ope nings shoul d neve r be block ed by plac ing t he se t-to p box o n a
bed , sofa , rug, or heat re gist er. T his s et-t op bo x shou ld not be pla ced in a
bui lt-in insta llati on suc h as a book case o r rack , unle ss proper vent ilat ion
is p rovid ed or t he set-to p box manu facture r's in structi ons h ave b een
fol lowed .
Att achme nts- D o not u se attach ment s unl ess reco mmen ded by the
set -top b ox man ufact urer a s they may caus e hazards .
The appar atus s hall n ot be expo sed t o drippin g or s plas hing and no objec ts
fil led wi th liq uids , such as va ses s hall be plac ed on the a pparatu s.
Cau tion: Maint ain el ectri cal sa fety. Powerlin e ope rate d equ ipmen t or ac cess orie s
con necte d to th is uni t should b ear s afet y cer tifi cati on mar k on th e accesso ry it self
and shoul d not b e modifie d so a s to c ompr omis e the saf ety f eatu res. Thi s wil l help
avo id any poten tial h azard from elec tric al sh ock o r fir e. If in dou bt, co ntact a
qua lifie d serv ice pe rsonn el.
Acc essor ies- D o not p lace this set- top box on a n uns tabl e cart, s tand , tripod,
bra cket, or tab le. Th e set-top box m ay fall, c ausi ng se rious injur y to a chil d or
adu lt as w ell as serious d amag e to t he se t-to p box. Us e thi s set -top box o nly
wit h a car t, sta nd, tripo d, br acke t, or ta ble r ecom mended b y the manu facture r's
or s old wi th the set-top b ox. A ny mo unti ng of the prod uct s houl d follow the
man ufact urer' s inst ructi ons an d use of a m ount ing acces sory reco mmend ed by
the manuf actur er.
A se t-top box an d cart com bina tion shou ld be m oved with care. Quick sto ps,
exc essiv e forc e, and uneve n surface s may caus e dam age t o the set-t op box .
Out door A ntenn a Grou nding - If an out side an tenn a or cable syst em is connect ed to
the set-t op box , be sure t he anten na or cabl e system is gr ound ed s o as t o provid e
som e prot ectio n agai nst vo ltage surges an d bui lt-u p sta tic c harg es. Se ction 810 of
the Natio nal El ectri cal Co de, ANSI/ NFPA No.7 0-19 84 (S ecti on 54 of Can adian
Ele ctric al Cod e, Par t1) pr ovide s informa tion with resp ect to prop er gr ounding of
the mast a nd sup porti ng struct ure, grou ndin g of t he le ad-i n wire to an a ntenn adis charg e unit , conn ectio n to groun ding elec trod es, an d requ irem ents for the
gro undin g elec trode .
Pow er Lin es-An outsi de ant enna syst em sh ould not b e loc ated in the vicin ity of
ove rhead power lines , othe r electri c lig ht or pow er ci rcui ts, or where it ca n fal l int o
suc h powe r line s or circu its. When inst allin g an ou tsid e ant enna s ystem , extr eme
car e shou ld be t aken to ke ep fr om touchi ng or appr oachi ng suc h powe r lines or
cir cuits , as co ntact with them migh t be f atal . Ins tall ing an outdoor a nten na ca n be
haz ardou s and s hould be left to a profess iona l ant enna installe r.
Use
Cle aning - Unpl ug the set-t op box from t he wal l out let b efore cl eani ng.
Do n ot use liqui d clea ners o r aero sol cl eane rs. U se a da mp clo th for clean ing.
Obj ects t hat ma y touc h dang erous volta ge poi nts or "sho rt-o ut" part s cou ld re sult in
a fi re or e lectr ic sho ck. Ne ver sp ill li quid of an y kind on the s et-t op bo x.
Lig htnin g-For added prote ction for th is set -top b ox dur ing a ligh tning st orm, or
whe n it is left u natte nded a nd unu sed fo r lon g per iods o f time , unpl ug it f rom t he
wal l outl et and disco nnect the an tenna o r cab le sy stem . This will p reven t dam age t o
the set-t op box due to light ning a nd pow er li ne su rges.
Ser vice
Ser vicin g-Do n ot att empt t o service this set- top b ox yo urse lf, as openi ng or
rem oving cover s may e xpose you to dan gero us volta ge or othe r haza rds. R efer a ll
ser vicin g to qu alifi ed ser vice pers onne l.
Con ditio ns Req uirin g Serv ice-U nplug the set-t op bo x fro m the wall outl et and
ref er ser vicin g to qu alifi ed servic e per sonn el un der th e fol lowi ng condi tion s:
A. When the D C pow er ada ptor or conn ecti ng po wer co rd is d amage d.
B. If li quid has b een sp illed , or ob ject s hav e fallen into the s et-to p box.
C. If th e set -top box ha s been expose d to r ain o r wate r.
D. If th e vid eo do es not opera te nor mall y by f ollow ing th e oper ating
instru ctio ns.
Adjust only thos e cont rols t hat ar e covered b y ope rating i nstr ucti ons.
Improp er ad just ment o f othe r cont rols m ay result i n dam age a nd wil l often
requir e ext ensi ve wor k by a q ualif ied techn icia n to re store the set-t op bo x
to its n orma l ope ratio n.
E. If th e set -top box ha s bee n dro pped or cab inet h as bee n dam aged .
F. When the s et-t op box exhib its a d isti nct c hange in perf orma nce-thi s
indica tes a need for se rvice .
Rep lacem ent Pa rts-W hen re place ment p arts are r equi red, ha ve the servi ce
tec hnici an ver ify th at the replacem ents he us es ha ve th e sam e safe ty cha racte risti cs
as t he ori ginal parts . Use of re plac emen ts sp ecif ied b y the s et-to p box manu fact urer
can preve nt fir e, ele ctric shock, or othe r hazards .
Saf ety Ch eck-U pon co mplet ion of any servi ce or r epair s to th is set -top b ox, ask
the servi ce tec hnici an to perf orm s afet y che cks re comm ende d by th e manu factu rer
to d eterm ine th at the set-top b ox is in sa fe op erat ing cond itio n.
Wal l or Ce iling Mount ing- The p rodu ct sh ould be moun ted t o a wa ll or ceil ing only
as r ecomm ended by the manufact urer .
Hea t-The produ ct sho uld be situated away from hea t sources such as ra diators ,
hea t regi sters , stov es, or other pro duct s (inclu ding ampl ifier s) tha t prod uce he at.
Page 3

CONTENTS
SA FETY INFORMATION
IN TRODUCTION
Front panel
Rear panel
Remote control
SY STEM CONNECTION
General
Connecting the TV
Connecting a HiFi System
GE TTING STARTED
Welcome
Installation
OP ERATION
Changing channels
Access the Electronic Programme Guide(EPG)
ED IT CHANNEL
Edit Channel menu
TV Channel list
Radio Channel list
Delete All
SY STEM SETUP
System setup menu
Language
TV System
Local Time Setting
Timer Setting
Parental Lock
OSD Setting
Favorite
Audio Description Setting
Multiview Setting
Other
TO OLS
Tools main menu
Information
Factory Setting
Software Upgrade
Remove USB device safely
GA MES
Game
RE C
REC main menu
Media Player
PVR Information
PVR Setting
TI MESHIFT/RECORD
Timeshift
Record
TR OUBLESHOOTING
SP ECIFICATIONS
1
1
2
3
3
3
4
4
5
5
6
6
6
6
7
7
7
7
8
8
8
8
9
9
9
10
10
10
10
10
11
12
12
13
13
14
14
15
16
Page 4
5V 50mA
RF IN
RF OUT
HDMI
220-240V~
50/60Hz
TV
COAXIAL
BEN150 HD
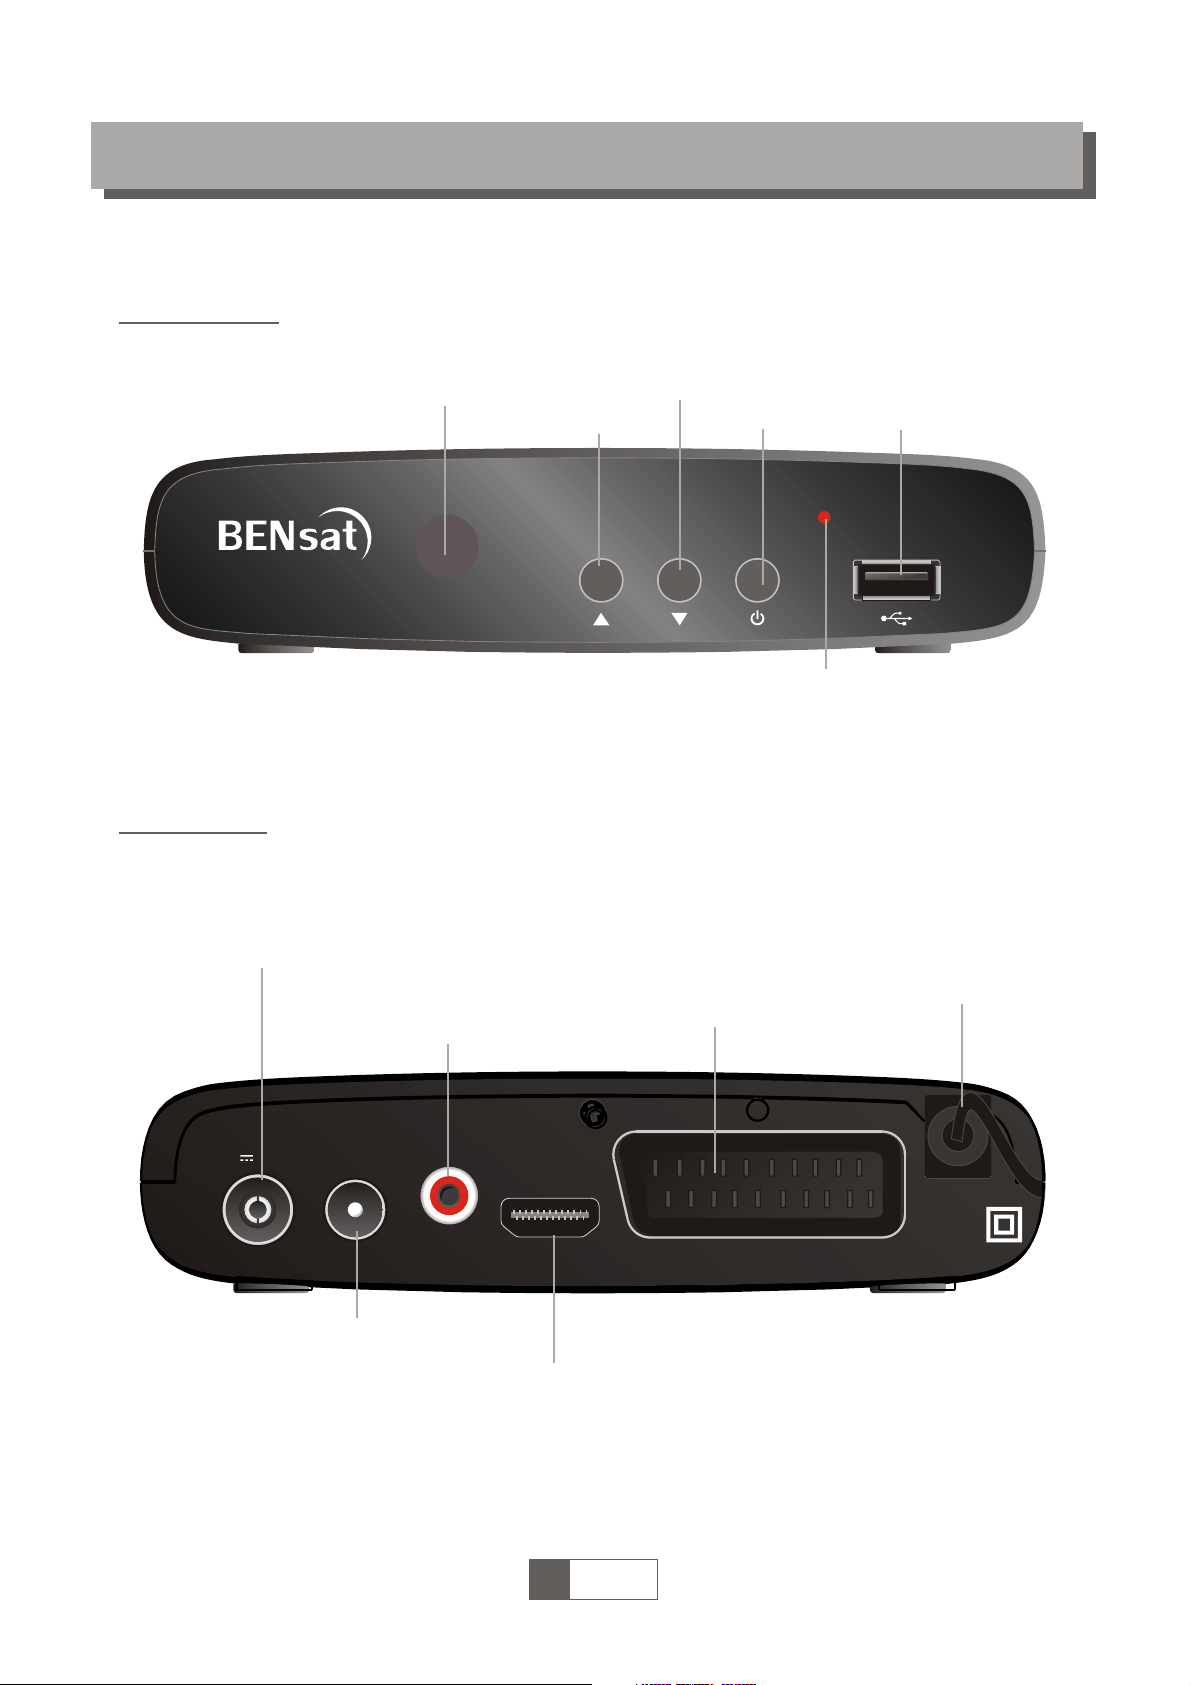
Front panel
Rear panel
INTRODUCTION
1
English
1
Remote sensor
USB port
AC Mains
Coaxial Digital Audio
TV aerial
for an external TV aerial
RF Loop through
for an external device
HDMI Output
TV Scart
for connection to the TV
Channel Up
Power indicator
Power
Channel Down
Page 5
STANDBY
INFO
SUBTITLE
AUDIO
TV/RADIO
BACK
CH+
CH-
TTX TIMER
FAV
MUTE
MEDIA
RES
EXIT
MENU
RECORD
4
5
6
VOL+
VOL-
1
2
3
0
7 8
9
OK
USB
EPG
DF00
IN TRO DU CT IO N
1
English
2
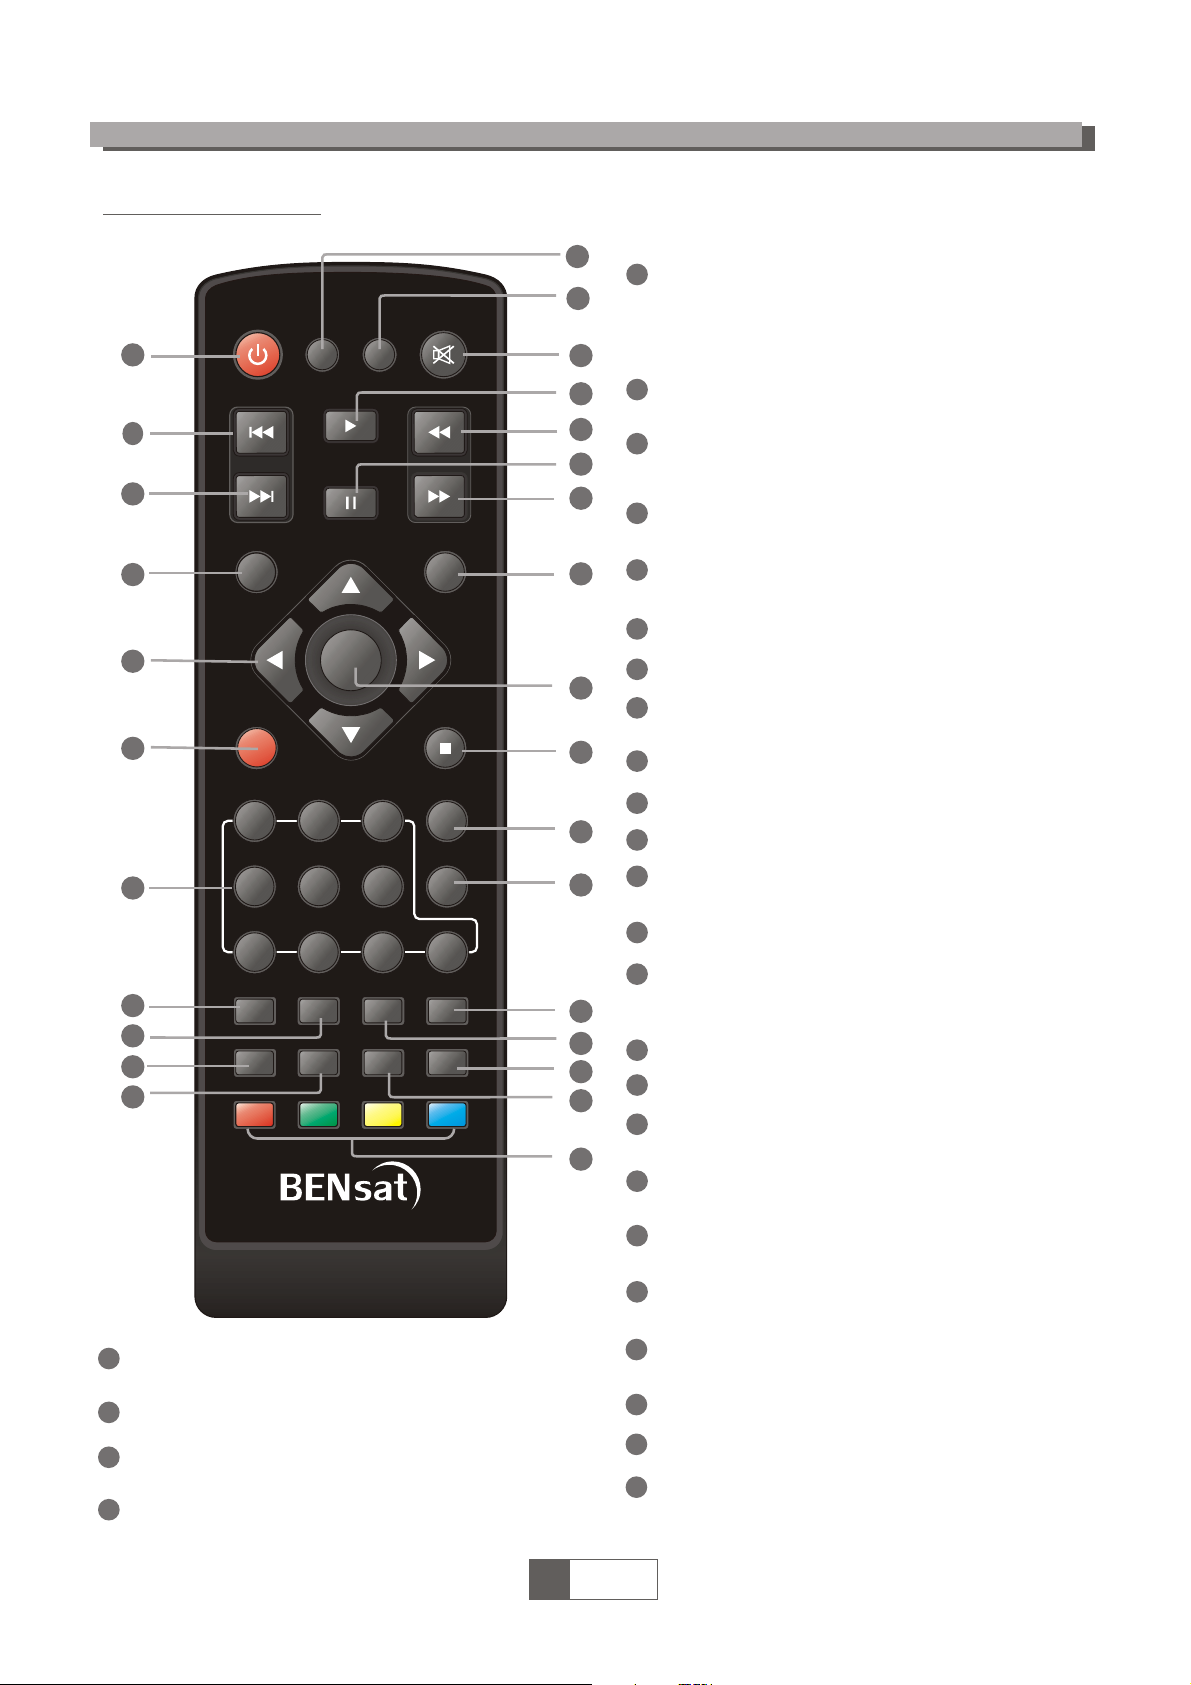
Remote control
1
3
4
5
2
6
7
8
12
23
25
19
9
10
11
13
13
14
15
17
16
20
21
24
22
20
21
22
23
24
25
RES (Switch HDMI resolution)
8
9
11
10
12
13
15
14
5
6
7
16
17
18
19
RECORD
(Re
cord the TV program)
Cursor/CH+,-/VOL+.(Cursor: Navigation buttons used to
navigatemenus items)
(CH+/-: Channel Up and Down
(VOL+/-:Volume Up and Down)
MUTE (Turn off/on the volume)
MEDIA
(Enter Record menu)
USB
(Enter Music menu)
PREV(previous)
NEXT
1
2
3
STANDBY
(sw
itch the STB on and standby)
4
Menu
(Open and close the menu screen)
Numeric entry
(Enter numeric values and select the channel
directly by entering it's number)
TTX (Open interactive service)
TIMER (Timer wake-up)
SUBTITLE (On/Off Subtitle)
INFO
(Press for current channel information )
PLAY
STOP
(Stop program playback or recording)
BACK
(Switch to previous channel)
REV
(Press REV but ton to rewind the playback)
18
FWD
(Pr
ess FWD button to fast forward
the playback)
EXIT(Exit from menu)
PAUSE(Pause/Active timeshift function)
EPG
(Open up Electronic Program Guide Me nu)
AUDIO
(Select audio mode and audio track)
TV/RADIO
(Switch between TV and Radio)
26
27
27
RED/GREEN/YELLOW/BLUE Buttons
(Fo
r interactive function/Submenu
function buttons)
26
FAV (Open the Favorite list)
28
OK
28
Page 6
5V 50mA
RF IN
RF OUT
HDMI
220-240V ~
50/60Hz
TV
COAXIAL
5V 50mA
RF IN
RF OUT
HDMI
220-240V ~
50/60Hz
TV
COAXIAL
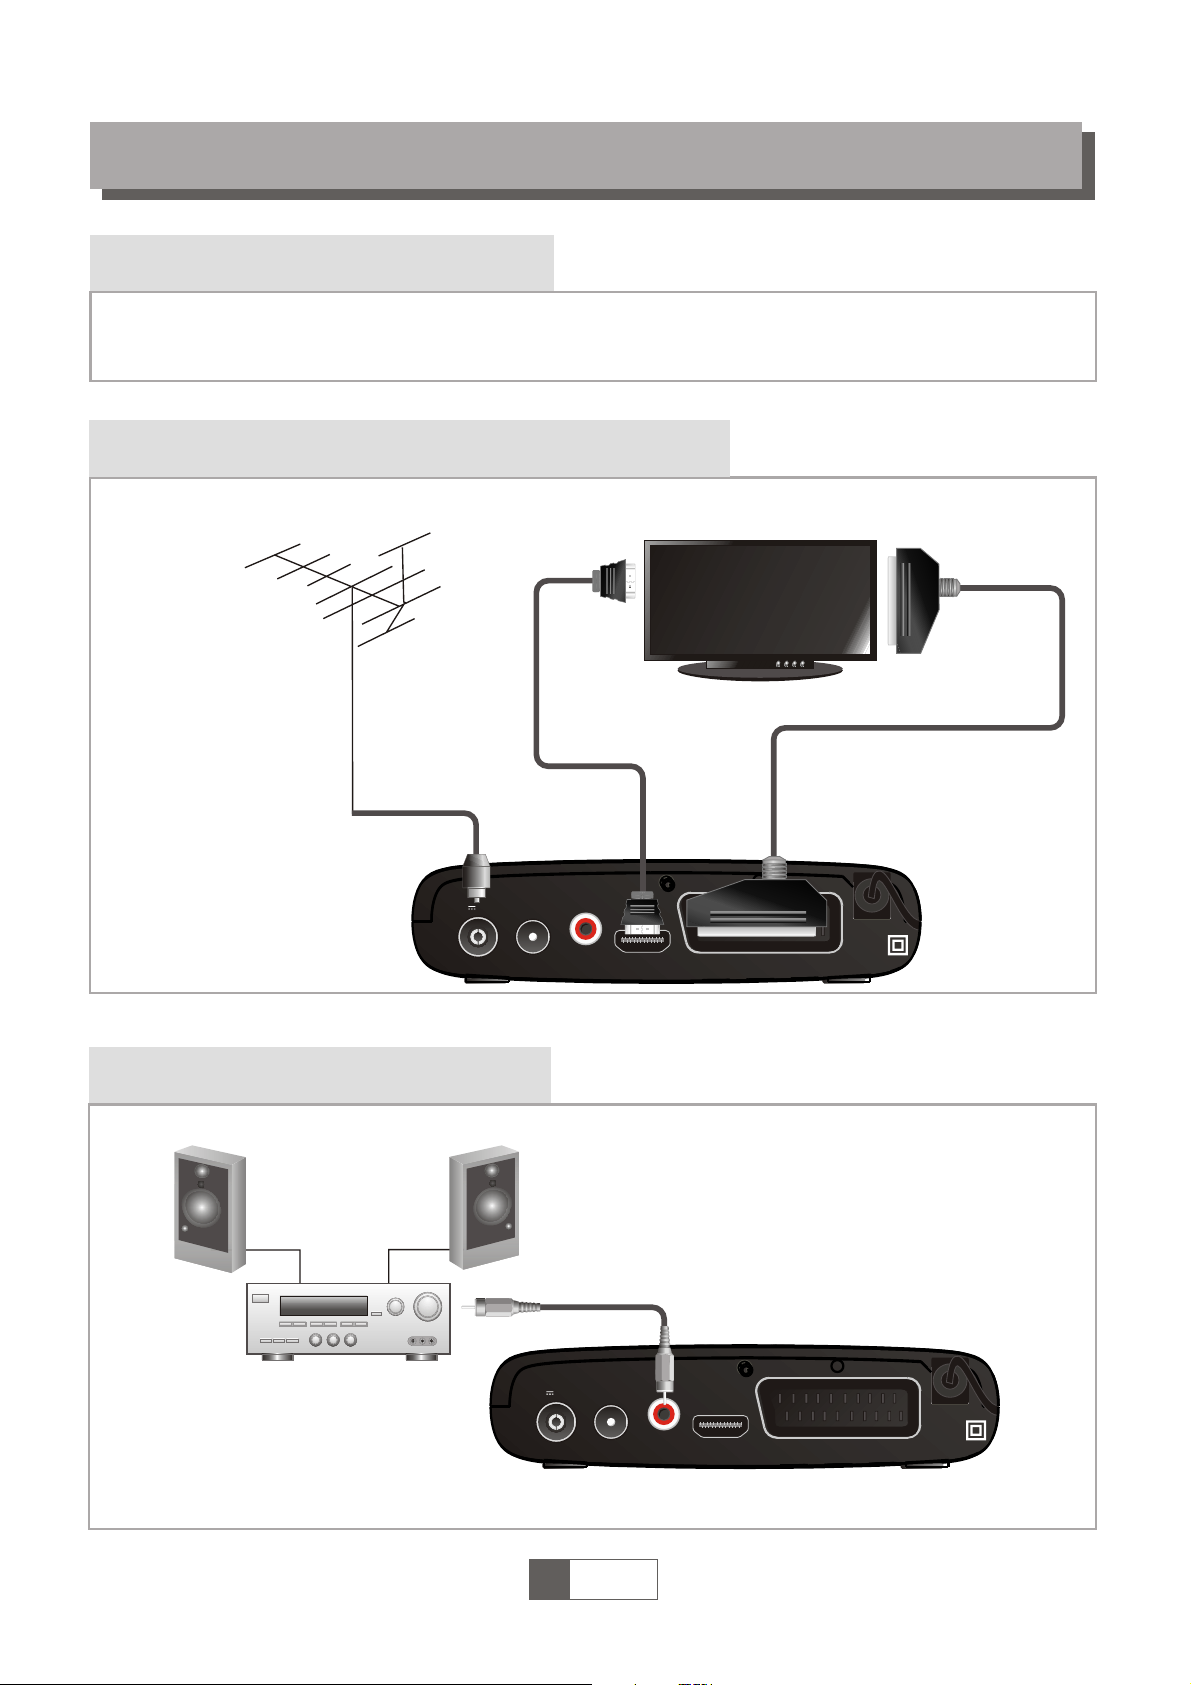
SYSTEM CONNECTION
There are many different types of TV and other equipment that you can connect to the STB.
In this manual you will see some of the most common ways to connect your equipment.
General
Connecting a HiFi system
Connecting the TV
1
English
3
Coaxial cable
Hi-Fi
HDMI TV
RF cable
Scart cable
Antenna
HDMI cable
Page 7
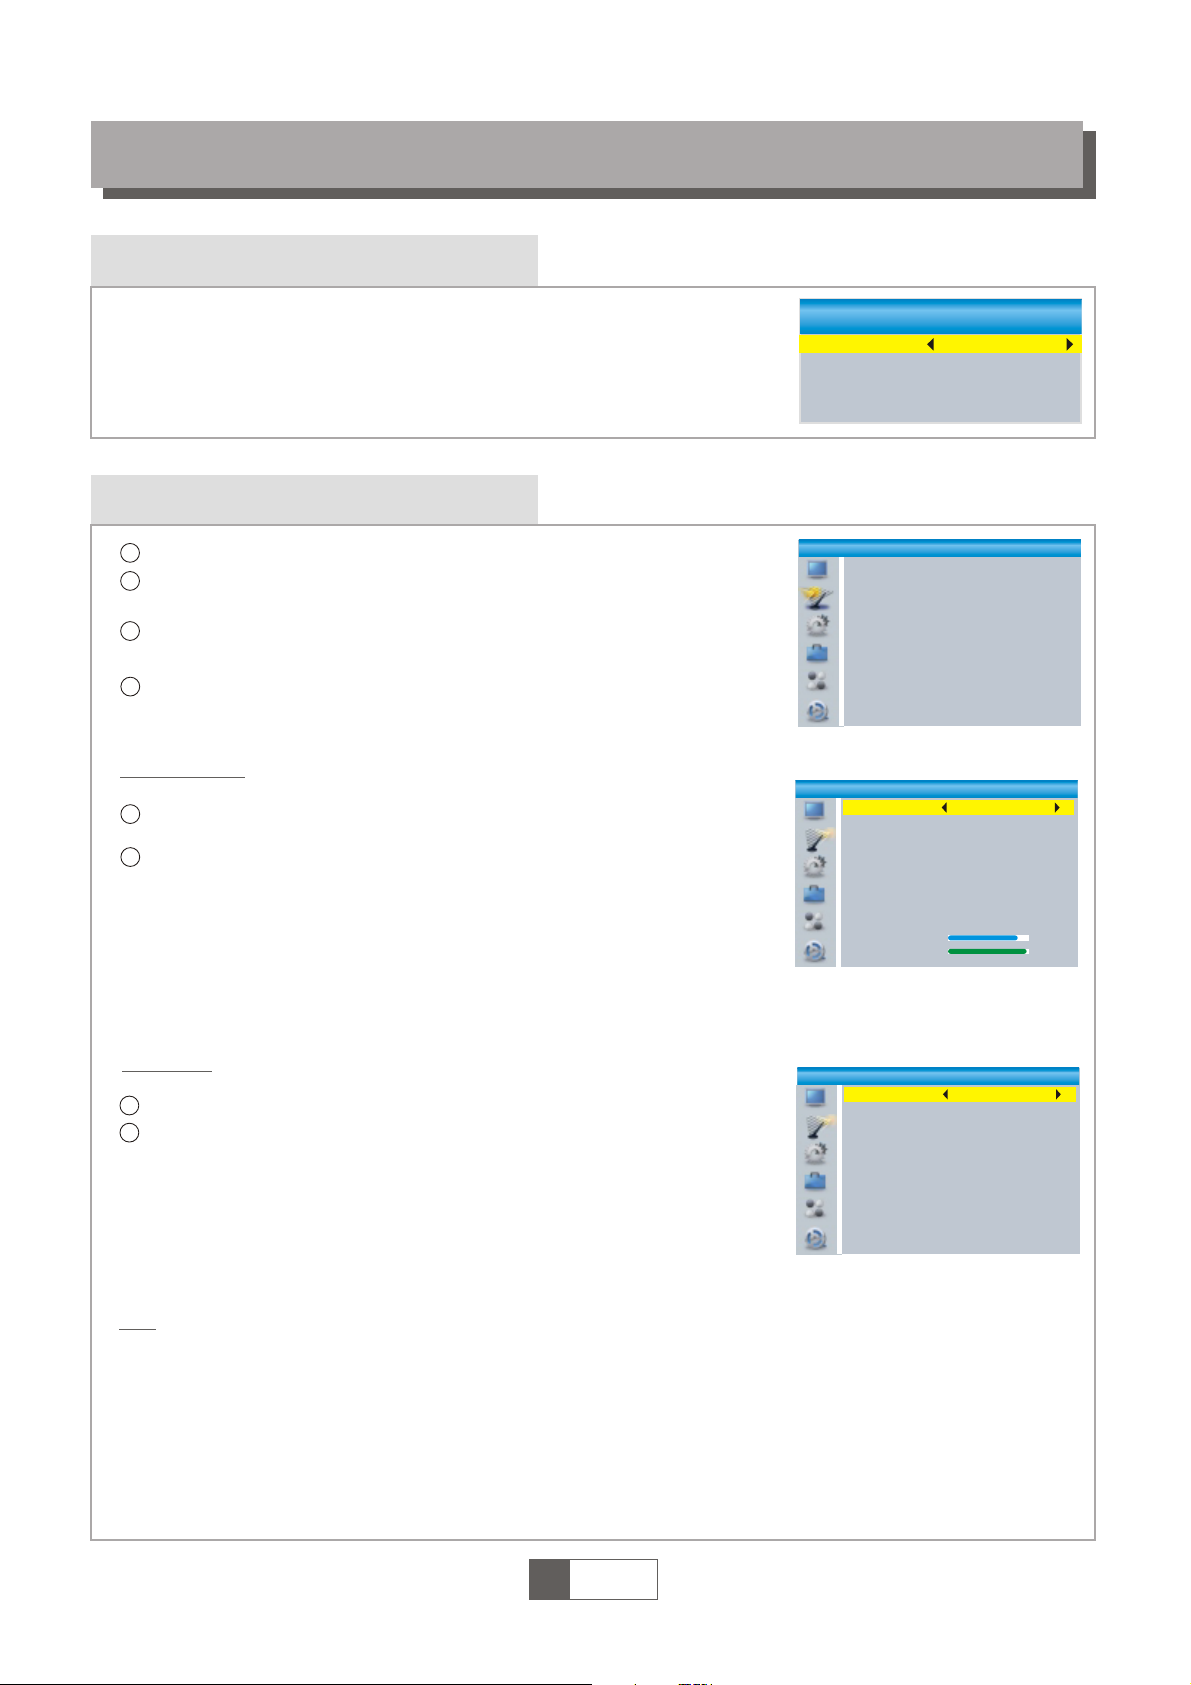
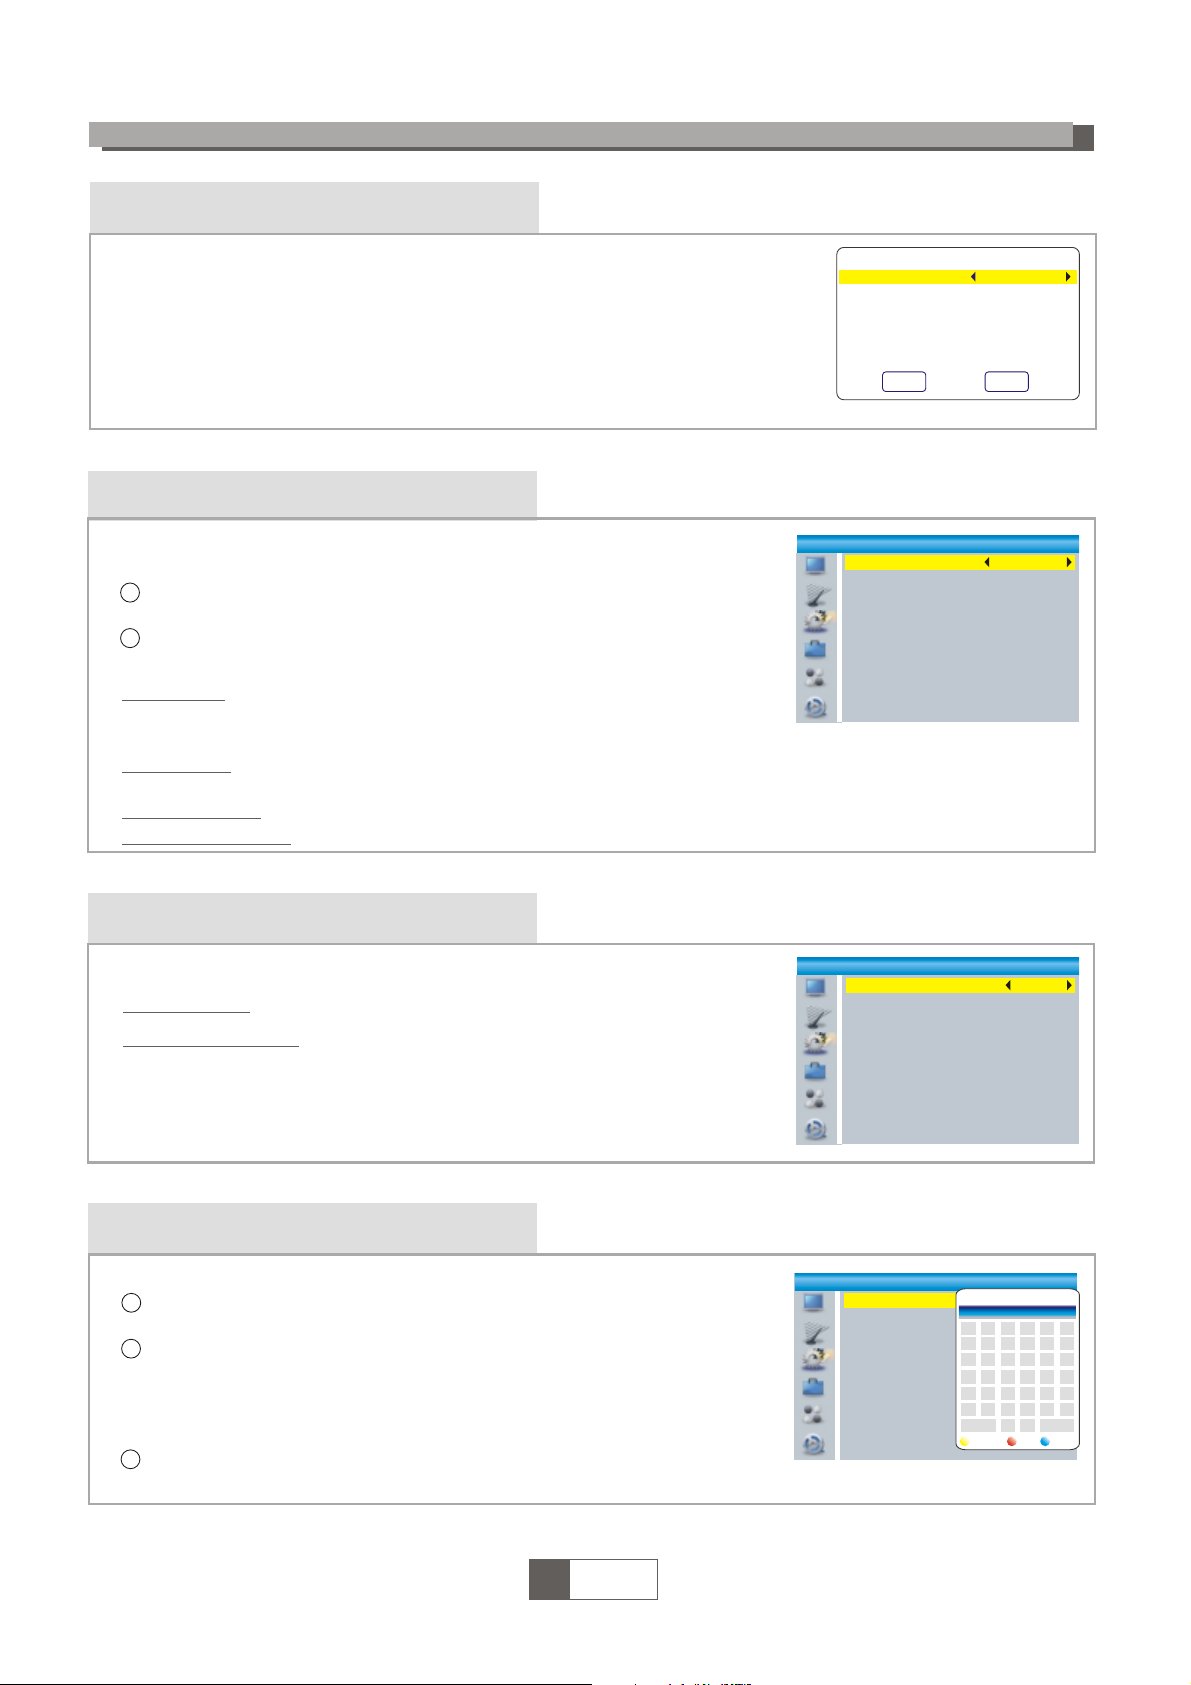
Welcome
If you use the STB for t he first time, the "Welcome" menu appears.
Press cursor button to setup the Region, Language, Display Mode
and Aspect Mode.
Highlight "OK" and press the "OK" button to start channel search.
GETTING STARTED
Installation
Sel
ect " Channel Scan", press the "OK" button to enter the
Channel Scan menu.
Press cursor button to set Scan mode, Scan Band ,Channel No.,
Frequency and Bandwidth, then highlight "Search", press "OK"
button to start channel scan .
1
1
2
2
4
Press the cursor button to set "FTA Only", then highlight "Search",
press the "OK" button to start auto scan .
1
2
3
1
English
4
Wel come
Reg ion
Lan guage
Dis play Mo de
Asp ect Mod e
Pol and
Eng lish
720 p@50H Z
4:3 LB
OK
Auto Scan
Channel Scan
LCN
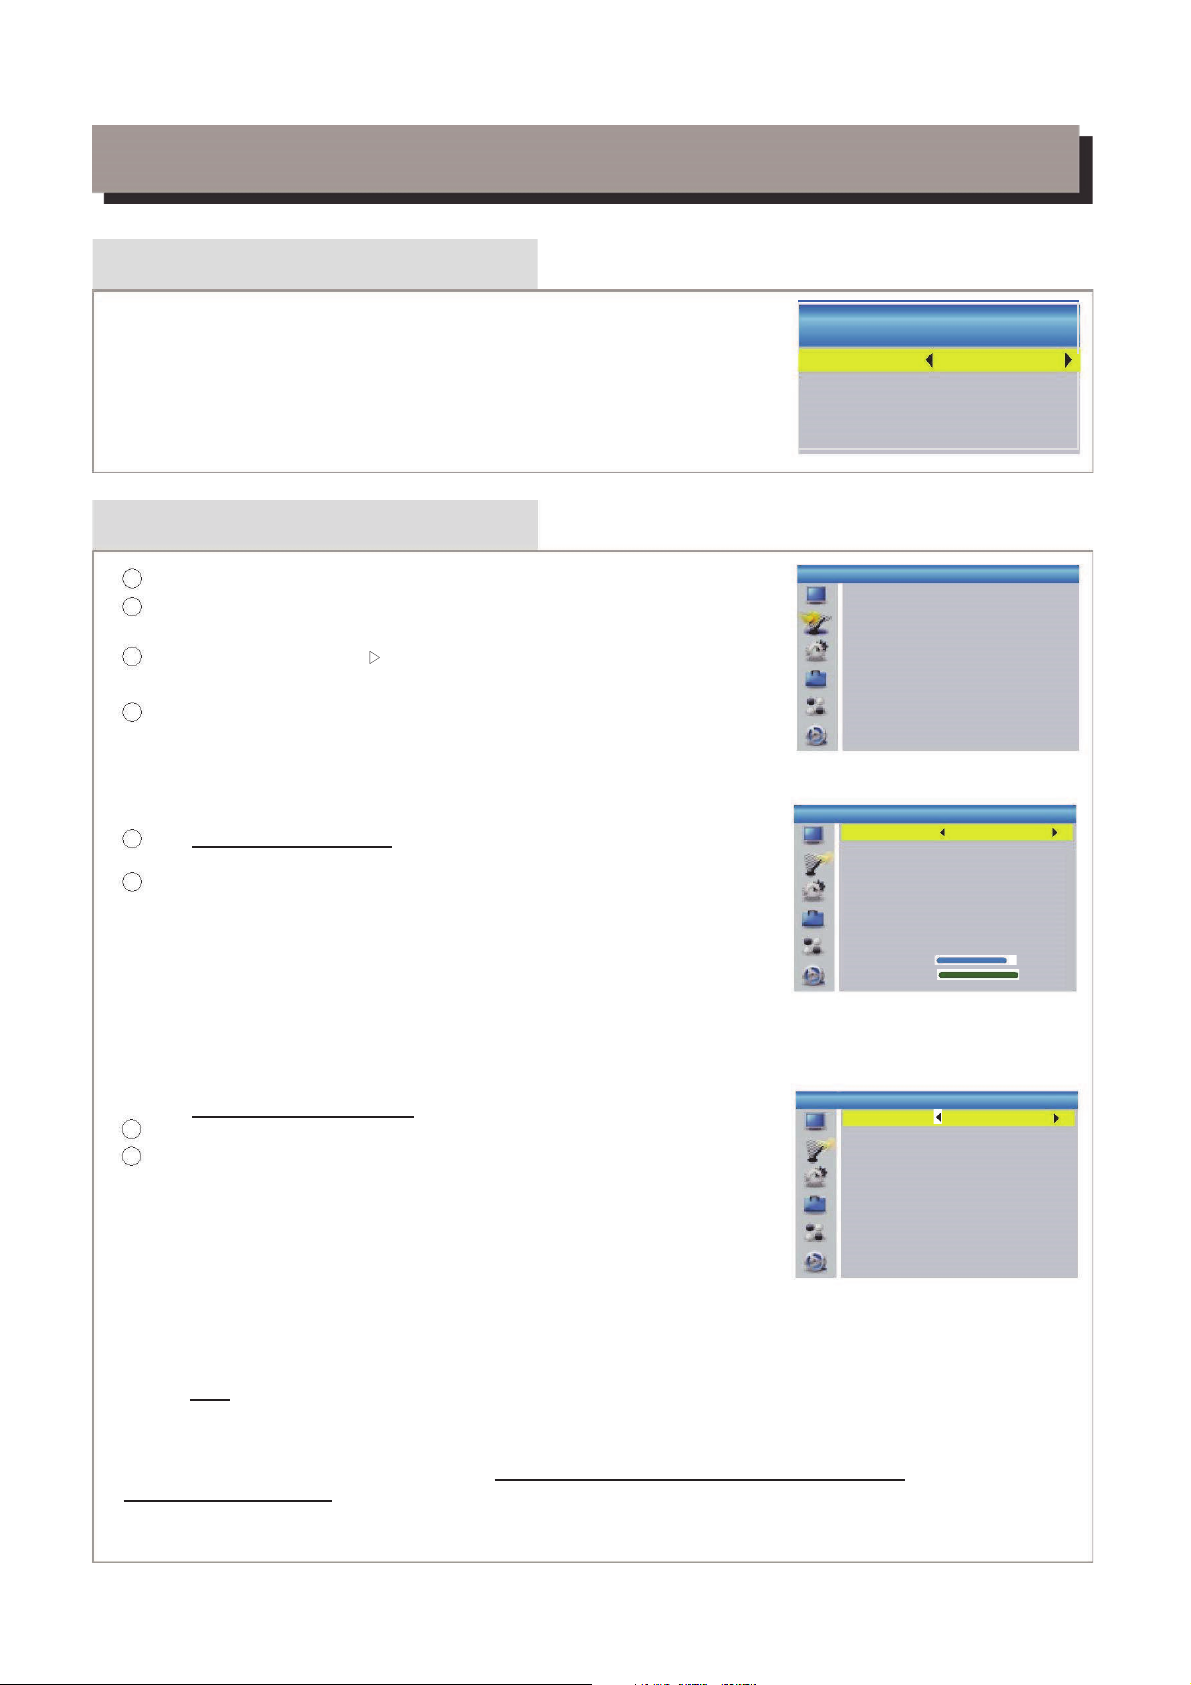
Press the "MENU" button to enter main menu.
Press "UP"or " DOWN " button to highlight "Installation", press
"RIGHT" button to enter the Installation menu.
Press "UP" or "DOWN" cursor button to highlight the desired item
and press "OK"button to enter the sub-menu .
Press "EXIT" button to exit.
Select the "Auto Scan", press "OK" button to enter the Auto Scan menu.
If LCN( Logical Channel Number) Select function is activated, you can't change the original
number of TV channels by scanning .
You can activate/disactivate the LCN function by setting the "LCN " to on/off.
Cha nnel Sc an
Aut o Scan
LCN
Ins talla tion
Aut o Scan
FTA Onl y
Sea rch
No
Cha nnel Sc an
Sca n Mode
Sca n Band
Ch No .
Sea rch
Fre quenc y
B
and width
By channel
UHF
CH37(6660 00KHz)
666000KHz
8
MHz
Sig nal Int ensit y
Sig
nal Q ualit y
81%
97%
Page 8
Ac ce ssing the Electronic Program Gu ide (EPG)
OPERATION
Changing Channels
There are three ways of channel selection - stepping through the channel list, selection by number
and from the on-screen channel list.
Stepping through the channel list:
To move through the channel list, press the upward arrow or downward arrow key on the
remote control.
Selected by number:
Enter the channel number directly by pressing numeric buttons ,and press the "OK" button
to select desired channel.
Selected by on-screen channels list:
You can also select the required channel directly from on-screen channel list. This is
displayed using the STB's main menu. See "Edit Channel" in this manual for operation detail.
1
2
3
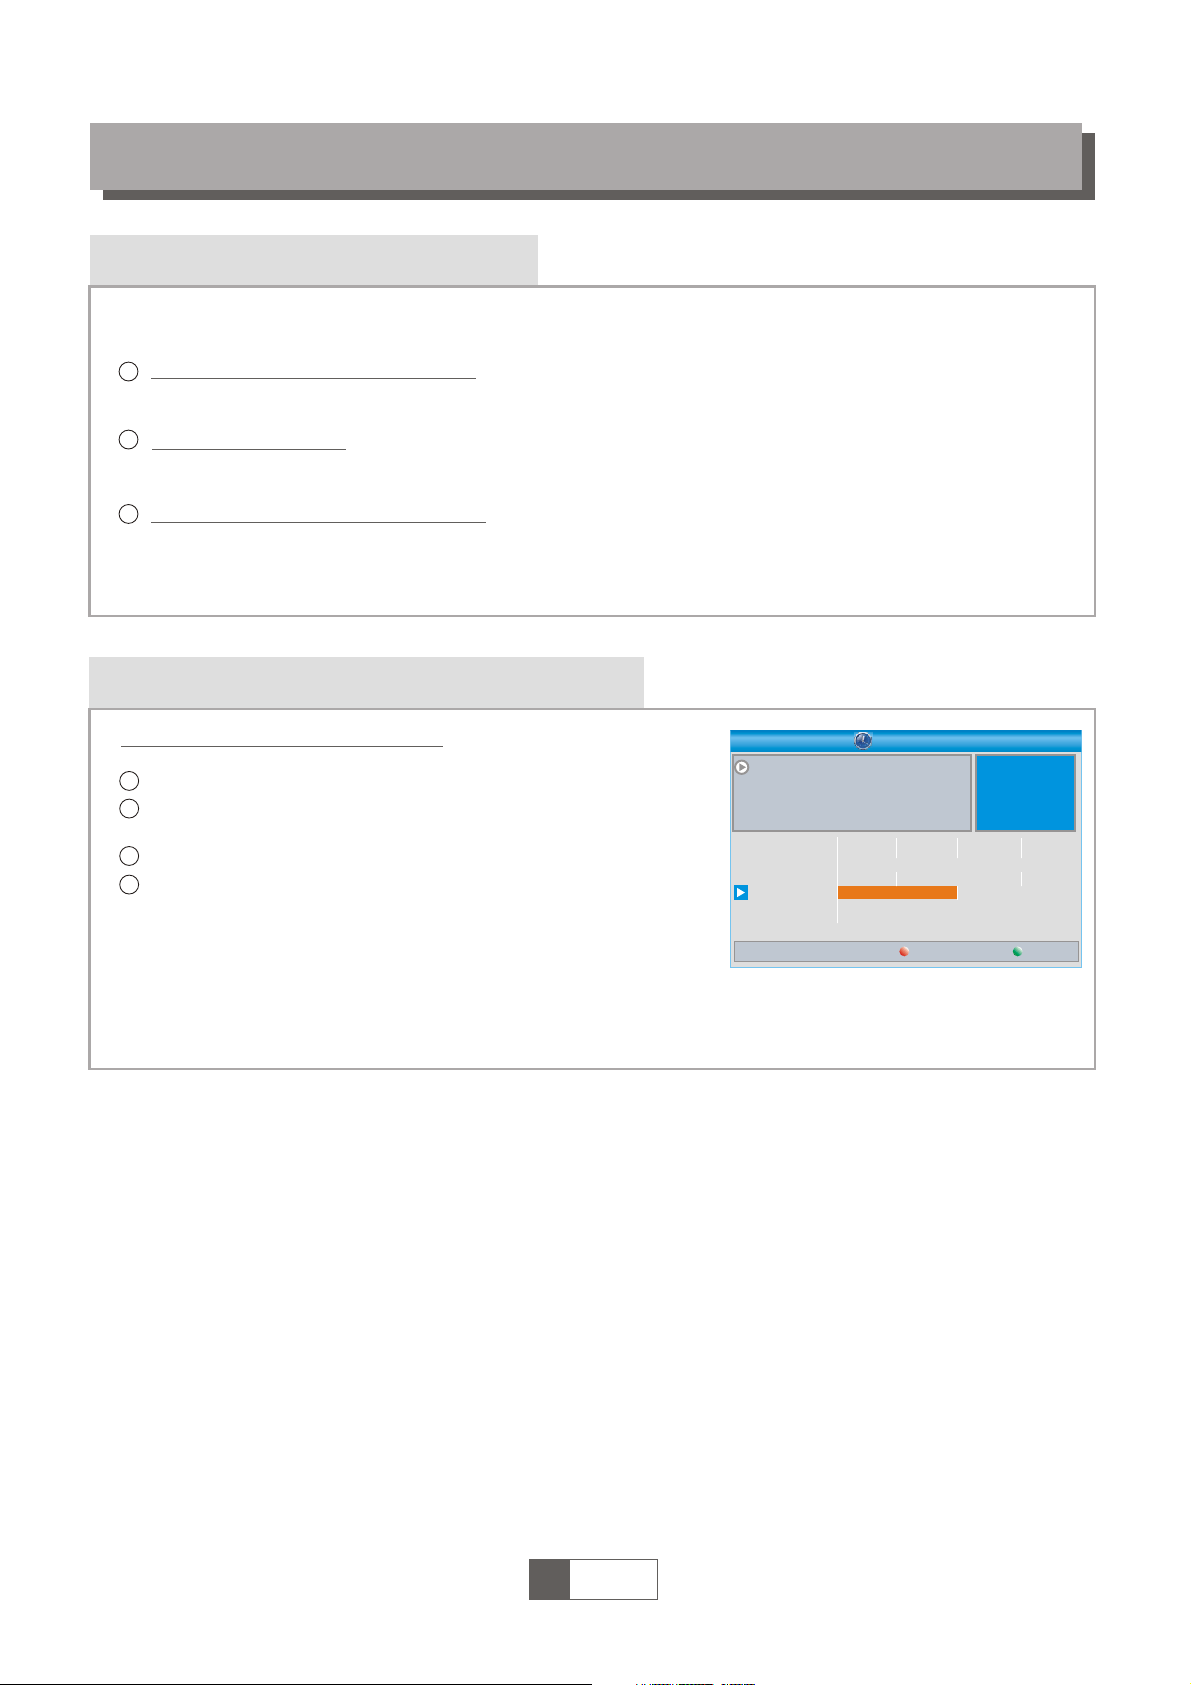
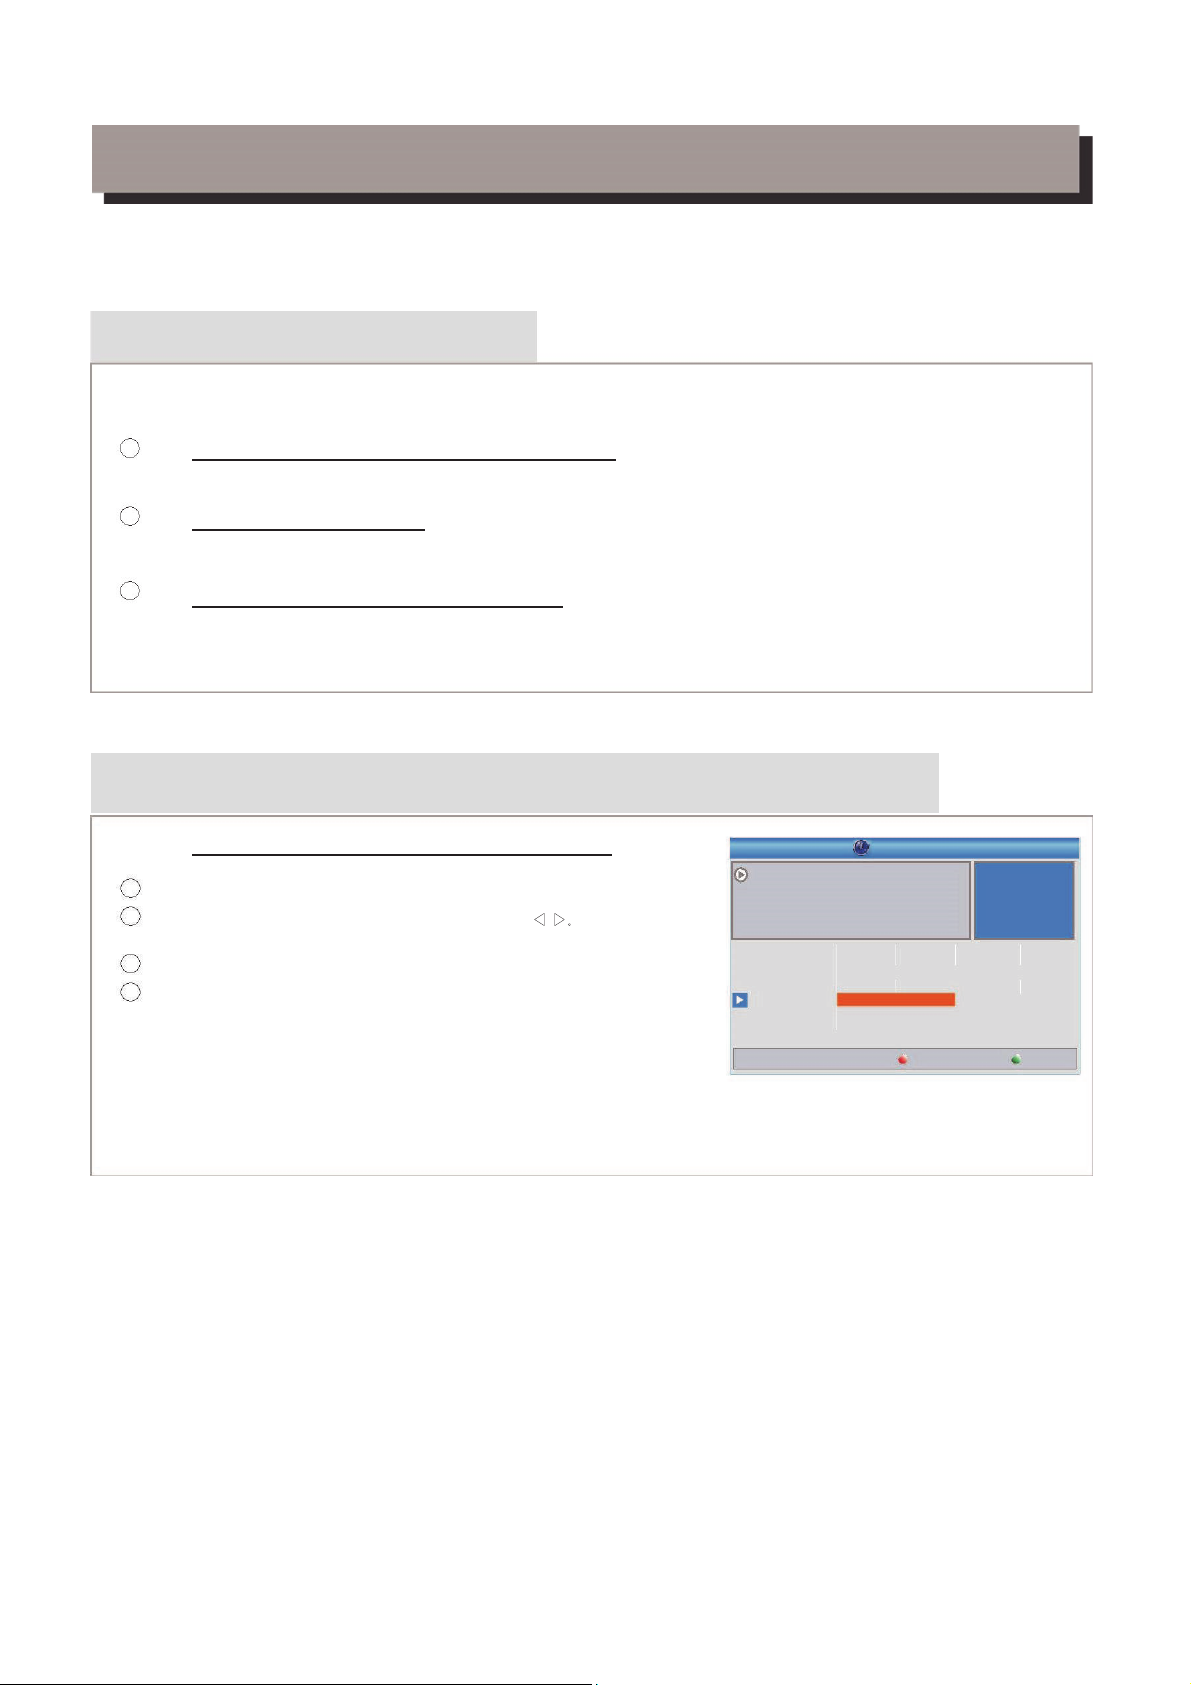
Accessing the EPG of all channels:
1
2
3
Press "EPG" button to enter EPG menu .
Press cursor button to switch between channel list, events
schedule of the selected channel and now/next events.
Press "Green" button to Timer the events.
Press "Red" button to display " Time Bar" menu.
4
1
English
5
000 8
000 9
001 0
0011
001 2
Int ereco n
BBC P arl
BBC F O
CBe ebie
301
001 0 BBC FOU R
The R ecor
Thi s is CBee bies!
Aun tie's Wa r on Smut
The R ecor
Com mons Qu estio ns
Pro ms on FOU R
Aun tie's Wa r on Smut
01: 30-02 -30
Tim er
Tim e
EPG
3/1 9
01: 30 02 :00 02:30 03:0 0
01: 39 xx/ xx/xx xx
Page 9
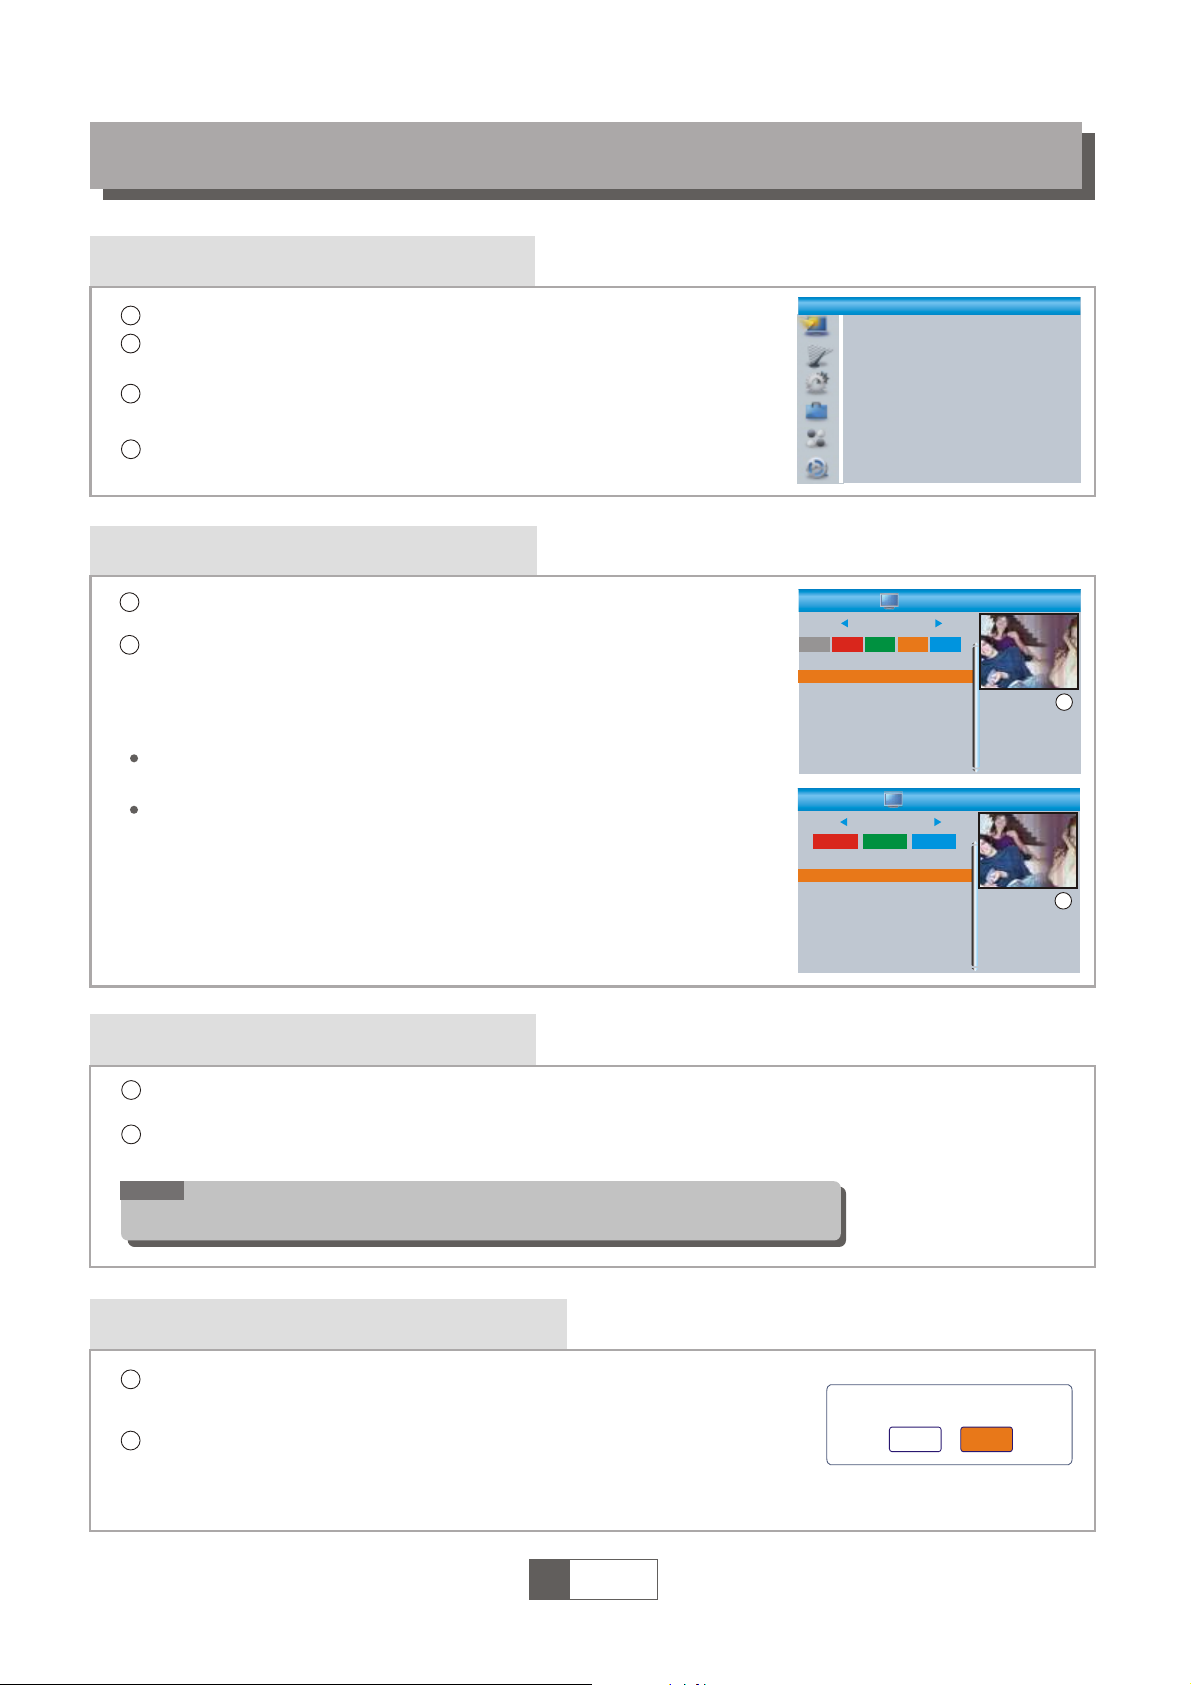
Edit Channel menu
EDIT CHANNEL
TV Channel list
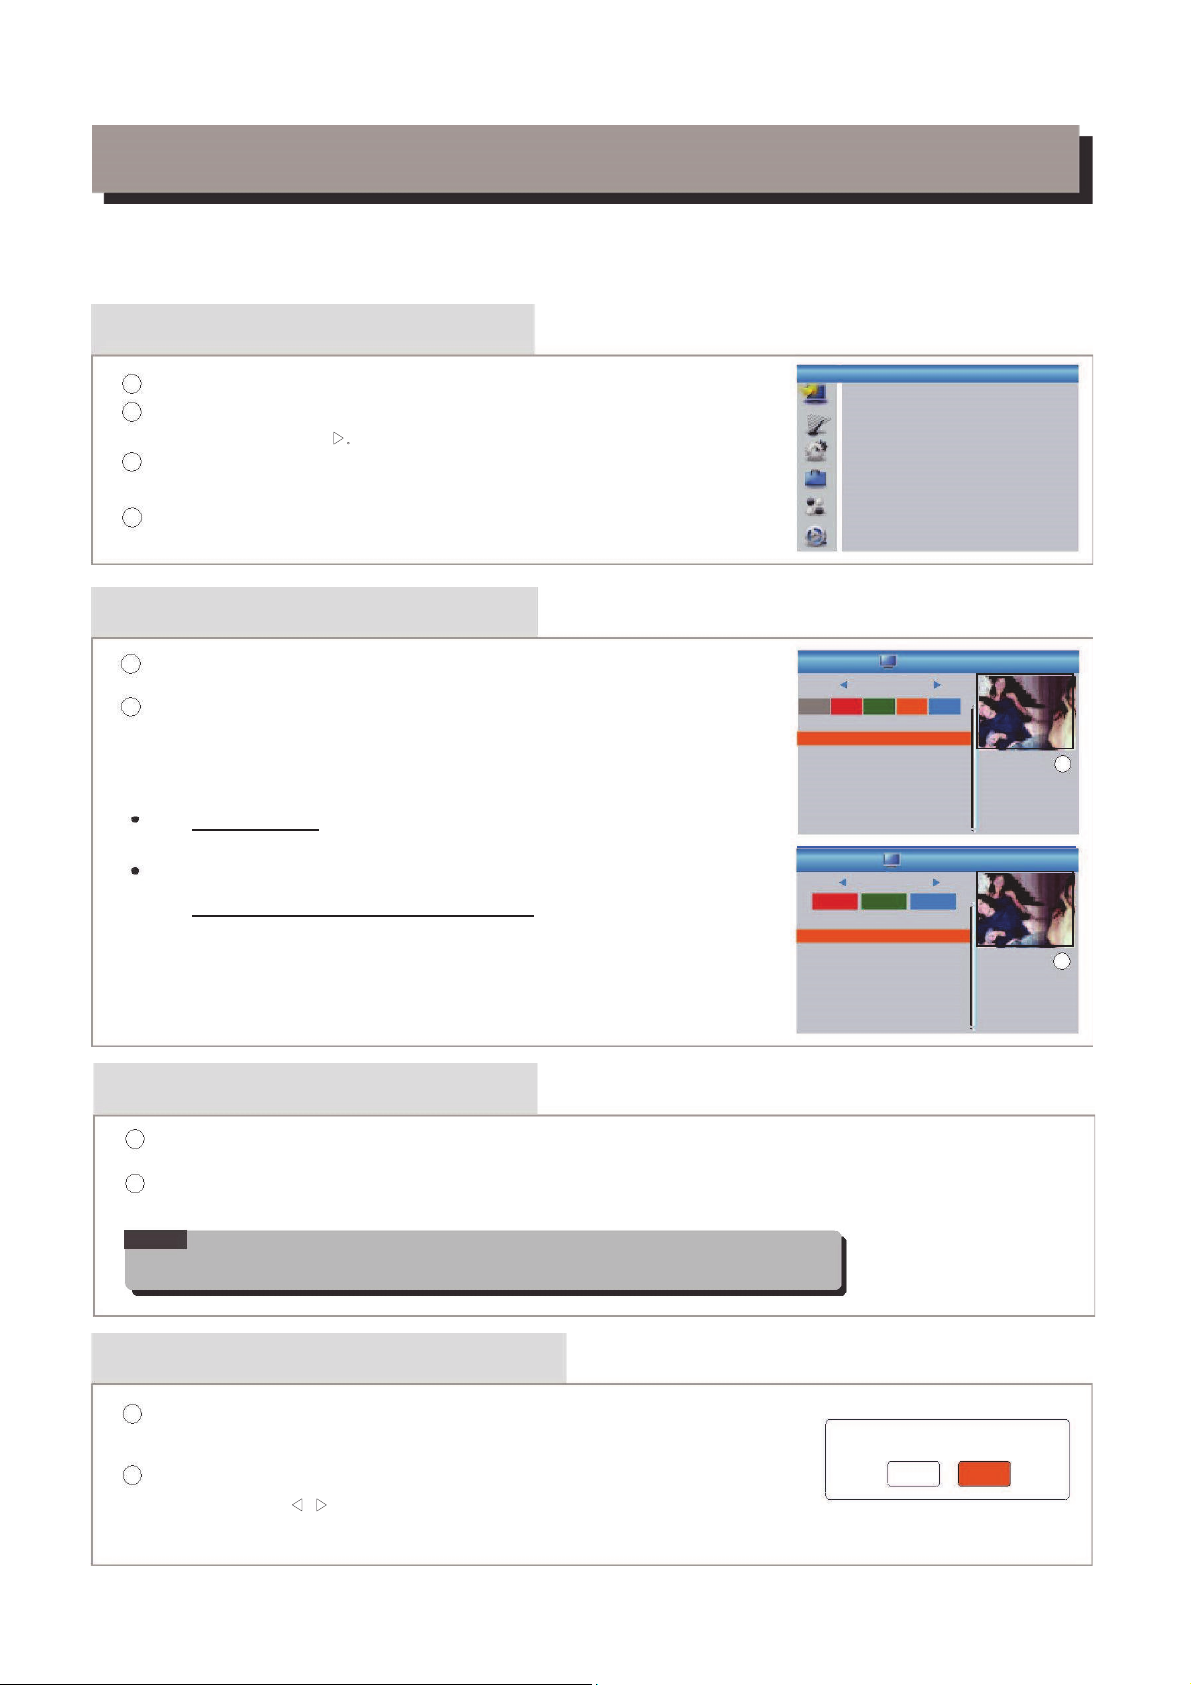
In the Edit Channel menu, select "TV Channel List", pres s "OK"
button to enter TV channel list menu.
1
2
Use this menu to fa vor, lock, skip, move, sort, delete and rename
channel.
Press "FAV" butto n, then press "OK" button to edit the FAV
function.
Press "UP" or "DOWN" button to highlight channel, press t he "OK"
butto n to preview the desir ed TV channel.
1
English
6
4
1
2
3
Press the "MENU" button to enter main menu.
Press "UP" or "DOWN " button to highlight "Edit Channel", press
"RIGHT" button to enter the Edit Channel menu.
Press "UP" or "DOWN" cursor button to highlight the desired item
and press "OK" button to enter the sub-menu .
Press "EXIT" button to exit.
Sor t
YooPl ay Ga
xxx xxxxx
xxx xxx
xxx x
xxx
TV Ch annel L ist
FAV
Loc k
Ski p
Mov e
Edi t
All T V
000 1 No Name
000 2 Yo oPlay G a
000 3 E4+1
000 4 UKTV Hi stor
000 5 SKY THRE E
000 6 Sky Spt s Ne
000 7 Sky New s
000 1 No Name
000 2 Yo oPlay G a
000 3 E4+1
000 4 UKTV Hi stor
000 5 SKY THRE E
000 6 Sky Spt s Ne
000 7 Sky New s
i
Radio Channel list
In the Edit Channel menu, select "Radio Channel List", press "OK" button to enter the Radio
Channel list menu.
Press "UP" or "DOWN" button to highlight chan nel press the "OK" button to listen the desired Rad io
chann el.
1
2
NOTE:
Basicall y, t he operation of " Radio Chann el L ist" is the same a s "TV Channel Lis t",
but there is o ne point differe nt: In "Radio Cha nne l List" mode, the re is no video
informat ion , so it will alway s display Radio' s lo go in the righ t si de preview windo w.
Delete All
1
2
Warning ! Do you really want to delet e
all channels?
Yes
No
Press "color" but ton, then press "OK" button to edit the
corresponding fu nction.
TV Ch annel L ist
Rad io Chan nel Lis t
Del ete All
Edi t Chann el
Ren ame
Del ete
YooPl ay Ga
xxx xxxxx
xxx xxx
xxx x
xxx
Edi t Chann el
All T V
i
A warning window appears.
Select "Yes", press "OK" button to delete all channels.
Select "No", Press "OK" button to cancel deleting.
In the Edit Channel men u, select "Delete Al l", press "OK" button.
You are asked to input a p assword(the default password is"0000").
Page 10
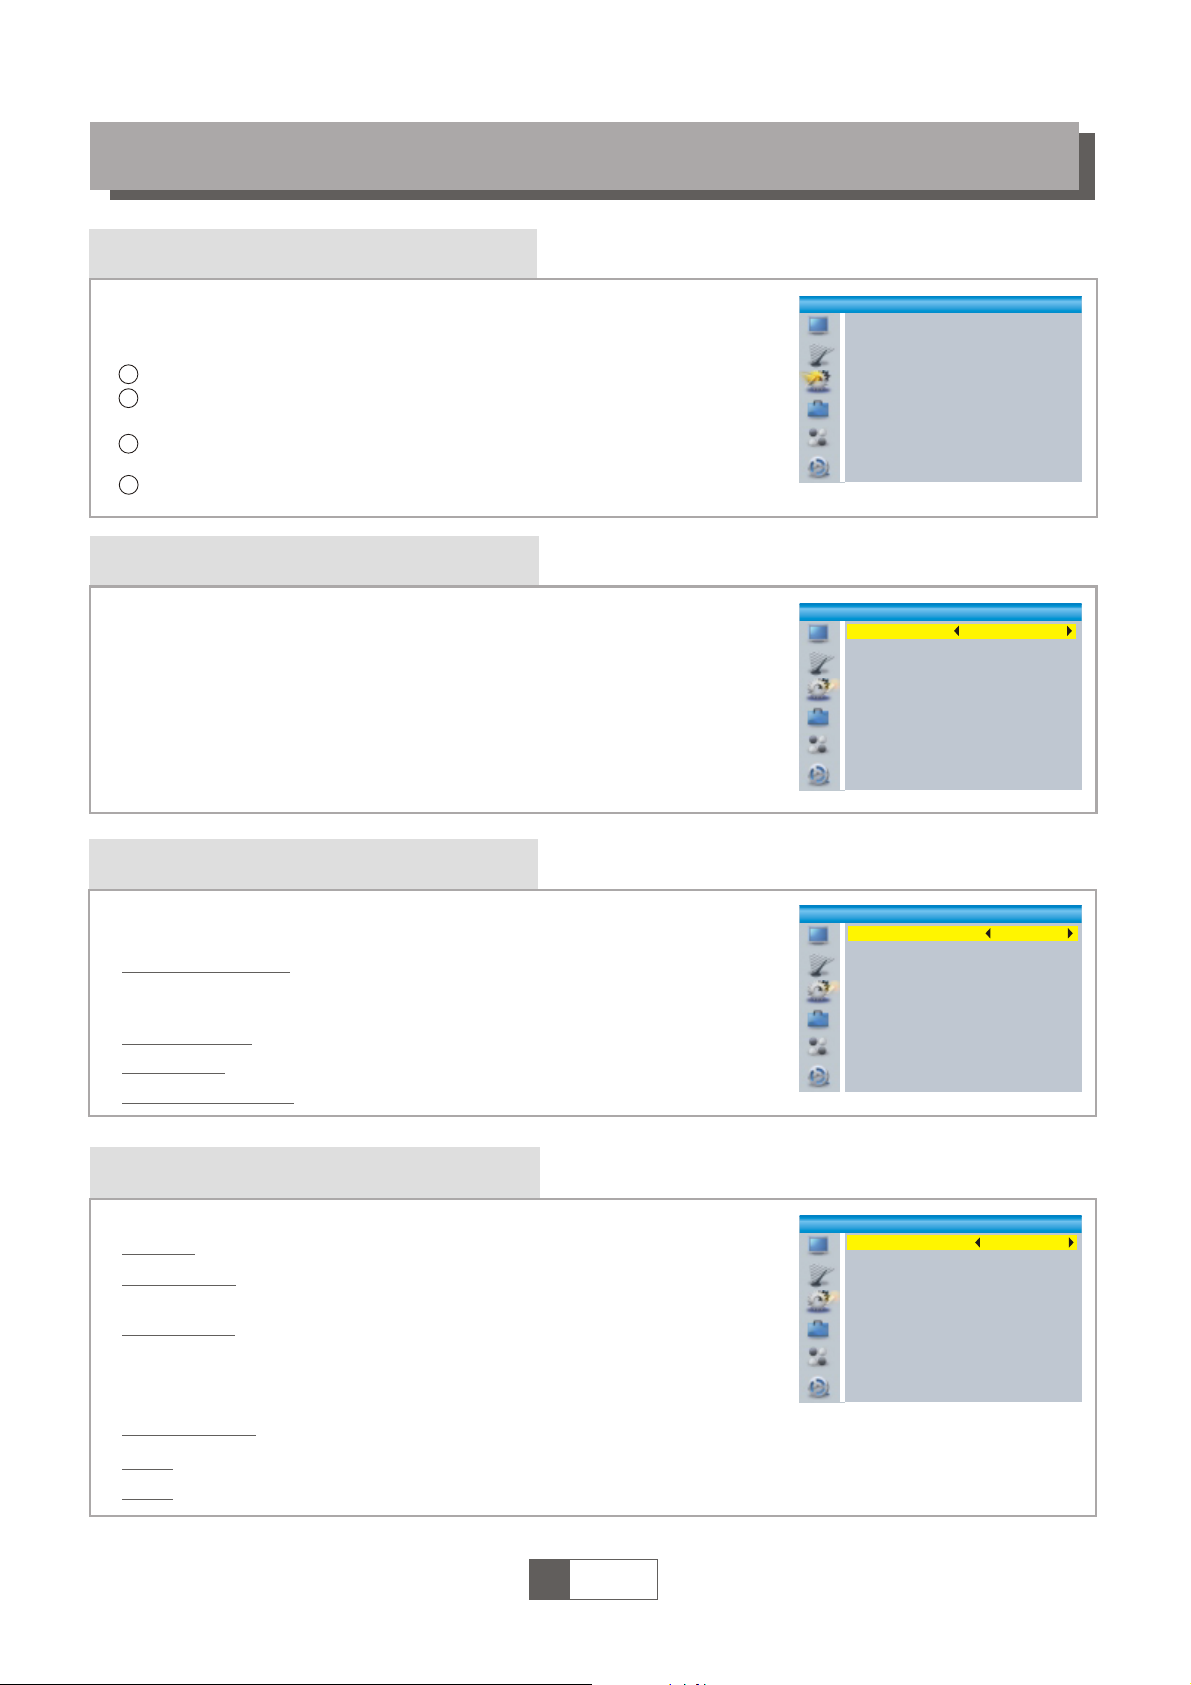
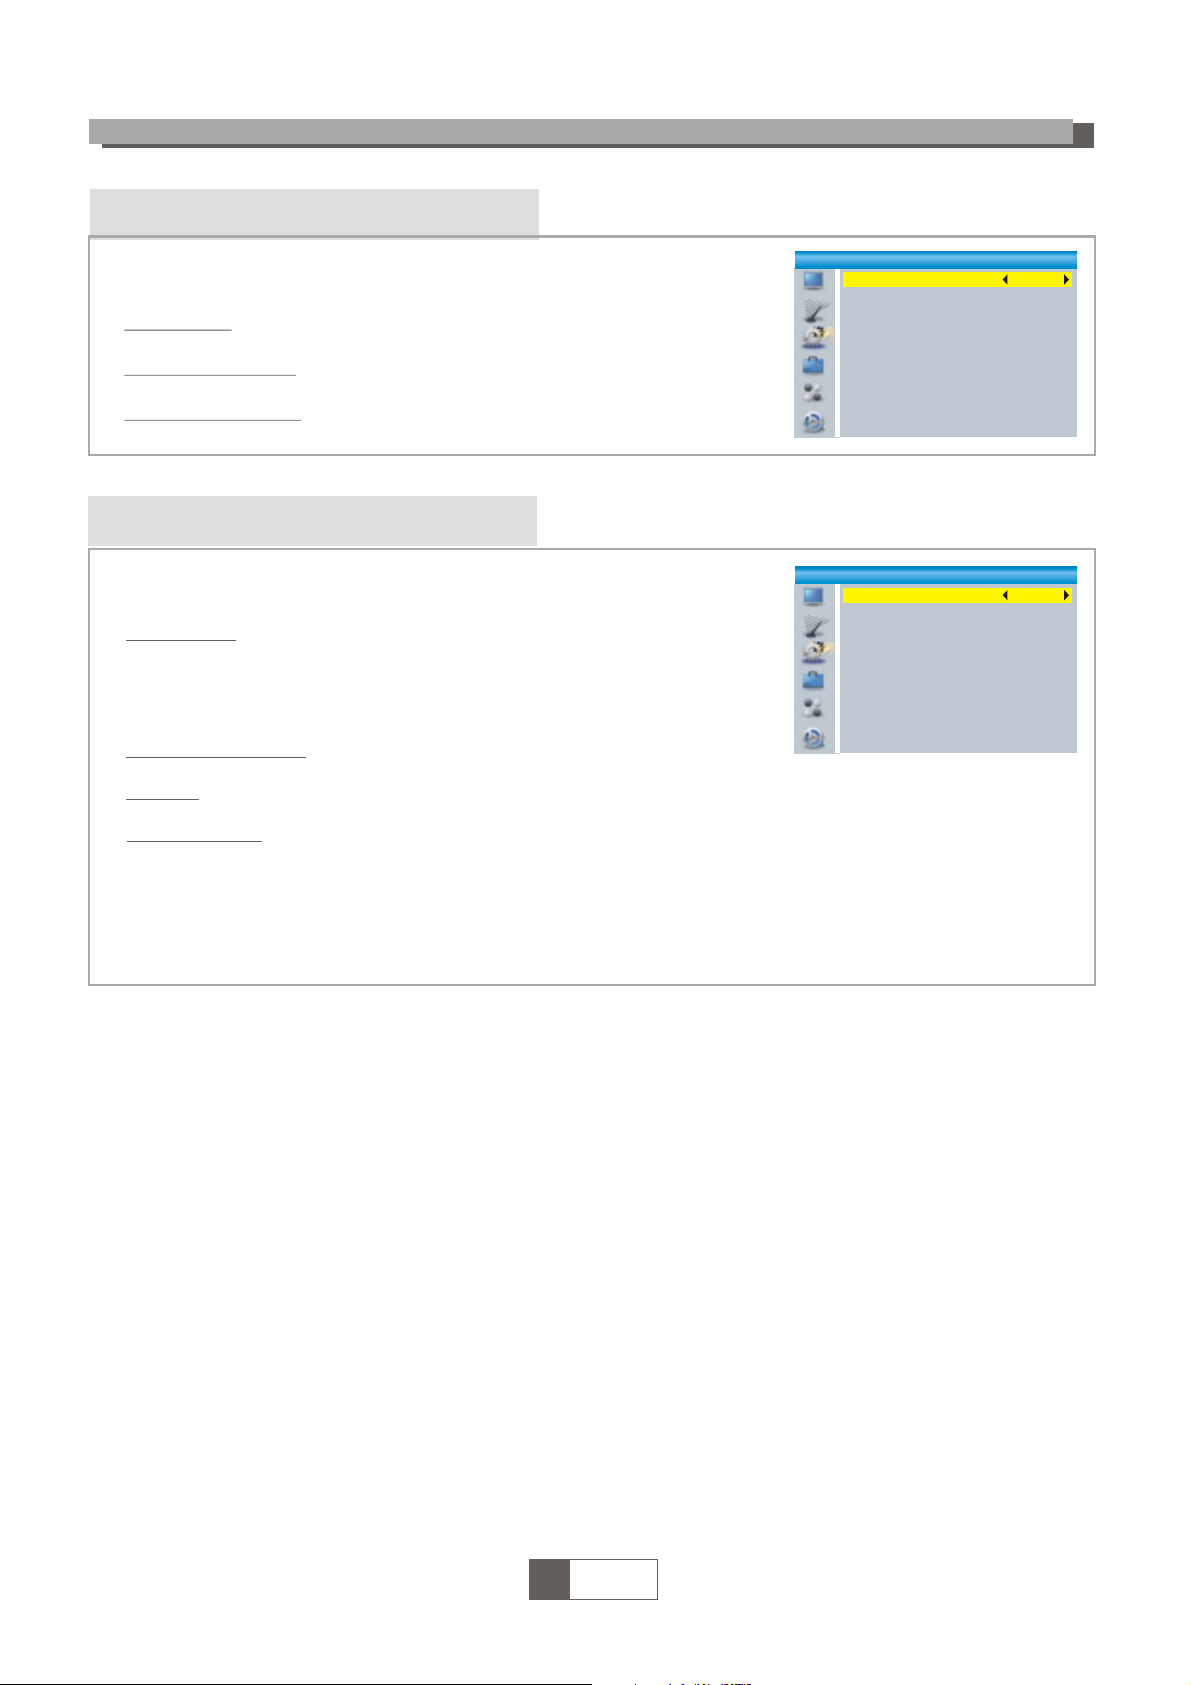
System setup menu
System setup menu allows us to set Language, TV System, Local Time
Setting, Timer Setting, Parental Lock, OSD Setting, Favorite, Auto
Description Setting, Other.
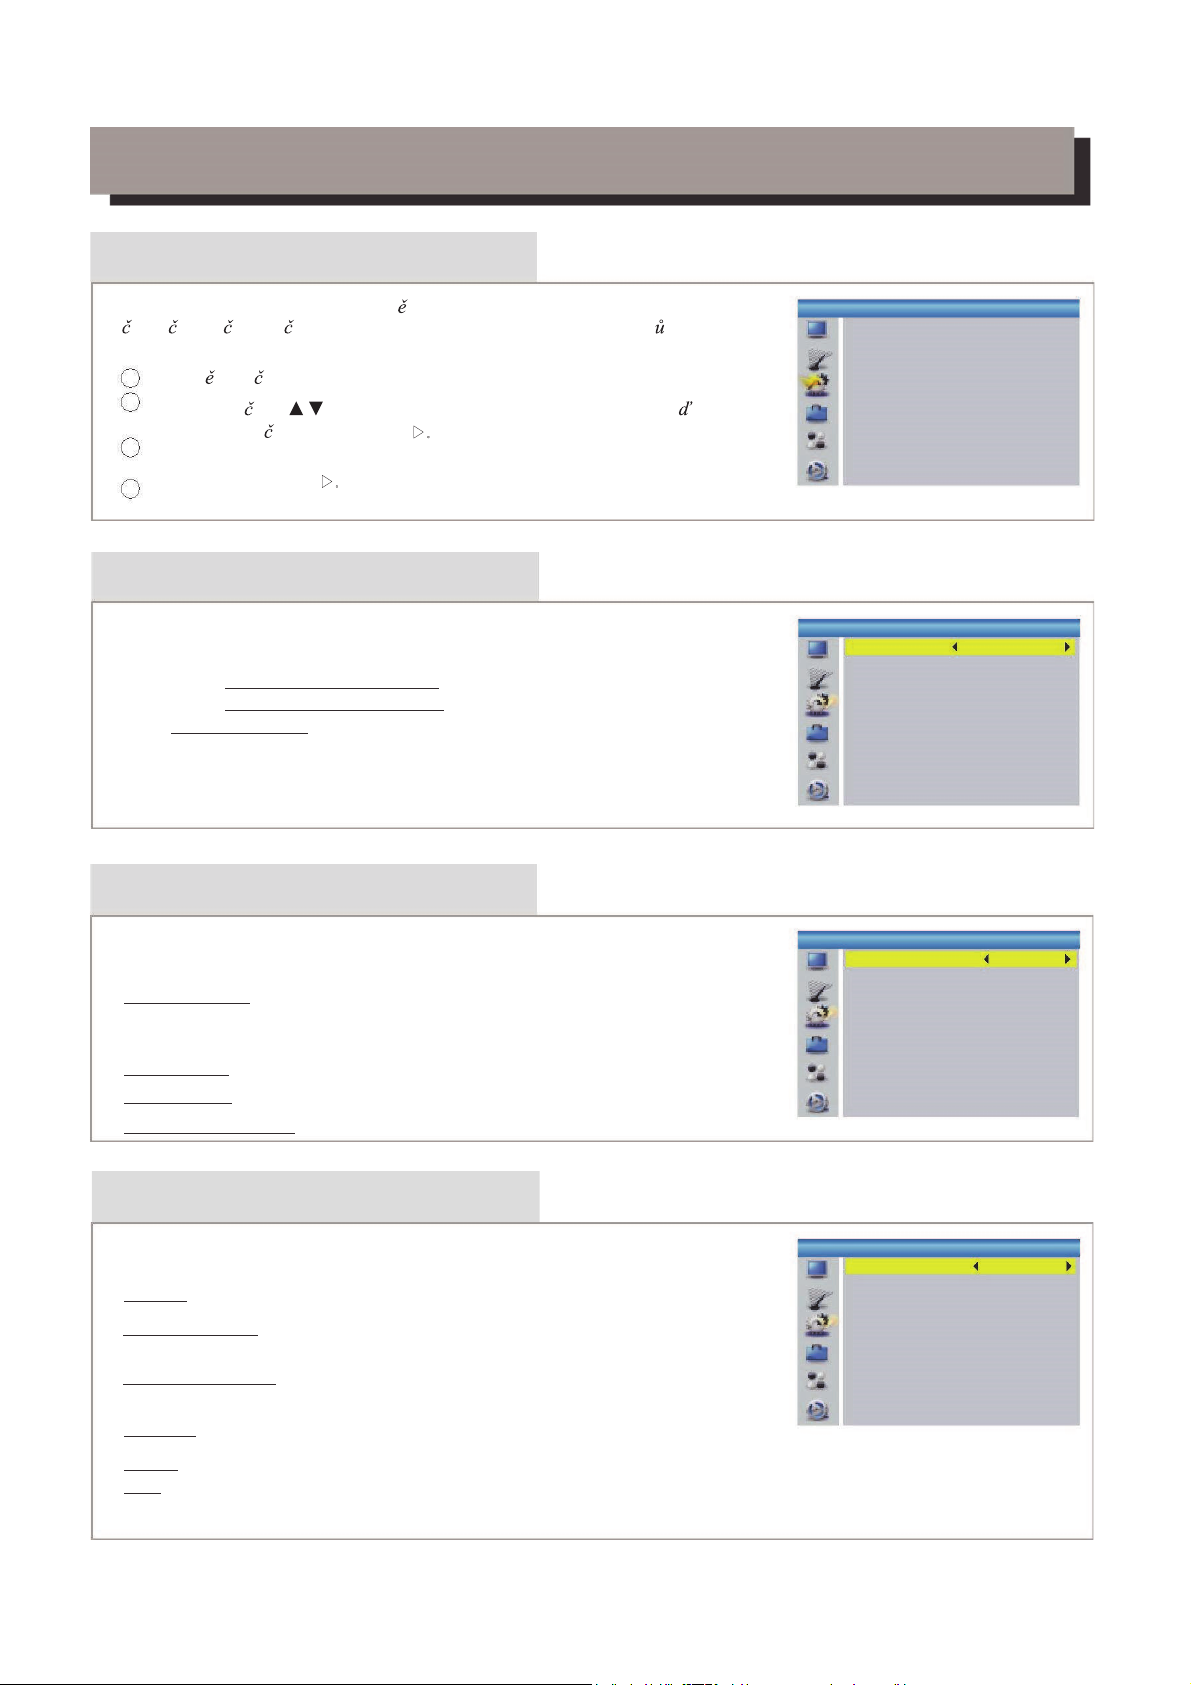
Language
This menu allows you to set Language.
SYSTEM SETUP
TV System
This menu allows us to set Video Resolution, Aspect Mode,
Video Out and Digital Audio Out.
Local Time Setting
This menu allows you to set the region and time.
GMT Usage:
This menu is used for open the usage of GMT.
The options are : By Region/User Define/Off
GMT Offset: This menu is valid only when selected "User Define"
in GMT Usage menu .
The GMT offset range is "-11:30 ~ +12:00", i ncreasing
half hour progressively.
Date:
Time:
"Date" and "Time" menus are valid only when selected "Off" in GMT Usage menu.
Press numeric button to input the time.
Region:
This menu is used for changing the region setting.
Aspect Mode:
Auto/4:3PS/4:3LB/16:9
Video Out:
Digital Audio Out:
SCART CVBS+ HDMI/ SCART RGB
Video Resolution:
LPCM Out/ BS Out
1
English
7
Vid eo Res olut ion
Asp ect Mod e
Vid eo Out
Dig ital Audio Out
720 p@50H Z
4:3 LB
SCA RT RGB
LPC M Out
TV Sy stem
4
1
2
3
Press the "MENU" button to enter main menu.
Press "UP" or "DOWN" button to highlight "System Setup",
press "RIGHT" button to enter the System Setup menu.
Press "UP" or "DOWN" cursor button to highlight the desired
item and press "OK" button to enter the sub-menu.
Press "EXIT" button to exit.
Lan guage
Fir st Audio
Sec ond Audio
Sub title L angua ge
Tele text
Sub title
Eng lish
Eng lish
Ger man
Eng lish
Eng lish
On
Lan guage
Sys tem Set up
Lan guage
TV Sy stem
Loc al Time S etti ng
Tim er Set ting
Par ental L ock
OSD S ettin g
Fav orite
Aut o Descr iptio n Setti ng
Oth er
Reg ion
GMT U sage
GMT O ffset
Sum mer Tim e
Dat e
Tim e
Fra nce
By Re gion
GMT +01:0 0
Off
xxx x/xx/ xx
01: 51
Loc al Time S etti ng
xxx x,xxx ,xxxx
Summer Time:
The options are: On/Off
By Source/By Native/480i/480p/576i/576p/
720p@50HZ/720p@60HZ/1080i@50HZ/
1080i@60HZ/1080p@50HZ/1080p@60HZ
Page 11
OSD Setting
This menu allows you to set OSD Timeout and OSD Transparency .
This menu allows you to rename the favorite group.
OSD Timeout:
1-10
OSD Transparency:
To set the OSD transparency to Off/10%/20%/30%/
40%.
SY STE M S ET UP
Parental Lock
In "System Setup" menu, select "Parental Lock" and press "OK" button,
you are asked to input a password(the default password is"0000").
After inputting the correct password by pressing numeric buttons,
the parental lock menu appears.
1
2
Menu Lock:
New Password:
To change the password.
Confirm Password:
To confirm the new password.
Rating Lock:
Off/ AGE 4/AGE5/AGE6/AGE7/AGE8/AGE9/AGE10/AGE11/AGE12/
AGE13/AGE14/AGE15/AGE16/AGE17/AGE18
1
English
8
To lock the Edit channel/ Installation menu. When you
want to enter these menus, you must input the password.
You can set menu lock to on/off.
This menu allows you to protect menu and channel, and change the
Password.
Favorite
In Channel menu, select "Favorite", press "OK" button to enter
Favorite menu.
Select desired group, press "OK" button to open the mock keypad.
Input letter and numeric one by one by pressing the cursor button
and press "OK" button to confirm. After finishing input, highlight
"OK" on mock keypad to confirm, you change Favorite group name
successfully.
Press "EXIT" button to quit the group rename menu.
1
2
3
Men u Lock
Rat ing Loc k
New P asswo rd
Con firm Pa sswor d
Off
Off
--- -
--- -
Par ental L ock
OSD T imeo ut
OSD Tr anspa rency
5
Off
OSD S ettin g
1
2
3
4
5
6
7
8
Fav orite
Fav g roup 1
F
av gr oup 2
Fav g roup 3
Fav g roup 4
Fav g roup 5
Fav g roup 6
Fav g roup 7
Fav g roup 8
CAP S
A
Fav g roup 1
G
M
S
Y
4
SP
Ren ame
Del
OK
B C D E F
K LHJI
N
T
Z
5
O
U
0
6
?
P
V
1
7
<-
Q
W
2
8
OK
R
X
3
9
Timer Setting
This menu allows us to set the program timer. You can set 8 timers.
Timer Mode:
Timer Service:
Wakeup Channel:
Wakeup Date:
On Time:
Duration:
Off/Once/Daily/Weekly/Monthly
Channel/Record
You can select a desired channel as the wakeup channel.
Press numeric button to input date.
Press numeric button to input the time.
Press numeric button to input the duration time.
Sav e
Can cel
Cur rent Ti me/da te: 01: 36PM xx/ xx/xx xx
Tim er Mode
Tim er Serv ice
Wake up Chan nel
Wake up Date
On Ti me
Dur ation
Dai ly
Cha nnel
BBC F OUR
xx/ xx/xx xx
xx: xx
xx: xx
Page 12
Other
No command to STB on front panel or Remoter in 30 Min- 3 hours and no timer event,
the STB will enter standby mode automatically.
If Off is selected, the STB can't enter standby mode automatically.
LNB P ower
Cha nnel Pl ay Type
Bee per
Aut o Stand by
Off
All
Off
Off
Oth er
SY STE M S ET UP
Auto Description Setting
On/Off
On/Off
-3~3
AD Service:
Use AD as default:
AD Volume Offset:
AD Se rvice
Use AD as default
AD Vol ume Of fset
On
Off
0
Aut o Descr iptio n Setti ng
LNB Power:
Channel Play Type:
Beeper:
Auto Standby:
This menu allows us to set LNB Power, Channel Play Type, Beeper and
Auto Standby.
When "LNB Power" is selected "On", the STB will provide 5V power
to antenna.
It will not provide when selected "Off".
On/Off
All/Free/Scrambled
On/Off
30Min/1 Hour/2 Hour/3 Hour/Off
This menu allows us to set AD Service, Use AD as default and
AD Volume Offset:
1
English
9
Page 13
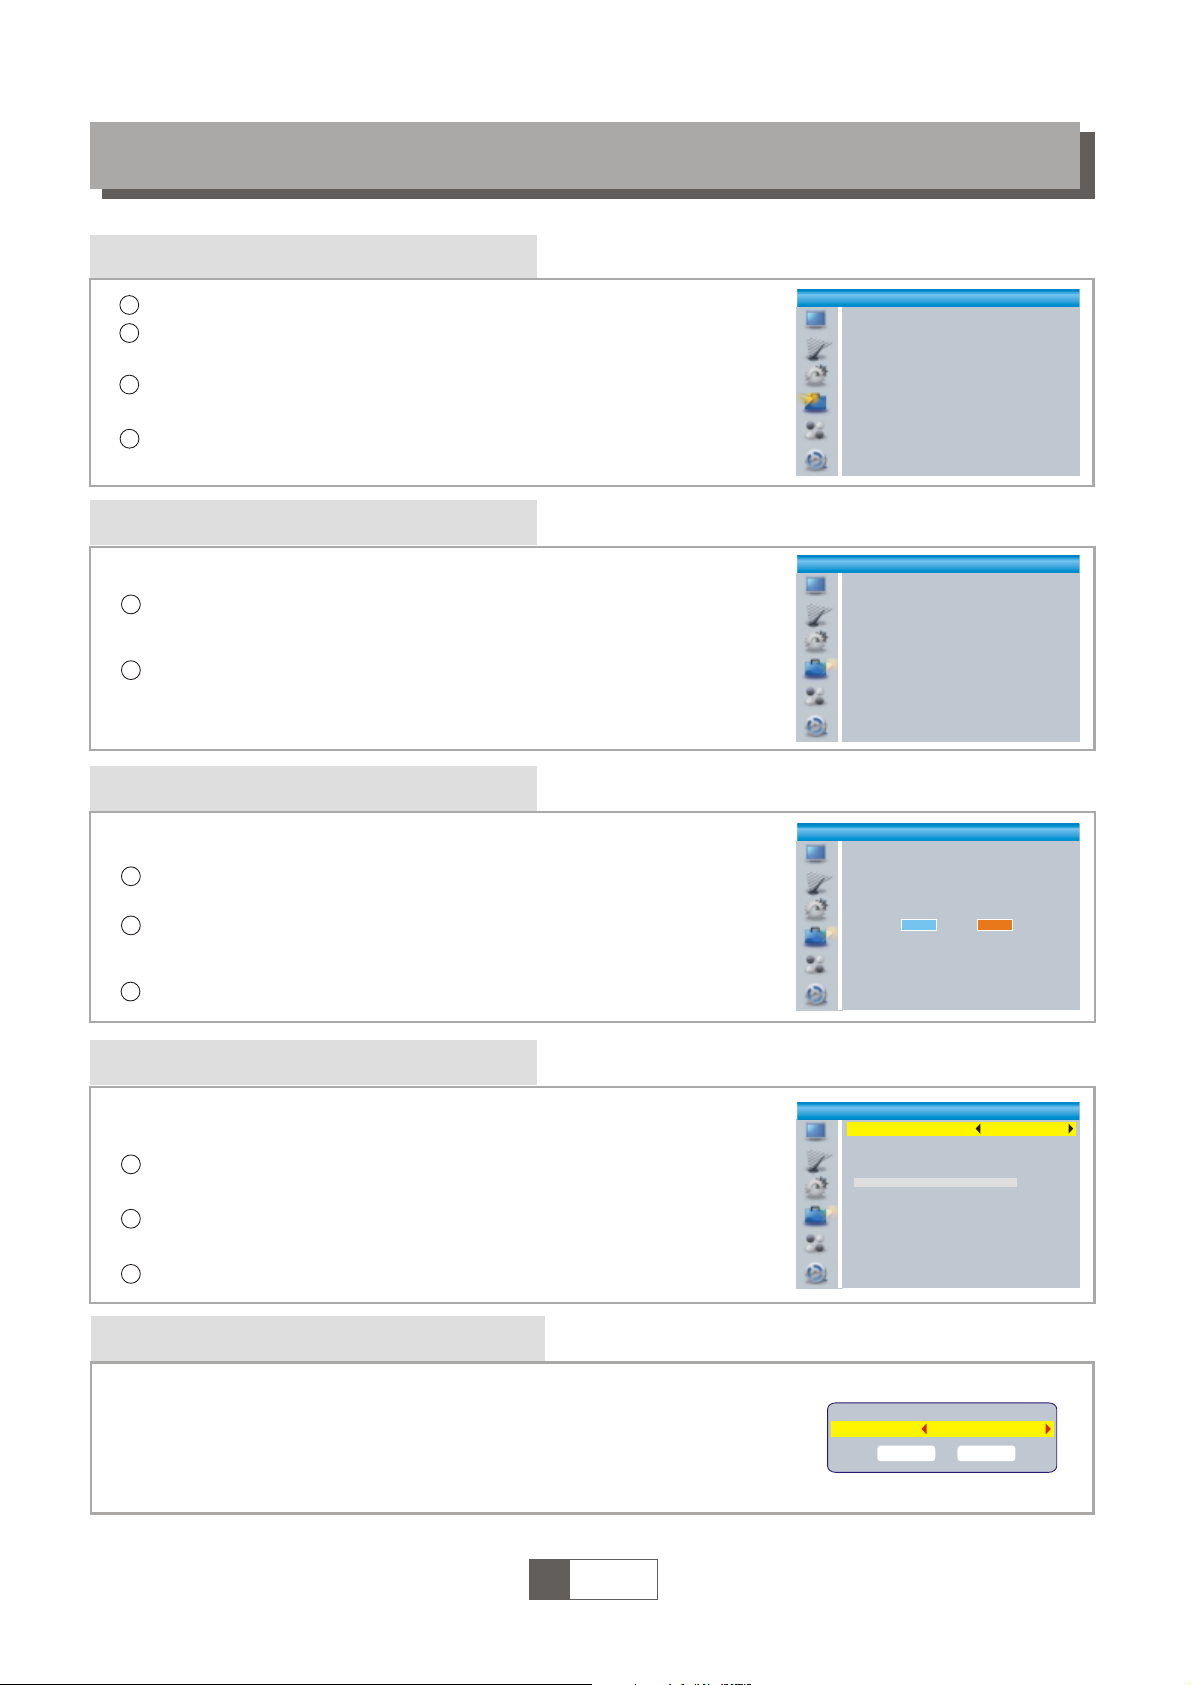
Tools main menu
Information
In "Tools" menu, select "Information", press "OK" button to open
information window.
Press "EXIT" button to exit.
1
2
This menu can display some parameters information in t
his STB.
Factory Setting
This menu allows you to re-set the STB back to factory settings,
clear all existed channels.
In the "Tools" menu, select "Factory Default", press "OK" button.
You are asked to input a password(the default password is"0000").
1
2
Software Upgrade
Press "EXIT" button to exit.
Enter "Tools" menu, select "S/W Upgrade by OTA" or "Upgrade
by USB", press "OK" button, Software Upgrade menu is sh own.
1
2
Press cursor button to select the desired item, th en highlight
"Start" and press "OK" button to start upgrade.
3
A confirmation window is displayed.
Select "Yes" to return back to factory settings and clear all channels.
Select "No" to cancel back to factory settings.
Press "EXIT" button to exit .
We offer the functions for user to upgrade software version by OTA
or by USB .
4
1
2
3
Press the "MENU" button to enter main menu.
Press "UP" or " DOWN " button to highlight "Tools", press "RIGHT"
button to enter the Tools menu.
Press "UP" or "DOWN" cursor button to highlight the desired item
and press "OK" button to enter the sub-menu.
Press "EXIT" button to exit.
3
Tool s
Inf ormat ion
Fac tory Se tting
S/W U pgrad e by OTA
Upg rade By U SB
R
emo ve USB de vice sa fely
Inf ormat ion
x.x .x
xxx xx
xxx xx
x.x .x
x.x .x
xxx
xxx xx
xxx xx
xxx
xxx
Fac tory Se tting
This ope ration will lo ad default and e rase all
the chan nels that user a dded, contin ue?
Yes No
Upg rade by U SB
Upg rade Mo de
Upg rade Fi le
Sta rt
All code
No Fi le
0%
Remove USB device safely
In "Tools" menu, select "Remove USB device safely",
Press "OK" button to confirm. Then a window is displayed.
Press "OK" button again.
Dis k Remov e
Rem ove
OK
USB D isk A-3 GB
Can cel
1
English
10
Page 14
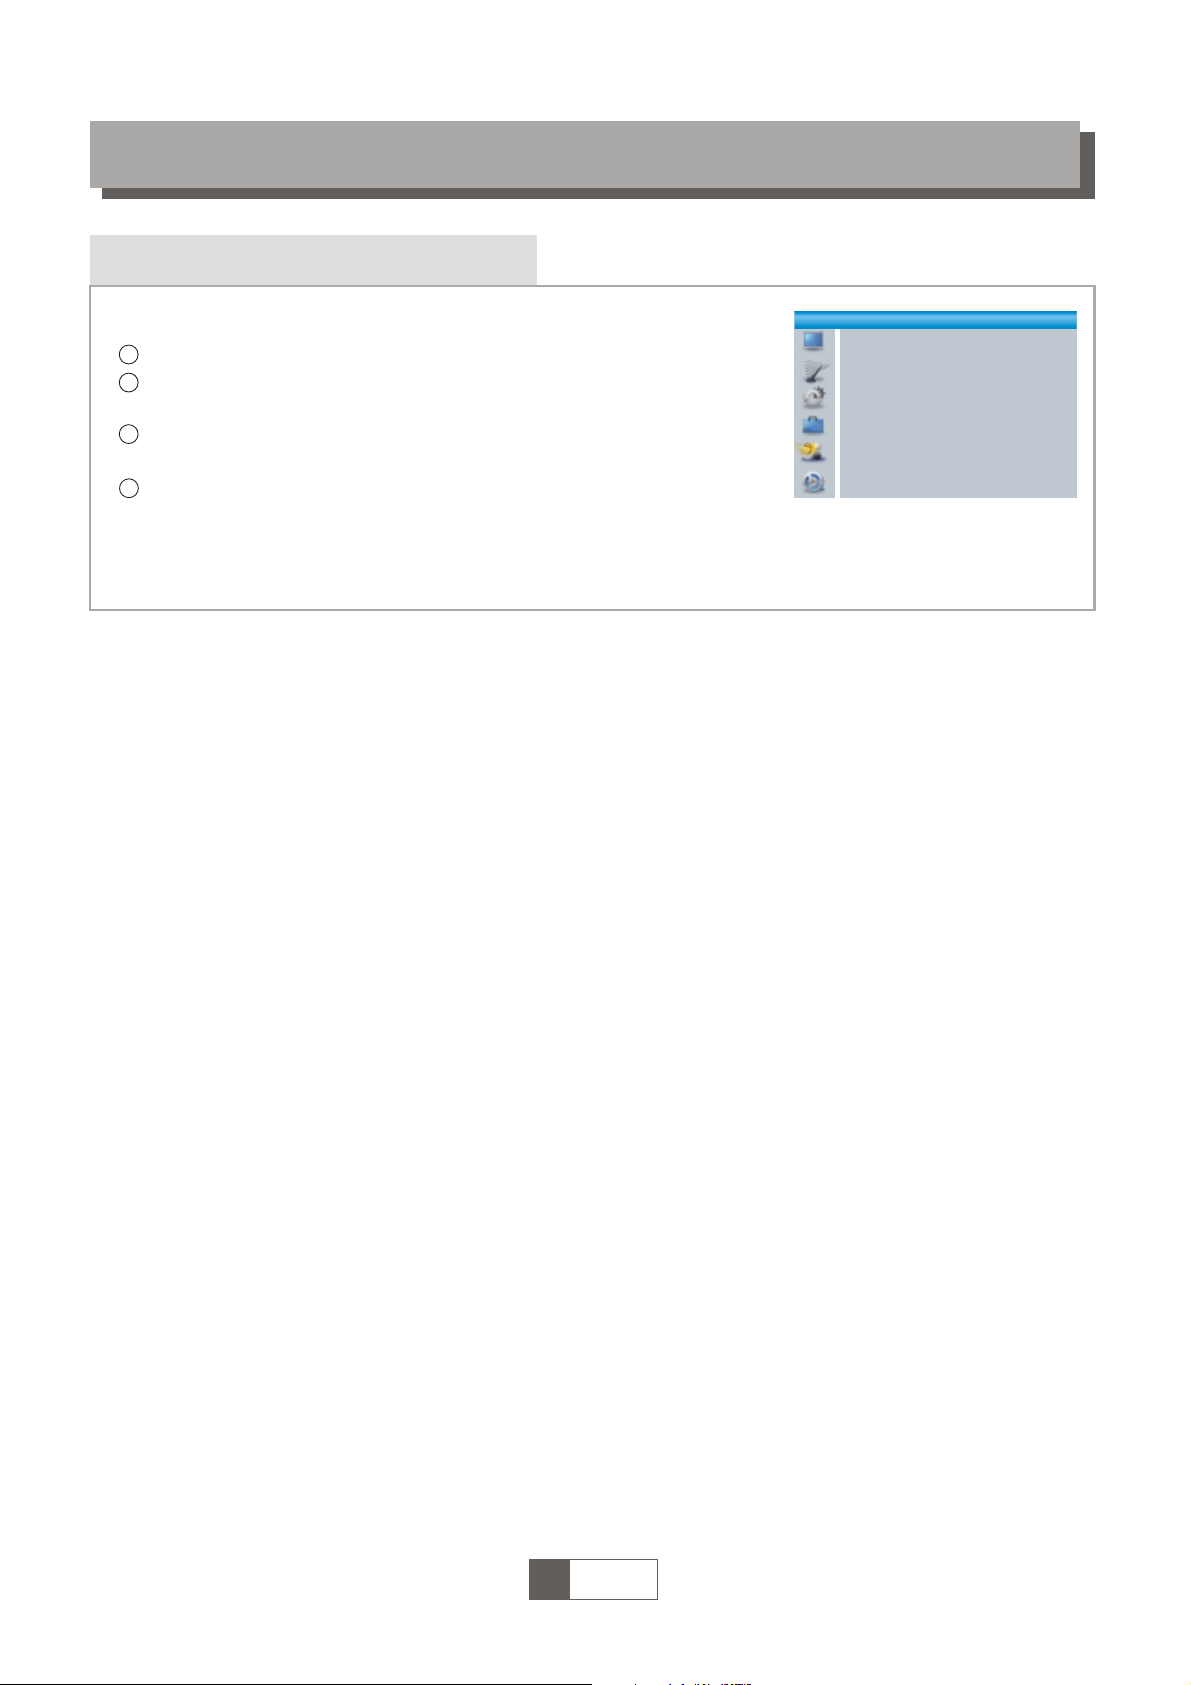
Game
This menu allows you to play games.
4
1
2
3
Press the "MENU" button to enter main menu.
Press "UP" or "DOWN" button to highlight "Game", press "RIGHT"
button to enter the Game menu.
Press "UP" or "DOWN" cursor button to highlight the desired item
and press "OK" button to enter the game.
Press "EXIT" button to exit.
1
English
11
Gam e
Oth ello
Sud oku
Page 15

REC main menu
REC
1
English
12
4
1
2
3
Press the "MENU" button to enter main menu.
Press "UP"or "DOWN" button to highl ight "REC", press
"RIGHT" button to enter the REC menu.
Press "UP" or "DOWN" cursor button to highlight the desired item
and press "OK"button to enter the sub- menu.
Press "EXIT" button to exit.
Media Player
3
In "REC" menu, select "Media Player", press "OK" button to enter
Media Player menu.
First you enter media player window, the highlight is on the
USB/HDD device. Press "Down" button to move the highlight to
directory and file field.
Press "1" button ,you can switch TAB between
Music/Image/Video/Record.
Press "UP" or "DOWN" cursor button to select a desired item,
and press "OK" button to play the desired files.
Press "EXIT" button to exit.
1
2
This function allows you to play files from USB port .
REC
Med ia Play er
PVR S torag e Infor matio n
PVR S ettin g
Music:
Image:
Press "RED" button to s how Play List.
Move the highlight to t he file which you want to add to play list, then press
"Green" button to add. It will mark a favorit e icon on the file.
Press "Yellow" button to add all file of current directory to play list. P ress again to
delete all file of current directory from t he play list.
Press "Blue" button to enter to edit sub-menu.
Press "2" button to op en the sort window.
You can sort by Name/Time/Size/Favorite.
Press "INFO" button to set repeat mode. The option is R epeat Folder/
Random Folder/Repeat One.
Return to parent directory.
4
5
Press "Red" button to s how play list.
Move the highlight to t he file which you want to add to play list, then press
"Green" button to add. It will mark a favorit e icon on the file.
Press "Yellow" button to add all file of current directory to play list. P ress again to
delete all file of current directory from t he play list.
Press "Blue" button to enter to edit sub-menu.
Press "2" button to op en the sort window.
You can sort by Name/Time/Size/Favorite.
Press "INFO" button to open image setup
Press "3" button to vi ew image in
multi view mode
Return to parent directory.
"RED" button:
"GREEN" button:
"YELLOW" button:
"BLUE" button:
"2" button:
"INFO" button:
"EXIT" button:
"RED" button:
"GREEN" button:
"YELLOW" button:
"BLUE" button:
"2" button:
"INFO" button:
"3" button:
"EXIT" button:
I swe ar.mp3
331 9KB
00: 03:32
00: 03:15 00: 03:32
1
3
4
5
6
7
2
Mus ic
840 .mpg
Why. mp3
Lon ely.mp 3
Bec ause. mp3
Ros e.jpg
Fly. jpg
I swe ar.mp3
USB 1
/..
Play List
Switch
Repeat
Sort
MP G
MP 3
MP 3
MP 3
MP 3
JP G
JP G
INF O
2
1
FAV FAVAll Edit
Exit
EXI T
Ima ge Vid eo Reco rd
i
NO TE :
When y ou browse pictures ,
press "RED" but ton or "GR EEN" button,
you ca n view 3D p ictures.
Page 16
This menu allows us to se t the PVR Setting.
Press "UP" or "DOWN" cursor button to select d esired item,
press "LEFT" or "RIGHT" cursor button to change the setting.
TimeShift AUTO/Pause/Off
Timeshift to Record On/Off
PS Record On/Off
PVR Setting
1
English
13
RE C
PVR Storage Information
In "REC" menu, select "HDD Information", press "OK"
button to open HDD information window.
Press "EXIT" button to exit.
This menu can display some parameters of Removable Disk.
1
2
PVR S torag e Infor matio n
USB D isk A: xxxG bytes
Volu me
Tota l Size
Fre e Size
Rec S ize
TMS S ize
Fil e Syste m
xxx x
xxx x
xxx x
xxx x
xxx x
xxx
For mat DVR S et
Timesh ift
Timesh ift to Recor d
PS Record
Pause
Off
Off
PVR S ettin g
DVR Set REC&TMS/Record/Timeshift
Press BLUE button to open DVR Set menu.
Press "LEFT" or "RIGHT" cursor button to change DVR Type.
Select "OK" to confirm. Select "Cancel" to cancel.
Press YELLOW button to open Format menu.
Press "LEFT" or "RIGHT" cursor button to change Disk Mode.
Select "OK" to format. Select "Cancel" to cancel.
Format FAT/NTFS
DVR S et
DVR Ty pe
OK
REC & TMS
Can cel
For mat
Dis k Mode
OK
FAT
Can cel
Record:
Press "Red" button to o pen rename window.
Move the highlight to t he program which you want to lock. Pressing "Green"
button, it will ask you t o input password. De fault password is "0000". After
input correct password, the program is locked. If you want to unlock the
program, press the "Green" button again.
Press "Yellow" button to make a delete mar k on the program which
you want to delete.
Return to parent directory.
Video:
Press "Blue" button to enter to edit s ub-menu.
Press "2" button to open the sort. You c an sort by Name/Time/Size.
Return to parent directory.
"BLUE" button:
"2" button:
"EXIT" button:
"RED" button:
"GREEN" button:
"YELLOW" button:
"EXIT" button:
Page 17
TIMESHIFT/RECORD
Timeshift
Plugging an external Mass Storage Device on the USB port gives you access to Time Shift/Record
a broadcast programme.
Pause a broadcast programme and con tinue watching it la ter (Time Shift )
Record a broadcast programme.
When the space available on the Mass Storage Device runs out, recording operation of
broadcast will stop.
Initiate
Trickmodes
Stop the Time Shift
Time Shift can be done in viewing mode by pressing the
"PAUSE" button.
Press "RIGHT" or "LEFT" button to move the cursor to
the time you desired to view. Press "O K" button to confirm.
During the playback, it is possible to perform the following actions :
Press "PAUSE" button to pause the playback
Press "FORWARD" button to fast forwa rd the playback
Press "BACKWARD" button to rewind t he playback
Record
Instant record
In viewing mode, press "RECORD" button to instantaneously start a record on the current channel.
Press "RECORD" button again can inp ut duration.
Press "STOP" button to stop recording, then a confirmation window appears.
Select "Yes" to stop recording. Select "No" to continue recording.
Press "STOP" button to stop TimeShift.
BB C FOU R
Play 00:02:37 00:07:12
TS
2%
03 /19
01 :36
1
English
14
NOTE:
Please use USB 2.0 disk w hen recording or timeshift .
For timeshift and rec ording feature, you need take bigger size USB pen
driver or HDD (>2GB) for recording.
Please select fa mous brand USB 2.0 USB HDD or USB stick for Recording and Timeshift, such as SAMSUNG,
HITACHI and SONY. Some USB devices maybe can't be supported due to its quality.
NOTE:
Page 18

In some region, the digital terrestrial signal may be weak. So you'd better use the antenna in
which the booster was built, for watching the weak signal channels.
TROUB L E SHOOTING
Problem
Standby light not lit
No signal found
No picture or sound
Scrambled channel
message
No response to remote
control
Forgotten channel lock
code
Forgotten menu lock
code
The remote control will
not operate your STB
After moving the STB to
another room you find you
are no longer able to
receive digital reception
Possible cause What to do
Mains lead unplugged
Mains fuse blown
Aerial is disconnected
Aerial is damaged/misaligned
Out of digital signal area
Scart/AV is not selected on your TV
Channel is scrambled
Receiver off
Handset not aimed correctly
Front panel obstructed
Hand set batteries exhausted
(1) The batteries in your remote
control need replacing
(2) There is an obstruction
blocking the signal path
between the remote control
and the box.
The aerial feed former new point
may come through a distribution
system which may reduce the
digital signal now received by the
box.
Check mains lead
Check fuse
Check aerial lead
Check aerial
Check with dealer
Reduce to another channel
Select alternative channel
Plug in and turn on plug
Aim handset at front panel
Check for obstructions
Replace handset batteries
Re-install channels to cancel
channel lock
Contact help line
(1) Replace the batteries
(2) Check that there is nothing in
the way of the path between
the remote control and the
receiver
Try a direct feed from the antenna
1
English
15
Page 19
Design and Specifications are subject to change without notice.
TUNER & CHANNEL
RF INPUT CONNECTOR x1
(IEC-TYPE, IEC169-2, FEMALE)
RF OUTPUT CONNECTOR x1
(IEC-TYPE, IEC169-2, MALE (LOOPTHROUGH))
FREQUENCY RANGE:
174MHz~230MHz(VHF)
470MHz ~862MHz (UHF)
SIGNAL LEVEL:
-15 ~ -70 dbm
DECODER
Video decoder
Audio decoder
VIDEO FORMATS
MODULATION
VIDEO OUTPUT
INPUT RATE
MAX. 48Mbit/s
4:3/,16:9 SWITCHABLE
HDMI, SCART
QPSK,16QAM,64QAM
CONNECTION
MAIN POWER CABLE
TUNER
SCART
SPDIF
FIXED TYPE
ANTENNA INPUTx1, RF OUTPUT x1
COAXIAL x1
POWER SUPPLY
INPUT VOLTAGE
POWER CONSUMPTION
220-240V~, 50/60Hz
MAX. 6W
TO TV x1
1
English
16
MPEG-2 MP@HL, AVC/H.264 HP @L4.1
MPEG-4 ASP SUPPORTED
MPEG-1 Layer 1,2/PCM/HE-AAC V1.0
ICE958 SPDIF
SPECI F I CATIONS
NOTE:
HDMI HDMI OUTPUT x1
DATA PORT USB slot
Page 20
SET TOP BOX
Digitální pĜijímaþ
BEN 150 HD
Už
ivatelský manuál
ĒG
G
G
G
BEN150 HD
Page 21
Bezpeþnostní upozornČní
DĤležité upozornČní pro bezpeþné používání pĜístroje
PĜed použitím výrobku si peþlivČ pĜeþtČte celý návod. Pod pojmem pĜístroj se v tomto návodu rozumí samotný
pĜístroj, pĜíslušenství a montážní materiál, jako jsou síĢové a signálové kabely, dálkový ovladaþ, baterie, a
napájecí zdroje apod.
Výrobce pĜístroje v žádném pĜípadČ neodpovídá za jakékoliv pĜímé i nepĜímé škody zapĜíþinČné nedodržením
jak obecnČ platných tak v tomto návodu uvedených pokynĤ pro zacházení s pĜístrojem.
Pokyny uvedené v následujícím textu obsahují dĤležité informace související s bezpeþným používáním pĜístroje
a jsou podle rizik vznikajících jejich nedodržením zaĜazeny do tĜí kategorií oznaþovaných v návodu údaji
• Varování
Oznaþuje situaci, která mĤže vest k vážnému zranení a ohrožení života.
• UpozornČní
Oznaþuje situaci, která mĤže poškodit, nebo zniþit pĜístroj.
• Poznámka
Oznaþuje doplĖující text, nebo informace, jak se má uživatel vyhnout možným problémĤm pĜ
i
obsluzepĜijímaþe.
Význam symbolĤ
K omezení rizika úrazu elektrickým proudem neotvírejte skĜíĖ pĜístroje. UvnitĜ nejsou díly, které
by mohl opravit nebo seĜídit uživatel. S požadavky na opravy se obracejte na pracovníky s
odpovídající kvalifikací.
Symbol blesku umístČný v rámeþku tvoĜeným rovnostranným trojúhelníkem upozorĖuje uživatele
na existenci neizolovaného „nebezpeþného napČtí“ pĜístroje, které mĤže mít takovou intenzitu,
že mĤže zpĤsobit úraz elektrickým proudem.
Tento výrobek byl vyroben v souladu s mezinárodními bezpeþnostními standardy. PĜeþtČte si prosím
peþlivČ následující bezpeþnostní pokyny.
NAPÁJENÍ: 90-260V AC 50/60Hz
Provozujte tento výrobek pouze pomocí napájení uvedeného na štítku. Nejste-li si jisti ohlednČ typu napájení ve
vaší domácnosti, kontaktujte vašeho místního distributora elektrické energie.
PĜed zahájením jakékoliv údržby nebo instalace odpojte výrobek od napájení.
PěETÍŽENÍ: NepĜetČžujte zásuvku, mohlo by dojít k požáru, nebo k zasažení elektrickým proudem.
KAPALINA: Výrobek nesmí být vystaven pĤsobení žádné kapaliny. RovnČž se na pĜístroj nesmČjí stavČt žádné
pĜedmČty naplnČné kapalinou.
ýIŠTċNÍ: PĜed zahájením þištČní odpojte výrobek od napájení. K setĜení prachu z výrobku použijte lehce
navlhþenou tkaninu, nikoliv rozpouštČdla.
VENTILACE: ŠtČrbiny na horní þásti výrobku musí zĤstat nezakryté, aby umožĖovaly potĜebné proudČní
vzduchu do pĜístroje. NeumísĢujte výrobek na mČkká bytová zaĜízení nebo koberce. Nepokládejte jiné
elektronické pĜístroje na výrobek.
PěÍSLUŠENSTVÍ: Nepoužívejte žádná nepodporovaná pĜíslušenství, aby nedošlo k poškození výrobku.
PěIPOJENÍ K ANTÉNċ: PĜed pĜipojováním nebo odpojováním kabelu z antény odpojte výrobek od napájení,
aby nedošlo k poškození antény.
PěIPOJENÍ K TV: PĜed pĜipojováním nebo odpojováním kabelu z TV odpojte výrobek od napájení, aby
nedošlo k poškození televizoru.
UMÍSTċNÍ: UmístČte výrobek uvnitĜ budovy, aby bylo zamezeno pĤsobení blesku, deštČ nebo slunce.
NeumísĢujte pĜístroj do blízkosti radiátoru nebo výmČníku tepla. ZajistČte odstup nejménČ 10 cm. Neblokujte
otvory žádnými pĜedmČty a neumísĢujte výrobek na postel, pohovku, pokrývku ani jiný podobný povrch.
Umístíte-li výrobek na polici nebo do knihovny, ujistČte se, že je zajištČno adekvátní odvČtrávání a že jste
dodrželi pokyny výrobce k montáži.
NeumísĢujte výrobek na nestabilní vozík, stojan, stativ, podpČru nebo stĤl, z nichž mĤže spadnout. Pád výrobku
mĤže zpĤsobit vážné zranČní dítČte i dospČlé osoby a vážné poškození pĜístroje.
ENERGETICKÉ RÁZOVÉ IMPULSY: Odpojte výrobek ze zásuvky a od antény za bouĜe, nebo pokud jej
nepoužíváte dlouhou dobu, abyste pĜedcházeli poškození pĜístroje bleskem a energetickými rázovými impulsy.
CIZÍ PěEDMċTY: Nestrkejte žádné pĜedmČty do pĜístroje. Mohlo by dojít ke styku s body nebezpeþného napČtí
nebo k poškození souþástí.
VÝMċNA SOUýÁSTEK: VýmČnu souþástí smí provádČt pouze servisní technik urþený výrobcem.
VÝSTRAHA!
Dodržujte prosím následující body, aby nedošlo k poškození kabelu nebo zástrþky:
- Neupravujte svévolnČ napájecí kabel nebo zástrþku.
Page 22

- Neohýbejte ani nezkrucujte napájecí kabel.
- PĜi odpojování držte napájecí kabel za zástrþku.
- Držte napájecí kabel co nejdále od tepelných spotĜebiþĤ, abyste zabránili tavení krycího vinylu.
- Zástrþka musí zĤstat snadno dostupná.
Dodržujte prosím následující body, aby nedošlo k zasažení elektrickým proudem:
- Neotevírejte hlavní jednotku.
- Nestrkejte do vnitĜní þásti výrobku kovové nebo vznČtlivé pĜedmČty.
- Nedotýkejte se zástrþky mokrýma rukama.
- V pĜípadČ výskytu blesku odpojte napájecí kabel.
Dodržujte prosím následující body, aby nedošlo k poškození výrobku:
- Nepoužívejte výrobek, nefunguje-li správným zpĤsobem, aby nedošlo k jeho vážnému poškození. Kontaktujte
místního prodejce.
- Nestrkejte do slotĤ pro moduly nebo Smart karty kov nebo cizí materiály, aby nedošlo k poškození výrobku a
zkrácení jeho životnosti.
-Zásuvka musí být nainstalovaná blízko pĜístroje a musí být snadno pĜístupná.
UpozornČní pro použití USB zaĜízení
Pro plnohodnotné využití USB portu musí, pamČĢ k nČmu pĜipojená, podporovat
standard USB 2.0. Pro bezchybné, stabilní nahrávaní a pĜehrávaní jsou
vyžadovány USB zaĜízení s rychlostí zápisu 9.0 MB/s nebo rychlejší. Pomalejší
pevné disky a flash pamČti mohou mít problémy s nahráváním, které se projeví
zasekáváním obrazu, nebo nemusí vĤbec pracovat.
SprávnČ pracují pouze disky s jedním základním oddílem se souborovým systémem
NTFS nebo FAT32 Pokud se na disku nachází jiný souborový systém, naformátujte
tento disk v PC na doporuþeny souborový systém ještČ pĜedtím, než jej p
Ĝipojíte k
pĜijímaþi.
SilnČ fragmentované nebo pĜeplnČnČ pamČti také nemusí fungovat správnČ a
plynule.
Externí pevné disky HDD musí mít vlastni napájení, port USB zabudovaný v
pĜijímaþi není schopen dodat dostateþnČ napČtí pro napájení pĜenosného USB
pevného disku.
BČhem nahrávaní nebo pĜehrávaní nelze USB zaĜízeni v žádném pĜípadČ odpojovat
od pĜijímaþe. Jeho odpojení bČhem práce pĜijímaþe mĤže zpĤsobit poškozeni
pĜijímaþe nebo flash pamČti a také poškodí data, která se na mediu nacházejí.
pĜijímaþ disponuje funkcí minimálního odbČru elektrické energie v pohotovostním stavu
a je tedy šetrnČjší k životnímu prostĜedí
ovládací software pro tento pĜijímaþ se neustále vyvíjí. Nová verze software mĤže
zmČnit nČkteré funkce a chování pĜijímaþe. Obrázky a popisy v tomto návodu mají
pouze informativní charakter. Pokud si všimnete chyby, prosíme o její nahlášení, udČláme všechno pro to,
abychom ji opravili.
NejnovČjší firmware naleznete vždy na stránkách produktu www.bensat.cz
pĜijímaþ je vybaven HDMI rozhraním ve verzi 1.3c pro pĜipojení nejnovČjších typĤ
televizorĤ v nejvyšší kvalitČ obrazu I zvuku. Pokud je Váš televizor vybaven tímto vstupem, využijte ho.
Page 23

OBSAH
Bezpeþnostní upozornČní
PěEDSTAVENÍ
PĜední panel
1
Z
adní panel
1
Dálkové ovládán
í
2
ZAPOJENÍ PěIJÍMAýE
Z
ákladní informace
3
PĜi
poj
ení k televizoru
3
PĜi
poj
ení
k
H
IFI systému
3
ZAýÍNÁME
První zapnutí pĜijímaþe
4
I
nstalace a ladČní kanálĤ
4
OVLÁDÁNÍ PěIJÍMAýE
Z
mČna kanálu
5
Ovládání Elektronického
prog
ramového
p
rĤvodce
(
EPG
)
5
ÚPRAVA KANÁLģ
M
enu editace kanálĤ
6
Editace seznamu TV kanálĤ
6
Editace seznamu Rádio kanálĤ
6
V
y
mazání všech kanálĤ ze seznamu
6
NASTAVENÍ SYSTÉMU
M
enu nastavení systému
7
Nastavení jazyka
7
TV Systém, Rozlišení videa
7
Nastavení místního þasu
7
Nastavení þasovaþe
8
Rodiþovsk
ý
záme
k
8
Nastavení OSD menu
8
Oblíbené kanál
y
8
Nastavení funkce Audio description (popis dČje pro zrakovČ postižené)
M
ultiview
(
zobrazení náhledĤ více stanic
)
9
Ostatn
í
(napáj
ení antény, zvuková signalizace síly signálu, automatické vypnutí
)
9
NÁSTROJE
H
lavní menu nástro
j
Ĥ
10
Inf
ormace
10
Tovární nastaven
í
(Vy
mazání dat
)
10
A
ktualizace software
10
Bez
p
eþnČ od
poj
ení USB zaĜízen
í
11
HRY
H
ry
11
MENU NAHRÁVÁNÍ, MULTIMEDIÁLNÍ PěEHRÁVAý
M
enu nahráván
í
12
M
ultimediáln
í
p
Ĝehráva
þ
12
PVR In
f
ormace
13
PVR Nastaven
í
13
TIMESHIFT/NAHRÁVÁNÍ
Timeshif
t
14
Nahráván
í
14
ěEŠENÍ ýASTÝCH PROBLÉMģ
15
TECHNICKÁ SPECIFIKACE
16
Page 24
PěEDSTAVENÍ
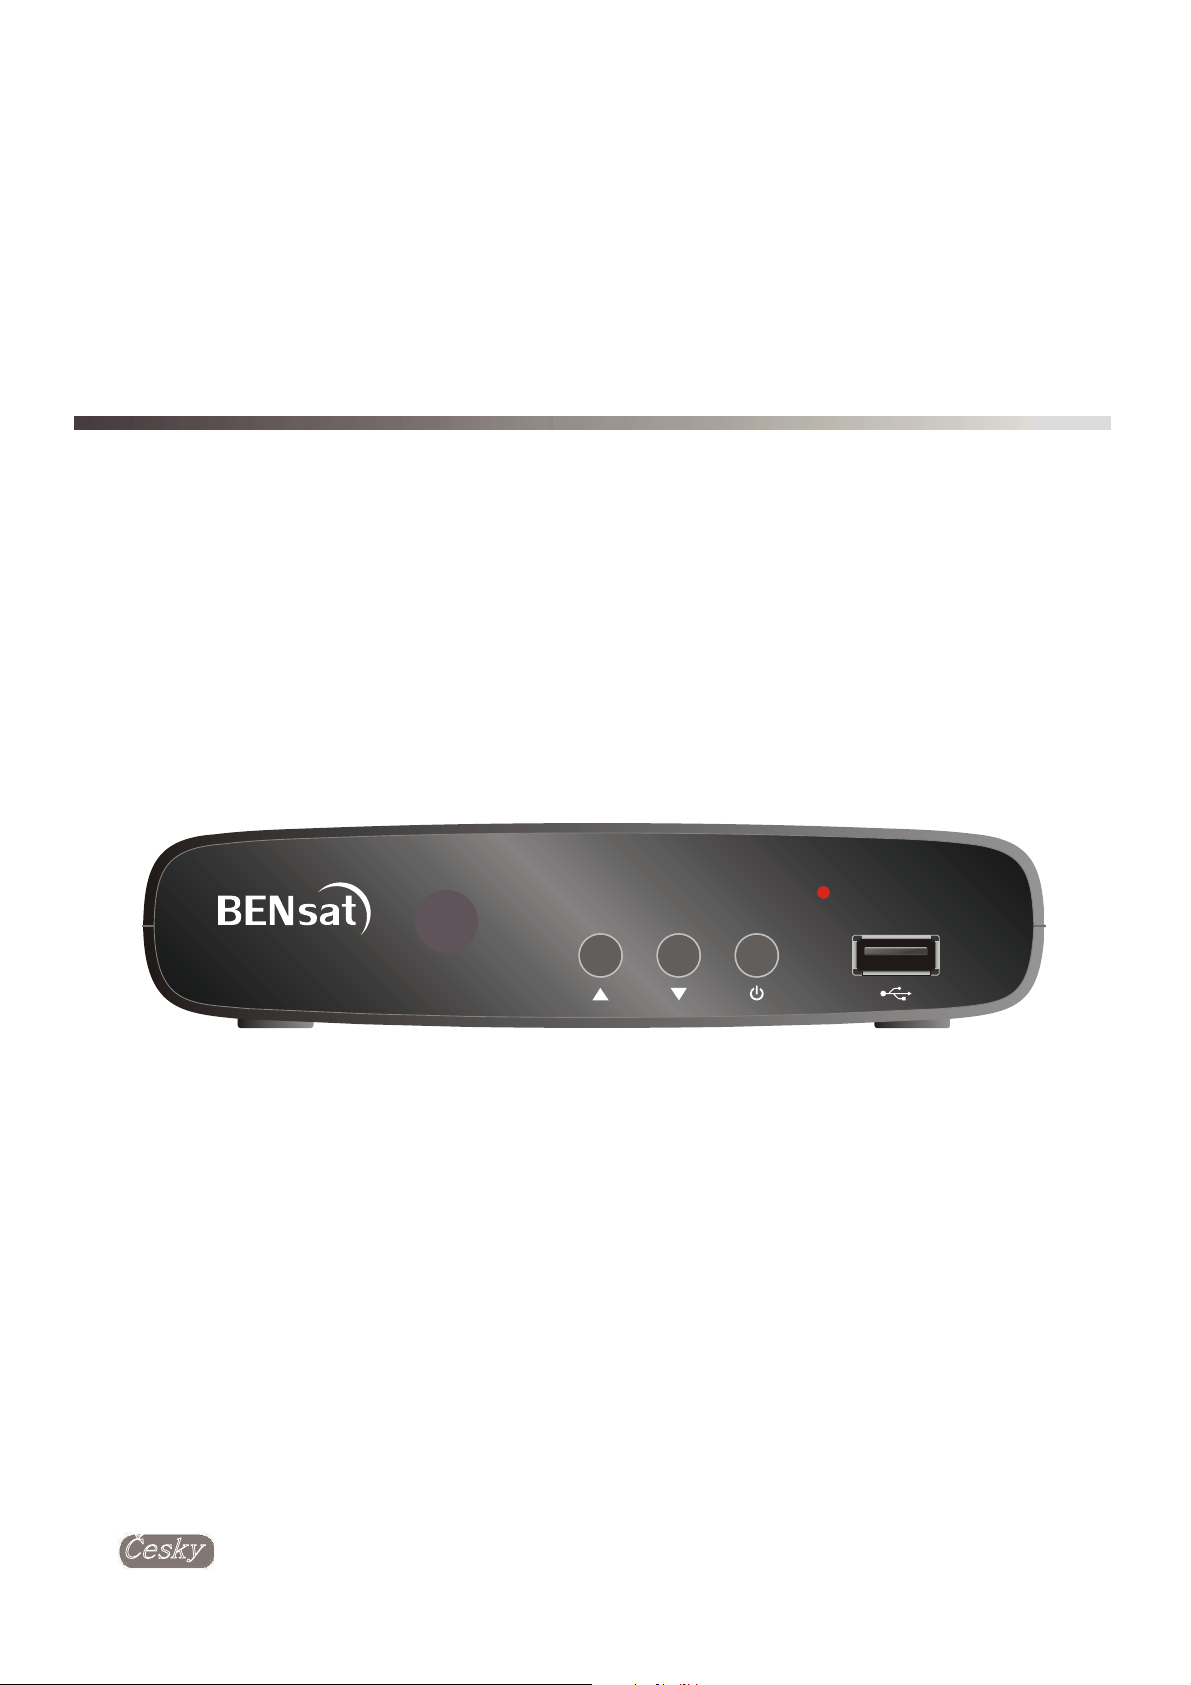
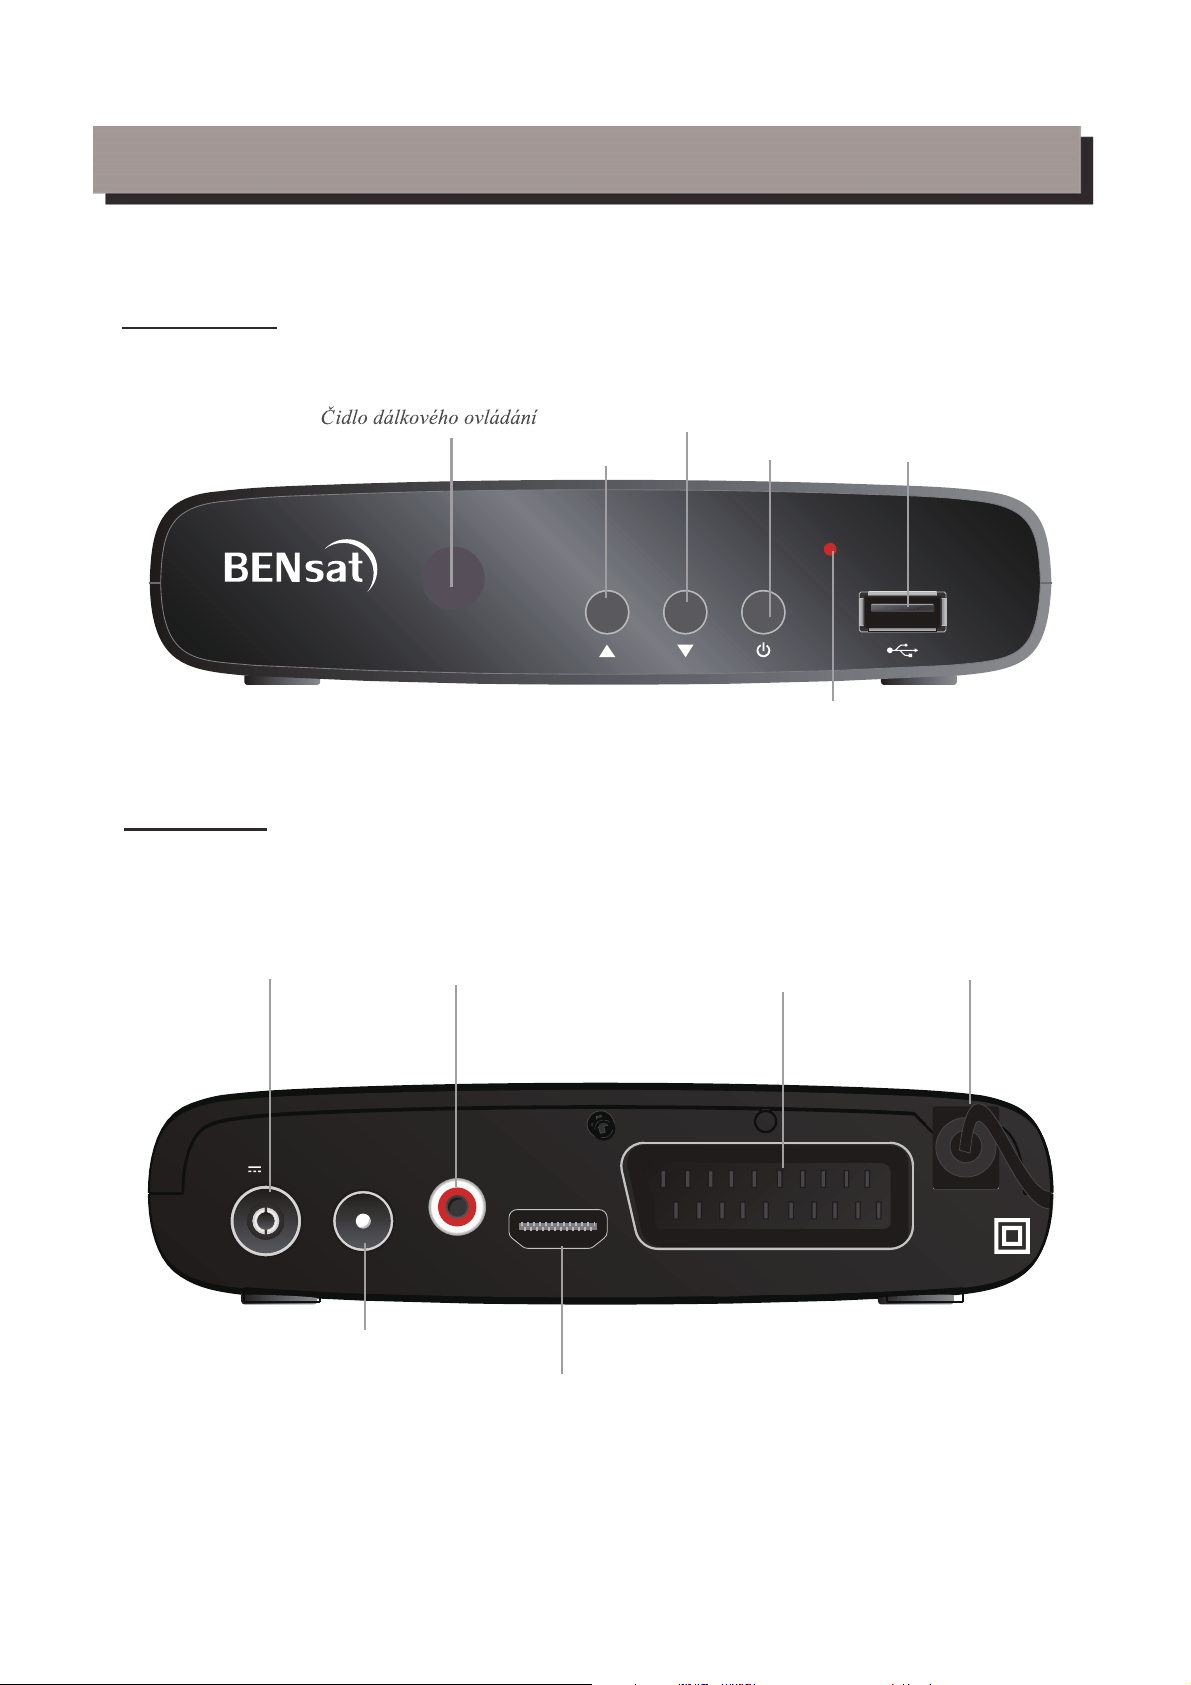
PĜední panel
Zadní panel
Vstup od antény
BEN150 HD
kanál nahoru
Digitální audio výstup
NDQiOGROĤ
ON-OFF
indikátor napájení
SCART výstup
USB port
Napájení
5V 50mA
RF IN
RF O
UT
RF OUT
COA
XIAL
HDMI
HDMI
220-240V~
50/60Hz
TV
Page 25
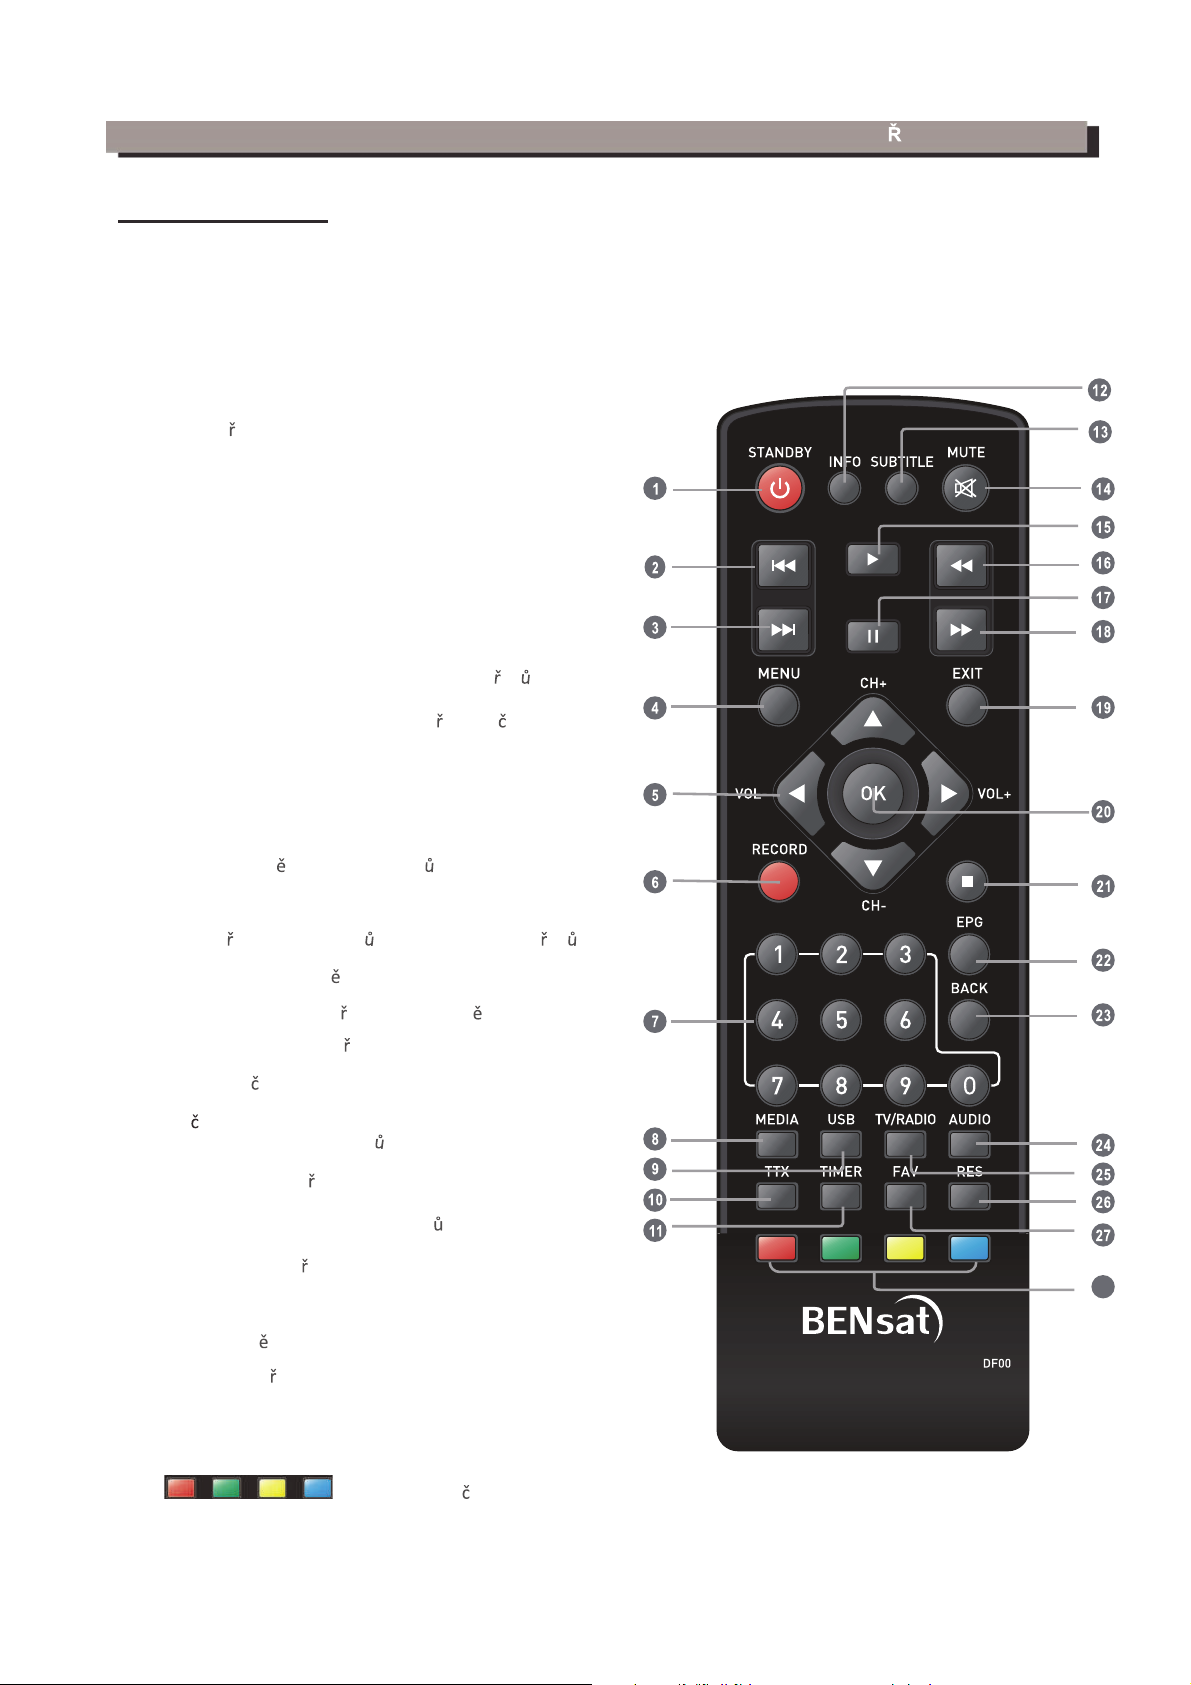
1. STANDBY
2.
3.
4. MENU
6.
5.
Tla
ítko OK
(zobrazení seznamu kanál / potvrzení nabídky v MENU)
7.
RECORD
;ŽŬĂŵǎŝƚĠŶĂŚƌĄǀĄŶşͿ
8.
VOL+/-
9.
10.
PREV
(p ĞĚĐŚŽnjşƐŽƵďŽƌǀƉůĂLJůŝƐƚƵŶĂŚƌĄǀŬĂͿ
11.
MEDIA
;njŽďƌĂnjĞŶşƐĞnjŶĂŵƵŶĂŚƌĂŶljĐŚƉŽad )
12.
USB
;njŽďƌĂnjĞŶşŵƵůƟŵĞĚŝĄůŶşŚŽƉĞŚƌĄǀĂe)
13.
Next
;ĚĂůƓşƐŽƵďŽƌǀƉůĂLJůŝƐƚƵŶĂŚƌĄǀĐĞͿ
14. MUTE
;njƟƓĞŶşnjǀƵŬƵͿ
15.
16.
17.
18.
19.
20.
EXIT
(ukon ĞŶşǀljƐƚƵƉnjŵĞŶƵͿ
21.
22.
23.
24.
REV
;ƌLJĐŚůljƉŽƐƵǀnjƉ t)
25.
PLAY
(p ĞŚƌĄǀĄŶşƐŽƵďŽƌŶĞďŽŶĂŚƌĂŶljĐŚƉŽad )
26.
FWD
;ƌLJĐŚůljƉŽƐƵǀǀƉed)
27.
PAUSE
(pozastavení p ĞŚƌĄǀĄŶşƐƉƵƓƚ
ŶşĨƵŶŬĐĞdŝŵĞƐŚŝŌͿ
28.
;ŝŶƚĞƌĂŬƟǀŶşƚůĂítka)
P EDSTAVENí
;ƐůŽƵǎşŬnjĂƉŶƵơǀLJƉŶƵơƉŝũşŵĂĞͿ
Numerická klávesnice
INFO
RES
TTX
(teletext)
TIMER
EPG
;ůĞŬƚƌŽŶŝĐŬljƉƌŽŐƌĂŵŽǀljƉƌvodce)
AUDIO
(zm ŶĂĂƵĚŝŽƐƚŽƉLJͿ
SUBTITLE
(zm ŶĂnjĂƉŶƵơƟƚƵůŬ)
TV/RADIO
(p ĞƉŶƵơŵĞnjŝƐůĞĚŽǀĄŶşŵdsĂƉŽƐůĞĐŚĞŵƌĂĚŝĂͿ
BACK
(návrat k p ĞĚĐŚŽnjşŵƵŵĞŶƵŶĄǀƌĂƚŶĂƉŽƐůĞĚŶ
ƐůĞĚŽǀĂŶljŬĂŶĄůͿ
STOP
(zastavení p ĞŚƌĄǀĄŶşͿ
FAV
;njŽďƌĂnjĞŶşƐĞnjŶĂŵƵŽďůşďĞŶljĐŚŬĂŶĄů
;njĂĚĄŶşŵşƐůĂƉĞƉŶĞƚĞƉşŵŽŶĂƉŽǎĂĚŽǀĂŶŽƵƉĞĚǀŽůďƵ
;njŽďƌĂnjĞŶşŚůĂǀŶşŚŽDEhƉŝũşŵĂĞͿ
;njǀljƓĞŶşƐŶşǎĞŶşŚůĂƐŝƚŽƐƟͿ
28
Dálkový ovladaþ
Page 26
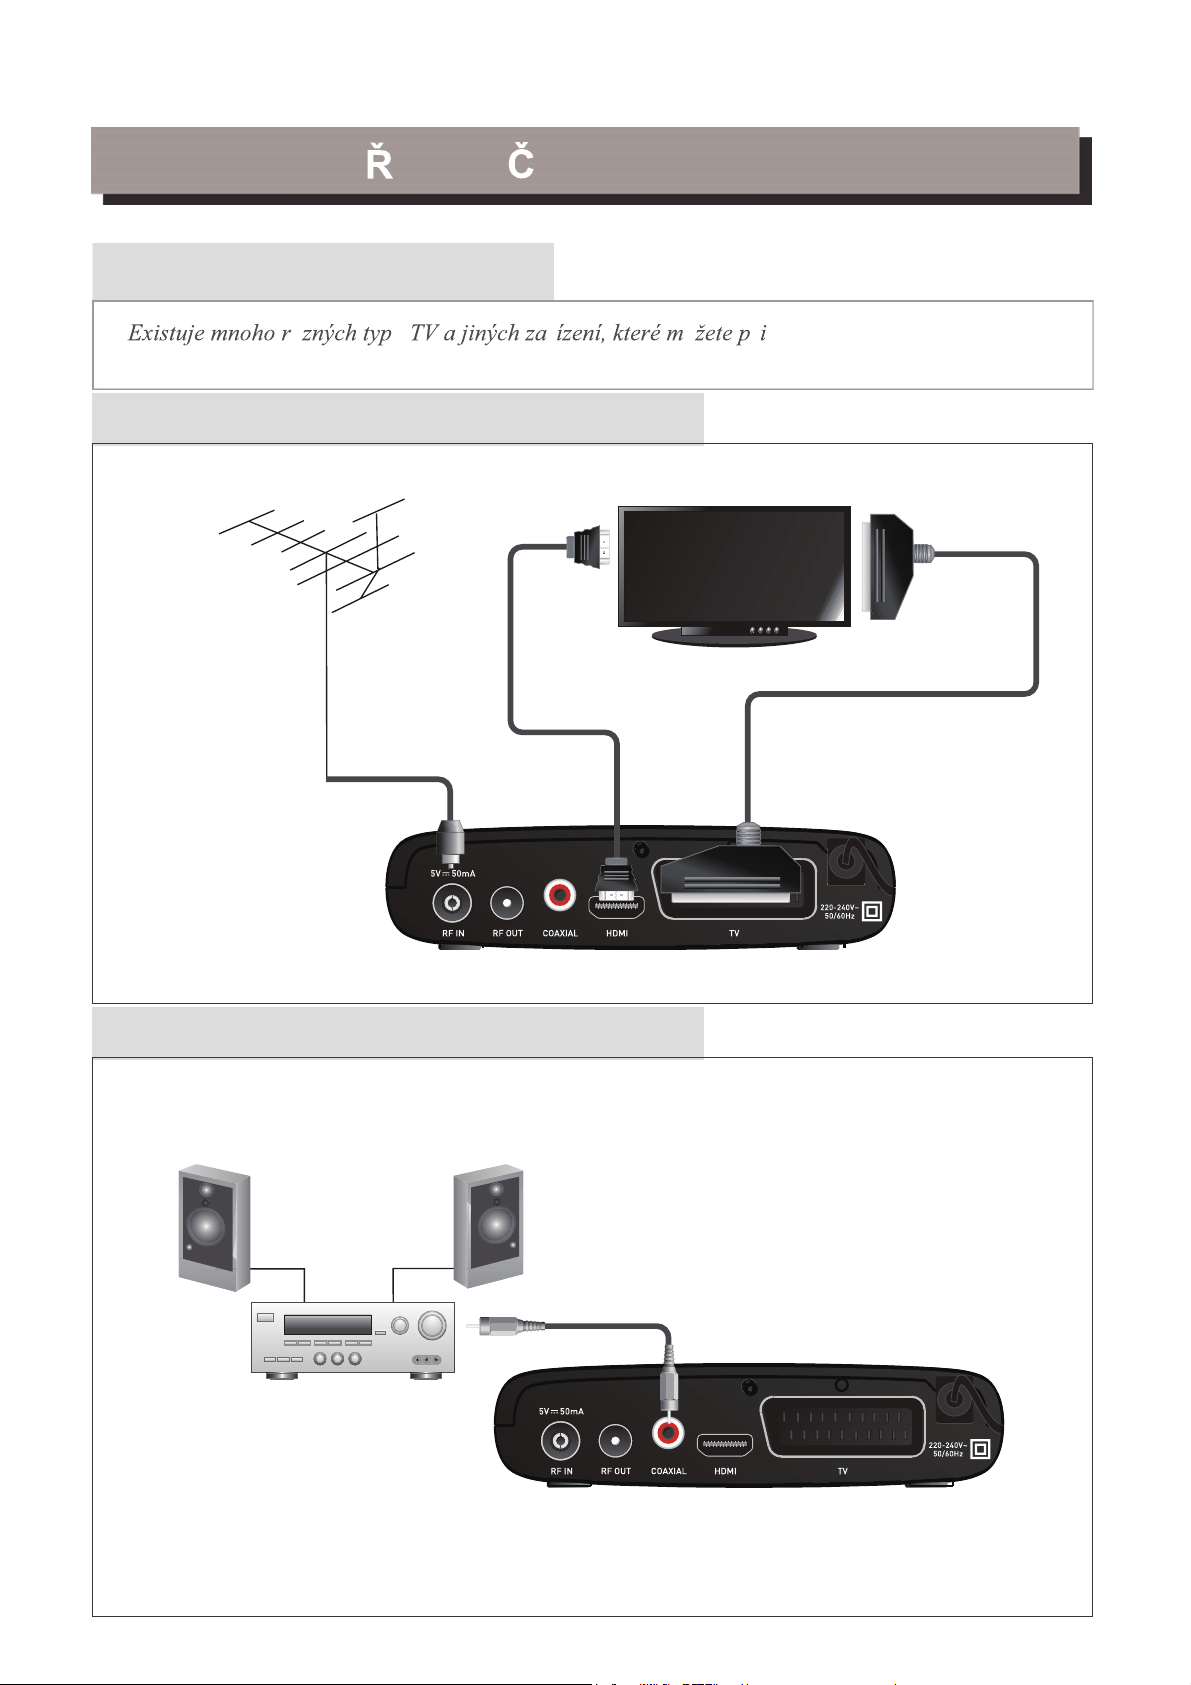
ZAPOJENí P IJíMA E
Hlavní
ů
ů ř ů ř pojit k přijímači. V této příručce
uvidíte některé z nejčastějších způsobů, jak připojit vaše zařízení.
Připojení k TV
HDMI TV
Anténa
HDMI Kabel
RF Koax
Scart Kabel
Připojení k HIFI systému
Hi-Fi
Coaxial Kabel
3
Z
Page 27
ZAýÍNÁME
PrĤvodce prvotním nastavením
P
o prvním zapnutí pĜijímaþe se zobrazí „Úvodní menu
“
Welcome
P
omocí šipek na dálkovém ovladaþi vyberte zemi použití, Jazyk OSD menu,
Region
R
ozlišení a
p
omČr stran obrazu.
Poland
Oznaþte a stisknČte tlaþítko OK pro automatické vyhledání kanálĤ.
Language English
Display Mode 720p@50
Aspect Mode 4:3LB
OK
Instalace
Stisknutím tlaþítka "MENU" vstupte do hlavního menu.
a.
b. Pomocí tlaþítek Ÿźoznaþte nabídku „Instalace",
stisknČte tlaþítko
൘
pro vstup do instalaþního menu.
c.
d. Pomocí tlaþítek Ÿźoznaþte požadovanou funkci a
potvrćte tlaþítkem OK.
Manuální ladČní kanálĤ
Pokud znáte parametry pro naladČní jednotlivých kanálĤ, použijte funkci
Manuálního hledání kanálĤ. Vyberte položku "Manuální ladČní" a
stisknČte tlaþítko "OK" pro vstup do pod menu ruþního ladČní.
Vyberte zpĤsob vyhledávání: pásmo, þíslo i frekvenci kanálu a šíĜku pásma.
Na ukazatelích signálu sledujte ukazatel „Kvalita signálu“. Pokud tento ukazatel
zobrazuje kvalitu signálu pomocí tlaþítek Ÿź oznaþte položku Hledat a spusĢte
vyhledávání tlaþítkem OK na dálkovém ovladaþi.
Automatické ladČní kanálĤ
Pokud neznáte parametry k naladČní pĜijímaþe, mĤžete nechat prohledat celé
pásmo pomocí funkce Automatické ladČní.
Vyberte položku "Automatické ladČní" a stisknČte tlaþítko "OK" pro vstup do pod
menu Automatického ladČní. Vyberte, jestli chcete vyhledat všechny kanály,
placené kanály, nebo pouze FTA (neplacené kanály). Pomocí tlaþítek Ÿź
oznaþte položku Hledat a spusĢte vyhledávání tlaþítkem OK na dálkovém ovladaþi.
Po dokonþení vyhledávání pĜijímaþ automaticky uloží všechny nalezené kanály
podle poĜadí v jakém byly nalezeny.
Installation
Channel Scan
Auto Scan
LCN
Channe
l Scan
Scan Mode By channel
Scan Band
UHF
Ch No.
CH37(666000KHz)
Frequency
666000KHz
Bandwidth
8MHz
Search
Signal Intensity 81%
Signal Quality 97%
Auto Scan
FTA Only No
Se
arch
LCN
LCN ( Logical Channel Number) – logické þíslování kanálĤ. Tato funkce, pokud ji operátor podporuje,
zajistí automatické seĜazení kanálĤ. V pĜípadČ zmČny v seznamu kanálĤ, tato funkce zajistí automatické
provedení doplnČní, smazání seznamu kanálĤ. Pokud je zapnuta volba LCN je znemožnČno ruþní
tĜídČní a seĜazení kanálĤ.
Pokud chcete ruþnČ seĜadit naladČné kanály vypnČte tuto funkci.
Page 28
OVLÁDÁNÍ
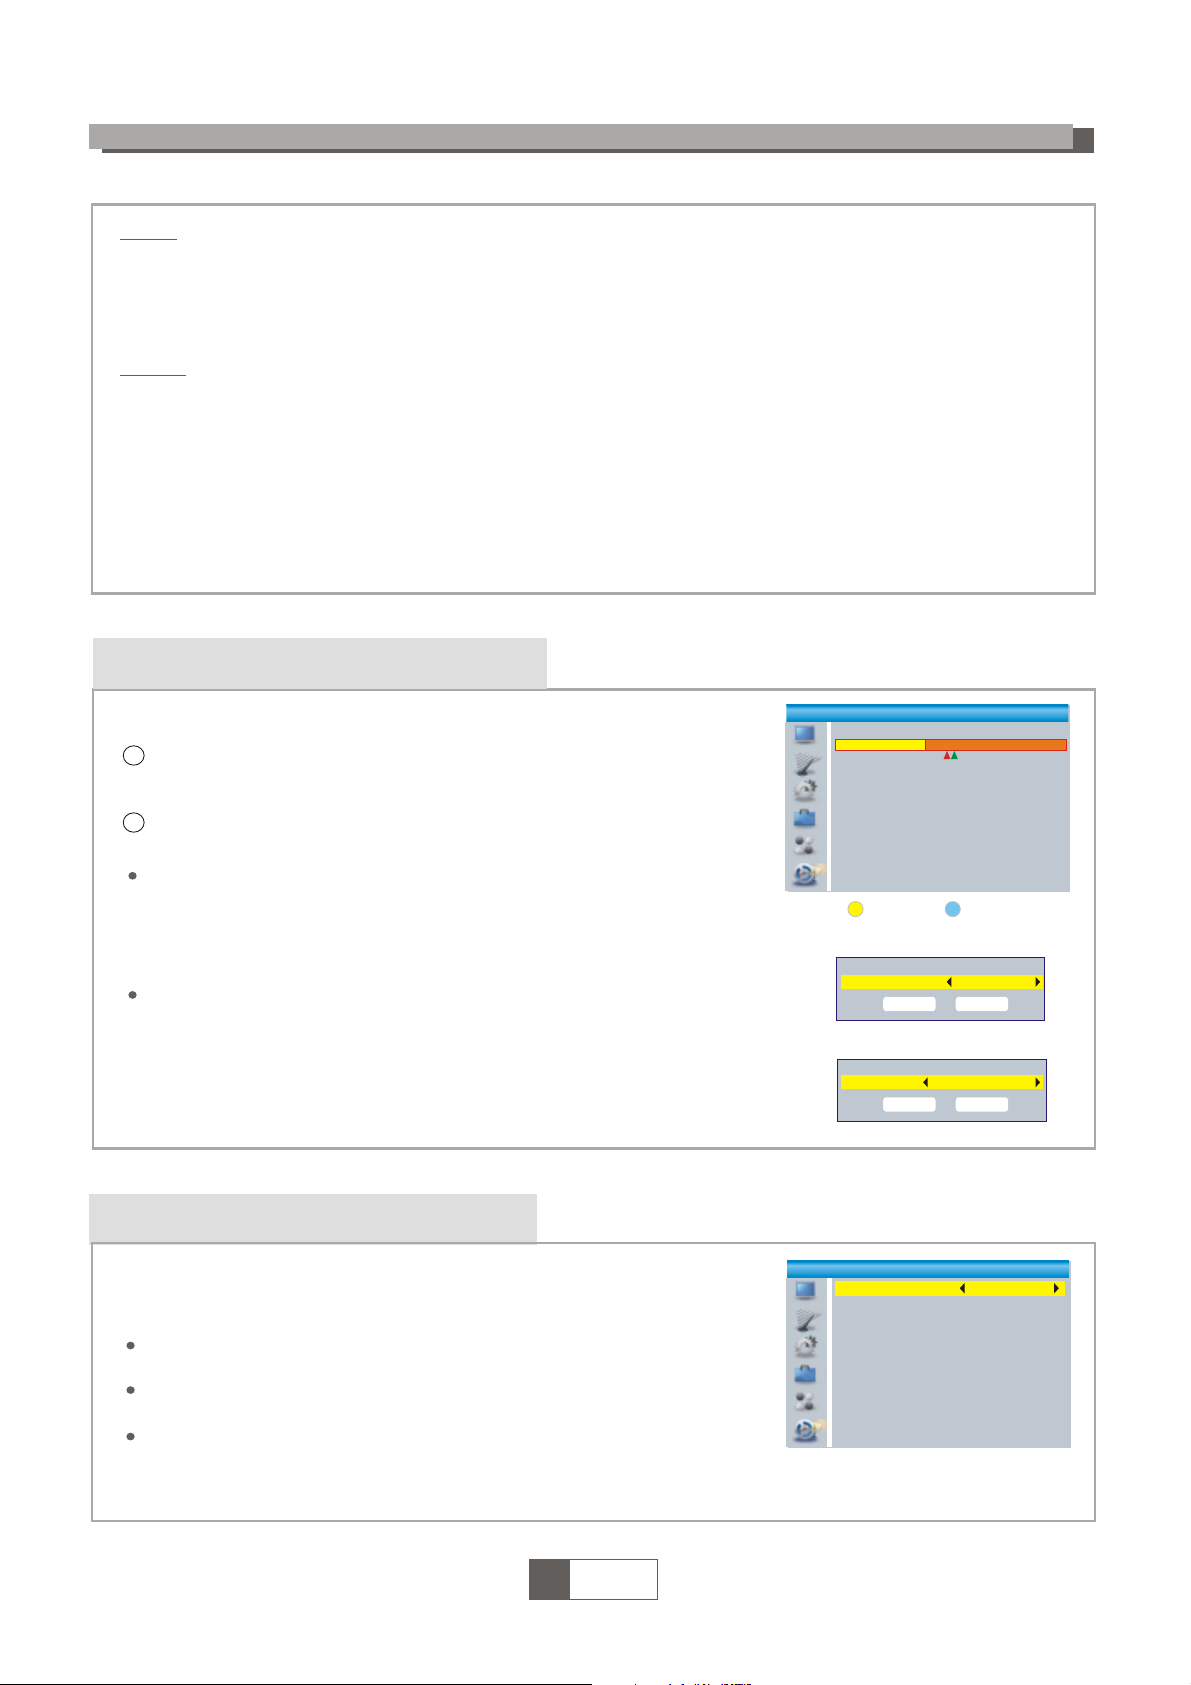
ZmČna kanálĤ
PĜijímaþ nabízí tĜi zpĤsoby zmČny kanálu – krokování pomocí tlaþítek CH+/CH-, pĜímá volba þísla, volba z menu
Krokování mezi kanály pomocí tlaþítek CH+ a CH-:
Pro pohyb mezi kanály použijte tlaþítka Ÿź na dálkovém ovladaþi .
PĜímá volba þísla pĜedvolby:
Pro pĜímou volbu stisknČte tlaþítko s þíslem pĜedvolby na numerické klávesnici dálkového ovladaþe
VýbČr pomocí zobrazeného seznamu kanálĤ:
PĜi sledování živého vysílání TV stisknČte tlaþítko OK na dálkovém ovladaþi. Na obrazovce bude zobrazena
nabídka naladČných kanálĤ. Pomocí tlaþítek Ÿź na dálkovém ovladaþi oznaþte kanál, který chcete
sledovat a potvrćte volbu tlaþítkem OK.
PĜístup a použití funkce Elektronického Programového PrĤvodce (EPG)
PĜístup do EPG menu se zobrazením všech kanálĤ:
StisknČte tlaþítko "EPG" pro vstup do EPG menu.
Pro pohyb v menu EPG použijte tlaþítka Ÿźa
ൖ൘UG
Oznaþte požadovaný poĜad a
G
StisknČte "ZELENÉ" tlaþítko pro pĜidání poĜadu do þasovaþe.
PĜi pĜidání poĜadu do þasovaþe je nutné zvolit, jestli chcete poĜad
pouze sledovat (mód kanál), nebo i nahrávat na USB (mód
rekordér).
StisknČte "ýERVENÉ" tlaþítko pro zobrazení " EPG v þasové linii"
menu.
EPG 01:39 xx/xx/xxxx
0010 BBC FOUR
Auntie's War on Smut
01:30-02-30
3
/19 01
:30 02:00 02:30 03:00
0008 Interecon
0009 BBC Parl The Recor Commons Questions The Recor
0010
BBC FO
Auntie's War on Smut Proms on FOUR
0011 CBeebie
This is CBeebies!
0012 301
Time Timer
Page 29
ÚPRAVA KANÁLģ
IT CHANNEL
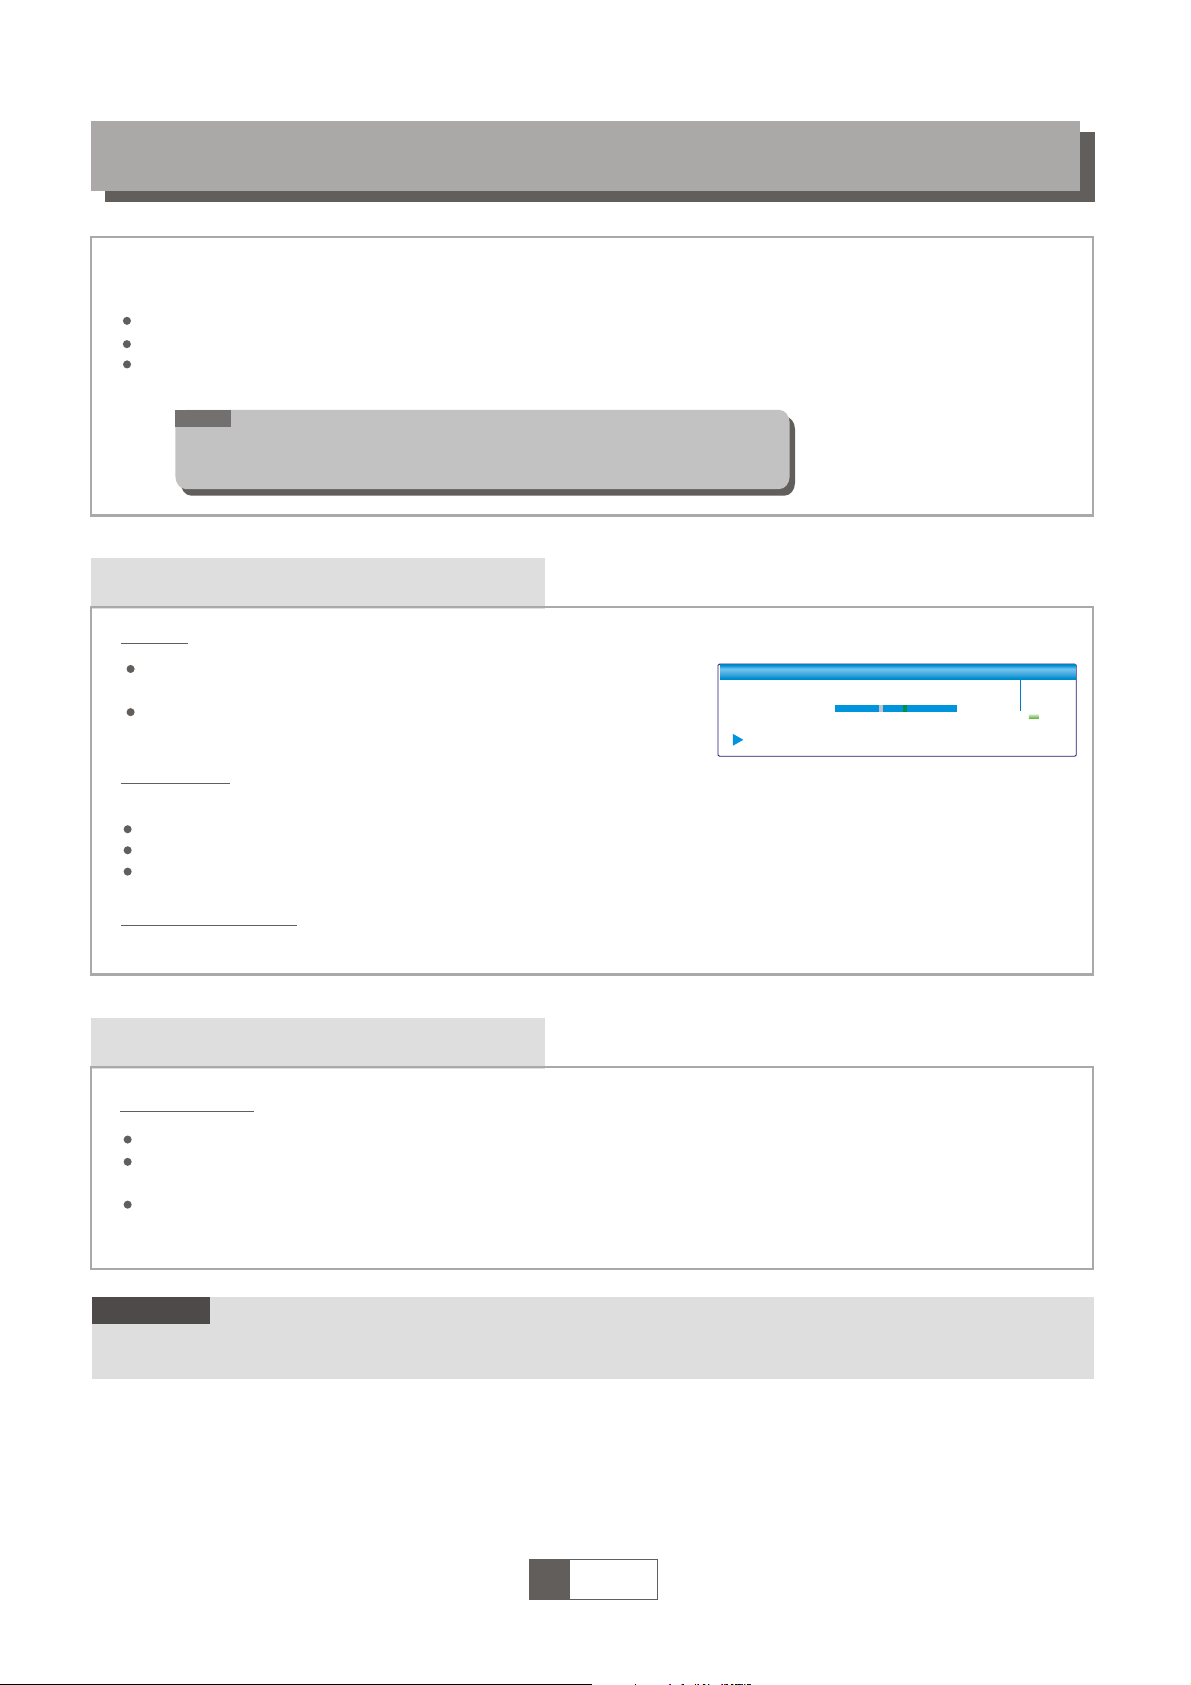
MENU editace kanálĤ
StisknČte tlaþítko "MENU" pro vstup do hlavního menu.
Pomocí tlaþítek Ÿź oznaþte požadovanou funkci a potvrćte stisknutím
tlaþítka „OK“, nebo
൘UGG
Edit Channel
TV Channel List
Radio Channel List
Delete All
Editace TV
V
menu úpravy kanálĤ lze pĜesouvat, mazat, pĜeskakovat všechny
naladČné kanály.
Pomocí tlaþítek Ÿź oznaþte požadované kanály a pomocí barevných
tlaþítek vyberte požadovanou funkci.
Pro zobrazení obrazového náhledu kanálu stisknČte tlaþítko „OK“.
Pomocí barevných tlaþítek vyberte požadovanou funkci a potvrćte
tlaþítkem „OK“.
PĜesun kanálu:
Oznaþte požadovaný kanál a stisknČte „ŽLUTÉ“ tlaþítko. Pomocí
tlaþítek ŸźpĜesuĖte kanál na novou pozici a potvrćte stisknutím
tlaþítka „OK“.
ZaĜazení kanálĤ do seznamu Oblíbených:
StisknČte tlaþítko "FAV“ a potom stisknČte tlaþítko „OK“
úpravu seznamu oblíbených kanálĤ.
TV Channel List
All T
V
FAV Lock Skip Move Edit
0001 No Name
0002 YooPlay Ga
0003 E4+1
Y
ooPlay Ga
i
0004 UKTV Histor
0005 SKY THREE
xxxxxxxx
0006 Sky Spts Ne
xxxxxx
0007 Sky News
xxxx
xxx
Edit Channel
All TV
Sort Rename Delete
0001 No Name
0002 YooPlay Ga
0003 E4+1
Y
ooPlay Ga
i
0004 UKTV Histor
0005 SKY THREE
xxxxxxxx
0006 Sky Spts Ne
xxxxxx
0007 Sky News
xxxx
xxx
Editace Rádií
V menu úpravy kanálĤ lze pĜesouvat, mazat, pĜeskakovat všechny naladČné kanály.
Pomocí tlaþítek Ÿź oznaþte požadované kanály a pomocí barevných tlaþítek vyberte požadovanou funkci.
Pozn:
V podstatČ je práce s rádii stejná jako editace TV kanálĤ pouze není dostupné okno s náhledem.
Místo toho je trvale zobrazeno logo rádia.
Smazat vše
Pokud chcete smazat všechny kanály, pĜejdČte v menu úpravy kanálĤ na
funkci „Smazat vše“ a potvrćte tlaþítkem „OK“. PĜi dotazu na heslo zadejte
„0000“.
Bude zobrazeno varování.
Pomocí tlaþítek
ൖ ൘G
oznaþte „Ano“ a potvrćte tlaþítkem
„OK“ pro smazání všech kanálĤ. Pokud nechcete smazat
všechny kanály zvolte „Ne“ pro návrat k pĜedchozí nabídce.
Warning! Do you really want to delete
all
channels?
Yes No
„
Page 30
Nastavení systému
0HQXQDVWDYHQtV\VWpPXXPRåQtP
SYSTÉM
nit nastavení jazyka, TV Systému, místního
asu, asova e, rodi ovského zámku, OSD menu, oblíbených kanál , nastavení
funkce Audio description.
Stiskn
te tla ítko "MENU" pro vstup do hlavního menu.
Pomocí tla
ítek vyberte funkci „Nastavení systému“ a potvr te
stisknutím tla
ítka „OK“, nebo
൘UG
Pomocí tlaþítek Ÿź oznaþte požadovanou funkci a potvrćte stisknutím
tlaþítka „OK“, nebo
൘UG
System Setup
Language
TV System
Local Time Setting
Timer Setting
Parental Lock
OSD Setting
Favorite
Auto Description Setting
Other
Jazy
k
9WRPWRPHQXMHPRåQpQDVWDYLW
3URRSXãWQtWRKRWRSRGPHQXVWLVNQWHWODtWNR
Ä(;,7³QDGiONRYpPRYODGDL
3UHIHURYDQêMD]\N]REUD]RYDQpKRPHQX
Preferovaný jazyk zvukového doprovodu,
Jazyk titulkĤ a teletextu.
V závislosti na zvoleném jazyku bude vybráno
správné kódování znakĤ.
Language
Language English
First Audio
English
Second Audio
German
Subtitle Language
English
Teletext
English
Subtitle
On
TV Systém
V tomto menu je možné nastavit Video rozlišení, pomČr s
tran videa,
video výstup a digitální audio výstup.
Video rozlišení:
podle zdroje/nativnČ TV/480i/480p/576i/
576p/720p@50/720p@60/1080i@25/
1080i@30/1080p@50/1080p@60
PomČr stran: Auto/4:3PS/4:3LB/16:9
Video výstup: SCART CVBS+ HDMI/ SCART RGB
Digital Audio výstup: LPCM výstup/ BS Výstup
TV System
Video Resolution 720p@50
Aspect Mode
4:3LB
Video Out
SCART RGB
Digital Audio Out
LPCM Out
Místní þas
V tomto menu je možné nastavit místní þas, region použití pĜijímaþe. Nastavení
þasu je dĤležité pro správnou funkci þasovaþe.
Region: Vyberte z menu region použití pĜijímaþe.
GMT nastavení : Vyberte nastavení GMT z možností : podle
Regionu/Uživatelsky definované/ Off
GMT þasový posun: Nastavte GMT þasový posun "-11:30 ~ +12:00",
s možností skoku po 30ti minutách.
Local Time Setting
Region France
GMT Usage
By Region
GMT Offset
GMT+01:00
Summer Time
Of
f
Date xxxx/xx/xx
Time
01:51
xxxx,xxx,xxxx
Letní þas: Nastavte
použití letního þasu z možností: On/Off
Datum: "Datum" a "ýas" menu je dostupné pouze pokud je v nastavení GMT zvoleno Off
ýas: Pro ruþní nastavení þasu použijte þíselnou klávesnici.
Page 31

SYSTÉM
Nastavení þasovaþe
V tomto menu je možné nastavit þasovaþ. MĤžete nastavit až 8 þasovaþĤ.
Mód þasovaþe: Off/Jednou/DennČ/TýdnČ/MČsíþnČ
Typ þasovaþe: PĜepnutí/Nahrávání
Kanál po zapnutí: Vyberte kanál, který bude zobrazen po zapnutí pĜístroje.
Datum zapnutí: Pomocí numerické klávesnice zadejte datum zapnutí pĜístroje.
ýas zapnutí: Pomocí numerické klávesnice zadejte þas zapnutí pĜístroje.
Doba trvání: Pomocí numerické klávesnice zadejte délku trvání þasovaþe.
Current Time/date: 01:36PM xx/xx/xxxx
Timer Mode Daily
Timer Service
Channel
Wakeup Channel BBC FOUR
Wakeup Date xx/xx/xxxx
On Time xx:xx
Duration xx:xx
Save
Cancel
Rodiþovský zámek
P
omocí této funkce mĤžete uzamknout menu a kanály pĜed neoprávnČnou zmČnou a
s
ledováním. V tomto menu mĤžete také zmČnit heslo.
Parental Lock
Pomocí tlaþítek Ÿź vyberte v MENU funkci „Nastavení systému“ a
potvrćte stisknutím tlaþítka „OK“, nebo
ڼ
.
Vyberte funkci Rodiþovská kontrola a potvrćte tlaþítkem „OK“.
P
Ĝístu
p
do tohoto nastavení
j
e chránČn heslem (z v
ý
roby 0000)
Zámek menu: Pokud je nastaven tento zámek je nutné pĜed vstupem do menu
„úpravy kanálĤ“ a „Instalaþního menu“ zadat platný kód.
Zámek podle vČku: Off/ VČk 4/ VČk 5/ VČk 6/ VČk 7/ VČk 8/ VČk 9/ VČk 10/ VČk 11/ VČk 12/VČk 13/
VČk 14/ VČk 15/ VČk 16/ VČk 17/ VČk 18
ZmČna hesla: Zadejte nové heslo.
Podvrćte heslo: Zadejte nové heslo pro potvrzení.
Nastavení OSD
V tomto menu mĤžete nastavit dobu zobrazení OSD a prĤhlednost OSD menu .
OSD délka zobrazení: 1-10
OSD PrĤhlednost: Nastavte prĤhlednost menu: Off/10%/20%/30%/40%.
OSD Setting
OSD Timeout 5
OSD Transparency
Of
f
Oblíbené
V tomto menu mĤžete pĜejmenovat seznamy Oblíbených kanálĤ.
Vyberte požadovanou skupinu oblíbených kanálĤ, stisknČte tlaþítko „OK“
pro otevĜení virtuální klávesnice.
Pomocí tlaþítek
Ÿźa
ൖ൘
vyberte písmena a þísla nového názvu seznamu
oblíbených kanálĤ. Po dokonþení zmČn pomocí šipek oznaþte klávesu OK a
stisknČte tlaþítko „OK“ na dálkovém ovladaþi pro potvrzení zmČn.
Pro návrat k pĜe
dchozí
mu menu stisknČte tlaþítko „EXIT“.
Favorite
1
Rename
Favgroup 1
2 Sport
Fav group 1
A B C D E F3 Dokumenty
4 Zprávy
G H I J K L
5 Fav group 5
M NOPQR
6 Fav group 6 S T U V W X
7 Fav group 7
Y
Z 0 1 2 3
8
Fav
g
roup 8
4 5 6 7 8 9
SP ? <- OK
CAPS Del OK
Page 32

Napájení antény: On/Off
30Min/1 Hod/2 Hod/3 Hod/Vypnuto
3RNXGSRGREXPLQDåKRGLQQHS
Ostatní
V tomto menu m åHWHQDVWDYLWIXQNFH
epnete kanál, nebo jakoukoOLYMLQRXIXQNFLSRPRFt
'2QHERSRPRFtWOD ítek na p edním panelu, p ijíma VHY\SQHGRSRKRWRYRVWQtKRVWDYX
.G\åMHnapájení antény zapnuto (On), p
ijíma bude SRVN\WRYDW
pot
ebné napájení 5V SURSURYR]]HVLOoYDe umtVWnéKRYDQtén
.
Pokud neQtYantén zabudoYDný ]HVLORYD YåGy tutoYRlbu Y\Sn
te
YROERXÄOff“),KUozí poškození p tVWURMH
P
HKráYDný kanál: Vše/Volné/KóGRYDQp
Other
LNB PowerOff
Channel Play Type
All
Beepe
r
Of
f
Auto Standby
Off
=YXNRYêpomoFQtNSURY\KOHGiQtVLgnálu: On/Off
P i manuálním lad ní bude p LYROE Ä2n“ Vpole n VJUDILFNêP]REUD]HQtPNYDOLW\
VLJQiOXVSXãW
né také]YXNRYé upozorn QtQDNYDOLWXVLJQiOX
AutoPDWLFNpY\SQXWtS
tVWURMHGRSRKRWRYRVWQtKRreåLPX
SYSTÉM
Nastavení Audio Description
V tomto menu mĤžete nastavit funkci popisu dČje pro nevidomé tzv.
AD.
Nastavit lze chování AD služby, použití AD služby jako prvního
doprovodu a Odstup hlasitosti AD stopy od klasické.
AD služba: On/Off
Auto Description Setting
AD Service On
Use AD as default
Of
f
AD Volume Offset 0
Použít AD jako výchozí: On/Off
AD
odstup hlasitosti: -3~3
Page 33

Menu Nástroje
StisknČte tlaþítko "MENU" pro vstup do hlavního menu.
Pomocí tlaþítek
Ÿź vyberte funkci „Nástroje“ a potvrćte stisknutím
tlaþítka „OK“, nebo
൘UG
Pomocí tlaþítek Ÿź oznaþte požadovanou funkci a potvrćte
stisknutím tlaþítka „OK“, nebo
൘UG
Pro opuštČní tohoto podmenu stisknČte tlaþítko „EXIT“ na dálkovém
ovladaþi.
Tools
Information
Factory Setting
S/W Upgrade by OTA
Upgrade By USB
Remove USB device safely
Informace
V tomto me
nu budou zobrazeny informace o pĜijímaþi.
V menu "Nástroje" zvolte položku "Informace" a potvrćte stisknutím
tlaþítka „OK“. Zobrazí se informace o verzi software, hardware atd.
Pro opuštČní tohoto podmenu stisknČte tlaþítko „EXIT“ na dálkovém
ovladaþi.
Information
xxx x.x.x
xxxxx xxxxx
xxxxx xxxxx
xxx x.x.x
xxx x.x.x
Vymazání dat
V
tomto menu mĤžete pĜijímaþ obnovit do továrního nastavení.
Všechna vámi provedené nastavení bude vymazáno a pĜijímaþ
bude uveden do pĤvodního nastavení z výroby.
V menu „Nástroje“ zvolte možnost „Tovární nastavení: a potvrćte
tlaþítkem „OK“. Po vyzvání k zadání hesla zadejte PIN Rodiþovského
zámku (z výroby pĜednastaveno na „0000“).
Po zadání hesla bude zobrazeno varování o vymazání nastavení.
Zvolte „Ano“ pro provedení, nebo „Ne“ pro zrušení.
Pro opuštČní tohoto podmenu stisknČte tlaþítko „EXIT“
Factory Setting
This operation will load default and erase all the
c
hannels that user added, continue?
Y
es No
Aktualizace
V t
omto menu bude umožnČno provést povýšení verze software v pĜijímaþi
pomocí USB, nebo OTA.
V menu „Nástroje“ zvolte možnost „Aktualizace software pĜes USB,
nebo „Aktualizace software pĜes OTA“ a potvrćte tlaþítkem „OK“
Pomocí tlaþítek Ÿźa
ൖ൘
vyberte soubor s novou verzí software a
oznaþte tlaþítko "Start". StisknČte tlaþítko "OK" pro zahájení
aktualizace. Pro opuštČní tohoto podmenu stisknČte tlaþítko „EXIT“
Pozn. V prĤbČhu aktualizace neodpojujte pĜijímaþ od napájení ani jej
nevypínejte
.
Upgrade by USB
Upgrade Mode Allcode
Upgrade File
No File
Start
0%
Odpojení disku USB
V menu „Nástroje“ zvolte položku "Bezpeþné odpojení USB disku",
Pro potvrzení stisknČte tlaþítko „OK“. Bude zobrazeno potvrzovací
okno a v nČm opČt stisknČte tlaþítko „OK“ pro odpojení USB disku.
Pozn.
Pokud odpojíte USB zaĜíze
ní bez provedení této procedury, riskujete ztrátu
dat, nebo poškození USB zaĜízení.
Disk Remove
Remove
USB Disk
A-3 GB
OK Cancel
Page 34

HRY
V tomto menu mĤžete hrát nainstalované hr
y
.
Game
Othello
StisknČte tlaþítko "MENU"
p
ro vstup do hlavního menu.
Sudoku
Pomocí tlaþítek Ÿź vyberte funkci „Hry“ a potvrćte stisknutím
tlaþítka „OK“, nebo
൘UG
Pomocí tlaþítek Ÿź oznaþte požadovanou hru a potvrćte
stisknutím tlaþítka „OK“, nebo
൘UG
Pro opuštČní tohoto podmenu stisknČte tlaþítko „EXIT“ na dálkovém ovladaþi.
Page 35

Nahrávání a multimédia
NAHRÁVÁNÍ
StisknČte tlaþítko "MENU" pro vstup do hlavního menu.
REC
Media Playe
r
Pomocí tlaþítek Ÿź v
y
berte funkci „Nahrávání“ a
p
otvrćte stisknutím
PVR Storage Information
tlaþítka „OK“, nebo
൘UG
PVR Settin
g
Pomocí tlaþítek Ÿź oznaþte požadovanou funkci a potvrćte
stisknutím tlaþítka „OK“, nebo
൘UG
Pro opuštČní tohoto podmenu stisknČte tlaþítko „EXIT“ na dálkovém ovladaþi.
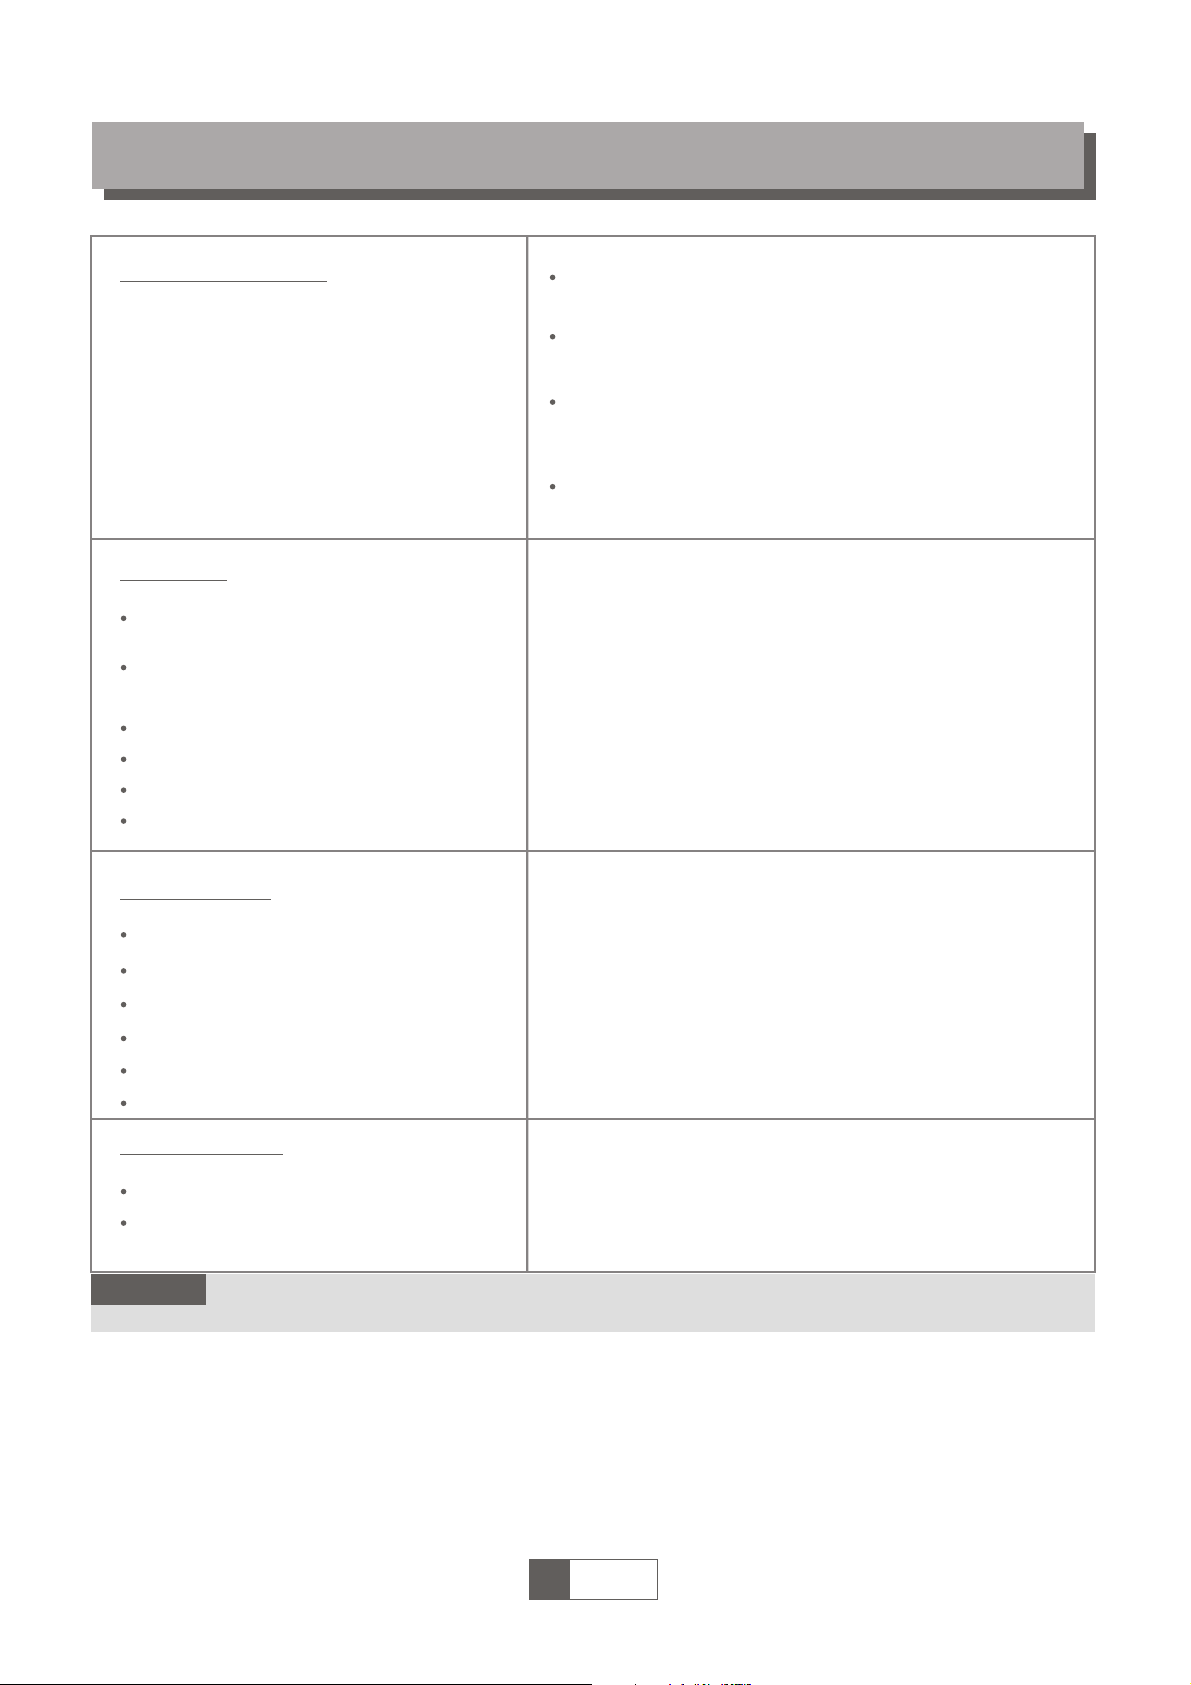
Media pĜehrávaþ
Tato funkce umožní pĜehrávat multimediální soubory z USB zaĜízení.
V menu „Nahrávání“ vyberte pomocí tlaþítek Ÿź „Media pĜehrávaþ“ a
stisknutím tlaþítka „OK“ spustíte pĜehrávaþ multimédií.
Po spuštČní media pĜehrávaþe je v horní þásti zobrazen název USB/HDD
zaĜízení. Tlaþítkem "ź" se pĜesuĖte na požadovanou složku, nebo soubor.
Stisknutím tlaþítka „1“ mĤžete pĜepnout mezi
zobrazením Hudba/Obrázek/Video/Nahrávky.
Pomocí tlaþítek Ÿź oznaþte požadovaný soubor a stisknutím tlaþítka
„OK“ zahájíte pĜehrávání.
Pro opuštČní media pĜehrávaþe stisknČte tlaþítko „EXIT“ na dálkovém
ovladaþi.
P
Ĝehrávání hudby:
"ýERVENÉ" tlaþítko: Zobrazení aktuálního playlistu (seznamu pĜehrávaných souborĤ).
"ZELE
N
É" tlaþítko:
P
Ĝ
idán
í
do seznamu pĜehrávaných souborĤ.
U souboru se objeví oznaþení, že je v seznamu pĜehrávaných souborĤ.
"
ŽLUT
É" tlaþítko:
P
Ĝidání všech souborĤ v aktuální složce do playlistu.
Druhým stisknutím smažete všechny soubory zaktuální složky z playlistu.
"MODRÉ" tlaþítko: OtevĜe se nové okno s možnostmi dodateþných nastavení.
"2" tlaþítko: TĜídČní zobrazení souborĤ.
Soubory lze zobrazit podle Jména, ýasu, Velikosti, Oblíbené.
"INFO" tlaþítko: Opakování pĜehrávání.
Lze nastavit opakování složky, náhodné opakování složky, opakovat jednou.
"EXIT" tlaþítko: Návrat do pĜedchozí složky.
P
rezentace obrázkĤ:
"ýERVENÉ" tlaþítko: Zobrazení aktuálního playlistu (seznamu pĜehrávaných souborĤ).
"ZELENÉ" tlaþítko: PĜidání do seznamu pĜehrávaných souborĤ.
U souboru se objeví oznaþení, že je v seznamu pĜehrávaných souborĤ.
"ŽLU
T
É" tlaþítko:
P
Ĝidání všech souborĤ v aktuální složce do playlistu.
Druhým stisknutím smažete všechny soubory z aktuální složky z playlistu.
"MODRÉ" tlaþítko: OtevĜe se nové okno s možnostmi dodateþných nastavení.
"2" tlaþítko: TĜídČní zobrazení souborĤ.
Soubory lze zobrazit podle Jména, ýasu, Velikosti, Oblíbené.
"INFO" tlaþítko: Nastaven
í zobrazení obrázkĤ
"3" tlaþítko:
Z
obrazení náhledu obrázkĤ v rastru 3x3
"EXIT" tlaþítko: Návrat do pĜedchozí složky.
Music Image Video Record
USB 1
/..
1
M P G
840.mp
g
2
M P 3
I swear.mp3
3
M P 3
Why.mp3
I swear.mp3
4
M P 3
Lonely.mp3
3319KB
5
M P 3
Because.mp3
00:03:32
6
J P G
Rose.jpg
7
J P G
Fly.jpg
00:03:15 00:03:32
INFO
Play ListFAV FAV All Edit
1 Switch
2
Sort
i
Repea
t
EXIT Exit
Page 36

Nahrávání a multimédia
PĜehrávání video souborĤ:
"MODRÉ" tlaþítko: OtevĜe se nové okno s možnostmi dodateþných nastavení.
"2" tlaþítko: TĜídČní zobrazení souborĤ.
„OK“ tlaþítko: zobrazení okna rychlého posuvu. V zobrazeném oknČ lze rychle skákat
ve videu pomocí kurzorových kláves
ൖ൘
.
"EXIT" tlaþítko: Návrat do pĜedchozí složky.
Nahrávání:
"ýERVENÉ" tlaþítko: slouží k pĜejmenování souborĤ.
"ZELENÉ" tlaþítko: slouží k uzamknutí souboru/ nahrávky pĜed neautorizovaným pĜehráním. Po stisknutí
„ZELENÉHO“ tlaþítka budete požádání o vložení hesla. PĜednastavené heslo je "0000".
Po zadání správného hesla je zvolený soubor uzamþen a pro jeho pĜehrání je nutné
zadání tohoto hesla. OpČtovným stiskem zeleného tlaþítka zámek deaktivujete.
"ŽLUTÉ" tlaþítko: Stisknutím žlutého tlaþítka smažete oznaþený soubor/ nahrávku.
"EXIT" tlaþítko: Návrat do pĜedchozí složky.
Informace o USB zaĜí
zení
V tomto menu je možné zobrazit informace o pĜipojeném USB zaĜízení.
V menu "Nahrávání", vyberte „Informace o USB zaĜízení“
a potvrćte tlaþítkem "OK".
V zobrazeném oknČ naleznete informace:
Formátování USB disku:
PĜipojený USB disk lze naformátovat
na formát souborĤFAT32, nebo NTFS
„ŽLUTÝM“ tlaþítkem vyberte menu formátování disku.
Pomocí tlaþítek
ൖG൘
vyberte požadovaný formát souborĤ USB
disku a vyberte "OK" pro zahájení formátování disku.. Pro
zrušení vyberte tlaþítko „ZRUŠIT“.
VýbČr zpĤsobu nahrávání: „MODRÝM“ tlaþítkem vyberte
Nastavení PVR: REC&TMS/Record/Timeshift
UpozornČní: formátováním smažete nenávratnČ celý obsah disku. PĜed zapoþetím
formátování data na disku zálohujte na jiné médiu.
PVR Storage Information
USB Disk A: xxxG bytes
Vo
lume xxxx
Total Size
xxxx
Free Size
xxxx
Rec Size
xxxx
TMS Size
xxxx
File System
xxx
Format DVR Set
Format
Di
sk Mode FAT
O
K
Cancel
DVR Se
t
DVR Type REC& TMS
OK Cancel
PVR
TimeShift AUTO/Pauza/Off
PVR Setting
Timeshift Pause
Timeshift to Record
ON
PS Record
OFF
Uložit nahrávku Timeshift
On/Off
PS Record On/Off
P
omocí tlaþítek Ÿź vyberte funkci „Nahrávání“ a potvrćte stisknutím
tlaþítka „OK“, nebo
൘UG
{ēóG
ൖG൘
zmČĖte nastavení.
Page 37

TIMESHIFT/NAHRÁVÁNÍ
Zapojením externího úložištČ do portu USB získáte pĜístup k funkci TimeShift / Záznamu vysílání.
Tato funkce umožní:
Pozastavení vysílaného programu a pokraþování ve sledování pozdČji (Timeshift)
Záznam vysílání programu.
Po úplném zaplnČní volného místa na zapojeném USB zaĜízení bude Timeshift/ Záznam ukonþen
Pozn:
Pro využití funkce Timeshift/ Záznam poĜadĤ
prosím použijte kvalitní USB 2.0
zaĜízení s rychlostí zápisu min. 9MB/s.
Timeshift/ ýasový posun
Inicializace
Funkci Timeshift aktivujete stisknutím tlaþítka "PAUSE" v
prĤbČhu sledování živého TV vysílání.
Pro rychlý posuv v záznamu použijte tlaþítka
ൖ൘
. Pro potvrzení
pozice v záznamu stisknČte tlaþítko "OK".
Rychloposuv ve video souboru a ve funkci Timeshift:
B B C F O U R
0 3 / 1 90 1 : 3 6
Play00:02:37 00:07:12
2 %
T S
BČhem pĜehrávání je možné provádČt následující akce:
Stisknutím tlaþítka "PAUSE" pozastavíte pĜehrávání
Stisknutím tlaþítka "൘൘" spustíte rychloposuv vpĜed
Stisknutím tlaþítka "
ൖൖ
" spustíte rychloposuv vzad
Zastavení funkce Timeshift
Pro zastavení funkce Timeshift stisknČte tlaþítko "STOP".
NAHRÁVÁNÍ
Okamžité nahrávání
PĜi sledování živého TV vysílání stisknČte tlaþítko "RECORD" pro spuštČní okamžitého nahrávání sledovaného
kanálu. OpČtovným stisknutím tlaþítka "RECORD" mĤžete nastavit délku trvání záznamu.
Záznam ukonþíte stisknutím tlaþítka "STOP". Po jeho stisknutí bude zobrazeno
potvrzovací okno. StisknČte tlaþítko „Ano“ pro ukonþení, nebo tlaþítko „Ne“ pro
pokraþování záznamu.
Nahrávání pomocí EPG a þasovaþe
Viz kapitola Ovládání EPG na str. 5.
Pokud máte naplánovaný þasovaþ pĜepnutí/nahrávání pĜijímaþ se automaticky zapne pĜed
stanoveným þasem, pĜepne na zvolený kanál a (pokud je pĜipojené USB zaĜízení
pĜipravené pro nahrávání) zahájí nahrávání. Po dokonþení þasovaþe se pĜijímaþ
automaticky pĜepne do pohotovostního režimu.
Pozn.:
Pro bezchybné, stabilní nahrávaní a pĜeh
rávaní jsou vyžadována USB zaĜízení s rychlostí zápisu 9.0 MB/s nebo
rychlejší. Pomalejší pevné disky a flash pamČti mohou mít problémy s nahráváním, které se projeví zasekáváním obrazu,
nebo nemusí vĤbec pracovat. PĜi použití USB disku s odbČrem vČtším než 500mA je nutné použití dodateþného napájení!
Page 38

ODSTRANċNÍ PROBLÉMģ
Bezproblémový pĜíjem TV signálu je vždy závislý na kvalitČ signálu v místČ pĜíjmu. V místech s nízkou intenzitou a
kvalitou signálu vždy používejte kvalitní anténní soustavu.
Problém Možná pĜíþina ěešení
Nesvítí þervená kontrolka
v pohotovostním režimu
Vytažený pĜívod ze zásuvky Zkontrolujte zapojení napájecí šĖĤry
PĜerušená pojistka v pĜístroji
K
ontrola pojistky
Není nalezen signál Není zapojena anténa Zkontrolujte zapojení antény
ŠpatnČ nastavená anténa
PĜemístČte anténu
Nacházíte se v místČ bez pokrytí signálem
K
ontaktujte místní odbornou firmu
Žádný obraz, nebo zvuk
Scart/AV/HDMI není zvolen na pĜepínaþi
vstupĤ vaší TV
Na ovladaþi TV pĜepnČte na správný
vstup
Z
obrazena zpráva „Zakódovan
ý
kanál“
Kanál je zakódován Vyberte jiný kanál pro sledování
Nefunguje dálkové ovládání PĜijímaþ je vypnutý ZapnČte pĜijímaþ
Dálkový ovladaþ nemíĜí pĜesnČ na pĜístroj
NamiĜ
t
e dálkový ovladaþ pĜesnČ na
pĜední panel pĜístroje
PĜední panel je zaclonČn pĜekážkou
OdstraĖte pĜekážku pĜed pĜedním
panelem
Baterie v dálkovém ovladaþi jsou KO
VymČĖte baterie
Z
apomenuté heslo pro záme
k
kanálu
PĜeinstalujte kanály pro odstranČní
zámku
Z
apomenuté heslo pro pĜístup do
menu
Kontaktujte technickou podporu dovozce
Nejde nahrávat na USB zaĜízení
USB zaĜízení má nesprávný formát
USB zaĜízení má nízkou rychlost zápisu
Naformátujte USB zaĜízení na formát
souborĤ NTFS, nebo FAT32
Vyzkoušejte jiné kvalitní USB zaĜízení
s vyšší rychlostí zápisu.
P
o pĜesunutí pĜístroje do jiné
místnosti pĜestal box pĜijíma
t
kanály
Prodloužením svodu od antény došlo
k poklesu kvality signálu pod funkþní
úroveĖ.
Použijte linkový zesilovaþ pokrývající
ztráty signálu v rozvodech.
Kontaktujte místní odbornou firmu
pro pĜesný návrh anténního systému.
Page 39

TECHNICKÁ SPECIFIKACE
TUNER RF VSTUPNÍ KONEKTOR x1
(IEC-TYP, IEC169-2, FEMALE)
RF VÝSTUPNÍ KONEKTOR x1
(IEC-TYP, IEC169-2, MALE (PRģCHOZÍ SMYýKA))
FREKVENýNÍ ROZSAH:
174MHz~230MHz(VHF)
470MHz ~862MHz (UHF)
ÚROVEĕ SIGNÁLU:
-15 ~ -70 dbm
DEKODÉR
Video dekodér MPEG-2 MP@HL, AVC/H.264 HP @L4.1
MPEG-4 ASP SUPPORTED
Audio dekodér MPEG-1 Vrstva 1,2/PCM/HE-AAC V1.0
ICE958 SPDIF
INPUT RATE MAX. 48Mbit/s
VIDEO FORMÁT 4:3/,16:9 promČnné
VIDEO VÝSTUP HDMI, RGB
MODULACE QPSK,16QAM,64QAM
KONEKTORY
PěÍVODNÍ ŠĕģRA PEVNÁ
TUNER ANTÉNNÍ VSTUP 1x, RF VÝSTUPNÍ SMYýKA 1x
SCART TV VÝSTUP 1x
SPDIF COAXIALNÍ 1x
DATA PORT USB PORT 2.0
HDMI HDMI VÝSTUP 1x verze 1.3c
NAPÁJECÍ ZDROJ
VSTUPNÍ NAPċTÍ AC220~240V, 50/60Hz
SPOT EBA EL. ENERGIE MAX. 6W
Pozn.:
Design a technická specifikace výrobku se mĤžou zmČnit bez pĜedchozího
upozornČní v závislosti na vývoji výrobku.
Page 40

EMOS spol. s r.o.
ŠíƎava 295/17
750 00 P\EROV
tel.: 581 261 111
ZÁRUNÍ LIST
BEN150HD
........
......................................... ................................................
DATUM PRODEJE RAZÍTKO A PODPIS PRODEJCE
ZÁRUNÍ PODMÍNKY
1. ZÁRUNÍ DOBA
Na tento výrobek poskytuje firma EMOS spol. s r. o. záruku po dobu 24 mĢsícƽ od data zakoupení výrobku spotƎebitelem.
Doba záruky se prodlužuje o dobu, po kterou byl výrobek v záruēní opravĢ anebo nemohl být v dobĢ trvání záruky používán,
jestliže charakter poruchy bránil jeho použití. Záruka se vztahuje pouze na závady zpƽsobené chybou výroby nebo vadou
materiálu!
2. ZÁRUNÍ LIST
Bezplatný záruēní servis je poskytován pouze v pƎípadĢ pƎedložení dokladu o zakoupení výrobku (úētenky) a správnĢ
vyplnĢného záruēního listu – musí obsahovat výrobní ēíslo, datum prodeje a razítko prodejny (montážní firmy). Na kopie a
nesprávnĢ vyplnĢné záruēní listy nebude brán zƎetel.
3. OPRAVY V ZÁRUNÍ A POZÁRUNÍ DOB
Záruēní servis lze uplatŸovat u organizace, kde byl výrobek zakoupen nebo u montážní firmy, která provedla instalaci. Po
uplynutí záruēní doby je možné se obrátit pƎímo na servis firmy EMOS spol. s r. o. PƎerov, tel. 581 261 273.
4. ROZSAH PLATNOSTI ZÁRUKY
Záruka je neplatná, jestliže je závada zpƽsobena mechanickým poškozením (vēetnĢ poškození v prƽbĢhu pƎepravy),
nesprávným používáním, nepozorností, neodvratnou událostí (živelná pohroma), byl-li výrobek pƎipojen na jiné napájecí
napĢtí než je uvedeno v jeho technické specifikaci, a také v pƎ
ípadĢ úprav nebo oprav provedených mimo servis firmy EMOS
spol. s r. o.. Záruka nemƽže být také uplatnĢna v pƎípadĢ, vyžaduje-li spotƎebitel modifikace nebo adaptace k rozšíƎení
funkcí výrobku (nebo systému sestaveného z nĢkolika komponentƽ) oproti výrobcem standardnímu provedení.
ZÁPIS ZÁRUN
ÍCH
OPRAV
Datum oznámení datum proveden
í ē. montáž. Listu podpis
ZÁZNAM O PROVEDENÉ VSTUPNÍ KONTROLE
Datum: kontroloval:
Page 41

Page 42

SET TOP BOX
Digitálny prijímaþ
BEN 150 HD
UžívateĐsk
ý manuál
zG
G
G
G
BEN150 HD
Page 43

Page 44

Bezpeþnostné upozornenie
Dôležité upozornenie pre bezpeþné používanie prístroja
Pred použitím výrobku si pozorne preþítajte celý návod. Pod pojmom prístroj sa v tomto návode rozumie
samotný prístroj, príslušenstvo a montážny materiál, ako sú sieĢové a signálové káble, diaĐkový ovládaþ,
batérie, a napájacie zdroje a pod.
Výrobca prístroja v žiadnom prípade nezodpovedá za akékoĐvek priame i nepriame škody zapríþinené
nedodržaním ako všeobecne platných tak v tomto návode uvedených pokynov pre zaobchádzanie s prístrojom.
Pokyny uvedené v nasledujúcom texte obsahujú dôležité informácie súvisiace s bezpeþným používaním prístroja
a sú podĐa rizík vznikajúcich ich nedodržaním zaradené do troch kategórií oznaþovaných v návode údajmi
• Varovanie
Oznaþuje situáciu, ktorá môže viest k vážnemu zranení a ohrozenia života.
• Upozornenie
Oznaþuje situáciu, ktorá môže poškodiĢ, alebo zniþiĢ prístroj.
• Poznámka
Oznaþuje doplĖujúcí text, alebo informácie, ako sa má užívateĐ vyhnúĢ možným problémom pri obsluhe
prijímaþa.
Význam symbolov
K obmedzeniu rizika úrazu elektrickým prúdom neotvárajte skriĖu prístroja. Vnútri nie sú diely,
ktoré by mohol opraviĢ alebo nastaviĢ používateĐ. S požiadavkami na opravy sa obracajte na
pracovníkov so zodpovedajúcou kvalifikáciou..
Symbol blesku umiestnený v rámþeku tvoreným rovnostranným trojuholníkom upozorĖuje
užívateĐa na existenciu neizolovaného "nebezpeþného napätia" prístroja, ktoré môže maĢ takú
intenzitu, že môže spôsobiĢ úraz elektrickým prúdom.
Tento výrobok bol vyrobený v súlade s medzinárodnými bezpeþnostnými štandardmi. Preþítajte si
prosím pozorne nasledujúce bezpeþnostné pokyny.
NAPÁJANIE: 90-260V AC 50/60Hz
Prevádzkujte tento výrobok len pomocou napájania uvedeného na štítku. Ak si nie ste istí ohĐadom typu
napájania vo vašej domácnosti, kontaktujte vášho miestneho distribútora elektrickej energie.
Pred zaþatím akejkoĐvek údržby alebo inštalácie odpojte výrobok od napájania.
PREġAŽENIE: NepreĢažujte zásuvku, mohlo by dôjsĢ k požiaru, alebo k zasiahnutiu elektrickým prúdom.
KVAPALINA: Výrobok nesmie byĢ vystavený pôsobeniu žiadne kvapaliny. Rovnako sa na prístroj nesmú
pokladaĢ žiadne predmety naplnené kvapalinou.
ýISTENIE: Pred zaþatím þistenia odpojte výrobok od napájania. K zotretiu prachu z výrobku použite Đahko
navlhþenú tkaninu, nie rozpúšĢadlá.
VENTILÁCIA: Štrbiny na hornej þasti výrobku musia zostaĢ nezakryté, aby umožĖovali potrebné prúdenie
vzduchu do prístroja. NeumiestĖujte výrobok na mäkké bytové zariadenia alebo koberce. Nepokladajte iné
elektronické prístroje na výrobok.
PRÍSLUŠENSTVO: Nepoužívajte žiadne nepodporované príslušenstvo, aby nedošlo k poškodeniu výrobku.
PRIPOJENIE K ANTÉNE: Pred pripájaním alebo odpájaním kábla z antény odpojte výrobok od napájania,
aby nedošlo k poškodeniu antény.
PRIPOJENIE K TV: Pred pripájaním alebo odpájaním kábla z TV odpojte výrobok od napájania, aby nedošlo
k poškodeniu televízora.
UMIESTNENIE: Umiestnite výrobok vo vnútri budovy, aby bolo zamedzené pôsobenie blesku, dažća alebo
slnka. NeumiestĖujte prístroj do blízkosti radiátora alebo výmenníka tepla. Zaistite odstup najmenej 10 cm.
Neblokujte otvory žiadnymi predmetmi a neumiestĖujte výrobok na posteĐ, pohovku, pokrývku ani iný podobný
povrch. Ak umiestnite výrobok na policu alebo do knižnice, uistite sa, že je zabezpeþené adekvátne odvetrávanie
a že ste dodržali pokyny výrobcu na montáž.
NeumiestĖujte výrobok na nestabilný vozík, stojan, statív, podperu alebo stôl, z ktorých môže spadnúĢ. Pád
výrobku môže spôsobiĢ vážne zranenie dieĢaĢa i dospelej osoby a vážne poškodenie prístroja.
ENERGETICKÉ RÁZOVÉ IMPULZY: Odpojte výrobok z elektrickej zásuvky a od antény za búrky, alebo ak
ho nepoužívate dlhú dobu, aby ste predchádzali poškodeniu prístroja bleskom a energetickými razovými
impulzmi.
CUDZIE PREDMETY: Nestrkajte žiadne predmety do prístroja. Mohlo by dôjsĢ k styku s bodmi nebezpeþného
napätia alebo k poškodeniu súþ
astí prístroja.
VÝMENA SÚýIASTOK: Výmenu súþiastok môže vykonávaĢ len servisný technik urþený výrobcom.
VÝSTRAHA!
Dodržujte prosím nasledujúce body, aby nedošlo k poškodeniu kábla alebo zástrþky:
- Neupravujte svojvoĐne napájací kábel alebo zástrþku.
Page 45

- Neohýbajte ani neskrucujte napájací kábel.
- Pri odpájaní držte napájací kábel za zástrþku.
- Držte napájací kábel þo najćalej od tepelných spotrebiþov, aby ste zabránili tavenie krycieho vinylu.
- Zástrþka musí zostaĢĐahko dostupná.
Dodržujte prosím nasledujúce body, aby nedošlo k zasiahnutiu elektrickým prúdom:
- Neotvárajte hlavnú jednotku.
- Nestrkajte do vnútornej þasti výrobku kovové alebo horĐavé predmety.
- Nedotýkajte sa zástrþky mokrými rukami.
- V prípade výskytu blesku odpojte napájací kábel.
Dodržujte prosím nasledujúce body, aby nedošlo k poškodeniu výrobku:
- Nepoužívajte výrobok, ak nefunguje správnym spôsobom, aby nedošlo k jeho vážnemu poškodeniu. Kontaktujte
miestneho predajcu.
- Nestrkajte do slotov pre moduly alebo Smart karty kov alebo cudzie materiály, aby nedošlo k poškodeniu
výrobku a skrátenie jeho životnosti.
-Zásuvka musí byĢ nainštalovaná blízko prístroja a musí byĢĐahko prístupná.
Upozornenie pre použitie USB zariadenia
Pre plnohodnotné využitie USB portu musí, pamäĢ k nemu pripojená, podporovaĢ
štandard USB 2.0. Pre bezchybné, stabilné nahrávanie a prehrávanie sú
vyžadované USB zariadenia s rýchlosĢou zápisu 9.0 MB/ s alebo rýchlejší.
Pomalšie pevné disky a flash pamäte môžu maĢ problémy s nahrávaním, ktoré sa
prejavia zasekávaním obrazu, alebo nemusí vôbec pracovaĢ.
Správne pracujú iba disky s jedným základným oddielom so súborovým
systémom NTFS alebo FAT32. Ak sa na disku nachádza iný súborový systém,
naformátujte tento disk v PC na odporúþaný súborový systém ešte predtým, než
ho pripojíte k prijímaþu.
Silne fragmentované alebo preplnenie pamäti tiež nemusia fungovaĢ správne a
plynulo.
Externé pevné disky HDD musia maĢ vlastné napájanie, port USB zabudovaný v
prijímaþi nie je schopný dodaĢ dostatoþne napätia pre napájanie prenosného USB
pevného disku.
Poþas nahrávania alebo prehrávania nemožno USB zariadenie v žiadnom prípade
odpájaĢ od prijímaþa. Jeho odpojenie poþas práce prijímaþa môže spôsobiĢ
poškodenie prijímaþa alebo flash pamäte a tiež poškodí dáta, ktoré sa na médiu
nachádzajú
prijímaþ disponuje funkciou minimálneho odberu elektrickej energie v pohotovostnom
stave a je teda šetrnejší k životnému prostrediu
ovládací softvér pre tento prijímaþ sa neustále vyvíja. Nová verzia software môže
zmeniĢ niektoré funkcie a správanie prijímaþa. Obrázky a popisy v tomto návode
majú len informatívny charakter. Ak si všimnete chyby, prosíme o ich nahlásenie,
urobíme všetko pre to, aby sme ich opravili.
Najnovšie firmware nájdete vždy na stránkach produktu
www.bensat.cz
prijímaþ je vybavený HDMI rozhraním vo verzii 1.3c pre pripojenie najnovších typov
televízorov v najvyššej kvalite obrazu aj zvuku. Ak je Váš televízor vybavený týmto vstupom, využite ho.
Page 46

OBSAH
Bezpeþnostné upozornenie
PREDSTAVENIE
P
r
edný panel
1
Z
adn
ý
p
anel
1
DiaĐkové ovládanie
2
ZAPOJENIE PRIJÍMAýA
Z
ákladné informácie
3
Pri
poj
enie k televízoru
3
P
ripoj
enie
k
H
IFI systému
3
ZAýÍNÁME
Prvé zapnutie pri
j
ímaþa
4
I
nštalácia a ladenie kanálov
4
OVLÁDANIE PRIJÍMAýA
Z
mena kanála
5
Ovládanie Elektronického
prog
ramového sprievodcu (EPG
)
5
ÚPRAVA KANÁLOV
M
enu editácie kanálov
6
Editácia zoznamu TV kanálov
6
Editácia zoznamu Rádio kanálov
6
V
y
mazanie všetkých kanálov zo zoznamu
6
NASTAVENIE SYSTÉMU
M
enu nastavenia systému
7
Nastavenie jazyka
7
TV Systém, Rozl
í
š
enie videa
7
Nastavenie miestneho þasu
7
Nastavenie þasova
þ
a
8
Rodiþovsk
ý
zámo
k
8
Nastavenie OSD menu
8
ObĐúbené kanál
y
8
Nastavenie
f
unkcie Audio description (popis dejapre zrakovo postihnutých
)
9
Ostatné
(
napájanie antény, zvuková signalizácia sily signálu, automatické vypnutie
)
9
NÁSTROJE
H
lavné menu nástrojov
10
Inf
ormácie
10
Továrenské nastavenia
(Vy
mazanie údajov
)
10
A
ktualizácia software
10
Bez
p
eþne od
poj
enie USB zariadenia
11
HRY
H
ry
11
MENU NAHRÁVANIE, MULTIMEDIÁLNY PREHRÁVAý
M
enu nahrávanie
12
M
ultimediáln
ypr
ehráva
þ
12
PVR In
f
ormácie
13
PVR Nastavenie
13
TIMESHIFT/NAHRÁVANIE
Timeshi
ft
14
Nahrávanie
14
RIEŠENIE ýASTÝCH PROBLÉMOV
15
TECHNICKÁ ŠPECIFIKÁCIA
16
Page 47

PREDSTAVENIE
Zadný panel
5V 50mA
RF IN
RF OUT
HDMI
220-240V~
50/60Hz
TV
COAXIAL
6LHĢRYê
'LJLWiOQ\NRD[LiOQ\DXGLR
79DQWpQD
RF Loop
+'0,
TV Scart
Predný panel
BEN150 HD
VHQ]RUGLDĐNRYpKRRYOiGDQLD
&KDQQHO'RZQ
&KDQQHO8S
212))
LQGLNiWRUQDSiMDQLD
USB port
Page 48

PREDSTAVENIE
DiaĐkový ovládaþ
1. STANDBY (slúåi na zapnutie / vypnutie prijíma a)
1.
2. Numerická klávesnice
(zadaním ísla predvo by prepneteƉƌŝĂŵŽŶĂƉŽǎĂĚŽǀĂŶƷ
predvo
bu)
3. INFO ( zobrazenie informácií o vysielanom programe )
)
4. MENU ( zobrazenie hlavného MENU prijíma a
6. OK tla idlo
(ƐůƷǎŝŶĂƉŽƚǀƌĚĞŶŝĞǀljďĞƌƵǀDEU)
7. RECORD ( priame spustenie nahrávania)
8. VOL+/- ( asitost)
9. TTX (teletext)
10. PREV (ƉƌĞĚĐŚĄĚnjĂũƷĐĞ)
11. MEDIA (otvára MENU prehráva ĂŶĂŚƌĂƚljĐŚƉƌŽŐƌĂŵŽǀͿ
12. USB (otvára MENU a)
13. Next ( alšie)
14. MUTE ( nie zvuku)
15. EPG (otvára Elektronického programového sprievodcu)
16. AUDIO (ǀljďĞr audio stopy)
17. SUBTITLE ( )
18. TV/RADIO (prepína medzi TV a rádio módom)
20. EXIT (návrat/ opustenie MENU)
21. (zastavenie prehrávanie/ nahrávanie)
22 CH+/- ( kanála preĚĐŚĄĚnjĂũƷĐŝalš
í
)
23. FAV (otvára zoznam Ob ƷďĞŶljĐŚŬanálov)
24. REV (ƌljĐŚůLJƉŽƐƵŶƐƉć)
25. PLAY (ƉƌĞŚƌĄǀĂŶŝĞƐƷďŽƌŽǀŶĂŚƌĄǀŽŬ)
26. FWD (
ƌljĐŚůLJƉŽƐƵŶǀƉƌĞĚ
)
27. PAUSE (
Pauza,
)
28.
(
inte tla ítka
)
2.
3. )
4. (
6.
)
7. ( )
8. (njǀljƓĞŶŝĞnjŶşǎĞŶŝĞŚů
9. (t
10. ( )
11.
12.
13.
14.
15.
16.
17.
18. )
19. BACK (návrat predchádzajƷĐĞŵƵŬĂŶĄůƵ)
20. )
21. STOP)
22 (
í
)
23. )
24. (
25. ( )
26. ( )
27. ( )
28.
(inƚĞƌĂŬơvne tla
ítka)
STANDBY
INFO
SUBTITLE
AUDIO
TV/RADIO
BACK
CH+
CH-
TTX TIMER
FAV
MUTE
MEDIA
RE S
EXIT
MENU
RE COR D
4
5
6
VOL +
VOL -
1
2
3
0
78
9
OK
USB
EPG
DF00
1
3
4
2
6
7
8
12
23
25
19
9
10
11
13
13
14
15
17
16
20
21
24
22
18
26
27
28
Page 49

ZAPOJENIE PRIJÍMA A
3
Hlavné
Existuje mnoho rôznych typov TV a iných zariadení, ktoré môåHWHpripoji k prijíma u. V tejto príru ke
uvidíte niektoré z naj astejších spôsobov, ako pripojiW vaše zariade nia.
Pripojenie k TV
HDMI TV
Anténa
RF Koax
Pripojenie k HIFI systému
Hi-Fi
Scart Kabel
HDMI Kabel
Coaxial Kabel
3
Z
Page 50

ZAýÍNÁME
Sprievodca prvotným nastavením
P
o prvom zapnutí prijímaþa sa zobrazí „Úvodné menu“
Welcome
P
omocou šípok na diaĐkovom ovládaþi vyberte krajinu použitia, Jazyk OSD menu,
Region
R
ozl
í
š
enie a pomer strán obrazu.
Poland
Oznaþte a stlaþte tlaþidlo OK pre automatické vyhĐadanie kanálov.
Language English
Display Mode 720p_50
Aspect Mode 4:3LB
OK
Inštalácia
Stlaþením tlaþidla "MENU" vstúpte do hlavného menu.
Pomocou tlaþidiel
Ÿźoznaþte ponuku „Inštalácia", stlaþte
tlaþidlo
൘
pre vstup do inštalaþného menu.
Pomocou tlaþidiel Ÿźoznaþte požadovanú funkciu a potvrćte
tlaþidlom OK.
Manuálne ladenie kanálov
Ak poznáte parametre pre naladenie jednotlivých kanálov, použite funkciu
Manuálneho hĐadania kanálov. Vyberte položku "Manuálne ladenie" a
stlaþte tlaþidlo "OK" pre vstup do pod menu ruþného ladenia.
Vyberte spôsob vyhĐadávania: pásmo, þíslo aj frekvenciu kanála a šírku pásma.
Na ukazovateĐoch signálu sledujte ukazovateĐ "Kvalita signálu". Ak tento
ukazovateĐ zobrazuje kvalitu signálu pomocou tlaþidiel Ÿź oznaþte položku
HĐadaĢ a spustite vyhĐadávanie tlaþidlom OK na diaĐkovom ovládaþi.
Automatické ladenie kanálov
Ak nepoznáte parametre k naladeniu prijímaþa, môžete nechaĢ prehĐadaĢ celé
pásmo pomocou funkcie Automatické ladenie.
Vyberte položku "Automatické ladenie" a stlaþte tlaþidlo "OK" pre vstup do pod
menu Automatického ladenia. Vyberte, þi chcete vyhĐadaĢ všetky kanály, platené
kanály, alebo iba FTA (neplatené kanály). Pomocou tlaþidiel Ÿź oznaþte
položku HĐadaĢ a spustite vyhĐadávanie tlaþidlom OK na diaĐkovom ovládaþi.
Po dokonþení vyhĐadávania prijímaþ automaticky uloží všetky nájdené kanály
podĐa poradia v akom boli nájdené.
Installation
Channel Scan
Auto Scan
LCN
Channe
l Scan
Scan Mode By channel
Scan Band
UHF
Ch No.
CH37(666000KHz)
Frequency
666000KHz
Bandwidth
8MHz
Search
Signal Intensity 81%
Signal Quality 97%
Auto Scan
FTA Only No
Se
arch
LCN
LCN ( Logical Channel Number) – logické þíslovanie kanálov. Táto funkcia, ak ju operátor podporuje,
zaistí automatické zoradenie kanálov. V prípade zmeny v zozname kanálov, táto funkcia zaistí
automatické prevedenie doplnenie, zmazanie zoznamu kanálov.
Ak je zapnutá voĐba LCN je znemožnené ruþné triedenie a zoradenie kanálov.
Ak chcete ruþne zoradiĢ naladené kanály vypnite túto funkciu.
Page 51

OVLÁDANIE
Zmena kanálov
Prijímaþ ponúka tri spôsoby zmeny kanálov - krokovanie pomocou tlaþidiel CH + / CH-, priama voĐba þísla, voĐba
z menu
Krokovanie medzi kanálmi pomocou tlaþidiel CH+ a CH-:
Pre pohyb medzi kanálmi použite tlaþidla Ÿź na diaĐkovom ovládaþi .
Priama voĐba þísla predvoĐby:
Pre priamu voĐbu stlaþte tlaþidlo s þíslom predvoĐby na numerickej klávesnici diaĐkového ovládaþa.
Výber pomocou zobrazeného zoznamu kanálov:
Pri sledovaní živého vysielania TV stlaþte tlaþidlo OK na diaĐkovom ovládaþi. Na obrazovke bude
zobrazená ponuka naladených kanálov. Pomocou tlaþidiel Ÿź na diaĐkovom ovládaþi oznaþte kanál, ktorý
chcete sledovaĢ a potvrćte voĐbu tlaþidlom OK.
Prístup a použitie funkcie Elektronického Programového Sprievodcu (EPG)
Prístup do EPG menu so zobrazením všetkých kanálov:
Stlaþte tlaþidlo "EPG" pre vstup do EPG menu.
Pre pohyb v menu EPG použite tlaþidlá Ÿźa
ൖ൘UG
Oznaþte požadovaný program a
G
Stlaþte "ZELENÉ" tlaþidlo pre pridanie programu do þasovaþa.
Pri pridaní programu do þasovaþa je nutné zvoliĢ, þi chcete
program iba sledovaĢ (mód kanál), alebo aj nahrávaĢ na USB (mód
rekordér).
Stlaþte "ýERVENÉ" tlaþidlo pre zobrazenie " EPG v þasovej línii"
menu.
EPG 01:39 xx/xx/xxxx
0010 BBC FOUR
Auntie's War on Smut
01:30-02-30
3
/19 01
:30 02:00 02:30 03:00
0008 Interecon
0009 BBC Parl The Recor Commons Questions The Recor
0010
BBC FO
Auntie's War on Smut Proms on FOUR
0011 CBeebie
This is CBeebies!
0012 301
Time Timer
Page 52

ÚPRAVA KANÁLOV
IT CHANNEL
MENU editácia kanálov
Stlaþte tlaþidlo "MENU" pre vstup do hlavného menu.
Pomocou tlaþidiel Ÿź oznaþte požadovanú funkcui a potvrćte
stlaþením tlaþidla „OK“, alebo
൘UGG
Edit Channel
TV Channel List
Radio Channel List
Delete All
Editácia TV
V me
nu úpravy kanálov je možné presúvaĢ, mazaĢ, preskakovaĢ všetky
naladené kanály.
Pomocou tlaþidiel Ÿź oznaþte požadované kanály a pomocou
farebných tlaþidiel vyberte požadovanú funkciu.
Pre zobrazenie obrazového náhĐadu kanálu stlaþte tlaþidlo "OK".
Pomocou farebných tlaþidiel vyberte požadovanú funkciu a potvrćte
tlaþidlom "OK".
Presun kanálov:
Oznaþte požadovaný kanál a stlaþte „ŽLTÉ“ tlaþidlo. Pomocou
tlaþidiel ŸźpresuĖte kanál na novú pozíciu a potvrćte stlaþením
tlaþidla „OK“.
Zaradenie kanálov do zoznamu ObĐúbených:
Stlaþte tlaþidlo "FAV“ a potom stlaþte tlaþidlo „OK“ úpravu
zoznamu obĐúbených kanálov.
TV Channel List
All T
V
FAV Lock Skip Move Edit
0001 No Name
0002 YooPlay Ga
0003 E4+1
Y
ooPlay Ga
i
0004 UKTV Histor
0005 SKY THREE
xxxxxxxx
0006 Sky Spts Ne
xxxxxx
0007 Sky News
xxxx
xxx
Edit Channel
All TV
Sort Rename Delete
0001 No Name
0002 YooPlay Ga
0003 E4+1
Y
ooPlay Ga
i
0004 UKTV Histor
0005 SKY THREE
xxxxxxxx
0006 Sky Spts Ne
xxxxxx
0007 Sky News
xxxx
xxx
Editácia Rádií
V menu úpravy kanálov je možné presúvaĢ, mazaĢ, preskakovaĢ všetky naladené kanály.
Pomocou tlaþidiel
Ÿź oznaþte požadované kanály a pomocou farebných tlaþidiel vyberte požadovanú
funkciu.
Pozn:
V podstate je práca s rádiami rovnaká ako editácia TV kanálov len nie je dostupné okno s náhĐadom.
Namiesto toho je trvalo zobrazené logo rádia.
ZmazaĢ všetko
Ak chcete zmazaĢ všetky
kanály, prejdite v menu úpravy kanálov na funkciu
"ZmazaĢ všetko" a potvrćte tlaþidlom "OK". Pri otázke na heslo zadajte "0000".
Bude zobrazené varovanie.
Pomocou tlaþidiel
ۆڼ
oznaþte "Áno" a potvrćte tlaþidlom "OK"
pre zmazanie všetkých kanálov. Ak nechcete zmazaĢ všetky
kanály zvoĐte "Nie" pre návrat k predchádzajúcej ponuke.
Warning! Do you really want to delete
al
l channels?
Yes No
Page 53

SYSTÉM
Nastavenie systému
Menu nastavenie systému umožní meniĢ nastavenia jazyka, TV Systému,
miestneho þasu, þasovaþa, rodiþovského zámku, OSD menu, obĐúbených
kanálov, nastavenie funkcie Audio description, a ćalšieho nastavenia systému.
Stlaþte tlaþidlo "MENU" pre vstup do hlavného menu.
Pomocou tlaþidiel Ÿź vyberte funkciu „Nastavenie systému“ a potvrćte
stlaþením tlaþídla „OK“, alebo
൘UG
Pomocou tlaþidiel Ÿź oznaþte požadovanú funkciu a potvrćte stlaþením
tlaþidla „OK“, alebo
൘UG
Pre opustenie tohto podmenu stlaþte tlaþidlo
„EXIT“ na diaĐkovom ovládaþi.
System Setup
Language
TV Sys
tem
Local Time Setting
Timer Setting
Parental Lock
OSD Setting
Favorite
Auto Description Setting
Other
Jazyk
V t
omto menu je možné nastaviĢ:
Preferovaný jazyk zobrazovaného menu,
Preferovaný jazyk zvukového sprievodu,
Jazyk titulkov a teletextu.
V závislosti na zvolenom jazyku bude vybrané
správne kódovanie znakov.
Language
Language English
First Audio
English
Second Audio
German
Subtitle Language
English
Teletext
English
Subtitle
On
TV Systém
V tomto menu je možné nastaviĢ Vi
deo rozlíšenie, pomer strán videa,
video výstup a digitálny audio výstup.
Video rozlíšenie:
podĐa zdroja/natívne TV/480i/480p/576i/
576p/720p@50/720p@60/1080i@25/
1080i@30/1080p@50/1080p@60
Pomer strán: Auto/4:3PS/4:3LB/16:9
Video výstup: SCART CVBS+ HDMI/ SCART RGB
Digital Audio výstup: LPCM výstup/ BS Výstup
TV System
Video Resolution 720p@50
Aspect Mode
4:3LB
Video Out
SCART RGB
Digital Audio Out
LPCM Out
Miestny þas
V tomto menu je možné nastaviĢ miestny þas, región použitia prijímaþa.
Nastavenie þasu je dôležité pre správnu funkciu þasovaþa.
Región: Vyberte z menu región použitia prijímaþa.
GMT nastavenia : Vyberte nastavenie GMT z možností : podĐa
Regiónu/UžívateĐsky definované/ Off
GMT þasový posun: Nastavte GMT þasový posun "-11:30 ~ +12:00",
s možnosĢou skoku po 30ti minútach.
Local Time Setting
Region France
GMT Usage
By Region
GMT Offset
GMT+01:00
Summer Time
Of
f
Date xxxx/xx/xx
Time
01:51
xxxx,xxx,xxxx
Letný þas: Nastavte použitie letného þa
su z možností: On/Off
Dátum: "Dátum" a "ýas" menu je dostupné len ak je v nastavení GMT zvolené Off
ýas: Pre ruþné nastavenie þasu použite þíselnú klávesnicu.
Page 54

heslo.
0000)
Zámok menu: Ak je nastavený tento zámok je nutné pred vstupom do menu „úpravy
Menu Lock
Rating Lock
New Password
Confirm Pas sword
Off
Off
----
----
Parental Lock
SYSTÉM
Nastavenie þasovaþa
V tomto menu je možné nastaviĢþasovaþ. Môžete nastaviĢ až 8 þasovaþov.
Mód þasovaþa: Off/1krát/Denne/Týždenne/Mesaþne
Typ þasovaþa: Prepnutie/Nahrávanie
Kanál po zapnutí: Vyberte kanál, ktorý bude zobrazený po zapnutí prístroja.
Dátum zapnutí: Pomocou numerickej klávesnice zadajte dátum zapnutia prístroja.
ýas zapnutia: Pomocou numerickej klávesnice zadajte þas zapnutia prístroja.
Doba trvania: Pomocou numerickej klávesnice zadajte dĎžku trvania þasovaþa.
Current Time/date: 01:36PM xx/xx/xxxx
Timer Mode Daily
Timer Service
Channel
Wakeup Channel BBC FOUR
Wakeup Date xx/xx/xxxx
On Time xx:xx
Duration xx:xx
Save
Cancel
Rodiþovský zámok
P
omocoutejtofunkcie môžete uzamknúĢ menu a kanály pred neoprávnenou zmenou
a sledovaním. V tomto menu môžete tiež zmeni
Ģ
Pomocou tlaþidiel Ÿź vyberte v MENU funkciu „Nastavenie systému“ a
potvrćte stlaþením tlaþidla „OK“, alebo
ڼ
.
Vyberte funkciu Rodiþovská kontrola a potvrćte tlaþídlom „OK“.
P
rístupdo tohto nastavenia je chránený heslom (z výrob
y
kanálov“ a „Inštalaþného menu“ zadaĢ platný kód.
Zámok podĐa veku: Off/ Vek 4/ Vek 5/ Vek 6/ Vek 7/ Vek 8/ Vek 9/ Vek 10/ Vek 11/ Vek 12/Vek 13/
Vek 14/ Vek 15/ Vek 16/ Vek 17/ Vek 18
Zmena hesla: Zadajte nové heslo.
Potvrćte heslo: Zadajte nové heslo pre potvrdenie.
Nastavenie OSD
V tomto menu môžete nastaviĢ dobu zobrazenia OSD a prehĐadnosĢOSD menu .
OSD dĎžka zobrazenia: 1-10
OSD PrehĐadnosĢ: Nastavte prehĐadnosĢ menu: Off/10%/20%/30%/40%.
OSD Setting
OSD Timeout 5
OSD Transparency
Of
f
ObĐúbené
V tomto menu môžete premenovaĢ zoznamy ObĐúbených kanálov.
Vyberte požadovanú skupinu obĐúbených kanálov, stlaþte tlaþidlo „OK“ pre
otvorenie virtuálnej klávesnice.
Pomocou tlaþidiel Ÿźa
ൖ൘
vyberte písmena a þísla nového názvu
zoznamu obĐúbených kanálov. Po dokonþení zmien pomocou šipok oznaþte
kláves OK a stlaþte tlaþidlo „OK“ na diaĐkovom ovládaþi pre potvrdenie
zmien.
Pre návrat k predchádzajúcemu menu stlaþt
e tlaþi
dlo "EXIT".
Favorite
1
Re
name
Favgroup 1
2 Šport
Fav group 1
A B C D E F3 Dokumenty
4 Správy
G H I J K L
5 Fav group 5
M N
O
P Q R
6 Fav group 6 S T U V W X
7 Fav group 7
Y
Z 0 1 2 3
8
Fav
g
roup 8
4 5 6 7 8 9
SP ? <- OK
CAPS Del OK
Page 55

SYSTÉM
Nastavenie Audio Description
V tomto menu môžete nastaviĢ funkciu popisu deja pre nevidiacich
tzv. AD.
NastaviĢ možno správanie AD služby, použitie AD služby ako
prvého sprievodu a Odstup hlasitosti AD stopy od klasickej.
AD služba: On/Off
Auto Description Setting
AD Service On
Use AD as default
Of
f
AD Volume Offset 0
PoužiĢ AD ako predvolené:
On/
Off
AD odstup hlasitosti:
-3~3
Ostatné
V tomto menu môžete nastaviĢ funkcie:
Napájanie antény: On/Off
Keć je napájanie antény zapnuté (On), prijímaþ bude poskytovaĢ
potrebné napájanie 5V pre prevádzku zosilĖovaþa umiestneného v
anténe. Ak nie je v anténe zabudovaný zosilĖovaþ vždy túto voĐbu
vypnite voĐbou "Off"), hrozí poškodenie prístroja!
Prehrávaný kanál: Všetko/VoĐné/Kódované
Other
LNB Powe
rOff
Channel Play Type
All
Beepe
r
Of
f
Auto Standby
Of
f
Zvukový pomocník pre vyhĐadanie signálu: On / Off
Pri manuálnom ladení bude pri voĐbe "On" spoloþne s grafickým zobrazením kvality
signálu spustené aj zvukové upozornenie na kvalitu signálu.
Automatické vypnutie prístroja do pohotovostného režimu:
30Min/1 Hod/2 Hod/3 Hod/Vypnuté
Ak po dobu 30 min. až 3 hodín neprepnete kanál, alebo akúkoĐvek inú funkciu pomocou
DO, alebo pomocou tlaþidiel na prednom paneli, prijímaþ sa vypne do pohotovostného
stavu.
9
TOO
Page 56

NÁSTROJE
Menu Nástroje
Stlaþte tlaþidlo "MENU" pre vstup do hlavného menu.
Pomocou tlaþidiel Ÿź vyberte funkciu „Nástroje“ a potvrćte
stlaþením tlaþidla „OK“, alebo
൘UG
Pomocou tlaþidiel Ÿź oznaþte požadovanú funkciu a potvrćte
stlaþením tlaþidla „OK“, alebo
൘UG
Pre opustenie tohto podmenu stlaþte tlaþidlo „EXIT“ na diaĐkovom
ovládaþi.
Tools
Information
Fa
ctory Setting
S/W Upgrade by OTA
Upgrade By USB
Remove USB device safely
Informácie
V
tomto menu budú zobrazené informácie o prijímaþi.
V menu "Nástroje" zvoĐte položku "Informácie" a potvrćte stlaþením
tlaþidla "OK". Zobrazia sa informácie o verzii software, hardware atć.
Pre opustenie tohto podmenu stlaþte tlaþidlo „EXIT“ na diaĐkovom
ovládaþi.
Information
xxx x.x.x
xxxxx xxxxx
xxxxx xxxxx
xxx x.x.x
xxx x.x.x
Vymazanie údajov
V tomto menu môžete prijímaþ obnoviĢ do
továrenského nastavenia.
Všetky vami vykonané nastavenia budú vymazané a prijímaþ bude
uvedený do pôvodného nastavenia z výroby.
V menu "Nástroje" zvoĐte možnosĢ "Továrenské nastavenia: a potvrćte
tlaþidlom" OK ". Po výzve na zadanie hesla zadajte PIN rodiþovského
zámku (z výroby prednastavené na "0000").
Po zadaní hesla bude zobrazené varovanie o vymazanie nastavení.
ZvoĐte "Áno" pre vykonanie, alebo "Nie" pre zrušenie.
Pre opustenie tohto podmenu stlaþte tlaþidlo "EXIT"
Factory Setting
This operation will load default and erase all the
channels that user added, continue?
Y
es No
Aktualizácia
V tomto menu bude umožnené vykonaĢ Upgrade verzie software v prijímaþi
pomocou USB, alebo OTA.
V menu "Nástroje" zvoĐte možnosĢ "Aktualizácia software cez USB,
alebo" Aktualizácia software cez OTA "a potvrćte tlaþidlom" OK "
Pomocou tlaþidiel Ÿźa
ൖ൘
vyberte súbor s novou verziou software
a oznaþte tlaþidlo "Štart". Stlaþte tlaþidlo "OK" pre zaþatie
aktualizácie. Pre opustenie tohto podmenu stlaþte tlaþidlo „EXIT“
Pozn. V priebehu aktualizácie neodpájajte prijímaþ od napájania ani ho
nevypínajte.
Upgrade by USB
Upgrade Mode Allcode
Upgrade File
No File
Start
0%
Page 57

Odpojenie disku USB
V menu „Nástroje“ zvoĐte položku "Bezpeþné odpojenie USB
disku",
Pre potvrdenie stlaþte tlaþidlo "OK". Bude zobrazené potvrdzovacie
okno a v Ėom opäĢ stlaþte tlaþidlo "OK" pre odpojenie USB disku.
Pozn.
Ak odpojíte USB zariadenie bez vykonania tejto procedúry, riskujete stratu
údajov, alebo poškodenie USB zariadenia.
Disk Remove
Remove
USB Disk A-3 GB
OK Cancel
HRY
V tomto menu môžete hraĢ nainštalované hry.
Game
Othello
S
t
laþte tla
þ
idlo "MENU" pre vstup do hlavného menu.
Sudoku
Pomocou tlaþidiel Ÿź vyberte funkciu „Hry“ a potvrćte stlaþením
tlaþidla „OK“, alebo
൘UG
Pomocou tlaþidiel Ÿź oznaþte požadovanú hru a potvrćte
stlaþením tlaþidla „OK“, alebo
൘UG
Pre opustenie tohto podmenu stlaþte tlaþidlo „EXIT“ na diaĐkovom ovládaþi.
Page 58

Nahrávanie a multimédia
NAHRÁVANIE
Stlaþte tlaþidlo "MENU" pre vstup do hlavného menu.
REC
Media Playe
r
Pomocou tla
þ
idiel Ÿź v
y
berte funkciu „Nahrávanie“ a
p
otvrćte stlaþením
PVR Storage Information
tlaþidla „OK“, alebo
൘UG
PVR Settin
g
Pomocou tlaþidiel Ÿź oznaþte požadovanú funkciu a potvrćte
stlaþením tlaþidla „OK“, alebo
൘UG
Pre opustenie tohto podmenu stlaþte tlaþidlo „EXIT“ na diaĐkovom ovládaþi.
Media prehrávaþ
Tato funkcia umožní prehrávaĢ multimediálne súbory z USB zariadenia.
V menu „Nahrávanie“ vyberte pomocou tlaþidiel Ÿź „Media
prehrávaþ“ a stlaþením tlaþidla „OK“ spustíte prehrávaþ multimédií.
Po spustení media prehrávaþa je v hornej þasti zobrazený názov USB/HDD
zariadenia. Tlaþidlom "ź" sa presuĖte na požadovaný prieþinok, alebo
súbor.
Stlaþením tlaþidla „1“ môžete prepnúĢ medzi
zobrazením Hudba/Obrázok/Video/Nahrávky.
Pomocou tlaþidiel
Ÿź
oznaþte požadovaný súbor a stlaþením tlaþidla
„OK“ zahájite prehrávanie.
Pre opustenie media prehrávaþa stlaþte tlaþidlo „EXIT“ na diaĐkovom
ovládaþi.
P
rehrávanie hudby:
"ýERVENÉ" tlaþidlo: Zobrazenie aktuálneho playlistu (zoznamu prehrávaných súborov).
"ZELENÉ" tlaþidlo:
P
r
idanie do zoznamu prehrávaných súborov.
Prisúbore
s
a objaví oznaþenie, že je v zozname p
r
ehrávaných súborov.
"ŽLTÉ" tlaþidlo: Pridanie všetkých súborov v aktuálnom prieþinku do playlistu.
Druhým
s
tlaþením vymažete všetky súbory z aktuálneho prieþinka z playlistu.
"MODRÉ" tla
þ
idlo: Otvorí sa nové okno s možnosĢami dodatoþných nastavení.
"2" tlaþidlo: Triedenie zobrazenie súborov.
Súbory je možné zobraziĢ podĐa Mená, ýasu, VeĐkosti, ObĐúbené.
"INFO" tlaþidlo: Opakovanie prehrávania.
Možno nastaviĢ opakovanie zložky, náhodné opakovanie zložky, opakovaĢ raz.
"EXIT" tlaþidlo: Návrat do predchádzajúcej zložky.
P
rezentácia obrázkov:
"ýERVENÉ" tlaþidlo: Zobrazenie aktuálneho playlistu (zoznamu prehrávaných súborov).
"ZELENÉ" tlaþidlo:
P
r
idanie do zoznamu prehrávaných súborov.
Pri súbore sa objaví oznaþenie, že je v zozname prehrávaných súborov.
"ŽLTÉ" tlaþidlo: Pridanie všetkých súborov v aktuálnom prieþinku do playlistu.
Druhým s
t
laþením vymažete všetky
s
úbory
z
aktuálneho prieþinka z playlistu.
"MODRÉ" tlaþidlo: Otvorí sa nové okno s možnosĢami dodatoþných nastavení.
"2" tlaþidlo: Triedenie zobrazenie súborov.
Súbory je možné zobrazi
Ģ
podĐaMená, ýasu, VeĐkosti, ObĐúbené.
"INFO" tlaþidl
o: Nastavenie zobrazenia obrázkov
"3" tlaþidlo: Zobrazenie náhĐadu obrázkov v rastri 3x3
"EXIT" tlaþidlo: Návrat do predchádzajúcejzložky.
Music Image Video Record
USB 1
/..
1
M P G
840.mp
g
2
M P 3
I swear.mp3
3
M P 3
Why.mp3
I swear.mp3
4
M P 3
Lonely.mp3
3319KB
5
M P 3
Because.mp3
00:03:32
6
J P G
Rose.jpg
7
J P G
Fly.jpg
00:03:15 00:03:32
INFO
Play ListFAV FAV All Edit
1 Switch
2
Sort
i
Repea
t
EXIT Exit
Page 59

Nahrávanie a multimédia
Prehrávanie video súborov:
"MODRÉ" tlaþidlo: Otvorí sa nové okno s možnosĢami dodatoþných nastavení.
"2" tlaþidlo: Triedenie zobrazenie súborov.
„OK“ tlaþidlo: zobrazenie okna rýchleho posunu. V zobrazenom okne je možné rýchlo
skákaĢ vo videu pomocou kurzorových klávesov
ൖ൘
.
"EXIT" tlaþidlo: Návrat do predchádzajúcej zložky.
Nahrávanie:
"ýERVENÉ" tlaþidlo: Premenovanie súborov.
"ZELENÉ" tlaþidlo: Uzamknutie súboru/ nahrávky pred neautorizovaným prehraním. Po stlaþení zeleného
tlaþidla budete požiadaný o vloženie hesla. Prednastavené heslo je "0000". Po zadaní
správneho hesla je zvolený súbor uzamknutý a pre jeho prehranie je nutné zadanie tohto
hesla. Opätovným stlaþením zeleného tlaþidla zámok deaktivujete.
"ŽLUTÉ" tlaþidlo: Stlaþením žltého tlaþidla zmažete oznaþený súbor/ nahrávku.
"EXIT" tlaþidlo: Návrat do predchádzajúcej zložky.
Informácie o USB zariadenia
V tomto menu je možné zobraziĢ
informácie o pripojenom USB zariadení.
V menu "Nahrávanie", vyberte „Informácie o USB
zariadenia“ a potvrćte tlaþidlom "OK".
V zobrazenom okne nájdete informácie:
Formátovanie USB disku:
Pripojen
ý USB disk je možné
naformátovaĢ na formát súborov FAT32, alebo NTFS
„ŽLTÝM“ tlaþidlom vyberte menu formátovanie disku.
Pomocou tlaþidiel
ൖG൘
vyberte požadovaný formát súborov
USB disku a vyberte "OK" pre zaþatie formátovania disku..
Pre zrušenie vyberte tlaþidlo „ZRUŠIġ“.
Výber spôsobu nahrávania: „MODRÝM“ tlaþidlom vyberte
Nastavenie PVR: REC&TMS/Record/Timeshift
Upozornenie: formátovaním zmažete nenávratne celý obsah disku. Pred zaþatím
formátovania údaje na disku zálohujte na iné médium.
PVR Storage Information
USB Disk A: xxxG bytes
Vo
lume xxxx
Total Size
xxxx
Free Size
xxxx
Rec Size
xxxx
TMS Size
xxxx
File System
xxx
Format DVR Set
Format
Di
sk Mode FAT
O
K
Cancel
DVR Se
t
DVR Type REC& TMS
OK Cancel
PVR
TimeShift AUTO/Pauza/Off
PVR Setting
Timeshift Pause
Timeshift to Record
ON
PS Record
OFF
UložiĢ nahrávku Timeshift
On/Off
PS Record
On/Off
P
omocou tlaþidiel Ÿź vyberte funkciu „Nahrávanie“ a potvrćte stlaþením
tlaþidla „OK“, alebo
൘UG
{ēG
ൖG൘
zmeĖte nastavenia.
Page 60

TIMESHIFT/NAHRÁVANIE
Zapojením externého úložiska do portu USB získate prístup k funkcii TimeShift / Záznam vysielania.
Táto funkcia umožní:
Pozastavenie vysielaného programu a pokraþovanie v sledovaní neskôr (Timeshift)
Záznam vysielania programu.
Po úplnom zaplnení voĐného miesta na zapojenom USB zariadenie bude Timeshift / Záznam ukonþený
Pozn:
Pre využitie funkcie Timeshift / Záznam programov prosím použite kvalitný
USB
2.0 zariadenia s rýchlosĢou zápisu min. 9MB / s.
Timeshift/ ýasový posun
Inicializácia
Funkciu Timeshift aktivujete stlaþením tlaþidla "PAUSE" v
priebehu sledovania živého TV vysielania.
Pre rýchly posun v zázname použite tlaþidla
ൖ൘
. Pre potvrdenie
pozície v zázname stlaþte tlaþidlo "OK".
Rýchloposuv vo video súbore a vo funkcii Timeshift:
B B C F O U R
0 3 / 1 90 1 : 3 6
Play00:02:37 00:07:12
2 %
T S
Poþas prehrávania je možné vykonávaĢ nasledujúce akcie:
Stlaþením tlaþidla "PAUSE" pozastavíte prehrávanie
Stlaþením tlaþidla "
൘൘
" spustíte rychloposuv vpred
Stlaþením tlaþidla "
ൖൖ
" spustíte rychloposuv vzad
Zastavenie funkcie Timeshift
Pre zastavenie funkcie Timeshift stlaþte tlaþidlo "STOP".
NAHRÁVANIE
Okamžité nahrávanie
Pri sledovaní živého TV vysielania stlaþte tlaþidlo "RECORD" pre spustenie okamžitého nahrávania sledovaného
kanála. Opätovným stlaþením tlaþidla "RECORD" môžete nastaviĢ dĎžku trvania záznamu.
Záznam ukonþíte stlaþením tlaþidla "STOP". Po jeho stlaþení bude zobrazené
potvrdzovacie okno. Stlaþte tlaþidlo "Áno" pre ukonþenie, alebo tlaþidlo "Nie" pre
pokraþovanie záznamu.
Nahrávanie pomocou EPG a þasovaþa
Vić kapitola Ovládanie EPG na str. 5.
Ak máte naplánovaný þasovaþ prepnutia / nahrávania prijímaþ sa automaticky zapne pred
stanoveným þasom, prepne na zvolený kanál a (ak je pripojené USB zariadenie pripravené
pre nahrávanie) zaþne nahrávanie. Po dokonþení þasovaþa sa prijímaþ automaticky
prepne do pohotovostného režimu.
Pozn.:
Pre bezchybné, stabilné nahrávanie a prehrávanie sú vy
žadované USB zariadenia s rýchlosĢou zápisu 9.0 MB / s alebo
rýchlejší. Pomalšie pevné disky a flash pamäte môžu maĢ problémy s nahrávaním, ktoré sa prejaví zasekávaním obrazu,
alebo nemusí vôbec pracovaĢ. Pri použití USB disku s odberom väþším ako 500mA je nutné použiĢ dodatoþné napájanie!
Page 61

ODSTRÁNENIE PROBLÉMOV
Bezproblémový príjem TV signálu je vždy závislý na kvalite signálu v mieste príjmu. V miestach s nízkou
intenzitou a kvalitou signálu vždy používajte kvalitnú anténnu sústavu.
Problém Možná príþina Riešenie
Nesvieti þervená kontrolka
v pohotovostnom režime
Vytiahnutý prívod zo zásuvky Skontrolujte zapojenie napájacej šnúry
P
r
erušená poistka v prístroji
K
ontrola poistky
Nie je nájdený signál Nie je zapojená anténa Skontrolujte zapojenie antény
Z
le nastavená anténa
P
r
emiestnite anténu
Nachádzatesa na mieste bez pokrytia
sig
nálom
Kontaktujte miestnu odbornú firmu
Žiadny obraz, alebo zvuk
Scart/AV/HDMI nie je zvolený na
prepínaþi vstupov vašej TV
Na ovládaþi TV prepnite na správny
vstup
Zobrazená správa „Zakódovan
ý
kanál“
Kanál je zakódovaný Vyberte iný kanál pre sledovanie
Nefunguje diaĐkové ovládanie Prijímaþ je vypnutý Zapnite prijímaþ
DiaĐkový ovládaþ nemieri presne na
prístroj
Namierte diaĐkový ovládaþ p
r
esne na
predný panel prístroja
Predný panel je zaclonený prekážkou
Odst
r
áĖte p
r
ekážku pred predným
panelom
Ba
t
érie v diaĐkovom ovládaþi
súK
O
VymeĖte batérie
Zabudnuté heslo pre zámo
k
kanála
Preinštalujte kanály pre odstránenie
zámku
Zabudnuté heslo pre prístup do
menu
Kontaktujte technickú podporu dovozca
Nejde nahrávaĢ na USB
zariadenia
USB zariadenie má nesprávny formát
USB zariadenie má nízku rýchlosĢ zápisu
Naformátujte USB zariadenie na formát
súborov NTFS, alebo FAT32
Vyskúšajte iné kvalitné USB zariadenia
s vyššou rýchlosĢou zápisu.
P
o presunutí prístroja do ine
j
miestnosti prestal box prijíma
Ģ
kanály
PredĎžením zvodu od antény došlo
k poklesu kvality signálu pod funkþnú
úroveĖ.
Použite linkový zosilĖovaþ pokrývajúci
straty signálu v rozvodoch.
Kontaktujte miestnu odbornú firmu
pre presný návrh anténneho systému.
Page 62

TECHNICKÁ ŠPECIFIKÁCIA
TUNER RF VSTUPNÝ KONEKTOR x1
(IEC-TYP, IEC169-2, FEMALE)
RF VÝSTUPNÝ KONEKTOR x1
(IEC-TYP, IEC169-2, MALE (PRIECHODNÁ SLUýKA))
FREKVENýNÝ ROZSAH:
174MHz~230MHz(VHF)
470MHz ~862MHz (UHF)
ÚROVEĕ SIGNÁLU:
-15 ~ -70 dbm
DEKODÉR
Video dekodér MPEG-2 MP@HL, AVC/H.264 HP @L4.1
MPEG-4 ASP SUPPORTED
Audio dekodér MPEG-1 Vrstva 1,2/PCM/HE-AAC V1.0
ICE958 SPDIF
INPUT RATE MAX. 48Mbit/s
VIDEO FORMÁT 4:3/,16:9 premenné
VIDEO VÝSTUP HDMI, RGB
MODULÁCIA QPSK,16QAM,64QAM
KONEKTORY
PRÍVODNÁ ŠNÚRA PEVNÁ
TUNER ANTÉNNY VSTUP 1x, RF VÝSTUPNÁ SLUýKA 1x
SCART TV VÝSTUP 1x
SPDIF COAXIALNÝ 1x
DATA PORT USB PORT 2.0
HDMI HDMI VÝSTUP 1x verzia 1.3c
NAPÁJACÍ ZDROJ
VSTUPNÉ NAPÄTIE AC220~240V, 50/60Hz
SPOTREBA EL. ENERGI E MAX. 6W
Pozn.:
Dizajn a technická špecifikácia výrobku sa môžu zmeniĢ bez
predchádzajúceho upozornenia v závislosti na vývoji výrobku.
Page 63

EMOS SK s.r.o.
Hlinická 409/22
014 01 BYTA
tel.: 041/509 16 32
ZÁRUNÝ LIST
BEN150HD
........
......................................... ................................................
DÁTUM PREDAJA PEIATKA A PODPIS PREDAJCU
ZÁRUNÉ PODMIENKY
1. ZÁRUNÁ DOBA
Na tento výrobok poskytuje firma EMOS SK s.r.o. záruku po dobu 24 mesiacov od dátumu zakúpenia výrobku
spotrebiteűom. Doba záruky sa predlžuje o dobu, po ktorú bol výrobok v záruēnej oprave alebo nemohol byƛ v dobe trvania
záruky používaný, ak charakter poruchy bránil jeho použitiu. Záruka sa vzƛahuje iba na poruchy spôsobené chybou výroby
alebo chybou materiálu!
2. ZÁRUNÝ LIST
Bezplatný záruēný servis je poskytovaný iba v prípade predloženia dokladu o zakúpení výrobku (úētenky) a správne
vyplneného záruēného listu - musí obsahovaƛ výrobné ēíslo, dátum predaja a peēiatku predajne (montážnej firmy). Na kópie
a nesprávne vyplnené záruēné listy nebude braný ohűad.
3. OPRAVY V ZÁRUNEJ A POZÁRUNEJ DOBE
Záruēný servis je možné uplatŸovaƛ u organizácie, kde bol výrobok zakúpený alebo u montážnej firmy, ktorá vykonala
inštaláciu. Po uplynutí záruēnej doby je možné sa obrátiƛ priamo na servis firmy EMOS SK s.r.o. Bytēa, tel.: 041/509 16 32.
4. ROZSAH PLATNOSTI ZÁRUKY
Záruka je neplatná, ak je porucha spôsobená mechanickým poškodením (vrátane poškodenia v priebehu prepravy),
nesprávnym používaním, nepozornosƛou, neodvratnou udalosƛou (živelná pohroma), ak bol výrobok pripojený na iné
napájacie napätie ako je uvedené v jeho technickej špecifikácii, a tiež v prípade úprav alebo opráv vykonaných mimo servis
firmy EMOS SK s.r.o. Záruka nemôže byƛ tiež uplatnená v prípade, ak vyžaduje spotrebiteű modifikácie alebo adaptácie k
rozšíreniu funkcií výrobku (alebo systému zostaveného z niekoűkých komponentov) oproti výrobcom štandardnému
prevedeniu.
ZÁPIS ZÁRUN
ÝCH
OPRÁV
Dátum oznámenia dátum vykonania ē. montáž. listu podpis
ZÁZNAM O VYKONANEJ VSTUPNEJ KONTROLE
Dátum: kontroloval:
Page 64

SET TOP BOX
Odbiornik cyfrowy
BEN 150 HD
Ins
trukcja uĪytkownika
wG
G
G
G
BEN150 HD
Page 65

BezpieczeĔstwo uĪytkowania
WaĪne uwagi związane z bezpiecznym uĪytkowaniem urządzenia
Przed uruchomieniem wyrobu naleĪy uwaĪnie przeczytaü caáą instrukcjĊ. Pod pojĊciem urządzenia w
tej instrukcji rozumie siĊ samo urządzenie, wyposaĪenie i materiaá montaĪowy, jak przewód sieciowy i
przewody sygnaáowe, pilot zdalnego sterowania, baterie, zasilacz, itp.
Producent urządzenia w Īadnym razie nie odpowiada za jakiekolwiek bezpoĞrednie i poĞrednie szkody
spowodowane nieprzestrzeganiem zarówno ogólnie obowiązujących, jak i podanych w tej instrukcji, przepisów i
zaleceĔ postĊpowania z tym urządzeniem.
Zalecenia podane w dalszym tekĞcie zawierają waĪne informacje związane z bezpiecznym korzystaniem
z urządzenia i są zaleĪnie od ryzyka spowodowanego ich nieprzestrzeganiem klasyfikowane do trzech kategorii
oznaczonych w instrukcji, jako:
• OstrzeĪenie
Oznacza sytuacjĊ, która moĪe prowadziü do powaĪnych obraĪeĔ i zagroĪenia dla Īycia.
• Uwaga
Oznacza sytuacjĊ, która moĪe prowadziü do zniszczenia albo uszkodzenia urządzenia.
• Informacja
Oznacza uzupeániający tekst, albo informacjĊ, jak uĪytkownik moĪe uniknąü niektórych problemów przy
obsáudze odbiornika.
Znaczenie symboli
ĩeby ograniczyü ryzyko poraĪenia prądem elektrycznym nie naleĪy otwieraü obudowy
urządzenia. Wewnątrz nie ma bowiem czĊĞci, które uĪytkownik mógáby sam wymieniü albo
wyregulowaü. Naprawy naleĪy zlecaü specjalistom posiadającym niezbĊdne kwalifikacje.
Symbol báyskawicy umieszczony w ramce o ksztaácie trójkąta równobocznego ostrzega
uĪytkownika o istnieniu nieizolowanego „niebezpiecznego napiĊcia“ w urządzeniu, które moĪe
osiągnąü taką wartoĞü, Īe spowoduje poraĪenie prądem elektrycznym.
Ten wyrób zostaá wykonany zgodnie z miĊdzynarodowymi standardami bezpiecze
Ĕstwa. Prosimy
uwaĪnie przeczytaü dalsze zalecenia bezpieczeĔstwa.
ZASILANIE 90-260V AC 50/60Hz
Ten wyrób zasilamy tylko za pomocą napiĊcia podanego na tabliczce znamionowej. JeĪeli nie ma pewnoĞci co
do rodzaju zasilania w PaĔstwa gospodarstwie domowym, naleĪy skontaktowaü siĊ z lokalnym dystrybutorem
energii elektrycznej.
Przed rozpoczĊciem jakiejkolwiek konserwacji albo instalacji wyrób naleĪy odáączyü od zasilania.
PRZECIĄĩENIE: Nie moĪna przeciąĪaü gniazdka zasilającego, bo moĪe to spowodowaü poĪaru, albo
poraĪenie prądem elektrycznym.
PàYNY: Wyrób nie moĪe byü naraĪony na dziaáanie Īadnej cieczy. Na urządzeniu nie wolno ustawiaüĪadnych
przedmiotów wypeánionych cieczą.
CZYSZCZENIE: Przed rozpoczĊciem czyszczenia wyrób odáączamy od zasilania. Do wytarcia kurzu z wyrobu
stosujemy lekko zwilĪoną tkaninĊ
, nigdy nie korzystamy z rozpuszczalników.
WENTYLACJA: Szczeliny w górnej czĊĞci wyrobu nie mogą byü zasáoniĊte, aby umoĪliwiü niezbĊdny dopáyw
powietrza do urządzenia. Wyrobu nie ustawiamy na miĊkkich meblach albo na dywanie. Nie ustawiamy innych
urządzeĔ elektronicznych na tym wyrobie.
WYPOSAĩENIE: Nie korzystamy z Īadnego nie obsáugiwanego wyposaĪenia, aby nie spowodowaü uszkodzenia
wyrobu.
PODàĄCZENIE DO ANTENY: Przed podáączeniem albo odáączeniem przewodu od anteny odáączamy wyrób
od zasilania, aby nie doszáo do uszkodzenia anteny.
Page 66

PODàĄCZENIE DO TV: Przed podáączeniem albo odáączeniem przewodu do TV odáączamy wyrób od
zasilania, aby nie doszáo do uszkodzenia telewizora.
USTAWIENIE: Wyrób umieszczamy wewnątrz budynku, aby ograniczyü oddziaáywanie wyáadowaĔ
atmosferycznych, deszczu albo sáoĔca. Urządzenia nie umieszczamy w pobliĪu grzejnika albo wymiennika ciepáa.
Zapewniamy co najmniej 10 cm odstĊpu. Otworów nie blokujemy Īadnymi przedmiotami i nie ustawiamy wyrobu
na áóĪku, koádrze, kocu, ani na innej podobnej powierzchni. JeĪeli wyrób ustawiamy na póáce albo w
biblioteczne, to konieczne jest sprawdzenie, czy zostaáa zapewniona niezbĊdna wentylacja i czy są przestrzegane
zalecenia producenta związane z montaĪem.
Wyrobu nie umieszczamy na niestabilnym wózku, stojaku, statywie, podporze albo na stole, skąd mógáby spaĞü.
Upadek wyrobu moĪe spowodowaü powaĪne obraĪenia u dziecka lub osoby dorosáej i powaĪne uszkodzenie
urządzenia.
ENERGETYCZNE IMPULSY UDAROWE: Odáączamy wyrób z gniazdka i od anteny w czasie burzy albo,
jeĪeli urządzenie nie bĊdzie wykorzystywane przez dáu
Īszy czas, aby zapobiec uszkodzeniu urządzenia przez
wyáadowanie atmosferyczne i energetyczne impulsy udarowe.
CIAàA OBCE: Nie wkáadamy Īadnych przedmiotów do tego urządzenia. MoĪe to bowiem doprowadziü do styku
z niebezpiecznym napiĊciem albo do uszkodzenia elementów wewnĊtrznych.
WYMIANA ELEMENTÓW: WymianĊ podzespoáów moĪe wykonywaü tylko technik serwisowy upowaĪniony
przez producenta.
OSTRZEĩENIE!
Prosimy przestrzegaü poniĪszych uwag tak, aby nie doszáo do uszkodzenia przewodu albo gniazdka
sieciowego:
- Nie dokonujemy Īadnych zmian w przewodzie zasilającym albo w gniazdku zasilającym.
- Nie wyginamy, ani nie skrĊcamy przewodu zasilającego.
- Przy odáączaniu przytrzymujemy wtyczkĊ od przewodu.
- Przewód zasilający prowadzimy jak najdalej od urządzeĔ wytwarzających ciepáo, Īeby zapobiec nadtopieniu
winylu, z którego jest wykonana obudowa.
- Gniazdko musi pozostaüáatwo dostĊpne.
Prosimy przestrzegaü poniĪszych uwag tak, aby nie doszáo do poraĪenia prądem elektrycznym:
- Nie otwieramy jednostki centralnej.
- Do wewnĊtrznej czĊĞci wyrobu nie wkáadamy Īadnych przedmiotów metalowych, ani áatwopalnych.
- Gniazdka nie dotykamy mokrymi rĊkami.
- W przypadku wystĊpowania wyáadowaĔ atmosferycznych odáączamy przewód zasilający.
Prosimy przestrzegaü poniĪszych uwag tak, aby nie doszáo do uszkodzenia wyrobu:
- Z wyrobu nie korzystamy, jeĪeli nie dziaáa w poprawny sposób tak, aby nie doszáo do jeszcze powaĪniejszych
uszkodzeĔ. Kontaktujemy siĊ z lokalnym sprzedawcą.
- Do záącz dla moduáów albo kart Smart nie wkáadamy metalu albo ciaá obcych, aby nie doszáo do uszkodzenia
wyrobu lub skrócenia jego ĪywotnoĞci.
-Gniazdko zasilające musi byü zainstalowane w pobliĪu odbiornika i musi byüáatwo dostĊpne.
Page 67

Uwagi do uĪytkowania urządzenia USB
Do peánego wykorzystania portu USB konieczne jest, aby pamiĊü do niego podáączona
obsáugiwaáa standard USB 2.0. Do pewnego i stabilnego nagrywania i odtwarzania
wymagane są urządzenia USB o prĊdkoĞci zapisu 9.0 MB/s albo szybsze. Wolniejsze dyski
twarde i pamiĊci flash mogą mieü problemy z nagrywaniem, które pojawią siĊ, jako
zatrzymania obrazu albo urządzenie przestanie w ogóle pracowaü.
Poprawnie pracują tylko dyski z jedną sekcją podstawową i systemem plików NTFS albo
FAT32. JeĪeli na dysku znajduje siĊ inny system plików, to ten dysk trzeba sformatowaü w
PC do zalecanego systemu plików, jeszcze przed jego podáączeniem do odbiornika.
Mocno fragmentowane albo przepeánione pamiĊci równieĪ mogą dziaáaü wadliwie i maáo
páynnie.
ZewnĊtrzne dyski twarde HDD muszą mieü wáasne zasilanie, port USB wbudowany do
odbiornika nie jest zdolny do dostarczenia napi
Ċcia do zasilania przenoĞnego dysku
twardego USB.
Podczas nagrywania albo odtwarzania nie wolno urządzenia USB w Īadnym przypadku
odáączyü od odbiornika. Jego odáączenie podczas pracy odbiornika moĪe spowodowaü
uszkodzenie odbiornika albo pamiĊci flash oraz uszkodziü dane, które znajdują siĊ na tym
noĞniku.
Odbiornik dysponuje funkcją minimalnego poboru energii elektrycznej w trybie gotowoĞci, a to
znaczy, Īe jest bardziej przyjazny dla Ğrodowiska naturalnego
Oprogramowanie sterujące dla tego odbiornika podlega staáemu rozwojowi. Nowa wersja
software moĪe zmieniü niektóre funkcje i zachowanie siĊ odbiornika. Rysunki i opisy w tej
instrukcji mają wyáącznie charakter informacyjny. JeĪeli zauwaĪą PaĔstwo jakieĞ báĊdy, prosimy to zgáosiü, a my
zrobimy wszystko, Īeby usunąü problem.
Najnowszy firmware moĪna zawsze znaleĨü na stronach produktu www.bensat.cz
odbiornik jest wyposaĪony w interfejs HDMI w wersji 1.3c do podáączenia najnowszych
typów telewizorów o najwyĪszej jakoĞci obrazu i dĨwiĊku. JeĪeli PaĔstwa telewizor jest wyposaĪony w to wejĞcie, to
naleĪy je wykorzystaü.
Page 68

SPIS TREĝCI
BezpieczeĔstwo uĪytkowania
PRZEDSTAWIAMY
P
anel przedni
6
P
anel tyln
y
6
Z
dalne sterowanie
7
PODàĄCZENIE ODBIORNIKA
Ogólnie
8
Podá
ą
czenie do TV
8
Podá
ą
czenie do systemuHIF
I
8
ZACZYNAMY
Z
miana kanaáów
9
I
nstalacja
9
STEROWANIE
Z
miana kanaáów
10
Dost
Ċp
i wykorzystaniefunkcji Elektronicznego Przewodnika Programowego(EPG
)
10
ZMIANA KANAàÓW
M
ENU edycji kanaáó
w
11
Ed
ycj
a kanaáów TV
11
Ed
ycj
a stacji radiowych
11
Skasu
j
wsz
y
stkich kanaáów z list
y
11
SYSTEM
M
enu ustawienia systemowe
12
Ustawienia
jĊ
zyka
12
S
y
stem TV, Rodzaje video
12
Czas lokaln
y
12
Ustawienia timera
13
Blokada rodzicielska
13
Ustawienia OSD
13
Ulubione
13
Ustawienia Audio Descri
p
tion (opis cz
y
nnoĞci dla osób ze sáab
y
m wzrokiem
)
14
I
nne (podáączenie anteny, dĨwiĊkowa sygnalizacja siáy sygnaáu, automa
t
yczne
w
y
á
ą
czanie
)
14
NARZĉDZIA
M
enu NarzĊdzia
15
Inf
ormacje
15
Ustawienia
f
abryczne
(
K
asowanie danych
)
15
A
ktualizacja oprogramowania
15
Odá
ą
czenie dysku USB
16
GRY
G
ry
16
NAGRYWANIE I MULTIMEDIA
M
enu nagrywanie
17
Odtwarzacz mediów
Inf
ormacje o urządzeniu USB
1
7
19
Inf
ormacje o PVR
19
Ustawienia PVR
19
TIMESHIFT/NAGRYWANIE
Timeshi
f
t/ PrzesuniĊcie czasowe
20
Na
gry
wanie
20
USUWANIE CZĉSTO WYSTĉPUJĄCYCH PROBLEMÓW
21
SPECYFIKACJA TECHNICZNA
22
Page 69

PRZEDSTAWIAMY
Panel przedni
Czujnik zdalnego sterowania
BEN150 HD
Panel tylny
kCH+
NCH–
ON-OFF
indikátor napájení
USB port
Wejście antenowe
5V 50mA
RF IN
RF OUT
RF OUT
Cyfrowe wyjście audio
COAXIAL
HDMI
HDMI
Wyjście SCART 230 V/AC
220-240V~
50/60Hz
TV
Page 70

PRZEDSTAWIAMY
Pilot zdalnego sterowania
PODàĄCZEN
1. STANDBY ( sųuǏy
do wųČczania/wyųČczania odbiornika
)
2. Klawiatura numeryczna
(wprowadzajČc zaprogramowany wczeƑniej numer kanaųu
bezpoƑrednio przechodzimy do wczeƑniej
zaprogramowanego ustawienia)
3. INFO (wyƑwietlanie informacji o nadawanym programie
)
4. MENU (wyƑwietlanie gųównego MENU odbiornika
)
6. Przycisk OK
(sųuǏy do potwierdzenia wyboru w MENU)
7. RECORD (bezpoƑrednie uruchamianie nagrywania)
8. VOL+/- ( zwiħkszanie/zmniejszanie gųoƑnoƑci)
9. TTX (teletekst)
10. PREV (poprzedn
i
)
11. MEDIA (otwiera MENU odtwarzacza nagranych programów)
12. USB (otwiera MENU odtwarzacza multimedialnego)
13. Next (nastħp
ny)
14. MUTE (wyciszenie dǍwiħku)
15. EPG (otwiera Elektroniczny przewodnik programowy)
16. AUDIO (wybór ƑcieǏki audio)
17. SUBTITLE (WųČczanie/wyųČczanie napisów)
18. TV/RADIO (przeųČcza pomiħdzy TV i stacjami radiowym
i
)
19. BACK (powrót do poprzedniego kanaųu)
20. EXIT (powrót/wyjƑcie z MENU)
21. STOP (zatrzymanie odtwarzania/nagrywania)
22 CH+/- (przeųČczanie kanaųów poprzedni/nastħpny)
23. FAV (otwiera listħ Ulubionych kanaųów)
24. REV (szybkie przewijanie do tyųu)
25. PLAY (odtwarzanie plików/nagraŷ)
26. FWD (szybkie przewijanie do przodu)
27. PAUSE (Pauza, wųČczenie funkcji Timeshift)
28.
(interaktywne przyciski)
STANDBY
INFO
SUBTITLE
AUDIO
TV/RADIO
BACK
CH+
CH-
TTX TIMER
FAV
MUTE
MEDIA
RE S
EXIT
MENU
RE COR D
4
5
6
VOL +
VOL -
1
2
3
0
78
9
OK
USB
EPG
DF00
1
3
4
2
6
7
8
12
23
25
19
9
10
11
13
13
14
15
17
16
20
21
24
22
18
26
27
28
Page 71

HDMI TV
Anténa
RF Koax
HDMI Kabel
Scart Kabel
Z
3
Hi-Fi
Coaxial Kabel
3
POD CZENIE ODBIORNIKA
Ogólnie
Istnieje du
o ró nych typów TV i innych urz dze , które mo na pod czy do odbiornika. W tej instrukcji s
przedstawione najpopular niejsze sposoby, jak pod
czy Pa stwa urz dzenie.
Pod czenie do TV
Antena
Pod
czenie do systemu HIFI
3
Page 72

ZACZYNAMY
Przewodnik do ustawieĔ wstĊpnych
P
o pierwszym wáączeniu odbiornika pojawia siĊ „Początkowe menu“
Welcome
Za pomocą strzaáek na pilocie zdalnego sterowania wybieramy kraj uĪytkownika
J
Ċzyk menu OSD,
Region
Roz
dzielczoĞü i stosunek boków obrazu.
Poland
Zaznaczamy i wybieramy przycisk OK do automatycznego wyszukiwania kanaáów
Language English
Display Mode 720p_50
Aspect Mode 4:3LB
OK
Instalacja
naciskając przycisk "MENU" wchodzimy do gáównego menu.
Za pomocą przycisków Ÿźz
aznaczamy opcjĊ „Instalacja "i
naciskamy przycisk
൘
, aby wejĞü do instalacyjnego menu.
Za pomocą przycisków Ÿźzaznaczamy wybraną funkcjĊ i
potwierdzamy przyciskiem OK.
RĊczne strojenie kanaáów
JeĪeli znane są parametry do dostrojenia poszczególnych kanaáów,
korzystamy z funkcji RĊcznego wyszukiwania kanaáów. Wybieramy pozycjĊ
"Strojenie rĊczne" i naciskamy przycisk "OK", aby wejĞü do podmenu
rĊcznego strojenia
Wybieramy sposób przeszukiwania: pasmo, numer i czĊstotliwoĞü kanaáu oraz
szerokoĞü pasma.
Na wskaĨnikach sygnaáu naleĪy obserwowaü parametr „JakoĞü sygnaáu“. JeĪeli
ten wskaĨnik sygnalizuje odpowiednią jakoĞü sygnaáu, to za pomocą przycisków
Ÿź zaznaczamy pozycjĊ Szukaj i wáączamy wyszukiwanie przyciskiem OK na
pilocie zdalnego sterowania.
Automatyczne strojenie kanaáów
JeĪeli nie są znane są parametry do dostrojenia, to moĪna przeszukaü caáe pasmo
za pomocą funkcji Automatycznego strojenia.
Wybieramy pozycjĊ "Automatyczne strojenie" i naciskamy przycisk "OK", aby
wejĞü do podmenu Automatycznego strojenia. Wybieramy, czy chcemy przeszukaü
wszystkie kanaáy, kanaáy páatne, albo tylko FTA (kanaáy bezpáatne). Za pomocą
przycisków Ÿź zaznaczamy pozycjĊ Szukaj i wáączamy przeszukiwanie
przyciskiem OK na pilocie zdalnego sterowania.
Po zakoĔczeniu przeszukiwania odbiornik automatycznie zapisze wszystkie
znalezione kanaáy w takiej kolejnoĞci, w której byáy znajdowane.
Installation
Channel Scan
Auto Sca
n
LCN
Channel Scan
Scan Mode By channel
Scan Band
UHF
Ch No.
CH37(666000KHz)
Frequency
666000KHz
Bandwidth
8MHz
Search
Signal Intensity
81%
Signal Quality 97%
Auto Scan
FTA Only No
Search
LCN
LCN ( Logical Channel Number) – logiczna numeracja kanaáów. Ta funkcja, jeĪeli operator ją
obsáuguje, zapewnia automatyczne dostrojenie kanaáów. W przypadku zmiany w liĞcie kanaáów, ta
funkcja umoĪliwia automatyczne uzupeánienie, skasowanie listy kanaáów. JeĪeli jest wáączona opcja
LCN to strojenie rĊczne i zapisywanie kanaáów jest niemoĪliwe.
JeĪeli chcemy rĊcznie uszeregowaü dostrojone kanaáy, to wyáączamy tĊ funkcjĊ.
Page 73

STEROWANIE
Zmiana kanaáów
Odbiornik udostĊpnia trzy sposoby zmiany kanaáu – krokowanie za pomocą przycisków CH+/CH-, bezpoĞredni
wybór numeru, opcja z menu
Krokowanie miĊdzy kanaáami za pomocą przycisków CH+ a CH-:
Do przechodzenia miĊdzy kanaáami wykorzystujemy przyciski Ÿź na pilocie zdalnego sterowania.
BezpoĞredni wybór zaprogramowanego wczeĞniej kanaáu:
Do bezpoĞredniego wybrania kanaáu naciskamy przycisk z zaprogramowanym numerem na klawiaturze
numerycznej pilota zdalnego sterowania.
Wybór za pomocą wyĞwietlanej listy kanaáów:
Przy oglądaniu na Īywo programu TV naciskamy przycisk OK na pilocie zdalnego sterowania. Na ekranie
zostanie wyĞwietlone menu dostrojonych kanaáów. Za pomocą przycisków Ÿź na pilocie zdalnego
sterowania zaznaczamy kanaá, który chcemy oglądaü i wybór potwierdzamy przyciskiem OK.
DostĊp i wykorzystanie funkcji Elektronicznego Przewodnika Programowego (EPG)
DostĊp do menu EPG z wyĞwietlaniem wszystkich kanaáów:
Naciskamy przycisk "EPG", aby wejĞü do menu EPG.
Do poruszania siĊ w menu EPG wykorzystujemy przyciski Ÿźi
ൖ
൘UG
Zaznaczamy odpowiednią kolejnoĞü i
G
naciskamy "ZIELONY" przycisk, Īeby wpisaü kolejnoĞü do timera.
Przy wpisywaniu kolejnoĞci do timera trzeba wybraü, czy chcemy
tylko obserwowaü kolejnoĞü (tryb kanaá), albo równieĪ nagrywaü na
USB (tryb rekorder).
Naciskamy "CZERWONY" przycisk, aby wyĞwietliü "EPG w
kolejnoĞci czasowej" menu.
EPG 01:39 xx/xx/xxxx
0010 BBC FOUR
Auntie's War on Smut
01:30-02-30
3/19 01:30 02:00 02:30 03:00
0008 Interecon
0009 BBC Parl The Recor Commons Questions The Recor
0010
BBC FO
Auntie's War on Smut Proms on FOUR
0011 CBeebie
This is CBeebies!
0012 301
Time Timer
Page 74

IT
MENU edycji kana ów
Naciskamy przycisk "MENU," aby wej do g ównego menu.
Za pomoc przycisków
zaznaczamy wybran
funkcj i
potwierdzamy naciskaj
c przycisk „OK“ albo
TV Channel List
Radio Channel List
Delete All
Edycja TV
W menu zmiany kana
ów mo na przesuwa , kasowa , przeskakiwa
wszystkie dostrojone kana y.
Za pomoc przycisków zaznaczamy wymagane kana y i za pomoc
kolorowych przycisków wybieramy odpowiedni
funkcj .
Aby wywietli podgl d obrazu kana u naciskamy przycisk „OK“.
Za pomoc kolorowych przycisków wybieramy odpowiedni funkcj i
potwierdzamy przyciskiem „OK“.
TV Channel List
All TV
FAV Lock Skip Move Edit
0001 No Name
0002 YooPlay Ga
0003 E4+1
Y
ooPlay Ga
i
0004 UKTV Histor
0005 SKY THREE
xxxxxxxx
0006 Sky Spts Ne
xxxxxx
0007 Sky News
xxxx
xxx
Edit Channel
All TV
Sort Rename Delete
0001 No Name
0002 YooPlay Ga
0003 E4+1
YooPlay Ga
i
0004 UKTV Histor
0005 SKY THREE
xxxxxxxx
0006 Sky Spts Ne
xxxxxx
000
7 Sky News
xxxx
xxx
Edycja stacji radiowych
W menu
zmiany kana ów mo na pr zesuwa , kasowa , przeskakiwa wszystkie dostrojone kana y.
Za pomoc
przycisków zaznaczamy wymagane kana y i za pomoc kolorowych przycisków wybieramy
odpowiedni funkcj .
Warning! Do you really want to delete
a
ll channels?
Yes
No
Skasuj wszystko
Je
eli chcemyskasowa wszystkie kana y, to przechodzimy w menu zmiany
kana
ów do funkcji „Skasuj wszystko“ i potwierdzamy przyciskiem „OK“.
Przy pytaniu o has
o wprowadzamy „0000“.
Zostanie wy
wietlone ostrze enie.
Za pomoc
przycisków
Uwaga:
W zasadzie edycja stacji radiowych jest taka sam , jak edycja kanaów TV, tylko nie jest dostpne okno
z podgldem. Zamiast niego jest na stae wywietlane logo stacji.
Przesuni
cie kana u:
Zaznaczamy wymagany kana i naciskamy „ Ó TY“ przycisk. Za
pomoc przycisków przesuwamy kana na now pozycj i
potwierdzamy naciskaj c przycisk „OK“.
Naciskamy przycisk "FAV,“ a potem naciskamy przycisk
„OK“ zmieniaj
c list Ulubionych kana ów.
Wpisywanie kanaów do wykazu Ulubione:
ZMIANA KANA
óW
Page 75

SYSTEM
Ustawienia systemowe
Menu ustawieĔ systemowych umoĪliwia zmianĊ ustawieĔ jĊzyka, systemu TV
czasu lokalnego, timera, blokady rodzicielskiej, menu OSD, Ulubionych
kanaáów, ustawieĔ funkcji Audio description i inne ustawienia systemowe.
Naciskamy przycisk "MENU", aby wejĞü do gáównego menu.
Za pomocą przycisków
Ÿź wybieramy funkcjĊ „Ustawienia systemowe“
i potwierdzamy naciskając przycisk „OK“ albo
൘UG
Za pomocą przycisków Ÿź zaznaczamy wybraną funkcjĊ i potwierdzamy
naciskając przycisk „OK“ albo
൘UG
Aby opuĞciü to podmenu naciskamy
przycisk „EXIT“ na pilocie zdalnego sterowania.
System Setup
Language
TV Sys
tem
Local Time Setting
Timer Setting
Parental Lock
OSD Setting
Favorite
Auto Description Setting
Other
JĊz
yk
W tym
menu moĪna ustawiü:
Preferowany jĊzyk wyĞwietlanego menu,
Preferowany jĊzyk towarzyszącej ĞcieĪki
dĨwiĊkowej,
JĊzyk napisów i teletekstu.
W zaleĪnoĞci od wyboru jĊzyka zostanie
wybrane odpowie kodowanie znaków.
Language
Language English
First Audio
English
Second Audio
German
Subtitle Language
English
Teletekst
English
Subtitle
On
System TV
W
tym menu moĪna ustawiü rozdzielczoĞü Video, stosunek boków
video, wyjĞcie video i cyfrowe wyjĞcie audio.
RozdzielczoĞü Video: zaleĪn
ie od Ĩródáa/
kraju TV/480i/480p/576i/
576p/720p@50/720p@60/1080i@25/
1080i@30/1080p@50/1080p@60
Stosunek boków: Auto/4:3PS/4:3LB/16:9
WyjĞcie Video: SCART CVBS+ HDMI/ SCART RGB
Cyfrowe wyjĞcie Audio: WyjĞcie LPCM / WyjĞcieBS
TV System
Video Resolution 720p@50
Aspect Mode
4:3LB
Video Out
SCART RGB
Digital Audio Out
LPCM Out
Czas lokalny
W
tym menu moĪna ustawiü czas lokalny, region korzystania z odbiornika
Ustawienie czasu jest waĪne do poprawnego dziaáania timera.
Region: Wybieramy z menu region korzystania z odbiornika.
Ustawienia GMT : Wybieramy ustawienia GMT z moĪliwoĞci:
zgodnie z Regionem/definiowane przez
uĪytkownika/ Off
PrzesuniĊcie czasowe GMT: Ustawiamy przesuniĊcie czasowe GMT "-11:30 ~
+12:00", z moĪliwoĞcią skoku co 30 minut.
Local Time Setting
Region France
GMT
Usage
By Region
GMT Offset
GMT+01:00
Summer Time
Of
f
Date xxxx/xx/xx
Time
01:51
xxxx,xxx,xxxx
Czas letni: Stosowanie czasu letniego wybieramy
z
moĪliwoĞci: On/Off
Data: Menu "Data" i "Czas" są dostĊpne tylko, jeĪeli w ustawieniach GMT wybrano Off
Czas: Do rĊcznego ustawienia czasu wykorzystujemy klawiaturĊ czasową.
Page 76

timera
Current Time/date: 01:36PM xx/xx/xxxx
Timer Mode
Daily
Timer Service
Channel
Wakeup Channel
BBC FOUR
Wakeup Date
xx/xx/xxxx
On Time
xx:xx
Duration
xx:xx
Save
Blokada rodzicielska
Za pomoc tej funkcji mo na zamkn menu i kana y przed nieuprawnion zmian i
ogl daniem. Wtym menu mo na równie zmieni has o.
Za pomoc przycisków wybieramy w menu funkcji „Ustawienia
systemowe“ i potwierdzamy naciskaj c przycisk „OK“ albo
.
Wybieramy funkcj Blokada rodzicielska i potwierdzamy przyciskiem „OK“.
Dost
p do tego ustawienia jest chronion y has em( fabr ycznie0000)
Blokada menu: Je eli jest ustawiona ta blokada, to przed wej ciem do menu
Menu Lock
Rating Lock
New Password
Confirm Pas sword
Off
Off
----
----
Parental Lock
SYSTEM
Ustawienia timera
W tym menu moĪna ustawiü timer. MoĪna ustawiaüdo 8 timerów.
Tryb timera: Off/Raz/Codziennie/Tygodniowo/MiesiĊcznie
Typ timera: Przeáączenie/Nagrywanie
Kanaá do wáączenia: Wybieramy kanaá, który bĊdzie wyĞwietlany po wáączeniu
urządzenia.
Data wáączenia: Za pomocą klawiatury numerycznej wprowadzamy datĊ
wáączenia urządzenia.
Czas wáączenia: Za pomocą klawiatury numerycznej wprowadzamy czas
wáączenia urządzenia.
Czas dziaáania Za pomocąklawiatury numerycznej dáugoĞüczasu aktywnoĞci
Cancel
„Zmiany kanaáów“ i „Menu instalacji“ trzeba podaü aktualny kod
Blokada zaleĪnie od wieku: Off/ Wiek 4/ Wiek 5/ Wiek 6/ Wiek 7/ Wiek 8/ Wiek 9/ Wiek 10/ Wiek
11/ Wiek 12/Wiek 13/ Wiek 14/ Wiek 15/ Wiek 16/ Wiek 17/ Wiek 18
Zmiana hasáa: Wprowadzamy nowe hasáo.
Potwierdzenie hasáa: Dla potwierdzenia ponownie
wprowadzamy nowe hasáo.
Ustawienia OSD
W tym menu moĪna ustawiü czas wyĞwietlania OSD i przejrzystoĞü Menu OSD .
OSD dáugoĞü wyĞwietlania: 1-10
OSD PrzejrzystoĞü: Ustawiamy przezroczystoĞü menu:
Off/10%/20%/30%/40%.
OSD Setting
OSD Timeout 5
OSD Transparency
Off
Ulubione
W
tym menu moĪemy zmieniaü nazwy list Ulubionych kanaáów.
Wybieramy wymaganą grupĊ Ulubionych kanaáów i naciskamy przycisk
„OK“, aby otworzyü wirtualną klawiaturĊ.
Za pomocą przycisków
Ÿźi
ൖ
൘ wybieramy litery i cyfry nowej nazwy listy
Ulubionych kanaáów. Po zakoĔczeniu zmian za pomocą strzaáek zaznaczamy
klawisz OK i naciskamy przycisk „OK“ na pilocie zdalnego sterowania dla
zatwierdzenia zmian.
Aby wróciü do poprzedniego menu naciskamy przycisk „EXIT“.
Fa
vorite
1 Rename
Fav group 1
2 Sport
Fav group 1
A B C D E F3 Dokumenty
4 Zprávy
G H IJK L
5 Fav group 5
M N
O
P Q R
6 Fav group 6 S T U V W X
7 Fav group 7 Y Z 0 1 2 3
8
Fav group 8
4 5 6
7 8 9
SP ? <- OK
CAPS Del OK
Page 77

W tym menu mo
Ustawienia Audio Description
SYSTEM
na ustawi funkcj opisu d wi kowego dla
niewidomych, tzw. AD.
Nale y ustawi us ug AD, zastosowa us ug AD, jako pierwsz
towarzysz c i Odst p g o no ci cie ki AD od cie ki d wi kowej.
Us
uga AD: On/Off
Auto Description Setting
AD Service On
Use AD as
default
Of
f
AD Volume Offset
0
Wykorzystanie AD, jako
us
uga wyj ciowa:
On/Off
Odst p g o no ci AD: -3~3
Pozostaáe
W tym menu moĪna ustawiü funkcje:
Zasilanie anteny: On/Off
JeĪeli zasilanie anteny jest wáączone(On), to odbiornik bĊdzie
wytwarzaü napiĊcie 5V niezbĊdne do pracy wzmacniacza znajdującego
siĊ w antenie. JeĪeli w antenie nie ma wbudowanego wzmacniacza, to
tĊ opcjĊ wyáączamy „Off“), poniewaĪ urządzenie moĪe ulec
uszkodzeniu!
Odtwarzany kanaá: Wszystkie/Bezpáatne/Kodowane
Other
LNB Power Off
Channel Play Type
AllI
Beeper
Of
f
Auto Standby
Of
f
Akustyczny pomocnik do wyszukiwania sygnaáu: On/Off
Przy strojeniu rĊcznym przy opcji „On“ razem z graficznym obrazem jakoĞci sygnaáu
wáączamy równieĪ akustyczny wskaĨnik jakoĞci sygnaáu.
Automatyczne przeáączenie urządzenia do trybu oczekiwania:
30Min/1 Godz./2 Godz./3 Godz./Wyáącz
JeĪeli w czasie od 30 min. do3 godzin nie zostanie przeáączony kanaá albo jakakolwiek
inna funkcja za pomocą pilota albo za pomocą przycisków na przednim panelu,
odbiornik sam przejdzie w tryb oczekiwania
9
TOO
Page 78

NÁSTROJ
Menu NarzĊdzia
Naciskamy przycisk "MENU", aby wejĞü do gáównego menu.
Za pomocą przycisków Ÿź wybieramy funkcjĊ „NarzĊdzia“ i
potwierdzamy naciskając przycisk „OK“ albo
൘UG
Za pomocą przycisków Ÿź zaznaczamy wybraną funkcjĊ i
potwierdzamy naciskając przycisk „OK“ albo
൘UG
Aby opuĞciüto podmenu naciskamy przycisk „EXIT“ na pilocie
zdalnego sterowania.
Tools
Information
Fac
tory Setting
S/W Upgrade by OTA
Upgrade By USB
R
emove USB device safely
Informacje
W t
ym menu bĊdą wyĞwietlane informacje o odbiorniku.
W menu "NarzĊdzia" wybieramy pozycjĊ"Informacje" i potwierdzamy
naciskając przycisk „OK“. WyĞwietli siĊ informacja o wersji
oprogramowania, sprzĊcie, itp.
Aby opuĞciüto podmenu naciskamy przycisk „EXIT“ na pilocie
zdalnego sterowania.
Information
xxx x.x.x
xxxxx xxxxx
xxxxx xxxxx
xxx x.x.x
xxx x.x.x
Kasowanie
danych
W tym menu moĪna przywróciü w odbiorniku ustawienia
fabryczne. Wszystkie wprowadzone przez PaĔstwa ustawienia
zostaną skasowane, a odbiornik zostanie wprowadzony do
początkowego stanu fabrycznego.
W menu „NarzĊdzia“ wybieramy opcjĊ„Ustawienia fabryczne: i
potwierdzamy przyciskiem „OK“. Po wezwaniu do podania hasáa
wprowadzamy PIN Blokady rodzicielskiej (fabrycznie ustawiony na
„0000“).
Po wprowadzeniu hasáa zostanie wyĞwietlone ostrzeĪenie o skasowaniu
ustawieĔ.
Wybieramy „Tak“ dla potwierdzenia albo „Nie“, aby to skasowaü.
Aby opuĞciüto podmenu naciskamy przycisk„EXIT“
Factory Setting
This operation will load default and erase all the
channels that user adde
d, continue?
Y
es No
Aktualizacja
W tym menu moĪna zaktualizowaü wersjĊ oprogramowania w odbiorniku za
pomocą USB albo OTA.
W menu „NarzĊdzia“ wybieramy opcjĊ „Aktualizacja oprogramowania
przez USB albo „Aktualizacja oprogramowania przez OTA“ i
potwierdzamy przyciskiem „OK“
Za pomocą przycisków
Ÿźi
ൖ ൘
wybieramy plik z nową wersją
oprogramowania i zaznaczamy przycisk "Start". Naciskamy przycisk
"OK", aby rozpocząü aktualizacjĊ. Aby opuĞciü to podmenu
naciskamy przycisk „EXIT“
Uwaga. W trakcie aktualizacji nie wyáączamy zasilania i nie wyáączamy
samego odbiornika
.
Upgrade by USB
Upgrade Mode Allcode
Upgrade File
N
o File
Start
0%
Page 79

o menu.
Sudoku
Za pomoc przycisków wybieramy funkcj „Gry“ i potwierdzamy naciskaj
c przycisk „OK“ albo
Za pomoc przycisków zaznaczamy wymagan gr i potwierdzamy
naciskaj
c przycisk „OK“ albo
Odáączenie dysku USB
W
menu „NarzĊdzia“ wybieramy pozycjĊ "Bezpieczne odáączenie
dysku USB ",
Dla potwierdzenia naciskamy przycisk „OK“. Zostanie wyĞwietlone
okno do potwierdzania, w którym ponownie naciskamy przycisk
„OK“, aby odáączyü dysk USB.
Uwaga. JeĪeli wyáączą PaĔstwo dysk USB bez zachowania tej procedury, to
ryzykują PaĔstwo utratĊ danych albo uszkodzenie urządzenia USB.
Disk Remove
Remove
USB Disk A-3 GB
OK
Cancel
GRY
W t
y
m menu moĪnagraü w zainstalowane
g
ry.
Game
Othello
Naciskamy przycisk "MENU", ab
y
we
j
Ğü dogáówne
g
൘UG
Aby opuĞciüto podmenu naciskamy przycisk „EXIT“ na pilocie zdalnego sterowania.
Page 80

Nagrywanie i multimedia
NAGRYWANIE
Naciskamy przycisk "MENU," aby wejĞü do gáównego menu.
REC
Media Playe
r
Za pomocą przycisków Ÿź wybieramy funkcjĊ „Nagrywanie“ i
p
otwierdzam
y
naciĞni
Ċ
ciemprzycisku
PVR Storage Information
przycisku „OK, albo
൘UG
PVR Settin
g
Za pomocą przycisków Ÿź zaznaczamy wybraną funkcjĊ i potwierdzamy
naciskając przycisk „OK.” albo
൘UG
Aby opuĞciü to podmenu naciskamy przycisk „EXIT“ na pilocie zdalnego sterowania.
Odtwarzacz mediów
Ta funkcja umoĪliwia odtwarzanie plików multimedialnych z urządzenia USB.
W menu „Nagrywanie“ wybieramy za pomocą przycisków Ÿź
„Odtwarzacz mediów“ i naciskając przycisk „OK“ wáączamy odtwarzacz
multimediów.
Po wáączeniu odtwarzacza mediów w górnej czĊĞci zostanie pokazana
nazwa urządzenia USB/HDD. Przyciskiem "ź" przesuwamy siĊ na
odpowiedni katalog albo plik.
Naciskając przycisk „1“ moĪemy przeáączaü
pomiĊdzy wyĞwietlaniem
Muzyka/Obraz/Video/Nagranie
Za pomocą przycisków Ÿź zaznaczamy wymagany plik i naciskając
przycisk „OK“ rozpoczynamy odtwarzanie
Aby opuĞciü odtwarzacz
mediów naciskamy przycisk „EXIT“ na pilocie
zdalnego sterowania.
Odtwarzanie muzyki:
"CZERWONY"
przycisk:
WyĞwietlanie aktualnej playlisty (wykazu odtwarzanych plików).
"ZIELONY" przycisk: Dodanie do wykazu odtwarzanych plików.
Przy pliku pojawi siĊ oznaczenie, Īe jest on w wykazie odtwarzanych plików.
"
ĩ
ÓàT
Y
" przycisk: Dodanie wszystkich plików w aktualnym katalogu do playlisty.
Drugim naciĞniĊciem kasujemy wszystkie pliki z aktualnego katalogu z playlisty.
"NIEBIESKI"
przycisk:
Otworzy siĊ nowe okno z moĪliwoĞciami dodatkowych ustawieĔ.
"2" przycisk: Sortowanie wyĞwietlania plików.
Pliki moĪna wyĞwietlaü w kolejnoĞci, jako: Nazwa, Czas, WielkoĞü, Ulubione.
"INFO" przycisk: Powtórzenie odtwarzania.
MoĪna ustawiü powtórzenie katalogu, przypadkowe powtórzenie katalogu,
powtórzenie jeden raz.
"EXIT" przycisk: Powrót do poprzedniego katalogu.
P
rezentacja obrazów:
"CZERWONY"
przycisk:
WyĞwietlanie aktualnej playlisty (wykazu odtwarzanych plików).
"ZIELONY" przycisk: Dodanie do wykazu odtwarzanych plików.
Przy pliku pojawi siĊ oznaczenie, Īe jest on w wykazie odtwarzanych plików.
"
ĩ
ÓàT
Y
" przycisk: Dodanie wszystkich plików w aktualnym katalogu do playlisty.
Drugim naciĞniĊciem kasujemy wszystkie pliki z aktualnego katalogu z playlis
t
y.
"NIEBIESKI" Otworzy siĊ nowe okno z moĪliwoĞciami dodatkowych ustawieĔ.
Music Image Video Record
USB 1
/..
1
M P G
840.m
pg
2
M P 3
I swear.mp3
3
M P 3
Why.mp3
I swear.mp3
4
M P 3
Lonely.mp3
3319KB
5
M P 3
Because.mp3
00:03:32
6
J P G
Rose.jpg
7
J P G
Fly.jpg
00:03:15 00:03:32
INFO
Play ListFAV FAV All Edit
1 Switch
2
Sort
i
Repea
t
EXIT Exit
Page 81

przycisk:
"2" przycisk: Sortowanie wyĞwietlania plików.
Pliki moĪna wyĞwietlaü w kolejnoĞci, jako: Nazwa, Czas, WielkoĞü, Ulubione.
"INFO" przycis
k
: Ustawienie wyĞwietlania ob
r
azó
w
"3" przycisk: WyĞwietlanie podglądu obrazów w rastrze 3x3
"EXIT" przycisk: Powrót do poprzedniego katalogu.
Page 82

Nagrywanie i multimedia
Odtwarzanie plików video:
"NIEBIESKI" przycisk: Otworzy siĊ nowe okno z moĪliwoĞciami dodatkowych ustawieĔ.
"2" przycisk: Sortowanie wyĞwietlania plików.
„OK“ przycisk: WyĞwietlenie okna szybkiego przewijania. W wyĞwietlonym oknie moĪna
szybko przeskakiwaü w video za pomocą kursorów
ൖ൘
.
"EXIT" przycisk: Powrót do poprzedniego katalogu.
Nagrywanie:
"CZERWONY" przycisk: Press "Red" button to open rename window.
"ZIELONY" przycisk: Move the highlight to the program which you want to lock. Pressing "Green" button, it
will ask you to input password. Default password is "0000". After input correct password,
the program is locked. If you want to unlock the program, press the "Green" button again.
"ĩÓàTY" przycisk: Press "Yellow" button to make a delete mark on the program which you want
to delete.
"EXIT" przycisk: Powrót do poprzedniego katalogu.
Informacje o urządzeniu USB
W tym menu moĪna wyĞwietliü informacje o podáączonym urządzeniu USB.
W menu "Nagrywanie", wybieramy „Informacje o
urządzeniu USB“ i potwierdzamy przyciskiem "OK".
W wyĞw
ietlanym oknie znajdują siĊ informacje:
Formatowanie dysku USB:
Podáączony dysk USB moĪna
sformatowaü do formatu plików FAT32 albo NTFS
„ĩÓàTYM“ przyciskiem wybieramy menu formatowania dysku.
Za pomocą przycisków
ൖG൘
wybieramy wymagany format
plików dysku USB i wybieramy "OK", aby rozpocząü
formatowanie dysku. Aby to skasowaü wybieramy przycisk
„SKASUJ“.
Wybór sposobu nagrywania: „NIEBIESKIM“ przyciskiem
wybieramy
Ustawienia PVR: REC&TMS/Record/Timeshift
Uwaga: formatując kasujemy nieodwracalnie caáą zawartoĞü dysku. Przed
rozpoczĊciem formatowania dane z dysku naleĪy skopiowaü na innym noĞniku.
PVR Storage Information
USB Disk A: xxxG bytes
Vol
ume xxxx
Total Size
xxxx
Free Size
xxxx
Rec Size
xxxx
TMS Size
xxxx
File System
xxx
Format DVR Set
Format
Disk Mode FAT
O
K
Cancel
DVR Se
t
DVR Type REC& TMS
O
K
Cancel
PVR
TimeShift
AUTO/Pauza/Off
PVR Setting
Timeshift Pause
Timeshift to Record
ON
PS Record
OFF
Zapisz nagranie Timeshift On/Off
PS
Record On/Off
Za pomocą
przycisków
Ÿź
wybieramy funkcjĊ
„Nagrywanie“
i
p
otwierdzamy naciĞniĊciem
przycisku „OK“ albo
൘UG
w¡G
ൖG൘
moĪna zmieniaü
ustawienia.
Page 83

TIMESHIFT/NAGRYWANIE
Pod czaj c zewn trzny no nik do portu USB uzyskujemy dost p do funkcji TimeShift / Zapis nadawania.
Ta funkcja umo
liwia:
Zatrzymanie nadawanego programu i obejrzenie go pó niej (Timeshift)
Zapis nadawanego programu.
Po ca
kowitym wype nieniu wolnego miejsca w pod czonym urz dzeniu USB Timeshift/ Zapis zostanie
zako czona
Uwaga:
Do wykorzystania funkcji Timeshift/ Zapis audycji musimy wykorzysta
dobrej jakoci urz dzenie USB 2.0
o pr
dko ci zapisu min. 9MB/s.
Timeshift/ Przesuni cie czasowe
Inicjacja
Funkcj
Timeshift aktywujemy naciskaj c przycisk "PAUSE" w
czasie ogl dania na ywo programu TV.
Do szybkiego przechodzenia w zapisie wykorzystujemy pr zyciski
ൖ
൘
. Dla potwierdzenia pozycji w zapisie naciskamy przycisk "OK".
Przewijanie szybkie w pliku video i w funkcji Timeshift:
B B C F O U R
0 3 / 1 90 1 : 3 6
Play00:02:37 00:07:12
2 %
T S
Podczas odtwarzania moĪna wykonaü nastĊpujące czynnoĞci:
Naciskając przycisk "PAUSE" zatrzymaü odtwarzanie
Naciskając przycisk "൘൘" wáączamy szybkie przewijanie do przodu
Naciskając przycisk "ൖൖ" wáączamy szybkie przewijanie do tyáu
Zatrzymanie funkcji Timeshift
Aby zatrzymaü funkcjĊ Timeshift naciskamy przycisk "STOP".
NAGRYWANIE
Nagrywanie na bieĪąco
Przy oglądaniu nadawanego na Īywo programu TV naciskamy przycisk "RECORD" i wáączamy nagrywanie na
bieĪąco aktualnie oglądanego kanaáu. Ponownie naciskając przycisk "RECORD" moĪemy ustawiü dáugoĞü
nagrywania.
Nagrywanie koĔczymy naciskając przycisk "STOP". Po jego naciĞniĊciu zostanie
wyĞwietlone okno do potwierdzenia. Naciskamy przycisk „Tak“, aby zakoĔczyü albo
przycisk „Nie“, Īeby kontynuowaü zapis.
Nagrywanie za pomocą EPG i timera
Patrz rozdziaá Sterowanie EPG na str. 5.
JeĪeli mamy zaprogramowany timer przeáączanie/odtwarzanie, to odbiornik
automatycznie wáączy siĊ przed ustawionym czasem, przeáączy na wybrany kanaá i (jeĪeli
jest podáączone urządzenie USB gotowe do nagrywania), rozpocznie nagrywaü. Po
zakoĔczeniu czasu timera odbiornik automatycznie przejdzie do trybu gotowoĞci.
Uwaga.:
Do bezproblemowego, stabilnego nagrywania i odtwarza
ni
a wymagane są urządzenia USB o prĊdkoĞci zapisu 9.0 MB/s
albo szybsze. Wolniejsze dyski twarde i pamiĊci flash mogą mieü problemy z nagrywaniem, które pojawią siĊ w postaci
zatrzymywania siĊ obrazu albo w ogóle odmówią wspóápracy. Przy zastosowaniu dysku USB o poborze prądu
przekraczającym 500mA trzeba zastosowaü dodatkowy zasilacz!
Page 84

USUWANIE PROBLEMÓW
Bezproblemowy odbiór sygnaáów TV jest zawsze zaleĪny od jakoĞci sygnaáów w miejscu odbioru. W miejscach o
niskim poziomie i jakoĞci sygnaáu naleĪy zawsze korzystaü z anteny o wysokiej jakoĞci.
Problem MoĪliwa przyczyna Rozwiązanie
Nie Ğwieci czerwona lampka
sygnalizacyjna trybu gotowoĞci
Wtyczka zasilająca wyjĊta z gniazdka
Sprawdziü podáączenie do zasilania
Wyáączony bezpiecznik w urządzeniu
K
ontrola bezpiecznika
Nie zostaá znaleziony sygnaáAntena nie jest wáączona Sprawdziü podáączenie anteny
ħ
le ustawiona antena
P
rzestawiü antenĊ
W tym miejscu nie ma sygnaáu
Skontaktowaü siĊ ze specjalistyczną
f
irmą
Brak obrazu albo dĨwiĊku
Scart/AV/HDMI nie jest dobrany do
przeáączania wejĞü w PaĔstwa TV
Na pilocie TV przeáączyü siĊ na
odpowiednie wejĞcie
WyĞwietla siĊ komunika
t
„Zakodowany kanaá“
Kanaá jest zakodowany Wybieramy inny kanaá do oglądania
Nie dziaáa zdalne sterowanie Odbiornik jest wyáączony Wáączamy odbiornik
Pilot zdalnego sterowania nie jest
skierowany na odbiornik
Pilota kierujemy dokáadnie na przedni
panel urządzenia
Przedni panel jest zasáoniĊty jakąĞ
przeszkodą
Usuwamy przeszkodĊ przed przednim
panelem
Baterie w pilocie zdalnego sterowania
s
ą
rozáadowane
Wymieniamy baterie
Zostaáo zapomniane hasáo do
blokady kanaáu
Przenosimy kanaáy, aby usunąü blokadĊ
Z
ostaáo zapomniane hasáo
dostĊpu do menu
Kontaktujemy siĊ ze wsparciem
technicznym importera
Nie moĪna nagrywaü na
urządzenie USB
Urządzenie USB ma niewáaĞciwy format
Urządzenie USB ma za maáą prĊdkoĞü
zapisu
Formatujemy urządzenie USB do
formatu plików NTFS albo FAT32
Sprawdzamy inne, dobre urządzenie USB
o wiĊkszej prĊdkoĞci zapisu.
P
o przestawieniu urządzenia do
innego pomieszczenia przestaáo
ono odbieraü kanaáy
PrzedáuĪenie przewodu antenowego
pogorszyáo jakoĞü sygnaáu poniĪej
poziomu wymaganego do dziaáania.
Stosujemy wzmacniacz liniowy
kompensujący stratĊ sygnaáu w
instalacji.
Kontaktujemy siĊ z miejscową
specjalistyczną firmą, aby dobrze
dobraü system antenowy.
Page 85

SPECYFIKACJA TECHNICZNA
TUNER RF Z CZE WEJ CIOWE x1
(IEC-TYP, IEC169-2, FEMALE)
RF Z CZE WYJ CIOWE x1
(IEC-TYP, IEC169-2, MALE (P TLA PRZEJ CIOWA))
PASMO CZ STOTLIWO CI:
174MHz~230MHz(VHF)
470MHz ~862MHz (UHF)
POZIOM SYGNA U:
-15 ~ -70 dBm
DEKODER
Video dekoder MPEG-2 MP@HL, AVC/H.264 HP @L4.1
MPEG-4 ASP SUPPORTED
Audio dekoder MPEG-1 Warstwa 1,2/PCM/HE-AAC V1.0
ICE958 SPDIF
INPUT RATE MAX. 48Mbit/s
VIDEO FORMAT 4:3/,16:9 zamiennie
VIDEO WYJ CIE HDMI, RGB
MODULACJA QPSK,16QAM,64QAM
Z CZA
PRZEWÓD ZASILAJ CY STA E
TUNER WEJ CIE ANTENOWE 1x, RF P TLA WYJ CIOWA 1x
SCART TV WYJ CIE 1x
SPDIF KONCENTRYCZNE 1x
DATA PORT PORT USB 2.0
HDMI HDMI WYJ CIE 1x wersja 1.3c
ZASILANIE
NAPI CIE ZASILAJ
CEAC220~240V, 50/60Hz
ZU YCIE ENERGII
ELEKTRYCZNEJ
MAX. 6W
Uwaga:
Design i specyfikacja techniczna wyrobu mo e si zmieni bez
wcze niejszego uprzedzenia ze wzgl du na unowocze nienie wyrobu.
Page 86

EMOS spol. s r.o.
ŠíƎava 295/17
750 00 P\EROV
tel.: 581 261 111
KARTA GWARANCYJNA
BEN150HD
........
......................................... ................................................
DATA SPRZEDAY PIECZTKA I PODPIS SPRZEDAWCY
WARUNKI GWARANCJI
1. OKRES GWARANCJI
N
a ten wyrób firma EMOS spol. s r. o. Udziela gwarancji w czasie 24 miesiħcy od daty zakupienia wyrobu przez uǏytkownika.
Czas gwarancji przedųuǏa siħ o okres, w którym wyrób byų w naprawie gwarancyjnej i/albo nie mógų byđ uǏytkowany w
czasie trwania gwarancji, o ile charakter usterki uniemoǏliwiaų jego wykorzystywanie. Gwarancja dotyczy wyųČcznie usterek
spowodowanych bųħdami w produkcji albo wadČ materiaųu!
2. KARTA GWARANCYJNA
Bezpųatny serwis gwarancyjny jest Ƒwiadczony tylko w przypadku przedstawienia dokumentu o zakupieniu wyrobu
(paragonu) i poprawnie wypeųnionej karty gwarancyjnej – musi ona zawierađ numer fabryczny, datħ sprzedaǏy i pieczČtkħ
sprzedawcy (firmy montujČcej). Kopie i bųħdnie wypeųnione karty gwarancyjne nie bħdČ brane pod uwagħ.
3. NAPRAWY GWARANCYJNE I POGWARANCYJNE
Serwis gwarancyjny moǏna zgųosiđ w firmie, w której wyrób zostaų zakupiony albo w firmie montujČcej, która wykonaųa
instalacjħ. Po upųywie okresu gwarancji moǏna zwróciđ siħ bezpoƑrednio do serwisu firmy EMOS spol. s r. o. PƎ
erov, tel. 581
261 273.
4. ZAKRES OBOWIZYWANIA GWARANCJI
Gwarancja przestaje obowiČzywađ, jeǏeli usterka jest spowodowana uszkodzeniem mechanicznym (ųČcznie z uszkodzeniem
podczas transportu), niewųaƑciwym uǏytkowaniem, nieostroǏnoƑciČ, nieodwracalnym wydarzeniem (klħskČǏywioųowČ),
jeǏeli wyrób zostaų podųČczony do innego napiħcia zasilajČcego niǏ podano w jego specyfikacji technicznej oraz w przypadku
dokonania zmian albo napraw poza serwisem firmy EMOS spol. s r. o. Uprawnienia gwarancyjne nie mogČ byđ równieǏ
wykorzystywane w przypadku, gdy uǏytkownik chce dokonađ modyfikacji albo adaptacji prowadzČcej do rozszerzenia funkcji
wyrobu (albo systemu skųadajČcego siħ z róǏnych komponentów) w stosunku do wykonania standardowego ustalonego
przez producenta.
ZAPIS Z NAPRAWY GWARANCYJNEJ
d
at
a zgųoszenia data wykonania nr karty montaǏu podpis
ZAPIS Z KONTROLI WYJ_CIOWEJ
Data: Kontrolowaų:
Page 87

Zgodnie z przepisami Ustawy z dnia 29 lipca 2005 r. o ZSEiE zabronione jest
umieszczanie ųČcznie z innymi odpadami zuǏytego sprzħtu oznakowanego symbolem
przekreƑlonego kosza. UǏytkownik, chcČc pozbyđ siħ sprzħtu elektronicznego i
elektrycznego, jest zobowiČzany do oddania go do punktu zbierania zuǏytego
sprzħtu.
W sprzħcie nie znajdujČ siħ skųadniki niebezpieczne, które majČ szczególnie
negatywny wpųyw na Ƒrodowisko i zdrowie ludzi.
Page 88

SET TOP BOX
Digitális vevĘkészülék
BEN 150 HD
Felhasználói kéz
ikönyv
tG
G
G
G
BEN150 HD
Page 89

Page 90

Biztonsági figyelmeztetések
Fontos figyelmeztetések a készülék biztonságos használatához
A készülék használata elĘtt figyelmesen olvassa el az egész tájékoztatót. Ebben a kézikönyvben "készülék" alatt
értjük magát a készüléket és tartozékait, valamint olyan szerelési anyagokat, mint a hálózati és jelkábelek,
távirányító, akkumulátor és tápforrások, stb.
A készülék gyártója semmiképpen nem felelĘs bármely olyan közvetlen és közvetett kárért, amely akár az
általában érvényes, akár a jelen kézikönyvben leírt elĘírások figyelmen kívül hagyásából ered.
Az alábbiakban ismertetett utasítások fontos, a készülék biztonságos használatával összefüggĘ információkat
tartalmaznak, a be nem tartásuk által okozott kockázatokat három csoportba osztottunk:
• Vigyázat
Olyan helyzetre hívja fel a figyelmet, ami súlyos sérüléshez és életveszélyhez vezethet.
• Figyelmeztetés
Olyan helyzetet jelez, amely a készülék meghibásodásához vagy tönkremeneteléhez vezethet.
• Megjegyzés
Olyan kiegészítĘ szövegre vagy információra utal, amely segít a felhasználónak elkerülni az esetleges
problémákat a készülék használata során.
A szimbólumok jelentése
Az áramütés kockázatának csökkentése érdekében ne nyissa fel a készülék házát. Belül nincsenek
olyan alkatrészek, amelyeket a felhasználó meg tudna javítani vagy be tudna állítani. Javítási
igényével forduljon megfelelĘ képzettséggel rendelkezĘ szakemberhez.
Az egyenlĘ szárú háromszög alakú keretben levĘ villám jel arra figyelmezteti a felhasználót,
hogy olyan intenzitású izolálatlan "veszélyes feszültség" van jelen a készülékben, amely
áramütést okozhat.
Ez a készülék a nemzetközi biztonsági szabványoknak megfelelĘen készült. Kérjük, olvassa el
figyelmesen az alábbi biztonsági utasításokat.
TÁPELLÁTÁS: 90-260V AC 50/60Hz
Ezt a terméket csak a címkén megjelölt tápellátással mĦködtesse. Ha nincs tisztában vele, milyen tápellátás áll
rendelkezésre a háztartásában, vegye fel a kapcsolatot a helyi áramszolgáltatóval.
Minden karbantartás vagy szerelés megkezdése elĘtt áramtalanítsa a készüléket.
TÚLTERHELÉS: Ne terhelje túl a csatlakozót, tĦzhöz vagy áramütéshez vezethet.
FOLYADÉK: A készüléket semmiféle folyadék hatásának nem szabad kitenni. Ugyancsak nem szabad a
készülékre semmiféle folyadékot tartalmazó edényt állítani.
TISZTÍTÁS: A tisztítás megkezdése elĘtt áramtalanítsa a készüléket. A készülék portalanításához használjon
enyhén megnedvesített rongyot (oldószer nélkül).
SZELLėZÉS: A készülék felsĘ részén található réseket nem szabad lefedni, hogy megfelelĘ levegĘáramlást
tegyenek lehetĘvé a készülékbe. Ne helyezze a készüléket puha lakberendezési tárgyra vagy szĘnyegre. Ne tegyen
más elektronikus berendezést a készülékre.
TARTOZÉKOK: Ne használjon semmiféle nem támogatott tartozékot, hogy elkerülje a készülék károsodását.
CSATLAKOZTATÁS AZ ANTENNÁHOZ: MielĘtt csatlakoztatná vagy kihúzná az antennakábelt,
áramtalanítsa a készüléket, hogy elkerülje az antenna károsodását.
CSATLAKOZTATÁS A TV-HEZ:
MielĘtt csatlakoztatná vagy kihúzná a kábelt a TV-bĘl, áramtalanítsa a
készüléket, hogy elkerülje a televízió károsodását.
ELHELYEZÉS: A készüléket épületen belül helyezze el, hogy minél kevésbé legyen kitéve a villámnak, esĘnek
vagy napnak. Ne helyezze a készüléket radiátor vagy hĘcserélĘ berendezés közelébe. Gondoskodjon legalább 10
cm-es távolságról. Ne zárja el a nyílásokat semmilyen tárggyal, és ne helyezze a készüléket ágyra, kanapéra,
takaróra vagy hasonló felületre. Ha a készüléket polcon vagy könyvszekrényben helyezi el, gyĘzĘdjön meg róla,
hogy biztosítva van a megfelelĘ szellĘzés, és hogy betartotta a gyártó összeszereléssel kapcsolatos utasításait.
Ne helyezze a készüléket olyan instabil kocsira, állványra, tartóra vagy asztalra, amelyrĘl leeshet. A készülék
leesése gyermek vagy felnĘtt komoly sérüléséhez, valamint a készülék súlyos károsodásához vezethet.
LÖKÉSSZERĥ ENERGETIKAI IMPULZUSOK: Húzza ki a készüléket a konnektorból és az antennából
viharban, vagy ha hosszabb ideig nem használja, hogy elkerülje a készülék villám vagy lökésszerĦ energetikai
impulzusok okozta meghibásodását.
IDEGEN TÁRGYAK: Ne dugjon semmilyen tárgyat a készülékbe. Ez azzal járhat, hogy veszélyes feszültséggel
érintkezik vagy valamelyik alkatrész meghibásodik.
ALKATRÉSZEK CSERÉJE: Alkatrészcserét csak a gyártó által kijelölt szervíztechnikus hajthat végre.
Page 91

FIGYELEM!
A kábel vagy a csatlakozódugók sérülésének elkerülése érdekében tartsa be az alábbi utasításokat:
- Ne módosítsa önhatalmúlag a tápkábelt vagy a csatlakozódugót.
- Ne hajlítsa meg és ne csavarja meg a tápkábelt.
- Kihúzáskor a tápkábelt a csatlakozónál fogva tartsa.
- Tartsa a tápkábelt minél távolabb a hĘt kibocsátó eszközöktĘl, hogy elkerülje a a mĦanyag fedĘréteg
megolvadását.
- A csatlakozódugó maradjon mindig könnyen elérhetĘ.
Áramütés elkerülése érdekében tartsa be az alábbi utasításokat:
- Ne nyissa ki a fĘegységet.
- Ne dugjon a készülék belsejébe fémbĘl készült vagy gyúlékony tárgyakat.
- Ne érjen a csatlakozódugóhoz nedves kézzel.
- Villámlás esetén húzza ki a tápkábelt.
A készülék meghibásodásának elkerülése érdekében tartsa be az alábbi utasításokat:
- Ne használja a készüléket, ha nem mĦködik megfelelĘen, hogy elkerülje a komolyabb meghibásodást. - Vegye
fel a kapcsolatot a helyi forgalmazóval.
- Ne dugjon a modulok és Smart kártya számára fenntartott nyílásokba fémet vagy más idegen anyagot, nehogy
megsérüljön a készülék, és csökkenjen az élettartama.
- A konnektornak a készülék közelében kell lennie, könnyen elérhetĘ helyen.
Figyelmeztetés az USB-eszköz használatával kapcsolatban
Az USB port teljes értékĦ használatához a csatlakoztatott tárolónak támogatnia kell
az USB 2.0 szabványt. A hibátlan, megbízható felvételhez és lejátszáshoz 9.0 MB/s
vagy gyorsabb írási sebességĦ USB-eszközre van szükség. Az ennél lassabb
merevlemezek vagy USB-tároló esetén probléma merülhet fel a felvételkor, aminek
a jele szaggatott kép, vagy akár teljesen megszakadhat a mĦködés.
Csak azok a lemezek mĦködnek megfelelĘen, amelyeken egy alappartíció van
NTFS vagy FAT32 fájlrendszerrel. Ha a lemezen más fájlrendszer található,
formázza a lemezt a számítógépben a kívánt fájlformátumra, mielĘtt a
vevĘkészülékhez csatlakoztatja.
Az erĘsen fragmentált vagy megtelt tárolók szintén nem feltétlenül mĦködnek
helyesen és folyamatosan.
A külsĘ merevlemezeknek saját tápellátással kell rendelkezniük, a vevĘkészülék
beépített USB portja nem képes elégséges feszültséget átadni a hordozható USB
merevlemeznek.
Felvétel vagy lejátszás közben az USB-eszközt semmiképpen nem szabad
eltávolítani a vevĘkészülékbĘl. A vevĘkészülék mĦködése közben történĘ
eltávolítás következtében megsérülhet a készülék vagy a flash memória, illetve a
médián található adatok.
A készülék készenléti módban rendelkezik minimális villamosenergia-felvétel
funkcióval, tehát jobban kíméli a környezetet.
A készülék kezelĘprogramja folyamatosan fejlĘdik. A szoftver új verziója
módosíthatja a készülék némely funkcióját és viselkedését. Az ebben az
útmutatóban található képek és leírások csak információs jellegĦek. Amennyiben hibát találna, kérjük,
jelezze, mindent megteszünk a kijavítása érdekében.
A legújabb firmware-t mindig megtalálja a termék honlapján:
www.bensat.cz
A készülék 1.3c verziójú HDMI interfésszel van ellátva, hogy a legújabb,
legmagasabb minĘségĦ képet és hangot szolgáltató televíziókat csatlakoztathassa. Ha a televíziója
rendelkezik ilyen bemenettel, használja.
Page 92

TARTALOM
Biztonsági figyelmeztetések
BEMUTATÁS
ElĘlap
1
H
átla
p
1
Távirán
y
ító
2
A KÉSZÜLÉK BEKÖTÉSE
A
lapinformáció
k
3
Csatlakoztatás a televízióho
z
3
Csatlakoztatás a HIF
I
-rendszerhe
z
3
KEZDJÜK
A
készülék elsĘ bekapcsolása
4
Tele
p
ítés és a csatornák behangolása
4
A VEVėKÉSZÜLÉK KEZELÉSE
Csatornaváltás
5
A
z elektronikus mĦsorkalauz
(
EPG) kezelése
5
A CSATORNAKIOSZTÁS SZERKESZTÉSE
Csatorna beállítás menü
6
Tv-csatornalista módosítása
6
Rádió-csatornalista módosítása
6
M
inden csatorna törlése a listából
6
RENDSZERBEÁLLÍTÁSOK
A
rendszerbeállítás menüje
7
A ny
elv beállítása
7
TV-rendszer, videó felbontás
7
A
hel
y
i idĘ beállítása
7
A
z idĘzítĘ beállítása
8
G
y
ermekzá
r
8
A
z OSD-menü beállítása
8
K
edvenc csatorná
k
8
A
udio description funkció(az események leírása látássérültek számára) beállítása
9
E
gy
éb (antenna tápellátás,
j
elerĘssé
g
hangjelzése, automatikus kikapcsolás
)
9
ESZKÖZÖK
Eszközök fĘmenüje
10
Inf
ormáció
10
G
y
ári beállítás (adatok törlése
)
10
Szo
f
tverfrissítés
10
USB-készülék biztonsá
g
os eltávolítása
11
JÁTÉKOK
J
átéko
k
11
FELVÉTEL MENÜ, MULTIMÉDIA LEJÁTSZÓ
F
elvétel menü
12
M
ultimédia lejátszó
12
PVR in
f
ormáció
13
PVR beállítás
13
TIMESHIFT/FELVÉTEL
Timeshi
ft
14
F
elvétel
14
GYAKORI HIBÁK ELHÁRÍTÁSA
15
MĥSZAKI ADATOK
16
Page 93

BEMUTATÁS
El lap
Hátlap
$WiYLUiQ\tWypU]pNHOĘMe
BEN150 HD
k&+
N&+±
212))
i
USB port
Antennabemenet Digitális audiókimenet
5V 50mA
RF IN
RF OUT
RF OUT
COAXIA
L
HDMI
HDMI
SCART kimenet 230 V/AC
220-240V~
50/60Hz
TV
Page 94

BEMUTATÁS
Távirányító
1. STANDBY
(a készülék be-/kikapcsolására szolgál)
2. Numerikus billentyƾzet
(a beállított csatorna számának megadásával közvetlenül
a kívánt csatornára kapcsolhat)
3. INFO
(információ
megjelenítése a sugárzott programról)
4. MENÜ (a készülék fƅmenüjének megjelenítése)
6.
OK gomb
(ezzel erƅsítheti meg a választását a MENÜ-ben)
7. RECORD
(felvétel közvetlen indítása)
8. VOL+ / -
(VOL+/-:hangerƅ növelése/csökkentése)
9. TTX (teletext)
10. PREV (elƅzƅ)
11. MEDIA(megnyitja a felvett mƾsorok lejátszójának MENÜ-jét)
12. USB (megnyitja a multimédia lejátszó MENÜ-jét)
1
3. Next (következƅ)
14. MUTE (hang elnémítása)
15. EPG (az elektronikus mƾsorkalauz megjelenítése)
16. AUDIO (audiosávok kiválasztása)
17. SUBTITLE (Felirat bekapcsolása/kikapcsolása)
18. TV/RADIO (TV- és rádiómód közti átkapcsolás)
19. BACK (visszatérés az elƅzƅ csatornára)
20. EXIT (MENÜ elhagyása/visszalépés)
21. STOP (felvétel/lejátszás megállítása)
22 CH+/- ( váltás az elƅzƅ/következƅ csatornára
23. FAV (megnyitja a Kedvenc csatornák listát)
24. REV (gyors tekerés visszafelé)
25. PLAY (állományok/felvételek lejátszása)
26. FWD (gyors tekerés elƅre)
2
7. PAUSE (Pillanat-állj, a Timeshift funkció aktiválása)
28
Page 95

A KÉSZÜLÉK BEKÖTÉSE
Bevezetés
Sok különböz típusú TV és egyéb berendezés létezik, amelyeket csatlakoztatni lehet a vev készülékhez. Ebben a
kézikönyvben talál néhányat a leggyakoribb módszerek közül, amelyekkel készülékét csatlakoztathatja.
HDMI TV
Anténa
RF Koax
HDMI Kabel
Scart Kabel
Csatlakoztatás a TV-hez
Z
3
Hi-Fi
Coaxial Kabel
3
3
Csatlakoztatás a HIFI-rendszerhez
Page 96

KEZDJÜK
Tájékoztató az elsĘdleges beállításokhoz
A
vevĘkészülék elsĘ bekapcsolása után megjelenik a „KezdĘmenü“
Welcome
A
távirányító nyílgombjai segítségével válassza ki a használat országát, az OSD
menü nyelvét,
Region
afelbontást és a képarányt.
Poland
J
elölje ki és nyomja meg az OK gombot a csatornák automatikus megkereséséhez.
Language English
Display Mode 720p_50
Aspect Mode 4:3LB
OK
Telepítés
A MENÜ gomb megnyomásával lépjen be a fĘmenübe.
A Ÿź gombok segítségével válassza ki a „Telepítés" menüpontot és
nyomja meg a
൘G
gombot a telepítĘ menübe való belépéshez.
A Ÿź gombok segítségével válassza ki a kívánt funkciót és erĘsítse meg
az OK gombbal
.
A csatornák kézi beállítása
Amennyiben ismeri az egyes csatornák beállítási paramétereit, használja a
Csatornák kézi beállítása funkciót. Válassza ki a „Kézi beállítás”
menüpontot és nyomja meg az "OK" gombot a kézi beállítási almenübe
való belépéshez.
Válassza ki a keresési módot: sávot, csatornaszámot és frekvenciát, sávszélességet.
A mutatókon figyelje a "JelminĘség" mutatót. Amennyiben ez a mutató kijelzi a
jelminĘséget, a Ÿź gombok segítségével jelölje ki a Keresés menüpontot és a
távirányító OK gombjával indítsa el a keresést.
A csatornák automatikus beállítása
Amennyiben nem ismeri a vevĘkészülék beállításához szükséges paramétereket, az
Automatikus beállítás funkció segítségével végigkerestetheti az egész sávot.
Válassza ki az „Automatikus beállítás” menüpontot és nyomja meg az "OK"
gombot a automatikus beállítási almenübe való belépéshez. Válassza ki, minden
csatornát meg akar-e keresni, csak a fizetĘs csatornákat, vagy csak az FTA
(ingyenes csatornákat). A Ÿź gombok segítségével jelölje ki a Keresés
menüpontot és a távirányító OK gombjával indítsa el a keresést.
A keresés befejeztével a vevĘkészülék automatikusan elmenti az összes megtalált
csatornát abban a sorrendben, ahogy megtalálta Ęket.
Installation
Channel Scan
Auto Scan
LCN
Channe
l Scan
Scan Mode By channel
Scan Band
UHF
Ch No.
CH37(666000KHz)
Frequency
666000KHz
Bandwidth
8MHz
Search
Signal Intensity 81%
Signal Quality 97%
Auto Scan
FTA Only No
Se
arch
LCN
LCN ( Logical Channel Number) – logikai csatornaszám. Ez a funkció, ha a szolgáltató támogatja,
biztosítja a csatornák automatikus elrendezését. Ha a csatornalistában változás lép életbe, ez a funkció
gondoskodik a csatornalista automatikus kiegészítésérĘl, vagy a felesleges csatornák törlésérĘl.
Amennyiben az LCN menüpont aktív, nem lehetséges a csatornák kézi osztályozása és rendezése.
Amennyiben kézzel akarja rendezni a beállított csatornákat, kapcsolja ki ezt a funkciót.
Page 97

KEZELÉS
Csatornaváltás
A vevĘkészülék háromféle módon teszi lehetĘvé a csatornaváltást – léptetés a CH+/CH- gombok segítségével, a
csatorna számának közvetlen kiválasztása, menübĘl való kiválasztás
Léptetés a csatornák között a CH+/CH- gombok segítségével:
A csatornák közti mozgáshoz használja a Ÿź gombokat a távirányítón.
A beállított csatorna számának közvetlen kiválasztása:
A közvetlen választáshoz nyomja meg a beállított csatorna számát a távirányítón.
Választás a kijelzĘn megjelenĘ csatornalistából:
ÉlĘ TV-közvetítés nézése közben nyomja meg az OK gombot. A képernyĘn megjelenik a beállított csatornák
kínálata. A távirányítóŸź gombjainak segítségével jelölje ki azt a csatornát, amelyet nézni szeretne, és
erĘsítse meg az OK gombbal.
Az Elektronikus MĦsorkalauz (EPG) megnyitása és használata
Az EPG megnyitása minden csatorna kijelzésével:
Nyomja meg az "EPG" gombot az EPG menübe való belépéshez.
Az EPG menüben való mozgáshoz használja a Ÿźés
ൖ
൘
gombokat.
G
Jelölje ki a kívánt mĦsort és
G
Nyomja meg a ZÖLD gombot a mĦsor idĘzítĘhöz való
hozzáadásához.
A mĦsor idĘzítĘhöz való hozzáadásakor ki kell választani, hogy csak
nézni szeretné-e a mĦsort (csatorna üzemmód), vagy fel is akarja
venni USB-re (felvevĘ üzemmód).
Nyomja meg a „PIROS” gombot az "EPG az idĘvonalon" menü
elĘhívásához.
EPG 1:39 xx/xx/xxxx
0010 BBC FOUR
Auntie's War on Smut
01:30-02-30
3
/19 1:
30 2:00 2:30 3:00
0008 Interecon
0009 BBC Parl The Recor Commons Questions The Recor
0010
BBC FO
Auntie's War on Smut Proms on FOUR
0011 CBeebie
This is CBeebies!
0012 301
Time Timer
Page 98

0004 UKTV Histor
0005 SKY THREE
xxxxxxxx
0006 Sky Spts Ne
xxxxxx
0007 Sky News
xxxx
xxx
A rádiók beállítása
A csatornák módosítása menüben minden beállított csatornát át lehet helye zni, törölni lehet, vagy ki lehet
hagyni.
A
gombok segítségével jelölje ki a kívánt csatornákat, és a színes gombokkal válassza ki a kívánt
funkciót.
Megj.:
A rádió beállításai alapvet
en ugyanúgy történnek, mint a TV esetében,
csak nem jelenik meg az el
nézet ablak. A helyén a rádió logója látható.
Minden törlése
Amennyiben minden csatornát törölni akar, a csatornák módosítása menüben
válassza ki a Minden törlése" funkciót és er
sítse meg az "OK" gomb
megnyomásával. A jelszó iránti kérésre adja meg a "0000" karaktersort.
Ekkor megjelenik egy figyelmeztetés.
A
A CSATORNAKIOSZTÁS SZERKESZTÉSE
IT CHANNEL
Csatornák szerkesztése MENÜ
Nyomja meg a „MENÜ" gombot a fĘmenübe való belépéshez.
A Ÿźgombok segítségével válassza ki a kívánt funkciót és erĘsítse
meg az "OK" vagy
൘
gombbal.
Edit Channel
TV Channel List
Radio Cha
nnel List
Delete All
A TV szerkesztése
A csatornák
módosítása menüben minden beállított csatornát át lehet
helyezni, törölni lehet, vagy ki lehet hagyni.
A Ÿź gombok segítségével jelölje ki a kívánt csatornákat, és a színes
gombokkal válassza ki a kívánt funkciót.
A csatorna képi nézetének megjelenítéséhez nyomja meg az „OK"
gombot.
A színes gombok segítségével válassza ki a kívánt funkciót és erĘsítse
meg az „OK" gombbal.
Csatorna áthelyezése:
Jelölje ki a kívánt csatornát és nyomja meg a „SÁRGA” gombot. A
Ÿź gombok segítségével helyezze át a csatornát az új pozícióba és
erĘsítse meg az „OK" gomb megnyomásával.
Csatornák hozzáadása a Kedvencek listához:
Nyomja meg a "FAV" gombot, majd nyomja meg az "OK"
gombot a kedvenc csatornák listájának szerkesztéséhez.
TV Channel List
All T
V
FAV Lock Skip Move Edit
0001 No Name
0002 YooPlay Ga
0003 E4+1
Y
ooPlay Ga
i
0004 UKTV Histor
0005 SKY THREE
xxxxxxxx
0006 Sky Spts Ne
xxxxxx
0007 Sky News
xxxx
xxx
Edit Channel
All TV
Sort Rename Delete
0001 No Name
0002 YooPlay Ga
0003 E4+1
Y
ooPlay Ga
i
ൖ ൘G
gombok segítségével jelölje ki az „Igen“-t és erĘsítse meg az
OK-val a csatornák törlését. Amennyiben mégsem akarja törölni az összes
csatornát, válassza a "Nem-et az elĘzĘmenühöz való visszatéréshez.
Warning! Do you really want to delete
all
channels?
Yes No
„
Page 99

RENDSZER
Rendszerbeállítások
A rendszerbeállító menü lehetĘséget nyújt a nyelv, a TV-rendszer, a helyi idĘ, az
idĘzítĘ, a gyerekzár, az OSD menü, a kedvenc csatornák, az Audio Description
beállításainak módosítására, és a rendszer más beállításaira.
Nyomja meg a „MENÜ" gombot a fĘmenübe való belépéshez.
A Ÿź gombok segítségével válassza ki a "Rendszerbeállítások" funkciót
és erĘsítse meg az "OK" vagy
൘
gombbal.
A Ÿź gombok segítségével válassza ki a kívánt funkciót és erĘsítse meg
az "OK" vagy
൘
gombbal.G Ennek az almenünek az elhagyásához nyomja
meg az "EXIT" gombot a távirányítón.
System Setup
Language
TV Sys
tem
Local Time Setting
Timer Setting
Parental Lock
OSD Setting
Favorite
Auto Description Setting
Other
Nyelv
Eb
ben a menüben az alábbiakat lehet beállítani:
A megjelenĘ menü kívánt nyelvét,
A hang kívánt nyelvét,
A feliratok és a teletext nyelvét.
A kiválasztott nyelvtĘl függĘen kerül kiválasztásra a
megfelelĘ jelkódolás.
Language
Language English
First Audio
English
Second Audio
German
Subtitle Language
English
Teletext
English
Subtitle
On
TV-rendszer
Ebben a menüben lehet beállítani a videófelbontást, a
videó
képarányát, a videókimenetet és a digitális audiókimenetet.
Videófelbontás:
a forrás alapján/natív TV/480i/480p/576i/
576p/720p@50/720p@60/1080i@25/
1080i@30/1080p@50/1080p@60
Képarány: Auto/4:3PS/4:3LB/16:9
Videókimenet: SCART CVBS+ HDMI/ SCART RGB
Digitális Audiókimenet: LPCM kimenet/ BS kimenet
TV System
Video Resolution 720p@50
Aspect Mode
4:3LB
Video Out
SCART RGB
Digital Audio Out
LPCM Out
Helyi idĘ
Ebben a menüben lehet beállítani a vevĘkészülék felhasználási helyének régióját,
helyi idejét. Az idĘ beállítása fontos az idĘzítĘ helyes használatához.
Régió: Válassza ki a menübĘl a vevĘkészülék felhasználási
helyének megfelelĘ régiót.
GMT beállítás: Válassza ki a GMT beállítást a következĘk közül:
Régió szerint/Felhasználó által definiált/Off
GMT idĘeltolódás: Állítsa be a GMT idĘeltolódást "-11:30 ~ +12:00",
30 perces ugrásokkal.
Local Time Setting
Region France
GMT Usage
By Region
GMT Offset
GMT+01:00
Summer Time
Of
f
Date xxxx/xx/xx
Time
1:51
xxxx,xxx,xxxx
Nyári idĘszámítás: Állítsa be a nyári idĘs
zámítás használatát a következĘkbĘl: On/Off
Dátum: A "Dátum és idĘ" menü csak akkor érhetĘ el, ha a GMT beállításnál Off van kiválasztva
IdĘ: Az idĘ kézi beállításához használja a számbillentyĦket.
Page 100

elszót is.
beállítva: 0000)
Zár menü: Amennyiben ez a zár be van állítva, a "csatornák módosítása" és a "Telepítési
Menu Lock
Rating Lock
New Password
Confirm Pas sword
Off
Off
----
----
Parental Lock
RENDSZER
Az idĘzítĘ beállítása
Ebben a menüben az idĘzítĘt lehet beállítani. Akár 8 idĘzítĘt is beállíthat.
IdĘzítĘ üzemmód: Off/Egyszer/Naponta/Hetente/Havonta
IdĘzítés típusa: Átkapcsolás/Felvétel
Bekapcsolás utáni csatorna: Válassza ki a készülék bekapcsolásakor megjelenĘ csatornát.
Bekapcsolás dátuma: A számbillentyĦk segítségével adja meg a készülék
bekapcsolásának napját.
Bekapcsolás ideje: A számbillentyĦk segítségével adja meg a készülék
bekapcsolásának idejét.
IdĘtartam: A számbillentyĦk segítségével adja meg az idĘzítĘ tartamának
hosszát.
Current Time/date: 01:36PM xx/xx/xxxx
Timer Mode D
aily
Timer Service
Channel
Wakeup Channel BBC FOUR
Wakeup Date xx/xx/xxxx
On Time xx:xx
Duration xx:xx
Save
Cancel
Gyermekzár
E
nnek a funkciónak a használatával lezárhatja a menüt és csatornákat a
j
ogosulatlan módosítás és bekapcsolás elkerülése érdekében. Ebben a menüpontban
változtathat
j
a meg a
j
A
ڸۂ
gombok segítségével válassza ki a MENÜ-ben a
"Rendszerbeállítások" funkciót és erĘsítse meg az "OK" vagy
ڼ
gombbal.
Válassza ki a SzülĘi ellenĘrzés funkciót és erĘsítse meg az "OK" gombbal.
A
z ehhez a beállításhoz való hozzáféréstjelszó védi (gyárila
g
menü""-be való belépés elĘtt meg kell adni az érvényes kódot.
Korhatáros zár: Off/ 4 év/ 5 év/ 6 év/ 7 év/ 8 év/ 9 év/ 10 év/ 11 év/ 12 év/13 év/ 14 év/ 15 év/ 16
év/ 17 év/ 18 év
Jelszó módosítása: Adja meg az új jelszót.
ErĘsítse meg a jelszót: Adja meg az új jelszót megerĘsítésképpen.
Az OSD-menü beállítása
Ebben a menüben állíthatja be az OSD menü megjelenésének hosszát és
átlátszóságát.
OSD megjelenés hossza: 1-10
OSD Átlátszóság: Állítsa be a menü átlátszóságát: Off/10%/20%/30%/40%.
OSD Setting
OSD Timeout 5
OSD Transparency
Of
f
Kedvencek
Ebben a menüben átnevezheti a Kedvenc csatornák listáit.
Válassza ki a kedvenc csatornák kívánt listáját, nyomja meg az "OK"
gombot a virtuális billentyĦzet megnyitásához.
A Ÿźé
s
ൖ൘
gombok segítségével válassza ki a kedvenc csatornák
listájának adandó név betĦit és számait. A módosítás befejezése után a
nyilak segítségével jelölje ki az OK billentyĦt és nyomja meg a távirányítón
az ""OK" gombot a módosítás megerĘsítéséhez.
Az elĘzĘm
enübe való visszatéréshez nyomja meg az "EXIT" gombot.
Favorite
1
Re
name
Favgroup 1
2 Sport
Fav group 1
A B C D E F3 Dokumentumok
4 Hírek
G H I J K L
5 Fav group 5
M N
O
PQR
6 Fav group 6 S T U V W X
7 Fav group 7
Y
Z 0 1 2 3
8
Fav
g
roup 8
4 5 6 7 8 9
SP ? <- OK
CAPS Del OK
 Loading...