

Page 1
Page 2

IMPORTANT SAFETY INSTRUCTIONS
Your Elna 8200 embroidery sewing machine is designed and constructed for HOUSEHOLD use
only. Read all instructions before using this machine.
DANGER – To reduce the risk of electric shock:
1. Your sewing machine should never be left unattended when plugged in. Always unplug the machine
from the electrical outlet immediately after using and before cleaning.
2. Always unplug before replacing light bulb. Replace bulb with same type rated 12 Volts, 5 watts.
3. Do not reach for the machine if it has fallen into water. Unplug immediately.
4. Do not place or store machine where it can fall or be pulled into a tub or sink. Do not place it in or
drop it into water or other liquid.
WARNING – To reduce the risk of burns, fire, electrical shock or injury:
1. Do not allow machine to be used as a toy. Supervision is necessary when this machine is used by or
near children.
2. Use this sewing machine only for its intended use as described in this manual. Only use
attachments recommended by the manufacturer as described in this manual.
3. Never operate this machine if it has a damaged cord or plug, is not working properly, has been
dropped or damaged or dropped into water. Return the machine to the nearest authorized dealer or
service center for examination, repair, electrical or mechanical adjustment.
4. This machine is equipped with a special connection cord which, if damaged, must be replaced by an
identical cord. This can be obtained from your dealer.
5. Never operate the sewing machine with any air opening blocked. Keep ventilation openings of the
sewing machine and foot control free from the accumulation of lint, dust and fibers.
6. Never drop or insert any object into any opening.
7. Do not use outdoors.
8. Do not operate where aerosol (spray) products are being used or where oxygen is being
administered.
9. To disconnect, turn machine off and remove plug from outlet.
10. Do not unplug by pulling on cord. To unplug, grasp the plug, not the cord.
11. Keep fingers away from all moving parts, especially the needle.
12. Always use the proper needle plate. The wrong plate can cause the needle to break.
13. Do not use bent needles.
14. Do not pull or push fabric while stitching. This may deflect the needle causing it to break.
15. Switch the sewing machine off when making any adjustment in the needle area, such as threading
needle, changing needle, threading bobbin, etc.
16. Always unplug the sewing machine from the electrical outlet when removing covers, lubricating or
making any other servicing adjustments mentioned in the instruction manual.
SAVE THESE INSTRUCTIONS
IMPORTANT
Be sure to keep machine away from static electricity, heat sources, humidity and direct sunlight.
USA only
Your machine comes equipped with a polarized plug (one prong wider than the other). A polarized plug
reduces the risk of electrical shock. This plug is intended to fit into a polarized outlet. If the plug does not
fit fully into the outlet, reverse the plug. If it still does not fit, contact a qualified electrician to install the
proper outlet. Do not modify the plug in any way.
1
Page 3

TABLE OF CONTENTS
Machine Parts and Functions
Part Names ........................................................................................................................................................... 3
Standard Accessories ........................................................................................................................................... 4
Extension Table (Storage Box) ............................................................................................................................. 5
Free Arm ............................................................................................................................................................... 5
Presser Foot Lever and Additional Presser Foot Clearance ............................................................................... 5
Adjusting the Needle Thread Tension .................................................................................................................. 6
Getting Ready to Embroider
Connecting Machine to Power Supply ................................................................................................................ 7
Start/Stop Key....................................................................................................................................................... 8
LCD Touch Screen ................................................................................................................................................ 9
Design Selection Window Keys............................................................................................................................ 9
Mode Selection Window Keys ............................................................................................................................ 10
SET Preference Keys .................................................................................................................................... 11-13
How to Access On Screen Information .............................................................................................................. 14
Winding a Bobbin .......................................................................................................................................... 15-16
Inserting the Bobbin............................................................................................................................................ 17
Threading the Machine ....................................................................................................................................... 18
Built-in Needle Threader .................................................................................................................................... 19
Drawing Up the Bobbin Thread .......................................................................................................................... 20
Changing Needles .............................................................................................................................................. 21
Embroidery Hoops .............................................................................................................................................. 22
Stabilizers ........................................................................................................................................................... 22
Templates ........................................................................................................................................................... 23
Securing Fabric in Hoop ................................................................................................................................ 23-24
Attaching Hoop to Carriage ................................................................................................................................ 25
Embroidering Small Areas .................................................................................................................................. 26
Sewing Designs
How to Select a Built-In Design ..................................................................................................................... 26-27
Sewing a Single Built-in Design ......................................................................................................................... 28
Ready to Sew Window After Embroidery Begins ............................................................................................... 29
How to Select Alphabets ............................................................................................................................... 30-31
Sewing Alphabets .......................................................................................................................................... 32-33
Alphabet Corrections .......................................................................................................................................... 34
2 Letter or 3 Letter Monograms .......................................................................................................................... 35
Sewing with PC Design Cards ........................................................................................................................... 36
Edit Window ........................................................................................................................................................ 37
Selecting a Design After Opening the Edit Window...................................................................................... 38-39
Combine a Built-in Design with Alphabet ...................................................................................................... 40-41
Saving a Design in a File ............................................................................................................................... 42-43
Opening a Saved File ......................................................................................................................................... 44
Embridery with Optional Free Arm Hoop C ........................................................................................................ 45
Taking Care of Your Machine
Cleaning the Hook Area ..................................................................................................................................... 46
Replacing the Bobbin Case ................................................................................................................................ 47
Changing the Light Bulb ..................................................................................................................................... 47
DESIGN CHART.......................................................................................................................... 48-49
TROUBLESHOOTING ...................................................................................................................... 50
INDEX .......................................................................................................................................... 51-52
NOTE: Information found in this instruction manual is current at the time of printing. Elna
reserves the right to change and update specifications and information as needed.
2
Page 4
18
17
16
15
19
14
2
1
3
4
5
6
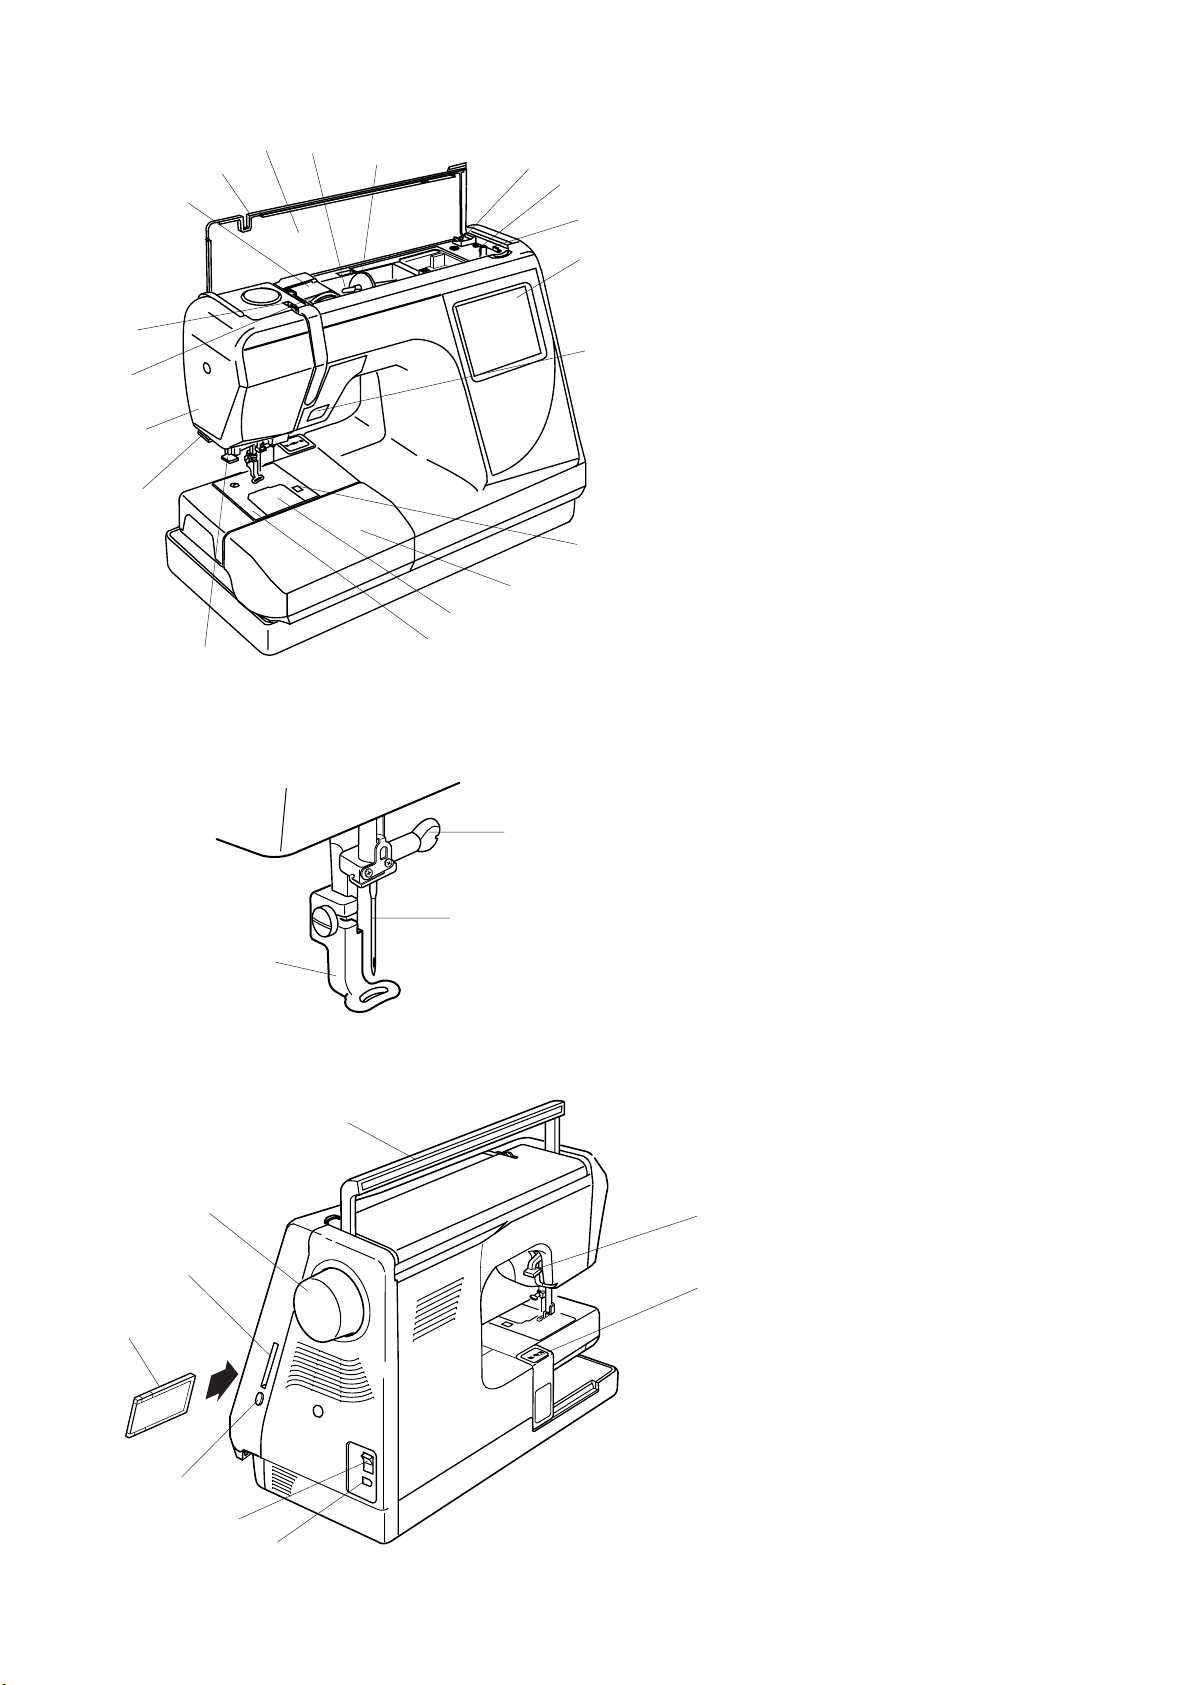
Machine Parts and Functions
7
Part Names
8
1. Top cover
2. Design chart
3. Spool pin
9
4. Spool holder, large
5. Bobbin winder cutter
6. Bobbin winder spindle
7. Bobbin winder stop
8. LCD touch screen
9. Start/Stop key
10. Bobbin cover plate release button
11. Extension table (accessory storage box)
10
11
12
13
20
21
22
12. Bobbin cover plate
13. Needle plate
14. Built-in needle threader
15. Thread cutter and holder
16. Face plate
17. Thread tension dial
18. Thread take-up lever
19. Thread guide slit
20. Needle clamp screw
21. Needle
22. Presser foot
23. Carrying handle
24. Presser foot lever
25. Carriage
26. Machine socket
27. Power switch
28. Card eject button
29. PC design card (optional)
30. PC design card slot
31. Flywheel (always turn towards you)
29
30
28
31
23
24
25
27
26
3
Page 5
1
2
43
5
6
87
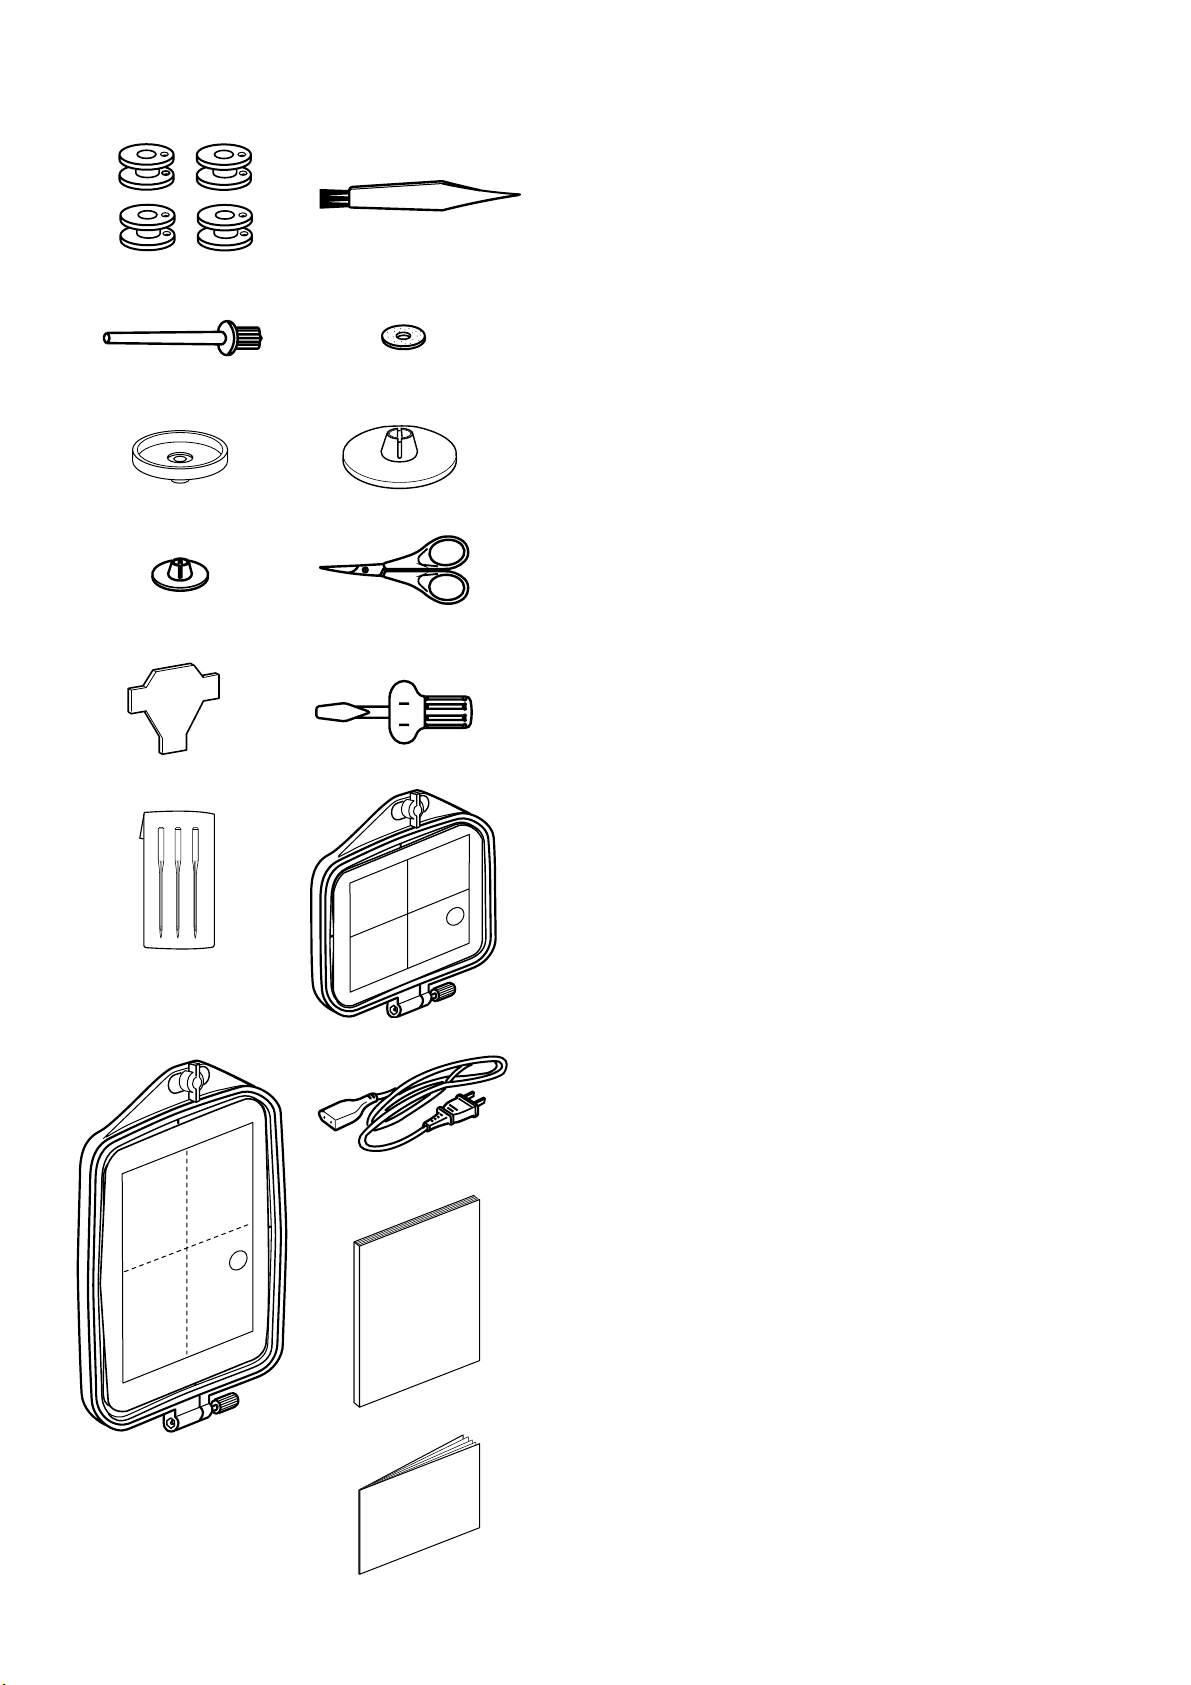
Standard Accessories
1. Bobbins
2. Lint brush
3. Additional spool pin
4. Spool pin felt
5. Spool stand
6. Spool holder (large)
7. Spool holder (small)
8. Scissors
9. Screw key
10. Screwdriver
11. Set of needles
12. Standard hoop – A (with template)
13. Large hoop – B (with template)
14. Power supply cord
15. Instruction Manual
16. Template sheets
9
10
11
13
12
14
15
16
4
Page 6
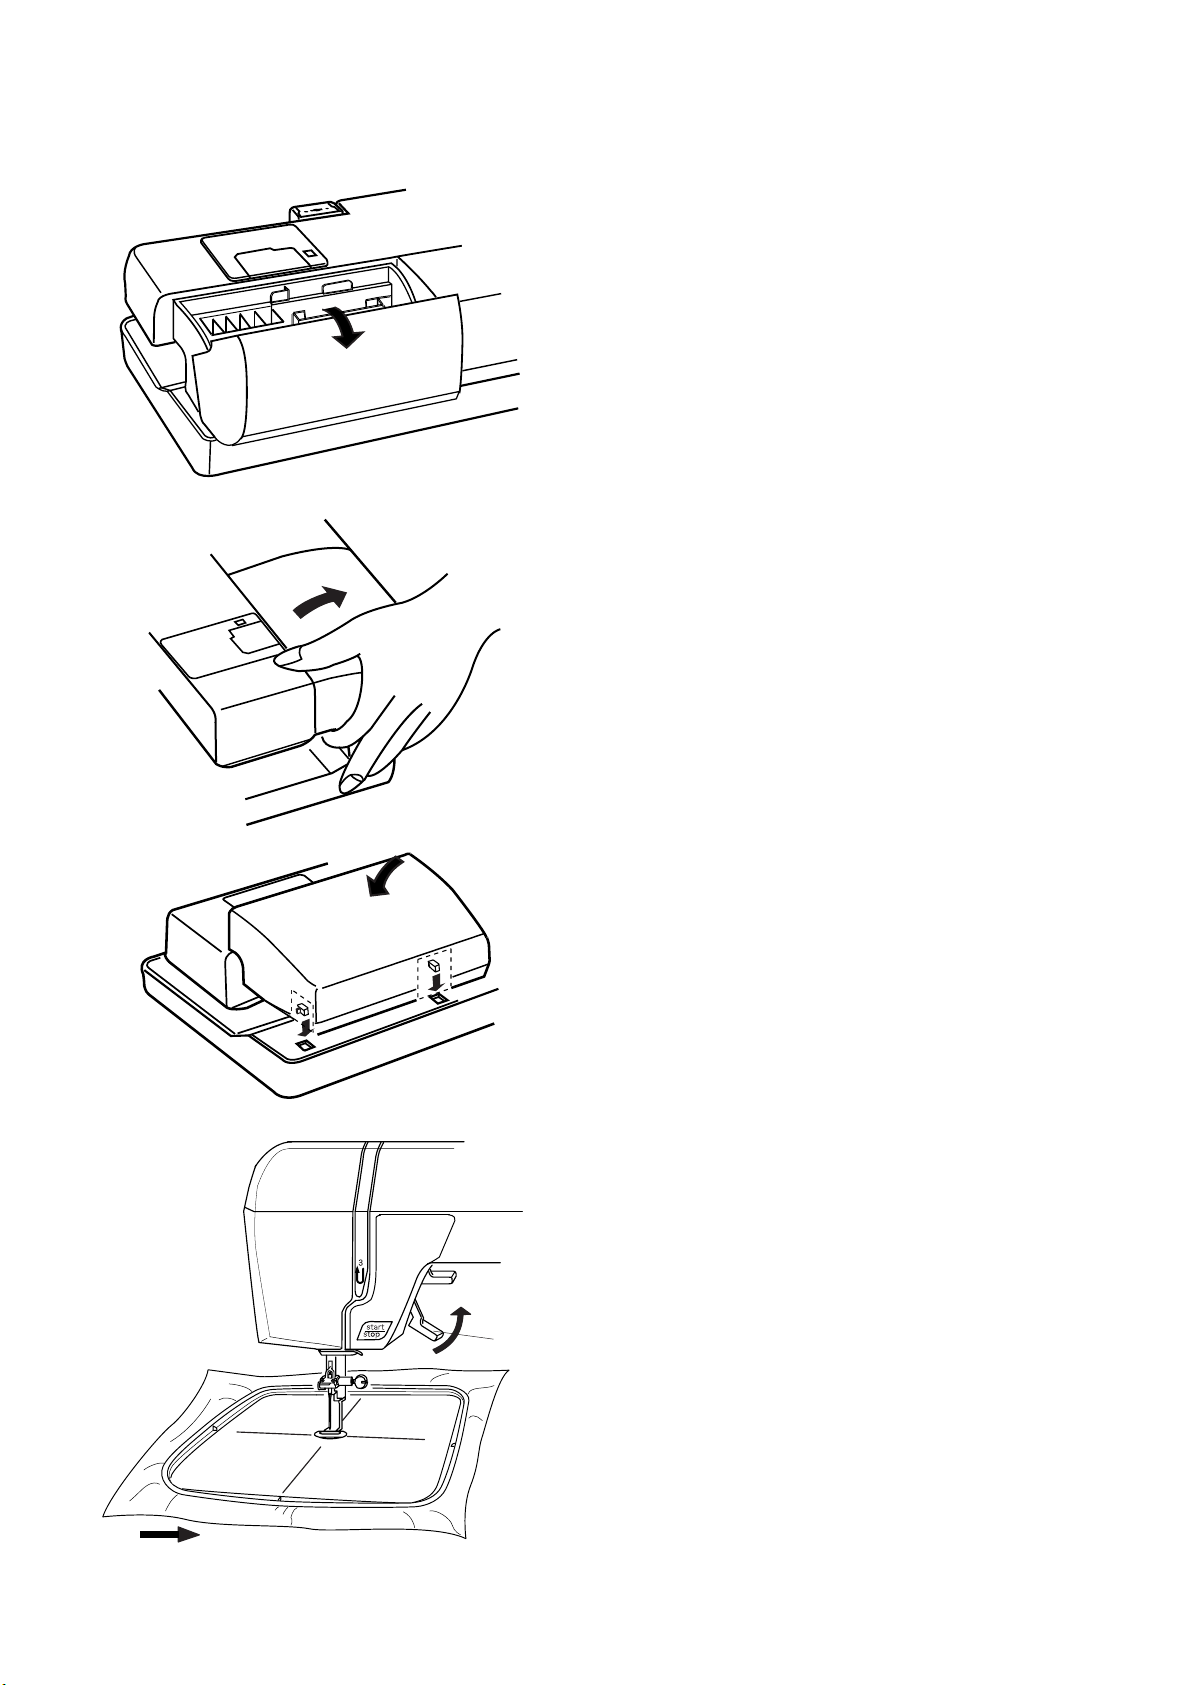
Extension Table (Storage Box)
Most accessories are stored inside the extension
table.
To Open:
Pull cover towards you. Lift out the packet of
accessories.
Ferr Arm
Remove the extension table to access the free
arm.
To Remove:
Lift out extension table away from the machine, as
shown.
NOTE: Always embroider with the extension table
attached unless using optional free arm hoop C.
See page 45.
q
To Attach:
Place tabs over slots and push down on table.
Presser Foot Lever and Additional Presser
Foot Clearance
Raise and lower the foot with this lever q.
Before sewing can occur, the presser foot must be
lowered to close the tension discs.
You can raise the presser foot about 6.5 mm (1/4")
higher than the normal up position for easier
removal of the hoop. Pull the presser foot lever q
up beyond the normal up position.
5
Page 7
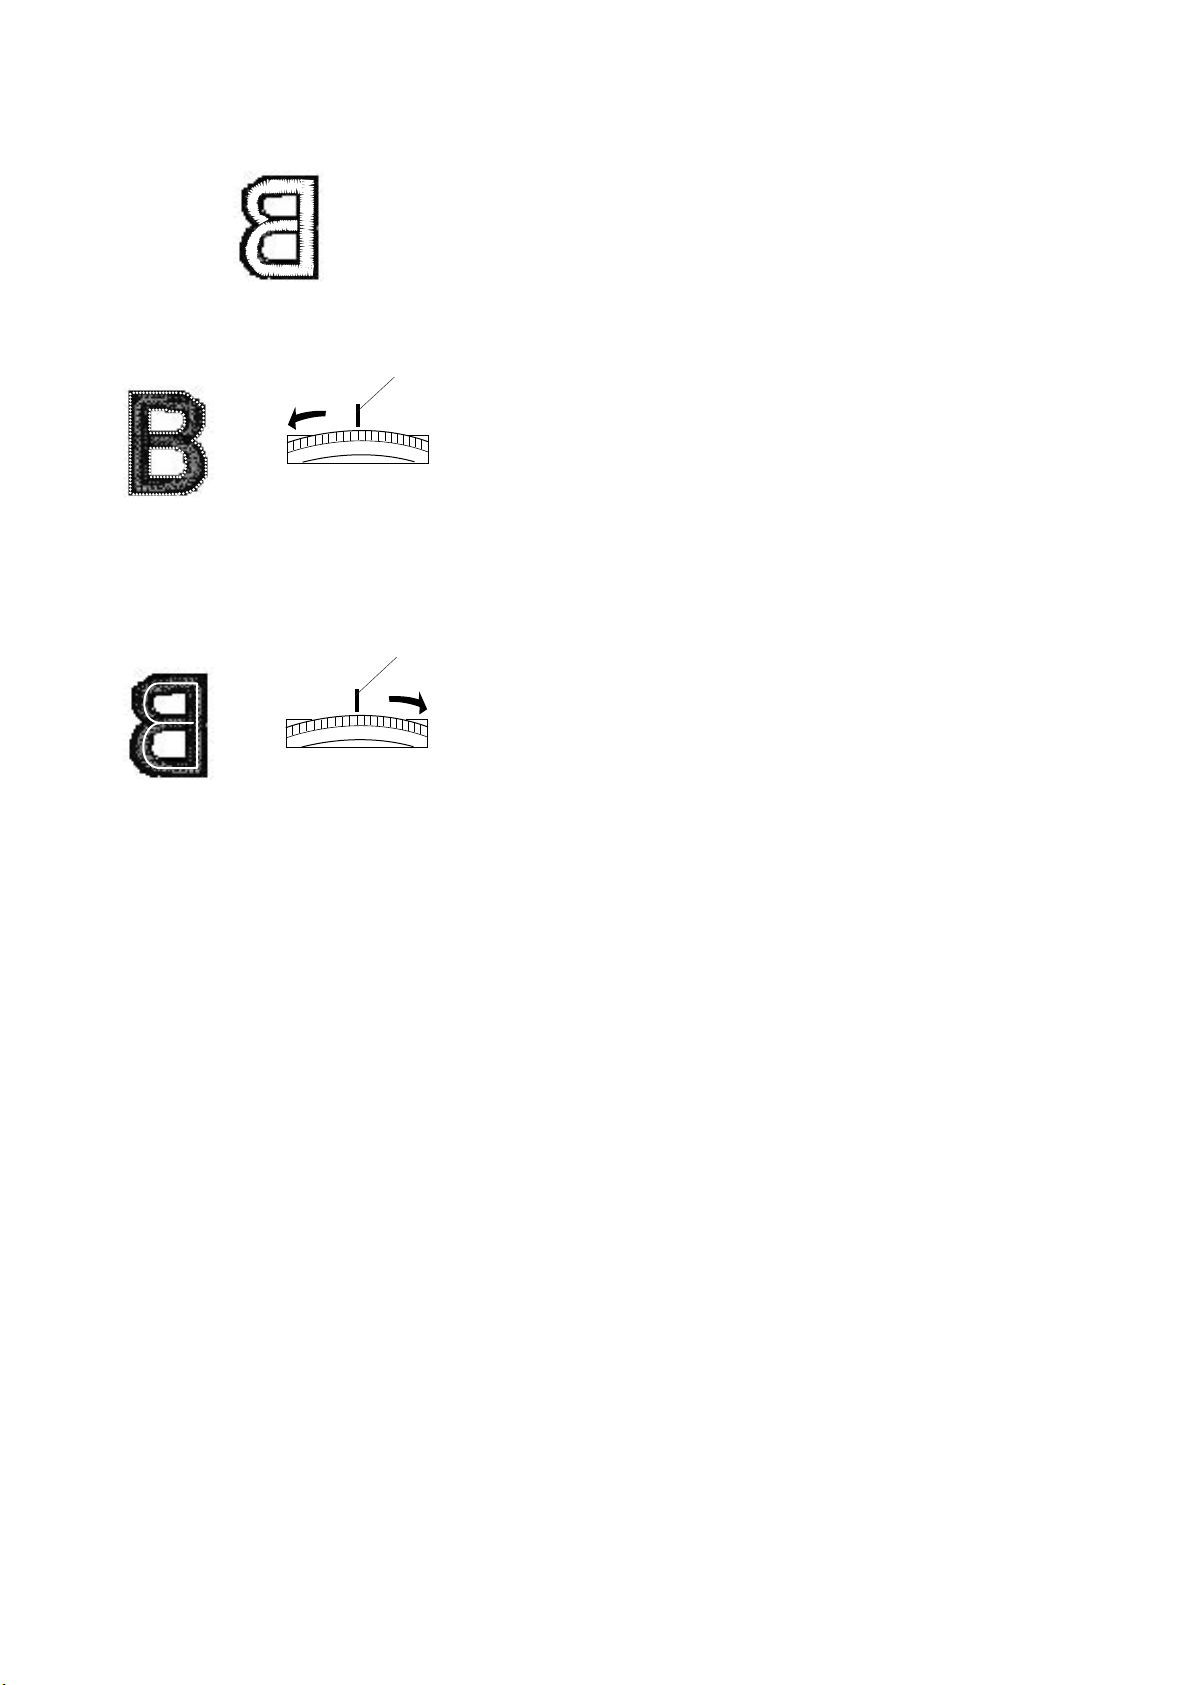
Adjusting the Needle Thread Tension
Align the number 2 on the tension dial with the
setting mark q.
Balanced thread tension:
A small portion of needle thread should appear on
q
the underside of the fabric.
When adjusting needle thread tension, the higher
2
3
1
numbers tighten, the lower numbers loosen.
•Tension is too tight
The bobbin thread shows through on the topside
of the fabric.
Turn the dial to a lower number to loosen the
needle thread tension.
q
•Tension is too loose
2
3
1
The needle thread forms loops and looks ragged.
Turn the dial to a higher number to tighten the
needle thread tension.
6
Page 8
Getting Ready to Embroider
w
q
N
O
e
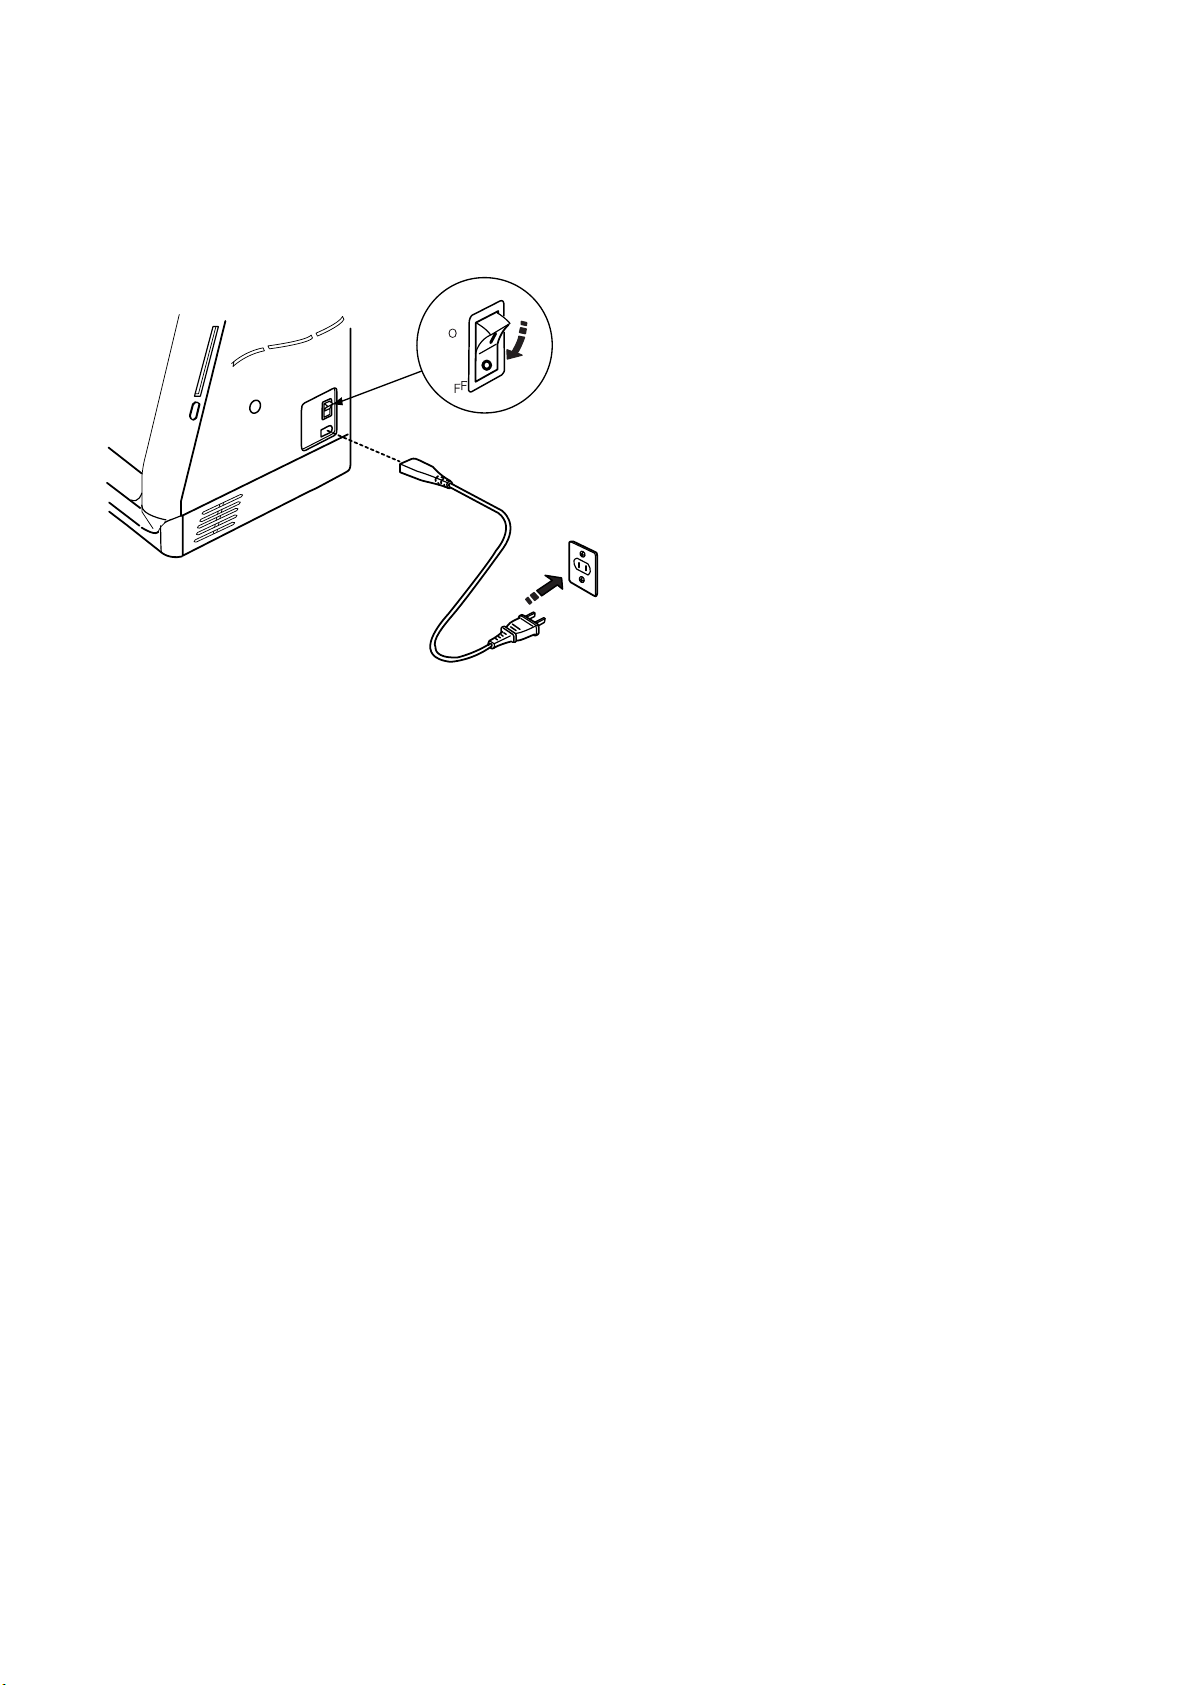
Connecting Machine to Power Supply
Machine has an auto voltage system and will
automatically adjust to any local power supply
voltage between 100 and 240V, 50/60 Hz.
Always use the power supply cord that came with
the machine.
To connect machine to power supply, turn off the
power switch
machine and the power supply plug e into the
wall socket.
Your machine may come equipped with a
polarized plug (one prong wider than the other). A
polarized plug reduces the risk of electrical shock.
This plug is intended to fit into a polarized outlet. If
the plug does not fit fully into the outlet, reverse
the plug. If it still does not fit, contact a qualified
electrician to install the proper outlet. Do not
modify the plug in any way.
q. Insert machine plug w into the
For Your Safety
Do not use extension cords or plug adapters.
Do not touch plug with wet hands.
Always turn off the power/light switch first and then
unplug from the electrical outlet. Examples:
• when leaving the machine unattended
• when cleaning the machine
• when attaching or removing parts such as
needle or needle plate
Do not place heavy items on cords. Do not subject
cords to heat. Do not use damaged cords. Have
the cord repaired immediately.
While the machine is in operation, always keep
your eye on the sewing area and do not touch
any moving parts such as the thread take-up
lever, flywheel or needle.
7
Page 9
Designs
Hoop Size A(F): 126X110mm
1 2 3 4
5 6 7 8
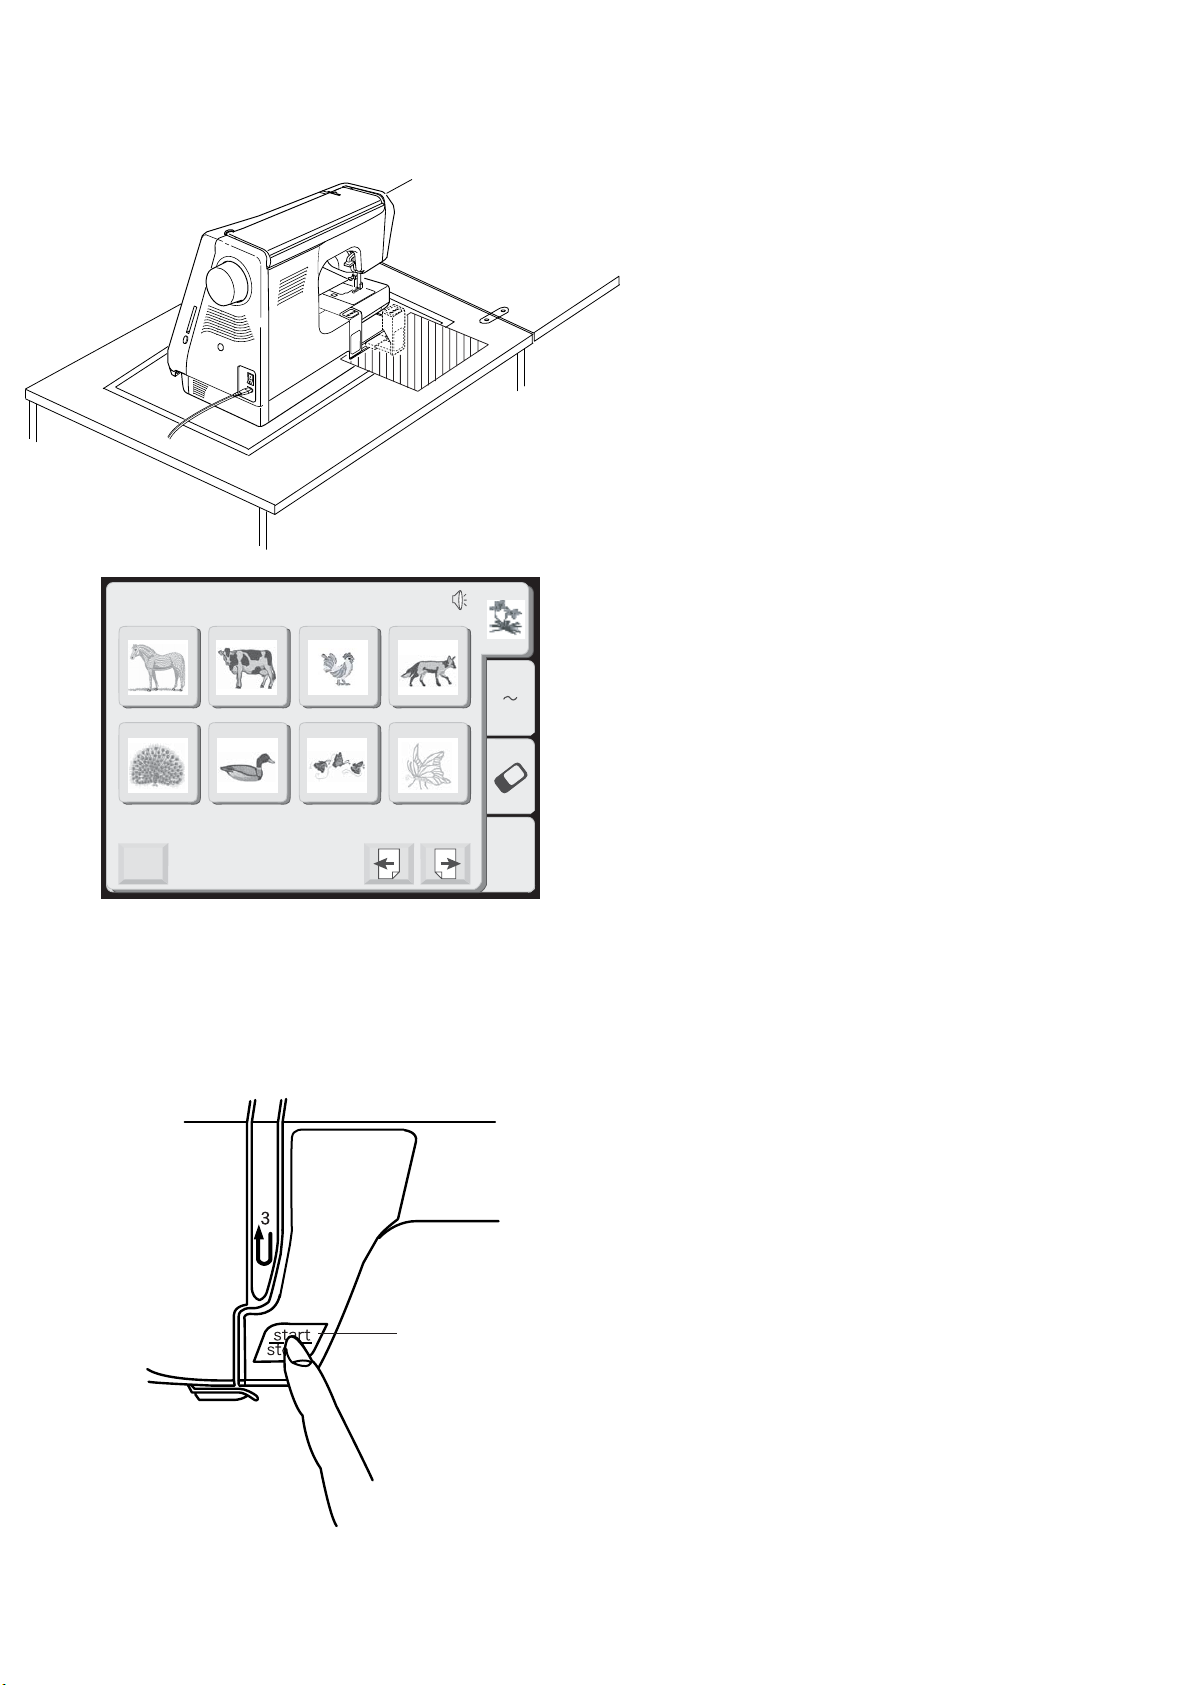
IMPORTANT:
Before turning on your machine, clear
your table surface of anything that might
obstruct the carriage movement. If your
machine is in a cabinet, check that the
machine is even or above the cabinet
surface. (The carriage could possibly hit
the cabinet and disturb the sewing result.)
TURN ON THE POWER SWITCH.
NOTE: After turning on the machine there is
approximately a six second delay before the LCD
To uch Screen becomes visible. (This is the
required boot up time and is not a malfunction.)
A Z
Mode
Edit
q Start/Stop Key (changes color to indicate
function)
Press this (green) key to start the machine.
When the machine is running, press this (red)
key to stop machine.
NOTE: The Elna 8200 is equipped with a
safety feature that will automatically shut down
the machine to prevent overheating if it is
running overloaded. Follow the instructions
that appear in the LCD touch screen should
this occur.
q
8
Page 10
7
8
Designs
Hoop Size A(F): 126X110mm
1 2 3 4
5 6 7 8
91
2
A Z
3
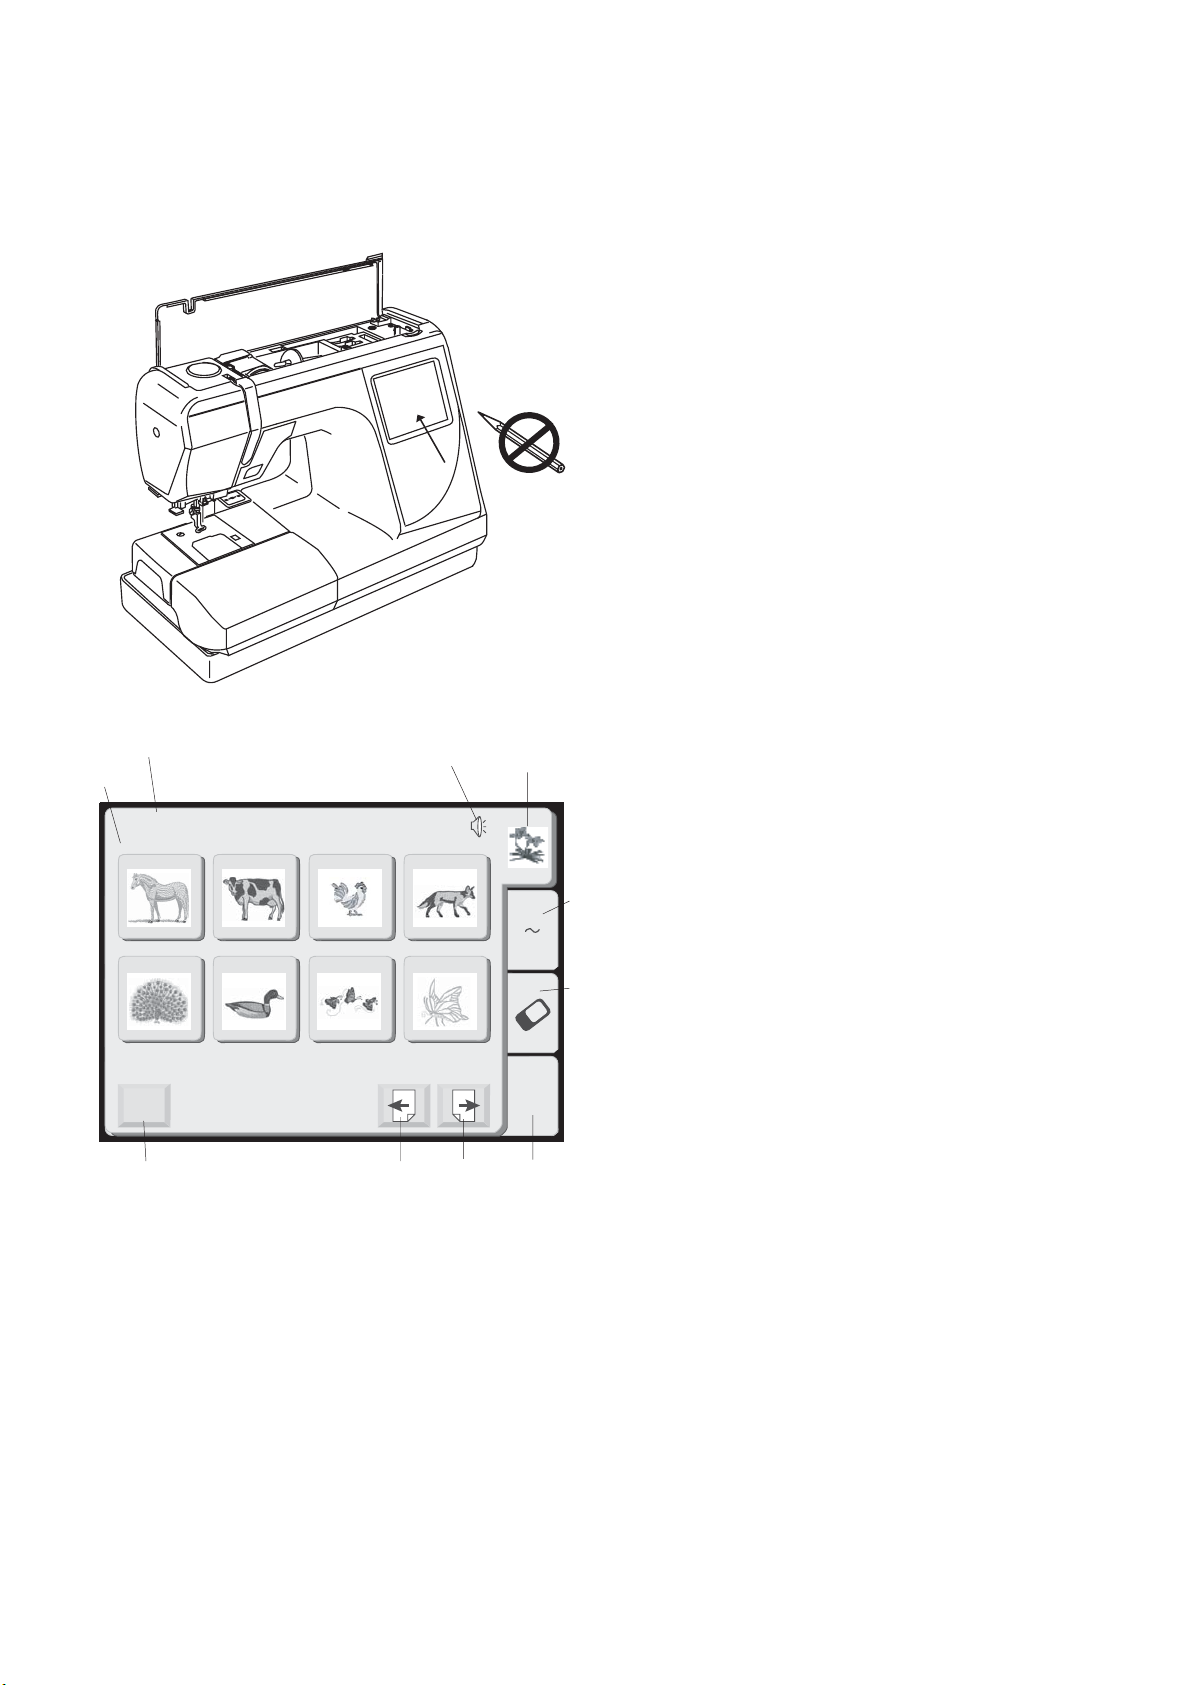
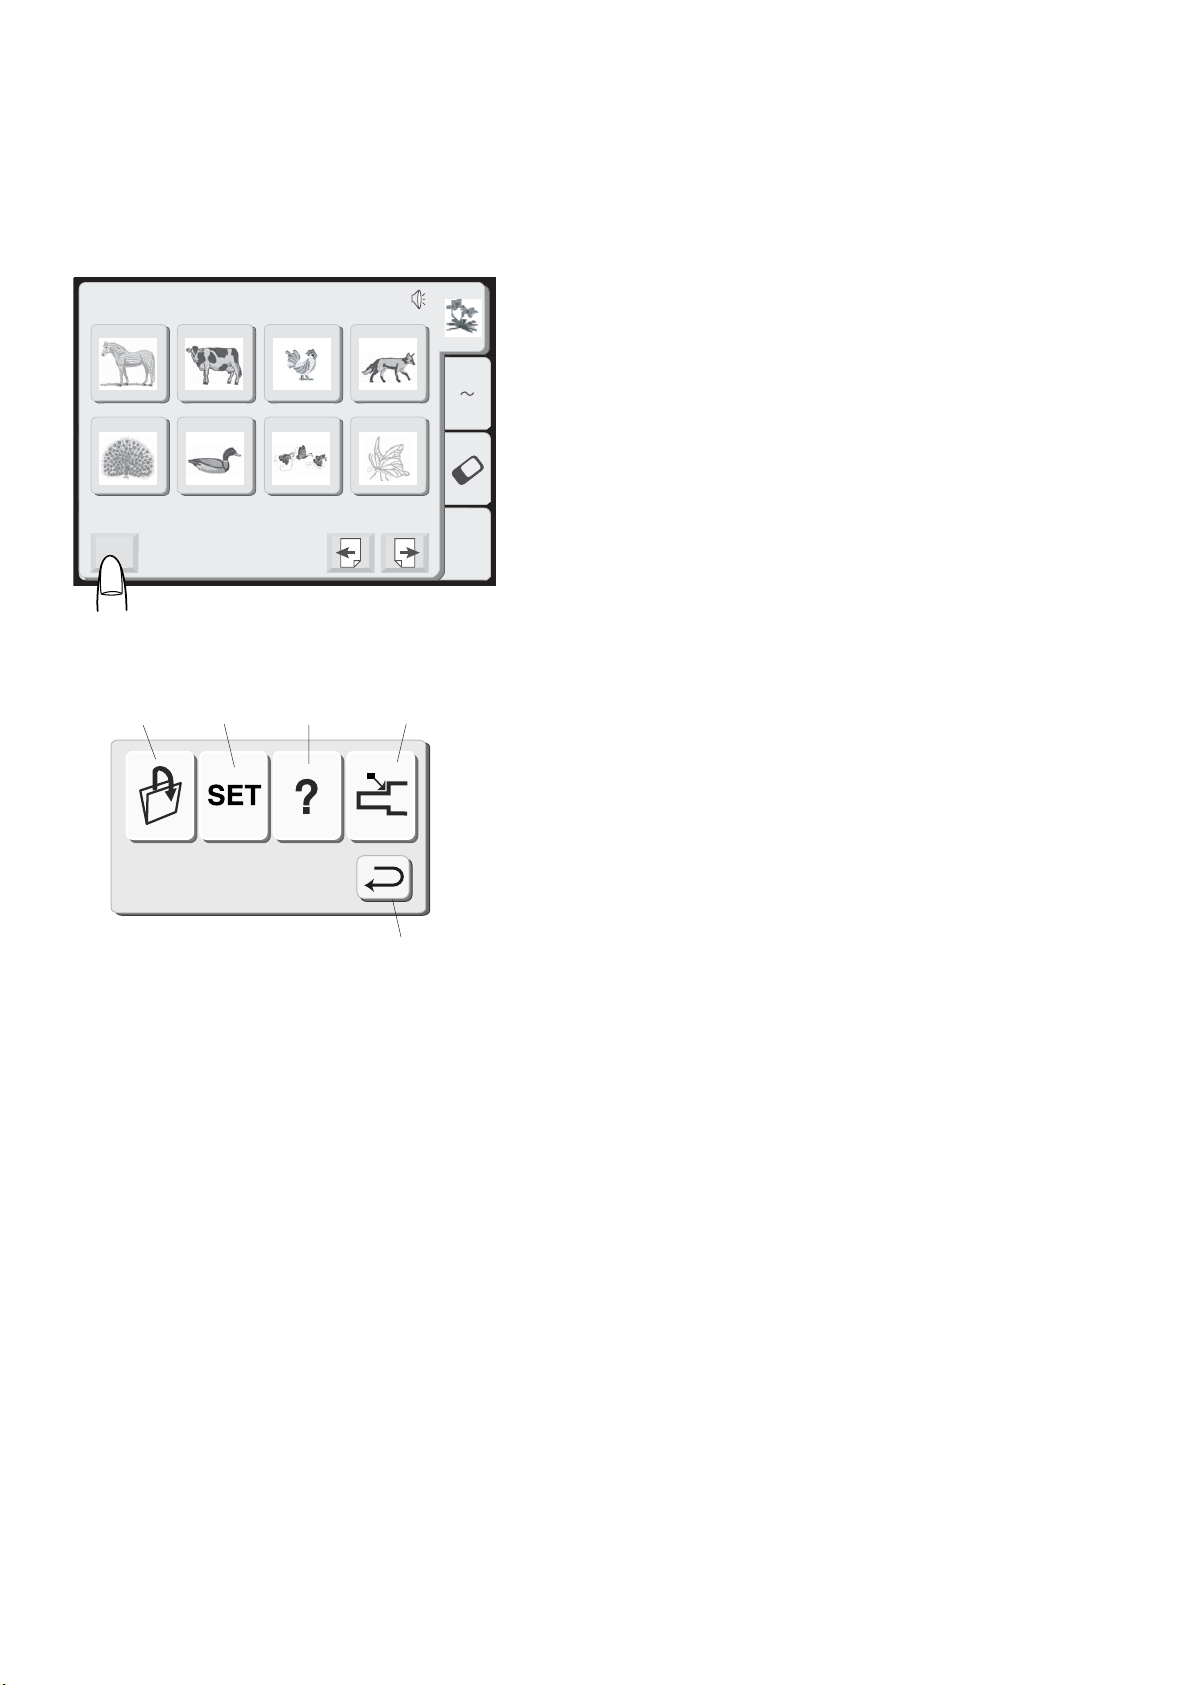
LCD Touch Screen
When the machine is turned on, the design
selection window will appear in the LCD touch
screen.
NOTE: Only a light touch is required when
making a selection on the LCD touch screen. Do
not touch the surface of the screen with any hard
or sharp object, such as pencils, pens,
screwdrivers, etc.
Design Selection Window Keys
1. Built-in designs
There are 58 built-in designs. For an overview,
see page 48.
2. Alphabets
Three distinctive fonts – Gothic, Script and
Cheltenham. In addition, 2 letter and 3 letter
monogramming. See page 30.
3. PC design cards (optional)
Please verify that this machine will accept
compact flash card. See page 36.
4. Edit
This is the window where you can modify and
combine designs. See page 37.
5. Next key
Touch this key to go forward to next window in
sequence.
6. Previous key
Touch this key to go back to the previous
window in sequence.
Mode
10
Edit
6
54
7. Window category
Names the window function based on the
activated category.
8. Hoop recommendation
Identifies the appropriate hoop (and shows its
dimensions) depending on the designs
displayed on the screen. The example shows
standard rectangular A hoop and the optional
round F hoop.
9. Sound
This symbol indicates the beep sound is on.
See page 11.
10. Mode key
This key opens the mode selection window.
See page 10.
9
Page 11
Designs
Hoop Size A(F): 126X110mm
1 2 3 4
5 6 7 8
Mode Selection Window Keys
The mode key is displayed in the selection
window no matter the category: built-in designs,
alphabets, PC design cards or edit.
Touch the “Mode” key.
A Z
Mode
Edit
21
3
4
5
The mode selection window will open.
1. Open file key
Any designs that have been saved can be
recalled. See page 44.
2. SET preference key
You can program the machine to change the
default settings to reflect your personal sewing
style. See page 11.
3. On screen information key
View basic operation information windows.
See page 14.
4. Return carriage key
Use this key to bring the carriage back to the
store position after completing embroidery.
IMPORTANT: Always have the carriage in the
stored position before turning OFF the
machine.
5. Return key
Use this key to close this window and return to
the previous window.
10
Page 12
Designs
Hoop Size A(F): 126X110mm
1 2 3 4
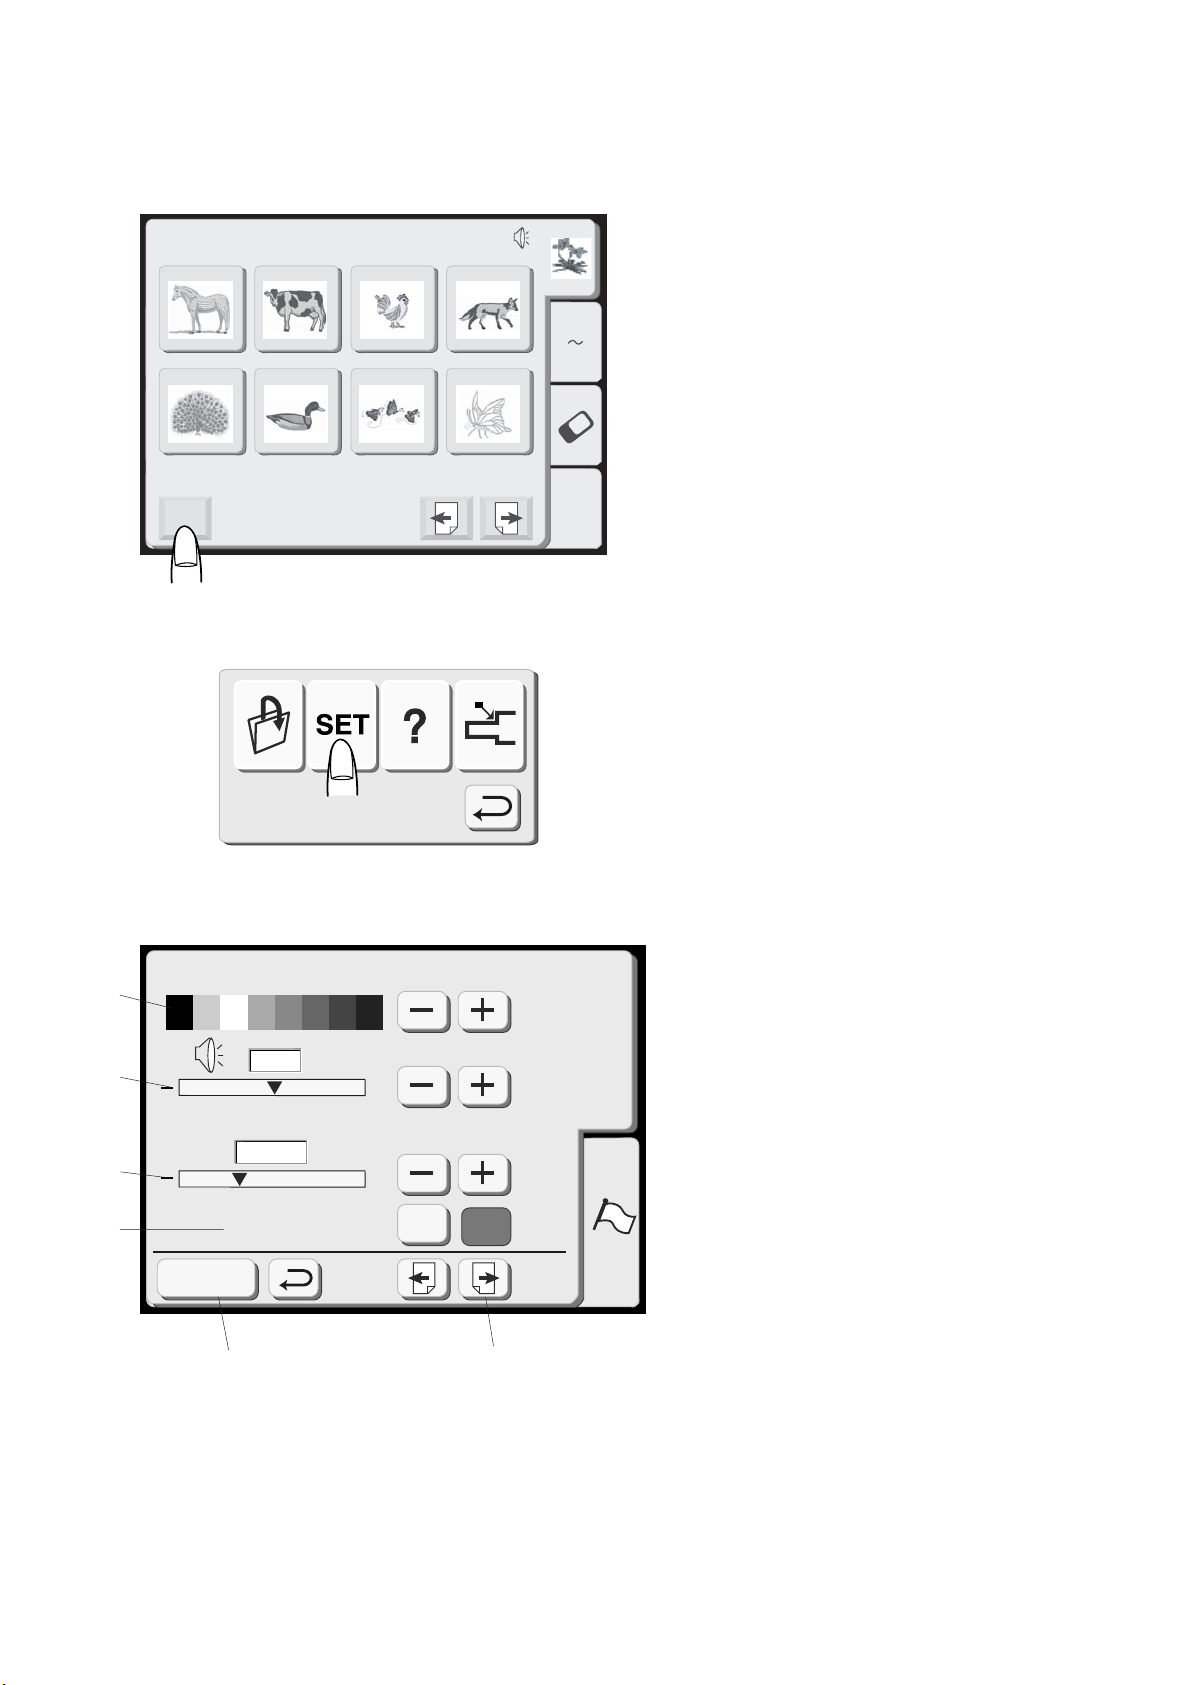
SET Preference Keys
These functions can be set according to your
preferences: screen contrast, sound volume, eco
mode, inch/mm, adjust key position, set maximum
embroidery speed, sewing light, thread selection,
format and language.
Mode
5 6 7 8
A Z
Edit
Touch the “Mode” key.
Touch the “SET” preference key to access and
personalize the machine settings.
1. Screen contrast
The LCD touch screen has an adjustable
backlight so the contrast can be lightened or
darkened. Touch the “+” key to darken and the
“–” key to lighten.
2. Sound
The beep volume default setting is 5 but it can
be adjusted between 0 (off) and 10 (loud).
Touch the “+” key to increase and the “–” key
to decrease or turn off.
3. Eco Mode
After turning on the machine this energy
1
SET
Screen Contrast
2
5
+
Eco Mode
10
3
4
Register
min
inch/mm
6
+
inch
mm
5
saving feature will darken the LCD touch
screen and turn off the sewing light if the
machine has not been used. Simply touch the
LCD screen for the screen and light to turn
back on. The eco mode default setting is 10
minutes but it can be adjusted between 1 and
30 minutes. Touch the “+” key to increase and
the “–” key to decrease. If you want to turn off
the eco mode, touch the “+” key until “OFF”
appears in the display.
4. Inch/millimeter
Choose to have the measuring unit for designs
readout in either inch or millimeters. The
default unit setting is millimeters. Touch either
the “inch” or “mm” key.
5. Touch the “Next” key.
NOTE: Any change in the set preference window
must be “registered” to be activated. Only touch
the “Register” key (6) after making all changes
desired.
11
Page 13
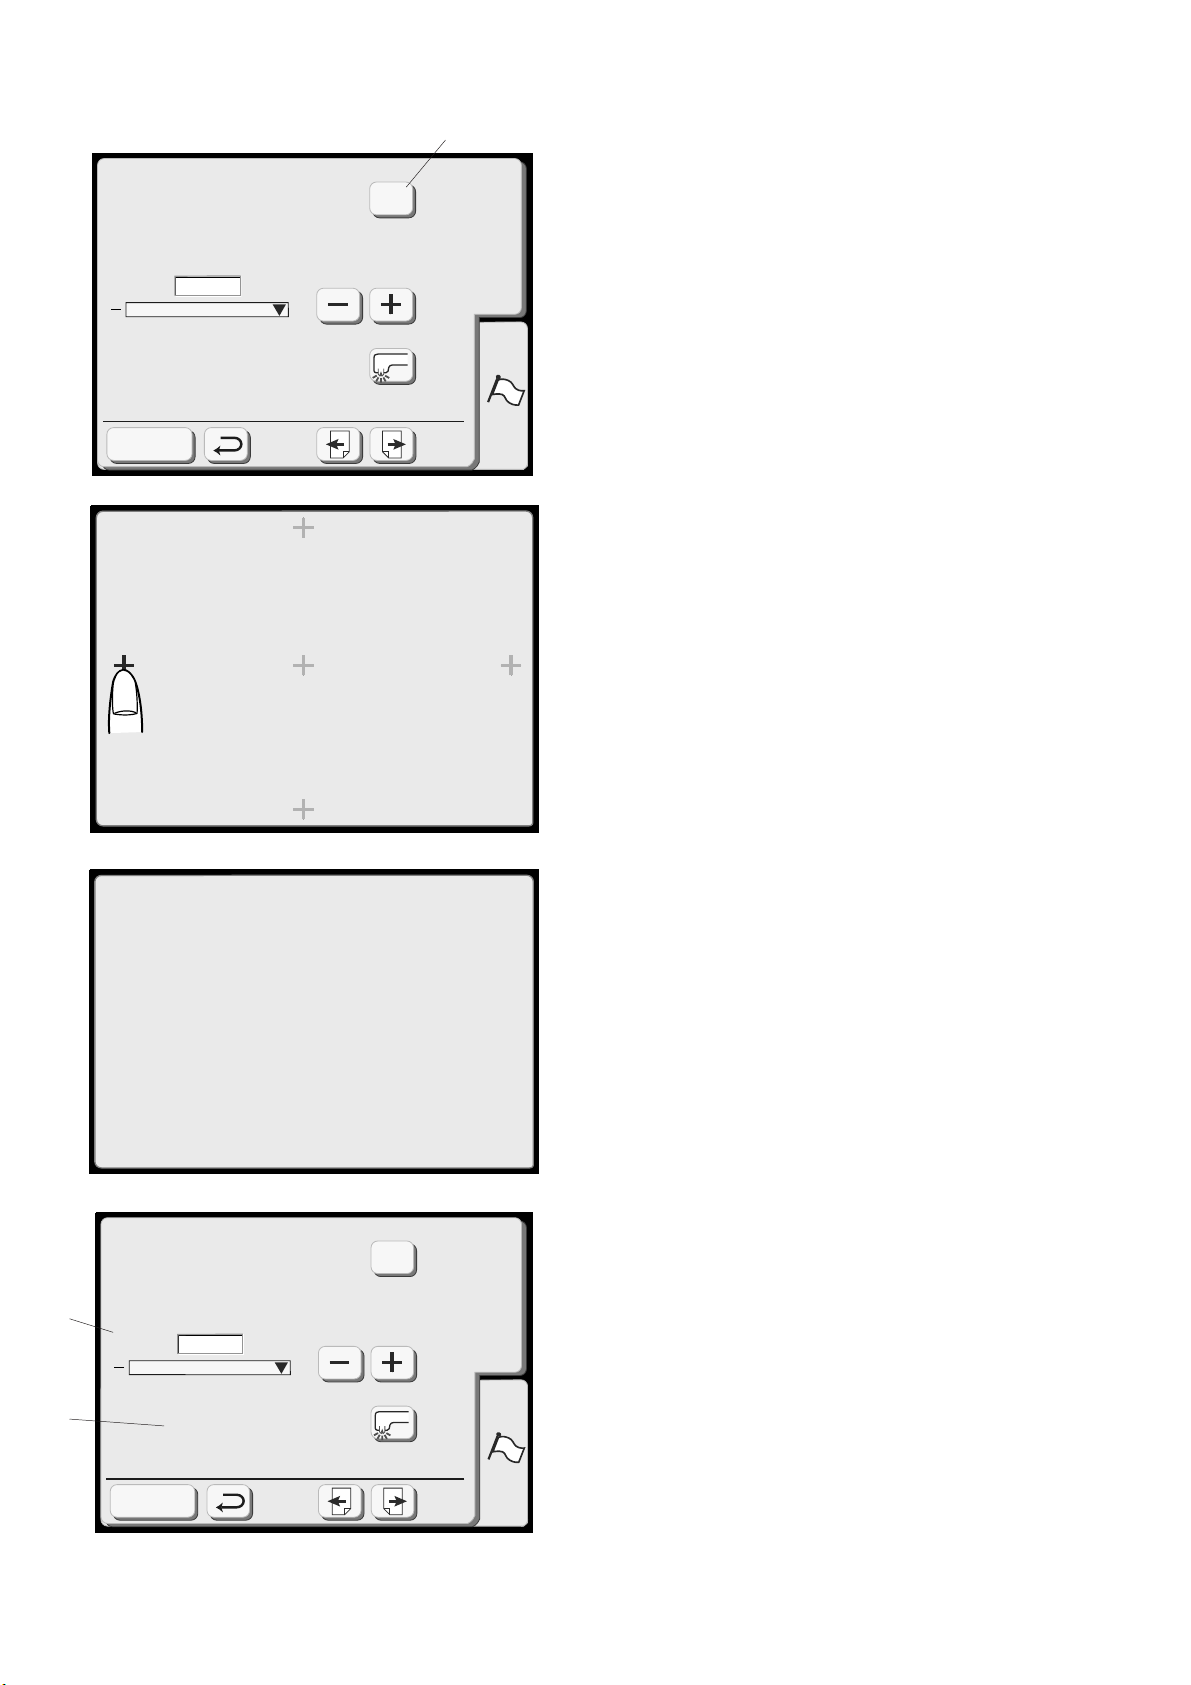
Key Position Adjustment
Maximum Speed Setting
650
spm
+
Sewing Light
Register
Key Position Adjustment
Yes
7
7. Adjust key positions
If the touch keys in the LCD touch screen do
not react to your touch, the keys may need to
SET
be adjusted or realigned.
Touch the “Yes” key to open the key position
adjustment window.
The first of five black plus (+) symbols will
appear. Touch the black symbols in the order
that they appear.
PRESS MARK ( )
+
.
Key Position Adjustment
END
After the fifth black symbol is touched, the
END message appears. Wait a few moments
and the set preference window reappears.
Key Position Adjustment
Maximum Speed Setting
8
650spm
9
Sewing Light
Register
8. Set maximum embroidery speed
Yes
SET
+
The maximum embroidery speed default
setting is 650 spm (stitches per minute).
Designs featuring narrow zigzag stitches may
need to be sewn at a slower speed for best
results. Touch the “–” key to decrease and “+”
key to increase.
9. Sewing light
You can operate the machine with the sewing
light on or off. Touch this key to change
between the two settings.
Touch the “Next” key.
12
Page 14
11
12
13
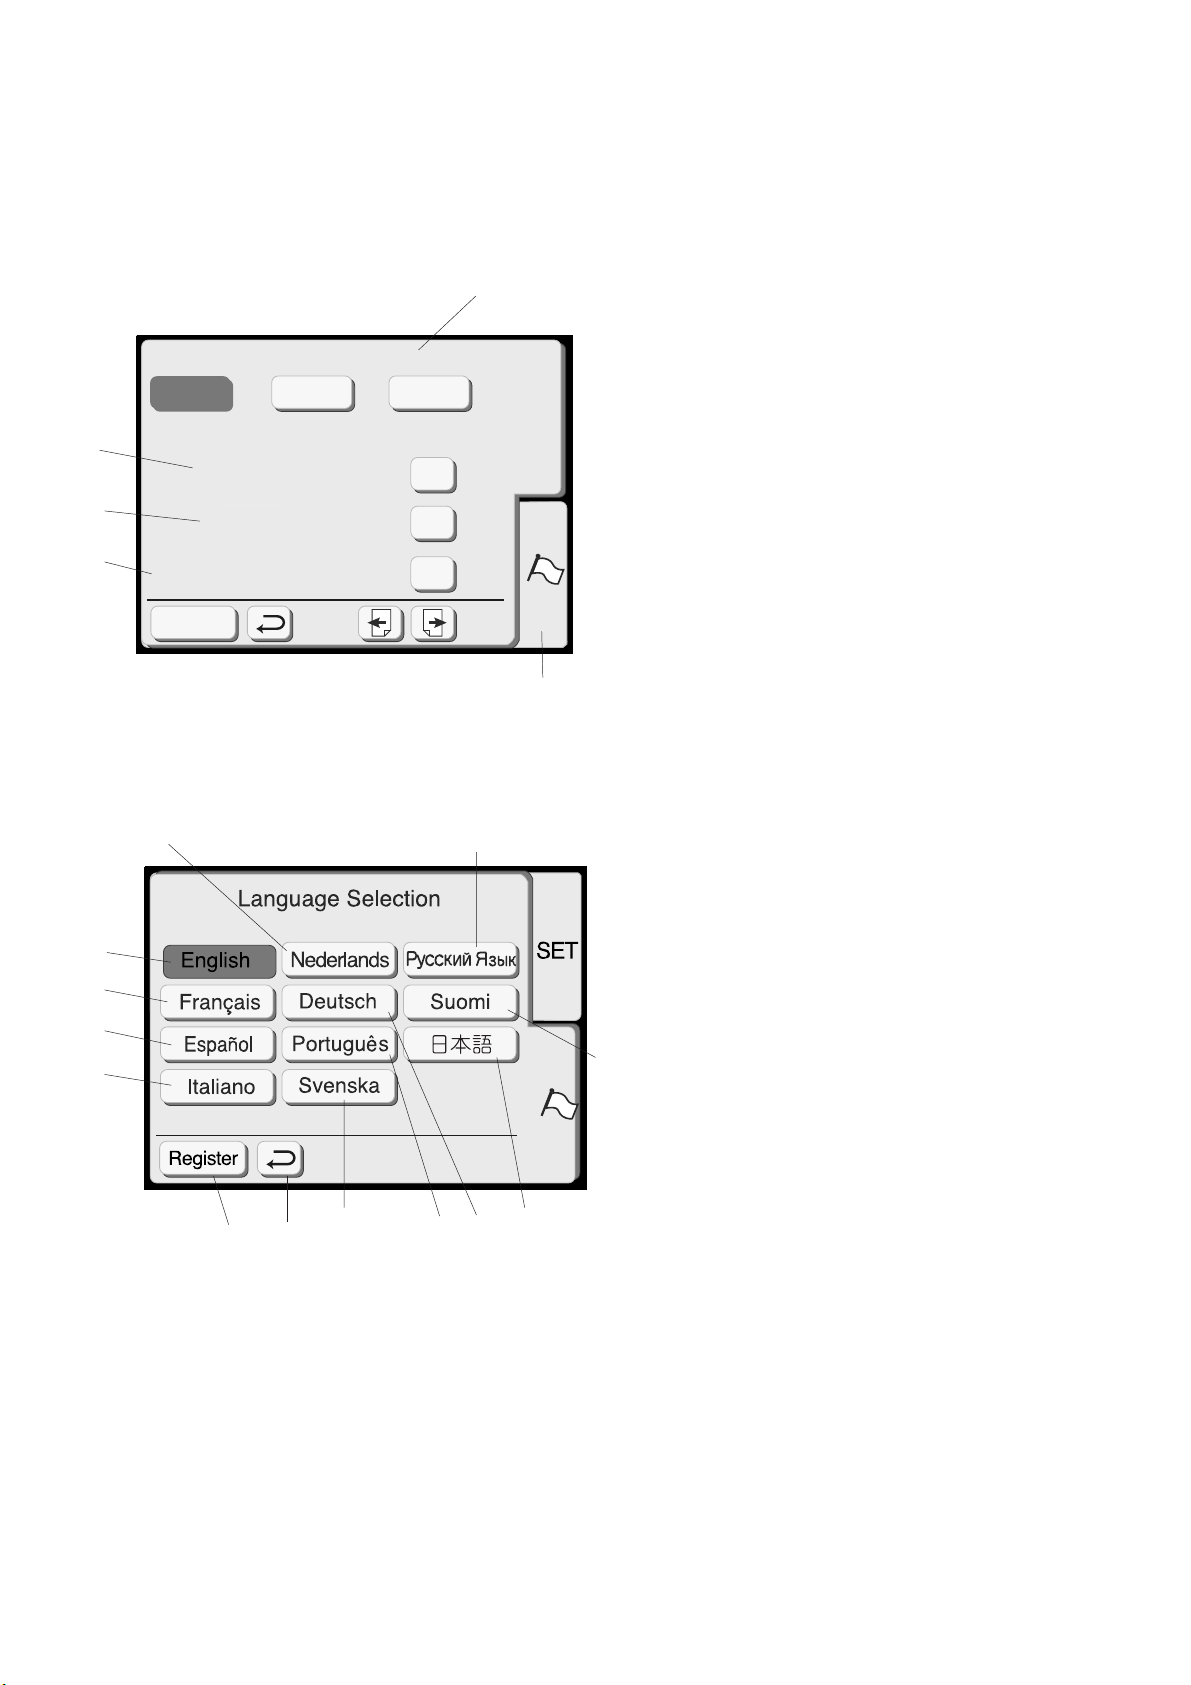
Thread selection
RobisonAnton
Madeira
Format
Built-in Memory
ATA PC Card
Reset all to defaults
Mettler
Yes
Yes
Yes
10
SET
10. Select thread brand
Choose from three popular brands of
embroidery thread. The default thread brand is
Robinson-Anton®. Touch the key that
represents the brand of thread you use most
commonly. The color code and name for that
brand of thread will be displayed in the LCD
screen after selecting a design.
Format
If the built-in memory or PC design card does not
function because the memory bank is damaged,
you must re-enable by formatting the memory.
NOTE: Formatting will erase all stored data.
11. Built-in memory
Touch “Yes” key next to Built-in memory.
Register
14
e
a
b
c
d
15
(16)
h
i
g
k
f
12. PC design card (or Compact Flash)
Touch “Yes” key next to ATA PC card.
13. Reset to factory defaults
Touch this key to return everything, except
language, to the default settings (same
settings as when you purchased the machine).
14. Language selection
Touch the language key to open the language
selection window.
Choose from eleven languages. Touch the key
that represents the language you desire.
a. English
b. French
c. Spanish
j
d. Italian
e. Dutch
f. German
g. Portuguese
h. Swedish
i. Russian
j. Finnish
k. Japanese
15. Register key
Touch this key to save your personal settings
and exit the set preferences window. If you
touch the “Return” key (16), you will exit the
set preference window but the new setting will
not be saved.
13
Page 15
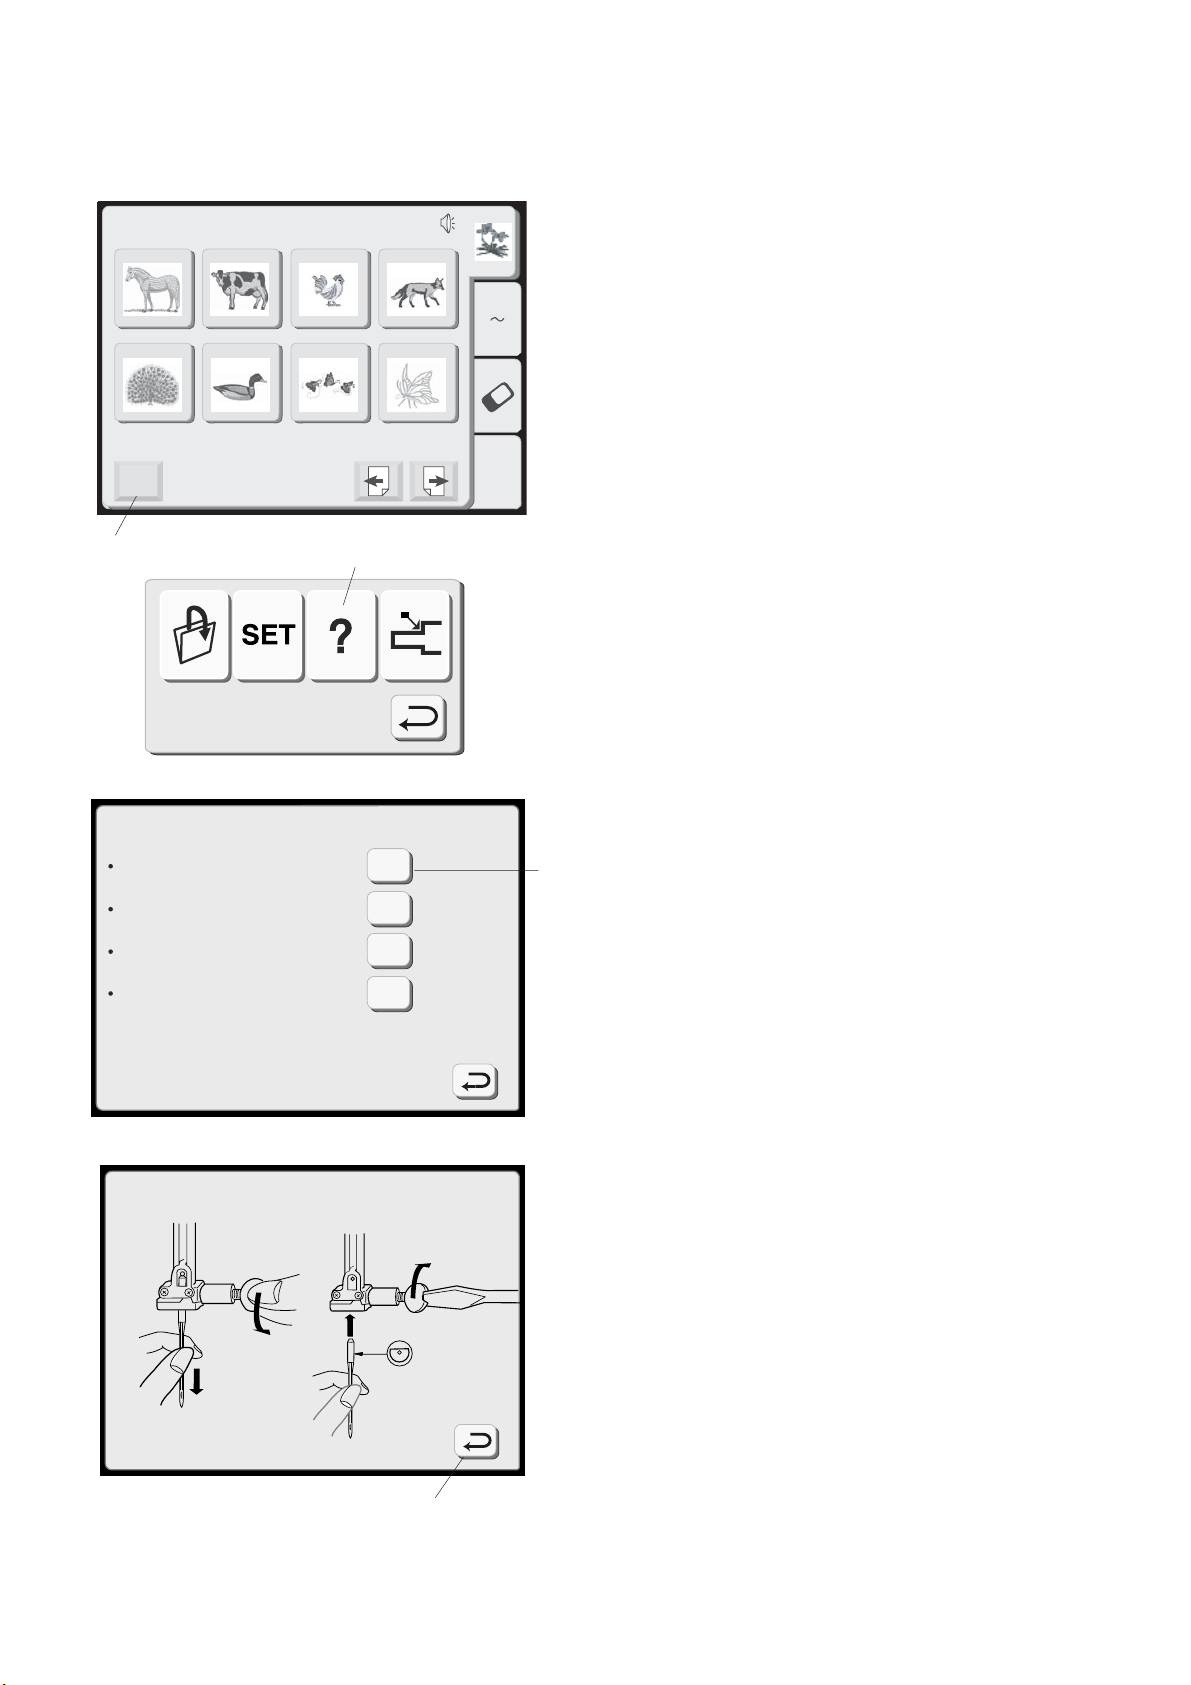
How to Access On Screen Information
Designs
Hoop Size A(F): 126X110mm
1 2 3 4
5 6 7 8
Mode
1
The LCD touch screen can show you information
for these basic machine operations: changing
needles, inserting the bobbin, threading the
machine and winding the bobbin.
A Z
1. Touch the “Mode” key to open the mode
selection window.
Edit
2
2. Touch the “On Screen Information” key to
open the index window.
Index
Changing needles
Inserting the bobbin
Threading the machine
Winding the bobbin
Changing needles
?
?
?
?
3
3. Touch one of the keys in the index window.
4. View the illustrations of the topic selected.
5. Touch the “Return” key to go back to the
index window. Touch “Return” key again to
exit mode selection window.
5
14
Page 16
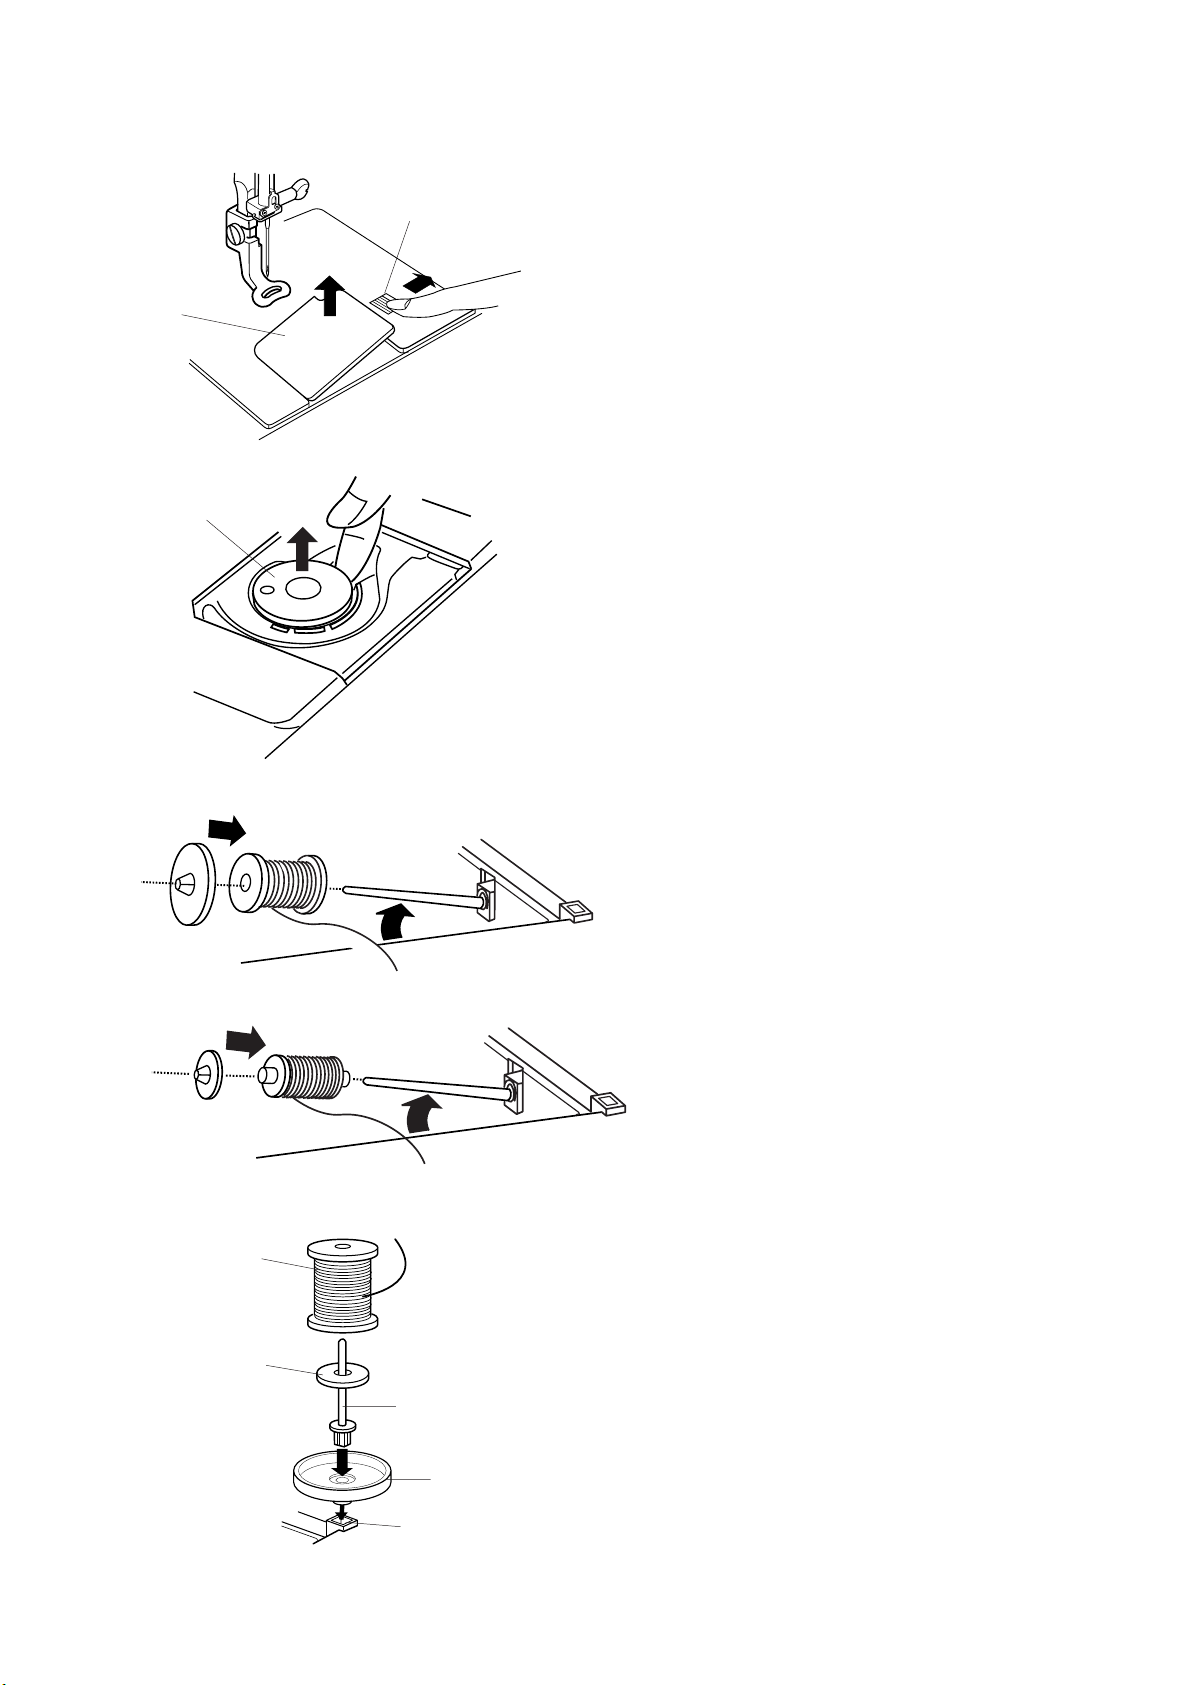
Winding a Bobbin
w
e
q
To remove bobbin, slide bobbin cover plate
release button q to the right and lift away the
bobbin cover plate w.
Lift out the bobbin e. (Always use bobbin type
supplied with machine.)
(A)
(B)
t
r
e
Lift up the spool pin. Place the spool of thread on
the spool pin with the thread coming off the spool
as shown. Attach the spool holder and press it
firmly against the spool of thread.
NOTE: Spool holder needs to be changed
according to the type of thread spool
(A) Large spool
(B) Small spool
Additional Spool Pin
The additional spool pin can be used to wind a
bobbin without unthreading the machine.
PROCEDURE: Insert the spool stand w and the
additional spool pin e in the hole q. Place the felt r
and spool t on the pin with the thread coming off
the spool as shown.
q
w
NOTE: Hole is located in front and to the right of
the standard spool pin.
15
Page 17
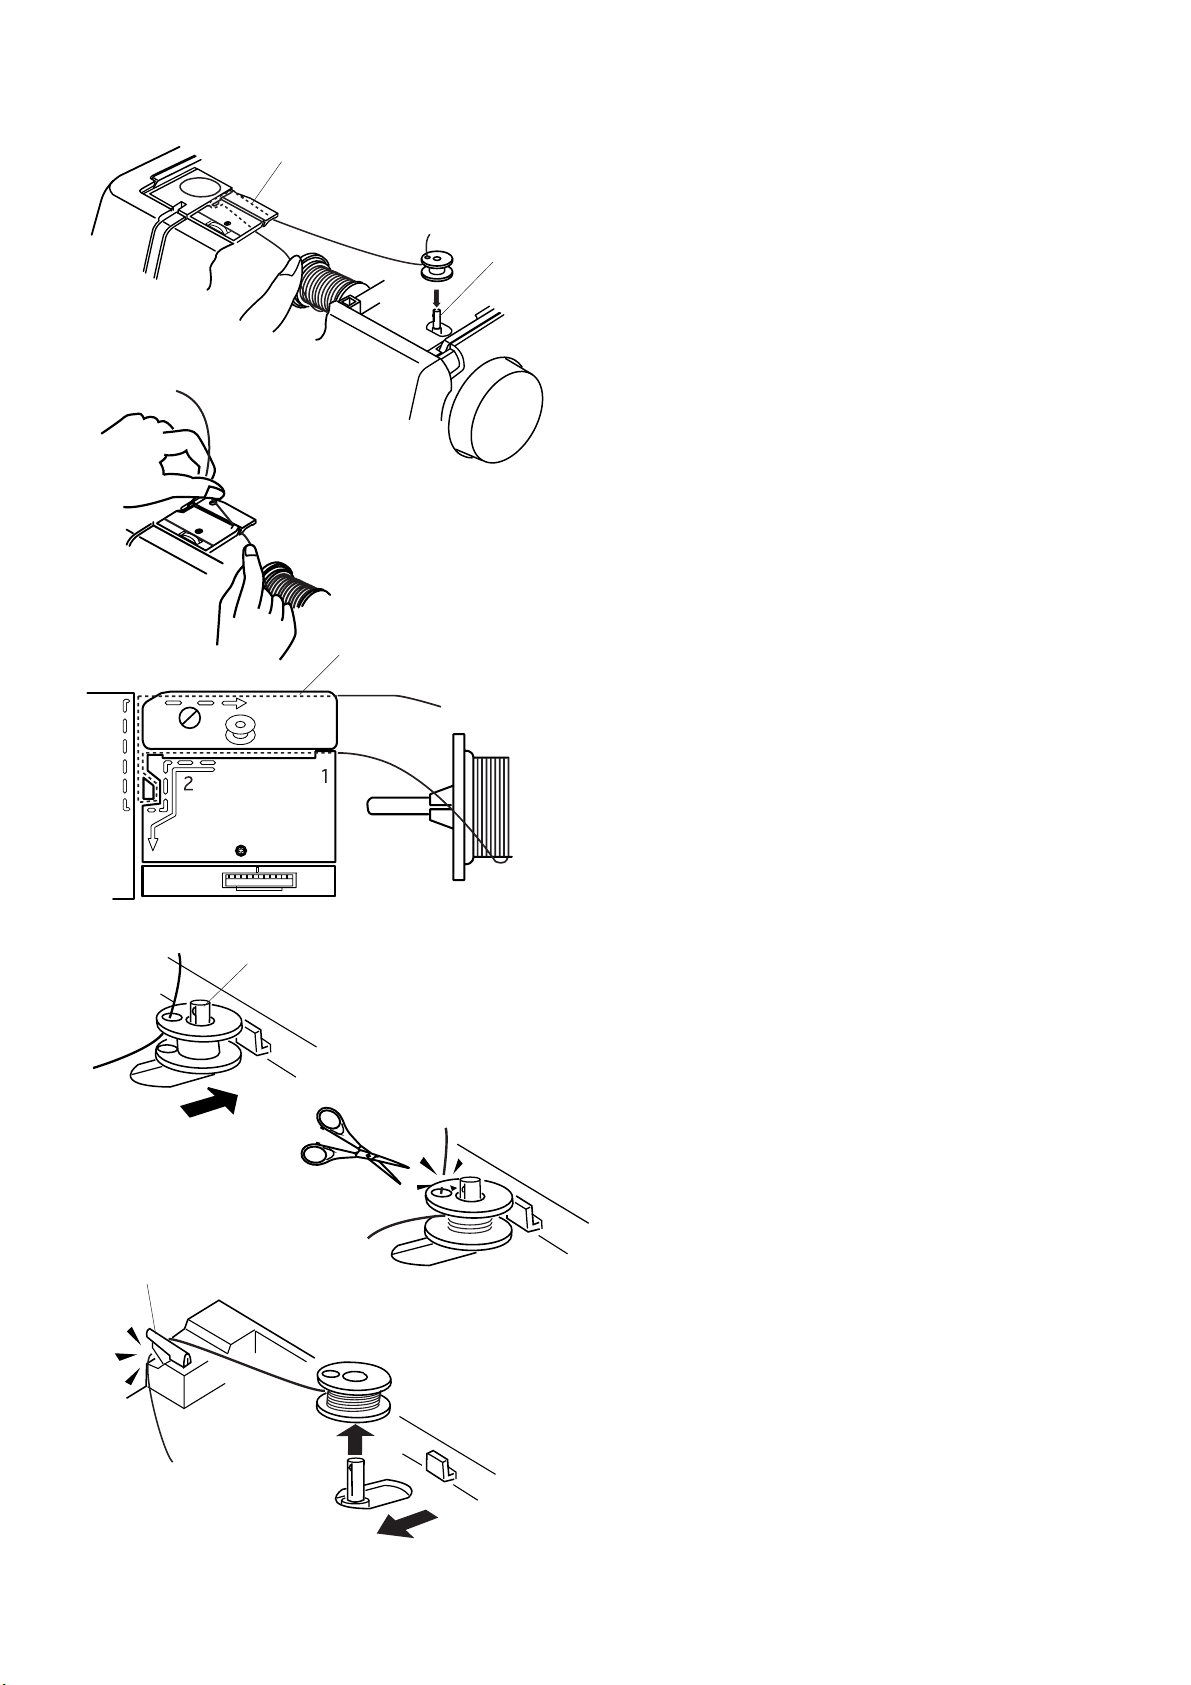
q
w
Using both hand, pull thread towards left and
insert thread into slit.
3
21
w
q
Pull the thread (dotted line in illustration) around
the thread guides following the broken lines
indicated on the machine .
Pass the thread through the hole in the bobbin
from inside to the outside. Place the bobbin on the
bobbin winder spindle
Push bobbin winder spindle to the right. (The LCD
touch screen will show a bobbin winding
message.) Holding the free end of the thread,
press the Start/Stop key. Stop machine after the
bobbin has made a few turns. Cut the thread tail
close to the hole in the bobbin. Start machine
again to continue winding bobbin. When the
bobbin is fully wound, stop the machine.
q
w.
e
Move the spindle to the left to return the bobbin
winder to its original position. Remove the bobbin
and cut the thread with the bobbin winder cutter e.
NOTE: Do not move the bobbin winder spindle
while the machine is running.
If the machine is running for more than two
minutes during bobbin winding, it will automatically
stop for safety purposes.
16
Page 18

q
Inserting the Bobbin
Place the bobbin in the bobbin case with the
thread running counterclockwise.
Guide the thread into notch q on the front side of
the bobbin case. Hold the bobbin with your right
hand and pull the thread to the left, through the
tension spring blades.
w
Continue pulling the thread lightly until the thread
slips into notch w.
Pull out about 15 cm (6") of thread.
Replace the bobbin cover plate.
Refer to the chart shown on the bobbin cover plate
to check the threading.
17
Page 19

q
Threading the Machine
Raise the presser foot with the presser foot lever.
Hand turn the flywheel (always turn towards you)
to bring the needle up to its highest position.
Using both hands, pull thread towards left and
insert thread into slit. firmly insert the thread under
the thread guide plate .
q
w
e
Pull thread foward around guide . (Thread
pathway is indicated on the machine with solid
line.)
3
21
Guide the thread down right channel and around
the thread holder .
Pull the thread up the left channel to the take-up
lever. Firmly pull the thread from right to left, over
the take-up lever and down into the take-up lever
eye r.
e
w
r
4
Proceed down left channel and through the lower
t
y
18
thread guide t.
Slide the thread to the left behind the needle bar
thread guide y.
Thread the needle from front to back manually or
use the built-in needle threader. See page 19.
Page 20

Built-in Needle Threader
Hand turn the flywheel (always turn towards you)
to bring the needle up to its highest position. Turn
OFF the power switch. Lower the presser foot.
Pull down the needle threader lever q as far as it
will go. Hook
needle eye.
w is automatically inserted into the
q
r
e
w
Bring the thread around guide e and under hook
w.
w
Slowly release the lever while holding the thread
end and let the needle threader return to its
original position. A loop of thread r is pulled
through the needle eye.
Pull the thread loop off the guide to the back and
manually bring the thread through the needle eye.
NOTE: The needle threader can be used with #11
to #16 size needles. Thread weight may vary from
30 to 90.
If the needle threader does not catch a thread
loop, check the needle and positioning.
19
Page 21

Drawing Up the Bobbin Thread
Raise the presser foot and hold the needle thread
lightly with your left hand.
Hand turn the flywheel (always turn towards you)
one full revolution. Draw up the needle thread
together with a loop of bobbin thread.
q
Pass the needle thread through the embroidery
foot. Pull thread up and secure it into thread holder
(located on front side of thread cutter)
a small thread tail.
q and leave
20
Page 22

q
Changing Needles
Never use a bent or blunt needle, as it may cause
skipped stitches or thread breakage. Defective
needles can ruin the fabric. Always purchase good
quality needles. Change needles often.
Turn OFF the power switch. Hand turn the flywheel
to bring needle up to highest position. Lower the
presser foot. Turn the needle clamp screw q
counterclockwise to loosen. Remove the needle
from the clamp.
w
Insert the new needle into needle clamp with the
flat side w to the back, pushing it up as far as it
will go. Tighten the clamp screw firmly.
To determine if the needle is defective, place the
flat side of the needle on something flat (a needle
plate, piece of glass, etc.). The gap between the
needle and the flat surface should be consistent.
NOTE: Use a 75/11 needle for fine fabrics and a
90/14 needle for medium to heavyweight fabrics.
Your Elna 8200 comes inserted with a 75/11
needle.
21
Page 23

Embroidery Hoops
e
A
q
w
r
Hoop A
The embroidery area is 126mm x 110mm
(5" x 4 3/8"). Ideal for sewing many of the built-in
designs and designs from optional PC design
cards.
Hoop B
The embroidery area is 140mm x 200mm
(5 1/2" x 8"). Use the generous dimensions of this
hoop for large size designs or combine several
designs or alphabets into one arrangement.
B
e
q
Hoop Part Names:
q Outer hoop
w Inner hoop
e Hoop turnkey
r Hoop tightening screw
w
Stabilizers
r
All embroidery needs some form of stabilizer that
can be easily removed. Use a stabilizer
appropriate to the fabric and project. Common
forms of stabilizer for embroidery sewing are
fusible, adhesive, tear-away, heat-away or washaway.
The fusible type is recommended for stretch
fabrics and fabrics that might shrink. Adhesive type
is great for velvets or other napped fabrics that
would be damaged if secured in the hoop. The non
adhesive types should be used when embroidering
fabric which cannot be ironed or for areas which
are difficult to iron.
Most stabilizers should be used on the wrong side
of fabric. More than one layer may be required.
Wash-away stabilizer may be placed on top of
fabrics like toweling so the loops lay flat under the
embroidery.
For any type of stabilizer, prepare a piece larger
than the embroidery hoop and place it in the hoop
so that the entire piece can be fastened within.
22
Page 24

e
y
t
Templates
Each hoop comes with a template to help you
place your design where you want it on the fabric.
w
r
STARTING POINT FOR MONOGRAMMING
STARTING POINT FOR MEMORY CARDS ( FROM No.102 )
STARTING POINT FOR MEMORY CARDS ( FROM No.1001 )
STARTING POINT
q
There are a variety of starting points visible on the
template. Find the one that is appropriate for your
machine/design.
q Starting point for built-in and PC
design cards.
w Starting point for alphabets with horizontal
placement.
e Starting point for 100 series EnVision card
and for Elna EnVision CE20 and 8007.
r Boundary edges for built-in and PC design
cards.
Starting point for alphabets with vertical
t
placement.
NOTE: The four indentations
template onto the hoop do not correspond with any
of the reference lines.
t for fitting the
y
q
Securing Fabric in Hoop
Use a washable fabric marker or tailor’s chalk to
draw centerlines q on your fabric (see stabilizers
on page 22).
Loosen the hoop tightening screw w and lift out
the inner hoop.
w
23
Page 25

L
R
e
Fit the template e into the inner hoop. (L and R
markings on the inner hoop should be visible.)
Place the inner hoop and template over the fabric,
matching the centerlines.
Place the outer hoop on a flat surface. Position
inner hoop, template and fabric over the outer
hoop.
Set inner hoop into outer hoop and slightly tighten
the hoop tightening screw r. Gently pull fabric taut
in hoop, respecting the fabric grain (vertical and
horizontal). Check fabric and template centerlines.
Once fabric is taut and properly positioned, tighten
adjustment screw with screwdriver.
r
Remove template from inner hoop.
24
Page 26

q
w
e
Attaching Hoop to Carriage
Lift up the presser foot. Rotate the hoop turnkey q
so it lies parallel to the hoop. With the hoop
turnkey turned towards the back, slide the hoop
from left side of machine. Position the hoop pins w
into the holes e on the carriage.
Rotate the hoop turnkey clockwise to lock hoop
onto carriage.
START
STOP
CAUTION:
Always allow plenty of room behind the carriage so
it can move freely. See page 8.
Never try to move the carriage by hand or touch
the carriage when it is moving.
Always return the carriage to store position before
turning off the machine. See page 10.
25
Page 27

Embroidering Small Areas
Attach stabilizer (cut larger than embroidery hoop)
to small piece of fabric. Draw centerline and place
stabilizer in hoop.
Sewing Designs
How to Select a Built-In Design
Designs
Hoop Size A(F): 126X110mm
1 2 3 4
5 6 7 8
Mode
Ready to Sew
Snow
White
5597
1
1
Seashell
P
5776
30 min
Size
2
A(F): 126 x110m m
GS
Gray
Mode
5 colors
109x84mm
3 4
Green
5802
Dust
Jog
ST
2
5757
A Z
Edit
A Z
Edit
The built-in designs have been organized by
recommended hoop size (A or B) and subject
matter (animals, floral, ocean life, etc.).
To select a design, touch the key that represents
the design you desire.
Hoop size warning message appears. Touch
“Return” key.
The ready to sew window opens. The LCD touch
screen now shows the design information like the
image, thread colors, sewing time, etc.
q Color/Part key
The design is separated into parts based on
thread color changes. The parts are sewn in
the order displayed. Thread color names and
numbers are shown based on your thread
brand preference (see page 13). The part that
will be sewn is darkened.
After a part is sewn, the machine will
automatically stop and the next color part key
will darken. Change thread to next color and
continue sewing.
How to Sew a Specific Part (Skipping)
You can eliminate parts of the design by
touching the “Color/Part” key previous to the
part you wish to sew. All parts located before
that color/part key will lighten.
q
w
w Next key
This key will be displayed if there are more
parts to the design. Touch the key to view the
other parts.
26
Page 28

e
Ready to Sew
1
1
30 min
P
Size
2
b
5 colors
109x84mm
A(F): 126 x110m m
3 4
a
c
q Return key
2
Touch this key to close this window and return to the
design selection window.
d
A Z
f
Snow
White
5597
w
Seashell
5776
t
GS
Gray
Mode
e
5802
Jog
Green
Dust
ST
5757
q
Edit
w Jog keys
The needle must be aligned directly above the
centerlines on the fabric. Touch these keys to adjust
the hoop position.
NOTE: See page 29 for explanation of “Jog/St” key.
Trace outline
Cancel
r
e Trace key
Check the size and sewing area of the design. Touch
this key. A message appears and tracing function
automatically starts. The carriage traces the outlying
boundaries of the design without any stitching.
r Cancel key (within tracing message)
You can cancel the tracing function while it is
happening by touching this key.
t Mode key
See page 10.
Sewing Information
a. Recommended needle thread tension
b. Sewing time in minutes
c. Number of colors/parts
d. Design size
e. Embroidery foot P
f. Appropriate hoop and its dimensions
27
Page 29

Designs
Hoop Size A(F): 126X110mm
1 2 3 4
Sewing a Single Built-in Design
Select a design.
5 6 7 8
Mode
Ready to Sew
Snow
White
5597
1
1
Seashell
5776
P
2
30 min
Size
GS
Gray
Mode
2
5 colors
109x84mm
A(F): 126 x110mm
3 4
Green
Dust
ST
START
STOP
5757
5802
Jog
A Z
Edit
A Z
Edit
Touch “Return” key in the hoop size warning
message.
Hoop fabric and attach hoop to carriage. Position
needle directly over centerlines on fabric. Thread
machine with first thread color. Lower presser foot.
Press “Start/Stop” key and sew 5 or 6 stitches.
Stop machine by pressing “Start/Stop” key.
Raise presser foot. Cut away beginning thread tail
close to the start point. Lower presser foot.
Press the “Start/Stop” key and let the machine sew
until it stops automatically for the thread change.
Sew entire design using method described above
for each thread change.
When design is finished, the word “Completed” will
appear. Touch the “Return” key.
The design should be aligned with the centerlines
on the fabric.
HINT: You can check the design positioning before
sewing with the tracing key or template sheets.
28
Page 30

Ready to Sew
1
Snow
5597
White
00001 ST/NO
q
w
1
Seashell
30 min
P
Size
2
5776 5802 5757
109x84mm
A(F): 126 x110m m
3 4
GS
Gray
Jog
Mode
e
Rethread and start.
5 colors
Green
Dust
ST
r
2
Ready to Sew Window After Embroidery
Begins
When you start to sew, the ready to sew window
A Z
will change – jog keys disappear and current stitch
count q, stitch minus/plus keys and return carriage
key appear.
Edit
Thread Breaks
If the needle thread breaks, the machine will stop
and show a warning message. Touch the “Return”
key. Rethread machine.
w Stitch Minus/Plus keys
Touch the “–” key to move the hoop back to
the point before the thread break occurred.
Each time you touch the “–” key the hoop
moves back 10 stitches. Each time you touch
the “+” key the hoop moves forward 10
stitches.
e Jog/ST key
Touch this key before sewing – the jog keys
disappear and the stitch minus/plus keys
appear.
r Return Carriage key
Since this is a very important key to use before
turning off your machine it appears here as
well as in the mode selection window (see
page 10).
29
Page 31

Designs
Hoop Size A(F): 126X110mm
1 2 3 4
5 6 7 8
A Z
q
How to Select Alphabets
Choose from five different fonts to create text and
monograms.
Touch the “A~Z” key q to open the alphabet
selection window.
Mode
Gothic
A
B
C
IJKL
Q
RST
YZ
Mode
DEF
N
M
U
V
A Z
AB
AB
AB
A(F)
G
H
OP
X
W
Font
L
M
OK
S
Edit
A Z
Edit
w
Touch the “Font” key
w.
Select one of the fonts by touching its
corresponding key.
Gothic
A
B
C
IJKL
Q
RST
YZ
Mode
DEF
N
M
U
V
A Z
AB
AB
AB
A(F)
G
H
OP
X
W
Font
L
M
OK
S
t
Touch the “Return” key e and the font selected will
be indicated.
e
r Diacritical Letter key
Touch this key to open/close diacritical letters.
(Letters with accents, umlauts, etc.)
A Z
t Upper/Lower Case key
Touch this key to switch between lower case
and upper case lettering. See page 32.
Edit
r
30
Page 32

Gothic
A
B
IJKL
Q
RST
YZ
Mode
o
q
DEF
C
M
U
A Z
we
y
i
AB
N
V
AB
r
AB
A(F)
G
H
OP
X
W
Font
L
M
OK
S
t
A Z
Edit
u
q Move Cursor keys
Touch either of these keys to move the cursor
(underline). The cursor location allows you to
edit the text. To add a letter, number or
punctuation (character), move the cursor until
it is under a character. When the new
character is selected it will be inserted on the
left side of the cursor (underlined character).
See page 34.
w Delete key
A character can be deleted if the cursor
(underline) is under it. Use the Move Cursor
keys until the character to be deleted is
underlined. Touch “Delete” key. See page 34.
e Numbers/Punctuation key
Touch this key to switch between letters and
numbers/punctuation keys.
r Horizontal/Vertical key
Touch this key to switch the embroidery
direction between horizontal and vertical. See
page 33.
A
DEF
C
B
IJKL
Q
RST
YZ
A Z
M
t Alphabet Size key
Touch this key to switch between large,
medium and small size lettering. This key will
not be active if the font selection is 2 or 3
letters.
y Magnifier key
AB
H
G
P
O
N
W
V
U
Font
L
M
X
OK
S
Touch this key to enlarge the keys so they are
easier to select. Touch the “Return” key to go
back to regular sized keys.
u OK key
When all characters have been selected,
touch this key to proceed to the ready to sew
window.
i Save File key
Touch this key to save your selections in a file
for future use. See page 42.
o Mode key
See page 10.
31
Page 33

Gothic
AB
Sewing Alphabets
A
B
DEF
C
IJKL
Q
RST
YZ
Mode
Gothic
Mode
A Z
A(F)
G
H
X
Font
OK
AB
A(F)
A Z
Edit
N
V
AB
OP
W
L
M
S
M
U
AB
The alphabet selection window should be open.
See page 30.
Touch the “Font” key and select the Gothic style.
Select “E”.
Touch the “Upper/Lower Case” key to select lower
case.
A Z
Font
L
AB
AB
M
S
OK
Edit
Gothic
Mode
Ready to Sew
P
AB
3 min
Size
A(F): 126 x110mm
L
AB
M
S
1 color
43x18mm
Color
Change
AB
A(F)
Font
2
OK
A Z
Edit
A Z
Select “l”, “n” and “a”.
Touch the “OK” key.
Touch the “Return” key in the hoop size warning
message.
The ready to sew window will open.
q Color Change key
Touch this key if you want the machine to stop
between each letter so that the thread color
can be changed.
Mode
Jog
ST
Edit
q
32
Page 34

Ready to Sew
P
3 min
Size
2
1 color
43x18mm
A(F): 126 x110mm
Color
Change
A Z
Hoop fabric with the centerlines located on left
side. (Remember the start position for horizontal
alphabets is on the left side of template. See page
23.)
Use the Jog keys q to position hoop and align
needle directly over the centerlines
w.
q
Mode
Jog
ST
Edit
w
Lower presser foot. Press “Start/Stop” key and
sew 5 or 6 stitches. Stop machine by pressing
“Start/Stop” key.
e
Raise presser foot. Cut away beginning thread tail
close to the start point. Lower presser foot.
Press the “Start/Stop” key and let the machine sew
until it stops automatically.
NOTE: Vertical orientation of alphabets would sew
out like illustration
e.
33
Page 35

Gothic
AB
A(F)
Alphabet Corrections
Deleting a letter
Example: Delete the “3” from “8300”
Gothic
Gothic
Gothic
AB
A(F)
AB
AB
Touch the “Move Cursor” keys until the cursor
(underline) is under the 3.
Touch the “Delete” key. The “3” is deleted.
A(F)
Inserting a letter
2
Gothic
Gothic
A(F)
AB
A(F)
AB
Example: Insert “2” into 800
Touch the “Move Cursor” keys until the cursor
(underline) is under the number where you want to
insert the new number.
Select “2”. The “2” will be inserted between the “8”
and “0”.
A(F)
34
Page 36

Gothic
A
B
C
IJKL
Q
RST
YZ
Mode
DEF
N
M
U
V
A Z
AB
AB
AB
A(F)
G
H
OP
X
W
Font
L
M
OK
S
A Z
Edit
2 Letter or 3 Letter Monograms
Example: 2 letters and frame for crest
The alphabet selection window should be open.
See page 30.
Touch the “Font” key and select “2 Letters” key.
2 Letters
A
B
C
IJKL
Q
RST
YZ
Mode
2
Letters
A
B
C
IJKL
Q
RST
YZ
Mode
DEF
N
M
U
V
A Z
AB
AB
DEF
N
M
U
V
A Z
AB
AB
AB
A(F)
G
H
OP
X
W
Font
L
M
OK
S
AB
A(F)
G
H
OP
X
W
Font
L
M
OK
S
A Z
Edit
A Z
Edit
Select one of the frames.
Select “A” and “B”.
Ready to Sew
P
8 min
Size
A(F): 126x1 10mm
Mode
1 color
53x62mm
Color
Change
Jog
ST
2
A Z
Touch “OK” key. Touch the “Return” key in the
hoop size warning message. Sew 2 letter crest.
Edit
NOTE: The starting point for 2 letter and 3 letter
monograms is the center of the hoop.
35
Page 37

q
Sewing with PC Design Cards (Optional)
Inserting the Card
w
Designs
Hoop Size A(F): 126X110mm
1 2 3 4
5 6 7 8
Mode
A Z
Edit
Insert PC design card
q into slot with front side
facing you. Push card in until it clicks and the card
eject button
w pops out. (You should see a red bar
on the button.)
Selecting from a PC Design Card
Touch the “PC Design Card” key e.
e
PC Card NO.1001
Hoop Size A(F):126x110mm
1
Mode
2
The PC design selections window opens. Designs
3
4
programmed on the card will appear. Select a
design.
A Z
Edit
Ejecting the Card
Push in the card eject button. Remove PC design
card from the slot.
CAUTION: Do not turn off the power switch or
eject the card when warning messages or
hourglass icon is displayed.
36
Page 38

Designs
Hoop Size A(F): 126X110mm
1 2 3 4
5 6 7 8
Edit Window
Modify and combine designs to create your unique
interpretation of them.
A Z
Touch the “Edit” key.
q
Mode
Edit
A(F)
B: 140x200mm
B
OK
w
r
Size
C
C
Cancel
Edit
A Z
e
The hoop selection window opens. Select one of these
hoops by touching its corresponding key.
q Standard Hoop A or Optional Hoop F –
126 mm x 110 mm (5" x 4 3/8")
w Large Hoop B – 140 mm x 200 mm (5 1/2" x 8")
Optional Free Arm Hoop C – 50 mm x 50 mm (2" x 2")
e
Touch “OK” key to open the selected hoop edit window.
NOTE: If you touch the “Cancel” key, the large hoop B edit
window will open because the large hoop B is the default
hoop.
NOTE: If you select a design before opening the edit
window, touch the “Hoop Selection” key and use same
method as described above.
r
B: 140x200mm
Edit
A(F): 126x1 10mm
Mode
Size
Mode
OK
OK
Cancel
Cancel
Large hoop B edit window
Edit
Standard hoop A and Optional hoop F edit window
A Z
Edit
37
Page 39

Edit
Selecting a Design After Opening the Edit
Window
Size
B: 140x200mm
Mode
Designs
Hoop Size A(F): 126X110mm
1 2 3 4
5 6 7 8
OK
Cancel
Open the design selection window.
A Z
Edit
Select a design.
A Z
Mode
Edit
B: 140x200mm
q
Size
Mode
OK
w
Cancel
Edit
The design will appear in the edit window with an
outline surrounding it.
A Z
Moving a Design
q Touch the design on the screen and drag it to
the new location with your fingertip. NEVER
drag it with a sharp pointed object.
Edit
OR
w Move Design keys
Use these keys to move the design to a new
position. The carriage will not move (like it
does with the jog keys) but instead the design
moves relative to the hoop and not the
machine.
38
Page 40

Edit
B: 140x200mm
Size
Mode
q
OK
Cancel
A Z
Edit
q Size key
Touch this key and the size adjustment window will
open. Design size can be changed in 10% increments
between 90% and 120% from the original size.
Touch the “–” key to decrease the design size.
Touch the “+” key to increase the design size.
Touch the “OK” key and the new size of design will
appear in the edit window. (If you touch the “Cancel”
key, size window closes and design remains at original
size.)
Size
Edit
B: 140x200mm
Edit
100%
Size
Mode
Size
OK
Cancel
OK
Cancel
w
e
A Z
Edit
A Z
w Mirror Image key
Touch this key to flip the design from left to right.
e Face to Face key
Touch this key to flip the design from top to bottom.
r Rotate key
r
Touch this key to rotate the design 45 degrees
clockwise.
y
t Delete key
t
The design that is surrounded by the outline will be
deleted.
B: 140x200mm
Mode
OK
Cancel
u
Edit
i
y Magnifier key
Touch this key to view the design in a larger image.
Touch “Return” key to close window.
OK key
u
All designs are grouped together and the ready to sew
window opens.
Cancel Key
i
Touch this key and all designs in the edit window will be
deleted and edit mode is deactivated.
39
Page 41

Designs
Hoop Size A(F): 126X110mm
17
21 22 23 24
Mode
18
19 20
A Z
Edit
Combine a Built-in Design with Alphabet
Example: Built-in design #18 and “Bear”
Select design #18 from the built-in design
selection window.
Touch the “Return” key in the hoop size warning
message.
Ready to Sew
18
P
Seashell
1
5776
Wicker
5789 Date 5590
2
Edit
Bear
A(F): 126x110mm
Gothic
B
A
B
IJKL
Q
RST
YZ
DEF
C
10 min
Size
A(F): 126x110mm
Mode
Size
Mode
M
U
6 colors
46x42mm
3 4
Visor
Gold
Jog
ST
OK
G
N
OP
V
W
2
5698
Cancel
AB
A(F)
H
X
Touch the “Edit” key.
A Z
Edit
Touch the “Alphabets” key.
A Z
Edit
Select “B” (upper case in Gothic style).
A Z
Mode
Gothic
B
Mode
AA
ZZ
AB
AB
Font
L
M
S
Edit
OK
AB
A(F)
Touch the “Upper/Lower Case” key to activate
lower case.
AB
AB
A Z
Font
L
M
S
OK
Edit
40
Page 42

Gothic
B
ear
Mode
Edit
AB
AB
AB
Select the “e”, “a” and “r”.
Touch the “OK” key.
A(F)
A Z
Font
L
M
S
OK
Edit
Position design and text by either dragging or using the
move design keys. Touch “OK” key to group everything
and open the ready to sew window.
A(F): 126x110mm
Ready to Sew
1
5776
Wicker
Seashell
P
5789
Size
13 min
Size
2
Mode
OK
49x63mm
A(F): 126x1 10mm
3 4
5590
Date
Cancel
6 colors
Visor
Gold
Touch the “Return” key in the hoop size warning
message.
A Z
Edit
The ready to sew window opens.
2
A Z
5698
Mode
Jog
ST
q
Edit
Sew design.
NOTE: If you touch the “Return” key in the ready to
q
sew window, edit mode is deactivated and all data is
deleted.
41
Page 43

Edit
Bear
Size
A Z
Saving a Design in a File
(Edit key must be activated)
q Save File key
Touch this key if you want to save your unique
combination so it can be used in the future.
A(F): 126x110mm
Mode
OK
Save File (Built-in)
M_001
OK
A
Cancel
B
B
A
E
K
C
HI JKLM
OPQR
VWX
YZ
Built-in
File Name
r
DEF
STU
Cancel
Card
Edit
G
N
w
e
q
The save file window will open.
Select the location of where the file will be saved
by touching the “Built-in/Card” key w.
• Built-in: the file will be saved in the internal
memory of the machine.
• Card: the file will be saved onto the PC
card.
File names are automatically assigned in
numerical order, beginning with M_001.
Touch the “File Name” key e to label the file with a
different name.
Touch the keys (up to 8 characters) that
correspond to the file name you wish to assign.
456
1
0
8
7
A
B
3
2
Cancel
9
B
E
C
OK
A
R
1
DEF
HI JKLM
OPQR
VWX
012
789
STU
YZ
456
3
Cancel
OK
To correct the last character in the name, touch the
“Backspace” key r.
r
G
N
Touch the remaining keys to complete file name.
42
Page 44

B
A
E
A
B
C
HI JKLM
1
R
DEF
G
N
Touch the “OK” key. The file name window will
close and the file will be saved with that name. (If
you touch the “Cancel” key, the file name window
will close without assigning the new file name.)
OPQR
VWX
012
789
STU
YZ
456
3
OK
The same file name exists,
overwrite it?
OK
Short of memory space,
the file cannot be saved.
Cancel
Cancel
NOTE: Should you try to save a file under a name
that already exists, this warning message will
appear. Touch “OK” key to overwrite the file. Touch
“Cancel” key if you don’t want to overwrite the file.
Change the file name and then save it under the
new name.
NOTE: When the memory is full, a warning
message will appear. Touch the “OK” key. Go to
the open file window (see page 44) and delete a
file you no longer want.
Save File (Built-in)
BEAR
M_00
M_00
M_00
M_00
M_001
OK
_
1
5
4
3
2
Cancel
Built-in
Card
File Name
q
q Next and Previous keys
The save file window will display 5 saved file
names at a time. Touch these keys to view the
other saved file names.
Touch the “OK” key to save the file. Touch
“Cancel” key to close the save file window without
saving the file.
CAUTION: Do not turn off the power switch or
eject the card when warning messages or
hourglass icon is displayed. The stored data could
be lost or damaged.
43
Page 45

Mode
Opening a Saved File
You can sew any design that has been saved in a
file.
Touch the “Mode” key. Touch the “Open File” key
q.
q
Open file window will open.
Touch the “Built-in/Card” key w and select the
location of the file directory.
r
Open File(Built-in)
M_002
BEAR
M_001
M_002
OK
_
1
Cancel
Built-in
Card
t
w
e
y
Touch the “File Up/Down” keys e to select the file
you want to open. It will appear in the active name
window .
The open file window will display 5 saved file
names at a time. Touch the next and previous keys
r
t to view the other saved file names.
Select the file you want to sew. Touch the “OK”
key. The file will appear either in the edit window
or ready to sew window depending on where you
accessed the open file key.
Deleting a Saved File
Display the file you want to delete in the active
name window .
Touch the “Delete” key y.
r
Are You Sure Y ou W ant
to Delete this File?
OK
Cancel
The confirmation window will open. Touch the “OK”
key to delete. Touch “Cancel” key to close the
confirmation window without deleting the file.
44
Page 46

Embroiderying with Optional Free Arm Hoop C
r
q
w
e
The dimension of the leg or sleeve opening must be
large enough to allow the hoop to move freely. Insert
the innner hoop of large hoop B into the opening
q
. If the inner hoop cannot be easily inserted, the
opening is too narrow for free arm embroidery.
Maximum distance for design position inside the
opening from the edge is 200mm (77/8”) .
Draw centerlines for design placement.
Remove extension table. See page 5.
Select hoop “C” in Edit Mode.
Select design or letters (dimensions or design/
letters must be 49mm or less).
NOTE: Built-in designs less than 49mm are 3, 9, 18,
20, 21, 22, 23, 24, 29, 30, 34, 35, 36 and 44.
r
w
e
y
t
Hoop fabric, aligning centerlines with hoop
template .
Place fabric around free arm and lock hoop onto
carriage. Roll up fabric edges so it will not be caught
at the neck of the free arm during embroidery sewing.
Insert the blocking plate (stored in the arm of the
hoop) next to the hoop opening. The blocking
plate prevents the fabric edge on the free arm from
rolling back into the embroidery area.
Touch the “Jog” keys to position needle directly over
centerline.
Sew design.
t
y
r
y
CAUTION: Immediately remove hoop from free arm
after sewing is completed. Never atempt to select a
new design, change modes or switch off machine
without first removing the hoop from the arm.
45
Page 47

Taking Care of Your Machine
w
q
r
e
The machine is self-lubricating, however, the area
around the bobbin and hook must be cleaned each
time the machine has had extensive use. Do not
dismantle the machine further than explained
on these pages. Clean the outside of the machine
with a soft cloth and pure soap.
Cleaning the Hook Area
Loose threads and dust may cause puckered
stitches and thread breakage during stitching.
Check for lint buildup after each project is
completed.
Hand turn the flywheel to raise the needle to its
highest position. Turn Off power switch. Unplug
the machine before cleaning.
Remove the needle. Use the screw key q supplied
with the machine to remove the screw w. Lift away
the needle plate e.
Take out the bobbin. Lift up and remove the bobbin
case r.
t
Clean the bobbin case with the lint brush and soft,
dry cloth.
Clean the hook area t with the lint brush.
Wipe out gently with soft, dry cloth. (You can also
use a small vacuum cleaner.)
46
Page 48

q
Replacing the Bobbin Case
Insert the bobbin case so the knob q fits next to
the stopper w in the hook area.
w
Attach the needle plate and tighten the screw.
After cleaning, be sure to replace the needle,
presser foot and bobbin.
q
w
e
r
t
Changing the Light Bulb
Turn OFF the power switch. Unplug the machine.
Wait until the bulb has cooled before touching it.
Remove screw cap q and set screw w. Pull away
face plate e.
Pull out light bulb t from the socket r.
Insert light bulb into light socket.
Replace face plate, screw and screw cap.
NOTE: Only use same type light bulb rated 12
Volts, 5 watts.
47
Page 49

Built-in designs
STITCH CHART
1
9
25
33 34 35 36
2
10 11 12
26
34
27
20191817
44434241
28
13
21
29
37
65 78
14 15 16
22
30
38
31
39 40
2423
32
48474645
57
52515049 56555453
58
48
Page 50

Gothic
Script
3-letters / 2-letters
Cheltenham
49
Page 51

TROUBLE SHOOTING
Condition
Needle thread breaks
Bobbin thread breaks
Needle breaks
Skipped stitches
Cause
1.The needle is not threaded properly.
2. The needle thread tension is too tight.
3. The needle is bent or blunt.
4. The needle is not inserted correctly.
5. The needle thread and bobbin thread are not
set in the thread holder before sewing starts.
1. The bobbin thread is not threaded correctly in
the bobbin case.
2. Lint has collected in the bobbin case.
3. The bobbin is damaged and does not turn
smoothly.
1. The needle is not inserted correctly.
2. The needle is bent or blunt.
3. The needle clamp screw is loose.
4. The needle thread tension is too tight.
1. The needle is not inserted correctly.
2. The needle is bent or blunt.
3. The needle thread is not threaded properly.
4. The hoop is not attached correctly to the
carriage.
5. Fabric is not taut in the hoop.
6. Stabilizer is not being used.
See page (s)
18
6
21
21
20
17
46-47
Change bobbin
21
21
21
6
21
21
18
25
24
22
Designs are distorted
Machine does
not work
Abnormal noise when
machine is turned on
LCD Touch Screen
is not visible
Noisy operation
1. Fabric is not taut in the hoop.
2. The hoop is not attached correctly to the
carriage.
3. The carriage is hitting into something around
the machine.
4. Fabric is caught or pulled by something
during sewing.
5. The needle thread tension is too tight.
6. Stabilizer is not being used.
7. The thread on the underside of fabric is not
cut correctly.
1. The machine is not plugged in.
2. A thread is caught in the hook area.
3. The control circuit is not working correctly.
1. Something is caught between the carriage
and arm.
2. The carriage is touching something around
the machine.
1. Screen contrast is not adjusted correctly.
2. Machine has not been used for a time and
enters eco mode.
1. Threads have been caught in the hook area.
2. Lint has built up in the bobbin case or hook
area.
24
25
8
Free up fabric
6
22
Cut thread
7
46-47
Turn machine off and on
Remove object
8
11
11
46-47
46-47
Selection keys
don’t work
1. Keys are not aligned correctly.
2. The control circuit is not working correctly.
50
12
Turn machine off and on
Page 52

INDEX
A
Accessories ............................................................................ 4
Accessory Storage ................................................................. 5
Adjust Key Positions ............................................................. 12
Alphabet Selection Window.................................................. 32
Alphabet Size Key ............................................................... 31
Alphabets............................................................................. 30
B
Backspace Key ..................................................................... 42
Bobbin
Drawing Up Bobbin Thread ............................................... 20
Inserting the Bobbin .......................................................... 17
Winding a Bobbin .......................................................... 15-16
Bobbin Case .............................................................. 17, 46-47
Built-in Designs..................................................... 9, 26, 48-49
C
Cancel Key........................................................................... 27
Card Eject Button ............................................................ 3, 36
Card Slot.......................................................................... 3, 36
Carriage ....................................................................... 3, 8, 25
Centerlines............................................................... 23, 28, 33
Centimeter Measurements .................................................. 11
Changing Needles ............................................................... 21
Cleaning.......................................................................... 46-47
Color Change Key ............................................................... 32
Color/Part Key...................................................................... 26
Combining Designs ........................................................ 37-41
Connecting Machine to Power Supply .................................. 7
Correcting Alphabets ........................................................... 34
Cutting Threads ................................................................... 28
D
Delete Key ..................................................................... 31, 39
Deleting a Saved File .......................................................... 44
Design Chart................................................................ 3, 48-49
Diacritical Letter Key............................................................ 30
E
Eco Mode.............................................................................. 11
Edit................................................................................... 37-39
F
Fabric ....................................................................... 22, 23, 26
Face Plate......................................................................... 3, 47
Face to Face Key................................................................. 39
Factory Default Settings ...................................................... 13
File Names........................................................................... 42
File Up/Down Keys ............................................................... 44
Files
Saving, Overwriting, Recalling and Deleting.......... 10, 42-44
Flywheel............................................................................ 3, 18
Font Key................................................................................ 30
Format.................................................................................. 13
Free Arm ........................................................................... 5, 45
Function Keys ........................... 9-14, 26-27, 29-32, 38-39, 44
H
Hook Area............................................................................ 46
Hoop Selection Window........................................................ 37
Hoop Tightening Screw ................................................. 22, 24
Hoop Turn key................................................................ 22, 25
Hoops..................................................... 4, 9, 22, 23-25, 37,45
Horizontal/Vertical Key ........................................................ 31
I
Inch Measurements .............................................................. 11
Index Window ....................................................................... 14
Inner Hoop ..................................................................... 22, 24
J
Jog keys......................................................................... 27, 33
Jog/ST Key .......................................................................... 29
K
Keys .......................................... 9-14, 26-27, 29-32, 38-39, 44
L
LCD Screen Contrast .......................................................... 11
LCD Touch Screen........................................................ 3, 9, 11
Language Selection.............................................................. 13
Letters/Numbers .................................................................. 30
Light Bulb.......................................................................... 1, 47
M
Magnifier Key................................................................. 31, 39
Maintenance ................................................................... 46-47
Memory Bank....................................................................... 13
Mirror Image Key .................................................................. 39
Mode Key......................................................................... 9, 10
Mode Selection Window ...................................................... 10
Monograms..................................................................... 30, 35
Move Cursor Keys ............................................................... 31
Move Design Keys ................................................................ 38
Moving Designs ................................................................... 38
N
Needle Plate ........................................................... 1, 3, 46-47
Needle Position.................................................................... 27
Needle Threader.............................................................. 3, 19
Needles.......................................................................... 19, 21
Next key ..................................................................... 9, 26, 43
Numbers/Letters .................................................................. 30
Numbers/Punctuation Key................................................... 31
O
OK Key ................................................................................. 31
On Screen Information key............................................. 10, 14
Open File key.................................................................. 10, 44
Outer Hoop .................................................................... 22, 24
Overwriting Saved File ........................................................ 43
P
PC Design Card......................................................... 3, 13, 36
PC Design Card Slot ................................................. 3, 13, 36
Part Names............................................................................ 3
Plugs .............................................................................. 1, 3, 7
Power/Light Switch ............................................................. 3, 7
Presser Foot .................................................................... 3, 27
Presser Foot Lever ............................................................ 3, 5
Previous Key.................................................................... 9, 43
R
Ready to Sew Window.................................................... 29, 32
Recalling Saved File............................................................ 44
Register Key .................................................................. 11, 13
Reset to Factory Defaults..................................................... 13
Return Carriage Key....................................................... 10, 29
51
Page 53

Return Key...................................................................... 10, 27
Rotate Key ........................................................................... 39
S
Save File Key................................................................. 31, 42
Saving a File .................................................................... 42-43
Screen Contrast................................................................... 11
SET Preference Key .................................................. 10, 11-13
Sewing Light .................................................................. 12, 47
Size Key ............................................................................... 39
Size of Design - Dimensions ............................................... 27
Skipping ............................................................................... 26
Small Area – Embroidery ............................................... 26,45
Sound................................................................................... 11
Speed................................................................................... 12
Spool Pins..................................................................... 3, 4, 15
Stabilizers ............................................................................ 22
Start/Stop Key.............................................................. 3, 8, 28
Stitch Minus/Plus Keys ........................................................ 29
T
Template Sheets .............................................................. 4, 28
Templates....................................................................... 23, 24
Thread.................................................................................. 13
Thread Breaks ..................................................................... 29
Thread Cutting ................................................................. 3, 28
Thread Holder.................................................................. 3, 20
Thread Tension ............................................................ .3, 6, 27
Threading........................................................................ 14, 18
Time ..................................................................................... 27
Trace Key ............................................................................. 27
U
Upper/Lower Case Key........................................................ 30
V
Vertical Orientation .............................................................. 33
W
Window category ................................................................... 9
52
 Loading...