


Ultra® 2400 Series
Dispensing Workstation
Electronic pdf files of EFD® manuals are also available at www.efd-inc.com/manuals.html.
User’s Guide
Ultra 2400
Ultra 2405
Ultra 2415
®
A NORDSON COMPANY

Introduction
Welcome to the Ultra 2400 Series, the most complete dispensing system on the market. This User’s Guide will help you maximize the usefulness of your new workstation.
Please spend a few minutes to become familiar with the controls and features. Follow our recommended testing procedures. Review the helpful information we have included, which is based on more than 30 years of industrial dispensing experience.
Most questions you will have are answered in this guide. However, if you need assistance, please do not hesitate to contact EFD or your authorized EFD distributor.
In the USA, call 800-556-3484 between 8:30 a.m. and 5:30 p.m. Eastern time.
In Europe, call +44 (0) 1582 666334
In Asia, call +86 (21) 5854 2345
In all other areas, call your authorized EFD distributor or +1-401-434-1680.
The EFD Pledge
We pledge that you will be completely satisfied with our products. We endeavor to ensure that every EFD product is produced to our no-compromise quality standards.
If you feel that you are not receiving all the support you require, or if you have any questions or comments, I invite you to write or call me personally.
Our goal is to build not only the finest equipment and components, but also to build long-term customer relationships founded on superb quality, service, value and trust.
Peter Lambert, President
2

Contents
Safety . . . . . . . . . . . . . . . . . . . . . . . . . . . . . . . . . . . . . . . . . . . . . . . . . . . . . . . . . . . . . . 4
Getting Started . . . . . . . . . . . . . . . . . . . . . . . . . . . . . . . . . . . . . . . . . . . . . . . . . . . . . . . . 6
Specifications . . . . . . . . . . . . . . . . . . . . . . . . . . . . . . . . . . . . . . . . . . . . . . . . . . . . . . . . . 7
Features and Controls . . . . . . . . . . . . . . . . . . . . . . . . . . . . . . . . . . . . . . . . . . . . . . . . 8-10
Back Panel . . . . . . . . . . . . . . . . . . . . . . . . . . . . . . . . . . . . . . . . . . . . . . . . . . . . . . 11
Filling the Syringe Barrel . . . . . . . . . . . . . . . . . . . . . . . . . . . . . . . . . . . . . . . . . . . . . . . 13
Vacuum Control . . . . . . . . . . . . . . . . . . . . . . . . . . . . . . . . . . . . . . . . . . . . . . . . . . . . . . 14
Syringe Barrel Loaders . . . . . . . . . . . . . . . . . . . . . . . . . . . . . . . . . . . . . . . . . . . . . . . . . 15
Test Procedures . . . . . . . . . . . . . . . . . . . . . . . . . . . . . . . . . . . . . . . . . . . . . . . . . . . . . . 16
Memory . . . . . . . . . . . . . . . . . . . . . . . . . . . . . . . . . . . . . . . . . . . . . . . . . . . . . . . . . . . . 18
Menu Functions . . . . . . . . . . . . . . . . . . . . . . . . . . . . . . . . . . . . . . . . . . . . . . . . . . . . . . 20
Input/Output Connection . . . . . . . . . . . . . . . . . . . . . . . . . . . . . . . . . . . . . . . . . . . . . . . . 22
Schematic . . . . . . . . . . . . . . . . . . . . . . . . . . . . . . . . . . . . . . . . . . . . . . . . . . . . . . . . . . 23
Troubleshooting . . . . . . . . . . . . . . . . . . . . . . . . . . . . . . . . . . . . . . . . . . . . . . . . . . . . . . 24
Helpful Hints. . . . . . . . . . . . . . . . . . . . . . . . . . . . . . . . . . . . . . . . . . . . . . . . . . . . . . . . . 25
Productivity Tools . . . . . . . . . . . . . . . . . . . . . . . . . . . . . . . . . . . . . . . . . . . . . . . . . . . . . 26
This manual is for the express and sole use of EFD dispenser purchasers and users, and no portion of it may be reproduced in any form.
3

Safety
Introduction
Read and follow these safety instructions. Taskand equipment-specific warnings, cautions and instructions are included in equipment documentation where appropriate.
Qualified Personnel
Equipment owners are responsible for making sure that EFD equipment is installed, operated and serviced by qualified personnel. Qualified personnel are those employees or contractors who are trained to safely perform their assigned tasks. They are familiar with all relevant safety rules and regulations, and are physically capable of performing their assigned tasks.
Intended Use
Use of EFD equipment in ways other than those described in the documentation supplied with the equipment may result in injury to persons or damage to property.
Some examples of unintended use of equipment include
•Using incompatible materials
•Making unauthorized modifications
•Removing or bypassing safety guards or interlocks
•Using incompatible or damaged parts
•Using unapproved auxiliary equipment
•Operating equipment in excess of maximum ratings
Regulations and Approvals
Make sure all equipment is rated and approved for the environment in which it is used. Any approvals obtained for EFD equipment will be voided if instructions for installation, operation and service are not followed.
Personal Safety
To prevent injury follow these instructions.
•Do not operate or service equipment unless you are qualified.
•Do not operate equipment unless safety guards, doors or covers are intact and automatic interlocks are operating properly. Do not bypass or disarm any safety devices.
•If you receive even a slight electrical shock, shut down all electrical or equipment immediately. Do not restart the equipment until the problem has been identified and corrected.
•Obtain and read Material Safety Data Sheets (MSDS) for all materials used. Follow the manufacturer’s instructions for safe handling and use of materials, and use recommended personal protection devices.
•To prevent injury, be aware of less-obvious dangers in the workplace that often cannot be completely eliminated, such as hot surfaces, sharp edges, energized electrical circuits and moving parts that cannot be enclosed or otherwise guarded for practical reasons.
•This equipment is for indoor use only.
•Use only the power adapter provided with the unit. Contact EFD to purchase a replacement adapter.
•Always keep dispensing end of syringe barrel pointed away from your face and towards the work piece. Store the syringe barrel in an appropriate holder when not in use.
4

Safety
Fire Safety
To avoid a fire or explosion, follow these instructions.
•Shut down all equipment immediately if you notice static sparking or arcing. Do not restart the equipment until the cause has been identified and corrected.
•Do not smoke, weld, grind or use open flames where flammable materials are being used or stored.
•Provide adequate ventilation to prevent dangerous concentrations of volatile particles or vapors. Refer to local codes or your material MSDS for guidance.
•Do not disconnect live electrical circuits when working with flammable materials. Shut off power at a disconnect switch first to prevent sparking.
•Know where emergency stop buttons, shutoff valves and fire extinguishers are located.
•Clean, maintain, test and repair equipment according to the instructions in your equipment documentation.
•Use only replacement parts that are designed for use with original equipment. Contact your EFD representative for parts information and advice.
Action in the Event of a Malfunction
If a system or any equipment in a system malfunctions, shut off the system immediately and perform the following steps:
•Disconnect and lock out system electrical power.
•Identify the reason for the malfunction and correct it before restarting the system.
Disposal
Dispose of equipment and materials used in operation and servicing according to local and national codes.
5

Getting
Started
The Ultra 2400 workstation is designed to provide complete process control for precise, repeatable fluid dispensing.
Key features include
•All-digital, multi-function display with simultaneous readout of air pressure, time, vacuum, deposit shot count and time of day
•Unique air management reservoir and high-speed solenoid system for consistent, repeatable deposits
•Time increment adjustments as small as 0.0001 seconds for precise deposit control
•Workstation panels to hold a variety of useful accessories, including light, ergonomic syringe barrel holder, magnifier and more
First Steps
First: Place the dispenser in your work area. The Ultra 2400 is equipped with “stay put” rubber pads. It can be placed on the benchtop or any flat surface.
Second: Connect to power and air supplies, and program the unit. For step-by-step setup instructions, see the Ultra 2400 Quick Start Guide.
Third: Now is a good time to activate your Ten Year Warranty. Please register your warranty online at www.efd-inc.com/warranty/ten. Or if you prefer, follow the instructions in the enclosed “Welcome” letter to contact your area EFD representative.
6
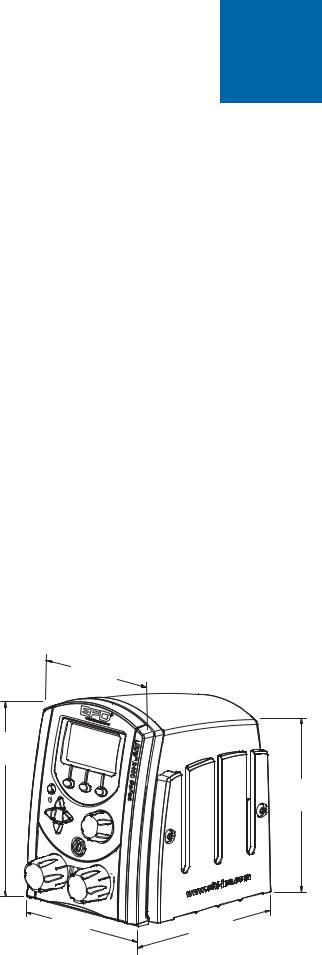
Specifications
Cabinet size: 14.3 x 18.1 x 17.3 cm (5.63W x 7.12H x 6.82D")
Weight: 2.3 kg (5.0 lb)
Power adapter:
AC input voltage: 100 to 240 VAC
AC input frequency: 47 to 63 Hz
DC output: 24 VDC @ 1.25A
End-of-cycle feedback circuits: 5 to 24 VDC; 100 mA maximum
Initiate circuits: Foot pedal, finger switch or 5 to 24 VDC signal
Cycle rate: Exceeds 600 cycles per minute
Time range: Programmable from 0.0001 to 999.9999 seconds
Ambient operating conditions:
Temperature: 5°C to 45°C (41°F to 113°F)
Humidity: 85% RH at 30°C non-condensing
Height above sea level: 2000 meters max (6,562 feet)
Meets or exceeds CE and CSA requirements
Ultra 2400
Air input: 80 to 100 psi (5.5 to 6.9 bar)
Air output: 0 to 100 psi (0 to 6.9 bar)
Ultra 2415
Air input: 80 to 100 psi (5.5 to 6.9 bar)
Air output: 0 to 15 psi (0 to 1.0 bar)
120.60mm
4.75"
Ultra 2405 |
180.91 mm |
Air input: 80 to 100 psi (5.5 bar to 6.9 bar) |
7.12 " |
|
|
Air output: 0 to 5 psi (0 to 0.34 bar) |
159.60 mm |
|
6.28 " |
Note: Specifications and technical details are subject to change without prior notification.
+
|
+ |
142.97 mm |
173.25 mm |
5.63 " |
6.82 " |
7
Features &
Controls:
Front Panel
|
|
|
|
|
|
|
|
|
|
|
cycle counter |
||||||||
|
|
|
|
|
|
|
|
|
|
|
|
|
|||||||
|
|
|
|
mode indicator |
|
|
time of day |
||||||||||||
|
|
|
|
|
|
|
|
|
|
|
|
|
|
|
|||||
|
|
dispense time |
|
|
|
|
|
|
|
dispense pressure |
|||||||||
|
|
|
|
|
|
|
|||||||||||||
|
|
|
|
|
|
|
|
|
|
|
|
|
|
|
|
||||
|
|
vacuum pullback |
|
|
|
||||||||||||||
|
|
|
|
|
|
|
|
|
|
|
|||||||||
|
|
|
|
|
|
|
|
|
|
|
|
|
|
|
|
menu |
|||
|
|
|
|
|
|
|
|
|
|
|
|
|
|
|
|
||||
|
|
|
|
|
|
|
|
|
|
|
|
|
|
|
|
|
|
|
|
|
|
|
power |
|
|
|
|
|
multi-function controls |
||||||||||
|
|
|
|
|
|
|
|
data/time control |
|||||||||||
|
|
|
|
|
|
|
|
|
|
|
|
||||||||
display navigation |
|
|
|
|
|
||||||||||||||
|
|
|
|
|
|
|
|
|
|
|
|
|
|
|
|
output air |
|
||
|
|
|
|
|
|
|
|
|
|
|
|
|
|
|
|
||||
|
|
|
|
|
|
|
|
|
|
|
|
|
|||||||
pressure regulator |
|
|
|
|
|
vacuum regulator |
|||||||||||||
|
|
|
|
|
|
|
|
|
|
|
|
|
|
|
|
|
|
|
|
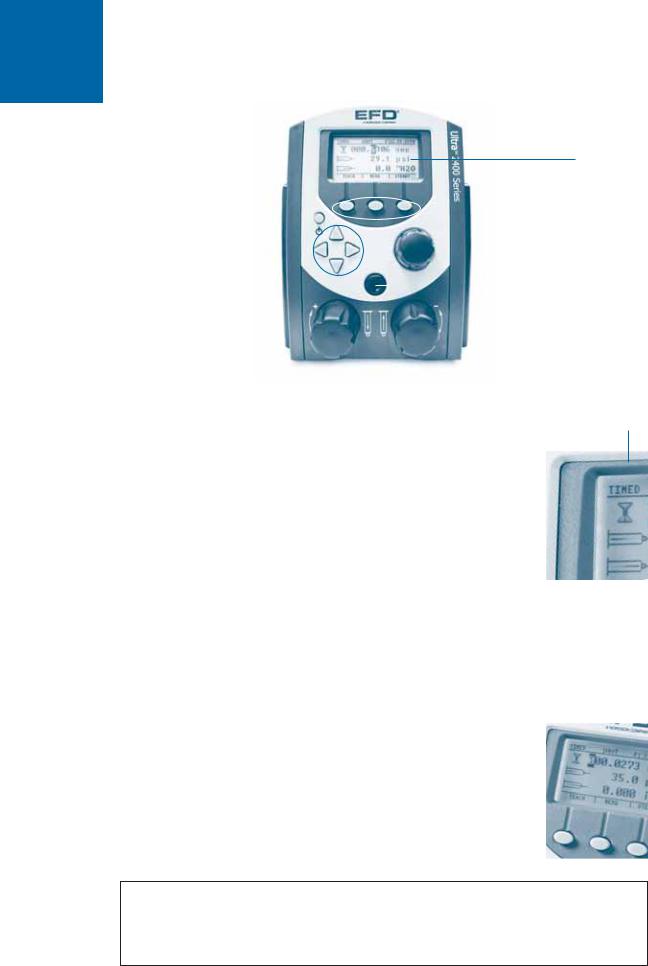
Dispense Mode
When powered for the first time, the Ultra 2400 Home screen displays in TIMED mode. Otherwise, it displays in the mode last used.
You can verify what mode you’re in by checking the top left corner of the display screen. It will be TIMED, TEACH, STEADY or MEMORY.
•You can return to TIMED mode from TEACH or STEADY by pressing TIMED in the bottom right corner of the display.
•You can return to TIMED mode from MEMORY by pressing MENU, then selecting TIMED.
See the appropriate section below for details on each dispense mode.
Timed
Mode
Dispense Time
Dispense time, shown with an hourglass icon, displays from 000.0001 to 999.9999 seconds. Follow these steps to set the dispense time.
•Begin in TIMED mode.
•Press the left/right arrows to highlight the first number you want to change.
•Press the up/down arrows to set the time. Or if you prefer, you can also use the timer dial (top right knob) to set the time.
•Repeat as needed to adjust the other numbers in the dispense time row.
See the Ultra 2400 Icon Guide, included with your dispensing system, if you are working in Chinese, Japanese, or Korean. Sample icons:
 (Timed)
  (Steady)
  (Teach)
  (Menu)
  (Select)
  (Home)
8
Features &
Controls:
Front Panel
Air Pressure
Air pressure is displayed in psi. See page 20 to change the display of pressure from psi to bar or kPa. It is shown with the icon of an arrow pushing into a syringe barrel. Follow these steps to set air pressure.
•Pull the air pressure regulator knob out to unlock it (bottom left knob).
•Turn the knob clockwise to the desired pressure setting.
•To reduce pressure, turn the knob counterclockwise until the display reads a lower pressure than needed. Then increase the pressure until you reach the correct setting.
•Push the knob in to lock the pressure setting.
For all Ultra 2400 Series units (models 2400, 2415, and 2405): Set plant air supply within 80 to 100 psi (5.5 to 6.9 bar).
Vacuum
Vacuum is displayed in inH2O (inches of water). See page 20 to change the display of vacuum from inH2O to inHg, kPa, mmHg, or Torr. It is shown with the icon of an arrow
pulling out of a syringe barrel. Follow these steps to set vacuum pressure.
•Pull the vacuum regulator knob out to unlock it (bottom right knob).
•Turn the knob clockwise to the desired setting. You can adjust the vacuum in increments of 0.1 inH2O.
•Push the knob in to lock the vacuum setting.
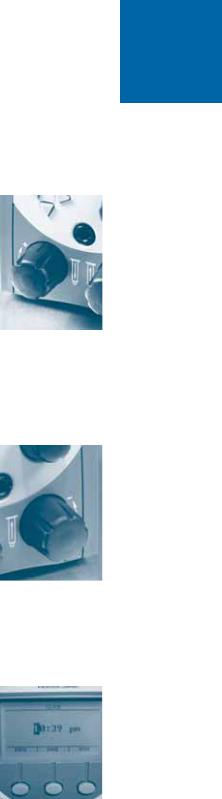
Clock
A real time clock is displayed in the top right corner. Follow these steps to set the clock.
•Press MENU.
•Press the down arrow to highlight SET CLOCK.
•Press SELECT.
•Press the left/right arrow to highlight the number to change.
•Press the up/down arrow to adjust the time. Or use the timer dial (top right knob) to adjust the time or toggle between AM (morning) and PM (afternoon/evening).
•Press SAVE. This saves the time and automatically returns you to the Home screen.
9
 Loading...