

Page 1

Babytherm 8004/8010
Open Care Infant Warmer System
Operating Instructions
WARNING:
For a full understanding of the
performance characteristics of this
equipment, the user should carefully
read this manual before operating.
MT-292-98
Page 2

NOTICE
Proprietary Information
This document contains information in which Dräger Medical, Inc. claims
proprietary rights. The information may not be reproduced in whole or in part
except as authorized in writing by Dräger. This information is the property of
Dräger Medical, Inc., it is provided solely for the use intended.
Repairs/Modifications
Repairs on this device shall be performed only by DrägerService or factory
authorized technical service personnel. Information about repairs can be
obtained from Dräger or Authorized Dealers. Dräger Medical, Inc. will not be
responsible for injury to persons or damage to property arising directly or
indirectly out of unauthorized repairs or modifications to this device. Furthermore, any unauthorized repairs or modifications void any warranty extended
by Dräger Medical Inc.
This document is provided for your information only. It will not be exchanged
or updated without request.
Trademarks
The Dräger name and logo are registered trademarks of Drägerwerk
Aktiengesellschaft.
Babytherm, BabyLink, and ThermoMonitoring are trademarks of
Drägerwerk Aktiengesellschaft.
© Dräger Medical AG & Co. KGaA 2001 . . . 2003
All rights reserved, Subject to modifications
Operating Instructions Babytherm 8004/8010, 4th ed.
2
Page 3

Contents
Important Safety Information . . . . . . . . . . . . . . . . . . . . . . . . . 4
Operator's Responsibility for Patient Safety . . . . . . . . . . . . . . 4
Limitation of Liability . . . . . . . . . . . . . . . . . . . . . . . . . . . . . . . . . . 4
Warranty . . . . . . . . . . . . . . . . . . . . . . . . . . . . . . . . . . . . . . . . . . . 5
Definitions . . . . . . . . . . . . . . . . . . . . . . . . . . . . . . . . . . . . . . . . . . 6
Summary of WARNINGS and CAUTIONS . . . . . . . . . . . . . . . 7
Intended Use . . . . . . . . . . . . . . . . . . . . . . . . . . . . . . . . . . . . . . 14
Applications . . . . . . . . . . . . . . . . . . . . . . . . . . . . . . . . . . . . . . . . 14
Restrictions of Use . . . . . . . . . . . . . . . . . . . . . . . . . . . . . . . . 15
Theory of Operation . . . . . . . . . . . . . . . . . . . . . . . . . . . . . . . . 16
Overview . . . . . . . . . . . . . . . . . . . . . . . . . . . . . . . . . . . . . . . . . . 16
Description of System Components . . . . . . . . . . . . . . . . . . . 17
Alarm System . . . . . . . . . . . . . . . . . . . . . . . . . . . . . . . . . . . . . . 18
Operating Concept . . . . . . . . . . . . . . . . . . . . . . . . . . . . . . . . . 19
Preparation . . . . . . . . . . . . . . . . . . . . . . . . . . . . . . . . . . . . . . . . 20
Preparing Pole Accessories . . . . . . . . . . . . . . . . . . . . . . . . . . 20
X-ray Tray . . . . . . . . . . . . . . . . . . . . . . . . . . . . . . . . . . . . . . . . . . 21
Preparing the Bed . . . . . . . . . . . . . . . . . . . . . . . . . . . . . . . . . . 22
Bed Canopy (Available Accessory) . . . . . . . . . . . . . . . . . . . . 24
Attaching Ventilator Circuit Support Arm . . . . . . . . . . . . . . . 24
Drainage Canister Hook . . . . . . . . . . . . . . . . . . . . . . . . . . . . . 24
Accessories for Oxygen Therapy . . . . . . . . . . . . . . . . . . . . . . 25
Storage Supplies . . . . . . . . . . . . . . . . . . . . . . . . . . . . . . . . . . . 26
Preparing for Intra-Hospital Patient Transport . . . . . . . . . . . 26
Configuration . . . . . . . . . . . . . . . . . . . . . . . . . . . . . . . . . . . . . . 59
Configuration . . . . . . . . . . . . . . . . . . . . . . . . . . . . . . . . . . . . . . 59
Activating Configuration Modes . . . . . . . . . . . . . . . . . . . . . . . 59
Activating Configuration Modes . . . . . . . . . . . . . . . . . . . . . . . 59
Using Configuration Modes . . . . . . . . . . . . . . . . . . . . . . . . . . 60
Using Configuration Modes . . . . . . . . . . . . . . . . . . . . . . . . . . 60
Equipment Care . . . . . . . . . . . . . . . . . . . . . . . . . . . . . . . . . . . . 64
Equipment Care . . . . . . . . . . . . . . . . . . . . . . . . . . . . . . . . . . . . 64
Disassembly . . . . . . . . . . . . . . . . . . . . . . . . . . . . . . . . . . . . . . . . 64
Disassembly . . . . . . . . . . . . . . . . . . . . . . . . . . . . . . . . . . . . . . . . 64
Cleaning / Disinfecting / Sterilizing . . . . . . . . . . . . . . . . . . . . 64
Cleaning / Disinfecting / Sterilizing . . . . . . . . . . . . . . . . . . . . 64
Before Next Use . . . . . . . . . . . . . . . . . . . . . . . . . . . . . . . . . . . . 65
Before Next Use . . . . . . . . . . . . . . . . . . . . . . . . . . . . . . . . . . . . 65
Inspection and Maintenance . . . . . . . . . . . . . . . . . . . . . . 66
Inspection and Maintenance . . . . . . . . . . . . . . . . . . . . . . 66
Replacement of Parts . . . . . . . . . . . . . . . . . . . . . . . . . . . . . . . . 66
Replacement of Parts . . . . . . . . . . . . . . . . . . . . . . . . . . . . . . . . 66
Preventive Maintenance Intervals . . . . . . . . . . . . . . . . . . . . . . 66
Preventive Maintenance Intervals . . . . . . . . . . . . . . . . . . . . . . 66
Disposing of the Babytherm . . . . . . . . . . . . . . . . . . . . . . . . . . 66
Disposing of the Babytherm . . . . . . . . . . . . . . . . . . . . . . . . . . 66
Troubleshooting . . . . . . . . . . . . . . . . . . . . . . . . . . . . . . . . . . . . 67
Troubleshooting . . . . . . . . . . . . . . . . . . . . . . . . . . . . . . . . . . . . 67
General System Failures . . . . . . . . . . . . . . . . . . . . . . . . . . . . . 67
General System Failures . . . . . . . . . . . . . . . . . . . . . . . . . . . . . 67
Mattress Heater (Babytherm 8010) . . . . . . . . . . . . . . . . . . . . 67
Mattress Heater (Babytherm 8010) . . . . . . . . . . . . . . . . . . . . 67
Radiant Heater . . . . . . . . . . . . . . . . . . . . . . . . . . . . . . . . . . . . . 68
Radiant Heater . . . . . . . . . . . . . . . . . . . . . . . . . . . . . . . . . . . . . 68
What’s What . . . . . . . . . . . . . . . . . . . . . . . . . . . . . . . . . . . . . . . 69
What’s What . . . . . . . . . . . . . . . . . . . . . . . . . . . . . . . . . . . . . . . 69
Overview . . . . . . . . . . . . . . . . . . . . . . . . . . . . . . . . . . . . . . . . . . 69
Overview . . . . . . . . . . . . . . . . . . . . . . . . . . . . . . . . . . . . . . . . . . 69
Radiant Warmer . . . . . . . . . . . . . . . . . . . . . . . . . . . . . . . . . . . . 70
Radiant Warmer . . . . . . . . . . . . . . . . . . . . . . . . . . . . . . . . . . . . 70
Controller . . . . . . . . . . . . . . . . . . . . . . . . . . . . . . . . . . . . . . . . . . 71
Controller . . . . . . . . . . . . . . . . . . . . . . . . . . . . . . . . . . . . . . . . . . 71
Controller - Rear View . . . . . . . . . . . . . . . . . . . . . . . . . . . . . . . 73
Controller - Rear View . . . . . . . . . . . . . . . . . . . . . . . . . . . . . . . 73
Labels . . . . . . . . . . . . . . . . . . . . . . . . . . . . . . . . . . . . . . . . . . . . . 74
Labels . . . . . . . . . . . . . . . . . . . . . . . . . . . . . . . . . . . . . . . . . . . . . 74
Technical Data . . . . . . . . . . . . . . . . . . . . . . . . . . . . . . . . . . . . . 76
Technical Data . . . . . . . . . . . . . . . . . . . . . . . . . . . . . . . . . . . . . 76
Operating Instructions Babytherm 8004/8010, 4th ed.
Testing Readiness for Operation . . . . . . . . . . . . . . . . . . . . . 27
Before First Time Use . . . . . . . . . . . . . . . . . . . . . . . . . . . . . . . 27
Before Each Use . . . . . . . . . . . . . . . . . . . . . . . . . . . . . . . . . . . . 27
Operation . . . . . . . . . . . . . . . . . . . . . . . . . . . . . . . . . . . . . . . . . 31
Precautions During Infant Care . . . . . . . . . . . . . . . . . . . . . . 31
Adjusting the Height (Available Option) . . . . . . . . . . . . . . . . 34
Switching On . . . . . . . . . . . . . . . . . . . . . . . . . . . . . . . . . . . . . . . 34
Manual Heater Operation . . . . . . . . . . . . . . . . . . . . . . . . . . . . 34
Using Skin Temperature Control . . . . . . . . . . . . . . . . . . . . . . 37
ThermoMonitoring™ Technique . . . . . . . . . . . . . . . . . . . . . . . 43
Switching Radiant Warmer Off . . . . . . . . . . . . . . . . . . . . . . . . 44
Using Heated Gel Mattress (Babytherm 8010) . . . . . . . . . . 44
Notes on Heater Settings . . . . . . . . . . . . . . . . . . . . . . . . . . . . 48
Using the Bed Canopy . . . . . . . . . . . . . . . . . . . . . . . . . . . . . . . 51
Using Phototherapy (Available Option) . . . . . . . . . . . . . . . . . 53
Switching Lighting On/Off . . . . . . . . . . . . . . . . . . . . . . . . . . . 55
Central Alarm . . . . . . . . . . . . . . . . . . . . . . . . . . . . . . . . . . . . . . 55
Oxygen Therapy . . . . . . . . . . . . . . . . . . . . . . . . . . . . . . . . . . . . 56
Suction . . . . . . . . . . . . . . . . . . . . . . . . . . . . . . . . . . . . . . . . . . . . 57
Taking X-Rays . . . . . . . . . . . . . . . . . . . . . . . . . . . . . . . . . . . . . . 58
Shutting Down . . . . . . . . . . . . . . . . . . . . . . . . . . . . . . . . . . . . . 58
Ordering Information . . . . . . . . . . . . . . . . . . . . . . . . . . . . . . . 80
Ordering Information . . . . . . . . . . . . . . . . . . . . . . . . . . . . . . . 80
Parts List . . . . . . . . . . . . . . . . . . . . . . . . . . . . . . . . . . . . . . . . . . 81
Parts List . . . . . . . . . . . . . . . . . . . . . . . . . . . . . . . . . . . . . . . . . . 81
Index . . . . . . . . . . . . . . . . . . . . . . . . . . . . . . . . . . . . . . . . . . . . . . 82
Index . . . . . . . . . . . . . . . . . . . . . . . . . . . . . . . . . . . . . . . . . . . . . . 82
Page 4

Important Safety Information
Operator's Responsibility for Patient Safety
Limitation of Liability
Important Safety Information
Operator's Responsibility for Patient Safety
WARNING !
Strictly follow this Operator's Instruction Manual.
Any use of the product requires full understanding and
strict observation of all portions of these instructions.
The equipment is only to be used for the purpose
specified under “Intended Use” on page 14.
Observe all WARNINGS and CAUTIONS as rendered
throughout this manual and on labels on the equipment.
The design of the equipment, the accompanying literature, and
the labeling on the equipment take into consideration that the
purchase and use of the equipment are restricted to trained
professionals, and that certain inherent characteristics of the
equipment are known to the trained operator.
Instructions, warnings, and caution statements are limited,
therefore, largely to the specifics of the Dräger design.
This publication excludes references to various hazards which
are obvious to a medical professional and operator of this
equipment, to the consequences of product misuse, and to
potentially adverse effects in patients with abnormal
conditions. Product modification or misuse can be dangerous.
Dräger Medical, Inc. disclaims all liability for the
consequences of product alterations or modifications, as well
as for the consequences which might result from the
combination of this product with other products whether
supplied by Dräger or by other manufacturers if such a
combination is not endorsed by Dräger Medical, Inc.
Limitation of Liability
Dräger Medical, Inc.'s liability, whether arising out of or related
to manufacture and sale of the goods, their installation,
demonstration, sales representation, use, performance, or
otherwise, including any liability based upon Dräger Medical,
Inc.'s Product Warranty, is subject to and limited to the
exclusive terms and conditions as set forth, whether based
upon breach of warranty or any other cause of action
whatsoever, regardless of any fault attributable to Dräger
Medical, Inc. and regardless of the form of action
(including, without limitation, breach of warranty, negligence,
strict liability, or otherwise).
THE STATED WARRANTlES ARE IN LlEU OF ALL OTHER
WARRANTIES, EXPRESSED OR IMPLIED, INCLUDING,
WITHOUT LIMITATION, WARRANTlES OF
MERCHANTABILITY, FITNESS FOR ANY PARTICULAR
PURPOSE, OR NONINFRINGEMENT.
Dräger Medical, Inc. shall not be liable for, nor shall buyer be
entitled to recover any special incidental or consequential
damages or for any liability incurred by buyer to any third party
in any way arising out of or relating to the goods.
Patient monitoring
The operators of the infant warmer system must recognize
their responsibility for choosing appropriate safety monitoring
that supplies adequate information on equipment performance
and patient condition. Patient safety may be achieved through
a wide variety of different means ranging from electronic
surveillance of equipment performance and patient condition
to simple, direct observation of clinical signs.
The responsibility for the selection of the best level of patient
monitoring lies solely with the equipment operator.
4
Operating Instructions Babytherm 8004/8010, 4th ed.
Page 5

Warranty
All Dräger products are guaranteed to be free of defects for a
period of one year from date of delivery.
The following are exceptions to this warranty:
1. The defect shall be a result of workmanship or material.
Defects caused by misuse, mishandling, tampering, or by
modifications not authorized by Dräger Medical, Inc. or its
representatives are not covered.
2. Rubber and plastic components and materials are
warranted to be free of defects at time of delivery.
Any product which proves to be defective in workmanship or
material will be replaced, credited, or repaired with Dräger
Medical, Inc. holding the option. Dräger Medical, Inc. is not
responsible for deterioration, wear, or abuse. In any case,
Dräger Medical, Inc. will not be liable beyond the original
selling price.
Important Safety Information
Warranty
Dräger Medical, Inc. is not responsible for normal
deterioration, wear, or abuse. In any event, Dräger Medical,
Inc. will not be liable beyond the original selling price of said
items. This warranty applies only if the following conditions are
met:
1. Dräger Medical, Inc. or its qualified representative is
promptly notified, in writing, upon detection of the defective
material or equipment.
2. Examination by Dräger Medical, Inc. or its qualified
representative confirms that the defect is covered by the terms
of this warranty.
The exclusive remedy in the event of breach of this warranty
shall be limited to repair or replacement of, or credit for, the
product, equipment or parts. Dräger Medical, Inc. alone shall
choose which of these options is appropriate.
The above is the sole warranty provided by Dräger Medical,
Inc. This warranty is in lieu of all other warranties, written or
oral, statutory, express or implied, including without limitation the warranty of merchantability, fitness for a particular
purpose or non-infringement of patent, trademark, or copyright.
Dräger Medical, Inc., Telford, PA
Operating Instructions Babytherm 8004/8010, 4th ed.
5
Page 6

Definitions
WARNING !
A WARNING statement refers to conditions with a
possibility of personal injury if disregarded.
CAUTION !
A CAUTION statement designates the possibility of damage
to equipment if disregarded.
NOTE: A NOTE provides additional information intended to
avoid inconveniences during operation.
Important Safety Information
Definitions
Inspection examination of actual condition
Service measures to maintain specified condition
Repair measures to restore specified condition
Maintenance inspection, service, and repair, where
necessary
Preventive
Maintenance
Typing conventions in this manual
Display messages are printed as »message«, e. g:
Controller keys are designated in bold print, e.g.
man.
Maintenance measures at regular
intervals
»battery charge low«
Operating Instructions Babytherm 8004/8010, 4th ed.
6
Page 7

Summary of WARNINGS and CAUTIONS
General WARNINGS and CAUTIONS
Important Safety Information
Summary of WARNINGS and CAUTIONS
WARNING !
Strictly follow this Operator's Instruction Manual !
Any use of the product requires full understanding and
strict observation of all portions of these instructions.
The equipment is only to be used for the purpose specified under "Intended Use" (see page 12). Observe all
WARNINGS and CAUTIONS as rendered throughout this
manual and on labels on the equipment.
WARNING !
Babytherm 8004/8010 must only be used by properly
trained clinical and nursing staff under the supervision of
a qualified physician familiar with the currently known
risks and benefits of using an infant warmer.
WARNING !
Dräger cannot warrant or endorse the safe performance
of third party accessories for use with the Babytherm
8004/8010 infant warmer system.
Only use accessories that are qualified to the required
specifications for an intended use in an oxygen enriched
environment.
WARNING !
This device is to be used only in rooms with line power
installations complying with national safety standards
for hospital patient rooms (e.g., IEC/EN 60601.1, "Safety
of Medical Equipment").
To maintain grounding integrity, connect only to a
"hospital grade" receptacle. Always disconnect supply
before servicing.
WARNING !
DANGER, risk of explosion if used in the presence of
flammable anesthetics.
This device is neither approved nor certified for use in
areas where combustible or explosive gas mixtures are
likely.
WARNING !
General information regarding electromagnetic compatibility (EMC) in accordance with the international EMC
standard IEC 60601-1-2: 2001
Electrical medical devices are subject to special precautionary measures with respect to electromagnetic compatibility
(EMC) and must be installed and commissioned in accordance with the EMC information provided in the technical
documentation available on request from DrägerService.
Portable and mobile HF communication devices can
affect electrical medical devices.
Do not touch the pins on plugs carrying ESD
warnings and do not establish connections
between these plugs without taking protective measures against ESD. Such measures
include wearing antistatic clothing and shoes,
holding an earthing bolt before and during connection, or
wearing electro-insulating or antistatic gloves. The staff
concerned should receive training in respect of these
ESD protective measures.
WARNING !
Do not use mobile phones within 33 feet (10 m) of the
device.
Mobile phones can cause interference to electrical and electronic medical devices, thereby putting patients at risk.
*
Dräger medical devices comply with the interference immunity
requirements of the specific standards for the products or
EN 60601-1-2 (IEC 60601-1-2). However, depending on the design
of the mobile phone and situation of use, field strengths may occur
in the immediate environment of a mobile phone that exceed the
limits of the standards quoted and therefore cause interference.
*
WARNING !
It is the responsibility of the physician to draw conclusions from any skin temperature measurements taken.
WARNING !
Operating Instructions Babytherm 8004/8010, 4th ed.
WARNING!
Electrical connections to equipment which is not listed in
these Operating Instructions should only be made following consultations with the respective manufacturers or a
qualified expert.
Skin temperature control must not be used with infants in
shock. Because of reduced peripheral blood flow the skin
temperature of these infants occasionally lies well below
the core body temperature. Using a skin temperature
control system could lead to overheating. We recommend
to set heater output manually when caring for patients
with such conditions.
7
Page 8

Important Safety Information
Summary of WARNINGS and CAUTIONS
WARNING !
Always check infant temperature at least at the intervals
of the timed alarm when using radiant heater in manual
mode.
WARNING !
Do not use skin temperature control for infants with a
fever. Their skin temperature is significantly higher than
normal so that controlling skin temperature would lead to
hypothermia. We recommend to set heater output manually when caring for patients with such conditions.
CAUTION !
Restriction of Distribution
Federal Law and Regulations in the United States and
Canada restrict this device to sale by or on the order of a
physician.
Device for use only in health care facilities and only by
persons with specific training and experience in the use of
the device.
WARNING !
To minimize the tendency of a mattress to slip at
maximum tilt, do not use sheets that would cover
mattress fully from the underside.
Use Dräger fitted mattress cover sheet (2M 21 272)
WARNING !
When preparing accessories for oxygen therapy, observe
all precautions against fire hazards from oxygen as
described in "Operation", page 56.
WARNING !
Use of the radiant warmer can cause an unnoticed
increase in the infant’s water loss.
WARNING !
Monitor oxygen concentration at all times during oxygen
therapy with an independent oxygen analyzer and take
the necessary precautions against the physiological risk
associated with the administration of oxygen, see
"Operation", page 56.
Precautions during preparation
WARNING !
Stability
To ensure continued protection against tipping over,
do not place unit on a slope of more than 10°.
Always observe load restrictions on indivual shelves/
poles as well as maximum combined load capacities.
WARNING !
For active infants use side panels of 230 mm (9 inch)
height.
Inner panels must be used with all patients, regardless of
whether (outer) side panels are open or closed!
Otherwise the patient could fall out!
Supervise active and older infants particularly closely.
WARNING !
Always select correct mattress type for intended mode of
operation, i.e. foam mattress for use without mattress
heater, gel mattress for use with matress heater
(Babytherm 8010 only).
CAUTION !
Always verify that monitor shelves and other accessories are
securely attached.
Always observe the following load limits per shelf:
max. 20 kg (44 lbs),
total load on both poles: max. 30 kg (66 lbs).
For items attached to pole on swivel shelves, do not exceed
load of 5 kg on that pole.
CAUTION !
Do not use the x-ray tray in the extended position to write on.
Do not place objects other than x-ray plate on tray.
Do not lean on the tray. Risk of damage.
Precautions during operation
WARNING !
Never leave infant unattended when surrounding panels
are down. Risk of patient injury! Infant may fall out of the
bassinet.
Operating Instructions Babytherm 8004/8010, 4th ed.
8
Page 9

Important Safety Information
Summary of WARNINGS and CAUTIONS
WARNING !
When operating surrounding panels, take care not to
pinch patient body parts, circuits, or other items, such as
bedding sheets.
WARNING !
Side panels must be securely locked in position and the
panel hardware must be visible above the surface of the
bed.
Inner panels must be used with all patients, regardless of
whether the side panels are open or closed.
With lively and/or older infants, 230 mm (9 inch) high
side panels should be used.
WARNING !
Continuous or intermittent audible alarms require immediate operator attention to avert or to prevent development of situations with the possibility of patient injury.
WARNING !
All accessories used must comply with national safety
standards for electromedical equipment used in patient
rooms (e.g. IEC/EN 60601.1).
WARNING !
Mattress Heater
(Babytherm 8010 only)
When mattress heating is used, the gel mattress must be
placed directly on the heated tray surface.
Do not use Dräger gel mattress (part no. 2M 20 827) in
any bassinets other than the Babytherm 8010. Use of a
gel mattress with unheated bassinets will result in uncontrolled cooling of infant.
Do not use a foam mattress with Babytherm 8010.
Heater plate temperatures above 40
cate the danger of patient burns when Babytherm 8010
is operated without the specified gel mattress.
Always take into account warm-up time of the mattress.
Wait approximately 1 hour before placing an infant in the
bassinet.
Do not switch off Babytherm while an infant is lying on the
gel mattress as this will result in uncontrolled cooling of
infant.
o
C (104 oF) impli-
WARNING !
Do not touch top of radiant warmer or protective screen.
Danger of burn injuries!
WARNING !
Operating Instructions Babytherm 8004/8010, 4th ed.
WARNING !
Infant Temperature Monitoring
Check infant temperature and skin condition at regular
intervals as prescribed by hospital protocol and adjust
temperature setting to individual patient needs.
Infant temperature must be closely monitored during
phototherapy or while the radiant heater is used in
conjunction with mattress heater.
Watch out for exposure to sunlight.
Do not place any objects on top of the radiant warmer.
Impeding ventilation may create a fire hazard!
WARNING !
When operating the radiant warmer while the bed is tilted,
closely monitor parts of the infant’s body that are closer
to the heater. They will receive more heat.
WARNING !
Do not use flammable cleaning agents or medications
while radiant heater is in operation.
Fire hazard!
WARNING !
Do not put any medications or infusion solutions in the
heated area.
9
Page 10

Important Safety Information
Summary of WARNINGS and CAUTIONS
WARNING !
Always check infant temperature at least at the intervals
of the timed alarm when using radiant warmer in manual
mode.
WARNING !
Do not use skin temperature control for infants in a state
of shock!
Skin temperature of these infants is much lower than
normal. Infants would be overheated using the automatic
skin temperature control. For infants in a state of shock,
set heater output to »man.« and measure infant temperature every 15 minutes.
WARNING !
Do not use skin temperature control for infants with a
fever. Their skin temperature is significantly higher than
normal. Using automatic skin temperature control would
lead to hypothermia. For infants with a high temperature,
set heater output to »man.« and measure infant temperature every 15 minutes.
WARNING !
Always use eye protection for the infant when using
phototherapy. Check regularly that the eye protection is
correctly positioned.
WARNING !
Always consider all aspects of an infant’s diffferentiated
diagnosis to ensure that no life-saving measures are
delayed.
Regularly measure the patient’s bilirubin level. Beware of
possible toxic effects of bilirubin photoisomers.
WARNING !
Always operate phototherapy lights in combination with
radiant warmer. Otherwise risk of hypothermia for the
undressed infant can occur.
Infant temperature must be closely monitored during
phototherapy because of the additional transfer of heat to
the infant.
Do not use reflective foil to boost the effect of phototherapy. A dangerous rise of the infant temperature can occur
when using reflective foil.
WARNING !
Phototherapy can upset the the patient’s water balance.
During phototherapy, the supply of fluids to the infant
must be increased, e.g. by parenteral infusion,
to compensate for the increased water loss.
WARNING !
Direct eye contact with the radiation source for an
extended period of time should be avoided when in use.
Protect patients in the immediate vicinity of the phototherapy device from the radiation emitted, e.g. by using goggles and shields.
Users should avoid remaining in the area of irradiation for
extended periods due to the risk of sunburn.
WARNING !
Fire Hazards from oxygen!
— Open flames or cigarettes!
— Textiles, plastics, and oils readily ignite in an oxygen
enriched atmosphere and burn with great intensity.
— Keep oxygen valves, connections, and seals free from
oil and grease.
— Open valves slowly.
— Do not operate Babytherm in the presence of
flammable anesthetics or disinfectants.
— Do not use or store flammable liquids such as alcohol,
ether, or acetone inside the Babytherm bassinet.
— Do not use electrical equipment inside canopy with the
exception of devices approved for use in explosive
environments.
WARNING !
Physiological risks of oxygen!
— Oxygen therapy only on the order of a physician.
— Elevated oxygen concentrations must be selected on
the basis of arterially measured oxygen partial
pressure in the infant's blood. Otherwise risk of
hyperoxemia (eye injuries with consequential blind-
ness) or hypoxemia (brain injuries) can occur.
— Monitor oxygen concentration at all times during
oxygen therapy using an independent oxygen analyzer.
WARNING !
Always monitor closely infant temperature when
bed canopy is in use.
Operating Instructions Babytherm 8004/8010, 4th ed.
10
Page 11

Important Safety Information
Summary of WARNINGS and CAUTIONS
WARNING !
Never leave Babytherm unattended with the side panels
open. Risk of patient injury can occur! Infant may fall out
of the bassinet.
WARNING !
Do not perform any infant care or therapy while configuring the system, because normal equipment functions
(e.g. temperature measurement, alarms) are disabled.
WARNING !
Always verify that sensor probe is specified and approved
for use with Dräger Babytherm 8004/8010.
WARNING !
Do not place sensor probe underneath the infant.
The measured value for skin temperature would become
distorted by the mattress.
WARNING !
Never use skin temperature probes for rectally measuring
infant temperature.
Specifically, never use skin temperature probe rectally for
skin temperature control as this would measure and use
core instead of skin temperature for control.
WARNING !
When using skin temperature control mode, check infant
skin condition at regular intervals as prescribed by hospital protocol and verify that skin temperature probe is
securely attached. A detached probe will measure air
temperature and the baby might become overheated.
WARNING !
Do not use a gel mattress with Babytherm 8004.
The unheated gel mattress would cool the infant.
Risk of hypothermia can occur!
WARNING !
Always consider all aspects of an infant’s diffferentiated
diagnosis to ensure that no life-saving measures are
delayed.
Regularly measure the patient’s bilirubin level.
WARNING !
During phototherapy, the supply of fluids to the infant
must be increased, e.g. by parenteral infusion,
to compensate for the increased water loss.
WARNING !
Never leave infant unattended while radiant warmer is in
operation.
Measure infant temperature at regular intervals as
prescribed by hospital protocol.
CAUTION !
Keep gel mattress clear of sharp objects. Risk of damage
can occur!
Do not fold or kink gel mattress. Roll up for transport.
CAUTION !
Do not place any objects above or underneath bassinet
where they might be damaged when height adjustments are
made.
Operating Instructions Babytherm 8004/8010, 4th ed.
WARNING !
Always warm up mattress before placing infant.
Do not switch off Babytherm while a baby is lying on the
gel mattress. Risk of hypothermia.
WARNING !
Check infant temperature at regular intervals as
prescribed by hospital protocol and adjust temperature
setting to individual patient needs.
CAUTION !
Always use cables with sufficient length for secure
connection at minimum and maximum height.
CAUTION !
Always observe the load limit of 50 kg (110 lbs) when electric
height adjustment option is installed.
CAUTION !
Do not use the x-ray tray in the extended position to write on.
Do not place objects other than x-ray plate.
Do not lean on the tray. Risk of damage.
11
Page 12

Important Safety Information
Summary of WARNINGS and CAUTIONS
CAUTION !
When using external phototherapy devices, keep in mind that
the maximum load on the bed canopy is11 kg (24 lbs).
Precautions during equipment care
WARNING !
Always follow accepted hospital procedures for handling
equipment contaminated with body fluids.
WARNING !
Always disconnect power supply before cleaning and
disinfecting.
CAUTION !
Do not fold gel mattress.
CAUTION !
Certain components of the bassinet consist of materials that
are sensitive to certain organic solvents sometimes used for
cleaning and disinfecting (e.g., alcohols, phenols, halogen
releasing compounds, oxygen releasing compounds, strong
organic acids, etc.). Exposure to such substances may cause
damage that is not always immediately recognized.
Sterilization of the bassinet itself with ethylene oxide (EtO) is
also not recommended.
Precautions during maintenance
WARNING !
To avoid any risk of infection, clean and disinfect bassinet
and accessories before any maintenance according to
established hospital procedures – this applies also when
returning units or parts for repair.
WARNING !
Maintenance work on the Babytherm 8004/8010 may be
performed by trained and factory authorized staff only.
WARNING !
Always disconnect power supply before servicing.
WARNING !
Never operate the infant warmer system if it has suffered
physical damage or does not seem to operate properly.
We recommend that you contact DrägerService for
maintenance service of the Babytherm 8004/8010.
WARNING !
When servicing the device, always use replacement parts
that are qualified to Dräger standards.
Dräger cannot warrant or endorse the safe performance
of third party replacement parts for use with Babytherm
infant warmers.
CAUTION !
Do not expose Babytherm 8004/8010 to high levels of
ultraviolet radiation. This may cause cracks in the acrylic
glass components.
CAUTION !
Only use detergents/disinfectants with a ph value of 7 to 9
for phototherapy lenses.
12
CAUTION !
Maintenance
The device must be inspected and serviced at regular
intervals. A record must be kept on this preventive
maintenance. We recommend obtaining a service contract
with DrägerService through your vendor.
For repairs of the device we recommend that you contact
DrägerService.
Operating Instructions Babytherm 8004/8010, 4th ed.
Page 13

This page intentionally left blank
Operating Instructions Babytherm 8004/8010, 4th ed.
13
Page 14

Intended Use
Applications
Intended Use
WARNING !
Babytherm 8004/8010 must only be used by properly
trained clinical and nursing staff under the supervision of
a qualified physician familiar with the currently known
risks and benefits of using an infant warmer.
Applications
Babytherm 8004/8010 is an open care infant warmer system
for warming premature babies, neonates and infants with a
body weight of up to 8 kg (17.6 lbs).
The device is intended for use in delivery rooms, operating
rooms, maternity and obstetric units, neonatal and pediatric
wards, neonatal and pediatric intensive care units.
Therapy and nursing uses
— As resuscitation table and in birthing rooms, obstetric units,
and NICUs
— As infant warmer bassinet during normal and intensive care
—For infant re-warming and compensation of heat loss
— For thermal stabilizing of infants with mattress heater
(Babytherm 8010 only)
— For gentle warming therapy using the combination of
radiant and mattress heater
— Cooling infants with fever (temperature of mattress below
infant body temperature, Babytherm 8010 only)
— With adjustable bed tilt for treatment of infants in
Trendelenburg and reverse Trendelenburg position
— For weaning infants from incubators
—For O
— For lowering an infant’s bilirubin levels when using the
Babytherm 8004 heating features
— Radiant warmer operation with a preset warmer output:
— Radiant warmer operation with infant temperature control
2 and nebulizer therapy (with appropriate
accessories)
phototherapy option
Radiant warmer output is set in manual mode, and therapy
time at higher warmer output levels is monitored with a
timed alarm.
("baby control mode"): Infant skin temperature is
automatically monitored and controlled.
Babytherm 8010 heating features
— Radiant warmer operation with a preset warmer output:
The radiant warmer output is set in manual mode, and
therapy time at the higher warmer output levels is
monitored.
— Radiant warmer operation with skin temperature control
(baby control mode): Skin temperature is automatically
monitored and controlled.
— Heated gel mattress, operating independently of the radiant
warmer:
Temperature of the heating pads is automatically monitored
and adjusted to attain and maintain a preselected temperature at the contact surface between infant and mattress.
Options
—Height adjustment
— One or two swivel cabinets
— Side panels (150 mm or 230 mm, (5.9 or 9.1 inches))
— IV-pole
— Phototherapy
— Bed canopy
— Swivel tray
— RS 232 interface
Frequently used third party accessories
— Bronchial aspirator
—O
2 flowmeter
—O2 distributor
—O2 distributor with cylinder connection
—O2 analyzer
—O2 hood
WARNING !
Dräger cannot warrant or endorse the safe performance
of third party accessories for use with the Babytherm
8004/8010 infant warmer system.
Only use accessories that meet the required specifications for an intended use in an oxygen enriched
environment.
Operating Instructions Babytherm 8004/8010, 4th ed.
14
Page 15

Restrictions of Use
CAUTION !
Restriction of Distribution
Federal Law and Regulations in the United States and
Canada restrict this device to sale by or on the order of a
physician.
This device is for use only in health care facilities and only by
persons with specific training and experience in the use of
the device.
WARNING !
This device is to be used only in rooms with properly
grounded 3-wire hospital grade outlets complying with
national safety standards for hospital patient rooms
(e.g., IEC/EN 60601.1, "Safety of Medical Equipment").
To maintain grounding integrity, connect only to a
"hospital grade" receptacle. Always disconnect supply
before servicing.
Intended Use
Restrictions of Use
WARNING !
DANGER! risk of explosion exists if this device is used in
the presence of flammable anesthetics. This device is
neither approved nor certified for use in areas where
combustible or explosive gas mixtures are likely.
WARNING !
Do not use mobile phones within 33 feet (10 m) of the
device.
Mobile phones can cause interference to electrical and
electronic medical devices, therefore placing patients at
*
risk.
* Dräger medical devices comply with the interference immunity
requirements of the specific standards for the products or
EN 60601-1-2 (IEC 60601-1-2). However, depending on the design
of the mobile phone and situation of use, field strengths may occur
in the immediate environment of a mobile phone that exceed the
limits of the standards quoted and therefore cause interference.
Operating Instructions Babytherm 8004/8010, 4th ed.
15
Page 16

Theory of Operation
Overview
Theory of Operation
Overview
Babytherm 8004 Babytherm 8010
D
Babytherm 8004
D
Babytherm 8010
C
skin C manual
skin
man.
10
5
1
Check
Inop.
OK
skin C manual matress C
10
C C
5
1
skin
man.
Check
>
38 C
<
Inop.
36 C
OK
20 15 10 5 0 5 10 15 20
Operating Instructions Babytherm 8004/8010, 4th ed.
16
Page 17

Description of System Components
Theory of Operation
Description of System Components
Babytherm consists of:
— a mobile chassis with infant bassinet
— a control unit with operating panel
— a radiant heater
— a heated gel mattress (Babytherm 8010 only)
Control unit
The control unit is located below the radiant warmer and
between the two support poles at the head end of the bed.
The control panel contains a membrane keypad and integral
alphanumeric display (2 x 40 characters) providing user
guidance for easier operation.
Radiant warmer
The radiant warmer combines two infrared ceramic heaters
and two examination lights for illuminating the bed surface.
The bed surface lighting can be adjusted as a examination
light and for night lighting. The well balanced color spectrum
of the lamps facilitates recognition of diagnostically significant
skin color nuances.
The radiant warmer can be operated in manual control or skin
temperature control mode. In manual mode, fixed warmer
output levels of 1 to 10 are set.
In "skin temperature control" mode, the patient’s skin
temperature is continuously adjusted towards a preselected
optimum setting.
In this mode, the radiant warmer output level is automatically
adjusted to the needs of the patient.
Both modes of operation are monitored by self-check routines
and alarms.
ThermoMonitoring™ technique (available option)
ThermoMonitoring is made possible with a secondary skin
temperature sensor. Abdominal/central and peripheral skin
temperature readings (tummy-toe temperature monitoring) are
displayed on the controller. They can be graphically
represented using the optional interface (RS 232) and
a monitor. This option improves the diagnostic capabilities
of the system.
Heated gel mattress (Babytherm 8010)
The mattress heater system consists of the following
components:
gel mattress, aluminium heating plate, and controller.
The gel mattress consists of a highly heat-conductive gel that
does not "run" or move even when the bed is tilted. The gel is
surrounded by a film of soft skin-like material.
The mattress molds itself to the body contours of the patient
laying on it, thereby providing a large contact surface that
transfers warmth to the patient and avoids pressure points.
When the gel mattress is cold, warmth is transferred from the
patient to the mattress.
The gel has good heat storage properties. If the AC power
supply is interrupted, e.g. during in-hospital transport, the
patient will be kept warm for about 15 minutes, provided that
insulation is sufficient (blanket, bed canopy).
The heating system consists of a thick aluminium plate and a
heating element below the plate. This system ensures that heat
is distributed evenly over the entire bed surface.
The control and display panel for the heated gel mattress is
located on the right-hand side of the controller.
Mattress temperature is adjusted with reference to a
temperature setpoint entered by the user. The set temperature
is only reached in areas where the patient is in contact with the
mattress.
System monitoring includes self-check routines and alarms.
Configuration modes
Configuration modes are special operational modes of the
Babytherm 8004/8010 controller. In these modes, information
regarding the current software version and error log can be
checked. The device can also be configured with user specific
settings for skin temperature alarm threshold, volume of
audible alarms, as well as language and display contrast.
A configuration mode can also test the built-in nurse call and
keys of the operating panel.
Operating Instructions Babytherm 8004/8010, 4th ed.
Phototherapy (available option)
Light from the halogen lamps contributes to photo-chemical
breakdown of bilirubin in the skin. Dräger halogen lights are
particularly effective at wavelengths around 460 nm.
Phototherapy is switched on/off from the main controller
operating panel.
17
Page 18

Theory of Operation
Alarm System
Alarm System
The Babytherm controller distinguishes three alarm levels.
Warning (high potential risk)
Continuous audible alarm that cannot be silenced in case of:
— device failure
— power failure
Alarm tone sequence that may be silenced in combination with
a blinking red LED for:
— mattress heater sensor failure
— mattress heater exceeding temperature limits
— skin temperature sensor not connected while operating in
skin temperature control mode
— failure of a skin temperature sensor
— skin temperature above 39 oC (102.2 °F)
91 29 457092 29 457093 29 457
Caution (medium potential risk)
Alarm tone sequence (may be silenced) in combination with a
blinking yellow LED for:
— deviation between setpoint and measured value of skin or
mattress temperature exceeding tolerance
— 15-minute alarm (as a reminder to check core temperature
at least every 15 minutes with heater levels higher than 4,
during manual mode)
Message (low potential risk)
Display messages for:
— measured values out of measuring range
— low battery voltage
Any alarm that has not been acknowledged is indicated by the
flashing red central alarm light on the radiant heater unit.
The alphanumeric display shows a specific message for the
active alarm.
NOTE: A new alarm being activated will always override
audible alarm silencing.
Operating Instructions Babytherm 8004/8010, 4th ed.
18
Page 19

Operating Concept
Theory of Operation
Operating Concept
➈
C C
skin C manual mattress. C
skin
man.
10
5
1
➇
➉
➆
Babytherm 8010
>
38 C
<
36 C
OK
Check
Inop.
➅
➄
➃
➂
➁
➀
094 29 458
Operating Instructions Babytherm 8004/8010, 4th ed.
➀ ON/OFF indicator:
The green LED is lit when the unit is ON.
The red LED is lit following a power failure.
➁ OK button confirms advisory messages and settings.
If the OK button is not pressed within 10 seconds of
entering a new setting, the previous settings remain active.
➂ Inop alarm display.
➃
Button for checking the LEDs, displays, enunciator, and
audible alarm.
➄ Button for silencing audible alarms.
➅ Visual display for alarms:
Warning = red LED. Caution = yellow LED.
➆ Text display: shows advisory messages for the user.
➇ Babytherm 8010 only – display and keypad for the heated
gel mattress:
top: display for the measured mattress temperature.
bottom: display for the set mattress temperature, with
buttons for setting the desired temperature.
right: indicators for operation in extended setting range –
high (> 38 °C / 100.4 °F) or low (< 36 °C / 96.8 °F).
➈ Display and keypad for the radiant warmer:
top: display for the measured value of the core and peripheral skin temperature.
bottom: display for the set skin temperature with buttons for
setting the desired value and a toggle button for selecting
"man." (manual control mode) or "skin" (skin temperature
control) mode.
The active mode is indicated by the relevant yellow LED.
right: display of heater output levels 1 to 10, for manual
operation of the radiant warmer.
Heater levels 1 to 3 = green LEDs
Heater levels 4 to 10 = yellow LEDs
buttons for selecting the desired increment.
➉ On/Off buttons for:
Examination light
Night light
Phototherapy (available option)
Radiant warmer
Each of these buttons has a yellow LED that is lit when the
respective function is switched on.
19
Page 20
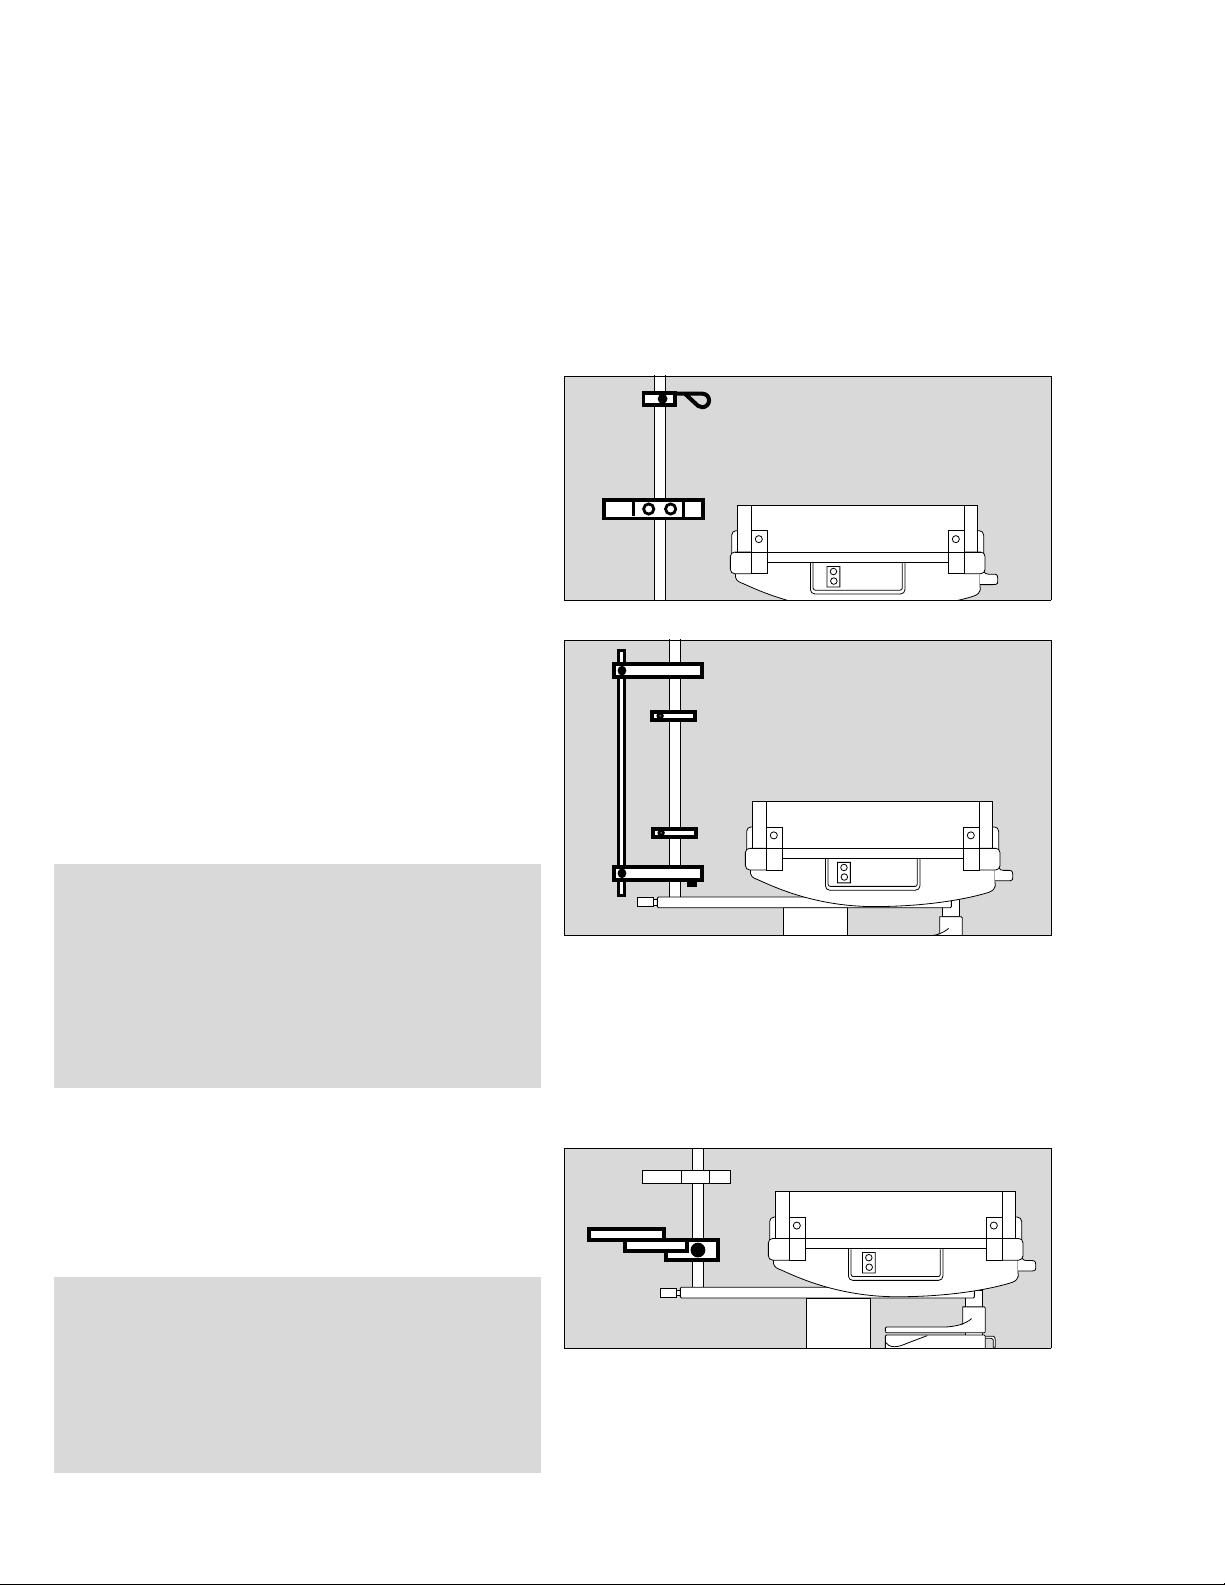
Preparation
Preparing Pole Accessories
Preparation
Preparing Pole Accessories
Monitor Shelf
Babytherm comes equipped with one monitor shelf.
Mounting rail elements (available option) for monitor shelf:
1 Screw rail element to left and/or right of monitor shelf
● Place desired auxiliary equipment on the rails and shelf.
Max. 20 kg per shelf.
2 Fasten infusion holder bracket (2M 21 514) to one of the
poles at a convenient height.
IV pump support/rail brackets
These rail accessories are designed to support smaller
auxiliary equipment, e.g. O2 flowmeter, O2 analyzer, infusion
pumps.
3 Attach compact rail brackets (2M 85 337) to one of the
poles at a convenient height.
4 Attach rail bracket (G13 821 or G 13 822) and
5 IV-pole (G 13 823 or G 13 831) through holes in rail
brackets at the required height.
2
1
003 29 457
4
3
5
3
CAUTION !
Always verify that monitor shelves and other accessories are
securely attached.
Always observe the following load limits per shelf:
max. 20 kg (44 lbs).
total load on both poles: max. 30 kg (66 lbs).
For items attached to pole on swivel shelves, do not exceed
load of 5 kg (11 lbs) on that pole.
Swivel tray
For small items or parts, maximum load capacity 3 kg (6.5 lbs).
● Position the swivel tray on one of the poles of the stand and
tighten the hand screw.
Recommended height: level with the mattress.
WARNING !
Stability
To ensure continued protection against tipping over,
do not place unit on a slope of more than 10
Always observe load restrictions on individual shelves/
poles as well as maximum combined load capacities
(see CAUTION above).
o
.
4
004 29 457
Operating Instructions Babytherm 8004/8010, 4th ed.
005 29 457
20
Page 21

X-ray Tray
Babytherm 8004 only
CAUTION !
Do not use the x-ray tray in the extended position to write on.
Do not place objects other than x-ray plates on the tray.
Do not lean on the tray. Risk of damage.
Preparation
1 Slide x-ray tray horizontally into its home position.
Preparation
X-ray Tray
1
2 Lower x-ray tray cover onto the bed
– pegs engage in the holes in the x-ray tray cover.
● Prepare the bed, see page 22.
006 29 457
2
2
007 29 457
Operating Instructions Babytherm 8004/8010, 4th ed.
21
Page 22

Preparation
Preparing the Bed
Preparing the Bed
The bed is surrounded by two side panels and two end panels,
which can be opened independently of each other. End panels
have cutouts with U-grommets for routing patient cables.
Installing surrounding panels
1 Insert lower mounting pins of panel hinges into the hinge
guide on either side of the bassinet base.
NOTE: With the panels on the long side, ensure that the
handle points outward.
2
2
● Position panel semi-upright.
2 Press panel down firmly, until pins lock into position at the
bottom of the hinge guide.
● Tilt panel fully upright and let it drop into the locking
position.
● Install all four panels in the same fashion.
Verify that the panels are seated correctly!
To open:
● Lift panel all the way up, until upper pins on hinge brackets
are out of their hinge guide, then fold panel down.
With lively infants or older children:
● Use 230 mm (9 inch) high panels.
Installing inner panels
● Insert pins into tapered holes in the corners of the bassinet
and press down slightly, until the inside panel is firmly
seated.
11
008 29 457
Operating Instructions Babytherm 8004/8010, 4th ed.
WARNING !
For active infants use side panels of 230 mm (9 inch)
height.
Inner panels must be used with all patients, regardless of
whether (outer) side panels are open or closed!
Otherwise the patient could fall out!
Supervise particularly active and older infants closely.
Verify that the panels are seated correctly!
22
009 29 457
Page 23

Mattress
WARNING !
Always select correct mattress type for intended mode of
operation, i.e. foam mattress for use without mattress
heater, gel mattress for use with matress heater
(Babytherm 8010 only).
● Place the mattress in bassinet and cover it with a cotton
sheet.
Tilting the bed
1 Pull handle of locking mechanism towards the front.
Preparation
Preparing the Bed
2 Press handle down for head-up (Trendelenburg) position.
Pull handle up for head-down (reverse-Trendelenburg)
position.
● Release locking handle: the bed automatically locks into
the selected position.
The bed can be tilted in small increments.
Maximum tilt angles:
Head up (Trendelenburg) position: 20
Head down (reverse Trendelenburg) position: 15
o
o
Preferred positions:
Horizontal,
o
tilt head-up and
10
o
10
tilt head-down.
The mattress may slip at maximum tilt.
WARNING !
To minimize the tendency of a mattress to slip at
maximum tilt, do not use sheets that would cover
mattress from the underside.
Use Dräger fitted mattress cover sheet (2M 21 272).
1
010 29 457
2
095 29 457
Operating Instructions Babytherm 8004/8010, 4th ed.
23
Page 24

Preparation
Bed Canopy (Available Accessory)
Attaching Ventilator Circuit Support Arm
Drainage Canister Hook
Bed Canopy (Available Accessory)
Higher side panels (230 mm or 9 inches) are recommended
when using the canopy.
● Check that the bed canopy (2M 30 392) is closed.
When the bed canopy is not required:
● Attach bracket (2M 21 342) to standard rail.
1 Hang bed canopy from bracket.
Attaching Ventilator Circuit Support Arm
● Insert flexible support arm (2M 21 191) into hole in the left
side of head panel and tighten with knurled screw.
011 29 457
1
012 37 077
019 29 457098 37 077
Drainage Canister Hook
2 Insert hook (2M 21 338) horizontally into the hole in the
Babytherm casing.
3 Pivot hook downwards.
24
Operating Instructions Babytherm 8004/8010, 4th ed.
2
3
3
Page 25

Accessories for Oxygen Therapy
WARNING !
When preparing accessories for oxygen therapy, observe
all precautions against fire hazards from oxygen as
described in "Operation", page 56.
O2 flowmeter
● Prepare flowmeter in accordance with its respective
Instructions for Use.
To install a flowmeter on the compact rail:
1 Mount flowmeter to the compact rail and secure.
2 Attach O2 supply hose.
3 Connect O2 supply hose to the O2 wall outlet terminal.
Preparation
Accessories for Oxygen Therapy
1
3
2
O2 analyzer
● Prepare O2 analyzer following its respective Instructions
for Use.
● Fasten analyzer, supplied with an appropriate holder or
clamp, to the compact rail.
● Place O2 sensor on the bed, and
feed cable through hole in the front.
● Plug sensor connector into the measuring unit.
O2 supply via injector (2M 14 190)
When using the injector, the higher side panels (23 cm or
9 inches) and the bed canopy should be used (see page 22
and following).
4 Press locking lever on mounting flange and push injector
into flange.
● Allow locking lever on injector to engage. The injector is
now locked.
● Connect the hose.
015 37 077
017 29 457018 37 077
4
Operating Instructions Babytherm 8004/8010, 4th ed.
WARNING !
Monitor oxygen concentration at all times during oxygen
therapy with an independent oxygen analyzer and take
the necessary precautions against the physiological risk
associated with the administration of oxygen, see
"Operation", page 56.
25
Page 26

Preparation
Storage Supplies
Storage Supplies
Units with height adjustable column:
— One or two swivel cabinets (available option) each with
2 swivel compartments and 1 swivel tray.
Units without height adjustment:
— 2 open compartments in the column (standard),
or
— 1 swivel cabinet with 2 swivel compartments and 1 swivel
tray (available option).
For clearly organized storage of necessary supplies and
accessories
Preparing for Intra-Hospital Patient Transport
● Monitor the infant’s core temperature.
● If height adjustment option is installed, lower the bed to
lowest possible position.
● Swivel all cabinets inwards.
● Swivel all swivel trays inwards.
● Remove X-ray cartridge from X-ray tray (see page 58).
● Remove or relocate any accessories protruding sideways
from the unit.
● Switch off heating systems and disconnect unit from power.
● Install canopy (available accessory) to protect infant from
cold drafts.
Immediately after transport:
● Connect unit back to AC line power and switch heating
systems on.
Operating Instructions Babytherm 8004/8010, 4th ed.
26
Page 27

Testing Readiness for Operation
Before First Time Use
1 Verify that AC line voltage matches values indicated on the
rating plate next to the power cable.
2 Connect power plugs to power outlets.
WARNING !
Testing Readiness for Operation
Before First Time Use
Before Each Use
To maintain grounding integrity, connect only to a
"hospital grade" receptacle.
Before Each Use
● Check that unit has been disinfected.
● Check that side panels are locked securely into place.
The panel hardware must be visible above the bed surface.
● Check that side panels are free from cracks and sharp
edges.
● Check that correct mattress is in the bassinet.
Operation with mattress heater – gel mattress
Operation without mattress heater – foam mattress
● Check that bed tilts properly and locks securely into
position.
● Check that required accessories and therapy equipment
are available and in proper working condition.
● Check that gas supply is available and sufficient for the
accessories and equipment to be used.
● Check that cables and hoses are correctly and securely
installed.
● Check that both infrared radiators are providing heat by
placing your hand carefully at a safe distance from the
radiant heater.
1
2
021 37 077
Operating Instructions Babytherm 8004/8010, 4th ed.
CAUTION !
Never route patient circuits, lines or cables over panels –
they may become pinched when folding up panels or when
installing bed canopy.
Checking height adjustment (available option)
Test height adjustment system if installed:
3 Press right pedal briefly to raise the bed.
4 Press left pedal briefly to lower the bed.
3
4
022 29 457
27
Page 28

Testing Readiness for Operation
Before Each Use
● Adjust to comfortable working height.
CAUTION !
Do not place any objects above or underneath bassinet
where they might be damaged when height adjustments are
made.
CAUTION !
Always use circuits and patient lines with sufficient length for
secure connection at minimum and maximum height.
CAUTION !
Always observe the load limit of 50 kg (110 lbs) when electric
height adjustment option is installed.
Switching on and activating the self-test
● Press On/Off button until it engages (ON).
● Babytherm now performs a self-test to check important
functions.
1 The following message appears in the display:
»All displays on, horn on«.
All displays will be lit for about 2 seconds:
digital displays will read 88.8 and the enunciator will emit a
continuous audible alarm.
1 The following message appears in the display:
»All displays off, soft alarm on«.
All displays will remain dark for about 2 seconds
simultaneously with an audible alarm.
2 The green LED is lit.
3 After about 2 seconds, the unit will display the radiant
warmer mode:
»Manual« – no skin temperature sensor in place
or
»Skin« – at least the yellow skin temperature sensor is
connected.
The corresponding LED flashes.
4 The preconfigured set values are displayed.
1 If text display reads »Battery charge low«
5 and the yellow LED is lit, the battery for the power failure
alarm is being charged. It takes about 30 minutes to charge
the battery.
5 The yellow LED will then go out.
6 If the red inop. LED is lit, indicating an operating fault,
see “Troubleshooting” on page 67.
1
10
5
skin C manual mattress. C
4
skin
man.
1
4
3
C
<
36 C
%$
Babytherm 8010
15min
023 29 457
5
6
Operating Instructions Babytherm 8004/8010, 4th ed.
2
024 29 457
28
Page 29

Checking LEDs, displays and audible alarm
Testing Readiness for Operation
Before Each Use
1 Press
k key.
2 The following message appears in the display:
»All displays on, horn on«.
All the displays will be lit for about 2 seconds:
digital displays will read 88.8 simultaneously with a
continuous audible alarm from the enunciator.
2 The following message appears in the display:
»All displays off, soft alarm on«.
All displays will remain dark for about 2 seconds
simulataneously with an audible alarm.
This functional check may also be performed while the unit
is in operation.
● Check at least once a day.
Testing power failure alarm
● Disconnect power plug.
3 The red
N LED should light simultaneously with a
continuous audible alarm.
● Reconnect power.
NOTE: Babytherm will continue to operate with values set from
before the power failure.
2
10
5
1
skin C manual mattress. C
skin
man.
10
5
1
skin C manual mattress. C
skin
man.
C
<
36 C
C
<
36 C
Babytherm 8010
15min
1
025 37 077
Babytherm 8010
15min
Operating Instructions Babytherm 8004/8010, 4th ed.
Testing lights
4 Press left-hand button. The bed should now be lit
by the examination light.
4 Press button again. The examination light will be switched
off.
5 Press middle button. The bed should now be lit by the night
light.
5 Press button again. The night light will be switched off.
45
3
026 37 077
29
Page 30

Testing Readiness for Operation
Before Each Use
Testing phototherapy (available option)
1 Press button. The yellow LED in the button will start to flash.
2 The following message appears in the text display:
»Phototherapy: Use eye protection
Press OK button to start XX:XX:XX«.
3 Pressing the OK button switches phototherapy lights on.
2 The following message appears in the text display for
5 seconds: :
»Duration of phototherapy XX:XX:XX«.
1 The yellow LED in the button is now continuously lit.
2
10
5
1
skin C manual mattress. C
skin
man.
C
<
36 C
Babytherm 8010
15min
3
1 Press button.
2 The following message appears in the text display:
»Phototherapy OFF
Press OK button to confirm XX:XX:XX«.
3 Press OK button to switch phototherapy lights off.
1 The yellow LED in the button will go out.
1
026 29 457
30
Operating Instructions Babytherm 8004/8010, 4th ed.
Page 31

Operation
Precautions During Infant Care
WARNING !
Never leave infant unattended when surrounding panels
are down. Patient injury can occur. Infant may fall out of
the bassinet.
WARNING !
Operation
Precautions During Infant Care
Increased heat is directed to the infant when the heated gel
mattress, radiant warmer, and phototherapy are operated in
combination. This should to be taken into account when
setting the heating systems. Follow closely instructions
beginning on page 48 for setting the two heating systems
both separately and in combination. Changes in ambient conditions, e.g. drafts, can affect the infant’s temperature balance.
When operating side panels or the bed canopy, take care
not to pinch patient body parts, cables, or other items,
such as bedding sheets.
WARNING !
Side panels must be securely locked in position and the
panel hardware must be visible above the surface of the
bed.
Inner panels must be used with all patients, regardless of
whether the side panels are open or closed.
With lively and/or older infants, 230 mm (9 inch) high
side panels should be used.
WARNING !
Continuous or intermittent audible alarms require immediate operator attention to avert or to prevent development of situations with the possibility of patient injury.
WARNING !
All accessories used must comply with national safety
standards for electromedical equipment used in patient
rooms (e.g. IEC/EN 60601.1).
WARNING !
Infant Temperature Monitoring
Monitor the patient's core temperature regularly using a
separate thermometer and adjust temperature setting to
individual patient needs. Watch out for exposure to sunlight.
It is the responsibility of the doctor to draw conclusions
from the skin temperature measurements taken.
At regular intervals, check whether both infrared radiators
are providing warmth by placing your hand carefully at a
safe distance from the radiant heater.
Mattress heater
WARNING !
Mattress heating
When mattress heating is used, the gel mattress must be
placed directly on the heated tray surface.
Do not use Dräger gel mattress (part no. 2M 20 827) in
any bassinets other than the Babytherm 8010. Use of a
gel mattress with unheated bassinets will result in uncontrolled cooling of infant.
Do not use a foam mattress with Babytherm 8010.
Heater plate temperatures above 40
cate the danger of patient burns when Babytherm 8010 is
operated without the specified gel mattress.
Always take into account warm-up time of the mattress.
Wait approximately 1 hour before placing an infant in the
bassinet.
Do not switch off Babytherm while an infant is laying on
the gel mattress as this will result in uncontrolled cooling
of infant.
CAUTION !
Keep gel mattress clear of sharp objects. Damage can occur.
Do not fold or kink gel mattress. Roll up for transport.
Radiant warmer
o
C (104 oF) impli-
WARNING !
Use of the radiant warmer can cause an unnoticed
increase in the infant’s water loss.
WARNING !
Do not touch top of radiant warmer or protective screen.
Burn injuries can occur.
Operating Instructions Babytherm 8004/8010, 4th ed.
31
Page 32

Operation
Precautions During Infant Care
WARNING !
Do not place any objects on top of the radiant warmer.
Impeding ventilation may create a fire hazard.
WARNING !
When operating the radiant warmer while the bed is tilted,
closely monitor parts of the infant’s body that are closer
to the heater. They will receive more heat.
WARNING !
Do not use flammable cleaning agents or medications
while radiant warmer is in operation.
This is a fire hazard.
WARNING !
Do not put any medications or infusion solutions in the
heated area.
WARNING !
Always check infant temperature at least at the intervals
of the timed alarm when using the radiant warmer in manual mode.
WARNING !
Do not use skin temperature control for infants in a state
of shock !
Skin temperature of infants in shock is much lower than
normal. Infants would be overheated using the automatic
skin temperature control. For infants in a state of shock,
set heater output to »man.« and measure infant temperature every 15 minutes.
WARNING !
Do not use the bed canopy in combination with the
radiant warmer.
Higher output settings of the radiant warmer may cause
surface temperatures of the canopy to rise beyond
acceptable levels. Burn injuries can occur.
Phototherapy (available option)
WARNING !
Always operate phototherapy lights in combination with
radiant warmer. Otherwise risk of hypothermia for the
undressed infant can occur.
Infant temperature must be closely monitored during
phototherapy because of the additional transfer of heat to
the infant.
WARNING !
Always use eye protection for the infant when using
phototherapy.
WARNING !
Check infant temperature at regular intervals as
prescribed by hospital protocol.
Phototherapy increases heat transfer to the infant.
Measure infant's bilirubin level at regular intervals as
prescribed by hospital protocol.
Oxygen therapy (with optional accessories)
WARNING !
Operating Instructions Babytherm 8004/8010, 4th ed.
WARNING !
Do not use skin temperature control for infants with a
fever. Their skin temperature is significantly higher than
normal. Using automatic skin temperature control would
lead to hypothermia. For infants with a high temperature,
set heater output to »man.« and measure infant temperature every 15 minutes.
32
Fire Hazards from oxygen!
— Do not use open flames or cigarettes!
— Textiles, plastics, and oils readily ignite in an oxygen
enriched atmosphere and burn with great intensity.
— Keep oxygen valves, connections, and seals free from
oil and grease.
— Open valves slowly.
— Do not operate Babytherm in the presence of flamma-
ble anesthetics or disinfectants.
— Do not use or store flammable liquids such as alcohol,
ether, or acetone inside the Babytherm bassinet.
— Do not use electrical equipment inside canopy with the
exception of devices approved and certified for use in
explosion hazard environments.
Page 33

Operation
Precautions During Infant Care
WARNING !
Physiological risks of oxygen!
— Use oxygen therapy only on the order of a physician.
— Elevated oxygen concentrations must be selected on
the basis of arterially measured oxygen partial
pressure in the infant's blood. Otherwise risk of
hyperoxemia (eye injuries with consequential blindness) or hypoxemia (brain injuries).
— Monitor oxygen concentration at all times during
oxygen therapy using an independent oxygen analyzer.
X-ray tray
CAUTION !
Do not use the x-ray tray in the extended position to write on.
Do not place objects other than x-ray plates in the x-ray tray.
Do not lean on the tray. Risk of damage.
Remove x-ray cartridge from the x-ray tray for transport.
Bed canopy
Configuration mode
WARNING !
Do not perform any infant care or therapy while configuring the system, because normal operating functions (e.g.
temperature measurement, alarms) are disabled.
WARNING !
Always closely monitor infant temperature when bed
canopy is in use.
The effect of the radiant warmer is reduced when the bed
canopy is in use.
When the bed canopy is in place, the side panels can be
folded down.
WARNING !
Never leave Babytherm radiant warmer unattended with
the side panels open. Risk of patient injury! Infant may fall
out of the bassinet.
The bed canopy should not be used as a convenient place to
lay objects, clothing, etc..
When using external phototherapy devices, keep in mind that
the maximum load on the bed canopy is 11 kg (24 lbs).
Operating Instructions Babytherm 8004/8010, 4th ed.
33
Page 34

Operation
Adjusting the Height (Available Option)
Switching On
Manual Heater Operation
Adjusting the Height (Available Option)
1 Briefly depress the right pedal.
The bassinet is raised.
2 Briefly depress the left pedal.
The bassinet is lowered.
● Adjust to comfortable working height.
CAUTION !
Do not place any objects above or underneath bassinet
where they might be damaged when height adjustments are
made.
CAUTION !
Always use cables with sufficient length for secure
connection at minimum and maximum height.
1
2
022 37 077
CAUTION !
Always observe the load limit of 50 kg (110 lbs) when the
variable height adjustment option is installed.
Switching On
After switching on the system, it performs a self-test and then
suggests the following default operating mode for the radiant
warmer:
— if no skin temperature probe connected = man (manual)
— if yellow "tummy" skin temperature probe is connected
= skin (skin temperature control)
3 The yellow LED for the selected mode will blink in the
button.
Manual Heater Operation
The heater is controlled manually for short-term treatment or
for infants in shock and for whom skin temperature control
must not be used.
In manual mode, the radiant warmer delivers a preset heat
output regardless of the infant’s body temperature.
10
5
1
skin C manual mattress. C
skin
man.
3
Babytherm 8010
C
<
36 C
15min
Operating Instructions Babytherm 8004/8010, 4th ed.
027 37 077
WARNING !
Do not leave this device operating unattended. Measure
the patient’s core temperature regularly using a separate
thermometer.
Measure infant temperature at regular intervals as
prescribed by hospital protocol or at least at the intervals
of the timed alarm.
34
Page 35
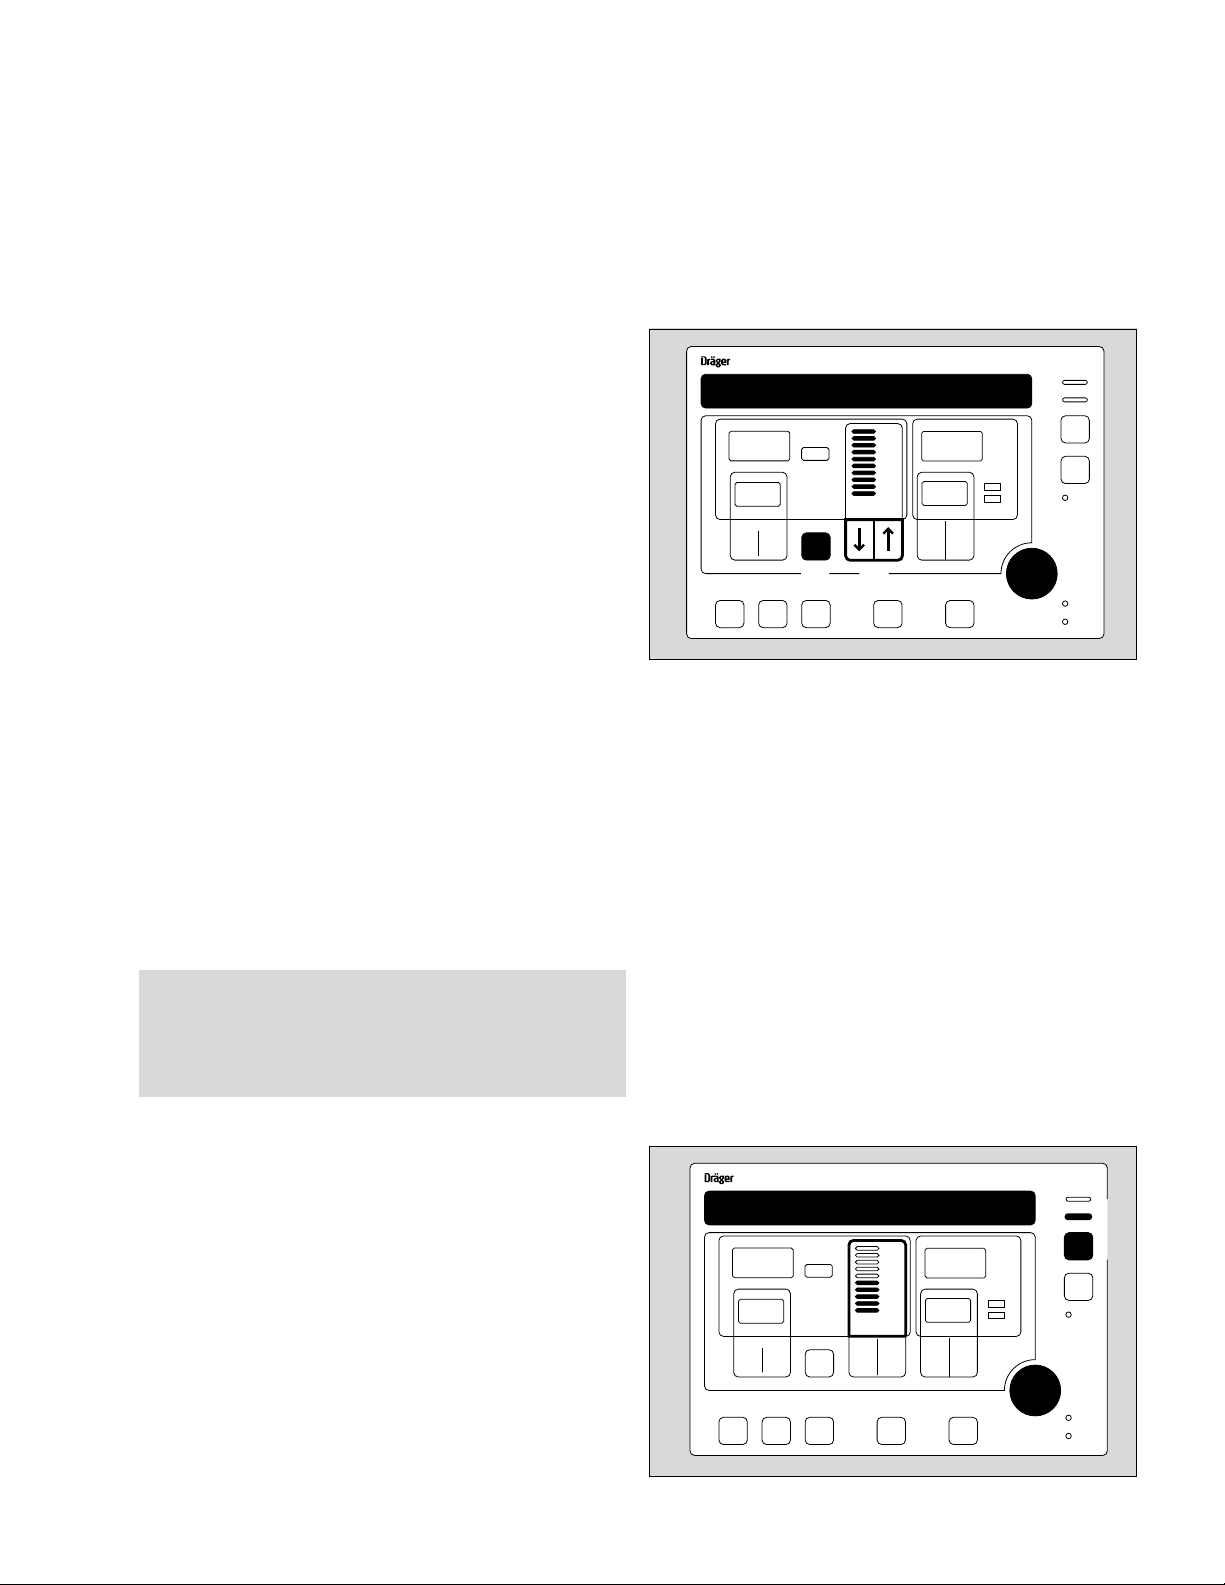
By placing your hand carefully at a safe distance under the
radiant heater, check whether both infrared heating elements
are providing warmth.
If the system is still in "skin" mode:
1 Press button until yellow man. LED starts blinking.
2 The following message appears in the text display:
»Set radiant heater level«
»Press OK-button to cancel«
3 Babytherm will propose the most recently calculated heater
output setting as the default (after switching on, the default
heater level is always 3).
Each LED segment represents one heater output level:
1 to 3 = green LEDs, radiant warmer power <10 mW/cm2
4 to 10 = yellow LEDs, radiant warmer power > 10 mW/cm2
4 Press OK button = confirm heater output at proposed
default level.
Or
Manual Heater Operation
3
2
10
10
5
5
3
2
1
skin C manual mattress. C
skin C manual mattress. C
skin
skin
man.
man.
1
1
5
Babytherm 8010
Babytherm 8010
C
C
<
36 C
<
36 C
5
4
Operation
1
4
15min
15min
028 37 077
5 Press
p or P button until the desired heater output
setting is displayed.
4 Press OK button to confirm selected heater output level.
If the OK button is not pressed within 10 seconds, the
message disappears and the previous setting will remain
in effect.
3 New selected heater output level is displayed.
1 Yellow LED in the button is lit continuously: "man." mode is
now active.
15 minute alarm
WARNING !
Always check infant temperature at least at the intervals
of the timed alarm when using the radiant warmer in
manual mode.
As a reminder for the required monitoring of infant
temperature at higher heater output levels, an audible alarm is
generated every 14 minutes at heater levels 4 and above.
At the same time:
6 Yellow LED starts blinking.
— Red central alarm light on the radiant warmer starts
flashing.
7 Display of set heater level starts blinking, and
8 the following message appears in the text display:
»15 min. patient temp check required
Press OK button to acknowledge alarm«
8
10
5
7
skin C manual mattress. C
skin
man.
1
Babytherm 8010
C
<
36 C
15min
6
9
Operating Instructions Babytherm 8004/8010, 4th ed.
9 Press G button,
or
10 press OK button.
10
029 37 077
35
Page 36

Operation
Manual Heater Operation
The audible alarm will stop and the yellow LED and the central
alarm light will go out. The heater will remain on. The heater
level display will be continuously lit.
NOTE: If there is no acknowledgement after 15 minutes (one
minute from time of the message), the heater will switch off.
In this case:
—Audible alarm remains on,
1 yellow LED keeps blinking, and
— red central alarm light on the radiant warmer keeps flashing.
2 The display of the heating level selected will disappear and
3 the following message will appear in the text display:
»15 min. patient temp check required
Press OK button to acknowledge alarm«
4 Press G button,
or
5 press OK button.
The heating will be switched on again.
The audible alarm will stop and both the yellow LED and the
central alarm light will go out. The heater level display will be lit
again.
NOTE: A skin temperature probe that might be connected
simultaneously in manual mode will provide a skin temperature
reading. It will, however, not control the heater output.
No reminder alarms are scheduled up to heater level 3.
Operating Instructions Babytherm 8004/8010, 4th ed.
36
Page 37

Using Skin Temperature Control
In this mode of operation, the infant's skin temperature is
controlled towards a setpoint using a temperature probe
attached to the skin. The radiant warmer output is adjusted
according to the temperature difference between the skin
temperature and the desired value.
WARNING !
Do not use skin temperature control for infants in a state
of shock.
Skin temperature of these infants is much lower than
normal. Infants would be overheated using the automatic
skin temperature control. For infants in a state of shock,
set heater output to »man.« and measure infant temperature every 15 minutes.
Operation
Using Skin Temperature Control
WARNING !
Do not use skin temperature control for infants with a
fever. Their skin temperature is significantly higher than
normal. Using automatic skin temperature control could
induce hypothermia. For infants with a high temperature,
set heater output to »man.« and measure infant temperature every 15 minutes.
To set heater level manually, see page 34.
Connecting the skin temperature sensor
When using a Dräger skin temperature sensor
(order separately, see “Ordering Information” on page 80).
1 Plug the yellow sensor connector fully into the yellow con-
nection socket.
2 Feed sensor cable through one of the flexible grommets
into the bassinet.
3 Remove the protective film from the ThermoPad
place the skin temperature sensor on the pad.
● Attach sensor probe with adhesive pad to an appropriate
area of infant's skin.
NOTE: For replacement sensor pads, see Ordering
Information, page 80.
TM
pad and
3
2
1
Operating Instructions Babytherm 8004/8010, 4th ed.
When using a third-party disposable temperature sensor:
WARNING !
Always verify that sensor probe is specified and approved
for use with Dräger Babytherm 8004/8010.
● If the infant is laying on his back, place sensor on the
abdomen in the liver region.
● If the infant is laying on his stomach, place sensor on the
back, preferably in the kidney region.
030 29 457
37
Page 38

Operation
Using Skin Temperature Control
WARNING !
Do not place the sensor probe underneath the infant.
The measured value for skin temperature would become
distorted by the mattress.
WARNING !
Never use skin temperature probes for rectally measuring
infant temperature.
Specifically, never use skin temperature probe rectally for
skin temperature control as this would measure and use
core instead of skin temperature for control.
● Secure sensor cable with adhesive tape as necessary to
provide strain relief.
WARNING !
When using skin temperature control mode, check infant
skin condition at regular intervals as prescribed by hospital protocol and verify that skin temperature probe is
securely attached.
Measure the patient’s core temperature regularly using a
separate thermometer.
Do not confuse the position of adhesion of the yellow skin
temperature sensor with the white skin temperature sensor! Skin temperature is regulated via the yellow skin temperature sensor. An incorrectly positioned sensor can put
the patient at risk of overheating!
If a skin temperature sensor becomes detached, it will
measure the air temperature and the infant may be at risk
of overheating.
For single use:
— Only use approved Dräger skin temperature sensors.
— Only use the Dräger ThermoPad
of other types can result in incorrect temperature measurements and therefore can affect the safety and effectiveness of the skin temperature measurement.
NOTE: Allow at least 5 minutes for the skin temperature probe
to adjust to the infant's skin temperature.
TM
. Using adhesive pads
Operating Instructions Babytherm 8004/8010, 4th ed.
38
Page 39

If a skin temperature probe is connected when switching the
unit on:
1 The Babytherm
TM
radiant warmer defaults to "skin tempera-
ture control" mode; the yellow skin LED in the toggle key
will be blinking.
2 The following prompt appears in the display:
»Check skin temperature sensor position
Press OK button to confirm«
3 Press the OK button.
2 The following message appears in the text display:
»Set skin temperature
Press OK button to confirm«
TM
4 The Babytherm
o
36.5
C (97.7 oF) or to the most recently used setpoint,
radiant warmer defaults to a setpoint of
respectively.
3 Press the OK button to accept the proposed setpoint.
Or
2
6
4
skin C manual mattress. C
skin
man.
1
5
Operation
Using Skin Temperature Control
Babytherm 8010
10
5
7
1
C
<
36 C
15min
3
031 29 457
5 Press
p or P until the desired setpoint is displayed.
The setpoint can be adjusted in 0.1 oC increments.
3 Press the OK button to confirm the setpoint.
4 The new setpoint is displayed.
1 The yellow skin LED lights up continuously, indicating that
skin temperature control mode is active.
6 The measured skin temperature value is displayed.
7 The heater output level display changes according to current
infant skin temperature and the skin temperature setpoint.
If the BabythermTM radiant warmerm has been in "manual" mode:
● Press the mode selection key; the yellow skin LED will start
blinking.
The system will propose the default mode "skin temperature
control." The prompts in the display should be
acknowledged as above.
NOTE: Always allow time for the system to reach steady state.
Deviations between setpoint for skin temperature and
measured values are normally corrected within 5 to 15 min.
NOTE: An infant's skin temperature changes frequently, for
instance as a result of food intake or treatment procedures.
Deviations of a tenth of a degree are normal.
Therefore: Only change setpoint for skin temperature if
infant temperature needs to be corrected.
Operating Instructions Babytherm 8004/8010, 4th ed.
By placing your hand carefully at a safe distance under the
radiant heater, check whether both infrared heater elements
are providing warmth.
Outside of measuring range
If temperature is outside the measuring range of
o
15
C (59 oF) to 42 oC (107.6 oF):
● 3 dashes at the bottom of the display = temperature
below 15
o
C (59 oF),
C
C
032 29 457
39
Page 40

Operation
Using Skin Temperature Control
● 3 dashes at the top of the display = temperature
above 42 oC (107.6 oF).
● Refer to "Troubleshooting", see page 67.
o
If temperature drops below 15
»Skin temp. below range« is displayed.
If temperature rises above 42
»Skin temp. above range« is displayed.
If the sensor probe is disconnected or the sensor is faulty:
1 Three dashes light up in the middle of the display.
After 10 seconds:
— The audible alarm sounds,
2 the red LED starts blinking, and
— the red central alarm light on the radiant warmer starts
flashing.
1 The three dashes on the display start blinking.
3 The display shows the message:
»Plug in skin temp. sensor
Press OK button to acknowledge«
or
»Skin temp. sensor fault
Press OK button to acknowledge«
C (59 oF), the message
o
C (107.6 oF), the message
3
1
skin C manual mattress. C
6
skin
man.
10
5
1
C
<
36 C
Babytherm 8010
15min
5
2
4
033 29 457
● Immediately connect the sensor plug or change the skin
temperature sensor. The audible alarm can be silenced
for 15 minutes:
4 Press
G button,
or
5 press the OK button
— The audible alarm will be silenced,
2 the red LED will go out, and
— the red central alarm light on the radiant warmer will go out.
3 The display shows the message:
»Plug in skin temp. sensor«.
Immediately connect sensor plug or change skin temperature
sensor.
If sensor problem cannot be remedied immediately:
6 Switch to manual mode ("man."). See page 34.
Operating Instructions Babytherm 8004/8010, 4th ed.
40
Page 41

Operation
Using Skin Temperature Control
For deviations greater than ±1.0
o
C between set and mea-
sured skin temperature:
NOTE: The default of ±1.0
o
C is used here as an example.
The threshold for this alarm is configurable between 0.3oC
and 1.0 oC (see page 60).
1 The skin temperature display starts blinking.
— An audible alarm sounds,
2 the yellow LED starts blinking, and
— the red central alarm light on the radiant warmer starts
flashing.
3 The following message appears in the text display:
»Skin temp. deviation above 1.0 oC
Press OK button to acknowledge«.
The alarm threshold for skin temperature deviations may be set
in the configuration mode, (see page 60).
The factory set default skin temperature alarm threshold
is ±1.0 oC.
The audible alarm can be silenced for 15 minutes:
4 Press G button.
3
1
skin C manual mattress. C
skin
man.
10
5
1
Babytherm 8010
C
<
36 C
2
4
15min
5
034 29 457
or
5 press the OK button.
— The audible alarm is cancelled.
2 The yellow LED stays continuously lit.
— The red central alarm light on the radiant warmer goes out.
1 The skin temperature display starts blinking.
3 The following message appears in the text display:
»Skin temp. deviation above 1.0
o
C«.
After measured skin temperature has returned to a value within
±1.0 oC of set temperature, the yellow LED will go out, the
audible alarm will be cancelled, and the message in the display
will disappear.
Before temporarily removing the skin temperature sensor from
the skin, switch to the manual mode ("man."). See page 34.
Operating Instructions Babytherm 8004/8010, 4th ed.
41
Page 42

Operation
Using Skin Temperature Control
Skin temperature above 39
o
C (102.2 oF)
1 The skin temperature display starts blinking.
— An audible alarm sounds.
2 The red LED starts blinking.
— The red central alarm light on the radiant warmer starts
flashing.
3 The following message appears in the text display:
»Skin temperature above 39
o
C (102.2 oF) alarm
Press the OK button to acknowledge«.
The alarm can be muted for 2 minutes:
4 Press G button,
or
5 press OK button.
— The audible alarm is silenced.
2 The red LED is lit continuously.
— The red central alarm light on the radiant warmer goes out.
3
1
skin C manual mattress. C
skin
man.
10
5
1
Babytherm 8010
C
<
36 C
2
4
15min
5
035 29 457
3 The following message appears in the text display:
»Skin temperature above 39 oC (102.2 oF) alarm«.
When operating in manual (”man.”) mode, the radiant warmer
is switched off:
1 The skin temperature display is lit.
2 The red LED starts blinking.
The alarm is automatically cancelled when measured skin
temperature has returned to values below 38.5 oC (101.3 oF).
Operating Instructions Babytherm 8004/8010, 4th ed.
42
Page 43

ThermoMonitoring™ Technique
For improved feedback on thermal condition of the infant, we
recommend measuring both central and peripheral skin
temperatures (tummy-toe measurement).
Connecting a peripheral skin temperature sensor
1 Plug the white sensor fully into the white socket.
2 Route sensor cable through one of the flexible grommets
onto bed surface.
3 Remove protective film from adhesive pad and place sensor
probe on pad.
● Attach the sensor with the ThermoPad
tremities, preferably the foot.
● Secure with skin compatible adhesive tape.
TM
to the patient’s ex-
Operation
ThermoMonitoring™ Technique
3
2
1
Displaying peripheral temperature
4 Peripheral temperature is displayed as soon as the
peripheral skin temperature sensor is attached.
5 The symbol for the peripheral skin temperature lights up.
If 3 dashes appear in the display, see page 67
("Troublehooting, Radiant Warmer").
NOTE: The measured value of peripheral temperature has no
effect on radiant warmer control. Both skin temperatures can
also be displayed when heater is operated in "manual" mode.
Data output via optional interface
Central and peripheral skin temperature can be displayed in
graphic format.
Prerequisites:
— Interface option
— MediCable connecting cable
— Monitor compatible with MEDIBUS protocol and
complying with requirements of IEC/EN 60601-1 and
IEC/EN 60601-1-2.
● For installation and operation, refer to respective
Instructions for Use.
5
4
skin C manual mattress. C
skin
man.
10
5
1
Babytherm 8010
C
<
36 C
036 29 457
15min
037 29 457
Operating Instructions Babytherm 8004/8010, 4th ed.
43
Page 44

Operation
Switching Radiant Warmer Off
Using Mattress Heater (Babytherm 8010)
Switching Radiant Warmer Off
1 Press the button.
2 The following message appears in the text display:
»Radiant heater OFF
Press OK button to confirm«.
3 Press OK button.
The radiant warmer will be switched off.
2 The following message appears in the text display:
»Radiant heater turned off«.
1 Press the button again to switch radiant warmer back on,
(see page 34 and following).
2
10
5
1
skin C manual mattress. C
skin
man.
1
Babytherm 8010
C
<
36 C
3
15min
038 37 077
Using Heated Gel Mattress (Babytherm 8010)
Wait until the desired mattress temperature is reached before
placing an infant in the Babytherm 8010.
WARNING !
Always warm up mattress before placing infant.
Do not switch off the BabythermTM radiant warmer while an
infant is laying on the gel mattress. Risk of hypothermia.
Setting mattress temperature
o
Temperature can be set in increments of 0.1
To set a temperature within the normal range of
36 oC (96.8 oF) to 38 oC (100.4 oF):
4 Display shows the current setpoint for the mattress
temperature.
5 Press
p or P button until the desired setpoint is
displayed.
6 The following message appears on the display:
»Set mattress temperature
Press OK button to confirm«.
If the setpoint is not confirmed within the next 10 seconds,
the message will disappear and the previous setpoint will
remain in effect.
7 Press the OK button to confirm new setpoint.
4 The new setpoint for the mattress temperature is displayed.
C.
6
10
5
4
skin C manual mattress. C
skin
man.
1
5
C
<
36 C
7
Babytherm 8010
Operating Instructions Babytherm 8004/8010, 4th ed.
15min
039 37 077
44
Page 45

Extending upper limit of setpoint range
o
38
C (100.4 oF) to 38.5 oC (101.3 oF):
Operation
Using Heated Gel Mattress (Babytherm 8010)
1 Press
P button until
2 setpoint of 38 oC (100.4 oF) is displayed.
3 The following message appears in the text display:
»Mattress temperature
Confirm temp. above 38
4 Press the OK button to confirm extended range.
5 The yellow >38
o
C LED starts blinking.
o
C with OK«.
1 Press P button, until the desired setpoint is showing in
the display.
3 The following message appears in the text display:
»Set mattress temperature
Press OK button to confirm«
4 Press the OK button to confirm new setpoint.
2 The new mattress temperature setpoint is displayed.
5 The yellow >38 oC LED stays lit continuously.
Extending lower limit of setpoint range
36 oC to 30 oC:
6 Press p button until the
7 setpoint of 36 oC (96.8 oF) is displayed.
8 The following message appears in the text display:
»Set mattress temperature
Confirm temp. below 36 oC with OK«.
9 Press the OK button to confirm the extended range.
10 The yellow <36 oC LED will become lit.
6 Press p button, until the desired setpoint is showing in
the display.
8 The following message appears in the text display:
»Set mattress temperature
Press OK button to confirm«.
9 Press the OK button to confirm new setpoint.
7 The new mattress temperature setpoint is displayed.
10 The yellow <36
o
C LED stays lit continuously.
3
10
5
2
skin C manual mattress. C
skin
man.
1
1
8
10
5
7
skin C manual mattress. C
skin
man.
1
6
Babytherm 8010
C
5
<
36 C
4
C
<
36 C
10
15min
040 37 077
Babytherm 8010
15min
9
041 37 077
Operating Instructions Babytherm 8004/8010, 4th ed.
45
Page 46

Operation
Using Heated Gel Mattress (Babytherm 8010)
Temperature out of measuring range
If the temperature is outside the measuring range
o
of 5
C (41 oF) to 45 oC (113 oF):
— 3 dashes at the bottom of the display = temperature
below 5
The following message appears in the text display:
»Mattress temperature below 5
● Wait until the mattress temperature reaches 5
o
C (41 oF)
o
oC«o
o
C (41 oF).
—3 dashes at the top of the display = temperature above
45 oC (113 oF).
● Wait until the mattress temperature falls below 45
o
C.
NOTE: These conditions may occur e.g. when the
Babytherm
TM
radiant warmer had been stored in ambient
conditions beyond the range of
5 to 45 oC (41 oFto 113 oF).
Deviation from set temperature
If the deviation between set and measured mattress
temperature exceeds ±1
o
C:
— Audible alarm will sound,
1 yellow LED starts blinking,
— the red central alarm light on the radiant warmer starts
flashing.
2 The measured value of mattress temperature starts blinking.
3 The following message appears in the text display:
»Mattress temp. deviation above 1
o
C
Press OK button to acknowledge«.
The audible alarm can be silenced for 15 minutes:
4 Press
G button,
or
5 press the »OK« button.
— The audible alarm is cancelled,
1 the yellow LED is lit continuously, and
— the red central alarm light on the radiant warmer is switched
off.
C
C
3
10
5
1
skin C manual mattress. C
skin
man.
Babytherm 8010
C
2
<
36 C
5
15min
042 29 457
1
4
043 29 457
Operating Instructions Babytherm 8004/8010, 4th ed.
3 The following message appears in the text display:
»Mattress temp. deviation above 1
o
C«.
2 The measured value of mattress temperature continues
blinking.
When the measured mattress temperature has returned to a
value within ±1
o
C of the setpoint:
1 The yellow LED will go out, and
— the audible alarm is switched off.
After initially switching on the mattress heater
— the audible alarm is silenced during warm-up.
1 The yellow LED is lit continuously.
46
Page 47

Operation
Using Heated Gel Mattress (Babytherm 8010)
Mattress temperature above 40
o
C (104 oF)
— Audible alarm will sound,
— Red central alarm light starts flashing.
1 Red LED starts blinking.
2 Measured value of mattress temperature starts blinking.
3 The following message appears in the text display:
»Mattress temperature above 40
o
C (104 oF)
Press OK button to acknowledge«.
The alarm can be suppressed for 10 minutes.
4 Press G button,
or
5 press the OK button.
1 The red LED continues to blink, while
— the red central alarm light on the radiant warmer is switched
off.
3 The following message appears in the text display:
»Mattress temperature above 40 oC«.
NOTE: The alarm is cancelled automatically as soon as the
mattress heater temperature drops below 39 oC (102.2 oF).
3
10
5
1
skin C manual mattress. C
skin
man.
C
2
<
36 C
Babytherm 8010
1
15min
4
5
044 29 457
Operating Instructions Babytherm 8004/8010, 4th ed.
47
Page 48

Operation
Notes on Heater Settings
Notes on Heater Settings
Below are notes on settings for use of the mattress heater with
and without radiant warmer.
Using mattress heater with gel mattress without using
radiant warmer (Babytherm 8010 only)
Normal settings:
The infant's central temperature will, in the long run, adjust to
the mattress temperature. Therefore, the set mattress heater to
a infant temperature appropriate for the particular infant, e.g.
between 38.0 oC (100.4 oF) and 38.3 oC (100.9 oF) for a
premature baby and to 37 oC (98.6 oF) for a term newborn.
WARNING !
Check infant temperature at regular intervals as
prescribed by hospital protocol and adjust temperature
setting to individual patient needs.
● Always cover and/or dress the infant. Do not place thicker
blankets or other insulating material under the infant, since
they obstruct heat transfer to and from the bed (warming/
cooling). Only use a thin cotton sheet as a cover for the gel
mattress.
● Warming the patient up:
Set the mattress temperature setpoint to the desired infant
(central) temperature or, if necessary, slightly higher in
order to reduce the warming period.
● Cooling the patient:
Set the mattress temperature to a value lower than the
current infant temperature, e.g. to 36.0 oC (96.8 oF).
049 29 457051 29 457052 29 457
Operating Instructions Babytherm 8004/8010, 4th ed.
48
Page 49

Using radiant warmer only
WARNING !
Check the infant temperature at regular intervals as
prescribed by hospital protocol and adjust temperature
setting to individual patient needs.
● The radiant warmer is less effective when the bed
canopy is used.
(The acrylic glass of the bed canopy is only partially
translucent to the infrared radiation of the radiant warmer).
Operation
Notes on Heater Settings
● Do not cover or clothe the infant. Otherwise, the effect of
the radiant warmer is not as effective.
Radiant warmer without mattress heater
Babytherm 8004
1 Always use a foam mattress.
WARNING !
Do not use a gel mattress with Babytherm 8004.
The unheated gel mattress will cool the infant.
Risk of hypothermia can occur!
053 29 457054 29 457055 29 457
1
Operating Instructions Babytherm 8004/8010, 4th ed.
49
Page 50

Operation
Notes on Heater Settings
Using radiant warmer in combination with mattress heater
and gel mattress (Babytherm 8010 only)
Normal setting:
Set mattress temperature to the central temperature
appropriate for the infant, e.g. between 38.0
o
38.3
C (100.9 oF) for a premature baby and 37.0 oC (98.6 oF)
for a term newborn.
Adjust skin temperature setpoint to the skin temperature
appropriate for the infant, e.g. 37.0 oC (98.6 oF) for a
premature baby and 36.5
● To raise infant temperature:
o
C (97.7 oF) for a term newborn.
Set mattress temperature to desired infant (central)
temperature. If necessary, set skin temperature to a slightly
higher value. For a very hypothermic infant, set mattress
temperature and skin control temperature to achieve infant
temperature gain of approximately 1 oC.
o
C (100.4 oF) and
● To stabilize or maintain infant temperature:
Set mattress temperature to a value appropriate for the
individual infant, e.g. 38 oC (100.4 oF)for a premature
infant. Set skin control temperature for the radiant warmer
according to protocol.
After the infant has stabilized, observe the average output of
the radiant warmer on the bar graph. Raising or lowering of
the setpoint for the mattress heater lowers or raises of the
average radiant warmer output.
To minimize insensible water loss, the average radiant
warmer output should be as low as possible while
maintaining the infant’s temperature.
● To lower infant temperature:
Set mattress temperature to the desired infant (central)
temperature. If necessary, set skin control temperature to a
slightly lower value.
056 29 457057 29 457058 29 457
Operating Instructions Babytherm 8004/8010, 4th ed.
50
Page 51

Using the Bed Canopy
When the bed canopy is in place, the side panels can be
folded down.
WARNING !
Never leave the Babytherm infant warmer unattended with
the side panels open. Risk of patient injury! Infant may fall
out of the
bassinet.
CAUTION !
When using external phototherapy devices, keep in mind that
the maximum load on the bed canopy is11 kg (24 lbs).
Operation
Using the Bed Canopy
The bed canopy should not be used as a convenient area
to place objects, clothing, etc.
Installing the bed canopy
Check whether the bed canopy is in the closed position;
otherwise:
1 Turn lock until it engages to close the bed canopy.
2 Hold bed canopy handles with both hands and place it over
the side panels.
1
045 29 457
Operating Instructions Babytherm 8004/8010, 4th ed.
It is recommended to use the higher side panels (230 mm,
9 inches) when using the bed canopy.
2
2
046 29 457
51
Page 52

Operation
Using the Bed Canopy
Opening / closing the bed canopy
1 Turn lock to unlock bed canopy
2 Swivel handles upwards until they engage to open the bed
canopy. The infant is now accessible for care and treatment
procedures.
2 Swivelg handles forward to close the bed canopy.
2
1
047 29 457
Removing the bed canopy
3 Turn lock until it engages, to place the bed canopy in the
closed position
● Hold handles with both hands to remove the bed canopy
(follow instructions on the bed canopy).
● Hang bed canopy onto its bracket.
3
048 29 457
Operating Instructions Babytherm 8004/8010, 4th ed.
3
012 29 457
52
Page 53

Using Phototherapy (Available Option)
Only use the phototherapy lights indicated, see "Technical
Data", page 76. Using other types of lights can affect the
safety and effectiveness of the phototherapy.
WARNING !
Always use eye protection for the infant when using
phototherapy. Check regularly that the eye protection is
correctly positioned.
WARNING !
Always consider all aspects of an infant’s diffferentiated
diagnosis to ensure that no life-saving measures are
delayed.
Operation
Using Phototherapy (Available Option)
Regularly measure the patient’s bilirubin level. Beware of
possible toxic effects of bilirubin photoisomers.
WARNING !
Always operate phototherapy lights in combination with
radiant warmer. Otherwise risk of hypothermia for the
undressed infant can occur.
Infant temperature must be closely monitored during
phototherapy because of the additional transfer of heat to
the infant.
Do not use reflective foil to boost the effect of phototherapy. A dangerous rise of the infant temperature can occur
when using reflective foil.
WARNING !
Phototherapy can upset the the patient’s water balance.
During phototherapy, the supply of fluids to the infant
must be increased, e.g. by parenteral infusion,
to compensate for the increased water loss.
Dangerous body temperatures can occur when using
reflective foil.
WARNING !
Operating Instructions Babytherm 8004/8010, 4th ed.
Avoid direct eye contact with the radiation source for an
extended period of time when in use.
Use eye protective devices for patients in the immediate
vicinity of the phototherapy device (e.g. goggles and
shields).
Users should avoid remaining in the area of irradiation for
extended periods due to the risk of sunburn.
53
Page 54

Operation
Using Phototherapy (Available Option)
Monitor the patient’s core temperature regularly using a
separate thermometer.
● Swing radiant unit over infant. Phototherapy lights should
be positioned vertically above infant for full effectiveness of
the therapy.
Switching phototherapy lights on
1 Press button. The yellow LED in the button will start
blinking.
2 The following message appears in the text display:
»Phototherapy: Use eye protection
Press OK button to start XX:XX:XX«
3 Press OK button to switch the phototherapy lights on.
2 The following message appears in the text display for
5 seconds:
»Duration of phototherapy XX:XX:XX«
1 The yellow LED in the button is now continuously lit.
2
10
5
1
skin C manual mattress. C
skin
man.
C
<
36 C
Babytherm 8010
15min
Resetting the duration of phototherapy
1 Press button for 3 seconds.
2 The following message appears in the text display:
»Duration of phototherapy XX:XX:XX
Press OK to confirm reset«
3 Press OK button to reset the counter.
2 The display now reads:
»Duration of phototherapy 00:00:00«
The counter is reset automatically when the unit is switched
off.
When using the radiant warmer in the "man." mode:
● Reduce radiant warmer output level by approximately
3 increments when compared to operation without
phototherapy
NOTE: When using the radiant warmer in "skin" mode, heater
output is automatically adjusted to the infant’s heat
requirements.
1
2
10
5
1
skin C manual mattress. C
skin
man.
1
3
C
<
36 C
3
Babytherm 8010
15min
059 29 457
059 29 457
Operating Instructions Babytherm 8004/8010, 4th ed.
Switching phototherapy lights off
1 Press button.
2 The following message appears in the text display:
»Phototherapy turned OFF
Press OK button to confirm XX:XX:XX«
3 Press OK button to switch the phototherapy off.
1 The yellow LED in the button will go out.
54
Page 55

Switching Lighting On/Off
1 Press button. The bed surface will now be illuminated
by the examination light.
1 Press button again. The examination light is switched off.
2 Press button. The bed surface will now be illuminated
by the night light.
2 Press button again. The night light is switched off.
10
5
skin C manual mattress. C
skin
man.
1
2
1
Operation
Switching Lighting On/Off
Central Alarm
Babytherm 8010
C
<
36 C
15min
061 37 077
Central Alarm
3 The red light on the radiant warmer flashes whenever an
audible alarm is emitted.
As soon as the alarm is acknowledged, the light will go out.
3
062 37 077
Operating Instructions Babytherm 8004/8010, 4th ed.
55
Page 56

Operation
Oxygen Therapy
Oxygen Therapy
WARNING !
Fire Hazards from oxygen!
— Open flames or cigarettes!
— Textiles, plastics, and oils readily ignite in an oxygen
enriched atmosphere and burn with great intensity.
— Keep oxygen valves, connections, and seals free from
oil and grease.
— Open valves slowly.
— Do not operate Babytherm in the presence of
flammable anesthetics or disinfectants.
— Do not use or store flammable liquids such as alcohol,
ether, or acetone inside the Babytherm bassinet.
— Do not use electrical equipment inside canopy with the
exception of devices approved for use in explosive
environments.
WARNING !
Physiological risks of oxygen !
— Oxygen therapy only on the order of a physician
— Elevated oxygen concentrations must be selected on
the basis of arterially measured oxygen partial pres-
sure in the infant's blood. Otherwise risk of hyperox-
emia (eye injuries with consequential blindness) or
hypoxemia (brain injuries) can occur.
— Monitor oxygen concentration at all times during
therapy using an independent oxygen analyzer.
O2 hood
1 Place the sensor of the oxygen analyzer with the adapter
ring in the star-shaped cuff cut-out. Plug the connector into
the analyzer.
2 Connect the O
● Lay infant on his/her back.
3 Place hood over the infant’s head: the hood must rest on
the mattress. Do not seal the collar area.
4 Set the O
0.5 to 4 L/min.
5 Monitor O
2 supply hose to the hood.
2 supply at the metering valve of the flow meter:
2 concentration with the O2 analyzer.
4
Operating Instructions Babytherm 8004/8010, 4th ed.
2
5
3
After use
● Remove the hood from the infant.
● Close the valve on the O2 flowmeter
● Dismantle and clean/disinfect the oxygen therapy
accessories, see page 64.
56
1
075 29 457
Page 57

Injector and closed bed canopy
WARNING !
Always closely monitor infant temperature when bed
canopy is in use.
● Place the canopy in position (see page 52).
1 Set the O2 concentration on the injector:
30, 40, 50 % vol. O2.
● Set the O2 supply on flowmeter.
Injector setting Vol.% O2 28 35 40
O
2 supply L/min 5 10 15
Operation
Suction
2
1
2 Monitor the O2 concentration with the O2 analyzer.
After use
● Open the bed canopy.
● Close the valve on the O2 flowmeter.
● Dismantle and clean/disinfect the oxygen therapy
accessories, see page 64.
Suction
Use bronchial suction equipment in accordance with its
specific Instructions for Use.
076 37 077
Operating Instructions Babytherm 8004/8010, 4th ed.
57
Page 58

Operation
Taking X-Rays
Shutting Down
Taking X-Rays
Babytherm 8010,
Babytherm 8004 without x-ray tray
● Swing the radiant warmer to one side. The infant will
continue to be warmed.
● Place the x-ray film cartridge directly underneath the infant.
● Position the x-ray machine above the bed surface.
20 15 10 5 0 5 10 15 20
Babytherm 8004 with x-ray tray
NOTE: The x-ray tray has no lock and can be completely
removed from the Babytherm bassinet.
● Pull out the x-ray tray and insert the x-ray cartridge, placing
it according to the position of the infant. Use the scale on
the side panels and x-ray tray as a guide.
● Push the x-ray tray in.
● Swing the radiant warmer to one side and position the x-ray
machine.
● After taking x-ray, remove the x-ray cartridge from the tray
and push the tray in again.
● After removing the x-ray machine, swing the radiant warmer
back into position.
Shutting Down
● Press the On/Off button. The green »On« LED will go out.
077 29 457
20 15 10 5 0 5 10 15 20
Operating Instructions Babytherm 8004/8010, 4th ed.
078 29 457
58
%$
079 29 457
Page 59

Configuration
WARNING !
Do not perform any infant care or therapy while configuring the system, because normal equipment functions
(e.g. temperature measurement, alarms) are disabled.
Activities available in configuration mode
Code Configuration Mode
c01 Show current software version
c02 Set skin temperature threshold
c03 Set volume of alarm speaker
c04 Operating hours of phototherapy
c05 Test control panel buttons
c06 Test nurse call
c07 Set language
c08 Set display
Err Error mode
Configuration
Activating Configuration Modes
NOTE: Control panel keys and displays have a different
function than in radiant warmer operation mode.
1 Activate/cancel configuration modes
2 Provides information regarding current mode
3 Displays abbreviation of current mode
4 Displays code for current mode
5 Advance to/from mode
6 Increase/decrease values for selected mode
7 Activate/leave error reporting mode
8 State changes within mode
9 Display setting for current mode
Activating Configuration Modes
1 Press OK button for 3 seconds.
A brief alert will sound.
2 The following message appears in the text display:
»Configuration Mode
Press OK button to start«
1 Press OK button again. A brief alert sounds again.
The configuration modes are now active.
The device defaults to mode c01 and displays the current
software version.
2
3
4
skin C manual mattress. C
9
7
skin
man.
5
6
2
skin C manual mattress. C
skin
man.
Babytherm 8010
10
5
1
C
<
36 C
15min
8
1
063 29 457
Babytherm 8010
10
5
1
C
<
36 C
15min
Operating Instructions Babytherm 8004/8010, 4th ed.
1
064 29 457
59
Page 60

Configuration
Using Configuration Modes
Using Configuration Modes
Show software version
1 The following message appears in the text display:
»Configuration Mode
Mode c01: Software version«
2 The current software version is indicated: e.g. »1.n«
3 The code for the current mode is displayed: »c01«
Set skin temperature alarm threshold
1 Briefly press
P button.
2 The following message appears in the text display:
»Configuration Mode
Mode c02: Max. skin temperature fault«
3 Abbreviation for this mode is displayed: »SdE«
4 The code for the current mode is displayed: »c02«
5 The display shows the skin temperature alarm threshold, at
which no alarm is yet generated.
Factory default: 1.0
6 Press
P or p buttons, until required value is displayed.
Values from 0.3 to 1.0 oC can be set in 0.1 oC
increments.
1
2
3
skin C manual mattress. C
skin
man.
2
3
4
skin C manual mattress. C
5
skin
man.
1
6
Babytherm 8010
10
5
1
10
5
1
C
<
36 C
C
<
36 C
15min
065 29 457
Babytherm 8010
15min
Adjust speaker volume for alarm tone sequences
1 Briefly press
P button.
2 The following message appears in the text display:
»Configuration Mode
Mode c03: Soft alarm start volume«
3 The abbreviation for this activity is displayed: »SSL«
4 The code for the current mode is displayed: »c03«
5 Set speaker volume is displayed.
Factory default: 2.
A brief audible alarm tone is generated with the currently
set volume.
6 Press
P or p buttons until the desired value is
displayed.
Values from 1 to 8 can be set.
A brief audible alarm sounds with the new volume setting.
60
2
3
4
skin C manual mattress. C
5
skin
man.
1
6
066 29 457
Babytherm 8010
10
5
1
C
<
36 C
15min
067 29 457
Operating Instructions Babytherm 8004/8010, 4th ed.
Page 61

Show hours of operation for phototherapy
Configuration
Using Configuration Modes
1 Briefly press
P button.
2 The following message appears in the text display:
»Configuration Mode
Mode c04: Time counter photo therapy«
3 Operating hours up to 1000 hours is displayed.
4 Press G button for 3 seconds. The counter is reset
to »0«.
NOTE: Resetting the counter must be performed when
changing the bulbs of the phototherapy lights.
Test control panel keys
1 Briefly press
P button.
2 The following message appears in the text display:
»Configuration Mode
Mode c05: Keyboardtest (inactive)«
3 The abbreviation for this activity is displayed: »but«
4 The code for the current mode is displayed: »c05«
5 Press
P or p button and the test is activated.
2 The following message appears in the text display:
»Configuration Mode
Mode c05: Keyboardtest (active)«
2
3
skin C manual mattress. C
3
skin
man.
10
1
2
3
4
skin C manual mattress. C
skin
man.
1
5
Babytherm 8010
4
C
5
1
10
5
1
<
36 C
C
<
36 C
15min
068 29 457
Babytherm 8010
15min
Operating Instructions Babytherm 8004/8010, 4th ed.
● Press the buttons to be tested.
1 A string of digits appears on the display:
st
digit = number of buttons momentarily pressed
1
nd
2
and 3rd digit = number of last button pressed.
● Press G button for 2 seconds. The test is ended.
Number of buttons:
1
skin C manual mattress. C
1
8
skin
2
3
man.
9
10
10
5
1
4 5 6 7
11 12
Babytherm 8010
C
<
36 C
13
15
15min
14
069 29 457
070 37 077
61
Page 62

Configuration
Using Configuration Modes
Test nurse call
1 Briefly press
P button.
2 The following message appears in the text display:
»Configuration Mode
Mode c06: Nurse Call Relay«
3 The abbreviation for this mode is displayed: »Nuc«
4 The code for the current mode is displayed: »c06«
5 Display »0« = Nurse call relay open.
Display »1« = Nurse call relay closed.
6 Press
G button until the relay is switched.
7 Press k button for 4 seconds.
The relay is activated.
The "Inop" alarm is triggered: the red inop LED lights up
and the continuous audible alarm sounds.
Select language
1 Briefly press
P button.
2 The following message appears in the text display:
»Configuration Mode
Mode c07: Display language –> English«
3 The abbreviation for this mode is displayed: »LAN«
4 The code for the current mode is displayed: »c07«
5 The language number is displayed; setting 2 = English.
6 Press P or p button, until the number of the desired
language is displayed.
Possible settings: from 1 to 11.
2
3
4
skin C manual mattress. C
5
skin
man.
1
2
3
4
skin C manual mattress. C
5
skin
man.
1
6
Babytherm 8010
10
5
1
10
5
1
C
<
36 C
C
<
36 C
Babytherm 8010
15min
15min
6
7
071 29 457
Set display contrast
1 Briefly press
P button.
2 The following message appears in the text display:
»Configuration Mode
Mode c08: Display contrast«
3 The abbreviation for this mode is displayed: »CON«
4 The code for the current mode is displayed: »c08«
5 The actual contrast value appears.
The default value is »128«
6 Press
P or p button until desired contrast has been
set. Possible settings: 1 to 255 in increments of 1.
62
2
3
4
skin C manual mattress. C
5
skin
man.
1
6
072 29 457
Operating Instructions Babytherm 8004/8010, 4th ed.
Babytherm 8010
10
5
1
C
<
36 C
15min
073 29 457
Page 63

Read error cache
1 Press button until error reporting mode is active.
2 The following message appears in the text display:
»Configuration Mode
Error memory«
3 The first error code is displayed: »FXX«
4 The display shows »Err«
5 The frequency of the error is indicated.
6 Press
P or p button, and the next error is displayed.
2
3
4
skin C manual mattress. C
5
skin
man.
1
6
Configuration
Using Configuration Modes
Babytherm 8010
10
5
1
C
<
36 C
15min
8
7
7 Press k button. The system runs a self-test.
8 Press G button for 3 seconds. The error cache is erased.
Return to radiant warmer mode
● Press OK button.
074 29 457
Operating Instructions Babytherm 8004/8010, 4th ed.
63
Page 64

Equipment Care
Disassembly
Cleaning / Disinfecting / Sterilizing
Equipment Care
The Babytherm 8004/8010 infant warmer system must be
thoroughly cleaned and disinfected after each patient, or at the
frequency prescribed by hospital protocol. Perform any
disinfection procedures according to established hospital
protocol and in conformance to the following instructions.
WARNING !
Always follow accepted hospital procedures for handling
equipment contaminated with body fluids.
For the cleaning and disinfecting of accessories, refer to their
respective operating instructions.
Disassembly
● Switch off all device(s), disconnect power plugs from AC,
and turn off all high pressure gas supplies.
WARNING !
Always disconnect power supply before cleaning and
disinfecting.
● Remove any installed auxiliary equipment.
● Remove mattress from bed.
Always store mattress flat.
CAUTION !
Do not fold gel mattress!
● Remove patient circuit clips.
● Remove silicone grommets.
● Swivel drainage canister bracket upwards and horizontally
remove it from the hole.
Cleaning / Disinfecting / Sterilizing
CAUTION !
Certain components of the bassinet consist of materials that
are sensitive to certain organic solvents sometimes used for
cleaning and disinfecting (e.g., alcohols, phenols, halogen
releasing compounds, oxygen releasing compounds, strong
organic acids, etc.). Exposure to such substances may cause
damage that is not always immediately recognized.
Sterilization of the bassinet with ethylene oxide (EtO) is also
not recommended.
CAUTION !
Do not expose Babytherm 8004/8010 to high levels of
ultraviolet radiation. This may cause cracks in the acrylic
glass components.
To prevent any damage, we recommend the use of detergents
and disinfectants compatible with the materials used in the
bassinet and its components and accessories, i.e. surface
disinfectants on the basis of
— aldehydes, or
— quarternary ammonium compounds.
Ensure that all disinfectants are registered with the U.S.
Environmental Protection Agency for use as intended.
Always follow the instruction labels especially with respect to
prescribed concentrations and the necessary exposure times.
● Before disinfecting/cleaning the radiant warmer, allow
it to cool down for about 30 minutes.
● Do not allow any liquids to penetrate inside the device
and/or the radiant warmer.
Operating Instructions Babytherm 8004/8010, 4th ed.
64
Page 65

Sequential cleaning and disinfection procedures
Bassinet, inside and outside;
Side panels, inside and outside;
Inner panels, inside and outside;
Bed surface;
Mattress;
X-ray tray and mattress stretcher;
Bed canopy;
Chassis, including all attachments:
● Using a detergent, remove visible soiling with a disposable
cloth.
● Use a disinfectant to wipe surfaces.
● After waiting the prescribed exposure time, wipe with a
clean damp cloth and dry.
Equipment Care
Before Next Use
Silicone grommets
● Disinfect components in disinfectant bath. After immersing
for the prescribed exposure time, rinse with clean water and
dry.
● Then wash with a detergent and rinse with clean water; or
● sterilize at 120
● Do not clean the reflectors on the infrared radiator with
o
C (glove program).
a damp cloth or brush!
Gel mattress
● Wipe gel mattress with disinfectant.
Phototherapy lenses
CAUTION !
Only use detergents/disinfectants with a ph value of 7 to 9
for phototherapy lenses.
Before Next Use
● To reassemble components, see page 20 and following.
● After disinfection, operate the fully assembled unit for a few
hours without a patient to eliminate any disinfectant
residues.
● Set the mattress temperature to 37
● Set the radiant warmer to heater level 3 in "man." mode.
o
C.
Operating Instructions Babytherm 8004/8010, 4th ed.
Before the next patient is placed in the unit:
● Install all therapy accessories required.
● Check that the unit is ready for operation,
see page 27 and following.
● Verify that the mattress is sufficiently preheated
(Babytherm 8010).
65
Page 66

Inspection and Maintenance
Replacement of Parts
Preventive Maintenance Intervals
Disposing of the Babytherm
Inspection and Maintenance
CAUTION !
Maintenance
The device must be inspected and serviced at regular
intervals. A record must be kept on this preventive
maintenance. We recommend obtaining a service contract
with DrägerService through your vendor.
For repairs of the device we recommend that you contact
DrägerService.
WARNING !
To avoid any risk of infection, clean and disinfect bassinet
and accessories before any maintenance according to
established hospital procedures – this applies also when
returning units or parts for repair.
WARNING !
Always disconnect the power supply before servicing.
WARNING !
Never operate the infant warmer system if it has been
physically damaged or does not seem to operate
properly.
We recommend that you contact DrägerService for
maintenance service for the Babytherm 8004/8010.
Replacement of Parts
WARNING !
When servicing the device, always use replacement parts
that are qualified to Dräger standards.
Dräger cannot warrant or endorse the safe performance
of third party replacement parts for use with Babytherm
infant warmers.
Gel mattress Patch over small cuts or other damage in
the covering film with adhesive tape.
Replace when the material has become
brittle or large cracks appear
or after approximately 2 years.
Silicone grommets Replace when material has become
brittle and/or sticky.
Lamps for procedure
and night light
Infrared lights Defective lights should be replaced by
Phototherapy lights To maintain the specified therapeutic
Replace if defective by factory trained
and authorized service personnel.
trained service personnel.
It is recommended that the lights be
replaced after 10,000 operating hours.
effect, all 6 lights must be replaced if a
single light fails or after 1,000 hours of
operation. Only the type of light specified
should be used - see "Technical Data" on
page 77.
66
Preventive Maintenance Intervals
Temperature measuring
system
Inspection and
maintenance (see
“Definitions” on page 6)
Check every 2 years by factory
trained and authorized service
personnel.
Perform yearly by factory trained
and authorized service
personnel.
Disposing of the Babytherm
At the end of its service life:
● Dispose of the unit in accordance with all local, state, and
federal waste disposal regulations.
or
● Ask a licensed waste management company to dispose of
the unit.
Contact your local environmental agency for further details.
Operating Instructions Babytherm 8004/8010, 4th ed.
Page 67

Troubleshooting
General System Failures
Message Likely Causes Remedy
Red LED N lit.
Continuous audible alarm.
Red Inop. LED lit.
Audible alarm.
Text display message:
»Battery charge low«
Power failure Check that unit is connected to power.
Check that power is switched on. Remove from
service.
Device failure Remove from service.
Unit has been switched off for a
relatively long time.
Battery will be charged automatically when unit
is switched on.
Display disappears after 15 minutes.
Troubleshooting
General System Failures
Mattress Heater (Babytherm 8010)
Mattress Heater (Babytherm 8010)
Message Likely Causes Remedy
Yellow LED blinking.
Measured value display flashing.
Text display message:
»Mattress temp. deviation above 1
Audible alarm.
or
The »Skin temp. deviation below X °C«,
alarm will sound.
Red LED blinking.
Measured value display blinking.
Text display message:
»Mattress temp. above 40
Audible alarm.
Red LED blinking.
Three middle segments of the measured
value display blinking.
Text display message:
»Mattress temp. sensor fault«
Audible alarm.
Three dashes at top of measured value
display.
o
C«
o
C«
Measured mattress temperature
deviates from set value by more
than ±1 oC.
Mattress temperature above
40oC (104 oF).
Temperature sensors in heating
panel faulty.
Mattress temperature
>45 oC (113 oF)
If the measured value is higher than the set value:
Measure the core temperature!
Check the plug connection. Ensure plug is fully
inserted.
If necessary, contact DrägerService.
If the measured value is lower than the set value:
Check whether both infrared radiators are
providing warmth by placing your hand carefully
at a safe distance from the radiant heater.
Check that the skin temperature sensor is
correctly attached.
If necessary, contact DrägerService.
If used in combination with radiant heater,
reduce output level of the radiant heater.
Remove from service.
Wait until mattress temperature is
below 45
o
C (113 oF).
Operating Instructions Babytherm 8004/8010, 3rd ed.
Three dashes at bottom of measured
value display.
Text display message:
»Mattress temp. below 5
o
C«
Mattress temperature
o
C (113 oF)
<5
Wait until mattress temperature is
above 5
o
C (41 oF).
67
Page 68

Troubleshooting
Radiant Heater
Radiant Heater
Message Likely Causes Remedy
Yellow LED blinking.
Measured value display blinking.
Text display message:
»Skin temp. deviation above X oC«
Audible alarm.
Red LED blinking.
Three middle segments of the measured
value display blinking.
Text display message:
»Plug in skin temp. sensor«
Audible alarm.
Red LED blinking.
Three middle segments of the measured
value display blinking.
Text display message:
»Skin temp. sensor fault«
Audible alarm.
Red LED blinking.
Measured value display flashing.
Text display message:
»Skin temperature above 39 oC«
Audible alarm.
Three dashes at top of measured value
display.
Text display message:
»Skin temp. above range«
The measured skin temperature deviates
from the set value by more than the skin
temperature deviation threshold set in
configuration mode (0.3 oC to 1.0 oC)
(32.5 oF to 33.8 oF).
Skin temperature sensor not connected
or sensor faulty.
Sensor faulty. Switch to "man." mode; replace sensor
Skin temperature >39 oC (102.2 oF) Check that the peripheral skin
Skin temperature >42 oC (107.6 oF)
If the measured value is lower than the
set value: check that the skin
temperature sensor is correctly attached.
If the measured value is higher than the
set value, measure infant temperature.
Check connection.
Switch to "man." mode; replace sensor
and then switch back to "skin" mode.
and then switch back to "skin" mode.
temperature sensor is correctly attached.
Check that the infant is not being
heated by additional heat sources,
e.g. phototherapy or sunlight.
Check that the skin temperature sensor
is correctly attached.
Three dashes at bottom of measured
value display.
Text display message:
»Skin temp. below range«
Three dashes at top of measured value
display.
Text display message:
»Peripheral temp. above range«
Three dashes at bottom of measured
value display.
Text display message:
»Peripheral temp. below range«
Red LED blinking.
Three middle segments of the measured
value display blinking.
Text display message:
»Peripheral temp. sensor fault«
Audible alarm.
68
Skin temperature <15 oC (59 oF)
Peripheral skin temperature
o
C (107.6 oF)
>42
Peripheral skin temperature
<15 oC (59 oF)
Sensor faulty. Replace sensor.
Check that the peripheral skin
temperature sensor is correctly attached.
Operating Instructions Babytherm 8004/8010, 3rd ed.
Page 69

What’s What
Overview
23
22
11
What’s What
Overview
1
20
21
18
17
16
15
14
13
12
19
11 11
11
10
98 7
19
24
25
2
3
4
5
6
080 37 077
Operating Instructions Babytherm 8004/8010, 4th ed.
1 Radiant warmer
2 End panel
3 Side panel
4 Inner panels (2 each)
5 Handle with inner release bar for tilting the bassinet
6 Swivel cabinet (available option, left and/or right)
7 Chassis with 4 castors, which can be locked
8 Height-adjustable column (available option)
9 Foot controls for variable height-adjustable column (8)
10 Height adjustment warning label
11 Main WARNING/CAUTION label
12 Skin temperature sensor connector:
top socket, yellow, for measuring and controlling central
skin temperature;
lower socket, white, for measuring peripheral skin temp.
13 Grounding pin (equipotential bonding connection)
14 Identification and rating plate
15 Accessory mounting rail
16 Bassinet
17 Gel mattress for use with mattress heater;
foam mattress for use without mattress heater
18 Silicone grommets
19 Warning label "Never leave baby unattended..."
20 Support poles
21 Monitor shelf
22 Control unit with control panel
23 Swivel joint for radiant heater, ±90
24 X-ray tray at rear, not illustrated – Babytherm 8004 only
25 Bed canopy
o
69
Page 70

What’s What
Radiant Warmer
Radiant Warmer
1
2
5
1 Handle
2 Red central alarm light
3 Heater elements
4 Examination light / night light
5 Phototherapy lights (available option), set of 6
5433
081 29 457
Operating Instructions Babytherm 8004/8010, 4th ed.
70
Page 71

Controller
What’s What
Controller
8910
Babytherm 8010
7
6
C C
skin C manual mattress C
skin
man.
11
12
13
1 ON/OFF indicator:
The green LED is lit when the unit is ON.
The red LED is lit after a power failure.
2 OK button for confirming settings and acknowledging
alarms.
10
5
1
14
5
>
38 C
<
36 C
OK
Check
Inop.
4
3
2
1
8 Text display provides advisory messages for the user and
prompts the user to confirm/acknowledge.
9 Display and keypad for operating the mattress heater.
10 Display and keypad for operating the radiant warmer.
082 29 458
Operating Instructions Babytherm 8004/8010, 4th ed.
3 Red Inop. LED
indicates device fault.
4 Button for checking LEDs, displays and audible alarm.
5 Button for muting the audible alarm.
6 Yellow alarm LED
blinks for Caution level alarm.
7 Red alarm LED
blinks for Warning level alarm.
11 On/Off buttons for examination light;
yellow LED in button is lit when examination light is on.
12 On/Off button for night light;
yellow LED in button is lit when night light is on.
13 On/Off button for phototherapy;
yellow LED in button is lit when phototherapy lamps are on
(blue background).
14 On/Off button for radiant heater;
yellow LED in button is lit when radiant warmer is on.
71
Page 72

What’s What
Controller
Display and keypad for mattress heater
Babytherm 8010
1 Display of measured (actual) mattress temperature
2 Indicator for upper extended range >38
o
C
12
3 Indicator for lower extended range <36
o
C
4 Keys (buttons) for setting the desired mattress temperature
5 Display of set (target) mattress temperature
Display and keypad for the radiant warmer
1 Display of measured skin temperature
2 Foot symbol for peripheral ("toe") skin temperature;
lit when the peripheral skin temperature sensor is
connected.
3 Display of measured value for peripheral skin temperature;
only possible when the peripheral skin temperature sensor
is connected.
C
>
38 C
<
mattress C
36 C
345
1234
C
skin C manual
10
5
1
OK
083 29 458
4 Display of radiant warmer output level;
Levels 1 to 3: green
Levels 4 to 10: yellow
5 Keys (buttons) for setting radiant warmer output level
6 Button for selecting between operating modes "man."
(manual) and "skin" (skin temperature control);
yellow LED corresponding to the selected mode stays lit.
7 Keys (buttons) for setting the desired skin temperature
8 Display of skin temperature setpoint
72
skin
man.
Operating Instructions Babytherm 8004/8010, 4th ed.
5678
084 29 458
Page 73

Controller - Rear View
What’s What
Controller - Rear View
2
1
6
1 Input ports for connecting the nurse call from up to three
equipment units at the workstation (connections for central
alarm)
2 Output for connection to internal paging systems,
nurse call (connection for central alarm)
3 RS 232 interface (BabyLink), available option
4 RS 232 interface (modem), available option
5 Controller ON/OFF switch;
% = OFF, $ = ON
3
4
5
%$
085 29 457
Operating Instructions Babytherm 8004/8010, 4th ed.
6 Cover panel
73
Page 74

What’s What
Labels
Labels
1 Main WARNING/CAUTION label
WARNING !
DO NOT SWITCH OFF BABYTHERM WHILE A BABY IS LYING ON THE
GEL MATTRESS AS THIS WILL RESULT IN COOLING PATIENT
WARNING !
CHECK BABY'S TEMPERATURE AND SKIN
CONDITION AT REGULAR INTERVALS AND ADJUST
TEMPERATURE SETTING TO INDIVIDUAL PATIENT NEEDS
WARNING !
USE FOAM MATTRESS WHEN THE HEATING
MATTRESS IS COLD. GEL MATTRESS WILL COOL THE INFANT IF
MATTRESS HEATER IS SWITCHED OFF
WARNING !
FOR ACTIVE AND BIGGER BABIES USE SIDE PANELS
OF 23 CM HEIGHT AND ADDITIONAL INNER PANELS.
MAKE SURE TO MONITOR MORE ACTIVE BABIES APPROPRIATELY
DANGER !
RISK OF EXPLOSION IF USED IN THE PRESENCE OF FLAMMABLE
ANESTHETICS
WARNING !
DISCONNECT SUPPLY BEFORE SERVICING
REPAIRS ON THIS EQUIPMENT TO BE PERFORMED ONLY BY
DrägerService OR ITS AUTHORIZED SERVICE CENTERS
CAUTION !
TO MAINTAIN GROUNDING INTEGRITY, CONNECT ONLY TO A
"HOSPITAL GRADE" RECEPTACLE
TO REDUCE RISK OF ELECTRIC SHOCK, DO NOT REMOVE COVER
FEDERAL (USA) LAW RESTRICTS THIS DEVICE TO
SALE BY OR ON THE ORDER OF A PHYSICIAN
2 Side panel WARNING labels (2x)
3 Servicing WARNING label
4 Height adjustment CAUTION labels (2x)
5 ID label, Dräger Medical Inc. (Importer)
WARNING !
DANGER OF PATIENT INJURY
NEVER LEAVE BABY UNATTENDED WHEN
SURROUNDING PANELS ARE DOWN
DISCONNECT BOTH SUPPLIES BEFORE SERVICING
KEEP SPACE KEEP SPACE
BELOW ABOVE
CABINET BASSINET
CLEAR WHEN CLEAR WHEN
LOWERING RAISING
WARNING !
CAUTION !
Dräger Medical, Inc.
3135 Quarry Road
Telford, PA 18969
Tel: (215) 721-5400
Fax: (215) 723-5935
Operating Instructions Babytherm 8004/8010, 4th ed.
74
Page 75

6 ID label radiant warmer,
Dräger Medizintechnik GmbH Lübeck
7 ID label bassinet,
Dräger Medizintechnik GmbH Lübeck
REF
SN
V~
A Hz 50/60
Made in Germany
Dräger Medical AG & Co. KGaA
23542 Lübeck, Germany
REF
SN
V~
A Hz 50/60
What’s What
Labels
xxxx
®
8 Radiant heater WARNING labels (2x)
9 Canopy label
Made in Germany
Dräger Medical AG & Co. KGaA
23542 Lübeck, Germany
DO NOT TOUCH OR COVER TOP OF RADIANT HEATER
DO NOT TOUCH PROTECTIVE SCREEN
DANGER OF BURN INJURIES!
WARNING !
xxxx
Operating Instructions Babytherm 8004/8010, 4th ed.
75
Page 76

Technical Data
Technical Data
Ambient conditions
For operation
Temp eratur e
Atmospheric pressure
rel. humidity
Air velocity in air-conditioned rooms
For storage/transport
Temp eratur e
Atmospheric pressure
rel. humidity
Radiant heater
Radiant power at a distance of 80 cm
between the bed and the radiant warmer
Heat level 3
Heat level 10
Lamps
Examination light
Night light
Minimum clearance between top edge
of radiant warmer and ceiling
15 oC to 35 oC
900 hPa to 1060 hPa
0 to 75 %, no condensation
max. 0.3 m/s
–20 oC to 60 oC
700 hPa to 1060 hPa
0 to 90 %, no condensation
10 mW/cm2
30 mW/cm
2
120 V
23 W / 20 W
9 W
>50 cm
Skin temperature measurement:
Sensor we recommend use of Drager sensors, see page 81.
Measuring range/Display range
Accuracy (sensor)
Accuracy of complete measuring system
(not including sensor)
Setting range
15 oC (59 oF) to 42 oC (107.6 oF)
o
C
±0.1
±0.2 oC
o
35
C to 37.5 oC
Mattress heater (Babytherm 8010 only)
Temperature measurement
Measuring range/display range accuracy
Setting range
5 oC (41 oF) to 45 oC (113 oF)
o
C between 20 and 42 oC
±0.5
o
±2
C in all other parts of range
o
C to 38.5 oC
30
Height adjustment (optional)
Height adjustment range
Specified operation
295 mm (11.6 inches)
Intermittent operation (1 min. operation followed by 60 min.
cooling period)
Operating Instructions Babytherm 8004/8010, 4th ed.
76
Page 77

Bed canopy
2 concentration with bed canopy installed max. 0.2 %
CO
Phototherapy (optional)
Lights Philips Masterline Plus halogen lights, model 13674
12 V / 50 W (set of 6)
or
Philips Brilliantline Pro halogen lights, model 14619 12 V / 50 W
(set of 6)
Opening angle 24
Radiation intensity at a distance of 80 cm and
o
9.5 W/m
2
useful area of 400 x 200 mm
Technical Data
Irradiated useful area on the bed (mm)
Relative spectral radiation intensity as
a function of wavelength
750
400
490
200
Relative spectral radiation intensity
Relative spectral radiation intensity
Wavelength (mm)
Wavelength (mm)
086 29 457
Operating Instructions Babytherm 8004/8010, 4th ed.
77
Page 78

Technical Data
Operating data
Mains voltage 100/120 V / 50/60 Hz
Current consumption A Babytherm 8004 Babytherm 8010
100 V 110 to 127 V 220 to 240 V 100 V 110 to127 V 220 to 240 V
without height adjustment
without phototherapy
without height adjustment
with phototherapy
with height adjustment
without phototherapy
withheight adjustment
with phototherapy
Power consumption
Radiant heater
Mattress heater (Babytherm 8010)
Lighting
Height adjustment (optional)
Phototherapy (optional)
Fuses
100 V /120 V F 15 A UL 248-14, 2 units
Height adjustment (optional)
100 V /120 V T 6.3 A L 250 V; IEC 127-2/III (2 units)
4.9 5.7 3.0 6.1 6.7 3.5
---- 9.3 4.9 ---- 10.3 5.4
8.7 10.3 5.4 9.9 11.4 5.9
---- 13.9 7.3 ---- 15.0 7.8
600 W
160 W
20 W
560 W
400 W
Standards
IEC/EN 60601-1
IEC/EN 60601-2-35, for mattress heater
IEC/EN 60601-2-21, for radiant warmer
Electrical protection class I
Skin temperature sensor Type BF
Heating surface of mattress Type BF
Classification
Class IIb
(according to EC Directive 93/42/EC Appendix IX)
UMDNS-Code
15-610
(Universal Medical Device Nomenclature System)
Electromagnetic compatibility (EMC) according to IEC/EN 60601-1-2
Interface RS 232
Level measured according to DIN 66020
Monitor cable (Part No. 83 06 488)
Wiring layout diagram
Babytherm 8004/8010
Pin
5
2
3
9-pin sub-D
socket
GND GND
RxD TxD
TxD RxD
Connector casing
Operating Instructions Babytherm 8004/8010, 4th ed.
Monitor
Pin
5
3
2
9-pin sub-D
socket
087 29 457
78
Page 79

Technical Data
Modem interface RS 232
Connection for external modem for service purposes
Wiring layout diagram
Pin
5
2
3
7
8
GND
RxD
TxD
RTS
CTS
The two RS 232 interfaces are electrically coupled to each other and with the central alarm input.
Central alarm Output for connecting internal paging systems (nurse call)
Operating voltage max. 24 V
Current max. 250 mA
Power max. 3 W
Potential-free, two-way contact
5
3
1
089 29 457
Input Connection of the nurse call from up to 3 devices (the red central
alarm LED lights up for every alarm forwarded from these devices to
the Babytherm 8004/8010).
088 29 457
Potential-free, normally open contact
2
3
090 29 457
Interfaces, optional
All interface signals are electrically isolated
from the patient sector.
Dielectric strength 1.5 kV.
Dimensions
Length x width 1315 x 750 mm (51.8 x 29.5 inches)
Overall height
Unit without height adjustment
Unit with height adjustment
1960 mm (77.2 inches)
1896 to 2210 mm (74.6 to 87.0 inches)
Working height of bed surface
without height adjustment
with height adjustment
Bed dimensions
Bed tilting
Tilt
Height of side panels
1025 mm (40.4 inches)
885 to 1180 mm (34.8 to 46.5 inches)
750 x 490 mm (29.5 x 19.3 inches)
adjustable in small increments
maximum of 20o front end down
maximum of 15
o
front end up
150 mm (5.9 inches) or
230 mm (9.1 inches)
Height of inner walls
70 mm (2.8 inches)
Operating Instructions Babytherm 8004/8010, 4th ed.
79
Page 80

Ordering Information
Weight (with one cabinet)
Unit without height adjustment
with mattress heater
without mattress heater
Unit with height adjustment
with mattress heater
without mattress heater
Freight
Dimensions
Weight
133 kg (293 lbs)
120 kg (265 lbs)
120 kg (265 lbs)
110 kg (243 l bs)
1200 x 800 x 1600 mm (47.2 x 31.5 x 63.0 inches)
172 kg (380 lbs)
Ordering Information
Name and Description Part No.
Babytherm 8010
with mattress heater and skin temperature
control, 100 V / 120 V
Babytherm 8004
with skin temperature control and X-ray
tray, 100 V / 120 V
— chassis with electric height adjustment
or
chassis with fixed column
— without swivel cabinet, with 1 swivel
cabinet or with 2 swivel cabinets
(only for chassis with electric height
adjustment)
— Interfaces
— Integral phototherapy
Accessories
Swivel cabinet 2M 20 638
Cabinet installation kit 2M 20 868
Interface option 2M 30 268
Phototherapy kit 2M 30 450
MediCable 83 06 488
Bed canopy 2M 30 392
Bed canopy bracket 2M 21 342
Infusion bottle holder 2M 21 514
Ventilation hose bracket 2M 21 191
FR 00 105
2M 30 404
Name and Description Part No.
Swivel tray 2M 21 186
Rail clamp adapter bracket 2M 85 337
Cable clips (bag of 4) G 13 171
Shelf 2M 21 158
Shelf bracket
Center distance: 37 mm
Center distance: 170 / 240 mm
Double clamp G 13 147
Pole for small items
Ø 25 mm, length 50 mm
Ø 25 mm, length 110 mm
Rails
Length: 400 mm
Length: 600 mm
Length: 800 mm
Shelf rail 2M 21 161
Basket 150 M 25 121
Basket 300 M 26 145
Basket 600 M 26 146
Waste bag holder M 24 695
Connecting hose clip 2M 85 446
Suction hose clip 2M 85 239
G 13 822
G 13 821
G 13 831
G 13 823
G 13 851
G 13 829
G 14 449
Operating Instructions Babytherm 8004/8010, 4th ed.
80
Page 81

Ordering Information
Parts List
Name and Description Part No.
Suction
Set hooked rail (Set of fixtures for suction
2M 21 150
kit below the mattress)
Oxygen therapy with canopy
Injector for 23 cm side panels 2M 14 190
2 flowmeter, 0 to 16 L/min 2M 85 501
O
Nebulizer 2M 85 835
Spiral hose, 1m (set of 5) 2M 85 811
Consumables/accessories
Foam mattress
for unheated bed surface 2M 21 012
Gel mattress
for use with mattress heater 2M 20 827
Repair kit for gel mattress 2M 21 324
Mattress cover sheet 2M 21 272
ThermoTrace
yellow, box of 5
TM
skin temperature sensor,
MX 11 000
(for single use)
ThermoTrace
white, box of 5
TM
skin temperature sensor,
MX 11 001
(for single use)
ThermoPadTM, box of 50 MX 11 002
Halogen lamp, box of 6
(Philips Masterline Plus, model 13674
or
Philips Brilliantline Pro, model 14619) 2M 30 084
Lamps for bed lighting (examination light) 2M 30 079
Lamps for night light 2M 30 078
Silicone grommet 2M 20 434
Drainage canister hook 2M 21 293
Waste bag M 26 240
Parts List
Instead of the part nos. shown in the Order List, the following
parts or units no longer in the Dräger product range can be
used:
Name and Description Part No.
Canopy 2M 21 030
Operating Instructions Babytherm 8004/8010, 4th ed.
Service documentation on request
81
Page 82

Index
Index
A
Alarm
15 minute reminder . . . . . . . . . . . . . . . . . . . . . . . . . . 9, 35
mattress temperature . . . . . . . . . . . . . . . . . . . . . . . 46, 47
mattress temperature > 40 °C
Alarm threshold
skin temperature
Ambient . . . . . . . . . . . . . . . . . . . . . . . . . . . . . . . . . . . . . . . . . . 76
Ambient conditions . . . . . . . . . . . . . . . . . . . . . . . . . . . . . . . . 76
. . . . . . . . . . . . . . . . . . . . . . . . . . . . . . . 60
. . . . . . . . . . . . . . . . . . . . 47
B
Bed
preparing
Bed canopy
preparing
using . . . . . . . . . . . . . . . . . . . . . . . . . . . . . . . . . . . . . . . . . 51
Before each use
Before next use . . . . . . . . . . . . . . . . . . . . . . . . . . . . . . . . . . . . 65
Before using for the first time . . . . . . . . . . . . . . . . . . . . . . . . 27
Bronchial suction . . . . . . . . . . . . . . . . . . . . . . . . . . . . . . . . . . 57
. . . . . . . . . . . . . . . . . . . . . . . . . . . . . . . . . . . . . . 22
. . . . . . . . . . . . . . . . . . . . . . . . . . . . . . . . . . . . . . 24
. . . . . . . . . . . . . . . . . . . . . . . . . . . . . . . . . . . 27
C
Care
equipment . . . . . . . . . . . . . . . . . . . . . . . . . . . . . . . . . . . . . 64
Central alarm
Classification . . . . . . . . . . . . . . . . . . . . . . . . . . . . . . . . . . . . . 78
Configuration . . . . . . . . . . . . . . . . . . . . . . . . . . . . . . . . . . . . . 59
activating modes . . . . . . . . . . . . . . . . . . . . . . . . . . . . . . . 59
using modes . . . . . . . . . . . . . . . . . . . . . . . . . . . . . . . . . . . 60
. . . . . . . . . . . . . . . . . . . . . . . . . . . . . . . . . . . . . . 55
D
Description of system components . . . . . . . . . . . . . . . . . . . 17
Dimensions
Disinfecting
Display contrast
Drainage canister hook . . . . . . . . . . . . . . . . . . . . . . . . . . . . . 24
. . . . . . . . . . . . . . . . . . . . . . . . . . . . . . . . . . . . . . . 79
. . . . . . . . . . . . . . . . . . . . . . . . . . . . . . . . . . . . . . . 64
. . . . . . . . . . . . . . . . . . . . . . . . . . . . . . . . . . . 62
E
Error cache . . . . . . . . . . . . . . . . . . . . . . . . . . . . . . . . . . . . . . . 63
G
Gel mattress
maintenance intervals
. . . . . . . . . . . . . . . . . . . . . . . . . . . 66
H
Hook for drainage canister . . . . . . . . . . . . . . . . . . . . . . . . . . 24
Hypothermia . . . . . . . . . . . . . . . . . . . . . . . . . . . . . . . . . . . . . . 44
I
Injector . . . . . . . . . . . . . . . . . . . . . . . . . . . . . . . . . . . . . . . . . . . 25
Inside panels
installing . . . . . . . . . . . . . . . . . . . . . . . . . . . . . . . . . . . . . . 22
Inspection
Interface
. . . . . . . . . . . . . . . . . . . . . . . . . . . . . . . . . . . . . . . . 66
BabyLink . . . . . . . . . . . . . . . . . . . . . . . . . . . . . . . . . . . . . . 73
modem . . . . . . . . . . . . . . . . . . . . . . . . . . . . . . . . . . . . 73, 78
serial
. . . . . . . . . . . . . . . . . . . . . . . . . . . . . . . . . . . . . . . . . . 78
K
Keys
testing . . . . . . . . . . . . . . . . . . . . . . . . . . . . . . . . . . . . . . . . 61
L
Label
Height adjustment CAUTION . . . . . . . . . . . . . . . . . . . . . 74
Main WARNING/CAUTION
Language
selecting
Limitation of liability . . . . . . . . . . . . . . . . . . . . . . . . . . . . . . . . . . 4
Load limits . . . . . . . . . . . . . . . . . . . . . . . . . . . . . . . . . . . . . . . . 20
. . . . . . . . . . . . . . . . . . . . . . . . . . . . . . . . . . . . . . 62
. . . . . . . . . . . . . . . . . . . . . . 74
M
Maintenance . . . . . . . . . . . . . . . . . . . . . . . . . . . . . . . . . . . . . . 66
Mattress heater
precautions . . . . . . . . . . . . . . . . . . . . . . . . . . . . . . . . . . . . 31
troubleshooting
using
. . . . . . . . . . . . . . . . . . . . . . . . . . . . . . . . . . . . . . . . . 44
mobile telephones . . . . . . . . . . . . . . . . . . . . . . . . . . . . . . 7, 15
Monitor shelf . . . . . . . . . . . . . . . . . . . . . . . . . . . . . . . . . . . . . . 20
Monitoring
oxygen concentration
. . . . . . . . . . . . . . . . . . . . . . . . . . . . . . . . 67
. . . . . . . . . . . . . . . . . . . . . . . . 10, 33
N
Nurse call
. . . . . . . . . . . . . . . . . . . . . . . . . . . . . . . . . . . . . . . . 62
testing
O
O2 flowmeter . . . . . . . . . . . . . . . . . . . . . . . . . . . . . . . . . . . . . 25
O2-monitor
Operating data
Operation
manual
shutting down
Order list
Oxygen
fire hazards
physiological risks
Oxygen therapy
Injector
O2 hood
precautions . . . . . . . . . . . . . . . . . . . . . . . . . . . . . . . . . . . . 32
preparing accessories
. . . . . . . . . . . . . . . . . . . . . . . . . . . . . . . . . . . . . . . 25
. . . . . . . . . . . . . . . . . . . . . . . . . . . . . . . . . . . . 78
. . . . . . . . . . . . . . . . . . . . . . . . . . . . . . . . . . . . . . . . . 31
. . . . . . . . . . . . . . . . . . . . . . . . . . . . . . . . . . . . . . . . 34
. . . . . . . . . . . . . . . . . . . . . . . . . . . . . . . . . . 58
. . . . . . . . . . . . . . . . . . . . . . . . . . . . . . . . . . . . . . . . . 80
. . . . . . . . . . . . . . . . . . . . . . . . . . . . . . . . . . . . 32
. . . . . . . . . . . . . . . . . . . . . . . . . . 10, 33
. . . . . . . . . . . . . . . . . . . . . . . . . . . . . . . . . . . . . . . . 57
. . . . . . . . . . . . . . . . . . . . . . . . . . . . . . . . . . . . . . 56
. . . . . . . . . . . . . . . . . . . . . . . . . . . 25
Operating Instructions Babytherm 8004/8010, 3rd ed. .
82
Page 83

Inde
x
P
Parts list . . . . . . . . . . . . . . . . . . . . . . . . . . . . . . . . . . . . . . . . . . 81
Patient monitoring
core temperature
Phones, mobile
Phototherapy
disinfecting of lenses . . . . . . . . . . . . . . . . . . . . . . . . . . . . 65
distribution of irradiation
hours of operation
precautions . . . . . . . . . . . . . . . . . . . . . . . . . . . . . . . . . . . . 32
resetting counter
spectral intensity
testing . . . . . . . . . . . . . . . . . . . . . . . . . . . . . . . . . . . . . . . . . 30
using
. . . . . . . . . . . . . . . . . . . . . . . . . . . . . . . . . . . . . . . . . . 53
Power failure alarm
testing . . . . . . . . . . . . . . . . . . . . . . . . . . . . . . . . . . . . . . . . . 29
Precautions
during patient care
Preparation
. . . . . . . . . . . . . . . . . . . . . . . . . . . . . . . . . . . . . . . . 20
. . . . . . . . . . . . . . . . . . . . . . . . . . . . . . . . 33
. . . . . . . . . . . . . . . . . . . . . . . . . . . . . . . . 7, 15
. . . . . . . . . . . . . . . . . . . . . . . . . 77
. . . . . . . . . . . . . . . . . . . . . . . . . . . . . . . 61
. . . . . . . . . . . . . . . . . . . . . . . . . . . . . . . . 54
. . . . . . . . . . . . . . . . . . . . . . . . . . . . . . . . 77
. . . . . . . . . . . . . . . . . . . . . . . . . . . . . . 31
R
Radiant heater
precautions . . . . . . . . . . . . . . . . . . . . . . . . . . . . . . . . . . . . 31
switching off . . . . . . . . . . . . . . . . . . . . . . . . . . . . . . . . . . . . 44
troubleshooting
. . . . . . . . . . . . . . . . . . . . . . . . . . . . . . . . . 68
S
Safety
information . . . . . . . . . . . . . . . . . . . . . . . . . . . . . . . . . . . . . . 4
patient . . . . . . . . . . . . . . . . . . . . . . . . . . . . . . . . . . . . . . . . . . 4
patient monitoring
Safety Information
Shelf, monitor . . . . . . . . . . . . . . . . . . . . . . . . . . . . . . . . . . . . . . 20
Skin temperature control
Skin temperature sensor
connecting . . . . . . . . . . . . . . . . . . . . . . . . . . . . . . . . . . . . . 37
peripheral
white
yellow
Software version . . . . . . . . . . . . . . . . . . . . . . . . . . . . . . . . . . . 60
Speaker volume
adjusting
Stability
Standards
Sterilizing
Sunlight
Support arm, for ventilator circuit
Switching . . . . . . . . . . . . . . . . . . . . . . . . . . . . . . . . . . . . . . . . . 34
Switching lighting On/Off . . . . . . . . . . . . . . . . . . . . . . . . . . . 55
. . . . . . . . . . . . . . . . . . . . . . . . . . . . . . . . . . . . . . 43
. . . . . . . . . . . . . . . . . . . . . . . . . . . . . . . . . . . . . . . . . . 43
. . . . . . . . . . . . . . . . . . . . . . . . . . . . . . . . . . . . . . . . . 37
. . . . . . . . . . . . . . . . . . . . . . . . . . . . . . . . . . . . . . . 60
. . . . . . . . . . . . . . . . . . . . . . . . . . . . . . . . . . . . . . . . . . . 20
. . . . . . . . . . . . . . . . . . . . . . . . . . . . . . . . . . . . . . . . . 78
. . . . . . . . . . . . . . . . . . . . . . . . . . . . . . . . . . . . . . . . . 64
. . . . . . . . . . . . . . . . . . . . . . . . . . . . . . . . . . . . . . . 9, 31
. . . . . . . . . . . . . . . . . . . . . . . . . . . . . . . . 4
. . . . . . . . . . . . . . . . . . . . . . . . . . . . . . . . . . . 4
. . . . . . . . . . . . . . . . . . . . . . . . . . . . 37
. . . . . . . . . . . . . . . . . . . . . 24
T
Technical data . . . . . . . . . . . . . . . . . . . . . . . . . . . . . . . . . . . . . 76
Testing readiness for operation . . . . . . . . . . . . . . . . . . . . . . . 27
ThermoMonitoring . . . . . . . . . . . . . . . . . . . . . . . . . . . . . . . . . . 43
Tilting the bed . . . . . . . . . . . . . . . . . . . . . . . . . . . . . . . . . . . . . 23
Transport
intra-hospital, preparations . . . . . . . . . . . . . . . . . . . . . . . . 26
Troubleshooting
General system failures . . . . . . . . . . . . . . . . . . . . . . . . . . 67
U
Unit
disposing . . . . . . . . . . . . . . . . . . . . . . . . . . . . . . . . . . . . . . 66
switching on
. . . . . . . . . . . . . . . . . . . . . . . . . . . . . . . . . . . . 34
W
Warranty . . . . . . . . . . . . . . . . . . . . . . . . . . . . . . . . . . . . . . . . . . . 5
Weight . . . . . . . . . . . . . . . . . . . . . . . . . . . . . . . . . . . . . . . . . . . 79
What’s what
controller . . . . . . . . . . . . . . . . . . . . . . . . . . . . . . . . . . . . . . 71
. . . . . . . . . . . . . . . . . . . . . . . . . . . . . . . . . . . . . . . . . . 74
labels
overview
radiant heater . . . . . . . . . . . . . . . . . . . . . . . . . . . . . . . . . . . 70
. . . . . . . . . . . . . . . . . . . . . . . . . . . . . . . . . . . . . . . 69
X
X-ray tray . . . . . . . . . . . . . . . . . . . . . . . . . . . . . . . . . . . . . . . . . . 21
precautions . . . . . . . . . . . . . . . . . . . . . . . . . . . . . . . . . . . . 33
Operating Instructions Babytherm 8004/8010, 3rd ed.
83
Page 84

These Instructions for Use apply only to
Babytherm 8004/8010
with Serial No.:
If no Serial No. has been filled in by
Dräger, these Operating Instructions are
provided for general information only and
are not intended for use with any specific
machine or device.
Manufactured by
Dräger Medical AG & Co. KGaA
Germany
z Moislinger Allee 53 – 55
D-23542 Lübeck
y +49 451 8 82- 0
x 26 80 70
FAX +49 451 8 82- 20 80
! http://www.draeger.com
Distributed by
Dräger Medical, Inc.
U.S.A.
z 3136 Quarry Road
Telford, PA 18969
y (215) 721-5400
(800) 4DRAGER (800 437-2437)
FAX (215) 723-5935
90 37 077 - GA 6132.303 en us
© Dräger Medical AG & Co. KGaA
4th edition - May 2004
Subject to modifications
 Loading...