

D-Link DPH-400G, DPH-400GE User Manual


Safety Notices
Please read the following safety notices before installing or using this phone.
They are crucial for the safe and reliable operation of the device.
Please use the external power supply that is included in the package. Other
power supplies may cause damage to the phone, affect the behavior or
induce noise.
Before using the external power supply in the package, please check with
home power voltage. Inaccurate power voltage may cause fire and damage.
Please do not damage the power cord. If power cord or plug is impaired, do
not use it, it may cause fire or electric shock.
The plug-socket combination must be accessible at all times because it
serves as the main disconnecting device.
Do not drop, knock or shake it. Rough handling can break internal circuit
boards.
Do not install the device in places where there is direct sunlight. Also do not
put the device on carpets or cushions. It may cause fire or breakdown.
Avoid exposure the phone to high temperature, below 0℃ or high humidity.
Avoid wetting the unit with any liquid.
Do not attempt to open it. Non-expert handling of the device could damage it.
Consult your authorized dealer for help, or else it may cause fire, electric
shock and breakdown.
Do not use harsh chemicals, cleaning solvents, or strong detergents to clean
it. Wipe it with a soft cloth that has been slightly dampened in a mild soap
and water solution.
When lightning, do not touch power plug or phone line, it may cause an
electric shock.
Do not install this phone in an ill-ventilated place.
You are in a situation that could cause bodily injury. Before you work on any
equipment, be aware of the hazards involved with electrical circuitry and be
familiar with standard practices for preventing accidents.

Table of Content
1 INTRODUCING VOIP PHONE ..................................................................................................... 6
1.1 SIMPLE INTRODUCTION ............................................................................................................... 6
1.2 DELIVERY CONTENT .................................................................................................................... 6
1.3 KEYPAD ....................................................................................................................................... 7
1.4 PORT FOR CONNECTING ............................................................................................................... 8
1.5 ICON INTRODUCTION ................................................................................................................... 9
1.6 LED INTRODUCTION .................................................................................................................. 10
2 INITIAL CONNECTING AND SETTING .................................................................................. 12
2.1 CONNECT THE PHONE ................................................................................................................ 12
2.1.1 Connect to network ............................................................................................................... 12
2.1.2 Power adaptor connection ..................................................................................................... 13
2.2 BASIC INITIALIZATION ............................................................................................................... 13
2.2.1 Network settings ................................................................................................................... 13
3 BASIC FUNCTION ........................................................................................................................ 15
3.1 MAKING A CALL ........................................................................................................................ 15
3.1.1 Call Device ........................................................................................................................... 15
3.1.2 Call Methods......................................................................................................................... 15
3.2 ANSWERING A CALL .................................................................................................................. 15
3.3 DND .......................................................................................................................................... 16
3.4 CALL FORWARD ........................................................................................................................ 16
3.5 CALL HOLD ............................................................................................................................... 16
3.6 CALL WAITING .......................................................................................................................... 16
3.7 MUTE ........................................................................................................................................ 16
3.8 CALL TRANSFER ........................................................................................................................ 17
3.9 3-WAY CONFERENCE CALL ......................................................................................................... 17
3.10 MULTIPLE-WAY CALL ................................................................................................................. 17
4 ADVANCED FUNCTION .............................................................................................................. 19
4.1 CALL PICKUP ............................................................................................................................. 19
4.2 JOIN CALL .................................................................................................................................. 19
4.3 REDIAL / UNREDIAL................................................................................................................... 19
4.4 CLICK TO DIAL ........................................................................................................................... 20
4.5 CALL BACK ................................................................................................................................ 20
4.6 AUTO ANSWER ........................................................................................................................... 20
4.7 HOTLINE .................................................................................................................................... 20
4.8 APPLICATION ............................................................................................................................. 20
4.8.1 SMS ...................................................................................................................................... 20
4.8.2 Memo .................................................................................................................................... 21
4.8.3 Voice Mail ............................................................................................................................ 21

4.9 PING .......................................................................................................................................... 21
4.10 PROGRAMMABLE KEY CONFIGURATION .................................................................................... 21
5 OTHER FUNCTIONS .................................................................................................................... 25
5.1 AUTO HANDDOWN .................................................................................................................... 25
5.2 BAN ANONYMOUS CALL............................................................................................................ 25
5.3 BAN OUTING ............................................................................................................................. 25
5.4 DIAL PLAN ................................................................................................................................. 25
5.5 DIAL PEER ................................................................................................................................. 25
5.6 AUTO REDIAL ............................................................................................................................ 26
5.7 CALL COMPLETION .................................................................................................................... 26
5.8 RING FROM HEADSET ................................................................................................................ 26
5.9 POWER LIGHT ............................................................................................................................ 26
5.10 HIDE DTMF .............................................................................................................................. 26
5.11 PASSWORD DIAL ................................................................................................ ........................ 26
5.12 PRE DIAL ................................................................................................................................ ... 27
5.13 ACTION URL & ACTIVE URI ..................................................................................................... 27
5.14 PUSH XML ................................................................................................................................ 27
6 BASIC SETTING ............................................................................................................................ 28
6.1 KEYBOAD .................................................................................................................................. 28
6.2 SCREEN SET ............................................................................................................................... 28
6.3 RINGER SET ............................................................................................................................... 28
6.4 VOICE VOLUME ......................................................................................................................... 28
6.5 TIME & DATE ............................................................................................................................ 28
6.6 GREETING WORD....................................................................................................................... 29
6.7 LANGUAGE SETTING .................................................................................................................. 29
7 ADVANCED SETTINGS ............................................................................................................... 30
7.1 ACCOUNT .................................................................................................................................. 30
7.2 NETWORK .................................................................................................................................. 30
7.3 SECURITY .................................................................................................................................. 30
7.4 MAINTENANCE .......................................................................................................................... 30
7.5 FACTORY RESET ......................................................................................................................... 30
8 WEB CONFIGURATION .............................................................................................................. 31
8.1 INTRODUCTION OF CONFIGURATION .......................................................................................... 31
8.1.1 Ways to configure ................................................................................................................. 31
8.1.2 Password Configuration........................................................................................................ 31
8.2 SETTING VIA WEB BROWSER ...................................................................................................... 31
8.3 CONFIGURATION VIA WEB........................................................................................................ 32
8.3.1 BASIC .................................................................................................................................. 32
8.3.2 Network ................................................................................................................................ 37
8.3.3 VOIP ..................................................................................................................................... 45
8.3.4 Phone .................................................................................................................................... 59

8.3.5 Function Key ........................................................................................................................ 76
8.3.6 Maintenance.......................................................................................................................... 79
8.3.7 Security ................................................................................................................................. 88
8.3.8 Logout................................................................................................................................... 93
9 APPENDIX ...................................................................................................................................... 94
9.1 SPECIFICATION .......................................................................................................................... 94
9.1.1 Hardware .............................................................................................................................. 94
9.1.2 Voice features ....................................................................................................................... 94
9.1.3 Network features ................................................................................................................... 95
9.1.4 Maintenance and management.............................................................................................. 96

1 Introducing VoIP Phone
1.1 Simple Introduction
Thank you for your purchasing DPH-400G/DPH-400GE.
DPH-400G/DPH-400GE is a full-feature telephone that provides voice
communication over the same data network that your computer uses. This phone
functions not only much like a traditional phone, allowing to place and receive
calls, and enjoy other features that traditional phone has, but also it owns many
data services features which you could not expect from a traditional telephone.
This guide will help you easily using the various features and services available
on your phone.
1.2 Delivery Content
Please check whether the delivery contains the following parts:
IP Phone are designed to look like conventional phones, the following photo
shows a broad overview of the IP Phone.
Item
Description
IP Phone
DPH-400G/DPH-400GE Phone with display and
keypad.
Power Adapter
Power supply for telephone.
Network Cable
Used to access network for the phone.
Handset
Make phone calls with the phone‟s basic functions.
Handset Cord
Connected with the handset and the phone.
Quick Installation Guide
Quick install the DPH-400G/DPH-400GE
guide.
CD
Containing manual and quick installation guide.
Warranty Safety Information
Warranty Safety Information for
DPH-400G/DPH-400GE .
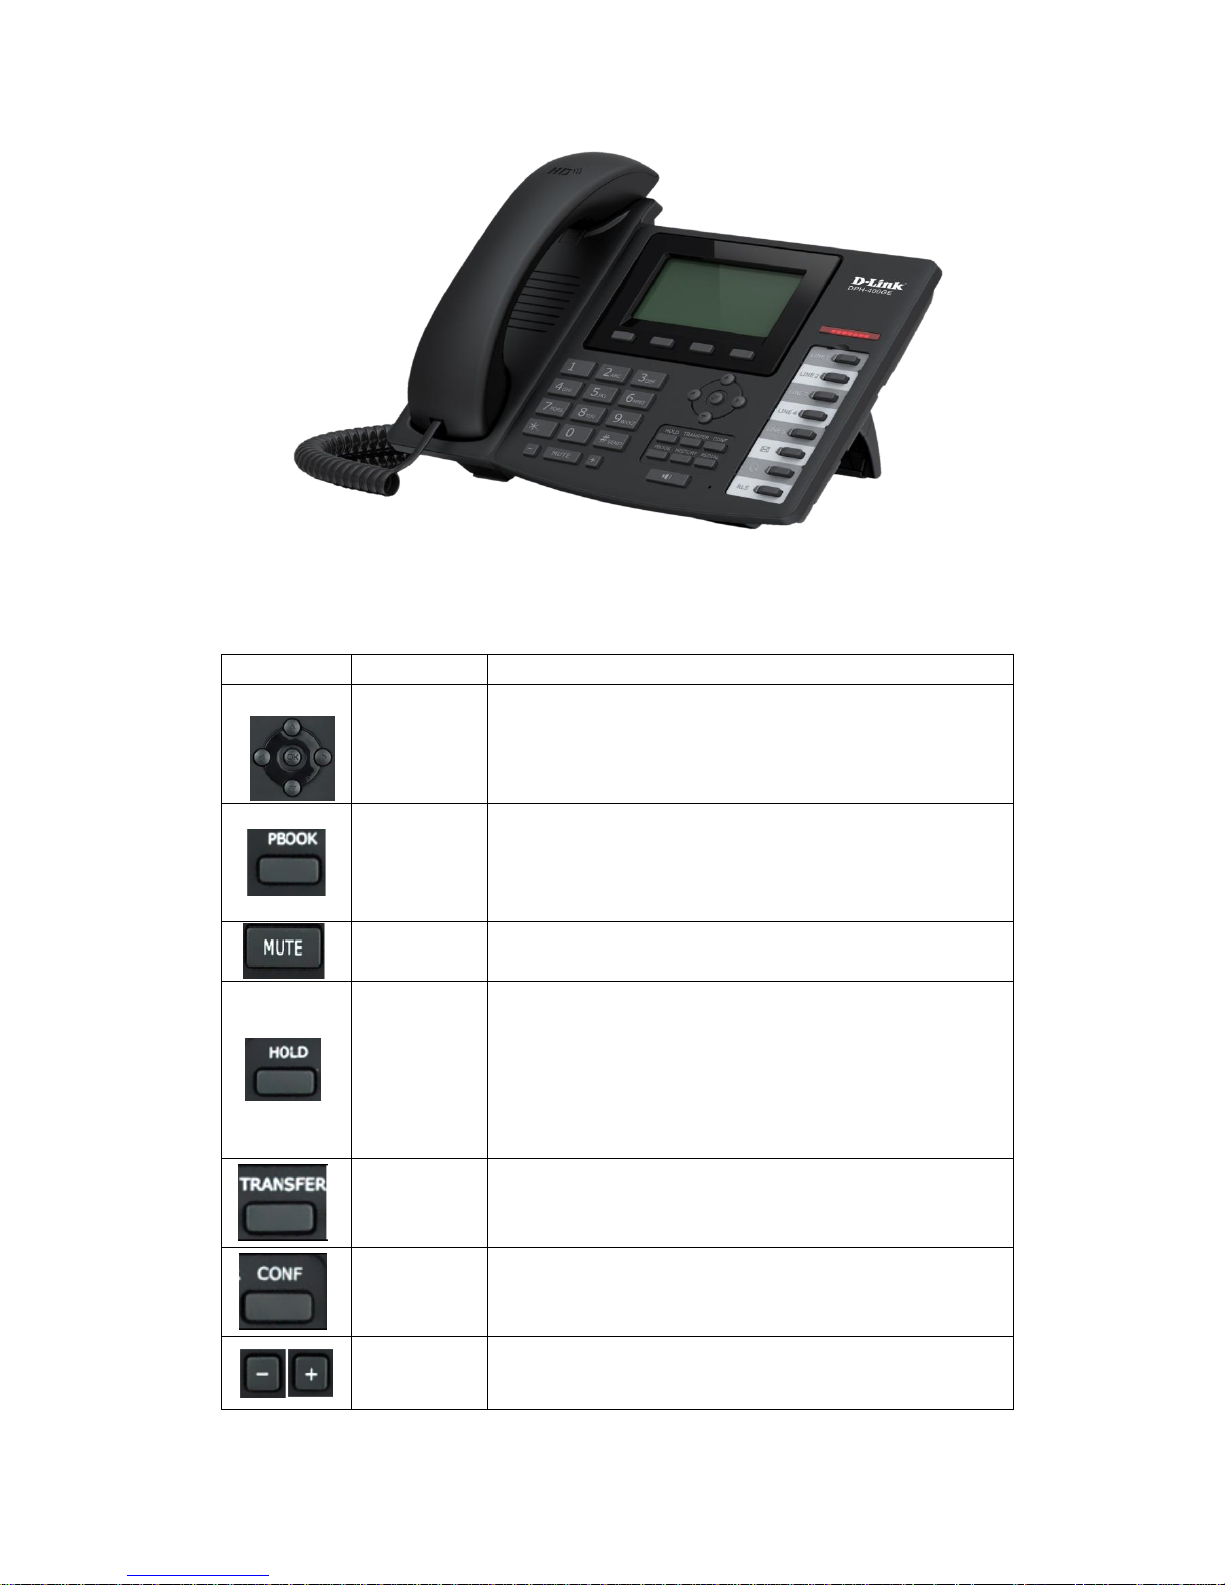
1.3 Keypad
Key
Key name
Function Description
Navigation
Navigation keys assist users for operating.
In idle state they have special function.
You can configure through the web page according
to your patterns of use.
Phonebook
Access to phone book, check the record list and
add new records and revise the record. When check
the phone book record, press this key again will
return to idle mode.
Mute
Press this key in calling mode, you can hear the
other side, and the other side cannot hear you.
Hold
Temporarily hold the active call during the talking;
press the key again to unhold the call. You also can
press this key then input the third party‟s phone
number and end with the # key during calling; you
can make a call with the third party and hold the
previous calling.
Transfer
Use the key to realize blind transfer or attended
transfer.
Conference
Use this key to realize the three party call.
Volume -/+
Turn down or turn up the volume by pressing these
two keys.
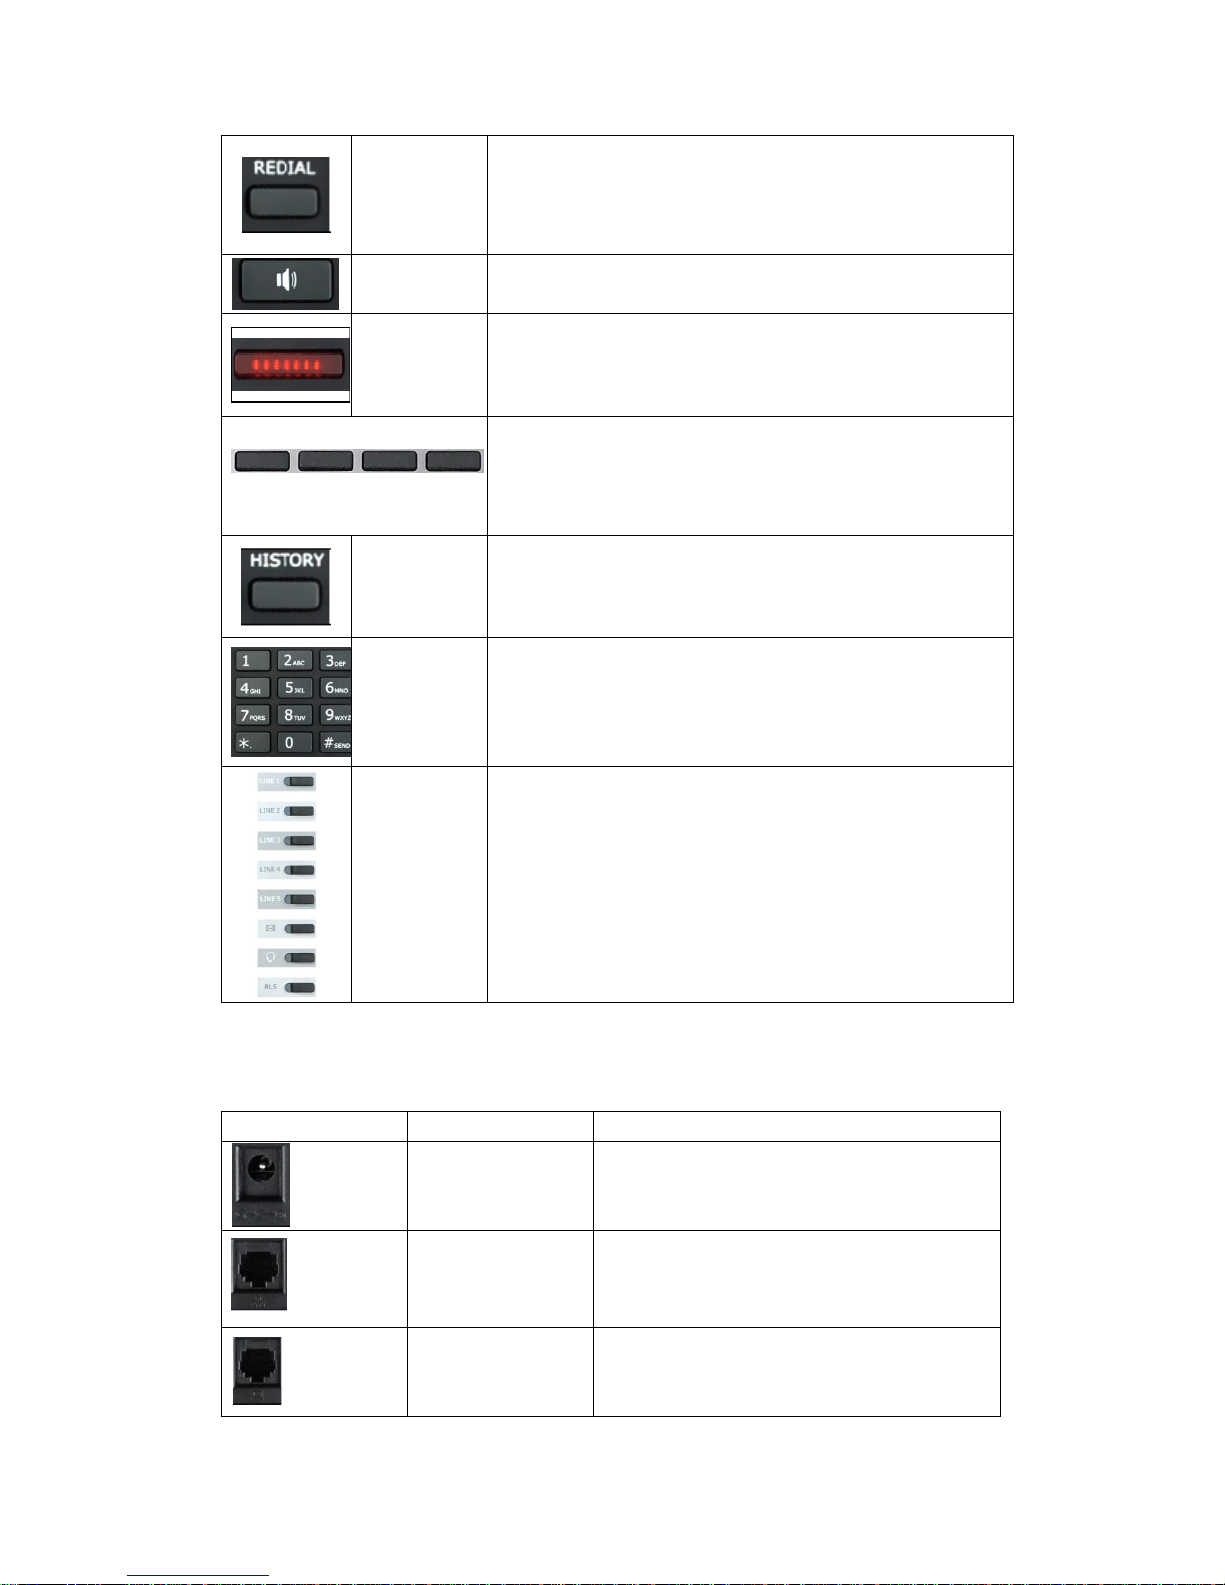
Redial
1. In the hook off /hands-free mode, use the key
to dial the last call number.
2. In stand-by mode, it has a function to check the
Outgoing Call.
Hands-free
Make the phone into hands-free mode.
Indicator
light
If power on, the indicator is light.
Soft key 1/2/3/4
Keys combination, include functions such as
History/PBook /DND /Menu /Del /Redial /Send /
Quit/Answer/Divert/Reject/Hold/Transfer/Conf/Cl
ose and so on.
Call logs
View the Missed call, Incoming Call and dialed
Call.
Digital
keyboard
Inputting the phone number or DTMF.
DSS keys
Programmable keys to let you customize with
different functions. You can configure them in the
web page.
1.4 Port for connecting
Port
Port name
description
Power switch
Input: 5V AC, 1A.
WAN
10/100M Connect it to Network.
LAN
10/100M Connect it to PC.
Headset
Port type: RJ-9 connector.
Handset
Port type: RJ-9 connector.
External console
interface
Port type: RJ-11 direct connector.
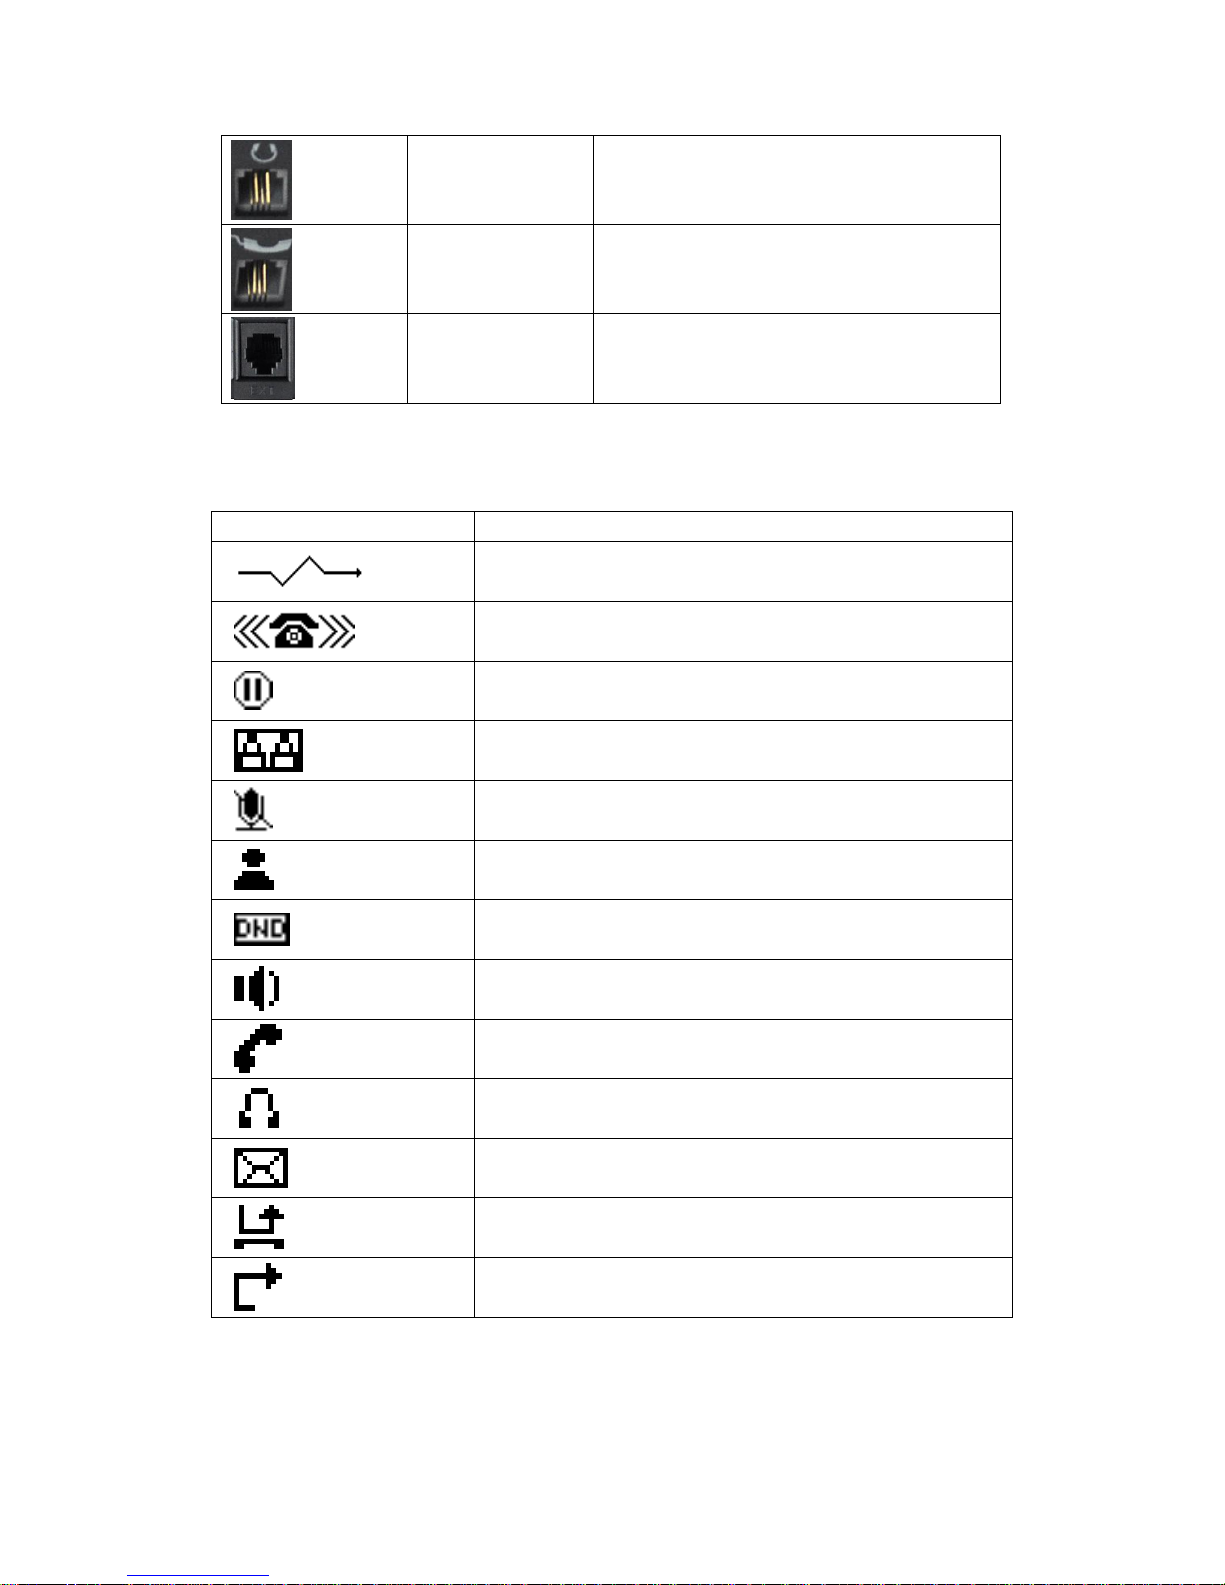
1.5 Icon introduction
Icon
Description
Call out.
Call in.
Call hold.
Auto answer.
Call mute.
Contact.
DND(Do not Disturb).
In hand free mode.
In handset mode.
In headset mode.
SMS.
Missed call.
Call forward.

1.6 LED introduction
Table 1 Programmable key LEDs for BLF
LED Status
Description
Steady green
The object is in idle status.
Slow blinking red
The object is ringing.
Steady red
The object is active.
Fast blinking red
The object is failed.
Off
The object is failed/ No subscribe
Table 2 Programmable key LEDs for Presence
LED Status
Description
Steady green
The object is online.
Slow blinking red
The object is ringing.
Steady red
The object is active.
Fast blinking red
The object is failed.
Off
The object is failed/ No subscribe
Table 3Line key LEDs
LED Status
Description
Steady green
The account is active
Fast Blinking green
There is an incoming call to the account
Slow Blinking green
The call is on hold/ Registration is unsuccessful
Off
The line is unapplied or idle
Table 4 Programmable key LEDs for line
LED Status
Description
Steady green
The account is active
Fast Blinking green
There is an incoming call to the account
Slow Blinking green
The call is on hold
Slow Blinking red
Registration is unsuccessful
Off
The line is not unapplied or idle
Table 5 Programmable key LEDs for MWI
LED Status
Description
Blinking green
There are new voice mails
Off
There is no new voice mail
Table 6 Power Indication LED
LED Status
Description
Steady red
Power on.
Fast Blinking red
There is an incoming call.

Off
Power off.
2 Initial connecting and Setting
2.1 Connect the phone
2.1.1 Connect to network
Step 1: Connect the IP Phone to the corporate IP telephony network. Before you
connect the phone to the network, please check if your network can work
normally.
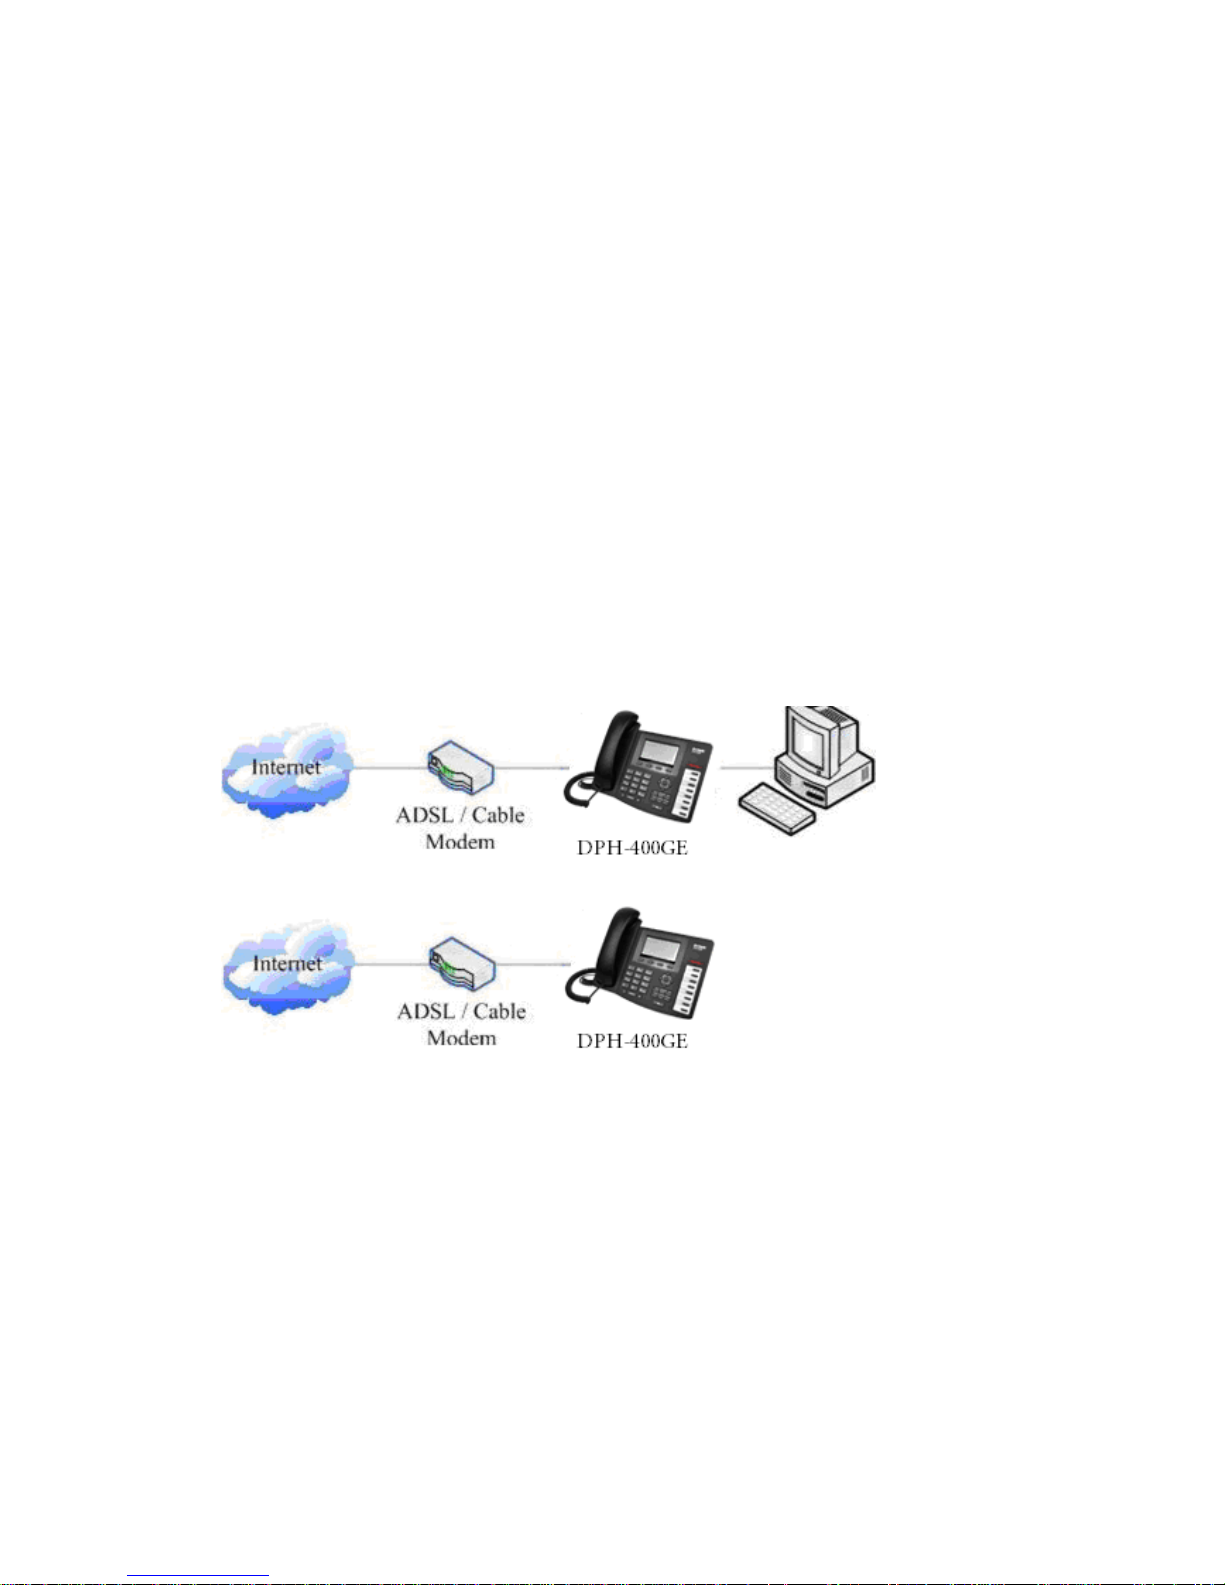
You can do this in one of two ways, depending on how your workspace is set up.
Direct network connection—by this method, you need at least one available
Ethernet port in your workspace. Use the Ethernet cable in the package to
connect WAN port on the back of your phone to the Ethernet port in your
workspace. Since this VoIP Phone has router functionality, whether you have a
broadband router or not, you can make direct network connect. The following
two figures are for your reference.
Shared network connection—Use this method if you have a single Ethernet port
in your workspace with your desktop computer already connected to it. First,
disconnect the Ethernet cable from the computer and attach it to the WAN port
on the back of your phone. Next, use the Ethernet cable in the package to
connect LAN port on the back of your phone to your desktop computer. Your IP
Phone now shares a network connection with your computer. The following
figure is for your reference.

Step 2: Connect the handset to the handset port by the handset cable in the
package.
Step 3: connect the power supply plug to the DC 5V adapter port on the back
of the phone. Use the power cable to connect the power supply to a standard
power outlet in your workspace.
If your LCD screen displays different information from the above, you need
refer to the next section “Initial setting” to set your network online mode.
If your VoIP phone registers into corporate IP telephony Server, your phone is
ready to use.
2.1.2 Power adaptor connection
Make sure that the power you use is comply with the parameters of power
adaptor.
1. Plug power adaptor to power socket.
2. Plug power adaptor‟s DC output to the DC5V port of
DPH-400G/DPH-400GE to start up.
3. There will be displayed black line and “initializing... wait logon...” on the
screen. After finishing startup, phone will show greeting, current date and time
and so forth.
4. If phone has registered to the server, you can place or answer calls.
2.2 Basic Initialization
DPH-400G/DPH-400GE is provided with a plenty of functions and parameters
for configuration. User needs some network and VoIP knowledge so that user
could understand the meanings of parameters. In order to make user use the
phone more easily and convenient, there are basic configurations introduced
which is mandatory to ensure phone calls.
2.2.1 Network settings
Make sure that network is connected already before setting network of phone.
DPH-400G/DPH-400GE uses DHCP to get WAN IP configurations, so phone
could access to network as long as there is DHCP server in it. If there is no

DHCP server available, phone has to be changed WAN network setting to Static
IP or PPPoE.
Setting PPPoE mode (for ADSL connection)
1. Get PPPoE account and password first.
2. Press Menu->Settings->Advanced Setting, then enter passwords, and choose
network ->WAN->Net Mode, enter and choose PPPoE through navigation keys
and press the Save key.
3. Press Quit, then choose PPPoE Set, press Enter.
4. The screen will show the current information. Press Del to delete it, then input
your PPPoE user and password and press Save.
5. Press Quit six times to return to the idle screen.
6. Check the status. If the screen shows “Negotiating…” it shows that the phone
is trying to access to the PPPoE Server; if it shows an IP address, then the phone
has already get IP with PPPoE.
Setting Static IP mode (static ADSL/Cable, or no PPPoE / DHCP network)
1. Prepare the network‟s parameters first, such as IP Address, Net mask,
Default Gateway and DNS server IP address. If you don‟t know this information,
please contact the service provider or technician of network.
2. Press Menu->Settings->Advanced Setting, then enter passwords, and choose
network ->WAN->Net Mode, enter and choose Static through navigation keys
and press the Save key.
3. Press Quit, then choose Static Set, press Enter.
4. The screen will show the current information, and then press Del to delete.
Input your IP address, Mask, Gateway, DNS and press Save to save what you
input.
5. Press Quit six times to return to the idle screen.
6. Check the status, the screen shows “Static” .the screen shows the IP address
and gateway which were set just now, if the phone could display the right time, it
shows that Static IP mode takes effect.
Setting DHCP mode
1. Press Menu->Settings->Advanced Setting, then enter passwords, and choose
network ->WAN->Net Mode, enter and choose DHCP through navigation keys
and press the Save key.
2. Press Quit six times to return to the idle screen.
3. Check the status, the screen shows “DHCP”,If the screen shows the IP
address and gateway which were set just now, it shows that DHCP mode takes
effect.

3 Basic function
3.1 Making a call
3.1.1 Call Device
You can make a phone call via the following devices:
1. Pick up the handset, icon will be showed in the idle screen.
2. Press the Speaker button, icon will be showed in the idle screen.
3. Press the Headset button if the headset is connected to the Headset Port in
advance. The icon will be showed in the idle screen.
You can also dial the number first, and then choose the method you will use to
speak to the other party.
3.1.2 Call Methods
You can press an available line button if there is more than one account, then
1. Dial the number you want to call.
2. Press History softkey, use the navigation buttons to highlight your choice
(press Left/Right button to choose Missed Calls, Incoming Calls and
Outgoing Calls.
3. Press the RD button to call the last number called.
4. Press the programmable keys which are set as speed dial button.
Then press the Send button or Send softkey to make the call if necessary.
3.2 Answering a call
Answering an incoming call
1. If there is no other calling, you could choose the handle or press the speaker
button or use softkey-answer or press the headset to accept the call.
2. If you are on another call, press the fluctuation navigation key to answer the
new call.
During the conversation, you can alternate between Headset, Handset and
Speaker phone by pressing the corresponding buttons or picking up the handset.

3.3 DND
Press the DND softkey to active DND Mode. New incoming calls will be rejected and
the display will show: icon. Press the DND softkey to choose deactivate DND
mode. Incoming calls will be stored in the Call History.
3.4 Call Forward
This feature allows you to forward an incoming call to another phone number.
The display showed icon.
The following call forwarding events can be configured:
Off: Call forwarding is deactivated by default.
Always: Incoming calls are immediately forwarded.
Busy: Incoming calls are immediately forwarded when the phone is busy.
No Answer: Incoming calls are forwarded when the phone is not answered
after a specific period.
To configure Call Forward via Phone interface:
1. Press Menu ->Features->Enter->Call Forward->Enter.
2. There are 4 options: Off, Always, Busy, No Answer.
3. If you choose one of them (except Off), enter the phone number you want to
forward your calls to. Press Save to save the changes.
3.5 Call Hold
1. Press the Hold button or Hold softkey to put your active call on hold.
2. If there is only one call on hold, press the hold softkey to retrieve the call.
3. If there are more than one call on hold, press the line button, and the
Up/Down button to highlight the call, then press the Unhold button to retrieve
the call.
3.6 Call Waiting
1. Press Menu ->Features->Enter->Call Waiting->Enter.
2. Use the navigation keys to active or inactive call waiting.
3. Then press the Save to save the changes.
3.7 Mute
Press Mute button during the conversation, icon will be showed in the LCD.
Then the called will not hear you, but you can hear the called. Press it again to

get the phone to normal conversation.
3.8 Call transfer
1. Blind Transfer
During talk, press the key Transf, and then dial the nu mber that you want to
transfer to, and finished by "#". Phone will transfer the current call to the third
party. After finishing transfer, the call you talk to will be hanged up. User cannot
select SIP line when phone transfers call.
2. Attended Transfer
During talk, press the key Transf, then input the number that you want to transfer
to and press Send. After that third party answers, then press Transfer to complete
the transfer. (You need enable call waiting and call transfer first). If there are two
calls, you can just talk to one, and keep hold to the other one. The one who is
keep hold cannot speak to you or hear from you. In other way, if user wants to
invite the third party during the call, they can press Conf to make calls mode in
conference mode. If user wants to stop conference, user can press Split. (User
must enable call waiting and three way call first).
Note: the server that user uses must support RFC3515 or it might not be used
3. Semi-attended Transfer
During the talk, press Transf firstly, and then press Send after inputting the
number that you want to transfer. You are waiting for connection, now, press
Transf and the transfer will be done. (To use this feature, you need enable call
waiting and call transfer first).
3.9 3-way conference call
1. Press the Conf softkey during an active call.
2. The first call is placed on hold. Then you will hear a dial tone. Dial the
number to conference in, then press Send key.
3. When the call is answered, press Conf and add the first call to the
conference.
4. If you want to release the conference, press Split key.
Note: the server that user uses must support RFC3515 or it might not be used
(User must enable call waiting and three way call first).
3.10 Multiple-way call
In this phone you can registe 5 SIP account numbers and the 5 accuonts can be
used at the same time.There are four keys used as SIP line toleranted to make
calls in SIP accounts.It will blink when the account registed failed.
In order to convenience the enterprise the phone support multiple call answering ,

call hold and multi-line call.The user can answer 10 incoming call phones at
most,you can choose any call through pressing the fluctuation navigation key in
taiking and the other 9 calls will be in held.You also can press the fluctuation
navigation key to change the call and recover the talking then last call will be
held automatic.You also can define the four line keys as multi-line keys ,then
each line key will relate to a call and you can choose the talking through pressing
the line keys and recover the talking and the light to the line key will bright all
the time when in taking ,then the light of the call in held is sparking.
If user has 5 line calls and wants to invite the five party during the call, they can
press Conf or Transf “New Call”, press OK, enter the number ,then press Send
and wait for the other party to answer. When the multiple-way calls, you can
press the arrow keys to select a call.
4 Advanced function
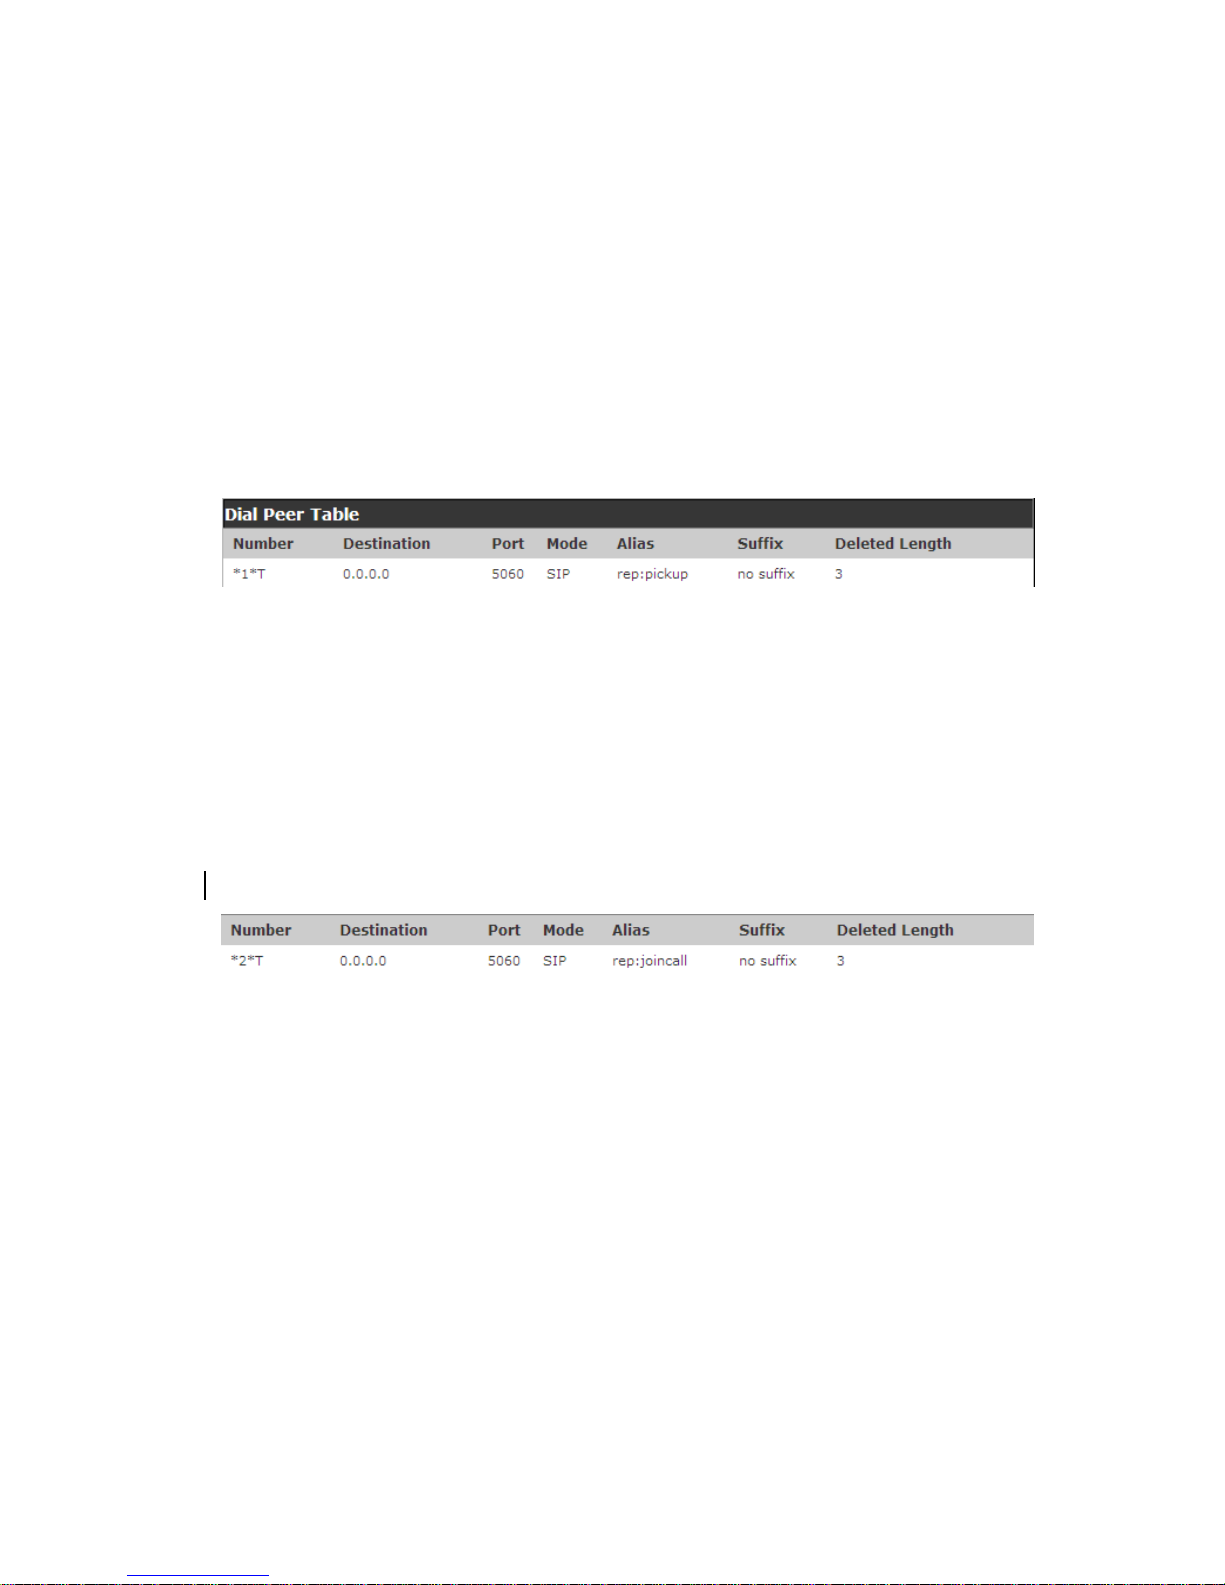
4.1 Call pickup
Call pickup is implemented by simulating pickup function of PBX. it‟s that,
when A calls B, B rings but no answer, at this moment, C can hook off and input
an appointed prefix plus B‟s number, pick up A‟s call and talk with A.
The following chart shows how to configure an appointed pref ix in dial peer to
have call pick up function.
*1* means appointed prefix code. After making the above configuration, C can
dial *1* plus B‟s phone number to pick up A‟s call. User can set prefix in
random, in the case of no affecting current dialing rules.
4.2 Join call
When B is calling C, A can join in the existing call by inputting an appointed
prefix numbers plus B or C number, if B or C also supports join call.
The following chart shows how to configure an appointed pref ix in dial peer to
have join call function.
*2* means appointed prefix code. After making the above configuration, A can
dial *2* plus B or C number to join B and C‟s call. User can set prefix in random,
in the case of no affecting current dialing rules.
4.3 Redial / Unredial
If B is in busy line when A calls B, A will get notice: busy, please hang up. If A
want to connect B as soon as B is in idle, he can use redial function at the
moment and he can dials an appointed prefix number plus B‟s number to realize
redial function.
What is redial function? A can‟t not build a call with B when B is in busy, then
A will subscribe B‟s calling mode at 60 second intervals. Once B is available, A
will get reminder of rings to hook off, while A hooks off, A will call B
automatically. If at this time A is occupied temporarily and unwilling to contact
B, A also can cancel the redial function by dialing an appointed prefix plus B‟s

number before making the redial function.
*3* is appointed prefix code. After making the above configuration, A can dial
*3* plus B‟s phone number to make the redial function.
*4* is appointed prefix code. After configuration, A can dial *4* to cancel redial
function.
User can set prefix in random, in the case of no affecting current dialing rules.
4.4 Click to dial
When user A browses in an appointed Web page, user A can click to call user B
via a link (this link to user B), then user A‟s phone will ring, after A hooks off,
the phone will dial to B.
4.5 Call back
This function allows you dial out the last phone call you received.
4.6 Auto answer
When there is an incoming call, after no answer time, the phone will answer the
call automatically.
4.7 Hotline
You can set hotline number for every sip, and then enter the dialer interface and
after Warm Line Time, the phone will call out the hotline number automatically.
4.8 Application
4.8.1 SMS
1) Press Menu ->Application->Enter->SMS->Enter.
2) Use the navigation keys to highlight the options. You can read the message in
the Inbox/Outbox.
3) After view the new message, you can press Reply to reply the message, and
use the 123 softkey to change the Input Method, when enter the reply message,
press OK, then use the navigation keys to select the line from which you want to

send, then Send.
4) If you want to write a message, you can press New and enter message. Use the
123 softkey to change the Input Method. When you input the message you want
to send, press OK, then use the navigation keys to select the line from which you
want to send, then Send.
5) If you want to delete the message, after view the message, press Del, then you
have three options to choose: Yes, All, No.
4.8.2 Memo
You can add some memos to record some important things to remind you.
Press Menu->Application->Memo->Enter->Add.
There are some options to configure: Mode, Date, Time, text, Ring. When the
configuration is completed, press Save.
4.8.3 Voice Mail
1) Press Menu->Voice Mail->Enter.
2) Use the navigation keys to highlight the line for which you want to set, press
Edit, and use the navigation key to turn on the mode, and the input the number.
Press 123 softkey to choose the proper input method.
3) Press Save to save the change.
4) To view the new voicemail, Press the Voicemail softkey directly. Press Dial,
then you may be prompted to enter the password, then you can listen to your
new and old messages.
4.9 Ping
1) Press Menu-> Application->ping>Enter.
2) Input the IP you want ,and press start key ,if input wrong, you can press
“delete” to modification the IP.
3) After input the IP, wait a moment it will display”confirmation” , it meas ping
successful ,or means ping failed.
4.10 Programmable Key Configuration
The phone has 8 programmable keys which are able to set up to many functions
per key. The following list shows the functions you can set on the programmable
keys and provides a description for each function. The default configuration for
each key is N/A which means the key hasn‟t been set for any functions.
1. Set the type as Memory Key
Press Menu->Settings->Basic Setting->Enter->DSS Key, you have two options:

Line As DSS Keys and Memory As DSS Keys, choose one you want to make
the assignment, use the navigation key to choose the type as memory key. In the
Dial field, you have some options, such as Normal, Speed Dial, Intercom, BLF,
Presence, and MWI.
Speed dial
You can configure the key as a simplified speed dial key. This key function
allows you to easily access your most dialed numbers.
Intercom
You can configure the key for Push to talk code and it is useful in an office
environment as a quick access to connect to the operator or the secretary.
BLF
BLF is also called “Busy lamp field”, and it is used to prompt the user to pay
attention to the state of the object than has been subscribed, and used to
cooperate with the server to pick up the phone call. You can configure the key
for Busy Lamp Field (BLF) which allows you to monitor the status (idle, ringing,
or busy) of other SIP account. User can dial out on a BLF configured key. Please
refer to “LED Instruction” for more detail about the LED status in different
situation.
Note: In the Web interface, you can also set the pickup number to active the
pickup function. For example, if you set the BLF number as 212, and the pickup
number is 189, then when there is an incoming call to 212, press the BLF key, it
will call out the 189 automatically to pick up the incoming call on 212.
Presence
Presence is called present, and compared to the BLF, it can also check whether
object online.
Note: You can subscribe the BLF and presence station of the same number at the
same time.
MWI
When the key is configured as MWI, you are allowed to access voicemail
quickly by pressing this key.
CALL PARK
You need setting a server number, when you have set what represent Call park.
If you have a calling and you busy now, you could press the key and hear a
number, then you could choose other phone and input this number. so you can
directly recover call..
Call forward
When there is an incoming call, press the key and the incoming call can be
transferred to the number set up.
2. Set the type as Line
You can set these keys as line keys, and press it, it will enter dialer interface.
3. Set the type as Key Event
You can set these keys as Key Event, and the subtype have many options.
Choose one and it will have corresponding function.
None

MWI
DND (Do Not Disable)
Hold
Transfer
Phone Book
Redial
Pick up
Join
Auto Redial On
Auto Redial Off
Call Forwarding
History
Flash
Memo
Headset
Release: Press the key you can end the call.
Lock: Press the key you can lock the keyboard.
SMS
Call Back
Power Light
Hide DTMF
Prefix
Hot Desking: Pressing the key, you can clear all sip information and register
yourself sip information
Agent
4. Set the type as Dtmf
You can configure the key as Dtmf. This key function allows you to easily dial
or edit dial number.
5. Set the type as Remote
You need to match a XML Phonebook address, pressing the button you can
directly access the corresponding remote phonebook.
6. Set the type as BLF List Key
It needs the cooperation with the Broadsoft server. The traditional BLF is
that every number will need to be subscribed, so if the numbers that
subscribed is so many that it will cause to obstruction. However, BLF List
Key will put the numbers that needed to be subscribed in a group, and the
phone use the URL of the group to subscribe and analyze the specific
information of each number such as number, name, state and so on according
to the notifications from the server. Then set the idle Memory key as BLF
List Key, later if the state of an object changes, the corresponding LED will
change.
7. set the type as Multicast
Set the multicast address and audio code, press this key to initiate the
multicast.

Notice: Detailed feature see 8.3.4.7

5 Other functions
5.1 Auto Handdown
1. Press Menu ->Features-> Enter->Auto Handdown-> Enter.
2. Set the Mode Enable through the navigation key, then set Time, unit is minute,
then press Save.
3. When the call ends, after the time that you have set, the phone will back to the
idle interface.
5.2 Ban Anonymous Call
1. Press Menu ->Features-> Enter->Ban Anonymous Call-> Enter.
2. Choose which sip you want to enable Ban Anonymous Call, and then press
Enter, choose Enabled or Disabled through navigation key.
3. If you choose Enabled, the others can‟t call the phone by anonymous. If you
choose Disabled, the others can call the phone by anonymous.
5.3 Ban Outing
1 . Press Menu ->Features-> Enter->ban outgoing> Enter
2.Enable the function, then you can not call any number.
5.4 Dial Plan
1. Press Menu ->Features-> Enter->Dial Plan-> Enter.
2. The following plans you can set: Press # to Send, Timeout to Send, Timeout,
Fixed Length Number, Press # to Do BXFER, BXFER On Onhook, AXFER On
Onhook. You can enable or disable each dial plan.
5.5 Dial Peer
1. Press Menu ->Features-> Enter->Dial Peer-> Enter.
2. Press Add to enter the Edit interface, and then input some information. For
example: Number: 1T, Dest.: 0.0.0.0, Port: 5060, Mode: SIP, Alisa: all:3333,
Suffix: no suffix, Del Len: 0. Then press Save. Then press Save.
3. Input 1+number (1234) in the dial interface, you can dial out 3333.
You can refer to 8.3.3.4 DIAL PEER.

5.6 Auto Redial
1. Press Menu ->Features-> Enter->Auto Redial-> Enter.
2. Choose Mode Enabled or Disabled through the navigation key. If you choose
Enable, you also need to set Interval and Times, and then press Save.
3. After enable auto redial, calling out someone, if he is in busy, it will pop up a
prompt box whether to auto redial, press OK, the phone will call out him
according the Interval and Times that you set.
5.7 Call completion
1. Press Menu ->Features-> Enter->Call Completion-> Enter.
2. Enable the function through the navigation key, and then Save .
3. Call out others, if he is in busy, it will pop up a prompt Call Completion
Waiting number? Press OK, when he is in idle, it will pop up a prompt Call
Completion Call number? Press OK, the phone will call out the number
automatically.
5.8 Ring From Headset
1. Press Menu ->Features-> Enter->Ring From Headset-> Enter.
2. Enable this function through the navigation key, the phone connects the
headset, when the phone has an incoming call, it will ring from the headset.
5.9 Power Light
1. Press Menu ->Features-> Enter->Power Light-> Enter.
2. Enable this function through the navigation key.
5.10 Hide DTMF
1. Press Menu ->Features-> Enter->Hide DTMF-> Enter.
2. Through the navigation key to choose: Disabled, All, Delay, Last Show. When
you set up a call with others and need to input the DTMF, the DTMF will show
as you have set.
5.11 Password Dial
1. Press Menu ->Features-> Enter->Password Dial-> Enter.
2. Enable this function, you can also set Prefix and Length. For example,you

want call out 1234567 and you set Password Dial Prefix 123 and Password
Length 3, then enter the dial interface and input 1234567, and then the screen
will show 123***7.
5.12 Pre Dial
1. Press Menu ->Features-> Enter->Pre Dial-> Enter.
2. Through navigation key to enable the feature,and to realize the Pre Dial
function.
5.13 Action URL & Active URI
1. Action URL: The action that the phone carries out e.g. open dnd can produces
one URL, then the phone can send the HTTP Get of the URL to PC, then the
phone can report the action to the PC.
2. Active URI: Enter the web page of the phone, PHONE->FEATURE, input
Active URL Limit IP, You can input internet server (e.g. PC'IP), PC can send one
URL to the phone, the phone will produce one action for example open dnd, so
PC can control the phone.
5.14 Push XML
Enter the web page of the phone->PHONE->FEATURE, input Push XML
Server(e.g. PC‟IP), then PC can push text, SMS, phonebook, advertisement,,
execute etc. to phone to update the message or the phone makes an action.

6 Basic setting
6.1 Keyboad
1. Press Menu ->Settings-> Enter->Basic Setting-> Enter->Keyboard->Enter.
2. There are four items: DSS Keys, Multiplex, Long Click, SoftKey, You can set
up respectively on them. Press the key Enter to the interface, then use the
navigation keys to choose the function for the key according to you want.
3. Press the key OK to save.
6.2 Screen Set
1. Press Menu ->Settings-> Enter->Basic Setting-> Enter->Screen Set->Enter.
2. You can set Contrast and Brightness, press Enter and use the navigation keys
to set, then press the key Save.
6.3 Ringer Set
1. Press Menu ->Settings-> Enter->Basic Setting-> Enter->Ringer Set->Enter.
2. You can set Ringer Volume and Ringer Type, press Enter and use the
navigation keys to set, then press the key Save. In the Ringer Type, the default
system rings have nine and the custom ringtones have five that can be set
through the web page.
6.4 Voice Volume
1. Press Menu ->Settings-> Enter->Basic Setting-> Enter->Voice
Volume->Enter.
2. Use the navigation keys to turn down or turn up the voice volume, the press
the key Save.
6.5 Time & Date
1. Press Menu ->Settings->Enter->Basic Setting-> Enter->Time & Date->Enter.
2. You have two options to choose: Auto and Manual, use the navigation keys to
choose, then press Save.

6.6 Greeting Word
1. Press Menu ->Settings-> Enter->Basic Setting-> Enter->Greeting
Word->Enter.
2. You can enter the message and press Save, it will display in the phone screen
when the phone start up.
6.7 Language Setting
1. Press Menu ->Settings-> Enter->Basic Setting-> Enter->Language->Enter.
2. DPH-400G/DPH-400GE support three languages, you can use the navigation
keys to choose. The default two languages are English and Chinese.
 Loading...