

Page 1
Page 2

Table of Contents
Table of Contents
Product Overview ........................................................ 4
Package Contents ................................................... 4
System Requirements ............................................. 4
Introduction ..............................................................5
Features ..................................................................6
Hardware Overview ................................................. 8
Connections .......................................................8
LEDs .................................................................. 9
Hardware Installation .............................................10
Software Installation ................................................. 12
Web-based Conguration Utility ............................ 25
Live Video ..............................................................26
Using RTSP Players ........................................ 27
Using 3GPP Mobile Phones ............................ 28
Camera ............................................................ 29
Snapshot ..........................................................31
Client Setup ..................................................... 32
Setup ..................................................................... 33
Wizard .............................................................. 33
Internet Connection Setup Wizard ............... 33
Motion Detection ..............................................53
Time and Date ................................................. 56
Event Setup ..................................................... 57
Add Server ................................................... 59
Add Media .................................................... 60
Add Event .....................................................63
Add Recording .............................................64
Advanced .........................................................65
DI and DO ........................................................65
ICR .............................................................. 66
HTTPS .........................................................67
Access List ....................................................... 69
Maintenance .......................................................... 71
Device Management ........................................71
Backup and Restore ........................................ 72
Firmware Update ............................................. 73
Status ....................................................................74
Device Info .......................................................74
Logs ................................................................. 75
Help ....................................................................... 76
Motion Detection Setup Wizard ....................38
Network Setup ................................................. 41
Dynamic DNS ..................................................48
Image Setup ....................................................49
Audio and Video ..............................................51
WDR Day & Night Fixed Dome Network Camera
Features......................................................................77
WDR D&N Fixed Dome Network Camera
Installation ..................................................................78
2D-Link DCS-6111 User Manual
Page 3

Table of Contents
Networking Basics .................................................... 80
Check your IP address .......................................... 80
Statically Assign an IP address ............................. 81
Reset and Restore ..................................................... 82
External I/O Port ........................................................ 83
Technical Specications........................................... 84
3D-Link DCS-6111 User Manual
Page 4
Section 1 - Product Overview
• D-Link DCS-6111 WDR D&N Fixed Dome Network Camera
• CAT5 Ethernet Cable
• Power Adapter
• Dome Enclosure
• Ring Enclosure
• Screw Driver
Note: Using a power supply with a different voltage than the one included with your
product will cause damage and void the warranty for this product.
Product Overview
Package Contents
• Screws
• I/O Connector Plug
• Alignment Stencil
• Manual and Software on CD
• Quick Install Guide
If any of the above items are missing, please contact your reseller.
System Requirements
• Windows® XP or Windows Vista
• At least 256MB of memory (512MB recommended)
• An available Ethernet connection
• Internet Explorer 6.x or higher
• VGA card resolution: 800 x 600 or above
• CPU: 1.7GHz or above (2.8GHz plus processor with 512MB memory and a 32MB video card is required
for multiple camera viewing and recording in IP surveillance program)
®
4D-Link DCS-6111 User Manual
Page 5

Section 1 - Product Overview
Introduction
The DCS-6111 is a xed dome network camera for indoor, ofce or home use, and designed to target the middle-
market.
With an ultra Wide Dynamic Range (WDR) CMOS sensor, the DCS-6111 is used to provide better performance
surveillance results under different lighting conditions. It can be used in highly contrast environments such as a lobby,
retail store, ATM and much more. The WDR sensor helps in balancing the strong backlight of the surveillance scenery,
like a window or glass door. The camera also includes an IR LED for night vision illumination and Infrared-Cut Removable
(ICR) module that enables for 24-hour surveillance. A built-in 802.3af compliant Power over Ethernet (PoE) module is
designed to ease the installation of your camera anywhere there is not an available power outlet.
The DCS-6111 provides high quality real-time videos in MPEG-4 and JPEG compression modes. It also supports the
3G mobile video feature that allows users to view a live video feed on a compatible 3G mobile phone or PDA anywhere
in your 3G coverage area. In addition, the DCS-6111 supports dual stream output for simultaneous live monitoring and
high resolution recording.
D-ViewCam software is also included to manage up to 32 cameras simultaneously from your computer, send automated
e-mail alerts, and record videos to the hard drive when motion is detected. This deluxe-size dome network camera
provides a better professional appearance to any location, making it an excellent choice for home and business
surveillance systems.
Note: Use of video equipment for recording the image of a person without their knowledge and consent is prohibited in certain states or jurisdictions.
Nothing herein represents a warranty or representation that the D-Link product provided herein is suitable for the end-user’s intended use under the
applicable laws of his or her state. D-Link disclaims any liability whatsoever for any end-user use of the D-Link product, which fails to comply with
applicable state, local, or federal laws.
5D-Link DCS-6111 User Manual
Page 6

Section 1 - Product Overview
Features
•Powerful Surveillance - The DCS-6111 uses the WDR VGA Progressive CMOS technology that delivers
exceptional picture quality. The Wide Dynamic Range capability achieves high resolution, more detailed
images in high contrast lighting conditions (for example, strong backlight). With this sensor architecture, the
DCS-6111 maintains a constant balance for different variations in illumination and signicantly improves the
quality of real-time videos.The DCS-6111 incorporates an varifocal lens equipped with IR LEDs that offers
more exibility and enhanced security, thus making it an ideal solution for 24 hour surveillance.
•EnhancedStreamingVideo - The DCS-6111 uses D-Link’s System-on-Chip (SoC) products to provide high
quality video compression in MPEG-4 and Motion JPEG formats. The camera supports simultaneous dualstreaming for live monitoring and recording. With the free-bundled 32-channel recording software, the DCS6111 is an ideal solution for high quality viewing and reliable recording. The live camera feed of the camera
can be pulled from the 3G cellular network by using a compatible cell phone or PDA with a 3G video player.
Anywhere within the 3GPP service area, users are offered a exible and convenient way to remotely monitor
a home or ofce in real time.
•VariousInstallationMethodsatDifferentAngles - The DCS-6111 has a unique built-in three axis mechanism that
can be drop-mounted to the ceiling for an unobtrusive look, or mounted on a wall with the same housing design.
For optimal detection, the DCS-6111 is recommended for indoor ceiling mounting to prevent possible damage
that maybe caused by a burglar.
•WiredPoEAccess - For effective surveillance in and around a building, this camera comes with a built-in
802.3af compliant Power Over Ethernet (PoE) module, which eases the installation process and also gives
users the freedom to place the camera anywhere. In addition, the 10/100BASE-TX Ethernet port is also
provided for convenient Ethernet connection or broadband internet gateway with router.
•Smart&EasyToUse - The DCS-6111 includes the D-ViewCam software that allows users to view up to
32 cameras on a single computer from a central location. Users can set up automated e-mail alerts to be
instantly informed of unusual activities. Furthermore, this network camera supports the Universal Plug-n-Play
feature. This allows Windows 2000/XP/Vista computers to automatically recognize the camera and adds to
the network.
6D-Link DCS-6111 User Manual
Page 7

Section 1 - Product Overview
•SupportedProtocols - The DCS-6111 supports IPv6, the latest version of the Internet Protocol and a wide
variety of protocols such as RTSP, FTP, SMTP, NTP, HTTP and HTTPS. In addition, UPnP DDNS and
LLTD protocols are supported for Windows Vista users. Users can sign up with one of the free Dynamic DNS
services available on the web to assign a name and domain name to the camera (e.g.mycamera.dlinkddns.
com). This allows them to remotely access the camera without having to remember the IP address. Using a
multicast stream will preserve the network bandwidth. Unicast streaming is point-to-point transmission; on
the other hand, multicast streaming enables the server to stream to a multicast IP address on the network,
and the clients need to subscribe to the IP address in order to receive the stream. DCS-6111 features a
built-in Samba client for NAS, and hence does not require a direct connection to a PC or any other hardware
or software to capture and transfer images.
•AlarmInputs/OutputsforExternalDevices - This network camera features an integrated 2-way audio support
via external audio input/output connections. This two-way audio function allows users to listen as well as
talk back at the remote camera location. The auxiliary input/output connectors enable users to connect to a
variety of external devices such as PIR sensors, switches and alarm relays. With programmable alarming
equipment, users can develop a variety of security applications which are used for triggering external
devices based on events. The DCS-6111 provides an industry standard input/output external connectors
for connectivity.
7D-Link DCS-6111 User Manual
Page 8
Section 1 - Product Overview
Hardware Overview
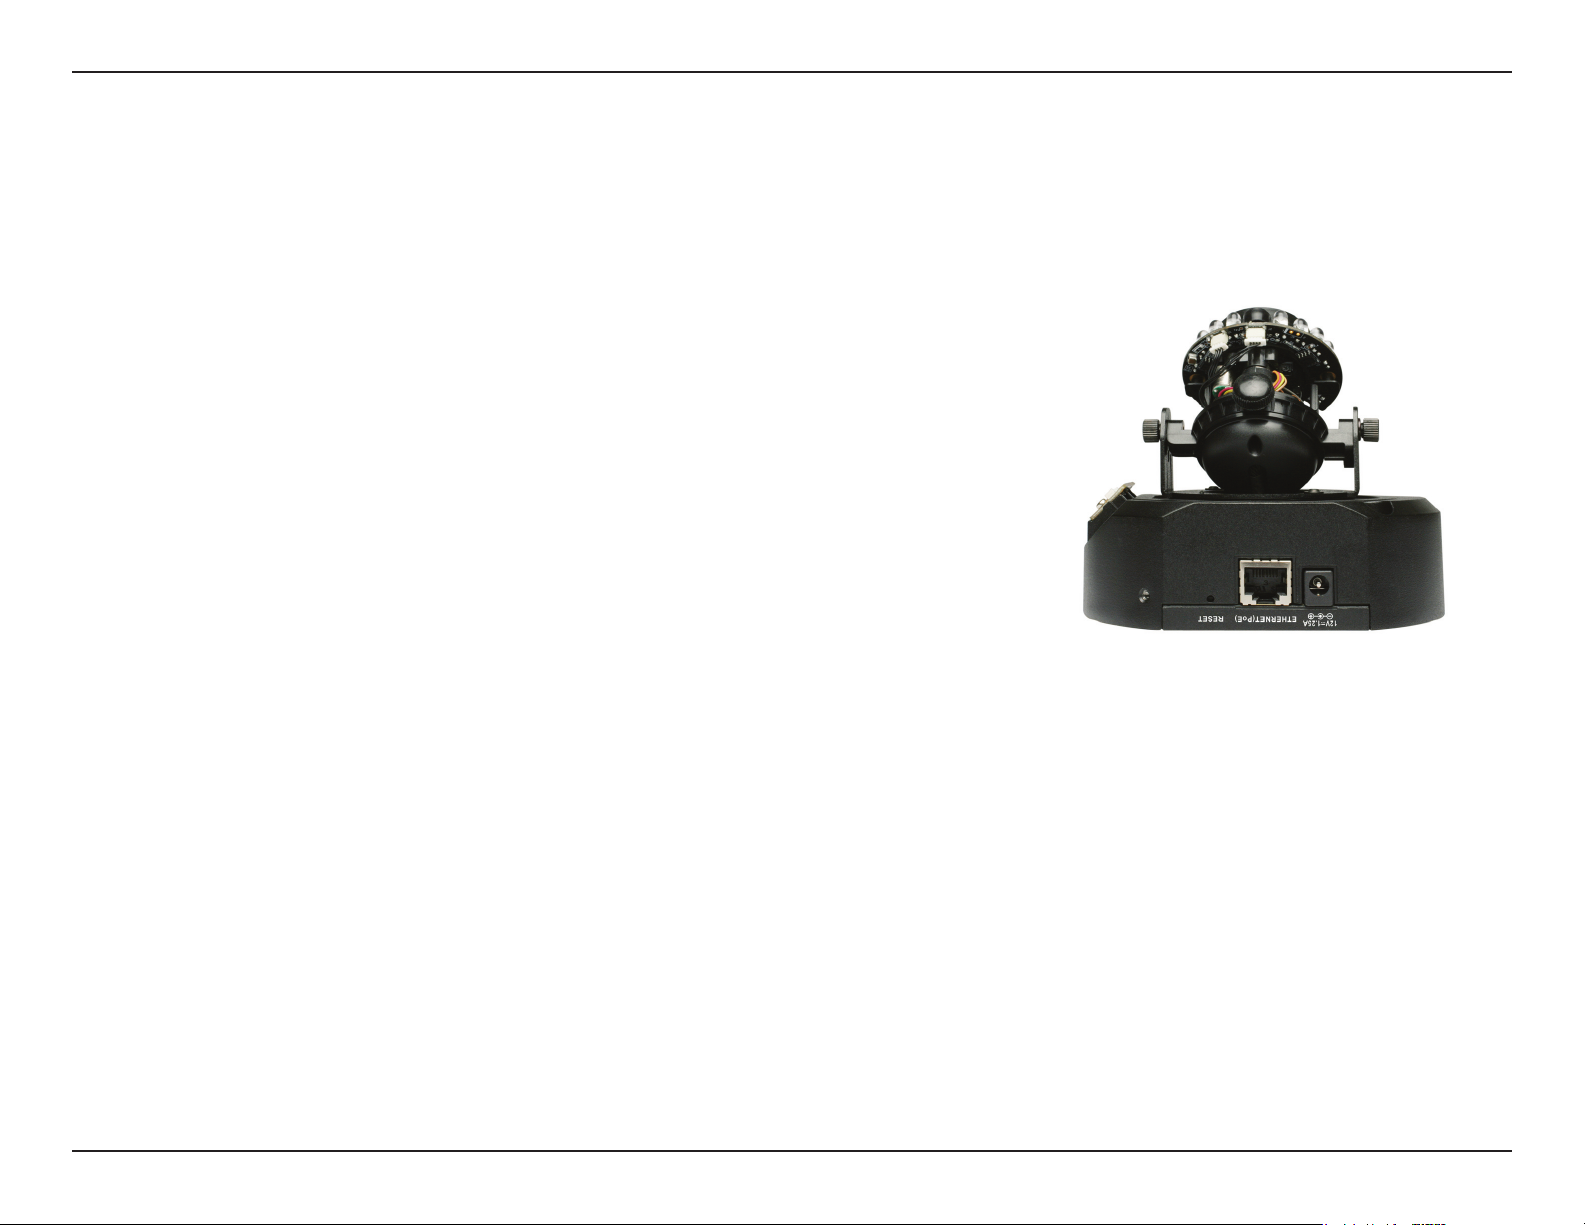
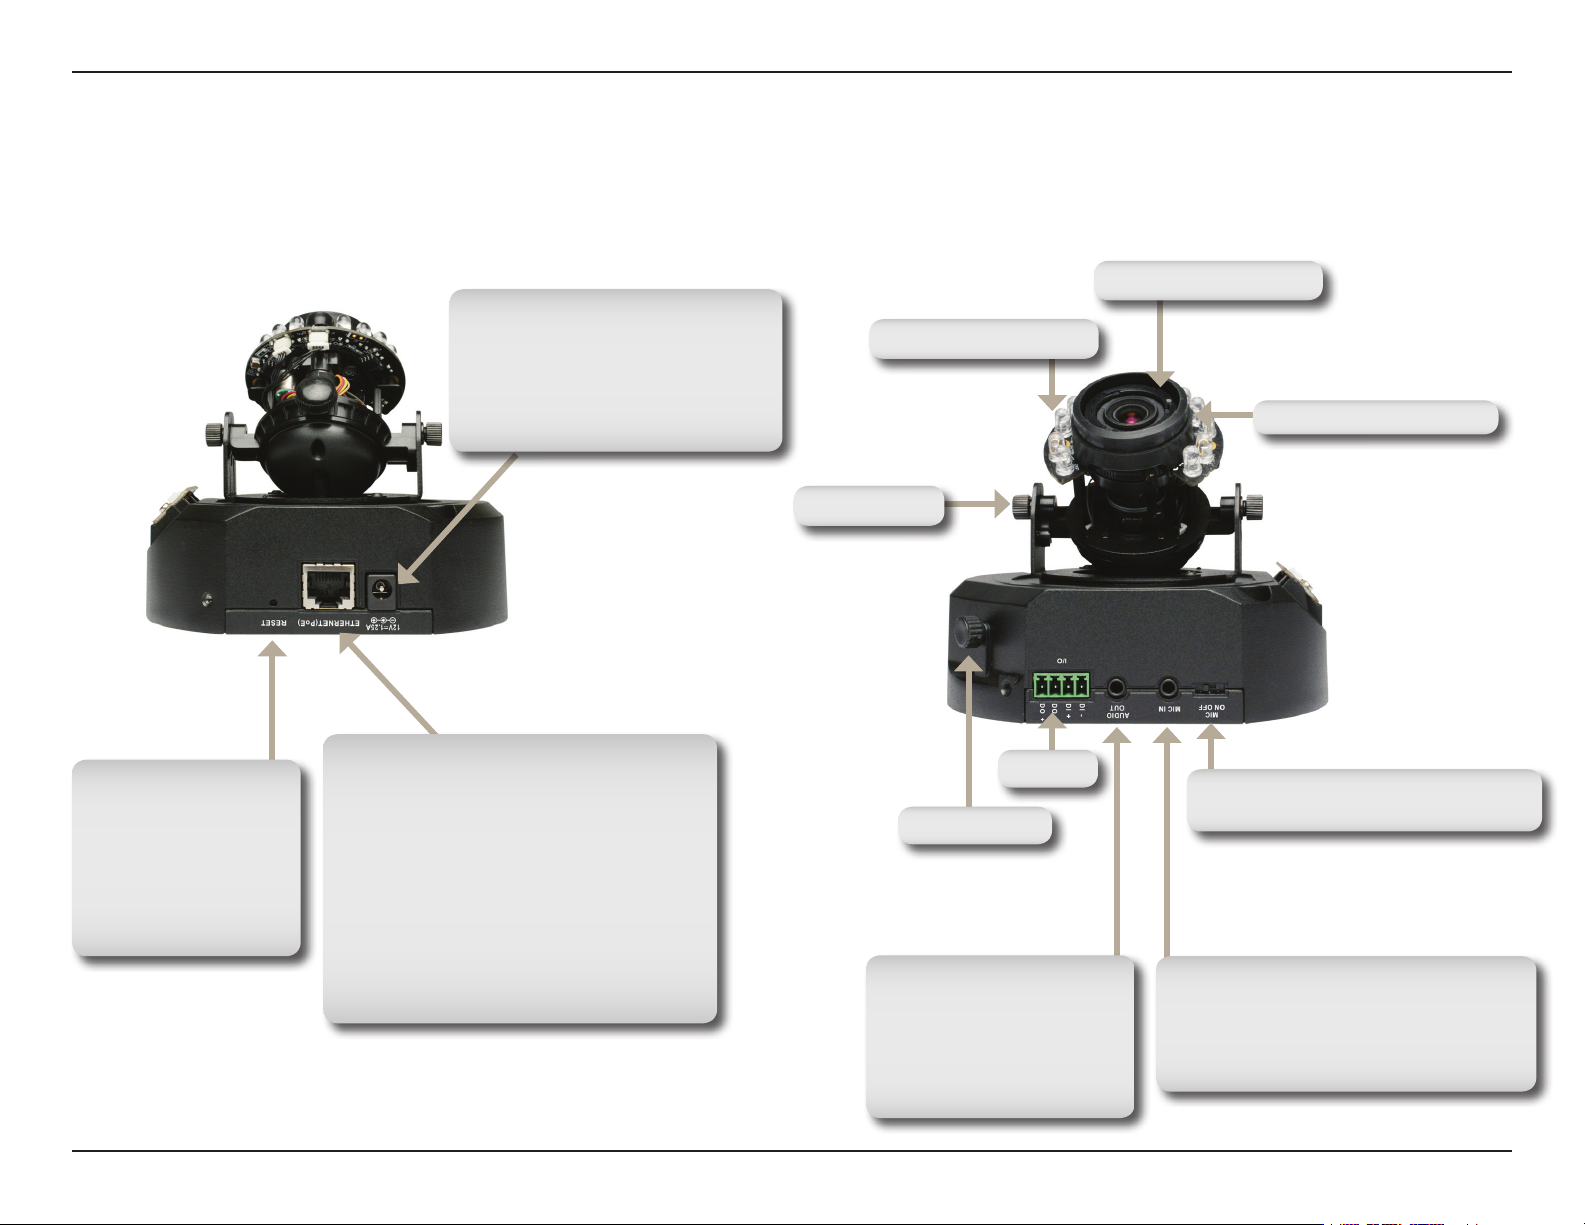
Connections
Focus Controller
Reset Button
Reset is initiated when
th e r es et bu tt o n is
pressed once and held
until th e power LE D
ashes through its cycle
twice.
DC Power Connector
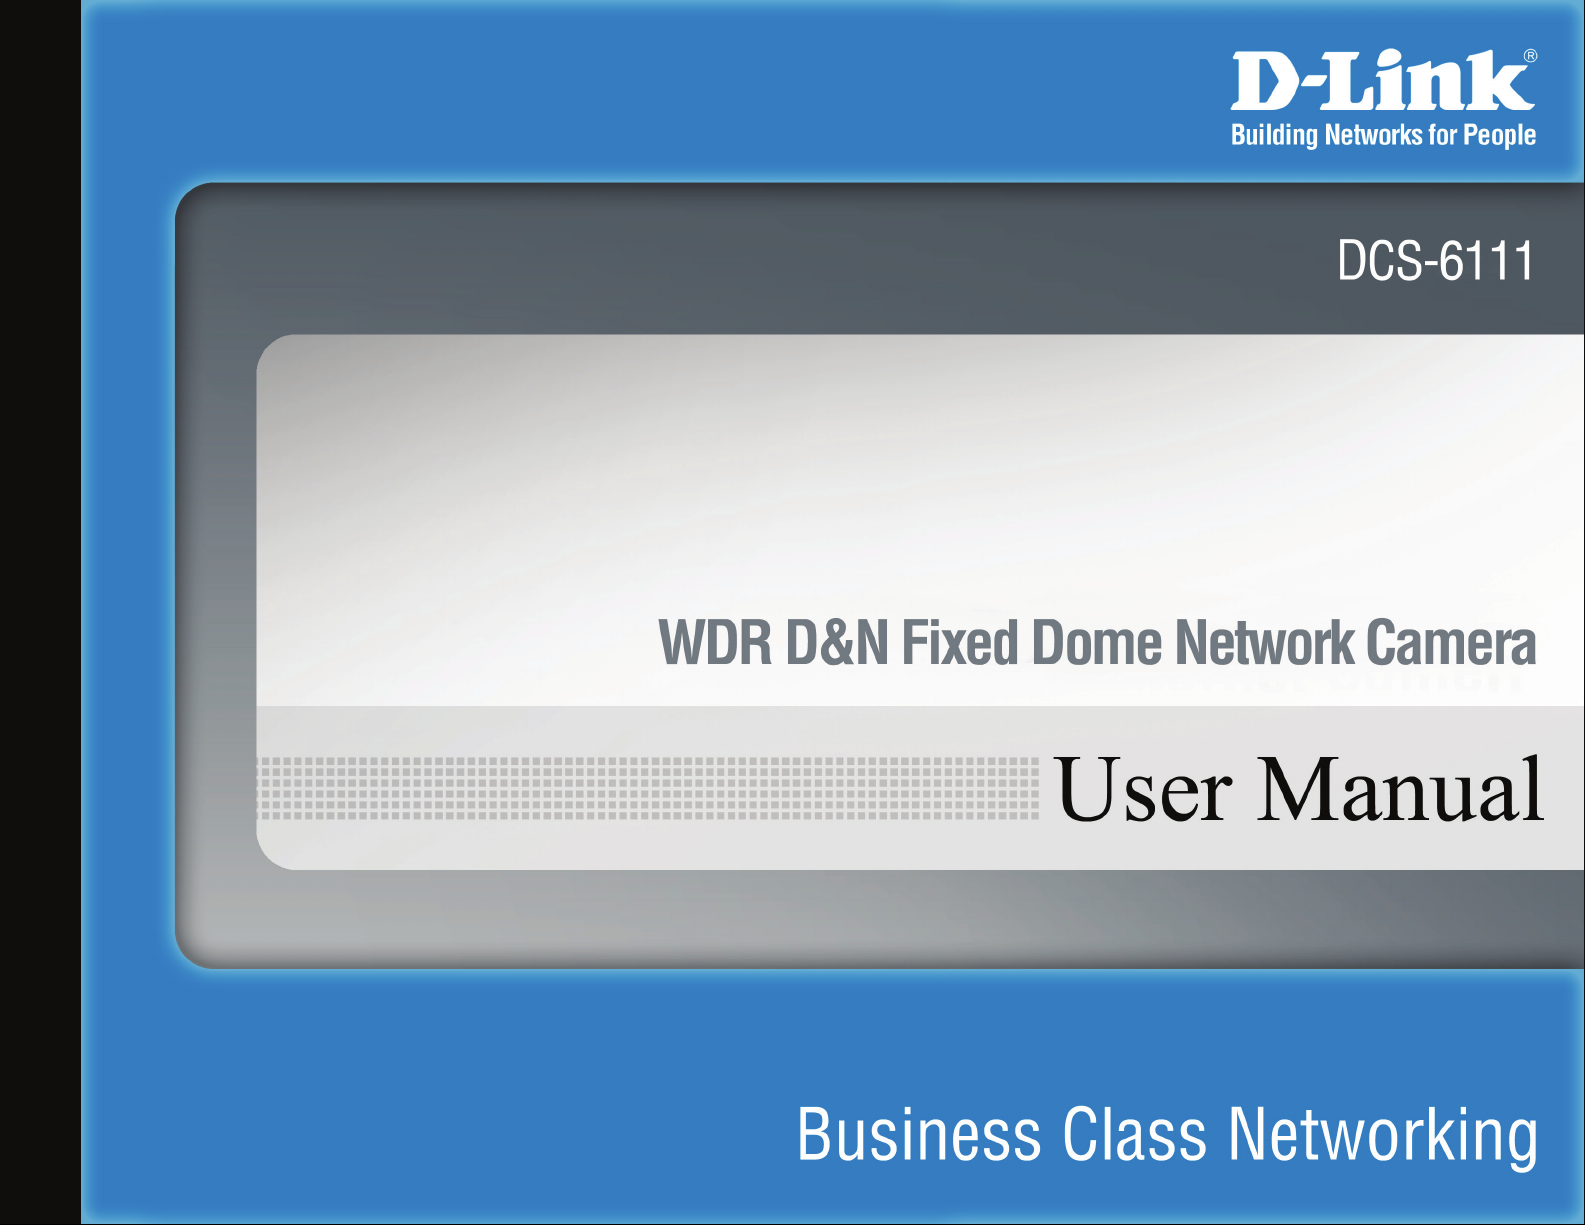
The DC power connector is located
on the side panel of the DCS-6111.
This 12V DC single-socket, supplies
power to the network camera.
Ethernet Cable Connector (PoE)
The network camera’s side panel features an
RJ-45 connector for connections to 10Base-T
Et hernet cabli ng or 100Base-TX Fast
Ethernet cabling. This network port supports
the NWay protocol, allowing this network
camera to automatically detect or negotiate
the transmission speed of the network. The
Ethernet port can also be used to power the
camera by using a PoE switch.
Zoom Controller
Tilt Screw
Audio Out Connector
Use the Audio Out connector
for 2-way audio connection.
Speakers (not included) may
be connected to the camera for
2-way audio communication.
DI/DO
Pan Screw
Adjustment Screw
Microphone On/Off Switch
To turn the microphone on/off.
MIC In (Microphone Connector)
Use the MIC In connector for 2-way audio
connection. Microphone (not included) may
be connected to the camera for 2-way
audio communication.
8D-Link DCS-6111 User Manual
Page 9
Section 1 - Product Overview
Hardware Overview
LEDs
Status LED
Blinking Red: indicates power is being supplied to the camera.
Solid Green: indicates that a connection has been established via Ethernet port.
Blinking Green: indicates trafc movement in the camera.
The Status LED will not glow if an Ethernet connection is not established.
9D-Link DCS-6111 User Manual
Page 10
Section 2 - Installation
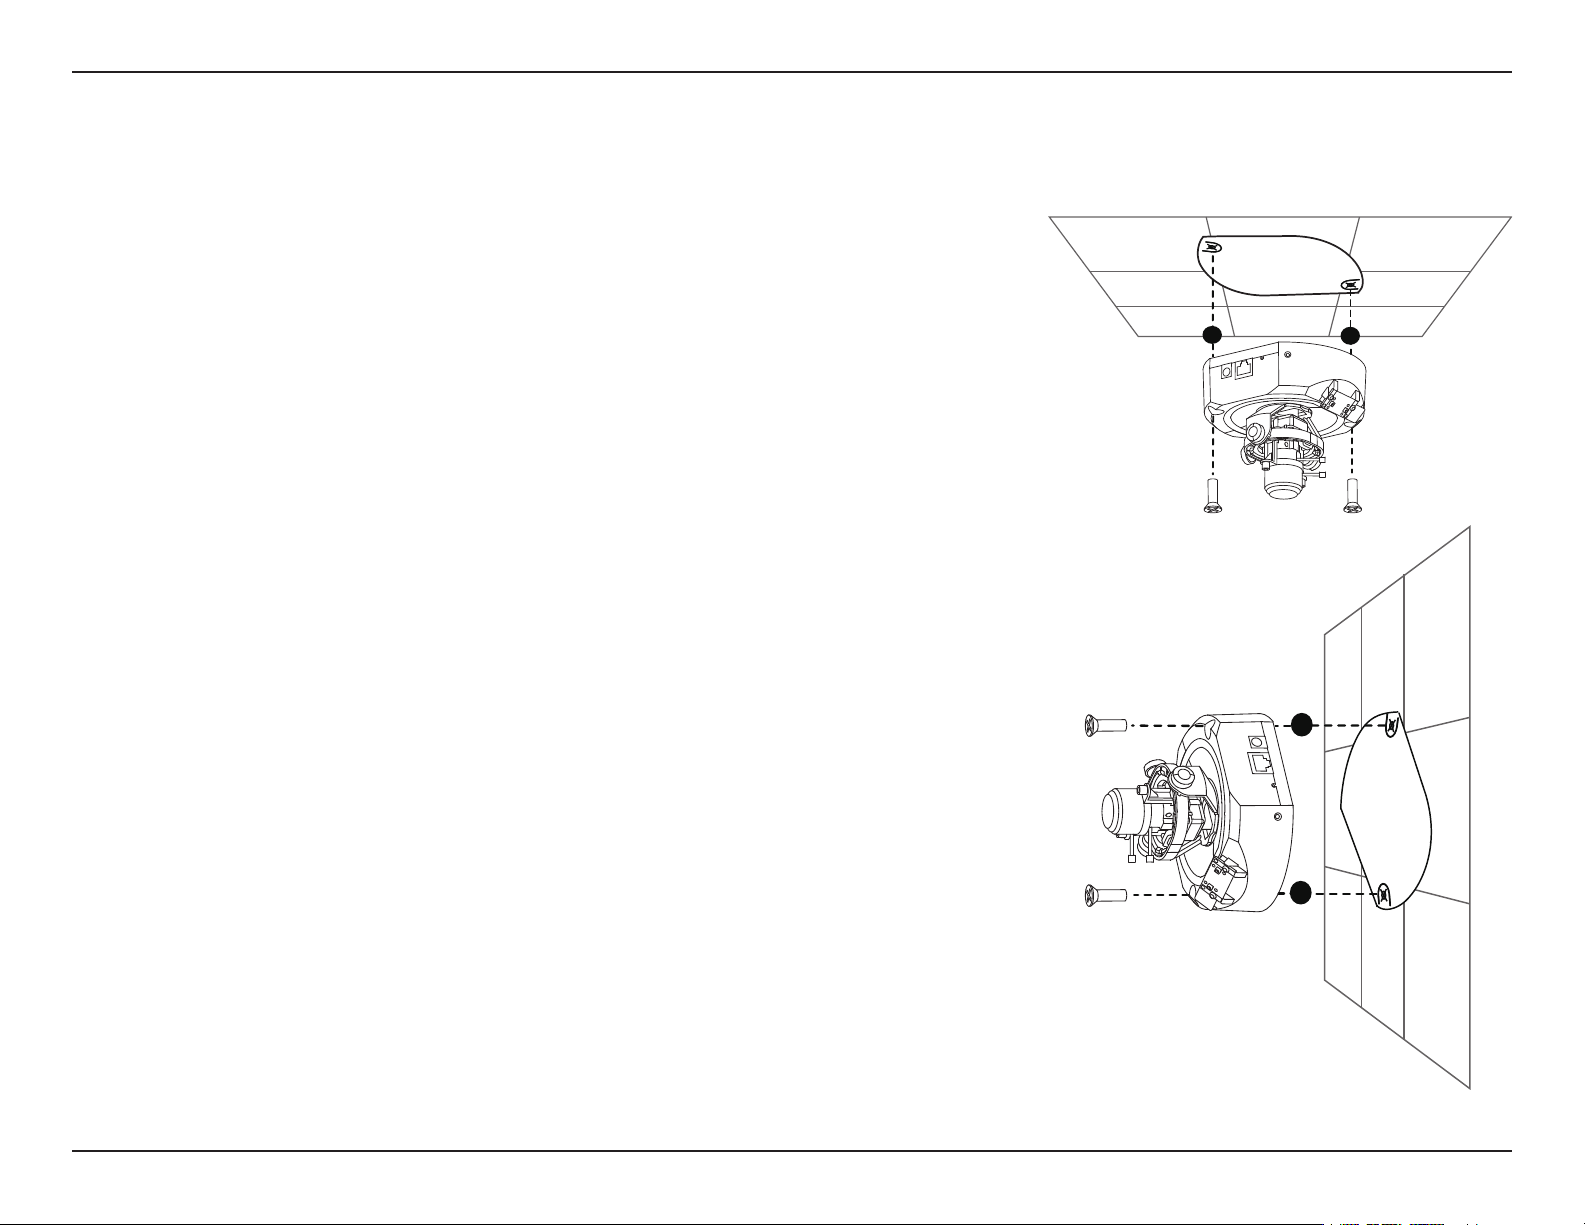
Hardware Installation
WhenMountingtoaCeiling
Find a suitable place to install the camera using the alignment stencil. Place
the camera at the desired operating location and insert the screws through the
two holes located at the base of the camera. Use a screwdriver to tighten and
secure.
WhenMountingtoaWall
Find a suitable place to install the camera by using the alignment stencil to nd
a desired operating location on the wall. Drill two pilot holes where the holes
of the alignment stencil are located. Insert the supplied plastic anchors into
the drilled holes, and align the holes at the base of the camera with the plastic
anchors. Once aligned, insert the provided screws through the holes. Use a
screwdriver to tighten and secure.
10D-Link DCS-6111 User Manual
Page 11

Section 2 - Installation
NetworkDeployment
General Connection (without PoE)
Connect the network camera to a switch via an Ethernet cable.
Connect the supplied power cable from the camera to a power outlet.
ConnectionwithaPoESwitch
If using a PoE switch, connect the network camera to the switch via an Ethernet
cable, which will provide both power and data transmission over a single
cable.
11D-Link DCS-6111 User Manual
Page 12
Section 2 - Installation
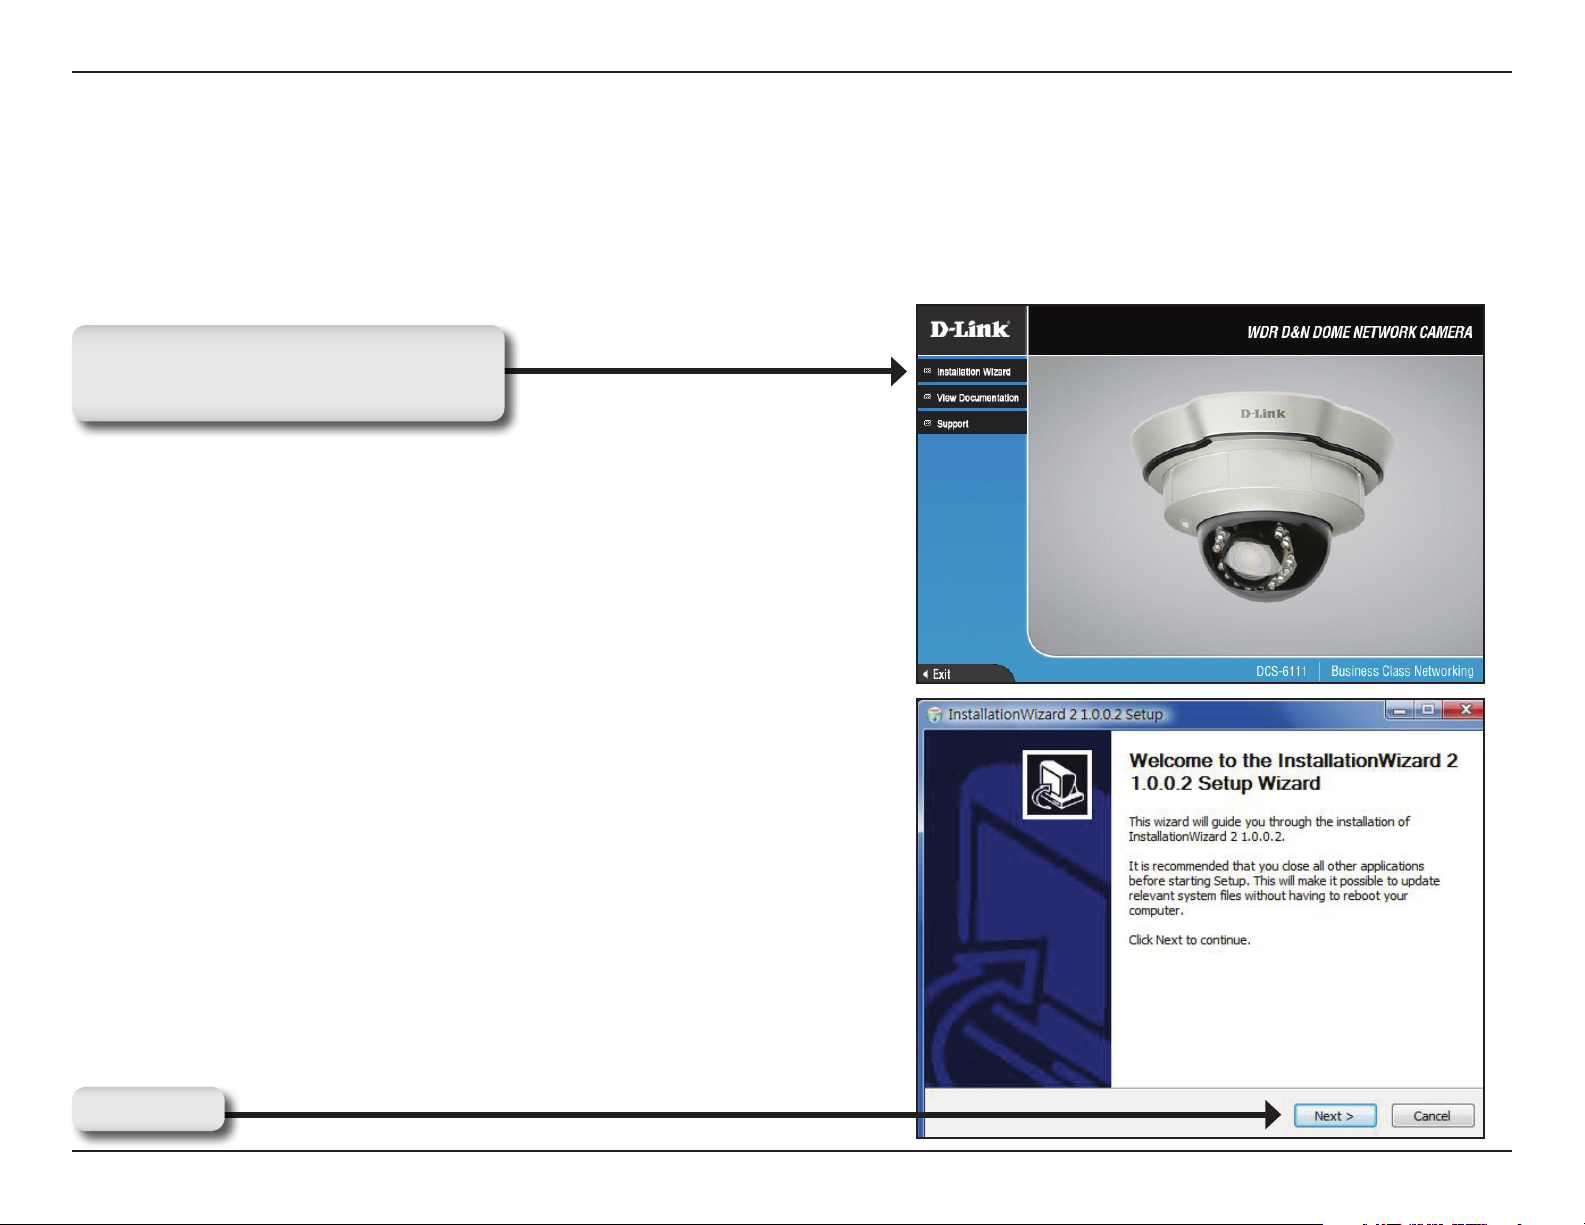
Software Installation
TurnonthecomputerandinserttheD-LinkDCS-6111AutorunCDintotheCD-ROMdrive. The following step-by-step instructions
displayed are shown when using Windows Vista® operating system. The steps and screens are similar when using
other Windows operating systems.
Click on Installation Wizard to
begin software installation.
The Installation Setup Wizard window will pop up. Click Next to
continue.
Click Next
12D-Link DCS-6111 User Manual
Page 13
Section 2 - Installation
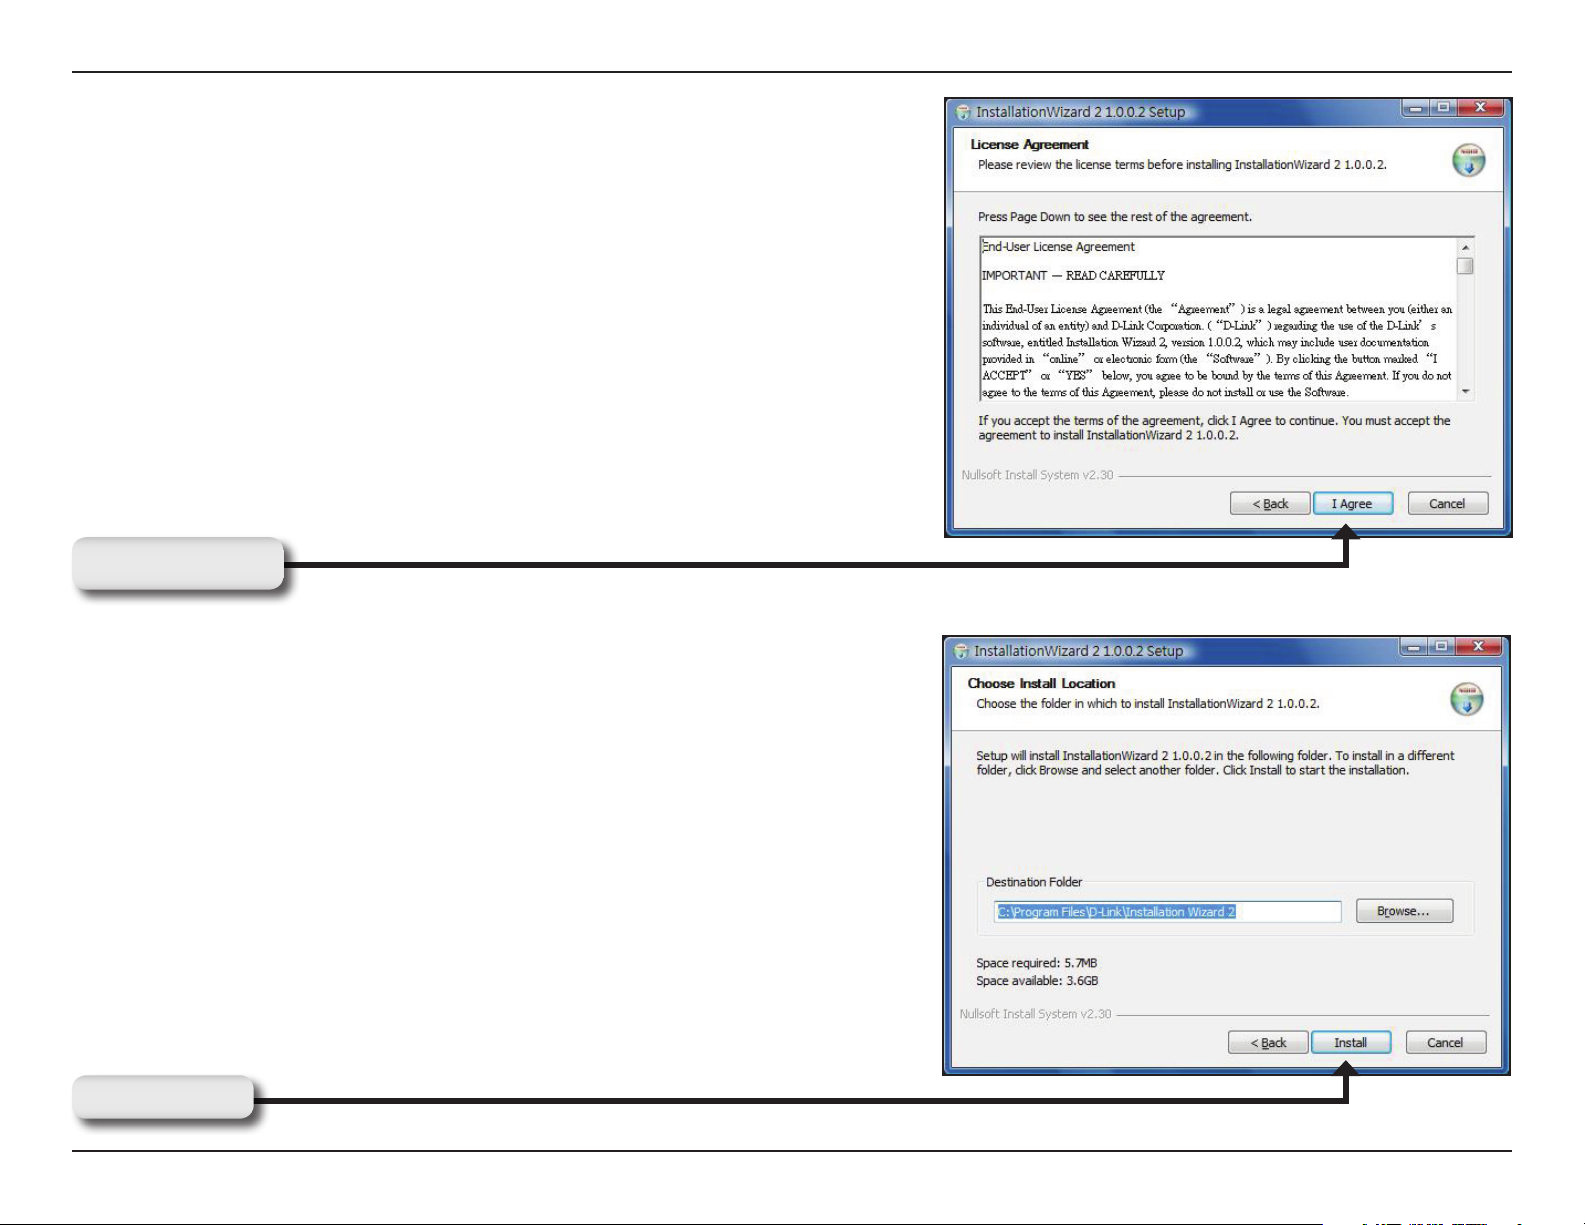
Click I Agree to accept the License Agreement.
Click I Agree
Click the Browse button if you would like to change the destination of
installation. Otherwise, click Install to continue.
Note: Installation may take several minutes to complete.
Click Install
13D-Link DCS-6111 User Manual
Page 14
Section 2 - Installation
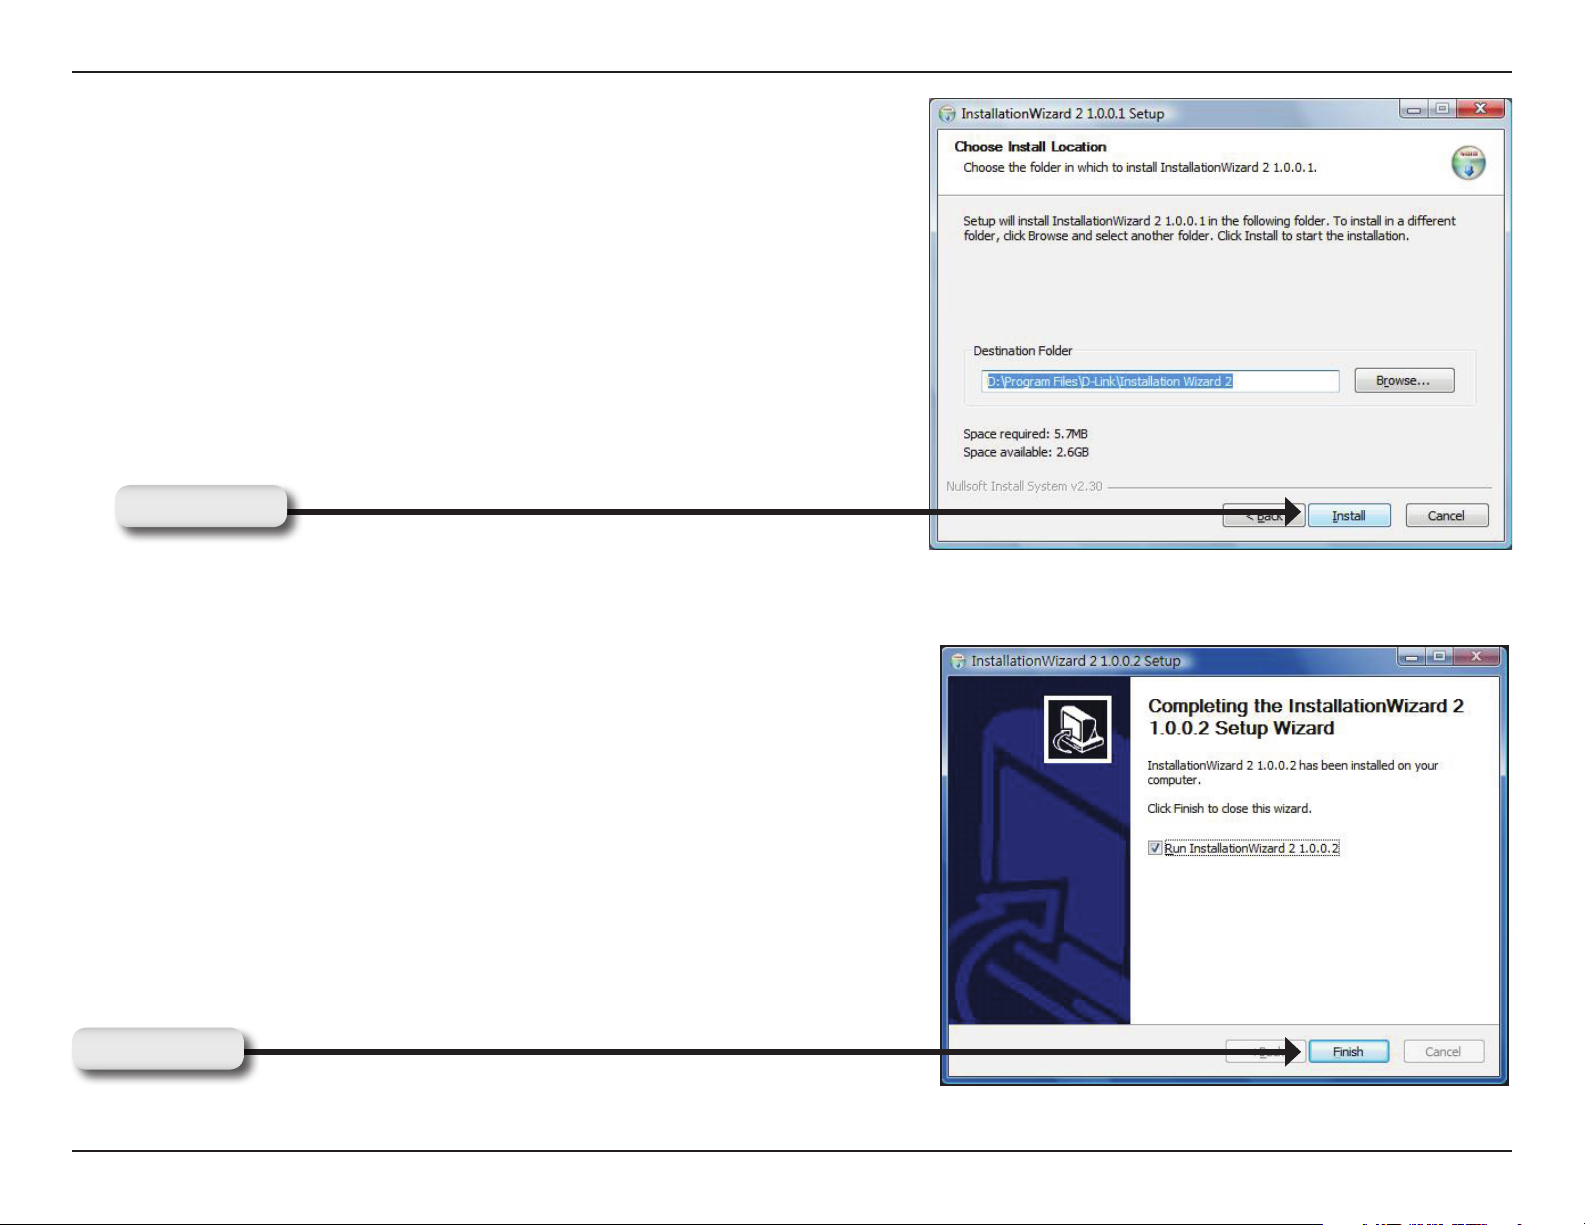
To start the installation click Install.
Note: The installation may take several minutes to complete.
Click Install
Click Finish to complete installation and the D-Link Installation
Wizard window will pop up for camera conguration.
Click Finish
14D-Link DCS-6111 User Manual
Page 15
Section 3 - Conguration
ConguringYourCamerawiththeInstallationWizard
If the D-LinkInstallationWizard window does not pop up after completion of software installation, click on the icon
that was created in your Windows Start Menu.
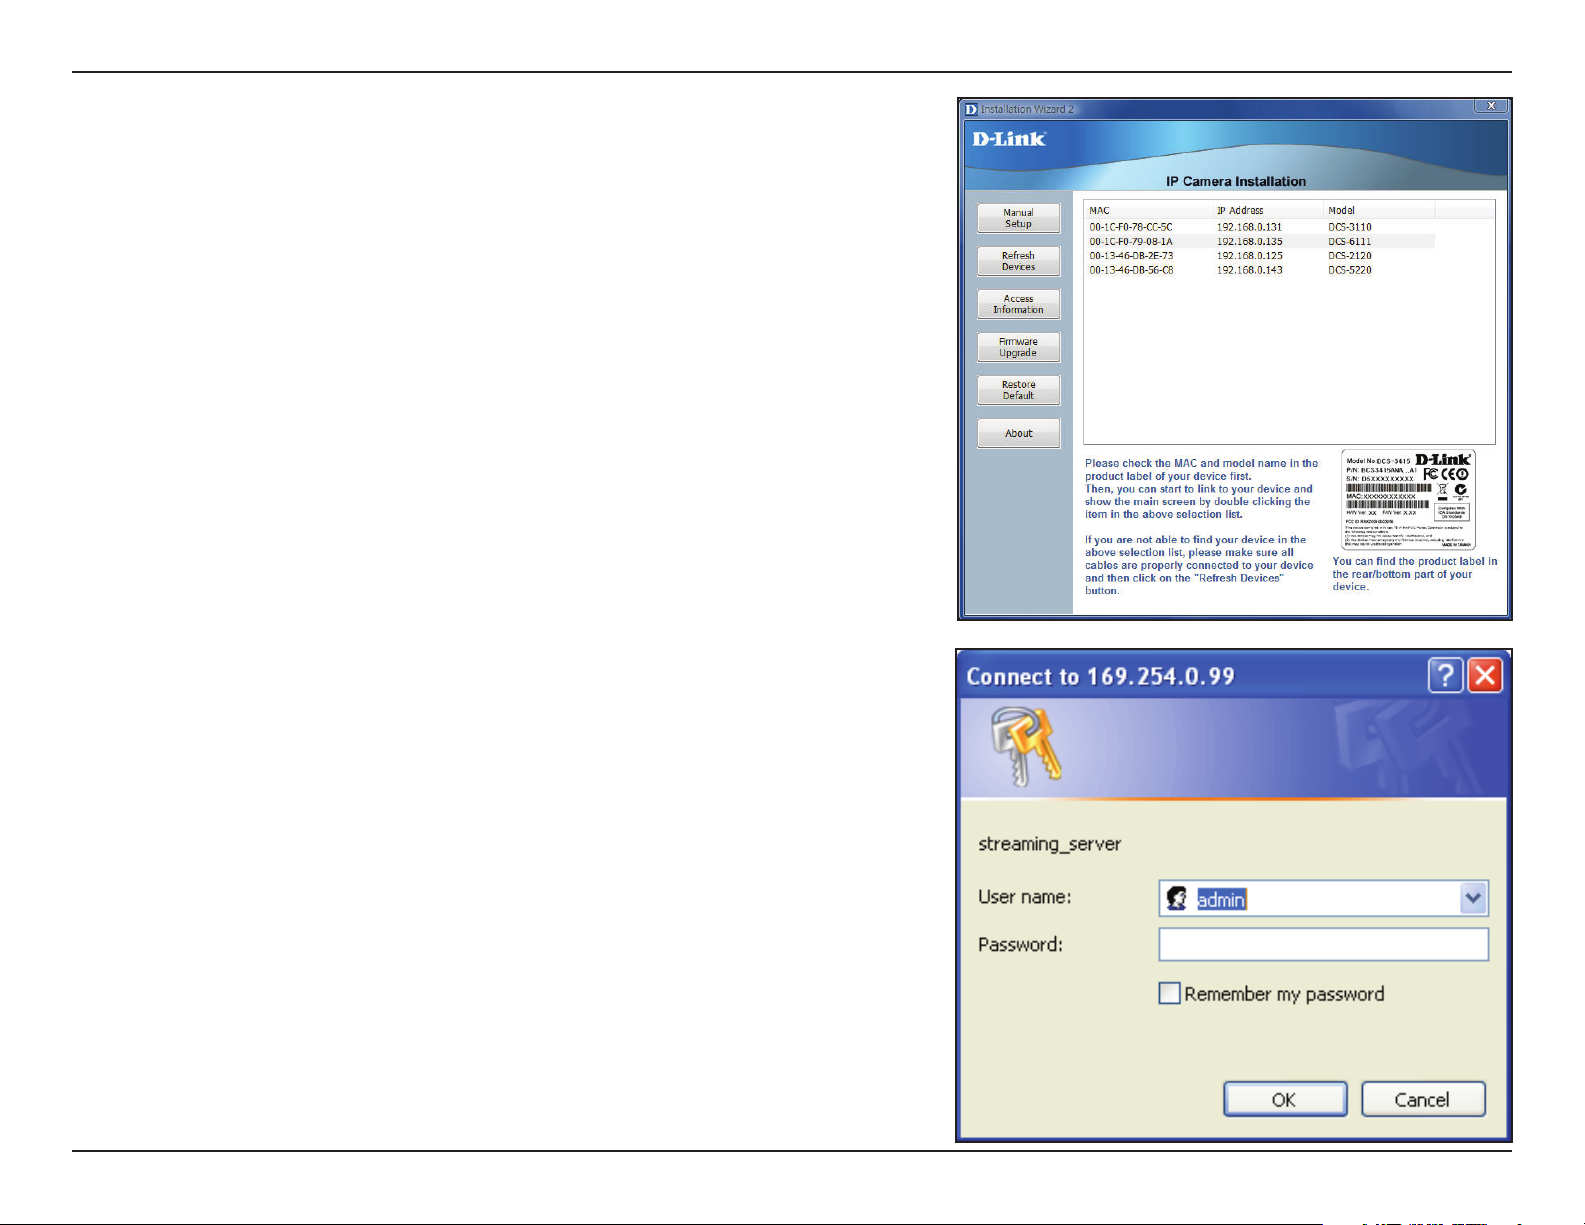
The Installation Wizard will appear and show the MAC address and IP address of your DCS-6111, which may appear
to be different from the actual address depending on what your device is connected to. If you have a DHCP server
on your network, there will be a valid IP address displayed here.
Note: A DHCP server is a device that supplies the same IP address.
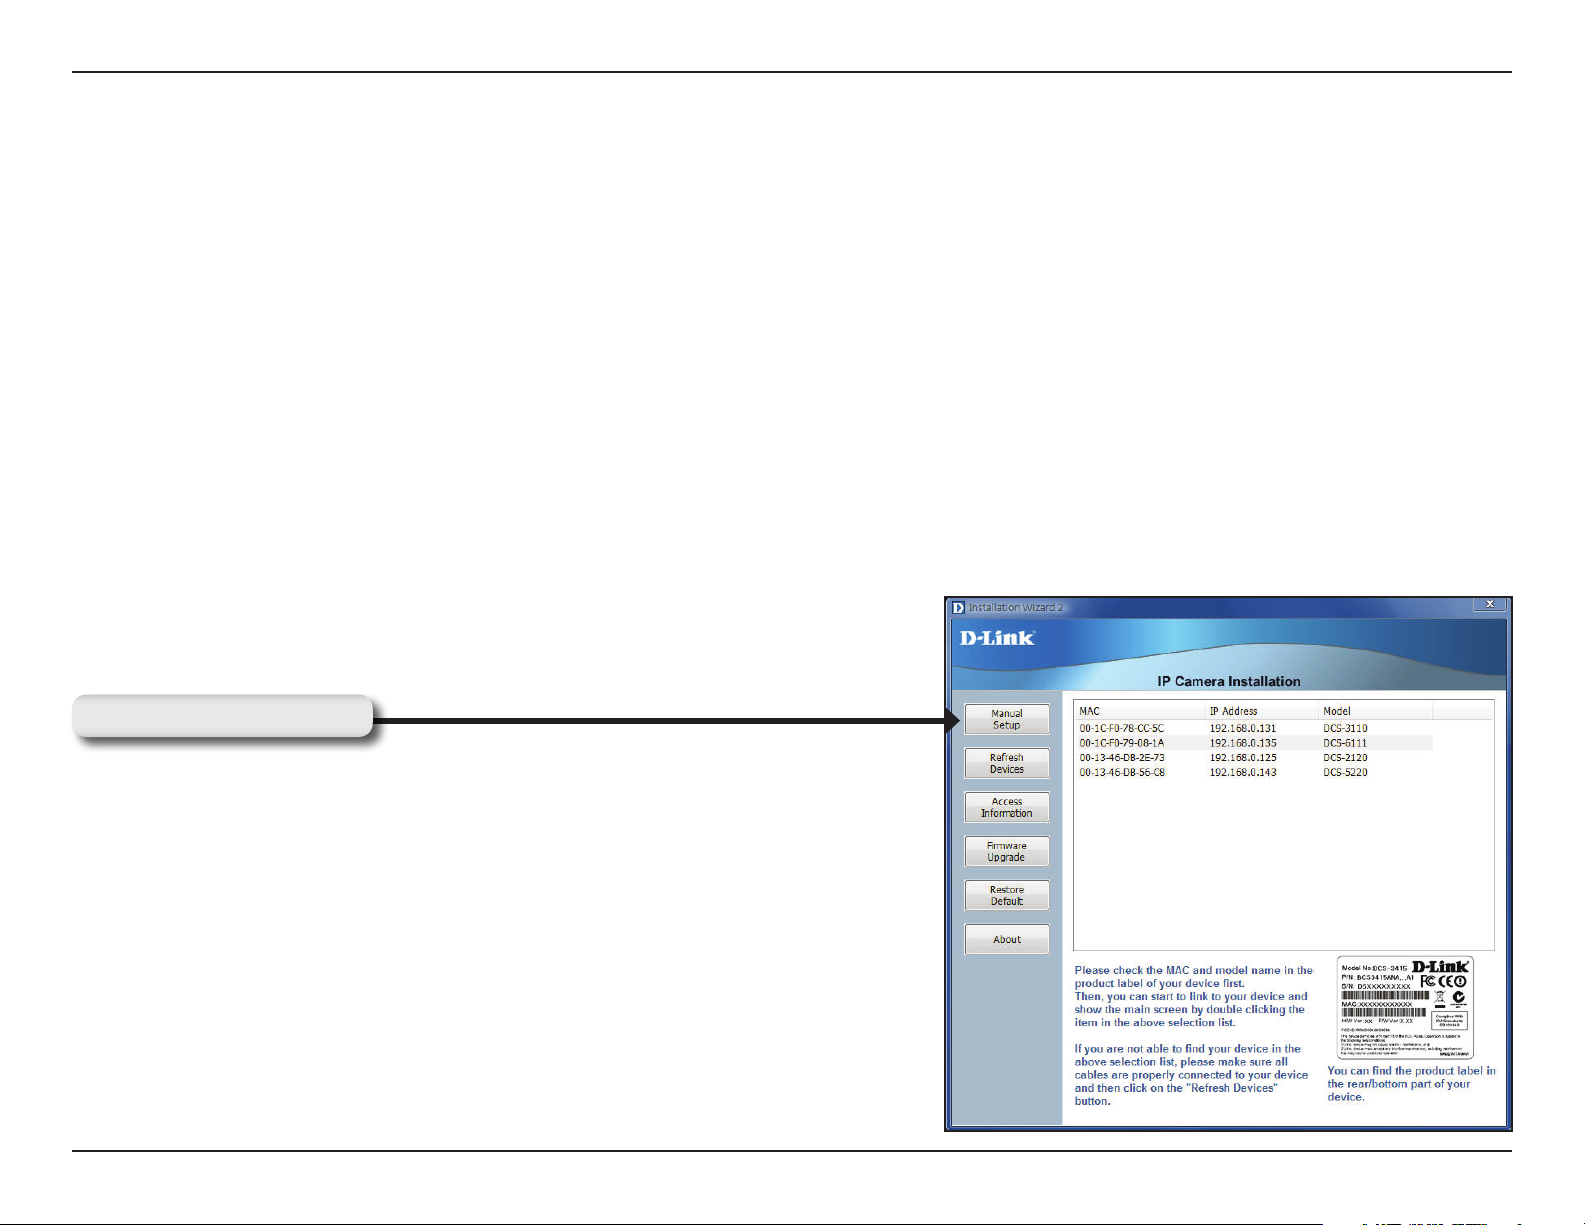
To begin setup, single-click on the DCS-6111 located in the camera list
and click Manual Setup located on the left of the Installation Wizard.
Click Manual Setup
15D-Link DCS-6111 User Manual
Page 16
Section 3 - Conguration
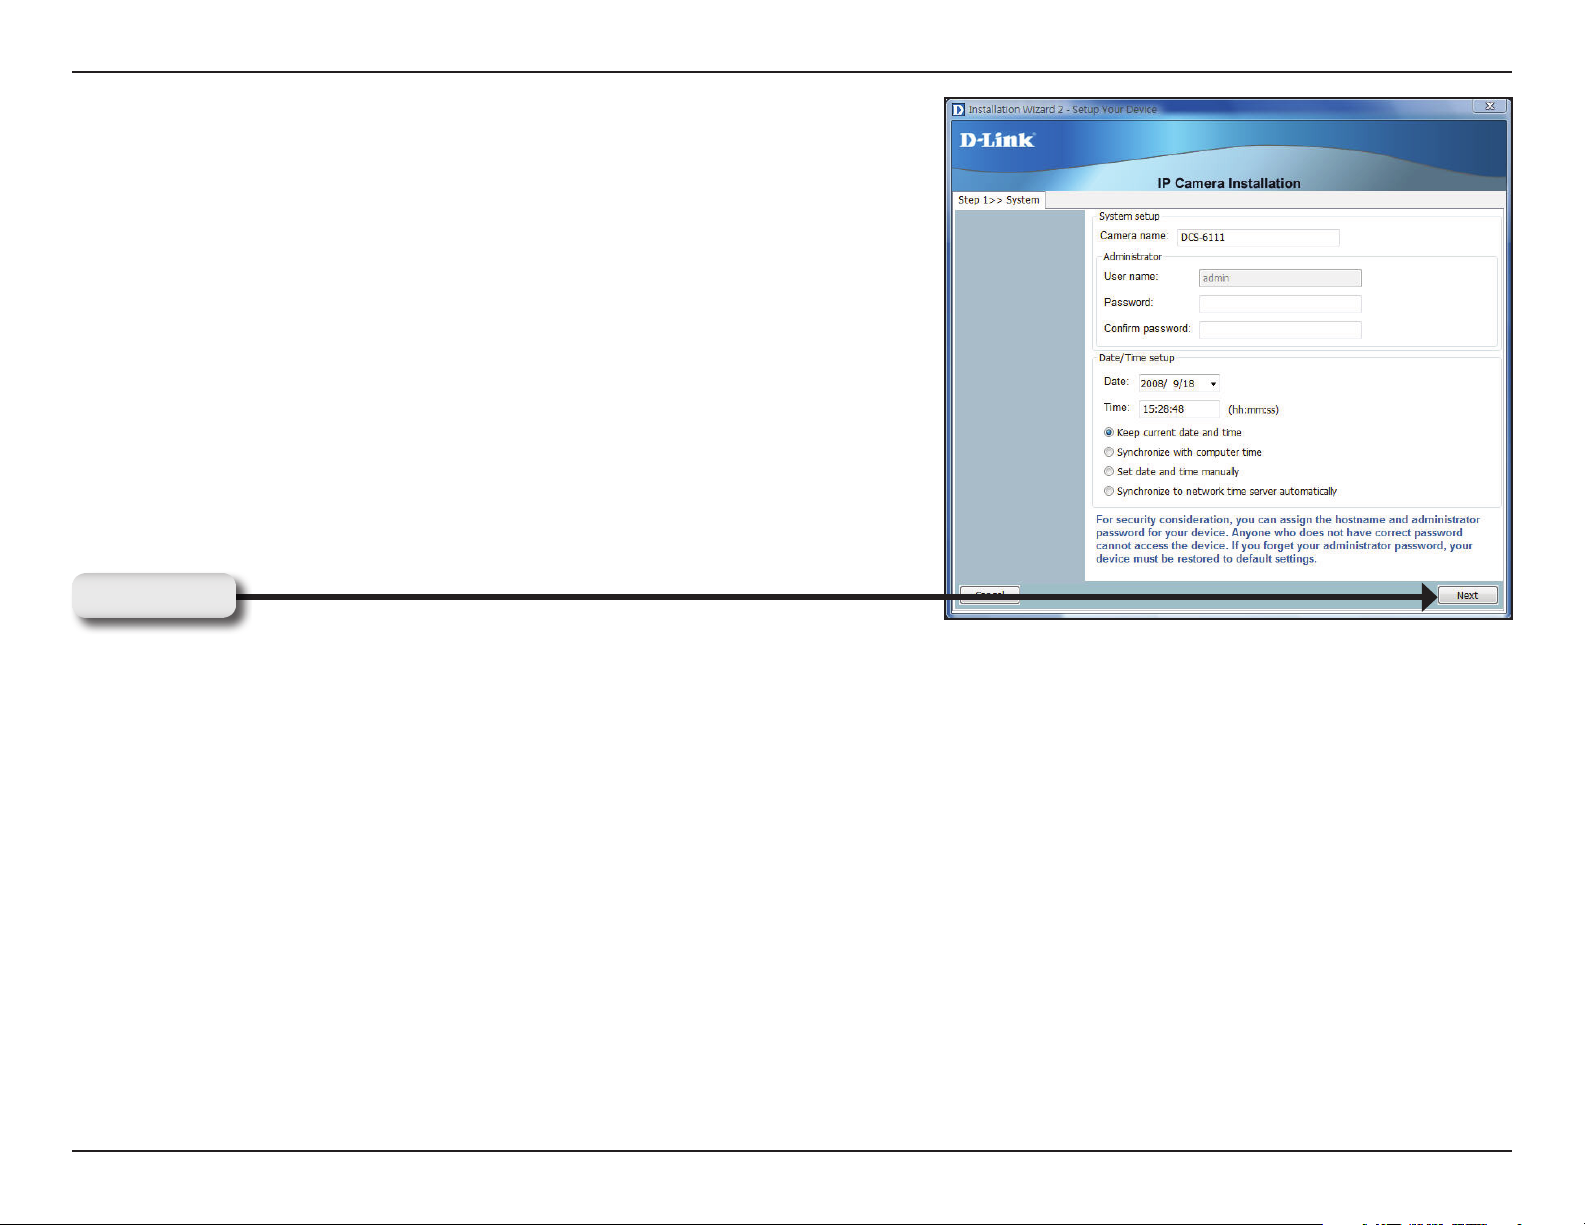
Enter a password, and conrm the password for your admin
acccount and click Next.
Note: The default administrator username is admin and the password is
left blank. The password can also be changed after installation.
Click Next
16D-Link DCS-6111 User Manual
Page 17
Section 3 - Conguration
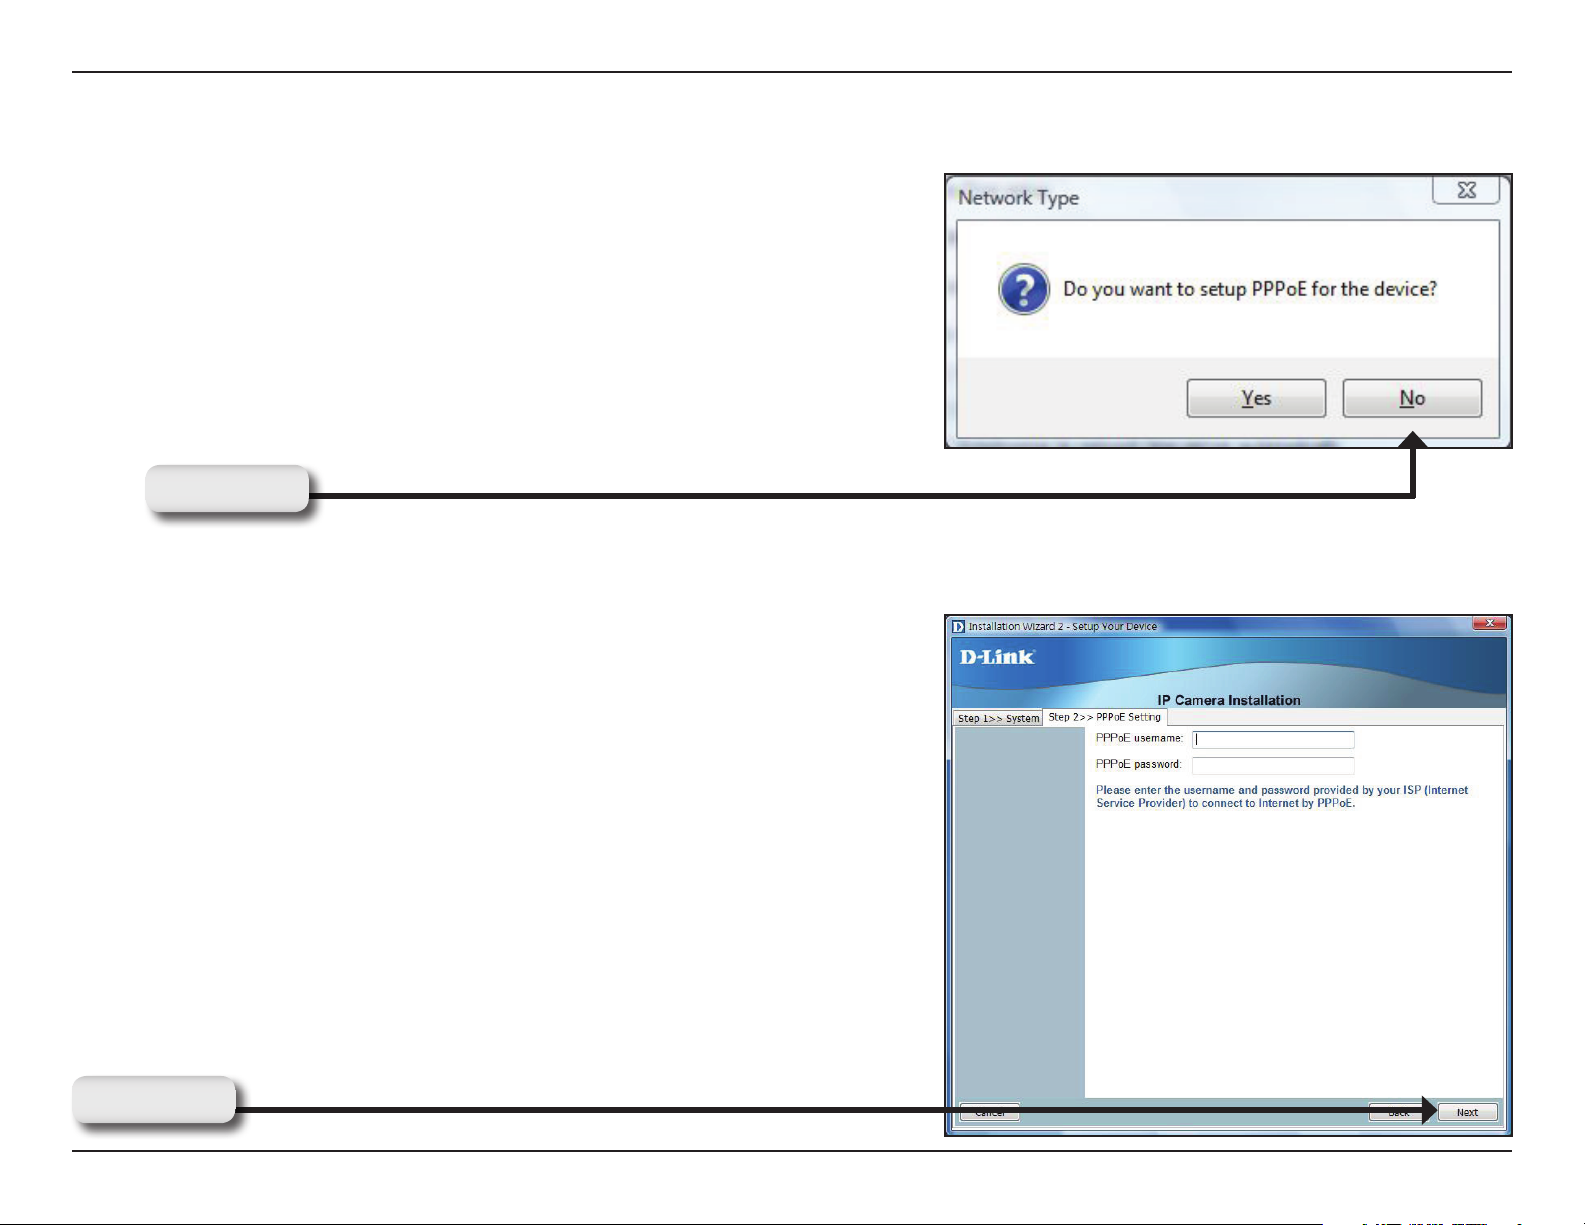
PPPoESetup
The Network Type screen displays will pop up to ask if you want to
setup PPPoE for the device. Click No for quick setup and skip to page
18.
Note: By using PPPoE, users can virtually dial from one machine to another over
an Ethernet network, establish a point to point connection between them and then
securely transport data packets over the connection.
Click No
The PPPoE Setting screen displays. Enter the username and password
provided by your ISP to connect to the Internet by PPPoE.
Click Next and skip to the setup screen as seen in page 19.
Click Next
17D-Link DCS-6111 User Manual
Page 18
Section 3 - Conguration
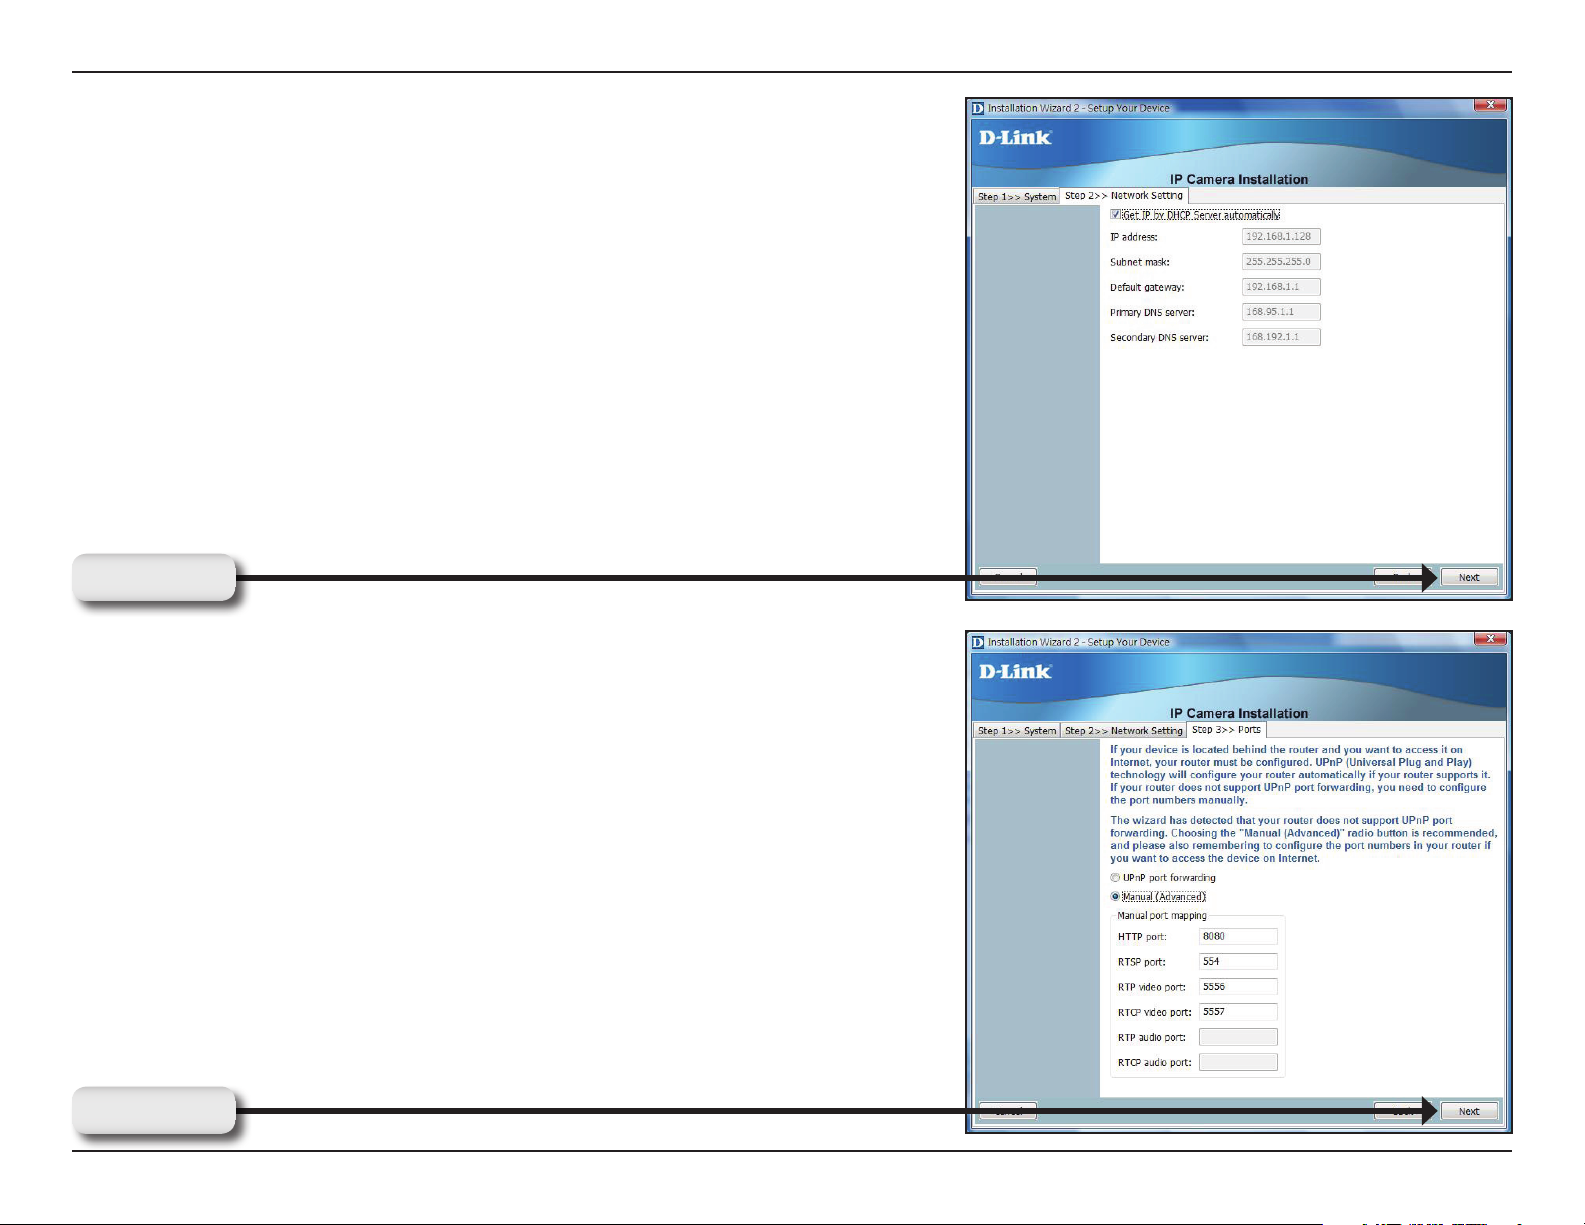
Check the GetIPbyDHCPServerautomatically box to obtain a new IP
address every time the camera starts up. Click Nextto continue.
Click Next
Select UPnPPortForwarding if your router supports this function. If
not, choose Manual to manually enter your port numbers. Click Next
to continue.
Click Next
18D-Link DCS-6111 User Manual
Page 19
Section 3 - Conguration
Click Nextto continue.
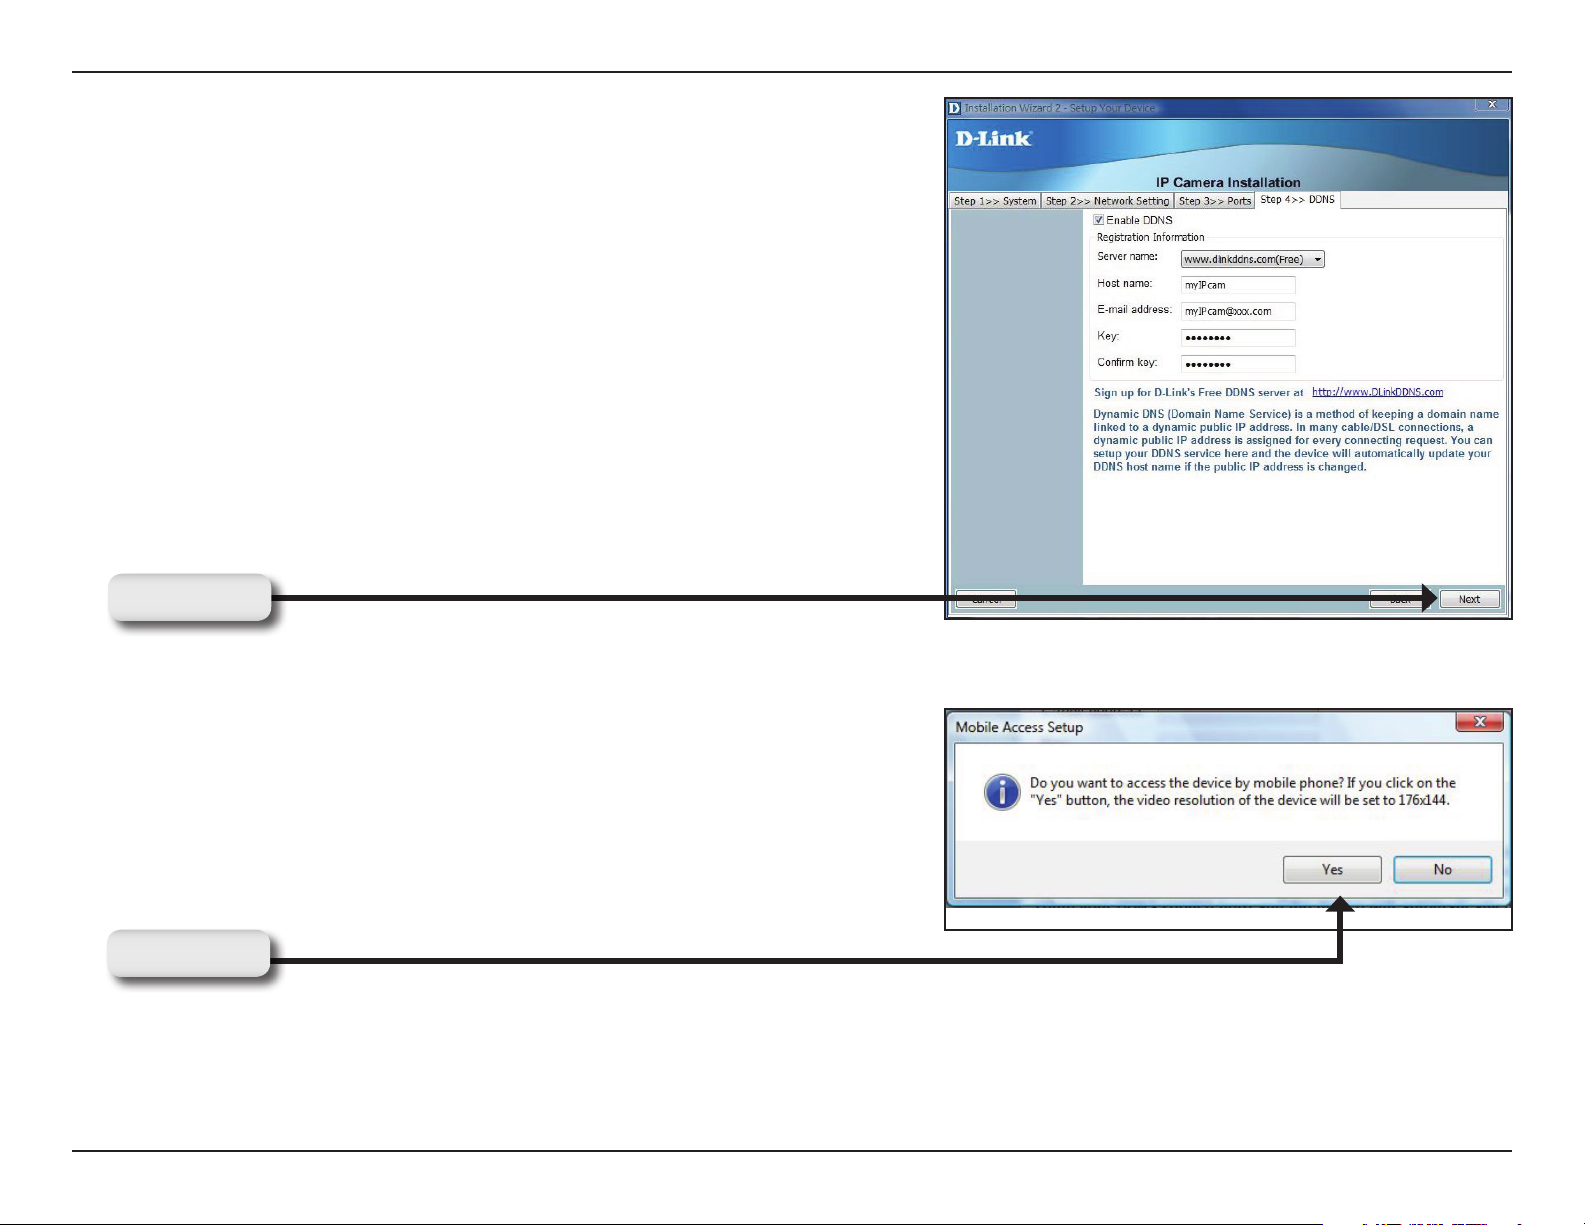
Click Next
A window will pop up asking you if you want to access the
DCS-6111 via mobile phone. Clicking Yes will set the video
resolution to 176x144.
Click Yes
19D-Link DCS-6111 User Manual
Page 20
Section 3 - Conguration
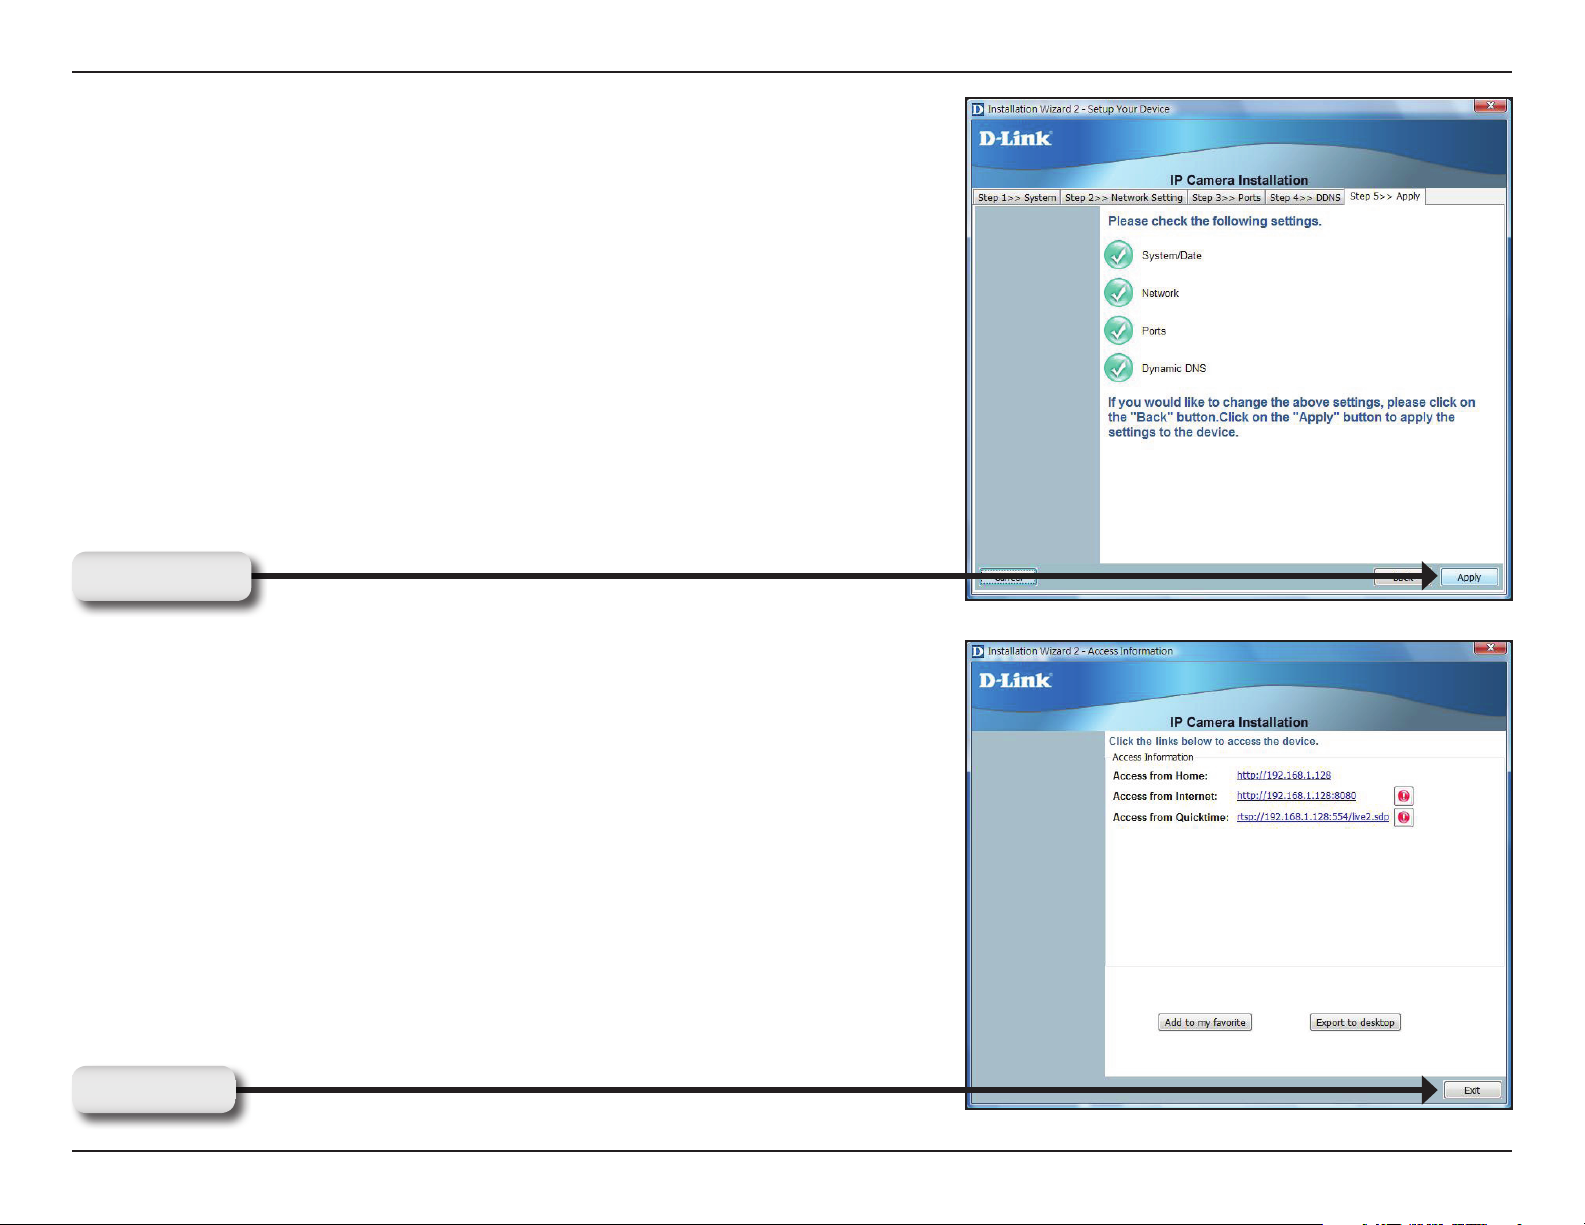
ClickApplyto apply the settings listed in the window to the device.
The application may take a few minutes to process.
Click Apply
A window will pop up to conrm that the application was successfully
congured. Click OK to continue.
A new window will pop up displaying the links/addresses to access
your device. Click Addtomyfavoriteto save the address and then
click Exit to complete the installation.
Click Exit
20D-Link DCS-6111 User Manual
Page 21
Section 3 - Conguration
Double-click DCS-6111 in the Installation Wizard window to launch
the camera’s web conguration page.
Note: Please see the user manual for more information.
Enter admin as the default username and leave the password blank
by default. Click OK to continue.
21D-Link DCS-6111 User Manual
Page 22
Section 3 - Conguration
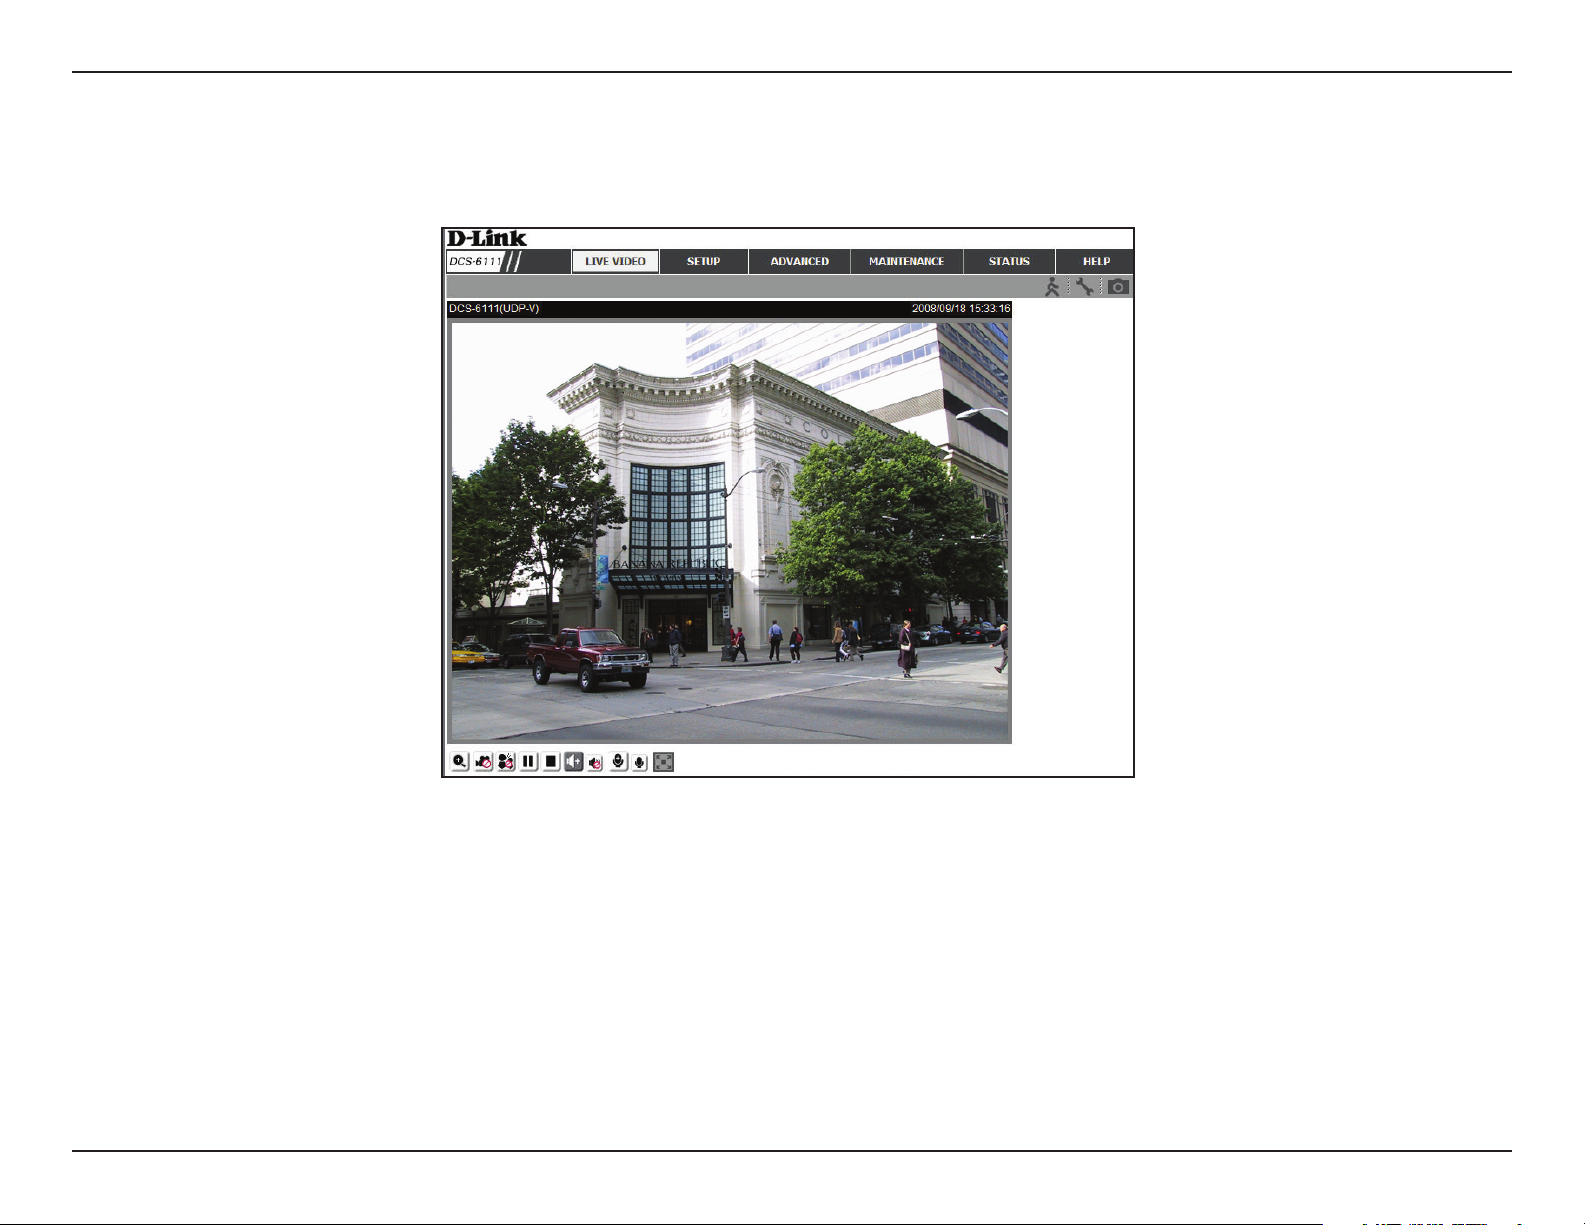
This section shows your camera’s live video. You can congure your settings using the buttons in the window. For
more information on using the web conguration, please refer to the user manual.
22D-Link DCS-6111 User Manual
Page 23
Section 3 - Conguration
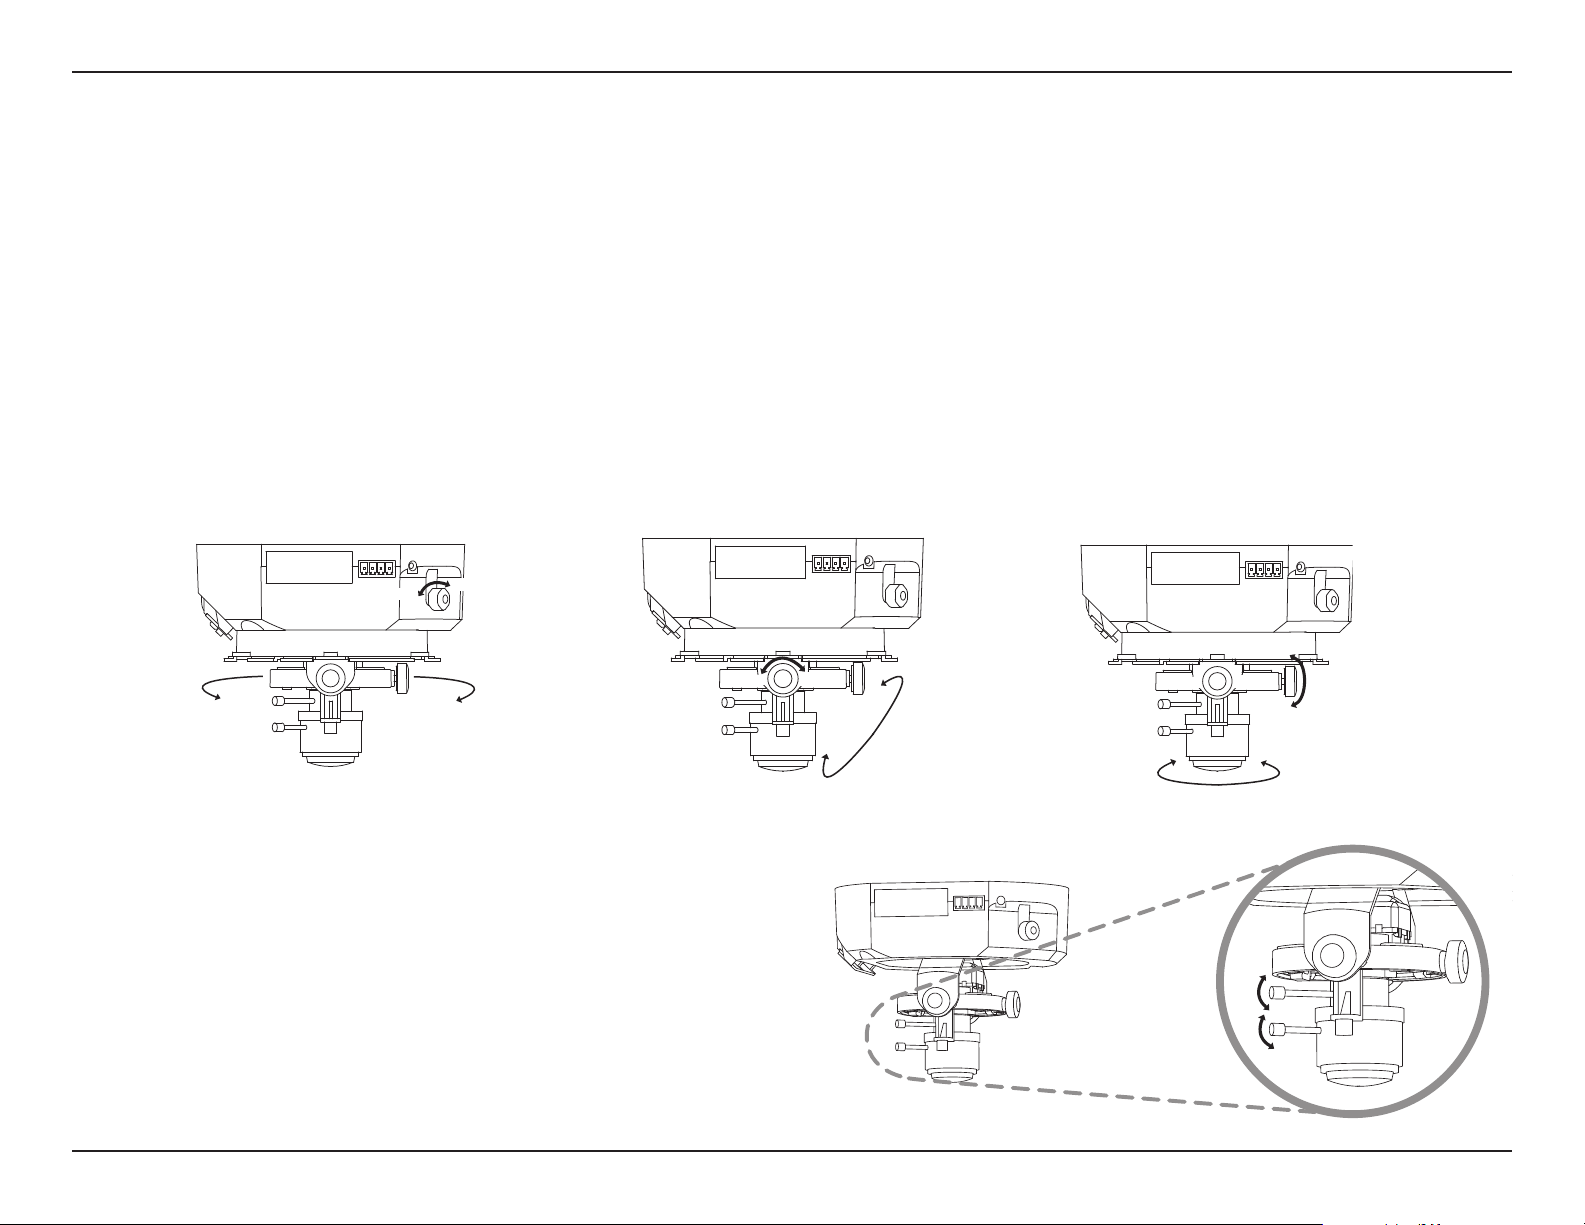
Loosen
Tighten
Tighten
Loosen
Tighten
Loosen
Loosen
Tighten
AdjustingtheLens
Based on the live image retrieved from the camera, adjust the camera lens by performing the following procedures:
AdjustingtheViewingAngle
Loosen the pan screw and turn the lens module left and right until the desired position is achieved. Tighten the pan
screw once completed.
Loosen the tilt screws on both sides of the camera, and turn the lens module up and down until the desired position
is achieved; tighten the tilt screws once completed.
Loosen the image adjustment screw and turn the lens to adjust the network camera’s image until the desired
orientation is achieved, tighten the image adjustment screw once completed.
AdjustingZoomandFocus
Loosen the zoom controller and adjust the zoom factor by
moving the controller left and right until the desired range is
achieved; tighten the zoom controller once completed.
Loosen the focus controller and adjust the focus range by
moving the controller left and right until the image is clear;
tighten the focus controller once completed.
23D-Link DCS-6111 User Manual
Page 24
Section 3 - Conguration
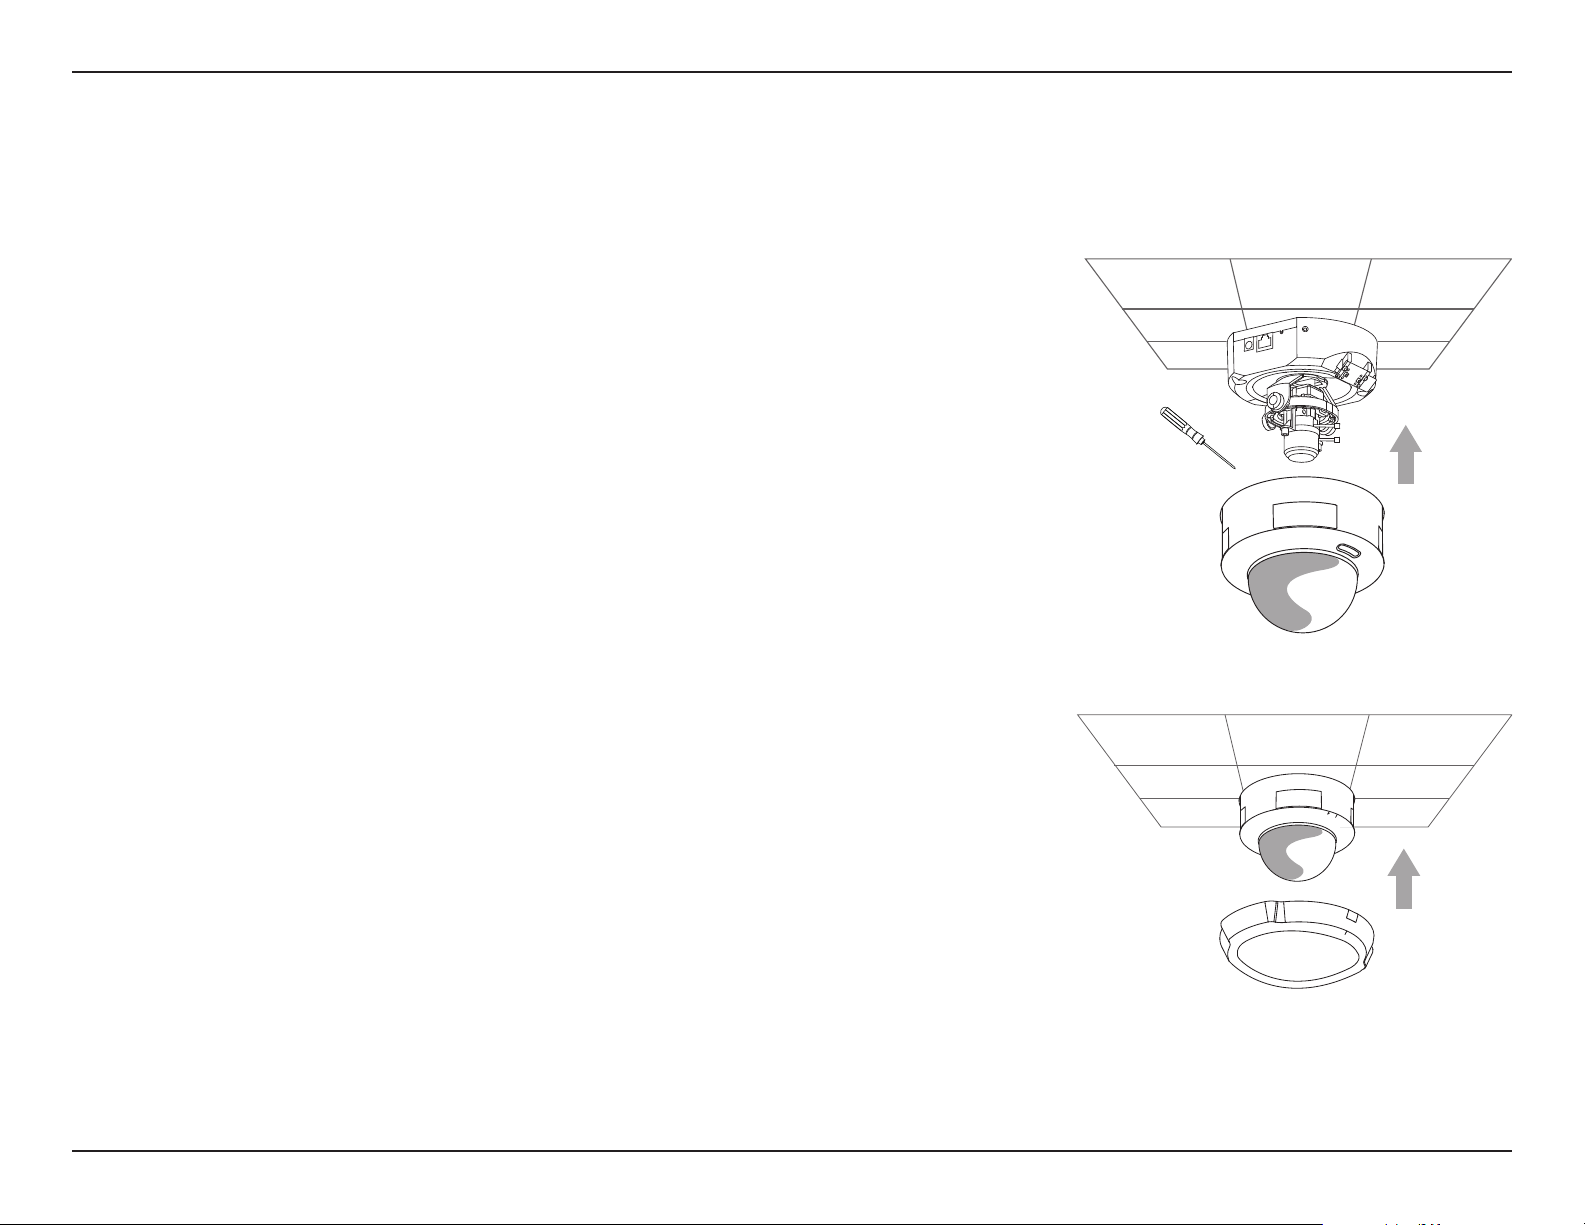
AttachingtheEnclosure
Once the lens is properly adjusted, rearrange the light shield so that it will not obstruct the lens during surveillance.
Place the dome enclosure over the network camera so that the LED sticker on
the dome enclosure is properly aligned with the camera’s LED. Insert the supplied
screws into the two holes located at the base of the dome enclosure, tighten until
secure.
Place the ring enclosure over the dome enclosure. Once placed, gently turn
the ring enclosure clockwise until it locks and is securely attached to the dome
enclosure.
Note: When attaching the ring enclosure, be sure to rst align the line on the ring enclosure
with the triangle on the dome enclosure. When attachment is successfully made, the line on
the ring enclosure will be aligned with the line on the dome enclosure.
24D-Link DCS-6111 User Manual
Page 25

Section 3 - Conguration
Web-basedCongurationUtility
This section will show you how to congure your new D-Link Network Camera using the Web-based Conguration
Utility.
To access the conguration utility, open a web-browser such as
Internet Explorer and enter the IP address of your Network Camera
(http://192.168.0.120)
Note: In the example, this address is 192.168.0.120. Your address may dier.
Type Admin in the user name eld and leave the password blank
by default.
Note: You may refer to page 71 to change the password for your
admin account.
Click OK
25D-Link DCS-6111 User Manual
Page 26
Section 3 - Conguration
LiveVideo
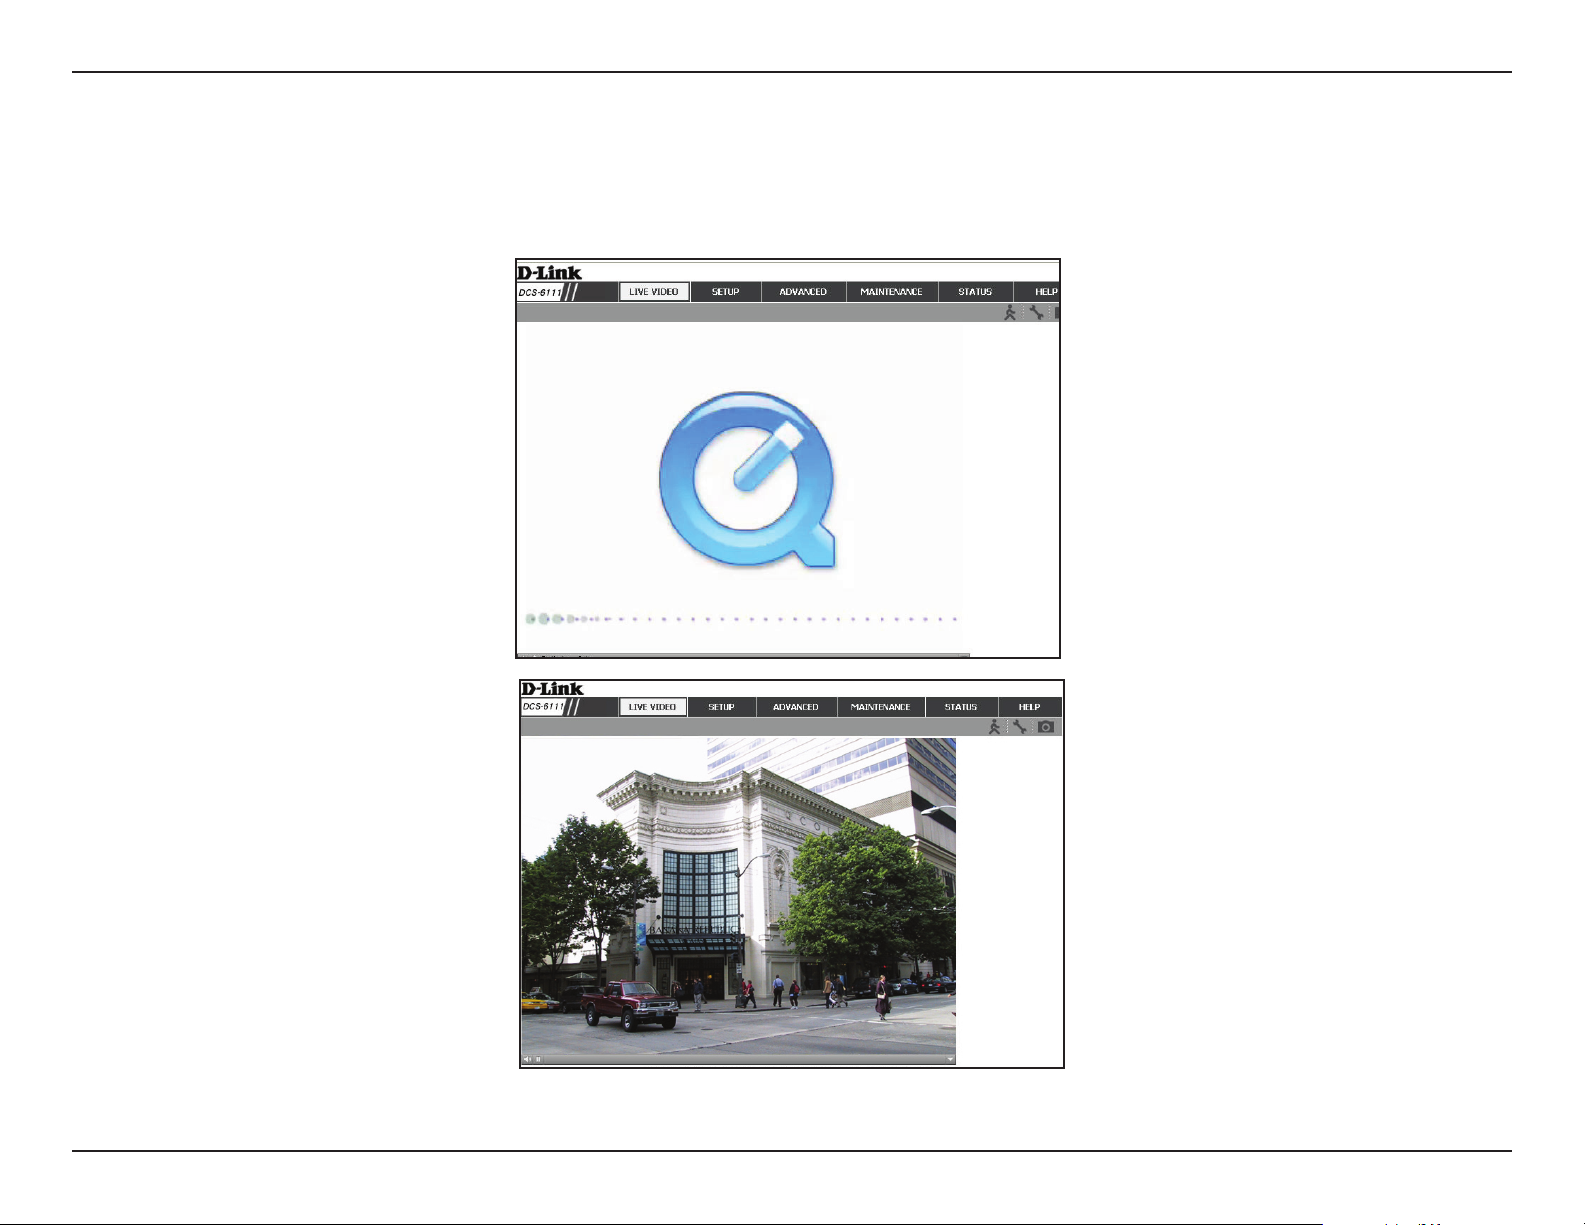
As seen by Mozilla Firefox and Netscape users, Quick Time player is invoked to stream the live video.
26D-Link DCS-6111 User Manual
Page 27

Section 3 - Conguration
UsingRTSPPlayers
Use one of the following media players that support RTSP streaming to view MPEG-4 streaming media.
Quick Time Player
Real Player
VLC media player
mpegable Player
pvPlayer
1. Launch a RTSP player.
2. Choose File > Open URL.
3. Type the URL command in the text box and then click OK.
URL command = rtsp://<ip address of your camera>:<rtsp port>/<access name for stream1 or stream2>
Note: Please refer to pages 44-45 for the RSTP port settings and streaming les.
For example:
4. You can view the live video in your player, as shown in the gure.
27D-Link DCS-6111 User Manual
Page 28

Section 3 - Conguration
Using3GPPMobilePhones
To view streaming media using mobile phones, make sure the Network Camera is setup on the Internet.
To utilize this feature, please check the Network Settings for your camera.
1. Most of the players on 3GPP mobile phones do not support RTSP authentication. Make sure the
authentication mode of RTSP streaming is set to Disable. For more information, see page 44.
2. The 3G network bandwidth is limited, therefore users cannot use large size videos. Please set the
video and audio streaming parameters as listed below. For more information, see Audio and Video
on page 51.
Video Mode MPEG-4
Frame size 176 x 144
Maximum frame rate 5 fps
Intra frame period 1S
Video quality (Constant bit rate) 40kbps
Audio type (GSM-AMR) 12.2kbps
3. Set the RTSP port to 554, since most ISPs and players do not support other port numbers.
4. Launch the players on 3GPP mobile phones, (ex. Real Player). Type the URL command in the
player.
URL Command = rtsp://<public ip address of your camera>:<rtsp port>/<access name for stream1/
stream2>
28D-Link DCS-6111 User Manual
Page 29

Section 3 - Conguration
Camera
This section shows your camera’s live video. You can congure the settings using the buttons listed below.
Logout: Logout the camera server and close the browser.
Client Settings: Click this button to access the Client Settings.
Snapshot: Capture a still picture of a video.
DisableDigital
Zoom:
ZoomFactors:
Enable/Disable the digital zoom feature. After selecting this
icon, a small pop-up window will appear (see below).
Select this to disable the digital zoom feature.
Adjust the threshold of the zoom factor. You can also adjust
and position the zoom area by dragging the box in the
window.
Click this icon to hide the window.
29D-Link DCS-6111 User Manual
Page 30

Section 3 - Conguration
12345678910111213141516
1/2
3/4
5/6
7/8
9
10
11/12
Digital Zoom - Refer to the previous page for more information.
Start/Stop Recording - Click (#3) to start recording. Video clips will be recorded in MP4 format to your computer. Press the button again
(#4) to stop recording. If you close your web browser, the video will stop recording.
Talk/Stop Talk - Click this button (#5) to talk to people around the Network Camera if there is an external speaker connected to the
camera and you have a microphone connected to your computer. Press the icon again (#6) to stop talking or disable this function.
Resume/Pause - Click this button (#8) to start or resume the transmission of video streaming. Click the button again (#7), the video will
pause.
Stop - Click to stop the transmission of video streaming. Click the resume button (#8) to begin streaming.
Speaker Volume - When the mute function is not active, move the slider bar to adjust the volume of the speakers that are connected to
your network camera.
Speaker Mute/Unmute - Click (#12) to mute the external speaker that is connected to the network camera. Press again (#11) to unmute
the speaker.
13
14/15
16
Microphone Level - When the mute function is not active, move the slider bar to adjust the level of the microphone that is connected to
your network camera (external).
Microphone Mute/Unmute - Click (#15) to turn off the microphone (external) that is connected to your network camera. Press again (#14)
to turn the microphone back on.
Full screen: To enlarge the video to full screen.
30D-Link DCS-6111 User Manual
Page 31

Section 3 - Conguration
Snapshot
This page shows a snapshot image of a live video taken from DCS-6111 network camera.
31D-Link DCS-6111 User Manual
Page 32

Section 3 - Conguration
ClientSetup
Select to access this section. To congure the settings for media streaming and recording, please read the
following denitions.
Stream
Options:
Media
Options:
Protocol
Options:
UDP
Protocol:
UDP Unicast:
UDP
Multicast
TCP:
Select which video stream prole to use.
There are 3 selectable Media Options for your stream
prole. The Default setting is Video and Audio.
There are 4 protocols for you to choose for video
streaming.
This is recommended because it is an ideal protocol
for transmitting real-time audio and video data, which
can tolerate some lost packets.
Stream to a single computer.
Stream to multiple computers using multicast
streaming.
Provides higher quality video streaming than UDP
and provides error correction. However, transmission
speed will be reduced.
HTTP
Protocol:
Record
Options:
Offers the highest image and video quality. However,
packet loss will diminish image quality when bandwidth
becomes restricted. If the network is protected by a rewall and it opens only HTTP port (80), HTTP protocol must be selected.
In this mode, audio is disabled and only video can be viewed. UDP connections will not be available to remote users if all four
ports have not been forwarded (as shown on page 46). Only the HTTP port must be forwarded for remote users to make an
HTTP connection (video only).
Allows the user to specify a destination folder and prex lename for the recorded video.
32D-Link DCS-6111 User Manual
Page 33

Section 3 - Conguration
Setup
Wizard
To quickly congure your network camera, click Internet
Connection Setup Wizard. Otherwise, click Manual
Internet Connection Setup to manually congure your
network camera.
To quickly congure your network camera’s motion
detection settings, click Motion Detection Setup
Wizard and skip to page 38. If you want to enter your
settings without running the wizard, click Manual
Motion Detection Setup and skip to page 41.
InternetConnectionSetupWizard
This wizard will guide you through a step-by-step process to congure your new D-Link Camera and connect the
camera to the internet. Click Next to continue.
Click Next
33D-Link DCS-6111 User Manual
Page 34

Section 3 - Conguration
Select DHCP if you are unsure which settings to pick.
Click Next to continue and skip to page 35.
Click Next
Select PPPoE if the camera is directly connected to the
Internet through a DSL modem and your ISP (Internet
Service Provider) requires you to use PPPoE for the
Internet connection. Click Next to continue and skip to
Step 2 on page 35.
Click Next
34D-Link DCS-6111 User Manual
Page 35

Section 3 - Conguration
Select Static IP if your Internet Service Provider has
provided you with connection settings, or you wish to set
a static address within your home network. Enter all the
relevant LAN information. Click Next to continue.
Click Next
If you have selected PPPoE, enter your username and
password. Click Next to continue.
Click Next
35D-Link DCS-6111 User Manual
Page 36

Section 3 - Conguration
With a Dynamic DNS account, the camera automatically
updates your IP address. To enable DDNS, enter your
host information. Click Next to continue.
Click Next
Enter a name for your camera and click Next to
continue.
Click Next
Congure the correct time to ensure all the events will
be triggered and scheduled at the correct time.Click
Next to continue.
Click Next
36D-Link DCS-6111 User Manual
Page 37

Section 3 - Conguration
Once you have selected Dynamic, PPPoE, or Static,
you will see a summary of your camera’s settings. Click
Apply to save and activate your settings.
Click Apply
37D-Link DCS-6111 User Manual
Page 38

Section 3 - Conguration
MotionDetectionSetupWizard
This wizard will guide you through a step-by-step process to congure your new D-Link Camera’s motion detection
functions. Click Next to begin the process.
Click Next
This screen will allow you to enable or disable the
motion detection feature. Click New to create and draw
the motion detection window. Then congure the type
of recording (snapshot, video clip), Window Name,
Sensitivity of detection, and Percentage of the window
required in order to set off motion detection.Click Next
to continue.
Click Next
38D-Link DCS-6111 User Manual
Page 39

Section 3 - Conguration
Select the recording time and date for your camera. Click
Next to continue.
Note: Recording camera footage will take up space on your hard
drive. It is recommended that you have sufficient disk space for
Always function.
Click Next
This step allows you to specify your event notication,
either via email or FTP. Enter the relevant information of
your email account or FTP settings and then click Next to
continue.
Click Next
39D-Link DCS-6111 User Manual
Page 40

Section 3 - Conguration
You have completed the Motion Detection Wizard. Click
Apply to activate and save your settings.
Click Apply
40D-Link DCS-6111 User Manual
Page 41

Section 3 - Conguration
NetworkSetup
LAN Settings:
DHCP:
Static IP Client:
IP Address:
Subnet Mask:
Default Gateway:
Primary DNS:
Secondary DNS:
Settings for your local area network.
Select this connection if you have a DHCP server running on your network
and would like a dynamic IP address to be assigned to your camera
automatically.
You may enter a static or xed IP address for your camera.
Enter an IP address.
The default value is “255.255.255.0.” This helps to determine if the
designated IP address is on the same subnet.
The gateway used to forward frames to destinations in a different subnet.
Invalid gateway settings may cause the failure of transmissions to a
different subnet. Usually the IP address of your router.
Primary domain name server that translates names to IP addresses.
Secondary domain name server to backup the primary one.
Enable UPnP
Presentation:
Allows a user to nd, view, and control this camera via a presentation
page or “Network Neighborhood” without conguration.
How does UPnP work?
UPnP
dynamic discovery of devices added to a network. Services and capabilities
offered by networked devices, such as printing and le sharing, are
available among each other without bothersome network conguration.
In the case of Network Cameras, you will see Network Camera shortcuts
at My Network Places.
TM
networking technology provides automatic IP conguration and
41D-Link DCS-6111 User Manual
Page 42

Section 3 - Conguration
Enabling UPnP port forwarding allows the Network Camera to open a secondary HTTP port on the router. You have
to add the secondary HTTP port number behind the Network Camera’s public address in order to access the Network
Camera from the Internet. For example, when the HTTP port is set to 80 and the secondary HTTP port is set to 8080,
refer to the list below for the Network Camera’s IP address.
From the Internet In a local area network
http://203.67.124.123:8080 http://192.168.4.160 or
http://192.168.4.160:8080
If the PPPoE settings are incorrectly congured or the Internet access is not working, restore the Network Camera to
factory default settings.
Enable UPnP Port
Forwarding:
Enable IPv6:
IPv6 Information:
Manually setup
the IP address:
Optional IP
address / Prex
length :
Enables the camera to automatically add the port forwarding entry into the router.
Allows users to adopt and deploy IPv6.
IPv6 is a new version of IP which is designed to be an evolutionary step from IPv4. IPv6 has a much larger address
space than IPv4, which allows exibility in allocating addresses and routing trafc. The very large IPv6 address space
supports 2128 (about 3.4×1038) addresses. IPv6 hosts can congure themselves automatically when connected to a
routed IPv6 network using ICMPv6 router discovery messages. If IPv6 stateless address autoconguration (SLAAC)
proves unsuitable, a host can use stateful conguration (DHCPv6) or be congured manually. In particular, stateless
autoconguration is not used by routers, these must be congured manually or by other means.
Displays the IPv6 status of the camera.
Select to manually setup IPv6.
Enter the IPv6 IP address and its prex length.
42D-Link DCS-6111 User Manual
Page 43

Section 3 - Conguration
Optional default
router :
Optional primary
DNS :
PPPoE
Settings:
HTTP:
Authentication:
Enter the IPv6 router address.
Enter the IPv6 DNS address.
Enable this setting if your ISP (DSL service) is using PPPoE. You may already have both Username and Password given
by your ISP, or you may check with your ISP. The Connect Status will be determined automatically by the system.
You may congure two HTTP ports for your camera. HTTP ports allow you to connect to the camera via a standard
web browser. These ports can be set to a number other than the default TCP ports 80 and 8080. A corresponding
port must be opened on the router. For example, if the port is changed to 1010, users must type in the web browser
“http://192.168.0.100:1010” instead of “http://192.168.0.100”.
Choose either Basic where the password is not encrypted, or Digest where the password is encrypted during the
transmission to the web server.
Note: Restart your browser, if you select Digest mode.
Basic authentication: The password is sent in plain text format; there can be potential risks of being intercepted.
Digest authentication: User credentials are encrypted in MD5 algorithm and thus provide better protection against
unauthorized accesses.
HTTP Port:
Secondary
HTTP Port:
Access name
for stream1:
The default value is 80.
The default value is 8080.
After you have enabled the Authentication, you will need to congure and use the access name to access your video le.
For example, http://camera ip/video.mjpg (video.mjpg is the Access name, you can modify it here)
The default name is video.mjpg.
43D-Link DCS-6111 User Manual
Page 44

Section 3 - Conguration
Access name for
stream2:
HTTPS Port:
FTP Port:
The default name is video2.mjpg.
Access name for stream 1 / Access name for stream 2 : The access name is used to differentiate the streaming source.
When using Mozilla Firefox or Netscape to access the Network Camera, and the video mode is set to JPEG, users will
receive continuous JPEG pictures. This technology, known as "server push", allows the Network Camera to feed live
pictures to Mozilla Firefox and Netscape. Use the following command to obtain the JPEG file:
http://<ip address>:<http port>/<access name for stream1 or stream2>
For example, when the access name for stream 1 is set to video.mjpg:
The URL command is http://192-168-0-051:80/video.mjpg
1. Launch Mozilla Firefox or Netscape
2. Type the URL command in the address field. Press Enter.
3. The JPEG image will be displayed in your web browser.
The default value is 443.
Default port is 21. If you want to change the port number, you will need to specify the port when connecting to the FTP
server. For example, FTP://68.5.1.81:60 (if you use port 60 for your FTP server)
RTSP Streaming:
Authentication:
Access name for
stream1:
Access name for
stream2:
This setting enables you to connect to a camera by using streaming mobile device(s), such as a mobile phone or PDA.
Select either Basic where the password is not encrypted, or Digest where the password is encrypted during the transmission
to the web server. After you have enabled the Authentication, you will need to congure and use the access name to access
your video le. RTSP://camera ip/live.sdp (live.sdp is the default access name, you can modify in the section below)
The default name is live.sdp.
The default name is live2.sdp.
44D-Link DCS-6111 User Manual
Page 45

Section 3 - Conguration
The accessibility of the RTSP streaming for the three authentication modes are listed in the following table.
Quick Time
player
Disable O O O O O
Basic O O X X X
Digest O X X X X
Real Player VLC media
player
mpegable
Player
pvPlayer
O indicates that the authentication mode is supported by the RTSP player.
X indicates that the authentication mode is NOT supported by the RTSP player.
Access name for stream 1 / Access name for stream 2 : The access name is used to differentiate the streaming source. When
using a RTSP player to access the Network Camera, and the video mode is set to MPEG-4, use the following RTSP URL command
to request a transmission of streaming data.
rtsp://<ip address>:<rtsp port>/<access name for stream1 or stream2>
For example, when the access name for stream 1 is set to live.sdp, the URL command is : rstp://192.168.5.121/live.sdp
1 : Launch a RTSP player.
2 : Choose File > Open URL. This opens the URL dialog box.
3 : Type the URL command in the text box.
For example:
4 : The live video will be displayed in your player.
45D-Link DCS-6111 User Manual
Page 46

Section 3 - Conguration
RTSP port:
RTP port for video:
RTCP port for
video:
Multicast group
address:
The port number that you use for RSTP streaming, the default port number is 554. RTP (Real Time Protocol) Port is used
to streaming audio and video while RTCP (Real Time Control Protocol) port is used to monitor QoS of RTP stream.
Note: RTP video port and RTP audio port must be an “even” number. The numbers of RTCP video port and RTCP audio
port must equal to the numbers of RTP video port and RTP audio port, plus one repetitively.
Default port number is 5556.
Default port number is 5557.
You may choose to enable multicast for your camera audio and video streaming so that your cameras (sources) and the
receivers (clients) can establish the connection to send and receive contents.
An IP Multicast group address is used to send and receive content. Sources use this group address as the destination
address while sending their data packets. Receivers use this group address to inform the network that they are interested
in receiving packets sent to that group.
46D-Link DCS-6111 User Manual
Page 47

Section 3 - Conguration
For example, if some content is associated with group 239.1.1.1, the source will send data packets destined to 239.1.1.1.
Receivers for that content will inform the network that they are interested in receiving data packets sent to the group
239.1.1.1. The receiver “joins” 239.1.1.1. The Multicast address ranges from 224.0.0.0 to 239.255.255.255, or, equivalently,
224.0.0.0/4
Multicast video
port:
Multicast RTCP
video port:
Multicast RTCP
audio port:
Multicast TTL
{1~255]:
Two way
audio port:
Default port number is 5560, or please choose between 1024 and 65534.
Default port number is 5561, or please choose between 1024 and 65534.
Default port number is 5563, or please choose between 1024 and 65534.
Set a Time to Live(TTL) value for multicast packet, please choose between 1 and 255.
The two way audio port is set to 5060 by default. It can also be assigned to another port number between 1025 and 65535.
This Network Camera supports two way audio communication so that operators can transmit and receive audio simultaneously.
By using the external microphone and an external speaker, users can communicate with people present around the Network
Camera.
Note: JPEG only transmits a series of JPEG images to the client. In order to utilize this audio feature, make sure the video
mode is set to MPEG-4 (refer to page 51) and the media option is set to Video and Audio (refer to page 32).
Unicast video transmission delivers a stream through point-to-point transmission. On the other hand, multicast video
transmission sends a stream to the multicast group address and allows multiple clients to acquire the stream by
requesting a copy from the Multicast group address.
The ve ports can be changed between 1025 and 65535. The multicast RTP port must be an even number and the
multicast RTCP port is equal to multicast RTP port number plus one; thus will always be an odd number. When the
multicast RTP port changes, the multicast RTCP port needs to be changed accordingly.
47D-Link DCS-6111 User Manual
Page 48

Section 3 - Conguration
DynamicDNS
DDNS (Dynamic Domain Name Server) will hold a DNS host name and synchronize the public IP address of the modem
when it has been modied. The username and password are required when using the DDNS service.
Enable DDNS:
Server Name:
Host Name:
Username:
Password:
Status:
Click to enable the DDNS function.
Select your Dynamic DNS provider from the drop
down menu.
Enter the host name of the DDNS server.
Enter your username or e-mail used to connect
to the DDNS server.
Enter your password used to connect to the DDNS
server.
Indicates the current connection status.
48D-Link DCS-6111 User Manual
Page 49

Section 3 - Conguration
ImageSetup
You may congure the image settings of the video for your network camera. A preview of the image will be shown in
the window of Live Video. Click Save Settings to save and activate your changes.
Color:
Power Line
Frequency:
Video Orientation:
AGC:
Select either a Color or B/W (black and white,
monochrome) video display.
Select either 50 or 60Hz.
Flip will vertically rotate the video. Mirror will
horizontally rotate the video. You may check both
options if the camera is being installed upside
down.
Select to set the Automatic Gain Control value.
Automatic Gain Control increases the sensitivity of
the camera and is used to automatically adjust the
gain level of the video signal to a predetermined
value. The following options are available - 2X,
4X, or 8 X (eld time multiples). The default value
is 4X. The higher the value, the brighter the image
will be, but this also increases the noise ratio
accordingly. This option is only available when
WDR is unchecked.
Exposure Level:
Select to set the exposure level from the dropdown box. The range included is from 1 to 8 and
the default value is 4. A higher value produces a
brighter image. This option is only available when
WDR is unchecked.
49D-Link DCS-6111 User Manual
Page 50

Section 3 - Conguration
Enable WDR
(Wide Dynamic
Range):
Switch to B/W
(Night Mode):
White Balance:
Maximum
Exposure Time:
Brightness:
Saturation:
Contrast:
Overlay Title and
Time Stamp on
Video:
Select to enable the WDR function. WDR provides better performance especially when the image contains both very dark
and bright areas. Also helps the camera to cope with varying lighting conditions.
Note: When you select this function, Exposure level and AGC functions will be disabled.
Select to automatically enable the camera to switch to B/W night mode.
Select either Auto or Fix from the drop-down box. Select Auto to automatically adjust the white balance of the object.
Otherwise, select Fix to manually set the white balance conditions in advance.
Select to set the exposure time of the camera. 1/30s, 1/15s, or 1/5s are the available options in the drop-down box. The
default value is 1/30s.
Select to change the brightness value for the Network Camera. The range varies from -5 to +5.
Select to change the saturation value of the camera. The default value is 0.
Select to change the contrast value of the camera. The default value is 0.
Select to add a date and time stamp on the video.
Privacy Mask:
Select Privacy Mask to open the Privacy Mask page. In this page,
you can block out certain sensitive zones for privacy concerns.
To set up a Privacy Mask Window, follow the steps given
below:
1. Click New to add a window.
2. The height and width of the window should be at least twice
the size of the object in order to resize and drag-drop the
window.
3. Enter a descriptive Window Name and click Save to apply
changes.
NOTE:
1. Up to ve privacy mask windows can be set in the same screen.
2. Privacy masks will appear on all video stream and recording video.
3. Privacy masks will overlap with motion detection windows. The masked area will not detect any motion.
4. Select Enable privacy mask to facilitate this function.
50D-Link DCS-6111 User Manual
Page 51

Section 3 - Conguration
AudioandVideo
Settings for two video streams (stream 1 and stream 2) can be congured here. You may congure one setting for
computer display and the other one for mobile display.
Mode:
Frame Size:
Maximum frame
rate:
Video quality:
Select either JPEG or MPEG4. In JPEG
mode, the video frames are independent.
However, MPEG4 consumes much less network
bandwidth than JPEG.
Select 176 x 144, 352 x 240 or 640 x 480 pixels
for the frame size. We recommend 176 x 144
for mobile viewing and 640 x 480 for a computer
monitor.
The minimum frame rate value is 1fps and
the maximum is 30fps. We recommend 30fps
for computer monitors and 5fps for mobile
viewing.
This setting limits the maximum refresh frame
rate. To set a xed bandwidth regardless of
the video quality, select Constant bit rate and
the desired bandwidth. Select Fixed Quality
to optimize the bandwidth utilization and video
quality.
Mute:
Select to mute audio.
51D-Link DCS-6111 User Manual
Page 52

Section 3 - Conguration
External
microphone input:
Audio type:
AAC bit rate:
GSM-AMR:
GSM-AMR
bit rate:
Set the microphone input gain at either 0dB or 20dB.
Note: The higher the decibel number, the louder the sound.
Advanced Audio Coding (AAC) is a wide band audio coding algorithm that exploits two primary coding strategies to
dramatically reduce the amount of data needed to convey high-quality digital audio. Select a higher bit rate number for better
audio quality.
Select an AAC bit rate from the drop-down list. Higher bit rate means higher audio quality but it takes more network bandwidth
to transmit.
A standard adapted audio codec by the 3GPP video (3rd Generation Partnership Project). It is an Adaptive Multi Rate-Narrow
Band (AMRNB) speech codec. Select a higher bit rate number for better audio quality.
Select the GSM-AMR bit rate from the drop-down list. Higher bit rate means higher audio quality but it takes more network
bandwidth to transmit.
52D-Link DCS-6111 User Manual
Page 53

Section 3 - Conguration
MotionDetection
Once Motion Detection feature is enabled, users will be able to monitor three windows with different settings. This
allows your camera to serve as a security device that records only when motion is detected.
Enable motion
detection:
Window name:
Sensitivity:
Percentage:
New:
Check this option to turn on the motion detection
feature.
Create your own name for the monitored area/
window. It will show at the top of the motion
window.
Set the measurable difference between two
sequential images that would indicate motion.
Set the amount of motion in the window being
monitored that is required to initiate a motion
detected alert. If this is set to 100%, this means that
motion must be detected within the whole window
to trigger a snapshot.
Note: Setting a higher sensitivity and a lower
pe rce ntage wil l ma ke mo ti on e as ie r to be
detected.
Click to add a new window. A maximum of three
motion windows can be opened simultaneously.
Use your mouse to drag the window frame to re-
size or the title bar to move. Clicking on the ‘x’ at
the upper right corner of the window will close the
window.
Save:
Save the related settings of that window.
53D-Link DCS-6111 User Manual
Page 54

Section 3 - Conguration
Percentage = 30%
To enable motion detection, follow the steps below:
1. Click New to add a new motion detection window.
2. Enter a name in the Window Name eld.
3. Dene the sensitivity to moving objects and the space ratio of all alerted pixels by moving the Sensitivity and
Percentage slide bar.
4. Click Save to apply the changes.
5. Select Enable motion detection to activate motion detection.
Note: Drag to resize the window and click X to close the window.
The Percentage Indicator will rise or fall depending on the image variation. When motions are detected by the Network
Camera and are judged to exceed the dened threshold, a red bar rises. Meanwhile, the motion detection window will
be outlined in red. Utilizing this device as a trigger source, photos or videos can be captured instantly and sent to the
remote server (Email, FTP).
A green bar indicates that even though motions are detected, the event will not be triggered because the image variations
are still falling under the dened threshold.
54D-Link DCS-6111 User Manual
Page 55

Section 3 - Conguration
A
B D
C
How does motion detection work?
There are two parameters for setting the motion detection: Sensitivity and Percentage. In the illustration above, frame
A and frame B are two sequential images. Pixel differences between the two frames are detected and highlighted in
gray (frame C), and will be compared with the sensitivity setting. Sensitivity is a value that expresses the sensitivity to
moving objects. Higher sensitivity settings are expected to sense a slight movement while smaller sensitivity settings
tend to neglect it. When the sensitivity is set to 70%, the Network Camera denes the pixels in the purple areas as
“alerted pixels” (frame D). Percentage is a value that expresses the proportion of “alerted pixels” to all pixels in the
motion detection window. In this case, 50% of pixels are identied as “alerted pixels”. When the percentage is set to
30%, the motions are judged to exceed the dened threshold; therefore, the motion window will be outlined in red.
For applications that require higher security management, it is suggested to set higher sensitivity settings and smaller
percentage values.
55D-Link DCS-6111 User Manual
Page 56

Section 3 - Conguration
TimeandDate
Automatically or manually congure, update, and maintain the internal system clock for your camera.
Current Server Time:
Time Zone:
Enable Daylight
Saving:
Daylight Saving
Dates:
Automatic Time
Conguration:
NTP Server:
Displays current time.
Select your time zone from the drop-down
menu.
Select this to enable the daylight saving time
(DST). During DST, the system clock moves
one hour ahead.
Note: To utilize this feature, ensure to set
the time zone of your network camera. Then
starting and ending time of the DST is displayed
upon selecting the option.
You may congure the daylight saving date
and time.
Enable this feature to obtain time conguration
automatically from NTP server.
Network Time Protocol (NTP) synchronizes the
DCS-6111 with an Internet time server. Choose
the one that is closest to your location.
Update Interval:
Set the date and time
manually:
Copy Your
Computer’s Time
Settings:
The time interval for updating the time information from NTP server.
This option allows you to set the time and date manually.
This will synchronize the time information from your PC.
56D-Link DCS-6111 User Manual
Page 57

Section 3 - Conguration
EventSetup
There are four sections in Event Setup page.
• Event
• Server
• Media
• Recording
1. To add a new item - event, server or media, click
Add. A pop-up will appear and update the elds
accordingly.
2. To delete the selected item from the pull-down menu
of event, server or media, click Delete.
3. Click on the item name for further modication.
Note: You can add up to four events, ve servers and ve media
elds.
57D-Link DCS-6111 User Manual
Page 58

Section 3 - Conguration
ex.
Motion detection,
Periodically, Digital input,
System reboot
Event Condition
ex.
Snapshot, Video Clips
ex.
Email, FTP
Media
(what to send)
Server
(where to send)
Action
Application
A typical application is that when motion is detected, the DCS-6111 Network Camera sends images to a FTP server or
via e-mail as notications. For example, as seen in the illustration below, an event can be triggered by many sources,
such as motion detection or external digital input devices. When an event is triggered, you can specify what kind of
action will be performed. You can congure the Network Camera to send snapshots or videos to your email address
or FTP site.
To start plotting an event, it is suggested to congure server and media columns rst so that the Network Camera will
know what action shall be performed when a trigger is activated.
58D-Link DCS-6111 User Manual
Page 59

Section 3 - Conguration
AddServer
You may congure up to 5 servers for media storage.
Server Name:
Email:
FTP:
HTTP:
Network Storage:
Unique name of your server.
Select this to enable and apply your email account
setting for your camera.
Select this to access a granted folder on the
external FTP server.
Select this to use a web server to store the
media.
Only one network storage device is supported.
59D-Link DCS-6111 User Manual
Page 60

Section 3 - Conguration
AddMedia
There are three types of media-Snapshot, Video Clip and System Log.
Media Name:
Snapshot:
Source:
Send pre-event
image(s) [0~7]:
Send post-event
image(s) [0~7]:
File name prex:
Add date and time
sufx to le name:
Video clip:
Enter an unique name for media.
Select this feature to enable camera to take
snapshot.
The source of stream: stream1 or stream2.
The number of pre-event images.
The number of post-event images. Refer page 61 for
more information.
The prex name will be added on the le name.
Check it to add timing information as le name sufx.
Refer page 61 for more information.
Select this feature to enable camera to take video
clip.
Source:
Pre-event recording:
Maximum duration:
Maximum le size:
File name prex:
System log:
The source of stream: stream1 or stream2.
The interval of pre-event recording in seconds.
The maximal recording le duration in seconds. Refer page 62 for more information.
The maximal le size would be generated.
The prex name will be added on the le name of the video clip. Refer page 62 for more information.
Select this feature to enable camera to display system log.
60D-Link DCS-6111 User Manual
Page 61

Section 3 - Conguration
1 pic. 2 pic. 3 pic. 4 pic. 5 pic. 6 pic. 7 pic. 8 pic. 9 pic.
10 pic. 11 pic. 10 pic. 12 pic. 13 pic. 14 pic. 15 pic.
The moment the
trigger is activated.
SNAPSHOTS20080104_100341
Date and time suffix
The format is: YYYYMMDD_HHMMSS
File name prefix
Send post-event image (s) [0~7)
Specify to capture the number of images after a trigger is activated. A maximum of seven images can be generated.
For example:
If both the Send pre-event images and Send post-event images are set to seven, a total of 15 images are generated
after a trigger is activated.
Add date and time sufx to le name
Select this option to add date and time to the le name sufx.
61D-Link DCS-6111 User Manual
Page 62

Section 3 - Conguration
1 sec. 2 sec. 3 sec. 4 sec. 5 sec. 6 sec. 7 sec. 8 sec. 9 sec. 10 sec.
The moment the
trigger is activated.
VIDEOS20080104_100341
Date and time suffix
The format is: YYYYMMDD_HHMMSS
File name prefix
Maximum duration
Specify the maximal recording duration in seconds. You can set up to ten seconds.
For example:
If the Pre-event recording is set to ve seconds and the Maximum duration is set to ten seconds, the Network Camera
continues to record for another four seconds after a trigger is activated.
File name prex
Enter the text that will be added at the beginning of the le name.
62D-Link DCS-6111 User Manual
Page 63

Section 3 - Conguration
AddEvent
Create and schedule up to 3 events with their own settings here.
Event name:
Enable this event:
Priority:
Delay:
Trigger:
Video motion
detection:
Periodic:
Digital input:
Enter a name for the event.
Select to activate this event.
Set the priority for this event. The event with higher
priority will be executed rst.
Select the delay time before checking next event.
It is being used for both events of motion detection
and digital input trigger.
The input type that triggers the event.
Motion is detected during live video monitoring.
Select the windows that need to be monitored.
The event is triggered in specied intervals. The
unit of trigger interval is minute.
External trigger input to the camera.
System boot:
Time:
Trigger D/O:
Triggers an event when the system boots up.
Select Always or enter the time interval.
Select to trigger digital output for specic number
of seconds when an event occurs.
63D-Link DCS-6111 User Manual
Page 64

Section 3 - Conguration
AddRecording
Here you can congure and schedule the recording settings.
Recording entry
name:
Enable this
recording:
Priority:
Source:
Recording
schedule:
Recording
settings:
Destination:
Total cycling
recording size
The unique name of the entry.
Select this to enable the recording function.
Set the priority for this entry. The entry with a
higher priority value will be executed rst.
The source of stream.
Scheduling the recording entry.
Conguring the setting for the recording.
Select the folder where will store the recording
le.
Please input a HDD volume between 1MB and
200GB for recording space. The recording data
will replace the oldest one when total recording
size exceeds this value. For example, if each
recording file is 6MB, and the total cycling
recording size is 600MB, then the camera will record 100 les to the specied location (folder) and then will delete the oldest
le and create new le for cycling recording.
Please note that if the HDD empty space is not enough, the recording will stop. Before you setup this option please make
sure your HDD has enough space and it is better to not save other les in the same folder as recording les.
Size of each le
for recording:
File Name Prex:
File size for each recording le. You may input the value in the range of 200-6000.
The prex name will be added on the le name of the recording le(s).
64D-Link DCS-6111 User Manual
Page 65

Section 3 - Conguration
Advanced
DIandDO
The I/O connector provides the physical interface for digital output (DO) and digital input (DI) that is used for connecting
such external alarm devices as IR-Sensors and alarm relays to the network camera.
DI and DO:
Digital input
trigger
condition:
Digital output:
Settings for both Digital input signal and digital
output signal can be congured here.
Please select High or Low for digital input trigger
condition. When an external device is connected
to the digital input pins, the state of the voltage will
be monitored. (Max. Input 500mA, 12Vdc)
Select Grounded or Open to dene normal status
of the digital output. The camera will show whether
the trigger is activated or not.
65D-Link DCS-6111 User Manual
Page 66

Section 3 - Conguration
ICR
ICR - IR-Cut Removable(ICR) lter is a switch mechanical design of two different sensor lters. It provides the best
light conditions both during the day and night. The following options are:
Auto:
Day Mode:
Night Mode:
Schedule Mode:
The Network Camera automatically switches
between day and night mode by judging the level
of ambient light. This mode is accessible only
when the exposure mode is set to Auto.
In this mode the Network Camera switches on
the infrared cut lter at all times, which will block
the infrared light from reaching the sensor so that
the colors are not distorted.
The Network Camera switches off the infrared cut
lter to allow the infrared light to pass through.
This helps the Network Camera to see more
clearly in low light conditions.
The Network Camera switches between day and
night mode based on a specic schedule.
Ensure to enter the starting and ending time
for the day mode. Note that the time format is
[hh:mm] and is expressed in 24-hour clock time.
By default, the starting time and ending time of
day mode are set to 07:00 and 18:00.
Disable IR LED:
Select to disable the IR LED. The IR LED
automatically switches on at night. By default the
LED automatically switches on at night.
66D-Link DCS-6111 User Manual
Page 67

Section 3 - Conguration
HTTPS
This section briey describes about the HTTPS services provided by the network camera.
Enable HTTPS
secure connection:
HTTP & HTTPS:
HTTPS only:
There are three methods to implement HTTPS. They are:
Method 1.
Create self-
signed certicate
automatically:
Select to enable a secure HTTPS connection.
Select to enable the HTTP and HTTPS services.
By default, this option is enabled.
Select this to automatically redirect an HTTP
connection to HTTPS.
Select to create a certicate signing
request for your server. If there is
no certicate available on the remote
client device, it automatically generates
one when Enable HTTPS secure
connection and Create self-signed
certicate automatically is selected.
Method 2.
Create self-
signed certicate
manually:
Note: Ensure to uncheck the Enable HTTPS secure connection to remove the certicate.
Click Create to manually update the information
as seen in the gure. And then click Save to
generate and install a self-signed certicate
on the remote client device.
67D-Link DCS-6111 User Manual
Page 68

Section 3 - Conguration
Method 3. Create
certicate request
and install:
To upload a signed-certificate, ensure to
create a certicate request. After creating
the request, click Browse to upload the
certicate le which has been signed by the
third party. Once uploaded, the Certicate
Information section displays the information
of the certicate and the status is changed to
Active.
68D-Link DCS-6111 User Manual
Page 69

Section 3 - Conguration
AccessList
The Access List page will allow you to congure access permissions for each user.
Allow list:
Delete allow
Deny list:
Delete deny
Always allow
the IP address
to access this
device:
Note:
Please do not rem ove th e defau lt access lis t (1.0. 0.0-255.255.255.2 55)
before adding a new one, otherwise you will not be able to access the camera
anymore. If removed accidentally, please press the reset button to restore the
default settings.
In addition, do not add your remote client IP address into the deny list (including
the administrator’s IP address).
The list of IP addresses that have the access rights
to the camera.
Remove the customized setting from the Allow
list:
List.
The list of IP addresses that have no access right
to the camera.
Remove the customized setting from the Delete
list:
List.
Select to enter an IP address. The administrator
always has access to this device.
69D-Link DCS-6111 User Manual
Page 70

Section 3 - Conguration
Alowed
List
Denied
List
For example:
When the range of allowed list is set from 1.1.1.0 to 192.255.255.255 and the range of denied
list is set from 1.1.1.0 to 170.255.255.255, Only users’ IP located between 171.0.0.0 and
192.255.255.255 can access the Network Camera.
There are three different IP formats to choose from the
list. Click Add to save the IP formats.
Single:
Network:
Range:
Add a single IP address.
Add a network IP addresses with subnet
mask.
Specify the range of IP addresses.
70D-Link DCS-6111 User Manual
Page 71

Section 3 - Conguration
Maintenance
DeviceManagement
You can modify both the camera’s name and the administrator’s password, as well as add more user accounts for
accessing the camera.
Admin password
setup:
Add user
account:
Username:
Password:
Privilege:
Manage user:
Authentication:
Camera Name:
Modify the password for the administrator’s
account.
Add a new user account.
Enter a username for the new account.
Enter a password for the new account.
Select the access rights for the new user.
Manage the accounts for existing users.
The access rights for existing users.
Create a unique name for your camera and you
can access the camera using this name in your
web-browser. For example: http://DCS-6111
(by default).
71D-Link DCS-6111 User Manual
Page 72

Section 3 - Conguration
BackupandRestore
The Backup and Restore page will allow you to turn the front panel LED off, restore factory default settings, and reboot
the camera.
Turn off the LED
indicator:
Restore:
Reboot:
Select this option to turn off the LED next to the
lens. This will prevent anyone from observing the
operation of the network camera.
Click the Restore button to reset the camera back
to its factory default settings. This will remove all the
conguration settings that were previously made.
Click the Reboot button to restart the camera.
72D-Link DCS-6111 User Manual
Page 73

Section 3 - Conguration
FirmwareUpdate
Your current rmware version and date will be displayed on your screen. You may go to the D-Link Support page to
check for the latest rmware version available.
To upgrade the rmware on your DCS-6111, please download and save the latest rmware version from the D-Link
support site to your local hard drive. Locate the le on your local hard drive by clicking the Browse button. Then, open
the le and click the “Upload” button to start the rmware upgrade.
Current rmware
version:
Current rmware
date:
File Path:
Upload:
It will be automatically determined and displayed
by the system.
It will be automatically determined and displayed
by the system.
Locate the le (upgraded rmware) on your hard
drive using the browse feature.
Start uploading and upgrading the new rmware
to your camera.
73D-Link DCS-6111 User Manual
Page 74

Section 3 - Conguration
Status
DeviceInfo
This page displays all the details information about your device and network connection.
74D-Link DCS-6111 User Manual
Page 75

Section 3 - Conguration
Logs
This page displays the log information of your camera. You can congure a remote log server so that you can view
your log details remotely.
Enable remote log:
Log server settings:
IP Address:
Port:
Save:
Current Log:
Click to enable this feature so that the
camera can send camera log files to a
remote server.
Congure the settings for the log server.
The IP address of the remote server.
The port number of the remote log server.
The default port is 514.
Click to save the settings.
Displays the the system’s log file. The
content of the le reveals useful information
about camera conguration and connectivity
status after the camera boots up.
75D-Link DCS-6111 User Manual
Page 76

Section 3 - Conguration
Help
76D-Link DCS-6111 User Manual
Page 77

Section 4 - Frequently Asked Questions
FrequentlyAskedQuestions
This chapter provides solutions to problems that may occur during the installation and operation of the DCS-6111.
Read the following descriptions if you are having any problems.
WDRD&NFixedDomeNetworkCameraFeatures
1. What is a WDR D&N Fixed Dome Network Camera?
The WDR D&N Fixed Dome Network Camera is a stand-alone system connecting directly to an Ethernet or Fast Ethernet network. The
WDR D&N Fixed Dome Network Camera differs from a conventional PC Camera because it has an integrated system with built-in CPU
and web-based solutions, providing a low cost solution that can transmit high quality video images for monitoring. The WDR D&N Fixed
Dome Network Camera can be remotely managed, accessed and controlled using a web browser from any computer over an Intranet or
Internet.
2. What is the maximum number of users that can access DCS-6111 simultaneously?
The maximum number of users that can log onto the WDR D&N Fixed Dome Network Camera at the same time is 10. Please keep in mind
the overall performance of the transmission speed will be reduced if many users have logged on to the camera simultaneously.
There is no limit on the number of users when a multicast-enabled router is being used. The multicast protocol helps reduce the network
bandwidth consumption.
Note that the Network Camera must be congured to enable multicast streaming. For more information, see RTSP Streaming on page
44.
3. What algorithm is used to compress the digital image?
The WDR D&N Fixed Dome Network Camera utilizes MPEG-4 simple prole or MJPEG Mode image compression technology providing
high quality images. MJPEG is a standard for image compression and it can be applied to various web browsers and application software
without installing any extra software
4. Can I capture still images from the WDR D&N Fixed Dome Network Camera?
Yes you can capture still images using the snapshot function.
77D-Link DCS-6111 User Manual
Page 78

Section 5 - Fixed Dome Day & Night Network Camera With WDR Sensor Installation
WDRD&NFixedDomeNetworkCameraInstallation
1. Can the Network Camera be used outdoors?
The WDR D&N Fixed Dome Network Camera is not weatherproof. It needs to be equipped with a weatherproof case for outdoor use but
it is not recommended.
2. When physically connecting the Network Camera to a network, what network cabling is required?
The WDR D&N Fixed Dome Network Camera uses Category 5 UTP cable allowing 10 Base-T and 100 Base-T networking solutions.
3. Can the Network Camera be setup as a PC-cam on a computer?
No, the WDR D&N Fixed Dome Network Camera is used only on an Ethernet or Fast Ethernet network. The D-Link DSB-C110, DSB-C310,
can be used as a PC Camera (Webcam).
4. Can the Network Camera be connected to the network if it consists only of private IP addresses?
Yes, the WDR D&N Fixed Dome Network Camera can be connected to a LAN using only a private IP address.
5. Can the Network Camera be installed and work if a rewall exists in the network?
If a rewall exists in the network, port 80 is open for ordinary data communication and HTTPS port 443 for . The DCS-6111 uses RTSP
port 554, RTP port 556, and RTP port 558 for streaming audio and video. These ports (or the ports you have specied in the Setup Tab
in the Conguration screen) need to be opened on the rewall.
6. Why am I unable to access the Network Camera from a web browser?
If a router or rewall is used on the network, the correct ports for the DCS-6111 may not be congured on the router or rewall. To correct
the problem, you need to determine if the DCS-6111 is behind a router or rewall and if the router or rewall is properly congured for
the ports the DCS-6111 is using. Refer to Page 42 for help in opening the correct ports on a router or rewall for use with the DCS-6111.
Other possible problems might be due to the network cable. Try replacing your network cable. Test the network interface of the product
by connecting a local computer to the unit. If the problem is not solved, the WDR D&N Fixed Dome Network Camera might be faulty.
7. Why does the Network Camera work locally but not externally?
• This might be caused by network rewall protection. The setting of the rewall may need to be changed in order for the WDR D&N
Fixed Dome Network Camera to be accessible outside of your local LAN. Check with the Network Administrator for your network.
• Make sure that your WDR D&N Fixed Dome Network Camera isn’t conicting with any Web server you may have running on your
network.
• The default router setting might be a possible reason. Check that the conguration of the router settings allows the WDR D&N Fixed
Dome Network Camera to be accessed outside of your local LAN.
78D-Link DCS-6111 User Manual
Page 79

Section 5 - Fixed Dome Day & Night Network Camera With WDR Sensor Installation
8. I connected the Network Camera directly to a computer with a cross-over Ethernet cable and received a
Windows error upon running the Installation Wizard?
• This Windows error will occur if the WDR D&N Fixed Dome Network Camera is connected to a computer that is not properly congured
with a valid IP address. Turn off DHCP from the Network Settings in Windows and congure the computer with a valid IP address or
connect the camera to a router with DHCP enabled.
• This error can also occur if the Installation Wizard icon had been clicked more than once from the setup wizard.
9. Noisy images occur. How can I solve the problem?
The video images might be noisy if the WDR D&N Fixed Dome Network Camera is used in a very low light environment. To solve this
issue you need more lighting.
10. The images appear to be of poor quality, how can I improve the image quality?
• Make sure that your computer’s display properties are set above 256 colors. Using 16 or 256 colors on your computer will produce
dithering artifacts in the image, making the image appear to be of poor quality.
• The conguration on the WDR D&N Fixed Dome Network Camera image display is incorrect. Through the Setup > Image Setup section
of the Web management you need to adjust the image related parameters such as brightness, white balance and power line frequency
for uorescent light.
79D-Link DCS-6111 User Manual
Page 80

Appendix A - Networking Basics
Networking Basics
CheckyourIPaddress
After you install your new D-Link adapter, by default, the TCP/IP settings should be set to obtain an IP address from
a DHCP server (i.e. wireless router) automatically. To verify your IP address, please follow the steps below.
Click on Start > Run. In the run box type cmd and click OK. (Windows Vista® users type cmd in the Start Search
box.)
At the prompt, type ipcong and press Enter.
This will display the IP address, subnet mask, and
the default gateway of your adapter.
If the address is 0.0.0.0, check your adapter
installation, security settings, and the settings
on your access point. Some firewall software
programs may block a DHCP request on newly
installed adapters.
If you are connecting to a wireless network at a hotspot (e.g. hotel, coffee shop, airport), please contact an employee
or administrator to verify their wireless network settings.
80D-Link DCS-6111 User Manual
Page 81

Appendix A - Networking Basics
StaticallyAssignanIPaddress
If you are not using a DHCP capable gateway/access point, or you need to assign a static IP address, please follow
the steps below:
Step 1
Windows Vista® - Click on Start > Control Panel > Network and Internet > Network and Sharing Center > Manage
Network Connections.
Windows® XP - Click on Start > Control Panel > Network Connections.
Step 2
Right-click on the Local Area Connection which represents your D-Link network adapter and select Properties.
Step 3
Highlight Internet Protocol (TCP/IP) and click Properties.
Step 4
Click Use the following IP address and enter an IP address that is on the same
subnet as your network or the LAN IP address on your access point.
Example: If the network camera’s LAN IP address is 192.168.0.1, make your IP
address 192.168.0.X where X is a number between 2 and 99. Make sure that the
number you choose is not in use on the network. Set Default Gateway the same
as the LAN IP address of your access point (192.168.0.1).
Set Primary DNS the same as the LAN IP address of your access point
(192.168.0.1). The Secondary DNS is not needed or you may enter a DNS server
from your ISP.
Step 5
Click OK to save your settings.
81D-Link DCS-6111 User Manual
Page 82

Appendix B - Reset and Restore
Reset and Restore
The hidden button in the pinhole beside the Ethernet socket is used to reset the system or restore the factory default
settings. Sometimes resetting the DCS-6111 will return the system back to a normal state. If the system still has
problems after reset, restore the factory settings and install again:
RESET:
1. Lightly insert a paper clip (or a similar sized tool) into the reset
hole on the back of the camera, press lightly and then release the
button.
2. The LED on the front of the camera will begin blinking red and
green.
Reset button
3. When the LED stops the blinking the reset has completed.
RESTORE:
1. Insert the paperclip or other tool and hold the button in.
2. Wait for the LED on the front of the camera to blink red and green
and hold the button for 30 seconds.
3. Withdraw the tool after the second cycle of the LED blinking and
a factory restore has been completed.
Restoring the factory defaults will result in
the loss of any previous settings and will
require running the Installation Wizard to
return the DCS-6111 to a normal state.
82D-Link DCS-6111 User Manual
Page 83

Appendix B - External I/O Port
12V
+12V
Digital output
PIN 1
Power+12V
PIN 2
Digital input
PIN 3
Ground
PIN 4
ExternalI/OPort
DI/DO Diagram
Pin 1~4 are used to connect with digital input and digital output devices.
Refer to the following illustration for connection method.
DO+
The DCS-6111 provides a general I/O terminal block with one digital input
and one relay switch for device control. The relay switch of DO+ and
DO- can be used to turn on or off the external device. DI+ and DI- can be
connected to an external sensor and the state of voltage will be monitored
from the initial state ‘LOW’.
The I/O connector provides the physical
interface for digital output (DO) and digital
input (DI) that is used for connecting a
diversity of external alarm devices to the
Network Camera such as IR-Sensors and
alarm relays.
External I/O Port
DO-
DI+
DI-
The digital input is used for connecting external alarm devices and once
triggered images will be taken and e-mailed.
83D-Link DCS-6111 User Manual
Page 84

Appendix C - Technical Specications
TechnicalSpecications
NETWORK PROTOCOL SUPPORT
+ IPv4, IPv6, TCP/IP, RTSP/ RTP/ RTCP, HTTP, HTTPS, SMTP, FTP,
NTP, DNS, DHCP, UPnP, DDNS, PPPoE, IGMP, Samba client, IP
Filtering, 3GPP, LLTD
BUILT-IN NETWORK INTERFACES
+ 10/100BASE-TX Ethernet port, RJ45
VIDEO ALGORITHM SUPPORT
+ JPEG for still image
+ Compression: MJPEG & MPEG-4
+ Streaming: Simultaneous dual-streaming
+ MPEG-4 streaming over UDP, TCP, or HTTP
+ MPEG-4 multicast streaming
+ MJPEG streaming over HTTP
+ Supports 3GPP mobile surveillance
+ Camera live viewing for up to 10 clients
VIDEO RESOLUTION
+ MPEG-4/MJPEG video resolution up to 640x480 (VGA)
+ Up to 30fps at 176 x 144
+ Up to 30fps at 320 x 240
+ Up to 30fps at 640 x 480
VIDEO FEATURES
+ Adjustable image size, quality, and bit rate
+ Time stamp and text overlays
+ 3 congurable motion detection windows
+ 5 congurable privacy masks
+ Flip & mirror
+ Congurable brightness, saturation, contrast
+ Adjustable AGC level, AWB and AES
VIDEO BIT RATE
20K to 4M
SENSOR & LENS SPECIFICATIONS
+ 1/4” WDR VGA CMOS sensor
+ 3.3-12mm vari-focal lens , F1.4-F2.9
+ Built-in IR-cut Removable (ICR) lter: Auto/Schedule/Manual
+ Minimum illumination: 1.5 Lux, F1.4
IR LED
+ 20M illumination distance with 12 LEDs and light sensor
EVENT MANAGEMENT
+ Motion detection weekly schedule
+ Event notication and upload snapshots/video clips via HTTP, SMTP, or FTP
+ Multiple HTTP, SMTP, or FTP server setups
+ Multiple event notication setups for exible application
+ Multiple recording methods for easier backup
SECURITY
+ Administrator and user group protected
+ Password authentication
+ HTTP and RTSP digest encryption
+ HTTPS streaming*
+ Remote client access allow / deny list
SURVEILLANCE SOFTWARE FUNCTIONS
+ Remote management/control of up to 32 cameras
+ Viewing of up to 32 cameras on one screen
+ Supports all management functions provided in web interface
+ Scheduled motion triggered, or manual recording options
REMOTE MANAGEMENT
+ Conguration accessible via web browser
+ Take snapshots/video clips and save to local hard drive or NAS via web browser
SYSTEM REQUIREMENTS
+ Operating System: Microsoft Windows 2000, XP, Vista
SUPPORTED PDA, MOBILE PHONES & SOFTWARE
HANDSETS WITH 3GPP PLAYER
+ Packet Video Player 3.0
+ QuickTime 6.5
84D-Link DCS-6111 User Manual
Page 85

Appendix C - Technical Specications
+ Real Player 10.5
NETWORK INTERFACE
+ IEEE 802.3/802.3u 10/100BASE-TX Ethernet port
+ Supports half/full-duplex operations
+ Supports 802.3x Flow Control in full-duplex mode
+ Supports IEEE 802.3af PoE
AUDIO
+ Compression and bit rate:
- GSM-AMR speech compression, bit rate: 4.75 kbps ~12.2 kbps
- MPEG-4 AAC audio encoding, bit rate: 16 kbps ~128 kbps
+ Interface: external microphone input, external speaker output
+ Supports two-way audio by SIP protocol
+ Supports hardware and software audio mute
EXTERNAL DEVICE INTERFACE
+ One D/I and one D/O for external sensor and alarm
DIAGNOSTIC LED
2 color LED
OPERATION TEMPERATURE
0º to 40º C (32º to 104º F)
STORAGE TEMPERATURE
-20º to 70º C (-4º to 158º F)
HUMIDITY
20% to 80% non-condensing
CERTIFICATIONS
+ FCC
+ CE
+ C-Tick
PACKAGE INCLUDES
+ DCS-6111 camera
+ External power adapter
+ CAT5 Ethernet cable
+ Quick Installation Guide
+ Master CD
POWER INPUT
100 - 240VAC, 50/60Hz, 12VDC, 1.25A
POWER CONSUMPTION
MAX 11 W
DIMENSIONS
194 (W) X 180 (D) X 107 (H) (mm)
WEIGHT
650 grams
*
HTTPS streaming will reduce the video frame rate automatically.
85D-Link DCS-6111 User Manual
 Loading...