

Page 1
Page 2

Table of Contents
Table of Contents
Product Overview ........................................................ 3
Package Contents ...................................................3
System Requirements ............................................. 3
Introduction ..............................................................4
Hardware Overview ................................................. 5
Front ..................................................................5
Left Panel ........................................................... 6
Right Panel ........................................................ 7
Bottom Panel ..................................................... 8
Rear Panel .........................................................9
Hardware Installation .............................................10
DI/DO Input Specications ....................................... 13
Wireless Installation Considerations ...................... 14
Conguration ............................................................. 15
D-Link Setup Wizard .............................................. 15
®
Enabling UPnP for Windows
Setting up a Wireless Connection with WPS .........21
XP .......................... 16
Status ............................................................... 50
Help .................................................................52
D-ViewCam Installation ............................................. 53
Adding a Camera ................................................... 56
Wireless Security.......................................................61
What is WEP? .......................................................61
What is WPA? .......................................................62
Using & Conguring the DCS-5230 with a NAT
Router ....................................................................63
Router Set-Up and Installation ......................... 67
Using & Conguring 3G Compatible Cell Phones . 70
Play from RealPlayer ....................................... 71
Play from PVPlayer .......................................... 76
Troubleshooting ........................................................ 79
Wireless Basics ......................................................... 82
Testing the DCS-5230 ........................................... 22
Viewing Your DCS-5230 ........................................ 23
Using the DCS-5230 with an Internet Browser ......24
Live Video ........................................................ 25
DCS-5230 Conguration .......................................27
Setup ...............................................................27
Maintenance .................................................... 46
Networking Basics .................................................... 87
Check your IP Address ..........................................87
Statically Assign an IP Address .............................88
Technical Specications........................................... 89
2D-Link DCS-5230 User Manual
Page 3
Section 1 - Product Overview
• D-Link DCS-5230 Wireless N PTZ Network Camera
• CAT5 Ethernet Cable
• Power Adapter
• Manual and Software on CD
• Quick Install Guide
• Camera Stand
• Mounting Screws
Note: Using a power supply with a different voltage than the one included with
your product will cause damage and void the warranty for this product.
If any of the above items are missing, please contact your reseller.
Product Overview
Package Contents
System Requirements
• Windows® 2000 or XP
• At least 256MB of memory (512MB recommended)
• A wireless (802.11n or 802.11g) or Ethernet network
• Internet Explorer 6.x or higher Internet Web Browser
• VGA card resolution: 800x600 or above
• CPU: 1.3GHz or above processor (2.4GHz processor or higher with 512MB memory and a 32MB
video card is required for multiple camera viewing and recording in IP surveillance program)
3D-Link DCS-5230 User Manual
Page 4

Section 1 - Product Overview
Introduction
D-Link’s 1.3 Megapixel DCS-5230 is a 802.11n (draft) wireless ptz network camera designed with home and SOHO
users in mind. The DCS-5230 delivers high quality real-time videos in MPEG-4 and JPEG allowing optimization for
both image quality and bandwidth-efciency.
The 1 Lux CMOS sensor ideal for low-light conditions and a built-in infrared LED for night surveillance allows this camera
to provide 24-hour real-time monitoring. The motorized pan/tilt controls with 16x digital zoom offer precision close up
imaging. A built-in PIR sensor provides effective motion detection capabilities. The WPS button offers a secure and
easy wireless connection setup.
The DCS-5230 features 3G mobile video support, enabling users to view a live video feed from their camera on a
compatible 3G mobile phone or PDA anywhere in a 3G coverage area. This allows users to remotely monitor the
camera without having to use a computer. D-ViewCam, IP video management software is also included to manage up
to 32 cameras simultaneously from your computer, send automated e-mail alerts, and record video to your hard drive
when motion is detected.
4D-Link DCS-5230 User Manual
Page 5
Section 1 - Product Overview
Hardware Overview
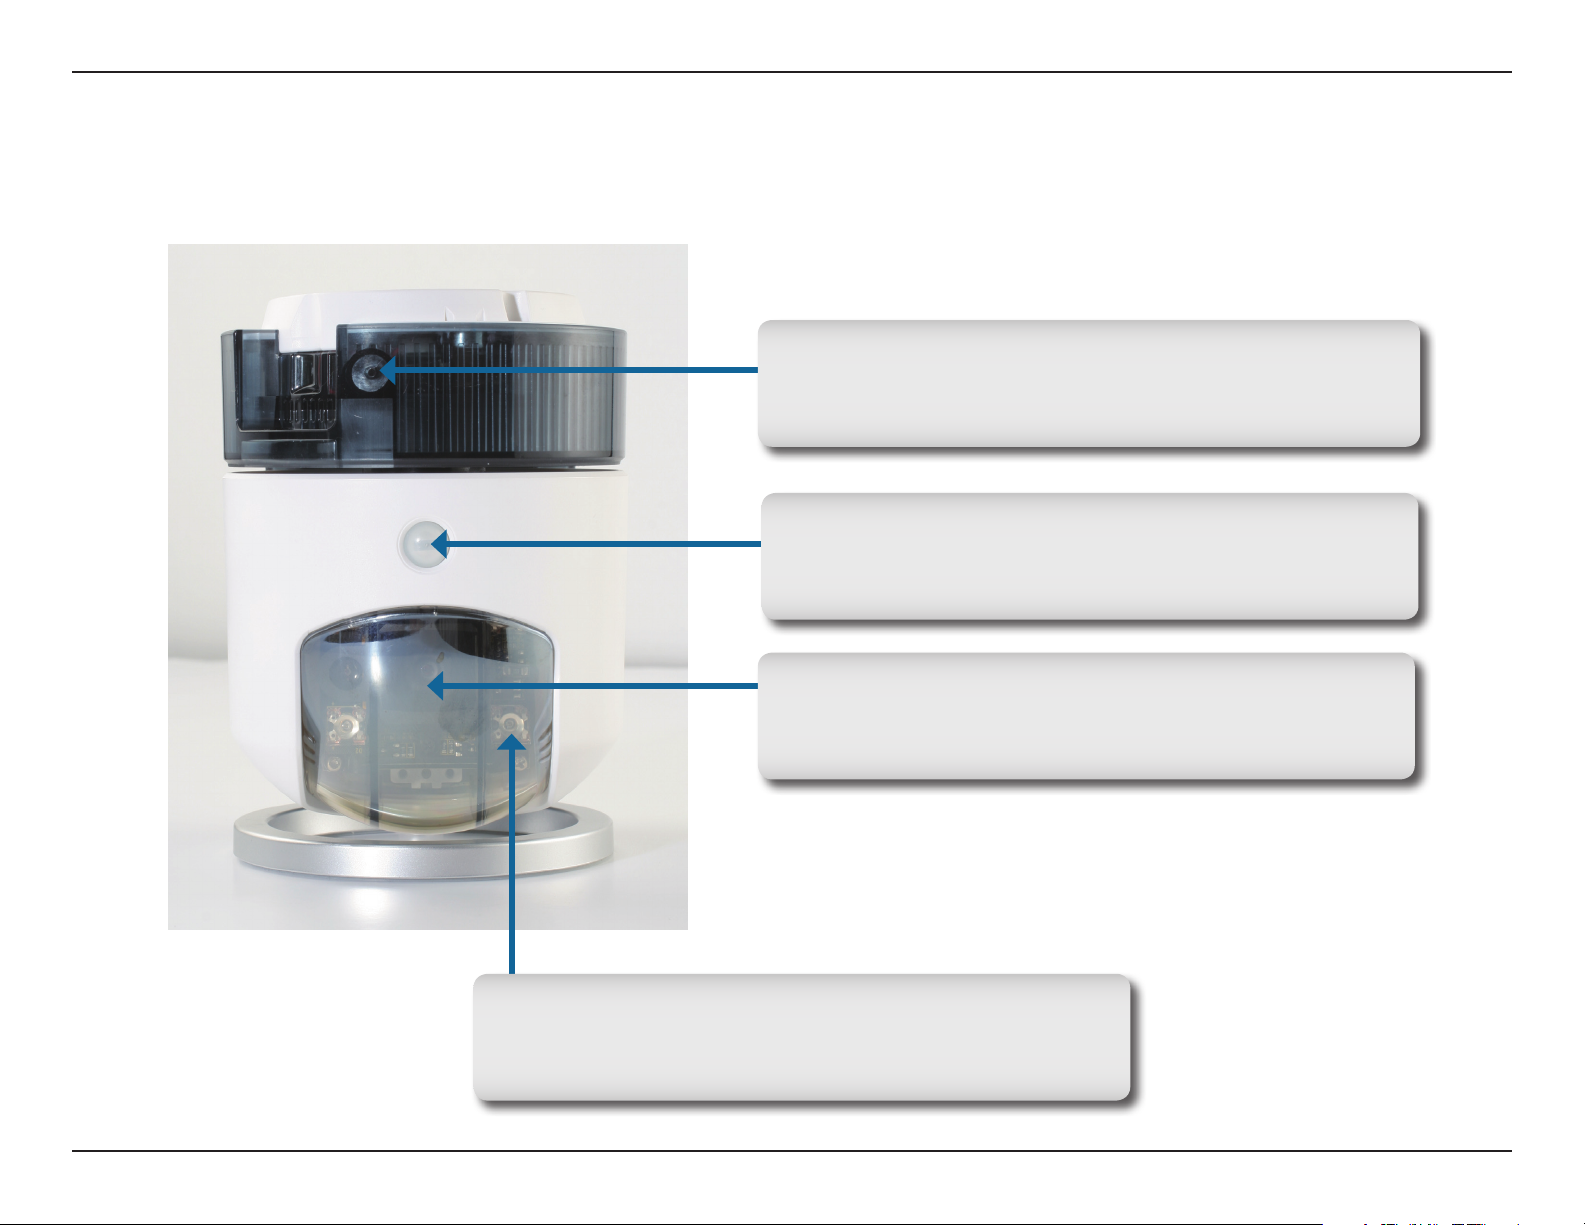
Front
Microphone
This built-in microphone can be used capture audio
from sources nearby the camera.
Pyroelectric Infrared (PIR) Sensor
This sensor is used to detect motion based on
temperature variations within the immediate area.
Camera Dome
This clear dome houses the camera lens and
protects the pan/tilt/zoom apparatus.
Infrared LEDs
LEDs enclosed in the dome illuminate the camera’s
eld of vision during low-light operation.
5D-Link DCS-5230 User Manual
Page 6
Section 1 - Product Overview
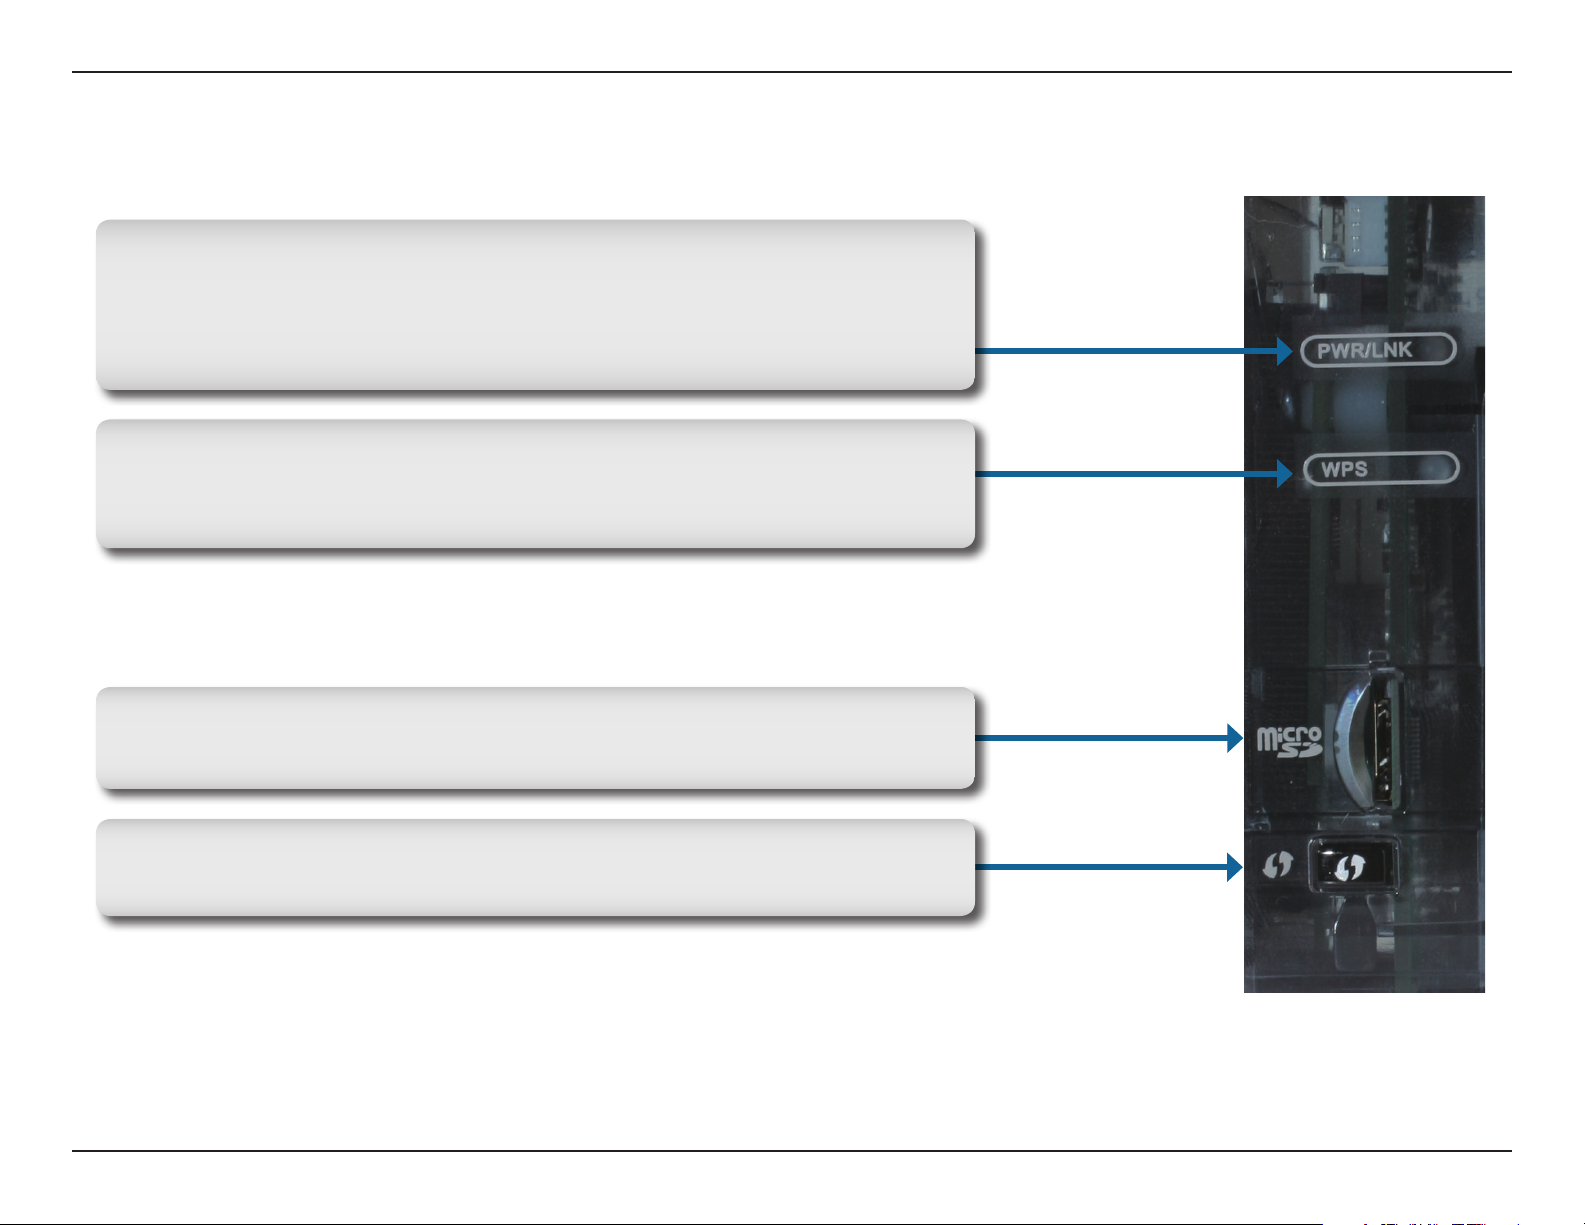
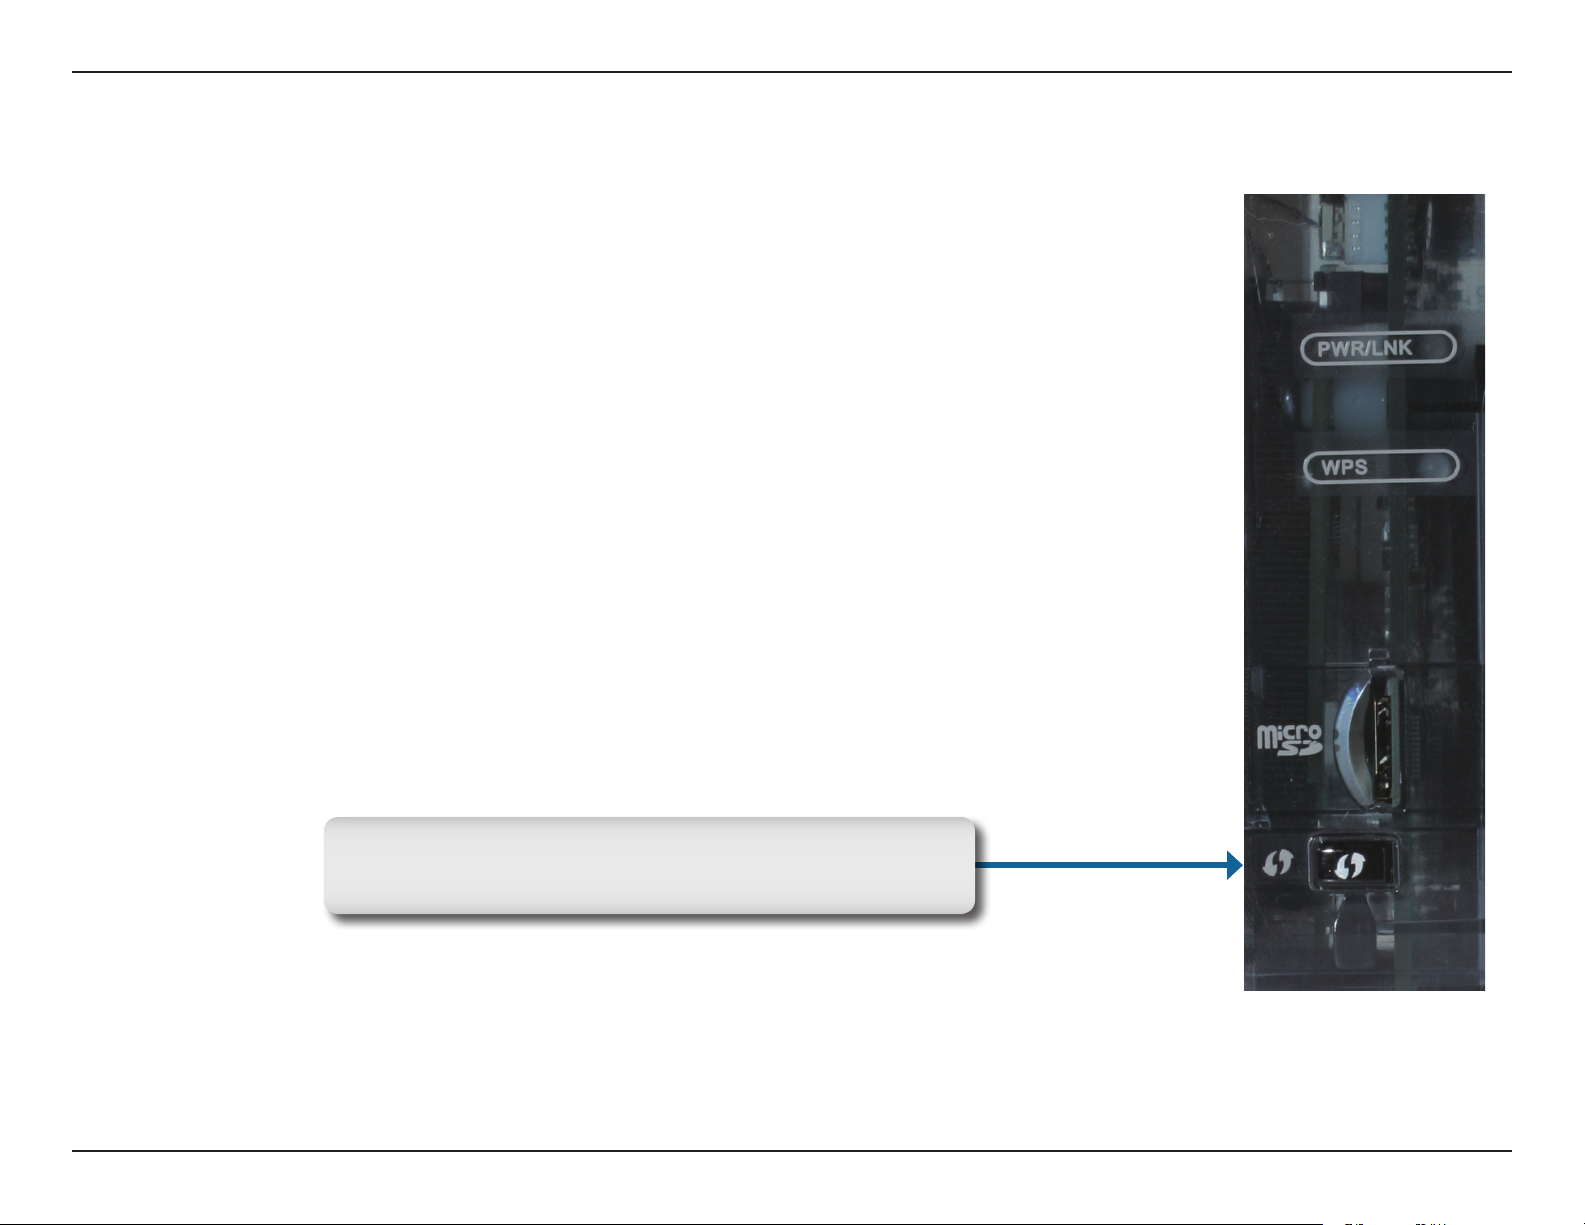
Left Panel
Power/Link LED
The Power LED will illuminate red when the power is turned on. The
light will remain red until the it has been initialized. The Link LED will
illuminate green once a connection is established.
WPS LED
The WPS LED will blink blue when initializing a connection, and
illuminate with solid blue once the connection has been established.
MicroSD Slot
Insert a standard MicroSD card into this slot for image storage.
WPS Button
Press this button to establish a WPS connection.
6D-Link DCS-5230 User Manual
Page 7
Section 1 - Product Overview
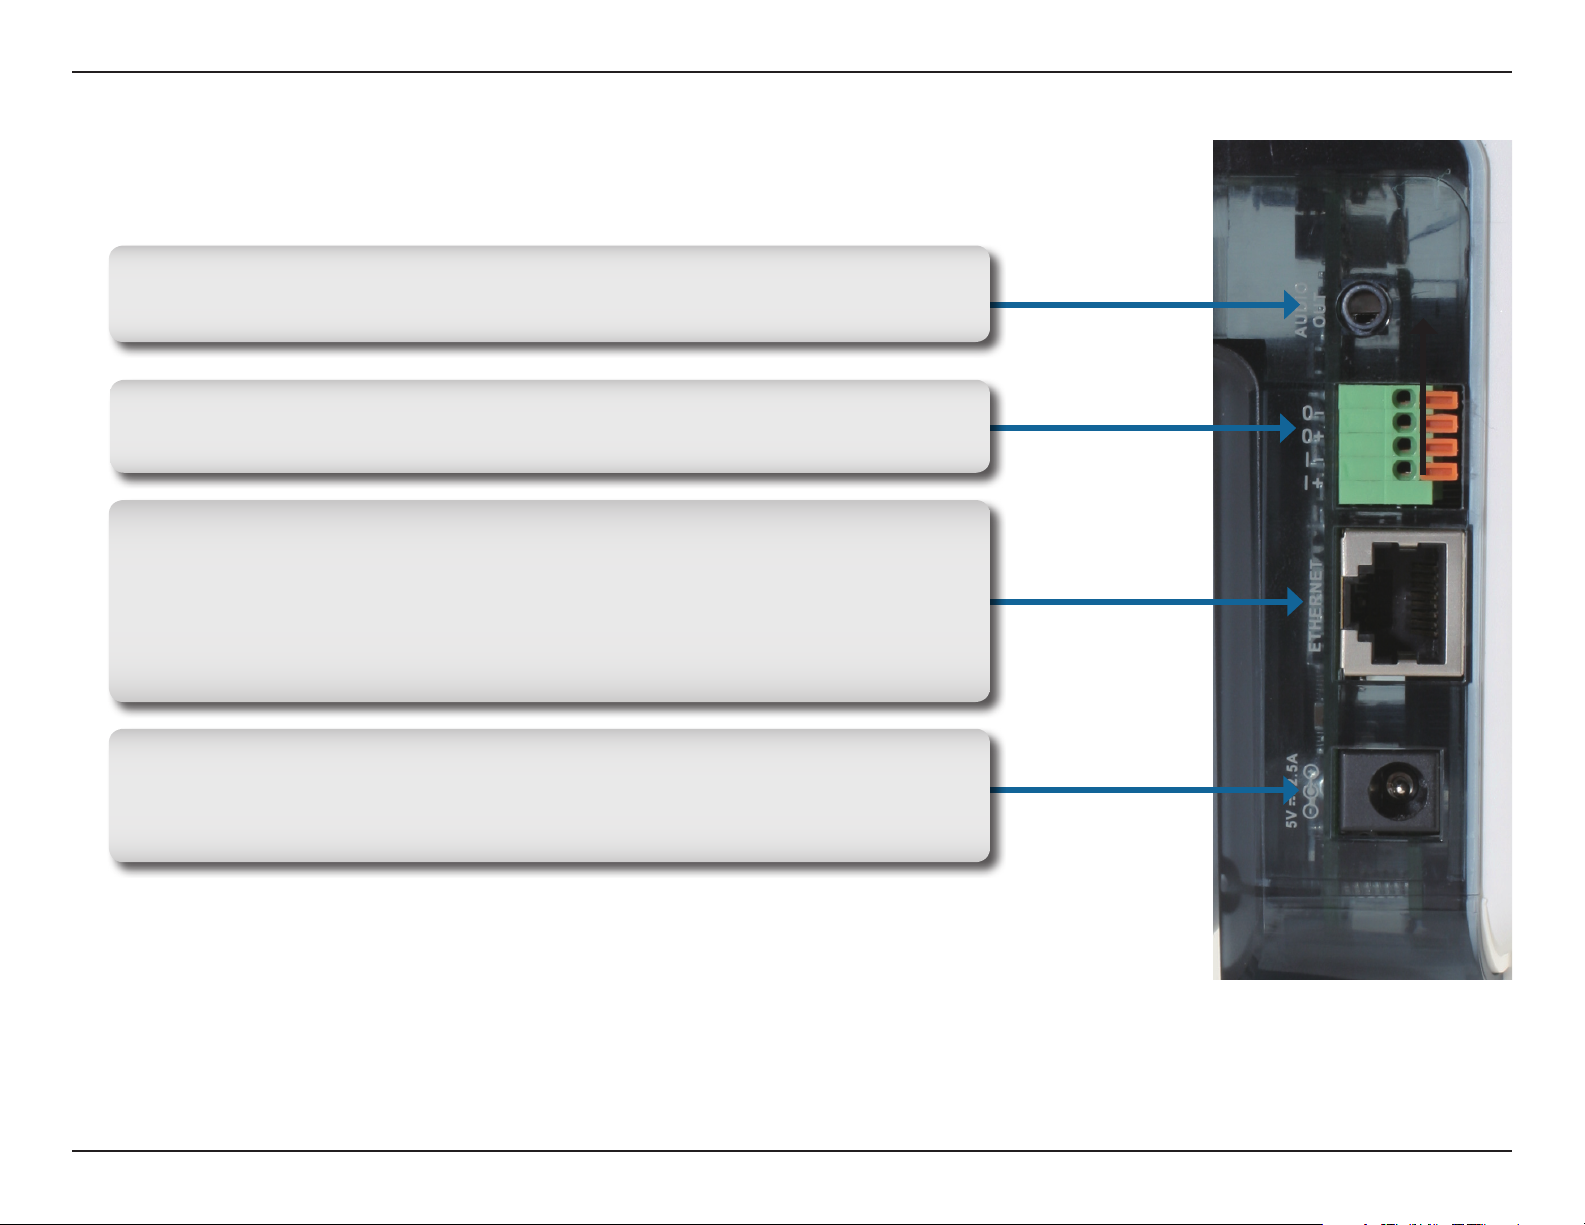
Right Panel
Audio Out
Connect a 3.5mm audio cable for output to a speaker.
Digital I/O Connector
Connect a digital I/O device to this pin block.
Ethernet Cable Connector
The DCS-5230 features a RJ-45 connector for connections to 10Base-T
Ethernet cabling or 100Base-TX Fast Ethernet cabling. The port
supports the NWay protocol, allowing the DCS-5230 to automatically
detect or negotiate the transmission speed of the network.
DC Power Connector
The DC Power input connector is labeled DC 12V with a single jack
socket to supply power to the DCS-5230.
7D-Link DCS-5230 User Manual
Page 8
Section 1 - Product Overview
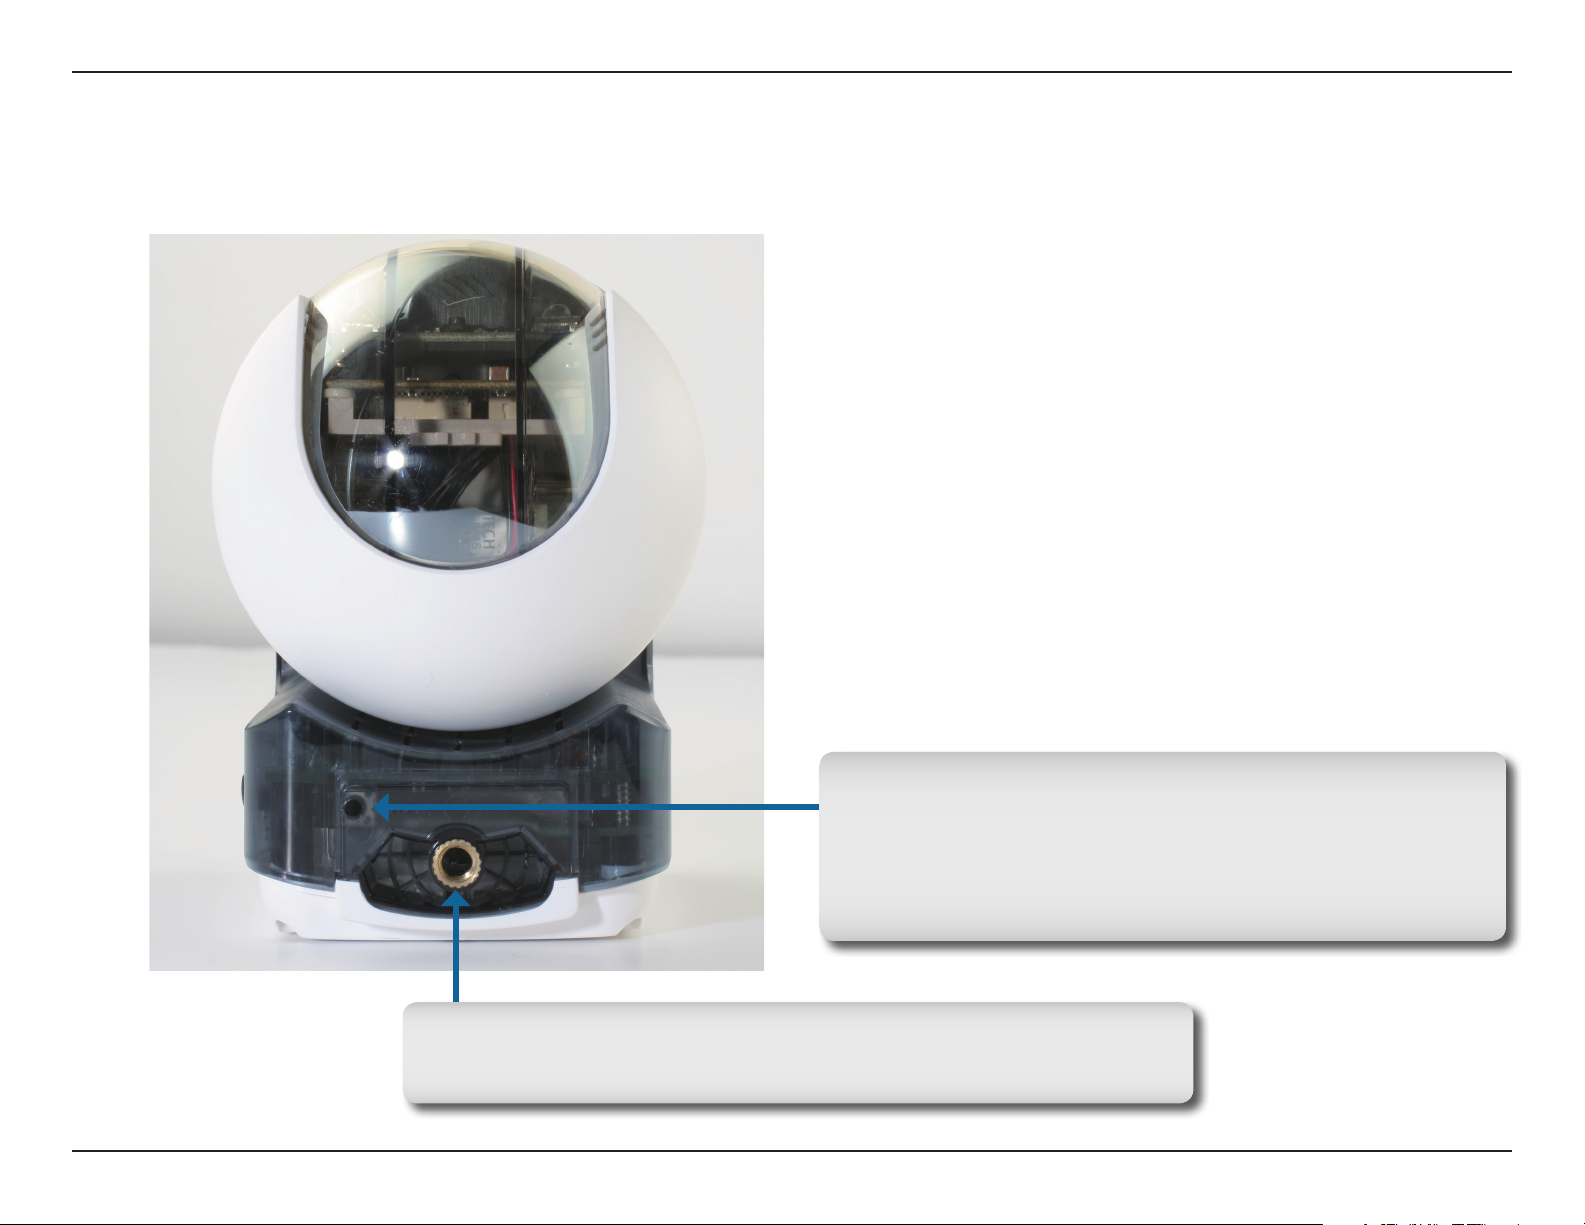
Bottom Panel
Reset Button
Depress this button with a straightened paper clip
for about 20 seconds to reset the camera to factory
default settings.
Mounting Socket
The silver mounting stand can be connected here if needed.
8D-Link DCS-5230 User Manual
Page 9
Section 1 - Product Overview
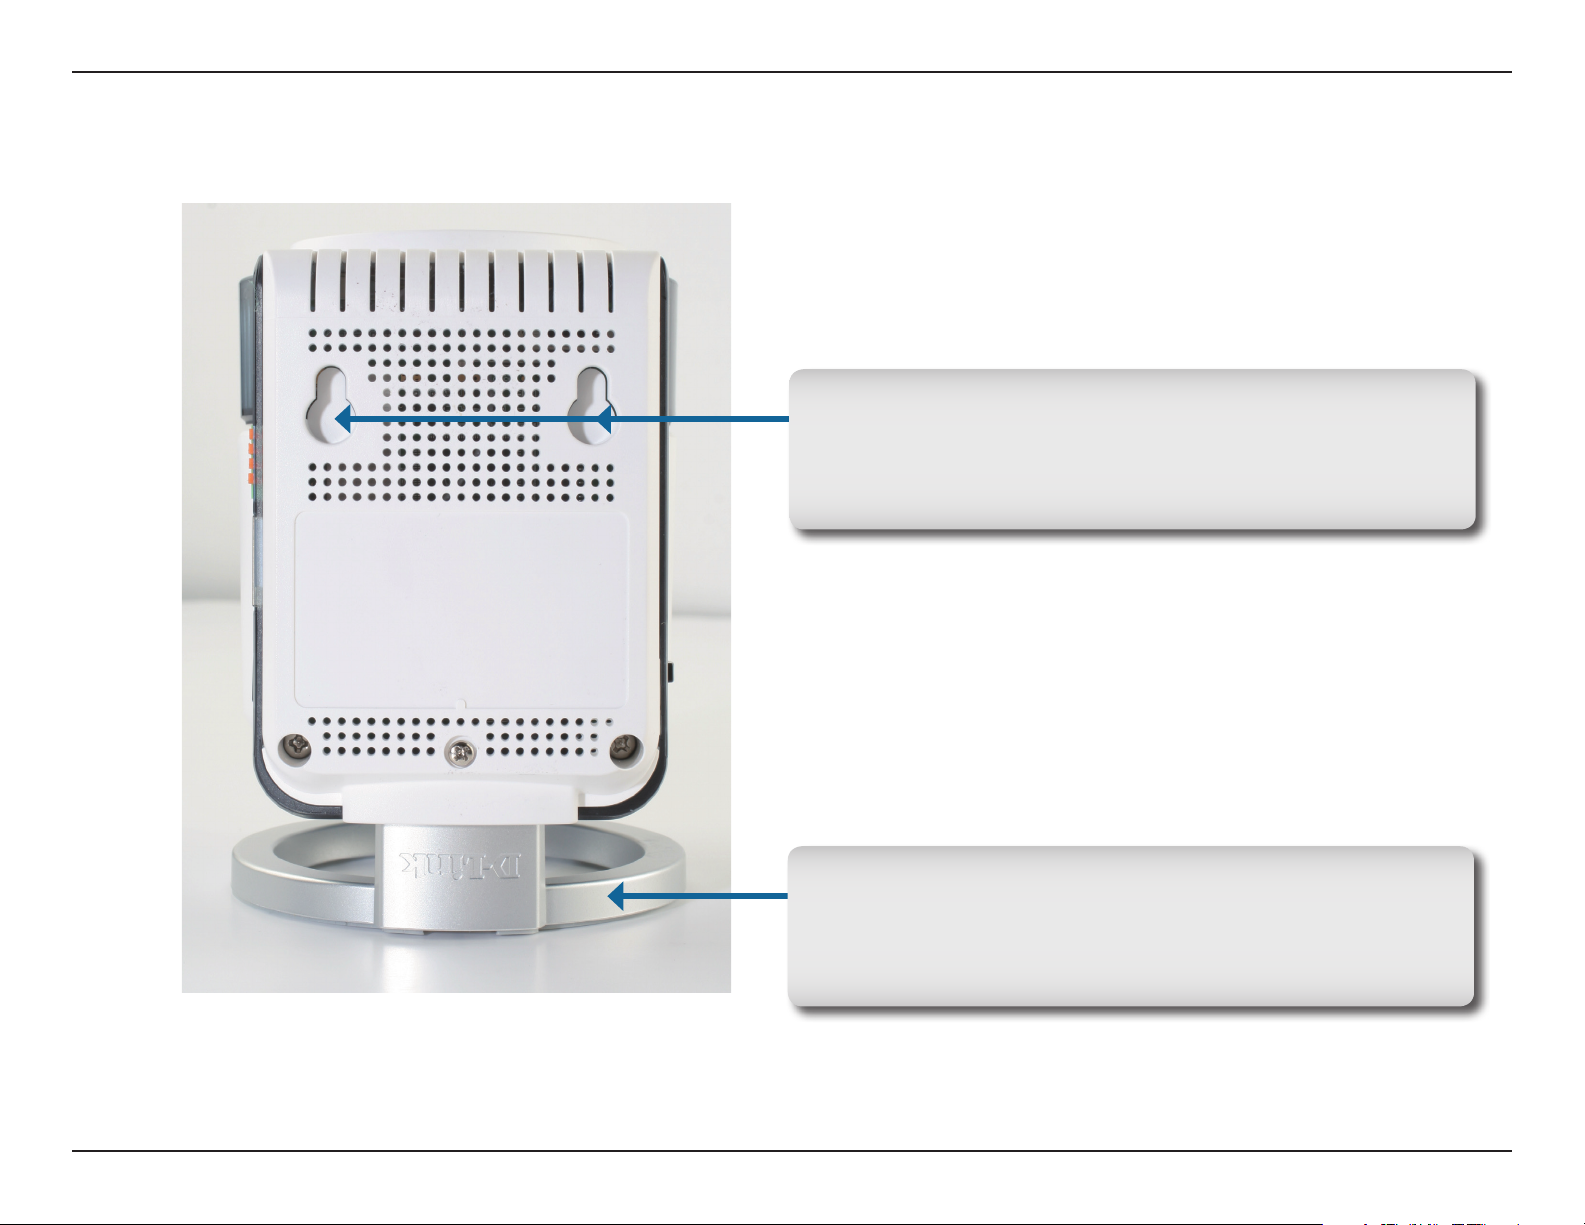
Rear Panel
Mounting Slots
These slots can be used to mount the camera against
a wall using protruding bolts, nails, or screws.
Mounting Stand
This stand can be mounted atop or on the bottom of the
enclosure depending on the camera’s orientation.
9D-Link DCS-5230 User Manual
Page 10
Section 1 - Product Overview
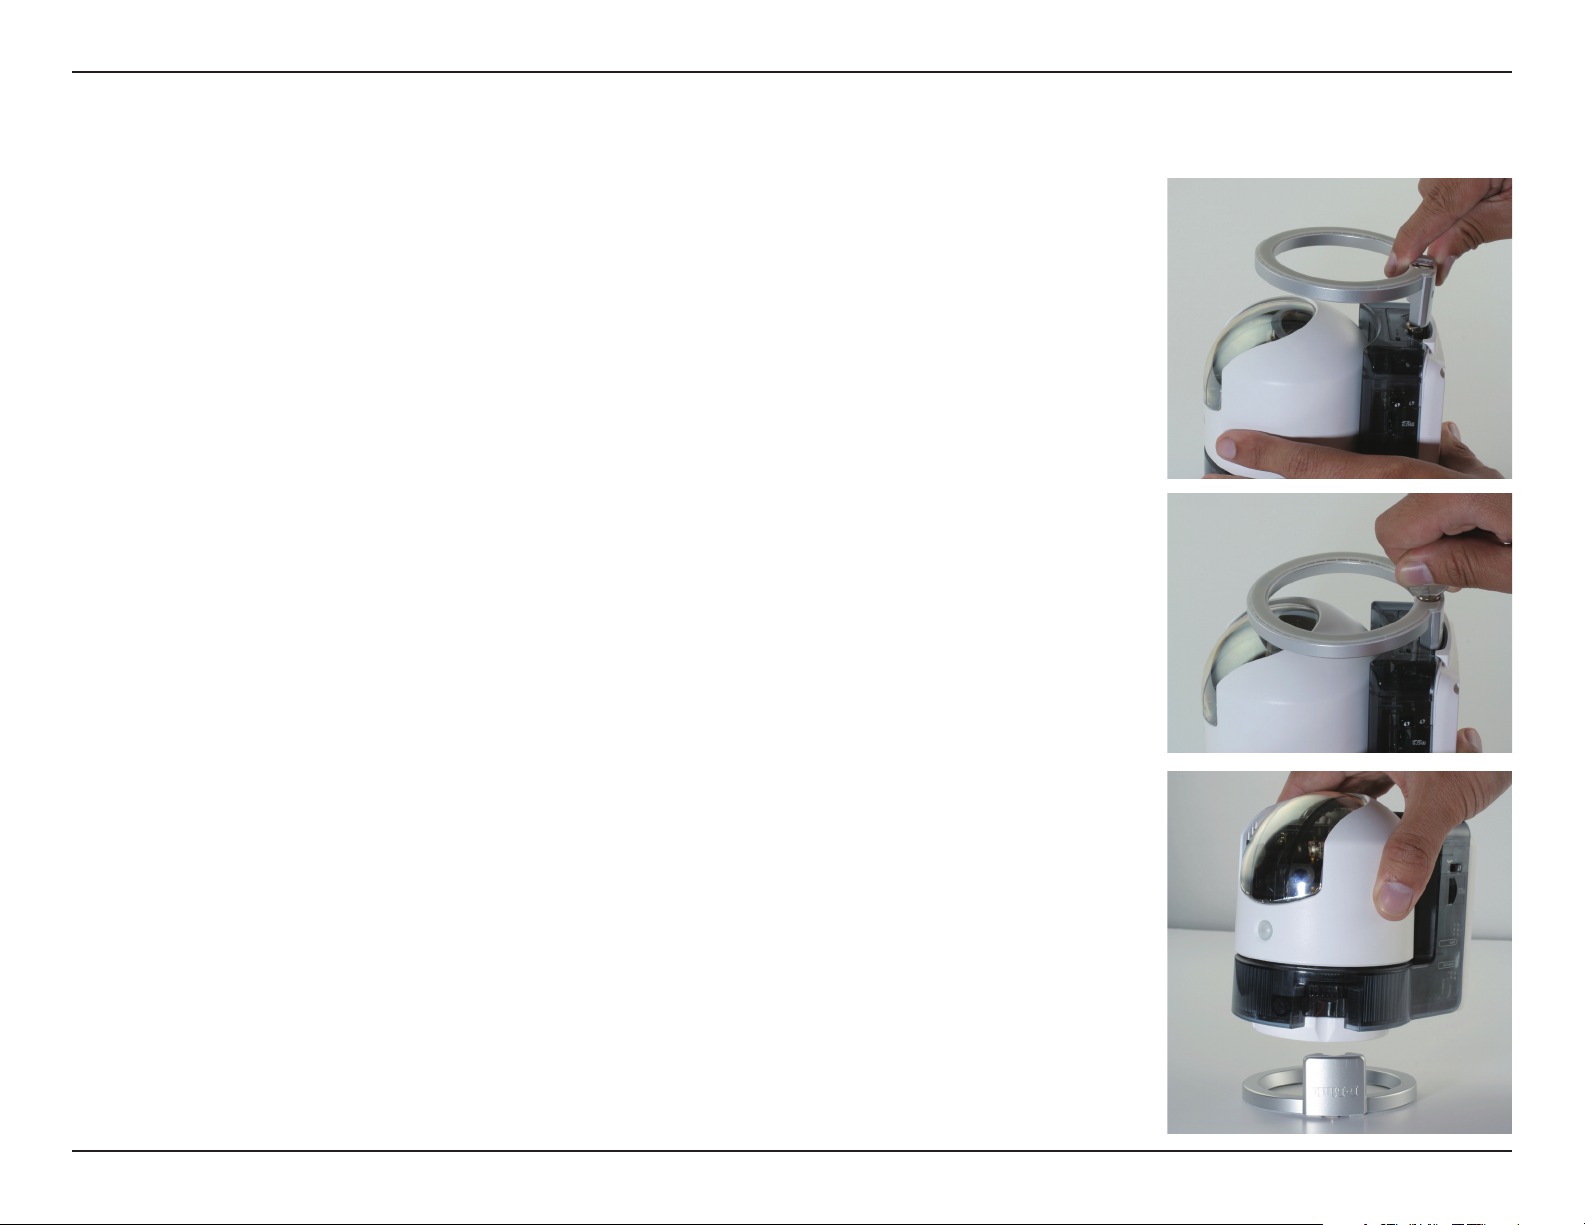
Hardware Installation
Standard Orientation
Attach the silver mounting stand above the dome of the camera.
Tighten the nut on the top of the mounting stand using a coin or a screwdriver.
Inverted Orientation
Set the mounting onto a at surface. Slide the camera down vertically onto the stand.
10D-Link DCS-5230 User Manual
Page 11
Section 1 - Product Overview
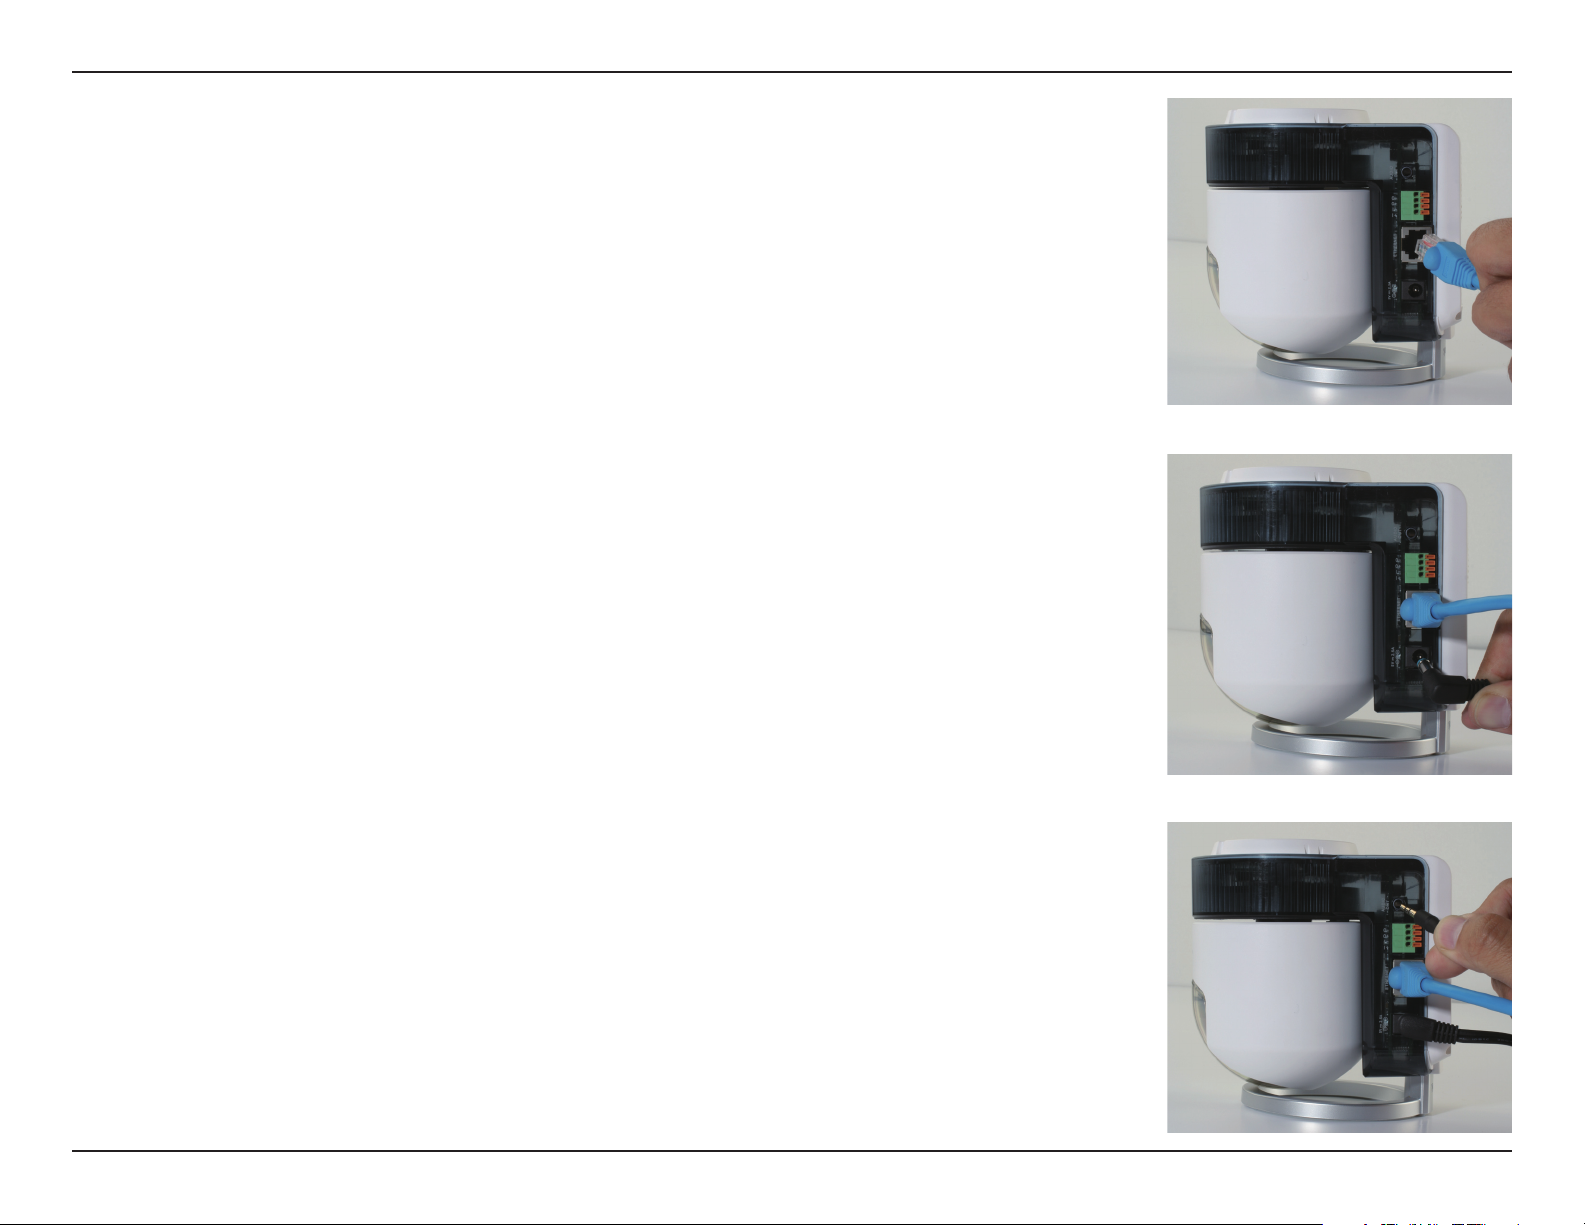
Cable Installation
Connect an Ethernet cable to the Ethernet port located on the camera’s back panel
and attach it to the network.
Note: An Ethernet cable is required during initial setup. Once your wireless configuration
has been set up, you may disconnect the Ethernet cable and begin communicating
wirelessly with your DCS-5230.
Attach the external power supply to the DC power input connector located on the
camera’s side panel, and connect the adapter to an AC power outlet.
Connect the 3.5mm audio connector from a speaker to the Audio Out port.
11D-Link DCS-5230 User Manual
Page 12
Section 1 - Product Overview
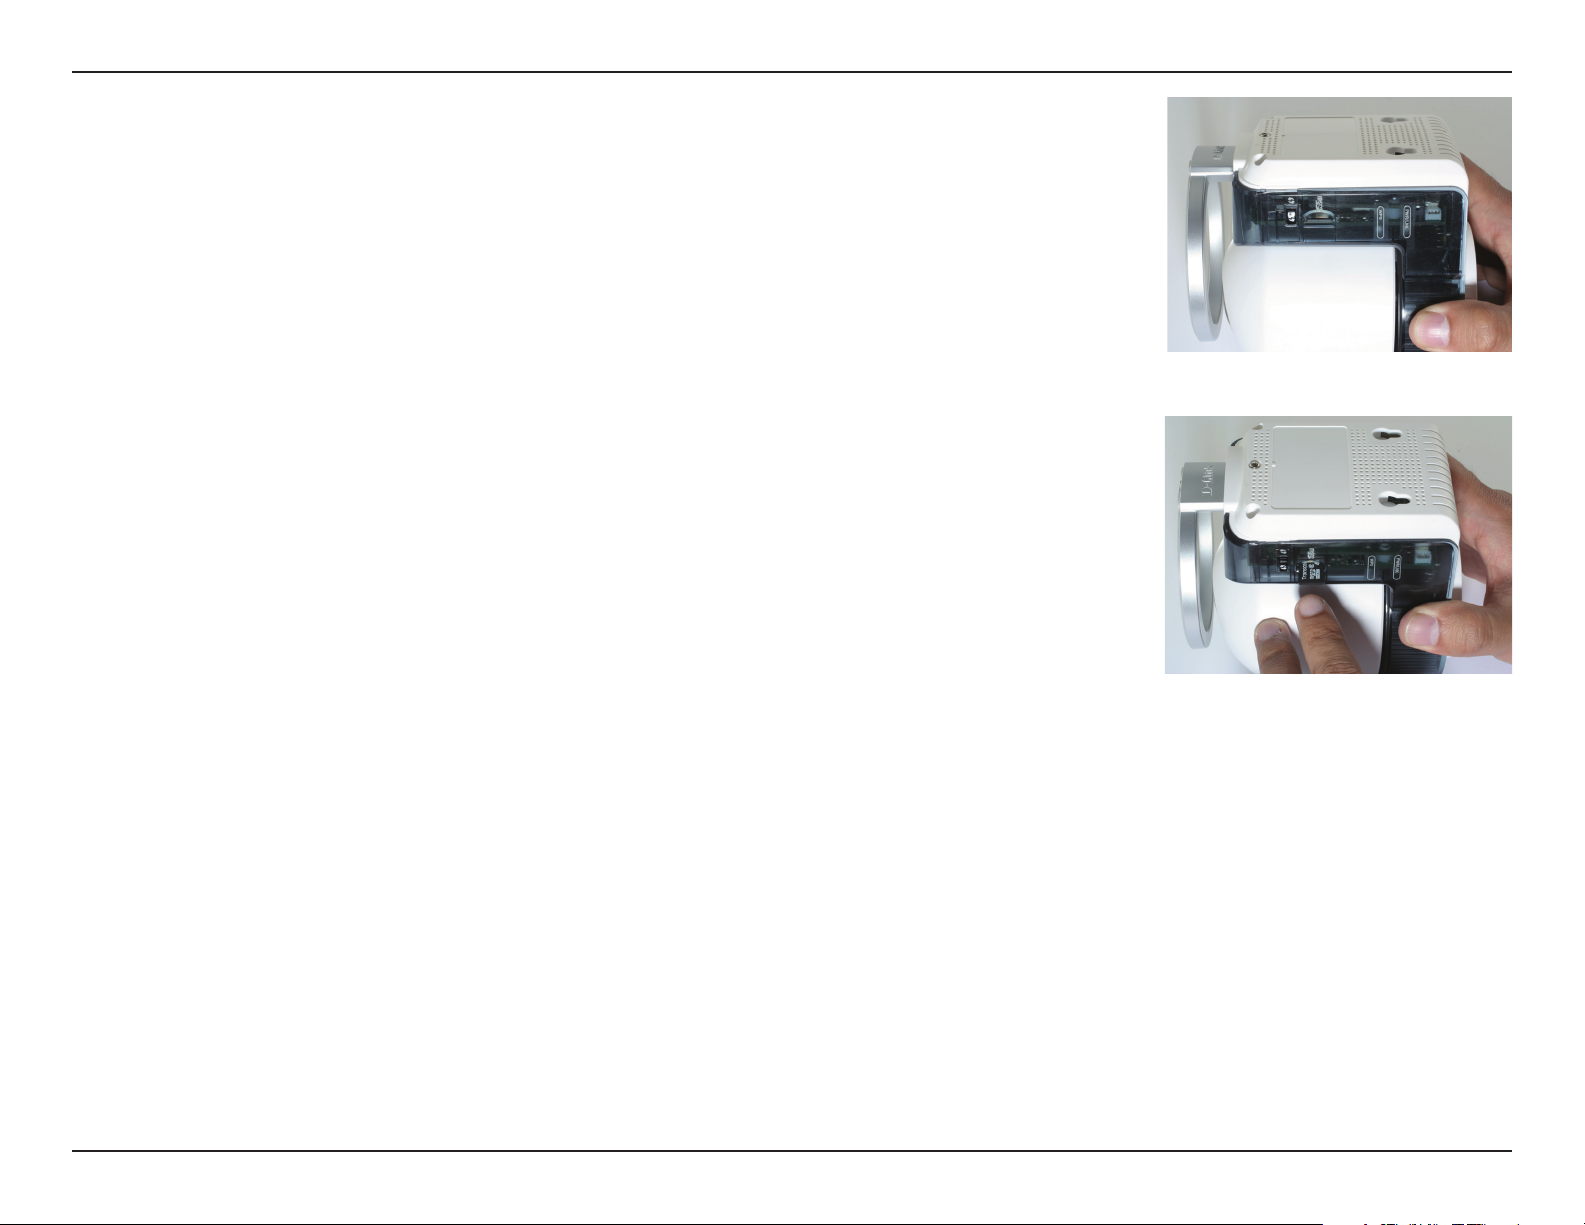
MicroSD Card Installation
Locate the MicroSD slot on the side of the camera.
Push a MicroSD card into the slot until it clicks into place.
Note: To remove a MicroSD card, gently push the card in and it will eject.
12D-Link DCS-5230 User Manual
Page 13
Section 1 - Product Overview
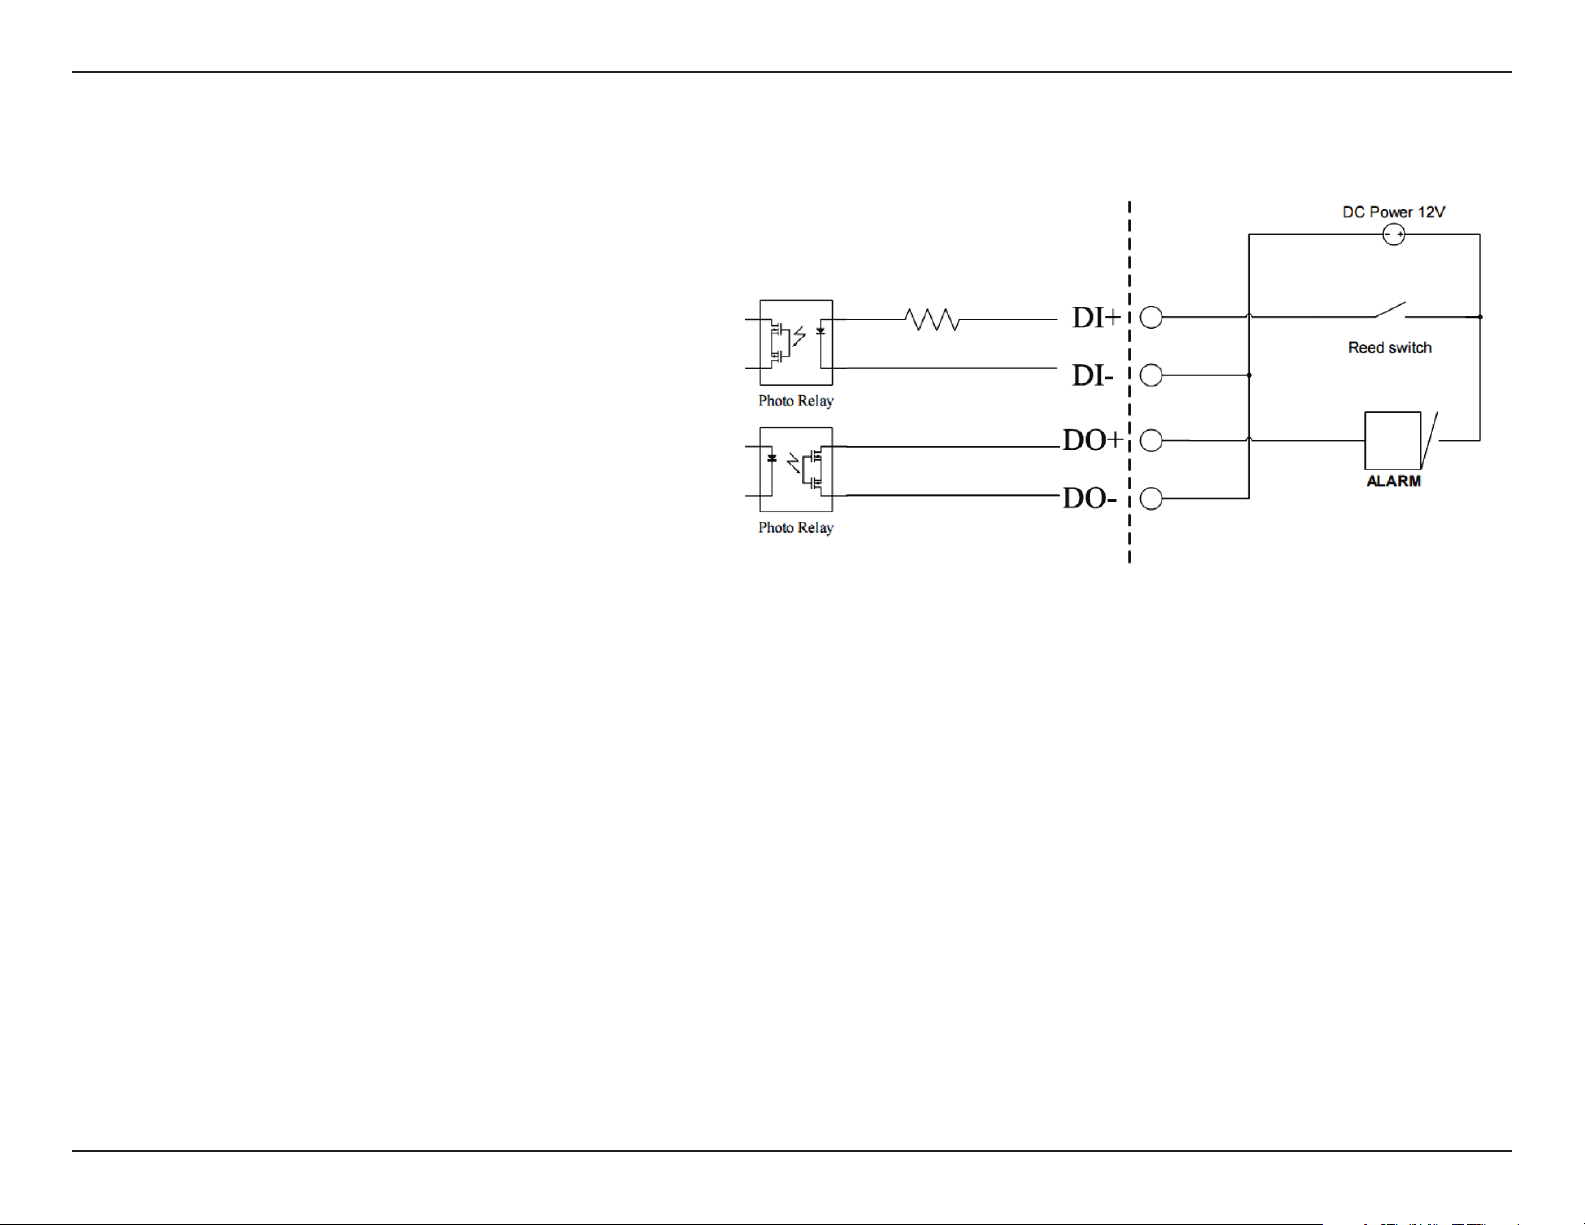
DI/DO Input Specifications
DO (Digital Output):
Normal: Open circuit
Trigger: Short circuit
After powering on or rebooting the DCS-5230,
the camera will be in Normal mode by default.
DI (Digital Input):
Normal: No current
Trigger: 12V current
Camera External Device
As the Digital Input signal is controlled by an external device, we recommend that you set your device to feed no current
normally, and feed a 12V current only to trigger a DI event on the DCS-5230.
Example use of DI/DO:
You can connect a motion sensor to the DI port, signaling the camera to take a snapshot and to trigger an alarm
connected to the DO port.
DI: Receives signals from an outside sensor. Connect any external security device to the DI port.
DO: Triggers an output device such as a buzzer or alarm.
Note: External device ports connected to the DI or DO port must provide 12V power.
13D-Link DCS-5230 User Manual
Page 14

Section 2 - Installation
Wireless Installation Considerations
The DCS-5230 can be accessed using a wireless connection from virtually anywhere within the operating range of your
wireless network. Keep in mind, however, that the quantity, thickness and location of walls, ceilings, or other objects
that the wireless signals must pass through, may limit the range. Ranges vary depending on the types of materials and
background RF (radio frequency) noise in your home or ofce. The key to maximizing the wireless range is to follow
these basic guidelines:
1. Minimize the number of walls and ceilings between the D-Link router and other network devices. Each
wall or ceiling can reduce your adapter’s range from 3 to 90 feet (1 to 30 meters).
2. Be aware of the direct line between network devices. A wall that is 1.5 feet thick (0.5 meters), at a
45-degree angle appears to be almost 3 feet (1 meter) thick. At a 2-degree angle it looks over 42 feet
(14 meters) thick. Position devices so that the signal will travel straight through a wall or ceiling (instead
of at an angle) for better reception.
3. Try to position access points, wireless routers, and computers so that the signal passes through open
doorways and drywall. Materials such as glass, metal, brick, insulation, concrete and water can affect
wireless performance. Large objects such as sh tanks, mirrors, le cabinets, metal doors and aluminum
studs may also have a negative effect on range.
4. Keep your product at least 3 to 6 feet (1-2 meters) away from electrical devices or appliances that
generate RF noise.
5. If you are using 2.4GHz cordless phones, make sure that the 2.4GHz phone base is as far away from
your wireless device as possible. The base transmits a signal even if the phone in not in use. In some
cases, cordless phones, X-10 wireless devices, and electronic equipment such as ceiling fans, uorescent
lights, and home security systems may dramatically degrade wireless connectivity.
14D-Link DCS-5230 User Manual
Page 15
Section 3 - Configuration
Configuration
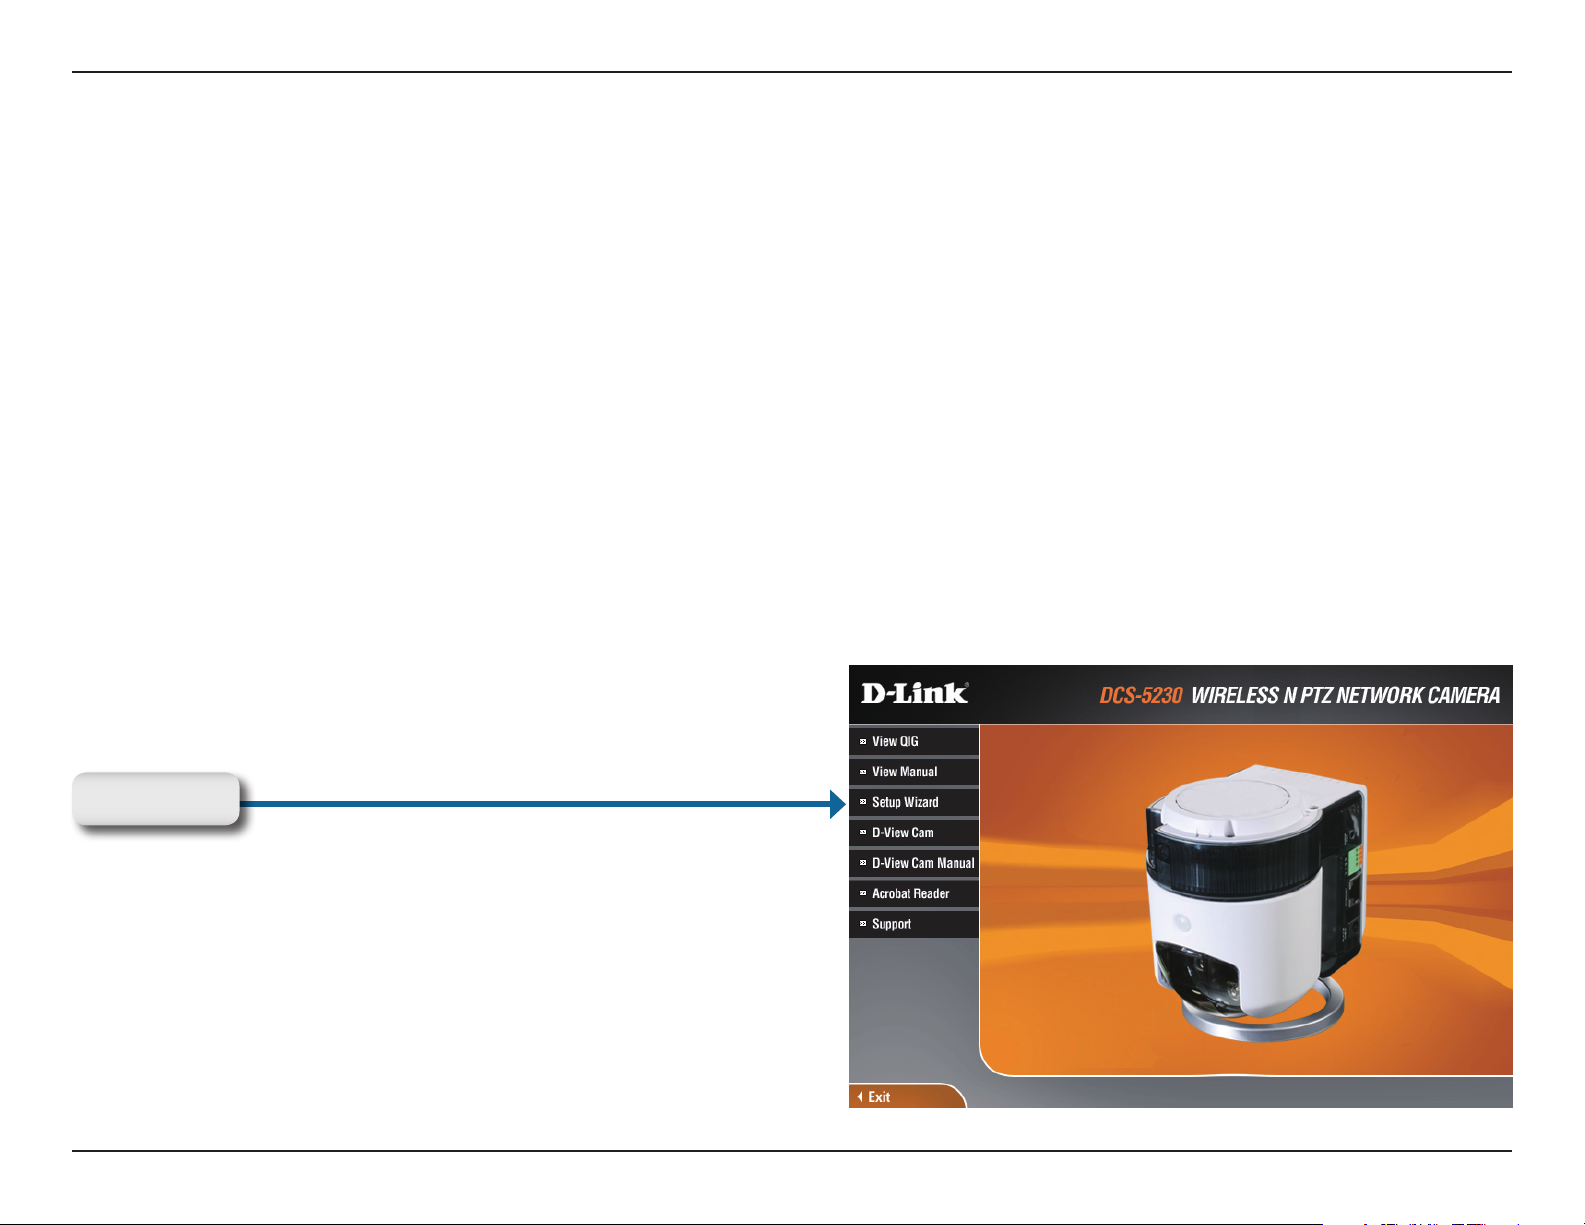
Turn on the computer and Insert the D-Link DCS-5230 Driver CD in the CD-ROM drive. The step-by-step instructions
will help you to search and setup your IP camera smoothly and quickly.
If the CD Autorun function does not automatically start on your computer, click Windows® Start > Run. In the Run
command box type “D:\DCS-5230.exe”, where D: represents the drive letter of your CD-ROM. If it does start, proceed
to the next screen.
D-Link Setup Wizard
DCC will show the MAC address and IP address of your DCS-5230. If you have a DHCP* server on your network,
there will be a valid IP Address displayed at the end of DCC process. You can begin to use the IP camera now.
*A DHCP server is a device that supplies IP Addresses to its clients that are on the same network.
Click Start
15D-Link DCS-5230 User Manual
Page 16
Section 3 - Configuration
Enabling UPnP for Windows® XP
UPnP (Universal Plug and Play) is a networking architecture that provides
compatibility among networking equipment, software, and peripherals. The
DCS-5230 is an UPnP enabled Internet camera. If your operating system is
UPnP enabled, the device will be easier to congure. If you do not want to use
the UPnP functionality, it can be disabled by unchecking the Enabled UPnP
checkbox on the Advanced > Network page (see page 29). Use the following
®
steps to enable UPnP settings only if you are running Windows
running Windows® 98/2000, UPnP is not available.
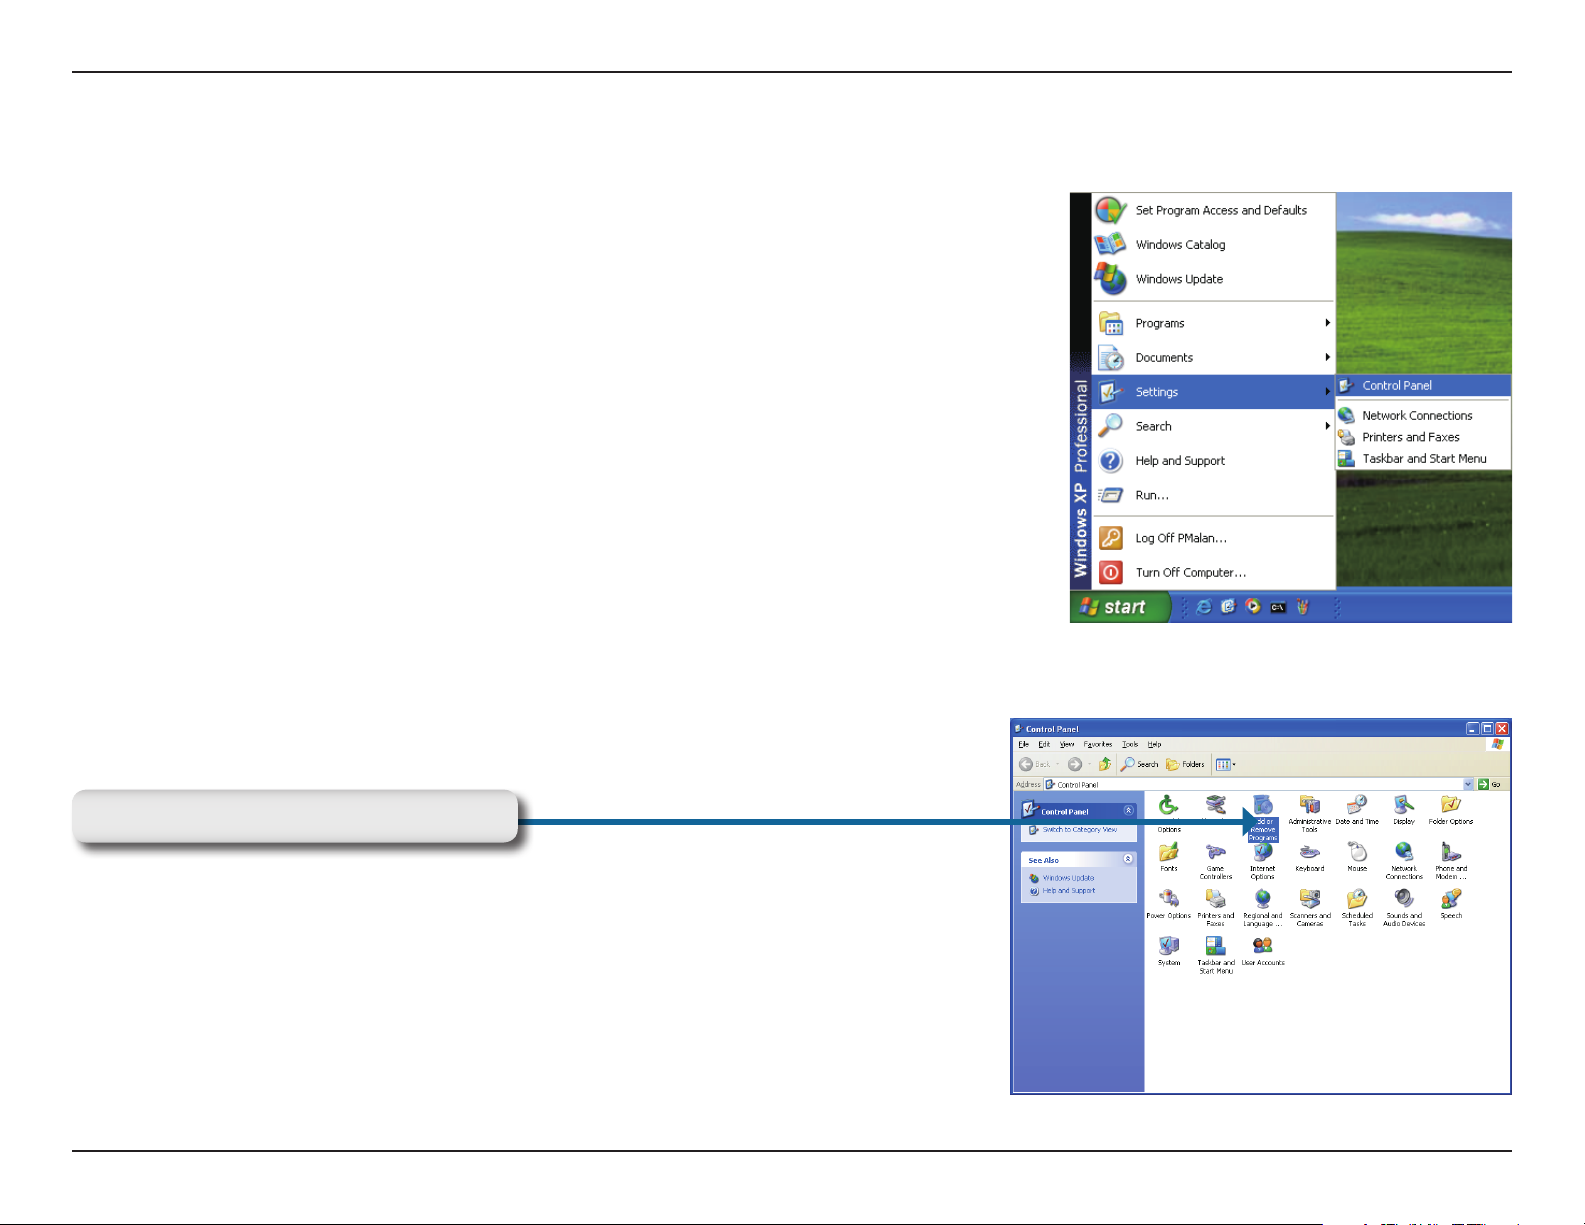
Go to Start > Settings. Click Control Panel.
XP. If you are
Click Add or Remove Programs
16D-Link DCS-5230 User Manual
Page 17
Section 3 - Configuration
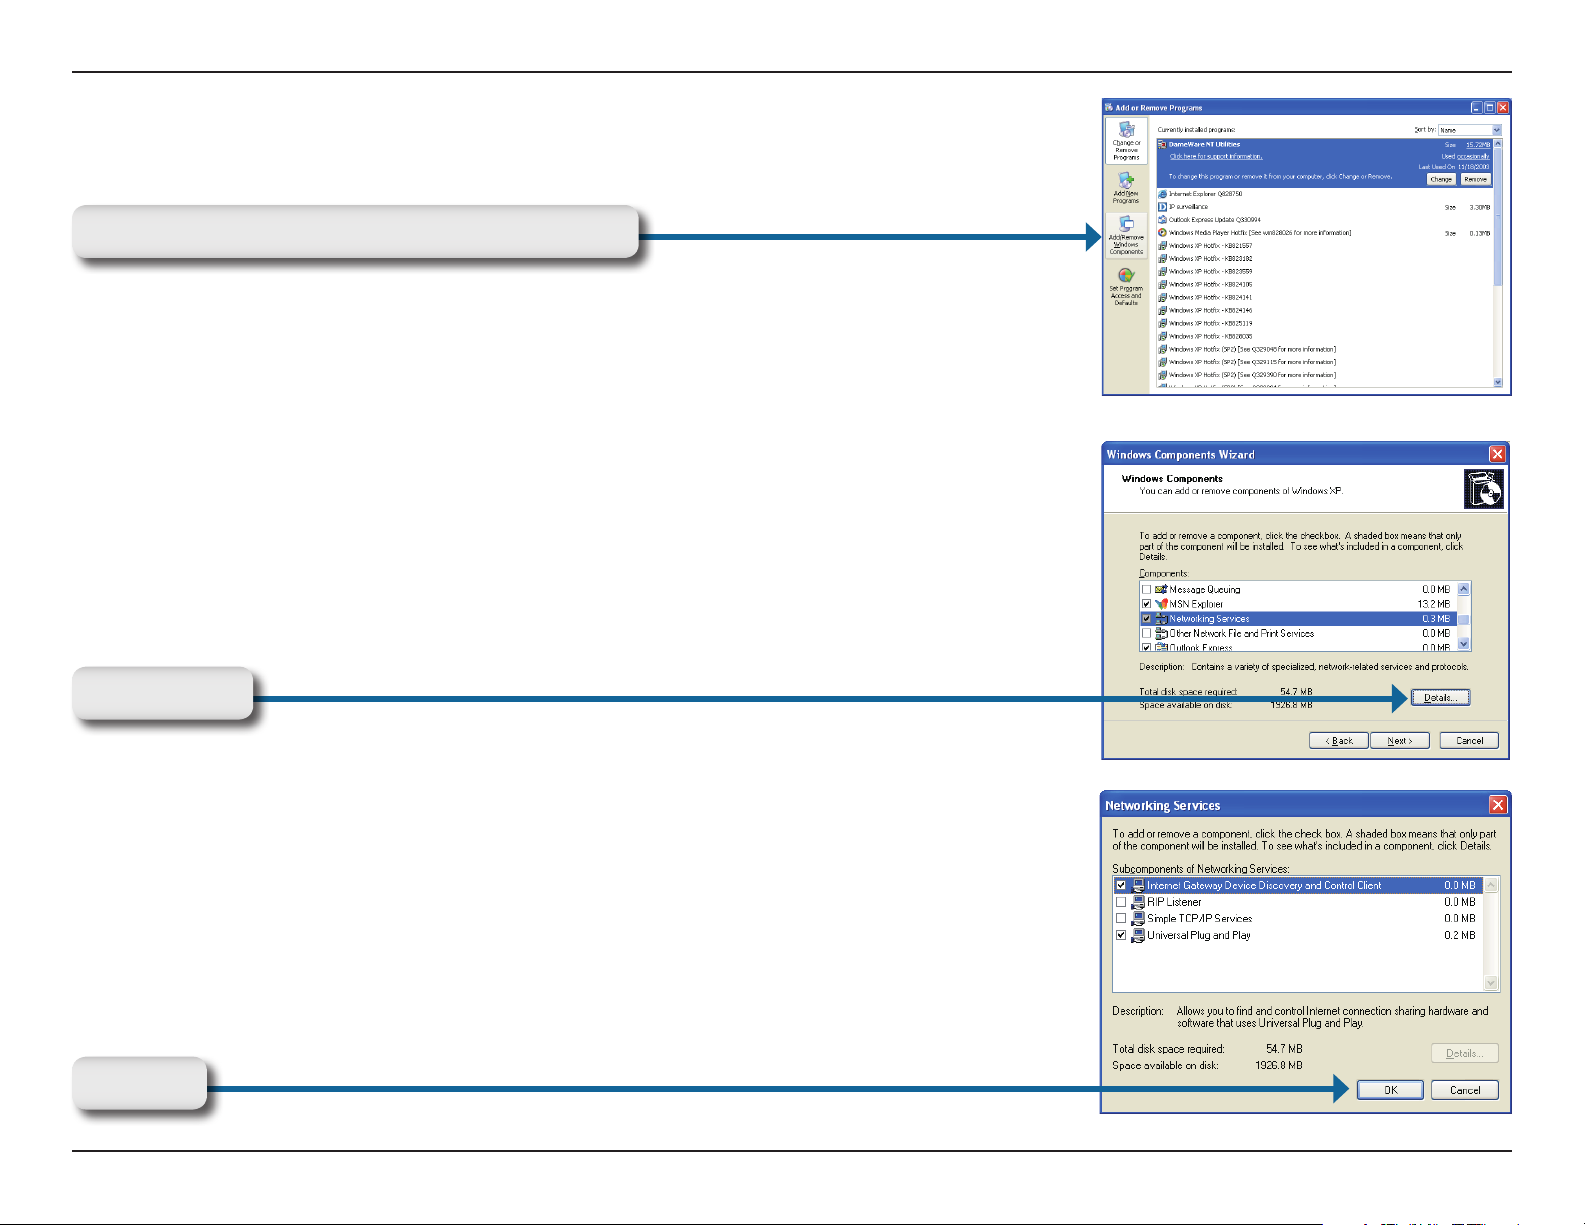
Click Add/Remove Windows Components
The following screen will appear.
Select Networking Services.
Click Details
Select Universal Plug and Play.
Click OK
17D-Link DCS-5230 User Manual
Page 18
Section 3 - Configuration
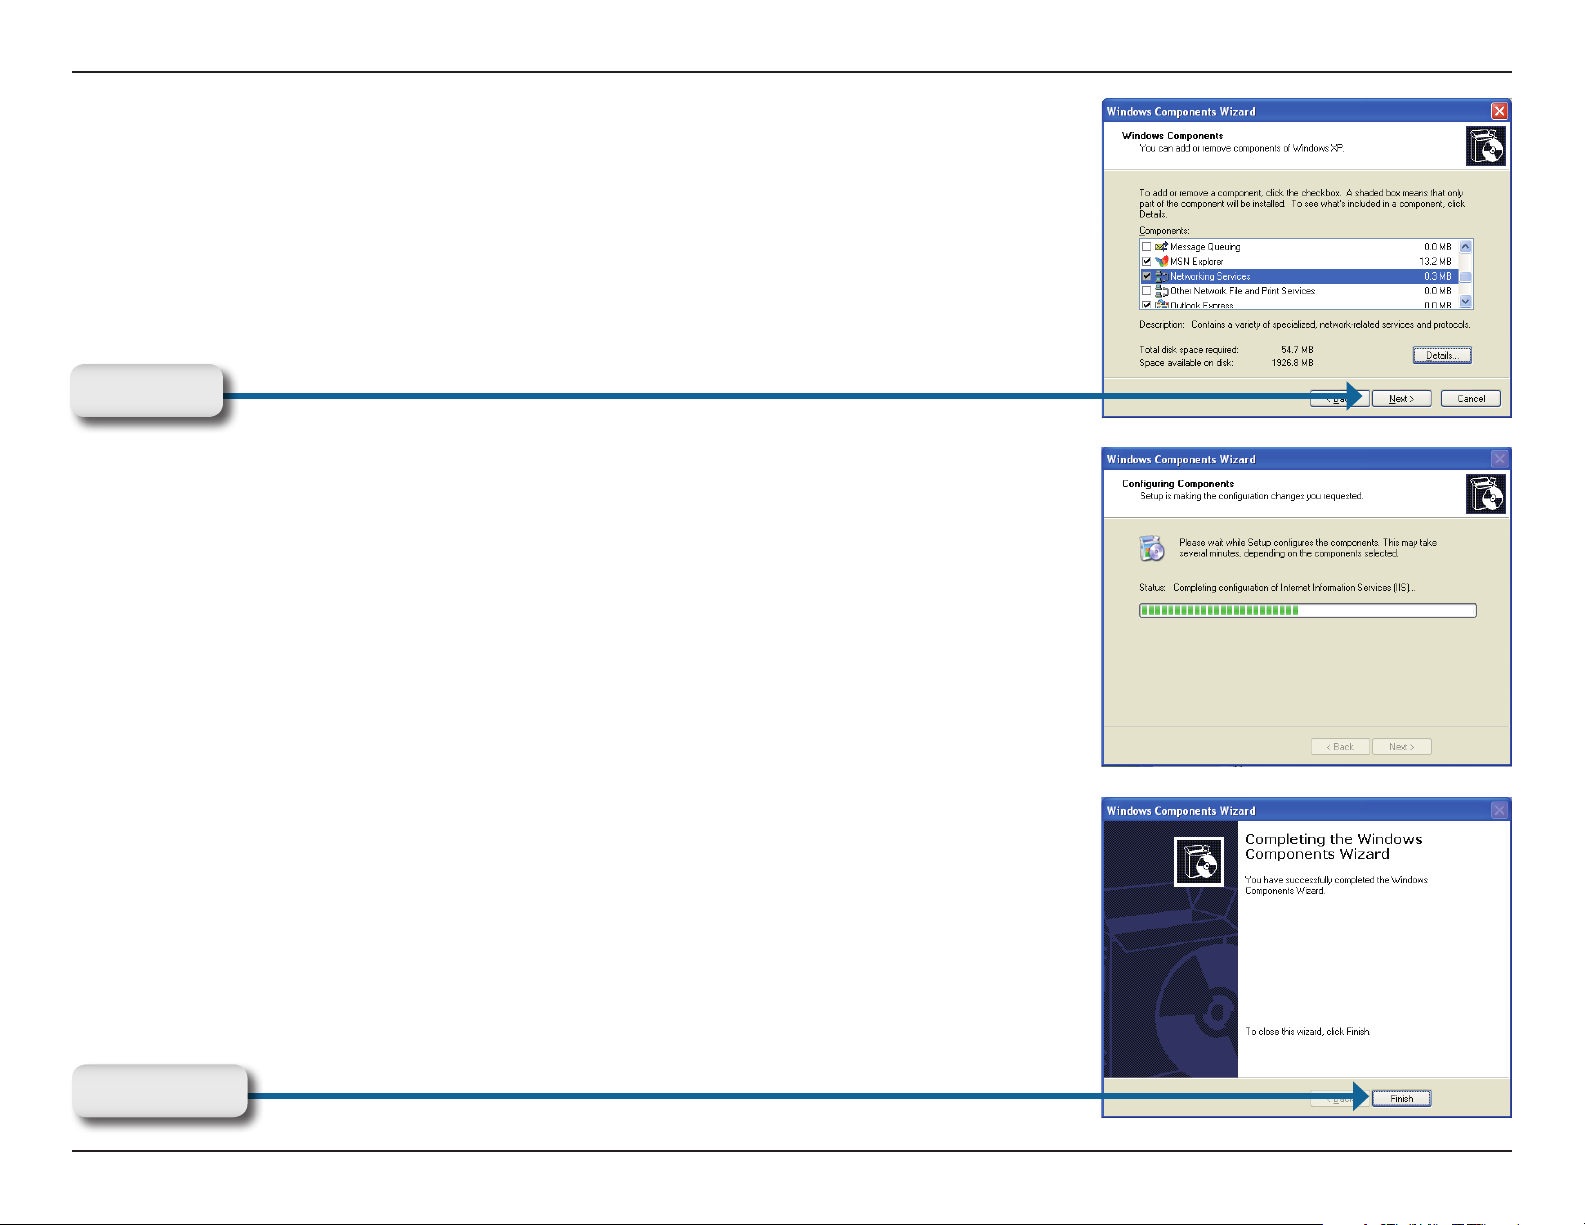
Click Next
Please wait while Setup congures the components.
Click Finish
18D-Link DCS-5230 User Manual
Page 19

Section 3 - Configuration
To view your DCS-5230 Internet Camera in an Internet browser, go
to your Desktop and click My Network Places.
Click DCS-5230 (192.168.0.120).
19D-Link DCS-5230 User Manual
Page 20
Section 3 - Configuration
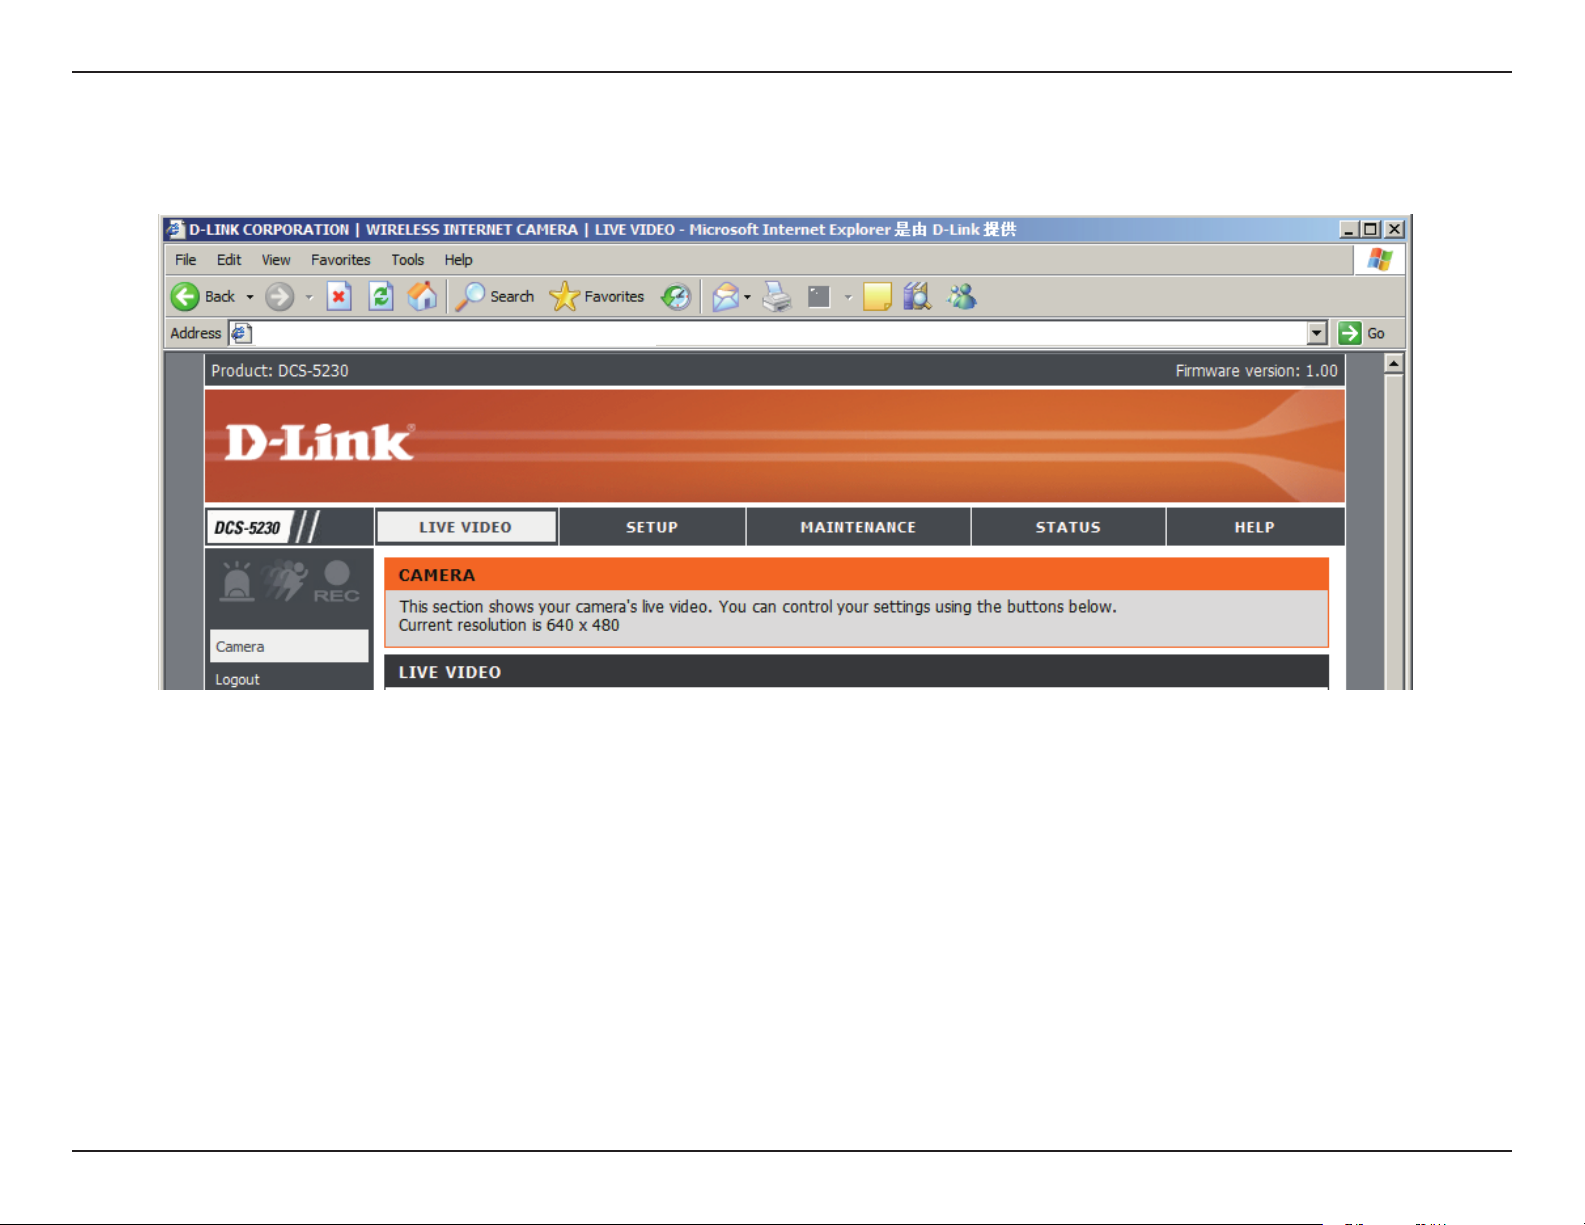
After you click on the DCS-5230 icon, your Internet browser will automatically be opened to the IP Address of the
DCS-5230, in this example it is: http://192.168.0.120. Your DCS-5230 may have a different IP Address.
http://192.168.0.120/eng/index.cgi
20D-Link DCS-5230 User Manual
Page 21
Section 3 - Configuration
Setting up a Wireless Connection with WPS
If your wireless access point or router supports push-button Wireless Protected Setup
(WPS), you can quickly congure your wireless network and camera without using the
camera’s web interface.
After plugging the power adapter to your camera and the front status LED lights up, hold
down the WPS button on the back of the camera for 3 seconds. After pressing the button,
it should start ashing blue.
Now press the WPS button on your router or access point within 1 minute to activate WPS
and allow your devices to automatically congure a wireless connection. After WPS is
successfully activated, the WPS LED on your camera will stop ashing, and will light up
solid blue, then reboot.
Note: On some routers/access points, you may need to enter the web interface to activate
WPS. Consult your product’s user manual for further assistance.
WPS Button
Press this button to establish a WPS connection.
21D-Link DCS-5230 User Manual
Page 22
Section 3 - Configuration
Testing the DCS-5230
Open your Internet browser and type in the IP address of the DCS-5230. In this example, the address is: http://192.168.0.120
(your DCS-5230 may have a different IP address based on what you used in the DCC program).
The window in the center of your browser is the camera image window. You should now see a video image and hear the
audio over your computer speakers from the DCS-5230. If you are having problems, please consult the Troubleshooting
section of this manual (page 79).
22D-Link DCS-5230 User Manual
Page 23
Section 3 - Configuration
Viewing Your DCS-5230
After all the router settings have been entered correctly, a PC user inside or outside your network will have access to
the camera through the Internet Explorer Web browser. To access the camera from the Internet, type the IP Address
of the router given to you by your ISP, followed by a colon, and the port number that you gave your camera (e.g.,
http://70.42.15.9:83). It is not necessary to enter the colon and port number if you are using the default Web server
port 80. To access from a computer on your local (home) network, simply enter the local IP Address of the Camera
followed by a colon and the port number (e.g., 192.168.0.120:83).
If you are following this manual in the order it is presented,
you should now have an operating DCS-5230 Internet Camera
congured with the Installer program. This section of the
manual will cover how to use the Internet Camera in two
methods:
Using the DCS-5230 with an Internet browser and •
accessing the screens to control and monitor the
camera.
Using IP surveillance software with the DCS-5230.•
23D-Link DCS-5230 User Manual
Page 24

Section 3 - Configuration
Using the DCS-5230 with an Internet Browser
Open your Internet Explorer Web browser and enter the IP address for your Internet Camera (http://192.168.0.120).
In the example, this address is 192.168.0.120. Your address may differ.
If a window appears asking to install a Verisign certicate for authentication click Yes. This allows the proprietary
MPEG4 video stream to be recognized by Internet Explorer.
24D-Link DCS-5230 User Manual
Page 25
Section 3 - Configuration
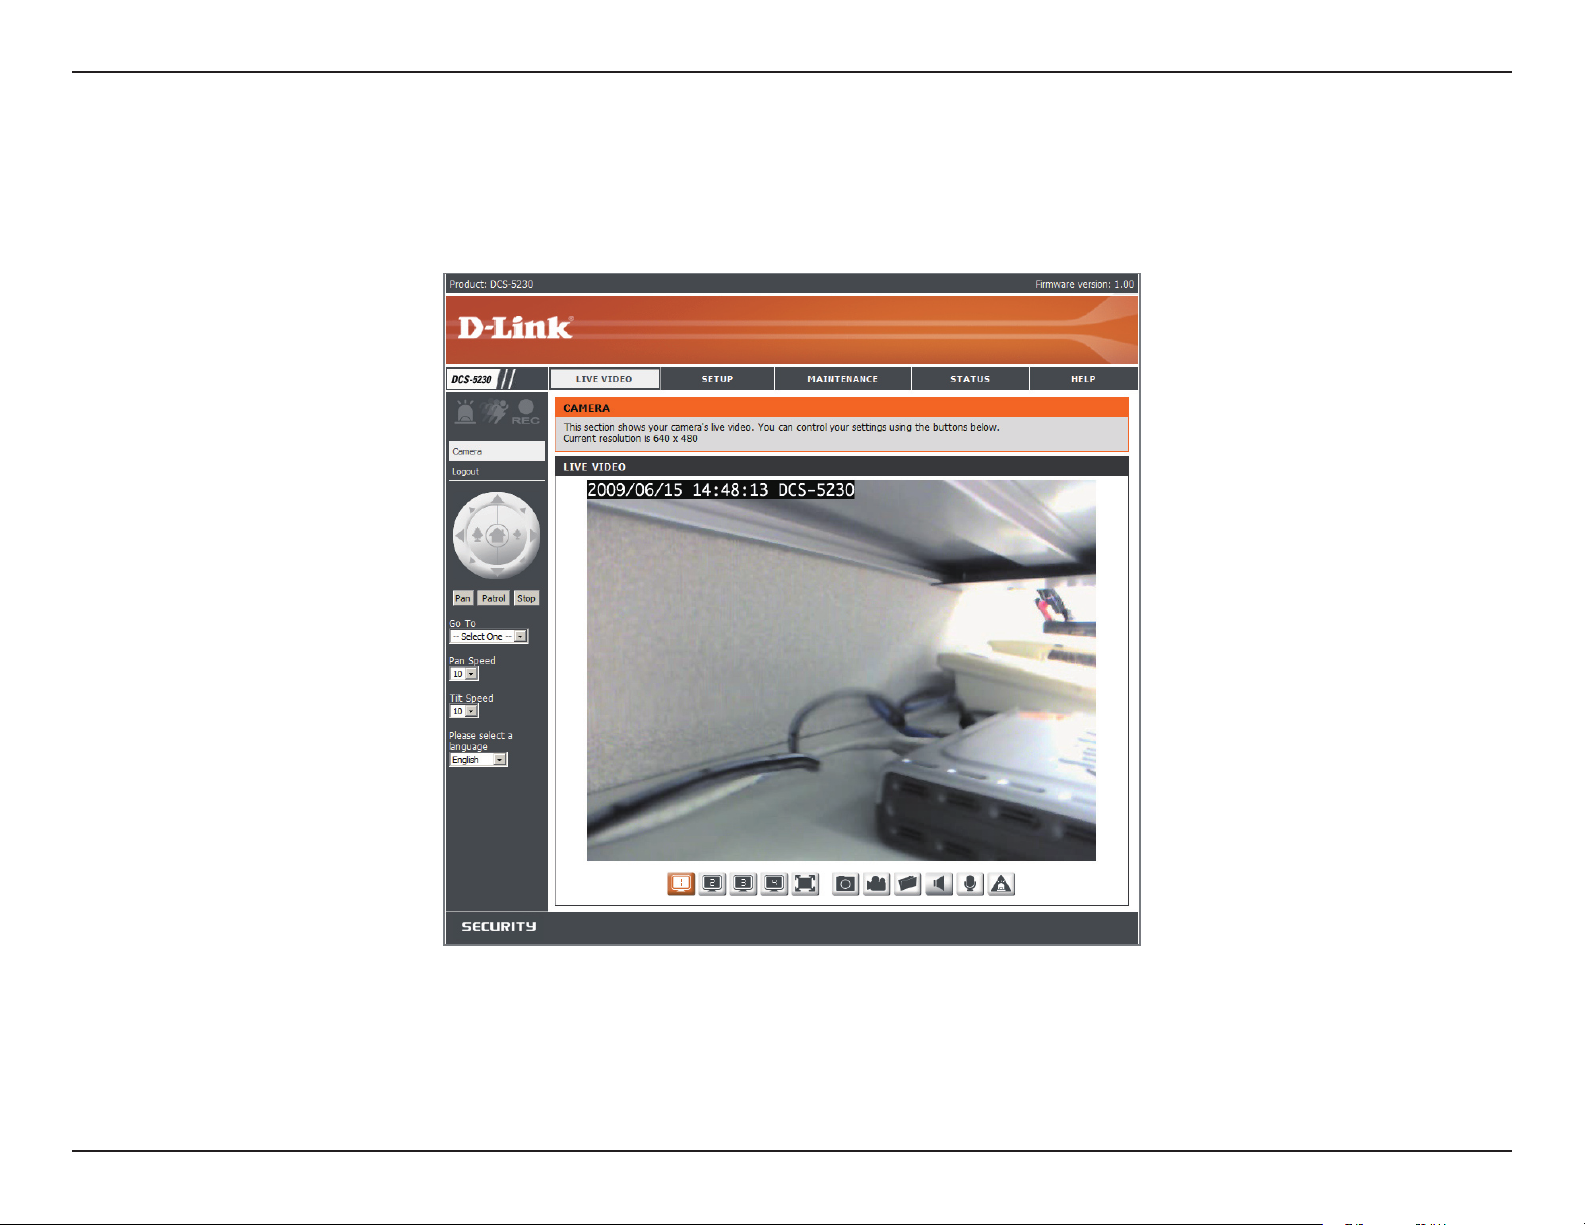
Live Video
The live image feed from the DCS-5230 should be visible from the device’s Live Video page on your web browser.
Client Setup:
Logout:
P/T/Z Action Pad:
Go To:
Pan/Tilt Speed:
Pan:
Stop:
Click on the Client Setup button to change
settings related to the camera connection.
Click on the Logout button to logout from the
camera server and close the browser.
Use the Pan / Tilt / Zoom Action Pad to
control the camera’s pan or tilt. The large tree
icon controls the zoom in function. The small
tree icon on the right side controls the zoom
out function. The Home button can move the
camera to the preset home position.
Select from the preset drop-down list to
quickly move the camera to the desired
preset position. (Please refer to “camera
control” setup for the preset list function).
This setting can change the camera’s Pan/
Tilt speed.
Press this button and the camera will pan from
left-most position to the right-most position
and then return to its original position.
This will stop pan and patrol.
Patrol:
Click this button to quickly move the camera to the desired patrol setup according to preset positions. (Please
refer to “camera control” setup for the preset list function).
The bottom of this page contains several icons which can be used to control the camera’s main functions.
25D-Link DCS-5230 User Manual
Page 26
Section 3 - Configuration
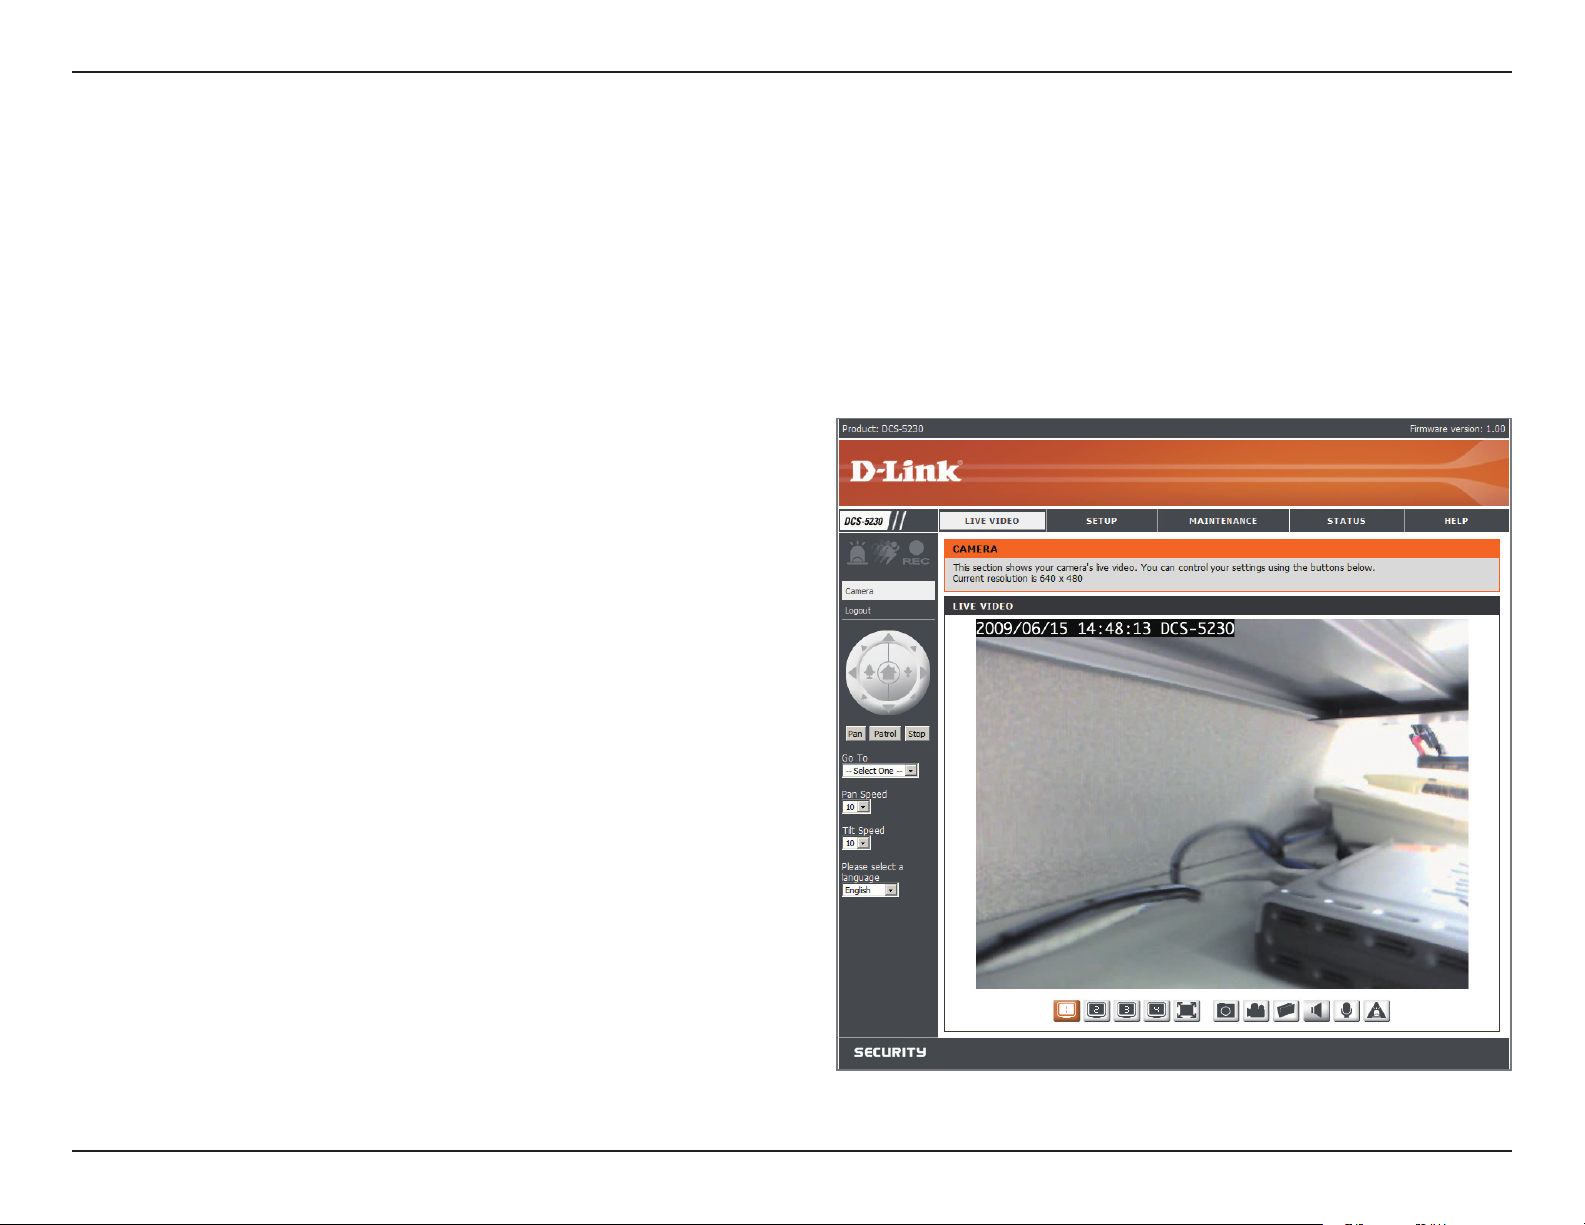
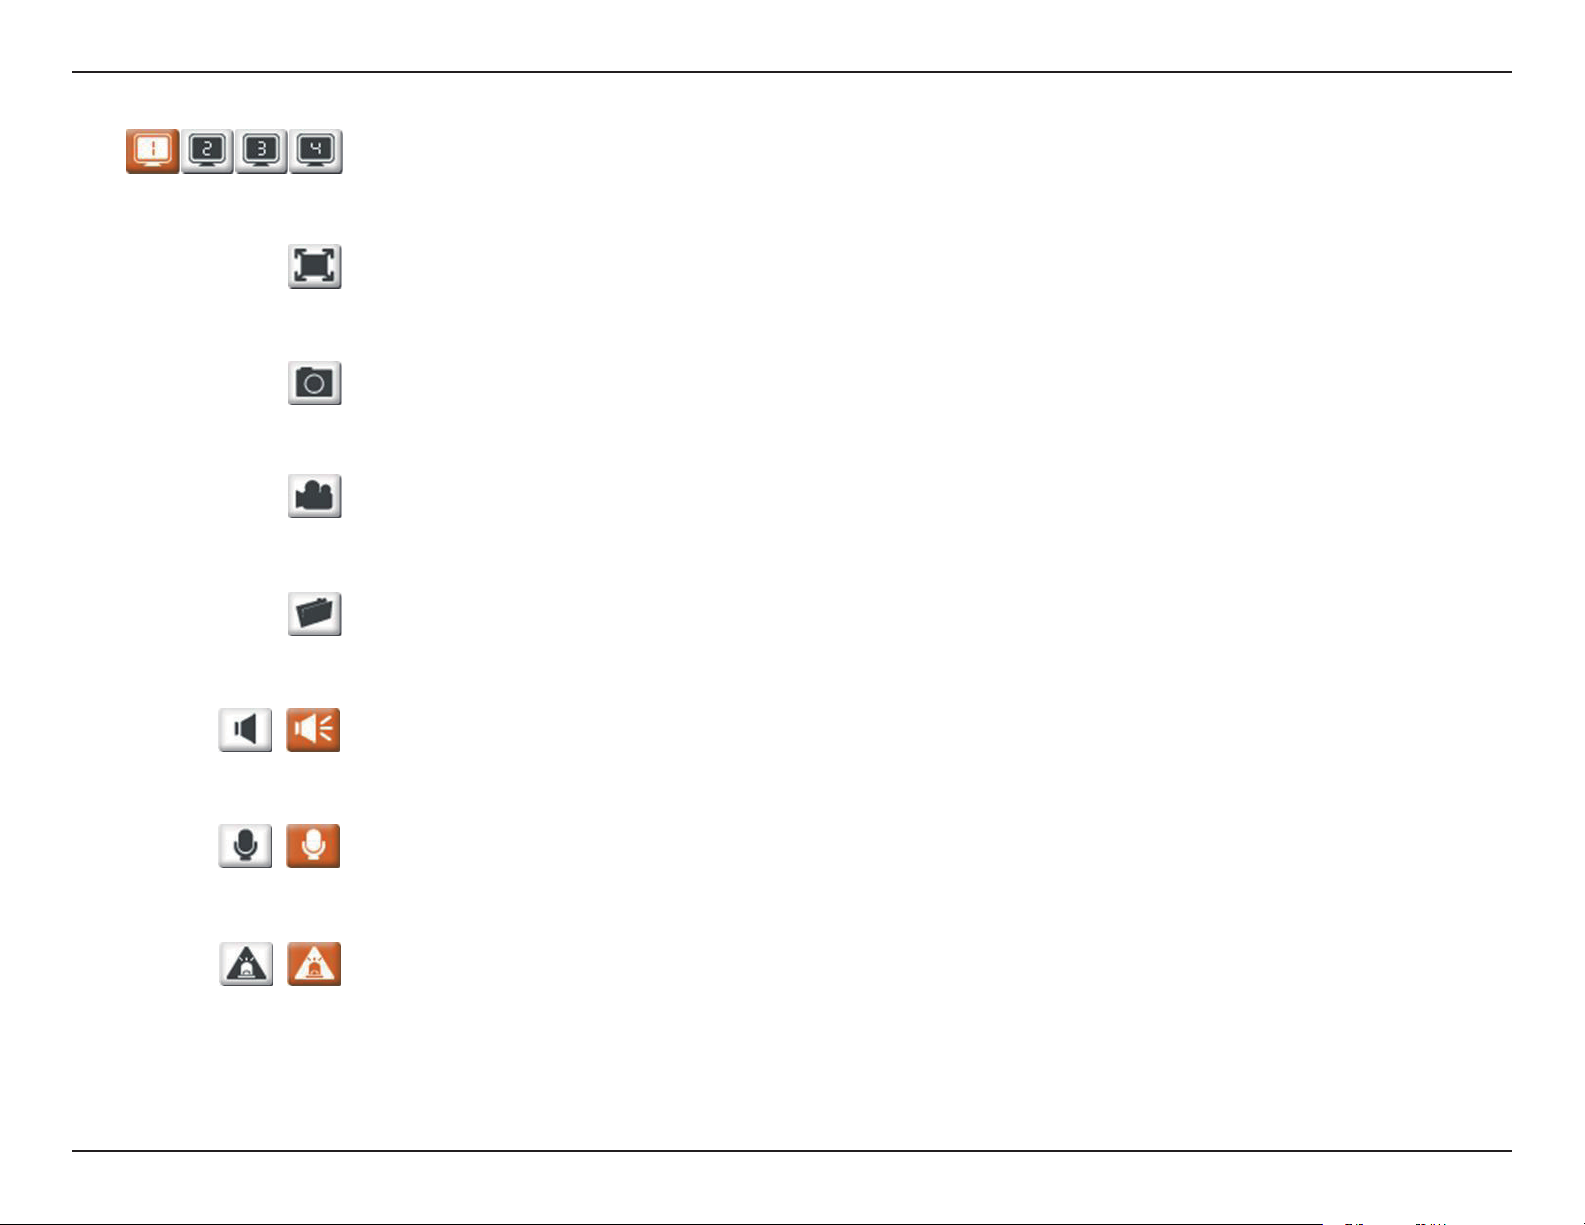
Video Profile:
Full Screen:
Snapshot:
Record Video:
Set Path:
Start/Stop Audio:
You can change between your different viewing proles, which you can set up in SETUP > Audio and Video.
This allows you to view the video in full screen mode. To exit full screen mode, press the ESC key on your
keyboard.
Click it to capture a snapshot image. The image will pop up in a new window. Then you may save this image
to a local hard drive.
Click this button will start or stop recording video to the le path specied with the Set Path button (to the
right).
You can change the folder your manual recordings will be saved to.
This button toggles the built-in microphone on and off, allowing you to hear audio from the area surrounding
your camera. Audio is on by default.
Start/Stop Talking:
Start/Stop Digital Output:
This will toggle audio to a speaker (not included) connected to the camera's Audio Out port. This can be used
to communicate with others near the camera.
This button will toggle the digital output on or off.
26D-Link DCS-5230 User Manual
Page 27
Section 3 - Configuration
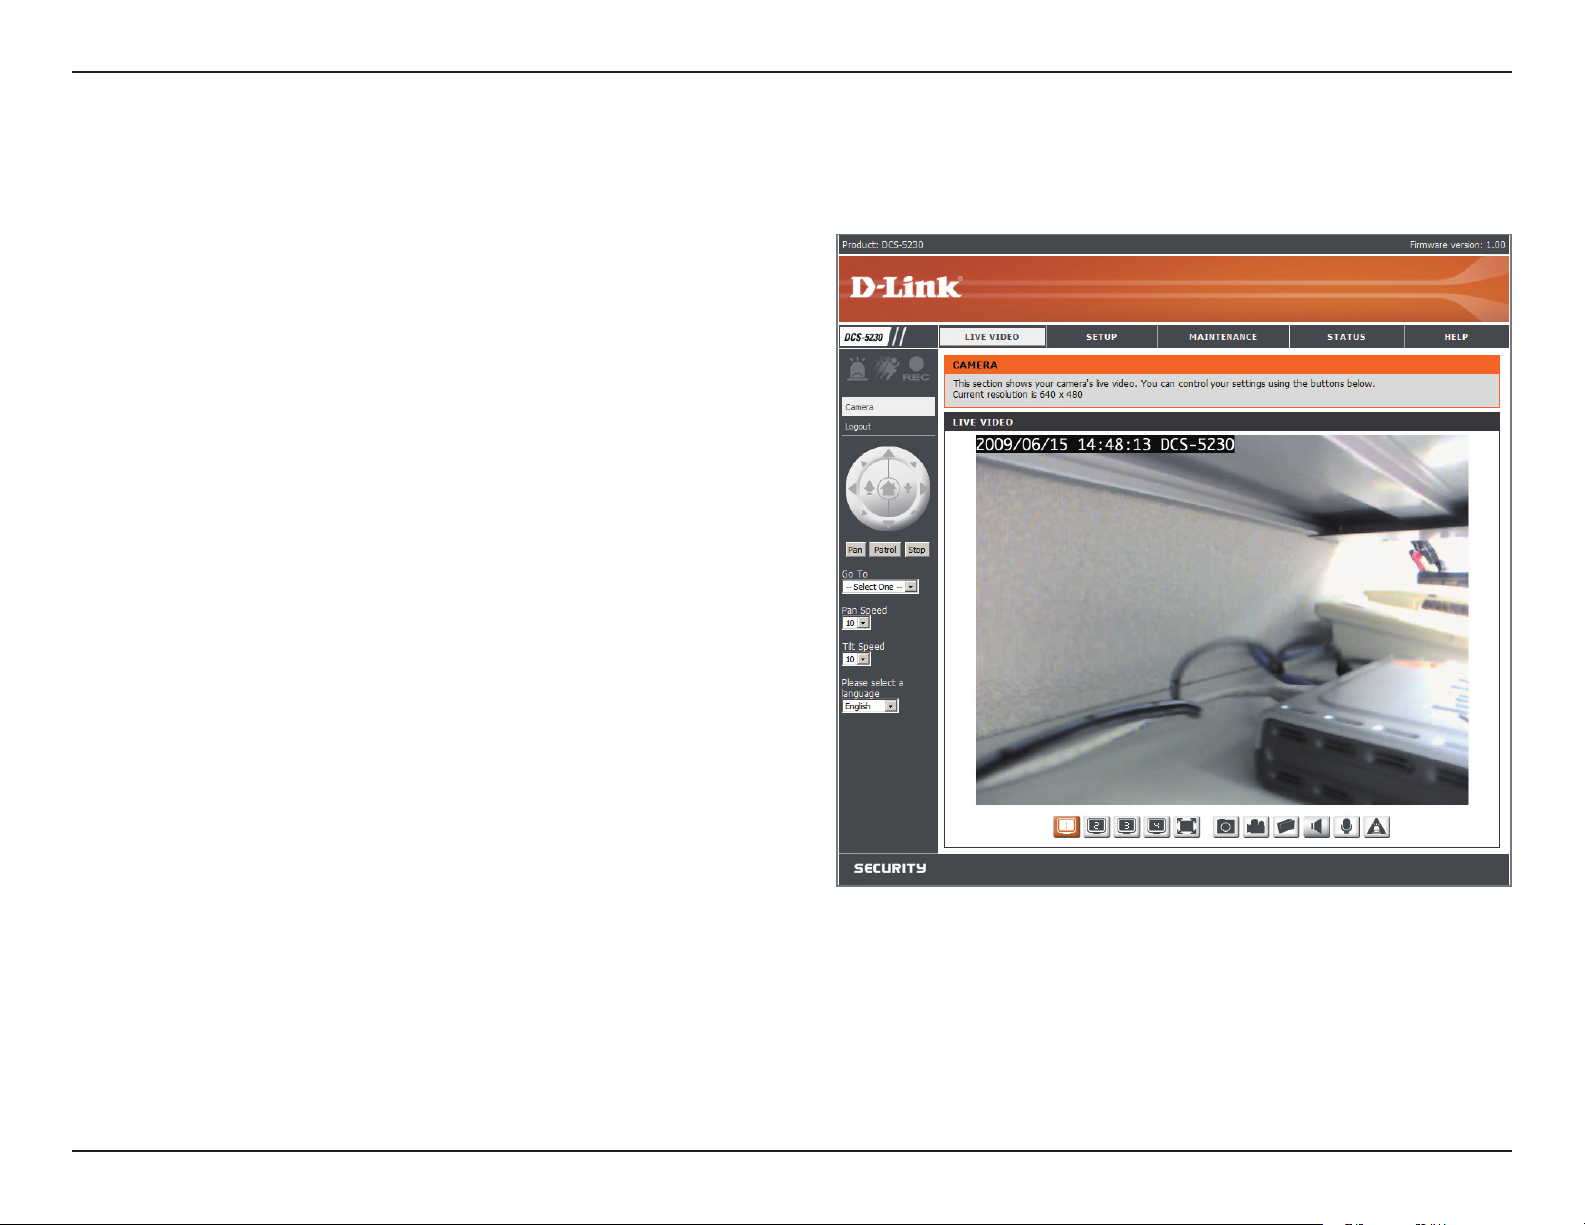
DCS-5230 Configuration
There are 5 tabs across the top of the Conguration
screen. The LIVE VIDEO page is used for viewing
live video and audio.
The SETUP page is used for basic setup of the
DCS-5230.
The MAINTENANCE page is used for server system
maintenance.
The STATUS page will show the camera’s status
and logs.
Setup
The HELP page contains useful information about
the setup and features of the DCS-5230.
The Setup page provides the following conguration options: Wizard, Network Setup, Wireless Setup, Dynamic DNS,
Image Setup, Audio and Video, Mail and FTP, Motion Detection, Time and Date, Schedule, Access List, Camera
Control, and Logout.
27D-Link DCS-5230 User Manual
Page 28
Section 3 - Configuration
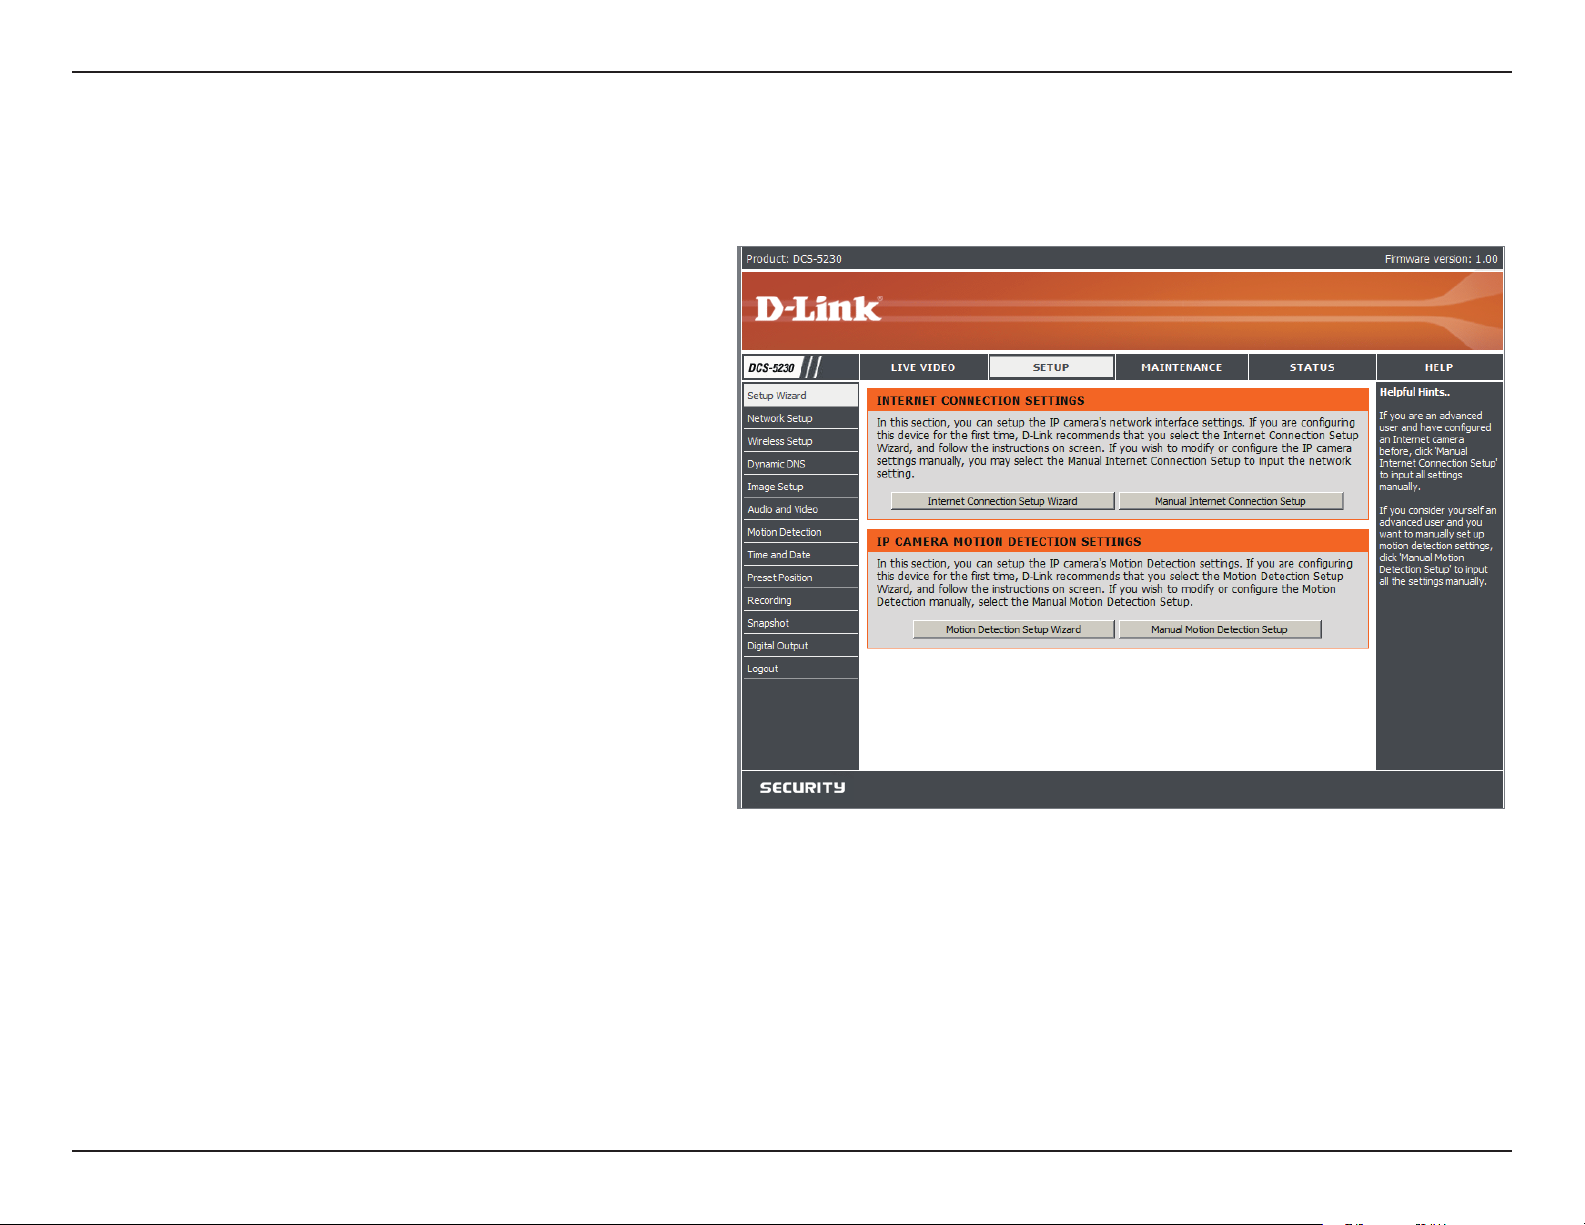
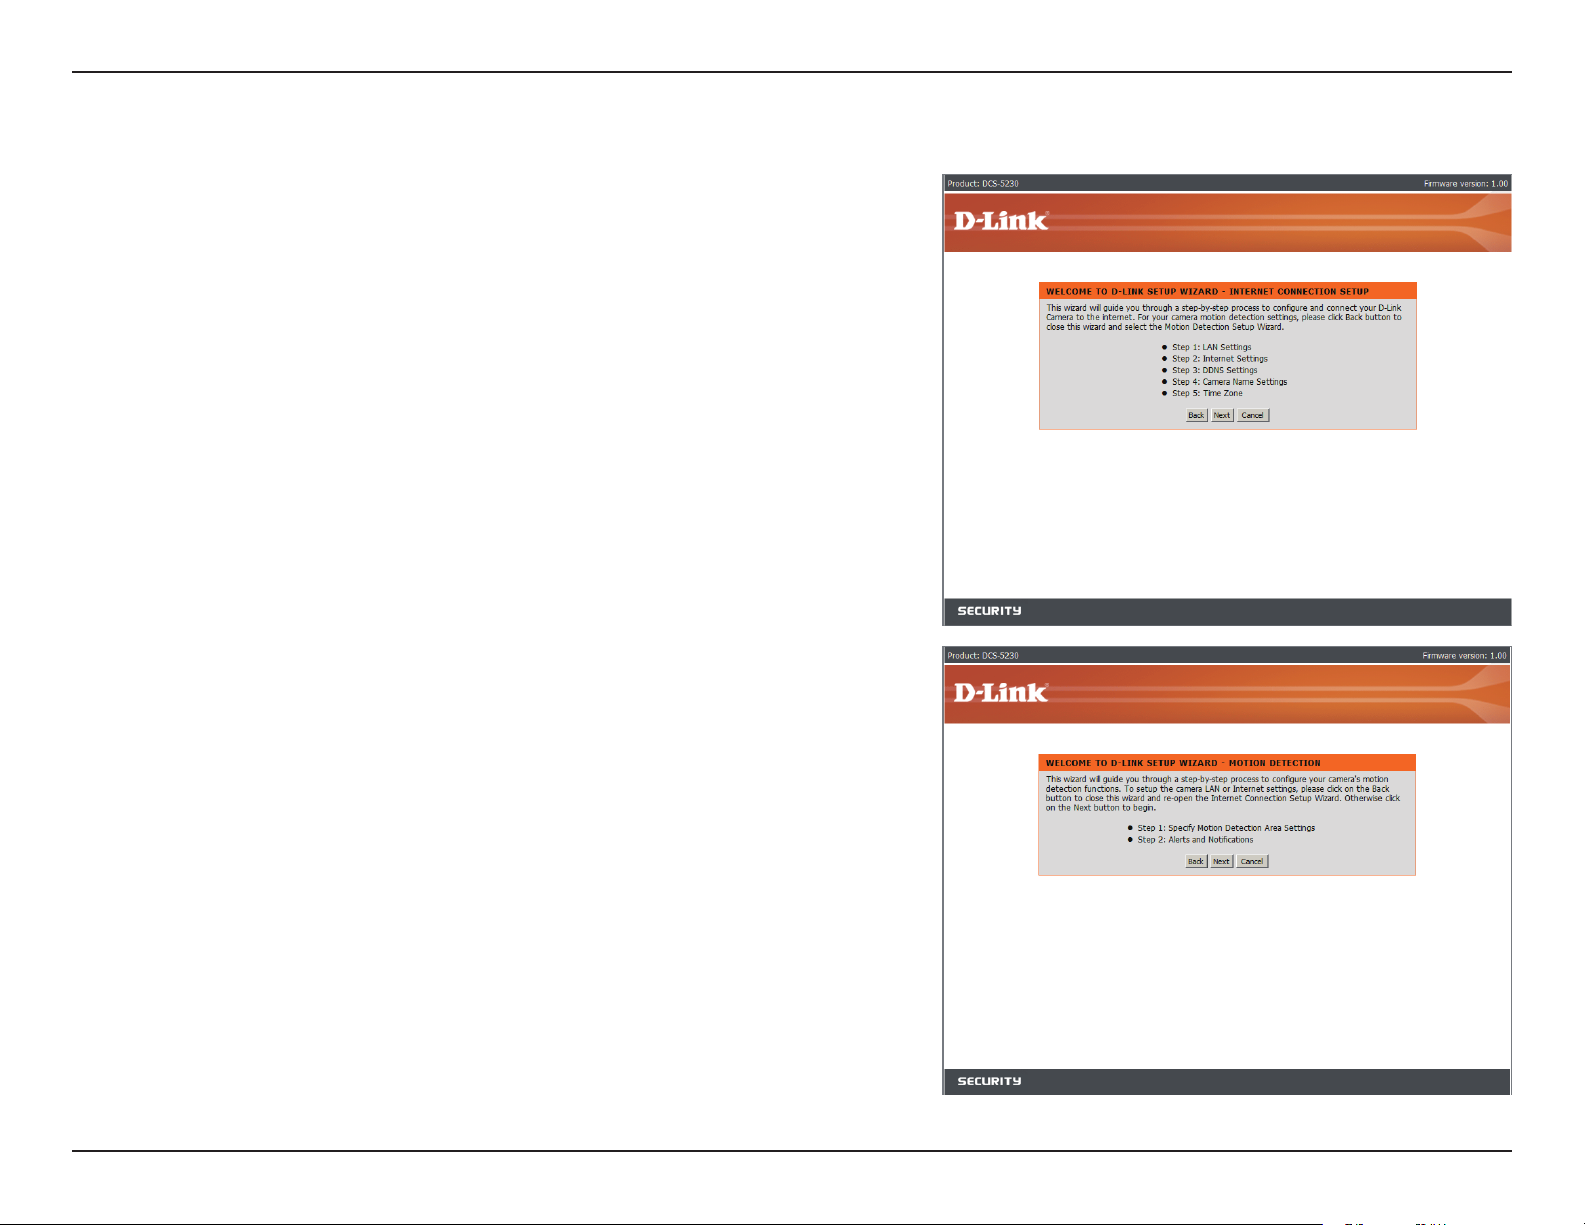
Wizard
The setup wizards guide you through initial setup of your IP camera.
You can use the Internet Connection Setup Wizard for initial network
setup, and you can use the Motion Detection Setup Wizard to set up
motion detection and snapshots. Simply follow the instructions given
in each step of the wizard to quickly set up your camera.
Alternatively, you can manually set up your Internet connection by
clicking Manual Internet Connection Setup, and you can manually
set up motion detection options by clicking on Manual Motion
Detection Setup. You can also see these settings by clicking on their
categories on the left side (Network Setup/ Wireless Setup/ Motion
Detection/ Snapshot).
Note: If the camera is set to SXGA mode in Audio and Video, Motion
Detection and Motion Triggered Snapshots are disabled.
28D-Link DCS-5230 User Manual
Page 29

Section 3 - Configuration
Network Setup
DHCP:
IP Address:
Subnet Mask:
Default Router:
Primary DNS:
Secondary DNS:
Enable UPnP:
DCS-5230 will request a new IP address from the
DHCP server every time it restarts. Once the DCS-
5230 is congured, this radio should be deselected
at all times. If this radio button has been selected
and the connection is lost, run the DCC nd the
camera’s IP address.
Necessary for network identication.
Used to determine if the destination is in the same
subnet. The default value is 255.255.255.0.
Enter the IP address of the router/gateway. Invalid
router settings may cause failed transmissions to
a different subnet.
The primary domain name server that translates
names to IP addresses.
The secondary domain name server which
operates as a backup for the primary DNS.
This option allows a computer to nd this camera through UPnP (Universal Plug & Play), which will show up
under “Network Neighborhood” without conguration. UPnP is based on TCP/IP and Internet protocols. UPnP is
a networking architecture that provides compatibility among networking equipment, software, and peripherals.
The camera is a UPnP enabled device and it will work with other UPnP devices and software.
29D-Link DCS-5230 User Manual
Page 30

Section 3 - Configuration
PPPoE Settings:
HTTP Port:
RTSP Port:
Note:
If you are using a PPPoE connection, enable it and enter the User Name and Password for your PPPoE
account. You can get this information from your Internet service provider (ISP).
This is the port that allows the user to connect to the camera’s user interface. By default the port is set to 80.
You may change the port number if using multiple cameras.
This is the port that the camera uses to stream video to. By default the port is set to 554. You may change the
port number if using multiple cameras.
You MUST also set up your router/gateway for Port Forwarding/Mapping; this will enable remote viewing of
your camera via the Internet. Please refer to your router’s instruction manual on how to open up ports. For
additional help on conguring your camera to work with your router, please refer to Installing the DCS-5230
Behind a Router later in the User Manual. For installing multiple cameras, ONE port per camera must be
opened on your router, the Web server (HTTP) port. Also, some browsers may restrict some ports, such as
1 or 22, for security purposes. If you have problems accessing your camera through HTTP, try using a port
higher than 1024.
After making any changes, click the Save Settings button to save your changes, or click the Don’t Save
Settings button to discard your changes.
30D-Link DCS-5230 User Manual
Page 31

Section 3 - Configuration
Wireless Setup
Enable Wireless:
Site Survey:
SSID:
Wireless Mode:
Channel:
To set up your IP camera’s wireless network
interface settings, enable Wireless Settings
in this window rst. Then continue the further
conguration next.
Clicking this button will scan for available wireless
networks. After scanning, you can use the drop-
down box to select an available wireless network,
and related information (SSID, Wireless Mode,
Channel, Authentication, Encryption) will be
automatically lled in for you.
Enter the SSID of the wireless access point you
wish to use.
Use the drop-down box to select the mode of the
wireless network you wish to connect to. Infrastructure is normally used to connect to an access point or router.
Ad-Hoc is usually used to connect directly to another computer.
If you are using Ad Hoc mode, select the channel of the wireless network you wish to connect to, or select Auto.
Authentication:
Encryption:
Key:
Select the authentication you use on your wireless network - Open, Shared(WEP), WPA-PSK, or WPA-PSK2.
If you use WPA-PSK or WPA-PSK2 authentication, you will need to specify whether your wireless network
uses TKIP or AES encryption. If you use Open or Shared authentication, this setting will be automatically set
for you.
If you use WEP, WPA-PSK, or WPA-PSK2 authentication, enter the Key (also known as password) used for
your wireless network.
After making any changes, click the Save Settings button to save your changes, or click the Don’t Save
Settings button to discard your changes.
31D-Link DCS-5230 User Manual
Page 32

Section 3 - Configuration
Dynamic DNS
If you have a DSL or Cable service provider that changes your modem IP address periodically, Dynamic DNS (Domain
Name Service), a method of keeping a domain name linked to a dynamic IP address, is useful. With most Cable and
DSL connections, you are assigned a dynamic IP address and that address is used only for the duration of that specic
connection. With the DCS-5230, you can set up your DDNS service and the DCS-5230 will automatically update your
DDNS server every time it receives a different IP address. Depending on the service, this update may take a few
hours.
Enable DDNS:
Server Address:
Host Name:
User Name:
Password:
Verify Password:
Timeout:
Check this checkbox to enable the DDNS function
of the camera.
Use the drop-down box to the right to select a
DDNS service to use.
Type in the Host Name of the DDNS service you
wish to use.
Enter your User Name for the DDNS service you
wish to use.
Enter the password for the DDNS service you
wish to use.
Retype the password for the DDNS service you
wish to use.
This sets the number of hours between DDNS updates.
After making any changes, click the Save Settings button to save your changes, or click the Don’t Save
Settings button to discard your changes.
32D-Link DCS-5230 User Manual
Page 33

Section 3 - Configuration
Image Setup
The options in Image Setup allow you to adjust the settings for your IP camera sensor and image.
Brightness:
Saturation:
Contrast:
Frequency:
White Balance:
B/W:
Flip:
This adjusts the brightness of the camera
image. This is set to 35 by default.
This adjusts the color saturation of the camera
image. This is set to 40 by default.
This adjusts the contrast of the camera image.
This is set to 40 by default.
This option adjusts the camera sensor’s to
prevent ickering under certain light sources,
such as orescent lights. This is set to Auto
by default.
By default the camera will automatically white
balance the image. You can turn off white
balancing by selecting Disable from the drop-
down box.
Ticking this checkbox will change the camera
image into black and white.
This will ip the image vertically.
Mirror:
This will ip the image horizontally in such a way that your left side will be on the left side of the screen and
vice versa.
Note: Mirror and Flip can be used if you choose to mount the DCS-5230 upside down on the ceiling.
33D-Link DCS-5230 User Manual
Page 34

Section 3 - Configuration
Audio and Video
Click the Audio and Video button on the left side of the Setup screen to access audio and video settings that affect
how the audio and video appears.
Sensor Output:
Video Profile:
Encode Type:
Resolution:
FPS:
You can set the camera’s sensor output to VGA quality
(640x480), XGA quality (1024x768), or SXGA quality
(1280x1024).
Note: When using SXGA mode, please note that motion
detection and motion triggered snapshots will be disabled
and that recordings will be done at a maximum of Medium
resolution.
You can set up 4 different video proles, which allow you
customize how you view your camera’s video stream.
This sets the video codec used for the video stream. You
can choose MPEG-4 or MJPEG(JPEG). IE browsers can
view both MPEG-4 and MJPEG video streams, and nonIE browsers can only view MJPEG video streams.
This sets the display resolution of the video stream. If
the Resolution is different than the Sensor Output size,
the video will be shrunk or enlarged to the Resolution
size you set here.
This sets the target number of frames per second (FPS)
for the video stream. Higher framerates will provide
smoother video.
bps:
This sets the target bitrate of the video stream. Higher
bitrates will provide better quality video. When the Encode Type is set to MJPEG, you cannot change the
bps setting. Also, available bps settings may change depending on what the Encode Type, Sensor Output,
Resolution, and FPS settings are set to.
34D-Link DCS-5230 User Manual
Page 35

Section 3 - Configuration
JPEG Quality:
RTSP URL:
Night Mode:
Enable Night Mode:
Shutter:
Enable Speaker:
Volume:
This sets the JPEG quality of any manual snapshots you take when this video prole is selected.
This setting allows you to set a sufx for your camera’s RTSP URL, so you can view your camera’s video with
this video prole’s settings. For example, if you enter “mpeg4” as your RTSP URL setting and your camera’s
IP is 192.160.0.30, you can view your camera’s video with these settings through 192.160.0.20/mpeg4 .
Note: Video Prole 3 is always set to MJPEG as the Encode Type to ensure that at least one of the Video
Proles are viewable by non-IE browsers. Video Prole 4 is for mobile devices only, and always uses MPEG-4
as the Encode Type.
Night mode allows the camera to use a longer shutter speed when the camera is in a low-light environment. If
the camera is in an area where there is sufcient lighting, Night Mode will not affect the video stream.
Check this box to enable Night Mode.
This sets the longest shutter speed Night Mode will use when Night Mode is enabled and the camera is viewing
a low-light scene.
Checking this box will enable you to send audio to an external speaker (not included) attached to the external
speaker jack of your camera. This will allow you to speak with another person through your camera.
This sets the volume level of the external speaker.
Enable Microphone:
Volume:
Checking this box will enable you to listen to audio picked up by the camera’s microphone. This will allow you
to hear what is happening near your camera.
This sets the volume level of the incoming audio.
Note: Higher frame size, frame rate and bit rates will give you better video quality, but they will also require
more network bandwidth. For best viewing results on a mobile phone, we suggest setting the frame rate to 5
fps and bit rate to 20 Kbps.
After making any changes, click the Save Settings button to save your changes, or click the Don’t Save
Settings button to discard your changes.
35D-Link DCS-5230 User Manual
Page 36

Section 3 - Configuration
Motion Detection
This option allows you to set up Motion Detection on your IP camera. In order to use motion detection you must
rst check the Enable Video Motion checkbox. You can then click on the video window and draw motion detection
zones by clicking and dragging your mouse. Red areas indicate areas that will be monitored for motion. The camera
also has a PIR sensor which is used to detect motion using a special infrared sensor. PIR is good at detecting
motion from live subjects such as people and animals.
Enable PIR:
Enable Video Motion:
Sensitivity:
Draw Motion Area:
Erase Motion Area:
Click this box to enable the PIR
sensor.
Click this box to enable video motion
detection.
This setting adjusts how sensitive the
camera will be to motion, where 100%
will be the most sensitive setting
and 0% will be the least sensitive
setting.
This will allow you to draw motion
detection zones when clicking and
dragging, or erase motion detection
zones when clicking and dragging
depending on which option you have
selected.
Clicking this button will clear all
motion detection zones.
After making any changes, click the Save Settings button to save your changes, or click the Don’t Save
Settings button to discard your changes.
Note: If the camera is set to SXGA mode in Audio and Video, Motion Detection is disabled.
36D-Link DCS-5230 User Manual
Page 37

Section 3 - Configuration
The red grid on the right indicates an area that has been selected for motion
detection.
When motion is detected, the LIVE VIDEO page will display a blinking orange
motion video icon like the one below.
No Motion Motion
The motion notication will continue to blink as long as motion is detected.
If no additional motion is detected, it will return to its original state after eight
seconds.
37D-Link DCS-5230 User Manual
Page 38

Section 3 - Configuration
Time and Date
Click on the Time and Date button to access the settings from the left side of the Setup menu.
Time zone:
Enable Daylight Saving:
Daylight Saving Dates:
Enable NTP Server:
NTP server Used:
Update interval:
Set the date and time
manually:
Used to adjust the hour of time servers for
local settings.
Check this to enable daylight saving
time.
Set daylight saving time start and end date
by your local denition.
Synchronize with the NTP server over the
Internet whenever the DCS-5230 starts
up. It will fail if the assigned time server
cannot be reached.
Assign the IP address or domain name of
the time server. Leaving the text box blank
will let the DCS-5230 connect to default
time servers.
Used to adjust the hour of time servers
for local settings. The time interval for the
camera to update the time settings from
a NTP server.
Adjust the date and time according to what is selected by the administrator.
Copy Your Computer’s time
Settings:
Synchronize the date and time of DCS-5230 with your local computer. The date and time of the PC is displayed
and updated in the DCS-5230.
38D-Link DCS-5230 User Manual
Page 39

Section 3 - Configuration
Preset Position
Click the Preset Position button from the left side of the Setup screen to access settings that affect how the DCS-5230
Internet Camera can pan and move to preset locations.
Pan Speed:
Tilt Speed:
Pan/Patrol Speed:
Current Position:
Preset Position:
Dwelling Time:
Select the speed at which the camera will pan for a full cycle
from the drop-down list. Select a value between 0 and 10, 0
being the slowest setting.
Select the speed at which the camera will tilt for a full cycle
from the pull down menu. Select a value between 0 and 10,
0 being the slowest setting.
Select the speed at which the camera will pan during auto
patrol. Select a value between 1 and 3, 1 being the slowest
setting.
Enter a name for the position at which you would like to preset
the DCS-5230. Click Add to add the new preset position to
the Preset Locations list.
Using the drop-down list, you can choose and delete a preset
position by selecting it and clicking Delete.
Specify the number of seconds that the camera should remain xed upon a specied preset position.
39D-Link DCS-5230 User Manual
Page 40

Section 3 - Configuration
Set as Home:
Patrol Selection:
Use the Set As Home button to set the current position as the home position. The Home position is the rst
position the camera goes to after the camera boots. You can also recall the default home position, use the
Default Home button.
To use the Auto Patrol feature, select the desired preset positions from the Preset Locations list and add
them to the Selected Locations list by clicking Select. You can then select the order in which the camera will
patrol through the preset locations by selecting a location and clicking Up or Down. Click Remove to remove
a location from the list.
40D-Link DCS-5230 User Manual
Page 41

Section 3 - Configuration
Recording
This option allows you to congure recording settings and scheduling. You can record video to a Secure Digital card
inserted into the SD card slot, or you can have video saved to a Samba network drive.
Enable Recording:
SD Card:
Samba Network Drive:
Samba Auth:
User Name:
Password:
Check this checkbox to enable the recording feature. After
enabling recording, you will need to select a location to record to
(SD Card or Samba network drive), and you will need to select
a scheduling method.
Selecting this will allow you to record to an SD Card inserted
into the SD slot on the right side of the unit. When recording to
an SD Card, you can only use Event Based recording.
Selecting this will allow you to record to a Samba network drive
on your wired or wireless network.
Here, select Anonymous if no user name or password is
required to access your Samba drive. If you require a user name
and password to log in to your Samba drive, select Account
and ll in the following information:
Enter the user name required to access your Samba drive.
Enter the password required to access your Samba drive.
Password Confirm:
Server:
Shared Folder:
Test:
Re-enter the password required to access your Samba drive
for verication.
Enter the name or the IP of the server your Samba drive is on.
Enter the name of your shared folder.
This button will try to make a connection to the Samba network drive, and will let you know if the settings
work.
41D-Link DCS-5230 User Manual
Page 42

Section 3 - Configuration
Resolution:
Note: You can create a simple Samba network drive on your Windows PC by right-clicking a folder, selecting
Sharing and Security…, and selecting Share this folder. Enter a Share name you would like to use for the
folder, then click the Permissions button and check the box for Full Control / Allow for the Everyone group.
For your camera's Recording settings, use Anonymous for the Samba Auth, your computer's IP address for the
Server, and the Share name you chose for the Shared Folder. Click on the Test button to test your settings.
Please note that when creating a simple network drive like this, all users on your local network will have access
to the contents of this folder.
This will let you set which video prole you wish to use to record video. Please note that if the bitrate(bps) of
the video prole is higher than your Samba network drive’s throughput, the recording’s framerate(FPS) may
be reduced.
Record Until:
When Storage if Full:
Event Based:
Motion Detection Trigger
Recording:
Digital Input Trigger
Recording:
Prerecord:
Postrecord:
You can use this setting to adjust how much free space must remain when recording. It is suggested that you
set this to at least 32M to allow for enough buffer space for the camera to record with.
When your storage device is full or has reached the free space limit specied in Record until, you can choose
to stop recording, or you can have the camera delete old recordings to free space for new recordings to be
saved.
Note: If the camera is set to SXGA mode in Audio and Video, recordings will be made at a maximum of Medium
resolution only.
Event based recording will allow you to record video when specic events happen.
Enabling this option will set the camera to record video when motion is detected by the camera.
When the camera receives a signal from its DI input, it will start recording. You can nd more information about
the DI/DO interface at the end of this document.
This will set how many seconds of video before the event takes place will be recorded.
This will set how many seconds of video after the event takes place will be recorded.
42D-Link DCS-5230 User Manual
Page 43

Section 3 - Configuration
Example: Using motion detection triggered recording and setting Prerecord to 5 seconds and Postrecord to
9 seconds, the camera will save video from 5 seconds before motion was detected to 9 seconds after motion
was detected.
Continuous:
Scheduled Recording:
This will set the camera to record continuously. This scheduling method can only be done when recording to
a Samba drive.
This will set the camera to automatically record video during the specied times in the table below. This
scheduling method can only be done when recording to a Samba drive.
After making any changes, click the Save Settings button to save your changes, or click the Don’t Save
Settings button to discard your changes.
43D-Link DCS-5230 User Manual
Page 44

Section 3 - Configuration
Snapshot
Here, you can set the camera to take snapshots when motion is detected and/or when a signal is sent to the DI input.
Snapshots can be sent to an e-mail address and/or to an FTP server.
Enable Snapshot:
Motion Detector:
D/I:
E-mail Address:
User Name:
Password:
SMTP Mail Server:
Sender E-mail Address:
Recipient E-mail Address:
Check this box to enable the snapshot feature.
This will set the camera to take a snapshot whenever motion is detected.
This will set the camera to take a snapshot whenever a signal is sent to the D/I input. You can nd more
information about the DI/DO interface at the end of this document.
When checked, the camera will send the snapshots it takes to the e-mail address specied in the following
text boxes. If you do not know what to enter for the User Name, Password, or SMTP Mail Server, contact your
e-mail service provider for details.
Enter the username or login name for your e-mail account.
Enter the password for your e-mail account.
Enter the SMTP server for your e-mail account.
Enter the e-mail address you want to appear as the “From:” e-mail address in the snapshot e-mail.
Enter the e-mail address you want to send your snapshots to.
Port:
Test:
Enter the port used by your SMTP server.
Clicking this button will take a snapshot and will try to upload it to your FTP server using the settings you have
entered.
44D-Link DCS-5230 User Manual
Page 45

Section 3 - Configuration
Digital Output
This screen allows you to enable the Digital Out (D/O) port, and allows you to select what events will trigger the Digital
Out signal.
Enable D/O:
Motion Detection:
D/I:
Check this box to enable the D/O port.
When checked, the D/O port will send a signal
whenever motion is detected by the camera.
(When motion detection has been enabled)
When checked, the D/O port will send a signal
whenever a signal is detected on the Digital In
(D/I) port.
Note: If the camera is set to SXGA mode in Audio
and Video, Motion Detection is disabled.
45D-Link DCS-5230 User Manual
Page 46

Section 3 - Configuration
Maintenance
Click on the Maintenance tab to access 3 utility screens for controlling and administering the DCS-5230. The default
screen for Maintenance is Device Management.
Admin
The DCS-5230 is congured without any passwords by default. This
allows anyone to access and congure the DCS-5230 as long as
the IP address is known. Therefore, for security it is best to specify
a password to restrict others from accessing your camera.
Type a password in the Admin Password eld to enable protection,
and then conrm the password in the Retype Password eld.
This password is used to identify the administrator. You can add
accounts with User name and User Password for other users in the
Add user section. A maximum of 20 user accounts can be added.
46D-Link DCS-5230 User Manual
Page 47

Section 3 - Configuration
Administrator’s password:
User name:
User List:
Delete user:
Enable OSD:
Label:
Show Time:
Camera Name:
LED Light:
Calibrate the Device:
Privacy Mode:
Password for the Administrator’s account. The administrator password must be entered in twice for
conrmation.
Create a new user for accessing the video image. A maximum of twenty user accounts can be added. The
new user name will be displayed in the list of user names below.
Administrator can edit or delete users here by selecting the user name.
Remove a user from the user list.
Check this box to enable the On Screen Display which can include the camera label and time. The OSD will
be displayed in the black bar above the video window with a timestamp.
Type a label for the camera which will be displayed at the top of the video feed’s on screen display.
Displays the camera’s current time in the on screen display area.
Type a name to identify your camera. This name will appear in the OSD unless a label is specied.
The LED lights on the side of the device can be enabled or disabled. When enabled, they help to indicate
the status of the camera. However, this information is readily available to anyone who can see the device.
Therefore, for security reasons, you may wish to disable the LED lights to prevent others from observing the
camera status.
Clicking this button will calibrate the camera so that the P/T/Z apparatus functions correctly. The camera is
automatically calibrated whenever it is powered on and initialized or reset. Should the camera’s pan, tilt, and
zoom functions begin to behave incorrectly, or if the device has been jarred or handled improperly, you may
need to recalibrate the camera manually by pressing this button.
On: Turning privacy mode on will completely disable the audio and video feed from the camera.
Off (Default): When privacy mode is off, the audio and video feed from the camera is enabled.
Scheduled: Scheduled privacy mode offers the option to disable monitoring during certain times of the day.
If scheduled privacy mode is enabled, you may put a checkmark next to the days that require privacy, and
specify the interval at which the camera feed should be disabled on a particular day.
47D-Link DCS-5230 User Manual
Page 48

Section 3 - Configuration
System
Save to Local Hard Drive:
Load from Local Hard
Drive:
Restore to Factory Default:
Reboot Device:
Clicking Save Conguration allows you
to save a copy of the camera’s current
conguration to a location which you
specify.
If you have previously backed up a your
camera’s conguration, you can restore
it using this menu. Click Browse, and
locate the le on your computer. Click
Load Configuration to restore the
backup. This will erase your current
settings.
This option will reset the camera back to
its factory default settings. This will erase
your current settings.
Clicking this button will restart the
camera.
Click Apply on this screen to restore the factory default settings. After conrmation, the system will restart and require
the DCC program to locate the IP address of the DCS-5230.
48D-Link DCS-5230 User Manual
Page 49

Section 3 - Configuration
Firmware Update
File Path:
This option allows you to upgrade the
rmware via a web browser. Click on
Browse to locate the rmware le and
then click on Upgrade to apply the
rmware to the camera.
49D-Link DCS-5230 User Manual
Page 50

Section 3 - Configuration
Status
Device Info
The Device Info screen lists the following important settings that are currently set for the DCS-5230:
• Camera Name
• Time & Date
• Firmware Version
• Mac Address
• IP Address
• IP Subnet Mask
• Default Gateway
• Primary DNS
• Secondary DNS
• PPPoE
• DDNS
50D-Link DCS-5230 User Manual
Page 51

Section 3 - Configuration
Log
The content of the log le reveals useful information about the current conguration and connection logged after the
DCS-5230 starts up.
Enable remote log:
IP Address:
Port:
Current log:
This option enables the camera to
send camera log les to a remote
server.
The IP addr e s s of the re m o t e
server.
The port number of the remote log
server. The default port is 514.
View the system log le. The content
of the le reveals useful information
about camera configuration and
connectivity status after the camera
boots up.
51D-Link DCS-5230 User Manual
Page 52

Section 3 - Configuration
Help
The help page provides detailed information for the camera’s Web interface.
52D-Link DCS-5230 User Manual
Page 53

Section 4 - D-ViewCam Installation
D-ViewCam Installation
D-ViewCam software is included to manage up to 32 cameras simultaneously, send automated e-mail alerts, and record
video to your hard drive when motion is detected or according to a set schedule.
Insert the software CD into the CD-ROM drive. The D-ViewCam Installation screen will appear.
Click D-ViewCam
Select a language and click OK to continue.
Click OK
53D-Link DCS-5230 User Manual
Page 54

Section 4 - D-ViewCam Installation
Click Next to continue.
Click Next
Click Browse to choose a specic folder for the installation, otherwise
click Next to continue.
Click Next
54D-Link DCS-5230 User Manual
Page 55

Section 4 - D-ViewCam Installation
Click Next to start the installation.
Note: The D-ViewCam installation process may take several minutes to
complete.
Click Next
Click Finish to complete the installation.
Click Finish
55D-Link DCS-5230 User Manual
Page 56

Section 4 - D-ViewCam Installation
Adding a Camera
This section will show you how to add a camera to the D-ViewCam system.
To start D-ViewCam, select Start > All Programs > D-Link >
D-Link D-ViewCam.
Enter Admin as the default user name and leave the
password blank. Click
to log into the system.
56D-Link DCS-5230 User Manual
Page 57

Section 4 - D-ViewCam Installation
The Add Camera Wizard screen will appear. Use this wizard to add your cameras to the D-ViewCam system.
Note: Use the left or right arrow icons for navigation
within the wizard.
Click
/ Next to continue.
Click Next
57D-Link DCS-5230 User Manual
Page 58

Section 4 - D-ViewCam Installation
Choose the method to add your camera(s). You can select Auto Discovery
to automatically search for your camera(s), or Add Manually to add your
camera(s) via the camera’s IP address.
Click Next to continue.
If you selected Auto Discovery, the system will search all available
cameras that are located on the same LAN with same subnet. The system
will place all the cameras under the default map called My Map.
Click Next to continue.
If you selected Add Manually, enter the IP address or domain name, http
port, model name, camera ID and password.
Click the “?” button to auto-detect the camera’s model name. The model
name will appear in the Model Name box.
Click Next to continue.
58D-Link DCS-5230 User Manual
Page 59

Section 4 - D-ViewCam Installation
D-ViewCam shows the detected IP camera(s) information. You can choose and schedule recordings for each
camera.
• 24/7 Continuous Recording: Continuous recording - 24 hours a day, 7 days a week.
• 24/7 Motion Detection Recording: Continuous monitoring, but records ONLY when motion is detected.
• Ofce Hours Only: Continuously monitors during ofce hours (08:00 AM to 06:00 PM) and records ONLY when
motion is detected.
• Non-Ofce Hours Only: Continuously monitors during non-ofce hours (06:00 PM to 08:00 AM) and records
ONLY when motion is detected.
Click Next to continue.
59D-Link DCS-5230 User Manual
Page 60

Section 4 - D-ViewCam Installation
Select Yes to add other camera(s), or select No if you have no additional
camera(s) to be added.
Click Next to continue.
The Add Camera wizard is now complete. Click Close to access the D-ViewCam’s main screen.
Your D-ViewCam Installation is Complete!
Note: Please refer to the D-ViewCam user manual for information
about using the D-ViewCam.
60D-Link DCS-5230 User Manual
Page 61

Section 4 - Security
Wireless Security
This section will show you the different levels of security you can use to protect your data from intruders.
The DCS-5230 offers the following types of security:
• WPA-PSK (Pre-Shared Key)
• WEP (Wired Equivalent Privacy)
What is WEP?
WEP stands for Wired Equivalent Privacy. It is based on the IEEE 802.11 standard and uses the RC4 encryption
algorithm. WEP provides security by encrypting data over your wireless network so that it is protected as it is transmitted
from one wireless device to another.
To gain access to a WEP network, you must know the key. The key is a string of characters that you create. When
using WEP, you must determine the level of encryption. The type of encryption determines the key length. 128-bit
encryption requires a longer key than 64-bit encryption. Keys are dened by entering in a string in HEX (hexadecimal using characters 0-9, A-F) or ASCII (American Standard Code for Information Interchange – alphanumeric characters)
format. ASCII format is provided so you can enter a string that is easier to remember. The ASCII string is converted to
HEX for use over the network. Four keys can be dened so that you can change keys easily.
61D-Link DCS-5230 User Manual
Page 62

Section 4 - Security
What is WPA?
WPA, or Wi-Fi Protected Access, is a Wi-Fi standard that was designed to improve the security features of WEP (Wired
Equivalent Privacy).
The 2 major improvements over WEP:
• Improved data encryption through the Temporal Key Integrity Protocol (TKIP). TKIP scrambles the keys
using a hashing algorithm and, by adding an integrity-checking feature, ensures that the keys haven’t been
tampered with. WPA2 is based on 802.11i and uses Advanced Encryption Standard instead of TKIP.
• User authentication, which is generally missing in WEP, through the extensible authentication protocol
(EAP). WEP regulates access to a wireless network based on a computer’s hardware-specic MAC
address, which is relatively simple to be sniffed out and stolen. EAP is built on a more secure public-key
encryption system to ensure that only authorized network users can access the network.
WPA-PSK/WPA2-PSK uses a passphrase or key to authenticate your wireless connection. The key is an alpha-numeric
password between 8 and 63 characters long. The password can include symbols (!?*&_) and spaces. This key must
be the exact same key entered on your wireless router or access point.
62D-Link DCS-5230 User Manual
Page 63

Section 4 - Security
Using & Configuring the DCS-5230 with a NAT Router
D-Link’s DCS-5230 is a versatile and cost effective Internet Camera offering both video and audio monitoring. It can
also serve as a powerful surveillance system in security applications. The DCS-5230 can be used with any wired or
802.11n/g wireless router. This section explains how to view the camera from either the Internet or from inside your
internal network.
Materials Needed:
• 1 DCS-5230 Internet Camera
• 1 Ethernet Cable
• A Wired or Wireless router such as the D-Link DIR-655 Wireless Router
• Ethernet based PC for system conguration
Setting up the DCS-5230 for Use Behind a Router
Installing a DCS-5230 Internet Camera on your network is an easy 4–step procedure:
1. Assign a Local IP Address to Your Internet Camera
2. View the Internet Camera Using Your Internet Explorer Web Browser
3. Access the Router with Your Web Browser
4. Open Virtual Server Ports to Enable Remote Image Viewing
This section is designed to walk you through the setup process for installing your camera behind a router and enable
remote video viewing. For the basic setup of the DCS-5230, follow the steps outlined in the Quick Installation Guide.
63D-Link DCS-5230 User Manual
Page 64

Section 4 - Security
After you have completed the setup of the DCS-5230 outlined in the Quick Installation Guide you will have an operating
camera that has an assigned IP Address. Because you are using a router to share the Internet with one or more PCs,
the IP Address assigned to the Internet Camera will be a local IP Address. This allows viewing within your Local Area
Network (LAN) until the router is congured to allow remote viewing of the camera over the Internet.
1. Assign a Local IP Address to Your Camera
Run the setup wizard from the CD included with the DCS-5230. Follow the steps in the Quick Installation Guide to
congure the DCS-5230. The camera will be assigned a local IP Address that allows it to be recognized by the router.
Write down this IP Address for future reference.
64D-Link DCS-5230 User Manual
Page 65

Section 4 - Security
2. View the Internet Camera Using Your Internet Explorer Web Browser
Run your Internet Explorer Web browser. In the address bar, type in the IP Address that was assigned to the Internet
Camera by the DCC program. The DCS-5230 Live Video Page appears with a window displaying live video from the
camera. You are able to view this screen from any PC running Internet Explorer on your LAN.
Click on the Setup button on the left side of the display. Scroll to the bottom of the Network Setup page (see page 29)
to display the ports used by HTTP and Streaming audio and video.
65D-Link DCS-5230 User Manual
Page 66

Section 4 - Security
The Setup > Network Setup page displays the port settings for your camera. If necessary, these ports can be changed
if they are already in use by other devices (e.g. in a multiple camera environment).
Note: Both the HTTP port and RTSP port are required
to be opened for the DCS-5230. Please refer to page
68 on how to open ports in the router.
66D-Link DCS-5230 User Manual
Page 67

Section 4 - Security
Router Set-Up and Installation
The following steps generally apply to any router that you have on your network. The D-Link DIR-655 is used as an
example to clarify the conguration process. Congure the initial settings of the DIR-655 by following the steps outlined
in the DIR-655 Quick Installation Guide.
3. Access the Router with Your Web Browser
If you have cable or DSL Internet service, you will most likely have a
dynamically assigned WAN IP Address. ‘Dynamic’ means that your
router’s WAN IP address can change from time to time depending on
your ISP. A dynamic WAN IP Address identies your router on the public
network and allows it to access the Internet. To nd out what your router’s
WAN IP Address is, go to the Status menu on your router and locate the
WAN information for your router (as shown on the next page). The WAN
IP Address will be listed. This will be the address that you will need to
type in your Web browser to view your camera over the Internet.
Your WAN IP Address will be listed on the router’s
Status > Device Info page.
67D-Link DCS-5230 User Manual
Page 68

Section 4 - Security
Note: Because a dynamic WAN IP can change from time to time depending on your ISP, you may want to obtain a
Static IP address from your ISP. A Static IP address is a xed IP address that will not change over time and will be
more convenient for you to use to access your camera from a remote location. The Static IP Address will also allow
you to access your camera attached to your router over the Internet.
4. Open Virtual Server Ports to Enable Remote Image Viewing
The rewall security features built into the DIR-655 router prevent users from accessing the video from the DCS-5230
over the Internet. The router connects to the Internet over a series of numbered ports. The ports normally used by the
DCS-5230 are blocked from access over the Internet. Therefore, these ports need to be made accessible over the
Internet. This is accomplished using the Virtual Server function on the DIR-655 router. The Virtual Server ports used
by the camera must be opened through the router for remote access to your camera. Virtual Server is accessed by
clicking on the Advanced tab of the router screen.
Follow these steps to congure your router’s Virtual Server settings:
1. Click Enabled.
2. Enter a different name for each entry.
3. Enter your camera’s local IP Address (e.g., 192.168.0.120 in the example in step 2 on page 69) in the
Private IP eld.
4. Select TCP for HTTP port, both (TCP and UDP) for RTSP and both (TCP and UDP) for 5556 - 5559
ports.
5. If you are using the default camera port settings, enter 80 into the Public and Private Port section, click
Apply.
6. Scheduling should be set to Always so that the camera images can be accessed at any time.
68D-Link DCS-5230 User Manual
Page 69

Section 4 - Security
Repeat the above steps adding the port 554 to both the Public and Private Port sections. A check mark appearing
before the entry name will indicate that the ports are enabled.
Important: Some ISPs block access to port 80 and other commonly used Internet ports to conserve bandwidth. Check
with your ISP so that you can open the appropriate ports accordingly. If your ISP does not pass trafc on port 80, you
will need to change the port the camera uses from 80 to something else, such as 800. Not all routers are the same,
so refer to your user manual for specic instructions on how to open ports.
Enter valid ports in the Virtual Server section of your router. Please make sure to check the box next to the camera
name on the Virtual Server List to enable your settings.
69D-Link DCS-5230 User Manual
Page 70

Section 4 - Security
Using & Configuring 3G Compatible Cell Phones
To enable mobile device video streaming, you will need to congure for mobile viewing (see below).
70D-Link DCS-5230 User Manual
Page 71

Section 4 - Security
Play from RealPlayer
The following steps are based on a Nokia 6630 cell phone.
Press the Menu button and select Media
Select Open
Select RealPlayer
71D-Link DCS-5230 User Manual
Page 72

Section 4 - Security
Select Open
When RealPlayer opens, press Options
72D-Link DCS-5230 User Manual
Page 73

Section 4 - Security
Select Download
Select Video Clips
Note: 71.34.50.5 is the camera’s IP address in this sample.
Press Options
73D-Link DCS-5230 User Manual
Page 74

Section 4 - Security
Select Navigation Options
Select Go to web address
Input your rtsp address
74D-Link DCS-5230 User Manual
Page 75

Section 4 - Security
Press Yes, and allow Connection and
Loading of the streaming video.
Enjoy streaming video on your cellphone.
75D-Link DCS-5230 User Manual
Page 76

Section 4 - Security
Press the Menu button and select PVPlayer
Select Open
Play from PVPlayer
Press the Options button
76D-Link DCS-5230 User Manual
Page 77

Section 4 - Security
Select Open location
Input your rtsp address
Note: 71.34.50.5 is the camera’s IP address in this sample.
77D-Link DCS-5230 User Manual
Page 78

Section 4 - Security
Enjoy streaming video on your cellphone.
78D-Link DCS-5230 User Manual
Page 79

Section 5 - Troubleshooting
Troubleshooting
1 What is an Internet Camera?
The Internet Camera is a stand-alone system connecting directly to an Ethernet or Fast Ethernet network. It differs
from a conventional PC Camera, the Internet Camera is an all-in-one system with built-in CPU and Web-based
solutions providing a low cost solution that can transmit high quality video images for monitoring. The Internet
Camera can be managed remotely, accessed and controlled from any PC/Notebook over an Intranet or the Internet
from a Web browser.
2. What is the maximum number of users that can be allowed to access DCS-5230 simultaneously?
The maximum number of users that can log onto the Internet Camera at the same time is 10. Please keep in mind
the overall performance of the transmission speed will slow down when many users are logged on.
3. What algorithm is used to compress the digital image?
The Internet Camera utilizes MPEG-4 Simple Prole Mode image compression technology to provide high quality
images.
4. Can I capture still images from the Internet Camera?
Yes you are able to capture still images with the snapshot function from the software application CD supplied with
the Internet Camera or with the snapshot function on the Home page using an Internet browser.
5. Can the Internet Camera be used outdoors?
The Internet Camera is not weatherproof, and needs to be equipped with a weatherproof case in order to be used
outdoors (recommended).
6. When physically connecting the Internet Camera to a network what network cabling is required?
The Internet Camera uses Category 5 UTP cable allowing 10 Base-T and 100 Base-T networking.
7. Can the Internet Camera be setup as a PC-cam on a computer?
No, the DCS-5230 Internet Camera is used only on a wireless 802.11n/g, Ethernet, or Fast Ethernet network.
79D-Link DCS-5230 User Manual
Page 80

Section 5 - Troubleshooting
8. Can the DCS-5230 be connected to the network if it consists of only private IP addresses?
Yes, the Internet Camera can be connected to a LAN with private IP addresses.
9. Can the DCS-5230 be installed and work if a rewall exists on the network?
If a rewall exists on the network, port 80 needs to be opened for ordinary data communication. The DCS-5230
uses HTTP port and RTSP port to stream video data. These ports (or the ports you specify from the Advanced Tab
in the Conguration screen if you change the default ports) need to be opened in the rewall device. Please refer to
page 68 for more information.
10. Why am I unable to access the DCS-5230 from a Web browser?
If a router or rewall is used on the network, the correct ports for the DCS-5230 may not be congured on the
router or rewall. To correct the problem, you need to determine if the DCS-5230 is behind a router or rewall
and if the router or rewall is properly congured for the ports the DCS-5230 is using. Refer to page 68 for help in
opening the correct ports on a router or rewall for use with the DCS-5230.
Other possible problems might be due to the network cable. Try replacing your network cable. Test the network
interface of the product by connecting a local computer to the unit, utilizing a Ethernet crossover cable. If the
problem is not solved the Internet Camera might be faulty.
11. Why does the Internet Camera work locally but not externally?
This might be caused by network rewall protection. The rewall may need to have some settings changed in
order for the Internet Camera to be accessible outside your local LAN. Check with the Network Administrator for
your network.
Make sure that the Internet Camera is not conicting with any Web server you may have running on your network.
The default router setting might be a possible reason. Check that the conguration of the router settings allow the
Internet Camera to be accessed outside your local LAN. Please refer to page 68 for more information.
80D-Link DCS-5230 User Manual
Page 81

Section 5 - Troubleshooting
12. I connected the Internet Camera directly to a computer with a cross-over cable Ethernet cable and
received the following Windows error upon running the Installation Wizard:
This Windows error will occur if the Internet Camera is connected to a computer that is not
®
properly congured with a valid IP address. Turn off DHCP from the Network Settings in Windows
and congure the computer with a valid IP address, or connect the camera to a router with DHCP
enabled.
13. Why does a series of broad vertical white lines appear throughout the image?
It could be that the CMOS sensor has become overloaded when it has been exposed to bright lights such as direct
exposure to sunlight or halogen lights. Reposition the Internet Camera into a more shaded area immediately as
prolonged exposure to bright lights will damage the CMOS sensor.
14. Noisy images occur. How can I solve the problem?
The video images might be noisy if the Internet Camera is used in a very low light environment. To solve this issue
you need more lighting.
15. The images appear to be of poor quality, how can I improve the image quality?
Make sure that your computer’s display properties are set above 256 colors. Using 16 or 256 colors on your
computer will produce dithering artifacts in the image, making the image appear to be of poor quality.
The conguration on the Internet Camera image display is incorrect. Through the Image Setup section of the Web
management you need to adjust the image related parameters such as brightness, contrast, hue and power line
frequency for uorescent light. Please refer to the Image Setup section on Page 33 for detailed information.
81D-Link DCS-5230 User Manual
Page 82

Appendix A - Wireless Basics
Wireless Basics
D-Link wireless products are based on industry standards to provide easy-to-use and compatible high-speed wireless
connectivity within your home, business or public access wireless networks. Strictly adhering to the IEEE standard,
the D-Link wireless family of products will allow you to securely access the data you want, when and where you want
it. You will be able to enjoy the freedom that wireless networking delivers.
A wireless local area network (WLAN) is a cellular computer network that transmits and receives data with radio signals
instead of wires. Wireless LANs are used increasingly in both home and ofce environments, and public areas such
as airports, coffee shops and universities. Innovative ways to utilize WLAN technology are helping people to work and
communicate more efciently. Increased mobility and the absence of cabling and other xed infrastructure have proven
to be benecial for many users.
Under many circumstances, it may be desirable for mobile network devices to link to a conventional Ethernet LAN in
order to use servers, printers or an Internet connection supplied through the wired LAN. A Wireless Router is a device
used to provide this link.
82D-Link DCS-5230 User Manual
Page 83

Appendix A - Wireless Basics
What is Wireless?
Wireless or WiFi technology is another way of connecting your computer to the network without using wires. WiFi uses
radio frequency to connect wirelessly, so you have the freedom to connect computers anywhere in your home or ofce
network.
Why D-Link Wireless?
D-Link is the worldwide leader and award winning designer, developer, and manufacturer of networking products.
D-Link delivers the performance you need at a price you can afford. D-Link has all the products you need to build your
network.
How does wireless work?
Wireless works similar to how cordless phone work, through radio signals to transmit data from one point A to point
B. But wireless technology has restrictions as to how you can access the network. You must be within the wireless
network range area to be able to connect your computer. There are two different types of wireless networks Wireless
Local Area Network (WLAN), and Wireless Personal Area Network (WPAN).
Wireless Local Area Network (WLAN)
In a wireless local area network, a device called an Access Point (AP) connects computers to the network. The access
point has a small antenna attached to it, which allows it to transmit data back and forth over radio signals. With an
indoor access point as seen in the picture, the signal can travel up to 300 feet. With an outdoor access point the signal
can reach out up to 30 miles to serve places like manufacturing plants, industrial locations, college and high school
campuses, airports, golf courses, and many other outdoor venues.
83D-Link DCS-5230 User Manual
Page 84

Appendix A - Wireless Basics
Who uses wireless?
Wireless technology as become so popular in recent years that almost everyone is using it, whether it’s for home,
ofce, business, D-Link has a wireless solution for it.
Home
• Gives everyone at home broadband access
• Surf the web, check e-mail, instant message, and etc
• Gets rid of the cables around the house
• Simple and easy to use
Small Ofce and Home Ofce
• Stay on top of everything at home as you would at ofce
• Remotely access your ofce network from home
• Share Internet connection and printer with multiple computers
• No need to dedicate ofce space
Where is wireless used?
Wireless technology is expanding everywhere not just at home or ofce. People like the freedom of mobility and it’s
becoming so popular that more and more public facilities now provide wireless access to attract people. The wireless
connection in public places is usually called “hotspots.”
84D-Link DCS-5230 User Manual
Page 85

Appendix A - Wireless Basics
Using a D-Link Cardbus Adapter with your laptop, you can access the hotspot to connect to Internet from remote
locations like: Airports, Hotels, Coffee Shops, Libraries, Restaurants, and Convention Centers.
Wireless network is easy to setup, but if you’re installing it for the rst time it could be quite a task not knowing where to
start. That’s why we’ve put together a few setup steps and tips to help you through the process of setting up a wireless
network.
Tips
Here are a few things to keep in mind, when you install a wireless network.
Centralize your router or Access Point
Make sure you place the router/access point in a centralized location within your network for the best performance. Try
to place the router/access point as high as possible in the room, so the signal gets dispersed throughout your home.
If you have a two-story home, you may need a repeater to boost the signal to extend the range.
Eliminate Interference
Place home appliances such as cordless telephones, microwaves, and televisions as away as possible from the router/
access point. This would signicantly reduce any interfere that the appliances might cause since they operate on same
frequency.
Security
Do not let you next-door neighbors or intruders connect to your wireless network. Secure your wireless network by
turning on the WPA or WEP security feature on the router. Refer to product manual for detail information on how to
set it up.
85D-Link DCS-5230 User Manual
Page 86

Appendix A - Wireless Basics
Wireless Modes
There are basically two modes of networking:
• Infrastructure – All wireless clients will connect to an access point or wireless router.
• Ad-Hoc – Directly connecting to another computer, for peer-to-peer communication, using wireless network
adapters on each computer, such as two or more DCS-5230 wireless network Cardbus adapters.
An Infrastructure network contains an Access Point or wireless router. All the wireless devices, or clients, will connect
to the wireless router or access point.
An Ad-Hoc network contains only clients, such as laptops with wireless cardbus adapters. All the adapters must be in
Ad-Hoc mode to communicate.
86D-Link DCS-5230 User Manual
Page 87

Appendix B - Networking Basics
Networking Basics
Check your IP Address
After you install your new D-Link adapter, by default, the TCP/IP settings should be set to obtain an IP address from
a DHCP server (i.e. wireless router) automatically. To verify your IP address, please follow the steps below.
Click on Start > Run. In the run box type cmd and click OK.
At the prompt, type ipconfig and press Enter.
This will display the IP address, subnet mask, and
the default gateway of your adapter.
If the address is 0.0.0.0, check your adapter
installation, security settings, and the settings
on your router. Some rewall software programs
may block a DHCP request on newly installed
adapters.
If you are connecting to a wireless network at a
hotspot (e.g. hotel, coffee shop, airport), please contact an employee or administrator to verify their wireless network
settings.
87D-Link DCS-5230 User Manual
Page 88

Appendix B - Networking Basics
Statically Assign an IP Address
If you are not using a DHCP capable gateway/router, or you need to assign a static IP address, please follow the steps
below:
Step 1
Windows® XP - Click on Start > Control Panel > Network Connections.
Windows® 2000 - From the desktop, right-click My Network Places > Properties.
Step 2
Right-click on the Local Area Connection which represents your D-Link network adapter and select Properties.
Step 3
Highlight Internet Protocol (TCP/IP) and click Properties.
Step 4
Click Use the following IP address and enter an IP address that is on the same subnet as your network or the LAN
IP address on your router.
Example: If the router´s LAN IP address is 192.168.0.1, make your IP address
192.168.0.X where X is a number between 2 and 99. Make sure that the number
you choose is not in use on the network. Set Default Gateway the same as the LAN
IP address of your router (192.168.0.1).
Set Primary DNS the same as the LAN IP address of your router (192.168.0.1). The
Secondary DNS is not needed or you may enter a DNS server from your ISP.
Step 5
Click OK twice to save your settings.
88D-Link DCS-5230 User Manual
Page 89

Appendix C - Technical Specifications
Technical Specifications
Network Protocol Support
IPv4, ARP, TCP, UDP, ICMP, DHCP Client, NTP Client (D-Link), DNS Client,
DDNS Client (D-Link), SMTP Client, FTP Client, HTTP Server, Samba Client,
PPPoE, RTP, RTSP, RTCP, 3GPP
Built-in Network Interfaces
802.11 n/g Wireless
WPS Support
10/100BASE-TX Fast Ethernet with auto-MDI/MDIX support
Video Algorithm Support
JPEG for still images
Enhanced video compression using MPEG4 Simple Prole
MPEG4/MJPEG dual format compression
Video Resolution
VGA (640 x 480)
640 x 480 at 30fps
320 x 240 at 30fps
160 x 120 at 30fps
Video Features
Adjustable image size and quality
Time stamp and text overlays
3 congurable motion detection windows
Flip & mirror
Video Bit Rate
20K to 4M
Camera Specications
1.3 Mega pixel 1/3” CMOS sensor
Standard xed mount type lens, 3.98mm lens, F2.0
AGC/AWB/AES
Electronic shutter: 1/60 to 1/15000 sec.
Standard xed mount type lens 4mm, F2.0
62˚ eld of view
PAN/TILT/ZOOM
Pan range: 130° ~ -180°
Title range: +5 ~ -85
Digital zoom : 16x
XGA (1024 x 768)
1024 x 768 at 10fps
512 x 384 at 10fps
256 x 192 at 10fps
SXGA (1280 x 1024)
1280 x 1024 at 10fps
Audio
Sample rate GSM-AMR : 12.20 kbps, ADPCM : 8kbps
Microphone
Directivity: omni-directional
Frequency: 20 ~ 20000Hz
S/N ratio: more than 58dB
89D-Link DCS-5230 User Manual
Page 90

Appendix C - Technical Specifications
Security
Administrator and user group protected
Password authentication
Wireless LAN security:64/128-bit WEP, WPA-PSK and WPA2 data
encryption
Viewing System Requirements
OS: Microsoft Windows XP, 2000 / Vista/ Linux/ MAC OS X10.3 or above
Browser: Internet Explorer v6.0 or above
Supported PDA, Mobile Phones & Software
Handsets with 3GPP player
Packet Video Player 3.0
QuickTime 6.5
Real Player 10.5
Windows 2000, XP, Vista
Wireless LAN
Wireless Data Rates
IEEE 802.11n: From MCS0 to MCS15
IEEE 802.11g: 54, 48, 36, 24, 18, 12, 9, 6 Mbps
IEEE 802.11b: 11, 5.5, 2, 1 Mbps
Auto-select or Manual specied.
Antenna
Connector: MHF
Operating Frequency: 2.4Ghz
Physical & Environmental
DIAGNOSTIC LED
Link/Power LED: Green/Red
WPS LED: Blue
Power Input
12V, 1.25A switching power adapter
External AC-to-DC switching power adapter
Power Consumption
Max 6 watts
Dimensions
110 (H) x 105 (W) x 112 (D) mm
(4.33 x 4.13 x 4.41 inches)
Weight
393 grams (0.87 lb)
Sensitivity:
HT40802.11n: Packet Error Rate < 10%, MCS6 < -60 dBm·
HT20802.11n: Packet Error Rate < 10%, MCS6 < -66 dBm
802.11g: Packet Error Rate < 10%, 54Mbps < -66 dBm
802.11b: Packet Error Rate < 8%, 11Mbps < -82 dBm
Operation Temperature
0º to 40º C (32º to 104º F)
Storage Temperature
-20º to 70º C (-4º to 158º F)
Humidity
20% to 80% non-condensing
90D-Link DCS-5230 User Manual
Page 91

Appendix C - Technical Specifications
Emission (EMI), Safety & Other Certications
FCC Class B
IC
CE
C-Tick
Package Includes
DCS-5230 camera
External power adapter
CAT5 Ethernet cable
Quick Installation Guide
Master CD
Camera stand
Mounting Screws
Version 1.0
07/14/2009
91D-Link DCS-5230 User Manual
 Loading...