

Page 1

RT45
Tier 4
Operator’s
Manual
CMW
®
Issue 2.0
053-2746
Page 2

RT45 Operator’s Manual Overview - 1
Overview
Chapter Contents
Serial Number Location . . . . . . . . . . . . . . . . . . . . . . 2
Intended Use . . . . . . . . . . . . . . . . . . . . . . . . . . . . . . . 3
Equipment Modification . . . . . . . . . . . . . . . . . . . . . . 3
Unit Components . . . . . . . . . . . . . . . . . . . . . . . . . . . 4
Operator Orientation. . . . . . . . . . . . . . . . . . . . . . . . . 5
About This Manual . . . . . . . . . . . . . . . . . . . . . . . . . . 5
• Bulleted Lists. . . . . . . . . . . . . . . . . . . . . . . . . . . . . . . . . . . . . . . . . . . . . . 5
• Numbered Lists. . . . . . . . . . . . . . . . . . . . . . . . . . . . . . . . . . . . . . . . . . . . 5
CMW
®
Page 3
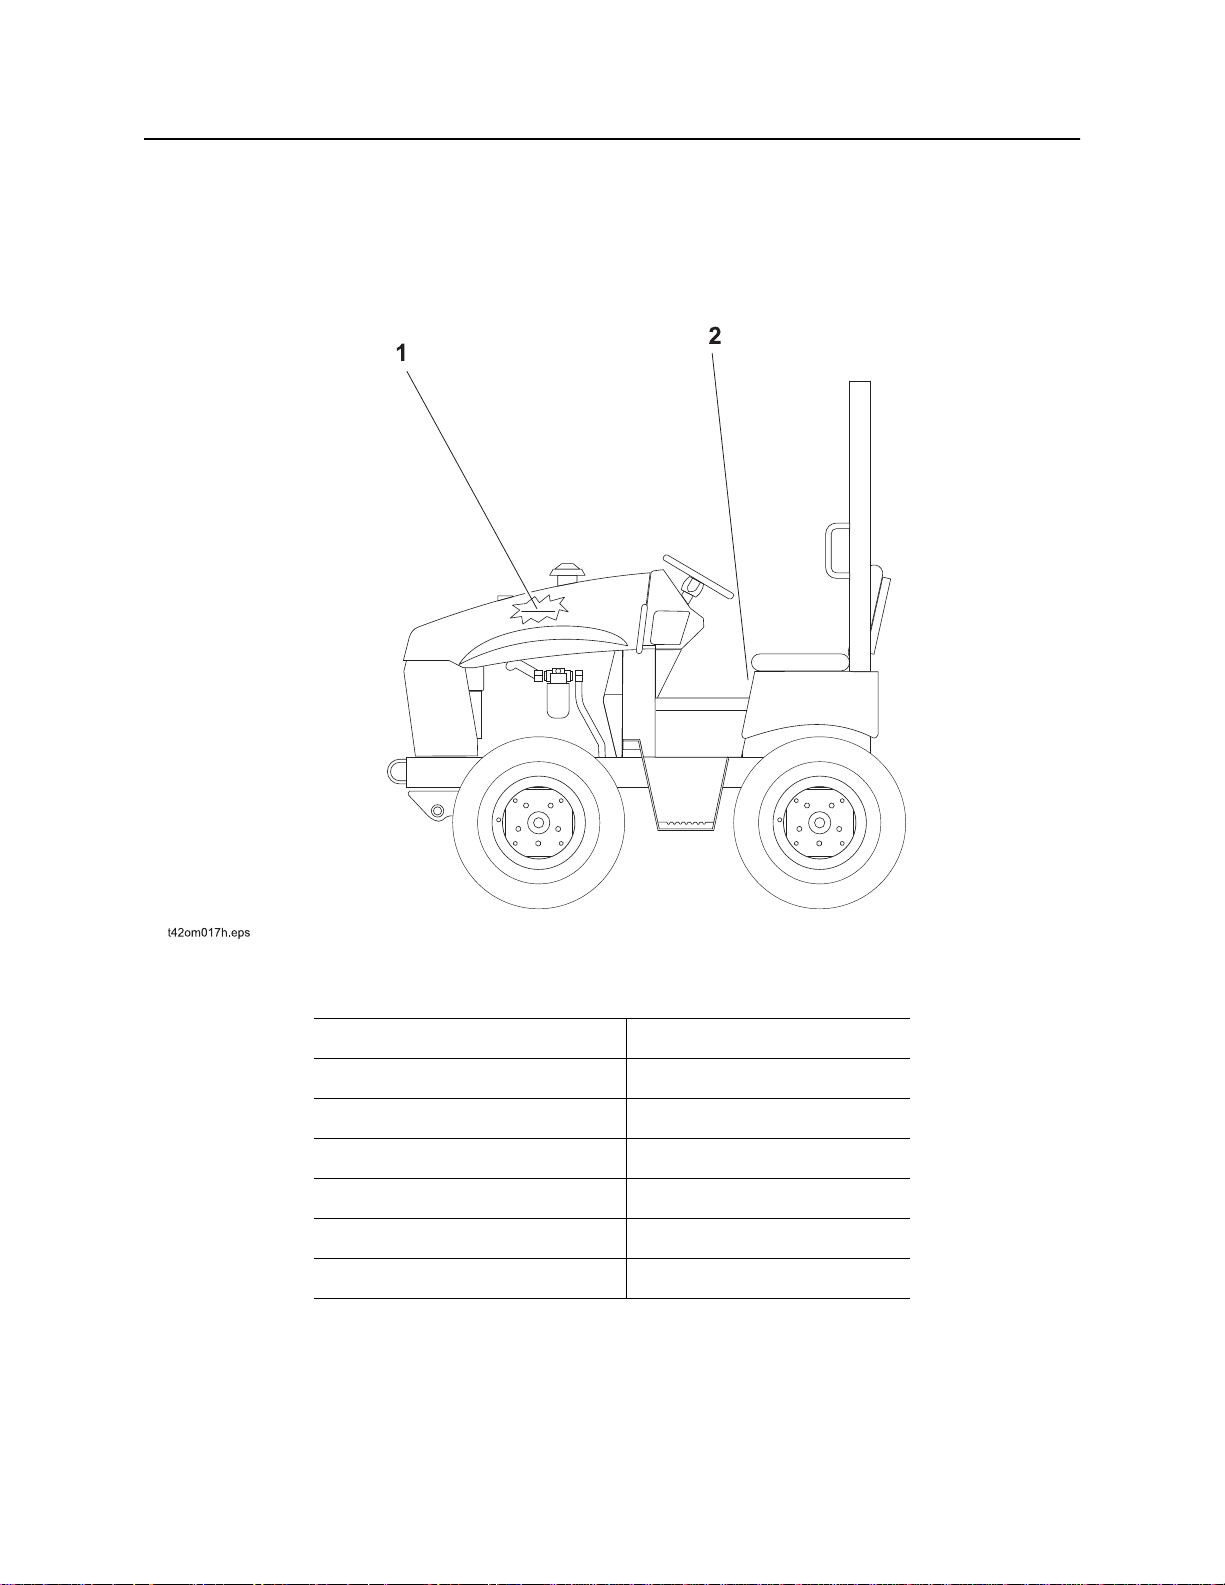
Overview - 2 RT45 Operator’s Manual
Serial Number Location
Serial Number Location
Record serial numbers and date of purchase in spaces provided. RT45 (2) and engine (1) serial numbers
are located as shown.
CMW
Date of manufacture
Date of purchase
RT45 serial number
Engine serial number
Front attachment serial number
Rear attachment serial number
Trailer serial number
®
Page 4

RT45 Operator’s Manual Overview - 3
Intended Use
Intended Use
The RT45 is a riding trencher designed to install buried service lines of various sizes using a variety of
Ditch Witch
®
attachments.
Attachment Max. width/diameter Max. depth
H313 trencher 12 in (305 mm) 63 in (1.6 m)
H314 trencher, center 12 in (305 mm) 52 in (1.3 m)
H314 trencher, offset 8 in (200 mm) 52 in (1.3 m)
H331 plow 3 in (76 mm) 24 in (610 mm)
H350 combo
trencher 8 in (200 mm) 42 in (1.1 m)
plow 3 in (76 mm) 24 in (610 mm)
H342 saw 5 in (130 mm) 18 in (455 mm)
A323 backhoe 18 in (460 mm) 93.2 in (2.4 m)
MT12 MicroTrencher 0.75-1.25 in (19-32 mm) 6-12.5 in (165-318 mm)
The unit is designed for operation in temperatures typically experienced in earth moving and construction
work environments. Provisions may be required to operate in extreme temperatures. Contact your Ditch
Witch dealer. Use in any other way is considered contrary to the intended use.
The RT45 should be used with genuine Ditch Witch chain, teeth, and sprockets. It should be operated,
serviced, and repaired only by persons familiar with its particular characteristics and acquainted with the
relevant safety procedures.
Equipment Modification
This equipment was designed and built in accordance with applicable standards and regulations.
Modification of equipment could mean that it will no longer meet regulations and may not function properly
or in accordance with the operating instructions. Modification of equipment should only be made by
competent personnel possessing knowledge of applicable standards, regulations, equipment design
functionality/requirements and any required specialized testing.
CMW
®
Page 5
Overview - 4 RT45 Operator’s Manual
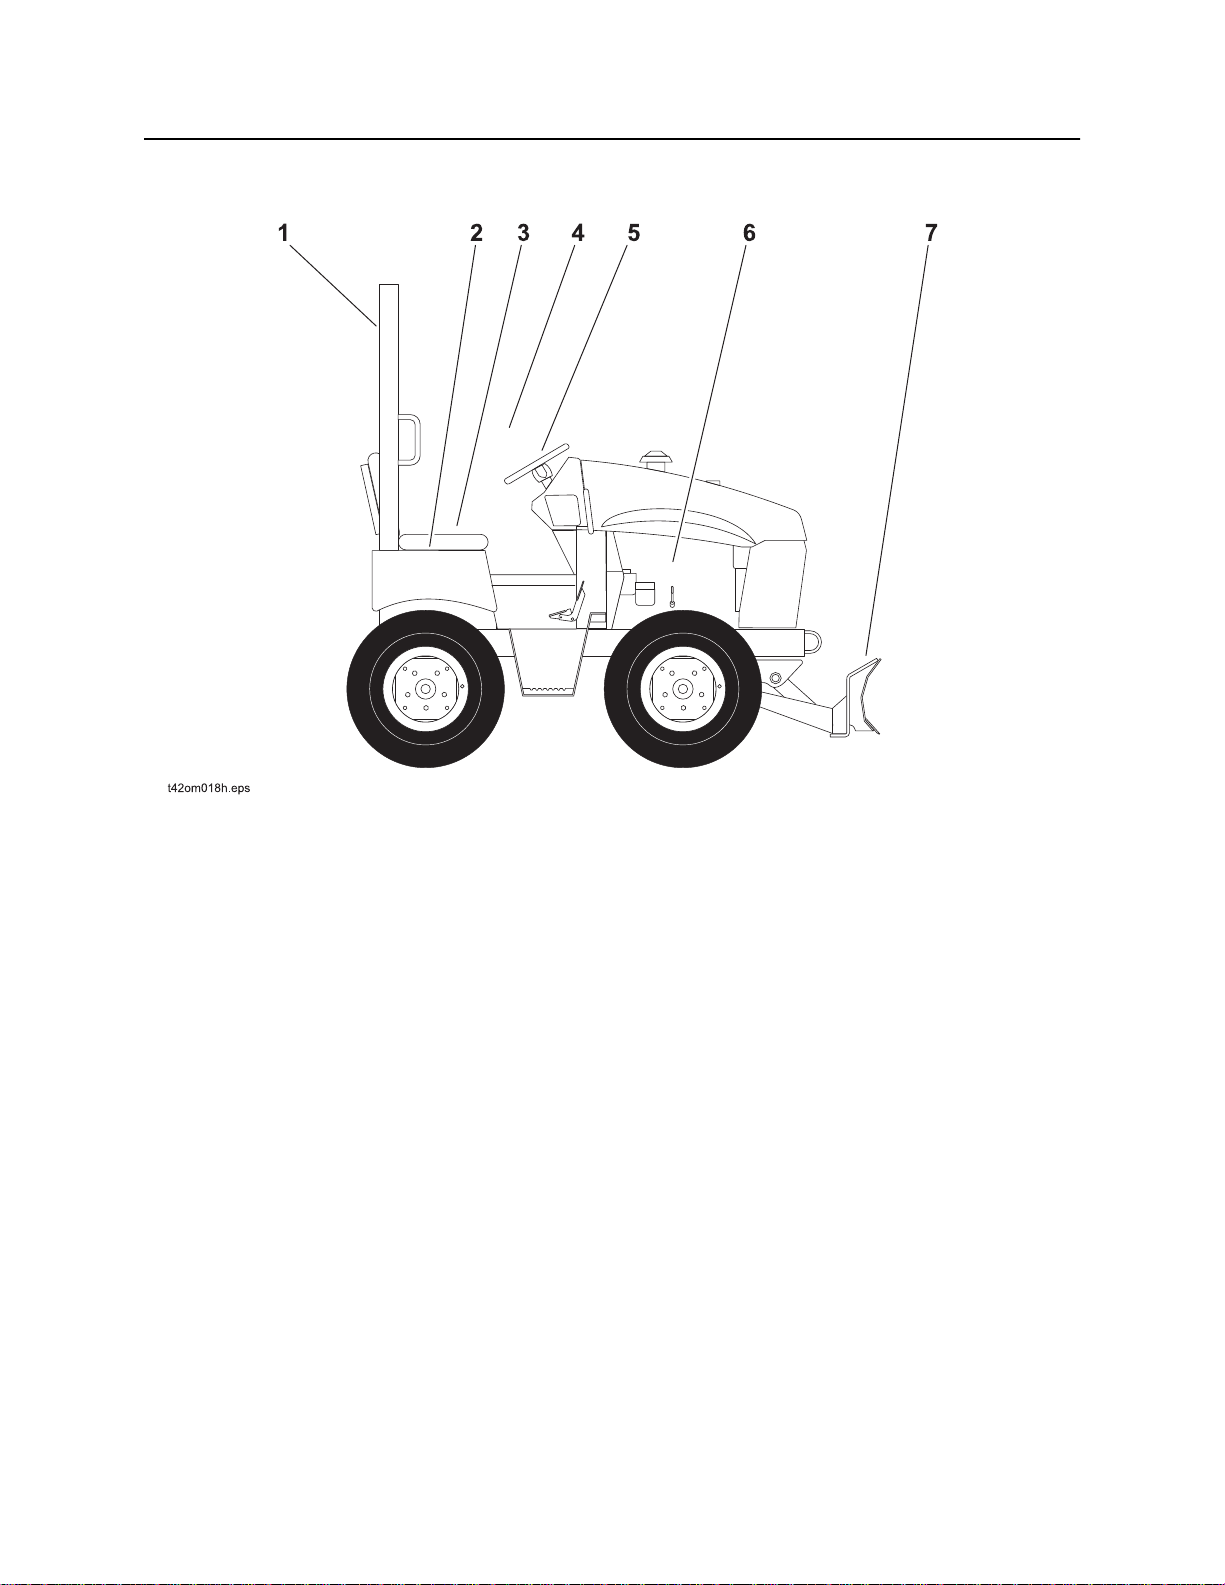
Unit Components
Unit Components
1. Rollover Protective Structure (ROPS)
2. Right console
3. Left console
4. Operator’s station
5. Center console
6. Engine compartment
7. Backfill blade
CMW
®
Page 6
RT45 Operator’s Manual Overview - 5
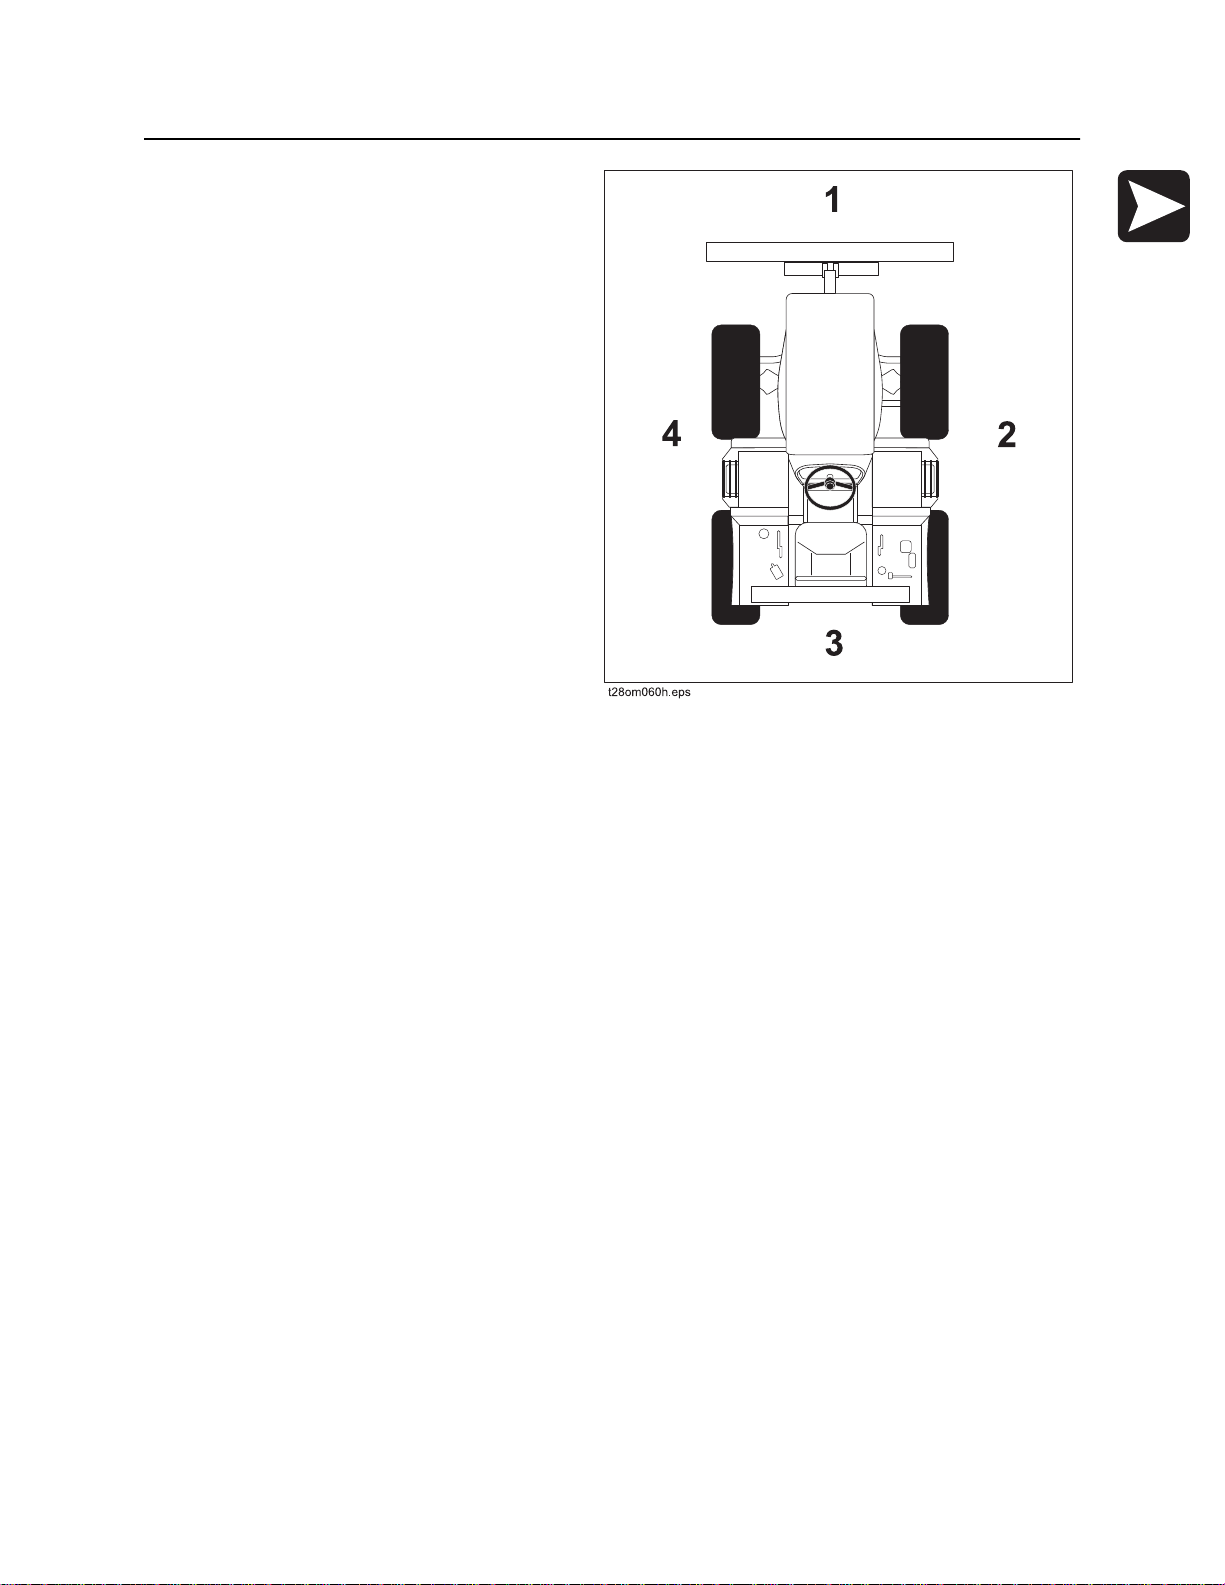
Operator Orientation
Operator Orientation
1. Front of unit
2. Right of unit
Right and left sides of machine are determined
by facing front of unit while seated at the
controls.
3. Rear of unit
4. Left of unit
About This Manual
This manual contains information for the proper use of this machine. See Operation Overview for basic
operating procedures. Cross references such as “See page 50” will direct you to detailed procedures.
Bulleted Lists
Bulleted lists provide helpful or important information or contain procedures that do not have to be
performed in a specific order.
Numbered Lists
Numbered lists contain illustration callouts or list steps that must be performed in order.
CMW
®
Page 7

Overview - 6 RT45 Operator’s Manual
CMW
®
Page 8

RT45 Operator’s Manual Foreword - 7
Foreword
This manual is an important part of your equipment. It provides safety information and operation
instructions to help you use and maintain your Ditch Witch
Read this manual before using your equipment. Keep it with the equipment at all times for future reference.
If you sell your equipment, be sure to give this manual to the new owner.
If you need a replacement copy, contact your Ditch Witch dealer. If you need assistance in locating a
dealer, visit our website at www.ditchwitch.com or write to the following address:
The Charles Machine Works, Inc.
Attn: Marketing Department
PO Box 66
Perry, OK 73077-0066
USA
The descriptions and specifications in this manual are subject to change without notice. The Charles
Machine Works, Inc. reserves the right to improve equipment. Some product improvements may have
taken place after this manual was published. For the latest information on Ditch Witch equipment, see your
Ditch Witch dealer.
®
equipment.
Thank you for buying and using Ditch Witch equipment.
CMW
®
Page 9

Foreword - 8 RT45 Operator’s Manual
RT45
Operator’s Manual
Machine Works, Inc.
This manual covers the following model: RT45 Tier 4.
Issue number 2.0/OM-09/14
Part number 053-2746
Copyright 2014
by The Charles Machine Works, Inc.
, Ditch Witch, CMW, and Roto Witch are registered trademarks of The Charles
This product is covered by one or more of the following patents: U.S. D640290, D640291, D640292, and
8375605 with other U.S. and foreign patents pending.
®
CMW
Page 10
RT45 Operator’s Manual Contents - 11
Contents
Overview
machine serial number, information about the type of work this machine is designed
to perform, basic machine components, and how to use this manual
Foreword
part number, revision level, and publication date of this manual, and factory contact
information
Safety
machine safety alerts and emergency procedures
Controls
machine controls, gauges, and indicators and how to use them
Operation Overview
an overview for completing a job with this machine: planning, setting up, installing
product, and restoring the jobsite; with cross references to detailed procedures
Prepare
procedures for inspecting and classifying the jobsite, planning the installation path,
and preparing the jobsite for work
Drive
procedures for startup, cold start, driving, and shutdown
1
7
13
29
61
65
71
Transport
procedures for lifting, hauling, and towing
Trench
procedures for trenching
Plow
procedures for plowing
Saw
procedures for sawing
Backhoe
procedures for digging with backhoe
75
85
89
95
101
CMW
®
Page 11
Contents - 12 RT45 Operator’s Manual
Drill
procedures for drilling
Microtrench
procedures for microtrenching
Systems and Equipment
chain, teeth, sprockets, and optional equipment
Complete the Job
procedures for backfilling and restoring the jobsite and rinsing and storing
equipment
Service
service intervals and instructions for this machine including lubrication, replacement
of wear items, and basic maintenance
Specifications
machine specifications including weights, measurements, power ratings, and fluid
capacities
Support
the warranty policy for this machine, and procedures for obtaining warranty
consideration and training
107
115
127
135
137
183
201
Service Record
a record of major service performed on the machine
205
CMW
®
Page 12

RT45 Operator’s Manual Safety - 13
Safety
Chapter Contents
Guidelines . . . . . . . . . . . . . . . . . . . . . . . . . . . . . . . . 14
Emergency Procedures . . . . . . . . . . . . . . . . . . . . . 15
• Electric Strike Description. . . . . . . . . . . . . . . . . . . . . . . . . . . . . . . . . . . 15
• If an Electric Line is Damaged . . . . . . . . . . . . . . . . . . . . . . . . . . . . . . . 16
• If a Gas Line is Damaged . . . . . . . . . . . . . . . . . . . . . . . . . . . . . . . . . . . 17
• If a Fiber Optic Cable is Damaged . . . . . . . . . . . . . . . . . . . . . . . . . . . . 18
• If Machine Catches on Fire. . . . . . . . . . . . . . . . . . . . . . . . . . . . . . . . . . 18
Safety Alert Classifications . . . . . . . . . . . . . . . . . . 19
Machine Safety Alerts . . . . . . . . . . . . . . . . . . . . . . 20
CMW
®
Page 13

Safety - 14 RT45 Operator’s Manual
Guidelines
Guidelines
Follow these guidelines before operating any jobsite equipment:
• Complete proper training and read operator’s manual before using equipment.
• Contact your local One-Call (811 in USA) or the One-Call referral number (888-258-0808 in USA and
Canada) to have underground utilities located before digging. Also contact any utilities that do not
participate in the One-Call service. Mark proposed path with white paint prior to contacting One-Call or
utilities.
• Classify jobsite based on its hazards and use correct tools and machinery , safety equipment, and work
methods for jobsite.
• Mark jobsite clearly and keep spectators away.
• Wear personal protective equipment.
• Review jobsite hazards, safety and emergency procedures, and individual responsibilities with all
personnel before work begins. Safety videos are available from your Ditch Witch
ditchwitch.com/resources/safety.
• Replace missing or damaged safety shields and safety signs.
®
dealer or at
• Use equipment carefully. Stop operation and investigate anything that does not look or feel right.
• Do not operate unit where flammable gas may be present.
• Contact your Ditch Witch dealer if you have any question about operation, maintenance, or equipment
use.
• Complete the equipment checklist located at www.ditchwitch.com/resources/safety.
CMW
®
Page 14
RT45 Operator’s Manual Safety - 15
Emergency Procedures
Emergency Procedures
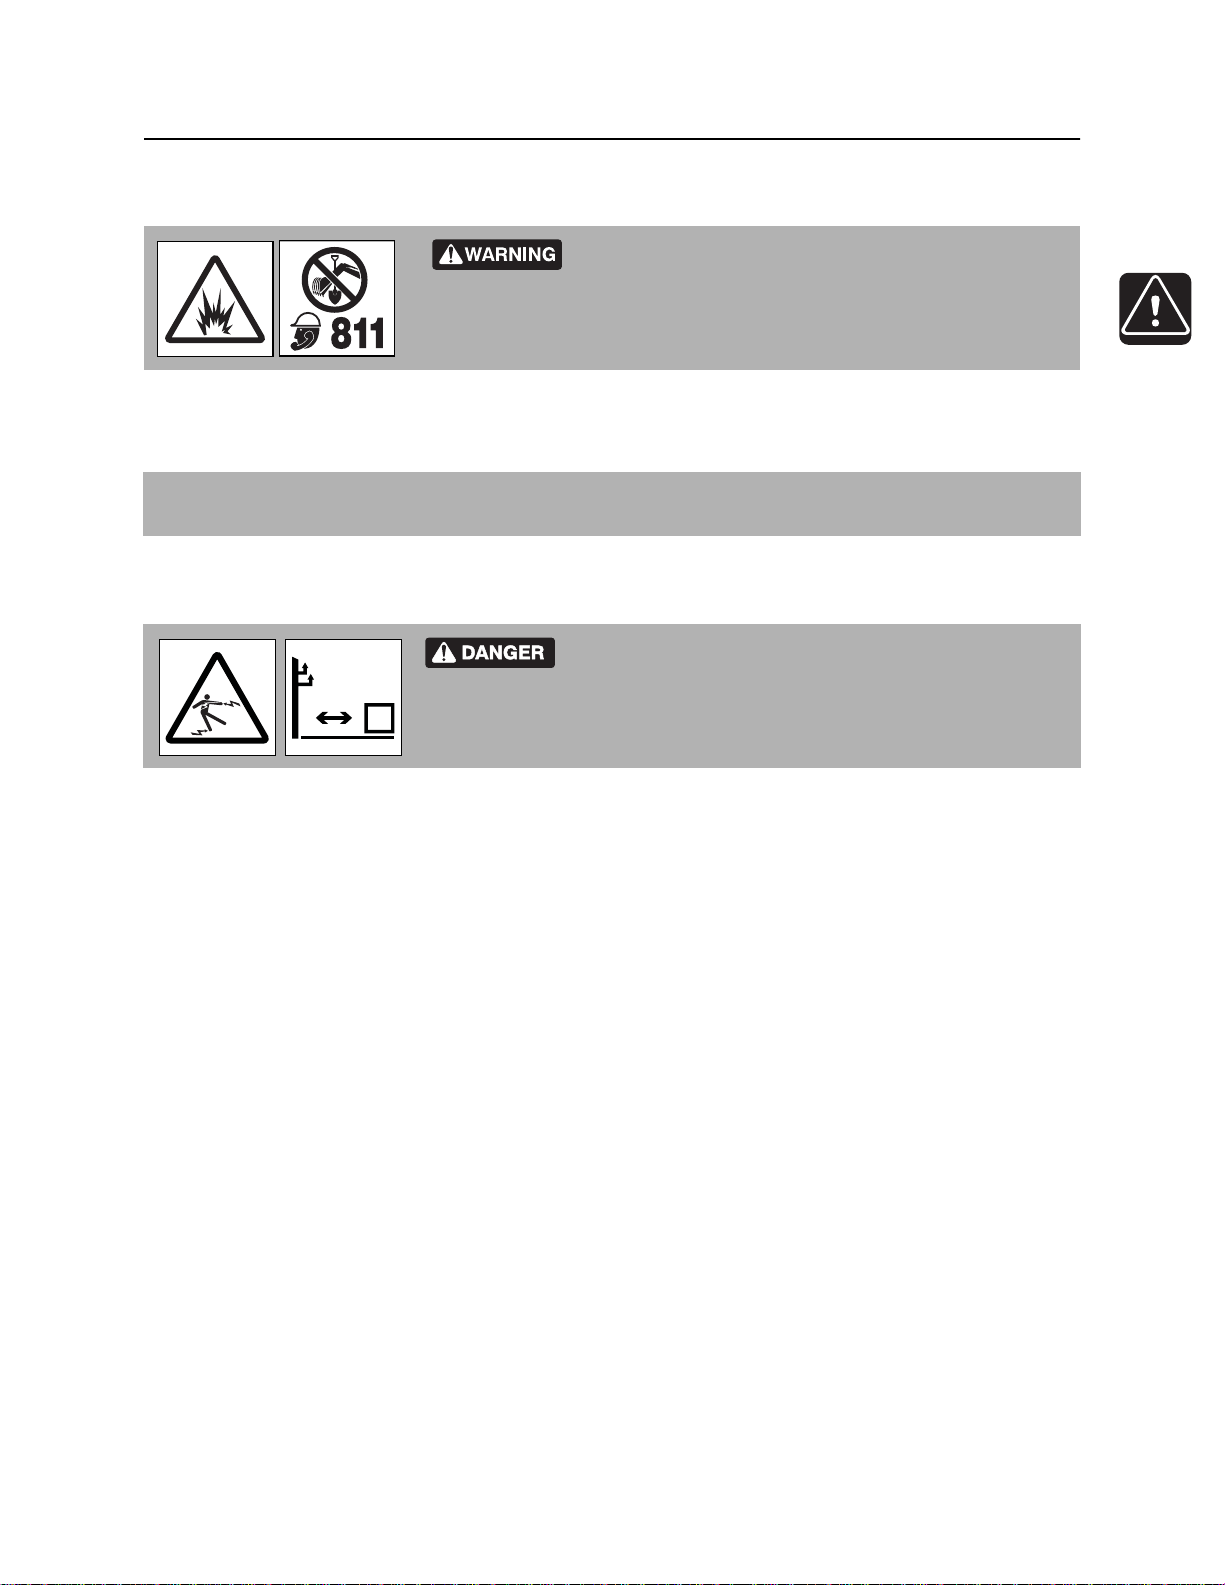
Jobsite hazards could cause death or serious injury . Use
correct equipment and work methods. Use and maintain proper safety
equipment. 274-050
Before operating any equipment, review emergency procedures and check that all safety precautions have
been taken.
EMERGENCY SHUTDOWN - Turn ignition switch to stop position or push remote engine stop button (if
equipped).
Electric Strike Description
Electric shock. Contacting electric lines will cause death
or serious injury. Know location of lines and stay away.
When working near electric cables, remember the following:
• Electricity follows all paths to ground, not just path of least resistance.
• Pipes, hoses, and cables will conduct electricity back to all equipment.
• Low voltage current can injure or kill. Many work-related electrocutions result from contact with less
than 440 volts.
Most electric strikes are not noticeable, but indications of a strike include:
• power outage
• smoke
• explosion
• popping noises
• arcing electricity
If any of these occur, assume an electric strike has occurred.
CMW
®
Page 15

Safety - 16 RT45 Operator’s Manual
Emergency Procedures
If an Electric Line is Damaged
If you suspect an electric line has been damaged and you are on tractor, DO NOT MOVE. Remain on
tractor and take the following actions. The order and degree of action will depend upon the situation.
• Warn people nearby that an electric strike has occurred. Instruct them to leave the area and contact
utility.
• Raise attachments and drive from immediate area.
• Contact utility company to shut off power.
• Do not return to jobsite or allow anyone into area until given permission by utility company.
If you suspect an electric line has been damaged and you are off tractor, DO NOT TOUCH TRACTOR.
Take the following actions. The order and degree of action will depend upon the situation.
• LEAVE AREA. The ground surface may be electrified, so take small steps with feet close together to
reduce the hazard of being shocked from one foot to the other. For more information, contact your
Ditch Witch dealer.
• Contact utility company to shut off power.
• Do not return to jobsite or allow anyone into area until given permission by utility company.
CMW
®
Page 16
RT45 Operator’s Manual Safety - 17
Emergency Procedures
If a Gas Line is Damaged
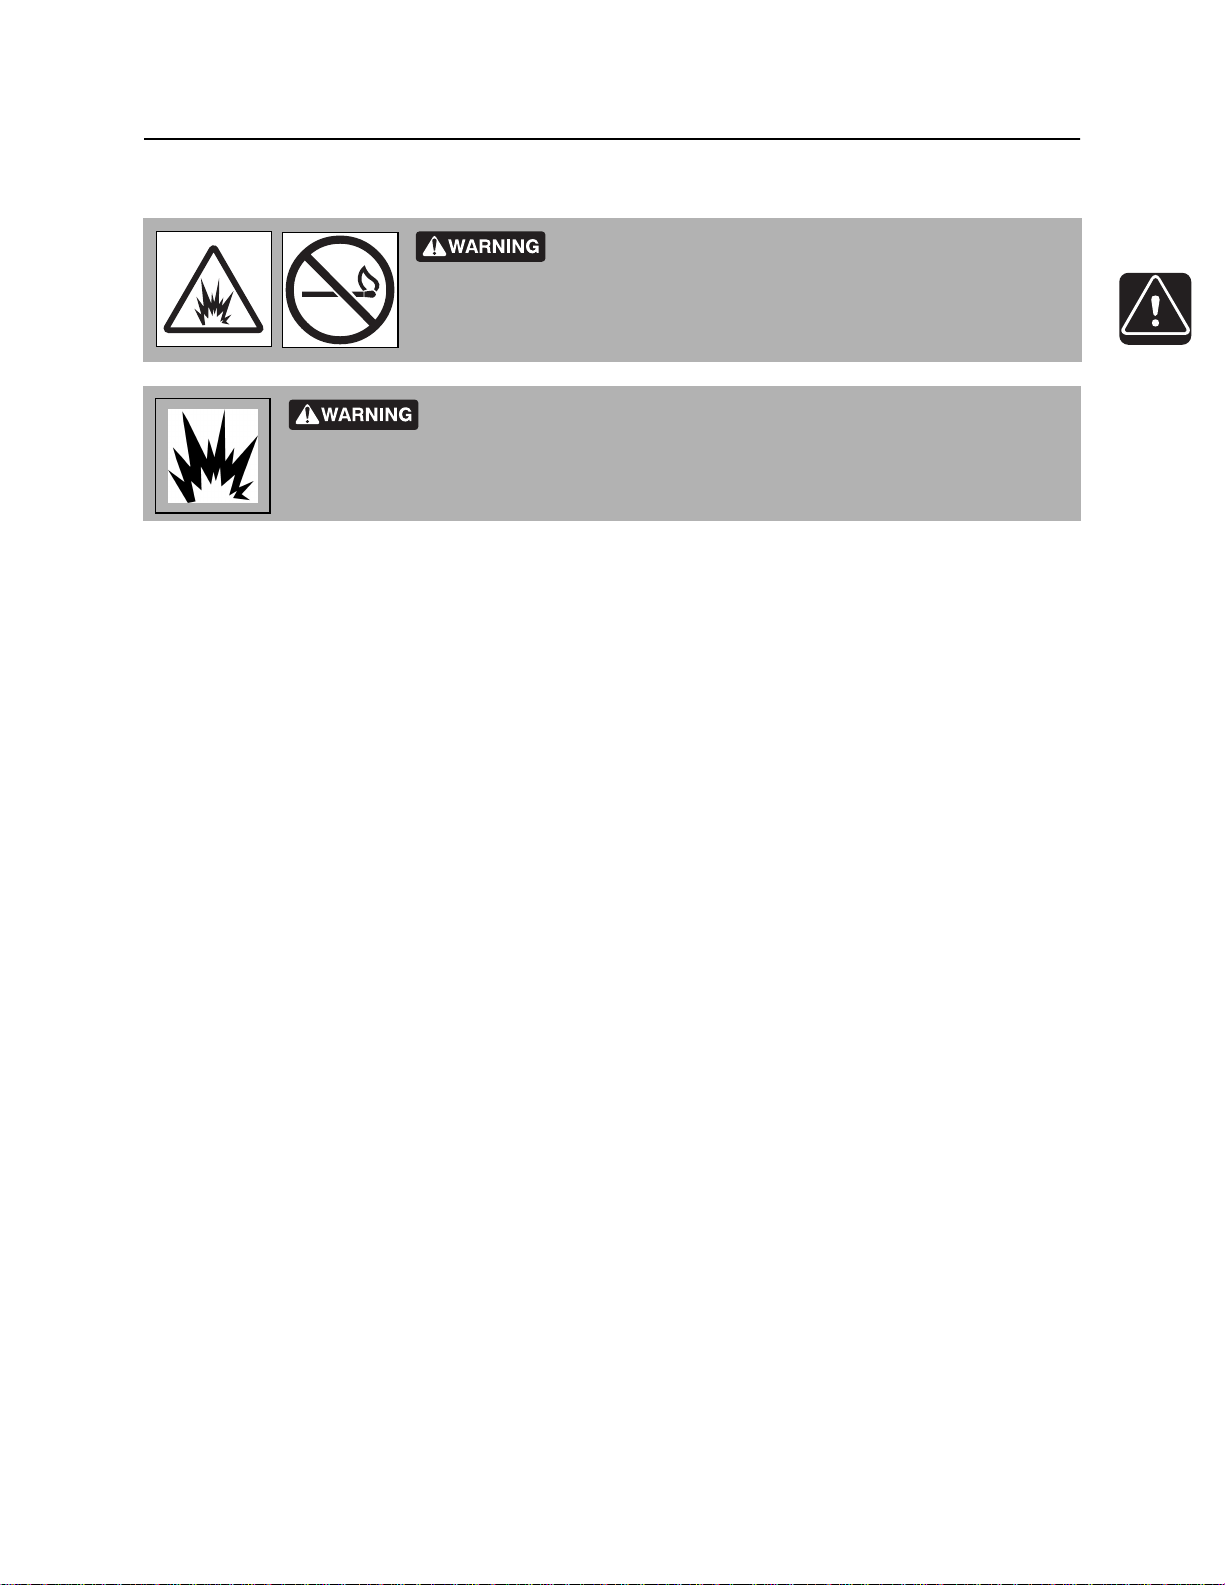
Fire or explosion possible. Fumes could ignite and cause
burns. No smoking, no flame, no spark. 275-419 (2P)
Explosion possible. Serious injury or equipment damage could occur.
Follow directions carefully.
If you suspect a gas line has been damaged, take the following actions. The order and degree of action will
depend on the situation.
• Immediately shut off engine(s), if this can be done safely and quickly.
• Remove any ignition source(s), if this can be done safely and quickly.
• Warn others that a gas line has been cut and that they should leave the area.
• Leave jobsite as quickly as possible.
• Immediately call your local emergency phone number and utility company.
• If jobsite is along street, stop traffic from driving near jobsite.
• Do not return to jobsite until given permission by emergency personnel and utility company.
CMW
®
Page 17

Safety - 18 RT45 Operator’s Manual
Emergency Procedures
If a Fiber Optic Cable is Damaged
Do not look into cut ends of fiber optic or unidentified cable. Vision damage can occur. Contact utility
company.
If Machine Catches on Fire
Perform emergency shutdown procedure and then take the following actions. The order and degree of
action will depend on the situation.
• Immediately move battery disconnect switch (if equipped and accessible) to disconnect position.
• If fire is small and fire extinguisher is available, attempt to extinguish fire.
• If fire cannot be extinguished, leave area as quickly as possible and contact emergency personnel.
CMW
®
Page 18

RT45 Operator’s Manual Safety - 19
Safety Alert Classifications
Safety Alert Classifications
These classifications and the icons defined on the following pages work together to alert you to situations
which could be harmful to you, jobsite bystanders or your equipment. When you see these words and
icons in the book or on the machine, carefully read and follow all instructions. YOUR SAFETY IS AT
STAKE.
Watch for the three safety alert levels: DANGER, WARNING and CAUTION. Learn what each level
means.
indicates a hazardous situation that, if not avoided, will result in death or serious injury.
This signal word is to be limited to the most extreme situations.
indicates a hazardous situation that, if not avoided, could result in death or serious injury.
indicates a hazardous situation that, if not avoided, could result in minor or moderate
injury.
Watch for two other words: NOTICE and IMPORTANT.
NOTICE indicates information considered important, but not hazard-related (e.g., messages relating to
property damage).
IMPORTANT can help you do a better job or make your job easier in some way.
CMW
®
Page 19
Safety - 20 RT45 Operator’s Manual
Machine Safety Alerts
Machine Safety Alerts
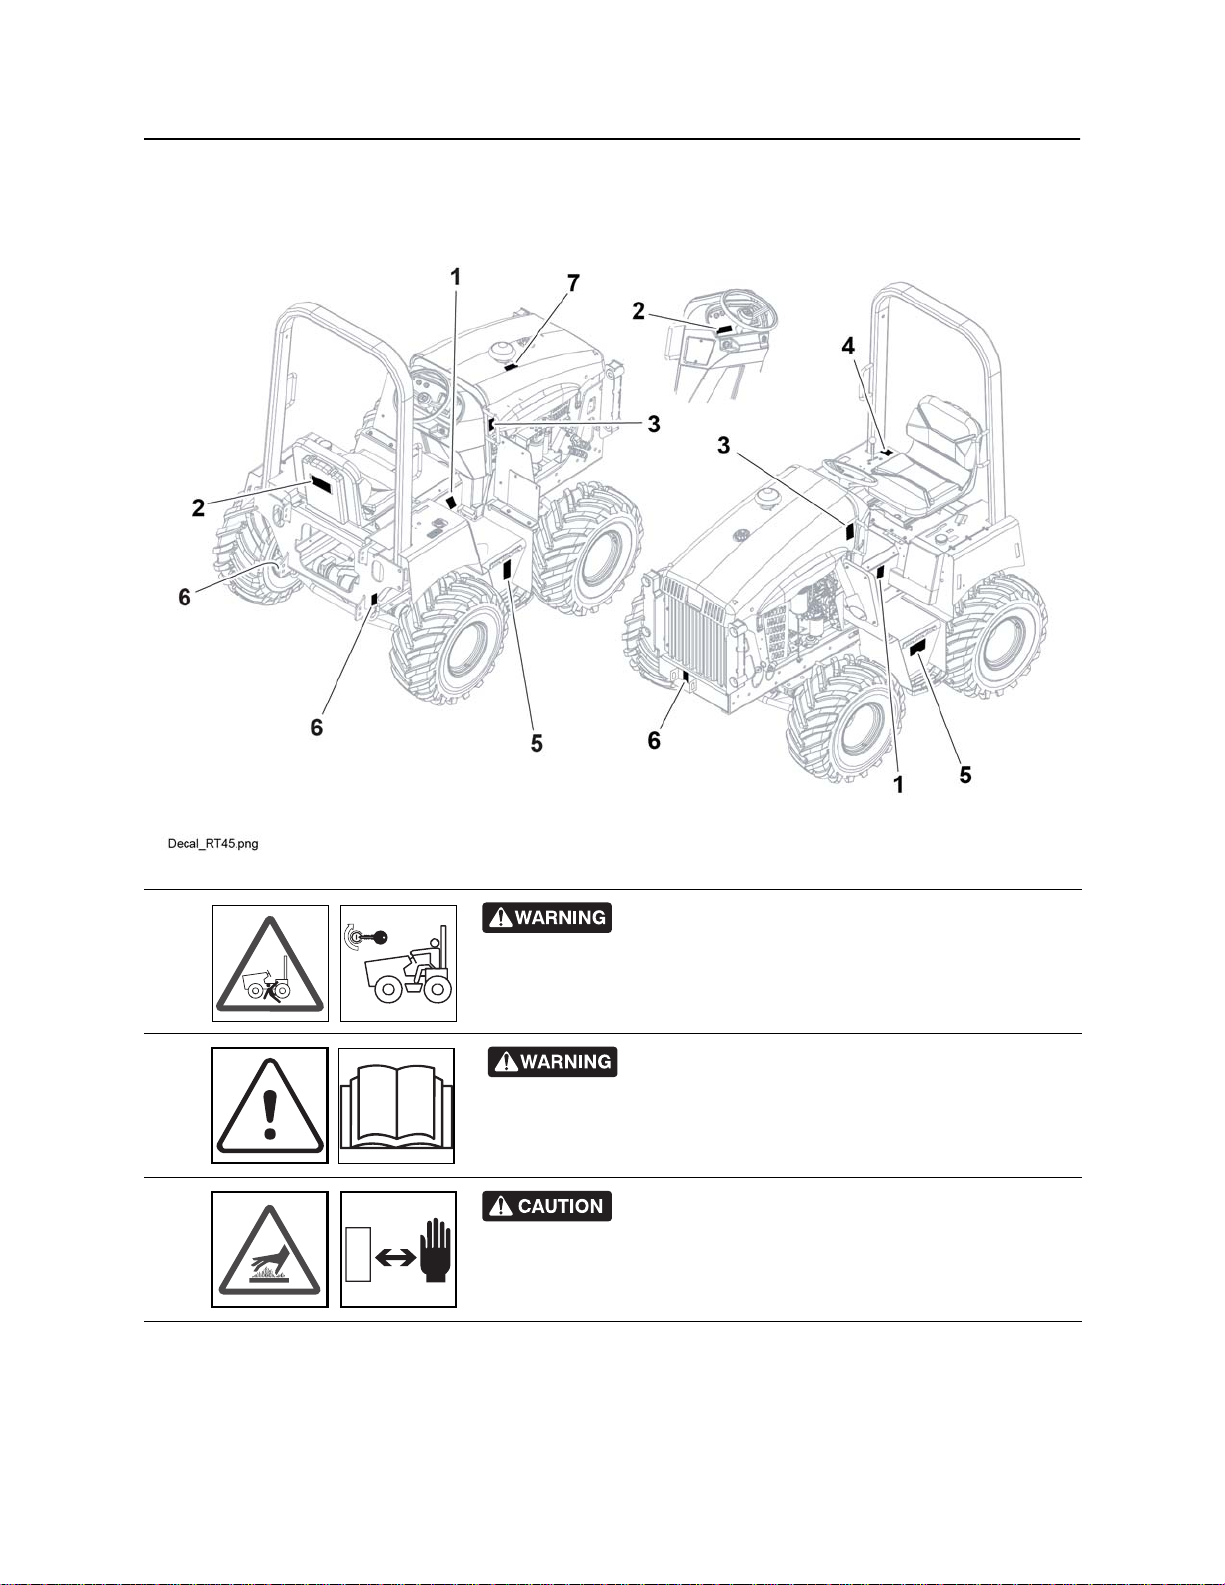
1
2
3
CMW
Runaway possible. Start from operator’s position
only. 275-070
Read operator’s manual. Know how to use all
controls. Your safety is at stake. 273-475
Hot parts may cause burns. Do not touch until cool
or wear gloves. 273-423
®
Page 20
RT45 Operator’s Manual Safety - 21
Machine Safety Alerts
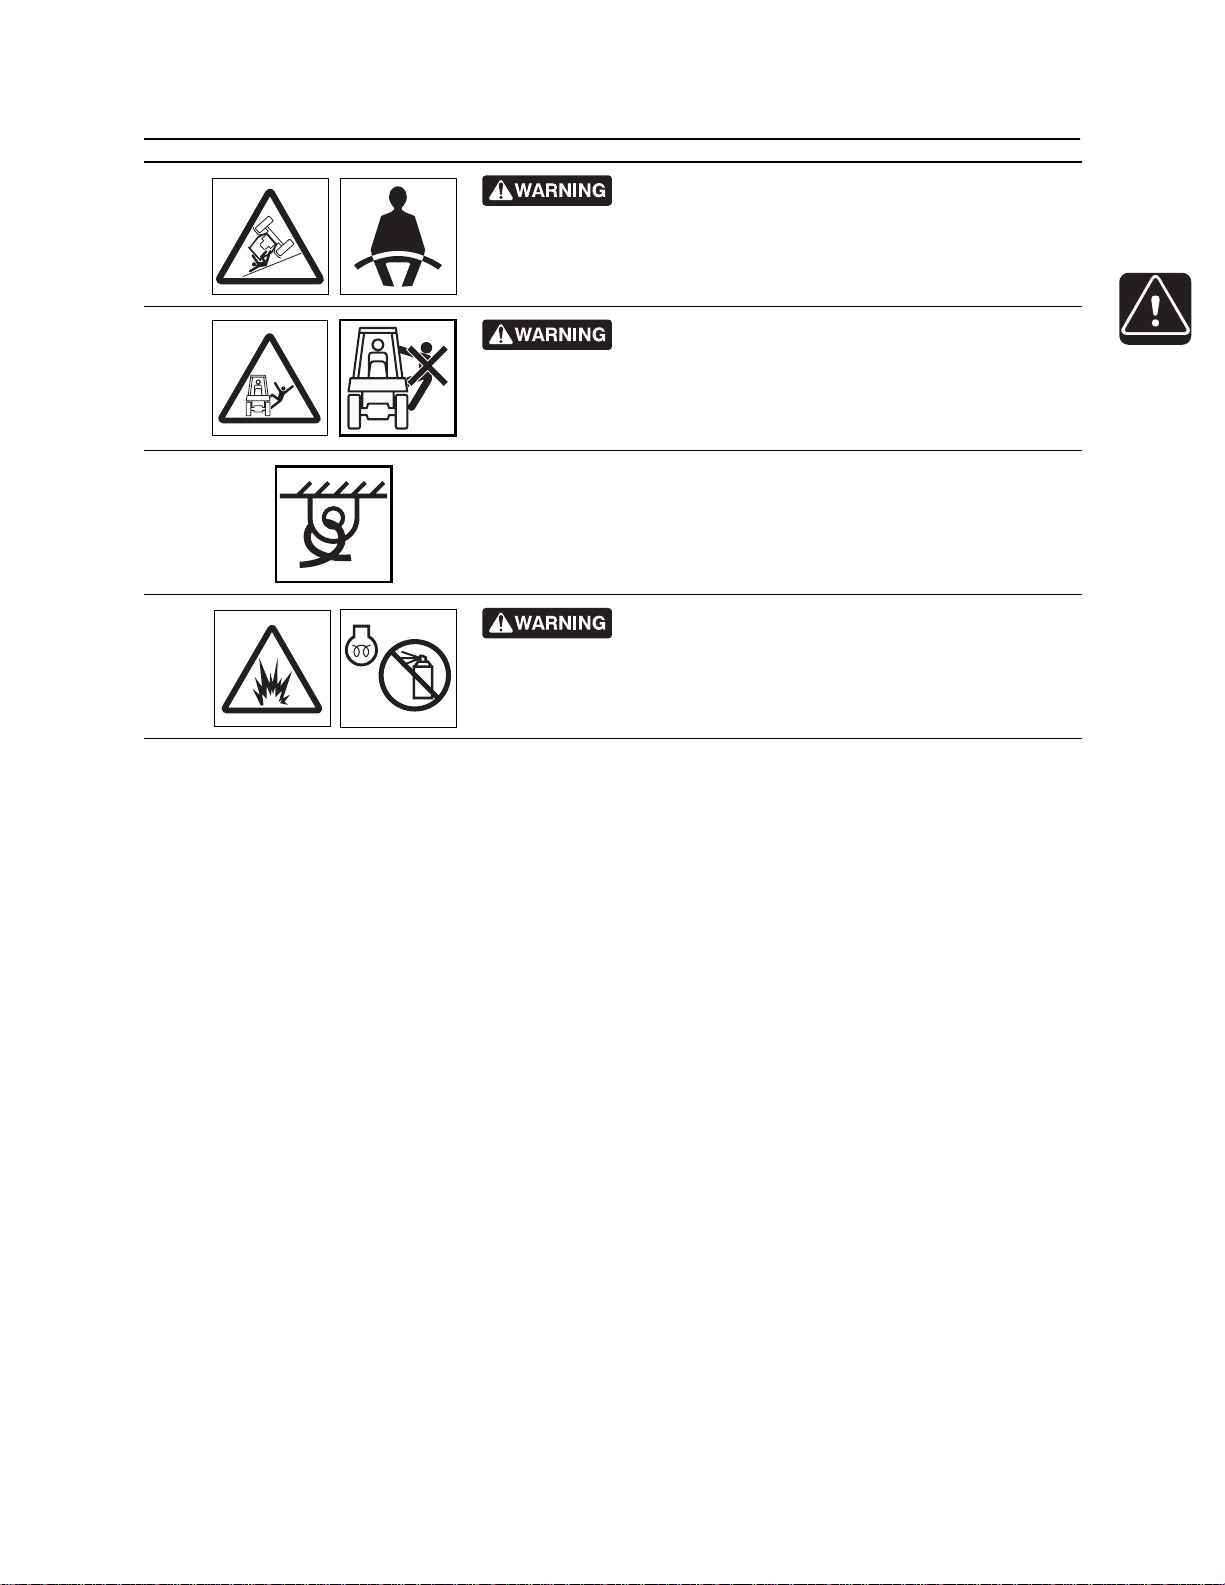
Rollover could kill or crush. Wear seat belt. 275-303
4
Fall possible. Riders can fall from machine and be
5
6
7
injured or killed. Only operator is allowed on machine. 273-487
Tiedown location. See Transport chapter for more information.
274-318
Fire or explosion possible. Do not use starter fluid.
273-459
CMW
®
Page 21
Safety - 22 RT45 Operator’s Manual
Attachment Safety Alerts
Attachment Safety Alerts
H313
1
2
3
CMW
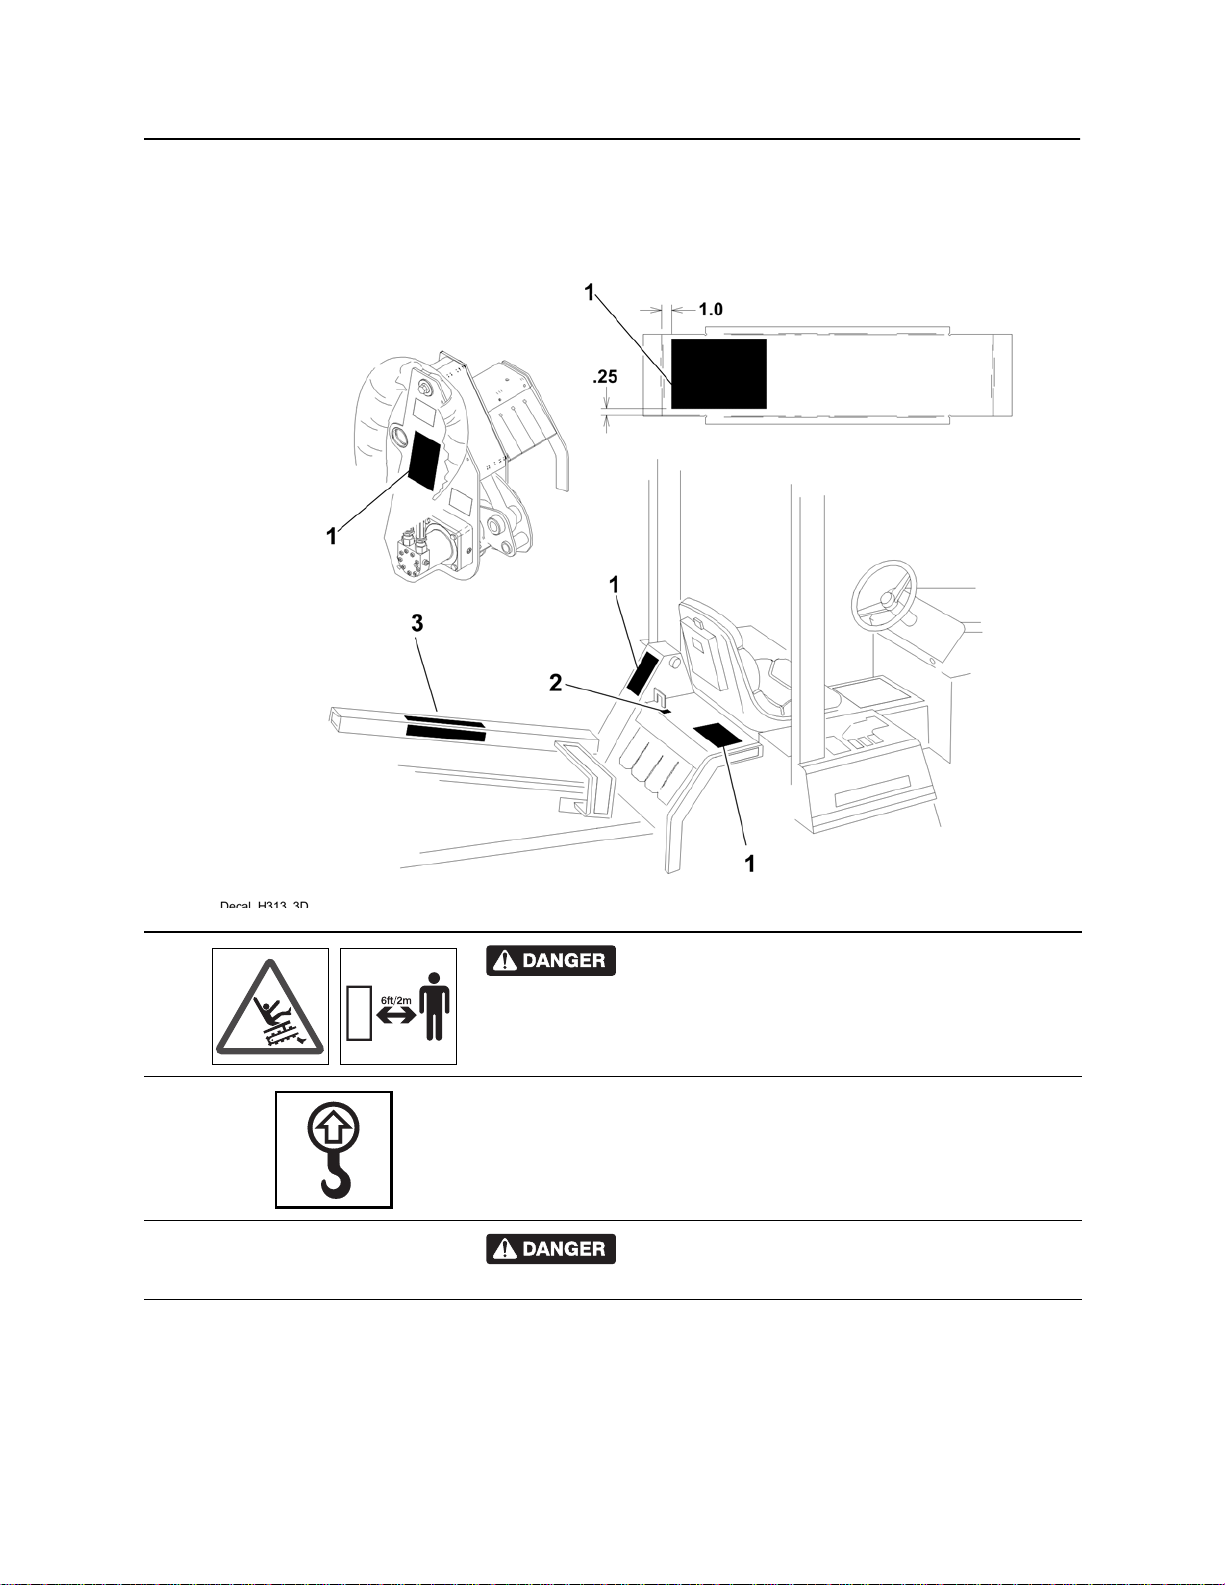
Moving digging teeth will cause death or serious
injury. Trench cave-in can cause you to fall. Stay away. 274-002
Lift point. See Transport chapter for more information. 274-442
Moving digging teeth will cause death or serious
injury. Trench cave-in can cause you to fall. Stay away.
®
Page 22

RT45 Operator’s Manual Safety - 23
Attachment Safety Alerts
H314
Moving digging teeth will cause death or serious
1
2
3
injury. Trench cave-in can cause you to fall. Stay away. 274-002
Lift point. See Transport chapter for more information. 274-442
Moving digging teeth will cause death or serious
injury. Trench cave-in can cause you to fall. Stay away.
CMW
®
Page 23
Safety - 24 RT45 Operator’s Manual
Attachment Safety Alerts
H331
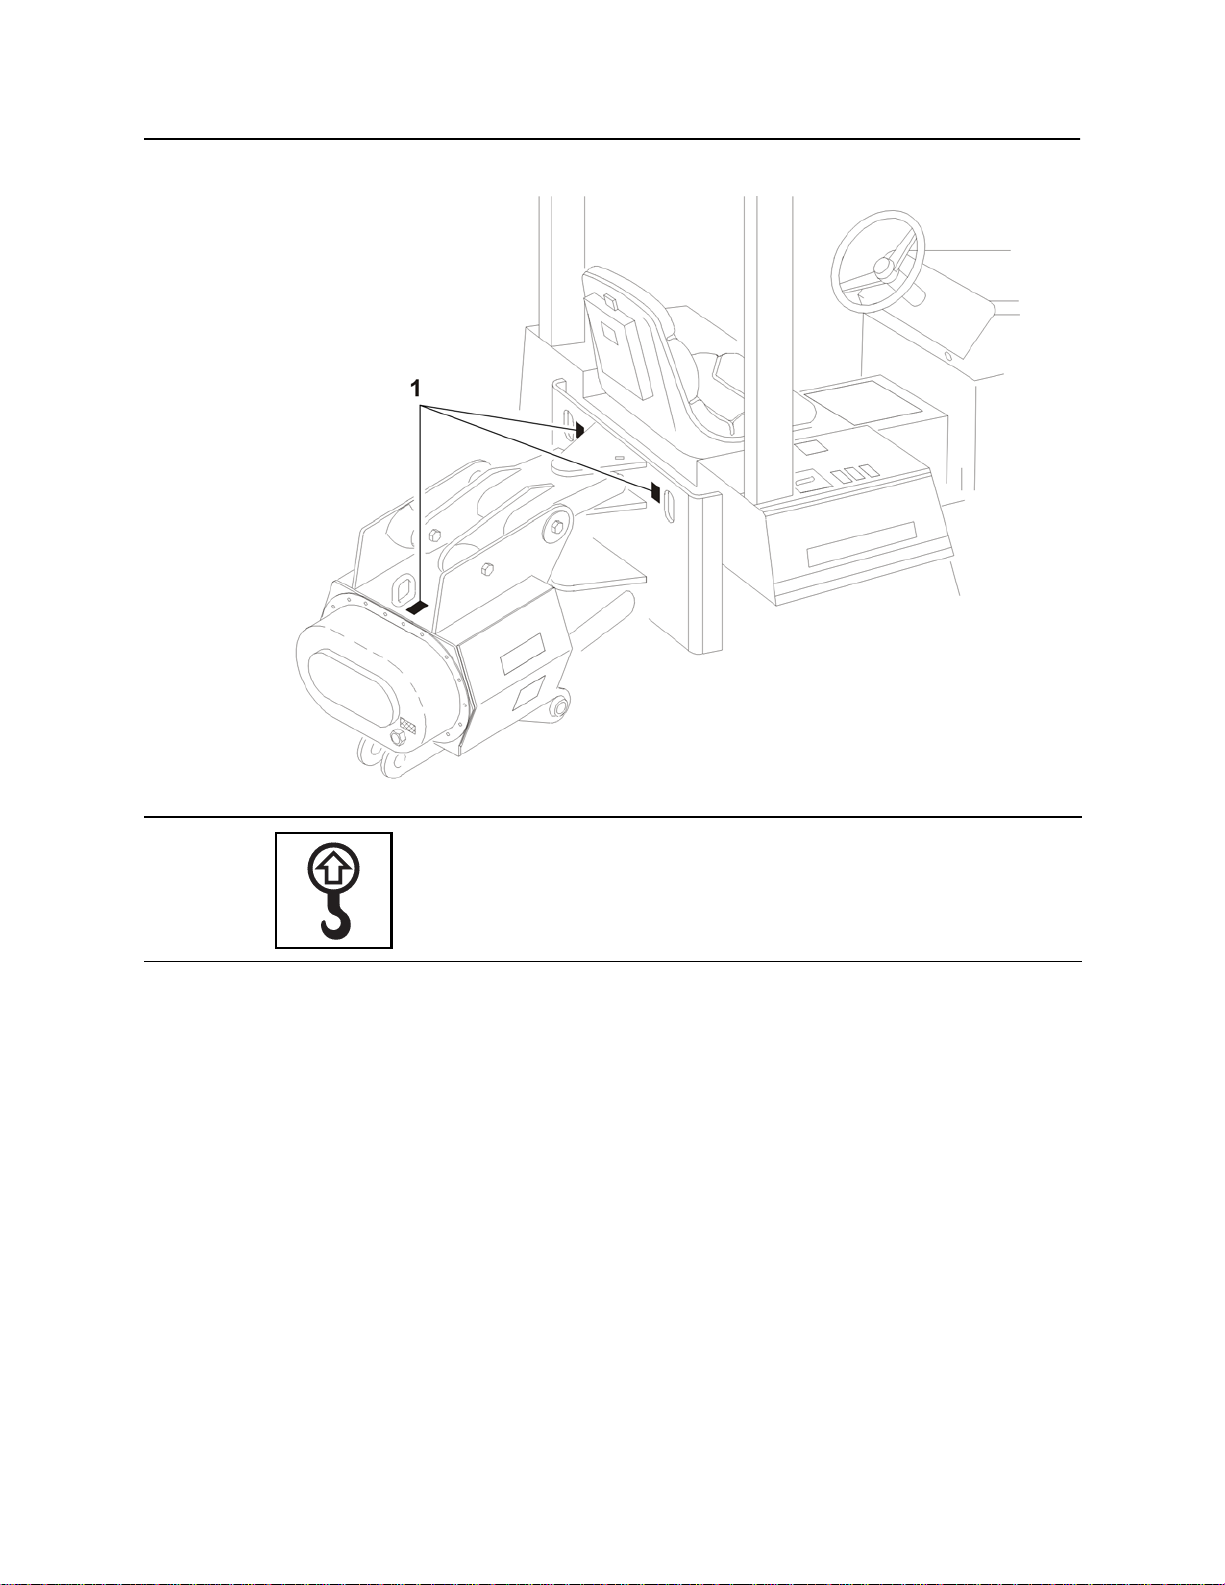
Lift point. See Transport chapter for more information. 274-442
1
CMW
®
Page 24
RT45 Operator’s Manual Safety - 25
Attachment Safety Alerts
H350
Moving digging teeth will cause death or serious
1
2
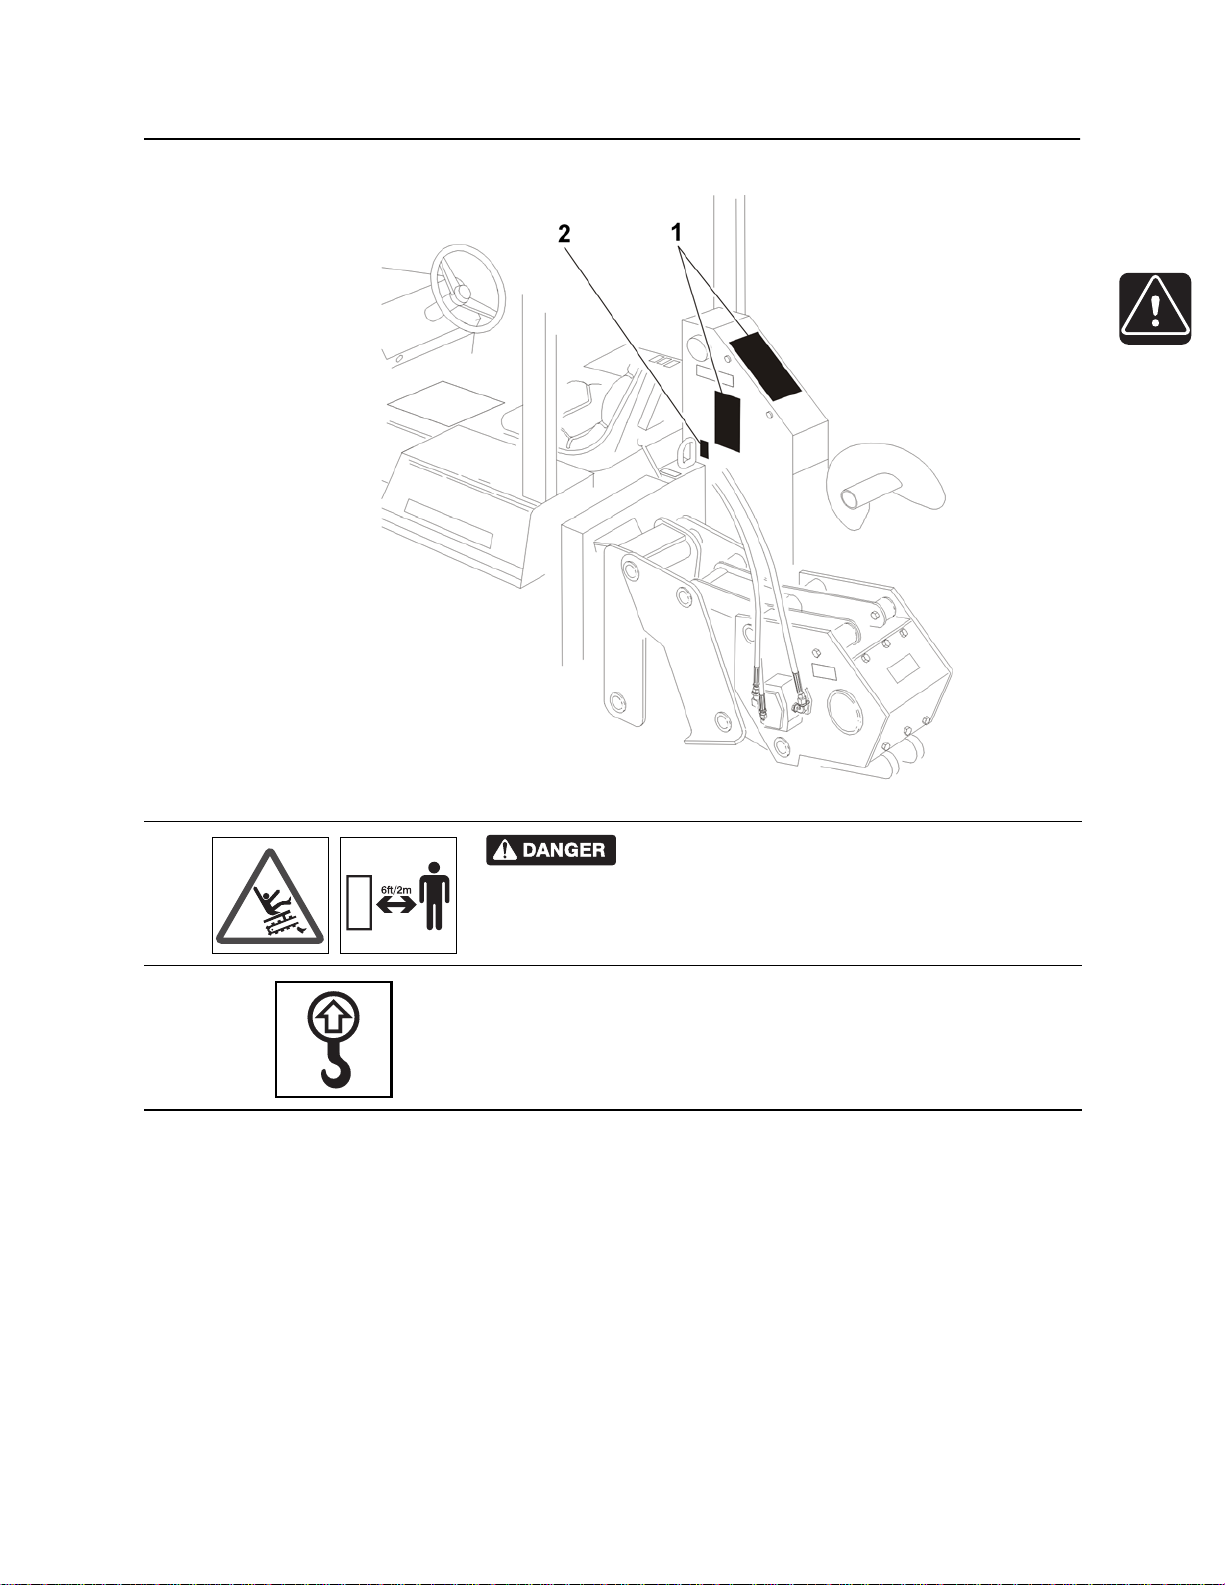
injury. Trench cave-in can cause you to fall. Stay away. 274-002
Lift point. See Transport chapter for more information. 274-442
CMW
®
Page 25

Safety - 26 RT45 Operator’s Manual
Attachment Safety Alerts
H342
Moving parts could cut off hand. Keep hands away .
1
2
3
4
275-184
Flying objects thrown by machine may strike
people. Wear safety glasses and hard hat. 275-193
Moving digging teeth will cause serious injury or
death. Stay away. 275-443
Crushing weight could cause death or serious
injury. Use proper procedures and equipment or stay away. 275-326
Lift point. See Transport chapter for more information. 274-442
5
CMW
®
Page 26

RT45 Operator’s Manual Safety - 27
Attachment Safety Alerts
MT12
Moving parts could cut off hand. Keep hands away .
1
2
3
4
275-184
Tiedown location. See Transport chapter for more information.
274-318
Lift point. See Transport chapter for more information. 274-442
Flying objects thrown by machine may strike
people. Wear safety glasses and hard hat. 275-193
CMW
®
Page 27
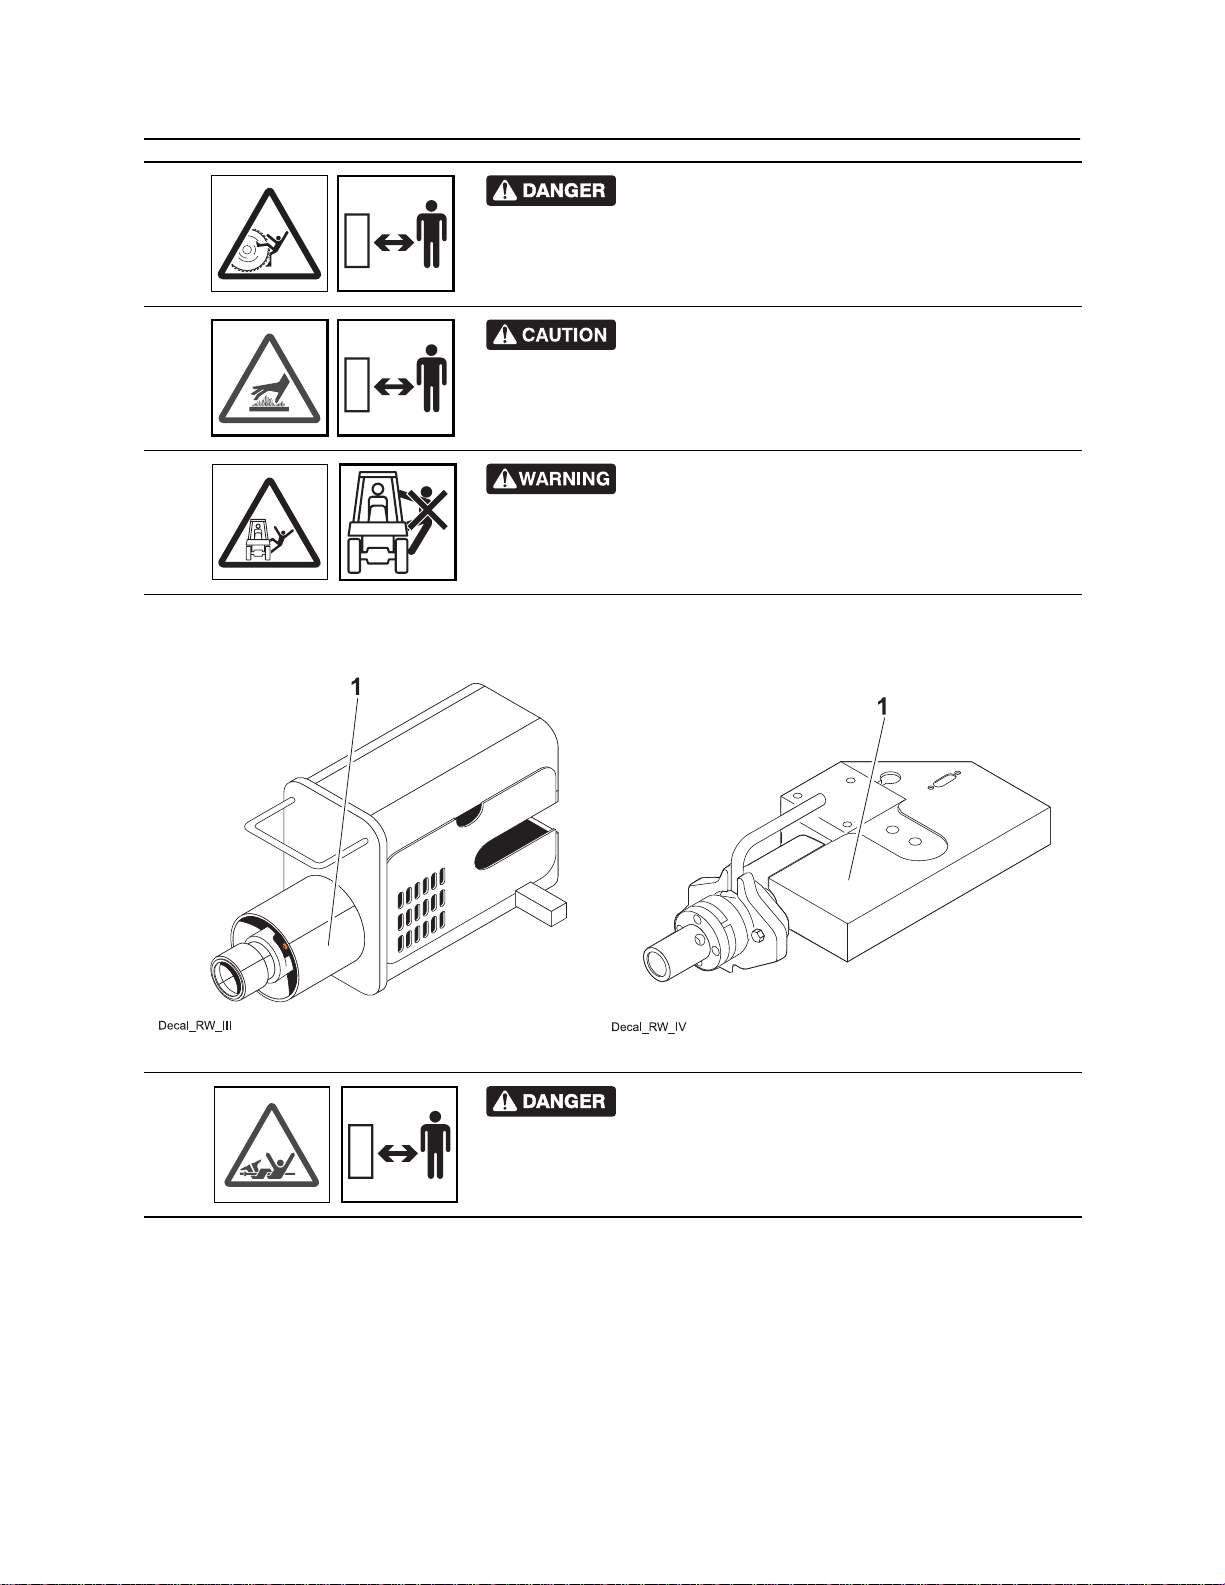
Safety - 28 RT45 Operator’s Manual
Attachment Safety Alerts
Moving digging teeth will cause serious injury or
5
6
7
death. Stay away. 275-443
Hot parts may cause burns. Do not touch until cool
or wear gloves. 275-355
Fall possible. Riders can fall from machine and be
injured or killed. Only operator is allowed on machine.
273-487
RWIII/RWIV
1
CMW
Turning shaft will kill you or crush arm or leg. Stay
away. 275-197
®
Page 28

RT45 Operator’s Manual Controls - 29
Controls
Chapter Contents
Center Console . . . . . . . . . . . . . . . . . . . . . . . . . . . 30
• Controls . . . . . . . . . . . . . . . . . . . . . . . . . . . . . . . . . . . . . . . . . . . . . . . . 30
• Graphic Display . . . . . . . . . . . . . . . . . . . . . . . . . . . . . . . . . . . . . . . . . . 33
Right Fender . . . . . . . . . . . . . . . . . . . . . . . . . . . . . . 37
• Tractor Controls . . . . . . . . . . . . . . . . . . . . . . . . . . . . . . . . . . . . . . . . . . 37
• Trencher Controls . . . . . . . . . . . . . . . . . . . . . . . . . . . . . . . . . . . . . . . . . 40
• Plow Controls . . . . . . . . . . . . . . . . . . . . . . . . . . . . . . . . . . . . . . . . . . . . 42
• Combo Controls . . . . . . . . . . . . . . . . . . . . . . . . . . . . . . . . . . . . . . . . . . 44
• Saw Controls . . . . . . . . . . . . . . . . . . . . . . . . . . . . . . . . . . . . . . . . . . . . 46
• Microtrench Controls. . . . . . . . . . . . . . . . . . . . . . . . . . . . . . . . . . . . . . . 48
Left Fender . . . . . . . . . . . . . . . . . . . . . . . . . . . . . . . 52
Seat . . . . . . . . . . . . . . . . . . . . . . . . . . . . . . . . . . . . . 54
Engine . . . . . . . . . . . . . . . . . . . . . . . . . . . . . . . . . . . 59
CMW
®
Page 29
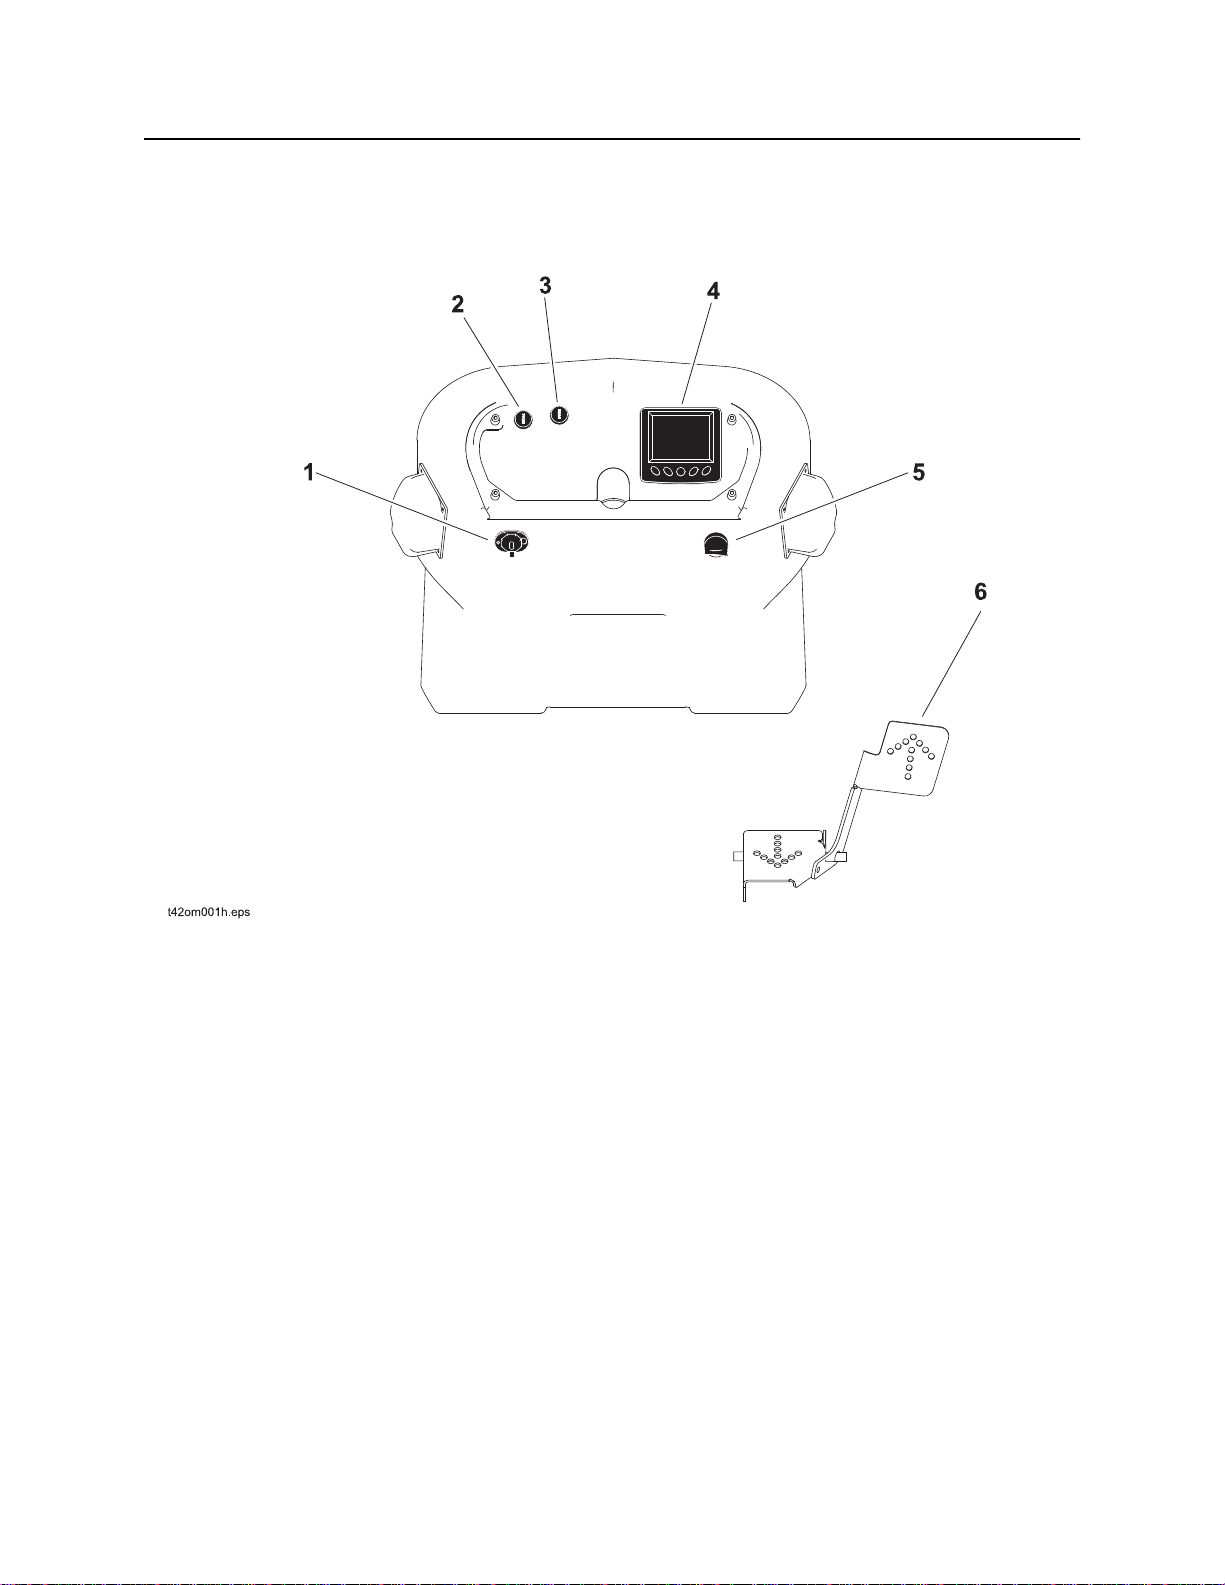
Controls - 30 RT45 Operator’s Manual
Center Console
Center Console
Controls
1. Auxiliary power outlet
2. Engine override switch
3. Horn
®
CMW
4. Graphic display
5. Ignition switch
6. Ground drive foot control
Page 30
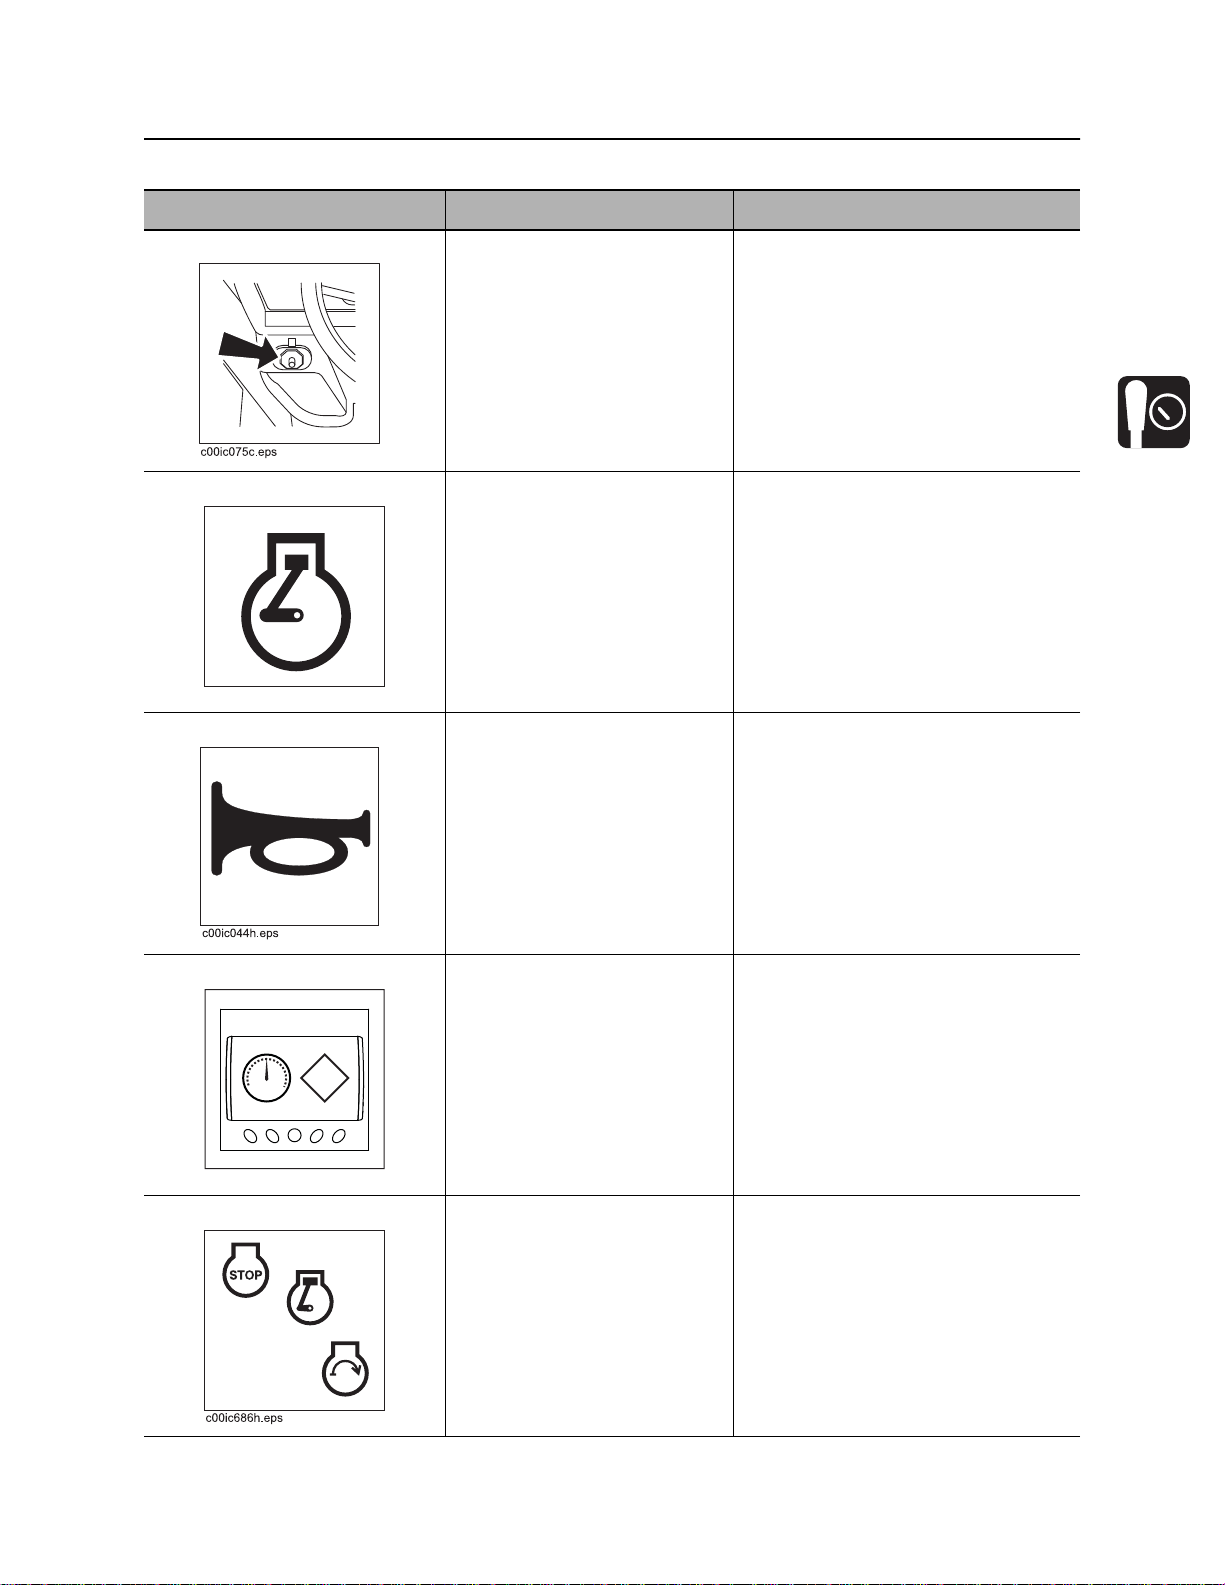
RT45 Operator’s Manual Controls - 31
Center Console
Item Description Notes
1. Auxiliary power outlet Provides power for other
equipment.
2. Engine override switch If engine shutdown indicator
comes on, press to delay
engine shutdown for 30
seconds.
c00ic024w.eps
3. Horn To sound horn, press.
Power output is 12V, 5A.
This control allows a temporary
override of engine shutdown.
NOTICE: After 30 seconds, engine
will again shut down unless fault
condition has been cleared on
diagnostic gauge.
4. Graphic display Graphic symbols are
displayed for indicators and
conditions previously shown
with gauges.
!
c00ic604w.eps
5. Ignition switch T o start engine, insert key and
turn clockwise.
To stop engine, turn
counterclockwise.
IMPORTANT: If error code SPN 190
FMI 8 appears, clear and reset
display. Restart engine.
IMPORTANT: If engine does not
start on first attempt, check that all
interlock requirements have been
met, return switch to STOP, and try
again.
CMW
®
Page 31
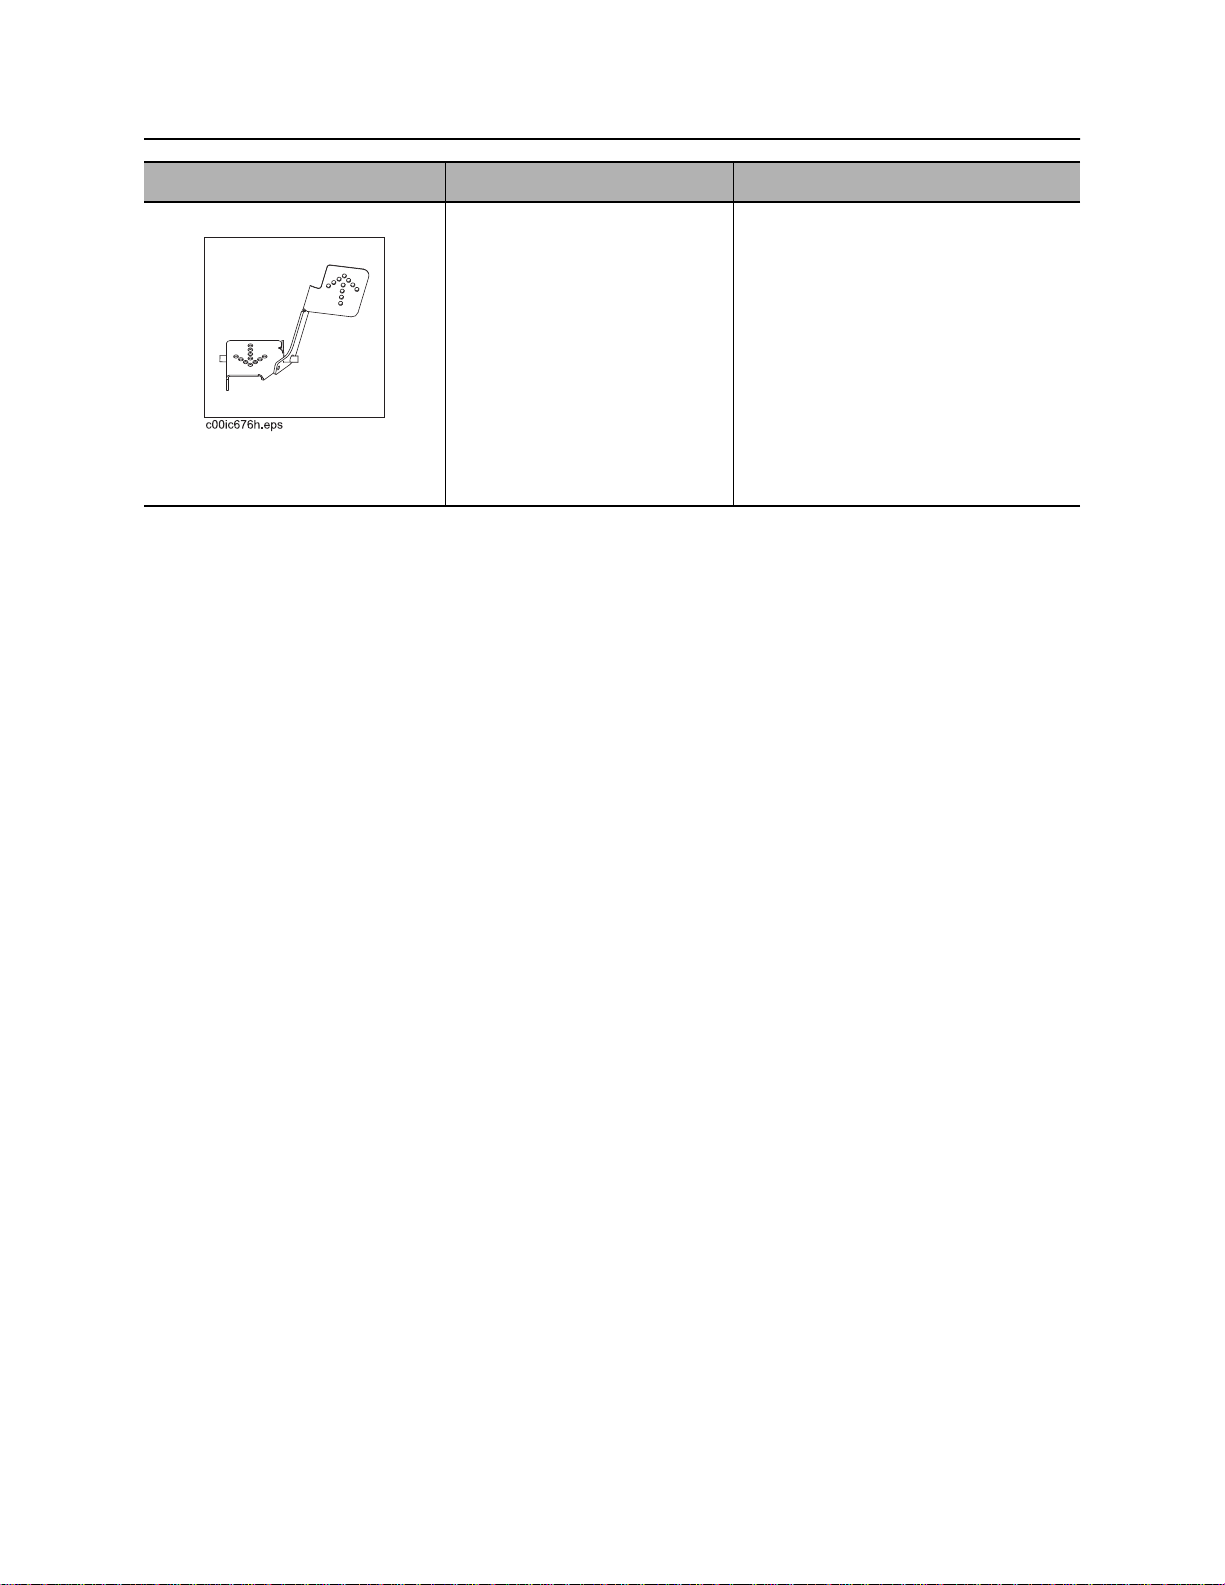
Controls - 32 RT45 Operator’s Manual
Center Console
Item Description Notes
6. Ground drive foot control T o move tractor forward, push
top of pedal.
To move tractor backward,
push bottom of pedal.
To increase speed in either
direction, push pedal farther
from center.
To reduce speed in either
direction, release pedal.
Pedal should automatically return to
neutral when released.
CMW
®
Page 32
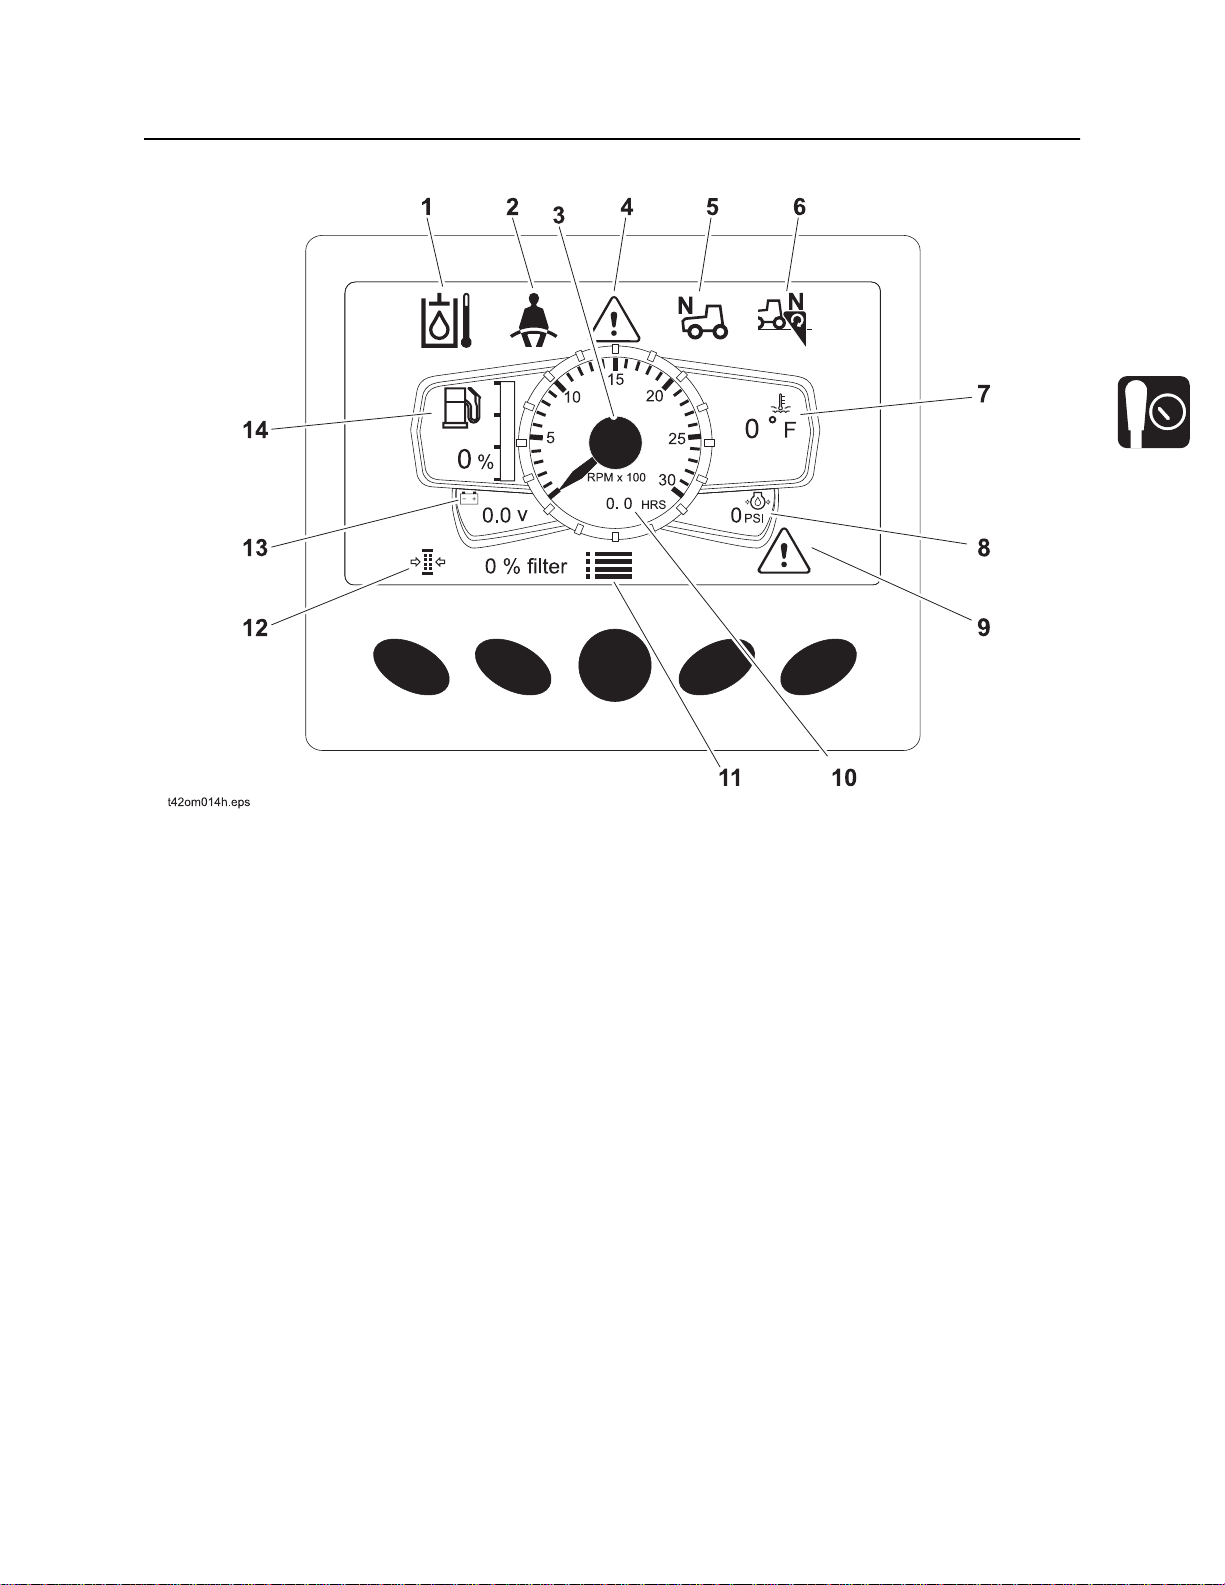
RT45 Operator’s Manual Controls - 33
Center Console
Graphic Display
1. Hydraulic fluid temperature indicator
2. Operator presence indicator
3. Engine speed (RPM)
4. Diagnostic message indicator
5. Ground drive neutral indicator
6. Attachment drive neutral indicator
7. Engine coolant temperature
8. Engine oil pressure indicator
9. Diagnostic menu button
10. Hourmeter
11. Settings menu button
12. Air filter restriction indicator
13. Electrical system voltage
14. Fuel level indicator
CMW
®
Page 33
Controls - 34 RT45 Operator’s Manual
Center Console
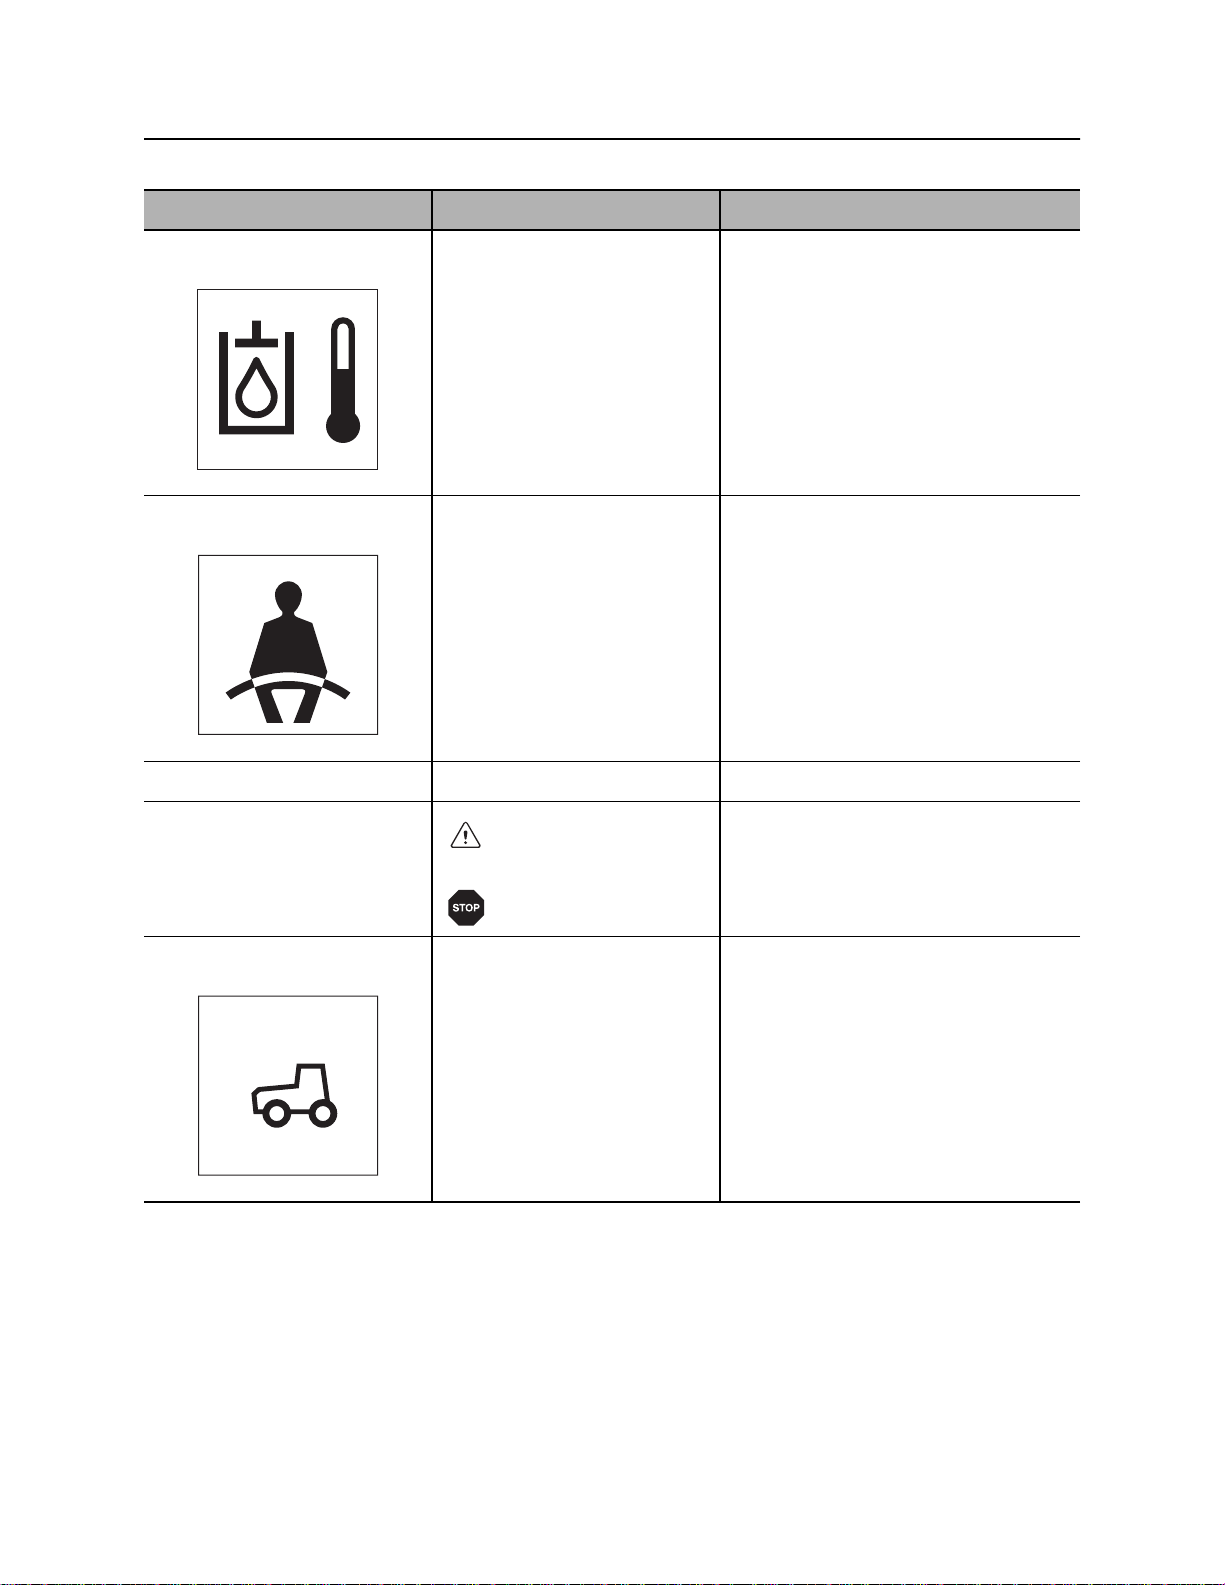
Item Description Notes
1. Hydraulic fluid
temperature indicator
c00ic037t.eps
2. Operator presence
indicator
c00ic001w.eps
3. Engine speed (RPM) Displays engine RPM.
4. Diagnostic message
indicator
Lights if hydraulic fluid
overheats. Light will come on
briefly when engine is started.
Lights when operator is in
seat.
indicates a warning
code
If light remains on:
• Check that engine fan is turning
when engine is running.
• Turn off engine and let it cool.
• Check hydraulic fluid level.
• Check front of hydraulic fluid
cooler for debris.
Part of the start interlock system. To
start engine,
• operator must be in seat,
• attachment drive control must be
in neutral, and
• ground drive control must be in
neutral.
5. Ground drive neutral
indicator
N
c00ic022w.eps
indicates a stop code
Lights when ground drive
control is in neutral.
Part of the start interlock system. To
start engine,
• operator must be in seat,
• attachment drive control must be
in neutral, and
• ground drive control must be in
neutral.
CMW
®
Page 34
RT45 Operator’s Manual Controls - 35
Center Console
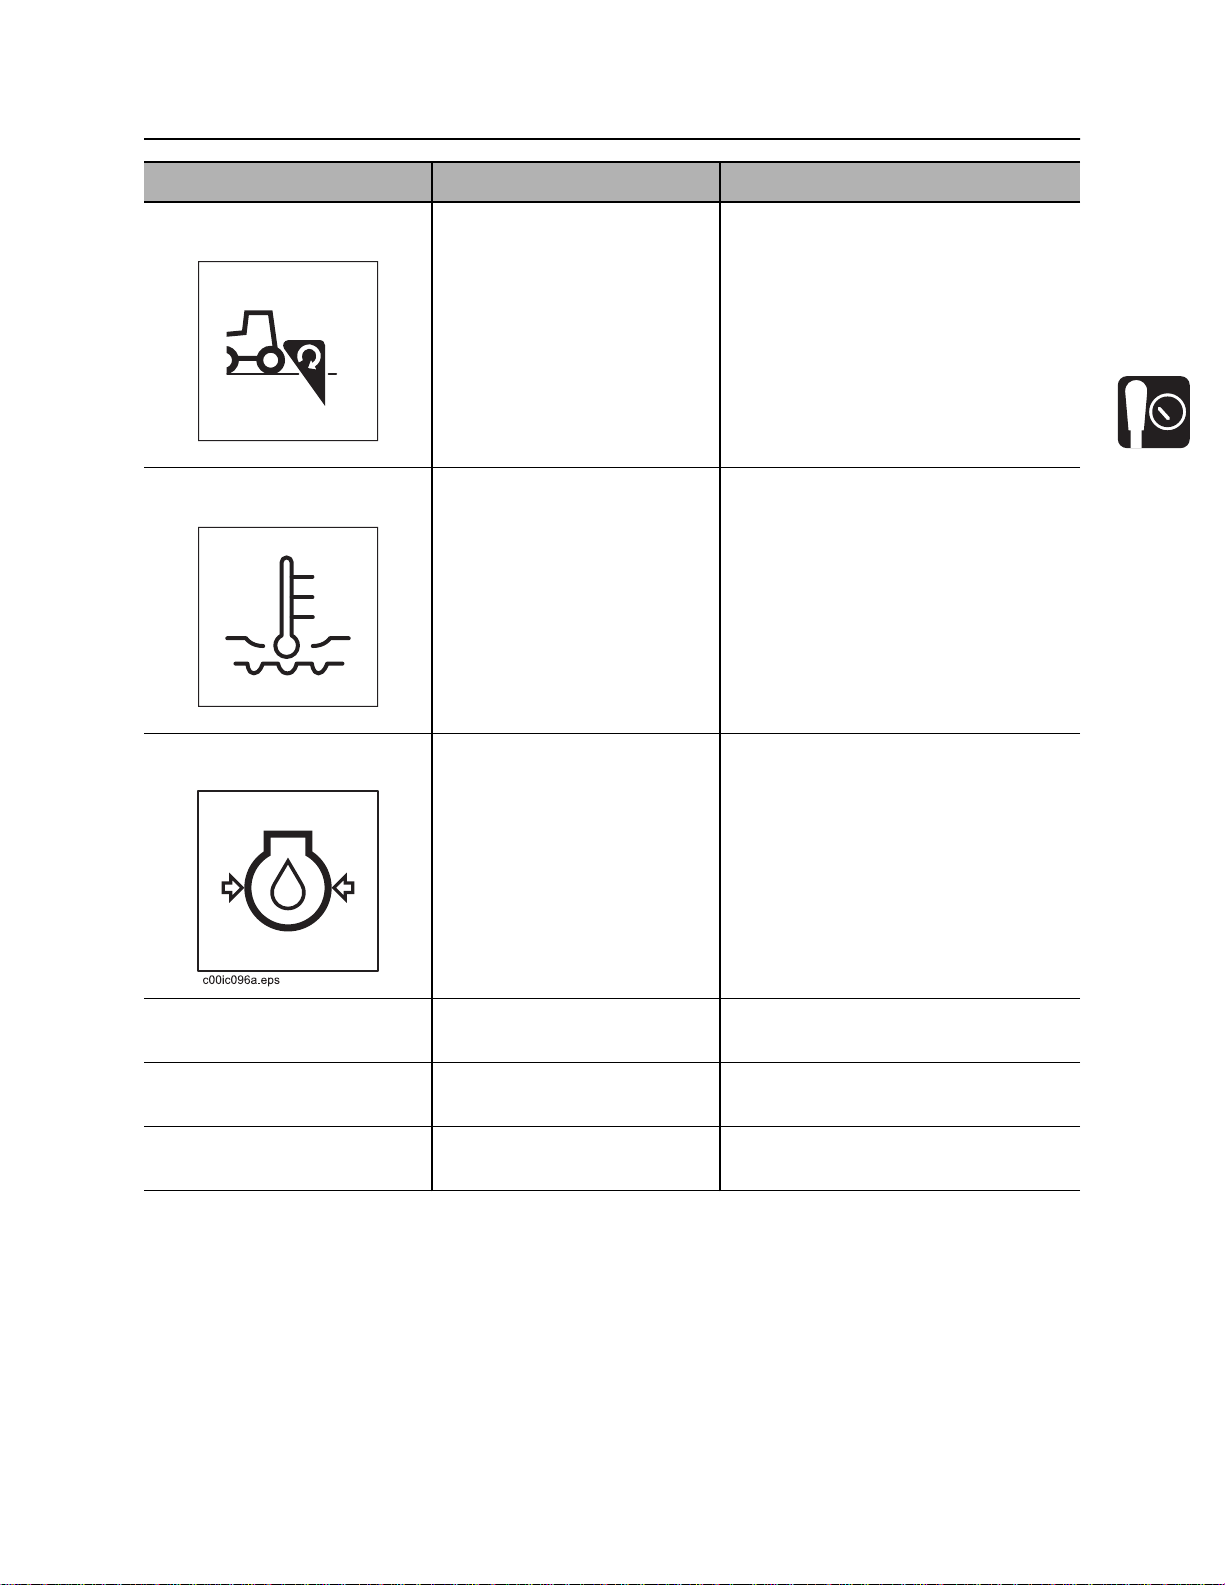
Item Description Notes
6. Attachment drive
neutral indicator
N
c00ic021w.eps
7. Engine coolant
temperature
c00ic004w.eps
8. Engine oil pressure
indicator
Lights when attachment drive/
direction control is in neutral.
Will flash if engine coolant
temperature rises above
230°F(110°C).
Will flash if oil pressure falls
below 20 psi (1.38 bar). Light
will come on briefly when
engine is started.
Part of the start interlock system. To
start engine,
• operator must be in seat,
• attachment drive control must be
in neutral, and
• ground drive control must be in
neutral.
If light remains on:
• Turn off engine.
• Check oil level.
9. Diagnostics menu
button
10. Hourmeter Records engine operating
11. Settings menu button Press button below icon to go
Press button below icon to go
to the Diagnostics menu.
time.
to the Settings menu.
• If pressure is still low, consult
engine manual.
Use engine operating times to
schedule service.
CMW
®
Page 35
Controls - 36 RT45 Operator’s Manual
Center Console
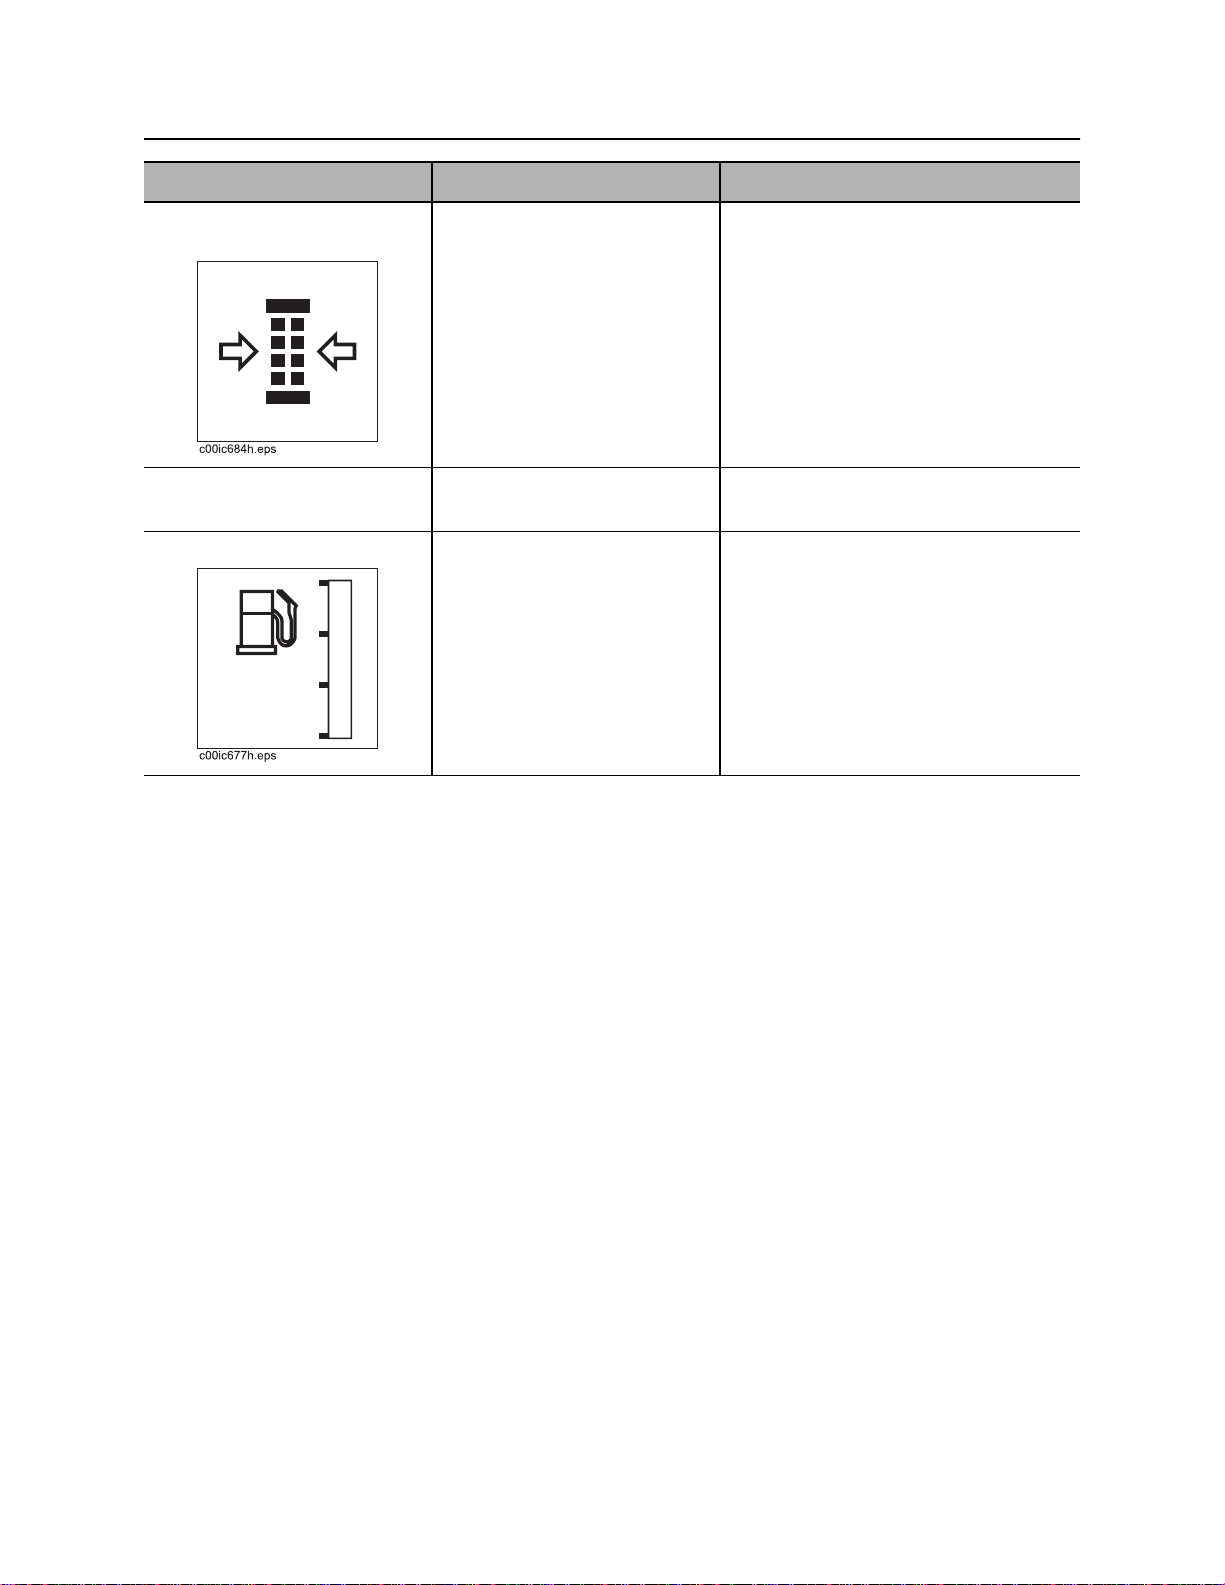
Item Description Notes
12. Air filter restriction
indicator
13. Electrical system
voltage
14. Fuel level indicator Displays fuel level in tank.
Indicator will begin flashing
once the air filter is 25%
unrestricted. Percentage will
decrease as air filter
becomes more restricted.
For best results, replace filter
between 25% and 0%. Reset
after replacing air filter.
Displays system voltage. Should show 12-14V with engine
Will flash if fuel level is below
10%.
T o view the air filter percentage before
25% unrestricted, press the
diagnostics menu button at any time.
running.
Fuel tank holds 13 gal (49 L).
NOTICE: Use low sulfur or ultra low
sulfur fuel only.
CMW
®
Page 36
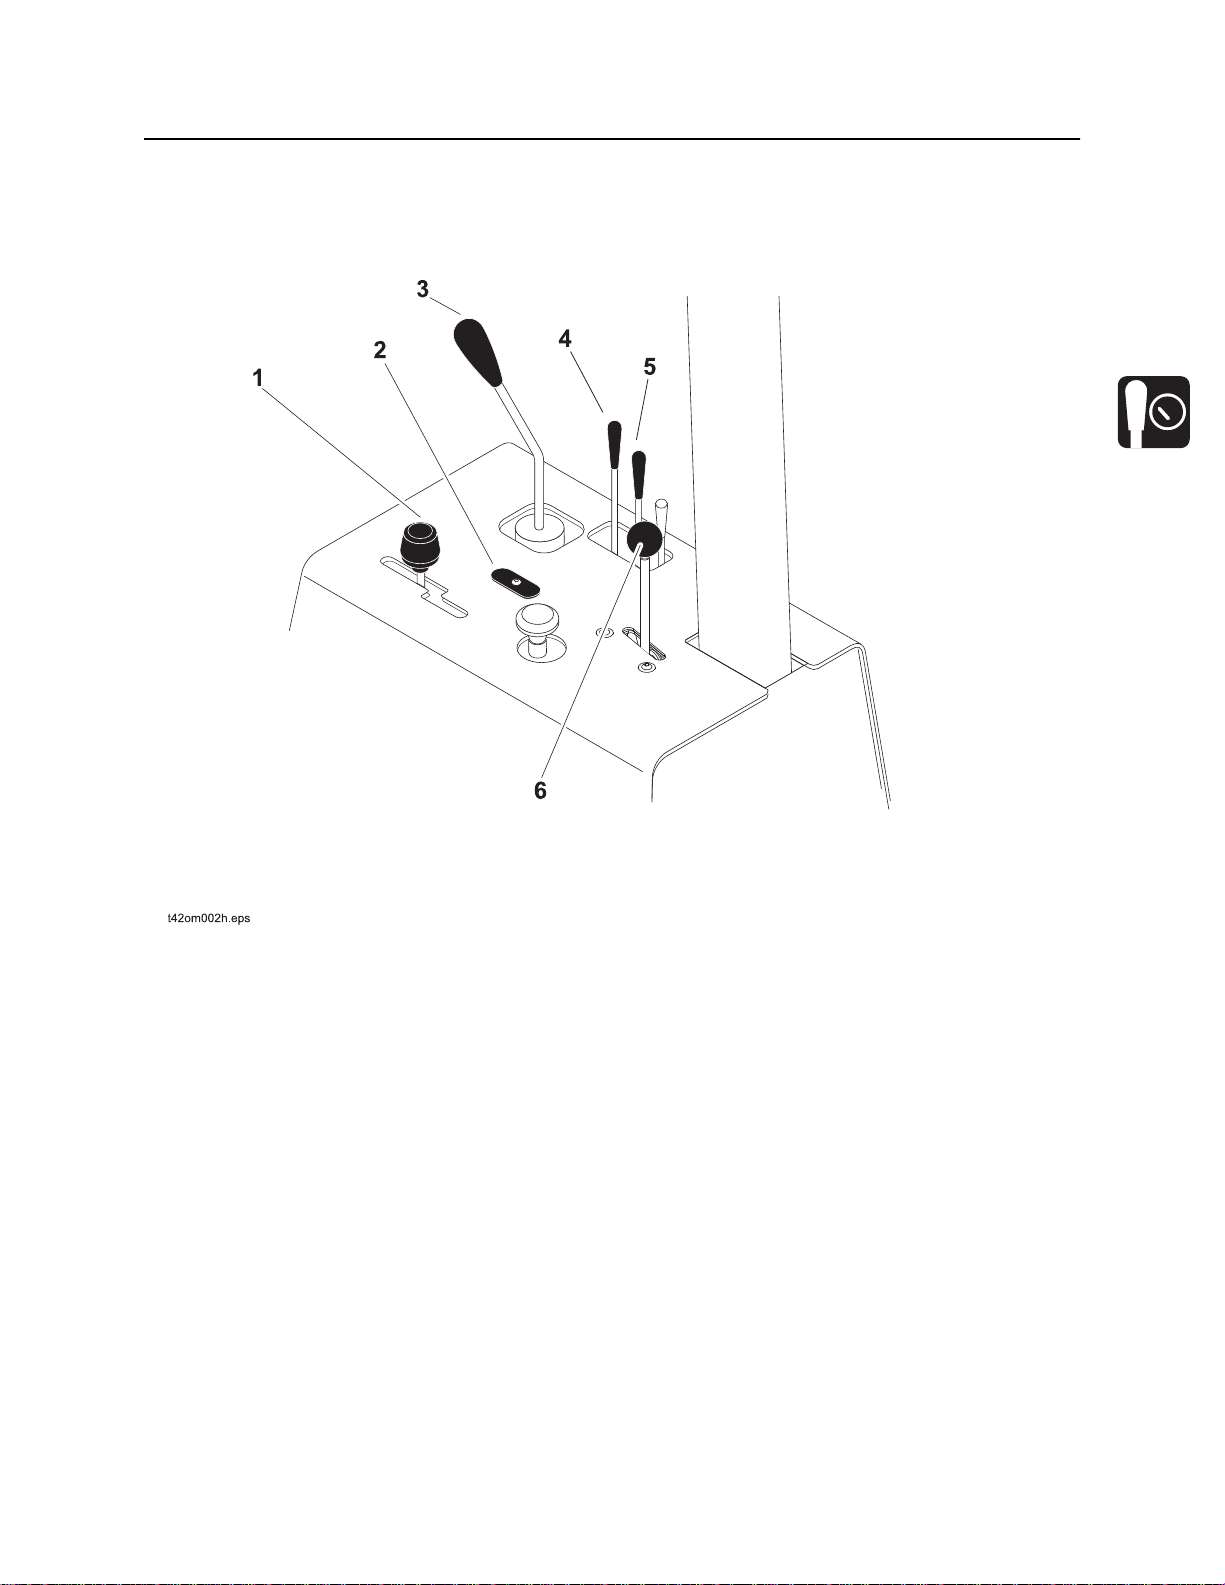
RT45 Operator’s Manual Controls - 37
Right Fender
Right Fender
Tractor Controls
1. Ground drive speed/direction control
2. Rear steer indicator*
3. Backfill blade control
4. Backfill blade tilt control *
5. Rear steer control*
6. Throttle
*optional
CMW
®
Page 37
Controls - 38 RT45 Operator’s Manual
Right Fender
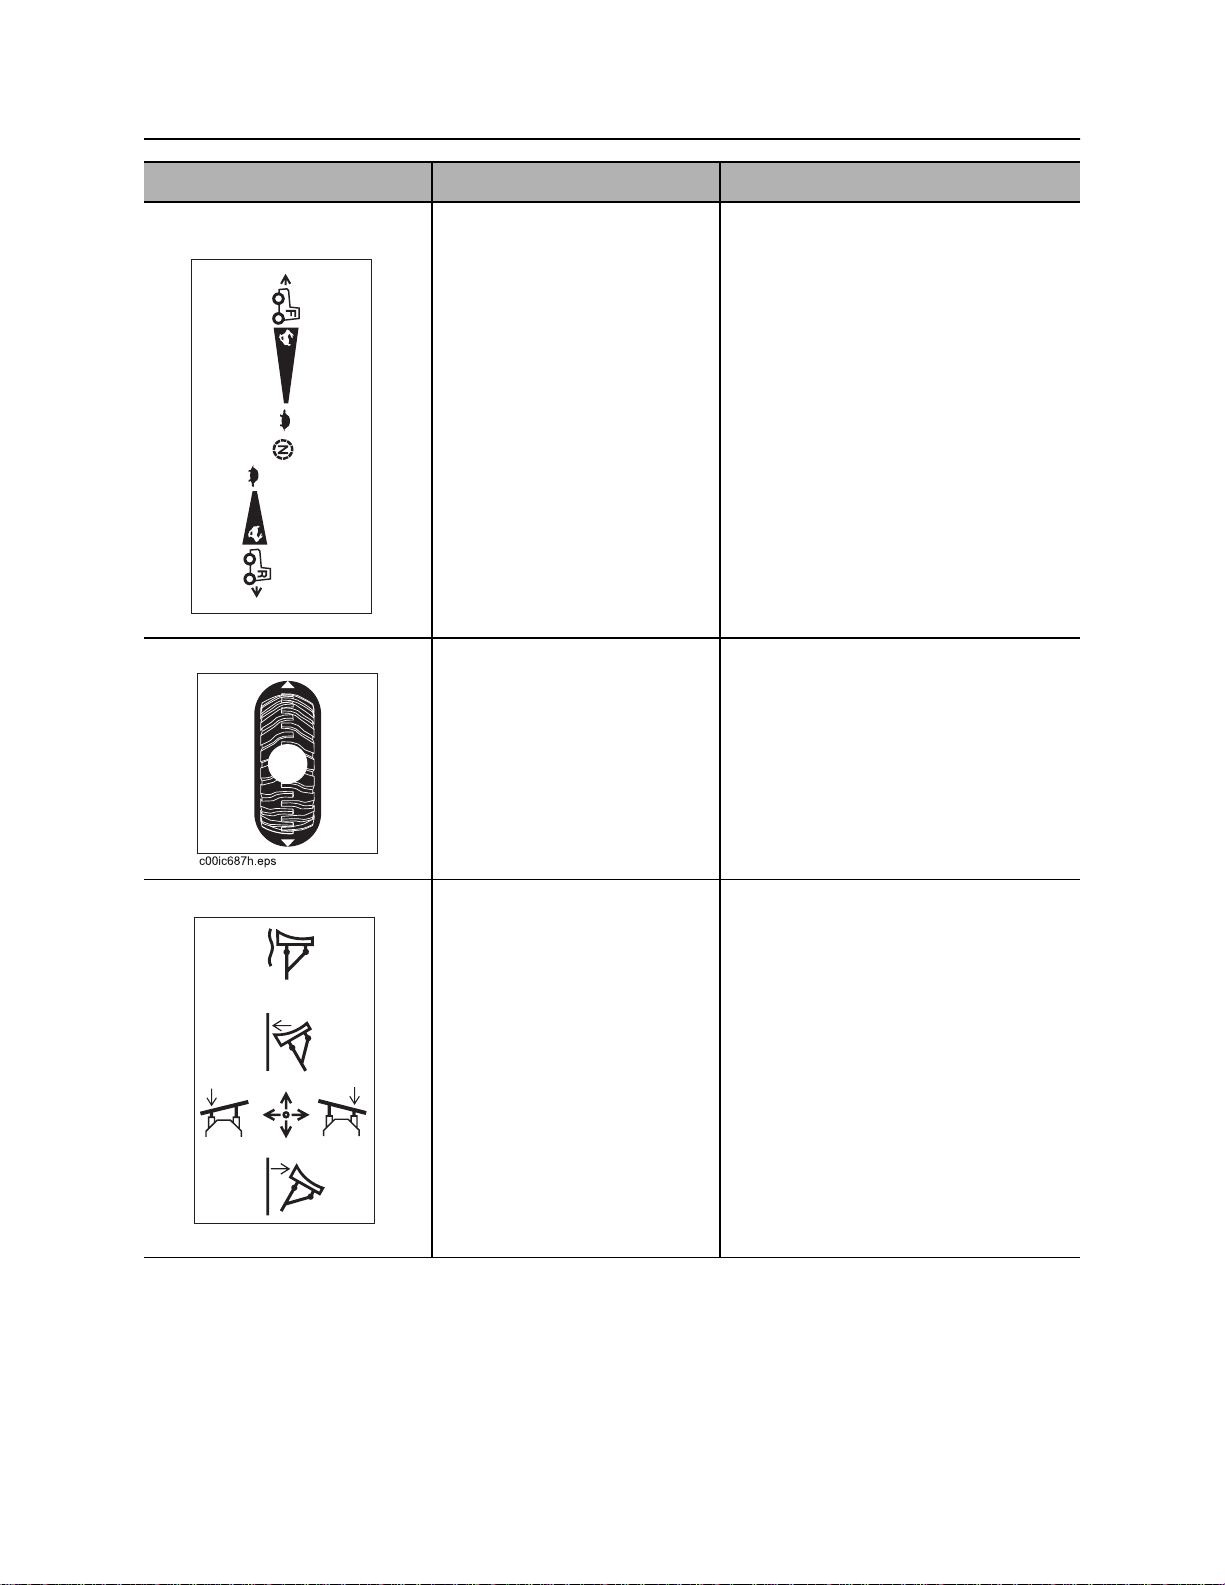
Item Description Notes
1. Ground drive speed/
To go forward, push.
direction control
To go backward, pull.
To go faster in either
direction, move farther from
center.
To stop, move to neutral.
c00ic251h.eps
2. Rear steer indicator Rotates to displays position of
rear wheels.
Control does not automatically return
to neutral position when released.
3. Backfill blade control To lower blade, push.
To put blade in float, push
fully forward.
To raise blade, pull.
To swing blade to right, move
right.
To swing blade to left, move
left.
c00ic252h.eps
CMW
®
Page 38
RT45 Operator’s Manual Controls - 39
Right Fender
Item Description Notes
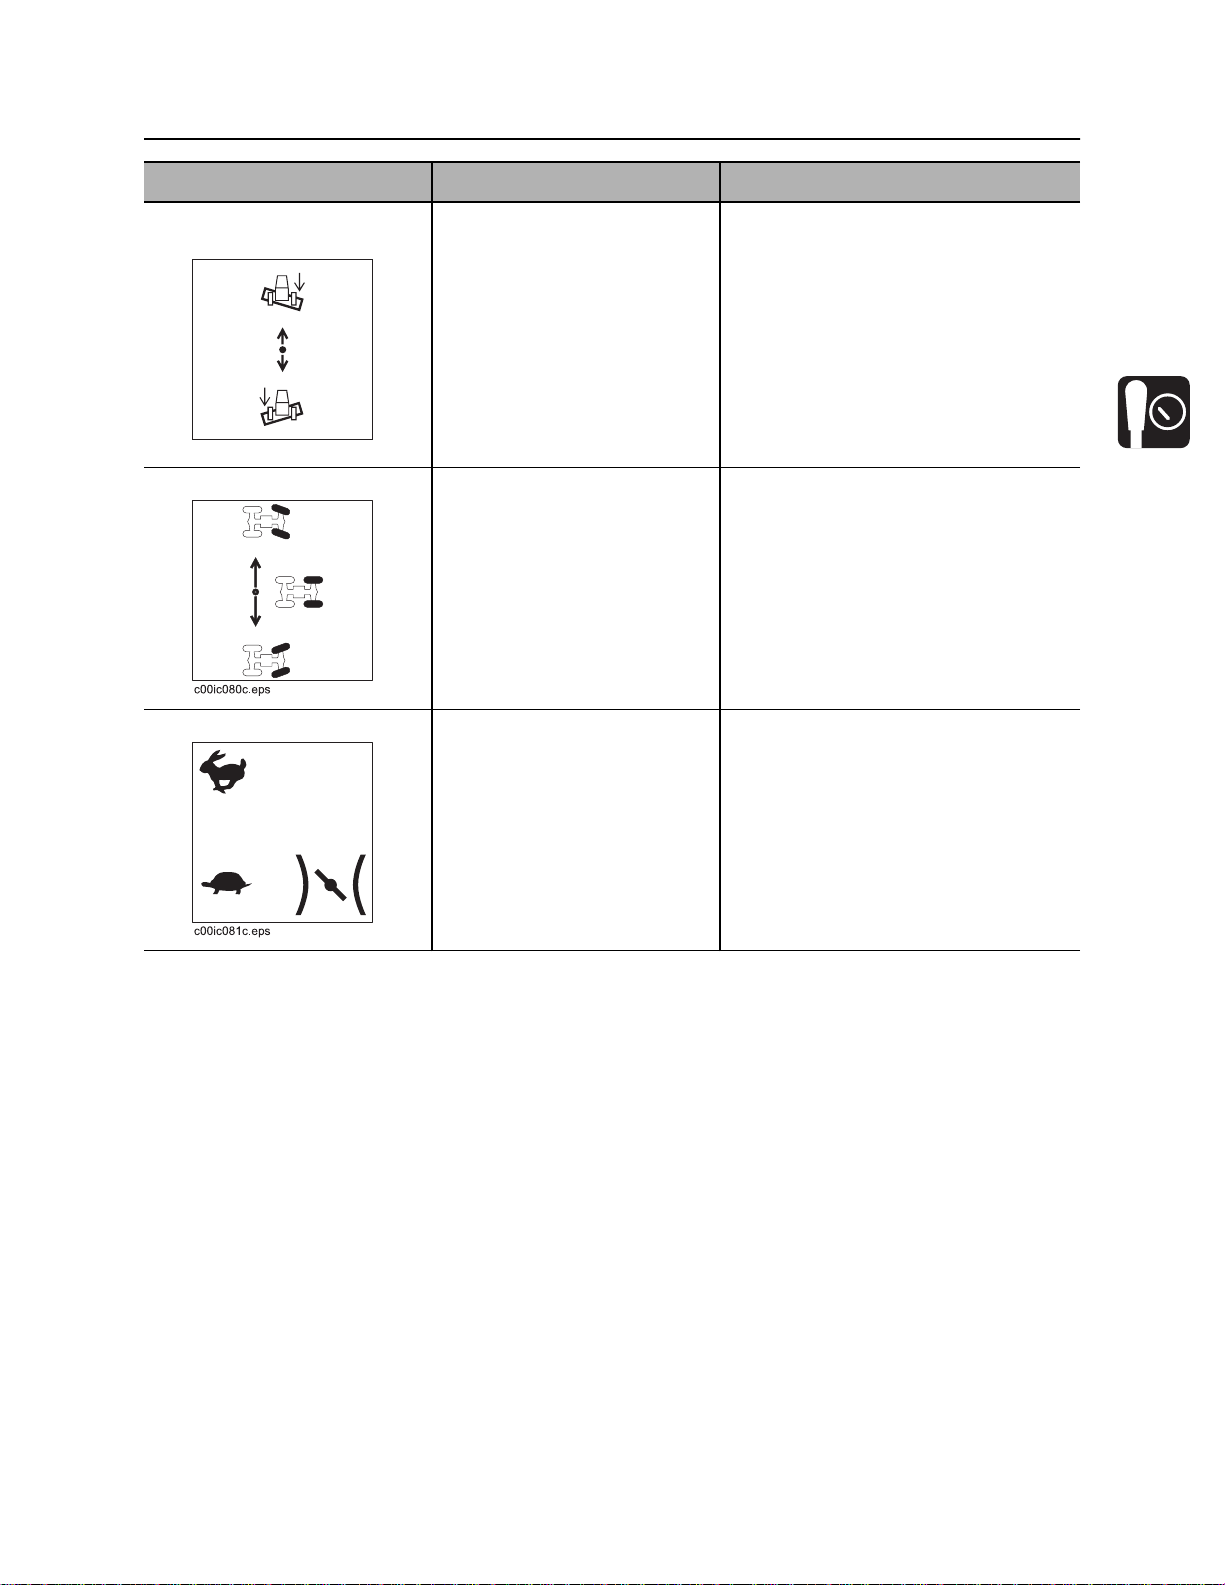
4. Backfill blade tilt
control
To tilt right side of blade
down, push.
To tilt left side of blade down,
pull.
c00ic253h.eps
5. Rear steer control To turn rear wheels right,
push until wheels reach
desired position, then
release.
To turn rear wheels left, pull
until wheels reach desired
position, then release.
6. Throttle To increase engine speed,
push.
To decrease engine speed,
pull.
CMW
®
Page 39
Controls - 40 RT45 Operator’s Manual
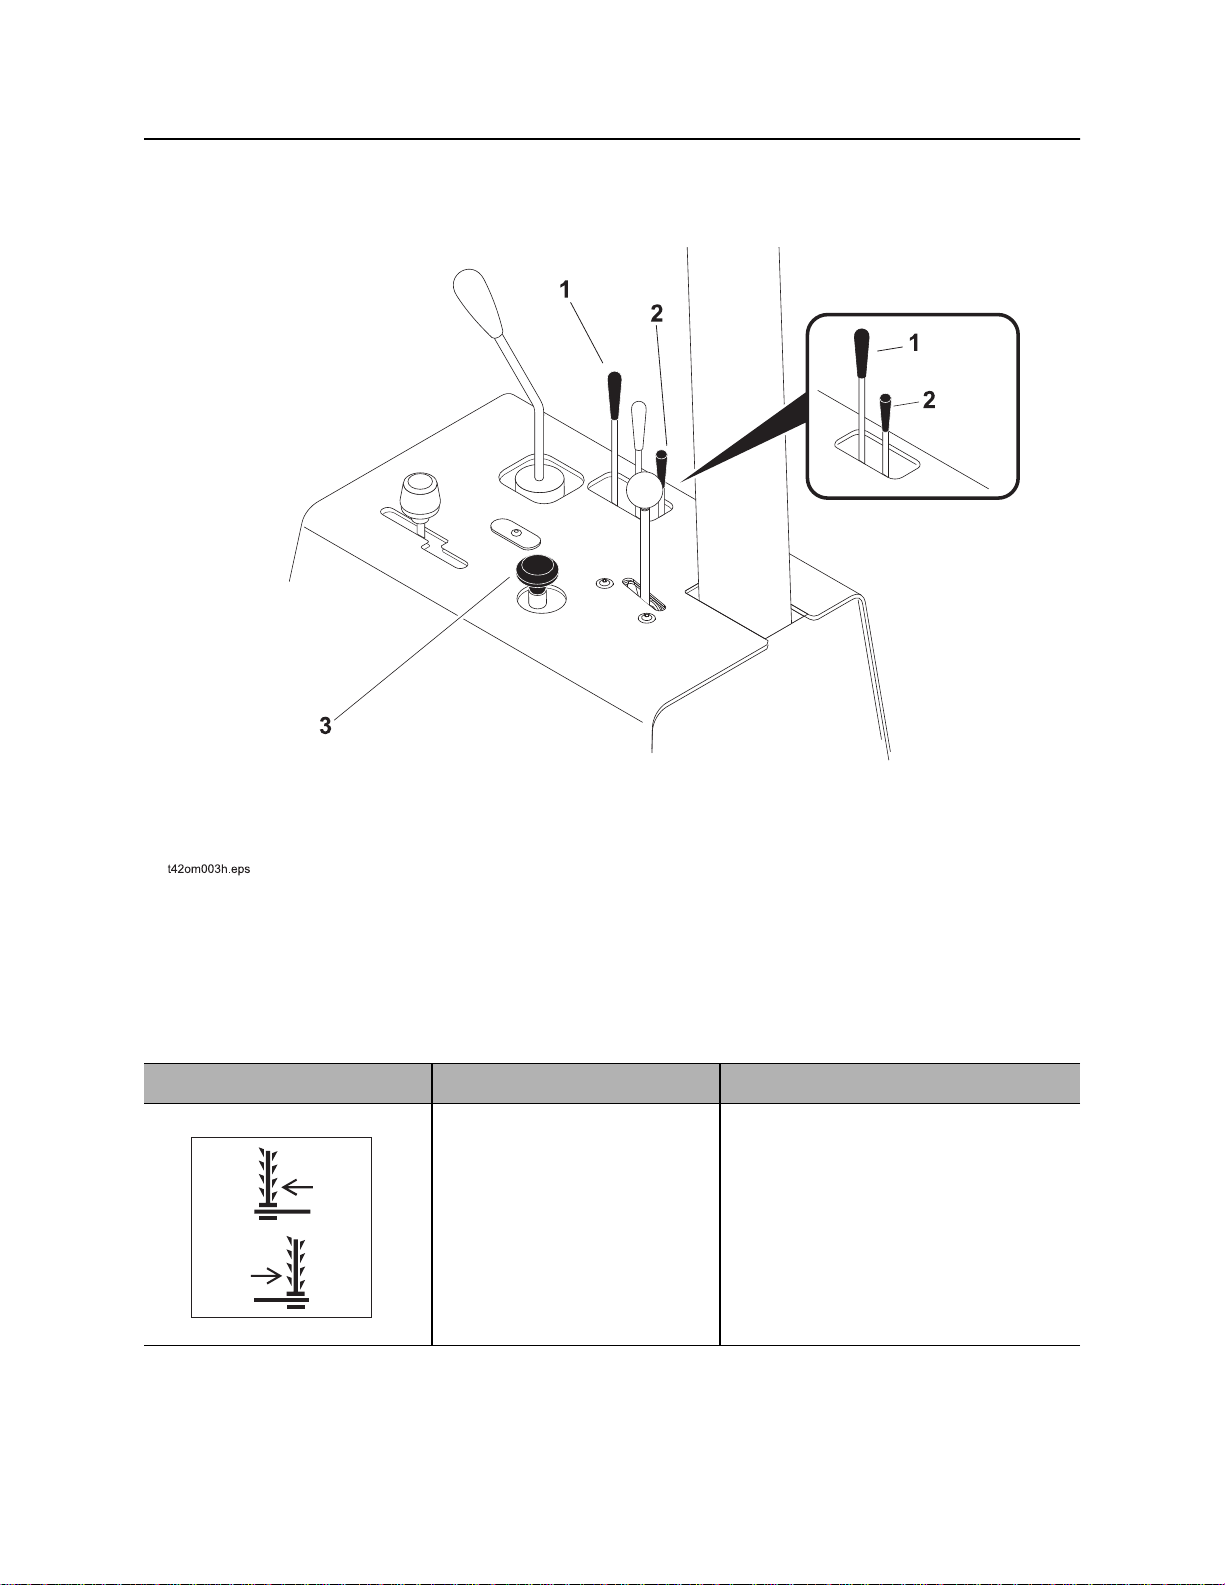
Right Fender
Trencher Controls
Note: Control configuration with rear steer option is shown in main
illustration. Control configuration without rear steer is shown in balloon.
1. Trencher slide control*
2. Boom lift control
3. Backfill blade tilt/trencher slide selector*
*H314 only
Item Description Notes
1. Trencher slide control To slide trencher right, push.
To slide trencher left, pull.
c00ic198h.eps
CMW
®
Page 40
RT45 Operator’s Manual Controls - 41
Right Fender
Item Description Notes
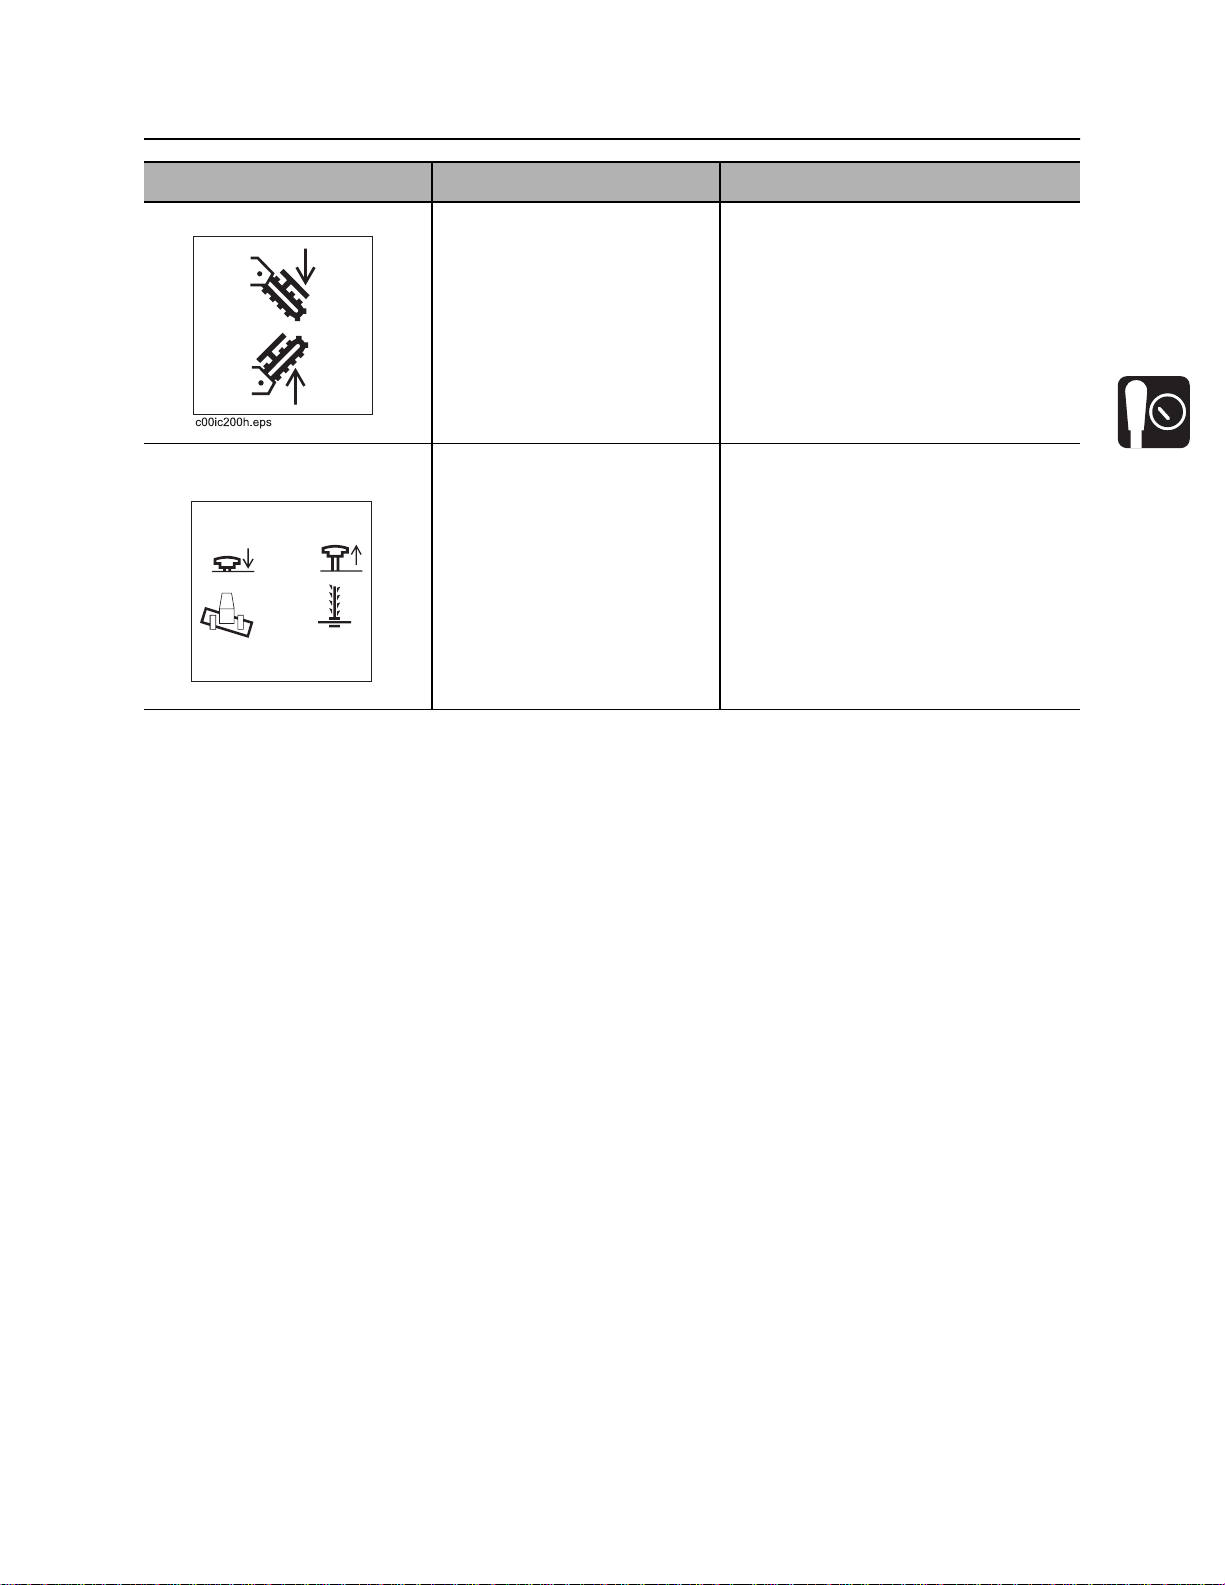
2. Boom lift control To lower, push.
To raise, pull.
3. Backfill blade tilt/
trencher slide selector
c00ic263h.eps
To control backfill blade tilt,
push.
To control trencher slide, pull.
CMW
®
Page 41
Controls - 42 RT45 Operator’s Manual
Right Fender
Plow Controls
Note: Control configuration with rear steer option is shown in main
illustration. Control configuration without rear steer is shown in balloon.
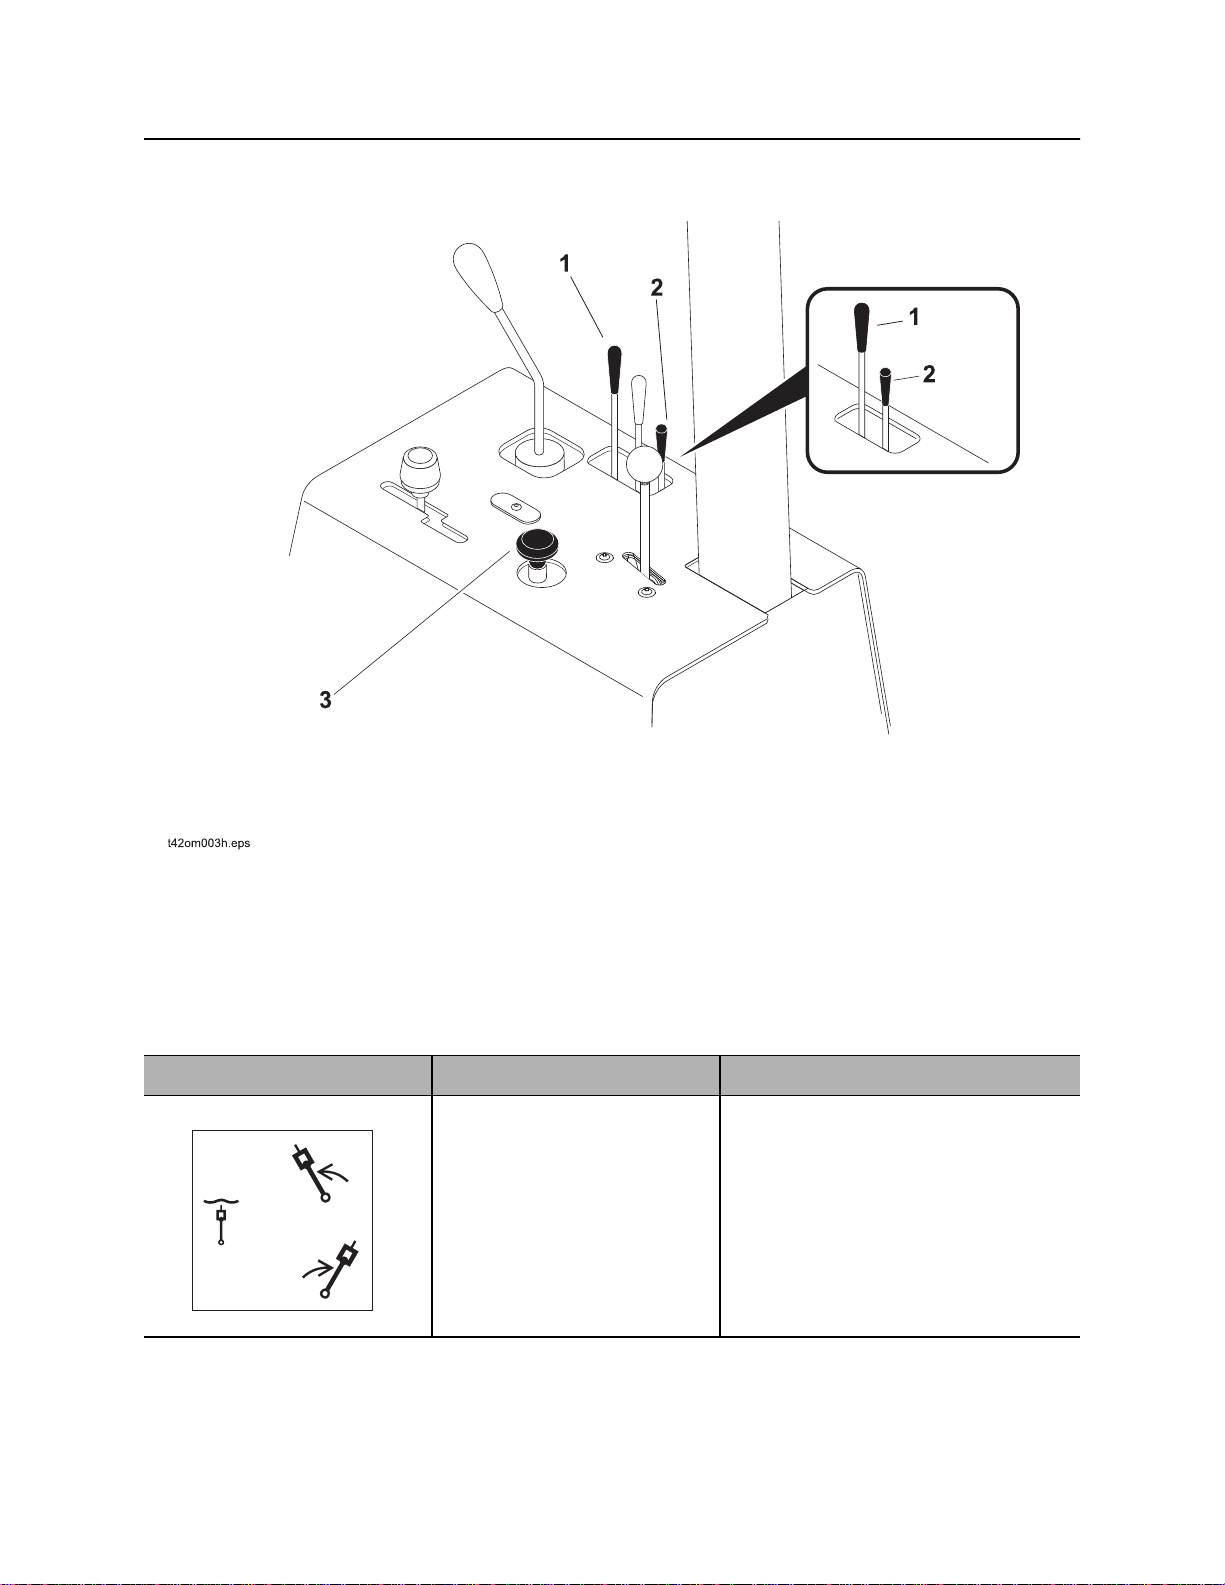
1. Plow swing control
3. Backfill blade tilt/plow swing selector
2. Plow lift control
Item Description Notes
1. Plow swing control To swing left, pull.
To swing right, push.
c00ic202h.eps
CMW
®
Page 42
RT45 Operator’s Manual Controls - 43
Right Fender
Item Description Notes
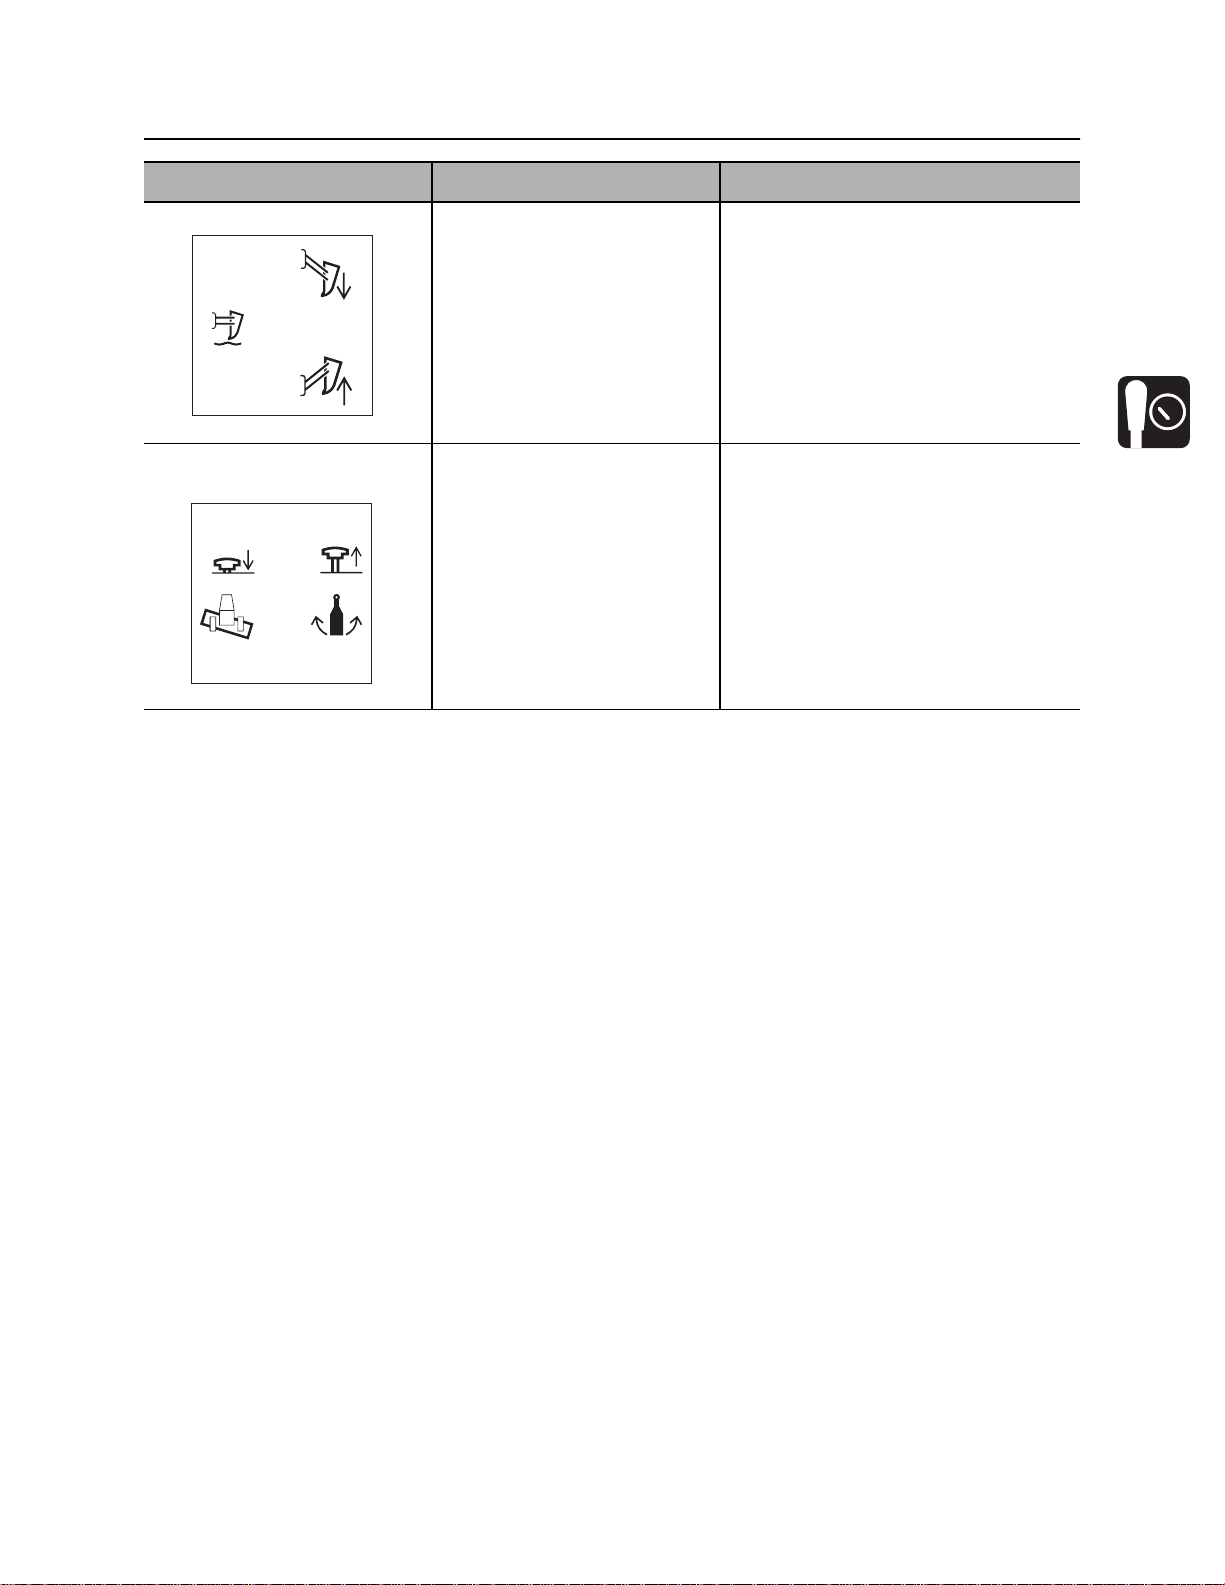
2. Plow lift control To raise, pull.
To lower, push.
c00ic204h.eps
3. Backfill blade tilt/plow
swing selector
c00ic264h.eps
To control backfill blade tilt,
push.
To control plow swing, pull.
Use when optional 6-way backfill
blade is installed.
CMW
®
Page 43
Controls - 44 RT45 Operator’s Manual
Right Fender
Combo Controls
Note: Control configuration with rear
steer option is shown in main illustration.
Control configuration without rear steer is
shown in balloon.
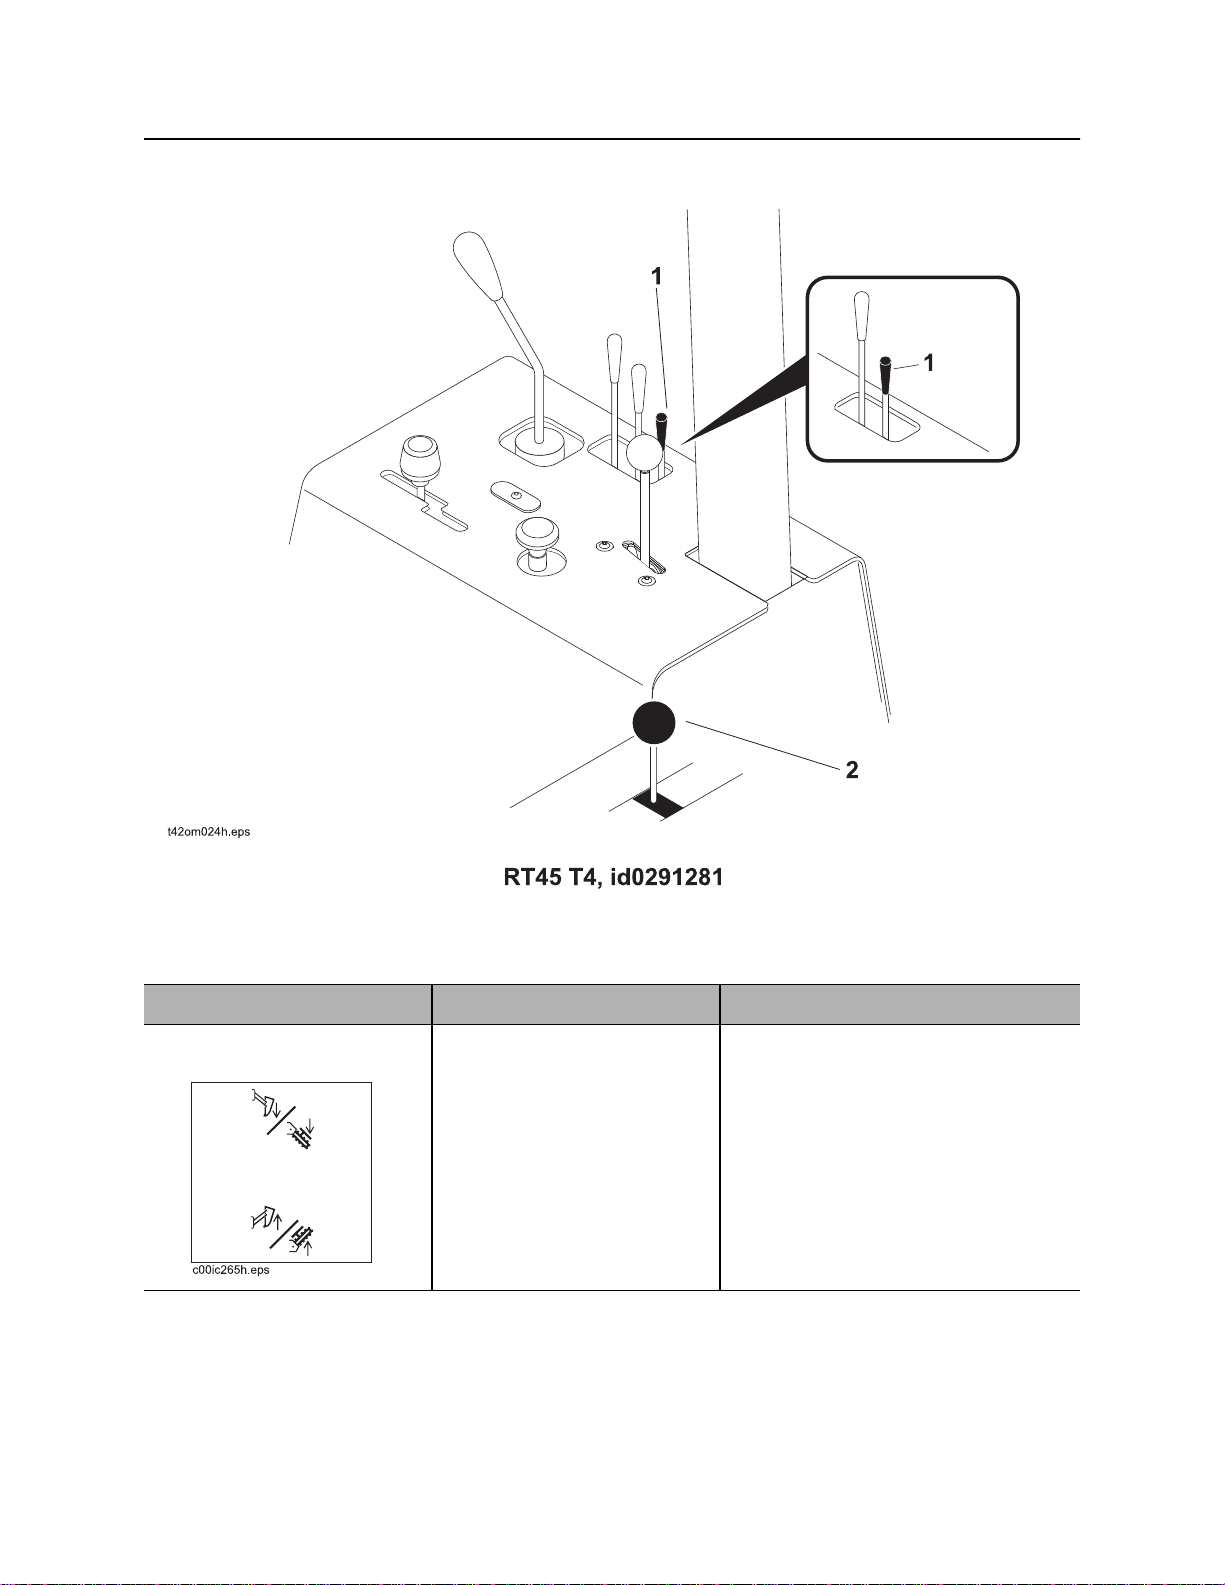
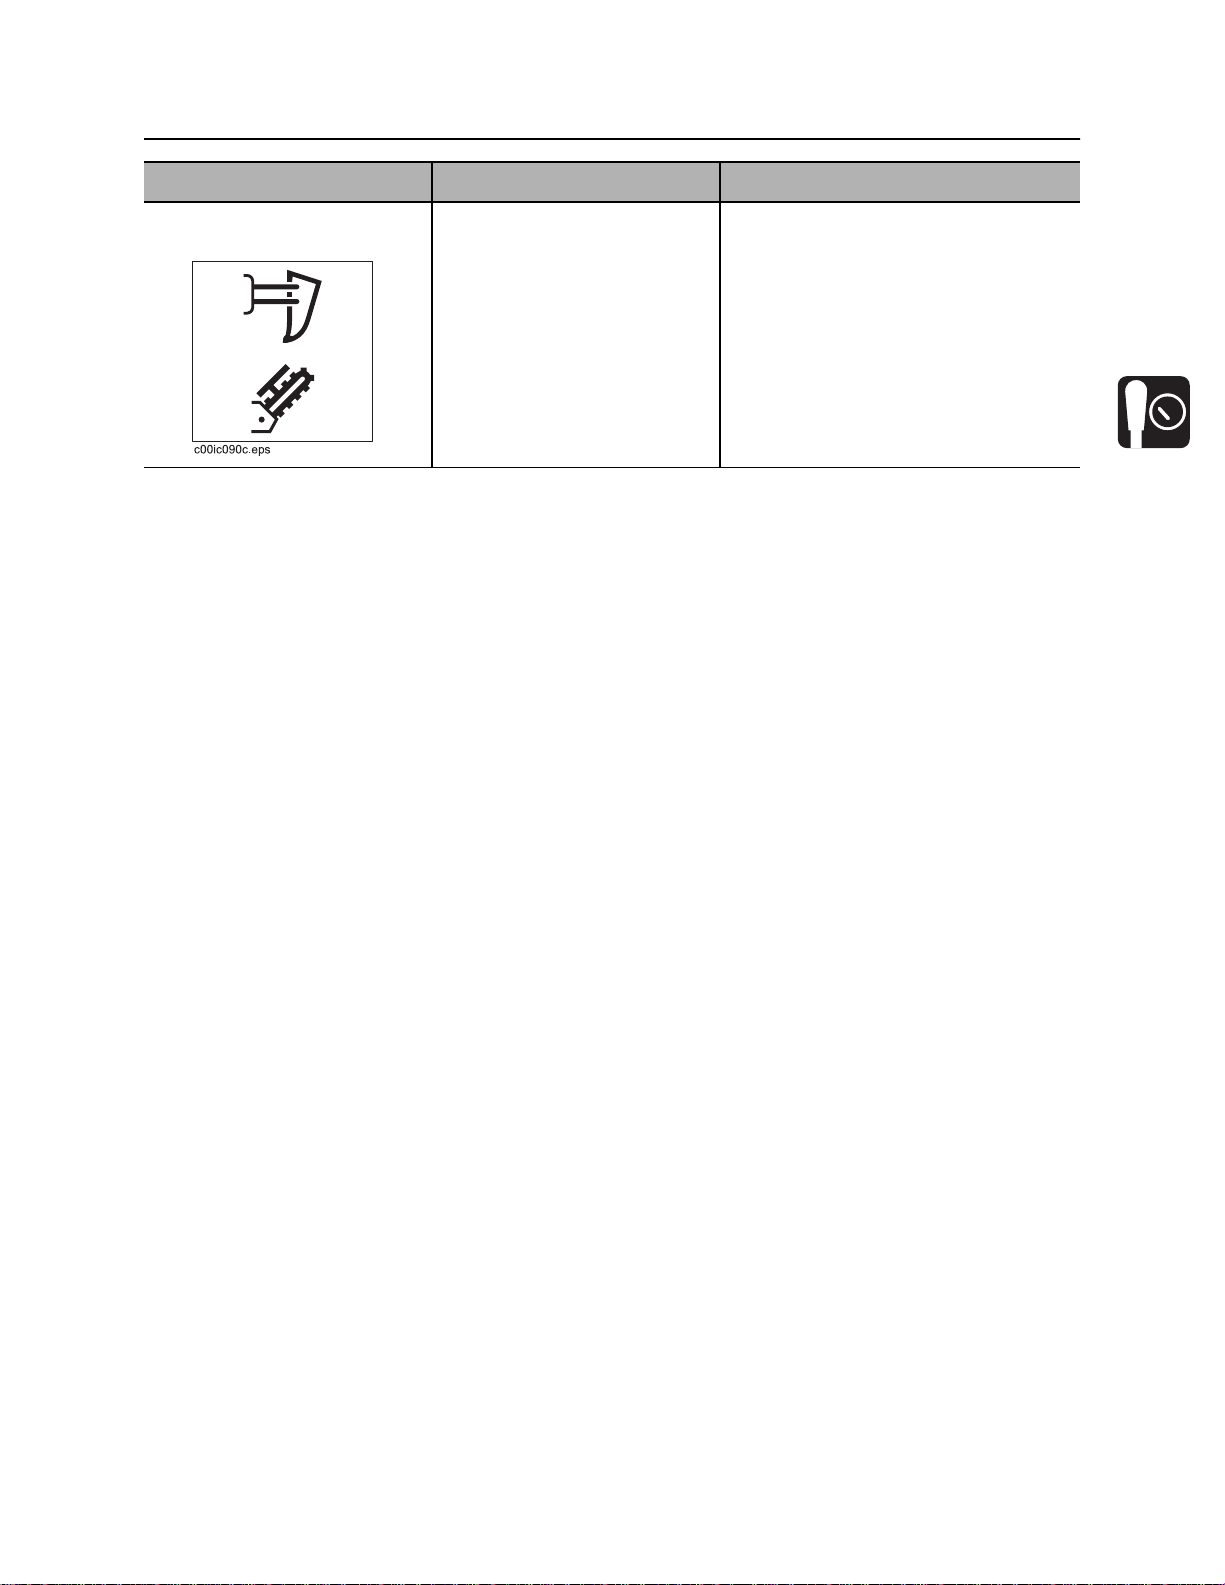
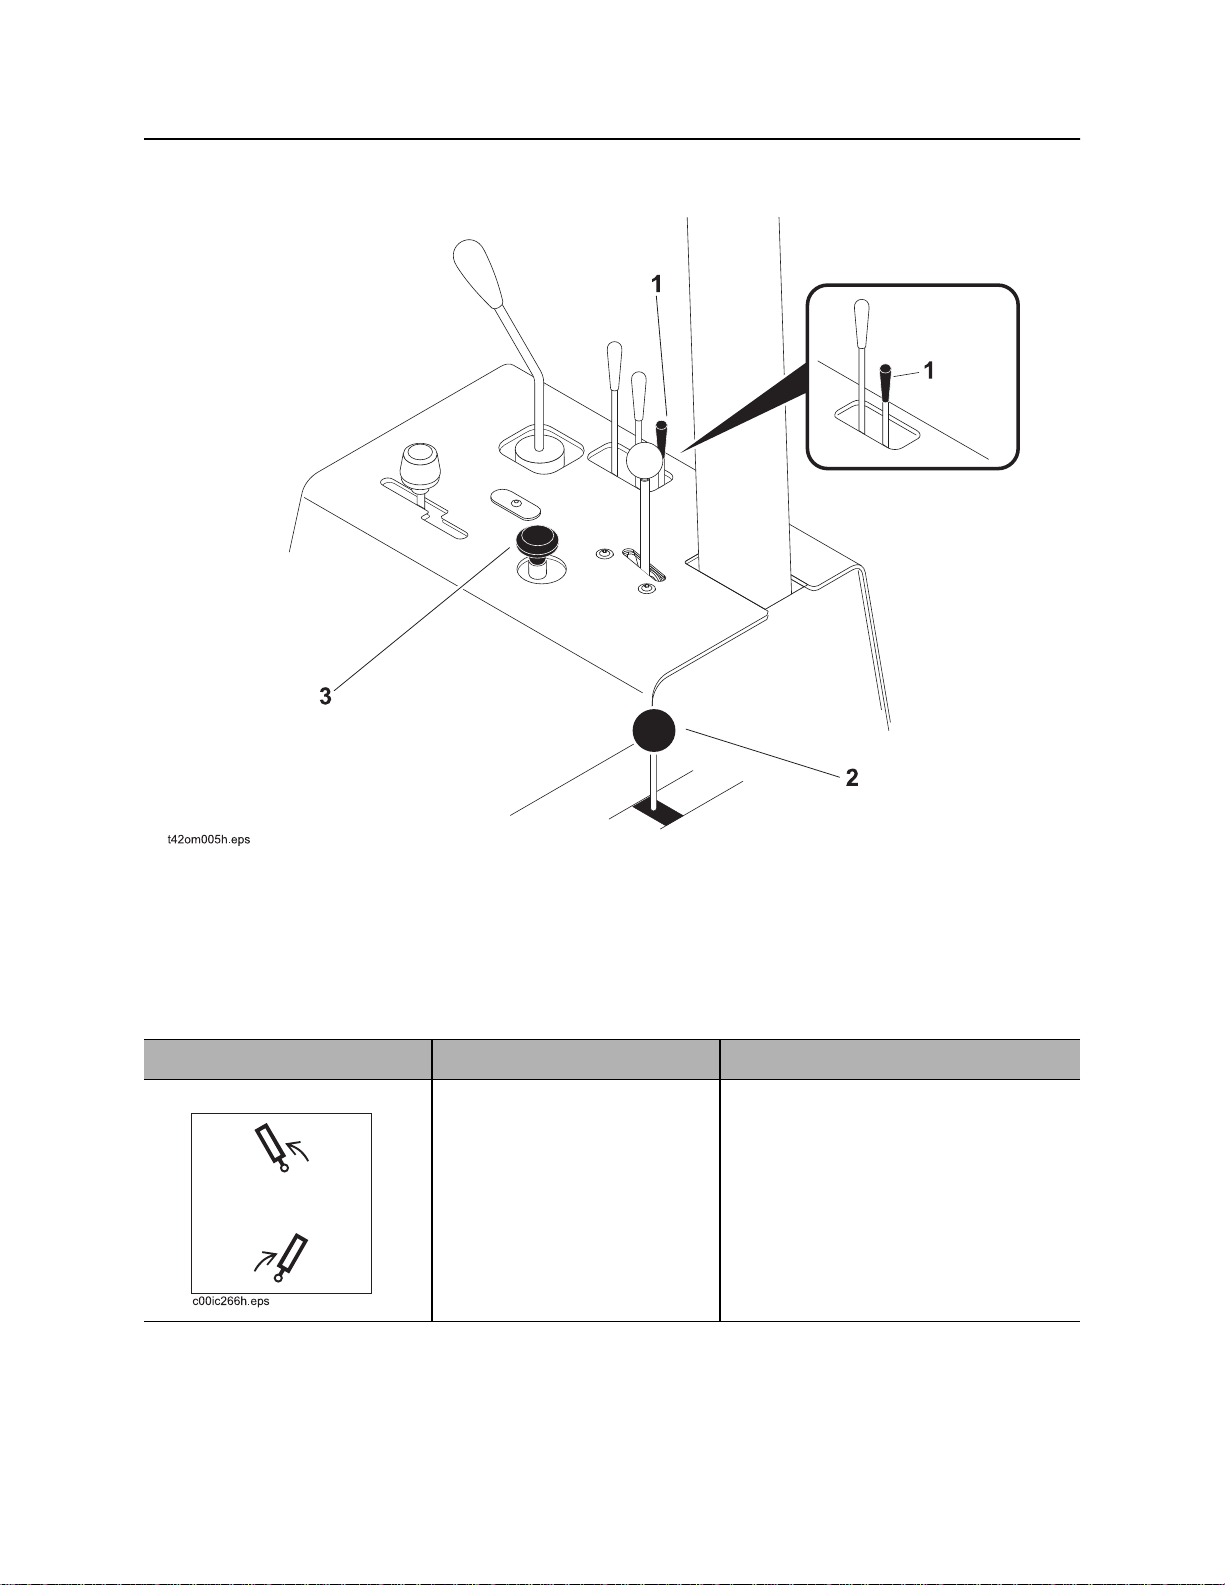
1. Trencher/Plow lift control 2. Trencher/plow select control
Item Description Notes
1. Trencher/Plow lift
control
To raise selected attachment,
pull.
T o lower selected attachment,
push.
CMW
®
Page 44
RT45 Operator’s Manual Controls - 45
Right Fender
Item Description Notes
2. Trencher/plow select
control
To select plow, push.
To select trencher, pull.
CMW
®
Page 45
Controls - 46 RT45 Operator’s Manual
Right Fender
Saw Controls
Note: Control configuration with rear steer option is shown in main
illustration. Control configuration without rear steer is shown in balloon.
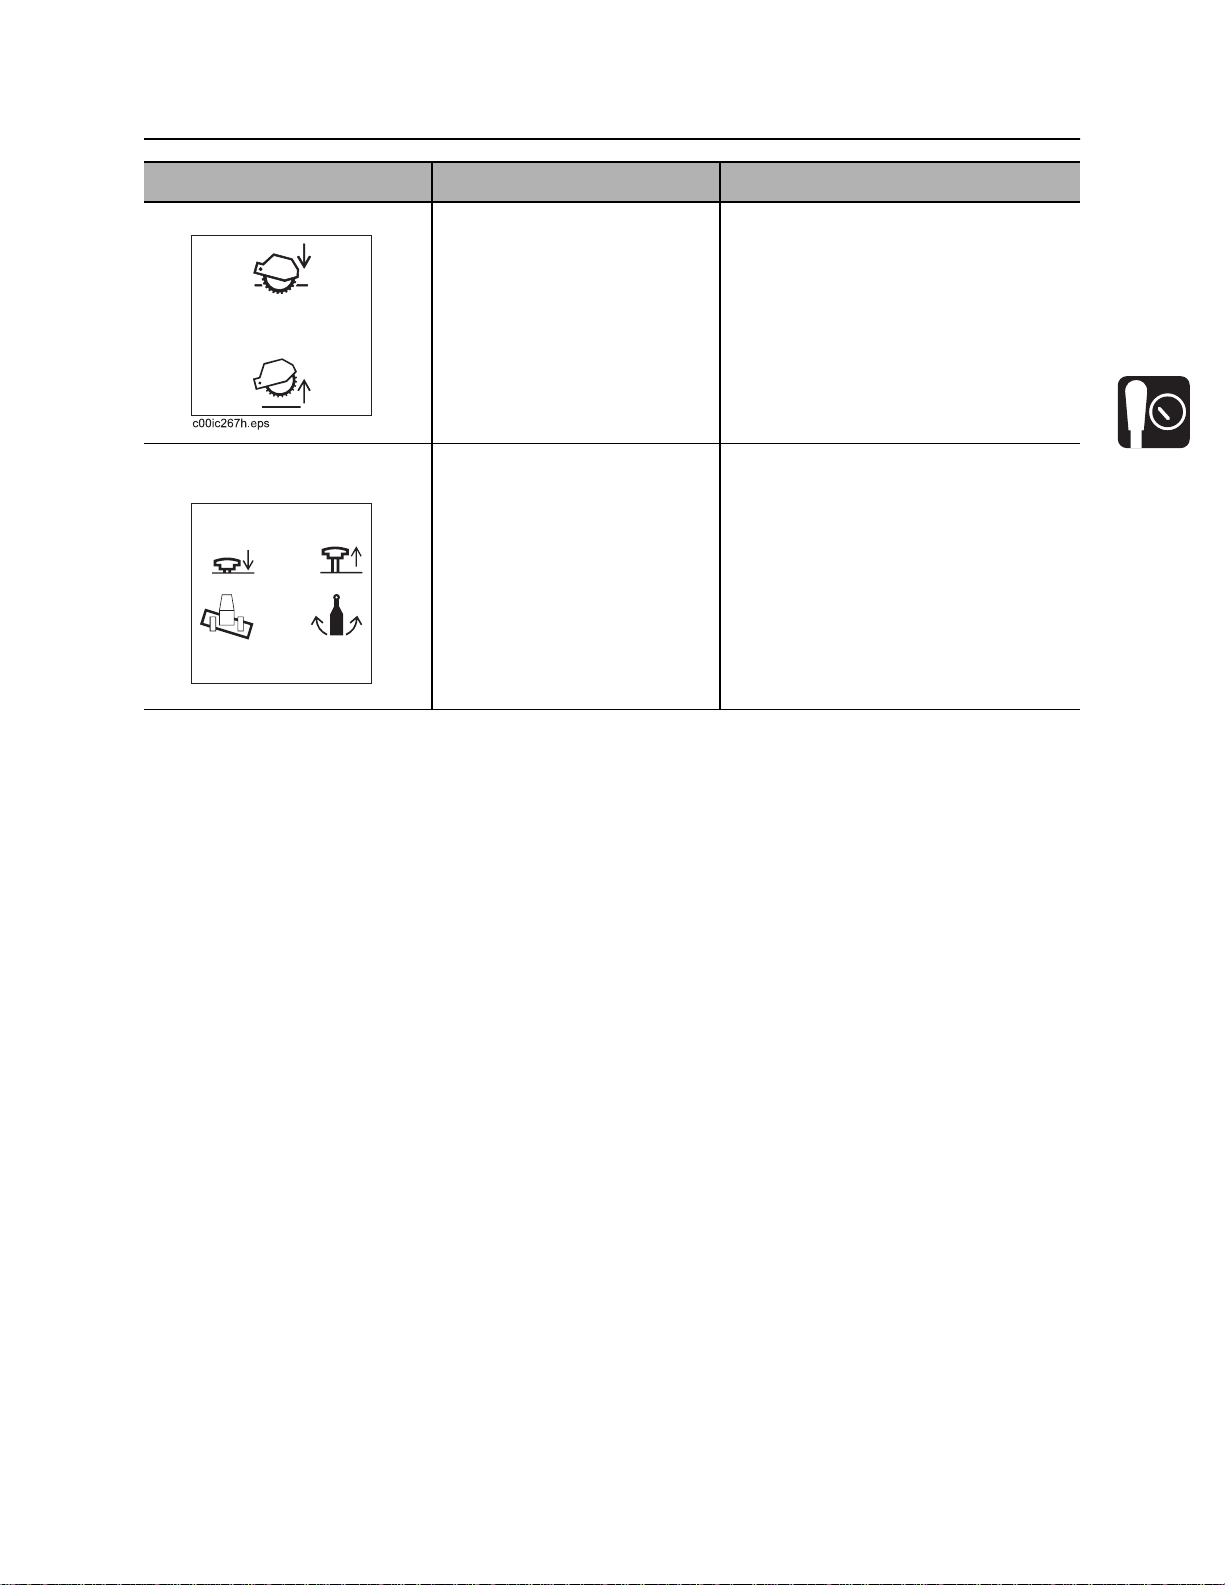
1. Saw swing control
2. Saw lift control
Item Description Notes
1. Saw swing control To swing saw to left, pull.
To swing saw to right, push.
3. Backfill blade tilt/saw swing selector
CMW
®
Page 46
RT45 Operator’s Manual Controls - 47
Right Fender
Item Description Notes
2. Saw lift control To lower, push.
To raise, pull.
3. Backfill blade tilt/saw
swing selector
c00ic264h.eps
To control backfill blade tilt,
push.
To control saw swing, pull.
CMW
®
Page 47
Controls - 48 RT45 Operator’s Manual
Right Fender
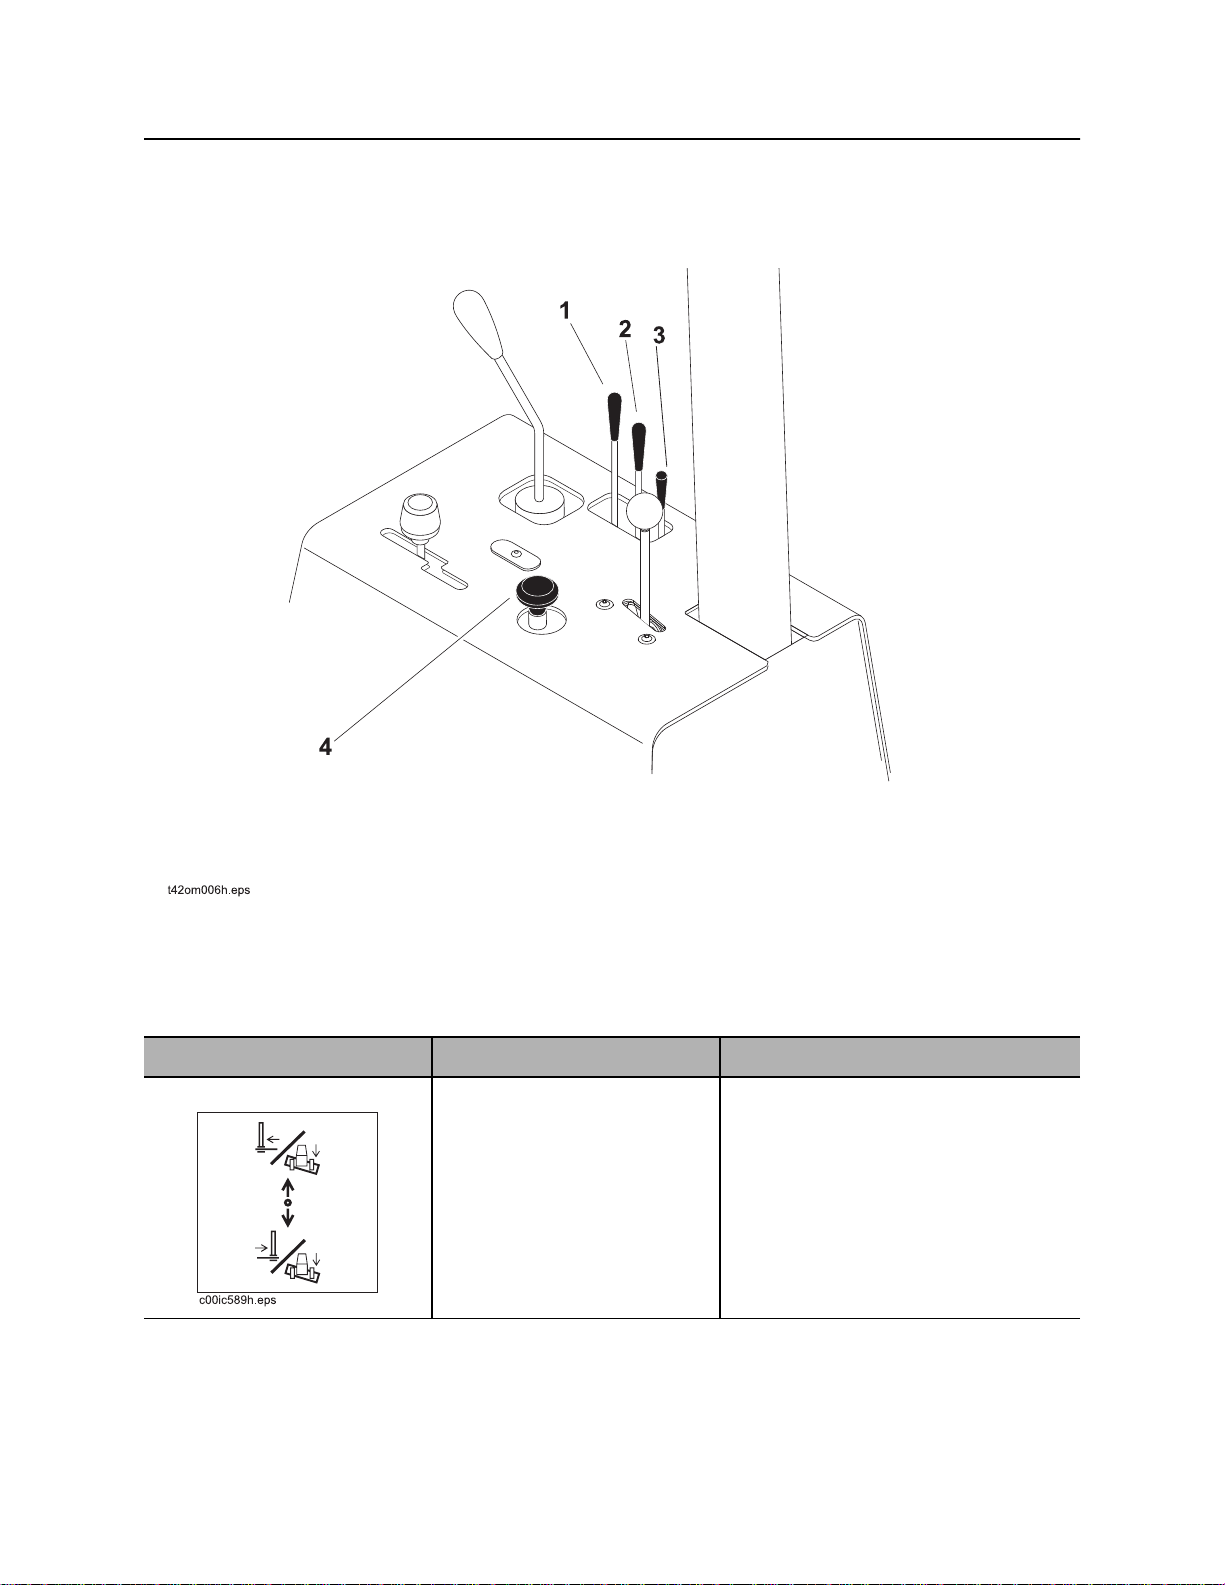
Microtrencher Controls
Tractor
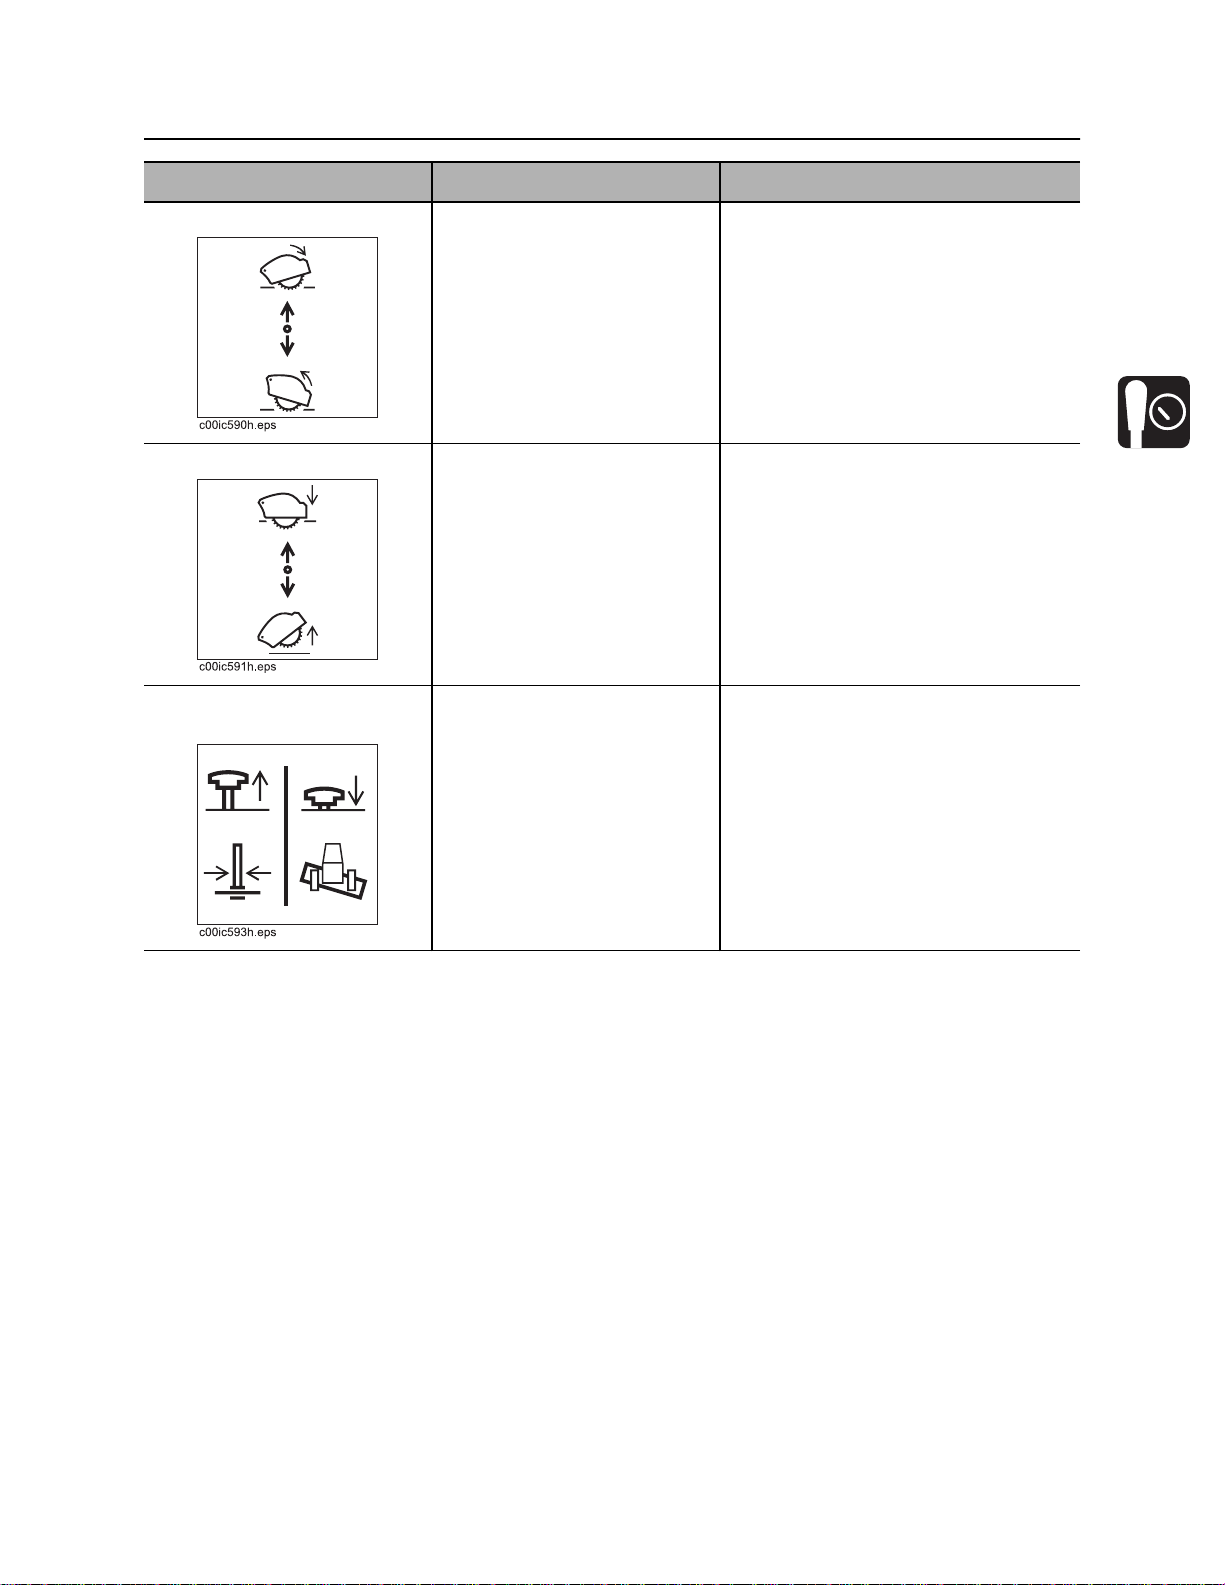
1. Traverse (slide) control
2. Level control
Item Description Notes
1. Traverse (slide) control To slide microtrencher right,
push.
To slide microtrencher left,
pull.
®
CMW
3. Lift control
4. Backfill blade tilt / Traverse selector
Page 48
RT45 Operator’s Manual Controls - 49
Right Fender
Item Description Notes
2. Level control To lower rear of
microtrencher, push.
T o raise rear of microtrencher ,
pull.
3. Lift control To lower, push.
To raise, pull.
4. Backfill blade tilt /
Traverse selector
To control backfill blade tilt,
push.
To control microtrencher
traverse, pull.
Use when optional 6-way backfill
blade is installed.
CMW
®
Page 49
Controls - 50 RT45 Operator’s Manual
Right Fender
MT12 MicroTrencher Attachment
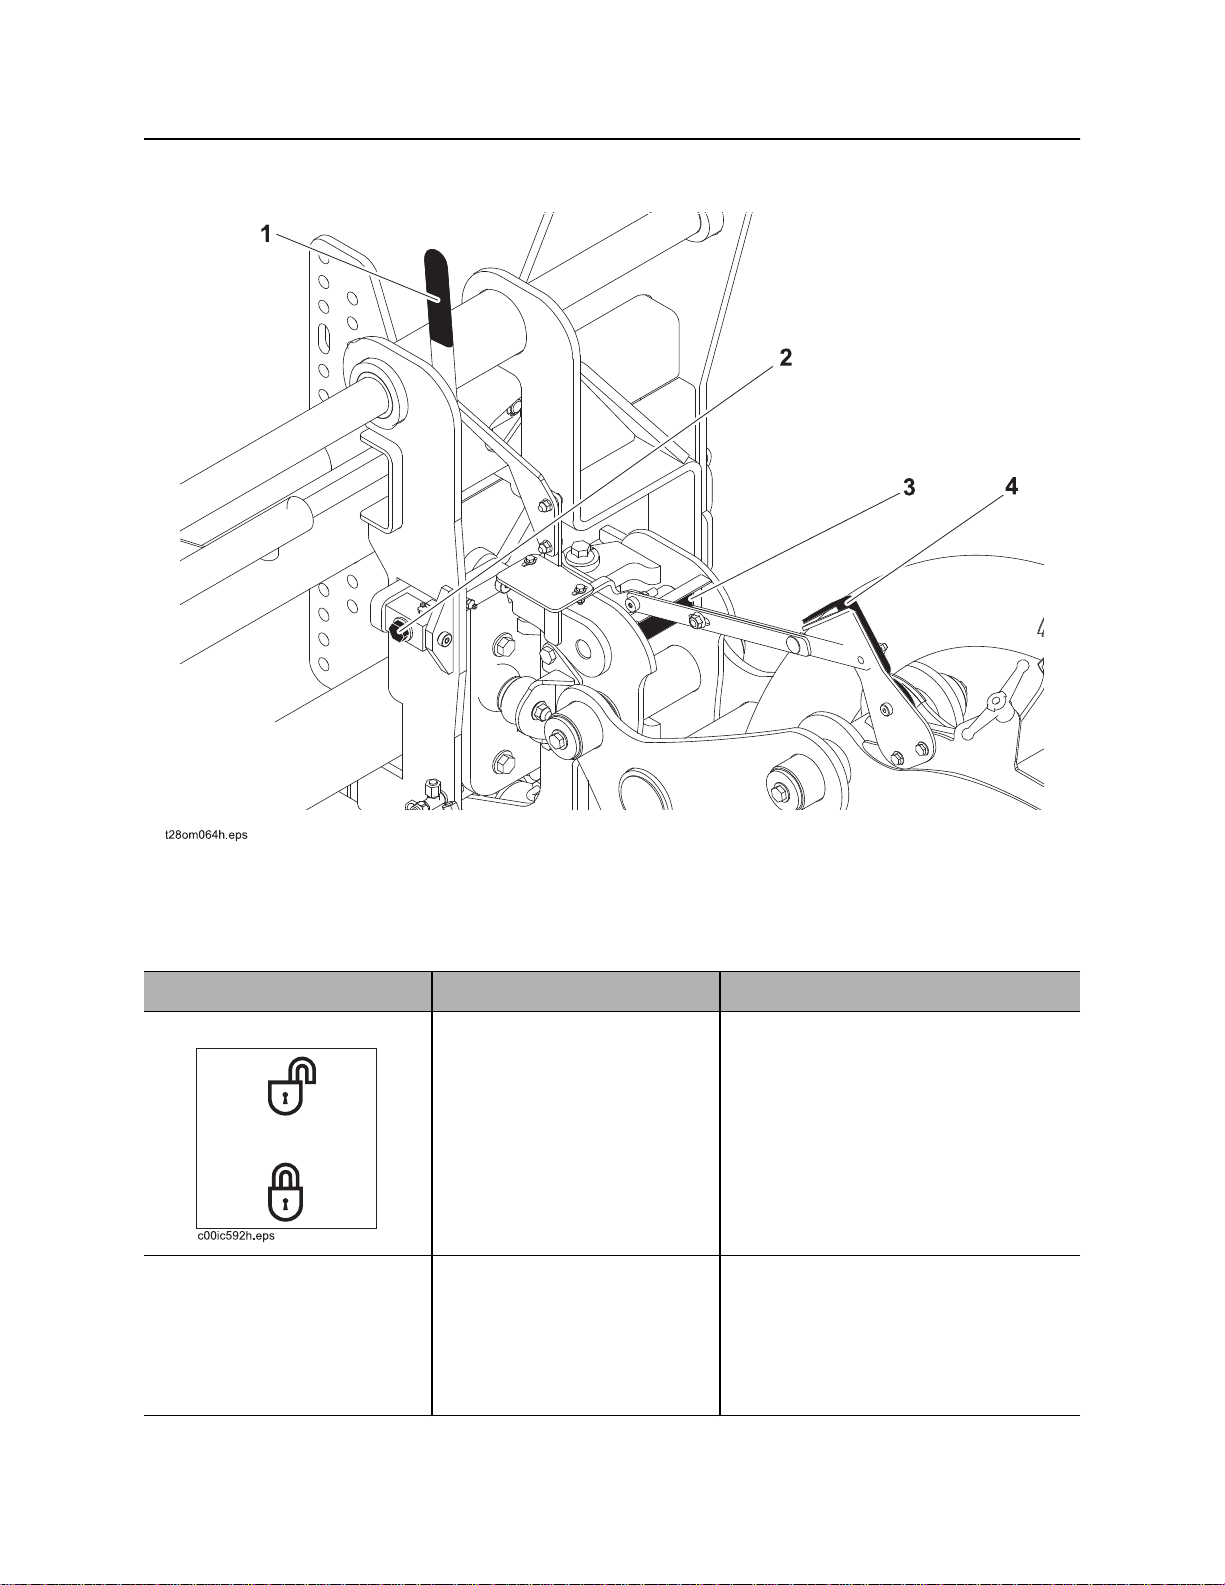
1. Swing lock handle
2. Manual tilt adjustment
Item Description Notes
1. Saw swing lock handle To lock, move handle toward
tractor.
To unlock, move handle
toward microtrencher.
2. Manual tilt adjustment Turn screw in to adjust angle
left.
Turn screw out to adjust
angle right.
3. Bubble level
4. Level indicator
Operate with microtrencher locked in
most situations.
Use manual tilt adjustment and
bubble level together to adjust
microtrencher to match jobsite
conditions.
See “Adjust Tilt” on page 119.
CMW
®
Page 50
RT45 Operator’s Manual Controls - 51
Right Fender
Item Description Notes
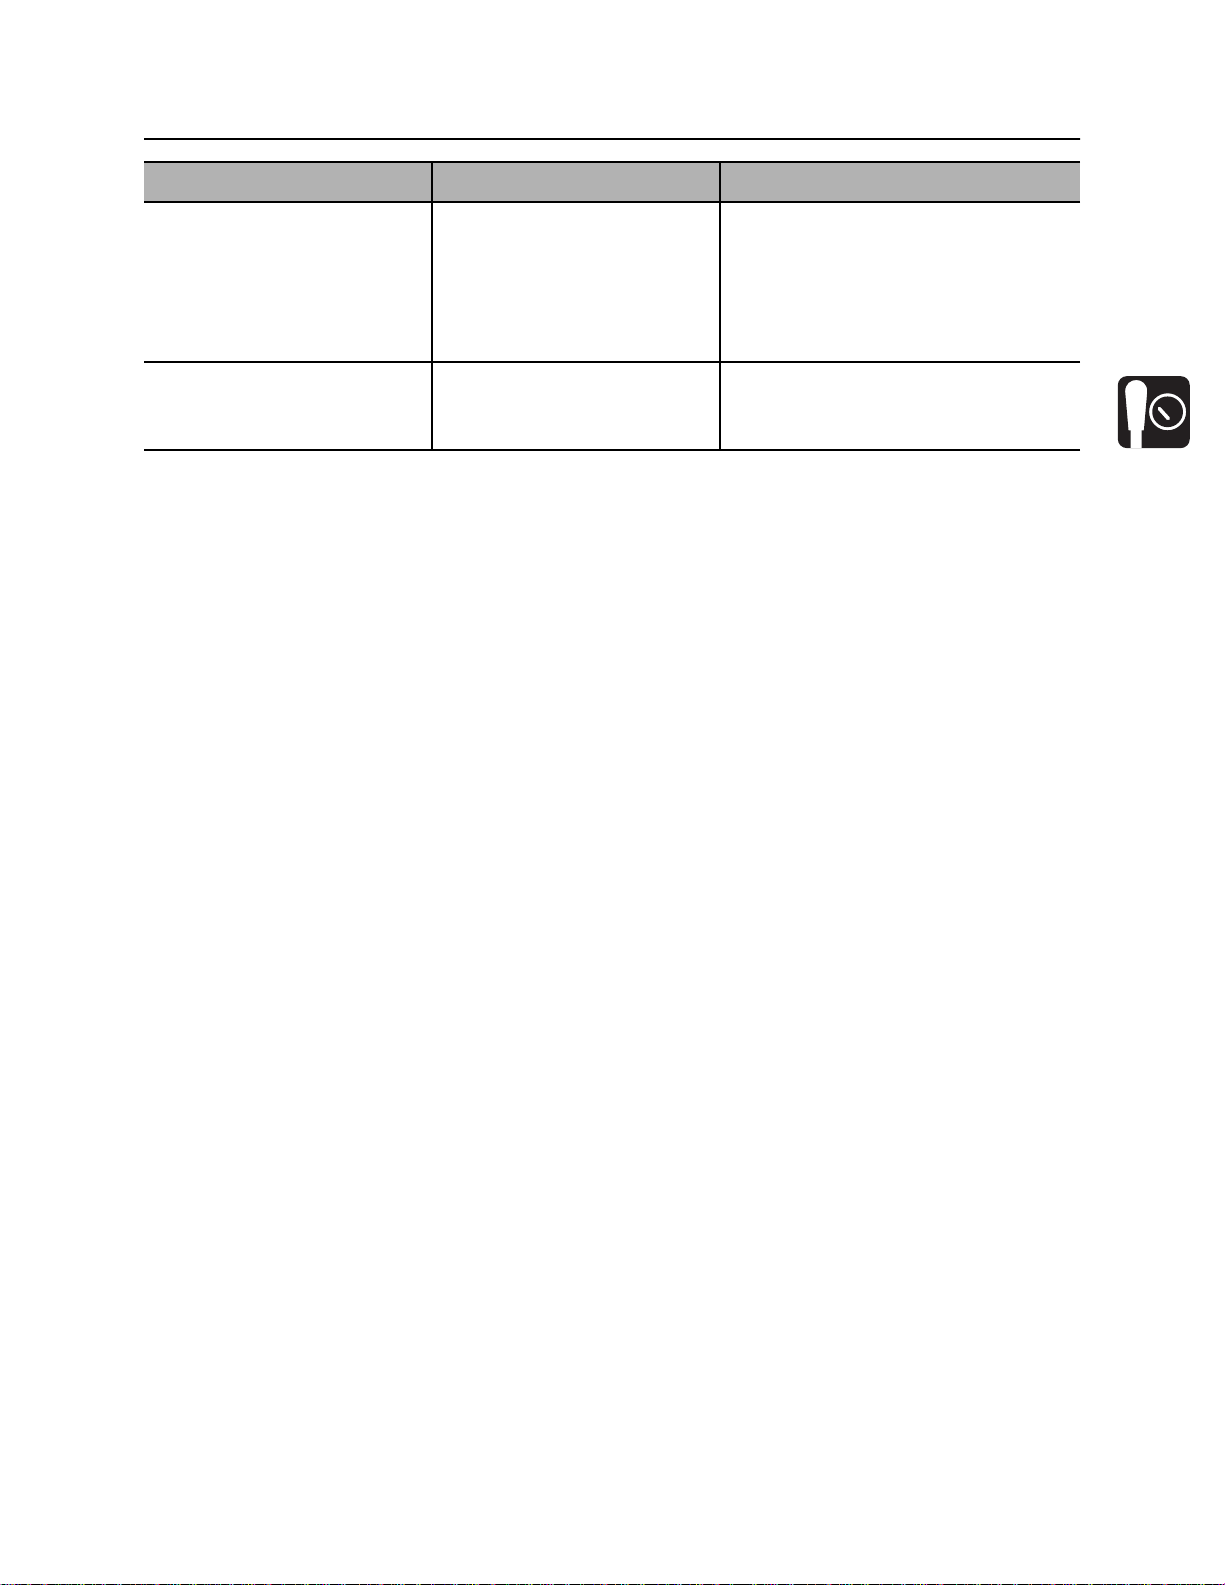
3. Bubble level Displays left-to-right
microtrencher angle.
4. Level indicator Indicates when base of
microtrencher is level with
pavement.
Use manual tilt adjustment and
bubble level together to adjust
microtrencher to match jobsite
conditions.
See “Adjust Tilt” on page
Use lift and level controls together to
adjust microtrencher base until it is
flat on pavement.
CMW
®
Page 51
Controls - 52 RT45 Operator’s Manual
Left Fender
Left Fender
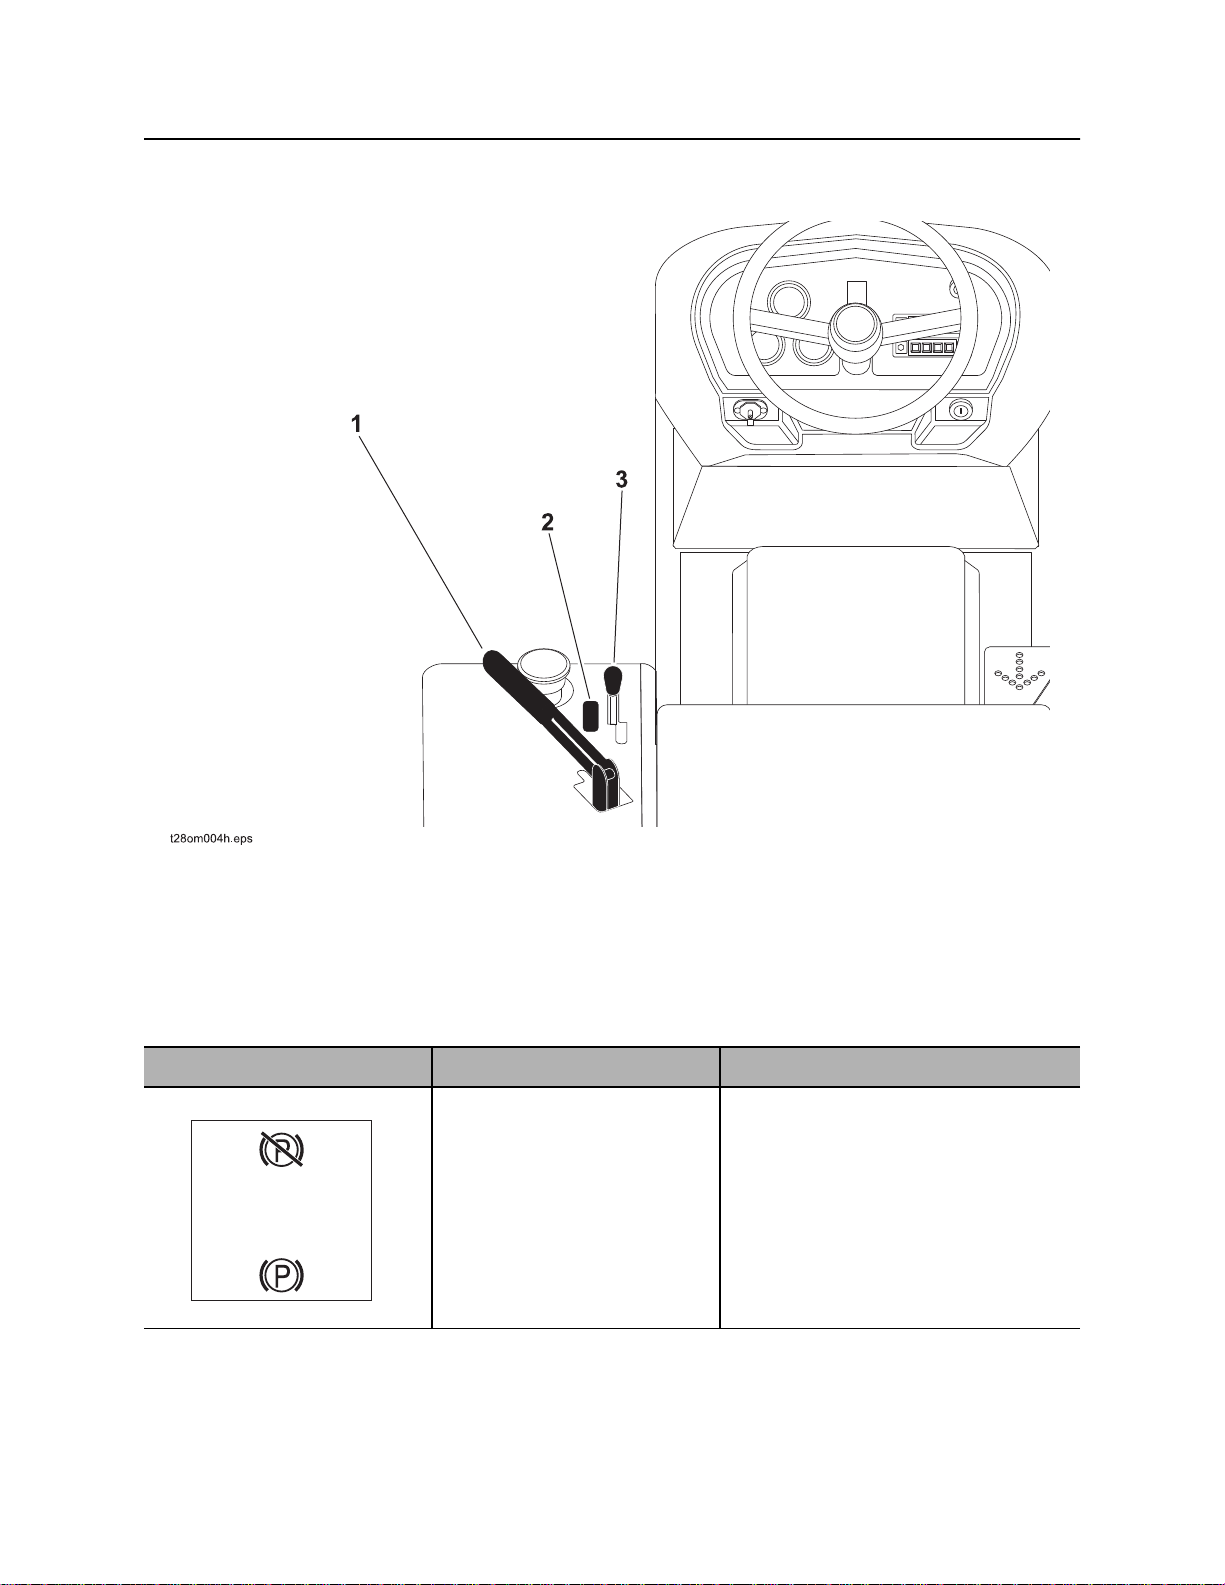
1. Parking brake
2. Work light switch*
Item Description Notes
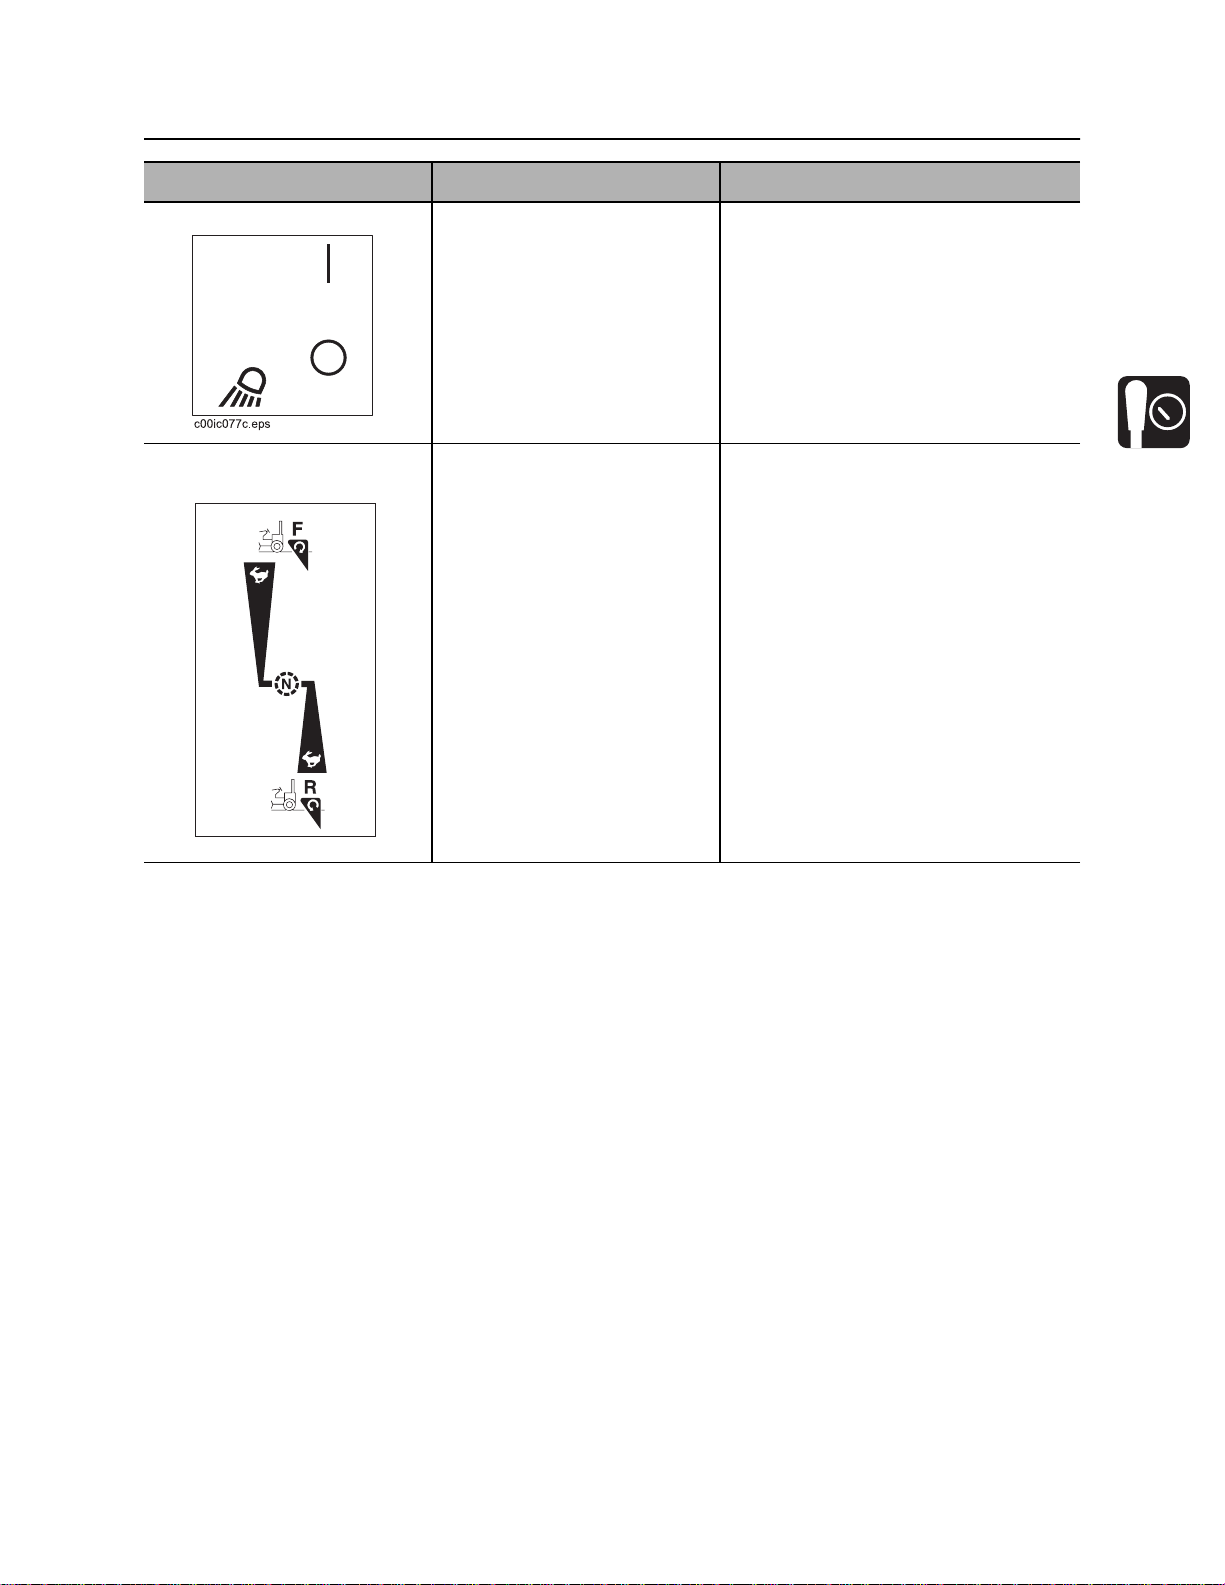
1. Parking brake To set, pull.
To release, push.
c00ic268h.eps
®
CMW
3. Attachment speed/direction control
* optional
Page 52
RT45 Operator’s Manual Controls - 53
Left Fender
Item Description Notes
2. Work light switch To turn on, press top.
To turn off, press bottom.
3. Attachment speed/
direction control
c00ic254h.eps
To rotate attachment forward
or to start plow vibrator box,
push.
To rotate attachment
backward, pull.
To go faster in either
direction, move farther from
center.
T o stop attachment rotation or
plow vibrator box, move to
neutral.
Control does not return to neutral
when released.
NOTICE: When operating plow, do
not pull control to reverse. Operating
plow in reverse could cause damage
to equipment.
CMW
®
Page 53
Controls - 54 RT45 Operator’s Manual
Seat
Seat
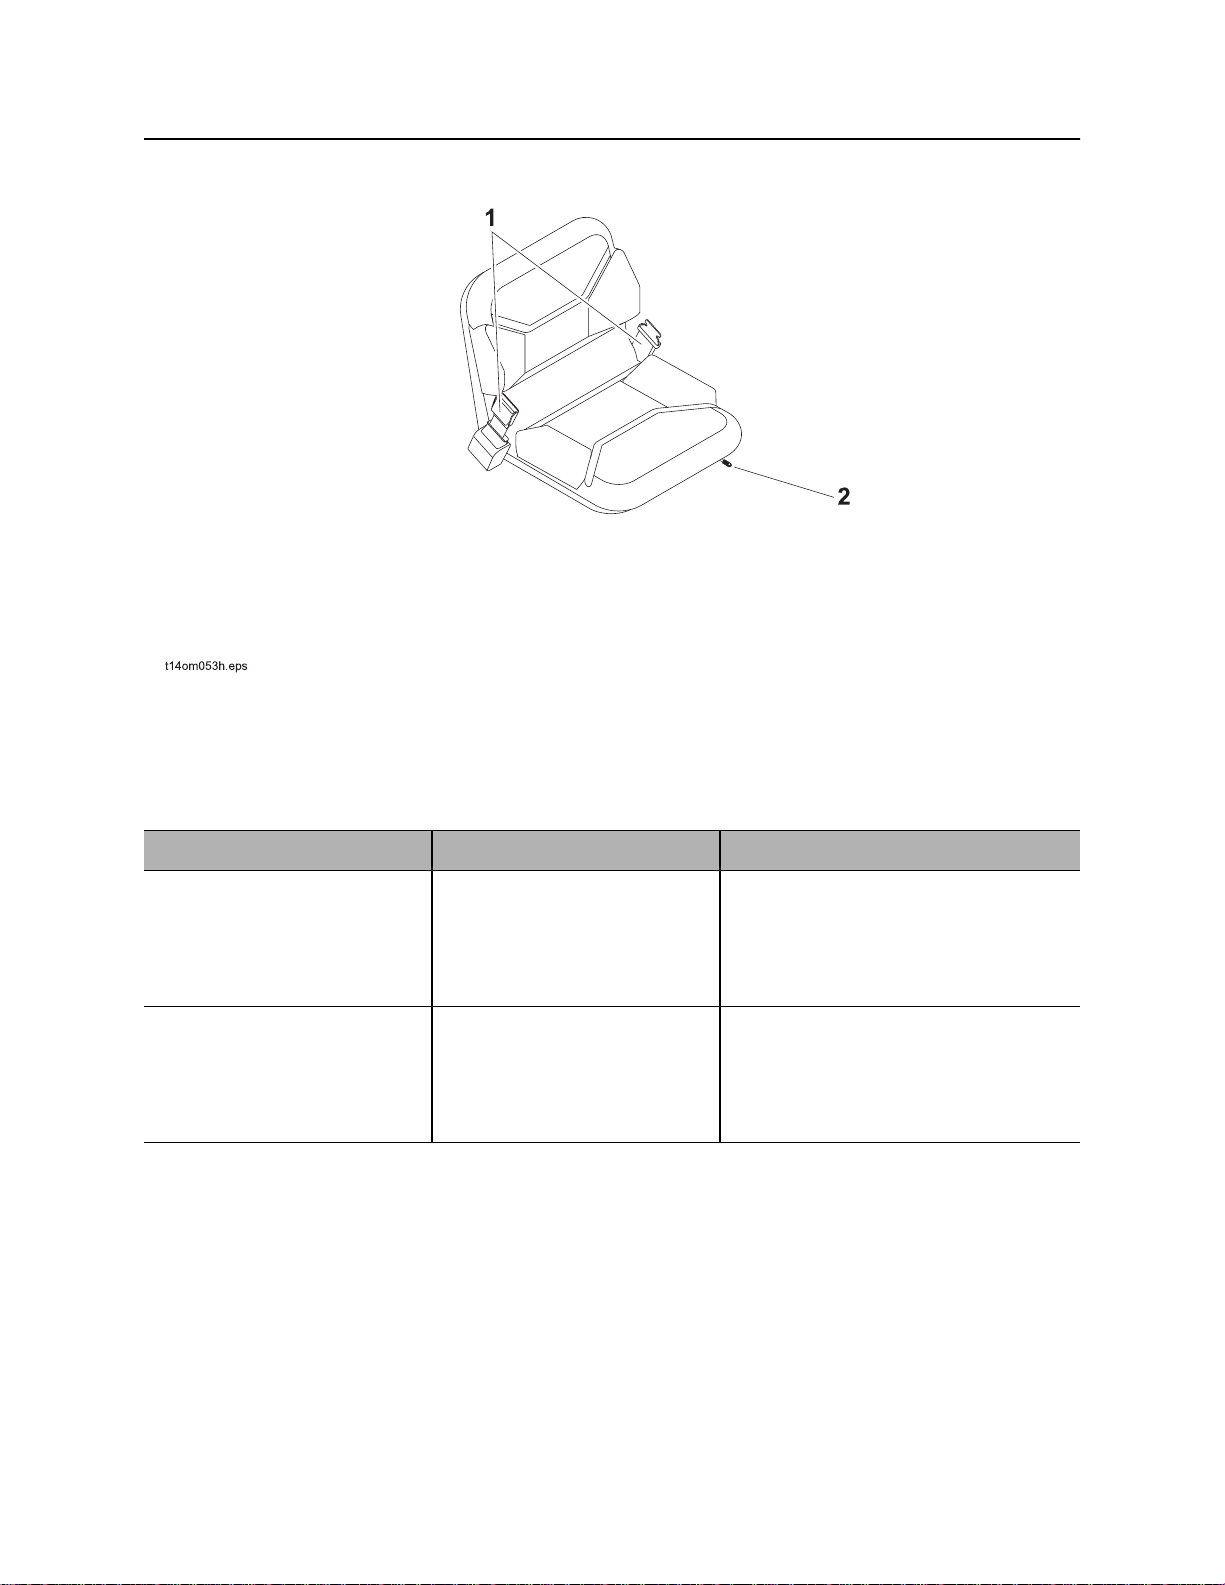
1. Seat belt 2. Seat slide control
Item Description Notes
1. Seat belt To fasten, insert latch into
buckle. Adjust until seat belt
is low and tight.
To release, lift top of buckle.
2. Seat slide control To slide seat forward or
backward, pull or push left,
then adjust seat.
To lock seat in place, release.
CMW
®
Page 54
RT45 Operator’s Manual Controls - 55
Backhoe Console
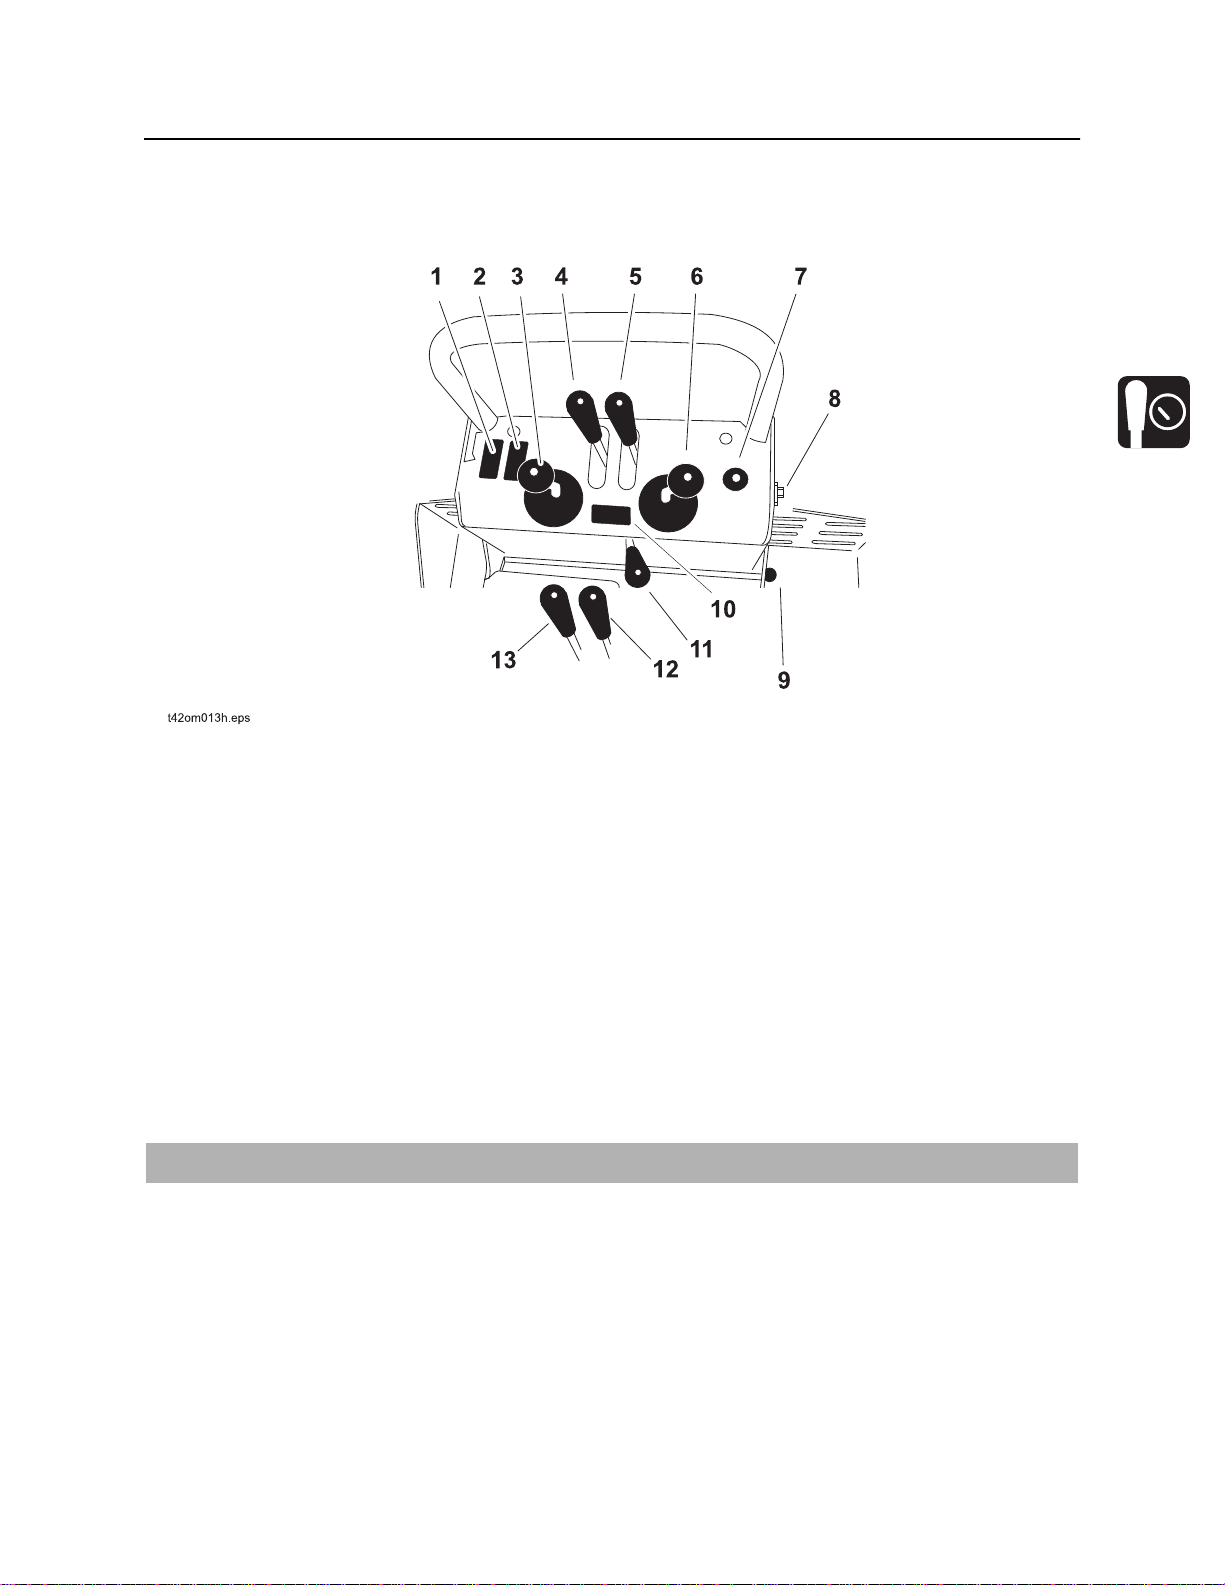
Backhoe Console
1. Remote throttle on/off
2. Remote throttle increase/decrease
3. Boom/Swing control
4. Left stabilizer control
5. Right stabilizer control
6. Bucket/Dipper control
NOTICE: Hydraulic functions will be disconnected if operator leaves the backhoe seat.
7. Remote engine stop switch
8. Seat latch
9. Neutral switch*
10. Mechanical stow lock control
11. Work light switch*
12. Backfill blade control*
13. Remote ground drive control*
*optional
CMW
®
Page 55
Controls - 56 RT45 Operator’s Manual
Backhoe Console
Item Description Notes
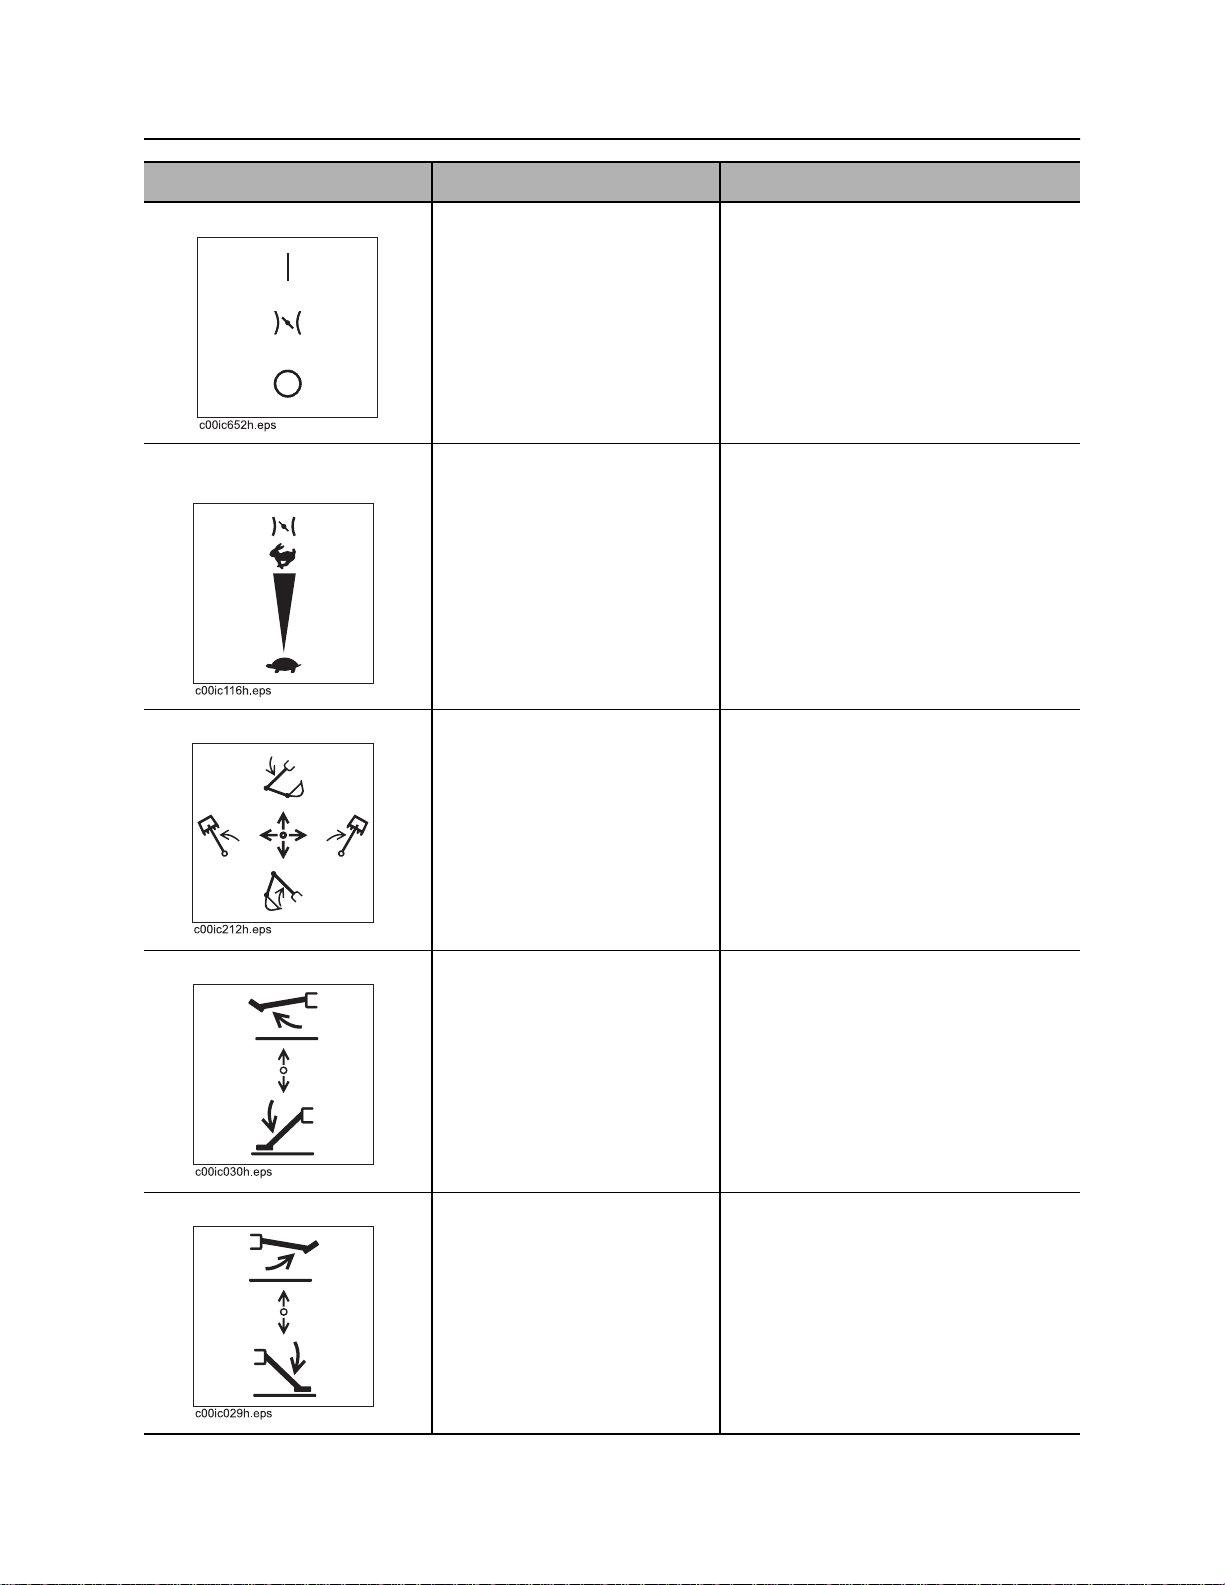
1. Remote throttle on/off To turn on, press top.
To turn off, press bottom.
2. Remote throttle
increase/decrease
3. Boom/Swing control To swing boom left, move left.
4. Left stabilizer control To lower, pull.
To increase engine speed,
press top.
To decrease engine speed,
press bottom.
To swing boom right, move
right.
To raise boom, pull.
To lower boom, push.
To raise, push.
Control can perform more than one
action at a time. By “feathering” the
control, operator can combine
backhoe operations.
NOTICE: Do not operate with
backhoe in the stowed (upright)
position. Component failure could
occur.
5. Right stabilizer control To lower, pull.
To raise, push.
®
CMW
Page 56
RT45 Operator’s Manual Controls - 57
Backhoe Console
Item Description Notes
6. Bucket/Dipper control To open bucket, move right.
To close bucket, move left.
To move dipper in, pull.
To move dipper out, push.
7. Remote engine stop
switch
8. Seat latch To release backhoe seat,
Stops engine immediately. IMPORTANT:
disengage lock by moving
hole in latch clear of bolt.
Control can perform more than one
action at a time. By “feathering” the
control, operator can combine
backhoe operations.
• Except in an emergency, move
throttle to idle before using stop
switch.
• For normal engine shutdown, use
ignition switch.
After pressing down to stop engine,
the switch must be pulled back up into
the run position before the unit can be
started.
IMPORTANT: Ensure seat is latched
before driving unit.
See “Backhoe” on page 88 for more
information.
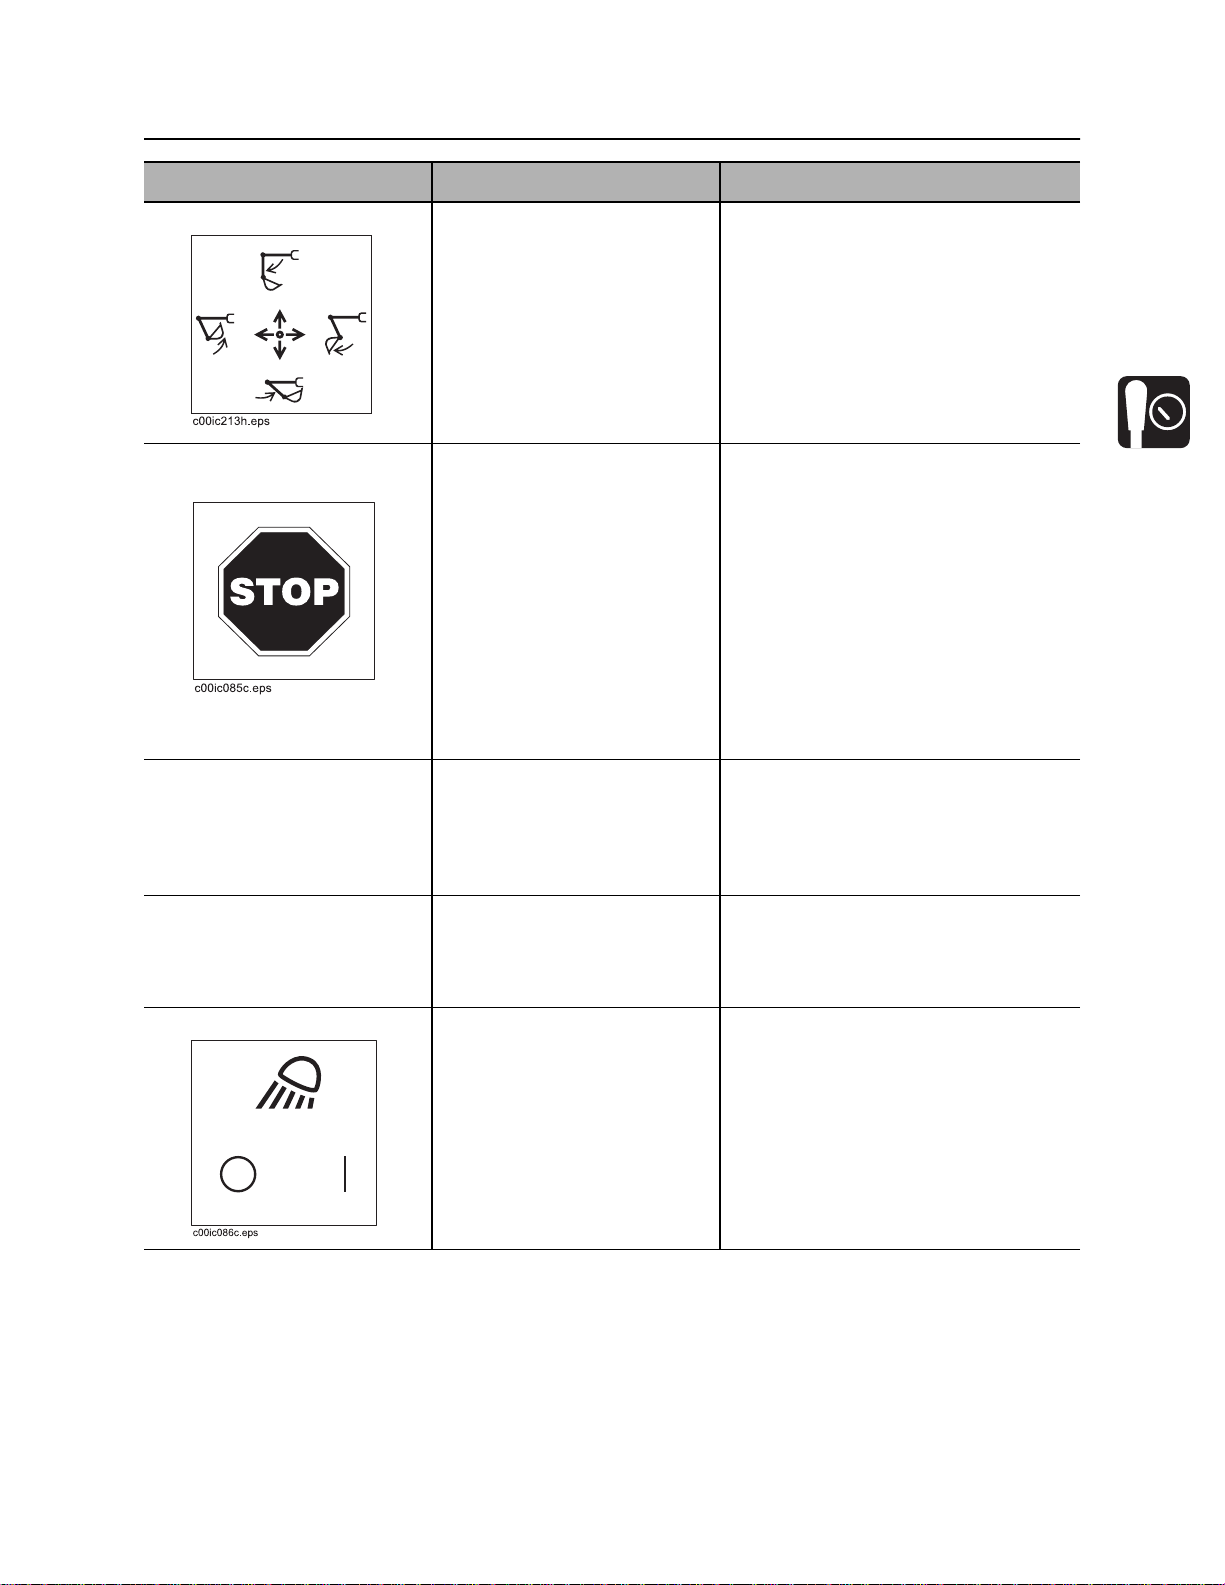
9. Neutral switch T o move tractor , press switch,
use bucket/dipper control to
move tractor, and release
switch.
10. Work light switch To turn on, press right.
To turn off, press left.
CMW
®
Page 57
Controls - 58 RT45 Operator’s Manual
Backhoe Console
Item Description Notes
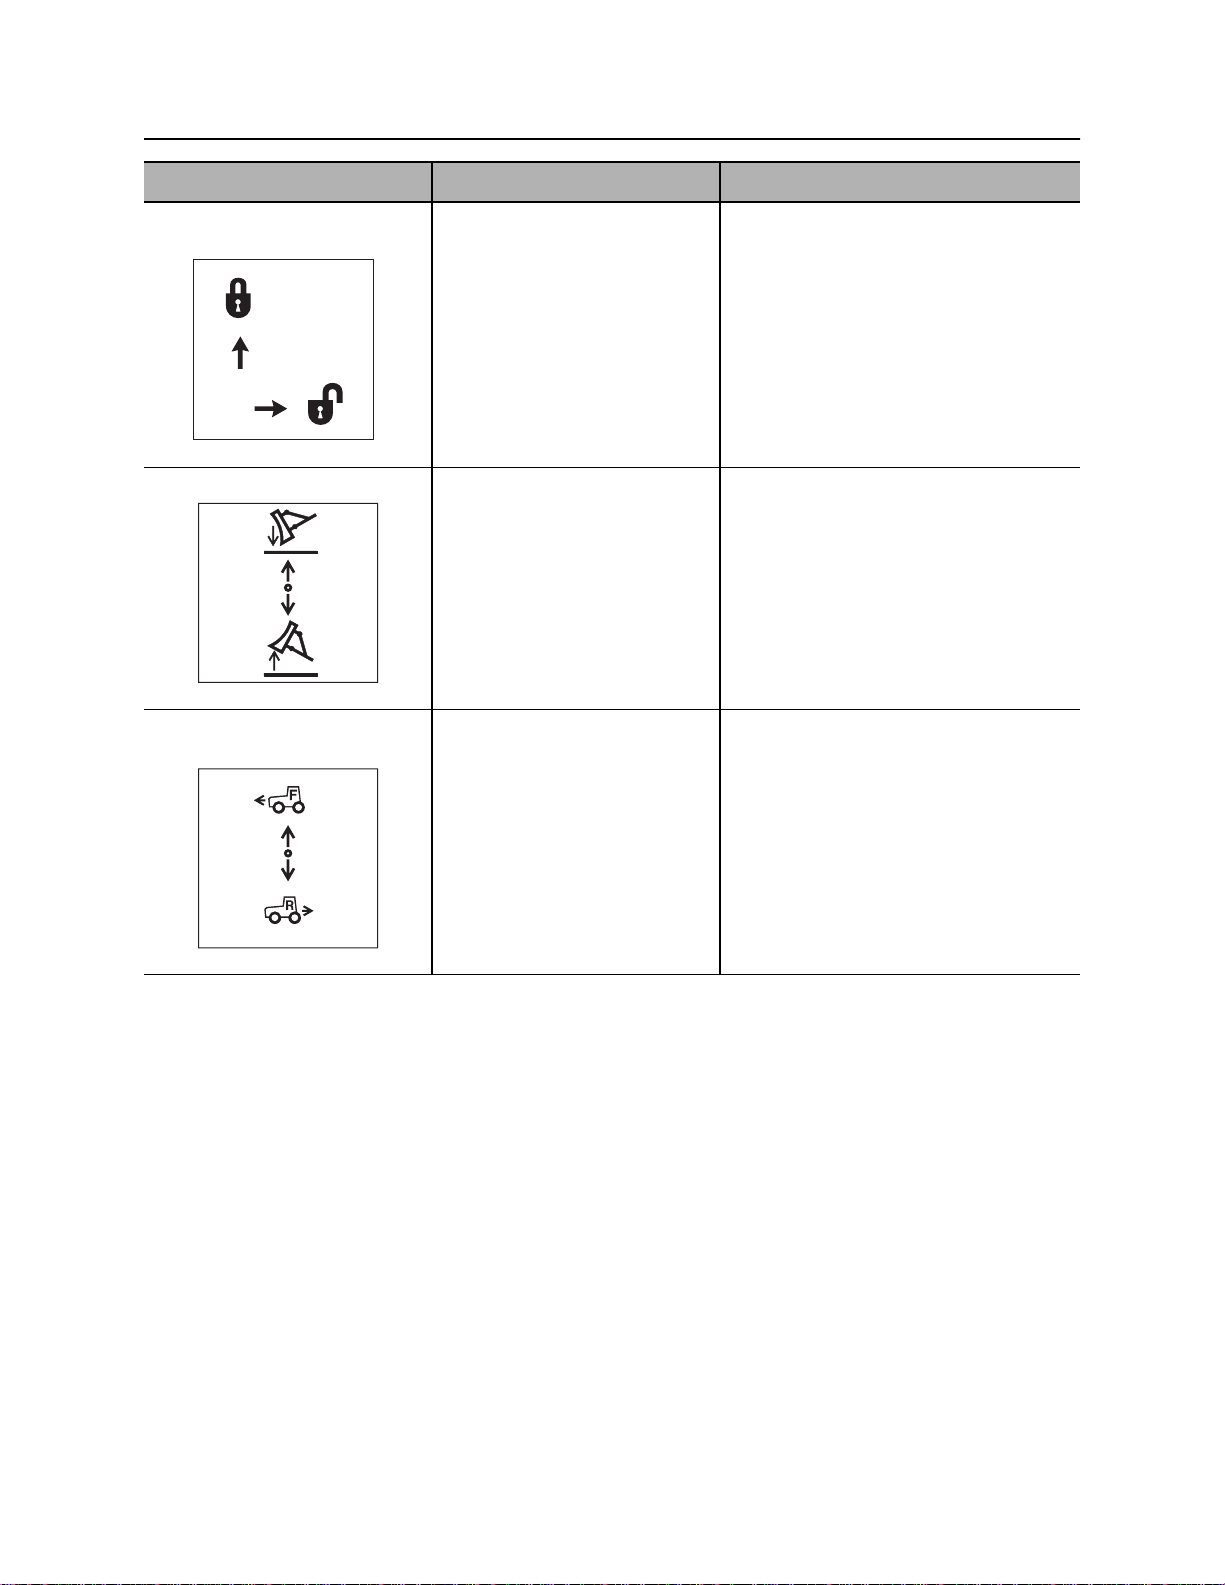
11. Mechanical stow lock
control
To lock, push stow lock
handle.
To unlock, move stow lock
handle to right.
c00ic269h.eps
12. Backfill blade control To lower, push.
To raise, push.
c00ic650w.eps
13. Remote ground drive
To move forward, push.
control
To move in reverse, pull.
Use this control to lock boom in the
stowed position.
NOTICE: Always lock boom during
transport.
CMW
c00ic652w.eps
®
Page 58
RT45 Operator’s Manual Controls - 59
Engine
Engine
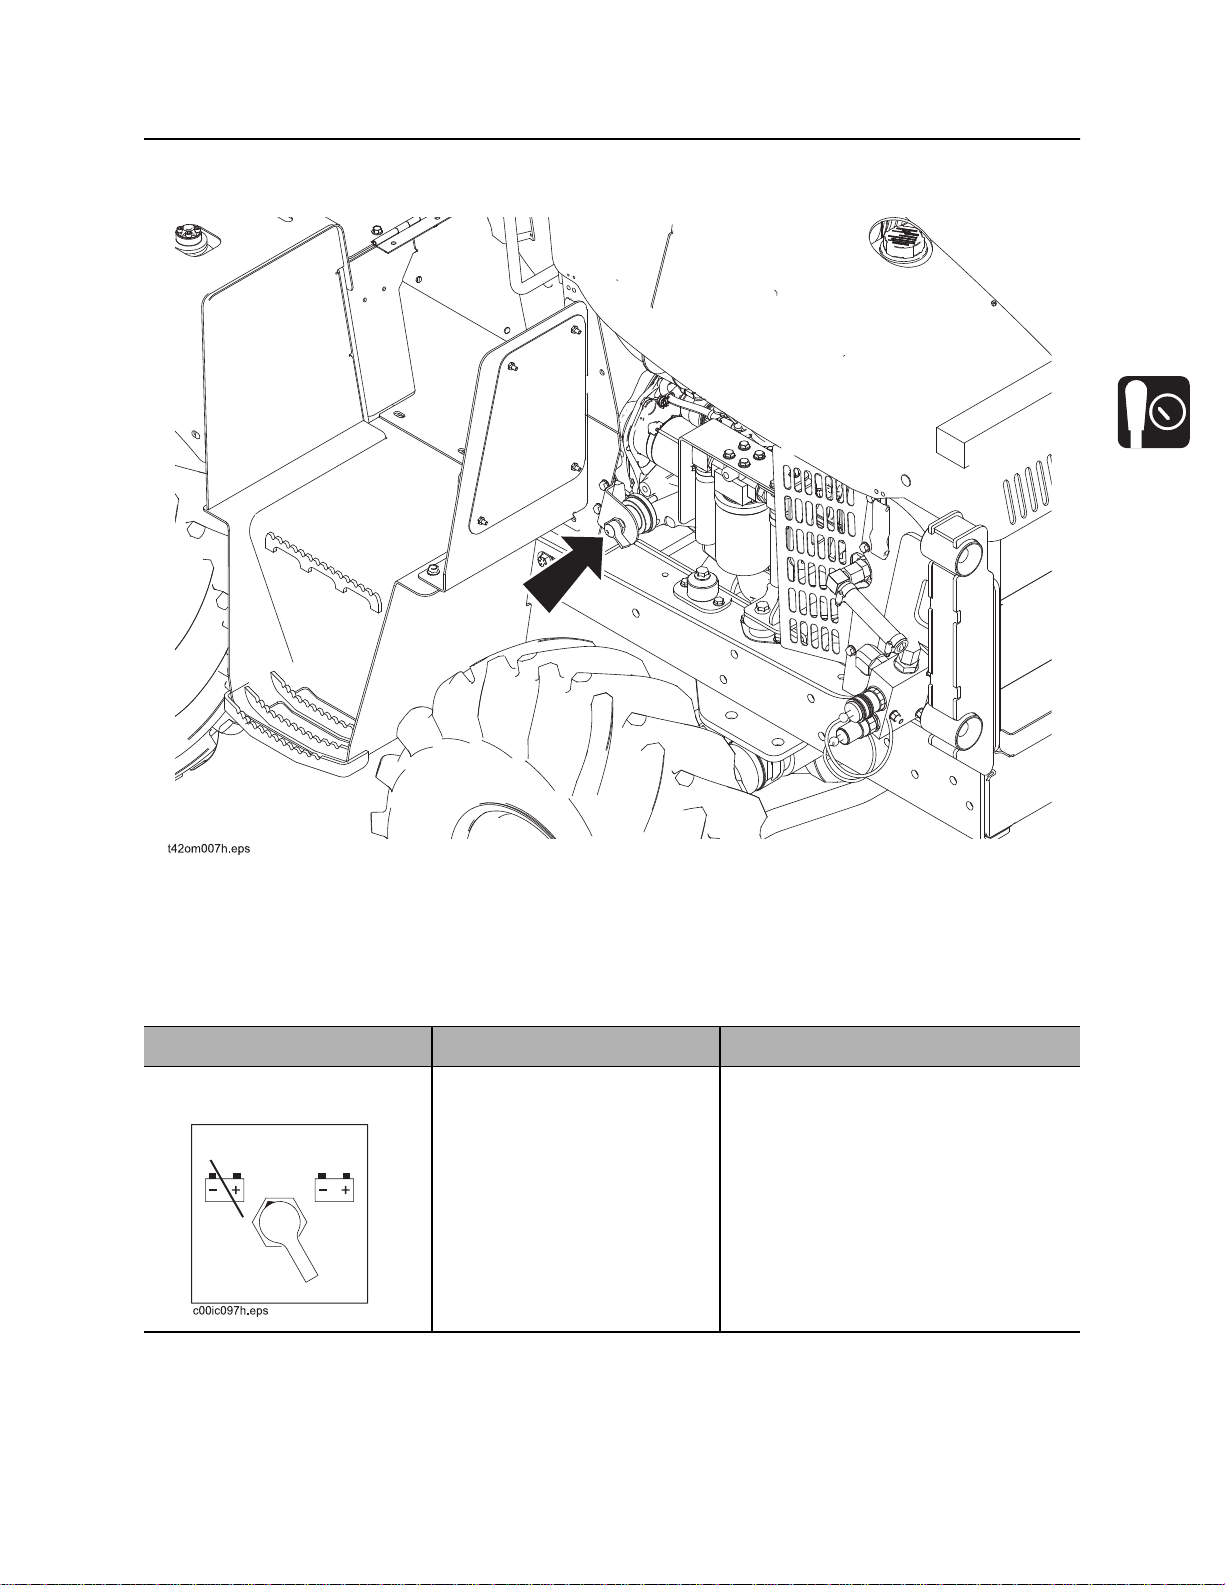
1. Battery disconnect switch
Item Description Notes
2. Battery disconnect
switch
To disconnect, move switch
so that indicator points left.
To connect, move switch so
that indicator points right.
CMW
®
Page 59

Controls - 60 RT45 Operator’s Manual
Engine
CMW
®
Page 60

RT45 Operator’s Manual Operation Overview - 61
Operation Overview
Chapter Contents
Planning. . . . . . . . . . . . . . . . . . . . . . . . . . . . . . . . . . 62
Trenching. . . . . . . . . . . . . . . . . . . . . . . . . . . . . . . . . 62
Plowing . . . . . . . . . . . . . . . . . . . . . . . . . . . . . . . . . . 62
Sawing . . . . . . . . . . . . . . . . . . . . . . . . . . . . . . . . . . 63
Drilling . . . . . . . . . . . . . . . . . . . . . . . . . . . . . . . . . . . 63
Digging with Backhoe . . . . . . . . . . . . . . . . . . . . . . 64
Microtrenching . . . . . . . . . . . . . . . . . . . . . . . . . . . . 64
Leaving Jobsite. . . . . . . . . . . . . . . . . . . . . . . . . . . . 64
CMW
®
Page 61

Operation Overview - 62 RT45 Operator’s Manual
Planning
Planning
1. Gather information about jobsite. See page 66.
2. Inspect jobsite. See page 67.
3. Classify jobsite. See page 68.
4. Select chain and teeth to match your soil type, if necessary. See page 128.
5. Check supplies and prepare equipment. See page 70.
6. Haul equipment to jobsite. See page 81.
Trenching
1. Start unit. See page 72.
2. Position tractor and controls. See page 86.
3. Begin trenching. See page 87.
4. Complete the installation. See page 87.
5. Backfill the trench. See page 136.
6. Shut down tractor. See page 74.
Plowing
1. Start unit. See page 72.
2. Position tractor and controls. See page 91.
3. Attach product. See page 91.
4. Begin plowing. See page 94.
5. Complete the installation. See page 94.
6. Shut down tractor. See page 74.
CMW
®
Page 62

RT45 Operator’s Manual Operation Overview - 63
Sawing
Sawing
1. Start unit. See page 72.
2. Position tractor and controls. See page 96.
3. Begin sawing. See page 98.
4. Complete the installation. See page 99.
5. Backfill the trench. See page 136.
6. Shut down tractor. See page 74.
Drilling
1. Start unit. See page 72.
2. Dig approach trench and target trench. See page 109.
3. Assemble drill string and position tractor. See page 110.
4. Begin drilling. See page 111.
5. Use drill string guide as needed. See page 112.
6. Add rod. See page 113.
7. Backream. See page 113.
8. Shut down tractor. See page 74.
9. Disassemble joints. See page 114.
CMW
®
Page 63

Operation Overview - 64 RT45 Operator’s Manual
Digging with Backhoe
Digging with Backhoe
1. Start unit. See page 72.
2. Set stabilizers and unstow backhoe. See page 102.
3. Excavate. See page 103.
4. Stow backhoe properly. See page 105.
5. Shut down tractor. See page 74.
Microtrenching
1. Start unit. See page 72.
2. Position tractor and controls. See page 116.
3. Begin trenching. See page 123.
4. Complete the installation. See page 124.
5. Backfill the trench. See page 136.
6. Shut down tractor. See page 74.
Leaving Jobsite
1. Backfill if necessary. See page 136.
2. Rinse equipment. See page 136.
3. Stow tools. See page 105.
4. Haul equipment away from jobsite. See page 81.
CMW
®
Page 64

RT45 Operator’s Manual Prepare - 65
Prepare
Chapter Contents
Gather Information . . . . . . . . . . . . . . . . . . . . . . . . . 66
• Review Job Plan . . . . . . . . . . . . . . . . . . . . . . . . . . . . . . . . . . . . . . . . . . 66
• Notify One-Call Services. . . . . . . . . . . . . . . . . . . . . . . . . . . . . . . . . . . . 66
• Arrange for Traffic Control. . . . . . . . . . . . . . . . . . . . . . . . . . . . . . . . . . . 66
• Plan for Emergency Services . . . . . . . . . . . . . . . . . . . . . . . . . . . . . . . . 66
Inspect Site . . . . . . . . . . . . . . . . . . . . . . . . . . . . . . . 67
• Identify Hazards . . . . . . . . . . . . . . . . . . . . . . . . . . . . . . . . . . . . . . . . . . 67
Classify Jobsite. . . . . . . . . . . . . . . . . . . . . . . . . . . . 68
• Inspect Jobsite . . . . . . . . . . . . . . . . . . . . . . . . . . . . . . . . . . . . . . . . . . . 68
• Select a Classification. . . . . . . . . . . . . . . . . . . . . . . . . . . . . . . . . . . . . . 68
• Apply Precautions. . . . . . . . . . . . . . . . . . . . . . . . . . . . . . . . . . . . . . . . . 69
Check Supplies and Prepare Equipment . . . . . . . 70
• Supplies . . . . . . . . . . . . . . . . . . . . . . . . . . . . . . . . . . . . . . . . . . . . . . . . 70
• Fluid Levels. . . . . . . . . . . . . . . . . . . . . . . . . . . . . . . . . . . . . . . . . . . . . . 70
• Condition and Function. . . . . . . . . . . . . . . . . . . . . . . . . . . . . . . . . . . . . 70
• Accessories. . . . . . . . . . . . . . . . . . . . . . . . . . . . . . . . . . . . . . . . . . . . . . 70
CMW
®
Page 65

Prepare - 66 RT45 Operator’s Manual
Gather Information
Gather Information
A successful job begins before you dig. The first step in planning is reviewing information already available
about the job and jobsite.
Review Job Plan
Review blueprints or other plans. Check for information about existing or planned structures, elevations, or
proposed work that may be taking place at the same time.
Notify One-Call Services
Contact your local One-Call (811 in USA) or the One-Call referral number (888-258-0808 in USA and
Canada) to have underground utilities located before digging. Also contact any utilities that do not
participate in the One-Call service.
Arrange for Traffic Control
If working near a road or other traffic area, contact local authorities about safety procedures and
regulations.
Plan for Emergency Services
Have the telephone numbers for local emergency and medical facilities on hand. Check that you will have
access to a telephone.
CMW
®
Page 66
RT45 Operator’s Manual Prepare - 67
Inspect Site
Inspect Site
Inspect jobsite before transporting equipment. Check for the following:
• changes in elevation such as hills or other open trenches
• obstacles such as buildings, railroad crossings, or streams
• signs of utilities (See “Inspect Jobsite” on page 68.)
• traffic
• access
• soil type and condition
Identify Hazards
Identify safety hazards and classify jobsite. See “Classify Jobsite” on page 68.
Jobsite hazards could cause death or serious injury. Use
correct equipment and work methods. Use and maintain proper safety
equipment.
To help avoid injury:
• Wear personal protective equipment including hard hat, safety eye wear, and hearing protection.
• Do not wear jewelry or loose clothing.
• Notify One-Call and companies which do not subscribe to One-Call.
• Comply with all utility notification regulations before digging or drilling.
• Verify location of previously marked underground hazards.
• Mark jobsite clearly and keep spectators away.
Remember, jobsite is classified by hazards in place -- not by line being installed.
CMW
®
Page 67

Prepare - 68 RT45 Operator’s Manual
Classify Jobsite
Classify Jobsite
Inspect Jobsite
• Follow U.S. Department of Labor regulations on excavating and trenching (Part 1926, Subpart P) and
other similar regulations.
• Contact your local One-Call (811 in USA) or the One-Call referral number (888-258-0808 in USA and
Canada) to have underground utilities located before digging. Also contact any utilities that do not
participate in the One-Call service.
• Inspect jobsite and perimeter for evidence of underground hazards, such as:
– “buried utility” notices
– utility facilities without overhead lines
– gas or water meters
– junction boxes
– drop boxes
– light poles
– manhole covers
– sunken ground
• Have an experienced locating equipment operator sweep area within 20’ (6 m) to each side of trench
path. Verify previously marked line and cable locations.
• Mark location of all buried utilities and obstructions.
• Classify jobsite.
Select a Classification
Jobsites are classified according to underground hazards present.
If working . . . then classify jobsite as . . .
within 10’ (3 m) of a buried electric line electric
within 10’ (3 m) of a natural gas line natural gas
in sand, granite, or concrete which is capable of producing
crystalline silica (quartz) dust
within 10’ (3 m) of any other hazard other
IMPORTANT: If you have any doubt about jobsite classification, or if jobsite might contain unmarked
hazards, take steps outlined previously to identify hazards and classify jobsite before working.
crystalline silica (quartz) dust
CMW
®
Page 68

RT45 Operator’s Manual Prepare - 69
Classify Jobsite
Apply Precautions
Once classified, precautions appropriate for jobsite must be taken.
Electric Jobsite Precautions
Use one or both of these methods.
• Expose line by careful hand digging or soft excavation.
• Have service shut down while work is in progress. Have electric company test lines before returning
them to service.
Natural Gas Jobsite Precautions
In addition to positioning equipment upwind from gas lines, use one or both of these methods.
• Expose lines by careful hand digging or soft excavation.
• Have gas shut off while work is in progress. Have gas company test lines before returning them to
service.
Crystalline Silica (Quartz) Dust Precautions
Crystalline silica dust is a naturally occuring substance found in soil, sand, concrete, granite, and quartz.
Breathing silica dust particles while cutting, drilling, or working materials may cause lung disease or
cancer. To reduce exposure:
• Use water spray or other means to control dust.
• Refer to U.S. Department of Labor Occupational Safety and Health Administration guidelines to learn
more about appropriate breathing protection and permissible exposure limits.
Other Jobsite Precautions
You may need to use different methods to safely avoid other underground hazards. Talk with those
knowledgeable about hazards present at each site to determine which precautions should be taken or if
job should be attempted.
CMW
®
Page 69

Prepare - 70 RT45 Operator’s Manual
Check Supplies and Prepare Equipment
Check Supplies and Prepare Equipment
Supplies
• fuel
• keys
• personal protective equipment, such as hard hat and safety glasses
Fluid Levels
• fuel
• hydraulic fluid
• battery charge
• engine oil
• engine coolant
Condition and Function
• digging chain and teeth
• fan belts
• light bulbs
• filters (air, oil, hydraulic)
• tires
• pumps and motors
• hoses and valves
• signs, guards, and shields
Accessories
Fire Extinguisher
If required, mount a fire extinguisher near the power unit but away from possible points of ignition. The fire
extinguisher should always be classified for both oil and electric fires. It should meet legal and regulatory
requirements.
CMW
®
Page 70

RT45 Operator’s Manual Drive - 71
Drive
Chapter Contents
Start Unit . . . . . . . . . . . . . . . . . . . . . . . . . . . . . . . . . 72
Drive. . . . . . . . . . . . . . . . . . . . . . . . . . . . . . . . . . . . . 74
Shut Down . . . . . . . . . . . . . . . . . . . . . . . . . . . . . . . . 74
CMW
®
Page 71
Drive - 72 RT45 Operator’s Manual
Start Unit
Start Unit
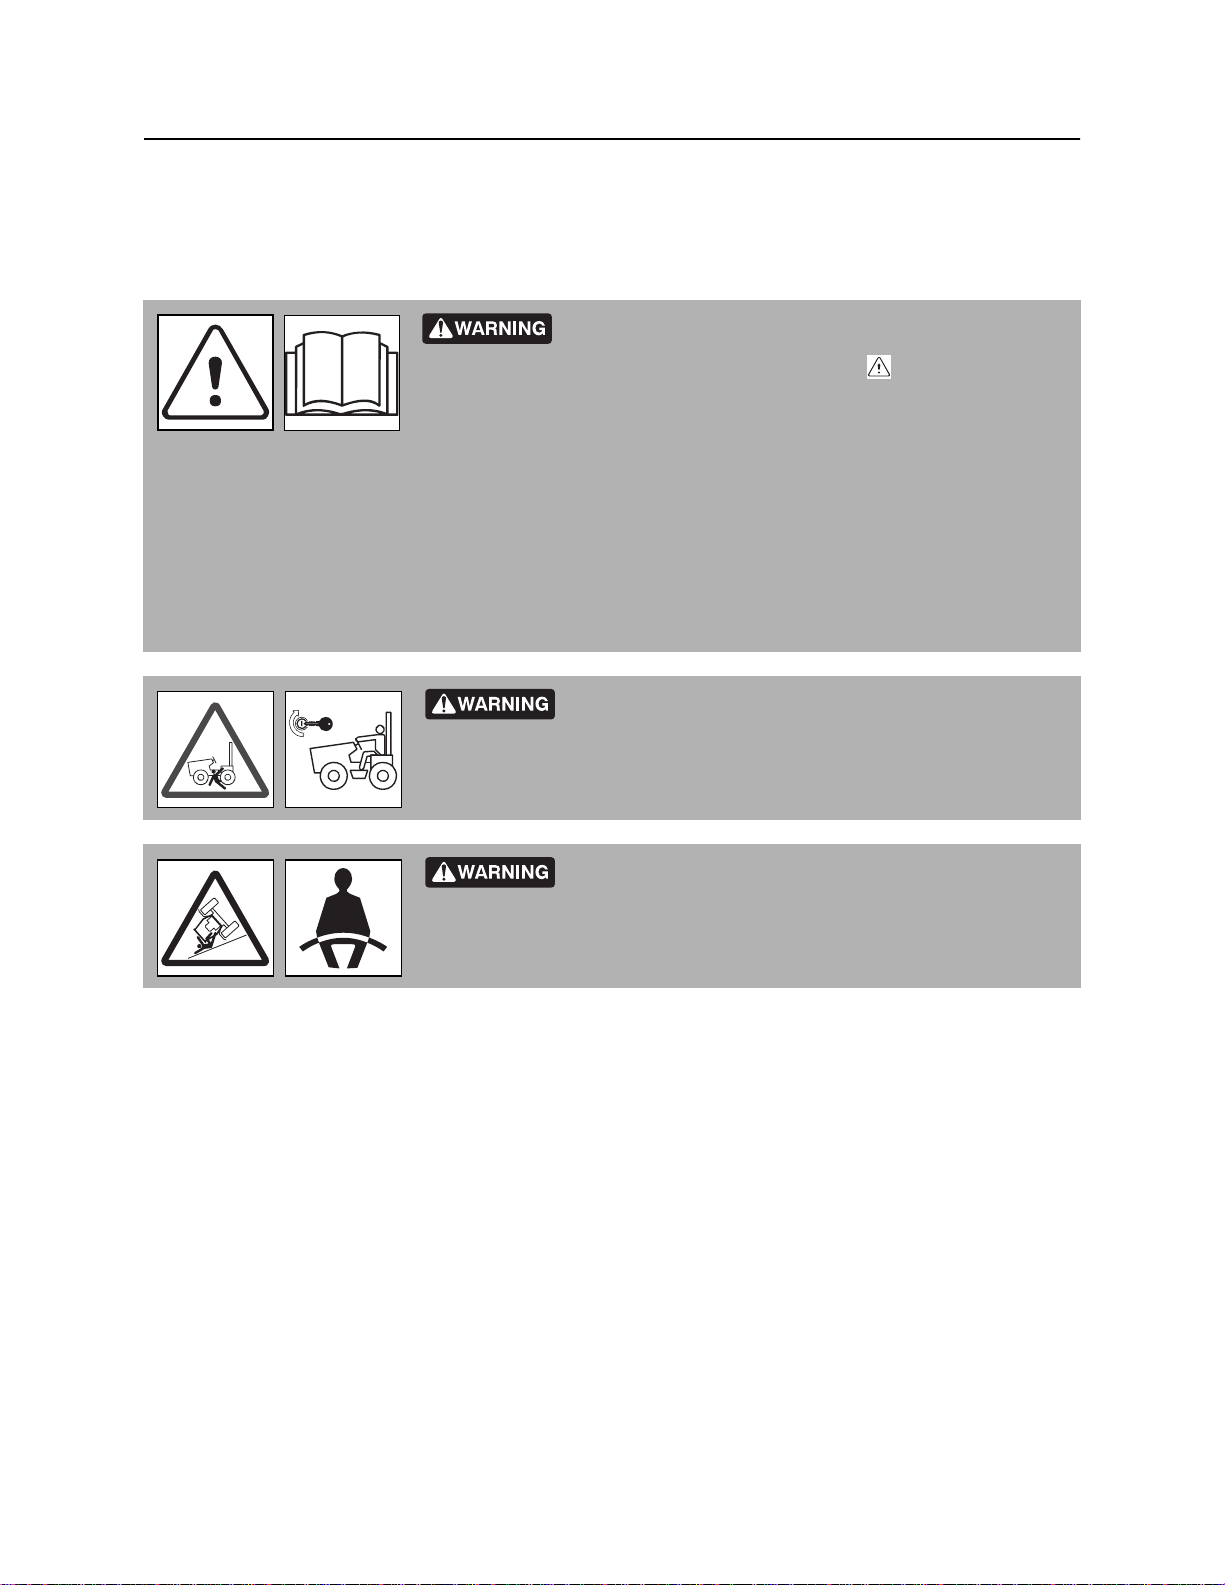
Before operating tractor, read engine manufacturer’s starting and operating instructions. Follow
instructions for new engine break-in.
Read operator’s manual. Know how to use all controls
before operating machine. When you see this sign on the machine or
in the manual, read it and use caution. Your safety is at stake. 273-475
To help avoid injury:
• Read operator’s manual before operating equipment. Follow instructions carefully. Contact Ditch
®
Witch
• Wear hard hat, safety glasses, and other protective equipment required by job. Do not wear jewelry
or loose clothing that can catch on controls.
dealership for operation information or demonstration.
Runaway possible. Machine could run over you or others.
Learn how to use all controls. Start and operate only from operator’s
position. 275-070
Rollover possible. If machine rolls over, you could be
thrown from seat and killed or crushed. Wear seat belt. 275-303
CMW
®
Page 72
RT45 Operator’s Manual Drive - 73
Start Unit
1. Fasten and adjust seat belt.
2. Check that ground drive control and attachment speed/direction control are in neutral.
3. Move throttle to idle.
4. Verify that parking brake is engaged.
5. Turn ignition switch to the run position (key on, engine off). Cold start wait indicator will appear.
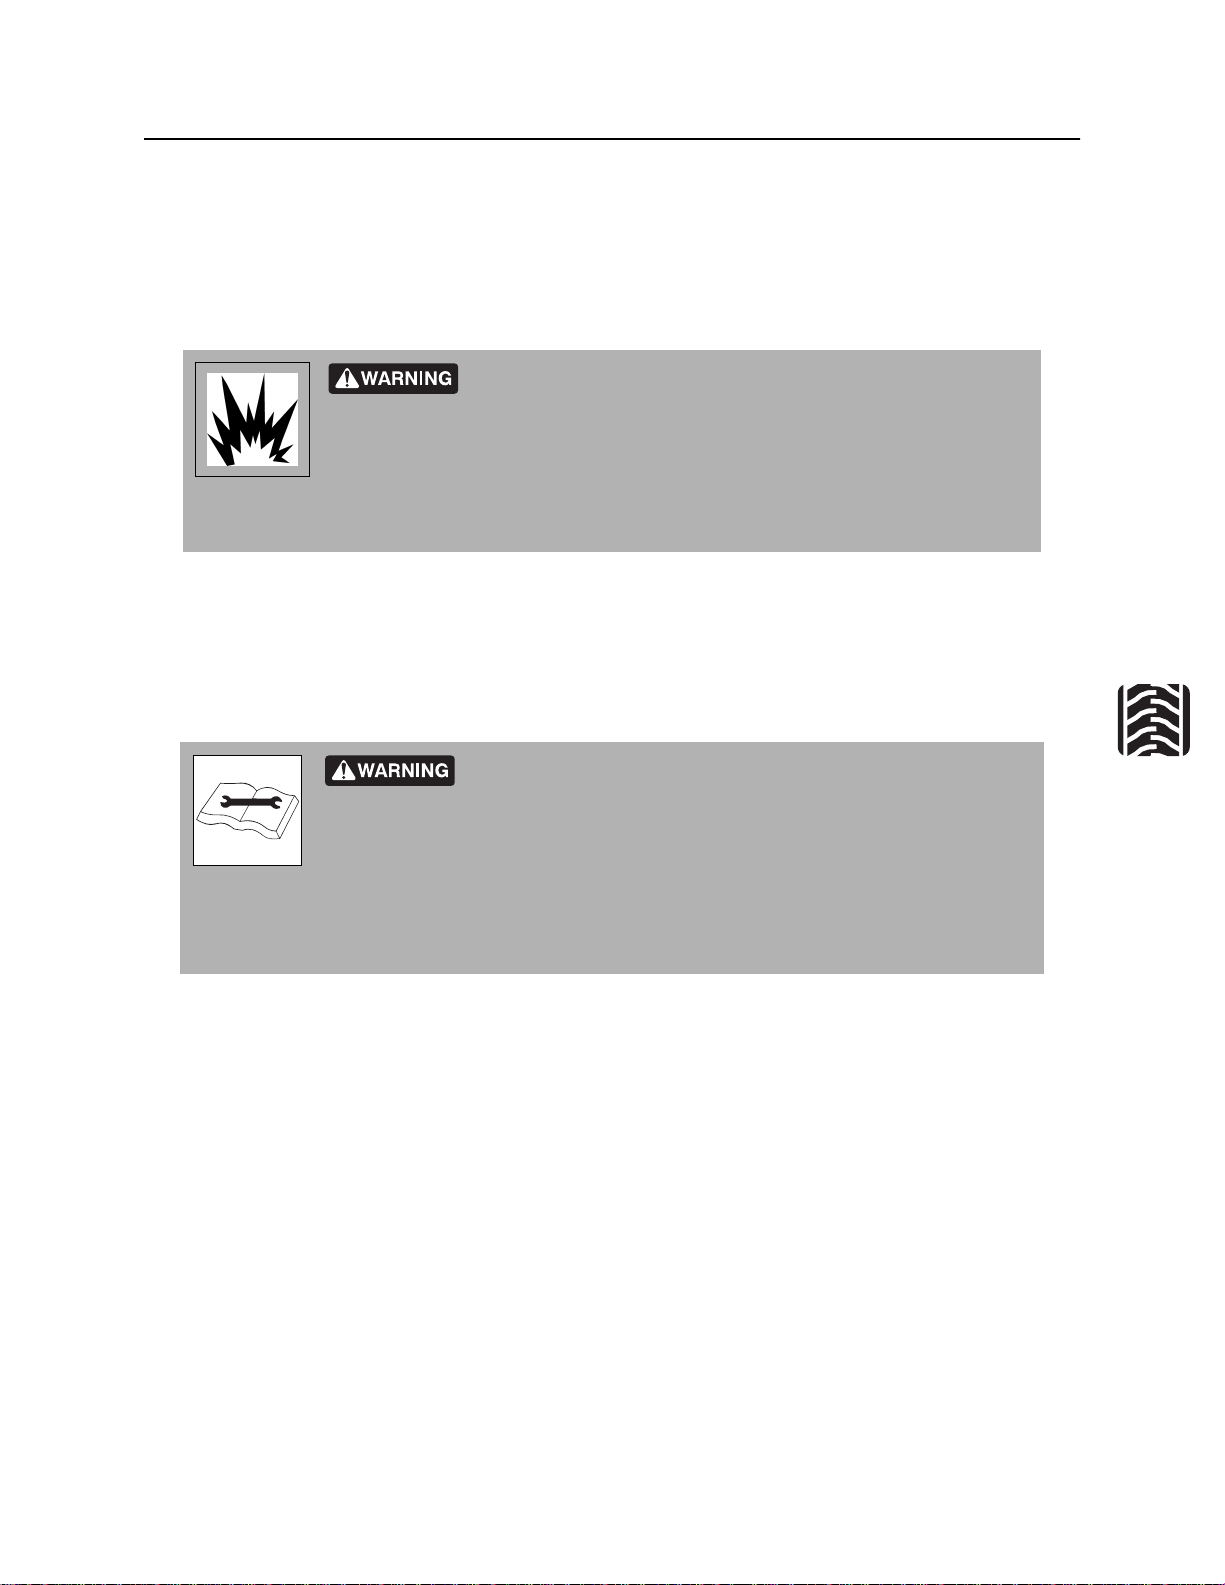
Explosion possible. Serious injury or equipment damage could
occur. Follow directions carefully.
To help avoid injury: Do not use ether or any other type of aerosol starting fluid when unit is
equipped with cold start option.
6. When cold start wait indicator goes off, turn ignition switch all the way clockwise to start tractor.
Warning alarm will sound. Indicators will light.
• If engine does not crank, check start interlock display. See page 34 for start interlock information.
• If engine turns but does not start within 10 seconds, allow starter to cool before trying to start
again.
Improper control function could cause death or serious injury.
T o help avoid injury: Stop machine and have it serviced if control does not work
as described in instructions.
IMPORTANT: Machine will not start if start interlock requirements are not met. See page 34 for
start interlock information.
7. Run engine at half-throttle or less for five minutes before operating tractor. During warmup, check that
all controls work properly.
CMW
®
Page 73

Drive - 74 RT45 Operator’s Manual
Drive
Drive
Moving traffic – hazardous situation. Death or serious injury could result.
Avoid moving vehicles, wear high visibility clothing, post appropriate warning signs.
To help avoid injury:
• Drive carefully in congested areas. Know machine’s clearance and turning radius.
• Keep attachments low when operating on slope. Drive slowly and cautiously.
EMERGENCY SHUTDOWN: Turn ignition switch to STOP.
1. Turn on lights as needed.
2. Raise backfill blade and all attachments.
3. Release parking brake.
4. Adjust throttle.
5. Move ground drive control to forward or reverse or press upper or lower part of foot pedal.
The ground drive foot pedal and the ground drive speed/direction control lever can override each
other. Use the override feature when trenching, plowing or sawing.
• When driving or backfilling, use only the foot pedal to control speed and direction.
• When trenching, sawing, or plowing, use hand lever to set travel speed and use the foot pedal to
adjust speed temporarily when digging conditions change. For example, if digging conditions
become tough, press the lower part of foot pedal to slow digging speed. When original digging
condition resumes, release foot pedal to return to original speed.
Shut Down
1. When job is complete, move ground drive control to neutral.
2. Set parking brake.
3. Lower all attachments to ground.
4. Move throttle to idle for 3 minutes to cool engine.
5. Turn ignition switch to STOP. If leaving machine unattended, remove key.
6. For maintenance or long-term storage, turn battery disconnect switch, if equipped, to the disconnect
position.
CMW
®
Page 74

RT45 Operator’s Manual Transport - 75
Transport
Chapter Contents
Lift . . . . . . . . . . . . . . . . . . . . . . . . . . . . . . . . . . . . . . 76
• Points . . . . . . . . . . . . . . . . . . . . . . . . . . . . . . . . . . . . . . . . . . . . . . . . . . 76
• Procedure . . . . . . . . . . . . . . . . . . . . . . . . . . . . . . . . . . . . . . . . . . . . . . . 77
Tie Down . . . . . . . . . . . . . . . . . . . . . . . . . . . . . . . . . 80
• Points . . . . . . . . . . . . . . . . . . . . . . . . . . . . . . . . . . . . . . . . . . . . . . . . . . 80
• Procedure . . . . . . . . . . . . . . . . . . . . . . . . . . . . . . . . . . . . . . . . . . . . . . . 80
Haul . . . . . . . . . . . . . . . . . . . . . . . . . . . . . . . . . . . . . 81
• Procedure . . . . . . . . . . . . . . . . . . . . . . . . . . . . . . . . . . . . . . . . . . . . . . . 81
Tow . . . . . . . . . . . . . . . . . . . . . . . . . . . . . . . . . . . . . 84
• Procedure . . . . . . . . . . . . . . . . . . . . . . . . . . . . . . . . . . . . . . . . . . . . . . . 84
CMW
®
Page 75
Transport - 76 RT45 Operator’s Manual
Lift
Lift
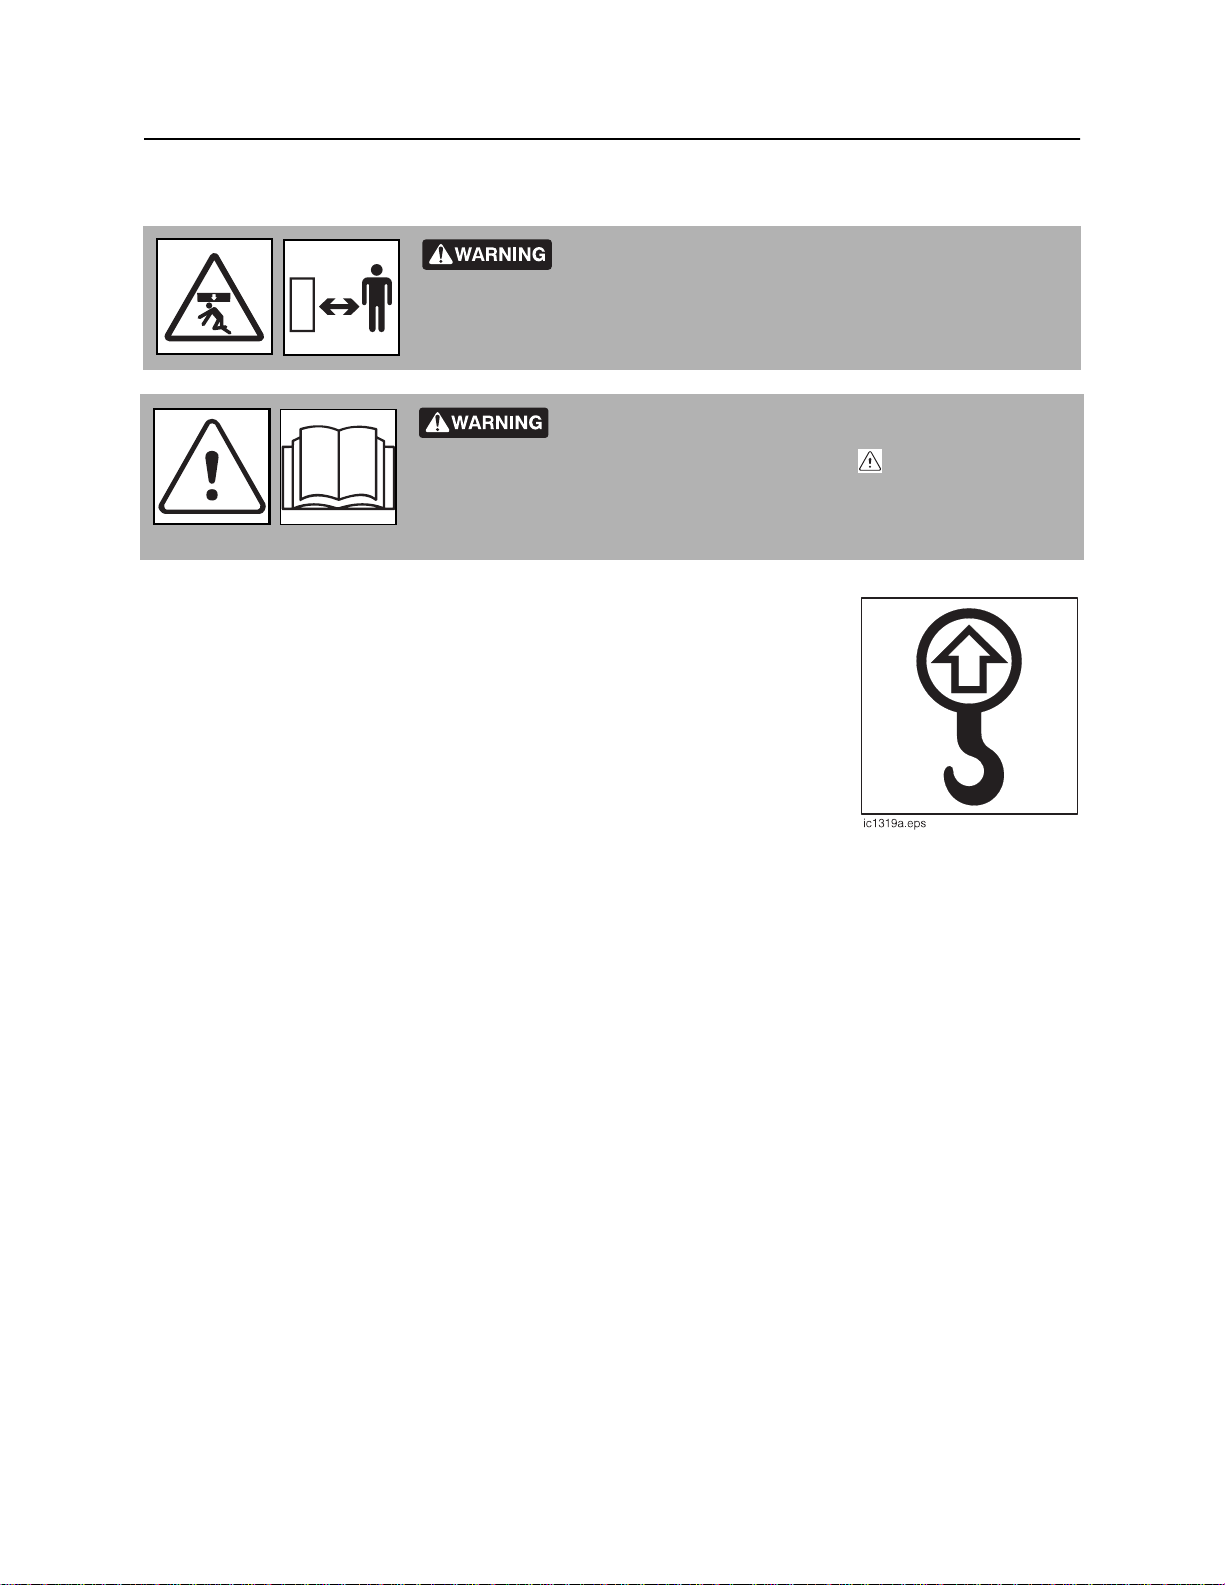
Crushing weight. If load falls or moves it could kill or crush
you. Use proper procedures and equipment or stay away.
Read operator’s manual. Know how to use all controls
before operating machine. When you see this sign on the machine or in
the manual, read it and use caution. Your safety is at stake.
Points
Lifting points are identified by lifting decals. Lifting at other points is unsafe
and can damage machinery.
273-475
CMW
®
Page 76
RT45 Operator’s Manual Transport - 77
Lift
Procedure
Tractor
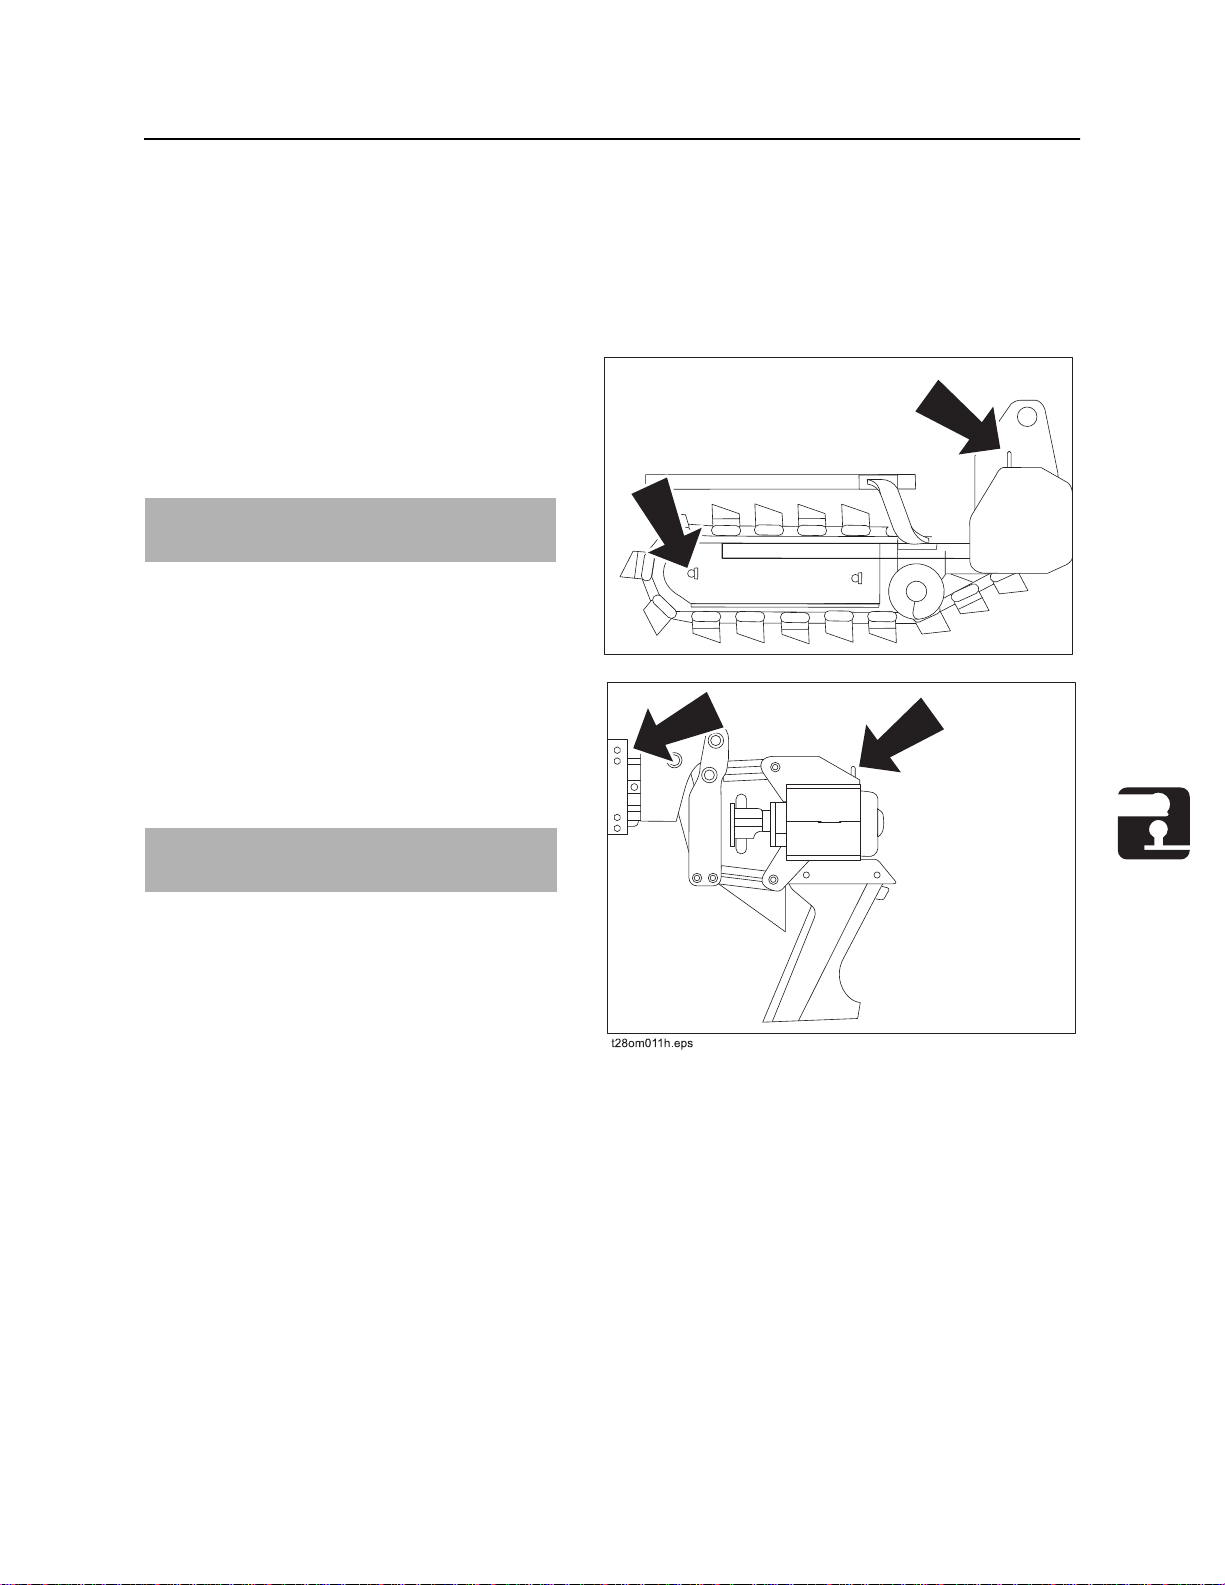
This machine is not configured for lifting. If the machine must be lifted, load machine into a container or
onto a platform appropriate for lifting. See “Specifications” on page 187 for size and weight of machine.
H313/H314 Trenchers
Use crane capable of supporting the
equipment's size and weight. See page 188 or
measure and weigh equipment before lifting.
NOTICE: Do not lift tractor with installed
attachment.
t28om010h.eps
H331 Plow
Use crane capable of supporting the
equipment's size and weight. See page 190 or
measure and weigh equipment before lifting.
NOTICE: Do not lift tractor with installed
attachment.
CMW
®
Page 77
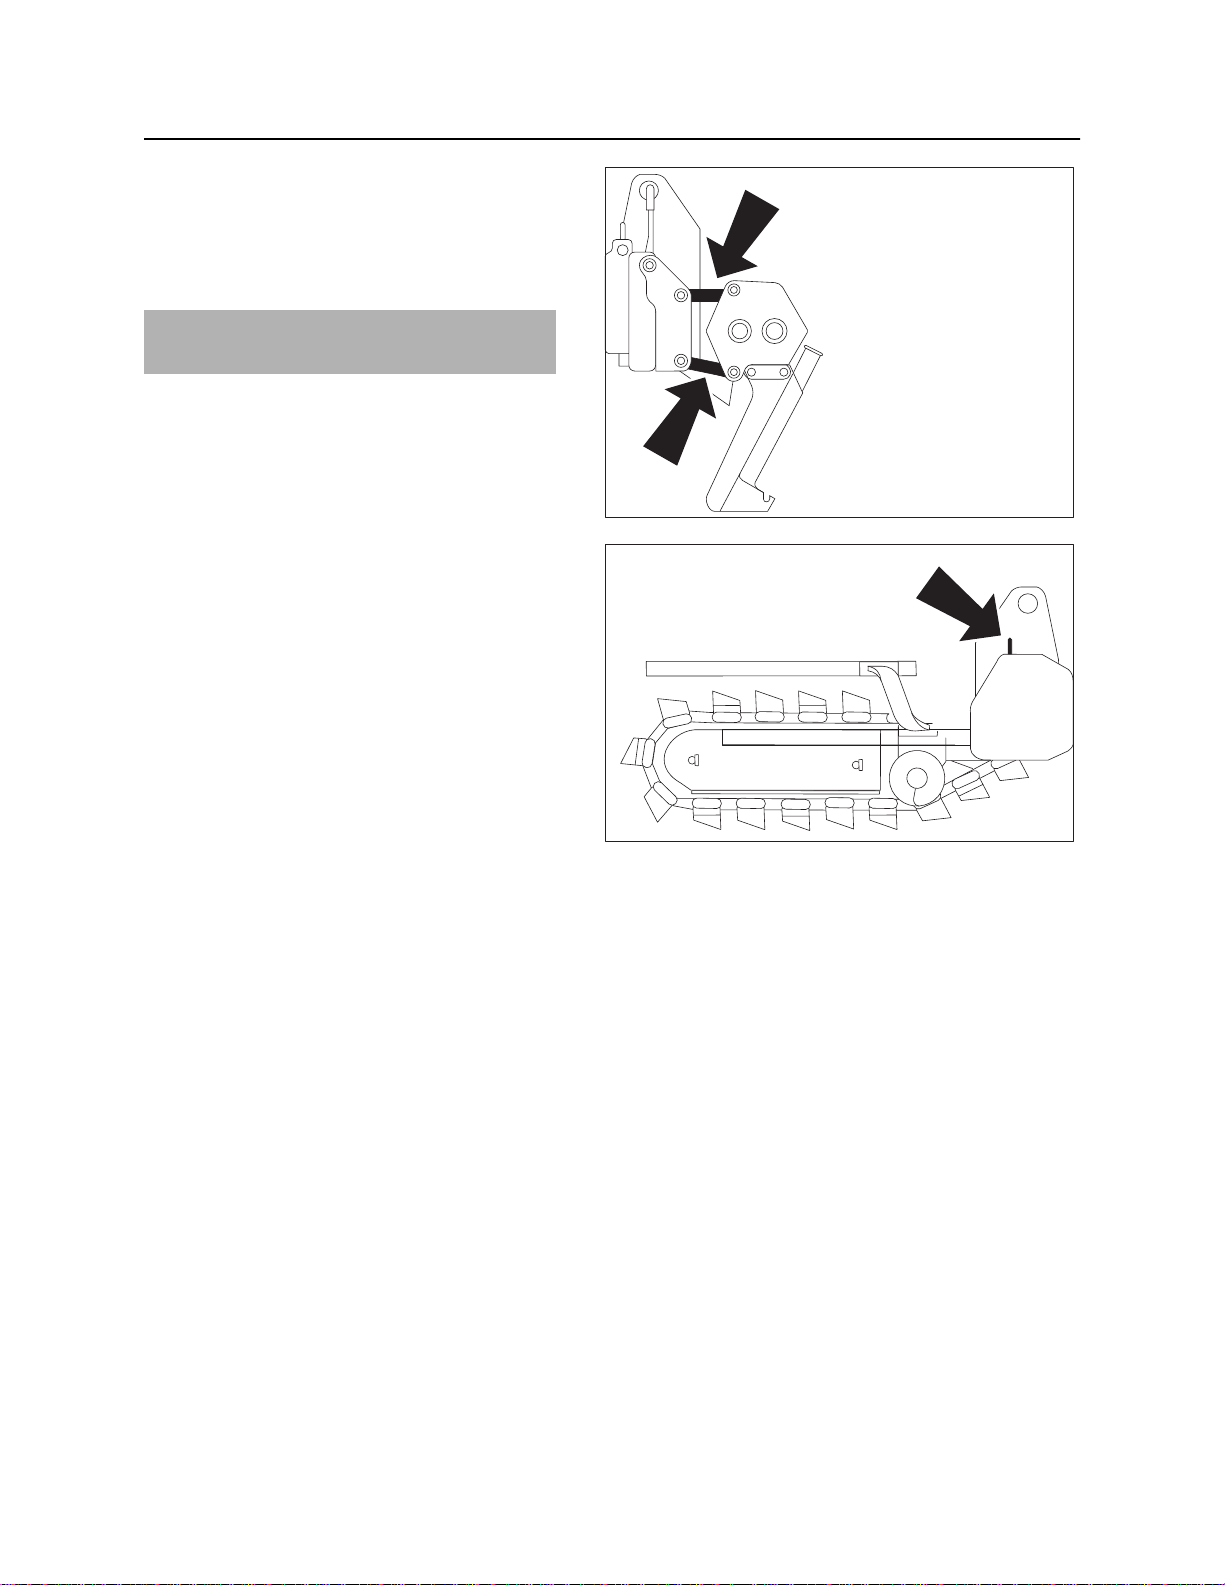
Transport - 78 RT45 Operator’s Manual
Lift
H350 Combo
Use crane capable of supporting the
equipment's size and weight. See page 192 or
measure and weigh equipment before lifting.
NOTICE: Do not lift tractor with installed
attachment.
t28om089h.eps
t28om090h.eps
CMW
®
Page 78
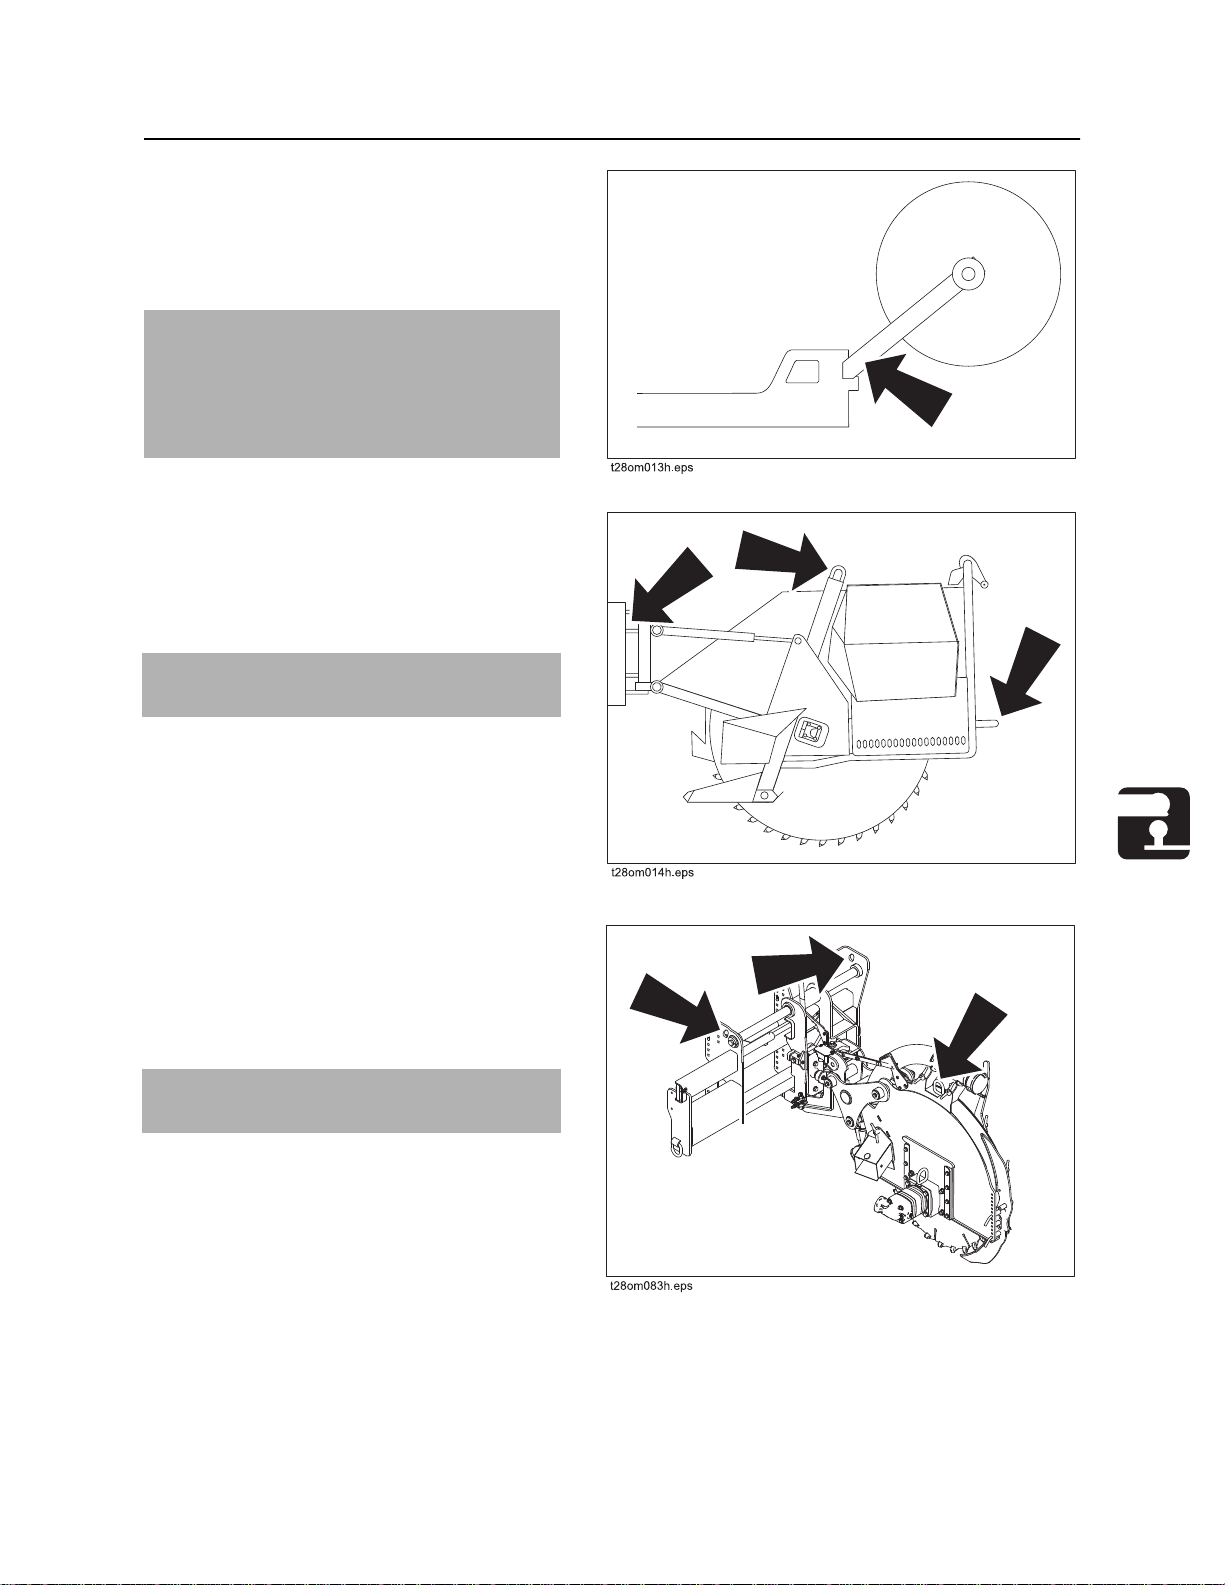
RT45 Operator’s Manual Transport - 79
Lift
Reel Carrier
Use crane capable of supporting the
equipment's size and weight. See page 183 or
measure and weigh equipment before lifting.
NOTICE:
• Do not lift reel carrier with reel installed.
• Do not lift tractor with installed
attachment.
H342 Saw
Use crane capable of supporting the
equipment's size and weight. See page 194 or
measure and weigh equipment before lifting.
NOTICE: Do not lift tractor with installed
attachment.
MT12 MicroTrencher
Use crane capable of supporting the
equipment's size and weight. See page 198 or
measure and weigh equipment before lifting.
NOTICE: Do not lift tractor with installed
attachment.
CMW
®
Page 79
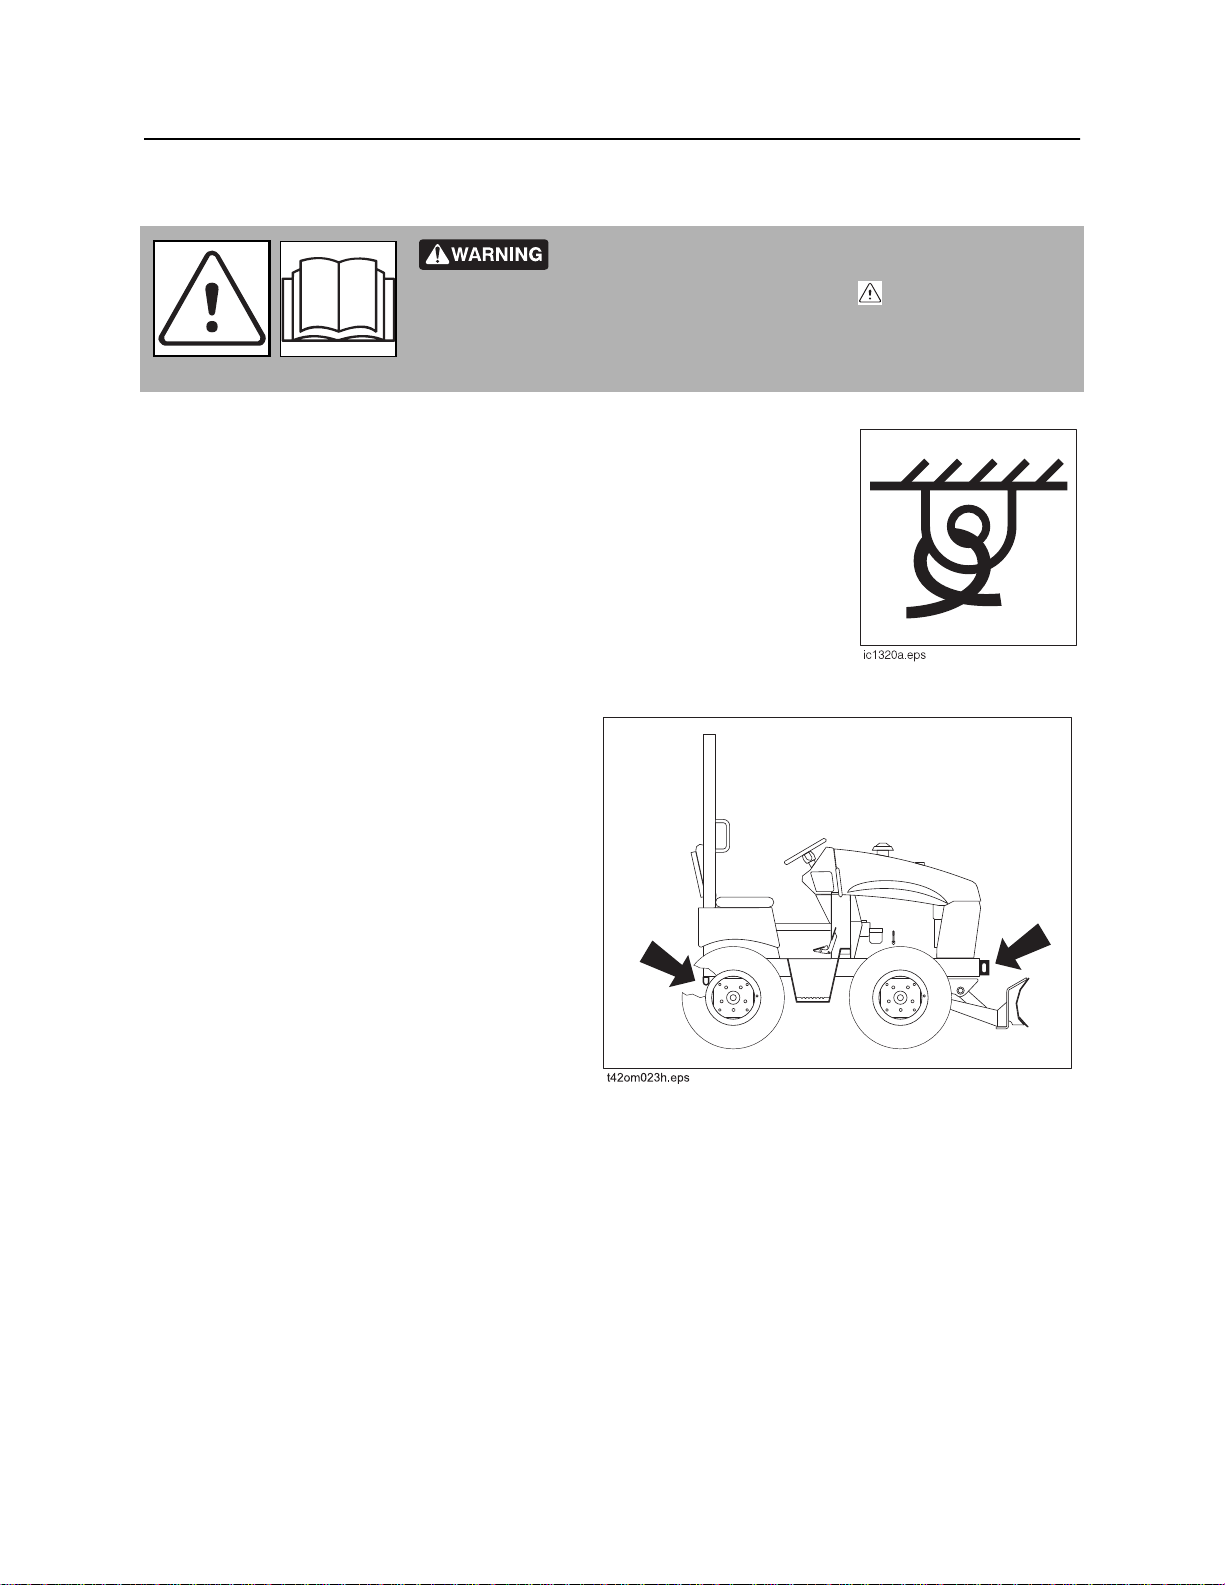
Transport - 80 RT45 Operator’s Manual
Tie Down
Tie Down
Read operator’s manual. Know how to use all controls
before operating machine. When you see this sign on the machine or in
the manual, read it and use caution. Your safety is at stake. 273-475
Points
Tiedown points are identified by tiedown decals. Securing to trailer at other
points is unsafe and can damage machinery.
Procedure
Tractor
Attach chains at front and rear tiedown points.
Make sure chains are tight before transporting
unit.
CMW
®
Page 80
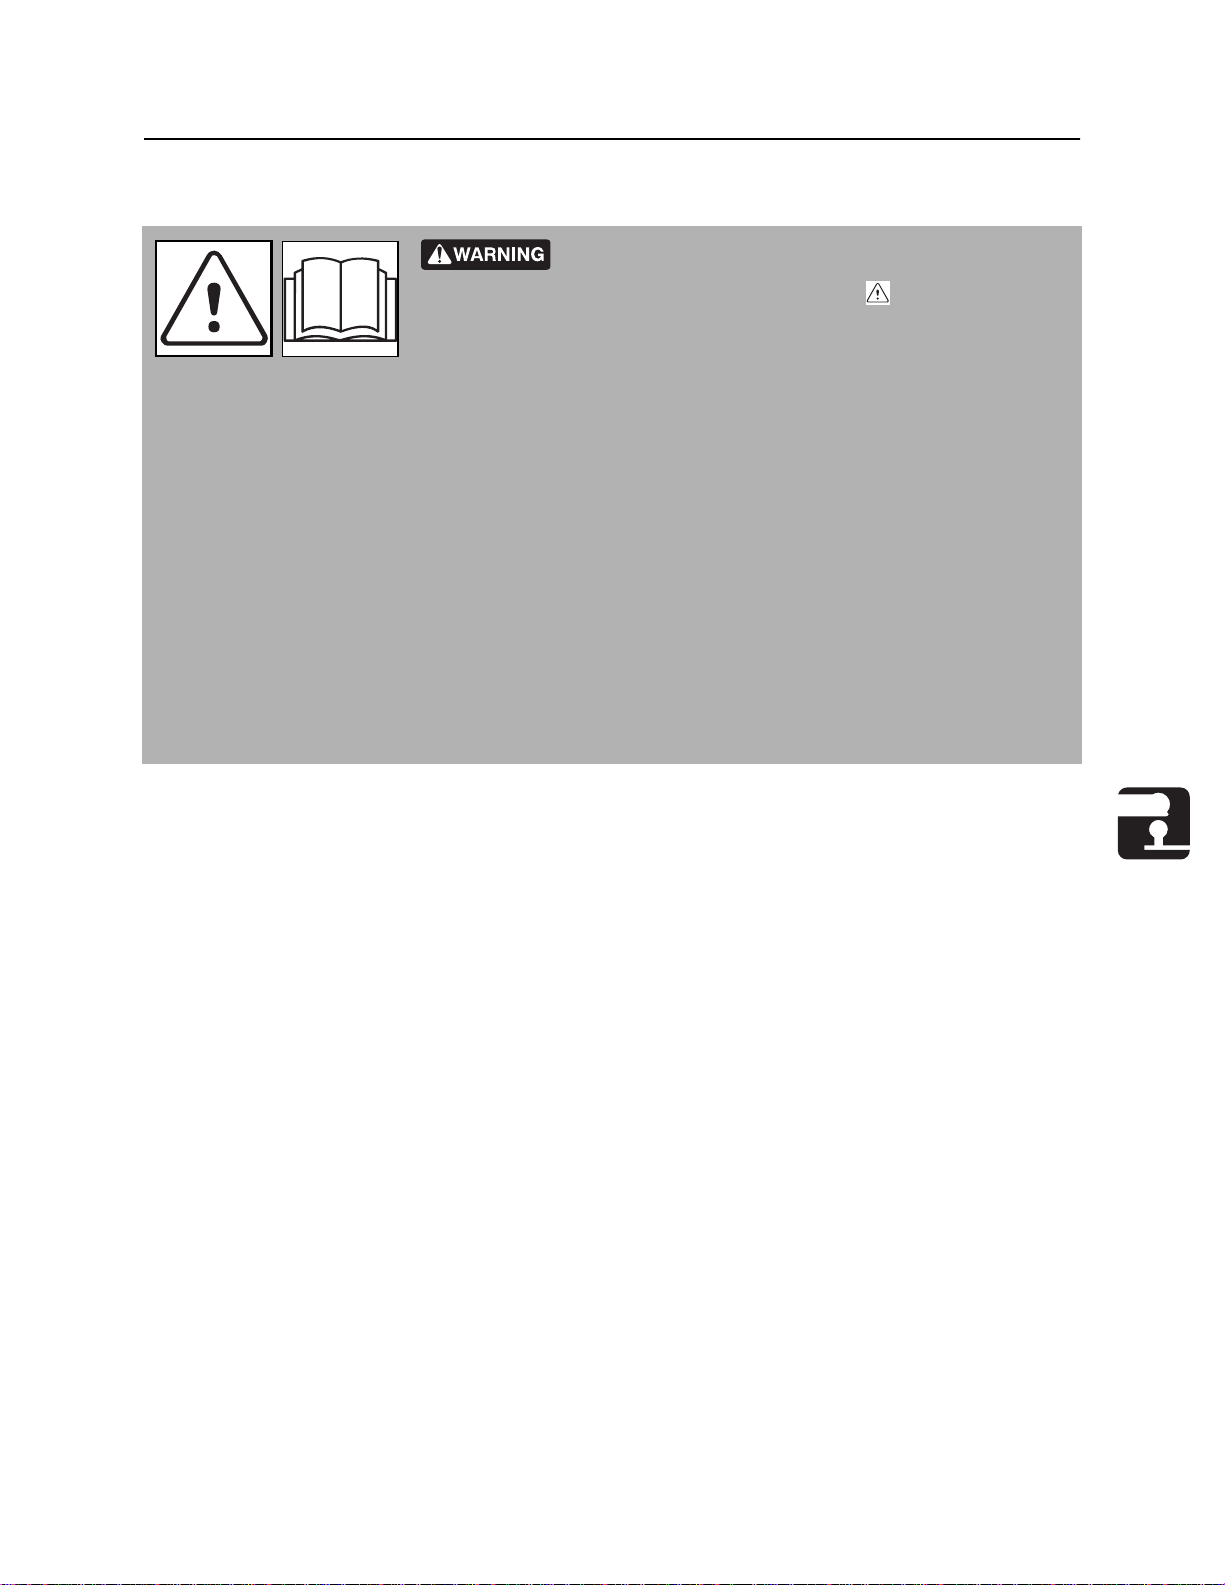
RT45 Operator’s Manual Transport - 81
Haul
Haul
Read operator’s manual. Know how to use all controls
before operating machine. When you see this sign on the machine or
in the manual, read it and use caution. Your safety is at stake. 273-475
To help avoid injury:
• Read trailer operator’s manual before loading or transporting your machine. Incorrectly loaded
machine can slip or cause trailer sway.
• Ensure that tow vehicle has proper tow capacity rating.
• Attach trailer to tow vehicle before loading or unloading.
• Park, load, and unload trailer on level ground.
• Check that unit and trailer do not exceed size or weight regulations.
• Load trailer correctly to avoid trailer swaying. Ten to fifteen percent of total vehicle weight
(equipment plus trailer) must be on tongue to help prevent trailer sway.
• Connect safety chains to tow vehicle. Attach left chain to right side of tow vehicle and vice versa to
cradle hitch. Do not connect to pintle hook or hitch ball.
• Connect breakaway switch cable to tow vehicle. Do not connect to pintle hook or hitch ball.
Procedure
Inspect Trailer
1. Check hitch for wear and cracks. Lubricate if needed.
2. Check battery for 12V charge.
3. Inspect lights for cleanliness and correct operation. Inspect reflectors and replace if needed.
4. Check tire pressure. Check lug nut torque with a torque wrench. Adjust if needed.
5. Ensure trailer brakes are adjusted to come on in synchronization with tow vehicle brakes.
6. Check ramps and trailer bed for cracks.
CMW
®
Page 81
Transport - 82 RT45 Operator’s Manual
Haul
Load
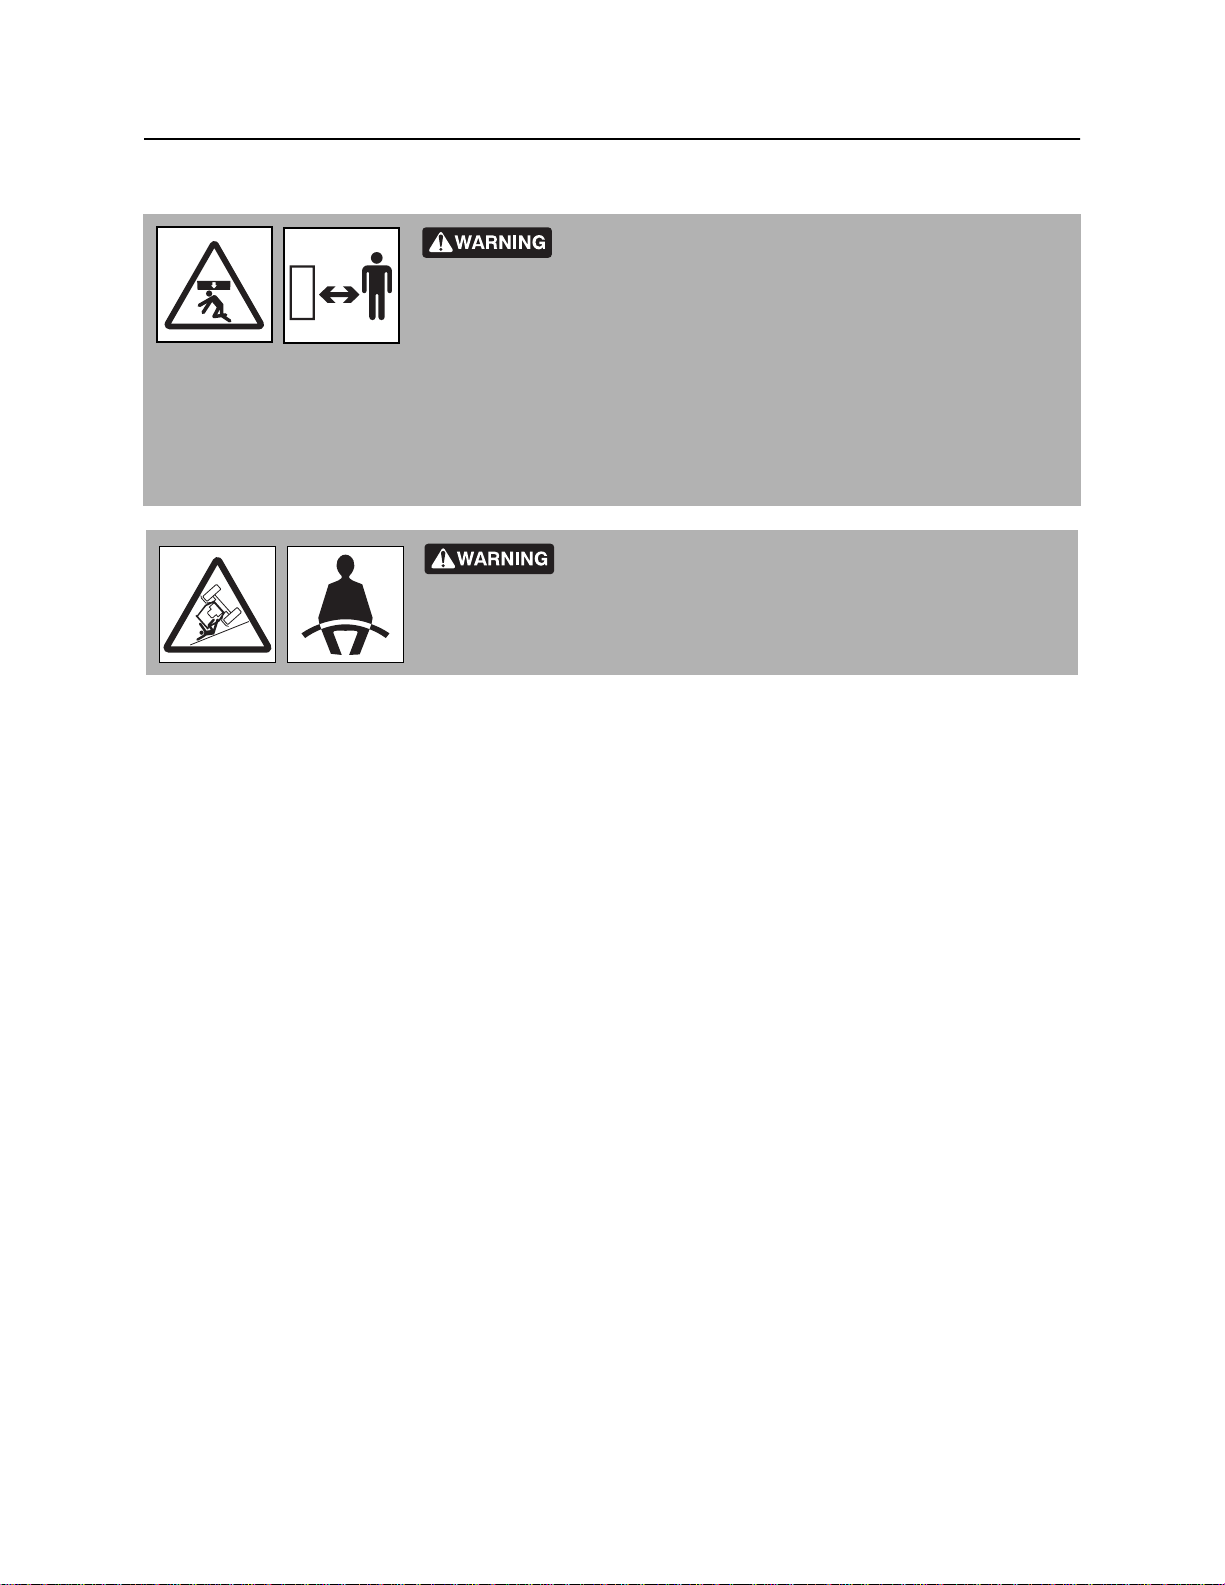
Crushing weight. If load falls or moves it could kill or crush
you. Use proper procedures and equipment or stay away.
To help avoid injury:
• Attach trailer to tow vehicle before loading or unloading.
• Load and unload trailer on level ground.
• Block trailer wheels.
Rollover possible. If machine rolls over, you could be
thrown from seat and killed or crushed. Wear seat belt.
275-303
1. Fasten and adjust seat belt.
2. Start tractor. See page 72 for proper start-up procedures.
3. Raise attachments, but keep them low.
4. Move attachments to center position.
5. Release parking brake.
6. Slowly drive tractor onto trailer.
7. Position tractor on trailer deck for proper weight distribution.
8. Engage parking brake.
9. Lower attachments to trailer bed and turn tractor off. See page 74 for proper shutdown procedures.
10. Attach chains to tractor and attachments where tiedown decals are located. See page 80.
CMW
®
Page 82
RT45 Operator’s Manual Transport - 83
Haul
Unload
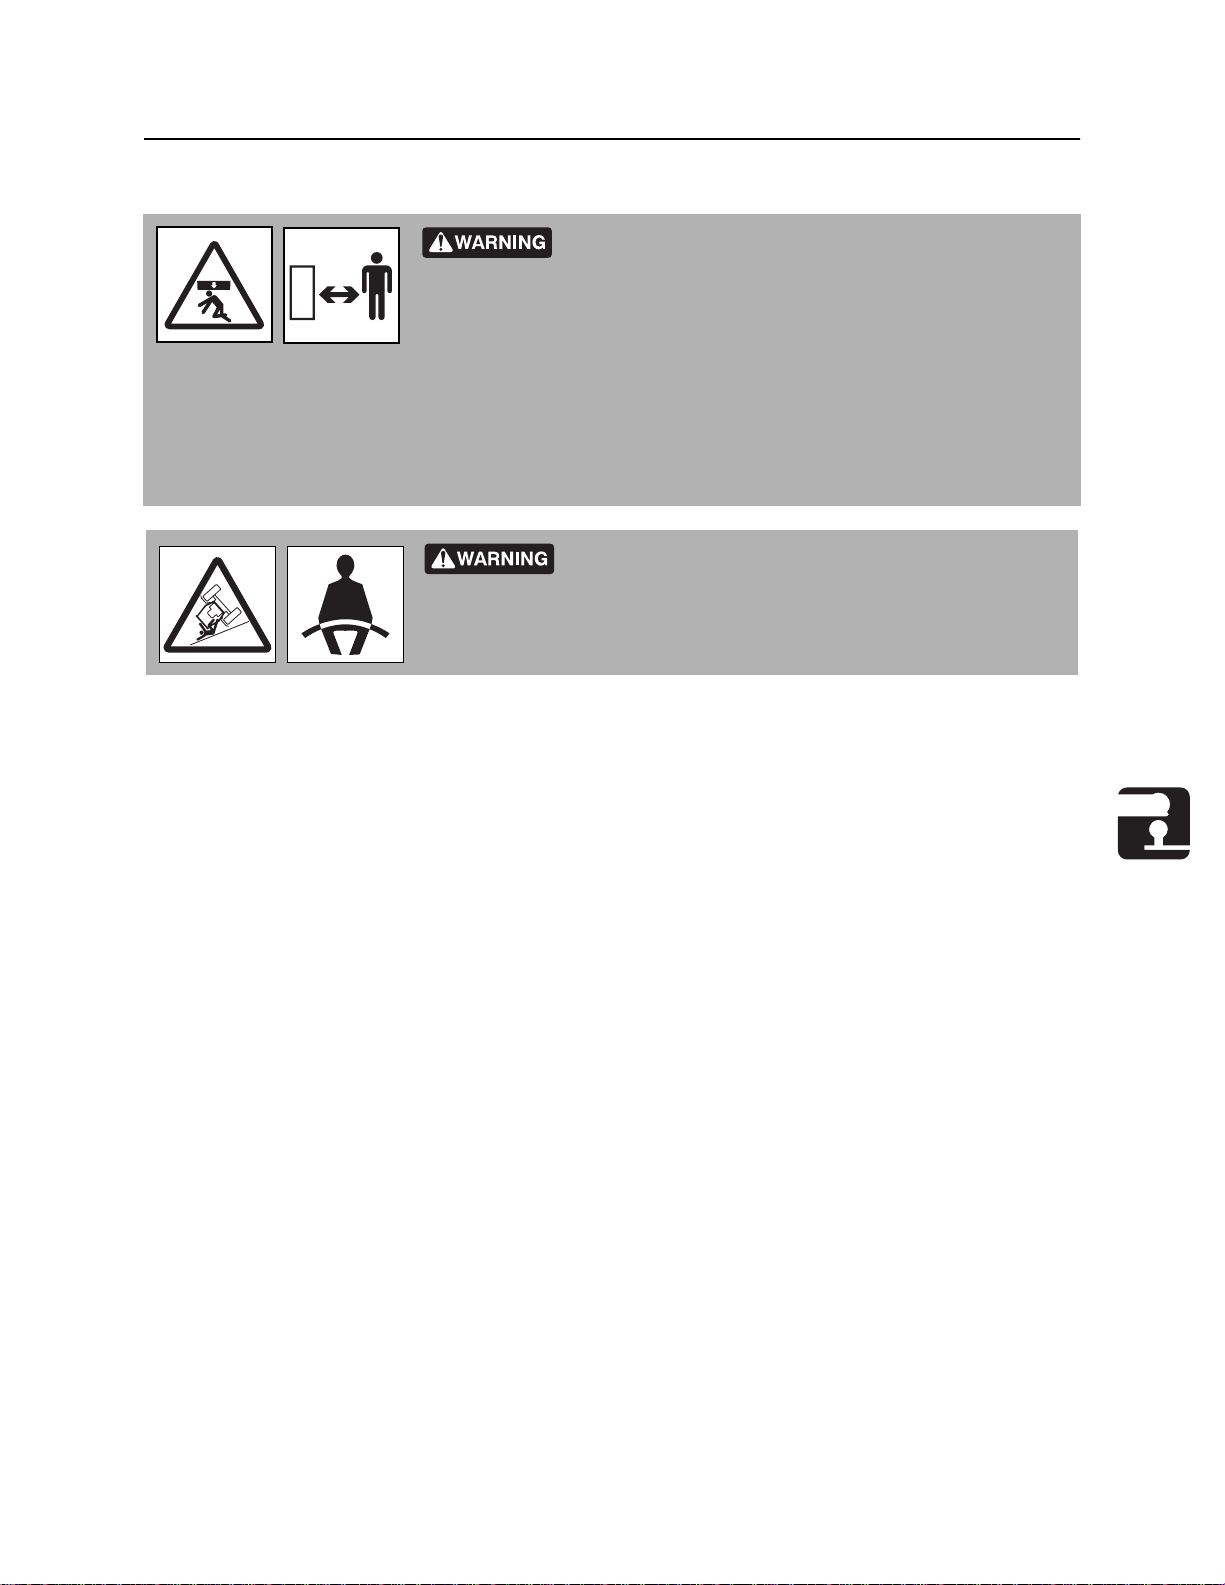
Crushing weight. If load falls or moves it could kill or crush
you. Use proper procedures and equipment or stay away.
To help avoid injury:
• Attach trailer to tow vehicle before loading or unloading.
• Load and unload trailer on level ground.
• Block trailer wheels.
Rollover possible. If machine rolls over, you could be
thrown from seat and killed or crushed. Wear seat belt.
275-303
1. Lower trailer or ramps.
2. Remove chains from tiedowns.
3. Fasten and adjust seat belt.
4. Start tractor. See page 72 for proper start-up procedures.
5. Raise attachments, but keep them low and centered.
6. Disengage parking brake.
7. Slowly back unit down trailer or ramps.
CMW
®
Page 83
Transport - 84 RT45 Operator’s Manual
Tow
Tow
Read operator’s manual. Know how to use all controls
before operating machine. When you see this sign on the machine or in
the manual, read it and use caution. Your safety is at stake. 273-475
Under normal conditions, tractor should not be towed. If tractor becomes disabled and towing is
necessary:
• Do not tow for more than 200 yd (180 m).
• Tow at less than 1 mph (1.6 km/h).
• Use maximum towing force of 1.5 times unit weight.
Procedure
1. Attach tow line to all available tiedown points facing towing vehicle.
2. Bypass hydraulic system.
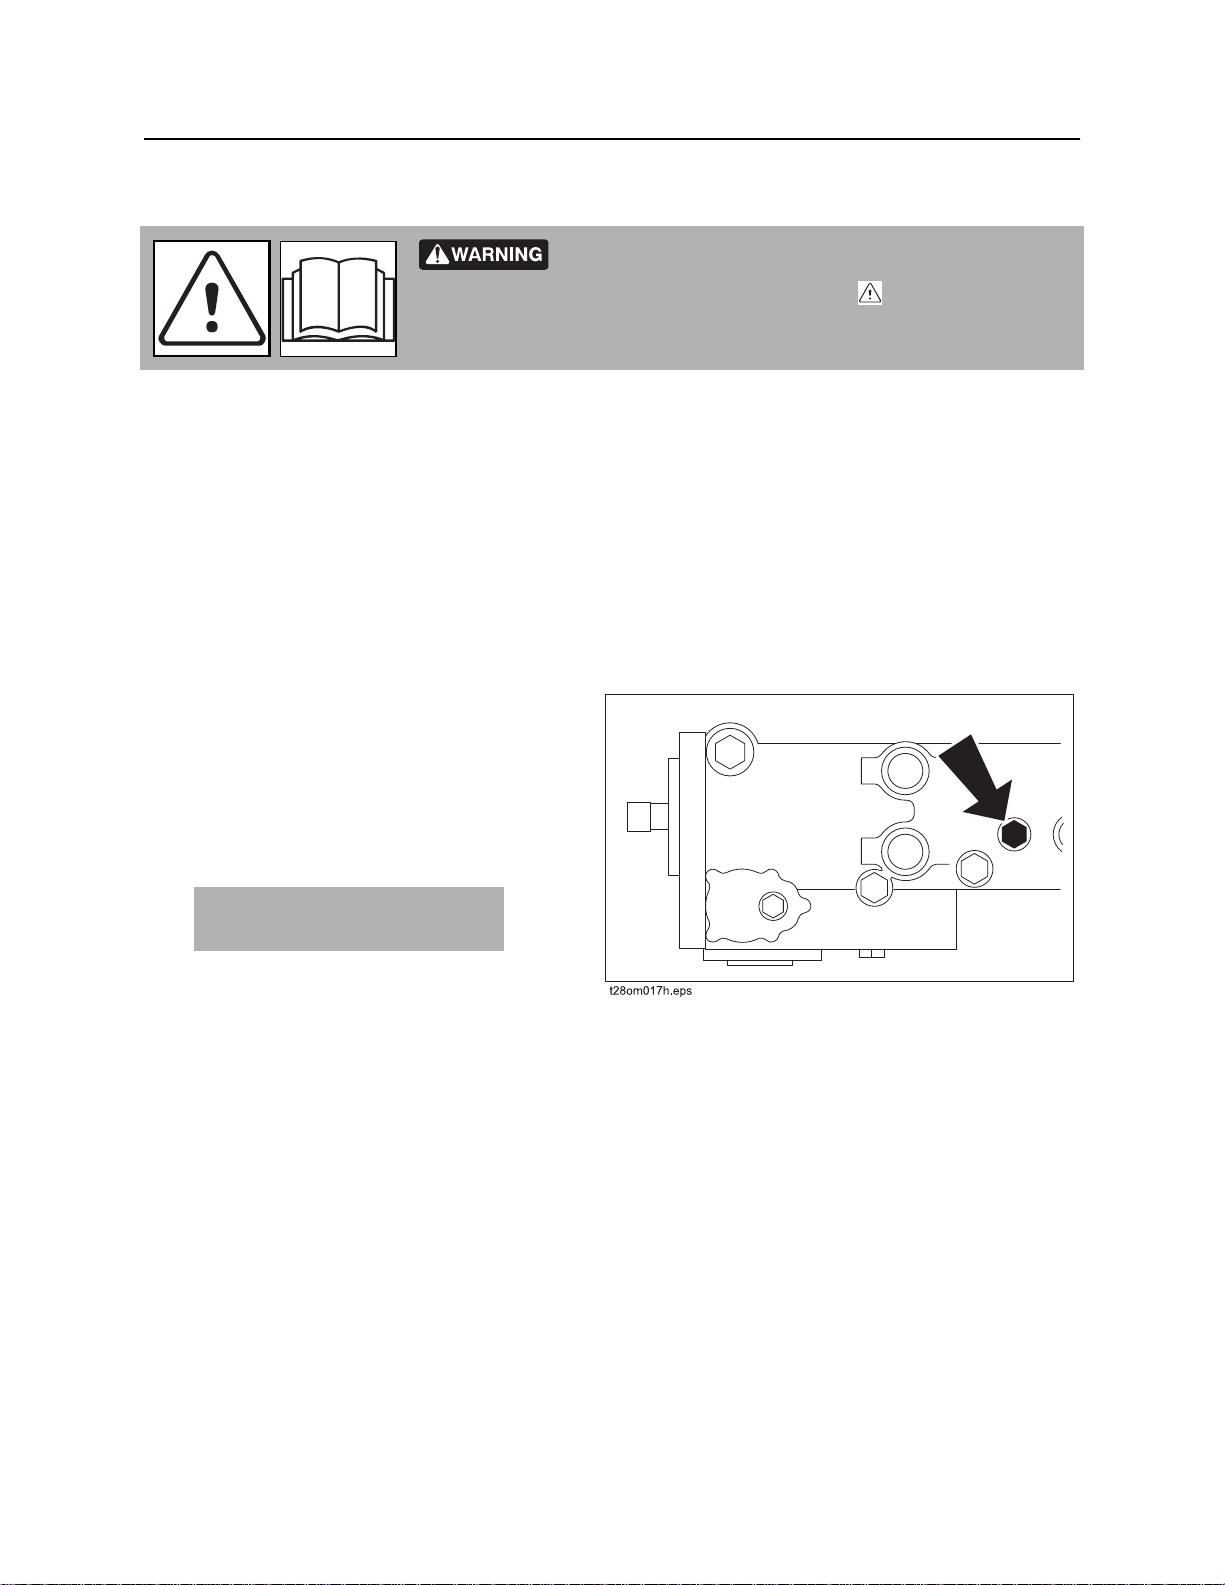
Remove tunnel cover and loosen bypass
valve two turns. Valve is on right rear of
front pump.
3. Fasten seat belt.
4. Disengage parking brake.
NOTICE: While towing, unit will
not have brakes.
5. Check that ground drive and attachment
speed/direction controls are in neutral
position.
CMW
®
Page 84

RT45 Operator’s Manual Trench - 85
Trench
Chapter Contents
Setup . . . . . . . . . . . . . . . . . . . . . . . . . . . . . . . . . . . . 86
Operation. . . . . . . . . . . . . . . . . . . . . . . . . . . . . . . . . 87
CMW
®
Page 85
Trench - 86 RT45 Operator’s Manual
Setup
Setup
EMERGENCY SHUTDOWN - Turn ignition switch to STOP.
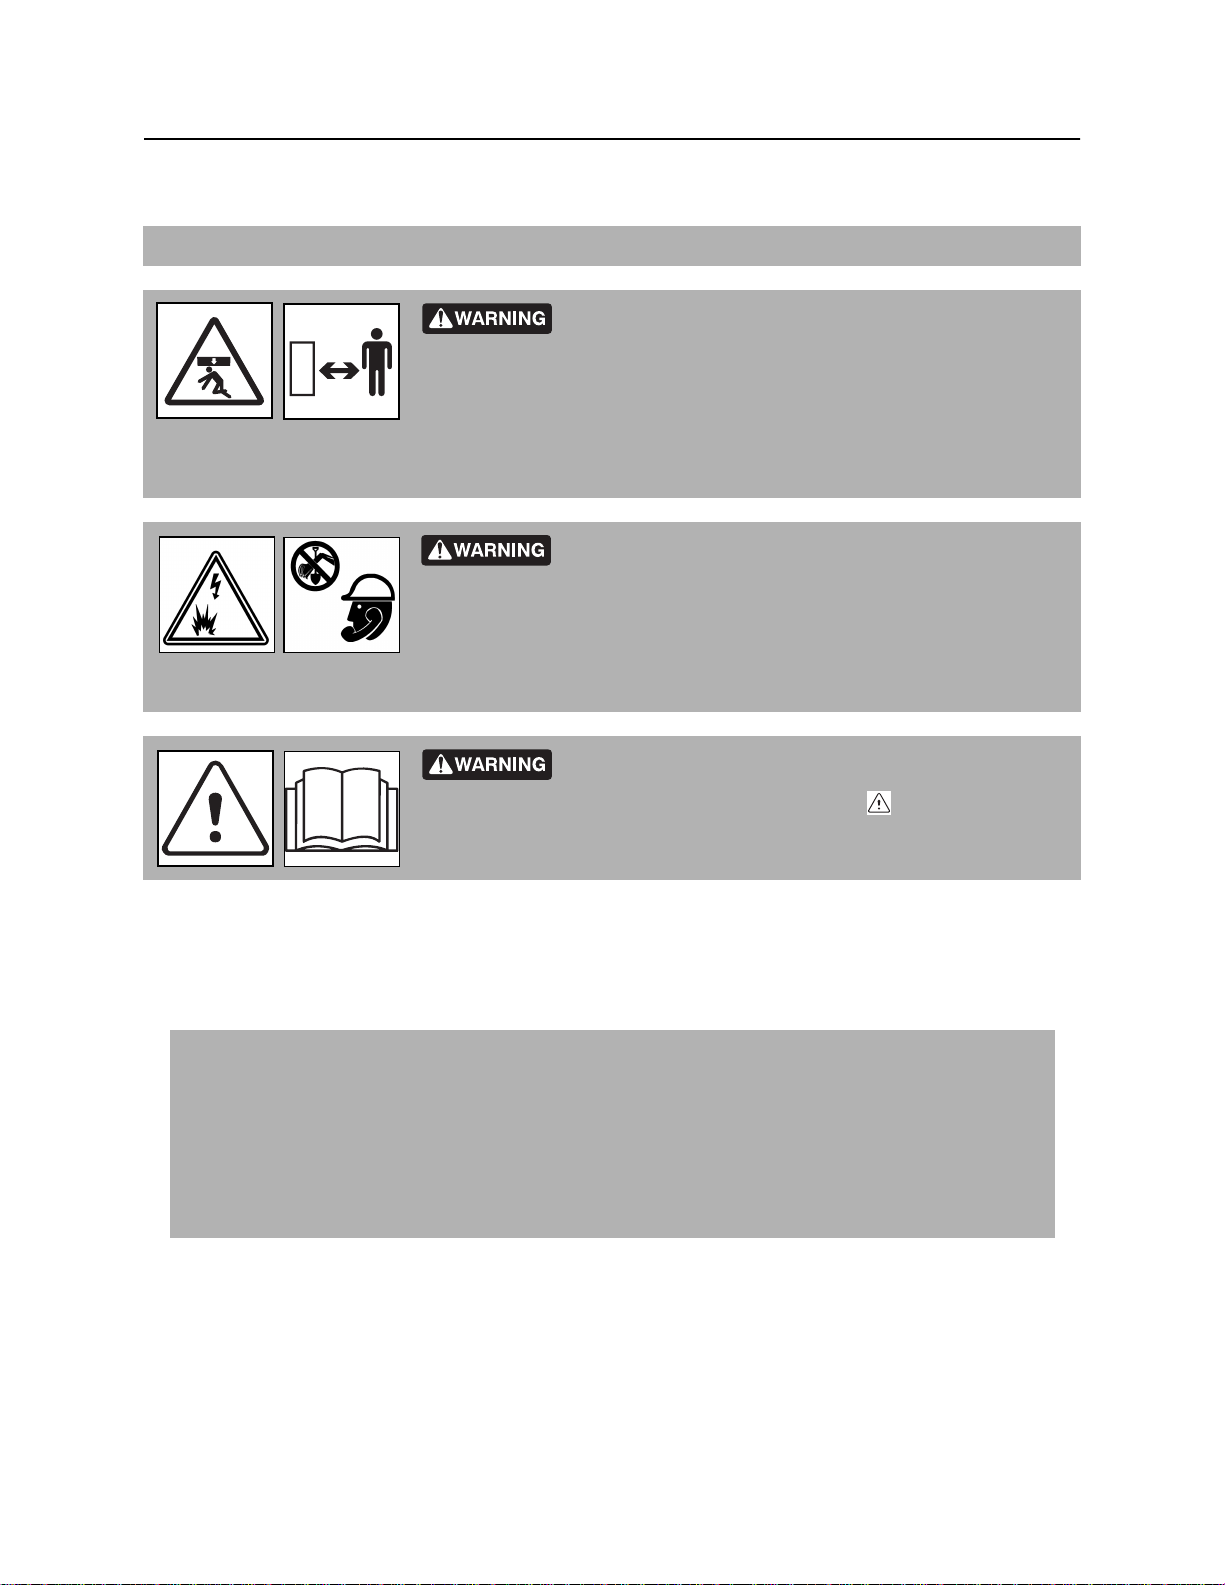
Crushing weight could cause death or serious injury. Use
proper procedures and equipment or stay away.
T o help avoid injury: Use attachments or counterweights to make front and rear loads balance when all
attachments are raised. Contact your Ditch Witch® dealer about counterweighting for your equipment.
Jobsite hazards could cause death or serious injury. Use
correct equipment and work methods. Use and maintain proper safety
equipment.
To help avoid injury: Comply with all utility notification regulations before digging or drilling.
Read operator’s manual. Know how to use all controls
before operating machine. When you see this sign on the machine or
in the manual, read it and use caution. Your safety is at stake. 273-475
1. Fasten and adjust seat belt.
2. Start tractor. See page 72 for start-up procedures.
3. Drive to starting point. Move in line with planned trench. See page 74 for operating procedures.
IMPORTANT:
• When cutting asphalt, start trench in soil at edge of road and use shortest possible boom at
full depth.
• Sight along center of hood to a stake driven beyond end of trench line for straight trench.
• For optimal spoils delivery, adjust the auger positions forward or backward to accommodate
terrain and digging depth.
4. Lower backfill blade.
5. Engage parking brake.
6. Lower boom to just above ground.
7. Check that attachment speed/direction control and ground drive controls are in neutral.
8. If equipped with combo, move selector valve to trenching position.
®
CMW
Page 86
RT45 Operator’s Manual Trench - 87
Setup
Operation
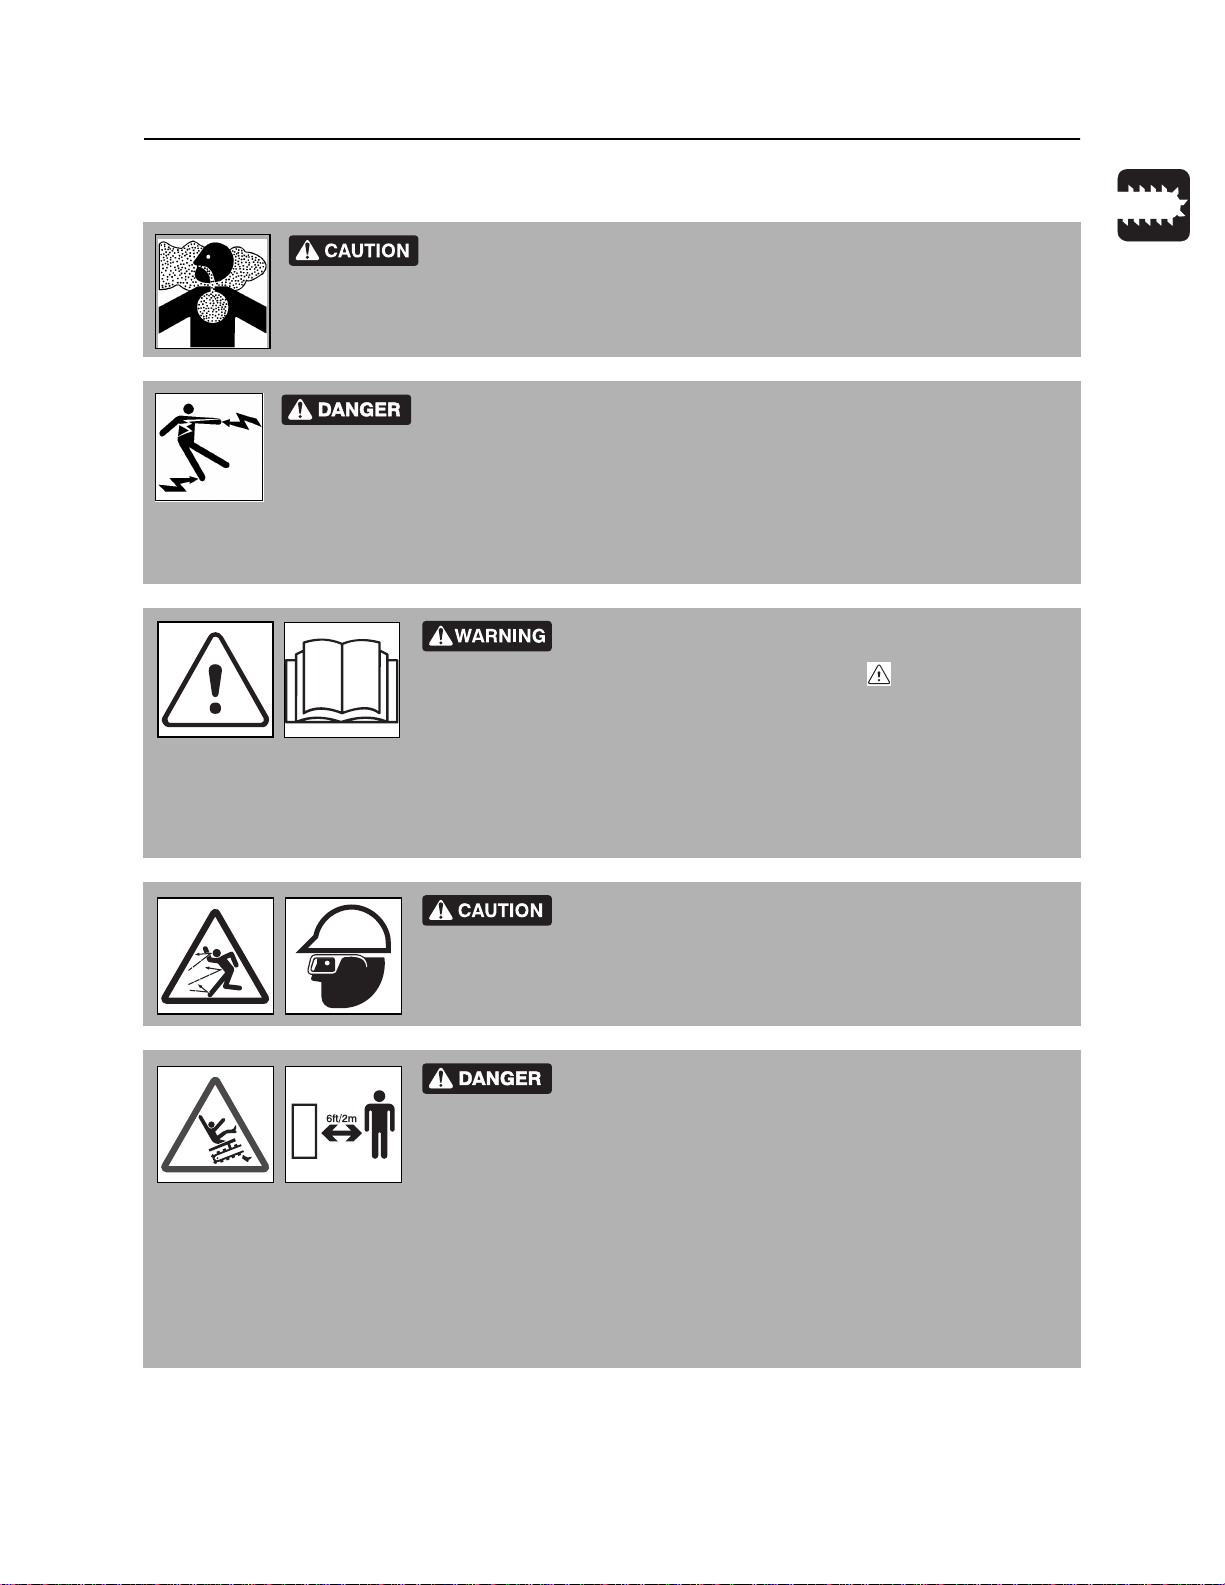
Breathing crystalline silica dust may cause lung disease. Cutting, drilling,
or working materials such as concrete, sand, or rock containing quartz may result in
exposure to silica dust. Use dust control methods or appropriate breathing protection
when exposed to silica dust.
Electrical shock. Contacting electrical lines will cause death or serious
injury. Know location of lines and stay away.
To help avoid injury: Expose lines by hand before digging. Cutting high voltage cable can cause
electrocution.
Read operator’s manual. Know how to use all controls
before operating machine. When you see this sign on the machine or
in the manual, read it and use caution. Your safety is at stake. 273-475
To help avoid injury:
• Comply with all utility notification regulations before digging or drilling.
• Notify companies that do not subscribe to One-Call.
Flying objects thrown by machine may strike people.
Wear hard hat and safety glasses. 275-193
Moving digging teeth will cause death or serious injury.
Stay away. 275-443
To help avoid injury:
• Ensure parking brake is engaged.
• Allow 3’ (1 m) between digging teeth and obstacle. Machine might jerk when digging starts.
• Keep everyone at least 6’ (2 m) from machine, attachments, and their range of movement.
1. Lower backfill blade to reduce shock when trenching begins.
CMW
®
Page 87

Trench - 88 RT45 Operator’s Manual
Setup
2. If necessary, adjust throttle to low idle.
3. Move attachment speed/direction control to desired speed. DIGGING CHAIN WILL MOVE.
NOTICE: Always start trenching with attachment speed set at low. If soil conditions permit
optimum digging at higher speeds, select high.
4. Increase engine speed to full throttle.
5. Slowly lower digging boom to depth.
6. Raise backfill blade and release parking brake.
7. Move ground drive control to desired speed.
8. If using optional trench cleaner:
• Stop tractor and turn ignition switch to STOP.
• Manually lower trench cleaner.
• Restart tractor, fasten seat belt, and continue trenching.
NOTICE:
• Do not have trench cleaner in working position when starting a trench.
• Do not back up with trench cleaner in working position.
• Do not use trench cleaner in conditions where large rocks can get between chain and
cleaner.
9. Push ground drive control forward to trenching speed.
NOTICE:
• Do not make sharp turns. Lower boom to full depth when turning.
• If an object becomes lodged in chain, move attachment speed/direction control to neutral
and raise boom slightly. Reverse chain direction. If object must be removed manually, turn
engine off and engage parking brake.
10. When trench is complete, move ground drive control to neutral.
11. Adjust throttle to low idle.
12. Raise boom.
13. As boom clears top of trench, move attachment speed/direction control to neutral.
14. Drive a short distance away from work site.
15. Shut down tractor. See page 74 for proper shutdown procedures.
16. Return optional trench cleaner to the stowed position.
®
CMW
Page 88

RT45 Operator’s Manual Plow - 89
Plow
Chapter Contents
Setup . . . . . . . . . . . . . . . . . . . . . . . . . . . . . . . . . . . . 90
• Position Tractor. . . . . . . . . . . . . . . . . . . . . . . . . . . . . . . . . . . . . . . . . . . 91
• Attach Product. . . . . . . . . . . . . . . . . . . . . . . . . . . . . . . . . . . . . . . . . . . . 91
Operation. . . . . . . . . . . . . . . . . . . . . . . . . . . . . . . . . 93
CMW
®
Page 89
Plow - 90 RT45 Operator’s Manual
Setup
Setup
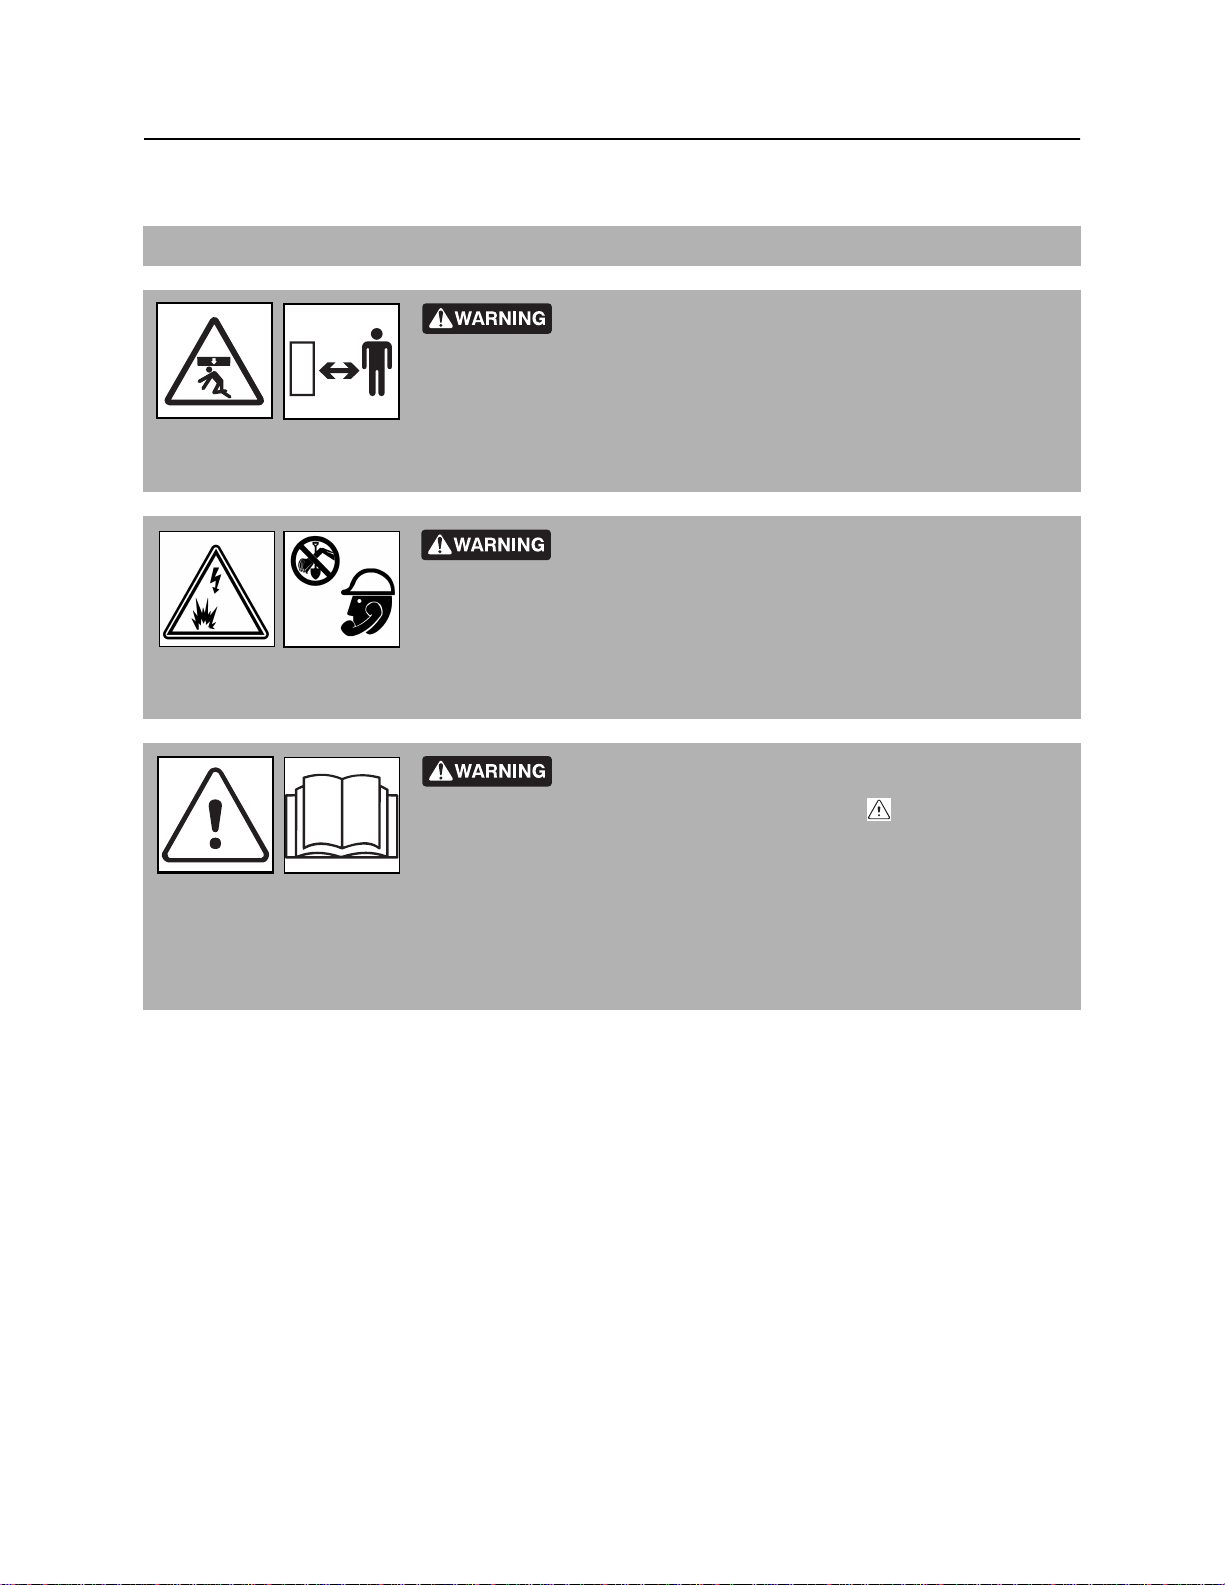
EMERGENCY SHUTDOWN - Turn ignition switch to STOP.
Crushing weight could cause death or serious injury. Use
proper procedures and equipment or stay away.
To help avoid injury: Keep everyone at least 6’ (2 m) from machine, attachments, and their range of
movement.
Jobsite hazards could cause death or serious injury. Use
correct equipment and work methods. Use and maintain proper safety
equipment.
To help avoid injury: Comply with all utility notification regulations before digging or drilling.
Read operator’s manual. Know how to use all controls
before operating machine. When you see this sign on the machine or
in the manual, read it and use caution. Your safety is at stake. 273-475
To help avoid injury: Use attachments or counterweights to make front
and rear loads balance when all attachments are raised. Contact your Ditch Witch® dealer about
counterweighting for your equipment.
NOTICE: Do not operate vibrator unless plow is in the ground.
CMW
®
Page 90
RT45 Operator’s Manual Plow - 91
Setup
Position Tractor
IMPORTANT: If material must be at a constant depth, dig starting and target trenches.
1. Fasten and adjust seat belt.
2. Start tractor. See page 72 for start-up procedures.
3. Drive to starting point. Move in line with planned trench. See page 74 for operating procedures.
4. Lower backfill blade.
5. Engage parking brake.
6. Lower plow to starting point of trench.
7. Turn ignition switch to STOP.
Attach Product
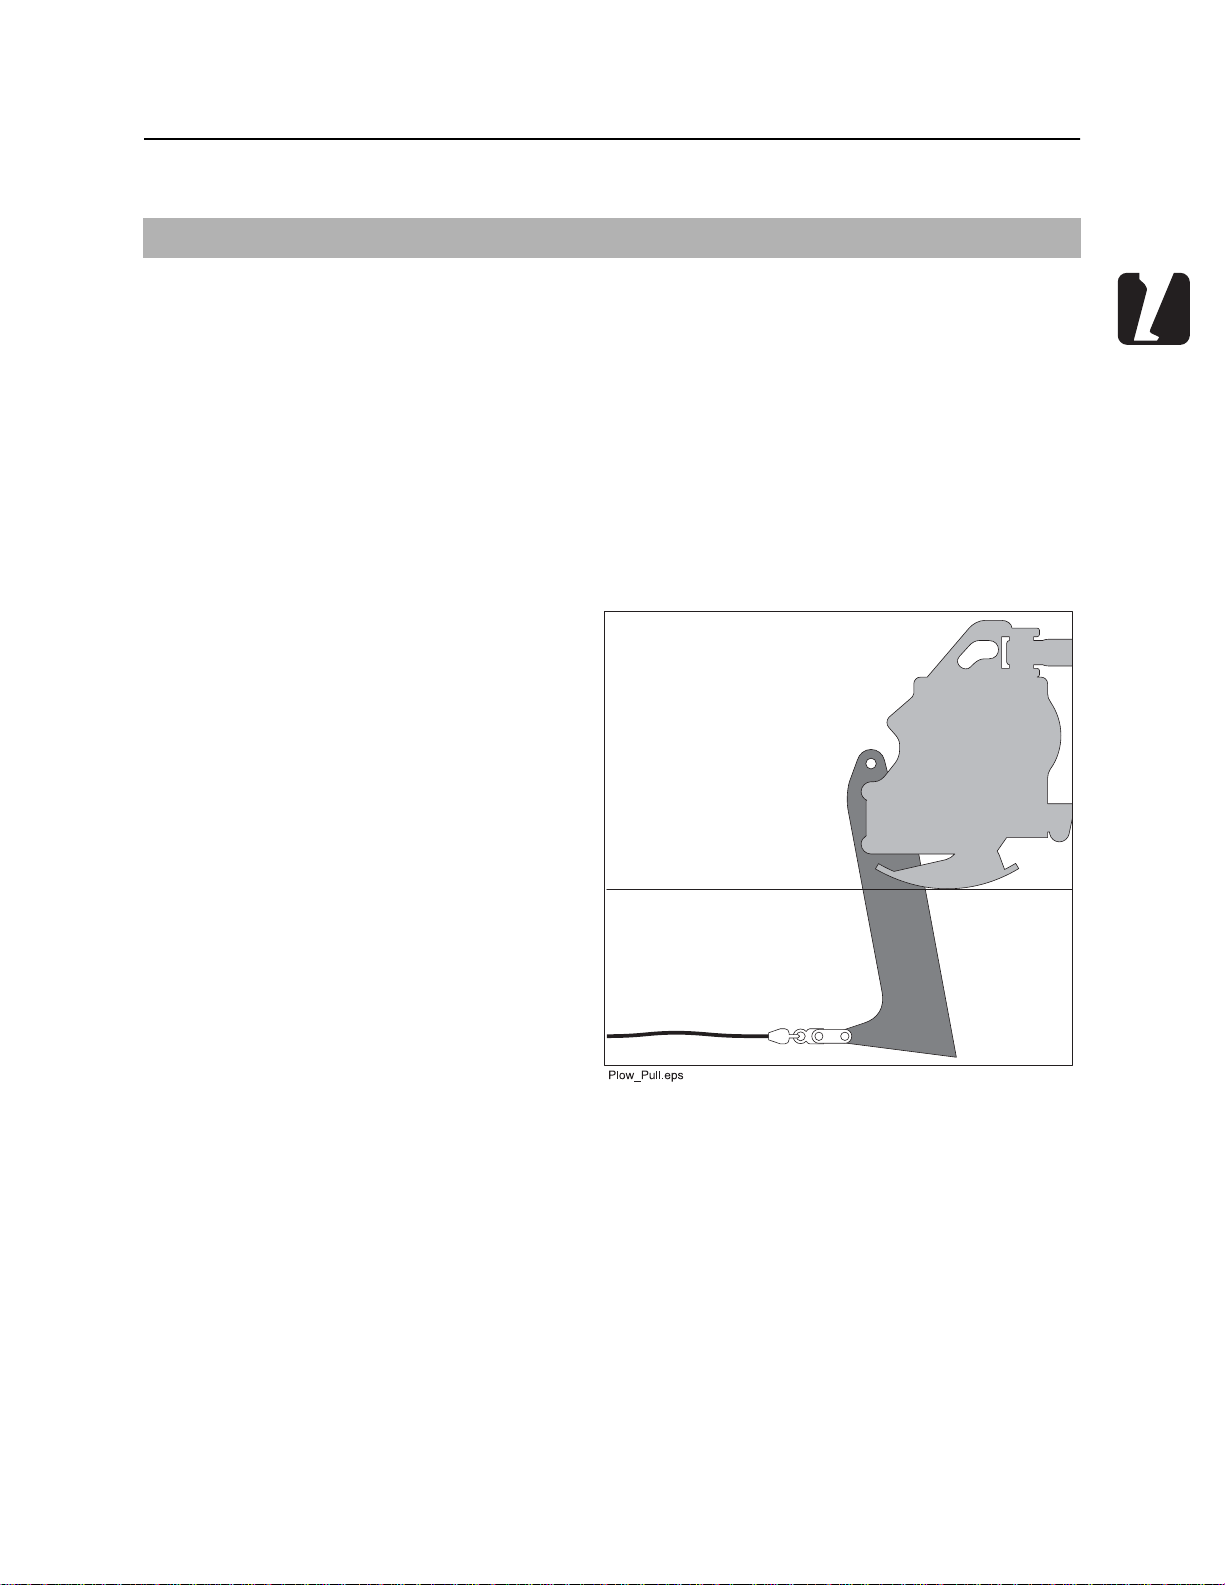
To Pull Product
1. Insert material into pulling grip.
2. Tape grip with duct tape.
CMW
®
Page 91
Plow - 92 RT45 Operator’s Manual
Setup
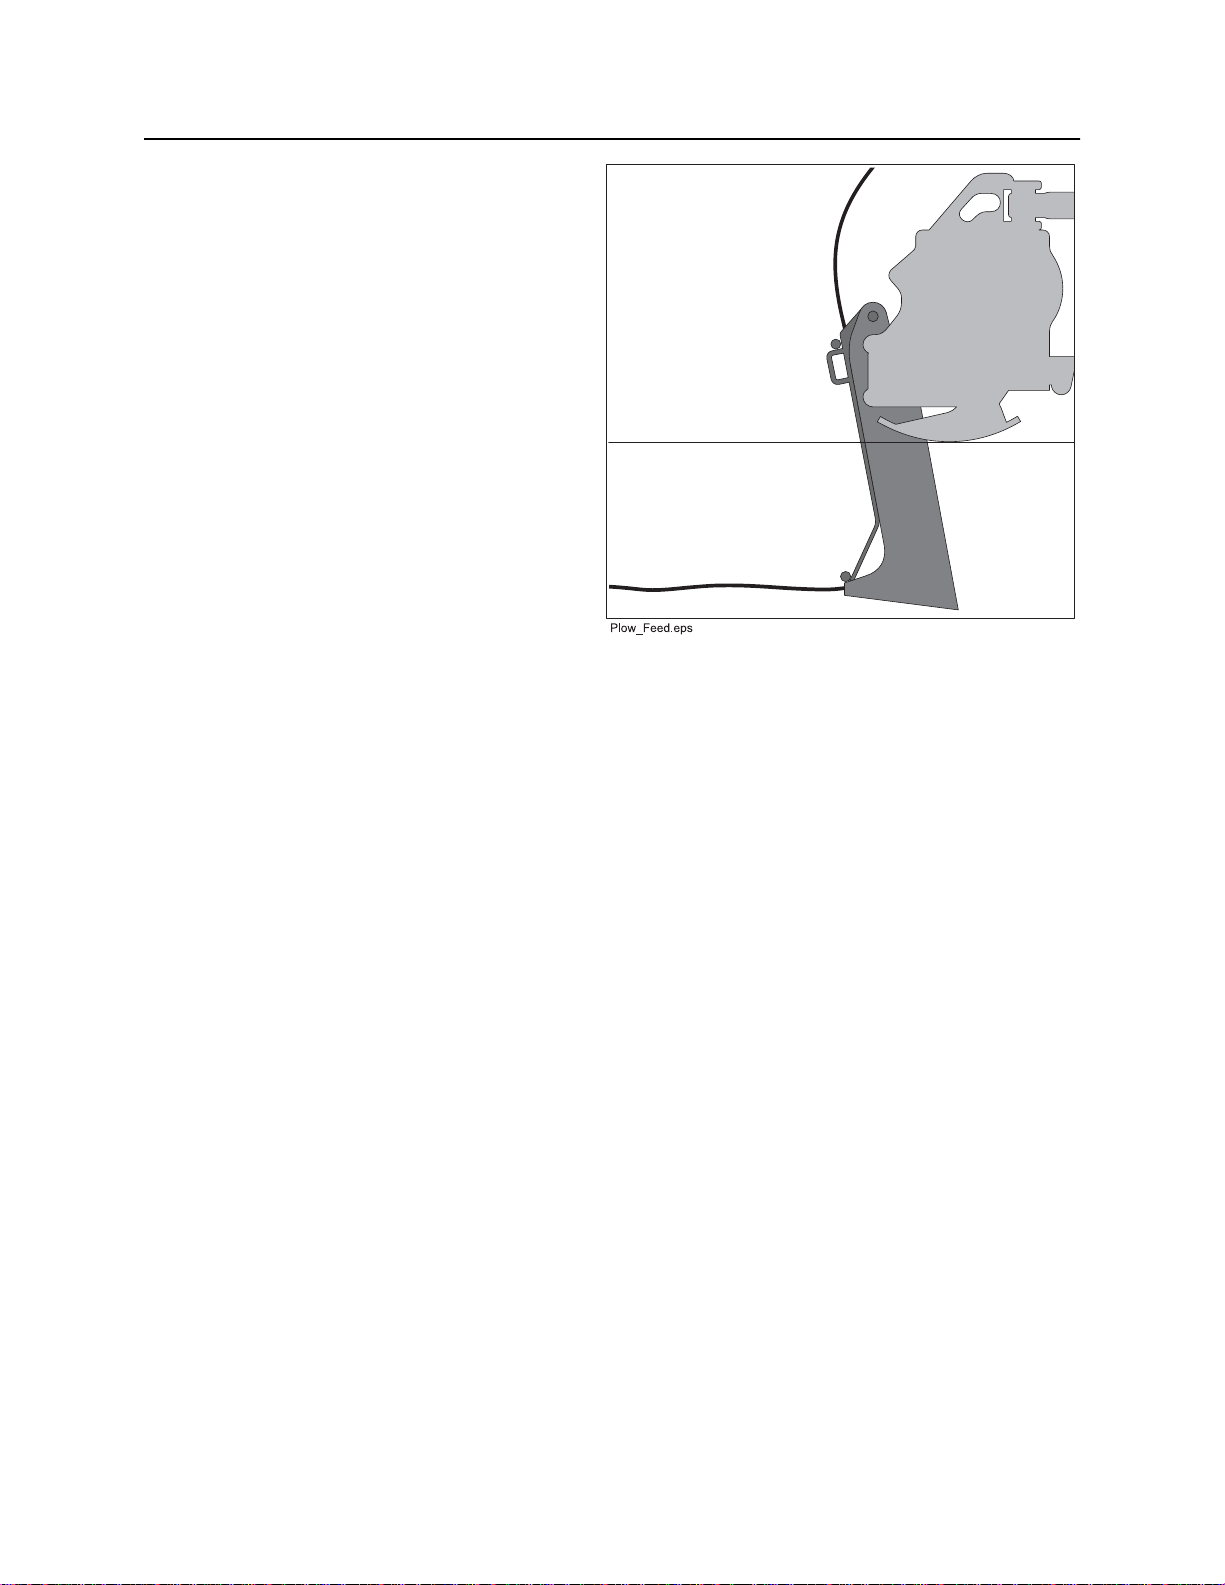
To Feed Product
1. Remove cable guide.
2. Feed cable through tube from top to
bottom.
3. Replace cable guide and tighten
fasteners.
4. Secure cable.
CMW
®
Page 92
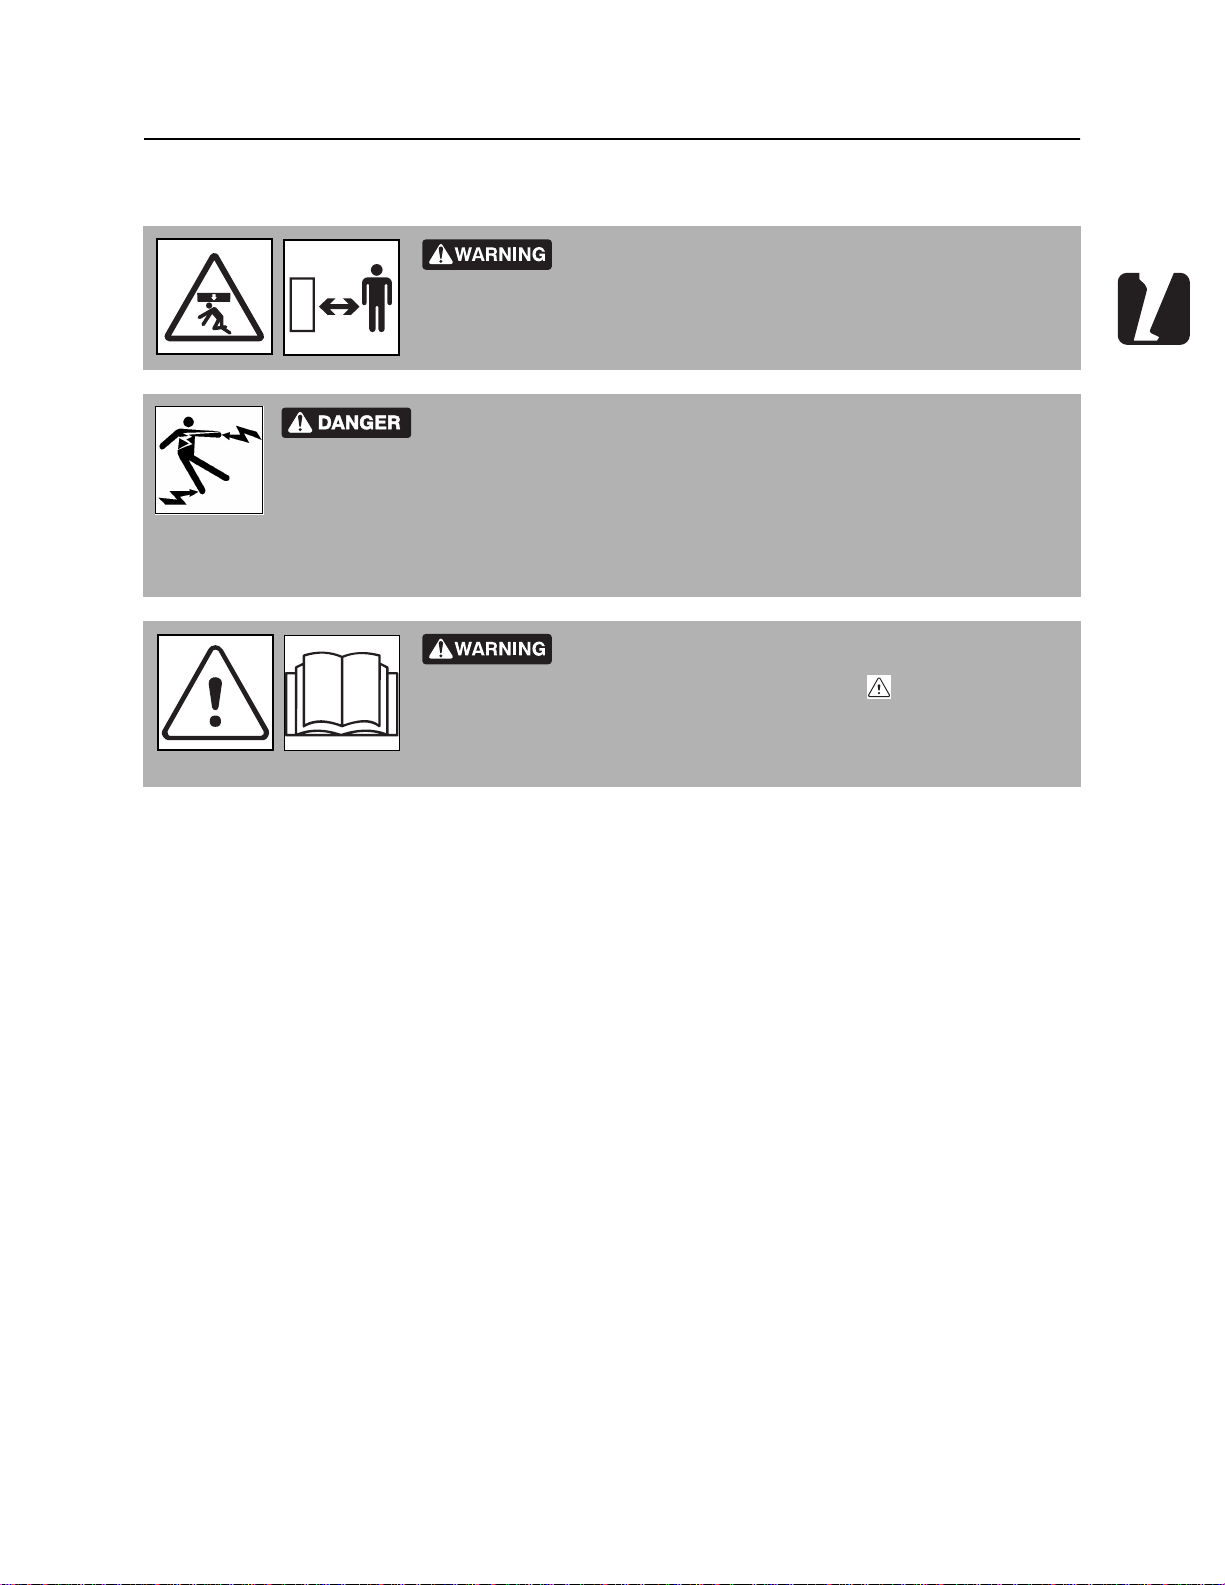
RT45 Operator’s Manual Plow - 93
Operation
Operation
Crushing weight could cause death or serious injury. Use
proper procedures and equipment or stay away.
Electrical shock. Contacting electrical lines will cause death or serious
injury. Know location of lines and stay away.
To help avoid injury: Expose lines by hand before digging. Cutting high voltage cable can cause
electrocution
Read operator’s manual. Know how to use all controls
before operating machine. When you see this sign on the machine or
in the manual, read it and use caution. Your safety is at stake. 273-475
NOTICE: Do not drive backward with plow in the ground.
CMW
®
Page 93

Plow - 94 RT45 Operator’s Manual
Operation
Start Plowing
1. Fasten and adjust seat belt.
2. Start tractor.
3. Adjust throttle to low idle.
4. Check that ground drive control is in neutral.
5. Lower reel carrier to lowest position possible, if equipped.
NOTICE: Use extreme caution when operating reel carrier on sloped surfaces.
6. If equipped with combo, move selector valve to plow position. If equipped with backfill blade tilt/
attachment swing valve and control, move selector to swing position.
7. Raise backfill blade.
8. Move ground drive control forward to plowing speed and lower plow blade into ground.
NOTICE: Do NOT move ground drive to reverse with plow blade in the ground.
9. Increase engine speed to full throttle.
10. Move attachment speed/direction control to full speed forward. PLOW WILL VIBRATE.
11. Reduce attachment speed to allow the least tractor vibration at the highest ground drive possible
without tire slippage.
12. Check cable for damage during plowing. Run continuity checks on electric cable and check pipe
pressure. Damage can result from improper operation, incorrect blade choice, striking underground
obstructions, or other conditions.
Finish Plowing
1. When installation is complete, move ground drive control to neutral.
2. With vibrator running, lower throttle speed and raise plow to ground level.
NOTICE: Do not operate vibrator when plow is out of the ground. This will cause excessive
vibration resulting in rapid wear, and possible damage to the unit and product being installed.
3. Move attachment speed/direction control to neutral.
4. Engage parking brake.
5. Lower backfill blade.
6. Turn ignition switch to STOP and remove product from plow.
7. Start tractor, raise backfill blade and drive a short distance away from work site.
8. Shut down tractor. See page 74 for proper shutdown procedures.
®
CMW
Page 94

RT45 Operator’s Manual Saw - 95
Saw
Chapter Contents
Setup . . . . . . . . . . . . . . . . . . . . . . . . . . . . . . . . . . . . 96
• Before First Use and After Replacing Bits. . . . . . . . . . . . . . . . . . . . . . . 97
• Normal Use. . . . . . . . . . . . . . . . . . . . . . . . . . . . . . . . . . . . . . . . . . . . . . 97
Operation. . . . . . . . . . . . . . . . . . . . . . . . . . . . . . . . . 98
CMW
®
Page 95
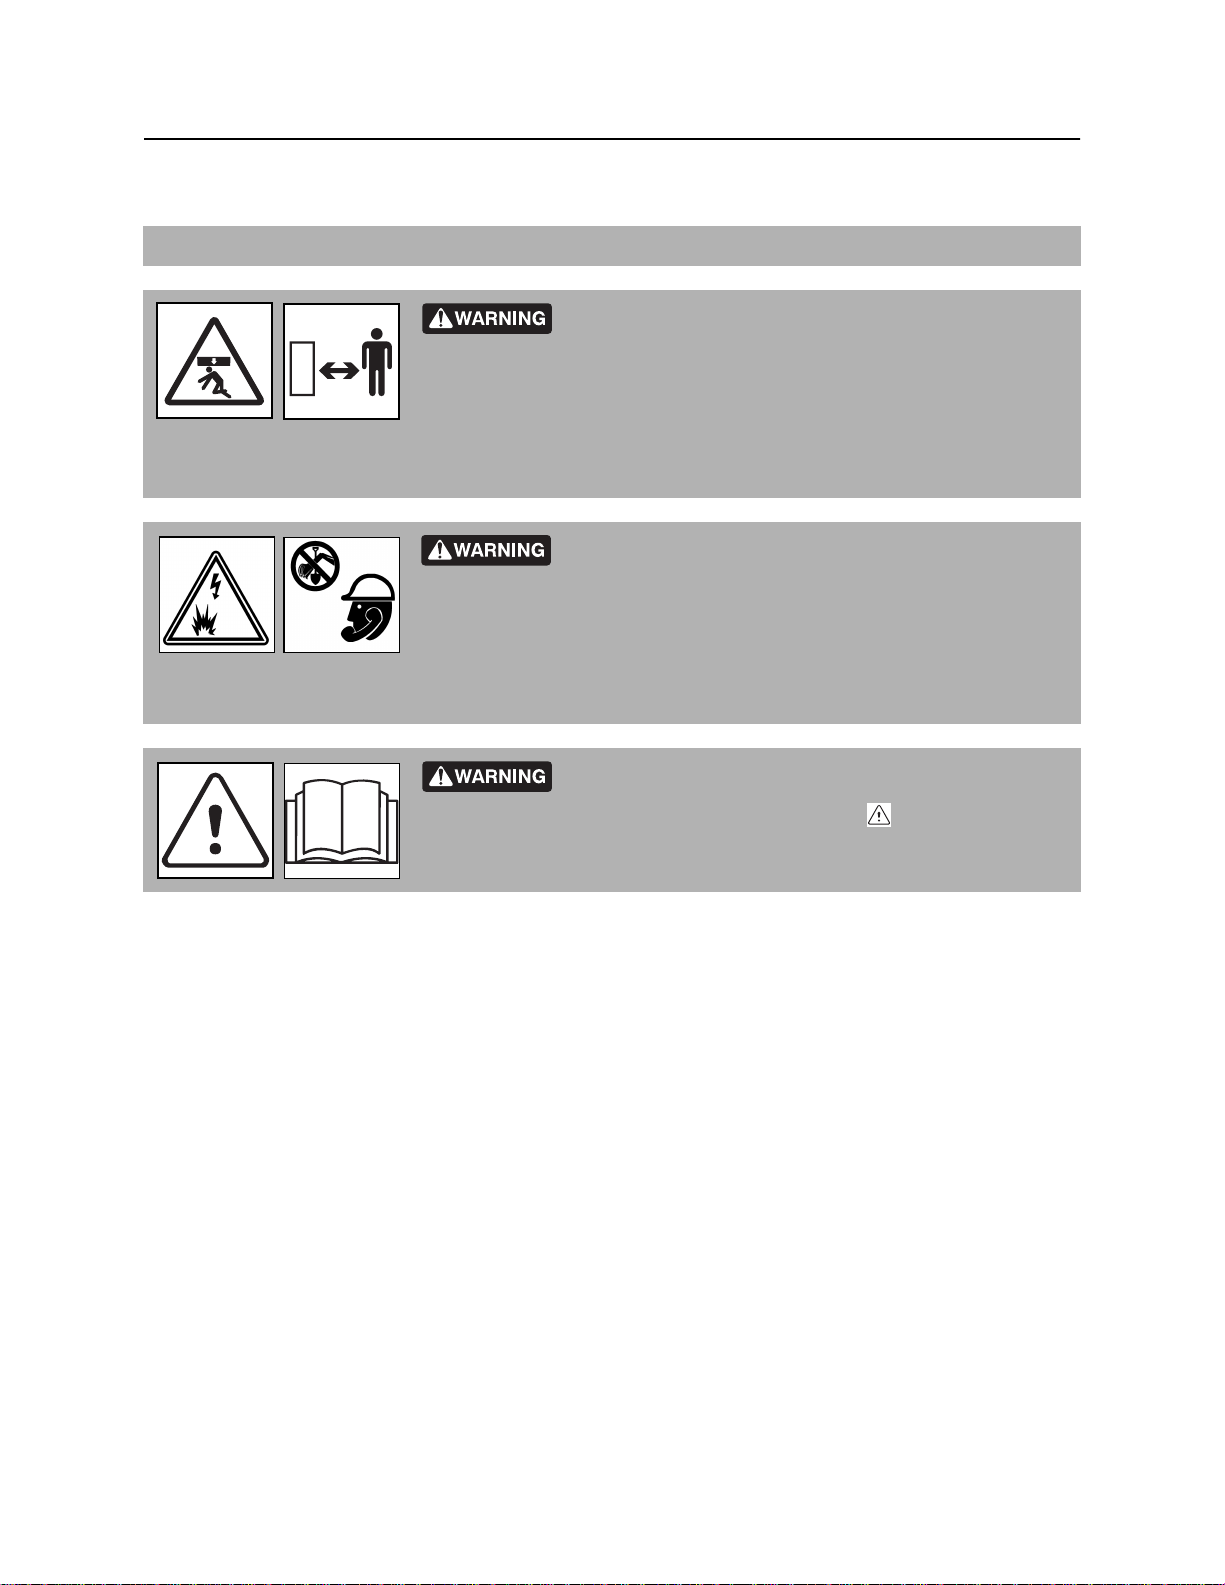
Saw - 96 RT45 Operator’s Manual
Setup
Setup
EMERGENCY SHUTDOWN - Turn ignition switch to STOP.
Crushing weight could cause death or serious injury. Use
proper procedures and equipment or stay away.
T o help avoid injury: Use attachments or counterweights to make front and rear loads balance when all
attachments are raised. Contact your Ditch Witch® dealer about counterweighting for your equipment.
Jobsite hazards could cause death or serious injury. Use
correct equipment and work methods. Use and maintain proper safety
equipment.
To help avoid injury: Comply with all utility notification regulations before digging or drilling.
Read operator’s manual. Know how to use all controls
before operating machine. When you see this sign on the machine or
in the manual, read it and use caution. Your safety is at stake. 273-475
CMW
®
Page 96
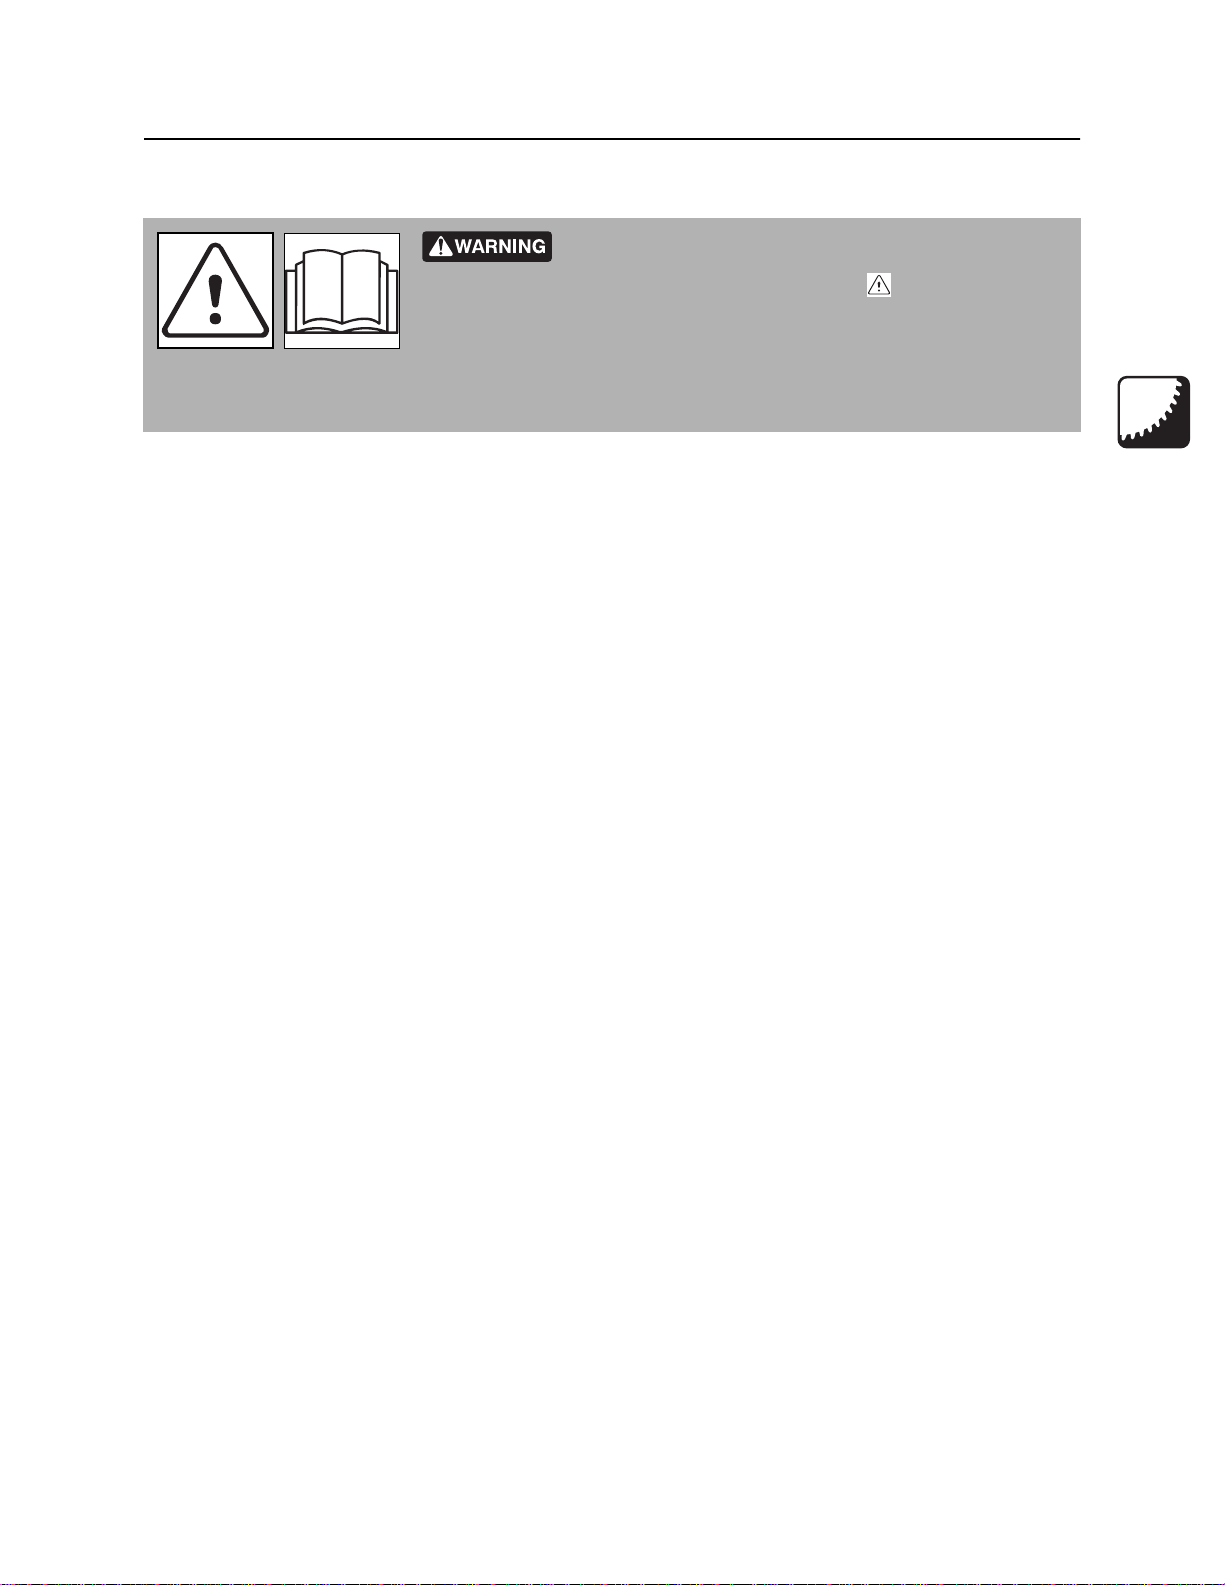
RT45 Operator’s Manual Saw - 97
Setup
Before First Use and After Replacing Bits
Read operator’s manual. Know how to use all controls
before operating machine. When you see this sign on the machine or
in the manual, read it and use caution. Your safety is at stake.
To help avoid injury: Unless otherwise instructed, all service should be performed with tractor off.
Check Bit Clearance
1. Check that all bits are properly secured.
2. Check that all bit retaining rings are secure.
3. Spin wheel by hand and listen for bits hitting diverters.
4. If bits hit diverters, repeat steps 1-3 to make sure bits are in the proper location and secured at proper
depth.
273-475
5. If bits do not hit diverters:
• Set parking brake.
• Fasten and adjust seat belt.
• Start tractor and adjust throttle.
• Raise saw slightly.
• Use attachment speed/direction control to rotate saw slowly. As it rotates, listen for clicking
sounds. If clicking is present, repeat steps 1-4.
Normal Use
1. Fasten and adjust seat belt.
2. Start tractor. See page 72 for start-up procedures.
3. Raise saw and drive to starting point. Move in line with planned trench. See page 74 for correct
operating procedures.
4. Lower backfill blade.
5. Engage parking brake.
6. Lower saw to just above ground.
7. Hold skid shoe and remove pins from one stabilizer.
8. Lower skid until distance from bottom of skid shoe to bottom of saw bits equals desired trench depth.
9. Reinsert pins.
10. Repeat process on other stabilizer. Be sure stabilizers are set at the same depth.
1 1. Support wheel guard with handle. Lift and pull stow lock and lower wheel guard into operating position.
12. Check that saw is in line with planned trench and that tires are pointing straight ahead.
CMW
®
Page 97
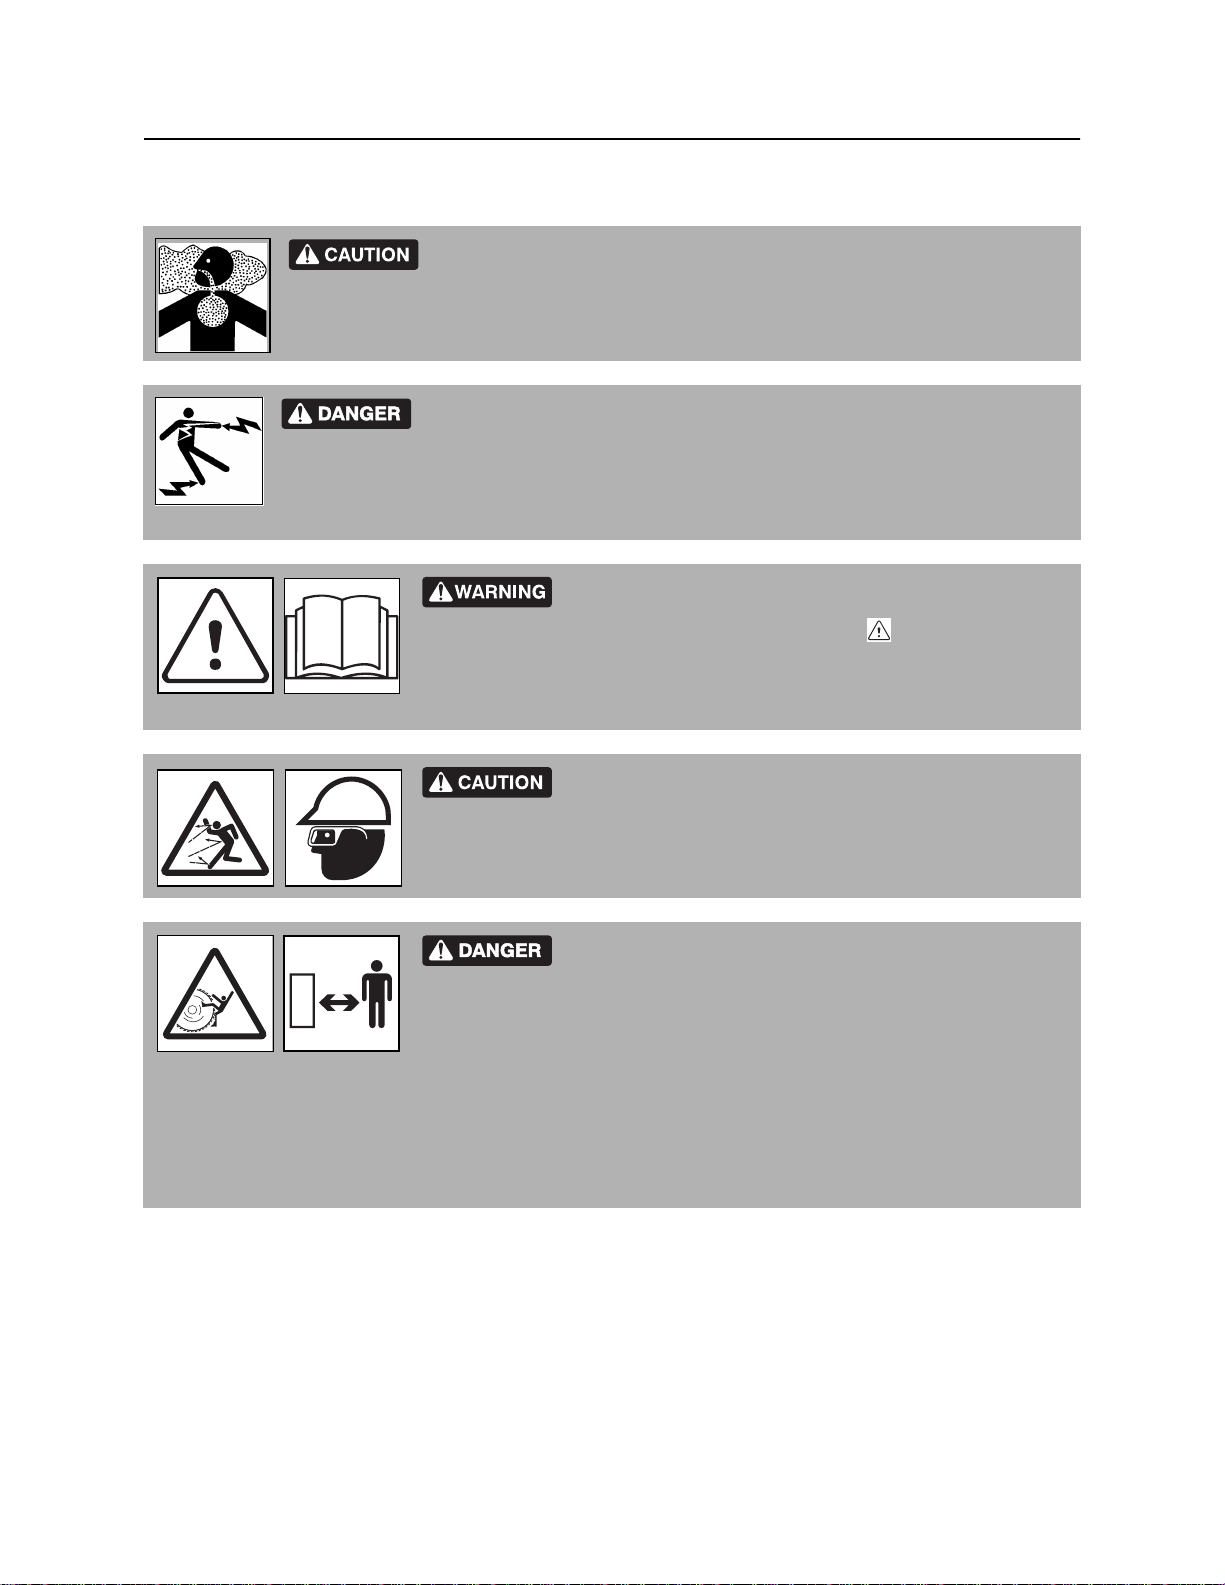
Saw - 98 RT45 Operator’s Manual
Operation
Operation
Breathing crystalline silica dust may cause lung disease. Cutting, drilling,
or working materials such as concrete, sand, or rock containing quartz may result in
exposure to silica dust. Use dust control methods or appropriate breathing protection
when exposed to silica dust.
Electrical shock. Contacting electrical lines will cause death or serious
injury. Know location of lines and stay away.
T o help avoid injury: Expose lines by hand before digging. Cutting high voltage cable can
cause electrocution.
Read operator’s manual. Know how to use all controls
before operating machine. When you see this sign on the machine or
in the manual, read it and use caution. Your safety is at stake. 273-475
Flying objects thrown by machine may strike people.
Wear hard hat and safety glasses.
Moving digging teeth will kill you or cut off arm or leg. Stay
away.
To help avoid injury:
• Allow 3’ (1 m) between digging teeth and obstacle. Machine might jerk when digging starts.
• Keep everyone at least 6’ (2 m) from machine, attachments, and their range of movement.
CMW
®
Page 98

RT45 Operator’s Manual Saw - 99
Operation
Start Sawing
IMPORTANT:
• Before operating saw, check bits for free rotation. Tap bits lightly with a hammer and turn by hand. If
bits are stuck, remove and clean packed soil from bit block.
• Work slowly and carefully.
• Saw use is not recommended for soft, wet, or sticky soil conditions.
1. Adjust throttle to low idle.
2. Lower backfill blade to ground
3. Move attachment speed/direction control to desired speed. SAW WILL TURN.
4. Increase engine speed to full throttle.
5. Slowly lower saw to trench depth.
NOTICE: Ensure that stabilizers are in contact with the ground while sawing. Failure to use
stabilizers correctly will damage equipment.
IMPORTANT:
• Lower saw into softer material then move into harder or abrasive material. For example, lower
saw into dirt at shoulder before cutting across road.
• If a curved trench must be cut, make a series of straight cuts.
6. Raise backfill blade.
7. Release parking brake.
8. Push ground drive control forward to trenching speed.
Finish Sawing
1. When trench is complete, move ground drive control to neutral and adjust throttle to low idle.
2. Raise saw and stabilizers.
3. As saw clears top of trench, move attachment speed/direction control to neutral.
4. Drive a short distance away from work site.
5. Shut down tractor. See page 74 for correct shutdown procedures.
6. Wash bits and mounting blocks with high pressure water before parking unit overnight.
CMW
®
Page 99

Saw - 100 RT45 Operator’s Manual
Operation
CMW
®
Page 100

RT45 Operator’s Manual Backhoe - 101
Backhoe
Chapter Contents
Setup . . . . . . . . . . . . . . . . . . . . . . . . . . . . . . . . . . . 102
Operation. . . . . . . . . . . . . . . . . . . . . . . . . . . . . . . . 103
Stowing . . . . . . . . . . . . . . . . . . . . . . . . . . . . . . . . . 105
CMW
®
 Loading...