


Desa VTD-24NV-JHB, VTD-24PV-JHB, VTD-18PV-JHB, VTD-30PV-JHB, VTD-30NV-JHB User Manual
...
VENTED DECORATIVE APPLIANCE
OWNER’S OPERATION AND INSTALLATION MANUAL
ANSI Z21.60-2003
CSA 2.26-2003
APPROVED
MODELS VTD-18NV-JHB, VTD-18PV-JHB, VTD-24NV-JHB,
VTD-24PV-JHB, VTD-30NV-JHB AND VTD-30PV-JHB
WARNING: If the information in this manual is not fol-
lowed exactly, a re or explosion may result causing
property damage, personal injury or loss of life.
— Do not store or use gasoline or other ammable
vapors and liquids in the vicinity of this or any other
appliance.
— WHAT TO DO IF YOU SMELL GAS
• Do not try to light any appliance.
• Do not touch any electrical switch; do not use any
phone in your building.
• Immediately call your gas supplier from a neighbor’s
phone. Follow the gas supplier’s instructions.
• If you cannot reach your gas supplier, call the re
department.
— Installation and service must be performed by a quali-
ed installer, service agency or the gas supplier.
INSTALLER: Leave this manual with the appliance
CONSUMER: Retain this manual for future reference.
For more information, visit www.desatech.com

TABLE OF CONTENTS
Safety Information ............................................... 2
Product Identication ........................................... 4
Local Codes......................................................... 5
Unpacking............................................................ 5
Product Features ................................................. 5
Optional Accessories ........................................... 5
Installation ........................................................... 5
Operating Appliance .......................................... 10
Inspecting Burners............................................. 12
Cleaning and Maintenance ................................ 12
SAFETy INFORMATION
Specications .................................................... 12
Troubleshooting ................................................. 13
Service Hints ..................................................... 17
Technical Service............................................... 17
Replacement Parts ............................................ 17
Accessories ....................................................... 17
Wiring Diagrams ................................................ 17
Illustrated Parts Breakdown and Parts List........ 18
Warranty Information ...........................Back Cover
WARNING: Improper installation, adjustment, al-
teration, service or main-
tenance can cause injury
or property damage. Refer
to this manual for correct
installation and operational procedures. For assis-
tance or additional infor-
mation consult a qualied
installer, service agency
or the gas supplier.
This appliance may be in-
stalled in an aftermarket,*
per man ent ly loc ate d,
manufactured (mobile)
home, where not prohibited by local codes.
This appliance is only for
use with the type of gas
indicated on the rating
plate. This appliance is
not convertible for use
with other gases.
* Aftermarket: Completion of sale, not for
purpose of resale, from the manufacturer
WARNING: This appli-
ance is for installation
only in a solid-fuel burning masonry or UL127
factory-built fireplace,
constructed of noncom-
bustib le material and
connected to a working
ue. (See page 6 for minimum ue opening.)
WARNING: This is a gasfired heater. It uses air
(oxygen) from the room in
which it is installed. Provisions for adequate combustion and ventilation air
must be provided. Refer
to the National Fuel Gas
Codes, ANSI Z233.1/NFPA
54, Section 5.3, Air for Combustion and Ventilation.
State of Massachusetts:
The in stall at ion m ust
be made by a licensed
plumber or gas tter in
the Commonwealth of
Massachusetts.
www.desatech.com
114370-02C2
SAFETy INFORMATION
Continued
WARNING: This product con-
tains and/or generates chemicals
known to the State of California
to cause cancer or birth defects
or other reproductive harm.
WARNING: Keep ue open
when operating unit.
IMPORTANT: Read this owner’s
manual carefully and completely
before trying to assemble, operate
or service this log set. Improper use
of this log set can cause serious
injury or death from burns, re,
explosion, electrical shock and
carbon monoxide poisoning.
DANGER: Carbon monoxide
poisoning may lead to death!
Carbon Monoxide Poisoning: Early signs of carbon
monoxide poisoning resemble the u, with headaches, dizziness or nausea. If you have these signs,
the log set may not be working properly. Get fresh
air at once! Have log set serviced. Some people
are more affected by carbon monoxide than others.
These include pregnant women, people with heart
or lung disease or anemia, those under the inuence
of alcohol and those at high altitudes.
Natural and Propane/LP Gas: Natural and pro-
pane/LP gas are odorless. An odor-making agent
is added to the gas. The odor helps you detect a gas
leak. However, the odor added to the gas can fade.
Gas may be present even though no odor exists.
Make certain you read and understand all warnings.
Keep this manual for reference. It is your guide to
safe and proper operation of this log set.
WARNING: Any change to
this log set or its controls can
be dangerous.
WARNING: Do not use a blower insert, heat exchanger insert or
other accessory not approved for
use with this appliance.
WARNING: This appliance is
equipped for use with type of gas
indicated on rating plate.
WARNING: Do not allow fans
to blow directly into the replace.
Avoid any drafts that alter burner
ame patterns.
Due to high temperatures, the
appliance should be located out
of trafc and away from furniture
and draperies.
Do not place clothing or other
ammable material on or near
the appliance. Never place any
objects on the heater.
Appliance base assembly becomes very hot when running.
Keep children and adults away
from hot surface to avoid burns
or clothing ignition. Log set
will remain hot for a time after
shutdown. Allow surface to cool
before touching.
Carefully supervise young chil-
dren when they are in the room
with log set. When using handheld remote accessory keep selector switch in the OFF position
to prevent children from turning
on burners with remote.
You must operate this log set with
a replace screen in place. Make
sure replace screen is closed
before running log set.
114370-02C 3
www.desatech.com
SAFETy INFORMATION
Continued
Keep the log set area clear and
free from combustible materials,
gasoline and other ammable
vapors and liquids.
Children and adults should be
alerted to the hazard of high temperature and should stay away to
avoid burns or clothing ignition.
1. Do not place propane/LP supply tank(s) inside any structure. Locate propane/LP supply
tank(s) outdoors (propane/LP units only).
2. If you smell gas
• shut off gas supply
• do not try to light any appliance
• do not touch any electrical switch; do not use
any phone in your building
• immediately call your gas supplier from a
neighbor’s phone. Follow the gas supplier’s
instructions
• if you cannot reach your gas supplier, call
the re department
3. Never install the log set
• in a recreational vehicle
• where curtains, furniture, clothing or other
ammable objects are less than 42" from the
front, top or sides of the log set.
• in high trafc areas
• in windy or drafty areas
4. Before installing in a solid fuel burning replace, the chimney ue and rebox must be
cleaned of soot, creosote, ashes and loose paint
by a qualied chimney cleaner. Creosote will
ignite if highly heated. Inspect chimney ue
for damage. If damaged, repair ue before
operating appliance.
5. Do not operate heater if any log is broken. Do
not operate heater if a log is chipped (dimesized or larger).
6. This log set is designed to be smokeless. If
logs ever appear to smoke, turn off appliance
and call a qualied service person. No te:
During initial operation, slight smoking could
occur due to log curing and the burning of
manufacturing residues. You may wish to add
more ventilation by opening a window.
7. To reduce the creation of soot, follow the instructions in Cleaning and Maintenance, page 12.
8. The installation and provisions for combustion
and ventilation air must conform with the Na-
tional Fuel Gas Codes, ANSI Z233.1/NFPA 54,
Section 5.3, Air for combustion and Ventilation.
9. To prevent performance problems, do not
use propane/LP fuel tank of less than 100 lb.
capacity (propane/LP units only).
10. Do not run log set
• where ammable liquids or vapors are used
or stored
• under dusty conditions
11. Do not burn solid fuel in the replace after
installing the log set. Do not use this log set
to cook food or burn paper or other objects.
12. Do not use heater if any part has been exposed
to or under water. Immediately call a qualied
service technician to inspect the room heater
and to replace any part of the control system and
any gas control which has been under water.
13. Turn log set off and let cool before servicing,
installing or repairing. Only a qualied service
person should install, service or repair log set.
14. Prov ide adeq ua te clearan ce s around air
openings.
PRODUCT
IDENTIFICATION
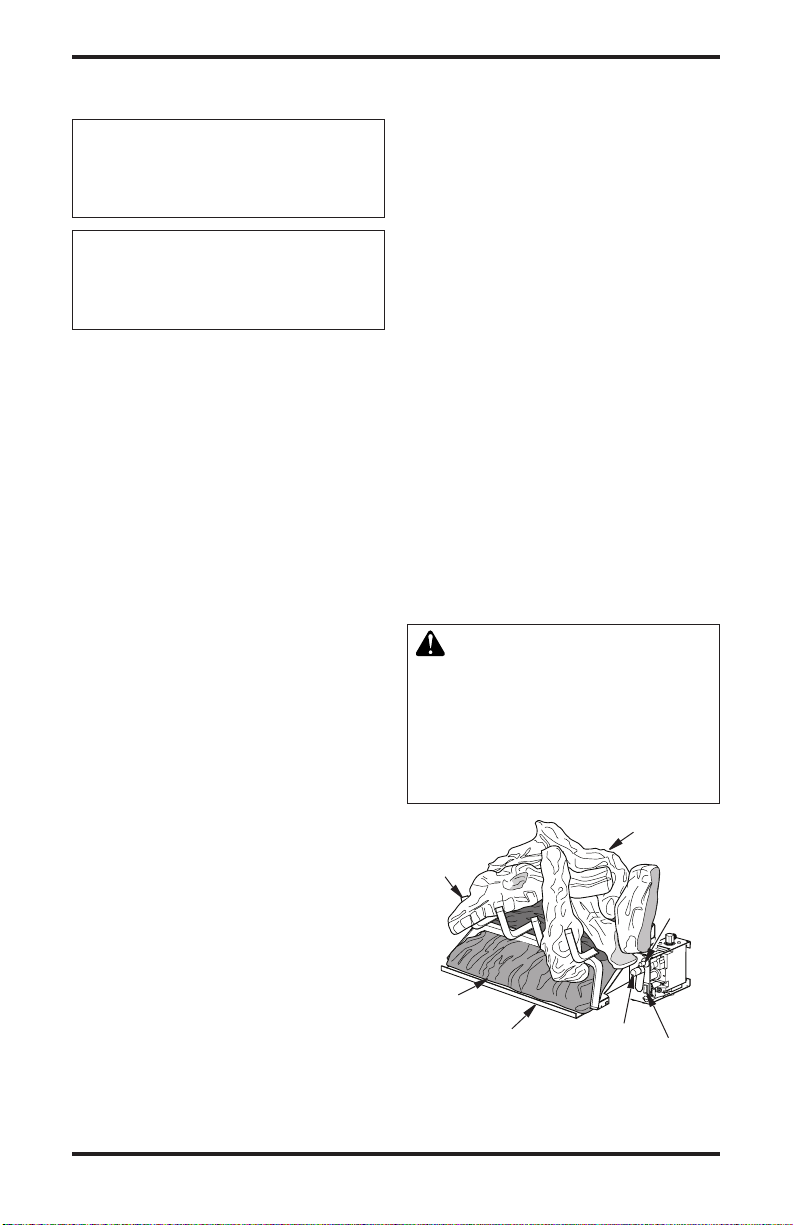
WARNING: Failure to position the parts in accordance
with these diagrams or failure
to use only parts specically
approved with this appliance
may result in property damage
or personal injury.
Log Set
Assembly
Grate
Piezo
Ignitor
Ceramic
Burner
Chassis
Assembly
Figure 1 - Product Identication
Control
Knob
ON/OFF
Switch
www.desatech.com
114370-02C4

LOCAL CODES
Install and use log set with care. Follow all local
codes. In the absence of local codes, use the lat-
est edition of the National Fuel Gas Code ANSI
Z223.1/NFPA 54*
*Available from:
American National Standards Institute, Inc.
1430 Broadway
New York, NY 10018
National Fire Protection Association, Inc.
Battery march park
Quincy, MA 02269
UNPACkINg
CAUTION: Do not remove the
data plates from the grate assembly. The data plates contain
important warranty and safety
information.
1. Remove log set assembly from carton. Note: Do
not pick up assembly by logs. This could damage
unit. Always handle assembly by grate.
2. Remove control cover oor media components.
3. Remove all protective packaging applied to log
set for shipment.
4. Check all items for any shipping damage. If
damaged, promptly inform dealer where you
bought appliance.
PRODUCT FEATURES
This unitized log set is tested and approved to
ANSI Z21.60-2003 and CSA 2.26-2003 as a vented
decorative appliance.
PIEzO IGNITOR
This unit has a piezo ignitor. This system requires
no matches, batteries or other sources to light
appliance.
OPTIONAL ACCESSORIES
• VTD-HLCN/P - Converts valve from ON/OFF
to HI/LO
• OFSM-RCN/P - Converts valve from ON/OFF
to HI/LO for use with hand-held ON/OFF
remote (included)
• OF-RC - Converts ON/OFF valve for use with
hand-held ON/OFF remote
See Accessories, page 17.
INSTALLATION
WARNING: Before installing
in a solid fuel burning replace,
the chimney ue and rebox
must be cleaned of soot, creosote, ashes and loose paint by
a qualified chimney cleaner.
Creosote will ignite if highly
heated. A dirty chimney ue may
create and distribute soot within
the house. Inspect chimney ue
for damage. If damaged, repair
ue damper before operating
appliance.
WARNING: Make sure selec-
tor switch is in the OFF position
before installing appliance.
NOTICE: Installation, service and
repair of this appliance must be
performed by a qualied installer,
service agency, company or
gas supplier experienced with
this type of gas appliance. Only
factory authorized components
listed in these instructions may
be used in accordance with the
manufacturer's instructions and
all codes and requirements of
the authority having jurisdiction.
Any modications to or use of
unauthorized components or
accessory items will void the
manufacturer’s warranty and may
result in a hazardous condition.
WARNING: Do not place lava
rocks and log scraps on burner.
CHECK GAS TYPE
Use the correct gas type (natural or propane/LP)
for your unit. If your gas supply is not correct, DO
NOT install this into your replace. See the dealer
where you bought the appliance for proper type.
114370-02C 5
www.desatech.com

INSTALLATION
Continued
WARNING: This appliance
is equipped for (natural or propane/LP) gas. Field conversion
is not permitted.
INSTALLATION AND CLEARANCES
The charts in Figure 2 indicate technical information
regarding the installation of your gas log set. Please
make sure that all of the specications shown are
applicable before installation is attempted.
MINIMUM FIREBOX SIzES
MODEL
VTD-18NV-JHB
VTD-18PV-JHB
VTD-24NV-JHB
VTD-24PV-JHB
VTD-30NV-JHB
VTD-30PV-JHB
29 3/4" 20" 15 1/2" 18"
*At depth indicated
BURNER ORIFICE
LOG
SIzE
NATURAL PROPANE/LP
INCHES NO. INCHES NO.
18" 0.1495 25 0.0935 42
24" 0.1570 22 0.0980 40
30" 0.1660 19 0.1015 38
SPECIFICATIONS (W.C.)
FUEL INLET PRESSURE
MIN. MAX.
NG 5" 10.5" 3.5
LP 11" 14" 10
Figure 2 - Technical Information Charts
FLUE OPENING SPECIFICATIONS
Note: This vented appliance must be installed
only in a solid-fuel burning replace constructed
of noncombustible material. The replace must
include a ue and venting system with the minimum openings shown in Figure 3.
BACK
WIDTH
FRONT
WIDTH*
DEPTH
28" 16" 14" 18"
36" 27" 18" 18"
MANIFOLD
PRESSURE
HEIGHT
MINIMUM
BTU
MODEL BURNER
VTD-18NV-JHB
VTD-18PV-JHB
VTD-24NV-JHB
VTD-24PV-JHB
VTD-30NV-JHB
VTD-30PV-JHB
INPUT
18" Ramp 59,000 8" dia.
24" Ramp 69,000 8" dia.
30" Ramp 74,000 8" dia.
VENT
OPENING
Figure 3 - Specications
VENTING SPECIFICATIONS FOR
INSTALLATION
The replace chimney ue and vent must be drafting properly. To check the vent for proper drafting:
Light a tightly rolled newspaper on one end and
place it at the inside front edge of the replace.
Observe the smoke and be sure the vent is properly
drawing it up the chimney. If the smoke spills out
into the room, extinguish the ame and remove any
obstruction until proper venting is achieved.
The chimney ue must have a minimum free air
opening of 43" during operation of this log set.
A damper clamp is provided to x the damper in
position.
The minimum ue sizes shown in Figure 2 are
based on a 6' chimney height using round pipe. Your
minimum ue size will vary based on input rate and
chimney height. Refer to the National Fuel Gas Code
ANSI Z223.1/NFPA 54, Section 6.6, for details.
INSTALLING DAMPER CLAMP
Secure the damper stop clamp to the edge of the
damper as shown in Figure 4. If for any reason this
clamp doesn't work on your replace, another suitable clamp or permanent stop must be installed, or
the damper blade must be cut or removed.
Damper
Clamp
Damper
Masonry
Fireplace
Figure 4 - Attaching Damper Clamp
Damper
Damper
Clamp
Damper
Manufactured
Fireplace
www.desatech.com
114370-02C6
 Loading...