

Page 1

USB MIDI / AUDIO INTERFACE & CONTROLLER
USBMIDI/AUDIOインタフェース&コントローラ
DN-HC4500
OPERATING INSTRUCTIONS
BEDIENUNGSANLEITUNG
MODE D’EMPLOI
INSTRUCCIONES DE FUNCIONAMIENTO
取扱説明書
Page 2
IMPORTANT SAFETY
INSTRUCTIONS
READ BEFORE OPERATING EQUIPMENT
This product was designed and manufactured to meet strict quality and safety
standards. There are, however, some installation and operation precautions
which you should be particularly aware of.
1. Read these instructions.
2. Keep these instructions.
3. Heed all warnings.
4. Follow all instructions.
5. Do not use this apparatus near water.
6. Clean only with dry cloth.
7. Do not block any ventilation openings. Install in accordance with the
manufacture’s instructions.
8. Do not install near any heat sources such as radiators, heat registers, stoves,
or other apparatus (including amplifiers) that produce heat.
9. Do not defeat the safety purpose of the polarized or grounding-type plug. A
polarized plug has two blades with one wider than the other. A grounding
type plug has two blades and a third grounding prong. The wide blade or the
third prong are provided for your safety. If the provided plug does not fit into
your outlet, consult an electrician for replacement of the obsolete outlet.
10. Protect the power cord from being walked on or pinched particularly at
plugs, convenience receptacles, and the point where they exit from the
apparatus.
11. Only use attachments/accessories specified by the manufacturer.
12. Use only with the cart, stand, tripod, bracket, or table
specified by the manufacturer, or sold with the apparatus.
When a cart is used, use caution when moving the
cart/apparatus combination to avoid injury from tip-over.
13. Unplug this apparatus during lightning storms or when unused for long
periods of time.
14. Refer all servicing to qualified service personnel. Servicing is required when
the apparatus has been damaged in any way, such as power-supply cord or
plug is damaged, liquid has been spilled or objects have fallen into the
apparatus, the apparatus has been exposed to rain or moisture, does not
operate normally, or has been dropped.
Additional Safety Information!
15. Marked terminals are HAZARDOUS LIVE and that the external wiring
connected to those terminal requires installation by an instructed
person or the use of ready-made leads or cords.
CAUTION
CAUTION:
TO REDUCE THE RISK OF ELECTRIC SHOCK, DO NOT REMOVE
COVER (OR BACK). NO USER-SERVICEABLE PARTS INSIDE. REFER
SERVICING TO QUALIFIED SERVICE PERSONNEL.
The lightning flash with arrowhead symbol, within an
equilateral triangle, is intended to alert the user to the
presence of uninsulated “dangerous voltage” within the
product’s enclosure that may be of sufficient magnitude to
constitute a risk of electric shock to persons.
IMPORTANT TO SAFETY
WARNING:
To reduce the risk of fire and electric shock, this apparatus should not
be exposed to rain or moisture and objects filled with liquids, such as
vases, should not be placed on this apparatus.
CAUTION:
1. Handle the power supply cord carefully
Do not damage or deform the power supply cord. If it is damaged or
deformed, it may cause electric shock or malfunction when used. When
removing from wall outlet, be sure to remove by holding the plug attachment
and not by pulling the cord.
2. Do not open the rear cover
In order to prevent electric shock, do not open the top cover.
If problems occur, contact your DENON DEALER.
3. Do not place anything inside
Do not place metal objects or spill liquid inside the system.
Electric shock or malfunction may result.
Please, record and retain the Model name and serial number of your set shown
on the rating label.
Model No. DN-HC4500
Serial No.
The exclamation point within an equilateral triangle is
intended to alert the user to the presence of important
operating and maintenance (servicing) instructions in the
literature accompanying the appliance.
CAUTION:
USE OF CONTROLS OR ADJUSTMENTS OR PERFORMANCE OF
PROCEDURES OTHER THAN THOSE SPECIFIED HEREIN MAY RESULT IN
HAZARDOUS RADIATION EXPOSURE.
THIS PRODUCT SHOULD NOT BE ADJUSTED OR REPAIRED BY ANYONE
EXCEPT PROPERLY QUALIFIED SERVICE PERSONNEL.
This device complies with Part 15 of the FCC Rules. Operation is subject to
the following two conditions: (1) This device may not cause harmful
interference, and (2) this device must accept any interference received,
including interference that may cause undesired operation.
This Class B digital apparatus meets all requirements of the Canadian
Interference-Causing Equipment Regulations.
Cet appareil numérique de la classe B respecte toutes les exigences du
Règlement sur le matériel brouilleur du Canada.
RISK OF ELECTRIC SHOCK
DO NOT OPEN
Page 3
NOTE ON USE / HINWEISE ZUM GEBRAUCH /
OBSERVATIONS RELATIVES A L’UTILISATION / NOTE SULL’USO /
NOTAS SOBRE EL USO / ALVORENS TE GEBRUIKEN / OBSERVERA
• Avoid high temperatures.
Allow for sufficient heat dispersion when
installed in a rack.
• Vermeiden Sie hohe Temperaturen.
Beachten Sie, daß eine ausreichend
Luftzirkulation gewährleistet wird, wenn das
Gerät auf ein Regal gestellt wird.
• Eviter des températures élevées
Tenir compte d’une dispersion de chaleur
suffisante lors de l’installation sur une étagère.
• Evitate di esporre l’unità a temperature alte.
Assicuratevi che ci sia un’adeguata
dispersione del calore quando installate l’unità
in un mobile per componenti audio.
•Evite altas temperaturas
Permite la suficiente dispersión del calor
cuando está instalado en la consola.
• Vermijd hoge temperaturen.
Zorg voor een degelijk hitteafvoer indien het
apparaat op een rek wordt geplaatst.
• Undvik höga temperaturer.
Se till att det finns möjlighet till god
värmeavledning vid montering i ett rack.
• Keep the apparatus free from moisture, water,
and dust.
• Halten Sie das Gerät von Feuchtigkeit, Wasser
und Staub fern.
•Protéger l’appareil contre l’humidité, l’eau et
lapoussière.
• Tenete l’unità lontana dall’umidità, dall’acqua e
dalla polvere.
•Mantenga el equipo libre de humedad, agua y
polvo.
• Laat geen vochtigheid, water of stof in het
apparaat binnendringen.
•Utsätt inte apparaten för fukt, vatten och
damm.
•Do not let foreign objects in the set.
• Keine fremden Gegenstände in das Gerät
kommen lassen.
• Ne pas laisser des objets étrangers dans
l’appareil.
• E’ importante che nessun oggetto è inserito
all’interno dell’unità.
• No deje objetos extraños dentro del equipo.
• Laat geen vreemde voorwerpen in dit apparaat
vallen.
• Se till att främmande föremål inte tränger in i
apparaten.
•Handle the power cord carefully.
Hold the plug when unplugging the cord.
• Gehen Sie vorsichtig mit dem Netzkabel um.
Halten Sie das Kabel am Stecker, wenn Sie
den Stecker herausziehen.
• Manipuler le cordon d’alimentation avec
précaution.
Tenir la prise lors du débranchement du
cordon.
•Manneggiate il filo di alimentazione con cura.
Agite per la spina quando scollegate il cavo
dalla presa.
• Maneje el cordón de energía con cuidado.
Sostenga el enchufe cuando desconecte el
cordón de energía.
• Hanteer het netsnoer voorzichtig.
Houd het snoer bij de stekker vast wanneer
deze moet worden aan- of losgekoppeld.
• Hantera nätkabeln varsamt.
Håll i kabeln när den kopplas från el-uttaget.
• Unplug the power cord when not using the
apparatus for long periods of time.
• Wenn das Gerät eine längere Zeit nicht
verwendet werden soll, trennen Sie das
Netzkabel vom Netzstecker.
• Débrancher le cordon d’alimentation lorsque
l’appareil n’est pas utilisé pendant de longues
périodes.
• Disinnestate il filo di alimentazione quando
avete l’intenzione di non usare il filo di
alimentazione per un lungo periodo di tempo.
• Desconecte el cordón de energía cuando no
utilice el equipo por mucho tiempo.
• Neem altijd het netsnoer uit het stopkontakt
wanneer het apparaat gedurende een lange
periode niet wordt gebruikt.
• Koppla ur nätkabeln om apparaten inte kommer
att användas i lång tid.
• Do not let insecticides, benzene, and thinner
come in contact with the set.
• Lassen Sie das Gerät nicht mit Insektiziden,
Benzin oder Verdünnungsmitteln in Berührung
kommen.
• Ne pas mettre en contact des insecticides, du
benzène et un diluant avec l’appareil.
• Assicuratevvi che l’unità non venga in contatto
con insetticidi, benzolo o solventi.
• No permita el contacto de insecticidas, gasolina
y diluyentes con el equipo.
• Laat geen insektenverdelgende middelen,
benzine of verfverdunner met dit apparaat in
kontakt komen.
• Se till att inte insektsmedel på spraybruk,
bensen och thinner kommer i kontakt med
apparatens hölje.
• Never disassemble or modify the apparatus in
any way.
• Versuchen Sie niemals das Gerät auseinander
zu nehmen oder auf jegliche Art zu verändern.
• Ne jamais démonter ou modifier l’appareil
d’une manière ou d’une autre.
• Non smontate mai, nè modificate l’unità in
nessun modo.
• Nunca desarme o modifique el equipo de
ninguna manera.
•Nooit dit apparaat demonteren of op andere
wijze modifiëren.
• Ta inte isär apparaten och försök inte bygga om
den.
• Do not obstruct the ventilation holes.
• Die Belüftungsöffnungen dürfen nicht verdeckt
werden.
• Ne pas obstruer les trous d’aération.
• Non coprite i fori di ventilazione.
• No obstruya los orificios de ventilación.
• De ventilatieopeningen mogen niet worden
beblokkeerd.
• Täpp inte till ventilationsöppningarna.
* (For apparatuses with ventilation holes)
CAUTION:
• The ventilation should not be impeded by covering the
ventilation openings with items, such as newspapers,
tablecloths, curtains, etc.
• No naked flame sources, such as lighted candles, should be
placed on the apparatus.
• Attention should be drawn to the environmental aspects of
battery disposal.
• Do not expose the set to dripping or splashing fluids.
• No objects filled with liquids, such as vases, shall be placed on
the apparatus.
ACHTUNG:
• Die Belüftung sollte auf keinen Fall durch das Abdecken der
Belüftungsöffnungen durch Gegenstände wie beispielsweise
Zeitungen, Tischtücher, Vorhänge o. Ä. behindert werden.
• Auf dem Gerät sollten keinerlei direkten Feuerquellen wie
beispielsweise angezündete Kerzen aufgestellt werden.
•Bitte beachten Sie bei der Entsorgung der Batterien die
geltenden Umweltbestimmungen.
• Das Gerät sollte keinerlei Flüssigkeit, also keinem Tropfen oder
Spritzen ausgesetzt werden.
• Auf dem Gerät sollten keinerlei mit Flüssigkeit gefüllten Behälter
wie beispielsweise Vasen aufgestellt werden.
ATTENTION:
• La ventilation ne doit pas être gênée en recouvrant les
ouvertures de la ventilation avec des objets tels que journaux,
rideaux, tissus, etc.
• Aucune flamme nue, par exemple une bougie, ne doit être
placée sur l’appareil.
• Veillez à respecter l’environnement lorsque vous jetez les piles
usagées.
• L’appareil ne doit pas être exposé à l’eau ou à l’humidité.
• Aucun objet contenant du liquide, par exemple un vase, ne doit
être placé sur l’appareil.
PRECAUZIONI:
• Le aperture di ventilazione non devono essere ostruite
coprendole con oggetti, quali giornali, tovaglie, tende e così via.
• Non posizionare sull’apparecchiatura fiamme libere, come ad
esempio le candele accese.
• Prestare attenzione agli aspetti legati alla tutela dell’ambiente
quando si smaltisce la batteria.
• L’apparecchiatura non deve essere esposta a gocciolii o spruzzi.
• Non posizionare sull’apparecchiatura nessun oggetto contenete
liquidi, come ad esempio i vasi.
PRECAUCIÓN:
• La ventilación no debe quedar obstruida por hacerse cubierto las
aperturas con objetos como periódicos, manteles, cortinas, etc.
• No debe colocarse sobre el aparato ninguna fuente inflamable
sin protección, como velas encendidas.
•A la hora de deshacerse de las pilas, respete la normativa para
el cuidado del medio ambiente.
• No se expondrá el aparato al goteo o salpicaduras cuando se
utilice.
• No se colocarán sobre el aparato objetos llenos de líquido, como
jarros.
WAARSCHUWING:
• De ventilatie mag niet worden belemmerd door de
ventilatieopeningen af te dekken met bijvoorbeeld kranten, een
tafelkleed, gordijnen, enz.
• Plaats geen open vlammen, bijvoorbeeld een brandende kaars,
op het apparaat.
• Houd u steeds aan de milieuvoorschriften wanneer u gebruikte
batterijen wegdoet.
• Stel het apparaat niet bloot aan druppels of spatten.
• Plaats geen voorwerpen gevuld met water, bijvoorbeeld een
vaas, op het apparaat.
OBSERVERA:
• Ventilationen bör inte förhindras genom att täcka för
ventilationsöppningarna med föremål såsom tidningar,
bordsdukar, gardiner osv.
• Inga blottade brandkällor, såsom tända ljus, bör placeras på
apparaten.
• Tänk på miljöaspekterna när du bortskaffar batteri.
• Apparaten får inte utsättas för vätska.
•Inga objekt med vätskor, såsom vaser, får placeras på
apparaten.
• DECLARATION OF CONFORMITY
We declare under our sole responsibility that this product, to
which this declaration relates, is in conformity with the
following standards:
EN60065, EN55013, EN55020, EN61000-3-2 and EN61000-3-3.
Following the provisions of 73/23/EEC, 2004/108/EC and
93/68/EEC Directive.
• ÜBEREINSTIMMUNGSERKLÄRUNG
Wir erklären unter unserer Verantwortung, daß dieses Produkt,
auf das sich diese Erklärung bezieht, den folgenden Standards
entspricht:
EN60065, EN55013, EN55020, EN61000-3-2 und EN61000-3-3.
Entspricht den Verordnungen der Direktive 73/23/EEC,
2004/108/EC und 93/68/EEC.
• DECLARATION DE CONFORMITE
Nous déclarons sous notre seule responsabilité que l’appareil,
auquel se réfère cette déclaration, est conforme aux standards
suivants:
EN60065, EN55013, EN55020, EN61000-3-2 et EN61000-3-3.
D’après les dispositions de la Directive 73/23/EEC, 2004/108/EC
et 93/68/EEC.
• DICHIARAZIONE DI CONFORMITÀ
Dichiariamo con piena responsabilità che questo prodotto, al
quale la nostra dichiarazione si riferisce, è conforme alle seguenti
normative:
EN60065, EN55013, EN55020, EN61000-3-2 e EN61000-3-3.
In conformità con le condizioni delle direttive 73/23/EEC,
2004/108/EC e 93/68/EEC.
QUESTO PRODOTTO E’ CONFORME
AL D.M. 28/08/95 N. 548
• DECLARACIÓN DE CONFORMIDAD
Declaramos bajo nuestra exclusiva responsabilidad que este
producto al que hace referencia esta declaración, está
conforme con los siguientes estándares:
EN60065, EN55013, EN55020, EN61000-3-2 y EN61000-3-3.
Siguiendo las provisiones de las Directivas 73/23/EEC,
2004/108/EC y 93/68/EEC.
• EENVORMIGHEIDSVERKLARING
Wij verklaren uitsluitend op onze verantwoordelijkheid dat dit
produkt, waarop deze verklaring betrekking heeft, in
overeenstemming is met de volgende normen:
EN60065, EN55013, EN55020, EN61000-3-2 en EN61000-3-3.
Volgens de bepalingen van de Richtlijnen 73/23/EEC,
2004/108/EC en 93/68/EEC.
• ÖVERENSSTÄMMELSESINTYG
Härmed intygas helt på eget ansvar att denna produkt, vilken
detta intyg avser, uppfyller följande standarder:
EN60065, EN55013, EN55020, EN61000-3-2 och EN61000-3-3.
Enligt stadgarna i direktiv 73/23/EEC, 2004/108/EC och
93/68/EEC.
Page 4
CAUTION:
To completely disconnect this product from the mains, disconnect the plug from the wall socket outlet.
The mains plug is used to completely interrupt the power supply to the unit and must be within easy access by the user.
VORSICHT:
Um dieses Gerät vollständig von der Stromversorgung abzutrennen, trennen Sie bitte den Netzstecker von der Wandsteckdose ab.
Die Hauptstecker werden verwendet, um die Stromversorgung zum Gerät völlig zu unterbrechen; er muss für den Benutzer gut und
einfach zu erreichen sein.
PRECAUTION:
Pour déconnecter complètement ce produit du courant secteur, débranchez la prise de la prise murale.
La prise secteur est utilisée pour couper complètement l’alimentation de l’appareil et l’utilisateur doit pouvoir y accéder facilement.
ATTENZIONE:
Per scollegare definitivamente questo prodotto dalla rete di alimentazione elettrica, togliere la spina dalla relativa presa.
La spina di rete viene utilizzata per interrompere completamente l’alimentazione all’unità e deve essere facilmente accessibile all’utente.
PRECAUCIÓN:
Para desconectar completamente este producto de la alimentación eléctrica, desconecte el enchufe del enchufe de la pared.
El enchufe de la alimentación se utiliza para interrumpir por completo el suministro de alimentación a la unidad y debe de encontrarse
en un lugar al que el usuario tenga fácil acceso.
VOORZICHTIGHEID:
Om de voeding van dit product volledig te onderbreken moet de stekker uit het stopcontact worden getrokken.
De netstekker wordt gebruikt om de stroomtoevoer naar het toestel volledig te onderbreken en moet voor de gebruiker gemakkelijk
bereikbaar zijn.
FÖRSIKTIHETSMÅTT:
Koppla loss stickproppen från eluttaget för att helt skilja produkten från nätet.
Stickproppen används för att helt bryta strömförsörjningen till apparaten, och den måste vara lättillgänglig för användaren.
A NOTE ABOUT RECYCLING:
This product’s packaging materials are recyclable and can be reused. Please dispose of any materials in accordance
with the local recycling regulations.
When discarding the unit, comply with local rules or regulations.
Batteries should never be thrown away or incinerated but disposed of in accordance with the local regulations
concerning chemical waste.
This product and the accessories packed together constitute the applicable product according to the WEEE directive
except batteries.
HINWEIS ZUM RECYCLING:
Das Verpackungsmaterial dieses Produktes ist für zum Recyceln geeignet und kann wieder verwendet werden. Bitte entsorgen Sie alle
Materialien entsprechend der örtlichen Recycling-Vorschriften.
Beachten Sie bei der Entsorgung des Gerätes die örtlichen Vorschriften und Bestimmungen.
Die Batterien dürfen nicht in den Hausmüll geworfen oder verbrannt werden; bitte geben Sie die Batterien gemäß örtlichen
Bestimmungen an den Sammelstellen oder Sondermüllplätzen ab.
Dieses Produkt zusammen mit den Zubehörteilen ist das geltende Produkt der WEEE-Direktive, davon ausgenommen sind die Batterien.
UNE REMARQUE CONCERNANT LE RECYCLAGE:
Les matériaux d’emballage de ce produit sont recyclables et peuvent être réutilisés. Veuillez disposer de tout matériau conformément
aux réglements de recylage locaux.
Lorsque vous mettez cet appareil au rebut, respectez les lois ou réglementations locales.
Les piles ne doivent jamais être jetées ou incinérées, mais mises au rebut conformément aux réglements locaux concernant les déchets
chimiques.
Ce produit et les accessoires emballés ensemble sont des produits conformes à la directive DEEE sauf pour les piles.
NOTA RELATIVA AL RICICLAGGIO:
I materiali di imballaggio di questo prodotto sono riutilizzabili e riciclabili. Smaltire i materiali conformemente alle normative locali sul
riciclaggio.
Per smaltire l’unità, osservare la normativa in vigore nel luogo di utilizzo.
Non gettare le batterie, né incenerirle, ma smaltirle conformemente alla normativa locale sui rifiuti chimici.
Questo prodotto e gli accessori inclusi nell’imballaggio sono applicabili alla direttiva RAEE, ad eccezione delle batterie.
ACERCA DEL RECICLAJE:
Los materiales de embalaje de este producto son reciclables y se pueden volver a utilizar. Disponga de estos materiales siguiendo los
reglamentos de reciclaje de su localidad.
Cuando se deshaga de la unidad, cumpla con las reglas o reglamentos locales.
Las pilas nunca deberán tirarse ni incinerarse. Deberá disponer de ellas siguiendo los reglamentos de su localidad relacionados con los
desperdicios químicos.
Este producto junto con los accesorios empaquetados es el producto aplicable a la directiva RAEE excepto pilas.
EEN AANTEKENING WAT BETREFT HET RECYCLEREN:
Het inpakmateriaal van dit product is recycleerbaar en kan opnieuw gebruikt worden. Er wordt verzocht om zich van elk afvalmateriaal
te ontdoen volgens de plaatselijke voorschriften.
Volg voor het wegdoen van de speler de voorschriften voor de verwijdering van wit- en bruingoed op.
Batterijen mogen nooit worden weggegooid of verbrand, maar moeten volgens de plaatselijke voorschriften betreffende chemisch afval
worden verwijderd.
Op dit product en de meegeleverde accessoires, m.u.v. de batterijen is de richtlijn voor afgedankte elektrische en elektronische
apparaten (WEEE) van toepassing.
EN KOMMENTAR OM ÅTERVINNING:
Produktens emballage är återvinningsbart och kan återanvändas. Kassera det enligt lokala återvinningsbestämmelser.
När du kasserar enheten ska du göra det i överensstämmelse med lokala regler och bestämmelser.
Batterier får absolut inte kastas i soporna eller brännas. Kassera dem enligt lokala bestämmelser för kemiskt avfall.
Denna apparat och de tillbehör som levereras med den är de som uppfyller gällande WEEE-direktiv, med undantag av batterierna.
Page 5

1
ENGLISH
ENGLISH
1 FEATURES
TABLE OF CONTENTS
z Features ........................................................1
x Connections ..................................................2
c Part names and function ........................3 ~ 5
v Device change ..............................................5
b Basic operation .............................................6
n Seamless loop/Hot start/Stutter....................7
m Trim ...............................................................8
ACCESSORIES
Check that the following parts are included in addition to the main unit:
q Audio cord....................................................2
w USB cable.....................................................1
e Operating instructions..................................1
r CD-ROM.......................................................1
2
Multi Functional Touch Sensitive Jog Disc
The 71mm JOG Disc is constructed with an
ultra high-resolution pulse and touch sensor to
accurately reproduce the most subtle or swift
scratching movements made by the human
hand. Of course, the Jog Disc can be mapped to
perform other vital functions too such as, pitch
bending, scanning, file searching and dry/wet
control for effects.
2
Vibrant Tube Display w/ 2-line Character
Text Support
Another unique quality of the DN-HC4500 is its
informative & animated tube display. The display
offers two lines of character information to
quickly navigate through your files, crates, folders
and confirms you loaded the correct file without
having to look up at your monitor. A visual 32position Marker Point indicator follows your hand
movements at lighting speeds without drift.
Other indicators include Looping, Hot Starts,
BPM info, Elapsed/Remain Time, MP3/WAV file
types, and other useable indicators.
2
Highly Responsive Soft Rubber Buttons,
Switches & Knobs
•5 easily accessible function keys at top of
each deck
• 45mm Pitch Sliders capable of deep resolution
or wide pitch ranges
•Vibrant CUE/PLAY button illumination
•2 level illumination of certain buttons
• Multi color illumination of certain buttons for
layering functions
• Multi color LED’ for layering functions
• Pitch Bend buttons
• Parameter Knob, Range, Sync, Playlist, Back,
Fast Search and other keys are available to
configure accordingly
2 BU4500 Drive Support
The sold separately and optional BU4500 dual
CD/MP3 player allows DJ’s to continue playing
from their CD collection (whenever required) while
still controlling your favorite DJ software. The
BU4500 can also be seen and used as a “backup”
system without having to rewire a thing in the
case of computer failure. Just select the SOURCE
button on either deck to switch off over to CD
playback seamlessly. This clever combo system
makes the DN-HC4500 the most powerful and
flexible DJ hardware controller on the planet. In
addition, current DENON DN-D4500 / DN-D4000
owners are welcome to enjoy all these benefits by
purchasing the DN-HC4500 and upgrading your
system to be computer performance ready.
2 Internal 24-Bit Processing & USB Audio
Unlike most DJ midi controllers that are only USB
bus powered, the DN-HC4500 encompasses its
own internal power supply to achieve the highest
electrical specifications, resulting in best possible
performance. The DN-HC4500 features industry
leading Burr Brown
(a product of TI) 24 bit DAC
processing for superior output audio fidelity. USB
Audio interface includes 2-Channel Stereo output
pair, 44.1/48/96 kHz sampling ranges and low
latency ASIO / OSX Core Audio support.
, Preset ............................................................8
.
Asio control panel (Windows version only)
...9, 10
⁄0 Updating .............................................11 ~ 13
⁄1 MIDI commands.................................14 ~ 19
⁄2 Tr oubleshooting...........................................19
⁄3 Specifications ..............................................20
2 Tr aditional & Intuitive Dual CD Player
Style Layout
2 High Speed USB 2.0 Interface
2 Fader Start
Supports traditional Fader Start, including all
DENON Mixers
2 X-Control
When the DN-HC4500 is combined with DENON’s
DN-X500/DN-X900 mixers, the crossfader of these
mixers can actually be mapped to crossfade your
software players by one simple 3.5mm stereo
mini cable
2
Recessed Side Panel for Easy Connections
2
Versatile Rackmount and Tabletop design
2 User Adjustable Presets
2 Software Upgradeable by USB
From time to time DENON DJ will make subtle
improvements to current features or add new
compelling ones based on valuable user
feedback. These new Plug Ins are always free
and made available via our www.denondj.com
website.
Page 6
2
ENGLISH
ENGLISH
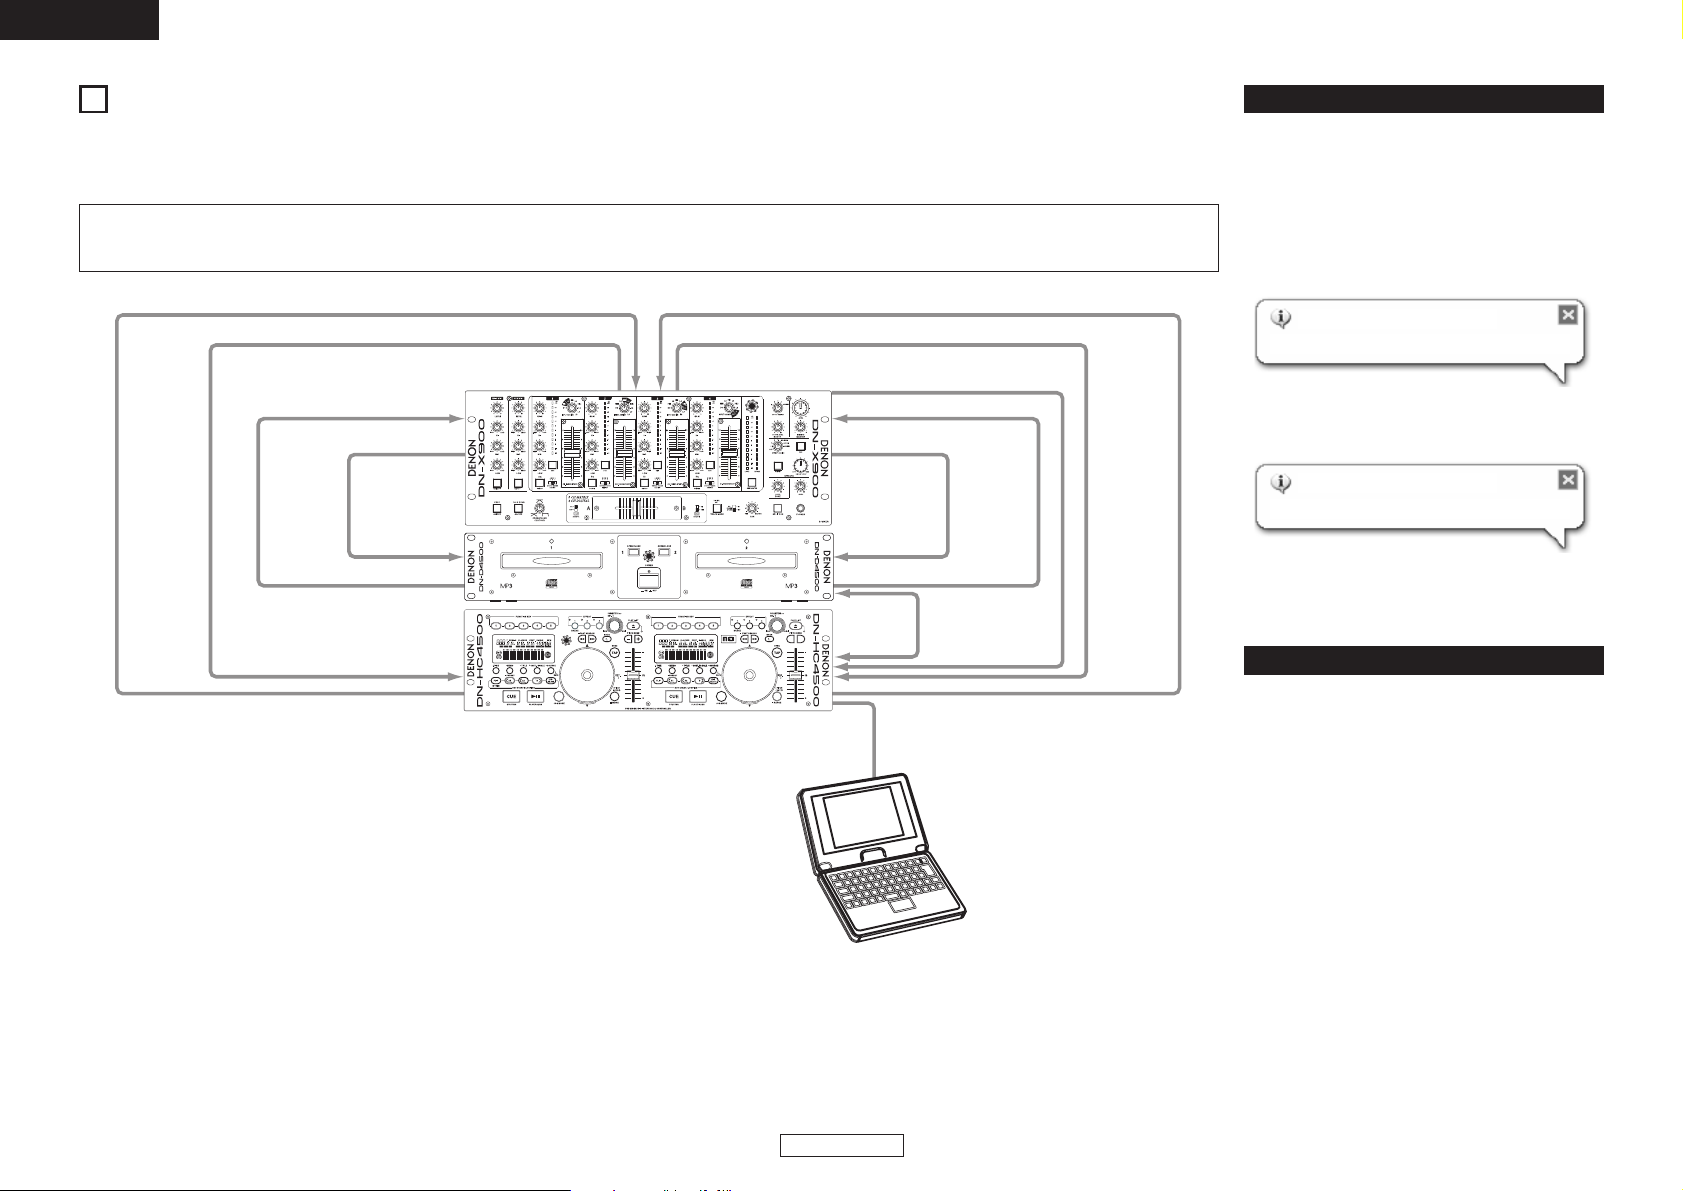
2 CONNECTIONS
CONNECTIONS
1. Turn off the POWER switch.
2. Connect the RCA pin cords to the inputs on your mixer.
CH6 Fader jackCH4 Fader jack
DN-X900
DN-HC4500
3.5 mm stereo mini cord
Deck2
Fader jack
CH6 Input jackCH4 Input jackRCA Cord RCA Cord
Deck1 Output jack Deck2 Output jack
DN-D4000/
DN-D4500/
BU4500
DENON PC/MAC Upgrade
Application and ASIO Driver
Application included.
COUTION:
• Be sure to use the supplied control cord. Using another type of cable may result in damage.
• Be sure the power is off when connecting the control cord. Otherwise the units may not work properly.
USB B terminal
CH2 Input jack
CH2 Fader jack
Drive1 Fader jack
Drive1 Output jack
Drive2 Fader jack
Drive2 Output jack
DRIVE terminal
CH8 Input jack
CH8 Fader jack
3.5 mm stereo mini cord
Deck1
Fader jack
Connection to a PC
RCA Cord RCA Cord
3.5 mm stereo
mini cord
3.5 mm stereo
mini cord
• The DN-HC4500 is a plug-and-play device.
This means that when the DN-HC4500 is first
connected to your computer, the driver is
installed automatically.
•To connect the DN-HC4500 and a PC via a usable
USB port, use the included USB cable.
• When connected, the display below appears at
the bottom right of the PC’s screen.
Once installation is completed, the message
“Your new hardware is installed and ready to
use.” is displayed, as shown below.
Installation is now complete. The DN-HC4500 is
now usable.
Connection to a Macintosh computer
• The DN-HC4500 is plug-and-play device based on
the Macintosh OS, and is immediately ready for
use when connected.
•To connect the DN-HC4500 and Macintosh
computer via a usable USB port, use the included
USB cable.
Computer OS versions that can be
connected to the DN-HC4500:
Windows XP SP2
Mac OSX 10.4 or later
Computers with other operating
systems are not compatible with USB
MIDI, so the computer may operate
erratically after connected to the DNHC4500 by USB.
Found New Hardware
USB audio device
Found New Hardware
Your new hardware is installed and ready to use.
Some features will not work for DN-D4000.
X-control
Page 7
3
ENGLISH
ENGLISH
3 PART NAMES AND FUNCTION
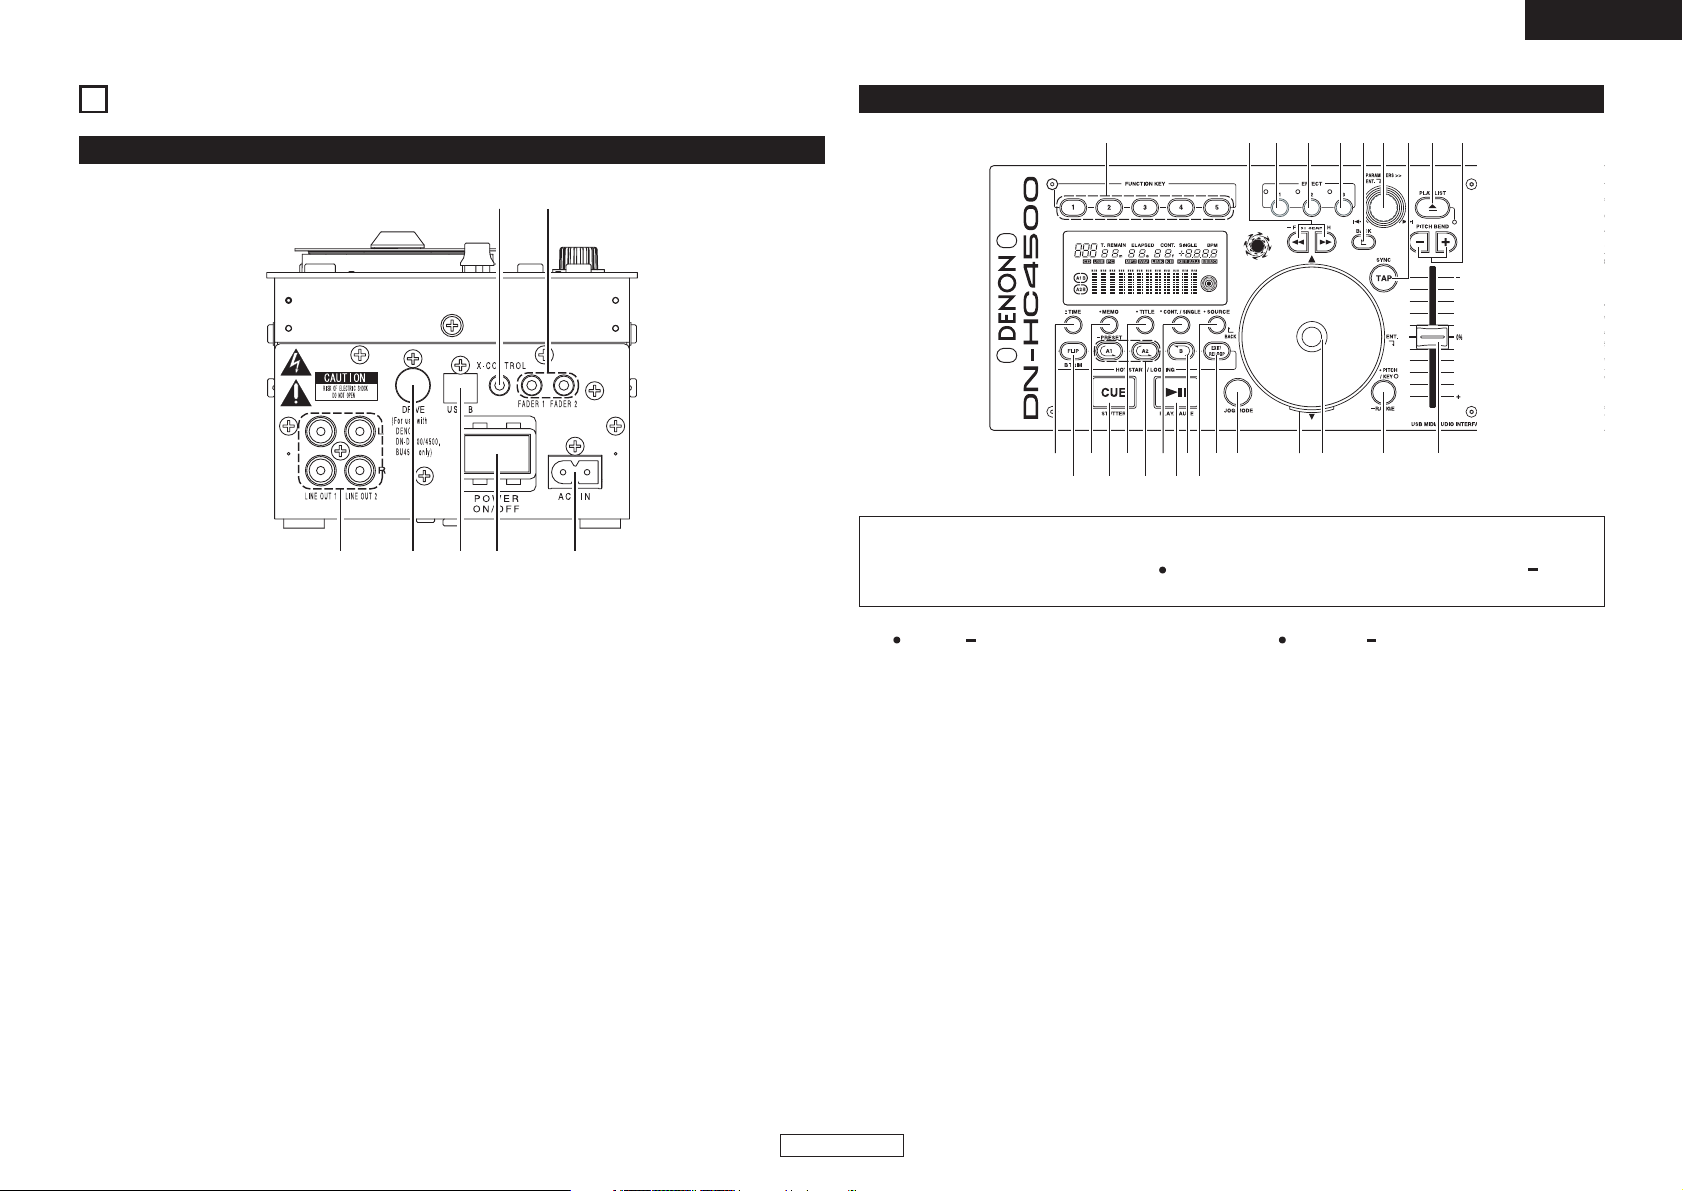
q Analog out put terminal (LINE OUT)
• This is unbalanced RCA output terminals.
• Audio signals outputs.
w DRIVE terminal
• Connect the DN-D4000/D4500/BU4500 drive
unit.
For instructions on operating the DN-D4000/
D4500/BU4500, refer to the respective
model’s operating instructions.
e USB B terminal
• Connect to a computer.
• Sends the USB MIDI and HID commands
from the DN-HC4500.
• Sends the USB audio signals from a PC.
(1) Side Panel
wretq
uy
r POWER button
•Push this button to turn power on and off.
t AC Inlet terminal
• Inlet the power cord’s plug into DN-HC4500’s
AC inlet terminal.
y Fader start terminals
• Use this when your mixer has the Fader Start
function.
u X-CONROL output terminal
• Use this when connected to a DENON DNX900 or DN-X500 mixer that offers X-Control.
•With the DN-HC4500 it is possible to convert
the input fader position into a MIDI signal and
send it from the USB terminal.
(2) Front panel
o!1 !3 !5
!0 !9 @1
!7
!2i!4 !6 @0!8
@9#3 #1 @6#2 @8#0 @7
@2@4@3
@5
i TIME, Total
[When PCDJ connected]
Refer to the PCDJ’s manual.
[When DN-D4500 connected]
• TIME:
When this button is pressed, the time
indicator switches between “ELAPSED”
(elapsed time), “REMAIN” (remaining time).
• Total:
When this button is pushed for more 1
second, you can display the total time.
o FLIP/B TRIM
[When PCDJ connected]
Refer to the PCDJ’s manual.
[When DN-D4500 connected]
• Push this button to switch between the loop
mode/hot start mode and stutter mode.
• After setting the B point, the B TRIM MODE
can be selected.
CAUTION:
Note that there are many buttons working two different function selected by short time pushing or
long pushing (1second or more). The “ ” mark indicates short time push function and “ ” mark
indicates long time push function.
!0 MEMO, PRESET
[When PCDJ connected]
Refer to the PCDJ’s manual.
[When DN-D4500 connected]
• MEMO:
The MEMO mode starts when this button is
pushed once in the Cue/Pause mode.
• PRESET:
When this button is pushed for more than 1
sec, the PRESET mode menu is displayed.
!1 CUE/STUTTER
[When PCDJ connected],
[When DN-D4500 connected]
• Pushing this button in play mode will force
the file back to the position which playback
started.
• In Cue mode, by pushing the CUE button
makes a Stutter sound from the Cue point.
This is called Stutter play. (Stutter)
Page 8

4
ENGLISH
ENGLISH
!2 TITLE
[When PCDJ connected]
Refer to the PCDJ’s manual.
[When DN-D4500 connected]
• CD TEXT:
CD text is displayed.
• MP3:
The ID3 tag information switches each time
the button is pressed.
!3 A1, A2
[When PCDJ connected],
[When DN-D4500 connected]
• Using this button you can create starting
point for Hot Start, Seamless Loop and
Stutter.
!4 CONT./SINGLE, RELAY
[When PCDJ connected]
Refer to the PCDJ’s manual.
[When DN-D4500 connected]
• CONT./SINGLE:
A short tap of this button will toggle between
3 possible END modes for playback CONT.
(continue: plays all files) SINGLE (stops
playing and ReCUE’s back to your original set
point), PLAYLOCK.
• RELAY:
When this button is pushed for more than 1
sec, you can turn on and off RELAY PLAY
mode.
!5 PLAY/PAUSE
[When PCDJ connected],
[When DN-D4500 connected]
• This button will start or pause playback.
!6 B
[When PCDJ connected],
[When DN-D4500 connected]
• Use this to set the B point for to create a
Seamless Loop after the A point has been
set.
!7 SOURCE
[When PCDJ connected]
Refer to the PCDJ’s manual.
[When DN-D4500 connected]
•
Press this button to select the source, PC or CD.
!8 EXIT/RELOOP
[When PCDJ connected],
[When DN-D4500 connected]
• Use this to exit or return back again to
Seamless loop playback.
You can add variety to looping with this
function.
!9 JOG MODE
[When PCDJ connected]
Refer to the PCDJ’s manual.
[When DN-D4500 connected]
Select from Bend mode or Manual Frame
Search mode.
@0 JOG indicator
[When PCDJ connected]
Refer to the PCDJ’s manual.
[When DN-D4500 connected]
• This vibrant blue bar provides JOG modes at
a glance such as, Pitch Bend and Frame
Search.
@1 JOG disc
[When PCDJ connected]
Refer to the PCDJ’s manual.
[When DN-D4500 connected]
• Use this vinyl JOG for manual search, Pitch
Bend operations.
@2 PITCH/KEY, RANGE
[When PCDJ connected]
Refer to the PCDJ’s manual.
[When DN-D4500 connected]
• PITCH/KEY:
The display toggles as follows each time the
key is pressed:
Pitch on / Key Adjust / both off
• RANGE:
Push this button for more than 1 sec to select
the pitch range.
@3 Pitch Slider
[When PCDJ connected],
[When DN-D4500 connected]
• Use this slider to adjust playing speed.
• The playing speed decreases when sliding
upwards and increases downwards.
@4 PITCH BEND±
[When PCDJ connected],
[When DN-D4500 connected]
• While pushing these buttons will change
main playing speed temporarily.
•When release button, playing speed returns
to the previous speed.
@5 PLAY LIST
[When PCDJ connected]
Refer to the PCDJ’s manual.
[When DN-D4500 connected]
• Push this butoon to open and close the disc
holder.
• The disc holder will not open during playback.
Stop playback before pushing this button.
@6 TAP
[When PCDJ connected]
Refer to the PCDJ’s manual.
[When DN-D4500 connected]
•Does not function.
@7 PARAMETERS Knob
[When PCDJ connected],
[When DN-D4500 connected]
• Turn:
Select the Track/File or preset parameters.
• Press:
Set the selected parameters.
@8 BACK
[When PCDJ connected]
Refer to the PCDJ’s manual.
[When DN-D4500 connected]
•Does not function.
@9 EFFECT3
[When PCDJ connected]
Refer to the PCDJ’s manual.
[When DN-D4500 connected]
•Does not function.
#0 EFFECT2
[When PCDJ connected]
Refer to the PCDJ’s manual.
[When DN-D4500 connected]
•Does not function.
#1 EFFECT1
[When PCDJ connected]
Refer to the PCDJ’s manual.
[When DN-D4500 connected]
•Turns the Brake mode ON or OFF.
#2
FAST SEARCH (6/7) QUICK JUMP
[When PCDJ connected],
[When DN-D4500 connected]
• QUICK JUMP:
When one of these buttons is tapped shortly,
the playback position jumps in the reverse
(6) or forward (7) direction.
• FAST SEARCH:
When one of these buttons is pressed and
held in, the disc is fast-searched in the
reverse (6) or forward (7) direction.
#3 FUNCTION
[When PCDJ connected]
Refer to the PCDJ’s manual.
[When DN-D4500 connected]
•Does not function.
Page 9
5
ENGLISH
ENGLISH
q Play Position indicators
• The white position indicator lights during
normal playback, and the position in the track
is indicated by the elapsed time.
•If the time to the end of the track is shorter
than the specified time, the playback position
indicator flashes according to the track’s
remaining time (EOM) to indicate the end of
the track.
w Loop mode indicators
•
The DN-HC4500 has two loop mode indicators,
A and B.
The A and B indicators light when A and B are
set.
e Character display
• This block displays various operational
information, text message, etc.
r File data indicators
• These indicate the type of file being played.
t
External device connection confirmation
indicator
• This lights when MIDI signals have been sent
or received between the DN-HC4500 and an
external device.
y Keyboard indicator
•
This lights when the light command is received
from a computer.
(3) Display
u KEY ADJ. indicator
• “KEY ADJ.” lights when in the key adjust
mode.
i Visual Marker
• The playback position is indicated according
to the playback status of the different decks.
o MEMO indicator
• The “MEMO” indicator lights when there is
memo data stored for the track that is
currently playing or set to standby.
!0 Pitch indicator
• This indicates the playing speed (pitch).
!1 BPM indicator
• This lights when the BPM is displayed in the
pitch display section.
!2 Play mode indicators
• These indicate the play mode.
CONT.:
Once playback of a track finishes, the next
track is played.
SINGLE:
Playback stops once the end of that track is
reached.
!3 Minute, second and frame displays
• This indicates the position currently playing
or at which the standby mode is set.
!4 Time mode indicators
• The display switches as follows when the
Time button is pressed:
ELAPSED:
The elapsed playing time from the beginning
of the track is displayed.
REMAIN:
The track’s remaining time is displayed.
T.ELAPSED:
The playing time from the first track on the
disc is displayed.
T.REMAIN:
The remaining time of all the tracks on the
disc is displayed.
!5 Track indicator
• This indicates the number of the currently
playing track.
!6 Connection indicators
• These indicate the connected devices
controlled by the DN-HC4500.
PC:
The DN-HC4500 is controlling the DJ
software on a PC/MAC.
CD:
The DN-HC4500 is controlling a DN-D4000/
D4500/BU4500.
✽ Playback of the USB audio signals from a
PC continues while in the CD mode.
4 DEVICE CHANGE
1
Press the SOURCE button
to display the “SOURCE”
selection screen.
Note:
• When the BACK button is pressed, source
switching is completed and the mode
returns to the normal model.
2
Turn the PARAMETERS
knob to select the device.
Press the knob again to
enter.
“OK to CHANGE” is displayed.
Note:
• The mode switches to “NO” when the
PARAMETERS knob is turned while “OK to
CHANGE?
Ø” is displayed.
• When in the “NO” mode, press the
PARAMETERS knob or BACK button to
return to step 1.
3
Press the knob again to enter.
“Completed!” is displayed and source
switching is completed.
wretquyo
!3!5 !0!2
!4!6
!1
i
Page 10

6
ENGLISH
ENGLISH
• Each push of the
PLAY/PAUSE button switches
between playback and pause.
PLAY/PAUSE button
illuminates solid green during
playback and flashes in pause.
• When the PLAY/PAUSE button is pushed during
play, the DN-D4500 pauses playback at that
point. Push PLAY/PAUSE button once again and
playback resumes.
5 BASIC OPERATION
PLAY and PAUSE
•
When the CUE button is
pushed during playback, the
track/file stops and returns to
the original position of which
playback started from, the
(Cue point). This function is also called Back-Cue.
With the Back-Cue function, you can start from
exactly same position.
The CUE button illuminates solid red when DND4000/D4500/BU4500 is ready to start playback.
•You can set and change Cue point as follows.
• When you started playback.
• File select finished.
• Manual search.
PLAY and Cue
With Pitch slider you can adjust the playback speed
(Pitch).
•Turn the PARAMETERS knob.
Select the File
Adjusting the pitch
2
3
The DN-D4000/D4500/BU4500 has several
pitch ranges.
When the RANGE button
is pushed for more than 1
sec, the pitch range can
be selected with the
PARAMETERS knob.
• When the PARAMETERS
knob is pushed the pitch
range is entered and the
pitch range selection
mode is cancelled.
1
Push the PITCH button to
light the PITCH LED.
This section describes the basic operations when connected to a DN-D4000/D4500/BU4500.
Move the Pitch Slider to adjust
the pitch.
The current pitch setting is
displayed on the display.
Pitch decreases
Pitch increases
With PITCH BEND function you can change pitch
temporary. DN-D4000/D4500/BU4500 has two
ways for this function PITCH BEND buttons and
JOG disc.
Pitch Bend
1
[PITCH BEND +/– buttons]
• Push the PITCH BEND
button for momentary
change of pitch.
While holding these
buttons down, the pitch
continues to change up to the limitation.
• After releasing the PITCH BEND buttons,
playback pitch returns to slider setting.
2
[JOG disc]
• The playback speed can
be changed by turning
JOG disc during
playback.
Power on play
1
When the DN-D4000/D4500/BU4500’s
“Power On Play” presetting is set to “ON”,
playback starts from the beginning of the
disc when the power is turned on.
For instructions on relay playback, refer to the
manual of the DN-D4000/D4500/BU4500.
Relay playback
Page 11
7
ENGLISH
ENGLISH
6 SEAMLESS LOOP/HOT START/STUTTER
Seamless Loop/Hot Start/Stutter (A1,A2 buttons)
t, ye, y
q, w, y
r
Operation display
(refer to the section describing the display)
1
Setting the A point
(loading the Hot Start data)
q Push the A1 or A2
button to set the A
point and Hot Start data
loading starts.
• A1 and A2 buttons can be used
separately for each Hot Start.
•
When an A point is set, the corresponding
A button and “ ” display light and that
button is set to the Hot Start mode.
2
Starts Hot Start
w When A1 or A2 button
is pushed, Hot Start
playback starts from
the corresponding A
point.
7
Clear the A1/A2 point
y
While pressing the FLIP button, push the
A1 or A2 button to clear the corresponding
A and B points.
Or push the FLIP button for more than 1
sec to clear both A1 and A2 points at
once.
Quickly pressing the “FLIP” button first
and then A1, A2 or B buttons will clear
these points individually.
3
Setting the B point for Seamless Loop
e When the B button is
pushed after setting
the A point or after
starting Hot start
playback, the B point is
set and Seamless Loop playback starts
from the A point.
• The B button works with respect to the
A point operated before the B button
was pushed.
•
If the B button is pushed during Seamless
Loop playback or after EXIT playback, the
B point moves to the point at which the
button was pushed.
•
When the B point is set, the B and “ ”
displays light.
4
Playing Seamless Loops
• When the B point for A1 is detected
after playback started from A1 point,
playback returns to A1 point with
seamless. While A1 to B looping, B
point for A2 ignored.
• When the B point for A2 is detected
after playback started from A2 point,
playback returns to A2 point with
seamless. While A2 to B looping, B
point for A1 ignored.
5
Exit/Reloop
r In Seamless Loop
playback, you can force
exit from or return to
the loop.
EXIT:
While the Seamless Loop playback, push
the EXIT/RELOOP button to exit from
loop. DN-D4000/D4500/BU4500 continues
playback after the B point.
RELOOP:
When the EXIT/RELOOP button is
pushed after exit the loop, Seamless
Loop playback resumes from the A point.
6
Stutter
• A1 and A2 points can
be also used for
Stutter playback.
t To enable stutter
playback, push FLIP
button for A1/A2 buttons, then “ ”
display turns off.
Press the FLIP button to switch between
the Hot Start/Seamless Loop and Stutter
modes.
Page 12

8
ENGLISH
ENGLISH
7 TRIM
For instructions on the trim function, refer to the
manual of the DN-D4000/D4500/BU4500.
NOTE:
If the setting made at the “CD Mode Sel”
presetting does not correspond to what is
actually connected, the unit may not operate
properly.
8 PRESET
• This function is only valid when the “PC” source is selected.
(When the DN-D4000/D4500/BU4500 is connected, the corresponding preset operation is performed.)
• The DN-HC4500 is equipped with a preset function allowing users to store and recall the devices’
operation modes. The function includes the items and values described below.
1. Preset mode
q Press and hold in the PRESET button for at least 1 second to enter the preset mode.
w Use the PARAMETERS knob to select the preset item.
e Select the item and press the PARAMETERS knob to set the preset item to be changed.
r Next, turn the PARAMETERS knob. The preset data is selected.
t Select the data and press the PARAMETERS knob to set the preset data to be changed.
y To make multiple presettings, repeat steps w ~ t.
u The preset mode is turned off when the PRESET button is pressed.
2. Preset items and data
The “*” mark next to the data indicates the default value.
(1) USB Mode Sel: HC4500 MIDI*
Selects the USB communications mode.
The DN-HC4500 uses unique MIDI specifications.
(2) CD Model Sel: DN-D4500* / DN-D4000
Select the name of the model to be connected to the DRIVE terminal and controlled.
The BU4500 is the same as the DN-D4500’s drive, so the PRESET setting is “DN-D4500”.
(3) Audio Fs Sel: 44.1k* / 48k / 96k / Auto
44.1 kHz: The sampling frequency (Fs) is fixed at 44.1 kHz, regardless of the data sent from the
PC.
48 kHz: The sampling frequency (Fs) is fixed at 48 kHz, regardless of the data sent from the PC.
96 kHz: The sampling frequency (Fs) is fixed at 96 kHz, regardless of the data sent from the PC.
AUTO: The sampling frequency (Fs) switches automatically according to the data sent from the
PC.
q To set “Fs”, press PARAMETERS.
“OK to CHANGE?Ø” is displayed on the character display.
w Push the PARAMETERS knob again.
e After the sampling frequency is changed, “Audio Fs Sel” is displayed.
(4) Unit No. Set: 1 to 15 / ALL*
Sets the device’s unit number.
For example, when two devices are connected to a PC, set one device to “No. 2” or the like.
(5) MIDI CH Set: 1&2* / 3&4 / 5&6
Sets the MIDI channel.
(6) JOG Pulse Sel: 1480* / 740 / 555 / 370 count/cycle
Selects the number of pulses output per one revolution of the jog wheel.
(7) FaderIn Mode: 1-PLAY/CUE / 2-PLAY / CUE
(8) X-CONT XFD: OFF / ON*
Sets whether to enable or disable X-control input signal cross fader input.
(9) Preset Init.: Set all the preset data back to the factory defaults.
q To clear the PRESET data, push the PARAMETERS knob.
“Preset Init” flashes on the character display.
w Push the PARAMETERS knob again.
“Push to ExeØ” is displayed on the character display.
e Push the PARAMETERS knob again.
“OK to CHANGE?Ø” is displayed on the character display.
r Once clearing is completed, “Completed!” is displayed.
Page 13
9
ENGLISH
ENGLISH
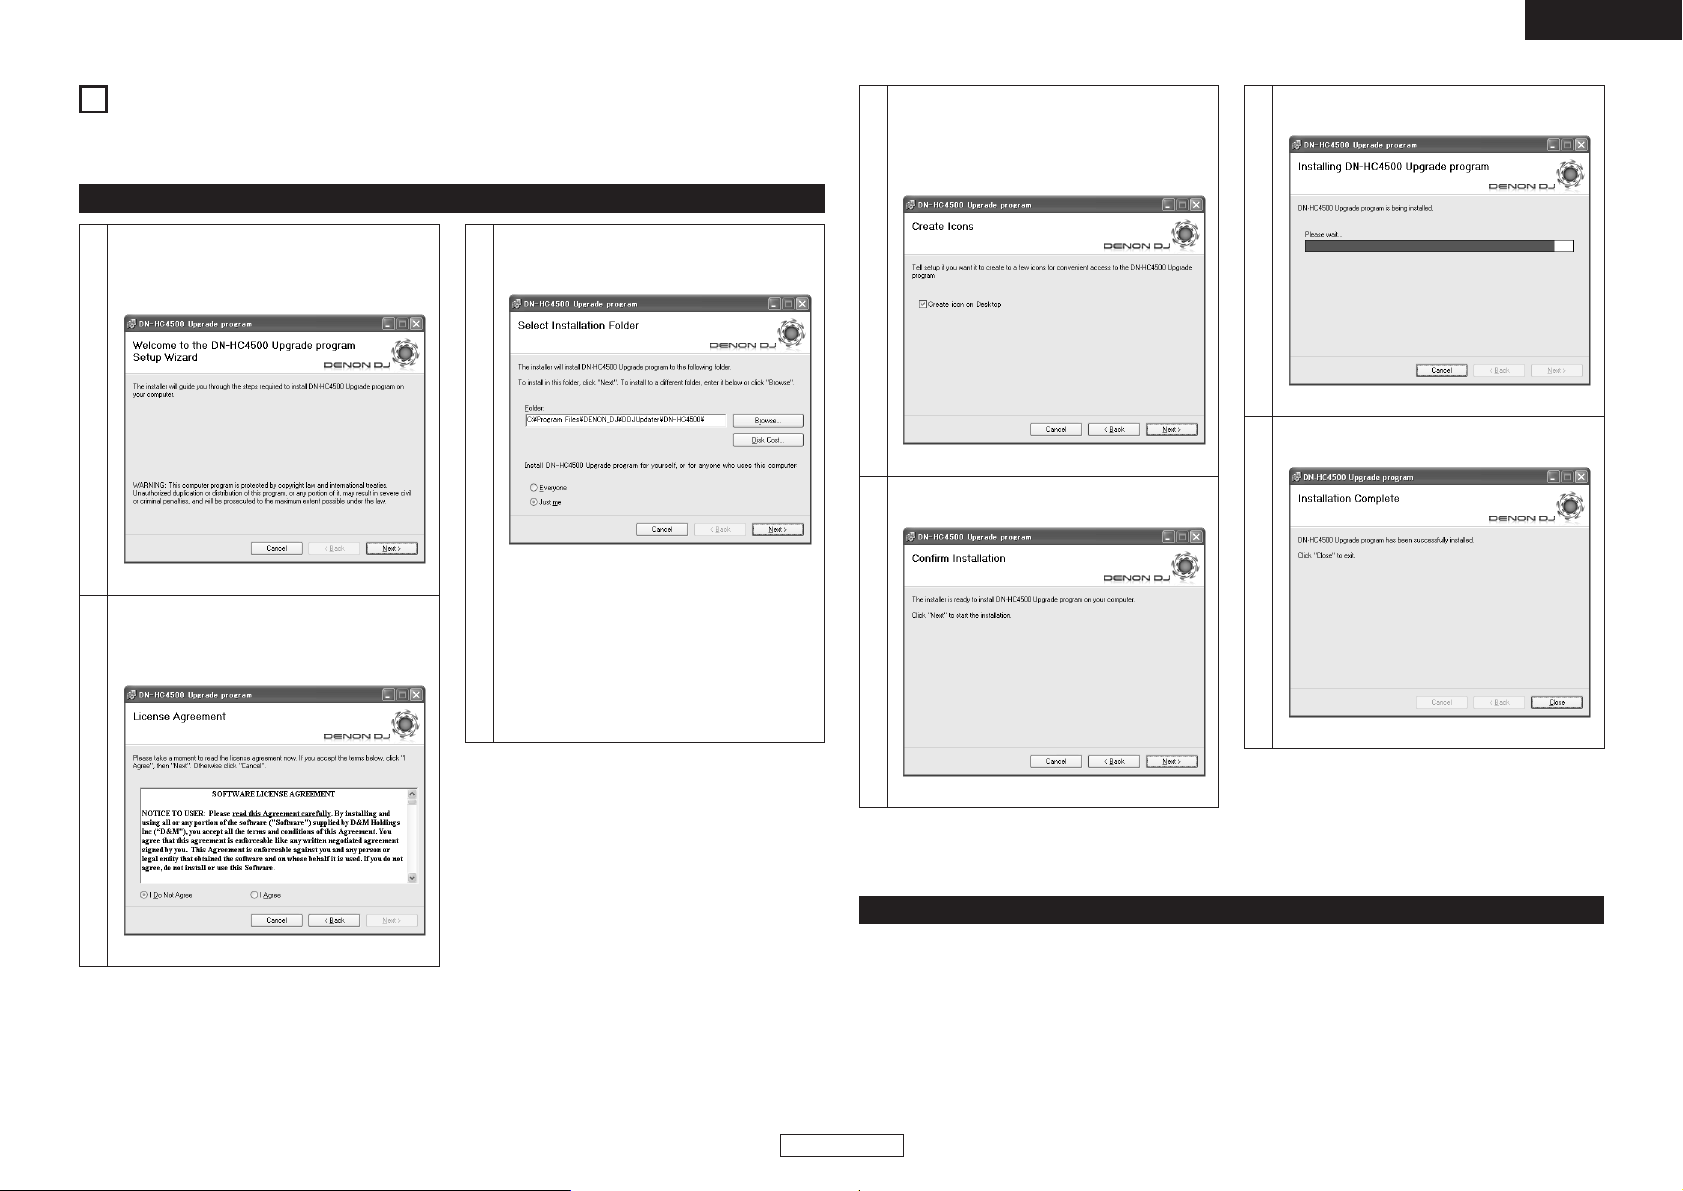
2 Uninstalling
Uninstall at the “Add or Remove Programs”
control panel.
5
Press the “Next>” button. Installation begins.
Diagram: Confirm Installation window
9 ASIO CONTROL PANEL (Windows version only)
Installing the ASIO driver
1
Double-click the installer.
The ASIO Driver Setup Wizard is launched.
Press “Next>”.
Diagram: ASIO Driver Setup Wizard window
2
The license agreement screen appears. If
you agree, select “I Agree”.
The “Next>” button can now be selected.
Press the “Next>” button.
Diagram: License Agreement window
3
A screen for verifying the folder in which the
ASIO driver is to be installed appears.
Press the “Next>” button.
Diagram: Select Installation Folder window
By default, the ASIO driver is installed in
“C\Program Files\DENON_DJ\DDJASIO\”.
To change this, select “Browse”, then
choose the desired folder.
Choose “Everyone” if “everyone” uses the
computer on which the update program is to
be installed, “Just me” if you are the only
user.
4
A window for verifying whether or not to
create icons on the desktop appears.
If you want to create the icons on the
desktop, check the checkbox, then press
the “Next>” button.
Diagram: Create Icons window
7
This window is displayed when installation is
finished. Press the “Close” button.
Diagram: Installation Complete window
6
This is the window displayed during
installation.
Diagram: Installing window
Page 14
10
ENGLISH
ENGLISH
When the DENON DJ ASIO driver’s “ASIO Control Panel” is called out from the host application, the
DENON DJ ASIO driver displays the ASIO control panel.
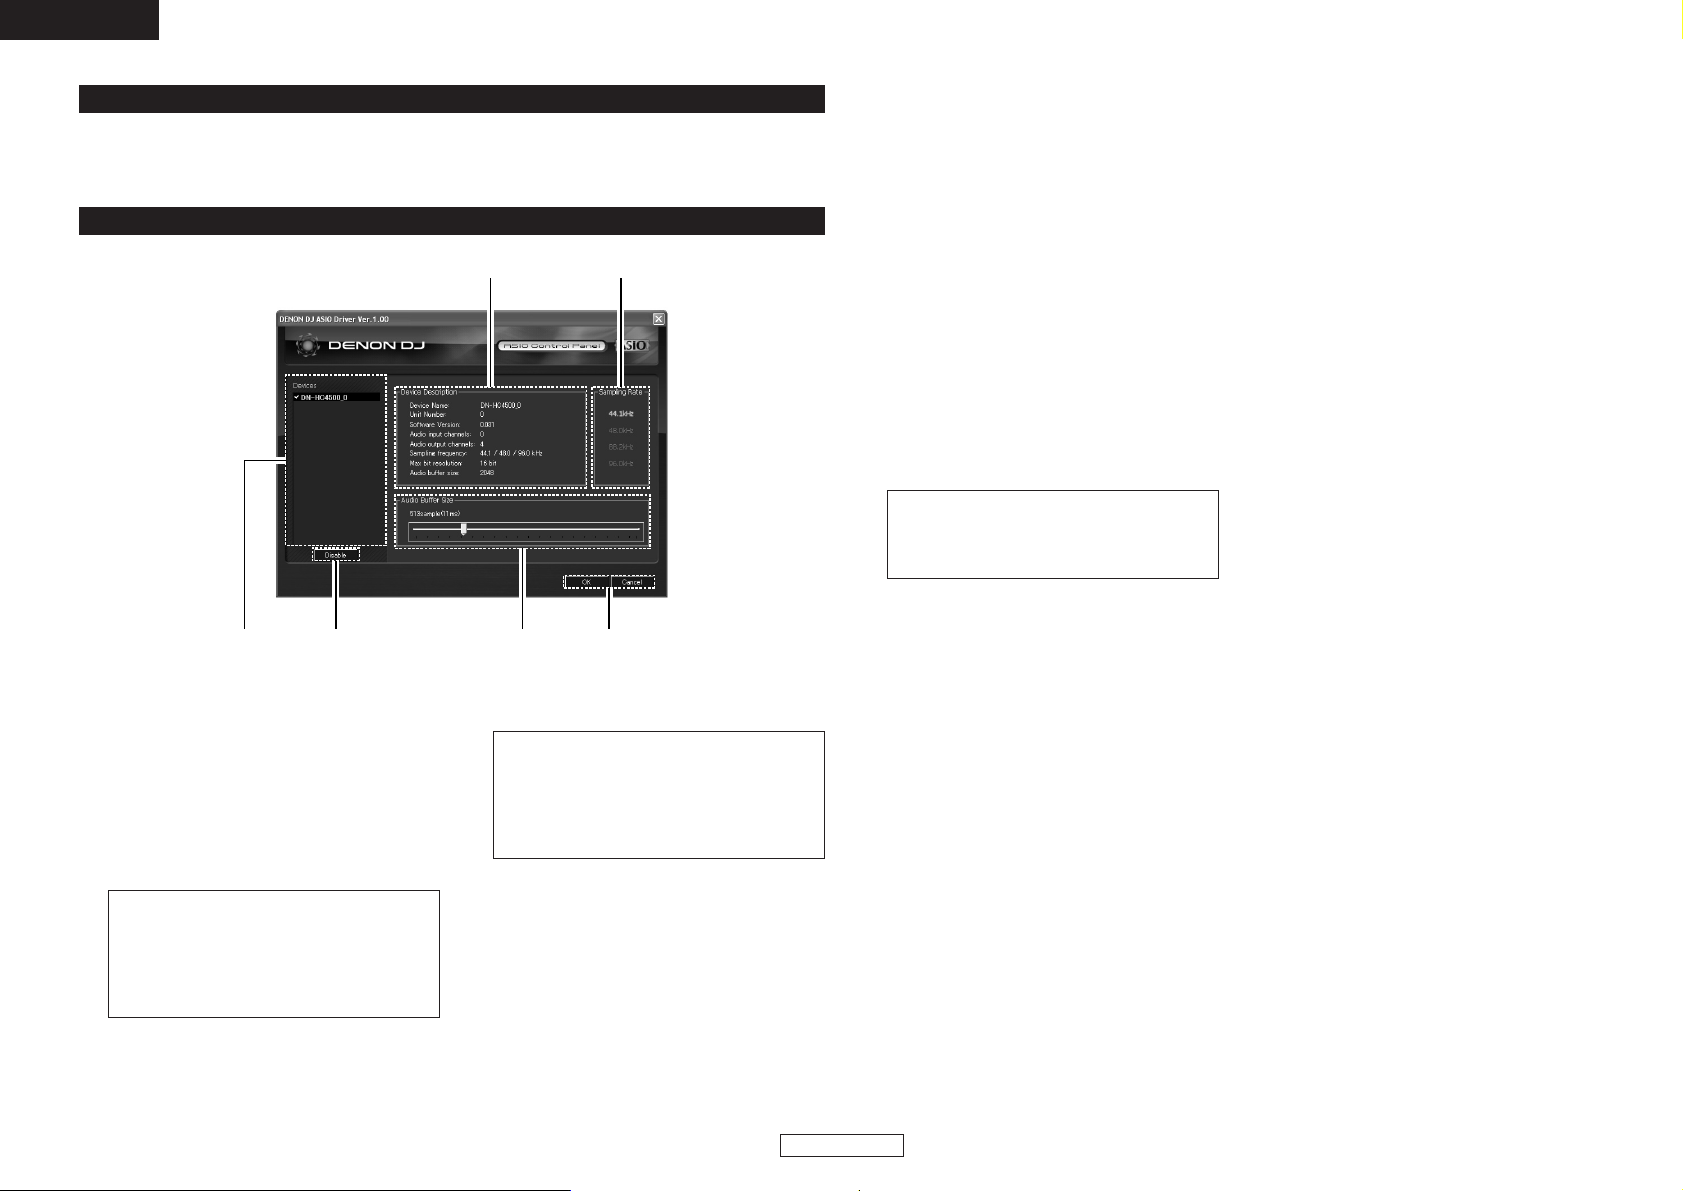
Starting Up
About the control panel screen
q Device
This is the area in which the list of compatible
DENON DJ devices is displayed automatically.
(Example: DN-HC4500-1)
• Select the device to be set from the list to
display the selected device’s current settings
on the right.
• If the device is double-clicked, the status of
the ASIO device specifications device
switches between enabled and disabled.
wreq
ty
NOTE:
• Only one device can be selected.
• The device currently being used as the
ASIO device is displayed in bold
characters. (Multiple devices can be
enabled simultaneously.)
w Enable/Disable
This button is for activating the device selected
in the device display list as the ASIO device.
e Audio Buffer Size
Use this slider to adjust the buffer size.
NOTE:
• The range of values is 88 to 2048 (sample
units), in steps of 1 ms.
• When multiple devices are activated, the
settings of all the active devices are
shared.
r OK/Cancel
OK:
Use this button to close the ASIO control
panel, reflecting the changes to the settings.
Cancel:
Use this button to close the ASIO control
panel without reflecting the changes to the
settings.
t Sampling Rate
The sampling rate selection is displayed here.
The frequencies with which the DENON DJ
ASIO driver is compatible are as follows:
• 44.1kHz/48kHz/96kHz
y Device Description
This is the area in which information for the
device selected in the device information list is
displayed.
The following are displayed:
• Device name
• Unit number
•Software version
• Audio input channels
• Audio output channels
• Sampling frequency
• Max bit resolution
• Audio buffer size
NOTE:
If the device’s information cannot be
acquired, “-” (hyphens) are displayed for all
items.
Page 15
11
ENGLISH
ENGLISH
10
UPDATING
Product are updated using the product version update software via our “www.denondj.com” website.
Check www.denondj.com for latest updates.
1
Double-click the installer.
The update program setup wizard is
launched.
Press “Next>”.
Installing the update program (Windows version)
Diagram: Setup Wizard window
2
The license agreement screen appears. If
you agree, select “I Agree”.
The “Next>” button can now be selected.
Press the “Next>” button.
Diagram: License Agreement window
3
A screen for verifying the folder in which the
update program is to be installed appears.
Press the “Next>” button.
Diagram: Select Installation Folder window
By default, the update program is installed in
“C\Program Files\DENON_DJ\DDJUpdater\DNHC4500\”.
To change this, select “Browse”, then
choose the desired folder.
Choose “Everyone” if “everyone” uses the
computer on which the update program is to
be installed, “Just me” if you are the only user.
5
Press the “Next>” button. Installation
begins.
Diagram: Confirm Installation window
2 Uninstalling (Windows version only)
Uninstall at the “Add or Remove Programs”
control panel.
4
A window for verifying whether or not to
create icons on the desktop appears.
If you want to create the icons on the
desktop, check the checkbox, then press
the “Next>” button.
Diagram: Create Icons window
6
This is the window displayed during
installation.
Diagram: Installing window
7
This window is displayed when installation is
finished. Press the “Close” button.
Diagram: Installation Complete window
With installation of the Macintosh version of the update program, the program itself is copied onto the
computer.
Installing the update program (Macintosh version)
Page 16

12
ENGLISH
ENGLISH
Updating procedure
1
Connect the computer by USB cable.
2
Turn on the device’s power in the update mode.
Turning on the power in the update mode:
Press the BACK and SOURCE buttons
simultaneously on Deck1 or Deck2.
The following appears on the device’s panel
display:
on Deck1
on Deck2
If the device is not yet connected, the following
appears on the device’s panel display:
on Deck2
3
-2
If the device is not connected or not in the
update mode at this time, the screen shown
below is displayed.
If the update file has not been loaded, “File
is not ready.” is displayed.
5
-1
Press the Load button to transfer the update
file.
Update file not loaded
The version information
is displayed.
Launch the DN-HC4500 update program.
The screen shown below appears on the
computer.
Current version information
The identified device name is displayed.
3
-1
4
Drag and drop the update file to the
“DENON DJ Upgrade program” screen. The
Load button can now be selected.
The Load button can be selected.
5
-2
The following is displayed on the device’s
panel:
During file transfer:
on Deck1
Once file transfer is finished;
(Left side: Old version; Right side: New version)
Once file transfer is finished, press the OK
button. The Execute button is now enabled
(can be pressed).
Page 17
13
ENGLISH
ENGLISH
7
Press the OK button to finish.
The following is displayed on the device’s
panel:
On Deck2:
Quit the updating program and turn off the
DN-HC4500’s power.
NOTE:
• Do not turn off the set’s power or disconnect
the cable connecting it to the computer during
loading or version updating. Also, do not press
any buttons on the set or any keys on the
computer’s keyboard.
• If an error message appears during loading or
version updating, repeat from step 1.
Other error messages are as follows:
“File is invalid”
When the loaded update file was invalid.
“Load failed. Check the connection, and retry”
When a transfer error has occurred during
transfer of the update file to the device.
“Loaded data is invalid. Check the file.”
When a SUM check error has occurred after
transfer of the update file to the device.
“Version up was not completed.”
When version updating was not completed
normally.
6
Press the Execute button to begin updating
the version.
Once version updating is completed,
“Version up was completed.” is displayed.
The following is displayed on the device’s
panel during version updating:
On Deck1:
Once version updating is completed:
If version updating has failed, “Version up
was not completed.” is displayed and the
screen returns to as it was before the
Execute button was pressed. Press the
Execute button again.
Page 18
14
ENGLISH
ENGLISH
11
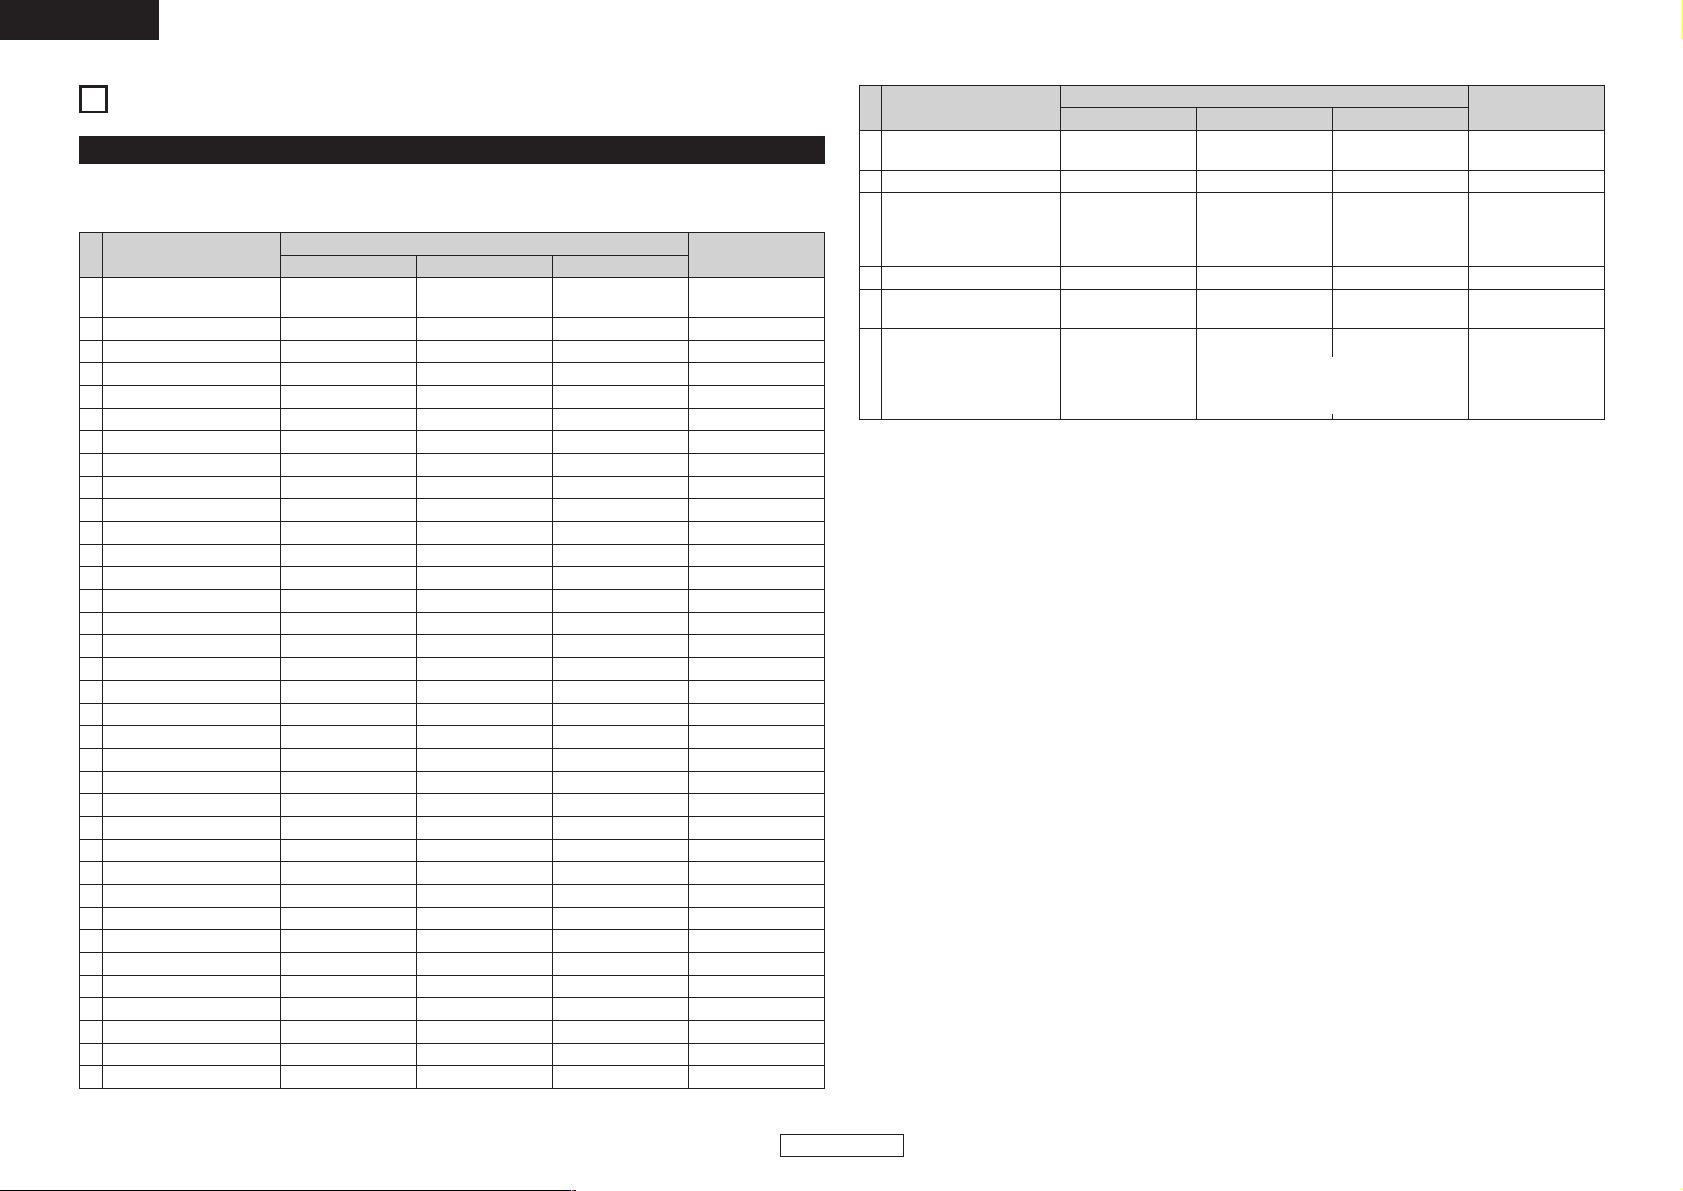
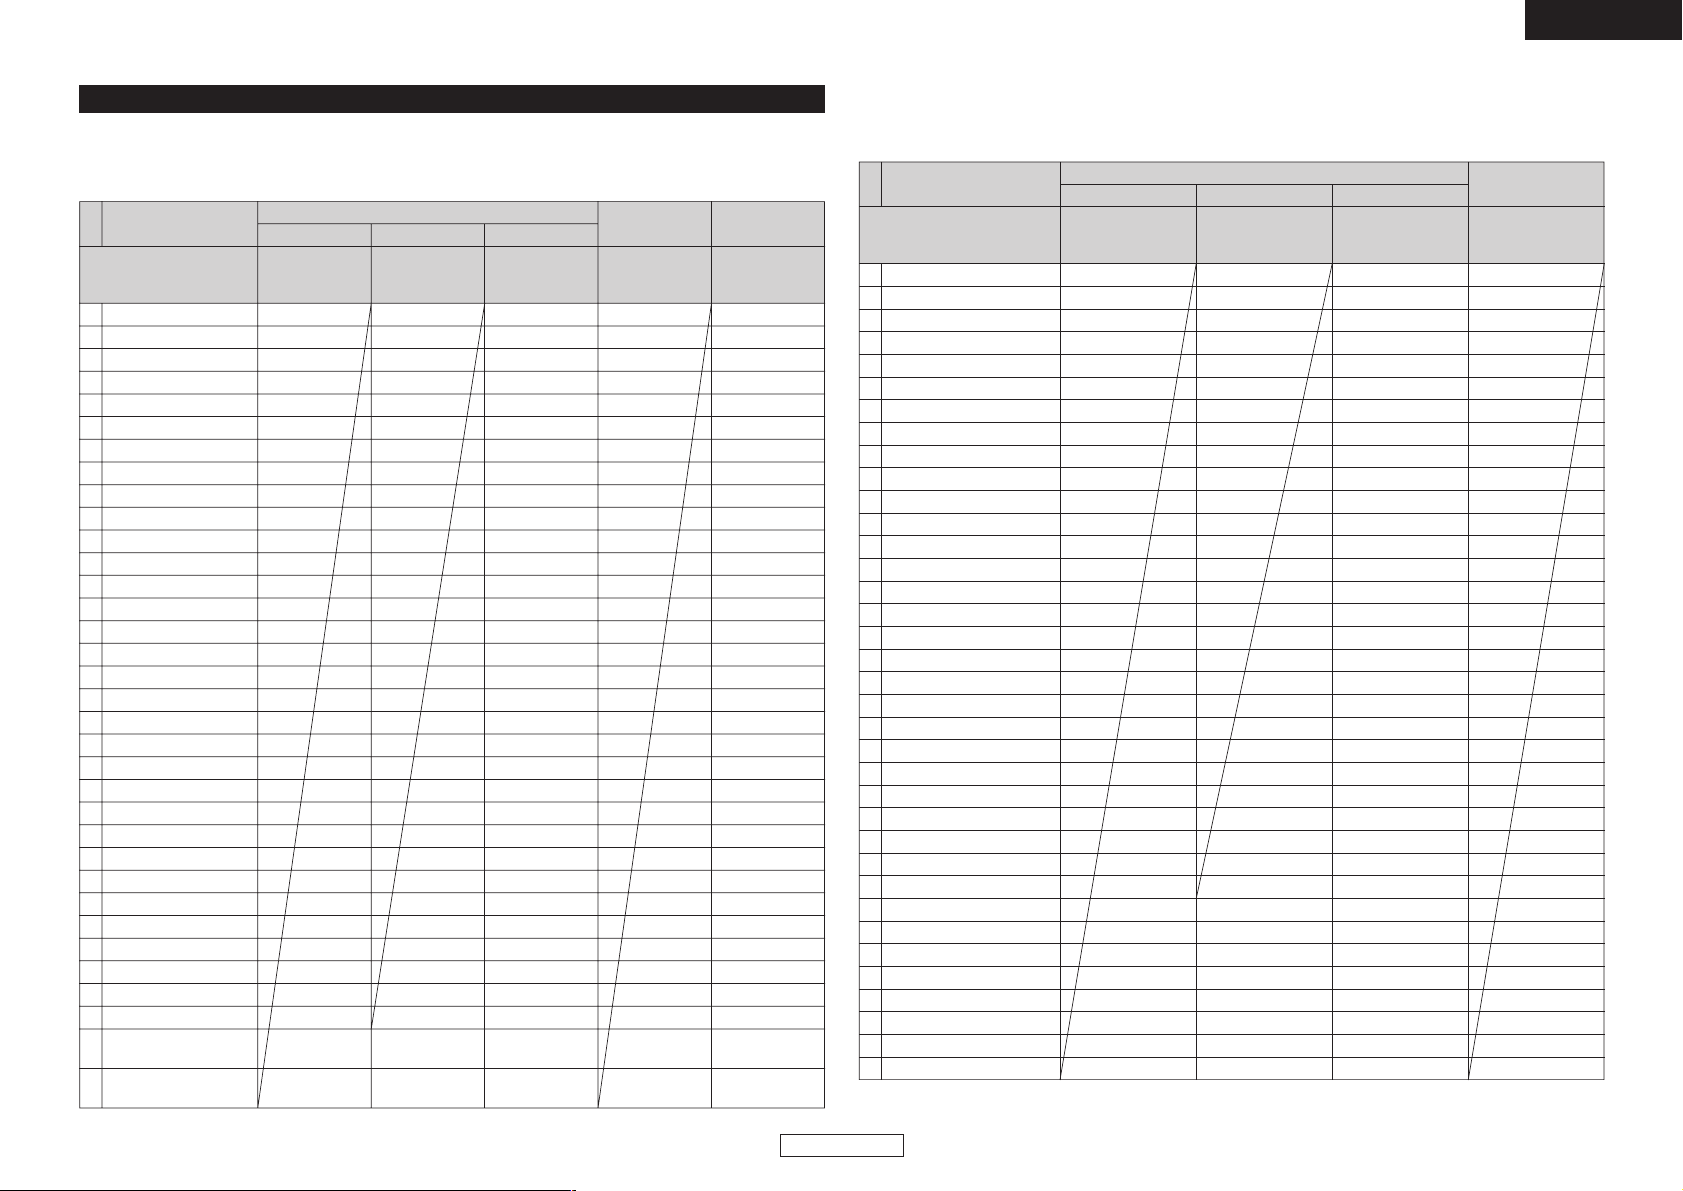
MIDI COMMANDS
Data transmission
The panel operation data is transmitted by MIDI command, as per the table below.
2 Send command to PC
1 Playlist
SW ON : 0x9n
SW OFF : 0x8n
0x02
SW ON : 0x40
SW OFF : 0x00
Note ON/OFF
2 JOG mode
≠
0x04
≠≠
3 Pitch/KEY
≠
0x05
≠≠
4TAP
≠
0x07
≠≠
5 Pitch Bend+
≠
0x08
≠≠
6 Pitch Bend–
≠
0x09
≠≠
7 Fast search+
≠
0x10
≠≠
8 Fast search–
≠
0x11
≠≠
9 EFX1/ECHO/LOOP
≠
0x12
≠≠
10 EFX2/FLANGER
≠
0x13
≠≠
11 EFX3/FILTER
≠
0x14
≠≠
12 HOT1
≠
0x17
≠≠
13 HOT2
≠
0x18
≠≠
14 HOT3
≠
0x19
≠≠
15 HOT4
≠
0x20
≠≠
16 HOT5
≠
0x21
≠≠
17 TIME/TOTAL
≠
0x23
≠≠
18 MEMO/PRESET
≠
0x24
≠≠
19 TITLE
≠
0x25
≠≠
20 CONT./SINGLE
≠
0x26
≠≠
21 Parameters KNOB SW
≠
0x28
≠≠
22 BACK
≠
0x30
≠≠
23 SOURCE mode
≠
0x31
≠≠
24 FLIP
≠
0x36
≠≠
25 A1
≠
0x37
≠≠
26 A2
≠
0x38
≠≠
27 B
≠
0x39
≠≠
28 EXIT/Reloop
≠
0x40
≠≠
29 Cue
≠
0x42
≠≠
30 Play
≠
0x43
≠≠
31 JOG UP
≠
0x47
≠≠
32 JOG DOWN
≠
0x48
≠≠
33 JOG LEFT
≠
0x49
≠≠
34 JOG RIGHT
≠
0x50
≠≠
35 Jogwheel touch
≠
0x51
≠≠
items
Command
MIDI command
Number Value
Message type
39 X-Control fader
≠
0x53
0x00 (min) → 0x7F (max)
≠
40
Parameters KNOB
Increment/Decrement
≠
0x54
Increment : 0x00
Decrement : 0x7F
≠
41 Pitch Slider 0xEn 0xllh (LSB) 0xmmh (MSB) Pitch bend change
36 Preset Mode
SW ON : 0x9n
SW OFF : 0x8n
0x52
SW ON : 0x40
SW OFF : 0x00
Note ON/OFF
37 D4500 Cont. mode
≠
0x53
≠≠
38 Jogwheel fwd/rev 0xBn 0x51
Reverse 0x3F ~ 0x00
Foward 0x41 ~ 0x7F
slow → fast
✽ relative data
Control change
items
Command
MIDI command
Number Value
Message type
–100% : 0x7F7F (MSB/LSB)
0% : 0x4000 (MSB/LSB)
+100% : 0x0000 (MSB/LSB)
n = MIDI CH
Page 19
15
ENGLISH
ENGLISH
VFD symbol data reception
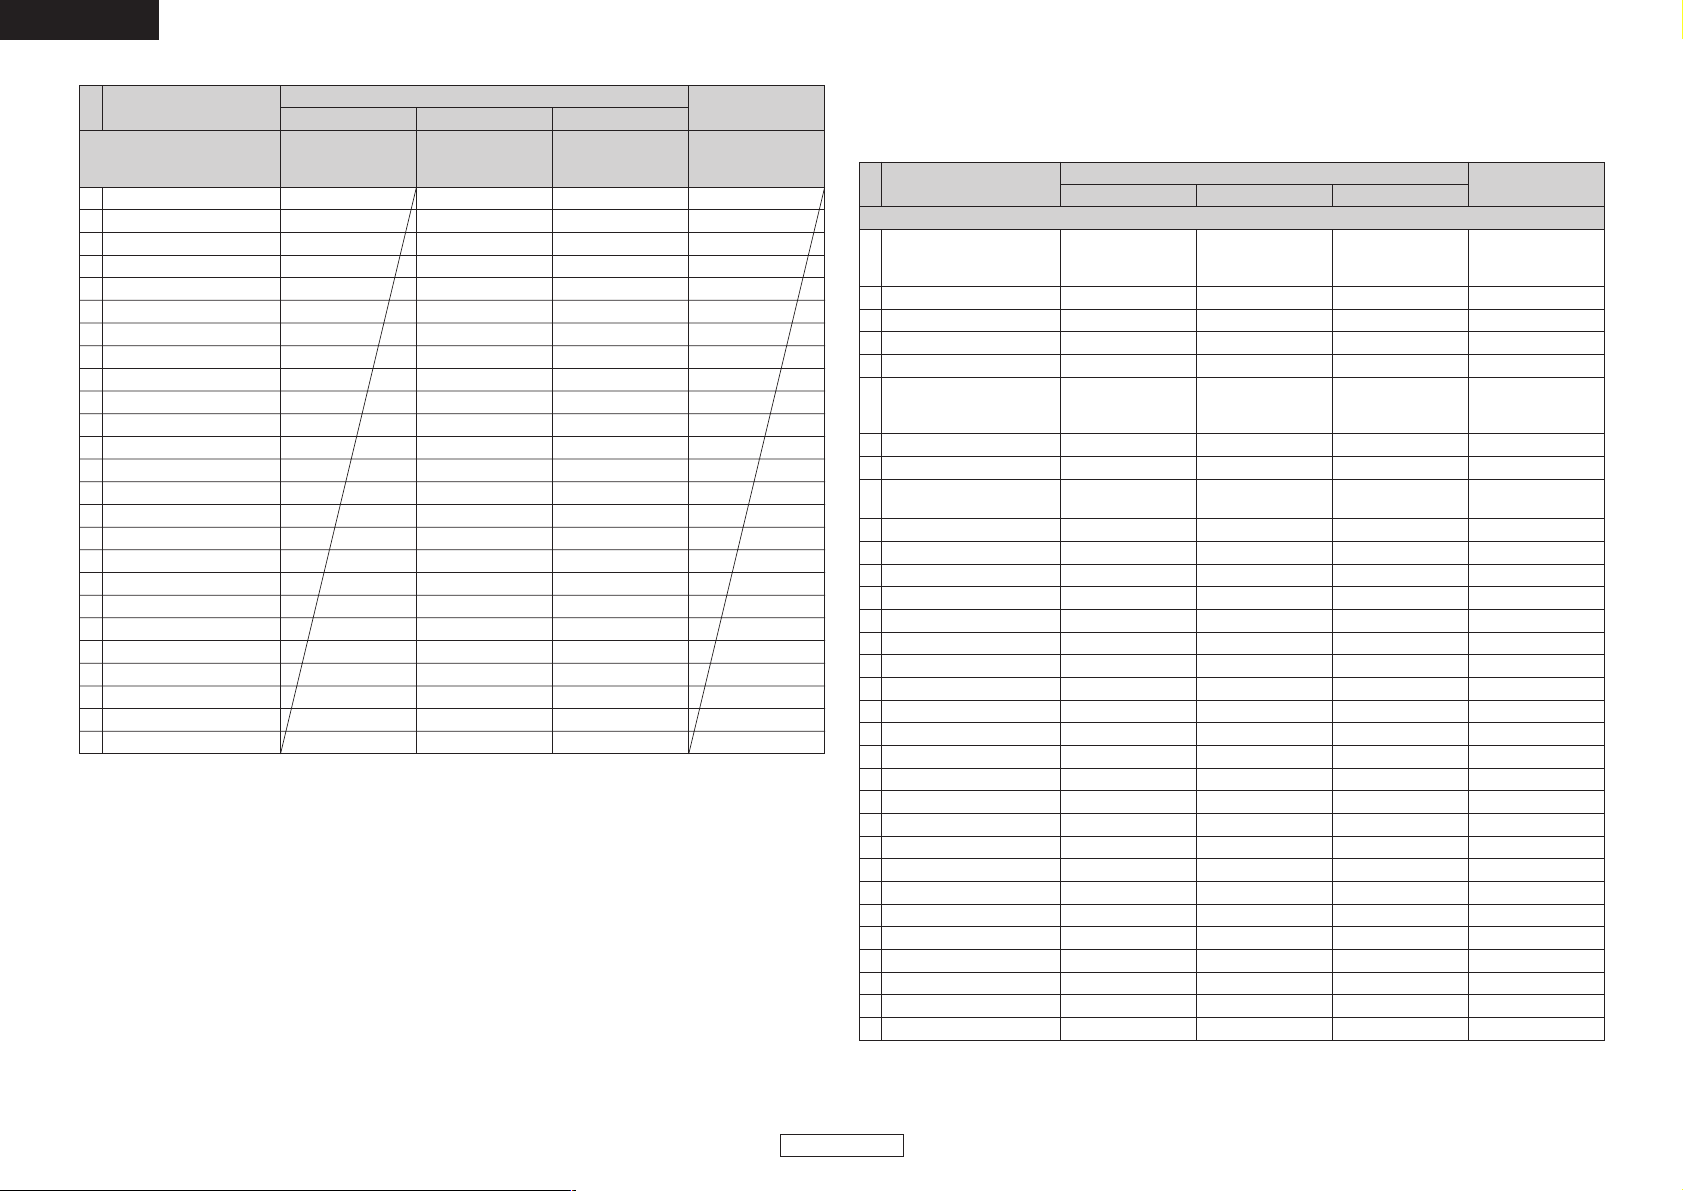
The various VFD symbols can be set to on, off or blinking, as per the table below.
2 Receive command for VFD Symbol
Data reception
LED data reception
The panel’s LEDs can be set to on, off or blinking by MIDI command, as per the table below.
2 Receive command for LED
n = MIDI CH
VFD Symbol 0xBn
ON TRG : 0x4D
OFF TRG : 0x4E
Blink ON TRG : 0x4F
↓↓
Control Change
1T. 0x01
2 REMAIN 0x02
3 ELAPSED 0x03
4 CONT. 0x04
5 SINGLE 0x05
6 BPM 0x06
7m 0x07
8s 0x08
9f 0x09
10 Pitch dot Right 0x0A
11 Pitch dot center 0x0B
12 Pitch dot left 0x0C
13 MP3 0x10
14 WAV 0x11
15 KB 0x13
16 KEY ADJ. 0x14
17 MEMO 0x15
18 ( : A1 side 0x16
19 ( : A2 side 0x17
20 ) : A1 side 0x18
21 ) : A2 side 0x19
22 A1 0x1A
23 A2 0x1B
24 B : A1 side 0x1C
25 B : A2 side 0x1D
26 Scratch Ring out side 0x1E
27 Scratch Ring in side 0x1F
28 Touch dot 0x20
29 Track Position Blink
only Use 0x4F/0x4E
0x21
30
Scratch Position 1 (Top right)
only Use 0x4D/0x4E
0x22
31 Scratch Position 2
only Use 0x4D/0x4E
0x23
32 Scratch Position 3
only Use 0x4D/0x4E
0x24
33 Scratch Position 4
only Use 0x4D/0x4E
0x25
34 Scratch Position 5
only Use 0x4D/0x4E
0x26
35 Scratch Position 6
only Use 0x4D/0x4E
0x27
36 Scratch Position 7
only Use 0x4D/0x4E
0x28
items
Command
MIDI command
Number Value
Message type
LED 0xBn
ON TRG : 0x4A
OFF TRG : 0x4B
Blink ON TRG : 0x4C
↓↓
Control Change
1 Playlist 0x02
2 Pitch match LED 0x04
3 JOG mode Green 0x05
4 JOG mode Orange 0x06
5 Pitch/KEY Green 0x07
6 Pitch/KEY Orange 0x08
7TAP Green 0x09
8TAP Orange 0x0A
9
EFX1/ECHO/LOOP RED
0x0B
10 EFX1 Green 0x0C
11 EFX2/FLANGER RED 0x0D
12 EFX2 Green 0x0E
13 EFX3/FILTER RED 0x0F
14 EFX3 Green 0x10
15 HOT1 0x11
16 HOT1 Dimmer 0x12
17 HOT2 0x13
18 HOT2 Dimmer 0x14
19 HOT3 0x15
20 HOT3 Dimmer 0x16
21 HOT4 0x17
22 HOT4 Dimmer 0x18
23 HOT5 0x19
24 HOT5 Dimmer 0x1A
25 Parameter KNOB 0x1E
26 A1 0x24
27 A1 Dimmer 0x3C
28 A2 0x25
29 A2 Dimmer 0x3D
30 Cue 0x26
31 Play 0x27
32 Jogwheel 0x3B
33 Pitch slider request 0x3C
DN-HC4500 return
pitch slider position
only Use 0x4A
(request TRG)
34
X-Control fader request
0x3D
DN-HC4500 return XControl fader position
only Use 0x4A
(request TRG)
items
Command
MIDI command
Number Value
Message type Notes
Page 20
16
ENGLISH
ENGLISH
VFD parameter data reception
The time-related display and segment display can be set by MIDI command, as per the table below.
2 Receive command for VFD Parameter
✽ “Track Position Blink” sets blinking of the entire track position display segment on or off.
41 Scratch Position 12
only Use 0x4D/0x4E
0x2D
42 Scratch Position 13
only Use 0x4D/0x4E
0x2E
43 Scratch Position 14
only Use 0x4D/0x4E
0x2F
44 Scratch Position 15
only Use 0x4D/0x4E
0x30
45
Scratch Position 16 (Bottom)
only Use 0x4D/0x4E
0x31
46 Scratch Position 17
only Use 0x4D/0x4E
0x32
47 Scratch Position 18
only Use 0x4D/0x4E
0x33
48 Scratch Position 19
only Use 0x4D/0x4E
0x34
49 Scratch Position 20
only Use 0x4D/0x4E
0x35
50 Scratch Position 21
only Use 0x4D/0x4E
0x36
51 Scratch Position 22
only Use 0x4D/0x4E
0x37
52 Scratch Position 23
only Use 0x4D/0x4E
0x38
53 Scratch Position 24
only Use 0x4D/0x4E
0x39
54 Scratch Position 25
only Use 0x4D/0x4E
0x3A
55 Scratch Position 26
only Use 0x4D/0x4E
0x3B
56 Scratch Position 27
only Use 0x4D/0x4E
0x3C
57 Scratch Position 28
only Use 0x4D/0x4E
0x3D
58 Scratch Position 29
only Use 0x4D/0x4E
0x3E
59 Scratch Position 30
only Use 0x4D/0x4E
0x3F
60 Scratch Position 31
only Use 0x4D/0x4E
0x40
61 Scratch Position 32 (Top)
only Use 0x4D/0x4E
0x41
VFD Symbol 0xBn
ON TRG : 0x4D
OFF TRG : 0x4E
Blink ON TRG : 0x4F
↓↓
Control Change
37 Scratch Position 8
only Use 0x4D/0x4E
0x29
38 Scratch Position 9
only Use 0x4D/0x4E
0x2A
39 Scratch Position 10
only Use 0x4D/0x4E
0x2B
40 Scratch Position 11
only Use 0x4D/0x4E
0x2C
items
Command
MIDI command
Number Value
Message type
n = MIDI CH
VFD Parameter
1Tr number MSB 0xBn 0x40
0-99
100-109 : “-0” to “-9”
110 : “--”, 111 : “ ”
Control Change
2Tr number LSB
≠
0x41
≠≠
3Time mini
≠
0x42
≠≠
4Time sec
≠
0x43
≠≠
5Time frame
≠
0x44
≠≠
6 Pitch POL
≠
0x45
“ ” 0x00
“+” 0x01
“–” 0x02
≠
7 Pitch MSB
≠
0x46
≠≠
8Pitch LSB
≠
0x47
≠≠
9Track Position
≠
0x48 normal
0x49 reverse
0-100%
≠
10 Segment 1-1 MSB
≠
0x01 0x00 ~ 0x0F
≠
11 Segment 1-2 MSB
≠
0x02
≠≠
12 Segment 1-3 MSB
≠
0x03
≠≠
13 Segment 1-4 MSB
≠
0x04
≠≠
14 Segment 1-5 MSB
≠
0x05
≠≠
15 Segment 1-6 MSB
≠
0x07
≠≠
16 Segment 1-7 MSB
≠
0x08
≠≠
17 Segment 1-8 MSB
≠
0x09
≠≠
18 Segment 1-9 MSB
≠
0x0A
≠≠
19 Segment 1-10 MSB
≠
0x0B
≠≠
20 Segment 1-11 MSB
≠
0x0C
≠≠
21 Segment 1-12 MSB
≠
0x0D
≠≠
22 Segment 1-1 LSB
≠
0x21
≠≠
23 Segment 1-2 LSB
≠
0x22
≠≠
24 Segment 1-3 LSB
≠
0x23
≠≠
25 Segment 1-4 LSB
≠
0x24
≠≠
26 Segment 1-5 LSB
≠
0x25
≠≠
27 Segment 1-6 LSB
≠
0x27
≠≠
28 Segment 1-7 LSB
≠
0x28
≠≠
29 Segment 1-8 LSB
≠
0x29
≠≠
30 Segment 1-9 LSB
≠
0x2A
≠≠
Items
Command
MIDI command
Number Value
Message Type
31 Segment 1-10 LSB
≠
0x2B
≠≠
32 Segment 1-11 LSB
≠
0x2C
≠≠
Page 21
17
ENGLISH
ENGLISH
VFD segment data reception
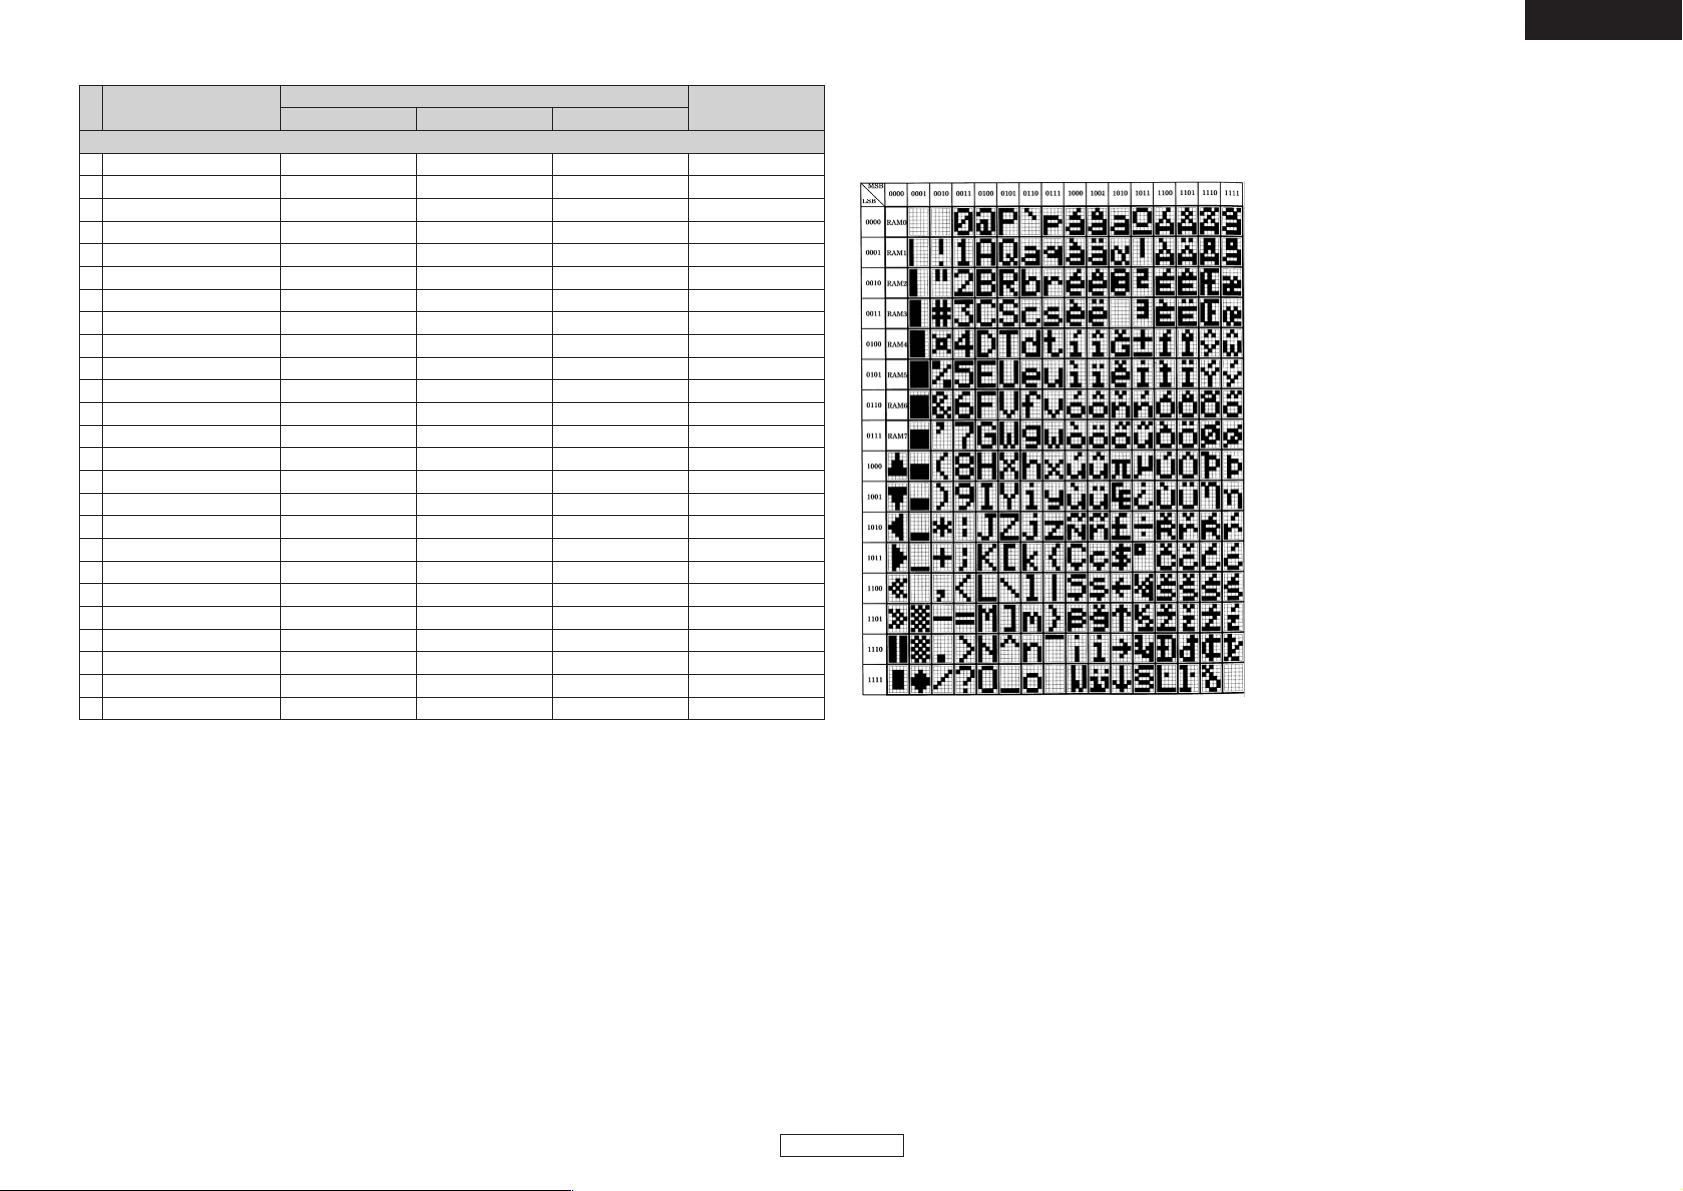
The various segments are set by 2-byte data, as per the following font code.
(0x00/0x00 to 0x00/0x07 cannot be used.)
2 Font codes for segments
33 Segment 1-12 LSB 0xBn 0x2D 0x00 ~ 0x0F Control Change
34 Segment 2-1 MSB
≠
0x0E
≠≠
35 Segment 2-2 MSB
≠
0x0F
≠≠
36 Segment 2-3 MSB
≠
0x10
≠≠
37 Segment 2-4 MSB
≠
0x11
≠≠
38 Segment 2-5 MSB
≠
0x12
≠≠
39 Segment 2-6 MSB
≠
0x13
≠≠
40 Segment 2-7 MSB
≠
0x14
≠≠
41 Segment 2-8 MSB
≠
0x15
≠≠
42 Segment 2-9 MSB
≠
0x16
≠≠
43 Segment 2-10 MSB
≠
0x17
≠≠
44 Segment 2-11 MSB
≠
0x18
≠≠
45 Segment 2-12 MSB
≠
0x19
≠≠
46 Segment 2-1 LSB
≠
0x2E
≠≠
47 Segment 2-2 LSB
≠
0x2F
≠≠
48 Segment 2-3 LSB
≠
0x30
≠≠
49 Segment 2-4 LSB
≠
0x31
≠≠
50 Segment 2-5 LSB
≠
0x32
≠≠
51 Segment 2-6 LSB
≠
0x33
≠≠
52 Segment 2-7 LSB
≠
0x34
≠≠
53 Segment 2-8 LSB
≠
0x35
≠≠
54 Segment 2-9 LSB
≠
0x36
≠≠
55 Segment 2-10 LSB
≠
0x37
≠≠
56 Segment 2-11 LSB
≠
0x38
≠≠
57 Segment 2-12 LSB
≠
0x39
≠≠
VFD Parameter
Items
Command
MIDI command
Number Value
Message Type
n = MIDI CH
Page 22

18
ENGLISH
ENGLISH
(2) Loading preset data from an external device
Issue the commands shown below from the PC to the DN-HC4500. [DRM]
Preset data
The DN-HC4500’s presettings can be loaded and some items can be set from an external device using
the DENON DJ’s MIDI system exclusive format.
(1) Configuration command format
The basic configuration supported by the DN-HC4500 is as follows:
The text shown below is returned from the DN-HC4500. [DSM]
The structure of the reply data to the preset request command is as shown below.
2 Return data table for Preset request command
CMD Item Data Length
SOX
IDC
FMT
Start of System Exclusive
ID code → DENON DJ ID
Communication format
0xF0
0x004003
0x12: one way
1Byte
3Byte
1Byte
MDN
UN
MCH
MST
CMD
DL
Data
Model number
Unit number
MIDI channel
Message Type
Command
Data Length
Preset data
0x41 (DN-HC4500)
depends on preset mode (0x00 to 0x0F)
depends on preset mode (0x00 to 0x05)
0x53: Selecting, 0x50: Polling,
0x20: Preset set/ 0x21: Preset request
0x** number of the data Byte
refer the preset data table
1Byte
1Byte
1Byte
1Byte
1Byte
1Byte
****
BCC
EOX
Block check character
End of System Exclusive
0x** EVEN parity of the Data block
0xF7
1Byte
1Byte
CMD Item Data Length
SOX
IDC
FMT
Start of System Exclusive
ID code → DENON DJ ID
Communication format
0xF0
0x004003
0x12: one way
1Byte
3Byte
1Byte
MDN
UN
MCH
MST
CMD
Model number
Unit number
MIDI channel
Message Type
Command
0x41 (DN-HC4500) or 0x7F (ALL model)
depends on preset mode (0x00 to 0x0F)
depends on preset mode (0x00 to 0x05)
0x50: Polling
0x21: Preset request
1Byte
1Byte
1Byte
1Byte
1Byte
EOX End of System Exclusive 0xF7 1Byte
CMD Item Data Length
SOX
IDC
FMT
Start of System Exclusive
ID code → DENON DJ ID
Communication format
0xF0
0x004003
0x12: one way
1Byte
3Byte
1Byte
MDN
UN
MCH
MST
CMD
DL
Data
Model number
Unit number
MIDI channel
Message Type
Command
Data Length
Preset data
0x41 (DN-HC4500)
depends on preset mode (0x00 to 0x0F)
depends on preset mode (0x00 to 0x05)
0x53: Selecting
0x21: Preset request (Return)
0x** number of the data Byte
refer the preset data table
1Byte
1Byte
1Byte
1Byte
1Byte
1Byte
****
BCC
EOX
Block check character
End of System Exclusive
0x** EVEN parity of the Data block
0xF7
1Byte
1Byte
Preset name Item Data Length
USB mode Sel
CD Model Sel
Audio Fs Sel
Unit number Set
MIDI CH Set
JOG Pulse Sel
Fader In Mode
Xcont XFD
Audio buffer
Model code
USB Control mode select
Drive control model select
Audio sampling frequency select
Unit number
MIDI CH
JOG count number per cycle
Fader In mode select
X-control mode select
Audio buffer size
Model number
0x00: HC4500 MIDI, 0x02 to 0x0F: Reserve
0x00: DN-D4500, 0x01: DN-D4000
0x01: 44.1kHz, 0x02: 48kHz, 0x08:
96kHz, 0x04; AUTO
(AUTO: Automatically follow Fs by USB data)
0x00 to 0x0F
0x00: CH1&2, 0x01: CH3&4, 0x02: CH5&6
0x00: 1480, 0x01: 740, 0x02: 555, 0x03: 370
0x00: 2wire Play/Cue, 0x01: 1wire Play/Cue
0x00: OFF, 0x01: ON
0x0040 to 0x0810 (2Byte)
0x41
1Byte
1Byte
1Byte
1Byte
1Byte
1Byte
1Byte
1Byte
2Byte
1Byte
PC DN-HC4500
[DRM] [DSM]
]\
[]
Page 23

19
ENGLISH
ENGLISH
12
TROUBLESHOOTING
2 DN-HC4500 does not operate normally or no sound is produced
• Are the USB cable, audio cables, etc., properly connected?
• Is the volume setting for the source, audio device, application, OS, etc., properly raised?
• Is the appropriate device selected on your audio application?
• Is the sampling frequency setting appropriate?
\Either make the same settings in the DN-HC4500’s preset mode and on the application or set the
DN-HC4500’s preset mode to “AUTO”.
• Are there WAV files with different sampling frequencies and bit rates?
\Depending on your audio application, it may not be possible to play WAV files with different
sampling frequencies and bit rates simultaneously.
• Is other USB equipment in use?
\If other USB devices are connected, try connecting only DN-HC4500 to check for problems.
• Is the USB connector of the connected computer compatible with USB 2.0 (Hi-Speed)?
\Use a USB 2.0-compatible cable.
2 Sound is broken or distorted
• Are other applications or device drivers operating?
\Close any unneeded applications.
• Are you playing multiple WAV files?
\When playing multiple WAV files simultaneously, depending on the capacity of your computer, the
sound may be broken.
(3) Setting the preset data from an external device.
Issue the selecting message shown below from the PC to the DN-HC4500. [DSM]
2 Preset set data table
When the DN-HC4500 identifies that the model number and unit number match, the preset data for the
items settable from an external device are updated according to the received message’s data table.
The structure of the preset set command’s data is as shown below.
CMD Item Data Length
SOX
IDC
FMT
Start of System Exclusive
ID code → DENON DJ ID
Communication format
0xF0
0x004003
0x12: one way
1Byte
3Byte
1Byte
MDN
UN
MCH
MST
CMD
DL
Data
Model number
Unit number
MIDI channel
Message Type
Command
Data Length
Preset data
0x41 (DN-HC4500)
depends on preset mode (0x00 to 0x0F)
depends on preset mode (0x00 to 0x05)
0x53: Selecting,
0x20: Preset set
0x** number of the data Byte
refer the preset data table
1Byte
1Byte
1Byte
1Byte
1Byte
1Byte
****
BCC
EOX
Block check character
End of System Exclusive
0x** EVEN parity of the Data block
0xF7
1Byte
1Byte
Preset name Item Data Length
USB mode Sel
CD Model Sel
Audio Fs Sel
JOG Pulse Sel
Fader In Mode
Xcont XFD
USB Control mode select
Drive control model select
Audio sampling frequency select
JOG count number per cycle
Fader In mode select
X-control mode select
0x00: HC4500 MIDI, 0x02 to 0x0F: Reserve
0x00: DN-D4500, 0x01: DN-D4000
0x01: 44.1kHz, 0x02: 48kHz, 0x08:
96kHz, 0x04; AUTO
(AUTO: Automatically follow Fs by USB data)
0x00: 1480, 0x01: 740, 0x02: 555, 0x03: 370
0x00: 2wire Play/Cue, 0x01: 1wire Play/Cue
0x00: OFF, 0x01: ON
1Byte
1Byte
1Byte
1Byte
1Byte
1Byte
PC DN-HC4500
[DSM] Reception message execution
]\
[]
Page 24
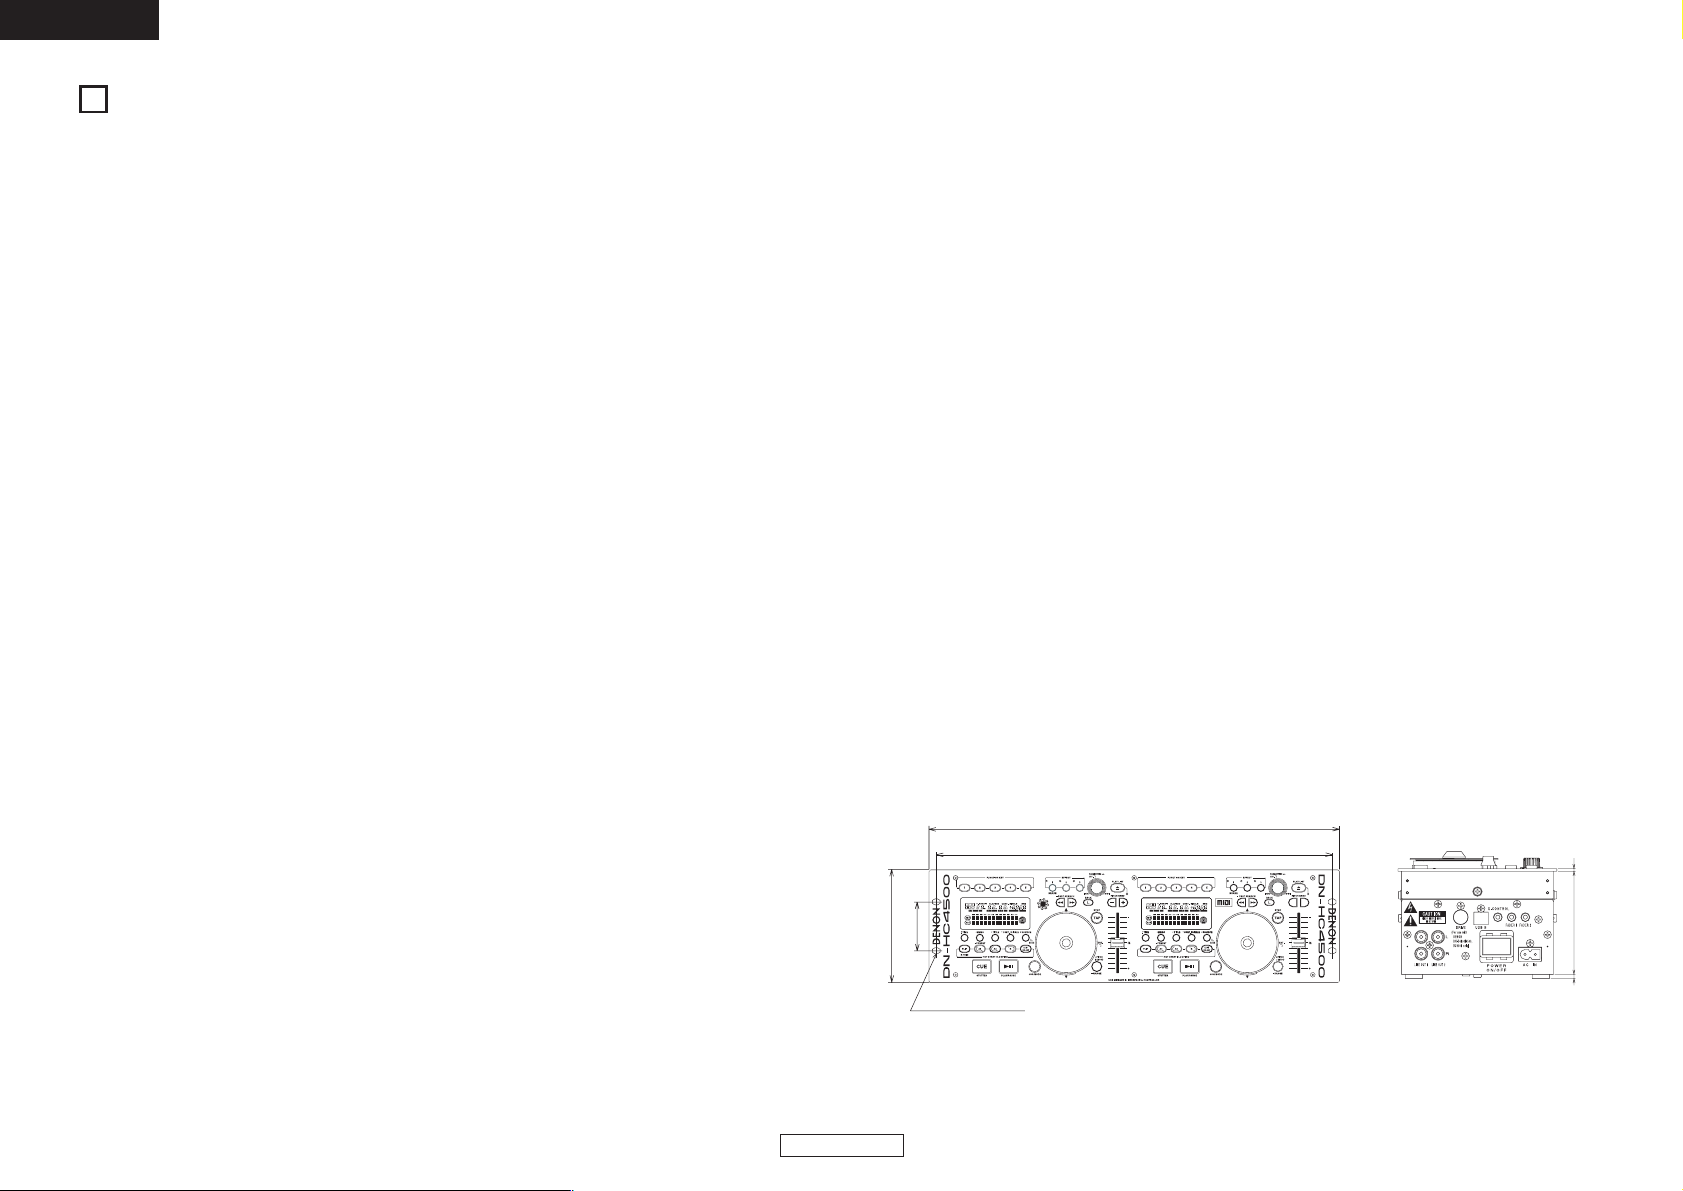
20
ENGLISH
ENGLISH
13
SPECIFICATIONS
2 General
Power requirement: U.S.A, CANADA model: AC 120 V 60 Hz
Europian model: AC 235 V 50 Hz
Japan model: AC 100 V 50 Hz/60 Hz
Power consumption: U.S.A, CANADA model: 12 W
Europian model: 12 W
Japan model: 10 W
Ambient operation
temperature: 0 °C to 40 °C
Dimensions: 482 (W) x 132 (H) x 88 (max106) (D) mm
rack space: EIA 3U
Weight: 3.7 kg
Finish: Front panel: Black (Painted steel)
Rear & Enclosure: Black (Painted steel)
2 Audio
Analog output: 1, 2 RCA pin: unbalanced
2Vrms = 0dBFS
DA converter: Type 24bit 32times oversampling Fs: 44.1 kHz/48 kHz/96 kHz
D-range 106 dB (TYP)
S/N 106 dB (TYP) (DIN)
Frequency response: 20 to 22 kHz, ±0.5 dB
T.H.D: Less than 0.05 % (input = output = 2Vrms/1 KHz, RL: 10 kΩ)
Residual noise: Less than –94 dBV (TYP)
Crosstalk: Less than –110 dB (TYP @1 kHz)
2 USB I/F
USB B connector: USB2.0 (Max480 Mbps)
PC/MAC (Host) ¤ DN-HC4500 (Slave) application
USB Audio (Speaker)
PCM 16bit/24bit 44.1 kHz/48 kHz/96 kHz 4ch
USB MIDI I/O
IN: 1 port, OUT: 1 port
USB HID I/O (General)
32Byte packet
2 Control I/F
Fader start: FADER 1
3.5 mm stereo mini jack (Tip/Ring:signal, Sleeve: GND), 0,5VDC
FADER 2
3.5 mm stereo mini jack (Tip/Ring:signal, Sleeve: GND), 0,5VDC
X-CONTROL: Input
3.5 mm stereo mini jack (Tip/Ring:signal, Sleeve: GND), 0,5VDC
CD Drive control: Mini-DIN 8pin connector (DN-D4500/D4000/BU4500 Drive unit control)
2 Others
Display: 40 mm x 100 mm VFD
Character w/12digitx2line dot matrix & Scratch marker
Jog wheel: 71 mm, touch moving detection
(Touch ON/OFF, Dir FWD/RVS, Pulse count) MIDI: Note ON/OFF
1480/740/555/370 Pulse/cycle MIDI: Control Change
Rubber SW: Function SW
5 w/LED
for HOT start and LOAD SW and others MIDI: Note ON/OFF
Other SW
10 w/LED
for CUE/PLAY/HOT start/EFX/LOAD and others MIDI: Note ON/OFF
Other SW
14 w/o LED
for Fast search / Pitch bend and others MIDI: Note ON/OFF
Pitch Fader: 60 mm w/center tap 1024 steps
MIDI: Pitch bend
(MIDI data –100 %: 0x7F7F / ±0 %: 0x4000 / +100 %: 0x0000)
Parameter knob: SW for Enter and others MIDI: Note ON/OFFF
FWD/RVS 24 Pulse/cycle MIDI: Control Change
2 DENON DJ ASIO Driver
Control parameter: Buffer size
88 (Fs: 44.1 kHz/48 kHz) /188 (Fs: 96 kHz) sample to 2048 sample
Hardware buffer control
Sampling Freq.
44.1 kHz/48 kHz/96 kHz (follow DN-HC4500 setting)
✽ ASIO is a trademark of Steinberg Media Technologies GmbH
✽ MAC is a trademark of Apple Computer, Inc.
✽ MIDI is a trademark of AMEI
482
465
132
57.2
7 x 10 hole
88.2
2
5
Unit: mm
Page 25

1
DEUTSCH
DEUTSCH
1 FUNKTIONEN
INHALTSVERZEICHNIS
z Funktionen ....................................................1
x Anschlüsse ....................................................2
c Bezeichnung und Funktion der Teile ......3 ~ 5
v Geräteumschaltung .......................................5
b Grundlegender Betrieb..................................6
n Seamless loop/Hot start/Stutter....................7
m Trim ...............................................................8
ZUBEHÖR
Stellen Sie sicher, dass das Paket zusätzlich zum Hauptgerät die folgenden Bestandteile enthält:
2
Multifunktions-Touchjog-Disc
Die 71-mm-Jog-Disc ist mit einem ultrahochauflösenden Takt- und Touchsensor
ausgestattet, damit auch die subtilsten oder
schnellsten Scratching-Bewegungen der Hand
genau wiedergegeben werden können.
Natürlich kann die Jog-Disc auch für andere
wichtige Funktionen wie beispielsweise PitchBending, Scannen, Suchen nach Dateien und
die Dry-/Wet-Steuerung für Effekte eingesetzt
werden.
2
Dynamisches Röhrendisplay mit 2Zeilen-Textsupport
Eine weitere wirklich einzigartige Eigenschaft des
DN-HC4500 ist sein informatives und animiertes
Röhrendisplay. Das Display bietet Ihnen mit seinem
zweizeiligen Buchstaben-Informationssystem eine
schnelle Navigationsmöglichkeit durch Ihre
Dateien, Kisten, Ordner; dadurch können Sie auf
einfache Art und Weise sicherstellen, dass Sie die
richtige Datei geladen haben, ohne dass Sie auf
Ihrem Monitor nachsehen müssen. Eine visuelle
32-Positions-Markierungspunkt-Anzeige folgt
blitzschnell und ohne jegliche Drift den
Bewegungen Ihrer Hand. Die übrigen Anzeigen
umfassen Looping, Hot Starts, BPM-Infos,
Verstrichene/verbliebene Zeit, MP3/WAVDateitypen und weitere nützliche Optionen.
2 Extrem reaktionsstarke Softgummi-
Tasten, -Schalter und -Knöpfe
•5 einfach zugängliche Funktionstasten oben
an jedem Deck
•
45-mm-Pitch-Schieber, die eine tiefe Auflösung
oder breite Pitch-Bereich gewährleisten
• Dynamische CUE/PLAY-Tastenbeleuchtung
• 2-stufige Beleuchtung bestimmter Tasten
• Mehrfarb-Beleuchtung bestimmter Tasten für
Überlagerungsfunktionen
• Mehrfarb-LED für Überlagerungsfunktionen
• Pitch Bend-Tasten
• Für die jeweilige Konfiguration stehen die
Tasten Parameter, Range, Sync, Playlist, Back,
Fast Search u. Ä. zur Verfügung
2 BU4500-Laufwerksunterstützung
Der separat im Handel erhältliche und optionale
BU4500-Dual-CD/MP3-Player ermöglicht DJs das
Fortsetzen der Wiedergabe ihrer CD-Sammlung
(wann immer erforderlich) bei gleichzeitiger
Steuerung der gewünschten DJ-Software. Der
BU4500 kann auch als “Sicherungs”-System
eingesetzt werden, ohne dass bei einem
Computerausfall irgendwelche neuen Anschlüsse
durchgeführt werden müssten. Verwenden Sie
einfach die SOURCE-Taste an einem der Decks,
um nahtlos zur CD-Wiedergabe umzuschalten.
Dieses raffinierte Combo-System macht den DNHC4500 zum leistungsstärksten und zugleich
flexibelsten DJ-Hardwarecontroller weltweit.
Darüber hinaus können DJs, die bereits den
DENON DN-D4500/DN-D4000 besitzen, in den
Genuss weiterer Vorteile kommen, indem sie
zusätzlich den DN-HC4500 erwerben und ihr
System dadurch für die Verwendung eines
Computers konfigurieren.
2 Integrierte 24-Bit-Verarbeitung und
USB-Audio
Im Gegensatz zu den meisten DJ-MidiControllern, die nur durch einen USB-Bus
angetrieben werden, enthält der DN-HC4500
seine eigene integrierte Stromversorgung, um die
höchstmöglichen elektrischen technischen Daten
zu erzielen und damit die bestmögliche Leistung
zu liefern. Der DN-HC4500 ist mit einer in ihrem
Bereich führenden Burr Brown (TI-Produkt)-24-BitDAC-Verarbeitung für hervorragende
Ausgangsaudio-Genauigkeit ausgestattet. Die
USBAudioschnittstelle besteht aus einem 2Kanal-Stereoausgangspaar, 44,1/48/96-kHzAbtastbereiche und eine Niedriglatenz-ASIO/OSX
Core-Audiounterstützung.
, Preset ............................................................8
.
Asio-Bedienfeld (nur Windows-Version)
...9, 10
⁄0 Aktualisierung .....................................11 ~ 13
⁄1 MIDI-Befehle ......................................14 ~ 19
⁄2 Fehlersuche.................................................19
⁄3 Technische Daten........................................20
2 Herkömmliches und intuitives Dual-
CD-Player-Layout
2 Hochgeschwindigkeits-USB 2.0-
Schnittstelle
2 FADER START
Unterstützt den herkömmlichen Fader-Start
einschließlich aller DENON-Mischpulte.
2 X-Control
Bei einer Kombination des DN-HC4500 mit den
Mischpulten DN-X500/DN-X900 von DENON
kann der Crossfader dieser Mischpulte mit einem
einfachen 3,5-mm-Stereo-Minikabel für das
Überblenden Ihrer Software-Player konfiguriert
werden.
2 Ve rtieftes Seitenfeld für einfachste
Anschlüsse
2 Vielseitiges Design für Tisch- oder
Rack-Installation
2 Durch den Benutzer justierbare
Voreinstellungen
2 Software-Upgrade über USB
Aufgrund des wertvollen Feedbacks unserer
Kunden nimmt DENON DJ gelegentlich kleinere
Verbesserungen an den aktuellen Funktionen
vor oder führt neue Funktionen ein. Diese PlugIns sind kostenlos auf unserer Website
www.denondj.com verfügbar.
q Audiokabel....................................................2
w USB-Kabel ....................................................1
e Bedienungsanleitung....................................1
r CD-ROM.......................................................1
Page 26
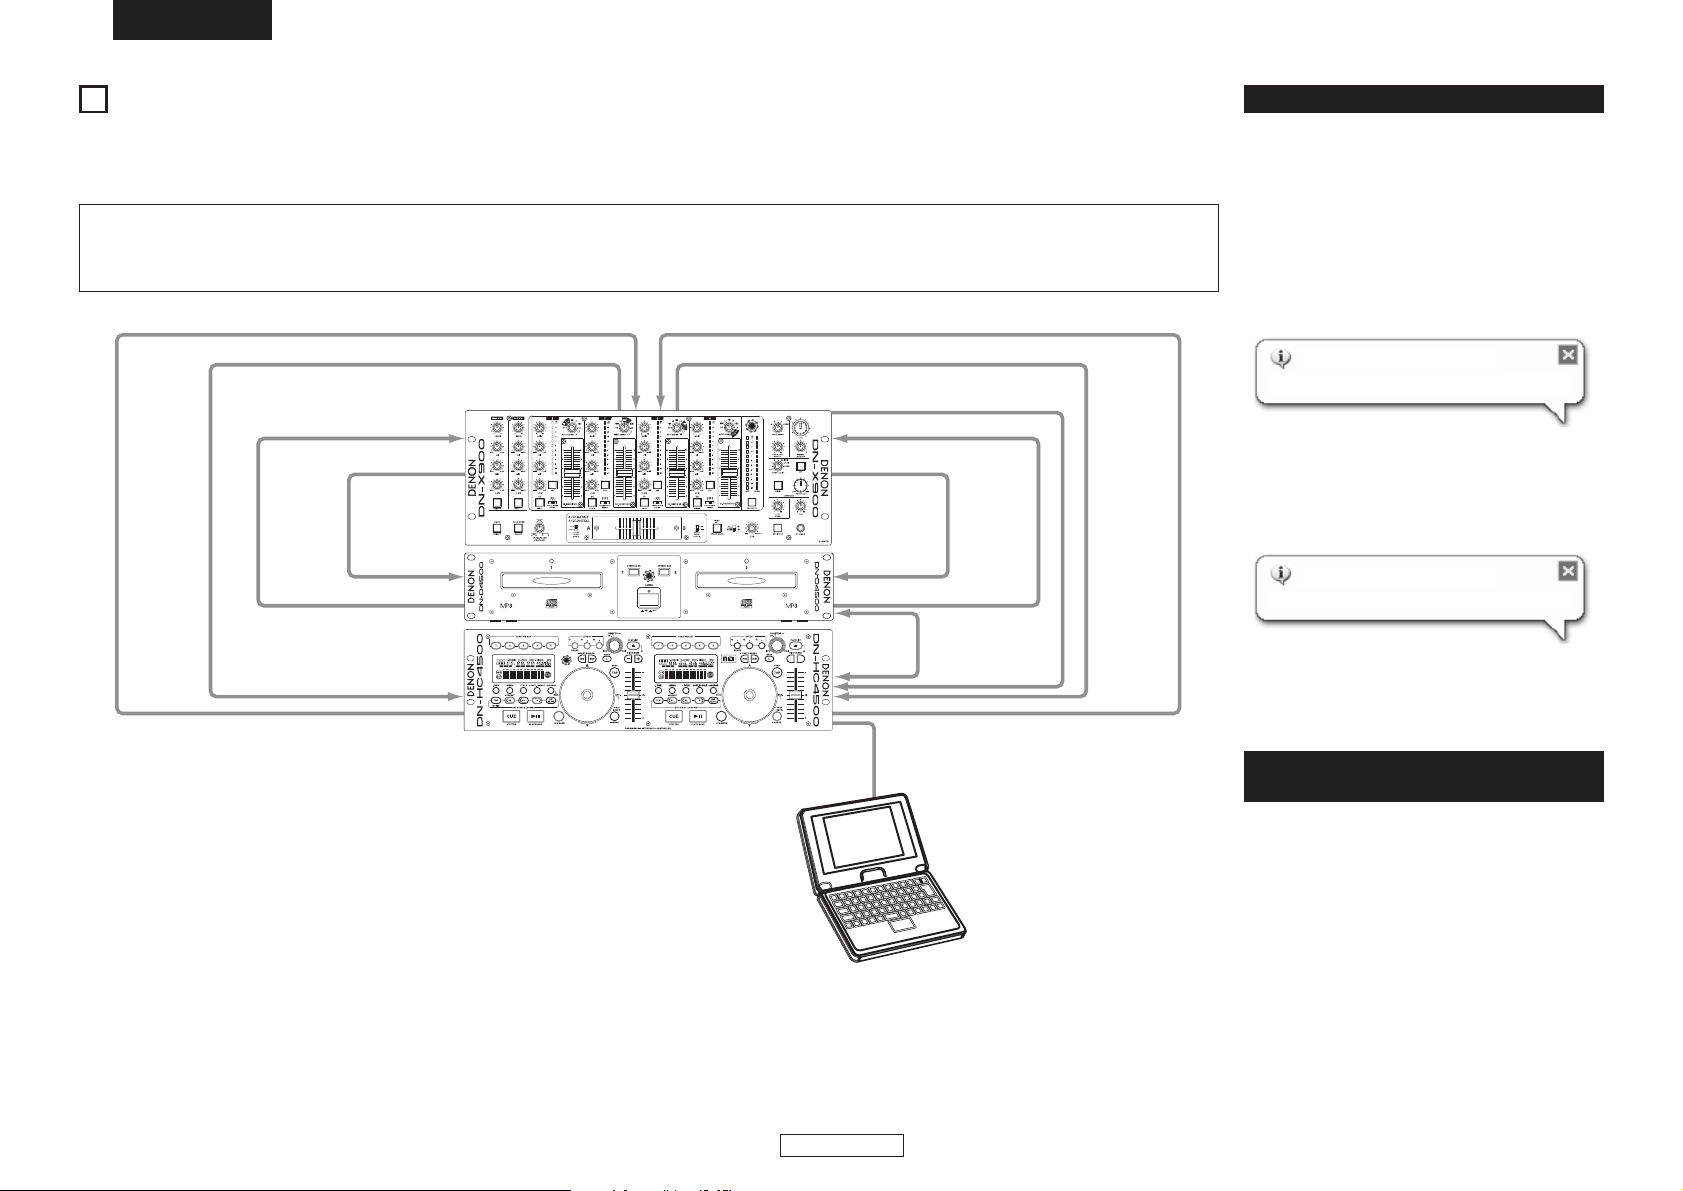
2
DEUTSCH
DEUTSCH
2 ANSCHLÜSSE
ANSCHLÜSSE
1. Schalten Sie den POWER-Schalter aus.
2. Schließen Sie die Cinchstecker-Kabel an den Eingängen Ihres Mischpultes an.
CH6-Fader-SteckerCH4-Fader-Stecker
DN-X900
DN-HC4500
3,5-mm-Stereo-Minikabel
Deck2-FaderStecker
CH6-EingangssteckerCH4-EingangssteckerCinchkabel Cinchkabel
Deck1-Ausgangsstecker Deck2-Ausgangsstecker
DN-D4000/
DN-D4500/
BU4500
DENON-PC/MAC-Aktualisierungsanwendung
und ASIO-Treiberanwendung im Lieferumfang
enthalten.
ACHTUNG:
• Stellen Sie sicher, dass das im Lieferumfang enthaltene Steuerkabel verwendet wird. Wenn ein anderer Kabeltyp verwendet wird, könnte es zu
Geräteschäden kommen.
• Stellen Sie sicher, dass der Strom ausgeschaltet ist, wenn das Steuerkabel angeschlossen wird. Anderenfalls arbeiten die Geräte nicht einwandfrei.
USB B-Anschluss
CH2-Eingangsstecker
CH2-Fader-Stecker
Drive1-Fader-Stecker
Drive1-Ausgangsstecker
Drive2-Fader-Stecker
Drive2-Ausgangsstecker
DRIVE-Anschluss
CH8-Eingangsstecker
CH8-Fader-Stecker
3,5-mm-Stereo-Minikabel
Deck1-FaderStecker
Anschluss an einen PC
Cinchkabel Cinchkabel
3,5-mm-StereoMinikabel
3,5-mm-StereoMinikabel
• Beim DN-HC4500 handelt es sich um ein Plugand-Play-Gerät.
Dies bedeutet, dass der Treiber beim ersten
Anschluss des DN-HC4500 an Ihren Computer
automatisch installiert wird.
•Verwenden Sie für den Anschluss des DNHC4500 an einen PC über einen freien USB-Port
das im Lieferumfang enthaltene USB-Kabel.
• Nach dem Anschluss wird unten rechts auf dem
PC-Bildschirm die folgende Meldung angezeigt.
Sobald die Installation abgeschlossen ist, wird wie
unten dargestellt die Meldung “Your new
hardware is installed and ready to use. (Die neue
Hardware wurde installiert und ist betriebsbereit.)”
angezeigt.
Die Installation ist abgeschlossen. Der DN-HC4500
ist betriebsbereit.
Anschluss an einen MacintoshComputer
• Beim DN-HC4500 handelt es sich um ein Plugand-Play-Gerät, das auf Macintosh OS basiert;
entsprechend ist er nach dem Anschluss sofort
betriebsbereit.
•Verwenden Sie für den Anschluss des DNHC4500 an einen Macintosh-Computer über
einen freien USB-Port das im Lieferumfang
enthaltene USB-Kabel.
An den DN-HC4500 anzuschließende
Versionen von ComputerBetriebssystemen:
Windows XP SP2
Mac OSX 10.4 oder neuer
Computer mit anderen
Betriebssystemen sind nicht mit USB
MIDI kompatibel, d. h. der Computer
funktioniert nach dem Anschluss an
den DN-HC4500 über einen USB-Port
u. U. nicht mehr ordnungsgemäß.
Found New Hardware
USB audio device
Found New Hardware
Your new hardware is installed and ready to use.
X-control
Einige der Funktionen arbeiten beim DN-D4000 nicht
(Neue Hardware erfasst)
(USB-Audiogerät)
(Neue Hardware erfasst)
(
Die neue Hardware wurde installiert und ist betriebsbereit
)
Page 27
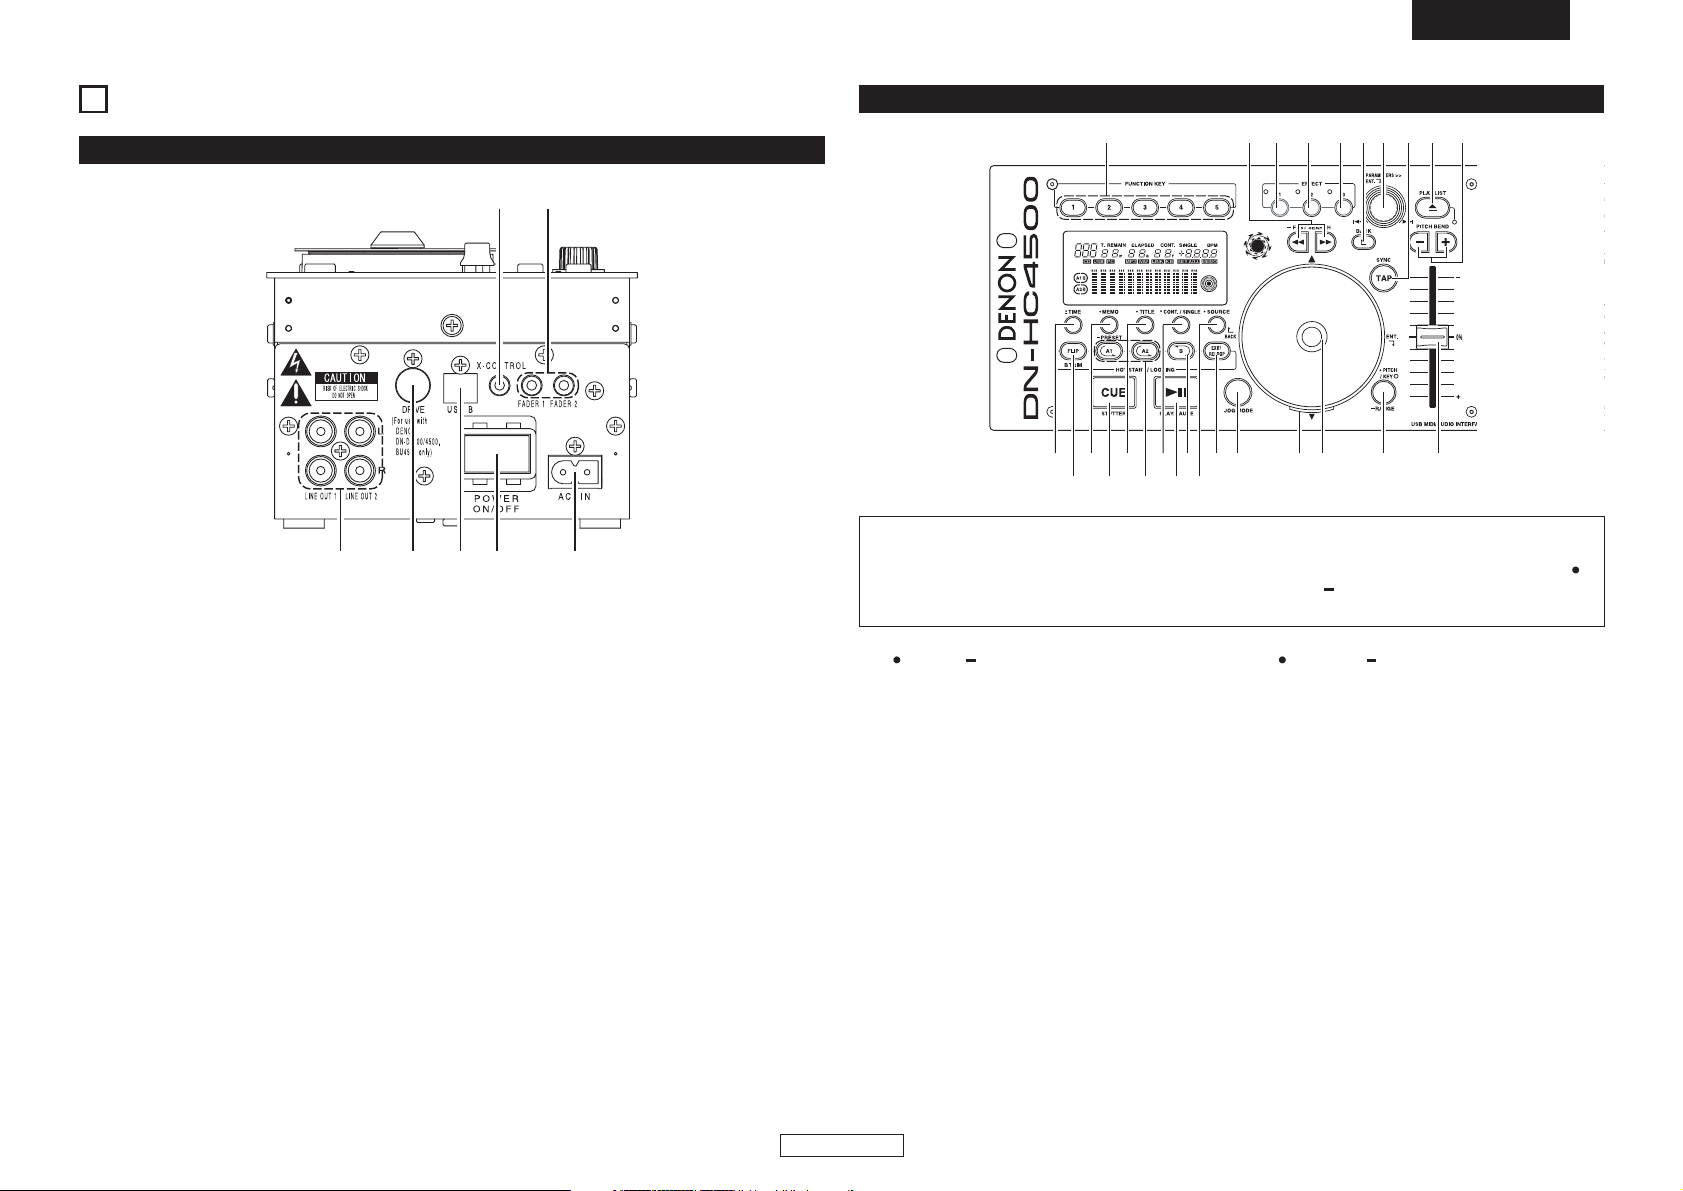
3
DEUTSCH
DEUTSCH
3 BEZEICHNUNG UND FUNKTION DER TEILE
q
Analog-Ausgangsanschluss (LINE OUT)
•
Nicht ausbalancierte Cinch-Ausgangsanschlüsse.
• Audiosignal-Ausgänge.
w DRIVE-Anschluss
• Anschluss der DN-D4000/D4500/BU4500Laufwerkseinheit.
Eine Bedienungsanleitung zum DN-D4000/
D4500/BU4500 finden Sie im Handbuch des
jeweiligen Modells.
e USB B-Anschluss
• Anschluss an einen Computer.
•Versenden von USB MIDI- und HID-Befehlen
über den DN-HC4500.
•
Versenden von USB-Audiosignalen über einen
PC.
(1) Seitenpanel
wretq
uy
r POWER-Taste
• Drücken Sie diese Taste, um den Strom einund auszuschalten.
t AC-Eingangsanschluss
• Netzstecker-Eingangsanschluss für den ACEingangsanschluss des DN-HC4500.
y Faderstart-Anschlüsse
•Verwenden Sie diese Anschlüsse, wenn Ihr
Mischpult die Funktion “Überblendregler
starten” hat.
u X-CONROL-Ausgangsanschluss
• Bitte verwenden, wenn ein DENON DNX900- oder DN-X500-Mischpult mit X-Control
angeschlossen ist.
• Mit dem DN-HC4500 können Sie die
Eingangsfader-Position in ein MIDI-Signal
umwandeln und dieses über den USBAnschluss senden.
(2) Bedienfeld
o!1 !3 !5
!0 !9 @1
!7
!2i!4 !6 @0!8
@9#3 #1 @6#2 @8#0 @7
@2@4@3
@5
i TIME, Total
[Beim PCDJ-Anschluss]
Lesen Sie diesbezüglich das PCDJ-Handbuch.
[Beim Anschluss des DN-D4500]
• TIME:
Beim Drücken dieser Taste schaltet sich die
Zeitanzeige zwischen “ELAPSED” (verstrichene
Zeit) und “REMAIN” (verbleibende Zeit) um.
• Total:
Beim Gedrückthalten dieser Taste für
mindestens 1 Sekunde können Sie sich die
Gesamtzeit anzeigen lassen.
o FLIP/B TRIM
[Beim PCDJ-Anschluss]
Lesen Sie diesbezüglich das PCDJ-Handbuch.
[Beim Anschluss des DN-D4500]
• Drücken Sie diese Taste, um zwischen LoopModus/Hot Start-Modus und Stutter-Modus
umzuschalten.
• Nach Einstellung des B-Punktes kann der B
TRIM MODE ausgewählt werden.
ACHTUNG:
Beachten Sie dabei, dass viele Tasten zwei verschiedene Funktionen erfüllen, die durch kurzes
Antippen oder langes Drücken (1 Sekunde oder länger) ausgewählt werden können. Das Zeichen “ ”
steht für die Funktion bei kurzem Antippen und das Zeichen “ ” steht für die Funktion bei langem
Drücken.
!0 MEMO, PRESET
[Beim PCDJ-Anschluss]
Lesen Sie diesbezüglich das PCDJ-Handbuch.
[Beim Anschluss des DN-D4500]
• MEMO:
Der MEMO-Modus startet, wenn diese Taste
im Cue/Pause-Modus einmal gedrückt wird.
• PRESET:
Wenn diese Taste für mindestens 1 Sekunde
gedrückt wird, wird das PRESET-Modusmenü
angezeigt.
!1 CUE/STUTTER
[Beim PCDJ-Anschluss],
[Beim Anschluss des DN-D4500]
• Das Drücken dieser Taste im
Wiedergabemodus führt dazu, dass die Datei
an die Ausgangsposition der Wiedergabe
zurückkehrt.
• Im Cue-Modus wird bei Drücken der CUETaste ein Stutter-Sound ab dem Cue-Punkt
ausgegeben. Dies wird als Stutter-Spiel
bezeichnet. (Stutter)
Page 28

4
DEUTSCH
DEUTSCH
!2 TITLE
[Beim PCDJ-Anschluss]
Lesen Sie diesbezüglich das PCDJ-Handbuch.
[Beim Anschluss des DN-D4500]
• CD TEXT:
CD-Text wird angezeigt.
• MP3:
Bei jedem Drücken der Taste wird die ID3Tag-Information umgeschaltet.
!3 A1, A2
[Beim PCDJ-Anschluss],
[Beim Anschluss des DN-D4500]
• Mit dieser Taste können Sie einen Startpunkt
für Hot Start, Seamless Loop und Stutter
erstellen.
!4 CONT./SINGLE, RELAY
[Beim PCDJ-Anschluss]
Lesen Sie diesbezüglich das PCDJ-Handbuch.
[Beim Anschluss des DN-D4500]
• CONT./SINGLE:
Mit einem kurzen Drücken auf diese Taste wird
zwischen 3 möglichen END-Modi für die
Wiedergabe umgeschaltet. CONT. (fortgesetzt:
alle Dateien werden abgespielt) SINGLE
(Wiedergabe wird gestoppt und der
ursprünglichen Einstellpunkt ReCUE wieder
gesucht), PLAYLOCK.
• RELAY:
Wenn diese Taste länger als 1 Sekunde
gedrückt wird, können Sie den RELAY PLAYModus ein- und ausschalten.
!5 PLAY/PAUSE
[Beim PCDJ-Anschluss],
[Beim Anschluss des DN-D4500]
•
Mit dieser Taste wird die Wiedergabe gestartet
oder unterbrochen.
!6 B
[Beim PCDJ-Anschluss],
[Beim Anschluss des DN-D4500]
•Verwenden Sie diese Funktion, um den BPunkt für das Erstellen eines Seamless
Loops einzustellen, nachdem bereits ein APunkt eingestellt wurde.
!7 SOURCE
[Beim PCDJ-Anschluss]
Lesen Sie diesbezüglich das PCDJ-Handbuch.
[Beim Anschluss des DN-D4500]
• Drücken Sie diese Taste, um als Quelle PC
oder CD auszuwählen.
!8 EXIT/RELOOP
[Beim PCDJ-Anschluss],
[Beim Anschluss des DN-D4500]
•Verwenden Sie diese Taste, um den Modus
zu verlassen oder zur Seamless LoopWiedergabe zurückzukehren.
Mit dieser Funktion können Sie eine Vielzahl
von Loop-Einstellungen hinzufügen.
!9 JOG MODE
[Beim PCDJ-Anschluss]
Lesen Sie diesbezüglich das PCDJ-Handbuch.
[Beim Anschluss des DN-D4500]
Wählen Sie den Bend-Modus oder den Modus
zur manuellen Einzelbild-Suche aus.
@0 JOG-Anzeige
[Beim PCDJ-Anschluss]
Lesen Sie diesbezüglich das PCDJ-Handbuch.
[Beim Anschluss des DN-D4500]
•
Dieser pulsierende blaue Balken bietet einen
schnellen Zugriff auf den gewünschten JOGModus wie z. B. Pitch Bend und Rahmensuche.
@1 JOG-Disc
[Beim PCDJ-Anschluss]
Lesen Sie diesbezüglich das PCDJ-Handbuch.
[Beim Anschluss des DN-D4500]
•Verwenden Sie diesen Vinyl-JOG für die
manuelle Suche und Pitch Bend-Betriebe.
@2 PITCH/KEY, RANGE
[Beim PCDJ-Anschluss]
Lesen Sie diesbezüglich das PCDJ-Handbuch.
[Beim Anschluss des DN-D4500]
• PITCH/KEY:
Bei jedem Drücken der Taste wird das Display
wie folgt umgeschaltet:
Pitch ein / Tasteneinstellung / beide aus
• RANGE:
Drücken Sie diese Taste länger als 1 Sekunde,
um den Pitch-Bereich einzustellen.
@3 Pitch Slider
[Beim PCDJ-Anschluss],
[Beim Anschluss des DN-D4500]
•Verwenden Sie diesen Schieber, um die
Wiedergabegeschwindigkeit einzustellen.
•
Die Wiedergabegeschwindigkeit verringert
sich, wenn der Schieber nach oben geschoben
wird, und erhöht sich, wenn er nach unten
geschoben wird.
@4 PITCH BEND±
[Beim PCDJ-Anschluss],
[Beim Anschluss des DN-D4500]
• Das Drücken dieser Tasten führt zu einer
vorübergehenden Umschaltung der HauptWiedergabegeschwindigkeit.
•Wenn Sie die Taste loslassen, wird die zuvor
eingestellte Wiedergabegeschwindigkeit
wiederhergestellt.
@5 PLAY LIST
[Beim PCDJ-Anschluss]
Lesen Sie diesbezüglich das PCDJ-Handbuch.
[Beim Anschluss des DN-D4500]
• Drücken Sie diese Taste, um den Disc-Halter
zu öffnen und zu schließen.
• Während der Wiedergabe lässt sich der DiscHalter nicht öffnen.
Stoppen Sie die Wiedergabe vor dem Drücken
dieser Taste.
@6 TAP
[Beim PCDJ-Anschluss]
Lesen Sie diesbezüglich das PCDJ-Handbuch.
[Beim Anschluss des DN-D4500]
• Funktioniert nicht.
@7 PARAMETERS-Knopf
[Beim PCDJ-Anschluss],
[Beim Anschluss des DN-D4500]
• Drehen:
Wählen Sie das Track/die Datei oder die
Voreinstellungs-Parameter aus.
• Drücken:
Einstellung der ausgewählten Parameter.
@8 BACK
[Beim PCDJ-Anschluss]
Lesen Sie diesbezüglich das PCDJ-Handbuch.
[Beim Anschluss des DN-D4500]
• Funktioniert nicht.
@9 EFFECT3
[Beim PCDJ-Anschluss]
Lesen Sie diesbezüglich das PCDJ-Handbuch.
[Beim Anschluss des DN-D4500]
• Funktioniert nicht.
#0 EFFECT2
[Beim PCDJ-Anschluss]
Lesen Sie diesbezüglich das PCDJ-Handbuch.
[Beim Anschluss des DN-D4500]
• Funktioniert nicht.
#1 EFFECT1
[Beim PCDJ-Anschluss]
Lesen Sie diesbezüglich das PCDJ-Handbuch.
[Beim Anschluss des DN-D4500]
• Schaltet den Bremsmodus ein oder aus.
#2
FAST SEARCH (6/7) QUICK JUMP
[Beim PCDJ-Anschluss],
[Beim Anschluss des DN-D4500]
• QUICK JUMP:
Wenn eine dieser Tasten kurz gedrückt wird,
springt die Wiedergabe-Position in Rückwärts
(6)- oder Vorwärts (7)-Richtung.
• FAST SEARCH:
Wenn eine dieser Tasten gedrückt gehalten
wird, wird die Disc schnell in Rückwärts (6)oder Vorwärts (7)-Richtung durchsucht.
#3 FUNCTION
[Beim PCDJ-Anschluss]
Lesen Sie diesbezüglich das PCDJ-Handbuch.
[Beim Anschluss des DN-D4500]
• Funktioniert nicht.
Page 29
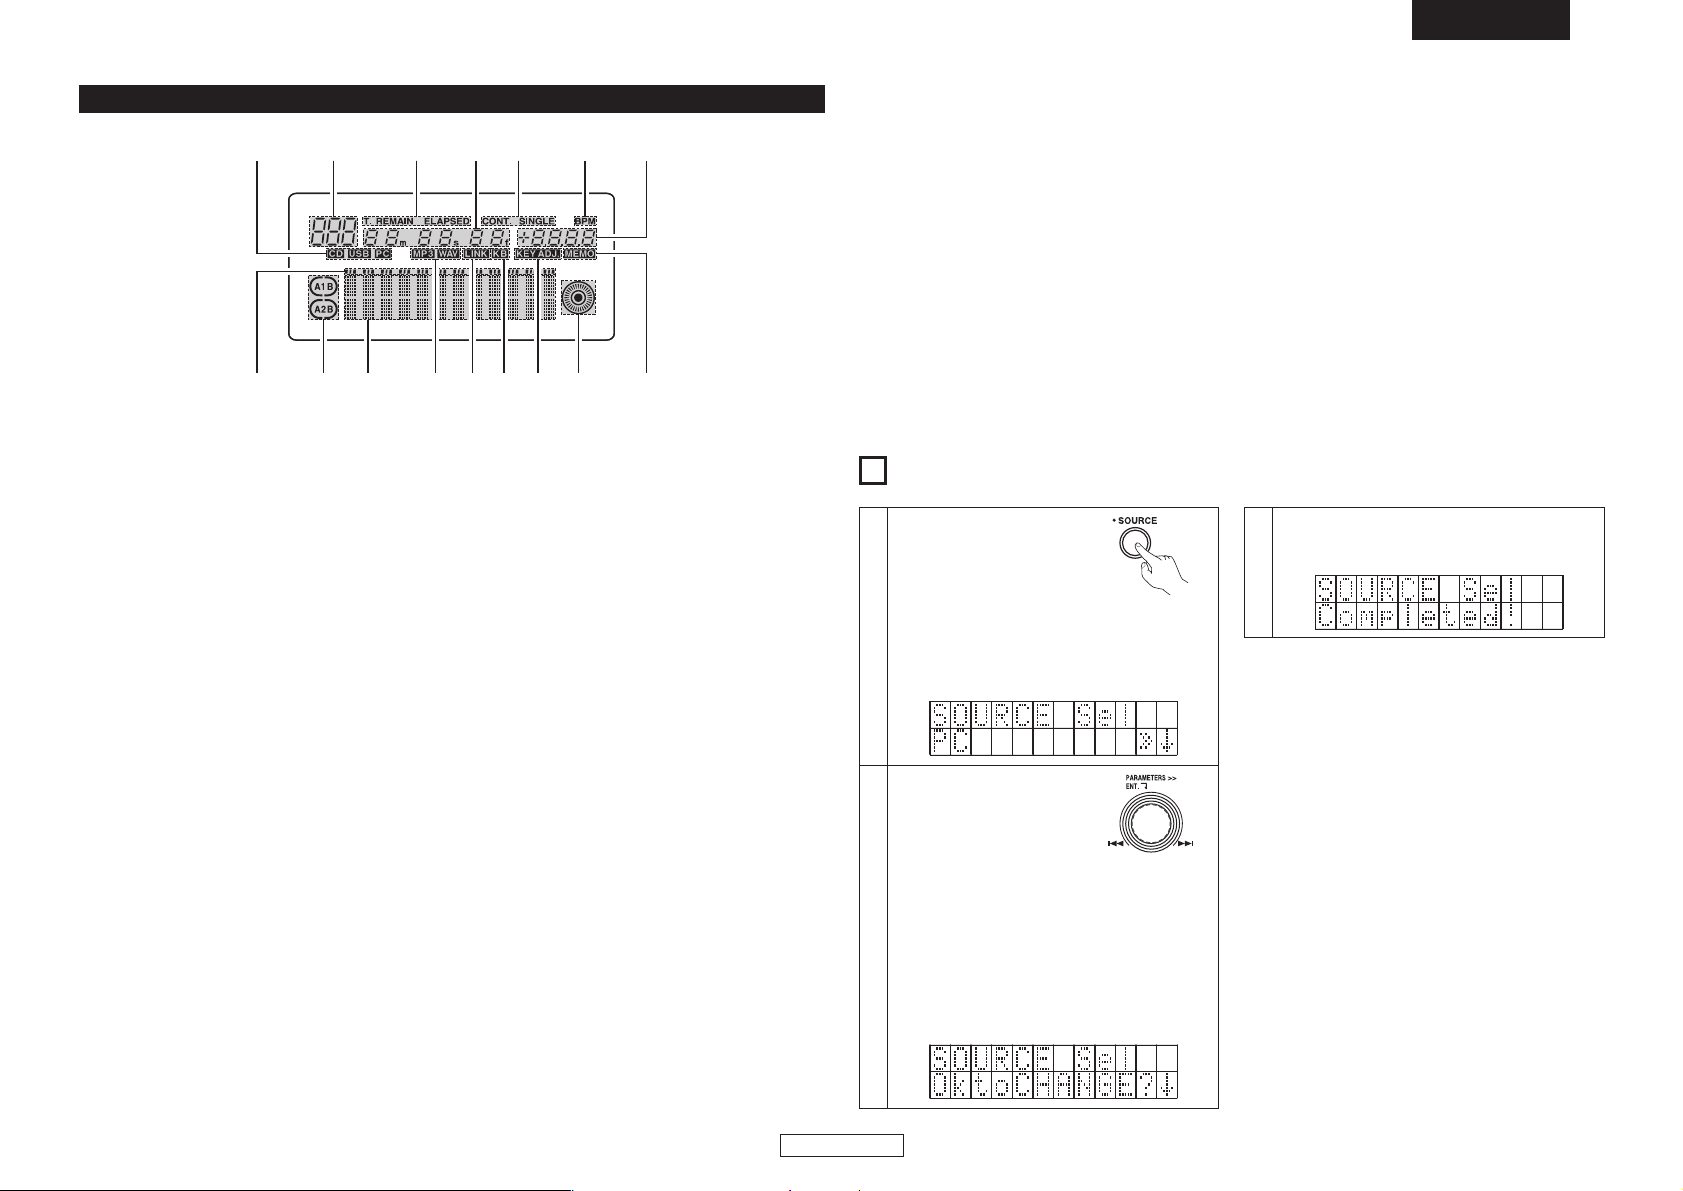
5
DEUTSCH
DEUTSCH
q Wiedergabe-Positionsanzeigen
• Während der normalen Wiedergabe leuchtet
die weiße Positionsanzeige, und die Position
innerhalb des Tracks wird durch die Anzeige
der bereits verstrichenen Zeit angezeigt.
• Falls die Zeit bis zum Ende des Tracks kürzer
ist als die spezifizierte Zeit, blinkt die
Wiedergabe-Positionsanzeige entsprechend
der verbleibenden Track-Zeit (EOM), um auf
das Ende des Tracks hinzuweisen.
w Loop-Modusanzeigen
• Der DN-HC4500 verfügt über zwei LoopModusanzeigen, A und B.
Bei Einstellung von A und B leuchten die
Anzeigen A und B.
e Zeichendisplay
•
In diesem Block werden die unterschiedlichsten
Informationen, Textmeldungen u. Ä. angezeigt.
r Datei-Datenanzeigen
• Hiermit wird der Typ der wiederzugebenden
Datei angezeigt.
t Anschlussanzeige externes Gerät
•
Diese Anzeige leuchtet, wenn MIDI-Signale zum
DN-HC4500 oder dem externen Gerät gesendet
oder von diesem empfangen werden.
y Tastatur-Anzeige
•
Diese Anzeige leuchtet, wenn ein Lichtbefehl
über einen Computer empfangen wird.
(3) Display
u KEY ADJ.-Anzeige
•
Im Tasten-Einstellmodus leuchtet “KEY ADJ.”.
i Visuelle Markierung
•
Die Wiedergabeposition wird entsprechend
dem Wiedergabestatus der unterschiedlichen
Decks angezeigt.
o MEMO Anzeige
•
Wenn für das gegenwärtig wiederzugebende
oder in Standby eingestellte Track Speicherdaten
vorhanden sind, leuchtet die “MEMO”-Anzeige.
!0 Pitch-Anzeige
• Hiermit wird die Wiedergabegeschwindigkeit
(Pitch) angezeigt.
!1 BPM-Anzeige
•
Bei Anzeige von BPM im Pitch-Anzeigebereich
leuchtet diese Anzeige.
!2 Wiedergabemodus-Anzeigen
•
Hiermit wird der Wiedergabemodus angezeigt.
CONT.:
Sobald die Wiedergabe des Tracks abgeschlossen
ist, wird das nächste Track wiedergegeben.
SINGLE:
Sobald das Ende dieses Tracks erreicht ist,
stoppt die Wiedergabe.
!3 Minuten-, Sekunden- und Einzelbild-
Anzeigen
• Hiermit wird die Position der gegenwärtigen
Wiedergabe oder die Position angezeigt, bei
der der Standby-Modus eingestellt wurde.
!4 Zeitmodus-Anzeigen
• Beim Drücken der Time-Taste schaltet sich
die Anzeige wie folgt um:
ELAPSED:
Die verstrichene Zeit vom Beginn des
Tracks an wird angezeigt.
REMAIN:
Die verbleibende Zeit des Tracks wird
angezeigt.
T.ELAPSED:
Die Zeit vom Beginn des ersten Tracks auf
der Disc wird angezeigt.
T.REMAIN:
Die verbleibende Zeit aller Tracks auf der
Disc wird angezeigt.
!5 Track-Anzeige
• Hiermit wird die Anzahl der gegenwärtig
wiederzugebenden Tracks angezeigt.
!6 Anschlussanzeigen
•
Hiermit werden die über den DN-HC4500 zu
steuernden angeschlossenen Geräte angezeigt.
PC:
Der DN-HC4500 steuert die DJ-Software
auf dem PC/MAC.
CD:
Der DN-HC4500 steuert DN-D4000/D4500/
BU4500.
✽ Die Wiedergabe der USB-Audiosignale von
einem PC wird im CD-Modus fortgesetzt.
4 GERÄTEUMSCHALTUNG
1
Drücken Sie die Taste
SOURCE, um das
Auswahlfenster
“SOURCE” anzuzeigen.
HINWEIS:
• Beim Drücken der BACK-Taste wird das
Umschalten der Quellen abgeschlossen
und der Modus wird in den normalen
Modus zurückgeschaltet.
2
Drehen Sie den
PARAMETERS-Knopf, um
das Gerät auszuwählen.
Drücken Sie zur Eingabe
erneut den Knopf.
“OK to CHANGE” wird angezeigt.
HINWEIS:
•
Beim Drehen des PARAMETERS-Knopfes
während der Anzeige von “OK to CHANGE?Ø”
wird “NO” angezeigt.
•
Drücken Sie im “NO”-Modus den
PARAMETERS-Knopf oder die BACK-Taste,
um zu Schritt 1 zurückzukehren.
3
Drücken Sie zur Eingabe erneut den Knopf.
“Completed!” wird angezeigt und das
Umschalten der Quellen wird abgeschlossen.
wretquyo
!3!5 !0!2
!4!6
!1
i
Page 30
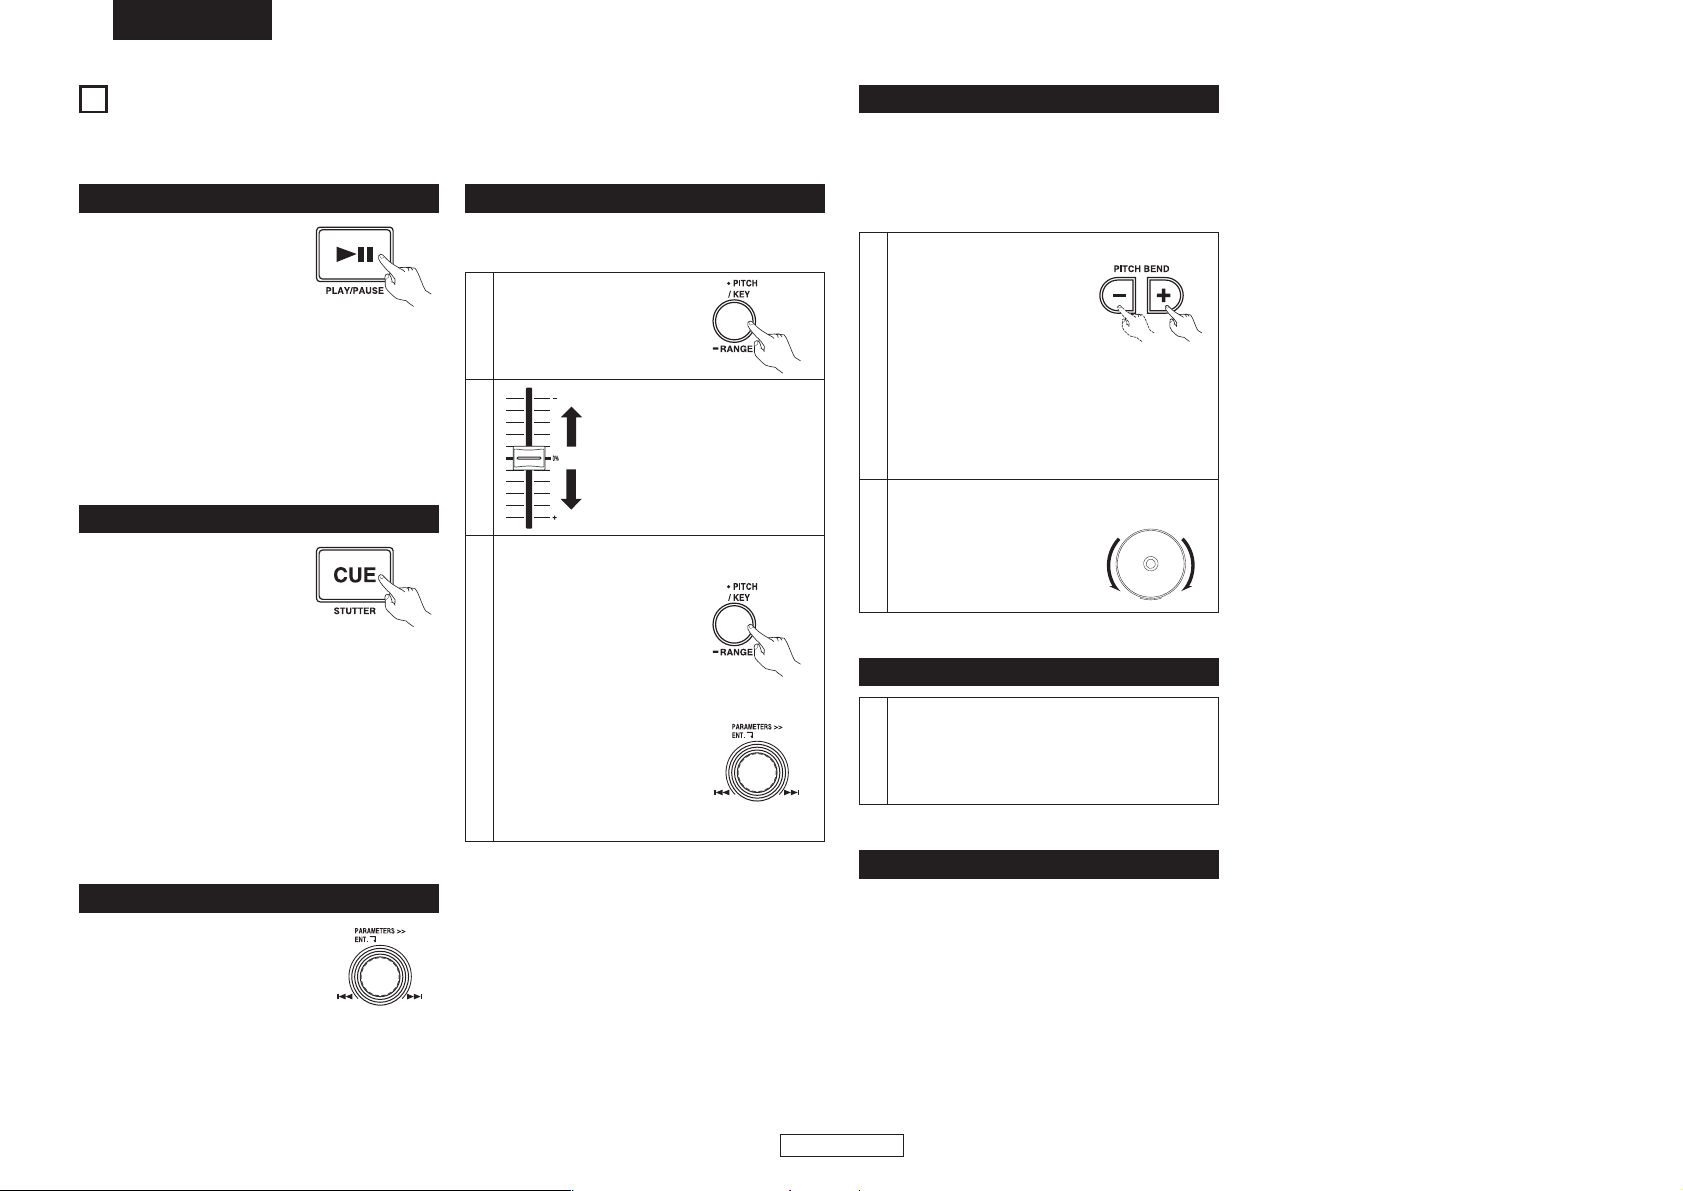
6
DEUTSCH
DEUTSCH
• Bei jeder Betätigung der
PLAY/PAUSE-Taste wird
zwischen Wiedergabe und
Pause umgeschaltet. Die
Taste PLAY/PAUSE leuchtet
während der Wiedergabe grün und blinkt im
Unterbrechungsmodus (Pause).
•
Wenn die PLAY/PAUSE-Taste während der
Wiedergabe gedrückt wird, unterbricht der DND4500 die Wiedergabe an dieser Stelle. Wenn Sie
die PLAY/PAUSE-Taste noch einmal drücken, wird
die Wiedergabe fortgesetzt.
5 GRUNDLEGENDER BETRIEB
WIEDERGABE und Pause
•
Wird während der Wiedergabe
die CUE-Taste gedrückt, stoppt
das Track/die Datei und kehrt
zum Ausgangspunkt der
Wiedergabe zurück (Cue-Punkt).
Diese Funktion wird als Back-Cue bezeichnet.
Mit der Back-Cue-Funktion können Sie die
Wiedergabe vom genau gleichen Punkt aus starten.
Wenn der DND4000/D4500/BU4500 für das Starten
der Wiedergabe bereit ist, leuchtet die CUE-Taste
rot.
•
Sie können Cue-Punkt wie folgt einstellen und ändern:
•Wenn Sie die Wiedergabe gestartet haben.
• Dateiauswahl beendet.
•Manuelle Suche.
WIEDERGABE und Cue
Mit dem Pitch-Slider können Sie die
Wiedergabegeschwindigkeit (Pitch) einstellen.
• Drehen Sie am PARAMETERSKnopf.
Wählen Sie die Datei aus
Pitch-Einstellung
2
3
Der DN-D4000/D4500/BU4500 verfügt über
verschiedene Pitch-Bereiche.
Wenn die RANGE-Taste
länger als 1 Sek. gedrückt
wird, kann der PitchBereich mit dem
PARAMETERS-Knopf
ausgewählt werden.
•
Beim Drücken des
PARAMETERS-Knopfs
wird der Pitch-Bereich
eingegeben und der PitchBereichsauswahlmodus
abgebrochen.
1
Drücken Sie die PITCHTaste, damit das PITCH
LED leuchtet.
In diesem Abschnitt wird der grundlegende Betrieb beim Anschluss eines DN-D4000/D4500/BU4500
näher erklärt.
Betätigen Sie den Pitch-Slider, um
den Pitch einzustellen.
Die gegenwärtige Pitch-Einstellung
wird auf dem Display angezeigt.
Pitch-Abnahme
Pitch-Zugewinn
Mit der PITCH BEND-Funktion können Sie den
Pitch vorübergehend ändern. Diese Funktion kann
beim DN-D4000/D4500/BU4500 auf zwei Arten
aktiviert werden: über die PITCH BEND-Tasten und
über die JOG-Disc.
Pitch-Bend
1
[Tasten PITCH BEND +/–]
• Drücken Sie die Taste
PITCH BEND – oder +,
um den Pitch
vorübergehend zu
ändern.
Während diese Tasten gedrückt gehalten
werden, wird der Pitch kontinuierlich bis
zum Limit verändert.
• Nach Loslassen der PITCH BEND-Tasten
kehrt der Wiedergabe-Pitch auf die SliderEinstellung zurück.
2
[JOG-Disc]
• Die Wiedergabegeschwindigkeit kann
durch Drehen der JOGDisc während der
Wiedergabe geändert
werden.
Wiedergabe bei Einschaltung
1
Wenn die “Power On Play”-Voreinstellung
des DN-D4000/D4500/BU4500 auf “ON”
gestellt wurde, wird die Wiedergabe beim
Einschalten der Stromversorgung vom
Anfang der Disc gestartet.
Lesen Sie hinsichtlich der Anweisungen für eine
verzögerte Wiedergabe das Handbuch des DND4000/D4500/BU4500.
Verzögerte Wiedergabe
Page 31

7
DEUTSCH
DEUTSCH
6 SEAMLESS LOOP/HOT START/STUTTER
Seamless Loop/Hot Start/Stutter (A1-, A2-Tasten)
t, ye, y
q, w, y
r
Betriebsanzeige
(Lesen Sie diesbezüglich den Abschnitt, in dem das Display beschrieben wird.)
1
Einstellung des A-Punkts
(Laden der Hot Start-Daten)
q Drücken Sie die A1-
oder A2-Taste, um den
A-Punkt einzustellen
und die Hot Start-Daten
zu laden.
• Die A1- und A2-Tasten können separat
für den Hot Start verwendet werden.
•Wenn ein A-Punkt eingestellt wurde,
leuchtet die entsprechende A-Taste und
das “ ”-Display, und die Taste wird in
den Hot-Start-Modus umgeschaltet.
2
Starten von Hot Start
w
Wenn die A1- oder A2Taste gedrückt wird,
startet die Hot StartWiedergabe ab dem
entsprechenden A-Punkt.
7
Löschen des A1/A2-Punktes
y Drücken Sie während des Drückens der
FLIP-Taste die A1- oder A2-Taste, um die
entsprechenden A- und B-Punkte zu
löschen.
Oder drücken Sie die FLIP-Taste länger
als 1 Sek., um beide A1- und A2-Punkte
gleichzeitig zu löschen.
Durch ein schnelles Drücken der “FLIP”Taste und ein anschließendes Drücken
der A1-, A2- oder B-Taste werden diese
Punkte einzeln gelöscht.
3
Einstellung des B-Punktes für Seamless
Loop
e
Wenn die B-Taste nach
Einstellen des APunktes oder nach Start
der Hot StartWiedergabe gedrückt wird, wird der BPunkt eingestellt und die Seamless LoopWiedergabe startet ab dem A-Punkt.
• Die B-Taste funktioniert hinsichtlich des
A-Punktes, der aktiviert worden ist,
bevor die B-Taste gedrückt wurde.
•
Wenn die B-Taste während der
Seamless Loop-Wiedergabe oder nach
der EXIT-Wiedergabe gedrückt wird, wird
der B-Punkt zu der Position verschoben,
an der die Taste gedrückt worden ist.
•Wenn der B-Punkt eingestellt wurde,
leuchtet das B- und das “ ”-Display.
4
Wiedergabe von Seamless Loops
•Wenn der B-Punkt für A1 nach dem
Wiedergabestart vom A1-Punkt erfasst
wird, kehrt die Wiedergabe nahtlos zum
A1-Punkt zurück. Während der Schleife
von A1 zu B, wird der B-Punkt für A2
ignoriert.
•Wenn der B-Punkt für A2 nach dem
Wiedergabestart vom A2-Punkt erfasst
wird, kehrt die Wiedergabe nahtlos zum
A2-Punkt zurück. Während der Schleife
von A2 zu B, wird der B-Punkt für A1
ignoriert.
5
Exit/Reloop
r Während der Seamless
Loop-Wiedergabe
können Sie die Schleife
verlassen oder diese
fortsetzen.
EXIT:
Drücken Sie während der Seamless
Loop-Wiedergabe die EXIT/RELOOPTaste, um die Schleife zu verlassen. Der
DN-D4000/D4500/BU4500 setzt die
Wiedergabe nach dem B-Punkt fort.
RELOOP:
Wenn die EXIT/RELOOP-Taste nach
Verlassen der Schleife gedrückt wird,
wird die Seamless Loop-Wiedergabe ab
Punkt A fortgesetzt.
6
Stutter
• Der A1- und A2-Punkt
kann auch für die
Stutter-Wiedergabe
verwendet werden.
t Drücken Sie zur Aktivierung der Stutter-
Wiedergabe die FLIP-Taste für die A1/A2Tasten; anschließend schaltet sich das
“ ”-Display aus.
Drücken Sie die FLIP-Taste, um zwischen
den Modi Hot Start/Seamless Loop und
Stutter umzuschalten.
Page 32

8
DEUTSCH
DEUTSCH
7 TRIM
Lesen Sie hinsichtlich der Anweisungen für die
Trim-Funktion das Handbuch des DN-D4000/
D4500/BU4500.
HINWEIS:
Falls die in der “CD Mode Sel”-Voreinstellung
durchgeführten Einstellungen nicht mit dem
gegenwärtig angeschlossenen Gerät
übereinstimmt, funktioniert das Gerät u. U. nicht
ordnungsgemäß.
8 PRESET
• Diese Funktion ist nur bei Auswahl der “PC”-Quelle verfügbar.
(Beim Anschluss des DN-D4000/D4500/BU4500 wird der entsprechende Voreinstellungsbetrieb
durchgeführt.)
• Der DN-HC4500 ist mit einer Voreinstellungsfunktion ausgestattet, die dem Benutzer das Speichern und
Abrufen der Geräte-Betriebsmodi ermöglicht. Die Funktion umfasst die unten aufgeführten Punkte und
Werte.
1. Voreinstellungsmodus
q Halten Sie die PRESET-Taste für mindestens 1 Sekunde gedrückt, um den Voreinstellungsmodus
zu aktivieren.
w Wählen Sie die Voreinstellungsfunktion mit dem PARAMETERS-Knopf aus.
e Wählen Sie das Objekt aus und drücken Sie den PARAMETERS-Knopf, um das zu ändernde
voreingestellte Objekt auszuwählen.
r Drehen Sie anschließend den PARAMETERS-Knopf. Die voreingestellten Daten werden
ausgewählt.
t Wählen Sie die Information aus und drücken Sie den PARAMETERS-Knopf, um die zu ändernden
voreingestellten Informationen auszuwählen.
y
Wenn mehrere Voreinstellungen vorgenommen werden sollen, wiederholen Sie die Schritte w ~ t.
u Beim Drücken der PRESET-Taste wird der Voreinstellungsmodus ausgeschaltet.
2. Voreinstellung von Punkten und Daten
Das “*” neben den Daten gibt den Grundwert an.
(1) USB Mode Sel: HC4500 MIDI*
Zur Auswahl des USB-Kommunikationsmodus.
Der DN-HC4500 bedient sich einzigartiger MIDI-Spezifikationen.
(2) CD Model Sel: DN-D4500* / DN-D4000
Wählen Sie den Namen des Geräts aus, dass an den DRIVE-Anschluss angeschlossen und
darüber gesteuert wird.
BU4500 entspricht DN-D4500, so dass die PRESET-Einstellung “DN-D4500” lautet.
(3) Audio Fs Sel: 44.1k* / 48k / 96k / Auto
44.1 kHz: Die Abtastfrequenz (Fs) ist unabhängig von den vom PC eingehenden Daten fest auf
44,1 kHz eingestellt.
48 kHz: Die Abtastfrequenz (Fs) ist unabhängig von den vom PC eingehenden Daten fest auf
48 kHz eingestellt.
96 kHz: Die Abtastfrequenz (Fs) ist unabhängig von den vom PC eingehenden Daten fest auf
96 kHz eingestellt.
AUTO: Die Abtastfrequenz (Fs) wird automatisch entsprechend den vom PC gesendeten
Daten umgeschaltet.
q Drücken Sie PARAMETERS, um “Fs” einzustellen.
“OK to CHANGE?Ø” wird auf dem Zeichendisplay angezeigt.
w Drücken Sie erneut den PARAMETERS-Knopf.
e Nach dem Umschalten der Abtastfrequenz wird “Audio Fs Sel” angezeigt.
(4) Unit No. Set: 1 to 15 / ALL*
Hiermit wird die Nummer des Geräts eingestellt.
Wenn beispielsweise zwei Geräte an einen PC angeschlossen sind, können Sie ein Gerät auf “No.
2” einstellen.
(5) MIDI CH Set: 1&2* / 3&4 / 5&6
Hiermit wird der MIDI-Kanal eingestellt.
(6) JOG Pulse Sel: 1480* / 740 / 555 / 370 count/cycle
Hiermit wird die Anzahl der Taktausgabe pro Drehung des Jog-Rads ausgewählt.
(7) FaderIn Mode: 1-PLAY/CUE / 2-PLAY / CUE
(8) X-CONT XFD: OFF / ON*
Hiermit wird der X-Steuereingangssignal-Crossfadereingang aktiviert oder deaktiviert.
(9) Preset Init.: Hiermit stellen Sie sämtliche voreingestellten Daten auf die werkseitigen
Grundeinstellungen zurück.
q Drücken Sie den PARAMETERS-Knopf, um die PRESET-Daten zu löschen.
“Preset Init” blinkt auf dem Zeichendisplay.
w Drücken Sie noch einmal auf den PARAMETERS-Knopf.
“Push to ExeØ” wird auf dem Zeichendisplay angezeigt.
e Drücken Sie erneut den PARAMETERS-Knopf.
“OK to CHANGE?Ø” wird auf dem Zeichendisplay angezeigt.
r Ist der Löschvorgang abgeschlossen, wird “Completed!” angezeigt.
Page 33

9
DEUTSCH
DEUTSCH
2 Deinstallation
Führen Sie die Installation über die Systemsteuerung
und den Befehl “Add or Remove Programs (Programme
hinzufügen und entfernen)” durch.
5
Klicken Sie auf die “Next>”-Taste.
Die Installation beginnt.
Schaubild: Fenster zur Installationsbestätigung
9 ASIO-BEDIENFELD (nur Windows-Version)
Installation des ASIO-Treibers
1
Doppelklicken Sie auf den
Installationsassistenten.
Nun wird der Setup-Assistent für den ASIOTreiber gestartet.
Klicken Sie auf “Next>”.
Schaubild:
Setup-Assistentfenster des ASIO-Treibers
2
Nun wird der Bildschirm mit der
Lizenzvereinbarung angezeigt. Wählen Sie
“I Agree”, wenn Sie den aufgeführten
Bedingungen zustimmen.
Klicken Sie anschließend auf die “Next>”Taste. Klicken Sie auf die “Next>”-Taste.
Schaubild: Fenster mit der Lizenzvereinbarung
3
Nun wird ein Bildschirm angezeigt, über den
der Ordner zur Installation des ASIO-Treibers
bestätigt wird.
Klicken Sie auf die “Next>”-Taste.
Schaubild:
Fenster zur Auswahl des Installationsordners
Standardmäßig wird der ASIO-Treiber unter
“C\Program Files\DENON_DJ\DDJASIO\”
installiert.
Wählen Sie die Option “Browse” und
wählen Sie einen anderen Ordner, wenn Sie
dies ändern möchten.
Wählen Sie die Option “Everyone”, wenn
“jeder” den Computer verwendet, auf dem
das Aktualisierungsprogramm installiert
werden soll; wählen Sie die Option “Just
me”, wenn es sich bei Ihnen um den
einzigen Benutzer handelt.
4
Nun wird ein Fenster angezeigt, über das Sie
auswählen können, ob Symbole auf dem
Desktop erstellt werden sollen oder nicht.
Wenn Sie die Symbole auf dem Desktop
erstellen möchten, markieren Sie bitte das
Kontrollfeld und klicken Sie anschließend auf
die “Next>”-Taste.
Schaubild: Fenster zur Erstellung von Symbolen
7
Nach dem Abschluss der Installation wird
dieses Fenster angezeigt. Drücken Sie die
“Close”-Taste.
Schaubild: Fenster zum Abschluss der Installation
6
Während der Installation wird dieses Fenster
angezeigt.
Schaubild: Installationsfenster
Page 34

10
DEUTSCH
DEUTSCH
Wenn das “ASIO-Bedienfeld” des DENON DJ ASIO-Treibers über die Host-Anwendung aufgerufen wird,
wird das ASIO-Bedienfeld des DENON DJ ASIO-Treibers angezeigt.
Hochfahren
Wissenswertes über den Bedienfeld-Bildschirm
q Gerät
In diesem Bereich wird automatisch ein
Verzeichnis der kompatiblen DENON DJGeräte angezeigt.
(Beispiel: DN-HC4500-1)
•
Wählen Sie aus dem Verzeichnis das
einzustellende Gerät aus; nun werden die
gegenwärtigen Einstellungen des betreffenden
Geräts rechts angezeigt.
•Wenn Sie doppelt auf das Gerät klicken, wird
der Status des durch die ASIOGerätespezifikationen bestimmten Gerätes
zwischen Aktiviert und Deaktiviert
umgeschaltet.
wreq
ty
HINWEIS:
• Sie können nur ein Gerät auswählen.
• Das gegenwärtig als ASIO-Gerät
verwendete Gerät wird durch Fettdruck
hervorgehoben. (Sie können gleichzeitig
mehrere Geräte aktivieren.)
w Enable/Disable
Diese Taste ist zur Aktivierung des im
Geräteanzeige-Verzeichnis ausgewählten Geräts
als ASIO-Gerät vorgesehen.
e Audio Buffer Size
Verwenden Sie diesen Schieber, um die
Puffergröße einzustellen.
HINWEIS:
•
Der Wertebereich liegt zwischen 88 und
2048 (Abtasteinheiten) in Stufen von 1 ms.
• Bei Aktivierung mehrerer Geräte werden
die Einstellungen sämtlicher aktivierter
Geräte geteilt.
r OK/Cancel
OK:
Verwenden Sie diese Taste, um das ASIOBedienfeld zu schließen und die
Einstellungsänderungen beizubehalten.
Cancel:
Verwenden Sie diese Taste, um das ASIOBedienfeld zu schließen, ohne dass die
Einstellungsänderungen beibehalten werden.
t Sampling Rate
Hier wird die Auswahl der Abtastrate angezeigt.
Die Frequenzen, mit denen der DENON DJ
ASIO-Treiber kompatibel ist, sind wie folgt:
• 44,1 kHz / 48 kHz / 96 kHz
y Device Description
Dies ist der Bereich, in dem die Informationen
über das im Geräte-Informationsverzeichnis
ausgewählten Gerät angezeigt werden.
Folgendes wird angezeigt:
• Device name
• Unit number
•Software version
• Audio input channels
• Audio output channels
• Sampling frequency
• Max bit resolution
• Audio buffer size
HINWEIS:
Falls keine Geräteinformationen zur
Verfügung stehen, wird für alle Punkte “-”
(ein Bindestrich) angezeigt.
Page 35

11
DEUTSCH
DEUTSCH
10
AKTUALISIERUNG
Die Produkte werden mit der Produkt-Aktualisierungssoftware von unserer Website “www.denondj.com”
aktualisiert.
Besuchen Sie hinsichtlich der neuesten Updates www.denondj.com.
1
Doppelklicken Sie auf den
Installationsassistenten.
Nun wird der Setup-Assistent des
Aktualisierungsprogramms gestartet.
Klicken Sie auf “Next>”.
Installation des Aktualisierungsprogramms (Windows-Version)
Schaubild: Fenster des Setup-Assistenten
2
Nun wird der Bildschirm mit der
Lizenzvereinbarung angezeigt. Wählen Sie
“I Agree”, wenn Sie den aufgeführten
Bedingungen zustimmen.
Klicken Sie anschließend auf die “Next>”Taste. Klicken Sie auf die “Next>”-Taste.
Schaubild: Fenster mit der Lizenzvereinbarung
3
Nun wird ein Bildschirm angezeigt, über
den der Ordner zur Installation des
Aktualisierungsprogramms bestätigt wird.
Klicken Sie auf die “Next>”-Taste.
Schaubild:
Fenster zur Auswahl des Installationsordners
Standardmäßig wird das
Aktualisierungsprogramm unter “C\Program
Files\DENON_DJ\DDJUpdater\DN-HC4500\”
installiert.
Wählen Sie die Option “Browse” und wählen
Sie einen anderen Ordner, wenn Sie dies
ändern möchten.
Wählen Sie die Option “Everyone”, wenn
“jeder” den Computer verwendet, auf dem
das Aktualisierungsprogramm installiert
werden soll; wählen Sie die Option “Just
me”, wenn es sich bei Ihnen um den einzigen
Benutzer handelt.
5
Klicken Sie auf die “Next>”-Taste.
Die Installation beginnt.
Schaubild: Fenster zur Installationsbestätigung
2 Deinstallation (nur bei der Windows-Version)
Führen Sie die Installation über die Systemsteuerung
und den Befehl “Add or Remove Programs (Programme
hinzufügen und entfernen)” durch.
4
Nun wird ein Fenster angezeigt, über das Sie
auswählen können, ob Symbole auf dem
Desktop erstellt werden sollen oder nicht.
Wenn Sie die Symbole auf dem Desktop
erstellen möchten, markieren Sie bitte das
Kontrollfeld und klicken Sie anschließend auf
die “Next>”-Taste.
Schaubild: Fenster zur Erstellung von Symbolen
6
Während der Installation wird dieses Fenster
angezeigt.
Schaubild: Installationsfenster
7
Nach dem Abschluss der Installation wird
dieses Fenster angezeigt. Drücken Sie die
“Close”-Taste.
Schaubild: Fenster zum Abschluss der Installation
Bei Installation der Macintosh-Version des Aktualisierungsprogramms wird das Programm selbst auf den
Computer kopiert.
Installation des Aktualisierungsprogramms (Macintosh-Version)
Page 36

12
DEUTSCH
DEUTSCH
1
Schließen Sie den Computer mit einem
USB-Kabel an.
2
Schalten Sie die Stromversorgung des Geräts
im Aktualisierungsmodus ein.
Einschalten der Stromversorgung im
Aktualisierungsmodus:
Drücken Sie gleichzeitig die BACK- und
SOURCE-Tasten von Deck1 oder Deck2.
Nun wird das Folgende auf dem Gerätedisplay
angezeigt:
Bei Deck1
Bei Deck2
Falls das Gerät noch nicht angeschlossen ist,
wird das Folgende auf dem Gerätedisplay
angezeigt:
Bei Deck2
3
-2
Falls das Gerät zu diesem Zeitpunkt nicht
angeschlossen ist oder sich nicht im
Aktualisierungsmodus befindet, wird der
unten dargestellte Bildschirm angezeigt.
Falls die Aktualisierungsdatei nicht geladen
wurde, wird “File is not ready” angezeigt.
5
-1
Klicken Sie auf die Load-Taste, um die
Aktualisierungsdatei zu übertragen.
Aktualisierungsdatei nicht geladen.
Die Informationen über die
Version werden angezeigt.
Starten Sie das DN-HC4500Aktualisierungsprogramm.
Nun wird der unten dargestellte Bildschirm
auf dem Computer angezeigt.
Informationen über die gegenwärtige Version
Der Name des identifizierten Geräts wird angezeigt.
3
-1
4
Ziehen Sie die Aktualisierungsdatei mit dem
Drag-and-Drop-Verfahren in den “DENON
DJ-Aktualisierungsprogramm-Bildschirm.
Klicken Sie anschließend auf die Load-Taste.
Klicken Sie anschließend auf die Load-Taste.
5
-2
Nun wird das Folgende auf dem
Gerätedisplay angezeigt:
Während der Datei-Übertragung:
Bei Deck1
Nach dem Abschluss der Datei-Übertragung:
(linke Seite: alte Version; rechte Seite: neue Version)
Klicken Sie nach dem Abschluss der DateiÜbertragung auf die OK-Taste. Nun wird die
Execute-Taste aktiviert (kann angeklickt
werden).
Aktualisierungsverfahren
Page 37

13
DEUTSCH
DEUTSCH
7
Klicken Sie zum Abschluss auf die OK-Taste.
Nun wird das Folgende auf dem Gerätedisplay
angezeigt:
Bei Deck2:
Verlassen Sie das Aktualisierungsprogramm
und schalten Sie die Stromversorgung des
DN-HC4500 aus.
HINWEIS:
• Schalten Sie während des Ladens oder der
Versionsaktualisierung auf keinen Fall die
Stromversorgung des Gerätes aus und
trennen Sie auch nicht das Kabel ab, mit dem
das Gerät am Computer angeschlossen ist.
Drücken Sie darüber hinaus keine Gerätetaste
oder Taste der Computer-Tastatur.
•Wiederholen Sie das Verfahren ab Schritt 1,
falls während des Ladens oder der
Versionsaktualisierung eine Fehlermeldung
angezeigt wird.
In den folgenden Fällen werden Fehlermeldungen
angezeigt:
“File is invalid”
Die geladene Aktualisierungsdatei ist ungültig.
“Load failed. Check the connection, and retry”
Während der Übertragung der Aktualisierungsdatei
zum Gerät ist ein Übertragungsfehler aufgetreten.
“Loaded data is invalid. Check the file.”
Nach der Übertragung der Aktualisierungsdatei
zum Gerät ist ein Prüfsummen-Fehler aufgetreten.
“Version up was not completed.”
Die Versionsaktualisierung konnte nicht normal
durchgeführt werden.
6
Klicken Sie auf die Execute-Taste, um mit
der Versionsaktualisierung zu beginnen.
Nach dem Abschluss der
Versionsaktualisierung wird die Meldung
“Version up was completed.” angezeigt.
Während der Versionsaktualisierung wird die
folgende Meldung auf dem Gerätedisplay
angezeigt:
Bei Deck1:
Nach Abschluss der Versionsaktualisierung:
Wenn die Aktualisierung der Version
fehlschlägt, wird die Meldung “Version up was
not completed.” angezeigt und der Bildschirm
kehrt zu der vor dem Anklicken der ExecuteTaste eingeblendeten Anzeige zurück. Klicken
Sie erneut auf die Execute-Taste.
Page 38

14
DEUTSCH
DEUTSCH
11
MIDI-BEFEHLE
Datenübertragung
Entsprechend der unten aufgeführten Tabelle werden die Bedienfeld-Betriebsdaten mit dem MIDI-Befehl
übertragen.
2 Senden eines Befehls an den PC
1 Playlist
SW ON : 0x9n
SW OFF : 0x8n
0x02
SW ON : 0x40
SW OFF : 0x00
Note ON/OFF
2 JOG mode
≠
0x04
≠≠
3 Pitch/KEY
≠
0x05
≠≠
4TAP
≠
0x07
≠≠
5 Pitch Bend+
≠
0x08
≠≠
6 Pitch Bend–
≠
0x09
≠≠
7 Fast search+
≠
0x10
≠≠
8 Fast search–
≠
0x11
≠≠
9 EFX1/ECHO/LOOP
≠
0x12
≠≠
10 EFX2/FLANGER
≠
0x13
≠≠
11 EFX3/FILTER
≠
0x14
≠≠
12 HOT1
≠
0x17
≠≠
13 HOT2
≠
0x18
≠≠
14 HOT3
≠
0x19
≠≠
15 HOT4
≠
0x20
≠≠
16 HOT5
≠
0x21
≠≠
17 TIME/TOTAL
≠
0x23
≠≠
18 MEMO/PRESET
≠
0x24
≠≠
19 TITLE
≠
0x25
≠≠
20 CONT./SINGLE
≠
0x26
≠≠
21 Parameters KNOB SW
≠
0x28
≠≠
22 BACK
≠
0x30
≠≠
23 SOURCE mode
≠
0x31
≠≠
24 FLIP
≠
0x36
≠≠
25 A1
≠
0x37
≠≠
26 A2
≠
0x38
≠≠
27 B
≠
0x39
≠≠
28 EXIT/Reloop
≠
0x40
≠≠
29 Cue
≠
0x42
≠≠
30 Play
≠
0x43
≠≠
31 JOG UP
≠
0x47
≠≠
32 JOG DOWN
≠
0x48
≠≠
33 JOG LEFT
≠
0x49
≠≠
34 JOG RIGHT
≠
0x50
≠≠
35 Jogwheel touch
≠
0x51
≠≠
items
Command
MIDI command
Number Value
Message type
39 X-Control fader
≠
0x53
0x00 (min) → 0x7F (max)
≠
40
Parameters KNOB
Increment/Decrement
≠
0x54
Increment : 0x00
Decrement : 0x7F
≠
41 Pitch Slider 0xEn 0xllh (LSB) 0xmmh (MSB) Pitch bend change
36 Preset Mode
SW ON : 0x9n
SW OFF : 0x8n
0x52
SW ON : 0x40
SW OFF : 0x00
Note ON/OFF
37 D4500 Cont. mode
≠
0x53
≠≠
38 Jogwheel fwd/rev 0xBn 0x51
Reverse 0x3F ~ 0x00
Foward 0x41 ~ 0x7F
slow → fast
✽ relative data
Control change
items
Command
MIDI command
Number Value
Message type
–100% : 0x7F7F (MSB/LSB)
0% : 0x4000 (MSB/LSB)
+100% : 0x0000 (MSB/LSB)
n = MIDI CH
Page 39

15
DEUTSCH
DEUTSCH
VFD-Symbol-Datenempfang
Entsprechend der unten aufgeführten Tabelle können die VFD-Symbole auf Ein oder Aus oder auf Blinken
eingestellt werden.
2 Befehlsempfang für VFD-Symbol
Datenempfang
LED-Datenempfang
Entsprechend der unten aufgeführten Tabelle können die Bedienfeld-LEDs mit dem MIDI-Befehl auf Ein
oder Aus oder auf Blinken eingestellt werden.
2 Befehlsempfang für LED
VFD Symbol 0xBn
ON TRG : 0x4D
OFF TRG : 0x4E
Blink ON TRG : 0x4F
↓↓
Control Change
1T. 0x01
2 REMAIN 0x02
3 ELAPSED 0x03
4 CONT. 0x04
5 SINGLE 0x05
6 BPM 0x06
7m 0x07
8s 0x08
9f 0x09
10 Pitch dot Right 0x0A
11 Pitch dot center 0x0B
12 Pitch dot left 0x0C
13 MP3 0x10
14 WAV 0x11
15 KB 0x13
16 KEY ADJ. 0x14
17 MEMO 0x15
18 ( : A1 side 0x16
19 ( : A2 side 0x17
20 ) : A1 side 0x18
21 ) : A2 side 0x19
22 A1 0x1A
23 A2 0x1B
24 B : A1 side 0x1C
25 B : A2 side 0x1D
26 Scratch Ring out side 0x1E
27 Scratch Ring in side 0x1F
28 Touch dot 0x20
29 Track Position Blink
only Use 0x4F/0x4E
0x21
30
Scratch Position 1 (Top right)
only Use 0x4D/0x4E
0x22
31 Scratch Position 2
only Use 0x4F/0x4E
0x23
32 Scratch Position 3
only Use 0x4F/0x4E
0x24
33 Scratch Position 4
only Use 0x4F/0x4E
0x25
34 Scratch Position 5
only Use 0x4F/0x4E
0x26
35 Scratch Position 6
only Use 0x4F/0x4E
0x27
36 Scratch Position 7
only Use 0x4F/0x4E
0x28
items
Command
MIDI command
Number Value
Message type
n = MIDI CH
LED 0xBn
ON TRG : 0x4A
OFF TRG : 0x4B
Blink ON TRG : 0x4C
↓↓
Control Change
1 Playlist 0x02
2 Pitch match LED 0x04
3 JOG mode Green 0x05
4 JOG mode Orange 0x06
5 Pitch/KEY Green 0x07
6 Pitch/KEY Orange 0x08
7TAP Green 0x09
8TAP Orange 0x0A
9
EFX1/ECHO/LOOP RED
0x0B
10 EFX1 Green 0x0C
11 EFX2/FLANGER RED 0x0D
12 EFX2 Green 0x0E
13 EFX3/FILTER RED 0x0F
14 EFX3 Green 0x10
15 HOT1 0x11
16 HOT1 Dimmer 0x12
17 HOT2 0x13
18 HOT2 Dimmer 0x14
19 HOT3 0x15
20 HOT3 Dimmer 0x16
21 HOT4 0x17
22 HOT4 Dimmer 0x18
23 HOT5 0x19
24 HOT5 Dimmer 0x1A
25 Parameter KNOB 0x1E
26 A1 0x24
27 A1 Dimmer 0x3C
28 A2 0x25
29 A2 Dimmer 0x3D
30 Cue 0x26
31 Play 0x27
32 Jogwheel 0x3B
33 Pitch slider request 0x3C
DN-HC4500 return
pitch slider position
only Use 0x4A
(request TRG)
34
X-Control fader request
0x3D
DN-HC4500 return XControl fader position
only Use 0x4A
(request TRG)
items
Command
MIDI command
Number Value
Message type Notes
Page 40

16
DEUTSCH
DEUTSCH
VFD-Parameter-Datenempfang
Entsprechend der unten aufgeführten Tabelle können das zeitbezogene und das Segment-Display mit
dem MIDI-Befehl eingestellt werden.
2 Befehlsempfang für VFD-Parameter
✽ “Track Position Blink” kann das gesamte Trackpositions-Displaysegment auf Ein oder Aus eingestellt
werden.
41 Scratch Position 12
only Use 0x4D/0x4E
0x2D
42 Scratch Position 13
only Use 0x4D/0x4E
0x2E
43 Scratch Position 14
only Use 0x4D/0x4E
0x2F
44 Scratch Position 15
only Use 0x4D/0x4E
0x30
45
Scratch Position 16 (Bottom)
only Use 0x4D/0x4E
0x31
46 Scratch Position 17
only Use 0x4D/0x4E
0x32
47 Scratch Position 18
only Use 0x4D/0x4E
0x33
48 Scratch Position 19
only Use 0x4D/0x4E
0x34
49 Scratch Position 20
only Use 0x4D/0x4E
0x35
50 Scratch Position 21
only Use 0x4D/0x4E
0x36
51 Scratch Position 22
only Use 0x4D/0x4E
0x37
52 Scratch Position 23
only Use 0x4D/0x4E
0x38
53 Scratch Position 24
only Use 0x4D/0x4E
0x39
54 Scratch Position 25
only Use 0x4D/0x4E
0x3A
55 Scratch Position 26
only Use 0x4D/0x4E
0x3B
56 Scratch Position 27
only Use 0x4D/0x4E
0x3C
57 Scratch Position 28
only Use 0x4D/0x4E
0x3D
58 Scratch Position 29
only Use 0x4D/0x4E
0x3E
59 Scratch Position 30
only Use 0x4D/0x4E
0x3F
60 Scratch Position 31
only Use 0x4D/0x4E
0x40
61 Scratch Position 32 (Top)
only Use 0x4D/0x4E
0x41
VFD Symbol 0xBn
ON TRG : 0x4D
OFF TRG : 0x4E
Blink ON TRG : 0x4F
↓↓
Control Change
37 Scratch Position 8
only Use 0x4D/0x4E
0x29
38 Scratch Position 9
only Use 0x4D/0x4E
0x2A
39 Scratch Position 10
only Use 0x4D/0x4E
0x2B
40 Scratch Position 11
only Use 0x4D/0x4E
0x2C
items
Command
MIDI command
Number Value
Message type
n = MIDI CH
VFD Parameter
1Tr number MSB 0xBn 0x40
0-99
100-109 : “-0” to “-9”
110 : “--”, 111 : “ ”
Control Change
2Tr number LSB
≠
0x41
≠≠
3Time mini
≠
0x42
≠≠
4Time sec
≠
0x43
≠≠
5Time frame
≠
0x44
≠≠
6 Pitch POL
≠
0x45
“ ” 0x00
“+” 0x01
“–” 0x02
≠
7 Pitch MSB
≠
0x46
≠≠
8Pitch LSB
≠
0x47
≠≠
9Track Position
≠
0x48 normal
0x49 reverse
0-100%
≠
10 Segment 1-1 MSB
≠
0x01 0x00 ~ 0x0F
≠
11 Segment 1-2 MSB
≠
0x02
≠≠
12 Segment 1-3 MSB
≠
0x03
≠≠
13 Segment 1-4 MSB
≠
0x04
≠≠
14 Segment 1-5 MSB
≠
0x05
≠≠
15 Segment 1-6 MSB
≠
0x07
≠≠
16 Segment 1-7 MSB
≠
0x08
≠≠
17 Segment 1-8 MSB
≠
0x09
≠≠
18 Segment 1-9 MSB
≠
0x0A
≠≠
19 Segment 1-10 MSB
≠
0x0B
≠≠
20 Segment 1-11 MSB
≠
0x0C
≠≠
21 Segment 1-12 MSB
≠
0x0D
≠≠
22 Segment 1-1 LSB
≠
0x21
≠≠
23 Segment 1-2 LSB
≠
0x22
≠≠
24 Segment 1-3 LSB
≠
0x23
≠≠
25 Segment 1-4 LSB
≠
0x24
≠≠
26 Segment 1-5 LSB
≠
0x25
≠≠
27 Segment 1-6 LSB
≠
0x27
≠≠
28 Segment 1-7 LSB
≠
0x28
≠≠
29 Segment 1-8 LSB
≠
0x29
≠≠
30 Segment 1-9 LSB
≠
0x2A
≠≠
Items
Command
MIDI command
Number Value
Message Type
31 Segment 1-10 LSB
≠
0x2B
≠≠
32 Segment 1-11 LSB
≠
0x2C
≠≠
Page 41

17
DEUTSCH
DEUTSCH
VFD-Segment-Datenempfang
Entsprechend dem folgenden Schriftarten-Code werden die unterschiedlichen Segmente über 2-ByteDaten eingestellt.
(0x00/0x00 bis 0x00/0x07 kann nicht verwendet werden.)
2 Schriftarten-Codes für die Segmente
33 Segment 1-12 LSB 0xBn 0x2D 0x00 ~ 0x0F Control Change
34 Segment 2-1 MSB
≠
0x0E
≠≠
35 Segment 2-2 MSB
≠
0x0F
≠≠
36 Segment 2-3 MSB
≠
0x10
≠≠
37 Segment 2-4 MSB
≠
0x11
≠≠
38 Segment 2-5 MSB
≠
0x12
≠≠
39 Segment 2-6 MSB
≠
0x13
≠≠
40 Segment 2-7 MSB
≠
0x14
≠≠
41 Segment 2-8 MSB
≠
0x15
≠≠
42 Segment 2-9 MSB
≠
0x16
≠≠
43 Segment 2-10 MSB
≠
0x17
≠≠
44 Segment 2-11 MSB
≠
0x18
≠≠
45 Segment 2-12 MSB
≠
0x19
≠≠
46 Segment 2-1 LSB
≠
0x2E
≠≠
47 Segment 2-2 LSB
≠
0x2F
≠≠
48 Segment 2-3 LSB
≠
0x30
≠≠
49 Segment 2-4 LSB
≠
0x31
≠≠
50 Segment 2-5 LSB
≠
0x32
≠≠
51 Segment 2-6 LSB
≠
0x33
≠≠
52 Segment 2-7 LSB
≠
0x34
≠≠
53 Segment 2-8 LSB
≠
0x35
≠≠
54 Segment 2-9 LSB
≠
0x36
≠≠
55 Segment 2-10 LSB
≠
0x37
≠≠
56 Segment 2-11 LSB
≠
0x38
≠≠
57 Segment 2-12 LSB
≠
0x39
≠≠
VFD Parameter
Items
Command
MIDI command
Number Value
Message Type
n = MIDI CH
Page 42

18
DEUTSCH
DEUTSCH
(2) Laden der Voreinstellungsdaten über ein externes Gerät
Laden Sie die unten aufgeführten Befehle vom PC zum DN-HC4500. [DRM]
Voreinstellungsdaten
Die Voreinstellungen des DN-HC4500 können mit dem exklusiven DENON DJ MIDI-Systemformat über
ein externes Gerät geladen und einige Einstellungen können darüber justiert werden.
(1) Konfiguration des Befehlsformats
Die grundlegende durch den DN-HC4500 unterstützte Konfiguration lautet wie folgt:
Der unten aufgeführte Text wird vom DN-HC4500 zurückgesendet. [DSM]
Die Struktur der Antwortdaten zum Voreinstellungsanforderungs-Befehl ist unten dargestellt.
2 Tabelle mit den Antwortdaten für den Voreinstellungsanforderungs-Befehl
CMD Item Data Length
SOX
IDC
FMT
Start of System Exclusive
ID code → DENON DJ ID
Communication format
0xF0
0x004003
0x12: one way
1Byte
3Byte
1Byte
MDN
UN
MCH
MST
CMD
DL
Data
Model number
Unit number
MIDI channel
Message Type
Command
Data Length
Preset data
0x41 (DN-HC4500)
depends on preset mode (0x00 to 0x0F)
depends on preset mode (0x00 to 0x05)
0x53: Selecting, 0x50: Polling,
0x20: Preset set/ 0x21: Preset request
0x** number of the data Byte
refer the preset data table
1Byte
1Byte
1Byte
1Byte
1Byte
1Byte
****
BCC
EOX
Block check character
End of System Exclusive
0x** EVEN parity of the Data block
0xF7
1Byte
1Byte
CMD Item Data Length
SOX
IDC
FMT
Start of System Exclusive
ID code → DENON DJ ID
Communication format
0xF0
0x004003
0x12: one way
1Byte
3Byte
1Byte
MDN
UN
MCH
MST
CMD
Model number
Unit number
MIDI channel
Message Type
Command
0x41 (DN-HC4500) or 0x7F (ALL model)
depends on preset mode (0x00 to 0x0F)
depends on preset mode (0x00 to 0x05)
0x50: Polling
0x21: Preset request
1Byte
1Byte
1Byte
1Byte
1Byte
EOX End of System Exclusive 0xF7 1Byte
CMD Item Data Length
SOX
IDC
FMT
Start of System Exclusive
ID code → DENON DJ ID
Communication format
0xF0
0x004003
0x12: one way
1Byte
3Byte
1Byte
MDN
UN
MCH
MST
CMD
DL
Data
Model number
Unit number
MIDI channel
Message Type
Command
Data Length
Preset data
0x41 (DN-HC4500)
depends on preset mode (0x00 to 0x0F)
depends on preset mode (0x00 to 0x05)
0x53: Selecting
0x21: Preset request (Return)
0x** number of the data Byte
refer the preset data table
1Byte
1Byte
1Byte
1Byte
1Byte
1Byte
****
BCC
EOX
Block check character
End of System Exclusive
0x** EVEN parity of the Data block
0xF7
1Byte
1Byte
Preset name Item Data Length
USB mode Sel
CD Model Sel
Audio Fs Sel
Unit number Set
MIDI CH Set
JOG Pulse Sel
Fader In Mode
Xcont XFD
Audio buffer
Model code
USB Control mode select
Drive control model select
Audio sampling frequency select
Unit number
MIDI CH
JOG count number per cycle
Fader In mode select
X-control mode select
Audio buffer size
Model number
0x00: HC4500 MIDI, 0x02 to 0x0F: Reserve
0x00: DN-D4500, 0x01: DN-D4000
0x01: 44.1kHz, 0x02: 48kHz, 0x08:
96kHz, 0x04; AUTO
(AUTO: Automatically follow Fs by USB data)
0x00 to 0x0F
0x00: CH1&2, 0x01: CH3&4, 0x02: CH5&6
0x00: 1480, 0x01: 740, 0x02: 555, 0x03: 370
0x00: 2wire Play/Cue, 0x01: 1wire Play/Cue
0x00: OFF, 0x01: ON
0x0040 to 0x0810 (2Byte)
0x41
1Byte
1Byte
1Byte
1Byte
1Byte
1Byte
1Byte
1Byte
2Byte
1Byte
PC DN-HC4500
[DRM] [DSM]
]\
[]
Page 43

19
DEUTSCH
DEUTSCH
12
FEHLERSUCHE
2 Der DN-HC4500 funktioniert nicht ordnungsgemäß oder es wird kein Ton
ausgegeben.
• Sind USB-Kabel, Audiokabel usw. ordnungsgemäß angeschlossen?
• Ist die Lautstärkeeinstellung der Quelle, des Audiogeräts, der Anwendung, des
Betriebssystems usw. ordnungsgemäß?
• Wurde das geeignete Gerät über die Audio-Anwendung ausgewählt?
• Ist die Einstellung der Abtastfrequenz ordnungsgemäß?
\Führen Sie entweder im Voreinstellungsmodus des DN-HC4500 und in der Anwendung dieselben
Einstellungen durch oder stellen Sie den Voreinstellungsmodus des DN-HC4500 auf “AUTO”.
• Weisen die WAV-Dateien unterschiedliche Abtastfrequenzen und Bitraten auf?
\Je nach Audio-Anwendung ist eine gleichzeitige Wiedergabe von WAV-Dateien mit
unterschiedlichen Abtastfrequenzen und Bitraten u. U- nicht möglich.
• Wird anderes USB-Gerät verwendet?
\Falls anderes USB-Gerät verwendet wird, versuchen Sie es bitte nur mit DN-HC4500, um auf evtl.
Probleme zu prüfen.
• Ist der USB-Anschluss des angeschlossenen Computers mit USB 2.0 (Hi-Speed) kompatibel?
\Verwenden Sie ein USB 2.0-kompatibles Kabel.
2 Der Ton ist unterbrochen oder gestört.
• Werden andere Anwendungen oder Geräte verwendet?
\Schließen Sie sämtliche nicht erforderlichen Anwendungen.
• Lassen Sie mehrere WAV-Dateien wiedergeben?
\Bei der gleichzeitigen Wiedergabe mehrerer WAV-Dateien wird der Ton je nach Leistung Ihres
Computers u. U. unterbrochen.
(3) Einstellung der Voreinstellungsdaten über ein externes Gerät.
Laden Sie die unten aufgeführte Auswahlmeldung vom PC zum DN-HC4500. [DSM]
2 Voreinstellungs-Datentabelle
Sobald der DN-HC4500 die Übereinstimmung von Modellnummer und Gerätenummer erfasst, werden
die Voreinstellungsdaten der über ein externes Gerät einzustellenden Punkte entsprechend der Tabelle
mit den Empfangsmeldungs-Daten aktualisiert.
Dir Struktur der Voreinstellungs-Befehlsdaten ist unten dargestellt.
CMD Item Data Length
SOX
IDC
FMT
Start of System Exclusive
ID code → DENON DJ ID
Communication format
0xF0
0x004003
0x12: one way
1Byte
3Byte
1Byte
MDN
UN
MCH
MST
CMD
DL
Data
Model number
Unit number
MIDI channel
Message Type
Command
Data Length
Preset data
0x41 (DN-HC4500)
depends on preset mode (0x00 to 0x0F)
depends on preset mode (0x00 to 0x05)
0x53: Selecting,
0x20: Preset set
0x** number of the data Byte
refer the preset data table
1Byte
1Byte
1Byte
1Byte
1Byte
1Byte
****
BCC
EOX
Block check character
End of System Exclusive
0x** EVEN parity of the Data block
0xF7
1Byte
1Byte
Preset name Item Data Length
USB mode Sel
CD Model Sel
Audio Fs Sel
JOG Pulse Sel
Fader In Mode
Xcont XFD
USB Control mode select
Drive control model select
Audio sampling frequency select
JOG count number per cycle
Fader In mode select
X-control mode select
0x00: HC4500 MIDI, 0x02 to 0x0F: Reserve
0x00: DN-D4500, 0x01: DN-D4000
0x01: 44.1kHz, 0x02: 48kHz, 0x08:
96kHz, 0x04; AUTO
(AUTO: Automatically follow Fs by USB data)
0x00: 1480, 0x01: 740, 0x02: 555, 0x03: 370
0x00: 2wire Play/Cue, 0x01: 1wire Play/Cue
0x00: OFF, 0x01: ON
1Byte
1Byte
1Byte
1Byte
1Byte
1Byte
PC DN-HC4500
[DSM] Ausführung der Empfangsmeldung
]\
[]
Page 44

2 Weitere Punkte
Display: 40 mm x 100 mm VFD
Zeichen mit 12-stelliger, 2-zeiliger Punktmatrix und Scratch-Marker
Jog-Rad: 71 mm, Berührungserfassung
(Berührung ON/OFF, Richtung FWD/RVS, Taktzählung) MIDI: Hinweis ON/OFF
1480/740/555/370 Takt/Zyklus MIDI: Steuerungsumschaltung
Gummischalter: Funktionsschalter
5 mit LED
für HOT-Start und LADE-Schalter und andere MIDI: Hinweis ON/OFF
Andere Schalter
10 mit LED
für CUE/PLAY/HOT-Start/EFX/LOAD und andere MIDI: Hinweis ON/OFF
Andere Schalter
14 ohne LED
für Schnellsuche/Pitch Bend und andere MIDI: Hinweis ON/OFF
Pitch-Fader: 60 mm mit Mittentippen 1024 Schritte
MIDI: Pitch-Bend
(MIDI-Daten –100 %: 0x7F7F / ±0 %: 0x4000 / +100 %: 0x0000)
Parameter-Knopf: Schalter für Eingabe und anderes MIDI: Hinweis ON/OFF
FWD/RVS 24 Takt/Zyklus MIDI: Steuerungsumschaltung
2 DENON DJ ASIO-Treiber
Steuerungsparameter: Puffergröße
88 (Fs: 44,1 kHz/48 kHz)/188 (Fs: 96 kHz) Abtastung bis 2048 Abtastung
Hardware-Puffersteuerung
Abtastfrequenz
44,1 kHz/48 kHz/96 kHz (der DN-HC4500-Einstellung folgend)
✽ ASIO ist ein Warenzeichen der Steinberg Media Technologies GmbH.
✽ MAC ist ein Warenzeichen der Apple Computer, Inc.
✽ MIDI ist ein Warenzeichen von AMEI.
20
DEUTSCH
DEUTSCH
13
TECHNISCHE DATEN
2 Allgemeines
Stromanforderung: Modell für die USA und Kanada: Wechselstrom 120 V 60 Hz
Modell für Europa: Wechselstrom 235 V 50 Hz
Modell für Japan: Wechselstrom 100 V 50 Hz/60 Hz
Stromaufnahme: Modell für die USA und Kanada: 12 W
Modell für Europa: 12 W
Modell für Japan: 10 W
UmgebungsBetriebstemperatur: 0 °C bis 40 °C
Abmessungen: 482 (Breite) x 132 (Höhe) x 88 (max. 106) (Tiefe) mm
Rack-Bereich: EIA 3U
Gewicht: 3,7 kg
Finish: Bedienfeld: schwarz (geschwärzter Stahl)
Rückseite und Gehäuse: schwarz (geschwärzter Stahl)
2 Audio
Analogausgang: 1, 2 Cinch-Pin: Asymmetrisch
2 Vrms = 0 dB FS
DA-Wandler: Typ 24-bit 32-faches Oversampling Fs: 44,1 kHz/48 kHz/96 kHz
D-Bereich 106 dB (TYP)
Signal-Rauschabstand106 dB (TYP) (DIN)
Frequenzgang: 20 bis 22 kHz, ±0,5 dB
Gesamt-Klirrfaktor: unter 0,05 % (Eingang = Ausgang = 2 Vrms/1 KHz, RL: 10 kΩ)
Reststörung: unter –94 dBV (TYP)
Crosstalk: unter –110 dB (TYP bei 1 kHz)
2 USB I/F
USB B-Anschluss: USB 2.0 (max. 480 Mbps)
PC/MAC (Host) ¤ DN-HC4500 (Slave)-Anwendung
USB-Audio (Lautsprecher)
PCM 16 bit/24 bit 44,1 kHz/48 kHz/96 kHz 4-Kanal
USB MIDI I/O
IN: 1-Port, OUT: 1-Port
USB HID I/O (allgemein)
32-Byte-Paket
2 I/F-Steuerung
Fader-Start: FADER 1
3,5-mm-Stereo-Minibuchse (Spitze/Ring: Signal, Muffe: Erde), 0,5 V Gleichstrom
FADER 2
3,5-mm-Stereo-Minibuchse (Spitze/Ring: Signal, Muffe: Erde), 0,5 V Gleichstrom
X-CONTROL: Eingang
3,5-mm-Stereo-Minibuchse (Spitze/Ring: Signal, Muffe: Erde), 0,5 V Gleichstrom
CD-Laufwerkssteuerung:
Mini-DIN-8-Pin-Anschluss (DN-D4500/D4000/BU4500-Laufwerkssteuerung)
482
465
132
57.2
Loch 7 x 10
88.2
2
5
Gerät: mm
Page 45

1
FRANCAIS
FRANCAIS
1 FONCTIONS
TABLE DES MATIERES
z Fonctions.......................................................1
x Connexions ...................................................2
c Noms et fonctions des composants ......3 ~ 5
v Changement de périphérique .......................5
b Fonctionnement de base ..............................6
n Seamless loop/Hot start/Stutter....................7
m Trim ...............................................................8
ACCESSOIRES
Veuillez vérifier que tous les composants suivants aient été fournis avec l’unité principale:
2
Disque Jog tactile multifonctions
Le disque JOG de 71mm a été construit autour
d’un capteur tactile à ultra-haute résolution,
capable de reproduire les mouvements de
scratch les plus doux et rapides, réalisables à la
main. De plus, il est possible de reconfigurer le
disque Jog afin qu’il puisse réaliser d’autres
fonctions importantes, telles que les distorsions
de tons, la recherche de fichiers et les
commandes sec/humide pour effets spéciaux.
2
Un affichage riche en couleurs à 2 lignes
avec support pour les caractères de texte
Une autre qualité unique du DN-HC4500 est
constituée par son affichage complet & animé.
L’ affichage est composé de deux lignes de
caractères, qui assurent une navigation rapide
dans les fichiers et les dossiers, et permet de
s’assurer d’avoir chargé le fichier correct sans
même avoir à regarder le moniteur. Un
marqueur visuel à 32 positions suit les
mouvements de votre main à une vitesse
vertigineuse, sans jamais la perdre. Les autres
témoins indiquent, entre autres, les fonctions de
Looping, Hot Starts, BPM info, Elapsed/Remain
Time, ainsi que les types de fichier MP3/WAV.
2 Touches, commutateurs & molettes en
gomme souple, à réaction rapide
•5 touches de fonction faciles d’accès audessus de chaque platine
• Potentiomètres à tonalité de 45 mm, pour une
résolution profonde ou à gamme élargie
•
Touche CUE/PLAY illuminées et avec animations
•
2 niveaux d’illumination pour certaines touches
•
Niveaux d’illumination multiples pour certaines
touches multifonctions
• LED’ multicolores pour la superposition des
fonctions
•Touches de Pitch Bend
• Les molettes Parameter, Range, Sync,
Playlist, Back, Fast Search ainsi que d’autres
touches peuvent également être configurées
si nécessaire
2 Support pour lecteurs BU4500
Le lecteur combiné de CD/MP3 en option (et
vendu séparément) BU4500 permet à chaque DJ
d’utiliser tous les CDs de sa collection (si il le
désire), tout en gardant le contrôle sur son logiciel
de DJ. Il est également possible de considérer le
BU4500 en tant que système de “sauvegarde”
facile à installer, sans avoir à reconfigurer votre
installation en cas de défaillance de l’ordinateur. Il
suffit simplement de commuter la SOURCE sur la
platine correspondante à l’aide de la touche
correspondante, pour retourner à la lecture du
CD. Cette combinaison astucieuse fait du DNHC4500 le contrôleur de matériel de DJ le plus
puissant et flexible au monde. De plus, chaque
propriétaire d’un système DENON DN-D4500 /
DN-D4000 pourra facilement profiter de tous ces
avantages en achetant un DN-HC4500, afin d’en
assurer la compatibilité avec son ordinateur.
2 Traitement de données 24-bits & Audio
USB
Contrairement à la plupart des contrôleurs DJ
midi qui ne sont alimentés que par bus USB, le
DN-HC4500 dispose de sa propre alimentation
interne répondant aux normes de sécurité
électriques les plus strictes, et qui lui permet
d’obtenir un résultat aussi parfait que possible.
Le DN-HC4500 est équipé d’un processeur DAC
de pointe Burr Brown 24 bits (produit par TI),
pour une qualité de reproduction audio sans
failles. L’interface audio USB est composée
d’une paire stéréo à 2 voies, avec gamme
d’échantillonage de 44.1/48/96 kHz et fonction
de support audio pour latence basse ASIO / OSX
Core.
, Preset ............................................................8
. Panneau de commandes Asio
(version Windows uniquement)..............9, 10
⁄0 Mise à jour..........................................11 ~ 13
⁄1 Commandes MIDI .............................14 ~ 19
⁄2 Résolutions de problèmes ..........................19
⁄3 Caractéristiques techniques........................20
2 Disposition classique & intuitive de
type lecteur à CD double
2 Interface à haute vitesse USB 2.0
2 FADER START
Supporte les démarrages classiques en fondu, y
compris sur tous les mixeurs DENON.
2 X-Control
Lorsqu’on combine le DN-HC4500 avec un
mixeur DENON de la gamme DN-X500/DNX900, il est possible de reproduire le crossfader
du mixeur, pour obtenir un effet de fondu
enchaîné avec les lecteurs logiciels, à l’aide d’un
simple câble mini stéréo de 3,5mm
2 Panneau arrière encastré pour des
connexions plus faciles
2 Design conçu pour un montage en bâti
ou sur table, au choix
2 Préréglages ajustables par l’utilisateur
2 Mise à jour du logiciel par USB
Des améliorations des fonctions existantes, ainsi
que l’ajout de nouvelles fonctions basées sur les
souhaits des utilisateurs seront régulièrement
apportés par DENON DJ. Ces nouvelles
extensions sont toujours gratuites et disponibles
via notre site Internet www.denondj.com.
q Cordon audio................................................2
w Câble USB....................................................1
e Mode d’emploi.............................................1
r CD-ROM.......................................................1
Page 46

2
FRANCAIS
FRANCAIS
2 CONNEXIONS
CONNEXIONS
1. Mettre l’interrupteur POWER hors circuit.
2. Connectez les cordons à broche RCA aux entrées du mixeur.
Prise fader CH6Prise fader CH4
DN-X900
DN-HC4500
mini cordon stéréo 3,5 mm
Prise fader
Deck2
Prise d’entrée CH6Prise d’entrée CH4Cordon RCA Cordon RCA
Prise de sortie Deck1 Prise de sortie Deck2
DN-D4000/
DN-D4500/
BU4500
Application de mise à jour
DENON PC/MAC et pilote
ASIO compris.
ATTENTION:
•Veillez à utiliser le cordon de commande fourni. L’utilisation d’un autre type de câble peut provoquer des dégats.
• Assurez-vous que l’alimentation est coupée lors de la connexion du cordon de commande. Dans le cas contraire, l’unité risquerait de ne pas fonctionner
correctement.
Borne USB B
Prise d’entrée CH2
Prise fader CH2
Prise fader lecteur1
Prise de sortie lecteur1
Prise fader lecteur2
Prise de sortie lecteur2
Borne DRIVE
Prise d’entrée CH8
Prise fader CH8
mini cordon stéréo 3,5 mm
Prise fader
Deck1
Connexion à un PC
Cordon RCA Cordon RCA
mini cordon
stéréo 3,5 mm
mini cordon
stéréo 3,5 mm
• Le DN-HC4500 est un périphérique de type plugand-play.
Ceci veut dire, entre autres, que le logiciel pilote
sera automatiquement installé dès la première
connexion du DN-HC4500 à votre ordinateur.
• N’utilisez que le câble USB fourni pour connecter
le DN-HC4500 à un des ports USB de votre PC.
• Le message ci-dessous s’affiche à l’écran du PC
dès la connexion de l’appareil.
Une fois l’installation terminée, le message “Your
new hardware is installed and ready to use. (Le
nouveau matériel a été installé et est prêt à
l’emploi.)” s’affiche, comme indiqué ci-dessous.
L’installation est terminée. Le DN-HC4500 est
désormais prêt à l’emploi.
Connexion à un ordinateur
Macintosh
• Le DN-HC4500 est un périphérique plug-and-play,
basé sur Macintosh OS, qui sera immédiatement
prêt à l’emploi dès sa première connexion.
• N’utilisez que le câble USB fourni pour connecter
le DN-HC4500 à un des ports USB de votre
Macintosh.
Versions des systèmes d’exploitation
compatibles avec le DN-HC4500:
Windows XP SP2
Mac OSX 10.4 ou plus récent
Notez également, qu’étant donné que
les ordinateurs tournant sous un autre
système d’exploitation ne sont pas
compatibles avec le protocole USB
MIDI, vous constaterez peut-être des
dysfonctionnements en cas de
connexion au DN-HC4500 par USB.
Found New Hardware
USB audio device
Found New Hardware
Your new hardware is installed and ready to use.
X-control
Certaines des fonctions suivantes ne sont pas
compatibles avec le modèle DN-D4000
(Nouveau matériel détecté)
(Périphérique audio USB)
(Nouveau matériel détecté)
(
Le nouveau matériel a été installé et est prêt à l’emploi.
)
Page 47

3
FRANCAIS
FRANCAIS
3 NOMS ET FONCTIONS DES COMPOSANTS
q
Bornes de sortie analogique (LINE OUT)
• Il s’agit de bornes de sortie RCA non
balancées.
• Sorties de signaux audio.
w Borne DRIVE
• Connectez un lecteur DN-D4000/D4500/
BU4500 à cette borne.
Pour connaître le fonctionnement du DND4000/D4500/BU4500, reportez-vous au
mode d’emploi de chaque modèle.
e Borne USB B
• S’utilise pour y connecter un ordinateur.
• Sert à envoyer les commandes USB MIDI et
HID à partir du DN-HC4500.
• Sert à envoyer les signaux audio USB à partir
du PC.
(1) Panneau latéral
wretq
uy
r Touche POWER
• Appuyez sur cette touche pour allumer et
éteindre le lecteur.
t Borne d’entrée AC
• Branchez le cordon d’alimentation dans la
borne d’entrée AC du DN-HC4500.
y Bornes Fader start
•A utiliser quand votre mixer possède la
fonction Fader Start.
u Borne de sortie X-CONROL
• Cette borne s’utilise pour les systèmes
comprenant un DENON DN-X900 ou un
mixer DN-X500, équipés des fonctions de XControl.
• Le DN-HC4500 permet de convertir la
position du fader en un signal MIDI, qui peut
ensuite être envoyé vers la borne USB.
(2) Panneau avant
o!1 !3 !5
!0 !9 @1
!7
!2i!4 !6 @0!8
@9#3 #1 @6#2 @8#0 @7
@2@4@3
@5
i TIME, Total
[Lorsqu’un PCDJ est connecté]
Reportez-vous au mode d’emploi du PCDJ.
[Lorsqu’un DN-D4500 est connecté]
• TIME:
A chaque pression sur cette touche,
l’affichage de la durée de la piste en cours
commute entre “ELAPSED” (durée écoulée)
et “REMAIN” (durée restante).
• Total:
Si cette touche est maintenue enfoncée
pendant plus d’1 seconde, la durée totale
s’affiche.
o FLIP/B TRIM
[Lorsqu’un PCDJ est connecté]
Reportez-vous au mode d’emploi du PCDJ.
[Lorsqu’un DN-D4500 est connecté]
• Appuyez sur cette touche pour commuter
entre le mode de lecture en boucle/de
démarrage rapide et de stutter.
• Lorsque le point B a été réglé, le B TRIM
MODE peut être sélectionné.
ATTENTION:
Noter qu’il y a plusieurs touches ayant deux fonctions différentes qui peuvent être sélectionnées par
une pression brève ou longue (1 seconde ou plus). La marque “ ” indique une fonction à pression
brève et la marque “ ” indique une fonction à pression longue.
!0 MEMO, PRESET
[Lorsqu’un PCDJ est connecté]
Reportez-vous au mode d’emploi du PCDJ.
[Lorsqu’un DN-D4500 est connecté]
• MEMO:
Le mode MÉMO démarre lorsque cette touche
est enfoncée une fois en mode Cue/Pause.
• PRESET:
Lorsque cette touche est enfoncée pendant
plus d’1 sec, le mode de menu PRESET
s’affiche.
!1 CUE/STUTTER
[Lorsqu’un PCDJ est connecté],
[Lorsqu’un DN-D4500 est connecté]
• Appuyez sur cette touche en mode lecture
pour forcer le fichier à revenir à sa position du
début de la lecture.
• En mode Cue, en enfonçant la touche CUE,
un son Stutter est émis à partir du point Cue.
Ceci est appelé la lecture Stutter. (Stutter)
Page 48

4
FRANCAIS
FRANCAIS
!2 TITLE
[Lorsqu’un PCDJ est connecté]
Reportez-vous au mode d’emploi du PCDJ.
[Lorsqu’un DN-D4500 est connecté]
• CD TEXT:
Le texte contenu sur le CD s’affiche.
• MP3:
Les données d’ID3 tag changent à chaque
pression sur la touche.
!3 A1, A2
[Lorsqu’un PCDJ est connecté],
[Lorsqu’un DN-D4500 est connecté]
• Cette touche s’utilise pour créer un point de
démarrage pour les modes de Démarrage
rapide, Boucle sans fin et Stutter.
!4 CONT./SINGLE, RELAY
[Lorsqu’un PCDJ est connecté]
Reportez-vous au mode d’emploi du PCDJ.
[Lorsqu’un DN-D4500 est connecté]
• CONT./SINGLE:
Une pression courte sur cette touche permet
de commuter entre 3 modes END possibles
pour la lecture CONT. (continue: lit tous les
fichiers) SINGLE (arrête la lecture et le mode
ReCUE revient au point original réglé au
préalable), PLAYLOCK.
• RELAY:
En appuyant sur cette touche pendant plus
d’une seconde, vous pouvez activer et
désactiver le mode RELAY PLAY.
!5 PLAY/PAUSE
[Lorsqu’un PCDJ est connecté],
[Lorsqu’un DN-D4500 est connecté]
• Cette touche démarre la lecture ou fait une
pause de lecture.
!6 B
[Lorsqu’un PCDJ est connecté],
[Lorsqu’un DN-D4500 est connecté]
•L’utiliser pour régler le point B et créer un
enchaînement continu après le réglage du
point A.
!7 SOURCE
[Lorsqu’un PCDJ est connecté]
Reportez-vous au mode d’emploi du PCDJ.
[Lorsqu’un DN-D4500 est connecté]
• Appuyez sur cette touche pour sélectionner
la source, PC ou CD.
!8 EXIT/RELOOP
[Lorsqu’un PCDJ est connecté],
[Lorsqu’un DN-D4500 est connecté]
• S’utilise pour quitter ou retourner en mode
de lecture en boucle sans fin.
Plusieurs enchaînements peuvent être
ajoutés avec cette fonction.
!9 JOG MODE
[Lorsqu’un PCDJ est connecté]
Reportez-vous au mode d’emploi du PCDJ.
[Lorsqu’un DN-D4500 est connecté]
S’utilise pour choisir entre le mode Bend et
celui de recherche manuel par trame.
@0 Indicateur JOG
[Lorsqu’un PCDJ est connecté]
Reportez-vous au mode d’emploi du PCDJ.
[Lorsqu’un DN-D4500 est connecté]
• Cette barre bleue vibrante donne accès
rapidement aux modes JOG tels que Pitch
Bend et Recherche de trame.
@1 Disque JOG
[Lorsqu’un PCDJ est connecté]
Reportez-vous au mode d’emploi du PCDJ.
[Lorsqu’un DN-D4500 est connecté]
•
Le disque JOG en vinyle s’utilise pour la
recherche manuelle, ou les opérations de Pitch
Bend.
@2 PITCH/KEY, RANGE
[Lorsqu’un PCDJ est connecté]
Reportez-vous au mode d’emploi du PCDJ.
[Lorsqu’un DN-D4500 est connecté]
• PITCH/KEY:
L’affichage change de la façon suivante à
chaque pression sur la touche:
Pitch activé / Réglage par touche / les
deux désactivés
• RANGE:
Maintenir cette touche enfoncée pendant plus
d’1 sec pour sélectionner la gamme de pitch.
@3 Potentiomètre Pitch
[Lorsqu’un PCDJ est connecté],
[Lorsqu’un DN-D4500 est connecté]
• Utilisez ce potentiomètre pour régler la
vitesse de lecture.
• La vitesse de lecture diminue lorsque le
potentiomètre monte et augmente lorsqu’il
descend.
@4 PITCH BEND±
[Lorsqu’un PCDJ est connecté],
[Lorsqu’un DN-D4500 est connecté]
•
Le fait d’enfoncer ces touches modifie
momentanément la vitesse de lecture principale.
• Lorsque la touche est relâchée, la vitesse de
lecture retourne à la vitesse précédente.
@5 PLAY LIST
[Lorsqu’un PCDJ est connecté]
Reportez-vous au mode d’emploi du PCDJ.
[Lorsqu’un DN-D4500 est connecté]
• Pour ouvrir et fermer le tiroir de disque,
enfoncez cette touche.
• Le plateau du disque n’est pas éjecté
pendant la lecture.
Arrêtez la lecture avant d’appuyer sur cette
touche.
@6 TAP
[Lorsqu’un PCDJ est connecté]
Reportez-vous au mode d’emploi du PCDJ.
[Lorsqu’un DN-D4500 est connecté]
• Ne fonctionne pas.
@7 Molette PARAMETERS
[Lorsqu’un PCDJ est connecté],
[Lorsqu’un DN-D4500 est connecté]
• En tournant:
Permet de sélectionner une piste/fichier ou
des paramètres préréglés.
• En appuyant:
Permet de configurer les paramètres
sélectionnés.
@8 BACK
[Lorsqu’un PCDJ est connecté]
Reportez-vous au mode d’emploi du PCDJ.
[Lorsqu’un DN-D4500 est connecté]
• Ne fonctionne pas.
@9 EFFECT3
[Lorsqu’un PCDJ est connecté]
Reportez-vous au mode d’emploi du PCDJ.
[Lorsqu’un DN-D4500 est connecté]
• Ne fonctionne pas.
#0 EFFECT2
[Lorsqu’un PCDJ est connecté]
Reportez-vous au mode d’emploi du PCDJ.
[Lorsqu’un DN-D4500 est connecté]
• Ne fonctionne pas.
#1 EFFECT1
[Lorsqu’un PCDJ est connecté]
Reportez-vous au mode d’emploi du PCDJ.
[Lorsqu’un DN-D4500 est connecté]
• Permet de mettre le mode de freinage en
MARCHE ou en ARRÊT.
#2
FAST SEARCH (6/7) QUICK JUMP
[Lorsqu’un PCDJ est connecté],
[Lorsqu’un DN-D4500 est connecté]
• QUICK JUMP:
Lorsqu’une de ces touches est tapée
brièvement, la position de lecture saute en
sens normal (6) ou inverse (7).
• FAST SEARCH:
Lorsqu’une de ces touches est maintenue
enfoncée, le disque est scanné en sens
inverse (6) ou normal (7).
#3 FUNCTION
[Lorsqu’un PCDJ est connecté]
Reportez-vous au mode d’emploi du PCDJ.
[Lorsqu’un DN-D4500 est connecté]
• Ne fonctionne pas.
Page 49

5
FRANCAIS
FRANCAIS
q Indicateurs de position de lecture
•L’indicateur de position s’allume pendant la
lecture normale, et la position au sein de la
piste est indiquée par la durée écoulée.
• Si la durée avant la fin de la piste est
inférieure à la durée spécifiée, l’indicateur de
position de lecture se met à clignoter pour
indiquer la fin de la piste par rapport à
l’indicateur de position de lecture (EOM).
w Indicateurs de mode Loop
• Le DN-HC4500 dispose de deux indicateurs
de mode de lecture en boucle Loop, A et B.
Les indicateurs A et B s’allument lorsqu’A et
B sont configurés.
e Affichage de caractères
•
Cet écran permet d’afficher plusieurs données
utiles, messages, etc.
r Indicateurs de type de fichier
• Servent à indiquer le type de fichier en cours
de lecture.
t
Indicateur de confirmation de connexion
d’un dispositif externe
• S’allume à chaque fois que des signaux MIDI
sont reçus ou envoyés entre le DN-HC4500
et un périphérique externe.
y Indicateur de clavier
• S’allume lorsqu’une commande lumineuse
est reçue depuis l’ordinateur.
(3) Affichage
u Indicateur KEY ADJ.
•L’indicateur “KEY ADJ.” s’allume en mode
de réglage par touche.
i Marqueur visuel
• La position de lecture est indiquée en
fonction des états de lecture respectifs de
chaque platine.
o Indicateur MEMO
•L’indicateur “MEMO” s’allume lorsque des
données de la piste en cours ou en attente de
lecture ont été mémorisées.
!0 Indicateur de pitch
• Indique la vitesse de lecture (pitch).
!1 Indicateur BPM
• S’allume lorsque le BPM est affiché dans la
section d’affichage de pitch.
!2 Indicateurs de mode de lecture
• Ces indicateurs servent à indiquer les
différents modes de lecture.
CONT.:
Une fois la lecture d’une piste terminée, la
piste suivante est lancée.
SINGLE:
La lecture s’arrête dès que la fin de la piste
est atteinte.
!3
Affichages en minutes, secondes et trames
• Indique la position de la piste en cours de
lecture, ou la position d’arrêt en mode de
veille.
!4 Indicateurs de mode de temps
•L’affichage change de la façon suivante à
chaque pression sur la touche Time:
ELAPSED:
La durée écoulée depuis le début de la piste
est affichée.
REMAIN:
La durée restante de la piste est affichée.
T.ELAPSED:
La durée écoulée depuis le début la
première piste est affichée.
T.REMAIN:
La durée totale de toutes les pistes du
disque est affichée.
!5 Indicateur de piste
• Indique le numéro de la piste en cours de
lecture.
!6 Indicateurs de connexion
• Ces témoins indiquent les périphériques
contrôlés par le DN-HC4500.
PC:
Le DN-HC4500 commande un logiciel DJ
sur un PC/MAC.
CD:
Le DN-HC4500 commande un DN-D4000/
D4500/BU4500.
✽ La lecture des signaux USB audio en
provenance d’un PC continue en mode de
CD.
4 CHANGEMENT DE PERIPHERIQUE
1
Appuyez sur la touche
SOURCE pour afficher
l’écran de sélection de la
“SOURCE”.
REMARQUE:
• Lorsqu’on appuie sur la touche BACK, la
fonction de commutation de source est
achevée, puis l’appareil retourne en mode
normal.
2
Sélectionnez le périphérique
désiré à l’aide de la molette
PAR AMETERS.
Appuyez à nouveau sur la
molette pour valider.
Le message “OK to CHANGE” s’affiche.
REMARQUE:
• Le mode passe sur “NO” si on tourne la
molette PARAMETERS à l’affichage du
menu “OK to CHANGE?
Ø”.
• En mode “NO”, appuyez sur la molette
PARAMETERS ou sur la touche BACK pour
retourner à l’étape 1.
3
Appuyez de nouveau sur la molette pour
valider.
Le message “Completed!” s’affiche, ce qui
termine la procédure de commutation de
source.
wretquyo
!3!5 !0!2
!4!6
!1
i
Page 50

6
FRANCAIS
FRANCAIS
• Chaque fois que la touche
PLAY/PAUSE est enfoncée, le
lecteur commute entre le
mode de lecture et de pause.
La touche PLAY/PAUSE
s’allume en vert pendant la lecture et clignote
en pause.
• Lorsque la touche PLAY/PAUSE est enfoncée
pendant la lecture, le DN-D4500 fait une pause
de lecture à ce point. Appuyez à nouveau sur la
touche PLAY/PAUSE pour reprendre la lecture.
5 FONCTIONNEMENT DE BASE
PLAY et PAUSE
• Lorsque vous appuyez sur la
touche CUE pendant la
lecture, le fichier/piste
s’arrête et revient en position
initiale, à partir de laquelle la
lecture a débuté (le point Cue). Cette fonction
est également nommée Back-Cue.
Avec la fonction de repérage en arrière, on peut
commencer à partir de la même position
exactement.
La touche CUE s’allume en rouge dès que le
DND4000/D4500/BU4500 est prêt à lancer la
lecture.
• Le point Cue peut être réglé et modifié comme
suit.
• Lorsque la lecture démarre.
• Sélection du fichier terminée.
• Recherche manuelle.
LECTURE et Cue
Le potentiomètre Pitch permet de régler la vitesse
de lecture (Pitch).
•Tournez la molette PARAMETERS.
Sélection de fichier
Réglage du Pitch
2
3
Le DN-D4000/D4500/BU4500 dispose de
plusieurs gammes de pitch.
Lorsque la touche RANGE
est enfoncée pendant plus
d’1 sec, la gamme de
pitch peut être
sélectionnée à l’aide du
bouton PARAMETERS.
• Lorsque le bouton
PARAMETERS est
enfoncé, la gamme du
pitch est entrée et le
mode de sélection de
gamme de pitch est annulé.
1
Appuyez sur la touche
PITCH pour allumer la LED
PITCH.
Ce chapitre décrit les opérations de fonctionnement de base pour des systèmes comprenant un DND4000/D4500/BU4500.
Déplacez le potentiomètre Pitch
pour ajuster le pitch.
Le réglage de pitch actuel
s’affiche sur l’affichage.
Le pitch diminue
Le pitch augmente
Avec la fonction PITCH BEND le pitch peut être
modifié momentanément. Le DN-D4000/D4500/
BU4500 peut utiliser les touches de PITCH BEND
et le disque JOG pour cela.
Variation du pitch
1
[Touches PITCH BEND +/–]
•
Appuyez sur la touche
PITCH BEND pour
modifier
momentanément le pitch.
Tout en maintenant ces
touches enfoncées, le pitch continue de
changer jusqu’à la vitesse limite.
• Lorsque les touches PITCH BEND sont
relâchées, la lecture du pitch retourne au
réglage du potentiomètre.
2
[Disque JOG]
• Il est possible de
modifier la vitesse de
lecture en tournant le
disque JOG en cours de
lecture.
Lecture à la mise sous tension
1
Lorsque la valeur préréglée “Power On
Play” du DN-D4000/D4500/BU4500 est
réglée sur “ON”, la lecture démarre à partir
du début du disque dès la mise en marche.
Pour plus de détails sur la lecture relayée, reportezvous au mode d’emploi du DN-D4000/D4500/
BU4500.
Lecture relayée
Page 51

7
FRANCAIS
FRANCAIS
6 SEAMLESS LOOP/HOT START/STUTTER
Boucle sans fin/Démarrage rapide/Stutter (touches A1, A2)
t, ye, y
q, w, y
r
Affichage en mode de marche
(reportez-vous au paragraphe concernant la section d’affichage)
1
Configuration du point A
(chargement des données de démarrage
rapide)
q Appuyez sur la touche
A1 ou A2 pour régler le
point A et le
chargement des
données Hot Start commence.
• Les touches A1 et A2 peuvent être
utilisées séparément pour chaque Hot
Start.
• Lorsqu’un point A est réglé, la touche A
correspondante et l’affichage “ ”
s’allument et cette touche est réglée en
mode Hot Start.
2
Démarrage rapide
w Lorsque la touche A1
ou A2 est enfoncée, la
lecture Hot Start
démarre à partir du
point A correspondant.
7
Effacement du point A1/A2
y Appuyez sur la touche FLIP tout en
enfonçant les touches A1 ou A2 pour
effacer les points A et B correspondants.
Ou maintenez la touche FLIP enfoncée
pendant plus d’1 sec pour effacer les
deux points A1 et A2 instantanément.
Il est possible de supprimer ces points
individuellement, en appuyant d’abord
rapidement sur la touche “FLIP”, puis
ensuite sur la touche A1, A2 ou B.
3
Réglage du point B pour Seamless Loop
e Lorsque la touche B est
enfoncée après le
réglage du point A ou
après le démarrage de
la lecture Hot Start, le
point B est réglé et la lecture Seamless
Loop démarre à partir du point A.
• La touche B fonctionne par rapport au
point A utilisé avant que la touche B ait
été enfoncée.
• Si la touche B est enfoncée pendant la
lecture Seamless Loop ou après la
lecture EXIT, le point B se déplace vers
le point où la touche a été enfoncée.
• Lorsque le point B est réglé, les
affichages B et “ ” s’allument.
4
Lecture en boucle sans fin
• Lorsque le point B pour A1 est détecté
après le début de la lecture au point A1,
la lecture reprend au point A1 sans
coupure. Pendant l’enchaînement de
A1 à B, le point B pour A2 est ignoré.
• Lorsque le point B pour A2 est détecté
après le démarrage de la lecture à partir
du point A2, la lecture retourne au point
A2 avec l’enchaînement continu.
Pendant l’enchaînement A2 à B, le
point B pour A1 est ignoré.
5
Exit/Reloop
r En mode de lecture
Seamless Loop, on peut
forcer la sortie ou
retourner à
l’enchaînement.
EXIT:
En mode de lecture Seamless Loop,
enfoncer la touche EXIT/RELOOP pour
quitter l’enchaînement. Le DN-D4000/
D4500/BU4500 continue la lecture à
partir du point B.
RELOOP:
Lorsque la touche EXIT/RELOOP est
enfoncée après la sortie de
l’enchaînement, la lecture Seamless Loop
reprend à partir du point A.
6
Stutter
• Les points A1 et A2
peuvent également
être utilisés pour la
lecture Stutter.
t
Pour activer la lecture
stutter, appuyez sur la touche FLIP pour
les touches A1/A2, puis l’affichage “ ”
s’éteint.
Appuyez sur la touche FLIP pour
commuter entre les modes de lecture de
Démarrage rapide/Boucle sans fin et
Stutter.
Page 52

8
FRANCAIS
FRANCAIS
7 TRIM
Pour plus de détails sur cette fonction, reportez-vous
au mode d’emploi du DN-D4000/D4500/BU4500.
REMARQUE:
Si la valeur préréglée du paramètre “CD Mode
Sel” ne correspond pas au périphérique connecté,
l’unité risque de ne pas fonctionner correctement.
8 PRESET
• Cette fonction n’est valide que lorsqu’une source “PC” est sélectionnée.
(Si le DN-D4000/D4500/BU4500 est connecté, l’opération préconfigurée correspondante sera lancée.)
• Le DN-HC4500 dispose d’une fonction préréglée permettant aux utilisateurs d’enregistrer et de rappeler
certains des modes d’opération du périphérique. Cette fonction inclut les éléments et valeurs cidessous.
1. Mode Preset
q Maintenir la touche PRESET enfoncée pendant au moins 1 seconde pour entrer en mode de
préréglage.
w Utilisez la molette PARAMETERS pour sélectionner l’élément à prérégler.
e Sélectionnez l’élément voulu, puis appuyez sur la molette PARAMETERS pour valider l’élément
préréglé à changer.
r Tournez ensuite la molette PARAMETERS. Les données préréglées sont sélectionnées.
t Sélectionnez les données et appuyez sur la molette PARAMETERS pour valider les données
préréglées à changer.
y Pour effectuer plusieurs préréglages, répétez les étapes w ~ t.
u Le mode préconfiguré est désactivé après avoir appuyé sur la touche PRESET.
2. Eléments et données préréglés
La marque “*” à côté des données indique la valeur par défaut.
(1) USB Mode Sel: HC4500 MIDI*
Permet de sélectioner le mode de communication par USB.
Le DN-HC4500 utilise des caractéristiques MIDI uniques.
(2) CD Model Sel: DN-D4500* / DN-D4000
Sélectionnez le nom du modèle à connecter et contrôler depuis la borne DRIVE.
Le BU4500 est identique au lecteur DN-D4500, le réglage PRESET est donc “DN-D4500”.
(3) Audio Fs Sel: 44.1k* / 48k / 96k / Auto
44.1 kHz: La fréquence d’échantillonage (Fs) est fixée à 44.1 kHz, indépendamment des données
envoyées du PC.
48 kHz: La fréquence d’échantillonage (Fs) est fixée à 48 kHz, indépendamment des données
envoyées du PC.
96 kHz: La fréquence d’échantillonage (Fs) est fixée à 96 kHz, indépendamment des données
envoyées du PC.
AUTO: La fréquence d’échantillonage (Fs) est automatiquement choisie en fonction des
données envoyées du PC.
q Pour configurer la “Fs”, appuyez sur PARAMETERS.
Le message “OK to CHANGE?Ø” est affiché sur l’affichage de caractères.
w Appuyez à nouveau sur la molette PARAMETERS.
e Une fois la fréquence d’échantillonage modifiée, “Audio Fs Sel” s’affiche.
(4) Unit No. Set: 1 to 15 / ALL*
Permet de configurer le numéro du périphérique.
Par exemple, lorsque deux périphériques sont connectés au PC, il est possible de choisir “No. 2”
pour l’un d’entre eux, et vice-versa.
(5) MIDI CH Set: 1&2* / 3&4 / 5&6
Permet de configurer le canal MIDI.
(6) JOG Pulse Sel: 1480* / 740 / 555 / 370 count/cycle
Permet de sélectionner le nombre d’impulsions par tour complet de la molette jog.
(7) FaderIn Mode: 1-PLAY/CUE / 2-PLAY / CUE
(8) X-CONT XFD: OFF / ON*
Permet de sélectionner l’activation de l’entrée en cross-fader du signal X-control.
(9) Preset Init.: Régler toutes les données préréglées aux réglages d’origine.
q Pour effacer les données PRESET, appuyez sur la molette PARAMETERS.
Le message “Preset Init” clignote à l’affichage.
w Enfoncer à nouveau la molette PARAMETERS.
Le message “Push to ExeØ” s’affiche à l’affichage.
e Enfoncer à nouveau la molette PARAMETERS.
Le message “OK to CHANGE?Ø” s’affiche à l’affichage.
r Dès que l’effacement est terminé, “Completed!” s’affiche.
Page 53

9
FRANCAIS
FRANCAIS
2 Désinstallation
Le logiciel peut être désinstallé à partir du panneau
de configuration “Add or Remove Programs (Ajout
et suppression de programmes)”.
5
Appuyez sur le bouton “Next>”. L’installation
démarre.
Figure: Fenêtre de confirmation d’installation
9
PANNEAU DE COMMANDES ASIO (version Windows uniquement)
Installation du pilote ASIO
1
Double-cliquez sur l’icône du programme
d’installation.
L’assistant de configuration du pilote ASIO
s’affiche alors.
Appuyez sur “ Next>”.
Figure:
Fenêtre de l’assistant de configuration du pilote ASIO
2
L’écran de licence d’utilisation du logiciel
s’affiche alors. Si vous approuvez les
conditions d’utilisation, cliquez sur “I Agree”.
Le bouton “Next>” peut alors être cliqué.
Appuyez sur le bouton “Next>”.
Figure: Fenêtre de licence d’utilisation du logiciel
3
Un écran s’affiche pour vous permettre de
confirmer le dossier dans lequel sera installé
le pilote ASIO.
Appuyez sur le bouton “Next>”.
Figure:
Fenêtre de sélection du dossier d’installation
L’emplacement d’installation par défaut
choisi pour le pilote ASIO est “C\Program
Files\DENON_DJ\DDJASIO\”.
Si vous désirez choisir un autre emplacement,
cliquez sur “Browse”, puis indiquez le dossier
désiré.
Choisir également l’option “Everyone” si
vous désirez que “chacun” puisse utiliser le
programme de mise à jour, ou “Just me”
pour en restreindre l’utilisation à vous seul.
4
Une fenêtre de confirmation de création des
icônes sur le bureau s’affiche.
Si vous désirez créer des icônes sur le
bureau, cochez la case correspondante, puis
appuyez sur le bouton “Next>”.
Figure: Fenêtre de création d’icônes
7
Cette fenêtre s’affiche à la fin de l’installation.
Appuyez sur le bouton “Close”.
Figure: Fenêtre d’installation terminée
6
Cette fenêtre est affichée pendant l’installation.
Figure: Fenêtre d’installation
Page 54

10
FRANCAIS
FRANCAIS
A chaque fois que le panneau de commande “ASIO Control Panel” du pilote DENON DJ ASIO est invoqué
par une application, le pilote DENON DJ ASIO affiche le panneau de commande ASIO.
Démarrage
A propos de l’écran du panneau de commande
q Périphérique
Tous les périphériques compatibles DENON
DJ sont affichés dans cette partie de l’écran.
(Exemple: DN-HC4500-1)
• Sélectionnez le périphérique à partir de la
liste, pour en afficher les paramètres à droite.
• Si vous double-cliquez sur le périphérique,
chacune des caractéristiques du périphérique
ASIO passera de enabled à disabled.
wreq
ty
REMARQUE:
•
Un seul périphérique peut être sélectionné
à la fois.
• Le nom du périphérique utilisé par ASIO
sera affiché en caractères gras. (Plusieurs
périphériques peuvent être activés en
même temps.)
w Enable/Disable
Ce bouton sert à activer le périphérique
sélectionné dans la liste en tant que périphérique
ASIO.
e Audio Buffer Size
Utilisez la réglette pour ajuster la taille du
tampon.
REMARQUE:
• La plage des valeurs va de 88 à 2048
(unités d’échantillonage), par pas de 1 ms.
• Lorsque plusieurs périphériques sont
activés, leurs paramètres seront mis en
commun.
r OK/Cancel
OK:
Utilisez ce bouton pour refermer le panneau
de commande ASIO, et appliquer les
modifications des paramètres.
Cancel:
Utilisez ce bouton pour refermer le panneau
de commande ASIO, sans toutefois appliquer
les modifications des paramètres.
t Sampling Rate
Les fréquences d’échantillonage disponibles
s’affichent ici.
Les fréquences compatibles avec le pilote
DENON DJ ASIO sont:
• 44,1kHz / 48kHz / 96kHz
y Device Description
Cette partie de l’écran sert à afficher les
données du périphérique sélectionné dans la
liste.
Les paramètres suivants sont affichés:
• Device name
• Unit number
•Software version
• Audio input channels
• Audio output channels
• Sampling frequency
• Max bit resolution
• Audio buffer size
REMARQUE:
Si les paramètres du périphérique ne
peuvent être obtenus, des “-” (tirets)
seront affichés pour chaque élément.
Page 55

11
FRANCAIS
FRANCAIS
10
MISE A JOUR
Nos produits sont mis à jour à l’aide des logiciels de mise à jour, disponible sur notre site Internet
“www.denondj.com”.
Consultez le site www.denondj.com pour les dernières mises à jour.
1
Double-cliquez sur l’icône du programme
d’installation.
L’assistant d’installation est alors lancé.
Appuyez sur “Next>”.
Installation du logiciel update program (version pour Windows)
Figure: Fenêtre de configuration de l’assistant
2
L’écran de licence d’utilisation du logiciel
s’affiche alors. Si vous approuvez les
conditions d’utilisation, cliquez sur “I Agree”.
Le bouton “Next>” peut alors être cliqué.
Appuyez sur le bouton “Next>”.
Figure: Fenêtre de licence d’utilisation du logiciel
3
Un écran s’affiche pour vous permettre de
confirmer le dossier dans lequel sera installé
le programme de mise à jour.
Appuyez sur le bouton “Next>”.
Figure:
Fenêtre de sélection du dossier d’installation
L’emplacement d’installation par défaut
choisi pour le programme de mise à jour est
“C\Program Files\DENON_DJ\DDJUpdater\DN-
HC4500\”.
Si vous désirez choisir un autre emplacement,
cliquez sur “Browse”, puis indiquez le dossier
désiré.
Choisir également l’option “Everyone” si
vous désirez que “chacun” puisse utiliser le
programme de mise à jour, ou “Just me”
pour en restreindre l’utilisation à vous seul.
5
Appuyez sur le bouton “Next>”. L’installation
démarre.
Figure: Fenêtre de confirmation d’installation
2
Désinstallation (version Windows uniquement)
Le logiciel peut être désinstallé à partir du panneau
de configuration “Add or Remove Programs (Ajout
et suppression de programmes)”.
4
Une fenêtre de confirmation de création des
icônes sur le bureau s’affiche.
Si vous désirez créer des icônes sur le
bureau, cochez la case correspondante, puis
appuyez sur le bouton “Next>”.
Figure: Fenêtre de création d’icônes
6
Cette fenêtre est affichée pendant l’installation.
Figure: Fenêtre d’installation
7
Cette fenêtre s’affiche à la fin de
l’installation. Appuyez sur le bouton “Close”.
Figure: Fenêtre de fin de l’installation
La version Macintosh du programme de mise à jour s’installe directement sur l’ordinateur.
Installation du logiciel de mise à jour (version pour Macintosh)
Page 56

12
FRANCAIS
FRANCAIS
1
Connectez l’ordinateur par câble USB.
2
Mettre l’appareil en mode de mise à jour.
Mise en marche en mode de mise à jour:
Appuyez en même temps sur les touches
BACK et SOURCE de la platine Deck1 ou
Deck2.
Le message suivant s’affiche alors:
sur Deck1
sur Deck2
Si le périphérique n’est pas connecté, le
message suivant s’affiche:
sur Deck2
3
-2
L’écran ci-dessous s’affiche lorsque le
périphérique n’est pas connecté ou qu’il ne
se trouve pas en mode de mise à jour.
Le message “File is not ready” s’affiche
lorsque le fichier de mise à jour n’est pas
disponible.
5
-1
Appuyez sur le bouton Load pour transférer
le fichier.
Fichier de mise à jour non disponible.
La version est affichée.
Lancez le programme de mise à jour du DNHC4500.
L’écran ci-dessous s’affiche à l’écran de
l’ordinateur.
Informations de version actuelle
Le nom du périphérique identifié s’affiche.
3
-1
4
Faites glisser le fichier de mise à jour dans la
fenêtre “DENON DJ Upgrade program”. Le
bouton Load peut maintenant être cliqué.
Le bouton Load peut alors être cliqué.
5
-2
Le message suivant s’affiche alors:
Pendant le transfert du fichier:
sur Deck1
Une fois le fichier transféré;
(A gauche: ancienne version ; à droite: nouvelle version)
Une fois le transfert du fichier terminé,
appuyez sur le bouton OK. Le bouton
Execute peut maintenant être sélectionné
(en cliquant dessus).
Procédure de mise à jour
Page 57

13
FRANCAIS
FRANCAIS
7
Appuyez sur le bouton OK pour quitter
l’application.
Le message suivant s’affiche alors:
sur Deck2:
Quittez le programme de mise à jour, puis
éteignez le DN-HC4500.
REMARQUE:
• Ne jamais éteindre ou débrancher le cordon
d’alimentation de l’ordinateur pendant le
chargement du fichier ou la mise à jour de
version. N’appuyez sur aucune touche de
l’appareil ou du clavier de l’ordinateur pendant
toute la procédure de mise à jour.
• En cas d’affichage d’un message d’erreur
pendant le chargement du fichier ou la mise à
jour de version, reprendre la procédure à partir
de l’étape 1.
Les autres messages d’erreur possibles sont les
suivants:
“File is invalid”
Ce message s’affiche lorsque le format du fichier
de mise à jour est incorrect.
“Load failed. Check the connection, and retry”
Ce message s’affiche en cas d’erreur pendant le
transfert du fichier de mise à jour vers l’appareil.
“Loaded data is invalid. Check the file.”
Ce message s’affiche en cas d’erreur de somme
de vérification SUM après le transfert du fichier
de mise à jour vers l’appareil.
“Version up was not completed.”
Ce message s’affiche lorsque la mise à jour n’a
pas été correctement terminée.
6
Cliquez sur le bouton Execute pour lancer la
mise à jour du logiciel.
Une fois la nouvelle version copiée, le
message “Version up was completed.”
s’affiche à l’écran.
Les messages suivants s’affichent sur le
panneau d’affichage pendant la mise à jour:
sur Deck1
Une fois la mise à jour de la version
terminée:
En cas d’échec de la mise à jour, le message
“Version up was not completed.” s’affiche
et l’écran retourne à l’état d’origine, avant
d’avoir appuyé sur le bouton Execute.
Appuyez à nouveau sur le bouton Execute.
Page 58

14
FRANCAIS
FRANCAIS
11
COMMANDES MIDI
Transmission de données
Les données du panneau sont transmises par commandes MIDI, comme indiqué dans le tableau cidessous.
2 Envoi d’une commande vers le PC
1 Playlist
SW ON : 0x9n
SW OFF : 0x8n
0x02
SW ON : 0x40
SW OFF : 0x00
Note ON/OFF
2 JOG mode
≠
0x04
≠≠
3 Pitch/KEY
≠
0x05
≠≠
4TAP
≠
0x07
≠≠
5 Pitch Bend+
≠
0x08
≠≠
6 Pitch Bend–
≠
0x09
≠≠
7 Fast search+
≠
0x10
≠≠
8 Fast search–
≠
0x11
≠≠
9 EFX1/ECHO/LOOP
≠
0x12
≠≠
10 EFX2/FLANGER
≠
0x13
≠≠
11 EFX3/FILTER
≠
0x14
≠≠
12 HOT1
≠
0x17
≠≠
13 HOT2
≠
0x18
≠≠
14 HOT3
≠
0x19
≠≠
15 HOT4
≠
0x20
≠≠
16 HOT5
≠
0x21
≠≠
17 TIME/TOTAL
≠
0x23
≠≠
18 MEMO/PRESET
≠
0x24
≠≠
19 TITLE
≠
0x25
≠≠
20 CONT./SINGLE
≠
0x26
≠≠
21 Parameters KNOB SW
≠
0x28
≠≠
22 BACK
≠
0x30
≠≠
23 SOURCE mode
≠
0x31
≠≠
24 FLIP
≠
0x36
≠≠
25 A1
≠
0x37
≠≠
26 A2
≠
0x38
≠≠
27 B
≠
0x39
≠≠
28 EXIT/Reloop
≠
0x40
≠≠
29 Cue
≠
0x42
≠≠
30 Play
≠
0x43
≠≠
31 JOG UP
≠
0x47
≠≠
32 JOG DOWN
≠
0x48
≠≠
33 JOG LEFT
≠
0x49
≠≠
34 JOG RIGHT
≠
0x50
≠≠
35 Jogwheel touch
≠
0x51
≠≠
items
Command
MIDI command
Number Value
Message type
39 X-Control fader
≠
0x53
0x00 (min) → 0x7F (max)
≠
40
Parameters KNOB
Increment/Decrement
≠
0x54
Increment : 0x00
Decrement : 0x7F
≠
41 Pitch Slider 0xEn 0xllh (LSB) 0xmmh (MSB) Pitch bend change
36 Preset Mode
SW ON : 0x9n
SW OFF : 0x8n
0x52
SW ON : 0x40
SW OFF : 0x00
Note ON/OFF
37 D4500 Cont. mode
≠
0x53
≠≠
38 Jogwheel fwd/rev 0xBn 0x51
Reverse 0x3F ~ 0x00
Foward 0x41 ~ 0x7F
slow → fast
✽ relative data
Control change
items
Command
MIDI command
Number Value
Message type
–100% : 0x7F7F (MSB/LSB)
0% : 0x4000 (MSB/LSB)
+100% : 0x0000 (MSB/LSB)
n = MIDI CH
Page 59

15
FRANCAIS
FRANCAIS
Réception de données de symbole VFD
Il est possible de configurer les différents symboles VFD pour qu’ils s’allument, s’éteignent ou clignotent,
comme indiqué dans le tableau ci-dessous.
2 Commande de réception pour symbole VFD
Réception de données
LED de réception de données
Il est possible de configurer les LEDs du panneau de commande pour qu’elles s’allument, s’éteignent ou
clignotent lors de la réception de commandes MIDI, comme indiqué dans le tableau ci-dessous.
2 Commande de réception de LED
VFD Symbol 0xBn
ON TRG : 0x4D
OFF TRG : 0x4E
Blink ON TRG : 0x4F
↓↓
Control Change
1T. 0x01
2 REMAIN 0x02
3 ELAPSED 0x03
4 CONT. 0x04
5 SINGLE 0x05
6 BPM 0x06
7m 0x07
8s 0x08
9f 0x09
10 Pitch dot Right 0x0A
11 Pitch dot center 0x0B
12 Pitch dot left 0x0C
13 MP3 0x10
14 WAV 0x11
15 KB 0x13
16 KEY ADJ. 0x14
17 MEMO 0x15
18 ( : A1 side 0x16
19 ( : A2 side 0x17
20 ) : A1 side 0x18
21 ) : A2 side 0x19
22 A1 0x1A
23 A2 0x1B
24 B : A1 side 0x1C
25 B : A2 side 0x1D
26 Scratch Ring out side 0x1E
27 Scratch Ring in side 0x1F
28 Touch dot 0x20
29 Track Position Blink
only Use 0x4F/0x4E
0x21
30
Scratch Position 1 (Top right)
only Use 0x4D/0x4E
0x22
31 Scratch Position 2
only Use 0x4F/0x4E
0x23
32 Scratch Position 3
only Use 0x4F/0x4E
0x24
33 Scratch Position 4
only Use 0x4F/0x4E
0x25
34 Scratch Position 5
only Use 0x4F/0x4E
0x26
35 Scratch Position 6
only Use 0x4F/0x4E
0x27
36 Scratch Position 7
only Use 0x4F/0x4E
0x28
items
Command
MIDI command
Number Value
Message type
n = MIDI CH
LED 0xBn
ON TRG : 0x4A
OFF TRG : 0x4B
Blink ON TRG : 0x4C
↓↓
Control Change
1 Playlist 0x02
2 Pitch match LED 0x04
3 JOG mode Green 0x05
4 JOG mode Orange 0x06
5 Pitch/KEY Green 0x07
6 Pitch/KEY Orange 0x08
7TAP Green 0x09
8TAP Orange 0x0A
9
EFX1/ECHO/LOOP RED
0x0B
10 EFX1 Green 0x0C
11 EFX2/FLANGER RED 0x0D
12 EFX2 Green 0x0E
13 EFX3/FILTER RED 0x0F
14 EFX3 Green 0x10
15 HOT1 0x11
16 HOT1 Dimmer 0x12
17 HOT2 0x13
18 HOT2 Dimmer 0x14
19 HOT3 0x15
20 HOT3 Dimmer 0x16
21 HOT4 0x17
22 HOT4 Dimmer 0x18
23 HOT5 0x19
24 HOT5 Dimmer 0x1A
25 Parameter KNOB 0x1E
26 A1 0x24
27 A1 Dimmer 0x3C
28 A2 0x25
29 A2 Dimmer 0x3D
30 Cue 0x26
31 Play 0x27
32 Jogwheel 0x3B
33 Pitch slider request 0x3C
DN-HC4500 return
pitch slider position
only Use 0x4A
(request TRG)
34
X-Control fader request
0x3D
DN-HC4500 return XControl fader position
only Use 0x4A
(request TRG)
items
Command
MIDI command
Number Value
Message type Notes
Page 60

16
FRANCAIS
FRANCAIS
Réception de données de paramètre VFD
Il est possible de configurer les affichages temporel et de segment par commande MIDI, comme indiqué
dans le tableau ci-dessous.
2 Commande de réception pour paramètre VFD
✽ Le message “Track Position Blink” permet de faire clignoter tous les segments de position de piste.
41 Scratch Position 12
only Use 0x4D/0x4E
0x2D
42 Scratch Position 13
only Use 0x4D/0x4E
0x2E
43 Scratch Position 14
only Use 0x4D/0x4E
0x2F
44 Scratch Position 15
only Use 0x4D/0x4E
0x30
45
Scratch Position 16 (Bottom)
only Use 0x4D/0x4E
0x31
46 Scratch Position 17
only Use 0x4D/0x4E
0x32
47 Scratch Position 18
only Use 0x4D/0x4E
0x33
48 Scratch Position 19
only Use 0x4D/0x4E
0x34
49 Scratch Position 20
only Use 0x4D/0x4E
0x35
50 Scratch Position 21
only Use 0x4D/0x4E
0x36
51 Scratch Position 22
only Use 0x4D/0x4E
0x37
52 Scratch Position 23
only Use 0x4D/0x4E
0x38
53 Scratch Position 24
only Use 0x4D/0x4E
0x39
54 Scratch Position 25
only Use 0x4D/0x4E
0x3A
55 Scratch Position 26
only Use 0x4D/0x4E
0x3B
56 Scratch Position 27
only Use 0x4D/0x4E
0x3C
57 Scratch Position 28
only Use 0x4D/0x4E
0x3D
58 Scratch Position 29
only Use 0x4D/0x4E
0x3E
59 Scratch Position 30
only Use 0x4D/0x4E
0x3F
60 Scratch Position 31
only Use 0x4D/0x4E
0x40
61 Scratch Position 32 (Top)
only Use 0x4D/0x4E
0x41
VFD Symbol 0xBn
ON TRG : 0x4D
OFF TRG : 0x4E
Blink ON TRG : 0x4F
↓↓
Control Change
37 Scratch Position 8
only Use 0x4D/0x4E
0x29
38 Scratch Position 9
only Use 0x4D/0x4E
0x2A
39 Scratch Position 10
only Use 0x4D/0x4E
0x2B
40 Scratch Position 11
only Use 0x4D/0x4E
0x2C
items
Command
MIDI command
Number Value
Message type
n = MIDI CH
VFD Parameter
1Tr number MSB 0xBn 0x40
0-99
100-109 : “-0” to “-9”
110 : “--”, 111 : “ ”
Control Change
2Tr number LSB
≠
0x41
≠≠
3Time mini
≠
0x42
≠≠
4Time sec
≠
0x43
≠≠
5Time frame
≠
0x44
≠≠
6 Pitch POL
≠
0x45
“ ” 0x00
“+” 0x01
“–” 0x02
≠
7 Pitch MSB
≠
0x46
≠≠
8Pitch LSB
≠
0x47
≠≠
9Track Position
≠
0x48 normal
0x49 reverse
0-100%
≠
10 Segment 1-1 MSB
≠
0x01 0x00 ~ 0x0F
≠
11 Segment 1-2 MSB
≠
0x02
≠≠
12 Segment 1-3 MSB
≠
0x03
≠≠
13 Segment 1-4 MSB
≠
0x04
≠≠
14 Segment 1-5 MSB
≠
0x05
≠≠
15 Segment 1-6 MSB
≠
0x07
≠≠
16 Segment 1-7 MSB
≠
0x08
≠≠
17 Segment 1-8 MSB
≠
0x09
≠≠
18 Segment 1-9 MSB
≠
0x0A
≠≠
19 Segment 1-10 MSB
≠
0x0B
≠≠
20 Segment 1-11 MSB
≠
0x0C
≠≠
21 Segment 1-12 MSB
≠
0x0D
≠≠
22 Segment 1-1 LSB
≠
0x21
≠≠
23 Segment 1-2 LSB
≠
0x22
≠≠
24 Segment 1-3 LSB
≠
0x23
≠≠
25 Segment 1-4 LSB
≠
0x24
≠≠
26 Segment 1-5 LSB
≠
0x25
≠≠
27 Segment 1-6 LSB
≠
0x27
≠≠
28 Segment 1-7 LSB
≠
0x28
≠≠
29 Segment 1-8 LSB
≠
0x29
≠≠
30 Segment 1-9 LSB
≠
0x2A
≠≠
Items
Command
MIDI command
Number Value
Message Type
31 Segment 1-10 LSB
≠
0x2B
≠≠
32 Segment 1-11 LSB
≠
0x2C
≠≠
Page 61

17
FRANCAIS
FRANCAIS
Réception de données de segment VFD
Chaque segment peut être configuré par une donnée à 2 octets, comme indiqué par le code de police
suivant.
(Les valeurs 0x00/0x00 à 0x00/0x07 ne pourront pas être utilisées.)
2 Codes de police de caractères de segments
33 Segment 1-12 LSB 0xBn 0x2D 0x00 ~ 0x0F Control Change
34 Segment 2-1 MSB
≠
0x0E
≠≠
35 Segment 2-2 MSB
≠
0x0F
≠≠
36 Segment 2-3 MSB
≠
0x10
≠≠
37 Segment 2-4 MSB
≠
0x11
≠≠
38 Segment 2-5 MSB
≠
0x12
≠≠
39 Segment 2-6 MSB
≠
0x13
≠≠
40 Segment 2-7 MSB
≠
0x14
≠≠
41 Segment 2-8 MSB
≠
0x15
≠≠
42 Segment 2-9 MSB
≠
0x16
≠≠
43 Segment 2-10 MSB
≠
0x17
≠≠
44 Segment 2-11 MSB
≠
0x18
≠≠
45 Segment 2-12 MSB
≠
0x19
≠≠
46 Segment 2-1 LSB
≠
0x2E
≠≠
47 Segment 2-2 LSB
≠
0x2F
≠≠
48 Segment 2-3 LSB
≠
0x30
≠≠
49 Segment 2-4 LSB
≠
0x31
≠≠
50 Segment 2-5 LSB
≠
0x32
≠≠
51 Segment 2-6 LSB
≠
0x33
≠≠
52 Segment 2-7 LSB
≠
0x34
≠≠
53 Segment 2-8 LSB
≠
0x35
≠≠
54 Segment 2-9 LSB
≠
0x36
≠≠
55 Segment 2-10 LSB
≠
0x37
≠≠
56 Segment 2-11 LSB
≠
0x38
≠≠
57 Segment 2-12 LSB
≠
0x39
≠≠
VFD Parameter
Items
Command
MIDI command
Number Value
Message Type
n = MIDI CH
Page 62

18
FRANCAIS
FRANCAIS
(2) Chargement de données préréglées à partir d’un périphérique externe
Emettre les commandes ci-dessous du PC vers le DN-HC4500. [DRM]
Données préréglées
Certains paramètres préréglés du DN-HC4500 peuvent être enregistrés à partir d’un périphérique externe,
à condition qu’ils soient compatibles avec le format spécial MIDI DENON DJ.
(1) Format des commandes de configuration
Le format de base des commandes de configuration supportées par le DN-HC4500 est:
Le texte ci-dessous est renvoyé par le DN-HC4500. [DSM]
La structure des données renvoyées pour chaque commande preset request est indiquée ci-dessous.
2 Tableau des données renvoyées pour chaque commande Preset request
CMD Item Data Length
SOX
IDC
FMT
Start of System Exclusive
ID code → DENON DJ ID
Communication format
0xF0
0x004003
0x12: one way
1Byte
3Byte
1Byte
MDN
UN
MCH
MST
CMD
DL
Data
Model number
Unit number
MIDI channel
Message Type
Command
Data Length
Preset data
0x41 (DN-HC4500)
depends on preset mode (0x00 to 0x0F)
depends on preset mode (0x00 to 0x05)
0x53: Selecting, 0x50: Polling,
0x20: Preset set/ 0x21: Preset request
0x** number of the data Byte
refer the preset data table
1Byte
1Byte
1Byte
1Byte
1Byte
1Byte
****
BCC
EOX
Block check character
End of System Exclusive
0x** EVEN parity of the Data block
0xF7
1Byte
1Byte
CMD Item Data Length
SOX
IDC
FMT
Start of System Exclusive
ID code → DENON DJ ID
Communication format
0xF0
0x004003
0x12: one way
1Byte
3Byte
1Byte
MDN
UN
MCH
MST
CMD
Model number
Unit number
MIDI channel
Message Type
Command
0x41 (DN-HC4500) or 0x7F (ALL model)
depends on preset mode (0x00 to 0x0F)
depends on preset mode (0x00 to 0x05)
0x50: Polling
0x21: Preset request
1Byte
1Byte
1Byte
1Byte
1Byte
EOX End of System Exclusive 0xF7 1Byte
CMD Item Data Length
SOX
IDC
FMT
Start of System Exclusive
ID code → DENON DJ ID
Communication format
0xF0
0x004003
0x12: one way
1Byte
3Byte
1Byte
MDN
UN
MCH
MST
CMD
DL
Data
Model number
Unit number
MIDI channel
Message Type
Command
Data Length
Preset data
0x41 (DN-HC4500)
depends on preset mode (0x00 to 0x0F)
depends on preset mode (0x00 to 0x05)
0x53: Selecting
0x21: Preset request (Return)
0x** number of the data Byte
refer the preset data table
1Byte
1Byte
1Byte
1Byte
1Byte
1Byte
****
BCC
EOX
Block check character
End of System Exclusive
0x** EVEN parity of the Data block
0xF7
1Byte
1Byte
Preset name Item Data Length
USB mode Sel
CD Model Sel
Audio Fs Sel
Unit number Set
MIDI CH Set
JOG Pulse Sel
Fader In Mode
Xcont XFD
Audio buffer
Model code
USB Control mode select
Drive control model select
Audio sampling frequency select
Unit number
MIDI CH
JOG count number per cycle
Fader In mode select
X-control mode select
Audio buffer size
Model number
0x00: HC4500 MIDI, 0x02 to 0x0F: Reserve
0x00: DN-D4500, 0x01: DN-D4000
0x01: 44.1kHz, 0x02: 48kHz, 0x08:
96kHz, 0x04; AUTO
(AUTO: Automatically follow Fs by USB data)
0x00 to 0x0F
0x00: CH1&2, 0x01: CH3&4, 0x02: CH5&6
0x00: 1480, 0x01: 740, 0x02: 555, 0x03: 370
0x00: 2wire Play/Cue, 0x01: 1wire Play/Cue
0x00: OFF, 0x01: ON
0x0040 to 0x0810 (2Byte)
0x41
1Byte
1Byte
1Byte
1Byte
1Byte
1Byte
1Byte
1Byte
2Byte
1Byte
PC DN-HC4500
[DRM] [DSM]
]\
[]
Page 63

19
FRANCAIS
FRANCAIS
12
RESOLUTIONS DE PROBLEMES
2 Le DN-HC4500 ne fonctionne pas correctement, ou aucun son n’est reproduit
• Les câbles USB, audio, etc., ont-ils été correctement connectés ?
• Le volume sonore de la source, périphérique audio, application, système d’exploitation, etc.,
a-t-il été correctement configuré ?
• Avez-vous choisi le bon périphérique audio dans votre application ?
• La fréquence d’échantillonage choisie est-elle correcte ?
\Pour résoudre ce problème, il est possible de régler le mode de préréglage du DN-HC4500 et de
l’application sur la même valeur, ou de régler le DN-HC4500 sur “AUTO”.
• Certains fichiers WAV ont-ils été enregistrés avec une fréquence d’échantillonage ou un débit
binaire différent ?
\En fonction de l’application audio que vous utilisez, certaines fréquences d’échantillonage ou
débits binaires différents ne pourront pas être reproduits simultanément.
• Un autre périphérique USB est-il en cours d’utilisation ?
\Si d’autres périphériques USB sont connectés, essayez de ne connecter que des DN-HC4500 pour
détecter d’éventuels problèmes.
• Le connecteur USB de votre ordinateur personnel est-il compatible avec la norme USB 2.0
(Haute vitesse) ?
\N’utilisez qu’un câble compatible USB 2.0.
2 Le son est coupé ou déformé
• D’autres applications ou pilotes sont-ils en cours d’utilisation ?
\Quittez toutes les applications non nécessaires.
• Plusieurs fichiers WAV sont-ils en cours de lecture ?
\Il est possible que le son soit interrompu lors de la lecture simultanée de plusieurs fichiers WAV,
en fonction notamment des capacités de votre ordinateur.
(3) Configuration des paramètres préréglés à partir d’un périphérique externe.
Emettre les messages de sélection ci-dessous du PC vers le DN-HC4500. [DSM]
2 Tableau des commandes préréglées
Lorsque le DN-HC4500 détecte une correspondance entre le numéro du modèle et un numéro d’unité,
tous les paramètres seront préréglés depuis le périphérique externe, en fonction du tableau des
messages reçus.
La structure des commandes de preset set est indiquée ci-dessous.
CMD Item Data Length
SOX
IDC
FMT
Start of System Exclusive
ID code → DENON DJ ID
Communication format
0xF0
0x004003
0x12: one way
1Byte
3Byte
1Byte
MDN
UN
MCH
MST
CMD
DL
Data
Model number
Unit number
MIDI channel
Message Type
Command
Data Length
Preset data
0x41 (DN-HC4500)
depends on preset mode (0x00 to 0x0F)
depends on preset mode (0x00 to 0x05)
0x53: Selecting,
0x20: Preset set
0x** number of the data Byte
refer the preset data table
1Byte
1Byte
1Byte
1Byte
1Byte
1Byte
****
BCC
EOX
Block check character
End of System Exclusive
0x** EVEN parity of the Data block
0xF7
1Byte
1Byte
Preset name Item Data Length
USB mode Sel
CD Model Sel
Audio Fs Sel
JOG Pulse Sel
Fader In Mode
Xcont XFD
USB Control mode select
Drive control model select
Audio sampling frequency select
JOG count number per cycle
Fader In mode select
X-control mode select
0x00: HC4500 MIDI, 0x02 to 0x0F: Reserve
0x00: DN-D4500, 0x01: DN-D4000
0x01: 44.1kHz, 0x02: 48kHz, 0x08:
96kHz, 0x04; AUTO
(AUTO: Automatically follow Fs by USB data)
0x00: 1480, 0x01: 740, 0x02: 555, 0x03: 370
0x00: 2wire Play/Cue, 0x01: 1wire Play/Cue
0x00: OFF, 0x01: ON
1Byte
1Byte
1Byte
1Byte
1Byte
1Byte
PC DN-HC4500
[DSM] Exécution de message de réception
]\
[]
Page 64

20
FRANCAIS
FRANCAIS
13
CARACTERISTIQUES TECHNIQUES
2 Généralités
Alimentation électrique: Modèle pour les U.S.A et le CANADA: CA 120 V 60 Hz
Modèle pour l’Europe: CA 235 V 50 Hz
Modèle pour le Japon: CA 100 V 50 Hz/60 Hz
Consommation d’énergie: Modèle pour les U.S.A et le CANADA: 12 W
Modèle pour l’Europe: 12 W
Modèle pour le Japon: 10 W
Température ambiante
de marche: de 0 °C à 40 °C
Dimensions: 482 (L) x 132 (H) x 88 (max106) (P) mm
espace requis en bâti: EIA 3U
Poids: 3,7 kg
Finition: Panneau avant: Noir (Acier peint)
Arrière & Boîtier: Noir (Acier peint)
2 Audio
Sortie analogique: 1, 2 RCA pin: Non balancée
2Vrms = 0dBFS
Convertisseur DA: Type
à 24 bits pour suréchantillonage de Fs à 32: 44,1 kHz/48 kHz/96 kHz
Gamme D 106 dB (TYP)
S/N 106 dB (TYP) (DIN)
Réponse en fréquence: de 20 à 22 kHz, ±0.5 dB
T.H.D: Inférieure à 0.05 % (entrée = sortie = 2Vrms/1 KHz, RL: 10 kΩ)
Parasites: Inférieurs à –94 dBV (TYP)
Diaphonie (crosstalk): Inférieure à –110 dB (TYP @1 kHz)
2 USB I/F
Connecteur USB B: USB2.0 (Max480 Mbps)
Application de type PC/MAC (Hôte) ¤ DN-HC4500 (Esclave)
Audio USB (Enceinte)
PCM 16bit/24bit 44.1 kHz/48 kHz/96 kHz 4ch
USB MIDI I/O
IN: 1 port, OUT: 1 port
USB HID I/O (Général)
Paquet de 32 octets
2 Contrôle I/F
Fader start: FADER 1
Jack mini stéréo 3.5 mm (Pointe/bague: signal, Manchon: GND), 0.5VDC
FADER 2
Jack mini stéréo 3.5 mm (Pointe/bague: signal, Manchon: GND), 0.5VDC
X-CONTROL: Entrée
Jack mini stéréo 3.5 mm (Pointe/bague: signal, Manchon: GND), 0.5VDC
Commande CD: Connecteur à 8 broches mini-DIN
(DN-D4500/D4000/BU4500 commande d’unité d’entraînement)
2 Autres
Affichage: 40 mm x 100 mm VFD
Affichage à caractères matriciel de 12 caractères par x 2 lignes &
marqueur de scratch
Molette Jog: 71 mm, à détection de mouvements
(MARCHE/ARRÊT par commande tactile, Dir FWD/RVS, compteur
d’impulsions) MIDI: Remarque MARCHE/ARRÊT
1480/740/555/370 Impulsions/cycle MIDI: Changement de commande
SW caoutchouc: SW de fonction
5 avec LED
pour démarrage rapide (HOT start) et LOAD SW, autres
MIDI: Remarque MARCHE/ARRÊT
Autres SW
10 avec LED
pour CUE/PLAY/Démarrage HOT/EFX/LOAD et autres
MIDI: Remarque MARCHE/ARRÊT
Autres SW
14 w/o LED
pour les fonctions de recherche rapide / Pitch et autres
MIDI: Remarque MARCHE/ARRÊT
Fondu de pitch: 60 mm avec tap central de 1024 pas
MIDI: Variation du pitch
(Données MIDI –100 %: 0x7F7F / ±0 %: 0x4000 / +100 %: 0x0000)
Molette Parameter: SW pour Enter et autres MIDI: Remarque MARCHE/ARRÊT
FWD/RVS 24 impulsions/cycle MIDI: Changement de commande
2 Pilote DENON DJ ASIO
Paramètre de commande: Taille du tampon
88 (Fs: 44,1 kHz/ 48 kHz) /188 (Fs: 96 kHz) échantillon à 2048
Commande de tampon physique
Fréquence d’échantillonage
44,1 kHz/ 48 kHz/ 96 kHz (suit le paramètre DN-HC4500)
✽ ASIO est une marque commerciale de Steinberg Media Technologies GmbH
✽ MAC est une marque commerciale d’Apple Computer, Inc.
✽ MIDI est une marque commerciale d’AMEI
482
465
132
57.2
Trou de 7 x 10
88.2
2
5
Unité: mm
Page 65

1
ESPAÑOL
ESPAÑOL
1 CARACTERÍSTICAS
CONTENIDO
z Características ...............................................1
x Conexiones ...................................................2
c Nombre y función de las partes .............3 ~ 5
v Cambio de dispositivo ...................................5
b Funcionamiento básico .................................6
n Seamless loop/Hot start/Stutter....................7
m Trim ...............................................................8
ACCESORIOS
Compruebe que los accesorios siguientes vienen incluidos con el equipo principal:
2
Disco Jog multifuncional sensible al tacto
El disco JOG de 71 mm está diseñado con un
sensor de impulsos y tacto de muy alta
resolución que permite reproducir hasta los más
sutiles y rápidos movimientos de la mano
humana. Como cabe esperar, el disco Jog
también puede programarse para realizar otras
funciones importantes como, por ejemplo,
variación de velocidad de reproducción,
exploración, búsqueda de archivos y control
“seco/mojado” para efectos.
2
Vibrante pantalla de visualización de
tubos con capacidad para 2 líneas de texto
Otra característica exclusiva del DN-HC4500 es
su pantalla de visualización de tubos, que
proporciona información y muestra
animaciones. La pantalla incluye dos líneas de
texto informativo donde el usuario puede
desplazarse rápidamente a sus archivos, cajas,
carpetas y confirmar que ha cargado el archivo
correcto sin siquiera tener que ver el monitor.
Un indicador visual de 32 posiciones sigue los
movimientos de la mano a la velocidad del rayo,
sin retardo alguno. Otros indicadores incluidos:
Looping, Hot Starts, BPM info, Elapsed/Remain
Time, tipo de archivo MP3/WAV y otros
indicadores útiles.
2 Botones, interruptores y controles de
goma suave altamente sensibles
•5 teclas de función fácilmente accesibles en la
parte superior de cada deck
• Deslizadores de velocidad de reproducción de
45 mm con gran capacidad de resolución y
amplia gama de variación de velocidad
• Espectacular iluminación del botón CUE/PLAY
•2 niveles de iluminación para ciertos botones
• Iluminación multicolor de ciertos botones para
funciones de superposición de capas
• LED multicolor para funciones de
superposición de capas
• Botones Pitch Bend
• Control Parameter y teclas Range, Sync,
Playlist, Back, Fast Search etc. configurables
por el usuario
2 Compatibilidad con el BU4500
El reproductor de CD/MP3 dual BU4500
opcional (se vende por separado) permite a los
DJ seguir reproduciendo su colección de CD
(siempre que sea necesario) al mismo tiempo
que controlan su software de DJ favorito. El
BU4500 también puede utilizarse como sistema
de “respaldo”, sin necesidad de cambiar
ninguna conexión en caso de que ocurra un fallo
en el ordenador. Simplemente pulse el botón
SOURCE en uno de los decks para cambiar a
reproducción de CD sin contratiempo alguno.
Este inteligente sistema combinado hace que el
DN-HC4500 sea el controlador de hardware de
DJ más poderoso y flexible del planeta.
Además, los usuarios que actualmente tienen el
DENON DN-D4500 / DN-D4000 pueden
disfrutar de todos estos beneficios adquiriendo
el DN-HC4500 y actualizando el sistema para
que pueda controlarse por ordenador.
2 Procesamiento interno de 24 bits y
audio USB
A diferencia de la mayoría de los controladores
midi para DJ, que sólo reciben energía del bus
USB, el DN-HC4500 tiene su propia fuente de
alimentación interna que le permite brindar las
más altas especificaciones eléctricas, lo que se
traduce en el mejor rendimiento posible. El DNHC4500 incorpora tecnología de procesamiento
DAC de 24 bits Burr Brown (un producto de TI)
para ofrecer una fidelidad de sonido superior. La
interfaz de audio USB incluye un par de salidas
estéreo de 2 canales, frecuencias de muestreo
de 44,1/48/96 kHz y compatibilidad con audio
ASIO / OSX Core de baja latencia.
, Preset ............................................................8
. Panel de control Asio
(sólo para versión Windows)...................9, 10
⁄0 Actualización .......................................11 ~ 13
⁄1 Comandos MIDI .................................14 ~ 19
⁄2 Solución de problemas................................19
⁄3 Especificaciones..........................................20
2 Diseño en estilo de reproductor de CD
dual tradicional e intuitivo
2 Interfaz USB 2.0 de alta velocidad
2 FADER START
Compatible con la tradicional función “Fader
Start”, incluyendo todos los mezcladores
DENON
2 X-Control
Cuando se combina el DN-HC4500 con los
mezcladores DN-X500/DN-X900 de DENON, el
crossfader de estos mezcladores puede
utilizarse como crossfader de los reproductores
de software con sólo conectar un minicable
estéreo de 3,5 mm
2 Panel lateral rebajado para facilidad de
conexión
2 Diseño versátil para montaje en
bastidor y uso de sobremesa
2 Preajustes configurables por el usuario
2 Actualización de software por USB
Cada cierto tiempo DENON DJ hará mejoras a
las funciones existentes o añadirá nuevas
funciones basándose en las opiniones de los
usuarios. Estos complementos siempre son
gratuitos y están disponibles en nuestro sitio
web www.denondj.com.
q Cable de audio..............................................2
w Cable USB....................................................1
e Instrucciones de funcionamiento.................1
r CD-ROM.......................................................1
Page 66

2
ESPAÑOL
ESPAÑOL
2 CONEXIONES
CONEXIONES
1. Desconecte el interruptor POWER.
2. Conecte los cables de la clavija RCA a las entradas del mezclador.
Conector de fader CH6Conector de fader CH4
DN-X900
DN-HC4500
Minicable estéreo de 3,5 mm
Conector de
fader Deck2
Conector de entrada CH6Conector de entrada CH4Cable RCA Cable RCA
Conector de salida Deck1 Conector de salida Deck2
DN-D4000/
DN-D4500/
BU4500
Se incluye la aplicación de
actualización DENON
PC/MAC y la aplicación de
actualización ASIO.
PRECAUCIÓN:
• Asegúrese de utilizar el cable de control suministrado. Si utiliza otro tipo de cable podría dañar la unidad.
• Compruebe que el equipo esté apagado cuando conecte el cable de control. En caso contrario, es posible que las unidades no funcionen correctamente.
Terminal USB B
Conector de
entrada CH2
Conector de
fader CH2
Conector de fader Drive1
Conector de salida Drive1
Conector de fader Drive2
Conector de salida
Drive2
Terminal DRIVE
Conector de entrada CH8
Conector de
fader CH8
Minicable estéreo de 3,5 mm
Conector de
fader Deck1
Conexión a un PC
Cable RCA Cable RCA
Minicable estéreo
de 3,5 mm
Minicable estéreo
de 3,5 mm
• El DN-HC4500 es un dispositivo plug-and-play.
Esto significa que cuando se conecta el DNHC4500 al ordenador por primera vez, el
controlador correspondiente se instala
automáticamente.
• Para conectar el DN-HC4500 al PC a través de un
puerto USB, utilice el cable USB suministrado.
• Cuando se realiza la conexión, en la parte inferior
derecha de la pantalla del PC aparece el mensaje
siguiente.
Una vez finalizada la instalación, aparece el
mensaje “Your new hardware is installed and
ready to use. (Su nuevo hardware está instalado
y listo para usarse.)”, como se muestra a
continuación.
De esta forma finaliza la instalación. El DNHC4500 está listo para utilizarse.
Conexión a un ordenador Macintosh
• El DN-HC4500 es un dispositivo plug-and-play
basado en el sistema operativo Macintosh OS, lo
que significa que puede utilizarse
inmediatamente al ser conectado al ordenador.
• Para conectar el DN-HC4500 a un ordenador
Macintosh a través de un puerto USB, utilice el
cable USB suministrado.
Versiones de sistemas operativos de
ordenadores que pueden conectarse
al DN-HC4500:
Windows XP SP2
Mac OSX 10.4 o posterior
Los ordenadores que tienen otros
sistemas operativos no son
compatibles con USB MIDI, por lo
que pueden funcionar erráticamente
al ser conectados al DN-HC4500 a
través de una conexión USB.
Found New Hardware
USB audio device
Found New Hardware
Your new hardware is installed and ready to use.
X-control
Algunas funciones no pueden utilizarse con el DN-D4000.
(Nuevo hardware encontrado)
(Dispositivo de audio USB)
(Nuevo hardware encontrado)
(Su nuevo hardware está instalado y listo para usarse.)
Page 67

3
ESPAÑOL
ESPAÑOL
3 NOMBRE Y FUNCIÓN DE LAS PARTES
q
Terminal de salida analógica (LINE OUT)
• Estos son terminales de salida RCA
asimétricos.
• Salidas de señales de audio.
w Te rminal DRIVE
• Conecte la unidad DND4000/D4500/BU4500.
Para acceder a instrucciones sobre cómo
utilizar el DN-D4000/D4500/BU4500,
consulte el manual de uso del modelo
respectivo.
e Te rminal USB B
• Conéctelo a un ordenador.
• Envía comandos USB MIDI y HID desde el
DN-HC4500.
• Envía señales USB audio desde un PC.
(1) Panel lateral
wretq
uy
r Botón POWER
• Pulse este botón para encender y apagar su
equipo.
t Te rminal de entrada AC
• Conecte la clavija del cable de alimentación al
terminal de entrada AC del DN-HC4500.
y Te rminales de inicio de Fader
• Utilice esta opción cuando su mezcladora
tiene la función de inicio de fader.
u Te rminal de salida X-CONTROL
• Utilice este terminal para conectar el equipo
a una mezcladora DENON DN-X900 o DNX500 que incluya la función X-Control.
• Con el DN-HC4500 se puede convertir la
posición de entrada de fader en una señal
MIDI y enviarla desde el terminal USB.
(2) Panel delantero
o!1 !3 !5
!0 !9 @1
!7
!2i!4 !6 @0!8
@9#3 #1 @6#2 @8#0 @7
@2@4@3
@5
i TIME, Total
[Cuando PCDJ está conectado]
Consulte el manual de PCDJ.
[Cuando el DN-D4500 está conectado]
• TIME:
Cuando se pulsa esta botón, el indicador de
tiempo cambia entre “ELAPSED” (tiempo
transcurrido) y “REMAIN” (tiempo restante).
• Total:
Si se pulsa este botón durante más de 1
segundo, se puede visualizar el tiempo total.
o FLIP/B TRIM
[Cuando PCDJ está conectado]
Consulte el manual de PCDJ.
[Cuando el DN-D4500 está conectado]
• Pulse este botón para cambiar entre el modo
de bucle/modo de inicio rápido y el modo de
“tartamudeo”.
• Después de configurar el punto B puede
seleccionarse el modo B TRIM MODE.
PRECAUCIÓN:
Tenga presente que hay varios botones que controlan dos funciones distintas que se seleccionan
mediante una pulsación corta o larga (1 segundo o mayor duración). La marca “ ” indica una función
de tiempo corto, mientras que la marca “ ” indica una función de pulsado de tiempo largo.
!0 MEMO, PRESET
[Cuando PCDJ está conectado]
Consulte el manual de PCDJ.
[Cuando el DN-D4500 está conectado]
• MEMO:
El modo MEMO se activa cuando se pulsa
este botón una vez en el modo
Localización/Pausa.
• PRESET:
Cuando se pulsa este botón durante más de
un segundo, se visualiza el menú del modo
PRESET.
!1 CUE/STUTTER
[Cuando PCDJ está conectado],
[Cuando el DN-D4500 está conectado]
• Si se pulsa este botón durante la
reproducción, el archivo vuelve a la posición
desde donde la reproducción comenzó.
• En modo Cue, al pulsar el botón CUE, se
creará un sonido Stutter desde el punto Cue.
Esto es lo que se llama la Sttuter play.
(Stutter)
Page 68

4
ESPAÑOL
ESPAÑOL
!2 TITLE
[Cuando PCDJ está conectado]
Consulte el manual de PCDJ.
[Cuando el DN-D4500 está conectado]
• CD TEXT:
Se visualiza texto de CD.
• MP3:
La información de etiqueta ID3 cambia cada
vez que se pulsa el botón.
!3 A1, A2
[Cuando PCDJ está conectado],
[Cuando el DN-D4500 está conectado]
• Con este botón se puede crear un punto de
inicio para Inicio rápido, Bucle continuo y
Tartamudeo.
!4 CONT./SINGLE, RELAY
[Cuando PCDJ está conectado]
Consulte el manual de PCDJ.
[Cuando el DN-D4500 está conectado]
• CONT./SINGLE:
Un pequeño toque de este botón cambiará entre
3 posibles modos END para la reproducción
CONT. (continua: reproduce todos los archivos),
SINGLE (la reproducción se detiene y se vuelve
(ReCUE) al punto inicial), PLAYLOCK.
• RELAY:
Cuando se pulsa este botón durante más de
1 segundo, se puede activar y desactivar el
modo RELAY PLAY.
!5 PLAY/PAUSE
[Cuando PCDJ está conectado],
[Cuando el DN-D4500 está conectado]
•
Este botón iniciará o detendrá la reproducción.
!6 B
[Cuando PCDJ está conectado],
[Cuando el DN-D4500 está conectado]
• Utilice este botón para establecer el punto B
de un bucle continuo después de establecer
el punto A.
!7 SOURCE
[Cuando PCDJ está conectado]
Consulte el manual de PCDJ.
[Cuando el DN-D4500 está conectado]
• Pulse este botón para seleccionar la fuente,
PC o CD.
!8 EXIT/RELOOP
[Cuando PCDJ está conectado],
[Cuando el DN-D4500 está conectado]
• Utilice este botón para salir o volver al modo
de reproducción en Bucle continuo.
Esta función permite variar la función de
bucle.
!9 JOG MODE
[Cuando PCDJ está conectado]
Consulte el manual de PCDJ.
[Cuando el DN-D4500 está conectado]
Seleccione entre el modo Variación de
velocidad de reproducción y el modo
Búsqueda manual de cuadro.
@0 Indicador JOG
[Cuando PCDJ está conectado]
Consulte el manual de PCDJ.
[Cuando el DN-D4500 está conectado]
• Esta barra azul indica claramente los distintos
modos JOG como, por ejemplo, cambio de
velocidad de reproducción y búsqueda de
cuadro.
@1 Disco JOG
[Cuando PCDJ está conectado]
Consulte el manual de PCDJ.
[Cuando el DN-D4500 está conectado]
• Utilice este JOG de vinilo para las
operaciones de búsqueda manual y variación
de velocidad de reproducción.
@2 PITCH/KEY, RANGE
[Cuando PCDJ está conectado]
Consulte el manual de PCDJ.
[Cuando el DN-D4500 está conectado]
• PITCH/KEY:
La visualización cambia como se indica a
continuación cada vez que se pulsa la tecla:
Velocidad de reproducción activada / Ajuste
de tono / ambos desactivados
• RANGE:
Pulse este botón durante más de 1 segundo
para seleccionar la variación de pitch.
@3 Barra de Pitch
[Cuando PCDJ está conectado],
[Cuando el DN-D4500 está conectado]
•Utilice esta barra para ajustar la velocidad de
reproducción.
• La velocidad de reproducción disminuye
cuando se desliza hacia arriba, y aumenta
cuando se desliza hacia abajo.
@4 PITCH BEND±
[Cuando PCDJ está conectado],
[Cuando el DN-D4500 está conectado]
• Mientras se pulsan estos botones, la
velocidad de reproducción principal cambia
temporalmente.
• Cuando libere el botón, la velocidad de
reproducción volverá a la velocidad previa.
@5 PLAY LIST
[Cuando PCDJ está conectado]
Consulte el manual de PCDJ.
[Cuando el DN-D4500 está conectado]
• Pulse este botón para abrir y cerrar el
portadisco.
• No es posible abrir el portadisco durante la
reproducción.
Detenga la reproducción antes de pulsar este
botón.
@6 TAP
[Cuando PCDJ está conectado]
Consulte el manual de PCDJ.
[Cuando el DN-D4500 está conectado]
• No funciona.
@7 Control PARAMETERS
[Cuando PCDJ está conectado],
[Cuando el DN-D4500 está conectado]
• Girar:
Seleccionar parámetros de pista/archivo o de
preajuste.
• Pulsar:
Para establecer los parámetros
seleccionados.
@8 BACK
[Cuando PCDJ está conectado]
Consulte el manual de PCDJ.
[Cuando el DN-D4500 está conectado]
• No funciona.
@9 EFFECT3
[Cuando PCDJ está conectado]
Consulte el manual de PCDJ.
[Cuando el DN-D4500 está conectado]
• No funciona.
#0 EFFECT2
[Cuando PCDJ está conectado]
Consulte el manual de PCDJ.
[Cuando el DN-D4500 está conectado]
• No funciona.
#1 EFFECT1
[Cuando PCDJ está conectado]
Consulte el manual de PCDJ.
[Cuando el DN-D4500 está conectado]
• Activa y desactiva el modo Freno.
#2
FAST SEARCH (6/7) QUICK JUMP
[Cuando PCDJ está conectado],
[Cuando el DN-D4500 está conectado]
• QUICK JUMP:
Cuando se pulsa brevemente uno de esto
botones, la posición de reproducción se
desplaza en dirección de retroceso (6) o
avance (7).
• FAST SEARCH:
Cuando se mantiene pulsado uno de estos
botones, se lleva a cabo una búsqueda rápida
del disco en dirección de retroceso (6) o
avance (7).
#3 FUNCTION
[Cuando PCDJ está conectado]
Consulte el manual de PCDJ.
[Cuando el DN-D4500 está conectado]
• No funciona.
Page 69

5
ESPAÑOL
ESPAÑOL
q
Indicadores de posición de reproducción
• El indicador de posición blanco se ilumina
durante la reproducción normal, y la posición
en la pista es indicada por el tiempo
transcurrido.
• Si el tiempo que falta para llegar al final de la
pista es más corto que el tiempo
especificado, el indicador de posición de
reproducción parpadea de acuerdo con el
tiempo restante de la pista (EOM) para
indicar el final de la pista.
w Indicadores de modo Loop
• El DN-HC4500 tiene dos indicadores de
modo de bucle, A y B.
Los indicadores A y B se iluminan cuando se
establecen los puntos A y B.
e Visualizador de caracteres
•
Este bloque muestra diversa información sobre el
funcionamiento del equipo, mensajes de texto, etc.
r Indicadores de datos de archivo
•
Indican el tipo de archivo que se está reproduciendo.
t Indicador de confirmación de conexión
de dispositivo externo
•
Se ilumina durante el envío o recepción de señales
MIDI entre el DN-HC4500 y un dispositivo externo.
y Indicador de teclado
• Se ilumina cuando se recibe el comando de
luz desde un ordenador.
(3) Pantalla
u Indicador KEY ADJ.
• “KEY ADJ.” se ilumina cuando se selecciona
el modo de ajuste de tono.
i Marcador visual
• La posición de reproducción se indica de
acuerdo con el estado de reproducción de los
distintos decks.
o Indicador MEMO
• El indicador “MEMO” se ilumina cuando hay
datos almacenados en la memoria para la
pista que se está reproduciendo o que está
en modo de espera.
!0
Indicador de velocidad de reproducción
•
Indica la velocidad de reproducción (altura tonal).
!1 Indicador de bytes por minuto (BMP)
•
Se ilumina cuando se visualiza BPM en la sección
de visualización de velocidad de reproducción.
!2 Indicadores de modo Reproducción
• Indican el modo de reproducción.
CONT.:
Cuando la reproducción de una pista
finaliza, se reproduce la pista siguiente.
SINGLE:
La reproducción se detiene cuando se llega
al final de dicha pista.
!3
Indicadores de minutos, segundos y cuadro
•
Indican la posición de reproducción actual o la
posición en que se ha establecido el modo de espera.
!4 Indicadores de modo Time
• La indicación cambia como se indica a
continuación cada vez que se pulsa el botón
Time:
ELAPSED:
Se visualiza el tiempo de reproducción
transcurrido desde el principio de la pista.
REMAIN:
Se muestra el tiempo restante de la pista.
T.ELAPSED:
Se visualiza el tiempo de reproducción
desde la primera pista de disco.
T.REMAIN:
Se visualiza el tiempo restante de todas las
pistas del disco.
!5 Indicador de pista
• Indica el número de la pista que se está
reproduciendo.
!6 Indicadores de conexión
• Indican los dispositivos conectados
controlados por el DN-HC4500.
PC:
El DN-HC4500 está controlando el software
DJ de un PC/MAC.
CD:
El DN-HC4500 está controlando un DND4000/D4500/BU4500.
✽ La reproducción de las señales USB audio
de un PC continúa durante el modo CD.
4 CAMBIO DE DISPOSITIVO
1
Pulse el botón SOURCE
para visualizar la pantalla de
selección “SOURCE”.
Nota:
• Cuando se pulsa el botón BACK, se
completa el cambio de fuente y se
restablece el modo normal.
2
Gire el control
PARAMETERS para
seleccionar el dispositivo.
Vuelva a pulsar el control
para introducir la opción
seleccionada.
Se visualiza “OK to CHANGE”.
Nota:
• El modo cambia a “NO” si se gira el
control PARAMETERS mientras se
visualiza “OK to CHANGE?
Ø”.
• En el modo “NO”, pulse el control
PARAMETERS o el botón BACK para
volver al paso 1.
3
Vuelva a pulsar el control para introducir.
Se visualiza “Completed!” y se completa el
cambio de fuente.
!4!6
wretquyo
!3!5 !0!2
!1
i
Page 70

6
ESPAÑOL
ESPAÑOL
• Cada vez que pulse el botón
PLAY/PAUSE se cambia entre
modo de reproducción y de
pausa. El botón PLAY/PAUSE
se ilumina en verde durante la
reproducción y parpadea en modo de pausa.
• Cuando pulse el botón PLAY/PAUSE durante la
reproducción, el DN-D4500 realizará una pausa
en la reproducción en ese punto. Pulse de nueve
el botón PLAY/PAUSE y se reiniciará la
reproducción.
5 FUNCIONAMIENTO BÁSICO
REPRODUCCIÓN y PAUSA
• Cuando se pulsa el botón
CUE durante la reproducción,
la reproducción de la
pista/archivo se detiene y se
vuelve a la posición de inicio
de la reproducción (el punto Cue). Esta función
también se llama “Back-Cue”.
Con la función “Back-Cue”, podrá empezar
exactamente desde la misma posición.
El botón CUE se ilumina en rojo sólido cuando el
DND4000/D4500/BU4500 está listo para iniciar la
reproducción.
• Podrá establecer y cambiar el punto Cue de la
siguiente manera.
• Cuando se inició la reproducción.
•Al terminar de seleccionar archivos.
• Búsqueda Manual.
REPRODUCCIÓN y Cue
Con el botón de control de Pitch podrá ajustar la
velocidad de reproducción (Pitch).
• Gire el botón PARAMETERS.
Seleccionar el archivo
Ajuste del Pitch
2
3
El DN-D4000/D4500/BU4500 tiene varios
intervalos de velocidad de reproducción.
Cuando se pulsa el botón
RANGE durante más de 1
segundo, el rango de pitch
se podrá seleccionar con
el botón PARAMETERS.
• Cuando se pulsa el botón
PARAMETERS, se
entrará en el intervalo de
tonos y se cancelará el
modo de selección de
intervalo de tonos.
1
Pulse el botón PITCH para
encender el PITCH LED.
En esta sección se describen las operaciones básicas cuando el equipo está conectado a un DND4000/D4500/BU4500.
Mueva el botón de control de
Pitch para ajustar el pitch.
La configuración actual del
pitch aparece en la visualizador.
La velocidad de reproducción disminuye
La velocidad de reproducción aumenta
Con la función PITCH BEND podrá cambiar el pitch
de forma temporal. En el DND4000/D4500/BU4500, esta función se puede
controlar de dos formas: mediante los botones
PITCH BEND y con el disco JOG.
Inflexión de Pitch
1
[Botones PITCH BEND +/–]
• Pulse el botón + o – del
PITCH BEND para un
cambio momentáneo de
pitch.
Mientras se mantienen
apretados estos botones, el pitch
continua subiendo hasta su límite.
• Una vez liberados los botones PITCH
BEND, el pitch de reproducción vuelve al
ajuste de la barra.
2
[Disco JOG]
• Se puede cambiar la
velocidad de
reproducción girando el
disco JOG durante la
reproducción.
Activar la reproducción
1
Cuando el preajuste “Power On Play” del
DN-D4000/D4500/BU4500 es “ON”, la
reproducción comienza desde el principio
del disco cuando se conecta la alimentación.
Para obtener información sobre la función de
reproducción por relevo, consulte el manual del
DN-D4000/D4500/BU4500.
Reproducción por relevo
Page 71

7
ESPAÑOL
ESPAÑOL
6 SEAMLESS LOOP/HOT START/STUTTER
Bucle continuo/Inicio rápido/Tartamudeo (botones A1, A2)
t, ye, y
q, w, y
r
Visualización
(consulte la sección en que se describe la visualización)
1
Establecer el punto A
(carga de datos para Inicio rápido)
q Pulse el botón A1 o A2
para establecer el
punto A y comenzará la
carga de los datos Hot
Start.
• Los botones A1 y A2 pueden usarse
independientemente para cada Hot
Start.
• Cuando se fija un punto A, el botón A
correspondiente y “ ” se iluminarán
y el botón se pondrá en el modo Hot
Start.
2
Activación de la función Hot Star (Inicio rápido)
w
Cuando se pulsa un
botón A1 o A2, la
reproducción Hot Start
comienza desde el punto
A correspondiente.
7
Borrar el punto A1/A2
y Mientras mantiene pulsado el botón FLIP,
pulse el botón A1 o A2 para borrar los
puntos A y B correspondientes.
O pulse el botón Flip durante más de 1
segundo para borrar tanto el punto A1
como el A2 de una vez.
Si pulsa rápidamente el botón “FLIP” y a
continuación pulsa los botones A1, A2 ó
B, estos puntos se borrarán de forma
individual.
3
Establecer el punto B para Seamless Loop
e Cuando se pulsa el
botón B después de
establecer el punto A o
tras iniciar la
reproducción Hot Start,
se activa el punto B y la reproducción
Seamless Loop empieza desde el punto
A.
• El botón B funciona en relación con el
punto A, activado antes de que se
pulsara el botón B.
•Si el botón B se pulsa durante la
reproducción del seamless loop o tras
FINALIZAR la reproducción, el punto B
se desplaza hasta el punto en el que se
haya pulsado el botón.
• Cuando el punto B se selecciona, el
punto B y “ ” se iluminarán.
4
Reproducción de bucles continuos
• Cuando se detecta el punto B para A1
tras empezar la reproducción desde el
punto A1, la reproducción vuelve al
punto A1 sin cambios. Mientras se
ejecuta la función de looping de A1 a B,
se ignora el punto B para A2.
• Cuando se detecta el punto B para A2
tras empezar la reproducción desde el
punto A2, la reproducción vuelve al
punto A2 sin cambios. Mientras se
ejecuta la función de looping de A2 a B,
se ignora el punto B para A1.
5
Exit/Reloop
r Durante la reproducción
de bucle continuo,
puede salir
forzosamente de la
función de bucle o
volver a ésta.
EXIT:
Durante la reproducción Seamless Loop,
pulse el botón EXIT/RELOOP para salir
de la función loop. El DND4000/D4500/BU4500 continúa con la
reproducción después del punto B.
RELOOP:
Si se pulsa el botón EXIT/RELOOP
después de haber salido de la función de
bucle, se reanuda la reproducción de
bucle continuo desde el punto A.
6
Stutter
• Los puntos A1 y A2
también pueden
usarse para la
reproducción Stutter.
t Para permitir una
reproducción repetida, pulse el botón
FLIP en los botones A1/A2; la pantalla
“” se apagará.
Pulse el botón FLIP para cambiar entre
los modos Inicio rápido/Bucle continuo y
“Tartamudeo”.
Page 72

8
ESPAÑOL
ESPAÑOL
7 TRIM
Para obtener información sobre la función de
recorte, consulte el manual del DND4000/D4500/BU4500.
NOTA:
Si el ajuste realizado en el preajuste “CD Mode
Sel” no corresponde con los dispositivos que
están conectados, el equipo puede no funcionar
correctamente.
8 PRESET
• Esta función sólo puede utilizarse cuando se selecciona la fuente “PC”.
(Si se conecta el DN-D4000/D4500/BU4500, se realiza la operación de preajuste correspondiente.)
• El DN-HC4500 está equipado con una función de preajuste que permite a los usuarios almacenar y
recuperar los modos de funcionamiento de los dispositivos. La función incluye los elementos y valores
que se indican a continuación.
1. Modo Preset
q Pulse el botón PRESET durante al menos 1 segundo para seleccionar el modo de preajuste.
w Utilice el control PARAMETERS para seleccionar el elemento de preajuste que desee.
e Seleccione el elemento y pulse el control PARAMETERS para establecer el elemento de preajuste
que desea cambiar.
r A continuación, gire el control PARAMETERS. Se seleccionan los datos de preajuste.
t Seleccione los datos y pulse el control PARAMETERS para establecer los datos de preajuste que
desea cambiar.
y Para hacer varios preajustes, repita los pasos w a t.
u El modo de preajuste se desactiva cuando se vuelve a pulsar el botón PRESET.
2. Elementos y datos predeterminados
El símbolo “*” junto a los datos indica el valor por defecto.
(1) USB Mode Sel: HC4500 MIDI*
Selecciona el modo de comunicación USB.
El DN-HC4500 utiliza especificaciones MIDI únicas.
(2) CD Model Sel: DN-D4500* / DN-D4000
Seleccione el nombre del modelo que se va a conectar y controlar desde el terminal DRIVE.
El BU4500 es igual que la unidad del DN-D4500, por lo que el ajuste PRESET es “DN-D4500”.
(3) Audio Fs Sel: 44.1k* / 48k / 96k / Auto
44,1 kHz: La frecuencia de muestreo (Fs) está fija en 44,1 kHz, independientemente de los datos
enviados desde el PC.
48 kHz: La frecuencia de muestreo (Fs) está fija en 48 kHz, independientemente de los datos
enviados desde el PC.
96 kHz: La frecuencia de muestreo (Fs) está fija en 96 kHz, independientemente de los datos
enviados desde el PC.
AUTO: La frecuencia de muestreo (Fs) cambia automáticamente según los datos enviados
desde el PC.
q Para ajustar “Fs”, pulse PARAMETERS.
“OK to CHANGE?Ø” aparece en el visualizador de caracteres.
w Pulse de nuevo el botón PARAMETERS.
e Cuando se modifica la frecuencia de muestreo, se visualiza “Audio Fs Sel”.
(4) Unit No. Set: 1 to 15 / ALL*
Establece el número de unidad del dispositivo.
Por ejemplo, cuando hay dos dispositivos conectados a un PC, ajuste un dispositivo a “No. 2” o
similar.
(5) MIDI CH Set: 1&2* / 3&4 / 5&6
Establece el canal MIDI.
(6) JOG Pulse Sel: 1480* / 740 / 555 / 370 count/cycle
Selecciona el número de impulsos emitidos por cada giro del disco JOG.
(7) FaderIn Mode: 1-PLAY/CUE / 2-PLAY / CUE
(8) X-CONT XFD: OFF / ON*
Determina si activa o desactiva la entrada cross fader de señales de entrada de control X.
(9) Preset Init.: Restablecer todos los datos preestablecidos a la configuración de fábrica.
q Para borrar los datos PRESET, pulse el control PARAMETERS.
“Preset Init” parpadea en el visualizador de caracteres.
w Pulse de nuevo el botón PARAMETERS.
“Push to ExeØ” aparece en el visualizador de caracteres.
e Pulse de nuevo el botón PARAMETERS.
“OK to CHANGE?Ø” aparece en el visualizador de caracteres.
r Cuando el borrado finaliza, se visualiza “Completed!”.
Page 73

9
ESPAÑOL
ESPAÑOL
2 Desinstalación
Desinstale el controlador en “Add or Remove
Programs (Agregar o quitar programas)” en el
Panel de control.
5
Haga clic en el botón “Next>”. La
instalación comienza.
Diagrama: ventana Confirmar instalación
PANEL DE CONTROL ASIO (sólo para versión Windows)
Instalación del controlador ASIO
1
Haga doble clic en el programa de
instalación.
Se inicia el Asistente para la configuración
del controlador ASIO.
Haga clic en “Next>”.
Diagrama: ventana Asistente para la configuración
del controlador ASIO
2
Aparece el contrato de licencia. Si está de
acuerdo con los términos y condiciones,
seleccione “I Agree”.
Ahora podrá seleccionar el botón “Next>”.
Haga clic en el botón “Next>”.
Diagrama: ventana Contrato de licencia
3
Aparece una pantalla donde puede confirmar
la carpeta en que se instalará el controlador
ASIO.
Haga clic en el botón “Next>”.
Diagrama: ventana Seleccionar carpeta de instalación
De forma predeterminada, el controlador
ASIO se instala en “C\Program
Files\DENON_DJ\DDJASIO\”.
Para cambiar esta ubicación, seleccione
“Browse” y elija la carpeta que desee.
Seleccione “Everyone” si el ordenador en
que se va a instalar el programa de
actualización tiene varios usuarios, o “Just
me” si usted es el único usuario.
4
Aparece una ventana donde puede
especificar si desea crear o no iconos en el
escritorio.
Si desea crear iconos en el escritorio, active
la casilla de verificación y, a continuación,
haga clic en el botón “Next>”.
Diagrama: ventana Crear iconos
7
Esta ventana se muestra cuando la
instalación ha finalizado. Haga clic en el
botón “Close”.
Diagrama: ventana Instalación completa
6
Esta es la ventana que se muestra durante la
instalación.
Diagrama: ventana Instalando
9
Page 74

10
ESPAÑOL
ESPAÑOL
Cuando se selecciona el “Panel de control ASIO” del controlador DENON DJ ASIO en la aplicación host,
el controlador DENON DJ ASIO muestra el panel de control ASIO.
Inicio
Acerca del panel de control
q Dispositivo
Esta es la sección donde se muestra
automáticamente la lista de dispositivos
compatibles con DENON DJ.
(Ejemplo: DN-HC4500-1)
• En la lista, seleccione el dispositivo que
desee para visualizar los ajustes actuales del
mismo a la derecha de la lista.
• Si hace doble clic en el dispositivo, el estado
de las especificaciones del dispositivo ASIO
cambia entre enabled y disabled.
wreq
ty
NOTA:
• Sólo se puede seleccionar un dispositivo.
• El dispositivo que actualmente se está
utilizando como dispositivo ASIO se
muestra con caracteres en negrita.
(Puede haber varios dispositivos activos
simultáneamente.)
w Enable/Disable
Este botón es para activar el dispositivo
seleccionado en la lista de dispositivos como
dispositivo ASIO.
e Audio Buffer Size
Utilice este control deslizante para ajustar el
tamaño de la memoria intermedia.
NOTA:
• El margen de valores es de 88 a o 2048
(unidades de muestra), en incrementos de
1 mseg.
• Cuando hay varios dispositivos activados,
los ajustes de todos los dispositivos son
compartidos.
r OK/Cancel
OK:
Utilice este botón para cerrar el panel de
control ASIO conservando los cambios
realizados.
Cancel:
Utilice este botón para cerrar el panel de
control ASIO sin conservar los cambios
realizados.
t Sampling Rate
Aquí se visualiza la frecuencia de muestreo
seleccionada.
Las frecuencias con que el controlador DENON
DJ ASIO es compatible son las siguientes:
• 44,1kHz/48kHz/96kHz
y Device Description
En esta sección se muestra información para el
dispositivo seleccionado en la lista de
información de dispositivos.
Se visualiza la información siguiente:
• Device name
• Unit number
•Software version
• Audio input channels
• Audio output channels
• Sampling frequency
• Max bit resolution
• Audio buffer size
NOTA:
Si no se puede obtener la información del
dispositivo, se visualiza “-” (guiones) para
todos los elementos.
Page 75

11
ESPAÑOL
ESPAÑOL
ACTUALIZACIÓN
El software de actualización de versión de producto permite actualizar los productos a través del sitio web
“www.denondj.com”.
Visite www.denondj.com para obtener las actualizaciones más recientes.
1
Haga doble clic en el programa de
instalación.
Se inicia el asistente de configuración del
programa de actualización.
Haga clic en “Next>”.
Instalación de update program (versión para Windows)
Diagrama: ventana Asistente de configuración
2
Aparece el contrato de licencia. Si está de
acuerdo con los términos y condiciones,
seleccione “I Agree”.
Ahora podrá seleccionar el botón “Next>”.
Haga clic en el botón “Next>”.
Diagrama: ventana Contrato de licencia
3
Aparece una pantalla donde puede confirmar
la carpeta en que se instalará el programa de
actualización.
Haga clic en el botón “Next>”.
Diagrama: ventana Seleccionar carpeta de instalación
De forma predeterminada, el programa de
actualización se instala en “C\Program
Files\DENON_DJ\DDJUpdater\DN-HC4500\”.
Para cambiar esta ubicación, seleccione
“Browse” y elija la carpeta que desee.
Seleccione “Everyone” si el ordenador en
que se va a instalar el programa de
actualización tiene varios usuarios, o “Just
me” si usted es el único usuario.
5
Haga clic en el botón “Next>”. La
instalación comienza.
Diagrama: ventana Confirmar instalación
2 Desinstalación (sólo en la versión para
Windows)
Desinstale el programa en “Add or Remove
Programs (Agregar o quitar programas)” en el
Panel de control.
4
Aparece una ventana donde puede
especificar si desea crear o no iconos en el
escritorio.
Si desea crear iconos en el escritorio, active
la casilla de verificación y, a continuación,
haga clic en el botón “Next>”.
Diagrama: ventana Crear iconos
6
Esta es la ventana que se muestra durante la
instalación.
Diagrama: ventana Instalando
7
Esta ventana se muestra cuando la
instalación ha finalizado. Haga clic en el
botón “Close”.
Diagrama: ventana Instalación completa
Cuando se instala la versión para Macintosh del programa de actualización, el programa se copia en el
ordenador.
Instalación del programa de actualización (versión para Macintosh)
10
Page 76

12
ESPAÑOL
ESPAÑOL
Procedimiento de actualización
1
Conecte el ordenador mediante el cable
USB.
2
Encienda el dispositivo en modo de actualización.
Conexión de la alimentación en el modo
de actualización:
Pulse los botones BACK y SOURCE
simultáneamente en Deck1 o Deck2.
Aparece la visualización siguiente en la
pantalla del dispositivo:
en Deck1
en Deck2
Si el dispositivo aún no ha sido conectado,
aparece la visualización siguiente en la
pantalla del dispositivo:
en Deck2
3
-2
Independientemente de si el dispositivo
está o no conectado en modo de
actualización en este momento, se visualiza
la pantalla que se muestra a continuación.
Si no se ha cargado el archivo de
actualización, se visualiza “File is not
ready.”.
5
-1
Haga clic en el botón Load para transferir el
archivo de actualización.
Archivo de actualización no cargado
Se visualiza la
información de versión.
Inicie el programa de actualización del DNHC4500.
En el ordenador aparece la pantalla que se
muestra a continuación.
Información de la versión actual
Se visualiza el nombre del dispositivo identificado.
3
-1
4
Arrastre el archivo de actualización a la
pantalla “Programa de actualización de
DENON DJ”. Ahora podrá seleccionar el
botón Load.
Se puede seleccionar el botón Load.
5
-2
Aparece la visualización siguiente en la
pantalla del dispositivo:
Durante la transferencia del archivo:
en Deck1
Cuando la transferencia del archivo finaliza;
(Lado izquierdo: versión antigua; Lado derecho:
versión nueva)
Cuando la transferencia del archivo finalice,
haga clic en el botón OK. El botón Execute
quedará disponible (podrá hacer clic en él).
Page 77

13
ESPAÑOL
ESPAÑOL
7
Haga clic en el botón OK para terminar.
Aparece la visualización siguiente en la
pantalla del dispositivo:
En Deck2:
Salga del programa de actualización y
desconecte la alimentación del DN-HC4500.
NOTA:
• No desconecte la alimentación del equipo ni
desconecte el cable que lo conecta al
ordenador durante la carga o actualización de
la versión. Asimismo, no pulse ningún botón
en el equipo ni ninguna tecla en el teclado del
ordenador.
• Si aparece un mensaje de error durante la
carga o actualización de la versión, repita el
procedimiento desde el paso 1.
Otros mensajes de error:
“File is invalid”
Cuando el archivo de actualización cargado no es
válido.
“Load failed. Check the connection, and retry”
Cuando ocurre un error de transferencia durante
la transferencia del archivo de actualización al
dispositivo.
“Loaded data is invalid. Check the file.”
Cuando ocurre un error suma de verificación
después de transferir el archivo de actualización
al dispositivo.
“Version up was not completed.”
Cuando la actualización de la versión no se
completa normalmente.
6
Haga clic en el botón Execute para iniciar la
actualización de la versión.
Cuando la actualización de la versión finaliza,
se visualiza “Version up was completed.”.
Durante la actualización de la versión, en la
pantalla del dispositivo se visualiza lo
siguiente:
En Deck1:
Cuando la actualización de la versión finaliza:
Si la actualización de la versión no se ha
completado correctamente, se visualiza
“Version up was not completed.” y la
pantalla vuelve al estado en que se
encontraba antes de que se hiciera clic en el
botón Execute. Vuelva a hacer clic en el
botón Execute.
Page 78

14
ESPAÑOL
ESPAÑOL
11
COMANDOS MIDI
Transmisión de datos
Los datos de funcionamiento del panel se transmiten mediante un comando MIDI, como se indica en la
tabla siguiente.
2 Envío de comando al PC
1 Playlist
SW ON : 0x9n
SW OFF : 0x8n
0x02
SW ON : 0x40
SW OFF : 0x00
Note ON/OFF
2 JOG mode
≠
0x04
≠≠
3 Pitch/KEY
≠
0x05
≠≠
4TAP
≠
0x07
≠≠
5 Pitch Bend+
≠
0x08
≠≠
6 Pitch Bend–
≠
0x09
≠≠
7 Fast search+
≠
0x10
≠≠
8 Fast search–
≠
0x11
≠≠
9 EFX1/ECHO/LOOP
≠
0x12
≠≠
10 EFX2/FLANGER
≠
0x13
≠≠
11 EFX3/FILTER
≠
0x14
≠≠
12 HOT1
≠
0x17
≠≠
13 HOT2
≠
0x18
≠≠
14 HOT3
≠
0x19
≠≠
15 HOT4
≠
0x20
≠≠
16 HOT5
≠
0x21
≠≠
17 TIME/TOTAL
≠
0x23
≠≠
18 MEMO/PRESET
≠
0x24
≠≠
19 TITLE
≠
0x25
≠≠
20 CONT./SINGLE
≠
0x26
≠≠
21 Parameters KNOB SW
≠
0x28
≠≠
22 BACK
≠
0x30
≠≠
23 SOURCE mode
≠
0x31
≠≠
24 FLIP
≠
0x36
≠≠
25 A1
≠
0x37
≠≠
26 A2
≠
0x38
≠≠
27 B
≠
0x39
≠≠
28 EXIT/Reloop
≠
0x40
≠≠
29 Cue
≠
0x42
≠≠
30 Play
≠
0x43
≠≠
31 JOG UP
≠
0x47
≠≠
32 JOG DOWN
≠
0x48
≠≠
33 JOG LEFT
≠
0x49
≠≠
34 JOG RIGHT
≠
0x50
≠≠
35 Jogwheel touch
≠
0x51
≠≠
items
Command
MIDI command
Number Value
Message type
39 X-Control fader
≠
0x53
0x00 (min) → 0x7F (max)
≠
40
Parameters KNOB
Increment/Decrement
≠
0x54
Increment : 0x00
Decrement : 0x7F
≠
41 Pitch Slider 0xEn 0xllh (LSB) 0xmmh (MSB) Pitch bend change
36 Preset Mode
SW ON : 0x9n
SW OFF : 0x8n
0x52
SW ON : 0x40
SW OFF : 0x00
Note ON/OFF
37 D4500 Cont. mode
≠
0x53
≠≠
38 Jogwheel fwd/rev 0xBn 0x51
Reverse 0x3F ~ 0x00
Foward 0x41 ~ 0x7F
slow → fast
✽ relative data
Control change
items
Command
MIDI command
Number Value
Message type
–100% : 0x7F7F (MSB/LSB)
0% : 0x4000 (MSB/LSB)
+100% : 0x0000 (MSB/LSB)
n = MIDI CH
Page 79

15
ESPAÑOL
ESPAÑOL
Recepción de datos de símbolos VFD
Se puede hacer que los diversos símbolos VFD se enciendan, apaguen o parpadeen, como se indica en
la tabla siguiente.
2 Recepción de comando para símbolo VFD
Recepción de datos
Recepción de datos de LED
Un comando MIDI puede hacer que los indicadores LED del panel se enciendan, apaguen o parpadeen,
como se indica en la tabla siguiente.
2 Recepción de comando para LED
n = MIDI CH
VFD Symbol 0xBn
ON TRG : 0x4D
OFF TRG : 0x4E
Blink ON TRG : 0x4F
↓↓
Control Change
1T. 0x01
2 REMAIN 0x02
3 ELAPSED 0x03
4 CONT. 0x04
5 SINGLE 0x05
6 BPM 0x06
7m 0x07
8s 0x08
9f 0x09
10 Pitch dot Right 0x0A
11 Pitch dot center 0x0B
12 Pitch dot left 0x0C
13 MP3 0x10
14 WAV 0x11
15 KB 0x13
16 KEY ADJ. 0x14
17 MEMO 0x15
18 ( : A1 side 0x16
19 ( : A2 side 0x17
20 ) : A1 side 0x18
21 ) : A2 side 0x19
22 A1 0x1A
23 A2 0x1B
24 B : A1 side 0x1C
25 B : A2 side 0x1D
26 Scratch Ring out side 0x1E
27 Scratch Ring in side 0x1F
28 Touch dot 0x20
29 Track Position Blink
only Use 0x4F/0x4E
0x21
30
Scratch Position 1 (Top right)
only Use 0x4D/0x4E
0x22
31 Scratch Position 2
only Use 0x4D/0x4E
0x23
32 Scratch Position 3
only Use 0x4D/0x4E
0x24
33 Scratch Position 4
only Use 0x4D/0x4E
0x25
34 Scratch Position 5
only Use 0x4D/0x4E
0x26
35 Scratch Position 6
only Use 0x4D/0x4E
0x27
36 Scratch Position 7
only Use 0x4D/0x4E
0x28
items
Command
MIDI command
Number Value
Message type
LED 0xBn
ON TRG : 0x4A
OFF TRG : 0x4B
Blink ON TRG : 0x4C
↓↓
Control Change
1 Playlist 0x02
2 Pitch match LED 0x04
3 JOG mode Green 0x05
4 JOG mode Orange 0x06
5 Pitch/KEY Green 0x07
6 Pitch/KEY Orange 0x08
7TAP Green 0x09
8TAP Orange 0x0A
9
EFX1/ECHO/LOOP RED
0x0B
10 EFX1 Green 0x0C
11 EFX2/FLANGER RED 0x0D
12 EFX2 Green 0x0E
13 EFX3/FILTER RED 0x0F
14 EFX3 Green 0x10
15 HOT1 0x11
16 HOT1 Dimmer 0x12
17 HOT2 0x13
18 HOT2 Dimmer 0x14
19 HOT3 0x15
20 HOT3 Dimmer 0x16
21 HOT4 0x17
22 HOT4 Dimmer 0x18
23 HOT5 0x19
24 HOT5 Dimmer 0x1A
25 Parameter KNOB 0x1E
26 A1 0x24
27 A1 Dimmer 0x3C
28 A2 0x25
29 A2 Dimmer 0x3D
30 Cue 0x26
31 Play 0x27
32 Jogwheel 0x3B
33 Pitch slider request 0x3C
DN-HC4500 return
pitch slider position
only Use 0x4A
(request TRG)
34
X-Control fader request
0x3D
DN-HC4500 return XControl fader position
only Use 0x4A
(request TRG)
items
Command
MIDI command
Number Value
Message type Notes
Page 80

16
ESPAÑOL
ESPAÑOL
Recepción de datos de parámetros VFD
La visualización de tiempo y la visualización de segmentos pueden configurarse mediante un comando
MIDI, como se indica en la tabla siguiente.
2 Recepción de comando para parámetro VFD
✽ “Track Position Blink” activa o desactiva el parpadeo del segmento de posición de pista completo.
41 Scratch Position 12
only Use 0x4D/0x4E
0x2D
42 Scratch Position 13
only Use 0x4D/0x4E
0x2E
43 Scratch Position 14
only Use 0x4D/0x4E
0x2F
44 Scratch Position 15
only Use 0x4D/0x4E
0x30
45
Scratch Position 16 (Bottom)
only Use 0x4D/0x4E
0x31
46 Scratch Position 17
only Use 0x4D/0x4E
0x32
47 Scratch Position 18
only Use 0x4D/0x4E
0x33
48 Scratch Position 19
only Use 0x4D/0x4E
0x34
49 Scratch Position 20
only Use 0x4D/0x4E
0x35
50 Scratch Position 21
only Use 0x4D/0x4E
0x36
51 Scratch Position 22
only Use 0x4D/0x4E
0x37
52 Scratch Position 23
only Use 0x4D/0x4E
0x38
53 Scratch Position 24
only Use 0x4D/0x4E
0x39
54 Scratch Position 25
only Use 0x4D/0x4E
0x3A
55 Scratch Position 26
only Use 0x4D/0x4E
0x3B
56 Scratch Position 27
only Use 0x4D/0x4E
0x3C
57 Scratch Position 28
only Use 0x4D/0x4E
0x3D
58 Scratch Position 29
only Use 0x4D/0x4E
0x3E
59 Scratch Position 30
only Use 0x4D/0x4E
0x3F
60 Scratch Position 31
only Use 0x4D/0x4E
0x40
61 Scratch Position 32 (Top)
only Use 0x4D/0x4E
0x41
VFD Symbol 0xBn
ON TRG : 0x4D
OFF TRG : 0x4E
Blink ON TRG : 0x4F
↓↓
Control Change
37 Scratch Position 8
only Use 0x4D/0x4E
0x29
38 Scratch Position 9
only Use 0x4D/0x4E
0x2A
39 Scratch Position 10
only Use 0x4D/0x4E
0x2B
40 Scratch Position 11
only Use 0x4D/0x4E
0x2C
items
Command
MIDI command
Number Value
Message type
n = MIDI CH
VFD Parameter
1Tr number MSB 0xBn 0x40
0-99
100-109 : “-0” to “-9”
110 : “--”, 111 : “ ”
Control Change
2Tr number LSB
≠
0x41
≠≠
3Time mini
≠
0x42
≠≠
4Time sec
≠
0x43
≠≠
5Time frame
≠
0x44
≠≠
6 Pitch POL
≠
0x45
“ ” 0x00
“+” 0x01
“–” 0x02
≠
7 Pitch MSB
≠
0x46
≠≠
8Pitch LSB
≠
0x47
≠≠
9Track Position
≠
0x48 normal
0x49 reverse
0-100%
≠
10 Segment 1-1 MSB
≠
0x01 0x00 ~ 0x0F
≠
11 Segment 1-2 MSB
≠
0x02
≠≠
12 Segment 1-3 MSB
≠
0x03
≠≠
13 Segment 1-4 MSB
≠
0x04
≠≠
14 Segment 1-5 MSB
≠
0x05
≠≠
15 Segment 1-6 MSB
≠
0x07
≠≠
16 Segment 1-7 MSB
≠
0x08
≠≠
17 Segment 1-8 MSB
≠
0x09
≠≠
18 Segment 1-9 MSB
≠
0x0A
≠≠
19 Segment 1-10 MSB
≠
0x0B
≠≠
20 Segment 1-11 MSB
≠
0x0C
≠≠
21 Segment 1-12 MSB
≠
0x0D
≠≠
22 Segment 1-1 LSB
≠
0x21
≠≠
23 Segment 1-2 LSB
≠
0x22
≠≠
24 Segment 1-3 LSB
≠
0x23
≠≠
25 Segment 1-4 LSB
≠
0x24
≠≠
26 Segment 1-5 LSB
≠
0x25
≠≠
27 Segment 1-6 LSB
≠
0x27
≠≠
28 Segment 1-7 LSB
≠
0x28
≠≠
29 Segment 1-8 LSB
≠
0x29
≠≠
30 Segment 1-9 LSB
≠
0x2A
≠≠
Items
Command
MIDI command
Number Value
Message Type
31 Segment 1-10 LSB
≠
0x2B
≠≠
32 Segment 1-11 LSB
≠
0x2C
≠≠
Page 81

17
ESPAÑOL
ESPAÑOL
Recepción de datos de segmentos VFD
Los diversos segmentos se configuran con datos de 2 bytes, como se indica en el código fuente
siguiente.
(No es posible utilizar 0x00/0x00 a 0x00/0x07.)
2 Códigos fuente para segmentos
33 Segment 1-12 LSB 0xBn 0x2D 0x00 ~ 0x0F Control Change
34 Segment 2-1 MSB
≠
0x0E
≠≠
35 Segment 2-2 MSB
≠
0x0F
≠≠
36 Segment 2-3 MSB
≠
0x10
≠≠
37 Segment 2-4 MSB
≠
0x11
≠≠
38 Segment 2-5 MSB
≠
0x12
≠≠
39 Segment 2-6 MSB
≠
0x13
≠≠
40 Segment 2-7 MSB
≠
0x14
≠≠
41 Segment 2-8 MSB
≠
0x15
≠≠
42 Segment 2-9 MSB
≠
0x16
≠≠
43 Segment 2-10 MSB
≠
0x17
≠≠
44 Segment 2-11 MSB
≠
0x18
≠≠
45 Segment 2-12 MSB
≠
0x19
≠≠
46 Segment 2-1 LSB
≠
0x2E
≠≠
47 Segment 2-2 LSB
≠
0x2F
≠≠
48 Segment 2-3 LSB
≠
0x30
≠≠
49 Segment 2-4 LSB
≠
0x31
≠≠
50 Segment 2-5 LSB
≠
0x32
≠≠
51 Segment 2-6 LSB
≠
0x33
≠≠
52 Segment 2-7 LSB
≠
0x34
≠≠
53 Segment 2-8 LSB
≠
0x35
≠≠
54 Segment 2-9 LSB
≠
0x36
≠≠
55 Segment 2-10 LSB
≠
0x37
≠≠
56 Segment 2-11 LSB
≠
0x38
≠≠
57 Segment 2-12 LSB
≠
0x39
≠≠
VFD Parameter
Items
Command
MIDI command
Number Value
Message Type
n = MIDI CH
Page 82

18
ESPAÑOL
ESPAÑOL
(2) Carga de datos de preajuste desde un dispositivo externo
Envíe los comandos que se indican a continuación desde el PC al DN-HC4500. [DRM]
Datos de preajuste
La carga de los preajustes del DN-HC4500, así como la selección de algunos elementos, puede realizarse
desde un dispositivo externo utilizando el formato de sistema MIDI exclusivo de DENON DJ.
(1) Formato de comando de configuración
La configuración básica admitida por el DN-HC4500 es la siguiente:
El DN-HC4500 responde con el texto que se muestra a continuación. [DSM]
La estructura de los datos de respuesta al comando preset request es la siguiente.
2 Tabla de datos de respuesta al comando Solicitud de preajuste
CMD Item Data Length
SOX
IDC
FMT
Start of System Exclusive
ID code → DENON DJ ID
Communication format
0xF0
0x004003
0x12: one way
1Byte
3Byte
1Byte
MDN
UN
MCH
MST
CMD
DL
Data
Model number
Unit number
MIDI channel
Message Type
Command
Data Length
Preset data
0x41 (DN-HC4500)
depends on preset mode (0x00 to 0x0F)
depends on preset mode (0x00 to 0x05)
0x53: Selecting, 0x50: Polling,
0x20: Preset set/ 0x21: Preset request
0x** number of the data Byte
refer the preset data table
1Byte
1Byte
1Byte
1Byte
1Byte
1Byte
****
BCC
EOX
Block check character
End of System Exclusive
0x** EVEN parity of the Data block
0xF7
1Byte
1Byte
CMD Item Data Length
SOX
IDC
FMT
Start of System Exclusive
ID code → DENON DJ ID
Communication format
0xF0
0x004003
0x12: one way
1Byte
3Byte
1Byte
MDN
UN
MCH
MST
CMD
Model number
Unit number
MIDI channel
Message Type
Command
0x41 (DN-HC4500) or 0x7F (ALL model)
depends on preset mode (0x00 to 0x0F)
depends on preset mode (0x00 to 0x05)
0x50: Polling
0x21: Preset request
1Byte
1Byte
1Byte
1Byte
1Byte
EOX End of System Exclusive 0xF7 1Byte
CMD Item Data Length
SOX
IDC
FMT
Start of System Exclusive
ID code → DENON DJ ID
Communication format
0xF0
0x004003
0x12: one way
1Byte
3Byte
1Byte
MDN
UN
MCH
MST
CMD
DL
Data
Model number
Unit number
MIDI channel
Message Type
Command
Data Length
Preset data
0x41 (DN-HC4500)
depends on preset mode (0x00 to 0x0F)
depends on preset mode (0x00 to 0x05)
0x53: Selecting
0x21: Preset request (Return)
0x** number of the data Byte
refer the preset data table
1Byte
1Byte
1Byte
1Byte
1Byte
1Byte
****
BCC
EOX
Block check character
End of System Exclusive
0x** EVEN parity of the Data block
0xF7
1Byte
1Byte
Preset name Item Data Length
USB mode Sel
CD Model Sel
Audio Fs Sel
Unit number Set
MIDI CH Set
JOG Pulse Sel
Fader In Mode
Xcont XFD
Audio buffer
Model code
USB Control mode select
Drive control model select
Audio sampling frequency select
Unit number
MIDI CH
JOG count number per cycle
Fader In mode select
X-control mode select
Audio buffer size
Model number
0x00: HC4500 MIDI, 0x02 to 0x0F: Reserve
0x00: DN-D4500, 0x01: DN-D4000
0x01: 44.1kHz, 0x02: 48kHz, 0x08:
96kHz, 0x04; AUTO
(AUTO: Automatically follow Fs by USB data)
0x00 to 0x0F
0x00: CH1&2, 0x01: CH3&4, 0x02: CH5&6
0x00: 1480, 0x01: 740, 0x02: 555, 0x03: 370
0x00: 2wire Play/Cue, 0x01: 1wire Play/Cue
0x00: OFF, 0x01: ON
0x0040 to 0x0810 (2Byte)
0x41
1Byte
1Byte
1Byte
1Byte
1Byte
1Byte
1Byte
1Byte
2Byte
1Byte
PC DN-HC4500
[DRM] [DSM]
]\
[]
Page 83

19
ESPAÑOL
ESPAÑOL
12
SOLUCIÓN DE PROBLEMAS
2 El DN-HC4500 no funciona normalmente o no produce sonido
• ¿Están conectados correctamente el cable USB, los cables de audio, etc.?
• ¿Se ha ajustado el volumen a un nivel apropiado para la fuente, dispositivo de audio,
aplicación, sistema operativo, etc.?
• ¿Se ha seleccionado el dispositivo apropiado en la aplicación de audio?
• ¿Es correcto el ajuste de frecuencia de muestreo?
\Realice los mismos ajustes en el modo de preajuste del DN-HC4500 y en la aplicación, o ajuste el
modo de preajuste del DN-HC4500 a “AUTO”.
• ¿Hay archivos WAV con frecuencias de muestreo y velocidades de transferencia en bits
distintas?
\Dependiendo de la aplicación de audio que se utilice, puede no ser posible reproducir
simultáneamente archivos WAV que tienen frecuencias de muestreo y velocidades de
transferencia en bit diferentes.
• ¿Se está utilizando algún otro equipo USB?
\Si hay otros dispositivos USB conectados, conecte sólo DN-HC4500 para comprobar si hay
problemas.
• ¿Es el Conector USB del ordenador conectado compatible con USB 2.0 (alta velocidad)?
\Utilice un cable compatible con USB 2.0.
2 El sonido se interrumpe o distorsiona
• ¿Hay otras aplicaciones o controladores de dispositivos en funcionamiento?
\Cierre todas las aplicaciones que no necesite.
• ¿Está reproduciendo varios archivos WAV?
\Dependiendo de la capacidad del ordenador que se utilice, el sonido puede interrumpirse al
reproducir varios archivos WAV simultáneamente.
(3) Ajuste de los datos de preajuste desde un dispositivo externo
Envíe el mensaje de selección que se muestra a continuación desde el PC al DN-HC4500. [DSM]
2 Tabla de datos de configuración de preajuste
Cuando el DN-HC4500 comprueba que el número de modelo y el número de unidad coinciden, los datos
de preajuste de los elementos configurables desde un dispositivo externo se actualizan según la tabla de
datos del mensaje recibido.
La estructura de los datos del comando preset set es la siguiente.
CMD Item Data Length
SOX
IDC
FMT
Start of System Exclusive
ID code → DENON DJ ID
Communication format
0xF0
0x004003
0x12: one way
1Byte
3Byte
1Byte
MDN
UN
MCH
MST
CMD
DL
Data
Model number
Unit number
MIDI channel
Message Type
Command
Data Length
Preset data
0x41 (DN-HC4500)
depends on preset mode (0x00 to 0x0F)
depends on preset mode (0x00 to 0x05)
0x53: Selecting,
0x20: Preset set
0x** number of the data Byte
refer the preset data table
1Byte
1Byte
1Byte
1Byte
1Byte
1Byte
****
BCC
EOX
Block check character
End of System Exclusive
0x** EVEN parity of the Data block
0xF7
1Byte
1Byte
Preset name Item Data Length
USB mode Sel
CD Model Sel
Audio Fs Sel
JOG Pulse Sel
Fader In Mode
Xcont XFD
USB Control mode select
Drive control model select
Audio sampling frequency select
JOG count number per cycle
Fader In mode select
X-control mode select
0x00: HC4500 MIDI, 0x02 to 0x0F: Reserve
0x00: DN-D4500, 0x01: DN-D4000
0x01: 44.1kHz, 0x02: 48kHz, 0x08:
96kHz, 0x04; AUTO
(AUTO: Automatically follow Fs by USB data)
0x00: 1480, 0x01: 740, 0x02: 555, 0x03: 370
0x00: 2wire Play/Cue, 0x01: 1wire Play/Cue
0x00: OFF, 0x01: ON
1Byte
1Byte
1Byte
1Byte
1Byte
1Byte
PC DN-HC4500
[DSM] Ejecución del mensaje de recepción
]\
[]
Page 84

20
ESPAÑOL
ESPAÑOL
13
ESPECIFICACIONES
2 General
Alimentación: Modelo para EE.UU. y CANADÁ: AC 120 V 60 Hz
Modelo para Europa: AC 235 V 50 Hz
Modelo para Japón: AC 100 V 50 Hz/60 Hz
Consumo eléctrico: Modelo para EE.UU. y CANADÁ: 12 W
Modelo para Europa: 12 W
Modelo para Japón: 10 W
Temperatura ambiente
bajo funcionamiento: 0 °C a 40°C
Dimensiones: 482 (an) x 132 (al) x 88 (máx. 106) (pr) mm
Espacio en bastidor: EIA 3U
Peso: 3,7 kg
Acabado: Panel delantero: Negro (acero pintado)
Panel trasero y caja: Negro (acero pintado)
2 Audio
Salida analógica: 1, 2 RCA pin: No equilibrada
2Vrms = 0dBFS
Convertidor DA: De 24 bits y sobremuestreo 32x Fs: 44,1 kHz/48 kHz/96 kHz
Margen D 106 dB (TÍP.)
S/R 106 dB (TÍP.) (DIN)
Respuesta de frecuencia: 20 a 22 kHz, ±0,5 dB
T.H.D: Inferior a 0,05 % (entrada = salida = 2 Vrms/1 KHz, RL: 10 kΩ)
Ruido residual: Inferior a –94 dBV (TÍP.)
Diafonía: Inferior a –110 dB (TÍP. @1 kHz)
2 USB I/F
Conector USB B: USB2.0 (máx. 480 Mbps)
PC/MAC (host) ¤ aplicación del DN-HC4500 (esclavo)
Audio USB (altavoz)
PCM 16 bits/24 bits, 44,1 kHz/48 kHz/96 kHz, 4 can.
USB MIDI I/O
ENTRADA: 1 puerto, SALIDA: 1 puerto
USB HID I/O (General)
Paquete de 32 bytes
2 Interfaz de control
Fader start: FADER 1
Miniconector estéreo de 3,5 mm (punta/aro: señal, manguito: GND), 0.5VDC
FADER 2
Miniconector estéreo de 3,5 mm (punta/aro: señal, manguito: GND), 0.5VDC
X-CONTROL: Entrada
Miniconector estéreo de 3,5 mm (punta/aro: señal, manguito: GND), 0.5VDC
Control de CD:
Conector Mini-DIN de 8 contactos (control de unidad DN-D4500/D4000/BU4500)
2 Otros
Pantalla: 40 mm x 100 mm VFD
Caracteres con matriz de puntos de 12 dígitos x 2 líneas y marcador de scratch
Dial JOG: 71 mm, con detección de toque/movimiento
(Toque ON/OFF, Dir. FWD/RVS, contador de impulsos) MIDI: ON/OFF
1480/740/555/370 impulsos/ciclo MIDI: Cambio de control
Interruptor de goma: Interruptor de función
5 w/LED
para inicio rápido (HOT), interruptor de carga (LOAD) y
otras funciones MIDI: ON/OFF
Otros interruptores
10 w/LED
para localización (CUE)/reproducción (PLAY)/inicio rápido (HOT)/
efectos (EFX)/carga (LOAD) y otras funciones MIDI: ON/OFF
Otros interruptores
14 w/o LED
para Búsqueda rápida/Variación de velocidad de reproducción y
otras funciones MIDI: ON/OFF
Fader de variación de
velocidad: 60 mm con pulsador central, 1024 pasos
MIDI: Inflexión de tono
(Datos MIDI –100 %: 0x7F7F / ±0 %: 0x4000 / +100 %: 0x0000)
Control Parameter: Interruptor para Intro y otras funciones MIDI: ON/OFF
FWD/RVS de 24 impulsos/ciclo MIDI: Cambio de control
2 Controlador DENON DJ ASIO
Parámetro de control: Tamaño de la memoria intermedia
88 (Fs: 44,1 kHz/ 48 kHz) /188 (Fs: 96 kHz) muestras a 2048 muestras
Control de memoria intermedia de hardware
Frecuencia de muestreo
44,1 kHz/ 48 kHz/ 96 kHz (según el ajuste de DN-HC4500)
✽ ASIO es una marca comercial de Steinberg Media Technologies GmbH
✽ MAC es una marca comercial de Apple Computer, Inc.
✽ MIDI es una marca comercial de AMEI
482
465
132
57.2
Orificio de 7 x 10
88.2
2
5
Unidad: mm
Page 85

2 安全上お守りいただきたいこと
万一異常が発生したら、電源プラグをすぐに抜く
煙が出ている、変なにおいがする、異常な
音がするなどの異常状態のまま使用する
と、火災・感電の原因となります。すぐに
本体の電源を切り、電源プラグをコンセン
トから抜いて、煙が出なくなるのを確認し
てから販売店に修理をご依頼ください。
お客様による修理は危険ですので絶対にお
やめください。
電源プラグを
コンセント
から抜け
警告
内部に異物を入れない
通風孔などから内部に金属類や燃えやすい
ものなどを差し込んだり、落とし込んだり
しないでください。火災・感電の原因とな
ります。特にお子様のいるご家庭ではご注
意ください。
万一内部に異物が入った場合は、まず本体
の電源を切り、電源プラグをコンセントか
ら抜いて販売店にご連絡ください。
ご使用になる前に
正しく安全にお使いいただくため、ご使用の前に必ず
よくお読みください。
警告
この表示を無視して、誤った取
り扱いをすると、人が死亡また
は重傷を負う危険が差し迫って
生じることが想定される内容を
示しています。
この表示を無視して、誤った取
り扱いをすると、人が傷害を負
う可能性が想定される内容およ
び物的損害のみの発生が想定さ
れる内容を示しています。
【絵表示の例】
記号は注意(危険・警告を含む)を促す
内容があることを告げるものです。
図の中に具体的な注意内容(左図の場合は感
電注意)が描かれています。
記号は禁止の行為であることを告げるも
のです。
図の中や近傍に具体的な禁止内容(左図の場
合は分解禁止)が描かれています。
記号は行為を強制したり指示する内容を
告げるものです。
図の中に具体的な指示内容(左図の場合は電
源プラグをコンセントから抜け)が描かれて
います。
この取扱説明書および製品への表示では、製品を安全
に正しくお使いいただき、あなたや他の人々への危害
や財産への損害を未然に防止するために、いろいろな
絵表示をしています。その絵表示と意味は次のように
なっています。
内容をよく理解してから本文をお読みください。
安全上のご注意
注意
水が入ったり、濡らしたりしないように
雨天・降雪中・海岸・水辺での使用は特に
ご注意ください。火災・感電の原因となり
ます。
ご使用は正しい電源電圧で
表示された電源電圧以外の電圧で使用しな
いでください。火災・感電の原因となりま
す。
キャビネット(天板・裏ぶた)を外したり、
改造したりしない
こ内部には電圧の高い部分がありますの
で、触ると感電の原因となります。内部の
点検・調整・修理は販売店にご依頼くださ
い。
この機器を改造しないでください。火災・
感電の原因となります。
電源コードは大切に
電源コードを傷つけたり、破損したり、加
工したりしないでください。また重いもの
をのせたり、加熱したり、引っ張ったりす
ると電源コードが破損し、火災・感電の原
因となります。
電源コードが傷んだら、すぐに販売店に交
換をご依頼ください。
雷が鳴り出したら
電源プラグには触れないでください。感電
の原因となります。
落としたり、キャビネットを破損した場合は
まず本体の電源を切り、電源プラグをコン
セントから抜いて販売店にご連絡くださ
い。そのまま使用すると火災・感電の原因
となります。
Page 86

2 安全上お守りいただきたいこと
注意
電源コードを熱器具に近づけない
コードの被ふくが溶けて、火災・感電の原
因となることがあります。
濡れた手で電源プラグを抜き差ししない
感電の原因となることがあります。
この機器の上に花瓶・植木鉢・コップ・化粧品・
薬品や水などが入った容器を置かない
こぼれたり、中に入った場合、火災・感電
の原因となります。
風呂・シャワー室では使用しない
火災・感電の原因となります。
水場での
使用禁止
この機器の上に小さな金属物を置かない
万一内部に異物が入った場合は、まず本体
の電源を切り、電源プラグをコンセントか
ら抜いて販売店にご連絡ください。そのま
ま使用すると、火災・感電の原因となりま
す。
2 取り扱いについて
電源プラグを抜くときは
電源プラグを抜くときは電源コードを引っ
張らずに必ずプラグを持って抜いてくださ
い。コードが傷つき、火災・感電の原因と
なることがあります。また、濡れた手で電
源プラグを抜き差ししないでください。感
電の原因となることがあります。
レーザー光源をのぞき込まない
レーザー光が目に当たると視力障害を起こ
すことがあります。
機器の接続は説明書をよく読んでから接続する
テレビ・オーディオ機器・ビデオ機器・ス
ピーカーなどの機器を接続する場合は、電
源を切り、各々の機器の取扱説明書に従っ
て接続してください。また接続は指定のコ
ードを使用してください。指定以外のコー
ドを使用したり、コードを延長したりする
と発熱し、やけどの原因となることがあり
ます。
電源を入れる前には音量を最小にする
突然大きな音が出て聴力障害などの原因と
なることがあります。
電源コードは確実に接続し、
束ねたまま使用しない
電源コードを接続するときは接続口に確実
に差し込んでください。差し込みが不完全
な場合、火災・感電の原因となることがあ
ります。また、電源コードは束ねたまま使
用しないでください。発熱し、火災の原因
となります。
2 置き場所について
壁や他の機器から少し離して設置する
壁から少し離して据え付けてください。ま
た放熱をよくするために、他の機器との間
は少し離して置いてください。ラックなど
に入れるときは、機器の天面や背面から少
し隙間をあけてください。内部に熱がこも
り、火災の原因となることがあります。
次のような場所には置かない
火災・感電の原因となることがあります。
●
調理台や加湿器のそばなど油煙や湯気が
当たるようなところ
●
湿気やほこりの多いところ
●
直射日光の当たるところや暖房器具の近
くなど高温になるところ
不安定な場所に置かない
ぐらついた台の上や傾いたところなど不安
定な場所に置かないでください。落ちたり
倒れたりして、けがの原因となることがあ
ります。
Page 87

2 取り扱いについて
移動させる場合は
まず電源を切り、必ず電源プラグをコンセ
ントから抜き、機器間の接続コードなど外
部の接続コードを外してからおこなってく
ださい。コードが傷つき、火災・感電の原
因となることがあります。
この機器の上にテレビなどを載せたまま移
動しないでください。倒れたり、落下して、
けがの原因となることがあります。
この機器に乗ったり、ぶら下がったりしない
特に幼いお子様のいるご家庭では、ご注意
ください。倒れたり、壊れたりして、けが
の原因となることがあります。
通風孔をふさがない
内部の温度上昇を防ぐため、ケースの上部
や底部などに通風孔が開けてあります。次
のような使いかたはしないでください。内
部に熱がこもり、火災の原因となることが
あります。
●
あお向けや横倒し、逆さまにする
●
押し入れ、専用のラック以外の本箱など
風通しの悪い狭い場所に押し込む
●
テーブルクロスをかけたり、じゅうた
ん・布団の上に置いて使用する
5年に一度は内部の掃除を
販売店などにご相談ください。内部にほこ
りがたまったまま、長い間掃除をしないと
火災や故障の原因となることがあります。
特に、湿気の多くなる梅雨期の前におこな
うと、より効果的です。
なお、内部の掃除費用については販売店な
どにご相談ください。
重いものをのせない
機器の上に重いものや外枠からはみ出るよ
うな大きなものを置かないでください。バ
ランスがくずれて倒れたり、落下して、け
がの原因となることがあります。
機器の接続は説明書をよく読んでから接続する
オーディオ機器などの機器を接続する場合
は、電源を切り、各々の機器の取扱説明書
に従って接続してください。また接続は指
定のコードを使用してください。指定以外
のコードを使用したり、コードを延長した
りすると発熱し、やけどの原因となること
があります。
2 使わないときは
長時間の外出・旅行の場合は
安全のため必ず電源プラグをコンセントか
ら抜いてください。火災の原因となること
があります。
2 お手入れについて
お手入れの際は
安全のため電源プラグをコンセントから抜
いておこなってください。感電の原因とな
ることがあります。
Page 88

取り扱い上のご注意
2 結露とは
冬期に暖房をした部屋の窓ガラスに水滴がつくような現象
をいいます。
2 結露が起こる条件は
冬期などに本機を戸外から暖房中の室内に持ち込んだり、
部屋の温度を暖房などで急に上げたりすると本機内部の動
作部に露がつき、正常に動作しなくなることがあります。
結露は、夏にエアコンの風が直接当たるところでも起こる
ことがあります。その場合には本機の設置場所を変えてく
ださい。
結露現象について
2 結露後の処置は
●
結露が起こった場合は、電源を入れてしばらく放置して
おいてください。周囲の状況によって異なりますが、1
〜2時間で使用できるようになります。
●
ディスクに露がついている場合がありますので、きれい
に拭き取ってください。
2 テレビ放送の電波状態により、本機の電源を入れたままテ
レビ放送を見ると、しま模様が出る場合がありますが、本
機やテレビの故障ではありません。テレビ放送を見る場合
には本機の電源を切ってご覧ください。
テレビ放送の画面にしま模様が入る場合
2 FMやAM放送を受信しているとき、本機の電源が入ってい
るとFMやAM放送の受信音に雑音が入る場合があります。
本機を使用しないときは電源を切ってください。
FMやAM放送を受信している場合
2 キャビネットや操作パネル部分の汚れを拭き取るときは、
柔らかい布を使用して軽く拭き取ってください。
●
化学ぞうきんをご使用の際は、その注意書に従ってくだ
さい。
2 ベンジン・シンナーなどの有機溶剤および殺虫剤などが本
機に付着すると変質したり変色することがありますので使
用しないでください。
お手入れについて
2 ふだん使わないとき
●
必ずディスクを取り出し、電源を切ってくだ
さい。
●
外出やご旅行の場合は、必ず電源プラグをコ
ンセントから抜いてください。
2 移動させるとき
●
衝撃を与えないでください。
●
必ずディスクを取り出し、接続コー
ドを外したことを確認してからおこ
なってください。
使わないときは
Page 89

1
日本語
日本語
1
特徴
目次
z 特徴 ........................................................................1
x 接続 ........................................................................2
c 各部の名称と機能.........................................3〜5
v デバイス交換 ........................................................5
b PRESET(プリセット).....................................6
n ASIOコントロールパネル
(Windows版のみ)........................................7、8
付属品に付いて
梱包箱の中には、本体とは別に下記の付属品が入っています。
ご使用の前にご確認ください。
q オーディオコード ..............................................2
w USBケーブル ......................................................1
e 取扱説明書...........................................................1
r CD-ROM ..............................................................1
2 トラディショナルで直観的なデュアルCD
プレーヤースタイルのレイアウト
2 高速USB2.0インターフェース
2 フェダースタート
すべてのDENONミキサーを含むトラディショ
ナルなフェダースタートをサポート
2 サイドパネルは凹型になっているので接
続が容易
2 多用途的なラックマウントおよびテーブ
ルトップデザイン
2 ユーザアジャスタブルなプリセット
2
ソフトウェアはUSBでアップグレード可能
DENON DJは、ユーザーからの貴重なフィード
バックに基づき、随時、現在の機能に細かな改
良をほどこしたり、新たな強力な機能を追加し
たりします。これらの新たなプラグインはいつ
でも無料で、ウェブサイトwww.denondj.com
から入手が可能です。
2 バイブラントチューブディスプレイ、
2行文字テキストサポート付き
DN-HC4500のもうひとつのユニークな特徴
は、情報量豊富で動きのあるチューブディスプ
レイにあります。このディスプレイは2行の文
字情報を表示してファイル、フォルダをすばや
くナビゲートし、正しいファイルがロードされ
ているかどうか確認しますので、ご自分のモニ
ターで探すまでもありません。ビジュアル32
桁マーカーポイントインジケータは、あなたの
手の動きを光速で、ドリフトなしにフォローし
ます。そのほかのインジケータには、Looping、
HotStarts、BPMinfo、Elapsed/Remain
Time、MP3/WAVファイルタイプ、その他の
有用なインジケータがあります。
2 レスポンスの優れたソフトラバーボタン、
スイッチ、ノブ
• 各デッキの上部に5個のアクセスしやすいフ
ァンクションキー
• 奥ゆきあるレゾリューションや幅広いピッチ
レンジが可能な45mmピッチスライダー
• バイブラントCUE/PLAYボタン照明
• 操作を確実にする二段階照明ボタン
• マルチカラー照明を備えたレイヤリング機能
ボタン
• レイヤリング機能用のマルチカラーLED
• PitchBendボタン
• Parameterノブ、Range、Sync、Playlist、
Back、Fast Searchおよびその他のキーは、
必要に応じて設定することができます。
2 内部24-Bitプロセッシング&
USBオーディオ
USBバスのみを電源にしている大部分のDJミデ
ィコントローラとは異なり、DN-HC4500は優
れた性能を得るために、独自の内部蔵電源装置
を搭載していますので、優れたパフォーマンス
が実現されます。DN-HC4500は、Burr Brown
(TIの製品)24ビットDACプロセッシング機能
を備えていますので、非常に忠実なオーディオ
出力が得られます。USBオーディオインターフ
ェースは、2チャンネル・ステレオ出力ペア、
44.1/48/96 kHzサンプリングレンジ、それに
低レイテンシASIO/OSXCoreオーディオサポー
トを含みます。
m バージョンアップ ......................................9〜11
, MIDIコマンド ...........................................12〜17
. 故障かな?と思ったら.....................................18
⁄0 保証とサービスについて ................................18
⁄1 主な仕様 .............................................................19
2
マルチファンクショナル・
タッチセンシティブJogディスク
71mm JOGディスクは、超高レゾリューション
パルスとタッチセンサで精細に構成されており、
人の手が演じる微妙ですばやいスクラッチング
の動作を正確に再現します。もちろん、Jogデ
ィスクをマップして、たとえばピッチベンド、
スキャン、ファイル検索、効果のためのドライ/
ウェット制御など、他の重要な機能を遂行させ
ることもできます。
Page 90

2
日本語
日本語
2
接続
接続
1. 電源スイッチをオフにします。
2. RCAピンコードをミキサーの入力端子に接続します。
フェダージャックフェダージャック
ミキサー
DN-HC4500
3.5mmステレオミニコード
デッキ2
フェダー
ジャック
入力ジャック入力ジャックRCAコード RCAコード
デッキ1出力ジャック デッキ2出力ジャック
DENONPC/MACアップグ
レードアプリケーションと
ASIOドライバーアプリケー
ション(組み込み)
注意:
• かならず付属の制御コードを使用してください。他の種類のケーブルの使用は損傷の原因となります。
• 制御コードを接続するときはかならず電源をオフにしてください。ユニットが正しく作動しないことがあります。
USBB端子
3.5mmステレオミニコード
デッキ1
フェダー
ジャック
PCとの接続
• DN-HC4500はPlug-and-Playデバイスです。
これによりあなたがコンピュータに初めてDNHC4500を接続したときに自動でドライバがイ
ンストールされます。
• DN-HC4500とPCの利用可能なUSBポートを接
続するには、付属のUSBケーブルを使用して下
さい。
• 接続すると下のような表示がPC画面右下に表示
されます。
インストールが終わると新しいハードウェア
がインストールされ、使用する準備ができまし
た。のメッセージが下のように表示されます。
これでインストールは終了です。DN-HC4500は
使える状態にあります。
MACとの接続
•
MACOSのもと、DN-HC4500はPlug-and-Playデ
バイスであり、接続するとすぐに使えるようにな
ります。
• DN-HC4500とMACの利用可能なUSBポートを
接続するには、付属のUSBケーブルを使用して
ください。
本機の接続可能なPCのOSバージョン:
WindowsXPSP2
MacOSX10.4以降
このOSバージョン以外のPCでは、
USBMIDIに対応していないため、本
機とUSBで接続後、PCが異常動作す
る場合があります。
新しいハードウェアが見つかりました。
USBオーディオデバイス
新しいハードウェアが見つかりました。
新しいハードウェアがインストールされ、使用する準備ができました。
Page 91

3
日本語
日本語
3
各部の名称と機能
q アナログ出力端子(LINEOUT)
• アンバランスRCA出力端子です。
• オーディオ信号出力
w USBB端子
• コンピュータに接続します。
• DN-HC4500からUSBMIDI、HIDコマンドを
送ります。
• PCからUSBAUDIOを送ります。
e 電源ボタン
• このボタンを押して、電源をオン/オフしま
す。
(1)サイドパネル
ewrq
t
(2)フロントパネル
uo!1 !3
i!7 !9
!5
!0y!2 !4 !8!6
@7#1 @9 @4#0 @6@8 @5
@0@2@1
@3
r ACインレット端子
• 電源コードのプラグをDN-HC4500のACイ
ンレット端子に差し込みます。
t フェダースタート端子
• ミキサーにフェダースタート機能があるとき
は、この端子を使用してください。
注意:
多くのボタンには2通りの異なる機能が割り当てられており、短く押すか長く(1秒以上)押すかによ
ってそれぞれの機能が選択されます。 のマークは短く押す機能を示し、 のマークは長く押
す機能を示します。
y TIME, Total(タイム、トータル)
【PCDJ接続時】
PCDJのマニュアルを参照してください。
u FLIP/BTRIM(フリップ/Bトリム)
【PCDJ接続時】
PCDJのマニュアルを参照してください。
i MEMO, PRESET
(メモ、プリセット)
【PCDJ接続時】
PCDJのマニュアルを参照してください。
o CUE/STUTTER(キュー/スタッター)
【PCDJ接続時】
• プレイモードでこのボタンを押すと、ファイ
ルは再生開始位置に戻されます。
• キューモード時にキューボタンを押すと、そ
のキューポイントからスタッターサウンドが
再生されます。これをスタッタープレイとい
います。(スタッター)
!0 TITLE(タイトル)
【PCDJ接続時】
PCDJのマニュアルを参照してください。
!1 A1,A2
【PCDJ接続時】
• このボタンを用いて、ホットスタート、シー
ムレスループ、およびスタッターの開始ポイ
トを設定することができます。
!2 CONT./SINGLE, RELAY
(コント./シングル、リレー)
【PCDJ接続時】
PCDJのマニュアルを参照してください。
!3 PLAY/PAUSE(プレイ/ポーズ)
【PCDJ接続時】
• このボタンを押すと、再生がスタートまたは
一時停止します。
Page 92

4
日本語
日本語
@3 PLAYLIST(プレイリスト)
【PCDJ接続時】
PCDJのマニュアルを参照してください。
@4 TAP(タップ)
【PCDJ接続時】
PCDJのマニュアルを参照してください。
@5 PARAMETERSKnob(パラメータノブ)
【PCDJ接続時】
• 回す:
Presetのパラメータを選択します。
• 押す:
選択されたパラメータを決定します。
@6 BACK(バック)
【PCDJ接続時】
PCDJのマニュアルを参照してください。
@7 EFFECT3(エフェクト3)
【PCDJ接続時】
PCDJのマニュアルを参照してください。
@8 EFFECT2(エフェクト2)
【PCDJ接続時】
PCDJのマニュアルを参照してください。
@9 EFFECT1(エフェクト1)
【PCDJ接続時】
PCDJのマニュアルを参照してください。
#0 FASTSEARCH(ファストサーチ)
(
6/7)
QUICKJUMP(クイックジャンプ)
【PCDJ接続時】
PCDJのマニュアルを参照してください。
#1 FUNCTION(ファンクション)
【PCDJ接続時】
PCDJのマニュアルを参照してください。
q 再生位置インジケータ
• 曲の終了位置までの時間が指定時間以下にな
ると、曲の残り時間(EOM)に合わせ再生
位置表示が点滅し、曲の終了を知らせます。
w ループモードインジケータ
• DN-HC4500は、ループモード表示としての
AとB、2個のループ表示があります。
AとB表示は、A、Bが設定されると表示され
ます。
e 文字ディスプレイ
• このブロックは、各種の操作情報、テキスト
メッセージなどを表示します。
r ファイルデータインジケータ
• 再生しているファイルの種類を表示します。
t 外部デバイス接続確認インジケータ
• DN-HC4500と外部機器との間でMIDI信号の
送受信があったときに点灯します。
y キーボードインジケータ
• 外部より点灯コマンドを受信したときに点灯
します。
u KEYADJ.インジケータ
• キーアジャストモードのときKEYADJ.
が点灯します。
(3)ディスプレイ
i ビジュアルマーカー
• 各Deckの再生状態に合わせて再生位置を表
示します。
o MEMOインジケータ
• 再生中またはスタンバイ中のファイルにメモ
データが記憶されているとき、MEMO表
示が点灯します。
!0 ピッチインジケータ
• 再生スピード(ピッチ)を表示します。
!1 BPMインジケータ
• Pitch表示部にBPMが表示されるときに表示
されます。
!2 再生モードインジケータ
• 再生モードを表示します。
CONT.:
1つの曲の再生が終了すると続けて次の曲
を再生します。
SINGLE:
1つの曲の再生が終了するとその曲で再生
が止まります。
!3 分、秒、フレーム表示
• これらは現在再生している位置や、スタンバ
イしている位置を表示します。
!4 B
【PCDJ接続時】
•
Aポイントを設定した後、これを使って、シーム
レスループ作成のためのBポイントを設定します。
!5 SOURCE(ソース)
【PCDJ接続時】
PCDJのマニュアルを参照してください。
!6 EXIT/RELOOP(エグジット/リループ)
【PCDJ接続時】
• このボタンを押して終了するか、またはふた
たびシームレスループ再生に戻ります。
この機能を使って、さまざまなル―ピングを
付け加えることができます。
!7 JOGMODE(ジョグモード)
【PCDJ接続時】
PCDJのマニュアルを参照してください。
!8 JOGindicator(ジョグインジケータ)
【PCDJ接続時】
PCDJのマニュアルを参照してください。
!9 JOGdisc(ジョグディスク)
【PCDJ接続時】
PCDJのマニュアルを参照してください。
@0 PITCH/KEY, RANGE
(ピッチ/キー、レンジ)
【PCDJ接続時】
PCDJのマニュアルを参照してください。
@1 PitchSlider(ピッチスライダー)
【PCDJ接続時】
• このピッチスライダーで、再生スピードを調
整します。
• 上にスライドさせると再生スピードは増大
し、下にスライドさせると再生スピードは減
少します。
@2 PITCHBEND±(ピッチベンド±)
【PCDJ接続時】
• これらのボタンを押している間、メインの再
生スピードは一時的に増減します。
• ボタンをはなすと、再生スピードは以前のス
ピードに戻ります。
wretquyo
!3!5 !0!2
!4!6
!1
i
Page 93

5
日本語
日本語
4
デバイス交換
1
SOURCEボタンを押して、
SOURCE選択画面を表
示します。
ご注意:
• BACKボタンを押すとソース切り替えを終
了し、通常モードへ戻ります。
2
PARAMETERSノブを回し
てデバイスを選択します。
ノブをもう一度押すと、登
録されます。
OKtoCHANGEが表示されます。
ご注意:
•OK to CHANGE?↓が表示されてい
るときにパラメータノブをまわすとNOに
切り替わります。
• NOのときにパラメータを押すかBACKボ
タンを押すと手順1へ戻ります。
3
ノブをもう一度押すと、登録されます。
Completed!が表示されソース切り替え
が終了します。
!4 タイムモードインジケータ
• Timeボタンを押したときに次のように切り
替わります。
ELAPSED:
曲の頭からの再生経過時間を表示します。
REMAIN:
曲の残量時間を表示します。
T.ELAPSED:
ディスクの先頭曲からの再生時間を表示し
ます。
T.REMAIN:
ディスクの全曲の残量時間を表示します。
!5 トラックインジケータ
• 現在再生されている曲番号を表示します。
!6 接続インジケータ
• DN-HC4500がコントロールする接続機器を
表示します。
PC:
PC/MACのDJソフトをコントロールしま
す。
Page 94

6
日本語
日本語
(8) PresetInit.:すべてのプリセットデータを出荷時のデフォルト設定に戻します。
q PRESETデータをクリアするには、PARAMETERSノブを押します。
文字ディスプレイにPresetInitが明滅します。
w もう一度PARAMETERSノブを押します。
文字ディスプレイにPushtoExe↓と表示されます。
e もう一度PARAMETERSノブを押します。
文字ディスプレイにOKtoCHANGE?↓と表示されます。
r 消去が完了すると、Completed!と表示されます。
5
PRESET(プリセット)
• ソース選択がPCの場合のみ本機能は有効です。
• 本機は、機器の動作モードをユーザが記憶/呼び出しできるプリセット機能を有し、以下の項目と値を
持ちます。
1. プリセットモード
q PRESETボタンを1秒以上押し続けると、プリセットモードに入ります。
w PARAMETERSノブで、プリセット項目を選びます。
e 項目を選んでPARAMETERSノブを押すと、プリセット項目が変更されます。
r つぎに、PARAMETERSノブを回します。プリセットデータが選択されます。
t データを選んでPARAMETERSノブを押すと、プリセットデータが変更されます。
y 複数のプリセットをおこなうときは、手順w〜tを繰り返してください。
u PRESETボタンを押すと、プリセットモードはオフになります。
2. プリセット項目およびデータ
データのわきに付いた*印はデフォルト値を意味します。
(1) USBModeSel:HC4500MIDI*
USB通信モードを選択します。
DN-HC4500MIDIは独自のMIDI仕様です。
(2) AudioFsSel:44.1k*/48k/96k/Auto
44.1kHz:PCから送信される情報によらず44.1kHzにサンプリング周波数(Fs)を固定します。
48kHz:PCから送信される情報によらず48kHzにサンプリング周波数(Fs)を固定します。
96kHz:PCから送信される情報によらず96kHzにサンプリング周波数(Fs)を固定します。
AUTO:PCから送信される情報に連動してサンプリング周波数(Fs)を切換えます。
q Fsを設定するには、PARAMETERSノブ押します。
文字ディスプレイにOKtoCHANGE?↓と表示されます。
w もう一度PARAMETERSノブを押します。
e 変更後はAudioFsSelが表示されます。
(3) UnitNo.Set:1to15/ALL*
機器のユニット番号を設定します。
例えば2台をPCに接続する場合は、片側の機器をNo2等に設定してください。
(4) MIDICHSet:1&2*/3&4/5&6
MIDIチャンネルを設定します。
(5) JOGPulseSel:1480*/740/555/370count/cycle
JOG1周あたりで出力するパルス数を選択します。
(6) FaderInMode:1-PLAY/CUE/2-PLAY/CUE
(7) X-CONTXFD:OFF/ON*
X-コントロール入力信号のクロスフェダー入力の有効/無効を設定します。
Page 95

7
日本語
日本語
7
インストール完了画面です。Closeボタ
ンを押してください。
図)インストール完了画面
2 アンインストール
アンインストールはコントロールパネルアプリ
ケーションの追加と削除から行ってください。
6
インストール中の画面です。
図)インストール中
4
Desk topにアイコンを作成するかを確認す
る確認画面が表示されます。
アイコンを作成する場合はチェックボック
スにチェックを入れてNext>ボタンを
押してください。
図)アイコン作成確認画面
5
Next>ボタンを押します。インストール
が始まります。
図)インストール開始画面
6
ASIOコントロールパネル(Windows版のみ)
ASIOドライバのインストール
1
インストーラをダブルクリックします。
ASIODriverSetupウィザードが立ち上がり
ます。Next>を押します。
図)ASIOドライバセットアップウィザード
2
ライセンス同意画面が表示されます。同意い
ただける場合は、IAgreeを選択します。
Next>ボタンが選択できるようになりま
す。Next>ボタンを押してください。
図)同意画面
3
Asio Driverをインストールするフォルダを
確認する画面が表示されます。
Next>ボタンを押してください。
図)インストール場所確認
デフォルトは
C¥ProgramFiles¥DENONDJ¥DDJASIO¥
です。
変更したい場合はBrowseを選択して適
当なフォルダを選択してください。
また、インストールしたパソコンをみん
なで使う場合にはEveryoneを、個
人で使う場合にはJustmeを選択し
てください。
Page 96

8
日本語
日本語
r OK/Cancel(OK/キャンセル)
OK:
設定の変更を反映してASIOコントロールパ
ネルを閉じるボタンです。
Cancel:
設定の変更を反映せずにASIOコントロール
パネルを閉じるボタンです。
t SamplingRate(サンプリング率)
サンプリングレートの選択状態を表示します。
DENON DJ ASIOドライバが対応する周波数
は以下の通りです。
• 44.1kHz/48kHz/96kHz
y DeviceDescription(デバイスの説明)
デバイス情報一覧で選択されているデバイス
の情報を表示する領域。
以下の内容が表示されます。
• Devicename(デバイス名)
• Unitnumber(ユニットナンバー)
• Softwareversion(ソフトウェアバージョン)
• Audioinputchannels(オーディオ入力チャ
ンネル)
• Audiooutput channels(オーディオ出力チ
ャンネル)
• Samplingfrequency(サンプリング周波数)
• Maxbitresolution(最大ビット分解能)
• Audiobuffer size(オーディオバッファサ
イズ)
注意:
機器情報が取得できなかった場合、全項目
を-(ハイフン)で表示します。
ホストアプリケーションからDENONDJ ASIOドライバのASIOコントロールパネルが呼び出された
とき、DENONDJASIOドライバはASIOコントロールパネルを表示します。
起動方法
コントロールパネル画面について
q Device
対応するDENONDJ機器を自動的に列挙して
その一覧をリスト表示する領域です。
(例:DN-HC4500-1)
• 設定対象となるデバイスを一覧から選択し、
選択されたデバイスの現在の設定が右側に表
示されます。
• デバイスをダブルクリックした場合、ASIO
デバイス仕様デバイスの状態がEnableなら
Disable、DisableならEnableに切り替わりま
す。
wreq
ty
注意:
• デバイスの選択は一つだけです。
• ASIOデバイスとして使用中のデバイスは
太字で表示します。(複数のデバイスを同
時に有効にできます。)
w Enable/Disable
(イネーブル/ディセーブル)
デバイス一覧表示部で選択されているデバイ
スをASIO使用デバイスとしてアクティブ化す
るボタンです。
e AudioBufferSize
(オーディオバッファサイズ)
バッファサイズを調整するスライダーです。
注意:
• 数値範囲は88〜2048(サンプル単位)、
ステップは1msずつです。
• 複数デバイスがActive化されている場合、
全Activeデバイスの設定値は共通です。
Page 97

9
日本語
日本語
4
Desk topにアイコンを作成するかを確認す
る確認画面が表示されます。
アイコンを作成する場合はチェックボック
スにチェックを入れてNext>ボタンを
押してください。
図)アイコン作成確認画面
5
Next>ボタンを押します。インストール
が始まります。
図)インストール開始画面
6
インストール中の画面です。
図)インストール中
7
インストール完了画面です。Closeボタ
ンを押してください。
図)インストール完了画面
2 アンインストール(Windows版のみ)
アンインストールはコントロールパネルアプリ
ケーションの追加と削除から行ってください。
Macintosh版Upgradeprogramのインストールではアプリケーション本体をMacにコピーします。
Upgradeprogram(アップグレードプログラム)のインストール(Mac版)
7
バージョンアップ
DENONのサイトで配布する機器バージョンアップファイルを、機器バージョンアップソフトウェアを用
いてバージョンアップします。
DENONのウェブサイトwwww.denon.jp/dj/で最新のソフトを確認してください。
1
インストーラをダブルクリックします。
Upgrade programセットアップウィザード
が立ち上がります。Next>を押します。
Upgradeprogram(アップグレードプログラム)のインストール(Windows版)
図)アップグレードウィザード
2
ライセンス同意画面が表示されます。同意い
ただける場合は、IAgreeを選択します。
Next>ボタンが選択できるようになりま
す。Next>ボタンを押してください。
図)同意画面
3
Upgrade programをインストールするフォ
ルダを確認する画面が表示されます。
Next>ボタンを押してください。
図)インストール場所確認
デフォルトは
C¥Program Files¥DENONDJ¥DDJUpdater¥
DN-HC4500¥
です。
変更したい場合はBrowseを選択して適
当なフォルダを選択してください。
また、インストールしたパソコンをみん
なで使う場合にはEveryoneを、個
人で使う場合にはJustmeを選択し
てください。
Page 98

10
日本語
日本語
5
-2
機器のパネル表示には、転送中Deck1側に
転送完了すると
が表示されます。
(左側:旧バージョン、右側:新バージョン)
転送完了後、OKボタンを押すとExecute
(実行)ボタンが有効表示(押せるような状
態)に切り替わります。
4
アップデートファイルをDENON DJアップ
グレードプログラム画面にドラッグ&ドロ
ップして下さい。Loadボタンが選択できる
状態になります。
Loadボタンが選択可能になる。
Loadボタンを押してアップデートファイル
を転送します。
5
-1
バージョンアップ手順
1
PCと機器をUSBで接続します。
2
機器をバージョンアップモードで電源を立
ち上げます。
バージョンアップモードでの立ち上げ方:
Deck1もしくはDeck2のBACKボタンと
SOURCEボタンを同時に押下しながら電源
を投入します。
機器のパネル表示には、Deck1側に
Deck2側に
が表示されます。
機器が未接続場合、機器のパネル表示には
Deck2側に
が表示されます。
3
-2
このとき機器が接続されていないか、機器
がバージョンアップモードでない場合は以
下の図のようになります。また、バージョ
ンアップファイルが読み込まれていない場
合はFileisnotready.が表示されます。
アップデートファイルがロードされていない状態。
バージョン情報が表示されます。
DN-HC4500 Update programを立ち上げ
ます。
PC上に以下の画面が表示されます。
現在のバージョン情報
認識したデバイス名が表示されます。
3
-1
Page 99

11
日本語
日本語
7
OKボタンを押して終了です。
機器のパネル表示には、Deck2側に
が表示されます。
アップデートプログラムを終了して、DNHC4500の電源をOFFしてください。
注意:
• ロード中やバージョンアップ中はセットの電
源をOFFしたり、PCとの接続ケーブルをは
ずしたりしないで下さい。また、セットのボ
タンやパソコンのキーボードも押さないで下
さい。
• ロード中やバージョンアップ中にエラー表示
が出た場合には、手順1からやり直して下さ
い。
その他エラー表示は以下の通りです。
Fileisinvalid.
アップデートファイル読み込み時ファイルが不
正だった場合。
Loadfailed.Checktheconnection,andretry.
アップデートファイルを機器へ転送時、送信エ
ラーになった場合。
Loadeddataisinvalid.Checkthefile.
アップデートファイルを機器へ転送後、SUMチ
ェックエラーになった場合。
Versionupwasnotcompleted.
バージョンアップが正常に終了しなかった場合。
6
Executeボタンを押して、バージョンアッ
プを開始します。
バージョンアップ完了後は、Version up
wascompleted.の表示がでます。
機器のパネル表示には、バージョンアップ中
Deck1側に
バージョンアップが完了すると
が表示されます。
バージョンアップ失敗時にはVersion up
was not completed.を表示しExecuteボ
タンを押す前に戻りますので、再度Execute
ボタンを押してください。
Page 100

12
日本語
日本語
8
MIDIコマンド
送信データ
パネル操作データの送信は、以下の表に従い、MIDIコマンドを送信します。
2 PCにコマンドを送る
1 Playlist
SWON:0x9n
SWOFF:0x8n
0x02
SWON:0x40
SWOFF:0x00
NoteON/OFF
2 JOGmode ↑ 0x04 ↑ ↑
3 Pitch/KEY ↑ 0x05 ↑ ↑
4 TAP ↑ 0x07 ↑ ↑
5 PitchBend+ ↑ 0x08 ↑ ↑
6 PitchBend− ↑ 0x09 ↑ ↑
7 Fastsearch+ ↑ 0x10 ↑ ↑
8 Fastsearch− ↑ 0x11 ↑ ↑
9 EFX1/ECHO/LOOP ↑ 0x12 ↑ ↑
10 EFX2/FLANGER ↑ 0x13 ↑ ↑
11 EFX3/FILTER ↑ 0x14 ↑ ↑
12 HOT1 ↑ 0x17 ↑ ↑
13 HOT2 ↑ 0x18 ↑ ↑
14 HOT3 ↑ 0x19 ↑ ↑
15 HOT4 ↑ 0x20 ↑ ↑
16 HOT5 ↑ 0x21 ↑ ↑
17 TIME/TOTAL ↑ 0x23 ↑ ↑
18 MEMO/PRESET ↑ 0x24 ↑ ↑
19 TITLE ↑ 0x25 ↑ ↑
20 CONT./SINGLE ↑ 0x26 ↑ ↑
21 ParametersKNOBSW ↑ 0x28 ↑ ↑
22 BACK ↑ 0x30 ↑ ↑
23 SOURCEmode ↑ 0x31 ↑ ↑
24 FLIP ↑ 0x36 ↑ ↑
25 A1 ↑ 0x37 ↑ ↑
26 A2 ↑ 0x38 ↑ ↑
27 B ↑ 0x39 ↑ ↑
28 EXIT/Reloop ↑ 0x40 ↑ ↑
29 Cue ↑ 0x42 ↑ ↑
30 Play ↑ 0x43 ↑ ↑
31 JOGUP ↑ 0x47 ↑ ↑
32 JOGDOWN ↑ 0x48 ↑ ↑
33 JOGLEFT ↑ 0x49 ↑ ↑
34 JOGRIGHT ↑ 0x50 ↑ ↑
35 Jogwheeltouch ↑ 0x51 ↑ ↑
items
Command
MIDIcommand
Number Value
Messagetype
36 PresetMode
SWON:0x9n
SWOFF:0x8n
0x52
SWON:0x40
SWOFF:0x00
NoteON/OFF
37 D4500Cont.mode ↑ 0x53 ↑ ↑
38 Jogwheelfwd/rev 0xBn 0x51
Reverse0x3F〜0x00
Foward0x41〜0x7F
slow→ fast
※ relativedata
Controlchange
items
Command
MIDIcommand
Number Value
Messagetype
39 X-Controlfader ↑ 0x53
0x00(min)→ 0x7F(max)
↑
40
ParametersKNOB
Increment/Decrement
↑ 0x54
Increment:0x00
Decrement:0x7F
↑
41 PitchSlider 0xEn 0xllh(LSB) 0xmmh(MSB)
Pitchbendchange
n=MIDICH
−100%:0x7F7F(MSB/LSB)
0%:0x4000(MSB/LSB)
+100%:0x0000(MSB/LSB)
 Loading...