

Page 1
FR GUIDE D'UTILISATION
CS NÁVOD K POUŽITÍ
DA BRUGERVEJLEDNING
DE BETRIEBSANLEITUNG
EN USER GUIDE
ES MANUAL DE UTILIZACIÓN
IT MANUALE D'USO
NL GEBRUIKSAANWIJZING
PT MANUAL DE UTILIZAÇÃO
Four
Trouba
Ovn
Backofen
Oven
Horno
Forno
Oven
Forno
99642242_A_ML.qxp 14/05/2007 14:53 Page 1
Page 2
2
FR
02
DE
39
EN
51
ES
63
IT
75
NL
87
PT
99
DA
27
CS
15
Chère Cliente, Cher Client,
Vous venez d'acquérir un four
DDEE DDIIEETTRRIICCHH
et nous vous en remer-
cions.
Nos équipes de recherche ont conçu pour vous cette nouvelle génération d’appareils, qui par leur qualité, leur esthétique, leurs fonctions et
leurs évolutions technologiques en font des produits d’exception, révélateurs de notre savoir-faire.
Votre nouveau four
DDEE DDIIEETTRRIICCHH
s’intégrera harmonieusement dans
votre cuisine et alliera parfaitement les performances de cuisson, et la
facilité d’utilisation. Nous avons voulu vous offrir un produit d’excellence.
Vous trouverez également dans la gamme des produits
DDEE DDIIEETTRRIICCHH
,
un vaste choix de cuisinières, de tables de cuisson, de hottes aspirantes, de lave-vaisselle, et de réfrigérateurs intégrables, que vous pourrez coordonner à votre nouveau four
DDEE DDIIEETTRRIICCHH
.
Bien entendu, dans un souci permanent de satisfaire le mieux possible
vos exigences vis-à-vis de nos produits, notre service consommateurs
est à votre disposition et à votre écoute pour répondre à toutes vos
questions ou suggestions (coordonnées à la fin de ce livret).
Et connectez-vous aussi sur notre site:
wwwwww..ddeeddiieettrriicchh--eelleeccttrroommeennaag
geerr..ccoomm
sur lequel vous trouverez nos
dernières innovations ainsi que des informations utiles et complémentaires.
DDEE DDIIEETTRRIICCHH
LLeess nnoouuvveeaauuxx oobbjjeettss ddee vvaalleeuurr
Dans le souci d'une amélioration constante de nos produits, nous nous réservons le droit d'apporter à leurs caractéristiques techniques, fonctionnelles ou esthétiques toutes modifications
liées à leur évolution.
Important :
Avant de mettre votre appareil en marche, veuillez lire attentivement ce guide d'installa-
tion et d'utilisation afin de vous familiariser plus rapidement avec son fonctionnement.
99642242_A_ML.qxp 14/05/2007 14:53 Page 2
Page 3

3
SOMMAIRE
FR
1 / DESCRIPTION DE VOTRE APPAREIL
••
Présentation de votre four
___________________________________ 4
••
Accessoires
_______________________________________________ 4
••
Présentation du programmateur et des sélecteurs_______________ 5
2 / UTILISATION DE VOTRE APPAREIL
••
Utilisation du programmateur
º
Comment régler l’heure _________________________________ 6
º
Cuisson immédiate _____________________________________ 7
••
Cuisson programmée
º
Départ immédiat _______________________________________ 7
º
Départ différé _________________________________________ 8
••
Fonction minuterie _________________________________________ 9
3 / MODES DE CUISSON DU FOUR_________________________________ 10
4 / ENTRETIEN ET NETTOYAGE DE VOTRE FOUR ____________________ 11
4 / NOTES ______________________________________________________ 13
5 / SERVICE APRES-VENTE
••
Interventions
______________________________________________ 14
••
Relations consommateurs
___________________________________ 14
99642242_A_ML.qxp 14/05/2007 14:53 Page 3
Page 4
4
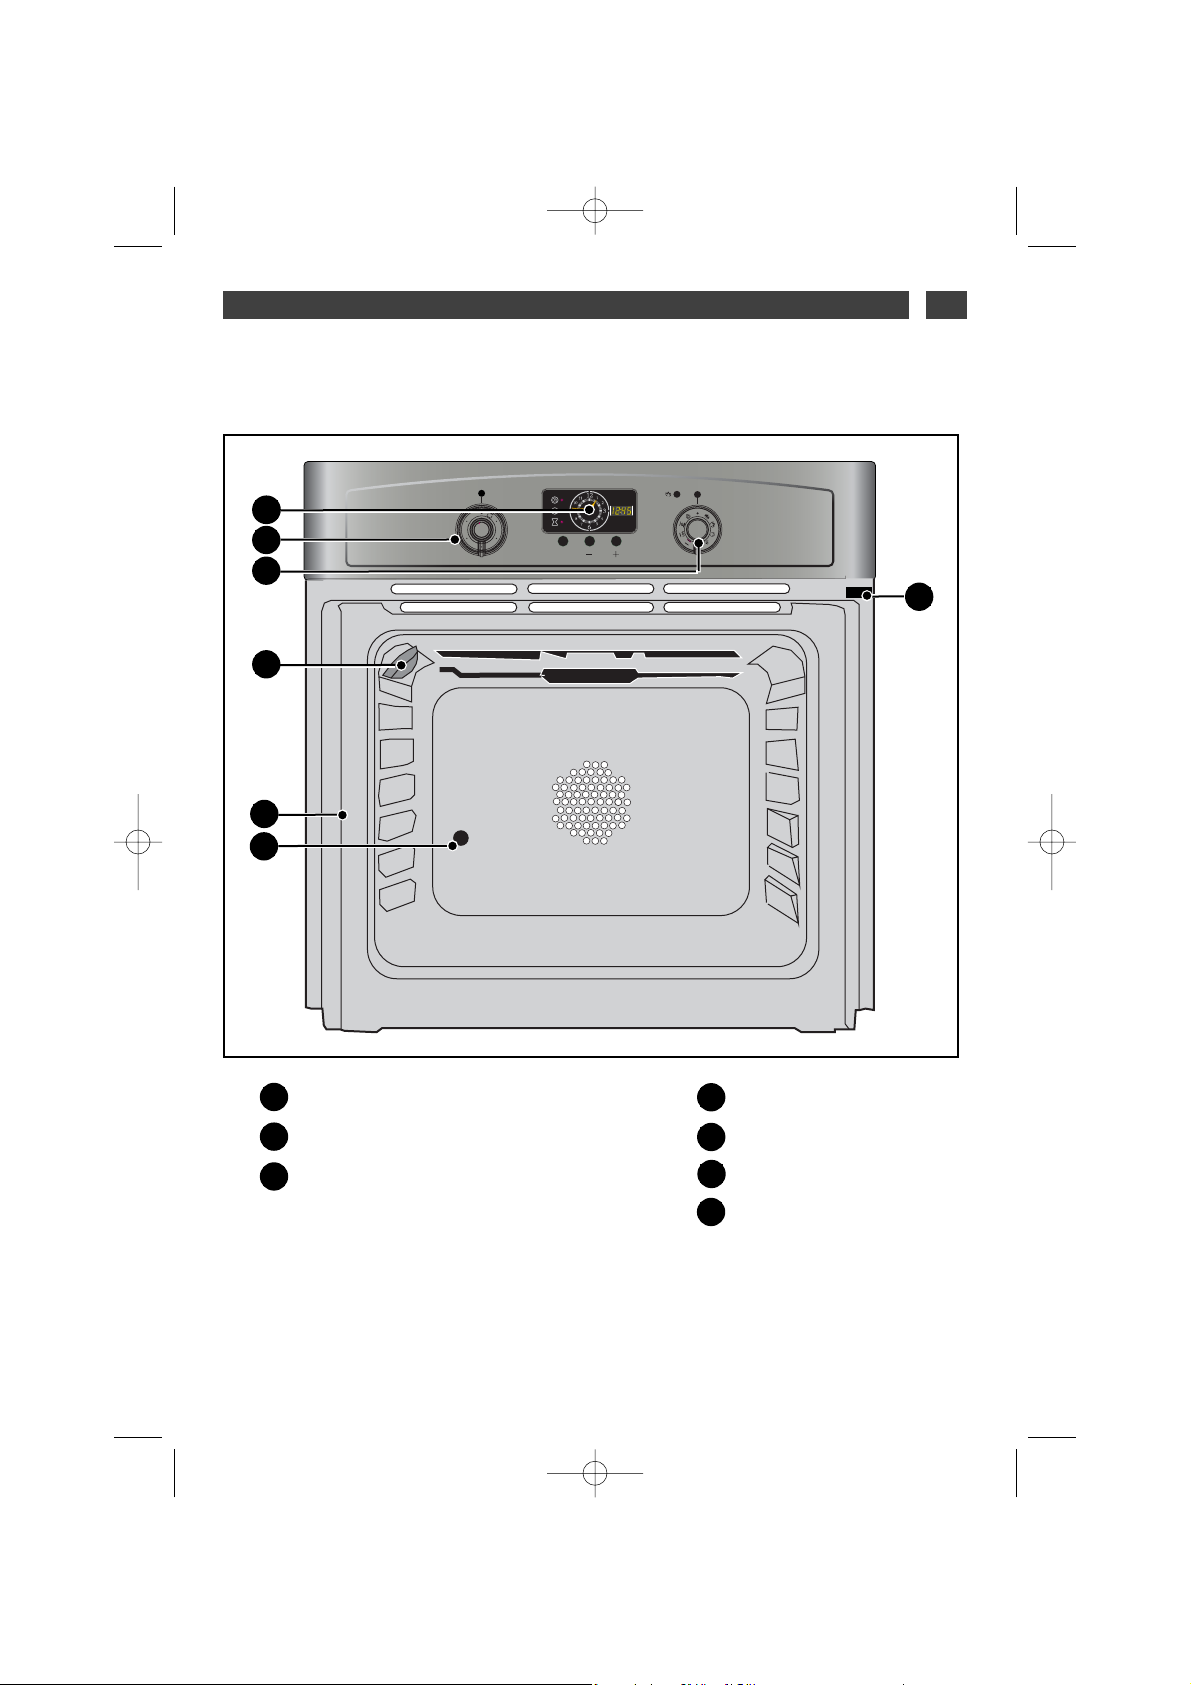
1 / DESCRIPTION DE VOTRE APPAREILFR
••
PRESENTATION DE VOTRE FOUR
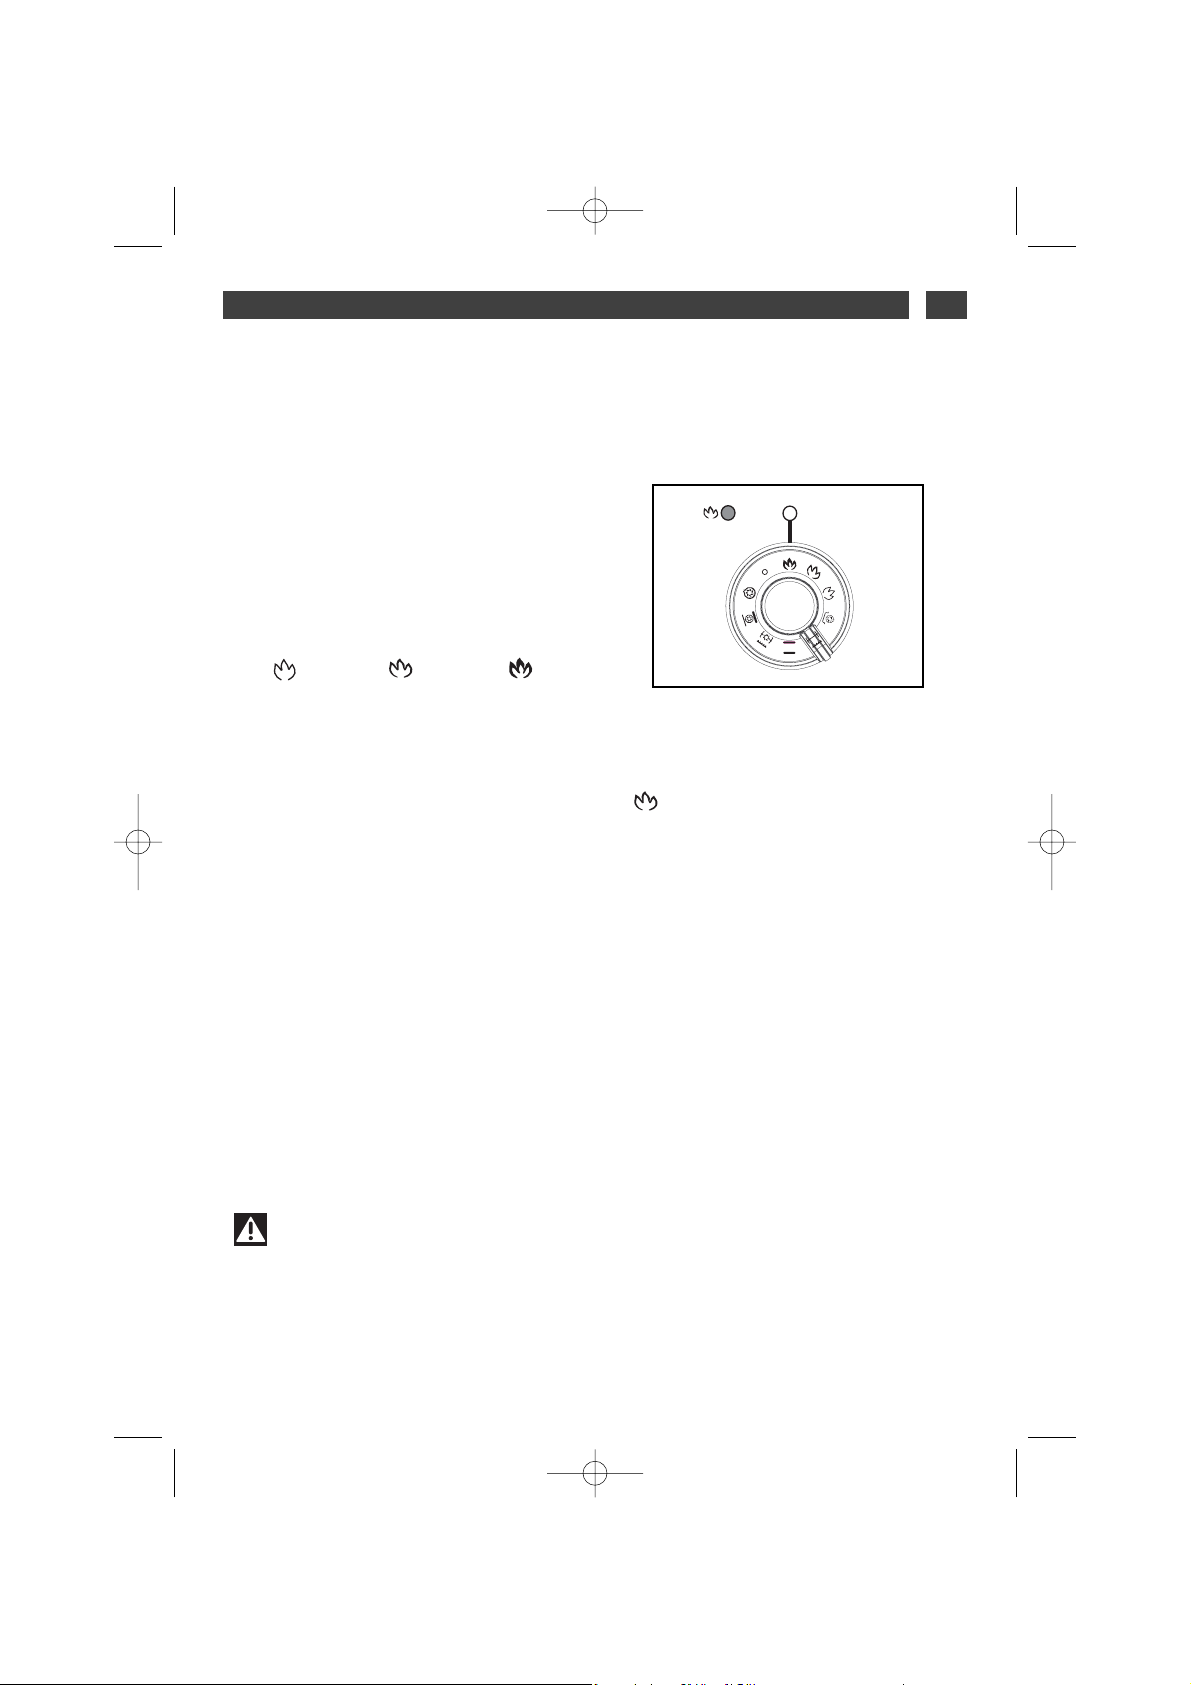
A
B
Programmateur
Sélecteur de température
Sélecteur de fonctions
C
D
E
Lampe
Indicateur de gradins
Trou pour tourne-broche
Contact de détection
d’ouverture de porte
1
3
5
SET
4
0
00
1
165
20
0
220
E
D
B
A
C
F
G
F
G
•Accessoires
Votre appareil est équipé de deux grilles sécurité avec poignée, d’une grille avec poignées pour
le plat 45 mm, d’un plat pâtisserie Lissium et d’un tourne-broche.
99642242_A_ML.qxp 14/05/2007 14:53 Page 4
Page 5
5
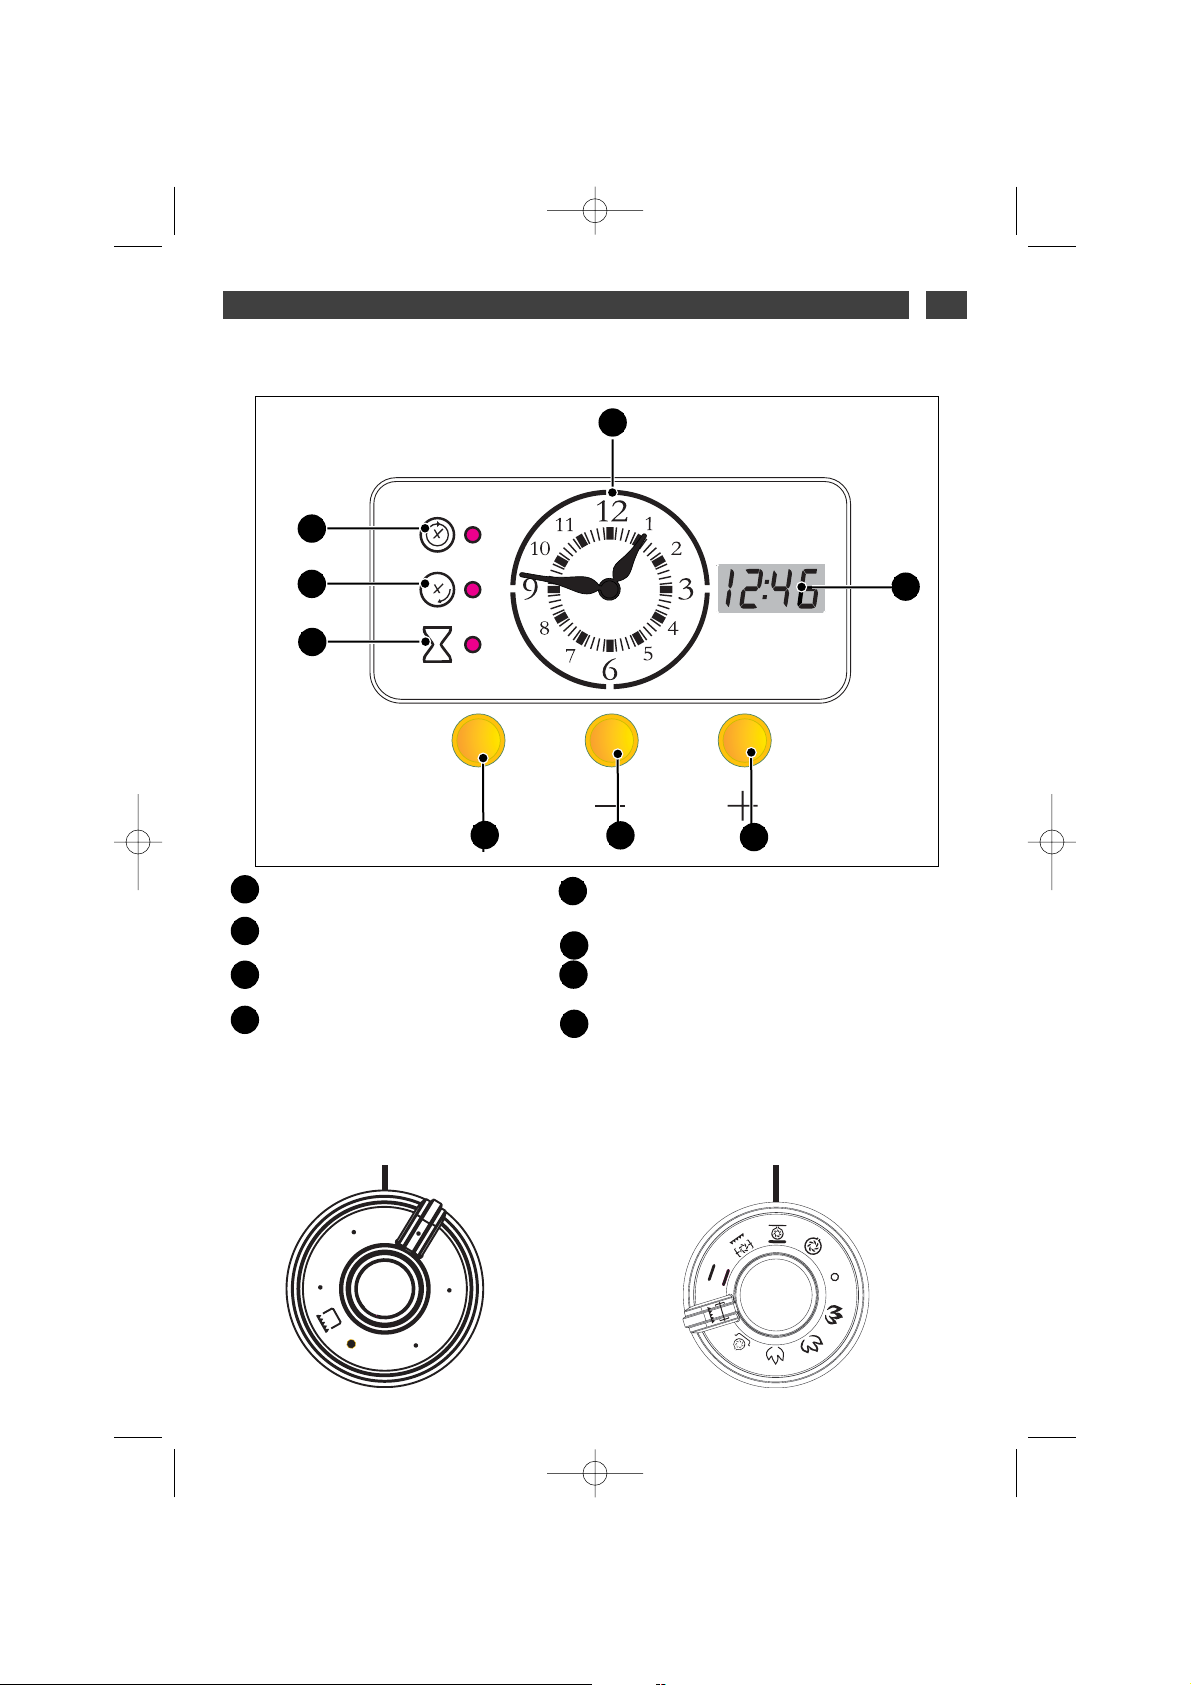
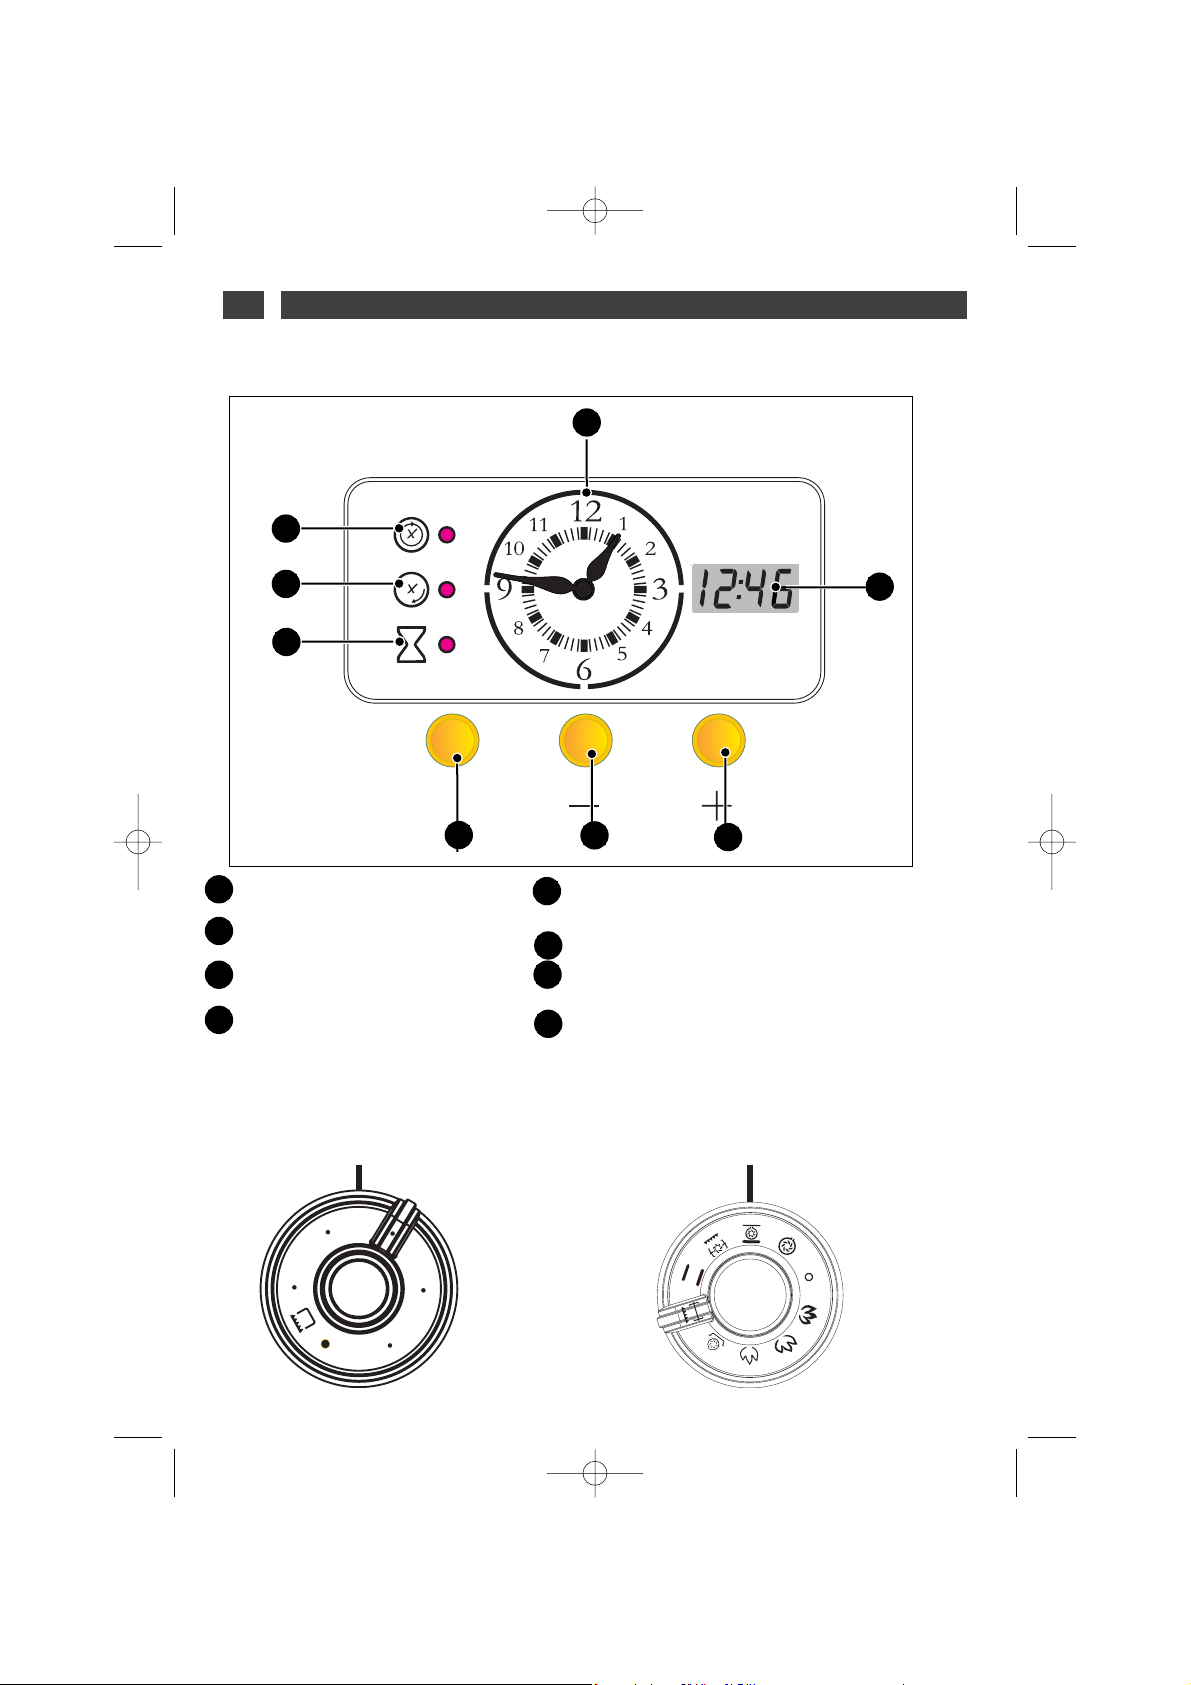
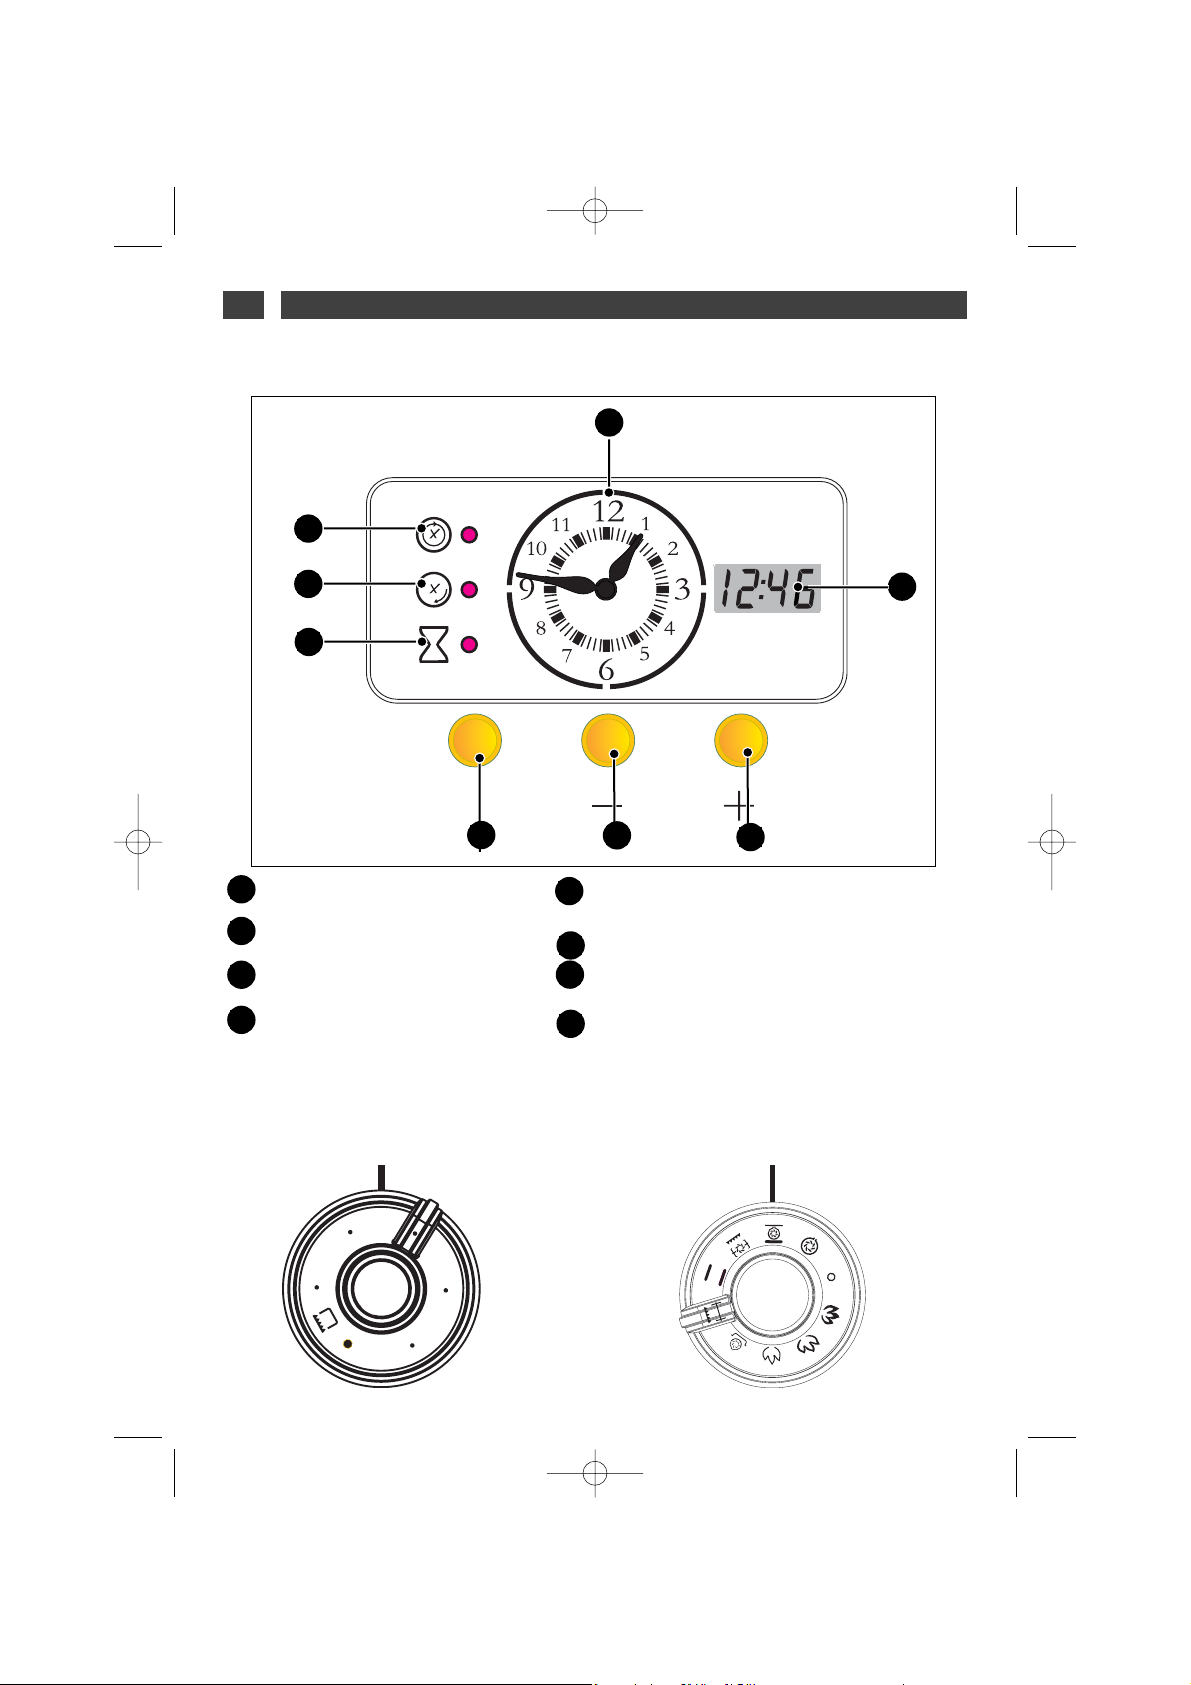
1 / DESCRIPTION DE VOTRE APPAREIL
FR
PRESENTATION DU PROGRAMMATEUR
••
A
B
Affichage de l’heure
Indicateur de durée de cuisson
Indicateur de fin de cuisson
Indicateur du minuteur
C
D
Touche d’accès aux différents programmes de
réglage du temps
Touches de réglages du temps
Afficheur digital (durée de cuisson, fin de cuisson, minuteur et mise à l’heure)
E
F
G
H
A
B
C
D
E
F
G
H
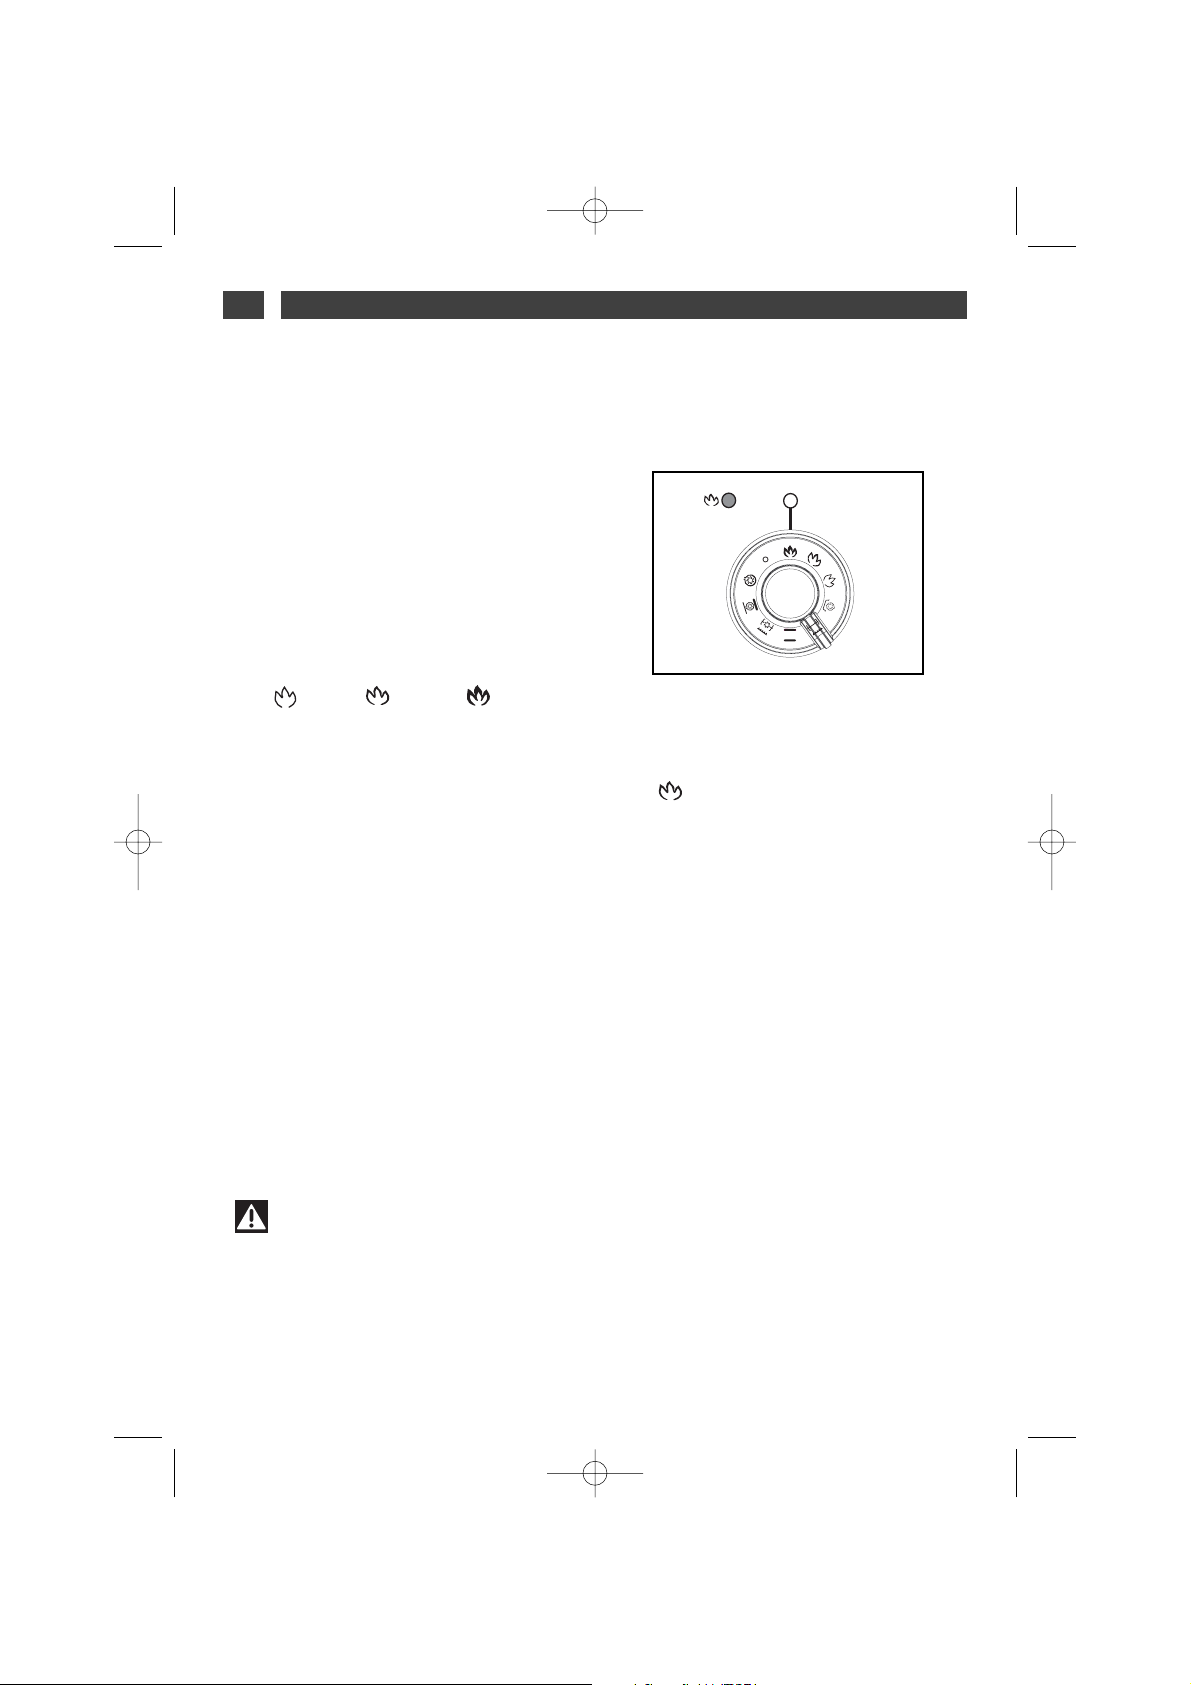
SELECTEUR DE TEMPERATURE
••
SELECTEUR DE FONCTIONS
••
99642242_A_ML.qxp 14/05/2007 14:53 Page 5
SET
200
165
220
1
00
40
Page 6
6
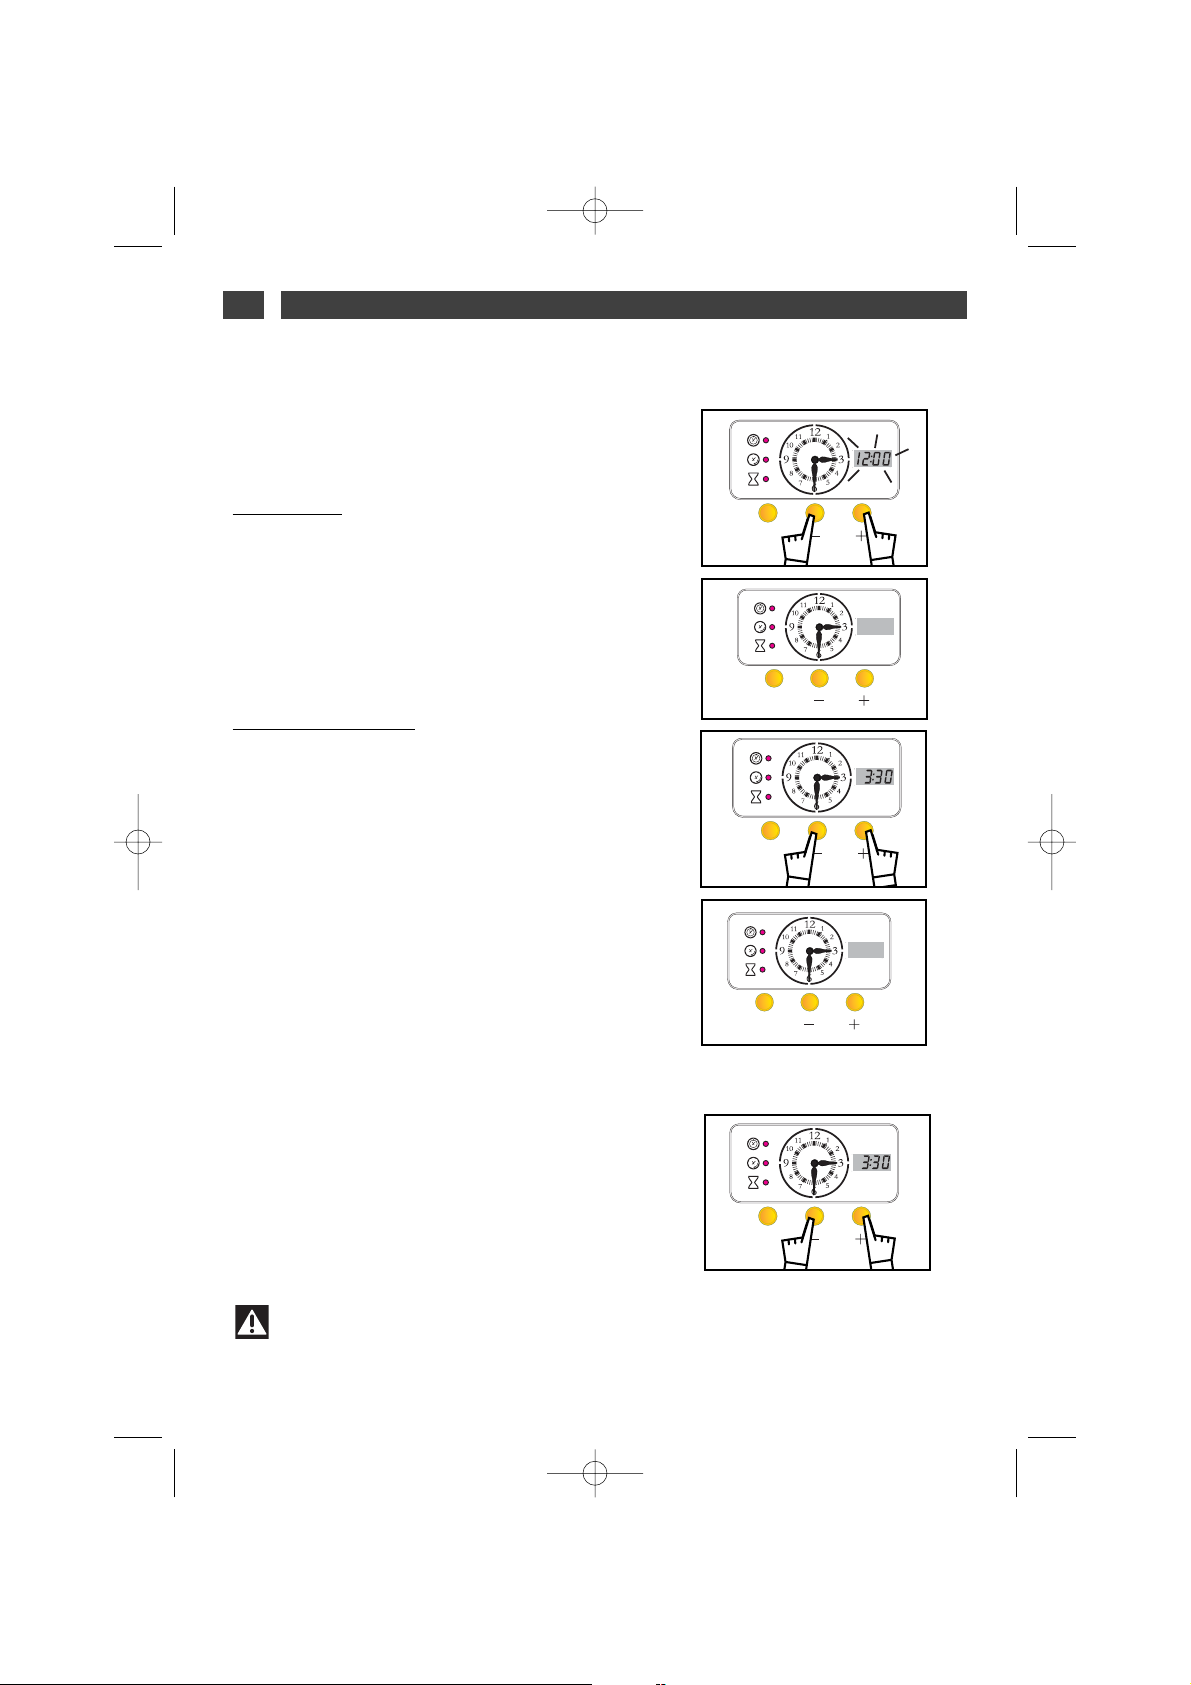
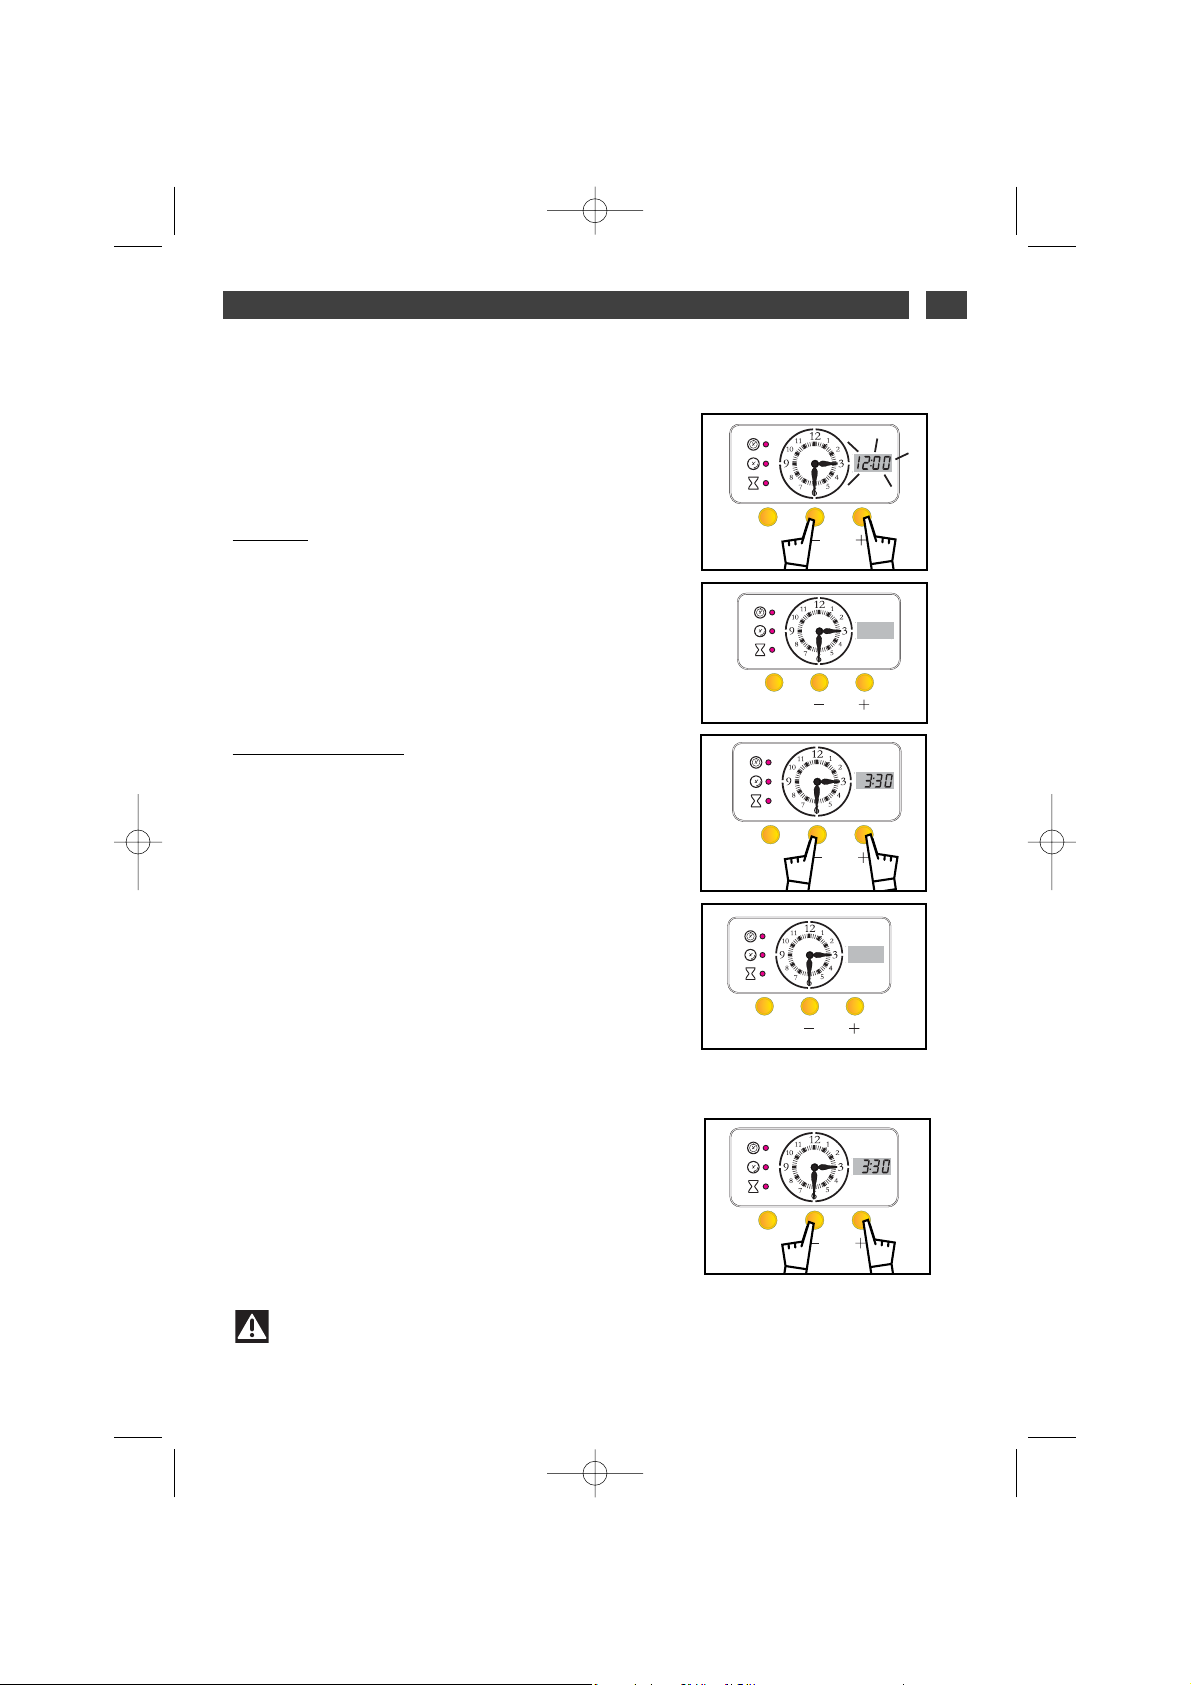
2 / UTILISATION DE VOTRE APPAREILFR
•
Comment régler l’heure
AA llaa mmiissee ssoouuss tteennssiioonn
L’HORLOGE :
• L’afficheur digital clignote.
• Réglez l’heure en appuyant sur les touches
++
ou --pour régler l’horloge à aiguilles (fig.1),l’afficheur digital ne clignote plus (fig.2).
• Appuyez sur la touche “SET” pour valider.
Exemple:3h30.
L’AFFICHEUR DIGITAL (servant
à la programmation)
Après quelques secondes, l’afficheur numérique
clignote de nouveau.
Réglez l’heure à l’identique de celle de l’horloge
en appuyant sur les touches + ou - de façon à
augmenter ou diminuer l’heure affichée (fig.3).
• Appuyez sur la touche “SET” pour valider
Une fois le réglage effectué, l’afficheur digital
s’éteint (fig.4).
RReemmiissee àà ll’’hheeuurree ddee ll’’hhoorrllooggee
• Appuyez simultanément sur les touches + et pendant quelques secondes jusqu’à faire clignoter l’affichage digital.
L’affichage de l’heure clignote pour vous indiquer que le réglage est alors possible.
Pour le réglage, appuyez sur les touches + ou de façon à augmenter ou diminuer l’heure affichée.(fig.5)
• Appuyez sur la touche “SET” pour valider.
Attention
S’il n’y a pas de validation par la touche “SET”, l’enregistrement est automatique
au bout de quelques secondes.
UTILISATION DU PROGRAMMATEUR
••
fig.1
fig.2
fig.3
fig.4
fig.5
99642242_A_ML.qxp 14/05/2007 14:53 Page 6
SET
SET
SET
SET
SET
Page 7

7
2 / UTILISATION DE VOTRE APPAREIL
FR
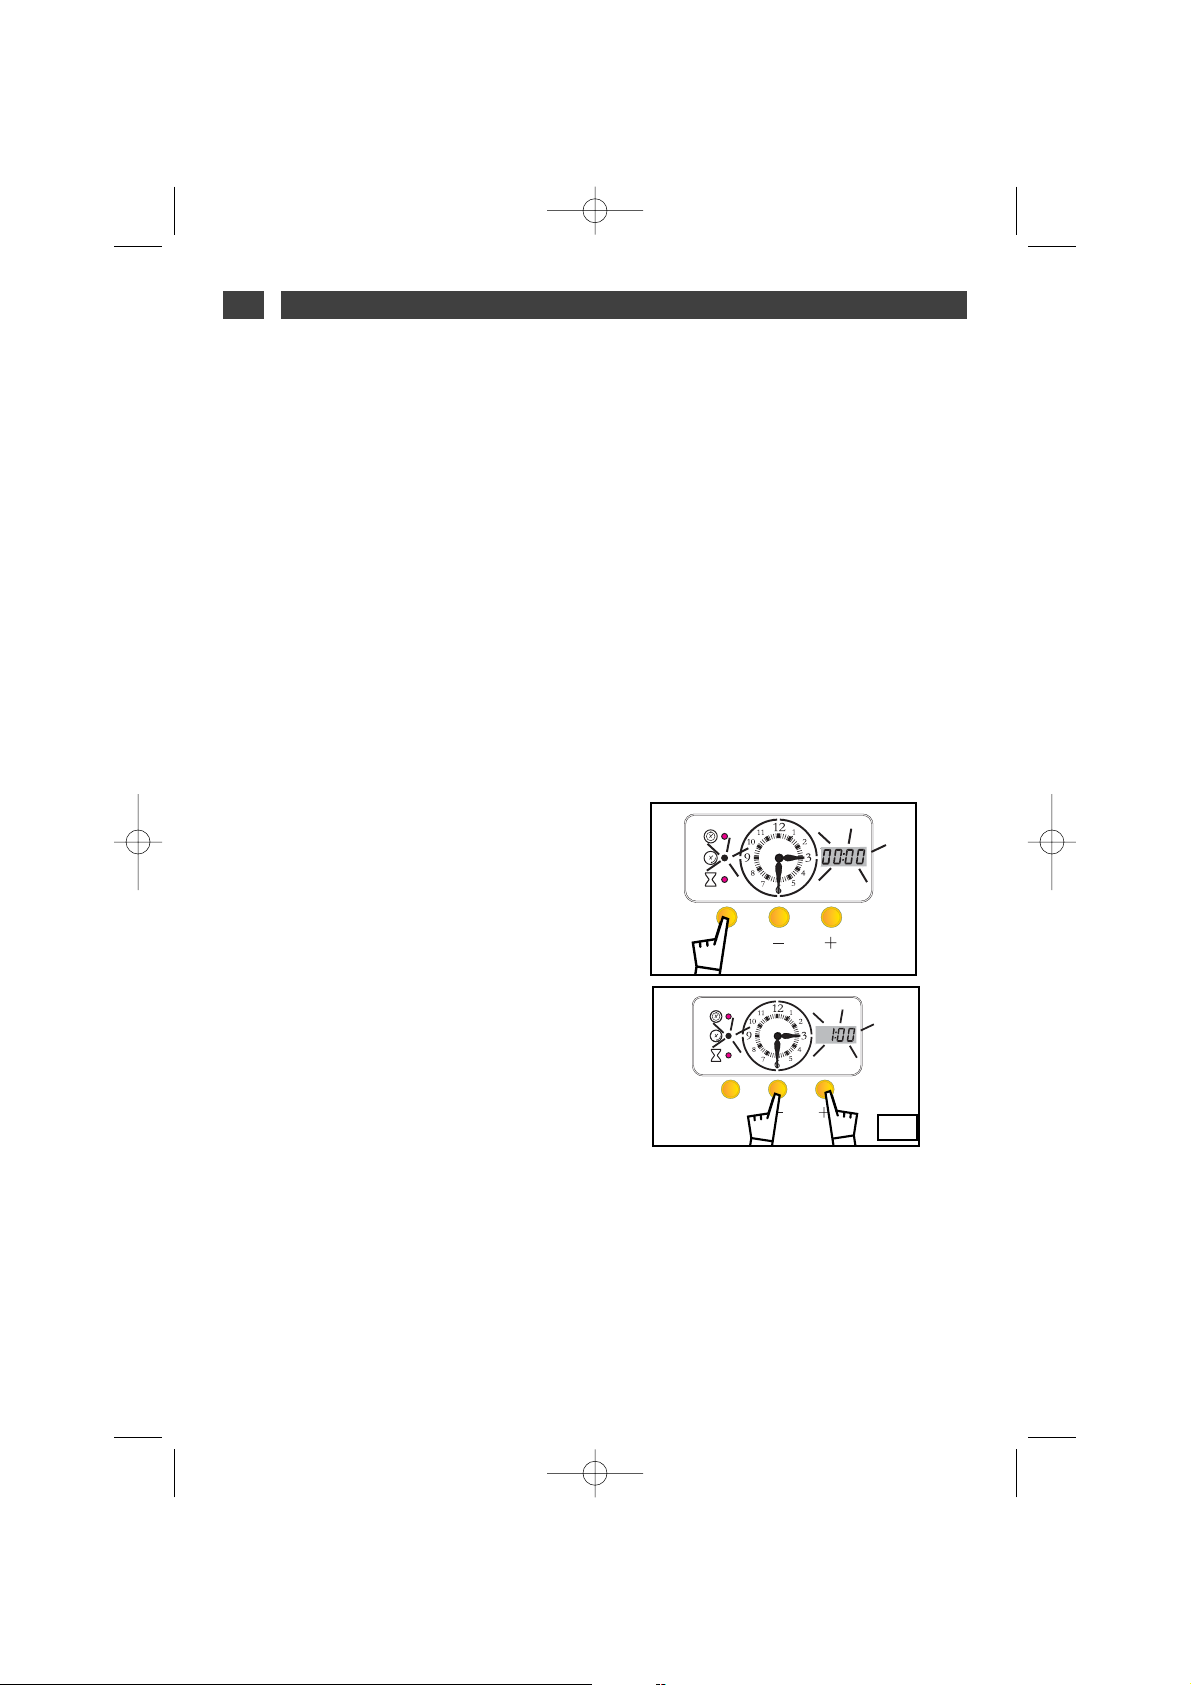
•Cuisson immédiate
L’afficheur digital ne doit pas clignoter.
• Choisissez le mode de cuisson :
Tournez le sélecteur de fonctions sur la position de votre choix (fig.1)
Exemple : position “ ”
le four se met en marche.
PPllaacceezz vvoottrree ppllaatt ddaannss llee ffoouurr
selon les recom-
mandations fournies par le guide de cuisson.
Exemple “ ” à 200°C.
Après ces actions, le four chauffe et le voyant
thermostat s’allume.
Vous pouvez régler l’heure de fin de cuisson
que dans une plage horaire s’étalant sur les
douze prochaines heures.
Attention
Après un cycle de cuisson, la turbine de
ventilation continue de fonctionner pendant
un certain temps, afin de refroidir le four.
fig.1
--
Cuisson avec départ immédiat, réglage
de la durée de cuisson.
11..
Choisissez le mode de cuisson et ajustez la
température (fig.1).
Exemple : position “ ”
22..
Appuyez sur la touche “SET” jusqu’à faire
clignoter le voyant “ ”
(fig.2)
L’affichage digital clignote à 0h00 pour indiquer que le réglage est alors possible.
33..
Appuyez sur la touche + ou - pour régler le
temps de cuisson souhaité (fig.3).
Exemple : 25 min de cuisson.
La validation se fait automatiquement au bout de
quelques secondes, ->l’afficheur ne clignote plus.
Le décomptage de la durée se fait immédiatement
après la validation.
AApprrèèss cceess 33 aaccttiioonnss,, llee ffoouurr cchhaauuffffee..
fig.1
fig.2
fig.3
CUISSON PROGRAMMEE
••
99642242_A_ML.qxp 14/05/2007 14:53 Page 7
220
200
165
1
00
40
SET
SET
Page 8
8
2 / UTILISATION DE VOTRE APPAREILFR
((ssuuiittee))
Il est possible de modifier à tout moment la
durée de cuisson en effectuant l’opération
décrite précédemment.
Vous pouvez déprogrammer une cuisson en
réglant la durée de cuisson sur 0.00.
En fin de cuisson, une série de bips sonores
est émise durant quelques minutes.
L’arrêt des bips se fait en appuyant sur les touches + ou -. Après ces actions vous pouvez
réutiliser votre four.
Remettez les sélecteurs de température et de
fonctions sur arrêt afin que votre four ne se
remette pas à chauffer.
CUISSON PROGRAMMEE
••
--
Cuisson avec départ immédiat et heure
de fin différée.
PPrrooccééddeezz ccoommmmee uunnee ccuuiissssoonn pprrooggrraammmmééee..
Après le réglage de la durée de cuisson,
Appuyez sur la touche “SET” jusqu’à faire clignoter le voyant “fin de cuisson” (fig.1),.
L’affichage digital clignote pour indiquer que le
réglage est alors possible.
Appuyez sur la touche + ou - pour régler l’heure
de fin souhaitée (fig.2).
Exemple : Fin de cuisson à 1h.
Après ces actions, le départ de la cuisson est
différé pour que la cuisson soit finie à 1h.
L’affichage digital est figé jusqu’au départ de la
cuisson.
A la fin de la cuisson, une série de bips sonores est émise durant quelques minutes.
Quand votre cuisson est terminée, remettre le
sélecteur de cuisson sur ” 0 ” et le sélecteur de
température sur arrêt.
Vous pouvez régler l’heure de fin de cuisson
que dans une plage horaire s’étalant sur les
douze prochaines heures.
fig.1
fig.2
99642242_A_ML.qxp 14/05/2007 14:53 Page 8
SET
SET
Page 9
9
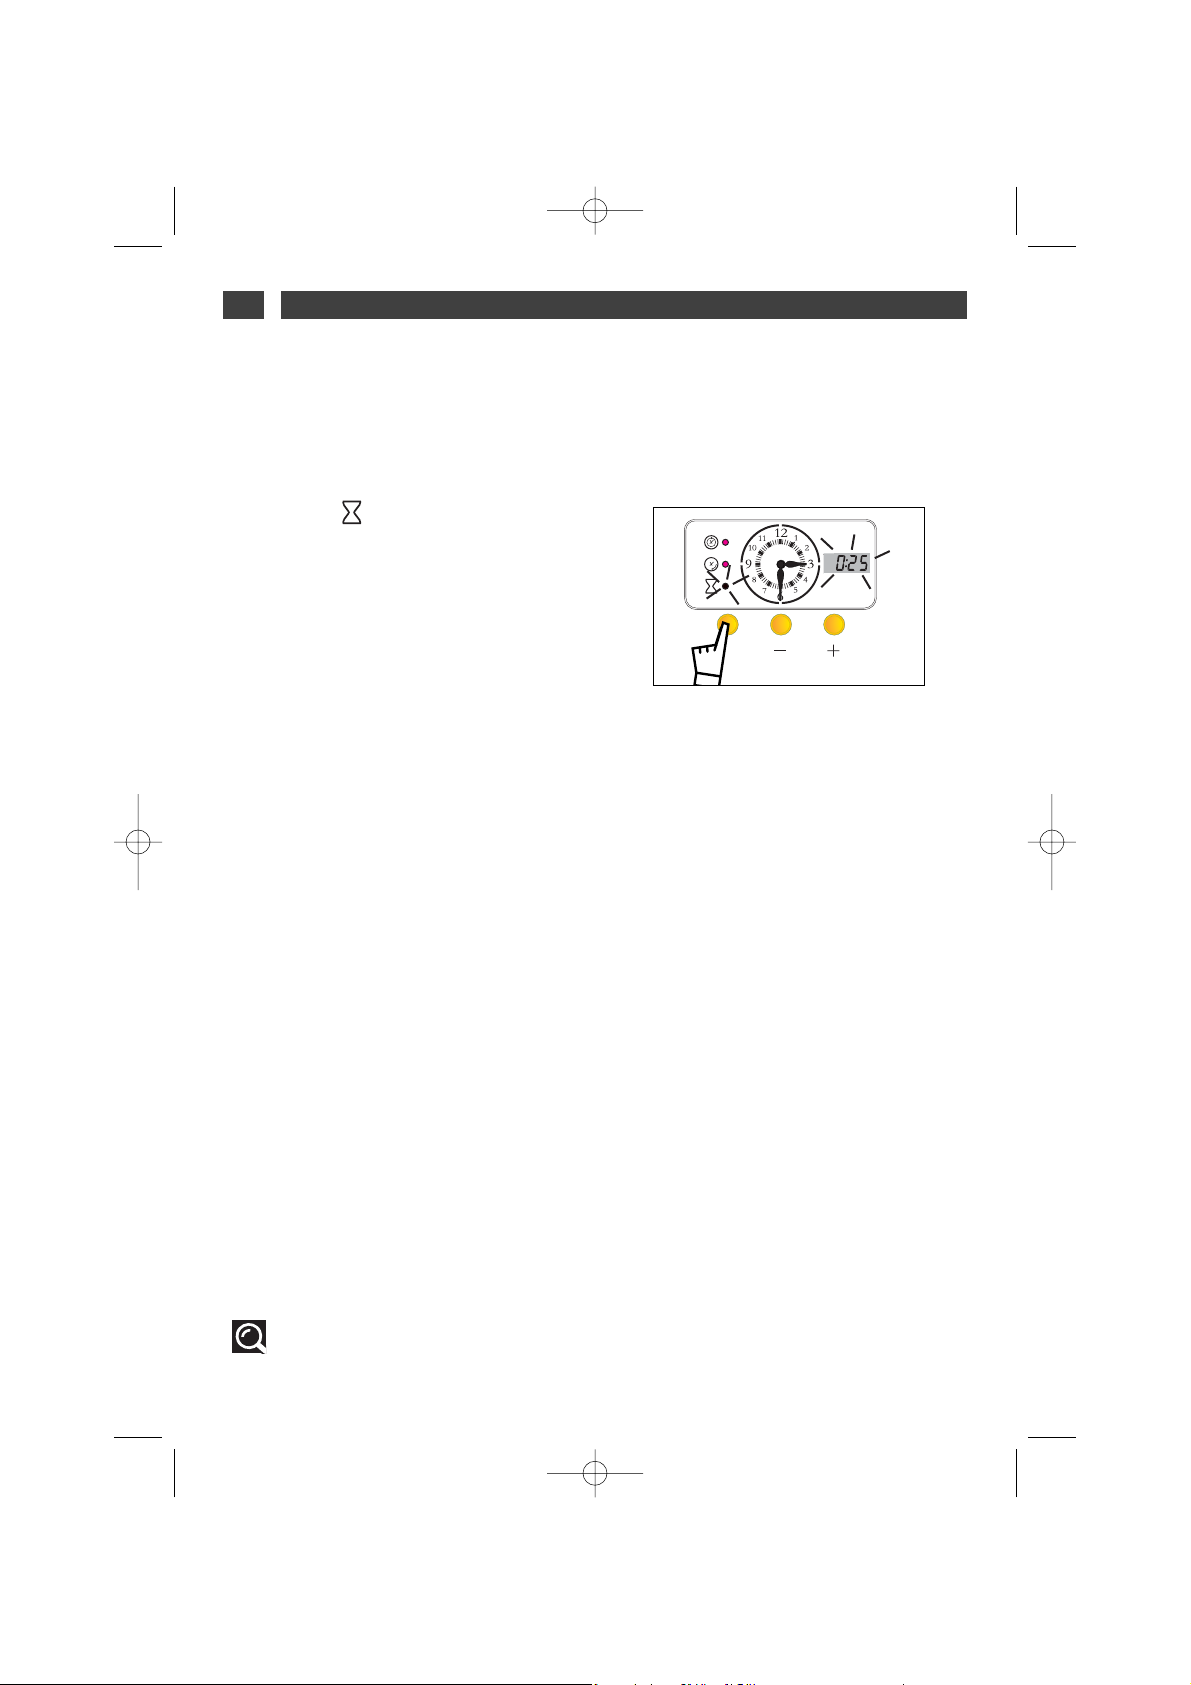
2 / UTILISATION DE VOTRE APPAREIL
FR
VVoottrree ffoouurr eesstt ééqquuiippéé dd’’uunn mmiinnuutteeuurr éélleeccttrroonnii--
qquuee iinnddééppeennddaanntt dduu ffoonnccttiioonnnneemmeenntt dduu ffoouurr
ppeerrmmeettttaanntt
ddee ddééccoommpptteerr uunn tteemmppss..
Appuyez sur la touche “SET” jusqu’à faire cli-
gnoter le voyant “ ” (fig.1).
Appuyez sur la touche (
++ oouu --
) jusqu’à obtenir la
durée voulue ( maxi 12h00)
Exemple : 25 minutes.
Le réglage 10 secondes en 10 secondes jusqu’à
19 :30 puis de 1 min en 1 minute au delà.
L’affichage est en minutes et secondes de 00:00
à 19:30.
Exemple : 19:30 équivaut à 19 minutes 30 secondes.
L’affichage est en heures et minutes à partir de
20 minutes :
Exemple : 00:20 équivaut à 0 heure, 20 minutes.
L’arrêt définitif des bips sonores se fait en appuyant sur les touches + ou -.
- S’il n’y a pas de programmation en cours, l’afficheur digital s’éteint.
- Si une cuisson avait été programmée, le temps
de cuisson restant apparaît dans l’afficheur digital.
- Si une cuisson programmée se termine avant la
fin de la minuterie, une série de bips sonores est
émise durant 3 minutes pour signaler la fin de la
cuisson.
Appuyez sur les touches + ou - pour arrêter les
bips. L’afficheur digital indique le temps restant
à être décompté par la minuterie.
L’afficheur s’arrête de clignoter au bout de quelques secondes, le minuteur se met à décompter.
Une fois la durée écoulée, la minuterie émet une
série de bips sonores pendant 30 secondes
pour vous avertir.
fig.1
IIll eesstt ppoossssiibbllee ddee mmooddiiffiieerr oouu dd’’aannnnuulleerr àà nn’’iimmppoorrttee qquueell mmoommeenntt llaa pprrooggrraammmmaattiioonn ddee llaa
mmiinnuutteerriiee..
FONCTION MINUTERIE
••
99642242_A_ML.qxp 14/05/2007 14:53 Page 9
SET
Page 10
10
3 / MODES DE CUISSON DU FOURFR
* Séquences(s) utilisée(s) pour l’annonce écrite sur l’étiquette énergétique conformément à la
norme européenne EN 50304 et selon la directive Européenne 2002/40/CE.
CCHHAALLEEUURR TTOOUURRNNAANNTTEE
•
La cuisson s’effectue par l’élément chauffant situé au fond du four et par l’hélice de
brassage d’air.
•
Montée rapide en température : Certains plats peuvent être enfournés four froid.
•
Recommandé pour garder le moelleux des viandes blanches, poissons, légumes
Pour les cuissons multiples jusqu’à 3 niveaux.
CCHHAALLEEUURR CCOOMMBBIINNEEEE
•
La cuisson s’effectue par les éléments inférieur et supérieur et par l’hélice de brassage d’air.
•
Trois sources de chaleur associées : beaucoup de chaleur en bas, un peu de chaleur
tournante et un soupcon de gril pour dorer.
•
Recommandé pour les quiches, tourtes, tarte aux fruits juteux, posés dans un plat en
tôle anti-adhérente de préference.
GGRRIILL VVEENNTTIILLEE ++ TTOOUURRNNEEBBRROOCCHHEE
•
La cuisson s'effectue , alternativement, par l’élément supérieur et par l’hélice de brassage
d’air.
•
Préchauffage inutile. Volailles et rôtis juteux et croustillants sur toutes les faces.
•
Le tournebroche continue de fonctionner jusqu’à l’ouverture de la porte.
•
Glissez la léchefrite au gradin du bas.
•
Recommandé pour toutes les volailles ou rôtis au tourne broche, pour saisir et cuire à
cœur gigot, côtes de bœuf. Pour garder leur fondant aux pavés de poissons.
TTRRAADDIITTIIOONNNNEELL EECCOO
•
La cuisson s'effectue par les éléments inférieur et supérieur.
•
Cette position permet de faire un gain d’énergie tout en conservant les qualités de cuisson.
•
La position ECO est utilisée pour l’étiquetage énergétique.
•
Toutes les cuissons se font
ssaannss pprréécchhaauuffffaaggee
GGRRIILL FFOORRTT ++ TTOOUURRNNEEBBRROOCCHHEE
•
La cuisson s’effectue par l’élément supérieur.
•
Effectuez un préchauffage de 5 min. Glissez la léche frite sur le gradin du bas.
•
Recommandé pour
ggrriilllleerr lleess ccôôtteelleetttteess,, ssaauucciisssseess,, ttrraanncchheess ddee ppaaiinn,, ggaammbbaass
posées sur la grille.
MMAAIINNTTIIEENN AAUU CCHHAAUUDD
•
Dosage de l’élément supérieur et inférieur associés au brassage d’air.
•
Recommandé pour
ffaaiirree lleevveerr lleess ppââtteess àà ppaaiinn,, àà bbrriioocchhee,, kkoouuggllooff
...en ne dépassant
pas 40° (chauffe-assiette, décongélation).
*
*
99642242_A_ML.qxp 14/05/2007 14:53 Page 10
Page 11
11
4 / ENTRETIEN ET NETTOYAGE DE VOTRE FOUR
FR
NETTOYAGE DE LA SURFACE EXTERIEURE
••
Pour nettoyer la fenêtre du programmateur électronique, ainsi que la porte du four, utilisez un
chiffon doux, imbibé de produit à vitre.
N'utilisez pas de crèmes à récurer, ni d'éponge grattoir.
Pour préserver votre appareil, nous vous recommandons d'utiliser les produits d'entretien
Clearit.
Clearit vous propose des produits professionnels et des solutions adaptées pour l'entretien quotidien de vos appareils électroménagers et de vos cuisines.
Vous les trouverez en vente chez votre revendeur habituel, ainsi que toute une ligne de produits
accessoires et consommables.
LL''eexxppeerrttiissee ddeess pprrooffeessssiioonnnneellss
aauu sseerrvviiccee ddeess ppaarrttiiccuulliieerrss
NETTOYAGE DE LA PORTE
••
Attention
Ce modèle n’est pas concerné par le chapitre “Démontage de la porte” page 11 du
GUIDE D’INSTALLATION ET INSTRUCTIONS D’EMPLOI (livré avec l’appareil).
99642242_A_ML.qxp 14/05/2007 14:53 Page 11
Page 12
12
4 / ENTRETIEN ET NETTOYAGE DE VOTRE FOURFR
Pour bénéficier de la quantité de chaleur déjà
emmagasinée dans le four, et économiser de
l’énergie :
- Débutez une pyrolyse après une cuisson.
Retirez les accessoires du four et enlevez les
débordements importants qui auraient pu se
produire.
- Vérifiez que le programmateur affiche l’heure
du jour et que celle-ci ne clignote pas.
Il suffit de positionner la manette “Sélecteur de
fonctions” sur la position “Pyro”(fig.1).
La durée de la pyrolyse est de:
1h30 ou 1h45 ou 2h00
Ces durées ne sont pas modifiables et le four
est indisponible pendant 2h ou 2h15 ou 2h30.
Attention
Le verrouillage de la porte est effectif quelques minutes après le départ du cycle.
La pyrolyse s’arrête automatiquement. Lorsque la température atteint environ 275°C, il est
alors possible d’ouvrir la porte.
DEMARRAGE DU NETTOYAGE PYROLYSE
••
FIN DU NETTOYAGE PYROLYSE
••
La pyrolyse s’arrête automatiquement lorsque le voyant de verrouillage s’éteint. Il est alors possible d’ouvrir la porte.
- Ramenez le sélecteur de fonctions sur la position 0.
Lorsque le four est froid, utilisez un chiffon humide pour enlever la cendre blanche. Le four est propre et à nouveau utilisable pour effectuer une cuisson de votre choix.
Ce temps prend en compte la durée de refroidissement jusqu’au déverrouillage de la porte.
Au cours du cycle de pyrolyse, le voyant de verrouillage s’allume pour vous indiquer que la
porte est verrouillée.
En cours de pyrolyse, le voyant de thermostat s’allume pour vous indiquer que la porte est verrouillée.
Le voyant de thermostat s’allume lorsque le four chauffe.
fig.1
99642242_A_ML.qxp 14/05/2007 14:53 Page 12
Page 13

13
5 / NOTES
FR
99642242_A_ML.qxp 14/05/2007 14:53 Page 13
Page 14

14
6 / SERVICE APRES-VENTE
FR
Les éventuelles interventions sur votre appareil doivent être effectuées par un professionnel qualifié dépositaire de la marque. Lors de
votre appel, mentionnez la référence complète
de votre appareil (modèle, type, numéro de
série). Ces renseignements figurent sur la plaque signalétique
(Fig.1).
PIÈCES D’ORIGINE
Lors d’une intervention d’entretien, deman-
dez l'utilisation exclusive de
pièces déta-
chées certifiées d’origine.
•INTERVENTIONS
BBrraannddtt AApppplliiaanncceess
- société par actions simplifiée au capital de 10.000.000 euros RCS Nanterre 440 302 347.
BRANDT APPLIANCES SAS
7 rue Henri Becquerel
92500 RUEIL MALMAISON
230V ~ 50 Hz
MADE IN FRANCE
fig.1
•RELATIONS CONSOMMATEURS
•Pour en savoir plus sur tous les produits de
la marque :
informations, conseils, les points de vente, les
spécialistes après-vente.
•Pour communiquer :
nous sommes à l'écoute de toutes vos remarques, suggestions, propositions auxquelles
nous vous répondrons personnellement.
> Vous pouvez nous écrire :
Service Consommateurs
DE DIETRICH
BP 9526
95069 CERGY PONTOISE CEDEX
> ou nous téléphoner au :
Tarif en vigueur au 1er avril 2004
**
Service fourni par Brandt Customer Services, société par actions simplifiée au capital de 2.5000.000 euros,
5/7 avenue des Béthunes, 95310 Saint Ouen l’Aumône - RCS Pontoise 440 303 303
99642242_A_ML.qxp 14/05/2007 14:53 Page 14
Page 15
15
FR
02
DE
39
EN
51
ES
63
IT
75
NL
87
PT
99
DA
27
CS
15
Vážená zákaznice, vážený zákazníku,
Právě jste zakoupil/a troubu
DDEE DDIIEETTRRIICCHH
, za což Vám děkujeme.
Naši výzkumní pracovníci pro Vás vyvinuli tuto novou generaci přístrojů, jejichž kvalita, estetický vzhled a úroveň technologického vývoje
z nich činí výjimečné výrobky, svědčící o našem know-how.
Vaše nová trouba
DDEE DDIIEETTRRIICCHH
harmonicky zapadne do Vaší kuchyně a dokonale sloučí funkce výkonného pečení s jednoduchostí
obsluhy. Přáli jsme si nabídnout Vám výrobek výborné jakosti.
Ve škále výrobků pod značkou
DDEE DDIIEETTRRIICCHH
najdete také širokou nabídku sporáků, varných desek, digestoří, myček nádobí a zabudovatelných chladniček, které můžete doplnit k Vaší nové troubě
DDEE DDIIEE--
TTRRIICCHH
.
Snažíme se neustále co nejlépe uspokojovat požadavky, které kladete
na naše výrobky, a proto pracovníci našeho oddělení péče o zákazníky
kdykoliv rádi odpoví na Vaše dotazy nebo náměty (kontakty na konci
této brožury).
Také se můžete připojit na naši internetovou stránku:
www.dedietrich-electromenager.com, kde najdete naše poslední novinky a
také užitečné a doplňující informace.
DDEE DDIIEETTRRIICCHH
NNoovvéé hhooddnnoot
tnnéé ppřřeeddmměěttyy
Ve snaze neustále zlepšovat naše výrobky si vyhrazujeme právo provádět změny jejich technických, funkčních nebo vzhledových vlastností v souvislosti s technickým vývojem.
Důležité upozornění:
Před uvedením přístroje do provozu si pozorně přečtěte tento návod na instalaci a
použití, abyste se rychleji seznámili s jeho funkcemi.
99642242_A_ML.qxp 14/05/2007 14:53 Page 15
Page 16

16
OBSAHCS
1 / POPIS PŘÍSTROJE
••
Popis trouby
_______________________________________________ 17
••
Příslušenství ______________________________________________ 17
••
Popis programovacího panelu a voličů funkcí ___________________ 18
2 / POUŽITÍ PŘÍSTROJE
••
Použití programovacího panelu
oo
Jak nastavit čas _______________________________________ 19
o
Okamžité pečení_______________________________________ 20
••
Naprogramované pečení
oo
Okamžitý start ________________________________________ 20
o Odložený start ________________________________________ 21
••
Funkce minutky____________________________________________ 22
3 / RŮZNÉ ZPŮSOBY PEČENÍ V TROUBĚ ___________________________ 23
4 / ÚDRŽBA A ČIŠTĚNÍ TROUBY ___________________________________ 24
5 / POPRODEJNÍ SERVIS
••
Opravy
____________________________________________________ 26
99642242_A_ML.qxp 14/05/2007 14:53 Page 16
Page 17
17
1 / POPIS PŘÍSTROJE
CS
••
POPIS TROUBY
A
B
Programovací panel
Volič teploty
Volič funkcí
C
D
E
Žárovka
Ukazatel vodící lišty
Otvor pro otočný rožeň
Kontakt pro detekci otevře-
ných dvířek
1
3
5
SET
40
00
1
16
5
2
0
0
220
E
D
B
A
C
F
G
F
G
•Příslušenství
Přístroj je vybaven dvěma bezpečnostními mřížkami s rukojetí, jedním roštem s rukojetí pro plech
45mm, formou na pečivo Lissium a otočným rožněm.
99642242_A_ML.qxp 14/05/2007 14:53 Page 17
Page 18
18
1 / POPIS PŘÍSTROJECS
POPIS PROGRAMOVACÍHO PANELU
••
A
B
Zobrazení času
Ukazatel doby pečení
Ukazatel konce pečení
Ukazatel minutky
C
D
Přístupové tlačítko k jednotlivým programům
pro nastavení času
Tlačítka pro nastavení času
Digitální displej (doba pečení, konec pečení,
minutka a nastavení času)
E
F
G
H
A
B
C
D
E
F
G
H
VOLIČ TEPLOTY
••
VOLIČ FUNKCÍ
••
99642242_A_ML.qxp 14/05/2007 14:53 Page 18
SET
220
200
40
165
1
00
Page 19
19
2 / POUŽITÍ PŘÍSTROJE
CS
•
Jak nastavit čas
PPřřii zzaappoojjeenníí ttrroouubbyy ddoo eelleekkttrriicckkéé
ssííttěě
HODINY :
• Digitální displej bliká.
• Nastavte čas stiskem tlačítek ++nebo --, čímž
nastavíte ručičkové hodiny (obr.1),digitální displej
přestane blikat(obr.2).
• Stiskem tlačítka „SET“ nastavení potvrdíte.
Příklad:3h30.
- DIGITÁLNÍ DISPLEJ (pro účely
programování)
Po několika vteřinách začne digitální displej
znovu blikat.
Nastavte čas stejně jako u hodin stiskem
tlačítka + nebo - , čímž zobrazený čas posunujete dopředu nebo dozadu (obr.3).
• Stiskem tlačítka „SET“ nastavení potvrdíte
Jakmile je nastavení provedeno, digitální displej
zhasne (obr.4).
NNoovvéé nnaassttaavveenníí hhooddiinn nnaa ddiisspplleejjii
• Stiskněte současně tlačítka + a -
a podržte několik vteřin, až digitální zobrazení
začne blikat.
Zobrazení hodiny bliká, čímž Vám oznamuje, že
lze provést nastavení.
Pro nastavení stiskněte tlačítko + nebo - , čímž
zobrazený čas posunujete dopředu nebo
dozadu(obr.5)
• Stiskem tlačítka „SET“ nastavení potvrdíte.
Pozor
Nepotvrdíte-li nastavení tlačítkem OK , nastavení se za několik vteřin potvrdí
automaticky.
POUŽITÍ PROGRAMOVACÍHO PANELU
••
obr.1
obr.2
obr. 3
obr.4
obr. 5
99642242_A_ML.qxp 14/05/2007 14:53 Page 19
SET
SET
SET
SET
SET
Page 20

20
2 / POUŽITÍ PŘÍSTROJECS
•Okamžitý start pečení
Zobrazení na displeji přestane blikat.
• Nastavte požadovaný způsob pečení:
Otočte voličem funkcí do polohy dle Vašeho výběru (obr.1)
Příklad: poloha “ ”
Trouba se spustí.
ZZaassuuňňttee ppookkrrmm ddoo ttrroouubbyy
podle doporučení,
uvedených v návodu k pečení.
Příklad “ ” až 200°C.
Po provedení těchto úkonů se trouba začne vyhřívat a kontrolka termostatu se rozsvítí.
Hodinu koce pečení můžete nastavit pouze v
rozsahu příštích dvanácti hodin.
Pozor
Po cyklu pečení je turbína ventilace po
určitou dobu ještě v provozu, aby vychladila
troubu.
obr.1
--
Pečení s okamžitým startem, nastavení
doby pečení.
11..
Vyberte způsob pečení a nastavte teplotu
(obr.1).
Příklad: poloha “ ”
22..
Stiskněte tlačítko “SET” a podržte, až začne
blikat
kontrolka “ ”
(obr.2)
Na displeji bliká 0h00, což Vám oznamuje, že lze
provést nastavení.
33..
Stiskněte tlačítko + nebo -, čímž nastavíte
požadovanou dobu pečení (obr.3).
Příklad: Pečení po dobu 25 min.
Potvrzení se provede automaticky po několika
vteřinách ->zobrazení přestane blikat. Odpočet
doby se začne provádět ihned po nastavení.
PPoo ttěěcchhttoo 33 úúkkoonneecchh ssee ttrroouubbaa zzaaččnnee vvyyhhřříívvaatt..
obr.1
obr.2
obr.3
NAPROGRAMOVANÉ PEČENÍ
••
99642242_A_ML.qxp 14/05/2007 14:53 Page 20
SET
SET
220
200
165
1
00
40
Page 21
21
2 / POUŽITÍ PŘÍSTROJE
CS
((ppookkrraaččoovváánníí))
Je možno kdykoliv změnit dobu pečení provedením výše popsaného úkonu.
Naprogramování pečení můžete zrušit nastavením doby pečení na 0.00.
Po ukončení pečení se po několik minut
vydává série zvukových signálů.
Zvukové signály vypnete stiskem tlačítka +
nebo -. Po provedení těchto úkonů můžete
troubu znovu používat.
Nastavte voliče teploty a funkcí do polohy vypnuto, pokud nechcete, aby se trouba začala
znovu vyhřívat.
PEČENÍ NAPROGRAMOVANÉ
••
--
Pečení s okamžitým startem a časem
konce pečení.
PPoossttuuppuujjttee jjaakkoo uu nnaapprrooggrraammoovvaannééhhoo ppeeččeenníí..
Po nastavení doby pečení
stiskněte tlačítko “SET” a podržte, až začne blikat kontrolka „konec pečení“ (obr.1),.
Symbol bliká, čímž oznamuje, že je možno provést nastavení.
Stiskněte tlačítko + nebo -, čímž nastavíte
požadovaný čas konce (obr.2).
Příklad: Konec pečení v 1h.
Po těchto úkonech je začátek vyhřívání odložen
tak, aby pečení skončilo v 1h.
Zobrazení na displeji je neměnné až do začátku
pečení.
Po ukončení pečení se po několik minut vydává
série zvukových signálů.
Jakmile se pečení ukončí, nastavte volič způsobu pečení na ”0 ” a volič teploty do polohy
vypnuto.
Hodinu koce pečení můžete nastavit pouze v
rozsahu příštích dvanácti hodin.
obr. 1
obr.2
99642242_A_ML.qxp 14/05/2007 14:53 Page 21
SET
SET
Page 22
22
2 / POUŽITÍ PŘÍSTROJECS
VVaaššee ttrroouubbaa jjee vvyybbaavveennaa eelleekkttrroonniicckkýýmm ččaassoo--
vvýýmm ssppíínnaaččeemm ((mmiinnuuttkkoouu)) nneezzáávviissllýýmm nnaa ffuunnggoo--
vváánníí ttrroouubby
y uummoožžňňuujjííccíímm ooddppooččííttáávváánníí ččaassuu..
Stiskněte tlačítko “SET”
aa ppooddrržžttee,,
až začne bli-
kat kontrolka “ ” (obr.1).
Stiskněte tlačítko (
++ nneebboo -- )aa ppooddrržžttee,,
až se zobrazí
požadovaný čas ( max. 12h00)
Příklad: 25 minut.
Nastavení po 10 vteřinách do 19:30, pak po minutách.
Údaj je zobrazen v minutách a vteřinách od 00:00 do
19:30
Příklad: 19:30 znamená 19 minut 30 vteřin.
Údaj je zobrazen v hodinách a minutách po 20
minutách :
Příklad: 00:20 znamená 0 hodin 20 minut.
Konečné zastavení zvukových signálů provedete
pomocí tlačítka + nebo - .
- Pokud není provedeno žádné naprogramování,
digitální displej zhasne.
- Pokud jste naprogramovali pečení, na digitálním
displeji je zobrazen zbývající čas pečení.
- Skončí-li naprogramované pečení před ukončením minutky, po dobu 3 minut vydává trouba sérii
zvukových signálů, aby Vás upozornila na konec
pečení.
Stiskněte tlačítko + nebo -, čímž vypnete zvukový
signál. Na digitálním displeji je zobrazen zbývající
čas, který odpočítává časový spínač (minutka).
Po několika vteřinách displej přestane blikat , minutka začne odpočítávat.
PPoo uuppllyynnuuttíí ddoobbyy bbuuddee mmiinnuuttkkaa vvyyddáávvaatt ppoo 3300
vvtteeřřiinn sséérriiii zzvvuukkoovvýýcchh ssiiggnnáállůů,, aabbyy VVááss uuppoozzoorrnniillaa..
obr.1
NNaapprrooggrraammoovváánníí mmiinnuuttkkyy llzzee kkddyykkoolliivv zzmměěnniitt nneebboo zzrruuššiitt..
FUNKCE MINUTKY
••
99642242_A_ML.qxp 14/05/2007 14:53 Page 22
SET
Page 23
23
3 / RŮZNÉ ZPŮSOBY PEČENÍ V TROUBĚ
CS
* Sekvence používaná(é) pro oznámení uvedené na energetické etiketě podle evropské normy
EN 50304 a podle Evropské směrnice 2002/40/ES.
HHOORRKKOOVVZZDDUUŠŠNNÉÉ PPEEČČEENNÍÍ
•
Pečení vyhřívacím tělesem, umístěným v zadní části trouby, a vrtulí pro rozhánění
vzduchu.
•
Rychlý vzestup teploty : Některé pokrmy je možno vložit do nevyhřáté trouby.
•
Doporučuje se k uchování lahodné měkkosti bílých mas, ryb, zeleniny.
Pro pečení několika pokrmů až do 3 úrovní nad sebou.
KKOOMMBBIINNOOVVAANNÉÉ PPEEČČEENNÍÍ
•
Pečení uskutečnuje dolní a horní těleso a vrtule spro rozhánění vzduchu.
•
Tři sdužené zdroje tepla: silné vyhřívání odspodu, trocha vířivého horkého vzduchu a
špetka grilu na zbarvení dozlatova.
•
Doporučuje se pro slané koláče, koláče s náplní, šťavnaté ovocné koláče, pečené nej-
lépe ve formě z nelepivého plechu.
GGRRIILL SS VVEENNTTIILLÁÁTTOORREEMM ++ OOTTOOČČNNÝÝ RROOŽžEEŇŇ
•
Peče se střídavě shora a s rozháněním vzduchu ventilátorem
•
Předehřátí není nutné. Drůbež a pečeně šťavnaté a křupavé ze všech stran.
•
Otočný rožeň je dále v provozu až do otevření dvířek.
•
Zasuňte plech na zachytávání tuku do spodní vodící lišty.
•
Doporučuje se pro drůbeží maso nebo pečeně na rožni, pro uchycení a dobré propečení
kýty, hovězích žeber. Pro zachování šťavnatosti rybích steaků.
TTRRAADDIIČČNNÍÍ PPEEČČEENNÍÍ EECCOO
•
Pečení probíhá shora a odspodu.
•
Tato volba umožňuje dosáhnout úspory energie a přitom zachovat skvělé vlastnosti pečení.
•
Volba ECO se používá pro energetické etikety
•
Peče se
bbeezz ppřřeeddeehhřřááttíí
SSIILLNNÝÝ GGRRIILL ++ OOTTOOČČNNÝÝ RROOŽžEEŇŇ
•
Ohřev horním tělesem.
•
Nastavte předehřívání po dobu 5 minut. Zasuňte plech na zachycování šťávy do spodní
vodící lišty.
•
Doporučeno pro grilování kotlet, klobás, plátků chleba, obřích krevet položených na mřížce
UUDDRRŽžEENNÍÍ TTEEPPLLÉÉHHOO PPOOKKRRMMUU
•
Horní a spodní dávkování spojené s rozháněním vzduchu ventilátorem.
•
Doporučuje se pro
kkyynnuuttíí ttěěssttaa nnaa cchhlleebbaa,, bbrriioošškkyy,, bbáábboovvkkuu
..., protože nepřekračuje
teplotu 40° (zahřívání talířů, rozmrazování).
*
*
99642242_A_ML.qxp 14/05/2007 14:53 Page 23
Page 24
24
4 / ÚDRŽBA A ČIŠTĚNÍ SPOTŘEBIČECS
ČIŠTĚNÍ VNĚJŠÍHO POVRCHU
••
K čištění okénka elektronického programátoru a dvířek trouby použijte měkký hadřík napuštěný prostředkem na mytí oken.
Nepoužívejte tekutý prášek ani drsné houbičky.
Pro ochranu Vašeho přístroje vám doporučujeme používat čistící prostředky Clearit.
Clearit Vám nabízí specializované výrobky a vhodná řešení pro každodenní údržbu Vašich elektrospotřebičů a kuchyní.
Zakoupit je můžete u Vašeho obvyklého prodejce společně s celou řadou příslušenství a spotřebního zboží.
ZZkkuuššeennoossttii ooddbboorrnnííkkůů
vvee sslluužžbbáácchh zzáákkaazznnííkkůů
ČIŠTĚNÍ DVÍŘEK
••
Pozor
Tohoto typu se netýká kapitola “Demontáž dvířek” na straně 11 NÁVODU NA INSTA-
LACI A POUŽITÍ (dodávaného s přístrojem).
99642242_A_ML.qxp 14/05/2007 14:53 Page 24
Page 25
25
4 / ÚDRŽBA A ČIŠTĚNÍ SPOTŘEBIČE
CS
Chcete-li využít množství tepla již nahromaděného v troubě a ušetřit energii:
- Spusťte pyrolýzu po pečení.
Vyjměte z trouby příslušenství a odstraňte velké
usazeniny, které mohly vzniknout.
- Zkontrolujte, zda programovací panel ukazuje
hodiny a zda neblikají.
Stačí nastait značku „Voliče funkcí“ do polohy
“Pyro”(obr.1).
Doba pyrolýzy je:
1h30 nebo 1h45 nebo 2h00
Tyto doby nelze změnit a trouba je mimo provoz
2h nebo 2h15 nebo 2h30.
Pozor
Dvířka se zablokují několik minut po spuštění cyklu.
Pyrolýza se vypne automaticky. Jakmile teplota dosáhne cca 275°C, můžete otevřít dvířka.
START ČIŠTĚNÍ PYROLÝZOU
••
KONEC ČIŠTĚNÍ PYROLÝZOU
••
Pyrolýza se automaticky vypne, jakmile zhasne kontrolka zablokování dvířek. Nyní můžete otevřít
dvířka.
- Vraťte volič funkcí do polohy 0
- Jakmile trouba vychladne, setřete vlhkým hadříkem bílý popílek. Trouba je znovu připravena k použití
podle Vaší volby.
Do této doby je zahrnuto vychlazení trouby až do odblokování dvířek.
Po dobu, kdy probíhá cyklus pyrolýzy, svítí kontrolka zablokování dvířek, která signalizuje, že
dvířka jsou zablokována.
V průběhu pyrolýzy se rozsvítí kontrolka termostatu, která oznamuje, že dvířka jsou zablokována.
Kontrolka termostatu se rozsvítí, když se trouba vyhřívá.
obr.1
99642242_A_ML.qxp 14/05/2007 14:53 Page 25
Page 26
26
55
/ POPRODEJNÍ SERVISCS
Případné opravy na Vašem přístroji musí provádět kvalifikovaný personál spolupracující s
výrobcem. Při objednávání opravy uveďte
kompletní referenci Vašeho přístroje (typ,
druh, sériové číslo). Tyto informace jsou uvedeny na výrobním štítku
(Obr.1).
PŮVODNÍ SOUČÁSTKY
Při zákroku v rámci údržby požadujte
používání výlučně původních
certifikova-
ných náhradních dílů.
•OPRAVY
obr.1
BBrraannddtt AApppplliiaanncceess -- aakkcciioovváá ssppoolleeččnnoosstt ssee zzáákkllaaddnníímm kkaappiittáálleemm 1100..000000..000000 eeuurr,, IIČČ:: NNaanntteerrrree 444400 330022 334477..
99642242_A_ML.qxp 14/05/2007 14:53 Page 26
BRANDT APPLIANCES SAS
7 rue Henri Becquerel
MADE IN FRANCE
92500 RUEIL MALMAISON
230V ~ 50 Hz
Page 27

27
FR
02
DE
39
EN
51
ES
63
IT
75
NL
87
PT
99
DA
27
CS
15
Kære kunde,
Tak, fordi du har købt en
DDEE DDIIEETTRRIICCHH
ovn.
Vores forskningsteam har udviklet denne nye generation af
kogeplader, hvis kvalitet, æstetik, funktion og teknologiske udvikling
resulterer i fremragende produkter, som understreger DE DIETRICH’s
enestående knowhow.
Din nye ovn fra
DDEE DDIIEETTRRIICCHH
integreres på harmonisk vis i køkkenet,
hvor dens fantastiske bage- og stegeegenskaber og den lette anvendelse fremhæves. Og det har netop været vores mål at kunne tilbyde et
uovertruffent produkt.
Den brede vifte af produkter fra
DDEE DDIIEETTRRIICCHH
tilbyder ligeledes et
stort udvalg af komfurer, kogeborde, emhætter, opvaskemaskiner og
integrerede køleskabe, som du kan sammensætte med din nye ovn fra
DDEE DDIIEETTRRIICCHH
.
For at kunne opfylde alle dine krav til vores produkter er vores kundeservice til rådighed og er klar til at svare på alle dine spørgsmål og
modtage dine forslag (se adresse og tlf.nr. bag i vejledningen).
Du kan også klikke ind på:
wwwwww..ddeeddiieettrriicchh--eelleeccttrroommeennaaggeerr.
.ccoomm
for at se de sidstenye produkter,
få nyttige oplysninger og yderligere oplysninger om vores produkter.
DDEE DDIIEETTRRIICCHH
FFoorrøøggeett vvæærrddii
Med en konstant forbedring af vores produkter for øje forbeholder vi os ret til ændringer af de
tekniske, funktionelle og æstetiske egenskaber i forbindelse med den teknologiske udvikling.
Vigtigt!
Inden apparatet tages i brug, bør du læse denne installations- og brugervejledning grun-
digt, så du hurtigt kan sætte dig ind i dets funktion.
99642242_A_ML.qxp 14/05/2007 14:54 Page 27
Page 28

28
INDHOLDSFORTEGNELSEDA
1 / BESKRIVELSE AF APPARATET
••
Oversigt over ovnen
________________________________________ 29
••
Tilbehør
__________________________________________________ 29
••
Oversigt over programvælger og funktionsvælger _______________ 30
2 / ANVENDELSE AF APPARATET
••
Brug af programvælger
º
Sådan indstilles klokkeslættet ____________________________ 31
º
Omgående bagning eller stegning ________________________ 32
••
Programmeret bagning eller stegning
º
Omgående bagning eller stegning ________________________ 32
º
Forskudt start _________________________________________ 33
••
Funktionen minutur_________________________________________ 34
3 / FREMGANGSMÅDE FOR BAGNING OG STEGNING I OVN __________ 35
4 / VEDLIGEHOLDELSE OG RENGØRING AF OVNEN _________________ 36
5 / KUNDESERVICE
••
Indgreb
___________________________________________________ 38
99642242_A_ML.qxp 14/05/2007 14:54 Page 28
Page 29

29
1 / BESKRIVELSE AF APPARATET
DA
••
OVERSIGT OVER OVNEN
A
B
Programvælger
Temperaturvælger
Funktionsvælger
C
D
E
Lampe
Trinindikator
Hul til stegespydvender
Kontakt til angivelse af
åben låge
1
3
5
SET
4
0
00
1
16
5
2
0
0
220
E
D
B
A
C
F
G
F
G
•Tilbehør
Apparatet er udstyret med to riste, som er forsynet med sikkerhedsgreb, en rist med greb til
plade på 45 mm, en Lissium bageplade og en stegespydvender.
99642242_A_ML.qxp 14/05/2007 14:54 Page 29
Page 30
30
1 / BESKRIVELSE AF APPARATETDA
OVERSIGT OVER PROGRAMVÆLGER
••
A
B
Klokkeslætsdisplay
Indikator for varighed af
bagning eller stegning
Indikator for afsluttet bagning
eller stegning
Indikator for minutur
C
D
Adgangsknap til de forskellige programmer til
tidsindstilling
Knapper til tidsregulering
Digitalt display (varighed, sluttidspunkt, minutur
og indstilling af uret)
E
F
G
H
A
B
C
D
E
F
G
H
TEMPERATURVÆLGER
••
FUNKTIONSVÆLGER
••
99642242_A_ML.qxp 14/05/2007 14:54 Page 30
SET
220
200
40
165
1
00
Page 31

31
2 / BRUG AF APPARATET
DA
•
Sådan indstilles klokkeslættet
VVeedd ssppæænnddiinnggssfføørriinngg
URET:
• Det digitale display blinker.
• Indstil klokkeslættet ved at trykke på tasterne
++
eller --for at indstille uret med visere (fig.1), og det
digitale display holder op med at blinke (fig.2).
• Tryk på tasten “SET” for at bekræfte dit valg.
Eksempel: 3:30.
DIGITALT DISPLAY (til programmering)
Efter nogle få sekunder blinker det digitale display igen.
Indstil klokkeslættet ligesom på uret ved at
trykke på tasterne + eller - for at øge eller formindske tiden på displayet (fig.3).
• Tryk på tasten “SET” for at bekræfte dit valg.
Når du har foretaget indstillingen, slukker det digitale display (fig.4).
NNuullssttiilllliinngg aaff uurreettss kkllookkkkeessllæætt
• Tryk samtidigt på tasterne + og i nogle få sekunder, indtil det digitale display begynder at blinke.
Timedisplayet blinker for at angive, at du nu kan
foretage reguleringen.
Tryk på knapperne + eller – for at øge eller formindske tiden på displayet.(fig.5)
• Tryk på tasten “SET” for at bekræfte dit valg.
Advarsel!
Hvis der ikke bekræftes på tasten “SET”, sker registreringen automatisk efter
nogle få sekunder.
OVERSIGT OVER PROGRAMVÆLGER
••
fig.1
fig.2
fig.3
fig.4
fig.5
99642242_A_ML.qxp 14/05/2007 14:54 Page 31
SET
SET
SET
SET
SET
Page 32

32
2 / BRUG AF APPARATETDA
•Omgående kogning eller stegning
Det digitale display må ikke blinke.
• Vælg fremgangsmåde for bagning eller
stegning:
Drej funktionsvælgeren til den ønskede position. (fig.1)
Eksempel: Position “ ”
Ovnen starter.
AAnnbbrriinngg rreetttteenn ii oovvnneenn
i henhold til anvisnin-
gerne i bage- og stegeguiden.
Eksempel “ ” ved 200° C.
Efter disse handlinger varmer ovnen op, og
lampen til termostaten lyser.
Du kan kun indstille klokkeslættet til endt tilberedning inden for et interval på de næste 12
timer.
Advarsel!
Efter en bage- eller stegecyklus fortsætter ovnens ventilator med at køre et
stykke tid for at sikre ovnens nedkøling.
fig.1
--
Tilberedning med omgående start, indstil-
ling af varighed.
11..
Vælg fremgangsmåde for bagning eller ste-
gning, og justér temperaturen (fig.1).
Eksempel: Position “ ”
22..
Tryk på tasten “SET”, indtil
lampen “ ”
lyser (fig.2)
Displayet blinker ved 0:00 for at angive, at du nu
kan regulere tiden.
33..
Tryk på tasten + eller - for at regulere den
ønskede tilberedningstid (fig.3).
Eksempel: 25 min. kogetid.
Godkendelsen sker automatisk efter nogle få
sekunder, -> displayet holder op med at blinke.
Nedtælling af varigheden starter omgående efter
denne validering.
NNåårr ddiissssee ttrree hhaannddlliinnggeerr eerr uuddfføørrtt,, ooppvvaarrmmeess
oovvnneenn..
fig.1
fig.2
fig.3
PROGRAMMERET BAGNING
OG STEGNING
••
99642242_A_ML.qxp 14/05/2007 14:54 Page 32
220
200
165
1
00
40
SET
SET
Page 33

33
2 / BRUG AF APPARATET
DA
((ffoorrttss..))
Man kan til enhver tid ændre tilberedningstiden ved at udføre ovennævnte handling.
Du kan afprogrammere en bagning eller
stegning ved at sætte tiden til 0.00.
Efter end stegetid udsendes der er række
biplyde i nogle minutter.
Du kan stoppe biplydene ved at trykke på tasten + eller - . Efter disse handlinger kan du
bruge ovnen igen.
Sæt temperatur- og funktionsvælger på stop,
så ovnen ikke varmer op igen.
PROGRAMMERET BAGNING
OG STEGNING
••
--
Bagning eller stegning med omgående
start og forskudt sluttid
FFoorrttssæætt ssoomm ffoorr eenn pprrooggrraammmmeerreett bbaaggnniinngg
eelllleerr sstteeggnniinngg..
Efter regulering af bage- eller stegetiden,
Tryk på tasten “SET”, indtil lampen for “endt tilberedning” blinker (fig.1),.
Det digitale display blinker for at angive, at du
nu kan foretage en indstilling.
Tryk på knappen + eller – for at regulere den
ønskede sluttid (fig.2).
Eksempel: Endt tilberedning kl. 13.00.
Efter disse handlinger forskydes bagning eller
stegningen, så tilberedningen er færdig kl.
13.00.
Det digitale display fastfryser, indtil tilberedningen starter.
Efter end stegetid udsendes der er række
biplyde i nogle få minutter.
Når maden er klar, skal vælgeren sættes tilbage
på ” 0 ” og temperaturvælgeren på stop.
Du kan kun indstille klokkeslættet til endt
tilberedning inden for et interval på de næste
12 timer.
fig.1
fig.2
99642242_A_ML.qxp 14/05/2007 14:54 Page 33
SET
SET
Page 34

34
2 / BRUG AF APPARATETDA
OOvvnneenn eerr uuddssttyyrreett mmeedd eett eelleekkttrroonniisskk mmiinnuuttuurr,,
ddeerr eerr uuaaffhhæænnggiiggtt aaff oovvnneennss ddrriifftt,, oogg ssoomm aakkttiivvee--
rreerr nneeddttæælllliinnggeenn..
Tryk på tasten “SET”, indtil lampen “ ” blinker
(fig.1).
Tryk på tasten (
++ eelllleerr --
), indtil den ønskede varighed er
opnået (maks. 12 timer)
Eksempel: 25 minutter.
Man kan indstille 10 sekunder ad gangen indtil kl. 19:30
og derefter 1 min. ad gangen.
Displayet vises minutter og sekunder fra 00:00 til 19:30.
Eksempel: 19:30 er lig 19 minutter og 30 sekunder.
Displayet viser timer og minutter fra 20 minutter:
Eksempel: 00:20 er lig 0 time, 20 minutter.
Du kan stoppe biplydene ved at trykke på tasten
+ eller - .
- Hvis der ingen programmering er i gang, slukkes det digitale display.
- Hvis en tilberedning er programmeret, vises
den resterende tilberedningstid i det digitale display.
- Hvis en programmeret tilberedning slutter, før
minuturet nulstilles, udsendes der er række
biplyde i 3 minutter for at angive, at tilberedningen er slut.
Tryk på tasten + eller - for at stoppe biplydene.
Det digitale display angiver den tid, minuturet
mangler at tælle ned.
Displayet holder op med at blinke efter nogle få
sekunder, og minuturet begynder at tælle ned.
NNåårr ttiiddeenn eerr uuddlløøbbeett,, uuddsseennddeerr mmiinnuuttuurreett eenn
rræækkkkee bbiippllyyddee ii
3300 sseekkuunnddeerr ffoorr aatt ggøørree oopp--
mmæærrkkssoomm ppåå,, aatt ffoorrlløøbbeett eerr aaffsslluutttteett..
fig.1
DDuu kkaann nnåårrssoommhheellsstt æænnddrree eelllleerr aannnnuulllleerree mmiinnuuttuurreettss pprrooggrraammmmeerriinngg..
FUNKTIONEN MINUTUR
••
99642242_A_ML.qxp 14/05/2007 14:54 Page 34
SET
Page 35

35
3 / FREMGANGSMÅDE FOR TILBEREDNING I OVN
DA
* Anvendt(e) sekvens(er) til skriftlig meddelelse om energimærkning til el-ovne til husholdningsbrug i overensstemmelse med den europæiske standard EN 50304 og i henhold til EF-direktiv
2002/40/EF.
CCIIRRKKUULLEERREENNDDEE VVAARRMMEE
•
Bagning eller stegning udføres ved hjælp af det nedre varmeelement i ovnen og ved
hjælp af den luftdrevne propel.
•
Hurtig temperaturstigning: Nogle retter kan sættes i en kold ovn.
•
Anbefales til at holde hvidt kød, fisk og grøntsager saftigt
Til bagning eller stegning i indtil 3 niveauer.
KKOOMMBBIINNEERREETT VVAARRMMEE
•
Bagning og stegning udføres ved hjælp af de nedre og øvre elementer uden luftopvarmning.
•
Tre kombinerede varmekilder: Meget varme nederst, lidt varme fra den cirkulerende
varme og en smule grill.
•
Anbefales til mad- eller desserttærter, som er anbragt på en slip-let plade.
VVEENNTTIILLEERREETT GGRRIILLLLFFUUNNKKTTIIOONN ++ SSTTEEGGEESSPPYYDDVVEENNDDEERR
•
Tilberedningen udføres alternativt ved hjælp af de øvre element og den luftdrevne
propel.
•
Forvarmning er ikke nødvendig. Fjerkræ, stege og flæskesvær steges og brunes på
alle sider.
•
Stegespydvenderen fortsætter med at køre, indtil lågen åbnes.
•
Sæt bradepanden på det nederste trin.
•
Anbefales til alt fjerkræ eller stege på spyd samt til brasning og rosastegning af køller og
oksestege. For at bevare saften fra fiskestykker.
NNOORRMMAALL ØØKKOO
•
Tilberedningen udføres ved hjælp af de nedre og øvre varmeelementer.
•
Denne stilling gør det muligt at spare energi, alt imens bage- og stegekvaliteten bibeholdes.
•
Stilligen ECO (ØKO) anvendes til energimærkning.
•
Alle tilberedninger sker
uuddeenn ffoorrooppvvaarrmmnniinngg
KKRRAAFFTTIIGG GGRRIILLLLFFUUNNKKTTIIOONN ++ SSTTEEGGEESSPPYYDDVVEENNDDEERR
•
Tilberedningen udføres ved hjælp af det øvre varmeelement.
•
Forvarm ovnen i 5 minutter. Sæt bradepanden nederst i ovnen.
•
Anbefales til
sstteeggnniinngg aaff kkootteelleetttteerr,, rriissttnniinngg aaff ppøøllsseerr oogg bbrrøøddsskkiivveerr ssaammtt ttiill ggrriillllnniinngg aaff
kkææmmppeerreejjeerr
anbragt på grillen.
HHOOLLDDEE R
REETTTTEENN VVAARRMM
•
Lidt fra det øvre og nedre element sammen med luftopvarmning.
•
Anbefales til
hhæævvnniinngg aaff ddeejj ttiill bbrrøødd,, kkaaggeerr oogg rroossiinnkkaaggeerr
og må ikke sættes på mere end
40° C (tallerkenopvarmning, optøning).
*
*
99642242_A_ML.qxp 14/05/2007 14:54 Page 35
Page 36

36
4 / VEDLIGEHOLDELSE OG RENGØRING AF OVNENDA
RENGØRING AF UDVENDIG OVERFLADE
••
Til rengøring af den elektroniske programvælgers rude og ovnlågen skal der anvendes en blød
klud med lidt rengøringsmiddel til vinduer.
Brug aldrig skurecreme eller skuresvampe.
Det anbefales at bruge renseprodukter af mærket Clearit til rengøring af apparatet.
Clearit tilbyder professionelle produkter og løsninger, der er udviklet til den daglige vedligeholdelse af husholdningsapparater og køkkener.
De kan købes i dagligvarebutikkerne sammen med et udvalg af tilbehør og forbrugsvarer.
PPrrooffeessssiioonneell eekkssppeerrttiissee
ttiill pprriivvaattee
RENGØRING AF OVNLÅGE
••
Advarsel!
Denne model henviser ikke til kapitlet “Afmontering af låge” på side 11 i INSTALLA-
TIONS- OG BRUGERVEJLEDNINGEN (som medfølger apparatet).
99642242_A_ML.qxp 14/05/2007 14:54 Page 36
Page 37

37
4 / VEDLIGEHOLDELSE OG RENGØRING AF OVNEN
DA
For at udnytte den varme, der allerede er ophobet i ovnen, og spare på energien:
- Start en pyrolyse lige efter en bagning eller
stegning.
Tag plader, rist og bradepande ud af ovnen og
fjern evt. overskydende snavs.
- Kontrollér, at programvælgerens display viser
det korrekte klokkeslæt, og at displayet ikke
blinker.
Sæt “funktionsvælgeren” til stillingen “Pyro”(fig.1).
Pyrolysen varer i:
1 time og 30 min , 1 time og 45 min , eller
i 2 timer . Disse varigheder kan ikke ændres, og man kan ikke benytte ovnen i enten 2 timer, 2 timer og 15 min. eller 2 timer og 30 min.
Advarsel!
Ovnlågen låses automatisk få minutter efter start af rengøringscyklussen.
Pyrolysen stopper automatisk. Når temperaturen når ca. 275° C, kan man åbne ovnlågen
igen.
START AF RENGØRING MED PYROLYSE
••
SLUT PÅ RENGØRING MED PYROLYSE
••
Pyrolysen stopper automatisk, når låsemekanismens lampe slukker. Og nu kan lågen åbnes.
- Drej funktionsvælgeren til positionen 0.
Når ovnen er blevet kold, skal du tage en fugtig klud og tørre den hvide aske op. Ovnen er ren igen,
og du kan nu bage eller stege i den.
Denne tid omfatter nedkølingstid, indtil lågen åbnes.
Under pyrolysecyklussen tændes låsemekanismens lampe for at angive, at lågen er låst.
Under pyrolysecyklussen tændes termostatens lampe for at angive, at lågen er låst.
Termostatens lampe tændes, når ovnen varmer op.
fig.1
99642242_A_ML.qxp 14/05/2007 14:54 Page 37
Page 38

38
55
/ KUNDESERVICEDA
Eventuelle reparationer skal udføres af en professionel kvalificeret tekniker. Når du ringer,
skal du referere til apparatets model, type og
serienr. Disse oplysninger finder du på skiltet
(Fig.1).
ORIGINALDELE:
I forbindelse med reparationer skal
du anmode om, at der kun anvendes
original-
dele.
• REPARATION
fig.1
BBrraannddtt AApppplliiaanncceess
- forenkelt aktieselskab med en kapital på 10.000.000 euro - RCS Nanterre 440 302 347.
99642242_A_ML.qxp 14/05/2007 14:54 Page 38
BRANDT APPLIANCES SAS
7 rue Henri Becquerel
MADE IN FRANCE
92500 RUEIL MALMAISON
230V ~ 50 Hz
Page 39

39
FR
02
DE
39
EN
51
ES
63
IT
75
NL
87
PT
99
DA
27
CS
15
Liebe Kundin, lieber Kunde,
Sie haben soeben einen
DDEE DDIIEETTRRIICCHH
Backofen erworben, und wir
danken Ihnen dafür.
Unsere Forschungsteams haben für Sie diese neue Generation von
Geräten entwickelt, die aufgrund ihrer Qualität, Ästhetik, Funktionen
und technischen Fortentwicklung Ausnahmeprodukte sind und unser
Know-how unter Beweis stellen.
Ihr neuer
DDEE DDIIEETTRRIICCHH
Backofen fügt sich harmonisch in Ihre Küche
ein und verbindet perfekt Kochleistung mit einfacher Benutzung. Wir
wollten Ihnen ein exzellentes Produkt bieten.
In der
DDEE DDIIEETTRRIICCHH
Produktpalette finden Sie auch eine große
Auswahl an Küchenherden, Kochfeldern, Dunstabzugshauben,
Geschirrspülern und Einbaukühlschränken, die Sie auf Ihren neuen
DDEE
DDIIEETTRRIICCHH
Backofen abstimmen können.
Wir sind stets darum bemüht, Ihre Anforderungen an unsere Produkte
so gut wie möglich zu erfüllen. Unser Verbraucherservice steht Ihnen
daher selbstverständlich immer zur Verfügung und geht auf alle Ihre
Fragen und Anregungen ein (Adresse am Schluss dieser Anleitung).
Besuchen Sie uns auch unter:
wwwwww..ddeeddiieettrriicchh--eelleeccttrroommeennaaggeerr..ccoomm
. Dort finden Sie unsere letzten
Innovationen und weitere nützliche Information.
DDEE DDIIEETTRRIICCHH
DDiiee nneeuueenn WWeerrttoobbjjeekkttee
Da wir unsere Produkte ständig verbessern möchten, behalten wir uns im Zuge der technischen
Weiterentwicklung das Recht vor, ihre technischen, funktionellen und ästhetischen Merkmale zu
verändern.
Wichtig:
Bitte lesen Sie die vorliegenden Hinweise zu Einbau und Gebrauch aufmerksam vor der
ersten Inbetriebnahme durch, damit Sie Ihr Gerät schnell beherrschen.
99642242_A_ML.qxp 14/05/2007 14:54 Page 39
Page 40

40
INHALTDE
1/ BESCHREIBUNG DES GERÄTS
••
Übersicht über den Backofen ________________________________
41
••
Zubehör
__________________________________________________ 41
••
Übersicht über die Programmiervorrichtung sowie
über die Wahlschalter_________________________________________ 42
2/ BENUTZUNG DES GERÄTS
••
Nutzung der Programmiervorrichtung
º
Einstellung der Uhr _____________________________________ 43
º
Sofortiger Garvorgang __________________________________ 44
••
Programmierter Garvorgang
º
Sofortiger Start ________________________________________ 44
º
Späterer Start _________________________________________ 45
••
Die Zeitschaltuhr___________________________________________ 46
3 / ZUBEREITUNGSARTEN IM BACKOFEN __________________________ 47
4 / PFLEGE UND REINIGUNG DES BACKOFENS _____________________ 48
5 / KUNDENDIENST
••
Reparaturarbeiten
__________________________________________ 50
99642242_A_ML.qxp 14/05/2007 14:54 Page 40
Page 41

41
1/ BESCHREIBUNG DES GERÄTS
DE
••
ÜBERSICHT ÜBER DEN OFEN
A
B
Programmiervorrichtung
Temperaturwahlschalter
Funktionswahlschalter
C
D
E
Lampe
Anzeiger der
Einschubleiste
Loch für Drehspieß
Kontakt für Türöffnung
1
3
5
SET
4
0
00
1
16
5
2
0
0
220
E
D
B
A
C
F
G
F
G
•Zubehör
Ihr Ofen wird mit zwei Sicherheitsrosten mit Griff, einem Rost mit Griffen für ein 45 mm Blech,
einem Lissium-Backblech und einem Drehspieß geliefert.
99642242_A_ML.qxp 14/05/2007 14:54 Page 41
Page 42

42
1/ BESCHREIBUNG DES GERÄTSDE
BESCHREIBUNG DER PROGRAMMIERVORRICHTUNG
••
A
B
Anzeige der Uhrzeit
Anzeiger der Gardauer
Anzeige des Endes der Garzeit
Anzeige der Zeitschaltuhr
C
D
Zugriffstaste zu den verschiedenen
Programmen der Zeiteinstellung
Zeiteinstelltasten
Digitalanzeige (Garzeit, Ende des Garvorgangs,
Zeitschaltuhr und Einstellung der Uhrzeit)
E
F
G
H
A
B
C
D
E
F
G
H
TEMPERATURWAHLSCHALTER
••
FUNKTIONSWAHLSCHALTER
••
99642242_A_ML.qxp 14/05/2007 14:54 Page 42
SET
220
200
40
165
1
00
Page 43

43
2 / BENUTZUNG DES GERÄTS
DE
•
Einstellung der Uhrzeit
BBeeii ddeerr IInnbbeettrriieebbnnaahhmmee
ZEIGERUHR:
• Die Digitalanzeige blinkt.
• Einstellung der Zeigeruhr durch Drücken der
Tasten ++oder --(Abb.1),die Digitalanzeige blinkt
nicht mehr (Abb. 2).
• Zur Bestätigung die Taste “SET” drücken.
Beispiel: 3 h 30.
DIGITALANZEIGE (für die Programmierung)
Nach einigen Sekunden blinkt die
Digitalanzeige erneut.
Durch Drücken der Tasten + oder - die Uhrzeit
wie bei der Zeigeruhr einstellen (Abb. 3).
• Zur Bestätigung die Taste “SET” drücken.
Nach Beendigung der Einstellung schaltet sich
die Digitalanzeige aus(Abb. 4)..
NNeeuueeiinnsstteelllluunngg ddeerr UUhhrrzzeeiitt ddeerr ZZeeiiggeerruuhhrr
• Gleichzeitiges Drücken für einige Sekunden
der Tasten + und - bis die Digitalanzeige blinkt.
Die Anzeige der Uhrzeit blinkt und zeigt an,
dass die Uhr eingestellt werden kann.
Durch Drücken der Tasten + oder - kann
Uhrzeit vor- oder nachgestellt werden.(Abb.5)
• Zur Bestätigung die Taste “SET” drücken.
Achtung
Wenn nicht mit der Taste “SET” bestätigt wird, erfolgt die Speicherung nach eini-
gen Sekunden automatisch.
NUTZUNG DER PROGRAMMIERVORRICHTUNG
••
Abb.1
Abb.2
Abb.3
Abb.4
Abb.5
99642242_A_ML.qxp 14/05/2007 14:54 Page 43
SET
SET
SET
SET
SET
Page 44

44
2 / BENUTZUNG DES GERÄTSDE
•Sofortiger Garvorgang
Die Digitalanzeige darf nicht blinken.
• Den Garmodus wählen:
Den Funktionsschalter auf die gewünschte
Position drehen (Abb.1)
Beispiel: Position “ ”
Der Backofen schaltet sich ein.
Das Gericht den Empfehlungen der Gartabelle
entsprechend in den Ofen schieben.
Beispiel “ ” bei 200 °C.
Danach heizt der Backofen und die
Anzeigelampe des Thermostats leuchtet auf.
Sie können nur ein innerhalb der nächsten 12
Stunden liegendes Garzeitende programmieren.
Achtung
Nach einem Garzyklus läuft das
Gebläse noch einige Zeit weiter, um den
Backofen abzukühlen.
Abb.1
--
Sofortiges Garen, Einstellung des Garzeit.
11..
Garmodus wählen und Temperatur einstellen
(Abb. 1).
Beispiel: Position “ ”
22..
Drücken der Taste“SET” bis
die Leuchtanzeige blinkt “ ”
(Abb. 2)
Die Digitalanzeige 0:00 blinkt, die Garzeit kann
jetzt eingestellt werden.
33..
Über die Taste + oder - die gewünschte
Garzeit einstellen (Abb.3).
Beispiel: Garzeit 25 Min.
Die Garzeit wird nach einigen Sekunden automatisch gespeichert, -> die Anzeige blinkt nicht
mehr.
Die Garzeit wird sofort nach dem Einstellen bis
auf Null zurückgezählt.
NNaacchh ddiieesseenn 33 SScchhrriitttteenn bbeeggiinnnntt ddeerr OOffeenn
zzuu HHeeiizzeenn..
Abb.1
Abb.2
Abb.3
PROGRAMMIERTER GARVORGANG
••
99642242_A_ML.qxp 14/05/2007 14:54 Page 44
220
200
165
1
00
40
SET
SET
Page 45

45
2 / BENUTZUNG DES GERÄTS
DE
((FFoorrttsseettzzuunngg))
Durch die oben beschriebenen Schritte kann
die Garzeit jederzeit geändert werden.
Sie können die Programmierung eines
Garvorgangs löschen, indem Sie die
Garzeiteinstellung auf 0.00 stellen.
Nach dem Garvorgang werden einige Minuten
lang akustische Signale ertönen.
Das akustische Signal kann durch Drücken der
Tasten + oder - abgestellt werden. Danach können Sie Ihren Backofen erneut benutzen.
Stellen Sie die Temperatur- und
Funktionswahlschalter auf ‘STOPP’, um somit
zu verhindern, dass der Backofen erneut zu
heizen beginnt.
PROGRAMMIERTER GARVORGANG
••
--
Sofort beginnende Garzeit und zeitlich ver-
setzter Endzeitpunkts des Garvorgangs.
WWiiee bbeeii eeiinneemm pprrooggrraammmmiieerrtteenn GGaarrvvoorrggaanngg vvoorr--
ggeehheenn..
Nach dem Einstellen der Garzeit
die Taste“SET” drücken, bis die Anzeige “Ende der
Garzeit” blinkt (Abb.1),.
Die Digitalanzeige blinkt, die Einstellung kann jetzt
vorgenommen werden.
Gewünschten Endzeitpunkt durch Drücken der
Taste + oder - einstellen (Abb.2).
Beispiel: Endzeitpunkt des Garens: 13 Uhr.
Nach diesen Schritten beginnt der Ofen später zu
heizen, damit die Garzeit um 13 Uhr beendet ist.
Die Digitalanzeige verändert sich bis zum Start
des Garvorgangs nicht.
Nach Ablauf der Garzeit ertönt mehrere Minuten
lang ein akustisches Signal.
Nach Ablauf der Garzeit den Wahlschalter für die
Garart auf „0“ und den Temperaturwahlschalter
auf ‘STOPP’ stellen.
Sie können nur ein innerhalb der nächsten 12
Stunden liegendes Garzeitende programmieren.
99642242_A_ML.qxp 14/05/2007 14:54 Page 45
SET
SET
Page 46

46
2 / BENUTZUNG DES GERÄTSDE
DDeerr BBaacckkooffeenn iisstt mmiitt eeiinneerr vvoomm OOffeennbbeettrriieebb uunnaabb--
hhäännggiiggeenn eelleekkttrroonniisscchheenn ZZeeiittsscchhaallttuuhhrr aauussggeessttaatt--
tteett,, ddiiee ddiiee ZZeeiitt rrüücckkwwäärrttss zzäähhlltt..
Die Taste“SET” solange drücken, bis die
Leuchtanzeige blinkt “ ” (Abb.1).
Tasten (
++ ooddeerr --
) drücken, bis die gewünschte
Dauer angezeigt wird (maximal 12 h).
Beispiel: 25 Minuten
Einstellung im 10-Sekunden-Rhythmus, bis 19:30,
darüber hinaus im Minutenrhythmus.
Die Anzeige erfolgt in Minuten und Sekunden von
00:00 bis 19:30.
Beispiel: 19:30 entspricht 19 Minuten und 30
Sekunden.
Ab einer Dauer von 20 Minuten erfolgt die Anzeige
in Stunden und Minuten:
Beispiel: 00:20 entspricht 0 Stunden, 20 Minuten.
Das akustische Signal kann durch Drücken der
Tasten + oder - abgestellt werden.
- Ist keine Programmierung aktiv, schaltet sich die
Digitalanzeige aus.
- Wurde eine Garzeit programmiert, erscheint die
restliche Garzeit in der Digitalanzeige.
- Endet eine programmierte Garzeit vor Ablauf der
Zeitschaltuhr, ertönt 3 Minuten lang ein akustisches Signal, um das Ende der Garzeit anzugeben.
Das akustische Signal kann durch Drücken der
Tasten + oder - abgestellt werden. Die
Digitalanzeige gibt die verbleibende Zeit der
Zeitschaltuhr an.
Die Anzeige hört nach einigen Sekunden auf zu
blinken und die Zeitschaltuhr beginnt auf Null
zurückzuzählen.
WWeennnn ddiiee ZZeeiittuuhhrr bbiiss NNuullll zzuurrüücckkggeezzäähhlltt hhaatt,
, eerrttöönntt
3300 SSeekkuunnddeenn llaanngg eeiinn aakkuussttiisscchheess SSiiggnnaall..
Abb.1
DDiiee PPrrooggrraammmmiieerruunngg ddeerr ZZeeiittsscchhaallttuuhhrr kkaannnn jjeeddeerrzzeeiitt ggeeäännddeerrtt ooddeerr ggeellöösscchhtt wweerrddeenn..
FUNKTION DER ZEITSCHALTUHR
••
99642242_A_ML.qxp 14/05/2007 14:54 Page 46
SET
Page 47

47
3 / ZUBEREITUNGSARTEN IM BACKOFEN
DE
* Benutzte Sequenz(en) für die Angabe auf dem Energieetikett gemäß der europäischen Norm
EN 50304 und der Europäischen Richtlinie 2002/40/EG.
UUMMLLUUFFTT
•
Das Garen erfolgt durch das Heizelement an der Rückwand des Backofens und durch die
Luftschraube.
•
Schneller Temperaturanstieg: Manche Gerichte können in den kalten Backofen gestellt
werden.
•
Für saftiges helles Fleisch, Fisch und Gemüse empfohlen
Für Koch- und Backvorgänge auf bis zu 3 Ebenen.
KKOOMMBBII--WWÄÄRRMMEE
•
Das Garen erfolgt durch Ober- und Unterhitze sowie Luftumwälzung.
•
Kombination dreier Heizquellen: viel Unterhitze, ein wenig Umlufthitze und kurzes Grillen
zum Anbräunen.
•
Empfohlen für Quiches, Blätterteigpasteten, saftige Obstkuchen, vorzugsweise auf nich-
thaftenden Blechen.
GGRRIILLLL MMIITT UUMMLLUUFFTT ++ SSPPIIEESSSS
•
Das Garen erfolgt abwechselnd durch das obere Heizelement und die Luftumwälzung.
•
Vorheizen nicht erforderlich. Geflügel und saftige, rundum knusprige Braten.
•
Der Spieß dreht sich bis zum Öffnen der Backofentür weiter.
•
Die Fettpfanne auf die untere Einschubleiste einschieben.
•
Für alle Geflügelsorten oder Spießbraten zum Anbraten und Garen von Lammkeule,
Rinderkoteletts empfohlen. Zur Erhaltung des zarten Charakters von Fischkoteletts.
EECCOO KKLLAASSSSIISSCCHH
•
Das Backen erfolgt durch Unter- und Oberhitze.
•
Mit dieser Einstellung kann unter Beibehaltung gleicher Backergebnisse Energie gespart
werden.
•
Die Energiesparposition ECO dient als Grundlage für die Angaben auf dem Energieetikett.
•
Alle Garvorgänge erfolgen
oohhnnee VVoorrwwäärrmmeenn
SSTTAARRKKEERR GGRRIILLLL ++ SSPPIIEESSSS
•
Das Garen erfolgt mit Oberhitze.
•
5 Minuten vorheizen. Die Fettpfanne auf die untere Einschubleiste schieben.
•
Wird für das Grillen von Koteletts, Würstchen, Brotscheiben und Gambas auf dem Grillrost
empfohlen.
WWAARRMM HHAALLTTEENN
•
Dosierung des oberen und unteren Heizelements verbunden mit Umluft.
•
Empfohlen, um
BBrroott--,, BBrriioocchhee-- uunndd NNaappffkkuucchheenntteeiigg
gehen zu lassen ... überschreitet 40 °C nicht
(Teller wärmen, Auftauen).
*
*
99642242_A_ML.qxp 14/05/2007 14:54 Page 47
Page 48

48
4 / PFLEGE UND REINIGUNG DES OFENSDE
REINIGUNG DER AUSSENFLÄCHE
••
Das Fenster der elektronischen Programmiervorrichtung und die Ofentür mit einem weichen
Tuch und Glasreiniger reinigen.
Weder Scheuercreme noch Scheuerschwamm verwenden.
Zur Pflege des Geräts empfehlen wir Clearit Pflegeprodukte.
Clearit bietet professionelle Produkte und geeignete Lösungen für die tägliche Pflege von
Haushaltsgeräten und Küchen.
Sie werden von Ihrem Händler angeboten, ebenso wie eine ganze Palette von Produkten,
Zubehör und Verbrauchsartikeln.
DDiiee EErrffaahhrruunngg ddeerr PPrrooffiiss
iimm DDiieennsstt ddeerr VVeerrbbrraauucchheerr
REINIGUNG DER TÜR
••
Achtung
Das Kapitel “Ausbau der Tür” auf Seite 11 der mit diesem Gerät mitgelieferten MON-
TAGE- UND BETRIEBSANLEITUNG gilt nicht für dieses Modell.
99642242_A_ML.qxp 14/05/2007 14:54 Page 48
Page 49

49
4 / PFLEGE UND REINIGUNG DES OFENS
DE
Nutzen Sie die bereits im Ofen vorhandene
Wärme und sparen Sie Energie:
- Führen Sie die Pyrolyse nach einem
Garvorgang durch.
Das Zubehör aus dem Backofen nehmen und
eventuell vorhandene stark übergelaufene Reste
entfernen.
- Prüfen, dass die Programmiervorrichtung die
Tageszeit anzeigt und diese nicht blinkt.
Den Funktionswahlschalter lediglich auf
“Pyrolyse” stellen (Abb. 1).
Die Pyrolysedauer beträgt:
1h30 oder 1h45 oder 2h00
Diese Zeiten können nicht verändert werden
und der kann Ofen für 2h, 2h15 oder 2h30 nicht
genutzt werden.
Achtung
Die Türverriegelung wird einige Minuten nach Zyklusstart aktiv.
Die Pyrolyse wird automatisch beendet. Wenn die Temperatur auf etwa 275°C gesunken ist,
kann die Tür geöffnet werden.
START DER PYROLYSEREINIGUNG
••
ENDE DER PYROLYSEREINIGUNG
••
Die Pyrolyse endet automatisch, wenn die Leuchtanzeige der Verriegelung erlischt. Die Tür kann
nun geöffnet werden.
Den Funktionswahlschalter auf die Position 0 stellen.
Wenn der Backofen kalt ist, die weiße Asche mit einem feuchten Tuch entfernen. Der Backofen ist
sauber und wieder betriebsbereit.
Bei dieser Zeitangabe ist die Abkühldauer bis zur Entriegelung der Tür berücksichtigt.
Während des Pyrolysezyklus leuchtet das Sperrsymbol auf. Dies bedeutet, dass die Tür
verriegelt ist.
Während des Pyrolysezyklus leuchtet das Sperrsymbol auf. Dies bedeutet, dass die Tür
verriegelt ist.
Die Anzeigelampe des Thermostats leuchtet, wenn der Backofen heizt.
Abb.1
99642242_A_ML.qxp 14/05/2007 14:54 Page 49
Page 50

50
5 / KUNDENDIENSTDE
Eventuelle Reparaturarbeiten an dem Gerät
müssen von qualifiziertem Fachpersonal des
Händlers vorgenommen werden. Bei
Benachrichtigung des Kundendienstes die
vollständigen Geräteangaben (Modell, Typ
und Seriennummer) angeben. Diese Angaben
sind dem Typenschild
(Abb. 1) zu entnehmen.
ORIGINAL ERSATZTEILE
Bitten Sie bei Reparaturarbeiten darum, dass
ausschließlich
zertifizierte Original
Ersatzteile verwendet werden.
•REPARATURARBEITEN
BBrraannddtt AApppplliiaanncceess
- vereinfachte Aktiengesellschaft mit einem Kapital von 10.000.000 Euro Handelsregister Nanterre 440 302 347.
BRANDT APPLIANCES SAS
7 rue Henri Becquerel
92500 RUEIL MALMAISON
230V ~ 50 Hz
MADE IN FRANCE
Abb.1
99642242_A_ML.qxp 14/05/2007 14:54 Page 50
Page 51

51
FR
02
DE
39
EN
51
ES
63
IT
75
NL
87
PT
99
DA
27
CS
15
Dear Customer,
You have just acquired a
DDEE DDIIEETTRRIICCHH
oven and we would like to
thank you..
Our research teams have created this new generation of appliances
for you. Their quality, appearance, functions and technological advances make them exceptional products, showcases of our unique knowhow.
Your new
DDEE DDIIEETTRRIICCHH
oven will blend harmoniously into your kitchen
and perfectly combine cooking performance and ease of use. We wanted to offer you a product of excellence.
In the line of
DDEE DDIIEETTRRIICCHH
products, you will also find a wide range of
cookers, hobs, ventilation hoods, dishwashers, and refrigerators, all of
which can be built in and all of which can be coordinated with your new
DDEE DDIIEETTRRIICCHH
oven.
Of course, in an ongoing effort to better satisfy your demands with regard to our products, our after-sales service department is at your disposal and ready to listen in order to respond to all of your questions
and suggestions (contact information at the end of this booklet).
And log onto our website:
wwwwww..ddeeddiieettrriicchh--eelleeccttrroommeennaag
geerr..ccoomm
where you will find our latest in-
novations as well as additional useful information.
DDEE DDIIEETTRRIICCHH
SSeettttiinngg NNeeww VVaalluueess
As part of our commitment to constantly improving our products, we reserve the right to make
changes to them based on advances to their technical, functional and/or aesthetic properties.
Important:
Before installing and using your appliance, please read this Installation and Usage Guide
carefully, as it will allow you to quickly familiarise yourself with its operation.
99642242_A_ML.qxp 14/05/2007 14:54 Page 51
Page 52

52
TABLE OF CONTENTSEN
1 / DESCRIPTION OF YOUR APPLIANCE
••
Introduction to your oven
____________________________________ 53
••
Accessories
_______________________________________________ 53
••
Introduction to your programmer and selectors _________________ 54
2 / USING YOUR APPLIANCE
••
Using the programmer
º
How to set the time_____________________________________ 55
º
Immediate cooking _____________________________________ 56
••
Programmed cooking
º
Immediate start ________________________________________ 56
º
Delayed start __________________________________________ 57
••
Timer function _____________________________________________ 58
3 / OVEN COOKING MODES_______________________________________ 59
4 / CARING FOR AND CLEANING YOUR OVEN_______________________ 60
5 / AFTER-SALES SERVICE
••
Repairs
___________________________________________________ 62
99642242_A_ML.qxp 14/05/2007 14:54 Page 52
Page 53

53
EN
••
INTRODUCTION TO YOUR OVEN
A
B
Programmer
Temperature selector switch
Function selector switch
C
D
E
Light
Shelf support indicator
Hole for the rotisserie (spit)
Open-door detector
1
3
5
SET
40
00
1
16
5
20
0
220
E
D
B
A
C
F
G
F
G
•Accessories
Your appliance is equipped with two safety grids with handles, one with handles for a 45 mm
dish, a Lissium pastry dish and a rotisserie.
99642242_A_ML.qxp 14/05/2007 14:54 Page 53
Page 54

54
1 / DESCRIPTION OF YOUR APPLIANCEEN
INTRODUCTION TO THE PROGRAMMER
••
A
B
Time display
Cooking time indicator
Cooking end time indicator
Timer indicator
C
D
Touch control for accessing various time setting programs
Touch controls for setting time
Digital display (cooking time, cooking end time,
timer and clock reset)
E
F
G
H
A
B
C
D
E
F
G
H
TEMPERATURE SELECTOR
••
FUNCTION SELECTOR
••
99642242_A_ML.qxp 14/05/2007 14:54 Page 54
SET
220
200
40
165
1
00
Page 55

55
2 / USING YOUR APPLIANCE
EN
•
How to set the time
WWhheenn sswwiittcchheedd oonn
CLOCK:
• The digital display flashes.
• Set the time by pressing the touch controls
++
or --to set the clock (fig.1). The digital display will
stop flashing (fig.2).
• Confirm by pressing “SET”.
For example: 3.30.
THE DIGITAL DISPLAY (used for
programming)
After a few seconds, the digital display will start
flashing again.
Align the time with the clock by pressing the
touch controls + or - to match the time you want
(fig.3).
• Confirm by pressing “SET”.
When the setting is complete, the display will turn
off (fig.4).
RReesseettttiinngg tthhee cclloocckk ttiimmee
• Press + and - simultaneously.
for a few seconds until the digital display starts
flashing.
The time display will flash, indicating that it is
now possible to adjust the time.
To set the time, press the + or – touch controls
to advance or turn back the time displayed.
fig.5)
• Confirm by pressing “SET”.
Warning
If the OK touch control is not pressed, the adjustment will be automatically
recorded after a few seconds.
INTRODUCTION TO THE PROGRAMMER
••
fig.1
fig.2
fig.3
fig.4
fig.5
99642242_A_ML.qxp 14/05/2007 14:54 Page 55
SET
SET
SET
SET
SET
Page 56

56
2 / USING YOUR APPLIANCEEN
•Immediate cooking
The digital display should not be flashing.
• Choose the cooking mode:
Turn the function selector to the position you
want (fig.1)
Example: position “ ”
The oven will begin heating.
PPllaaccee yyoouurr ddiisshh iinn tthhee oovveenn
based on the recom-
mendations provided by the cook book.
Example “ ” at 200°C.
After these steps, the oven will heat up and the
temperature light will come on.
You can adjust the end of cooking time for any
time within the next 12 hours only.
Warning
After a cooking cycle, the fan rotor will
continue to operate for a while, in order to
cool the oven.
fig.1
--
Immediate-start cooking cycle, setting
the cooking time.
11..
Select the cooking mode and adjust the
temperature (fig.1).
Example: position “ ”
22..
Press the touchpad “SET” until the
indicator starts flashing “ ”
(fig.2)
The display will flash 0:00 to indicate that you
can now adjust the setting.
33..
Press + or - to adjust the desired cooking
time (fig.3).
Example: 25 min cooking time.
The setting will be automatically confirmed after a
few seconds -> the display will stop flashing.
The countdown of the length of time will begin
immediately after it has been set.
AAfftteerr tthheessee 33 sstteeppss,, tthhee oovveenn hheeaattss uupp..
fig.1
fig.2
fig.3
PROGRAMMED COOKING
••
99642242_A_ML.qxp 14/05/2007 14:54 Page 56
SET
220
200
165
1
00
40
SET
Page 57

57
2 / USING YOUR APPLIANCE
EN
((ccoonntt’’dd))
You can change the cooking time at any time
by performing the step described above.
You can cancel a cooking programme by setting the cooking time to 0:00.
At the end of cooking, a series of beeps is
emitted for a few minutes.
You can stop the beeping by pressing + or -.
After these steps you can use your oven again.
Return the temperature and function selectors
to the off position so that your oven does not
begin heating up again.
PROGRAMMED COOKING
••
--
Cooking with delayed start and delayed
cooking end time
PPrroocceeeedd aass wwiitthh pprrooggrraammmmeedd ccooookkiinngg..
After setting the cooking time,
Press “SET” until “cooking end” indicator starts
flashing (fig.1),.
The digital display will flash to indicate that you
can now adjust the setting.
Press the + or - touch control to set the desired
end time.(fig.2).
Example: End of cooking at 13:00.
After these steps, the oven heating start will be
delayed so that cooking ends at 13:00.
The digital display is locked until cooking begins.
At the end of cooking, it will beep for a few
minutes.
When your cooking programme is finished,
return the cooking selector to “0” and the temperature control to the off position.
You can set the cooking to end at any time
within the next 12 hours.
fig.1
fig.2
99642242_A_ML.qxp 14/05/2007 14:55 Page 57
SET
SET
Page 58

58
2 / USING YOUR APPLIANCEEN
YYoouurr oovveenn iiss eeqquuiippppeedd wwiitthh aann eelleeccttrroonniicc ttiimmeerr
tthhaatt iiss iinnddeeppeennddeenntt ooff tthhee oovveenn ffuunnccttiioonnss,, mmaa--
kkiinngg iitt ppoossssiibbllee ttoo ccoouunntt ddoowwnn aa sseett ttiimmee..
Press the “SET” touch control until the indicator
starts to flash “ ” (fig.1).
Press the (
++ oorr --
) until you see the time you want (max
12hrs)
Example: 25 minutes.
The setting advances by 10-second intervals up to
19:30, at which point the setting begins advancing in
one-minute intervals.
The display shows minutes and seconds from 00:00 to
19:30.
Example: “19:30” means 19 minutes and 30 seconds.
The display shows hours and minutes beginning
at 20 minutes:
Example: 00:20 equals 0 hours and 20 minutes.
You can stop the beeping by pressing + or -.
- If there is no program underway, the digital display will turn off.
- If a cooking cycle has been programmed, the
remaining cooking time will appear in the digital
display.
- If a scheduled cooking programme ends before the timer goes off, a series of beeps will be
emitted for three minutes to indicate the end of
cooking.
Press the + or - touch controls to stop the beeping. The digital display will indicate the time remaining on the timer countdown.
The display will stop flashing after a few seconds, and the timer will start to count down.
OOnnccee tthhee ttiimmee hhaass eexxppiirreedd,, tthhee ttiimmeerr wwiillll
eemmiitt aa
sseerriieess ooff bbeeeeppss ffoorr 3300 sseeccoonnddss ttoo nnoottiiffyy yyoouu..
fig.1
IItt iiss ppoossssiibbllee ttoo cchhaannggee oorr ccaanncceell tthhee ttiimmeerr aatt aannyy ttiimmee..
TIMER FUNCTION
••
99642242_A_ML.qxp 14/05/2007 14:55 Page 58
SET
Page 59

59
3 / OVEN COOKING MODES
EN
* Program(s) used to obtain the performance indicated on the energy label in accordance with
European standard EN 50304 and European Directive 2002/40/CE.
CCIIRRCCUULLAATTIINNGG HHEEAATT
•
Cooking controlled by the heating element located at the back of the oven by the fan.
•
Rapid temperature increase: Some dishes can be placed in the oven while it is still cold.
•
Recommended for keeping white meat, fish and vegetables moist
For cooking multiple items on up to 3 levels.
CCOOMMBBIINNEEDD HHEEAATT
•
Cooking controlled by the upper and lower heating elements and by the fans.
•
Three combined sources of heat: a lot of heat from the bottom, and a small amount of
circulating heat and grilling heat.
•
Recommended for quiches, pies and wet fruit tarts, placed preferably on a non-stick
baking tray.
GGRRIILLLL WWIITTHH FFAANN ++ RROOTTIISSSSEERRIIEE
•
Cooking controlled, alternately, by the upper element and by the fan.
•
Preheating is unnecessary. Roasts and poultry are juicy and crispy all over.
•
The spit keeps turning until the door is opened.
•
Slide the drip tray onto the bottom shelf support.
•
Recommended for all poultry and roasts on the spit, for cooking leg joints thoroughly,
and cuts of beef. Keeps fish steaks moist.
TTRRAADDIITTIIOONNAALL ((EECCOO))
•
Cooking controlled by the upper and lower heating elements.
•
This position allows for energy savings while preserving the quality of the cooking.
•
The ECO position is used for energy label performance.
•
All types of cooking take place
wwiitthhoouutt pprreehheeaattiinngg
GGRRIILLLL OONN HHIIGGHH ++ RROOTTIISSSSEERRIIEE
•
Cooking is performed by the upper element.
•
Preheat the oven for 5 minutes. Slide the drip tray onto the bottom shelf support.
•
Recommended for
ggrriilllliinngg cchhooppss,, ssaauussaaggeess,, ttooaasstt aanndd pprraawwnnss
placed on the grid.
KKEEEEPPIINNGG TTHHIINNGGSS WWAARRMM
•
Heat regulated by the upper and lower elements with use of fan.
•
Recommended for
hheellppiinngg ddoouugghh ttoo rriissee ((bbrreeaadd,, bbrriioocchhee,, kkuuggeellhhooppff......))
, without raising
the temperature above 40° (heating plates, defrosting).
*
*
99642242_A_ML.qxp 14/05/2007 14:55 Page 59
Page 60

60
4 / CARING FOR AND CLEANING YOUR OVENEN
CLEANING THE OUTER SURFACES
••
To clean both the electronic programmer window and the oven door, use a window washing
product applied to a soft cloth.
Do not use abrasive creams or scouring sponges.
To preserve your appliance, we recommend that you use Clearit cleaning products.
Clearit offers you professional products and solutions designed for the daily care of your household appliances and kitchens.
They are on sale at your regular retailer, along with a complete line of accessories and consumables.
PPrrooffeessssiioonnaall eexxppeerrttiissee
wwoorrkkiinngg ffoorr yyoouu aatt hhoommee
CLEANING THE DOOR
••
Warning
The chapter “Dismantling the door” on page 11 of the INSTALLATION AND USER
GUIDE (supplied with the appliance) does not apply to this model.
99642242_A_ML.qxp 14/05/2007 14:55 Page 60
Page 61

61
4 / CARING FOR AND CLEANING YOUR OVEN
EN
In order to make the most of the heat which is
already stored in the oven, thus saving energy:
- Start a pyrolysis cycle after cooking.
Remove the accessories from the oven and
remove any major spill residue.
- Check that the programmer is displaying the
time of day and that it is not flashing.
Simply set the “Function selector” to
“Pyro”(fig.1).
The pyrolysis duration is:
1hr 30 min or 1hr 45 min or 2hr
You cannot change these durations and the
oven is not usable for 2hr or 2hr 15min or 2hr 30
min.
Warning
Door locking comes into effect several minutes after the start of the cycle.
The pyrolysis operation stops automatically. Once the temperature cools to approximately
275°C, it is possible to open the door.
STARTING THE CLEANING CYCLE
••
END OF PYROLYSIS CYCLE
••
Pyrolysis stops automatically when the lock indicator light goes out. You can now open
the door.
- Return the function selector to the 0 position.
When the oven is cool, use a damp cloth to remove the white ashes. The oven is clean and once again
ready for the cooking application of your choice.
This time includes the cooling time until the door can be unlocked.
During the pyrolysis cycle, the lock warning light is activated to indicate that the door
is locked.
During the pyrolysis cycle, the thermostat display indicator lights up to show that the door
is locked.
The thermostat indicator lights up when the oven is heating.
fig.1
99642242_A_ML.qxp 14/05/2007 14:55 Page 61
Page 62

62
5 / AFTER-SALES SERVICEEN
Any repairs that are made to your appliance
must be handled by a qualified professional
authorised to work on the brand. When you
call, mention your appliance’s complete reference (model, type, serial number). This information appears on the manufacturer’s nameplate
(Fig.1).
GENUINE REPLACEMENT PARTS
During maintenance work, request that only
certified genuine replacement parts are
used.
• SERVICE CALLS
BBrraannddtt AApppplliiaanncceess
- simplified shareholder company with capital of 10,000,000 Euros RCS Nanterre 440,302,347.
BRANDT APPLIANCES SAS
7 rue Henri Becquerel
92500 RUEIL MALMAISON
230V ~ 50 Hz
MADE IN FRANCE
fig.1
99642242_A_ML.qxp 14/05/2007 14:55 Page 62
Page 63

63
FR
02
DE
39
EN
51
ES
63
IT
75
NL
87
PT
99
DA
27
CS
15
Estimado cliente, estimada clienta,
Acaba de adquirir un horno
DDEE DDIIEETTRRIICCHH
por lo que le quedamos su-
mamente agradecidos.
Nuestros equipos de investigación han diseñado para usted esta
nueva generación de aparatos que por su calidad, su estética, sus funciones y su desarrollo tecnológico los convierten en productos excepcionales, exponentes de nuestra maestría.
Su nuevo horno
DDEE DDIIEETTRRIICCHH
se integrará armoniosamente en su cocina combinando perfectamente el dominio tecnológico, las prestaciones de cocción y la facilidad de utilización. Hemos querido ofrecerle
un producto óptimo.
En la gama de productos
DDEE DDIIEETTRRIICCHH
, también encontrará un amplio
surtido de cocinas, placas de cocción, campanas extractoras, lavavajillas y frigoríficos integrables, que podrá combinar con su nuevo
horno
DDEE DDIIEETTRRIICCHH
.
Por supuesto, con el deseo permanente de satisfacer al máximo sus
exigencias con relación a nuestros productos, nuestro servicio de
atención al cliente está a su entera disposición para responder a todas
sus preguntas o sugerencias (datos al final de este manual).
Asimismo, visite nuestra página web:
wwwwww..ddeeddiieettrriicchh--eelleeccttrroommeennaag
geerr..ccoomm
donde encontrará nuestras últi-
mas innovaciones y otras informaciones útiles y adicionales.
DDEE DDIIEETTRRIICCHH
LLooss nnuueevvooss oobbjjeettooss ddee vvaalloorr
Con el objetivo de mejorar constantemente nuestros productos, nos reservamos el derecho de
efectuar modificaciones en sus características relacionadas con los avances.
Importante:
Antes de poner en marcha la placa, lea atentamente esta guía de instalación y utiliza-
ción para familiarizarse más rápidamente con su funcionamiento.
99642242_A_ML.qxp 14/05/2007 14:55 Page 63
Page 64

64
ÍNDICEES
1 / DESCRIPCIÓN DEL APARATO
••
Presentación del horno
_____________________________________ 65
••
Accesorios
________________________________________________ 65
••
Presentación del programador y los selectores _________________ 66
2 / UTILIZACIÓN DEL APARATO
••
Utilización del programador
º
Cómo ajustar la hora ___________________________________ 67
º
Cocción inmediata _____________________________________ 68
••
Cocción programada
º
Puesta en marcha inmediata _____________________________ 68
º
Puesta en marcha retardada _____________________________ 69
••
Función minutero __________________________________________ 70
3 / MODOS DE COCCIÓN DEL HORNO _____________________________ 71
4 / MANTENIMIENTO Y LIMPIEZA DEL HORNO ______________________ 72
5 / SERVICIO TÉCNICO
••
Intervenciones
____________________________________________ 74
99642242_A_ML.qxp 14/05/2007 14:55 Page 64
Page 65

65
1 / DESCRIPCIÓN DEL APARATO
ES
••
PRESENTACIÓN DEL HORNO
A
B
Programador
Selector de temperatura
Selector de funciones
C
D
E
Lámpara
Indicador de altura
Orificio para el asador rotativo
Contacto de detección de
apertura de puerta
1
3
5
SET
40
00
1
16
5
2
00
220
E
D
B
A
C
F
G
F
G
•Accesorios
Su aparato está equipado con dos rejillas de seguridad con empuñadura, una parrilla con empuñaduras para bandeja de 45 mm, una bandeja de repostería Lissium y un asador rotativo.
99642242_A_ML.qxp 14/05/2007 14:55 Page 65
Page 66

66
1 / DESCRIPCIÓN DEL APARATOES
PRESENTACIÓN DEL PROGRAMADOR
••
A
B
Visualización de la hora
Indicador de duración de cocción
Indicador de final de cocción
Indicador del minutero
C
D
Mando de acceso a los distintos programas de
regulación del tiempo
Mandos de regulación del tiempo
Pantalla digital (duración de la cocción, final de
cocción, minutero y puesta en hora)
E
F
G
H
A
B
C
D
E
F
G
H
SELECTOR DE TEMPERATURA
••
SELECTOR DE TEMPERATURA
••
99642242_A_ML.qxp 14/05/2007 14:55 Page 66
SET
220
200
40
165
1
00
Page 67

67
2 / UTILIZACIÓN DEL APARATO
ES
•
Cómo ajustar la hora
AAll ccoonneeccttaarr eell hhoorrnnoo
EL RELOJ:
• La pantalla digital parpadea.
• Regule la hora pulsando los mandos ++o --para
ajustar el reloj de agujas (fig.1),la pantalla digital
deja de parpadear (fig.2).
• Pulse el mando “SET” para validar.
Ejemplo: 3:30.
LA PANTALLA DIGITAL (que
sirve para la programación)
Unos segundos después, la pantalla digital parpadea de nuevo.
Regule la hora del mismo modo que con el
reloj, pulsando los mandos + o - para aumentar
o disminuir la hora que aparece en la pantalla.
(fig.3).
• Pulse el mando “SET” para validar.
Una vez efectuada la regulación, el visor digital se
apaga ( fig.4).
VVoollvveerr aa ppoonneerr eenn hhoorraa eell rreelloojj
• Pulse simultáneamente los mandos + y -
durante unos segundos, hasta que comience a
parpadear la pantalla digital.
La visualización de la hora parpadea para indicarle que es posible el ajuste.
Para regularlo, pulse los mandos + o – para
aumentar o disminuir la hora visualizada.(fig.5)
• Pulse el mando “SET” para validar.
Atención
Si no se valida con la tecla “SET”, el registro es automático al cabo de unos
segundos.
UTILIZACIÓN DEL PROGRAMADOR
••
fig.1
fig.2
fig.3
fig.4
fig.5
99642242_A_ML.qxp 14/05/2007 14:55 Page 67
SET
SET
SET
SET
SET
Page 68

68
2 / UTILIZACIÓN DEL APARATOES
•Cocción inmediata
El visor digital no debe parpadear.
• Elija el modo de cocción:
Gire el selector de funciones hasta la posición
elegida (fig.1)
Ejemplo: posición “ ”
el horno se pone en marcha
CCoollooqquuee llaa bbaannddeejjaa eenn eell hhoorrnnoo
según las reco-
mendaciones indicadas en la guía de cocción.
Ejemplo “ ” a 200°C.
Una vez que se han realizado estas operaciones,
el horno comienza a calentar y se enciende el piloto del termostato.
Sólo se puede regular la hora de fin de cocción
dentro del intervalo horario de las doce horas
siguientes.
Atención
Después de un ciclo de cocción, la tur-
bina de ventilación sigue funcionando
durante cierto tiempo, para enfriar el horno.
fig.1
--
Cocción con inicio inmediato, ajuste de
la duración de la cocción.
11..
Elija el modo de cocción deseado y ajuste
la temperatura (fig.1).
Ejemplo: posición “ ”
22..
Pulse el mando “SET” hasta que
comience a parpaear el piloto “ ”
(fig.2)
La pantalla parpadea en 0:00 para indicar que
se puede comenzar la regulación.
33..
Pulse el mando + o - para ajustar el tiempo
deseado (fig.3).
Ejemplo: 25 min. de cocción.
Se valida automáticamente al cabo de unos
segundos, -> el visor deja de parpadear.
La cuenta atrás se inicia inmediatamente después
de la validación.
UUnnaa vveezz eeffeeccttuuaaddaass eessttaass 33 ooppeerraacciioonneess,, eell
hhoorrnnoo ccoommiieennzzaa aa ccaalleennttaarr..
fig.1
fig.2
fig.3
COCCIÓN PROGRAMADA
••
99642242_A_ML.qxp 14/05/2007 14:55 Page 68
220
200
165
1
00
40
SET
SET
Page 69

69
2 / UTILIZACIÓN DEL APARATO
ES
((ccoonnttiinnuuaacciióónn))
Se puede modificar en todo momento el
tiempo de cocción efectuando la operación
arriba descrita.
Puede desprogramar una cocción regulando
el tiempo de cocción en 0.00.
Al finalizar la cocción, se emitirán una serie de
pitidos durante unos minutos.
Los pitidos se detienen definitivamente pulsando los mandos + ou -. Una vez efectuadas
estas operaciones, ya puede volver a utilizar el
horno.
Vuelva a colocar los selectores de temperatura
y de funciones en parada para que el horno no
comience a calentar de nuevo.
COCCIÓN PROGRAMADA
••
--
Cocción con puesta en marcha inmediata
y hora de fin de cocción programada
PPrroocceeddaa ccoommoo ppaarraa uunnaa ccoocccciióónn pprrooggrraammaaddaa..
Después del ajuste de la duración de cocción,
Pulse el mando “SET” hasta que comience a
parpadear el piloto “final de cocción” (fig.1),.
La pantalla parpadea para indicar que se puede
comenzar la regulación.
Pulse el mando + o - para regular la hora de fin
de cocción que desea (fig.2).
Ejemplo: Fin de cocción a las 13:00.
Una vez efectuadas estas operaciones, la
puesta en marcha queda retardada para que la
cocción termine a las 13:00.
El visor digital queda fijo hasta que comience la
cocción.
Al finalizar la cocción, se emitirán una serie de
pitidos durante unos minutos.
Cuando la cocción haya terminado, vuelva a
poner el selector de cocción en ” 0 ” y el selector de temperatura en parada.
Sólo se puede regular la hora de fin de cocción
dentro del intervalo horario de las doce horas
siguientes.
fig.1
fig.2
99642242_A_ML.qxp 14/05/2007 14:55 Page 69
SET
SET
Page 70

70
2 / UTILIZACIÓN DEL APARATOES
SSuu hhoorrnnoo eessttáá eeqquuiippaaddoo ddee uunnaa mmiinnuutteerrííaa eelleecc--
ttrróónniiccaa iinnddeeppeennddiieennttee ddeell hhoorrnnoo,, qquuee ppeerrmmiittee
rreeaalliizzaarr uunnaa ccuueennttaa aattrrááss..
Pulse el mando “SET” hasta que comience a
parpadear el piloto “ ” (fig.1).
Pulse el mando (
++ oo --
) hasta conseguir la duración
deseada (máximo 12h00)
Ejemplo: 25 minutos.
La regulación es de 10 en 10 segundos hasta 19:30 y
después de minuto en minuto.
Se presenta en minutos y segundos de 00:00 a 19:30
Ejemplo: 19:30 equivale a 19 minutos y 30 segundos.
Se presenta en horas y minutos a partir de 20
minutos:
Ejemplo: 00:20 equivale a 0 horas y 20 minutos.
Los pitidos se detienen definitivamente pulsando los mandos + ou -.
- Si no hay una programación en curso, la pantalla digital se apaga.
- Si se ha programado una cocción, la pantalla
digital muestra el tiempo de cocción que falta.
- Si una cocción programada se termina antes
de que finalice el minutero, se emitirán una serie
de pitidos durante 3 minutos para señalar que
ha finalizado la cocción.
Pulse los mandos + o - para detener los pitidos.
El visor digital indica el tiempo que falta en la
cuenta atrás del minutero.
El visor deja de parpadear al cabo de unos segundos y el minutero comienza la cuenta atrás.
UUnnaa vveezz ffiinnaalliizzaaddoo eell ttiieemmppoo,, eell mmiinnuutteerroo eemmiittee
uunnaa sseerriiee dde
e ppiittiiddooss dduurraa nnttee 3300 sseegguunnddooss
ppaarraa aavviissaarrllee..
fig.1
SSee ppuueeddee mmooddiiffiiccaarr oo aannuullaarr eenn ccuuaallqquuiieerr mmoommeennttoo llaa pprrooggrraammaacciióónn ddeell mmiinnuutteerroo..
FUNCIÓN MINUTERO
••
99642242_A_ML.qxp 14/05/2007 14:55 Page 70
SET
Page 71

71
3 / MODOS DE COCCIÓN DEL HORNO
ES
Secuencia o secuencias utilizadas para el anuncio escrito en la etiqueta energética de conformidad con la norma europea EN 50304 y según la directiva europea 2002/40/CE.
CCAALLOORR GGIIRRAATTOORRIIOO
•
La cocción se efectúa con el elemento calefactor situado al fondo del horno y con la hélice para
mover el aire.
•
Aumento rápido de la temperatura. Algunos platos se pueden introducir en el horno frío.
•
Recomendado para conservar tiernas las carnes blancas, pescados y verduras
Para las cocciones múltiples de hasta 3 niveles.
CCAALLOORR CCOOMMBBIINNAADDOO
•
La cocción se efectúa con la resistencia inferior y la superior y con la hélice de movimiento de
aire.
•
Tres fuentes de calor asociadas: mucho calor en la parte inferior, un poco de calor giratorio y un
toque de grill para dorar.
•
Recomendado para quiches, empanadas, tartas de frutas jugosas, colocadas preferentemente
en una bandeja de barro.
GGRRIILLLL PPUULLSSAADDOO ++ AASSAADDOORR RROOTTAATTIIVVOO
•La cocción se realiza alternativamente con el elemento superior y con la hélice para mover el aire.
• No hace falta precalentamiento. Aves y asados jugosos y crujientes por todos los lados.
• El asador rotativo continua funcionando hasta que se abre la puerta.
• Coloque la bandeja para recoger la grasa en la posición más baja.
• Recomendado para todas las aves o asados hechos con el asador, para soasar y cocinar hasta
el centro piernas de cordero y chuletas de buey. Para que los bloques de pescado queden jugosos y tiernos.
TTRRAADDIICCIIOONNAALL EECCOO
•
La cocción se efectúa con la resistencia inferior y superior.
•
Esta posición permite ahorrar energía conservando las cualidades de cocción.
•
La posición ECO se utiliza para el etiquetado energético.
•
Todas las cocciones se realizan
ssiinn pprreeccaalleennttaammiieennttoo
GGRRIILLLL FFUUEERRTTEE ++ AASSAADDOORR RROOTTAATTIIVVOO
•
La cocción se efectúa con la resistencia superior.
•
Efectúe un precalentamiento de 5 minutos. Coloque la bandeja para recoger la grasa en la posición más baja.
•
Secuencias recomendadas para
aassaarr cchhuulleettiillllaass,, ssaallcchhiicchhaass,, rreebba
annaaddaass ddee ppaann,,
langostinos a
a parrilla.
MMAANNTTEENNIIMMIIEENNTTOO CCAALLIIEENNTTEE
•
Dosis de la resistencia superior y la inferior, unida al movimiento de aire.
•
Recomendado para
lleevvaannttaarr llaass mmaassaass ddee ppaann bbrriioocchhee,, kkoouuggllooff
...sin superar 40° (calienta-platos,
descongelación).
*
*
99642242_A_ML.qxp 14/05/2007 14:55 Page 71
Page 72

72
4 / MANTENIMIENTO Y LIMPIEZA DEL HORNOES
LIMPIEZA DE LA SUPERFICIE EXTERIOR
••
Para limpiar la ventana del programador electrónico y la puerta del horno, utilice un trapo
suave empapado con un producto limpiacristales.
No utilice cremas para fregar ni un estropajo.
Para mantener en buen estado su aparato, le recomendamos que utilice los productos de limpieza Clearit.
Clearit le propone productos profesionales y soluciones adecuadas para el mantenimiento cotidiano de sus aparatos electrodomésticos y su cocina.
Los podrá encontrar a la venta en su distribuidor habitual, junto con toda una línea de productos accesorios y consumibles.
LLaa ppeerriicciiaa ddee llooss pprrooffeessiioonnaalleess
aall sseerrvviicciioo ddee llooss ppaarrttiiccuullaarreess
LIMPIEZA DE LA PUERTA
••
Atención
El capítulo “Demontaje de la puerta”, página 11 del MANUAL DE INSTALACIÓN E INS-
TRUCCIONES DE USO (incluido con el aparato), no incumbe a este modelo.
99642242_A_ML.qxp 14/05/2007 14:55 Page 72
Page 73

73
4 / MANTENIMIENTO Y LIMPIEZA DEL HORNO
ES
Para aprovechar la cantidad de calor que ya
tiene el horno y ahorrar energía:
- Ponga en marcha la pirólisis después de una
cocción.
Retire la batería de cocina del horno y los desbordamientos importantes que hubieran podido
producirse.
- Verifique que el programador indica la hora del
día y que ésta no parpadea.
Basta con colocar el mando “Selector de funciones” en la posición “Piro”(fig.1).
La duración de la pirólisis es de:
1h30 ó 1h45 ó 2h00
Las duraciones no se pueden modificar y el
horno queda indisponible durante 2h ó 2h15
ó 2h30.
Atención
El bloqueo de la puerta es efectivo unos minutos después de que se inicie el ciclo.
La pirólisis se para automáticamente. Cuando la temperatura alcanza aproximadamente
275ºC, se puede abrir la puerta.
INICIO DE LA LIMPIEZA PIRÓLISIS
INICIO DE LA LIMPIEZA PIRÓLISIS
••
La pirólisis se detiene automáticamente cuando se apaga el piloto de bloqueo, ya se puede abrir
la puerta.
- Vuelva a colocar el selector de funciones en la posición 0.
Cuando el horno esté frío, utilice un paño húmedo para retirar la ceniza blanca. El horno está limpio
y puede ser utilizado de nuevo para efectuar la cocción que desee.
Este tiempo incluye el tiempo de enfriamiento hasta que se pueda abrir la puerta.
Durante el ciclo de pirólisis, el piloto de bloqueo se enciende para indicarle que la puerta
está bloqueada.
Durante el ciclo de pirólisis, del termostato se enciende para indicarle que la puerta está bloqueada.
El piloto del termostato se enciende cuando el horno está calentando.
fig.1
••
99642242_A_ML.qxp 14/05/2007 14:55 Page 73
Page 74

74
5 / SERVICIO TÉCNICOES
Las posibles intervenciones en su aparato
deberán ser realizadas por un profesional cualificado depositario de la marca. Cuando realice su llamada, mencione la referencia completa del aparato (modelo, tipo, número de
serie). Esta información figura en la placa de
características
(Fig.1).
PIEZAS ORIGINALES
Al realizar una intervención de mantenimiento, solicite el uso exclusivo de
piezas de
recambio certificadas originales.
•INTERVENCIONES
fig.1
BBrraannddtt AApppplliiaanncceess
- sociedad por acciones simplificada con un capital de 10.000.000 euros RCS Nanterre 440 302 347.
99642242_A_ML.qxp 14/05/2007 14:55 Page 74
BRANDT APPLIANCES SAS
7 rue Henri Becquerel
MADE IN FRANCE
92500 RUEIL MALMAISON
230V ~ 50 Hz
Page 75

75
FR
02
DE
39
EN
51
ES
63
IT
75
NL
87
PT
99
DA
27
CS
15
Egregio/Gentile Cliente,
Hai acquistato un forno
DDEE DDIIEETTRRIICCHH
e ti ringraziamo.
Le nostre equipe di ricerca hanno studiato per te una nuova generazione di elettrodomestici, che per qualità, estetica, funzioni ed evoluzione tecnologica è costituita da prodotti d’eccezione e rivela capacità
uniche.
Il tuo nuovo forno
DDEE DDIIEETTRRIICCHH
s’inserirà armoniosamente nella tua
cucina e unirà perfettamente l’efficienza in cottura e la facilità dell’uso.
Vogliamo offrirti un prodotto eccellente.
Nella gamma dei prodotti
DDEE DDIIEETTRRIICCHH
, troverai anche una vasta
scelta di cucine, piani cottura, cappe aspiranti, lavastoviglie e frigoriferi incassabili, che potrai coordinare al nuovo forno
DDEE DDIIEETTRRIICCHH
.
Con il costante scrupolo di soddisfare al meglio le tue esigenze nei
confronti dei nostri prodotti, il nostro servizio consumatori è ovviamente a tua disposizione per rispondere a qualsiasi domanda o suggerimento (indirizzi e numeri in fondo al libretto).
Connettiti al nostro sito:
wwwwww..ddeeddiieettrriicchh--eelleeccttrroommeennaaggeerr..ccoomm
nel quale troverai le ultime inno-
vazioni e informazioni utili e complementari.
DDEE DDIIEETTRRIICCHH
NNuuoovvii ooggggeettttii ddii vvaalloorree
Con il costante scrupolo di migliorare i nostri prodotti, ci riserviamo il diritto di apportare modifiche alle loro caratteristiche tecniche, funzionali o estetiche, parallelamente all’evoluzione tecnica.
Importante:
Prima di avviare l’apparecchio, leggi attentamente questa guida d’installazione e di uti-
lizzo al fine di abituarti rapidamente al suo funzionamento.
99642242_A_ML.qxp 14/05/2007 14:55 Page 75
Page 76

76
INDICEIT
1 / DESCRIZIONE DELL’APPARECCHIO
••
Presentazione del forno
_____________________________________ 77
••
Accessori_________________________________________________
77
••
Spiegazione del quadro di programmazione e dei pulsanti ________ 78
2 / UTILIZZO DELL’APPARECCHIO
••
Uso del quadro di programmazione
___________________________
º
Come regolare l’ora ____________________________________ 79
º
Cottura istantanea______________________________________ 80
••
Cottura programmata
º
Avvio istantaneo _______________________________________ 80
º
Avvio differito__________________________________________ 81
••
Regolazione del timer_______________________________________ 82
3 / MODALITÀ DI COTTURA DEL FORNO ____________________________ 83
4 /MANUTENZIONE E PULIZIA DEL FORNO _________________________ 84
5 / SERVIZIO DI ASSISTENZA
••
Interventi _________________________________________________
86
99642242_A_ML.qxp 14/05/2007 14:55 Page 76
Page 77

77
1 / DESCRIZIONE DELL’APPARECCHIO
IT
••
PRESENTAZIONE DEL VOSTRO FORNO
A
B
Quadro di programmazione
Pulsante della temperatura
Pulsante delle funzioni
C
D
E
Lampada
Indicatore dei ripiani
Foro per girarrosto
Contatto di rilevazione
porta aperta
1
3
5
SET
40
00
1
1
65
2
00
220
E
D
B
A
C
F
G
F
G
•Accessori
Il vostro apparecchio è dotato di 2 griglie di sicurezza con maniglia, di una griglia con maniglie
per teglia da 45 mm, di una teglia da pasticcere Lissium e di un girarrosto.
99642242_A_ML.qxp 14/05/2007 14:55 Page 77
Page 78

78
1 / DESCRIZIONE DELL’APPARECCHIOIT
PRESENTAZIONE DEL QUADRO DI PROGRAMMAZIONE
••
A
B
Impostazione dell’ora
Indicatore del tempo di cottura
Indicatore del tempo di fine cottura
Indicatore orologio
C
D
Pulsante di accesso ai diversi programmi di
regolazione dell’ora
Pulsanti di regolazione dei tempi di cottura
Regolatore digitale (dei tempi di cottura e del
timer)
E
F
G
H
A
B
C
D
E
F
G
H
PULSANTE DELLA TEMPERATURA
••
PULSANTE DELLE FUNZIONI
••
99642242_A_ML.qxp 14/05/2007 14:55 Page 78
SET
220
200
40
165
1
00
Page 79

79
2 / USO DEL VOSTRO APPARECCHIO
IT
•
Come regolare l’ora
DDooppoo iill ccoolllleeggaammeennttoo eelleettttrriiccoo
L’OROLOGIO:
• Il display digitale lampeggia.
• Regolate l’orario premendo i tasti ++o --per
regolare l’orologio a sfere (fig. 1),il display digitale
cesserà di lampeggiare (fig. 2).
Premi il pulsante “SET” per confermare.
Esempio: 3h30.
IL DISPLAY DIGITALE (per l’impostazione della programmazione)
Dopo qualche secondo il display numerico inizia
a lampeggiare nuovamente.
Impostate lo stesso orario dell’orologio premendo i pulsanti + o - per aumentare o diminuire
i minuti o le ore visualizzate (fig. 3).
• Premi il pulsante “SET” per confermare.
Dopo aver impostato l’ora il display digitale si
spegne (fig. 4).
RReeggoollaazziioonnee ddeellll’’oorraa
• Premi simultaneamente i pulsanti + e per qualche secondo fino a far lampeggiare il display digitale.
La visualizzazione dell’ora lampeggia per indicare che è possibile modificarla.
Per impostare l’ora, girare il pulsante verso + o in modo da incrementare o diminuire l’ora visualizzata.(fig. 5)
• Premere il pulsante “SET” per confermare.
Attenzione
Se non viene confermata mediante il pulsante “SET” la memorizzazione avviene
in modo automatico dopo qualche secondo.
UTILIZZO DEL PROGRAMMATORE
••
fig.1
fig.2
fig.3
fig.4
fig.5
99642242_A_ML.qxp 14/05/2007 14:55 Page 79
SET
SET
SET
SET
SET
Page 80

80
2 / USO DEL VOSTRO APPARECCHIOIT
•Cottura istantanea
Il display digitale non deve lampeggiare.
• Selezionare la modalità di cottura :
Impostare il pulsante delle funzioni sulla posizione da voi desiderata (fig.1)
Esempio : posizione “ ”
il forno si accende.
MMeetttteerree llaa vviivvaannddaa nneell ffoorrnnoo
secondo i consigli
riportati nella guida alla cottura.
Esempio “ ” regolata a 200°C.
Dopo queste operazioni il forno si riscalda e la
spia del pulsante della temperatura si
accende.
É possibile impostare l’ora di fine cottura
nell’ambito delle 12 ore successive.
Attenzione
Dopo un ciclo di cottura, la ventola
continua a funzionare per alcuni minuti allo
scopo di raffreddare il forno.
fig.1
--
Cottura con inizio istantaneo, impostazione
del tempo di cottura.
11..
Selezionare la modalità di cottura e regolare la
temperatura (fig.1).
Esempio: posizione “ ”
22..
Premere il pulsante SET fino a che
la spia non inizia a lampeggiare “ ”
(fig.2)
Il display digitale lampeggia su 0:00 indicando che
è possibile impostare l’ora.
33..
Premere il pulsante + o - per impostare i tempi
di cottura desiderati (fig.3).
Esempio : 25 minuti di cottura.
La registrazione della durata avviene in modo automatico dopo qualche secondo ed il display cessa di
lampeggiare.
Il conto alla rovescia della durata comincia subito
dopo la conferma.
DDooppoo aavveerree eesseegguuiittoo qquueessttee ttrree ooppeerraazziioonnii iill ffoorrnnoo
iinniizziiaa aa rriissccaallddaarrssii..
fig.1
fig.2
fig.3
COTTURA PROGRAMMATA
••
99642242_A_ML.qxp 14/05/2007 14:55 Page 80
SET
SET
220
200
165
1
00
40
Page 81

81
2 / USO DEL VOSTRO APPARECCHIO
IT
((sseegguuee))
É possibile modificare in qualunque momento
il tempo di cottura impostato eseguendo l’operazione precedentemente descritta.
É possibile annullare la programmazione di
cottura impostata impostando il tempo di cottura su 0.00.
A fine cottura, viene emessa una serie di bip
acustici per alcuni minuti.
Per interrompere questo segnale acustico,
premere i tasti + o -. Dopo aver effettuato
queste procedure è possibile riutilizzare il vostro forno.
Rimettere i pulsanti di selezione della temperatura e di selezione delle funzioni su “spento”
per non far avviare nuovamente il forno.
COTTURA PROGRAMMATA
••
--
Cottura con inizio istantaneo e selezione
dell’orario di fine cottura.
PPrroocceeddeerree ccoommee uunnaa ccoottttuurraa pprrooggrraammmmaattaa..
Dopo avere regolato la durata della cottura,
Premere il pulsante “SET” fino a che la spia di
“fine cottura” inizia a lampeggiare” (fig.1),.
Il display digitale lampeggia indicando che è
possibile impostare l’ora.
Premere i tasti + o - per impostare l’ora di fine
cottura desiderata (fig.2).
Esempio : Fine cottura alle ore 13:00.
Dopo queste operazioni l’inizio del riscaldamento viene differito affinché la cottura termini
alle ore 13:00.
Il display digitale non visualizzerà nulla fino
all’inizio della cottura.
A fine cottura, viene emessa una serie di bip
acustici per alcuni minuti.
Quando la cottura è terminata, rimettere il pulsante della cottura sulla posizione “0” ed il pulsante della temperatura sulla posizione
“spento”.
É possibile impostare l’ora di fine della cottura
nell’ambito delle 12 ore successive.
fig.1
fig.2
99642242_A_ML.qxp 14/05/2007 14:55 Page 81
SET
SET
Page 82

82
2 / USO DEL VOSTRO APPARECCHIOIT
QQuueessttoo ffoorrnnoo èè ddoottaattoo ddii uunn ttiimmeerr eelleettttrroonniiccoo iinnddii--
ppeennddeennttee ddaall ffuunnzziioonnaammeennttoo ddeell ffoorrnnoo sstteessssoo cchhee
ppeerrmmeettttee ddii eeffffeettttuuaarree uunn ccoonnttoo aallllaa rroovveesscciiaa..
Premere il pulsante “SET” fino a che la spia ini-
zia a lampeggiare “ ” (fig.1).
Premere i tasti (
++ oo --
) fino ad ottenere la durata desiderata ( maxi 12h00)
Esempio: 25 minuti.
La regolazione viene impostata di 10 secondi in 10
secondi fino ad una durata di 19 minuti e 30 secondi
poi viene impostata di minuto in minuto.
Il display visualizza i minuti e i secondi da 00.00 fino a
19.30.
Esempio: 19.30 equivale a 19 minuti e 30 secondi
Il display visualizza le ore ed i minuti a partire dal
ventesimo minuto.
Esempio: 00:20 equivale a 0 ore, 20 minuti.
Per interrompere definitivamente questo
segnale acustico, premere i tasti + o -.
- Se non è in corso nessuna programmazione il
display digitale si spegne.
- Se ci fosse una cottura programmata il display
visualizzerebbe il relativo tempo di cottura.
- Qualora una cottura programmata terminasse
prima della fine del conteggio alla rovescia, vengono emessi una serie di bip sonori per 3 minuti
per indicare la fine della cottura.
Premere i tasti + o - per interrompere i bip
sonori. Il display digitale mostra il tempo rimasto
del conteggio alla rovescia.
Il display cessa di lampeggiare nel giro di qualche secondo, il timer inizia il conteggio alla
rovescia.
QQuuaannddoo llaa dduurraattaa iimmppoossttaattaa èè ssttaat
taa rraaggggiiuunnttaa llaa
ffuunnzziioonnee ddeell ccoonnttoo aallllaa rroovveesscciiaa eemmeettttee uunnaa
sseerriiee ddii bbiipp ssoonnoorrii ppeerr 3300 sseeccoonnddii ppeerr sse
eggnnaallaarr--
vveelloo..
fig.1
ÈÈ ppoossssiibbiillee mmooddiiffiiccaarree oo aannnnuullllaarree iinn qquuaalluunnqquuee mmoommeennttoo llaa pprrooggrraammmmaazziioonnee ddeellllaa ffuunnzziioonnee
ccoonnttoo aallllaa rroovveesscciiaa
FUNZIONE DEL TIMER
••
99642242_A_ML.qxp 14/05/2007 14:55 Page 82
SET
Page 83

83
3 / MODALITÀ DI COTTURA DEL FORNO
IT
* Sequenza(e) utilizzata(e) per l’annuncio riportato sulla segnalazione energetica in conformità
alle norme europee EN 50304 ai sensi della direttiva europea 2002/40/CE.
CCAALLOORREE VVEENNTTIILLAATTOO
•
La cottura avviene mediante il termoelemento posto in fondo al forno e grazie all’intervento della
dell’aria.
•
Raggiungimento rapido della temperatura : Alcuni piatti possono essere inseriti a forno freddo.
•
Raccomandata per mantenere tenere carni bianche, pesce, verdure
Per cottura multipla fino a 3 livelli.
CCAALLOORREE CCOOMMBBIINNAATTOO
•
La cottura avviene mediante l’elemento inferiore e superiore e tramite la ventola di movimenta-
zione dell’aria.
•
Le fonti di calore sono tre: calore forte dal basso, calore medio ventilato e calore medio dal grill
per dorare.
•
Raccomandato per le torte salate, torte di frutta, poste preferibilmente in una teglia di anti-ade-
rente.
GGRRIILLLL VVEENNTTIILLAATTOO ++ GGIIRRAARRRROOSSTTOO
•La cottura avviene alternativamente grazie all’elemento superiore e alla ventola di movimentazione dell’aria.
•Pre-riscaldamento non richiesto. Volatili e arrosti succosi e croccanti su ogni lato.
• Il girarrosto continua a funzionare fino all’apertura dello sportello
• Inserire lo sgocciolatoio nel livello basso.
•Raccomandato per tutti i volatili, o arrosti allo spiedo per cuocere a fuoco vivo cosciotti e bistecche di manzo. Per mantenere teneri tranci di pesce.
EECCOO TTRRAADDIIZZIIOONNAALLEE
•
La cottura viene effettuata tramite elementi inferiori e superiori.
•
Questa posizione consente di risparmiare energia pur conservando le qualità di cottura.
•
La posizione ECO viene utilizzata per conformità al marchio di risparmio energetico.
•
Tutte le cotture non richiedono il
pprree--rriissccaallddaammeennttoo
GGRRIILL FFOORRTTEE ++ GGIIRRAARRRROOSSTTOO
•
La cottura viene effettuata tramite l’elemento superiore.
•
Effettuare un preriscaldamento del forno di 5 min. Posizionare il piatto sul ripiano più basso.
•
Raccomandato per
ccuuoocceerree llee ccoottoolleettttee,, llee ssaallssiiccccee,, llee ffeettttee d
dii ppaannee,, ii ggaammbbeerroonnii
alla griglia.
MMAANNTTEENNEERREE AALL CCAALLDDOO
•
Dosaggio dell’elemento superiore ed inferiore associato alla movimentazione dell’aria.
•
Raccomandato per fare
lliieevviittaarree llaa ppaassttaa ddeell ppaannee,, ddeellllee bbrriioocchhee ee ii kkoouuggllooff
...senza superare
i 40° (riscalda-piatto, scongelamento).
*
*
99642242_A_ML.qxp 14/05/2007 14:55 Page 83
Page 84

84
4 /MANUTENZIONE E PULIZIA DEL FORNOIT
PULIZIA DELLA SUPERFICIE ESTERNA
••
Per pulire il quadro della programmazione elettronica e lo sportello del forno utilizzare un
panno morbido con un detergente usato per la pulizia dei vetri.
Non utilizzare creme per lucidare né spugne abrasive.
Per conservare il vostro apparecchio vi consigliamo di utilizzare i prodotti Clearit per la sua
manutenzione.
Clearit vi propone dei prodotti professionali e delle soluzioni idonee per la manutenzione quotidiana dei vostri apparecchi elettrici e delle vostre cucine.
Li potete trovare in vendita presso il vostro rivenditore di fiducia insieme alla linea di prodotti
accessori e prodotti di consumo.
LL’’eessppeerriieennzzaa ddeeii pprrooffeessssiioonniissttii
aall sseerrvviizziioo ddeeii pprriivvaattii
PULIZIA DELLO SPORTELLO
••
Attenzione
Il Capitolo “Smontaggio dello sportello” a pagina 11 della GUIDA ALL’INSTALLAZIONE
E ISTRUZIONI PER L’USO (consegnato insieme all’apparecchio) non si riferisce a
questo modello.
99642242_A_ML.qxp 14/05/2007 14:55 Page 84
Page 85

85
4 /MANUTENZIONE E PULIZIA DEL FORNO
IT
Per beneficiare della quantità di calore già
immagazzinata nel forno e risparmiare energia:
- Avviare la pirolisi dopo la cottura.
Togliere tutti gli elementi estraibili dal forno ed
eliminare lo sporco più grosso.
- Verificare che il quadro di programmazione
mostri l’orario del giorno e che esso non lampeggi.
Basta posizionare la manopola “Selettore di funzioni” sulla posizione “Pirolisi”(fig.1).
La durata della pirolisi è di:
1h30 o 1h45 o 2h00
Questi tempi non sono modificabili ed il forno
rimane indisponibile per 2h o 2h15 o 2h30.
Attenzione
Il blocco della porta è effettivo qualche minuto dopo l’avvio del ciclo.
La pirolisi si ferma automaticamente. Quando la temperatura raggiunge i 275°C circa è possibile aprire lo sportello.
AVVIO DELLA PULIZIA CON PIROLISI
••
TERMINE DELLA PULIZIA CON PIROLISI
••
La pirolisi si ferma automaticamente quando si spegne la spia di bloccaggio dello sportello. A
questo punto è possibile aprire lo sportello.
- Riportare il selettore di funzioni sulla posizione 0.
Quando il forno è freddo, utilizzare un panno umido per togliere la cenere bianca. Il forno è pulito e
nuovamente utilizzabile per la cottura desiderata.
Questo tempo comprende la durata di raffreddamento finché non viene tolto la protezione della
porta.
Durante il ciclo della pirolisi, la spia di protezione si accende indicando che la porta è bloccata.
Durante il ciclo della pirolisi, la spia della temperatura si accende indicando che la porta è bloccata.
La spia della temperatura si accende quando il forno si sta riscaldando.
fig.1
99642242_A_ML.qxp 14/05/2007 14:55 Page 85
Page 86

86
5 / SERVIZIO DI ASSISTENZAIT
Gli eventuali interventi sull’apparecchio
devono essere effettuati da personale qualificato e autorizzato dalla ditta depositaria del
marchio. Al momento della chiamata, esporre
i riferimenti dell’apparecchio (modello, tipo,
numero di matricola). Queste informazioni
sono riportate sulla targhetta
segnaletica.
(Fig.1).
PEZZI ORIGINALI
In sede d’intervento di manutenzione, richiedere l’utilizzo esclusivo dei
pezzi di ricambio
originali certificati.
•INTERVENTI
BBrraannddtt AApppplliiaanncceess
- società per azioni semplificata con capitale sociale di 10.000.000 Euro - Registro Camera di Commercio di
Nanterre n° 440 302 347.
BRANDT APPLIANCES SAS
7 rue Henri Becquerel
92500 RUEIL MALMAISON
230V ~ 50 Hz
MADE IN FRANCE
fig.1
99642242_A_ML.qxp 14/05/2007 14:55 Page 86
Page 87

87
FR
02
DE
39
EN
51
ES
63
IT
75
NL
87
PT
99
DA
27
CS
15
Geachte Klant,
U hebt net een oven van
DDEE DDIIEETTRRIICCHH
aangekocht, wij willen u hier
graag voor bedanken.
Onze onderzoeksteams hebben voor u deze nieuwe generatie apparaten ontworpen die uitzonderlijk is door de kwaliteit, de vormgeving, de
functies en de technologische vooruitgang. Hierdoor zijn het unieke
producten die getuigen van onze knowhow.
Uw nieuwe
DDEE DDIIEETTRRIICCHH
oven past bij elke keuken. Uw toestel is een
geslaagde combinatie van kookprestaties en gebruiksgemak. Wij wilden u een voortreffelijk product bieden.
In het gamma van
DDEE DDIIEETTRRIICCHH
-producten vindt u ook een ruime
keuze aan kookplaten, afzuigkappen, vaatwassers en koelkasten die
allemaal kunnen worden ingebouwd en harmonisch met uw nieuwe
DDEE
DDIIEETTRRIICCHH
oven kunnen worden gecombineerd.
Uiteraard streven wij ernaar zo goed mogelijk aan uw wensen ten aanzien van onze producten te voldoen. Daarom staat onze klantenservice voor u klaar en luistert naar u om al uw vragen te beantwoorden of
uw suggesties te noteren (gegevens achter in dit boekje).
En bezoek ook onze website:
wwwwww..ddeeddiieettrriicchh--eelleeccttrroommeennaagge
err..ccoomm
waar u onze nieuwste producten
en nuttige en aanvullende informatie zult vinden.
DDEE DDIIEETTRRIICCHH
DDee nniieeuuwwee wwaaaarrddeeoobbjjeecctteenn
Uit een voortdurend streven naar het verbeteren van onze producten, behouden we ons het
recht voor om wijzigingen aan te brengen aan de technische, functionele of esthetische kenmerken, om de technische evolutie op de voet te volgen.
Belangrijk:
Alvorens het apparaat in gebruik te nemen vragen wij u eerst deze installatie- en ge-
bruikshandleiding aandachtig te lezen om u snel met de werking vertrouwd te maken.
99642242_A_ML.qxp 14/05/2007 14:56 Page 87
Page 88

88
INHOUDNL
1 / BESCHRIJVING VAN HET APPARAAT
••
Presentatie van uw oven
____________________________________ 89
••
Toebehoren
_______________________________________________ 89
••
Voorstelling van de programmaschakelaar _____________________ 90
2 / GEBRUIK VAN HET APPARAAT
••
Gebruik van de programmaschakelaar
º
Instellen van de tijd _____________________________________ 91
º
Onmiddellijk bakken ____________________________________ 92
••
Geprogrammeerd bakken
º
Onmiddellijk bakken ____________________________________ 92
º
Uitgesteld bakken ______________________________________ 93
••
De schakelklok ____________________________________________ 94
3/BAKWIJZEN VAN DE OVEN ______________________________________ 95
4 / ONDERHOUD EN REINIGING VAN HET APPARAAT ________________ 96
5 /SERVICEDIENST
••
Ingrepen
__________________________________________________
98
99642242_A_ML.qxp 14/05/2007 14:56 Page 88
Page 89

89
1 / BESCHRIJVING VAN HET APPARAAT
NL
••
PRESENTATIE VAN UW OVEN
A
B
Programmaschakelaar
Temperatuurknop
Keuzeknop
C
D
E
Lamp
Weergave nummer richel
Opening voor braadspit
Detectiecontact voor openen
en sluiten van de ovendeur
1
3
5
SET
40
00
1
16
5
2
00
220
E
D
B
A
C
F
G
F
G
•Oventoebehoren
Uw apparaat is uitgerust met twee veiligheidsrekken met handvat, een rooster met handvat voor
een schotel van 45mm, een Lissium gebaksschotel en een braadspit
99642242_A_ML.qxp 14/05/2007 14:56 Page 89
Page 90

90
1 / BESCHRIJVING VAN HET APPARAATNL
PRESENTATIE VAN DE PROGRAMMASCHAKELAAR
••
A
B
Tijdweergave
Indicator bakduur
Weergave einde bakduur
Indicator van de schakelklok
C
D
Toets voor activering van de verschillende programma’s voor het instellen van de tijdgegevens
Toetsen voor tijdinstellingen
Digitaal display (bakduur/eindtijd van het bakken,
schakelklok en tijdinstelling)
E
F
G
H
A
B
C
D
E
F
G
H
TEMPERATUURSELECTIE
••
FUNCTIESELECTIE
••
99642242_A_ML.qxp 14/05/2007 14:56 Page 90
SET
220
200
40
165
1
00
Page 91

91
2 / GEBRUIK VAN HET APPARAAT
NL
•
Instellen van de tijd
TTiijjddeennss hheett aaaannsslluuiitteenn vvaann ddee
oovveenn
DE OVENKLOK:
• Het digitale display knippert.
• Stel de tijd in door te drukken op toetsen ++of
--
om de wijzerklok in te stellen (fig.1),het digitale
display knippert niet meer (fig.2).
• Druk op de toets “SET” om te bevestigen.
Bijvoorbeeld : 3u30
HET DIGITALE DISPLAY (wordt
gebruikt voor programmering)
Na enkele seconden knippert het digitale display opnieuw.
Stel de tijd in op dezelfde manier als voor de
ovenklok, door te drukken op de toetsen + of om de getoonde tijd te verhogen of te
verlagen(fig.3).
• Druk op de toets “SET” om te bevestigen.
Als de tijd is ingesteld gaat het digitale display
uit(fig.4)..
WWiijjzziiggeenn vvaann ddee iinnggeesstteellddee ttiijjdd
Gelijktijdig op de + / – toetsen drukken voor enkele seconden. Het display begint te knipperen .
Als de weergave van de tijd knippert, betekent
dit dat u dan kunt instellen.
Om in te stellen drukt u op de toetsen + of – om
de tijd eerder of later te zetten.(fig.5)
• Druk op de toets “SET” om te bevestigen.
Let op
Indien u niet met de toets “SET” bevestigt, zal het display na enkele seconden
zelf de tijd bevestigen.
GEBRUIK VAN DE PROGRAMMASCHAKELAAR
••
fig.1
fig.2
fig.3
fig.4
fig.5
99642242_A_ML.qxp 14/05/2007 14:56 Page 91
SET
SET
SET
SET
SET
Page 92

92
2 / GEBRUIK VAN HET APPARAATNL
•Onmiddellijk bakken
Het digitale display mag niet knipperen.
• Kies de bakwijze:
Draai de keuzeknop op de stand van uw keuze
(fig.1)
Bijvoorbeeld: stand “ ”
De oven gaat aan.
PPllaaaattss uuww oovveennsscchhootteell iinn ddee oovveenn
volgens de
aanbevelingen van uw kookgids.
Bijvoorbeeld “ ” op 200°C.
Na deze handelingen begint de oven te werken
en gaat het thermostaatlampje branden.
U kunt het einde van de baktijd alleen instellen
binnen de komende twaalf uur.
Let op
Na een bakcyclus blijft de ventilator een
tijdje doorwerken om de oven af te laten koelen.
fig.1
--
Onmiddellijk bakken, instelling van de
bakduur.
11..
Kies de gewenste bakwijze en stel de tem-
peratuur bij (fig.1).
Bijvoorbeeld: stand “ ”
22..
Druk op toets “SET” tot
het lampje knippert “ ”
(fig.2)
Het display knippert op 0u00. U kunt de bakduur nu instellen.
33..
Druk op toets + of - om de gewenste baktijd
in te stellen (fig.3).
Bijvoorbeeld: 25 min bakken.
Na enkele seconden wordt de bakduur automatisch bevestigd, ->het display knippert niet meer.
Direct na bevestiging begint het aftellen van de
bakduur.
NNaa ddeezzee 33 hhaannddee llii nnggeenn bbeeggiinntt ddee oovveenn ttee
wweerrkkeenn..
fig.1
fig.2
fig.3
GEPROGRAMMEERD BAKKEN
••
99642242_A_ML.qxp 14/05/2007 14:56 Page 92
SET
220
200
165
1
00
40
SET
Page 93

93
2 / GEBRUIK VAN HET APPARAAT
NL
((vveerrvvoollgg))
U kunt op ieder moment de bakduur wijzigen
door de hierboven beschreven handeling uit te
voeren.
U kunt de programmering van een bakduur
annuleren door de bakduur op 0.00 te zetten.
Na het bakken hoort u gedurende enkele
minuten een reeks pieptonen.
U stopt de pieptonen door op de toetsen + of te drukken. Na deze handelingen kunt u de
oven opnieuw gebruiken.
Zet de temperatuurknop en de keuzeknop op
stop zodat de oven niet opnieuw gaat werken.
GEPROGRAMMEERD BAKKEN
••
--
Onmiddellijk bakken met uitgestelde
eindtijd
GGaa ttee wweerrkk zzooaallss vvoooorr ggeepprrooggrraammmmeeeerrdd bbaakkkkeenn
Na instelling van de bakduur
Druk op toets “SET” tot “einde bakduur” knippert (fig.1),.
Het digitale display knippert. U kunt de bakduur
nu instellen.
Druk op toets + of - om de gewenste eindtijd in
te stellen (fig.2).
Bijvoorbeeld: Einde bakduur 13u00.
Na deze handelingen wordt het begin van de
bakcyclus uitgesteld zodat het bakken is afgelopen om 13u00.
Het digitale display blijft stilstaan tot het begin
van de bakcyclus.
Na het bakken hoort u enkele minuten lang een
reeks pieptonen.
Wanneer het bakken klaar is zet u de
keuzeknop weer op ” 0 ” en de temperatuurknop op stop.
U kunt het einde van de baktijd alleen instellen
binnen de komende twaalf uur.
fig.1
fig.2
99642242_A_ML.qxp 14/05/2007 14:56 Page 93
SET
SET
Page 94

94
2 / GEBRUIK VAN HET APPARAATNL
UUww oovveenn iiss uuiittggeerruusstt mmeett eeeenn eelleeccttrroonniisscchhee
sscchhaakkeellkkllookk ddiiee oonnaaffhhaannkkeelliijjkk iiss vvaann ddee oovveenn eenn
ttooeellaaaatt d
dee ttiijjdd aaff ttee tteelllleenn..
Druk op toets “SET” tot het lichtje knippert
“ ” (fig.1).
Druk op toets (
++ ooff --
) tot de gewenste duur bereikt is
(maxi 12u00)
Bijvoorbeeld : 25 minuten.
Het instellen gaat per 10 seconden tot 19:30 en vervolgens per minuut.
De tijd wordt weergegeven in minuten en seconden
van 00:00 tot 19:30
Bijvoorbeeld : 19:30 komt neer op 19 minuten en 30
seconden.
De tijd wordt in uren en minuten aangegeven vanaf 20 minuten:
Bijvoorbeeld : 00:20 komt neer op 0 uur en 20 minuten.
U stopt de pieptonen door op de toetsen + of - te
drukken.
- Indien geen bakcyclus is geprogrammeerd
gaat het digitale display uit.
- Indien een bakcyclus was geprogrammeerd
verschijnt de resterende baktijd op het digitale
display.
- Indien een geprogrammeerde bakcyclus eindigt voor het einde van de schakelklok hoort u 3
minuten lang een reeks pieptonen.
Druk op de toetsen + of - om een einde te maken
aan de pieptonen. Het digitale display geeft de
resterende tijd van de schakelklok weer.
Het display stopt met knipperen na enkele seconden, de schakelklok begint met aftellen.
AAaann hheett eeiinnddee vvaann ddee bbaakkdduuuurr wwoorrddtt uu 3300 sseeccoonn--
ddeenn llaanngg
ddoooorr eeeenn rreeeekkss ppiieeppttoonneenn ggeewwaaaarr--
sscchhuuwwdd..
fig.1
UU kkuunntt oopp eellkk mmoommeenntt ddee pprrooggrraammmmeerriinngg vvaann ddee sscchhaakkeellkkllookk aannnnuulleerreenn ooff wwiijjzziiggeenn..
SCHAKELKLOK FUNCTIE
••
99642242_A_ML.qxp 14/05/2007 14:56 Page 94
SET
Page 95

95
3/BAKWIJZEN VAN DE OVEN
NL
* Bakwijzen waarnaar verwezen wordt in het energie-label overeenkomstig de Europese norm
EN 50304 en de Europese richtlijn 2002/40/EG.
DDRRAAAAIIEENNDDEE WWAARRMMTTEE
•
Het bakken gebeurt met een verwarmingselement dat zich achter in de oven bevindt en
door de luchtvermengingsschroef. .
•
Snelle temperatuurstijging: Voor sommige gerechten is het niet nodig de oven voor te
verwarmen.
•
Aanbevolen om de sappigheid van wit vlees, vis en groenten te bewaren.
Voor veelvuldige bakcycli tot 3 niveaus.
GGEECCOOMMBBIINNEEEERRDDEE WWAARRMMTTEE
•
Het bakken gebeurt met het onderste en het bovenste verwarmingselement en met de luchtver-
mengingsschroef.
•
Drie gezamenlijke warmtebronnen : veel warmte onder, een beetje hete lucht en een lage
grillstand om een gouden korstje te bekomen.
•
Aanbevolen voor quiches, pasteien, sappige fruittaarten bij voorkeur in anti-kleef
schotel.
GGRRIILLLL HHEETTEELLUUCCHHTT ++ DDRRAAAAIISSPPIITT
•
Het bakken gebeurt afwisselend door het bovenste verwarmingselement en de luchtver-
mengingsschroef.
•
Voorverwarmen niet nodig. Gevogelte en gebraad blijven sappig en krokant.
•
Het draaispit blijft draaien tot u de ovendeur opent.
•
Schuif de braadslee op de laagste richel.
•
Aanbevolen voor alle gevogelte of gebraad op het braadspit, om lamsvlees en rundsge-
braad door te bakken. Om stukken vis zacht te houden.
TTRRAADDIITTIIOONNNNEEEELL EECCOO
•
Het bakken gebeurt met het onderste en het bovenste verwarmingselement.
•
In deze stand kunt u energie besparen zonder de bakkwaliteit te beïnvloeden.
•
De ECO stand wordt gebruikt voor de energielabeling.
•
Al deze bakwijzen gebeuren zonder
vvoooorrvveerrwwaarrmmiinngg
.
SSTTEERRKKEE GGRRIILLLL ++ DDRRAAAAIISSPPIITT
•
Het bakken gebeurt met het bovenste verwarmingselement van de oven.
•
Verwarm de oven 5 minuten voor. Zet de vetvanger op de onderste richel.
•
Aanbevolen voor
hheett rroooosstteerreenn vvaann kkaarrbboonnaaddee,, wwoorrssttjjeess,, ppllaakkjjeess bbrroooodd,, ggaammbbaa’’ss
rechtstreeks
op het rooster.
WWAARRMMHHOOUUDDEENN
•
Bovenste en onderste verwarmingselement en luchtvermenging.
•
Aanbevolen voor
hheett rriijjzzeenn vvaann bbrrooooddddeeeegg,, bbrriioocchhee,, ttuullbbaanndd
...zonder te overschrijden
(opwarmen van borden, ontdooien).
*
*
99642242_A_ML.qxp 14/05/2007 14:56 Page 95
Page 96

96
4 / ONDERHOUD EN REINIGING VAN HET APPARAATNL
REINIGING VAN DE BUITENKANT
••
Om het venstertje van de elektronische programmaschakelaar en de ovendeur te reinigen,
gebruikt u een zachte doek bevochtigd met wat ruitenspray.
Gebruik geen reinigende crèmes of een schuursponsje.
Voor het onderhoud van het apparaat bieden wij u de Clearit-producten aan.
Clearit biedt professionele producten en oplossingen voor het dagelijks onderhoud van uw elektrische apparaten en van uw keuken.
Deze producten, alsmede accessoires, zijn te krijgen bij uw verkoper.
DDee eexxppeerrttiissee vvaann pprrooffeessssiioonnaallss
iinn ddiieennsstt vvaann ppaarrttiiccuulliieerreenn
REINIGING VAN DE DEUR
••
Let op
Het hoofdstuk “De deur demonteren” pagina 11 van de INSTALLATIE- EN GEBRUIK-
SAANWIJZINGEN (bijgeleverd met het apparaat) is niet van toepassing op dit model.
99642242_A_ML.qxp 14/05/2007 14:56 Page 96
Page 97

97
4 / ONDERHOUD EN REINIGING VAN HET APPARAAT
NL
Om te profiteren van de hoeveelheid warmte die
reeds aanwezigheid is in de oven en zo energie
te besparen:
Start de pyrolysereiniging na een bakcyclus.
Verwijder alle toebehoren uit de oven en verwijder eventuele grove bakresten.
- Op de programmaschakelaar moet de tijd vermeld staan, deze mag niet knipperen.
Zet de selectieknop op de stand “Pyro” (fig.1).
De duur van de pyrolyse is:
1u30 of 1u45 of 2u00
Deze tijden kunnen niet gewijzigd worden en de
oven zal onbeschikbaar zijn 2u of 2u15 ou 2u30.
Let op
De deur wordt enkele minuten na het begin van de cyclus vergrendeld.
De pyrolyse stopt automatisch. Wanneer de temperatuur ongeveer 275°C bereikt heeft, kan
de ovendeur geopend worden.
STARTEN VAN DE PYROLYSE REINIGING
••
EINDE VAN DE PYROLYSE REINIGING
••
Zodra het hangslot op het display uitgaat, stopt de pyrolyse automatisch. Nu kan de ovendeur
geopend worden.
- Zet de keuzeknop weer op 0.
Als de oven koud is geworden, veegt u met een vochtige doek de witte as op. De oven is nu weer
schoon en klaar voor een nieuwe bakcyclus.
Hierbij is rekening gehouden met de afkoelingstijd tot de ontgrendeling van de deur.
Tijdens de pyrolyse brandt het vergrendelingslampje om aan te geven dat de deur vergrendeld is.
Tijdens de pyrolyse brandt het thermostaatlampje om aan te geven dat de deur vergrendeld is.
Het thermostaatlampje gaat aan als de oven warm aan het worden is.
fig.1
99642242_A_ML.qxp 14/05/2007 14:56 Page 97
Page 98

98
5 / SERVICEDIENSTNL
Eventuele ingrepen op het apparaat dienen
door een gekwalificeerde alleenvertegenwoordiger van het merk te worden uitgevoerd.
Vermeld de “Service” referentie van het apparaat (model, type, serienummer). Deze inlichtingen staan op het identificatieplaatje
(Fig.1).
OORSPRONKELIJKE ONDERDELEN
Bij een onderhoudsingreep, dient u uitsluitend
om oorspronkelijke onderdelen te
vragen.
•INGREPEN
BBrraannddtt AApppplliiaanncceess
- vennootschap op aandelen met kapitaal van 10.000.000 euro RCS Nanterre 440.302.347.
BRANDT APPLIANCES SAS
7 rue Henri Becquerel
92500 RUEIL MALMAISON
230V ~ 50 Hz
MADE IN FRANCE
fig.1
99642242_A_ML.qxp 14/05/2007 14:56 Page 98
Page 99

99
FR
02
DE
39
EN
51
ES
63
IT
75
NL
87
PT
99
DA
27
CS
15
Estimado(a) Cliente,
Acabou de adquirir um forno
DDEE DDIIEETTRRIICCHH
e estamos-lhe gratos por
isso.
As nossas equipas de investigação conceberam esta nova geração de
aparelhos a pensar em si, que pela sua qualidade, estética, funções e
evoluções tecnológicas se tornam produtos excepcionais, reveladores do nosso saber-fazer.
O seu novo forno
DDEE DDIIEETTRRIICCHH
integra-se harmoniosamente na sua
cozinha e alia perfeitamente os mais altos desempenhos de cozedura
com a facilidade de utilização. Foi nosso desejo oferecer-lhe um produto de excelência.
Na gama de produtos
DDEE DDIIEETTRRIICCHH
, encontrará igualmente uma vasta
gama de fogões, placa de cozinha, exaustores, máquinas de lavar
louça e frigoríficos integráveis que poderá coordenar com o seu novo
forno
DDEE DDIIEETTRRIICCHH
.
No intuito permanente de satisfazer o melhor possível as suas exigências em relação aos nossos produtos, o nosso serviço de Apoio ao
Consumidor encontra-se, naturalmente, à sua disposição e à sua escuta para responder a todas as suas perguntas ou sugestões (morada
e n.º de telefone no fim deste guia).
Também pode contactar-nos através do nosso website:
wwwwww..ddeeddiieettrriicchh--eelleeccttrroommeenna
aggeerr..ccoomm
onde poderá tomar conhecimento das nossas mais recentes inovações e obter informações de
carácter útil e complementar.
A Marca
DDEE DDIIEETTRRIICCHH
NNoovvooss oobbjjeeccttooss ddee vvaalloorr
Num esforço de melhoria constante dos nossos produtos, reservamos o direito de fazer alterações técnicas, funcionais ou estéticas para melhorar o produto.
Importante:
Antes de ligar o seu aparelho, leia com atenção este manual de instalação e de utiliza-
ção, de modo a familiarizar-se mais rapidamente com o seu funcionamento.
99642242_A_ML.qxp 14/05/2007 14:56 Page 99
Page 100

100
ÍNDICEPT
1 / DESCRIÇÃO DO SEU APARELHO
••
Apresentação do seu forno
__________________________________ 101
••
Acessórios
________________________________________________ 101
••
Apresentação do programador e selectores ____________________ 102
2 / UTILIZAÇÃO DO SEU APARELHO
••
Utilização do programador
º
Como acertar a hora____________________________________ 103
º
Cozedura imediata _____________________________________ 104
••
Cozedura programada
º
Início imediato _________________________________________ 104
º
Início diferido__________________________________________ 105
••
Função do temporizador ____________________________________ 106
3 / MODOS DE COZEDURA DO FORNO_____________________________ 107
4 / MANUTENÇÃO E LIMPEZA DO FORNO __________________________ 108
5 / NOTAS
______________________________________________________ 110
6 / SERVIÇO PÓS-VENDA
••
Intervenções
______________________________________________ 111
99642242_A_ML.qxp 14/05/2007 14:56 Page 100
 Loading...