

Page 1

Le guide d’utilisation de votre four
Using your oven
DOD448*
FR
GB
99634101_ML.qxd 16/07/04 09:41 Page 1
Page 2

Tout au long de la notice,
vous signale les consignes de sécurité,
vous signale les conseils et les astuces
Edito P.3
Comment se présente votre four ?
Descriptif de l’appareil P.4
Accessoires P.5-6
Conseils de sécurité P.7
Comment installer votre four ?
Raccordement électrique P.8
Changement du câble d’alimentation P.8
Dimensions utiles pour encastrer votre four P.9
Comment utiliser votre four inférieur?
Le détail de votre programmateur P.10
Comment mettre à l’heure l’horloge du four ? P.11
Comment faire une cuisson immédiate ? P.12
Comment programmer une cuisson ? P.13-14
Comment utiliser la minuterie ? P.15
Comment faire une cuisson Economique ? P.16
Comment personnaliser la température de cuisson ? P.17
Comment utiliser la sécurité enfant ? P.17
Comment mettre en veille votre afficheur ? P.18
Modes de cuisson du four inférieur P.20-21
Comment nettoyer la cavité de votre four inférieur?
Qu’est-ce qu’une pyrolyse ? P.22
Dans quel cas faut-il effectuer une pyrolyse ? P.22
Comment faire une pyrolyse ? P.22-23
Comment changer l’ampoule ? P.24
Que faire en cas d’anomalies de fonctionnement P.24
Comment utiliser votre four supérieur?
Comment faire une cuisson immédiate ? P.25
Comment faire une cuisson au gril ? P.25
Comment faire une pyrolyse ? P.26
Comment changer l’ampoule ? P.26
Modes de cuisson du four supérieur P.28-29
Qui contacter ?
P.30
2
Sommaire
99634101_ML.qxd 16/07/04 09:41 Page 2
Page 3

3
Edito
Chère Cliente, Cher Client,
Vous venez d'acquérir un four DE DIETRICH et nous vous en remercions.
Nos équipes de recherche ont conçu pour vous une nouvelle génération d'appareils, qui par leur qualité, leur design et leurs évolutions technologiques en
font des produits d'exception et révèle un savoir-faire unique.
Avec des lignes modernes et raffinées, votre nouveau four DE DIETRICH s'intègre harmonieusement dans votre cuisine et allie parfaitement la maîtrise
technologique, les performances de cuisson, et le luxe esthétique.
Vous trouverez également dans la gamme des produits DE DIETRICH, un vaste
choix de tables de cuisson, de hottes aspirantes, de lave-vaisselle, de fours
micro-ondes et de réfrigérateurs intégrables, que vous pourrez coordonner à
votre nouveau four DE DIETRICH.
Bien entendu, dans un souci permanent de satisfaire au mieux vos exigences
vis à vis de nos produits, notre service consommateurs est à votre disposition
et à votre écoute pour répondre à toutes vos questions ou suggestions (coordonnées à la fin de ce livret).
Grâce à ces "nouveaux objets de valeurs" qui nous servent de repère dans nos
vies de tous les jours, DE DIETRICH, référence de l'excellence, est une véritable invitation à un nouvel art de vivre.
La Marque DE DIETRICH.
FR
99634101_ML.qxd 16/07/04 09:41 Page 3
Page 4

4
C
omment se présente votre four ?
1
3
5
ECO
START
STOP
150
65
100
165
180
200
210
40
220
240
5
4
Four inférieur
Four supérieur
2
2
3
6
1
2
3
4
Programmateur four inférieur
Lampe
Indicateur de gradin
Trou pour tourne broche
Contact de détection d’ouverture de porte
Sélecteur de fonctions
four supérieur
Thermostat four supérieur
DESCRIPTIF DE L’APPAREIL
1
5
6
7
7
99634101_ML.qxd 16/07/04 09:41 Page 4
Page 5
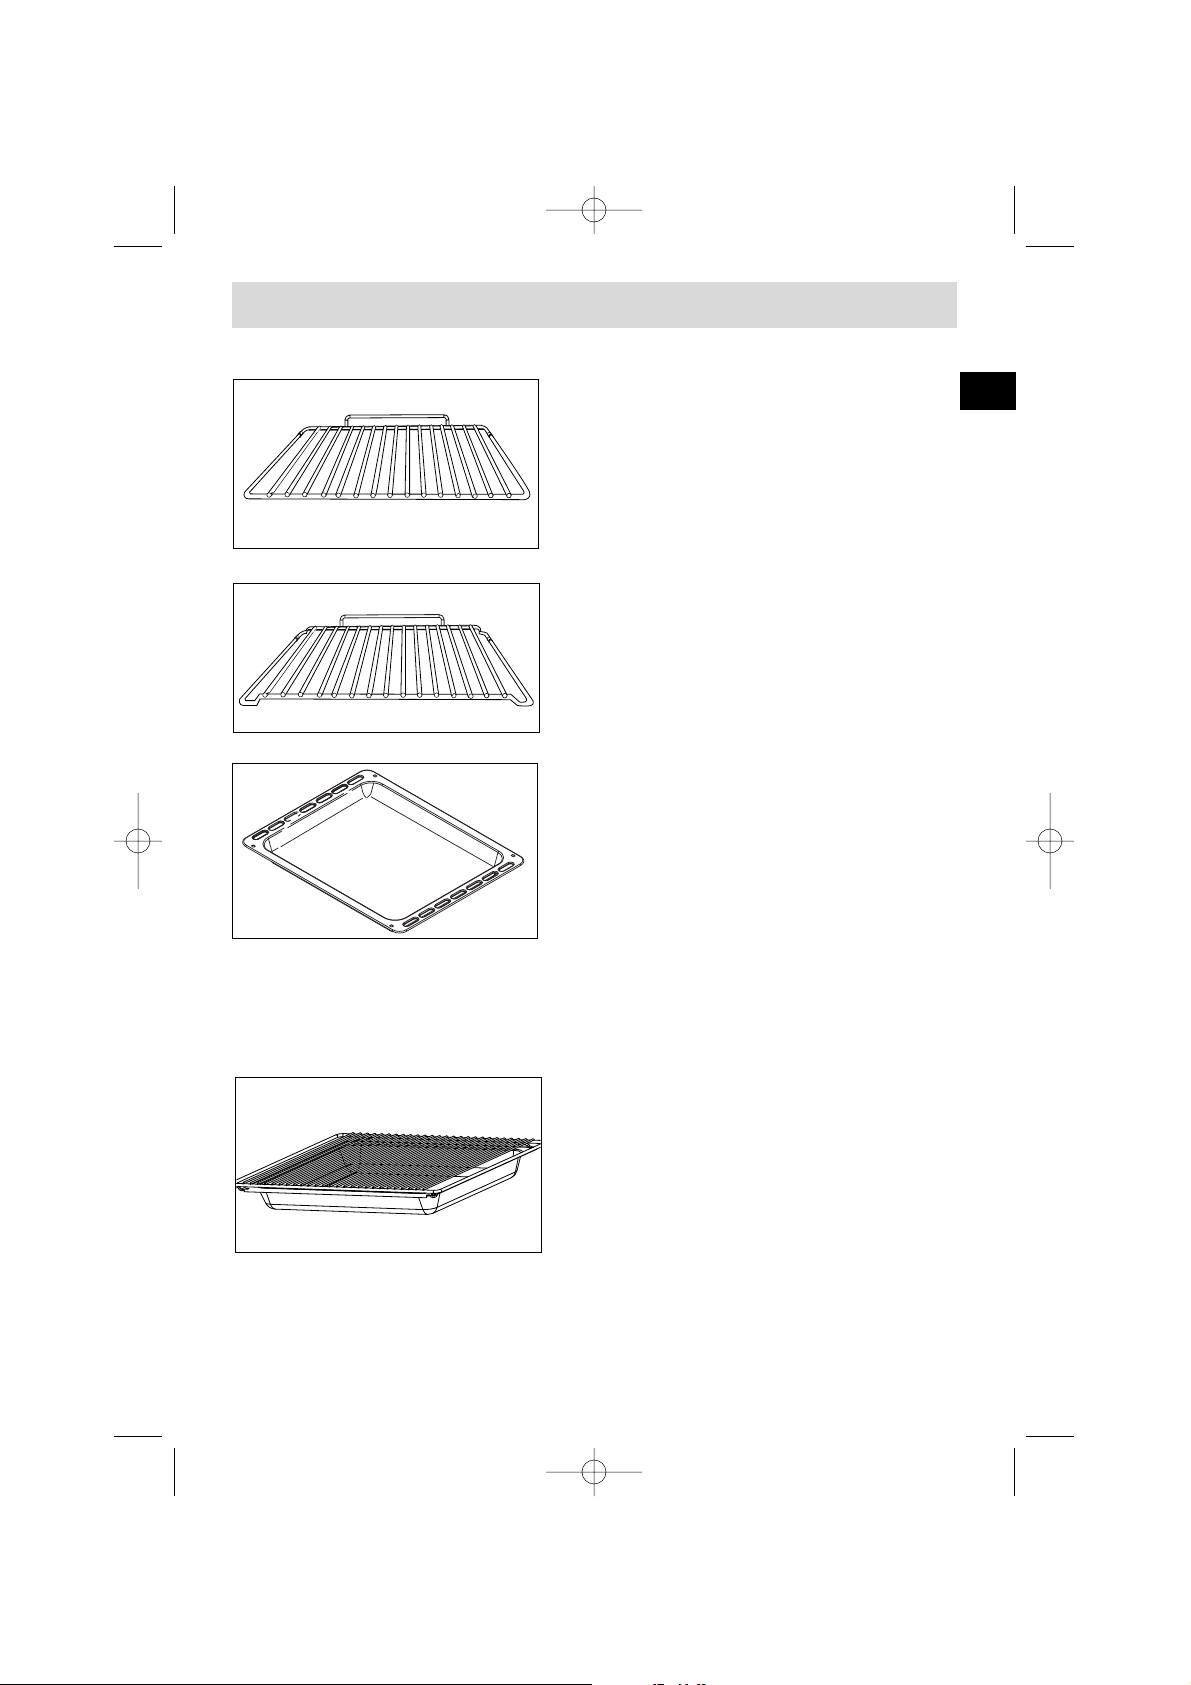
Accessoires
AR
AV
Grille sécurité anti basculement
cambrée
Même utilisation que la grille plate.
Sa forme est étudiée pour vous permettre de
positionner votre plat entre 2 niveaux de gradin.
A n'utiliser que sur la grande cavité.
Plat (lèchefrite) + grille
Inséré sous la grille, il recueille les jus et les
graisses des grillades. Il peut aussi être utilisé
à demi rempli d'eau pour des cuissons au bainmarie.Evitez de poser directement dans ce plat
des rôtis ou des viandes car vous aurez automatiquement d'importantes projections sur les
parois du four.
FR
Grille sécurité
anti basculement
La grille peut être utilisée pour supporter tous
les plats et moules contenant des aliments à
cuire ou à gratiner. Elle sera utilisée pour les
grillades (à poser directement dessus).
5
Inséré dans les gradins sous la grille, il recueille les jus et les graisses des grillades. Il peut aussi être utilisé à demi rempli d'eau pour des cuissons au bain-marie.
Evitez de poser directement dans ce plat des rôtis ou des viandes car vous aurez
automatiquement d'importantes projections sur les parois du four.
Plat multi usages
(
plat à gâteaux ou lèchefrite)
Il sert de plat à gâteaux et dispose d'un
rebord incliné. Il s'utilise pour la cuisson de
pâtisseries telles que choux à la crème,
meringues, madeleines, pâtes feuilletées...
99634101_ML.qxd 16/07/04 09:41 Page 5
Page 6

Accessoires
6
Tournebroche
• Positionnez le support broche dans les encoches
du plat lèche frite (voir dessin).
• enfournez l’ensemble au deuxieme gradin(en
partant du bas). Après avoir embrochéla piece
de viande à rôtir, placez la broche sur le support,
glissez l’ensemble jusqu’àce que la pointe de la
broche soit dans le moteur situé au fond du four.
Retirez la poignée en la dévissant. Après la cuisson, sortez l’ensemble. A l’extrémité
de la poignée, une empreinte vous permet de dévissez les fourchettes.
Support de plat sortant
(en option)
(KITSORTF1)
Grâce à ce système, vous pouvez extraire
entièrement votre plat émaillé et accéder très
facilement à vos mets en cours de cuisson.
Plaque pâtisserie anti-adhérante
(
à poser sur grille)
Posée sur la grille support de plat, elle s’utilise
pour la cuisson de pâtisserie, tarte, pizza.
Recouverte d’un revêtement anti-adhérent, les
aliments n’accrocheront pas.
Munissez vous de gants isolants pour la mani-
puler à la sortie du four.
Laissez la refroidir avant de la nettoyer manuel-
lement à l’évier avec un produit à vaisselle. Evitez les éponges grattantes.
ATTENTION : Ne coupez pas dessus avec un couteau ou une roulette à pizza
métallique, utilisez plûtot des ustensiles en plastique ou en silicone.
Ne pas utiliser la plaque au delà de 260°C ainsi qu’en fonction PYROLYSE.
99634101_ML.qxd 16/07/04 09:41 Page 6
Page 7

7
Conseils de sécurité
Merci de prendre connaissance de ces conseils avant d’installer et d’utiliser votre four. Ce four a été conçu pour être utilisé par des particuliers
dans leur lieu d’habitation. Il est destiné exclusivement à la cuisson des denrées
alimentaires. Ce four ne contient aucun composant à base d’amiante.
PREMIERE UTILISATION :
Avant d’utiliser votre four pour la première fois, chauffer le à vide, porte fermée,
pendant 15 minutes environ sur la position maxi afin de “roder” l’appareil. La laine
minérale qui entoure la cavité du four peut dégager, au début, une odeur particulière due à sa composition. De même, vous constaterez peut-être un dégagement
de fumée. Tout ceci est normal.
UTILISATIONS SUIVANTES :
- Assurez vous que votre porte de four est bien fermée afin que le joint
d’étanchéité remplisse correctement sa fonction.
- Ne laissez personne s’appuyer ou s’asseoir sur la porte du four ouverte.
- Lors de l’utilisation du gril porte entre-ouverte, les parties
accessibles ou les surfaces peuvent devenir chaudes.
Eloignez les jeunes enfants.
- Lors de son utilisation, l’appareil devient chaud. Veillez à ne pas toucher
les éléments chauffants situés à l’intérieur du four.
- Après une cuisson, ne prenez pas à main nue la casserolerie (grille, tournebroche, léchefrite, berceau de tournebroche...), utilisez une manique ou un tissu
isolant.
- Ne garnissez pas votre four de feuilles en aluminium. Sinon, il en résulterait une accumulation de chaleur qui influencerait désavantageusement le résultat de la cuisson et du rôtissage et endommagerait l’émail.
Pour toute intervention de nettoyage dans la cavité du four, le
four doit être arrêté.
Ne pas accrocher de linge ou de torchon à la poignée du four.
- Pendant un nettoyage, les surfaces accessibles deviennent plus
chaudes qu’en usage normal. Eloigner les jeunes enfants.
- Pour votre sécurité votre four est équipé d’un ARRÊT AUTOMATIQUE
si par mégarde vous oubliez d’éteindre votre four. Après 23 heures de fonctionnement , la fonction AS (Automatique Stop) s’active et votre four s’arrête de
chauffer. AS s’affiche à la place de l’heure et une série de 2 bips successifs est
émise pendant un certain temps.
Remettez impérativement le sélecteur de fonction sur 0 pour
réutiliser votre four.
FR
99634101_ML.qxd 16/07/04 09:41 Page 7
Page 8
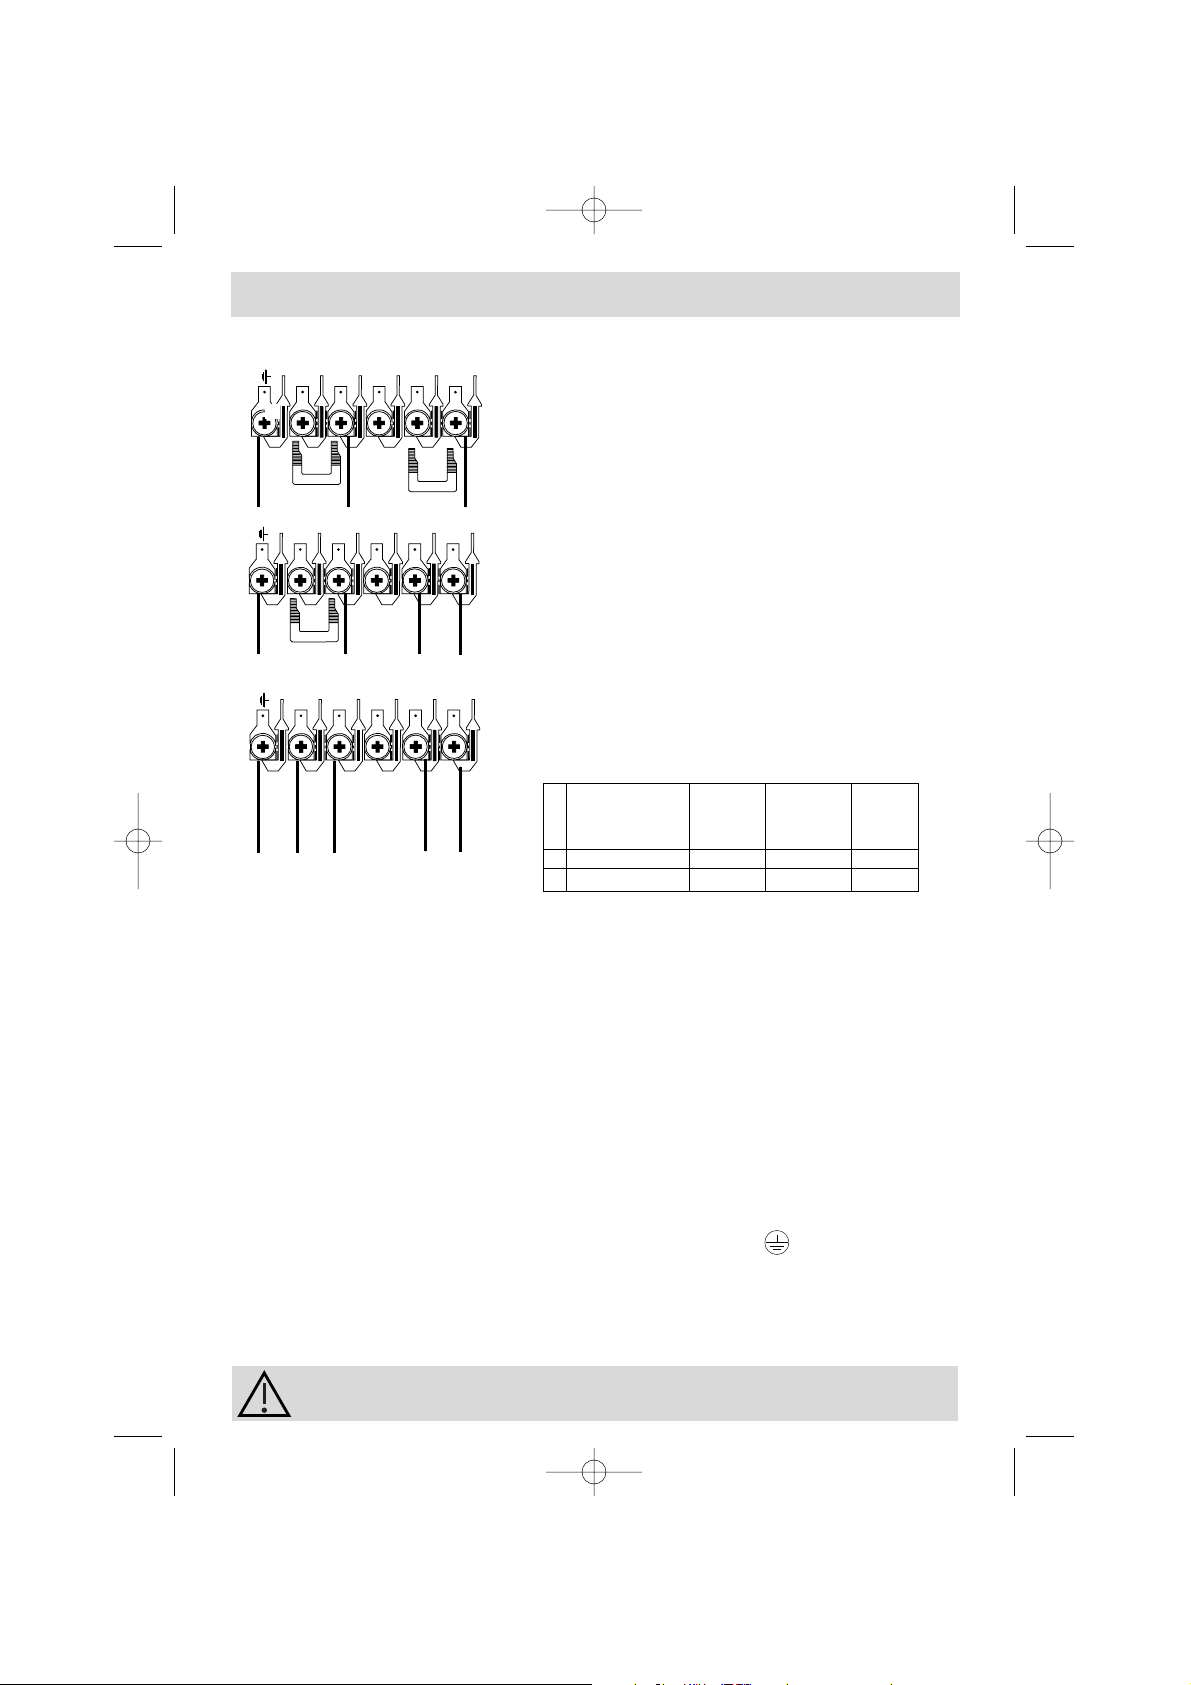
• Le câble d’alimentation (H05 RR-F, H05 RN-F ou H05 VV-F) doit avoir une longueur
suffisante pour être raccordé au four à encastrer posé au sol devant le meuble.
Pour cela l’appareil doit être déconnecté du réseau :
• Ouvrez la trappe située en bas à droite du capot arrière en dévissant les 2 vis,
puis faîtes pivoter la trappe.
• Dénudez chaque fil du nouveau câble d’alimentation sur 12mm.
• Torsadez soigneusement les brins.
• Desserrez les vis du bornier et retirez le cordon d’alimentation à changer.
• Introduire le câble d’alimentation par le côté du capot dans le serre-câble situé à
droite du bornier.
• Raccordez les fils du câble conformément au(x) repère(s) écrit(s) sur le bornier.
• Tous les brins des fils d’alimentation doivent être emprisonnés sous les vis.
• Le fil de la phase sur la borne L.
• Le fil de terre couleur vert-jaune doit être relié à la borne .
• Le fil du neutre (bleu) sur la borne N.
• Vissez à fond les vis du bornier et vérifiez le branchement en tirant sur chaque fil.
• Fixez le câble au moyen du serre-câble situé à droite du bornier.
• Refermez la trappe à l’aide des 2 vis.
Installation et /ou Changement du câble d’alimentation
Notre responsabilité ne saurait être engagée en cas d'accident consécutif à une mise à la terre inexistante, défectueuse ou incorrecte.
8
Le raccordement électrique est à réaliser avant la mise
en place de l'appareil dans le meuble.
• Avant d'effectuer le branchement, s'assurer que les
fils de votre installation électrique sont d'une section
suffisante pour alimenter normalement l'appareil (section au minimum égale à celle du câble d'alimentation).
Le fusible de votre installation doit être conforme au tableau ci-contre.
• Dans le cas d’un branchement avec prise de courant,
celle-ci doit rester accessible après l’installation de l’appareil.
• Lorsque l’appareil n’est pas raccordé au réseau par
l’intermédiaire d’une fiche de prise de courant, un
dispositif de coupure omnipolaire (avec une ouverture
de contact de 3 mm minimun) doit être installé côté alimentation pour respecter les prescriptions de sécurité.
• Le four doit être branché avec un câble d’alimentation
normalisé dont le nombre de conducteur dépend du
type de raccordement désiré et conformément au tableau ci-dessous.
Comment installer votre four?
➀
➁
③
T
N
Ph
T
T
N
Ph 1
Ph 2
T
N2
Ph 1
Ph 2
N1
Raccordement électrique
section calibre du
secteur branchement minimum dispositif
du câble de protection
➀ 230V- 50Hz 1 Ph + N 4 mm² 32 A
➁ 400V 2N-50Hz 2 Ph + N 1,5 mm² 16 A
④ 230V 2N-50Hz 2 Ph + N 1,5 mm² 16 A
99634101_ML.qxd 16/07/04 09:41 Page 8
5
4
5
4
2
3
3
1
2
1
5
4
2
3
1
Page 9

9
Comment installer votre four ?
Pour être assuré d’avoir une installation conforme, n’hésitez pas
à faire appel à un spécialiste électroménager.
Dimensions utiles pour encastrer votre four
Votre four possède une circulation d’air optimisée qui permet d’obtenir des résultats
de cuisson et de nettoyage remarquables en respectant les éléments suivants :
• Centrez le four dans le meuble de façon à garantir une distance mini de 5 mm
avec le meuble voisin.
• La matière du meuble d’encastrement doit résister à la chaleur (ou être revêtu
d’une telle matière).
• Pour plus de stabilité, fixez le four dans le meuble par 2 vis au travers des trous
prévus à cet effet sur les montants latéraux (cf schéma).
Pour ce faire :
1) Retirez les cache vis en caoutchouc pour accéder aux trous de fixation.
2) Effectuez un trou de Ø 3 mm dans la paroi du meuble pour éviter l’éclatement du bois.
3) Fixez le four avec les 2 vis.
4) Remettez les cache vis en caoutchouc (ceux-ci servent également à amortir la
fermeture de la porte du four).
(*) si le meuble est ouvert, son ouverture doit être de 70 mm (maxi).
875 mini
5
5
888
875
875
870
595
545
20
50
50
20
FR
99634101_ML.qxd 16/07/04 09:41 Page 9
Page 10

10
C
omment utiliser votre four inférieur ?
1.
Le détail de votre programmateur
Indicateur de pyrolyse
Afficheur de l’horloge et des temps
Indicateur de température
Symbole du minuteur
Indicateur de fin de cuisson
Indicateur de durée de cuisson
1
2
3
4
5
6
ECO
START
STOP
7
8
9
10
11
12
7
8
9
10
11
12
Bouton : Marche/Arrêt
Réglages des temps et
des températures
Réglages des températures
Durée de cuisson
Fin de cuisson
Minuteur indépendant
1
2
3
4
56
99634101_ML.qxd 16/07/04 09:41 Page 10
Page 11

11
Comment utiliser votre four inférieur ?
a) A la mise sous tension
• L’afficheur clignote.
• Réglez l’heure en appuyant sur les touches + ou - (le maintien du doigt sur la
touche permet d’obtenir un défilement rapide)
Exemple:12h30.
• Appuyez sur la touche START/STOP pour valider.
b) Remise à l’heure de l’horloge
• Appuyez simultanément sur les touches et pendant quelques secondes
jusqu’à faire clignoter l’affichage.
• Ajustez le réglage de l’heure avec les touches + ou -.
• Appuyez sur la touche pour valider.
2. Comment mettre à l'heure l’horloge du four ?
S’il n’y a pas de validation par la touche , l’enregistrement
est automatique au bout de quelques secondes.
FR
99634101_ML.qxd 16/07/04 09:41 Page 11
START
STOP
ECO
START
STOP
START
STOP
ECO
ECO
ECO
START
STOP
Page 12
12
Comment utiliser votre four inférieur ?
3. C
omment faire une cuisson immédiate ?
• Choisissez le mode de cuisson
• Sélectionnez, avec la touche
,
la fonction de votre choix :
Exemple : position "
"
.
Un appui continu sur la touche vous permettra de faire défiler les fonctions
de cuisson.
La température proposée s’affiche :
Exemple : 205°C.
• Appuyez sur la touche START/STOP pour démarrer votre cuisson.
Votre four vous propose la température la plus couramment utilisée.
Il vous est cependant possible d’ajuster la température
• Appuyez sur la touche °C. Le symbole °C clignote.
• Ajustez en appuyant sur les touches + ou
-
•
Enregistrez votre choix en appuyant sur la touche °C(s’il n’y a pas de validation
par la touche °C, l’enregistrement est automatique après quelques secondes).
Durant votre cuisson la valeur de la température choisie clignote : une fois atteinte,
l’affichage devient fixe et votre four émet une série de bips sonores.
99634101_ML.qxd 16/07/04 09:41 Page 12
START
START
STOP
START
STOP
STOP
ECO
ECO
ECO
1 / 3
2
Page 13
Comment utiliser votre four inférieur ?
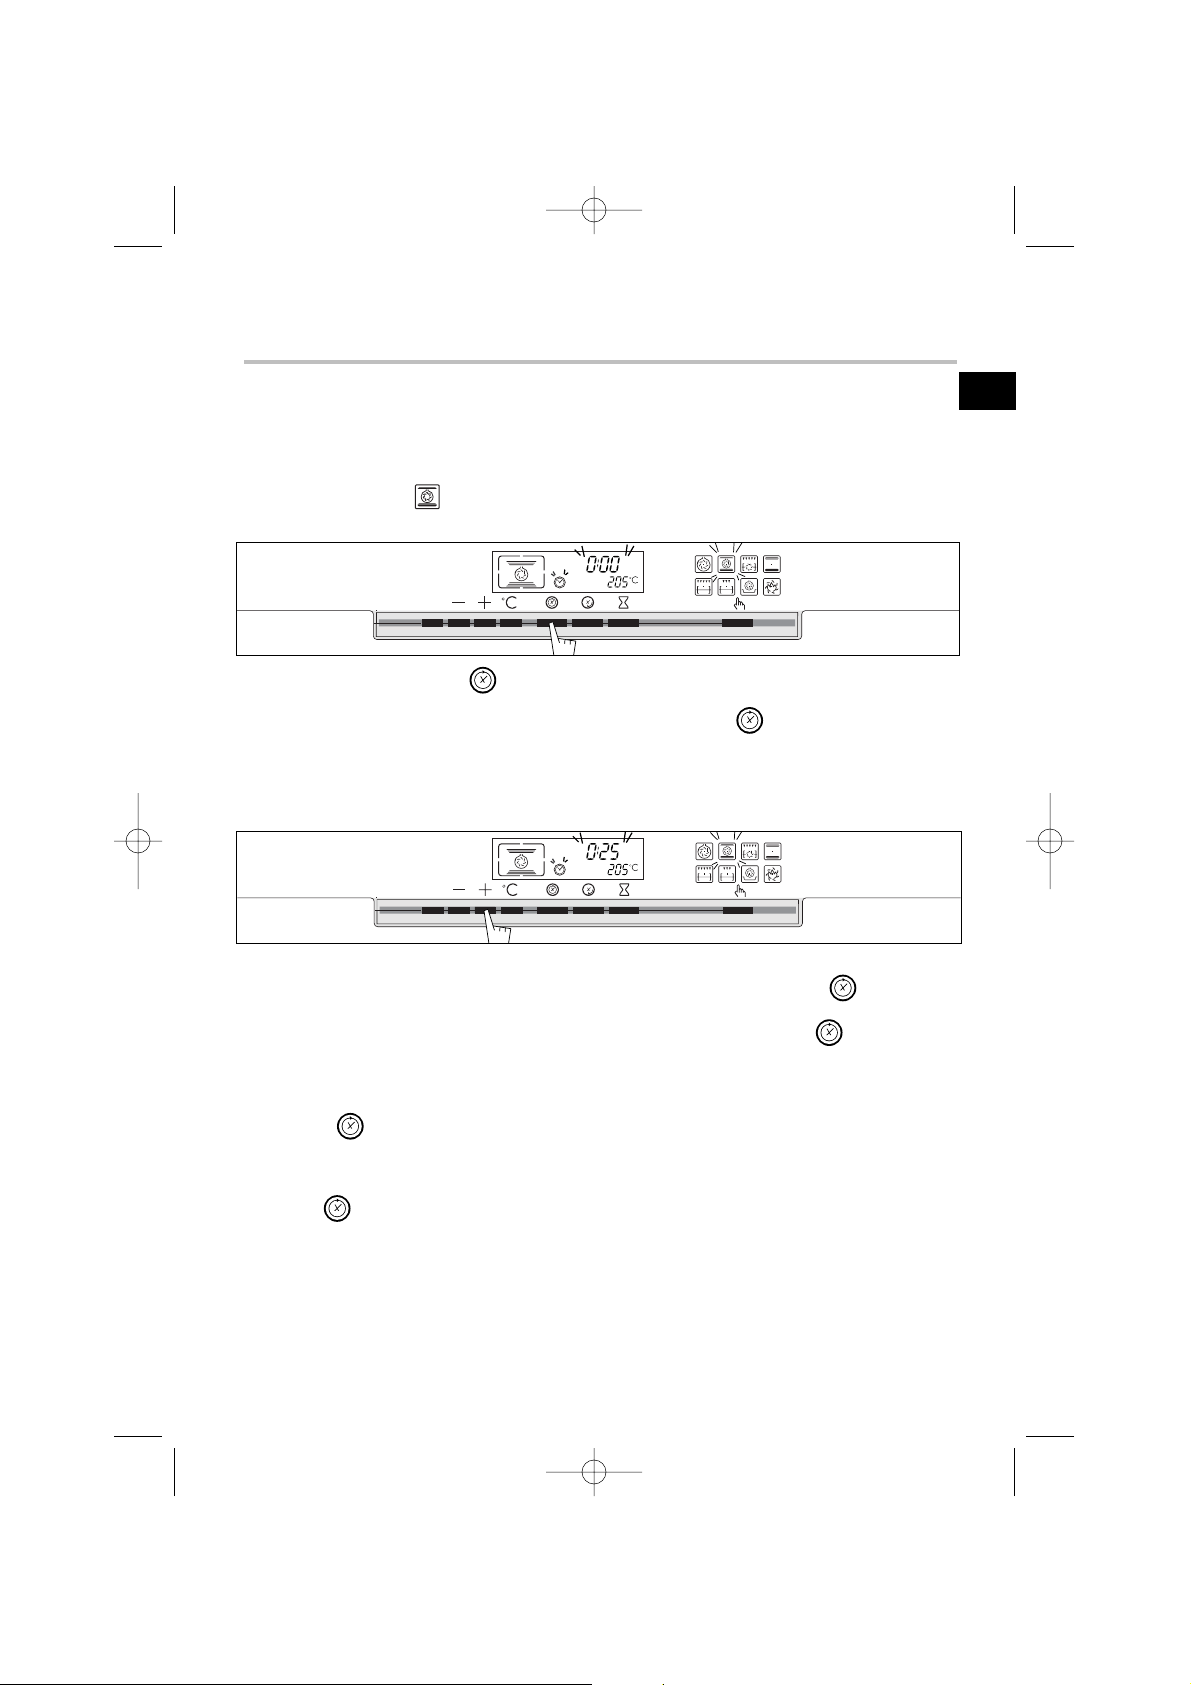
4. Comment programmer une cuisson ?
a) Avec un départ immediat :
• Réglez le mode de cuisson choisi et éventuellement ajustez la température
Exemple : position
température 205°C.
• Appuyez sur le bouton “ ”
• La durée de cuisson clignote à 0:00 ainsi que le
symbole pour indiquer que le
réglage est
alors possible.
• Appuyez sur les touches + ou - pour régler le temps souhaité.
Exemple : 25 min de cuisson.
L’enregistrement de la durée ajustée est automatique au bout de quelques secon-
des ou peut être confirmé en appuyant de nouveau sur la touche
.
A ce moment là, l’heure réapparaît dans l’affi
cheur et le symbole devient fixe.
Après ces actions, le four chauffe.
En fin de cuisson, une série de bips sonores est émise durant quelques minutes et
le symbole clignote.
L’arrêt des bips se fait en appuyant sur la touche START/STOP pendant 1 seconde.
Vous pouvez à tout moment consulter ou modifier la fin de cuisson en appuyant sur
la touche
.
Pour annuler votre programmation, appuyez sur la touche START/STOP.
13
FR
99634101_ML.qxd 16/07/04 09:42 Page 13
START
START
STOP
STOP
ECO
ECO
Page 14
14
Il est possible de :
- modifier à tout moment la fin de cuisson.
- consulter à tout moment la fin de cuisson en appuyant sur la
touche
.
- d’annuler à tout moment la programmation en appuyant sur la
touche START/STOP.
Comment utiliser votre four inférieur ?
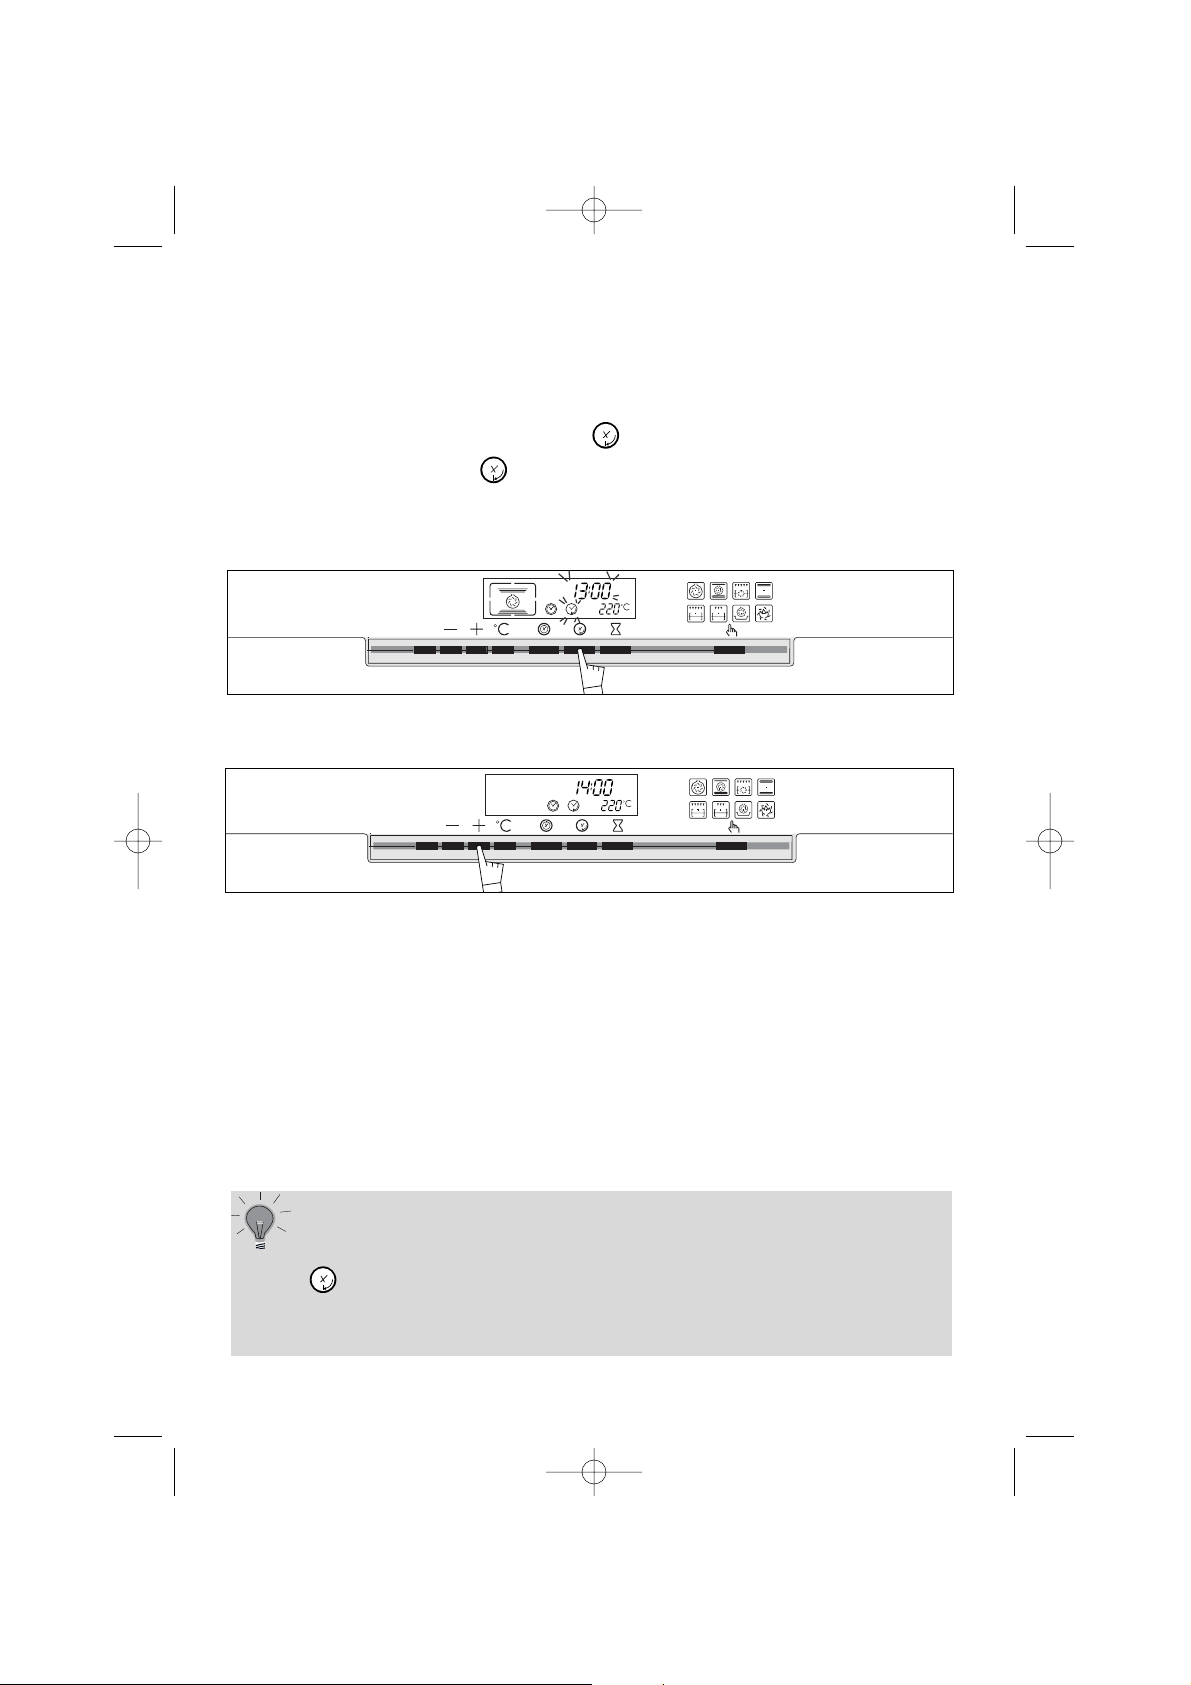
b) Avec un départ différé : (heure de fin choisie)
Procédez comme une cuisson programmée puis, après la durée de cuisson,
• Appuyez sur la touche “fin de cuisson” , l’heure de fin de cuisson s’affiche et
cligote ainsi que le symbole pour indiquer que le réglage est alors possible.
Exemple : il est 12h30.
Vous avez programmé une durée de cuisson de 30 min.
L’heure de fin de cuisson affichée est 13h.
• Réglez l’heure de fin de cuisson en appuyant sur les touches + ou -.
Exemple : Fin de cuisson 14h00.
Une fois l’heure de fin de cuisson différée programmée, l’heure réapparaît dans l’afficheur.
Après ces actions, le départ de la chauffe est différé pour que la cuisson soit finie
à 14h.
Quand votre cuisson est terminée, une série de bips sonores est émise pendant
quelques minutes. L’arrêt des bips se fait en appuyant sur la touche
START/STOP
pendant 1 seconde.
99634101_ML.qxd 16/07/04 09:42 Page 14
ECO
START
STOP
START
ECO
STOP
Page 15

15
Votre four est équipé d'une minuterie électronique indépendante du fonc-
tionnement du four permettant de décompter un temps. Dans ce cas, l’affichage est prioritaire sur l’affichage de l’heure du jour.
• Appuyez sur la touche sablier
. L’afficheur clignote et le symbole du sablier
apparait et clignote.
• Appuyez sur les touches + ou - jusqu’à obtenir la durée voulue (maxi 59 minutes 50 secondes).
L’afficheur s’arrête de clignoter au bout de quelques secondes et la minuterie se
met en marche et décompte le temps de secondes en secondes. Une fois la
durée écoulée, la minuterie émet des bips sonores pour vous avertir et le symbo-
le clignote.
L’arrêt des bips se fait en appuyant sur la touche ou START/STOP.
A ce moment l’heure réapparaît dans l’afficheur.
5.
Comment utiliser la minuterie ?
Il est possible de :
- modifier le temps restant en appuyant sur la touche et en
réglant par les touches + ou -.
- annuler à tout moment la programmation en ramenant le
temps sur 0.00 et en appuyant sur la touche START/STOP.
Comment utiliser votre four inférieur ?
FR
99634101_ML.qxd 16/07/04 09:42 Page 15
START
STOP
ECO
START
STOP
ECO
Page 16

6. C
omment faire une cuisson économique ?*
Le programmateur ne doit afficher que l'heure; celle-ci ne doit pas clignoter.
• Placez votre plat dans le four selon la préconisation indiquée dans l’afficheur.
Sélectionnez la position " "
-> gradin 2 conseillé.
.
• Votre four vous propose la température optimale pour le mode de cuisson choisi 200°C.
Il vous est cependant possible d’ajuster celle-ci en utilisant le bouton
situé sous l’afficheur.
Exemple : position " " ajustée à 190°C.
Après ces actions le four chauffe :
La valeur de la température clignote.
3 bips vous indiqueront que la température de réglage est atteinte.
*Pour optimiser la cuisson ECO, ne pas faire de préchauffage et ne pas
ouvrir la porte.
Cette position permet de faire un gain d’énergie jusqu’à 20% tout en
conservant les résultats de cuisson identiques.
La position ECO est utilisée pour l’étiquettage énergétique.
Après un cycle de cuisson, le ventilateur du four continue de
fonctionner pendant un certain temps, afin de garantir un bon
refroidissement des éléments.
16
Comment utiliser votre four inférieur ?
99634101_ML.qxd 16/07/04 09:42 Page 16
ECO
ECO
Page 17

7. Comment personnaliser la température de cuisson ?
8. Comment utiliser la sécurité enfant ?
Lors de la sélection du mode de cuisson ou en cours de cuisson, vous pouvez
personnaliser votre température :
• Appuyez sur la touche °C jusqu’à ce que les chiffres de température clignotent.
• Ajustez par les touches + ou - la consigne de température que vous désirez enregistrer.
• Validez par un appui sur la touche °C.
Lors de vos prochaines cuissons, la température que vous venez d’enregistrer
sera prise en compte.
Cette opération de personnalisation de votre température de cuisson est renouvelable autant de fois que vous le désirez.
Afin de pouvoir éviter la mise en route intempestive de votre four, il vous est
possible de verrouiller vos commandes, pour cela :
• Appuyez sur la touche START/STOP jusqu’à ce que vous entendiez un bip sonore long retentir.
Ne relâchez la touche qu’à la fin du bip sonore et à l’apparition de la clé
dans l’afficheur.
• Pour déverrouiller vos commandes, effectuez de nouveau la même opération.
Appuyez sur la touche START/STOP jusqu’à ce que vous entendiez un bip sonore
long. Ne relâchez la touche qu’à la fin du bip sonore et la disparition de la clé
dans l’afficheur.
Seule la fonction “minuterie indépendante” reste fonctionnelle.
17
Comment utiliser votre four inférieur ?
FR
99634101_ML.qxd 16/07/04 09:42 Page 17
START
STOP
ECO
START
STOP
ECO
Page 18
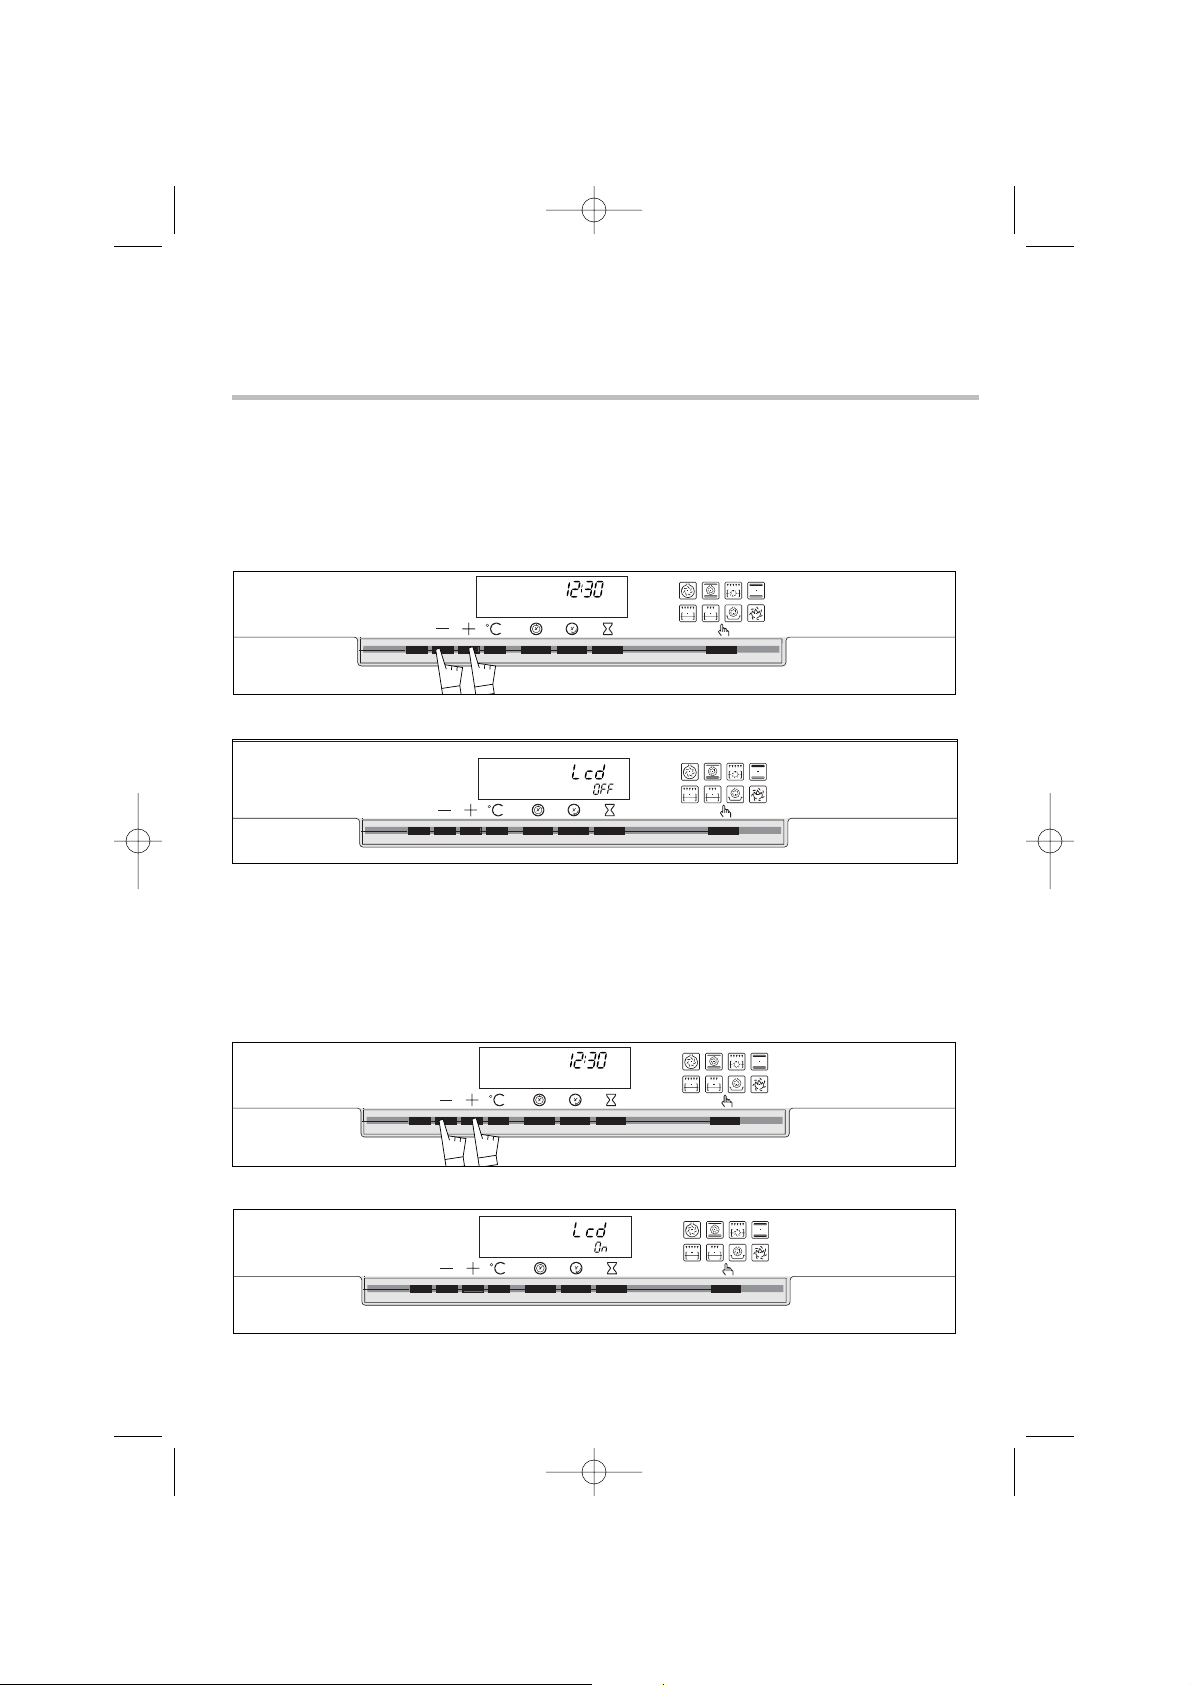
Afin de limiter la consommation d’énergie de votre four hors utilisation, vous
avez la possibilité de mettre votre afficheur en MODE VEILLE.
Pour cela, veuillez suivre la procédure suivante :
ACTIVATION DU MODE VEILLE :
Votre four doit être en mode affichage heure.
• Appuyez simultanément sur les touches + et - pendant 5 secondes.
Votre afficheur indique “Lcd off”
Relâchez l’appui 30 secondes après votre afficheur s’éteint.
Votre four est maintenant en mode veille, il s’éteindra automatiquement après
30 secondes en mode affichage heure.
DESACTIVATION DU MODE VEILLE :
Votre four doit être en mode affichage heure.
• Appuyez simultanément sur les touches + et - pendant 5 secondes.
Votre afficheur indique “Lcd on”
• Relâchez l’appui.
Vous êtes sorti du MODE VEILLE, votre afficheur reste allumé en permanence.
9. Comment mettre en veille votre afficheur ?
18
Comment utiliser votre four inférieur ?
99634101_ML.qxd 16/07/04 09:42 Page 18
ECO
START
STOP
START
STOP
START
STOP
ECO
ECO
START
STOP
ECO
Page 19

19
FR
99634101_ML.qxd 16/07/04 09:42 Page 19
Page 20

20
C
uisson combinée
La cuisson s’effectue par les éléments inférieur, supérieur au fond
du four et par l’hélice de brassage
d’air.
Turbo gril
La cuisson s’effectue, alternativement, par l’élément supérieur et
par l’hélice de brassage d’air.
Gril double
La cuisson s’effectue par l’élément
supérieur
Gril simple
La cuisson s’effectue par l’élément
supérieur
.
Cette position permet de faire
un gain d’énergie tout en
conservant les qualités de
cuisson.
La position ECO est utilisé
pour l’étiquetage énergétique.
Maintien au chaud
Dosage de l’élément situé au fond
du four associé au brassage d’air.
Maintien au chaud.
Symbole
Nom de la fonction Description de la fonction
10. Modes de cuisson du four inférieur
*
* Séquences(s) utilisée(s) pour l’annonce écrite sur l’étiquette énergétique conformém
C
haleur tournante
La cuisson s’effectue par l’élément
chauffant situé au fond du four et
par l’hélice de brassage d’air.
Montée rapide en température. Certains plats peuvent être enfournés four
froid.
Traditionnel ECO
La cuisson s’effectue par les éléments inférieur et supérieur sans
brassage d’air.
Trois sources de chaleur
associés : beaucoup de
chaleur en bas, un peu de
chaleur tournante et un
soupçon de gril.
Le gril double couvre toute
la surface de la grille.
Quand au gril simple, il
montrera une même efficacité pour de plus petites
quantités.
Ce mode combine l’effet de
la turbine et du gril ; le gril
fait rayonner l’infrarouge
sur l’aliment et le mouvement d’air crée par la turbine en attenue l’effet
99634101_ML.qxd 16/07/04 09:42 Page 20
ECO
Page 21

21
Recommandé pour les quiches, tour-
tes, tartes aux fruits juteux.
Recommandé pour griller les
côtelettes, saucisses, tranches de
pain, gambas posées sur la grille.
Recommandé pour faire lever les
pâtes à pain, à brioche, kouglof...en
ne dépassant pas 40°C (chauffe-assiettes, décongélation).
Recommandations
Modes de cuisson du four inférieur ?
Recommandé pour garder le moelleux des
viandes blanches, poissons, légumes
Pour les cuissons multiples jusqu’à 3
niveaux.
Nota : toutes les cuissons se font sans
préchauffage.
Recommandé poursaisir et cuire à coeur
viandes rouges et blanches.
Pour cuire doucement les volailles jusqu’à
2 kg
Préco T°
mini
préco
maxi
35°
180°
235°
mini
préco
maxi
35°
205°
275°
mini
préco
maxi
200°
230°
mini
préco
maxi
35°
275
mini
préco
maxi
35°
80°
100°
180°
200°
mini
préco
maxi
4
4
1
2
FR
99634101_ML.qxd 16/07/04 09:42 Page 21
Page 22

1.
Qu’est-ce qu’une pyrolyse ?
CUISSONS PEU Biscuits, légumes, patisseries Cuissons sans éclaboussures
SALISSANTES quiches, soufflés une pyrolyse n’est pas justifiée
CUISSONS viandes, poissons, la pyrolyse peut se justifier
SALISSANTES (dans un plat) légumes farcis toutes les 3 cuissons
CUISSONS TRES grosses pièces de viandes la pyrolyse peut se faire après
SALISSANTES à la broche 1 cuisson de ce type si les
projections sont importantes
Votre four fume lors d’un préchauffage ou fume énormément lors d’une cuisson.
Votre four dégage une odeur à froid désagréable suite à différentes cuissons
(mouton, poisson, grillades...).
2. Dans quel cas faut-il effectuer une pyrolyse ?
Il ne faut pas attendre que le four soit chargé de graisses pour
effectuer ce nettoyage.
-La pyrolyse est un cycle de chauffe de la cavité du four à très haute température qui permet d’éliminer toutes les salissures qui proviennent des éclaboussures
ou des débordements. Les fumées et odeurs dégagées sont détruites par le passage dans un catalyseur.
- La pyrolyse n’est toutefois pas nécessaire après chaque cuisson, mais seulement si le degré de salissure le justifie.
- Par mesure de sécurité, l’opération de nettoyage ne s’effectue qu’après blocage automatique de la porte. Dès que la température à l’intérieur du four dépasse les températures de cuisson, il est impossible de déverrouiller la porte même
en positionnant la manette «sélecteur de fonctions» sur 0.
Comment nettoyer la cavité de votre four inférieur?
3. Comment faire une pyrolyse ?
1) Faire une pyrolyse immédiate
a) Retirez la casserolerie du four et enlevez les débordements importants qui auraient
pu se produire.
b) Vérifiez que le programmateur affiche l’heure du jour et que celle-ci ne clignote pas.
c) Appuyez sur la touche de sélection des fonctions jusqu’à la fonction
.
22
99634101_ML.qxd 16/07/04 09:42 Page 22
START
STOP
ECO
Page 23

Votre four affiche les 3 symboles pyrolyse correspondant à 1 pyro de 2 h (non
modifiable)
Vous pouvez sélectionner 2 autres durées de pyrolyse ( 1h45, 1h30) non modifiable,
en appuyant
sur les touches -ou +
.
Le four est indisponible pendant 2h ou 2h15 ou 2h30. Ce temps prend en compte
la durée de refroidissement jusqu’au déverrouillage de la porte.
d) Appuyez sur la touche START/STOP
La porte se verrouille en cours de pyrolyse (au bout de 6 min environ).
Vous pouvez consulter l’heure à laquelle doit se terminer votre pyrolyse en
appuyant sur la touche . En fin de pyrolyse, le symbole reste allumé jusqu’au
déverrouillage de la porte
e) Arrêtez votre four en appuyant sur la touche START/STOP.
f) Lorsque le four est froid, utilisez un chiffon humide pour enlever la cendre blanche.
Le four est propre et à nouveau utilisable pour effectuer une cuisson de votre choix.
Remarques : La température de nettoyage n’est pas modifiable. Durant le cycle de
pyrolyse, l’éclairage est éteint. Si votre four n’est pas propre après une pyrolyse,
vous avez attendu trop longtemps. Renouvellez l’opération.
2) Faire une pyrolyse différée
Suivre les instructions décrites dans le paragraphe “Faire une pyrolyse immédiate” puis,
a) appuyez sur la touche , l’ heure de fin de pyrolyse clignote et le
symbole clignote pour indiquer que le réglage est alors possible.
b) Réglez l’heure de fin de pyrolyse en appuyant sur les touches + ou
-.
Exemple : fin de pyrolyse à 5h00.
Quand votre pyrolyse est terminée, appuyez sur la touche START/STOP.
23
FR
99634101_ML.qxd 16/07/04 09:42 Page 23
ECO
START
STOP
START
STOP
ECO
Page 24

24
Que faire en cas d’anomalies de fonctionnement ?
Vous avez un doute sur le bon fonctionnement de votre four, ceci ne
signifie pas forcément qu'il y a une panne.
Dans tous les cas, vérifiez les
point suivants :
Vous constatez que...
Les causes possibles Que faut-il faire ?
Le four ne chauffe pas.
• Le four n'est pas branché.
• Le fusible de votre installation est
hors service.
• La température sélectionnée est
trop basse.
- Brancher le four.
- Changer le fusible de votre installation et vérifier sa valeur (16A).
- Augmenter la température sélectionnée.
Le picto pyro clignote.
• Défaut de verrouillage de la porte.
- Faire appel au Service Après-Vente.
La lampe du four ne fonctionne plus.
• La lampe est hors service.
• Le four n'est pas branché ou le
fusible est hors service.
- Changer la lampe.
- Brancher le four ou changer le
fusible.
Le nettoyage par pyrolyse ne se
fait pas.
• La porte est mal fermée.
• Le système de verrouillage est
défectueux.
- Vérifier la fermeture de la porte.
- Faire appel au Service AprèsVente.
Votre four émet des bips.
• En cours de cuisson.
• En fin de cuisson.
- La température de consigne de
votre choix est atteinte.
- Votre cuisson programmée est
terminée.
Votre four affiche
• Lors de l’appui sur les touches.
• Verrouillagedes commandes pour
la sécurité enfant.
- Fonctionnement normal.
- Pour le supprimer faîtes un appui
long sur Start/Stop jusqu’à disparition du symbole.
Le tourne broche continu de fonctionner après la fin de la cuisson.
• Le moteur du tourne broche
continue de tourner jusqu’à ce que
le sélecteur soit revenu sur la position zéro.
- R.A.S
• L’ampoule se situe au plafond de la cavité de votre four.
a) Dévissez le hublot (voir ci-contre).
b) Tirez l'ampoule .
Caractéristiques de l'ampoule halogène :
- 25 W
- 220-240 V
- 300°C
c) Changez l'ampoule puis remonter le
hublot et rebrancher votre four.
Débrancher votre four avant toute intervention sur l'ampoule
pour eviter tout risque de choc électrique et laisser refroidir si
besoin l’appareil.
Comment changer l’ampoule ?
Ampoule
Dévissez
Hublot
Comment utiliser votre four inférieur ?
99634101_ML.qxd 16/07/04 09:42 Page 24
Page 25

1. Comment faire une cuisson immédiate ?
Le programmateur ne doit afficher que l’heure ; celle-ci ne doit pas clignoter.
• Tournez le sélecteur de fonctions sur la position de votre
choix (le voyant de sélecteur s’allume).
• Tournez le thermostat sur la température recommandée
par votre recette.
Après ces actions, le four chauffe, le voyant de thermostat s’allume.
2. Comment faire une cuisson au gril ?
• Tournez le sélecteur de fonctions sur une séquence “gril”
(gril double, gril simple).
• Tournez la manette de thermostat sur la position
• Arrêtez la cuisson en ramenant le sélecteur de fonctions
en position zéro.
Comment utiliser votre four supérieur ?
25
FR
99634101_ML.qxd 16/07/04 09:42 Page 25
40
240
220
210
200
65
100
150
165
180
40
240
220
210
200
65
100
150
165
180
Page 26

Comment changer l’ampoule ?
• L’ampoule se situe au fond de la cavité de votre four.
a) Dévissez le hublot (voir ci-contre).
b) Tirez l'ampoule .
Caractéristiques de l'ampoule :
- 15 W
- 220-240 V
- 300°C
c) Changez l'ampoule puis remonter le
hublot et rebrancher votre four.
Débrancher votre four avant toute intervention sur l'ampoule
pour eviter tout risque de choc électrique et laisser refroidir si
besoin l’appareil.
Ampoule
Dévissez
Hublot
3. Comment faire une pyrolyse ?
Comment nettoyer la cavité supérieure de votre four ?
1) Faire une pyrolyse immédiate
a) Retirez la casserolerie du four et enlevez les
débordements importants qui auraient pu se produire.
b) Positionnez la manette «sélecteur de fonctions»
sur la position «PYRO».
La durée de la pyrolyse est de 2h (non modifiable) et le
four est indisponible pendant 2h30.
Ce temps prend en compte la durée de refroidissement jusqu’au déverrouillage
de la porte.
• Au cours du cycle de pyrolyse, le voyant de verrouillage s’allume pour vous indi-
quer que la porte est verrouillée.
• Le voyant de thermostat s’allume lorsque le four chauffe.
• La pyrolyse s’arrête automatiquement. Lorsque le voyant de verrouillage s’éteint,
il est alors possible d’ouvrir la porte.
d) Ramenez le sélecteur de fonctions sur la position 0.
e) Lorsque le four est froid, utilisez un chiffon humide pour enlever la cendre blan-
che. Le four est propre et à nouveau utilisable pour effectuer une cuisson de votre
choix.
26
99634101_ML.qxd 16/07/04 09:43 Page 26
Page 27

FR
99634101_ML.qxd 16/07/04 09:43 Page 27
Page 28

C
uisson combinée
La cuisson s’effectue par les éléments
inférieur, supérieur, et au fond du four, et
par l’hélice de brassage d’air.
Turbo gril
La cuisson s’effectue, alternativement,
par l’élément supérieur et par l’hélice de
brassage d’air.
Maintien au chaud
Dosage de l’élément situé au fond du
four associé au brassage d’air.
Symbole
Nom de la fonction
4. Modes de cuisson du four supérieur
* Séquences(s) utilisée(s) pour l’annonce écrite sur l’étiquette énergétique conforméme
Chaleur tournante
La cuisson s’effectue par l’élément chauffant situé au fond du four et par l’hélice
de brassage d’air.
*
Traditionnel
La cuisson s’effectue par les éléments
inférieur et supérieur.
Gril double
La cuisson s’effectue par l’élément
supérieur.
28
Gril simple
La cuisson s’effectue, alternativement,
par l’élément supérieur et par l’hélice de
brassage d’air.
99634101_ML.qxd 16/07/04 09:43 Page 28
Page 29

Trois sources de chaleur associées
: beaucoup de chaleur en bas, un
peu de chaleur tournante et un
soupcon de gril pour dorer.
Maintien au chaud.
Description de la fonction
Montée rapide en température.
Certains plats peuvent être
enfournés four froid.
Nécessite parfois un préchauffage
avant d’enfourner le plat.
Ce mode combine l’effet de la turbine et du gril ; le gril fait rayonner l’infrarouge sur l’aliment et le
mouvement d’air crée par la turbine en attenue l’effet.
Le gril double couvre toute la surface de la grille.
Quand au gril simple, il montrera
une même efficacité pour de plus
petites quantités.
29
Recommandé pour faire lever les
pâtes à pain, à brioche, kouglof...en ne dépassant pas 40°C
(chauffe-assiettes, décongélation).
Recommandé pour les quiches,
tourtes, tarte aux fruits juteux,
posés dans un plat en terre de préference
Recommandations
Modes de cuisson du four supérieur ?
Recommandé pour garder le moelleux des viandes blanches,
poissons, légumes
Pour les cuissons multiples jusqu’à
2 niveaux.
Recommandé pour garder le moelleux des viandes blanches,
poissons, légumes
Pour saisir et cuire à coeur gigot,
côtes de boeuf.
Pour garder leur fondant aux pavés
de poissons.
Recommandé pour griller les
côtelettes, saucisses, tranches
de pain, gambas posées sur la
grille.
FR
99634101_ML.qxd 16/07/04 09:43 Page 29
Page 30

30
Dans le souci d’une amélioration constante de nos produits, nous nous
réservons le droit d’apporter toutes modifications de leurs caractéristiques
liées à l’évolution technique.
Les éventuelles interventions sur votre appareil doivent être effectuées par un
professionnel qualifié dépositaire de la marque.
Lors de votre appel, mentionnez la référence complète de votre appareil(modèle,
type, numéro de série). Ces renseignements figurent sur la plaque signalétique.
PIECES D’ORIGINE : lors d’une intervention d’entretien, demandez
l’utilisation exclusive de PIÈCES DÉTACHÉES CERTIFIÉES D’ORIGINE.
Service après-vente
Reportez ci-dessous les indications figurant sur la plaque signalétique de votre four :
Q
ui contacter ?
De Dietrich c’est aussi le minitel...
... pour en savoir plus sur tous les produits de la
marque :
informations, conseils, les points de vente, les spécialistes
après-vente.
... pour communiquer :
nous sommes à l’écoute de toutes vos remarques, suggestions, propositions auxquelles nous vous répondrons personnellement.
Vous pouvez aussi nous écrire :
SERVICE CONSOMMATEURS DE DIETRICH - BP 9526 - 95069 CERGY PONTOISE CEDEX
ou nous téléphoner au :
*0,197 TTC la minute
tarif en vigueur à la date
d’impression du document
R
elations consommateurs
3615
à tarif en vigueur à la date d’impression du document.
MADE IN FRANCE
220 - 240V ~ 50 Hz
BRANDT APPLIANCES SAS
7 rue Henri Becquerel
92500 RUEIL MALMAISON
De Dietrich
99634101_ML.qxd 16/07/04 09:43 Page 30
0 825
06 16 04
Page 31

Using your oven
Model : DOD448*
99634101_ML.qxd 16/07/04 09:43 Page 31
Page 32

Throughout this manual,
indicates safety recommendations,
indicates advice to help you make the
best use of your oven
Introduction P.33
Your oven
Oven features P.34
Accessories P.35-36
Safety recommendations P.37
How to install your oven
Electrical connections P.38
Changing cables P.38
Dimensions for installation use P.39
How to use your lower oven
The oven programmer P.40
How to set the clock P.41
How to cook straightaway P.42
How to programme your cooking P.43-44
How to use the timer P.45
How to cook economically P.46
Entering your own choice of cooking temperature P.47
Using the child safety P.47
Putting your display on standby mode P.48
Lower oven cooking modes P.50-51
Cleaning the lower oven cavity
Pyrolysis explained P.52
When to clean by pyrolysis P.52
How to use the pyrolysis program P.52-53
Changing a bulb P.54
Troubleshooting P.54
How to use your upper oven
How to cook straightaway P.55
Cooking using the grill P.55
How to use the pyrolysis program P.56
Changing a bulb P.56
Upper oven cooking modes P.58-59
32
Contents
99634101_ML.qxd 16/07/04 09:43 Page 32
Page 33

33
Introduction
Dear Customer,
Thank you for buying a DE DIETRICH oven.
Our design staff have produced a new generation of kitchen equipment, to
make everyday cooking a pleasure.
You will find that the clean lines and modern look of your DE DIETRICH oven
blends in perfectly with your kitchen décor. It is easy to use and performs to a
high standard.
DE DIETRICH also makes a range of products that will enhance your kitchen
such as hobs, extractor hoods, built-in dishwashers, microwave ovens and
refrigerators. There are models to complement your new DE DIETRICH oven.
Of course, we make every effort to ensure that our products meet all your
requirements, and our Customer Relations department is at your disposal, to
answer all your questions and to listen to all your suggestions (see back cover
of manual).
De Dietrich is certain that by setting new standards of excellence. Customers
will find that De Dietrich appliances offer a better and more exciting way of
living.
The DE DIETRICH name.
GB
99634101_ML.qxd 16/07/04 09:43 Page 33
Page 34

34
Y
our oven
1
3
5
ECO
START
STOP
150
65
100
165
180
200
210
40
220
240
5
4
Lower oven
Upper oven
2
2
3
6
1
2
3
4
Lower oven programmer
Light
Rail positions
Hole for rotisserie
Door-open detector plate
Upper oven function
selector
Upper oven thermostat
OVEN FEATURES
1
5
6
7
7
99634101_ML.qxd 16/07/04 09:43 Page 34
Page 35

35
A
ccessories
BACK
FRONT
The arched anti-drop safety shelf
This is used in the same way as the flat shelf.
Its shape has been carefully designed to enable
you to position your dish between two runner
levels.
Use only in the main oven cavity.
Dish + shelf
(
dripping pan)
Inserted under the shelf, this pan catches
cooking juices and fat from grilled food. It can
also be used half filled with water as a double
boiler. Joints should not be cooked in this tray
uncovered because fat could spit all over the
oven sides.
GB
Inserted in the runners under the shelf, this pan catches cooking juices and fat
from grilled food. It can also be used half filled with water as a double boiler.
Joints should not be cooked in this tray uncovered because fat could spit all over
the oven sides.
Multi-purpose baking tray
(
cake tray or dripping pan)
This tray has a raised edge and can be used
for baking pastries (choux buns, meringues,
small cakes, flaky pasties, etc).
Anti-tip safety shelf
Food can either be placed on the shelf in a
dish or cake tin for cooking or browning.
BACK
FRONT
99634101_ML.qxd 16/07/04 09:43 Page 35
Page 36

Accessories
36
Rotating spit
• Position the spit support in the drip tray
notches (see diagram).
• place the unit in the oven on the second shelf
(starting from the bottom). After placing the joint
of meat to roast on the spit, place the spit on
the support, slide the unit until the spit's point
is in the motor located at the back of the oven.
Remove the handle by unscrewing it. After cooking, take out the unit. At the end of
the handle, an imprint enables you to unscrew the forks.
Baking tray support
(optional)
(KITSORTF1)
By using this feature, you can pull your baking
tray completely out of the oven, knowing it is
secure, and easily attend to the dish.
Non-stick baking tray
(to be placed on the grill)
Placed on the grill support, it is used for
cooking pastries, tarts and pizzas, etc.
Covered with a non-stick coating, food does
not stick to it.
Wear insulating gloves when taking it out of
the oven.
Leave it to cool down before cleaning it manually in the sink with washing up
liquid. Avoid using abrasive sponges.
CAUTION: Do not cut on it with a knife or a metal pizza cutter, use plastic or
silicon utensils instead.
Do not use the tray above 260°C or in the PYROLYSIS function.
99634101_ML.qxd 16/07/04 09:43 Page 36
Page 37

37
Safety recommendations
Please read these instructions before installing and using your oven.
The oven has been designed for domestic use only for cooking food. No asbestos
has been used in its construction.
USING FOR THE FIRST TIME:
Before you use your oven for the first time, leave it empty and, with the door
closed, turn it on to maximum temperature and let it heat up for 15 minutes. This
"runs the oven in". During this time there may be some smell from the mineral
wool that insulates the oven and there could be some smoke. This is perfectly
normal.
NORMAL USE:
- Always close the door properly. The oven is fitted with a seal designed
to work with a closed door.
- Never lean or let anyone sit on the oven door when it is open.
- The oven parts and accessories can become hot when the door
is left partially open and the grill on.
Always keep children at a safe distance.
- When the oven is on it will get hot. Take care not to touch the heating
elements inside the oven.
- Always protect your hands with oven gloves or something similar when
removing food, accessories or containers from the oven.
- Do not line your oven with kitchen foil. The metal will increase the heat
produced and could ruin the food and damage the enamel.
Always check that the oven is off before you clean the inside.
Never hang household linen (towels, dishcloths, etc.) on the
oven door handle.
- During the cleaning cycle accessible surfaces become much
hotter than during normal cooking. Keep children at a distance.
- For your safety your oven is equipped with an AUTOMATIC STOP should
you inadvertently forget to turn off your oven. After 23 hours' operation, the AS
(Automatic Stop) function is activated and your oven stops heating. AS is
displayed in place of the time and a series of 2 successive pips is sounded for a
certain time.
Ensure that the function selector is returned to 0 to re-use your
oven.
GB
99634101_ML.qxd 16/07/04 09:43 Page 37
Page 38

• The supply cable (H05 RR-F, H05 RN-F or H05 W-F) must be long enough to allow
the oven to rest on the floor in front of its housing.
With the oven sitting on the floor and disconnected:
• Open the trapdoor at the bottom right hand side at the back of the oven by
removing the 2 screws and swinging the door away.
• Remove the sheath from each wire in the new cable up to 12 mm.
• Twist the ends carefully together.
• Unscrew the terminal screws and remove the wires that need changing.
• Pass the new cable through the wire clamp to the right of the terminals.
• Connect the wires up in accordance with the markings on the terminals.
• Make sure all wires are trapped under the screws.
• The brown wire (live) going to terminal marked L.
• The green and yellow wire (earth) going to the one marked .
• The blue wire (neutral) going to the terminal marked N.
• Tighten the screws and check, by tugging on each wire, that they are firmly
connected.
• Tighten the clamp to hold the cable.
• Close the trapdoor using the two screws.
Installation and /or Changing cables
We cannot accept any liability in the event of an accident resulting
from non-existent or faulty earthing.
38
The electrical connections are made before the oven
is installed in its housing.
• Before connecting your oven, make sure you are
using the correct size cable. The cross-section should
be the same as the cable connected to the oven. The
fuse for your installation must conform to the table
shown opposite.
• Where the oven is connected using a separate plug
and socket this must be accessible after the oven has
been installed.
• Where the appliance is not connected to the mains
electricity supply by a plug, an omnipolar cutout
device (with a contacts gap of at least 3 mm) must be
fitted on the supply side of the connection to meet requirements.
• The oven must be connected using a standard
power cable for which the number of conductors is
dependent upon the type of connection required and
in conformity with the table shown below.
How to install your oven
➀
➁
③
T
N
L
E
E
N
L 1
L 2
E
N2
L 1
L 2
N1
Electrical connections
min.
network voltage connection diameter fuse
of cable
➀ 230V- 50Hz 1 L + N 4 mm² 32 A
➁ 400V 2N-50Hz 2 L + N 1,5 mm² 16 A
④ 230V 2N-50Hz 2 L + N 1,5 mm² 16 A
99634101_ML.qxd 16/07/04 09:43 Page 38
5
4
5
4
2
3
3
1
2
1
5
4
2
3
1
Page 39

39
How to install your oven
If you are unsure about fitting this oven yourself please use a
qualified electrician.
Dimensions for installation use
Your oven works at its best and produces excellent results when cooking and
cleaning itself, if its air circulation is not compromised:
• The oven must be centred in the unit so that there is a minimum distance of
5 mm between it and the surrounding unit.
• The housing unit or its outer surface must be capable of withstanding heat.
• To ensure the oven rests firmly in the housing, screw it to the housing unit using
the holes on the side uprights provided (see diagram).
To do this:
1) Remove the rubber stoppers masking the fixing holes.
2) To prevent the housing unit splintering, drill two holes 3 mm in diameter in the
wall of the housing unit opposite the fixing holes.
3) Attach the oven using the two screws.
4) Conceal the hole using the rubber stoppers. (These also help to cushion the
closing of the oven door).
(*) If the housing unit is open at the back, the gap must not be more
than 70 mm.
875 mini
5
5
888
875
875
870
595
545
20
50
50
20
GB
99634101_ML.qxd 16/07/04 09:43 Page 39
Page 40

40
How to use your lower oven
1. The oven programmer
Pyrolysis indicator
Clock and time display
Temperature indicator
Timer indicator
Cooking complete indicator
Cooking time indicator
1
2
3
4
5
6
ECO
START
STOP
7
8
9
10
11
12
7
8
9
10
11
12
START/STOP button
Time and temperature
adjustment
Temperature adjustment
Cooking time
Cooking complete
Independent timer
1
2
3
4
56
99634101_ML.qxd 16/07/04 09:43 Page 40
Page 41

41
How to use your lower oven
a) When the oven is first switched on at the mains
• The display blinks.
• Press on the + and - buttons until the correct time is shown (Keeping a
finger on the button, rather than tapping it, is quicker).
The example shows:12.30
• Press the START/STOP button to confirm.
b) Altering the clock
• Press on both and buttons together for a few seconds until the display
blinks.
• Adjust the time using the + or - buttons.
• Confirm the time by pressing .
2. How to set the clock
If you forget to confirm the time by pressing button , the oven will
do it automatically after a few seconds.
GB
99634101_ML.qxd 16/07/04 09:43 Page 41
START
STOP
START
STOP
ECO
ECO
ECO
START
STOP
START
STOP
ECO
Page 42

42
How to use your lower oven
3. How to cook straightaway
• Choose how you want to cook your food:
• Select the function of your choice using the button:
The example chosen is "
"
.
Pressing on the button and holding it down will enable you to scroll
through the cooking functions.
Example : 205°C.
• Press on the START/STOP button to start the cooking cycle.
Your oven proposes the temperature most often used.
However, you can adjust the temperature if you wish:
• Press on the °C button. The °C symbol starts flashing.
• Adjust by pressing on the + or
- buttons.
•
Record your choice by pressing on the °Cbutton (if confirmation using button
°C
is not possible, the recording will take place automatically after a few seconds).
During cooking, the chosen temperature value will flash: once reached, the display
stops flashing and your oven emits a series of beeps.
99634101_ML.qxd 16/07/04 09:43 Page 42
START
START
STOP
STOP
START
STOP
ECO
ECO
ECO
1 / 3
2
Page 43

How to use your lower oven
4. How to programme your cooking
a) Cook straightaway :
•
Choose the method of cooking and adjust the temperature if necessary.
The example is
temperature 205°C.
• Press the “ ” button.
• The cooking time will start flashing at 0:00 as well as the
symbol to indicate
that adjustment is now possible.
• Press + or - to set the time chosen.
E.g. 25 minutes cooking time.
The recording of the modified cooking time is automatic after a few seconds, or
can be confirmed by pressing once again on the button.
When this is done, the time reappears on the display and the symbol stops flashing.
After these actions, the oven starts heating.
At the end of the cooking cycle, a series of beeps are emitted lasting several
minutes and the symbol starts flashing.
You can stop the oven from beeping by pressing on the START/STOP button for
1 second.
You can consult or modify the cooking end time whenever you wish by pressing the
button.
To cancel your programme, press on the START/STOP button.
43
GB
99634101_ML.qxd 16/07/04 09:44 Page 43
ECO
START
STOP
START
STOP
ECO
Page 44

44
It is possible to:
- Modify the cooking end time whenever you wish.
- Consult the cooking end time whenever you wish by pressing
on the button.
- Cancel the programme whenever you wish by pressing on the
START/STOP button.
How to use your lower oven
b) With delayed start: (with the cooking end time of your choice)
Proceed as you would for a programmed cooking cycle and then, after the cooking
time,
• Press on the “Cooking end” button , the cooking end time is displayed and
flashes as well as the symbol to show that adjustment is now possible.
Example: it is 12:30.
You have set a cooking time of 30 minutes.
The cooking end time displayed is 13:00.
• Adjust the cooking end time by pressing the + or - buttons.
Example: cooking end: 14:00.
Once the deferred cooking end time has been entered, the time reappears on the
display.
After these steps, the cooker will only starts heating later, so that the cooking cycle
finishes at 14:00 instead.
When cooking is completed, a series of beeps are emitted for several minutes. You
can stop the oven from beeping by pressing on the
START/STOP
button for
1 second.
99634101_ML.qxd 16/07/04 09:44 Page 44
START
STOP
ECO
START
STOP
ECO
Page 45

45
Your oven is fitted with a separate minute timer. It is not connected to the
oven's programmes. You can use it just like a kitchen timer. For this, the timer
display makes the hour of day temporarily disappear.
• Press the hourglass symbol
. The display flashes; the hourglass symbol
appears and flashes.
• Press + or - until the display shows the length of cooking time required (up to
59 minutes and 50 seconds).
The display stops flashing after a few seconds and the timer starts, counting
down the time in seconds. When the time is up, the timer bleeps to warn you
and the symbol flashes.
Stop the bleeping by pressing the touch control or START/STOP.
Normal time is now displayed.
5. H
ow to use the timer
It is possible to:
- To change the remaining time at any point by pressing the
touch control and using the + or - touch controls.
- To cancel the timer program, set the time at 0.00 and press the
START/STOP touch control.
How to use your lower oven
GB
99634101_ML.qxd 16/07/04 09:44 Page 45
START
STOP
ECO
START
STOP
ECO
Page 46

6. How to cook economically*
The autotimer should display only the time. This should not be flashing.
• Place your dish in the oven in accordance with the recommendations shown on
the display.
Select the position " "
-> level 2 recommended.
• Your oven proposes the optimal temperature for the chosen cooking mode:
200 °C. However, you can adjust this by using the button located under the
display.
Example: position " " adjusted to 190°C.
After this, the oven starts heating:
The temperature figure flashes on and off.
When the set temperature is reached, the oven beeps three times.
*For optimal "ECO" cooking, do not carry out preheating and do not
open the door.
This position allows you to make a 20% saving in energy while at the
same time achieving identical cooking results.
The ECO position is used for the energy label.
Following a cooking cycle, the oven's fan continues to operate
for a while afterwards in order to ensure that everything cools
down properly.
46
How to use your lower oven
99634101_ML.qxd 16/07/04 09:44 Page 46
ECO
ECO
Page 47

7.
Entering your own choice of cooking temperature.
8.
Using the child safety
During the selection of the cooking mode or during the cooking cycle, you can
enter your own choice of temperature:
• Press on the °C button until the temperature figures starts flashing.
• Adjust the temperature using the + or - buttons until you reach the
temperature that you wish to record.
• Confirm your choice by pressing on button °C.
When you cook in future, the temperature that you have just recorded will be
used.
This cooking temperature adjustment operation can be renewed as often as you
wish.
In order to prevent your oven being turned on unintentionally, you may lock the
controls. To do this:
• Press on the START/STOP button until you hear a long drawn-out beep.
Keep pressing on the touch control until the bleep stops and a key
appears on the indicator panel.
• To unlock the controls, repeat the operation.
Press the START/STOP touch control until you hear a long bleep. Keep your finger
on the touch control until the bleep stops and the
key disappears from the
display panel.
Only the “independent timer” function remains functional.
47
How to use your lower oven
Key
GB
99634101_ML.qxd 16/07/04 09:44 Page 47
ECO
START
STOP
START
STOP
ECO
Page 48

To reduce your oven's power consumption to a minimum when it is not in use,
you can put your readout system in STANDBY MODE.
To carry out this operation, proceed as follows:
GOING INTO STANDBY MODE:
Your oven must be in normal time readout mode.
• Press both the + and - controls for five seconds at the same time.
The display reads “Lcd off”
Take your fingers off the two controls. 30 seconds later your readout will switch off.
Your oven is now in standby mode; whenever you are in the normal time
readout mode, it will turn off automatically after 30 seconds.
COMING OUT OF STANDBY MODE:
Your oven must be in the normal time readout mode.
• Press both the + and - controls for five seconds at the same time.
The display reads “Lcd on”
• Take your fingers off the two controls.
You are now out of the STANDBY MODE; the readout is now permanently lit.
9. Putting your display on standby mode
48
How to use your lower oven
99634101_ML.qxd 16/07/04 09:44 Page 48
START
STOP
ECO
START
STOP
START
STOP
START
STOP
ECO
ECO
ECO
Page 49

49
GB
99634101_ML.qxd 16/07/04 09:44 Page 49
Page 50

50
Combined
Cooking is carried out by the lower
and upper elements at the bottom
of the oven, and by the air
circulation device.
Turbo grill
Cooking is done alternately by
the top element and by the fan.
D
ouble grill
Cooking is carried out by the upper
element.
Single grill
Cooking is carried out by the
upper element.
This is an energy-saving
programme that still
produces good results.
The ECO feature is used to
label the oven.
Warming oven
Upper element at a control
temperature, warm air is circulated.
Stays warm
Symbol
Feature Description
10. Lower oven cooking modes
*
* Cooking methods referred to in the advertisement about energy labelling in accord
F
an oven
A heater element at the back of
the oven and the fan help cook the
food.
Oven rapidly reaches the
selected temperature.
Some dishes can start off
in the cold oven.
C
onventional oven ECO
Food is cooked by a top and
bottom element. No fan.
Three associated heat
sources: lots of heat at the
bottom of the oven, a small
amount of circulating heat
and a slight grill effect.
The double grill covers the
full surface of the oven
shelf.
The single grill is equally
efficient, but covers a
smaller area.
This mode combines the
effects of the turbine and the
grill. The grill directs infrared
energy at the food and the
air movement created by the
turbine enhances this effect.
99634101_ML.qxd 16/07/04 09:44 Page 50
ECO
Page 51

51
Recommended for juicy quiches, pies
and fruit tarts.
Recommended for grilling chops,
sausages, and large prawns and for
making toast.
Recommended for leaving breads to
rise (keeping temperature below 40ºC),
keeping dishes warm and thawing food.
Recommendations
Lower oven cooking modes
Recommended to prevent meat drying
out, and for cooking vegetables and
fish and food placed on up to 3 shelves.
NB. All food is cooked without
pre-heating the oven
Recommended for sealing red and white
meat and cooking it through and
through.
Also for gently cooking poultry up to
2kg.
Cº Recom’d
min.
recom'd
max.
35°
180°
235°
min.
recom'd
max.
35°
205°
275°
min.
recom'd
max.
200°
230°
min.
recom'd
max.
35°
275
min.
recom'd
max.
35°
80°
100°
180°
200°
min.
recom'd
max.
4
4
1
2
GB
99634101_ML.qxd 16/07/04 09:44 Page 51
Page 52

1.
Pyrolysis explained
FOOD WITH LITTLE Biscuits, vegetables, cakes You do not need to use
SPATTERING quiches, soufflés pyrolysis feature
FOOD THAT Meat, fish (in an open dish) Use the pyrolysis feature
SPATTERS stuffed vegetables after 3 oven uses
FOOD THAT Large pieces of If a lot of spitting occurs
SPITS BADLY meat on the spit run the pyrolysis feature
afterwards
If your oven smokes when the pre-heat feature is on or if there is a lot of
smoke during a cooking cycle run the pyrolysis cycle.
You can also use this feature if there is an unpleasant smell of cooking when the
oven is cold.
2. When to clean by pyrolysis
Do not wait until the oven is coated in dirt before cleaning it.
- Pyrolysis is a cleaning method during which the oven is heated to a high
temperature to remove debris and splatter caused by spitting and dripping food.
The smoke and smells that this produces are removed as the air passes through
a catalyst.
- It is not necessary to run the pyrolysis feature after every use of the oven,
simply when the oven is dirty.
- As a safety measure, once the temperature is higher than normal use the door
automatically locks. You cannot unlock it even by turning the pyrolysis feature off.
Cleaning the lower oven cavity
3. How to use the pyrolysis program
1) Carrying out an immediate pyrolysis cleaning session
a) Remove any accessories from the oven and wipe off any excess grime.
b) Check that the programmer displays normal time and that it is not flashing.
c) Press the program selection touch control until the program appears.
52
99634101_ML.qxd 16/07/04 09:44 Page 52
START
STOP
ECO
Page 53

Your oven has 3 pyrolysis symbols that correspond to 1 two-hour pyro (nonadjustable).
You can select the two other cycles ( 1h45, or 1h30) non-adjustable, by
pressing the - or +.
The oven cannot be used for 2h, 2h15 or 2h30. This length of time includes the
required cooling time until the door unlocks.
d) Press the START/STOP touch control.
The door is locked during pyro-cleaning (after about 6 minutes).
You can consult the finishing time for the pyro-clean cycle by pressing touch control
. At the end of pyro-cleaning the symbol remains lit until the door is
automatically unlocked.
e) Stop the oven by pressing the START/STOP touch control.
f) Use a damp cloth for removing the white ash after the oven has cooled down.
The oven is now ready for use.
Note: The pyro-cleaning temperature cannot be altered. During the cleaning cycle
the light is switched off. If your oven is still not clean after pyro-cleaning you have
delayed cleaning too long. Repeat the pyro-clean program.
2) How to program your pyro-clean to start when you want
Follow the instructions given in the section entitled “How to use the pyro-clean
program”, then:
a) Press touch control , the finishing time for the pyro-clean program
flashes and the symbol also flashes to show that this time can be modified.
b) Set the time the program is due to finish by pressing the + or
-.
Example: End of the pyro-clean program at 5h00.
When the pyro-clean program is over, press the START/STOP touch control.
53
GB
99634101_ML.qxd 16/07/04 09:44 Page 53
ECO
START
STOP
START
STOP
ECO
Page 54

54
Troubleshooting
If you're not sure that your oven is working properly, it doesn't necessarily
mean that there's a problem.
In all cases, check the following points:
If you realize that..
Possible causes What should you do?
The oven isn't heating.
• The oven isn't connected to the
power supply.
• The fuse has blown.
• The temperature selected is too
low.
- Connect to power supply.
- Change the fuse, checking that it is
16A.
- Increase the temperature selected.
The pyro symbol is flashing.
• The door lock is faulty.
- Contact the After-Sales Service.
The light inside the oven isn't
working.
• The lamp is unusable.
• The oven isn't connected to the
power supply or the fuse has
blown.
- Change the bulb.
- Connect to power supply or
change fuse.
Cleaning by pyrolysis has not
occurred.
• The door is not shut properly.
• The door-locking system is faulty.
- Check the door is properly closed.
- Contact the After-Sales Service.
Your oven makes a beeping
noise.
• During cooking.
• When cooking is complete.
- The temperature of your choice
has been reached.
- Your programmed cooking cycle is
complete.
Your oven displays
• When you press on the buttons.
• The controls are locked (child
safety).
- This is normal operation.
- To cancel it, press the
Start/Stop button for a prolonged
length of time until the symbol
disappears.
The spit continues to operate
after the cooking is finished.
• The motor driving the spit
continues to turn until the selector
has returned to the zero position.
- Nothing to report.
• The bulb is located in the top of the oven.
a) Unscrew the protective shade (see
diagram).
b) Pull the bulb out.
A halogen bulb is used:
- 25 W
- 220-240 V
- 300°C
c) Change the bulb, replace the shade
and switch your oven back on at the
mains.
Warning! Switch off the power at the main switch before
attempting to change the bulb. Leave the oven to cool if necessary.
Changing a bulb
bulb fitting
unscrew
cover
How to use your lower oven
99634101_ML.qxd 16/07/04 09:44 Page 54
Page 55

1. How to cook straightaway
The timer display only shows the time of day. It should not be blinking.
• Turn the dial until it is indicating your choice (the selector
indicator lights up)
• Turn the dial to the temperature recommended for the
food you are cooking.
When you have done both these the oven heats up and the temperature light
glows.
2. Cooking using the grill
• Turn the function selector and set it to one of the “grill”
settings (double grill, single grill).
• Turn the thermostat knob to the position.
• You can switch off the cooking cycle by turning the
function selector back to the “0” position.
How to use your upper oven
55
GB
99634101_ML.qxd 16/07/04 09:44 Page 55
40
240
220
210
200
65
100
150
165
180
40
240
220
210
200
65
100
150
165
180
Page 56

Changing a bulb
• The bulb is located in the top of the oven.
a) Unscrew the protective shade (see
diagram).
b) Pull the bulb out.
A bulb is used:
- 15 W
- 220-240 V
- 300°C
c) Change the bulb, replace the shade
and switch your oven back on at the
mains.
Warning! Switch off the power at the main switch before
attempting to change the bulb. Leave the oven to cool if
necessary.
bulb fitting
unscrew
cover
3. How to use the pyrolysis program
Cleaning the upper oven cavity
1) Carrying out an immediate pyrolysis cleaning session
a) Remove any accessories from the oven and
wipe off any excess grime.
b) Turn the "function selector" knob to the "PYRO"
position.
The duration of the pyrolysis cleaning process is 2 hours
(which cannot be modified) and the oven will be out of use
for 2 hours 30 mins.
This length of time includes the required cooling time until the door unlocks.
• During the pyrolysis cleaning cycle, the lock symbol shown on the display lights up
to show you that the door is locked.
• The thermostat indicator lights up when the oven is heating.
• The pyrolysis cleaning process turns off automatically when the lock symbol
disappears. It is then possible to open the door.
d) Return the function selector knob to the zero position.
e) When the oven has cooled down completely, use a damp cloth to wipe away the
white ash. The oven is clean and can be used once again to cook the dishes of your
choice.
56
99634101_ML.qxd 16/07/04 09:44 Page 56
Page 57

GB
99634101_ML.qxd 16/07/04 09:44 Page 57
Page 58

C
ombined
Cooking is carried out by the lower and
upper elements at the bottom of the
oven, and by the air circulation device.
Turbo grill
Cooking is done alternately by the top
element and by the fan.
Warming oven
Upper element at a control
temperature, warm air is circulated.
Symbol
Feature
4. Upper oven cooking modes
* Cooking methods referred to in the advertisement about energy labelling in accordan
F
an oven
A heater element at the back of the oven
and the fan help cook the food.
*
C
onventional oven
Food is cooked by a top and bottom
element.
D
ouble grill
Cooking is carried out by the upper
element.
58
Single grill
Cooking is done alternately by the top
element and by the fan.
99634101_ML.qxd 16/07/04 09:45 Page 58
Page 59

Three associated heat
sources: lots of heat at the
bottom of the oven, a small
amount of circulating heat and a
slight grill effect.
Stays warm.
Description
Oven rapidly reaches the
selected temperature. Some
dishes can start off in the cold
oven.
Pre-heating is sometimes
necessary to reach the required
temperature.
This mode combines the effects of
the turbine and the grill. The grill
directs infrared energy at the food
and the air movement created by
the turbine enhances this effect.
The double grill covers the full
surface of the oven shelf.
The single grill is equally efficient,
but covers a smaller area.
59
Recommended for leaving breads
to rise (keeping temperature below
40ºC), keeping dishes warm and
thawing food.
Recommended for juicy quiches,
pies and fruit tarts, preferably
placed in an earthenware dish.
Recommendations
Upper oven cooking modes
Recommended to prevent meat
drying out, and for cooking
vegetables and fish and food
placed on up to 2 shelves.
Recommended to keep white
meat, fish and vegetables
juicy and succulent.
To seal or thoroughly cook legs of
lamb and beef rib roasts.
To keep fish steaks nice and juicy.
Recommended for grilling cutlets,
sausages, slices of bread and
Mediterranean prawns placed on
the oven shelf.
GB
99634101_ML.qxd 16/07/04 09:45 Page 59
Page 60

60
99634101 06/04
99634101_ML.qxd 16/07/04 09:45 Page 60
 Loading...