

Page 1

EN INSTRUCTIONS FOR USE
Microwave oven
DME795X/B/W COMPACT 45 COMBINATION MICROWAVE
Page 2

EN
38
Dear Customer,
You have just acquired a DE DIETRICH microwave oven and we
would like to thank you.
Our research teams have created this new generation
of appliances for you. Their quality, design, features and
technological advances make them exceptional products, and
reveal our unique know-how.
Your new DE DIETRICH microwave oven will blend harmoniously
into your kitchen and will perfectly combine performance adapted
to the food being cooked and ease of use. We wanted to offer you
a pro-duct of excellence.
In the DE DIETRICH product line, you will also find a wide range
of ovens, hobs, hoods, dishwashers and fridges, that you can
coordinate with your new DE DIETRICH microwave oven.
Of course, in an ongoing effort to best satisfy your demands with
regard to our products, our after-sales service department is at
your disposal and ready to listen in order to respond to all of your
questions and suggestions (contact information at the end of this
booklet).
Visit our website www.dedietrich-electromenager.com, where
you will find our latest innovations as well as useful and
complementary information.
DE DIETRICH
Setting New Values
As part of our commitment to constantly improving our products, we
reserve the right to make changes to them based on technological
advances to their technical and functional features and appearance.
Warning: Before installing and using your appliance, please
carefully read this Guide to Installation and Use, which will
allow you to quickly familiarise yourself with its operation.
Page 3

TABLE OF CONTENTS EN
1/NOTICES TO THE USER
• Safety instructions ............................................................................................ 40
• Operating principle ........................................................................................... 41
• Environmental protection ................................................................................. 41
2/INSTALLING YOUR APPLIANCE
• Before connecting ............................................................................................ 42
• Electrical connection ........................................................................................ 42
• Build-in ............................................................................................................ 43
3/DESCRIPTION OF YOUR APPLIANCE
• The appliance .................................................................................................. 44
• Accessories ...................................................................................................... 45
• The control panel ............................................................................................. 47
• The displays ..................................................................................................... 48
4/USING YOUR APPLIANCE
• How to set and change the time ...................................................................... 50
• Child safety ...................................................................................................... 50
• Programming .................................................................................................... 51
• Using the power levels ..................................................................................... 51
• Microwave function .......................................................................................... 52
• Reheating on 2 levels ...................................................................................... 52
• Automatic cooking functions ............................................................................. 53
• Guide to automatic functions ........................................................................... 54
• Defrosting ......................................................................................................... 57
• The SPEED DEFROST function ...................................................................... 58
• Defrosting guide ............................................................................................... 59
• Grill functions ................................................................................................... 60
• Guide to cooking using the Grill function ......................................................... 60
• The TURBO Grill function ................................................................................ 61
• Guide to cooking using the TURBO Grill function ........................................... 61
• The Grill + Microwave function......................................................................... 62
• Guide to cooking using the Grill + Microwave function ................................... 62
• The Fan cooking function ................................................................................ 63
• Guide to cooking using the Fan cooking function ............................................ 64
• The Fan cooking + Microwave function ........................................................... 65
• Guide to cooking using the Fan cooking + Microwave function ...................... 66
• Delayed start .................................................................................................... 66
• The Keep warm function .................................................................................. 67
• The M1/M2/M3 memory buttons ...................................................................... 67
5/CARING FOR AND CLEANING YOUR APPLIANCE ............................................ 68
6/IN THE EVENT OF OPERATING ANOMALIES .................................................... 69
7/OPERATING PROFICIENCY TESTING ................................................................ 70
39
Page 4

EN 1/NOTICES TO THE USER
Warning:
Keep this user guide with your
appliance. If the appliance is ever
sold or transferred to another person,
ensure that the new owner receives
the user guide. Please become familiar
with these recommendations before
installing and using your oven. They
were written for your safety and the
safety of others.
• SAFETY INSTRUCTIONS
Your appliance is intended exclusively for
domestic use for cooking, reheating and
defrosting food. The manufacturer declines all
responsibility in the event of improper use.
Check that utensils are suitable for use in a
microwave oven.
To avoid damage to your appliance, never
operate it when empty or without the turntable.
Do not tamper with the holes of the front lock, as
this could damage your appliance and result
in the need for repair.
The seal and the frame of the door must be
inspected regularly to ensure that they are not
damaged. If these areas become damaged,
stop using the appliance and have it checked
by a specialised technician.
Never heat a bottle with the nipple (risk of
explosion).
Never allow children to use the oven without
supervision, except when appropriate
instructions have been given so that the child
can use the oven safely and understand the
dangers of improper use.
Always use oven gloves to remove dishes from
the oven. Certain dishes absorb heat from the
food and can become very hot.
Liquids or other foods must not be heated in
closed containers as they may explode.
You should avoid heating eggs in their shell
and whole hard-boiled eggs in a microwave
oven as they may explode, even after cooking
has finished.
When drinks are heated by microwave, boiling
liquid may suddenly spurt even after heating,
precautions must therefore be taken when
handling the container.
When cooking small quantities (e.g. 1 sausage,
1 croissant, etc.), place a glass of water next
to the food.
Cooking for too long can dry out food and
burn it. To avoid this type of incident, never
use the same cooking time as recommended
for a traditional oven.
When heating food in plastic or paper
containers, keep an eye on the oven due to
the risk of fire.
When using the microwave and microwave +
fan cooking function, you should avoid using
metal containers, forks, spoons, knives or
metal fasteners or staples for freezer bags.
The contents of bottles or jars for babies must
be stirred or shaken and the temperature
must be checked before use, in order to avoid
burns.
If smoke appears, stop or unplug the oven and
keep the door closed to smother any flames.
40
Page 5
1/NOTICES TO THE USER
EN
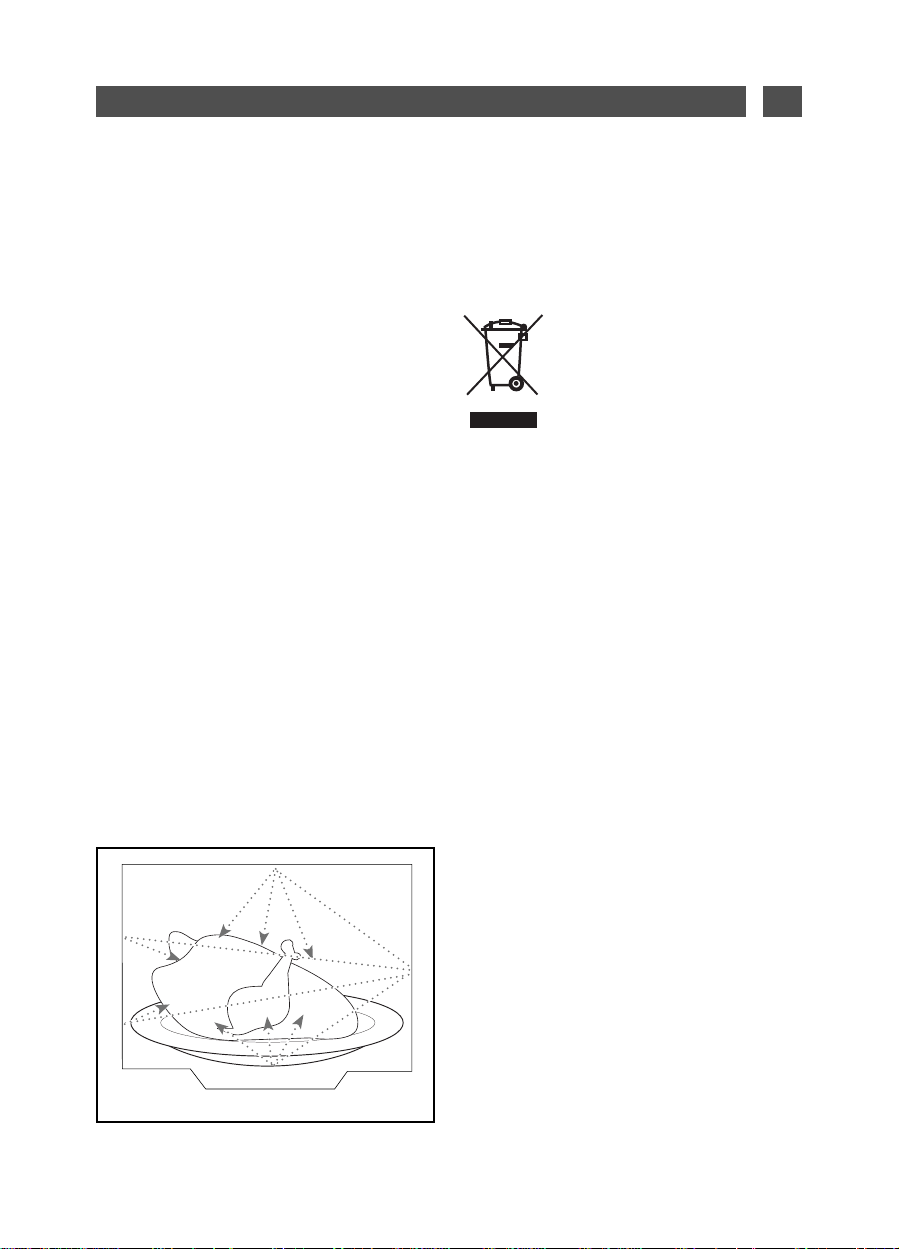
• OPERATING PRINCIPLE
The microwaves used for cooking are electromagnetic waves. They are found naturally in
our environment as radio-electric waves, light
or infra-red radiation.
Their frequency is located in the 2450 MHz
band.
Their properties:
• They are reflected by metals.
• They can pass through all other materials.
• They are absorbed by molecules of
water, fat and sugar.
When a food is exposed to microwaves, the
molecules are quickly shaken up, which causes
heating.
The microwaves penetrate into the food to a
depth of around 2.5 cm. If the food is thicker,
it will be cooked to its core by conduction, as
with traditional cooking.
It is important to know that microwaves cause
a simple thermal reaction inside the food, and
that they are not harmful.
• ENVIRONMENTAL
This appliance’s packaging material is
recyclable. Help recycle it and protect the
environ-ment by dropping it off in the municipal
receptacles provided for this purpose.
by your manufacturer will be done under the
best possible conditions, in compliance with
European Directive 2002/96/EC on Waste
Electrical and Elec-tronic Equipment. Contact
your town hall or your retailer for the used
appliance collection points closest to your
home. We thank you for doing your part to
protect the environment.
PROTECTION
Your appliance also contains a
great amount of recyclable
material. It is marked with this
label to indicate the used
appliances that should not be
mixed with other waste. This way,
the appliance recycling organised
Fig.01
41
Page 6

EN 2/INSTALLING YOUR APPLIANCE
• BEFORE CONNECTING
Warning:
Check that your appliance has not
been damaged during transport (damage
to door or seal, etc.). If you notice any
damage, contact your retailer before using
the appliance.
In order to easily locate the reference
information for your appliance, we
recommend that you note these data on the
«After-Sales Service» page.
• ELECTRICAL CONNECTION
Check that:
- the electrical installation has sufficient vol-
tage.
- the supply cables are in good condition
- the diameter of the wires complies with the
installation requirements.
- your equipment has a protection of at least
16 amps.
If in doubt, contact your electrician.
The electrical connections should be made
before the appliance is installed in its housing.
If the connection is made with a plug, it must
remain accessible after the appliance has been
installed.
The oven’s neutral (blue cable) must be
connected to the network’s neutral.
Ensure your electrical installation has a system
accessible to the user which can cut off the
appliance from the power grid, with a contact
opening of at least 3mm for all the terminals.
If the supply cable is damaged, it must be
replaced by the manufacturer, its after-sales
service or any other similarly qualified person
to avoid any danger.
any accident resulting from an inexistent,
defective or incorrect ground lead.
If the oven presents any irregularity, unplug
the appliance or remove the relevant fuse at
the oven’s connection lead-in.
Warning:
We cannot be held responsible for
Electrical safety must be ensured through
proper installation in the housing. During
installation and maintenance operations, the
appliance must be unplugged from the electrical
grid; fuses must be cut off or removed.
The appliance must be connected using a
(standardised) feeder cable with 3 conductors
of 1.5 mm
be connected to the 220-240 V ~ monophase
network using a CEI 60083-standardised 1 live
+ 1N + ground electrical outlet or one which
complies with installation requirements. The
protection cable (green-yellow) is connected to
the appliance’s
connected to the appliance’s ground.
2
(1 live + 1N + ground) which must
terminal and must be
42
Page 7
EN2/INSTALLING YOUR APPLIANCE
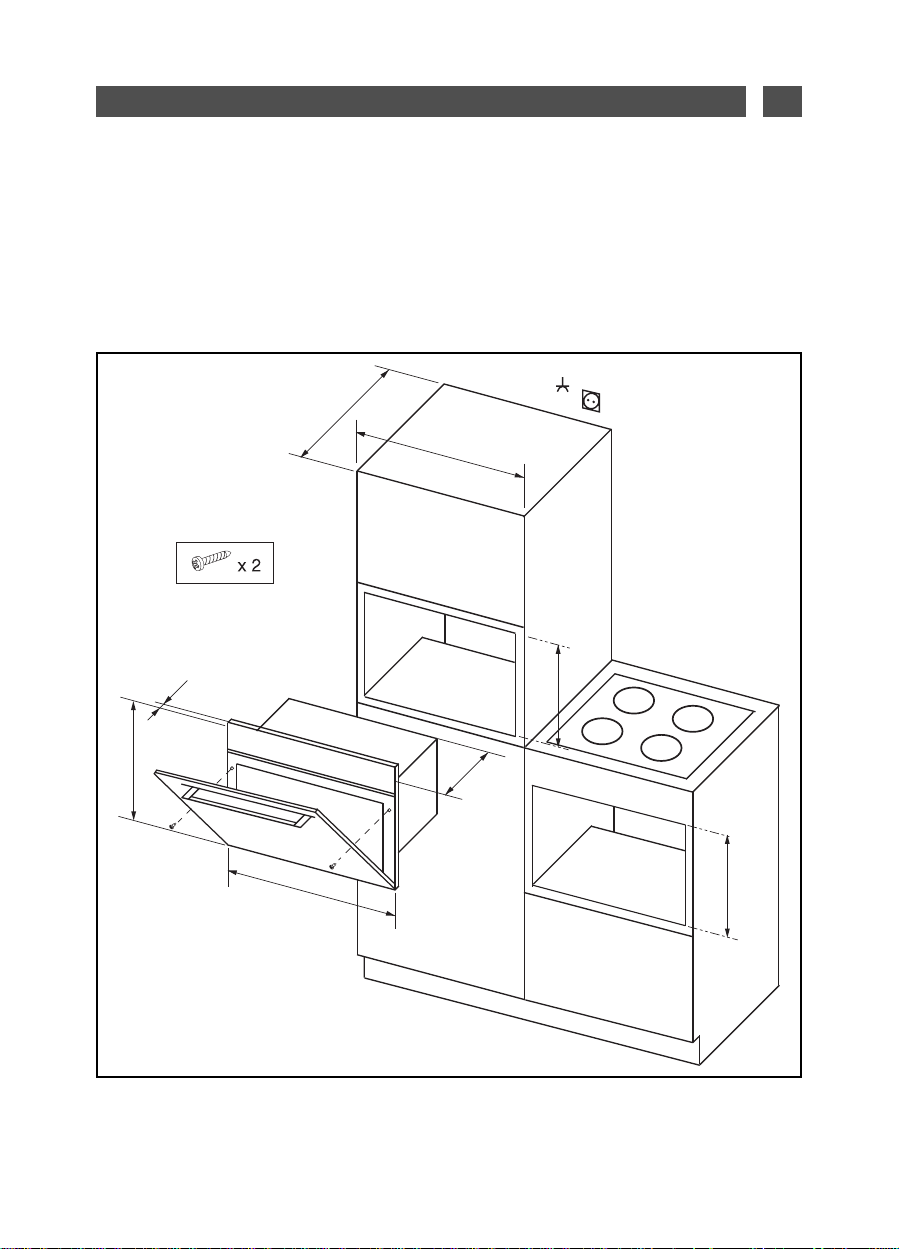
• BUILD-IN
The appliance may be installed beneath a work surface or in column housing (open or closed)
which has the required built-in measurements (Fig.02).
Do not use your appliance immediately (wait 1 or 2 hours) after moving it from a cold to a warm
place as condensation may cause a malfunction.
550 int.
600 ext.
456
Fig.02
23
450 int.
547
592
450 int.
43
Page 8
EN443/DESCRIPTION OF YOUR APPLIANCE
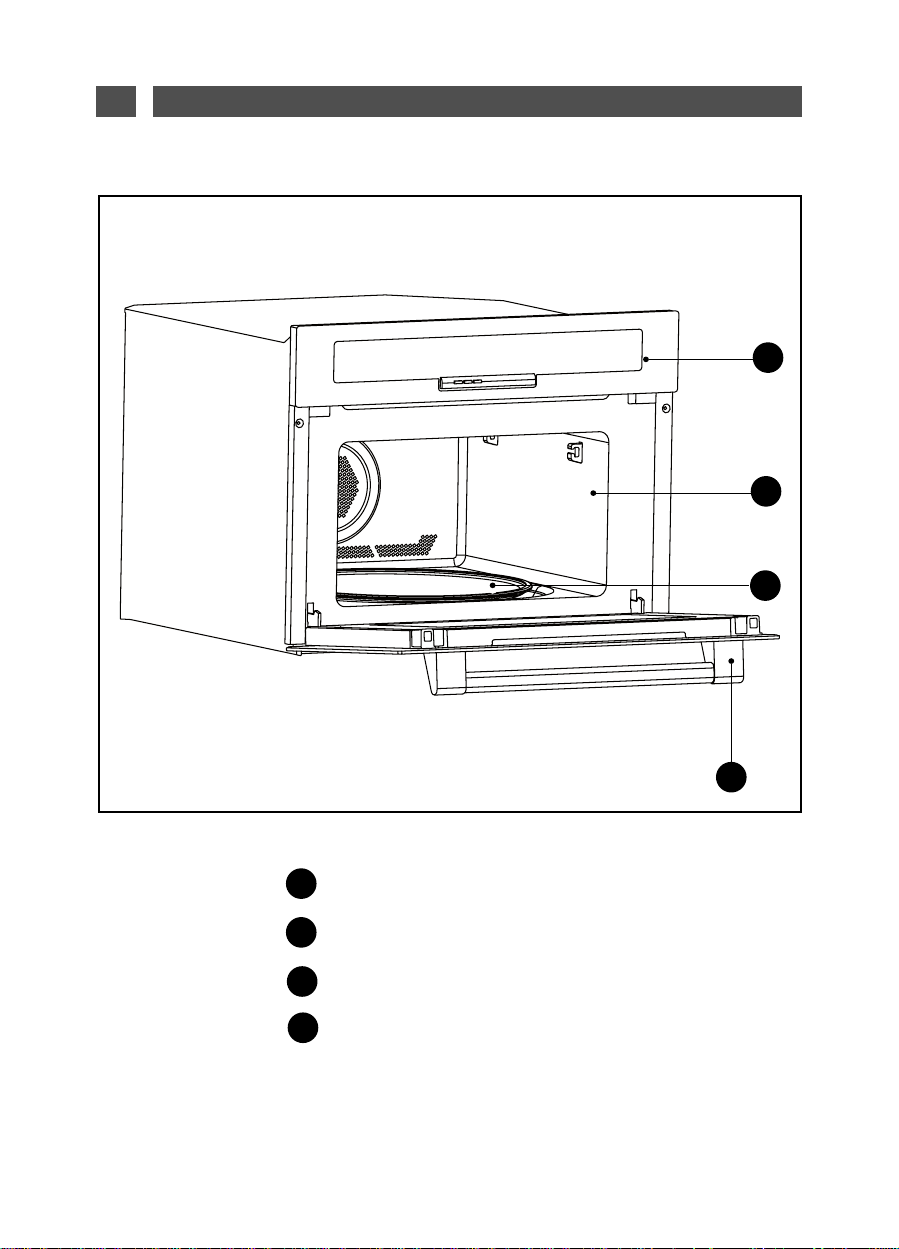
• THE APPLIANCE
A
B
C
Fig.03
A
Control panel
Cavity
B
Turntable
C
D
Door handle
D
Page 9
3/DESCRIPTION OF YOUR APPLIANCE
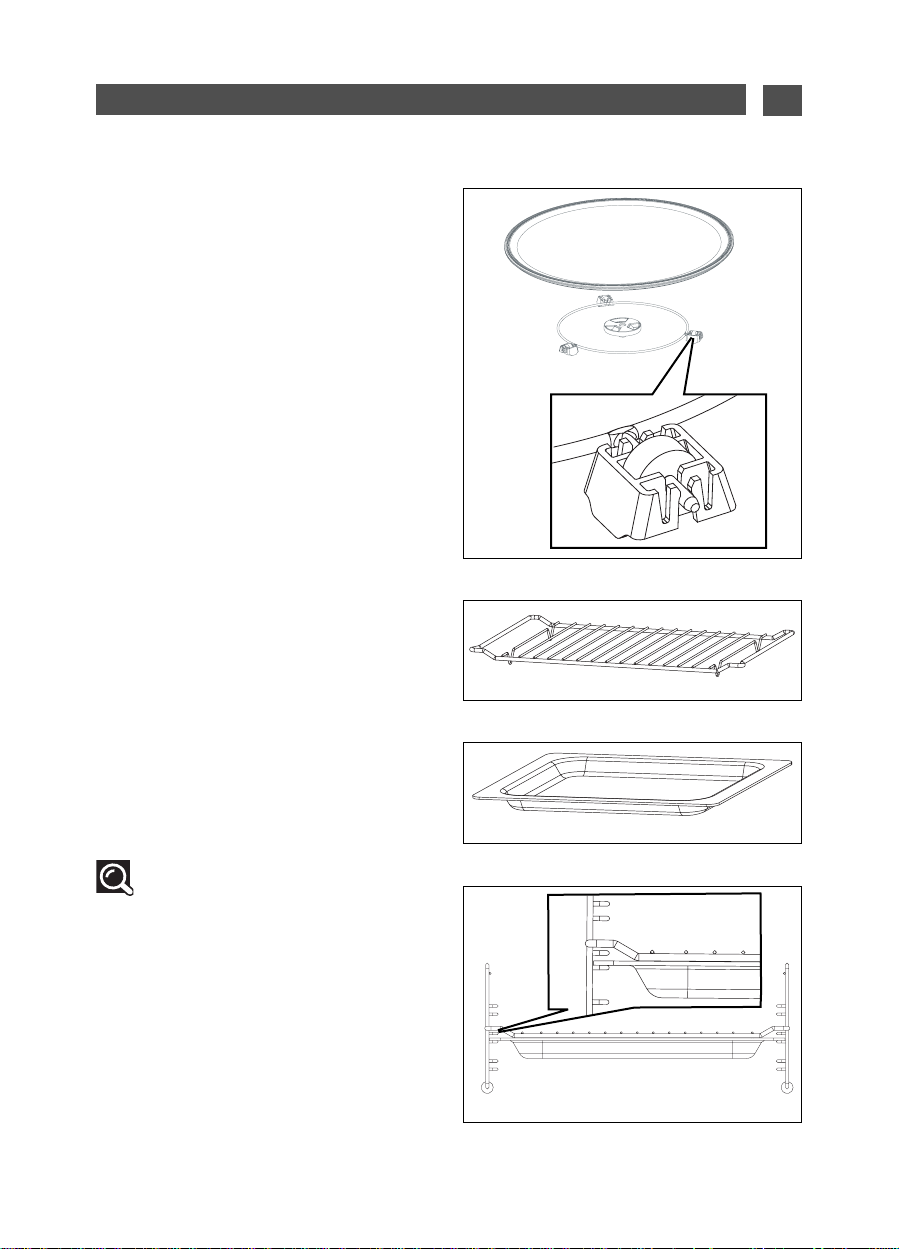
• ACCESSORIES
• The turntable: means food is cooked
uniformly with no need for handling.
It revolves in both directions. If it does not
revolve, check that all elements are correctly
positioned.
Do not attempt to turn it manually, as you
may damage the drive system.
It may be used as a cooking dish.
To remove it, grasp it using the access areas
provided inside the cavity.
• The driver: causes the glass turntable to
turn (Fig.04).
• The base rollers: Rollers must be
positioned in the right direction (Fig.04).
If they are not rotating properly, check for
foreign bodies under the rollers.
EN
Fig.04
• The grill (Fig.05):
toast, brown or grill. The grill must under
no circumstances be used with other metal
containers in the microwave, grill + microwave
or fan cooking + microwave functions.
However, you may heat food in an aluminium
tray by using a plate to separate it from the
grill.
may be
used to
• The glass drip tray (Fig.06): It may be
used half filled with water for «bain marie»
cooking or fan cooking. It may be used as a
cooking dish.
Comments:
Ensure that the drip tray is correctly
centred on the side grills so that air circulation
is not altered.
•The grill + the glass drip tray: for
roasting and to recover cooking juices, place
the grill on the drip tray (Fig.07).
45
Fig.05
Fig.06
Fig.07
Page 10

EN
3/DESCRIPTION OF YOUR APPLIANCE
• The side grills (Fig.08): 2 shelves
with hooks allow you to use the accessories
on 3 levels.
The 3 insertion levels are available according
to the type of cooking and type of food
(Fig.09).
In the Grill or Grill + Microwave functions
you use the accessories (grill or drip tray)
at the 1
roasts, and at the 3rd level for less thick
foods such as chops or sausages.
In the Fan cooking or Microwave + Fan
cooking functions you insert the grill or
drip tray at level 1 or 2 depending on the
food item being cooked.
st
level for thick foods such as
Fig.08
Fig.
09
e
d
c
46
Page 11

3/DESCRIPTION OF YOUR APPLIANCE
• THE CONTROL PANEL
EN
A
D F G
C
Fig.10
The displays help with programming by displaying the following: functions, time or
A
weight programmed, the clock and the food category.
The STOP button lets you erase or cancel a programme in progress.
B
C
The MODE button allows you to change temperatures and microwave power.
D
The CLOCK button allows you to set the time.
E
The - button allows you to reduce the time, the temperature, etc.
The OK button allows you to access the keyboard, to confirm an operation.
F
G
The + button allows you to increase the time, the temperature, etc.
EB
47
Page 12

EN 3/DESCRIPTION OF YOUR APPLIANCE
• THE DISPLAYS
The displays guide you in choosing the food type, the functions, the power, the weight and the
programming time.
A B C D E F H KI JG
L M N O P Q R
Fig.11
MICROWAVE COOKING
A
SPEED DEFROST
B
HIGH-POWER GRILL
C
LOW-POWER GRILL
D
TURBO GRILL
E
CIRCULATING HEAT
F
MICROWAVE + HIGH-POWER GRILL
G
MICROWAVE + LOW-POWER GRILL
H
MICROWAVE + CIRCULATING HEAT
I
KEEP WARM
J
K
AUTOMATIC PROGRAM
S T U
MEMORY 1
L
MEMORY 2
M
MEMORY 3
N
DELAYED START
O
TURNTABLE
P
CHILD SAFETY
Q
TIME / PROGRAMMING TIME
R
MICROWAVE POWER /
S
WEIGHT OF FOOD
TEMPERATURE CIRCULATING HEAT /
T
TURBO GRILL
THE COOKING EXPERIENCE
U
48
Page 13

3/DESCRIPTION OF YOUR APPLIANCE
A B C D E
F H I JG
Fig.12
A
PORK, VEAL, TURKEY
BEEF
B
C
FISH
POULTRY
D
VEGETABLES
E
POTATO GRATIN
F
EN
FROZEN PREPARED MEALS
G
FROZEN PIZZA
H
FRESH QUICHE
I
FRESH TARTS
J
49
Page 14

EN 4/USING YOUR APPLIANCE
• HOW TO SET AND CHANGE THE TIME
After connecting your appliance or after a prolonged power failure, the clock displays 12:00, the
display is blinking.
To set the clock Display
Press the clock set button .
Press +/– until the time you want appears.
Confirm by pressing OK.
Your clock is set.
When there is a time change Display
Press the clock set button . The time display blinks.
Program the new time by pressing +/–.
Confirm by pressing OK.
Your clock is set.
Comments:
If you do not press OK after setting the time, the time you selected will not be saved.
Your appliance is equipped with a back-up so that during a power failure the time remains
displayed.
• CHILD SAFETY
You can programme “CHILD SAFETY” to block unauthorised use of your microwave oven.
Setting:
Press the STOP button for 5 seconds with the door closed, the
procedure is confirmed by a beep.
To cancel:
Follow the same procedure: press the STOP button for 5 seconds with the door closed. The
icon switches off. The procedure is confirmed by a beep.
50
icon lights up. The
Page 15

4/USING YOUR APPLIANCE
EN
• PROGRAMMING
Your appliance is now connected and displaying the correct time.
Open the door using the handle. Place the food in the appliance and close the door.
If the door is not closed the appliance will not function properly.
If the door is opened during operation, the programming is not cancelled but simply interrupted. To
turn the oven on again after closing the door, simply press OK.
If no action is taken in 3 minutes, the programme is cancelled and the appliance returns to clock
mode.
When the appliance stops, the time is displayed again. Three beeps indicate the end of the
programme. This signal is repeated once a minute for 5 minutes until the door is opened. The
beeping can be interrupted by pressing STOP or OK.
In order to evacuate any steam remaining in the oven, your appliance is fitted with a post
ventilation function. The oven ventilation will continue to operate for 15 minutes after the end of
the programme.
If you think that the size of the dish is preventing the turntable from turning, use the STOP
TURNTABLE function before or during the programme.
To launch this function at any time, press
is recorded.
The
icon lights up and the turntable stops. To cancel the function, follow the same procedure. It
is not possible to use the STOP TURNTABLE function during a SPEED DEFROST programme.
It is necessary to turn the container or stir the contents halfway through the programme when the
turntable has stopped. If there is a programming error, press the STOP button, the programming
will be cancelled.
°C/W and simultaneously. A beep confirms that it
• USING THE POWER LEVELS
Power Use
Rapidly heating drinks, water, dishes containing a lot of water.
1000 W / 900 W
800 W / 700 W Cooking fresh or frozen vegetables.
600 W Melting chocolate.
500 W
400 W / 300 W Simmering dairy products, jams.
200 W Manual defrosting. Softening butter, ice cream.
100 W Defrosting pastries containing cream.
MICROWAVE POWER RESTORED: 1000 W
Cooking foods containing a lot of water (soups, sauces,
tomatoes, etc.).
Cooking fish and shellfish. Reheating on 2 levels.
Simmering pulses. Heating or cooking delicate egg-based foods.
51
Page 16

EN524/USING YOUR APPLIANCE
• MICROWAVE FUNCTION
Programming by power Display
Press OK, the MICROWAVE cooking mode is selected, the
microwave icon flashes.
Confirm the function by pressing OK.
remains lit, 1000W blinks.
Press +/– to set the microwave power you want. Confirm by
pressing OK, the time start flashing.
Press +/– to set the required cooking time.
Confirm by pressing OK, the lamp lights up, the oven starts.
Comments :
If the door is opened during cooking, the appliance stops and the remaining time blinks in the
display. To end your cooking you simply close the door again and press OK.
You can change the time whenever you want by pressing +/–.
You can change the power setting by pressing C°/W, then press +/– to reach the power level you
want.
The microwave icon
• REHEATING ON 2 LEVELS
In the microwave function, 500 W position, you can heat 2 dishes at the same time. If you choose
to do this, place one plate on the turntable and another on the grill at level 3.
Recommendations:
Cover the plates with microwave-safe cling film, a plate cover or another upside down
plate:
- for more uniform heating.
- to avoid drying of foods.
- to reduce the heating time.
- to prevent splashing in the oven.
The steam effect helps foods retain their flavours.
Type of food Quantity Time
Homogeneous foods such as purees,
peas, celery, etc.
Heterogeneous foods such as cassoulet,
stews, ravioli, etc.
2 x 200 g plates 4 to 6 min
2 x 300 g plates 6 to 8 min
Page 17

4/USING YOUR APPLIANCE
EN
• AUTOMATIC COOKING FUNCTIONS
With the automatic cooking function, the time and function are calculated automatically according
to the type of food and its weight.
Programming the automatic cooking time according to
weight.
Press OK then +/- until you see the AUTOMATIC cooking
mode, the icon flashes.
Confirm by pressing OK. The first food logo blinks.
Press +/- to select the type of food. Confirm by pressing OK.
The minimum weight is displayed and blinks.
Press +/- to set the weight of food if necessary.
Press OK, the icon of the type of cooking used and
the automatically calculated time are displayed. The oven
starts up.
Comments :
You have the choice between 2 automatic programmes for cooking vegetables, L1 and L2
(see the chapter on AUTOMATIC COOKING GUIDE).
Automatic programming for fresh quiches and pies is not according to weight, but according to a
dish diameter of between 27 and 30 cm.
Display
53
Page 18

EN 4/USING YOUR APPLIANCE
• GUIDE TO AUTOMATIC FUNCTIONS
Turkey,
pork, veal
Beef
Vegetable
This function is used for cooking and browning turkey, pork or veal roasts weighing
between 500 g and 2,000 g.
Cooking is in the combined microwave + fan cooking function.
Use a microwave-safe and heatproof dish, preferably made of earthenware (less
splashing than with glass).
Cook preferably non-barded roasts to avoid grease splashes and smoke.
Remove the meat from the refrigerator and leave it at room temperature for 1 hour
before placing in the oven.
Place the dish on the grill at insertion level 2.
After cooking, let the roast sit in aluminium foil for 10 minutes. This helps the meat
fibres to relax and the roast will be more tender.
Season after cooking.
This function is used for cooking and browning beef roasts weighing between 500 g
and 2,000 g.
Cooking is in the combined microwave + fan cooking function.
Use a microwave-safe and heatproof dish, preferably made of earthenware (less
splashing than with glass).
Cook preferably non-barded roasts to avoid grease splashes and smoke.
The less thick they are, the better the results.
Remove the meat from the refrigerator and leave it at room temperature for 1 hour
before placing in the oven.
Place the dish on the grill at insertion level 2.
After cooking, let the roast sit in aluminium foil for 10 minutes. This helps the meat
fibres to relax and the roast will be more tender.
Deglaze the cooking juices in the dish to make the sauce. Season after cooking
This function is used for cooking vegetables weighing between 100 g and 1,000 g.
The food is cooked using the microwave function.
Choose fresh vegetables and cook them with:
- 2 tablespoons of water up to 200 g
- 1/2 dl of water up to 500 g
- 1 dl of water up to 1,000 g
Use a container suitable for the volume of vegetables, cover it, except when cooking
mushrooms.
Place the dish on the glass turntable.
Halfway through cooking, a beep reminds you to stir the vegetables. Add cooking
fat and season as desired.
After cooking, let the vegetables sit for a few minutes before eating.
L1 is used for cooking tougher, more fibrous vegetables:
Brussels sprouts, grated white cabbage, florets of cauliflower or broccoli, sliced
carrots, cubed celeriac, etc.
L2 is used for cooking softer vegetables that contain more water:
Sliced or cubed courgettes, finely sliced leeks, whole sliced potatoes of even size,
quartered tomatoes, endives sliced into 4 and dressed with lemon, stripped spinach,
chopped mushrooms, etc.
54
Page 19

EN4/USING YOUR APPLIANCE
Fish
Poultry
Potato
au gratin
This function is used for cooking fish weighing between 100 g and 1,000 g. All types
of fish are suitable for microwave cooking. Simply ensure that the fish chosen is
fresh.
The food is cooked using the microwave function.
You may cook the fish whole (if so, score the thickest part), in slices or in fillets.
Arrange the fish in a round or oval dish, suitable for the microwave, add 2 to 3
tablespoons of water, lemon juice or white wine and cover with the dish lid or cling
film, season when cooked.
Place the dish on the glass revolving plate.
This function is used for cooking and browning a whole chicken or chicken pieces
(thighs) weighing between 500 g and 2,000 g.
Chicken is cooked using the combined microwave + fan cooking function and/or
grill.
Use a microwave-safe and heatproof dish , preferably made of earthenware (less
splashing than with glass). The chicken thighs may be placed directly on the glass
drip tray.
Before cooking; pierce the skin to avoid spitting.
Rub oil, salt and pepper on the chicken, dust it with spices if desired.
Whole chicken: place the dish on the grill at level 1.
Chicken thighs: Up to 900 g, insert the drip tray at level 2.
When cooked, let the chicken stand for 5 minutes in the oven before eating.
This function is used for cooking and browning potato gratin weighing between 500
g and 2,000 g.
The food is cooked using the combined microwave + grill function.
Use a microwave-safe and heatproof gratin dish.
Preparation: Grease the gratin dish, arrange half of the peeled potatoes cut into
fine round slices. Scatter half of the cheese on top. Add the remaining potatoes and
cover with the remaining cheese. Mix together the cream, milk and egg and season.
Pour the mixture on the potatoes.
Place the dish on the glass revolving plate.
When cooked, leave to stand for 5 to 10 minutes.
0.5 kg 0.75 kg 1 kg 1.5 kg 2 kg
Potatoes
Sour cream
Milk
Eggs
Gruyère cheese
Salt, pepper, nutmeg
300 g 450 g 600 g 900 g 1200 g
50 g 75 g 100 g 150 g 200 g
50 g 75 g 150g 250 g 300 g
1 1 1 2 2
50 g 75 g 100 g 100 g 150 g
yes yes yes yes yes
55
Page 20

EN 4/USING YOUR APPLIANCE
Frozen
pizza
Frozen
gratin
Fresh
quiche
Fresh
pie
This function is used for heating or cooking and browning frozen pizzas weighing
between 100 g and 750 g.
The pizza is heated or cooked using the fan cooking function.
Remove the pizza from packaging and place it on the grill at level 2.
This function is used for heating and browning frozen ready meals (lasagna, potato
gratin, cottage pie, fish gratin, etc.) weighing between 250 g and 1,000 g.
The dishes are heated or cooked using the microwave + grill function.
Remove the product from its packaging and place it in a microwave-safe heatproof
dish. Try to use a dish with the same dimensions as the ready meal. Do not cover.
Place the dish on the glass revolving plate.
This function is used for cooking and browning fresh quiches measuring between
27 and 30 cm in diameter.
Cooking is in the combined microwave + fan cooking function.
Use a microwave-safe heatproof quiche dish (made from Pyrex, china, etc.).
If using ready-made pastry, leave it on the greaseproof paper.
Cut the excess paper to fit the dish.
Place the quiche dish on the grill at insertion level 2.
Recommendations: Do not use a metal dish.
As soon as the mixture is poured into the pastry, cook the quiche. Never let the
pastry soak up the liquid, otherwise it will not cook properly.
This function is used for cooking and browning fresh pies measuring between 27
and 30 cm in diameter.
Cooking is in the combined microwave + fan cooking function.
Use a microwave-safe heatproof pie dish (made from Pyrex, china, etc.).
If using ready-made pastry, leave it on the greaseproof paper.
Cut the excess paper to fit the dish.
Place the quiche dish on the grill at insertion level 2.
Recommendations: Do not use a metal dish.
56
Page 21

4/USING YOUR APPLIANCE
EN
• DEFROSTING
Defrosting frozen foods in your microwave oven saves you considerable time. To defrost
food, use the
What you need to know:
Small pieces of meat or fish may be cooked immediately after defrosting. It is to be
expected that large pieces such as meat roasts or whole fish will still be slightly frozen.
We recommend leaving them to stand for a period at least equal to the defrosting time
in order to obtain a uniform temperature.
Food covered with ice crystals will take longer to defrost. In this case, you will need to
increase the defrosting time.
Recommendations:
Defrosting time varies according to the type of appliance. It also depends on the shape,
size, initial temperature and quality of the food.
Remember to remove metal fasteners from packaging.
Most foods need to be removed from their packaging.
Halfway through defrosting, the pieces must be turned, mixed or broken apart if they
are stuck together.
If you are defrosting large pieces of meat or fish which prevent the turntable from
revolving, use the stop turntable function. In this case, turn the food regularly.
SPEED DEFROST function
or the MICROWAVE
function
power
200W
.
Defrost meat and fish on an upside down saucer on top of another plate so that the juice
runs off. If it remains in contact with the food, it will begin cooking.
Never refreeze food before cooking it.
Times:
Times are calculated for foods frozen at -18°C. They are given for information only;
they may vary according to the thickness, shape, size and packaging of the food.
57
Page 22

EN 4/USING YOUR APPLIANCE
• THE SPEED DEFROST FUNCTION
The SPEED DEFROST button lets you quickly defrost foods weighing a maximum of 500 g. This
limitation aims to guarantee good results.
There are two defrost levels according to the type of food:
Sd1 - Pork, veal, turkey, poultry, fish, vegetables
Sd2 - Pastries, bread
Defrosting using SPEED DEFROST Display
Press OK then +/– , in order to select the SPEED DEFROST
defrosting mode, the icon flashes.
Confirm the function by pressing OK.
icon remains lit, Sd1 blinks.
Depending on the type of food to be defrosted, press OK to
confirm Sd1 or +/– to select Sd2, and confirm by pressing
OK. 100g flashes.
Press +/– to program the weight of food.
C
onfirm by pressing OK
the automatically calculated time are displayed.
starts up.
Comments:
Defrosting time is automatically calculated according to the weight of the food. This time may
vary depending on the initial temperature of the food (times are given for foods frozen at -18°C).
, the icon
The SPEED DEFROST
SPEED DEFROST
and
The oven
When the SPEED DEFROST function is used, halfway through the programme a beep reminds
you to turn the food for better results. Close the door again and press the selector to start up the
oven again.
Defrosting time cannot be changed in SPEED DEFROST position.
The STOP TURNTABLE function may not be used with the SPEED DEFROST function.
For foods that do not appear in Sd1 or Sd2 categories, and for all foods weighing more than 500 g,
use the MICROWAVE 200 W function. Refer to the DEFROSTING GUIDE.
58
Page 23

4/USING YOUR APPLIANCE
• DEFROSTING GUIDE (See recommendations page 21)
Defrosting pastry
Food Quantity Time Recommandations
Flaky or shortcrust pastry 400 g 1 - 3 min
Defrosting shellfish
Food Quantity Time Recommandations
Scallops 500 g 5 - 7 min
Peeled prawns 100 g 1 - 2 min
Whole pink prawns 200 g 2 - 4 min
Langoustine /Gambas (10)
Defrosting fish, meat and vegetables
Food Quantity Time
Fish: whole/fillets/steaks
Turkey/pork/veal/beef/poultry
Roasted/sliced/in pieces, etc.
Cauliflower/broccoli/carrots/mushrooms/mixed
vegetables, etc.
500 g
6 - 8 min
Place on kitchen paper and turn
halfway through defrosting
Place on a plate, mix halfway
through defrosting.
100 g
200 g
400 g
500 g
750 g
1000 g
100 g
200 g
400 g
500 g
750 g
1000 g
1250 g
1500 g
1750 g
2000 g
500 g
750 g
1000 g
1 - 2 min
3 - 5 min
5 - 7 min
7 - 9 min
12 - 14 min
17 - 19 min
1 - 2 min
3 - 5 min
5 - 7 min
7 - 9 min
12 - 14 min
17 - 19 min
23 - 25 min
28 - 30 min
34 - 36 min
39 - 41 min
7 - 9 min
12 - 14 min
17 - 19 min
EN
Defrosting fruit
Food Quantity Time
Strawberries
Raspberries/sour cherries
Gooseberries/blueberries/blackcurrants
59
250 g
250 g
250 g
7 - 9 min
6 - 8 min
5 - 7 min
Page 24

EN
4/USING YOUR APPLIANCE
• GRILL FUNCTIONS
This function is used for cooking and browning foods such as gratin dishes and meats.
It may be used before or after cooking, according to the recipe.
Warning:
Accessible areas may become hot when the grill is used. Children should be kept
away.
If the appliance is operating in combined mode, we recommend that children be supervised
by adults when using the oven due to the high temperatures.
When using the grill, you must protect your hands when taking out dishes and use
containers made from heatproof materials such as flameproof glass or china.
There are 2 grill levels: HIGH GRILL and LOW GRILL.
As a rule, you should use HIGH GRILL to grill meat and fish and LOW GRILL in microwave + grill
function for gratin dishes and browning more delicate dishes.
Use the accessories (grill or drip tray) at level 1, 2 or 3, depending on the height of the container
or the food.
Programming the GRILL function Display
Press OK then +/- , in order to select the GRILL cooking mode at
the level of your choice, the GRILL icon flashes.
Confirm the function by pressing OK. The GRILL icon remains lit
and the time digits blink.
Press +/- to set the required cooking time.
Confirm by pressing OK, the lamp lights up, the oven starts.
Comment:
You can change the time whenever you want by pressing +/–.
• GUIDE TO COOKING USING THE GRILL FUNCTION
Cooking using the HIGH GRILL. function. Place the food item on the grill + drip tray (to recover
the juices) and insert at level 3. Turn the food halfway through cooking.
Food Quantity Time
Andouillettes, blood sausage, sausages
(pierce with a fork)
Pork chops 4 units 27 - 32 min
Lamb cutlets 4 units 15 - 17 min
Rib roast 800 g 23 - 25 min
Side bacon 4 to 6 slices 18 - 25 min
4 to 6 units 22 - 30 min
60
Page 25

4/USING YOUR APPLIANCE
EN
• THE TURBO GRILL FUNCTION
This function lets you use the Grill function + ventilation at the same time, which produces uniform
cooking for thick food items.
The cooking temperature may be adjusted in 10°C increments from 50°C to 200°C.
Programming a TURBO grill function Display
Press OK then +/- , in order to select the TURBO GRILL
cooking mode, the TURBO GRILL icon flashes.
Confirm the function by pressing OK. The temperature
blinks.
Select the temperature of your choice. Confirm by pressing
OK. The time digits blink.
Press +/- to set the required cooking time.
Confirm by pressing OK, the lamp lights up, the oven starts.
Comment:
You can change the cooking time whenever you want by pressing +/–.
You can change the power setting by pressing C°/W, then press +/- to reach the temperature you
want.
• GUIDE TO COOKING USING THE TURBO GRILL FUNCTION
Place the food item in a dish on the grill at insertion level 1.
Turn the food halfway through cooking.
Food Quantity Temperature Time
Beef roast 1000 g 190°C 36 - 38 min
Whole chicken 1200 g 180°C 75 - 80 min
Pork roast 1000 g 170°C 90 min
61
Page 26

EN
4/USING YOUR APPLIANCE
• THE GRILL + MICROWAVE FUNCTION
This function lets you use the grill + microwave at the same time, which allows rapid cooking.
There are two grill + microwave cooking levels:
High grill + microwave and Low grill + microwave function.
You may combine with the 7 following power levels: 100 W/200 W/300 W/400 W/500 W/
Programming a grill + microwave function Display
Press the OK then +/–, to select the GRILL + MICROWAVE
cooking mode at the level of your choice, the selected icon
flashes.
Confirm the function by pressing OK, the selected icon remains
lit, the time flashes. The MICROWAVE 500 W power level
blinks.
Press +/- to set the microwave power you want. Confirm by
pressing OK. The time digits blink.
Press +/- to set the required cooking time.
Confirm by pressing OK, the lamp lights up, the oven starts.
Comments :
You can change the time whenever you want by pressing +/–.
You can change the power setting by pressing the touchpad C°/W, then press +/- to reach the
power level you want.
600 W/700 W
• GUIDE TO COOKING USING THE GRILL + MICROWAVE FUNCTION
Use a microwave-safe and heatproof dish, preferably made of earthenware (less splashing than
with glass).
Place the food item in a dish on the grill at level 1, turn it halfway through cooking.
Cook preferably non-barded roasts to avoid grease splashes and smoke.
Season when cooked, let the meat sit in aluminium foil for 10 minutes. This helps the meat fibres to
relax and the roast will be more tender.
Food Quantity Programming Time
Shoulder of lamb (boned and tied) 1300 g 200 W + High Grill 40 - 45 min
Ribeye steak 800 g 200 W + High Grill 18 - 23 min
Chicken, guinea fowl 1200 g 500 W + High Grill 25 - 27 min
Turkey roast 800 g 300 W + High Grill 27 - 32 min
Pork roast 1000 g 300 W + High Grill 35 - 40 min
Veal roast 1200 g 300 W + High Grill 50 - 55 min
62
Page 27

4/USING YOUR APPLIANCE
EN
• THE FAN COOKING FUNCTION
The fan cooking function lets you cook and brown food as in a traditional oven.
Recommendations:
The cooking temperature may be adjusted in 10°C increments from 50°C to 250°C.
Cooking time may be set from 0 to 90 minutes.
It is preferable to programme the minimum time and add more time if necessary; check on the
colour of the food.
Always use the accessories (grill or drip tray) inserted at level 1 or 2. You will obtain better heat
distribution and better cooking results.
Use heatproof containers.
Protect your hands when removing dishes as they may become very hot.
If you want to defrost food after using one of the fan cooking functions, we recommend that you let
the oven cool for around 20 minutes to achieve better results.
Cooking on 2 levels:
To cook 2 apple pies at the same time: 1 hour at 200°C. We suggest that you place the first pie in
the glass drip tray at level 1 and the second pie in a pie dish on the grill at level 3. Change the two
dishes round halfway through cooking.
Programming the fan cooking function Display
Press OK then +/- , in order to select the CIRCULATING
HEAT mode, the CIRCULATING HEAT icon flashes.
Confirm the function by pressing OK.
digits blink.
Press +/- to select the temperature you want. Confirm by
pressing OK.
Press +/- to set the required cooking time.
Confirm by pressing OK, the lamp lights up, the oven starts.
has been reached, a beep sounds.
You can change the time whenever you want by pressing +/–.
You can change the temperature by pressing C°/W, then press +/- to reach the temperature you
want.
The time digits blink.
Comments :
You may preheat your oven with the fan cooking function. When the programmed temperature
The temperature
63
Page 28

EN
4/USING YOUR APPLIANCE
• GUIDE TO COOKING USING THE FAN COOKING FUNCTION
* Preheat the oven to the temperature indicated.
Food Temperature Insertion level Time
Meat
Pork roast (1 Kg)
Veal roast (1 Kg)
Beef roast (1 Kg)
Lamb (leg, shoulder 1.5 Kg)
Poultry (1.2 Kg)
Large poultry
Rabbit
Fish (1.2 Kg)
Cooked (snapper, salmon,
hake)
Vegetables
Potato gratin
Lasagna
Stuffed tomatoes
Pastries
Sponge cake
Genoese
Sponge roll
Cake
Cookies
Shortbread
Cream
Madeleines
Pound cake
Cheesecake
Kugelhopf
Choux pastry
Shortcrust pastry pie
Flaky pastry pie
Miscellaneous
Pâté in a terrine (1 Kg)
Savoury pie
Closed casserole dish
(stews, baeckeoffe)
Bread (500 g of flour)
160°C
180°C
220°C*
180°C
180°C
180°C
230°C
180°C In the drip tray level 2 35 - 45 min
180°C
180°C
180°C
150°C
150°C
150°C
160°C
180°C
160°C
160°C
170°C
170°C
170°C
180°C
180°C
200°C
250°C*
190°C
170°C
160°C
220°C *
On the grill at level 2
On the grill at level 2
On the grill at level 2
In the drip tray level 2
On the grill at level 1
On the grill at level 1
In the drip tray level 2
On the grill at level 2
On the grill at level 2
On the grill at level 2
On the grill at level 2
On the grill at level 1
In the drip tray level 2
On the grill at level 1
In the drip tray level 2
In the drip tray level 2
On the grill at level 2
In the drip tray level 2
On the grill at level 2
On the grill at level 1
spring form mold, 26 cm
diameter
On the grill at level 1
in a special mold
In the drip tray level 2
On the grill at level 2
On the grill at level 2
On the grill at level 1
On the grill, level 2
20 cm mold
On the grill, level 1 depending
on the dish
On the grill at level 2
90 min
70 - 75 min
38 - 40 min
50 - 60 min
70 - 75 min
1 1/2 hr - 2 hr
40 - 45 min
50 - 55 min
40 - 45 min
45 - 55 min
35 - 45 min
35 - 45 min
20 - 25 min
40 - 50 min
18 - 22 min
20 - 25 min
35 - 45 min
bain marie
20 - 30 min
40 - 50 min
65 - 75 min
45 - 50 min
35 - 40 min
selon la taille
40 - 45 min
30 - 40 min
1 1/2 hr
55 - 65 min
1 1/2 hr - 3 hr
25 - 30 min
64
Page 29

4/USING YOUR APPLIANCE
EN
• THE FAN COOKING + MICROWAVE FUNCTION
The fan cooking + microwave function lets you combine the microwave with fan cooking, saving
you considerable time. The following microwave power levels are available: 100-200-300-400500W.
Recommendations:
When cooking using the fan cooking + microwave function, do not use a metal container.
Cooking on 2 levels:
To cook an 800 g veal roast and potato gratin with 800 g of potatoes at the same time, 55 min at
170°C, microwave power level 300 W. We recommend you place the gratin dish on the turntable
and the veal roast on the drip tray inserted at level 3.
Warning :
To cook an 800 g veal roast and potato gratin with 800 g of potatoes at the same time,
55 min at 170°C, microwave power level 300 W. We recommend you place the gratin dish on
the turntable and the veal roast on the drip tray inserted at level 3.
Programming the fan cooking + microwave function Display
Press OK then +/- , in order to select the CIRCULATING HEAT
+ MICROWAVE mode, the corresponding icon flashes.
Confirm the function by pressing OK.
temperature blinks.
want. Confirm by pressing OK.
The Microwave power level blinks.
temperature you want. Confirm by pressing OK.
The time digits blink.
time.
Confirm by pressing OK, the lamp lights up, the oven starts.
Comments :
You can change the cooking time whenever you want by pressing +/–.
You can change the temperature by pressing C°/W, then press +/- to reach the temperature you
want. The same goes for the microwave power level.
Press +/- to select the temperature you
Press +/- to set the required cooking
The fan cooking
Press +/- to select the
65
Page 30

EN
4/USING YOUR APPLIANCE
•GUIDE TO COOKING USING THE FAN COOKING +
MICROWAVE FUNCTION
Use a microwave-safe and heatproof dish, preferably made of earthenware (less splashing than
with glass).
Cook preferably non-barded roasts to avoid grease splashes and smoke.
Season when cooked, let the meat sit in aluminium foil for 10 minutes. This helps the meat fibres
to relax and the roast will be more tender.
Food Qty
Shoulder of lamb
on the bone
Ribeye steak 800 g 200 W + 200°C 23 - 28 In a dish, on the grill, level 2
Chicken/guinea
fowl
Turkey roast 800 g 300 W + 180°C 32 - 37 In a dish, on the grill, level 2
Pork roast 1200 g 300 W + 180°C 47 - 52 In a dish, on the grill, level 2
Veal roast 1000 g 300 W + 180°C 37 - 42 In a dish, on the grill, level 2
1300 g 200 W + 200°C 32 - 37 In the drip tray level 2
1200 g 200 W + 200°C 35 - 40 In a dish, on the grill, level 1
Programming
MW + FC
Time
(min)
Recommendations
• DELAYED START
Warning :
Check that the clock is at the correct time before starting programming.
Programming delayed start Display
Programme your function and cooking duration as you would for
immediate start.
Instead of confirming the start, press the CLOCK button. The cooking
end time blinks.
Press +/- to program the cooking END time you want.
Confirm by pressing OK. The cooking end time is displayed as well as
the type of function programmed.
The programme will start so that your dish is ready at the pre-
programmed cooking end time.
Comments :
The minimum programming time for DELAYED START is one minute.
You may programme DELAYED START with all the functions except the defrost function.
66
Page 31

4/USING YOUR APPLIANCE
EN
• THE KEEP WARM FUNCTION
This function lets you keep the food hot after cooking.
Programming the keep warm function Display
Press OK and +/-, to select the KEEP WARM function, the corresponding
icon flashes.
Confirm the function by pressing OK.
Press +/- to reach the required cooking time.
Confirm by pressing OK, the lamp lights up, the oven starts.
Comments:
The maximum programming time for KEEP WARM is 30 minutes.
You may change the KEEP WARM time at any time.
• M1/M2/M3 MEMORY BUTTONS
The 3 memory functions allow you to record 3 regularly used programmes that you can then select
rapidly.
Programming a memory button Display
Programme the cooking of your choice.
Access the memory function by pressing long (5 seconds) on
OK. The M1 logo blinks.
Select the memory you want by pressing +/-.
Confirm your choice by pressing OK. The memory and the
associated programme are displayed.
Press the STOP button to bring back the clock display.
Using a memory programme Display
Press OK, and press +/- to select the memory M1, M2 or M3.
The
icon for the memory chosen blinks.
Confirm by pressing OK.
The memory programme is displayed and the oven starts up.
Comments:
If you programme another memory onto one of the 3 functions already programmed, the
previous programme is cancelled and replaced.
All functions may be memorised except AUTOMATIC COOKING, SPEED DEFROST and KEEP
WARM.
67
Page 32

EN
5/CARING FOR AND CLEANING YOUR APPLIANCE
We recommend that you clean the oven
regularly and remove any food deposits inside
and outside the appliance. Use a damp, soapy
sponge. If the appliance is not kept clean, its
surface may become damaged and this will
considerably shorten its lifespan and cause
a dangerous situation. If the door or seal are
damaged, the oven must not be used until
repaired by a qualified person.
Do not clean the appliance with a steam
cleaner.
The use of abrasive products, alcohol or
solvents is not recommended; They are likely
to damage the appliance.
If the oven smells unpleasant or is encrusted
with dirt, boil a cup of water with lemon juice
for 2 minutes and clean the sides with a little
washing-up liquid.
In order to clean the roof of the cavity, tip the
grill resistance downwards (Fig.13).
Unhook the grill resistance by pressing on the
rod at top left (Fig.14).
The turntable may be removed for easier
cleaning. To remove it, grasp it by the access
areas provided for this purpose. If you remove
the driver, avoid getting any water in the motor
axis hole.
Remember to put back the driver, the base
rollers and the turntable.
To preserve your appliance, we recommend
that you use Clearit cleaning products.
Clearit offers you professional products and
solutions designed for the daily care of your
household appliances and kitchens.
They are on sale at your regular retailer,
along with a complete line of accessories and
consumable products.
Professional expertise
serving individuals.
Fig.13
Fig.14
68
Page 33

6/IN THE EVENT OF OPERATING ANOMALIES
If you have a query concerning the operation of your appliance, this does not necessarily mean
that there is a breakdown. In all events, check the following points:
You notice that What should I do?
EN
①
The time is counting down but the
appliance is not functioning (the turntable
is not revolving, the light is not on and the
food is not heated).
Check that the appliance is properly connected.
The appliance does not switch on.
The appliance continues to make a noise
after cooking has finished.
Check that the oven door is properly closed.
Check that the child safety feature is not
programmed.
In order to evacuate residual steam, your appliance
is equipped with a delayed ventilation
According to the cooking mode chosen (solo/
combined), the ventilation may continue to function
after cooking has finished.
②
AB
A + B = 10 secondes
feature.
grill/
The appliance is noisy.
The turntable does not revolve properly.
You notice steam on the glass. Wipe off the condensation with a cloth.
The food is not heated in the microwave
programme.
Smoke comes off the grill at the start of
the programme.
The appliance produces sparks.
Clean the rollers and the roller area under the
turntable.
Check that the rollers are correctly positioned.
Check that the utensils are suitable for use with
microwave ovens and that the power level is
appropriate.
Remove all cooking residues from the heating
element before each use.
Clean the appliance thoroughly: remove grease,
cooking particles, etc.
Make sure no metal objects are close to the oven
walls.
Never use metal objects with the grill.
69
Page 34

EN
Operating proficiency testing according to CEI/EN/NF EN 60705 standards;
The International Electrotechnical Commission, SC.59K, has established a standard relative to
comparative performance tests conducted on various microwaves. We recommend the following
for this appliance:
7/OPERATING PROFICIENCY TESTING
Test Load
Egg custard
(12.3.1)
Sponge cake
(12.3.2)
Meatloaf
(12.3.3)
Defrosting
meat
(13.3)
Defrosting
raspberries
(B.2.1)
Potato gratin
(12.3.4)
Chicken
(12.3.6)
Cake
(12.3.5)
Approx
time
1000 g
750 g
475 g 6 - 7 min 700 W
900 g 14 min 700 W
500 g 11 - 12 min 200 W On the turntable
250 g 6 - 7 min 200 W
1100 g 23 - 25 min
1200 g
700 g 20 min
16 - 18 min
13 - 15 min
24 - 26 min
35 - 40 min
Power
selector
500 W
Low Grill
+ 700 W
High Grill
+ 500 W
Fan cooking
200°C
+ 200 W
Fan cooking
220°C
+ 200 W
Containers /
Recommendations
Pyrex 227
On the turntable
Pyrex 220
On the turntable
Pyrex 827
On the turntable
Pyrex 838
Cover with cling film.
On the turntable
On a flat plate
On the turntable
Pyrex 827
On the turntable
Place on the grill + drip tray
Insert
at the 1st level
from the bottom
Turn halfway through
In an enamelled earthenware dish
Place on the grill inserted at
the 1st level from the bottom
Pyrex 828
Place on the grill level 1
99 64 40 81 FR / EN - 06/07
70
 Loading...