

Page 1
FR GUIDE D'UTILISATION
DA BRUGERVEJLEDNING
DE BETRIEBSANLEITUNG
EL ΟΔΗΓΙΕΣ ΧΡΗΣΗΣ
EN USER GUIDE
ES MANUAL DE UTILIZACIÓN
IT MANUALE D'USO
NL GEBRUIKSAANWIJZING
PT MANUAL DE UTILIZAÇÃO
Four
Ovn
Backofen
Φούρνος
Oven
Horno
Forno
Oven
Forno
99643571_b_ml.qxp 03/01/2008 10:35 Page 1
Page 2
96
FR
02
DE
48
EL
72
EN
96
ES
120
IT
144
NL
168
PT
192
DA
26
Dear Customer,
You have purchased a
DDEE DDIIEETTRRIICCHH
oven and we would like to say
thank you.
Our research teams have designed a new generation of appliances for
you, which, thanks to their quality, esthetics and technological
advances have resulted in exceptional products, a testament to our
know-how.
Your new
DDEE DDIIEETTRRIICCHH
oven will fit in harmoniously in your kitchen,
combining top cooking performance with ease of use. Our wish is to
offer you a product of excellence.
In the
DDEE DDIIEETTRRIICCHH
line of products, you will also find a wide range of
cookers, hobs, ventilation hoods, dishwashers, built-in refrigerators,
which can be coordinated with your new
DDEE DDIIEETTRRIICCHH
oven.
Of course, in an ongoing effort to better satisfy your demands with
regard to our products, our after-sales service department is at your
disposal and ready to listen in order to respond to all of your questions
and suggestions (contact information at the end of this booklet).
You can also log on to our web site:
wwwwww..ddeeddiieettrriicchh--eelleeccttrroommeennaaggeer
r..ccoomm
where you will find our latest
innovations as well as useful and additional information.
DDEE DDIIEETTRRIICCHH
SSeettttiinngg NNeeww VVaalluueess
As part of our commitment to constantly improving our products, we reserve the right to make
changes to them based on advances to their technical, functional and/or aesthetic properties.
Attention:
Before installing and using your appliance, please read this Installation and Usage Guide
carefully, which will allow you to quickly familiarize yourself with its operation.
99643571_b_ml.qxp 03/01/2008 10:39 Page 96
Page 3

97
TABLE OF CONTENTS
EN
1 / INFORMATION FOR THE USER
••
Safety instructions _________________________________________ 98
••
Care for the environment ____________________________________ 99
2 / INSTALLING YOUR APPLIANCE
••
Choice of location__________________________________________ 100
••
Fitting ____________________________________________________ 100
••
Electric connection_________________________________________ 101
3 / DESCRIPTION OF YOUR APPLIANCE
••
Introduction to your oven____________________________________ 103
••
Accessories_______________________________________________ 104
••
Introduction to the programmer ______________________________ 105
••
Introduction to the selecting buttons __________________________ 105
4 / USING YOUR APPLIANCE
••
Using the programmer
º
How to set the time_____________________________________ 106
º
How to change the time _________________________________ 106
º
Micro-wave cooking ____________________________________ 107
••
Programmed cooking
º
Automatic micro-wave defrosting _________________________ 108
º
Defrosting guide _______________________________________ 109
••
Customising the cooking power ______________________________ 110
••
How to record cooking programmes using the memory functions __ 111-112
••
How to start a cooking programme using the memory function ____ 113
••
Locking the controls________________________________________ 114
••
Display stand-by mode______________________________________ 115
5 / OVEN COOKING MODES_______________________________________ 116
6 / CARING FOR AND CLEANING YOUR APPLIANCE
••
Cleaning the outer surfaces__________________________________ 117
7 / TROUBLESHOOTING __________________________________________ 118
8 / AFTER-SALES SERVICE
••
Service calls ______________________________________________ 119
99643571_b_ml.qxp 03/01/2008 10:39 Page 97
Page 4

98
1 / INFORMATION FOR THE USER
EN
SAFETY INSTRUCTIONS
• Your appliance is designed for standard
household use for cooking, reheating and
defrosting foods. The manufacturer declines
any responsibility in the case of inappropriate
use.
• Before each use, ensure that any
receptacles and accessories are suitable for
use in your micro-wave oven (for example:
pyrex, porcelain, etc.)
• To avoid damaging your appliance, never
operate it while empty or without the
turntable.
• Do not interfere with the orifices on the
lock on the front of the appliance; this could
cause damage to your appliance that would
require a service call.
• Check the oven regularly when cooking or
heating food in disposable containers made
from plastic, paper or other flammable
materials to avoid the risk of fire.
• It is not recommended to use metallic
cookware, forks, spoons, knives or metal
staples or fasteners for defrosting bags.
However, occasionally you can defrost food
packaged in low-rise aluminium containers
(maximum 4cm) without the lid. However, the
reheating time will be slightly longer. In this
case, make sure that the container is placed
in the centre of the base of the oven; it must
never be placed less than 1 cm away the
metallic walls or the door of the appliance.
• For children, always:
- heat bottles without the teat, shake
the liquid and check its temperature on the
back on your hand before feeding the child.
- mix and check the temperature of
children’s food before eating in order to avoid
serious internal burns.
WWAARRNNIINNGG
: Do not allow children to use the
micro-wave oven without supervision, unless
appropriate instructions have been given so
that the child can use the oven safely and
understands the dangers of incorrect
operation.
• It is recommended to cover food in most
cases; it will have more flavour and your
appliance will remain cleaner for longer.
However, before cooking or reheating liquids
in a bottle or sealed container, you must
remove the cap or lid to avoid the risk of
explosion.
• Never heat or cook eggs in the microwave
in their shells, on a dish or on a plate. They are
liable to explode even after the cooking has
finished and risk causing serious burns
and/or irreparable damage to your microwave
oven.
• Heating beverages in the micro-wave oven
can cause sudden and/or delayed splattering
of boiling liquid, so precautions must be
taken when handling their containers.
• In the case of small quantities (a sausage,
croissant, etc.) place a glass of water next to
the food.
• Excessive cooking times may dry out
foods and burn them. To avoid such incidents,
never use the same times recommended for
cooking in a traditional oven.
• If you notice the appearance of smoke,
leave the door of the appliance shut, turn off
the power or disconnect the oven from the
power supply.
••
Warning
Keep this user guide with your appliance. If
the appliance is ever sold or transferred to
another person, ensure that the new owner
receives the user guide. Please become
familiar with these recommendations before
installing and using your oven. They were
written for your safety and the safety of
others.
99643571_b_ml.qxp 03/01/2008 10:39 Page 98
Page 5

99
1 / INFORMATION FOR THE USER
EN
CARE FOR THE ENVIRONMENT
••
— This appliance’s packing materials are recyclable. Recycle them and play a role in protecting
the environment by depositing them in municipal containers provided for this purpose.
— Your appliance also contains many recyclable materials. It is therefore marked with
this logo to indicate that used appliances must not be mixed with other waste.
Recycling of the appliances organised by your manufacturer will thus be undertaken
in optimum conditions, in accordance with European directive EC/2002/96 relating to
electrical and electronic equipment waste. Consult your city hall or your retailer to find
the drop-off points for used appliances that is nearest to your home.
— We thank you for your help in protecting the environment.
Warning
Installation should only be performed by installers and qualified technicians.
This appliance complies with the following European directives:
- Low Voltage Directive EEC/73/23 modified by directive EEC/93/68 for insertion of
EC marking.
- Electromagnetic Compatibility Directive 89/336/EEC modified by directive 93/68/EEC for
insertion of EC marking.
- EC regulation no. 1935/2004 concerning materials and objects intended for contact with
food substances.
— This appliance is not intended for use by people (including children) with impaired physical,
sensorial or mental abilities, or people lacking in knowledge or experience, unless they receive
prior supervision or instructions on using the appliances through a person responsible for their
safety.
— Never use steam or high-pressure devices to clean the oven (requirement imposed by
electrical safety concerns).
— Do not modify or attempt to modify any of the characteristics of this appliance. This would be
dangerous to your safety.
— During cooking, ensure that the door of your oven is completely closed so that the seal can
do its job properly.
99643571_b_ml.qxp 03/01/2008 10:39 Page 99
Page 6
100
2 / INSTALLING YOUR APPLIANCE
EN
FITTING
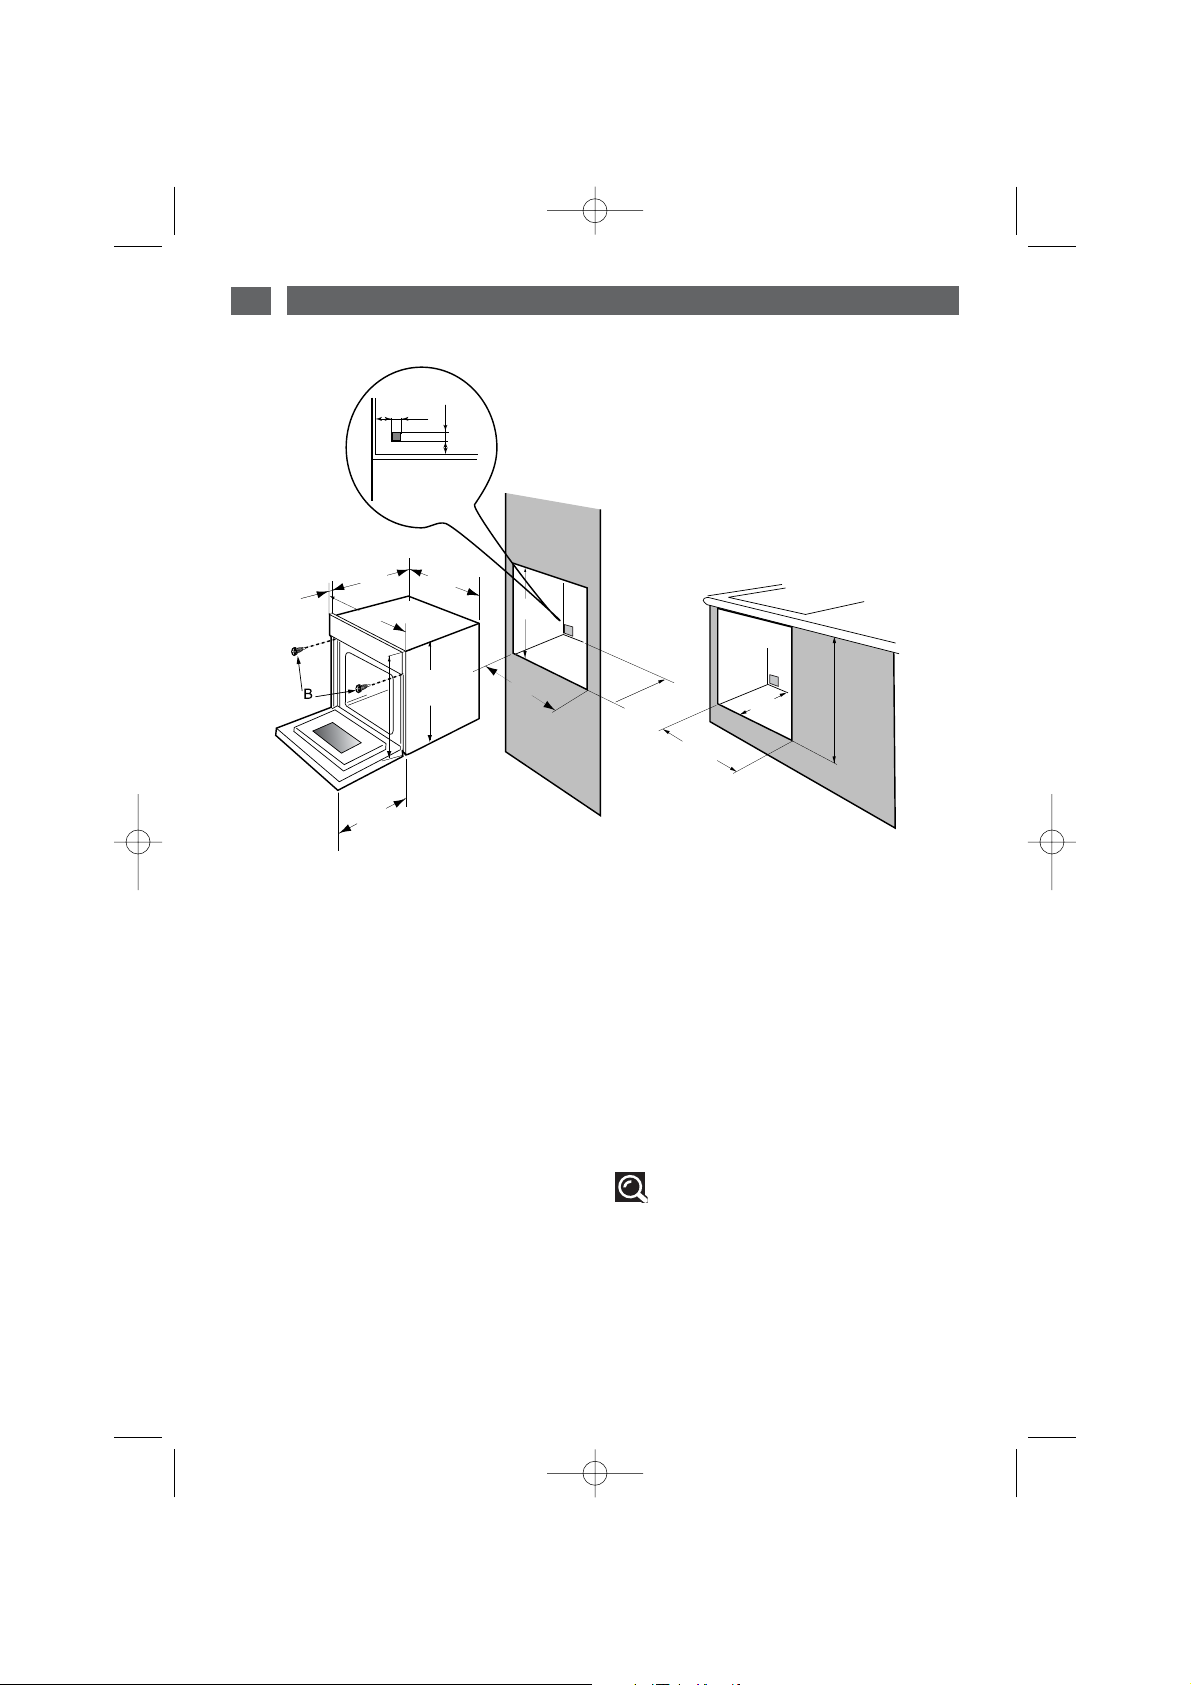
To do this:
1) Remove the rubber screw covers to access
the mounting holes.
2) Drill a Ø 2 mm hole in the cabinet panel to
avoid splitting the wood.
3) Attach the oven with the two screws.
4) Replace the rubber screw covers (they also
serve to absorb the shock caused by closing
the oven door).
(*) if the cabinet is open, its opening must be
70 mm (maximum).
Tip
To be certain that you have properly
installed your appliance, do not hesitate to
seek advice from a household appliance
specialist.
••
CHOICE OF LOCATION
The diagrams above determine the
dimensions of a cabinet that will be able to
hold your oven.
The oven can be installed under a work top or
in a column of cabinetry (open* or closed)
having the appropriate dimensions for built-in
installation (see adjacent diagram).
Your oven has optimised air circulation that
allows it to achieve remarkable cooking and
cleaning results if the following guidelines are
followed:
• Centre the oven in the cabinet so as to
guarantee a minimum distance of 5 mm
between the appliance and the neighbouring
cabinet.
• The material or coating of the cabinet must
be heat-resistant.
• For increased stability, fix the oven in the
cabinet by means of 2 screws through the
holes designed for this purpose on the lateral
mounts (fig.1).
••
99643571_b_ml.qxp 03/01/2008 10:39 Page 100
20
50
50
10
540
22
595
310
390
560
376
380
560-580
550
mini
560-580
550 mini
400
Page 7
101
2 / INSTALLING YOUR APPLIANCE
EN
••
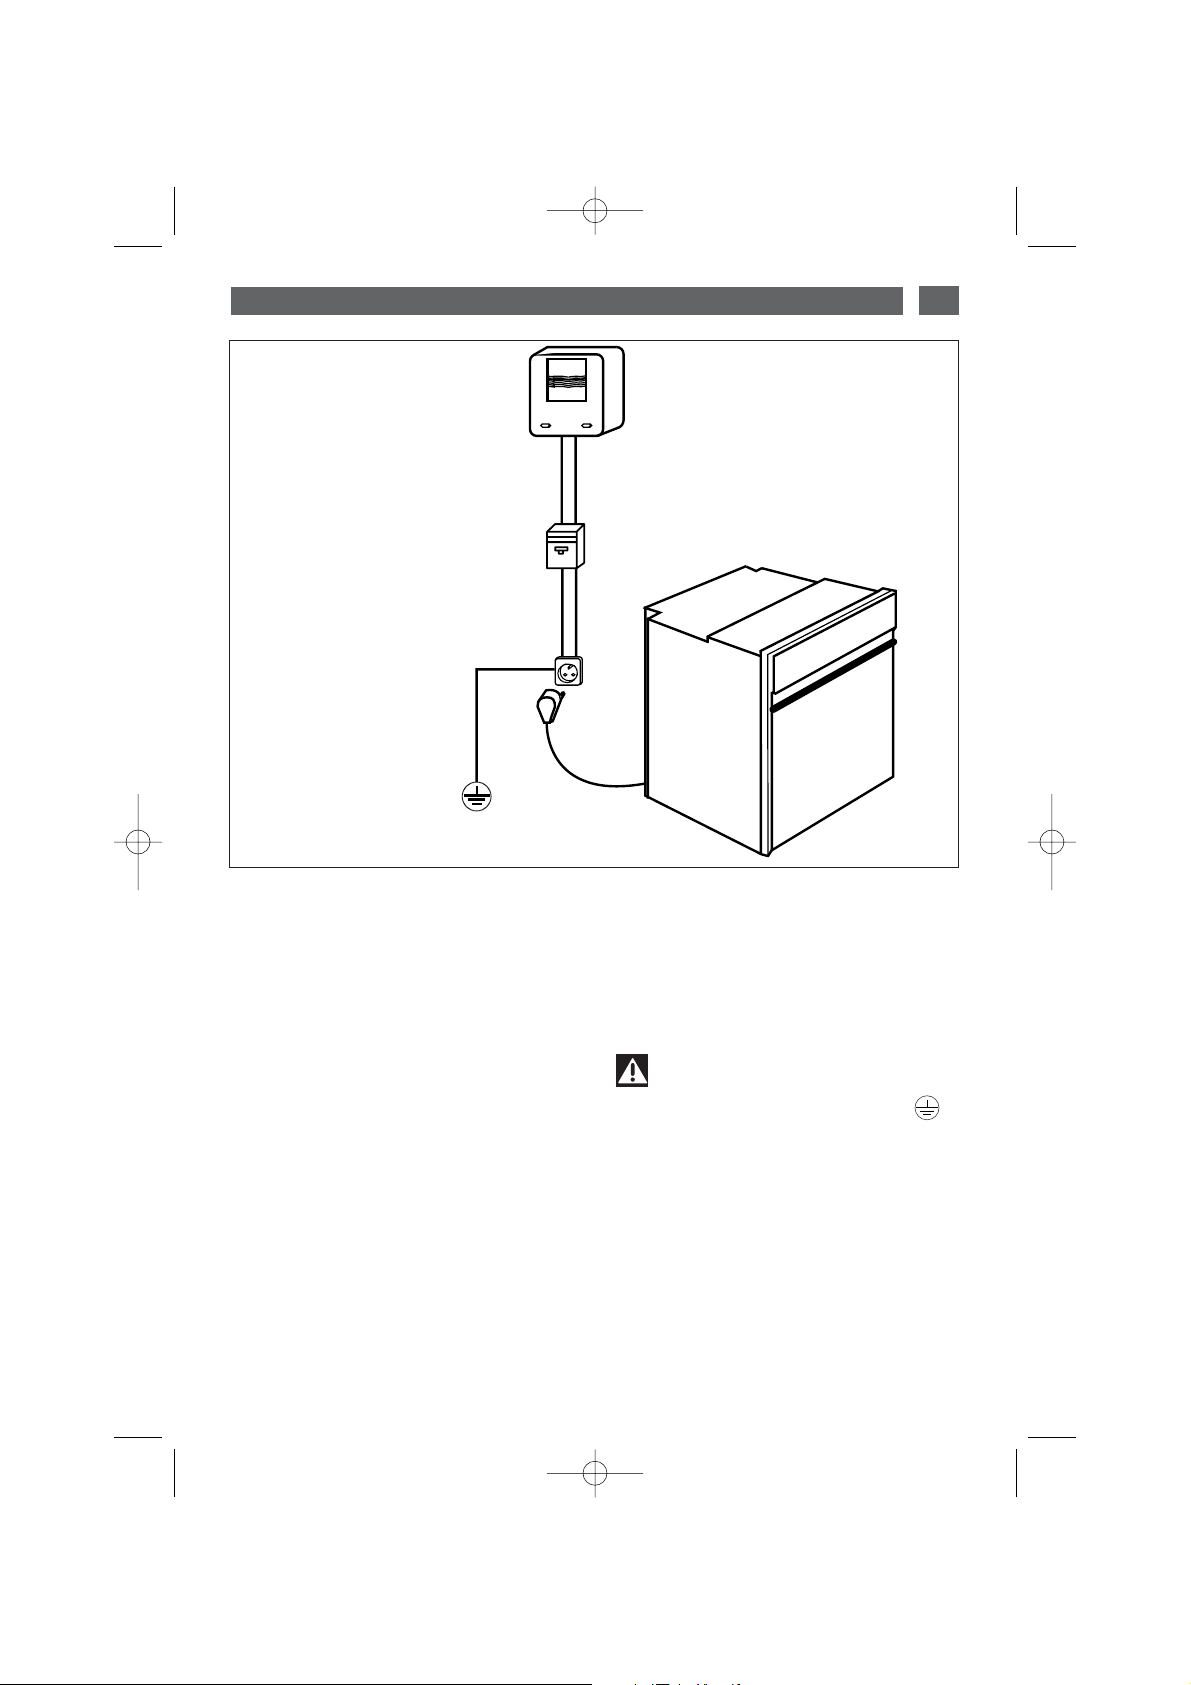
ELECTRIC CONNECTION
Monophase 20A Counter
220-240V~50Hz
Electrical outlet
2 prong receptacle +
eeaarrtthh
CEI Standard 60083
Monophase line 220-240 V
~
Power
supply cable
length 1.50 m approx.
16A fuse or differential
circuit breaker
Electrical safety must be ensured by a correct
build-in. During fitting and maintenance
operations, the appliance must be unplugged
from the electrical grid; fuses must be
switched off or removed.
The electrical connection should be
performed before the appliance is installed in
the cabinet.
Ensure that:
- the electrical installation has sufficient
voltage,
- the electrical wires are in good condition
- the diameter of the wires complies with the
installation requirements.
Your oven must be connected with a
(standardised) power cable with
3 conductors of 1.5mm2 (1 live + 1 neutral +
earth) which must be connected to a
220-240V~single-phase grid via the
intermediary of a 1 live + 1 neutral + earth CEI
60083 standardised power socket or via an
all-pole cut-off device or in compliance with
the installation rules.
Warning
The safety wire (green-yellow) is
connected to the appliance’s terminal
and must be connected to the ground lead
of the electrical set-up.
In the case of connection to an electric wall
socket, it must remain accessible after
installation.
The fuse in your set-up must be 16 amperes.
If the power cable is damaged, it must be
replaced by the manufacturer, its AfterSales Service Department or a similarly
qualified person to avoid danger.
99643571_b_ml.qxp 03/01/2008 10:39 Page 101
Page 8

102
2 / INSTALLING YOUR APPLIANCE
EN
Warning
We cannot be held responsible for any accident or incident resulting from non-existent,
defective or incorrect earthing.
If the electrical installation in your residence requires any changes in order to hook up your
appliance, call upon a professional electrician.
If the oven malfunctions in any way, unplug the appliance or remove the fuse corresponding
to the sector where the oven is hooked up.
99643571_b_ml.qxp 03/01/2008 10:39 Page 102
Page 9

103
3 / DESCRIPTION OF YOUR APPLIANCE
EN
INTRODUCTION TO YOUR OVEN
••
A
B
Controls
Programmer
C
D
Lamp
Wire shelf supports
D
C
B
A
•Accessories
Your appliance is equipped with a flat rack and a glass dish.
99643571_b_ml.qxp 03/01/2008 10:39 Page 103
Page 10

Please note:
At the end of cooking, do not touch the
dishes with bare hands.
Please note:
In order to keep your oven clean for all
cooking functions, you can place the dish
on the base of the oven.
Please note:
Take care to place the drip tray in the
centre of the side grills to avoid modifying
the circulation of air.
104
3 / DESCRIPTION OF YOUR APPLIANCE
EN
ACCESSORIES
••
fig.1
fig.2
fig.3
•Rack (fig.1):
Allows you to toast, brown or grill. The rack
should not under any circumstances be used
with other metal cookware on the micro-wave,
grill + micro-wave or circulating heat + microwave settings.
However, you can reheat food in an aluminium
tray if you insulate it from the rack using a
plate.
•Glass drip tray (fig.2):
It can also be used half-full of water for
double-boiler cooking methods using the
circulating heat function. It can be used as a
cooking dish.
•Rack + glass drip tray (fig.3):
To roast and retain the cooking juices, place
the grill on the drip tray.
99643571_b_ml.qxp 03/01/2008 10:39 Page 104
Page 11

105
3 / DESCRIPTION OF YOUR APPLIANCE
EN
••
INTRODUCTION TO THE PROGRAMMER
A
B
C
D
G
E
F
A
B
Cooking modes display
Cooking time indicator
Power rise indicator
Clock or timer display
Timer indicator
Memory 1,2,3 display
Control panel lock indicator
(Child safety device).
C
D
E
F
G
INTRODUCTION TO THE SELECTING BUTTONS
••
A
B
C
D
E
F
E
B
Start/Stop
Cooking mode selection
Micro-wave power
Touch controls
Memory 1
Memory 2
Memory 3
Locking
F
G
H
A
C
D
G
H
99643571_b_ml.qxp 03/01/2008 10:39 Page 105
W
Page 12

106
4 / USING YOUR APPLIANCE
EN
•
How to set the time
--
When supplied with electricity
The display flashes at 12:00 (fig.1)
Set the time by pressing the + or - buttons
(holding your finger on the button allows you
to scroll through the numbers rapidly).
Example: 12:30
Press the
SSTTAARRTT
button to validate.
The time display no longer flashes (fig.2).
fig.1
fig.2
fig.2
fig.1
•
How to change the time
- To set the time on the clock
Press and hold the W button for a few
seconds until the display is flashing (fig.1),
then release.
Audible beeps indicate that it is now possible
to set the time.
Adjust the clock setting with the + and touch controls (fig.2).
Press the
SSTTAARRTT
button to validate.
99643571_b_ml.qxp 03/01/2008 10:39 Page 106
W
W
W
W
Page 13

107
4 / USING YOUR APPLIANCE
EN
• Micro-wave cooking
YOUR OVEN HAS 6 MICRO-WAVE
COOKING FUNCTIONS
fig.2
Warning
Never turn on the oven in any mode when
empty.
Please note:
The function does not need power
adjustment.
fig.1
fig.3
Press once on the START button to select the
function (fig.1).
Press the START button a second time to
access the cooking time settings (fig.2):
- 0.00 flashes
- Adjust by pressing the + or – buttons.
Example: 30 seconds
Adjusting the power level:
- Press the W button, “850 w” begins flashing
(fig.3).
- Adjust by pressing the + or - buttons.
Example: 800W
- Make sure that the door is firmly closed.
Confirm your selection by pressing START.
Your oven starts by counting down second by
second.
If necessary, cooking can be stopped by
pressing on START/STOP for 1 second.
OPENING THE DOOR DURING COOKING
When the door is opened during cooking, the
oven stops operating.
When the door is closed again, cooking can
be recommenced by pressing START/STOP.
99643571_b_ml.qxp 03/01/2008 10:39 Page 107
W
W
W
Page 14

108
4 / USING YOUR APPLIANCE
EN
• AUTOMATIC MICRO-WAVE DEFROSTING
With your new micro-wave, say goodbye to hours of waiting for your food to defrost! The microwave is the freezer’s best ally, making it possible to defrost food up to 10 times quicker than
at room temperature.
Tip:
Defrosting time depends on the type of appliance. It also depends on the shape, size,
initial temperature and quality of the food.
Be sure to remove the metallic tie from the defrosting bag when defrosting food directly in
the bag.
If there are any ice crystals on the food, remove them with a knife, otherwise the ice will
act as a screen and the food will take longer to defrost.
Defrost meat and fish by placing it on an upside-down saucer on a plate; this will allow any
juices to drain away which otherwise would cause the food to begin to cook if left in
contact with it.
In order to obtain even defrosting, as soon as possible separate poultry breasts or fish
fillets and break apart cubes of meat.
Turn over or stir food half-way through defrosting.
Leave the food to stand after defrosting. General guidelines: resting time = defrosting time.
Never refreeze food unless it has been cooked.
99643571_b_ml.qxp 03/01/2008 10:39 Page 108
Page 15

109
4 / USING YOUR APPLIANCE
EN
DDeeffrroossttiinngg
bbrreeaadd aanndd
ppaassttrryy
DDeeffrroossttiinngg
ccrruussttaacceeaannss
DDeeffrroossttiinngg
FFiisshh
DDeeffrroossttiinngg
MMeeaatt
DDeeffrroossttiinngg
FFrruuiittss
ppllaaccee tthhee
ggllaassss ddiisshh
oonn tthhee bbaassee
ppllaaccee tthhee
ggllaassss ddiisshh
oonn tthhee bbaassee
ppllaaccee tthhee
ggllaassss ddiisshh
oonn tthhee bbaassee
ppllaaccee tthhee
ggllaassss ddiisshh
oonn tthhee bbaassee
ppllaaccee tthhee
ggllaassss ddiisshh
oonn tthhee bbaassee
Food Quantity
Time
French bread
Loaf of bread
Flaky or short crust
100g
200g
400g
300g
45 to 55 sec.
1 to 1 min. 30 secs
2 to 2 min. 30 secs
1 minutes
Food Quantity Time
Scallops
Shelled prawns
Whole pink shrimp
Prawns (10)
Langoustines
500g
100g
200g
500g
1,000g
5 minutes
1 min 30 secs to 2 min
5 to 7 min.
11 to 13 min.
10 to 11 min.
Food Quantity Time
Cod or haddock fillets
Atlantic cod, hake
Sole, plaice (2)
Slices of hake
Pollock, salmon
Trout (3)
400g
500g
300g
1 piece
4 pieces
540g
3 to 4 min.
3 to 4 min.
2 to 2 min. 30 secs
1 min 30 secs to 2 min
4 to 5 min.
4 to 5 min.
Food Quantity Time
Cockerel, pigeon
Chicken breast (2)
Chicken legs (4)
Whole chicken
Veal ribs
Roast beef
Beefburgers (4)
Cubes of meat
500g to 600g
200g
1,000g
1,000g
600g
1,000g
360g
600g
5 to 7 min.
3 to 4 min.
7 to 9 min...........
11 to 13 min.
5 minutes
10 minutes
3 to 4 min.
6 to 7 min.
Food Quantity Time
Strawberries
Raspberries/cherries
Gooseberries,
blueberries, black
currants
250g
250g
250g
2 to 3 min.
2 to 3 min.
2 min 3 secs to 4 min
Turn midway through
• DEFROSTING GUIDE
99643571_b_ml.qxp 03/01/2008 10:39 Page 109
Page 16

110
EN
4 / USING YOUR APPLIANCE
CUSTOMISING THE COOKING POWER
••
• Micro-wave cooking
When selecting the cooking mode or during a
cooking programme, you can customise the
ppoowweerr
for micro-wave cooking:
Press once on the START button to select the
function.
Press the START button a second time to
access the cooking time settings.
- 0.00 flashes
- Adjust by pressing the + or – buttons.
Example: 30 seconds:
- Press the W button (approx. 2 seconds) until
the power digits begin flashing (fig.1).
- Use the + and - buttons to adjust the power
setting you wish to record (fig.2).
- Validate by pressing the W button (fig.3).
For subsequent cooking programmes, the
power you have just entered will be taken into
account.
This procedure for customising the cooking
temperature can be repeated as many times
as you wish.
fig.2
fig.1
fig.3
99643571_b_ml.qxp 03/01/2008 10:39 Page 110
W
W
W
Page 17

111
4 / USING YOUR APPLIANCE
EN
••
HOW TO RECORD COOKING PROGRAMMES USING THE MEMORY
FUNCTIONS M1/M2/M3
Your oven is equipped with 3 memory buttons
- M1, M2 and M3 - that allow you to save the
features of your 3 most frequently used
cooking modes.
This memory function is possible for the
following functions
Example of use in the function
- Select the cooking programme with
the + or - buttons (fig.1):
Press the START to access the cooking time
settings.
- 00:00 flashes (fig.2).
- Use the + or - buttons to set the cooking
time, e.g.: 20 seconds (fig.3):
- You can then memorise your choice by
pressing on the M1, M2 or M3 button for
2 seconds.
- 2 beeps confirm your selection and M1, M2
or M3 is displayed (fig.4).
fig.1
fig.2
fig.3
fig.4
99643571_b_ml.qxp 03/01/2008 10:40 Page 111
AUTO
W
W
W
W
Page 18

112
4 / USING YOUR APPLIANCE
EN
••
HOW TO RECORD COOKING PROGRAMMES USING THE MEMORY
FUNCTIONS M1/M2/M3
- When using the function, you can also
record the power setting after choosing the
cooking time.
- After setting the cooking time, press the
WW
button.
WW
flashes.
- Set the power by pressing the ++or --buttons.
example: 900W
- Record your choice by pressing
MM11
or
MM22
for a few seconds. 2 beeps confirm your
choice and M2 is displayed.
99643571_b_ml.qxp 03/01/2008 10:40 Page 112
W
W
W
Page 19

113
4 / USING YOUR APPLIANCE
EN
HOW TO START A COOKING PROGRAMME USING THE MEMORY
FUNCTIONS M1/M2/M3
••
To start a recorded cooking programme:
- Press the
MM11, MM22
or
MM33
button.
To start your cooking programme press
SSTTAARRTT//SSTTOOPP
.
To interrupt your cooking programme before
the countdown has finished press
SSTTAARRTT//SSTTOOPP..
99643571_b_ml.qxp 03/01/2008 10:40 Page 113
W
W
W
Page 20

114
EN
4 / USING YOUR APPLIANCE
LOCKING THE CONTROLS (CHILD SAFETY)
OVEN OFF
You have the option of preventing access to
the oven controls by taking the following
steps:
When the oven is off, hold down the
button for a few seconds; a “key” will then be
displayed on the screen -> access to the oven
controls is now blocked (fig.1).
To unlock access, hold down the
button for a few seconds.
The oven controls are once again accessible.
••
Warning
You cannot lock the oven if you have programmed a cooking cycle.
fig.1
99643571_b_ml.qxp 03/01/2008 10:40 Page 114
W
Page 21
115
EN
4 / USING YOUR APPLIANCE
- To limit your oven’s consumption of energy
when it is not in use, you may put it in
STAND-BY MODE.
To do so, perform the following procedure:
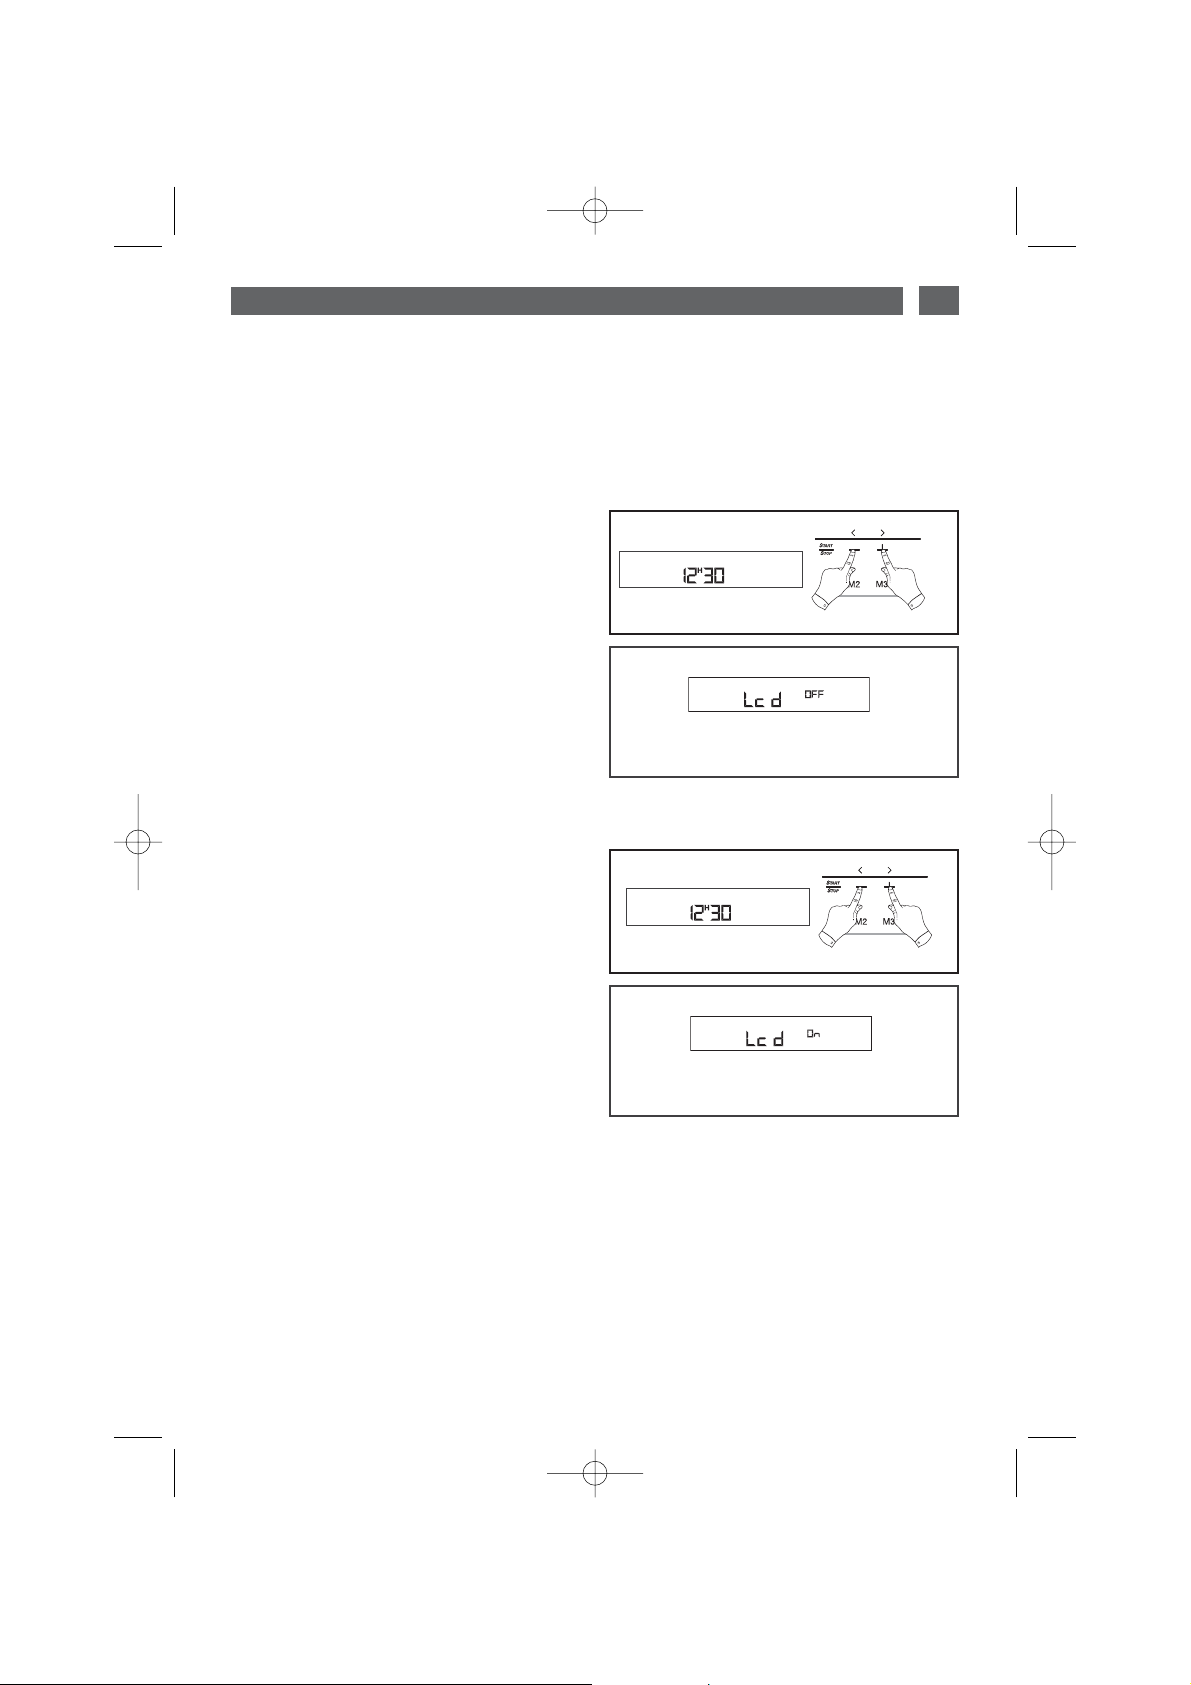
AACCTTIIVVAATTIIOONN OOFF SSTTAANNDD--BBYY MMOODDEE::
- Your oven must be in time display mode.
- Press the + and – buttons simultaneously for
5 seconds (fig.1).
- Your display indicates “LCD OFF” (fig.2).
- Release the buttons.
- 30 seconds later, your display will turn off.
Your oven is now in stand-by mode, it will
automatically turn off after 30 seconds in time
display mode.
DDEEAACCTTIIVVAATTIIOONN OOFF SSTTAANNDD--BBYY MMOODDEE::
- Your oven must be in time display mode.
- Press the + and – buttons simultaneously for
5 seconds (fig.1).
- Your display indicates “LCD ON” (fig.2).
- Release the buttons.
- You are out of STAND-BY MODE, your
display will remain on constantly.
DISPLAY STAND-BY MODE
••
fig.2
fig.1
fig.2
fig.1
99643571_b_ml.qxp 03/01/2008 10:40 Page 115
W
W
Page 22

116
EN
5 / OVEN COOKING MODES
MMIICCRROO--WWAAVVEE
(recommended positions
11000000 WW
min 100 max 1000)
•The energy source is supplied by the micro-waves.
•Energy is distributed by a combination of
- 1 upper element
- 1 lower element.
AAUUTTOOMMAATTIICC DDEEFFRROOSSTTIINNGG
(recommended power
220000 WW
)
•
This function allows optimised defrosting.
KKEEEEPPIINNGG WWAARRMM
(recommended power
335500 WW
)
•
Food is kept warm by the fan which circulates heated air.
The temperature never exceeds 50°C to avoid drying out the food.
MMEEDDIIUUMM PPOOWWEERR
(recommended power
775500 WW
)
•
This function is used to reheat or cook all types of liquid or solid food as well as fresh
or frozen prepared meals.
FFUULLLL PPOOWWEERR
(recommended power
11000000 WW
)
•
This function can be used to speed up cooking of liquids (e.g.: soups, etc.) and food
with high water content (tomatoes, courgettes, etc.).
SSIIMMMMEERRIINNGG AANNDD LLOOWW PPOOWWEERR
(recommended power
550000 WW
)
•
This function is used to finish cooking ready-prepared food: (white beans, lentils,
dairy products), to cook fish and reheat two plates at the same time on level 0 and level
2 placed on the rack.
99643571_b_ml.qxp 03/01/2008 10:40 Page 116
Page 23

117
6 / CARING FOR AND CLEANING YOUR APPLIANCE
EN
Before manually cleaning your oven, allow the appliance to cool down.
In general
aabbrraassiivvee ppoowwddeerrss aanndd ssccoouurriinngg ppaaddss aass wweellll aass sshhaarrpp oobbjjeeccttss sshhoouulldd bbee aavvooiiddeedd..
It is recommended that you clean your oven regularly using a damp sponge and soapy water
and to remove any food build-up.
If the appliance is not cleaned regularly, its surface could become damaged, affecting the
appliance’s lifespan and possibly causing a safety hazard.
- Shelf support r
emoval:
shelf supports can be removed for cleaning
a) Raise slightly
b) Remove.
- The borders of the door and the enclosure should be clean at all times. If these surfaces are
damaged due to excess soiling, contact a specialised technician before using your appliance.
- In the event of odour or caked-on dirt, boil water with lemon juice and vinegar in a cup for
2 minutes and clean the walls with a small amount of washing-up liquid.
To preserve your appliance, we recommend that you use Clearit cleaning products.
Clearit offers you professional products and solutions designed for the daily care of your
household appliances and kitchens.
They are on sale at your regular retailer, along with a complete line of accessories and
consumable products.
PPrrooffeessssiioonnaall eexxppeerrttiissee
wwoorrkkiinngg ffoorr yyoouu aatt hhoommee
CLEANING THE OUTER SURFACES
••
99643571_b_ml.qxp 03/01/2008 10:40 Page 117
Page 24

118
7 / TROUBLESHOOTING
EN
Tip
In all circumstances, if your efforts are not sufficient, contact the After-Sales Service
Department without delay.
WWHHAATT SSHHOOUULLDD YYOOUU DDOO??PPOOSSSSIIBBLLEE
CCAAUUSSEESS
YYOOUU OOBBSSEERRVVEE TTHHAATT……
IIff yyoouu hhaavvee aa ddoouubbtt aabboouutt tthhee ccoorrrreecctt ffuunnccttiioonniinngg ooff yyoouurr oovveenn,,
this does not
necessarily mean that there is a malfunction.
IInn aannyy eevveenntt,, cchheecckk tthhee ffoolllloowwiinngg iitteemmss::
Warning
- Repairs to your appliance should only be performed by professionals. Non-standard
repairs may be a source of danger for the user.
- Replace the light.
- Connect the oven or replace the
fuse.
- The light is out of order.
- The oven is not connected or the fuse
is not working.
The oven light is not working.
The oven is not heating.
- The oven is not connected.
- Your fuse is out of order.
- The selected temperature is too low.
- Other causes.
- Connect the oven.
- Replace the fuse in your electrical
set-up and check its capacity (16A).
- Increase the selected temperature.
- Call the After Sales Service
Department.
The cooling fan continues to
operate after the oven stops.
- The fan should stop a maximum of one
hour after cooking, or as soon as the oven
temperature has lowered to approximately
125°C.
- If it does not stop after 1 hour.
- Nothing to report
- Call the After Sales Service
Department.
The oven produces sparks.
- A metallic element is too near one of
the walls or the grill..
- Move any metal items away from
the walls of the oven.
- Never use metal items with the rack.
Food is not heated during a microwave programme.
The oven lamp stays on when the
oven is not operating.
- The oven door is not properly closed.
- A micro-wave component is defective.
- Verify that the door is closed
properly.
- Call the After Sales Service
Department.
- The micro-waves cannot reach the
food.
- The door is not properly closed.
- Check that the utensils are suitable
for use in micro-wave ovens.
- Verify that the door is closed
properly.
- Ventilation of the upper part of the
oven (invisible) is operating (even at the
stop position)
- This is normal, the oven is fitted with
a ventilation system which operates
until the oven has cooled down.
The oven makes noise when
cooking has finished.
99643571_b_ml.qxp 03/01/2008 10:40 Page 118
Page 25

119
EN
8 / AFTER-SALES SERVICE
Any repairs that are made to your appliance
must be handled by a qualified professional
authorised to work on the brand. When you
call, mention your appliance’s complete
reference (model, type, serial number). This
information appears on the manufacturer’s
nameplate (fig.1).
SPARE PARTS
During maintenance work, request the
exclusive use of
certified genuine
replacement parts.
• SERVICE CALLS
BBrraannddtt AApppplliiaanncceess
- simplified shareholder company with capital of 10,000,000 Euro RCS Nanterre 440,302,347.
BRANDT APPLIANCES SAS
7 rue Henri Becquerel
92500 RUEIL MALMAISON
230V ~ 50 Hz
MADE IN FRANCE
fig.1
99643571_b_ml.qxp 03/01/2008 10:40 Page 119
Page 26

9999664433557711
08/07
Translation/DTP by Technicis SAS - Boulogne-Billancourt - France
DDMMEE 778888XX
99643571_b_ml.qxp 03/01/2008 10:44 Page 216
 Loading...