

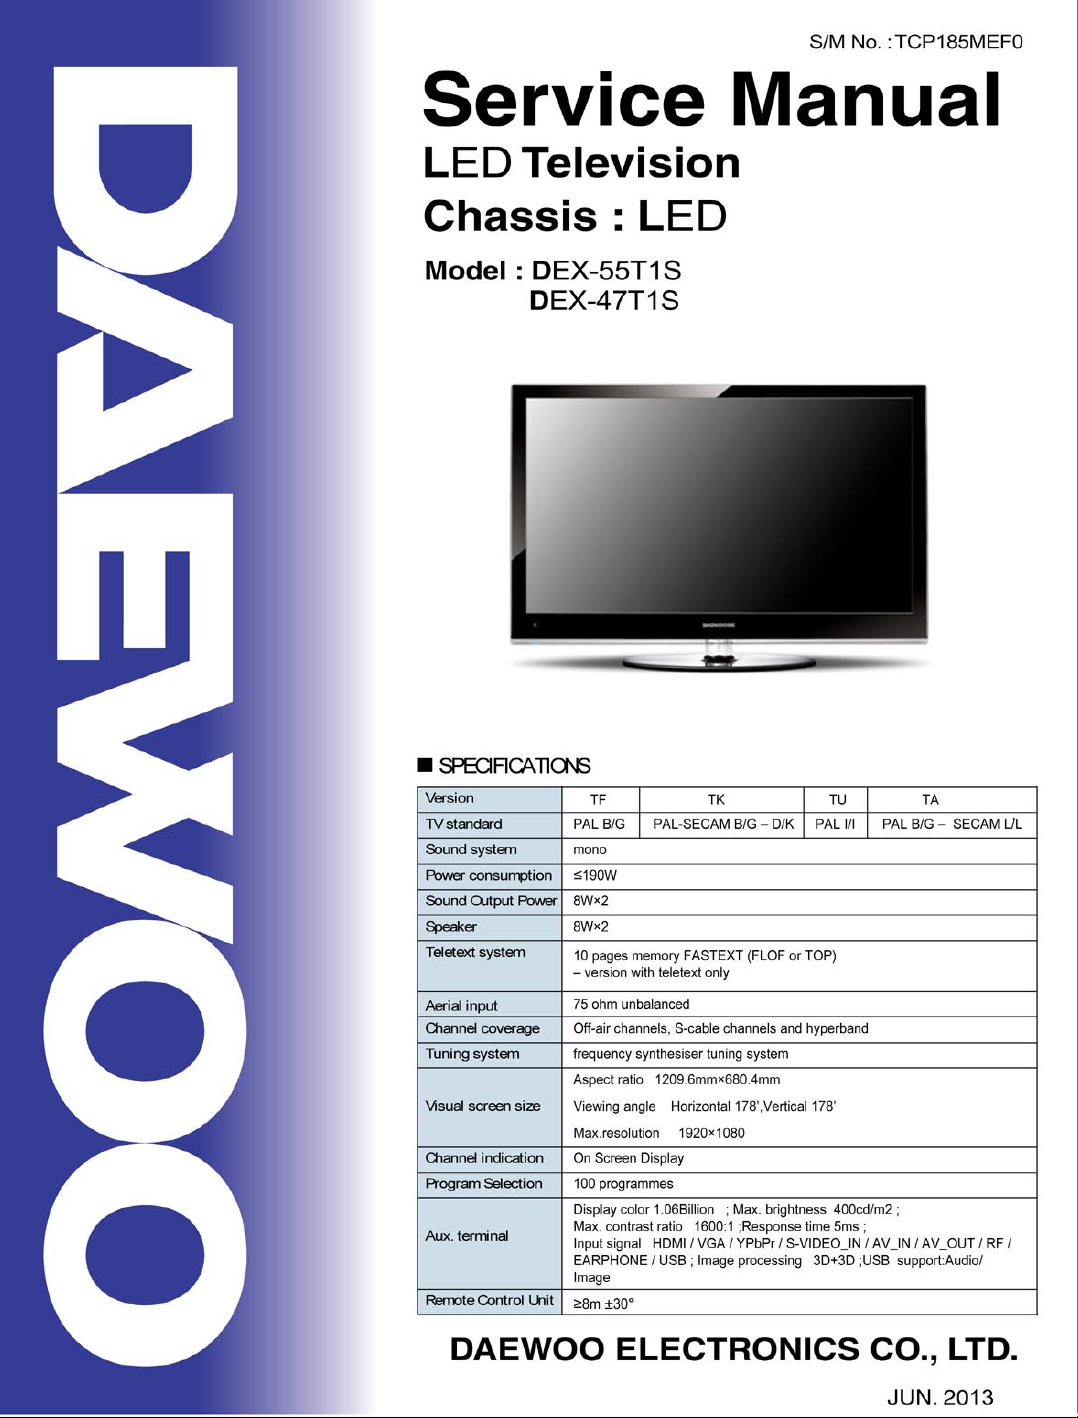
Page 1
Page 2
Contents
Features…… … … ……… … … …… … … …… … … …1
Safety Warning and Notice… …… …… …… …… …1
Mounting and Connecting… … … … … …… … … …3
Packing list…… … …… ……… …… … …… …… …3
Mounting the TV set… … ……… … … ……… … …4
Connecting peripheral equipment… … … … … …5
Panel Control Keys… … … ……… … … … … … … …7
Remote Control… …… ……… …… ……… …… ……7
Basic Operations……… … … ……… … … ……… …9
Power on 9
…… …… …… …… ……… …… …… ……
Standby… …… … … … … … … …… … … … … … …9
Signal source selection… … … … … … … … … … 9
Menu operation description… … … … … … … … 10
CHANNEL…… …… ……… …… …… …… …… …10
PICTURE……… … ……… … …… … … …… … …12
SOUND 13
OPTION… …… …… …… ……………………… …13
TIME 14
LOCK ……… … … … … … … … … … … … … … … 15
REC option … … … … … … ……… … … … … … …15
Time-shift option… ……… … …… … … …… … …16
EPG option… … … … … … ……… … … … … ……16
USB Media Function… … … ……… … … … … …16
Troubleshooting… … …… … ……… … ……… … …18
Technical Specifications… … … … … … …… …… 19
…… … …… ……… …… … …… ……… …
…… … … …… … …… … … …… … ……… …
Features
1. High-quality LED backlight LCD screen, energy saving, environmental protection, ultra-thin, brilliant features.
2. Having inter high quality speakers, which will give you purely audiovisual enjoyment and save your table
place.
3. Having many ideal connectors, you may directly connect your DVD, vidicon etc. its disport components of
input connector let you enjoy beautiful image effect. The product can be used as a computer monitor with
VGA and HDMI connectors. Also it can be used as a TV machine when you insert the antenna.
4. Much faster response time will completely eliminate shadow of picture. seeing film and playing game may be
more fluent.
5. Enough colours.
6. Wider viewing angle, higher brightness, higher contrast, lower consumption.
7. Intelligent image mode and sound mode can offer you intelligent audiovisual effect.
8. Built-in the latest digital comb filter, which makes image more clear. The internal 3D De-Interlace technique
can totally eliminate the screen dithering caused by interlace signals.
9. Own perfect timing functions, you can set time to turn off. It will be turned off in state of no signals, too.
10. Automatically operated convenient with telecontrol device.
11. Auto-setup function help you set the image to best performance in several seconds in VGA mode.
12. Auto color balance adjustment technology takes your machine to the best color setting for all different kinds
of display adapters in VGA mode.
13. Automatic denoise technique can greatly eliminate background noise caused by menu interference and the
noise caused by weak signals so as to make the picture on the screen clear.
14. Support USB interface.
15. Support for H.264 FULL HD receiver and supports PVR functionality.
Safety Warning and Notice
Thank you to choose the LCD TV with LED backlight made by our company, a valuable product with excellent
quality and multiple functions. This machine will bring you more audiovisual enjoyment. Its design can insure
user's safety. All machine are strictly tested before leaving factory. But incorrect use can lead to electric shock
or fire. In order to ensure safety and extend its life, please read carefully before
using it and comply with the following safety instructions. Please k
Warning
May result in casualties
1
the manual and marking label
eep the user manual for later use.
Attention
May result in personal injury or
property losses
Page 3
Safety Warning and Notice
Indicate the behaviors that must be
prohibited
Under Following Conditions
Power failure or unstable voltage.
●
Abnormal sound or smell from the device.
●
AC power cord is damaged.
●
TV set is damaged due to falling off, knock or impact.
●
Any liquid or foreign matters enter into the TV set.
●
● If coal gas or other flammable gases leak, do not unplug the power cord of the TV set or other electric
appliances; instead, close the valve of the gas immediately and open the doors and windows.
Indicate the operations that must be
performed
Turn off the TV set immediately,
unplug the power cord from the
power outlet, and contact
authorized maintenance
personnel.
Warning
Only use 240VAC 60/50Hz power supply.
●
This TV must be connected to a three pin socket outlet for safety.
●
All cables can be connected or pull out only after power supply is turned off.
●
Do not fix the TV set on instable position, or else it may cause falling off, damage, or even
●
fire.
Do not put the TV set in the environment:
●
1. With direct sunshine, moisture, overheating, undercooling or heavy dust;
2. With flammable or explosive substance;
3. With flammable or corrosive gas;
4. In bathroom, kitchen, etc.
Do not use damaged or improper power socket, and ensure that the plug and socket are
●
connected properly.
Keep the power plug and socket free of dust and metal pieces.
●
Do not damage the power cord:
●
1. It is prohibited to refit the power cord;
2. Do not put heavy object on the power cord;
3. Keep the power cord away from heat source;
4. Do not drag the power cord when unplugging.
Do not connect too many appliances to one power strip, or else it may cause fire due to high
●
power consumption.
Do not let open flame (e.g. lit candle) approach the TV set, or else it may cause electric shock
●
or fire.
Do not put the container filled with water on the TV set, to avoid electric shock or fire caused
●
by water drop of splashing.
Do not penetrate any sharp object, metal or liquid into the signal connector or air vents, to
●
avoid short circuit and product damage as well as electric shock.
The slots on the case is designed to release heat so as to assure that all inside components
●
will not reach an extra high temperature and can work normally for a long time. Please do not
cover the holes while place it.
100-
Do not touch the plug with wet hands, or else it may cause electric shock.
2
Page 4
Safety Warning and Notice
Warning
Do not turn on the TV set in thunderstorm weather; instead, unplug the power plug and antenna
connector to avoid lightning strike.
Do not disassemble the TV set by yourself, or else it may cause electric shock or fire. Contact
qualified personnel for maintenance.
Attention
Do not let children climb onto the TV set.
●
Keep the small accessories away from children's reach to avoid swallowing.
●
If the TV set won't be used for a long time, please turn off the device and unplug the power cord.
●
Before cleaning the TV set, unplug the power cord and wipe with soft cloth; do not use chemical
●
reagents and avoid foreign substances entering into the device. Improper cleaning may damage
the appearance or erase the printing information on the product.
To adjust the position or angle of the TV set, please disconnect all wires and move slowly to
●
avoid falling off.
Do not rub with hard object, knock at, bend or squeeze the screen.
●
Do not use machine immediately after transfering machine to the places with high temperature
●
from low temperature, which will cause fogging inside machine and failures.
If the screen is broken and the liquid splashes on skin, please wash with clean water immediately
●
for 15 minutes, and go to see your doctor.
To carry the TV set with hands, please grasp the corners and hold the bottom; do not apply force
●
on the panel.
Displaying the same image for a long time or active image with fixed words, icons will leave
●
image persistence on screen which will not disappear after powering off for a long time. This
" "
undesirable phenomenon is not covered by warranty.
Healthy TV watching:
●
1. Watch in appropriate light; poor light or long time watching may hurt your eyes.
2. If a headset is used, adjust the volume appropriate to avoid hurting your hearing.
●
Unplug the power cord of the device to cut off the power supply.
●
If a power plug or appliance coupler is used as disconnecting device, it should ensure easy
operation.
●
Power plug shall be connected reliably. Loose power plugs may cause sparkle and fire.
●
All the technical specifications in the user manual and on the packaging are subject to changes
without prior notice. If there is slight deviation between the user manual and actual operation,
the latter shall prevail.
Mounting and Connecting
Packing list
1. The TV set; 2. User Manual; 3: Remote control; 4: Power cord: 1 (or attached to TV set)
3
Page 5
Mounting and Connecting
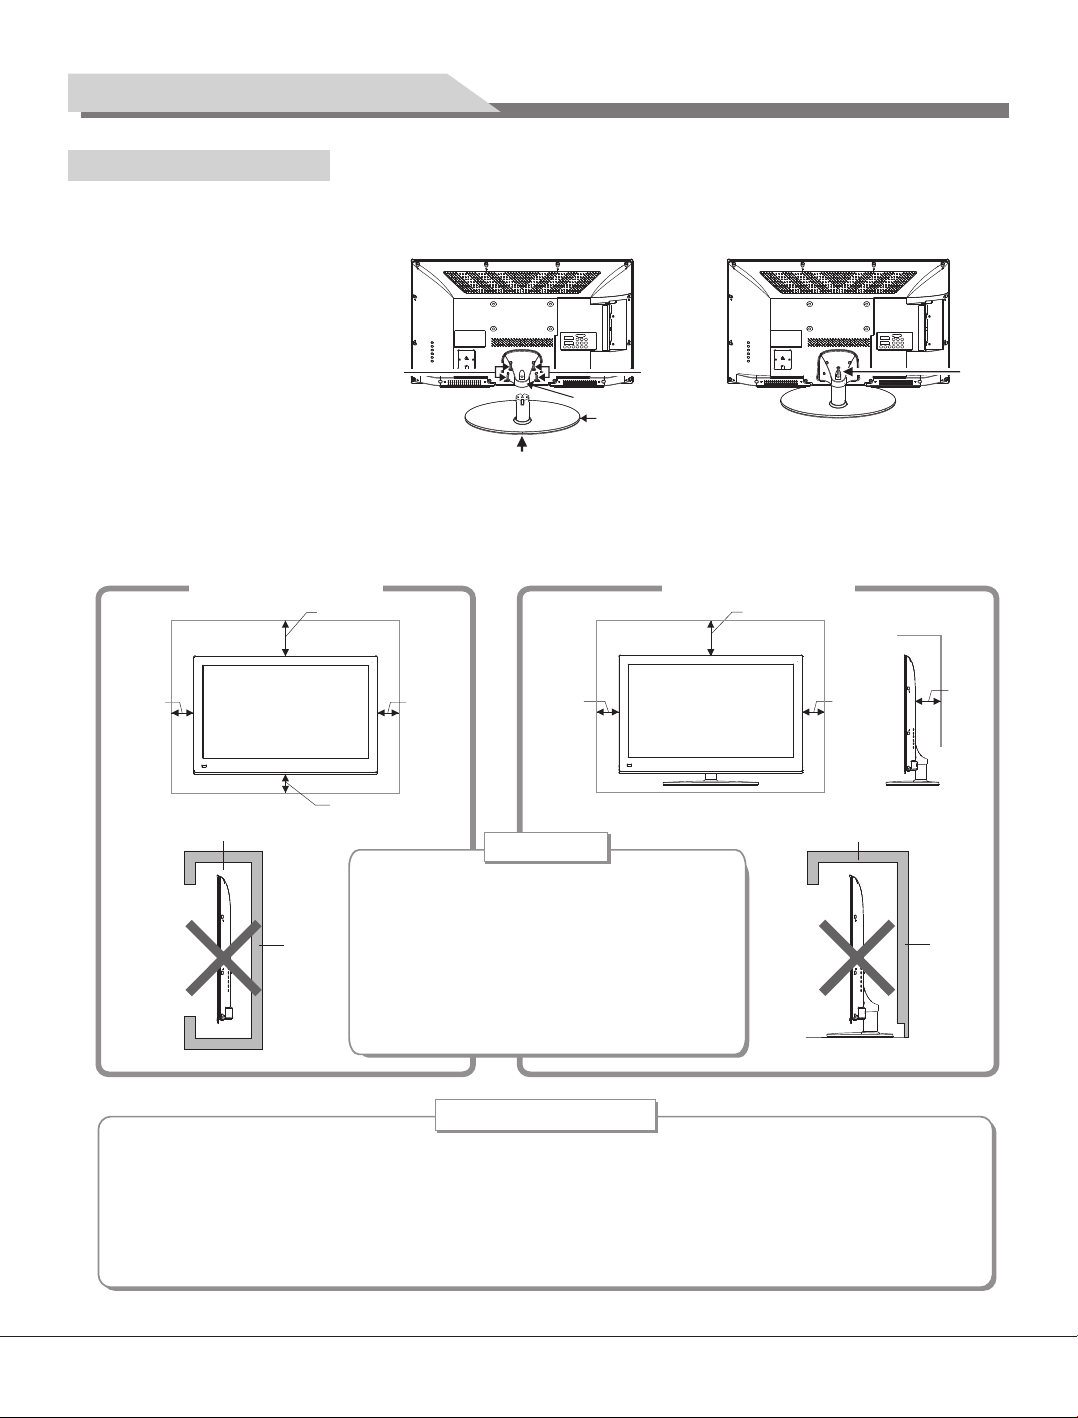
Mounting the TV set
Fasten the base supporting cover to the back cover of machine (It needn't to operate this step when base
support cover had been installed.), and then Insert base assembly to supporting shield hole of complete
machine back cover as illustrated direction of arrow, to make supporting shield and supporting hole center in
the same line, finally fasten the
screw.
Note: The base and machine
appearance may not be the
same as the picture, specific
in accordance with work order.
●
The TV set should be mounted near the AC power socket for easy plugging and unplugging.
●
For your safety, please select appropriate wall mount bracket or base.
●
To avoid hurt, it is required to place the TV set on stable plane, or fix on firm wall.
●
Ask qualified personnel to mount the TV set on the wall. Improper mounting may result in instable TV set.
Base su pp orting co ve r
The base
ScrewsScrews
Screw
Mount on the wall
10cm
Obstruct the air circula ti on
Wal l
30cm
10cm
10cm
●
Please keep this space at least around
,
the TV as shown in the figure.
●
Do not cover the air vents or insert any
object into the enclosure.
●
Do not put the device in limited space,
Ventilation
Mount on the base
30cm
10cm10cm
Obstruct the air circula ti on
e.g. bookcase or embedded closet,
unless the TV set is properly ventilated.
Tips on Installa tion
Do not place the TV set at any place susceptible to mechanical vibration.
●
Do not place the TV set at any place that insects may enter.
●
Do not mount the TV set against air conditioner, or else the internal panel of the display may
●
condense moisture and cause failure.
Do not place the TV set at any place with strong magnetic field, or else it may be interfered with
●
and damaged by electromagnetic wave.
7cm
Wal l
4
Page 6
Mounting and Connecting
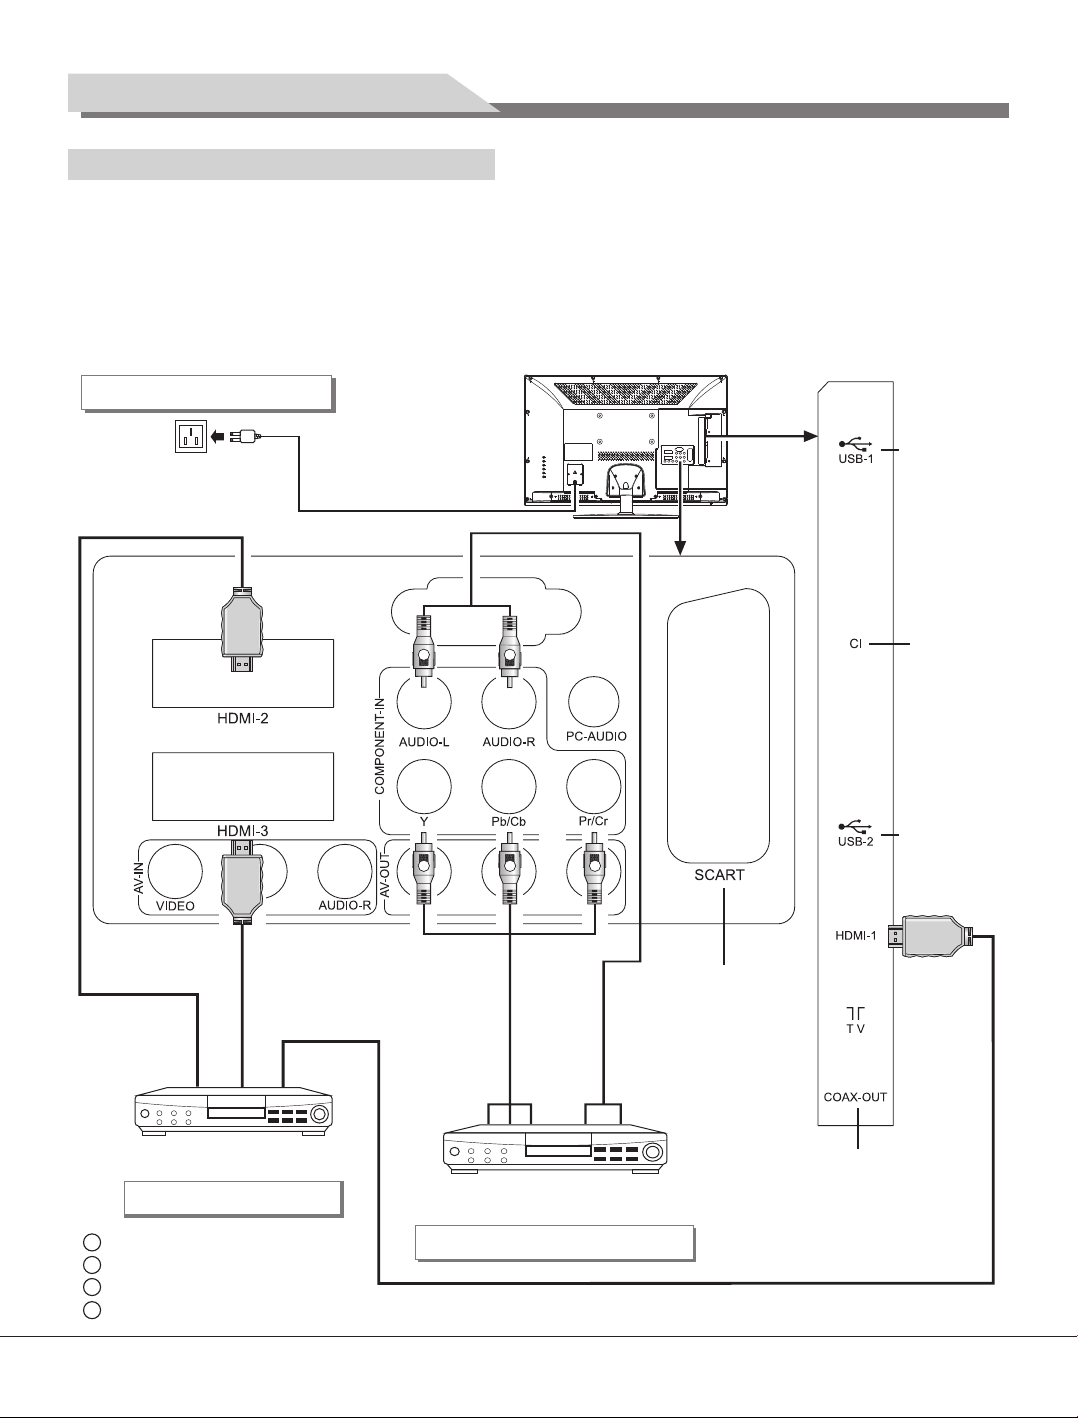
Connecting peripheral equipment
You can connect various devices to the TV set and view high quality images. If the video device has HDMI,
YPbPr/YCbCr, AV, PC and other video output/input ports. You can select one of them and connect to
corresponding input or output ports of the TV set. After connected, press "SOURCE" key, then menu of signal
source will be displayed on the screen. Press the "▲/▼" key to select the input signal, and press "OK" key to
confirm. The connecting mode is shown in the figure.
Note:
1. USB and HDMI interfaces are alterable; please refer to the actual configuration.
2. The peripheral equipment and cables described in this manual should be purchased separately.
Connecting power supply
To power socket
(100-240VAC 60/50Hz)
HDMI signal cable
Power cord
W
G
R
B R
YPbPr/YCbCr cable
SCART interf ac e
Audio cable
USB 1 inter fa ce
CI CARD
USB 2 inter fa ce
Connect to the AV device
with HDMI interface
HDMI input connection
G Gre en ( Y signal ca bl e)
B Blu e (P b/ Cb sign al c able)
W White(A UD IO-L si gn al c able)
R Red ( AU DI O-R and P r/ Cr signal c ab les)
Connect t
YPbP r/YCbCr
o the device with
output interface
Component input connection
5
Coaxial c ab le inte rf ac e
HDMI signal cable
Page 7
Mounting and Connecting
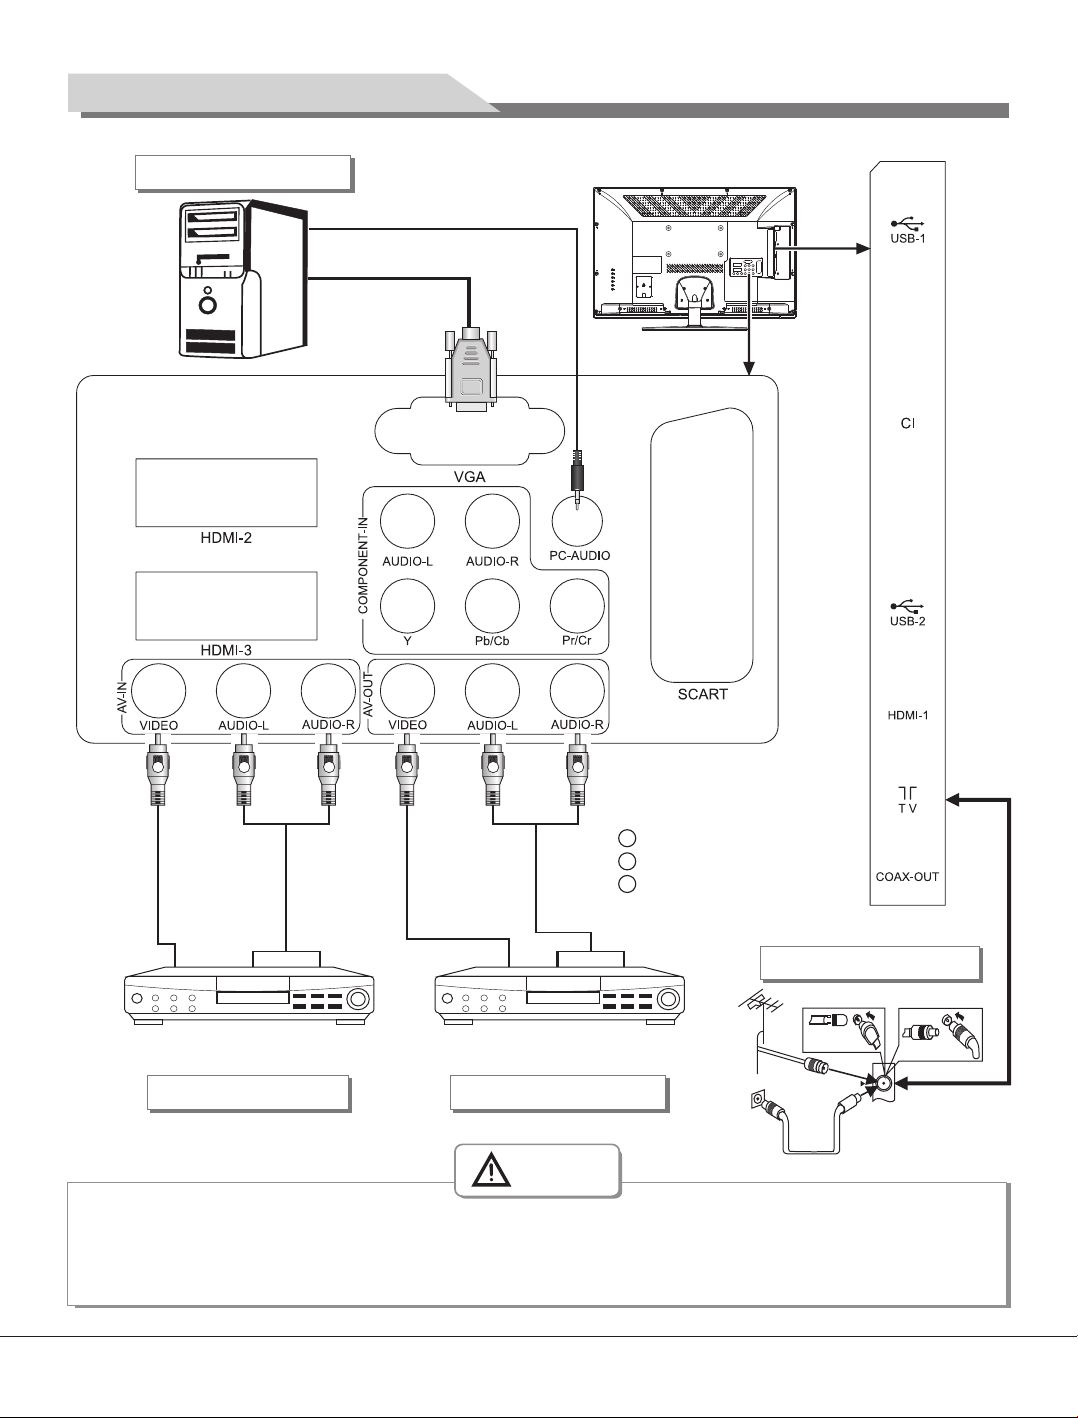
VGA input connection
PC audio cable
VGA cable
Y
Video cable
W R R
Audio cable
Y
Video cable
W
Audio cable
Y Yello w (V ID EO sign al c able)
W White(A UD IO-L si gn al c able)
R Red ( AU DI O-R sig na l cables)
Antenna connection
Connect to the devices with AV output
interface (e.g. DVD, VCR, game console)
AV input connection
Connect to the devices with AV
input interface (e.g. Monitor)
AV output connection
R F
Warning
When connecting outdoor antenna to signal port of the TV set, please turn off the main power switch
of the TV set first. Do not approach the outdoor antenna to high voltage mains power line to avoid
electric shock. The wired network antenna connected to this TV set must be isolated from the
protective grounding, or else it will cause fire or other hazards.
6
Page 8

Panel Control Keys
4
5
1
2
3
1) Remote receiving window.
2) Power LED indicator
3) Power switch (press '' I '' end to turn power on, and press ''O'' end to turn power off)
4) SOURCE: Press this key to enter the menu of signal source and choose signal source.
5) CH+/CH-: Press these two keys to select the channel. In OSD menu, press the two keys to adjust the items,
which have the same functions as ▲/▼ key on the remote control.
6) VOL+/VOL-: Press these two keys to add or reduce volume. In OSD menu, press the two keys to adjust the
analog value of selected item, which have the same functions as t/u key on the remote control.
7) MENU: Press this key to enter main menu.
Note: Different models may have different appearances; please refer to the actual device.
6
7
3
Remote Control
Installing battery
Remove the battery cover, and insert two AAA (1.5V) batteries; make sure that the polarity of the battery is
consistent with the marks "+/-" in the battery slot.
Precautions of remote control usage
●
Point the remote control to the receiver window. The objects between remote control and the receiver
window may disturb the normal operation.
●
Keep the remote control away from strong vibration. In addition, do not set or put the remote control in
direct sunshine, which may result in deformation of the remote control.
●
The remote control may be invalid if the receiver window is in direct sunshine or strong light; in this case,
please adjust the angle of the light or the device, or approach the remote control to the receiver window.
●
The effective range of the remote control may be affected if the battery voltage is low; in this case, please
replace with a new battery; if the remote control won't be used or battery voltage is too low, please take out
the battery to avoid corrosion due to battery liquid leakage.
●
Do not mix different types of batteries, or used and new batteries.
●
Do not throw the batteries into fire, charge or break up, or charge, short circuit, disassemble, heat or burn
the used batteries. Please follow the environmental protection regulations to disposal of the batteries.
7
Page 9

Remote Control
Remote Control Key Instruction
F1
POWER ( )
WIDE (16:9)
MUTE ( )
Numerical
CURSOR KEY
(▲,▼,t,u)
F1
MENU
SMART S
SMART P
SOURCE
CH+/CH-
VOL+/VOL-
OK
INFO
Time ( )
Return ( )
L/R (optional)
INDEX ( )
ZOOM ( )
REVEAL ( )
TTX ( )
HOLD ( )
LIST ( )
LANGUAGE ( )
RADIO ( )
REC (red key)
SUBTITLE
(green key)
FAV (yellow key)
EPG (blue key)
Switch the receiver in and out of standby mode.
Switch picture ratio: Auto, 4:3, 16:9, Zoom1, Zoom2. Panorama,
Switch off sound when viewing a program.
Input number.
Press ▲/▼/t/u key to select menu item or press t/u key to
change analog value.
Picture freeze on or off.
Press this button to display menu
Smart sound mode selection: Standard, Music, Movie, Sports, User.
Smart image mode selection: Standard, Soft, User, Dynamic.
Press this key to display signal source selection menu
Add or reduce channel Number.
Press to adjust the volume.
To confirm current setting.
Display the information of current program.
Press this key to set time of sleeping automatically: Off, 10min,
20min, 30min, 60min, 90min, 120min, 180min, 240min.
Press this button to return to last watching channel.
Select NICAM mode in ATV or select audio Languages in DTV
For teletext operation or USB operation.
Switch to radio channel or for USB operation
Muti-function red key or record.
Muti-function green key or display subtitle message, when current
channel has subtitle option.
Muti-function yellow key or Favourite key, to set or display your
favorite programs.
Muti-function blue key, or to show the Electronic Program Guide
of current channel during no-menu state.
Remark: The picture may be different from the remote control; please refer to the
actual product.
Remote control user manual about teletext
TeleText: Press 'Teletext' key, It loops in 3 modes: Text Mode → Mix Display → TeleText Off.
In text mode or mix Display, press number 0~9 to select text page, press
"▲/▼" key to page up or
page down text page.
Reveal: Press this key to display concealed information, such as solutions of riddles or puzzles. Press this key
again to remove the information from the display.
8
Page 10

Remote Control
Hold: Press this key to Toggle hold on or off for current display pages. If the page is not held, it will become
held, thus preventing it from being updated. If the page is currently held, the hold will be removed thus
allowing the page to update. When the page is held, this is indicated by a Hold prompt.
Index: Press this key to return back to index page.
ZOOM: Press "ZOOM" key, It allows you to zoom in character.
List: Press this button you force the Teletext to List Mode. List the pages that you have previously stored in the
memory. Press List button again to exit from List Mode to teletext.
Red, Green, Yellow, Cyan: Request the associated page in the display block according to the acquisition mode.
Basic Operations
Before power-on platform, please make sure that the power supply is stable; the antenna cable is well
connected.
Power On
Please select an OSD Language
Croation
Norway Rumania
Poland Russian Spain
Portugal Serbia Sweden NewZealand Algeria
French
German
Italian PolishEnglish
Spanish Dutch Arabic
Portuguese Russian Farsi
OK: ENTER
Fig.1 Fig.2
Plug power cord into the electrical socket, press " " button on the panel, then
press " " key on the remote control to turn on the TV. The screen display ''please
Select an OSD Language" menu when you use the TV for the first time
(Fig.1).Press "▲ /▼ /t/u" key on the remote control to select language which
you wish, then press "OK" key on the remote control to confirm. The screen
display ''Country'' menu at the same time (Fig.2). You can select country where
you are by pressing "▲/▼ /t/u'' key on the remote control, the machine start
auto search channel after pressing ''OK'' key (Fig.3).
Standby
Press " " key on the remote control, TV will be in standby.
★ Special Attention:
1. TV set will automatically turn to standby if there is no signal input for 5 minutes
when the TV turns on.
2. TV set will automatically turn to standby when the preset time for turning off is
reached.
Signal source selection
Press "SOURCE" key either on the remote control or on the panel, and the menu
of "Input Source" will be displayed on the screen (Fig.4). Press "▲/▼ " key on
remote control or "CH+/CH-" key on the panel to select the signal source. Press
Country
Slovenia Switzerland
OK: ENTER
Channel Tuning
:
TV
:
DTV
:
Rad io
:
Dat a
0 %... (TV)
Input Source
UK
0 Programme(s)
0 Programme(s)
0 Programme(s)
0 Programme(s)
Fig.3
DTV
ATV
AV
SCART
YPBPR
HDMI1
HDMI2
HDMI3
VGA
USB
OK:ENTER
Fig.4
Morocco
Tunis
EXIT
MENU
9
Page 11

Basic Operations
''OK" key on the remote control and the TV will switch the current signal source to the source which you select.
Menu operation description
Press "MENU" key on the remote control or on the
panel. The screen will display the main menu (Fig.5).
1. Press "t/u" key on the remote control or "VOL+/
VOL-" key on the panel to select the adjustment
sort menu, which includes 6 sorts, CHANNEL,
PICTURE, SOUND, OPTION, TIME, LOCK.
CHANNEL
2. Press "▲ /▼ " key on the remote control or "CH+/
CH-" on the panel to select what is needed to
adjust in sort menu.
3. Press "OK" key on the remote control to set or
enter into next menu.
OK: ENT ER
4. Press "MENU" key to exit the main menu when the
TV displays the Main Menu; Press "MENU" key to return to previous menu when the TV displays the submenu; Press "SOURCE" key to display the signal source menu.
5. During the operation, the selections which can not be adjusted at current mode will be hidden automatically
and the color of the selections will be changed into gray.
6. Menu Operation Instruction in this manual is explained according to TV mode. The operations in other modes
are similar to the one in TV mode. Users can take it as reference.
Note: "▲ , ▼ , t, u" key in this Manual stand for the direction cursor keys on the remote control unless
specifically defined. The operating instructions in the text below are all based on keys on the remote control.
Please understand the keys on the panel by yourself.
Auto Tuning
DTV Manual Tuning
ATV Manual Tuning
Programme Edit
Signal Information
CI Information
Software Update (USB)
Fig.5
MENU: RETURN
CHANNEL
Press "MENU" key, CHANNEL menu shows on the screen. Press
"▲/▼" key to select the item you'd like to adjust or set.
Auto Tuning
Press "MENU" key, CHANNEL menu shows on the screen. Press
"▲ /▼ " key to select Auto Tuning. Press ''OK'' key, then press
''t/u" key to select Tune Type: DTV+ATV, DTV, ATV (Fig.6). Press
"▼" key to enter into ''Country'' menu, then you can select country
where you are by pressing "▲/▼/t/u". Press "OK" key to confirm,
the machine start auto Tuning. During auto tuning, the screen
display "Do you want to skip ATV Tuning" by pressing "MENU" key.
Press "t" key to confirm, or press "u" key to cancel. When you
press "t" key to confirm, the machine start auto tuning DTV channel,
During auto tuning DTV channel, the screen display ''Do you want to skip
DTV Tuning'' by pressing "MENU" key. Press "t" key to confirm, or press
"u" key to cancel.
DTV Manual Tuning
Press "MENU" key, CHANNEL menu shows on the screen. Press "▲/▼ "
key to select DTV Manual Tuning. Press "OK" key to enter into DTV Manual
Tuning menu (Fig.7). Press "t/u" key to select channel, then press "OK"
10
Tune Typ e
Rumania
Russian
Serbia NewZealand
MENU: RETURN
Bad
DT V + ATV
Slovenia
Spain
Sweden
Fig.6
DTV Manual Tuning
UHF CH 21
NO SIGNAL
Normal Good
Fig.7
Switzerland
UK
Page 12

Basic Operations
key to conduct search. After searching, the DTV Manual Tuning menu automatically exits. During the search
you may press "MENU" key to interrupt the search and return to the last menu.
ATV Manual Tuning
Press "MENU" key, CHANNEL menu shows on the screen. Press "▲ /▼ "
key to select ATV Manual Tuning. Press "OK" key to enter into ATV Manual
Tuning menu (Fig.8). Press "▲/▼ " key to select Search, and then press
''t/u'' key to conduct manual search. After searching, you may save the
channel searched to other positions. At this time, press "▲/▼" key to select
Storage To, and then press the "t/u" key to choose channel Number. After
selecting Fine-Tune press "t/u" key to tune from low frequency or high
frequency. During manual searching, you also may press ''MENU'' key to
interrupt the search and return to the last menu.
ATV Manual Tuning
Storage To 6
System DK
Current CH 1
Search
Fine-Tune
Frequency Unre gistered
MENU : RET URN
Programme Edit
Press "MENU" key, CHANNEL menu shows on the screen. Press "▲ /▼ "
key to select Programme Edit. Press "OK" key to enter into Programme Edit
menu (Fig.9), then press "▲/▼" key to select the channel you'd like to edit.
DELETE: When you select a channel, a dialogue box of "Are you sure?" will
appear on the screen after pressing the red key, then press "t" key to
delete the channel, Press ''u'' key to cancel operation.
MOVE: After selecting channel press the green key, press "▲ /▼ " key to
select the channel position that you'd like to move, then press "OK" key to
1 C-01
2 S-42
3 C-06
4 C-11
5 S-11
6 S-13
7 C-21
8 C-51
Fig.8
Programme Edit
ATV
ATV
ATV
ATV
ATV
ATV
ATV
ATV
confirm. You can press "MENU" key to return main menu.
SKIP: After selecting channel press the blue key, SKIP icon appears behind
the channel which you select, press the blue key again to cancel it. Press
''MENU'' key to return main menu.
Delete
OK: E NTER
Move
Favourite
MENU : RETU RN
Skip
Fig.9
Favourite: After choosing channel press the yellow key, Favourite icon appears behind the channel which you
select, press the yellow key again to cancel it. Press "MENU" key to return main menu.
Signal Information
Press "MENU" key, CHANNEL menu shows on the screen. Press "▲/▼" key to select Signal Information. Press
"OK" key to enter into Signal Information menu. You can look through signal information.
CI Information
Press "MENU" key, CHANNEL menu shows on the screen. Press "▲/▼" key to select CI Information. When you
insert the CI card, press "OK" key to enter into CI Information menu. You can look through CI information.
Note: Before you press "MENU" key, please select the input source first. Only in DTV mode you can select it.
Software Update(USB)
Update software by U disk.
Select Channels with "CH+/CH-" Key
Press "CH+/CH-" key to select the channels.
11
Page 13

Basic Operations
Select channels with the Return key: you can go to the last channel when pressing the Return key. For example,
if the last channel is 10 and the current channel is 20, you will go to channel 10 when pressing the Return key.
You can switch the two favourite channels as you like.
Select Channels with Numeric Keys
1. Operations to select channels with 1 digit:
Press the number keys on the remote control to select TV channel directly.
2. Operations to select channels with 2 digits:
Press the number keys with 2 digits on the remote control to select TV channels.
3. Operations to select channels with 3 digits:
Press the number keys with 3 digits on the remote control to select TV channels.
PICTURE
Press "MENU" key, CHANNEL menu shows on the
screen. Press "t/u" key to select PICTURE (Fig.10),
then press "▲/▼" key to choose the item you'd like to
adjust or set.
Picture Mode: Press "OK" key to enter into picture
mode submenu. Press""▲/▼" key to select item you'd
like to adjust or set, and press "t/u" key to adjust
the item.
Item
Picture Mode
Contrast
Brightness
Color
Sharpness
Tint
Function
Select picture mode
Adjust the contrast of whole
picture
Adjust brightness and
blackness of whole picture
Adjust the color of whole
picture
Adjust the sharpness of whole
picture
Adjust the tint of whole picture
Description
"Standard", "Soft", "User", "Dynamic" four modes.
Increasing analog value increases Contrast;
Decreasing analog value decreases Contrast (0-100).
Increasing analog value increases brightness;
Decreasing analog value decreases brightness(0-100).
Increasing analog value increases color temperature;
Decreasing analog value decreases color temperature (0-100).
Increasing analog value increases definition;
Decreasing analog value decreases definition (0-100).
Increasing analog value increases green;
Decreasing analog value increases purple (0-100).
Note: Tint can be adjusted only in NTSC system.
PICTURE
OK: ENT ER
Picture Mode
Color Temperature
Aspect Ratio
Noise Reduction
PC Setting
Fig.10
MENU: RETURN
Standard
Standard
16:9
Middle
Color Temperature: Press "OK" key to enter into Color Temperature submenu. Press "▲/▼" key to select item
you'd like to adjust or set, and press "t/u" key to adjust the item.
Item
Color Temperature
Red
Function
Select Color Temperature
Adjust red of whole picture
Description
"Standard", "Warm", "User", "Cool" four modes.
Increasing analog value increases red;
Decreasing analog value decreases red (0-100).
Green
Adjust green of whole picture
Increasing analog value increases green
Decreasing analog value decreases green (0-100).
Blue
Adjust blue of whole picture
Increasing analog value increases blue;
Decreasing analog value decreases blue (0-100).
12
Page 14

Basic Operations
Note: The adjustment on Red, Green and Blue can be adjust only under User states.
Aspect Ratio: Press "OK" key to enter into Aspect Ratio submenu. Press "▲ /▼ " key to select aspect ratio
mode: Auto, 4:3, 16:9, Zoom1, Zoom2 and Panorama.
Noise Reduction: Press "OK" key to enter into Noise Reduction submenu. Press "▲/▼" key to select Noise
Reduction mode: Off, Low, Middle, High and Default.
SOUND
Press "MENU" key, CHANNEL menu shows on the
screen. Press "t/u" key to select SOUND (Fig.11),
then press "▲/▼ " key to select the item you'd like to
adjust or set, Press "OK" key on the remote control to
set or enter into next menu.
Sound Mode: Press "OK" key to enter into sound
mode submenu. Press "▲/▼" key to select item you'd
like to adjust or set, and press "t/u" key to adjust the
item.
Item
Sound Mode
Treble
Function
Select Sound Temperature
Adjust treble value
Description
"Standard", "Music", "Movie", "Sports", "User" five modes.
Increasing analog value increases treble;
Decreasing analog value decreases treble (0-100).
Bass
Adjust bass value
Increasing analog value increases bass;
Decreasing analog value decreases bass (0-100).
Balance
Adjust balance of left or right sound
Increasing analog value decreasing left volume;
Decreasing analog value decreases right volume(0-100).
SOUND
OK: ENT ER
Sound Mode
Auto Volume
Surround Sound
AD Switch
SPDIF MODE
Fig.11
MENU: RETURN
Standard
Off
Off
Off
PCM
Auto Volume: Press "OK" key to select "On" or "Off", open or close Auto Volume function.
Surround Sound: Press "OK" key to enter into Surround Sound submenu. Press "▲/▼" key to select surround
sound mode: Off, Surround.
AD Switch: Press "OK" key to enter into AD Switch submenu. Press "t/u" key to select "On" or "Off", when
you select "On", you can adjust AD volume by pressing "t/u" key.
SPDIF MODE:
Press "OK" key to select "PCM" or
"AUTO".
OPTION
Press "MENU" key, CHANNEL menu shows on the
screen. Press "t/u" key to select OPTION (Fig.12),
then press "▲ /▼ " key to select the item you'd like to
OPTION
OSD Language
Audio Language
Subtitle Language
Hearing Impaired
Country
PVR File System
Restore User Default
Blue Screen
English
English
English
Off
UK
On
adjust or set.
OSD Languages: Press "OK" key to Enter into OSD
languages submenu. Press "▲/▼/t/u" key to select
OK: ENT ER
MENU: RETURN
Fig.12
13
Page 15

Basic Operations
language which you wish. Press "MENU" key to return previous menu.
Note: The operation method of the Audio Languages, and Subtitle Language are the same as OSD Languages
(Only available in DTV).
Hearing Impaired: Press "OK" key to select "On" or "Off" (only available in
DTV).
Country: Displays the country you selected before performing Auto Tuning
function. (To change country, go to Auto Tuning in the Channel menu.)
PVR File System: Press "OK" key to enter into PVR File System
submenu(Fig.13). Choosing storage disk in "select disk" submenu , Press
"▲ /▼ " key to select "Check PVR File System", then the machine start
check by pressing "OK" key. After checking successful, press "MENU" key
Select Disk
Check PVR File System
USB Disk
Format
Time Shift Size
Speed
Free Record Limit
MENU: RETURN
Fig.13
C:
Start
6 Hr.
to exit menu operation. Press the red key to record.
Note: Insert U disk into the interface of the machine before operating the PVR File System function.
Restore User Default: The screen display "Are you sure?" by pressing "OK" key .You can press "t" key to
resume the factory setting or press "u" key to cancel current operation.
Blue Screen: Press "OK" key to select "On" or "Off".
Open or close Blue Screen function.
TIME
Press "MENU" key, CHANNEL menu shows on the
screen. Press "t/u" key to select TIME (Fig.14),
TIME
Clock
Off Time
On Time
Sleep Timer
Time Zone
-- -- -- --
Off
Off
Off
London GMT
then Press "▲/▼" key to select the item you'd like to
adjust or set.
Clock: When in DTV input source, The clock will be
synchronized with TV programme .
OK: ENT ER
MENU: RETURN
Fig.14
Off Time: Press OK key to enter into Off Time submenu. Press key to select Off Time, Hour and
Minute, then press key to adjust value to set the off timers that the TV will switch off automatically at the
" " "▲ /▼ "
"t/u"
time you select.
Note: Yon can set Hour and Minute only the Off Time is not under ''Off'' Mode.
On Time: Press "OK" key to to enter into On Time submenu. Press key to select On Time, Hour and
Minute, DTV, channel, Volume, then press key to adjust value to set the on timer that the TV will switch
"t/u"
"▲/▼ "
on automatically and tune to the mode of your choice at the time you select.
Sleep Time: Press OK key to enter into Sleep Time submenu. Press key to select sleep time: Off,
" " "▲ /▼ "
10min, 20min, 30min, 60min, 90min, 120min, 180min, 240min.
Time Zone: Press OK key to enter into Time Zone submenu. Press key to select your time zone.
" " "▲/▼/t/u"
14
Page 16

Basic Operations
LOCK
Press "MENU" key, CHANNEL menu shows on the
screen. Press "t/u" key to select LOCK. After
pressing "OK" key, press the Numerical key to input
default password 0000 for entering LOCK menu
(Fig.15), and then press "▲/▼" key to select the item
you'd like to adjust or set.
Lock System: Press "OK" key to select "On" or "Off",
Block program option can work when It is on state.
LOCK
OK: EN TER
Lock System
Set Password
Block Program
MENU: RETURN
Off
Set Password: Press "OK" key, then a dialogue box
Fig.15
of "Set Password" appears on the screen. Press the numerical key to input old password, and input new
password twice to complete the password change and return to last menu. Note: Please make sure you
remember your new password after changing. Otherwise, system will lock forever when system lock is on .
Block Program, press "OK" key, then a "Block Program" menu shows on the screen. Press "▲/▼" key to select
the channel that you'd like to lock, and then press the green key to lock or unlock, finally press "MENU" key to
exit menu operation.
REC option
1
In DTV mode, Press "REC" key, REC option
menu shows on the screen.(Fig.16) and system
begin recording right now. Press "REVEAL" key
to stop and quit recording; After quit recording,
press "INDEX" key, the recorded list will pop up,
select the file you want to play, you can read the
file information by pressing "u" key or delete it
by pressing "REC" key. Press "OK" key to play
it.
Pla y
FB
FF
CH2
2
Pre v.
Nex t
Pau se
Sto p
[00:00:37]
3
[0001:40:30]
10:17
5
4
Fig.16
Icon
Description
1
Indicates that system is recording program.
2
Indicates the current program number.
3
Indicates the recorded program duration..
4
Indicates the longest duration that U disk can provide (relevant to the capacity of U disk)
5
Indicates the current program time.
Play: lay the video or set A-B repeat.
Select this icon, press "OK" key to p
FB: Select this icon, press "OK" key to fast back, press " " key to play normally.
FF: Select this icon, press "OK" key to fast forward, press " " key to play normally.
INDEX
INDEX
Prev.: Select this icon, press "OK" key to play previous chapter from recorded list.
Next: Select this icon, press "OK" key to read next chapter from recorded list.
Pause: Select this function, press "OK" key to play or pause.
Stop: Select this icon, press "OK" key to stop and quit playing window.
15
Page 17

Basic Operations
Note: The recording function can only support memorizer with Fat32 file system. Memorizer with other file
systems need to be formatted; Before formatting memorizer, back-up useful data because the content of
memorizer can not recover after formatting.
Time-shift option
In DTV mode, Press "ZOOM" key, Time-shift
option menu shows on the screen(Fig.17) and
the program is in suspended state.
"INDEX" key to resume play program. Press
"REVEAL" key to stop and quit time-shift.
When user leaves program for a short time,
time-shift function can suspend and cache the
playin g progra m to U d is k. When use r
resumes playing, the program can continue to
be played.
Icon
Description
1
Indicates that program is in the suspended state.
2
Indicates the time when the program suspended..
3
Indicates the longest cache time that Udisk can provide.
4
Indicates the Current program time.
Select this icon, press "OK" key to
Play: Play the video or set A-B repeat.
FB: Select this icon, press "OK" key to fast back, press "i " key to play normally.
FF: Select this icon, press "OK" key to fast forward, press "i " key to play normally.
Prev.: Select this icon, press "OK" key to play previous chapter from recorded list.
Next: Select this icon, press "OK" key to read next chapter from recorded list.
Pause: Select this function, press "OK" key to play or pause.
Stop: Select this icon, press "OK" key to stop and quit playing window.
Press
1
Pla y
S
FB
FF
Pre v.
Nex t
Pau se
Fig.17
Sto p
21:43
21:43
00:30:00
2
4
3
ndex()
ndex()
EPG option
In DTV mode, Press "EPG" key,
operation with the red, green, yellow, blue multifunction keys.
Icon
● Record
●
Info
●
Schedule
Remind
●
Description
Press the red key to enter the sub-menu. You can choose
the time of the appointment to record you want.
Press the green key to display the detail information about
the program.
Press the yellow key to see the setting that you have done
before.
Press the blue key to set the time that you want to remind
the program you want to see.
EPG option menu shows on the screen(Fig.18). User can make following
PROGRAMME GUIDE
21:10-21:39 A-studio
21:40-21:59 A-plus
22:00-22:49 Kaasua
22:50-22:59 T-uutiset
23:00-23:04 Kulttuuriuutiset
Record
OK:ENTER
CH 800 YLE TV1
Schedule Remind
Info
CHANNEL
Fig.18
USB media function
Please insert USB storage device into USB interface of TV, and press "SOURCE" key, then the menu of "Input
Source" will be displayed on the screen. Then press "▲ /▼" key to select USB. Press ''OK'' key to enter into
USB (Fig.19).
16
Page 18

Basic Operations
Note:
① USB function support file format with video file/sound file/graphic file/text file. For some nonstandard USB
storage devices, may appear condition of unable recognize, please replace the standard USB storage
device.
② Streaming media system to play a file for each format has certain limitations, if more than the system limit,
then play will be wrong.
③ Do not pull up USB storage devices when system playing, this may result in system or equipment problems
④ The system supports USB1.1 and USB2.0 connector, the standard transport protocol such as U disk and
removable hard disk storage devices, USB devices file format must be FAT or FAT32,does not support
NTFS.
The USB interface of this TV set can supply a voltage of 5V and the maximum current is 500mA; accurate
⑤
identification of the multimedia player will be affected when a storage device above 500mA is used, which is
a normal phenomenon.
USB 2.0
★Remote Control Shortcut Keys
The "IND EX", "ZOO M", " REVE A L", " TTX" ,
"HOLD", "LIST", "LANGUAGE", "RADIO" keys on
the remote control are used for USB operation.
Press "t/u" key to select the adjustment sort
menu, which includes 4 sorts: PHOTO, MUSIC,
MOVIE, TEXT.
PHOTO MUSIC MOVIE TEXT
Press "t/u" key to select PHOTO. Then press
"OK" key to read your photo documents. Press "▲
/▼ /t/u" key to select photo and press "OK" key ( the file lower right corner
After the photo was selected,
Fig.19
shows a red hook. you can choose photos to join playlist.). Press "INDEX" key on the remote control to play.
When you choose nothing, the machine will join all the photos in the file in playlist automatically.
Note: The operation method of the MUSIC, MOVIE and TEXT are the same as PHOTO. Please refer to PHOTO
options.
Basic Function
When photos are playing, press "INFO" key, then a toolbar will display under the screen. (Press "▼" key to hide
toolbar).
Play/Pause: Press "t/u" key on the remote control to select this function, press "OK" key to play
or pause.
Prev.: Press "t/u" key on the remote control to select this function, press "OK" key to read
previous photo.
Next: Press "t/u" key on the remote control to select this function, press "OK" key to read next
photo.
Stop: Press "t/u" key on the remote control to select this function, press "OK" key to stop playing
and return to previous menu.
Repeat: Press "t/u" key on the remote control to select this function, press "OK" key to select
repeat One or repeat all or not repeat.
Music: Press "t/u" key on the remote control to select this function, press "OK" key to play
background music.(Music and photos need to place in the identical folder, or you may select some
music in music file first.)
17
Page 19

Basic Operations
Playlist: Press "t/u" key on the remote control to select this function, press "OK" key to show
playlist.
Info. : Press "t/u" key on the remote control to select this function, press "OK" key to show the
information of photo. Including resolution, size and so on.
Clockwise: Press "t/u" key on the remote control to select this function, press "OK" key to
clockwise rotation photo.
Counter-clockwise: Press "t/u" key on the remote control to select this function, press "OK" key
to counter-clockwise rotation photo.
Zoom in: Press "t/u" key on the remote control to select this function, press "OK" key to enlarge
picture.
Zoom out: Press "t/u" key on the remote control to select this function, press "OK" key to reduce
picture.
Movie View: If the picture big enough to surpasses the screen, you may use this function to move
the picture.
FB: Press "t/u" key on the remote control to select this function, press "OK" key to fast back.
Press "PLAY" key to play normally.
FF: Press "t/u" key on the remote control to select this function, press "OK" key to fast forward.
Press "PLAY" key to play normally.
MUTE: Press "t/u" key on the remote control to select this function, press "OK" key to fast back.
Press "MUTE" key to Switch off sound.
GO TO Time: Press "t/u" key on the remote control to select this function, press "OK" key to
select the time to play.
Set A: Press "t/u" key on the remote control to select this function, press "OK" key to set A and B,
the film will circulating play in the time of A to B.
SF: Press "t/u" key on the remote control to select this function, press "OK" key to slow down
play speed. Press "PLAY" key to play normally.
Step: Press "t/u" key on the remote control to select this function, press "OK" key to play one
step by step. Press "PLAY" key to play normally.
Troubleshooting
Symptom
Snowflake speckle and
sound noise.
TV image is better, but has
noise.
No image. No sound.
TV image has stripes.
TV image has shadows.
Factor
1. Antenna cable connector is loose,
cable is damaged.
2. Antenna cable type is not matching.
3. Direction or position of antenna is
incorrect.
4. Signal is weak.
Antenna cable connector is loose,
cable is damaged.
Power plug is loose, power cord don't
connect well.
Signal is exposed to interference, such
as car, neon light, electric blower etc.
1. TV signal is reflected by valley or
building.
2. Direction of antenna is incorrect.
18
Solution
1. Check the antenna cable connector plug whether
or not loose, cable whether or not perfect.
2. Check antenna cable type(VHF/UHF)
3. Adjust direction or position of antenna .
4. Attempt to use signal amplifier.
Check the antenna cable connector plug whether
or not loose, check cable condition.
1. Check power cord whether or not connect well.
2. Check if " " button on the panel is on.
Don't use electric blower around machine, adjust
antenna cable direction to reduce interference.
1. Use high directional antenna.
2. Adjust direction of antenna.
Page 20

Troubleshooting
Symptom
TV no sound.
Computer no display, and
prompt no signal input, red
indicator LED twinkling.
Remote control distance is
short, lose control.
Computer display is faint.
Computer display image
does not fill the screen.
Noise Signals at turning off.
Can not operate this
machine.
1.Volume setting is too low.
2.Sound is muted.
Signal cable is loose or fallen off.
1. Receive window of remote control
was covered by objects.
2. The battery energy of remote control
is to low.
1. Adjustment is incorrect.
2. Display mode is incorrect.
1. Adjustment is incorrect.
2. Display mode is incorrect.
Electrical release at turning off.
Exterior influence, for example
lightning, static electricity and so on,
which are possibly to disturb the
normal operation of this machine.
Technical Specifications
Factor
Solution
1. Adjust volume to proper value.
2. Press "MUTE" key on remote control to eliminate
mute.
Check signal cable whether or not loose, fall off,
reconnect again.
1. Remove objects, obstructing the receiver window
of remote control.
2. Change battery.
1. Use auto-adjustment function.
2. Use recommended mode.
1. Use Auto-adjustment function.
2. Enter "PICTURE" to adjust horizontal or vertical
position.
3. Use recommended mode.
It is normal.
Press " " button to turn off electrical source, then
press " " button to turn on the TV again after 1-2
minutes.
Master unit
Panel size
Max. Resolution
Best Resolution
Pixel Pitch
Active Area
Power Supply
Power Consumption of Speaker
Dimension (L×H×W) and
Weight
26"
1366×768
1360×768@60Hz
0.4215mm×0.4215mm
575.769mm×323.712mm
100-240VAC 60/50Hz
6W+6W
Unpacking: 654×432×46(mm ) Net Weight: 5.5kg
Excluding base
Packing: 750×530×135(mm ) Gross Weight: 7.0kg
Unpacking: 654×459×46(mm ) Net Weight: 6.0kg
Packing: × × (mm ) Gross Weight: 7.5kg
Including base
850 530 145
Unpacking: 654×459×46(mm ) Net Weight: 6.5kg
Packing: 850×530×180(mm ) Gross Weight: 8.0kg
3
3
3
3
3
3
19
Page 21

Technical Specifications
Panel size
Max. Resolution
Best Resolution
Pixel Pitch
Active Area
Power Supply
Power Consumption of Speaker
Dimension (L×H×W) and
Weight
32" (HD)
1366×768
1360×768@60Hz
0.51075mm×0.51075mm
697.685mm×392.256mm
32" (FHD)
1920×1080
1920×1080@60Hz
0.36375mm×0.36375mm
698.40mm×392.85mm
100-240VAC 60/50Hz
8W+8W
Unpacking: 778×501×48(mm ) or 789×505×49.3(mm )
Net Weight: 9.0kg
Excluding base
Packing: 880×605×135(mm )
3 3
3
Gross Weight: 11.0kg
Unpacking: 778×535×48(mm ) or 789×541×49.3(mm )
3 3
Net Weight: 9.5kg
Packing: × × (mm )
Gross Weight: 11.5kg
Including base
980 605 145
Unpacking: 778×535×48(mm ) or 789×541×49.3(mm )
3
3 3
Net Weight: 10.5kg
Packing: × × (mm ) 1005×635×180(mm )
995 602 165 or
3 3
Gross Weight: 12.5kg
Panel size
Max. Resolution
Best Resolution
Pixel Pitch
Active Area
Power Supply
Power Consumption of Speaker
Dimension (L×H×W) and
Weight
36.5"
1366×768
1360×768@60Hz
0.5916mm×0.5916mm
808.128mm×454.348mm
100-240VAC 60/50Hz
8W+8W
Unpacking: 898×572×47(mm ) Net Weight: 11.0kg
Excluding base
Packing: 1000×680×135(mm ) Gross Weight: 13.5kg
Unpacking: 898×624×47(mm ) Net Weight: 12.0kg
Packing: × × (mm ) Gross Weight: 14.5kg
Including base
1100 680 145
Unpacking: 898×624×47(mm ) Net Weight: 13.0kg
Packing: 1120×685×180(mm ) Gross Weight: 15.5kg
3
3
3
3
3
3
20
Page 22

Technical Specifications
Panel size
Max. Resolution
Best Resolution
Pixel Pitch
Active Area
Power Supply
Power Consumption of Speaker
Dimension (L×H×W) and
Weight
Panel size
Max. Resolution
Best Resolution
Pixel Pitch
Active Area
Power Supply
Power Consumption of Speaker
Dimension (L×H×W) and
Weight
42"
1920×1080
1920×1080@60Hz
0.4845mm×0.4845mm
930.24mm×523.26mm
100-240VAC 60/50Hz
8W+8W
Unpacking: 1008×634×48(mm ) Net Weight: 15.0kg
Excluding base
Packing: 1110×745×135(mm ) Gross Weight: 18.0kg
Unpacking: 1008×684×48(mm ) Net Weight: 16.0kg
Packing: × × (mm ) Gross Weight: 19.0kg
Including base
1210 745 145
Unpacking: 1008×684×48(mm ) Net Weight: 17.0kg
Packing: 1230×760×180(mm ) Gross Weight: 20.0kg
3
3
3
3
3
3
47"
1920×1080
1920×1080@60Hz
0.5415mm×0.5415mm
1039.68mm×584.82mm
100-240VAC 60/50Hz
8W+8W
Unpacking: 1124×702×48(mm ) Net Weight: 18.5kg
Excluding base
Packing: 1235×815×145(mm ) Gross Weight: 22.5kg
Including base
Unpacking: 1124×756×48(mm )
3
3
3
Panel size
Max. Resolution
Best Resolution
Pixel Pitch
Active Area
Power Supply
Power Consumption of Speaker
Dimension (L×H×W) and
Weight
Operating environment: temperature: 5 ~40 ; RH: 10%~85%; atmospheric pressure: 86kPa~104kPa
Storage environment: temperature: -20 ~55 ; RH: 5%~95%; atmospheric pressure: 86kPa~104kPa
55"
1920×1080
1920×1080@60Hz
0.63mm×0.63mm
1209.6mm×680.4mm
100V-240VAC 60/50Hz
8W+8W
Unpacking: 1301×807×48(mm ) Net Weight: 22.0kg
Excluding base
Packing: 1420×930×153(mm ) Gross Weight: 27.0kg
Including base
Unpacking: 1301×861×48(mm )
3
3
3
℃ ℃
℃ ℃
21
Page 23

Technical Specifications
Technical Specifications for TV
1. Compatible system:
2. Antenna input: coaxial 75 unbalanced
3. AV video input: 75 , 1 Vp-p, RCA terminal
4. AV audio input: 20k , 500mV RMS
5. YPbPr / HDMI video input: 480i, 480P, 576i, 576P, 720P, 1080i, 1080P
VGA display mode
26" / 32"(HD) / 36.5"
NO.
Reco mmended m ode:136 0X768@6 0Hz
Mode Res olution
1
2
3
4
5
VGA
SVGA
XGA
WXGA
Power management
Mode
Normal working
Standby
ATV: PAL B/G, I, D/K, SECAM L', B/G, D/K DTV:: DVB-T ,DVB-T2 (optional)
Ω
Ω
Ω
32"(FHD) / 42" / 47" / 55"
Mode Res olution
1
2
3
4
5
6
7
8
VGA
SVGA
XGA
WXGA
WUXG A
Powe r consump tion
42"
≤140W
≤0.5W
720×40 0
640×48 0
800×60 0
1024×7 68
1280×7 20
1360×7 68
1600×9 00
1920×1 080
47"
≤160W
≤0.5W
70Hz
60Hz
60Hz
60Hz
60Hz
60Hz
60Hz
60Hz
≤190W
≤0.5W
720×40 0
640×48 0
800×60 0
1024×7 68
1360×7 68
Power LED state
Off
On
Refr esh rate Refr esh rate
70Hz
60Hz
60Hz
60Hz
60Hz
26"/32"
≤75W
≤0.5W
NO.
Reco mmended m ode:192 0X1080@ 60Hz
36.5"
≤100W
≤0.5W
55"
22
 Loading...