


Recipe
Booklet
Reverse Side
INSTRUCTION BOOKLET
Cuisinart™ Convection Bread Maker |
CBK-200 |
|
|
For your safety and continued enjoyment of this product, always read the instruction book carefully before using. |
IB-5859B |
|

IMPORTANT SAFEGUARDS
When using electrical appliances, basic safety precautions should always be followed including the following:
1.READ ALL INSTRUCTIONS, PRODUCT LABELS AND WARNINGS BEFORE USING THIS BREAD MAKER.
2.Do not touch hot surfaces; carry the unit by handles. Always use oven mitts when handling hot material, and allow metal parts to cool before cleaning. Allow the bread maker to cool thoroughly before putting in or taking off parts.
3.When unit is not in use and before cleaning, unplug the bread maker from wall outlet. Let the bread maker cool down thoroughly before assembling or disassembling it.
4.To protect against risk of electrical shock, do not immerse the appliance or plugs in water or other liquids.
5.Close supervision is always necessary when this or any appliance is used near children or incapacitated persons.
6.Do not allow anything to rest on the power cord. Do not plug in cord where people may walk or trip on it. Unplug this bread maker from the wall outlet before you go out for a trip or long excursion.
7.Do not operate this or any appliance with a frayed or damaged cord, or plug, or after the appliance malfunctions or is dropped or has been damaged in any manner. Take appliance to the nearest authorized service facility for examination, repair or electrical or mechanical adjustment.
8.Do not let the cord dangle over the edge of a table or counter or touch hot surfaces. Do not place on an unsteady or cloth-covered surface.
9.Avoid contact with moving parts.
10.Do not use attachments not recommended by the manufacturer. They may cause fire, electric shock or injury.
11.Do not use outdoors or for commercial purposes.
12.Do not place the appliance near a hot gas or electric burner, or in a heated oven.
13.Keep power cord away from the hot surface of this bread maker. Do not put any flammable object on the hot surface of this bread maker.
14.Place this bread maker a minimum of 2 inches away from wall or any other object.
15.Do not use this bread maker for other than its intended use.
16.When plugging or unplugging this bread maker, be sure not to touch the plug blades with your fingers.
17.To unplug, press and hold the Stop/Pause button for 1–3 seconds, grip plug and pull from wall outlet. Never pull on the cord.
18.Use of extension cords: A short power supply cord has been provided to reduce the risk of injury resulting from becoming entangled in or tripping over a longer cord. Extension cords are available from hardware stores and may be used with care. The cord should be arranged so that it will not drape over the counter or tabletop where it can be pulled by children or tripped over accidentally. If the appliance is of the grounded type, the extension cord should be grounding-type 3-wire cord.
19.Electric power: If electric circuit is overloaded with other appliances, your bread maker may not operate properly. This bread maker should be operated on a separate electrical circuit from other operating appliances.
THIS UNIT IS INTENDED FOR HOUSEHOLD USE ONLY
READ AND SAVE THESE INSTRUCTIONS
1
SPECIAL CORD SET INSTRUCTIONS
NOTICE
This appliance has a polarized plug (one blade is wider than the other).
To reduce the risk of electric shock, this plug will fit in a polarized outlet only one way. If the plug does not fit fully in the outlet, reverse the plug. If it still does not fit, contact a qualified electrician. Do not modify the plug in any way.
CONTENTS
Important Safeguards . . . . . . . . . . . . . . . . . . . . . . . . . . . . . . . . . . . . . . 1 Introduction . . . . . . . . . . . . . . . . . . . . . . . . . . . . . . . . . . . . . . . . . . . . . . 2 Parts and Features . . . . . . . . . . . . . . . . . . . . . . . . . . . . . . . . . . . . . . . . 2 Before First Use . . . . . . . . . . . . . . . . . . . . . . . . . . . . . . . . . . . . . . . . . . 3 Control Panel . . . . . . . . . . . . . . . . . . . . . . . . . . . . . . . . . . . . . . . . . . . . 3 Operating Instructions . . . . . . . . . . . . . . . . . . . . . . . . . . . . . . . . . . . . . 3 Power Failure Backup . . . . . . . . . . . . . . . . . . . . . . . . . . . . . . . . . . . . . 5 Program Options . . . . . . . . . . . . . . . . . . . . . . . . . . . . . . . . . . . . . . . . . 6 Types of Bread . . . . . . . . . . . . . . . . . . . . . . . . . . . . . . . . . . . . . . . . . . . 8 Cycles of Breadmaking . . . . . . . . . . . . . . . . . . . . . . . . . . . . . . . . . . . . . 9 Timetable . . . . . . . . . . . . . . . . . . . . . . . . . . . . . . . . . . . . . . . . . . . 10–13 Measuring Ingredients . . . . . . . . . . . . . . . . . . . . . . . . . . . . . . . . . . . . 13 Loading Ingredients into the Bread Pan . . . . . . . . . . . . . . . . . . . . . . . 13 Measurement/Conversion Chart . . . . . . . . . . . . . . . . . . . . . . . . . . . . . 13 Cleaning, Care and Maintenance . . . . . . . . . . . . . . . . . . . . . . . . . . . . 14 Tips and Hints . . . . . . . . . . . . . . . . . . . . . . . . . . . . . . . . . . . . . . . . . . . 14 Troubleshooting . . . . . . . . . . . . . . . . . . . . . . . . . . . . . . . . . . . . . . . . . 16 Bread Maker Pantry . . . . . . . . . . . . . . . . . . . . . . . . . . . . . . . . . . . . . . 17 Warranty . . . . . . . . . . . . . . . . . . . . . . . . . . . . . . . . . . . . . . . . . . . . . . . 19
INTRODUCTION
Get ready to enjoy warm, fresh, homemade bread whenever you want it! Your new CuisinartTM Convection Bread Maker makes it easy, and even lets you program your baking for some breads up to 12 hours in advance.
Decide which of our fabulous recipes you want to try, or use a family favorite.
Then just add ingredients and select a menu option, crust color and loaf size. We'll do the rest! We've included recipes for our Low-Carb and Gluten-Free menu options, as well as a variety of other breads, doughs and jams.
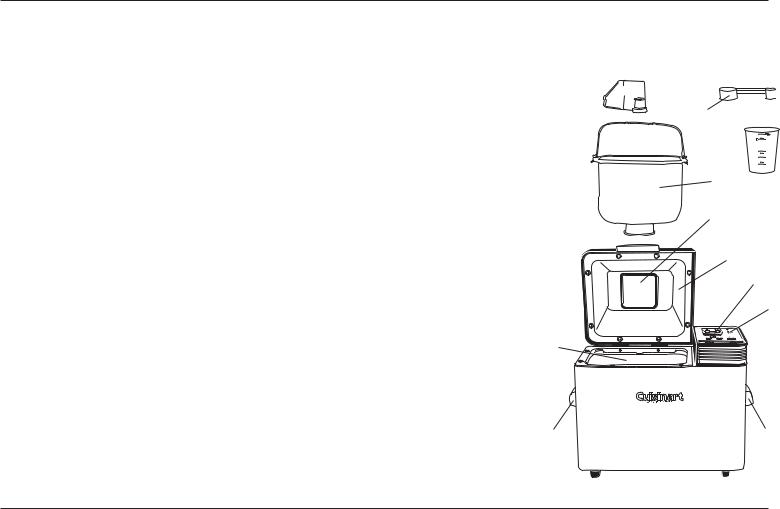
PARTS AND FEATURES
1.Removable lid:
brushed stainless steel with polished chrome rim
2.Viewing window:
Glass viewing window
3. Side handles: Elegant, chrome side handles
4.Control Panel: Easy
push button controls; 16 menu options, 3 crust colors, and 3 loaf sizes for over 100 choices
5.LCD display: Indicates
program selections and baking cycles
6.Removable bread pan with handle:
Horizontal loaf, nonstick
7. |
Kneading paddle: |
|
|
Removable, nonstick |
8 |
|
paddle |
|
|
|
|
8. |
Baking chamber |
|
9. |
Heating element |
|
|
(not shown) |
|
10. |
Power cord |
|
|
(not shown) |
|
11. |
Measuring Spoon |
3 |
12.Measuring Cup
13.BPA free (not shown) All
parts that come into contact with food are BPA free.
 7
7
11
12 


6
2
1
5
4
3
2
BEFORE FIRST USE
Remove all packaging and any promotional labels or stickers from your bread maker. Be sure that all parts (page 2) of your new bread maker have been unpacked before discarding any packaging materials. You may want to keep the box and packing materials for use at a later date.
Before using your CuisinartTM Convection Bread Maker for the first time, remove all protective paper and wrapping. Wipe housing with a damp cloth to remove any dust from the warehouse or shipping. Wash inside of lid with sponge or damp cloth.
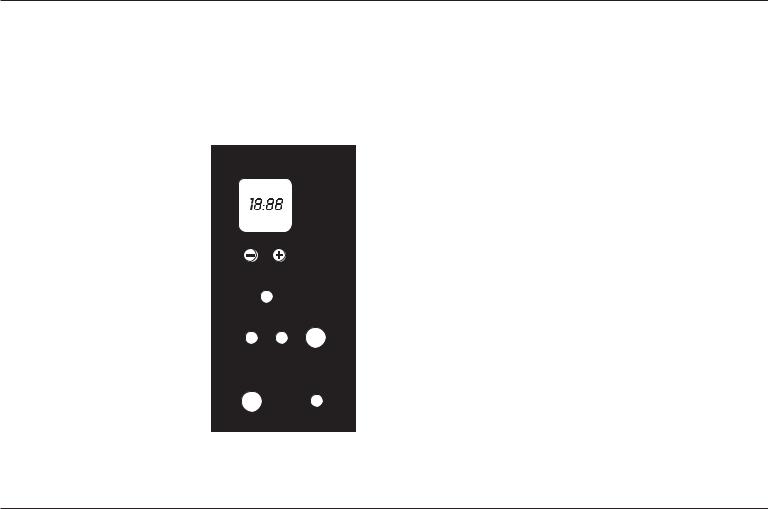
CONTROL PANEL
Display Window – Indicates your menu selection, current baking cycle, loaf size, crust color and baking time.
Delay Start Timer – The CuisinartTM
Convection Bread Maker allows you t o program baking for a later time. Just set the Delay Start Timer for a finish-time up to 12 hours later.
Mix-ins – This audible signal will alert user when to add extra ingredients, such as fruits and nuts, during the second kneading cycle.
The red LED indicator will be on when
the Mix-ins feature is activated; off when it’s deactivated. Press the button once to
deactivate the Mix-ins feature. The Mixins feature automatically defaults to on
except for Low Carb, Quick Breads, Gluten Free and Last Minute Loaf.
Please note: There are no Mix-ins signals for Low Carb, Quick Bread, Gluten Free or Last Minute Loaf program options. Mix-ins must be added at the very beginning of the cycle with other basic ingredients.
Menu – The CuisinartTM Convection Bread Maker offers 16 different menu cycles. Press the Menu button to scroll through and select a cycle. The numbers on the LCD will correspond with the numbers on the control panel. Please see list of program options on pages 6–7 for reference.
Crust – Press Crust to select desired crust color. An indicator arrow will appear above the color selected: Light, Medium or Dark. The machine automatically defaults to Medium.
Loaf – Press Loaf to select desired loaf size: (1 LB, 1.5 LB or 2 LB)
An indicator arrow will appear below the size selected. The machine will automatically default to 2 LB.
Some menu cycles are limited to certain loaf options, and the LCD panel will display accordingly. Please see selection options on pages 6–7 for all available combinations.
Start – Press Start to start the program selected, and to resume after Pause. The red LED indicator will remain on during the Preheat, Knead, Rise and Bake cycle. The LED indicator will flash on/off during the Keep Warm function.
If you hear a beep after pressing a button, the beep is indicating an
invalid choice. For example, Crust selection is not available for Dough, Jam and Bake Only programs. There will be an error beep if the Crust button is pressed after selecting these menu options.
Stop/Pause – Press this button once to pause the cycle. This will pause the machine for a maximum of 15 minutes, after which the unit will resume the set menu program. To reactivate before 15 minutes, simply press Start again.
Press this button once and hold for three seconds to stop machine.
OPERATING INSTRUCTIONS
1.Remove bread pan and attach kneading paddle.
2.Properly measure all ingredients into the bread pan in the exact order they are listed. Always put the liquids in first, the dry ingredients in next, and the yeast last. Yeast cannot be allowed to touch wet ingredients.
3

Please refer to the measuring and loading ingredients sections (page 13) for instructions.
3. Insert the bread pan back into the baking chamber. Press firmly so that the bread pan fits securely within the two brackets.
4. Close the lid and connect power cord to standard electrical outlet.
5. Choose Menu option. Press Menu and scroll through the 16 menu cycles until you reach your preferred cycle. The corresponding menu number will be indicated on the LCD screen. Please note: You will need to scroll through the list again if you pass your preferred cycle.
6.Select Crust color – Press Crust to choose your preferred crust:
Light, Medium or Dark. The CuisinartTM Convection Bread Maker will automatically default to medium crust.
Please note: the crust control feature will not operate for Dough, Jam and Bake Only cycles. If you choose an invalid option, you will hear an error beep.
7.Select Loaf Size – Press Loaf to choose your preferred dough size: 1, 1.5 or 2 LB. The CuisinartTM Convection Bread Maker will automatically default to a 2 LB loaf size.
Please note: the Loaf control feature will not operate for all menu options, such as Jam and Bake Only cycles. Gluten-free and Low-Carb settings do not offer 1-pound setting. If you choose an invalid option, you will hear an error beep.
See a full list of Program Options (page 6).
8.Mix-ins feature – There are some wonderful recipes for fruit and nut breads, olive loaf, cheese bread, and so on, which require mix-in ingredients such as fruit and nuts, to be added after basic ingredients are kneaded.
The Mix-ins option will automatically default to on except for Low Carb, Quick Bread, Gluten Free or Last Minute Loaf programs. Press Mix-ins once if you choose to deactivate this feature. The LED light will indicate whether the signal is on or off. The signal can be set or deactivated anytime before the second knead cycle.
The Mix-ins signal will sound (if activated) at 14 minutes before the end of the second knead. This signal consists of a series of four sets of 5 long beeps each.
When you hear the signal, carefully open the bread maker lid and add any additional mix-ins the recipe requires. Gently close the lid to continue baking.
Please note: There are no Mix-ins signals for Low Carb, Quick Bread, Gluten Free or Last Minute Loaf program options. Mix-ins must be added at the very beginning of the cycle with other basic ingredients.
9.You can press Start at this stage or activate Delay Start Timer.
Never use the delay feature if your recipe includes ingredients which can spoil (eggs, milk or milk products, meat, fish, and so on).
See Tips and Hints (pages 14–15) for important advice on using this feature.
The CuisinartTM Convection Bread Maker gives you the convenient option of choosing the exact time your bread will be fresh and warm and ready to eat! Your bread maker has a delay setting up to 12 hours. The time you set relates to the finish-time of baking the loaf. Simply set the Delay Start Timer the number of hours ahead that you want the loaf to finish. Press the + or – buttons to set time for completion up to 12 hours later. Press to increase or decrease time by 10-minute increments or hold either button down for continuous movement.
In other words, if you decide in the morning that you would like a warm loaf of bread for dinner at 7 pm, simply set the Delay Start Timer the number of hours ahead to the time you want the loaf to finish. If it’s 8 in the morning you can place your ingredients in the bread maker and set the delay timer to read 11:00. At 7 pm, eleven hours later, the
end bake signal will sound to let you know that the bread is ready.
4
10.Press Start to begin baking process. An indicator arrow on the LCD will indicate the current function: Preheat, Knead, Rise, Bake, Keep Warm.
The first knead cycle will actually mix the basic ingredients. Three kneads are standard for most bread settings. The first knead is a few minutes, followed by a longer knead. There are periods of resting in which
the unit will not be active except for the countdown display. These are rise cycles.
Once you choose a menu program and press Start, the unit will automatically take care of each step for you until the loaf finishes baking. If you choose a recipe with mix-ins such as fruits and nuts, the unit will signal the time to add these ingredients and the Mix-ins light will flash. See operating instruction #8 (page 4).
11.Remove paddle signal: For your convenience, there will be an audible signal before the last rise cycle, indicating the point at which the mixing/kneading is complete, and the paddle can be removed (to avoid a small hole in the bottom of your baked loaf).
Signal consists of a series of three sets of 6 quick beeps each.
If you want to remove the paddle at this time, or remove and re-shape the dough before replacing in bread pan, press Pause. Using oven mitts, open the lid and remove the bread pan by the handles. Close lid. The bread machine will pause for 15 minutes before automatically resuming.
Take the dough from pan and remove paddle. Form dough into a neat ball and replace in center of bread pan. Replace pan in bread maker. As soon as you replace bread pan and dough in machine, press Start again to resume baking program.
If you plan to remove the dough and reshape in another pan for baking in your conventional oven, this signal is an indication of the appropriate time for that too. Be sure to press Stop to reset the machine before it continues on to Rise, Bake and Keep Warm cycles. (Machine would automatically resume after 15 minutes.)
12.When the baking cycle is complete the end bake signal will sound. The bread display window will indicate unit is in Warm cycle and time will read 00:00.
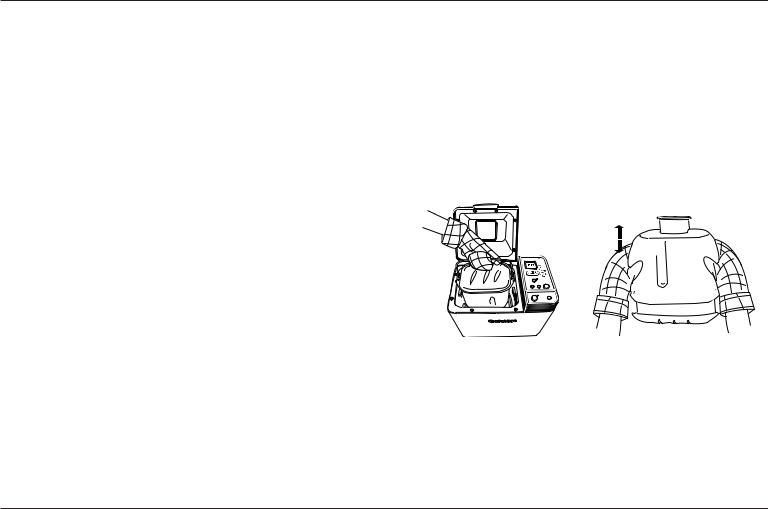
Using oven mitts, open the lid and remove the bread pan by the handle. Please note: If you do not Stop the machine and remove your bread, the bread maker will automatically switch to its keep warm feature. Your bread will be kept warm for 60 minutes to prevent your loaf from becoming soggy. For optimal results, we recommend removing your loaf as soon as the baking cycle is complete, and letting it cool on a baking rack.
Please note: The keep warm function will not operate for any Dough, Jam and Bake Only cycles.
13.Remove bread from pan – Using oven mitts, grab the bottom of the bread pan, move handle aside, and shake until the bread is released.
For best results, allow the loaf to cool on a wire rack for 20 to 30 minutes prior to cutting.
Please note: Be sure to remove the kneading paddle from the finished loaf. Caution: the kneading paddle will be extremely hot.
POWER FAILURE BACKUP
This unit is equipped with a power failure backup system. In case of any disruption of power supply, the unit will store in memory the stage of bread making cycle and resume once power is restored. The power
backup feature can maintain memory for a power failure up to 15 minutes.
5

PROGRAM OPTIONS
Select from these Bread/Dough Cycles:
1.White Bread Light (1 LB)
2.White Bread Light (1.5 LB)
3.White Bread Light (2 LB)
4.White Bread Medium (1 LB)
5.White Bread Medium (1.5 LB)
6.White Bread Medium (2 LB)
7.White Bread Dark (1 LB)
8.White Bread Dark (1.5 LB)
9.White Bread Dark (2 LB)
10.White Bread Rapid Light (1 LB)
11.White Bread Rapid Light (1.5 LB)
12.White Bread Rapid Light (2 LB)
13.White Bread Rapid Medium (1 LB)
14.White Bread Rapid Medium (1.5 LB)
15.White Bread Rapid Medium (2 LB)
16.White Bread Rapid Dark (1 LB)
17.White Bread Rapid Dark (1.5 LB)
18.White Bread Rapid Dark (2 LB)
19.Whole Wheat Bread Light (1 LB)
20.Whole Wheat Bread Light (1.5 LB)
21.Whole Wheat Bread Light (2 LB)
22.Whole Wheat Bread Medium (1 LB)
23.Whole Wheat Bread Medium (1.5 LB)
24.Whole Wheat Bread Medium (2 LB)
25.Whole Wheat Bread Dark (1 LB)
26.Whole Wheat Bread Dark (1.5 LB)
27.Whole Wheat Bread Dark (2 LB)
28.Whole Wheat Bread Rapid Light (1 LB)
29.Whole Wheat Bread Rapid Light (1.5 LB)
30.Whole Wheat Bread Rapid Light (2 LB)
31.Whole Wheat Bread Rapid Medium (1 LB)
32.Whole Wheat Bread Rapid Medium (1.5 LB)
33.Whole Wheat Bread Rapid Medium (2 LB)
34.Whole Wheat Bread Rapid Dark (1 LB)
35.Whole Wheat Bread Rapid Dark (1.5 LB)
36.Whole Wheat Bread Rapid Dark (2 LB)
37.French/Italian Bread Light (1 LB)
38.French/Italian Bread Light (1.5 LB)
39.French/Italian Bread Light (2 LB)
40.French/Italian Bread Medium (1 LB)
41.French/Italian Bread Medium (1.5 LB)
42.French/Italian Bread Medium (2 LB)
43.French/Italian Bread Dark (1 LB)
44.French/Italian Bread Dark (1.5 LB)
45.French/Italian Bread Dark (2 LB)
46.French/Italian Bread Rapid Light (1 LB)
47.French/Italian Bread Rapid Light (1.5 LB)
48.French/Italian Bread Rapid Light (2 LB)
49.French/Italian Bread Rapid Medium (1 LB)
6
 Loading...