


Recipe
Booklet
Reverse Side
INSTRUCTION BOOKLET
|
|
Cuisinart® Automatic Bread Maker |
BMKR-200 Series |
For your safety and continued enjoyment of this product, always read the instruction book carefully before using.

IMPORTANT SAFEGUARDS
When using electrical appliances, basic safety precautions should always be followed including the following:
1.Read all instructions, product labels and warnings before using this bread maker.
2.Do not touch hot surfaces; carry the unit by handles. Always use oven mitts when handling hot material, and allow metal parts to cool before cleaning. Allow the bread maker to cool thoroughly before putting in or taking off parts.
3.When unit is not in use and before cleaning, unplug the bread maker from wall outlet. Let the bread maker cool down thoroughly before assembling or disassembling it.
4.To protect against risk of electrical shock, do not immerse the appliance or plugs in water or other liquids.
5.Close supervision is always necessary when this or any appliance is used near children or incapacitated persons.
6.Do not allow anything to rest on the power cord. Do not plug in cord where people may walk or trip on it. Unplug this bread maker from the wall outlet before you go out for a trip or long excursion.
7.Do not operate this or any appliance with a frayed or damaged cord, or plug, or after the appliance malfunctions or is dropped or has been damaged in any manner. Take appliance to the nearest authorized service facility for examination, repair or electrical or mechanical adjustment.
8.Do not let the cord dangle over the edge of a table or counter or touch hot surfaces. Do not place on an unsteady or cloth-covered surface.
9.Avoid contact with moving parts.
10.Do not use attachments not recommended by the manufacturer. They may cause fire, electric shock or injury.
11.Do not use outdoors or for commercial purposes.
12.Do not place the appliance near a hot gas or electric burner, or in a heated oven.
13.Keep power cord away from the hot surface of this bread maker. Do not put any flammable object on the hot surface of this bread maker.
14.Place this bread maker a minimum of 2 inches away from wall or any other object.
15.Do not use this bread maker for other than its intended use.
16.When plugging or unplugging this bread maker, be sure not to touch the plug blades with your fingers.
17.To unplug, press and hold the Stop/Pause button for 1 to 3 seconds, grip plug and pull from wall outlet. Never pull on the cord.
18.If electric circuit is overloaded with other appliances, your bread maker may not operate properly. This bread maker should be operated on a separate electrical circuit from other operating appliances.
19.Extreme caution must be used when moving an appliance containing hot oil or other hot liquids.
20.Always attach plug to appliance first, then plug cord into the wall outlet. To disconnect, turn any control to "off", then remove plug from wall outlet.
SAVE THESE
INSTRUCTIONS
FOR HOUSEHOLD USE
ONLY
1
Special Cord Set Instructions
A short power supply cord is provided to reduce the risks resulting from becoming entangled in or tripping over a longer cord.
Longer extension cords are available and may be used if care is exercised in their use.
If a long extension cord is used, the marked electrical rating of the extension cord must be at least as great as the electrical rating of the appliance, and the longer cord should be arranged so that it will not drape over the countertop or tabletop where it can be tripped over or pulled on by children.
Notice
This appliance has a polarized plug (one blade is wider than the other).
To reduce the risk of electric shock, this plug will fit in a polarized outlet only one way. If the plug does not fit fully in the outlet, reverse the plug. If it still does not fit, contact a qualified electrician. Do not modify the plug in any way.
Contents
Important Safeguards . . . . . |
. . . . . . . |
. |
. |
. |
. . |
|
|
1 |
Introduction . . . . . . . . . |
. . . . . . . |
. |
|
|
|
|
|
2 |
Parts and Features . . . . . . . |
. . . . . . |
. . |
. |
. |
|
|
|
2 |
Control Panel . . . . . . . . . |
. . . . . . |
. . |
|
|
|
|
|
3 |
Making Bread . . . . . . . . . |
. . . . . . |
. . |
|
|
|
|
|
3 |
Programs . . . . . . . . . . |
. . . . . . . |
|
|
|
|
|
5 |
|
Measuring Ingredients . . . . . |
. . . . . . . |
. |
. |
. |
. . |
|
|
6 |
Loading Ingredients into the Bread |
Pan . . . . . |
. |
. |
. |
. . |
. |
|
7 |
Tips and Hints . . . . . . . . |
. . . . . . . |
. |
. |
|
|
|
|
7 |
Cleaning and Care . . . . . . . |
. . . . . . |
. . |
. |
. |
|
|
|
8 |
Troubleshooting . . . . . . . . |
. . . . . . |
. . |
. |
|
|
|
|
9 |
Warranty . . . . . . . . . . . |
. . . . . . |
|
|
|
|
|
|
10 |
INTRODUCTION
Nothing says "home" like warm, just-baked bread. With your new automatic bread maker, all you have to do is add ingredients and select the time you'd like Cuisinart to start the process. We mix it, knead it, let it rise, and bake it. We've included lots of bread recipes, as well as recipes for pastries and jams. You'll discover you've bought yourself much more than a beadmaker!
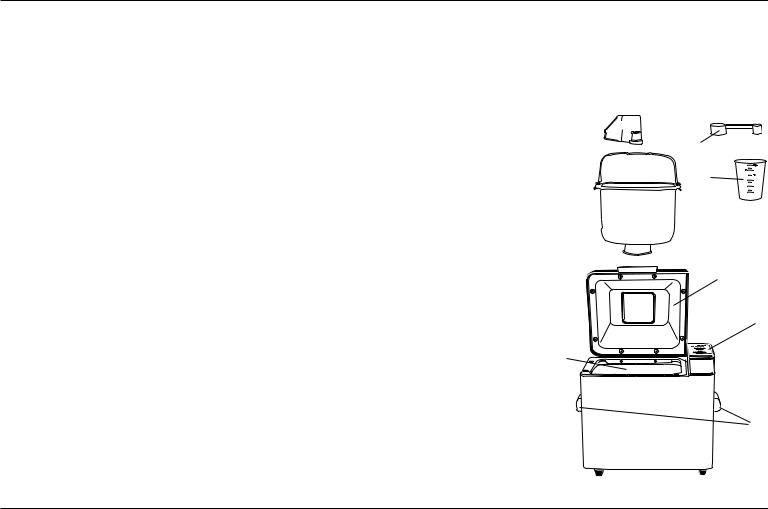
Parts AND Features |
4b |
||
6 |
|||
|
|
||
1. |
Lid with viewing window |
|
|
2. |
Side handles |
7 |
|
3. |
Control Panel |
|
|
|
(see page 3 for more detail) |
4a |
|
4.Baking chamber:
a.Removable bread pan with handle
|
b. Kneading paddle |
|
1 |
|
|
|
|
|
c. Heating element (not shown) |
|
|
5. |
Power Cord (not shown) |
|
3 |
6. |
Measuring Spoon |
|
|
7. |
Measuring Cup |
4 |
|
|
|
||
|
|
|
2 |
2
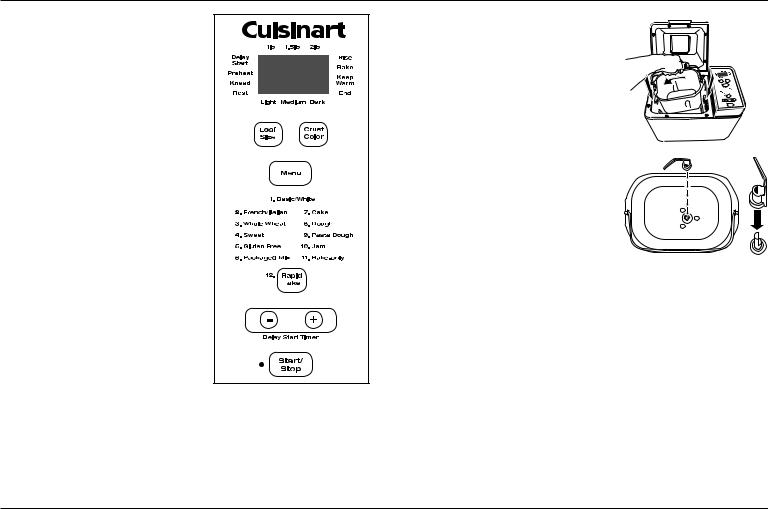
CONTROL PANEL
LCD Display – Displays your loaf size and crust color selection along with the current function. Also used to view menu selection and delay start timer.
Loaf Size Button – Selects a 1lb, 1½ lb or 2lb loaf.
Crust Color Button – Selects a light, medium or dark crust.
Menu Button – Selects program; refer to the program list for options.
Program List – Lists the first 11 preprogrammed menu selections; use the menu button to select from this list.
Rapid Bake Button – Selects the 12th |
|
pre-program, Rapid Bake (Please refer |
|
to page 6 for more information on this |
|
setting). |
B |
|
Delay Start Timer Buttons – Set the delay start timer.
Start/Stop Button – Starts and stops the bread making process.
MAKING BREAD
Before First Use
Before using your Cuisinart® Automatic Bread Maker for the first time, remove all protective paper and wrapping. Be sure that all parts of your new bread maker have been unpacked before discarding any packaging materials. You may want to keep the box and packaging materials for use at a later date.
Wipe housing and inside of lid with a damp cloth and rinse bread pan, kneading paddle, measuring spoon and cup.
Setting Up |
1a |
|
1. Remove bread pan by grasping the |
||
|
||
handle, turning the pan to the left and |
|
|
pulling up. Attach kneading paddle. (see |
|
|
figures 1a and 1b). |
|
|
2. Put ingredients in bread pan – refer to |
|
|
the measuring and loading ingredients |
|
|
section (pages 6-7) for detailed |
|
|
instructions. |
1b |
|
|
Note: Always put liquid ingredients into the pan first, followed by dry ingredients. Be sure to put yeast last, as yeast must not touch wet ingredients, to avoid activation before kneading.
3. Insert the bread pan back into the baking chamber, turning the pan to the right. Be sure it locks in place.
4. Close the lid and plug in the bread maker.
Programming
1.Select your loaf size (1, 1½ or 2lbs) by pressing the Loaf Size button until your desired size is selected. Your current selection will be displayed on the LCD panel.
2. Select your crust color (light, medium or dark) by pressing the Crust Color button until your desired color is selected. Your current selection will be displayed on the LCD panel.
3. Select your program number by pressing the Menu button until your desired program is displayed. (The pre-programmed menu selections are listed on the control panel for easy reference.) For Rapid Bake, press the Rapid Bake button. For more information on each program, see pages 5-6.
3
 Loading...