


INSTRUCTION AND RECIPE BOOKLET
For your safety and continued enjoyment of this product, always read the instruction book carefully before using.

IMPORTANT SAFEGUARDS
When using an electrical appliance, basic safety precautions should always be followed, including the following:
1.READ ALL INSTRUCTIONS BEFORE USING.
2.To protect against the risk of electrical shock, do not put blender motor base in water or other liquid.
3.Close supervision is necessary when any appliance is used by or near children.
4.Unplug from outlet when not in use, before putting on or taking off parts, and before cleaning or removing contents from blender jar. Never put hands into the blender jar or container, or handle the blades with appliance plugged in.
5.Avoid contact with moving parts.
6.Do not operate any appliance with a damaged cord or plug or after the appliance malfunctions, or is dropped or damaged in any manner. Return appliance to nearest Cuisinart service facility for examination, repair, and/or mechanical or electrical adjustment.
7.The use of attachments, including canning or ordinary jars, not recommended or sold by Cuisinart may cause fire, electrical shock, or risk of injury to persons.
8.Do not use outdoors.
9.Do not let cord hang over edge of counter or table or touch hot surfaces.
10.Keep hands and utensils out of jar while blending, to reduce the risk of severe injury to persons or damage to blender itself. A rubber or plastic spatula may be used but must be used only when the blender is turned OFF.
11.When blender is in ON mode, and LED lights are flashing or glowing, do not touch cutting assembly, interfere with blade movement, or remove blender jar cover. Accidentally touching a speed button may activate the blender.
12.BLADES ARE SHARP. HANDLE CAREFULLY.
13.To reduce the risk of injury, never place cutting assembly on base unless the blender jar is properly attached.
14.Always operate blender with the cover in place.
15.Never leave your blender unattended while running.
16.When blending HOT liquids, remove measured pour lid (center piece of cover) to allow steam to escape.
17.Twist on locking ring firmly. Injury can result if moving blades accidentally become exposed.
18.Do not use an extension cord with this unit. Doing so may result in fire, electrical shock, or personal injury.
Regarding your cord set: A longer cord has been provided so that you will have flexibility in positioning your Cuisinart® SmartPower™ Blender near an electrical outlet. Exercise care when using the longer cord, to avoid entangling or tripping over the cord. The longer cord should be arranged so that it will not drape over the counter or tabletop, where it can be pulled on by children or tripped over. Excess cord should be stored in the cord storage area at the back of the blender base to avoid injury caused by the longer cord.
19.Wash the blender jar, cutting assembly, locking ring, and cover before first use.
20.WARNING: TO REDUCE THE RISK OF ELECTRICAL SHOCK OR FIRE, DO NOT REMOVE THE BASE PANEL. NO USER SERVICEABLE PARTS ARE INSIDE. REPAIR SHOULD BE DONE ONLY BYAUTHORIZED PERSONNEL.
SAVE THESE INSTRUCTIONS FOR HOUSEHOLD USE ONLY
NOTICE:
This appliance has a polarized plug (one prong is wider than the other). To reduce the risk of electric shock, this plug will fit into a polarized outlet only one way. If the plug does not fit fully into the outlet, reverse the plug. If it still does not fit, contact a qualified electrician. Do not modify the plug in any way.
2

UNPACKING INSTRUCTIONS
1.Place the gift box containing your Cuisinart® SmartPower Premier™ 600 Watt Blender on a flat, sturdy surface before unpacking.
2.Remove instruction booklet and other printed materials from top of corrugated insert. Next remove the top corrugated insert.
3.Carefully lift blender base from box and set aside.
4.Remove the lower corrugated insert containing the blender jar assembly. Be careful not to tip the jar when removing.
To assemble the blender, follow the “Assembly” instructions in the instruction booklet. Replace all corrugated inserts in the box and save the box for repackaging.
Before using for the first time: Wash all parts according to the “Cleaning and Maintenance” section on page 6 of this booklet to remove any dust or residue.
TABLE OF CONTENTS
Important Safeguards . . . . . . . . . . . . . . . . . . . . . . . . . . . . |
Page 2 |
Unpacking Instructions . . . . . . . . . . . . . . . . . . . . . . . . . . . |
Page 3 |
Introduction . . . . . . . . . . . . . . . . . . . . . . . . . . . . . . . . . . . |
Page 3 |
Features and Benefits . . . . . . . . . . . . . . . . . . . . . . . . . . . |
Page 4 |
Use and Care . . . . . . . . . . . . . . . . . . . . . . . . . . . . . . . . . |
Page 4 |
Assembly . . . . . . . . . . . . . . . . . . . . . . . . . . . . . . . . . . . . . |
Page 4 |
Helpful Reminders . . . . . . . . . . . . . . . . . . . . . . . . . . . . . . |
Page 5 |
Operation . . . . . . . . . . . . . . . . . . . . . . . . . . . . . . . . . . . . . |
Page 5 |
Easy Reference Guides . . . . . . . . . . . . . . . . . . . . . . . . . . |
Page 5 |
Cleaning and Maintenance . . . . . . . . . . . . . . . . . . . . . . . . |
Page 7 |
Do’s and Don’ts . . . . . . . . . . . . . . . . . . . . . . . . . . . . . . . . |
Page 7 |
Recipe Tips . . . . . . . . . . . . . . . . . . . . . . . . . . . . . . . . . . . |
Page 8 |
Recipes . . . . . . . . . . . . . . . . . . . . . . . . . . . . . . . . . . . . . . |
Page 9 |
Warranty Information . . . . . . . . . . . . . . . . . . . . . . . . . . . . . |
Page 19 |
INTRODUCTION
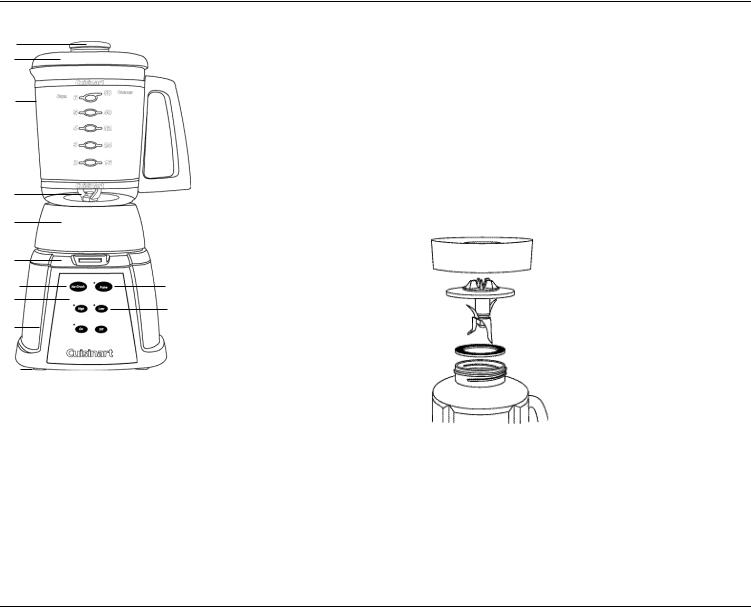
The Cuisinart® SmartPower Premier™ 600-Watt Blender is constructed with a heavy die-cast metal base and 50-ounce glass blender jar. This dynamic new look for blending - solid, sophisticated, and elegantly commercial - is perfect for today’s gourmet kitchen.
The most powerful of the SmartPower™ Blenders, it’s engineered with a 600-watt motor that’s more than capable of handling extra tough blending tasks, including crushing ice. The flip side of this heavy-duty blender is its versatile, precision control. A Count-Up™ Timer ensures that any recipe can be followed to the second, and a professional-quality stainless steel blade finely minces even small portions of delicate herbs or nuts. Separate Hi, Low, Pulse, and Ice Crush controls, plus LED indicator lights, offer the kind of ease of operation and control that result in the perfect blend, time after time.
A crowd pleaser, the heavy glass blender jar holds 50 ounces of tropical island drinks, luscious fruit and yogurt shakes, creamy chocolate pie filling, crepe or tempura batters...and more! If you think of something else you want to add while blending, just remove the measured pour lid insert and pour ingredients in. The blender jar has a spillproof spout, and all the removable parts are dishwasher safe. Great look. Perfect blend. Welcome to Cuisinart!
3
FEATURES AND BENEFITS
2.
1.
3.
5.
6.
7. |
|
8c. |
8b. |
8.
8a.
9.
10.
Note: Blades are sharp...
handle carefully.
1.Cover
Just press on. Tight-fitting seal resists leakage.
2.Measured Pour Lid
Allows you to measure and add ingredients without removing the cover.
3.50-oz. Glass Jar
Has a unique, sturdy, widemouth design.
4.Leak-proof Rubber Gasket (not shown)
Holds the glass jar snugly in position for safe operation.
5. High-quality Cutting Assembly with Patented Stainless Steel Blades
Is strong enough for all blender tasks, including tough jobs, from ice crushing to chopping delicate herbs.
6.Locking Ring
Is self-aligning so that the glass blender jar slides easily into position.
7.Count-Up™ Timer
Five-minute timer times your recipes for perfect results.
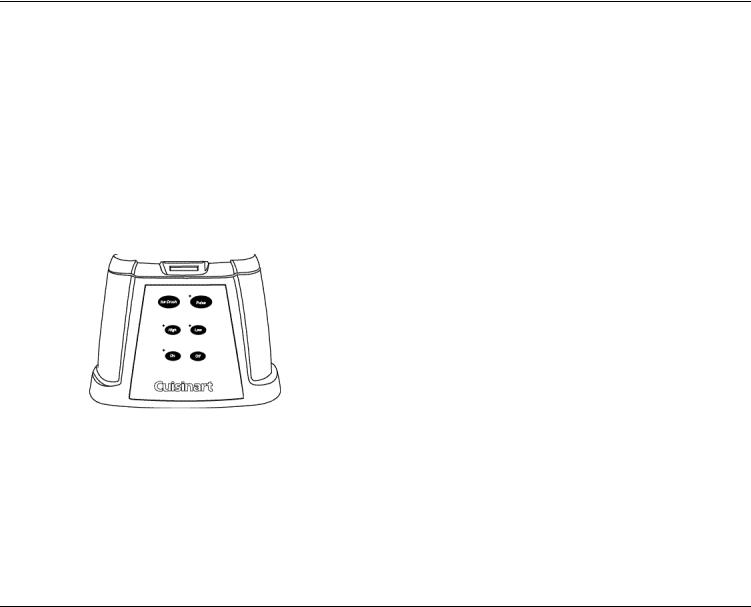
8.Push-button Controls
a.High and Low Buttons
Choose High or Low speed to blend the ingredients to the desired consistency. Red LED lights will indicate which speed you are using.
b.Pulse Button
Allows you to pulse at High or Low speeds, so you can
blend ingredients only as much as needed.
c.Ice Crush Button
Press on and begin crushing. This button is preset to the best speed for crushing ice.
9.Heavy-duty Motor Base
Is so sturdy and stable, it will not “walk” on your counter – even during ice crushing!
10.Slip-proof Feet
Prevent movement during use and prevent damaging marks on countertops or tables.
11.Cord Storage (not shown)
Keeps countertop safe and neat by conveniently storing excess cord.
|
|
|
|
|
USE AND CARE |
(d) |
|
|
|
|
ASSEMBLY |
|
|||||
|
|
|
|
|
To use your Cuisinart® SmartPower |
|
|
|
|
|
Premier™ 600-Watt Blender, begin by |
(c) |
|
|
|
|
assembling the blender jar. |
|
|
|
|
1. Turn the blender jar (a) upside |
|
|
|
|
|
||
|
|
|
|
|
down, and place it flat on a |
|
|
|
|
|
sturdy surface. |
|
|
|
|
|
2. Position the rubber gasket (b) |
(b) |
|
|
|
|
on the round opening on the |
|
|
|
|
||
|
|
|
|
|
bottom of the blender jar. |
(a) |
|
|
|
|
3. Turn the cutting assembly (c) |
|
|
|
|
||
|
|
|
|
|
upside down, and place the |
|
|
|
|
|
blade end in the blender jar |
|
|
|
|
|
opening. |
|
|
|
|
|
Note: Blades are sharp… |
|
|
|
|
|
handle carefully. |
4.Secure the rubber gasket and cutting assembly into position by placing the smaller opening of the locking ring (d) on top of the cutting assembly. Engage threads by twisting the locking ring clockwise until tightened. Make sure locking ring is tightly fastened to blender jar. Once assembled, turn the blender jar right-side up.
5.Push the cover onto the top of the blender jar. Push the measured pour lid into the cover.
6.Place the blender jar on the motor base so that the jar markings are facing you and the handle is positioned to one side.
7.Plug in power cord. Your blender is now ready to be used.
4

HELPFUL REMINDERS
•Once the cover is in position, additional ingredients can be added during blending by simply lifting the measured pour lid, adding ingredients, and replacing the measured pour lid.
•Cover should always be in place while the unit is on.
•Warning: Do not place blender jar onto base while motor is running.
•Do not twist locking ring from blender jar when removing blender jar from base. Simply lift blender jar from motor base.
•Boiling liquid or solid frozen foods (with the exception of ice cubes or 1/2 inch [1.3 cm] pieces of frozen fruit) should never be placed in the blender jar.
•Do not place ice, frozen foods or very cold liquids into a blender jar which has come directly from a hot dishwasher.
•Do not place very hot liquids or foods into a blender jar which has come directly from the freezer. Boiling liquids should cool for
5 minutes before being placed in blender jar.
•Follow “Cleaning and Maintenance” instructions on page 6, prior to your first use.
OPERATION
1.Place the motor base of your Cuisinart® SmartPower Premier™ 600-Watt Blender onto a flat, sturdy surface. It is important that the surface be clean and dry. Assemble the blender by following the assembly instructions. Once the jar is assembled and is in position on the motor base, plug the Cuisinart® SmartPower Premier™ 600-Watt Blender into an electrical outlet.
2.Add all necessary ingredients to the blender jar, and replace the cover. You may add more ingredients by lifting the measured pour lid and dropping ingredients through the fill area.
Replace the measured pour lid after adding ingredients. Do not place hands into blender jar with blender plugged in.
Note: Add liquid ingredients first, then follow with solid ingredients. This will provide more consistent blending and prevent unnecessary stress on the motor.
Note: To remove blender jar cover, lift edge of cover upwards. Lifting measured pour lid will not remove cover.
3.TIMING YOUR RECIPES: The SmartPower Premier™
5
600-watt Blender features a 5-minute Count-up™ Timer, so that you can time your recipes and guarantee perfect results.
The timer begins counting from 0 as soon as you push your desired speed: HIGH, LOW, PULSE or ICE CRUSH. The timer will continue to count up even if you change speeds during blending. You can pause the timer by pausing the blending process. Pushing the button corresponding to the speed in which you are currently blending does this. For example: If you are blending in LOW speed and you push the LOW speed button, the blender will stop blending and the timer will stop counting, but the unit will remain on. To continue blending and timing your recipe, push one of the speed buttons. The timer will also stop counting when it reaches 5:00 minutes. The timer will only reset itself when the OFF button is pushed.
4.START BLENDING: Press the ON button. The red LED indicator light will illuminate, indicating that the blender is turned on but no speed has been selected.
5.CHOOSE BLENDING SPEED: Press HIGH or LOW button to determine the speed at which you would like to blend the ingredients. Both the “On” indicator light and the activated speed indicator light will glow. The blender will now be functioning at the desired speed. It is possible to switch speeds without pressing the OFF button, by simply pushing the other speed button.
Note: The Count-up™ timer will begin counting when the desired speed button is pushed. The timer will continue to count if you change speeds.
6.TO PAUSE OR STOP BLENDING PROCESS: a. To Pause Blending Process:
Push the button corresponding to the speed in which you are currently blending. For example: If you are blending on HIGH speed, push the HIGH speed button and the blender will stop blending, but the unit will remain on.
Note: By pausing the blending process, you will also pause the timer. The timer will remain paused until you start blending again.
b.To Stop Blending Process:
Push the OFF button when you are finished with your recipe and would like to turn the blender off.
Note: When you push the OFF button, the timer will stop counting and the LED display will reset to 0:00. When the blender is turned back on and a speed button is pushed, the timer will begin to count from 0:00.
7.PULSE MODE: The pulse mode allows you to create a burst of power for quick, efficient blending. To use the pulse function, push the ON button and the red LED indicator light will illuminate. Push the PULSE button, and the pulse LED indicator light will blink. Push and release the desired speed button. Repeat as desired. You determine the duration of each pulse. While pulsing the LED indicator light will glow. The pulse function can be used to break apart larger pieces of food or to control the texture of food when chopping. The pulse function is also effective in starting the blending process when you do not want continuous power, or when processing items that do not require an extended amount of blending.
Note: The timer will count when you push or hold down the PULSE button. The timer will pause when you release the PULSE button.
8.TO CRUSH ICE: The SmartPower Premier™ 600-Watt Blender motor is strong enough to crush ice without liquid at any speed; however for your convenience, we have preset the best speed for ice crushing. To give you greater control, the ice crush function automatically operates as a pulse function. To crush ice, place ice cubes in the blender jar. Press the ON button. The “on” indicator light will illuminate. Press the ICE CRUSH button in short pulses until ice is crushed to desired consistency. See “RecipeTips” section on page 7 for more details.
Note: The timer will count when you push or hold down the ICE CRUSH button. The timer will pause when you release the ICE CRUSH button.
6
 Loading...