

Crivit Z31147 User Manual [pl, cs, de, en]
Sunlounger
Assembly, operating and safety instructions
leżak Plażowy
Wskazówki montażu, obsługi i bezpieczeństwa
nyugá gy
Szerelési, használati és biztonsági tudnivalók
ležalnik za na Plažo
Navodila za montažo, uporabo in varnostna navodila
Plážové lehátk o
Pokyny k montáži, obsluze a bezpečnostní pokyny.
Plážové ležadlo
Pokyny pre montáž, obsluhu a bezpečnostné pokyny
Strandliege
Montage-, Bedienungs- und Sicherheitshinweise
4
Z31147

iMPortant, retain For Future
reFerenCe: read CareFully!
ważne, zaChowaĆ do
PÓŹnieJSzego użytku: uważnie
PrzeCzytaĆ!
FontoS, kéSŐBBi hivatkozáSok
CélJáBÓ Őrizze Meg: olvaSSa el
Fig yelMeSen!
PoMeMBno, Shranite za
kaSneJŠo reFerenCo: SkrBno
PreBerite!
GB Assembly, operating and safety instructions Page 7
PL Wskazówki montażu, obsługi i bezpieczeństwa Strona 9
HU Szerelési, használati és biztonsági tudnivalók Oldal 11
SI Navodila za montažo, uporabo in varnostna navodila Stran 13
CZ Pokyny k montáži, obsluze a bezpečnostní pokyny. Strana 15
SK Pokyny pre montáž, obsluhu a bezpečnostné pokyny Strana 17
DE / AT / CH Montage-, Bedienungs- und Sicherheitshinweise Seite 19
DŮLEŽITÉ, USCHOVEJTE PRO
POZDĚJŠÍ POUŽITÍ: ČTĚTE PEČLIVĚ!
DÔLEŽITÉ, USCHOVAJTE PRE PRÍPAD
POUŽITIA V BUDÚCNOSTI:
DÔKLADNE SI PREČÍTAJTE POKYNY!
WICHTIG, FÜR SPÄTERE BE
AUFBEWAHREN:
SORGFÄLTIG LESEN!
ZUGNAHME
3
1
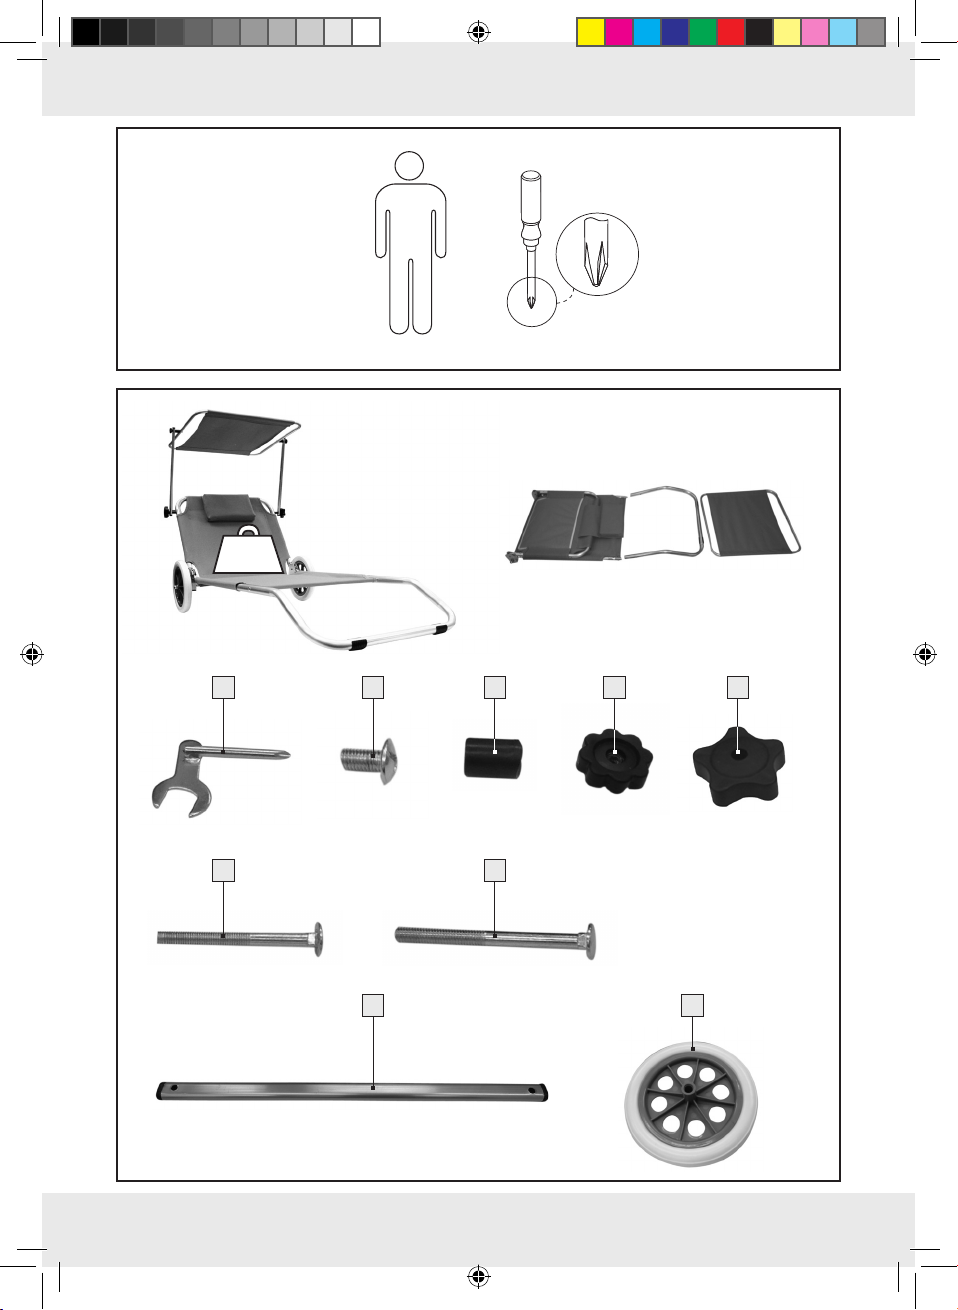
You need · Potrzebujecie
Szüksége van · Potrebujete · Potřebujete · Budete potrebovať · Sie benötigen:
max.
10 0 k g
4
1 x
2 x
1
6
2 x
2 x
2
8
4 x
2 x
3
7
2 x
4
2 x
5
2 x
9
A
II
B
IV III
I
C
E
G
D
II
III
F
X
VIII
VII
H
IX
5
I
J
XI
XII
K
M
N
L
XIII
max.
20 kg
6
Sunlounger
Intended use
This product is intended to be used for recreational
and camping purposes (outdoor area) only. The
product is not intended for commercial use.
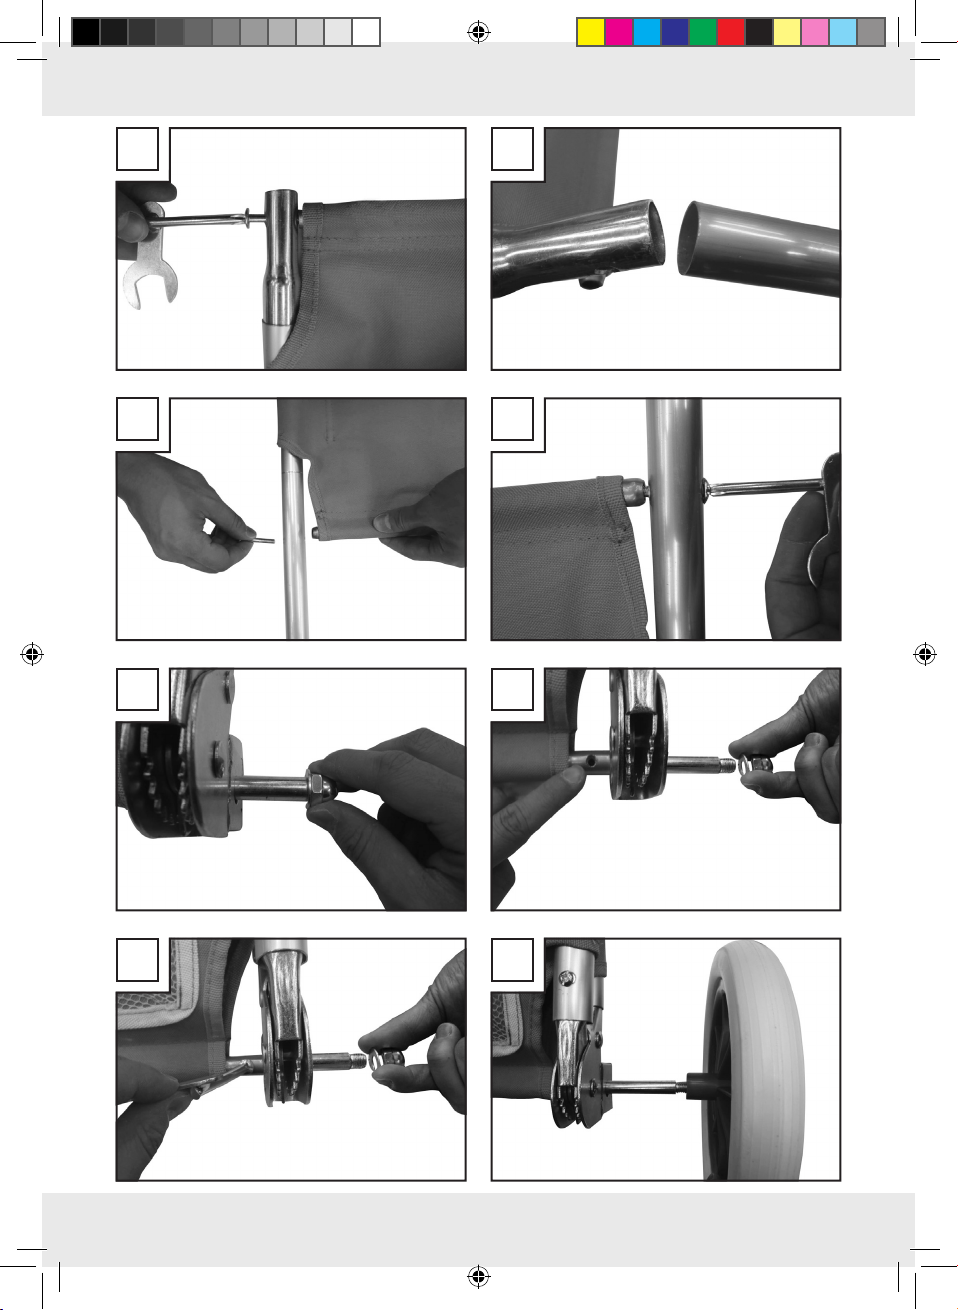
Safety instructions
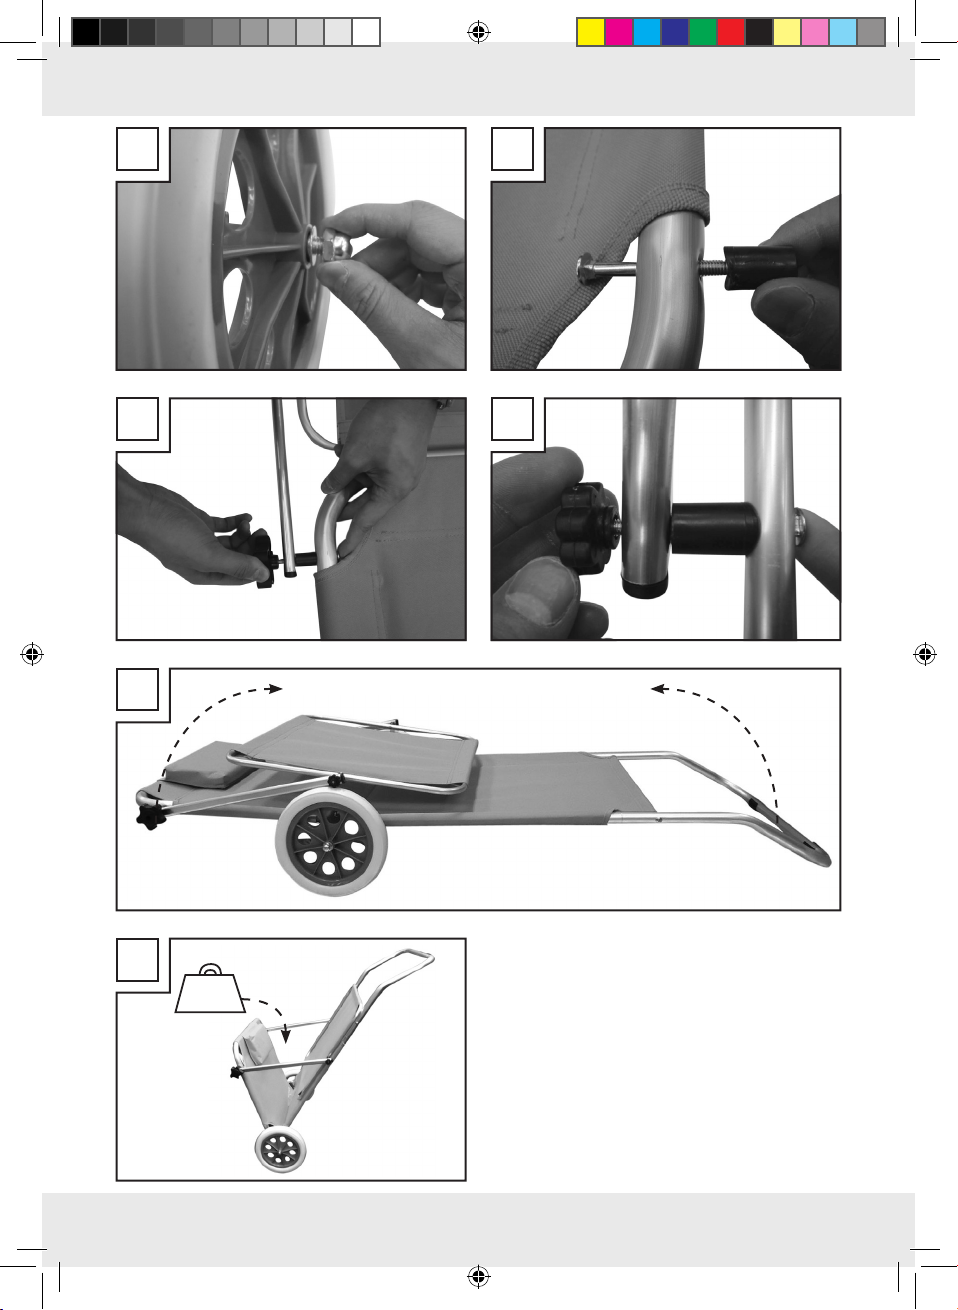
rod using the enclosed assembly tool and put
them to one side (see Fig. A).
Pull out the inside rod approx. 2 cm. Make sure
that the holes of the inner rod are in the same
position as the holes of the foot frame. Now
insert the foot frame (III) into the main frame (IV)
(see Fig. B).
Now fasten the connecting rod to the foot
frame using the screw (I) and assembly tool
(see Fig. C, D).
DANGER TO
LIFE AND RISK OF ACCIDENT
TO INFANTS AND CHILDREN!
Never leave children unattended with the packaging material. There is a danger of suffocation.
CAUTION! RISK OF INJURY! Make sure
that no parts are damaged. Damaged parts
could adversely affect safety and proper function.
CAUTION! DANGER OF INJURY DUE
TO CRUSHING! Make sure you do not trap
your fingers when opening or closing the product. A moment of inattention may result in injury
due to crushing.
Make sure that this product is standing on a
solid, level surface.
CAUTION! Do not allow children to use the
product unsupervised! This product is not a
climbing frame or a toy! Make sure that nobody,
in particular a child, sits on the top or bottom
end of the product.
This lounger is not suitable for the transportation
of persons!
Assembly
Assembling foot frame
Note: Leave the lounger folded together to make
the assembly of the foot frame easier.
Note: To assemble, you need the enclosed assem-
bly tool
1
or a crosshead screwdriver.
The screws (I) are already pre-fitted at the lower
end of the main frame when delivered. Loosen
the screws completely from the connecting (II)
Assembling wheels
Unscrew the domed nut and washer from the
joint (VII) (see Fig. E).
Remove the pin with thread (X) from the joint
(VII). Now reinsert the pin into the joint and
make sure that the threaded hole of the pin is
pointing upwards. Insert the pin until the
threaded hole and the hole of the axle rod lie
on top of each other (see Fig. E – G).
Now screw the locking screw 2 into the
threaded holes provided on either side. Push
the wheel
the washer and domed nut. You will require the
assembly tool for this (see Fig. H, I).
Repeat this procedure to assemble the other
wheel.
9
onto the joint and fasten this with
Assembling sunshade
Push the screws 7 through the frame from the
inside to the outside (XII). Attach the sleeves
and fasten the oval rod
locking screw
Repeat this procedure at the upper end of the sun-
shade. Here, however, use the small screws
and small locking screws
5
8
using the large
(see Fig. J, K).
4
.
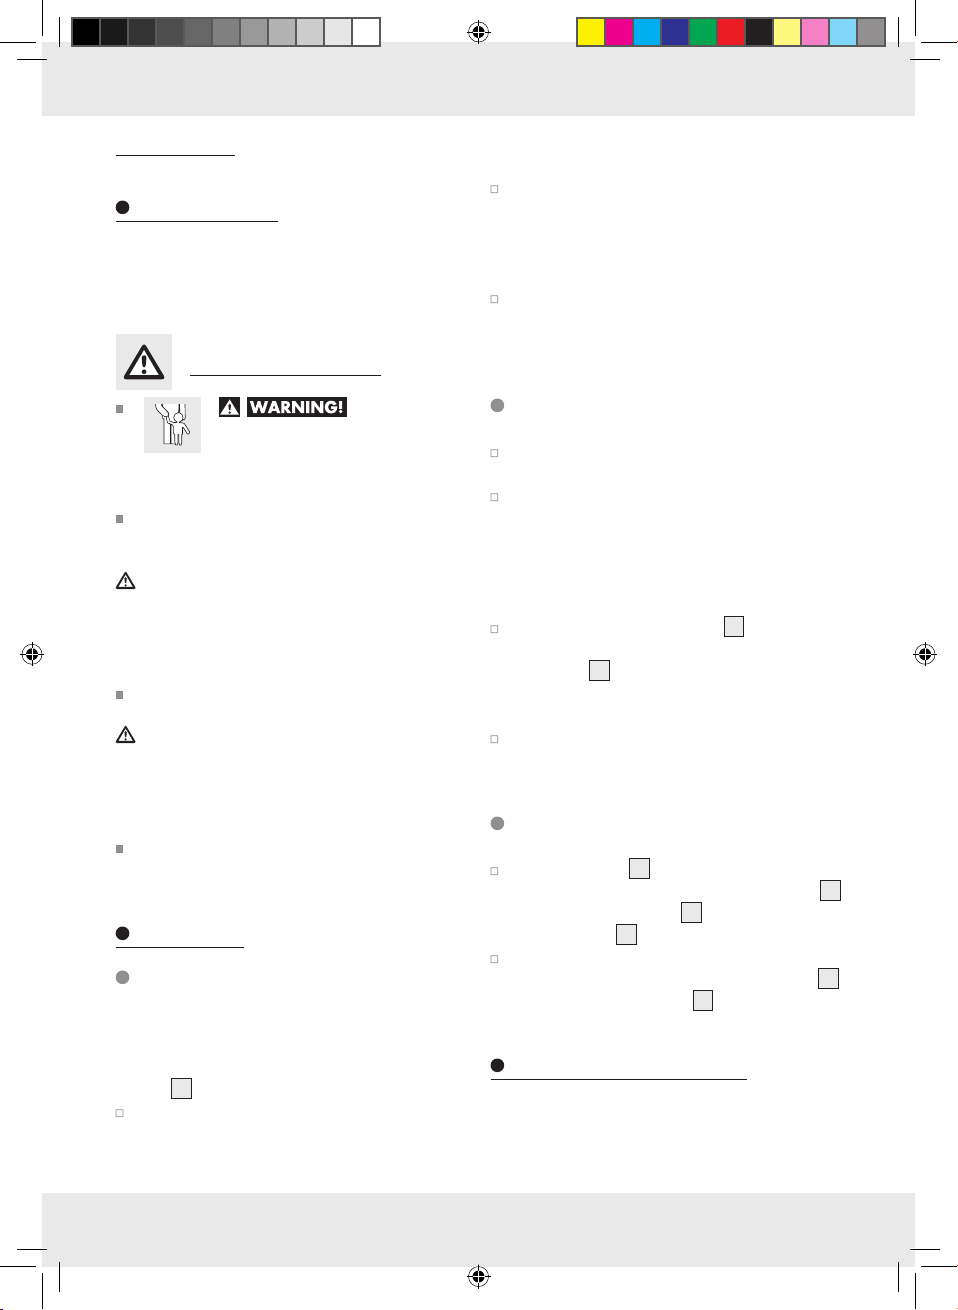
Using as transport aid
The lounger can also be used as a transport aid
(see Fig. M, N).
3
6
7 GB
 Loading...