


 Loading...
AM-200/AM-300
AirMedia® Presentation Systems
Product Manual
Crestron Electronics, Inc.

The product warranty can be found at www.crestron.com/legal/sales-terms-conditions-warranties.
The specific patents that cover Crestron products are listed at www.crestron.com/legal/patents.
Certain Crestron products contain open source software. For specific information, visit www.crestron.com/legal/open- source-software.
Crestron, the Crestron logo, AirMedia, .AV Framework, Crestron Connected, Crestron Fusion, Crestron Studio, Crestron Toolbox, Crestron XiO Cloud, DigitalMedia, DM, Pinpoint, and Zūm are either trademarks or registered trademarks of Crestron Electronics, Inc. in the United States and/or other countries. App Store, iPad, iPhone, iTunes, and Mac are either trademarks or registered trademarks of Apple, Inc. in the United States and/or other countries. Appspace is either a trademark or a registered trademark of Appspace Inc. in the United States and/or other countries. Android, Google Play, and YouTube are either trademarks or registered trademarks of Google, Inc. in the United States and/or other countries. iOS is either a trademark or registered trademark of Cisco Systems, Inc. in the United States and/or other countries. HDMI and the HDMI logo are either trademarks or registered trademarks of HDMI Licensing LLC in the United States and/or other countries. Microsoft, Active Directory, Microsoft Exchange Server, Outlook, PowerShell, and Windows are either trademarks or registered trademarks of Microsoft Corporation in the United States and/or other countries. Other trademarks, registered trademarks, and trade names may be used in this document to refer to either the entities claiming the marks and names or their products. Crestron disclaims any proprietary interest in the marks and names of others. Crestron is not responsible for errors in typography or photography.
This document was written by the Technical Publications department at Crestron. ©2019 Crestron Electronics, Inc.
Contents |
|
Introduction................................................................................................................................... |
1 |
Requirements ............................................................................................................................... |
3 |
Administrator ............................................................................................................................................. |
3 |
Operating Environment............................................................................................................................ |
3 |
Configuration............................................................................................................................... |
4 |
Requirements.............................................................................................................................................. |
4 |
Connect to the Device............................................................................................................................... |
4 |
Log Out from the Device.......................................................................................................................... |
6 |
Configure the Device................................................................................................................................. |
6 |
HDMI INPUT ......................................................................................................................................... |
6 |
DM IN (AM-300 Only) ........................................................................................................................ |
7 |
HDMI OUTPUT..................................................................................................................................... |
8 |
NETWORK .......................................................................................................................................... |
10 |
DEVICE................................................................................................................................................ |
15 |
APPSPACE.......................................................................................................................................... |
24 |
AMPS ................................................................................................................................................... |
26 |
AirMedia .............................................................................................................................................. |
39 |
Enterprise Deployment Options.............................................................................................. |
41 |
Crestron XiO Cloud Service ................................................................................................................... |
41 |
Claim a Single Device ....................................................................................................................... |
41 |
Claim Multiple Devices ..................................................................................................................... |
42 |
Crestron Deployment Tool for PowerShell® Software.............................................................. |
43 |
Operation.................................................................................................................................... |
44 |
Connect a Source..................................................................................................................................... |
44 |
Touch Screen Operation......................................................................................................................... |
44 |
System Controls................................................................................................................................ |
45 |
Schedule a Meeting........................................................................................................................... |
45 |
Present Content ............................................................................................................................... |
48 |
Keypad Operations................................................................................................................................. |
50 |
System Power................................................................................................................................... |
50 |
Volume................................................................................................................................................ |
50 |
Use AirMedia ............................................................................................................................................ |
50 |
Establish a Connection .................................................................................................................... |
51 |
Share Content ................................................................................................................................... |
53 |
Appendix: AM-200 and AM-300 Systems............................................................................ |
56 |
Hookup Diagrams .................................................................................................................................... |
56 |
Supported and Tested DigitalMedia Transmitters (AM-300 Only).............................................. |
57 |
Zūm™ Devices ........................................................................................................................................... |
57 |
Supported Devices ........................................................................................................................... |
58 |
Product Manual – DOC. 8254E |
Contents • i |
Add a Zūm Device to the Network ............................................................................................... |
58 |
Monitor and Test Zūm Devices...................................................................................................... |
58 |
Add a Touch Screen ................................................................................................................................. |
59 |
IP Table Entry..................................................................................................................................... |
59 |
Load a Touch Screen Project File................................................................................................... |
59 |
ii • Contents |
Product Manual – DOC. 8254E |

AM-200/AM-300: AirMedia
Presentation Systems
Introduction
The AM-200 and AM-300 AirMedia® Presentation Systems provide room scheduling, and wired and wireless presenting capabilities for smaller conference rooms and huddle spaces. For more information on features, capabilities, and specifications on the AM-200 and AM-300, visit their respective websites at www.crestron.com.
Feature Comparison
FEATURE |
AM-101 |
AM-200 |
AM-300 |
|
|
|
|
AirMedia 2.0 technology |
|
|
|
|
|
|
|
AirMedia Device Support |
|
|
|
|
|
|
|
Windows® OS (All Versions) |
|
|
|
|
|
|
|
Mac® |
|
|
|
|
|
|
|
iPad® |
|
|
|
|
|
|
|
iPhone® |
|
|
|
|
|
|
|
iOS® |
|
|
|
|
|
|
|
Android™ |
|
|
|
|
|
|
|
AirMedia Screen Mirroring Support |
|
|
|
|
|
|
|
Windows® OS (All Versions) |
|
|
|
|
|
|
|
Mac |
|
|
|
|
|
|
|
iPad |
|
|
|
|
|
|
|
iPhone |
|
|
|
|
|
|
|
iOS |
|
|
|
|
|
|
|
Android |
|
|
|
|
|
|
|
AirMedia Video + Audio Playback |
|
|
|
|
|
|
|
PC-Windows |
|
|
|
(All Versions) |
|
|
|
|
|
|
|
Mac |
|
|
|
|
|
|
|
iPad |
|
|
|
|
|
|
|
iPhone |
|
|
|
|
|
|
|
iOS |
|
|
|
|
|
|
|
Android |
|
|
|
|
|
|
|
AirMedia Playback Features |
|
|
|
|
|
|
|
DRM Content Support |
|
|
|
(Netflix, etc) |
|
|
|
|
|
|
|
Device Internet |
|
|
|
Connection Required for |
|
|
|
AirPlay Mirroring |
|
|
|
|
|
|
|
Product Manual – DOC. 8254E |
AM-200/AM-300: AirMedia Presentation Systems • 1 |

FEATURE |
AM-101 |
AM-200 |
AM-300 |
|
|
|
|
Security |
|
|
|
|
|
|
|
AES-128/TLS security |
|
|
|
|
|
|
|
802.1X |
|
|
|
|
|
|
|
Active Directory® |
|
|
|
Authentication |
|
|
|
|
|
|
|
Crestron® Control |
|
|
|
|
|
|
|
.AV Framework™ Platform |
|
|
|
|
|
|
|
Crestron XiO Cloud™ |
|
|
|
Service |
|
|
|
|
|
|
|
Crestron Studio® software |
|
N/A |
N/A |
|
|
|
|
SIMPL Windows |
|
|
|
|
|
|
|
SIMPL# |
|
|
|
|
|
|
|
Virtual Control |
|
|
|
|
|
|
|
Video Inputs |
|
|
|
|
|
|
|
HDMI® Input |
|
1 |
1 |
|
|
|
|
HDMI Resolution |
|
1080p |
1080p |
|
|
|
|
HDMI HDCP |
|
HDCP 1.4 |
HDCP 1.4 |
|
|
|
|
4K DigitalMedia™ Input |
|
|
1 |
|
|
|
|
4K DigitalMedia Resolution |
|
|
4k60 4:2:0 |
|
|
|
|
4K DigitalMedia HDCP |
|
|
HDCP 2.2 |
|
|
|
|
Video Outputs |
|
|
|
|
|
|
|
HDMI Output |
1 |
1 |
1 – 4K |
|
|
|
|
HDMI Resolution |
1080p |
1080p |
4K30 |
|
|
|
|
HDMI HDCP |
HDCP 1.4 |
HDCP 1.4 |
HDCP 2.2 |
|
|
|
|
Touch Screen Support |
Via programming only |
External |
External |
|
|
|
|
Zūm™ Sensors and/or Buttons |
|
|
|
|
|
|
|
Other Interfaces |
|
|
|
|
|
|
|
COM/IR Support |
|
|
|
|
|
|
|
CEC |
|
|
|
|
|
|
|
Power Over Ethernet |
|
|
|
|
|
|
|
UC Features |
|
|
|
|
|
|
|
PinPoint™ UX |
|
|
|
|
|
|
|
Appspace® Application |
|
|
|
|
|
|
|
Crestron Airboard™ |
|
Coming Soon |
Coming Soon |
Whiteboard Capture System |
|
|
|
|
|
|
|
Quad view |
|
|
|
|
|
|
|
Remote View |
|
|
|
|
|
|
|
Moderator Mode |
Windows & Android |
|
|
|
|
|
|
Control System Interface |
|
|
|
|
|
|
|
AM-101 Compatibility Mode |
N/A |
|
|
|
|
|
|
YouTube® Push Mode Support |
|
|
|
|
|
|
|
Mounting |
Freestanding |
Freestanding |
Freestanding |
|
Surface |
Surface |
Surface |
|
|
Rack |
Rack |
|
|
|
|
2 • AM-200/AM-300: AirMedia Presentation Systems |
|
Product Manual – DOC. 8254E |
|

FEATURE |
AM-101 |
AM-200 |
AM-300 |
|
|
|
|
Dimensions |
6.15 in. x 1.10 in. x |
7.40 in. x 6.42 in. x |
9.29 in. x 7.93 in. x |
(W x H x D) |
2.39 in. |
1.35 in. |
1.36 in. |
|
|
|
|
This product manual discusses the requirements, configuration instructions, and operating instructions for the AM-200 and AM-300. For information on installing the AM-200, refer to the AM-200 DO Guide (Doc. 8260). For information on installing the AM-300, refer to the AM-300 DO Guide (Doc. 8253) at www.crestron.com/manuals.
Requirements
Administrator
This document is written for use by a facility’s Information Technology (IT) administrator. The IT administrator should have the following knowledge and skills:
•General Skills
-IP Networking
-Basic PC Operation and Administration
-Calendaring system administration (for Exchange connectivity)
•Crestron-specific skills
-Crestron Fusion® software (if applicable)
-Crestron XiO Cloud service (if applicable)
Operating Environment
The AM-200 and AM-300 require the following to make the most of their capabilities.
•Zūm™ devices for control and occupancy sensing. The following devices can be used with an AM-200 or AM-300.
-ZUMMESH-AVBRIDGE Wireless Control Integration Module
-ZUMMESH-KP10AMBATT AirMedia keypad
-ZUMMESH-PIR-OCCUPANCY-BATT Wireless Battery-Powered Occupancy Sensor
For details on configuring and using Zūm devices as part of an AM-200 or AM-300 system, refer to “Zūm™ Devices” on page 57.
•TSW touch screens for system control. The following touch screens can be used with an AM-200 or AM-300.
-TSW-760 7 in. Touch Screen
-TSW-1060 10 in. Touch Screen
For details on configuring and using a touch screen as part of an AM-200 or AM-300 system, refer to “Add a Touch Screen” on page 59.
Product Manual – DOC. 8254E |
AM-200/AM-300: AirMedia Presentation Systems • 3 |
•Crestron Fusion software allows the AM-200 or AM-300 to be monitored and managed through a central location. When used with an optional occupancy sensor, Crestron Fusion software also supports room scheduling, provides the ability to integrate with many third-party calendaring applications. Crestron Fusion software can also send pop-up messages that can display prominently on the connected display device in the event of an emergency or other important announcement.
•A Crestron XiO Cloud license allows the AM-200 or AM-300 to be monitored and managed through a central location using Crestron’s XiO Cloud service.
•Microsoft® Exchange software allows the space’s availability and details about the current scheduled meeting to appear on screen.
Configuration
Requirements
Configuration requires a computer with web browser software. The computer must be connected to the same network as the device to be configured.
Connect to the Device
To connect to the device, follow this procedure:
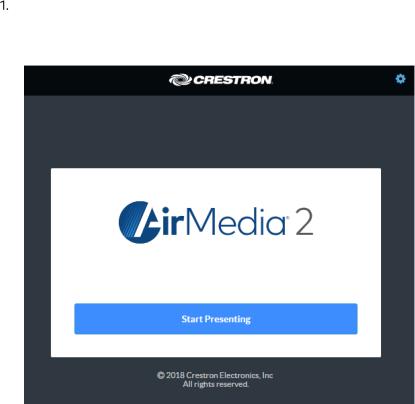
On the computer, open a web browser and navigate to the IP address or host name that is shown on the display device. The welcome screen is displayed.
Welcome Screen
4 • AM-200/AM-300: AirMedia Presentation Systems |
Product Manual – DOC. 8254E |

Click  to continue. A prompt for the user name and password is displayed.
NOTE: Prior to displaying the prompt for login credentials, the web browser may display a security warning message about the security certificate. It is safe to ignore this warning as long as the user verifies that the browser’s address bar indicates the correct IP address or host name of the device.
Enter the default user name (“admin”) and password (“admin”), and press Enter to continue. The device’s Status screen is displayed.
Status Screen
The Status screen displays information about the device and allows configuration of the device’s operating parameters:
•STATUS contains general information about the device and network information.
-Click General to view general information.
-Click Network to view network information.
-Click Control System Connections to view information about the device’s connection to a control system.
•HDMI INPUT configures the HDMI input.
•DM IN configures the DM® input (AM-300 only).
•HDMI OUTPUT displays information about the HDMI output.
•NETWORK configures the device for operation in a network environment.
•DEVICE is used to set the connected display’s standby time, upload firmware and projects, reboot the device, view the system log, configure the control system connection, and configure authentication management.
•APPSPACE is used to configure the device to work with the Appspace content management application for digital signage.
•AMPS configures the settings for Crestron Fusion integration, meeting functionality, room scheduling, and Zūm devices.
•AIRMEDIA configures the device’s AirMedia presentation gateway functionality.
Product Manual – DOC. 8254E |
AM-200/AM-300: AirMedia Presentation Systems • 5 |

When displayed on any screen, click + Show More to view more details or click - Show Less to view fewer details.
Log Out from the Device
To log out from the device and return to the welcome screen, click  .
.
Configure the Device
Configure the device as required for the installation.
HDMI INPUT
Click HDMI INPUT to configure the HDMI input. The screen displays selectors for HDCP support and EDID, as well as information about the input signal (if present).
HDMI INPUT Screen
General Settings
Select whether the HDMI Input should be set to Enable or Disable. When set to Enable, sources connected to the HDMI input are received. When set to Disable, sources connected to the HDMI input are not received.
Select whether HDCP Support should be set to Enable or Disable. When HDCP support is enabled, source signals that require HDCP compliance are allowed to pass through to the display that is connected to the HDMI output. When HDCP support is disabled, source signals that require HDCP compliance are not allowed to pass through to the connected display.
NOTE: When HDCP Support is set to Enable, the connected display must be HDCP compliant as well.
6 • AM-200/AM-300: AirMedia Presentation Systems |
Product Manual – DOC. 8254E |
EDID
EDID is a data structure provided by a digital display to describe its capabilities to a video source (i.e., graphics card or set-top box). It is what enables a modern personal computer to know what kinds of monitors are connected to it.
The EDID section of the HDMI INPUT screen specifies the EDID profile that is selected for use. Only source devices that use the selected EDID profile are allowed to send signals through the device.
To select an EDID profile to support, select one of the profiles to support from the dropdown list, and click Apply CEDID.
If a profile is not listed in the menu, a custom profile can be loaded onto the device. To load a custom CEDID profile, follow this procedure:
From the Select drop-down list, select Custom.
Click Load CEDID file.
Click Browse and navigate to the location of the custom CEDID file.
Select the file to use and click Open. Click Send EDID.
Input Signal
Click Input Signal to view details about the input signal connected to the HDMI input port.
DM IN (AM-300 Only)
Click DM IN to configure the DM input. The screen displays a selector for EDID, as well as information about the input signal (if present).
DM IN Screen
Product Manual – DOC. 8254E |
AM-200/AM-300: AirMedia Presentation Systems • 7 |

EDID
EDID is a data structure provided by a digital display to describe its capabilities to a video source (i.e., graphics card or set-top box). It is what enables a modern personal computer to know what kinds of monitors are connected to it.
The EDID section of the DM INPUT screen specifies the EDID profile that is selected for use. Only source devices that use the selected EDID profile are allowed to send signals through the device.
To select an EDID profile to support, select one of the profiles to support from the dropdown list, and click Apply CEDID.
If a profile is not listed in the menu, a custom profile can be loaded onto the device. To load a custom CEDID profile, follow this procedure:
From the Select drop-down list, select Custom.
Click Load CEDID file.
Click Browse and navigate to the location of the custom CEDID file.
Select the file to use and click Open. Click Send EDID.
Input Signal
Click Input Signal to view details about the input signal connected to the DM input port.
HDMI OUTPUT
Click HDMI OUTPUT to change settings for the HDMI OUTPUT port and to display information about the connected display and output signal.
HDMI OUTPUT Screen
8 • AM-200/AM-300: AirMedia Presentation Systems |
Product Manual – DOC. 8254E |
HDMI Output Setting
•Select the output resolution from the HDMI Output Resolution drop-down list.
•Select the HDCP mode from the HDCP Mode drop-down list.
When HDCP Mode is set to Auto, the device will always attempt to use HDCP compliance on the output device if support is detected on the display device.
When HDCP Mode is set to Always (AM-300 only), the device will always attempt to use HDCP compliance on the output even if downstream devices do not support HDCP.
When HDCP Mode is set to Never, the device will never attempt to use HDCP compliance with downstream, regardless of support.
Connected Display
Click Connected Display to view details about the device connected to the HDMI output port.
Output Signal
Click Output Signal to view details about the signal sent to the HDMI output port.
Product Manual – DOC. 8254E |
AM-200/AM-300: AirMedia Presentation Systems • 9 |

NETWORK
Click NETWORK to configure the device for operating in a network environment. The screen displays controls for configuring the network settings and 802.1x authentication.
Network Setting
To configure the network settings, follow this procedure:
NETWORK Screen - Network Setting
Enter a host name (15 characters or less) in the Host Name field and a domain name (optional) in the Domain Name field.
NOTE: Use a host name and domain name as an alternative to IP addressing when connecting client computers to the device.
Select whether Secure Shell protocol (SSH) should be Enabled or Disabled.
The network adapter can be set to have the DHCP server automatically provide the IP address, subnet mask, default gateway, and DNS settings or to enable entering these settings manually. Choose one of the following options.
-Set DHCP to Enabled to use a DHCP server to automatically provide the IP address, subnet mask, default gateway, and DNS server.
-Set DHCP to Disabled to manually enter the Ethernet parameters. When set to Off, the IP address, subnet mask, default gateway, and DNS servers must be manually entered.
Click Save Changes to apply any changes. Click Revert to revert back to the previously used settings.
10 • AM-200/AM-300: AirMedia Presentation Systems |
Product Manual – DOC. 8254E |

802.1x Configuration
Some networks require devices to use 802.1x port-based network access control for access to the network.
NETWORK Screen - 802.1x Configuration
To use 802.1x, set IEEE 802.1x Authentication to Enabled and select the desired method of authentication.
Certificate Authentication
In the Authentication Method field, select EAP-TLS Certificate.
Enter the domain name of the authentication server.
Product Manual – DOC. 8254E |
AM-200/AM-300: AirMedia Presentation Systems • 11 |

Upload a machine certificate.
a.Click Manage Certificates to manage certificates for 802.1x authentication. A list of certificates is displayed.
Manage Certificates Dialog Box
b.Click the Machine tab. The current machine certificate is displayed.
c.Click  to delete the certificate from the list of certificates.
d.Click Add Machine Certificate. The Add Certificate dialog box is displayed.
Add Certificate Dialog Box
e.Click Browse, select the certificate file, and click Open.
f.When prompted, enter the password used to encrypt the file.
g.Click Load to upload the certificate to the device. A message confirming the upload is displayed.
h.Click OK to close the Add Certificate dialog box.
12 • AM-200/AM-300: AirMedia Presentation Systems |
Product Manual – DOC. 8254E |

If authentication server validation is not used, set Enable Server Validation to Disabled and continue to step 6. Otherwise, set Enable Server Validation to Enabled and select the trusted certificate authorities to use.
-To select all of the authorities, click the check box next to the search box. To unselect all of the authorities, click the check box again.
-To search for a specific authority, start typing the name of the authority in the search box and check the box next to the desired authority.
Click Manage Certificates to manage certificates for 802.1x authentication. A list of certificates is displayed.
Manage Certificates Dialog Box
a.Click  to delete a certificate from the list of certificates.
b.Click Add Root Certificate. The Add Certificate dialog box is displayed.
Add Certificate Dialog Box
c.Click Browse, select the certificate file, and click Open.
d.Click Load to upload the certificate to the device. A message confirming the upload is displayed.
Product Manual – DOC. 8254E |
AM-200/AM-300: AirMedia Presentation Systems • 13 |

e. Click OK to close the Add Certificate dialog box.
Click Save Changes when done or Revert to return to the previous setting.
Password Authentication
In the Authentication Method field, select EAP-MSCHAP V2-password.
Enter the domain name of the authentication server, the user name, and the password in their respective fields.
Set Enable Server Validation to Enabled and select the trusted certificate authorities to use.
-To select all of the authorities, click the check box next to the search box. To unselect all of the authorities, click the check box again.
-To search for a specific authority, start typing the name of the authority in the search box and check the boxes next to the desired authorities.
To load a custom certificate, click Manage Certificates and follow this procedure:
a.Click the Root tab to manage certificates for 802.1x authentication.
Manage Certificates: Root Tab
14 • AM-200/AM-300: AirMedia Presentation Systems |
Product Manual – DOC. 8254E |

b.Click Add Root Certificate. The Add Certificate dialog box is displayed.
Add Certificate Dialog Box
c.Click Browse, select the certificate file, and click Open.
d.Click Load to upload the certificate to the device. A message confirming the upload is displayed.
e.Click OK to close the Add Certificate dialog box.
Click Save Changes when done or Revert to return to the previous setting.
DEVICE
Click DEVICE to manage the device, enable automatic updates, identify the device to a control system, configure date and time, and configure authentication management.
DEVICE Screen –Device Management
Product Manual – DOC. 8254E |
AM-200/AM-300: AirMedia Presentation Systems • 15 |
Device Management
Firmware
To upload device firmware, follow this procedure:
Click Firmware Upgrade.
Click Browse and navigate to the location of the firmware file.
Select the file to use and click Open.
Click Load to load the firmware.
Maintenance
Click Restore to restore the factory settings. Click Reboot to reboot the device.
Device Logs
Click Download Logs to download the device’s system logs to the PC.
Cloud Settings
The Cloud Settings section controls the device’s connection to the Crestron XiO Cloud service. By default, the Cloud Configuration Service Connection is set to Enabled. To disable the connection, set Cloud Configuration Service Connection to Disabled. For more information, refer to “Crestron XiO Cloud Service” on page 41.
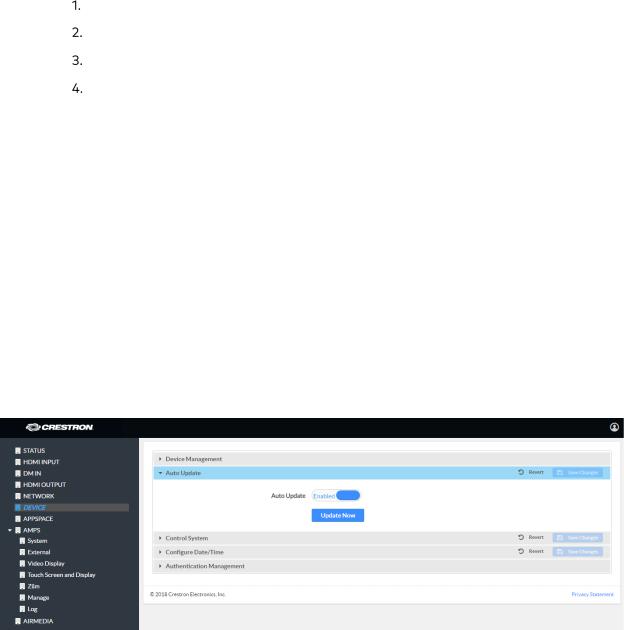
Auto Update
DEVICE Screen - Auto Update
The device can automatically check for firmware updates and update the device as needed.
To allow auto updating, set Auto Update to Enabled. To turn off auto updating, set Auto Update to Disabled.
To check for available updates, click Update Now.
16 • AM-200/AM-300: AirMedia Presentation Systems |
Product Manual – DOC. 8254E |
Loading...