


Operator’s Manual
7-1/4in.SLIDINGCOMPOUND MITERSAWWITHLASERTRAC® ModelNo.137.211940
CAUTION:
Before using this Miter Saw, read this manual and follow all its Safety Rules and Operating Instructions
Customer Help Line
For Technical Support
1-800-843-1682
●Safety Instructions
●Installation
●Operation
●Maintenance
●Parts List
Sears Parts & Repair Center 1-800-488-1222
Sears, Roebuck and Co., Hoffman Estates, lL 60179 USA |
|
Visit our Craftsman website: www.sears.com/craftsman |
|
Part No. 137211940001 |
Printed in China |

TABLE OF CONTENTS |
|
SECTION |
PAGE |
Warranty ......................................................................................... |
2 |
Product Specifications .................................................................... |
3 |
Symbols.......................................................................................... |
4 |
Power Tool Safety .......................................................................... |
5 |
Compound Miter Saw Safety .......................................................... |
7 |
Electrical Requirements and Safety.................................................. |
9 |
Accessories and Attachments ........................................................ |
11 |
Tools Needed for Assembly ............................................................ |
12 |
Carton Contents ............................................................................. |
13 |
Know Your Sliding Compound Miter Saw......................................... |
14 |
Glossary of Terms .......................................................................... |
15 |
Assembly and Adjustments............................................................. |
17 |
Operation ....................................................................................... |
26 |
Maintenance ................................................................................... |
37 |
Troubleshooting Guide ................................................................... |
39 |
Parts List ........................................................................................ |
41 |
WARRANTY |
|
CRAFTSMAN ONE YEAR FULL WARRANTY
If this Craftsman tool fails due to a defect in material or workmanship within one year from the date of purchase, call 1-800-4-MY-HOME® to arrange for free repair (or replacement if repair proves impossible).
This warranty applies for only 90 days from the date of purchase if this product is ever used for commercial or rental purposes.
This warranty does not include expendable parts, such as lamps, batteries, bits or blades.
This warranty gives you specific legal rights, and you may also have other rights which vary from state to state.
Sears, Roebuck and Co., Hoffman Estates, IL 60179
! WARNING
Some dust created by using power tools contains chemicals known to the state of California to cause cancer and birth defects or other reproductive harm. Some examples of these chemicals are:
●Lead from lead-based paints
●Crystalline silica from bricks, cement and other masonry products
●Arsenic and chromium from chemically treated lumber
Your risk from these exposures varies, depending on how often you do this type of work. To reduce your exposure to these chemicals, work in a well ventilated area and work with approved safety equipment such as dust masks that are specially designed to filter out microscopic particles.
2
2008/05

PRODUCT SPECIFICATIONS
MOTOR |
|
Power Source ..................................................................... |
9Amp, 120V AC, 60Hz |
Speed ................................................................................. |
5000 RPM (No load) |
Brake .................................................................................. |
Electric |
Double Insulated ................................................................. |
Yes |
BLADE SIZE |
|
Diameter.............................................................................. |
7-1/4 in. |
Arbor size............................................................................ |
5/8in. |
ROTATING TABLE: |
|
Diameter............................................................................ |
9-1/32 in. |
Miter Detent Stops ............................................................ |
0,15,22.5,31.6,45ºR&L |
Bevel Positive Stops ......................................................... |
0, 45º L |
CUTTING CAPACITY: |
|
Crosscut ............................................................................ |
2 in. x 8 in. |
Miter 45° R & L................................................................... |
2 in. x 6 in. |
Bevel 45º L......................................................................... |
1-1/2 in. x 8 in. |
45° Miter and 45° Bevel..................................................... |
1-1/2 in. x 6 in. |
! WARNING
To avoid electrical hazards, fire hazards or damage to the tool, use proper circuit protection.
This tool is wired at the factory for 110-120 Volt operation. It must be connected to a 110-120 Volt / 15 Ampere time delay fuse or circuit breaker. To avoid shock or fire, replace power cord immediately if it is worn, cut or damaged in any way.
Before using your tool, it is critical that you read and understand these safety rules. Failure to follow these rules could result in serious injury to you or damage to the tool.
 3
3 

SYMBOLS
WARNING ICONS
Your power tool and its Operator’s Manual may contain “WARNING ICONS” (a picture symbol intended to alert you to, and/or instruct you how to avoid, a potentially hazardous condition). Understanding and heeding these symbols will help you operate your tool better and safer. Shown below are some of the symbols you may see.
SAFETY ALERT: Precautions that involve your safety.
PROHIBITION
WEAR EYE PROTECTION: Always wear safety goggles or safety glasses with side shields.
READ AND UNDERSTAND OPERATOR’S MANUAL: To reduce the risk of injury, user and all bystanders must read and understand operator’s manual before using this product.
KEEP HANDS AWAY FROM BLADE: Failure to keep your hands away from the blade will result in serious personal injury.
SUPPORT AND CLAMP WORK
! DANGER
! WARNING
! CAUTION
CAUTION
DANGER: indicates an imminently hazardous situation which, if not avoided, will result in death or serious injury.
WARNING: indicates a potentially hazardous situation which, if not avoided, could result in death or serious injury.
CAUTION: indicates a potentially hazardous situation which, if not avoided, may result in minor or moderate injury.
CAUTION: used without the safety alert symbol indicates a potentially hazardous situation which, if not avoided, may result in property damage.
 4
4 

POWER TOOL SAFETY
GENERAL SAFETY INSTRUCTIONS BEFORE USING THIS POWER TOOL
Safety is a combination of common sense, staying alert and knowing how to use your power tool.
CAUTION
To avoid mistakes that could cause serious injury, do not plug the tool in until you have read and understood the following.
1. READ and become familiar with the entire Operator’s
Manual. LEARN the tool’s application, limitations and possible hazards.
2.KEEP GUARDS IN PLACE and in working order.
3.REMOVE ADJUSTING KEYS AND WRENCHES. Form the habit of checking to see that keys and adjusting wrenches are removed from the tool before turning ON.
4.KEEP WORK AREA CLEAN. Cluttered areas and benches invite accidents.
5.DO NOT USE IN DANGEROUS ENVIRONMENTS. Do not use power tools in damp locations, or expose them to rain or snow. Keep work area well lit.
6.KEEP CHILDREN AWAY. All visitors and bystanders should be kept a safe distance from work area.
7.MAKE WORKSHOP CHILD PROOF with padlocks, master switches or by removing starter keys.
8.DO NOT FORCE THE TOOL. It will do the job better and safer at the rate for which it was designed.
9.USE THE RIGHT TOOL. Do not force the tool or an attachment to do a job for which it was not designed.
10.USE PROPER EXTENSION CORDS. Make sure your extension cord is in good condition. When using an extension cord, be sure to use one heavy enough to carry the current your product will draw. An undersized cord will result in
a drop in line voltage and in loss of power which will cause the tool to overheat. The table on page 10 shows the correct size to use depending on cord length and nameplate ampere rating. If in doubt, use the next heavier gauge. The smaller the gauge number, the heavier the cord.
11.WEAR PROPER APPAREL. Do not wear loose clothing, gloves, neckties, rings, bracelets or other jewelry which may get caught in moving parts. Nonslip footwear is recommended. Wear protective hair covering to contain long hair.
12.ALWAYS WEAR EYE
PROTECTION. Any power tool can throw foreign objects into the eyes and
could cause permanent eye damage. ALWAYS wear Safety Goggles (not glasses) that comply with ANSI Safety standard Z87.1. Everyday eyeglasses have only impact–resistant lenses. They ARE NOT safety glasses. Safety Goggles are available at sears.
 5
5 

NOTE: Glasses or goggles not in compliance with ANSI Z87.1 could seriously injure you when they break.
13.WEAR A FACE MASK OR DUST MASK. Sawing operation produces dust.
14.SECURE WORK. Use clamps or a vise to hold work
 when practical. It is safer
 than using your hand and it frees both hands to operate the tool.
15.DISCONNECT TOOLS FROM POWER SOURCE before servicing, and when changing accessories such as blades, bits and cutters.
16.REDUCE THE RISK OF UNINTENTIONAL STARTING. Make sure switch is in the OFF position before plugging the tool in.
17.USE RECOMMENDED ACCESSORIES. Consult this Operator’s Manual for
recommended accessories. The use of improper accessories may cause risk of injury to yourself or others.
18.NEVER STAND ON THE TOOL. Serious injury could occur if the tool is tipped or if the cutting tool is unintentionally contacted.
19.CHECK FOR DAMAGED PARTS. Before further use of the tool, a guard or other part that is damaged should be carefully checked to determine that it will operate properly and perform its intended function – check for alignment of moving parts, binding of moving parts, breakage of parts, mounting
and any other conditions that may affect its operation. A guard or other part that is damaged should be properly repaired or replaced.
20.NEVER LEAVE THE TOOL RUNNING UNATTENDED. TURN THE POWER “OFF”. Do not walk away from a running tool until the blade comes to a complete stop and the tool is unplugged from the power source.
21.DO NOT OVERREACH. Keep proper footing and balance at all times.
22.MAINTAIN TOOLS WITH CARE. Keep tools sharp and clean for best and safest performance. Follow instructions for lubricating and changing accessories.
23.WARNING: Dust generated from certain materials can be hazardous to your health. Always operate saw in well-ventilated area and provide for proper dust removal.
24. |
|
DANGER |
People with |
|
|
! |
|
|
electronic devices, such as |
||
|
pacemakers, should consult their |
||
|
physician(s) before using this |
||
|
product. Operation of electrical |
||
|
equipment in close proximity to |
||
|
a heart pacemaker could cause |
||
|
interference or failure of the |
||
|
pacemaker. |
|
|
 6
6 

COMPOUND MITER SAW SAFETY
SPECIFIC SAFETY INSTRUCTIONS FOR THIS COMPOUND MITER SAW
1.DO NOT operate the miter saw until it is completely assembled and installed according to these instructions.
2.IF YOU ARE NOT thoroughly familiar with the operation of miter saws, seek guidance from your supervisor, instructor or other qualified person.
3.ALWAYS hold the work firmly against the fence and table. DO NOT perform any operation free hand (use clamp wherever possible).
4.KEEP HANDS out of the path of the saw blade. If the workpiece you are cutting would cause your hands to be within 6-3/4 in. of the saw blade, the workpiece should be clamped in place before making the cut.
5.BE SURE the blade is sharp, runs freely and is free of vibration.
6.ALLOW the motor to come up to full speed before starting a cut.
7.KEEP THE MOTOR AIR SLOTS CLEAN and free of chips or dust.
8.ALWAYS MAKE SURE all handles are tight before cutting, even if the table is positioned in one of the positive stops.
9.BE SURE both the blade and the collar are clean and the arbor bolt is tightened securely.
10.USE only blade collars specified for your saw.
11.NEVER use blades larger in diameter than 7-1/4 inches.
12.NEVER apply lubricants to the blade when it is running.
13.ALWAYS check the blade for cracks or damage before operation. Replace a cracked or damaged blade immediately.
14.NEVER use blades recommended for operation at less than 5000 RPM.
15.ALWAYS keep the blade guards in place and use at all times.
16.NEVER reach around the saw blade.
17.MAKE SURE the blade is not contacting the workpiece before the switch is turned ON.
18.IMPORTANT: After completing the cut, release the trigger and wait for the blade to stop before returning the saw to the raised position.
19.MAKE SURE the blade has come to a complete stop before removing or securing the workpiece, changing the workpiece angle or changing the angle of the blade.
20.NEVER cut metals or masonry products with this tool. This miter saw is designed for use on wood and wood-like products.
 7
7 
21.NEVER cut small pieces. If the workpiece being cut would cause your hand or fingers to be within 6-3/4 in. of the saw blade the workpiece is too small.
22.PROVIDE adequate support to the sides of the saw table for long work pieces.
23.NEVER use the miter saw in an area with flammable liquids or gases.
24.NEVER use solvents to clean plastic parts. Solvents could possibly dissolve or otherwise damage the material.
25.SHUT OFF the power before servicing or adjusting the tool.
26.DISCONNECT the saw from the power source and clean the machine when finished using.
27.MAKE SURE the work area is clean before leaving the machine.
28.SHOULD any part of your miter saw be missing, damaged, or fail in any way, or any electrical component fail to perform properly, lock the switch and remove the plug from the power supply outlet. Replace missing, damaged, or failed parts before resuming operation.
 8
8 
ELECTRICAL REQUIREMENTS AND SAFETY
POWER SUPPLY AND MOTOR SPECIFICATIONS
The AC motor used in this saw is a universal, nonreversible type. See “MOTOR” in the “PRODUCT
SPECIFICATIONS” section on page 3.
way. If the plug does not fit fully in the outlet, reverse the plug. If it still does not fit, contact a qualified electrician to install the proper outlet. Do not change the plug in any way.
! WARNING
To avoid electrical hazards, fire hazards, or damage to the tool, use proper circuit protection. Your saw is wired at the factory for 120 V operation. Connect to a 120 V, 9A circuit and use a 9 A time delay fuse or circuit breaker. To avoid shock or fire, if power cord is worn or cut, or damaged in any way, have it replaced immediately.
DOUBLE INSULATED 


The power tool is double insulated to provide a double thickness of insulation between you and tool’s electrical system. All exposed metal parts are isolated from the internal metal motor components with protecting insulation.
Replacement parts – When servicing, use only identical replacement parts.
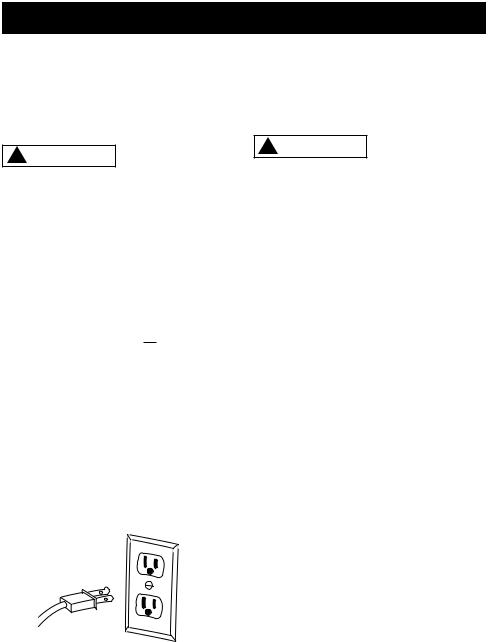
Polarized plugs – This saw has a plug that looks like the one shown below:
To reduce the risk of electrical shock, this saw has a polarized plug (one blade is wider than the other). This plug will fit in a polarized outlet only one
! WARNING
Double insulation does not take the place of normal safety precautions when operating this tool.
To avoid electrocution:
1.Use only identical replacement parts when servicing a tool with double insulation. Servicing should be performed by a qualified technician.
2.Do not use power tools in wet or damp locations or expose them to rain or snow.
MOTOR SAFETY PROTECTION IMPORTANT
To avoid motor damage, the motor should be blown out or vacuumed frequently to keep sawdust from interfering with the motor ventilation.
1.Connect this saw to a 120 V circuit. This circuit must not be less than a #18 wire with a 9 A time lag fuse.
NOTE: When using an extension cord on a circuit with a #18 wire, the extension cord must not exceed 25 feet in length.
2.If the motor will not start, release the trigger switch immediately.
UNPLUG THE SAW. Check the saw blade to make sure it turns freely. If the blade is free, try to start the saw again. If the motor still does not start, refer to the TROUBLESHOOTING GUIDE.
3.If the tool suddenly stalls while cutting wood, release the trigger switch, unplug the tool and free the blade from the wood. The saw may
 9
9 

now be started and the cut finished.
4.FUSES may “blow” or circuit breakers may trip frequently if:
a.MOTOR is overloaded – overloading can occur if you feed too rapidly or make too many start/stops in a short time.
b.LINE VOLTAGE is more than 10% above or below the nameplate voltage rating. For
heavy loads, the voltage at motor terminals must equal the voltage specified on the nameplate.
c.IMPROPER or dull saw blades are used.
5.Most motor troubles may be traced to loose or incorrect connections, overload, low voltage or inadequate power supply wiring. Always check the connections, the load and supply circuit if the motor doesn’t run well. Check minimum gauge for the length of cord you are using on the chart below.
GUIDELINES FOR EXTENSION CORDS
Use a proper extension cord. Make sure your extension cord is in good condition. When using an extension cord, be sure to use one heavy enough to carry the current your product will draw. An undersized cord will cause a drop in line voltage, resulting in
loss of power and overheating. The table below shows the correct size to use depending on cord length and nameplate ampere rating. If in doubt, use the next heavier gauge. The
smaller the gauge number, the heavier the cord.
Be sure your extension cord is properly wired and in good condition. Always replace a damaged extension cord or have it repaired by a qualified person before using it. Protect your extension cords from sharp objects,
excessive heat and damp or wet areas.
Use a separate electrical circuit for your tools. This circuit must not be less than a #18 wire with a 9 A time lag fuse. NOTE: When using an extension cord on a circuit with a #18 wire, the extension cord must not exceed 25 feet in length. Before connecting the tool to the power line, make sure the switch is in the OFF position and the electric current is rated the same as the current stamped on the motor nameplate, running at a lower voltage will damage the motor.
MINIMUM GAUGE FOR EXTENSION CORDS (AWG)
(When using 120 volts only)
Ampere Rating |
|
Total length of Cord |
|||
More Than |
Not More Than |
25ft. |
50ft. |
100ft. |
150ft. |
|
|
|
|
|
|
0 |
6 |
18 |
16 |
16 |
14 |
|
|
|
|
|
|
6 |
10 |
18 |
16 |
14 |
12 |
10 |
12 |
16 |
16 |
14 |
12 |
|
|
|
|
|
|
12 |
16 |
14 |
12 |
Not Recommended |
|
|
|
|
|
|
|
CAUTION: In all cases make certain the receptacle in question is properly grounded. If you are not sure, have a certified electrician check the receptacle.
 10
10 
ACCESSORIES AND ATTACHMENTS
RECOMMENDED ACCESSORIES
!WARNING
●Use only accessories recommended for this miter saw. Follow instructions that accompany accessories. Use of improper accessories may cause hazards.
●The use of any cutting tool except 7-1/4 in. saw blades which meet the requirements under recommended accessories
is prohibited. Do not use accessories such as shaper cutters or dado sets. Ferrous metal cutting and the use of abrasive wheels is prohibited.
●Do not attempt to modify this tool or create accessories not recommended for use with this tool. Any such alteration or modification is misuse and could result in a hazardous condition leading to possible serious injury.
ACCESSORIES
Visit your Sears Hardware Department or see the Sears Power and Hand Tool Catalog to purchase recommended accessories for this power tool.
!WARNING
●To avoid the risk of personal injury, do not modify this power tool or use accessories not recommended by Sears.
●Read warnings and conditions on your CARBIDE TIPPED SAW BLADE. Do not operate the saw without the proper saw blade guard in place. Carbide is a very hard but brittle material. Care
should be taken while mounting, using, and storing carbide tipped blades to prevent accidental damage. Slight shocks, such as striking the tip while handling, can seriously damage the blade. Foreign objects in the workpiece, such as wire or nails, can also cause tips to crack or break off. Before using, always visually examine the blade and tips for bent blade, cracks, breakage, missing or loose tips, or other damage. Do not use if damage is suspected. Failure to heed safety instructions and warnings can result in serious bodily injury.
 11
11 
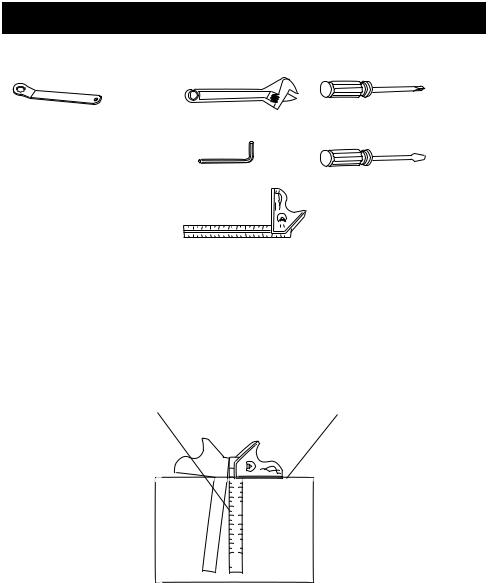
TOOLS NEEDED FOR ASSEMBLY
Supplied |
Not supplied |
|
Blade Wrench |
Adjustable Wrench |
Phillips Screwdriver |
|
6mm Hex Wrench |
Slotted Screwdriver |
Combination Square
COMBINATION SQUARE MUST BE TRUE
Should not gap or overlap when square is flipped over (see dotted figure).
Draw light line on |
|
|
|
Straight edge or a 3/4 in. board, this |
||||
|
|
|
edge must be perfectly straight. |
|||||
board along this edge. |
|
|
|
|||||
|
|
|
|
|
|
|||
|
|
|
|
|
|
|
|
|
|
|
|
|
|
|
|
|
|
|
|
|
|
|
|
|
|
|
|
|
|
|
|
|
|
|
|
|
|
|
|
|
|
|
|
|
|
|
|
|
|
|
|
|
|
|
|
|
|
|
|
|
|
|
|
|
|
|
|
|
|
|
|
Should not gap or overlap when square flipped over (see dotted figure).
 12
12 
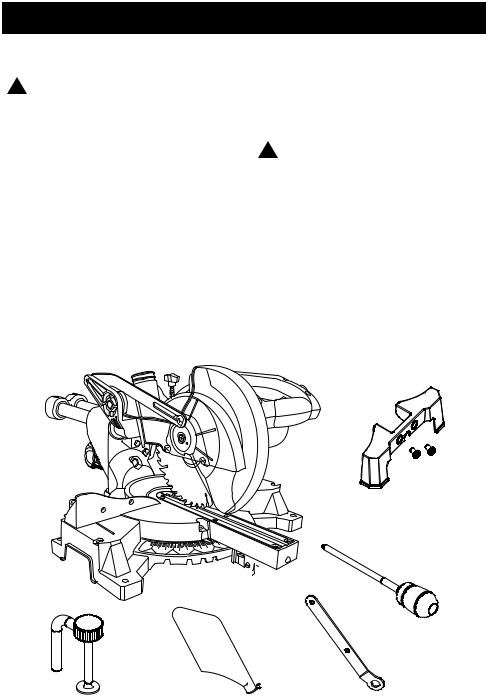
CARTON CONTENTS
UNPACKING YOUR MITER SAW |
3. |
Separate all parts from the packing |
||||
|
|
|
|
material. Check each one with |
||
! WARNING |
|
|
|
the illustration to make certain all |
||
|
|
|
|
items are accounted for, before |
||
To avoid injury from unexpected |
|
|
||||
|
|
discarding any packing material. |
||||
starting or electrical shock, do not |
|
|
||||
|
|
|
|
|||
plug the power cord into a source |
|
|
|
|
||
of power during unpacking and |
|
|
! WARNING |
|
||
assembly. This cord must remain |
|
|
|
|
||
● |
If any part is missing or |
|||||
unplugged whenever you are |
||||||
|
|
damaged, do not attempt to |
||||
working on the saw. |
|
|
||||
|
|
assemble the miter saw, or |
||||
|
|
|
|
|||
1. Remove the miter saw from the |
|
|
plug in the power cord until |
|||
|
|
the missing or damaged part |
||||
carton. |
|
|
||||
|
|
is correctly replaced. Call |
||||
IMPORTANT: Do not lift miter saw |
|
|
||||
|
|
1-800-843-1682 for missing or |
||||
by the trigger switch handle. It |
|
|
||||
|
|
damaged parts. |
||||
may cause misalignment. Only lift |
● |
|||||
To avoid electric shock, use |
||||||
machine by the base hand holds. |
||||||
|
|
only identical replacement parts |
||||
2. Place the saw on a secure |
|
|
||||
|
|
when servicing double insulated |
||||
stationary work surface. |
|
|
||||
|
|
tools. Call 1-800-4-MY-HOME® for |
||||
|
|
|
|
|||
|
|
|
|
replacement parts. |
||
Support bracket assembly
Miter saw 


Miter handle
Hold-down clamp |
Dust bag |
Blade wrench |
|
|
 13
13 

KNOW YOUR SLIDING COMPOUND MITER SAW
Upper blade guard |
Switch handle |
|
|
||
|
|
ON/OFF trigger |
|
|
switch |
Bevel lock handle |
|
Motor |
|
|
|
Hold-down clamp |
|
Laser guide |
|
|
Table insert |
|
|
Miter handle |
Mounting hole |
Turntable |
Support bracket |
|
||
|
Laser ON/OFF switch |
|
Lower blade guard |
|
Hold-down latch |
Slide carriage
Slide carriage lock knob
Bevel scale
Saw blade
Hand hold for transportation
Positive stop locking lever |
Positive miter detent |
Base |
|
|
 14
14 
 Loading...