

Page 1

Owner’s manual & Installation manual
Mode d’emploi et manuel d’installation
Manual de instrucciones y de instalación
VX400
VZ400
2-DIN DVD MULTIMEDIA STATION WITH 6.5-inch
TOUCH PANEL CONTROL
STATION MULTIMÉDIA DVD 2-DIN AVEC COMMANDE
ÉCRAN TACTILE DE 6,5 pouces
ESTACIÓN DVD MULTIMEDIA DOBLE DIN CON PANEL
DE CONTROL TÁCTIL DE 6,5 pulgadas
DVD MULTIMEDIA STATION WITH 7-inch
TOUCH PANEL CONTROL
STATION MULTIMÉDIA DVD AVEC COMMANDE
ÉCRAN TACTILE DE 7 pouces
ESTACIÓN DVD MULTIMEDIA CON PANEL DE CONTROL
TÁCTIL DE 7 pulgadas
Page 2

English
Dear Customer:
Owner’s Manual
Congratulations on your purchase of a Clarion mobile electronic product. We are
confident that you’ll enjoy your Clarion experience.
There are many benefits to registering your product. We invite you to visit our
website at www.clarion.com to register your Clarion product.
We have made product registration simple with our easy to use website.
The registration form is short and easy to complete. Once you’re registered, we can
keep you informed of important product information.
Register at www.clarion.com - it’s easy to keep your Clarion product up to date.
CLARION PRODUCT REGISTRATION INFORMATION
For USA and Canada only
www.clarion.com
2 VX400/VZ400
Page 3

Contents
1. FEATURES .........................................................................................................................4
Expanding Systems ...........................................................................................................4
2. PRECAUTIONS .................................................................................................................5
3. CONTROLS .......................................................................................................................
Operational Panel ............................................................................................................... 7
Functions of Buttons ..........................................................................................................
Remote Control ..................................................................................................................9
Functions of Remote Control Buttons................................................................................10
4. CAUTIONS ON HANDLING .............................................................................................. 12
Operation panel .................................................................................................................. 12
USB Port ............................................................................................................................12
Cleaning .............................................................................................................................12
Handling Discs ...................................................................................................................13
5. DVD VIDEO SYSTEM ........................................................................................................
DVD Video Features ...........................................................................................................14
Discs ................................................................................................................................
About the registered marks etc. ......................................................................................... 16
6. OPERATIONS ....................................................................................................................17
Basic Operations ................................................................................................................
Radio Operations ...............................................................................................................20
DVD Video Player Operations ............................................................................................21
Sirius Satellite Radio Operations ........................................................................................ 29
7. ACCESSORIES ................................................................................................................. 31
iPod/iPhone Operations .....................................................................................................31
USB Operations .................................................................................................................33
Bluetooth Audio Player Operations .................................................................................... 34
HD Radio Operations ......................................................................................................... 38
AUX In/AV In Operations ....................................................................................................
Camera In Operations ........................................................................................................
Setup Operations ............................................................................................................... 41
8. TROUBLESHOOTING .......................................................................................................43
9. ERROR DISPLAYS ............................................................................................................
10. SPECIFICATIONS
..............................................................................................................45
INSTALLATION/ WIRE CONNECTION GUIDE ...................................................46
7
8
14
15
17
40
40
44
English
English
Owner’s Manual
VX400/VZ400 3
Page 4
English
1. FEATURES
Double Din 6.5” Touch Panel Control
Motorized 7” Touch Panel Control
Owner’s Manual
DVD Video/CD-DA/MP3/WMA
Playback Capability
NP400 Navigation Control with Touch
Panel
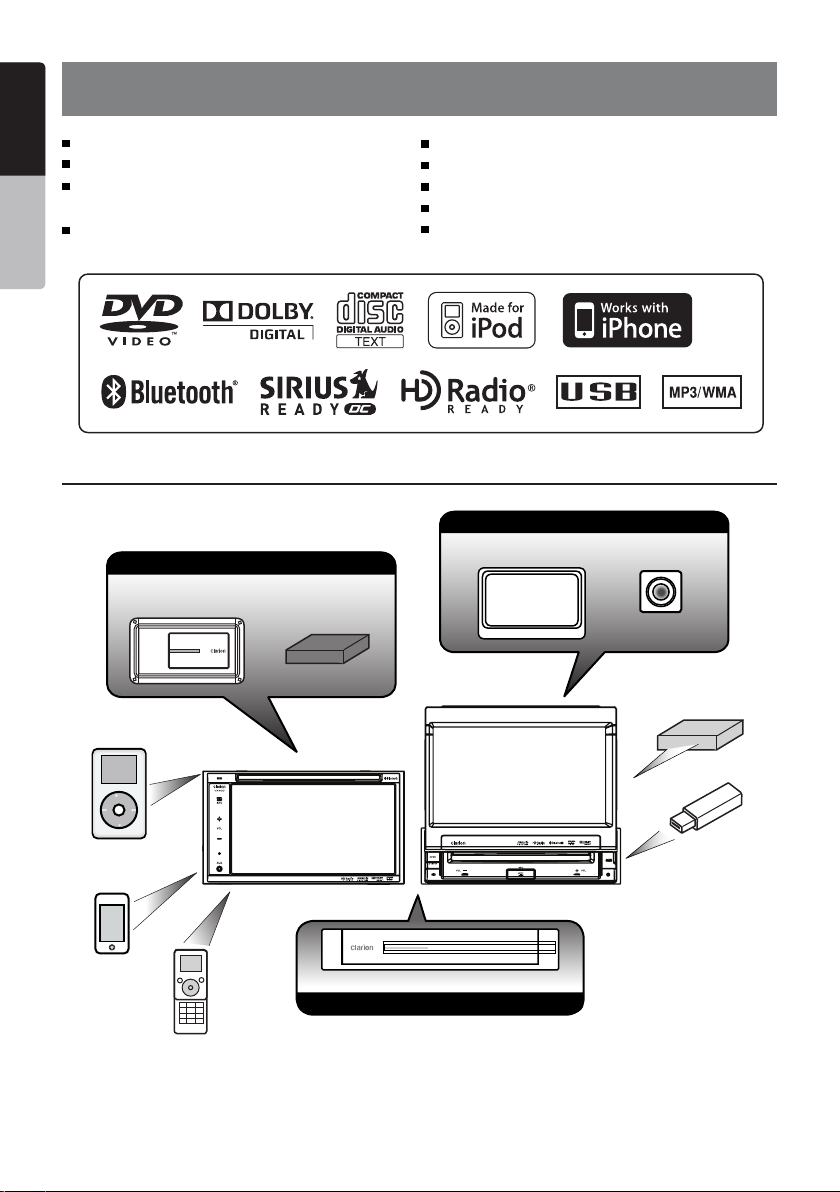
Expanding Systems
Expanding audio features
External Power
Amplifier
iPod
HD Radio™
Tuner Module
OEM Steering Wheel Remote Ready
Compatible with Sirius Satellite Radio
Built-In Bluetooth
®
Compatible with iPod® / iPhone™ via USB
HD Radio™ Ready
Expanding visual features
Rear monitor
Back up camera
Sirius Direct
Connect Tuner
USB
iPhone
Bluetooth
Telephone
Expanding navigation features
Memory
NOTE:
The unit can receive analog, HD Radio (optional) and satellite radio (optional) broadcasts.
The items listed outside the frames are the commercial products generally sold.
4 VX400/VZ400
Page 5

2. PRECAUTIONS
English
WARNING
• For your safety, the driver should not watch any video sources and/or operate the controls while driving.
Please note that watching and operating any video sources while driving are prohibited by law in some
countries. Also, while driving, keep the volume to a level at which external sounds can be heard.
• When using the navigation system, follow the precautions listed below. After reading this manual,
be sure to keep it in a handy place (such as the glove box of your car).
• This navigation system should not be used to replace your own judgment. No itinerary suggested
by this navigation system should ever override any highway regulations, your own judgment, or a
knowledge of safe driving practices. Do not follow the navigation system’s suggested itinerary if it
would cause you to perform a dangerous or illegal act, place you in a dangerous situation, or take
you into an area you consider unsafe.
• The advice provided by the navigation system is to be regarded as a suggestion only. There
may be times when the navigation system displays the vehicle’s location incorrectly, fails to
suggest the shortest route, or fails to direct you to your desired destination. In such instances, rely
on your own driving judgment, taking into account the driving conditions at the time.
• Do not use the navigation system to locate emergency services. The database does not contain a
complete listing of emergency services such as police stations, fire halls, hospitals and walk-in
clinics. Please show discretion and ask for directions in such instances.
• As the driver, you alone are responsible for your driving safety.
• In order to avoid a traffic accident, do not operate the system while driving.
• In order to avoid a traffic accident, operate the system only when the vehicle is stopped at a safe
place and the parking brake is on.
• In order to avoid a traffic accident or traffic offense, remember that actual road conditions and
traffic regulations take precedence over the information contained on the navigation system.
• The software may contain inaccurate or incomplete information due to the passage of time,
changing circumstances, and the sources of information used. Please respect current traffic
conditions and regulations at all times while driving.
• Where actual road conditions and highway regulations differ from the information contained on
the navigation system, abide by the highway regulations.
• Keep the amount of time spent viewing the screen while driving to a strict minimum.
• The navigation system does not provide, nor represent in any way information on: traffic and
highway regulations; technical aspects of the vehicle including weight, height, width, load and
speed limits; road conditions including grade, percentage of incline and surface conditions;
obstacles such as the height and width of bridges and tunnels; and other current driving or road
conditions. Always rely on your own judgment when driving a car, taking into account current
driving conditions.
• Do not disassemble or modify this unit. It may cause an accident, fire, or electric shock.
• Do not use this unit when a trouble exists, such as no screen content appears or no sound is
audible. It may cause an accident, fire, or electric shock. For that case, consult your authorized
dealer or a nearest Clarion service center.
• In case of a problem, such as foreign materials have entered in the unit, the unit gets wet, or
smoke or strange smells come out of the unit, etc., stop using this unit immediately, and consult
your authorized dealer or a nearest Clarion service center.
Using it in that condition may cause an accident, fire, or electric shock.
• Use a fuse with the same specification only when replacing the fuse.
Using a fuse with a different specification may causes a fire.
• For the installation of this unit or a change in the installation, ask your authorized dealer or a
nearest Clarion service center for safety. Professional skills and experiences are required to do so.
English
Owner’s Manual
VX400/VZ400 5
Page 6

English
MODEL
SERIAL NO.
MANUFACTURED: EYS
This device complies with Part 15 of the FCC rules. Operation is subject to the
following two conditions: (1) this device may not cause harmful interference, and
(2) this device must accept any interference received, including interference that
may cause undesired operation.
THIS DEVICE COMPLIES WITH DHHS RULES 21 CFR CHAPTER I
SUBCHAPTER J APPLICABLE AT DATE OF MANUFACTURE.
Apparatus Claims of U.S. Patent Nos. 6,836,549; 6,381,747;7,050,698; 6,516,132;
and 5,583,936, licensed for limited viewing uses only.
This product includes technology owned by Microsoft Corporation and cannot
be used or distributed without a license from MSLGP.
1
AM 530-1730kHz FM 87.9-107.9MHz
Manufactured under license from Dolby Laboratories.
“Dolby” and the double-D symbol are trademarks of Dolby Laboratories.
VZ400
This Class B digital apparatus complies with Canadian ICES-003.
Cet appareil numérique de la classe B est conforme à la norme NMB-003 du Canada.
The HD Radio Ready logo is proprietary trademark of iBiquity Digital Corp.
MADE IN CHINA
Clarion Co., Ltd
12V 15Amax
FCC ID : V8VCES8 116CL
IC : 8614A-C ES8116 CL
Bluetooth ID : B015864
1.When the inside of the car is very cold and
the player is used soon after switching on the
heater, moisture may form on the disc (DVD/
Owner’s Manual
CD) or the optical parts of the player and
proper playback may not be possible. If
moisture forms on the disc (DVD/CD), wipe it
off with a soft cloth. If moisture forms on the
optical parts of the player, do not use the
player for about one hour. The condensation
will disappear naturally allowing normal
operation.
2.Driving on extremely bumpy roads which
cause severe vibration may cause the sound
to skip.
3.This unit uses a precision mechanism. Even
in the event that trouble arises, never open
the case, disassemble the unit, or lubricate
the rotating parts.
4.This equipment has been tested and found to
comply with the limits for a Class B digital
device, pursuant to Part 15 of the FCC Rules.
These limits are designed to provide
reasonable protection against harmful
interference in a residential installation. This
equipment generates, uses, and can radiate
radio frequency energy and, if not installed
and used in accordance with the instructions,
may cause harmful interference to radio
communications. However, there is no
guarantee that interference will not occur in a
particular installation. If this equipment does
cause harmful interference to radio or
television reception, which can be determined
by turning the equipment off and on, the user
is encouraged to consult the dealer or an
experienced radio/TV technician for help.
INFORMATION FOR USERS:
CHANGES OR MODIFICATIONS TO
THIS PRODUCT NOT APPROVED
BY THE MANUFACTURER WILL VOID
THE WARRANTY AND WILL VIOLATE
FCC APPROVAL
6 VX400/VZ400
Page 7
3. CONTROLS
English
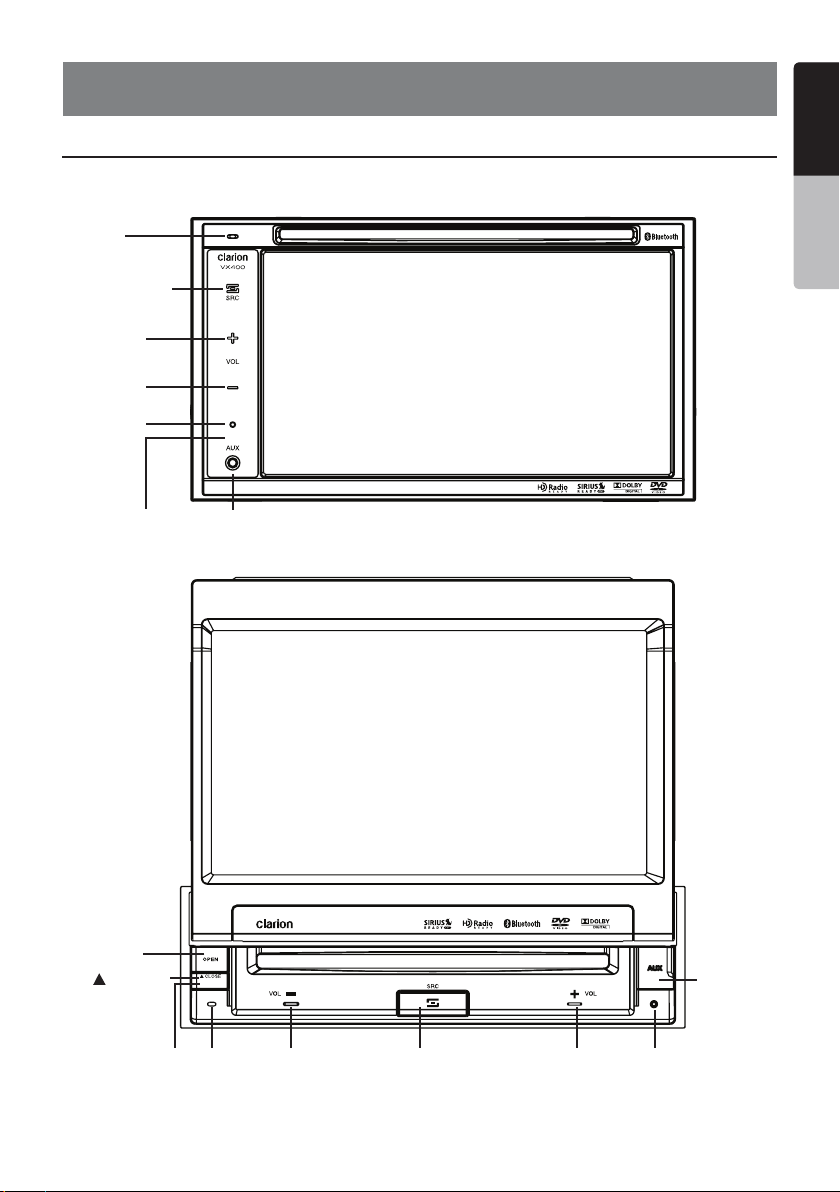
Operational Panel
MIC
[SOURCE]
[PWR]
[VOL+]
[VOL-]
RESET
AUX INSENSOR
English
Owner’s Manual
[OPEN]
[ CLOSE]
SENSOR
[PWR]
AUX IN
[VOL+][SOURCE]
RESETMIC [VOL-]
VX400/VZ400 7
Page 8

Functions of Buttons
English
Note: Be sure to read this chapter while
referring to front diagram “CONTROLS”.
[ SRC] Button
• Press this button to turn the unit power On.
Owner’s Manual
The Main menu will be dispalyed. Scroll
through the available sources such as AM/FM
Tuner, Sirius, DVD, NAVI, USB, Camera
modes, etc.
• Press and hold this button for more than 2
seconds to turn the power Off.
[VOL -], [VOL +] Buttons
• Use these buttons to increase/decrease the
volume.
[OPEN] [CLOSE] Button (VZ400)
• Use this button to open/close operation
panel.
RESET Button
• Press this button to reset the unit.
SENSOR
• Receiver for the remote control unit (operating
range: 30 degree in all directions).
MIC
• Internal microphone for use during Bluetooth
phone calls. Sensitivity can be adjusted from
the Settings menu.
8 VX400/VZ400
Page 9
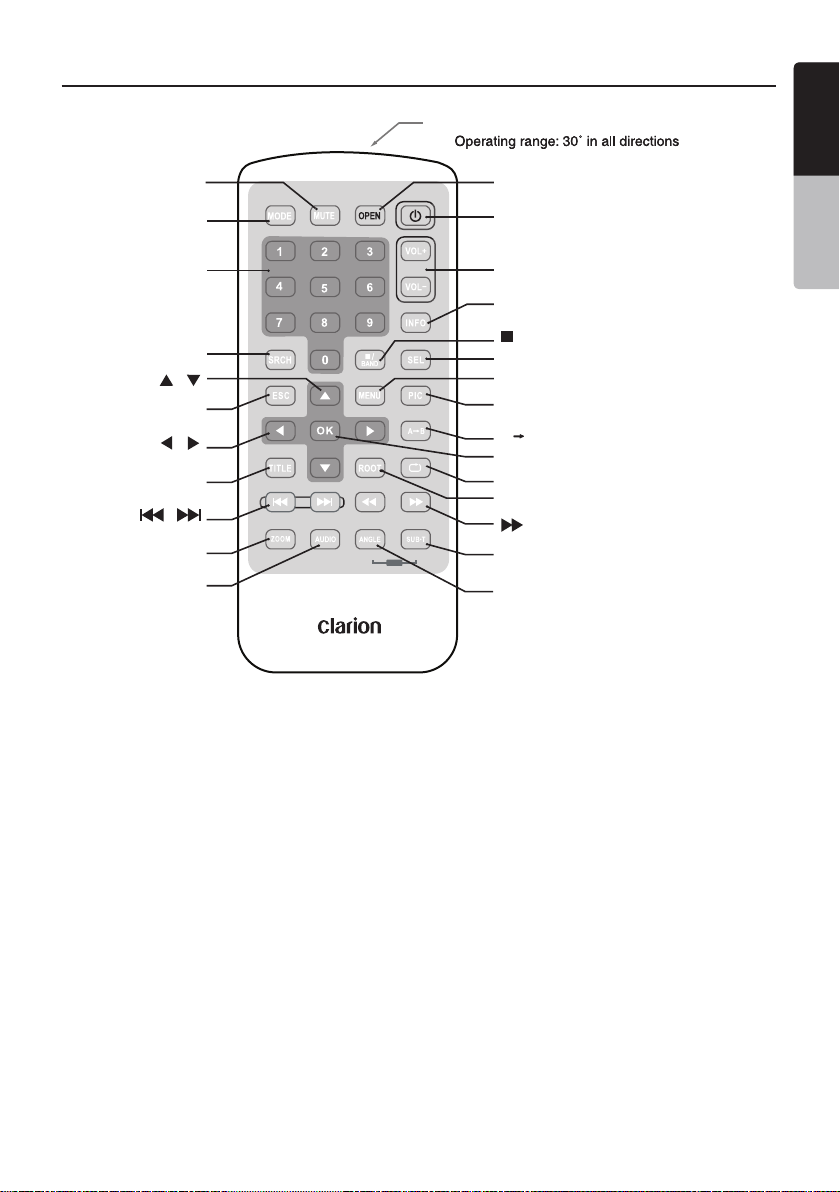
Remote Control
[
]
MUTE
Signal transmitter
Signal transmitter
[
OPEN
English
English
]
Owner’s Manual
[
]
MODE
[
]
0 - 9
[
]
SRCH
[ ] [ ]
[
]
ESC
[ ] [ ]
[
]
TITLE
[ ]
[ ]
[
]
ZOOM
[
]
AUDIO
Replacing the batteries
1. Press the retention tab and pull
out the battery tray and remove
the old battery.
2. Insert the new CR2025 battery
and slide the battery tray back
in the remote control the same
direction that you removed it.
Please ensure the tray is inserted in
the correct direction.
AUDIO VIDEO
iPod
[
POWER
[
VOLUME
[
INFO
[
[
SEL
[
MENU
[
PIC
[ ]
A B
[
OK
[ ]
REPEAT
[ ]
ROOT
]
/ BAND
]
]
]
]
]
]
]
[ ]
[SUB TITLE/VIDEO iPod MODE*]
[
ANGLE/AUDIO iPod MODE*]
* Only when capable iPod/iPhone
is connected
Note:
Using batteries improperly can cause
them to explode. Take note of the
following points:
• When replacing batteries, replace
both batteries with new ones.
• Do not short-circuit, disassemble or
heat batteries.
• Do not dispose of batteries into fire or
flames.
• Dispose of discharged batteries
properly.
VX400/VZ400 9
Page 10

Functions of Remote Control Buttons
English
You can use the remote control unit to control the VX400 and VZ400.
Note:
•
The wireless remote control operation may not be optimal in direct sunlight.
Owner’s Manual
Shared modes
[MODE] Button
• Press this button to scroll through the various
available sources such as the AM/FM tuner,
DVD player, iPod, Sirius Radio, or AUX IN.
[VOLUME] Button
Increase and decrease volume.
[MUTE] Button
Turns mute on and off.
[POWER] Button
Press this button to turn the unit on or off.
[OPEN] Button
Press this button to OPEN or CLOSE the
motorized screen. Please ensure there are
no obstructions before starting the operation.
[MENU] Button
Press this button to enter the MAIN MENU.
From the main menu, you can select your
desired source or change your settings.
[PIC] Button
Press this button to change your monitor
settings such as Brightness, Color, and
Contrast.
[SEL] Button
Press this button to change your audio
settings such as Tone, Fader, and Balance.
[ESC] Button
Press this button to exit selection and
adjustment menus.
TUNER/Satellite Radio mode
[BAND] button
Switches reception band.
[0 - 9] Buttons
• Use in the Key Pad screen to set the radio
frequency or Satellite Radio channels.
• Use to select the preset number in the Preset
List screen.
[SEARCH] Button
Press to show/hide the Key Pad screen.
[OK] button
Press to fix the entered data in the Key Pad
screen.
[ ], [ ] Buttons
Press to seek the next available higher or
lower station in TUNER mode. In Sirius Radio
mode, you will scroll through the categories.
[ ], [ ] Buttons
Press to manually select the next higher or
lower station in TUNER and Satellite Radio
modes.
[ ], [ ] Buttons
Press to scroll through the saved presets in
the TUNER mode. Press [OK] to tune to the
highlighted preset.
[INFO] Button
Press to switch in and out of the LIST mode
while in the TUNER/ Sirius Radio mode.
DVD PLAYER mode
• Press to turn on and off the playtime display
in the DVD video.
• Press to switch in and out of the LIST mode
while playing CD audio.
[SEARCH] Button
Press to open the direct search menu while in
the DVD video mode.
[OK] Button
Press to select, play or pause video and
audio media.
[ /BAND] Button
• Press to stop video and audio media play
back.
[0 - 9] Buttons
• Press to enter DVD video chapters/titles in the
Key Pad screen.
• Press to set the track/folder number of the
CD, or MP3/WMA in the Key Pad screen.
[DISC SEL] Button
• Press to show/hide the Track List screen in
the CD mode.
• Press to show/hide the Folder List screen in
the MP3/WMA mode.
[TITLE] Button
Press to go to the title menu on the DVD.
[ROOT] Button
Press to go to the root menu on the DVD.
[ ], [ ], [ ], [ ] Buttons
• Press to select button items on the menu
screen of a DVD video.
• Press [ ], [ ] to scroll through the page
screens in the CD and MP3/WMA modes.
10 VX400/VZ400
Page 11
Functions of Remote Control Buttons
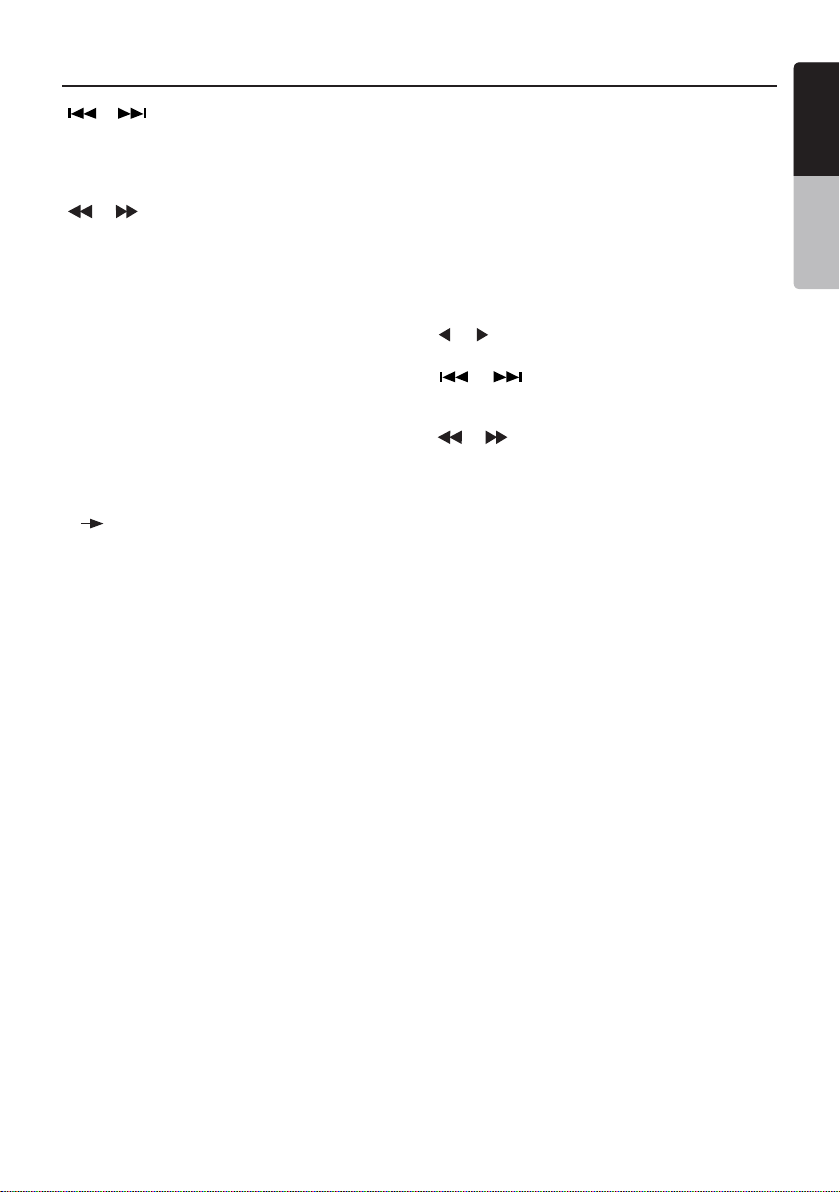
[ ], [ ] Buttons
• Press to select the next higher or lower
chapter number in DVD video mode.
• Press to select the next higher or lower track
in CD.
[ ], [ ] Buttons
Press to perform fast-forward and fastbackward. Press again to advance to higher
speed reversing or forwarding such as 2x,
4x, 8x and 1 6x. Press once more to resume
normal speed playback.
[RPT] Button
• Press to perform chapter repeat in the DVD
video mode, and track repeat in CD and MP3/
WMA modes.
• Press again to perform title repeat in DVD
video mode or folder repeat in MP3/WMA
mode. In CD mode, this will activate the
repeat all mode.
• Press again to perform all repeat in MP3/WMA
playback mode.
[A B] Button
• Press to set initial starting point of repeat.
The screen will show ‘REP A-’.
• Press again to set repeat ending point.
The screen will show ‘REP A-B’
• Press again to turn off A-B repeating. The
screen will show ‘REP AB Off’
[ZOOM] Button
Press to turn on and zoom in while in DVD
Video mode. You can zoom in up to 3x.
[AUDIO] Button
Press to switch the AUDIO function in the DVD
video mode.
[SUB-T] Button
Press to display subtitles in the DVD video
mode.
[ANGLE] Button
Press to switch the ANGLE function in the DVD
video mode when the Angle mark is displayed.
[OK ] Button
Press to play or pause the selected media.
[ ], [ ] Buttons
Press to scroll the list screens.
[ ], [ ] Buttons
Press to select the next higher or lower track
numbers.
[ ], [ ] Buttons
Press to perform fast-forward or fast-backward
searching. Press again to change the speed
to 2x, 4x, 8x or 16x.
English
English
Owner’s Manual
VX400/VZ400 11
Page 12

English
4. CAUTIONS ON HANDLING
Operation Panel
For a longer service life, be sure to read the following cautions.
Owner’s Manual
• The operation panel will operate properly in a
temperature range of 0˚ to 60˚ C.
• Do not allow any liquids on the set from
drinks, umbrellas etc. Doing so may damage
the internal circuitry.
• Do not disassemble or modify the set in any
way. Doing so may result in damage.
• Subjecting the operation panel to shocks may
result in breakage, deformation or other
damage.
• Do not let cigarettes burn the display.
• If a problem should occur, have the set
inspected at your store of purchase.
• Do not insert objects or poke in the space
between the operation panel and the main
unit when the panel is tilted.
• The remote control unit may not work if the
remote control sensor is exposed to direct
sunlight.
• In extremely cold weather, the display
movement may slow down and the display
may darken, but this is not a malfunction. The
display will work normally when the
temperature increases.
• Small black and shiny spots inside the liquid
crystal panel are normal for LCD products.
USB Port
• The USB memory stick may stick out when
inserted, so it may cause danger during
driving. In such cases, you can use a
commercial USB extension cable, etc., but
use it safely under your own judgment.
• The USB memory sticks must be recognized
as “USB mass storage class” to work
properly. Some models may not operate
correctly.
When the memorized data is lost or
damaged by any chance, Clarion shall not
be liable for any damage.
When using an USB memory stick, we
recommend that you backup your data stored
on it before by using a personal computer
etc.
• Data files may be broken when using USB
memory sticks in the following situation:
When disconnecting the USB memory stick
or turning the power off during writing or
Cleaning
• Cleaning the cabinet
Use a soft, dry cloth and gently wipe off the
dirt. For tough dirt, apply some neutral
detergent diluted in water to a soft cloth, wipe
off the dirt gently, then wipe again with a dry
cloth.
Do not use benzene, thinner, car cleaner, etc.,
as these substances may damage the cabinet
reading data.
When affected by static electricity or electric
noise.
Connect/disconnect the USB memory stick
when it is not accessed.
• Some USB memory sticks cannot be inserted
to the main unit because of their shape. In
such cases, use a commercial USB extension
cable to connect them.
• Connecting with the computer is not covered.
• Music files (MP3, WMA, etc.) stored in the
USB memory stick cannot be played back.
WARNING
Alkaline (CR) button batteries contain
Perchlorate.
Dispose of discharged batteries properly.
or cause the paint to peel. Also, leaving rubber
or plastic products in contact with the cabinet
for long periods of time may cause stains.
• Cleaning the liquid crystal panel
The liquid crystal panel tends to collect dust,
so wipe it off occasionally with a soft cloth.
The surface is easily scratched, so do not rub
it with hard objects.
12 VX400/VZ400
Page 13
Handling Discs
English
Handling
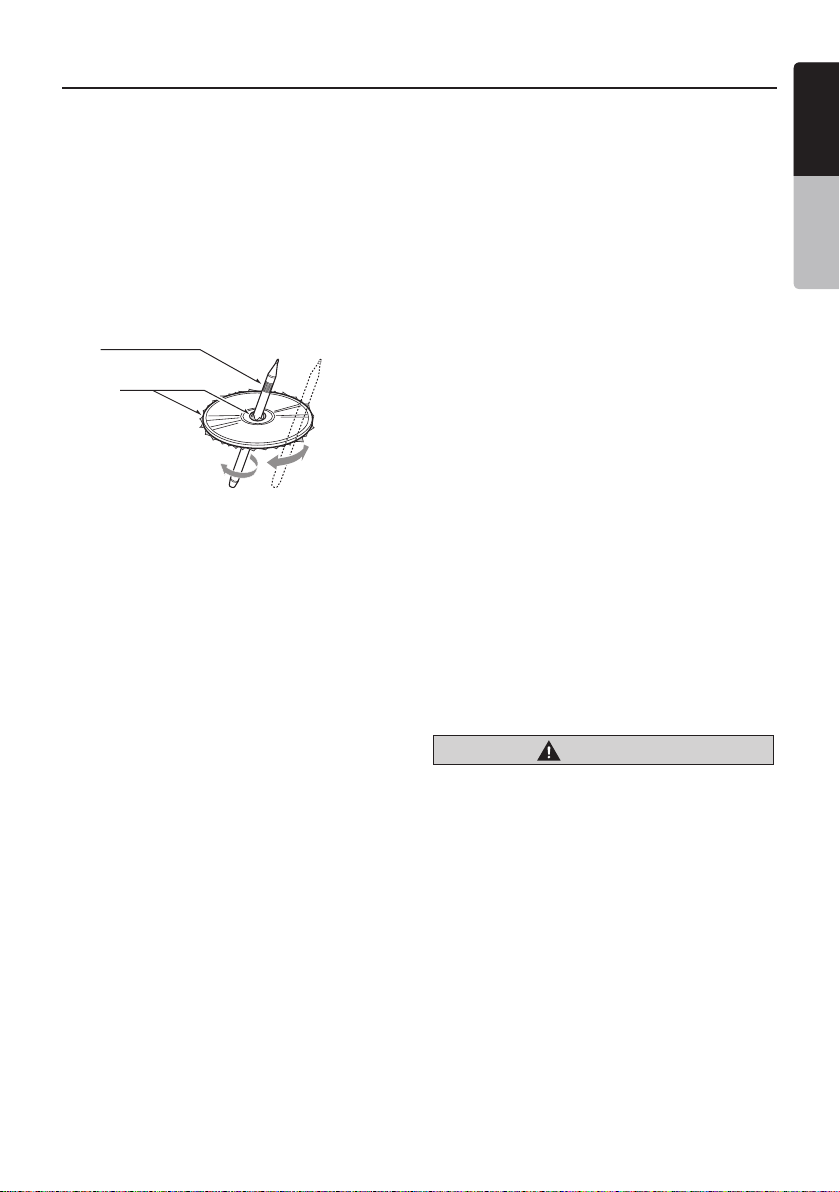
• New discs may have some roughness
around the edges. If such discs are used,
the player may not work or the sound
may skip. Use a ball-point pen or the like
to remove any roughness from the edge
of the disc.
Ball-point pen
Roughness
• Never stick labels on the surface of the
disc or mark the surface with a pencil or
pen.
• Never play a disc with any cellophane
tape or other glue on it or with peeling off
marks. If you try to play such a disc, you
may not be able to get it back out of the
DVD player or it may damage the DVD
player.
• Do not use discs that have large
scratches, are misshapen, cracked, etc.
Use of such discs may cause
misoperation or damage.
• To remove a disc from its storage case,
press down on the center of the case
and lift the disc out, holding it carefully
by the edges.
• Do not use commercially available disc
protection sheets or discs equipped with
stabilizers, etc. These may damage the
disc or cause breakdown of the internal
mechanism.
Storage
• Do not expose discs to direct sunlight or
any heat source.
• Do not expose discs to excess humidity
or dust.
• Do not expose discs to direct heat from
heaters.
Cleaning
• To remove fingermarks and dust, use a
soft cloth and wipe in a straight line from
the center of the disc to the
circumference.
• Do not use any solvents, such as
commercially available cleaners,
anti-static spray, or thinner to clean
discs.
• After using special disc cleaner, let the
disc dry off well before playing it.
On Discs
• Exercise a good precaution when loading
a disc. The operation panel will close
automatically when leaving it open for a
while.
• Never turn off the power and remove the
unit from the car with a disc loaded.
CAUTION
For your safety, the driver should
not insert or eject a disc, opening
the operation panel while driving.
English
Owner’s Manual
VX400/VZ400 13
Page 14
English
5. DVD VIDEO SYSTEM
DVD video is a high-quality digital video source that provides crisp and clear images.
One 12 cm disc contains either one film or four hours of music.
Owner’s Manual
DVD Video Features
This unit provides the following functions
in addition to the high image quality and
sound quality of DVD video.
Note:
•
The functions described in this section,
for example, the recorded language,
subtitles, angles, etc. differ depending on
the DVD video disc.
Refer to the instructions provided with
the DVD video.
•
Some disc functions may operate
differently from described in this manual.
Multi-sound function
DVD video can store up to 8 languages for
one film; select the language of your
preference.
• The languages stored on the disc are
indicated by the icon shown below.
Multi-angle function
A DVD video that is filmed from multiple
angles allows you to select the angle of
choice.
• The number of recorded angles are
indicated by the icon shown below.
Subpicture (subtitles) function
A DVD video can record subtitles for up
to 32 languages and you can select the
language of the subtitles you wish to see.
The number of recorded subtitle
languages are indicated by the icon shown
below.
Multi-story function
When a DVD video contains more than
one story for a film, you can select the
story you wish to enjoy. The operation
procedures vary with the disc; observe the
instructions for selecting a story provided
during playback.
Menu screens
Menus can be called up during DVD
video playback to perform menu setting.
• Example showing menu display
14 VX400/VZ400
Page 15
Discs
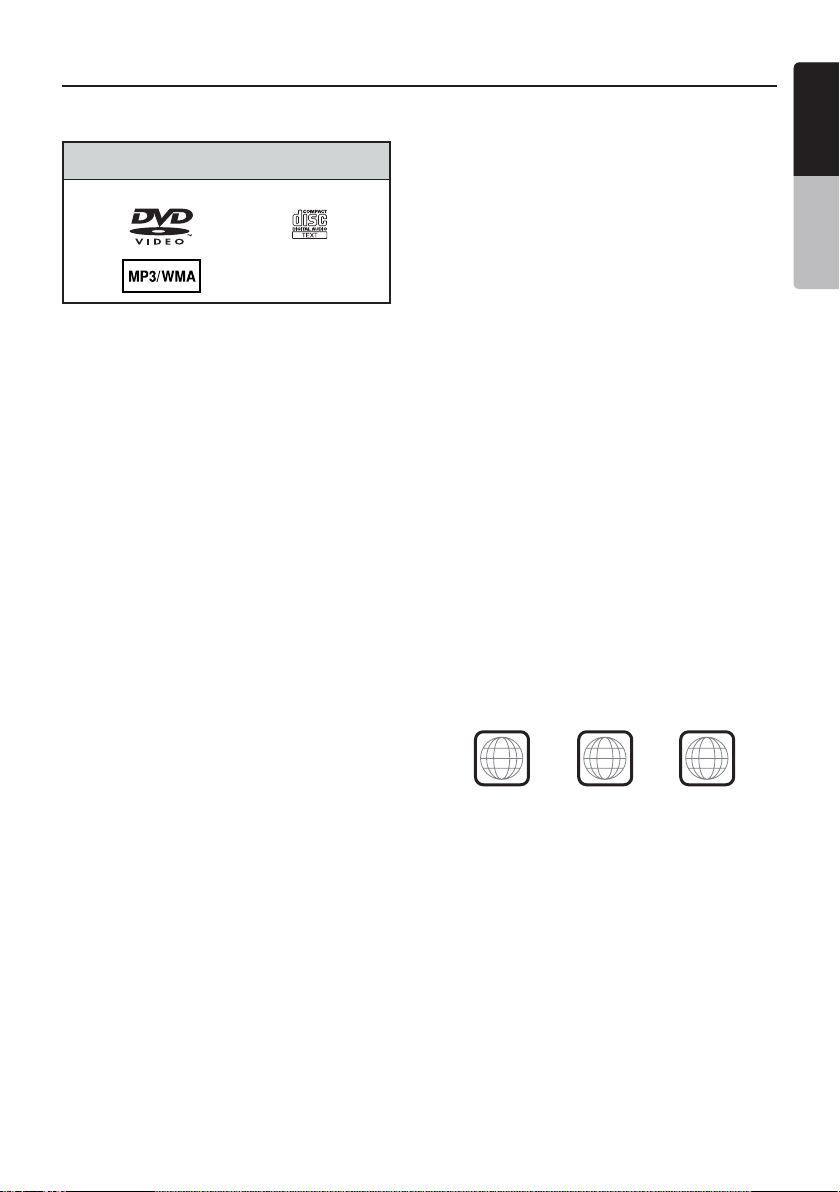
Playable discs
This DVD video player can play the following
discs.
DVD video discs
About CD Extra discs
A CD Extra disc is a disc in which a total of two
sessions have been recorded. The first session
is Audio session and the second session is
Data session.
Your personally-created CDs with more than
second data sessions recorded cannot be
played on this DVD video player.
Note:
•
When you play a CD Extra disc, only the first
session will be recognized.
About playing a CD-R/CD-RW disc
(MP3, WMA)
This player can play CD-R/CD-RW discs
previously recorded in music CD format (MP3,
WMA) or video CD format.
About playing a DVD-R/RW or DVD+R/RW
disc
This player cannot play DVD-R/RW and
DVD~R/ RW discs previously recorded in video
CD format.
However, MP3/WMA files recorded on DVD-R/
RW and DVD+R/RW discs can be played.
Playable discs
Audio CDs
Discs that cannot be played back
This DVD video player cannot play back DVDAudio, DVD-RAM, Photo CDs, etc.
Note:
•
I
t may also not be possible to play back CDs
recorded on a CD-R unit and CD-RW unit.
(Cause: disc characteristics, cracks, dust/dirt,
dust/dirt on player’s lens, etc.)
•
If a CD-R or CD-RW disc that has not been
finalized is played, it will take a long time to
start playing. Also, it may not be possible
to play depending on its recording conditions.
•
You cannot play SuperAudio CDs
Playback of the CD player is not supported
even if it is a hybrid disc.
About MP3/WMA playback
This unit can play back CD-R/CD-RW, DVD-R/
RW and DVD~R/RW discs on which MP3/WMA
music data have been recorded.
For a detailed information, see the section
entitled “Listening to MP3/WMA”.
Note on region numbers
The DVD video system assigns a region number
to DVD video players and DVD discs by sales
area. DVD video players sold in the United
States can play back DVD discs with the region
number “ALL”, “1” or any combination of
numbers that also incorporate a “1”.
The DVD video region number is marked on the
disc jacket as shown below.
1
ALL
1
4
6
English
English
Owner’s Manual
VX400/VZ400 15
Page 16

About the registered marks, etc.
English
•
This product incorporates copyright protection
technology that is protected by U.S. patents
and other intellectual property rights. Use of this
copyright protection technology must be
Owner’s Manual
authorized by Macrovision, and is intended for
home and other limited viewing uses only
unless otherwise authorized by Macrovision.
Reverse engineering or disassembly is prohibited.
•
Manufactured under license from Dolby
Laboratories.
“Dolby”, “Pro Logic” and the double-D symbol are
trademarks of Dolby Laboratories.
•
“Made for iPod” means that an electronic
accessory has been designed to connect
specifically to iPod and has been certified by the
developer to meet Apple performance standards.
“Works with iPhone” means that an electronic
accessory has been designed to connect
specifically to iPhone and has been certified by the
developer to meet Apple performance standards.
Apple is not responsible for the operation of this
device or its compliance with safety and regulatory
standards.
iPod and iTunes® are trademarks of Apple Inc.,
registered in the U.S. and other countries.
iPhone is a trademark of Apple Inc.
•
HD Radio™ and the HD Radio and HD Radio
Ready logos are proprietary trademarks of iBiquity
Digital Corporation.
•
The Bluetooth® word mark and logos are owned
by the Bluetooth® SIG, Inc. and any use of such
marks by Clarion Co.,Ltd. is under license. Other
trademarks and trade names are those of their
respective owners.
•
2009 SIRIUS XM Radio Inc., SIRIUS, XM and all
related marks and logos are trademarks of SIRIUS
XM Radio Inc. and its subsidiaries. All other marks,
channel names and logos are the property of their
respective owners.
16 VX400/VZ400
Page 17
6. OPERATIONS
English
Basic Operations
Note:
•
Be sure to read this chapter referring to the
chapter “3. CONTROLS”
CAUTION
When the unit is turned on, starting and
stopping the engine with its volume raised to
the maximum level may harm your hearings.
Be careful about adjusting the volume.
Turning ON and OFF the Power
Note:
•
Start the engine before using this unit.
•
Be careful about using this unit for a long
time without running the engine. If you drain
the car’s battery too far, you may not be able
to start the engine and this can reduce the
service life of the battery.
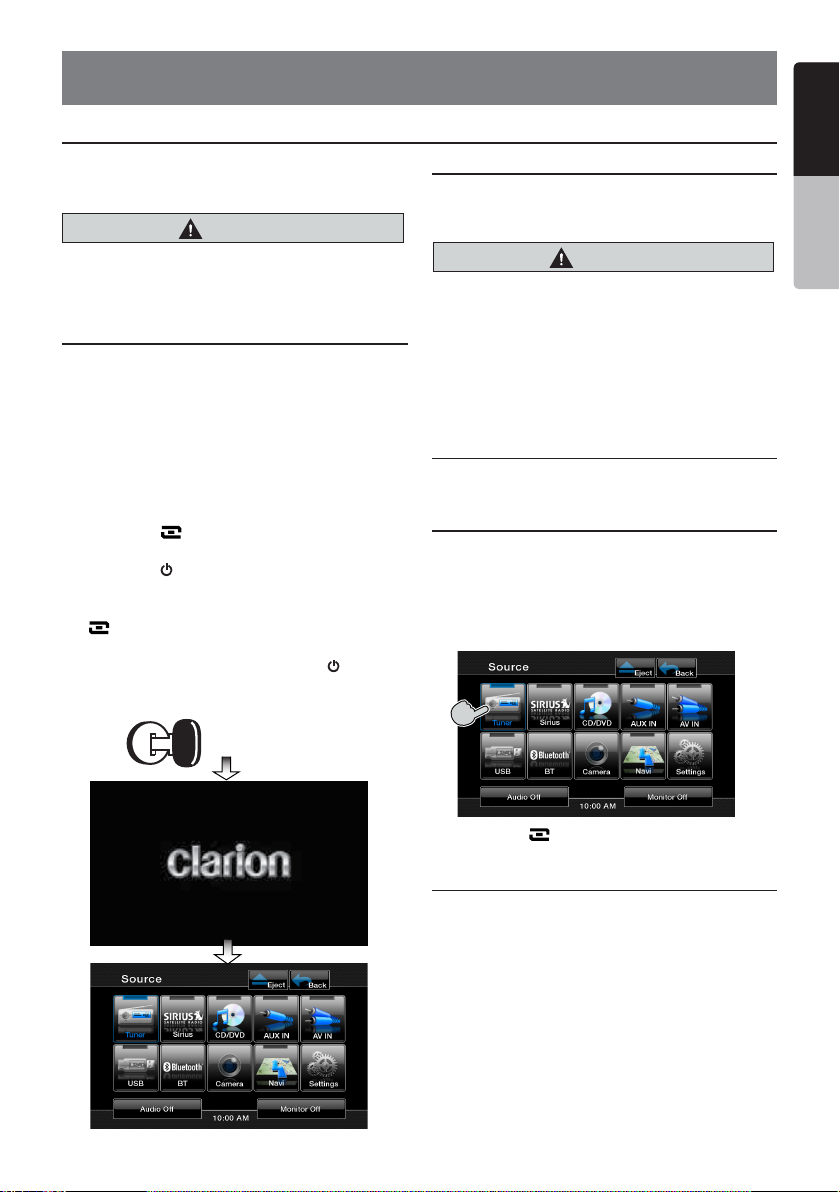
1. Start the engine. The power button
illumination on the unit will light up.
2. Press the [ SRC] button on the tuner to
turn ON the power.
3. Press the [ ] power button on the remote
control to turn ON the power.
4. To turn OFF the power, press and hold the
[ SRC] power button on the tuner for
more than 2 seconds.
5. To turn OFF the power, press the [ ] power
button on the remote control.
Opening and Closing Operational Panel
Press [OPEN] button on the unit (VZ400).
The operational panel will be open.
Press the same button again to close the panel.
CAUTION
• Do not move the operation panel forcibly or
apply strong force to the operation panel.
• When the operation panel is operating, be
careful not to get your hand or finger caught
between the operation panel and main unit
or its mechanical parts.
• The driver should not operate the operation
panel while driving.
Adjusting the Angle of the Operational Panel
Adjust the desired angle by changing the tilt
angle in the Settings menu (VZ400).
Selecting a Mode
1. Touch the desired source key you wish to
change to: Tuner, Disc, NAVI, USB, Sirius,
AUX IN, AV IN, etc., iPod/iPhone.
*External equipment not connected to this
unit is not displayed.
English
Owner’s Manual
Engine ON
position
2. Press the [ ] SRC button to scroll through
the available sources
Turning Monitor ON or OFF
1. Touch the screen button Monitor OFF on the
Main Menu to turn Off the screen.
2. Touch the screen again to turn monitor
screen On.
VX400/VZ400 17
Page 18

Basic Operations
English
Adjusting the Volume
Press [VOL -]/[VOL+] buttons to adjust the
volume.
Owner’s Manual
[VOL -]: Decreases the volume.
[VOL+]: Increases the volume.
• The volume level indicated in the display is
in a range from 0 (min.) to 40 (max.).
CAUTION
While driving, keep the volume level at which
external sounds can be heard.
Mute
Press the [MUTE] button on the remote control
to turn mute On and Off.
Adjusting the Settings
1. Press [Settings] to enter the setting menu
mode.
2. Press the desired mode key.
Modes come in the following order:
• General
• Audio
• Regional
• Monitor Adjust
• Video
• Rating
• Others
1. Touch the [Audio Settings] key on the
screen or press the [SEL] key on the
remote control.
2. Touch the item key to adjust.
3. Perform the adjustment.
4. Touch the [ ]/[ ] keys to scroll between
the pages.
5. Touch the [ ] key to return to the previous
screen.
* In the following sections, only the details
regarding adjustments are described,
procedures to select items are skipped.
3. Perform the adjustment for the desired item.
See the following sections fo details.
Adjusting the Audio Settings
18 VX400/VZ400
Adjusting the EQ
The EQ can be adjusted as follows.
1. Touch the [ ] or [ ] key to select your
settings.
2. Select User to set your preferable settings.
3. Select from preset setting list:
Flat, Jazz, Pop or Classical.
Adjusting the Bass
The Bass gain and Bass frequency can
be adjusted as follows.
1. Touch [ + ] or [ - ] key to set the
desirable level.
2. To set the Bass center frequency, enter
the Audio adjustment in the Settings
menu.
3. To set the Bass Q-Factor, enter the Audio
Adjustment in the Settings menu.
Page 19

Basic Operations
Adjusting the Treble
The Treble gain and Treble frequency can
be adjusted as follows.
1. Touch [ + ] or [ - ] key to set the desirable
level.
2. To set the Treble center frequency, enter
the Audio adjustment in the SETUP menu.
Adjusting the Balance/Fader
The Balance or Fader can be adjusted as
follows.
1. Touch the [R] or [F] key to adjust to the
fader level.
• The factory default setting is “0”.
(Adjustment range: front 9 to rear -9)
2. Touch the [L] or [R] key to adjust to
the balance level.
• The factory default setting is “0”.
(Adjustment range: left -9 to right 9).
Adjusting the Subwoofer
The Subwoofer can be adjusted as follows.
1. Touch the [ ] or [ ] key to adjust to
the subwoofer level.
• The factory default setting is “0”.
(Adjustment range: left -9 to right 9).
4. Touch the [Clock Mode] to change time
settings to 12Hr or 24Hr.
Adjusting the Radio region
1. Touch the [Settings] key. The Settings
menu will be displayed.
2. Touch the [Radio Field] key in the General
sub menu.
3. A region selection menu will appear. Scroll
down using the arrow at the bottom of the
menu. Scroll up using the arrow at the
bottom of the menu. Select the area’s radio
region that you are in. If the region selected is
incorrect, radio reception will be poor.
Reset to Factory Defaults
1. Touch the [Settings] key. The Settings
menu will be displayed.
2. Touch the [Others] key.
3. Touch the [Reset] key.
Select [YES] to restore your unit to factory
default settings. This function will erase all
memory from the unit and you must reset all
personalized items such as tuner presets.
NOTE: You will be asked once to confirm that
you would like to reset the unit. The unit will
power down and restart with factory defaults.
English
English
Owner’s Manual
Adjusting the Loudness
The Loudness can be adjusted as follows.
1. Touch the [ - ] or [ + ] key to turn loudness
On or Off.
Adjusting the clock
1. Touch the [Settings] key. The Settings
menu will be displayed.
2. Touch the [Clock] key in General sub
menu.
3. Set up the time by touching the digital
numbers on the screen. After inputting the
time, you can choose AM or PM if the Clock
Mode is set to 12 Hr.
VX400/VZ400 19
Page 20

Radio Operations
English
Listening to the Radio
1. Touch the [Tuner] key on the Main menu
display. The tuner mode screen is displayed.
2. Touch the [BAND] key or touch the [Band]
Owner’s Manual
button on remote control to select the radio
band. Each time the button is pressed, the
radio reception band changes in the following
order: FM1, FM2, FM3, AM, FM1...
1
8
7
6
1211
1 - Band key
2 - Scan key
3 - Tune Up key
4 - Tune Down key
5 - Audio Settings
key
6 - List key
7 - Seek Down key
8 - Seek Up key
9 - Eject key
10 - Main Menu key
11 - Tuner display
Seek Tuning
1. Touch the [BAND] key to select the radio
band (FM or AM).
2. Touch the [ ] or [ ] key to
automatically seek a station.
Seek
• When touching the [ ] key, the station is
sought in the direction of higher frequencies.
• When touching the [ ] key, the station is
Seek
Seek
Seek
sought in the direction of lower frequencies.
Manual Tuning
1. Touch the [BAND] key to select the radio
band (FM or AM).
2. Touch the [ ] or [ ] key to
automatically seek a station.
M-Seek
• When touching the [ ] key, the station is
sought in the direction of higher frequencies.
• When touching the [ ] key, the station is
M-Seek
M-Seek
M-Seek
sought in the direction of lower frequencies.
Recalling a preset station
There are 2 ways to recall the preset station.
• Using the remote control:
1. Touch the [BAND] button to select the
desire band (FM or AM) on the remote
control.
2. Touch the preset number (1 to 12) on
numeric pad.
29 10
• Using the tuner unit:
1. Touch the [BAND] key to select the
desire band (FM or AM) on the tuner.
2. Touch the
3
[List] key to display the Preset
List screen.
3. Touch the preset station (1 to 12) on tuner
display.
4
4. Touch
[ ] or [ ] to select next station
up or down the preset list.
5. Touch
5
the preset stations.
the [PS] button to begin scanning
Manual memory
1. Touch the desired Band key to select the
band you wish to store in.
2. Tune in the station you wish to store using the
seek tuning, manual tuning, or preset tuning.
3. Touch and hold the desired Preset key you
wish to store the current station for more than
2 seconds.
4. Touch
[ ] or [ ] to select next station
up or down the preset list.
Auto Store
The Auto Store is a function for storing up to 12
stations that are automatically tuned in
sequentially. If 12 receivable stations cannot be
received, a previously stored station remains
unoverwritten at the memory position.
1. Touch the
band. (FM or AM)
2. Touch and hold the
the Auto Store function.
A beep sounds and the stations with good
reception are stored automatically to the
preset channels.
[Band] key to select the desired
[Auto Store] key to start
20 VX400/VZ400
Page 21

Radio Operations
Preset Scan
The Preset Scan receives the stations stored in
the preset memory in order. This function is
useful when searching for the desired station in
memory.
1. Touch the [Band] key to select the desired
band. (FM or AM).
2. Touch the [List] key to display the Preset
List screen.
3. Touch the [PS] key to start the Preset Scan.
The unit starts scanning each station for 10
seconds sequentially. Presets with a weak
signal will be skipped.
DVD Video Player Operations
4. When the desired station is tuned in, touch
the [PS] key again to continue receiving that
station.
LOC/DX Setting
The DX / LOC setting changes the tuner
sensitivity in order to seperate closely spaced
stations. This feature is useful in areas that
have many radio stations in close proximity.
1. Touch the [List] key to display the Preset
List screen.
2. Touch the [DX] key to switch to DX
tuner sensitivity.
3. Touch the [LOC] key to switch to Local
tuner sensitivity.
English
English
Owner’s Manual
Change DVD System Settings
Note:
If the set up operation is performed in
the middle of DVD video play, the disc
will restart from the beginning.
Selecting DVD Set Up Menu
1. Touch the [Settings] key on the Main
Menu to access the Video set up menu.
2. Touch the [Video] key. The video menu is
displayed.
Setting up the Screen Size
1. Touch the [Aspect Ratio] key in the Video
sub menu to change the sceen size.
2. Touch the desired aspect ratio: 4:3 or 16:9.
The factory default setting is “ 16:9 ”.
• When watching a wide type through a
conventional type of the rear view monitor
(4:3), the leftmost and rightmost areas of the
screen are cut off.
This function allows displaying the important
part of image fully on the screen. In some
cases, image is displayed while being panned
(scrolled).
• When watching a wide type through a wide
type of the rear view monitor (16:9),
the leftmost and rightmost areas of the
screen are not cut off.
Setting up the Video System Format
1. Touch the [Aux IN] key in the Video sub
menu to set up the video system format.
2. Touch the required format :
NTSC.
The default setting is Auto.
Auto, PAL or
Setting up the AUX Input Sensitivity
1. Touch the [AUX Input Sens] key in the Video
sub menu to set up the sensitivity level.
2. Touch the desired sensitivity level displayed:
Low, Mid or High.
The default setting is
Mid.
VX400/VZ400 21
Page 22

DVD Video Player Operations
English
Setting up the password for parental level
control
The factory default setting is “0000”.
Owner’s Manual
1. In Main Menu touch the [Settings] key.
2. Touch the [Rating] key on the dispaly.
3. Touch the [Set Password] key, the numerical
key pad will appear.
4. Input a new password and touch the
[OK] key. The password is set.
Note: When a disc with view restrictions is
inserted, you will be prompted to input
a password. The disc will not be
viewable until the correctpassword is
entered.
Set rating for parental level control
1. Touch the [Settings] key in the Main Menu.
2. Touch the [Parental Control] key in the
Rating sub menu. The Parental Control
selections will appear.
3. Touch the desired rating for level control.
Use this table to set the parental level.
NC-17 NO ONE 17 AND
UNDER ADMITTED
R RESTRICTED
PG13 PARENTS STRONGLY
CAUTIONED
PG PARENTAL GUIDANCE
SUGGESTED
G GENERAL AUDIENCES
Watching/Listening to a disc
Note: Refer to the diagram in “CONTROLS”
chapter.
To load a disc:
1. Press the [OPEN/CLOSE] button to
retract the control panel. (VZ400 only)
2. Insert the disc into the center of the insertion
slot the label side facing up.
CAUTION
For your safety, the driver should not insert
or eject a disc, or operate the controls
while driving.
Note:
•
Never insert foreign objects into the disc
insertion slot.
•
If the disc is not inserted easily, there maybe
another disc in the mechanism or the unit may
require service.
•
8cm (single play) discs cannot be used.
3. Disc starts playing automatically.
WARNING
Some videos may be recorded at higher
than desired volume levels. Increase the
volume gradually from the minimal
setting after the video has started.
Ejecting a disc
1. Touch the center of the control panel.
2. Touch the [
*If the disc is left in the ejected position for
10 seconds, the disc is automatically
reloaded. In this case, the play mode will
remain set to the Tuner mode.
Note: If you force a disc into before auto
reloading, it will damage the player.
Eject
] key.
• The contents that the parental level restricts
vary with the country code.
Note: The rating can be selected only under
the password unlocked status, and the
limits can be set only under the password
locked status.
22 VX400/VZ400
Page 23

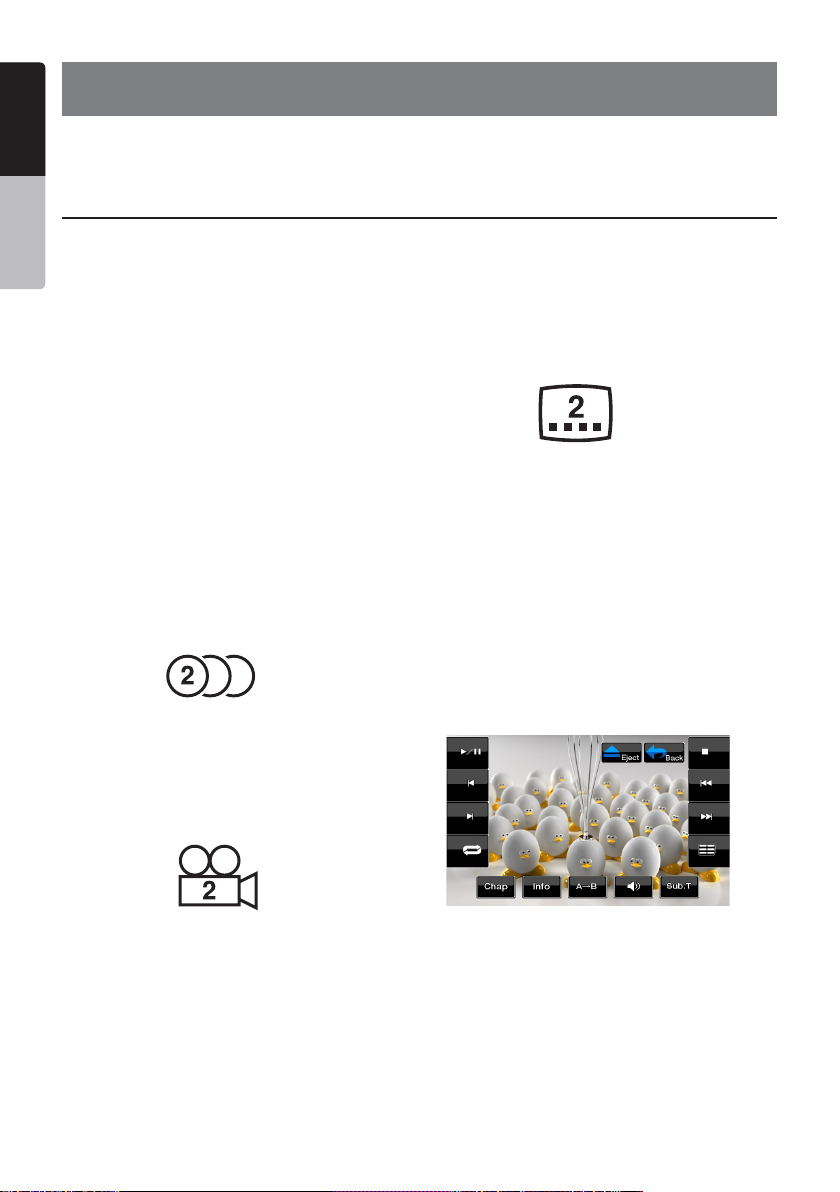
DVD Video Player Operations
Showing DVD Player mode screen
After disc is loaded, the play mode is
automatically engaged.
Touch the screen of the playing disc to display
DVD Video menu. The display will return to the
playback screen, if you do not touch the screen
for 5 seconds.
15
14
13
12 11 10 9 8
1 - Play/Pause key
2 - Eject
key
3 - Main Menu key
4 - Stop Playback key
5 - Previous Playback key
6 - Next Playback key
7 - Title List key
8 - Subtitle List key
Operate the DVD Player menu
You can select the key items displayed in the
DVD menu by directly touching it.
If the key items are hard to select correctly,
you can also operate them by using the remote
control directional buttons.
Stop Playback
1. Touch the [ ] key. Playback is stopped.
2. To resume playback, press the [ ] key.
Playback resumes from the scene where
playback is stopped.
Play/Pause Playback
1. Touch the [ ] key to pause during
playback.
2. Touch the [ ] key again to resume
playback.
Skip (Search) a Chapter
1. Touch the [ ] or [ ] key during
playback.
Chapters are skipped down or up from
current locations, as many times as the
key is pressed, and playback starts.
2 3 41
5
6
7
9 - Audio key
10 - Repeat Segment key
11 - Information key
12 - Chapter key
Repeat key
13 14 - Fast Forward key
15- Fast Backward key
Fast Forward Fast Backward
1. Touch the [ ] or [ ] key to start your
fast backward or fast forward during
playback.
The playback speed starts at 2x, then will
increase to 4x, 8x, and 16x with each
additional press.
*No audio is reproduced during fast forward
and fast backward operation.
*The fast forward and fast backward speed
may differ depending on the disc.
Direct Search Options
You can locate the beginning of a scene using
the time, chapter numbers or title numbers
recorded on the DVD Video disc.
1. Showing the DVD PLAYER mode screen,
touch the [Chap] key.
2. The Direct Search Option menu appears with
the search options that are available:
• Title
A large segment to divide the data area of
the disc.
• Chapter
A small segment to divide the data area of
the disc.
• Time
A specific time on the disc.
3. Touch the Direct Search method you would
like to use.
4. Input the number of the title/chapter/time that
you want to play back with the numeric key.
5. Touch the [OK] key to confirm.
Playback starts from the scene of the input
title number, time or chapter number.
*If the input title/chapter/time number does
not exist or searching with a title/chapter
number is not allowed, the screen image will
not change.
English
English
Owner’s Manual
VX400/VZ400 23
Page 24

DVD Video Player Operations
English
Repeat Playback
This operation plays back chapters recorded on
the DVD Video repeatedly.
1. Showing the DVD Player mode screen,
Owner’s Manual
touch the
2. Touch the
3. Touch the
the repeat playback.
[ ] key for Chapter Repeat.
[ ] key again for Title Repeat.
[ ] key again to turn off
Repeat A B
Select the desired passage to play back.
1. Touch the
loop starting position.
2. Touch the
Repeat loop ending position. The Repeat
loop will begin.
3. Touch the
[A B] key to select the Repeat
[A B] key again to select the
[A B] key again to stop replay.
Using the Title Menu
On DVD discs containing two or more titles, you
can select from the title menu for playback.
1. Showing the DVD Player mode screen,
touch the
The title menu screen appears.
*Depending on the disc, the title menu cannot
be called.
2. Select the key items displayed in the title
menu screen by the same way of the DVD
menu operation.
*Depending on the disc, items cannot be
selected with the ten-key buttons.
[ ] key during playback.
Switching among the languages
On discs in which two or more audios or audio
languages have been recorded, you can switch
among the audio languages during playback.
1. Touch the [ ] audio key during playback.
• Each time you touch the key, you can
switch among audio languages.
• It may take time to switch among audios.
* Depending on the disc, up to 8 audios may
be recorded. For details, see the mark of
the disc: ( Indicates that 8 audios
have been recorded).
* When the power is turned on and when the
disc is changed to a new one, the language
set as the factory default is selected. If that
language has not been recorded, the
language specified on the disc.
* Depending on the disc, switching may be
completely impossible or impossible on
some scenes.
2. The DVD PLAYER mode screen will hide in
5 seconds after your selection is made.
24 VX400/VZ400
8
S
witching Subtitles
On DVD discs in which two or more subtitle
languages have been recorded, you can switch
among the subtitle languages during playback.
1. Touch the [Sub T.] key during playback.
Each time you touch the key, you can switch
among subtitles.
• It may take time to switch among subtitles.
* Depending on the disc, up to 32 kinds of
subtitles may be recorded. For details, see
the mark of the disc: ( Indicates that 8
kinds of 8 subtitles have been recorded).
* Depending on the disc, switching may be
completely impossible or impossible on
some scenes.
2. The DVD Player mode screen will hide in
5 seconds after your selection is made.
3. To turn off subtitles, repeat touching the
[Sub T.] key until subtitles are turned off.
8
Switching angles
On DVD discs in which video images have been
recorded in two or more angles, you can switch
among the angles during playback.
1. Press the [Angle] button on the remote
control during playback. Each time you
press the key, you can switch among angles.
* It may take time to switch among angles.
* Depending on the disc, up to 9 angles may
be recorded. For details, see the mark of
the disc: ( Indicates multi-angle).
* Depending on the disc, angles may switch
smoothly or switch with a momentary still
image.
* Depending on the disc, switching may be
completely impossible or impossible on
some scenes.
* Depending on the disc, scenes recorded in
two or more angles may be played back.
Displaying the playback status
Touch the [Info] key on the DVD Player mode
screen, or remote control.
Playback status is displayed on the screen.
Page 25

DVD Video Player Operations
LISTENING TO a CD
1 2 3 4
10
9
8
11 12 13 14
1 - Play/Pause key
2 - Eject key
3 - Main Menu key
4 - Stop Playback key
5 - Previous Track key
6 - Next Track key
7 - Audio Settings key
8 - List key
Pausing Playback
9 - Fast Forward key
10 - Fast Backward key
11 - Media Information
12 - User (Name, Artist,
Album) Information
13 - Track Play number
14 - Track Play time
1. Touch the [ ] key to pause playback.
2. To resume playback, touch the [ ] key
again.
Skipping a Track (searching)
Touch the [ ] or [ ] key during playback.
Tracks are skipped as many times the key is
pressed, and playback starts.
• Pressing the [ ] key starts playback
from the beginning of the next track.
• Pressing the [ ] key starts playback
from the beginning of the current track.
When this key is pressed again within
about 2 seconds, playback starts from the
beginning of the previous track.
Fast Forward and Fast Backward
1. Touch the [ ] or [ ] key during
playback. The media will advance at 2x
speed.
2. Touch again to advance to higher speed
reversing or forwarding such as 4x, 8x
and 16x. Touch once more to resume
normal speed playback.
Scanning the Tracks
1. Touch the [List] key to display the Disc List
screen.
2. Touch the [Scan] key to begin previewing
the first 10 seconds of each song on the disc.
5
6
7
Searching with the Track Number
This operation allows searching using the track
numbers recorded on the CDs.
1. Touch the [List] key to display the Disc List
screen.
2. Touch the [ Key ] key to display the
numerical keypad.
3. Input the track number that you want to play
back with numerical keypad.
4. Touch the [OK] key to confirm.
• If the input track number does not exist or
searching with a track number is not
allowed, the unit will return to the List
screen.
Selecting a track on the Track List Screen
This function allows you to select tracks from a
displayed list.
1. Touch the [List] key to display the Disc List
screen.
2. Touch the track title on the display list.
The selected track will start playing.
3. When the desired track is not displayed,
touch the [ ] or [ ] key to scroll the track
list.
4. Touch the desired track title key in the List
display. The corresponding track will start
playback.
5. Touch the [List] key to return to the main
screen.
Stop Playback
1. Touch the [ ] key to stop playback.
Audio Settings
1. Touch the
[Audio Settings] key to enter
Audio menu.
English
English
Owner’s Manual
VX400/VZ400 25
Page 26

DVD Video Player Operations
English
Other various play functions
1. Touch the [List] key to display the Disc List
screen.
2. Touch the key of the function you want
Owner’s Manual
to play:
Repeat [ ]: Touch once to start a single
track repeat. Touch again to activate repeat
all. To turn repeat off, press same key again.
• Repeat symbols are displayed in the info
window above the song list.
Shuffle [ ]: Touch the key to shuffle the
tracks during playback. Touch the key again
to turn off the feature.
• A shuffle symbol is displayed in the info
window above the song list.
Stop [ ]: Touch the key to stop playback.
LISTENING TO MP3/WMA
This unit is an ID3 Tag compatible model.
This unit supports the ID3 TAGs of the Version
2.4, 2.3, 1.1 and 1.0.
In displaying, this unit gives priority to the
Version 2.3 and 2.4 TAGs.
After USB device inserted into USB slot, or
disc is loaded, the play mode is automaticlly
engaged.
What is MP3/WMA?
MP3 is an audio compression method and
classified into audio layer 3 of MPEG standards.
WMA is an audio compression method
developed by Microsoft Corporation.
These audio compression methods have
penetrated into PC users and become a
standard format.
These features compress the original audio data
to about 10 percent of its initial size with a high
sound quality. This means that about 10 music
CDs can be recorded on a CD-R disc or CD-RW
disc to allow a long listening time without
having to change CDs.
Note:
•
Some CDs recorded on CD-R/RW mode may
not be usable.
Displaying MP3/WMA TAG titles
Tag information such as title, artist and album
title can be displayed for MP3/WMA file
containing Tag information.
Precautions when creating MP3 disc
•
File extensions
1. Always add a file extension “.MP3” or “.mp3”
to an MP3 file, and “.WMA” or “.wma” to a
WMA file by using single byte letters. If you
add a file extension other than specified or
forget to add these file extension, the file
cannot be played. In addition, if you use
upper case and lower case letters (capital
and small letters) mixedly for file extensions,
normal play may not be possible.
2. Files other than MP3/WMA data cannot be
played.
Playing files with a format not supported will
be skipped, and the scan, random and
repeat playback mode may be canceled.
File and Disc Not Supported
•
Files and discs with following extensions are
not supported: *.AAC, *.DLF, *.M3U, *.PLS,
MP3 PRO files, files with DRM, open session
discs.
Logical format (File system)
•
1. When writing an MP3/WMA file on a disc,
please select “ISO9660 level 1 or level 2
(without including expansion format)” as
the writing software format. Normal playback
may not be possible if the disc is recorded
on another format.
2. The folder name and file name can be
displayed as the title during MP3/WMA play
but the title must be within 31 single byte
alphabetical letters and numerals for the
folder name and file name (including an
extension). Entering more letters or numerals
than specified may cause an incorrect
display.
•
Entering File and Folder Names
Names using the code list characters are the
only file names and folder names that can be
entered and displayed. Using any other
character will cause the file and folder names
to be displayed incorrectly.
•
Electronic Shock Protection
10 seconds for CD-DA (CDA)
45 seconds for MP3 recorded at 44.1 kHz,
128kbps
90 seconds for WMA recorded at 44.1 kHz,
128kbps
•
Folder structure
A disc with a folder having more than 8
hierarchical levels will conflict with the
ISO9660 and playback will be impossible.
26 VX400/VZ400
Page 27

DVD Video Player Operations
•
Number of files or folders
1. The maximum allowable number of folders is
255 (including root directory); the maximum
allowable number of files is 512 (max. 255 per
folder). This represents the maximum number
of tracks that can be played back.
2. Tracks are played in the order that they were
recorded onto a disc. (Tracks might not
always be played in the order displayed on
the PC).
• Some noise may occur depending on the
type of encoder software used while
recording.
• In case of a track recorded at VBR (variable
bit rate), the display for the play time of the
track may be slightly different from the
actual play time. Also, the recommended
value of VBR ranges from 32 kbps to
320 kbps.
• After disc selection, the play mode is
automatically engaged.
English
English
Owner’s Manual
VX400/VZ400 27
Page 28

DVD Video Player Operations
English
Playing MP3 folders
When selected for play, files and folders
(Folder Search, File Search or Folder Select)
are accessed in the order in which they were
Owner’s Manual
written to the media. As a result, the order in
which they are expected to be played may not
match the order in which they are actually
played.
You may be able to set the order in which
MP3/WMA files are to be played by assigning
file names beginning with play sequence
numbers such as “01” to “99”.
For example, a medium with the following
folder/ file hierarchy is subject to Folder
Search, File Search or Folder Select.
See the diagram below.
The player will only recognize three folder
levels and does not display folders containing
other folders. In the example above, the unit
will display folders 3, 4, 6, and 8, but not 2 and
7 since they do not contain others.
28 VX400/VZ400
Page 29

Sirius Satellite Radio Operations
This function is available when a Sirius Satellite
Radio Receiver is connected through the
dedicated connection.
This unit is recommended to be used with the
following receiver:
SIRIUS Satellite Radio Receiver: SC-C1
Note:
SIRIUS satellite radio is a subscription service.
Please contact Sirius Radio to begin or alter
your subscription:
•
Internet: www.sirius.com
Telephone: 888-539-SIRIUS (747487)
Selecting a Satellite Radio Mode
Press the [SIRIUS] key on Main Menu display.
The system changes to the Sirius Satellite Radio
mode. The Sirius mode screen is displayed.
13
1
11
10
9
2 3 4
5
6
7
8
Confirming Your Radio ID
1. Touch the [KEY] key on the SIRIUS Menu
display to display the keypad.
Enter
“0” and press “OK”.
Your SIRIUS ID (12-digit number) will be
displayed.
Channel Selection
1. Touch the [List] key on the SIRIUS Menu
display to enter channel list preview mode.
2. Select the channel with the [ ] or [ ].
Only channels that can be received are
Seek
Seek
selected.
Channels that are locked and channels not
covered by the contract will be skipped.
The receiver seeks the next available channel
below or above the current channel.
English
English
Owner’s Manual
12
1 - Band key
2 -
Satellite Signal
3 - Eject key
4 - Main Menu key
5 - Key Pad key
6 - Tune Up key
7 - Tune Down key
8 - Audio Settings key
9 - List key
10 - Fast Backward key
11 - Fast forward key
12 - Media Information
13 - Sirius Channel
Information
Information Displayed During Reception
The following information is displayed when the
satellite radio cannot be received normally.
• When the receiver is turned on the first time or
after a reset: “UPDATING” followed by a
percentage of completion.
• When a channel is being tuned in (no signal is
yet received): “ACQUIRING SIGNAL”
• A channel without a broadcast has been
selected: “INVALID CHANNEL”
• A channel not covered by your contract:
“CALL 888-539-SIRIUS”
Call (888) 539-747487 to activate your radio.
• When a channel is out of air time: “OFF AIR”
• When the antenna is disconnected or has
been damaged: “ANTENNA ERROR”
Channel Selection with the Channel Number
1. Touch the direct access [Key] on the
SIRIUS Menu display to enter direct channel
selection.
2. Enter the channel number of your desired
station by touching the [0] to [9] keys.
3. Touch the [OK] key to tune the selection.
If you enter a wrong number, you can cancel
it by touching the [BACK] key.
VX400/VZ400 29
Page 30

Sirius Satellite Radio Operations
English
Recalling the preset station
A total of 20 satellite radio stations can be
stored in the receiver’s memory. You can access
the presets by touching the Presets keys.
Owner’s Manual
This allows you to store your favorite satellite
radio stations in the memory for later recall.
1. Touch the [Band] key to enter the
preset list to select or save your presets.
2. Touch the corresponding preset displayed
station to start play.
* There are 5 pages of preset memory space
available for your use. You can scroll the
pages by touching the right of the screen.
3. Touch the [Band] key to return to the
previous screen.
Auto Preset Store
1. Touch the channel, you would like to store.
2. Touch the [Band] key and hold it for 2
seconds the corresponding preset key to
save the selected channel.
Deleting a Preset
1. Touch the [Band] key and enter the preset
menu.
2. Touch the preset key you would like to
delete.
3. Touch and hold the [Del] key to for more
than 3 seconds.
the category of the last received channel is
displayed first.
Parental Controls Lock Channels
1. Touch the [Settings] key to enter setting list.
2. Touch the
is displayed.
3. Enter the code to lock the desired channel.
4. Touch the [OK] key to save.
5. To unlock the channel, follow steps 1 to 3,
than touch the [Clear] key.
[Lock] key. The numerical keypad
Receiving Stations by Category
Satellite Radio allows you to select broadcast
channel category (contents).
1. Touch [ ] or [ ] key to view all valid
categories.
2. Touch [ ] or [ ] to scroll through the pages
3. Touch the desired category item key to select
the category.
4. Select the desired channel by touching it
momentarily on the screen.
5. Touch the [List] key to exit category tuning
mode.
Seek
Seek
Note:
When the category selection mode is entered,
30 VX400/VZ400
Setting the Password
1. Touch the [Settings] key to enter setting list.
2. Touch the [Rating] key to display password
screen.
3. Enter the password on displayed numerical
pad.
4. Touch the [OK] key to save.
5. Touch the [ ] key to return to Sirius menu.
Note:
If you set passwords, you must input the correct code to
enter lock list. When you try to locked channel by keypad,
it will dispaly password’s keypad. Only entering correct
code can tune to the channel, or it will be back to the last
channel, if a password is wrong.
Page 31

7. ACCESSORIES
English
iPod/iPhone Operations
iPod/iPhones can be connected by using the connector cable supplied with the iPod/iPhone, but in
this case, you can enjoy its audio sound only. To enjoy video movies stored in the iPod/iPhone with
video displaying them on this unit, it is required to use the special connector cable separately sold.
Note:
•
This system will not operate or may operate improperly with unsupported versions.
•
For detailed information on the playable iPod/iPhone models, see our home page:
www.clarion.com
Notes on using Apple iPod/iPhone
•
Do not connect an iPod/iPhone to this unit
with a headphone connected to the iPod/
iPhone.
•
After the iPod/iPhone has been connected
to this unit, the iPod’s buttons are
disabled for operation in the Music mode.
•
In the Video mode, do not operate the iPod’s
buttons.
•
When in the iPod mode, a special iPod/iPhone
control screen is displayed different from the
main screens for other modes.
•
When no data is present, the title display will
remain blank.
•
The iPod/iPhone is used with the equalizer
function turned OFF.
•
Set the iPod/iPhone’s language setting to
English before connecting your iPod/iPhone.
Some characters of the other languages may
not be displayed correctly in this system.
• Precautions on battery consumption:
If the iPod/iPhone is connected to this unit
when the iPod/iPhone’s internal battery has
run down, this function may not operate
correctly. You must connect the iPod/iPhone
after charging the battery if it has run down.
Selecting the iPod Mode
1. Connect your iPod/iPhone to the USB
connector. The system will automatically
detect the connected device. The iPod icon
is displayed on the Main Menu screen.
• When a iPod/iPhone is already connected
Touch the [iPod] key on the Main Menu
screen. The system changes to the iPod
mode, and starts playback from the previous
position.
Controlling the iPod/iPhone
Operation keys
• iPod audio mode screen
1 2 3 4
10
9
8
1 - Play/Pause key
2 - Eject key
3 - Main Menu key
4 - Video/Music key
5 - Previous Track key
6 - Next Track key
7 - Audio Settings key
8 - List key
9 - Fast Forward key
10 - Fast Backward key
5
6
7
[ ] Play/Pause key
• Use to control playback and pause.
1. Touch the key during playback. Playback
pauses.
2. To resume playback touch the key again.
[ ] Eject key
• Touch this key to remove the disc.
*If the disc is left in the ejected position for
10 seconds, the disc is automatically
reloaded.
Note: If you force a disc into the insertion
slot before auto reloading, this can
damage the player.
[ ] Main Menu key
• Touch this key to return to the Main menu.
[Video] Video/Music key
• Touch this key to switch operation mode to
the Video mode or Music mode.
VX400/VZ400 31
English
Owner’s Manual
Page 32

iPod/iPhone Operations
English
Note:
•
Note that not all iPod/iPhone devices are
compatible to output video to this unit.
Owner’s Manual
[ ] Previous Track key
• Touch this key to play the previous track.
[ ] Next Track key
• Touch this key to play the next track.
[Audio Settings] key
• Touch this key to switch to the Audio menu for
setting the audio settings.
[ ] Fast Forward key
• Touch this key to fast forward the track
selection.
[ ] Fast Backward key
• Touch this key to fast backward the track
selection.
[List] key
• Touch the List key to display the menu screen
to search tracks to be played.
Viewing video data in the iPod/iPhone (only
for the iPod/iPhone with video features)
When you connect an iPod/iPhone with video
features by using the optional connector cable
for iPod/iPhone with video, you can enjoy the
video data and slide show data stored in the
iPod/iPhone showing them on the display of this
unit (and the rear monitor if connected).
Note:
Do not connect the iPod/iPhone to this unit
when a Video Playlists item is selected on the
iPod/iPhone.
1. Touch the [Video] key on the iPod audio
mode menu screen. The iPod play video
screen is displayed.
4
5
6
1 - Scroll Up key
2 - Scroll Down key
3 - Return key
1
2
4 - Folders key
5 - Repeat key
6 - Shuffle key
3
[ ] Scroll Up key
• Touch this key to scroll up the track list.
[ ] Scroll Down key
• Touch this key to scroll down the track list.
[Return] key
• Touch this key to return to the previous menu.
[Folders] key
• Touch this key to return to the main track
search screen.
[ ] Repeat key
• Touch this key to repeat the play of the
selected track.
[ ] Shuffle key
• Touch this key to shuffle between the tracks.
32 VX400/VZ400
2. Select the type of video you would like
to play, by touching the menu. The video
playback will start.
Note:
Video playback is not available on all iPod/
iPhone devices. Please contact your Clarion
dealer for details. An optional connection cable
or accessory may be required for this feature.
3. To stop the video play, touch the screen.
iPod play video menu will be displayed.
4. Touch the [Music] key to return to the iPod
audio menu.
Note:
•
“AUDIO ONLY” is displayed when the
automobile is moving.
•
Image data may not be played back according
to the status of the iPod/iPhone.
•
The volume setting of video data is relatively
lower than audio data. Be sure to lower the
volume setting before switching to the other
mode.
•
Do not select the categories with no track
registered from the iPod menu screen.
The iPod/iPhone may be frozen. If the iPod
/iPhone is frozen, reset the iPod/iPhone
by following the procedure described in the
instruction manual of the iPod/iPhone.
•
Audio may be played back slightly out of
synchronization with video images.
Page 33

USB Operations
This system can play audio files (MP3/WMA) stored in an USB memory which is recognized as
“USB Mass Storage Class device”. You can use your USB memory as an audio device by simply
copying desired audio files into it.
Note:
•
This system will not operate or may operate improperly with some USB memory.
•
Files protected with any DRM can not be played.
Notes on using USB memories
•
General notes
• When no data is present, the message
“NO FILE” will be displayed.
•
Notes on the MP3/WMA files
• This system can play the MP3/WMA
files stored in the USB memory.
• This system cannot play DivX files stored in
the USB memory.
• Set the Sampling Frequency to:
For MP3 files:
• MPEG1 Layer3: 32, 44.1, or 48 kHz
• MPEG2 Layer3: 16, 22.05, or 24 kHz
• MPEG2.5 Layer3: 8, 11.025, or 12 kHz
For WMA files: 32, 44.1, or 48 kHz
• Set the Bit Rate to:
For MP3 files:
• MPEG1 Layer3: 32 to 320 kbps (VBR)
• MPEG2 Layer3: 16 to 160 kbps (VBR)
• MPEG2.5 Layer3: 16 to 160 kbps (VBR)
For WMA files: 32,48, 64, 80, 96, 128, 160,
or 192 kbps
• Add the following file extension using single
byte characters:
For MP3 files: “.MP3” or “.mp3”
For WMA files: “.WMA” or “.wma”
•
Notes on the folder structure
• The folder hierarchy must be within 8
hierarchical levels. Otherwise, playback will
be impossible.
• The maximum allowable number of folders
is 512 (including root directory and folders
with no MP3/WMA file).
• The maximum allowable number of files in a
folder is 255.
• You can store the MP3 files, WMA files
together in a folder.
•
Notes on the Tag titles
The limitations on the Tag titles are same as
those in the MP3/WMA modes.
• Folder representation in the folder list
The limitations on the folder representation
are same as those in the MP3/WMA
modes.
Selecting the USB Memory Mode
Connect your USB memory to the USB
connector. Touch the [USB] key to select the
USB on the Main Menu screen.
The system changes to the USB mode and
starts playback.
Playing Back Files in the USB Memory
The operations in the USB Memory mode are
same as those in the MP3/WMA modes.
See “Listening to a CD” for details.
Note:
When performing the fast forward or fast
backward function, the playback speed will
become 10-time faster. For the VBR files, it
may differ depending on the file.
English
English
Owner’s Manual
VX400/VZ400 33
Page 34

Bluetooth Audio Player Operations
English
Some Bluetooth cellular phones have the audio features, and some portable audio player support
the Bluetooth feature. These devices will be called as “Bluetooth audio players” in this manual.
This system can play audio data stored in a Bluetooth audio player.
Note:
Owner’s Manual
•
This system will not operate or may operate improperly with some Bluetooth audio players.
•
For detailed information on the playable Bluetooth audio players, see our home page:
www.clarion.com
This unit has a Bluetooth indicator ( ) on the top of the screen.
When the Bluetooth function is “OFF”, the indicator is grey.
When the Bluetooth function is “ON” and the phone is not connected, the indicator will blink.
If the phone is connected, the indicator is light up solid.
Selecting the Bluetooth Mode
1. Touch the ( ) Bluetooth indicator on the top
of the screen to access the Bluetooth mode
directly.
Touch the [ ] key in the Main Menu
screen .
2. The system changes to the Bluetooth mode.
Perform these operations according to the
message displayed.
5. When the pairing operation is completed,
the registered Bluetooth device is set
as current. The display returns to the
Bluetooth mode screen.
Note:
•
Registering your Bluetooth Device (Pairing)
You can register up to 4 Bluetooth devices.
The required password to pair the phone to the
unit is “1234”.
1. Touch the [Settings] key on the screen.
2. Touch the [Pair mode] key on the Settings
screen.
3. Touch the [Pairing] key to begin the pairing
process.
You cannot register the same Bluetooth
audio player which is already registered
doubly.
Controlling the Bluetooth Audio Player
Note:
•
Occasionally, depending on the environment,
playback sounds may be fragmented, or
switch noises may be generated.
Playing Music
After the connection with a Bluetooth audio
player is established, the play mode is
automatically engaged.
• When playback is not started, touch the
[ ] key.
4. The cellular phone may prompt to
acknowledge the Bluetooth connection and
to enter the Pass Key code of this unit.
34 VX400/VZ400
Page 35

Bluetooth Audio Player Operations
Pausing Playback
1. Touch the [ ] key during playback.
Playback pauses.
2. To resume playback, touch the
Playback resumes.
Skipping a Track (Searching)
1. Touch the [ ] or [ ] key during
playback.
Tracks are skipped, as many as the times
the key is touched, and playback starts.
Note:
•
Control functions such as play, pause and
track skipping are not available on all
devices.
Fast Forward and Fast Backward
1. Touch and hold the [ ] or [ ] key
during playback.
The system enters the fast backward or fast
forward playback mode during touching the
key. Releasing the key resumes the
normal speed playback.
[ ] key.
with the communication condition or the
used telephone, use the optional
microphone (RCB-199), and set the
Microphone Select setting to “External”.
The sound will be improved, but noises
may still be heard depending on the
communication condition.
Selecting the BT Phone mode
1. Touch the [ ] key to display the Menu
screen.
2. Touch the [Bluetooth] key to select the
Bluetooth mode.
3. Touch the [Keypad] key to select the BT
Phone mode.
The Telephone screen is displayed.
• When the connection with a Bluetooth
telephone has been established, the
icon and signal level indicator are displayed
at the top of the screen.
English
English
Owner’s Manual
When the connection with your Bluetooth
cellular phone is established, the following
functions are available on this unit:
• Listening to your telephone calls on the car
speakers.
• Answering to an incoming call.
• Making a call using the Ten-Key pad screen.
• Making a call using the Phone Book data in
the selected cellular phone.
• Making a call using the History data of the
dialed/received calls.
Note:
•
Some cellular phones may not be able to
transfer the Phone Book data.
•
The Phone Book data transmission may take
a long time. The operations of sending calls
are disabled during the data transmission.
• You can talk with other party by using
the internal microphone. When it is hard
to hear for the other party in accordance
Setting the Telephone Features
1. Touch the [Setting] key to display the
Telephone Settings screen.
2. Perform setting for the desired item.
See the following sections for detail.
VX400/VZ400 35
Page 36

Bluetooth Telephone Operations
English
Setting Automatic Connection
The system automatically reconnects the
cellular phone after the connection is lost or
Owner’s Manual
the system is restarted.
• The factory default setting is “Manual”.
Touch the [Manual] or [Auto] key of the
Automatic [Connect] item to set the
function preference.
Selecting Microphone
You can select the microphone to be used.
• The factory default setting is “Internal”.
Touch the [External] or [Internal] key of the
[MIC Select] item to set the function
Note:
•
When “Internal” is selected, and a call
comes in during the operation panel open,
the operation panel is automatically closed
because the microphone is on the operation
panel. (VZ400 only)
•
When “Internal” is selected, the
[OPEN /CLOSE] button is disabled
during a call. (VZ400 only)
Setting Microphone Gain
1. You can adjust the input level of the
microphone in 5 levels.
• The factory default setting is “3”.
Note:
•
The input level of the microphone can be
affected by its surroundings. Adjust the level
when the person on the other end of
the telephone has a reception problem.
2. Touch the level indicator of the
[MIC Gain] key to adjust the input
level.
Obtaining the Phone Book Data
Sending the Phone Book data from the cellular
phone enables you to make a call using the
Phone Book function from this unit.
1. Perform the Object Push transfer operation
of the Phone Book data on the current
cellular phone.
For details of the operation, see the
operation manual of the cellular phone.
Note:
•
Some cellular phones may not be able to
transfer the Phone Book data.
•
Some cellular phones cannot transfer
the Phone Book data when the hands-free
mode is set or it is also registered in the
Bluetooth mode. In those cases, disable
these functions from the cellular phone
before performing the Object Push transfer.
•
Some cellular phones may transfer Phone
Book data automatically.
Telephone operations
Note:
• For your safety, this system disables the
calling functions when the car is moving. Be
sure to stop the car and apply the parking
brake before making a call.
Making a Call Using the Ten-Key Pad
1. Touch the [Keypad] key to display the
Ten-Key pad screen.
2. Enter the telephone number by using the
Ten-Key pad displayed on the screen.
3. Touch the
number.
• The following Telephone Interrupt screen is
displayed during phone call.
• Touch the
using the cellular phone canceling the
hands-free function.
To return to the hands-free mode, touch
the
4. When the call is finished, touch the [End]
key to hang up. The display will return
to the previous mode screen selected before
entering the BT Phone mode.
Note:
•
Depending on the cellular phone, the
[Send] key to call the entered
[Audio Transfer] key to talk
[Audio Transfer] key.
Telephone Interrupt screen may be closed
and the connection with this system may
be disconnected when entering the Private
mode.
36 VX400/VZ400
Page 37

Bluetooth Telephone Operations
Making a Call Using the Phone Book
You can use the Phone Book data obtained
from the cellular phone to make a call from this
unit.
Note:
•
Before using this function, the Phone Book
data must be sent from the cellular phone
•
Only the Phone Book items with at least one
telephone number registered in the captured
Phone Book data are displayed on the Phone
Book screen.
1. Touch the [Phone Function] key to display
the Phone Log screen.
2. Select [My Phonebook] or
[SIM Phonebook] to select your desired
phonebook to view.
2. Touch the desired Name key you wish to dial.
• Touch the [ ] or [ ] key to scroll the list.
• When you touch the alphabet key at the
right of the screen, the list scrolls to the item
which starts with the specified character.
3. Touch the desired selection you wish to
dial.
• When the call is finished, touch the [End]
key to hang up.
Making a Call Using the History
The system will recall the Dialed/Received
calls record data in the handset memory. You
can confirm it and use it to make a call from this
unit.
1. Touch the [Phone Function] key.
The History List screen is displayed.
2. Select [Dialed Call], [Received Call] or
[Missed Call] key to select your desired call
log.
• Touch the [ ] or [ ] key to scroll the list.
• Touch the [Phone Function] key to return
to the previous screen.
2. Touch the desired History item key you wish
to dial.
• When the call is finished, touch the [End]
key to hang up.
Answering to an Incoming Call
When a call comes in, the following Telephone
Interrupt screen appears.
You can answer to the incoming call on this
system by the following operation.
1. Touch the [Send] key to answer to the
call.
• When the call is finished, touch the [End]
key to hang up.
English
English
Owner’s Manual
VX400/VZ400 37
Page 38

HD Radio Operations
English
This function is available when an HD Radio tuner is connected.
This unit can control the following HD Radio tuner:
• HD Radio Module (THD400)
Note:
Owner’s Manual
•
Be sure to disconnect power before connecting/disconnecting the HD Radio tuner.
•
Not all areas offer HD Radio broadcasts
•
HD Radio stations may not always broadcast subchannels
•
Volume levels of HD Radio stations may vary. Increase the volume gradually from the minimal
setting after the channel is selected. Be sure to lower the volume setting before switching to
another mode or channel.
Additional information about HD Radio technology can be found at www.hdradio.com
Listening to HD Radio Broadcasts
1. Touch the Tuner key on the Main menu
display. The tuner mode screen is displayed.
2. Touch the [BAND] key or press the [Band]
button on remote control to select the radio
band. Each time the key is touched, the
radio reception band changes between FM
and AM.
1 2 3 4 5
2. Touch the [ ] or [ ] key to
M-Seek
automatically seek a station.
• When touching the [ ] key, the station is
sought in the direction of higher frequencies.
• When touching the [ ] key, the station is
sought in the direction of lower frequencies.
Recalling a preset station
There are 2 ways to recall the preset station.
M-Seek
M-Seek
M-Seek
• Using the remote control:
1. Touch the [BAND] button to select the
11
10
6
desire band (FM or AM) on the remote
control.
7
2. Touch the preset number (1 to 16) on
numeric pad.
• Using the tuner unit:
1. Touch the [BAND] key to select the
9
8
desire band (FM or AM) on the tuner.
2. Touch the [List] key to display the Preset
1 - Band key
Signal Strength
2 -
3 - Eject key
4 - Main Menu key
5 - HD Multicast key
6 - Tune Up key
7 - Tune Down key
8 - Tag key
9 - List key
10 - Seek Down key
11 - Seek Up key
Seek Tuning
1. Touch the [BAND] key to select the radio
band (FM or AM).
2. Touch the [ ] or [ ] key to
automatically seek a station.
Seek
• When touching the
sought in the direction of higher frequencies.
• When touching the
sought in the direction of lower frequencies.
Seek
[ ] key, the station is
Seek
[ ] key, the station is
Seek
Manual Tuning
1. Touch the [BAND] key to select the radio
List screen.
3. Touch the preset station (1 to 16) on tuner
display.
4. Touch [ ] or [ ] to select next station
up or down the preset list.
5. Touch the [PS] button to begin scanning
the preset stations.
Manual memory
1. Touch the desired Band key to select the
band you wish to store in.
2. Tune in the station you wish to store using the
seek tuning, manual tuning, or preset tuning.
3. Touch and hold the desired Preset key you
wish to store the current station for more than
2 seconds.
4. Touch [ ] or [ ] to select next station
up or down the preset list.
band (FM or AM).
38 VX400/VZ400
Page 39

HD Radio Operations
English
Auto Store
The Auto Store is a function for storing up to 16
stations that are automatically tuned in
sequentially. If 16 receivable stations cannot be
received, a previously stored station remains
unoverwritten at the memory position.
1. Touch the [Band] key to select the desired
band. (FM or AM)
2. Touch and hold the [Auto Store] key to start
the Auto Store function.
A beep sounds and the stations with good
reception are stored automatically to the
preset channels.
Preset Scan
The Preset Scan receives the stations stored in
the preset memory in order. This function is
useful when searching for the desired station in
memory.
1. Touch the [Band] key to select the desired
band. (FM or AM)
2. Touch the [PS] key to start the Preset Scan.
The unit starts scanning each station for 10
seconds sequentially.
2. To tune to the desired subchannel touch the
corresponding key.
3. You can save your desired subchannel by
touching and holding the desired Preset key
you wish to store the current subchannel for
more than 2 seconds.
Note: Not all stations have HD Radio
subchannel broadcasts.
iTunes Tagging Function
This unit offers iTunes® Tagging, which
allows the user to “Tag” songs playing on HD
Radio™ stations for purchase later through
iTunes. When press TAG key, the unit
stores the title and artist song information that
can then be transferred to your iPod when
connected to the unit. A list titled “Tagged”
will appear in iTunes, allowing you the option
to purchase your tagged songs.
1. Touch the [TAG] key to store the current
music information to memory.
English
Owner’s Manual
3. When the desired station is tuned in, touch
the [PS] key again to continue receiving that
station.
HD Radio Subchannel Function
1. Touch the [HD] key to enter the Subchannels
list.
2. Up to 64 tags will be stored in the memory.
3. When the unit is switched to iPod mode, the
unit will automatically transfer the tags to the
iPod/iPhone.
Note: Not all broadcasted material can be
tagged. The iTunes Tagging function is
only available for Apple iPod and iPhone
devices.
Downloading Tags to Your iPod
To download tags to your iPod, plug an iPod
into the unit. All existing tags are automatically
transferred to the iPod and deleted from the
head unit’s memory. If an iPod is connected
when a song is tagged, the Tag will be
automatically transferred to the device when
the iPod mode is selected.
VX400/VZ400 39
Page 40

AUX In / AV In Operations
English
External peripheral devices, including a game
console, camcorder, navigation unit, iPod/
iPhone, etc. can be connected to the AUX IN or
AV IN connector on the back of this unit using
Owner’s Manual
the A/V media cables.
WARNING
For your safety, the driver should not
watch the VTR, etc. or operate the controls
while driving. Please note that watching
and operating the VTR, etc. while driving
are prohibited by law in some countries.
NOTE:
For your safety, the unit has a safety function,
which turns off the picture when car is moving,
so only the audio can be heard. The picture can
be only watched, when the car is stopped and
parking brake is applied.
Switching to AUX IN / AV IN mode
Touch [AUX IN] or [AV IN] key on Main Menu
to select desired mode (when unit is reading).
The LCD will display the external video.
The screen will dispaly “No Video” menu, if
there is no video signal.
You cannot directly control external devices
connected to the AUX IN or AV IN input.
Camera In Operations
Switching to Camera mode
Touch [Camera] key on Main Menu
to select desired mode (when unit is reading).
The LCD will display the external video.
The screen will dispaly “No Video” menu, if
there is no video signal. Touch [ ] Main
Menu key to return to the Main Menu.
40 VX400/VZ400
When the video signal is displayed, touch the
center of the screen to return to the Main Menu.
Page 41

Setup Operations
You can customize the various settings of this
unit from the Settings screen.
Touch [Settings] key on the Main Menu screen.
The Setting menu screen will be displayed.
Touch the [Main] key to return to the Main
screen.
General Settings
1. Touch the [General] key. The general setting
screen appears. The screen includes:
Clock, Clock Mode, Radio, and Version.
2. Touch the desired tab key and perform the
basic adjustments.
• Setting the Clock
Touch this tab to set the time.
The keypad will appear for adjustment.
Touch the
• Setting the Clock Mode
Touch this tab to change to 12Hr or
24Hr mode.
• Radio
Touch this tab to select the region you
are in. Incorrect selection results in poor
reception.
• Version
This tab displays the software version of
your unit.
Advanced Audio Settings
1. Touch the [Audio] key to set: Bass Freq,
Treble Freq, and Bass Q-Factor.
2. Touch the desired tab key to make the
desired audio adjustments.
Bass Freq
•
Select the desired bass center adjustment
frequency: 60Hz, 80Hz, 100Hz, 200Hz
• Treble Freq
Select the desired treble center adjustment
frequency:10KHz,12.5KHz,15KHz,17.5KHz
• Bass Q-Factor
Select the desired bass Q-Factor:
1.0, 1.25, 1.5, 2.0.
Regional Preference Settings
1. Touch the [Regional] key to set the default
subtitle and audio language preferences.
2. Touch the desired tab key and perform the
adjustments.
Select the desired audio/subtitle language:
English, French or Spanish.
Select
[OK] key to save.
Auto to automatically set the
language. Select
function off.
Off to turn the desired
Monitor Settings
1. Touch the [Monitor Adjust] key to set:
Touch Screen Callibration and Brightness.
2. Touch the desired tab key and perform the
necessary adjustments.
•
TS Callibrate
This key is to activate the touch screen
activation mode, please consult technical
support before attempting this process.
• Brightness
Set screen brightness value from 0 to 20.
Video Settings
1. Touch the [Video] key to set: Aux In
Sensitivity, Aux In Format, and Aspect Ratio.
2. Touch the desired tab key and perform the
adjustments.
•
Aux In Input SW
Select the Low, Mid or High for the
Aux In input sensitivity level.
• Aux In
Select the video format for Aux In signal.
Select from Auto, PAL or NTSC.
• Aspect Ratio
Select the screen area shape: 4:3 or 16:9.
Restrictive Settings
1. Touch the [Rating] key to set: Password,
DVD Parental control rating.
2. Touch the desired tab key and perform the
adjustments.
• Password
Touch this key to set password of the child
lock. The keypad screen will be displayed.
Set the numerical password. Touch the
[OK] key to save it. Touch the [Clear]
key to clear it and set a new password.
This password is shared between the
Sirius Channel Lock and DVD Restriction.
VX400/VZ400 41
English
English
Owner’s Manual
Page 42

Setup Operations
English
• Parental control
Touch this key to set the DVD Rating
Restriction level:
1. Kid Safe
Owner’s Manual
2. G
3. PG
4. PG-13
5. PG-R
6. R
7. NC-17
8. Adult
Other Settings
1. Touch the [Other] key to set: Anti-theft code,
Anti-theft Lock, Bluetooth Status, Bluetooth
Speaker Output, Blinking LED, Beep, GPS
Time Sync, DST, and Unit Reset.
2. Touch the desired tab key and perform the
adjustments.
• Anti-theft code
Touch this tab to change your anti-theft
lock code. The numerical keypad will be
displayed. If your unit is unlocked, enter
your code.Touch the [OK] key to save it.
• Anti-theft
Touch this tab to turn On or Off the anti theft lock function.
• Bluetooth
Touch this tab to turn the Bluetooth
feature
• Tel Sp
Touch this tab to set the output speaker
for the Bluetooth feature. You may select
the Left Front speaker or Right Front
speaker.
• Blinking
Touch this tab to turn the anti-theft
blinking indicator On or Off.
• Beep
Touch this key to turn On or Off the beep
sound.
• GPS Time
Touch this key to automatically
synchronize the time from the optional
navigation system. Select On or Off.
• DST
Touch this key to set Daylight Savings
Time Adjustment On or Off when the
automatic GPS Time sync is activated.
• Reset
Touch this key to reset the unit to default
settings. This will delete all presets and
user memory.
On or Off.
42 VX400/VZ400
Page 43

8. TROUBLESHOOTING
English
GENERAL
Problem Cause Measure
Power does not turn on. (No
sound is produced.)
Nothing happens when buttons are pressed.
Display is not accurate.
The remote control unit does
not work.
Fuse is blown. Replace with a fuse of the
Incorrect wiring. Consult your installation
The microprocessor has malfunctioned due to noise, etc.
Direct rays of the sun fall on
the light-receptive part of the
remote control unit.
The batteries of the remote
control unit are dead or there
is no battery in the remote
control unit.
same amperage. If the fuse
blows again, consult your
store of purchase.
center.
Turn off the power and open
the operation panel. Press the
reset button with a thin rod.
Note:
When the Reset button is
pressed, turn off the ACC
power.
* When the Reset button is
pressed, frequencies of radio
stations, titles, etc. stored in
memory are cleared.”
When direct rays of the sun fall
on the light-receptive part of
the remote control unit, it may
not work.
Check the batteries of the
remote control unit.
DVD PLAYER
Problem Cause Measure
Disc cannot be loaded. A disc is already loaded. Eject the disc before loading
There is foreign matter already
in the disc slot.
Sound skips or is noisy. Compact disc is dirty. Clean the compact disc with a
Compact disc is heavily
scratched or warped.
Sound is bad directly after
power is turned on.
Video images are not displayed.
Disc cannot play with the
display “PARENTAL VIOLA-
TION” shown.
Condensation may form on the
internal lens when the car is
parked in a humid place.
The parking brake is not
engaged.
Feature exceeds set parental
level.
the new one.
Remove the foreign matter, or
consult a service station.
soft cloth.
Replace with a compact disc
in good condition.
Let dry for about 1 hour with
the power on.
Check that the parking brake
is engaged.
Release the view limitation or
change the parental level.
See the subsection “Setting up
the parental level”
English
Owner’s Manual
VX400/VZ400 43
Page 44

USB DEVICE
English
Problem Cause Measure
USB device cannot be inserted.
Owner’s Manual
USB device is not recognized. The USB device is damaged. Disconnect the USB device
No sound heard with the display “NO FILE” shown.
Sound skips or is noisy. MP3/WMA files are not en-
The iPod/iPhone’s video
image is disturbed.
The USB device has been
inserted with wrong direction.
The USB connector is broken. Replace with a new USB
Connectors are loose.
No MP3/WMA file is stored in
the USB device.
coded properly.
The TV Signal setting of the
iPod/iPhone is not set correctly.
Reversing the connection
direction of the USB device,
try it again.
device.
and reconnect. If the device
is still not recognized, try
replacing with a different USB
device.
Store these files properly in the
USB device.
Use MP3/WMA files encoded
properly.
Set the TV Signal setting
(NTSC/PAL) of the iPod/iPhone
correctly.
9. ERROR DISPLAY
If an error occurs, one of the following displays is displayed.
Take the measures described below to solve the problem.
DVD PLAYER
Display Cause Measure
BAD DISC
BAD DISC
BAD DISC
PARENTAL VIOLATION
WRONG REGION
If an error display other than the ones described above appears, press the Reset button.
If the problem persists, turn off the power and consult your store of purchase.
* When the Reset button is pressed, frequencies of radio stations, titles, etc. stored in
memory are cleared.
44 VX400/VZ400
A disc is caught inside the CD
deck and is not ejected.
A disc cannot be played due
to scratches, etc.
A disc is loaded upside- down
inside the DVD deck and does
not play.
Parental level error Set the correct Parental level.
Region code error Eject the disc, and replace
This is a failure of DVD deck’s
mechanism and consult your
store of purchase.
Replace with a non-scratched,
non-warped disc.
Eject the disc then reload it
properly.
correct region code disc.
Page 45

10. SPECIFICATIONS
English
FM Tuner
Frequency Range: 87.9 MHz to 107.9 MHz
Usable Sensitivity: 8 dBµV
50dB Quieting Sensitivity: 14 dBµV
Alternate Channel Selectivity: 70 dB
Stereo Separation: 25 dB (1 kHz)
Frequency Response: 30 Hz to 15kHz
AM Tuner
Frequency Range: 530 kHz to 1710 kHz
Usable Sensitivity: 28 dBµV
DVD Player System
Digital Versatile Disc System with CDDA
capable
Usable discs:
DVD video disc, Compact disc
Frequency Response: 20 Hz to 20 kHz
Sound/Noise Ratio: 95 dbA (1W Ref)
Dynamic Range: 95 dB (1 kHz)
Distortion: 0.05%
Video system: NTSC
Audio/Video Input
Audio input voltage: 300 µVrµs (low)
Audio input voltage: 600 µVrµs (med)
Audio input voltage: 950 µVrµs (high)
Video input voltage: 1.0Vp-p @75
Audio/Video output
Audio output impedance: 10k
Video output voltage: 1.0Vp-p @75
LCD Monitor
VX400 Screen Size: 6.5” wide type
Pixels: 280,800
Resolution: 1200 x 234 (RGB)
VZ400 Screen Size: 7” wide type
Pixels: 336,960
Resolution: 1440x234 (RGB)
General
Power source voltage:
14.4 V DC (10.8 to 15.6 V allowable)
Ground: Negative
Current consumption:
4.0 A @1 W (57.6W @1W)
Auto Antenna Rated Current: 500 mA less
VX400 dimensions:
7” (178mm) width, 3-15/16” (100mm) height,
7” (179mm) depth
VX400 weight: 3.5 kg
VZ400 dimensions:
7” (178mm) width, 2” (50 mm) height,
7.5” (191.5mm) depth
VZ400 weight: 3.5 kg
Remote Control dimensions:
2-1/8” (54mm) width, 9/16” (14mm) height
4-13/16” (122 mm) depth
Remote Control weight:
50 grams (including battery)
Note:
•
Specifications comply with JEITA
Standards
•
Specifications and design are subject
to change without notice for further
improvement.
Power Output:
18W RMS x 4 Channels at 4
and 1% THD+N
Signal to Noise Ratio:
85 dBA (reference: 1W into 4 )
.
English
Owner’s Manual
VX400/VZ400 45
Page 46

English
INSTALLATION /WIRE
CONNECTION GUIDE
Owner’s Manual
CONTENTS
1. Before Starting ....................................................................
2. Package Contents ..............................................................
3. General Cautions ................................................................
4. Cautions On Installation .....................................................
5. Installing The Main Unit ......................................................
6. Cautions On Wiring ............................................................
7. Wire Connections ...............................................................
1. Before Starting
1. This set is exclusively for use in cars with a
negative ground 12V power supply.
2. Read these instructions carefully.
3. Be sure to disconnect the battery“ ”terminal
before starting. This is to prevent short circuits
during installation. (Figure 1)
2. Package Contents
Main unit .................................... 1
Wiring harness ........................... 1
AV cable .................................... 1
Remote control unit ................... 1
Battery (CR2025) ....................... 1
(Installed in remote control)
Trim ring .................................... 1
2DIN trim ring 200mm wide
(VX400 only) ............................... 1
Back Strap ................................. 1
Flush mount bolts ..................... 4
Cap bolts ................................... 4
Rear radio stud and stopper .... 1
Cleaning cloth ........................... 1
Warranty Card ........................... 1
Owner’s manual and
Installation manual .................... 1
46
46
46
47
48
50
51
3. General Cautions
1. Do not open the case. There are no
user- serviceable parts inside. If you
drop anything into the unit during
installation, consult your dealer or an
authorized Clarion service center.
46 VX400/VZ400
2. Use a soft, dry cloth to clean the case.
Never use a rough cloth, thinner,
benzine, or alcohol etc. For tough dirt,
apply a little cold or warm water to a
soft cloth and wipe off the dirt gently.
Page 47

4. Cautions on Installation
1. Prepare all articles necessary for
installing the source unit before starting.
2. This model features an operation panel
that slides forward.
On some types of cars, the operation
panel may make contact with the
dashboard or gearshift lever, in which
cause it cannot be installed. Before
installing, check that the unit will not
hamper operation of the gearshift lever
or obstruct your view before selecting
the installation location. (Figure 2)
Dashboard
VZ400
4. If you have to do any work on the car
body, such as drilling holes, consult
your car dealer before hand.
5. Use the enclosed screws for
installation. Using other screws can
cause damage. (Figure 4)
Chassis Chassis
Damage
Max. 8 mm (M5 screw)
Figure 4
English
English
Owner’s Manual
Gearshift lever
(Check that it does
not touch the LCD)
Gearshift lever
Figure 2
3. Install the unit within 30° of the
horizontal plane. (Figure 3)
VX400
VZ400
Figure 3
VX400/VZ400 47
Page 48

5. Installing the Main Unit
English
This unit is designed for fixed installation in the
dashboard.
1. When installing the main unit in NISSAN
Owner’s Manual
vehicles, use the parts attached to the unit
and follow the instructions in Figure 6.
When installing the main unit in TOYOTA
vehicles, use the parts attached to the
Mounting Screw Holes (Side View of the Main Unit)
For NISSAN vehicle
Installing the Main Unit in NISSAN Vehicle
vehicle and follow the instructions in
Figure 7.
2. Wire as shown in Section 7.
3. Reassemble and secure the unit in the
dashboard and set the face panel and center
panel.
For TOYOTA vehicle
Figure 5
Main Unit
Finisher (
*1)
Mounting bracket
(1 pair for the left and right sides)
Figure 6
Note:
*
1: Position the face panel with its wide edge at the
bottom. Fit the edge into the groove of the main unit.
48 VX400/VZ400
6- Spacer (thickness: 1mm)
6-Spacer (thickness: 1 mm)
6- Flat head screws
6-Flat head screw
(M5x8)
(M5 8)
(Attached to the main unit)
(attached to the main unit)
Page 49

Installing the Main Unit in TOYOTA Vehicle
Install by using parts attached to the vehicle. (Screws marked are attached to the
vehicle.)
Main Unit
8- Hexagonal screws
8-Hexagonal screw
(M5x8)
(M5 8)
Mounting bracket
Center Panel
(* 2 )
* 3
Figure 7
Figure 7
Mounting bracket
(1 pair for the left
(1 pair for the left
and right sides)
and right sides)
English
English
Owner’s Manual
*2 Some panel openings are too small for the
unit depending on the vehicle type and
model. In such a case, trim the upper and
lower sides of the panel frame by about
0.5 to 1.5 mm so the unit can be inserted
smoothly.
*3 If a hook on the installation bracket
interferes with the unit, bend and flatten it
with a nipper or similar tool.
Typical Mounting Brackets
3elpmaxE1elpmaxE Example 2
Affix the screws to the marks.
Vehicles other than NISSAN and TOYOTA
In some cases the center panel may require modification. (Trimming, filing, etc.)
• Removing the Main Unit
When the main unit is to be removed, disassemble it in the reverse of the order in
“INSTALLING THE MAIN UNIT”.
VX400/VZ400 49
Page 50

6. Cautions on Wiring
English
1. Be sure to turn the power off before wiring.
2. Be particularly careful where you route the wires.
Keep them well away from the engine, and
exhaust pipe, etc. Heat may damage the wires.
Owner’s Manual
3. If the fuse should blow, check to see if the
wiring is correct.
If a fuse is blown, replace it with a new one of
the same amperage rating as the original (15A FUSE).
4. To replace the fuse, remove the old fuse on the back
of the unit and insert the new one. (Figure 8)
NOTE:
There are various types of fuse holder. Do not let the battery
side touch other metal parts.
caution
CAUTION
After the connection, fix the cord by a clamp
or insulation tape for protection.
Fuse (15A FUSE)
Fuse holder
Figure 8
Figure 8
50 VX400/VZ400
Page 51

7. Wire Connections
iPod/iPhone
Video In
Audio/L
Audio/R
Connector Cable
4-Channel Amplifier
Subwoofer 1
Subwoofer 2
Line Out
Rear
R
Line Out
Rear
L
Line Out
Front
R
Line Out
Front
L
Red
Steering Wheel
Remote Control Terminal
External Microphone
Connection
Monitor
Connector Cable
Sirius
SIRIUS CONNECTVEHICLE TUNER
Gray
Black
Black
Video Out
Video Out
Camera
HD Radio
Radio Antenna
Jack
GPS Navigation
Module
Black
White
Black
Purple
Gray
Black
Yellow
Red
White
Red
White
Red
White
Yellow
Yellow
White
Red
Antenna Cable
HD Radio™ Tuner Module
Connector
Cable
Antenna
Navigation
Connection
Note:
•
Before installing, be sure to disconnect the negative cable of the car battery.
•
In the optional devices, the RCA cables and the Connector cables are separately-sold
items.
VX400
Refer to
page 53
English
English
Owner’s Manual
VX400/VZ400 51
Page 52

English
Radio Antenna Jack
4-Channel Amplifier
Line Out
Subwoofer
Line Out
Rear R
Line Out
Rear L
Line Out
Front R
Line Out
Video Out
Front L
Video
Audio/R
Audio/L
Video Out
Camera
Yellow
White
White
Red
Red
Red
White
Yellow
Purple
Gray
Gray
Red
Black
Black
Black
Black
White
Steering Wheel
Remote Control Terminal
Yellow
Monitor
iPod/iPhone
Connector Cable
Yellow
White
Red
Red
External
Microphone
Connection
Navigation
Connection
White
Connector Cable
Sirius
SIRIUS CONNECTVEHICLE TUNER
HD Radio™ Tuner Module
GPS Navigation
Module
Black
Antenna Cable
Connector
Cable
Antenna
Yellow
Black
Purple
Purple/Black
Grass-green
Gray
Gray/Black
White
White/Black
Green
Green/Black
Blue/White
Orange/White
Red
Brown
Blue
+12V main power
Ground
Rear right +
Rear right -
Parking brake cord
Purple/White
Reverse gear cord
Front right +
Front right -
Front left +
Front left -
Rear left +
Rear left -
Amplifier turn-on cord
Illumination
+12V accessory
Phone interrupt (*1)
Auto antenna
Note:
*1: Connecting the PHONE INTERRUPT terminal
The phone interrupt will mute the audio if the lead receives a negative or ground signal.
VZ400
Owner’s Manual
Refer to
page 53
52 VX400/VZ400
Page 53

English
Yellow
Black
Purple
Purple/Black
Grass-green
Gray
Gray/Black
White
White/Black
Green
Green/Black
Blue/White
Orange/White
Red
Brown
Blue
+12V main power
Ground
Rear right +
Rear right -
Parking brake cord
Purple/White
Reverse gear cord
Front right +
Front right -
Front left +
Front left -
Rear left +
Rear left -
Amplifier turn-on cord
Illumination
+12V accessory
Phone interrupt (*1)
Auto antenna
Note:
*1: Connecting the PHONE INTERRUPT terminal
The phone interrupt will mute the audio if the lead receives a negative or ground signal.
English
Owner’s Manual
See next page for how to connect the parking brake cord.
VX400/VZ400 53
Page 54

English
Connecting the parking brake cord
Connect the cord to parking brake lamp ground in the meter panel.
Note:
•
Connecting the parking brake cord to lamp ground allows you to watch iPod/iPhone
Owner’s Manual
video/DVD video/AV input when the parking brake is engaged.
•
When the parking brake cord is not connected, the monitor will not show any video
sources.
•
If
“AUDIO ONLY”
appears on the screen just after turning on the ACC power of the car,
release the parking brake while confirming safety, and then engage the parking brake
again.
How to attach the electro-tap (not included)
Electro-tap
(not included)
Connecting the accessories
• Connecting to the external amplifier
The external amplifiers can be connected to the 6 channel RCA output connections.
Ensure that the connectors are not grounded or shorted to prevent damage to the unit.
•
Connecting to iPod/iPhone device
The iPod/iPhone device can be connected to dedicated iPod/iPhone connection on the
main unit. For detailed information, refer to the instruction sheet or manual for the
iPod/iPhone cable.
Note:
•
This unit may not support all functions of all iPod/iPhone devices.
•
The iPod/ iPhone connection will charge your iPod/iPhone unless the iPod/iPhone
battery is completely depleted. If the specified cord of the cellular phone is connected
to the phone interrupt cord of the main unit, the audio mute is activated when cellular
phone in use.
• Connecting to Sirius Satellite Radio Receiver
When Sirius Satellite Radio Receiver is to be connected, use the dedicated connector.
For detailed information,refer to the instruction manual of the Sirius Satellite Radio
Receiver.
54 VX400/VZ400
Page 55

This device complies with Part 15 of the FCC Rules. Operation is subject
to the following two conditions:
(1) this device may not cause harmful interference, and
(2) this device must accept any interference received, including
interference that may cause undesired operation.
This Class B digital apparatus complies with Canadian ICES-003.
Cet appareil numerique de la classe B est conforme a la norme NMB-003
du Canada.
VX400
FCC ID: V8VCNE8215BCL
IC: 8614A-CNE82115BCL
Bluetooth ID: B015864
VZ400
FCC ID: V8VCNE8115BCL
IC: 8614A-CNE81115BCL
Bluetooth ID: B015864
Clarion Co., Ltd.
All Rights Reserved. Copyright © 2009: Clarion Co., Ltd.
Printed in China / Imprime au Chiné / Impreso en China
2009/12 VX400/VZ400
 Loading...