

Page 1

V
S
7
5
5
S AF E TY IN F O R MA
C AU T IO N:
MO B ILE DV D P LAY E R I S A C L AS S
LAS E R P R ODU C T. HO WE VE R T HIS
MO B ILE DV D P LAY E R U SE S A
V IS IB LE /INV IS IB LE LAS E R B E AM
WHI C H C OUL D C AU S E HA ZAR DO US
R ADIAT IO N E X P OS UR E I F.
B E S UR E TO O P E R ATE T HE MO B ILE
DV D P LAYE R C OR R E C TLY A S
IN S TR UC TE D. US E OF C ON T R O LS
OR ADJ US TME NT S OR
P E R FOR MANC E O F P R O C E DU R E S
OTHE R T HAN T HOS E S PE CIF IE D
HE R E IN MAY R E S ULT IN HAZAR DOU S
R ADIAT IO N E X P OS UR E .
DO NO T OP E N C OV E R S AN D
DO NO T R E PAIR Y OU R S E LF.
R E FE R S E R VIC IN G T O
QUA LIF IE D P E R SONN E L.
WA R NING :
_ T O R E DU C E T HE R IS K O F F IR E OR
E LE C TR IC S HOC K , D O N O T
E XP OS E T HIS E QU IP ME NT TO R AIN
OR MO IS T UR E .
_ T O R E DU C E T HE R IS K O F F IR E OR
E LE C TR IC S HOC K , A ND AN NO YI NG
INT E R FE R E NC E , U S E O NLY T HE
R E CO MME NDE D A C CE S S OR IE S .
_ T HIS D E VIC E IS INT E NDE D F OR
C O NTINUO US O P E R ATIO N.
T IO N
3
Page 2

V
S
7
5
5
S AF E TY INF OR MA
This product incorporates copyright
protection technology that is protected by
method c laims of certain U .S . patents and
other intellectual property rights owned by
Macrovision C orporation a nd other rights
owners . Us e of this copyright protection
technology mus t be a uthorized by
Macrovision C orporation, and is intended
for home and other limited viewing uses
only unles s otherwise authorized by
Macrovision C orporation. R eve rs e
engineering or disa ss embly is prohibited.
R egion Mana gement Info rmatio n:
R egion Management Information:
This Mobile DV D P laye r is designed and
manufactured to res pond to the R egion
Management Information that is recorded
on a DV D disc. If the R egion number
des cribed on the DVD disc does not
corre s pond to the R egion number of this
Mobile DV D P layer, this Mobile D V D
P layer cannot pla y this disc.
TIO N
4
Page 3

C ONTE NT S
V
S
7
5
5
1. Introduc tion . ... ....... ... ... ... ... ... ... ....... ... ... ... ... ... ... ....... ... 6
2. G enera l Inform ation . ... ....... ... ... ... ... ... ... ....... ... ... ... ... ... 7
3. C are and Ma inten anc e.. ... ... ... ....... ... ... ... ... ... ....... ... ... ..11
4. G enera l Opera tio n....... ... ... ... ... ... ....... ... ... ... ... ... ... ....... .15
5. B as ic Operation... ... ... ... ... ... ... ... ....... ... ... ... ... ... ... ....... ... 22
6. A dv anc ed O pera tion.... ... ... ... ... ... ... ... ... ... ....... ... ... ... ... .32
7. S ettings. ... ... ... ... ... ... ... ....... ... ... ... ... ... ... ....... ... ... ... ... ... ... 36
8. P referen c e S et Up Menu.. ... ... ... ....... ... ... ... ... ... ....... ... ..38
9. Ins tallation.... ... ... ... ....... ... ... ... ... ... ... ....... ... ... ... ... ... ... ... .40
10. G los s ary.. ... ... ... ....... ... ... ... ... ... ....... ... ... ... ... ... ... ....... ... . 52
11. T
ro uble S hooting
12. S pecifications.. ... ... ... ....... ... ... ... ... ... ....... ... ... ... ... ... ... ...54
13. W
ar ran ty Informa tio n
.. ... ... ... ....... ... ... ... ... ... ....... ... ... ... ... ... .53
.. ... ... ... ....... ... ... ... ... ... ....... ... ... ... 56
5
Page 4

1. INT R ODU CTION
V
S 7
5
5
The C larion VS 755 is a full-fea ture d Digital Media Player
des igned s pecifically for the mobile environment. It is intended
for us e with other C larion multimedia produc ts, and can also
be integrated with many other products as pa rt of a complete
mobile video solution. With a set of auxiliary a udio and video
inputs and a digital audio output, the V S755 can als o support
use of optional audio/video components s uch a s ca mcorders ,
videoga mes, or digital audio proces sors . TheV S 755 incorpora tes
many different video output s ettings to allow the bes t pos sible
viewing experience, rega rdles s of what type of video monitor
you may be using.
The V S755 plays DVD discs in NT S C or P AL formats (NTS C
is the s tandard N orth American video forma t), C D-Audio
discs , a nd CD-recordable dis cs with MP3 files . F or more
details on disc types s upported, pleas e s ee “Dis cs P layed by
the V S 755. ”
The remote control (included) provides access to the full set
of s tanda rd DV D functions, such as s ubtitle control, digital
freeze -frame viewing, viewing from multiple camera angles,
selection of various language audio s oundtracks , a nd digital
playback at fa s t or slow s peeds . T he VS 755 a lso supports
direct acces s to defined points on a DVD or C D.
6
Page 5

V
S 7
5
5
G E NE R AL INF OR MAT ION
No te:
• T he V S 755 is designed to be a c omponent in a full audio/video
sys tem. If you ha ve a ny questions a bout compatible components,
such as s ystem controllers, monitors, F M modulators, or other audio/
video products , pleas e c ontact your authorized C larion dealer.
Acc es s ories S upplie d with the V S 755
• Infra red (IR ) remote control
• E xternal IR R ec eiver for optional applications
• P ower-s upply ha rness a nd R C A audio a nd video ca bles
• Assorted mounting ha rdware
• O wner•s Manual / Ins ta llation Guide
About the R egis tered Ma rks
This product incorporates copyright protection technology that
is protected by method cla ims of certain U.S . patents and
other intellectual property rights owned by Macrovision
C orporation and other rights owners. Use of this copyright
protection technology must be authorized by Ma crovision
C orporation, and is intended for limited viewing us es only
unles s otherwise authorized by Macrovision C orporation.
R everse engineering or disas sembly is prohibited.
7
Page 6

GENERAL INFORMATION
VS755
Temperature and Moisture
If the player is used while the interior of the vehicle is very cold,
condensation may form on the disc or on the internal optical
pickup system and prevent proper playing of the disc. If you
suspect that condensation is an issue, eject the disc and inspect
the playing surface. If necessary, remove the condensation with
a clean soft cloth as described above. If you still experience
problems with playback, you will need to wait for approximately
one hour to allow the VS755 to warm up, and for the condensation to evaporate. If playback issues continue, please see your
authorized Clarion dealer.
Discs Compatible with VS755
This VS755 is designed and manufactured to play DVD discs
with region code 1.
CLASS 1
LASER PRODUCT
Supported Discs Formats Unsupported Formats
• DVD video 5, 9, 10, and 18 • DVD-ROM•
Video CD • DVD-RW/DVD-RAM
• Super Video CD • CDV
• CD Audio • CD-G
• MP3 (CD-ROM) • DVDs with Region code
• JPEG image CD 1 and 0 • Kodak photo CD (previously
CDI format)
NOTE:
As a rule, even Burned CDs are supported, however depend
ing on the blank discs and burning program used, playback
difficulties may arise.
8
-
Page 7

G E NE R AL INF OR MAT ION
V
S 7
5
5
Macro vis ion
C opyright protection technology developed by Ma crovision
C orporation. C opyright owners can protec t their videocassettes
from una uthorized recording on VC R s by us ing
Macrovision technology.
MP 3
Digital audio data compressed in MPE G1 Layer 3 format.
MP 3 files are approximately ten times smaller than the
non-compres sed P CM data.
OS D (On S cr een Dis pla y )
Information about the dis c a nd playe r status are displayed directly
on the monitor s cree n.
P are ntal guidanc e function
F requently Te rmed “P arental C ontrol” or “P arental Ma nagement Leve l”,
this function is bas ed on a movie rating a ss igned by the MPA A
(Motion P icture As sociation of America). Depending on the D V D player
setting, this classification enables entire DV Ds to be blocke d for viewing
by childrena nd teena gers. Note - not all DVD. manufac turers support
this rating s ystem.
C urrently, the following levels a re officia lly
recognized by the MP AA :
G (G eneral audience ): suitable for a ll members of the genera l public
including children.
P G (P are ntal G uidance): a llowed for genera l viewing but with
pare ntal supervis ion.
9
Page 8

GENERAL INFORMATION
VS755
CAUTION: Any inappropriate use of the device may expose
the user to visible/invisible laser rays which exceed the limits
for Class 1 laser products. Do not attempt to repair it yourself
refer servicing it to a trained Clarion authorized dealer.
Copyright Protection
This product incorporates copyright protection technology that
is protected by method claims of certain U.S. patents and other
intellectual property rights owned by Macrovision Corporation
and other rights owners. Use of this copyright protection
technology must be authorized by Macrovision Corporation,
and is intended for home and other limited viewing uses only
unless other wise authorized by Macrovision Corporation.
Reverse engineering or disassembly is prohibited.
“Dolby” Digita
Manufactured license from Dolby Laboratories. “Dolby” and
Double-Dsymbolare trademarks of Dolby Laboratories.
Confidential unpublished works. 1992-1997 Dolby Laboratories
All rights reserved.
l
10
Page 9
C AR E A ND MA INT ENANC E
V
S 7
5
5
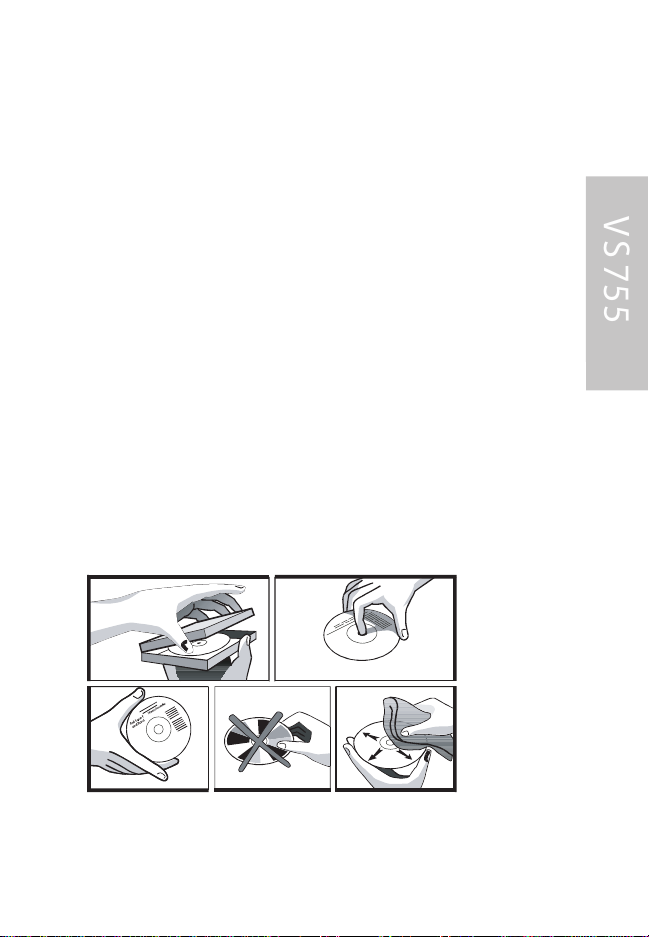
Ha ndling a nd C leaning DVDs a nd C Ds
• Avoid leaving fingerprints on the disc s when handling it, ne ver
handle a disc by its edges .
• Always s tore discs in their protective ca s es .
• Always ens ure that discs are clean a nd dry before inserting.
• P rotect discs from he at and direct s unlight. Dirt, dust, scra tches
and wa rped discs will caus e unit ma lfunction.
• DO NOT P UT L A B E LS ON DIS CS.
Dis c C lea ni ng
Use a dry s oft cloth to wipe the s urface of a dis c. If a dis c is
es pecially dirty use a s oft cloth slightly moistened with rubbing
alcohol. Never use s olvents such as benzine, or conventional
record clea ners a s they may ma r the s urface of the disc.
Disc Cleaning
11
Page 10
C AR E A ND MA INT ENANC E
V
S
7
5
5
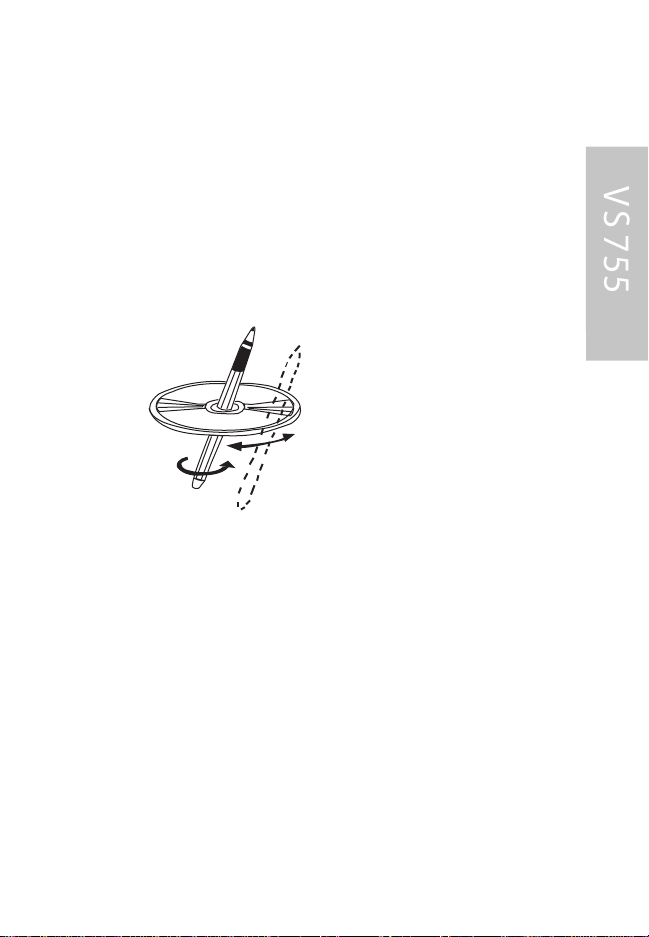
P repar in g a New Dis c
Ne w dis c ma y have s ome roughne s s around the edge. T he DV D
player may not work properly or the video/sound reproduction
may s kip if s uch disc s are used. U s e a ballpoint pen or pencil to
remove roughnes s from the edges of the disc.
NO TE :
NE V E R US E A K NIF E O R A S HA R P OB J EC T TO R E MOVE
THE R OU G HNE S S AR OU ND T HE E DG ES Y OU MAY HA R M
Y OUR S E L F OR T HE DIS C!
S ervicing the VS 755 DV D Pla yer in the eve nt a problem a ris es
with the V S755, do not a ttempt to disa s s emble or repair the
monitor yours elf. Opening or attempting to service the monitor will
void the warranty; instead, contact a local C larion dealer for
as sis tance. The internal parts are not s erviceable by the us er. T he
VS 755 is a clas s I laser product, us ing a las er which could c ause
haza rdous radia tion exposure if improperly disas sembled. All
warra nty s ervice should be performed by an authorized C larion
service center.
C AUT IO N!
C hanges or modifications to this product not a pproved by the
manufacturer will void the warranty and will viola te FC C a pproval.
12
Page 11

C AR E A ND MA INT ENANC E
V
S
7
5
5
F C C A pproval
The C larion VS 755 ha ve been tes ted and found to comply within the
limits of a C las s B digital device, pursuant of P art 15 of the F C C
rules . Thes e limitations a re designed to provide reas onable protection agains t harmful interference in a res idential ins tallation. T his
equipment generates and us es radio frequency energy and if not
installed and us ed in ac cordance with the ins tructions, may caus e
harmful interfere nce to radio communications.
There is no guarantee that interfere nce will not occur in a particular
installation. If this equipment does caus e harmful interference to a
radio or televis ion reception, turn off the equipment and contact a
loca l C larion dealer for assistance. C hanges or modifica tions to this
product not approved by the manufacturer will void the warranty and
violate F CC Approval.
13
Page 12

Temperature and Mois tur e
V
S
7
5
5
If the player is used while the interior of the ve hicle is very
cold, c ondensation ma y form on the disc or on the internal
optical pickup s ys tem and prevent proper playing of the disc. If
you suspect that condens ation is an issue, eject the disc and
inspect the playing surface. If neces sary, remove the condensation
with a clean s oft cloth as described above. If you still
experience problems with playback, you will need to wait for
approximately one hour to a llow the V S 755 to warm up, a nd
for the condens ation to evaporate. If pla yback is sues continue,
please s ee your authorized C larion dealer.
14
Page 13

G E NE R AL O PE R AT IO N
V
S
7
5
5
E jec ting a Dis c
P ress (E J EC T) button on the front panel or on the re mote control to ejec t
the dis c.
B AS IC P L A Y
S topping P lay bac k
- Briefly pres s (S top) button to pre-s top the unit playback. W hen
button on the front panel or (Pla y) button on the remote control is
pres sed, normal playback will continue.
- P ress (S top) button twice to s top the playba ck and go ba ck to the DVD.
P aus ing P lay / S tep P lay
P ressing on the remote control for the first time or pressing on the
front panel during playbac k will s top playbac k temporarily. To return to
normal playbac k, pres s on the remote control or on the
front panel.
If you play a D V D/VC D/SVC D, press on the remote c ontrol again to
stop at the next picture (step function). If you play a C D/MP 3/Picture C D,
pres sing on the remote control aga in is ineffective.
R apid F orwar d / R apid R ev ers e
P ress & during playback. E ach time the button is pres sed, the
speed of rapid forward /reverse changes a ccording to the disc as follows.
15
Page 14
G E NE R AL O PE R AT IO N
V
S
7
5
5
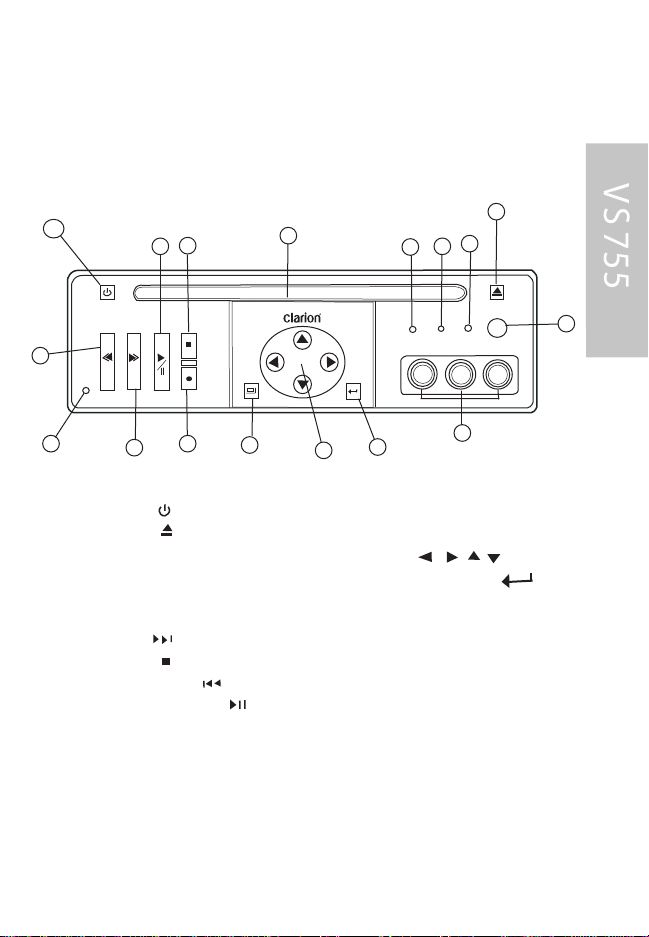
THE P L AY E R
F R ONT VIE W
1
POWER
9
12
PREVIOUS
10 8
STOP
PLAY/PAUSE
SOURCE
NEXT
5
7
1. P ower ( )
2. E J E C T ( )
3. ME NU
4. IR
5. S OUR C E
6. Disc S lot
7. NE XT ( )
8. S TOP ( )
9. P R EVIO US ( )
10. PLAY/PAUS E( )
2
6
CONTROLS
MENU
3
ENTER
13
15
DISC
14
17
16
EJECT
AV2
AV1
AUDIO
L
VIDEO
R
11
4
11. V ideo and A udio Input
12. R es et
13. / , / cursor buttons
14. E NT E R ( )
15. Indicator Light for DIS C
16. Indicator Light for AV 1
17. Indicator Light for AV 2
16
Page 15
G E NE R AL O PE R ATIO N
V
S
7
5
5
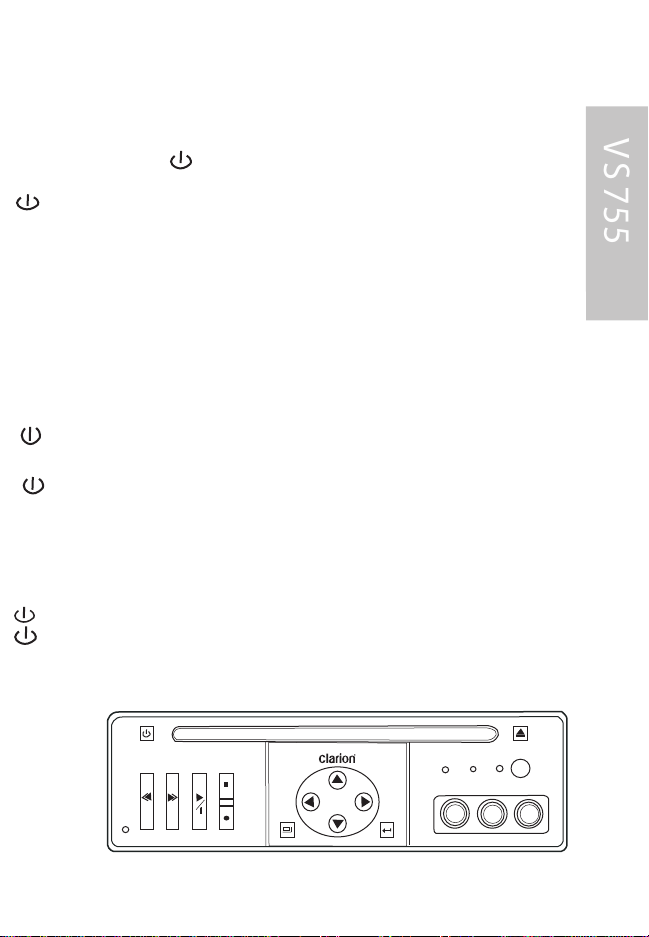
TUR N T HE UNIT O N
After all connections are completed
corre ctly, pres s the (P OW E R )
button on the front panel or
to turn on the power.
When the unit is on, it will search the
disc automatica lly. If there is a disc in
the dis c s lot, the unit will start
playback automatica lly.
B esides this,you s hould turn on
the monitor that conne cted to
the player.
S tandby S tate
1) W hen the unit is on, press
(P OWE R )
on the front panel or
(P OWE R ) on
the remote control to turn the unit off
temporarily, in order to s top the
playback in a s hort time and the unit
goes into s tandby s tate.
2) In s tandby s tate, pres s
(P OW ER ) onthe front panel or
aga in to recall playback.
And for disc pla yback, it ca n rea lize
memory play function.
POWER
STOP
PLAY/PAUSE
PREVIOUS
SOURCE
NEXT
MENU
No te:
The unit has screen saver
function(s elect “O N” in S cree n
S aver setup). If the playback
is stopped a nd there is not any
button operation in 5 minutes,
it will activate the s cree n saver
function automatically;
when any button for DV D
function is pres sed, the
screen s aver function will
release automatically.
R emote S ens or (IR )
P oint the remote handset to the
remote s ensor IR on the front
panel. Receive the s ignal from
the remote hands et.
L oading a Dis c
1. Ins ert the dis c with printed
side facing up into the disc slot.
2. The player will s tart
playback automatica lly.
EJECT
AV2
DISC AV1
L
AUDIO
CONTROLS
VIDEO
ENTER
R
17
Page 16

G E NE R AL O PE R ATIO N
V
S
7
5
5
R E MOT E C ONT R O L
P repar in g the R emote C ontrol
Ins erting the B atte ries
1. Open the battery compartment cover.
2. Ins ert the new batteries. Make s ure that
the pos itive and negative terminals of the
batteries are oriented indica ted.
3. Close the cove r.
B attery: C R 2032 (B utton batte ry)
Us in g the R emote C ontrol
F ace the remote control towards the pla yer
front fac e IR mark (remote control s ignal receiver).
Operation angle: About ±30 degree in ea ch
the direction of the front of the IR mark.
18
Page 17
G E NE R A L O PE R A T IO N
V
S
7
5
5
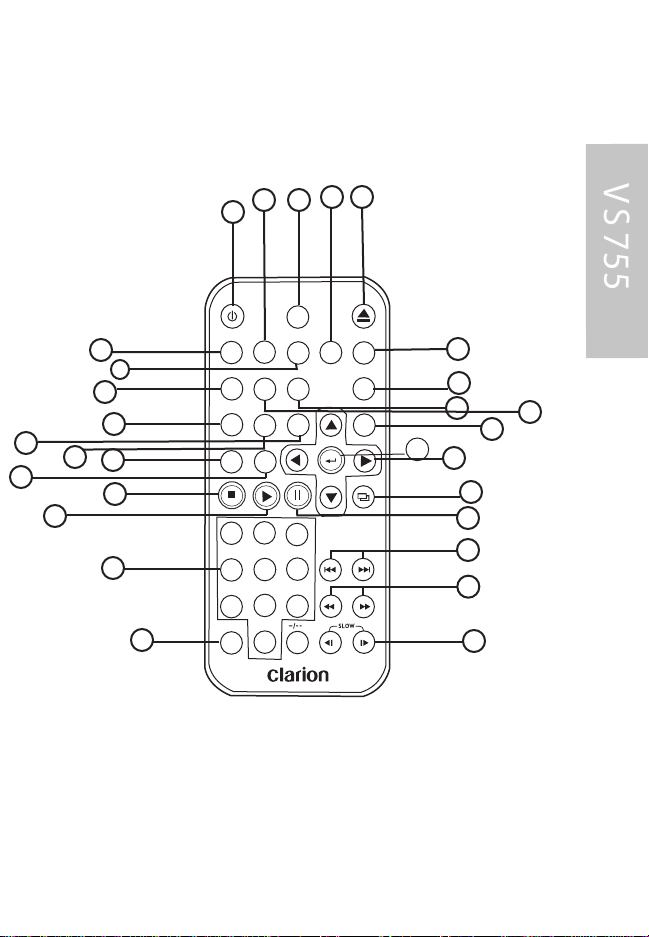
R E MOT E C ONT R O L
L OC AT IO N A N D F U NC T IO N O F K E Y S
DISPLAY
3
9 2
6
EJECT
SOURCE
P/NPBC
ANGLE
SETUP
ENTER
MENU
7
5
4
11
8
14
13
12
20
23
1
POWER
MUTE
ZOOM
3
24
25
SHUFFLE
RESUME SUB-T
REPEAT A-B TITLE
27
28
19
26
PROGRAM GOTO
10
19
16
2
1
18
21
4 5
6
17
8 9
7
22
CLEAR
0
10+
15
19
Page 18

G E NE R AL O PE R AT IO N
V
S
7
5
5
R E MOT E C ONT R O L
1. POWE R P ress P OW E R to turn the unit O N or O FF.
2. E JE C T P ress to eject the disc.
3. MUTE P ress to mute the sound.
4. S UB T ITLE C hanging of the S UBT IT LE la nguage on
multisubtitle language DVD disc.
5. ANG LE C hanging of the view angle on multi-angle
DV D dis c.
6. DIS P LAY Dis play s tatistical disc information
during playback.
7. S OUR CE C hanging betwee n DV D mode a nd AV mode.
8. S ET UP Dis play the S E TU P menu.
9. PAL/NT S C S witch between PA L mode, NTS C mode a nd
AU T O mode.
10. G OT O P res s the button to s elect cha pter by numberic
key.C hanging of the sound mode of the VC D/C D
discs .
11. T ITLE Display the TIT LE menu that is s tored in D V D dis c.
12. ME NU Dis play the root menu that is s tored on the DVD disc.
13. / , / In ca s e of ME NU mode, / , / buttons
served as cursor buttons to s elect item left/right,
ahe ad/bac k.
14. E NT E R C onfirm the Track/C hapter s elected with the numeric
buttons or s elected with the curs or buttons
on T V s creen.
20
Page 19

G E NE R AL O PE R AT IO N
V
S
7
5
5
R E MOTE C ONTR OL
15. / Cha nging for slow forward/ revers e playback motion.
16. Pre s s to play the disc.
17. / P ress to s earch forward rapidly &
to s earch revers e ra pidly.
18. / Pres s to skip to the next track & pre s s
to skip ba ck one track.
19. Pre s s it onc e to pre-stop pla yback; pres s it twice to
s top playback.
20. P ress it for the first time to pause playback.
P ress it a gain to res ume a t the
next picture (s tep function for DV D/VC D/S VC D).
21. 0-9 Nume ric buttons
22. C LE AR Whe n you input a number in error, pres s the
button to clear it.
23. ZO OM Allows the picture to be increase d in s ize .
24. P BC C hanging between P BC ON and P BC O FF on
the VC D disc only.
25. R ANDO M Allows the track played in ra ndom order.
26. P R OG R AM Allows the track played in the order you progra mmed.
27. R E PE AT S witch the R epeat mode of dis cs.
28. A-B A-B repeat allows a passage to be repeated continuous ly.
21
Page 20

B AS IC O PE R AT IO N
V
S 7
5
5
DV D P LA Y B A C K
Video C Ds with P B C (playback c ontrol )
Video C Ds with P BC ca n be playe d with or without a menu:
- P res s the ME NU button to s elect
between playback with or without P BC .
P aus e (s till pictur e)
- P res s the button during playback.
- P res s the button onc e again to resume normal playback.
F as t for wa rd/reve rs e
- P res s the or button during playba ck.
E ach time the button is pres s ed, the speed of fas t forward/revers e
cha nges as follows :
DV D:
Normal - >2x - >4x - >6x - >8x - >20x
VC D/CD /MP 3:
Normal - >2x - >4x - >6x - >8x
S kippi ng chapters /tracks
- P res s one of the buttons during playback.
- P res s the button to jump to the next chapter (D V D) or
track (V C D/CD).
- P res s the button to jump to the previous chapter (D V D) or
track (V C D/CD).
No te:
F or some V C D2. 0 discs (P AC playback control), the /
buttons may not work.
22
Page 21

V
S
7
5
5
B AS IC O PE R AT IO N
S ound Qua lity
S ome noise might be audible—this depends on the type of
encoder s oftware us ed while recording. It is not noise created
by the V S 755.
B it R ates
The V S755 supports the following bit ra tes : 32kHz, 44.1kH z,
48kHz, and 96kHz. In ca s e of a track recorded at V B R
(va riable bit ra te), the dis play for the play time of the track ma y
be slightly different from the actual play time. Also, the
re commended va lue for VBR ra nges from 32 kbps to 320 kbps .
ID3V 1 and ID 3V 2 T ags S uppor t
B oth ID3V1 and ID3V 2 tags are supported. T hese allow up to
30 characters per song na me and 30 chara cters per artist na me.
23
Page 22

B AS IC O PE R AT IO N
V
S
7
5
5
MP 3 P LAY B AC K O N C D-R D IS C S
Wha t is MP 3?
MP 3 is an a udio c ompression method. T his audio compres sion
method ha s become a popular forma t with many PC
users . MP 3 a llows the original digital audio data to be
compressed to about 10 perce nt of its initial file size while s till
retaining high s ound quality. This means that about 10 mus ic
C Ds can be recorded on a CD-R disc, thus allowing longer
listening time without having to change C Ds.
No tes :
• T he V S 755 ca nnot play ba ck a disc rec orded on a C D-R W D isc.
• S ome C Ds recorded in C D-R mode may not be usable.
• F iles without MP3 data will not play.
MP 3 P laybac k
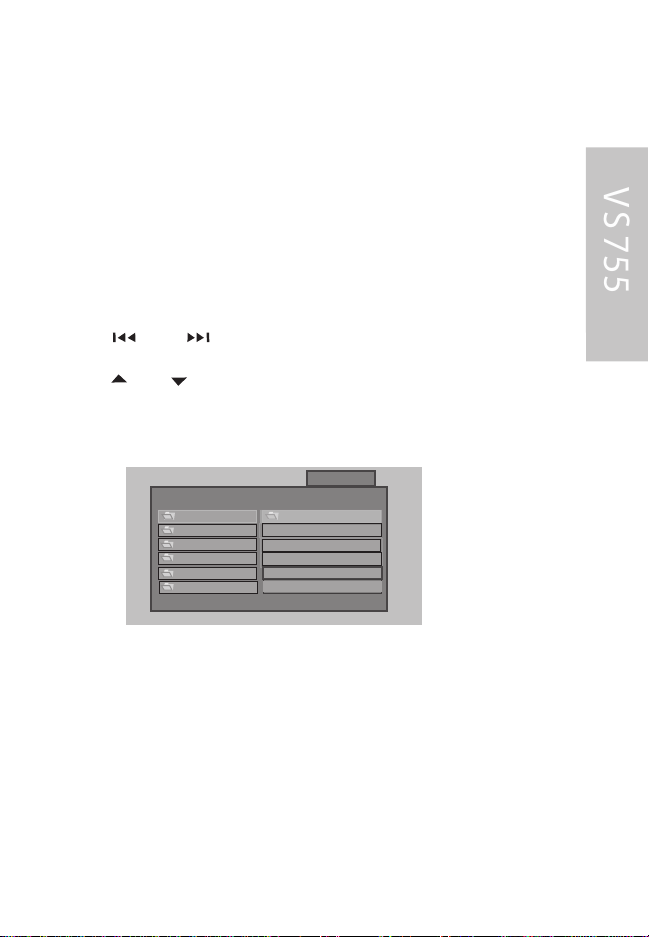
When a dis c with MP 3 files is ins erted, the S MAR T NAVI
screen will a ppea r. E ach folder a nd file will be shown (the
order may be slightly differe nt than that on your P C). Navigate
the files a nd folders using the navigation a rrow keys, a nd
select a file or folder to be played by us ing the [E NT E R ]
button.
24
Page 23

No te:
V
S 7
5
5
The folder cannot be selec ted in
thismode.
R epea t file/directory - R E PE AT
- P ress the R E PE AT button once or more than
onc e to s elect one of the following repeat modes:
WIT H ME NU
- R E P -ON E :
R epea t the current MP 3 file.
- FOLDE R R E PE AT:
R epea ts all MP 3 files in the curre nt
directory in sequence.
- NO R E PE AT:
The R E PE AT function is
switches off.
WIT HOUT ME NU
- R E P - ONE :
The current track is re pea ted.
a re repea ted.
- R E P E AT O FF :
The R E PE AT function is
switched off.
NE X T /PR E VIOU S files
During playback:
- P ress the button to select the next MP 3 file.
- P ress the button to s elect the
previous MP 3 file.
FA S T F OR WAR D/R E V E R S E
- P ress the or button during playba ck.
E ach time the button is pres sed, the
speed of fas t forwa rd/reverse cha nges
as follows:
Normal playback >2x - >4x - >6x - >8x
25
Page 24

B AS IC O PE R AT IO N
V
S
7
5
5
F ile E xtens ions
Always add a file extens ion “ .MP 3” or “.mp3” to a n MP 3 file
by using s ingle-byte lette rs . If you a dd a different file extens ion,
or forget to a dd the file extension “ .MP 3” or “.mp3, ” the
file cannot be played. In addition, if you us e upper c ase and
lower ca s e lette rs (capital and s mall lette rs ) mixed together for
file extensions, normal play may not be pos sible.
F ile and F older S truc ture
The folder name and file name ca n be displayed a s the title
during MP3 play. H owever, the title mus t be within 31 and 27
single-byte alphabetical letters a nd numerals for the folder
name and file name , re s pectively (not including an extens ion).
E ntering more letters or numerals than s pec ified may cause an
incorrect display.
A dis c with a folder having more than 8 hierarc hica l levels will
conflict with MP 3 s ys tem requirements a nd pla yback will
be impossible.
A total of 255 files and folders are allowed. W hen the number
of files and folders is more than 255, playba ck of tracks in
excess of that number is impossible. T here is a maximum of
31 files in each folder. F ile tracks are playe d in the order that
they were re corded onto a dis c. (F iles might not a lways be
played in the order dis played on the P C.)
26
Page 25

V
S
7
5
5
B AS IC O PE R AT IO N
R epe ating cha pters /tr acks
- P res s the R E P E AT button onc e, or more than once to select
the R E P EAT mode as followes.
DV D:
C HAP TE R R E PE AT ON:
The current c hapter is repeated.
TIT LE R E P E AT ON: The current title is repeated.
R E PE AT O FF : T he repeat function is s witched off.
VC D/CD
R E P - ONE : T he current track is repea ted.
R E P - ALL : All tracks of the inserted disc are repeated.
R E PE AT O FF : T he repeat function is s witched off.
27
Page 26

B AS IC O PE R AT IO N
V
S
7
5
5
Time dis plays
P ress the DIS P button during pla yback to dis play differe nt
time information on the scre en of the dis c that is playing.
E xample:
DV D:
-P ress DIS P once :
T he following information is s hown on the s creen:
TITLE 02 / 05 CHAPTER 001 / 027
01 : 14 : 39
- current title number and total number of titles ,
- current chapter number and total number of chapters , and
e lapse d total time.
P ress DIS P again.
TITLE REMAIN
01 : 14 : 39
P ress DIS P for the third time:
CHAPTER ENLAPSED
00 : 12 : 24
28
Page 27

V
S
7
5
5
B AS IC O PE R AT IO N
Time Dis play
P ress DIS P for the fourth time:
CHAPTER REMAIN
01 : 14 : 39
P ress DIS P for the fifth time:
The message on the scre en will be clea red.
C D/VC D:
E ach time the D IS P button is pres sed, the time displayed
cha nges in the following order:
- S ING LE E LAP S E D (track/chapter)
- S ING LE R E MAIN (track/chapter)
- TOTAL E L AP S E D (C D)
- TOTAL R E MAIN (C D)*
- OFF
* only when P BC is off
MP 3:
E ach time the D IS P button is pres sed, cha nges in the following order:
- C HAP TE R E LAP S E D
- C HAP TE R R E MAIN
ME NU function
ME NU button
- P ress the ME NU button during playba ck. T he ba s ic menu of the DV D
is dis played. If different menu options a re available, move the cursor to
the desired menu option with the curs or buttons or .
- C onfirm your selection by pres sing the E NT E R button.
29
Page 28

B AS IC O PE R AT IO N
V
S
7
5
5
F ile E xtens ions
Always add a file extens ion “ .MP 3” or “.mp3” to a n MP 3 file
by using s ingle-byte lette rs . If you a dd a different file extens ion,
or forget to a dd the file extension “ .MP 3” or “.mp3, ” the
file cannot be played. In addition, if you us e upper c ase and
lower ca s e lette rs (capital and s mall lette rs ) mixed together for
file extensions, normal play may not be pos sible.
F ile and F older S truc ture
The folder name and file name ca n be displayed a s the title
during MP3 play. H owever, the title mus t be within 31 and 27
single-byte alphabetical letters a nd numerals for the folder
name and file name , re s pectively (not including an extens ion).
E ntering more letters or numerals than s pec ified may cause an
incorrect display.
A dis c with a folder having more than 8 hierarc hica l levels will
conflict with MP 3 s ys tem requirements a nd pla yback will
be impossible.
A total of 255 files and folders are allowed. W hen the number
of files and folders is more than 255, playba ck of tracks in
excess of that number is impossible. T here is a maximum of
31 files in each folder. F ile tracks are playe d in the order that
they were re corded onto a dis c. (F iles might not a lways be
played in the order dis played on the P C.)
30
Page 29

V
S 7
5
5
B AS IC O PE R ATIO N
No tes :
T he number of s ubtitle langua ges is
dependent on the ins erted DVD. S ome
discs only contain one s ubtitle langua ge.
If only one la nguage is a vailable on the disc,
the “ ” appears in the left top corne r of
the s creen when press ing the S UB TIT LE button.
Zoom (ma gnification)
- P ress the ZO OM button once or
several times during playback to s elect
the required amount of zoom.
OFF - >1.5X - >2X - >3X - >OF F
S electing the viewing a ngle (D V D only)
When the ANG LE MA R K (camera angle)
function is a ctivated, the symbol is displaye d on
the s cree n when a s cene with a lternative
c amera angles is played from a DV D.
- P res s the A NGLE button onc e or
several times while the s ymbol
is dis played to s elect the va rious
ca mera angles .
No tes : T his function only works with discs
having s cenes re corded at differe nt angles .
The number of viewing angles depends on
the individual D V D. To activate AN G LE MAR K see
G eneral s ettings.
MP 3 dis c playback
This player s upports the following C D
formats for MP3 playback:
31
Page 30
ADVANC E D O PE R AT IO N
V
S
7
5
5
Make s ure that the MP 3 files have file format des ignation of .mp3.
Two different modes of MP3 playback are available:
- WIT H ME NU
- NO ME NU
The playbac k mode can be s et in the S E TU P menu under
“ P R EF E R E NC E S ” W ITH ME NU.
In this mode the displa y shows a ll the MP 3 folders of the disc
on the left and the file name s of the folder currently opened
on the right.
In S TO P mode:
- Us e the and buttons to select between the left a nd
right column.
- Us e the a nd buttons to s elect the desired item or folder.
- P ress the E NT ER or button to playba ck the s elected item.
The s creen s hows:
00 : 02 : 5800 : 02 : 58
I
0
2PAC - Ca li
MP3
MP3
MP3
MP3
MP3
ANAS TA CIA
BAB Y LON ZO O
BR AN DY MONI
CU LTUR E B E A
1
2
3
4
5
R OO T
RO OT R OO T
ACI D - JA ZZ A CID - J AZ Z
INDE P E NDE NT
LATI N
PO P
SS MMAARR TT NN AAVV
No tes :
The F OLDE R c an only be s elected in S TO P mode. During playback,
the s cree n will display the MP 3-ID3 tags instead of the R E PE AT mode.
WIT HOUT ME NU
When the S MAR T NAV function is s et to“ NO ME NU ”, only the track
(file) number and the elapsed time for the current file are displayed
on the s creen. All the tracks (files ) of the MP 3 C D inse rted are
played sequentially.
32
Page 31

V
S
7
5
5
ADVANC E D O PE R AT IO N
In order to s tart the slide s how with a particular ima ge from the
folder curre ntly s elected, enter the number which appears a fter
the ima ge in the na vigation menu using the numeric key buttons and
pres s the E NTE R button.
No tes :
J P E G image s can be recognized by the ca mera s ymbol to the left
of the file name. T he directory ca n only be selected in S TOP mode .
Volume, color, contras t a nd brightnes s ca nnot be a djusted during
image CD playbac k.
Ne xt/previous image
During playback:
- P ress to select the next J P E G file.
- P ress to select the previous J PE G file. R epea t file/directory R E PE AT
- P ress the R E PE AT button briefly once or several times to set the R E PE AT
mode a s follows:
- R E P -ON E :
T he current J P E G file is displaye d a gain.
- FOLDE R R E PE AT:
All the J P EG files in the curre nt directory are displayed again.
- R E P E AT O FF :
T he R E P E AT function is s witched off.
33
Page 32
ADVANC E D O PE R AT ION
V
S
7
5
5
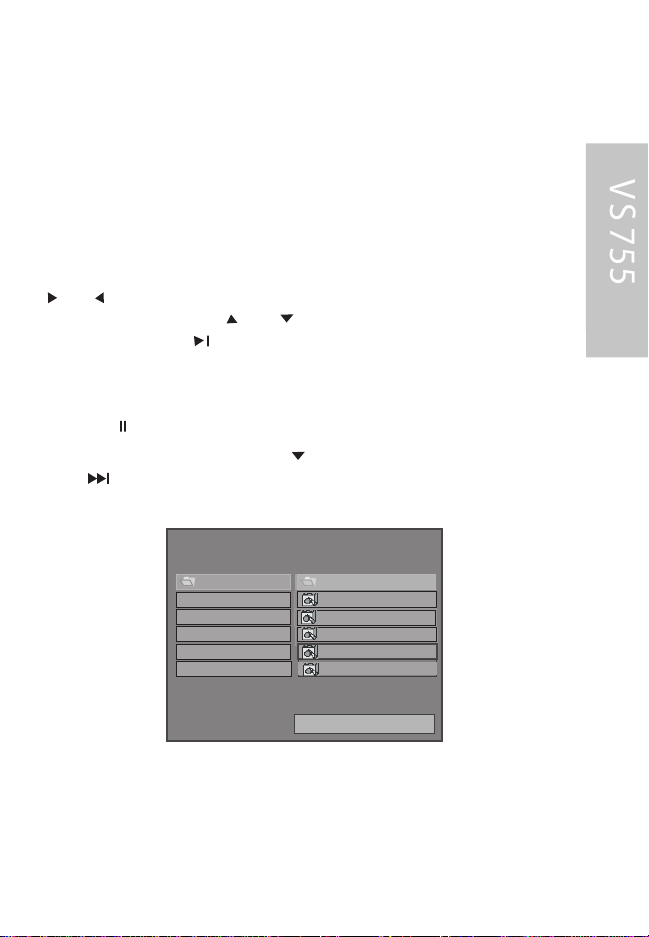
J PE G image C Ds
The DVD player supports the display of J PE G ima ges.
E nsure that the J P E G images have a file format des ignation . jpg.
J P E G image C D playback
- Ins ert a dis c with J PE G images in the player.
- The navigation menu appears on the display as follows:
In S TOP mode:
- You ca n switch between the left a nd right-hand columns us ing the
a nd buttons . You can s elect the des ired file or the
desired directory us ing the a nd buttons.
- P ress the E NT ER or button in order to start a slide s how,
beginning with the s elected file.
- All the images in the current directory are displayed in s eque nce for
approx. 5 s econds each.
- P ress the button in order to pause or res ume the s lide
s how.
F or the same folder, you ca n pres s to go to the next image,
press for the paginal display (next page).
SSS MMM AAA RRR TTT NNNAAAVVV III
R OO T
0
DSC 04050001
1
DSC 04050002
2
DSC 04050003
3
DSC 04050004
DSC 04050005
4
5
RE PE AT O F F
34
Page 33
ADVANC E D O PE R AT IO N
V
S
7
5
5
1
POWER
DISPLAY
MUTE
ZOOM
SHUFFLE
RESUME SUB-T
REPEAT A-B TITLE
3
PROGRAM GOTO
1
4 5
7
CLEAR
2
8 9
0
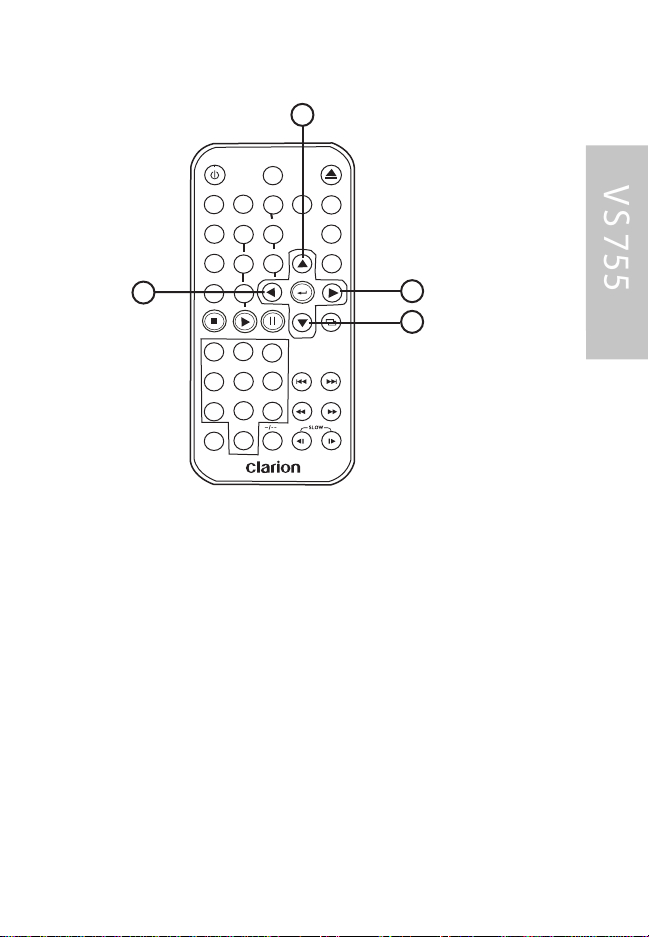
Image R otation
1. horizontal image mirror.
2. V ertical image mirror.
3. 90 degree clockwise.
4. 90 degree counterclockwise.
EJECT
SOURCE
P/NPBC
ANGLE
SETUP
ENTER
MENU
3
6
10+
4
2
35
Page 34

S E T TING S
V
S
7
5
5
S etup Menu
Main page In S TOP mode:
- P ress the S E TU P button.
- The initial S E TUP menu is dis played.
- S elect the preferred item by usingthe / buttons.
- P ress the E NT ER button to confirm your s election.
The following options a re ava ilable :
• G E NE R A L S E T-U P
This includes TV display. F or details plea s e refer to
the G eneral s etup me nu.
• S P E AK E R S E T-UP
This c hanges the a udio output from DO LB Y AC 3 5.1 DO WNMIX
to 2 channel mode. P lease refer to S peaker
set-up menu.
• A UDIO S E T-UP
This s elects all other AU DIO functions. P lea se refer to Audio
set-up menu.
• P R E F E R E NC E S
This c onfigures the sys tem. F or details pleas e re fer to P references
set-up menu G enera l s et-up menu.
36
Page 35

S E T TING S
V
S
7
5
5
G ENE R AL S E T-UP
• NOR MA L/LB (F or 4: 3 V iewing)
P layed back in letterbox style. (If connected to a
wide-s creen video s ource,black bands appear at
top and bottom of the s creen.)
• W IDE (F or 16:9 Viewing)
S elect when a wide-screen video s ource is c onnected.
P IC MO DE
If you s elect A UTO, the sys tem PIC mode will de pend
on the D V D dis c.
- S elect HI-R E S format for best image res olution.
- S elect N-FLIC KE R format if flickering nois e a ppea rs .
A NG LE MAR K
- S elect ON, if you want to display the angle icon when
a multiangle.
O S D L ANG
- S elect the des ired language for the On- S creen Display.
C AP TION S
- Activate the C AP TIONS feature by s electing O N.
S pea k er s et-up me nu
DR C - Dynamic range Control
- S elect DR C to a djust the dynamic
range of a Dolby Digital encoded
program. T here are 8 s teps between off
and full compression.
37
Page 36

V
S
7
5
5
P R E FE R E NC E S E T-UP ME NU
T V T Y PE
T his s ystem can play discs recorded in either P AL
or NT S C formats AU T O.
and N T S C .
- S elect NT S C format, if the video source supports NT S C only.
- S elect P AL format, if the video source supports P AL only.
38
Page 37

V
S
7
5
5
P R E FE R E NC E S E T U P ME NU
AUDIO
- S elect the initial audio s oundtrack langua ge you prefer.
S UB T IT LE
- S elect the initial subtitle la nguage you prefer.
DIS C ME NU
- S elect the initial disc menu language you pre fer.
PA R ENTAL
- S elect the des ired parental guidance level from the lis t. The
factory default pas sword for changing the parental
guidance is 3308.
PA S S WOR D
- S elect C HAN G E to cha nge the fac tory s et password for
parental control. K ey in the initial fa ctory pas sword of 3308.
T hen key in a new 4 digit pas sword. C onfirm the new password
by ree ntering it.
S MAR T NAV
T his is us ed to s et the display mode for MP 3 playback.
- S elect NO ME NU to play MP 3 files without folder/file display.
- S elect WIT H ME NU to show the disc contents in folder/file style.
DE FAUL T S
-S elect R E S E T to return the player to the fac tory defaults.
39
Page 38

IN S TA L LAT IO N
V
S
7
5
5
T HE P L A Y E R
B AC K V IE W
5
4
3
2
IN2
IN1
1. DC 12 V INP UT S ocket
2. R E MO T E S oc ket
3. AV O UT P U T C AB LE
4. AU DI O/V ID E O O UT P UT 1
5. AU DI O/V ID E O O UT P UT 2
OUT
IR
1
40
Page 39
INS TAL LAT IO N
V
S 7
5
5
Notes :
- C hoos e the mounting location
where the unit will not interfere
with the norma l driving function
of the driver.
- Before finally installing the unit,
connect the wiring tempora rily
and make s ure it is all connected
up properly and the unit a nd
the s ystem work properly.
- Us e only the parts included
with the unit to e ns ure proper
installation. T he us e of
unauthorized parts can
ca us e ma lfunctions.
- C ons ult with your nea rest
dea ler if ins tallation requires
the drilling of holes or other
modifications of the vehicle.
- Ins tall the unit where it does
not get in the driver•s way a nd
ca nnot injure the pas se nger if
there is a s udden s top, like an
emergency stop.
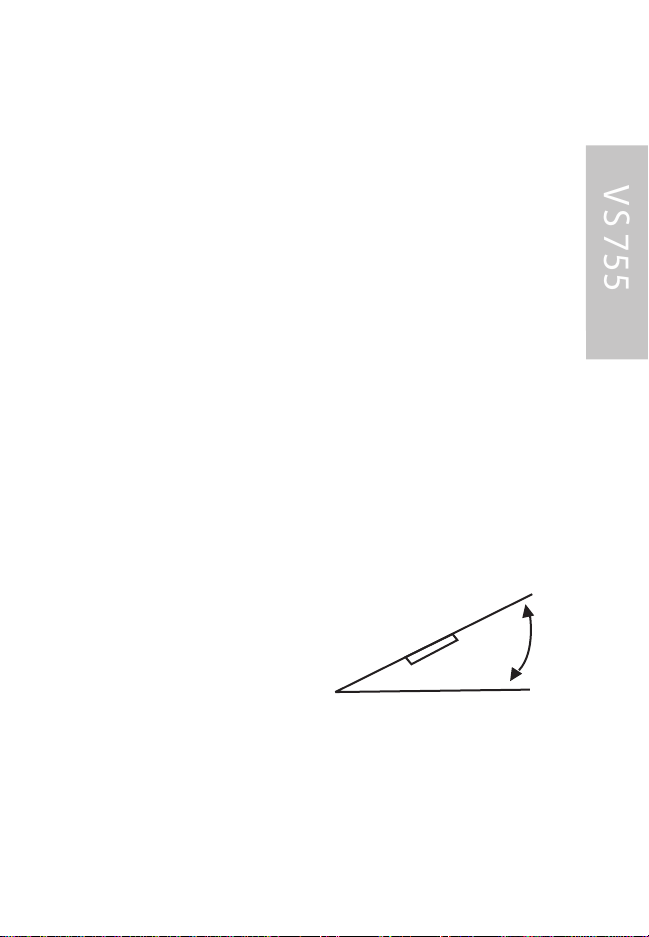
- If installation a ngel exce eds
30
might not give its optimum
performa nce .
Avoid installing the unit where it
would be s ubject to high
tempera ture, s uch as from
direct sunlight, or from hot air,
from the heater, or where it
would be s ubject to dus t, dirt or
excessive vibration.
DIN F RONT /R E A R-MO UNT
This unit c an be properly
installed either from “Front”
(conventional DIN F ront-mount)
or “R ear” (DIN R ear-mount
installation, utilizing threa ded
screw holes at the s ides of the
unit cha s s is ). F or details , re fer
to the following illustrated
installation me thods.
30
41
0
Page 40
V
S
7
5
5
INS TAL LAT IO N
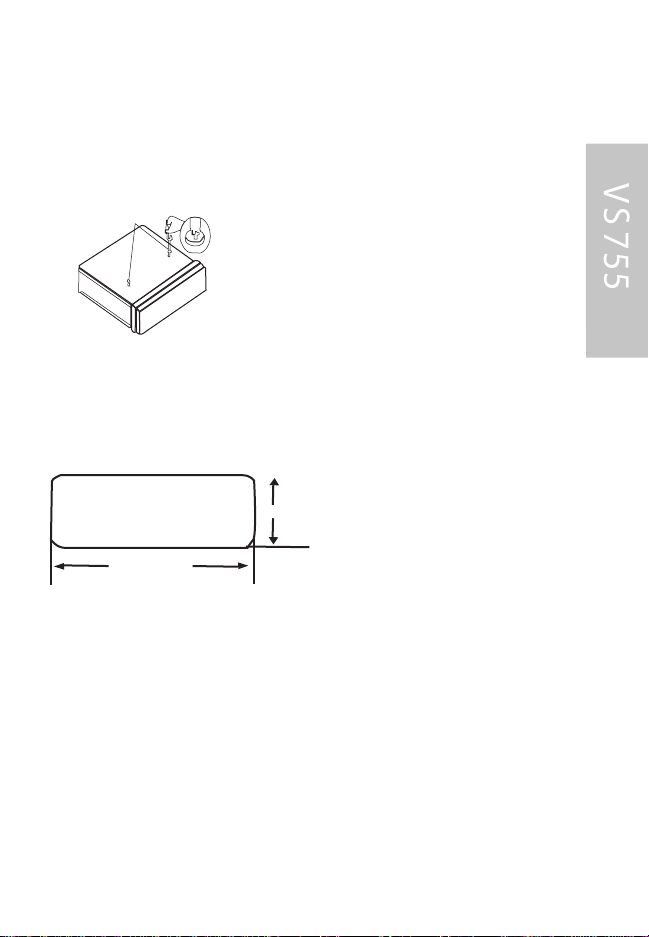
TA K E OUT S C R E W B E FOR E INS T AL L AT ION
B efore install the unit, please remove the two s crews .
DIN F RONT -MOUNT ( Metho d A ) In s tallation Opening
This unit c an be ins talled in any da s hboard ha ving an opening
a s shown below:
182mm
Ins talling the u nit
B e s ure you tes t a ll c onnections firs t, and then follow thes e
steps to install the unit.
1. Make s ure the ignition is turned off, and then disconnect the
ca ble from the vehicle battery•s ne gative (-) terminal.
2. Dis connect the wire ha rness a nd the a ntenna.
3. Lift the top of the outer trim ring then pull it out to remove it.
53mm
42
Page 41

V
S
7
5
5
INS TA LL ATION
INS TAL L ATIO N
DIN R E AR -MOUNT (Method B )
If your vehicle is a Nis sa n, Toyota or
S uzuki, follow thes e mounting ins tructions.
Use the s crew holes marked T (Toyota),
N (Nis s an) or S (S uzuki) loca ted on both
sides of the unit to fasten the unit to
the fa ctory radio mounting bra ckets
s upplied with your vehicle.
Side View showing
Screw Holes marked
T, N or S
Factory Radio
Mounting Bracket
Screw
Hook
Screw
Dash board or
Console
T
o fa sten the unit to the factory radio
moun tin g br ackets .
1. Use a s crewdrive r to loose the hook•s
screws on the front left and right s ides of
2. Align the screw holes on the
bra cket with the s cre w holes on the unit,
and then tighte n the s crews
on e ach side.
3. Fas ten with the s upplied truss
s crews (5x5mm) or flus h surface
screws (4x5mm), depending on the
s hape of the s crew holes in the bracket.
Note: the outer trim ring, s leeve and the
metal s trap are not us ed for method B
installation.
4. The two supplied keys relea s e
tabs inside the unit•s s lee ve s o
you ca n remove it. O ne key is for
the right s ide a nd the other is for
the left side. Ins ert the ke ys as
far as they will go (with the
notches facing up) into the appropriate s lots at the middle left and
right sides of the unit. Then s lide
the s leeve off the back othe unit.
43
Page 42

INS TA LL ATION
V
S 7
5
5
5. Mount the sleeve by inserting the s lee ve into the
opening of the dashboard and bend open the tabs
loca ted around the sleeve with a s crewdriver. Not a ll tabs
will be able to make contact, so examine which one s will
be most effective. Bending open the appropriate tabs
behind the da s hboard to s ecure the s leeve in place.
Sleeve
L key
Outer Trim Ring
R key
6. R econnect the wire harnes s and the antenna and be
ca reful not to pinch a ny wires or ca bles .
7. S lide the unit into the s leeve until it locks into place.
Dashboard
Tabs
Screwdriver
Sleeve
44
Page 43
INS TAL LAT IO N
V
S 7
5
5
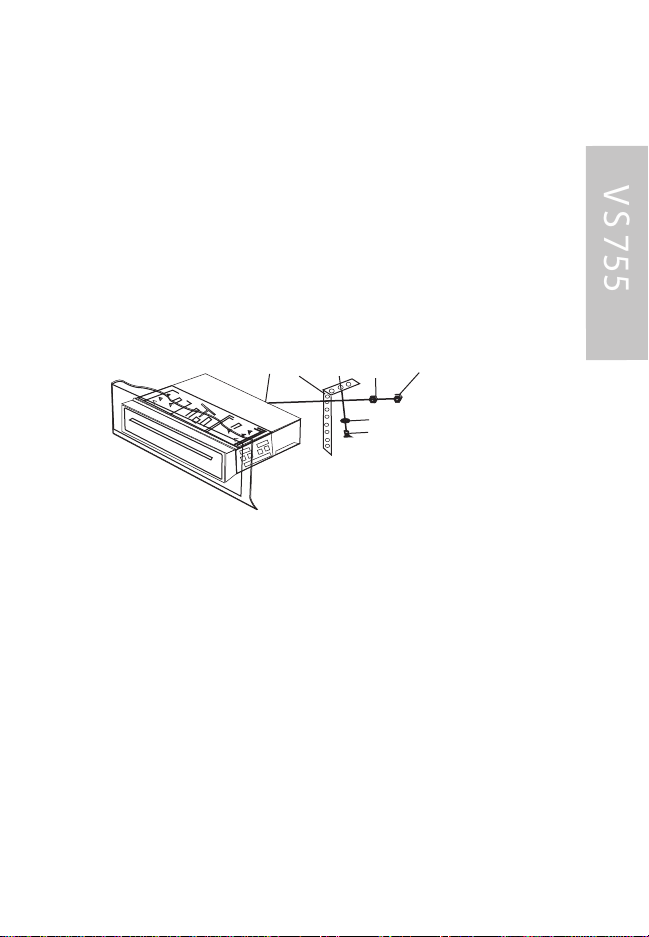
8. To further s ecure the unit, use the supplied metal
strap to secure the back of the unit in pla ce . U s e the
supplied ha rdware (Hex N ut (M5mm) a nd S pring
Wa s her) to attach one end of the s trap to the mounting
bolt on the back of the unit. If necessary, bend the metal
strap to fit your vehicle•s mounting area . T hen use the
supplied ha rdware (Ta pping S cre w ( 5x25mm) and P lain
Wa s her) to attach the other end of metal strap to a s olid
metal part of the vehicle under the das hboard.
This s trap also helps ensure proper electrical grounding
of the unit.
Mounting Bolt
Metal Strap
Spring Washer
Hex Nut
9. R econnect the cable to the vehicle battery•s negative
(-) terminal. Then replace the outer trim ring.
R emoving the un it
1. Make s ure the ignition is turned off, then disc onnect
the c able from the vehicle batte ry•s negative (-) terminal.
2. R emove the metal s tra p a ttached the bac k of the unit
(if attached)
3. L ift the top of the outer trim ring then pull it out to
remove it.
4. Ins ert both of the supplied keys into the s lots at the
middle left and right s ides of the unit, then pull the unit out
of the dashboard.
Plain Washer
Tapping Screw
45
Page 44
IN S TA L LAT IO N
V
S
7
5
5
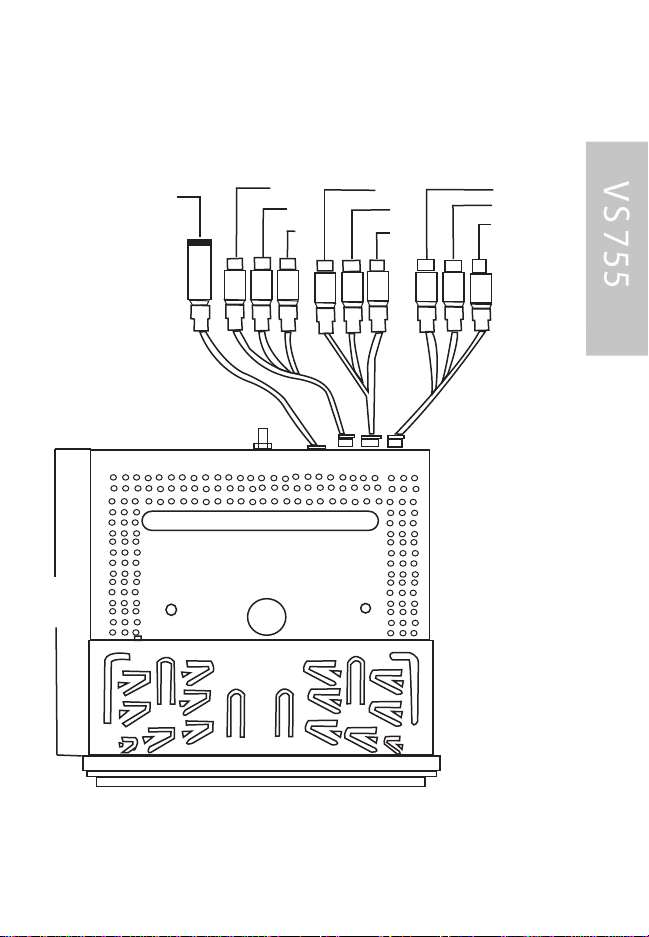
E L E C T R IC AL C ON NE C TI O N
EXTERNAL
IR INPUT
180.0+0.5
VIDEO- OUT
RIGHT
OUT
LEFT
OUT
VIDEO- IN
RIGHT
IN
LEFT
IN
VIDEO- IN
RIGHT
IN
LEFT
IN
46
Page 45

INS TAL LAT IO N
V
S
7
5
5
E lec tric al c onnec tions .
R oute a ll cables with care.
Do not cut off un-used cables ,
tape them up a nd secure
them to one side. They may
be useful in the future for
additional functions.
If the yellow +12v permanent
positive lead is lengthened and
connected directly to the batte ry,
it must be protected by
an additional
10 Amp fus e located nea r the
battery (ma x. 10-15 cm)
P ower s upply c onnections
C able color C ategory C onnection
Yellow input +12v perma nent positive
+12 V cons tant lead (yellow):
C onnect the yellow lea d to a
suitable conne ctor with +12v
perma nent pos itive voltage.
This c onnection s hould be rated
for a current of at least 3 amps.
+12 V switched lead (red):
C onnect the red lead to a s uitable
+12v circuit s witched through
the ignition.
B atte ry negative lea d (black):
C onnect the black lea d to a
suitable ground
(ve hicle c hassis).
(mus t be ra ted for a t leas t 3 amps)
R ed
B lack
B lue
input
input
output
input +12v ignition pos itive
(s witched plus)
B atte ry negative
(ve hicle c hassis)
Auto antenna l
R emote control power
47
Page 46

V
S
7
5
5
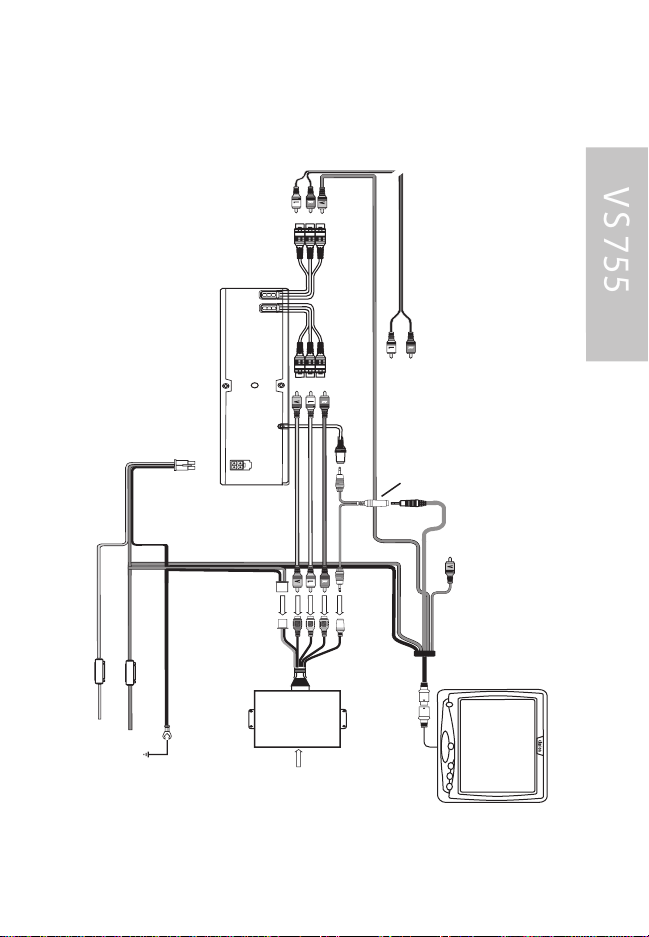
INS TAL LAT IO N DIA GR A M
VS 755 C ON NE CTIO NS
+1
2
V
C
o
ns
t
a
n
t
Y
P
e
o
l
l
we
ow
r
B
G
l
a
r
o
c
R
+1
u
k
e
n
2
d
d
V
A
c
c
e
s
s
o
r
y
A
/
V
O
u
t
p
ut
A
A
u
/
V
x
i
l
I
i
n
a
p
r
y
ut
E
I
R
x
t
e
i
n
r
n
p
a
u
l
t
C
-
o
ns
P
B
G
l
a
r
o
c
u
k
n
d
p
i
n
a
s
s
i
g
n
m
e
n
t
s
Y
+1
ow
e
t
l
a
l
2
ow
n
e
V
r
t
P
o
w
e
r
c
o
n
n
e
c
t
o
r
R
+1
A
e
c
2
d
c
V
e
s
s
o
r
y
48
Page 47

INS TAL LAT IO N DIA GR A M
V
S
7
5
5
VS 755 A DDE D T O F AC T O R Y A UDIO S Y STE M
A
/
V
o
u
t
p
u
t
V
S
7
5
5
P
o
w
e
r
h
a
r
n
e
s
s
R
A
e
c
d
c
e
s
+
s
1
o
2
r
V
y
G
B
l
r
a
o
c
u
k
n
d
-
i
V
n
i
p
d
u
t
1
t
o
mo
n
i
t
o
r
A
/
V
A
u
x
i
l
i
a
r
y
i
n
p
u
t
s
I
R
i
n
p
u
t
A
e
o
u
d
i
o
V
i
d
o
e
u
o
t
p
u
o
t
u
t
p
u
t
-
F
M
2
0
0
i
V
n
i
p
d
u
e
t
o
1
a
n
t
e
n
n
a
V
i
d
e
o
i
n
p
u
t
2
T
o
r
a
d
i
o
a
n
d
B
l
a
R
Y
c
e
e
k
d
l
l
o
-
+
w
1
G
2
r
+
V
o
1
u
2
A
n
V
d
c
c
C
e
o
s
n
s
o
s
t
r
a
y
n
t
P
o
w
e
r
49
V
C
m
M
l
o
a
A
n
r
i
i
o
7
t
o
n
1
r
9
4
Page 48
INS TAL LATIO N DIAG R AM
V
S
7
5
5
VS 755 WIT H T V T UNE R
P
ow
e
r
Ha
r
ne
s
s
B l
a
R e
Y
e
l
l
o
w
+
1
2
V
C o
n
s
t
a
n
t
P
o
w
e
r
c
k
d
-
+
1
G
2
rou
V
Ac
nd
c
e
s
s
o
r
y
A
o
r
u
d
i
V
n
i
p
d
u
e
t
o
A
/
V
O
ut
p
ut
V
S
7
5
5
P
Ha
o
w
r
n
e
e
r
s
s
1
V
t
o
i
d
e
m
o
o
n
o
i
u
t
o
t
p
r
u
t
-
A/
V
A
u
x
i
l
i
a
r
y
i
n
p
u
t
s
I
R
i
n
p
u
t
T
T
T X
V
T
u
0
ne
0
5
r
An
Z
C B
t
e
n
0
na
0
1
C
i
o
l
a
r
o
i
o
u
n
t
p
u
F
t
M
2
-
0
t
0
o
F
h
M
e
a
d
M
o
u
d
n
u
i
l
t
a
t
w
o
r
i
t
h
v
o
l
u
m
e
c
V
o
i
d
n
e
t
r
o
o
l
i
n
(
3
n
p
-
o
c
u
t
o
" Y
t
n
1
s
d
" -
u
u
c
p
c
a
p
t
b
o
l
i
l
e
r
e
d
)
V
i
d
e
R e
o
d
B l
a
c
k
r
G
o
u
n
d
i
n
+
p
1
u
2
t
V
2
A
C C
V
C l
m
M
o
a
A
n
r
i
i
o
7
t
o
n
1
r
9
4
50
Page 49

INS TAL LAT IO N DIA GR A M
V
S
7
5
5
VS 755 W IT H MO NIT O R
V
P
o
w
er
H
a
r
n
es
A
s
c
c
e
s
s
o
r
y
G r
o
u
n
d
A
o
r
u
i
n
p
u
t
1
A
/V
t
o
O
m
u
o
t
n
p
i
u
t
o
t
r
A
/
V
A
u
x
i
l
i
a
r
y
i
n
p
u
t
S
75
5
R
e
d
+1
2
V
B
l
a
c
k
-
s
I
R
i
n
p
u
t
V
i
d
e
o
V
i
d
eo
o
u
t
p
u
t
-
d
C
i
o
l
ar
o
i
o
u
n
t
p
u
F
t
M
20
t
0
o
F
h
M
ea d
M
o
u
d
n
u
i
l
t
at
w
o
r
i
t
h
vo
l
u
m
e
c
o
n
t
r
V
o
l
i
d
e
o
i
n
p
u
t
1
V
i
d
e
o
i
n
p
u
t
2
Y
e
l
l
o
w
+1
2
V
C
o
n
s
t
a
n
t
P
o
w
e
r
c
e
k
d
-
+1
G
2
r
V
o
u
A
n
d
c
c
e
s
s
o
r
y
V
C
m
M
l
o
a
A
n
ri
i
o
7
t
o
n
1
r
9
4
B
l
a
R
51
Page 50

G L OS S AR Y
V
S 7
5
5
G
(G eneral audience 13) :
suitable for a ll members of the general
public including children.
P G
(P arental Guidanc e) :
Allowed for general veiwing but with
pare ntal supervis ion.
P G -13
(P arental Guidanc e 13): allowed for
viewing by children over 13 with
pare ntal supervis ion.
R
(R estricted): parental s upervision
or the accompaniment by an adult
is ma ndatory
NC -17:
contents unsuitable for children under
17 O ther classifications (non MPAA):
.
ADU LT:
only s uita ble for adults
NR
(Not R ated): no clas s ification.
P B C
(P layba ck C ontrol).
S ome VC D 2.0 V ideo C Ds arencoded
with pla yback control, allowing you
to navigate through the disc contents
with a menu.
S VC D
(S uper V ideo C D)
This is an E ast As ian standard
for video data on a s ta ndard 12
cm C D. T he da ta is s tored in
MP E G 2 forma t.
The maximum bit ra te for video
is 2264 kbps. Two different
stereo audio s oundtrac ks ca n be
recordedon a S V CD .
VC D
(V ideo C ompact Dis c)
A world wide standard for
digital video on a s tanda rd 12
cm C D.
The data is s tored in MP E G1
format. T he maximum bit rate
for video is 1150 kbps. O nly
one s tereo a udio track can be
recorded on a V CD .
VF D
(Vacuum Fluores cent D isplay)
This D V D player is equipped
with a multicolor dis play with
adjus table brightnes s .
TF T
(T hin F ilm T rans istor)
A tec hnology for manufacturing
large , high res olution L C D flatscreen displays (e. g.computer
monitors, LC D T V s,etc. ).
52
Page 51
V
S 755
TR OU BL ES HO O T IN G
In rare ca s es, your DVD sys tem may not function the way
you expect it to.
B efore calling for s ervice please rea d the operating ins tructions and go through the following che ck lis t:
. Symptoms
P layer does not work when
switching on ignition and
pres sing the P OW ER button.
The remote control does
not work.
S kips during DV D playback.
Dis torted s ound.F rozen picture.
Interferenc e in picture.
P layer does not re ad dis c a t all.
P layer does not re cognize the
inse rted disc.
P layer hang-up ( picture freezes ).
No FO LDE R /FILE dis play whe n
playing an MP 3 disc.
Wrong language for a udio, DVD
menu or subtitles is se lected
when inse rting a DV D.
C olor saturation is too
weak/strong during
DV D/VC D/S VC D playback.
Pos sible caus e / re medy
C heck fuses (unit a nd vehic le) a nd c onnections
• Pre ss the R E SE T button ( see page 16) .
C hange the ba tteries in the remote control.
• Replac e the batteries
The infrared lens on the re mote or the unit
is cove red by objects or dirty.
• Clean the infrared le nses with a damp cloth.
P layer cannot re ad the ins erted disc due to disc
dama ge or dirt on the s urface. Clean the disc
and attempt to re play.
Ins erted dis c type is not compatible with the
playe r (s ee spe cifications).
In cold we ather conditions , condens ation may
occur on the la ser.
• Wait a pproxima te ly 5 minutes until the
condensa tion evapora tes .
• Switch the player off a nd on to re sume
norma l opera tion.
• Pre ss the R E SE T button
S et S MAR T NAV option to: W IT H ME NU in the
prefere nces set-up menu.
C heck initial la nguage settings in the
P RE FE R E NC E S set-up menu.
• Remove the disc.
• Se t the required C OLO R value us ing the or
buttons and re-inse rt the disc.
R es et default va lue:
• With the dis c re moved, press the DIS P button.
53
Page 52

S PE CIF IC AT IONS
V
S
7
5
5
Model: VS 755
S ignal s ystem: Dua l sys tem NT S C /P AL
Video input level: 1. 0 V pp ±10 %
Audio input leve l: 0. 3 Vrms
H umidity for normal operation: 10% ~75%
Operating voltage (direct curre nt): 10-16
C urrent c ons umption (Max): 2.0 A (at +12V )
C urrent consumption: O ff 3 mA (a t +12V)
Opera ting temperature:
S torage temperature:
Dimensions: 188x59x176mm
W eight: 1500g
S pec ification s s ubjec ted to c hange.
-4 F ~ 158 F (-20 C to +70 C )
-22 F ~ 176 F (-30 C to +80 C )
54
Page 53

G L OS S AR Y
V
S
7
5
5
Do lby Digital
Dolby L aboratories audio compres sion
technology that allows up to 6 cha nnels
(R ight, Left, C enter, S urround R ight,
S urround L eft and S ubwoofer) in one audio
stream (AC 3). Most DV Ds contain Dolby
Digital audio.
Do lby S urround
Dolby L aboratories audio encoding
technology that combines the information for
two additional cha nnels (C enter, S urround)
in a standard s tereo signal. The Dolby
S urround s ignal can be played on any stereo
equipment, however a Dolby S urround
Decoder is ne eded to separa te the C enter
and S urround cha nnels from the stereo channe ls .
Do lby S urround P ro L ogic
An optimized decoder tec hnology for Dolby
S urround encoded signals .
DR C (Dyna mic R ange C ontrol)
DR C lets you limit the dyna mic ra nge of a
Dolby Digital encoded progra m.
DT S
An audio compression s ystem for cinemas
deve loped by Digital T heater S ys tems , Inc.
DV D (Digita l V ers atile Dis c)
The DVD dis c is a 12 cm disc, containing
two layers of digita l information. T he
maximum amount of data on a s ingle-layer ,
single-s ided DVD can be up to 4.7 Gigabytes.
A two-layer double-sided DV D c an be
up to 18 G igabytes .
55
J PE G
(J oint P hotographic
E xpert G roup)
J PE G
images are bitmapped
images that use a
compression me thod
in order to save
me mory s pace.
Page 54

WA R R ANT Y IN F OR MA T ION
V
S
7
5
5
This product is warra nted aga inst all defects in material workma ns hip
for a period of one yea r from the date of original purchas e. C larion
P roAudio products, except for s pea kers , a re covered by a two year
limited warranty when installed by an authorized C larion dealer. T he
conditions of this limited warranty and the extent of re s ponsibility of
C larion C orporation of America (“C larion”) under this limited wa rranty
are as follows:
1. P R OOF OF D ATE O F P UR CHAS E W IL L B E R E QUIR E D FOR
WAR R ANTY S E R VIC E O F T HIS P R ODUC T. IN THE C AS E OF T HE
TWO (2) Y E AR LIMIT E D WA R R ANTY F OR C LAR ION P R OAUDIO
P R ODU C T, P R OOF O F INS TAL LATIO N B Y AN AUT HOR IZE D
DE AL E R IS R E QU IR E D. INFOR MATION ABOUT C LAR ION AU T HOR IZE D WAR R AN T Y S E R VIC E C ENT E RS MAY B E O BTAINE D BY
C ONTACT IN G OR W R IT ING C LAR ION AT T HE ADD R E S S
LIS TE D BE LO W.
2. This limited wa rranty will become void if service performe d by
anyone other than an approved C larion Warranty S ervice C enter
res ults in dama ge to the product.
3. T his limited warranty does not apply to a ny product which ha s been
subject to misuse, neglec t or accident, or which ha s had the serial
number altere d, defaced or remove d, or which has been connected,
installed, a djusted or repaired, other than in accordance with the
instructions furnished by C larion.
4. T his limited warranty does not cover ca r static or other electrica l
interferences, ta pe head or las er pick-up cleaning or adjus tme nts, or
labor costs for the removal or reins tallation of the unit for repair
5. T he s ole res pons ibility of C larion under this limited warranty s hall be
limited to the repair of the product or replacement of the product, a t the
sole discretion of C larion.
6. P roduct mus t be shipped in its original c arton or equiva lent carton,
fully ins ured, with shipping cha rges prepaid. Clarion will not as sume
any re s pons ibility for a ny loss or da mage incurred in s hipping.
56
Page 55

WA R R ANT Y IN F OR MA T ION
V
S
7
5
5
AL L IMP LIE D WAR R ANT IE S E XC EP T TO T HE E XTE NT
P R OHIB IT E D B Y AP P LIC AB LE LAW S HA LL HAVE NO
G R E ATE R DUR ATION THAN T HE W AR R ANT Y P ER IOD
S E T FOR TH AB OV E . U NDE R NO C IR C UMS TANC E S S HAL L
C LAR ION BE L IAB LE F OR ANY L OS S OR DAMAG E ,
DIR E CT OR C ON S E QUE NT IAL, AR IS ING O UT OF T HE U S E
OR IN ABIL IT Y T O US E T HE P R ODUC T. B EC AUS E S OME
S TATE S DO NO T AL LOW L IMITATIONS ON HO W LON G AN
IMP LIE D WAR R ANT Y L AS TS OR E XC LUS IO NS OR
LIMITAT IO NS OF INC ID E NTAL O R C ONS E QUE NTIAL
DAMAG E S , THE AB OV E LIMITATIONS OR E XC LUS ION S
MAY NO T AP PLY TO Y O U.
8. THIS LIMIT E D WAR R ANT Y G IVE S Y OU S P EC IFIC LE GAL
R IG HTS , AN D Y OU MAY ALS O HAVE OTHE R R IG HT S WHIC H
VAR Y F R OM S TATE TO S TAT E.
9. S hould you have any difficulties with the performa nce of this
product during the warra nty period, plea se call or visit our web
site for a lis ting of Authorize d Warranty S ervice C enters in
your area. You ma y also contact the C larion C us tomer S ervice
at the a ddres s listed below for any service help you may need
with C larion products.
C LAR ION C O R P OR ATION OF AME R IC A
ATTN: C US TO ME R S ER VIC E MAN AG E R
661 WE S T R E DON DO B EAC H B LVD.
G AR DE NA, C A 90247
1 - 800 - GO - C LAR ION
(310) 327 - 9100
www.clarion. com
57
Page 56

Warning!
VS755
THE CLARION VS755 DIGITAL MEDIA PLAYER IS DESIGNED
TO ENABLE VIEWING OF DVD OR CD-VIDEO
RECORDINGS ONLY FOR REAR-SEAT OCCUPANTS.
DIGITAL VIDEO PRODUCTS ARE NOT INTENDED FOR
VIEWING BY THE DRIVER WHILE THE VEHICLE IS IN
MOTION. SUCH USE MAY DISTRACT THE DRIVER OR
INTERFERE WITH THE DRIVERʼS SAFE OPERATION OF
THE VEHICLE, AND THUS RESULT IN SERIOUS INJURY
OR DEATH. SUCH USE MAY ALSO VIOLATE STATE LAW.
CLARION DISCLAIMS ANY LIABILITY FOR ANY BODILY
INJURY, INCLUDING FATALITIES, OR PROPERTY DAMAGE
THAT MAY RESULT FROM ANY IMPROPER OR UNINTENDED
USES OF THIS PRODUCT.
About Installation
Installation of mobile audio and video components requires
experience with a variety of mechanical and electrical procedures.
Even though this manual provides general installation
and operation instructions for your new Clarion VS755 Digital
Media Player, it does not show the exact installation methods
for your particular vehicle.
If you do not have the required knowledge and experience to
successfully complete the installation, we strongly recommend
consulting an authorized Clarion dealer about professional
installation options.
.
2
 Loading...