

Page 1

Setting Instructions for Movement Caliber C650
Contents
1. FEATURES
2. BEFORE USING
3. SECIFICATIONS
4. NAME OF COMPONENTS AND MAJOR FUNCTIONS
5. SWITCHING THE MODE (DISPLAY FUNCTIONS)
6. CHECKING O-POSITION OF EACH HAND
7. ACCESSING TIMES OF DATES OF MAJOR CITIES
8. SWITCHING ANALOG TIME AND DIGITAL TIME
9. SETTING THE TIME (TIME IS CORRECTED BY DIGITAL DISPLAY)
10. SETTING THE DATE (DATE IS CORRECTED BY DIGITAL DISPLAY)
11. USING THE ALARM MODE
12. USING THE CHRONOGRAPH
13. USING THE TIMER
14. USING ZONE SETTING
(click on a topic)
15. ALL RESET
16. FUNCTIONS UNIQUE TO SOLAR-POWERED WATCHES
17. POWER CONSERVATION FEATURE
18. GENERAL REFERENCE FOR CHARGING TIMES
19. NOTES REGARDING HANDLING OF THIS WATCH
20. USING THE BEZEL REGISTER RING
21. CARE OF YOUR WATCH
Page 2

Return to Table of Contents
1. FEATURES
This watch is a combination solar-powered watch that contains a solar cell in its face that drives the watch
hands, alarm, chronograph, timer and numerous other functions by converting light energy into electrical
energy.
It is also equipped with convenient functions including three power save modes that reduce power
consumption when light is not shining on the solar cell, and a "charge indicator" that roughly indicates how
much the secondary battery is charged.
2. BEFORE USING
This watch is a solar-powered watch. Before using, allow light to shine onto the watch so
that it is sufficiently charged.
If the manual power save function has been activated, cancel it before charging. (Refer to
p.19 for information on the procedure for canceling the manual Power-Save function.)
A rechargeable battery is used in this watch to store electrical energy. This rechargeable battery is a clean
energy battery that does not contain mercury or other toxic substances. Once fully charged, the watch will
continue to run for a maximum of 4 years without additional charging (when in the power save 2 mode). Please
note this is not a user replaceable item.
[Proper Use of this Watch]
To use this watch comfortably, make sure to recharge it before it stops running completely. There is no risk of
overcharging the watch no matter how often it is recharged
(Overcharging Prevention Function).
It is recommended that the watch be recharged everyday for optimum performance.
Return to Table of Contents
Page 3
3. Specifications
Return to Table of Contents
Movement Caliber Number
Accuracy Within +/- 15 seconds per month (when worn at normal temperatures of
C650
o
5
C to 35 oC/(41oF to 95 oF)
Operating temperature range Watch operating temperature range : 0oC +55oC (32oF to 131oF)
Analog Display Time: Second, minutes, hours, 24 hours, UTC minutes,
UTC hours, mode
Time Seconds, minutes, hours, city name, daylight savings time, A/P
Calendar Month, date, day, city name
Alarm 1 Hours, Minutes, A/P, city name, ON/OFF
Alarm 2 Hours, Minutes, A/P, city name, ON/OFF
Display
Function
Alarm 3 Hours, Minutes, A/P, city name, ON/OFF
Chronograph Chronograph hours, chronograph minutes, chronograph seconds,
chronograph 1/100 seconds, SPL, 24 hour measurement
Timer Timer remaining minutes, timer remaining seconds, set minutes (timer
Digital Display
setting range: 99 minutes to 1 minutes in 1 minute units
Zone Setting City name (SET/OFF), daylight savings time (ON/OFF), display setting
and cancellation for each city, setting of ON/OFF for daylight savings
time for each city.
x Switching between main time (analog) and sub-time (digital)
x Power save 1: Automatically stops second hand movement and
liquid crystal display
x Power Save 2: Automatically stops watch functions
x Manual Power Save: Enables watch functions to be stopped
arbitrarily (forcibly)
x Power indicator: Approximate indication of Eco Drive Rechargeable
battery charging level
Additional Functions
x Insufficient charging warning function
x Time setting warning function
x Overcharging prevention function
Continuous running times Fully charged to stopped: Roughly 4 years (when Power Save 2 function is
operating)
Two –second interval movementto stopped: Roughly 1.5 days
Battery Eco Drive rechargeable Manganese Titanium battery. Not user replaceable
Return to Table of Contents
Page 4
Return to Table of Contents
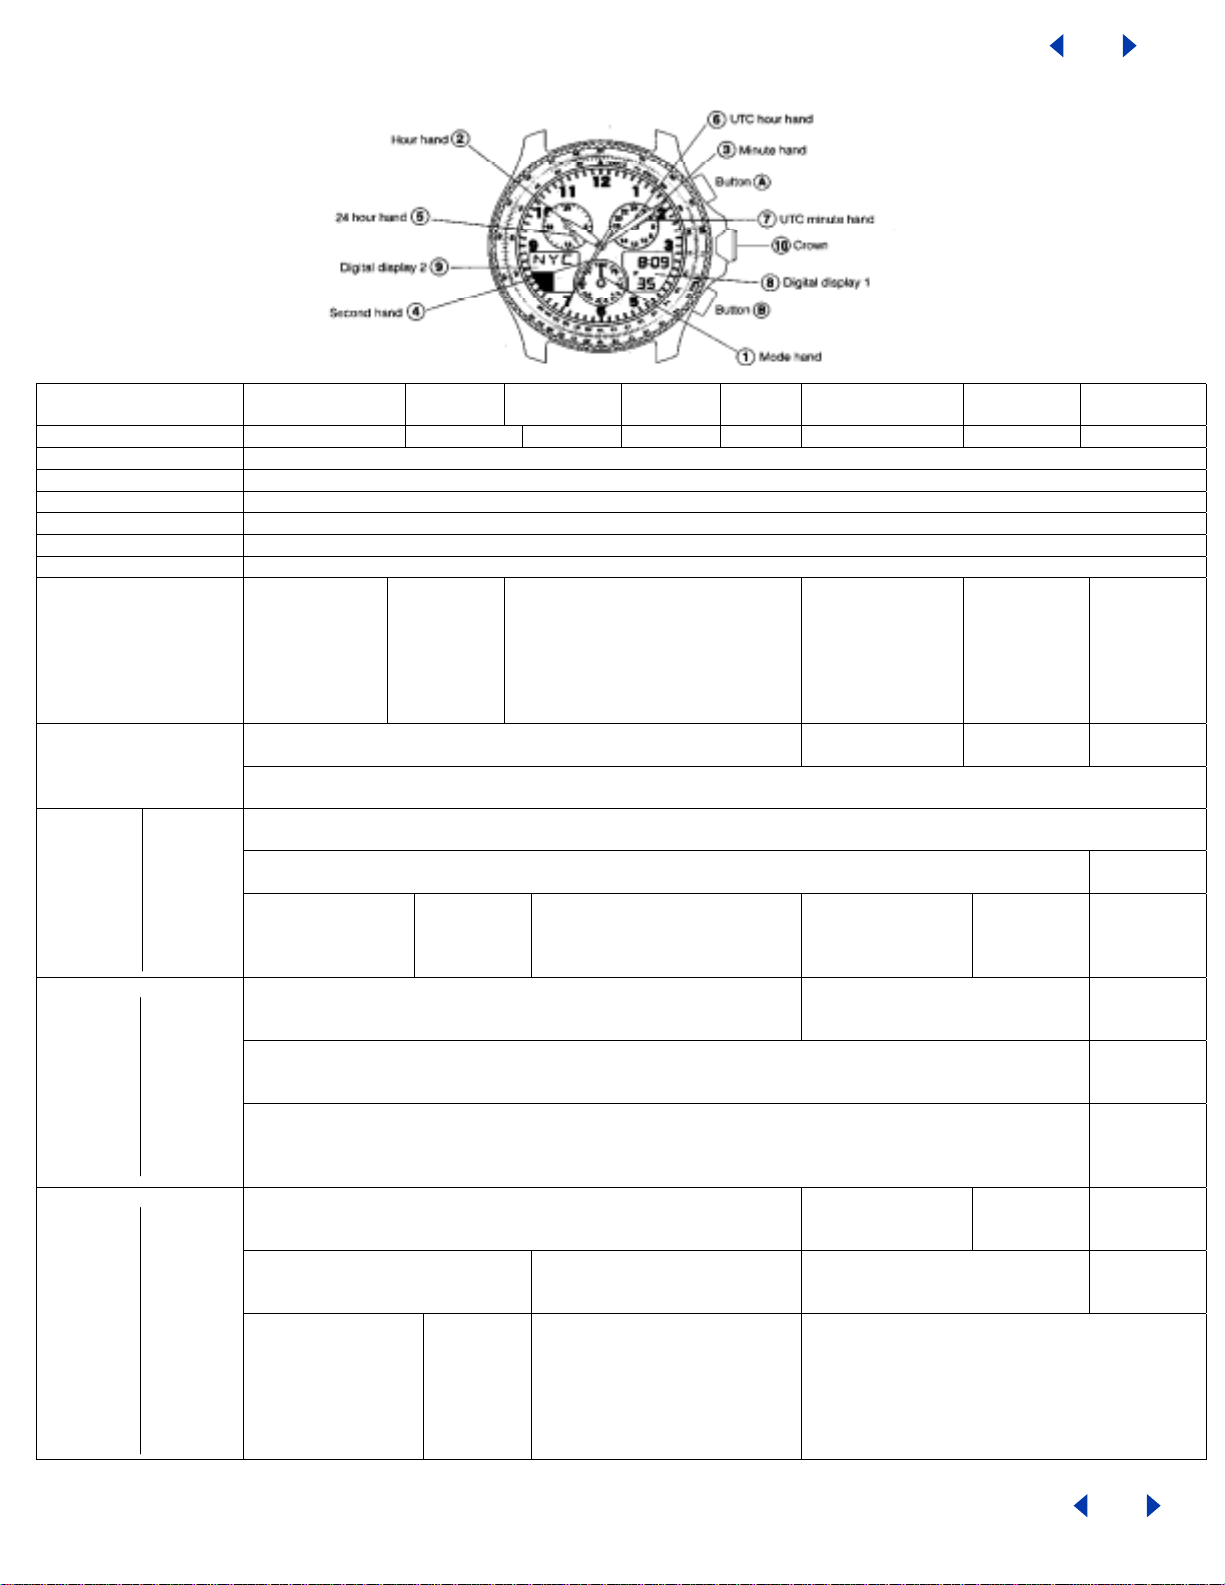
4. NAMES OF COMPONENTS AND MAJOR FUNCTIONS
Name /Mode Time Calendar Alarm 1 Alarm 2 Alarm3Chronograph Timer Zone
Setting
(1) Mode Hand TME CAL AL-1 AL-2 AL-3 CHR TMR SET
(2) Hour Hand Always Indicates Hours
(3) Minute Hand Always Indicates Minutes
(4) Second Hand Always Indicates Seconds
(5) 24 Hour Hand Always indicates “24-Hour time” in conjunction with hour and mi nutes
(6) UTC hour hand Always indicates “UTC Hours”
(7) UTC minute hand Always indicates “UTC Minutes”
(8) Digital Display 1 Hours,
minutes,
seconds, A/P,
SMT(when set
to daylight
savings time
City Name Measured time
Charge indicator
Month,
date, day,
SMT( when
set to
daylight
savings
time
Hours, minutes, A/P, alarm
(ON/OFF)
Measured time
(seconds,
minutes, 1/100
seconds)
(hours)
Remaining
time display
(minutes
seconds)
Set time
(minutes)
City name
(SET/OFF)
SMT
(ON/OFF)
City Name(9) Digital Display 2
(10) Crown Normal
Position
1st Click Changing
2nd Click Time Correction Date
(A) Button A
Normal
Position
1st Click Switching
2nd Click Switching Location to be corrected Switching
(B) Button B
Normal
Position
1st Click Switching alarm (on/off) Switching
2nd Click Switching SMT
Mode Switching
the city
Correction
Alarm Correction 0-position
adjustment
Set time
correction
City name,
time
difference
setting
Changing the city Start Stop Changing
the city
City Name
(set/off)
Location
to be
corrected
Split, reset Reset Changing
Changing the city
the city
SMT
(on/off)
Switching alarm (on/off)
(on/off) Switching
between
“seconds”
correction and
“24 hour time”
correction
Return to Table of Contents
Page 5
Return to Table of Contents
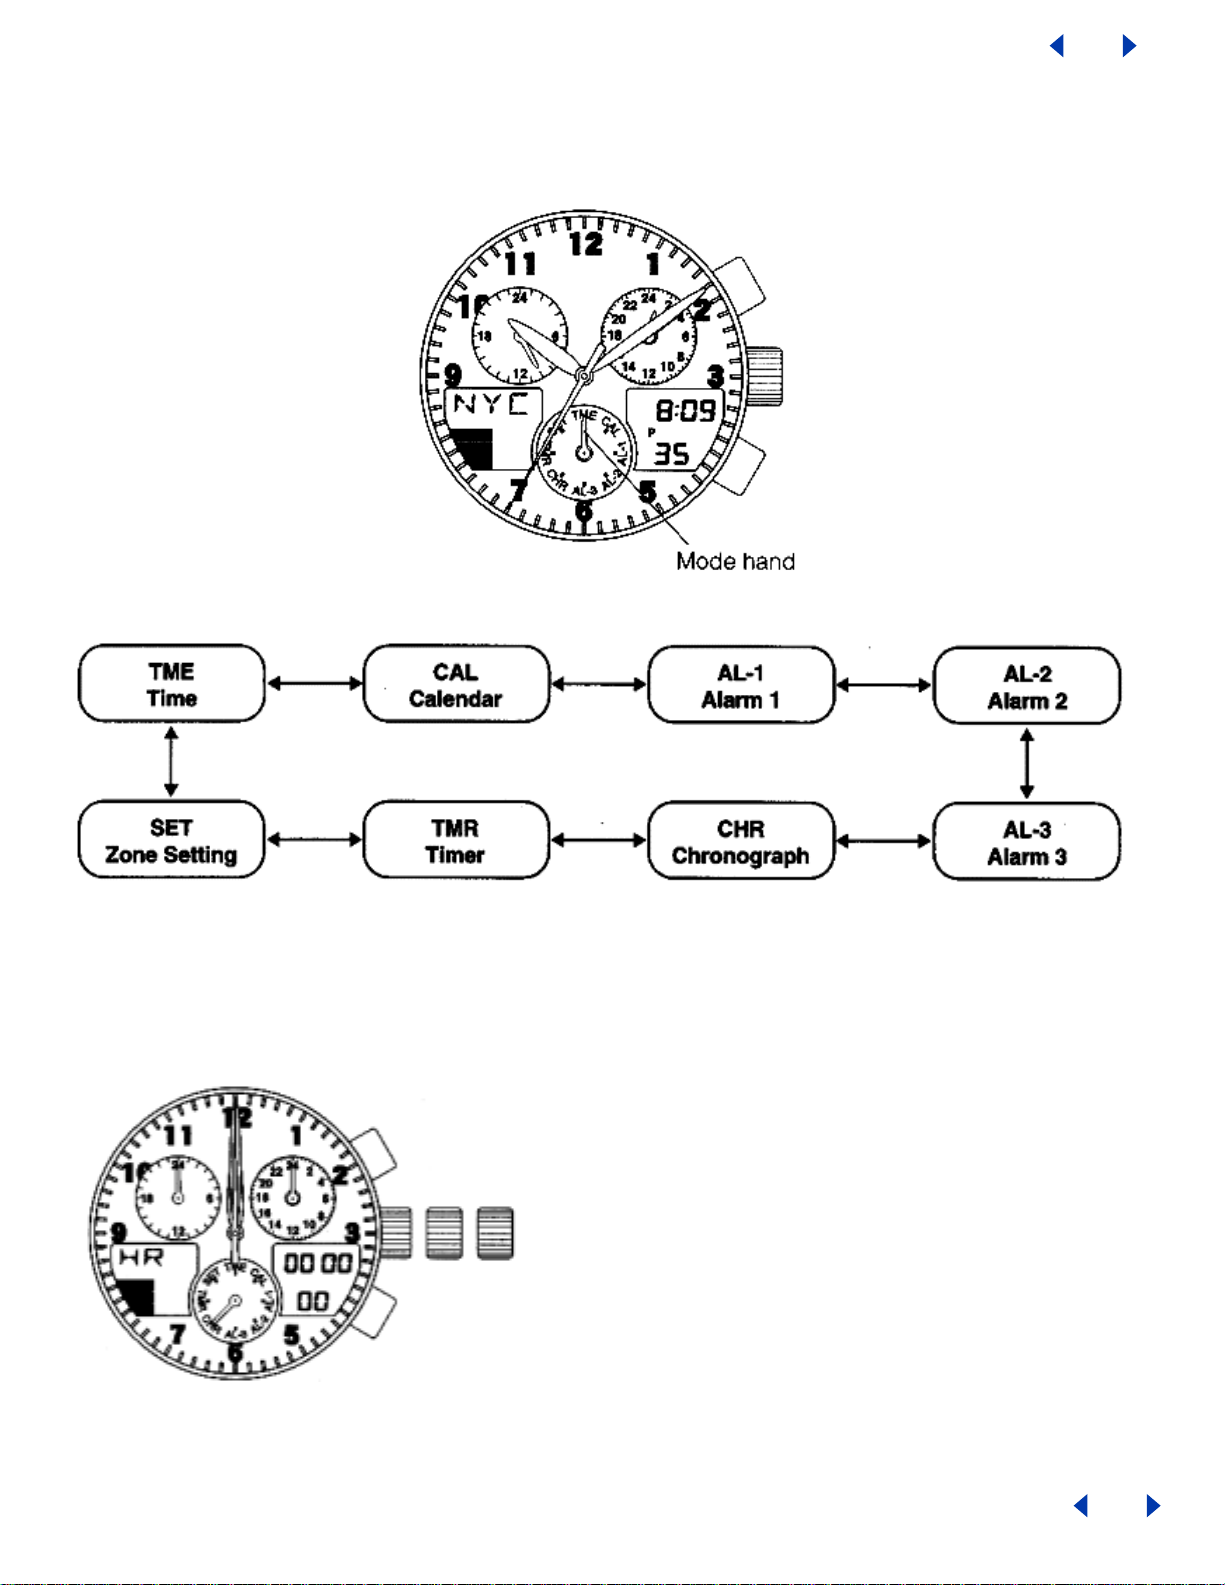
5. SWITCHING THE MODE (DISPLAY FUNCTIONS)
In addition to the time and date modes, this watch is also equipped with three additional modes consisting of
the alarm, chronograph and timer modes. The mode can be switched by turning the crown. Check the current
mode with the mode hand.
<Switching the Mode>
6. CHECKING O-POSITION OF EACH HAND
Before using this watch, check that the 0-position (based position of each hand) is set correctly to ensure that
the functions of the watch operate properly by performing the following procedure.
<O-Position Check>
1. Turn the crown while in the normal position to set
the mode hand to the chronograph [CHR) mode.
2. Pull the crown out to the second click (Oposition correction position). The second hand,
minute hand, hour hand, 24-hour hand, UTC
hour hand and UTC minute hand rapidly advance
to the 0-position (12:00 position).
Note:
When each hand is not at the 0-position, perform the
"O-position correction" procedure. If this 0-position is
out of alignment, each hand will not indicate the
correct position.
Return to Table of Contents
Page 6
Return to Table of Contents
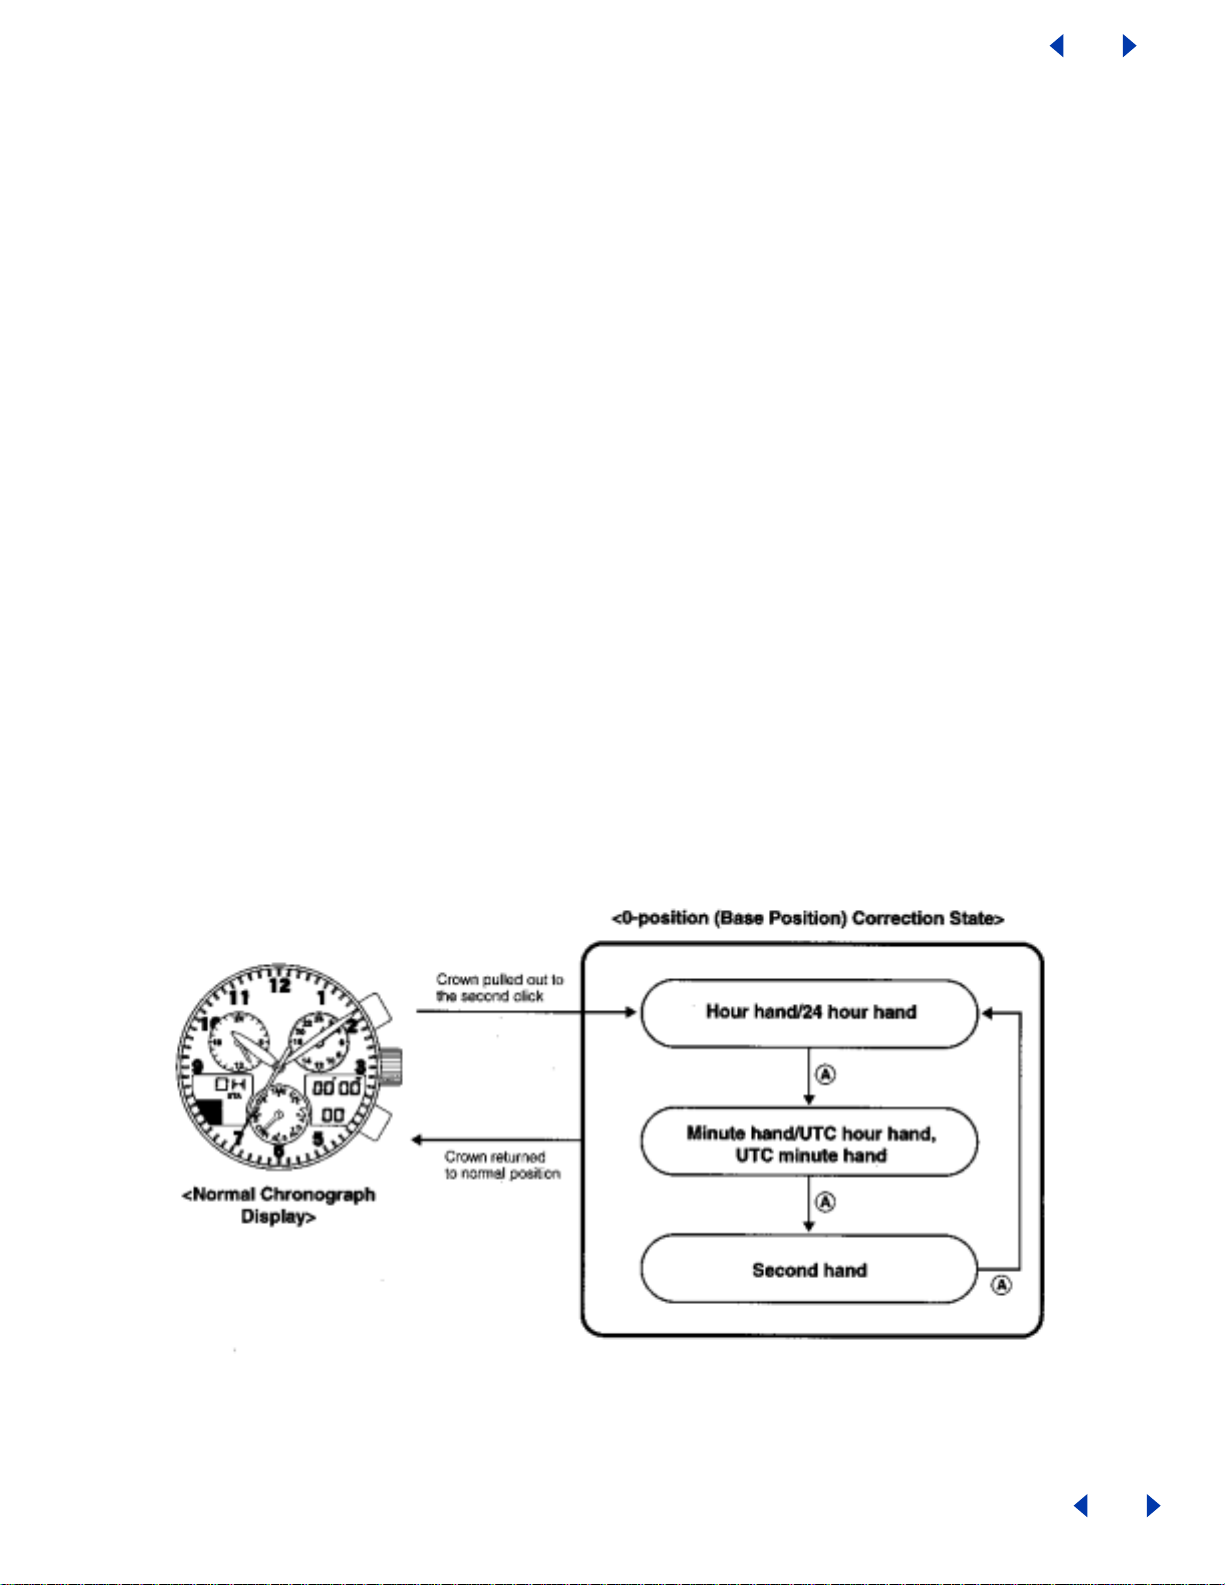
O-Position Correction (Setting to the Watch Base Position)
When setting the 0-position of each hand, always make sure to turn the crown forward (clock- wise) to set each
hand to its 0-position in the clockwise direction.
1. Turn the crown while in the normal position to set the mode hand to the chronograph [CHR] mode.
2. Pull the crown out to the second click (0-position correction position).
x The second hand, minute hand, hour hand, 24-hour hand, UTC hour hand and UTC minute hand
rapidly advance to the position stored in memory.
x "HR" lights during digital display 2 indicating that the watch is in the correction state.
3. Turning the crown forward (clockwise) allows correction to be made in the positive direction. Turning the
crown continuously allows the 0-position to be corrected continuously.
4. Pressing button (A) switches the correction location between "MIN" (minute hand) and "SEC" (second hand)
each time it is pressed.
5. Turn the crown forward (clockwise) to align each hand at the 0-position at each correction location. Although
correction can be made in the negative direction by turning the crown backward (counter-clockwise), always
make sure to set the 0-position by turning the crown for- ward to ensure that the 0-position is set correctly.
x The 24-hour hand is corrected in conjunction with the hour hand.
x The UTC hour and minute hands are corrected in conjunction with the minute hand. • The second
hand can only be corrected in the forward (clockwise) direction only. 6. After correcting, return the
crown to the normal position.
After correcting the 0-position of each hand, reset the time, calendar and other modes before using the watch.
Note:
None of the buttons on the watch operate during movement of each hand. Operate the buttons only after the
hands have stopped moving.
Return to Table of Contents
Page 7
Return to Table of Contents
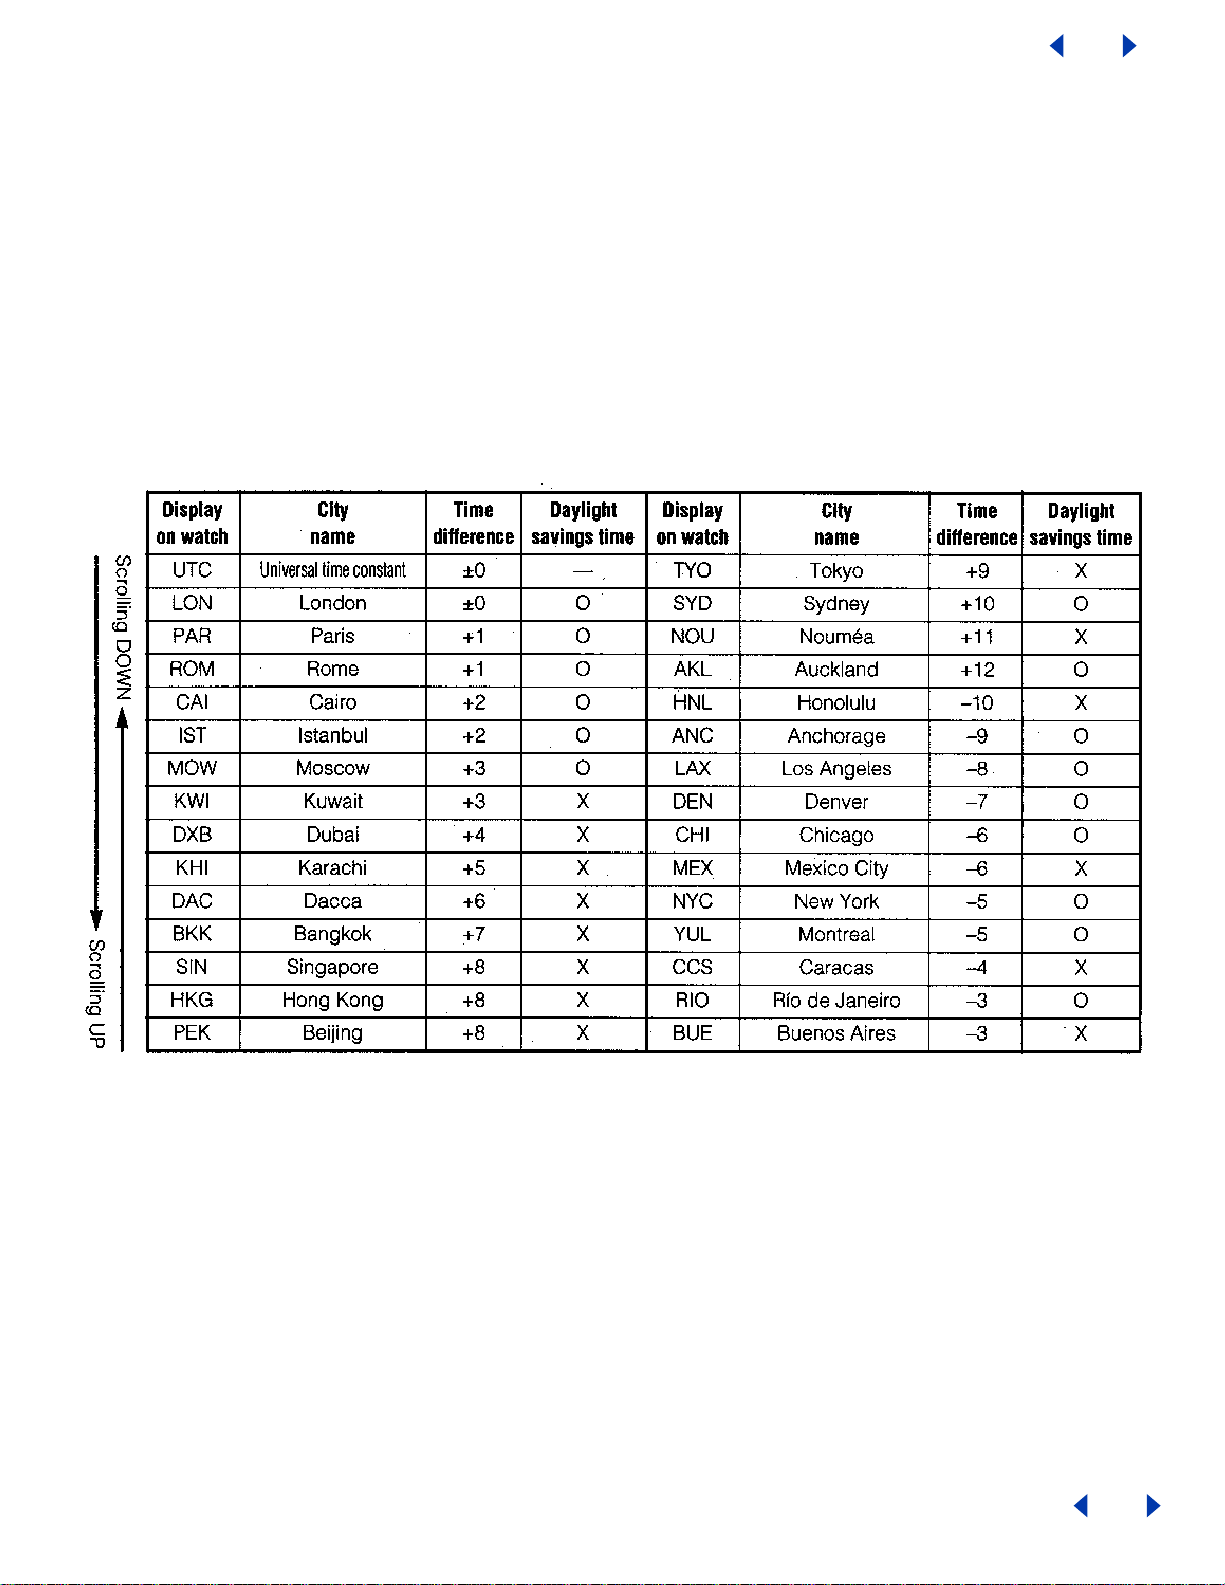
7. ACCESSING TIMES OR DATES OF MAJOR CITIES
The time of date of major cities pre-registered in this watch can be easily accessed by pressing the buttons.
<Access Procedure>
1. Turn the crown to set the mode hand to the time [TME] or calendar [CAL] mode.
2. When button (A) is pressed, the times or dates of major cities are displayed while scrolling up
each time it is pressed.
3. When button (B) is pressed, the times or dates of major cities are displayed while scrolling
down each time it pressed.
* Pressing button (A) or (B) continuously causes the display to advance rapidly.
<Cities and UTC Time Difference Pre-registered in this Watch>
x Cities (regions) in which daylight savings time is used are indicated with a 0, while those in which it is
not are indicated with an X.
x The time difference and use of daylight savings time of each city are subject to change by the
particular country.
Return to Table of Contents
Page 8
Return to Table of Contents
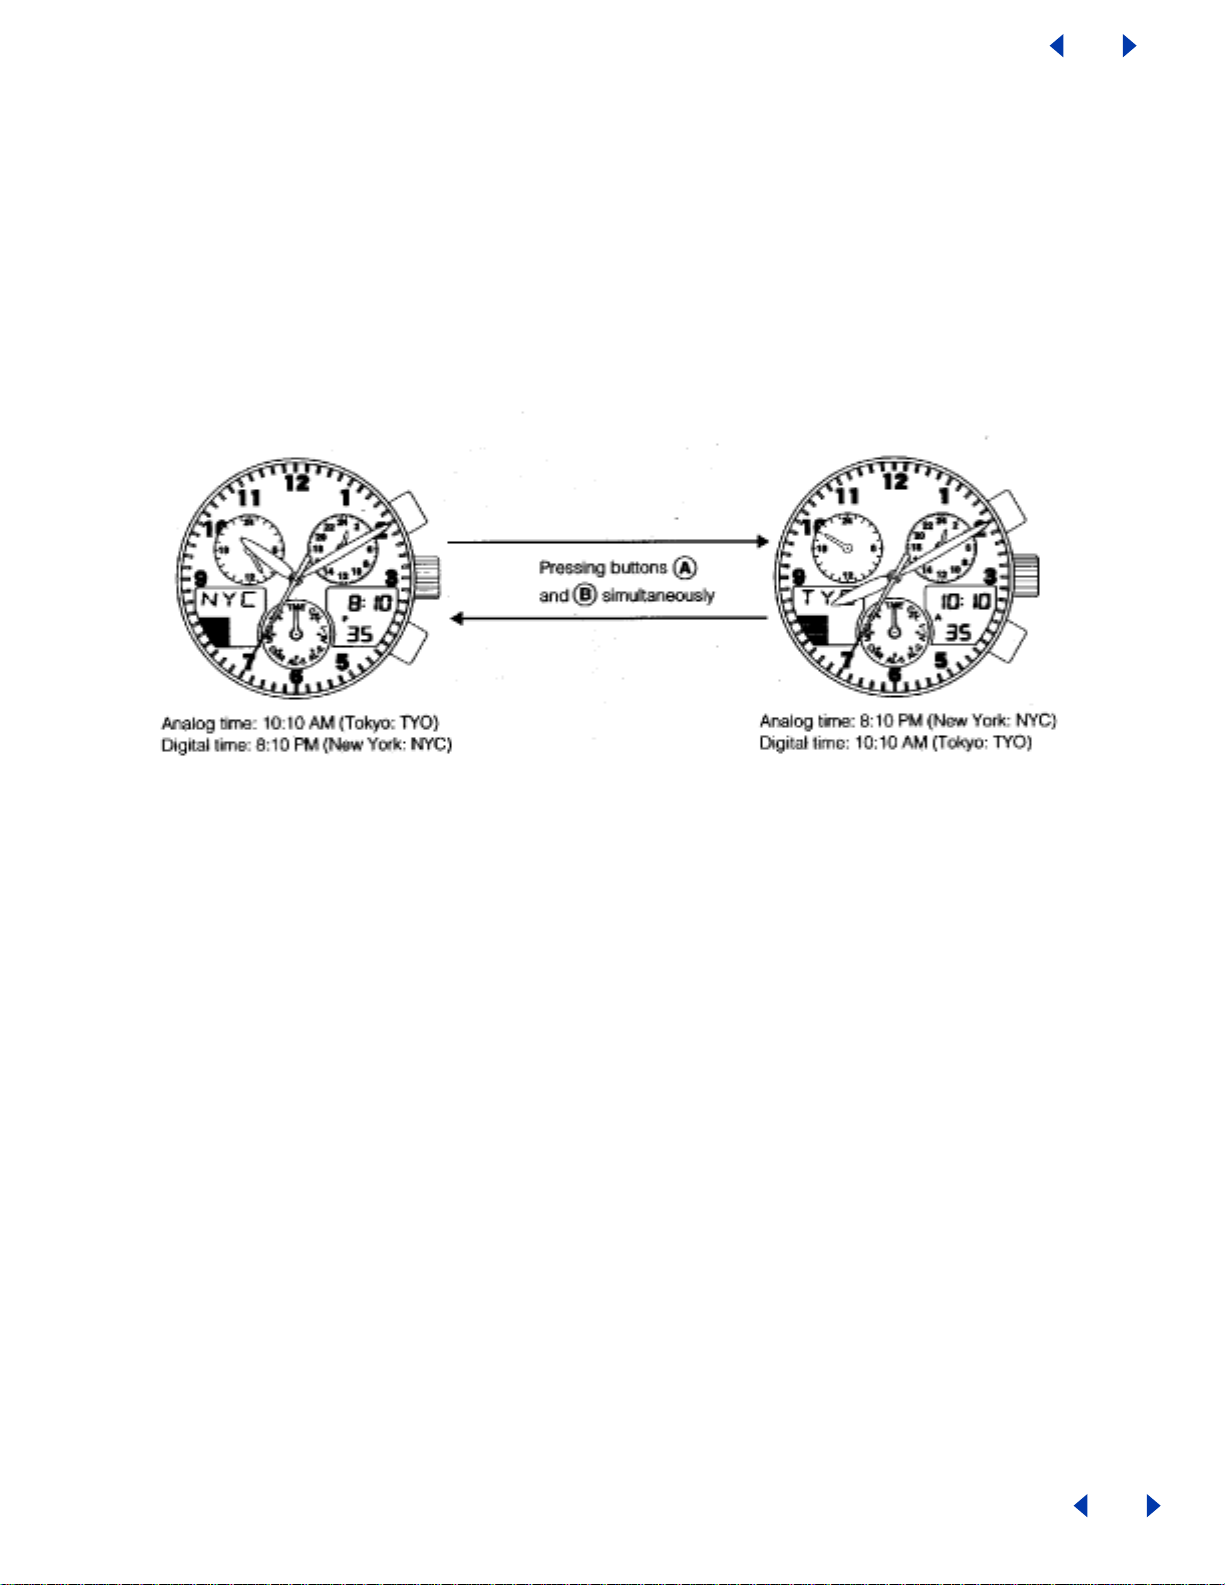
8. SWITCHING ANALOG TIME AND DIGITAL TIME
This watch is able to switch between analog time display and digital time display.
<Switching Procedure>
1. Turn the crown to set the mode hand to the time [TME) mode.
2. Press button (A) and (B) simultaneously.
3. After a confirmation tone sounds, the watch switches the time of the city displayed by analog display and
the time of the city displayed by digital display.
If buttons (A) and (B) are simultaneously pressed when in the calendar [CAL] Mode, the watch switches the
date of the city displayed by analog display and the date of the city displayed by digital display (the times are
switched at this time as well).
9. SETTING THE TIME (TIME IS CORRECTED BY DIGITAL DISPLAY)
When digital time is corrected, the second, minute, hour, 24 hour and UTC hour and minute hands of the
analog time are corrected automatically in conjunction with digital time.
1. Turn the crown and set the mode hand to the time [TME] mode.
2. Press either button (A) or button (B) to access the city to be corrected.
3. When the crown is pulled out to the second click (time setting position), the watch enters the
time correction state.
4. When button (A) is pressed, the location to be corrected changes each time it is pressed. Select the
location to be corrected. (The location that is flashing is the location that can be corrected.)
• When button (B) is pressed in the [SMT] daylight savings time correction state daylight savings time can
be set (ON) or canceled (OF).
• "Seconds" return to zero when button (B) is pressed in the "seconds" correction state.
• When the crown is turned forward (clockwise) in the "hour" or "minute" correction states, correction is
made in the positive direction. Turning the crown continuously allows "hours" or 11 minutes" to be
corrected continuously. Although correction can be made in the negative direction when the crown is
turned backward (counter-clockwise), always make sure to turn the crown forward to ensure that the time
is set correctly.
• Switching "12H/24H time" is performed by pressing button (B).
5. After corrections have been completed, return the crown to the normal position
Return to Table of Contents
Page 9

Return to Table of Contents
10. SETTING THE DATE (DATE IS CORRECTED BY DIGITAL DISPLAY)
1. Turn the crown and set the mode hand to the calendar [CAL] mode.
2. Press either button (A) or button (B) to access the city to be corrected.
3. When the crown is pulled out to the second click (date setting position), the watch enters the
date correction state.
4. When button (A) is pressed, the location to be corrected changes each time it is pressed. Select the
location to be corrected so that it is flashing.
When the crown is turned forward (clockwise), correction is made in the positive direction. When the crown
is turned backward (counter-clockwise), correction is made in the negative direction. Turning the crown
continuously allows corrections to be made rapidly.
5. After corrections have been completed, return the crown to the normal position.
Notes:
1. When the date is set for any one city, the dates of other cities, including UTC time, are corrected
automatically.
2. The year can be set from 2000 to 2099.
3. The day is corrected automatically when the year, month and date are set.
4. Since this watch is equipped with an auto-calendar function, it is not necessary to correct the date at the
end of the month.
5. When the date has been set to a non-existent date, the watch automatically displays the lst day of the
following month when the watch is returned to the normal display.
Return to Table of Contents
Page 10

Return to Table of Contents
11. USING THE ALARM MODE
The alarm setting procedure and other procedures for alarm use are the same for Alarm 1, 2 and 3. Only the
tone that sounds is different.
The alarm sounds for 15 seconds when the set time is reached once a day. When the alarm is sounding, it can
be turned off by pressing button (A) or (B).
<Setting the Alarm Time>
1.Turn the crown and set the mode hand to either the Alarm 1, 2 or 3 [AL-1, 2 or 3] mode.
2. Press either button (A) or button (B) to access the city to be corrected.
3. When the crown is pulled out to the second click (alarm time setting position), the watch
enters the alarm correction state.
4. When button (A) is pressed, the location to be corrected changes each time it is pressed. Select the
location to be corrected so that it flashes.
x The alarm can be set (ON) or canceled (OF) by pressing button (B) when the watch is in the alarm
ON/OF correction state.
x When the crown is turned forward (clockwise) in the "hours" or "minutes" correction state, correction is
made in the positive direction. When the crown is turned backward (counter-clockwise), correction is
made in the negative direction.
x Turning the crown continuously allows corrections to be made rapidly.
5. After corrections have been completed, return the crown to the normal position.
Note:
1. When the time mode is set to the 12-hour time display, the alarm time also uses a 12-hour time display.
Pay attention to AM and PM when setting the alarm time.
Return to Table of Contents
Page 11

e "S
es du
gsp
Return to Table of Contents
<Switching Alarm ON and OFF>
The alarm can be switched ON and OF by pulling out the crown to the first click even when not in the alarm
correction state.
1. Pull out the crown to the first click in the alarm mode to allow the alarm to be switched ON and OF.
2. Pressing button (B) switches the alarm ON and OF each time it is pressed.
3. Return the crown to the normal position after the alarm has been set to ON or OF.
<Alarm Monitor>
1. Pressing button A and B simultaneously during the normal alarm display causes the alarm to sound for
as long as they are pressed.
12. USING THE CHRONOGRAPH
The chronograph is able to measure and display time up to a maximum of 23 hours, 59 minutes, 59.99
seconds in 1/100th second units. After 24 hours have elapsed, the chronograph automatically returns to the
chronograph reset display (00'00"00) and stops.
Normal Chronograph Display <Chronograph Measurement>
1. Turn the crown to set the mode hand to the
chronograph [CHR] mode.
2. Pressing button A repeatedly starts and stops
the chronograph each time it is pressed.
3. Split time is displayed for 10 seconds when
button (B) is pressed during chronograph
measurement.
4. Pressing button (B) while the chronograph is
stopped returns the chronograph to the
chronograph-reset display.
Th
PL" mark flash
rin
lit timedisplay.
Return to Table of Contents
Page 12

Return to Table of Contents
13. USING THE TIMER
The timer can be set to a maximum of 99 minutes in 1-minute units. When the set time has elapsed, a tone
indicating that the set time is up sounds for about 5 seconds, after which the timer returns to the timer initial
setting display.
<Timer Initial Setting Display> <Setting the Timer>
1. Turn the crown to set the mode hand to the timer
[TMR] mode.
2. Pull out the crown to the second click (timer
setting position) to enter the "minutes" correction
state.
3. When the crown is turned forward (clock- wise) in
the "hours" or "minutes" correction state, correction
can be made in the positive direction. When the
crown is turned backward (counter-clockwise),
correction can be made in the negative direction.
4. After setting, return the crown to the normal
position.
<Using the Timer>
1. Press button (A) to start the timer.
2. Pressing button (A) again during measurement stops the timer.
3. Pressing button (B) during measurement returns the watch to be timer initial setting display and resumes
measurement.
4. Pressing button (B) when the timer is stopped returns the watch to the timer initial setting display.
Return to Table of Contents
Page 13

correctionstate forthetimed
Return to Table of Contents
14. USING ZONE SETTING
The zone setting function enables only those cities for which "SET" has been selected to be easily accessed
(displayed) in each mode. Daylight savings time can be also be set for each city. In addition, the user is also
able to arbitrarily register one city and time difference.
<Using Zone Setting>
1.Turn the crown while in the normal position and set the mode hand to the mode setting [SET] mode.
2. The city can be changed by pulling out the crown to the first click (for changing cities between SET and
OF and for setting the location for switching to daylight saving time).
3. Turn the crown to access the city to be set. Turning the crown continuously causes the cities to advance
rapidly.
4. Press button (A) to set the city and press button (B) to set daylight savings time.
5. After setting, return the crown to the normal position.
<Confirming Set Cities>
1. When button (A) or button (B) is pressed when the watch is in the zone setting [SET) mode (with the crown
in the normal position), the city name and SET or OF are displayed each time the button is pressed.
x Only those cities for which SET is displayed can be accessed from each mode.
<Registration of Arbitrary City and Time Difference>
1. Turn the crown while in the normal position and set the
mode hand to the zone setting [SET] mode.
2. When the crown is pulled out to the second click (city
setting position), the watch enters the correction state for the
third letter of the city name.
3. Turning the crown displays those characters that are used
for city names.
Turning the crown continuously causes the characters to
advance rapidly.
4. The correction location changes each time button (A) is
pressed.
5. When button (A) is pressed during the correction state of
the first character of the city name, the watch enters the
ifference fromUTC.
Return to Table of Contents
Page 14

Return to Table of Contents
6. Turn the crown to display the time difference.
7. After setting, return the crown to the normal position.
<Characters and Symbols Used in City Names>
• Letters of the alphabet (A to Z)
• Numbers (0-9)
• Symbols (--: hyphens, M: blank spaces)
<Display Sequence>
When the crown is turned forward (clockwise), the display changes in the order of letters (A-Z), numbers (0-9)
and then symbols (M: blank spaces, --: hyphens).
When the crown is turned backward (counter-clockwise), the display sequence is opposite that when turning
the crown forward.
<Order in which Registered Cities and Displayed>
The location having the same time difference among the 30 cities pre-registered in this watch is displayed first.
However, a city is not displayed if the time difference of a registered city has not been set.
<Canceling Registered Cities>
1. Turn the crown to set the mode hand to the zone setting [SET) mode.
2. When the crown is pulled out to the second click (city setting position), the watch enters the city name
correction state.
3. Turn the crown to change the display of the registered city name to 4. After canceling registration, return
the crown to the normal position.
15. ALL-RESET
When this watch indicates an abnormal display or does not function properly (no display, alarm continues to
sound, etc.) as a result of being subjected to the effects of static electricity or strong impact and so forth,
perform the all-reset procedure described below.
When performing the all-reset procedure, first make sure that the watch is sufficiently charged and that the
charge indicator is lit.
<All-Reset Procedure>
1. Turn the crown to set the mode hand to the
chronograph [CHR] mode.
2. Pull out the crown to the second click (0- position
correction mode).
The second hand, minute hand, hour hand, 24
hour hand, UTC hour hand and
UTC minute hand rapidly advances to the 0
position stored in memory.
3. Press buttons (A) and (B) simultaneously and then
release. All segments of the digital display are
shown when either of the buttons is released.
Return to Table of Contents
Page 15

Return to Table of Contents
4. This fully lit display is canceled when the crown is returned to the normal position.
x After canceling, a confirmation tone is sounded after which each of the hands perform a demonstration
movement in the order of the second hand, minute hand, UTC minute hand, UTC hour hand and 24
hour hand to indicate that the all-reset procedure is finished.
x After the demonstration movement, pull the crown out to the second click to switch the watch to the
watch base position setting state.
Always make sure to set the 0 position (base position) for the hour hand, minute hand, second hand,
24-hour hand and UTC hour and minute hands while referring to "5. Checking 0- Position of Each Hand
<O-Position Correction>".
Note:
After setting the 0 position (base position) for each hand, correctly reset the time, calendar and other modes
before using the watch.
16. FUNCTIONS UNIQUE TO SOLAR-POWERED WATCHES
Return to Table of Contents
Page 16

Return to Table of Contents
[Insufficient Charging Warning Function]
(Analog Display)
Regardless of the display (Mode) of the watch at the time,
when the watch becomes insufficiently charged, the watch
changes to the time display and the second hand begins to
move at two-second-interval movement. Although the 24-hour
hand, hour hand and minute hand continue to keep the correct
time, the watch stops after about 1.5 days have elapsed after
the insufficient charging warning function is activated. When
this happens, charge the watch by exposing to light so that it
returns to one-second-interval movement.
However, if the watch again becomes insufficiently charged
without setting the time after it has been sufficiently charged by
exposing to light as a result of having stopped due to being
insufficiently charged, it will not return to the normal display
unless the time is set after again sufficiently charging.
(Digital Display)
"CHARGE" flashes on digital display area 2 in all modes.
<Digital Display in Each Mode>
• The watch displays the normal time display regardless of the position of the crown (pulled out to the first or
second click) in each mode except for the calendar mode.
• When the watch is in the calendar mode, the normal date display is displayed regardless of the position of the
crown.
Notes:
x Crown operations do not function <except for mode switching (with the crown in the normal position)>
in any of the modes.
x Button operations do not function, except for changing the city name (UP/DOWN), in any of the
modes.
x The alarm tone does not sound even if it is set.
x The chronograph is interrupted and reset even if measurement is in progress.
x Timing by the timer is immediately interrupted even if timing is in progress
x In the case the watch switches to the insufficient charging warning function as a result of being
insufficiently charged, it takes a minimum of 30 minutes for the watch to return to the normal operating
state even if sufficiently exposed to light.
<When the Insufficient Charging Warning Function is Canceled>
When the insufficient charging warning function is canceled as a result of exposing the watch to light and
sufficiently charging, the watch returns to the mode indicated by the mode hand.
Return to Table of Contents
Page 17

Return to Table of Contents
[Time Setting Warning Function]
(Analog Display)
The watch stops when insufficient charging
continues for about 1.5 days. When the watch
is charged by exposing to light after having
stopped due to insufficient charging, each
hand is rapidly advanced to the base position
and stops. Each hand remains stopped until
the time is reset.
(Digital Display)
The initial setting display (12 hours, 00 minutes, 00 seconds, UTC or January 1 SA) flashes in the time or
calendar mode.
<Canceling the Time Setting Warning Function>
1 .Set the mode hand to the time mode and pull the crown out to the second click to set the time. Flashing of
the digital display is only canceled in the time mode. After correcting the time, return the crown to the normal
position.
2. Set the mode hand to the calendar mode and pull the crown out to the second click to set the
date. Flashing of the digital display is canceled in the calendar mode. 3. After correcting the date, return the
crown to the normal position.
Note:
x The time setting warning function will not be canceled unless the time is first set followed by setting the
date.
x It takes a minimum of 30 minutes until the watch switches to the time setting warning display after the
watch has stopped due to insufficient charging even if the watch is exposed to light.
[Overcharging Prevention Function]
The overcharging prevention function is activated when the secondary battery is fully charged so that it is not
charged further. This allows the user to charge the watch without any risk of overcharging.
Return to Table of Contents
Page 18

Return to Table of Contents
17. Power Save Features
[Power Save 1]
When power is not generated as a result of the solar cell not being exposed to light, the second hand stops
when it reaches the zero seconds position and the watch automatically enters the power save state to inhibit
power consumption of the secondary battery.
(Analog Display)
• The second hand stops at the base position (12:00).
• Other hands continue to keep the correct time.
(Digital Display)
In coordination with the analog second hand stopping at the zero seconds’ position, the entire digital display
goes out. However, the alarm, chronograph and other functions continue to measure time internally even
though there is no display.
<Canceling Power Save 1>
Power Save I is canceled when power generation resumes as a result of exposing the solar cell to light.
• The second hand rapidly advances to the current time and begins one-second interval movement.
• The digital display reappears simultaneous to resumption of power generation.
Notes: During the secondary battery is fully charged and the overcharging prevention function is activated, the
power save function is not activated even if power generation is interrupted as a result of the solar cell not
being exposed to light. In addition, the power save function is similarly not activated when the solar cell is
exposed to intense light and temporally becomes fully charged.
[Power Save 2]
When the Power Save I state continues for about 3 days and the minute hand reaches the base position
(12:00), the watch automatically enters the Power Save 2 state.
(Analog Display)
• The minute and second hands stop at the base position (12:00).
• Other hands stop moving at their current locations.
(Digital Display)
• The digital display remains completely out in continuation from the Power Save 1 state.
Notes:
• Crown and button operations do not function in any mode.
• The alarm tone does not sound even if it is set.
• The tone indicating that time is up does not sound in the timer mode.
<Canceling Power Save 2>
Similar to Power Save 1, Power Save 2 is canceled when power generation resumes as a result of exposing
the solar cell to light.
• Each hand rapidly advances to the current time and begins to move.
• The digital display reappears simultaneous to resumption of power generation. However, the chronograph
returns to the reset state and the timer switches to the initial setting display.
Return to Table of Contents
Page 19

Return to Table of Contents
[Manual Power Save]
When not using the watch for an extended period of time, activating the manual power save function after first
charging the watch until all three bars of the graphic display of the secondary battery charge indicator are lit
enables the watch to be stored for a longer period of time. Furthermore, do not charge the watch while the
manual power save function is activated. First cancel the manual power save function before charging.
<Setting Manual Power Save>
The manual power save function is activated by setting the city name to "C65" and the time difference to "O"
while following the procedure described in “<Registration of Arbitrary City and Time Difference>” in section 14
on Using Zone Setting, and then returning the crown to the normal position.
(Analog Display)
• Each hand stops moving at its current location.
(Digital Display)
• The entire digital display is not lit.
Notes:
• None of the button operations function in any mode.
• The mode does not change even when the mode hand is attempted to be moved by turning
the crown.
<Canceling Manual Power Save>
Each hand rapidly advances to the current time and Manual Power Save is canceled when the crown is pulled
out to the second click.
Return the crown to the normal position after canceling the manual power save function. -P Each hand rapidly
advances to the current time and begins to move.
The digital display reappears simultaneous to resumption of power generation, and the alarm sounds for the
set duration. However, the chronograph returns to the reset state and the timer switches to the initial setting
display.
[Charge Indicator]
The charge indicator provides a simple graphic indication in digital display area 2 of the amount of charge
remaining in the secondary battery.
<Interpretation of Secondary Battery Charge Levels>
Fully charged Sufficiently charged Low charge Hardly any charge
When none of the bars of the graphic display are lit, the secondary battery has essentially become completely
discharged and the second hand begins two-second interval movement. Since the watch will stop due to
insufficient charging if this state continues for about 1.5 days, sufficiently charge the watch by exposing to light.
Return to Table of Contents
Page 20

Return to Table of Contents
18. GENERAL REFERENCE FOR CHARGING TIMES
The time required for recharging varies according to the model of the watch (color of the dial, etc). The
following times are shown below to serve only as a reference.
Recharging time refers to the amount of time the watch is continuously exposed to light.
Charging Time
Charge Rates from Indoor Light Source
Indoors, Office
(500 lux)
One Day
Use
2.5 Hours 15 Hours 182 Hours 20 Minutes 3 Hours 29 Hours
One Second
Step
Full
Charge
One Day
Use
Charge Rates from Outdoor Light Source
Outdoors Cloudy
(10,000 lux)
One Day
Use
6 Minutes 1.5 Hours 9 Hours 3 Minutes 50 Minutes 5 Hours
One Second
Step
Full
Charge
One Day
Use
Flouresecent at 6" Distance
Incandescent at 20" Distance
(3000 lux)
One Second
Step
Outdoors Bright Sun
(100,000 lux)
One Second
Step
Full
Charge
Full
Charge
Full recharging time: Time required for recharging the watch from the stopped state to full charged.
Charging time for 1 day of operation: Time required for recharging the watch to run for 1
day at one-second-interval movement.
19. NOTES REGARDING USE OF THIS WATCH
<Be sure to keep the watch charged at all times>
x Please note that if you routinely wear long sleeves, the watch can easily become insufficiently charged
as a result of it being concealed and unable to be exposed to light.
x When you take the watch off, try to place it in as bright location as possible to ensure that it always
keeps the correct time.
Notes: Charging Precautions
x Avoid recharging at high temperature (over about 60OC/1400F) since this may result in dam- age to the
watch as a result of reaching excessively high temperatures. Examples: Charging the watch in close
proximity to an incandescent lamp, halogen lamp or other light source that can easily reach high
temperatures, charging the watch in a location that reaches high temperatures such as on a car
dashboard.
x When charging the watch with an incandescent lamp, always make sure the watch is at least 50 cm (20
in.) away from the lamp so that it does not reach excessively high temperatures during charging.
Return to Table of Contents
Page 21

20. Using the Register Ring
Return to Table of Contents
NOTE:
The bezel design may vary depending on the model.
[Calculation function]
Note the following points when
using this function. Use the
calculation function of this
watch only as a guide. These
scales do not indicate the
position of the decimal point.
A. Navigational Calculation
Time required
1.
Example: Obtain the time required for the fight of an aircraft at 180 knots
for 450 nautical miles.
Answer. Align'18’ on the outer scale with the SPEEDINDEX /\ on the inner
scale. Then, "45" on the outer scale corresponds to "2:30" on the inner
scale (time scale). Thus, the time required for the flight is 2 hours and 30
minutes.
Knots (air speed)
2.
Example: Obtain the knots (air speed) for 240 nautical miles with a flight
time of 1 hour and 20 minutes.
Speed Index
Outer Scale
(distance scale)
Inner Scale
(time scale)
Answer. Align ‘24’ on the outer scale with "1:20' on the inner scale (time
scale). Then, the SPEED INDEX /\ on the inner scale corresponds to '18’ on
the outer scale. Thus, the air speed for the flight is 180 knots.
Flight distance
3.
Example: Obtain the air distance when the air speed is 210 knots and the
flight time is 40 minutes.
Answer. Align ‘21'on the outer scale with the SPEEDINDEX /\ on the inner
scale. Then, "40" on the inner scale corresponds to "14" on the outer scale.
Thus, the air distance of the flight is 140 nautical miles.
Rate of fuel consumption
4.
Example: Obtain the rate of fuel consumption (gallons / hour) when the
flight time is 30 minutes and the fuel consumption is 120 gallons.
Answer. Align "12" on the outer scale with "30" on the inner scale. Then,
the SPEED INDEX /\ on the inner scale corresponds to "24" on the outer
scale. Thus, the fuel consumption is 240 gallons per hour.
Fuel consumption
5.
Example: Obtain the fuel consumption required for a flight when the vats of
fuel consumption is 250 gallons per hour and the flight time is 6 hours.
Answer. Align "25" on the outer scale with the SPEED INDEX /\ on the inner
scale. Then, "6:00" on the inner scale (time scale) corresponds to "15' on
the outer scale. Thus, the fuel consumption is 1,500 gallons.
Estimated flight time
6.
Example: Obtain the estimated flight time when the vats of fuel consumption
is 220 gallons per hour and the aircraft has 550 gallons of fuel.
Answer. Align "22" on the outer scale with the SPEED INDEX /\on the inner
scales. Then, ‘55' on the outer scale corresponds to ‘2:30' on this inner
Return to Table of Contents
Page 22

Return to Table of Contents
scale (time scale), Thus, the estimated flight time is 2 hours and 30
minutes.
Difference in altitude
7.
The difference in altitude can be obtained from the rate of descent and the
descent time.
Example: Obtain the difference in altitude when an aircraft continues
descending for 23 minutes at a rate of 250 feet per minute.
Answer. Align"25"on the outer scale with "10" on the inner scale. Then,"23"
on the inner scale corresponds to "57.5" on the outer scale. Thus, the
difference in altitude is 5,750 feet.
Rate of climb (or descent)
8.
The rate of climb (or descent) ran be obtained from the time required to
reach an altitude.
Example: Obtain the rate of climb when an aircraft reaches an altitude of
7,500 feet after climbing for 16 minutes.
Answer. Align "75" on the outer scale with "16" on the inner scale.
Then,'10'on the inner scale corresponds to "47" on the outer scale. Thus,
the rate of climb is 470 per minute.
Time of climb (or descent)
9.
The time required for climb can be obtained from the altitude to be reached
and the rate of climb (or descent).
Example: Obtain the time of climb when an aircraft is to climb to 6,300 feet
at a rate of 550 feet per minute.
Answer. Align "55" on the outer scale with '10’ on the inner scale. Then,
"63" on the outer scale corresponds to "11.5" on the inner scale. Thus, the
time of climb is 11 minutes and 30 seconds.
Conversion
10.
Example: Convert 30 statuts miles into nautical miles and kilometers.
Operation: Align ‘30’ on the outer scale with STAT /\ on the inner scale.
Then, NAUT /\ on the inner scale corresponds to "26" nautical miles on the
outer scale, and "12 km" (s) on the inner scale corresponds to "48.2" km on
the outer scale.
B. General Calculation Functions
Multiplication
1)
Example: 20 X 15
Operation:
Align "20" on the outer scale with "10' on the inner scale. Then, "15" on
the inner scale corresponds to "30" on the outer scale. Take into account
the position of the decimal point and add one zero to obtain 300. Note that
with the scales of this watch, the position of the decimal point cannot be
obtained.
Division
2)
Example: 250/20
Operation:
Align "25" on the outer scale with "20" on the inner scale. Then, '10', on
the inner scale corresponds to "12.5" on the outer scale. Take into account
the position of the decimal point to obtain 12.5.
Return to Table of Contents
Page 23

Proportion
3)
Example: 30/20 = 60/x
Operation:
Align "30" on the outer scale with ‘20’ on the inner scale, Then, ‘60’ on
the outer scale corresponds to ‘40’ on the inner scale. At this point, the
proportion for every value on the inner and outer scales is 30:20.
Square root
4)
Example: Square root of 225
Operation:
Turn the outer scale slowly and find a value that corresponds to both "22.5"
on the outer scale and "10" on the inner scale. In this example, "22.5" on
the outer scale corresponds to "15" on the inner scale, and "10" on the
inner scale corresponds to "15" on the outer scale. Thus, the answer is 15.
Return to Table of Contents
Return to Table of Contents
Page 24

Return to Table of Contents
PRECAUTIONS ABOUT CARE AND
HANDLING OF WATCHES
TEMPERA TURE CARE
Avoid temperature extremes. Exposing your watch to high
temperatures, such as placing it on the dashboard of a vehicle
or use in a hot tub, may cause the watch to malfunction,
shorten battery life or damage certain components. Leaving
the watch in extreme cold temperatures may cause irregular
timekeeping until the watch returns to normal operating
temperature.
SHOCK-RESIST ANT
The watch may be worn while playing golf or other activities,
but avoid severe shocks such as dropping it on a hard surface.
MAGNETIC-RESIST ANT
No problem should occur from using the watch around
ordinary household electric appliances such as TV sets or
stereos. Keep away from magnets.
CHEMICAL/GAS RESIST ANT
Do not expose the watch to chemicals or gases for long
periods.
WATCH CLEANING
Stains, waterspots and accumulated dirt on the case, crystal
or band should be removed with a soft cloth to prevent
damage and premature wear.
HANDLING OF WATER-RESISTANT WATCHES
Although water-r esistant watches ar e warranted, steps should
be taken to avoid damage that may result from
accidents or mishandling:
■
Do not operate the crown or push-button in the water or
while the watch is wet. Tighten screw lock crown completely.
■
Should the watch become immersed in water, dry it off
right away. If the watch comes in contact with salt water, be
sure to rinse it thoroughly in warm fresh water to remove any
trace of salt.
■
If a watch is wet from cleaning or by accident, never store it
in a closed container. It should be dried immediately or taken
to a watchmaker or jeweler if moisture is inside the case to
prevent damage from rust.
■
Vital components necessary to resist the entrance of
moisture deteriorate with time and use. Gaskets, crowns and
other materials should be replaced every year or two to ensure
that water resistant quality remains at factory specifications.
CARE FOR MET AL BRACELETS
To extend the life and maintain the good appearance of the
metal watch bracelet, the following recommendations are
given:
■
Be aware that since the watch and bracelet is worn next to
the skin, it collects dust and perspiration and becomes soiled if
not cleaned regularly. This is particularly true of the inner parts
of the links or mesh of the bracelet.
■
Soil and rust, when present in a bracelet, are dissolved by
perspiration and can cause staining of cuffs and
irritation of the skin in some instances.
■
Heavy perspiration should be wiped off the watch and
bracelet with a soft dry cloth. The bracelet should be cleaned
occasionally by using an old toothbrush and warm soapy
water after which the soap is thoroughly rinsed with clear water
and the bracelet dried completely. The foregoing manner of
cleaning should not be done if the watch is not water-r esistant
but should instead be done by your jeweler.
CARE FOR STRAPS
LEATHER
■
Heavy perspiration, if not removed from a leather strap, can
wash out the natural oils and cause the leather to become dry
and deteriorate. Any moisture should be blotted with a soft dry
cloth or paper towel and the strap allowed to dry naturally.
■
Salt residue and soil can be removed from the leather by
cleaning with a dampened soft cloth and mild soap or saddle
soap.
■
Occasionally, the inside surface of the strap should be
cleaned by using a soft cloth dampened with alcohol.
■
The strap should always be worn a little loosely (one finger
space between wrist and strap) to allow air to circulate thus
causing any moisture to evaporate.
RUBBER
■
Rubber straps should be washed frequently with mild soap
and warm water using a soft brush.
■
Thorough cleaning, using the same method, should
especially be done after use in salt water.
■
Solvents, oils, perspiration, tanning lotion and salt can cause
rubber to deteriorate if not removed.
Marking Marking Water-resistant
on the Dial on the characteristics
NONE NONE NO NO NO NO watch and must be kept
NONE WATER OK NO NO NO watch and can withstand
WR100M WATER For frequent use with
WR10bar RESIST OK OK OK NO water. It is not specially
WR150M designed for scuba diving.
WR200M WATER OK OK OK OK Usable up to the respective
See instruction book for further information
Caseback
RESIST splashes, sweat, rain-drops
RESIST indicated depths.
Face washing, Swimming Skin diving Scuba diving
splashes, (diving (diving with
sweat, without air tanks)
raindrops, etc. air tanks)
Return to Table of Contents
Non water-resistant
away from water.
An ordinary water-resistant
and etc. for daily life use.
For skin and scuba diving.
Page 25

Water Resistance
The water-resistant quality of our timepieces is offered in varying degrees depending on the model. This
ranges from non-water resistant models to those suitable for SCUBA diving. Water resistance of our
timepieces is measured in BAR or Barometric Pressure. Each BAR of pressure is equal to 14.5 pounds per
square inch of pressure.
Water resistance is measured when the watch is at a static, or motionless state. As the watch is moved in
water, such as from the motion of swimming, pressure is added from velocity. While you may be swimming in
a pool at surface level, the watch may be experiencing forces equal to that of 100 feet of water pressure
(3 BAR). Diving into a pool can cause forces on the watch to exceed those pressures. As such, you
should always allow a margin of safety when exposing your watch to moisture. Never "push the limit" of
the degree of water resistance of your timepiece.
A primary factor to keep in mind about water resistance is that periodic maintenance is needed to
maintain original factory specifications for water resistance. When a watch is new, it meets
specifications for water resistance as indicated on the case back. However, as the watch ages, the
gaskets that seal the watch become dry and brittle, diminishing its water resistant quality. Exposure to
environments such as chlorinated pools, salt water or soaps from showering can accelerate drying of the
gaskets. We recommend that the gaskets be changed at least every 18 to 24 months to maintain the water
resistant quality of your timepiece. If the watch is frequently exposed to chlorinated pools, soaps salt
water, etc., we recommend that the gaskets be changed on a yearly basis.
From time to time, you may notice condensation that appears then goes away after a short period of time.
This is a normal occurrence and happens primarily from sudden temperature changes. When there are sudden
temperature changes such as entering a cool building from the hot out of doors, or jumping into pool on a
hot day the watch may fog. Conversely, if you go to the cold outdoors from a warm building, fogging may
occur. As long as the fogging clears in a short period of time, there is no need for concern.
Be sure the crown is completely pushed in prior to any contact with moisture. If your model is equipped
with a screw down crown, be sure it is properly seated against the case. Do not operate the crown or any
push button when the watch is wet as this may allow the entrance of moisture. . If at anytime, you notice
moisture in your timepiece that does not clear in a short period of time, you should send your timepiece
as soon as possible to the nearest Authorized Service Center for inspection.
You can determine the level of water resistance of our watches from the markings on your case-back.
Additionally, models that are water resistant to 100 or 200 meters have an indication on the dial as
well. The case-backs and dials are normally marked as follows:
The case back has no indication of water resistance
This indicates the watch is a non water-resistant model and is not designed for contact with moisture at
all. Caution should be exercised to avoid any contact with moisture, such as when washing your hands or
from a rainstorm.
“Water Resist”
This watch is designed to withstand water from accidental splashing, such as from washing your hands or
rain. Any submersion into water may result in the entrance of moisture.
“Water Resist 10BAR” or “W.R. 10BAR”, Dial marked “WR100”
This watch is designed to withstand water pressure up to 333 feet. This includes water exposure from
accidental splashing and rain, but also from showering, swimming in a pool and snorkeling. Be sure to
rinse the watch with fresh water after exposure to a chlorinated pool, salt water, soaps, etc. After
rinsing with fresh water, be sure to dry the exterior with a soft cloth.
“Water Resist 20BAR” or “W.R. 20BAR”, Dial marked “WR200”
This watch is designed to withstand water pressure up to 666 feet. This includes all exposure to water up
to and including recreational SCUBA diving. Be sure to rinse the watch with fresh water after exposure to
a chlorinated pool, salt water, soaps, etc. After rinsing with fresh water, be sure to dry the exterior
with a soft cloth.
Special Note about Jacuzzis and Hot Tubs
The various components used in the manufacture and assembly of your watch expand at various rates. This
results in a loss of the sealing capabilities of gaskets, which may allow moisture to enter. In addition,
heat from these sources can cause deformation of certain materials leading to mechanical failures. For
these reasons, you should remove your watch before entering a hot tub or Jacuzzi.
 Loading...