


Chevrolet Corvette Convertible 2012, Corvette Coupe 2012, Corvette GS Convertible 2012, Corvette Z06 2012, Corvette GS Coupe 2012 Get To Know Manual
...Review this Quick Reference Guide for an overview of some important features in your Chevrolet Corvette. More detailed information can be found in your Owner Manual. Some optional equipment described in this guide may not be included in your vehicle. For easy reference, keep this guide with your Owner Manual in your glove box.
denotes optional equipment |
www.chevrolet.com |

INSTRUMENT PANEL
Head-Up |
Turn Signal Lever/ |
|
Paddle Shift |
Windshield |
Driver |
|
Exterior Lamps |
|
Information |
||||
Bluetooth |
(Not shown – |
|||||
Display |
Control/Cruise |
Wipers |
Center |
|||
automatic |
||||||
Controls |
Control |
Controls |
transmission only) |
Lever |
Controls |
Interior |
Fuel Door |
Power |
Tilt Steering |
Telescopic |
Audio Steering |
Start/Stop |
Lighting |
Release Button/ |
Folding Top |
Wheel |
Steering |
Wheel |
Button |
Control |
Hatch/Trunk |
Button |
Lever |
Wheel |
Controls |
|
|
Release Button |
|
|
Control |
|
|
Symbols |
|
|
|
|
|
|
Fog Lamps |
Check Engine |
|
Antilock Brake System |
|||
Lights On |
Low Tire Pressure |
|
Warning |
|
||
|
Safety Belt Reminder |
|||||
Security |
Brake System Warning |
|||||
1-to-4 Shift (manual |
Active Handling/ |
|
Airbag Readiness |
|||
transmission) |
Traction Control Off |
|
|
|||
2

Hazard Warning |
Audio System/ |
Automatic Climate |
Flashers Button |
Navigation System |
Controls |
Driver’s |
Active |
Magnetic |
Passenger’s |
Heated Seat |
Handling |
Selective Ride |
Heated Seat |
Control |
System Button |
Control |
Control |
Note: Refer to your Owner Manual to learn about the information being relayed by the lights and gauges of the instrument cluster, as well as what to do to ensure safety and prevent damage to your vehicle.
See Instruments and Controls in your Owner Manual.
3
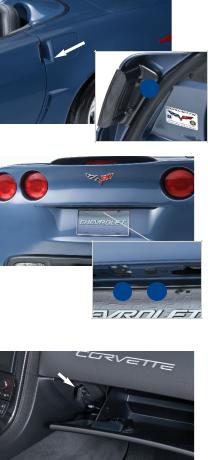
KEYLESS ACCESS SYSTEM
The Keyless Access System enables operation of the doors, ignition and hatch/trunk without removing the transmitter from a pocket or purse. The system will recognize the transmitter when it is within 3 feet of the vehicle.
Entering the Vehicle
• With the transmitter within range of the vehicle, press the pad (A) at the rear edge of each door to unlock and open the door.
A |
Leaving the Vehicle |
|
• Press the button at the top of the pull |
||
|
||
|
handle to open the door. |
CB
Hatch/Trunk Access
There are four ways to open the hatch/trunk:
•With the transmitter within range of the vehicle, press the release button (B).
•Press and hold the  Hatch/Trunk Release button on the transmitter.
•Insert the master key from the transmitter into the lock cylinder (C).
•From inside the vehicle, press the 
Hatch/Trunk Release button on the left side of the instrument panel.
Transmitter Battery
Refer to the Owner Manual for transmitter battery replacement information.
Note: Do not twist the master key inside the transmitter to open the case.
If the transmitter battery is weak and the No Fob Detected message is displayed:
•Insert the transmitter into the pocket on the left side of the glove box. This will enable the engine to start.
See Keys, Doors and Windows in your Owner Manual.
4
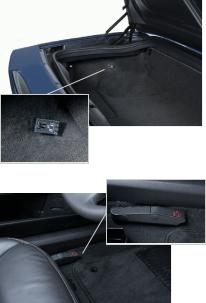
AUXILIARY RELEASES
If the vehicle battery is weak or disconnected, the driver’s door can be opened manually.
Outside the Vehicle
1. Insert the master key into the lock cylinder above the license plate and turn it to open the hatch/trunk.
2. Pull the  Door Release handle on the driver’s side of the hatch/trunk.
Inside the Vehicle
• Pull the  Door Release handle on the floor next to the driver’s seat.
See Keys, Doors and Windows in your Owner Manual.
BATTERY CARE TIPS
Battery Charger
If the vehicle is not driven weekly or the battery is disconnected or drained, use the optional battery charger to charge the battery. To operate the charger, plug it into a standard electrical outlet and into the vehicle’s accessory power outlet.
See Vehicle Care in your Owner Manual.
Window Indexing
To provide a tight seal, the window will automatically open slightly when the door is opened and then automatically close when the door is closed.
If battery power is disconnected, initialize the indexing feature:
1.With the door closed, pull up the window switch to fully raise the window.
2.Hold up the switch for 3 seconds after the window is closed; then release it.
3.Hold up the switch again for 3 seconds; then release it.
Note: The power windows and power convertible top will not operate until the window indexing feature is initialized.
See Keys, Doors and Windows in your Owner Manual.
5
 Loading...