


 Loading...

Contents
Introduction . . . . . . . . . . . . . . . . . . . . . . 2
Seats and Restraints . . . . . . . . . . . . 3
Instruments and Controls . . . . . . . . 4
Infotainment System . . . . . . . . . . . . . 8
Driving and Operating . . . . . . . . . . 14
Vehicle Care . . . . . . . . . . . . . . . . . . . . 30
Service and Maintenance . . . . . . . 45
Technical Data . . . . . . . . . . . . . . . . . 47
Index . . . . . . . . . . . . . . . . . . . . . 51

2Introduction
Introduction
The names, logos, emblems, slogans, vehicle model names, and vehicle body designs appearing in this manual including, but not limited to, GM, the GM logo, CHEVROLET, the CHEVROLET Emblem, CAMARO, and the CAMARO Emblem are trademarks and/or service marks of General Motors LLC, its subsidiaries, affiliates,
or licensors.
For vehicles first sold in Canada, substitute the name “General Motors of Canada Company” for Chevrolet Motor Division wherever it appears in this manual.
Litho in U.S.A.
Part No. 84295539 B Second Printing
This manual describes features that may or may not be on the vehicle because of optional equipment that was not purchased on the vehicle, model variants, country specifications, features/applications that may not be available in your region, or changes subsequent to the printing of this owner’s manual.
Refer to the purchase documentation relating to your specific vehicle to confirm the features.
Keep this manual in the vehicle for quick reference.
Canadian Vehicle Owners
A French language manual can be obtained from your dealer, at www.helminc.com, or from:
Propriétaires Canadiens
On peut obtenir un exemplaire de ce guide en français auprès du concessionnaire ou à l'adresse suivante:
Helm, Incorporated
Attention: Customer Service
47911 Halyard Drive
Plymouth, MI 48170
USA
Using this Supplement
This supplement contains information specific to the unique components of the vehicle. It does not explain everything you need to know about the vehicle. Read this supplement along with the owner’s manual to learn about the vehicle's features and controls.
Index
A good place to look for what you need is the Index in the back of this supplement. It is an alphabetical list of what is in the supplement, and the page number where you will find it.
© 2019 General Motors LLC. All Rights Reserved.

Seats and Restraints |
3 |
Seats and
Restraints
Seat Belts
Lap-Shoulder Belt . . . . . . . . . . . . . . . 3
Seat Belts
Lap-Shoulder Belt
On coupe models, the driver seat belt has a shoulder belt retractor lock feature. This feature is useful in performance driving scenarios where the driver wants to be held in the seat more tightly to take advantage of the aggressive bolstering of the seat.
To use:
1.Move the seat 8–10 cm (3–4 in) rearward from the normal driving position.
2.Pull the driver shoulder belt out as far as it will go, until it stops, to set the lock. While holding the shoulder belt in this position, buckle the belt.
When you release the shoulder belt, the retractor will make a ratchet sound when it retracts. When the retractor lock is set, the belt can be tightened but not pulled out of the retractor.
3.Adjust the belt close to your body, and then move the seat forward 8–10 cm (3–4 in) to the desired driving position. This will hold the belt to your body even tighter. The belt fit should be tight, but not uncomfortable.
To unlatch the belt, press the button on the buckle. The belt should return to its stowed position.

4Instruments and Controls
Instruments and
Controls
Warning Lights, Gauges, and
Indicators
Instrument Cluster . . . . . . . . . . . . . . 5
Boost Gauge . . . . . . . . . . . . . . . . . . . . 6
Instruments and Controls |
5 |
Warning Lights, Gauges, and Indicators
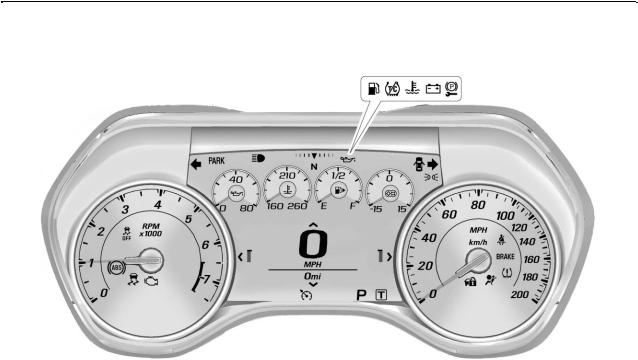
Instrument Cluster
English Cluster Shown, Metric Cluster Similar
6Instruments and Controls
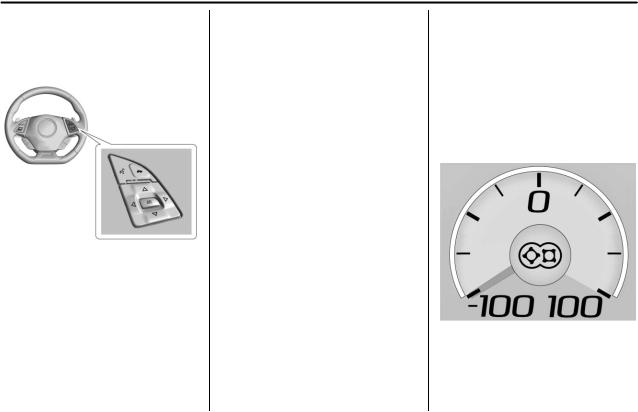
Cluster Menu
There is an interactive display area in the center of the instrument cluster.
Use the right steering wheel control to open and scroll through the different items and displays.
Press o to access the cluster applications. Use w or x to scroll through the list of applications. Press SEL to select the application from the list.
Performance
Press SEL to enter the Performance menu. Use w or x to scroll through the available items.
Tire Temperature : Displays tire temperature status. Unknown may display if information is unavailable.
Tire temperature states:
.Cold — Drive with caution as tire performance may be degraded.
.Cool — Drive with caution as tire performance may be degraded.
.Normal — Tires are at normal driving temperature.
.Warm — Tires are ready for aggressive driving.
.Overheated — Tire temperature may be higher than optimal.
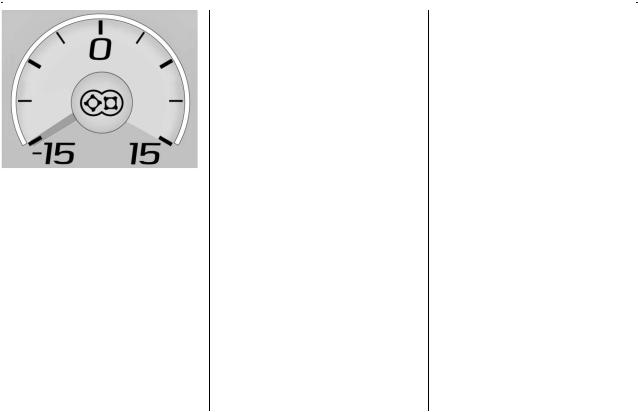
eLSD and Wheel Slip : The upper eLSD display indicates the eLSD clutch locking percentage. The lower Wheel Slip display indicates the rear tire slip compared to the speed of the front tires. See
Limited-Slip Differential 0 27 and Track Events and Competitive Driving 0 14.
Boost Gauge
Metric
Instruments and Controls |
7 |
English
This gauge indicates vacuum during light to moderate throttle and boost under heavier throttle.
It displays the air pressure level in the intake manifold before it enters the engine's combustion chamber.
The gauge is automatically centered at zero every time the engine is started. Actual vacuum or boost is displayed from this zero point. Changes in ambient pressure, such as driving in mountains and changing weather, will slightly change the zero reading.

8Infotainment System
Infotainment
System
Performance Data
Recorder (PDR)
Performance Data
Recorder (PDR) . . . . . . . . . . . . . . . 8
Performance Data
Recorder (PDR)
If equipped, the PDR icon displays on the Home Page.
Important Information
Use of the PDR may be prohibited or legally restricted in certain countries and situations. Ensure compliance with applicable laws and regulations, including, but not limited to: privacy laws, laws related to camera surveillance and recordings, road traffic and security laws, and laws on the protection of publicity and personality rights.
.Do not use the PDR if it causes distraction.
.Do not rely on camera footage to steer the vehicle.
.Comply with any notice and consent requirements before capturing and/or recording the voices or images of other persons or before collecting other personal data.
.Notify other drivers of your vehicle of the above rules and require them to comply.
.General Motors does not accept any responsibility or liability in connection with use that is not permitted.
.Law enforcement authorities may have the right to seize video recordings and use them as evidence of criminal/driving offenses against you or third parties.
The PDR records video, audio, and vehicle data. This data is stored on a removable SD card. The SD card reader is below the instrument panel to the left of the steering wheel and just above the hood release.
The recorded data is not stored anywhere else and is only accessible from the SD card.
To begin, insert a FAT32 formatted SD card, Class 10 required, 8, 16, or 32 GB recommended, into the SD card reader.
Infotainment System |
9 |
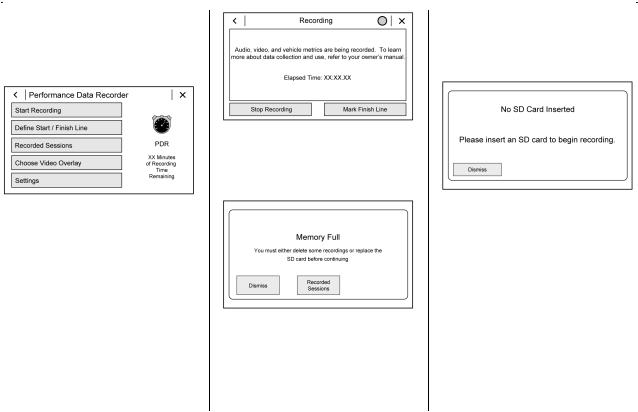
Touch the PDR icon to access the PDR menu. The options displayed are:
Start Recording
If the system is unable to begin recording, the Start Recording button is grayed out.
Touch Start Recording to begin recording. After recording begins, this button changes to Stop Recording. Touch to stop the recording session.
The recording must be stopped and the file closed before removing the SD card, or the recording cannot be reviewed.
The elapsed time will show when recording. To define a finish line, see “Define Finish Line” later in this section.
If there is no available space on the SD card, a message displays. Delete or transfer recordings on the SD card or use another SD card with free space.
To delete a recording, go to the Recorded Sessions menu and touch
V next to the item. See “Recorded Sessions” later in this section.
If no SD card is inserted, a message displays.
Define Finish Line
To track and record the vehicle’s lap times, the starting point of a lap must be set. Crossing this point activates the lap timer when recording.
10 Infotainment System
To set the finish line, position the vehicle with the front bumper at the start/finish point. From the PDR menu, touch Define Finish Line and then touch Mark Finish Line. This can be done with the vehicle moving.
Recorded Sessions
To view recorded videos, touch Recorded Sessions.
A list of recordings displays.
Select the recording to start playback.
Touch V next to an item to delete that recording. Touch Yes to delete or No to cancel on the confirmation screen.
Video playback is not allowed while the vehicle is in motion.
Tap the screen while the video is playing to display the video controls:
Video Scrubber : Changes the position and playback. The length of the bar corresponds to the time of the video. Advance or rewind the video by dragging along the bar.
Delete Recording : Touch to delete the video. A confirmation screen displays. Touch Yes to delete or No to cancel.
Pause/Play : Touch to play or pause the video. The button will change when touched.
/ : Touch to display the previous screen.
Exit : Touch to exit the current display.
Choose Video Overlay
Touch Choose Video Overlay to display the menu.
Select one:
.No Overlay
.Sport

Infotainment System |
11 |
.Track
.Performance Timing
No Overlay:
No vehicle data displays on top of the recorded video. Vehicle data is still available with the video when accessed in the toolbox software.
Sport:
Displays these vehicle metrics:
.Vehicle Speed: Up to three digits are displayed in km/h or MPH depending on vehicle settings.
.Engine Rotations Per Minute (RPMs): The vertical line and triangle show current RPMs. As the RPMs increase, the backfill follows.
.Transmission State (Current Gear): Automatic and manual transmissions display 1, 2, etc.
.Lateral G-Force Graphic: Left and Right G-Forces are displayed. The graphic fills to the left or the right depending on the measure value. The measured G-Force displays as a number at the top of the graphic.
.Event Odometer: This displays the distance driven since the recording began.
Track:
Displays these vehicle metrics:
.Vehicle Speed: Same as Sport.
.GPS Tracking Map: Shows the vehicle’s current position relative to a known route.
.Engine Rotations Per Minute (RPMs): The vertical line and triangle indicate current RPMs. As the RPMs increase, the backfill follows.
.Transmission State (Current Gear): Same as Sport.
.Friction Bubble Graphic: Lateral and longitudinal G-Forces are displayed as a dot within a bubble. A red dot displays when the vehicle starts braking and turns green when the vehicle accelerates. The dot is white when the vehicle is not moving. A white dot is the default.
.Brake and Throttle Graphic: Displays the percentage value of brake and throttle pedal position from 0–100%.
.Steering Angle: The graphic fills from the center to the left or right depending on the direction of

12 Infotainment System
steering. The numerical steering angle displays below the graphic.
.StabiliTrak/Electronic Stability Control (ESC) Active Indicator: The graphic only displays if the active handling systems are activated.
.Performance Traction Management (PTM) Mode: Displays the current PTM mode. The options are Wet, Dry, Sport 1, Sport 2, or Race.
.Current Lap Time: Displays the elapsed lap time if the finish line is defined and the vehicle has crossed the defined finish line at least once.
.Event Odometer: Displays the distance driven since the recording began.
.Drive Mode: Displays the vehicle’s current drive mode.
Performance Timing:
Displays these vehicle metrics:
.Vehicle Speed: Same as Sport.
.Engine Rotations Per Minute (RPMs): Same as Sport.
.Transmission State (Current Gear): Same as Sport.
.0–100 km/h (0–60 mph),
0–200 km/h (0–100 mph), 400 m (1/4 mi), and 0–200–0 km/h (0–100–0 mph): The timer starts recording as soon as the vehicle accelerates. As the vehicle passes each speed and distance milestone, it is displayed on the overlay.
.Throttle Position: Displays
the percentage of throttle applied from 0–100%.
.StabiliTrak/ESC Active Indicator: The graphic only displays if the active handling systems are activated.
Naming Convention
The recorded video file name is stored as the recorded date and the length of the recording.
If the recorded session was recorded while the system was in Valet Mode, the file name will display the mode, date, and length of time.
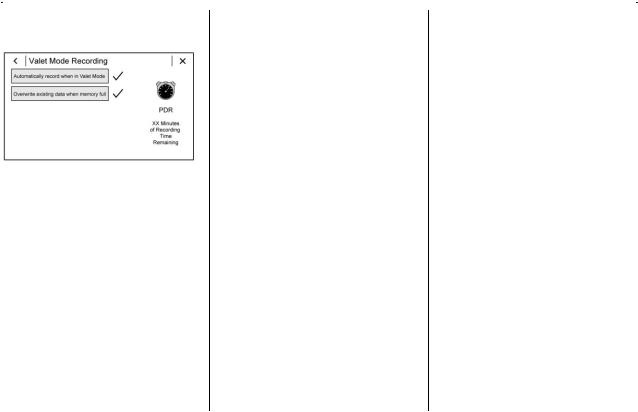
Settings
Infotainment System |
13 |
Touch Settings on the PDR menu to display settings.
Valet Mode Recording : Allows recording preferences to be selected. It is recommended that a blank SD card be used. Available choices are:
.Automatically record when in Valet Mode: Enables the PDR to begin recording as soon as the vehicle is in Valet Mode.
.Overwrite existing data when memory full: Allows manual overwriting of previous recordings, one at a time starting with the oldest, when the current recording requires additional storage to continue.
Audio will not record during Valet Mode.
Record Audio : Allows audio to be recorded along with video.
Audio will not record during Valet Mode.
Software Information : Displays PDR software information and version numbers.
Toolbox Software : Allows for the evaluation of the driver and the vehicle performance on a personal computer after a recorded event. See www.chevrolet.com or your dealer for details to download the software.

14 Driving and Operating
Driving and
Operating
Driving Information
Track Events and Competitive
Driving . . . . . . . . . . . . . . . . . . . . . . . 14
Automatic Transmission
Automatic Transmission . . . . . . . 22
Ride Control Systems
Competitive Driving Mode . . . . . 24
Limited-Slip Differential . . . . . . . . 27
Fuel
Top Tier Fuel . . . . . . . . . . . . . . . . . . 28
Recommended Fuel . . . . . . . . . . . 29
Prohibited Fuels . . . . . . . . . . . . . . . 29
Driving Information
Track Events and
Competitive Driving
{Danger
High-performance features are intended for use only on closed tracks by experienced and qualified drivers and should not be used on public roads. High-speed driving, aggressive cornering, hard braking, and other high-performance driving can be dangerous. Improper driver inputs for the conditions may result in loss of control of the vehicle, which could injure or kill you or others. Always drive safely.
This section covers specific track events and competitive driving information for the Camaro High Performance models only. For additional track events and competitive driving information, see the owner’s manual.
Track events or competitive driving may affect the vehicle warranty. See the warranty manual before using the vehicle for racing or other competitive driving.
The Engine Sound Management setting should not be set to Stealth Mode during track events and competitive driving. See “Driver Mode Control” in the owner’s manual.
{Warning
Prior to each track event and again before returning to public roads, tighten the wheel nuts with a torque wrench to the proper torque specification. Wheel nuts that are improperly or incorrectly tightened can cause the wheels to become loose or come off, resulting in a crash. See “Capacities and Specifications” in the owner’s manual for wheel nut torque specifications.

Driving and Operating |
15 |
Engine Oil
Caution
If you use the vehicle for racing or other competitive driving, the engine may use more oil than it would with normal use. Low oil levels can damage the engine. For information on how to add oil, see Engine Oil 0 32.
Be sure to check the oil level often during racing or other competitive driving and keep the level at or near the upper mark that shows the proper operating range on the engine oil dipstick.
The LT1 and LT4 engines are factory filled with 0W-40 dexos2 oil. 0W-40 dexos2 engine oil is approved for both track and street use with the LT1 and LT4 (ZL1 only, not ZL1 1LE) engines. 15W-50 full synthetic engine oil may also be used for track use and is required on the ZL1 1LE, but after track use must be changed back to 0W-40 dexos2 for street use. See
Capacities and Specifications 0 48.
Fuel
Consider using 100 octane unleaded gasoline if the air temperature is above 30 °C (86 °F) at a track event. Do not use any fuel with conditions listed in Prohibited Fuels 0 29.
Automatic Transmission Fluid
Transmission fluid should be changed after every 15 hours of track use. Any transmission level set or change should be performed at your dealer.
Manual Transmission Fluid
Manual transmission fluid should be changed after every 15 hours of track usage.
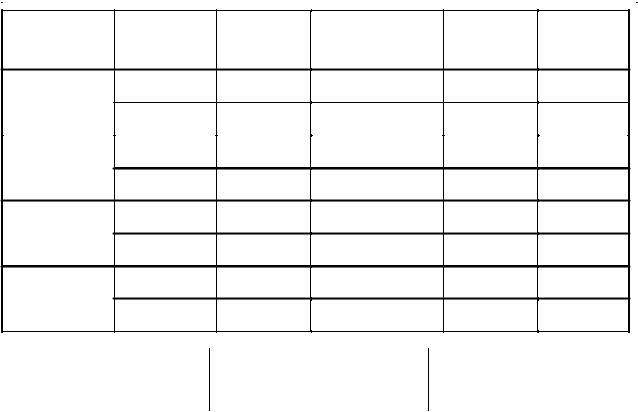
Tire Pressures
Tire pressure specifications are listed in psi (kPa). Limit the vehicle weight to a maximum of the driver and one passenger, with no additional cargo.
16 |
Driving and Operating |
|
|
|
|
|
|
|
|
|
|
|
|
|
|
|
|
|
|
|
|
|
Road course |
|
|
Drag strip cold |
Sustained |
||
|
|
|
Road course target |
high speed |
|||||
|
Model |
Axle |
cold starting |
starting |
|||||
|
1 |
) |
cold starting |
||||||
|
|
|
1 |
|
hot pressures ( |
|
|||
|
|
|
pressures ( |
) |
|
|
pressures |
pressures (2) |
|
|
ZL1 1LE Tire |
Front |
180 kPa |
|
220–240 kPa (32– |
N/A |
300 kPa |
||
Pressure Settings |
|
(26 psi) |
|
35 psi) |
|
|
(44 psi) |
|
|
|
|
Rear |
180 kPa |
|
220–240 kPa (32– |
N/A |
300 kPa |
||
|
|
|
(26 psi) |
|
35 psi) |
|
|
(44 psi) |
|
ZL1 Tire Pressure |
Front |
190 kPa |
|
240–255 kPa (35– |
220 kPa |
300 kPa |
|||
|
Settings |
|
(28 psi) |
|
37 psi) |
|
(32 psi) |
(44 psi) |
|
|
|
Rear |
190 kPa |
|
255–270 kPa (37– |
180 kPa |
300 kPa |
||
|
|
|
(28 psi) |
|
39 psi) |
|
(26 psi) |
(44 psi) |
|
|
SS 1LE Tire |
Front |
190 kPa |
|
240–255 kPa (35– |
N/A |
300 kPa |
||
Pressure Settings |
|
(28 psi) |
|
37 psi) |
|
|
(44 psi) |
||
|
|
Rear |
190 kPa |
|
255–270 kPa (37– |
N/A |
300 kPa |
||
|
|
|
(28 psi) |
|
39 psi) |
|
|
(44 psi) |
|
|
LS/LT 1LE Tire |
Front |
210 kPa |
|
250–260 kPa (36– |
N/A |
280 kPa |
||
Pressure Settings |
|
(30 psi) |
|
38 psi) |
|
|
(41 psi) |
||
|
|
Rear |
210 kPa |
|
250–260 kPa (36– |
N/A |
280 kPa |
||
|
|
|
(30 psi) |
|
38 psi) |
|
|
(41 psi) |
|
(1) Value will vary based on driving style, track, temperature, and weather conditions.
(2) Autobahn, standing mile, etc.
Before leaving the track event, reset tire pressures to the recommended inflation pressures on the Tire and Loading Information label.
Loading...