


 ®
®
SEMI-RECUMBENT TYPE
Instruction Manual
MODEL EC-8OOOU
CONTENTS
Introduction ________________________________________________________2 For safety operation _______________________________________________2 Checking the parts ________________________________________________3 Name of each part _________________________________________________3 Assembly __________________________________________________________4 Preparing for your exercise ________________________________________5 Your first ride ______________________________________________________6 Flow of your exercise ______________________________________________8 Useful functions (operation of buttons and workload shift lever) __9 For your effective exercise ______________________________________ 10 Troubleshooting __________________________________________________ 12 Specifications ____________________________________________________ 12
8OOOU -EC
For your quick reference
Experiencing the first ride
6
Using the unit by designating time 8
Using the unit by designating calories
to be consumed |
8 |
Pe r fo r m i n g t h e e x e rc i s e a s
programmed previously |
9 |
When the battery symbol is displayed 9
What about the exercise plan?
10
Introduction
Thank you very much for your purchase of Cateye Ergociser Model EC-8000.
Something about Cateye Ergocisers
Let's enjoy physical fitness among all of your family members; sisters, mother, father, and even grandparents.
Cateye Ergociser EC-8000 is not a professional training machine. You can enjoy healthy and safe physical fitness through an easy exercise
with Cateye Ergociser EC-
8000, while monitoring
your pulse. Intense workouts are not always necessary. All you need to do is to continue the exercise
at a moderate level, for a rather long time. It will help you to increase your metabolism rate and burn excessive body fat, thus mak- i n g y o u r b o d y healthier. You can
continue your exercise without pushing yourself too hard, since Cateye Ergociser EC-8000 provides you an easy exercise. Therefore, Cateye
Ergociser EC-8000 is adequate for a variety of usage among your family members including the shaping up of young bodies, the prevention of growing old of the middleaged, and the rehabilitation of the old.
Please read through this manual carefully and understand the benefits of the Cateye Ergociser EC-8000 before proceeding to the operation of this unit. In addition, please keep this manual and the warranty card for your future reference.
For safety operation
Please read through this section before proceeding to operate your Cateye Ergociser.
For your safety, you are kindly requested to observe the following:
WARNING!!!
•Before using the EC-8000, it is important to consult a medical specialist if you are suffering from any of the following: heart disease (angina pectoris, myocardial infraction), hypertension, diabetes, respiratory disease (asthma, chronic bronchitis, pulmonary emphysema, etc.), articular metamorphosis, rheumatism, gout, or any other disease and physical complaints.
•If you are not used to regular physical activities, it may be dangerous to suddenly start strenuous exercise. Try to increase your exercise level gradually and always avoid careless exertion.
•If you feel sick or sense something is wrong with your body during exercise, immediately stop exercising.
•In case children, sick persons, or those who are physically disabled are using this unit, be sure that they should be attended by someone else.
CAUTION
•The pulse (earlobe) sensor should always be used with the correct age setting. This allows the upper pulse limit alarm to issue a warning when your heart rate has unusually increased.
•Be sure to remove pulse sensor cord by holding the plug instead of pulling it by holding the cord.
•Do not use this unit in areas where there are a lot of spray products or inflammable substance.
•Do not use this unit with the ventilation hole, etc. covered.
•Do not let substance fall or insert into the openings of the unit. As otherwise, it may result in failures of the unit.
•Avoid using or storing the unit outdoors or in areas where it is exposed to direct sunlight.
•Do not use the unit in areas where temperature and humidity are high.
•Avoid using the unit in other manners than stated in this manual.
•Do not use the unit whenever it does not operate normally, it is dropped or damaged, or when it is wet. When such events have occurred, contact our authorized dealer in your location.
•For repairing the unit, be sure to use the genuine parts for Cateye Ergocisers only.
Symbol marks used for safety precautions in this manual
The descriptions with the following symbol marks in this manual refer to very important matter in terms of your safety and handling of the unit. You are strictly requested to observe these precautions.
WARNING Should this indication be neglected and improper handling attempted by the operator, such critical risks which could result in a fatal or serious injuries are impending.
CAUTION Should this indication be neglected and improper handling attempted by the operator, there are possibilities of physical injuries or material damages.
REFERENCE This symbol mark describes advantageous items to the user or complementary items.
2

Name of Each Part
Checking the parts |
|
|
|
|
|
|
Make sure all the components are included in the package. If anything is |
|
Main Unit of |
||||
missing, contact the dealer where you purchased this unit.) |
|
|
Cateye Ergociser |
|||
Seat Back |
|
Pulse (Earlobe) |
|
|
|
|
|
Sensor |
Rear Leg |
|
|
|
|
|
|
|
|
|
|
|
|
Handlebar |
|
|
Tool Set |
|
|
|
|
|
Cable Clip |
Sensor Clip |
|
|
|
|
Operating Instructions |
Batteries (AA x 4) |
Pedals (L, R) |
Front Leg |
|
Screw set |
Seat |
Warranty and Registration Card |
||||
|
|
|
|
|
|
(with casters) |
Pulse sensor |
|
|
Control panel |
|
|
|
|
|
Plug |
Battery case |
|
|
|
|
Cable holder |
|
|
|
|
|
Earlobe sensor |
INPUT |
( UPPER PULSE LIMIT ) |
|
|
AGE |
|
EXERCISE |
HEART RATE |
|
PROGRESS |
TARGET TIME |
|
|
|
|
TO |
TIME |
|
TARGET |
|
Pulse sensor jack |
|
PEDAL |
CADENCE |
RESISTANCE |
|
|
( rpm ) |
|
|
Sensor clip |
CALORIE |
|
|
TARGET |
|
WORK RATE |
CALORIE |
|
( watt ) |
|
|
CONSUMPTION |
|
|
|
Lock
Display
|
|
MODE |
ADV |
|
|
|
Advance button |
Seat Back |
Handlebar |
|
|
Seat |
Value adjust buttons |
Mode button |
|
|
Control panel |
|
|
|
Workload shift lever |
|
|
Seat base plate |
|
Main unit |
|
|
|
||
Seat base
Lock lever
Rear leg
Pedal
Frame
Front leg
3
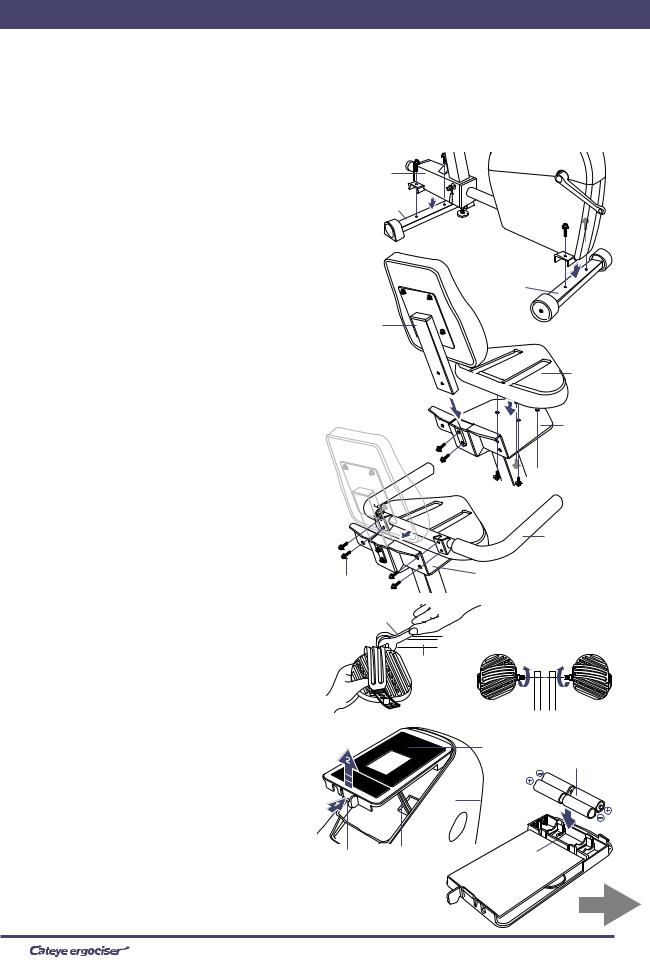
Assembly
Assembling is easy. Assemble the unit according to the following procedures.
1Installing Front and Rear legs
•Attach the front leg (with casters) under the main unit, and the rear leg under the seat base using two screws each, as illustrated.
CAUTION: Be sure to fasten all the screws tightly.
2Installing the seat and seat back
•Insert the steel pipe of the seat back into the seat base, and fasten with the two screws provided. Place the seat on the flat part of the seat base, and use the four screws to fasten the seat from the bottom.
CAUTION: Be sure to fasten all the screws tightly.
3Installing the handlebar
•Mount the handlebar as illustrated between the seat and the seat back pipe, and fasten with the four screws. Install the handlebar so the grip ends are lifted.
CAUTION: Be sure to fasten all the screws tightly.
4Attaching the pedals
•Attach the pedals at the end of the crank. Identify R(right) and L(left) of the pedal with the engraved mark. Use the spanner wrench provided as illustrated to fasten the pedals.
CAUTION: Fasten the R pedal clockwise, and the L counterclockwise.
CAUTION: Be sure to fasten the pedals tightly.
5Loading the batteries
•Detach the control panel from the main unit. Carefully lift the control panel while pressing the lock.
CAUTION: The control panel and the main unit is connected by a cable. Any excessive pulling of the cable may result in failures of the unit.
•Load the batteries (AA x 4) which come with the unit into the battery case on the control panel. Check the polarities of the battery and load them as shown in the drawing.
CAUTION: Do not mix old and brand-new batteries or different types of batteries.
•Install the control panel on the main unit. For this purpose, insert the front part of the panel first.
Seat base
Main unit
Rear Leg
Front Leg (with casters)
Seat back
Seat
INSERT
Seat base
 Screws
Handlebar
Seat base
Screws
#15 Wrench
Left(L) FRONT Right(R)
Crank
Control panel
Batteries (AA x 4)
|
|
Main unit |
Lock |
Cable |
Battery case |
|
4
 Loading...