

Page 1
USER’S GUIDE
GUÍA DEL USUARIO
ES
CTK720ES1A
Page 2

GUIDELINES LAID DOWN BY FCC RULES FOR USE OF THE UNIT IN THE U.S.A. (not applicable to other areas).
NOTICE
This equipment has been tested and found to comply with the limits for a Class B digital device, pursuant to Part 15
of the FCC Rules. These limits are designed to provide reasonable protection against harmful interference in a
residential installation. This equipment generates, uses and can radiate radio frequency energy and, if not installed
and used in accordance with the instructions, may cause harmful interference to radio communications. However,
there is no guarantee that interference will not occur in a particular installation. If this equipment does cause harmful
interference to radio or television reception, which can be determined by turning the equipment off and on, the user
is encouraged to try to correct the interference by one or more of the following measures:
• Reorient or relocate the receiving antenna.
• Increase the separation between the equipment and receiver.
• Connect the equipment into an outlet on a circuit different from that to which the receiver is connected.
• Consult the dealer or an experienced radio/TV technician for help.
FCC WARNING
Changes or modifications not expressly approved by the party responsible for compliance could void the user’s
authority to operate the equipment.
Declaration of Conformity
Model Number: CTK-720
Trade Name: CASIO COMPUTER CO., LTD.
Responsible party: CASIO, INC.
Address: 570 MT. PLEASANT AVENUE, DOVER, NEW JERSEY 07801
Telephone number: 973-361-5400
This device complies with Part 15 of the FCC Rules, Operation is subject to the following two conditions:
(1) This device may not cause harmful interference, and (2) this device must accept any interference received,
including interference that may cause undesired operation.
Important!
Please note the following important information before using this product.
• Before using the optional AD-5 Adaptor to power the unit, be sure to check the AC Adaptor
for any damage first. Carefully check the power cord for breakage, cuts, exposed wire and
other serious damage. Never let children use an AC adaptor that is seriously damaged.
• Never attempt to recharge batteries.
• Do not use rechargeable batteries.
• Never mix old batteries with new ones.
• Use recommended batteries or equivalent types.
• Always make sure that positive (+) and negative (–) poles are facing correctly as indicated
near the battery compartment.
• Replace batteries as soon as possible after any sign they are getting weak.
• Do not short-circuit the battery terminals.
• The product is not intended for children under 3 years.
• Use only CASIO AD-5 adaptor.
• The AC adaptor is not a toy.
• Be sure to disconnect the AC adaptor before cleaning the product.
This mark applies in EU countries only.
CASIO Europe GmbH
Bornbarch 10, 22848 Norderstedt, Germany
628A-E-002B
Page 3
Safety Precautions
Congratulations on your selection of the CASIO
electronic musical instrument.
• Before using the instrument, be sure to carefully
read through the instructions contained in this
manual.
• Be sure to keep all user documentation handy for
future reference.
Symbols
Various symbols are used in this user’s guide and on
the product itself to ensure that the product is used
safely and correctly, and to prevent injury to the user
and other persons as well as damage to property.
Those symbols along with their meanings are shown
below.
DANGER
This symbol indicates information that, if ignored
or applied incorrectly, creates the danger of death
or serious personal injury.
WARNING
This indication stipulates matters that have the risk
of causing death or serious injury if the product is
operated incorrectly while ignoring this indication.
Symbol Examples
This triangle symbol ( ) means that the
user should be careful. (The example at
left indicates electrical shock caution.)
This circle with a line through it (
means that the indicated action must not
be performed. Indications within or
nearby this symbol are specifically
prohibited. (The example at left indicates
that disassembly is prohibited.)
The black dot (
indicated action must be performed.
Indications within this symbol are actions
that are specifically instructed to be
performed. (The example at left indicates
that the power plug must be unplugged
from the electrical socket.)
)
) means that the
CAUTION
This indication stipulates matters that have the risk
of causing injury as well as matters for which there
is the likelihood of occurrence of physical damage
only if the product is operated incorrectly while
ignoring this indication.
628A-E-003A
E-1
Page 4

Safety Precautions
DANGER
Alkaline Batteries
Perform the following steps immediately if
fluid leaking from alkaline batteries ever
gets into your eyes.
1. Do not rub your eyes! Rinse them with
water.
2. Contact your physician immediately.
Leaving alkaline battery fluid in your eyes
can lead to loss of sight.
WARNING
Smoke, Strange Odor, Overheating
Continued use of the product while it is
emitting smoke, a strange odor, or heat
creates the risk of fire and electric shock.
Take the following steps immediately.
1. Turn off power.
2. If you are using the AC adaptor for
power, unplug it from the wall outlet.
3. Contact your original retailer or an
authorized CASIO Service Provider.
AC Adaptor
● Misuse of the AC adaptor creates the
risk of fire and electric shock. Always
make sure you observe the following
precautions.
• Be sure to use only the AC adaptor
that is specified for this product.
• Use only a power source whose
voltage is within the rating marked on
the AC adaptor.
• Do not overload electrical outlets and
extension cords.
● Misuse of the AC adaptor’s electric cord
can damage or break it, creating the risk
of fire and electric shock. Always make
sure you observe the following
precautions.
• Never place heavy objects on the cord
or subject it to heat.
• Never try to modify the cord or subject
it to excessive bending.
• Never twist or stretch the cord.
• Should the electric cord or plug
become damaged, contact your
original retailer or authorized CASIO
Service Provider.
● Never touch the AC adaptor while your
hands are wet.
Doing so creates the risk of electric shock.
● Use the AC adaptor where it will not be
splashed with water. Water creates the
risk of fire and electric shock.
● Do not place a vase or any other container
filled with liquid on top of the AC
adaptor. Water creates the risk of fire
and electric shock.
Batteries
Misuse of batteries can cause them to leak,
resulting in damage to nearby objects, or to
explode, creating the risk of fire and
personal injury. Always make sure you
observe the following precautions.
• Never try to take batteries apart or allow
them to become shorted.
• Never expose batteries to heat or dispose
of them by incineration.
• Never mix old batteries with new ones.
• Never mix batteries of different types.
• Do not charge the batteries.
• Make sure the positive (+) and negative
(–) ends of the batteries are facing
correctly.
Do not incinerate the product.
Never throw the product into fire.
Doing so can cause it to explode, creating
the risk of fire and personal injury.
Water and Foreign Matter
Water, other liquids, and foreign matter
(such as pieces of metal) getting into the
product create the risk of fire and electric
shock. Take the following steps
immediately.
1. Turn off power.
2. If you are using the AC adaptor for
power, unplug it from the wall outlet.
3. Contact your original retailer or an
authorized CASIO Service Provider.
Disassembly and Modification
Never try to take this product apart or
modify it in any way. Doing so creates the
risk of electric shock, burn injury, or other
personal injury. Leave all internal
inspection, adjustment, and maintenance up
to your original retailer or authorized
CASIO Service Provider.
E-2
628A-E-004A
Page 5
Safety Precautions
Dropping and Impact
Continued use of this product after it has
been damaged by dropping or subjecting it
to strong impact creates the risk of fire and
electric shock. Take the following steps
immediately.
1. Turn off power.
2. If you are using the AC adaptor for
power, unplug it from the wall outlet.
3. Contact your original retailer or an
authorized CASIO Service Provider.
Plastic Bags
Never place the plastic bag the product
comes in over your head or in your mouth.
Doing so creates the risk of suffocation.
Particular care concerning this precaution
is required where small children are
present.
Keep off of the product and stand.*
Climbing onto the product or stand can
cause it to tip over or become damaged.
Particular care concerning this precaution
is required where small children are
present.
Location
Avoid locating the product on an unstable
stand, on an uneven surface, or any other
unstable location. An unstable location can
cause the product to fall over, creating the
risk of personal injury.
CAUTION
AC Adaptor
● Misuse of the AC adaptor creates the
risk of fire and electric shock. Always
make sure you observe the following
precautions.
• Do not locate the electric cord near a
stove or other sources of heat.
• Never pull on the cord when
unplugging from the electrical outlet.
Always grasp the AC adaptor when
unplugging.
● Misuse of the AC adaptor creates the
risk of fire and electric shock. Always
make sure you observe the following
precautions.
• Insert the AC adaptor into the wall
outlet as far as it will go.
• Unplug the AC adaptor from the wall
outlet during lightening storms or
before leaving on a trip or other longterm absence.
• At least once a year, unplug the AC
adaptor from the wall outlet and wipe
away any dust that is built up in the
area around the prongs of the plug.
Relocating the Product
Before relocating the product, always
unplug the AC adaptor from the wall outlet
and disconnect all other cables and
connecting cords. Leaving cords connected
creates the risk of damage to the cords, fire,
and electric shock.
628A-E-005A
Cleaning
Before cleaning the product, always unplug
the AC adaptor from the wall outlet first.
Leaving the AC adaptor plugged in creates
the risk of damage to the AC adaptor, fire,
and electric shock.
Batteries
Misuse of batteries can cause them to leak
resulting in damage to nearby objects, or to
explode, creating the risk of fire and
personal injury. Always make sure you
observe the following precautions.
• Use only batteries that are specified for
use with this product.
• Remove batteries from the product if you
do not plan to use it for a long time.
E-3
Page 6
Safety Precautions
Connectors
Connect only the specified devices and
equipment to the product’s connectors.
Connection of a non-specified device or
equipment creates the risk of fire and
electric shock.
Location
Avoid the following locations for this
product. Such locations create the risk of
fire and electric shock.
• Areas subject to high humidity or large
amounts of dust.
• In food preparation areas or other areas
subject to oil smoke.
• Near air conditioning equipment, on a
heated carpet, in areas exposed to direct
sunlight, inside of a vehicle parked in
the sun, or any other area that subjects
the product to high temperatures.
Display Screen
• Never push on the display screen’s LCD
panel or subject it to strong impact. Doing
so can cause the LCD panel’s glass to
crack, creating the risk of personal injury.
• Should the LCD panel ever crack or
break, never touch the liquid inside of
the panel. LCD panel liquid can cause
skin irritation.
• Should LCD panel liquid ever get inside
your mouth, immediately wash out your
mouth with water and contact your
physician.
• Should LCD panel liquid ever get into
your eyes or onto your skin, rinse with
clear water for at least 15 minutes, and
then contact a physician.
Sound Volume
Do not listen to music at very loud volumes
for long periods. Particular care concerning
this precaution is required when using
headphones. High volume settings can
damage your hearing.
Correct Stand* Assembly
An incorrectly assembled stand can tip over,
causing the product to fall and creating the
risk of personal injury.
Make sure you assemble the stand correctly,
following the assembly instructions that
come with it. Make sure you mount the
product on the stand correctly.
* Stand is available as an option.
IMPORTANT!
When using batteries, be sure to replace them or shift to
one of the alternate power sources whenever you notice
any of the following symptoms.
• Dim power supply indicator
• Instrument does not turn on.
• Dim, difficult to read display
• Abnormally low speaker/headphone volume
• Distortion of sound output
• Occasional interruption of sound when playing at high
volumes
• Sudden power failure when playing at high volumes
• Dimming of the display when playing at high volume
• Continued sound output even after you release a key
• A totally different tone may sound
• Abnormal rhythm pattern and demo tune play
• Abnormally low microphone volume
• Distortion of microphone input
• Dim power supply indicator when a microphone is used
• Sudden power failure when using the microphone
Company and product names used in this
manual may be registered trademarks of
others.
Heavy Objects
Never place heavy object on top of the
product.
Doing so can make the product top heavy,
causing the product to tip over or the object
to fall from it, creating the risk of personal
injury.
E-4
628A-E-006A
Page 7
Introduction
Care of your
keyboard
Congratulations upon your selection of this CASIO musical
instrument. This keyboard provides you with the following
features and functions.
❐ 242 tones
Choose from among orchestral sounds, synthesized
sounds, and more.
❐ 100 rhythms
100 versatile rhythms help to add plenty of life to all your
keyboard performances.
❐ Auto Accompaniment
Simply play a chord and the corresponding rhythm, bass
and chord parts play automatically.
❐ PIANO BANK button
The touch of a button takes you directly to piano tones
and piano lessons.
❐ 3-Step Lesson System
The 3-Step Lesson System lets you practice at your own
pace. The keyboard automatically grades your
performances, so you can trace your progress as you
improve.
• 3-Step Lesson System: Now you can learn the parts
that make up the keyboard’s built-in tunes. Guidance
that appears on the monitor screen helps lead you down
the path to music proficiency.
• Evaluation System: The keyboard can be configured to
rate your performances during Step 3 lesson by
assigning points.
Avoid heat, humidity or direct sunlight.
Do not overexpose the instrument to direct sunlight, or place
it near an air conditioner, or in any extremely hot place.
Do not use near a TV or radio.
This instrument can cause video or audio interference with
TV and radio reception. If this happens, move the instrument
away from the TV or radio.
Do not use lacquer, thinner or similar
chemicals for cleaning.
Clean the keyboard with a soft cloth dampened in a weak
solution of water and a neutral detergent. Soak the cloth in
the solution and squeeze until it is almost dry.
Avoid use in areas subjected to temperature
extremes.
Extreme heat can cause figures on the LCD screen to become
dim and difficult to read. This condition should correct itself
when the keyboard is brought back to normal temperature.
NOTE
• You may notice lines in the finish of the case of this
keyboard. These lines are a result of the molding process
used to shape the plastic of the case. They are not cracks
or breaks in the plastic, and are no cause for concern.
❐ 100 built-in tunes, including piano pieces
Built-in tunes are divided into two groups: a Song Bank
of 50 tunes with Auto Accompaniment, and a Piano Bank
of 50 piano tunes.
❐ Musical Information System
A big LCD screen graphically shows you fingerings,
keyboard keys to be pressed, and notes, making keyboard
play more informative and enjoyable than ever before.
628A-E-007A
E-5
Page 8

Contents
Safety Precautions ................ E-1
Introduction ........................... E-5
Care of your keyboard .......... E-5
General Guide........................ E-8
Attachment of the Score Stand ................ E-9
Quick Reference .................. E-10
To play the keyboard .............................. E-10
Power Supply ...................... E-12
Using batteries ....................................... E-12
Using the AC Adaptor............................. E-13
Auto Power Off....................................... E-13
Settings .................................................. E-13
Auto Accompaniment ......... E-17
Selecting a Rhythm ................................ E-17
Playing a Rhythm ................................... E-17
Adjusting the Tempo............................... E-18
Using Auto Accompaniment ................... E-18
Using a Fill-in Pattern ............................. E-20
Synchro Starting Accompaniment with
Rhythm Play........................................... E-20
Playing a Built-in Tune........ E-21
To play back a Song Bank tune ............. E-21
To play back a Piano Bank tune............. E-22
Adjusting the Tempo............................... E-22
To change the melody tone .................... E-23
To play all tunes in succession............... E-23
Using the PIANO BANK Button ............. E-23
Connections ........................ E-14
Phones/Output Terminal......................... E-14
Connecting to a Computer or
Other Equipment .................................... E-14
Sustain jack Terminal ............................. E-14
Microphone Jack .................................... E-14
Accessories and Options ....................... E-14
Basic Operations................. E-15
Playing the Keyboard ............................. E-15
Selecting a Tone..................................... E-15
Using the Microphone Jack.................... E-16
E-6
3-Step Lesson...................... E-24
Evaluation Mode .................................... E-25
Using the Lesson Functions and
Evaluation Mode .................................... E-25
Step 1 – Master the timing. .................... E-25
Step 2 – Master the notes. ..................... E-26
Step 3 – Play at normal speed. .............. E-26
Voice Fingering Guide............................ E-27
628A-E-008A
Page 9

Keyboard Settings .............. E-28
Adjusting Accompaniment and
Song Bank Volume ................................ E-28
Transposing the Keyboard ..................... E-28
Tuning the Keyboard.............................. E-29
Contents
Connection to a Computer ....
Connecting to a Computer ..................... E-30
General MIDI Tone ................................. E-31
Changing the Settings............................ E-31
E-30
Troubleshooting .................. E-33
Specifications ...................... E-34
Appendix ................................ A-1
Tone List................................................... A-1
Percussion Instrument List....................... A-5
Fingered Chord Chart .............................. A-6
Rhythm List .............................................. A-8
Song List .................................................. A-9
MIDI messages that can be sent
and received using the USB port
628A-E-009A
E-7
Page 10
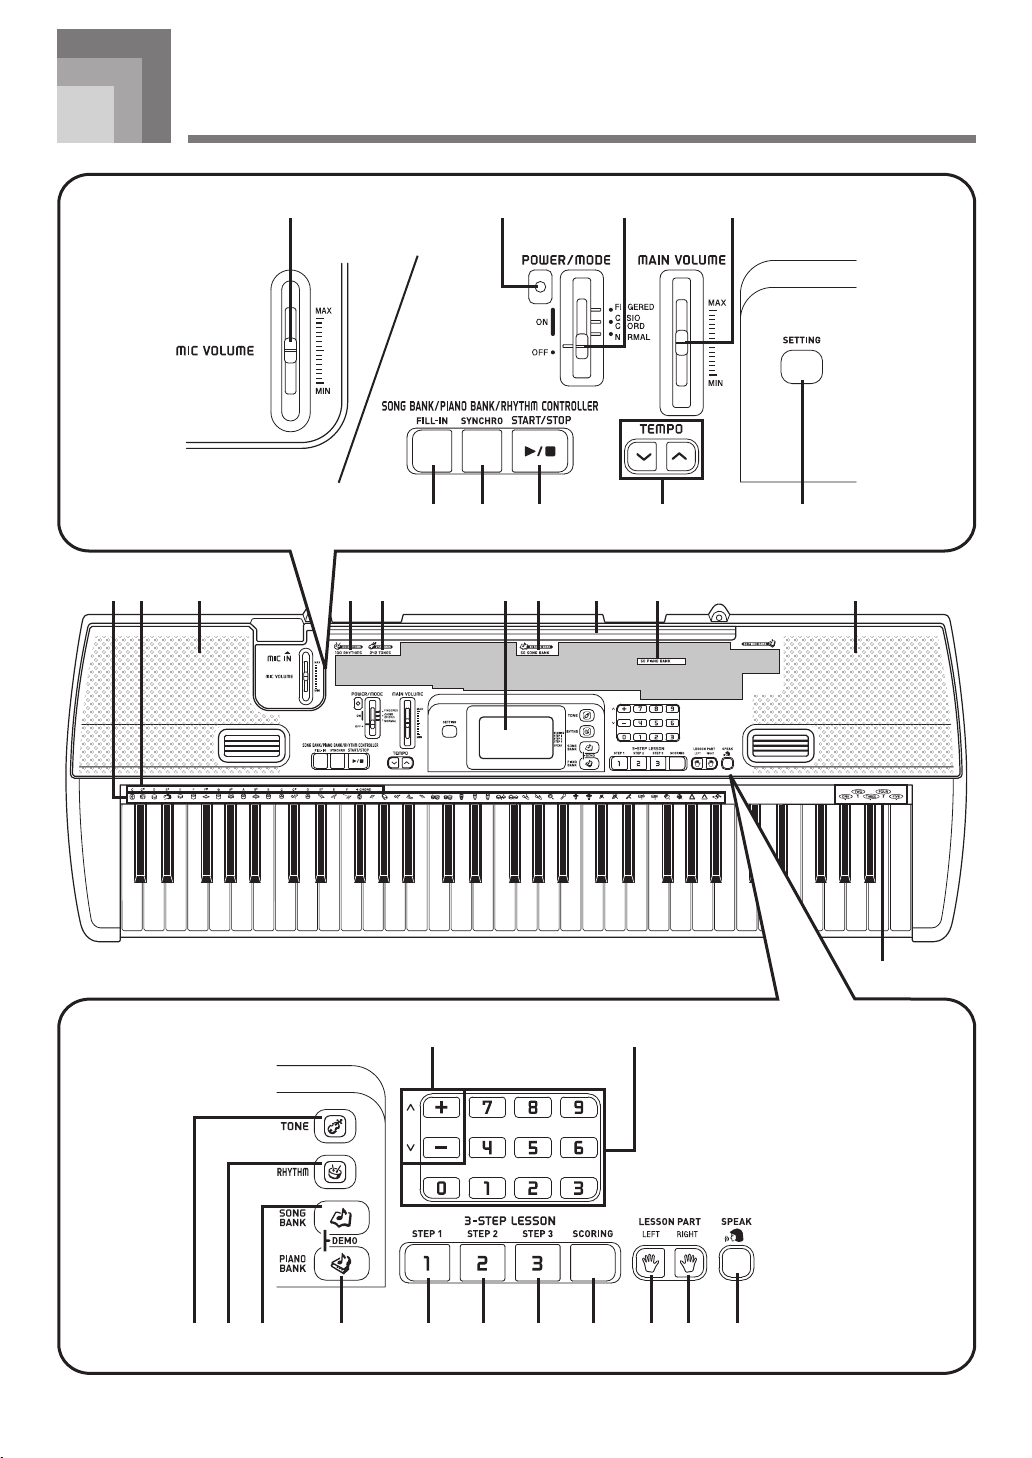
General Guide
B
1 2
5 6 7 98
E
3 4
*
BA0 C D F G
E-8
I J
ONL MK
P Q R US T
H
628A-E-010B
Page 11

General Guide
1
MIC VOLUME slider
2
Power indicator
3
POWER/MODE switch
4
MAIN VOLUME slider
● SONG BANK/PIANO BANK/RHYTHM CONTROLLER
5
FILL-IN button
6
SYNCHRO button
7
START/STOP button
8
TEMPO buttons
9 SETTING button
0 Percussion instrument list
A CHORD root names
B Speaker
C Rhythm list
D Tone list
E Display
F Song Bank list
G
Piano Bank list
Rear Panel
H
COUNT VOICE 1 to 5
I
[+]/[–] buttons
• Negative values can be changed only by using [+] and
[–] to increase and decrease the displayed value.
J Number buttons
• For input of numbers to change displayed settings.
K TONE button
L
RHYTHM button
M
SONG BANK button
N
PIANO BANK button
● 3-STEP LESSON
O
STEP 1 button
P
STEP 2 button
Q
STEP 3 button
R
SCORING button
S
LEFT button
T
RIGHT button
U
SPEAK button
WV X Y Z
V
USB port
W
SUSTAIN jack terminal
X
DC 9V terminal
Y
PHONES/OUTPUT terminal
Z
MIC IN jack
*Attachment of the Score Stand
Insert both ends of the music stand provided with the
keyboard into the two holes on the top surface.
NOTE
• Display examples shown in this User’s Guide are intended for illustrative purposes only. The actual text and values that
appear on the display may differ from the examples shown in this User’s Guide.
• Viewing a liquid crystal display screen from an angle can change the appearance of display contrast. The display contrast of
this keyboard is set to allow easy viewing for a person seated on a chair in front of the keyboard. Note that display contrast
is fixed, and cannot be adjusted.
628A-E-011A
E-9
Page 12
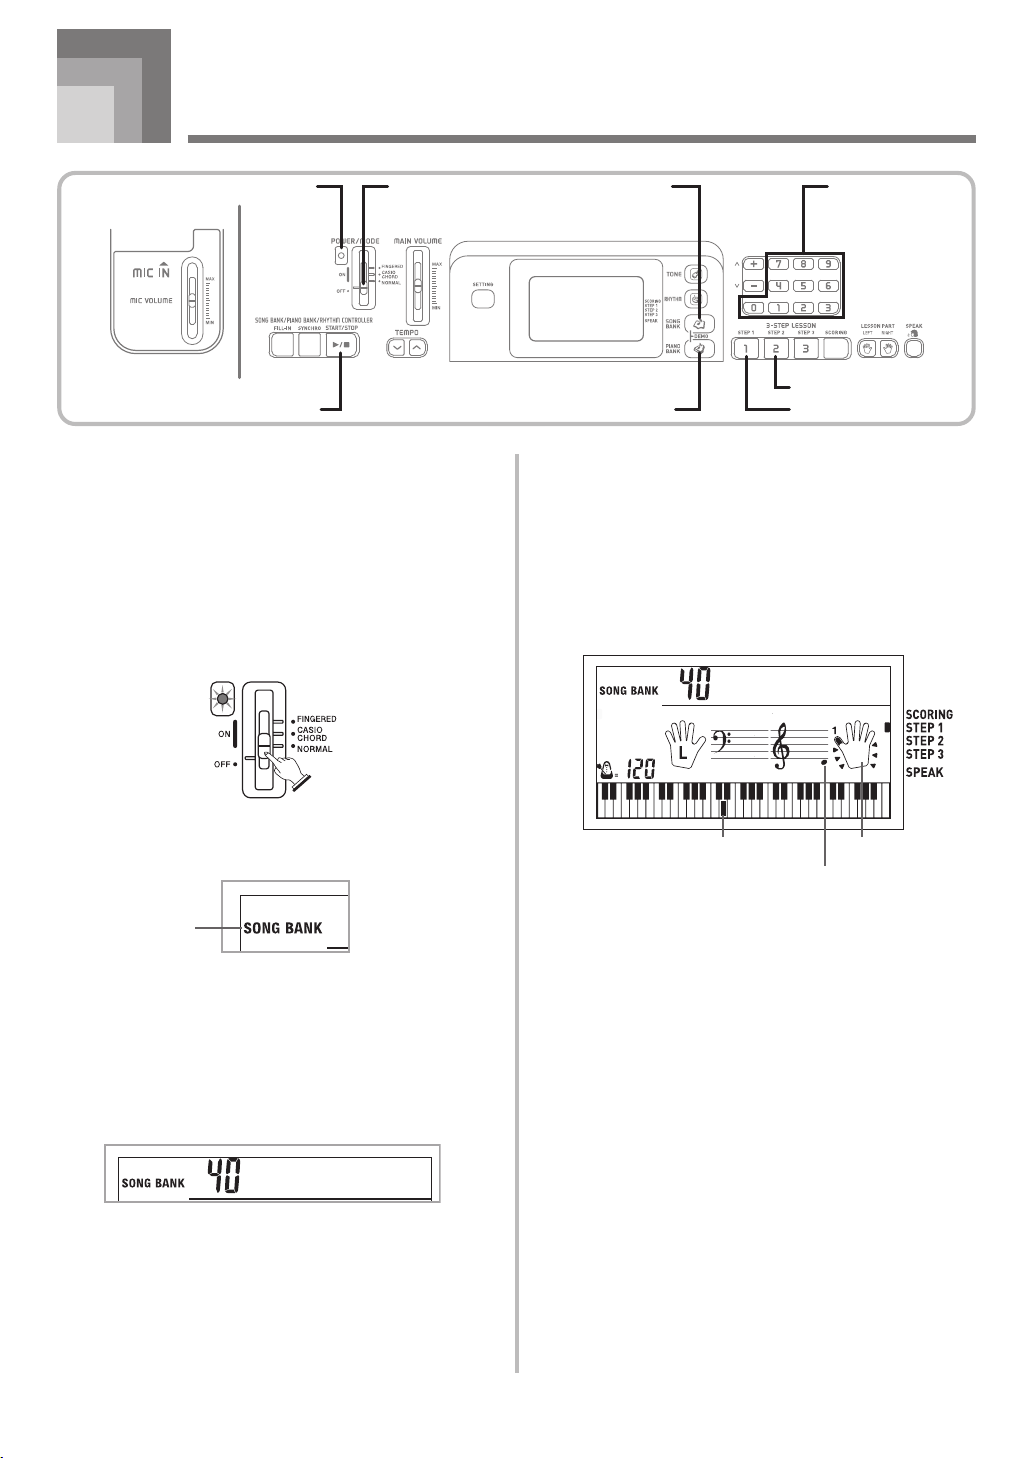
Quick Reference
Power indicator
START/STOP PIANO BANK
This section provides a quick overview of keyboard operation
using steps one and two of the 3-step lesson feature.
With the 3-step lesson feature, the on-screen keyboard guide
keys light to show the next note of the tune.
POWER/MODE
To play the keyboard
1
Set the POWER/MODE switch to NORMAL.
• This causes the power indicator to light.
Lit
Number buttonsSONG BANK
STEP 2
STEP 1
4
Press the STEP 1 button or STEP 2 button.
• The keyboard sounds a count beat and waits for you
to play something on the keyboard. The keys that you
need to press first flash on the display.
5
Play the melody along with the selected tune’s
accompaniment.
• Play in accordance with the keyboard keys, fingerings
and notes that appear on the display.
Al ohaOe
2
Press the SONG BANK button.
Indicator
appears
3
Find the tune you want to play in the SONG BANK
List, and then use the number buttons to input its
two-digit number.
• See page A-9 for the SONG BANK List.
Example: To select “40 ALOHA OE”, input 4 and then 0.
Al ohaOe
E-10
FingeringKeyboard key used
Note pitch
If you selected lesson Step 1
• Play the notes on the keyboard.
• Accompaniment (left-hand part) plays in time with
the notes.
• With Step 1, the correct melody note is played no
matter which keyboard key you press.
If you selected lesson Step 2
• Play the correct notes on the keyboard.
• While an on-screen keyboard guide key is lit, press
the corresponding key on the actual keyboard. In the
case of a Piano Bank tune, the keyboard guide
indication turns off when you press a keyboard key,
and the on-screen keyboard guide key lights for the
next note to be played.
• Accompaniment (left-hand part) plays in time with
the notes, as long as you press the correct keyboard
keys.
628A-E-012A
Page 13
6
To stop play at any time, press the START/STOP
button.
To play an Etude or Concert Piece tune
1
When you get to step 2 of the above procedure,
press the PIANO BANK button in place of the
SONG BANK button.
Indicator
appears
2
Find the tune you want to play in the PIANO BANK
List, and then use the number buttons to input its
two-digit number.
• See page A-9 for the PIANO BANK List.
3
Next, continue from step 4 of the above procedure.
Quick Reference
628A-E-013A
E-11
Page 14
Power Supply
This keyboard can be powered by current from a standard
household wall outlet (using the specified AC adaptor) or by
batteries. Always make sure you turn the keyboard off
whenever you are not using it.
Using batteries
Always make sure you turn off the keyboard before loading
or replacing batteries.
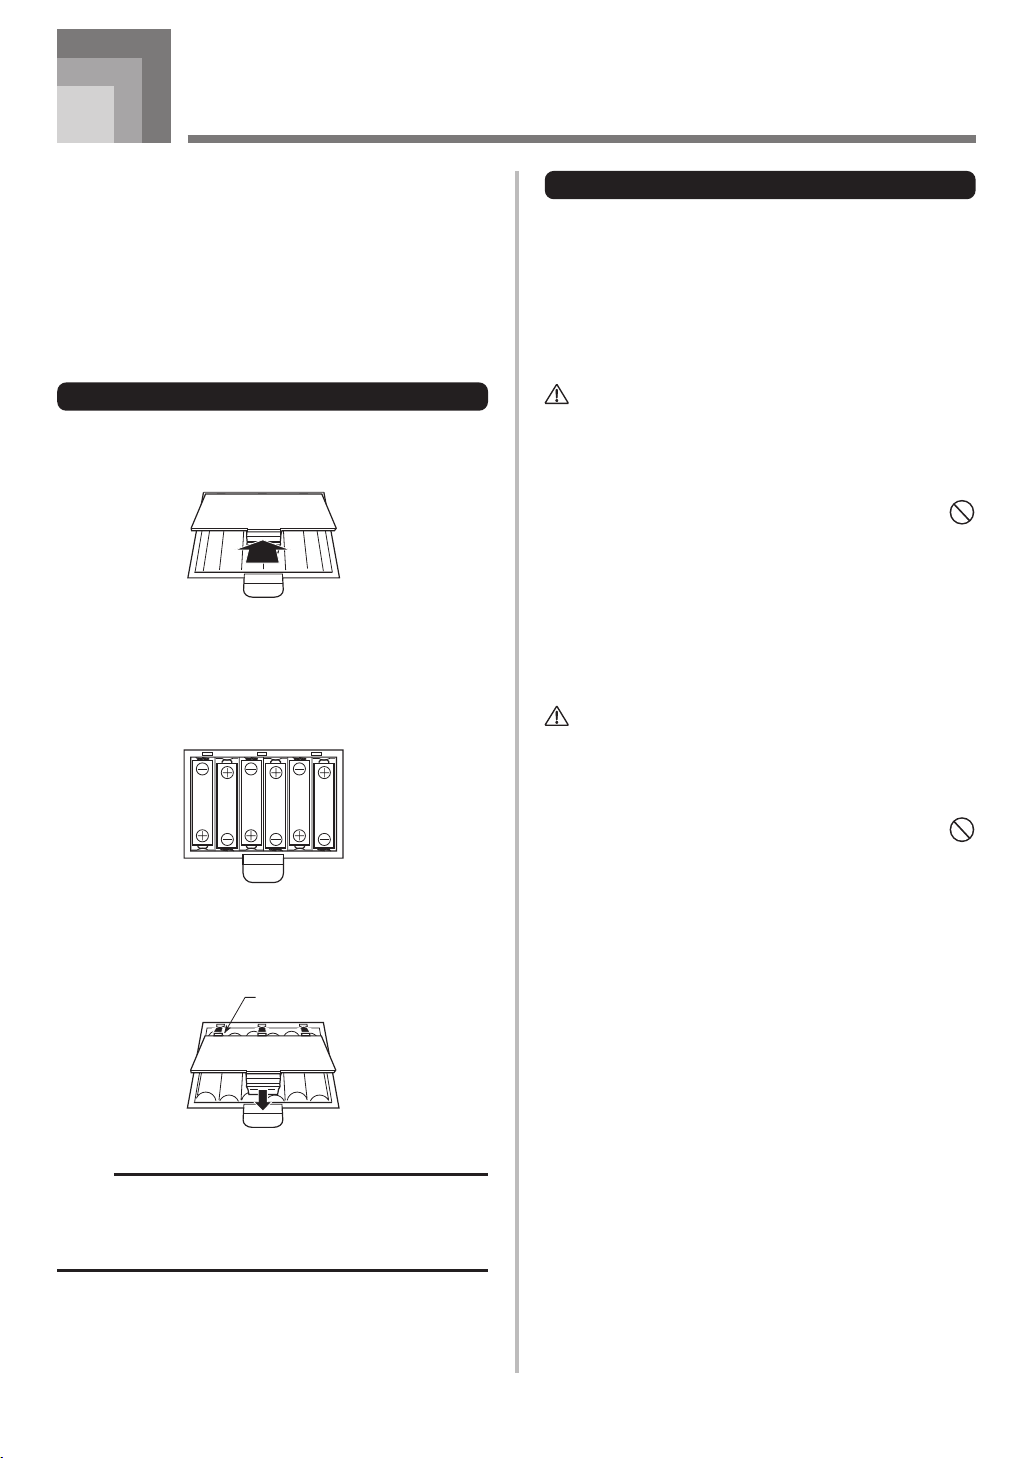
To load batteries
1
Remove the battery compartment cover.
2
Load 6 AA-size batteries into the battery
compartment.
• Make sure that the positive (+) and negative (–) ends
are facing correctly.
Important Battery Information
■
The following shows the approximate battery life.
Alkaline batteries .................................... 4 hours
Manganese batteries ............................... 2 hours
The above value is standard battery life at normal
temperature, with the keyboard volume at medium
setting. Temperature extremes or playing at very loud
volume settings can shorten battery life.
WARNING
Misuse of batteries can cause them to leak, resulting in
damage to nearby objects, or to explode, creating the risk of
fire and personal injury. Always make sure you observe the
following precautions.
• Never try to take batteries apart or allow them to
become shorted.
• Never expose batteries to heat or dispose of them by
incineration.
• Never mix old batteries with new ones.
• Never mix batteries of different types.
• Do not charge the batteries.
• Make sure the positive (+) and negative (–) ends of
the batteries are facing correctly.
CAUTION
Misuse of batteries can cause them to leak resulting in
damage to nearby objects, or to explode, creating the risk of
fire and personal injury. Always make sure you observe the
following precautions.
• Use only batteries that are specified for use with this
product.
• Remove batteries from the product if you do not plan
to use it for a long time.
3
Insert the tabs on the battery compartment cover
into the holes provided and close the cover.
Tab
NOTE
• The keyboard may not function correctly if you load or
replace batteries with power turned on. If this happens,
turning the keyboard off and then back on again should
return functions back to normal.
E-12
628A-E-014A
Page 15
Power Supply
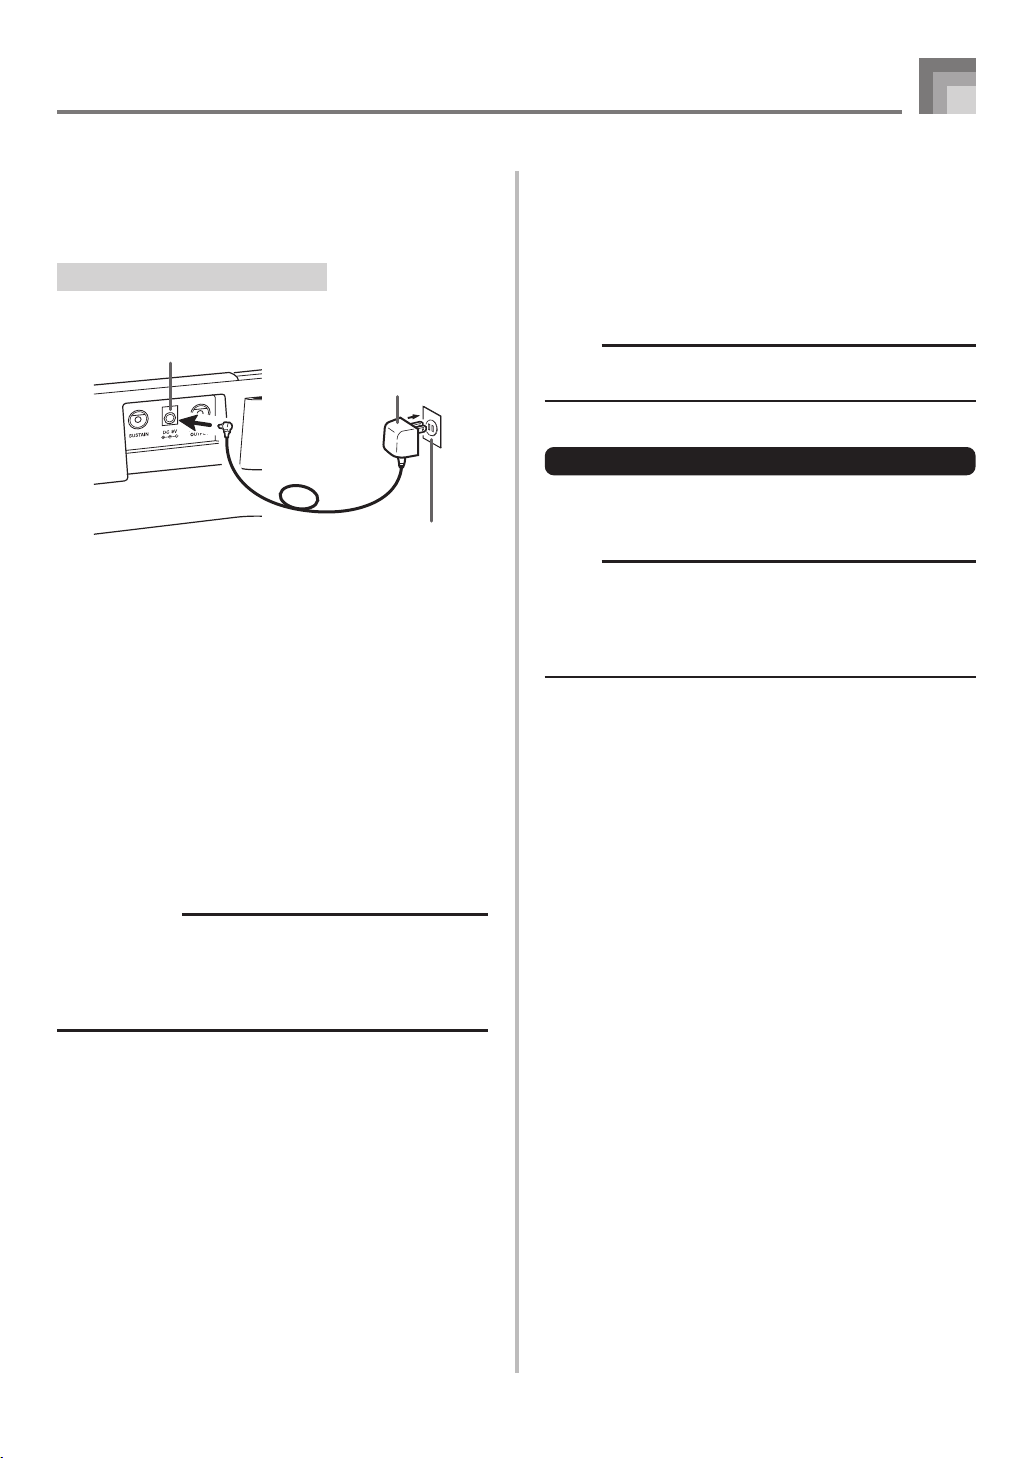
Using the AC Adaptor
Make sure that you use only the AC adaptor specified for
this keyboard.
Specified AC Adaptor: AD-5
[Rear Panel]
DC 9V jack
AC adaptor AD-5
AC outlet
Note the following important precautions to avoid damage
to the power cord.
● During Use
• Never pull on the cord with excessive force.
• Never repeatedly pull on the cord.
• Never twist the cord at the base of the plug or connector.
• The power cord should not be stretched tight while it is
in use.
● During Movement
• Before moving the keyboard, be sure to unplug the AC
adaptor from the power outlet.
● During Storage
• Loop and bundle the power cord, but never wind it
around the AC adaptor.
Auto Power Off
When you are using battery power, keyboard power turns
off automatically whenever you leave it on without
performing any operation for about 6 minutes. When this
happens, use the POWER/MODE switch to turn power back
on.
NOTE
• Auto Power Off is disabled (it does not function) when
you are using the AC adaptor to power the keyboard.
To disable Auto Power Off
Hold down the TONE button while turning on the keyboard
to disable Auto Power Off.
NOTE
• When Auto Power Off is disabled, the keyboard does
not turn off automatically no matter how long it is left
with no operation being performed.
• Auto Power Off is automatically enabled whenever you
turn on keyboard power.
Settings
All keyboard settings are returned to their initial defaults
whenever keyboard power is turned back on after being
turned off by operation of the POWER/MODE switch or Auto
Power Off.
IMPORTANT!
• Make sure that the keyboard is turned off before
connecting or disconnecting the AC adaptor.
• Using the AC adaptor for a long time can cause it to
become warm to touch. This is normal and does not
indicate malfunction.
628A-E-015A
E-13
Page 16

Connections
Phones/Output Terminal
Before connecting phones or other external equipment, be
sure to first turn down the volume settings of the keyboard
and the connected equipment. You can then adjust volume
to the desired level after connections are complete.
[Rear Panel]
Audio connection
RIGHT
Red
1
PIN plug
PHONES/OUTPUT terminal
Stereo standard plug
White
3
Keyboard amp,
guitar amp, etc.
2
LEFT
AUX IN or similar terminal
of audio amplifier
Connecting Phones (Figure 1)
Connecting phones cuts off output from the keyboard’s builtin speakers, so you can play even late at night without
disturbing anyone.
Audio Equipment (Figure 2)
Connect the keyboard to a audio equipment using a
commercially available connecting cord with a standard plug
on one end and two PIN plugs on the other end. Note that
the standard plug you connect to the keyboard must be a
stereo plug, otherwise you will be able to output only one of
stereo channels. In this configuration, you normally set the
input selector of the audio equipment to the terminal (usually
marked AUX IN or something similar) where the cord from
the keyboard is connected. See the user documentation that
comes with your audio equipment for full details.
Musical Instrument Amplifier (Figure 3)
Use a commercially available connecting cord* to connect the
keyboard to a musical instrument amplifier.
[Connection Example]
To keyboard’s
PHONES/OUTPUT
terminal
Stereo standard plug
PIN plug (red)
PIN plug (white)
PIN jack
Standard plug
INPUT 1
INPUT 2
Keyboard or
guitar amp
Connecting to a Computer or
Other Equipment
You can also connect the keyboard to a computer or sequencer.
See “Connecting to a Computer” on page E-30 for details.
Sustain jack Terminal
You can connect an optional sustain pedal (SP-3 or SP-20) to
the SUSTAIN jack terminal to enable the capabilities
described below.
SUSTAIN jack Terminal
SP-20
Sustain Pedal
• With piano tones, depressing the pedal causes notes to
linger, much like a piano’s damper pedal.
• With organ tones, depressing the pedal causes notes to
continue to sound until the pedal is released.
* Be sure to use a connecting cord that has a stereo standard
plug on the end you connect to the keyboard, and a
connector that provides dual channel (left and right) input
to the amplifier to which you are connecting. The wrong
type of connector at either end can cause one of the stereo
channels to be lost.
When connected to a musical instrument amplifier, set the
volume of the keyboard to a relatively low level and make
output volume adjustments using the amplifier’s controls.
E-14
Microphone Jack
You can connect a commercially available microphone to the
microphone jack and sing along with notes played on the
keyboard. For details, see “Using the Microphone Jack” on
page E-16.
Accessories and Options
Use only the accessories and options specified for this
keyboard. Use of non-authorized items creates the danger of
fire, electrical shock, and personal injury.
628A-E-016A
Page 17

Basic Operations
POWER/MODE
MAIN VOLUME
MIC VOLUME
This section provides information on performing basic
keyboard operations.
Playing the Keyboard
To play the keyboard
1
Set the POWER/MODE switch to NORMAL.
2
Use the MAIN VOLUME slider to lower the
keyboard volume.
• It’s always a good idea to set the keyboard volume at
a relatively low level before playing.
3
Play something on the keyboard.
Number buttonsTONE
3
Use the number buttons to input the three digit tone
number for the tone you want to select.
Example:
To select “041 ACOUSTIC BASS”, input 0, 4 and
then 1.
Acous .Bs
NOTE
• Always input all three digits for the tone number,
including leading zeros (if any). If you input one or two
digits and stop, the display will automatically clear your
input after a few seconds.
• You can also increment the displayed tone number by
pressing [+] and decrement it by pressing [–].
Selecting a Tone
This keyboard comes with 242 built-in tones. Use the
following procedure to select the tone you want to use.
To select a tone
1
Find the tone you want to use in the TONE List and
note its tone number.
• Not all of the available tones are shown on the tone
list printed on the keyboard console. For a complete
list, see the “Tone List” on page A-1.
2
Press the TONE button.
Indicator
appears
628A-E-017A
Combination tones
The following describes the two types of combination tones
that are available.
Layered Tones (Tone Numbers: 098 through 107)
Example: 098 STRINGS PIANO
This tone layers a strings tone with a piano tone so they both
sound when a keyboard key is pressed.
Split Tones (Tone Numbers: 108 through 112)
Example: 108 BASS/PIANO
This tone splits the keyboard so one range is assigned a bass
tone and another range is assigned a piano tone.
BASS
PIANO
E-15
Page 18

Basic Operations
Percussion sounds
Example: 241 DRUM SET
This tone assigns various percussion sounds to the keyboard.
See the “Percussion Instrument List” on page A-5 for full
details.
Polyphony
The term polyphony refers to the maximum number of notes
you can play at the same time. The keyboard has 32-note
polyphony, which includes the notes you play as well as the
rhythms and auto-accompaniment patterns that are played
by the keyboard. This means that when a rhythm or autoaccompaniment pattern is being played by the keyboard, the
number of notes (polyphony) available for keyboard play is
reduced. Also note that some of the tones offer only 16-note
polyphony.
NOTE
• When rhythm or auto accompaniment is playing, the
number of sounds simultaneously played is reduced.
Using the Microphone Jack
Connecting a commercially available microphone to the MIC
IN jack makes it possible to sing along with the keyboard’s
built-in tunes. When connecting a microphone, be sure to first
adjust the MIC VOLUME to a relatively low setting, and then
adjust to the level you want after connecting.
IMPORTANT!
• Be sure to use the microphone’s ON/OFF switch to turn
off the microphone and to disconnect the microphone
from the keyboard whenever you are not using it.
Recommended Microphone Type
• Dynamic microphone (standard plug)
IMPORTANT!
• Be sure to disconnect the microphone from the keyboard
whenever you are not using it.
Howling (Feedback Noise)
Any of the following conditions can cause howling (feedback
noise).
• Covering the head of the microphone with your hand
• Positioning the microphone too near to a speaker
Should howling occur, try grasping the microphone further
away from the head, and move away from any nearby
speaker.
Static Noise
Fluorescent lighting can cause static noise in the microphone
signal. When this happens, move away from the lighting you
suspect may be causing the static.
1
Set the MIC VOLUME slider setting so it is on the
“MIN” side.
2
Turn on the microphone’s ON/OFF switch.
3
Use the MIC VOLUME slider to adjust microphone
volume to the level you want.
[Rear Panel]
Microphone ON/OFF switch
Microphone
MIC VOLUME slider
E-16
628A-E-018A
Page 19

Auto Accompaniment
POWER/MODE
FILL-IN
START/STOPSYNCHRO
This keyboard automatically plays bass and chord parts in
accordance with the chords you finger. The bass and chord
parts are played using sounds and tones that are
automatically selected to select the rhythm you are using.
All of this means that you get full, realistic accompaniments
for the melody notes you play with your right hand, creating
the mood of an one-person ensemble.
TEMPO
Selecting a Rhythm
This keyboard provides you with 100 exciting rhythms that
you can select using the following procedure.
To select a rhythm
1
Find the rhythm you want to use in the RHYTHM
List and note its rhythm number.
• Not all of the available rhythms are shown on the
rhythm list printed on the keyboard console. For a
complete list, see the “Rhythm List” on page A-8.
Number buttonsRHYTHM
NOTE
•“00 8 Beat 1” is the initial default rhythm setting whenever
you turn on keyboard power.
• You can also increment the displayed rhythm number
by pressing [+] and decrement it by pressing [–].
• Accompaniment sounds (chords, bass, etc.) do not
sound while a metronome rhythm (No. 95 to 99: 0, 2, 3,
4, 6) is being used, even if the POWER/MODE switch
setting is “CASIO CHORD” or “FINGERED”. Because
of this, you should set the POWER/MODE switch to
“NORMAL” when using a metronome rhythm.
Playing a Rhythm
Use the following procedure to start and stop rhythm play.
To play a rhythm
1
Set the POWER/MODE switch to NORMAL.
2
Press the RHYTHM button.
Indicator
appears
3
Use the number buttons to input the two digit
rhythm number for the rhythm you want to select.
Example: To select “48 WALTZ 1”, input 4 and then 8.
W
altz 1
628A-E-019A
2
Press the START/STOP button to start play of the
currently selected rhythm.
3
To stop rhythm play, press the START/STOP button
again.
NOTE
• All of the keyboard keys are melody keys while the
POWER/MODE switch is set to NORMAL.
E-17
Page 20

Auto Accompaniment
Adjusting the Tempo
You can adjust the tempo of rhythm play within a range of
40 to 255 beats per minute. The tempo setting is applied to
Auto Accompaniment chord play, and song bank operations.
3
Play a chord.
• The actual procedure you should use to play a chord
depends on the current POWER/MODE switch
position. Refer to the following pages for details on
chord play.
To adjust the tempo
1
Use the TEMPO buttons ( / ) to adjust the tempo.
: Increases the tempo value.
: Decreases the tempo value.
Example: Hold down the button until the tempo
NOTE
• Pressing both TEMPO buttons ( and ) at the same
time resets the tempo to the default value of the currently
selected rhythm.
value 110 is on the display.
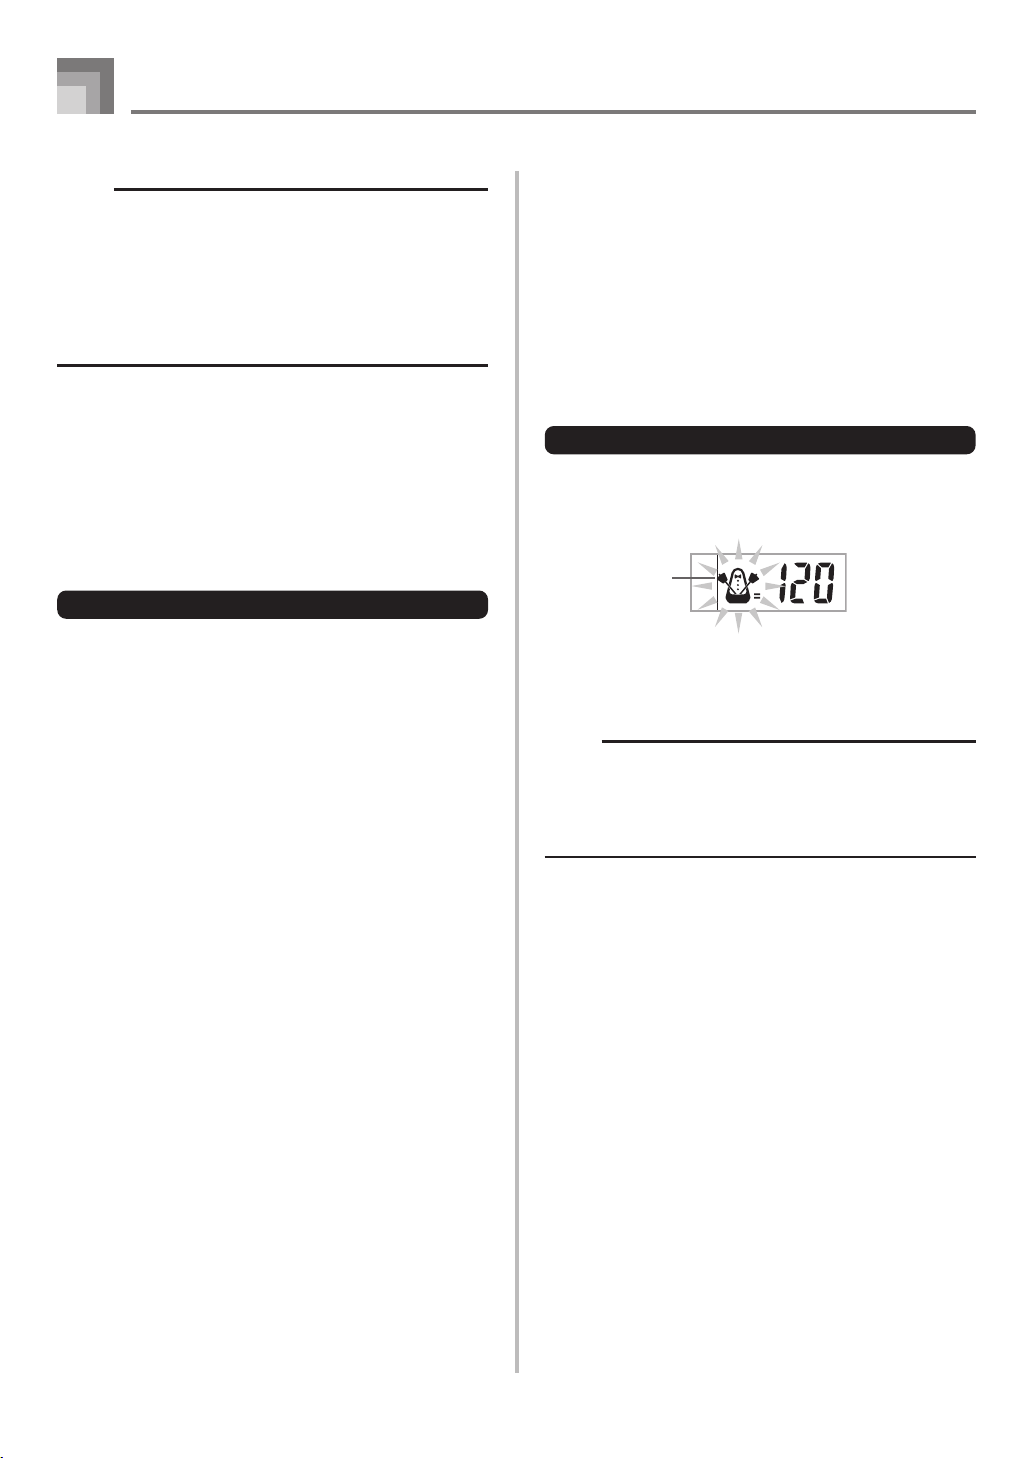
About the Graphic Metronome
The graphic metronome appears on the display along with
the tempo value and beat of a rhythm or built-in tune. The
graphic metronome helps you keep in time as you play along
with a rhythm or built-in tune.
Tempo valueGraphic metronome
CASIO CHORD ...............This page
FINGERED .......................Page E-19
Chord name
8B e
Basic fingering of current chord
(May be different from chord actually
being played on the keyboard.)
4
To stop Auto Accompaniment play, press the
START/STOP button again.
NOTE
• If you press the SYNCHRO button in place of the START/
STOP button in step 2, the rhythm pattern starts to play
automatically when you perform the operation in step 3.
For details about these buttons, see page E-20.
• You can adjust the accompaniment part volume level
independently of the main volume. For details, see
“Adjusting Accompaniment and Song Bank Volume” on
page E-28.
at 1
Using Auto Accompaniment
The following procedure describes how to use the keyboard’s
Auto Accompaniment feature. Before starting, you should
first select the rhythm you want to use and set the tempo of
the rhythm to the value you want.
To use Auto Accompaniment
1
Set the POWER/MODE switch to CASIO CHORD
or FINGERED.
2
Press the START/STOP button to start play of the
currently selected rhythm.
E-18
CASIO CHORD
This method of chord play makes it possible for anyone to
easily play chords, regardless of previous musical knowledge
and experience. The following describes the CASIO CHORD
“Accompaniment keyboard” and “Melody keyboard”, and
tells you how to play CASIO CHORDs.
628A-E-020A
Page 21

Auto Accompaniment
CASIO CHORD Accompaniment Keyboard and Melody
Keyboard
Accompaniment
keyboard
Melody keyboard
NOTE
• The accompaniment keyboard can be used for playing
chords only.
No sound will be produced if you try playing single
melody notes on the accompaniment keyboard.
Chord Types
CASIO CHORD accompaniment lets you play four types of
chords with minimal fingering.
Chord types
Major chords
Major chord names are marked
above the keys of the
accompaniment keyboard. Note
that the chord produced when you
press an accompaniment keyboard
does not change octave, regardless
of which key you use to play it.
#
E#G
DE FF
C
C
Example
C Major (C)
#
E
DE F
A
C
B
C
AB
FINGERED
FINGERED provides you with a total of 15 different chord
types. The following describes the FINGERED
“Accompaniment keyboard” and “Melody keyboard”, and
tells you how to play a C-root chord using FINGERED.
FINGERED Accompaniment Keyboard and Melody
Keyboard
Accompaniment
keyboard
NOTE
• The accompaniment keyboard can be used for playing
chords only. No sound will be produced if you try playing
single melody notes on the accompaniment keyboard.
C
Caug
*1
Cm
Csus4
Melody keyboard
Cdim
C7
*2
Minor chords (m)
To play a minor chord, keep the
major chord key depressed and
C minor (Cm)
#
E#G
A
DE FF
C
C
AB
#
E
DE F
C
B
C
press any other accompaniment
keyboard key located to the right
of the major chord key.
Seventh chords (7)
To play a seventh chord, keep the
major chord key depressed and
C seventh (C7)
#
E#G
A
DE FF
C
B
C
AB
#
E
DE F
C
C
press any other two
accompaniment keyboard keys
located to the right of the major
chord key.
Minor seventh chords (m7)
To play a minor seventh chord,
C minor seventh (Cm7)
#
E#G
DE FF
C
C
#
E
A
DE F
C
B
C
AB
keep the major chord key
depressed and press any other
three accompaniment keyboard
keys located to the right of the
major chord key.
NOTE
• It makes no difference whether you press black or white
keys to the right of a major chord key when playing minor
and seventh chords.
*2
Cm7
5 *1
C7
Cmadd9
*2
Cmaj7
C7sus4
*2
CmM7
*2
Cm7
Cadd9
Cdim7
5
*2
*1
See the “Fingered Chord Chart” on page A-6 for details on
playing chords with other roots.
*1: Inverted fingerings cannot be used. The lowest note is the
root.
*2:
The same chord can be played without pressing the 5th G.
628A-E-021A
E-19
Page 22
Auto Accompaniment
NOTE
• Except for the chords specified in note*1 above, inverted
fingerings (i.e. playing E-G-C or G-C-E instead of C-EG) will produce the same chords as the standard
fingering.
• Except for the exception specified in note*2 above, all of
the keys that make up a chord must be pressed. Failure
to press even a single key will not play the desired
FINGERED chord.
Using a Fill-in Pattern
Fill-in patterns let you momentarily change the rhythm
pattern to add some interesting variation to your
performances.
The following procedure describes how to use the Fill-in
feature.
To insert a fill-in
1
Press the START/STOP button to start rhythm play.
2
Press the FILL-IN button to insert a fill-in pattern
for the rhythm you are using.
Synchro Starting Accompaniment
with Rhythm Play
You can set up the keyboard to start rhythm play at the same
time you play the accompaniment on the keyboard.
The following procedure describes how to use synchro start.
Before starting, you should first select the rhythm you want
to use, set the tempo, and use the POWER/MODE switch to
select the chord play method you want to use (CASIO
CHORD, FINGERED).
To use synchro start
1
Press the SYNCHRO button to put the keyboard
into synchro start standby.
Flash
2
Play a chord on the accompaniment keyboard and
the rhythm pattern starts to play automatically.
NOTE
• If the POWER/MODE switch is set to NORMAL, only
the rhythm plays (without a chord) when you play on the
accompaniment keyboard.
• To cancel synchro start standby, press the SYNCHRO
button one more time.
E-20
628A-E-022A
Page 23

Playing a Built-in Tune
START/STOP
TEMPO
TONE
Number buttons
SONG BANK
PIANO BANK
Your keyboard comes with a total of built-in 100 tunes. You
can play back built-in tunes for your own listening pleasure,
or you can use them for practice and even sing-along. Builtin tunes are divided between the two groups described below.
• Song Bank: 50 tunes
The tunes in this group are Auto Accompaniment tunes.
• Piano Bank Group: 50 tunes
The tunes in this group are piano tunes.
To play back a Song Bank tune
PREPARATION
• Adjust the main volume (page E-15).
1
Find the tune you want to play in the SONG BANK
List, and note its number.
• See page A-9 for the SONG BANK List.
2
Press the SONG BANK button to enter the Song
Bank Mode.
Indicator
appears
3
Use the number buttons to input the tune’s twodigit number.
Example: To select “40 ALOHA OE”, input 4 and then 0.
Song number Song name
Al ohaOe
NOTE
• Tune Number 00 is the initial default Song Bank tune
setting whenever you turn on keyboard power.
• You can also increment the displayed tune number by
pressing [+] and decrement is by pressing [–].
4
Press the START/STOP button to start play of the
tune.
Staff display
Al ohaOe
628A-E-023A
Keyboard keys used Fingering
Chord name
5
Press the START/STOP button to stop playback of
the Song Bank tune.
• The tune you select continues to play until you stop
it.
E-21
Page 24

Playing a Built-in Tune
To play back a Piano Bank tune
1
Find the tune you want to play in the PIANO BANK
List, and note its number.
• See page A-9 for the PIANO BANK List.
2
Press the PIANO BANK button to specify the Piano
Bank group.
Indicator
appears
NOTE
• Pressing the PIANO BANK button changes the tone to
STEREO GRAND PIANO (Tone Number 000).
3
Use the number buttons to input the two-digit tune
number you looked up in step 1.
Example: To select tune number 03 (Ode To Joy), input
NOTE
• Tune Number 00 is the initial default Piano Bank tune
setting whenever you turn on keyboard power.
• You can also change the displayed tune number using
the [+] and [–] buttons.
0 and then 3.
O
deToJo
y
Adjusting the Tempo
Each tune has a preset default tempo (beats per minute) that
is set automatically whenever you select a tune. While the
tune is playing, you can change the tempo setting to a value
in the range of 40 to 255.
To set the tempo
1
Use the TEMPO buttons to set the tempo.
: Increases the tempo value.
: Decreases the tempo value.
Flash
Tempo value
NOTE
• While the tempo value is flashing, you can also use the
number buttons or [+] and [–] to input a three-digit value.
Note that you must input leading zeros, so 90 is input
as 090.
• Pressing both the and TEMPO buttons at the same
time automatically returns the currently selected rhythm
to its default tempo.
• Piano Bank tunes have tempo changes part way through
in order to produce specific musical effects. Note that
the tempo setting automatically returns to the default
whenever a tempo change occurs within one of these
tunes.
4
Press the START/STOP button to start playback.
5
To stop playback, press the START/STOP button.
• The tune you select continues to play until you stop
it.
E-22
628A-E-024A
Page 25

Playing a Built-in Tune
To change the melody tone
1
Press the TONE button.
Indicator
appears
2
Find the tone you want in the TONE List, and then
use the number buttons to input its three-digit
number.
Example: To select “049 VIOLIN”, input 0, then 4, then 9.
• You can select any one of the keyboard’s built-in tones.
Viol in
NOTE
• You can also use the [+] and [–] buttons to change the
melody tones.
• For two-hand tunes (Piano Bank tunes), the same tone
is applied for both the left and right hand parts.
• Specifying the tune number for the same tune that is
currently selected returns the melody tone to the default
setting for that tune.
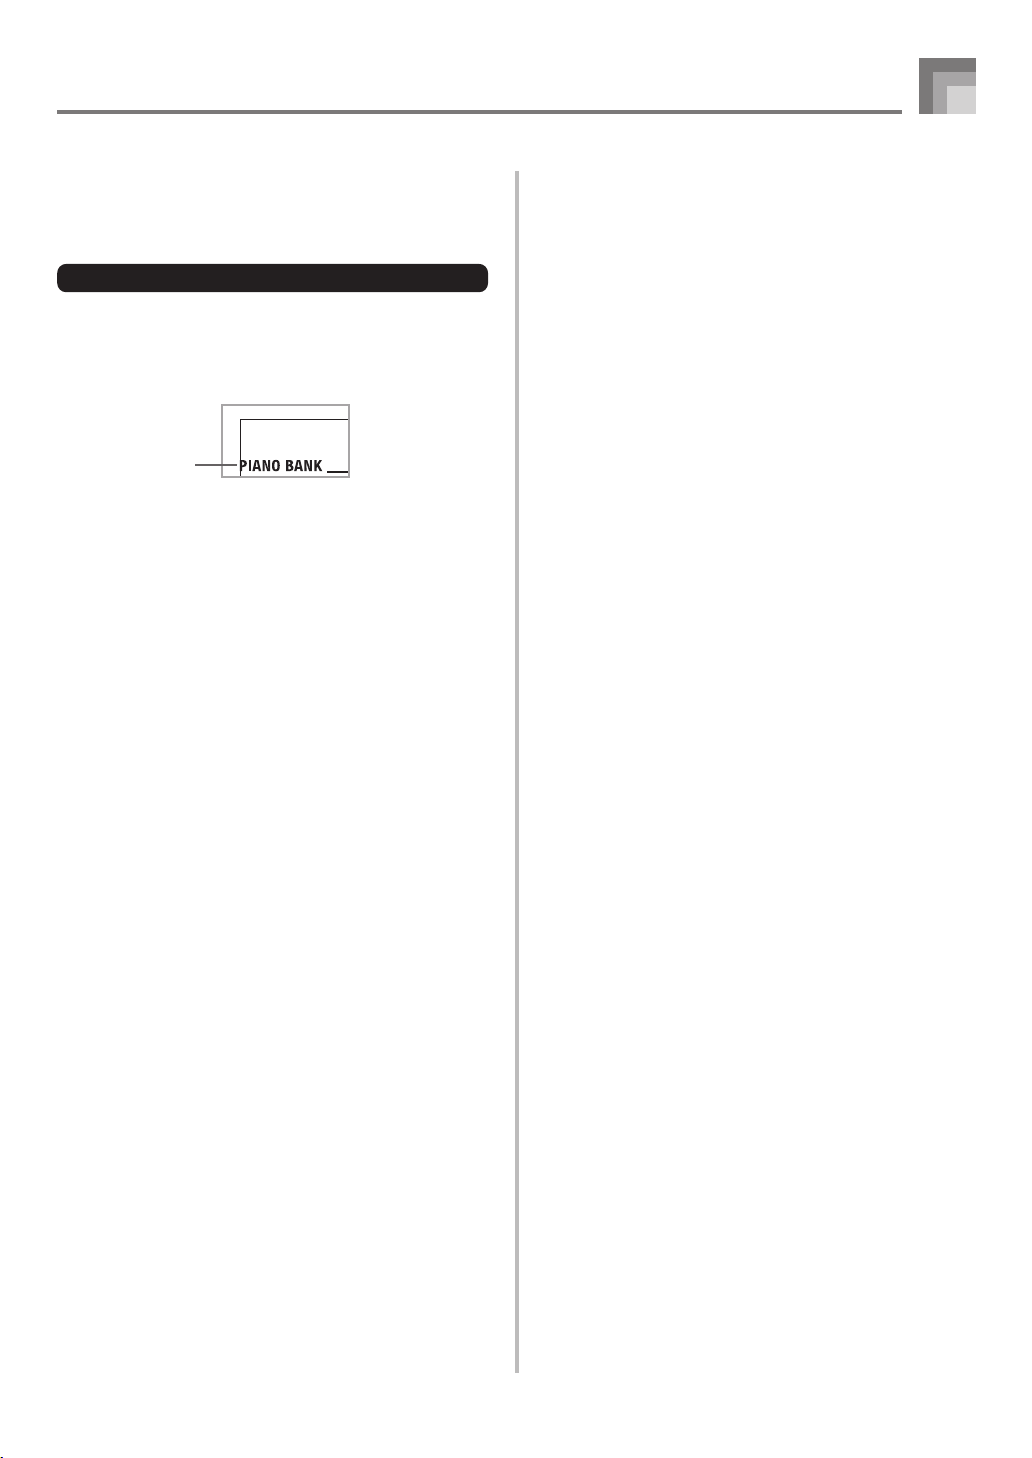
Using the PIANO BANK Button
Pressing the PIANO BANK button provides instant access to
piano tones and piano tune selection.
Initial Piano Bank Setting
Tone: 000 STEREO GRAND PIANO
To use the piano bank
1
Press the PIANO BANK button.
Indicator
appears
2
Now try playing something on the keyboard.
• The notes you play sound with a piano tone.
3
If you want to playback the built-in tune, press the
START/STOP button.
• This causes the currently selected tune to play in an
endless loop.
• To stop playback, press the START/STOP button
again.
To play all tunes in succession
1
Press the SONG BANK button and PIANO BANK
button at the same time.
• Playback starts from Song Bank tune number 00,
followed in sequence by Piano Bank tunes.
2
To stop tune play, press the START/STOP button.
NOTE
• While a tune is playing, you can use the number buttons
or [+] and [–] to change to another tune.
• You can play along with the tunes on the keyboard.
628A-E-025A
E-23
Page 26

3-Step Lesson
With the 3-Step Lesson System, you can practice built-in tunes
and even plot your progress according to the evaluation
points the keyboard awards you.
Lesson Progress
Step 1
Targeted Practice
EvaluationStep 2 Step 3
3-Step Lesson
The 3-step lesson feature takes you through the three distinct
steps described below to help you learn to play tunes on the
keyboard.
Step 1 – Master the timing.
Step 2 – Master the notes.
Step 3 – Play at normal speed.
Tune Types and Their Parts
Song Bank Tunes
When using these tunes for a 3-step lesson, you can practice
playing along with the melody (right hand) part only.
Piano Bank Tunes
When using these tunes for a 3-step lesson, you can practice
playing along with both the left hand and right hand parts.
Display Contents During 3-step
Lesson Play
Whenever you select an Auto Accompaniment tune for 3step lesson play, the on-screen keyboard guide and staff
notation shows the note you should play and its length. The
on-screen keyboard guide also shows the notes you play on
the keyboard. The following describes the information that
appears on the display.
Note Pitch
The key you should press lights on the on-screen keyboard
guide, while the actual pitch of the note appears in the
display’s staff notation area. The fingers you should use to
play the notes are also shown on the display.
Next Note
An on-screen keyboard guide key flashes to indicate the next
note to be played, while a number appears on the display
near the finger you should use to play the next note.
Series of Same Pitch Notes
The on-screen keyboard guide key turns off momentarily
between the notes, and lights again for each successive note.
The staff notation and fingerings also turn off and back on
again.
Example: When play requires pressing keys with fingers
Next note
Current note
On-screen
keyboard
guide
3, 2, and then 1
1st Note 2nd Note 3rd Note
Flash
Lit
Flash
Lit
Flash
Lit
NOTE
• Note length is not indicated when you are using Piano
Bank tunes with 3-step lesson Steps 1 and 2. As soon
as you press a key that is lit on the on-screen keyboard
guide, it goes out and the next key you need to press
starts to flash.
• Note length is indicated by the on-screen keyboard guide
when you use Piano Bank tunes with Step 3. In this case,
the next key to be pressed does not flash when you
press a lit key and the next finger number does not
appear on the display. Only the current finger number is
shown.
3-step Lesson Tempo Setting
Use the procedure under “Adjusting the Tempo” on page
E-22 to adjust the tempo for 3-step lesson play.
Note Length
The key stays lit on the on-screen keyboard guide for as long
as the note should be sustained. The staff notation and
fingerings also remain on the display for the length of the
note.
E-24
628A-E-026A
Page 27

STEP 1 SCORING
START/STOP STEP 3STEP 2
3-Step Lesson
SPEAK
RIGHT
LEFT
Evaluation Mode
The keyboard’s Evaluation Mode awards points to your
performances during Step 3 of the 3-Step Lesson. A perfect
score is 100. Also, the Evaluation Mode provides comments
about your play on the monitor screen.
Evaluation Mode Display
Level Indicator (9 Levels): This indicator shows the evaluation
of your current performance at a glance. The more segments
that appear, the higher your points.
Example: 50 points
Evaluation Results
After you finish playing, the keyboard calculates an
evaluation of your total performance, from beginning to end,
and displays your total score on the monitor screen. The
greater the score, the higher your evaluation is.
Evaluation Rank Display Messages
Display Message
“Bravo!” <High>
“Great!”
“Not bad!”
“Again!” <Low>
Evaluation Ranges
Using the Lesson Functions and
Evaluation Mode
Perform the following steps to master your favorite tunes.
Step 1 – Master the timing.
1
Select the tune you want to use.
2
Press the STEP 1 button to start Step 1 play.
• The hand you should use is indicated by arrows
around it.
Indicators
• Left hand practice can also be performed with Piano
Bank tunes. Simply select one of the Piano Bank tunes
in step 1, and then press the LEFT button following
step 2.
Indicator appearsNote pitch
Al ohaOe
“****” : indicates that the Evaluation Mode was exited
before an evaluation result could be obtained.
NOTE
• If you press the START/STOP button and interrupt the
Evaluation Mode part way through, the monitor screen
shows the evaluation points you have accumulated up
to that point. In this case, the keyboard does not display
a message.
628A-E-027A
Keyboard keys used Fingering
• After a count sounds, they keyboard stands by and
waits for you to play the first note of the tune.
• Voice fingering guide will use a simulated human
voice to call out fingering numbers. See “Voice
Fingering Guide” on page E-27 for details.
E-25
Page 28

3-Step Lesson
3
Press any keyboard keys to play the notes.
• The key for the next note to be played flashes on the
on-screen keyboard guide and the keyboard waits for
you to play it. When you press any key to play the
note, the on-screen key remains lit as the note plays.
• Accompaniment (left-hand part) waits until you press
any key to play a note.
• If you accidentally press more than one key in
succession, accompaniment is played for the
corresponding number of notes.
• Pressing more than one key at the same time counts
as a single note. Pressing a key while another key is
held down is counted as two notes.
4
To stop play at any time, press the START/STOP
button.
Step 2 – Master the notes.
1
Select the tune you want to use.
2
Press the STEP 2 button to start Step 2 play.
• Indicators appear around the hand on the display
whose part is selected for practice.
• Left hand practice can also be performed with Piano
Bank tunes. Simply select one of the Piano Bank tunes
in step 1, and then press the LEFT button following
step 2.
Indicator appears
3
Play the notes as indicated by the on-screen
keyboard guide.
• The key for the next note to be played flashes on the
on-screen keyboard guide and the keyboard waits for
you to play it. When you press any key to play the
note, the on-screen key remains lit as the note plays.
• If multiple keys light on the on-screen keyboard guide
when you are using a two-hand tune, it means that
you must press all of the keys that are lit.
4
To stop play at any time, press the START/STOP
button.
Step 3 – Play at normal speed.
1
Select the tune you want to play.
2
Press the STEP 3 button to start Step 3 play.
• Indicators appear around the hand on the display
whose part is selected for practice.
• Left hand practice can also be performed with Piano
Bank tunes. Simply select one of the Piano Bank tunes
in step 1, and then press the LEFT button following
step 2.
Indicator appears
Al ohaOe
Al ohaOe
Keyboard keys used Fingering
• After a count sounds, the keyboard stands by and
waits for you to play the first note of the tune.
• Voice fingering guide will use a simulated human
voice to call out fingering numbers. See “Voice
Fingering Guide” on page E-27 for details.
E-26
Keyboard keys used Fingering
• Accompaniment (left hand part) starts to play at
normal speed.
3
Play the notes as indicated by the on-screen
keyboard guide.
4
To stop play at any time, press the START/STOP
button.
628A-E-028A
Page 29

3-Step Lesson
Evaluation: Find out how the
keyboard evaluates your Step 3 play.
Use the SCORING button to check the evaluation of your
play in Step 3.
1
Press the SCORING button.
• This causes the SCORING indicator to appear on the
display.
• A count beat sounds and then evaluation mode starts.
Indicator appears
2
Play in accordance with the guidance on the
monitor screen and as told by the voice.
• To stop evaluation, press the START/STOP button.
This displays only the points accumulated up to that
point.
3
After you finished playing, your evaluation result
appears on the display.
• For information about evaluation ranks and sound
effects, see “Evaluation Results” on page E-25.
• Pressing the SONG BANK button returns to the tune
selection screen.
Voice Fingering Guide
Voice fingering guide uses a simulated human voice to call
out fingering numbers during Step 1 and Step 2 one-hand
part practice. If you need to press a key with your thumb, for
example, voice fingering guide says, “One!” In the case of a
chord to be played with your thumb, middle and little finger,
voice fingering guide says, “One, three, five!”
Voice Fingering Guide calls out fingerings only when you do
not press the proper key when you should.
Voice Fingering Guide
One : Thumb
Two : Forefinger
Three : Middle finger
Four : Ring finger
Five : Little finger
To turn voice fingering guide on or off
Press the SPEAK button to toggle voice fingering guide on
(voice fingering guide indicator displayed) and off (indicator
not displayed).
Indicator
appears
NOTE
• Note that Voice Fingering is disabled in the Evaluation
Mode.
• Exiting the Evaluation Mode automatically restores the
Voice Fingering setting that was in effect when you
entered the Evaluation Mode.
628A-E-029A
Bravo!
E-27
Page 30

Keyboard Settings
SETTING
About SETTING button
Each press of the SETTING button cycles through the setting
screens. If you accidentally pass the screen you want to use,
keep pressing the SETTING button until the screen appears
again.
Adjusting Accompaniment and
Song Bank Volume
You can adjust the volume of the accompaniment and Song
Bank tunes independently of the notes you play on the
keyboard. You can specify a volume level in the range of 00
(minimum) to 99 (maximum).
[+] / [–]
Number buttons
To adjust built-in tune volume
Enter the Song Bank mode or Piano Bank mode, and then
perform the procedure under “To adjust the accompaniment
volume”.
• In this case, a song volume screen will appear in place of
the accompaniment volume screen.
Transposing the Keyboard
Transpose lets you raise and lower the overall key of the
keyboard in semitone units. If you want to play an
accompaniment for a vocalist who sings in a key that’s
different from the keyboard, for example, simply use
transpose to change the key of the keyboard.
To adjust the accompaniment volume
1
Press the SETTING button until the accompaniment
volume adjustment screen appears.
Aco
Current accompaniment volume setting
2
Use the number buttons or the [+]/[–] buttons to
change the current volume setting value.
Example:80
Aco
NOTE
• The current accompaniment volume value that appears
in Step 1 automatically clears from the display if you do
not input anything within about five seconds.
• Pressing [+] and [– ] buttons at the same time
automatically sets an accompaniment volume of 99.
mpVo l
mpVo l
To transpose the keyboard
1
Press the SETTING button until the transpose screen
appears on the display.
2
Use [+] and [–] to change the transpose setting of
the keyboard.
Example: To transpose the keyboard five semitones
upwards
.
Trans
()
+
E-28
628A-E-030A
Page 31

NOTE
• The keyboard can be transposed within a range of –12
to +12.
• The default transpose setting is “00” when keyboard
power is turned on.
• If you leave the transpose screen on the display for about
five seconds without doing anything, the screen is
automatically cleared.
• The transpose setting also affects Auto Accompaniment.
• Playing back a Song Bank tune automatically returns
the transpose setting to its standard default of “00”.
• The effect of a transpose operation depends on the pitch
of each note and on the tone you are currently using. If
a transpose operation causes a note to be outside of
the allowable range for a tone, the same note in the
nearest octave within the range will be substituted.
Tuning the Keyboard
Use the following procedure to fine tune the keyboard to
match the tuning of another musical instrument.
Keyboard Settings
To tune the keyboard
1
Press the SETTING button until the tuning screen
appears.
Tune
2
Use the [+], [–], and the number buttons to adjust
the tuning value.
Example: To lower tuning by 20
()
Tune
NOTE
• The keyboard can be tuned within a range of –50 cents
to +50 cents.
* 100 cents is equivalent to one semitone.
• The default tuning setting is “00” when keyboard power
is turned on.
• If you leave the tuning screen on the display for about
five seconds without doing anything, the screen is
automatically cleared.
• The tuning setting also affects playback from song
memory and Auto Accompaniment.
• To return the keyboard to its default tuning, perform the
above procedure and press the [+] and [–] buttons at
the same time in step 2.
-
628A-E-031A
E-29
Page 32

Connection to a Computer
SETTING
Connecting to a Computer
The keyboard’s USB port makes it quick and simple to connect
to a computer. After installing the USB MIDI driver onto your
computer from the CD-ROM that comes with the keyboard,
you will be able to use commercially available MIDI software
on your computer to exchange data between the keyboard
and your computer.
To install the USB MIDI driver
1
On the computer to which you plan to connect,
install the USB MIDI driver that comes on the CDROM that comes bundled with the keyboard.
• For information about installing the USB MIDI driver,
see the “CASIO USB MIDI Driver User’s Guide”
(manual_e.pdf) on the “USB Manual and Driver CDROM”.
[+] / [–]
Number buttons
LEFT
RIGHT
Minimum Computer system Requirements
Supported Operating Systems
Operation is supported under Windows® XP, Windows® 2000,
Windows® Me, Windows® 98SE, and Windows® 98.
● Universal
• IBM AT or compatible computer
• USB port that provides normal operation under Windows
• CD-ROM drive (for installation)
• At least 2MB of free hard disk space (not including space
required for Adobe Reader)
● Windows XP
• 300MHz or higher Pentium processor
• At least 128MB of memory
● Windows 2000
• 166MHz or higher Pentium processor
• At least 64MB of memory
NOTE
• Before starting actual installation of USB MIDI driver,
be sure to read the contents of the “readme.txt” file in
the “English” folder on the CD-ROM.
• Use Adobe Reader or Acrobat Reader to access the USB
MIDI driver user’s guide.*
* You need to have Adobe Reader or Acrobat Reader installed on
your computer in order to view the contents of the “CASIO USB
MIDI Driver User’s Guide” (manual_e.pdf). If your computer
does not have either Adobe Reader or Acrobat Reader installed,
use the procedure below to install it.
Installing Adobe Reader (Acrobat Reader**)
• Place the “USB Manual and Driver CD-ROM” into your
computer’s CD-ROM drive.
• On the CD-ROM, navigate to the folder named “Adobe”,
open the folder named “English”, and then double-click
“ar601enu.exe” (“ar505enu.exe”**). Follow the instructions
that appear on your computer screen to install Adobe
Reader.
** Adobe Reader cannot be installed on a computer running
Windows 98. If your computer is running under Windows 98,
double-click “ar505enu.exe” to install Acrobat Reader.
E-30
● Windows Me, Windows 98SE, Windows 98
• 166MHz or higher Pentium processor
• At least 32MB of memory
Driver Signing
● Windows XP
1
Log on to Windows XP using a Computer
administrator account. See the documentation that
comes with Windows XP for information about
Computer administrator accounts.
2
On the Windows [Start] menu, click [Control
Panel].
• If you cannot see the [System] icon on the Control
Panel, click [Switch to Classic View].
3
Click the [System] icon. On the dialog box that
appears, click the [Hardware] tab, and then click
the [Driver Signing] button.
4
On the dialog box that appears, select [Ignore], and
then click [OK].
628A-E-032A
Page 33

Connection to a Computer
● Windows 2000
1
Log on using an Administrators group account. See
the documentation that comes with Windows 2000
for information about the Administrators group.
2
On the Windows [Start] menu, point to [Settings]
and then click [Control Panel].
3
Click the [System] icon. On the dialog box that
appears, click the [Hardware] tab, and then click
the [Driver Signing] button.
4
On the dialog box that appears, select [Ignore], and
then click [OK].
NOTE
• Company and product names used herein are
trademarks of their respective owners.
Using the USB port
Note that you need to purchase a commercially available USB
cable to connect the keyboard to a computer using the USB
port. Once you establish a USB connection between the
keyboard and a computer, you can exchange data between
them.
To connect to a computer using the
USB port
1
Use a commercially available USB cable to connect
the keyboard to the computer.
Computer
USB port
USB cable
General MIDI Tone
The General MIDI standard defines the tone numbering
sequence, the drum sound numbering sequence, the number
of MIDI channels that can be used, and other general factors
that determine the sound source configuration. Because of
this, musical data produced on a General MIDI sound source
can be played back using similar tones and identical nuances
as the original, even when played on another manufacturers
sound source.
This keyboard conforms with General MIDI standards, so it
can be connected to a computer and used to play back General
MIDI data that has been purchased, downloaded from the
Internet, or obtained from any other source.
Changing the Settings
This section tells you how to make the settings required when
connecting to a computer.
GM MODE (Default: Off)
on: Configures the keyboard for optimal General MIDI data
play (tone specification matching, etc.)
oFF: Returns to default keyboard setup.
1
Press the SETTING button until the GM MODE
screen appears.
Example: When GM MODE is turned off
G
MM
2
Use the [+] and [–] or [0] and [1] buttons to turn
the setting on and off.
Example: To turn GM MODE on
ode
628A-E-033A
USB connector
Keyboard USB port
G
MM
ode
E-31
Page 34

Connection to a Computer
KEYBOARD CHANNEL (Default: 1)
The keyboard channel is the channel used to send messages
from this keyboard to a computer. You can specify one channel
from 1 to 16 as the keyboard channel.
1
Press the SETTING button until the KEYBOARD
CHANNEL screen appears.
KeybdCh
2
Use the [+], [–], and the number buttons to change
the channel number.
Example: To specify channel 4
KeybdCh
NAVIGATE CHANNEL (Default: 4)
When messages are received from a computer for play on
this keyboard, the navigate channel is the channel whose note
data appears on the display. You can select one channel from
01 to 16 as the navigate channel. Since this setting lets you
use the data on any channel of commercially available SMF
data to light on the on-screen keyboard guide, you can
analyze how different parts of an arrangement are played.
1
Press the SETTING button until the NAVIGATE
CHANNEL screen appears.
N
av i .Ch
To turn off specific sounds before playing back tune data
that is being received
<<Navigate channel on/off>>
1
While playing tune data, press the RIGHT button.
• This cuts the sound of the navigate channel, but onscreen keyboard guide keys continue to light in
accordance with the channel’s data as it is received.
Press RIGHT button again to turn the channel back
on.
<<Next lower channel from navigate channel on/off>>
1
While playing tune data, press the LEFT button.
• This cuts the sound of the channel whose number is
one less than the navigate channel, but on-screen
keyboard guide keys continue to light in accordance
with the channel’s data as it is received. Press LEFT
button again to turn the channel back on.
Example: If the navigate channel is channel 4, the above
LOCAL CONTROL (Default: On)
oFF: Anything played on the keyboard is output as a message
from the USB port, without being sounded by the
internal sound source.
• Note that no sound is produced by the keyboard if LOCAL
CONTROL is turned off and no external device is
connected.
1
Press the SETTING button until the LOCAL
CONTROL screen appears.
Example: When LOCAL CONTROL is on
operation turns off channel 3.
2
Use the [+], [–], and the number buttons [0] through
[9] to change the channel number.
Example: To specify channel 2
N
av i .Ch
E-32
Loca l
2
Use the [+] and [–] or [0] and [1] buttons to turn
the setting on and off.
Example: To turn LOCAL CONTROL off
Loca l
628A-E-034A
Page 35

Troubleshooting
Problem Possible Cause
No keyboard Sound
Any of the following symptoms
while using battery power.
• Dim power supply indicator
• Instrument does not turn on
• Dim, difficult to read display
• Abnormally low speaker/headphone volume
• Distortion of sound output
• Occasional interruption of sound when playing at high
volumes
• Sudden power failure when playing at high volumes
Auto Accompaniment does not
sound.
On-screen keyboard guide keys
stay on.
When playing with another
instrument, keys or tunings do not
match.
Static noise when a microphone is
connected.
No microphone sound
After transferring song data from
my computer, playback stops part
way through.
A tone’s quality and volume
sounds slightly different
depending where it is played on
the keyboard.
1. Power supply problem.
2. Power is not turned on.
3. Volume setting is too low.
4. The POWER/MODE switch is
in the CASIO CHORD or
FINGERED position.
Low battery power
Accompaniment volume is set to
00.
Keyboard is waiting for play of the
correct note during Step 1 or Step 2
play.
Transpose or tuning is set to a value
other than 00.
1. Use of a microphone that is a
different from the type that is
recommended.
2. Use of the microphone in the
vicinity of fluorescent lighting.
1. Microphone volume setting is
too low.
2. Microphone ON/OFF switch is
set to OFF.
Digital noise from the USB cable or
power cord caused data
communication between your
computer and keyboard to be
interrupted.
This is an unavoidable result of the digital sampling process,* and does not indicate malfunction.
* Multiple digital samples are taken for the low range, middle range, and high range of the
original musical instrument. Because of this, there may be a very slight difference in tonal
quality and volume between sample ranges.
See pageAction
1. Correctly attach the AC adaptor, make
sure that batteries poles (+/–) are facing
correctly, and check to make sure that
batteries are not dead.
2. Set the POWER/MODE switch to the
NORMAL position.
3. Use the MAIN VOLUME slider to increase
volume.
4. Normal play is not possible on the
accompaniment keyboard while the
POWER/MODE switch is set to CASIO
CHORD or FINGERED. Change the
POWER/MODE switch setting to
NORMAL.
Replace the batteries with a set of new ones
or use the AC adaptor.
• Dimming of the display when playing at high volume
• Continued sound output even after you release a key
• A totally different tone may sound
• Abnormal rhythm pattern and demo tune play
• Abnormally low microphone volume
• Distortion of microphone input
• Dim power supply indicator when a microphone is used
• Sudden power failure when using the microphone
Use the SETTING button to increase the
volume.
1. Press the lit key to continue with Step 1 or
Step 2 play.
2. Press the START/STOP button to quit
Step 1 or Step 2 play.
Use the SETTING button to display the
applicable setting screens and set both
transpose and tuning to 00.
1. Use a recommended type microphone.
2. Move the microphone away from source
of the static.
1. Increase the microphone volume setting.
2. Change the microphone ON/OFF switch
setting to ON.
Stop playback, disconnect the USB cable
from and then reconnect it to the keyboard’s
USB port, and then try playing back the tune
again.
If this does not correct the problem, exit the
MIDI software you are using, and then
disconnect the USB cable from and then
reconnect it to the keyboard’s USB port.
Next, restart your MIDI software and try
playback again.
Pages
E-12, 13
Page E-15
Page E-15
Page E-15
Pages
E-12, 13
Page E-28
Pages
E-25, 26
Pages
E-25, 26
Pages
E-28, 29
Page E-16
Page E-16
Page E-16
Page E-16
Page E-31
628A-E-035A
E-33
Page 36

Specifications
Model: CTK-720
Keyboard: 61 standard-size keys, 5 octaves
Tones: 242 (113 panel tones + 128 General MIDI tones + 1 drum set)
Polyphony: 32 notes maximum (16 for certain tones)
Main Volume: Adjustable
Auto Accompaniment
Rhythm Patterns: 100
Chords: 2 fingering methods (CASIO CHORD, FINGERED)
Rhythm Controller: START/STOP, SYNCHRO, FILL-IN
3-step Lesson: 3 lessons (Step 1, 2, 3)
Playback: Repeat play of a single tune
Lesson Part: Left hand, right hand
Evaluation Mode: Scoring
Voice Fingering Guide: On/Off
Song Bank, Piano Bank
Number of Tunes: Song Bank: 50, Piano Bank: 50
Controllers: START/STOP
Display
Name display: TONE, RHYTHM, SONG BANK, PIANO BANK name/number, keyboard
Tempo: Tempo value, metronome, synchro standby
Chord: Chord name, Chord form
Fingering: Fingering indicators, parts
Staff: 5 octaves with sharp and flat indications, pedal symbol, octave symbol
Keyboard: 5 octaves
Other Functions
Tempo: Variable (216 steps, = 40 to 255)
Transpose: 25 steps (–12 semitones to +12 semitones)
Tuning: Variable (A4 = approximately 440Hz ±50 cents)
Accompaniment/
Song Bank Volume: Variable (100 steps, 0 to 99)
Terminals
USB port: TYPE B
Sustain Terminal: Standard jack
Phones/Output Terminal: Stereo standard jack
Power Supply Terminal: 9V DC
Microphone In: Standard jack (with microphone volume slider)
Power Supply: Dual power supply system
Batteries: 6 AA-size batteries
Battery Life: Approximately 4 hours continuous operation on alkaline batteries
AC Adaptor: AD-5
Auto Power Off: Turns power off approximately 6 minutes after last key operation. Enabled
Speaker Output: 2.0W + 2.0W
Power Consumption: 9V 7.7W
Dimensions: 95.6 x 35.6 x 13.3 cm (37 11/16 × 14 1/16 × 5 1/4 inch)
Weight: Approximately 4.0kg (8.8lbs) (without batteries)
settings name/value
Output Impedance: 100Ω
Output Voltage: 4V (RMS) MAX
Input impedance: 2kΩ
Input sensitivity: 10mV
Approximately 2 hours continuous operation on manganese batteries
under battery power only, can be disabled manually.
E-34
628A-E-036B
Page 37

Appendix/Apéndice
A
A
C
6
32
32
32
002
002
008
345
039
040
040
Cambio de programa
Tipo de gama
2
3: Program Change/
6: Range Type/
C
32
002
042
A
32
002
046
A
32
002
048
A
32
002
049
A
16
001
048
A
32
002
050
A
32
002
051
A
32
002
052
A
32
002
053
A
16
002
054
A
32
002
056
C
32
002
057
C
32
002
058
A
32
002
059
C
16
002
060
A
32
002
061
A
16
008
061
A
32
002
062
A
16
002
063
A
32
002
064
C
32
002
065
C
32
002
066
C
32
002
067
A
32
002
068
A
32
002
071
B
32
002
072
A
32
002
073
A
32
008
073
A
32
002
074
A
32
002
075
A
32
002
079
A
16
002
080
A
16
002
081
A
16
008
081
A
32
008
080
A
16
002
082
A
16
002
085
A
16
002
087
A
16
002
088
A
16
002
089
A
16
002
090
A
16
002
092
A
16
002
094
SYNTH-BASS 2
STR/ORCHESTRA
VIOLIN
SLOW VIOLIN
1
048
049
050
ía máxima
Polifon
Nombre de sonido
2: Tone Name/
5: Maximum Polyphony/
6
345
A
16
002
000
A
32
004
000
A
32
002
001
ón de banco
2
CELLO
HARP
051
052
A
A
32
32
001
001
000
001
ENSEMBLE
STRINGS
SLOW STRINGS
CHAMBER
053
054
055
A
A
A
A
16
16
16
32
002
008
002
002
003
003
002
004
SYNTH-STRINGS 1
SYNTH-STRINGS 2
CHOIRS
VOICE DOO
SYNTH-VOICE
BRASS
TRUMPET
056
057
058
059
060
061
A
A
A
A
A
A
32
16
16
32
16
32
002
001
008
002
008
002
005
004
004
006
006
007
TROMBONE
TUBA
MUTE TRUMPET
FRENCH HORN
062
063
064
065
A
B
A
A
32
32
32
32
002
002
002
002
011
008
009
012
BRASS
BRASS SFZ
SYNTH-BRASS 1
SYNTH-BRASS 2
066
067
068
069
A
A
A
16
16
16
002
001
002
016
016
017
REED
SOPRANO SAX
ALTO SAX
TENOR SAX
BARITONE SAX
070
071
072
073
A
A
A
A
A
16
16
16
16
32
001
008
002
002
008
017
016
018
019
019
OBOE
CLARINET
PIPE
074
075
A
A
A
16
16
16
002
008
002
021
021
023
PICCOLO
FLUTE
MELLOW FLUTE
RECORDER
076
077
078
079
A
C
C
32
32
32
002
002
002
022
024
025
PAN FLUTE
OCARINA
SYNTH-LEAD
SQUARE LEAD
080
081
082
C
C
C
C
16
32
32
16
008
002
002
001
025
026
027
027
SAW LEAD
MELLOW SAW LEAD
SINE LEAD
083
084
085
C
C
C
32
32
32
002
002
002
028
029
030
CALLIOPE
VOICE LEAD
BASS+LEAD
SYNTH-PAD
086
087
088
C
C
C
16
32
16
008
002
008
031
032
032
FANTASY
089
C
32
002
033
WARM PAD
POLYSYNTH
090
091
C
C
32
32
002
002
034
035
BOWED PAD
092
C
32
002
036
HALO PAD
093
C
32
002
038
o
Tone List/Lista de sonidos
1: No./N
628A-E-073A
PIANO
STEREO GRAND PIANO
GRAND PIANO
BRIGHT PIANO
MELLOW PIANO
DANCE PIANO
HONKY-TONK
OCTAVE PIANO
ELEC.GRAND PIANO
ELEC.PIANO
1
Bank Select MSB/MSB de selecci
:
4
000
001
002
003
004
005
006
007
008
MODERN E.PIANO
CHORUS EP
SOFT E.PIANO
HARPSICHORD
COUPLED HARPSICHORD
CLAVI
CHROMATIC PERC
011
009
010
012
013
014
CELESTA
GLOCKENSPIEL
VIBRAPHONE
MARIMBA
ORGAN
015
016
017
018
DRAWBAR ORGAN 1
DRAWBAR ORGAN 2
PERC.ORGAN 1
PERC.ORGAN 2
ELEC.ORGAN
ROCK ORGAN
019
020
021
022
023
024
CHURCH ORGAN
CHAPEL ORGAN
ACCORDION
OCTAVE ACCORDION
BANDONEON
HARMONICA
GUITAR
025
026
027
028
029
030
NYLON STR.GUITAR
031
STEEL STR.GUITAR
032
12 STR.GUITAR
033
JAZZ GUITAR
034
CLEAN GUITAR
035
ELEC.GUITAR
MUTE GUITAR
OVERDRIVE GT
DISTORTION GT
036
037
038
039
FEEDBACK GT
BASS
ACOUSTIC BASS
RIDE BASS
FINGERED BASS
PICKED BASS
040
041
042
043
FRETLESS BASS
SLAP BASS
SYNTH-BASS 1
044
045
046
047
A-1
Page 38

Appendix/Apéndice
A
A
A
A
A
A
32
000
039
32
000
040
32
000
041
32
000
042
A
32
000
043
6
32
000
345
037
2
32
000
038
A
32
000
044
A
32
000
045
A
32
000
046
A
32
000
047
A
32
000
048
A
32
000
049
A
32
000
050
A
32
000
051
A
32
000
052
A
32
000
053
A
16
000
054
A
16
000
055
A
32
000
056
A
32
000
057
A
32
000
058
A
32
000
059
A
16
000
060
A
32
000
061
A
32
000
062
A
16
000
063
A
32
000
064
A
32
000
065
A
32
000
066
A
32
000
067
A
32
000
068
A
32
000
069
A
32
000
070
A
32
000
071
A
32
000
072
A
32
000
073
A
32
000
074
A
32
000
075
A
16
000
076
A
16
000
077
A
32
000
078
A
32
000
079
A
16
000
080
A
16
000
081
A
16
000
082
A
16
000
083
A
16
000
084
A
16
000
085
A
16
000
086
A
16
000
087
A
16
000
088
A
16
000
089
A
16
000
090
A
16
000
091
A
16
000
092
A
16
000
093
A
16
000
094
A
16
000
095
GM SLAP BASS 2
GM SYNTH-BASS 1
GM SYNTH-BASS 2
GM VIOLIN
1
150
151
152
153
A
A
A
16
002
097
16
002
099
16
002
100
A
16
002
102
6
345
2
GM VIOLA
GM CELLO
GM CONTRABASS
GM TREMOLO STRINGS
GM PIZZICATO
154
155
156
157
158
A
A
A
A
16
16
16
16
008
008
008
004
000
001
005
004
GM HARP
GM TIMPANI
GM STRINGS 1
GM STRINGS 2
GM SYNTH-STRINGS 1
159
160
161
162
163
A
A
B
A
C
16
16
16
16
16
004
008
008
004
008
005
007
009
019
030
GM SYNTH-STRINGS 2
GM CHOIR AAHS
GM VOICE DOO
GM SYNTH-VOICE
GM ORCHESTRA HIT
GM TRUMPET
GM TROMBONE
GM TUBA
GM MUTE TRUMPET
164
165
166
167
168
169
170
171
172
A
E
E
E
E
E
A
16
32
16
32
32
32
32
008
002
002
002
002
002
000
107
120
121
122
123
124
000
GM FRENCH HORN
GM BRASS
GM SYNTH-BRASS 1
GM SYNTH-BRASS 2
GM SOPRANO SAX
GM ALTO SAX
GM TENOR SAX
173
174
175
176
177
178
179
A
A
A
A
A
A
A
32
16
16
32
32
32
32
000
000
000
000
000
000
000
001
002
003
004
005
006
007
GM BARITONE SAX
GM OBOE
GM ENGLISH HORN
GM BASSOON
GM CLARINET
GM PICCOLO
180
181
182
183
184
185
A
A
A
A
A
A
32
32
16
32
32
32
000
000
000
000
000
000
011
008
009
010
012
013
GM FLUTE
GM RECORDER
GM PAN FLUTE
GM BOTTLE BLOW
GM SHAKUHACHI
186
187
188
189
190
A
A
A
A
A
32
16
16
16
16
000
000
000
000
000
014
015
016
017
018
GM WHISTLE
GM OCARINA
GM SQUARE LEAD
GM SAWTOOTH LEAD
GM CALLIOPE
191
192
193
194
195
A
A
A
A
A
16
32
16
32
16
000
000
000
000
000
019
020
021
022
023
GM CHIFF LEAD
GM CHARANG
GM VOICE LEAD
GM FIFTH LEAD
GM BASS+LEAD
GM FANTASY
196
197
198
199
200
201
A
A
A
A
A
A
32
32
32
32
32
32
000
000
000
000
000
000
024
025
026
027
028
029
GM WARM PAD
GM POLYSYNTH
GM SPACE CHOIR
GM BOWED GLASS
GM METAL PAD
202
203
204
205
206
A
A
A
A
A
32
32
32
32
32
000
000
000
000
000
030
031
032
033
034
GM HALO PAD
207
A
32
000
035
GM SWEEP PAD
208
A
32
000
036
SOUND TRACK
1
094
A-2
ATMOSPHERE
BRIGHTNESS
ECHO PAD
LAYER
STRINGS PIANO
095
096
097
098
PIANO PAD
E.PIANO PAD 1
E.PIANO PAD 2
SYNTH-STR. E.PIANO
CLAVI & DRAWBAR
GLOCKENSPIEL PAD
099
100
101
102
103
104
ORGAN & HARPSICHORD
DIST.GT & BASS
KOTO PAD
SPLIT
BASS/PIANO
BASS/E.PIANO
BASS/VIB
BASS/NYLON STR. GT
STRINGS/PIANO
GM TONES
111
110
105
106
107
108
109
112
GM PIANO 1
GM PIANO 2
GM PIANO 3
GM HONKY-TONK
113
114
115
116
GM E.PIANO 1
GM E.PIANO 2
GM HARPSICHORD
GM CLAVI
GM CELESTA
GM GLOCKENSPIEL
117
118
119
120
121
122
GM MUSIC BOX
GM VIBRAPHONE
GM MARIMBA
GM XYLOPHONE
GM TUBULAR BELL
GM DULCIMER
123
124
125
126
127
128
GM ORGAN 1
GM ORGAN 2
GM ORGAN 3
GM PIPE ORGAN
GM REED ORGAN
129
130
131
132
133
GM ACCORDION
GM HARMONICA
GM BANDONEON
GM NYLON STR.GUITAR
GM STEEL STR.GUITAR
GM JAZZ GUITAR
134
135
136
137
138
139
GM CLEAN GUITAR
GM MUTE GUITAR
GM OVERDRIVE GT
GM DISTORTION GT
GM GT HARMONICS
GM ACOUSTIC BASS
140
141
142
143
144
145
GM FINGERED BASS
GM PICKED BASS
GM FRETLESS BASS
GM SLAP BASS 1
146
147
148
149
628A-E-074A
Page 39

Appendix/Apéndice
• The meaning of each range type is described below.
NOTE
A
A
A
6
16
16
16
000
000
000
345
096
097
098
2
GM RAIN DROP
GM SOUND TRACK
GM CRYSTAL
• El significado de cada tipo de gama se describe debajo.
NOTA
A
A
A
A
A
A
A
A
A
A
A
A
A
A
A
16
16
16
16
16
16
000
000
000
000
000
000
099
100
101
102
103
104
GM ATMOSPHERE
GM BRIGHTNESS
GM GOBLINS
GM ECHOES
GM SF
GM SITAR
32
32
32
32
16
000
000
000
000
000
105
106
107
108
109
GM BANJO
GM SHAMISEN
GM KOTO
GM THUMB PIANO
GM BAGPIPE
A
32
32
32
32
16
000
000
000
000
000
111
110
112
113
114
GM FIDDLE
GM SHANAI
GM TINKLE BELL
GM AGOGO
GM STEEL DRUMS
D
D
32
32
000
000
115
116
GM WOOD BLOCK
GM TAIKO
A
D
32
000
117
GM MELODIC TOM
A
D
D
D
16
32
32
32
16
000
000
000
000
000
118
119
120
121
122
GM SYNTH-DRUM
GM REVERSE CYMBAL
GM GT FRET NOISE
GM BREATH NOISE
GM SEASHORE
D
D
D
D
D
16
32
32
16
32
000
000
000
000
000
123
124
125
126
127
GM BIRD
GM TELEPHONE
GM HELICOPTER
GM APPLAUSE
GM GUNSHOT
D
32
120
000
DRUM SET
DRUM SET
1
209
628A-E-075A
210
211
212
213
214
215
216
217
218
219
220
221
222
223
224
225
226
227
228
229
230
231
232
233
234
235
236
237
238
239
240
241
A-3
Page 40

Appendix/Apéndice
A=440Hz
Range Type/Tipo de gama
A
(Standard type)
(Tipo estándar)
B
“016 GLOCKENSPIEL”/
“076 PICCOLO”/
“104 GLOCKENSPIEL PAD”
“016 GLOCKENSPIEL”/
“076 PICCOLO”/
“104 GLOCKENSPIEL PAD”
C
Low pitch
instruments
Instrumentos de
altura tonal baja
D
(Sound Effect)
(Efecto de sonido)
E
(SPLIT)
(División)
C-1 C9C8C7 G7C6C5C4C3C2C1C0 G9
No scale for tones.
Sin escala para los sonidos.
Scale changes in accordance with tone.
La escala cambia de acuerdo con el sonido.
A-4
a
b
c
........Keyboard range
........Gama del teclado
........Available range (using transpose or message receive)
........Gama disponible (usando la transposición o recepción de mensajes)
........Notes in these ranges are produced by playing the notes in range b that are in
the nearest octave as the result of transpose and message receive operations.
........Las notas en estas gamas se producen ejecutando las notas en la gama b que
se encuentre en la octava más cercana como resultado de las operaciones de
transposición y recepción de mensajes.
628A-E-076A
Page 41

Percussion Instrument List
Lista de instrumentos de percusión
• DRUM SET (tone 241) assigns percussion sound to the keyboard as illustrated below.
The sound assigned to each key are indicated above the keyboard.
• DRUM SET (sonido 241) asigna sonidos de percusión al teclado como se ilustra debajo.
Los sonidos asignados a cada tecla se indican sobre el teclado.
* No sound is produced when the keys in this range are
pressed.
* Cuando se presionan las teclas en esta gama no se produce
ningún sonido.
Appendix/Apéndice
STANDARD KICK
SIDE STICK
STANDARD SNARE 1
HAND CLAP
STANDARD SNARE 2
LOW TOM 2
CLOSED HI-HAT
LOW TOM 1
PEDAL HI-HAT
MID TOM 2
OPEN HI-HAT
MID TOM 1
HIGH TOM 2
CRASH CYMBAL 1
HIGH TOM 1
RIDE CYMBAL 1
CHINESE CYMBAL
RIDE BELL
TAMBOURINE
SPLASH CYMBAL
COWBELL
CRASH CYMBAL 2
VIBRA-SLAP
RIDE CYMBAL 2
HIGH BONGO
LOW BONGO
MUTE HIGH CONGA
OPEN HIGH CONGA
LOW CONGA
HIGH TIMBALE
LOW TIMBALE
HIGH AGOGO
LOW AGOGO
CABASA
MARACAS
SHORT HIGH WHISTLE
LONG LOW WHISTLE
SHORT GUIRO
LONG GUIRO
CLAVES
HIGH WOOD BLOCK
LOW WOOD BLOCK
MUTE CUICA
OPEN CUICA
MUTE TRIANGLE
OPEN TRIANGLE
SHAKER
COUNT VOICE 1
COUNT VOICE 2
COUNT VOICE 3
COUNT VOICE 4
COUNT VOICE 5
628A-E-077A
A-5
Page 42

Appendix/Apéndice
Fingered Chord Chart
Cuadros de acordes Fingered
This table shows the left-hand fingerings (including inverted forms) for a number of
often-used chords. These fingering indications also appear on the keyboard’s display.
Chords marked with asterisk (*) cannot be played in the Fingered Mode on this
keyboard.
Esta tabla muestra las digitaciones (incluyendo las formas invertidas) para varios de
los acordes más a menudo usados. Estas indicaciones de digitación también aparecen
sobre la presentación del teclado.
En este teclado, los acordes marcados con asterisco (*) no pueden ejecutarse en el
modo de digitación.
Chord
Type
Root
C
C
(D )
D
E
(D )
E
F
F
(G )
G
A
(G )
A
B
(A )
B
M m 7 m7 dim7
[5, 3, 1]
[5, 3, 1]
[5, 3, 1]
[5, 3, 1]
[5, 3, 1]
[5, 3, 1]
[5, 3, 1]
[5, 3, 1]
[5, 3, 1]
[5, 3, 1]
[5, 3, 1]
[5, 2, 1]
[5, 3, 1]
[5, 3, 1]
[5, 3, 1]
[5, 3, 1]
[5, 3, 1]
[5, 3, 1]
[5, 3, 1]
[5, 3, 1]
[5, 3, 1]
[5, 3, 1]
[5, 3, 1]
[5, 2, 1]
[5, 3, 2, 1]
[5, 3, 2, 1]
[5, 3, 2, 1]
[5, 3, 2, 1]
[5, 3, 2, 1]
[5, 3, 2, 1]
[5, 3, 2, 1]
[5, 3, 2, 1]
[5, 4, 2, 1]
[5, 4, 2, 1]
[5, 4, 2, 1]
[5, 3, 2, 1]
[5, 3, 2, 1]
[5, 3, 2, 1]
[5, 3, 2, 1]
[5, 3, 2, 1]
[5, 3, 2, 1]
[5, 3, 2, 1]
[5, 3, 2, 1]
[5, 3, 2, 1]
[5, 4, 2, 1]
[5, 4, 2, 1]
[5, 4, 2, 1]
[5, 3, 2, 1]
[5, 3, 2, 1]
[5, 3, 2, 1]
[5, 3, 2, 1]
[5, 3, 2, 1]
[5, 3, 2, 1]
[5, 3, 2, 1]
[5, 3, 2, 1]
[5, 3, 2, 1]
[5, 3, 2, 1]
*
*
*
4
5
numbers
1
:Números de los
: Left hand finger
3
2
dedos de la mano
izquierda
M7 m7-5 dim
[5, 3, 2, 1]
[5, 3, 2, 1]
[5, 3, 2, 1]
[5, 3, 2, 1]
[5, 3, 2, 1]
[5, 3, 2, 1]
[5, 3, 2, 1]
[5, 4, 2, 1]
[5, 4, 2, 1]
[5, 4, 2, 1]
[5, 4, 2, 1]
[5, 3, 2, 1]
[5, 3, 2, 1]
[5, 3, 2, 1]
[5, 3, 2, 1]
[5, 3, 2, 1]
[5, 3, 2, 1]
[5, 3, 2, 1]
[5, 3, 2, 1]
[5, 3, 2, 1]
[5, 4, 2, 1]
[5, 4, 2, 1]
[5, 4, 2, 1]
[5, 4, 2, 1]
[5, 3, 2]
[5, 3, 2]
[5, 3, 2]
[5, 3, 2]
[5, 3, 2]
[5, 3, 2]
[5, 3, 2]
[5, 3, 2]
[5, 3, 2]
[5, 3, 2]
[5, 3, 2]
[5, 3, 2]
A-6
628A-E-078A
Page 43

Chord
Type
Root
[5, 3, 1]
C
[5, 3, 1]
C
(D )
[5, 3, 1]
D
[5, 3, 1]
E
(D )
[5, 3, 1]
E
[5, 3, 1]
F
[5, 3, 1]
F
(G )
[5, 3, 1]
G
[5, 3, 1]
A
(G )
[5, 3, 1] [5, 2, 1]
A
B
(A )
B
aug sus4
[5, 2, 1]
[5, 2, 1]
[5, 2, 1]
[5, 2, 1]
[5, 2, 1]
[5, 2, 1]
[5, 2, 1]
[5, 2, 1]
[5, 2, 1]
[5, 2, 1]
*
[5, 2, 1]
*
Appendix/Apéndice
7 sus4 m add9 m M7 7-5 add9
[5, 3, 2, 1]
[5, 3, 2, 1]
[5, 3, 2, 1]
[5, 3, 2, 1]
[5, 3, 2, 1]
[5, 3, 2, 1]
[5, 3, 2, 1]
[5, 3, 2, 1]
[5, 4, 2, 1]
[5, 4, 2, 1]
[5, 4, 2, 1]
[5, 3, 2, 1]
[4, 3, 2, 1]
[4, 3, 2, 1]
[4, 3, 2, 1]
[4, 3, 2, 1]
[4, 3, 2, 1]
[4, 3, 2, 1]
[4, 3, 2, 1]
[4, 3, 2, 1]
[4, 3, 2, 1]
[4, 3, 2, 1]
[4, 3, 2, 1]
[5, 3, 2, 1]
[5, 3, 2, 1]
[5, 3, 2, 1]
[5, 3, 2, 1]
[5, 3, 2, 1]
[5, 3, 2, 1]
[5, 3, 2, 1]
[5, 3, 2, 1]
[5, 4, 2, 1]
[5, 4, 2, 1]
[5, 4, 2, 1]
[5, 4, 2, 1]
[5, 3, 2, 1]
[5, 3, 2, 1]
[5, 3, 2, 1]
[5, 3, 2, 1]
[5, 3, 2, 1]
[5, 3, 2, 1]
[5, 3, 2, 1]
[5, 3, 2, 1]
[5, 3, 2, 1]
[5, 4, 2, 1]
[5, 4, 2, 1] [4, 3, 2, 1]
[5, 4, 2, 1]
[4, 3, 2, 1]
[4, 3, 2, 1]
[4, 3, 2, 1]
[4, 3, 2, 1]
[4, 3, 2, 1]
[4, 3, 2, 1]
[4, 3, 2, 1]
[4, 3, 2, 1]
[4, 3, 2, 1]
[4, 3, 2, 1]
[4, 3, 2, 1]
[5, 3, 2, 1]
628A-E-079A
A-7
Page 44

Appendix/Apéndice
Rhythm List
Lista de ritmos
POPS I
00 8 BEAT 1
01 8 BEAT 2
02 POP 1
03 POP 2
04 SOUL BALLAD 1
05 POP BALLAD 1
06 POP SHUFFLE 1
07 SOUL
08 OFF BEAT
09 POP BALLAD 2
POPS II
10 FOLKIE POP 1
11 SOUL BALLAD 2
12 LITE POP 1
13 CLUB POP 1
14 8 BEAT POP
15 16 BEAT 1
16 DANCE POP 1
17 POP BALLAD 3
18 DANCE POP 2
19 16 BEAT 2
DANCE/FUNK
20 TECHNO
21 TRANCE 1
22 RAP 1
23 DISCO 1
24 FUNK 1
25 FUNK 2
26 DISCO 2
ROCK
27 LATIN ROCK
28 SHUFFLE ROCK
29 POP ROCK 1
30 ROCK WALTZ 1
31 SLOW ROCK
32 50’S ROCK 1
33 60’S ROCK 1
34 TWIST
35 NEW ORLNS R&R
36 ROCK 1
37 SOFT ROCK 1
JAZZ
38 JAZZ COMBO 1
39 JAZZ COMBO 2
40 BIG BAND
41 SWING
42 SLOW SWING
43 JAZZ WALTZ 1
44 FOX TROT
EUROPEAN
45 POP POLKA
46 POLKA
47 MARCH 1
48 WALTZ 1
49 WALTZ 2
50 SLOW WALTZ
51 TANGO 1
LATIN/VARIOUS
52 REGGAE POP
53 BOSSA NOVA 1
54 SAMBA 1
55 REGGAE
56 MAMBO
57 SKA
58 MERENGUE
59 RUMBA CATALANA
60 BOSSA NOVA 2
61 SAMBA 2
62 FOLKLORE
63 COUNTRY
64 TOWN SHIP
65 SLOW GOSPEL
66 BAROQUE
67 TEX-MEX
68 FAST GOSPEL
69 NEW AGE
WITHOUT DRUMS
70 POP BALLAD 4
71 POP SHUFFLE 2
72 ROCK WALTZ 2
73 FOLKIE POP 2
74 TANGO 2
DRUM & BASS
75 POP BALLAD 5
76 LITE POP 2
77 POP ROCK 2
78 CLUB POP 2
79 16 BEAT 3
80 ROCK WALTZ 3
81 SOFT ROCK 2
82 50’S ROCK 2
83 ROCK 2
84 60’S SOUL 2
85 TRANCE 2
86 RAP 2
87 DISCO 3
88 FUNK 3
89 JAZZ COMBO 3
90 JAZZ WALTZ 2
91 TANGO 3
92 BOSSA NOVA 3
93 SAMBA 3
94 MARCH 2
METRONOME
95 0 BEAT
96 2 BEAT
97 3 BEAT
98 4 BEAT
99 6 BEAT
A-8
628A-E-080A
Page 45

Song List/Lista de canciones
SONG BANK List
Lista SONG BANK
Appendix/Apéndice
00 CAN YOU FEEL THE LOVE TONIGHT
(“LION KING” THEME)
01 HAPPY BIRTHDAY TO YOU
02 WE WISH YOU A MERRY CHRISTMAS
03 JINGLE BELLS
04 SILENT NIGHT
05 JOY TO THE WORLD
06 O CHRISTMAS TREE
07 WHEN THE SAINTS GO MARCHING IN
08 GREENSLEEVES
09 AMAZING GRACE
10 AULD LANG SYNE
11 TWINKLE TWINKLE LITTLE STAR
12 LIGHTLY ROW
13 UNDER THE SPREADING CHESTNUT TREE
14 COME BIRDS
15 THE MUFFIN MAN
16 LONG LONG AGO
17 DID YOU EVER SEE A LASSIE?
18 LONDON BRIDGE
19 ON THE BRIDGE OF AVIGNON
20 SIPPIN’ CIDER THROUGH A STRAW
21 GRANDFATHER’S CLOCK
22 MICHAEL ROW THE BOAT ASHORE
23 ANNIE LAURIE
24 MY BONNIE
PIANO BANK List
Lista PIANO BANK
00 FÜR ELISE
01 SONATA op.13 “PAT HÉTIQUE” 2nd Mov.
02 SONATA op.27 no.2 “MOONLIGHT” 1st Mov.
03 ODE TO JOY
04 ETUDE op.10 no.3 “CHANSON DE L’ADIEU”
05 PRELUDE op.28 no.7 (CHOPIN)
06 VALSE op.64 no.1 “PETIT CHIEN”
07 HEIDENRÖSLEIN
08 FRÖHLICHER LANDMANN
09 CANON (PACHELBEL)
10 MINUET (J.S.BACH)
11 MUSETTE (J.S.BACH)
12 JESUS BLEIBET MEINE FREUDE
13 GAVOTTE (GOSSEC)
14 SERENADE FROM “EINE KLEINE NACHTMUSIK”
15 SONATA K.331 1st Mov. “THEME”
16 TURKISH MARCH (MOZART)
17 HUNGARIAN DANCES no.5
18 WEDDING MARCH FROM
“MIDSUMMER NIGHT’S DREAM”
19 LIEBESTRÄUME no.3
20 BRINDISI FROM “LA TRAVIATA”
21 GOING HOME FROM “FROM THE NEW WORLD”
22 JE TE VEUX
23 THE ENTERTAINER
24 AMERICAN PATROL
25 IF YOU’RE HAPPY AND YOU KNOW IT,
CLAP YOUR HANDS
26 MY DARLING CLEMENTINE
27 HOME SWEET HOME
28 J’AI PERDU LE DO DE MA CLARINETTE
29 I’VE BEEN WORKING ON THE RAILROAD
30 LITTLE BROWN JUG
31 AURA LEE
32 HOUSE OF THE RISING SUN
33 SHE WORE A YELLOW RIBBON
34 CAMPTOWN RACES
35 SWANEE RIVER (OLD FOLKS AT HOME)
36 YANKEE DOODLE
37 TURKEY IN THE STRAW
38 MY OLD KENTUCKY HOME
39 HOME ON THE RANGE
40 ALOHA OE
41 HOLDIRIDIA
42 LA PALOMA
43 SANTA LUCIA
44 TROIKA
45 WALTZING MATILDA
46 AJO MAMMA
47 LA DONNA É MOBILE FROM “RIGOLETTE”
48 CHANSON DU TOREADOR FROM “CARMEN”
49 HABANERA FROM “CARMEN”
25 CHOPSTICKS
26 MARY HAD A LITTLE LAMB
27 DECK THE HALL
28 SWING LOW, SWEET CHARIOT
29 THE FARMER IN THE DELL
30 ON TOP OF OLD SMOKEY
31 DOWN IN THE VALLEY
32 OH! SUSANNA
33 WHEN JOHNNY COMES MARCHING HOME
34 RED RIVER VALLEY
35 JAMAICA FAREWELL
36 LA CUCARACHA
37 CIELITO LINDO
38 BEAUTIFUL DREAMER
39 DANNY BOY
BEYER VORSCHULE IM KLAVIERSPIEL Opus 101
40 No.5
41 No.6
42 No.8
43 No.11
44 No.12
45 No.18
46 No.20
47 No.35
48 No.48
49 No.60
628A-E-081A
A-9
Page 46

Version: 1.0
Remarks
1-16
1-16
Recognized
*1: Depends on tone
*1: Depende en el sonido
*1
X
Mode 3
0-127
12-108
❊❊❊❊❊❊❊❊❊❊❊❊❊❊
*2 = no relation
*2 = sin relación
2
X
X
9nH V = 1-127
O
9nH V = 0,8nH V = *
X
O
Bank select
Modulation
Data entry
Volume
O
O
O
O
Pan
Expression
O
O
1
1-16
Transmitted
Function ...
X
Mode 3
Default
36-96
❊❊❊❊❊❊❊❊❊❊❊❊❊❊
Altered
❊❊❊❊❊❊❊❊❊❊❊❊❊❊
X
9nH V = 0
9nH V = 100
X
X
Note OFF
X
X
X
O
1
0, 32
X
X
X
X
10
11
CTK-720
MIDI messages that can be sent and received using the USB port
Model
Los mensajes MIDI pueden enviarse y recibirse usando el puerto USB
Basic Default
Channel Changed
Mode Messages
Note
Number True voice
Velocity Note ON
After Key’s
Touch Ch’s
Pitch Bender
Control 6, 38
Change 7
628A-E-086B
Page 47

Hold1
RPN LSB, MSB
All sound off
Reset all controller
: Yes
: No
X
O
3
*
O
O
X
O
64
100, 101
O
X
120
O
X
121
4
*
X
0-127
O
O
X
❊❊❊❊❊❊❊❊❊❊❊❊❊❊
X
X
0-127
X
O
❊❊❊❊❊❊❊❊❊❊❊❊❊❊
X
X
: Tune
X
X
X
X
X
O
X
X
X
X
X
X
FINE TUNE, COARSE TUNE receive, and PITCH BEND SENSE, RPN Null receive.
FINE TUNE, recepción COARSE TUNE, y PITCH BEND SENSE, recepción RPN Null.
GM on/off GM ON : [F0] [7E] [7F] [09] [01] [F7] GM OFF : [F0] [7E] [7F] [09] [02] [F7]
Activación/desactivación GM GM ON: [F0] [7E] [7F] [09] [01] [F7]
3
3
*
: All notes OFF
: Reset
*
GM OFF: [F0] [7E] [7F] [09] [02] [F7]
4
4
*
*
628A-E-087A
Program
Change :True #
System Exclusive
System : Song Pos
Common : Song Sel
System : Clock
Real Time : Commands
Aux : Local ON/OFF
Messages : Active Sense
Remarks
Mode 1 : OMNI ON, POLY Mode 2 : OMNI ON, MONO
Mode 3 : OMNI OFF, POLY Mode 4 : OMNI OFF, MONO
Page 48

This recycle mark indicates that the packaging conforms to
the environmental protection legislation in Germany.
Esta marca de reciclaje indica que el empaquetado se
ajusta a la legislación de protección ambiental en Alemania.
CASIO COMPUTER CO.,LTD.
6-2, Hon-machi 1-chome
Shibuya-ku, Tokyo 151-8543, Japan
F
MA0704-B Printed in China
CTK720ES1A
 Loading...