


Casio CASSIOPEIA MPC-501 Manual
FIVA
User’s Guide
(MPC-501 series)
Thank you for purchasing the CASIO FIVA MPC-501. This guide describes the basic operations of the product.
Read this guide in its entirely before handling or operating the product, and keep it close at hand so it can be easily referenced.

International ENERGY STAR® Program
As a member of the International ENERGY STAR® Program, CASIO products have been judged to meet International ENERGY STAR® standards.
ENERGY STAR® is a U.S. registered mark.
Power Plug and AC Adaptor
|
te |
o |
|
N |
|
AC cord plug and wall outlet illustrated in this User’s Guide shows the two-pin plug type. It may not be the same shape of AC cord plug used in your area.
FIVA’s AC adaptor has an automatic voltage switching circuit (input: 100 to 240VAC, 50/60Hz) and lets you use your FIVA under AC power virtually anywhere in the world without having an extra power-transformer. Note, however, that AC cord plug shape differs according to area you are in. Make sure that the AC cord you will use can fit into wall outlet and is compliance with the local electric safety standard.
•Microsoft, MS-DOS and Windows are registered trademarks of Microsoft Corporation in the United States and/or other countries.
•PS/2 is a registered trademark of International Business Machines Corporation in the United States.
•smARTwriter, smARTscribble and Quick Trainer are trademarks or registered trademarks of Advanced Recognition Technologies in the United States.
•Other company, product and service names used herein may also be trademarks or
service marks of respective companies.
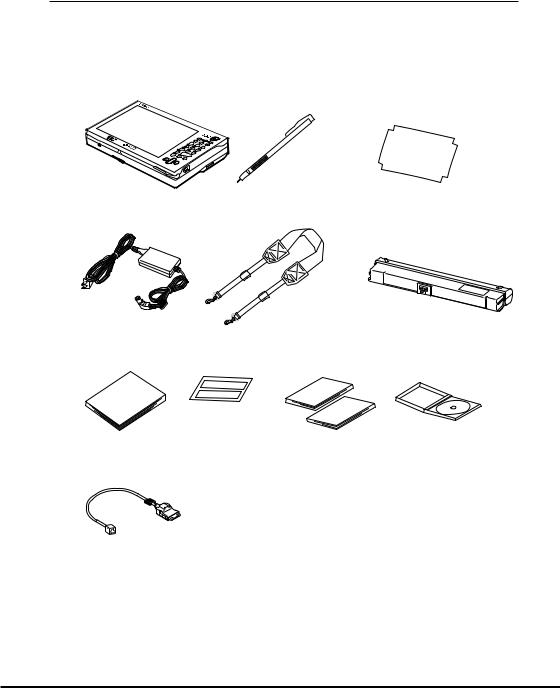
Packing List
Thank you for purchasing the CASSIOPEIA FIVA MPC-501 series. A list of the items included with this product is given below. Confirm that nothing is missing or damaged. If anything is missing or damaged, contact the dealer from which you purchased this product.
FIVA MPC-501
Stylus |
Screen protective film |
AC adaptor
Battery pack
Neck strap
User’s Guide
User’s |
FIVA |
501 |
|
|
Guide |
Keep in a safe place
Moduler cable
ID sticker
Windows98 SE
First Step Guide Product
Recovery CD-ROM
Windows98 |
|
|
|
|
|
|
F |
|
F |
|
|
S |
te |
irst |
C |
iV |
A |
Gu |
p |
D |
|
||
|
|
|
|||
ide |
|
|
|
||
(Not included with the MPC-501M63O)
(Standard with the MPC-501M62E)
•Do not dispose of the box and packing materials. Use the box and packing materials for storage and transport.
1
Safety Precautions
•To use this product safely and correctly, read this User’s Guide thoroughly and operate as instructed.
After reading this guide, keep it close at hand for easy reference. Please keep all informations for future reference.
•Always observe the warnings and cautions indicated on the product.
•If this guide is misplaced or damaged so as to be unreadable, a new one can be ordered. To obtain a new User’s Guide, contact the dealer from which this product was purchased.
About the icons
 Warning!
 Caution!
In this guide various icons are used to highlight safe operation of this product and to prevent injury to the operator and other personnel and also to prevent damage to property and this product. The icons and definitions are given below.
Indicates that there is a risk of severe injury or death if used incorrectly.
Indicates that injury or damage may result if used incorrectly.
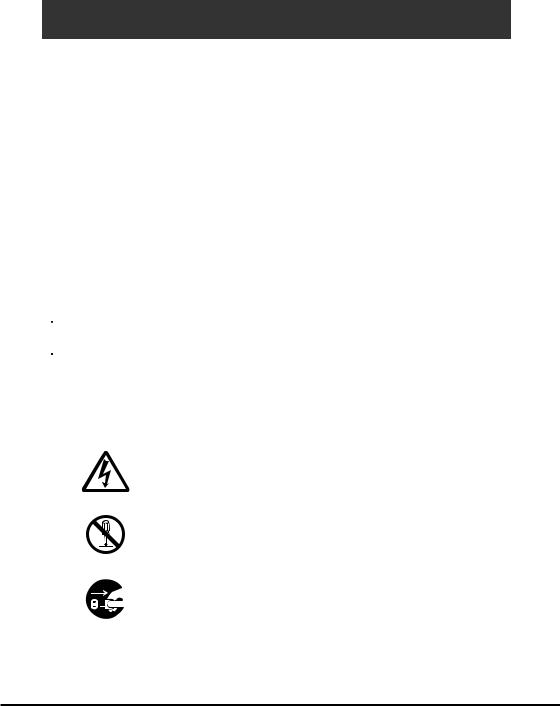
Icon examples
To bring attention to risks and possible damage, the following types of icons are used.
The  symbol indicates that it includes some symbol for attracting attention (including warning). In this triangle the actual type of precautions to be taken (electric shock, in this case) is indicated.
The  symbol indicates a prohibited action. In this symbol the actual type of prohibited actions (disassembly, in this case) will be indicated.
The  symbol indicates that a restriction. In this symbol the type of actual restriction (removal of the power plug from an outlet, in this case) is indicated.
2
 Warning!
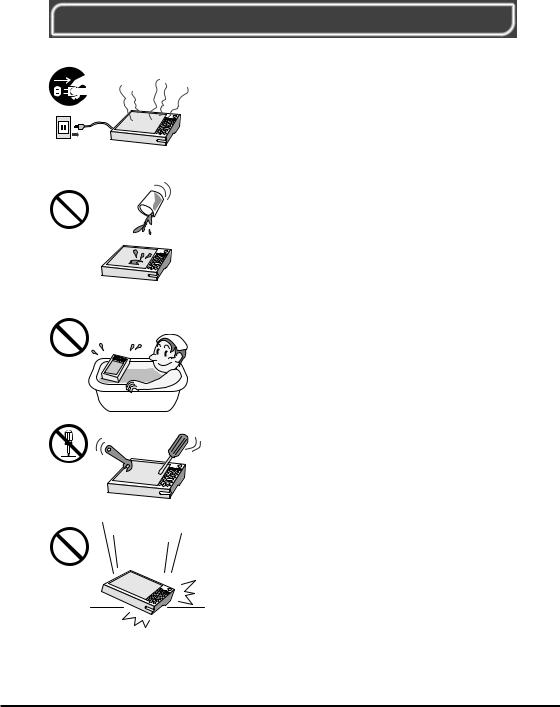
Handling FIVA
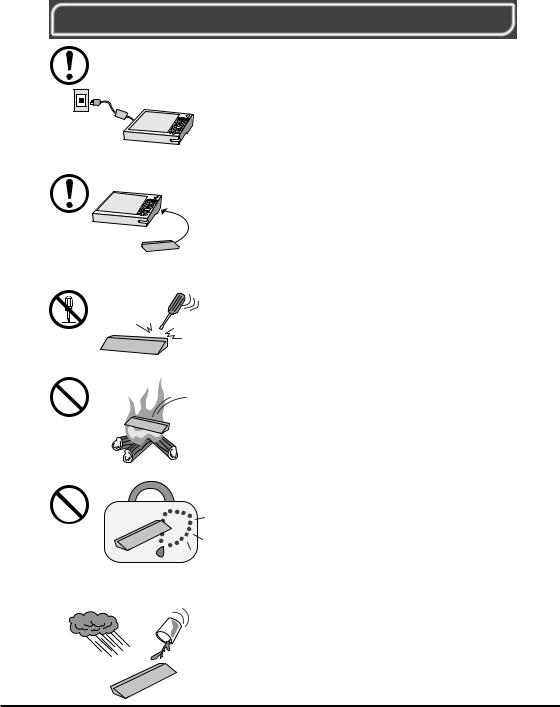
Should FIVA malfunction, start to emit smoke or a strange odor, or otherwise behave abnormally, immediately shut down the power, remove batteries, and unplug the AC adaptor from the power outlet. Continued use creates the danger of fire and electric shock.
• Contact your original retailer or authorized distributor.
Do not place containers of liquids near FIVA and do not allow any foreign matter to get into it. Should water or other foreign matter get into FIVA, immediately shut down the power and unplug the AC adaptor from the power outlet. Continued use creates the danger of shorting, fire and electric shock.
• Contact your original retailer or authorized distributor.
Never bring in FIVA a bathroom or any other location where the possibility of splashing or high humidity exists. Use of FIVA in such an area creates the danger of electric shock. Be especially carefully when using FIVA while rain or snow is falling, or in beach areas.
Never try to take FIVA apart or modify it in any way. High-voltage components inside FIVA create the danger of fire and electric shock.
• Contact your authorized distributor for all repair and maintenance.
Should you drop FIVA and damage it, immediately shut down the power and unplug the AC adaptor from the power outlet. Continued use creates the danger of shorting, fire and electric shock.
• Attempting to repair FIVA yourself is extremely
dangerous. Contact your authorized distributor for all repair and maintenance.
3
 Warning!
The liquid inside the LCD is harmful to humans. Never touch it or allow it to get in your mouth.
• Should liquid from the LCD panel accidentally get into your mouth immediately wash out your mouth with clean water. If it gets onto your skin, immediately rinse for at least 15 minutes with clean tap water. In either case, consult a physician.
Power Plug and AC Adaptor
|
te |
o |
|
N |
|
AC cord plug and wall outlet illustrated in this User’s Guide shows the two-pin plug type. It may not be the same shape of AC cord plug used in your area.
|
|
|
|
|
Use only a proper AC electric outlet (100V~240V) |
|
|
|
|
|
when powering FIVA with the AC adaptor. Use of an |
|
|
|
|
|
outlet with a different voltage from the rating creates |
|
|
|
|
|
|
|
|
|
|
|
|
|
|
|
|
|
the danger of malfunction, fire, and electric shock. |
|
|
|
|
|
|
|
|
|
|
|
Overloading an electric outlet creates the danger of |
|
AC100~240V |
||||
|
|
|
|
|
overheating and fire. |
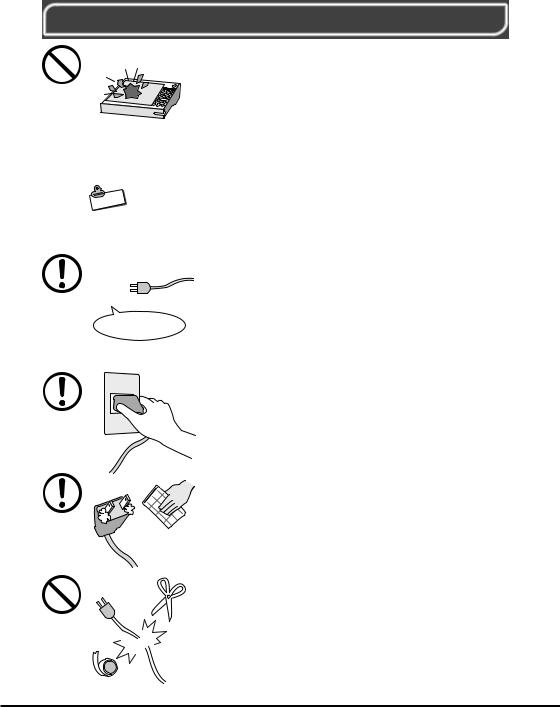
Make sure the power plug and AC adaptor plug are inserted as far as they will go. Loose plugs create the danger of electric shock, overheating, and fire.
•Do not use the adaptor if the plug is damaged. Never connect to a power outlet that is loose.
Use a dry cloth to periodically wipe off any dust built up on the prongs of the plug. Humidity can cause poor insulation and create the danger of electric shock and fire if dust stays on the prongs.
Do not allow the power cord or plug to become damaged, and never try to modify them in any way. Continued use of a damaged power cord can cause deterioration of the insulation, exposure of internal wiring, and shorting, which creates the danger of electric shock and fire.
•Contact your authorized distributor whenever the power cord or plug requires repair or maintenance.
4
 Warning!
Use only the AC adaptor specified by CASIO for this product. Use of another type of AC adaptor creates the danger of fire.
Use only the battery pack that comes with FIVA. When the battery pack reaches the end of its life, replace it with a new battery pack as specified by CASIO. Other types of batteries have different voltage rating and polarity, which creates the danger of fire and bursting of the batteries.
Never try to take the battery pack apart or modify it in any way. Doing so creates the danger of overheating, fire, and bursting of the battery pack.
Never throw the battery pack into fire or otherwise expose it to direct flame. Doing so creates the danger of fire and explosion.
Never allow the positive (+) and negative (–) poles of the batteries to become connected by metal. Do not store or transport the battery pack together with metal necklaces, hairpins, or other metal items. Connection of the battery pack poles creates the danger of overheating, fire, and explosion.
•When transporting or storing the battery pack, wrap it in plastic to keep the poles away from metal items that might cause a short.
Never allow the battery pack to be exposed to water or moisture. Moisture creates the danger of overheating, fire, and explosion. Should the battery pack ever become wet, immediately stop using it.
5
 Caution!
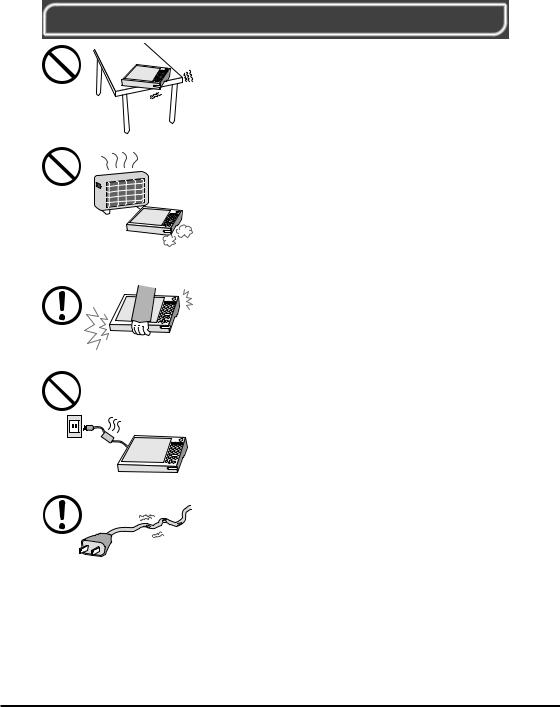
Do not place FIVA on an unstable or uneven surface. Doing so can cause FIVA to fall, creating the danger of malfunction, fire, and electric shock.
Do not leave FIVA in the following areas.
•Areas where FIVA will be subject to large amounts of humidity or dust, or directly exposed to hot or cold air.
•Areas exposed to direct sunlight, in a close motor vehicle, or any other area subject to very high temperatures.
The above conditions can cause malfunction or deformation of FIVA, which creates the danger of fire.
When transporting FIVA, take care to avoid subjecting it to vibration and impact. This unit contains a hard disk and other precision components that can be damaged by rough handling.
The AC adaptor normally becomes warm during use. Avoid allowing the AC adaptor to rest on your lap or other part of your body when using it for long period. Long term with the AC adaptor creates the danger of burns.
Do not overly bend the power cord, do not allow it to be caught between desks or other furniture, and never place heavy objects on top of the power cord. Doing so can cause shorting or breaking of the power cord, creating the danger of fire and electric shock.
6
 Caution!
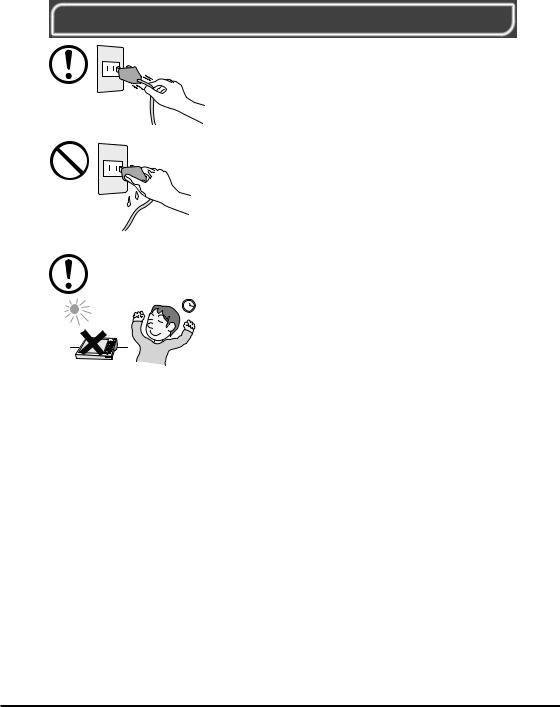
Be sure to grasp the plug when unplugging the power cord from the wall outlet. Pulling on the cord can damage it, break the wiring, or cause short, creating the danger of fire and electric shock.
Never touch the plug while your hands are wet. Doing so creates the danger of electric shock. Pulling on the cord can damage it, break the wiring, or cause short, creating the danger of fire and electric shock.
Avoid use in areas where the brightness around the display is very different from surrounding lighting, or where the sunlight is shining directly on the display. Such conditions can cause eye fatigue.
7

Before Using FIVA
•This product has been designed and manufactured under stringent quality control. Should you suspect FIVA is defective or malfunctioning, contact your original dealer or authorized distributor. Repair and maintenance are subject to the terms and conditions of the Warranty.
•CASIO COMPUTER CO., LTD. shall not be held liable for any loss or claims due to using this product except as instructed to do so in this User’s Guide.
•CASIO COMPUTER CO., LTD. shall not be held liable for any loss or claims (lost profits, interruption of business, corruption or loss of memory data, etc.) by you or any third party due to the use of this product or the inability to use this product for a specific purpose, except as specifically stipulated by law.
•Unauthorized copying of this product or its software is prohibited.
•This product is guaranteed only when operating under the version of Windows 98 that comes bundled with it.
Product Application
•This product is intended for use as a general office computing device.
•CASIO makes no warranties that this product is fault-tolerant. It is not designed, manufactured or intended for use in any equipment or system (such as traffic control devices, safety devices, medical devices, etc.) where the malfunction or misoperation of FIVA could lead directly to death, personal injury, or serious damage to physical assets.
System Recovery
•This product comes with Windows 98 and a collection of utility software pre-installed on its hard disk. Should the system start to malfunction or produce errors, you can use the “Product Recovery CD-ROM” that comes with FIVA to restore the factory default system. This returns FIVA the same settings and state it was in when you originally purchased it.
|
te |
o |
|
N |
|
Windows 98 and other software are not pre-installed in the MPC501M63O.
8
Computer Viruses
Avoiding Computer Viruses
A computer virus is a program. It gets installed on your system without you being aware of it, and can do anything from displaying strange messages to destroying your data and other programs. A virus can enter your system via a floppy diskette or network. Taking the following precautions are normally sufficient to protect against having a virus invade your system.
•Write protect the master copies of your programs and data files.
•Never open data files or run programs of unknown origin.
•Use a commercially available virus checker to check new programs, and periodically check your system for virus contamination.
Use the latest version of a commercially available virus checker to check your system.
An immediate virus check is recommended in the following cases.
•Check your system each time you start up your computer.
•Check any data file or program you received on a floppy diskette or other external media, over a network, from a BBS or the Internet, via e-mail, etc. before opening the file or running the program.
9
FIVA
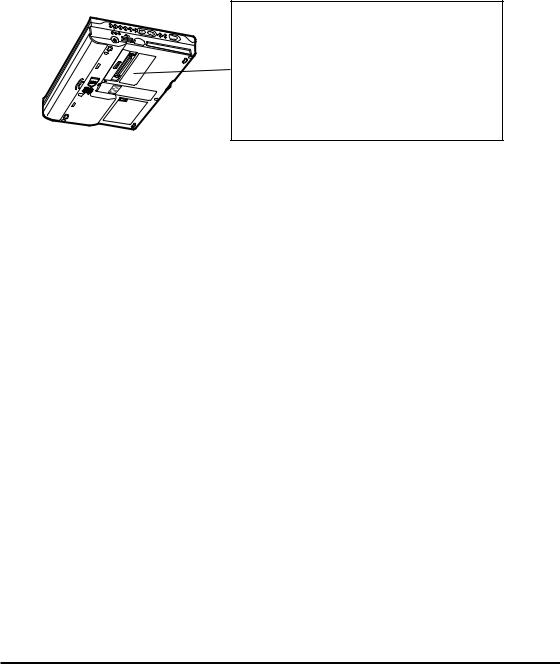
Caution
• Turn off this product before connecting or disconnecting peripherals.
• Never apply impact or vibration.
• Never take this product apart.
• Use only the specified AC adaptor.
• The bottom of this product becomes warm during use. Avoid using it in your lap for a long period.
Precaution Label
•The label shown above is affixed to the bottom of FIVA. Be sure to carefully observe these precautions at all times. Never remove this label. Should this label ever start to come off or should its contents become unreadable, contact your original dealer or authorized distributor.
Power Requirements
•Plug the AC adaptor into a power outlet rated for 100V to 240V AC, 50/60Hz only.
•Do not connect FIVA to the same outlet of another device that generates electrical noise. Such a device can corrupt data in FIVA.
Turning Off Power
•Never unplug the power cord or otherwise cut off power to FIVA while the system is starting up or while a program is running. Doing so can cause data to be lost or corrupted, and can lead to malfunction of FIVA.
•Do not turn power off and then suddenly back on again. Doing so can cause data to be lost or corrupted, and can lead to malfunction of FIVA.
Cables
•Use only the cables that come with FIVA to connect it to other optional equipment.
•Never pull on cable or place a heavy object on it. Doing so can cause the cable to break or short.
10

Avoid Strong Vibration and Impact
•Strong vibration or impact can cause malfunction. Be particularly careful when FIVA is turned on. Vibration and impact can cause corruption of data on built-in hard disk.
Transporting FIVA
•Be sure to shut down the power and disconnect all options (port replicator, CD-ROM drive, etc.) before removing FIVA. Leaving cables connected while removing FIVA can damage the cables and creates the danger of accident.
•Store FIVA in its case whenever you are transporting it or not using it. Doing so protects FIVA against damage.
Avoid Water and Moisture
•FIVA is not water resistant. Never use or store FIVA where there is the danger it might become exposed to water or moisture.
Options
•Be sure to carefully follow the procedures provided in the applicable User’s Guides whenever connecting or disconnecting peripherals. Failure to do so can damage FIVA or the peripheral.
AC adaptor: WARNING
• Use AC adaptor type MPC-577ADP (SQS45W16P-02).
Main battery: WARNING
•Replace this main battery with Model MPC-173BAT or MPC174LBAT.
Use of another battery may present a risk of fire or explosion.
•This battery pack is suitable for use only with MPC-501 series.
•Keep away from children.
•Dispose of used batteries according to the manufacturer’s instruction.
Non-CASIO options
•Check with each manufacturer for compatibility before using any non-CASIO options with this unit.
•CASIO assumes no responsibility for any loss (including but not limited to personal injury, material loss, damage to FIVA) suffered by you or other arising out of the use of a non-CASIO option.
Use Only as Directed
•Be sure to connect or disconnect an option only as expressly directed in the documentation that comes with the option.
•Incorrect use of options can cause malfunction and serious damage to FIVA, which can required extensive repair work to correct.
11

Floppy Diskette and Hard Disk Data
Disk Operations
•A lit hard disk drive or floppy disk drive access lamp indicates that a disk operation is being performed.
•Never shut down while a hard disk drive or floppy disk drive operation is being performed. Also, never eject the floppy diskette while a floppy disk drive operation is being performed. Doing so can make data or applications on the disk unusable.
Backup Data
•You should occasionally back up data on the hard disk by copying it to floppy diskette. This ensures that you always have backup data on hand in case of accidental data deletion or corruption caused by mis-operation, malfunction, maintenance, etc.
Note that CASIO is not liable for any losses suffered by you or any third party due to the loss of data stored on FIVA’s hard disk.
Formatting a Floppy Diskette
•Formatting a floppy diskette deletes all data stored on it.
•Be sure to check the contents of a floppy diskette before formatting it.
CD-ROM
Protecting CD-ROMs from Dirt and Dust
•Keep CD-ROMs in their original cases, and store them in a safe place.
•Handle CD-ROMs by pinching between two fingers, one inside the center hold and one on the outside edge of the disk.
•Never bend a CD-ROM, write on its surface, or allow its surface to become damaged.
•Do not affix labels to a CD-ROM.
•Keep CD-ROMs out of direct sunlight and areas exposed to extreme heat or cold.
•To clean a CD-ROM, wipe it with a soft dry cloth. Wipe from the center outwards to the edge.
Consumables
The following items are consumables.
You will need to inform your original dealer or authorized distributor of the model number of your unit when purchasing the stylus, screen protective film, and battery pack.
12
Stylus
•Purchase a new stylus whenever the tip of your stylus becomes damaged.
Screen Protective film
•Purchase a new screen protective film when the one on your FIVA becomes scratched to the point that it makes display contents difficult to see.
Standard Battery Pack
•Long use of the battery pack causes it to deteriorate and lose its ability to recharge. If you feel your battery pack is not providing enough operating time, it may be time to contact your dealer or authorized distributor about purchasing a new one.
Disposal
When it comes time to dispose of your FIVA, do so in accordance with local regulations in your area. Contact your local government authorities for details about proper disposal methods.
Maintenance and Care
Normal Care
Shut down the power and unplug the power cord from the power outlet before cleaning FIVA. Cleaning FIVA with the power on creates the danger of electric shock.
•Clean FIVA by wiping it with a soft, dry cloth. If FIVA is very dirty, wipe it with a cloth that has been moistened with a weak solution of water and a mild neutral detergent. Wring out all excess of moisture before wiping. Take particular care to keep the contacts on the bottom of the FIVA clean. Dirty contacts can lead to malfunction.
•Clean the LCD by wiping it with a soft, dry cloth. Never use water, detergent, or chemical agents to clean the LCD. The surface of the LCD is easily scratched. Never apply excess pressure when wiping it.
•Also, use a soft cloth to clean the tip of the stylus. Take care that you do not misplace your stylus.
•Thinner, benzene, or other organic agents can cause deformation or discoloration of FIVA’s case, and even malfunction of FIVA. Never use such agents when cleaning FIVA.
13
•Keep the tip of the stylus free of dirt by wiping it periodically with a soft cloth. Also take care that you do not misplace or lose the stylus.
•Clean the FIVA screen by wiping it with a soft, clean cloth. Never use water, neutral detergents, or chemically treated cloths to clean the screen. A dirty screen can interfere with response to stylus operations, and smooth movement of the stylus tip. The screen is easily scratched, so take care that you do not apply to much pressure when cleaning it.
Maintenance
Never remove FIVA’S outer cover or otherwise try to take it apart or modify it in any way. High voltage inside the case creates the danger of electric shock.
Whenever you notice any of the following symptoms, immediately shut down the power, unplug the AC adaptor from the power outlet, and contact your original dealer or authorized distributor.
•Damaged power cord or plug
•Liquid leaking from FIVA
•Exposure of FIVA to water or rain
•Unit being dropped
•Damaged unit cover
•Very abnormal function
•Abnormal operation
Never try to make any adjustments except as specifically instructed by this User’s Guide. Improper adjustment or modification of FIVA can permanently damage it and make it impossible to restore normal operation.
Never attempt to repair or modify this unit in any way.
14
The CE marking below applies to the EU region. Declarator of conformity is as follows:
CASIO ELECTRONICS CO. LTD.
Unit 6, 1000 North Circular Road, London NW2 7JD
GUIDELINES LAID DOWN BY FCC RULES FOR USE OF THIS UNIT IN THE U.S.A. (not applicable to other areas.)
NOTICE
This equipment has been tested and found to comply with the limits for a Class B digital device, pursuant to Part 15 of the FCC Rules. These limits are designed to provide reasonable protection against harmful interference in a residential installation. This equipment generates, uses and can radiate radio frequency energy and, if not installed and used in accordance with the instructions, may cause harmful interference to radio communications. However, there is no guarantee that interference will not occur in a particular installation. If this equipment does cause harmful interference to radio or television reception, which can be determined by turning the equipment off and on, the user is encouraged to try to correct the interference by on or more of the following measures:
•Reorient or relocate the receiving antenna.
•Increase the separation between the equipment and receiver.
•Connect the equipment into an outlet on a circuit different from that to which the receiver is connected.
•Consult the dealer or an experienced radio/TV technician for help.
FCC WARNING
Changes or modifications not expressly approved by the party responsible for compliance could void the user’s authority to operate the equipment.
|
Declaration of Conformity |
Model Number: |
MPC-501M63E, MPC-501M63O, MPC-501M62E |
Trade Name: |
CASIO |
Responsible party: |
CASIO INC. |
Address: |
570 Mt. Pleasant Avenue, Dover, New Jersey 07801. |
Telephone number: |
973-361-5400 |
This device complies with part 15 of the FCC Rules. Operation is subject to the following two conditions: (1)This device may not cause harmful interference, and (2)this device must accept any interference received, including interference that may cause undesired operation.
15

Contents |
|
|
Packing List ................................................................................................. |
1 |
|
Safety Precautions ...................................................................... |
2 |
|
Before Using FIVA ....................................................................................... |
8 |
|
About This User’s Guide .......................................................................... |
19 |
|
Chapter 1 |
Getting Ready ........................................................ |
21 |
Features ..................................................................................................... |
|
23 |
Front ................................................................................................................... |
|
24 |
Back .................................................................................................................... |
|
25 |
Keyboard ................................................................................................... |
|
26 |
Key Combinations ............................................................................................... |
27 |
|
Before Using FIVA for the First Time....................................................... |
28 |
|
Connecting the Neck Strap ................................................................................. |
28 |
|
Affixing the Screen Protective Film ..................................................................... |
28 |
|
Pulling out the Stylus .......................................................................................... |
28 |
|
Connecting the AC Adaptor ................................................................................ |
29 |
|
Power Supply ............................................................................................ |
29 |
|
Attaching and Removing the Battery Pack ......................................................... |
29 |
|
Charging the Battery Pack .................................................................................. |
31 |
|
Turning on Power ...................................................................................... |
33 |
|
To turn on the power ........................................................................................... |
33 |
|
Shutting Down the Power ........................................................................ |
34 |
|
To shut down Windows 98 from the Start menu ................................................. |
35 |
|
To enter the Standby Mode from the Start menu ................................................ |
36 |
|
To enter the Hibernation Mode with the power switch ........................................ |
37 |
|
Chapter 2 |
Using FIVA ............................................................. |
39 |
Using the Stylus ........................................................................................ |
41 |
|
To calibrate the screen ........................................................................................ |
41 |
|
Pen Operations ................................................................................................... |
42 |
|
Using the Keyboard .................................................................................. |
43 |
|
Keyboard Types .................................................................................................. |
43 |
|
Changing the Mobile Keyboard Size .................................................................. |
44 |
|
Moving the Mobile Keyboard on the Screen ....................................................... |
44 |
|
Inputting Text with the Mobile Keyboard ................................................ |
45 |
|
16

Using handwriting input (smARTwriter) ................................................. |
47 |
How does it work? .............................................................................................. |
47 |
Training smARTwriter ......................................................................................... |
47 |
Achieving Good Recognition .............................................................................. |
48 |
Using Quick Trainer ............................................................................................ |
48 |
Using the Euro Trainer ........................................................................................ |
49 |
Using smARTwriter ............................................................................................. |
50 |
Using Gestures ................................................................................................... |
52 |
Activating the Correction Box ............................................................................. |
52 |
The smARTwriter Menu ...................................................................................... |
54 |
Train .................................................................................................................... |
55 |
Character ............................................................................................................ |
55 |
Macros & Gestures ............................................................................................. |
57 |
Application Shortcuts .......................................................................................... |
58 |
Library ................................................................................................................. |
60 |
Library Manager .................................................................................................. |
60 |
Using the Libraries Window ................................................................................ |
62 |
Properties ........................................................................................................... |
63 |
Quitting smARTwriter .......................................................................................... |
66 |
Using smARTscribble ............................................................................... |
67 |
Basic Concepts ................................................................................................... |
67 |
Starting Up smARTscribble ................................................................................. |
67 |
Working with Images .......................................................................................... |
67 |
Working with Text ................................................................................................ |
68 |
Ink ....................................................................................................................... |
70 |
smARTscribble Documents ................................................................................. |
71 |
Navigating Around a Document .......................................................................... |
71 |
Guidelines ........................................................................................................... |
71 |
Page Size ........................................................................................................... |
72 |
Previewing a Document ...................................................................................... |
72 |
Using Mobile Cockpit ............................................................................... |
73 |
1 Toolbar Switch ................................................................................................ |
74 |
2 Starting Up a System Tool .............................................................................. |
75 |
3 Making Mobile Cockpit Settings ..................................................................... |
79 |
4 Making Power Management Settings ............................................................ |
81 |
5 Adjusting Display Brightness .......................................................................... |
84 |
6 Changing the CPU Clock Speed .................................................................... |
84 |
7 Adjusting Speaker Volume ............................................................................. |
85 |
8 Power Management for Specific Hardware .................................................... |
86 |
9 Show Properties ............................................................................................. |
87 |
0 Displaying the Battery Report ........................................................................ |
87 |
q Battery Level Indicator ................................................................................... |
88 |
w Putting the System Into the Standby Mode .................................................... |
88 |
e Entering the Hibernation Mode ...................................................................... |
89 |
r Using Mobile Cockpit Help ............................................................................. |
89 |
1
2
3
17

Using the Battery Pack ............................................................................. |
90 |
Checking the Current Charge Level of the Battery Pack .................................... |
90 |
Using the Battery Pack Effectively ...................................................................... |
91 |
Using the Large-capacity Battery Pack ............................................................... |
92 |
Chapter 3 Supplementary Information ................................. |
93 |
Connecting a Peripheral to FIVA ............................................................. |
95 |
Connecting to the Communication Port .............................................................. |
95 |
Infrared Data Communication ............................................................................. |
96 |
USB Connection ........................................................................................ |
97 |
Loading PC Card and Expansion Memory ............................................. |
98 |
Using a PC Card ................................................................................................. |
98 |
Using the Port Replicator ......................................................................... |
99 |
Using the Floppy Disk Drive ............................................................................. |
101 |
Using an External Monitor ................................................................................ |
102 |
Connecting a Mouse or External Keyboard ...................................................... |
104 |
Connecting a USB Device ................................................................................ |
104 |
Connecting an RS-232C Peripheral ................................................................. |
104 |
Connecting a Printer ......................................................................................... |
104 |
Troubleshooting ...................................................................................... |
105 |
Using the Terminal Equipment MBH7MD23-8556CA ........................... |
114 |
Specifications .......................................................................................... |
122 |
Options List ............................................................................................. |
124 |
18
About This User’s Guide
This User’s Guide is divided into the five sections shown below. Be sure you read the section titled “Before Using FIVA” starting from page 8 before you do anything else.
Before Using FIVA
This section provides important safety precautions and things you need to know to use FIVA correctly.
Chapter 1 Getting Ready
This chapter provides you with general description of functions and part names. It also explains required procedures for turning power on and off for the first time.
Chapter 2 Using FIVA
This chapter explains how to turn on power and perform a number of basic computer operations.
Chapter 3 Supplementary Information
This chapter contains information about how to connect peripherals and what to do when you experience problems.
 Important
This mark indicates important cautions and things to which you need to pay attention when you operate the FIVA.
|
te |
o |
|
N |
|
This mark indicates that you need to memorize.
The words “Windows 98” and “Windows” used in this user’s guide simply refer to the “Microsoft® Windows® 98 Second Edition” operating system.
19

Chapter 1
Getting Ready
This chapter provides you with general description of functions and part names. It also explains required procedures for turning power on and off for the first time.
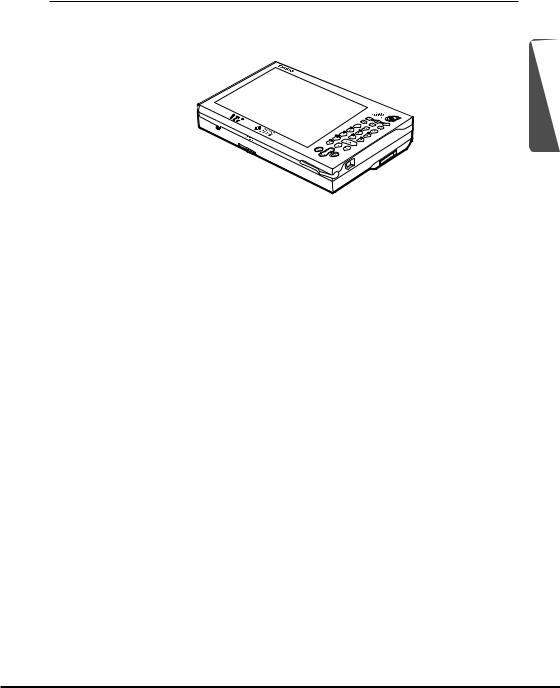
Features
The MPC-501 Series is a lightweight and compact pen type computer.
1
6.7-inch SVGA (800 × 600) TFT LCD
•High-precision, high-resolution CASIO Hyper Amorphous Silicon TFT (HAST) LCD
•Thin display design contributes to overall compact and lightweight configuration.
Highly mobile A5 size
•Compact 870g*, A5 size goes along anywhere.
•Comes with 32MB of memory as standard (96MB maximum) and a 10 or 15GB hard disk built in.
•Two-way power supply operates on batteries or AC for operation just about anywhere. Power management functions include standby and hibernation modes
•Built-in Windows 98* lets you take your desktop files along everywhere.
Versatile Stylus Interface
•Pointing is performed by touching the screen with a stylus.
•Highly efficient handwriting recognition
Versatile Networking
•Use of a LAN card, SS wireless LAN card, or other card provides quick and easy networking.
•Connection to remote networks using the built-in modem* or cellular phone data communication card.
* Varies depending on the model. (See page 122)
23
The part names introduced in this chapter are used throughout the rest of this User’s Guide.
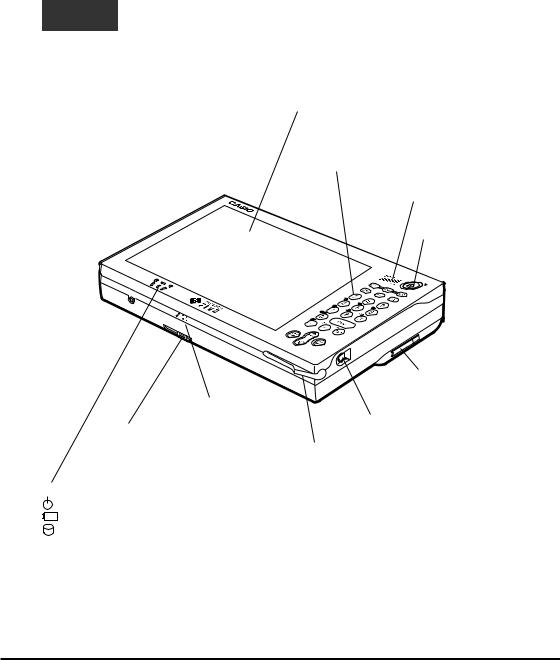
Front
Monitor
 6.7-inch color Hyper Amorphous
Silicon TFT LCD (SVGA)
LCD touch panel screen
Keyboard
Control key and 10-key pad
Speaker
Power switch
Turns FIVA power on and off.
|
Multi-Communication port*1 |
|
Connect the cable here for |
Microphone |
data communication. |
|
Hooks |
PC card release lever |
Secure FIVA in place. |
Use this lever when removing a PC |
Stylus |
card from FIVA. |
Use this stylus for touch panel input. |
Indicator lamps |
See pages 28 and 41. |
|
|
PW: Power indicator (pages 34 and 90) |
|
BAT: Battery status indicator (page 32)
HDD: Hard disk access lamp (green during access)
*1 Multi-communication port is not equipped in some models.
24

Back
AC adaptor connector
1
Battery release latch
Operate this latch to
USB connector
release the battery pack.
For connection of USB
(page 31)
compatible devices.
Infrared port
Control/Shift key
Battery pack
PC card slot
Port replicator connector
Connects to the port replicator
RAM module screw
Never touch here.
Cradle Contact
Establishes contact when FIVA is placed on a cradle.
Reset switch
Pressing this switch with a thin, pointed object turns off unit power. Only press this switch when experiencing operational problems.
25
Keyboard
This section describes the basic functions of the keyboard. Actual keyboard functions may differ in accordance with the application you are using.
• Keyboard keys are grouped according to function: control keys, 10-key pad, and
arrow keys. The Shift and Ctrl keys are located on the left side of the FIVA unit.
|
Function |
Key |
Key Name |
Description |
|
|
|
Control |
Esc |
Escape |
Cancels an operation. |
|
|
|
Keys |
|
|
|
|
|
|
Del |
|
Delete |
Deletes the character to the right of the |
|
|
|
|
|
cursor. |
|
||
|
|
|
|
|
|
|
|
|
|
|
|
|
|
|
|
BS |
|
Backspace |
Deletes the character to the left of the cursor. |
|
|
|
|
|
|
|
|
|
|
Tab |
Tab |
Inputs a tab operation. |
|
|
|
|
|
|
|
|
|
|
|
Fn |
|
Fn |
Activates certain “hot keys” functions. |
|
|
|
|
|
|
|
|
|
|
Alt |
|
Alternate |
Used in combination with other keys to |
|
|
|
|
perform operations and execute commands. |
|
||
|
|
|
|
|
|
|
|
|
|
|
|
|
|
|
|
Ctrl |
|
Control |
Used in combination with other keys to |
|
|
|
|
perform operations and execute commands. |
|
||
|
|
|
|
|
|
|
|
|
|
|
|
|
|
|
|
Shift |
Shift |
Shifts the keyboard between upper case |
|
|
|
|
and lower case. |
|
|||
|
|
|
|
|
|
|
|
|
|
|
|
|
|
|
10-key Pad |
0 |
~ 9 |
10 keys |
Inputs numbers (0 to 9). |
|
|
|
Enter |
Enter (Return) |
Enters data or inserts a carriage return. |
|
|
|
|
|
|
|
|
|
|
|
. |
|
Decimal point |
Inputs a decimal point. |
|
|
|
|
|
|
|
|
|
|
– |
|
Hyphen |
Inputs a hyphen or a minus sign. |
|
|
|
|
|
|
|
|
|
|
Spc |
|
Space |
Inputs a blank space. |
|
|
|
|
|
|
|
|
|
Arrow Keys |
|
PgUp |
Cursor |
Moves the cursor on the screen. |
|
|
|
Home |
End |
|
|
|
|
|
|
PgDn |
|
|
|
|
|
|
|
|
|
|
|
|
|
|
|
|
|
26
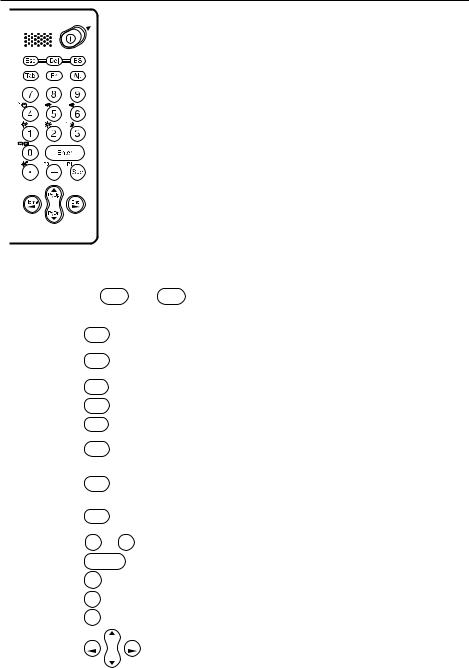
Key Combinations
•Key combinations where you must hold down one key and press a second are indicated by a plus symbol.
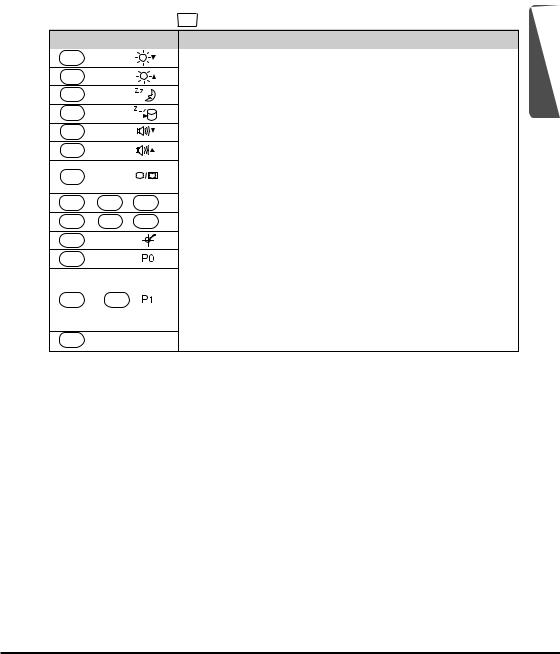
•The following shows the key combinations that are available with the Fn key. This is called the “hot keys” function.
Key
Fn + “1”
Fn + “2”
Fn + “3”
Fn + “4”
Fn + “5”
Fn + “6”
Fn + “0”
Fn + Del + Alt
Ctrl  Alt
Alt  Del
Del
Fn + “ . ”
Fn + “–”
Fn + Spc
Fn + 


|
Description |
|
|
Decreases LCD brightness. (page 84) |
1 |
||
|
|
||
Increases LCD brightness. (page 84) |
|||
|
|||
|
|
|
|
Puts FIVA into Standby Mode. (page 88) |
|
||
|
|
|
|
Puts FIVA into Hibernation Mode. (pages 88 and 89) |
|
||
|
|
|
|
Decreases speaker sound volume. (page 85) |
|
||
|
|
|
|
Increases speaker sound volume. (page 85) |
|
||
|
|
|
|
Cycles through monitor function in the following sequence: |
|
||
LCD(FIVA) → CRT* → CRT* and LCD(FIVA) → LCD(FIVA). |
|
||
Places a displayed image of the active window onto the clipboard. |
|
||
|
|
|
|
Restarts the system without turning off power. |
|
||
|
|
|
|
Launches the screen calibration routine. (page 41) |
|
||
|
|
|
|
The SOFT KEYBOARD will appear on the FIVA display. |
|
||
|
|
|
|
Launch previously |
For an application to be launched, it |
|
|
defined applications. |
must be compatible with the special |
|
|
|
application software. Check with the |
|
|
|
producer of the application for details. |
|
|
|
|
|
|
Perform page operations (PgUp, PgDn, Home, End).
CRT* = External monitor
27

Before Using FIVA for the First Time
Connecting the Neck Strap
Connect the supplied neck to the hook on the left side of the FIVA unit.
Affixing the Screen Protective Film
The screen protective film protects the display surface from scratches.
1.Peel the screen protective film from the back surface of the display protector sheet.
2.Bow the screen protective film in the middle and insert its edges on either side of the FIVA display.
Pulling out the Stylus
Use your finger to slide the stylus from its storage slot on the front of the FIVA unit. To replace the stylus, slide it carefully back into the slot so the raised part of the stylus enters the slit.
 Important
• Take care to avoid misplacing the stylus.
•Take care to avoid damaging or breaking the tip of the stylus.
•Keep the tip of the stylus and the FIVA screen clean and free of dirt. Performing stylus operations when the stylus or screen is dirty can damage the screen.
28
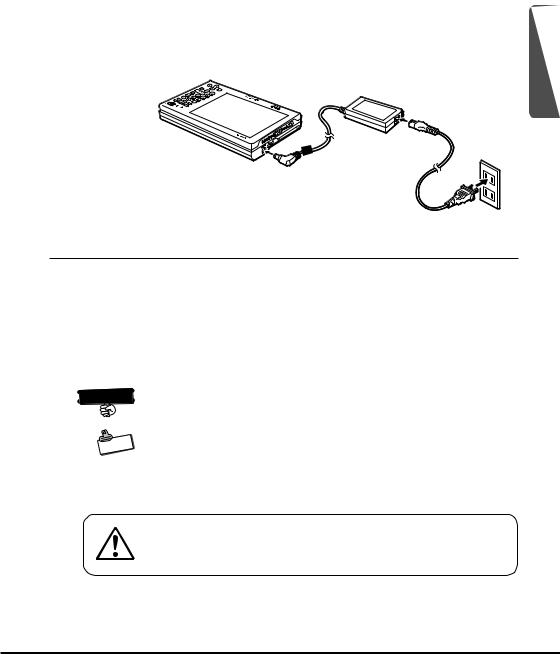
Connecting the AC Adaptor
Connect the AC adaptor to FIVA as shown in the illustration below. You can connect the AC adaptor with the battery pack in place. To prevent unnecessary consumption of electrical power, do not leave the AC adaptor plugged into the power outlet when it is not connected to FIVA.
1
Power Supply
This section describes how to set up, remove, and charge the battery pack.
Attaching and Removing the Battery Pack
Though operation is possible using the AC adaptor only, it is a good idea to attach the battery pack and charge it before using FIVA for the first time.
 Important
Battery packs can also be charged using a separately available charger unit (MPC-570CHG).
|
te |
o |
|
N |
|
•The supplied battery pack is not charged when you purchase your FIVA. Note that the battery pack takes about four hours to reach a full charge, certain condition can cause charging to take even longer. A battery taking a long time to reach full charge does not indicate malfunction.
Use only the battery pack that comes with FIVA or a battery pack specified in this User’s Guide. Use of another type of battery pack creates the danger of fire.
29
 Loading...