

Page 1

MP-C545
USER
MANUAL
Canon
Page 2

C
OLOR BUBBLE JET
™
PRINTER
MULTIPASS
™
FAX • SCANNER • COPIER
User's Manual
C545
Page 3

Copyright
Disclaimer
This manual is copyrighted by Canon Computer Systems, Inc. (CCSI) with all
rights reserved. Under the copyright laws, this manual may not be reproduced in
any form, in whole or part, without prior written consent of CCSI.
Portions copyrighted by Infowave Software Inc. and Second Glance Software.
©1999 Canon Computer Systems, Inc.
Canon Computer Systems, Inc. has reviewed this manual thoroughly in order to
make it an easy to use guide for your Canon MultiPASS system. All statements,
technical information, and recommendations in this guide and in any guides or
related documents are believed reliable, but the accuracy and completeness
thereof are not guaranteed or warranted, and they are not intended to be, nor
should they be understood to be, representations or warranties concerning the
products described.
Your MultiPASS and the softwar e media included with your system hav e been sold
to you subject to the limited warranties set forth in the warranty and license
agreement enclosed with the respective products. All software is licensed AS IS, as
described in the license agreement enclosed with the software media. Further,
CCSI reserves the right to make changes in the specifications of the products
described in this guide at any time without notice and without obligation to notify
any person of such changes.
Trademarks
ii
Canon, BCI, BJ, Bubble Jet, MultiPASS, ScanGear, and UHQ are trademarks and
SelectExchange is a service mark of Canon Inc.
PowerPrint, SpoolMaster, and the Infowave logo are trademarks of Infowave
Software Inc.
Apple, Finder, ColorSync and Macintosh are registered trademarks of Apple
Computer, Inc. ScanTastic is a trademark of Second Glance Software.
Portions copyrighted by Infowave Software, Inc. and Second Glance Software.
All other product and brand names are trademarks or service marks of their
respective owners.
ENERGY STAR® COMPLIANT
As an ENERGY STAR® Partner, Canon U.S.A., Inc. has determined that this
product meets the ENERGY STAR® guidelines for energy efficiency.
Preface
Page 4

Users in the U.S.A.
PRE-INSTALLATION REQUIREMENTS FOR CANON FACSIMILE
EQUIPMENT
A. Location
Supply a suitable table, cabinet, or desk. See Appendix A for the unit’s
dimensions and weight.
B. Order Information
1. Only a single line, touch-tone or rotary telephone set is to be used.
2. Order an RJ11-C modular jack (USOC code), which should be
installed by the phone company. If the RJ11-C jack is not present,
installation cannot occur.
3. Order a normal business line from your telephone compan y’ s business
representative. The line should be a regular voice grade line or the
equivalent. Use one line per unit.
DDD (DIRECT DISTANCE DIAL) LINE
-orIDDD (INTERNATIONAL DIRECT DISTANCE DIAL) LINE IF Y OU
COMMUNICATE OVERSEAS
n
Preface
Canon recommends an individual line following industry standards, e.g. the
2500 (Touch Tone) or 500 (Rotary/Pulse Dial) telephones. A dedicated
extension off a PBX unit without “Call Waiting” can be used with your
MultiPASS. Key telephone systems are not recommended because they send
non-standard signals to individual telephones for ringing and special codes,
which may cause a fax error.
C. Power Requirements
This equipment should be connected to a standard 120 volt AC, thr ee-wire
grounded outlet only. Do not connect this unit to an outlet or power line
shared with other appliances that cause “electrical noise”. Air conditioners,
electric typewriters, copiers, and machines of this sort generate electrical
noise which often interferes with communications equipment and the
sending and receiving of documents.
iii
Page 5

CONNECTION OF THE EQUIPMENT
This equipment complies with Part 68 of the FCC rules. On the rear panel of this
equipment is a label that contains, among other information, the FCC
Registration Number and Ringer Equivalence N umber (REN) for this equipment.
If requested, this information must be given to the telephone company. This
equipment may not be used on coin service provided by the telephone company.
Connection to party lines is subject to state tariffs.
An FCC compliant telephone cord and modular jack is provided with this
equipment. This equipment is designed to be connected to the t elephone network
or premises wiring using a compatible modular jack which is Part 68 compliant.
See Installation instructions for details.
The REN is used to determine the quantity of devices which may be connected to
the telephone line. Exc essi ve RENs on the telephone line may result in the devices
not ringing in response to an incoming call. In most, but not all areas, the sum of
the RENs should not exceed five (5.0). To be certain of the number of devices that
may be connected to the line, as determined by the total RENs, contact the
telephone company to determine the maximum REN for the calling area.
IN CASE OF EQUIPMENT MALFUNCTION
Should any malfunction occur which cannot be corrected by the procedures
described in this
or unplug the power cord. The telephone line should not be reconnected
User’ s Manual
, disconnect the equipment from the telephone line
or the power cord plugged in until the problem is completely resolved. Users
should contact Canon Authorized Service Facilities for servicing of equipment.
Information regarding Authorized Service Facility locations can be obtained by
calling the Canon Computer Systems Customer Care Center. (See page 1-9 for
details.)
iv
Preface
Page 6

RIGHTS OF THE TELEPHONE COMPANY
Should the equipment cause harm to the telephone network, the telephone
company may temporarily disconnect service. The telephone company also
retains the right to make changes in facilities and services which may affect the
operation of this equipment. When such changes are necessary, the telephone
company is required to give adequate prior notice to the user.
WARNING
Do not make any changes or modifications to the equipment unless otherwise
specified in this manual. If such changes or modifications should be made, you
could be required to stop operation of the equipment.
MultiPASS C545: Facsimile Transceiver, Model H12159
This device complies with Part 15 of the FCC Rules. Operation is subject to the
following two conditions:
(1) This device may not cause harmful interference, and
(2) this device must accept an interference received, including interference that
may cause undesired operation.
This equipment has been tested and found to comply with the limits for a class
n
B digital device, pursuant to Part 15 of the FCC Rules. These limits ar e designed
to provide reasonable protection against harmful interference in a residential
installation. This equipment generates, uses and can radiate radio frequency
energy and, if not installed and used in accordance with the instructions, may
cause harmful interference to radio communications. However, there is no
guarantee that interference will not occur in a particular installation. If this
equipment does cause harmful interference to radio or television reception,
which can be determined by turning the equipment off and on, the user is
encouraged to try to correct the interference by one or more of the following
measures:
Preface
Reorient or relocate the receiving antenna.
❑
Increase the separation between the equipment and receiver.
❑
❑
Connect the equipment into an outlet on a circuit different from that to
which the receiver is connected.
Consult the dealer or an experienced radio/TV technician for help.
❑
v
Page 7

Use of shielded cable is required to comply with class B limits in Subpart B of Part
15 of FCC Rules. Do not make any changes or modifications to the equipment
unless otherwise specified in this manual. If such changes or modifications should
be made, you could be required to stop operation of the equipment.
The Telephone Consumer Protection Act of 1991 makes it unlawful for any person
to use a computer or other electronic device to send any message via a telephone
fax machine unless such message clearly contains in a margin at the top or bottom
of each transmitted page or on the first page of the transmission, the date and time
it is sent and an identification of the business or other entity, or other individual
sending the message and the telephone number of the sending machine or such
business, other entity, or individual.
To automatically enter this information into your MultiPASS, follow the
instructions in your
Quick Start Guide
.
vi
Preface
Page 8

Users in Canada
PRE-INSTALLATION REQUIREMENTS FOR CANON FACSIMILE
EQUIPMENT
A. Location
Supply a suitable table, cabinet, or desk. See
dimensions and weight.
B. Order Information
1. Only a single line, touch-tone or rotary telephone set terminated with
a standard 4-pin modular phone plug. (Touch tone is recommended if
available in your area.)
2. Order an RJ11-C modular jack (USOC code), which should be
installed by the phone company. If the RJ11-C jack is not present,
installation cannot occur.
3. Order a normal business line from your telephone compan y’ s business
representative. The line should be a regular voice grade line or
equivalent. Use one line per unit.
DDD (DIRECT DISTANCE DIAL) LINE
-orIDDD (INTERNATIONAL DIRECT DISTANCE DIAL) LINE IF Y OU
COMMUNICATE OVERSEAS
Appendix A
for the unit’s
n
Preface
Canon recommends an individual line following industry standards, e.g. the
2500 (Touch Tone) or 500 (Rotary/Pulse Dial) telephones. A dedicated
extension off a PBX without “Camp On” signals is also permissable with your
MultiPASS. Key telephone systems are not recommended because they send
non-standard signals to individual telephones for ringing and special codes,
which may cause a fax error.
vii
Page 9

NOTICE
C. Power Requirements
The power outlet should be a three-prong grounded receptacle (Single or
Duplex). It should be independent from copiers, heaters, air conditioners
or any electric equipment that is thermostatically controlled. The rated
value is 120 volts and 15 amperes. The RJ11-C modular jack should be
relatively close to the power outlet to facilitate installation.
The Industry Canada label identifies certified equipment. This certification means
that the equipment meets telecommunications networks protective, operational
and safety requirements as prescribed in the appropriate Terminal Equipment
Technical Requirements document(s). The Department does not guarantee the
equipment will operate to the user’s satisfaction.
Before installing this equipment, users should ensure that it is permissible to be
connected to the facilities of the local telecommunications company. The
equipment must also be installed using an acceptable method of connection. The
customer should be aware that compliance with the above conditions may not
prevent degradation of service in some situations.
Repairs to certified equipment should be coordinated by a representative
designated by the supplier. Any repairs or alterations made by the user to this
equipment, or equipment malfunctions, may give the telecommunications
company cause to request the user to disconnect the equipment.
c
n
viii
Users should ensure for their own protection that the electrical ground
connections of the power utility, telephone lines and internal metallic water pipe
system, if present, are connected together. This precaution may be particularly
important in rural areas.
Users should not attempt to make such connections themselves, but should
contact the appropriate electric inspection authority, or electrician, as
appropriate.
This Class B digital apparatus meets all requirements of the Canadian
Interference-Causing Equipment Regulations.
Cet appareil numérique de la classe B respecte toutes les exigences du Règlement
sur le matériel brouilleur du Canada.
Preface
Page 10

The Ringer Equivalence Number (REN) assigned to each terminal device pro vides
an indication of the maximum number of terminals allowed to be connected to a
telephone interface. The termination on an interface may consist of any
combination of devices subject only to the requirement that the sum of the Ringer
Equivalence Numbers of all the devices does not exceed 5. The REN of this
product is 0.3.
CANON CANADA INC.
1-800-263-1121
24 HOURS A DAY, SEVEN DAYS A WEEK
Preface
ix
Page 11

Contents
Chapter 1: Introduction.......................................................................................1-1
Welcome..................................................................................................................1-2
Main Features of the MultiPASS............................................................................1-2
Using the MultiPASS Desktop Manager Software................................................1-3
Hardware and Software Requirements..................................................................1-3
Supplies and Accessories........................................................................................1-4
BJ Cartridges and BJ Tanks................................................................................1-4
Canon Specialty Papers......................................................................................1-6
Using Your Documentation...................................................................................1-7
Type Conventions Used in This Manual...........................................................1-8
Getting Help From Canon.....................................................................................1-9
Servicing the MultiPASS...................................................................................1-10
Important Safety Instructions.............................................................................1-10
Main Components of the MultiPASS..................................................................1-14
Front View.........................................................................................................1-14
Back View..........................................................................................................1-15
Inside View........................................................................................................1-15
Operation Panel................................................................................................1-16
Special Function Buttons.................................................................................1-18
Chapter 2: Paper Handling..................................................................................2-1
Print Media Requirements.....................................................................................2-2
Selecting Print Media.............................................................................................2-3
Print Media Guidelines..........................................................................................2-6
Setting the Paper Thickness Lever.........................................................................2-6
Loading Paper.........................................................................................................2-9
Guidelines...........................................................................................................2-9
Loading Paper in the Multi-Purpose Tray.......................................................2-11
Loading Envelopes................................................................................................2-14
Using Canon’s Specialty Papers...........................................................................2-16
Specialty Paper Guidelines...............................................................................2-16
Printing on High Resolution Paper.................................................................2-18
Printing on Fabric Sheets.................................................................................2-21
Printing on Banner Paper................................................................................2-23
x
Contents
Page 12

Chapter 3: Document Handling..........................................................................3-1
Document Requirements for Faxing, Copying, and Scanning............................3-2
Problem Documents..............................................................................................3-3
Scanned Image Area...........................................................................................3-4
Selecting Automatic/Manual Document Feed......................................................3-5
Loading Documents for Automatic Feed..........................................................3-6
Loading Documents for Manual Feed.............................................................3-11
Copying Documents............................................................................................3-13
Setting the Paper Type for Color Copying..........................................................3-16
Setting the Length of the Bottom Margin for Color Printing............................3-17
Chapter 4: Sending Faxes ...................................................................................4-1
Preparing to Send a Fax.........................................................................................4-2
Adjusting the Quality of Your Faxes..................................................................4-2
Dialing Methods.................................................................................................4-5
Sending Methods....................................................................................................4-6
Memory Sending................................................................................................4-6
Manual Sending..................................................................................................4-8
Canceling Sending................................................................................................4-10
Removing the Document From the Automatic Document Feeder (ADF).......4-11
Redialing When the Line Is Busy.........................................................................4-13
Manual Redialing..............................................................................................4-13
Automatic Redialing.........................................................................................4-13
Sequential Broadcasting.......................................................................................4-15
Sending a Document to More Than One Destination...................................4-15
Documents Stored in Memory............................................................................4-19
Printing a List of Documents in Memory.......................................................4-19
Printing a Document in Memory....................................................................4-20
Deleting a Document From Memory..............................................................4-23
Special Dialing......................................................................................................4-25
Dialing Through a Switchboard......................................................................4-25
Dialing a Long Distance Number....................................................................4-25
Switching Temporarily to Tone Dialing..............................................................4-27
Contents
Chapter 5: Receiving Faxes.................................................................................5-1
Different Ways to Receive a Fax.............................................................................5-2
Receiving Both Faxes and Telephone Calls Automatically:
Fax/Tel Mode ......................................................................................................5-4
Receiving Faxes Manually: MANUAL MODE..................................................5-5
xi
Page 13

Receiving Faxes Automatically: FAX ONLY MODE.........................................5-5
Receiving With an Answering Machine: ANS.MACHINE MODE..................5-5
Receiving Using the Distinctive Ring Pattern Detection
Feature: DRPD....................................................................................................5-6
Receiving in Color..................................................................................................5-8
Receiving While Registering, Copying, or Printing..............................................5-8
Receiving Faxes in Memory When a Problem Occurs..........................................5-9
Canceling Receiving.............................................................................................5-11
Chapter 6: Maintenance .....................................................................................6-1
MultiPASS Guidelines ............................................................................................6-2
Periodic Cleaning...................................................................................................6-3
Cleaning the Outside of the MultiPASS............................................................6-4
Cleaning the Interior of the MultiPASS ............................................................6-4
BJ Cartridges and BJ Tanks..................................................................................6-10
Maintenance.....................................................................................................6-11
Using Ink...........................................................................................................6-12
Testing and Cleaning the BJ Cartridge Print Head.........................................6-13
When to Replace the BJ Cartridge...................................................................6-15
Replacing the BJ Cartridge...............................................................................6-16
Replacing a BJ Tank in the BC-21e Color BJ Cartridge..................................6-22
Storing a BJ Cartridge ......................................................................................6-28
Transporting the MultiPASS................................................................................6-30
xii
Chapter 7: Troubleshooting ................................................................................7-1
If You Cannot Solve the Problem..........................................................................7-2
Clearing Jams..........................................................................................................7-3
Jams in the Automatic Document Feeder (ADF).............................................7-3
Jams in the Multi-Purpose Tray.........................................................................7-5
LCD Messages.....................................................................................................7-6
Printing Problems.............................................................................................7-15
Print Quality Problems........................................................................................7-19
Color Printing and Copying Problems...............................................................7-21
Paper Feeding Problems.......................................................................................7-24
Faxing Problems...............................................................................................7-26
Telephone Problems.........................................................................................7-31
Copying Problems................................................................................................7-32
General Problems.................................................................................................7-33
If the Power Goes Out..........................................................................................7-34
Contents
Page 14

Appendix A: Specifications.................................................................................A-1
Printing Specifications..........................................................................................A-2
BJ Cartridges..........................................................................................................A-5
Facsimile................................................................................................................A-6
Copier ....................................................................................................................A-8
Scanner...................................................................................................................A-9
MultiPASS Desktop Manager Software..............................................................A-12
General Specifications.........................................................................................A-13
Glossary.................................................................................................................G-1
Index.......................................................................................................................I-1
Contents
xiii
Page 15

xiv
Contents
Page 16

Chapter 1
Introduction
This chapter introduces you to your MultiPASS and briefly describes the main
features. It describes the supplies available for use with your MultiPASS, and
explains how to use your documentation.
❑
Welcome.........................................................................................................1-1
❑
Main Features of the MultiPASS ...................................................................1-2
Using the MultiPASS Desktop Manager Software........................................1-3
❑
Hardware and Software Requirements.........................................................1-4
❑
❑
Supplies and Accessories................................................................................1-4
●
BJ Cartridges and BJ Tanks......................................................................1-4
●
Canon Specialty Papers...........................................................................1-5
Using Your Documentation...........................................................................1-7
❑
Type Conventions Used in This Manual ................................................1-8
●
❑
Getting Help From Canon.............................................................................1-9
Servicing the MultiPASS........................................................................1-10
●
Important Safety Instructions.....................................................................1-10
❑
❑
Main Components of the MultiPASS .........................................................1-14
Front View..............................................................................................1-14
●
Back View...............................................................................................1-15
●
Inside View.............................................................................................1-15
●
Operation Panel.....................................................................................1-16
●
Special Function Buttons.......................................................................1-18
●
Introduction
Chapter 1 Introduction
1-1
Page 17
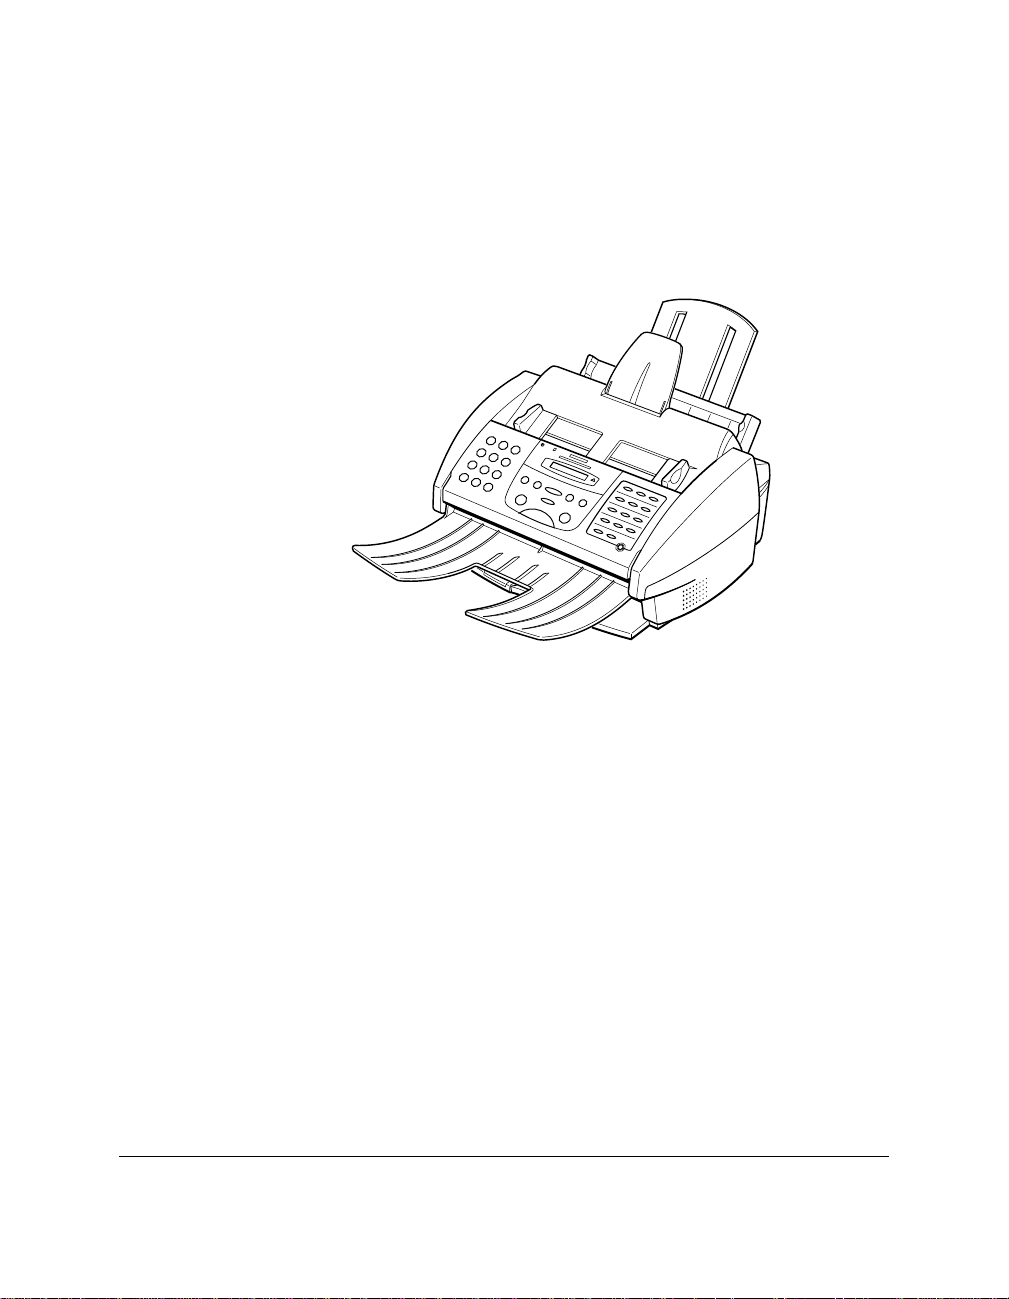
Welcome
Thank you for purchasing the Canon MultiPASS C545—the multi-talented color
printer for your home office and the whole family . We are sure that your MultiPASS
C545 will provide all you need in one machine: Color Bubble Jet printer, plain
paper fax, color copier, and color scanner.
Main Features of the MultiPASS
1-2
The MultiPASS is a complete multifunction system for your home or small office.
The MultiPASS combines the following essential office machines into a single,
convenient desktop unit:
Color Printer
❑
❑
Color Fax Machine
Plain Paper Fax Machine
❑
Color Copier
❑
❑
Color Scanner
In addition, you can attach a telephone and/or an answering machine to your
MultiPASS.
Introduction Chapter 1
Page 18

The multitasking ability of your MultiPASS enables you to perform a number of
operations simultaneously. For example, you can print, scan a document, or make
copies at the same time you are sending or receiving a fax.
The compact size of the MultiPASS makes it ideal for desktop use, and lets you use
it in places where other machines might not fit.
Using the MultiPASS Desktop Manager Software
Canon’s MultiPASS Desktop Manager software package allows you to use or
configure the printing, faxing, scanning, and telephone functions of your
MultiPASS directly from your computer.
For more details on using your MultiPASS with the MultiPASS Desktop Manager
software, refer to the
in Adobe® Acrobat® PDF format on your MultiPASS C545 Installer CD. You can
open the
folder on your hard disk. If you do not have Adobe Acrobat loaded, simply follow
the instructions to load it on your system.
Software Guide
MultiPASS Desktop Manager Software Guide
from your CD or from the MultiPASS Desktop Manager
. This manual is
Hardware and Software Requirements
Before you start, make sure you have the following computer setup. These are the
minimum requirements.
Introduction
❑
Power PC™, iMac, G3 or G4 USB enabled
System 8.5 or later
❑
❑
32MB of RAM (64MB recommended)
75MB of available hard disk space; 150 MB recommended
❑
CD-ROM drive (2x or better)
❑
❑
Color monitor with 256 or more colors and 800 x 600 pixel display
USB-to-Parallel cable (included)
❑
Chapter 1 Introduction
1-3
Page 19

Supplies and Accessories
Your MultiPASS C545 supports ex c ellent and unique print media options that will
allow you to produce dazzling, professional, and fun presentations. All of these
print media are specially designed and manufactured to work with your Canon
MultiPASS so you can produce the finest output possible.
Canon has an extensive dealer network equipped to offer y ou supplies as y ou need
HELP
BJ Cartridges and BJ Tanks
them. To find a dealer near you, call the Canon Referral Service at
1-800-OK-CANON
If supplies are not available from your local dealer, you can order directly from
Canon by calling 1-800-385-2155.
Your MultiPASS comes with:
❑
One BC-21e Color BJ® Cartridge
One SB-21 Ink Cartridge Storage Box
❑
One extra BCI-21 Black BJ Tank
❑
You can also purchase the following BJ cartridge for use with the MultiPASS:
(1-800-652-2666).
1-4
❑
BC-20 Black BJ Cartridge
You can purchase the following BJ tanks for use in the BC-21e Color BJ Cartridge:
❑
BCI-21 Black BJ Tank (one extra BJ tank comes with the printer)
BCI-21 Color BJ Tank
❑
Introduction Chapter 1
Page 20

n
BJ cartridges contain the Bubble Jet print head and ink, while BJ tanks contain ink
only. Some BJ cartridges, like the BC-21e Color BJ Cartridge, contain replaceable
BJ tanks; when you run out of ink, you can replace the empty tank. Some BJ
cartridges, like the BC-20 Black BJ Cartridge, contain both the print head and ink;
when you run out of ink, you replace the entire BJ cartridge. See Chapter 6,
Maintenance
Canon has more engineers dedicated to creating quality ink for providing the
best results for output on Bubble Jet products than any other organization.
Canon does not prohibit the use of third-party inks and the use of third-party
inks does not invalidate the product’s limited warranty. However, Canon cannot
guarantee the quality or performance of your MultiPASS when you are using inks
from other suppliers.
Canon’s limited warranty does not cover damage caused to Canon’s Bubble Jet
products that is attributable to the use of third party parts or supplies, including
inks. The limited warranty remains in effect for its life once that particular
damage has been properly repaired.
For optimum printing results, Canon recommends that you use only Canon ink
cartridges.
, for details on replacing BJ cartridges and BJ tanks.
Introduction
Chapter 1 Introduction
1-5
Page 21

Canon Specialty Papers
Canon manufactures numerous specialty papers, including:
Glossy Photo Paper
❑
❑
Banner Paper
❑
Brilliant White Paper
High Resolution Paper
❑
❑
T-Shirt Transfers
❑
Greeting Cards
Bubble Jet Paper (water resistant)
❑
❑
Transparencies
❑
High Gloss Film
See Chapter 2,
Paper Handling
, for details on Canon’s Specialty Papers.
1-6
Introduction Chapter 1
Page 22

Using Your Documentation
Your MultiPASS includes the following documentation to help you learn how to
use your unit quickly and easily. You can access the online Adobe Acrobat PDF
format manuals either from your MultiPASS C545 Installer CD or from the
MultiPASS Desktop Manager folder on your hard drive.
Quick Start Guide
❑
This foldout sheet describes how to unpack and set up your new MultiPASS
unit. It includes instructions on how to install the software that comes with
the MultiPASS C545, including the MultiPASS Fax Setup Utility, ScanTastic™
for MultiPASS scanning software, the MultiPASS Toolbar, and the MultiPASS
Printer Driver. This software enables you to use all the features of the
MultiPASS C545 —color printing, color copying, faxing, and color scanning.
MultiPASS C545 User’s Manual
❑
This online manual (in Adobe A cr obat format) offers detailed information on
how to operate your new MultiP ASS. It describes how to use the MultiPASS as
a monochrome or color printer and covers the basics on how to send and
receive faxes. It also includes maintenance, troubleshooting, and
specifications.
❑
MultiPASS Desktop Manager Software Guide
This online manual (in Adobe Acrobat format) describes how you use the
MultiPASS Desktop Manager software — the Printer Driver, F ax Setup U tility ,
and ScanTastic for MultiPASS. If you plan to use the scanning features, the
Toolbar, and set up fax preferences with the Fax Setup U tility, you must install
the MultiPASS Desktop Manager software. You can then use the Desktop
Manager software to define and control all of the features of the MultiPASS.
Introduction
❑ Standalone Fax Manual
This online manual (in Adobe Acrobat format) describes how you use the
operation panel on the MultiPASS to control all your faxing and receiving
functions. If you decide not to install and use the M ultiPASS Fax Setup Utility,
you can still use many of the features of the MultiPASS. In this case, you will
define and control the features of the MultiPASS through the operation panel.
Chapter 1 Introduction
1-7
Page 23

Type Conventions Used in This Manual
c
n
Please read the list below of symbols, terms, and abbreviations used in this manual,
and make sure you know what they mean. A c omplete glossary of terms is included
at the end of this manual.
Cautions tell you how to avoid actions that could injure you or damage your
MultiPASS. In order to use your unit safely, always pay attention to these
cautions.
Notes provide advice on using the M ultiPASS more effectively, describe operating
restrictions, and tell you how to avoid minor difficulties. Reading these is
recommended to make the most of your unit and its functions.
default A setting that remains in effect unless you change it.
document or A document or fax is the original sheet(s) of fax
fax paper you send or receive on the unit.
menu A menu is a list of settings or features from which you
select an item to set up or change. A menu has a title which
appears in the LCD display.
d and u buttons The d and u buttons are used to select an item in a menu.
Press d to select the next item, and press u to select the
previous item.
transaction number When you send or receive a document, your unit
automatically assigns the document a unique transaction
number. A transaction number is a four-digit number that
will help you keep track of documents you send and receive.
TX/RX NO. On the LCD display, TX/RX NO. is the abbreviation used
for transaction number.
RX Denotes receiving.
TX Denotes sending.
1-8 Introduction Chapter 1
Page 24

In addition, this manual uses distinctiv e typefaces to identify the buttons you press,
the lights on the operation panel, and any commands you enter at your computer.
❑ The buttons you press appear in this typeface: Start/Scan.
❑ The names of lights you see appear in this typeface: Alarm.
❑ What you see in the LCD display appears in this typeface:
REGISTRATION.
Getting Help From Canon
Canon Computer Systems, Inc. offers a full range of customer technical support*
options including:
❑ 24-hour, 7-day-a-week, toll-free aut omated support for troubleshooting issues
on most current products (1-800-423-2366)
❑ Speak to a technician free of service charge (currently Monday — Friday 8:00
a.m. to 10:00 p.m. and Saturday 12:00 p.m. to 6:00 p.m. EST, excluding
holidays) for products still under warranty** (1-757-413-2848)
❑ Speak to a technician (currently $24.99 per call) during holidays and days/
hours not listed above regarding urgent pr oduct questions or for products no
longer under warranty (1-800-423-2366)
Or for a charge of $2.50 per minute, to a maximum of $25.00 per call
(1-900-246-1200)
❑ To find out about all Canon products and accessories, to download the latest
drivers, and to explore all your technical support options incuding e-mail
support, visit the Canon Computer Systems, Inc. Web site
(www.ccsi.canon.com)
Introduction
❑ 24-hour, toll-free Fax Retrieval System (1-800-526-4345)
❑ To download the latest drivers using your modem, 24-hour Bulletin Board
Service (1-757-420-2000)
❑ Within Canada, 24 hours a day, 7 days a week* (1-800-263-1121)
* Support program specifics subject to change without notice.
** Refer to individual product information for warranty details.
Chapter 1 Introduction 1-9
Page 25

Servicing the MultiPASS
n
The Canon MultiPASS C545 is designed with the latest technology to provide
trouble-free operation. The warranty card that comes with your MultiPASS
describes Canon’s limited warranty. Be sure to read the warranty information to
find out about the different service options available to you.
Save your sales rec eipt for pr oof of purchase. In the ev ent that your printer needs
service, you will need your proof of purchase to obtain warranty service.
Be sure to fill out the Registration card and send it in. This will help Canon give
you better support service.
If you seem to have a problem, try to solve it by referring to the troubleshooting
information in Chapter 7, Troubleshooting. If you cannot solve the problem,
contact the Canon Computer Systems Customer Care Center (see previous page
for details).
If you feel your MultiPASS needs servicing, contact Canon on the World Wide Web
to locate the Canon Authorized Service Facility (ASF) nearest you. If you do not
have access to the Web, you can call Canon (see previous page for details).
Important Safety Instructions
Read these safety instructions thoroughly before using your MultiPASS, and refer
to them later if you have any questions.
❑ Except as specifically described in this manual, do not attempt to service the
MultiPASS yourself. Never attempt to disassemble the unit: opening and
removing its interior covers will expose you to dangerous voltages and other
risks. Refer all servicing to a Canon A uthorized Service Facility (ASF). Call the
Canon Customer Care Center for details.
❑ Follow all warnings and instructions marked on the MultiPASS.
❑ Place the MultiPASS on a level surface. To avoid serious damage from falling,
never place the unit on an unstable cart, stand, or table.
❑ Do not use the MultiPASS near water. Mak e sure that no wet or humid objects
come into contact with the unit.
❑ Do not use or store the unit outdoors.
1-10 Introduction Chapter 1
Page 26

❑ To ensure reliable operation of the MultiPASS and to protect it from
overheating (which can cause it to operate abnormally and create a fire risk),
never block or cover an y openings on the unit by placing it on a bed, sofa, rug,
or other similar surface. Do not place the unit in a closet or built-in
installation, or near a radiator or other heat register unless proper ventilation
is provided.
❑ Only operate the MultiPASS from the type of power source indicated on the
unit’s label. If you are not sure of the type of power available, consult your
dealer or local power company.
❑ The MultiPASS is equipped with a three-prong, grounding-type plug provided
with a third (grounding) pin. This plug will only fit into a grounding-type
outlet. This is a safety feature. If you are unable to insert the plug into your
outlet, contact an electrician to replace your outlet. Do not defeat the safety
purpose of the grounding-type plug by breaking off the third prong or using a
3-to-2 adapter.
❑ Do not allow anything to rest on the power cord, and do not locate the unit
where the cord will be walked on. M ak e sure the c or d is not knotted or kink ed.
❑ If you use an extension cord with the MultiPASS, make sure that the total of
the ampere ratings on the products plugged into the extension cord does not
exceed the extension c ord amper e rating. Also mak e sure that the total amper e
rating of all products plugged into the wall outlet does not exceed the current
amperage of the circuit breaker.
Introduction
❑ Do not push objects of any kind into the slots or openings on the cabinet as
they may touch dangerous voltage points or short out parts. This could result
in fire or electric shock.
❑ Do not allow small objects (such as pins, paper clips, or staples) t o fall into the
MultiPASS. If something does fall into it, unplug the unit immediately and call
the Canon Customer Care Center.
❑ To avoid spillage in or around the unit, do not eat or drink near the unit. If you
spill liquid or if any substance falls into the unit, immediately unplug the unit
and call the Canon Customer Care Center.
❑ Always unplug the MultiPASS before moving or cleaning it.
❑ Whenever you unplug the MultiPASS, wait at least five seconds before you
plug it in again.
❑ During electrical storms, disconnect the power cord from the power outlet.
(Please note that any documents stored in the unit’s memory will be deleted
when you unplug the unit.)
Chapter 1 Introduction 1-11
Page 27
❑ Do not install the MultiPASS near devices that contain magnets or generate
magnetic fields, such as speakers.
❑ Do not stack boxes or furniture around the power outlet. Keep the area open
so you can reach the outlet quickly. If you notice anything unusual (smoke,
strange odors, noises) around the MultiPASS, unplug the unit immediately
and call the Canon Customer Care Center.
❑ To avoid paper jams, never unplug the power cord, open the printer cover, or
remove paper from the multi-purpose tray while printing.
❑ Keep the M ultiPASS away from direct sunlight, as this may damage the unit. I f
you have to place it near a window, install heavy curtains or blinds.
❑ Locate the MultiPASS in a cool, dry, clean, well ventilted place. Do not expose
the MultiPASS to extreme temperature fluctuations. Install the unit in a place
with temperatures in the 50°–90.5°F (10°–32.5°C) range.
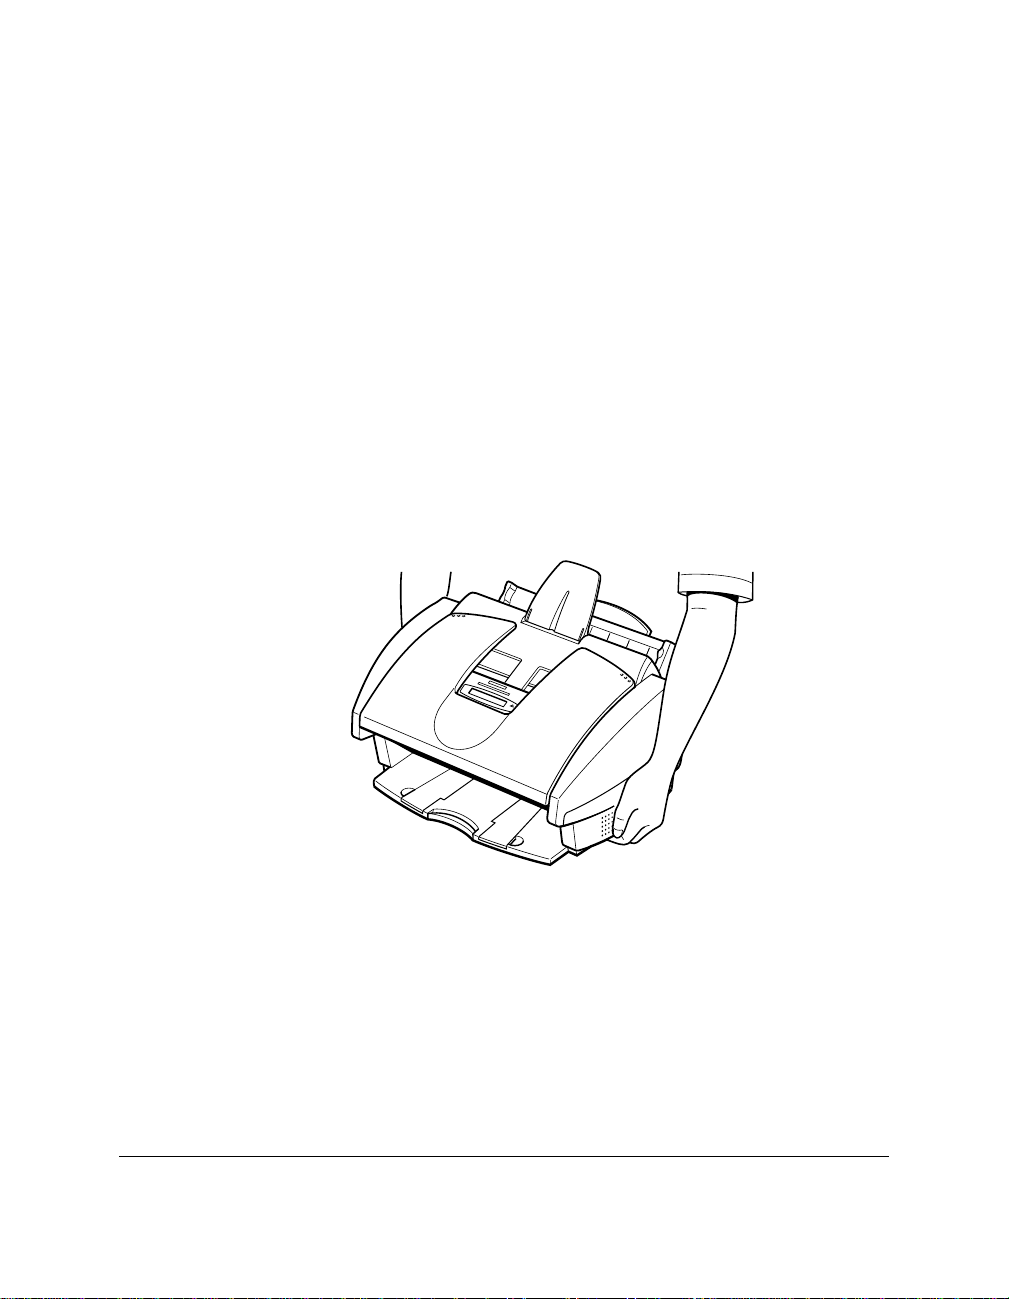
❑ Always lift the MultiPASS as shown below. Never lift it by its multi-purpose
tray, document support, or document tray.
1-12 Introduction Chapter 1
Page 28

❑ Unplug the MultiPASS from the wall outlet and refer service to qualified
c
personnel under the following conditions:
● When the power cord or plug is damaged or frayed.
● If liquid has spilled into the unit.
● If the unit has been exposed to rain or water.
● If the unit does not operate normally when you have followed the
instructions in this manual. Adjust only those controls that are covered by
the operating instructions in this manual. Improper adjustment of other
controls may result in damage and may require extensive work by a
qualified technician to restore the product to normal operation.
● If the unit has been dropped or the cabinet has been damaged.
● If the unit exhibits a distinct change in performance, indicating a need for
service.
❑ Plug the MultiPASS into a standard 120 V AC pow er outlet. Do not att empt to
use it outside of the country where you purchased it.
❑ Do not plug the MultiPASS into the same circuit as an appliance such as an air
conditioner, electric typewriter, television, or copier. Such devices generate
electrical noise that can interfere with your MultiPASS sending and receiving
faxes.
❑ Check the plug frequently and make sure that it is firmly plugged into the
socket.
● This product emits low level magnetic flux.
● If you use a cardiac pacemaker and feel abnormalities, please move away
from this product and consult your doctor.
Introduction
Chapter 1 Introduction 1-13
Page 29

Main Components of the MultiPASS
Before using your MultiPASS, take a few moments to look over the unit and
become familiar with its components.
Front View
AUTOMATIC DOCUMENT FEEDER (ADF)
AND PRINTER COVER
Holds documents to be scanned.
PAPER GUIDE
Keeps print media in position.
Adjust to the width of the print
media.
DOCUMENT GUIDES
Keep the document in
position when being
scanned. Adjust to the
width of the document.
DOCUMENT TRA Y
When open, holds scanned
documents as they exit the
MultiP ASS . When closed,
serves as a cover for the
operation panel.
DOCUMENT SUPPORT
Holds documents as they
feed into the Automatic
Document Feeder (ADF).
PAPER REST
Supports print media
stacked in the multi-purpose
tray.
MUL TI-PURPOSE TRAY
Holds plain paper and
other print media.
OPERATION PANEL
Use to control the
MultiPASS.
OUTPUT TRA Y
Holds printed pages as
they exit the MultiPASS.
PAPER OUTPUT GUIDES
Hold high resolution paper
when using the BC-22e
Photo BJ cartridge. Also
hold banner paper.
OUTPUT TRA Y EXTENSION
Holds printed pages as they
exit the MultiPASS.
1-14 Introduction Chapter 1
Page 30
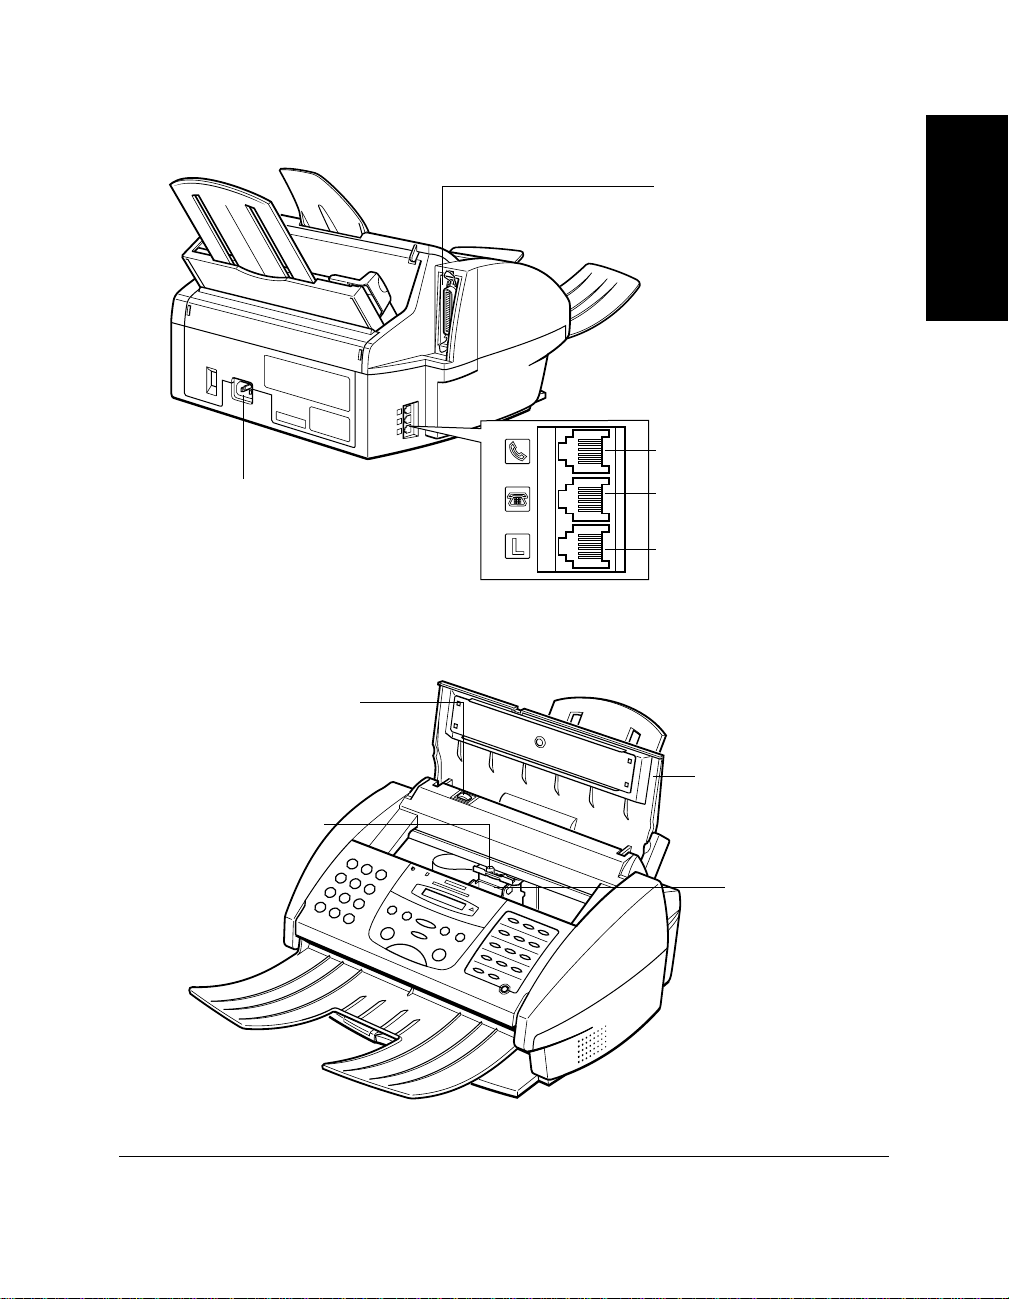
Back View
POWER CORD
CONNECTOR
Inside View
(CARTRIDGE) BUTTON
Press this button to move
the cartridge holder to its
center position for
installing or replacing the
BJ cartridge or BJ tank.
PARALLEL INTERFACE
PORT
Introduction
TELEPHONE/ANSWERING
MACHINE JACK
DATA MODEM JACK
TELEPHONE LINE JACK
PRINTER COVER
P APER THICKNESS
LEVER
Adjust for the
type of print
media you
are using.
CARTRIDGE
HOLDER
Chapter 1 Introduction 1-15
Page 31

Operation Panel
DOCUMENT FEED LEVER
1
Color/B&W BUTTON
2
LCD DISPLAY
3
4
Receive Mode BUTTON
Alarm LIGHT
5
6
ONE-TOUCH SPEED
DIALING/SPECIAL
FUNCTION BUTTONS
ABC DEF
1
GHI JKL MNO
45
TUV WXY
PRS
7
OPER
Tone
7
NUMERIC BUTTONS
8
Redial/Pause BUTTON
9
Hook BUTTON
Coded Dial BUTTON
10
1
2
2
3
6
8
9
SYMBOLS
0#
Redial /Pause
Hook
MultiPASS C545
Coded Dial
Color / B&W
Resolution
Start / Scan
Receive Mode
12
11
Start/Scan BUTTON
Alarm
Copy
Stop
Resolution BUTTON
01 02 03
Data Registration
04 05 06
Memory Reference
07
Report
10 11 12
Cleaning
Function
14
Copy BUTTON
Stop BUTTON
13
Space
+
09
08
Clear
Set
Resume
Document Feed Lever
Sets the Aut omatic Document F eeder (ADF) to a (automatic document feed)
for feeding multipage documents, or to B (manual document feed) for
feeding single sheets.
Color/B&W Button
Sets the unit for color or black & white transmission or copying. For color
transmission or color copying, press this button to turn on its light.
LCD Display
3
Displays messages and prompts during operation, and displays selections,
text, numbers, and names when registering information.
Receive Mode Button
4
Selects the receive mode.
1-16 Introduction Chapter 1
Page 32

Alarm Light
5
Flashes when an error occurs, or when the MultiPASS is out of paper or ink.
One-Touch Speed Dial/Special Function Buttons
6
Dial fax/telephone numbers registered for one-touch speed dialing. Also used
to perform special functions.
Numeric Buttons
7
Enter numbers when dialing or registering numbers. Also enter letters when
registering names.
Redial/Pause Button
8
Redials the last number that was dialed using the numeric buttons (regular
dialing). Also enters pauses between or after the telephone/fax number when
dialing or registering numbers.
Hook Button
9
Engages or disengages the telephone line.
Coded Dial Button
10
Press this button and a two-digit code to dial a fax/t elephone number that you
have registered for coded speed dialing.
Start/Scan Button
11
Starts sending, receiving, scanning, and copying.
Introduction
Resolution Button
12
Selects the resolution the MultiPASS uses for the document you are sending or
copying.
Stop Button
13
Cancels sending, receiving, registering data, copying and other operations,
and returns the MultiPASS to standby mode.
Copy Button
14
Sets the MultiPASS to make copies.
Chapter 1 Introduction 1-17
Page 33

Special Function Buttons
01 02 03
Data Registration
04 05 06
08
Space
+
09
Memory Reference
07
Report
10 11 12
Cleaning
Function
Clear
Set
Resume
❑ Data Registration Button
Accesses the different menus for setting speed dialing, user preferences,
sending and receiving options, and many other important settings.
❑ d u Buttons
Scroll through the settings so you can see other selections in the menus during
data registration.
❑ Memory Reference Button
Performs operations with documents currently stored in memory, including
printing a list of documents, printing a document, and deleting a document.
❑ Space Button
Enters a space between letters and numbers when registering information.
❑ + Button
Enters a plus sign (+) when registering your unit telephone/fax number.
1-18 Introduction Chapter 1
Page 34

❑ lr Buttons
Move the cursor left or right when registering data.
❑ Report Button
Prints reports containing information registered in the unit and information
on transactions.
❑ Cleaning Button
Prints the nozzle check and performs cleaning operations for the BJ cartridge
print head and unit rollers.
❑ Clear Button
Clears an entire entry when registering information.
❑ Function Button/Light
Accesses the special function buttons. To use the special function buttons,
press this button to turn on its light. To use the one-touch speed dialing
buttons, press to turn off its light.
❑ Set Button
Selects a menu setting and registers information during data registration.
❑ Resume Button
Form-feeds paper when printing, and resumes printing after an error is
corrected.
Introduction
Chapter 1 Introduction 1-19
Page 35

1-20 Introduction Chapter 1
Page 36

Chapter 2
Paper Handling
This chapter describes how to select, pr epare, and load print media for the different
functions your MultiPASS can perform.
❑ Print Media Requirements............................................................................2-2
❑ Selecting Print Media.....................................................................................2-3
❑ Print Media Guidelines..................................................................................2-6
❑ Setting the Paper Thickness Lever.................................................................2-6
❑ Loading Paper................................................................................................2-9
● Guidelines.................................................................................................2-9
● Loading Paper in the Multi-Purpose Tray............................................2-11
❑ Loading Envelopes.......................................................................................2-14
❑ Using Canon’s Specialty Papers...................................................................2-16
● Specialty Paper Guidelines....................................................................2-16
● Printing on High Resolution Paper.......................................................2-18
● Printing on Fabric Sheets......................................................................2-21
● Printing on Banner Paper......................................................................2-23
Paper Handling
Chapter 2 Paper Handling 2-1
Page 37

Print Media Requirements
You can stack the following media in the multi-purpose tray.
Type Size Weight Capacity
Plain paper
20 lb. (75 g/m2)
paper
Envelopes U.S. Commercial
Glossy photo
paper
Banner paper Max. 66 in.
Brilliant White Paper Letter Approx. 100 sheets
High resolution
paper
T-shirt Transfers Letter 1 sheet
Greeting Cards Regular, half-fold 1 card
Bubble Jet paper A4, Letter Approx. 100 sheets
Letter
(8.5 x 11 in.)
Legal
(8.5 x 14 in.)
A4
(210 x 297 mm)
(9.5 x 4.1 in.)
European DL
(220 x 110 mm)
A4, Letter 1 sheet
(1676 mm)
A4, Letter Approx 10 sheets
17–24 lb.
17–24 lb.
17–24 lb.
No. 10 10 envelopes
Approx. 100 sheets
(Max. 0.4 in./10 mm stack)
Approx. 100 sheets
(Max. 0.4 in./10 mm stack)
Approx. 100 sheets
(Max. 0.4 in./10 mm stack)
10 envelopes
1 sheet (2 to 6 long)
(Max. 0.4 in./10 mm stack)
Transparencies A4, Letter 50 sheets
High gloss film A4, Letter 1 sheet
For specifications on the printable area of papers and envelopes, see Appendix A,
Specifications.
2-2 Paper Handling Chapter 2
Page 38

Selecting Print Media
This section describes the different print media you can use with your MultiPASS.
To achieve the best possible printing performance, be sure to select the correct
print media.
Be sure to test print media before purchasing a large quantity. If you have any
n
questions on whether a particular medium is suitable for your MultiPASS, please
contact your local Canon dealer.
Plain Paper
The MultiPASS supports paper sizes of letter, legal, and A4 in portrait orientation.
You can use regular copier paper, cotton bond paper, and typical letterhead. Your
unit does not require special ink jet paper, and produces letter quality print on
most plain bond paper, including cotton bond and photocopy paper. Always use
paper without curls, folds, staples, or damaged edges. Copier paper has a preferred
side for printing. Look at the label on the package to see which side to print on.
Envelopes
The MultiPASS can print on U.S. Commercial No. 10 envelopes and European DL
envelopes.
The following envelopes are not recommended because they may cause jams or
smears, or may damage your unit:
Paper Handling
❑ Envelopes with windows, holes, perforations, cutouts, and double flaps.
❑ Envelopes made with special coated paper or deeply embossed paper.
❑ Envelopes using peel-off sealing strips.
❑ Envelopes in which letters have been enclosed.
You may be able to stack envelopes of other sizes in the multi-purpose tray.
n
Chapter 2 Paper Handling 2-3
However, Canon cannot guarantee consistent performance on envelope sizes
other than U.S. Commercial No. 10 or European DL.
Glossy Photo Paper
Canon Glossy Photo Paper is a high gloss, thick paper that produces the look and
feel of a photograph.
Page 39

Banner Paper
This paper is specifically designed for printing one continuous sheet in a banner
format. The connected sheets are di vided by a perforation. You can print from two
to six sheets at one time. Canon’s Banner Paper is specially designed for use with
Bubble Jet printers and to produce bright and vivid color images.
Brilliant White Paper
Canon’s unique paper formulation gives you a bright white printing surface that
produces incredibly brilliant colors and dark, crisp black text. This paper works
great for proposals, color presentations, color charts/graphs, flyers, and
newsletters. You can print on both sides of the sheet.
High Resolution Paper
Canon High Resolution Paper is designed to produce near-photographic quality
print output with sharp and vivid graphics. W hen using this paper , be sure to print
on the whiter side of the sheets, and after printing a pack of this paper, use the
cleaning sheet provided with it to clean the unit’s rollers.
T-Shirt Transfers
Use Canon’s popular T-Shirt Transfers to create and personalize T-shirts,
sweatshirts, aprons, tablecloths, napkins, tote bags, and anything else your
imagination allows! Use on any cotton or cotton/poly blend fabric. Your image is
printed in mirror image (when you select T-Shirt Transfer for the Media Type in
the MultiPASS printer driver) so when you iron it on the T-shirt, the image is
viewed correctly.
Greeting Cards
Get the most out of your Canon Creative or other card-making software with
Canon Greeting Cards. These cards give your unique, personalized cards the look
and feel of professional cards. You can create cards, invitations, announcements,
and more. The cards come in regular size and half-fold.
Bubble Jet Paper (water resistant)
Canon Bubble Jet Paper has been dev eloped for high quality printing with minimal
or no smearing or running when in contact with water or damp surfaces, making it
a good choice for damp environments. Images printed on this paper are bright and
vivid and will not run if liquid is spilled on them. This paper also stands up to
normal office highlighters, unlike images printed on other paper. The paper is
specially coated and printable on both sides.
2-4 Paper Handling Chapter 2
Page 40

Transparencies
Canon Transparencies are recommended. These transparencies produce excellent
contrast, sharpness, and color to produce crisp and professional overhead
presentations. Do not use normal transparencies in the MultiPASS, as they do not
absorb ink and may cause ink to run.
High Gloss Film
The Canon High Gloss Film features a bright white finish that lends striking visual
power to charts, graphs, and photographic images. It creates a sharper and more
vivid color output than is possible with coated paper. Use of this film gives your
presentation materials and graphics a professional look. This film provides the best
color print quality for the BC-21e Color BJ Cartridge and is recommended when
printing at 720
× 360 dpi.
Assorted Paper Starter Kit
If you would like to try some of the papers described above, look for Canon’s
Starter Kit. It contains an assortment of five paper types.
Paper Handling
Chapter 2 Paper Handling 2-5
Page 41

Print Media Guidelines
c
Follow these guidelines when selecting or loading print media:
❑ Attempting to print on damp, curled, wrinkled, or torn print media can cause
jams and poor print quality.
❑ Use cut-sheet paper only. You cannot use multipart paper.
❑ When using graph paper, the lines may not match because the 1/6-inch (4
mm) line spacing of the printer is slightly less than that of graph paper.
❑ If the print density of your page is very high, light paper stock may curl slightly
due to the large amount of ink. If you need to print dense graphics, try
printing on heavier stock.
❑ Do not use thicker paper than meets the specifications for this unit. Printing
with paper that is thick enough to come in contact with the print head nozzles
may damage the BJ cartridge.
❑ Many media have a “right” side for printing. If you are using such a medium,
make sure you set it in the multi-purpose tray with the print side facing
upward.
Setting the Paper Thickness Lever
Before loading paper or other print media in the multi-purpose tray, set the paper
thickness lever. The paper thickness lever adjusts the gap between the print head
and the print paper to suit the paper’s thickness.
Set to the left (m) for paper and most other print media.
❑ Set to the right (A) for envelopes.
❑ If the paper thickness lever is not set correctly before printing, smudging and
poor print quality may result.
If the paper thickness lever is not set correctly before printing, smudging and
n
2-6 Paper Handling Chapter 2
poor print quality may result.
To avoid paper jams, smearing, and other problems, never open the printer
cover to set the paper thickness lever while the MultiPASS is printing.
Page 42

Set the paper thickness lever as follows:
1. Open the document tray.
2. If the printer cover does not open easily, slide the document guides outward
and then open the printer cover.
❑ Open the printer cover by grasping the document guides and lifting.
Paper Handling
DO NOT TOUCH THE
ROUND SHAFT
DO NOT TOUCH THE
GUIDE RAIL
DO NOT TOUCH THE
RIBBON CABLE
Chapter 2 Paper Handling 2-7
Page 43

3. Press the cartridge button .
c
❑ The cartridge holder moves to the center of the unit.
Do not try to manually move or stop the cartridge holder as this may damage the
MultiPASS.
4. Set the paper thickness lever.
❑ Set to the left ( m ) for paper and most other print media.
❑ Set to the right (A) for envelopes.
C
In
a
B
rtridg
k
C
C
l-
e
o
2
lo
1
M
ade in
r
Japan
C
I
a
n
BC
r
k
tr
i
B
d
l-21
g
lack
e
M
a
J
d
a
e
p
a
i
n
n
5. Press the cartridge button .
❑ The cartridge holder moves to its home position on the right side of the
unit.
2-8 Paper Handling Chapter 2
Page 44

Do not try to manually move or stop the cartridge holder as this may damage the
c
MultiPASS.
6. Close the printer cover.
7. Close the document tray.
Loading Paper
You can stack paper in the multi-purpose tray to feed it automatically into the
MultiPASS.
Certain environmental conditions, such as extreme temperatures or humidity,
n
Guidelines
can cause some print media to feed incorrectly in the multi-purpose tray. If you
have trouble with print media becoming skewed or multiple sheets being fed, do
not stack them in the multi-purpose tray, but feed them one sheet at a time.
When automatically feeding a stack of paper in the multi-purpose tray, follow
these guidelines:
Paper Handling
❑ To avoid paper jams and poor print quality, never try to print on damp,
curled, wrinkled, or torn paper.
❑ Do not try to load paper into the multi-purpose tray beyond the paper limit
❑ Make sure there ar e no gaps between the stack of paper and the paper guide or
Chapter 2 Paper Handling 2-9
D
mark ( ) or beyond the tabs on the multi-purpose tray. Stacking too much
paper may cause paper feeding or printing problems.
the right side of the multi-purpose tray.
Page 45

NO GAP HERE NO GAP HERE PAPER LIMIT MARK
❑ Do not leave paper stacked in the multi-purpose tray for long periods of time;
longer sheets of paper may become bent or curled over time. This may cause
the paper to misfeed or jam.
❑ Depending on the density of your printed pages, the ink may need time to dry.
Within two or three seconds, the ink becomes smudge resistant. After drying
for several minutes, the ink becomes water resistant.
❑ If your printed page contains a large amount of graphics, the ink on the page
may be damp due to the print density. Leave the page in the output tray for 30
to 60 seconds to allow the ink to dry. Then remove the page being careful not
to touch the document tray (if it is open). Should you dirty the document tray
when removing the page, wipe it clean with a clean, soft, lint-free cloth
moistened with water or diluted dishwashing detergent solution.
❑ The capacity of the paper output tray is 50 sheets of paper. To reduce paper
jams, remove paper from the output tray before the count reaches 50.
❑ If paper curls after printing, remove it immediately; otherwise paper jams may
occur.
❑ The platen (a roller on the inside of the unit) may become inked if you print
data beyond the width of the page. If this happens, clean the platen with a soft
cloth (see page 6-6).
❑ Let the paper run out before you refill the multi-purpose tray. Avoid mixing
“new” paper with paper remaining in the tray.
❑ Use cut-sheet paper only, not paper that comes on a roll.
❑ Do not use paper that is thicker than specified for the MultiPASS. Printing
with paper that is thick enough to come in contact with the print head nozzles
may damage the BJ cartridge.
2-10 Paper Handling Chapter 2
Page 46

❑ Store paper and other media on a flat surface, and leave it in its wrapper until
c
you are ready to use it. Store unused paper from opened packs in the original
packing in a cool, dry location.
❑ Store paper at 64.4°–75.2°F (18°–24°C), 40%–60% relative humidity.
Loading Paper in the Multi-Purpose Tray
1. Make sure the paper thickness lever is set to the left m (see page 2-6).
C
Ink
a
BCl-21
rt
rid
Color
g
e
M
ad
J
a
e
p
i
a
n
n
C
I
a
n
B
r
k
t
r
C
i
B
d
l
g
-2
la
e
M
c
1
a
k
J
d
a
e
p
a
i
n
n
To avoid paper jams, smearing, and other problems, never open the printer
cover to set the paper thickness lever while the MultiPASS is printing.
Paper Handling
2. Pull the paper rest up until it stops.
Chapter 2 Paper Handling 2-11
Page 47

3. Move the paper guide to the left to match the size of your paper.
4. Prepare a stack of paper by fanning the edge that will feed into the unit first,
and then tapping the stack on a flat surface to even its edges.
2-12 Paper Handling Chapter 2
Page 48

5. Insert the stack into the multi-purpose tray until it stops, so that the right edge
of the stack is aligned with the right side of the multi-purpose tray.
❑ The multi-purpose tray holds up to 100 sheets of plain paper — 20 lb. (75
g/m2) paper.
Paper Handling
Make sure the top of the stack is below the paper limit mark ( ).
D
n
6. Slide the paper guide snugly against the left edge of the stack.
The MultiPASS is now ready to print.
Chapter 2 Paper Handling 2-13
Page 49

Loading Envelopes
c
You can stack up to 10 envelopes in the multi-purpose tray to feed them
automatically into the MultiPASS.
1. Make sure the paper thickness lever is set to the right A (page 2-6).
To avoid paper jams, smearing, and other problems, never open the printer
cover to set the paper thickness lever while the MultiPASS is printing.
C
In
a
B
rtri
k
C
d
C
g
l-
e
o
2
l
1
Made in
o
r
Japan
C
I
a
n
B
r
k
t
ri
C
B
d
l
g
-
l
e
a
2
M
c
1
a
k
J
d
a
e
p
a
i
n
n
2. Arrange the stack of envelopes on a firm, clean surface, and press down firmly
on the edges to make the folds crisp.
❑ Press all the way around the envelopes to remove any curls and expel air
from inside the envelopes. Also, pr ess firmly on the ar ea that c orresponds
to the edges of the flap.
FLAP
2-14 Paper Handling Chapter 2
Page 50

3. Remove any curling from the envelopes by holding the edge of the envelopes
diagonally and bending them gently.
4. Make sure the flaps of the envelopes are flat and not curled.
FLAP
5. Insert the stack of envelopes into the multi-purpose tray until it stops, so that
the right edge of the stack is aligned with the right side of the multi-purpose
tray. Then slide the paper guide snugly against the left edge of the stack.
❑ Insert the envelopes with the print side up.
❑ Feed the top of the envelope (return address portion) into the multi-
purpose tray first.
❑ Make sure the back flap is toward the multi-purpose tray.
Paper Handling
The MultiPASS is now ready to print envelopes.
Chapter 2 Paper Handling 2-15
Page 51

Using Canon’s Specialty Papers
This section provides guidelines for printing on Canon’s specialty papers and
describes special procedures required for high resolution paper, fabric sheets, and
banner paper.
Specialty Paper Guidelines
Be sure to read any instructions that come with your Canon specialty paper.
n
These instructions provide important information regarding how to achieve the
highest print quality with these papers.
Follow these guidelines:
❑ When feeding transparencies, remove each sheet after it is delivered, being
careful not to touch the document tray. Do not allow transparency sheets to
stack up in the output tray. (Should you dirty the document tray when
removing the sheets, wipe the document tray clean with a clean, soft, lint-free
cloth moistened with water or diluted dishwashing detergent solution.)
❑ Let the printed sheets of transparency or paper dry completely before storing
them.
Paper Type Drying Time
Canon High Gloss Film 10 minutes
Canon Glossy Photo Paper 10 minutes
Canon Transparencies 15 minutes
❑ When your output has dried completely, cover its printed side with a sheet of
plain (not coated) paper before storing it; this is recommended even if you
place the sheets of film in a clear file or plastic holder.
2-16 Paper Handling Chapter 2
Page 52

❑ When loading transparencies, insert one sheet of plain paper as the last sheet
in the stack.
❑ Do not leave film in the multi-purpose tray for long periods of time. Dust and
dirt may accumulate on the film resulting in spotty printing.
❑ To avoid smudging caused by fingerprints, use a pair of thin cloth gloves while
loading and handling film.
❑ To avoid fading, do not expose printed film to prolonged sunlight.
❑ Store unused papers and films flat. Do not remove papers from their
protective packaging until you are ready to use them.
❑ Store unused film at temperatures between 59° and 86°F (15° and 30°C). The
relative humidity should be between 10% and 70%.
Printing on High Resolution Paper
To load High Resolution Paper in the MultiPASS, follow the same procedure as for
loading paper in the multi-purpose tray (see page 2-11). However, before printing,
be sure to raise the paper output guides, as described below.
After using a package of High Resolution Paper, be sure to perform the cleaning
operation described on page page 2-18.
Paper Handling
Using the Paper Output Guides
When printing on High Resolution Paper or Banner Paper, use the guides on the
paper output tray to help support the printed sheet as it exits the unit. This will
keep the sheet from sagging and pulling through the unit as it exits, which can lead
to poor print quality.
Chapter 2 Paper Handling 2-17
Page 53

n
n
1. Raise both paper output guides to a vertical position.
Always raise both paper output guides.
2. When you finish printing on High Resolution Paper or Banner Paper, lower
the paper output guides.
Always lower the paper output guides when using the MultiPASS as a fax
machine; in the raised position they can cause the faxes to pile up and jam.
Using the Cleaning Sheet
Canon’s High Resolution P aper is designed for high quality printing. This paper is
specially coated to produce delicate color output.
After using a package of High Resolution Paper (200 sheets) you need to use
the cleaning sheet, provided with the paper, to remove paper dust from the unit’s
rollers; this will help prevent paper feed problems.
1. Make sure the paper thickness lever is set to the left m (see page 2-6).
2-18 Paper Handling Chapter 2
Page 54

C
c
In
a
B
rt
k
rid
C
C
g
l
-2
e
o
lo
1
Made in
r
Japan
C
I
a
n
B
r
k
t
rid
C
B
l
g
-
l
e
a
2
M
c
1
a
k
J
d
a
e
p
a
i
n
n
To avoid paper jams, smearing, and other problems, never open the printer
cover to set the paper thickness lever while the MultiPASS is printing.
2. Remove the covers from the two pieces of tape on the cleaning sheet.
3. With the sticky side out (toward you) and do wn (going into the multi-purpose
tray), insert the sheet into the multi-purpose tray until it stops, so that the
right edge of the sheet is aligned with the right side of the multi-purpose tray .
Then slide the paper guide snugly against the left edge of the cleaning sheet.
Paper Handling
Chapter 2 Paper Handling 2-19
Page 55
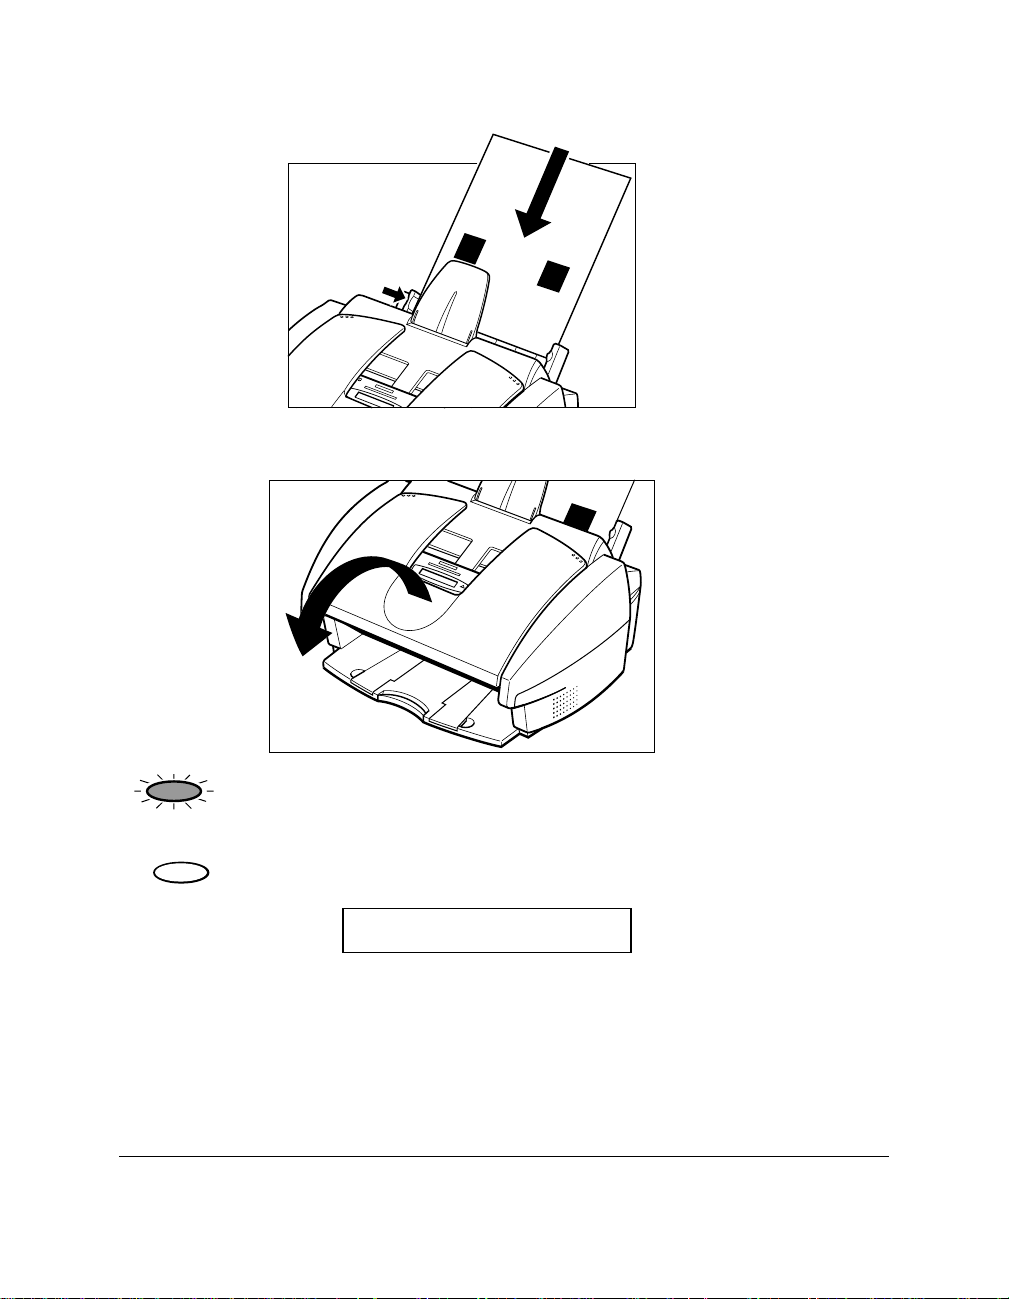
4. Open the document tray.
.
Function
5. Press Function.
10
6. Press Cleaning.
Cleaning
NOZZLE CHECK
2-20 Paper Handling Chapter 2
Page 56

08
7. Use d or u to select ROLLER CLEANING.
02
ROLLER CLEANING
Set
8. Press
Set.
The MultiPASS feeds the cleaning sheet into the MultiPASS and cleans the
rollers.
Printing on Banner Paper
Banner paper is a continuous sheet of paper with perforations at equal distances
along its length, where it can be cut to the length required. For best results, use
Canon’s Banner Paper.
To set up a print job on banner paper, you must decide on the number of sheets
you need. The banner can be a maximum of five actual printed pages (for a total of
six pages, including the first sheet on which the banner cannot be printed).
● Always leave an extra sheet at the end of the banner — just in case the type
n
runs over.
● Printing on banner paper requires quite a bit of ink. If you think your BJ
cartridge may run out of ink, use a new BJ cartridge.
● For best print results on banner paper, use light design patterns.
● To prevent ink from running over the edges of the sheet, print within the
margins (see page A-4).
Paper Handling
Chapter 2 Paper Handling 2-21
Page 57

1. Place the MultiP ASS near the edge of a table so that the paper can flow ov er the
c
edge as it exits the unit.
❑ Make sure the paper rest is extended.
2. Make sure the paper thickness lever is set to the left m (see page 2-6).
C
Ink
a
BCl-21
rtrid
Color
g
e
M
a
de
J
a
pa
in
n
C
I
a
n
B
r
k
t
r
C
i
B
d
l
g
-2
la
e
M
c
1
a
k
J
d
a
e
p
a
i
n
n
To avoid paper jams, smearing, and other problems, never open the printer
cover to set the paper thickness lever while the MultiPASS is printing.
2-22 Paper Handling Chapter 2
Page 58

3. Raise both paper output guides to a vertical position.
4. Cut the banner paper along one of the perforations to the length required.
❑ Your banner can be up to six sheets (66 inches/1676 mm) long.
Paper Handling
5. Place the banner paper behind the unit on a flat surface.
6. Gently fold along the perforations between the first and second sheets.
Chapter 2 Paper Handling 2-23
Page 59

7. Insert the first sheet into the multi-purpose tray until it stops, so that the right
edge of the sheet is aligned with the right side of the multi-purpose tray.
❑ Make sure the sheets behind the unit are aligned with the multi-purpose
tray.
2-24 Paper Handling Chapter 2
Page 60

8. Slide the paper guide against the left edge of the sheet, leaving a 0.04 inch (1
mm) gap between the paper guide and the edge of the sheet.
❑ Make sure the sheet is under the tabs on the multi-purpose tray.
9. Your MultiPASS is now ready to print. Set your Macintosh to print on the
banner paper.
❑ Allow the paper to flow over the edge of the table as it exits the M ultiPASS.
Paper Handling
Chapter 2 Paper Handling 2-25
Page 61

2-26 Paper Handling Chapter 2
Page 62

Chapter 3
Document Handling
This chapter gives details on the requirements for documents you can feed into
your MultiPASS. Whether you are faxing, copying, or scanning a document, read
this chapter carefully for information on the types of documents you can feed, and
instructions on loading documents for your specific needs. This chapter also
describes how to use your MultiPASS to make copies.
❑ Document Requirements for Faxing, Copying, and Scanning....................4-2
● Problem Documents................................................................................4-3
● Scanned Image Area.................................................................................4-4
❑ Selecting Automatic/Manual Document Feed.............................................4-5
● Loading Documents for Automatic Feed...............................................4-6
● Loading Documents for Manual Feed..................................................4-11
❑ Copying Documents....................................................................................4-13
❑ Setting the Paper Type for Color Copying..................................................4-16
❑ Setting the Length of the Bottom Margin for Color Printing...................4-17
Document
Handling
Chapter 3 Document Handling 3-1
Page 63

Document Requirements for Faxing, Copying, and Scanning
The documents you feed into the Automatic Document Feeder (ADF) for faxing,
copying, and scanning must meet the following requirements.
When the document feed lever is set for automatic document feed
Size:
(W x L)
Quantity: Up to 20 letter-size, 20 A4-size, or 10 legal-size sheets
Thickness: 0.003 to 0.005 in. (0.08 to 0.13 mm)
Weight: 20 to 24 lb. (75 to 90 g/m2)
When the document feed lever is set for manual document feed
Size:
(W x L)
Quantity: 1 sheet
Thickness: 0.003 to 0.017 in. (0.08 to 0.43 mm)
Weight: 24 to 90.7 lb. (90 to 340 g/m2)
Maximum: 8.5 x Approx. 39 in. (216 mm x Approx. 1 m)
Minimum: 8.27 x 5.83 in. (210 x 148 mm)
1 sheet for sizes other than the above
20 lb (75 g/m2) paper
All sheets should be of the same thickness.
All sheets should be the same weight
Maximum: 8.5 x Approx. 39 in. (216 mm x Approx. 1 m)
Minimum: 3.15 x 1.77 in. (80 x 45 mm)
3-2 Document Handling Chapter 3
Page 64
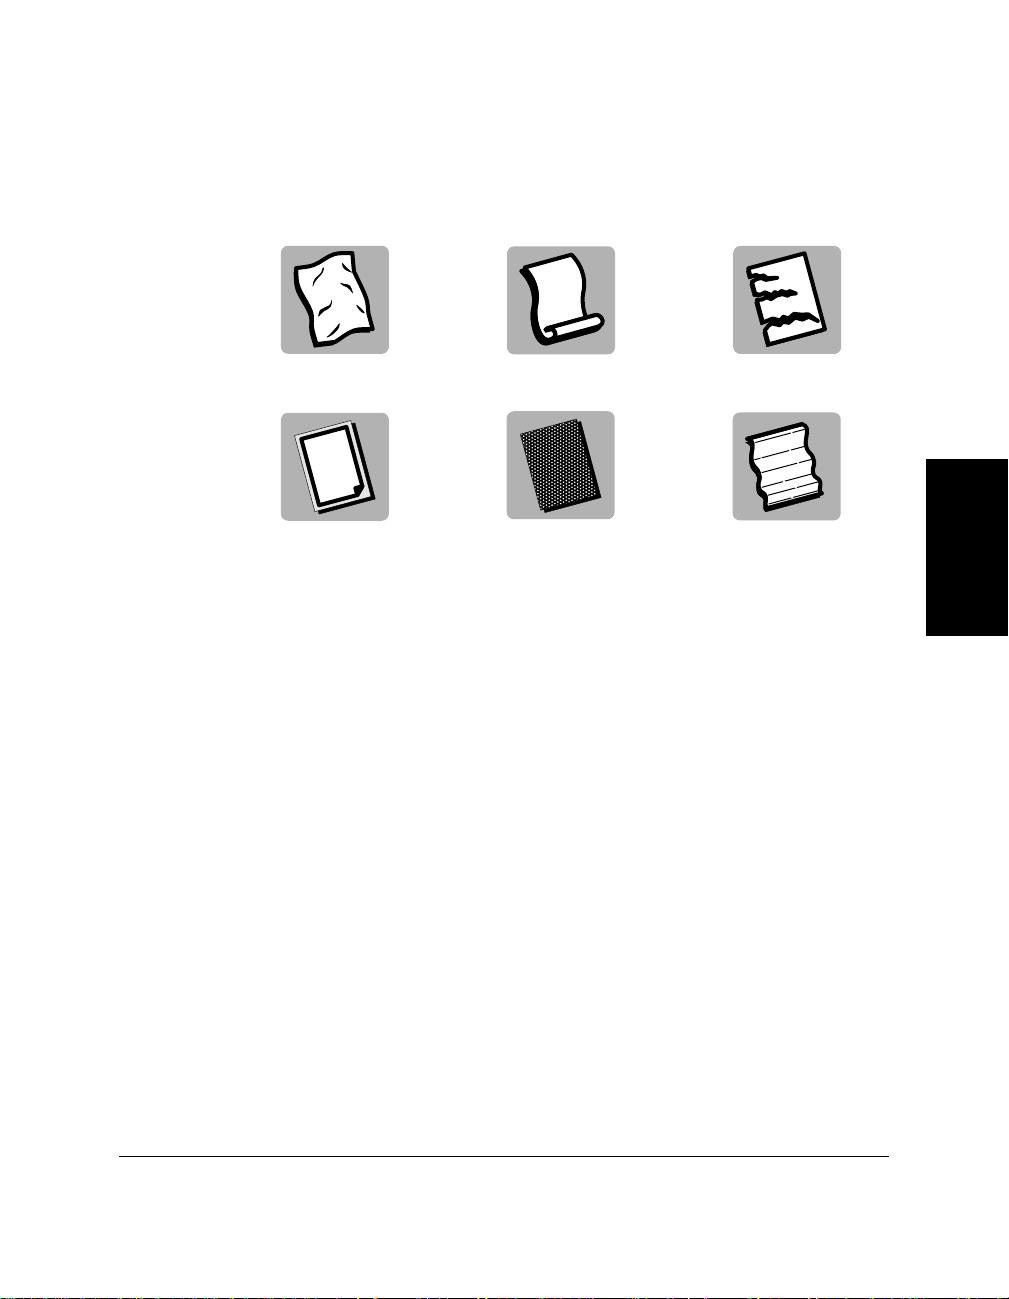
Problem Documents
❑ To prevent paper jams in the ADF, do not use any of the following in the
MultiPASS:
WRINKLED OR
CREASED PAPER
CARBON PAPER OR
CARBON-BACKED
PAPER
CURLED OR
ROLLED PAPER
COATED PAPER
TORN PAPER
ONION SKIN OR
THIN PAPER
❑ Remove all staples, paper clips, or any other fasteners before loading the
document into the ADF.
❑ Make sure any glue, ink, or correction fluid on the paper is completely dry
before loading the document into the ADF.
❑ If you have a document that will not feed into the MultiPASS properly, make a
photocopy of the document, then load the copy instead.
Document
Handling
Chapter 3 Document Handling 3-3
Page 65

Scanned Image Area
The shaded area in the illustration below is outside the scanning area of the
MultiPASS. Make sure your document’s text and graphics do not extend into these
margins.
MAX. 0.18"
(MAX. 4.5 mm)
Letter/Legal
8.42"
(214 mm)
MAX. 0.18"
(MAX. 4.5 mm)
MAX. 0.16"
(MAX. 4.0 mm)
MAX. 0.16"
(MAX. 4.0 mm)*
3-4 Document Handling Chapter 3
Page 66

Selecting Automatic/Manual Document Feed
With the MultiPASS, you can select whether you want to scan documents
automatically or manually.
Automatic document feed is used when scanning multipage documents on
normal paper.
Use manual document feed to scan one sheet at a time of the following types of
documents:
❑ Thick paper
❑ Thin paper
❑ Documents with uneven surfaces
❑ Photographs
❑ Small documents (business cards or postcards, for example)
❑ Special types of paper
When using manual feed, use a carrier sheet to avoid scratching the surface of
n
important documents (photographs, for example).
Use the document feed lever, located at the top of the operation panel, to select
automatic document feed or manual document feed.
Document
Handling
AUTOMATIC DOCUMENT FEED MANUAL DOCUMENT FEED
Chapter 3 Document Handling 3-5
Page 67
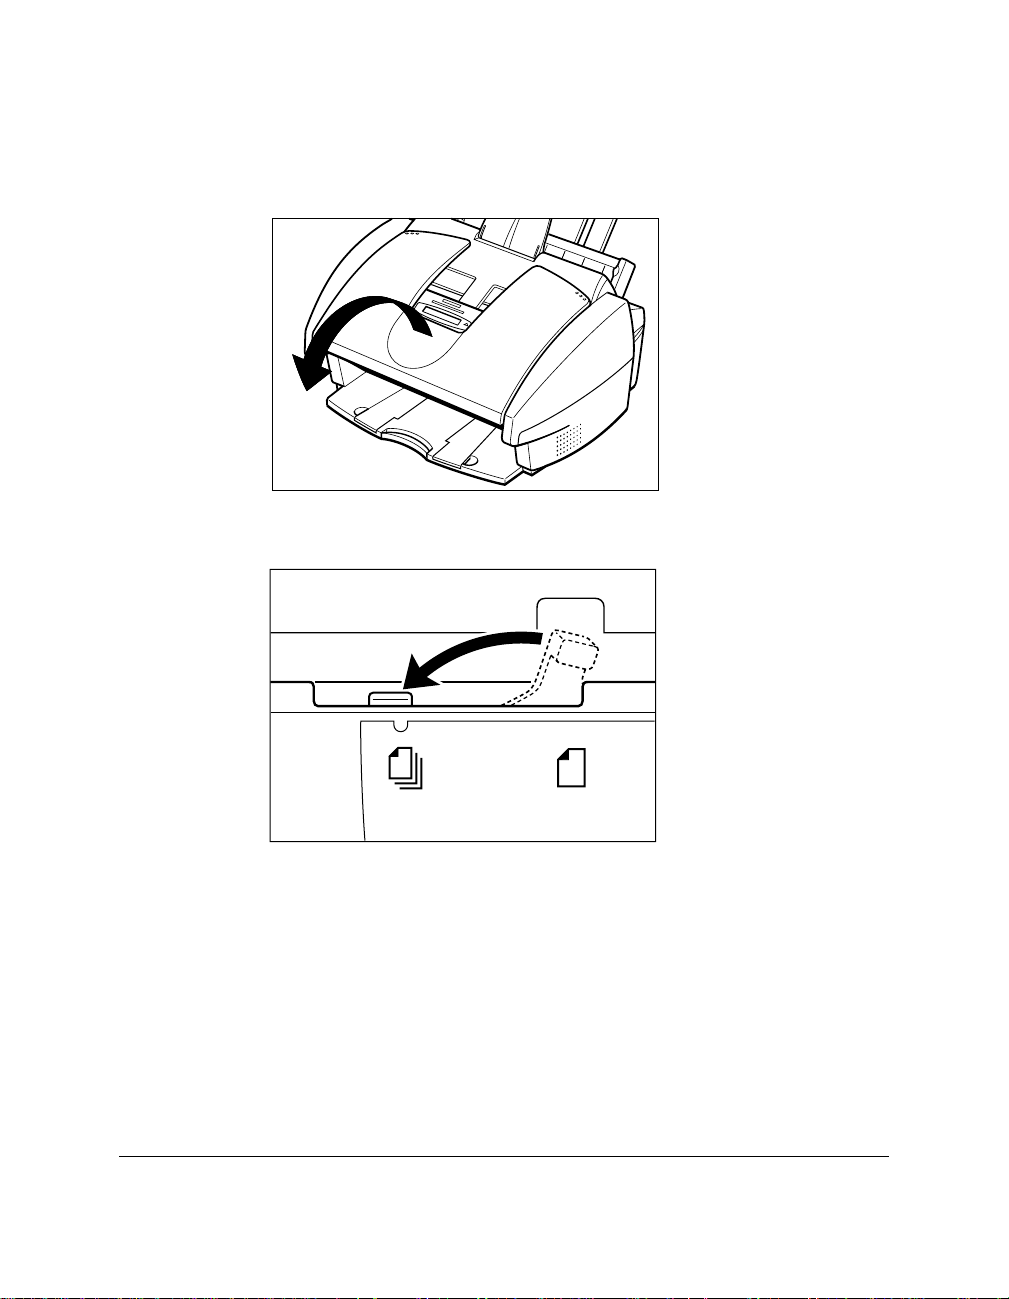
Loading Documents for Automatic Feed
1. Open the document tray.
2. Make sure the document feed lever is set to automatic document feed.
3-6 Document Handling Chapter 3
Page 68

3. If the document has multiple pages, tap it on a flat surface to even the stack’s
edges.
4. Adjust the document guides to the width of the document.
Document
Handling
Chapter 3 Document Handling 3-7
Page 69

5. Gently insert the document, facedown (top of the document toward you), into
the ADF until you hear a beep.
❑ The document is now ready for scanning. The MultiPASS automatically
feeds the pages one by one from the bottom of the stack.
Wait until all pages of your document have been scanned completely before
n
3-8 Document Handling Chapter 3
starting a new job
Page 70

Trouble With Multipage Documents
If you have trouble feeding a multipage document, do the following:
1. Remove the stack and tap it on a flat surface to even the edges.
2. “Slant” the stack so that its front edge is bevelled as shown below, then insert
the stack into the ADF.
Document
Handling
● You cannot feed a multipage document of thick media, such as postcards or
n
Chapter 3 Document Handling 3-9
business cards. Use manual feed instead to feed one sheet at a time.
● Wait until all pages of your document have been scanned completely before
starting a new job.
Page 71

Adding Pages to the Document
The MultiPASS Automatic Document Feeder (ADF) can hold up to 20 letter, 20
A4, or 10 legal-size pages at a time when the document feed lever is set to
automatic document feed. If your document has more pages than this, you can add
pages while the MultiPASS is scanning.
1. Wait until the last sheet in the ADF starts feeding.
2. Load up to 20 additional sheets (10 legal size).
❑ Insert the first new sheet so that it overlaps the last sheet by about one
inch (2.5 cm).
1" (2.5 cm)
Wait until all pages of your document have been scanned completely before
n
3-10 Document Handling Chapter 3
starting a new job.
Page 72

Loading Documents for Manual Feed
1. Open the document tray.
2. Make sure the document feed lever is set to manual document feed.
Document
Handling
Chapter 3 Document Handling 3-11
Page 73

3. Adjust the document guides to the width of the document.
c
3. Gently insert the document, facedown (top of the document toward you), into
the ADF until you hear a beep.
❑ The document is now ready for scanning.
Wait until your document has been scanned completely before starting a new job.
n
When you have finished scanning your document, be sure to slide the
document guides outward. Leaving the document guides near the center of the
ADF may obstruct opening the printer cover, and cause damage to the unit.
3-12 Document Handling Chapter 3
Page 74

Copying Documents
One of the convenient features of your MultiPASS is its ability to make up to 99
high-quality black & white copies. It can also make one color copy of a document
at a time.
Be sure to adjust the document feed lever before loading your document.
n
(See page 3-5.)
1. Open the document tray.
2. Prepare the document and load it, facedown, in the ADF.
❑ The LCD display shows the following:
Currently used memory: MEMORY USED 0%
Color / B&W
Color / B&W
Copy
Standby to scan: DOCUMENT READY
3. Select color or black & white copying.
❑ For color copying, press Color/B&W to turn on its light.
❑ For black & white copying, make sure the Color/B&W light is off.
If the Color/B&W light is on, press Color/B&W to turn it off.
4. Press Copy.
❑ The display now shows COPY, the reduction size the copy will be printed
at (the default is 100%), and the number of copies (the default is 1):
COPY 100% 01
Document
Handling
Chapter 3 Document Handling 3-13
Page 75

Color / B&W
Resolution
5. To change the copying resolution for color copying, make sure the
Color/B&W
light is on, then press Resolution until the resolution you want
appears.
COLOR DRAFT
COLOR FINE
COLOR SNAPSHOT
-or-
Color / B&W
Resolution
n
To change the copying resolution for black & white copying, make sure the
Color/B&W light is off, then press Resolution until the resolution you want
appears.
B&W TEXT
B&W PHOTO
❑ When copying in color:
● Use COLOR DRAFT resolution for 360 x 360 dpi.
● Use COLOR FINE resolution for 360 x 360 dpi; this results in a much
better quality reproduction, but takes longer than other settings.
● Use COLOR SNAPSHOT when scanning photos that are less wide than a
letter-size page. The resolution is 360 x 360 dpi.
❑ When copying in black & white:
● Use B&W TEXT resolution for copying most text documents.
● Use B&W PHOTO resolution when copying documents that contain
photographs. This scans areas of the document that contain photos with
64 levels of gray, and results in a much better reproduction of the
photograph.
● When copying in color, you can set the unit to print on plain paper or high
resolution paper (see page 3-16.)
● You cannot use the BC-22e Photo BJ Cartridge to make black & white c opies.
● For copying speeds, refer to Appendix A, Specifications.
3-14 Document Handling Chapter 3
Page 76

Function
08
6. If you want to reduce the size of the copies, press Function.
02
7. Use
d or u to select the reduction percentage you want.
❑ You can select 70%, 80%, 90%, or 100%.
Ex: COPY 80% 01
ABC DEF
2
1
GHI JKL MNO
45
TUV WXY
PRS
8
7
OPER
0#
Tone
Start / Scan
n
8. If you want to make multiple copies, use the numeric buttons to enter the
SYMBOLS
3
6
9
number of copies.
❑ You can make up to 99 black & white copies.
❑ You can only make one color copy at a time.
Ex: COPY 80% 05
9. Press Start/Scan to begin copying.
COPY
❑ To stop copying, press Stop. You may then need to lift the operation panel
to remove the document (see page 7-3).
If MEMORY FULL appears in the display while you are making multiple copies of
a document, you will not be able to use the multiple copy feature for copying the
document. Instead, you will need to make single copies of the document (as many
times as required). To correct this situation, print out any documents stored in
memory (see page 4-20).
Document
Handling
Chapter 3 Document Handling 3-15
Page 77

Setting the Paper Type for Color Copying
For best results when copying in color, adjust the MultiPASS for the type of
paper you are using. The default paper type setting is PLAIN PAPER.
Follow the procedure below:
Function
1. Press Function.
01
Data Registration
Set
08
02
Set
08
02
Set
2. Press Data Registration.
DATA REGISTRATION
3. Press Set.
USER SETTINGS
4. Use d or u to select PRINTER SETTINGS.
PRINTER SETTINGS
5. Press Set.
RX REDUCTION
6. Use d or u to select COLOR COPY MEDIA.
COLOR COPY MEDIA
7. Press Set.
❑ The current paper type setting is displayed.
Ex: PLAIN PAPER
3-16 Document Handling Chapter 3
Page 78

08
8. Use d or u to select the paper type setting you want for color copying.
02
Ex: HIGH RES. PAPER
❑ You can select from the following settings:
● PLAIN PAPER
● HIGH RES. PAPER (High resolution paper)
Set
9. Press Set to register your setting.
BOTTOM MARGIN
Stop
9. Press Stop to return to standby mode.
Ex: 12/27 FaxTel
Setting the Length of the Bottom Margin for Color Printing
You can adjust the length of the bottom margin for color copying, color printing,
and color reception. The default margin length is NORMAL (0.83 inches/21 mm).
Function
01
Data Registration
Set
1. Press Function.
2. Press Data Registration.
DATA REGISTRATION
3. Press
Set.
USER SETTINGS
Document
Handling
Chapter 3 Document Handling 3-17
Page 79

08
Use d or u to select PRINTER SETTINGS.
02
PRINTER SETTINGS
Set
4. Press
Set.
RX REDUCTION
08
02
Use d or u to select BOTTOM MARGIN.
BOTTOM MARGIN
Set
5. Press Set.
❑ The current setting is displayed.
Ex: NORMAL
08
02
6. Use d or u to select the length of the bottom margin for color copying, color
printing, and color reception.
Ex: SMALLER
❑ You can select from the following settings:
● NORMAL
The bottom margin is longer than the bottom margin of a black & white
printed page (0.83 inches/21 mm).
● SMALLER
The bottom margin is the same length as the bottom margin of a black &
white printed page (0.28 inches/7 mm).
Set
. Press Set to register your setting.
SYSTEM SETTINGS
Stop
7. Press Stop to return to standby mode.
Ex: 12/27 FaxTel
3-18 Document Handling Chapter 3
Page 80

n
Chapter 4
Sending Faxes
This chapter describes how to use your M ultiPASS to send faxes and how to use the
special dialing features.
If you are using the MultiPASS Fax Setup Utility software, you can set up and
control all the fax sending and speed dialing features through the Fax Setup
Utility. See the online Desktop Manager Software Guide for details.
❑ Preparing to Send a Fax.................................................................................4-2
● Adjusting the Quality of Your Faxes .......................................................4-2
● Dialing Methods......................................................................................4-6
❑ Sending Methods...........................................................................................4-7
● Memory Sending......................................................................................4-7
● Manual Sending.......................................................................................4-9
❑ Canceling Sending.......................................................................................4-11
● Removing the Document From the Automatic Document
Feeder (ADF) .........................................................................................4-12
❑ Redialing When the Line is Busy.................................................................4-13
● Manual Redialing...................................................................................4-13
● Automatic Redialing..............................................................................4-14
❑ Sequential Broadcasting..............................................................................4-18
● Sending a Document to More Than One Destination.........................4-18
❑ Delayed Sending...........................................................................................4-21
● Sending Other Documents While the MultiPASS is
Set for Delayed Sending.........................................................................4-21
❑ Documents Stored in Memory....................................................................4-22
● Printing a List of Documents in Memory............................................4-22
● Printing a Document in Memory.........................................................4-23
● Deleting a Document From Memory...................................................4-26
❑ Special Dialing .............................................................................................4-27
● Dialing Through a Switchboard............................................................4-27
● Dialing a Long Distance Number.........................................................4-28
❑ Switching Temporarily to Tone Dialing......................................................4-29
Sending Faxes
Chapter 4 Sending Faxes 4-1
Page 81

Preparing to Send a Fax
For information on the types of documents you can fax, their requirements, and
details on loading documents, refer to Chapter 3, Document Handling. To use the
MultiPASS Fax Setup Utility to change factory default settings, including fax
sending options and speed dial codes, see Chapter 3, Using the MultiPASS Fax
Setup Utility, in the online Desktop Manager Software Guide.
To send a color fax, you need to use the MultiPASS operation panel. Color fax
n
Adjusting the Quality of Your Faxes
settings cannot be adjusted using the MultiPASS Fax Setup Utility. For more
information on sending a color fax, see the the following section.
Canon’s Ultra High Quality (UHQ™) imaging technology enables you to send
documents that are very close to the quality of the original. The MultiPASS allows
you to send a document in color or black & white, and to adjust the r esolution and
contrast to best suit your particular document.
Setting Color or Black & White Transmission
Your MultiPASS can send faxes in black & white. It can also send faxes in color to
fax machines with color capability. Before sending a document, you need to adjust
whether the document will be sent in color, or in black & white only.
Sending in black & white
Color / B&W
Color / B&W
n
4-2 Sending Faxes Chapter 4
❑ Make sure the Color/B&W light is turned off. If not, press the Color/B&W
button to turn it off.
Sending in color (to fax machines that support color fax reception)
❑ Press the Color/B&W button to turn on the light above this button.
If you send a color document to a fax machine that does not support color
faxing, the document will not be sent, and the LCD display will show this
message: TRY AGAIN IN B/W. Try sending again in black & white.
Page 82

n
Color / B&W
Setting the Scanning Resolution
Resolution is a measure of the fineness or clarity of a printout and is usually
expressed in horizontal and vertical dots per inch (dpi). Low r esolutions may cause
text and graphics to have a jagged appearance, while higher resolutions provide
smoother curves and lines, crisp text and graphics, and a better match to
traditional typeface designs.
You can set the scanning resolution for the documents you send.
The higher the resolution, the higher the quality of output, but the slower the
scanning speed.
Setting the resolution for black & white sending
1. Make sure the Color/B&W light is turned off.
❑ If not, press the Color/B&W button to turn it off.
Resolution
Resolution
2. Press Resolution.
❑ The current resolution setting is displayed.
Ex:
FAX STANDARD
3. Press Resolution to select the resolution setting you want.
❑ You can select from the following:
FAX STANDARD
(203 x 98 dpi) — Suitable for most text-only documents.
FAX FINE
(203 x 196 dpi) — Suitable for documents with fine print
(smaller than the print in this sentence).
FAX PHOTO
Sending Faxes
Chapter 4 Sending Faxes 4-3
Page 83

Color / B&W
(203 x 196 dpi with halftones) — Suitable for documents that
contain photographs. With this setting, areas of the document
that contain photos are automatically scanned with 64 levels of
gray, rather than just two (black & white). This gives a much
better reproduction of photos, though the transmission time is
longer.
❑ After about 10 seconds, the LCD display returns to standby mode.
Setting the resolution for color sending
1. Press the Color/B&W button to turn on the Color/B&W light.
Resolution
Resolution
n
2. Press Resolution.
❑ The current color resolution setting is displayed.
Ex:
FAX STANDARD
3. Press Resolution to select the color resolution setting you want.
❑ You can select from the following:
FAX STANDARD
Provides standard color resolution.
FAX FINE
Provides a higher quality color resolution.
❑ After about 10 seconds, the LCD display returns to standby mode.
You can change the resolution setting while the document is being scanned for
sending. However, please note that your new setting will only be effective from
the next page scanned.
4-4 Sending Faxes Chapter 4
Page 84

Setting the Scanning Contrast
Contrast is the difference in brightness between the lightest and darkest parts of a
printed document. You can adjust the contrast the MultiPASS uses to send faxes.
Adjust the contrast according to how light or dark your document is.
● You can set the scanning contrast from the MultiPASS Fax Setup Utility. If
n
you are using the Fax Setup Utility, see the online MultiPASS Desktop
Manager Software Guide for details.
● If you are not using the Fax Setup Utility, you can set the contrast using the
operation panel. See the online Standalone Fax Manual.
Dialing Methods
There are several ways of dialing the number of the party you want to send to:
❑ Regular Dialing
Dial a fax number by using the numeric buttons, just like dialing a telephone
number.
❑ One-Touch Speed Dialing
Dial a fax number by pressing the one-touch speed dialing button (01 to 12)
that the number is assigned to. F or details on r egistering and using one-touch
speed dialing, see the online MultiPASS Desktop Manager Software Guide. If
you are using your MultiPASS as a standalone fax, see the online Standalone
Fax Manual.
❑ Coded Speed Dialing
Dial a fax number by pressing the Coded Dial button follow ed by the two-digit
code (00 to 99) that the number is assigned to. For details on registering and
using coded speed dialing, see the online MultiP ASS Desktop M anager Software
Guide. If you are using your MultiPASS as a standalone fax, see the online
Standalone Fax Manual.
❑ Group Dialing
Send a document to a predefined group of fax numbers. (The numbers must
already be registered under one-touch speed dialing buttons or coded speed
dialing codes.) For details on creating groups and using group dialing, see the
online MultiPASS Desktop Manager Software Guide. If you are using your
MultiPASS as a standalone fax, see the online Standalone Fax Manual.
Sending Faxes
Chapter 4 Sending Faxes 4-5
Page 85

Sending Methods
This section describes the methods and advantages of the two main sending
methods.
❑ Memory sending
Allows you to send a document easily and quickly.
❑ Manual sending
Allows you to talk to the other party before you send the document.
Memory Sending
Memory sending is a quick and easy way to send a document. The M ultiPASS scans
the document into its memory, and as the first page of a multipage document is
being scanned, the unit begins calling the other party and transmitting the
information even as the remaining pages are being scanned.
Because the MultiPASS is multitasking, you can even scan a document into
memory while sending another document, receiving a document, or printing a
report.
The unit has enough memory to store up to 42 pages* (fewer if the document
contains many graphics or particularly dense text).
Be sure to adjust the document feed lever before loading your document (see
n
4-6 Sending Faxes Chapter 4
page 3-5).
1. Open the document tray.
2. Prepare the document and load it, facedown, in the Automatic Document
Feeder (ADF).
❑ The LCD display shows the following:
Currently used memory:
Standby to scan:
* Based on ITU-T/CCITT No. 1 Chart, standard mode.
MEMORY USED 0%
DOCUMENT READY
Page 86

Start / Scan
❑ If you are sending in color to a fax machine with color capability, press
Color/B&W to turn on its light (see page 4-2).
❑ If necessary, you can adjust the resolution and contrast (see page 4-3 and
page 4-5).
❑ You may not be able to use memory sending if the percentage shown in
the MEMORY USED display is close to 100%. In this case, use manual
sending to send your document.
3. Dial the other party’s fax number.
❑ Use one of the dialing methods described earlier in this chapter.
Ex:
TEL= 9p7654321
❑ If you enter the wrong number, press Stop, then enter the correct
number.
❑ If you must first dial a digit to get an outside line (9 for example), add a
pause after that digit by pressing Redial/Pause, as shown in the example
above.
4. Press Start/Scan to begin scanning for sending.
❑ If you used speed dialing to dial the number, the unit will automatically
begin scanning the document into memory a few seconds after making
the entry.
❑ You will see a series of brief messages showing details on the transmission.
❑ To cancel the transmission once the unit has started to dial, press Stop.
The LCD display then asks you to confirm canceling. Press T to cancel
sending (see page 4-10).
Sending Faxes
● You can scan up to 30 different documents for memory sending.
n
Chapter 4 Sending Faxes 4-7
● When the document is sent, it is automatically deleted from memory.
● If an error occurs during sending, the MultiPASS will print out an error
report. If this happens, try sending the document again.
● When an error occurs during sending, the document is automatically deleted
from memory, even if it is not sent completely.
● If you send a color document to a fax machine that does not support color
faxing, the document will not be sent, and the LCD display will show this
message: TRY AGAIN IN B/W. Try sending again in black & white.
Page 87

Manual Sending
Manual sending allows you to talk to the other party before you send the
document. This method is useful if the other party must manually set their fax
machine to receive before they can receive a fax.
To use this mode, you need to connect a telephone to your MultiPASS.
n
1. Open the document tray.
2. Prepare the document and load it, facedown, in the Automatic Document
Feeder (ADF).
❑ The LCD display shows the following:
Hook
Currently used memory:
Standby to scan:
❑ If you are sending in color to a fax machine with color capability, press
Color/B&W to turn on its light (see page 4-2).
❑ If necessary, you can adjust the resolution and contrast (see page 4-3 and
page 4-5).
3. Press Hook.
TEL=
❑ You can also lift the handset of the telephone or extension phone
connected to your unit instead of pressing Hook.
❑ You can adjust the volume of the speaker. If you are using the MultiPASS
Fax Setup Utility, see the online MultiPASS Desktop Manager Software
Guide. If you are using the Operation panel, see the online Standalone F ax
Manual.
MEMORY USED 0%
DOCUMENT READY
4-8 Sending Faxes Chapter 4
Page 88

Start / Scan
4. Dial the other party’s telephone/fax number.
Ex:
TEL= 7654321
❑ Use one of the dialing methods described earlier in this chapter.
❑ If you make a mistake during dialing, press Hook or put down the
handset and start again from step 3.
5. When you hear the other party answer the call, pick up the handset and you
can talk.
❑ If you pressed Hook in step 3 instead of lifting the handset, you will hear
the other party’s voice but they will not be able to hear you through the
speaker. Pick up the handset to talk to the other party.
❑ If you hear a high-pitched signal, instead of the other party’s voice, press
Start/Scan. If you picked up the handset to dial, hang up the handset.
The unit will begin sending the document.
6. When you are ready to send the document, ask the other party to press the
start button on their fax unit.
7. When you hear the high-pitched signal of the other party’s fax unit press
Start/Scan on your unit and then hang up the handset.
❑ The unit begins sending the document.
❑ You will see a series of brief messages showing details on the transmission.
● Be sure to hang up the handset after you press the Start/Scan button on your
n
Chapter 4 Sending Faxes 4-9
unit. If you hang up first, you will disconnect the call.
● If the offhook alarm starts beeping, make sure the handset is resting properly
in its cradle.
● If you send a color document to a fax machine that does not support color
faxing, the document will not be sent, and the LCD display will show this
message: TRY AGAIN IN B/W. Try sending again in black & white.
Sending Faxes
Page 89

Canceling Sending
Follow this procedur e if you want to stop sending a document before transmission
is completed:
Stop
Tone
1. Press Stop.
❑ For manual sending, the transmission is canceled.
❑ For memory sending, the MultiPASS asks you to confirm that you want to
cancel.
CANCEL? AYES #NO
YES=(A) NO=(#)
2. Press T to cancel sending.
❑ Sending is not canceled until you press T.
❑ If you change your mind and want to continue sending, press #.
❑ To cancel transmission of a document waiting to be sent (because the unit
is waiting to redial), refer to Deleting a Document From Memory (see
page 4-23).
❑ To cancel transmission of a document waiting to be sent from memory, refer
to Deleting a Document From Memory (see page 4-23).
When you cancel sending, you may need to open the operation panel to remove
n
4-10 Sending Faxes Chapter 4
the document from the ADF. For details, refer to the next page, Removing the
Document From the Automatic Document Feeder (ADF).
Page 90

Removing the Document From the Automatic Document Feeder (ADF)
Do not try to pull the document out without opening the operation panel, or you
n
might tear or smudge the document.
1. Open the operation panel by gently pulling it toward you.
2. Remove the document by pulling it out from the top or bottom.
If the paper does not pull out easily, do not force it.
n
Chapter 4 Sending Faxes 4-11
Sending Faxes
Page 91

n
3. When you are finished, close the operation panel by pressing it do wn from the
center.
Be sure to close the operation panel until it locks into place. Otherwise the unit
will not function properly.
4-12 Sending Faxes Chapter 4
Page 92

Redialing When the Line Is Busy
There are two methods of redialing: manual redialing and automatic redialing.
Manual Redialing
Press the Redial/Pause butto n to dial the last number y ou dialed with the numeric
buttons. (This also starts redialing regardless of whether automatic redialing is
enabled.)
Canceling Manual Redialing
To cancel manual redialing, press the Stop button.
Automatic Redialing
When you are using memory sending and the other party’s line is busy, the unit
waits a specified time and then dials the same number again. You can set the
MultiPASS to redial several times if the previous attempts failed because the line
was busy. This feature is called automatic redialing.
After the initial dial attempt, the default setting is to wait two minutes and try to
dial again. If the second attempt fails because the line was busy, the unit will again
wait for two minutes and make a final attempt to complete the call. (Even if the
MultiPASS is set to redial several times, it will redial only once if there is no tone or
there is a ring back tone during the first attempt.)
You can turn automatic redialing off and on. Also, you can adjust the number of
redialing attempts and the time interval between attempts.
You can set the Automatic Redialing features through the MultiPASS Fax Setup
Utility or the operation panel. If you are using the M ultiPASS Fax Setup Utility, see
the online MultiPASS Desktop Manager Software Guide. If you are using the
operation panel, see the online Standalone Fax Manual.
When using automatic redialing, the LCD display alternately displays AUTO
REDIAL and the transaction number (TX/RX NO.) while it is waiting to redial.
AUTO REDIAL
Ex:
TX/RX NO. 0013
Chapter 4 Sending Faxes 4-13
Sending Faxes
Page 93

When it begins redialing, the LCD display shows details on the transmission.
If the receiving fax machine is still busy on the last attempt, the L CD displa y shows
BUSY/NO SIGNAL, the transaction number (TX/RX NO.), and prints the Error
TX report (if set to print one).
BUSY/NO SIGNAL
Ex:
TX/RX NO. 0013
PRINTING REPORT
If this happens, try sending again later.
Canceling Automatic Redialing
You cannot cancel automatic redialing with the Stop button while the unit is
waiting to redial. To cancel automatic redialing, do the following:
1. Wait until the MultiPASS begins redialing.
DIALING
Stop
2. Press Stop.
❑ The MultiPASS asks you to confirm that you want to cancel.
CANCEL? AYES
YES=(A) NO=(#)
3. Press T to cancel redialing.
Tone
❑ Redialing is not canceled until you press T.
❑ If you change your mind and want to continue redialing, press #.
❑ The unit then prints an error report (if set to print one).
4-14 Sending Faxes Chapter 4
Page 94

● You control error reports through the MultiPASS Fax Setup Utility or the
n
operation panel. If you are using the MultiPASS Fax Setup Utility see the
online MultiPASS Desktop Manager Software Guide. If you are using the
operation panel, see the online Standalone Fax Manual.
● If you want to cancel a transmission while the unit is waiting to redial, refer
to Deleting a Document From Memory (see page 4-23).
Sequential Broadcasting
Sending a Document to More Than One Destination
Follow this procedur e t o scan a document onc e and send it to sev eral destinations.
With this sending method, called sequential broadcasting, you can send the same
document to a maximum of 113 destinations.
This feature allows you to send a document to a number of destinations using a
combination of dialing methods as follows:
❑ One-touch speed dialing: up to 12 destinations
❑ Coded speed dialing: up to 100 destinations
❑ Regular dialing (using the numeric buttons): one destination
You can enter the one-touch speed dialing and coded speed dialing destinations in
any order. You can also include one destination which you dial using the numeric
buttons. (Be sure to press Set after you enter the destination with the numeric
buttons.)
If you frequently send the same document to the same group of recipients, use
n
Chapter 4 Sending Faxes 4-15
group dialing. If you are using the MultiPASS Fax Setup Utility, group dialing is
described in the online MultiPASS Desktop Manager Software Guide. If you are
using the MultiPASS as a standalone fax, group dialing is described in the online
Standalone Fax Manual.
Sending Faxes
Page 95

Transmitting the Document
1. Open the document tray.
2. Prepare the document and load it, facedown, in the Automatic Document
Feeder (ADF).
❑ The LCD display shows the following:
Currently used memory:
Standby to scan:
MEMORY USED 0%
DOCUMENT READY
❑ If you are sending in color to a fax machine with color capability, press
Color/B&W to turn on its light (see page 4-2).
❑ If necessary, you can adjust the resolution and contrast (see page 4-3 and
page 4-5).
3. Enter up to 113 fax numbers using any of the following methods:
❑ One-touch speed dialing
Press the desired one-touch speed dialing button(s).
01 02 03
Data Registration
04 05 06
Space
Memory Reference
07 08
Report
10 11 12
Cleaning
Clear
Function
Set
09
+
Resume
❑ Coded speed dialing
Press Coded Dial, then use the numeric buttons to enter the two-digit
code.
● Be sure to press Coded Dial before each code.
Coded Dial
➔
ABC DEF
2
1
GHI JKL MNO
45
PRS
TUV WXY
8
7
OPER
0#
Tone
3
6
9
SYMBOLS
4-16 Sending Faxes Chapter 4
Page 96

❑ Regular dialing
n
Use the numeric buttons to enter the fax number, then press
Set to add the
number to the broadcast list.
● You can only enter one fax number this way.
ABC DEF
2
3
1
GHI JKL MNO
45
PRS
TUV WXY
8
7
OPER
0#
Tone
● If you enter the wrong destination, press Function, then Clear. Then press
6
9
SYMBOLS
➔
Set
Function again, and enter the correct destination.
● You must dial the second number within five seconds of dialing the first
number. All subsequent numbers must be dialed within 10 seconds. If you
wait longer than the time-out interval before dialing the next number, the
unit will start scanning the document. You can turn off the time-out interval
using the MultiPASS Fax Setup Utility (the “Auto Start and Send” option) or
the operation panel. If you are using the M ultiPASS Fax Setup Utility, see the
online MultiPASS Desktop Manager Software Guide. If you are using the
operation panel, see the online Standalone Fax Manual.
● If you want to review the numbers you entered, pr ess Function and use d or
u to scroll through the numbers.
Start / Scan
4. Press Start/Scan to begin scanning for sending, or wait a few seconds for the
MultiPASS to begin scanning automatically.
❑ The MultiPASS then scans the document into memory, and begins
sending it to the destinations.
❑ You will see a series of brief messages showing details on the transmission.
❑ To cancel sending, press Stop. You will be asked to confirm canceling.
Press T to cancel. Sending to all destinations you specified in st ep 3 will be
canceled. (You cannot cancel only one destination.)
Chapter 4 Sending Faxes 4-17
Sending Faxes
Page 97

n
● If a number is busy, the unit will continue sending to the other destinations
and then redial the number that was busy.
● If the MultiPASS memory becomes full while scanning your document,
MEMORY FULL appears in the LCD display. If this happens, remove the
remainder of the document from the ADF (you may need to open the
operation panel to do so), then divide the document into several sections and
send each section individually.
● The document is automatically deleted from memory when sequential
broadcasting is completed.
4-18 Sending Faxes Chapter 4
Page 98

Documents Stored in Memory
Printing a List of Documents in Memory
The MultiPASS can print out a list of documents stored in memory, along with the
transaction number (TX/RX NO.) of each. Onc e you know the transaction number
of a document in memory, you can print it or delete it.
Function
04
Memory Reference
Set
1. Press Function.
2. Press Memory Reference.
3. Press Set.
DOC. MEMORY LIST
PRINTING REPORT
❑ The MultiPASS begins printing a list of documents stored in memory.
12/27/2000 23:42 FAX 123 4567 CANON 001
******************************
DOC. MEMORY LIST
*** ***
******************************
TX/RX NO MODE CONNECTION TEL/ID PGS. SET TIME
0046 TRANSMIT [A 01] Canon TOKYO 3 12/27 23:24
0047 TRANSMIT COL [ 04] Canon ITALIA 2 12/27 23:24
0048 B’CAST [ 01] Canon CANADA 1 12/27 23:38
0049 B’CAST [ 03] Canon GROUP 2 1 12/27 23:39
[A 02] Canon FRANCE
Sending Faxes
Chapter 4 Sending Faxes 4-19
Page 99

Printing a Document in Memory
Before printing a document, make sure you have the correct BJ cartridge installed.
You cannot print a document using the MultiPASS C545 printer driver if a Photo
n
Function
04
Memory Reference
BJ Cartridge is installed. You must use the operation panel as described in this
section.
1. Press Function.
2. Press Memory Reference.
BC-21e Color
BJ Cartridge
BC-20 Black
BJ Cartridge
BC-22e Photo
BJ Cartridge
Black and White Document
in Memory
Printing possible Printing possible
Printing possible Printing possible if converted
Change BJ cartridge
to BC-21e Color or
BC-20 Black BJ Cartridge
DOC. MEMORY LIST
Color Document
in Memory
to black and white
Printing possible
08
02
3. Use d or u to select PRINT DOCUMENT.
PRINT DOCUMENT
Set
4-20 Sending Faxes Chapter 4
4. Press Set.
Ex:
TX/RX NO. 0001
Page 100
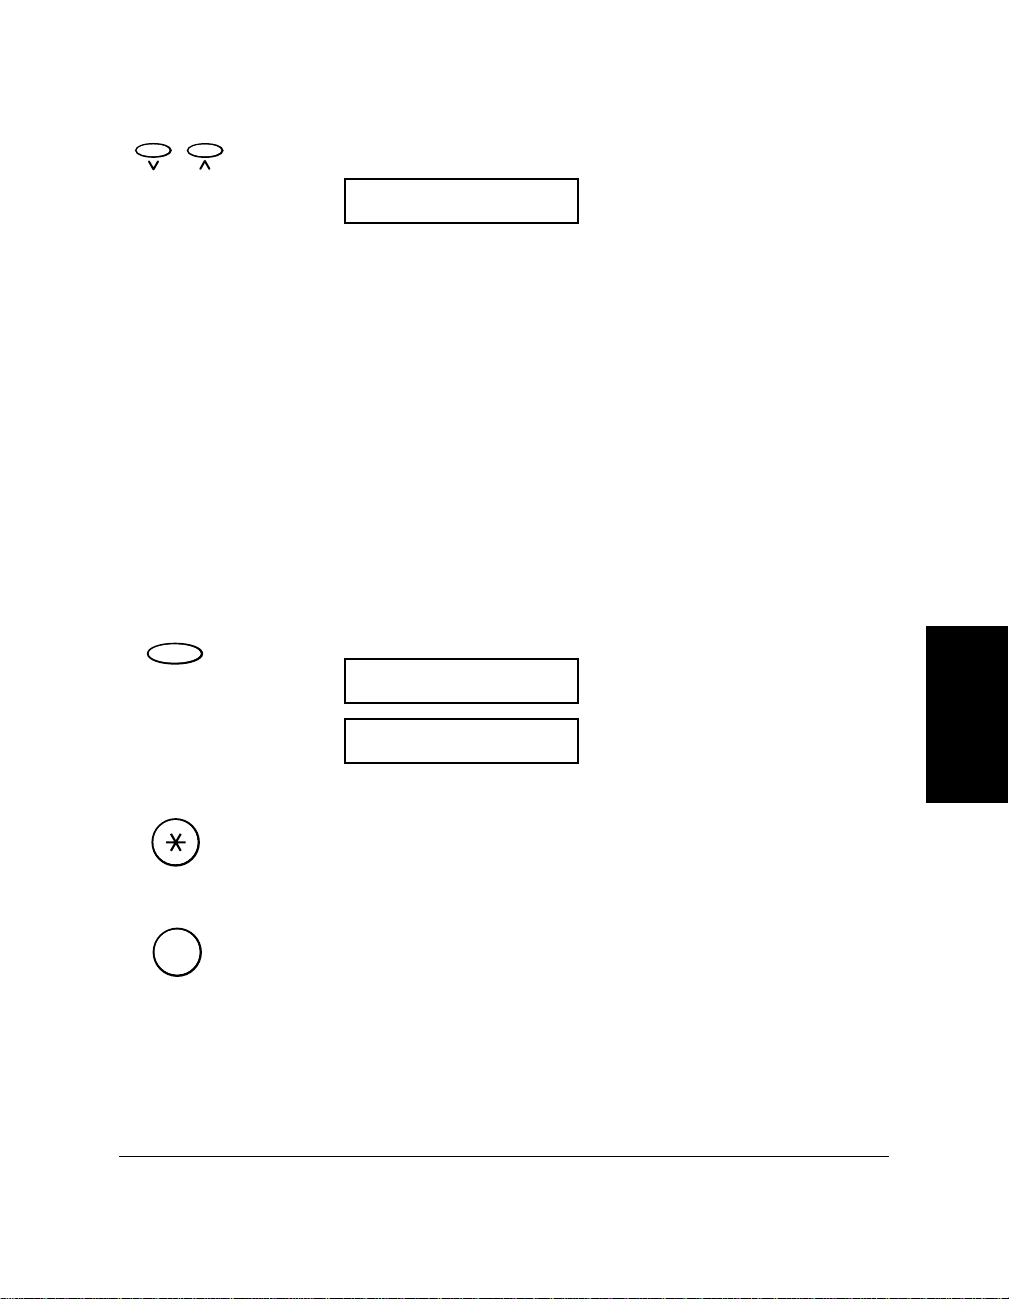
08
5. Use d or u to select the transaction number (TX/RX NO.) of the document
02
you want to print.
Ex:
TX/RX NO. A0003
❑ The marks before the transaction number (TX/RX NO.) have the
following meanings:
(No mark): The document is in black & white.
A: The document is in color.
#: The document is in black & white and is being sent or
printed automatically.
&: The document is in color and is being sent or printed
automatically.
❑ If you are unsure of the transaction number (TX/RX NO.) of the
document you want to print, you can print the list of documents stored in
memory (see page 4-19).
❑ Use l or r to display the details of the transaction (destination, for
example).
Set
6. Press Set.
1ST PG ONLY?
YES=(A) NO=(#)
7. Select whether you want to print the first page of the document only, or all
pages of the document.
Press T to print the first page only.
Tone
SYMBOLS
#
-orPress # to print all pages.
If you have the BC-21e Color BJ Cartridge installed, the MultiPASS starts
printing the document.
If you are printing a black & white document and have the BC-20 Black BJ
Cartridge installed, the MultiPASS starts printing the document.
Chapter 4 Sending Faxes 4-21
Sending Faxes
 Loading...