

Canon MP37-MG User Manual
CONTENTS
BEFORE STARTING.................................................................................. P.1
INSERTING PRINTING PAPER................................................................. P.2
REPLACING THE INK RIBBON................................................................. P.2
BACKUP BATTERY ................................................................................... P.3
GENERAL MAINTENANCE ....................................................................... P.3
DECIMAL POINT SELECTOR SWITCH .................................................... P.3
ROUNDING SWITCH................................................................................. P.4
GRAND TOTAL / TAX RATE SET SWITCH .............................................. P.4
ITEM COUNT SWITCH .............................................................................. P.4
MEMORY / CURRENCY CONVERSION SELECTION SWITCH .............. P.5
TAX CALCULATION FUNCTION............................................................... P.6
BUSINESS SALES CALCULATION........................................................... P.6
CLOCK & CALENDAR FUNCTION............................................................ P.6
AUTO POWER SAVE ................................................................................ P.6
OVERFLOW............................................................................................... P.7
SPECIFICATIONS...................................................................................... P.7
CALCULATION EXAMPLE ................................................................. P.71-80
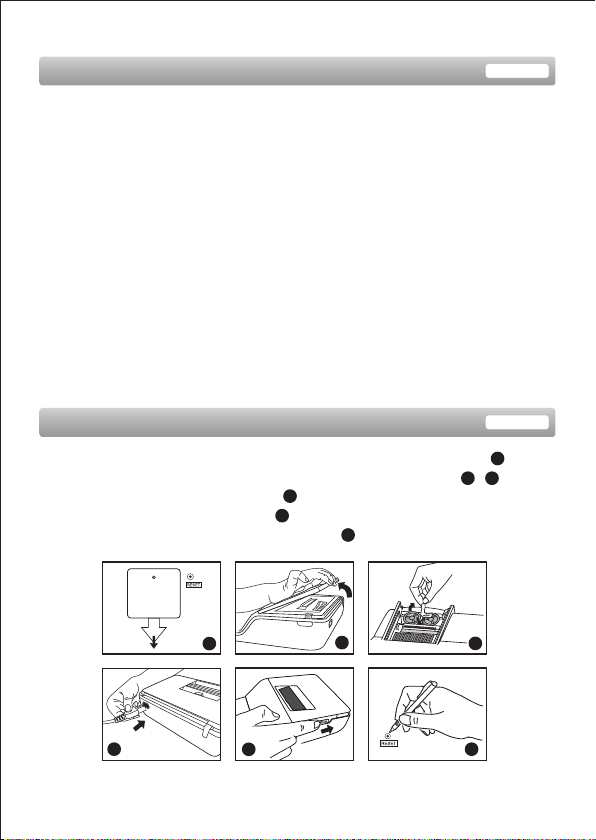
BEFORE STARTING
1) Remove the insulation tape at the back of calculator. (Figure )
2) Remove the tape on the ink ribbon of calculator. (Figure , )
3) Plug in AC power cord. (Figure )
4) Turn power switch on. (Figure )
5) Press [RESET] key before use. (Figure )
d
e
f
b ca
a
c
b
d
e
- 1 -
f

INSERTING PRINTING PAPER
Note : Turn the power off
1) Remove the printer cover (Figure ) and lift up the paper arm (Figure ).
2) Replace the printer cover (Figure ).
• When inserting the paper, cut the edge of the paper as shown (Figure ).
3) Turn the power switch on (Figure ).
4) Place the new paper roll on the arm. The edge of the paper should be
positioned as shown (Figure ).
• Suitable paper roll -- Width : 57mm (2-1/4”) / Diameter: 86mm (3-3/8”)
5) Press the paper feed key to advance the paper (Figure ).
REPLACING THE INK RIBBON
Note: Turn the power off.
1) Remove the cover and lift up the paper arm.
2) Lift ribbon spools off the shafts. Discard the old ribbon and spools.
3) Place the ribbon spool on the left spool pin and push it down until it clicks.
4) Thread the ribbon along the outer edge of the side guide, making sure that the
black half of the ribbon is still on the top.
5) Place the ribbon between the printing ring and printing roller. Thread the ribbon
along the outer edge of the left side guide.
6) Place the other ribbon spool on another spool pin.
7) Push the spool down until it clicks.
8) Take up any ribbon slack by rotating the left spool counterclockwise.
9) Replace the printer cover.
ENGLISH
IMPORTANT: Use only the same type of ribbon spools.
- 2 -
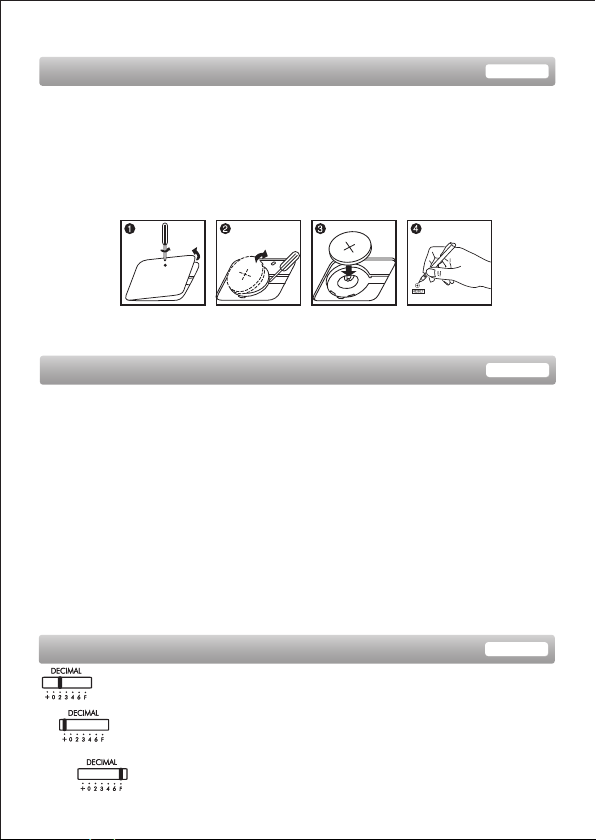
BACKUP BATTERY
Memory backup battery retains the currency rate, tax rate, calendar and clock
setting, even if the power is off or the AC cord is disconnected.
Battery : 1 Lithium battery (Type : CR2032)
Battery life : Backup time 2000 hours
CAUTION: Risk of explosion if battery is replaced by an incorrect type.
Dispose of batteries according to local regulations. Do not dispose
After replace the back-up battery, press the [RESET] button, after resetting be sure
to set the currency rate, tax rate, clock and calendar again.
Dispose of used batteries according to the instruction.
as household waste.
GENERAL MAINTENANCE
1) Do not use or leave the calculator under direct sunlight. Press subject to rapid
temperature changes, high humidity, dust and dirt should also be avoided.
2) Use a dry cloth to clean the casing of the unit. Do not use water or detergents.
3) Activate the printer when the paper roll is loaded.
4) Avoid using the calculator in places where there are iron filings, as this may
affect the electrical circuits of the calculator.
5) Do not place anything on top of the machine, particularly on top of the printer
mechanism.
6) Turn the calculator off before removing the plug from the electrical outlet.
7) Pull the main plug out of the wall socket if you want to switch off the main power
or in case of electrical fault (i.e. smoke), disconnect the plug from the electrical
socket outlet immediately.
8) The AC outlet must be located near the equipment and easily accessible.
9) Under the environment with electrostatic discharge, the sample may
malfunction and require user to reset the sample.
DECIMAL POINT SELECTOR SWITCH
– Used for designating the decimal point position (+ 0 2 3 4 6 F)
for calculated results.
+ (Add-Mode) – Addition and subtraction functions are performed
with an automatic 2-digit decimal. It is convenient for currency
calculations.
F (Floating Decimal Point) – All effective numbers up to 12 digits
are printed or displayed.
- 3 -
 Loading...