

Page 1
Advanced Fax
Features
Advanced Copy
Features
1
2
System Monitor
3
Reports and Lists
4
Troubleshooting
5
Appendix
6
TOP
Back Previous Next
Advanced Guide
Table of Contents
Index
Please read this guide before operating this product.
After you finish reading this guide, store it in a safe place
for future reference.
How to Use This Guide
Page 2

Advanced Fax
Features
Advanced Copy
Features
1
2
System Monitor
3
Reports and Lists
4
Troubleshooting
5
Manuals for the Machine
● Machine Set-Up
● Software Installation
● Basic Features
● Maintenance
● Machine Settings
● Specifications
Starter Guide
Basic Guide
TOP
Back Previous Next
Appendix
Table of Contents
Index
6
● Advanced Features
● System Monitor
● Reports and Lists
● Scanning Features
Indicates the manual is supplied in PDF format in the accompanying CD-ROM.
CD-ROM
● To view the manual in PDF format, Adobe Reader/Acrobat Reader/Acrobat is required. If Adobe Reader/
Acrobat Reader/Acrobat is not installed on your system, please download it from the Adobe Systems
Incorporated website (http://www.adobe.com).
● Considerable effort has been made to ensure that this manual is free of inaccuracies and omissions.
However, as we are constantly improving our products, if you need an exact specification, please contact
Canon.
● The machine illustration on the cover may differ slightly from your machine.
Advanced Guide
(This Document)
Scanner Driver Guide
CD-ROM
CD-ROM
i
Page 3

Advanced Fax
Features
Advanced Copy
Features
System Monitor
1
2
TOP
Back Previous Next
Legal Notices
Trademarks
Canon, the Canon logo and imageCLASS are trademarks of Canon Inc.
All other product and brand names are registered trademarks, trademarks or service marks of their respective owners.
3
Reports and Lists
4
Troubleshooting
5
Appendix
6
Copyright
Copyright © 2006 by Canon Inc. All rights reserved. No part of this publication may be reproduced, transmitted, transcribed, stored in a retrieval
system, or translated into any language or computer language in any form or by any means, electronic, mechanical, magnetic, optical, chemical,
manual, or otherwise, without the prior written permission of Canon Inc.
Disclaimers
The information in this document is subject to change without notice.
CANON INC. MAKES NO WARRANTY OF ANY KIND WITH REGARD TO THIS MATERIAL, EITHER EXPRESS OR IMPLIED, EXCEPT AS
PROVIDED HEREIN, INCLUDING WITHOUT LIMITATION, THEREOF, WARRANTIES AS TO MARKETABILITY, MERCHANTABILITY,
FITNESS FOR A PARTICULAR PURPOSE OF USE OR NON-INFRINGEMENT. CANON INC. SHALL NOT BE LIABLE FOR AN
INCIDENTAL, OR CONSEQUENTIAL DAMAGES OF ANY NATURE, OR LOSSES OR EXPENSES RESULTING FROM THE USE OF THIS
MATERIAL.
Y DIRECT,
Table of Contents
Index
ii
Page 4

Advanced Fax
Features
Advanced Copy
Features
System Monitor
1
2
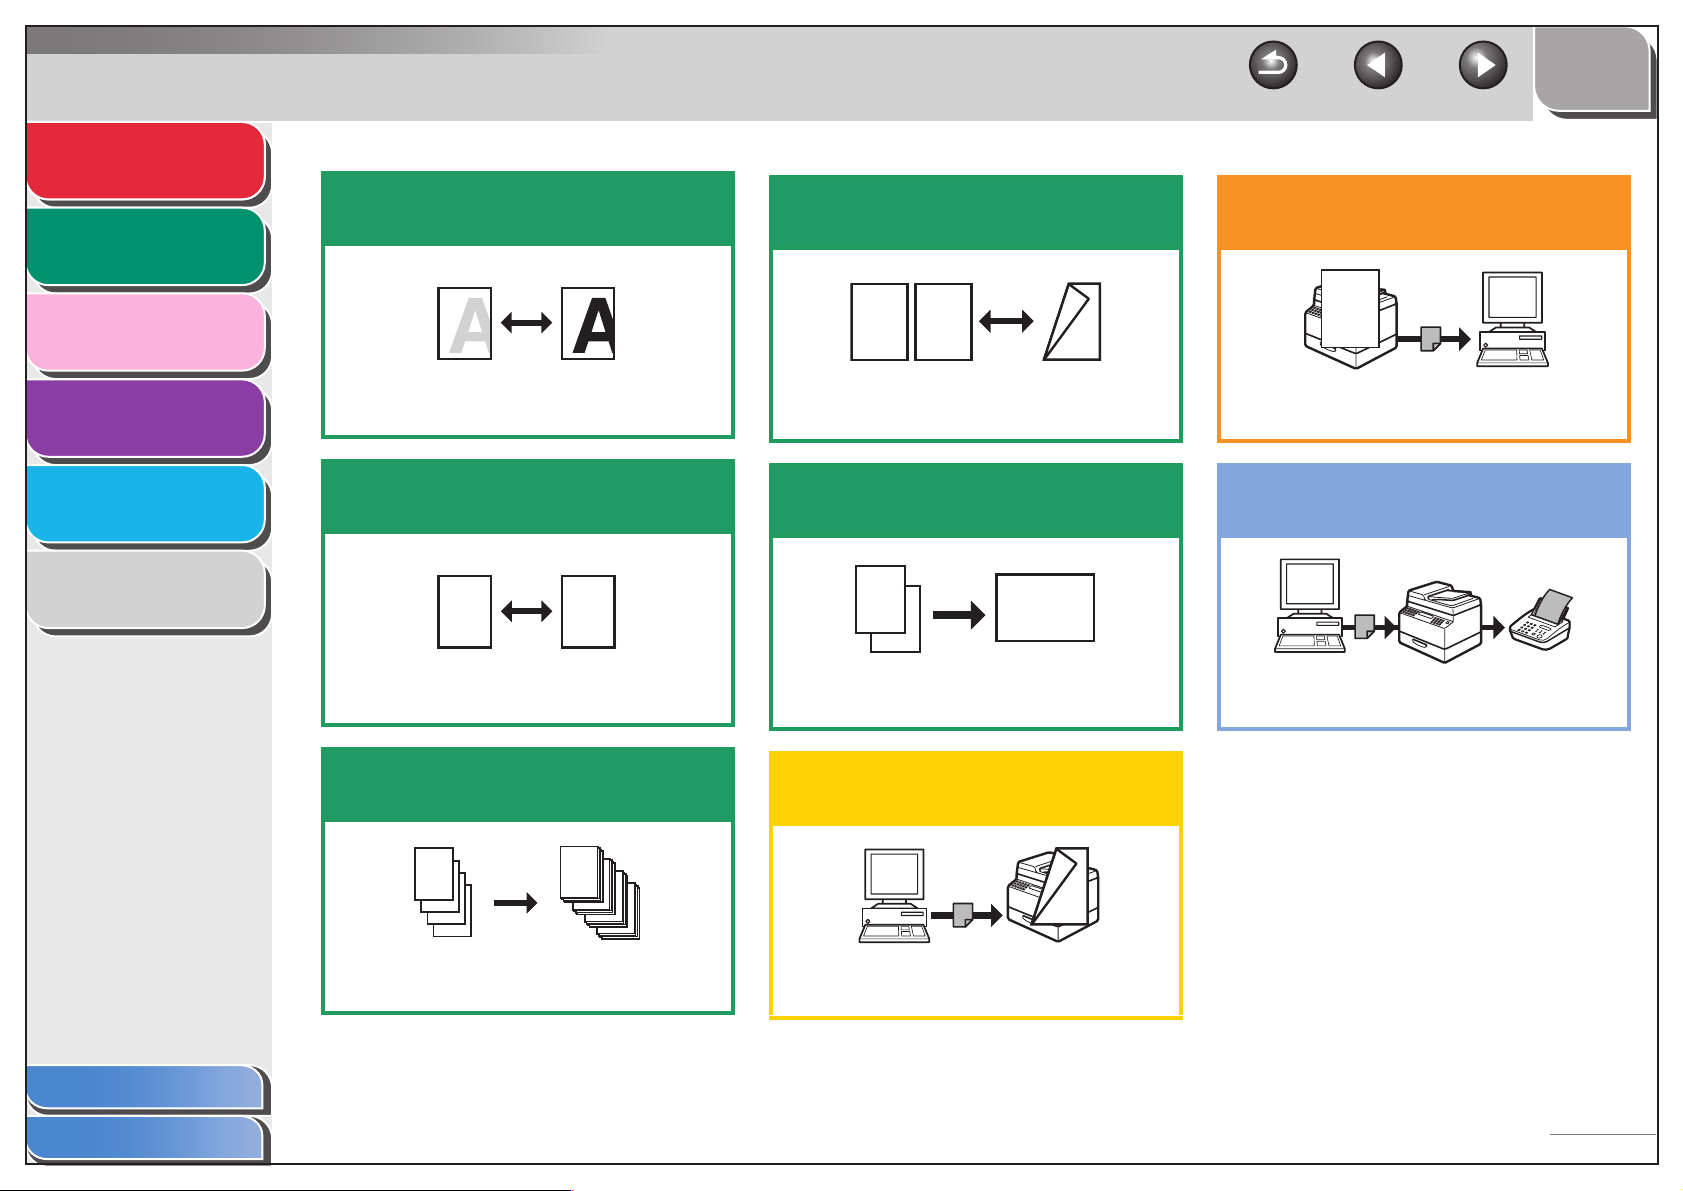
Things You Can Do
Specify a recipient with a
single key
Look up a particular
recipient
TOP
Back Previous Next
Receive faxes in memory
without printing out
3
Reports and Lists
4
Troubleshooting
5
Appendix
6
One-Touch Speed Dialing
→ Basic Guide
Specify a recipient with a
two-digit code
Coded Dialing
→ Basic Guide
Specify multiple recipients
with a single key
AAAAA
BBBBB
CCCCC
Using Address Book
→ p. 1-3
Redial when the line is busy
Redialing
→ p. 1-4
Send a fax to multiple
recipients
Memory Reception
→ p. 1-11
Reject faxes without their
numbers
Reception Restriction
→ p. 1-12
Select a scan mode depending
on the type of image
Table of Contents
Index
Group Dialing
→ Basic Guide
Broadcasting
→ p. 1-15
ABC
ABC
ABC
ABC
Image Quality
→ Basic Guide
iii
Page 5
Advanced Fax
DEF
DEF
DEF
DEF
ABC
ABC
ABC
ABC
1
DEF
DEF
DEF
DEF
DEF
DEF
DEF
DEF
ABC
ABC
ABC
ABC
1
F
F
Features
1
Advanced Copy
Features
2
System Monitor
3
Reports and Lists
4
Troubleshooting
5
Adjust the density level of
scanned images
Density
→ Basic Guide
Enlarge or reduce copied
images
Make two-sided copies
ABC
ABC
ABC
ABC
1
2
Two-Sided Copying
→ p. 2 -3
Copy two documents on one
sheet
TOP
Back Previous Next
Specify detailed scanning
options to suit various images
ABC
ABC
ABC
ABC
Scanning
→ Scanner Driver Guide
Send a fax from a PC
Appendix
Table of Contents
Index
6
A
A
Zoom Ratio
→ Basic Guide
Sort copies by page order
AAAA
AAAA
BBBB
AAAA
BBBB
CCCC
AAAA
BBBB
CCCC
DDDD
1
BBBB
CCCC
DDDD
2
CCCC
DDDD
3
DDDD
4
Collate Copy
→ p. 2-2
AAAA
AAAA
AAAA
AAAA
AAAA
AAAA
AAAA
1
AAAA
AAAA
AAAA
AAAA
AAAA
AAAA
1
AAAA
AAAA
1
AAAA
1
ABC
ABC
ABC
ABC
1
2
ABC
ABC
ABC
ABC
1
2
2 on 1 Combination
→ p. 2 -4
Print a document from a PC
Printing
→ Online Help
PC Faxing
→ Online Help
iv
Page 6

Advanced Fax
Features
Advanced Copy
Features
System Monitor
1
2
3
TOP
Back Previous Next
Table of Contents
Manuals for the Machine ................................................................................i
Legal Notices................................................................................................. ii
Reports and Lists
4
Troubleshooting
5
Appendix
6
Things You Can Do ...................................................................................... iii
How to Use This Guide..................................................................................x
Using the Top Page ...............................................................................x
Using the Chapter Topic List ................................................................. xi
1 Advanced Fax Features................................................................................................. 1-1
Dialing Features ........................................................................................ 1-3
Using Address Book............................................................................ 1-3
Redialing ............................................................................................. 1-4
Switching Temporarily to Tone Dialing................................................ 1-5
Checking Dialing Line ......................................................................... 1-6
Dialing an Overseas Number (With Pauses)....................................... 1-6
Table of Contents
Index
v
Page 7

Advanced Fax
Features
1
TOP
Back Previous Next
Receiving Features.................................................................................... 1-8
Advanced Copy
Features
2
System Monitor
3
Reports and Lists
4
Troubleshooting
5
Appendix
6
Setting the Receive Mode ................................................................... 1-8
Memory Reception ............................................................................ 1-11
Reception Restriction ........................................................................ 1-12
Remote Reception ............................................................................ 1-12
Printing Received Documents ........................................................... 1-13
Additional Fax Modes .............................................................................. 1-15
Broadcasting ..................................................................................... 1-15
Canceling Fax Jobs ................................................................................. 1-16
Canceling an Ongoing Job................................................................ 1-16
Canceling Reservation ...................................................................... 1-16
2 Advanced Copy Features.............................................................................................. 2-1
Advanced Copy Features .......................................................................... 2-2
Collate Copy........................................................................................ 2-2
Table of Contents
Index
Two-Sided Copying............................................................................. 2-3
2 on 1 Combination ............................................................................. 2-4
Canceling Copy Jobs................................................................................. 2-5
Canceling a Job While Scanning ........................................................ 2-5
Canceling a Job While Printing ........................................................... 2-5
vi
Page 8

Advanced Fax
Features
1
TOP
Back Previous Next
3 System Monitor .............................................................................................................. 3-1
Advanced Copy
Features
2
System Monitor
3
Reports and Lists
4
Troubleshooting
5
Appendix
6
Checking Job and Machine Status ............................................................ 3-2
Checking Print Status.......................................................................... 3-2
Checking Print and Scan Counts ........................................................ 3-2
Checking and Deleting Documents Stored in Memory........................ 3-2
Checking and Printing Transmission/Reception Results..................... 3-3
Checking Remaining Memory ............................................................. 3-3
4 Reports and Lists........................................................................................................... 4-1
Summary of Reports and Lists .................................................................. 4-2
Printing Reports Automatically .................................................................. 4-3
TX REPORT........................................................................................ 4-3
RX REPORT ....................................................................................... 4-4
ACTIVITY REPORT ............................................................................ 4-5
Table of Contents
Index
Printing Reports and Lists Manually .......................................................... 4-6
vii
Page 9

Advanced Fax
Features
1
TOP
Back Previous Next
5 Troubleshooting............................................................................................................. 5-1
Advanced Copy
Features
2
System Monitor
3
Reports and Lists
4
Troubleshooting
5
Appendix
6
General Problems...................................................................................... 5-2
Paper Feeding Problems........................................................................... 5-4
Faxing Problems........................................................................................ 5-5
Sending Problems............................................................................... 5-5
Receiving Problems ............................................................................ 5-9
Copying Problems ................................................................................... 5-16
Printing Problems .................................................................................... 5-17
Telephone Problems ............................................................................... 5-19
Customer Support ................................................................................... 5-20
Customer Support (U.S.A.) ............................................................... 5-20
Customer Support (Canada) ............................................................. 5-20
Table of Contents
Index
viii
Page 10

Advanced Fax
Features
1
TOP
Back Previous Next
6 Appendix......................................................................................................................... 6-1
Advanced Copy
Features
2
System Monitor
3
Reports and Lists
4
Troubleshooting
5
Appendix
6
Glossary .................................................................................................... 6-2
Index.......................................................................................................... 6-8
Table of Contents
Index
ix
Page 11
Advanced Fax
Features
Advanced Copy
Features
System Monitor
1
2
TOP
Back Previous Next
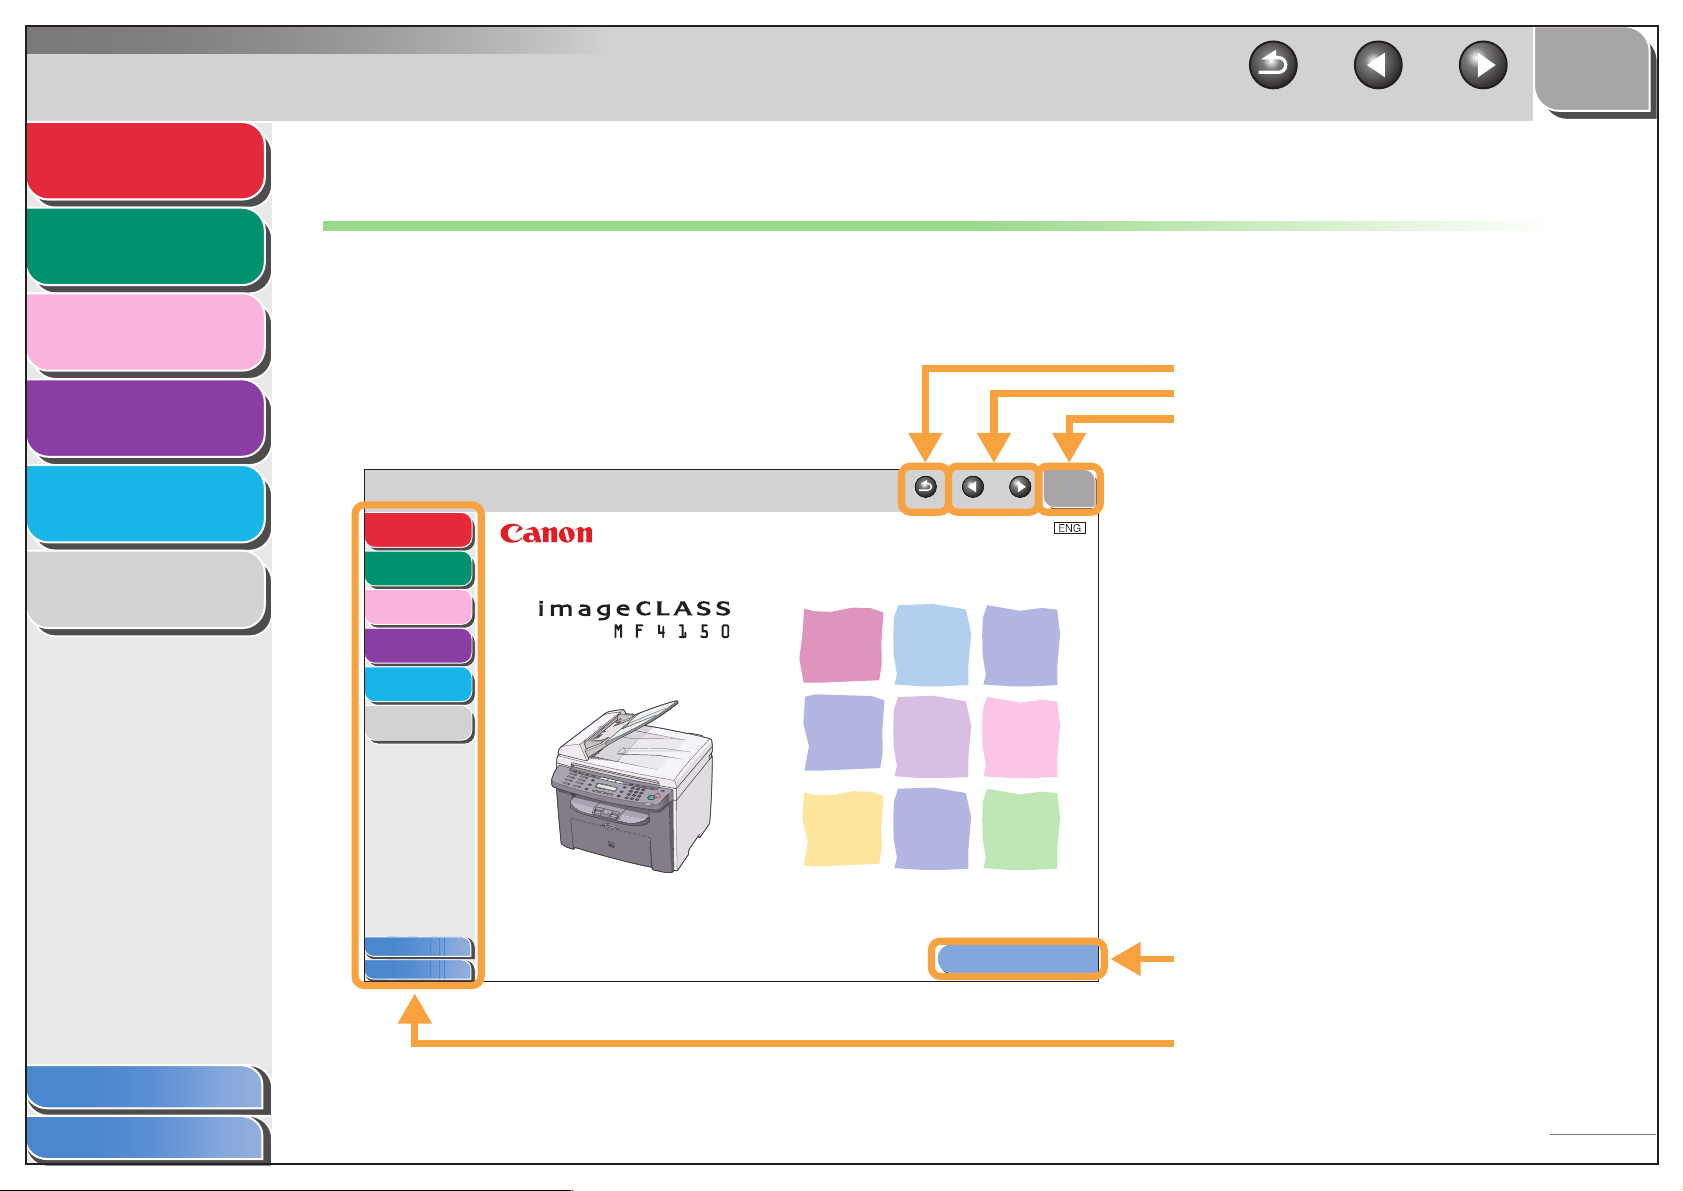
How to Use This Guide
■ Using the Top Page
3
Reports and Lists
4
Troubleshooting
5
Appendix
6
Advanced Fax
Features
Advanced Copy
Features
System Monitor
Reports and Lists
Troubleshooting
Appendix
1
2
Advanced Guide
3
4
5
6
Returns to the last page opened.
Displays the previous or next page.
Returns to the top page.
TOP
Back Previous Next
Table of Contents
Index
Table of Contents
Index
Please read this guide before operating this pr
After you finish reading this guide, store it in a safe place
for future reference.
oduct.
How to Use This Guide
Displays the “How to Use This Guide” page.
Quick links to the list of things you can do, topics
for each chapter, table of contents, and the index.
x
Page 12

Advanced Fax
Features
1
TOP
Back Previous Next
■ Using the Chapter Topic List
Advanced Copy
Features
2
System Monitor
3
Reports and Lists
4
Troubleshooting
5
Appendix
6
Advanced Fax
Features
Advanced Copy
Features
System Monitor
Reports and Lists
Troubleshooting
Appendix
1
1 Advanced Fax Features
2
Dialing Features....................................................................................... 1-3
3
4
5
6
Receiving Features............................................................
Back Previous Next
TOP
Using Address Book ............................................... 1-3
Redialing................................................................. 1-4
Switching Temporarily to Tone Dialing.................... 1-5
Checking Dialing Line............................................. 1-6
Dialing an Overseas Number (With Pauses).......... 1-6
...................... 1-8
Setting the Receive Mode ...................................... 1-8
Memory Reception ............................................... 1-11
Reception Restriction ........................................... 1-12
Remote Reception................................................ 1-12
Printing Received Documents .............................. 1-13
Returns to the last page opened.
Displays the previous or next page.
Returns to the top page.
Table of contents for the chapter.
Table of Contents
Index
Table of Contents
Index
1-1
Quick links to the list of things you can do, topics
for each chapter, table of contents, and the index.
xi
Page 13

Advanced Fax
Features
Advanced Copy
Features
System Monitor
1
2
3
TOP
Back Previous Next
The following symbols are used throughout the manuals for the machine and indicate the warnings, cautions and notes you should
keep in mind when using the machine.
WARNING
Indicates a warning that may lead to death or serious injury if not observed.
CAUTION
Explains how to avoid actions that could injure you or damage your machine.
Reports and Lists
4
Troubleshooting
5
Appendix
6
NOTE
Explains operating restrictions and how to avoid minor difficulties.
In addition, this guide uses distinctive notations to identify keys and information in the LCD:
– The keys you press appear in square brackets: [Stop/Reset].
– Information in the LCD appears in angle brackets: <LOAD PAPER>.
Table of Contents
Index
xii
Page 14
Advanced Fax
Features
Advanced Copy
Features
System Monitor
1
2
TOP
Back Previous Next
1 Advanced Fax Features
Dialing Features....................................................................................... 1-3
3
Reports and Lists
4
Troubleshooting
5
Appendix
6
Using Address Book ............................................... 1-3
Redialing................................................................. 1-4
Switching Temporarily to Tone Dialing.................... 1-5
Checking Dialing Line............................................. 1-6
Dialing an Overseas Number (With Pauses) .......... 1-6
Receiving Features.................................................................................. 1-8
Setting the Receive Mode ...................................... 1-8
Memory Reception ............................................... 1-11
Reception Restriction ........................................... 1-12
Remote Reception................................................ 1-12
Printing Received Documents .............................. 1-13
Table of Contents
Index
1-1
Page 15
Advanced Fax
Features
1
TOP
Back Previous Next
Additional Fax Modes............................................................................ 1-15
Advanced Copy
Features
2
System Monitor
3
Reports and Lists
4
Troubleshooting
5
Appendix
6
Broadcasting......................................................... 1-15
Canceling Fax Jobs............................................................................... 1-16
Canceling an Ongoing Job ................................... 1-16
Canceling Reservation ......................................... 1-16
Table of Contents
Index
1-2
Page 16
Advanced Fax
Features
Advanced Copy
Features
1
2
System Monitor
3
Reports and Lists
4
Troubleshooting
5
Appendix
6
Dialing Features
The machine provides the following dialing features:
address book dialing, redialing, temporary tone dialing,
checking dialing line, and dialing an overseas number.
■ Using Address Book
Address book dialing enables you to search for a particular
recipient registered in the machine. This is useful when you
forget which one-touch speed dialing key or coded dialing code
the recipient you want is registered under.
You can either go through all the recipients registered in the
machine (LIST), or look up a particular one by their name
(SEARCH).
Listing All Recipients
TOP
Back Previous Next
4. Use [ ] or [ ] to select <LIST>, then
press [OK].
5. Use [ ] or [ ] to find the required
recipient.
– The recipients are listed in the order of one-touch speed
dialing keys (01 to 08), and coded dialing codes (00 to 99).
– For a one-touch speed dialing key or coded dialing code with
no recipient name registered, their fax number is displayed.
6. Press [Start].
When you set the documents on the platen glass, press [Start] for
each document. When scanning is complete, press [OK] to start
dialing.
Looking Up a Recipient
Table of Contents
Index
1. Set documents.
Place the first page on the platen glass if you are not using the
ADF.
2. Press [FAX].
3. Press [Address Book].
If no recipient is registered for speed dialing, <NOT
REGISTERED> is displayed.
1. Set documents.
Place the first page on the platen glass if you are not using the
ADF.
2. Press [FAX].
1-3
Page 17
Advanced Fax
Features
Advanced Copy
Features
1
2
System Monitor
3
Reports and Lists
4
Troubleshooting
5
Appendix
6
3. Press [Address Book].
If no recipient is registered for speed dialing, <NOT
REGISTERED> is displayed.
4. Use [ ] or [ ] to select <SEARCH>, then
press [OK].
5. Use the numeric keys to enter up to 10 first
characters of the recipient’s name, then
press [OK].
Ex.
SEARCH [A]
CANON
– When the search is complete, the number of recipients that
match the characters you entered is displayed in parentheses.
– Press [Clear] to run a new search.
6. Use [ ] or [ ] to find the required
recipient.
TOP
Back Previous Next
■ Redialing
Redialing can be done manually or automatically. For automatic
redialing, you can set how many times the machine redials and
the time between redials.
Redialing Manually
1. Set documents.
Place the first page on the platen glass if you are not using the
ADF.
2. Press [FAX].
3. Press [Redial/Pause].
4. Press [Start].
When you set the documents on the platen glass, press [Start] for
each document. When scanning is complete, press [OK] to start
dialing.
Table of Contents
Index
7. Press [Start].
When you set the documents on the platen glass, press [Start] for
each document. When scanning is complete, press [OK] to start
dialing.
NOTE
When <RESTRICT REDIAL> is set to <ON> in the <TX
SETTINGS> of the <FAX SETTINGS> menu, Redialing is not
available.
1-4
Page 18
Advanced Fax
Features
Advanced Copy
Features
1
2
System Monitor
3
Reports and Lists
Redialing Automatically
1. Press [Additional Functions].
2. Use [ ] or [ ] to select <FAX
SETTINGS>, then press [OK].
3. Use [ ] or [ ] to select <TX SETTINGS>,
then press [OK].
TOP
Back Previous Next
7. Use [] or [] to select the time (in
minutes) between redials, then press [OK].
Ex.
REDIAL INTERVAL
2MIN.
You can also enter values with the numeric keys.
8. Press [Stop/Reset] to return to the standby
mode.
Troubleshooting
Appendix
4
5
6
4. Use [ ] or [ ] to select <AUTO REDIAL>,
then press [OK].
5. Use [ ] or [ ] to select <ON>, then press
[OK].
6. Use [ ] or [ ] to select the number of
redials the machine will make, then press
[OK].
Ex.
REDIAL TIMES
2TIMES
You can also enter values with the numeric keys.
NOTE
Reagrdless of the number you entered, the machine makes only one
redialing attempt if it does not detect a busy signal.
■ Switching Temporarily to Tone Dialing
If your machine is set for pulse dialing, use the procedure below
to switch to tone dialing to use information services (e.g., banks,
airline reservations, and hotel reservations).
NOTE
To talk to the other party, you will need to connect a telephone to the
machine.
1. Press [FAX].
2. Press [Hook].
NOTE
Make sure to confirm the dial tone before entering a fax number.
If you enter the number before the dial tone can be heard, the call
may not be connected, or the wrong number may be dialed.
Table of Contents
Index
1-5
Page 19

Advanced Fax
Features
Advanced Copy
Features
1
2
System Monitor
3
Reports and Lists
4
Troubleshooting
5
Appendix
6
3. Use the numeric keys to dial the required
information service.
4. When the recorded message of the
information service answers, press [Tone] to
switch to tone dialing.
5. Use the numeric keys to enter the numbers
requested by the information service.
6. If you want to receive faxes, press [Start].
When finished, the line is disconnected automatically and the
tone dialing is canceled.
■ Checking Dialing Line
Checking dialing line function enables you to configure the
setting on whether to check for a dial tone.
TOP
Back Previous Next
4. Use [ ] or [ ] to select <DIALING LINE
CHCK>, then press [OK].
5. Use [ ] or [ ] to select <ON>, then press
[OK].
6. Press [Stop/Reset] to return to the standby
mode.
■ Dialing an Overseas Number (With
Pauses)
When you dial or register an overseas number, you may need to
insert a pause within the number.
1. Set documents.
Place the first page on the platen glass if you are not using the
ADF.
Table of Contents
Index
1. Press [Additional Functions].
2. Use [ ] or [ ] to select <FAX
SETTINGS>, then press [OK].
3. Use [ ] or [ ] to select <TX SETTINGS>,
then press [OK].
2. Press [FAX].
3. Adjust any necessary settings (fax
resolution, etc.) for your documents.
4. Use the numeric keys to dial the international
access code.
For details on international access codes, contact your local
telephone company.
1-6
Page 20
Advanced Fax
Features
Advanced Copy
Features
1
2
System Monitor
3
Reports and Lists
4
Troubleshooting
TOP
Back Previous Next
5. If necessary, press [Redial/Pause] to enter a
2.5-second pause.
Ex.
=123P
– <P> in the fax/telephone number represents 2.5-second
pause.
– For a longer pause, press [Redial/Pause] again.
6. Use the numeric keys to dial the country
code, the area code, and the fax/telephone
number of the recipient.
Appendix
Table of Contents
5
6
7. Press [Start].
When you set the documents on the platen glass, press [Start] for
each document. When scanning is complete, press [OK] to start
dialing.
Index
1-7
Page 21

Advanced Fax
Features
Advanced Copy
Features
1
2
System Monitor
3
Reports and Lists
4
Troubleshooting
5
Appendix
6
Receiving Features
You can set the receive mode that suits your needs. The
machine also provides the following receiving features:
memory reception, reception restriction, and remote
reception.
■ Setting the Receive Mode
To determine the right mode for you, see “Set the Machine for
Receiving Faxes,” in the Starter Guide.
1. Press [Additional Functions].
2. Use [ ] or [ ] to select <FAX
SETTINGS>, then press [OK].
3. Use [ ] or [ ] to select <RX SETTINGS>,
then press [OK].
4. Use [ ] or [ ] to select <RX MODE>,
then press [OK].
TOP
Back Previous Next
5. Use [ ] or [ ] to select the desired
receive mode, then press [OK].
<FaxOnly>: Answers all calls as faxes and disconnects voice
calls.
<AnsMode>: Receives faxes automatically and records voice
messages, see “AnsMode: Additional Settings,” on p. 1-9.
<DRPD> (Distinctive Ring Pattern Detection): Distinguishes
between fax and voice calls using distinctive ring patterns. Select
the ring pattern assigned by your telephone company. For
additional settings, see “DRPD: Additional Settings,” on p. 1-9.
<FAX/TEL>: Switches between fax and voice calls automatically.
For additional settings, see “FAX/TEL: Additional Settings,” on
p. 1-10.
<MANUAL>: Does not answer any calls. You have to manually
receive faxes.
NOTE
– For <DRPD>, <FAX/TEL>, or <MANUAL>, make sure an
external telephone is connected to the machine.
– For <AnsMode>, make sure an answering machine is
connected to the machine.
– For <DRPD>, subscription to a DRPD service is required.
Contact your telephone company for availability.
Table of Contents
Index
6. Press [Stop/Reset] to return to the standby
mode.
1-8
Page 22
Advanced Fax
Features
Advanced Copy
Features
1
2
System Monitor
3
Reports and Lists
4
Troubleshooting
5
AnsMode: Additional Settings
If required, change the additional settings as follows:
1. Press [Additional Functions].
2. Use [ ] or [ ] to select <FAX
SETTINGS>, then press [OK].
3. Use [ ] or [ ] to select <RX SETTINGS>,
then press [OK].
4. Use [ ] or [ ] to select <RX MODE>,
then press [OK].
TOP
Back Previous Next
7. Use [ ] or [ ] to select the duration (10
to 70 seconds) for the fax to detect, then
press [OK].
You can also enter values with the numeric keys.
8. Press [Stop/Reset] to return to the standby
mode.
DRPD: Additional Settings
If required, change the additional settings as follows:
1. Press [Additional Functions].
Appendix
Table of Contents
Index
6
5. Use [ ] or [ ] to select <AnsMode>, then
press [OK].
6. Use [ ] or [ ] to select the time (10 to 30
seconds) for the answering machine to start
playing outgoing message after receiving a
call, then press [OK].
You can also enter values with the numeric keys.
2. Use [ ] or [ ] to select <FAX
SETTINGS>, then press [OK].
3. Use [] or [] to select <RX SETTINGS>,
then press [OK].
4. Use [ ] or [ ] to select <RX MODE>,
then press [OK].
1-9
Page 23

Advanced Fax
Features
Advanced Copy
Features
1
2
System Monitor
3
Reports and Lists
4
Troubleshooting
5. Use [ ] or [ ] to select <DRPD>, then
press [OK].
6. Use [ ] or [ ] to select a ring pattern,
then press [OK].
<NORMAL RING>
<DOUBLE RING>
<SHORT-SHORT-LONG>
<SHORT-LONG-SHORT>
<OTHER RING TYPE>
7. Press [Stop/Reset] to return to the standby
mode.
TOP
Back Previous Next
4. Use [ ] or [ ] to select <RX MODE>,
then press [OK].
5. Use [ ] or [ ] to select <FAX/TEL>, then
press [OK].
6. Use [ ] or [ ] to select the time (0 to 30
seconds) for the phone start ringing after
receiving a call, then press [OK].
You can also enter values with the numeric keys.
7. Use [ ] or [ ] to select the duration (10
to 45 seconds) of ringing, then press [OK].
Appendix
Table of Contents
5
6
FAX/TEL: Additional Settings
If required, change the additional settings as follows:
1. Press [Additional Functions].
2. Use [ ] or [ ] to select <FAX
SETTINGS>, then press [OK].
3. Use [ ] or [ ] to select <RX SETTINGS>,
then press [OK].
You can also enter values with the numeric keys.
8. Use [] or [] to select the action the
machine will take after the ringing ends, then
press [OK].
<RECEIVE>: Switches to the receive mode.
<DISCONNECT>: Disconnects the call.
9. Press [Stop/Reset] to return to the standby
mode.
Index
1-10
Page 24

Advanced Fax
Features
1
Manual Reception
TOP
Back Previous Next
Selecting the Receive Mode for Printing
Advanced Copy
Features
2
System Monitor
3
Reports and Lists
4
Troubleshooting
5
Appendix
6
When you select <MANUAL> in <RX MODE>, follow the
procedure below to receive a fax.
1. When the telephone rings, pick up the
handset of the external telephone.
2. Confirm that the modem’s connecting sound
is heard, then press [Start].
3. Hang up the external telephone.
■ Memory Reception
The machine automatically receives faxes in memory when
printing is disabled under certain conditions (e.g., toner or paper
has run out).
When the problem is cleared, the machine automatically prints
the fax which was stored in the memory.
NOTE
– The machine memory can store up to 256 fax jobs or approximately
256 pages.*
* Based on the condition that the other party sends the fax by the
imageCLASS MF4150 with ITU-T Standard Chart No. 1, standard
mode. The maximum number of pages that the machine’s memory
can store differs depending on the other party’s machine.
– Once the pages are printed, they are deleted from the memory.
– If the memory becomes full, you will not be able to receive the
remaining pages. Contact the other party and ask them to resend the
remaining pages of the fax.
You can select whether the machine stores all received pages in
the memory before printing them out or prints each page as it is
received.
1. Press [Additional Functions].
2. Use [ ] or [ ] to select <FAX
SETTINGS>, then press [OK].
3. Use [] or [] to select <RX SETTINGS>,
then press [OK].
4. Use [ ] or [ ] to select <RX PRINT>,
then press [OK].
5. Use [] or [] to select desired printing
method, then press [OK].
<MEMORY RX>: Prints after all the pages of the document are
received.
<PRINT RX>: Prints each page as it is received.
6. Press [Stop/Reset] to return to the standby
mode.
Table of Contents
Index
1-11
Page 25

Advanced Fax
Features
Advanced Copy
Features
1
2
System Monitor
3
Reports and Lists
4
Troubleshooting
5
Appendix
6
■ Reception Restriction
You can reject incoming faxes without sending their numbers in
the sender’s machines.
1. Press [Additional Functions].
2. Use [ ] or [ ] to select <FAX
SETTINGS>, then press [OK].
3. Use [ ] or [ ] to select <RX SETTINGS>,
then press [OK].
4. Use [ ] or [ ] to select <RX
RESTRICTION>, then press [OK].
5. Use [ ] or [ ] to select <ON>, then press
[OK].
TOP
Back Previous Next
Registering Remote Reception ID
Follow this procedure if you want to change the default remote
reception ID of 25.
1. Press [Additional Functions].
2. Use [ ] or [ ] to select <FAX
SETTINGS>, then press [OK].
3. Use [] or [] to select <RX SETTINGS>,
then press [OK].
4. Use [ ] or [ ] to select <REMOTE RX>,
then press [OK].
5. Use [ ] or [ ] to select <ON>, then press
[OK].
Table of Contents
Index
■ Remote Reception
Remote reception enables you to use an external telephone
connected to the machine to receive faxes manually. This can
be useful when the machine is not nearby or is being used by
someone else.
6. Use the numeric keys to enter the remote
reception ID (00 to 99), then press [OK].
7. Press [Stop/Reset] to return to the standby
mode.
1-12
Page 26

Advanced Fax
Features
1
Receiving a Fax Remotely
TOP
Back Previous Next
1. Press [Additional Functions].
Advanced Copy
Features
2
System Monitor
3
Reports and Lists
4
Troubleshooting
5
Appendix
6
The following procedure is available only when the machine
receives the tone signal.
1. When you receive a call, pick up the handset
of the external telephone.
2. Use the numeric keys to enter the two-digit
remote reception ID to start reception.
3. When the reception starts, put the handset of
the external telephone.
■ Printing Received Documents
The machine provides the following printing features: received
image reduction, two-sided printing.
Reducing Received Images
When a received document is divided and printed over multiple
pages of paper, the data contained in the bottom 8 mm of a
page are duplicated at the top of the following page, making the
duplicated section easier to read.
You can also print received documents in a reduced size or cut
off the end of a document that does not fit on one page.
2. Use [ ] or [ ] to select <FAX
SETTINGS>, then press [OK].
3. Use [ ] or [ ] to select <PRINTER
SETTINGS>, then press [OK].
4. Use [ ] or [ ] to select <RX
REDUCTION>, then press [OK].
5. Use [] or [] to select desired setting,
then press [OK].
<ON>: Reduces the documents automatically depending on the
length of the documents.
<OFF>: Prints documents on a paper without reducing the size.
<CUT>: Cuts off the end of a document that does not fit on one
page up to 24 mm. When the height of the area to be cut off is
more than 24 mm, the document will be printed on the following
page without being cut off.
6. Press [Stop/Reset] to return to the standby
mode.
Table of Contents
Index
1-13
Page 27

Advanced Fax
Features
1
TOP
Back Previous Next
Two-Sided Printing
Advanced Copy
Features
2
System Monitor
3
Reports and Lists
4
Troubleshooting
5
Appendix
6
You can print received documents on both sides of the paper.
1. Press [Additional Functions].
2. Use [ ] or [ ] to select <FAX
SETTINGS>, then press [OK].
3. Use [ ] or [ ] to select <PRINTER
SETTINGS>, then press [OK].
4. Use [ ] or [ ] to select <2-SIDED
PRINT>, then press [OK].
5. Use [ ] or [ ] to select <ON>, then press
[OK].
6. Press [Stop/Reset] to return to the standby
mode.
Table of Contents
Index
1-14
Page 28

Advanced Fax
Features
Advanced Copy
Features
1
2
System Monitor
3
Reports and Lists
4
Troubleshooting
5
Additional Fax Modes
The machine provides the following additional fax modes:
broadcasting and canceling reservation.
■ Broadcasting
Broadcasting enables you to send the same document to
multiple recipients.
1. Set documents.
Place the first page on the platen glass if you are not using the
ADF.
TOP
Back Previous Next
5. Repeat step 4 to enter all required recipients
(up to 124), then press [Start].
When you set the documents on the platen glass, press [Start] for
each document. When scanning is complete, press [OK] to start
dialing.
Appendix
Table of Contents
Index
6
2. Press [Additional Functions].
3. Use [ ] or [ ] to select <BROADCAST>,
then press [OK].
4. Use the numeric keys, one-touch speed
dialing key, coded dialing code, or address
book dialing to enter a recipient.
Be sure to press [OK] after entering the recipient’s number if you
use the numeric keys. You can enter up to 16 different fax
numbers using the numeric keys.
1-15
Page 29

Advanced Fax
Features
Advanced Copy
Features
System Monitor
1
2
3
Canceling Fax Jobs
■ Canceling an Ongoing Job
Cancel an ongoing job (sending or receiving) as follows.
TOP
Back Previous Next
■ Canceling Reservation
You can cancel sending jobs reserved in memory.
Reports and Lists
4
Troubleshooting
5
Appendix
6
1. Press [Stop/Reset].
2. Press [ ] to select <YES>.
If you do not want to cancel the job, press [ ] to select <NO>.
NOTE
– For sending jobs, remove any unscanned documents from the
ADF.
– If you are in the copy or scan standby mode and want to cancel
a fax job, press [FAX] to return to the fax mode first.
1. Press [System Monitor].
2. Use [ ] or [ ] to select <TX STATUS>,
then press [OK].
3. Use [ ] or [ ] to select the job you want
to cancel, then press [OK].
<MEMORY>: Documents in memory.
<BROADCAST>: Broadcasting.
NOTE
For <BROADCAST>, all recipients entered for a broadcasting job
will be canceled.
4. Press [ ] to select <YES>.
5. Press [Stop/Reset] to return to the standby
mode.
Table of Contents
Index
1-16
Page 30

Advanced Fax
Features
Advanced Copy
Features
1
2
System Monitor
3
Reports and Lists
4
TOP
Back Previous Next
2 Advanced Copy Features
Advanced Copy Features........................................................................ 2-2
Collate Copy ........................................................... 2-2
Two-Sided Copying................................................. 2-3
2 on 1 Combination ................................................ 2-4
Troubleshooting
Appendix
5
6
Canceling Copy Jobs .............................................................................. 2-5
Canceling a Job While Scanning............................ 2-5
Canceling a Job While Printing............................... 2-5
Table of Contents
Index
2-1
Page 31

Advanced Fax
Features
Advanced Copy Features
1
2
System Monitor
3
Reports and Lists
4
Troubleshooting
5
Appendix
6
Advanced Copy Features
■ Collate Copy
You can copy documents collated into sets arranged in page
order. This feature can be used with both “Two-Sided Copying”
(see p. 2-3) and “2 on 1 Combination” (see p. 2-4) at the same
time.
1. Set documents.
Place the first page on the platen glass if you are not using the
ADF.
2. Press [COPY].
3. Press [Collate/2 on 1].
NOTE
If <AUTO COLLATE> is set to <ON> in the <COPY SETTINGS>
of the Additional Functions menu, skip step 3 and 4.
TOP
Back Previous Next
6. Press [Start].
When the documents are loaded in the ADF, collate copying
starts and no further operation is required.
7. Place the next page of the document on the
platen glass, then press [Start].
Repeat this step to scan all pages. The machine prints only one
copy of each page.
8. Press [OK].
The machine prints the rest of sets of copies.
NOTE
– To cancel all settings, press [Stop/Reset].
– When scanning multiple page documents, <MEMORY FULL>
may appear in the LCD and scanning may be canceled. In this
case, the machine returns to the standby mode automatically.
Table of Contents
Index
4. Use [ ] or [ ] to select <COLLATE>,
then press [OK].
5. Use the numeric keys to enter the desired
copy quantity (1 to 99).
2-2
Page 32

Advanced Fax
Features
Advanced Copy
Features
1
2
System Monitor
3
Reports and Lists
■ Two-Sided Copying
Two-sided copying enables you to make two-sided copies from
one-sided documents. This feature can be used together with
both “Collate Copy” (see p. 2-2) and “2 on 1 Combination” (see
p. 2-4).
Two-Sided Copying
Copy
TOP
Back Previous Next
1. Set documents.
Place the first page on the platen glass if you are not using the
ADF.
2. Press [COPY].
3. Press [2-Sided].
4. Use [ ] or [ ] to select <ON>, then press
[OK].
Troubleshooting
Appendix
4
5
6
Originals
NOTE
Paper used to make two-sided copies must conform to the following
specifications:
– Paper size: LTR and A4
– Paper weight: 17 to 21 lb [64 to 80 g/m
Book Type
selected
Calendar
Type
selected
2
]
Copy
5. Use [ ] or [ ] to select <BOOK TYPE> or
<CALENDAR TYPE>, then press [OK].
<BOOK TYPE>: The front and back sides of the copy will have
the same top-bottom orientation.
<CALENDAR TYPE>: The front and back sides of the copy will
have opposite top-bottom orientations.
6. Press [Start].
When you set the document on the platen glass, press [Start] for
each document. When scanning is complete, press [OK].
NOTE
To cancel all settings, press [Stop/Reset].
Table of Contents
Index
2-3
Page 33

Advanced Fax
Features
Advanced Copy
Features
1
2
System Monitor
3
Reports and Lists
4
Troubleshooting
5
Appendix
6
■ 2 on 1 Combination
2 on 1 combination automatically reduces two documents to fit
on LTR or A4 size paper. This feature can be used with both
“Collate Copy” (see p. 2-2) and “Two-Sided Copying” (see
p. 2-3) at the same time.
Originals
Copy
1
2
1
2
1. Set documents.
Place the first page on the platen glass if you are not using the
ADF.
TOP
Back Previous Next
5. Use the numeric keys to enter the desired
copy quantity (1 to 99).
6. Press [Start].
When you set the document on the platen glass, press [Start] for
each document. When scanning is complete, press [OK].
NOTE
– If you press [OK] without scanning the second document, only
the first document will be printed on the left side of the paper.
– A maximum of 1/8" (4 mm) margin will be produced between
the two reduced documents in 2 on 1 combination copying.
– To cancel all settings, press [Stop/Reset].
Table of Contents
Index
2. Press [COPY].
3. Press [Collate/2 on 1].
4. Use [ ] or [ ] to select <2 ON 1 >, then
press [OK].
If you want to use <2 ON 1> with “Collate Copy” (see p. 2-2) at
the same time, select <COLLATE+2 ON 1>, then press [OK].
2-4
Page 34

Advanced Fax
Features
Advanced Copy
Features
1
2
TOP
Back Previous Next
Canceling Copy Jobs
Cancel an ongoing job as follows.
System Monitor
3
Reports and Lists
4
Troubleshooting
5
Appendix
6
■ Canceling a Job While Scanning
1. Press [Stop/Reset].
■ Canceling a Job While Printing
1. Press [Stop/Reset].
Ex.
CANCEL COPYING?
< YES NO >
2. Press [ ] to select <YES>.
Table of Contents
Index
2-5
Page 35

Advanced Fax
Features
Advanced Copy
Features
System Monitor
1
2
TOP
Back Previous Next
3 System Monitor
Checking Job and Machine Status ........................................................ 3-2
3
Reports and Lists
4
Troubleshooting
5
Appendix
6
Checking Print Status ............................................. 3-2
Checking Print and Scan Counts............................ 3-2
Checking and Deleting Documents Stored in
Memory .................................................................. 3-2
Checking and Printing Transmission/Reception
Results.................................................................... 3-3
Checking Remaining Memory ................................ 3-3
Table of Contents
Index
3-1
Page 36

Advanced Fax
Features
Advanced Copy
Features
1
2
System Monitor
3
Reports and Lists
4
Troubleshooting
5
Appendix
6
Checking Job and Machine Status
System monitor enables you to view and print the
transmission/reception results, check remaining memory,
monitor the status of fax, and check print and scan counts.
■ Checking Print Status
You can check and delete the print jobs sent from a computer.
1. Press [System Monitor].
2. Use [ ] or [ ] to select <PRINT
STATUS>, then press [OK].
3. Use [ ] or [ ] to view the job list.
4. If you want to delete the print job, press [OK],
then press [ ] to select <YES>.
2. Use [ ] or [ ] to select <VIEW PAGE
TOTALS>, then press [OK].
3. Use [ ] or [ ] to view the print or scan
counts.
4. Press [Stop/Reset] to return to the standby
mode.
■ Checking and Deleting Documents
Stored in Memory
1. Press [System Monitor].
2. Use [ ] or [ ] to select <TX STATUS>,
then press [OK].
TOP
Back Previous Next
Table of Contents
Index
5. Press [Stop/Reset] to return to the standby
mode.
■ Checking Print and Scan Counts
1. Press [System Monitor].
3. Use [ ] or [ ] to check the desired
document.
4. If you want to delete the document, press
[OK], then press [ ] to select <YES>.
5. Press [Stop/Reset] to return to the standby
mode.
3-2
Page 37

Advanced Fax
Features
Advanced Copy
Features
1
2
System Monitor
3
Reports and Lists
4
Troubleshooting
5
Appendix
6
■ Checking and Printing Transmission/
Reception Results
1. Press [System Monitor].
2. Use [ ] or [ ] to select <TX/RX LOG>,
then press [OK].
3. Use [ ] or [ ] to view the required
transmission/reception result.
The following items are displayed:
– Transaction number (60 down to 01, from the newest to the
oldest)
– Date and time
– Type of transaction (TX or RX)
– Recipient’s name or fax number
– Result of transaction (OK or NG)
4. If you want to print the transmission/
reception result, press [Start].
TOP
Back Previous Next
2. Use [ ] or [ ] to select <MEMORY
INDICATOR>, then press [OK] to confirm the
remaining memory.
Ex.
AVAILABLE MEMORY
75%
3. Press [Stop/Reset] to return to the standby
mode.
Table of Contents
Index
■ Checking Remaining Memory
You can check the remaining memory according to the status of
the machine.
1. Press [System Monitor].
3-3
Page 38

Advanced Fax
Features
Advanced Copy
Features
System Monitor
1
2
TOP
Back Previous Next
4 Reports and Lists
Summary of Reports and Lists .............................................................. 4-2
3
Reports and Lists
4
Troubleshooting
5
Appendix
6
Printing Reports Automatically.............................................................. 4-3
TX REPORT ........................................................... 4-3
RX REPORT........................................................... 4-4
ACTIVITY REPORT................................................ 4-5
Printing Reports and Lists Manually ..................................................... 4-6
Table of Contents
Index
4-1
Page 39

Advanced Fax
Features
Advanced Copy
Features
System Monitor
1
2
3
TOP
Back Previous Next
Summary of Reports and Lists
The machine can generate the following reports and lists. For how to print reports, see “Printing Reports Automatically,” on p. 4-3,
and “Printing Reports and Lists Manually,” on p. 4-6.
Report/List Description
Reports and Lists
4
Troubleshooting
5
Appendix
6
TX REPORT Shows the transmission result. Can be set to print automatically.
RX REPORT Shows the reception result. Can be set to print automatically.
ACTIVITY REPORT Shows last 60 transmissions and receptions. Can be set to print automatically.
MEMORY DATA LIST Lists reserved jobs stored in memory.
MEMORY IMAGE PRNT Shows information and the first page of a reserved job.
1-TOUCH LIST Lists the names and fax numbers of recipients registered under one-touch speed dialing keys.
CODED DIAL LIST Lists the names and fax numbers of recipients registered in coded dialing codes.
GROUP DIAL LIST Lists the names and fax numbers of recipients registered in each group dialing group.
USER’S DATA LIST Lists all the current settings and registered sender information.
LOST REPORT Lists received documents that were lost from the memory due to power cut. Cannot be
manually printed out.
Table of Contents
Index
4-2
Page 40

Advanced Fax
Features
Advanced Copy
Features
1
2
System Monitor
3
Reports and Lists
4
Troubleshooting
Printing Reports Automatically
TX REPORT, RX REPORT, and ACTIVITY REPORT can be
set to print automatically.
■ TX REPORT
1. Press [Additional Functions].
2. Use [ ] or [ ] to select <REPORT
SETTINGS>, then press [OK].
Report Items
The following items are displayed in the Transmission Result
Report:
● JOB NO.: Job number
● TYPE: Type of transmission
– TX: Memory transmission
– BROADCAST: Broadcasting
TOP
Back Previous Next
Appendix
Table of Contents
5
6
3. Use [ ] or [ ] to select <SETTINGS>,
then press [OK].
4. Use [ ] or [ ] to select <TX REPORT>,
then press [OK].
5. Use [ ] or [ ] to select the setting you
want, then press [OK].
<PRINT ERROR ONLY>: Prints a report only when a
transmission error occurs.
<OUTPUT NO>: Does not print a report.
<OUTPUT YES>: Prints a report every time you send a
document.
6. Press [Stop/Reset] to return to the standby
mode.
● NO.: Sequence number
● DESTINATION TEL/ID: Name and number of recipient
● DATE: Date of transaction
● TIME: Time of transaction
● PAGE: Number of pages sent
● TIME USE: Amount of time taken for a transaction
● MODE: Mode of transaction (G3 or ECM)
Index
4-3
Page 41

Advanced Fax
Features
Advanced Copy
Features
1
2
System Monitor
3
Reports and Lists
4
Troubleshooting
5
Appendix
6
● RESULT: Result of transaction
– OK: Transmission successful
– NG: Transmission failed
– STOP: Transmission manually canceled before completion
– MEM.FULL: Memory became full during transmission
– NO ANSWER: Call not answered
– PAPER JAM: ADF jam occurs during Manual TX
● Error code: For descriptions of error codes, see Chapter
11, “Troubleshooting,” in the Basic Guide.
NOTE
ERROR TX REPORT or MULTI TX REPORT is printed out depending
on the transmission result.
■ RX REPORT
TOP
Back Previous Next
5. Use [ ] or [ ] to select the setting you
want, then press [OK].
<OUTPUT NO>: Does not print a report.
<OUTPUT YES>: Prints a report every time you receive a
document.
<PRINT ERROR ONLY>: Prints a report only when a reception
error occurs.
6. Press [Stop/Reset] to return to the standby
mode.
Report Items
The following items are displayed in the Reception Result
Report:
● JOB NO.: Job number
● TYPE: Type of reception
Table of Contents
Index
1. Press [Additional Functions].
2. Use [ ] or [ ] to select <REPORT
SETTINGS>, then press [OK].
3. Use [ ] or [ ] to select <SETTINGS>,
then press [OK].
4. Use [ ] or [ ] to select <RX REPORT>,
then press [OK].
– RX: Memory or print reception
● NO.: Sequence number
● DESTINATION TEL/ID: Number of the sending machine
(displayed only if registered in their machine)
● DATE: Date of transaction
● TIME: Time of transaction
● PAGE: Number of pages received
● TIME USE: Amount of time taken for a transaction
● MODE: Mode of transaction (G3 or ECM)
4-4
Page 42

Advanced Fax
Features
Advanced Copy
Features
1
2
System Monitor
3
Reports and Lists
4
Troubleshooting
5
Appendix
6
● RESULT: Result of transaction
– OK: Reception successful
– NG: Reception failed
– STOP: Reception manually canceled before completion
– MEM.FULL: Memory became full during reception
● Error code: For descriptions of error codes, see Chapter
11, “Troubleshooting,” in the Basic Guide.
■ ACTIVITY REPORT
1. Press [Additional Functions].
2. Use [ ] or [ ] to select <REPORT
SETTINGS>, then press [OK].
3. Use [ ] or [ ] to select <SETTINGS>,
then press [OK].
TOP
Back Previous Next
Report Items
The following items are displayed in the Activity Report:
● NO.: Transaction number (01 to 60)
● JOB NO.: Job number
● DATE: Date of transaction
● TIME: Time of transaction
● TX/RX: Type of transaction (transmission or reception)
● DESTINATION TEL/ID: Name and number of recipient
● PAGE: Number of pages sent or received
● TIME USE: Amount of time taken for a transaction
● MODE: Mode of transaction (G3 or ECM)
● RESULT: Result of transaction (OK or NG) and error code
if applicable
Table of Contents
Index
4. Use [ ] or [ ] to select <ACTIVITY
REPORT>, then press [OK].
5. Use [ ] or [ ] to select the setting you
want, then press [OK].
<OUTPUT YES>: Prints a report after every 60 transactions.
<OUTPUT NO>: Does not print a report.
6. Press [Stop/Reset] to return to the standby
mode.
4-5
Page 43

Advanced Fax
Features
Advanced Copy
Features
1
2
System Monitor
3
Reports and Lists
4
Troubleshooting
TOP
Back Previous Next
Printing Reports and Lists Manually
For information on each report or list, see “Summary of
Reports and Lists,” on p. 4-2.
1. Press [Additional Functions].
2. Use [ ] or [ ] to select <REPORT
SETTINGS>, then press [OK].
3. Use [ ] or [ ] to select <LIST PRINT>,
then press [OK].
Appendix
Table of Contents
5
6
4. Use [ ] or [ ] to select the required
report or list, then press [OK].
<TX REPORT>: Transmission Result Report
<RX REPORT>: Reception Result Report
<ACTIVITY REPORT>: Activity Report
<MEMORY DATA LIST>: Memory Data List
<MEMORY IMAGE PRNT>: Memory Image Print
<1-TOUCH LIST>: One-Touch Speed Dialing List
<CODED DIAL LIST>: Coded Dialing List
<GROUP DIAL LIST>: Group Dialing List
<USER’S DATA LIST>: Machine Status List
If no relevant data is stored in memory, <NO DATA> is displayed.
Index
4-6
Page 44

Advanced Fax
Features
Advanced Copy
Features
System Monitor
1
2
TOP
Back Previous Next
5 Troubleshooting
General Problems.................................................................................... 5-2
3
Reports and Lists
4
Troubleshooting
5
Appendix
6
Paper Feeding Problems......................................................................... 5-4
Faxing Problems...................................................................................... 5-5
Sending Problems .................................................. 5-5
Receiving Problems................................................ 5-9
Copying Problems ................................................................................. 5-16
Printing Problems.................................................................................. 5-17
Telephone Problems.............................................................................. 5-19
Customer Support ................................................................................. 5-20
Customer Support (U.S.A.)................................... 5-20
Customer Support (Canada) ................................ 5-20
Table of Contents
Index
5-1
Page 45

Advanced Fax
Features
Advanced Copy
Features
1
2
General Problems
The machine has no power.
TOP
Back Previous Next
The Error indicator flashes.
System Monitor
3
Reports and Lists
4
Troubleshooting
5
Appendix
6
Q Is the power cord plugged in securely?
A Check that the power cord is securely plugged into
the machine and into the wall outlet. If the machine
is plugged into a power strip, make sure the power
strip is plugged in and turned on.
Q Is the power cord supplying power?
A Use a different power cord, or test the cord for
continuity using a voltmeter.
Q Is the main power switch turned on?
A Turn on the main power switch.
Q Does the machine feed paper correctly, or is
there paper in the paper feeding tray or multipurpose tray?
A Clear the paper jam, or load paper in the paper
feeding tray or multi-purpose tray. (For instructions
on clearing paper jam, see Chapter 11, “Clearing
Jams,” in the Basic Guide. For instructions on
loading paper, see “Set Up the Machine,” in the
Starter Guide.)
A If the machine has no paper jam, or paper is
loaded in the paper feeding tray or multi-purpose
tray, turn off the main power switch and wait for
more than five seconds, then turn it on in again. If
the problem is fixed, the Error indicator will turn off,
and the LCD will return to the standby mode. If the
Error indicator remains flash, turn off the main
power switch, and contact Canon Authorized
Service Facilities or the Canon Customer Care
Center.
Table of Contents
Index
5-2
Page 46

Advanced Fax
Features
1
TOP
Back Previous Next
Nothing appears in the LCD.
Advanced Copy
Features
2
System Monitor
3
Reports and Lists
4
Troubleshooting
5
Appendix
6
Q Is the power cord plugged in securely?
A Check that the power cord is securely plugged into
the machine and into the wall outlet. If the machine
is plugged into a power strip, make sure the power
strip is plugged in and turned on.
Q Is the main power switch turned on?
A Turn on the main power switch.
Q Is the machine in the Sleep mode?
A Press [Energy Saver] to take the machine out of
the Sleep mode.
Table of Contents
Index
5-3
Page 47

Advanced Fax
Features
Advanced Copy
Features
1
2
System Monitor
3
Reports and Lists
4
Troubleshooting
5
Appendix
6
Paper Feeding Problems
Paper does not feed properly.
Q Is the paper loaded correctly?
A Make sure the paper is correctly loaded. (See “Set
Up the Paper Cassette and Load Paper,” in the
Starter Guide.)
Q Does the machine contain too many sheets?
A Make sure you load the correct quantity. (See
Chapter 3, “Print Media,” in the Basic Guide.)
Multiple sheets feed together into the machine.
Q Is the paper loaded correctly?
TOP
Back Previous Next
Q Are different types of paper loaded in the
machine?
A Load only one type of paper.
A Make sure you load paper that meets the
requirements for use. (See Chapter 3, “Print
Media,” in the Basic Guide.)
A Let the paper run out before refilling the machine.
Avoid mixing new stock with paper already loaded.
Repeated paper jams occur.
Q Is the correct type of paper loaded in the
machine?
Table of Contents
Index
A Make sure the paper is correctly loaded. (See “Set
Up the Paper Cassette and Load Paper,” in the
Starter Guide.)
Q Does the machine contain too many sheets?
A Make sure you load the correct quantity. (See
Chapter 3, “Print Media,” in the Basic Guide.)
A Make sure you load paper that meets the
requirements for use. (See Chapter 3, “Print
Media,” in the Basic Guide.)
5-4
Page 48

Advanced Fax
Features
Advanced Copy
Features
System Monitor
1
2
3
Faxing Problems
■ Sending Problems
Cannot send a fax.
Back Previous Next
Q
A Press [FAX] to show the fax standby display.
Is your machine in the fax mode?
TOP
Reports and Lists
4
Troubleshooting
5
Appendix
6
Q Did you just turn on the machine?
A Wait for a while. After turning on the machine, the
machine cannot scan documents immediately.
Q Is the machine set for the correct telephone line
type?
A Make sure the machine is set for the correct
telephone line type. (See “Set the Telephone Line
Type,” in the Starter Guide.)
Q Is the document loaded correctly?
A Make sure the document is correctly loaded. (See
Chapter 2, “Document Handling,” in the Basic
Guide.)
A Make sure the scanning platform and rear cover
are fully closed.
Q Is the one-touch speed dialing key or coded
dialing code you entered registered correctly?
A Check that the speed dialing settings are
registered correctly. (See Chapter 4, “Sending
Faxes,” in the Basic Guide.)
Table of Contents
Index
5-5
Page 49

Advanced Fax
Features
1
Q Did you dial the correct number?
TOP
Back Previous Next
Q Is the telephone cable connected properly?
Advanced Copy
Features
2
System Monitor
3
Reports and Lists
4
Troubleshooting
5
Appendix
6
A Check that you have the correct number.
Q Is the machine in the Sleep mode?
A Press [Energy Saver] to take the machine out of
the Sleep mode.
Q Is the recipient’s machine out of paper?
A Ask the recipient to make sure the paper is loaded
in the machine.
Q Are there other documents being sent from
memory?
A Allow time for the documents to finish sending.
Q Has an error occurred during transmission?
A Check the LCD for an error message. (See
Chapter 11, “Troubleshooting,” in the Basic Guide.)
A Make sure the cable is connected properly. (See
“Connect Telephone Cables,” in the Starter Guide.)
Q Is the telephone line working properly?
A Make sure there is a dial tone when you press
[Hook] or when you lift the handset of any external
telephone connected to the machine. If there is no
dial tone, contact your local telephone company.
Q Is the recipient’s machine a G3 fax machine?
A Make sure the recipient’s machine is compatible
with your machine.
Table of Contents
Index
A Print an Activity Report and check for an error.
(See “ACTIVITY REPORT,” on p. 4-5.)
5-6
Page 50

Advanced Fax
Features
Advanced Copy
Features
1
2
System Monitor
3
Reports and Lists
4
Troubleshooting
5
Appendix
6
Q Did the recipient’s machine answer within 35
seconds (after all automatic redialing
attempts)?
A Ask the recipient to check the machine. For an
overseas call, add pauses to the registered
number. (See “Dialing an Overseas Number (With
Pauses),” on p. 1-6.)
Q Is the Processing/Data indicator lit?
A The external phone is busy. Please wait until the
external phone becomes free.
Q Is the machine overheated?
A Turn off the main power switch and let it cool for
about 5 minutes. Then turn on the main power
switch and try sending again.
TOP
Back Previous Next
Memory fills up immediately when you try to send.
Q Are you sending with the resolution set to
<SUPER FINE>?
A If you keep your document quality, divide the
document into some parts and send them
separately.
A If your document does not contain fine text or
photographs, set the resolution to <STANDARD>.
Q Is a document stored in memory, leaving little
or no memory available?
A Print, send, or delete any documents stored in
memory.
Table of Contents
Index
5-7
Page 51

Advanced Fax
Features
1
Faxes sent from the machine are spotted or dirty.
TOP
Back Previous Next
The documents you sent are too light.
Advanced Copy
Features
2
System Monitor
3
Reports and Lists
4
Troubleshooting
5
Appendix
6
Q Is the recipient’s machine working properly?
A Check the machine by making a copy. If the copy is
clear, the problem may be in the recipient’s
machine. If the copy is spotted or dirty, clean the
scanner components. (See Chapter 10,
“Maintenance,” in the Basic Guide.)
Q Is the document loaded correctly?
A Make sure the document is correctly loaded. (See
Chapter 2, “Document Handling,” in the Basic
Guide.)
Documents are printed out in a reduced size on the recipient’s
machine.
Q Is the recipient’s paper smaller than the size of
the documents you sent?
A If the recipient is using small-size paper, your
machine automatically reduces the size of the
document in accordance with the recipient’s paper.
Q Is the density setting changed to be lighter?
A Adjust the density for light documents to be darker.
(See Chapter 4, “Sending Faxes,” in the Basic
Guide.)
Q Are the scanning components of the machine
clean?
A If scanning components is dirty, clean the scanner
components. (See Chapter 10, “Maintenance,” in
the Basic Guide.)
Sending of documents is too slow.
Q Is the resolution set to <FINE> or <SUPER
FINE>?
A If your document does not contain fine text or
photographs, set the resolution to <STANDARD>
reduces the sending time.
Table of Contents
Index
5-8
Page 52

Advanced Fax
Features
1
Errors occur frequently while sending.
TOP
Back Previous Next
■ Receiving Problems
Advanced Copy
Features
2
System Monitor
3
Reports and Lists
4
Troubleshooting
5
Appendix
6
Q Are the telephone lines in poor condition, or do
you have a bad connection?
A Check if there is a device nearby that interferes
with signal transmission (e.g., microwave oven).
Cannot redial with [Redial/Pause].
Q Is <RESTRICT REDIAL> set to <ON> in the <TX
SETTINGS> of the <FAX SETTINGS> menu?
A When <RESTRICT REDIAL> is set to <ON> in the
<TX SETTINGS> of the <FAX SETTINGS> menu,
Redialing is not available. (See Chapter 12,
“Machine Settings,” in the Basic Guide.)
Entering the fax number is required again after pressing [Start].
Q Is <CONFIRM NEW DEST.> set to <ON> in the
<TX SETTINGS> of the <FAX SETTINGS>
menu?
Part of the documents you receive are cut off.
Q Are the slide guides in your multi-purpose tray
set to the size of the paper?
A Adjust the guides of the multi-purpose tray to the
size of the paper.
Q Have you specified the correct paper size for
the multi-purpose tray?
A Specify the correct paper size for the multi-purpose
tray.
Q Is the printing method for received documents
set to <CUT>?
A If you want to print a received document without
cutting off the end, set the printing method to <ON>
or <OFF>. (See “Reducing Received Images,” on
p. 1-13.)
Table of Contents
Index
A If <CONFIRM NEW DEST.> is set to <ON> in the
<TX SETTINGS> of the <FAX SETTINGS> menu,
you need to enter the fax number again after
pressing [Start]. (See Chapter 12, “Machine
Settings,” in the Basic Guide.)
5-9
Page 53

Advanced Fax
Features
1
Cannot receive a fax automatically.
TOP
Back Previous Next
Q Is paper loaded in the machine?
Advanced Copy
Features
2
System Monitor
3
Reports and Lists
4
Troubleshooting
5
Appendix
6
Q Is the machine set to receive automatically?
A For the machine to receive faxes automatically,
receive mode must be set to <FaxOnly>,
<AnsMode>, <DRPD> or <FAX/TEL>. If you have
set <AnsMode>, confirm that an answering
machine is connected to the machine and that it is
turned on with an outgoing message properly
recorded. (See “Setting the Receive Mode,” on
p. 1-8.)
Q Is a document stored in memory, leaving little
or no memory available?
A Print, send, or delete any documents stored in
memory.
Q Has an error occurred during reception?
A Check the LCD for an error message. (See
Chapter 11, “Troubleshooting,” in the Basic Guide.)
A Make sure paper is loaded in the machine. (See
“Set Up the Paper Cassette and Load Paper,” in the
Starter Guide.)
Q Is the telephone cable connected properly?
A Make sure the cable is connected properly. (See
“Connect Telephone Cables,” in the Starter Guide.)
Cannot receive a fax on both sides of the paper
Q Is the two-sided printing switch set to ‘ON’?
A Make sure that the two-sided printing switch is set
to ‘ON’. (See “Two-Sided Printing,” on p. 1-14.)
Table of Contents
Index
A Print an Activity Report and check for an error.
(See “ACTIVITY REPORT,” on p. 4-5.)
5-10
Page 54

Advanced Fax
Features
1
No automatic switching between telephone and fax calls.
TOP
Back Previous Next
Q Has an error occurred during reception?
Advanced Copy
Features
2
System Monitor
3
Reports and Lists
4
Troubleshooting
5
Appendix
6
Q Is the machine set to switch automatically
between telephone and fax calls?
A For the machine to switch between fax and
telephone calls automatically, the receive mode
must be set to <AnsMode>, <DRPD> or <FAX/
TEL>. If you have set <AnsMode>, confirm that an
answering machine is connected to the machine
and that it is turned on with an outgoing message
properly recorded. (See “Setting the Receive
Mode,” on p. 1-8.)
Q Is a document stored in memory, leaving little
or no memory available?
A Print, send, or delete any documents stored in
memory.
A Check the LCD for an error message. (See
Chapter 11, “Troubleshooting,” in the Basic Guide.)
A Print an Activity Report and check for an error.
(See “ACTIVITY REPORT,” on p. 4-5.)
Q Is paper loaded in the machine?
A Make sure paper is loaded in the machine. (See
“Set Up the Paper Cassette and Load Paper,” in the
Starter Guide.)
Q Can the sender’s machine send the CNG signal,
which tells your machine that the incoming call
is a fax call?
A Some machines cannot send this signal. In such
cases, receive the fax manually.
Table of Contents
Index
5-11
Page 55

Advanced Fax
Features
1
Cannot receive a document manually.
TOP
Back Previous Next
Print quality is poor.
Advanced Copy
Features
2
System Monitor
3
Reports and Lists
4
Troubleshooting
5
Appendix
6
Q Is the machine set to receive manually?
A For the machine to receive faxes manually, the
receive mode must be set to <MANUAL>. (See
“Setting the Receive Mode,” on p. 1-8.)
Q Have you disconnected the call by pressing
[Start] or dialing the remote reception ID after
hanging up?
A Always press [Start] or dial the remote reception ID
before hanging up. Otherwise you will disconnect
the call.
Q Is the toner low or unevenly distributed?
A Redistribute the toner inside the toner cartridge. If
the problem persists, replace the toner cartridge.
(See Chapter 10, “Maintenance,” in the Basic
Guide.)
Q Is the correct type of paper loaded in the
machine?
A Make sure you load paper that meets the
requirements for use. (See Chapter 3, “Print
Media,” in the Basic Guide.)
Q Is the sender’s machine functioning properly?
A Ask the sender to check that the scanning
components of the machine are clean.
Q Is the machine in the toner saver mode?
A Set <TONER SAVER MODE> to <OFF> in
<COMMON SETTINGS>. (See Chapter 12,
“Machine Settings,” in the Basic Guide.)
Table of Contents
Index
5-12
Page 56

Advanced Fax
Features
1
Faxes do not print.
TOP
Back Previous Next
Q Is the toner cartridge out of toner?
Advanced Copy
Features
2
System Monitor
3
Reports and Lists
4
Troubleshooting
5
Appendix
6
Q Have you removed the sealing tape from the
toner cartridge?
A Make sure you remove the sealing tape from the
cartridge. (See “Install Toner Cartridge,” in the
Starter Guide.)
Q Is the toner cartridge installed properly?
A Make sure the toner cartridge is installed properly.
(See “Install Toner Cartridge,” in the Starter Guide.)
Q Is the toner low?
A If you want to print out the received documents
without replacing the toner cartridge, set <CONT.
PRINTING> to <ON> in the <PRINTER
SETTINGS> of the <FAX SETTINGS> menu. The
machine continues printing received documents
and reports although the toner is almost run out.
However, if the toner is run out, the machine does
not receive the document in memory. You must
install the new toner cartridge, and set <CONT.
PRINTING> to <OFF>.
A Replace the toner cartridge. (See Chapter 10,
“Maintenance,” in the Basic Guide.)
Q Is the correct type of paper loaded in the
machine?
A Make sure you load paper that meets the
requirements for use. (See Chapter 3, “Print
Media,” in the Basic Guide.)
Table of Contents
Index
5-13
Page 57

Advanced Fax
Features
1
Received faxes print blotched or unevenly.
TOP
Back Previous Next
Receiving of documents is too slow.
Advanced Copy
Features
2
System Monitor
3
Reports and Lists
4
Troubleshooting
5
Appendix
6
Q Are the telephone lines in poor condition, or do
you have a bad connection?
A Error Correction Mode (ECM) should eliminate
such problems. However, if the telephone lines are
in poor condition, you may have to try again.
Q Is the sender’s machine functioning properly?
A Ask the sender to check that the scanning
components of the machine are clean.
Q Is the toner low or unevenly distributed?
A Redistribute the toner inside the toner cartridge. If
the problem persists, replace the toner cartridge.
(See Chapter 10, “Maintenance,” in the Basic
Guide.)
Q Is the resolution set to <FINE> or <SUPER
FINE>?
A Setting the resolution to <STANDARD> reduces
the receiving time. However, any fine text in the
document will also be harder to read.
You cannot get documents from information services.
Q Is your machine connected to a rotary pulse
telephone line?
A According to the instructions of information
services, press [Tone] to carrying out the tone
pulse temporarily.
Q Were there any instructions from the sender,
such as to set to receive?
A Just before receiving, press [Start].
Table of Contents
Index
5-14
Page 58

Advanced Fax
Features
1
TOP
Back Previous Next
Errors occur frequently while receiving.
Advanced Copy
Features
2
System Monitor
3
Reports and Lists
4
Troubleshooting
5
Appendix
6
Q Are the telephone lines in poor condition, or do
you have a bad connection?
A Check if there is a device nearby that interferes
with signal reception (e.g., microwave oven).
Q Is the sender’s machine functioning properly?
A Ask the sender to check that the machine is
functioning properly.
Table of Contents
Index
5-15
Page 59

Advanced Fax
Features
Advanced Copy
Features
1
2
System Monitor
3
Reports and Lists
4
Troubleshooting
5
Appendix
6
Copying Problems
Cannot make copies.
Q Have you removed the sealing tape from the
toner cartridge?
A Make sure you remove the sealing tape from the
cartridge. (See “Install Toner Cartridge,” in the
Starter Guide.)
Q Is the toner cartridge installed properly?
A Make sure the toner cartridge is installed properly.
(See “Install Toner Cartridge,” in the Starter Guide.)
A Make sure the scanning platform and rear cover
are fully closed.
TOP
Back Previous Next
Q Does the document meet the requirements for
the machine?
A Make sure you load documents that meet the
requirements for use. (See Chapter 2, “Document
Handling,” in the Basic Guide.)
The alarm sounds or <MEMORY FULL> appears in the LCD
when making copies.
Q Has an error occurred during transmission or
reception?
A Change to the fax mode and check the LCD for an
error message and solve the problem. (See
Chapter 11, “Troubleshooting,” in the Basic Guide.)
Table of Contents
Index
Q Is the document loaded correctly?
A Make sure the document is correctly loaded. (See
Chapter 2, “Document Handling,” in the Basic
Guide.)
Q Is the machine’s memory full?
A Check remaining memory. (See “Checking
Remaining Memory,” on p. 3-3.)
5-16
Page 60

Advanced Fax
Features
Advanced Copy
Features
1
2
Printing Problems
Nothing prints.
TOP
Back Previous Next
Printout does not match paper size.
System Monitor
3
Reports and Lists
4
Troubleshooting
5
Appendix
6
Q Is the power cord plugged in securely?
A Check that the power cord is securely plugged into
the machine and into the wall outlet. If the machine
is plugged into a power strip, make sure the power
strip is plugged in and turned on.
Q Is the main power switch turned on?
A Turn on the main power switch.
Q Have you removed the sealing tape from the
toner cartridge?
A Make sure you remove the sealing tape from the
cartridge. (See “Install Toner Cartridge,” in the
Starter Guide.)
Q Is the cartridge out of toner?
A Replace the toner cartridge. (See Chapter 10,
“Maintenance,” in the Basic Guide.)
Q Does the size of paper loaded in the machine
match the paper size setting?
A Change the paper size setting or load the correct
size paper. (See Chapter 3, “Print Media,” in the
Basic Guide.)
Cannot print documents on both sides of the paper
Q Do you check the setting of the two-sided
printing in the printer driver?
A Make sure that you check the setting of the two-
sided printing in the printer driver.
Table of Contents
Index
5-17
Page 61

Advanced Fax
Features
1
Printout is skewed.
TOP
Back Previous Next
Printout is not clear.
Advanced Copy
Features
2
System Monitor
3
Reports and Lists
4
Troubleshooting
5
Appendix
6
Q Is the paper loaded correctly?
A Make sure the paper is correctly loaded in the
machine. (See “Set Up the Paper Cassette and
Load Paper,” in the Starter Guide.)
A Make sure the paper delivery slot is free of
obstructions.
Paper jams occur.
Q Is the correct type of paper loaded in the
machine?
A Make sure you load paper that meets the
requirements for use. (See Chapter 3, “Print
Media,” in the Basic Guide.)
Q Is the correct type of paper loaded in the
machine?
A Make sure you load paper that meets the
requirements for use. (See Chapter 3, “Print
Media,” in the Basic Guide.)
Q Are you printing on the wrong side of the
paper?
A Some papers have a “right” side for printing. If the
print quality is not as clear as you think it should be,
try printing on the other side of the paper.
Printout has vertical white streaks.
Q Is toner low or unevenly distributed?
A Redistribute the toner inside the cartridge. If the
problem persists, replace the cartridge. (See
Chapter 10, “Maintenance,” in the Basic Guide.)
Table of Contents
Index
5-18
Page 62

Advanced Fax
Features
Advanced Copy
Features
1
2
Telephone Problems
Cannot dial.
TOP
Back Previous Next
Telephone disconnects while you are talking.
System Monitor
3
Reports and Lists
4
Troubleshooting
5
Appendix
6
Q Is the telephone cable connected properly?
A Make sure the cable is connected properly. (See
“Connect Telephone Cables,” in the Starter Guide.)
Q Is the power cord plugged in securely?
A Check that the power cord is securely plugged into
the machine and into the wall outlet. If the machine
is plugged into a power strip, make sure the power
strip is plugged in and turned on.
Q Is the main power switch turned on?
A Turn on the main power switch.
Q Is the machine set for the correct telephone line
type?
A Make sure the machine is set for the correct
telephone line type. (See “Set the Telephone Line
Type,” in the Starter Guide.)
Q Is the telephone cable connected properly?
A Make sure the cable is connected properly. (See
“Connect Telephone Cables,” in the Starter Guide.)
Q Is the power cord plugged in securely?
A Check that the power cord is securely plugged into
the machine and into the wall outlet. If the machine
is plugged into a power strip, make sure the power
strip is plugged in and turned on.
Q Is the telephone cable defective?
A Use another cable.
Calls do not connect, or the wrong number is dialed.
Q
A Make sure to confirm the dial tone before entering
Did you confirm the dial tone before entering
the fax/telephone number?
a fax/telephone number. If you enter the number
before the dial tone can be heard, the call may not
be connected, or the wrong number may be dialed.
Table of Contents
Index
5-19
Page 63

Advanced Fax
Features
Advanced Copy
Features
1
2
System Monitor
3
Reports and Lists
4
Troubleshooting
5
Appendix
Customer Support
■ Customer Support (U.S.A.)
Your machine is designed with the latest technology to provide
trouble-free operation. If you encounter a problem with the
machine’s operation, try to solve it by using the information in
this Chapter. If you cannot solve the problem or if you think your
machine needs servicing, contact Canon Customer Care Center
at 1-800-828-4040 between the hours of 8:00 A.M. to 8:00 P.M.
EST Monday through Friday and 10:00 A.M. to 8:00 P.M. on
Saturday. On-line support for 24 hours is also available at the
website.
http://www.canontechsupport.com/
TOP
Back Previous Next
– For the location of the authorized service facility nearest you,
visit http://www.canon.ca/ or 1-800-652-2666
– If the problem cannot be corrected by using one of the above
technical support options, repair options are available at the
time of your call to the live technical support number above or
via the website at http://www.canon.ca/
* Support program specifics are subject to change without notice.
Table of Contents
Index
6
■ Customer Support (Canada)
Canon Canada Inc., offers a full range of customer technical
support options*:
– For step-by-step troubleshooting, e-mail technical support,
the latest driver or document downloads, and answers to
frequently asked questions, visit http://www.canon.ca/
– Free live technical support 9 A.M. to 8 P.M. EST Monday
through Friday (excluding holidays) for products still under
warranty 1-800-652-2666
5-20
Page 64

Advanced Fax
Features
Advanced Copy
Features
System Monitor
1
2
TOP
Back Previous Next
6 Appendix
Glossary ................................................................................................... 6-2
3
Reports and Lists
4
Troubleshooting
5
Appendix
6
Index ......................................................................................................... 6-8
Table of Contents
Index
6-1
Page 65

Advanced Fax
Features
Advanced Copy
Features
1
2
System Monitor
3
Reports and Lists
4
Troubleshooting
5
Appendix
6
Glossary
A
Activity Report
A journal of the machine’s fax transactions, both sent and
received.
Automatic Document Feeder (ADF)
The device included in the machine that feeds the document
being faxed or copied, or scanned into the machine.
Automatic redialing
When the receiving fax machine is busy or does not answer, or
when an error occurs while sending, the machine waits a
specified time and then automatically redials the number. If the
receiving fax is still busy or does not answer, the machine waits
the specified time and dials again.
B
TOP
Back Previous Next
C
CNG
Calling Tone. This is a signal sent by fax machines to identify the
call as an incoming document. When the receiving fax detects
this signal, it automatically starts to receive the fax transmission.
The majority of fax machines in use today can send and detect
CNG signals.
Coded Dialing
An automatic dialing method that allows you to dial a fax or
telephone number by pressing [Coded Dial] and a two-digit code
using the numeric keys.
Table of Contents
Index
Broadcasting
Transmitting documents to more than one location (through the
machine’s memory).
6-2
Page 66

Advanced Fax
Features
Advanced Copy
Features
1
2
System Monitor
3
Reports and Lists
4
D
Document
DRPD
E
The sheet of paper containing the data that you send to, or
receive from a machine.
This receive mode allows the machine to distinguish fax and
voice calls depending on the distinctive ring patterns assigned to
different numbers. Subscription to a DRPD service offered by
some telephone companies is required.
TOP
Back Previous Next
F
FAX/TEL switching
This option allows you to set the machine to automatically detect
whether a call is from a fax or telephone. If the call is from another
fax, the transmission is automatically received. If the call is from a
telephone, the machine rings to let you know, so you can pick up
the handset. With this feature, one telephone line can be shared
by both the telephone and the fax.
FINE
The resolution setting for documents with very small characters
and thin lines.
Troubleshooting
Appendix
5
6
ECM
Error Correction Mode. The ability of your machine to reduce
system and line errors when sending to or receiving from another
fax with ECM capability. ECM is most effective in areas where the
telephone lines are in poor condition or there is frequent
interference on the line.
Table of Contents
Index
6-3
Page 67

Advanced Fax
Features
1
Advanced Copy
Features
2
System Monitor
3
Reports and Lists
4
Troubleshooting
5
Appendix
6
G
G3, Group 3 fax machine
Defined by CCITT/ITU-T. Uses encoding schemes to transmit
image data while reducing the amount of data that needs to be
transmitted, thus reducing transmission time. G3 fax machines
can transmit one page in less than one minute. Encoding
schemes for G3 fax machines are Modified Huffman (MH),
Modified READ (MR), Modified Modified READ (MMR) , and Joint
Bi-level Image expert Group (JBIG).
Group Dialing
A dialing method that enables you to dial multiple one-touch
speed dialing or coded dialing numbers together as a group. This
means that you can press just one key to enter numbers when
sending the same document to many destinations.
I
ITU-T
A committee created to set international standards for
telecommunications.
TOP
Back Previous Next
M
Manual redialing
When you use regular dialing, you can redial a number manually
simply by pressing [Redial/Pause] on the operation panel. The
last number called is the number redialed.
Modem
A device that converts (MOdulates) digital data for transmission
over telephone lines. At the receiving end, this device converts
the modulated data (DEModulates) to digital format that the
computer understands.
N
Numeric Keys
The round, numbered keys on the operation panel marked the
same as a standard telephone keypad.
Press them to perform regular dialing. You also use the numeric
keys to enter numbers and letters when you register telephone or
fax numbers and names, and to enter coded dialing codes.
Table of Contents
Index
6-4
Page 68

Advanced Fax
Features
1
Advanced Copy
Features
2
System Monitor
3
Reports and Lists
4
Troubleshooting
5
Appendix
6
O
One-Touch Speed Dialing
An automatic dialing method that allows you to dial a fax or
telephone number by pressing a single one-touch speed dial key.
One-Touch Speed Dial keys
The numbered keys on the operation panel that may be
registered as single or a group of fax numbers. Once a number or
group is registered, you press one key to dial the entire number or
group.
P
Paper feed
Refers to guiding a sheet of paper into the machine’s paper path.
Paper feeder
The device in the machine that feeds recording media into the
machine for printing copied or faxed documents.
Pause
A timing entry required for registering certain long distance
numbers and for dialing out through some telephone systems or
switchboards. Pressing [Redial/Pause] enters a pause between
digits of a telephone number.
Pulse
See Rotary pulse.
TOP
Back Previous Next
R
Receiving
Receiving transmission is also defined as RX or Reception. The
machine can be customized to receive fax documents in several
ways.
Reception
See Receiving.
Registering
A process by which you place fax or telephone numbers and
names in the machine’s memory for speed dialing so that you can
save time dialing destinations you call frequently.
Remote reception ID
The two-digit code that enables you to manually activate fax
reception using an external telephone.
Table of Contents
Index
6-5
Page 69

Advanced Fax
Features
1
Advanced Copy
Features
2
System Monitor
3
Reports and Lists
4
Troubleshooting
5
Appendix
6
Remote reception
Activating fax reception by answering an external telephone that
is not located near the machine. You need to dial a remote
receiving ID number to start remote reception.
Report
A document printed by the machine and containing information
about the faxes it has sent or received.
Resolution
The density of dots for any given output device. Expressed in
terms of dots per inch (dpi). Low resolution causes font
characters and graphics to have a jagged appearance. Higher
resolution means smoother curves and angles as well as a better
match to traditional typeface designs. Resolution values are
represented by horizontal data and vertical data, for example, 600
× 600 dpi.
Rotary pulse
A telephone dialing system where a dial is rotated to send pulses
to the telephone switching system. In pulse dialing, you hear
clicks. In touch-tone dialing, the most common dialing system,
you hear tones. Rotary pulse dialing requires certain setting
adjustments.
RX
See Receiving.
TOP
Back Previous Next
S
Sending
A fax document that has been scanned by a fax machine is sent
over telephone lines, in the form of electrical pulses, to another
fax machine. Also called TX or Transmit.
Speed dialing
Dialing fax or telephone numbers by pressing a few keys. To use
automatic dialing, you must register the numbers in the machine’s
memory. See also One-Touch Speed Dialing, Coded Dialing, and
Group Dialing.
Standby
The mode in which the machine is on and ready to use.
Table of Contents
Index
6-6
Page 70

Advanced Fax
Features
Advanced Copy
Features
1
2
System Monitor
3
Reports and Lists
4
Troubleshooting
5
Appendix
6
TOP
Back Previous Next
T
Tone
A key that allows you to temporarily switch to touch-tone from
pulse dialing. In some countries, on-line data services may
require that you use tone dialing.
Toner
A black, resin coated powder contained in the toner cartridge.
The machine applies the toner to the surface of the
photosensitive drum inside the machine via an
electrophotographic mechanism.
Toner saver
The feature that extends cartridge life by reducing toner
consumption rate at a slight decrease in print quality.
TSI
Stands for Transmitting Subscriber Identification. Also called
sender information. The TSI is the facsimile number of the
machine that sends a document.
TX
See Sending.
Table of Contents
Index
6-7
Page 71

Advanced Fax
Features
1
Advanced Copy
Features
2
System Monitor
3
Reports and Lists
4
Troubleshooting
5
Appendix
6
Index
Symbols & Numerics
1-TOUCH LIST 4-2
A
ACTIVITY REPORT 4-2, 6-2
Printing automatically 4-5
Additional Fax Modes 1-15
Address Book 1-3
LIST 1-3
SEARCH 1-3
AnsMode 1-8
Additional Settings 1-9
B
Broadcasting 1-15, 6-2
C
Canceling
Copy Jobs 2-5
Fax Jobs 1-16
CODED DIAL LIST 4-2
coded dialing 1-3
Copy
2 on 1 Combination 2-4
Collate Copy 2-2
Two-Sided Copying 2-3
D
DRPD 1-8
Additional Settings 1-9
F
FAX/TEL 1-8
Additional settings 1-10
FaxOnly 1-8
G
GROUP DIAL LIST 4-2
L
LOST REPORT 4-2
M
MANUAL 1-8
MEMORY DATA LIST 4-2
MEMORY IMAGE PRNT 4-2
Memory Reception 1-11
O
one-touch speed dialing 1-3
P
pulse dialing 1-5, 6-6
TOP
Back Previous Next
R
Redialing
Automatically 1-5
Manually 1-4
Remote Reception 1-12
Remote Reception ID 1-12
Reports and Lists 4-1
Printing automatically 4-3
RX REPORT 4-2
Printing automatically 4-4
T
Tone Dialing 1-5
[Tone] key 1-6
Troubleshooting 5-1
Copying Problems 5-16
Faxing Problems 5-5
General Problems 5-2
Paper feeding Problems 5-4
Printing Problems 5-17
Telephone Problems 5-19
TX REPORT 4-2
Printing automatically 4-3
U
USER’S DATA LIST 4-2
Table of Contents
Index
6-8
Page 72

Advanced Fax
Features
Advanced Copy
Features
1
2
System Monitor
3
Reports and Lists
4
Troubleshooting
5
Appendix
6
Table of Contents
Index
TOP
Back Previous Next
CANON INC.
30-2, Shimomaruko 3-chome, Ohta-ku, Tokyo 146-8501, Japan
CANON U.S.A., INC.
One Canon Plaza, Lake Success, NY 11042, U.S.A.
CANON CANADA INC.
6390 Dixie Road Mississauga, Ontario L5T 1P7, Canada
CANON EUROPA N.V.
Bovenkerkerweg 59-61 1185 XB Amstelveen, The Netherlands
CANON FRANCE S.A.S.
17, quai du Président Paul Doumer 92414 Courbevoie Cedex, France
CANON COMMUNICATION & IMAGE FRANCE S.A.S.
12, rue de I’Industrie 92414 Courbevoie Cedex, France
CANON (U.K.) LTD.
Woodhatch, Reigate, Surrey, RH2 8BF, United Kingdom
CANON DEUTSCHLAND GmbH
Europark Fichtenhain A10, 47807 Krefeld, Germany
CANON ITALIA S.p.A.
Via Milano, 8 20097 San Donato Milanese (MI) Italy
CANON ESPAÑA, S.A.
c/ Joaquín Costa 41, 28002 Madrid, Spain
CANON LATIN AMERICA, INC.
703 Waterford Way Suite 400, Miami, Florida 33126 U.S.A.
CANON AUSTRALIA PTY. LTD
1 Thomas Holt Drive, North Ryde, Sydney, N.S.W. 2113, Australia
CANON CHINA CO., LTD
15F Jinbao Building No.89 Jinbao Street, Dongcheng District, Beijing 100005, China
CANON SINGAPORE PTE. LTD.
1 HarbourFront Avenue #04-01 Keppel Bay Tower, Singapore 098632
USRM1-0439-00 © CANON INC. 2006
 Loading...