

Page 1

Laser Beam Printer
User's Guide
User's Guide
Please read this guide before operating this equipment.
After you finish reading this guide, store it in a safe place for future reference.
ENG
Page 2

Canon Laser Beam Printer
LBP-2000
User's Guide
Page 3

About the Manuals for the Machine
The manuals for this machine are divided as follo ws . Use this chart to help you find the information you
require.
Installing and setting up the printer ......................
Connecting the printer to a PC ............................
Installing options............................................
Setup Guide
Using the printer.............................................
Printer settings ..............................................
Maintenance and troubleshooting ........................
Installing the printer driver ................................
Printing from a PC...........................................
Controlling the printer via a web browser ...............
Connecting to and setting up a network..................
The manuals supplied with optional equipment are included in the list above.
Depending on the system configuration and product purchased, some manuals may be unavailable
(irrelevant).
User's Guide
(This Manual)
PCL Driver Guide
Remote UI Guide
Network Guide
CD-ROM
CD-ROM
CD-ROM
CD-ROM
The photograph of the product on the cover may differ from the actual product.
•
The volumes marked with this symbol are PDF manuals included in accompanying CD-ROMs.
CD-ROM
Page 4

How the User's Guide is Organized
Chap 1
Chap 2
Chap 3
Chap 4
Chap 5
Chap 6
Chap 7
Chap 8
Chap 9
Chap 10
Before You Start Using the Machine
Using the Printer
Input and Output of the Paper
The Printing Environment
PostScript Printing
The Printer Menu
Printing Environment Settings
Maintenance
Troubleshooting
Appendix
1
2
3
4
5
6
7
8
9
10
Lists the main specifications, glossary, maintenance agreement and index.
Some of the data contained herein may not exactly reflect the current model of the particular product with which this manual has been included. If y ou
•
have a need for an exact specification, please contact Canon for the current specification.
•
No part of this document may be photocopied, reproduced, or translated into another language without prior written consent of Canon Inc.
Page 5

Table of Contents
How to Use This Manual . . . . . . . . . . . . . . . . . . . . . . . . . . . . . . . . . . . . . . . . . . . . ix
Symbols Used in This Manual. . . . . . . . . . . . . . . . . . . . . . . . . . . . . . . . . . . . . . . . . . . . . . ix
Keys Used in This Manual . . . . . . . . . . . . . . . . . . . . . . . . . . . . . . . . . . . . . . . . . . . . . . . . ix
Illustrations Used in This Manual . . . . . . . . . . . . . . . . . . . . . . . . . . . . . . . . . . . . . . . . . . . ix
Abbreviations Used in This Manual . . . . . . . . . . . . . . . . . . . . . . . . . . . . . . . . . . . . . . . . . .x
Safety Information. . . . . . . . . . . . . . . . . . . . . . . . . . . . . . . . . . . . . . . . . . . . . . . . . xi
Laser Safety Information . . . . . . . . . . . . . . . . . . . . . . . . . . . . . . . . . . . . . . . . . . . . . . . . . . xi
International Energy Star-Program . . . . . . . . . . . . . . . . . . . . . . . . . . . . . . . . . . xii
About Trademarks. . . . . . . . . . . . . . . . . . . . . . . . . . . . . . . . . . . . . . . . . . . . . . . . xii
Important Safety Instructions . . . . . . . . . . . . . . . . . . . . . . . . . . . . . . . . . . . . . . xiv
Installation . . . . . . . . . . . . . . . . . . . . . . . . . . . . . . . . . . . . . . . . . . . . . . . . . . . . . . . . . . . . xiv
Power Supply . . . . . . . . . . . . . . . . . . . . . . . . . . . . . . . . . . . . . . . . . . . . . . . . . . . . . . . . . .xv
Handling . . . . . . . . . . . . . . . . . . . . . . . . . . . . . . . . . . . . . . . . . . . . . . . . . . . . . . . . . . . . . xvi
Maintenance and Inspections. . . . . . . . . . . . . . . . . . . . . . . . . . . . . . . . . . . . . . . . . . . . . xvii
Consumables . . . . . . . . . . . . . . . . . . . . . . . . . . . . . . . . . . . . . . . . . . . . . . . . . . . . . . . . xviii
Legal Limitation on Usage of Your Product and the Use of Images. . . . . . . . xix
Chapter 1 Before You Start Using the Machine
Features of the Product . . . . . . . . . . . . . . . . . . . . . . . . . . . . . . . . . . . . . . . . . . .1-2
Standard Features. . . . . . . . . . . . . . . . . . . . . . . . . . . . . . . . . . . . . . . . . . . . . . . . . . . . . . 1-2
High-speed Printing . . . . . . . . . . . . . . . . . . . . . . . . . . . . . . . . . . . . . . . . . . . . . . . . . 1-2
Superior Print Quality . . . . . . . . . . . . . . . . . . . . . . . . . . . . . . . . . . . . . . . . . . . . . . . . 1-2
Software Compatibility and Language Switching. . . . . . . . . . . . . . . . . . . . . . . . . . . 1-2
Memory Saving Technology . . . . . . . . . . . . . . . . . . . . . . . . . . . . . . . . . . . . . . . . . . . 1-2
Paper Handling. . . . . . . . . . . . . . . . . . . . . . . . . . . . . . . . . . . . . . . . . . . . . . . . . . . . . 1-2
Energy Saving. . . . . . . . . . . . . . . . . . . . . . . . . . . . . . . . . . . . . . . . . . . . . . . . . . . . . . 1-3
Reducing Toner Consumption . . . . . . . . . . . . . . . . . . . . . . . . . . . . . . . . . . . . . . . . . 1-3
Interface Features. . . . . . . . . . . . . . . . . . . . . . . . . . . . . . . . . . . . . . . . . . . . . . . . . . . 1-3
Typefaces . . . . . . . . . . . . . . . . . . . . . . . . . . . . . . . . . . . . . . . . . . . . . . . . . . . . . . . . . 1-3
Printer drivers and Utilities . . . . . . . . . . . . . . . . . . . . . . . . . . . . . . . . . . . . . . . . . . . . 1-3
Remote UI Support . . . . . . . . . . . . . . . . . . . . . . . . . . . . . . . . . . . . . . . . . . . . . . . . . . 1-3
E-mail Notification. . . . . . . . . . . . . . . . . . . . . . . . . . . . . . . . . . . . . . . . . . . . . . . . . . . 1-4
Optional Equipment . . . . . . . . . . . . . . . . . . . . . . . . . . . . . . . . . . . . . . . . . . . . . . . . . . . . 1-4
Adobe PostScript 3. . . . . . . . . . . . . . . . . . . . . . . . . . . . . . . . . . . . . . . . . . . . . . . . . . 1-4
250 Sheet Paper Feed Unit. . . . . . . . . . . . . . . . . . . . . . . . . . . . . . . . . . . . . . . . . . . . 1-4
Flash ROM Module . . . . . . . . . . . . . . . . . . . . . . . . . . . . . . . . . . . . . . . . . . . . . . . . . . 1-4
RAM DIMM Modules. . . . . . . . . . . . . . . . . . . . . . . . . . . . . . . . . . . . . . . . . . . . . . . . . 1-4
Network Card . . . . . . . . . . . . . . . . . . . . . . . . . . . . . . . . . . . . . . . . . . . . . . . . . . . . . . 1-4
Parts and Their Functions. . . . . . . . . . . . . . . . . . . . . . . . . . . . . . . . . . . . . . . . . . 1-5
Parts of the Printer. . . . . . . . . . . . . . . . . . . . . . . . . . . . . . . . . . . . . . . . . . . . . . . . . . . . . . 1-5
Front View . . . . . . . . . . . . . . . . . . . . . . . . . . . . . . . . . . . . . . . . . . . . . . . . . . . . . . . . . 1-5
iii
Page 6

Rear View. . . . . . . . . . . . . . . . . . . . . . . . . . . . . . . . . . . . . . . . . . . . . . . . . . . . . . . . . 1-6
Inside the Front Cover . . . . . . . . . . . . . . . . . . . . . . . . . . . . . . . . . . . . . . . . . . . . . . . . . . 1-7
Printer Control Panel . . . . . . . . . . . . . . . . . . . . . . . . . . . . . . . . . . . . . . . . . . . . . . . . . . . 1-8
Chapter 2 Using the Printer
Turning the Printer On/Off. . . . . . . . . . . . . . . . . . . . . . . . . . . . . . . . . . . . . . . . . .2-2
Tur ning On the Printer . . . . . . . . . . . . . . . . . . . . . . . . . . . . . . . . . . . . . . . . . . . . . . . . . . 2-2
Tur ning Off the Printer . . . . . . . . . . . . . . . . . . . . . . . . . . . . . . . . . . . . . . . . . . . . . . . . . . 2-3
If the Printer is Not Using a Hard Disk. . . . . . . . . . . . . . . . . . . . . . . . . . . . . . . . . . . 2-3
If the Printer is Using a Hard Disk . . . . . . . . . . . . . . . . . . . . . . . . . . . . . . . . . . . . . . 2-4
About On-line and Off-line . . . . . . . . . . . . . . . . . . . . . . . . . . . . . . . . . . . . . . . . .2-6
On-line . . . . . . . . . . . . . . . . . . . . . . . . . . . . . . . . . . . . . . . . . . . . . . . . . . . . . . . . . . . . . . 2-6
Off-line . . . . . . . . . . . . . . . . . . . . . . . . . . . . . . . . . . . . . . . . . . . . . . . . . . . . . . . . . . . . . . 2-7
Cancelling a Print Job. . . . . . . . . . . . . . . . . . . . . . . . . . . . . . . . . . . . . . . . . . . . .2-8
Chapter 3 Input and Output of the Paper
Paper Requirements . . . . . . . . . . . . . . . . . . . . . . . . . . . . . . . . . . . . . . . . . . . . . .3-2
Printable Paper . . . . . . . . . . . . . . . . . . . . . . . . . . . . . . . . . . . . . . . . . . . . . . . . . . . . . . . 3-2
General Specifications . . . . . . . . . . . . . . . . . . . . . . . . . . . . . . . . . . . . . . . . . . . . . . 3-2
Paper Capacity of Paper Sources . . . . . . . . . . . . . . . . . . . . . . . . . . . . . . . . . . . . . . 3-3
Paper Capacity of the Paper Delivery Tray . . . . . . . . . . . . . . . . . . . . . . . . . . . . . . . 3-3
Abbreviations of Paper Sizes . . . . . . . . . . . . . . . . . . . . . . . . . . . . . . . . . . . . . . . . . 3-4
Plain White Paper . . . . . . . . . . . . . . . . . . . . . . . . . . . . . . . . . . . . . . . . . . . . . . . . . . 3-4
Coloured Paper . . . . . . . . . . . . . . . . . . . . . . . . . . . . . . . . . . . . . . . . . . . . . . . . . . . . 3-4
Heavy (thick) Paper . . . . . . . . . . . . . . . . . . . . . . . . . . . . . . . . . . . . . . . . . . . . . . . . . 3-5
Paper You Cannot Use. . . . . . . . . . . . . . . . . . . . . . . . . . . . . . . . . . . . . . . . . . . . . . . . . . 3-5
Transparency Film . . . . . . . . . . . . . . . . . . . . . . . . . . . . . . . . . . . . . . . . . . . . . . . . . . 3-6
Adhesive Labels . . . . . . . . . . . . . . . . . . . . . . . . . . . . . . . . . . . . . . . . . . . . . . . . . . . 3-6
Envelopes . . . . . . . . . . . . . . . . . . . . . . . . . . . . . . . . . . . . . . . . . . . . . . . . . . . . . . . . 3-6
Storing Paper . . . . . . . . . . . . . . . . . . . . . . . . . . . . . . . . . . . . . . . . . . . . . . . . . . . . . . . . . 3-7
Handling Paper . . . . . . . . . . . . . . . . . . . . . . . . . . . . . . . . . . . . . . . . . . . . . . . . . . . . . . . 3-7
Selecting Paper Feeding. . . . . . . . . . . . . . . . . . . . . . . . . . . . . . . . . . . . . . . . . . .3-8
Paper Orientation . . . . . . . . . . . . . . . . . . . . . . . . . . . . . . . . . . . . . . . . . . . . . . . . . . . . . . 3-8
Paper Feeding Method . . . . . . . . . . . . . . . . . . . . . . . . . . . . . . . . . . . . . . . . . . . . . . . . . 3-9
Paper Delivery Method . . . . . . . . . . . . . . . . . . . . . . . . . . . . . . . . . . . . . . . . . . .3-11
Face-down Tray . . . . . . . . . . . . . . . . . . . . . . . . . . . . . . . . . . . . . . . . . . . . . . . . . . . . . . 3-11
Printing from the Paper Cassette. . . . . . . . . . . . . . . . . . . . . . . . . . . . . . . . . . .3-12
Loading Paper in the Paper Cassette . . . . . . . . . . . . . . . . . . . . . . . . . . . . . . . . . . . . . 3-12
Printing from the Multi-Purpose Tray. . . . . . . . . . . . . . . . . . . . . . . . . . . . . . . .3-17
Guidelines for Using the Multi-Purpose Tray . . . . . . . . . . . . . . . . . . . . . . . . . . . . . . . . 3-17
Loading Paper in the Multi-Purpose Tray. . . . . . . . . . . . . . . . . . . . . . . . . . . . . . . . . . . 3-18
Loading Paper (other than envelopes) . . . . . . . . . . . . . . . . . . . . . . . . . . . . . . . . . 3-18
Setting the Paper Size for the Multi-Purpose Tray . . . . . . . . . . . . . . . . . . . . . . . . . . . . 3-21
Printing the First Sheet on Letterhead . . . . . . . . . . . . . . . . . . . . . . . . . . . . . . . . . . . . . 3-22
Using the Multi-Purpose Tray as a Manual Feed Station . . . . . . . . . . . . . . . . . . . . . . . 3-24
iv
Page 7

Tur ning on Manual Feed. . . . . . . . . . . . . . . . . . . . . . . . . . . . . . . . . . . . . . . . . . . . . 3-24
Printing Envelopes from the Multi-Purpose Tray . . . . . . . . . . . . . . . . . . . . . .3-25
Before Loading Envelopes . . . . . . . . . . . . . . . . . . . . . . . . . . . . . . . . . . . . . . . . . . . . . . 3-25
Loading Envelopes . . . . . . . . . . . . . . . . . . . . . . . . . . . . . . . . . . . . . . . . . . . . . . . . . . . . 3-27
Cautions on Closing the Multi-Purpose Tray . . . . . . . . . . . . . . . . . . . . . . . . . . . . . . . . . 3-30
Printing Transparencies . . . . . . . . . . . . . . . . . . . . . . . . . . . . . . . . . . . . . . . . . . . . . . . . 3-31
Chapter 4 The Printing Environment
What is the Printing Environment? . . . . . . . . . . . . . . . . . . . . . . . . . . . . . . . . . .4-2
About the Printing Environment. . . . . . . . . . . . . . . . . . . . . . . . . . . . . . . . . . . . . . . . . . . . 4-2
Quick Tour of the Printing Environment . . . . . . . . . . . . . . . . . . . . . . . . . . . . . . 4-3
How the Menus Are Organized. . . . . . . . . . . . . . . . . . . . . . . . . . . . . . . . . . . . . . . . . . . . 4-3
Going Off-line for Menu Display and Item Selection. . . . . . . . . . . . . . . . . . . . . . . . . . . . 4-4
Making a Selection from a Menu. . . . . . . . . . . . . . . . . . . . . . . . . . . . . . . . . . . . . . . . . . . 4-4
Chapter 5 PostScript Printing
Testing the PostScript Installation. . . . . . . . . . . . . . . . . . . . . . . . . . . . . . . . . . . 5-2
Checking the Menus . . . . . . . . . . . . . . . . . . . . . . . . . . . . . . . . . . . . . . . . . . . . . . . . . . . . 5-2
Setting PostScript Printing Options . . . . . . . . . . . . . . . . . . . . . . . . . . . . . . . . .5-3
Automatic Personality Switching. . . . . . . . . . . . . . . . . . . . . . . . . . . . . . . . . . . . . . . . . . . 5-3
Dedicating the Printer to the PostScript Language . . . . . . . . . . . . . . . . . . . . . . . . . . . . 5-3
Setting Up the PostScript Printing Environment . . . . . . . . . . . . . . . . . . . . . . . . . . . . . . . 5-4
Printing the PS Font List . . . . . . . . . . . . . . . . . . . . . . . . . . . . . . . . . . . . . . . . . . . . . . . . . 5-4
Notes on the PostScript Personality . . . . . . . . . . . . . . . . . . . . . . . . . . . . . . . . . 5-5
Chapter 6 Summary of the Printer Menus
SHUTDOWN MENU . . . . . . . . . . . . . . . . . . . . . . . . . . . . . . . . . . . . . . . . . . . . . . . 6-3
About SHUTDOWN MENU . . . . . . . . . . . . . . . . . . . . . . . . . . . . . . . . . . . . . . . . . . . . . . . 6-3
Operation flow for SHUTDOWN MENU. . . . . . . . . . . . . . . . . . . . . . . . . . . . . . . . . . . . . . 6-3
SECURED JOB MENU. . . . . . . . . . . . . . . . . . . . . . . . . . . . . . . . . . . . . . . . . . . . . 6-4
About SECURED JOB MENU . . . . . . . . . . . . . . . . . . . . . . . . . . . . . . . . . . . . . . . . . . . . . 6-4
Operation flow for SECURED JOB MENU. . . . . . . . . . . . . . . . . . . . . . . . . . . . . . . . . . . . 6-4
TEST MENU . . . . . . . . . . . . . . . . . . . . . . . . . . . . . . . . . . . . . . . . . . . . . . . . . . . . . 6-5
About TEST MENU . . . . . . . . . . . . . . . . . . . . . . . . . . . . . . . . . . . . . . . . . . . . . . . . . . . . . 6-5
Operation flow for TEST MENU. . . . . . . . . . . . . . . . . . . . . . . . . . . . . . . . . . . . . . . . . . . . 6-5
PCL MENU . . . . . . . . . . . . . . . . . . . . . . . . . . . . . . . . . . . . . . . . . . . . . . . . . . . . . . 6-6
About PCL MENU . . . . . . . . . . . . . . . . . . . . . . . . . . . . . . . . . . . . . . . . . . . . . . . . . . . . . . 6-6
Operation flow for PCL MENU . . . . . . . . . . . . . . . . . . . . . . . . . . . . . . . . . . . . . . . . . . . . 6-6
PS MENU . . . . . . . . . . . . . . . . . . . . . . . . . . . . . . . . . . . . . . . . . . . . . . . . . . . . . . .6-7
About PS MENU . . . . . . . . . . . . . . . . . . . . . . . . . . . . . . . . . . . . . . . . . . . . . . . . . . . . . . . 6-7
Operation flow for PS MENU. . . . . . . . . . . . . . . . . . . . . . . . . . . . . . . . . . . . . . . . . . . . . . 6-7
v
Page 8

FEEDER MENU. . . . . . . . . . . . . . . . . . . . . . . . . . . . . . . . . . . . . . . . . . . . . . . . . . .6-8
About FEEDER MENU . . . . . . . . . . . . . . . . . . . . . . . . . . . . . . . . . . . . . . . . . . . . . . . . . . 6-8
Operation flow for FEEDER MENU. . . . . . . . . . . . . . . . . . . . . . . . . . . . . . . . . . . . . . . . . 6-8
CONFIG MENU . . . . . . . . . . . . . . . . . . . . . . . . . . . . . . . . . . . . . . . . . . . . . . . . . . .6-9
About CONFIG MENU . . . . . . . . . . . . . . . . . . . . . . . . . . . . . . . . . . . . . . . . . . . . . . . . . . 6-9
Operation flow for CONFIG MENU . . . . . . . . . . . . . . . . . . . . . . . . . . . . . . . . . . . . . . . . 6-9
ENTER PASSWORD. . . . . . . . . . . . . . . . . . . . . . . . . . . . . . . . . . . . . . . . . . . . . .6-10
About the ENTER PASSWORD Menu . . . . . . . . . . . . . . . . . . . . . . . . . . . . . . . . . . . . . 6-10
Operation flow for the ENTER PASSWORD Menu . . . . . . . . . . . . . . . . . . . . . . . . . . . . 6-10
JOB CONTROL MENU. . . . . . . . . . . . . . . . . . . . . . . . . . . . . . . . . . . . . . . . . . . .6-11
About JOB CONTROL MENU . . . . . . . . . . . . . . . . . . . . . . . . . . . . . . . . . . . . . . . . . . . 6-11
Operation flow for JOB CONTROL MENU . . . . . . . . . . . . . . . . . . . . . . . . . . . . . . . . . . 6-11
PARALLEL MENU . . . . . . . . . . . . . . . . . . . . . . . . . . . . . . . . . . . . . . . . . . . . . . .6-12
About PARALLEL MENU . . . . . . . . . . . . . . . . . . . . . . . . . . . . . . . . . . . . . . . . . . . . . . . 6-12
Operation flow for PARALLEL MENU. . . . . . . . . . . . . . . . . . . . . . . . . . . . . . . . . . . . . . 6-12
USB MENU . . . . . . . . . . . . . . . . . . . . . . . . . . . . . . . . . . . . . . . . . . . . . . . . . . . . .6-13
About USB MENU . . . . . . . . . . . . . . . . . . . . . . . . . . . . . . . . . . . . . . . . . . . . . . . . . . . . 6-13
Operation flow for USB MENU . . . . . . . . . . . . . . . . . . . . . . . . . . . . . . . . . . . . . . . . . . . 6-13
ETHERNET MENU . . . . . . . . . . . . . . . . . . . . . . . . . . . . . . . . . . . . . . . . . . . . . . .6-14
About ETHERNET MENU . . . . . . . . . . . . . . . . . . . . . . . . . . . . . . . . . . . . . . . . . . . . . . . 6-14
Operation flow for ETHERNET MENU . . . . . . . . . . . . . . . . . . . . . . . . . . . . . . . . . . . . . 6-14
LANGUAGE MENU. . . . . . . . . . . . . . . . . . . . . . . . . . . . . . . . . . . . . . . . . . . . . . .6-15
About LANGUAGE MENU . . . . . . . . . . . . . . . . . . . . . . . . . . . . . . . . . . . . . . . . . . . . . . 6-15
Operation flow for LANGUAGE MENU . . . . . . . . . . . . . . . . . . . . . . . . . . . . . . . . . . . . 6-15
RESET MENU . . . . . . . . . . . . . . . . . . . . . . . . . . . . . . . . . . . . . . . . . . . . . . . . . . .6-16
About RESET MENU . . . . . . . . . . . . . . . . . . . . . . . . . . . . . . . . . . . . . . . . . . . . . . . . . . 6-16
Operation flow for RESET MENU . . . . . . . . . . . . . . . . . . . . . . . . . . . . . . . . . . . . . . . . . 6-16
JOB LOG MENU. . . . . . . . . . . . . . . . . . . . . . . . . . . . . . . . . . . . . . . . . . . . . . . . .6-17
About JOB LOG MENU . . . . . . . . . . . . . . . . . . . . . . . . . . . . . . . . . . . . . . . . . . . . . . . . 6-17
Operation flow for JOB LOG MENU. . . . . . . . . . . . . . . . . . . . . . . . . . . . . . . . . . . . . . . 6-17
CHANGE PASSWORD . . . . . . . . . . . . . . . . . . . . . . . . . . . . . . . . . . . . . . . . . . . .6-18
About the CHANGE PASSWORD Menu. . . . . . . . . . . . . . . . . . . . . . . . . . . . . . . . . . . . 6-18
Operation flow for the CHANGE PASSWORD Menu . . . . . . . . . . . . . . . . . . . . . . . . . . 6-18
Chapter 7 Printing Environment Settings
List of Standard Printing Environment Settings. . . . . . . . . . . . . . . . . . . . . . . .7-2
List of Advanced Printing Environment Settings . . . . . . . . . . . . . . . . . . . . . . .7-5
SHUTDOWN MENU . . . . . . . . . . . . . . . . . . . . . . . . . . . . . . . . . . . . . . . . . . . . . . .7-8
SECURED JOB MENU . . . . . . . . . . . . . . . . . . . . . . . . . . . . . . . . . . . . . . . . . . . . .7-9
TEST MENU . . . . . . . . . . . . . . . . . . . . . . . . . . . . . . . . . . . . . . . . . . . . . . . . . . . .7-10
PCL MENU . . . . . . . . . . . . . . . . . . . . . . . . . . . . . . . . . . . . . . . . . . . . . . . . . . . . .7-12
PS MENU . . . . . . . . . . . . . . . . . . . . . . . . . . . . . . . . . . . . . . . . . . . . . . . . . . . . . .7-17
vi
Page 9

FEEDER MENU . . . . . . . . . . . . . . . . . . . . . . . . . . . . . . . . . . . . . . . . . . . . . . . . . 7-19
CONFIG MENU. . . . . . . . . . . . . . . . . . . . . . . . . . . . . . . . . . . . . . . . . . . . . . . . . . 7-22
ENTER PASSWORD. . . . . . . . . . . . . . . . . . . . . . . . . . . . . . . . . . . . . . . . . . . . . .7-26
JOB CONTROL MENU. . . . . . . . . . . . . . . . . . . . . . . . . . . . . . . . . . . . . . . . . . . . 7-27
PARALLEL MENU . . . . . . . . . . . . . . . . . . . . . . . . . . . . . . . . . . . . . . . . . . . . . . . 7-28
USB MENU . . . . . . . . . . . . . . . . . . . . . . . . . . . . . . . . . . . . . . . . . . . . . . . . . . . . . 7-30
ETHERNET MENU . . . . . . . . . . . . . . . . . . . . . . . . . . . . . . . . . . . . . . . . . . . . . . .7-32
LANGUAGE MENU. . . . . . . . . . . . . . . . . . . . . . . . . . . . . . . . . . . . . . . . . . . . . . . 7-35
RESET MENU. . . . . . . . . . . . . . . . . . . . . . . . . . . . . . . . . . . . . . . . . . . . . . . . . . . 7-36
JOB LOG MENU. . . . . . . . . . . . . . . . . . . . . . . . . . . . . . . . . . . . . . . . . . . . . . . . . 7-37
CHANGE PASSWORD. . . . . . . . . . . . . . . . . . . . . . . . . . . . . . . . . . . . . . . . . . . . 7-39
Chapter 8 Maintenance
Replacing the Toner Cartridge . . . . . . . . . . . . . . . . . . . . . . . . . . . . . . . . . . . . . .8-2
When to Replace the Toner Cartridge. . . . . . . . . . . . . . . . . . . . . . . . . . . . . . . . . . . . . . . 8-3
Before Replacing the Toner Cartridge . . . . . . . . . . . . . . . . . . . . . . . . . . . . . . . . . . . 8-3
Replacing the Toner Cartridge . . . . . . . . . . . . . . . . . . . . . . . . . . . . . . . . . . . . . . . . . . . . 8-9
Handling Toner Cartridges . . . . . . . . . . . . . . . . . . . . . . . . . . . . . . . . . . . . . . . . . . . . . . 8-15
Storing Toner Cartridges . . . . . . . . . . . . . . . . . . . . . . . . . . . . . . . . . . . . . . . . . . . . . . . . 8-16
Adjusting the Print Density . . . . . . . . . . . . . . . . . . . . . . . . . . . . . . . . . . . . . . . 8-18
Cleaning the Printer . . . . . . . . . . . . . . . . . . . . . . . . . . . . . . . . . . . . . . . . . . . . . 8-20
Cleaning the Fixing Roller . . . . . . . . . . . . . . . . . . . . . . . . . . . . . . . . . . . . . . . .8-22
Printing a Cleaning Page . . . . . . . . . . . . . . . . . . . . . . . . . . . . . . . . . . . . . . . . . . . . . . . 8-22
Cleaning the Fixing Roller . . . . . . . . . . . . . . . . . . . . . . . . . . . . . . . . . . . . . . . . . . . . . . . 8-23
Cleaning the Paper Feed Roller and Separation Pad. . . . . . . . . . . . . . . . . . . 8-25
Cleaning Procedure . . . . . . . . . . . . . . . . . . . . . . . . . . . . . . . . . . . . . . . . . . . . . . . . . . . 8-25
Chapter 9 Troubleshooting
When You Have Trouble Printing . . . . . . . . . . . . . . . . . . . . . . . . . . . . . . . . . . . . 9-2
Problems and Solutions Without Messages. . . . . . . . . . . . . . . . . . . . . . . . . . . 9-4
Printer Trouble . . . . . . . . . . . . . . . . . . . . . . . . . . . . . . . . . . . . . . . . . . . . . . . . . . . . . . . . . 9-4
Print Problems. . . . . . . . . . . . . . . . . . . . . . . . . . . . . . . . . . . . . . . . . . . . . . . . . . . . . . . . . 9-6
Clearing Paper Jams. . . . . . . . . . . . . . . . . . . . . . . . . . . . . . . . . . . . . . . . . . . . . . 9-9
Procedure for Clearing Paper Jams . . . . . . . . . . . . . . . . . . . . . . . . . . . . . . . . . . . . . . . . 9-9
Responding to Error Codes and Messages . . . . . . . . . . . . . . . . . . . . . . . . . . 9-18
Other Print Problems . . . . . . . . . . . . . . . . . . . . . . . . . . . . . . . . . . . . . . . . . . . . 9-26
Correcting Poor Print Quality. . . . . . . . . . . . . . . . . . . . . . . . . . . . . . . . . . . . . . . . . . . . . 9-26
vii
Page 10

Chapter 10 Appendix
Checking the Printer Operation . . . . . . . . . . . . . . . . . . . . . . . . . . . . . . . . . . . .10-2
Configuration Page . . . . . . . . . . . . . . . . . . . . . . . . . . . . . . . . . . . . . . . . . . . . . . . . . . . 10-2
Test Print (Configuration Page) Sample. . . . . . . . . . . . . . . . . . . . . . . . . . . . . . . . . 10-3
Font List . . . . . . . . . . . . . . . . . . . . . . . . . . . . . . . . . . . . . . . . . . . . . . . . . . . . . . . . . . . . 10-6
PCL Font List Sample . . . . . . . . . . . . . . . . . . . . . . . . . . . . . . . . . . . . . . . . . . . . . . 10-7
Typeface Samples . . . . . . . . . . . . . . . . . . . . . . . . . . . . . . . . . . . . . . . . . . . . . . .10-9
Scalable Fonts (PCL) . . . . . . . . . . . . . . . . . . . . . . . . . . . . . . . . . . . . . . . . . . . . . . . . . . 10-9
Bar Code Scalable Fonts (PCL). . . . . . . . . . . . . . . . . . . . . . . . . . . . . . . . . . . . . . . . . 10-11
OCR Scalable Fonts (PCL) . . . . . . . . . . . . . . . . . . . . . . . . . . . . . . . . . . . . . . . . . . . . 10-12
Bitmapped Fonts (PCL) . . . . . . . . . . . . . . . . . . . . . . . . . . . . . . . . . . . . . . . . . . . . . . . 10-13
PS Fonts . . . . . . . . . . . . . . . . . . . . . . . . . . . . . . . . . . . . . . . . . . . . . . . . . . . . . . . . . . . 10-14
Symbol Sets Supported . . . . . . . . . . . . . . . . . . . . . . . . . . . . . . . . . . . . . . . . .10-18
Character Code Tables . . . . . . . . . . . . . . . . . . . . . . . . . . . . . . . . . . . . . . . . . . . . . . . 10-18
ISO Substitution Table . . . . . . . . . . . . . . . . . . . . . . . . . . . . . . . . . . . . . . . . . . . . . . . . 10-41
Specifications . . . . . . . . . . . . . . . . . . . . . . . . . . . . . . . . . . . . . . . . . . . . . . . . .10-42
Hardware Specifications . . . . . . . . . . . . . . . . . . . . . . . . . . . . . . . . . . . . . . . . . . . . . . 10-42
Controller Specifications . . . . . . . . . . . . . . . . . . . . . . . . . . . . . . . . . . . . . . . . . . . . . . 10-43
Software Specifications . . . . . . . . . . . . . . . . . . . . . . . . . . . . . . . . . . . . . . . . . . . . . . . 10-43
Interface Specifications . . . . . . . . . . . . . . . . . . . . . . . . . . . . . . . . . . . . . . . . .10-44
Parallel Interface (Centronics Compliant) . . . . . . . . . . . . . . . . . . . . . . . . . . . . . . . . . 10-44
Location of signal lines and pins . . . . . . . . . . . . . . . . . . . . . . . . . . . . . . . . . . . . . 10-44
Connector and Cable . . . . . . . . . . . . . . . . . . . . . . . . . . . . . . . . . . . . . . . . . . . . . 10-45
Timing Chart . . . . . . . . . . . . . . . . . . . . . . . . . . . . . . . . . . . . . . . . . . . . . . . . . . . . 10-45
Parallel Connections . . . . . . . . . . . . . . . . . . . . . . . . . . . . . . . . . . . . . . . . . . . . . . 10-45
Glossary . . . . . . . . . . . . . . . . . . . . . . . . . . . . . . . . . . . . . . . . . . . . . . . . . . . . . .10-46
Index . . . . . . . . . . . . . . . . . . . . . . . . . . . . . . . . . . . . . . . . . . . . . . . . . . . . . . . . .10-58
viii
Page 11

Preface
Thank you for purchasing the Canon LBP-2000. Please read this manual thoroughly before
operating the LBP-2000 in order to familiarize yourself with its capabilities, and to make the
most of its many functions. After reading this manual store it in a safe place for future
reference.
How to Use This Manual
Symbols Used in This Manual
The following marks are used in this manual to indicate safety precautions,
restrictions and notices for handling the product.
WARNING
CAUTION
IMPORTANT
NOTE
Indicates a warning concerning operations that may lead to death or
injury to persons if not performed correctly. In order to use the
machine safely, always pay attention to these warnings.
Indicates a caution concerning operations that may lead to injury to
persons or damage to property if not performed correctly. In order to
use the machine safely, always pay attention to these cautions.
Indicates operational warnings and restrictions. Be certain to read
these items to operate the machine correctly , and to a v oid damage to
the machine.
Indicates notes for operation or additional explanations. Reading
these is recommended.
Keys Used in This Manual
The following symbols, key names and unit names are used in this manual.
•
Control panel keys................... [Go]
Illustrations Used in This Manual
Unless otherwise mentioned, illustrations used in this manual are those taken when
the optional network card, and hard disk are installed on the printer.
ix
Page 12

Abbreviations Used in This Manual
In this manual, product names and model names are abbreviated as follows:
Microsoft
Canon Laser Beam Printer LBP-2000 is referred to as the LBP-2000.
®
Windows
®
operating system is referred to as Windows.
x
Page 13

Safety Information
This section lists important safety information and precautions about handling the
machine. Be sure to read this information before using the machine for the first
time.
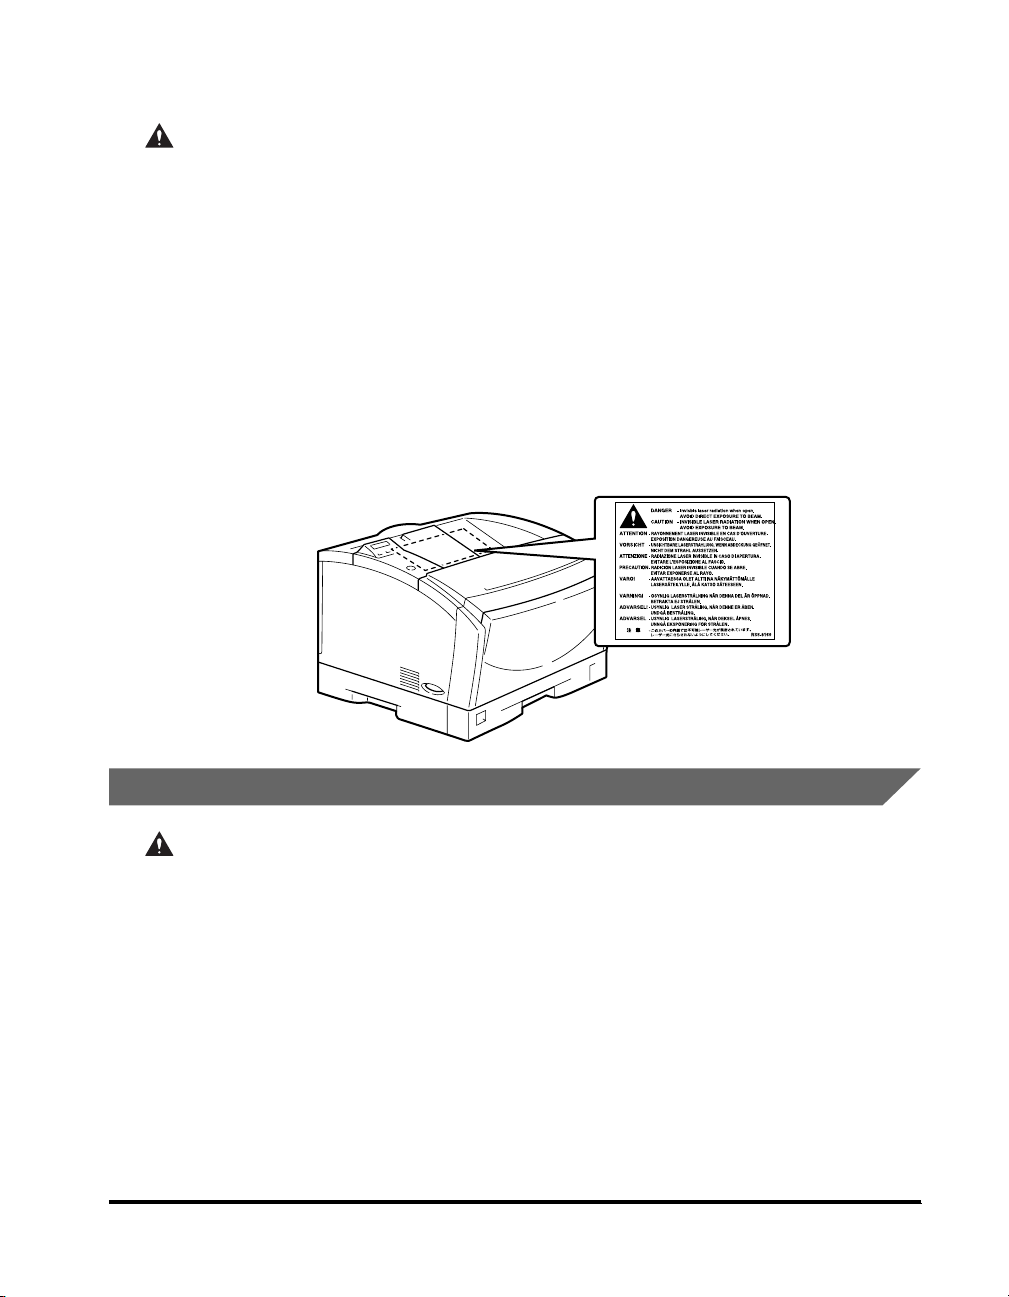
Laser Safety Information
Laser radiation could be hazardous to the human body. For this reason, laser
radiation emitted inside this printer is hermetically sealed within the protective
housing and external cover. No radiation can leak from the machine in the normal
operation of the product by the user.
This printer is classified as a Class 1 laser product under EN 60825-1: 1994, and
as for the U.S.A., it is classified as Class I under the Code of Federal Regulations,
1040.10 of Title 21.
DANGER
- Invisble laser radiation when open.
AVOID DIRECT EXPOSURE TO BEAM.
- INVISIBLE LASER RADIATION WHEN OPEN.
CAUTION
AVOID EXPOSURE TO BEAM.
- RAYONNEMENT LASER INVISIBLE EN CAS D’OUVERTURE.
ATTENTION
EXPOSITION DANGEREUSE AU FAISCEAU.
UNSICHTBARE LASERSTRAHLUNG, WENN ABDECKUNG GEÖFNET.
-
VORSICHT
NICHT DEM STRAHL AUSSETZEN.
ATTENZIONE
- RADIAZIONE LASER INVISIBLE IN CASO DI APERTURA.
EVITARE L’ESPOSIZIONE AL FASCIO.
- RADICION LASER INVISIBLE CUANDO SE ABRE.
PRECAUTION
EVITAR EXPONERSE AL RAYO.
VARO!
- AAVATTAESSA OLET ALTTIINA NÄKYMÄTTÖMÄLLE
LASERSÄTEILYLLE. ÄLÄ KATSO SÄTEESEEN.
VARNING!
- OSYNLIG LASERSTRÅLNING NÄR DENNA DEL ÄR ÖPPNAD.
BETRAKTA EJ STRÅLEN.
ADVARSEL!
- USYNLIG LASER STRÅLING, NÅR DENNE ER ÅBEN.
UNDGÅ BESTRÅLING.
ADVARSEL
- USYNLIG LASERSTRÅLING, NÅR DEKSEL ÅPNES.
UNNGÅ EKSPONERING FOR STRÅLEN.
RS5-8169
This printer has been classified under EN60825-1: 1994 and conforms to the
following classes:
CLASS 1 LASER PRODUCT
LASER KLASSE 1
APPAREIL A RAYONNEMENT LASER DE CLASSE 1
APPARECCHIO LASER DI CLASSE 1
PRODUCTO LASER DE CLASE 1
APARELHO A LASER DE CLASSE 1
CAUTION
• Performance of procedures other than those specified in this guide may result
in hazardous radiation exposure.
xi
Page 14

International Energy Star-Program
As an ENERGY STAR® Partner, Canon USA, Inc. has
determined that this product meets the ENERGY STAR®
Program for energy efficiency.
The International ENERGY ST AR® Office Equipment Program is
an international program that promotes energy saving through
the use of computers and other office equipment. The program
backs the development and dissemination of products with
functions that effectively reduce energy consumption. It is an
open system in which business proprietors can participate
voluntarily. The targeted products are office equipment such as
computers, displays, printers, facsimiles, and copiers. Their
standards and logos are uniform among participating nations.
About Trademarks
■ License Notice
Copyright© 2001 Peerless Systems Corp.
Universal Font Scaling Technology, UFST, is licensed from Agfa Monotype Corporation.
Copyright© 1993-2000 Agfa Monotype Corporation.
xii
■ Trademark Credits
Adobe, the Adobe logo, PostScript, PostScript 3, Carta, Tekton and the PostScript logo are
trademarks of Adobe Systems Incorporated.
Agfa is a trademark of Agfa-Gevaert AG and may be registered in some jurisdictions.
Albertus, Arial, Book Antiqua, Bookman Oldstyle, Century Gothic, GillSans, Joanna and
Times New Roman are trademarks of The Monotype Corporation Plc., and may be
registered in some jurisdictions.
Apple, Apple Chancery, Chicago, Geneva, Hoefler Text, Macintosh, Monaco, New York and
TrueType are trademarks of Apple Computer, Inc. Macintosh computer is a product of Apple
Computer, Inc.
Coronet is a registered trademark of Ludlow Type Foundry.
CG, Intellifont and UFST are trademarks of Agfa Monotype Corporation or its affiliated
companies and may be registered in some jurisdictions.
Page 15

CG Omega is a product of Agfa Monotype Corporation and CG Times , based on Times New
Roman under license from the Monotype Corporation, is a product of Agfa Monotype
Corporation.
Clarendon, Helvetica, New Century Schoolbook, Optima, Palatino, Stempel Garamond and
Times are trademarks of Linotype-Hell AG and/or its subsidiaries. Univers is a trademark of
Linotype-Hell AG and/or its subsidiaries and may be registered in some jurisdictions.
Eurostile is a trademark of Nebiolo.
ITC AvantGarde Gothic , ITC Bookman, ITC Lubalin Graph, ITC Mona Lisa, ITC Symbol, ITC
Zapf Chancery and ITC Zapf Dingbats are registered trademarks of International Typeface
Corporation.
LBP, Canon and the Canon logo are trademarks of Canon Inc.
Marigold and Oxford are trademarks of AlphaOmega Typography, Inc.
Memory Reduction Technology is a trademark of Peerless Systems Corporation that may be
registered in some countries.
Microsoft, Windows and Windows NT are either registered trademarks or trademarks of
Microsoft Corporation in the United States and/or in other countries. Wingdings is a
trademark of Microsoft Corporation.
PCL, PCL 5e and PCL6 are trademarks of Hewlett-Packard Company.
UNIX is a registered trademark exclusively licensed from X/Open Company, Ltd. in the
United States and other countries.
Ethernet is a trademark of Xerox Corporation, Inc. (US)
As concerns typeface credit, the actual names on a FONT LIST for this printer may differ
from those listed above.
Other company or product names used in this manual and not included in the list above are
trademarks of those companies and may be registered in certain jurisdictions.
Copyright 2001 by Canon, Inc. All rights reserved.
No part of this publication may be reproduced or transmitted in any form or by any means,
electronic or mechanical, including photocopying and recording, or by any information
storage or retrieval system without the prior written permission of Canon, Inc.
xiii
Page 16

Important Safety Instructions
Installation
WARNING
• Do not install the machine near alcohol, paint thinner or other inflammable
substances. If inflammable substances come into contact with electrical parts inside
the machine, this may result in a fire or electrical shock.
• Do not place the following items on the machine. If these items come into contact
with a high-voltage area inside the machine, this may result in a fire or electrical
shock.
If these items are dropped or spilled inside the machine, immediately turn off the
power switch on the printer, then the main power switch, and unplug the power plug
from the outlet. Then, contact your service representative or the shop that you
purchased this product.
- Necklaces and other metal objects
- Cups, vases, flowerpots and other containers filled with water or liquids
xiv
CAUTION
• Do not install the machine in unstable locations such as on unsteady platforms or on
inclined floors, or in locations which are subject to excessive vibrations, as this may
cause the machine to fall or tip over, resulting in personal injury.
• Never block the ventilation slots and louvers on the machine. These openings are
provided for proper ventilation of working parts inside the machine. Blocking these
openings can cause the machine to overheat, so never place the machine on a soft
surface like a sofa, rug or similar surface.
• Do not install the machine in the following locations.
-A damp or dusty location.
-A location exposed to smoke and steam such as cookeries and humidifiers.
-A location exposed to rain and snow.
Page 17

-A location near water faucets and water.
-A location which is exposed to direct sunlight.
-A location subject to high temperatures.
-A location that is subject to open flames.
• To avoid damaging the printer or personal injury, carry the printer in the manner
shown in the illustration, after removing any paper cassettes. Hold it firmly, with one
hand on each side.
• When connecting the interface cable, connect it properly according to this guide. If
not connected properly, this might result in malfunction or electrical shock.
• If a problem or error occurs on the optional hard disk, the data stored on the har d disk
may be lost. Be sure to keep bac kup copies, on external media, of any important data
or files that have been stored on the optional hard disk. Canon cannot accept any
responsibility for any loss of data arising from the use of or inability to use the
optional hard disk.
• When moving the printer, follow the instructions in this manual to hold it correctly.
Failure to do so may cause you to drop the printer, resulting in personal injury.
Power Supply
WARNING
• Do not damage or modify the power cord. Also, do not place heavy objects on the
power cord, or pull on or excessively bend it, as this could cause electrical damage
and result in a fire or electrical shock.
• Keep the power cord away from a heat source; failure to do this causes the cord
coating to melt and results in fire or electrical shock.
• Do not insert or unplug the power plug with wet hands, as this may result in electrical
shock.
• Do not plug the machine into a multi-plug power strip, as this may cause a fire or
electrical shock.
• Do not bundle up or tie the power cord in a knot, as this may result in a fire or
electrical shock.
• Insert the power cord completely into the outlet, as failure to do so may result in a fire
or electrical shock.
xv
Page 18

• As a general rule, do not use extension cords. Using an extension cord may result in
a fire or electrical shock. If an extension cord must be used, however, use the type
rated for voltages of AC 230 V and over and untie the cord binding and insert the
power plug completely into the extension cord outlet to ensure a firm connection
between the power and extension cords.
CAUTION
• Do not use power supplies with voltages other than those specified, as this may
result in a fire or electrical shock.
• Always grasp the plug portion when unplugging the power plug. Pulling on the power
cord may expose or snap the core wire, or otherwise damage the power cord. If the
cord is damaged, this could cause an electricity leak and result in a fire or electrical
shock.
• Leave sufficient space around the power plug so that it can be unplugged easily. If
objects are placed around the power plug, you will be unable to unplug it in an
emergency.
Handling
WARNING
• Do not attempt to disassemble or modify the machine. There are high-temperature
and high-voltage components inside the machine, which may result in a fire or
electrical shock.
• Electrical equipment can be hazardous if not used properly. To avoid injury, do not
allow children access to the interior of any electrical product and do not let them
touch any electrical contacts or gears that are exposed.
• If the machine makes strange noises, or emits smoke, heat or unusual smells,
immediately turn off the Control Panel Power Switch, then the main power switch,
and unplug the power plug from the outlet. Then, contact your service representative
or the shop that you purchased this product. Continued use of the machine in this
condition may result in a fire or electrical shock.
• Do not use highly flammable sprays near the machine. If gas from these sprays
comes into contact with the electrical components inside the machine, this may
result in a fire or electrical shock.
• To avoid damage to the power cord and creating a fire hazard, always turn the main
power switch to off, and unplug the interface cable when moving the machine. Or
else, power cord and interface cab le may be damaged and will lead to fire or electrical
shock.
• Do not drop paper clips, staples or other metal objects inside the machine. Also, do
not spill water, liquids or flammable substances (alcohol, benzene, paint thinner, etc.)
inside the machine. If these items come into contact with a high-voltage area inside
the machine, this may result in a fire or electrical shoc k. If these items are dropped or
spilled inside the machine, immediately turn the main power switch to OFF and
unplug the power plug from the outlet. Then contact your service representative or
the shop you purchased the machine.
• When connecting the printer to the USB interface when the power switch is on, be
sure to connect the grounding cord to avoid electrical shock.
xvi
Page 19
• When unplugging the USB cable while the power switch is on, do not touch the metal
part of the connector. This may lead to electrical shock.
CAUTION
• Do not place heavy objects on the machine, as they may tip over or fall resulting in
personal injury.
• When handling the main board, expansion board, RAM, or ROM, be careful not to cut
your hand by touching the corner and sharp parts.
• Turn off the main power switch for safety when the machine will not be used for a
long period of time such as overnight. Also, turn the control panel power switch and
the main power switch on the right of the machine and unplug the power plug for
safety when the machine will not be used for an extended period of time such as
during consecutive holidays.
• Laser beam may be harmful to human bodies. Since radiation emitted inside the
product is completely confined within protective housings and external covers, the
laser beam can not escape from the machine during any phase of user operation.
Read the following remarks and following instructions for safety.
• Never open covers other than those instructed in this manual.
Maintenance and Inspections
WARNING
• When cleaning the machine, first turn OFF the main power switch, then unplug the
power plug. Failure to observe these steps may result in a fire or electrical shock.
• Unplug the power plug from the outlet regularly, and clean the area around the base
of the plug’s metal pins and the power outlet with a dry cloth to ensure all dust and
grime is removed. If the machine is plugged in for a long time in a damp, dusty, or
fumy location, dust can build up around the plug and become damp. This may cause
a short circuit and result in a fire.
• There are some areas inside the machine which are subject to high voltages. When
removing jammed paper or when inspecting the inside of the machine, do not allow
necklaces, bracelets or other metal objects to touch the inside of the mac hine, as this
may result in burns or electrical shock.
• Do not throw used toner cartridges into open fires. The toner will catch on fire and
may cause burns or fire.
xvii
Page 20

CAUTION
• The fixing unit and its surroundings inside the machine may become hot during use.
When removing jammed paper or when inspecting the inside of the machine, do not
touch the fixing unit and its surroundings, as this may result in burns or electrical
shock.
• When removing jammed paper or replacing the toner cartridge, take care not to allow
the toner to come into contact with your hands or clothing, as this will dirty your
hands or clothing. If they become dirty, wash them immediately with cold water.
Washing with warm water will set the toner and make it impossible to remove the
toner stains.
• When removing paper which has become jammed inside the machine, remove the
jammed paper gently to prevent the toner on the paper from scattering and entering
your eyes or mouth. If toner enters your eyes or mouth, wash immediately with cold
water and consult a physician.
• When loading paper or removing jammed paper, take care not to cut your hands on
the edges of the paper.
• When removing used toner cartridges from the toner cartridge slot, remove the
cartridge carefully to prevent the toner from scattering and entering your eyes or
mouth. If the toner enters your eyes or mouth, wash immediately with cold water and
consult a physician.
Consumables
WARNING
• Do not throw used toner cartridges into open flames, as this may cause toner
remaining inside the cartridges to ignite and result in burns or a fire.
• Do not store toner cartridges or copy paper in places exposed to open flames, as this
may cause the toner or paper to ignite and result in burns or a fire.
CAUTION
• Keep toner and other consumables out of the reach of small children. If these items
are ingested, consult a physician immediately.
xviii
Page 21

Legal Limitation on Usage of Your Product and the Use of Images
Using your product to scan, print or otherwise reproduce certain documents, and
the use of such images as scanned, printed or otherwise reproduced by your
product, may be prohibited by law and may result in criminal and/or civil liability. A
non-exhaustive list of these documents is set f orth below. This list is intended to be
a guide only. If you are uncertain about the legality of using your product to scan,
print or otherwise reproduce any particular document, and/or of the use of the
images scanned, printed or otherwise reproduced, you should consult in advance
with your legal advisor for guidance.
• Paper Money • Travelers Checks
• Money Orders • Food Stamps
• Certificates of Deposit • Passports
• Postage Stamps (cancelled or
uncancelled)
• Identifying Badges or Insignias • Internal Revenue Stamps (cancelled
• Selective Service or Draft Papers • Bonds or Other Certificates of
• Checks or Drafts Issued by
Governmental Agencies
• Motor Vehicle Licenses and
Certificates of Title
• Immigration Papers
or uncancelled)
Indebtedness
• Stock Certificates
• Copyrighted Works/Works of Art
without Permission of Copyright
Owner
xix
Page 22

Before You Start Using the Machine
This chapter describes the major features and the functions of the printer.
Features of the Product . . . . . . . . . . . . . . . . . . . . . . . . . . . . . . . . . . . . . . . . . . . . . . . . . .1-2
Standard Features . . . . . . . . . . . . . . . . . . . . . . . . . . . . . . . . . . . . . . . . . . . . . . . . . . . . . . . . . . . .1-2
Optional Equipment . . . . . . . . . . . . . . . . . . . . . . . . . . . . . . . . . . . . . . . . . . . . . . . . . . . . . . . . . . .1-4
Parts and Their Functions . . . . . . . . . . . . . . . . . . . . . . . . . . . . . . . . . . . . . . . . . . . . . . . . 1-5
Parts of the Printer . . . . . . . . . . . . . . . . . . . . . . . . . . . . . . . . . . . . . . . . . . . . . . . . . . . . . . . . . . . .1-5
Inside the Front Cover . . . . . . . . . . . . . . . . . . . . . . . . . . . . . . . . . . . . . . . . . . . . . . . . . . . . . . . . .1-7
Printer Control Panel . . . . . . . . . . . . . . . . . . . . . . . . . . . . . . . . . . . . . . . . . . . . . . . . . . . . . . . . . .1-8
1
CHAPTER
1-1
Page 23

Features of the Product
1
Your printer offers fast printing speed, superior print quality, sophisticated paper
handling, and ecology- and energy-sensitive features. The printer also
accommodates hardware options to meet your networking requirements.
Standard Features
High-speed Printing
The Power PC405 processor enables a print speed of up to 20 pages per minute
(ppm) for Letter- or A4-size paper.
Superior Print Quality
High resolution printing at 600 dpi (dots per inch) is further enhanced by Automatic
Before You Start Using the Machine
Image Refinement to smooth jagged edges along with the use of super fine toner.
Combined, these will ensure superior reproduction quality of text and graphics.
Software Compatibility and Language Switching
The printer supports Hewlett-Packard’ s PCL 5e and PCL6 printer languages, which
enables the printer to work with a wide variety of software applications supporting
PCL. The printer can also support Adobe PostScript® 3™, which allows you to print
PostScript data files at 600 dpi. With the optional Canon Adobe PostScript® 3™
Module A-65 (an add-in ROM for Adobe PostScript 3) installed, the printer can
sample the print data as it is received and then automatically switch between the
PCL and PostScript personalities.
1-2
Memory Saving Technology
Memory Reduction Technology accomplishes 600 dpi printing with only 8 MB of
memory for Letter- or A4-printing. Complex page data is compressed to optimise
available resources.
Paper Handling
The standard paper cassette holds 250 sheets of paper while the Multi-Purpose
tray holds about 100 sheets of standard-size paper. The tray can hold a variety of
media for automatic feeding and operate as a manual feed station.
Features of the Product
Page 24

In addition, there are optional paper feed units to greatly increase your printing
capacity: up to three Canon Paper Feed Unit PF-65s can be installed.
Energy Saving
The on-demand fusing technology of the printer provides improved energy
efficiency . Because of this power saving feature, the printer meets the guidelines for
the International Energy Star Program.
Reducing Toner Consumption
To save toner, you can select the economy mode to print rough drafts with less
toner. The printed page is much lighter, similar to the draft mode found on many dot
matrix printers.
Interface Features
The printer has a standard IEEE 1284 compatible parallel interface, which supports
ECP and Compatible/Nibble protocols. It also supports Microsoft’s Plug & Play
technology. The printer also has a USB port for easy connection to a personal
computer or other USB devices. You can also insert a network card into the
expansion slot to enable network printing.
Typefaces
The printer comes with 45 scalable typefaces in 16 typeface families (Agfa 45
MicroType fonts) and 32 additional TrueType fonts (barcode and OCR fonts), all
compatible with application software supporting Microsoft Windows. In addition, 9
bitmapped typefaces of the Line Printer family are also included. The printer uses
the Universal Font Scaling Technology (UFST) for outline fonts, provided under
license from Agfa Monotype Corporation. Also supplied with the printer are the
TrueType screen fonts for 137 font solution and Canon Font Manager for easy
management of installed fonts in Microsoft® Windows® 95/98/Me and Windows NT
4.0/2000/XP. A list of typeface samples is provided in the Appendix.
1
Before You Start Using the Machine
Printer drivers and Utilities
The printer comes with PCL printer drivers for Microsoft Windows 95/98/Me and
Windows NT 4.0/2000/XP. This allows you to control most printer settings from the
Windows driver screens.
Remote UI Support
The printer supports a Remote UI function that allows you to control or monitor the
status of the printer from a personal computer. (See the Remote UI Guide.)
Features of the Product
1-3
Page 25

E-mail Notification
The printer can notify you by e-mail when a job has finished printing, or if an error
occurs. (See the Remote UI Guide.)
Optional Equipment
1
Below is a list of the options available for installation with this printer. For more
details, contact your local supplier.
Adobe PostScript 3
The software that enables your printer to perform Adobe PostScript 3 printing is
supplied in the Canon Adobe PostScript® 3™ Module A-65 (hereafter referred to as
the PostScript module) as an optional ROM. This software includes a total of 136
fonts. (Typeface samples are shown in Chapter 10.) The module comes with Adobe
PostScript 3 printer drivers for Macintosh OS computers, Microsoft Windows 95/98/
Me, and Windows NT 4.0/2000.
250 Sheet Paper Feed Unit
Before You Start Using the Machine
The Canon Paper F eed Unit PF-65 units are designed for high volume printing and
sit underneath the universal paper cassette. Each unit holds 250 sheets (80 g/m2 or
21 lb. paper) and can be adjusted to accept different sizes of paper, up to Legalsize. Up to three 250-sheet paper feed units can be installed under the printer.
Flash ROM Module
Easily installed in the printer, this increases the amount of memory availab le f or the
storage of fonts and macros in the printer.
RAM DIMM Modules
Easily installed in the printer, these increase the amount of memory availab le to the
printer. If using third-party RAM, use Intel PC 100 compatible SDRAM 144-pin SODIMM.
1-4
Network Card
With the optional Canon Ethernet Board EB-65, your printer can handle network
jobs by connecting the printer to your network using a Category 5 twisted pair LAN
cable.
Features of the Product
Page 26

Parts and Their Functions
The following section describes the parts of the printer, and their various functions,
so that you can make full use of all the features of your printer.
Parts of the Printer
Front View
11
10
9
8
11
11
Extension T ray
Extend when loading B4-, A3-, or other largesized paper to prevent it from drooping.
22
22
Face-down T ray
Holds approximately 250 printed sheets (80 g/m2
or 21 lb.) delivered face down and collated. (See
p.3-11)
33
33
Front Cover
Open to install the toner cartridge, clear paper
jams, and for printer maintenance. (See p.8-20),
44
44
Release Levers
Release the locks of the front cover. Pull down
both levers to pull out the front cov er. (See p .8-2),
55
55
Multi-Purpose T ray
Holds a variety of print media such as plain
paper, envelopes, labels, transparencies and
non-standard size paper. The capacity is
approximately 100 sheets of plain paper (80 g/m2
or 21 lb.) (See p.3-17)
66
66
Extension Support
Supports large-sized paper.
1
2
3
4
5
6
7
77
77
Paper Size Guides
Adjust to the size of the paper loaded in the multipurpose tray. The guides can easily be adjusted
by hand.
88
88
Universal Paper Cassette
You can load up to 250 sheets of plain paper with
the size of A5 to A3.
99
99
Power Switch
Press to turn the printer on or off. (See p.2-2)
00
00
Ventilation Slots
Slots ventilating the air blown by the fan cooling
the printer interior. Install the printer so as not to
block these slots.
AA
AA
Control Panel
This indicates the operations and status of the
printer, as well as configures the functions. (See
p.1-8)
Before using the control panel, peel off the
•
protective film from the display.
1
Before You Start Using the Machine
Parts and Their Functions
1-5
Page 27
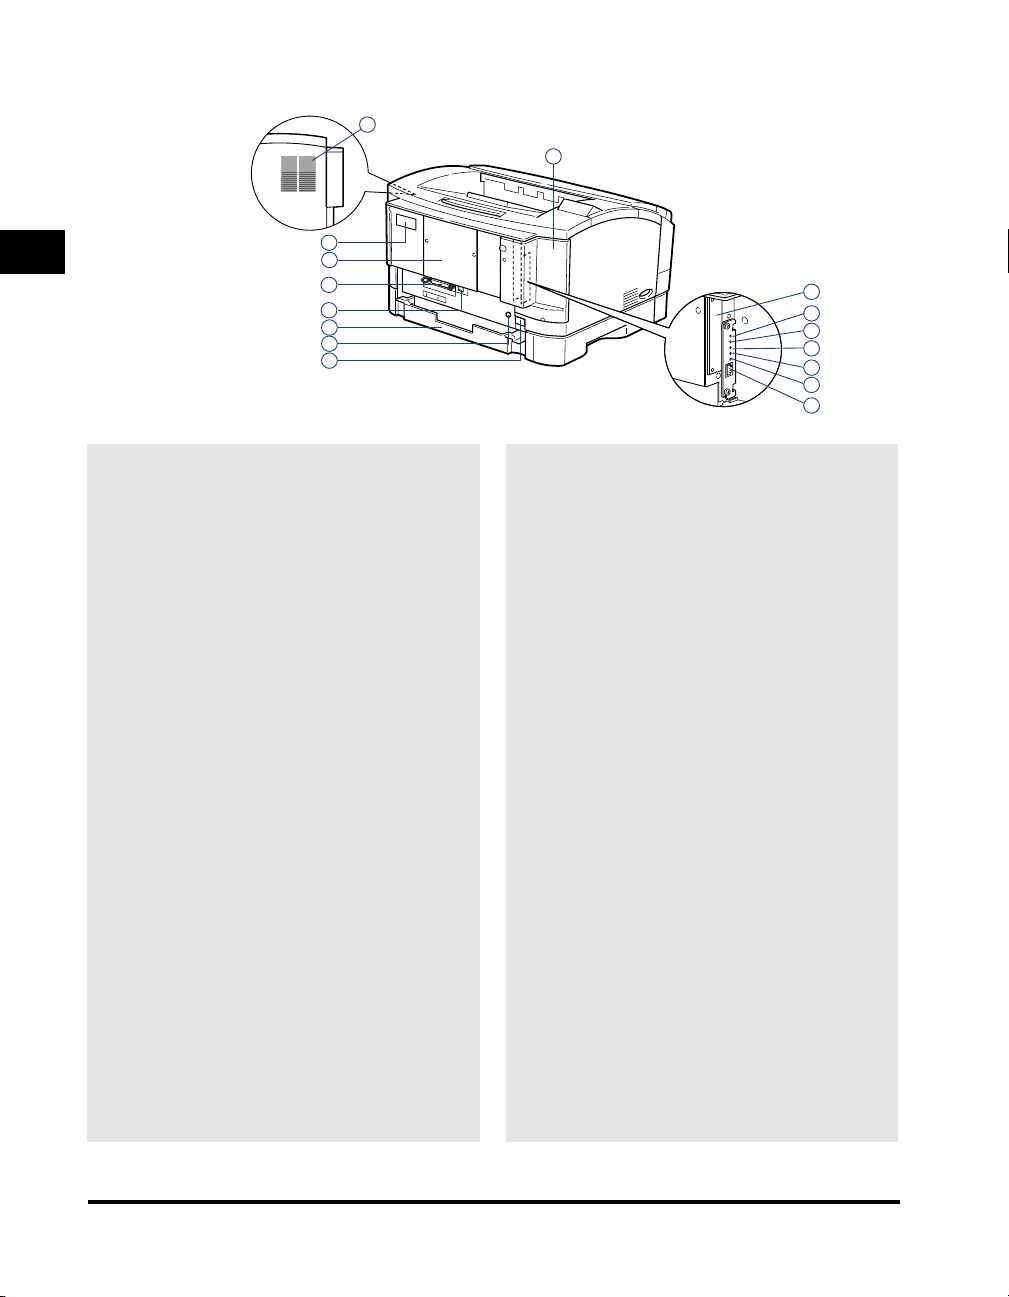
Rear View
1
2
1
11
11
Ventilation Slots
Slots ventilating the air blown by the fan cooling
the printer interior. Install the printer so as not to
block these slots.
22
22
Expansion Board Slot Cover
Before You Start Using the Machine
Cover protecting the expansion board slot. Use
the printer with this cover attached.
33
33
Expansion Board Slot
Install optional expansion boards here, such as
the hard disk, etc.
44
44
ERR LED
Lights or blinks when the optional Ethernet board
is operating incorrectly.
55
55
LNK LED
Lights when the optional Ethernet board is
correctly connected to a network.
66
66
100 LED
Lights when the optional Ethernet board is
connected to a network via a 100BASE-TX. Does
not light when connected to a 10BASE-T.
77
77
TXD LED
Lights when the optional Ethernet board is
transmitting data.
88
88
RXD LED
Lights when the optional Ethernet board is
receiving data.
99
99
LAN Connector
Connect to a 10BASE-T/100BASE-TX LAN
cable.
16
15
14
13
12
11
10
00
00
Power Socket
Connects to an AC outlet.
AA
AA
Grounding Wire T erminal
Connect a commercially available grounding wire
to this terminal.
BB
BB
Universal Paper Cassette Rear Side
Rear side of universal paper cassette. Do not
grasp this to lift the printer.
CC
CC
USB Connector
Connect to a USB interface cable. Use this port
when connecting to a computer with a USB
interface.
DD
DD
Parallel Connector
Use this port when connecting to a computer with
the printer cable.
EE
EE
Expansion Board Slot Cover
Cover protecting the expansion board slot. Use
the printer with this cover attached.
FF
FF
Rating Label
The serial number is indicated to identify the
printer. Refer to this number when calling a
service technician. This label also shows the
current and average power consumption.
3
4
5
6
7
8
9
1-6
Parts and Their Functions
Page 28
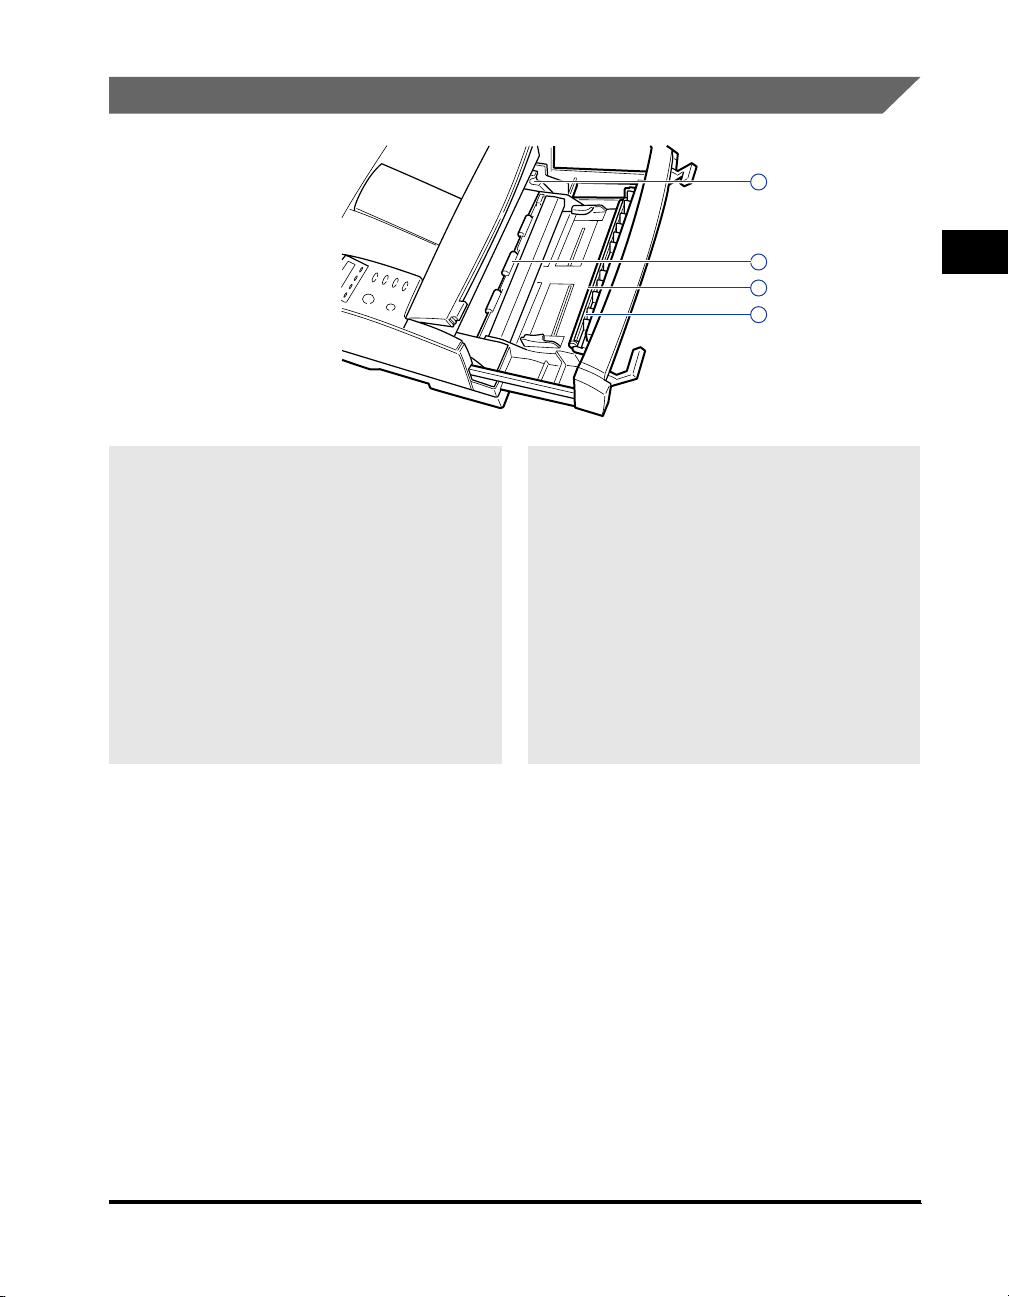
Inside the Front Cover
1
11
11
Toner Cartridge Compartment
Holds the Canon EP-65 Toner Cartridge. Align
the toner cartridge with the guides inside the
compartment.
22
22
Paper Feed Roller
Located inside the printer, the transfer guide area
and registration roller area should be cleaned
periodically with a damp cloth to remove any
paper dust collected on the plate or transparent
sheet.
2
3
4
33
33
Transfer Roller
This delicate roller should be kept free of
fingerprints and oil to prevent print quality
deterioration.
To ensure optimum print quality, never
•
touch the transfer charging roller or attempt
to clean it.
44
44
Discharger
An important part that releases the electronic
charge from paper during printing.
Do not touch the discharger with your
•
hands. Otherwise, print quality may
deteriorate.
1
Before You Start Using the Machine
Parts and Their Functions
1-7
Page 29
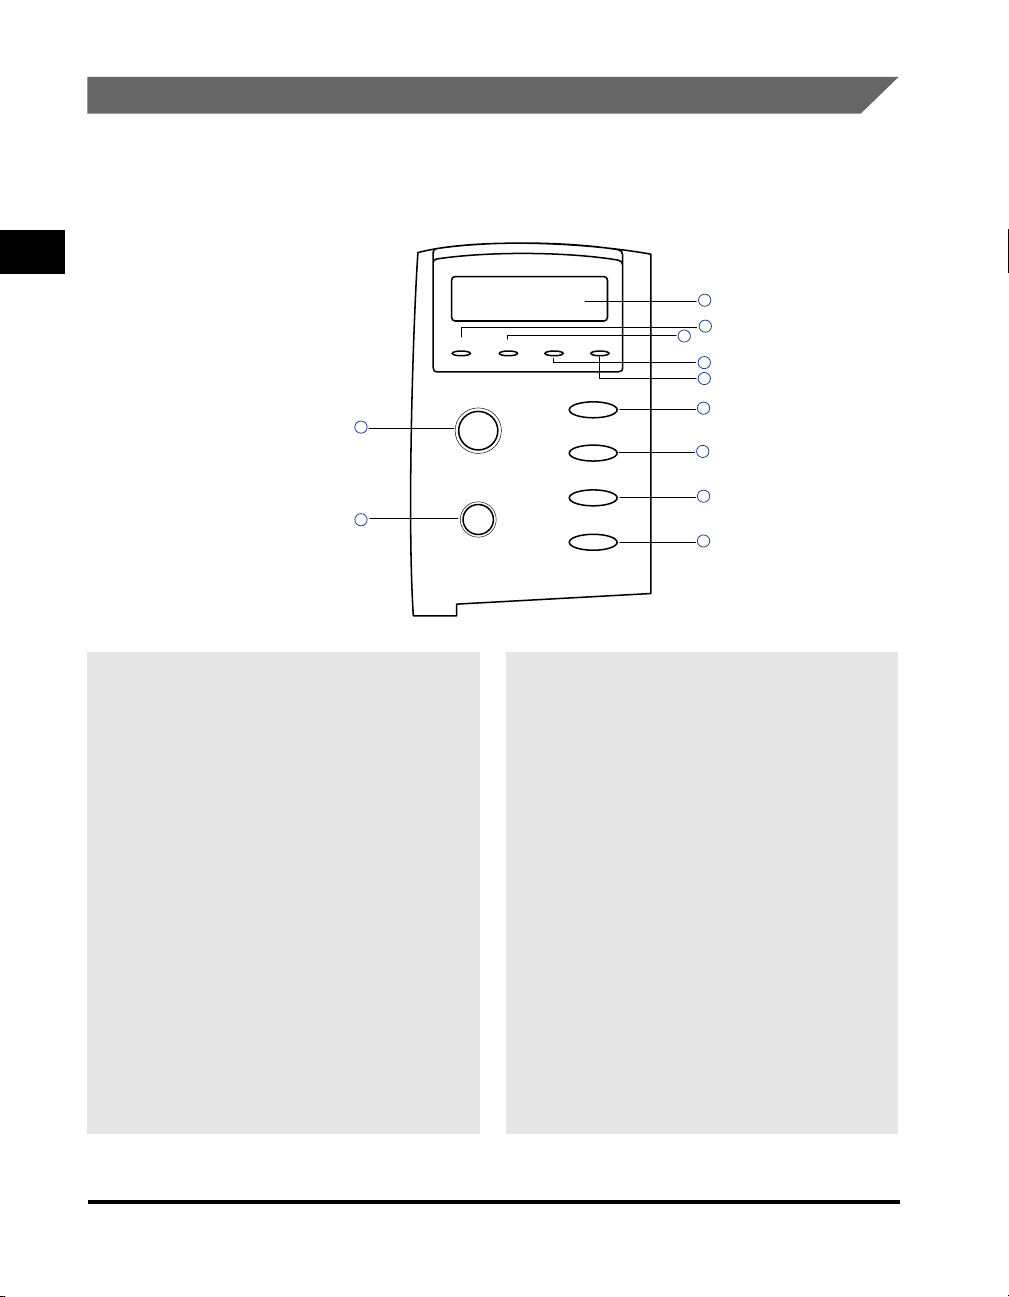
Printer Control Panel
Located at the front on top of the printer, the control panel features: an LCD display
and four status indicators at the top; and six operation keys below the display. The
functions of the indicators, operation keys, and displays are as follows.
1
Before You Start Using the Machine
1
2
On Line Job Alarm HD
Go
6
Shift
7
Menu
Item
Value
Enter/Cancel
3
4
5
8
9
10
11
11
11
LCD Display
The two-line, 16-digit display tells you what is
happening inside the printer and shows you the
menus and settings that can be changed. The
display informs you about the printer’ s operational
status, allows you to make menu selections,
warns you about problems, and identifies errors.
22
22
On Line Indicator (green)
On:
The printer is on-line (power on, warmed up and
ready to receive data for printing). Before you
send a print job, this indicator must be on.
Blinking:
The printer is processing a print job. Do not turn
the power off, otherwise you may lose print data.
The page is printed when all of the data has been
processed.
Off:
The printer is off-line. You can now use the printer
control panel buttons to view and change
settings. When off-line, the printer cannot accept
data for printing.
1-8
Parts and Their Functions
33
33
Job Indicator (green)
On:
Part of a page has been processed and stored in
the printer’s memory.
Off:
There is no data stored in the printer’s memory.
44
44
Alarm Indicator (orange)
On:
An error has occurred and printing has stopped.
Check the display for a message describing the
problem.
Off:
Operation is normal and there is no error.
If the printer enters Sleep Mode while off-line,
only the Alarm indicator (orange) lights, with other
indicators extinguishing.
Page 30

55
55
HD Indicator (green)
On:
Indicates that the optional Canon Hard Disk HD65 has been installed,
Blinking:
The hard disk is being accessed.
Off:
Indicates that there is no optional hard disk
installed.
If a problem occurs on the optional hard
•
disk, the data stored on the hard disk may
be lost. Be sure to keep backup copies, on
external media, of any important data or
files that have been stored on the hard
disk. Canon cannot accept any
responsibility for any loss of data arising
from the use of, or inability to use , the hard
disk.
66
66
[Go] Key
Takes the printer off-line and brings it back online. When the On Line indicator is on, the printer
is ready to receive data and print. When the On
Line indicator is off, the printer is off-line and you
can use the other buttons on the printer control
panel to view and change settings.
Resumes printing after the printer stops printing
and displays a message. For most situations,
after you press [Go] the message clears and
printing resumes. When the multi-purpose tray is
being used as a manual feed station
(<MANUAL=ON> in the FEEDER MENU), press
[Go] each time you feed a single sheet of paper.
To perform a form feed and print any data
•
remaining in the printer, press Go twice in
succession.
•
To reset the printer settings to their default
values, press and hold this button while
turning on the printer. This resets all
settings except the PAGE COUNT field on
the TEST PRINT page.
77
77
[Shift] Key
Press this button to scroll through menu or
settings items in reverse order.
88
88
[Menu] Key
When the printer is off-line, press [Menu] to scroll
through the menu names and return to the first
menu name. To scroll through menu names in
reverse order, press [Shift] and [Menu].
Depending on what options you have installed,
some menu names may not appear.
99
99
[Item] Key
With a menu name displayed, press [Item] to
scroll through all the items in a menu and return
to the first item. To scroll through the items in
reverse order, press [Shift] and [Item].
Depending on what options you have
•
installed, some items may not appear.
00
00
[Value] Key
With an item name displayed, press [Value] to
scroll through the item’s values. Press [Shift] and
[Value] to step through the values in reverse
order. Some items ha ve a large r ange of numbers
from which to choose a value. For example, for
COPIES you can set a value from 1 to 999. In this
case, to quickly scroll through the values, press
and hold down “Value.”
AA
AA
[Enter] Key
Saves a value you selected for an item in the
menu. An asterisk (*) marks the current default
setting.
[Cancel] Key
Press [Shift] and [Enter/Cancel] to cancel the
current operation.
If a cancel operation is performed while the
•
printer is receiving data, this will cause the
input data to be flushed from the printer’s
memory. In this case, <READY/
FLUSHING> will appear on the display
while the data is being flushed. <READY>
appears after the data has been flushed
from memory.
1
Before You Start Using the Machine
Parts and Their Functions
1-9
Page 31

Using the Printer
This chapter describes the basics of how to use the printer.
Turning the Printer On/Off. . . . . . . . . . . . . . . . . . . . . . . . . . . . . . . . . . . . . . . . . . . . . . . . . 2-2
Tur ning On the Printer . . . . . . . . . . . . . . . . . . . . . . . . . . . . . . . . . . . . . . . . . . . . . . . . . . . . . . . . .2-2
Tur ning Off the Printer . . . . . . . . . . . . . . . . . . . . . . . . . . . . . . . . . . . . . . . . . . . . . . . . . . . . . . . . .2-3
About On-line and Off-line . . . . . . . . . . . . . . . . . . . . . . . . . . . . . . . . . . . . . . . . . . . . . . . .2-6
On-line . . . . . . . . . . . . . . . . . . . . . . . . . . . . . . . . . . . . . . . . . . . . . . . . . . . . . . . . . . . . . . . . . . . . .2-6
Off-line . . . . . . . . . . . . . . . . . . . . . . . . . . . . . . . . . . . . . . . . . . . . . . . . . . . . . . . . . . . . . . . . . . . . .2-7
Cancelling a Print Job. . . . . . . . . . . . . . . . . . . . . . . . . . . . . . . . . . . . . . . . . . . . . . . . . . . . 2-8
2
CHAPTER
2-1
Page 32

Turning the Printer On/Off
This section describes how to turn the printer on and off.
2
Using the Printer
Turning On the Printer
When you turn the printer on, the printer performs a self-diagnostic test to check
the status of the printer and any options installed.
IMPORTANT
•
Insert the paper cassette before turning the power on when the printer is being turned on
for the first time after it has been installed.
•
A blank sheet of paper may be discharged when the power is turned on for the first time
after the printer has been installed. This is normal, and is not a malfunction.
1
Press the “I” side of the power switch located on the left side
of the printer.
2-2
When the power is turned on, the indicators and the LCD display on the control
panel are turned on. Then, the printer performs a self-diagnostic test to check the
status of the printer and any options installed.
If there are no errors found, the On Line indicator lights up, and the printer is
ready to print.
The information shown on the LCD display is as follows:
Ready to print and no
data is being processed
for printing.
Turning the Printer On/Off
READY
Page 33

IMPORTANT
•
See “Printer Trouble,” on p.9-4 if the printer does not operate normally or an error
message is shown.
Turning Off the Printer
The printer should be turned off as described in the following procedure. The
procedure for turning off the power differs depending on whether or not the optional
hard disk has been installed.
IMPORTANT
•
If the printer has the optional hard disk installed, turning off the power should follow the
designated procedure to protect the hard disk.(See “If the Printer is Using a Hard Disk,”
on p.2-4)
•
If the printer is connected to a network, make sure that the printer is not printing data
from another personal computer before turning off the power.
•
If the power is turned off while the job indicator is on, the print data remaining in the
memory of the printer and the print data being spooled in the hard disk are erased. Wait
for the necessary print data to be printed and turn off the power after printing has been
completed. (See “Cancelling a Print Job,” on p.2-8)
•
Do not turn off the power to the printer while it is printing.
•
Do not turn off the power to the printer during the self-diagnostic test performed
immediately after the power has been turned on.
•
If the printer has a hard disk installed, make sure that the HD indicator (green) is not on.
If the power is turned off while the HD indicator is on (the hard disk is reading or writing
data), the hard disk may be damaged and become unusable.
•
If the message <Flash Memory/Initializing> or <Flash Memory/Deleting > is displayed,
make sure that the message has been cancelled before turning off the power.
2
Using the Printer
If the Printer is Not Using a Hard Disk
If the hard disk has not been installed on the printer, turn off the power as described
in the following procedure.
1
Make sure that the job indicator is off
On Line Job Alarm HD
Turning the Printer On/Off
2-3
Page 34

2
Press the “ ” side of the power switch on the left side of the
printer.
2
The power is turned off.
Using the Printer
If the Printer is Using a Hard Disk
If the hard disk has been installed on the printer, turn off the power as described in
the following procedure.
IMPORTANT
•
If you shut down the printer when there is an aborted job or a secure print job on the hard
disk, the message <JOB IN PROGRESS +CANCEL/-CONT.> is displayed. All of the jobs
will be cancelled by conducting a shut down.
•
Once the shut down procedure has been selected, you cannot cancel the operation. If
you need to turn the printer on again, first turn off the power according to the messages,
then turn the printer on again.
1
Make sure that the Job indicator and HD indicator (green) are
off.
On Line Job Alarm HD
2-4
Go
2
Press [Go] to turn off the On Line indicator.
The printer gets ready for settings to be entered from the control panel.
Turning the Printer On/Off
Page 35

Menu
E
3
Press [Menu].
The first menu will be displayed.
PAUSED
SHUTDOWN MENU
Menu
Enter/Cancel
Value
Enter/Cancel
4
Select <SHUTDOWN MENU> by pressing [Menu] and then
pressing [Item].
The message, <SHUTDOWN=NO> is shown.
SHUTDOWN=NO
5
Press [Value].
SHUTDOWN=YES
6
Check the message and press [Enter].
SAFE TO TURN OFF
PRINTER
The process to turn off the power has been conducted and the message, <SAFE
TO TURN OFF PRINTER> is shown when the printer gets ready.
7
Press the “ ” side of the power switch on the left side of the
printer body when the message <SAFE TO TURN OFF
PRINTER> is displayed.
2
Using the Printer
The power is turned off.
Turning the Printer On/Off
2-5
Page 36

About On-line and Off-line
When the printer can receive data from a personal computer and is able to print the
data is called <on-line>, and when the printer cannot receive data it is called <offline>. The printer should be off-line when you operate the printer using the menu on
2
Using the Printer
the control panel.
On-line
The printer must be on-line in order to print data received from a personal
computer. Make sure that the printer is on-line before you send a job to the printer.
If the printer is not on-line, bring the printer on-line as described in the following
procedure. The printer automatically comes on-line when it is turned on.
Go
1
Press [Go] to turn on the On Line indicator.
The printer comes on-line and is ready for printing.
IMPORTANT
•
If there is an error in the printer (when the Alarm indicator (orange) is on or the digit
part of the message is flashing), the printer will not become on-line. Eliminate the
cause of the error before bringing the printer on-line.
•
The printer does not come on-line during operations such as selecting a menu
function or a paper feed method, or setting the paper size. Complete the operation
before bringing the printer on-line.
•
Do not open the cover of the printer or remove the paper cassette while printing. If
the cover is opened or the paper cassette is removed, the printer will stop printing
and may not be able to resume printing again.
● Saving Power Consumption (Sleep Mode)
After a specific time period has passed without any operation or without any
data sent from the personal computer, the printer automatically switches to
Sleep Mode. Sleep Mode is automatically cancelled when any of the buttons on
the control panel are pressed or an error occurs. Sleep Mode is also canceled if
the printer has received data while it is on-line. Sleep Mode is also cancelled
when the error has been cancelled while the printer is off-line.
2-6
About On-line and Off-line
Page 37

Off-line
The printer must be off-line when you use the menu on the control panel of the
printer, to select the paper feeding method or set the paper size. Check that the
printer is in the off-line state before you use keys on the control panel. If not, take
the printer off-line as described in the following procedure.
Go
1
Press [Go] to turn off the On Line indicator.
The printer gets ready for operation using the control panel.
IMPORTANT
•
If you try to print data from a personal computer while the printer is off-line, the
message <PAUSED> is shown and the printer is not available for printing.
•
The printer automatically goes on-line after being left off-line for more than five
minutes. However, the printer does not come on-line when an error occurs (when
the Alarm indicator (orange) is on or the digit part of the message is flashing) or
during operations such as selecting a menu function or the paper feeding method,
or setting the paper size.
2
Using the Printer
About On-line and Off-line
2-7
Page 38

Cancelling a Print Job
Follow the procedure below to cancel a print job.
2
Using the Printer
Enter/Cancel
Shift
1
To cancel a job while the printer is off-line and <PAUSED> is
displayed, press [Enter] while holding down [Shift].
NOTE
•
When the printer is connected to a personal computer via the USB or parallel
interface, use the following procedure to cancel a print job when several print jobs
have been sent to the printer.
-To cancel a print job at the printer:
Press [Go] to take the printer off-line, then press [Shift] and [Enter] at the same
time. Make sure that the <READY> message is displayed to confirm that the
printer is back on-line.
-To cancel a print job from a personal computer:
Pause the next job in the print spool, then cancel the job you want to cancel. W ait
for a while before resuming the paused job.
2-8
Cancelling a Print Job
Page 39

Input and Output of the Paper
This chapter explains the paper available for this printer and how to load and output paper.
Paper Requirements. . . . . . . . . . . . . . . . . . . . . . . . . . . . . . . . . . . . . . . . . . . . . . . . . . . . . 3-2
Printable Paper. . . . . . . . . . . . . . . . . . . . . . . . . . . . . . . . . . . . . . . . . . . . . . . . . . . . . . . . . . . . . . .3-2
Paper You Cannot Use . . . . . . . . . . . . . . . . . . . . . . . . . . . . . . . . . . . . . . . . . . . . . . . . . . . . . . . . .3-5
Storing Paper . . . . . . . . . . . . . . . . . . . . . . . . . . . . . . . . . . . . . . . . . . . . . . . . . . . . . . . . . . . . . . . .3-7
Handling Paper . . . . . . . . . . . . . . . . . . . . . . . . . . . . . . . . . . . . . . . . . . . . . . . . . . . . . . . . . . . . . .3-7
Selecting Paper Feeding. . . . . . . . . . . . . . . . . . . . . . . . . . . . . . . . . . . . . . . . . . . . . . . . . .3-8
Paper Orientation . . . . . . . . . . . . . . . . . . . . . . . . . . . . . . . . . . . . . . . . . . . . . . . . . . . . . . . . . . . . .3-8
Paper Feeding Method. . . . . . . . . . . . . . . . . . . . . . . . . . . . . . . . . . . . . . . . . . . . . . . . . . . . . . . . .3-9
Paper Delivery Method. . . . . . . . . . . . . . . . . . . . . . . . . . . . . . . . . . . . . . . . . . . . . . . . . .3-11
Face-down Tray . . . . . . . . . . . . . . . . . . . . . . . . . . . . . . . . . . . . . . . . . . . . . . . . . . . . . . . . . . . . .3-11
Printing from the Paper Cassette . . . . . . . . . . . . . . . . . . . . . . . . . . . . . . . . . . . . . . . . . .3-12
Loading Paper in the Paper Cassette . . . . . . . . . . . . . . . . . . . . . . . . . . . . . . . . . . . . . . . . . . . .3-12
Printing from the Multi-Purpose Tray . . . . . . . . . . . . . . . . . . . . . . . . . . . . . . . . . . . . . . . 3-17
Guidelines for Using the Multi-Purpose Tray . . . . . . . . . . . . . . . . . . . . . . . . . . . . . . . . . . . . . . .3-17
Loading Paper in the Multi-Purpose Tray . . . . . . . . . . . . . . . . . . . . . . . . . . . . . . . . . . . . . . . . . .3-18
Setting the Paper Size for the Multi-Purpose Tray . . . . . . . . . . . . . . . . . . . . . . . . . . . . . . . . . . .3-21
Printing the First Sheet on Letterhead . . . . . . . . . . . . . . . . . . . . . . . . . . . . . . . . . . . . . . . . . . . .3-22
Using the Multi-Purpose Tray as a Manual Feed Station . . . . . . . . . . . . . . . . . . . . . . . . . . . . . .3-24
Printing Envelopes from the Multi-Purpose Tray. . . . . . . . . . . . . . . . . . . . . . . . . . . . . . . 3-25
Before Loading Envelopes . . . . . . . . . . . . . . . . . . . . . . . . . . . . . . . . . . . . . . . . . . . . . . . . . . . . .3-25
Loading Envelopes. . . . . . . . . . . . . . . . . . . . . . . . . . . . . . . . . . . . . . . . . . . . . . . . . . . . . . . . . . .3-27
Cautions on Closing the Multi-Purpose Tray . . . . . . . . . . . . . . . . . . . . . . . . . . . . . . . . . . . . . . .3-30
Printing Transparencies . . . . . . . . . . . . . . . . . . . . . . . . . . . . . . . . . . . . . . . . . . . . . . . . . . . . . . .3-31
3
CHAPTER
3-1
Page 40

Paper Requirements
This section describes the size and type of paper you can use with the printer.
Printable Paper
You can use the following types of paper with this printer. To ensure optimum
3
Input and Output of the Paper
performance, only use paper that falls within the specifications listed here, (X
indicates that the paper type is supported, while - indicates that it is not supported.)
General Specifications
Type of Paper
Plain Paper 64-90 g/m2
(17-24 lb.) A5
Plain Paper B5-JIS
Plain Paper A4
Plain Paper B4*2
Plain Paper A3*2
Plain Paper Letter
Plain Paper Executive
Plain Paper Legal*2
Plain Paper 11x17*2
Custom Paper*2
Width:76.2-297mm (3”11 3/4”)
Length: 127-431 mm (5“-17”)
Heavy Paper 91-157 g/m2
(24-32 lb.)
Width: 100-297 mm (4”11 3/4”)
Length: 98-431.8 mm (3 7/8“17”)
Transparencies Letter
Paper Source
Multi-Purpose
Tray
✕
✕
✕✕✕
✕
✕
✕
✕
✕
✕
✕ −−
✕ −−
✕ −−
Paper Cassette
*1 ✕*1
✕
*1 ✕*1
✕
*1 ✕*1
✕
*1 ✕*1
✕
*1 ✕*1
✕
✕
*1 ✕*1
*1 ✕*1
✕
✕
*1 ✕*1
250-Sheet Paper
Feed Units
(Option)
3-2
Paper Requirements
Page 41

Paper Source
Type of Paper
Transparencies A4
Adhesive Labels Letter
Adhesive Labels A4
Monarch Envelopes *3
COM 10 Envelopes *3
C5 Envelopes *3
DL Envelopes *3
*1 Only plain paper of 64-90 g/m2 (17-24 lb.) can be loaded in the paper cassette.
*2 Load the paper in portrait orientation.
*3 Envelopes can be loaded only in landscape orientation, with the flap closed.
Multi-Purpose
Tray
Paper Cassette
✕ −−
✕ −−
✕ −−
✕ −−
✕ −−
✕ −−
✕ −−
250-Sheet Paper
NOTE
•
Printing speed may be reduced for settings such as paper orientation, size, type, and
number of print copies.
Paper Capacity of Paper Sources
Feed Units
(Option)
3
Paper Source
Type of Paper
Paper Feed Tray Paper Cassette
Plain Paper 80 g/m2 (21 lb.) About 100 sheets *4 About 250 sheets About 250 sheets
Heavy Paper 157 g/m2
(32 lb.)
Transparencies About 50 sheets
Adhesive Labels
Envelopes About 10 sheets
*4 Only about 50 sheets can be loaded for A3, B4, Ledger, and Legal size paper.
About 50 sheets
1 sheet
−−
−−
−−
−−
250-Sheet Paper
Feed (Option)
Paper Capacity of the Paper Delivery Tray
Type of Paper
Plain Paper 80 g/m2 (21 lb.) About 250 sheets
Heavy Paper 157 g/m2 (32 lb.) About 150 sheets
Paper Delivery Tray
Face-down Delivery Tray
Paper Requirements
Input and Output of the Paper
3-3
Page 42

Type of Paper
Transparencies About 100 sheets
Adhesive Labels 1 sheet
Envelopes About 10 sheets
IMPORTANT
•
The printing speed may decrease according to the printing condition such as the type
and the size of the paper used.
Paper Delivery Tray
Face-down Delivery Tray
Abbreviations of Paper Sizes
3
The size indication on the paper cassettes and paper size selector of the printer
uses the following abbreviations.
Input and Output of the Paper
Paper Size
Ledger 11X17
Legal LGL
Letter LTR
Executive EXEC
Paper size indicators on the paper
cassettes and paper size selector
Plain White Paper
Plain white paper must meet the following general requirements:
IMPORTANT
•
Paper weight must meet the specifications listed in “General Specifications,” on p.3-2.
Heavier or lighter paper can cause paper feed failures, paper jams and excessive wear
on the printer.
•
Must be precisely cut and smooth.
•
Uniform physical characteristics and free of paper dust and lint.
•
Paper must not be wrinkled, curled, torn, marked or have folded corners.
•
Delivered in sealed packs, protected from humidity and physical damage.
•
Never use any type of pre-printed paper (e.g. letterhead) that will melt, degrade, or emit
fumes at high temperatures of 195 °C (413 °F).
•
The stack of paper should contain only paper of the same size and weight. To avoid
misfeeds and paper jams, do not mix different kinds of paper in the same stack.
3-4
Coloured Paper
Coloured paper can be used in this printer provided the following requirements are
met:
Paper Requirements
Page 43

IMPORTANT
•
The paper must be able to withstand temperatures of 190 °C (374 °F) without
degradation from the printer’s fixing assembly.
•
The paper must be free of colour coating.
•
Coloured paper should meet the same specifications f or plain paper listed in the General
Specifications table. (See “General Specifications,” on p.3-2)
Heavy (thick) Paper
This printer can handle thick paper of 91-157 g/m2 (24-32 lb.). Thick paper should
be loaded on the multi-purpose tray.
IMPORTANT
•
The size of thick paper (91-157 g/m2 or 24-32 lb .) that can be loaded in the m ulti-purpose
tray is 100-297mm (4”-11 3/4”) wide and 98-431.8mm (3 7/8”-17”) long. You can load up
to about 50 sheets of the paper (157g/m
2
or 32 lb.).
Paper You Cannot Use
To avoid problems such as paper jams and printer malfunctions, the follo wing types
of paper should never be used.
IMPORTANT
•
Paper that tends to cause paper jams.
-Paper that is too thick or too thin.
-Paper that is irregular shaped.
-Paper that is wet or holding moisture.
-Paper that is torn or damaged.
-Paper that is rough, extremely smooth, or glossy.
-Paper that has holes for binding or perforations.
- Curled paper and paper with creases.
- The paper that has special coating on its surface (Coated paper dedicated to ink jet
printer, etc.).
- The adhesive labels with the base easily peeled.
- The paper that has been used once b y the printer, copy machine or other laser printers
(the back of that paper is also improper).
-Paper that has fins.
-Paper that is wrinkled.
-Paper that is folded at corners.
•
Paper that changes its quality at high temperature.
•
The paper that: uses ink that melts, burns, evaporates or emits harmful gas with the
temperature (about 150 °C or 302 °F) of the fixing assembly.
- Heat-sensitive paper.
-Paper used for colour printing with a processed surface.
-Paper with a special coating on its surface. (Coated paper for ink jet printers, etc.)
3
Input and Output of the Paper
Paper Requirements
3-5
Page 44

3
Input and Output of the Paper
-Paper with adhesive on its surface.
•
Paper that causes failure or damage to the printer
- Carbon paper.
-Paper with staples, clips, ribbons or tapes.
-Paper that has been used once by the printer, copy machine or other laser printers (the
back of that paper is also improper).
•
Paper that is difficult for the toner to adhere to.
-Paper with rough surfaces such as rough paper and Japanese paper.
-Paper containing thick fibers.
-Paper with special coating on its surface. (Coated paper for ink jet printers, etc.)
Transparency Film
The transparencies may sometimes stick together. We recommend that you f an the
transparencies, while holding them by the edges, before loading them in the multipurpose tray.
IMPORTANT
•
Use only transparencies designed to this printer. If other types of transparency are used,
it may cause a paper feed jams or a reduction in print quality.
•
Be sure to load transparencies in landscape orientation.
Adhesive Labels
Be sure to load adhesive labels face down into the multi-purpose tray.
IMPORTANT
•
Load adhesive labels only in the
cassette, it may cause irrecoverable paper jams or a printer malfunction.
•
Never use such labels as follows. Paper jams that are hard to clear or a printer failure
may occur if the paper does not meet the specifications.
-Paper with partly detached label or partially printed paper.
- The labels partly used and with part of some labels turned upside-down exposing the
sticky surface.
- The labels that are easy to peel from the base.
•
Be sure to load adhesive labels one sheet at a time in landscape orientation.
•
Take out each sheet of the printed adhesive labels every time it has been discharged.
multi-purpose tray
. If they are loaded in the paper
3-6
Envelopes
Close the flap and press the envelope with hands to let the air out of it. Flatten it
well and load it with face down to the paper feed tray. For details including setting
procedure, See “Loading Envelopes,” on p.3-27.
IMPORTANT
•
Never use the following types of envelope. Paper jams which are hard to recover and
printer failure may occur when paper type out of specification is used.
Paper Requirements
Page 45

-Envelopes with fasteners or snaps.
-Envelopes with a window cut.
-Envelopes with wrinkles or creases.
-Envelopes with very irregular thickness at the folds or overlaps.
-Envelopes with irregular shape other than rectangle.
•
Do not print on the back of envelopes.
•
Be sure to load envelopes in landscape orientation.
Storing Paper
Handling and storing paper properly will ensure high print quality and prevent
potential paper jams. Using paper that is crumpled or e xposed to moisture or direct
sunlight during improper storage or handling can contribute to poor print quality and
paper jams. Follow these guidelines when you store and handle paper.
IMPORTANT
•
Choose an appropriate location for storage.
For best performance, keep the ambient storage and work area temperature at 20 °C
(±3%) or 68 °F (±5%). Keep the relative humidity at 45% (±5%).
•
Guard against moisture.
Paper quality degrades in a moist environment. Store all unused paper in its wrapper.
Never store paper on the floor where water and moisture can collect. In areas of high
humidity you may need to store paper in a specially designed storage box.
•
Avoid direct sunlight.
Exposure to direct sunlight can dramatically degrade paper quality. Store paper away
from sunlight and keep unused paper in its wrapper.
•
Avoid sudden changes in temperature or humidity.
If paper is moved between locations that differ widely in temperature or humidity, it may
curl. If this situation cannot be avoided, store the paper in the work area by the printer for
at least one day to give the paper time to adjust to the new conditions.
•
Avoid physical damage to stored paper.
Store paper on a flat surface to avoid creasing or curling. Never store paper on its end or
lean it against something.
3
Input and Output of the Paper
Handling Paper
IMPORTANT
•
Check the paper and ensure it is not torn, folded or otherwise damaged.
•
Leave unused paper in its wrapper.
•
Never mix different types of paper when you load the cassette or Multi-Purpose tray.
•
Always wait until the cassette or tray is empty before loading fresh paper. This will help
avoid paper jams.
•
If paper in the output tray is excessively curled, turn over the paper stack in the cassette
or tray.
Paper Requirements
3-7
Page 46

Selecting Paper Feeding
This section describes how to select the paper source for print jobs.
Paper Orientation
When using pre-printed paper (letterhead etc.), be sure to load the paper in the
3
Input and Output of the Paper
correct way as explained below:
■ Paper Cassette
The printed side should be face up with the top of the paper at the front.
3-8
■
Multi-Purpose T ray
The printed side should be face down and placed as shown below.
For details on paper feeding, See “Loading P aper in the P aper Cassette ,” on p.3-12 or See
“Loading Paper in the Multi-Purpose Tray,” on p.3-18.
Selecting Paper Feeding
Page 47

Paper Feeding Method
This printer has a multi-purpose tray in front of it, paper cassettes beneath it as the
standard equipment. The printer can automatically feed up to about 350 sheets (80
g/m2 or 21 lb.) total. In addition, up to three of 250-sheet paper feed units can
installed under the printer, so that it can automatically feed up to about 1,100
sheets (80 g/m2 or 21 lb.).
■ Ordinary type
■ With one 250-sheet paper feed unit attached
3
Input and Output of the Paper
■ With two 250-sheet paper feed units attached
■ With three 250-sheet paper feed units attached
Selecting Paper Feeding
3-9
Page 48

NOTE
•
You cannot install more than three 250-sheet paper feed units.
•
Use only Canon Paper F eed Unit PF-65 units with this printer. Y ou cannot use paper feed
units designed for other printers.
3
Input and Output of the Paper
3-10
Selecting Paper Feeding
Page 49

Paper Delivery Method
This printer delivers the printed pages as described below.
Face-down Tray
The printed pages are delivered with the printed surface facing downwards (face
down) to the face-down tr a y, which is located at the top of the printer. Each sheet of
printed paper is stacked in the order the pages were printed.
3
NOTE
•
Remove each sheet after it has been printed when printing on adhesive labels.
Paper Delivery Method
Input and Output of the Paper
3-11
Page 50

Printing from the Paper Cassette
The paper cassette compartment can hold a universal paper cassette. The cassette
can hold about 250 sheets of A3, Ledger (11x17), Letter, Legal, B5-JIS , Executive,
A5, or A4 size paper of 64-90 g/m2 (17-24 lbs.) in weight.
The paper should be set as shown below.
3
Input and Output of the Paper
IMPORTANT
•
To ensure optimum print quality and avoid paper jams, note the following items.
- Always adjust the side and rear paper guides to match the size of paper you want to
load into the cassette.
-Never remove the paper cassette while the printer is printing.
- Only use paper that is within the recommended range of paper weights.
-Never use wrinkled or curled paper into the cassette.
- The 250 Sheet Universal Cassette can hold about 250 sheets of paper with a weight of
-Never stack paper in the cassette higher than the limit guide located inside the
-For details about what kind of paper can be used, see “Printable Paper,” on p.3-2.
•
The paper volume status bar on the right of the cassette allo ws y ou to find out at a glance
how much paper remains without having to remove the cassette.
2
80 g/m
cassette.
or 21 lbs.
Loading Paper in the Paper Cassette
1
Pull out the paper cassette until it stops. Remove it from the
printer body by lifting the front of the cassette slightly.
3-12
Printing from the Paper Cassette
Page 51

IMPORTANT
•
The paper cassette cannot be pulled straight out of the printer. If you use force to
pull it out horizontally, the printer or cassette maybe damaged.
•
When loading 250 sheets into the paper cassette, load the paper in two evenly
sized stacks.
•
Do not load transparencies in the paper cassette. For transparencies, use the
multi-purpose tray. (See “Printing Transparencies,” on p.3-31)
2
Adjust the cassette extension according to the paper size to
be loaded.
The lock release lever releases the cassette by pushing it inward and locks the
cassette by pushing it outward.
Shorten the extension cassette for landscape orientation.
Extend the extension cassette for portrait orientation.
Lock
Release
Lock
Release
Separation Pad
IMPORTANT
•
Gently press the lock release levers using the inside of your fingers without
applying pressure.
•
Never touch the separ ating pad located at the front side of the cassette. It may lead
to problems when feeding paper into the printer.
3
Input and Output of the Paper
Printing from the Paper Cassette
3-13
Page 52

3
Input and Output of the Paper
3
Determine the paper size you want to load. Then press and
hold the tab on the rear guide. Slide it so that it aligns with the
selected paper size. The guide should click into place.
4
Slide the side guides so that they align with the selected
paper size.
The paper guides on both sides move together.
3-14
5
Tap the stack of paper on a flat surface to properly align the
edges.
IMPORTANT
•
Fan the stack of paper well. If not, it may cause misfeeds or paper jams.
Printing from the Paper Cassette
Page 53

6
Load the stack of paper so that it rests snugly against the rear
guide, and side guides.
Limit Mark
IMPORTANT
•
Make sure the paper stack is not above the limit guides as shown in the illustration.
7
Adjust the paper size selector according to the size of the
paper loaded.
3
Input and Output of the Paper
Paper Size Selector
IMPORTANT
•
Make sure that the paper size indicated by the selector is the same as the paper
size loaded before inserting the cassette into the printer. Errors may occur if the
paper size is incorrect.
Printing from the Paper Cassette
3-15
Page 54

3
Input and Output of the Paper
8
Insert the paper cassette at a slight angle, as shown in the
figure to insert it to the printer body.
IMPORTANT
•
Do not let the paper cassette touch the floor, or other surfaces. If the paper
cassette touches other surfaces, the position of the paper volume status bar may
be moved.
•
The paper volume status bar shows how much paper remains.
•
During printing, do not open or close the paper cassette, while the paper is being
fed, etc. The vibration caused by doing so, especially when loaded to full capacity,
will cause the image to move and adversely affect the quality of the printout.
9
When the cassette extension is extended, mount the cassette
protecting cover on the back of the cassette.
3-16
IMPORTANT
•
Do not put hands, push strongly or place objects on the cassette protecting cover.
Otherwise, the cover may be damaged.
Printing from the Paper Cassette
Page 55

Printing from the Multi-Purpose Tray
The multi-purpose tray can hold a variety of print media: plain paper, envelopes,
labels, transparencies and non-standard size paper. The capacity is approximately
100 sheets of cut-sheet paper (80 g/m2 or 21 lbs.). When not in use, the tray can
fold up into the printer.
Guidelines for Using the Multi-Purpose Tray
Print quality and printer life are greatly affected by what and how the print media is
used. Please read “Printable Paper,” on p.3-2 to ensure the correct print media is
used.
Use of print media not meeting the paper requirements may cause severe paper
jams or result in excessive mechanical wear of the printer.
IMPORTANT
•
Do not use the following paper in the tray:
- Moist paper
-Paper that is wavy, curled or damaged
-Folded, clipped or stapled paper
-Paper with cut-outs or perforations (not recommended)
-Paper containing materials that melt, vaporize, offset, discolour or emit dangerous
fumes at a temperature of 195°C (413°F) or higher
•
Avoid pressing or applying excessive force on the tray as this may cause damage.
- The paper stack must not exceed the limit guide.
- Do not load different paper sizes on the tray at the same time.
- Do not add paper to the tray if paper is already loaded; incorrect paper feed or a paper
jam may occur. Only add paper when the tray is empty.
- If printed pages come out of the printer all curled up, you can correct the problem by
turning over the paper stack in the tray so that the bottom sheet in the stack is now at
the top.
- If the leading edge of the paper is curled, straighten it out as much as possible before
loading it into the tray.
•
Do not set the paper guides too tight so that the paper stack bends.
- Do not set the paper guides too loose so that the paper stack is not evenly aligned.
- Do not set the paper guides too loose so as to leave room between the guides and the
paper.
- Do not place the paper into the tray at an angle.
- Do not set the paper so that the trailing edge is at an angle.
3
Input and Output of the Paper
Printing from the Multi-Purpose Tray
3-17
Page 56

3
Input and Output of the Paper
Loading Paper in the Multi-Purpose Tray
Loading Paper (other than envelopes)
To load plain paper, thick paper , labels, or transparencies in the multi-purpose tray,
follow the steps of procedure described below.
IMPORTANT
•
Data cannot be printed in the 5mm wide border of the paper.
•
Be sure to set transparencies and labels in landscape orientation.
•
Use only transparencies dedicated to this printer. If other types of transparencies are
used, it may cause a paper feed failure or deterioration in print quality.
1
Grasp the tabs on either side of the multi-purpose tray and
gently pull it open.
3-18
IMPORTANT
•
Support the tray with both hands when opening it.
•
When loading paper larger than B4, open the extension tray.
•
To avoid damaging the multi-purpose tray and extension tra y, do not place anything
other than paper on them. In addition, avoid pressing or applying excessive force
on the tray as this may damage it.
Printing from the Multi-Purpose Tray
Page 57

•
To avoid damaging the multi-purpose tray, do not close the multi-purpose tray with
the extension tray left opened.
2
Fan a stack of paper, then tap the stack of paper on a flat
surface to properly align the edges.
IMPORTANT
•
When fanning or aligning transparencies, always hold the edges, where possible,
to avoid touching the print side.
•
Be sure to load a stack of transparencies after thoroughly fanning them. If not, the y
can be fed with overlapped causing paper jams.
•
Take care not to mark/stain the print side of transparencies with fingerprints/dust or
oil. They may cause poor printing.
•
If the leading edge of the paper is bent or curled, straighten out the paper before
loading it into the tray.
3
3
Set the paper guide width slightly larger than the paper width.
Printing from the Multi-Purpose Tray
Input and Output of the Paper
3-19
Page 58

3
Input and Output of the Paper
4
Insert the paper stack as far as it will go into the printer, with
the print side facing down and the top of the paper going into
the printer first.
Press the paper stack so it is below the limit guide.
Limit Guide
IMPORTANT
•
Make sure that the leading edge of the paper is inserted all the way into the tray so
that it is below the paper feed roller. The paper sensor for the tray is located
underneath the paper feed roller. Please note the following points when loading
small size paper in the tray. (If the paper is not loaded correctly, the paper will not
be detected by the printer and a message will appear asking you to load paper in
the tray.)
•
Make sure that the paper guides are set correctly.
•
Make sure that the paper is loaded correctly and that the leading edge is fully
inserted into the printer.
•
Always insert paper into the multi-purpose tray with the side you want to print on
facing down. To avoid misfeeds and paper jams, paper should be inserted into the
tray with the correct side as the leading edge.
•
Do not load adhesive labels with plain paper. If you want to load adhesive labels
when plain paper is loaded, remove all the plain paper, then load the adhesive
labels.
•
Check the right side of the adhesive labels. Load them face down into the multipurpose tray one sheet at a time.
•
Be sure to load adhesive labels in landscape orientation.
3-20
NOTE
•
When the paper such as A4- or letter-sized paper is loaded in the landscape
orientation, the left side of paper will be the top end of image as viewed from the
front of the main unit.
•
When the paper such as B4- or A3-sized paper is loaded in the portrait orientation,
the far side of the paper will be the top end of image.
Printing from the Multi-Purpose Tray
Page 59

5
Slide the side guides so that they closely fit the right and left
edges of the paper.
IMPORTANT
•
Be sure to set the paper guides to the paper width. Misfeeds or paper jam may
occur if the paper guides are too loose or too tight.
Loading paper in the multi-purpose tray is completed. Proceed to “Setting the Paper
Size for the Multi-Purpose Tray,” on p.3-21.
Setting the Paper Size for the Multi-Purpose Tray
3
The printer does not have a paper size sensor f or the m ulti-purpose tra y. Please be
sure to set the correct paper size from the control panel. If you do not set the
correct paper size, misprints and paper jams will occur. The default paper size is
A4-size paper.
Go
1
Press [Go] to take the printer off-line.
The printer goes off-line and is ready for settings to be made from the control
panel.
Menu
Item
2
Press [Menu] until you see <FEEDER MENU> in the top line.
FEEDER MENU
3
Press [Item] until you see <MPT SIZE=> in the top line.
MPT SIZE=
Printing from the Multi-Purpose Tray
Input and Output of the Paper
3-21
Page 60

Value
4
Press [Value] until you see the size of the paper in the multipurpose tray. Letter size is shown here, as an example.
MPT SIZE=
The current setting appears on the LCD display.
MPT SIZE=
LETTER
3
Input and Output of the Paper
Enter/Cancel
Go
5
Press [Enter].
B5
A “*” appears to the right of the paper size. This indicates the selected paper
size for the multi-purpose tray.
B5 *
6
Press [Go] to turn on the On Line indicator.
The printer comes on-line and is ready for printing.
To print from the printer driver, specify the paper type in the printer driver . (See the PCL
Driver Guide.)
Printing the First Sheet on Letterhead
Follow this procedure to print the first page on letterhead paper and the remainder
on paper from the standard paper cassette.
Go
1
Press [Go] to take the printer off-line.
At this time, make sure the On Line indicator is off. The <READY> message will
be changed to <PAUSED>.
3-22
Menu
Item
2
Press [Menu] until you see <FEEDER MENU> in the top line.
3
Press [Item].
The following message will appear in the bottom line.
FEED=CASSETTE
Printing from the Multi-Purpose Tray
Page 61

A different message <CASSETTE2> may appear if an optional Canon Paper
Feed Unit PF-65 is installed.
Value
Enter/Cancel
Item
Item
Value
Go
4
5
6
7
8
9
10
Press [Value] until you see <MPT>.
Press [Enter].
Press [Item] until you see <TRAY SWITCH> to make sure it is
on. If it is not, press Value until you see ON and press [Enter].
3
Press [Item] until you see <MPT SIZE=> in the top line.
For manual feed, you have to set the paper size for the tray because the tray has
no paper size sensor.
Press [Value] until you see the paper size you want. Then
press [Enter].
Press [Go] to bring the printer back on-line.
Input and Output of the Paper
Open the tray and load one sheet of letterhead with the print
side face-down and the top of the page inserted into the
printer.
11
12
13
Start to print with the software application.
The printer will take the first sheet from the tray and will
automatically feed remaining sheets from the standard paper
cassette.
Close the multi-purpose tray.
If you frequently print letters on letterhead paper, you may want to leave the
printer in this setting. The printer will always check the multi-purpose tray first. If
no paper is loaded, the printer will then select the standard paper cassette.
Printing from the Multi-Purpose Tray
3-23
Page 62

Using the Multi-Purpose Tray as a Manual Feed Station
Follow this procedure to use the tray as a manual feed station. In this setting, you
will have to feed one sheet at a time. Use manual feed for media that should be
printed one sheet at a time, such as overhead transparencies, which tend to stick
together when stacked.
Turning on Manual Feed
Go
1
Press [Go] to take the printer off-line.
3
At this time, make sure the On Line indicator is off. The <READY> message will
be changed to <PAUSED>.
Input and Output of the Paper
Menu
Item
Value
Enter/Cancel
Item
Value
Go
2
Press [Menu] until you see <FEEDER MENU> in the top line.
3
Press [Item] until you see <MANUAL> in the bottom line.
4
Press [Value] to change the setting to ON.
5
Press [Enter].
For manual feed, you have to set the paper size for the tray because the tray has
no paper size sensor.
6
Press [Item] until you see <MPT SIZE=> in the top line.
7
Press [Value] until you see the paper size you want to select.
Then press [Enter].
8
Press [Go] to bring the printer back on-line.
3-24
Printing from the Multi-Purpose Tray
Page 63

Printing Envelopes from the Multi-Purpose Tray
Before Loading Envelopes
Before you load envelopes in the multi-purpose tray, observe the following
precautions.
IMPORTANT
•
To avoid serious damage to the printer:
-Never use envelopes with metal or plastic fasteners or snaps.
-Never use envelopes that are torn, curled, wrinkled or damaged in any way.
- Do not use envelopes with peel-off strips.
- Do not use envelopes with any type of treated surface or lettering that might melt,
discolour or degrade at a high temperature of 195°C (413°F).
-To avoid paper jams, use only envelopes of the same size and follow the simple
procedure described below before loading a stack of envelopes into the tray.
1
Fan the stack of envelopes to make sure none of the
envelopes are stuck together.
3
Input and Output of the Paper
Printing Envelopes from the Multi-Purpose Tray
3-25
Page 64

3
Input and Output of the Paper
2
Place the envelopes on a clean, flat surface and press down
the corners to flatten the envelopes.
3
Flex the stack on all four sides to remo ve an y stiffness. Chec k
all corners. If the corners are curled, straighten them.
3-26
IMPORTANT
•
Be sure to flatten out the leading edges of the envelopes if they are curled
downwards. Otherwise a paper jam may occur.
4
Correct any dog-eared corners, then align the edges of the
stack of envelopes by tapping them on a flat surface.
Printing Envelopes from the Multi-Purpose Tray
Page 65

Loading Envelopes
The multi-purpose tray can hold Monarch, COM 10, C5, and DL envelopes . To load
envelopes in the multi-purpose tray, follow the steps below.
1
Grasp the tabs on either side of the multi-purpose tray and
gently pull it open.
IMPORTANT
•
Support the multi-purpose tray with both hands when opening it.
2
Close the envelope flap and put the envelopes on a flat
surface. Press down the corners to crease and flatten the
envelopes.
3
Input and Output of the Paper
Align the edges of the stack of envelopes on a flat surface.
Printing Envelopes from the Multi-Purpose Tray
3-27
Page 66

3
Input and Output of the Paper
3
Fan the envelopes holding them at both edges.
4
Set the side guides width slightly larger than the envelope
width.
5
Slide the stack of envelopes into the printer as far as it will go,
with the print side facing down and the flap as the leading
edge facing towards the printer. Adjust the paper guides to
the width of the envelopes.
Press the envelope stack so that it is below the limit guide. The multi-purpose tray
can hold about ten envelopes.
3-28
Limit Guide
IMPORTANT
•
The stack of envelopes must not exceed the paper limit guides.
•
Printing is only possible on the address side of the en velopes , so y ou must load the
envelopes with the flap on top and as the leading edge.
•
Make sure that the paper guides are set to the siz e of the en v elopes . Paper jams or
misfeeds may occur if they are too loose or too tight.
•
Make sure that the envelopes are not placed at an angle.
•
You must use landscape orientation when printing on envelopes.
•
Do not open the extension tray when loading envelopes in the multi-purpose tray.
Printing Envelopes from the Multi-Purpose Tray
Page 67

NOTE
•
After you have loaded the envelopes in the multi-purpose tray, but before they start
printing, please check the following items to avoid paper jams or misfeeds.
- Is the stack of envelopes bending? The stack may bend if the paper guides are too
tight.
- Are the envelopes evenly stacked? If the paper guides are loose, the envelopes may
not stack evenly.
- Is the stack straight? Do not place the stack of envelopes at an angle.
- Are the flaps of each of the envelopes separate? If the flaps of the envelopes overlap,
paper jams or misfeeds will occur.
The illustrations below show the acceptab le and unacceptab le arr angement of the flaps
for the envelopes in the stack.
Acceptable
The flap of each envelope should be separate, not overlapping the edges of any of the
other envelopes in the stack.
Unacceptable
If the flap of any of the env elopes o verlap the edges of an y of the other en v elopes in the
stack, like those in the example below, paper jams or misfeeds will occur.
flaps overlapping
Examples of unacceptable overlapping flaps
top flap and other flaps overlapping the envelopes underneath
or
top flap overlaps the envelopes underneath
3
Input and Output of the Paper
Printing Envelopes from the Multi-Purpose Tray
3-29
Page 68

3
Input and Output of the Paper
Cautions on Closing the Multi-Purpose Tray
IMPORTANT
•
To prevent damage to the top cover avoid slamming it shut.
•
Closing the multi-purpose tray:
1. Close the flap of extension tray.
2. Then slide the extension tray back into its original position.
3. Gently close the multi-purpose tray.
NOTE
•
If the multi-purpose tray does not close easily, do not try to force it shut.
1. Press down lightly at the center of the tray as shown in the illustration.
2. Gently close the multi-purpose tray.
3-30
Printing Envelopes from the Multi-Purpose Tray
Page 69

Printing Transparencies
Transparencies can only be loaded in the multi-purpose tray. About 50 sheets can
be loaded at a time.
For optimum printing results, we recommend using Canon transparencies. For
details contact your local supplier.
Follow these steps to load transparencies:
1
Before loading, fan a stack of transparencies, then tap them
on a flat surface to align the edges.
NOTE
•
When handling transparencies, always hold the edges to avoid touching the print
area.
3
Input and Output of the Paper
2
Slide the transparencies into the printer as far as they will go
11
11
, with the print side facing down. Adjust the limit guides to
the width of the stack of transparencies 2222.
2
Limit Guide
1
2
Printing Envelopes from the Multi-Purpose Tray
3-31
Page 70

IMPORTANT
•
The transparencies must not exceed the paper limit guide.
•
Take care not to scratch or mark the print area of the transparencies with
fingerprints.
NOTE
•
Remove each transparency as soon as it is delivered to the face-down tray. This will
prevent curling and paper jams.
3
Input and Output of the Paper
3-32
Printing Envelopes from the Multi-Purpose Tray
Page 71

The Printing Environment
CHAPTER
This chapter describes the keys on the control panel and how to use them to adjust the printer
settings to your own particular requirements.
What is the Printing Environment? . . . . . . . . . . . . . . . . . . . . . . . . . . . . . . . . . . . . . . . . . . 4-2
About the Printing Environment . . . . . . . . . . . . . . . . . . . . . . . . . . . . . . . . . . . . . . . . . . . . . . . . . .4-2
Quick Tour of the Printing Environment . . . . . . . . . . . . . . . . . . . . . . . . . . . . . . . . . . . . . .4-3
How the Menus Are Organized . . . . . . . . . . . . . . . . . . . . . . . . . . . . . . . . . . . . . . . . . . . . . . . . . .4-3
Going Off-line for Menu Display and Item Selection . . . . . . . . . . . . . . . . . . . . . . . . . . . . . . . . . .4-4
Making a Selection from a Menu . . . . . . . . . . . . . . . . . . . . . . . . . . . . . . . . . . . . . . . . . . . . . . . . .4-4
4
4-1
Page 72

What is the Printing Environment?
Before using the control panel of the printer you should familiarize yourself with the
keys on the control panel and how they can be used to adjust the various settings of
the printer. After you install the printer driver, you can control most routine printing
tasks from your application software. Software application settings override most of
the control panel settings.
About the Printing Environment
4
The Printing Environment
The printing environment is a collection of settings that determine how the printer
operates. These settings affect what kind of data the printer can process and how it
prints on a page. All these settings are already stored in the printer to ensure
optimum operation of your printer. Every time you turn the printer on, a range of
settings called defaults stored in the printer’s memory are enabled. Default settings
are configured at the factory before shipping. When you unpack the printer and set
it up, it is ready for operation using the factory defaults. You can change these
factory defaults to suit your own needs so they are enabled every time you turn the
printer on.
How you use the printer depends on how many built-in features and options you
intend to set up and use. If you are the only person using the printer, then your
printing environment is less complicated than someone who is connected to a
shared network with the printer set up for personality switching. Even if you hav e no
interest in adjusting the factory default settings or if they have already been done
for you, read through this chapter at least once to familiarize yourself with some of
the printer’s most important features.
4-2
What is the Printing Environment?
Page 73

Quick Tour of the Printing Environment
This is a brief introduction to the printer control panel buttons you can use to open
menus and view their contents or change their settings.
Take a few minutes to actually use the printer control panel buttons as you read
through this section.
How the Menus Are Organized
■ Quick Summary: Using the menu buttons
Button What it does
Press [Go] to take the printer off-line so you can see the menus and settings. The
Go
Menu
Item
Value
Enter
Cancel
IMPORTANT
•
If you do not press any button for more than five minutes, the printer closes the menus,
returns to the initial on-line condition and displays the <READY> message. However, the
printer does not automatically come back on-line when there is a printer error (the Alarm
indicator is lit or a warning message code is blinking on the LCD display), or when a
menu function or the paper size is being set.
printer must be off-line before you can use the menus. When you have finished
with the menus, press [Go] to bring the printer back on-line.
Press [Menu] to open the menu display and display the next menu title. Press
[Menu] repeatedly to scroll through the menu titles until you see the menu you
want to use. Press [Shift] and [Menu] repeatedly to scroll through the menu titles
in reverse order.
With the title of the menu you want to open on the LCD display, press [Item] to
display the first item in the menu. Press [Item] repeatedly to scroll through all the
item names. Press [Shift] and [Item] repeatedly to scroll through the item names
in reverse order.
With the name of the item you want to change on the LCD display, press [Value]
to display the first setting value. Press [Value] repeatedly to scroll through all the
values. Press [Shift] and [Value] to scroll through the values in reverse order.
With the value you want to select on the LCD display, press [Enter]. After you
press [Enter], a small asterisk (*) appears next to the value. This indicates that the
displayed value is the current setting.
Press [Shift] and [Enter/Cancel] to cancel the current operation.
4
The Printing Environment
Quick Tour of the Printing Environment
4-3
Page 74

4
The Printing Environment
Going Off-line for Menu Display and Item Selection
Press [Go] to switch the On Line indicator on and off. When the On Line indicator is
on, the printer is on-line and ready to print. The printer must be on-line to receive
data from the host computer.
Every time you start a print job, check the On Line indicator to ensure it is on. If y ou
press other buttons on the printer control panel while the printer is on-line, the
printer will beep to warn you that these buttons are presently disabled.
When the On Line indicator is off, the printer is off-line. The printer must be off-line
before you can use the [Menu], [Item], and [Value] buttons.
Making a Selection from a Menu
Follow this example procedure to familiarize yourself with how to use the printer
control panel buttons to view or change menu settings. The example below shows
you how to view or change the density setting.
1
Check the control panel to ensure that the Job indicator is off.
Go
2
Press [Go] to take the printer off-line.
The On Line indicator goes off and <PAUSED> is displayed in the top line.
4-4
Menu
Item
3
Press [Menu] until you see CONFIG MENU in the top line.
CONFIG MENU
4
Press [Item] to open the CONFIG MENU and display the first
item in the menu.
<JAM RECOVERY=OFF> is displayed in the bottom line of the LCD display.
Quick Tour of the Printing Environment
Page 75

Item
5
Press [Item] until you see <DENSITY> in the bottom line.
Value
Value
6
Press [Value] to scroll through the values for the DENSITY
setting.
7
If you want to change the setting, press [Value] until the
values you want is displayed. Then press [Enter].
To use a darker setting, select a higher number. A darker setting will use more
toner.
To use a lighter setting, select a lower number. A lighter setting will use less toner.
If you want to exit or return to the item level of the menu without making any
changes, press [Item].
If you want to exit or return to the menu level without making any changes, press
[Menu].
If you want to bring the printer back on-line without making any changes, press
[Go].
NOTE
•
Some menus and items will not be displayed until the corresponding optional
equipment has been installed. For example, you will not see the PS MENU or any
of the PostScript items unless the optional Adobe PostScript module has been
installed in the printer.
•
When the printer is off-line, and <PAUSED> is displayed in the printer control
panel, you can cancel a job by pressing [Enter] while holding down [Shift].
4
The Printing Environment
Quick Tour of the Printing Environment
4-5
Page 76

PostScript Printing
This chapter describes the features available with the optional Canon Adobe PostScript 3
Module A-65, which includes the Adobe PostScript 3 software.
Testing the PostScript Installation. . . . . . . . . . . . . . . . . . . . . . . . . . . . . . . . . . . . . . . . . . . 5-2
Checking the Menus . . . . . . . . . . . . . . . . . . . . . . . . . . . . . . . . . . . . . . . . . . . . . . . . . . . . . . . . . .5-2
Setting PostScript Printing Options. . . . . . . . . . . . . . . . . . . . . . . . . . . . . . . . . . . . . . . . . .5-3
Automatic Personality Switching . . . . . . . . . . . . . . . . . . . . . . . . . . . . . . . . . . . . . . . . . . . . . . . . .5-3
Dedicating the Printer to the PostScript Language . . . . . . . . . . . . . . . . . . . . . . . . . . . . . . . . . . .5-3
Setting Up the PostScript Printing Environment . . . . . . . . . . . . . . . . . . . . . . . . . . . . . . . . . . . . . .5-4
Printing the PS Font List . . . . . . . . . . . . . . . . . . . . . . . . . . . . . . . . . . . . . . . . . . . . . . . . . . . . . . . .5-4
Notes on the PostScript Personality . . . . . . . . . . . . . . . . . . . . . . . . . . . . . . . . . . . . . . . . . 5-5
5
CHAPTER
5-1
Page 77

Testing the PostScript Installation
The Adobe PostScript 3 personality is available as an option for the printer. The
descriptions in this section assume that you have already purchased and installed
the optional Canon Adobe PostScript 3 Module A-65 for Adobe PostScript 3
printing.
For more information about how to install the Canon Adobe PostScript 3 Module A65 on the printer, see the instructions in the Setup Guide.
Checking the Menus
5
PostScript Printing
After installing the PostScript module, follow the procedure below to check that you
can now display and select items from PS MENU.
Go
1
Press [Go] to take the printer off-line.
The On Line indicator should go off. <PAUSED> will appear in the display.
Menu
2
Press [Menu] to display each of the menus listed below to
check their settings.
- The PS MENU is now enabled and ready to use.
- The PERSONALITY item under the PARALLEL MENU, USB MENU and the
ETHERNET MENU is now ready to use.
- Under the TEST MENU, you can now select and print the PS Font List.
5-2
Testing the PostScript Installation
Page 78

Setting PostScript Printing Options
This section describes personality switching, setting up the PostScript en vironment,
and the PostScript menu.
Automatic Personality Switching
After successful installation of the PostScript module, the printer is set by factory
default for automatic personality switching on all the active ports. This means the
printer automatically selects the correct personality for the print job based on the
type of data it receives from the host computer. If you leave the printer set for
automatic personality switching, the printer will select the PostScript personality for
a print stream that contains PostScript data.
Dedicating the Printer to the PostScript Language
You can specify that the printer should only print PostScript print jobs. Follow the
procedure below to dedicate your printer to the PostScript personality.
5
Go
Menu
Item
1
Press [Go] to take the printer off-line.
The On Line indicator should go off. <PAUSED> will appear in the display.
2
Press [Menu] until you see <PARALLEL MENU> (USB MENU,
ETHERNET MENU) in the top line.
3
Press [Item] until you see <PERSONALITY=AUTO>.
Setting PostScript Printing Options
PostScript Printing
5-3
Page 79

Value
G
4
Press [Value] until you see <PERSONALITY=PS> (PostScript).
5
PostScript Printing
Enter/Cancel
o
5
To select PS, press [Enter].
6
Press [Go] to bring the printer back on-line.
The printer is now dedicated to the PostScript personality.
Setting Up the PostScript Printing Environment
After you have installed the optional PostScript module and tested the PostScript
personality, you can use the enabled menus and menu items to set up your
PostScript printing environment.
Printing the PS Font List
Before you try to print the font list, follo w the procedure to dedicate the printer to the
PostScript personality (See “Dedicating the Printer to the PostScript Language,” on
p.5-3).
Follow the procedure below to print the PS Font List. Samples and a description of
what each page contains are provided on the following pages.
Go
1
Press [Go] to take the printer off-line.
Menu
Item
Enter/Cancel
5-4
Setting PostScript Printing Options
The On Line indicator should go off. <PAUSED> will appear in the display.
2
Press [Menu] until you see <TEST MENU> in the top line.
3
Press [Item] until you see <PRINT PS FONTS> in the bottom
line.
4
Press [Enter] to start printing the font list.
It may take a few minutes for the font list to print.
Page 80

Notes on the PostScript Personality
After the Canon Adobe PostScript 3 Module A-65 is installed, the printer offers a
variety of PostScript 3 features. However, before you start printing, note the
following important points:
• When the PostScript personality is in use, pressing [Go] will not print data
remaining in the printer when the On Line indicator is blinking.
• If the amount of printer memory is insufficient when you print PostScript data, you
may experience some reduction in the quality of your printed images. To avoid
reduction in the quality of printed images, ensure you have enough memory in the
printer.
• Do not turn on the Level 1 Compatible option on the driver menu. This printer will
not work properly on PostScript created with this option.
• When sending data from PostScript printer driver via USB interface, be sure to
disable bi-directional support on the PostScript printer driver. Otherwise, you may
not be able to delete print data from the print spool. F ollo w the procedure below to
disable bi-directional support for the PostScript printer driver.
-For Windows 95/98/Me:
Click “Details,” then “Spool Settings” to select “Disable bi-directional support for
this printer.”
-For Windows NT4.0/2000:
Click “Ports” to remove the check mark on “Enable bidirectional support” via USB
interface
5
PostScript Printing
Notes on the PostScript Personality
5-5
Page 81

Summary of the Printer Menus
This chapter provide a brief outline of the function of each of the printer menus, and an
example of how to use them.
SHUTDOWN MENU. . . . . . . . . . . . . . . . . . . . . . . . . . . . . . . . . . . . . . . . . . . . . . . . . . . . . 6-3
About SHUTDOWN MENU . . . . . . . . . . . . . . . . . . . . . . . . . . . . . . . . . . . . . . . . . . . . . . . . . . . . . .6-3
Operation flow for SHUTDOWN MENU . . . . . . . . . . . . . . . . . . . . . . . . . . . . . . . . . . . . . . . . . . . .6-3
SECURED JOB MENU . . . . . . . . . . . . . . . . . . . . . . . . . . . . . . . . . . . . . . . . . . . . . . . . . . 6-4
Operation flow for SECURED JOB MENU . . . . . . . . . . . . . . . . . . . . . . . . . . . . . . . . . . . . . . . . . .6-4
Operation flow for SECURED JOB MENU . . . . . . . . . . . . . . . . . . . . . . . . . . . . . . . . . . . . . . . . . .6-4
TEST MENU. . . . . . . . . . . . . . . . . . . . . . . . . . . . . . . . . . . . . . . . . . . . . . . . . . . . . . . . . . . 6-5
About TEST MENU . . . . . . . . . . . . . . . . . . . . . . . . . . . . . . . . . . . . . . . . . . . . . . . . . . . . . . . . . . . .6-5
Operation flow for TEST MENU . . . . . . . . . . . . . . . . . . . . . . . . . . . . . . . . . . . . . . . . . . . . . . . . . .6-5
PCL MENU. . . . . . . . . . . . . . . . . . . . . . . . . . . . . . . . . . . . . . . . . . . . . . . . . . . . . . . . . . . .6-6
About PCL MENU. . . . . . . . . . . . . . . . . . . . . . . . . . . . . . . . . . . . . . . . . . . . . . . . . . . . . . . . . . . . .6-6
Operation flow for PCL MENU . . . . . . . . . . . . . . . . . . . . . . . . . . . . . . . . . . . . . . . . . . . . . . . . . . .6-6
PS MENU . . . . . . . . . . . . . . . . . . . . . . . . . . . . . . . . . . . . . . . . . . . . . . . . . . . . . . . . . . . . . 6-7
About PS MENU . . . . . . . . . . . . . . . . . . . . . . . . . . . . . . . . . . . . . . . . . . . . . . . . . . . . . . . . . . . . . .6-7
Operation flow for PS MENU . . . . . . . . . . . . . . . . . . . . . . . . . . . . . . . . . . . . . . . . . . . . . . . . . . . .6-7
FEEDER MENU . . . . . . . . . . . . . . . . . . . . . . . . . . . . . . . . . . . . . . . . . . . . . . . . . . . . . . . . 6-8
About FEEDER MENU . . . . . . . . . . . . . . . . . . . . . . . . . . . . . . . . . . . . . . . . . . . . . . . . . . . . . . . . .6-8
Operation flow for FEEDER MENU . . . . . . . . . . . . . . . . . . . . . . . . . . . . . . . . . . . . . . . . . . . . . . . .6-8
CONFIG MENU . . . . . . . . . . . . . . . . . . . . . . . . . . . . . . . . . . . . . . . . . . . . . . . . . . . . . . . .6-9
About CONFIG MENU . . . . . . . . . . . . . . . . . . . . . . . . . . . . . . . . . . . . . . . . . . . . . . . . . . . . . . . . .6-9
Operation flow for CONFIG MENU. . . . . . . . . . . . . . . . . . . . . . . . . . . . . . . . . . . . . . . . . . . . . . . .6-9
ENTER PASSWORD . . . . . . . . . . . . . . . . . . . . . . . . . . . . . . . . . . . . . . . . . . . . . . . . . . . 6-10
About the ENTER PASSWORD Menu. . . . . . . . . . . . . . . . . . . . . . . . . . . . . . . . . . . . . . . . . . . . .6-10
Operation flow for the ENTER PASSWORD Menu . . . . . . . . . . . . . . . . . . . . . . . . . . . . . . . . . . .6-10
JOB CONTROL MENU. . . . . . . . . . . . . . . . . . . . . . . . . . . . . . . . . . . . . . . . . . . . . . . . . .6-11
About JOB CONTROL MENU . . . . . . . . . . . . . . . . . . . . . . . . . . . . . . . . . . . . . . . . . . . . . . . . . .6-11
Operation flow for JOB CONTROL MENU . . . . . . . . . . . . . . . . . . . . . . . . . . . . . . . . . . . . . . . . .6-11
PARALLEL MENU . . . . . . . . . . . . . . . . . . . . . . . . . . . . . . . . . . . . . . . . . . . . . . . . . . . . . 6-12
About PARALLEL MENU . . . . . . . . . . . . . . . . . . . . . . . . . . . . . . . . . . . . . . . . . . . . . . . . . . . . . .6-12
Operation flow for PARALLEL MENU . . . . . . . . . . . . . . . . . . . . . . . . . . . . . . . . . . . . . . . . . . . . .6-12
6
CHAPTER
6-1
Page 82

6. Summary of the Printer Menus
USB MENU. . . . . . . . . . . . . . . . . . . . . . . . . . . . . . . . . . . . . . . . . . . . . . . . . . . . . . . . . . .6-13
About USB MENU . . . . . . . . . . . . . . . . . . . . . . . . . . . . . . . . . . . . . . . . . . . . . . . . . . . . . . . . . . . 6-13
Operation flow for USB MENU . . . . . . . . . . . . . . . . . . . . . . . . . . . . . . . . . . . . . . . . . . . . . . . . . 6-13
ETHERNET MENU. . . . . . . . . . . . . . . . . . . . . . . . . . . . . . . . . . . . . . . . . . . . . . . . . . . . .6-14
About ETHERNET MENU . . . . . . . . . . . . . . . . . . . . . . . . . . . . . . . . . . . . . . . . . . . . . . . . . . . . . 6-14
Operation flow for ETHERNET MENU . . . . . . . . . . . . . . . . . . . . . . . . . . . . . . . . . . . . . . . . . . . . 6-14
LANGUAGE MENU . . . . . . . . . . . . . . . . . . . . . . . . . . . . . . . . . . . . . . . . . . . . . . . . . . . .6-15
About LANGUAGE MENU . . . . . . . . . . . . . . . . . . . . . . . . . . . . . . . . . . . . . . . . . . . . . . . . . . . . 6-15
Operation flow for LANGUAGE MENU . . . . . . . . . . . . . . . . . . . . . . . . . . . . . . . . . . . . . . . . . . . 6-15
RESET MENU . . . . . . . . . . . . . . . . . . . . . . . . . . . . . . . . . . . . . . . . . . . . . . . . . . . . . . . .6-16
About RESET MENU . . . . . . . . . . . . . . . . . . . . . . . . . . . . . . . . . . . . . . . . . . . . . . . . . . . . . . . . . 6-16
Operation flow for RESET MENU . . . . . . . . . . . . . . . . . . . . . . . . . . . . . . . . . . . . . . . . . . . . . . . 6-16
JOB LOG MENU. . . . . . . . . . . . . . . . . . . . . . . . . . . . . . . . . . . . . . . . . . . . . . . . . . . . . . .6-17
About JOB LOG MENU. . . . . . . . . . . . . . . . . . . . . . . . . . . . . . . . . . . . . . . . . . . . . . . . . . . . . . . 6-17
Operation flow for JOB LOG MENU . . . . . . . . . . . . . . . . . . . . . . . . . . . . . . . . . . . . . . . . . . . . . 6-17
CHANGE PASSWORD. . . . . . . . . . . . . . . . . . . . . . . . . . . . . . . . . . . . . . . . . . . . . . . . . .6-18
6
About the CHANGE PASSWORD Menu . . . . . . . . . . . . . . . . . . . . . . . . . . . . . . . . . . . . . . . . . . 6-18
Operation flow for the CHANGE PASSWORD Menu. . . . . . . . . . . . . . . . . . . . . . . . . . . . . . . . . 6-18
Summary of the Printer Menus
6-2
Page 83

SHUTDOWN MENU
About SHUTDOWN MENU
This menu is used to shut down the printer. You should always use this menu to
shut down the printer if the optional Canon Hard Disk HD-65 has been installed.
See “SHUTDOWN MENU,” on p.7-8 for details.
Operation flow for SHUTDOWN MENU
Follow the procedure below to shut do wn the printer using the SHUTDO WN MENU.
To do this... Do this...
Take the printer off-line. Press [Go].
1
Open the menus. Press [Menu].
2
Open the Shutdown menu.
3
Choose an item.
4
Turn the printer off.
6
Press [Menu] until <SHUTDOWN MENU>
appears in the display, then press [Item].
Press [Enter] and wait for the message
<SAFE TO TURN OFF PRINTER> to be
displayed.
Summary of the Printer Menus
SHUTDOWN MENU
6-3
Page 84

SECURED JOB MENU
About SECURED JOB MENU
This menu is used to print secured jobs that are stored on the printer. See
“SECURED JOB MENU,” on p.7-9 for details of the various settings.
IMPORTANT
•
This menu will only appear if there is a secured job stored on the printer. Otherwise, the
TEST MENU will be the first menu displayed.
Operation flow for SECURED JOB MENU
6
To do this... Do this...
Take the printer off-line. Press [Go].
1
Open the menus. Press [Menu].
2
Press [Menu] until <SECURED JOB
MENU> appears in the display.
Press [Item] until you see the job, then
press [Enter].
Enter the password for the job by pressing
[Value] or [Shift] and [Value], then press
[Enter].
Press [Value] or [Shift] and [Value], then
press [Enter].
Summary of the Printer Menus
Open the SECURED JOB MENU.
3
Choose a secured print job.
4
Enter the password for the job
5
Enter the number of copies.
6
6-4
SECURED JOB MENU
Page 85

TEST MENU
About TEST MENU
This menu is used to print test prints and other configuration details for the printer.
See “TEST MENU,” on p.7-10 for details of the various options available from this
menu.
Operation flow for TEST MENU
Use the example procedure below to open the TEST MENU and specify the option
you want to select.
To do this... Do this...
Take the printer off-line. Press [Go].
1
Open the menus. Press [Menu].
2
Open the Test menu. Press [Menu] until you see <TEST MENU>.
3
6
Choose an item.
4
Example: PRINT JOB LOG
TEST MENU=
PRINT JOB LOG
Press [Item] until you see the item in the
display, then press [Enter].
TEST MENU
Summary of the Printer Menus
6-5
Page 86

PCL MENU
About PCL MENU
This menu is used to specify various print options for PCL print jobs. See “PCL
MENU,” on p.7-12 for details of the various settings.
Operation flow for PCL MENU
Use the example procedure below to open the PCL MENU and specify the option
you want to select.
To do this.... Do this...
6
Summary of the Printer Menus
Take the printer off-line. Press [Go].
1
Open the menus. Press [Menu].
2
Open the PCL menu.
3
Choose an item.
4
Choose a setting.
5
Bring the printer back on-line. Press [Go].
6
Press [Menu] until <PCL MENU> appears
in the display.
Press [Item] until you see the item in the
display.
Press [Value] until you see the setting you
want, then press [Enter].
To scroll through the values quickly, press and
hold [Value].
6-6
PCL MENU
Page 87

PS MENU
About PS MENU
This menu is used to specify various options for P ostScript print jobs. This menu will
only appear if the optional Canon Adobe PostScript 3 Module A-65 has been
installed. See “PS MENU,” on p.7-17 for details of the various settings.
Operation flow for PS MENU
Use the example procedure below to open the PS MENU and specify the option
you want to select.
To do this... Do this...
Take the printer off-line. Press [Go].
1
Open the menus. Press [Menu].
2
6
Open the PS menu.
3
Choose an item.
4
Choose a setting.
5
Bring the printer back on-line. Press [Go].
6
Press [Menu] until <PS MENU> appears in
the display.
Press [Item] until you see the item in the
display.
Press [Value] until you see the setting you
want, then press [Enter].
To scroll through the values quickly, press and
hold [Value].
PS MENU
6-7
Summary of the Printer Menus
Page 88

FEEDER MENU
About FEEDER MENU
This menu is used to specify the paper size loaded in each of the paper sources
and to select other paper feed options. See “FEEDER MENU,” on p.7-19 for details
of the various settings.
Operation flow for FEEDER MENU
Use the example procedure below to open the FEEDER MENU and specify the
option you want to select.
6
1
2
To do this... Do this...
Take the printer off-line. Press [Go].
Open the menus. Press [Menu].
Summary of the Printer Menus
6-8
Open the Feeder menu.
3
Choose an item.
4
Choose a setting.
5
Bring the printer back on-line. Press [Go].
6
FEEDER MENU
Press [Menu] until <FEEDER MENU>
appears in the display.
Press [Item] until you see the item in the
display.
Press [Value] until you see the setting you
want, then press [Enter].
To scroll through the values quickly, press and
hold [Value].
Page 89

CONFIG MENU
About CONFIG MENU
This menu is used to specify various configuration options for printer, such as toner
density and power saving options. See “CONFIG MENU,” on p.7-22 for details of
the various settings.
Operation flow for CONFIG MENU
Use the example procedure below to open the CONFIG MENU and specify the
option you want to select.
To do this... Do this...
Take the printer off-line. Press [Go].
1
Open the menus. Press [Menu].
2
6
Open the Config menu.
3
Choose an item.
4
Choose a setting.
5
Bring the printer back on-line. Press [Go].
6
Press [Menu] until <CONFIG MENU>
appears in the display.
Press [Item] until you see the item in the
display.
Press [Value] or [Shift] and ]Value] until you
see the setting you want, then press
[Enter].
CONFIG MENU
6-9
Summary of the Printer Menus
Page 90

ENTER PASSWORD
About the ENTER PASSWORD Menu
This menu is used to enter the password for the printer. If a password has been set
for the printer, you must enter the password to access the advanced printing option
menus. See “ENTER PASSWORD,” on p.7-26 for details.
Operation flow for the ENTER PASSWORD Menu
Use the procedure below to open the ENTER PASSWORD menu and enter the
password for the printer.
6
Take the printer off-line. Press [Go].
1
Open the menus. Press [Menu].
2
To do this... Do this...
Summary of the Printer Menus
6-10
Open the ENTER PASSWORD menu.
3
Enter the password.
4
Bring the printer back on-line. Press [Go].
5
ENTER PASSWORD
Press [Menu] until <ENTER PASSWORD>
appears in the display.
Press [Value] or [Shift] and [Value] to adjust
the digits for the password.
Page 91

JOB CONTROL MENU
About JOB CONTROL MENU
This menu is used to specify options for handling jobs received by the printer. See
“JOB CONTROL MENU,” on p.7-27 for details on the various settings.
Operation flow for JOB CONTROL MENU
Use the example procedure below to open the JOB CONTROL MENU and specify
the option you want to select.
To do this... Do this...
Take the printer off-line. Press [Go].
1
Open the menus. Press [Menu].
2
Open the Job Control menu.
3
Choose an item.
4
Choose a setting.
5
Bring the printer back on-line. Press [Go].
6
Press [Menu] until <JOB CONTROL
MENU> appears in the display.
Press [Item] until you see the item in the
display.
Press [Value] or [Shift] and [Value] until you
see the setting you want, then press
[Enter].
6
Summary of the Printer Menus
JOB CONTROL MENU
6-11
Page 92

PARALLEL MENU
About PARALLEL MENU
This menu is used to specify the default printer personality and interface settings f or
jobs received via the parallel interface port. See “PARALLEL MENU,” on p.7-28 for
details of the various settings.
Operation flow for PARALLEL MENU
Use the example procedure below to open the PARALLEL MENU and specify the
option you want to select.
6
Take the printer off-line. Press [Go].
1
Open the menus. Press [Menu].
2
To do this... Do this...
Summary of the Printer Menus
6-12
Open the Parallel menu.
3
Choose an item.
4
Choose a setting.
5
Bring the printer back on-line. Press [Go].
6
PARALLEL MENU
Press [Menu] until <PARALLEL MENU>
appears in the display.
Press [Item] until you see the item in the
display.
Press [Value] or [Shift] and [Value] until you
see the setting you want, then press
[Enter].
Page 93

USB MENU
About USB MENU
This menu is used to specify the default printer personality and interface settings f or
jobs received via the USB port. See “USB MENU,” on p.7-30 for details of the
various settings.
Operation flow for USB MENU
Use the example procedure below to open the USB MENU and specify the option
you want to select.
To do this... Do this...
Take the printer off-line. Press [Go].
1
Open the menus. Press [Menu].
2
6
Open the USB menu.
3
Choose an item.
4
Choose a setting.
5
Bring the printer back on-line. Press [Go].
6
Press [Menu] until <USB MENU> appears
in the display.
Press [Item] until you see the item in the
display.
Press [Value] or [Shift] and [Value] until you
see the setting you want, then press
[Enter].
USB MENU
6-13
Summary of the Printer Menus
Page 94

ETHERNET MENU
About ETHERNET MENU
This menu is used to specify the default printer personality and interface settings f or
jobs received via the optional Canon Ethernet Board EB-65 network card. This
menu will only appear if the optional network card has been installed. See
“ETHERNET MENU,” on p.7-32 for details of the various settings.
Operation flow for ETHERNET MENU
Use the example procedure below to open the ETHERNET MENU and specify the
option you want to select.
6
Take the printer off-line. Press [Go].
1
Open the menus. Press [Menu].
2
Open the Ethernet menu.
3
Choose an item.
4
Summary of the Printer Menus
Choose a setting.
5
Bring the printer back on-line. Press [Go].
6
To do this... Do this...
Press [Menu] until <ETHERNET MENU>
appears in the display.
Press [Value] until you see the item in the
display.
Press [Value] or [Shift] and [Value] until you
see the setting you want, then press
[Enter].
6-14
ETHERNET MENU
Page 95

LANGUAGE MENU
About LANGUAGE MENU
This menu is used to specify the default language f or the LCD displa y on the printer
control panel. See “LANGUAGE MENU,” on p.7-35 for details of the various options.
Operation flow for LANGUAGE MENU
Follow the procedure below to specify the language for the LCD display.
To do this... Do this...
Take the printer off-line. Press [Go].
1
Open the menus. Press [Menu].
2
6
Open the Language menu.
3
Choose a language for the LCD display.
4
Bring the printer back on-line. Press [Go].
5
Press [Menu] until <LANGUAGE MENU>
appears in the display, then press [Item].
Press [Value] until you see the language
you want in the display, then press [Enter].
LANGUAGE MENU
6-15
Summary of the Printer Menus
Page 96

RESET MENU
About RESET MENU
This menu is used to reset various settings to their default values. See “RESET
MENU,” on p.7-36 for details of the various items that can be reset.
Operation flow for RESET MENU
Use the example procedure below to open the RESET MENU and specify the type
of settings you want to reset to their default values.
To do this... Do this...
6
Summary of the Printer Menus
Take the printer off-line. Press [Go].
1
Open the menus. Press [Menu].
2
Open the Reset menu.
3
Choose the type of settings you want to
4
reset.
Press [Menu] until <RESET MENU>
appears in the display,
Press [Item] until you see the item you want
to reset in the display, then press [Enter].
6-16
RESET MENU
Page 97

JOB LOG MENU
About JOB LOG MENU
This menu is used to specify various options for the job log. See “JOB LOG MENU ,”
on p.7-37 for details of the various settings.
Operation flow for JOB LOG MENU
Use the example procedure below to open the JOB LOG MENU and specify the
option you want to select.
To do this... Do this...
Take the printer off-line. Press [Go].
1
Open the menus. Press [Menu].
2
Open the Job Log menu.
3
Choose an item.
4
Choose a setting.
5
Bring the printer back on-line. Press [Go].
6
Press [Menu] until <JOB LOG MENU>
appears in the display.
Press [Item] until you see the item in the
display.
Press [Value] or [Shift] and [Value] until you
see the setting you want, then press
[Enter].
6
Summary of the Printer Menus
JOB LOG MENU
6-17
Page 98

CHANGE PASSWORD
About the CHANGE PASSWORD Menu
This menu is used to set or change the password for the printer. See “CHANGE
PASSWORD,” on p.7-39 for details.
Operation flow for the CHANGE PASSWORD Menu
Use the procedure below to open the CHANGE PASSWORD menu and enter the
new password for the printer.
NOTE
•
If you set a password with this setting, the menus from JOB CONTROL MENU onward
can only be accessed by users (such as system managers) who have entered the
6
password.
Take the printer off-line. Press [Go].
1
Open the menus. Press [Menu].
2
To do this... Do this...
Summary of the Printer Menus
6-18
Open the Change Password menu.
3
Change the password.
4
Bring the printer back on-line. Press [Go].
5
CHANGE PASSWORD
Press [Menu] until <CHANGE
PASSWORD> appears in the display, then
press [Item].
Press [Value] or [Shift] and [Value] to adjust
the digits for the password, then press
[Enter].
Page 99

Printing Environment Settings
CHAPTER
This chapter explains how to adjust printer settings to meet your own particular requirements.
List of Standard Printing Environment Settings . . . . . . . . . . . . . . . . . . . . . . . . . . . . . . . .7-2
List of Advanced Printing Environment Settings. . . . . . . . . . . . . . . . . . . . . . . . . . . . . . . . 7-5
SHUTDOWN MENU. . . . . . . . . . . . . . . . . . . . . . . . . . . . . . . . . . . . . . . . . . . . . . . . . . . . . 7-8
SECURED JOB MENU . . . . . . . . . . . . . . . . . . . . . . . . . . . . . . . . . . . . . . . . . . . . . . . . . . 7-9
TEST MENU. . . . . . . . . . . . . . . . . . . . . . . . . . . . . . . . . . . . . . . . . . . . . . . . . . . . . . . . . . 7-10
PCL MENU. . . . . . . . . . . . . . . . . . . . . . . . . . . . . . . . . . . . . . . . . . . . . . . . . . . . . . . . . . .7-12
PS MENU . . . . . . . . . . . . . . . . . . . . . . . . . . . . . . . . . . . . . . . . . . . . . . . . . . . . . . . . . . . . 7-17
CONFIG MENU . . . . . . . . . . . . . . . . . . . . . . . . . . . . . . . . . . . . . . . . . . . . . . . . . . . . . . .7-22
PS MENU . . . . . . . . . . . . . . . . . . . . . . . . . . . . . . . . . . . . . . . . . . . . . . . . . . . . . . . . . . . . 7-17
ENTER PASSWORD . . . . . . . . . . . . . . . . . . . . . . . . . . . . . . . . . . . . . . . . . . . . . . . . . . . 7-26
JOB CONTROL MENU. . . . . . . . . . . . . . . . . . . . . . . . . . . . . . . . . . . . . . . . . . . . . . . . . .7-27
PARALLEL MENU . . . . . . . . . . . . . . . . . . . . . . . . . . . . . . . . . . . . . . . . . . . . . . . . . . . . . 7-28
USB MENU. . . . . . . . . . . . . . . . . . . . . . . . . . . . . . . . . . . . . . . . . . . . . . . . . . . . . . . . . . . 7-30
ETHERNET MENU. . . . . . . . . . . . . . . . . . . . . . . . . . . . . . . . . . . . . . . . . . . . . . . . . . . . . 7-32
LANGUAGE MENU . . . . . . . . . . . . . . . . . . . . . . . . . . . . . . . . . . . . . . . . . . . . . . . . . . . .7-35
RESET MENU . . . . . . . . . . . . . . . . . . . . . . . . . . . . . . . . . . . . . . . . . . . . . . . . . . . . . . . .7-36
JOB LOG MENU . . . . . . . . . . . . . . . . . . . . . . . . . . . . . . . . . . . . . . . . . . . . . . . . . . . . . . 7-37
CHANGE PASSWORD. . . . . . . . . . . . . . . . . . . . . . . . . . . . . . . . . . . . . . . . . . . . . . . . . . 7-39
7
7-1
Page 100

List of Standard Printing Environment Settings
■ How to use the list
• Menus or items that require a printer option are indicated with an asterisk (*).
• The default values are shown in bold text.
<SHUTDOWN MENU>* (See p. 7-8)
Setting Name Setting Options Description
SHUT DOWN YES, NO Shuts down the printer.
<SECURED JOB MENU>* (See p. 7-9)
Setting Name Setting Options Description
ENTER PASSWORD 7 digits Prompts you to enter the password required
for printing the selected job.
PASSWORD 7 digits Asks you to verify the password.
COPIES 1-999 Sets the number of copies to be printed for
7
INVALID PASSWORD
REENTER
<TEST MENU> (See p. 7-10)
YES, NO Asks whether or not you want to re-enter the
the secured print job.
password.
Setting Name Setting Options Description
SHOW PAGE COUNT TOTAL
SMALL
LARGE
TEST PRINT - Prints the Test Print page.
Printing Environment Settings
PRINT PCL FONTS - Prints the PCL Font List.
PRINT PS FONTS* - Prints the PS Font List.
PRINT JOB LOG - Prints the job log.
CONTINUOUS TEST - Prints the Test Print page continuously.
PRINT EN CONFIG - Prints the Ethernet configuration page.
CLEANING PAGE - Prints the cleaning page used to clean the
7-2
List of Standard Printing Environment Settings
Displays the total number of pages printed.
Displays the total number of small pages
printed.
Displays the total number of large pages
printed.
fixing assembly.
 Loading...