

Canon D1250U2F - CanoScan USB Flatbed Scanner, ScanGear Toolbox 3.1 User Manual
ww
1
Contents Index Next Page
User’s Guide
for Windows
ScanGear Toolbox 3.1
English

ww
Contents Index Previous View Next View Previous Page Next Page
2
Warning
When you use this product, you should pay attention to the following legal issues.
• Scanning of certain documents, such as bank notes (bank bills), government bonds and public certificates,
may be prohibited by law and may result in criminal and/or civil liability.
•You may be required under law to obtain authorization from a person possessing copyrights or other legal
rights to the item being scanned.
If you are uncertain of the legality of scanning any particular item, you should consult your legal adviser in
advance.
1. No part of this guide may be reproduced, transmitted, transcribed, stored in a retrieval system, or translated into any
language in any form, by any means, without the prior written permission of Canon Inc.
2. Canon Inc. reserves the right to change the specifications of the hardware and software described herein at any time
without prior notice.
3. Notwithstanding the considerable care taken in preparing this guide, please note that Canon Inc. does not accept
liability for any results arising from the operation of the equipment or software mentioned herein.
4. Portions of this guide are reproduced herein with the permission of Adobe Systems Incorporated.
• ScanGear is a trademark of Canon Inc.
• Adobe and Photoshop are trademarks of Adobe Systems Incorporated.
• Microsoft and Windows are trademarks or registered trademarks of Microsoft Corporation in the United States and/or
other countries.
• Other names and products not mentioned above may be registered trademarks or trademarks of their respective companies.
* Screen shots are taken with Windows XP in this guide.
I-0E-067A ©CANON INC. 2001

ww
Contents Index Previous View Next View Previous Page Next Page
3
ww
Contents Index Previous View Next View Previous Page Next Page
10
Chapter 1
Toolbox Basics
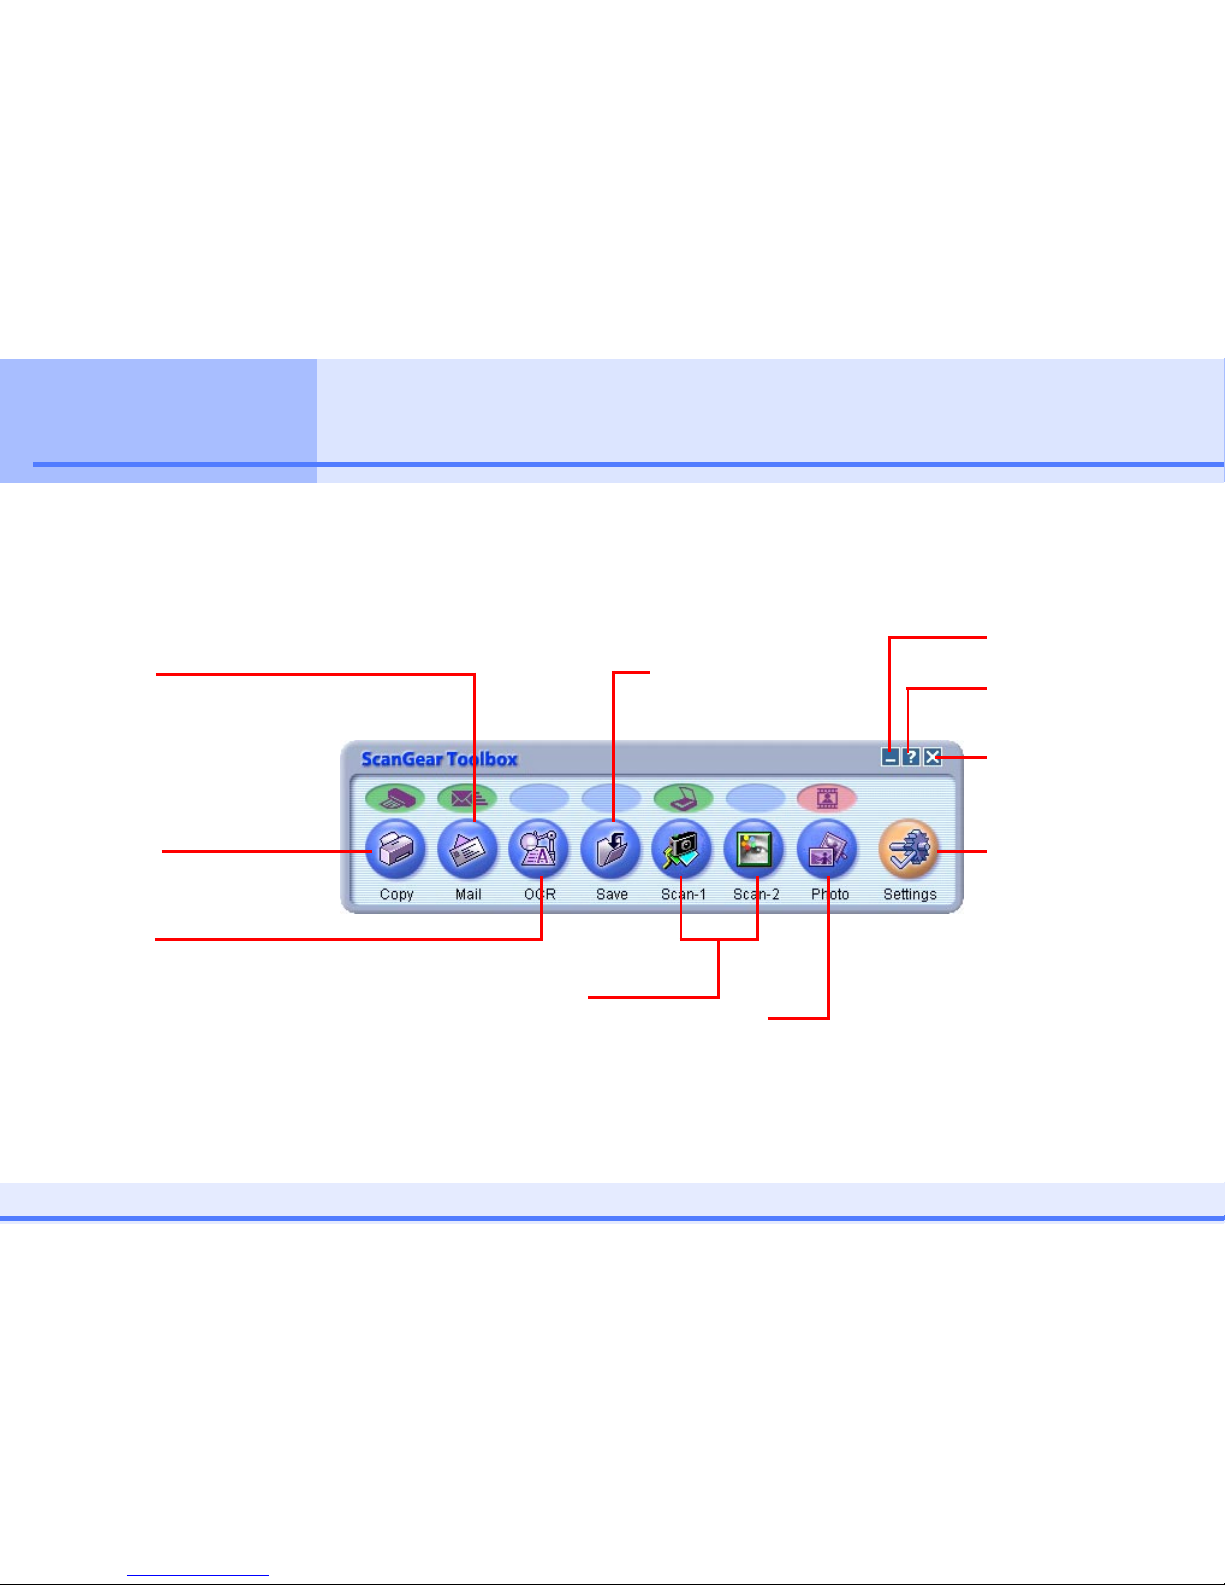
Toolbox Buttons (1/2)
This topic introduces the buttons contained in the Toolbox’s main
window. See
j
Chapter 2 “Using the Toolbox” for the
instructions to adjust each button’s settings.
Copy
After scanning, it prints the
image on a printer.
Mail
After scanning, it starts
a linked mail program
and creates a new
message with the image
file attached.
OCR
After scanning a document,
it starts a linked OCR
program (an image-to-text
converter) and opens the
image file. If you installed
the OCR program from the
CanoScan Setup CD-ROM, it
will already be linked.
Save
After scanning, it saves
the image file to disk.
Photo
After scanning, it starts a linked
program and transfers the
image to it. See jthe next
page for details.
Scan-1 and Scan-2
After scanning, it starts a
linked program and transfers
the image to it. See jthe
next page for details.
Click here to minimize
the window.
Click here and click an
object to open its help
topic.
Click here to close the
Toolbox.
Settings
The Settings button can
be used to set the
functions performed by
the scanner buttons on
the scanner’s front panel.
It can also be used to
select the scanner if more
than one is connected to
your computer.
A j symbol in the text marks a link to
a page related to that topic. Click the
j
to jump to that page.
Click this button to go
forward 1 page.
Click this button to return to a
linked page to which you jumped
1 step previously. Use it to view a
link again.
Click this button to return to the
page displayed 1 step previously. Use
it to return after jumping via a link.
Click this button to go
back 1 page.
How to Use the Buttons in this Guide
Click this button to jump
to the Index.
Click this button to jump
to the Contents page.

ww
Contents Index Previous View Next View Previous Page Next Page
4
How to Use the Buttons in this Guide ............................3
Contents.......................................................................... 4
Chapter 1 Toolbox Basics
What is the Toolbox? ...................................................... 6
Installing the Program .................................................... 7
System Requirements............................................................ 7
Installing the Toolbox ........................................................... 7
Starting/Closing the Toolbox .......................................... 8
Starting the Toolbox ............................................................. 8
Closing the Toolbox .............................................................. 9
Toolbox Buttons ............................................................ 10
Chapter 2 Using the Toolbox
Clicking a Button to Start an Action ............................. 12
Settings Common to the Dialogs .................................. 13
Scanner Settings - Image type ............................................ 14
Scanner Settings - Image quality........................................ 15
Scanner Settings - Paper size .............................................. 15
Scanner Settings - Use the scanner driver to make
advanced settings................................. 16
Save scanned image to - File name .................................... 17
Save scanned image to - Save as type................................ 17
Save scanned image to - Folder ......................................... 17
Save scanned image to - Put pictures in a subfolder
using today’s date .................... 18
Link scanned images to ...................................................... 18
Scan Button ......................................................................... 18
Copy Settings Dialog ..................................................... 19
Scanner settings - Image quality ........................................19
Scanner settings - Brightness.............................................. 20
Scanner settings - Scale....................................................... 20
Printer settings ....................................................................21
Mail Settings Dialog ...................................................... 22
Scanner settings - Upper limit of attached file ................. 22
Scanner settings - Image quality ........................................23
Link scanned images to ...................................................... 23
OCR Settings Dialog ...................................................... 24
Scanner settings - Image type ............................................ 24
Scanner settings - Image quality ........................................24
Save Settings Dialog .....................................................25
Scanner settings - Image quality ........................................25
Scan-1 and Scan-2 Settings Dialog ................................ 26
Scanner settings - Image quality ........................................26
Photo Settings Dialog ................................................... 27
Scanner settings - Original ................................................. 27
Scanner settings - Image quality ........................................28
Scanner settings - Paper size .............................................. 28
Chapter 3 Using the Scanner Buttons
Using the Scanner Buttons............................................ 29
Confirming Scanner Button Settings ................................. 29
What Happens when a Scanner Button is Pressed? .......... 30
What Scan Settings Are Used? ........................................... 31
Changing Settings after a Button Has Been Pressed ........ 31
Changing the Functions of Scanner Buttons .................. 32
Contents (1/2)

ww
Contents Index Previous View Next View Previous Page Next Page
5
Contents (2/2)
Chapter 4 Useful Hints
Selecting a Scanner ....................................................... 34
Linking to Other Application Programs ........................ 35
Appendices
File Formats................................................................... 37
Uninstalling the Toolbox ............................................... 38
List of Default Settings.................................................. 39
Index ............................................................................. 40
ww
Contents Index Previous View Next View Previous Page Next Page
6
Chapter 1
Toolbox Basics
What is the Toolbox?
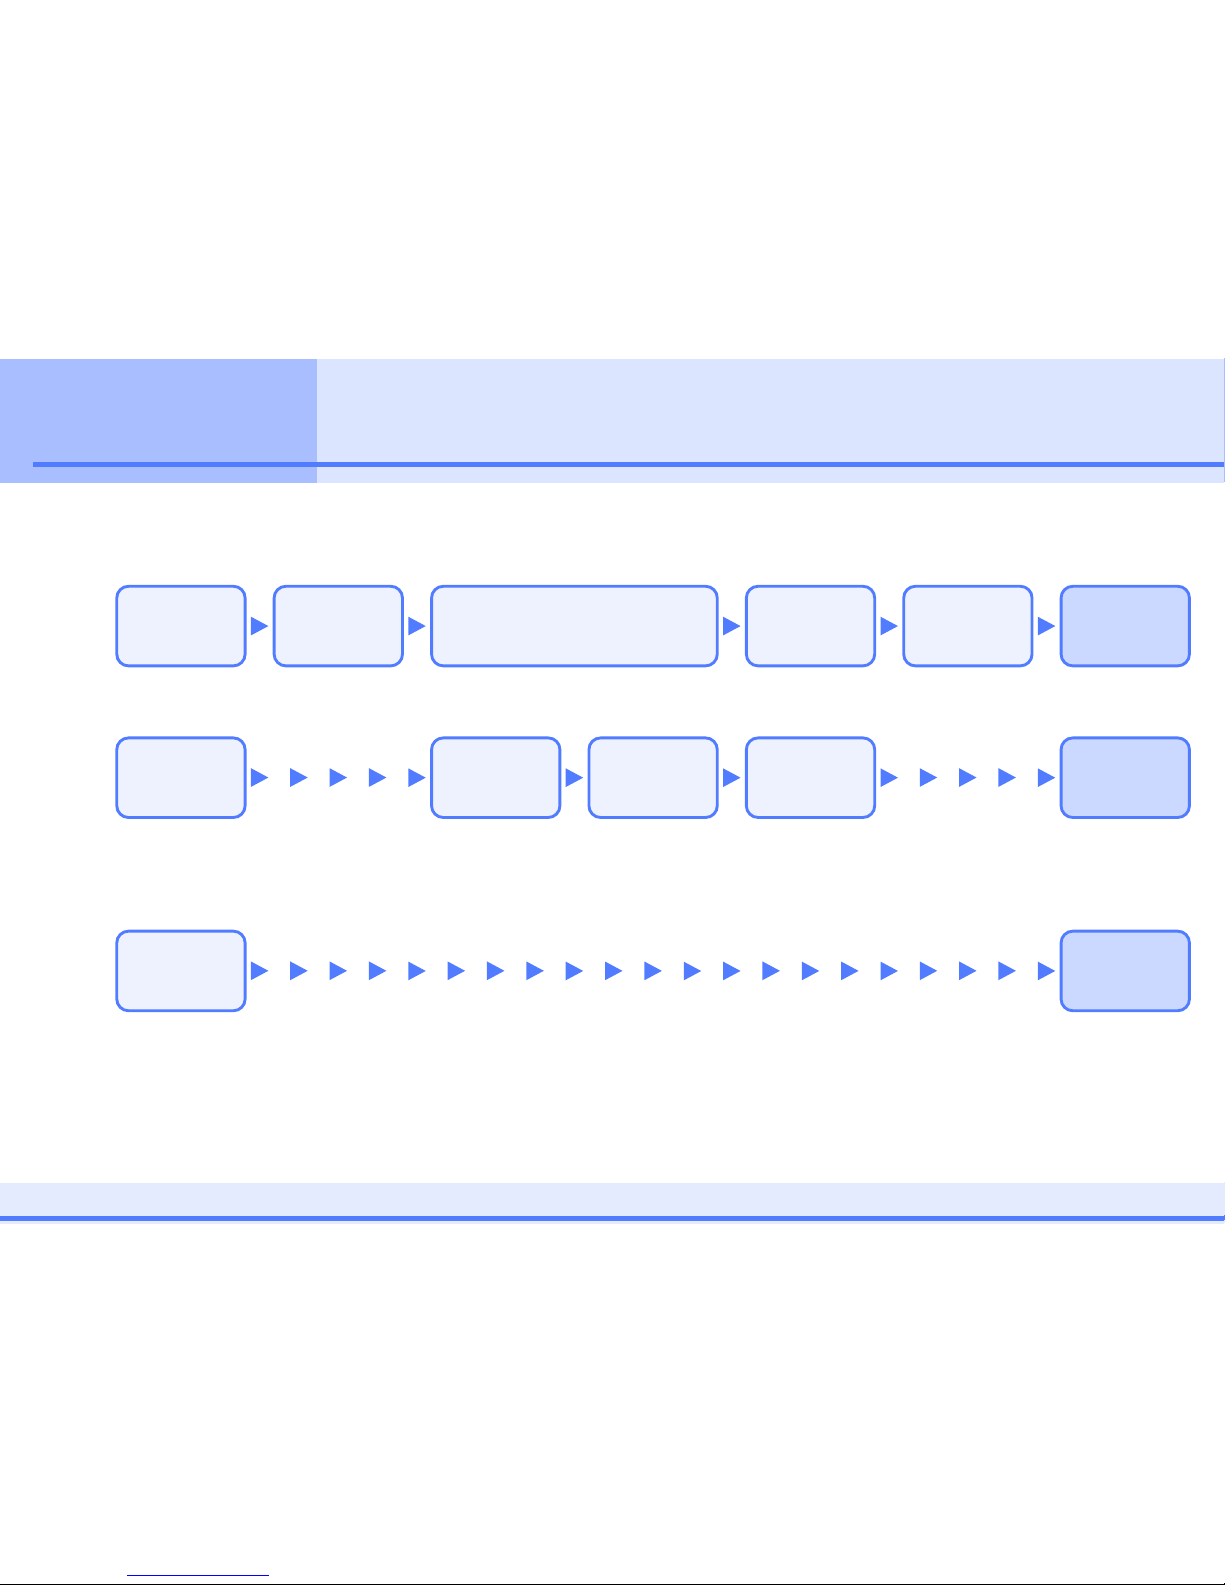
ScanGear Toolbox 3.1 (the Toolbox) is a program that makes your scanner faster and easier to use.
Without the Toolbox, for example, you would have to perform each of the following steps if you wished to scan and display a
page from a magazine in an image editing application program.
You can perform the same functions with the following steps using the Toolbox.
As you can see, the process is simplified with the Toolbox.
You can simplify it even further by using a button on the scanner.
As this demonstrates, the Toolbox makes it considerably easier and faster to use your scanner.
View the scanned
image in the
application
program.
Start the
application
program.
Start the scanner
driver.
Set the detailed
scan settings.
Initiate the scan.
Close the scanner
driver.
Start the
Toolbox.
Select a function
button in the
main window.
Set a few simple
settings in the
settings dialog.
Initiate the scan.
View the scanned
image in the
application
program.
Press the SCAN
button on the
scanner.
(The Toolbox will start and automatically perform the entire process)
View the scanned
image in the
application
program.

ww
Contents Index Previous View Next View Previous Page Next Page
7
Chapter 1
Toolbox Basics
Installing the Program
This topic explains how to install the Toolbox program.
System Requirements
The following minimum requirements must be met to
install the program.
Supported System Software:
Windows 98
Windows 2000 Professional
Windows Millennium Edition
Windows XP Professional
Windows XP Home Edition
Free Hard Disk Space: Approximately 10 MB
(before installation)
Display: 800 x 600 pixels
Medium (16 bit)/High Color
(16 bit) or higher
Installing the Toolbox
Use the CanoScan Setup CD-ROM that came with your
scanner to install the Toolbox program. Please see the
separate Quick Start Guide for installation instructions.
e
Important
• With Windows XP (Professional, Home Edition) and
Windows 2000 Professional, you should log on with a
user name set to an administrator when you install
software programs.
f
Note
• See the j “Uninstalling the Toolbox” topic in the
Appendices for instructions for removing the installed
program from your computer.
• Unless there is a need to specify one operating system,
the term Windows is used in this guide to refer
collectively to Windows 98, Windows 2000 Professional,
Windows Millennium Edition (Windows Me), Windows
XP Professional and Windows XP Home Edition.
ww
Contents Index Previous View Next View Previous Page Next Page
8
Chapter 1
Toolbox Basics
Starting/Closing the Toolbox (1/2)
This topic explains how to start and close the Toolbox.
e
Important
• Before starting the Toolbox program, confirm that the
scanner driver ScanGear CS-U has been installed and the
scanner correctly connected.
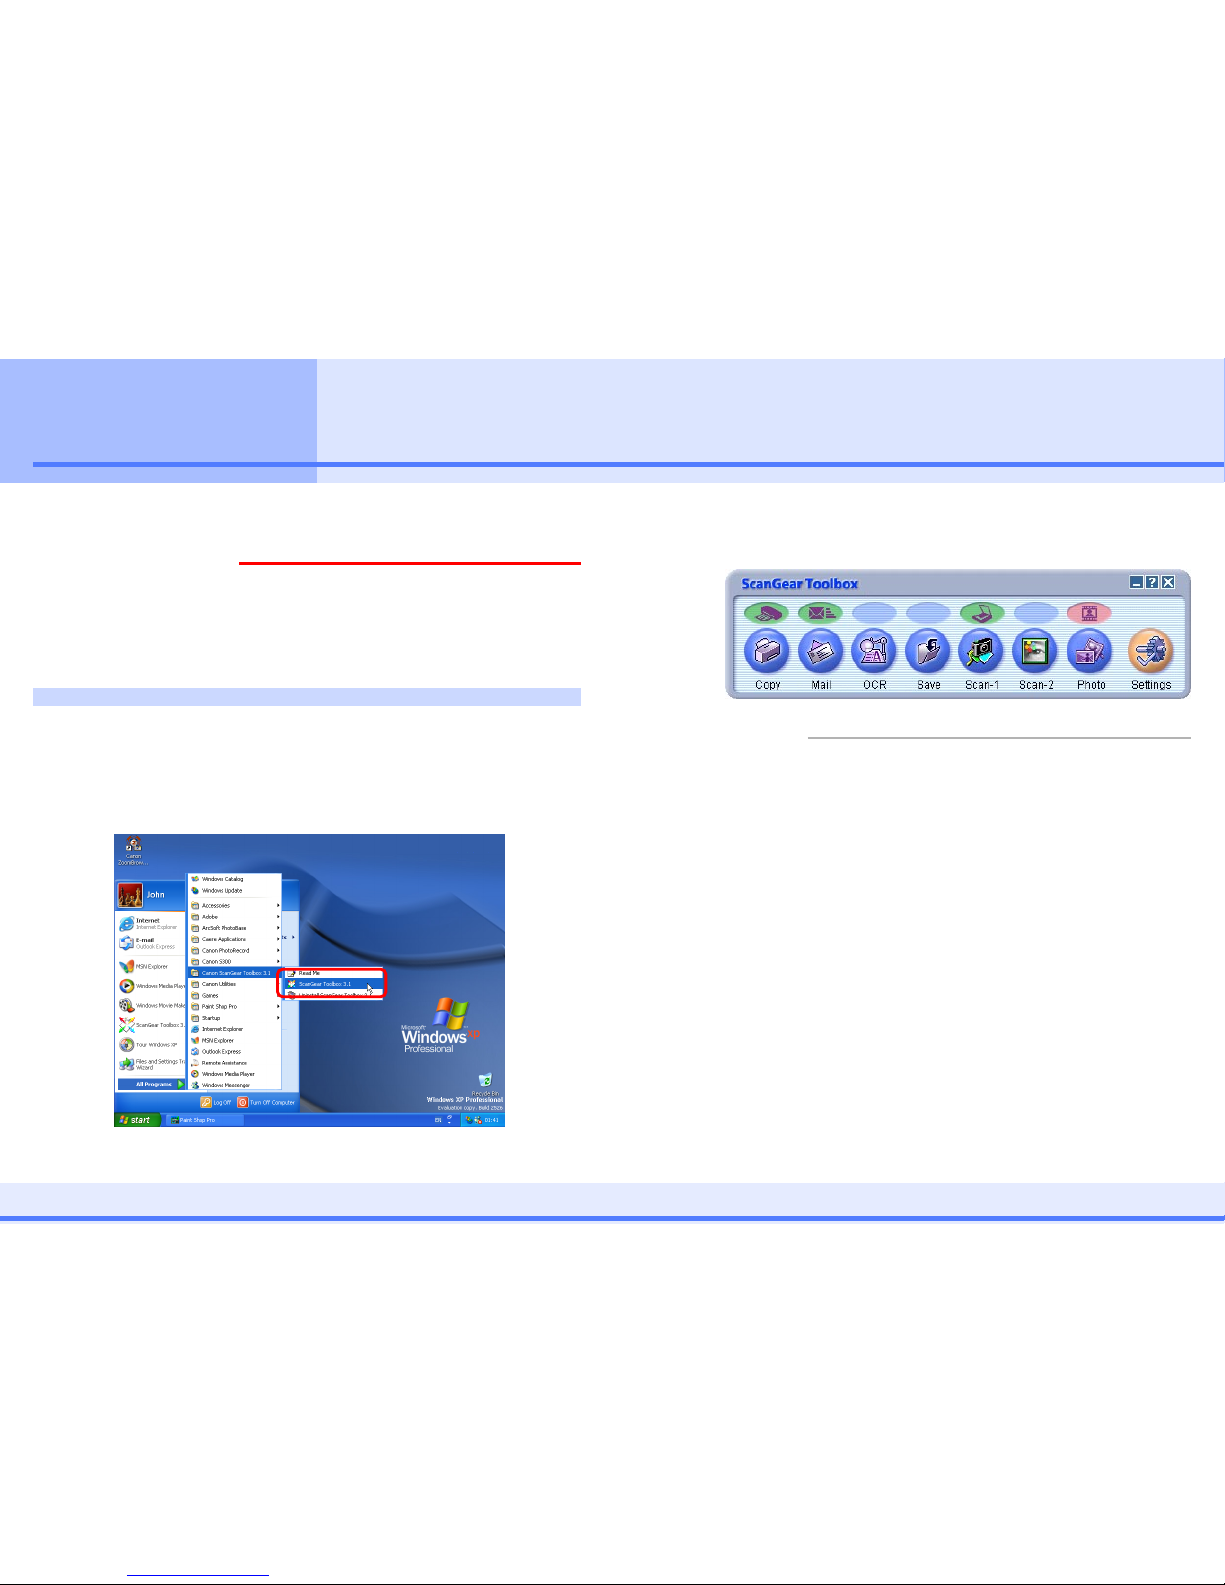
Starting the Toolbox
Use the following procedures to start the Toolbox.
Click the Windows [start] menu and select [All Programs]
or [Programs], followed by [Canon ScanGear Toolbox 3.1]
and [ScanGear Toolbox 3.1].
This will start the Toolbox and display its main window,
which will appear similar to the example below.
f
Note
• Please see jChapter 3 “Using the Scanner Buttons” for
instructions for using Toolbox with the buttons on the
scanner.
ww
Contents Index Previous View Next View Previous Page Next Page
9
Chapter 1
Toolbox Basics
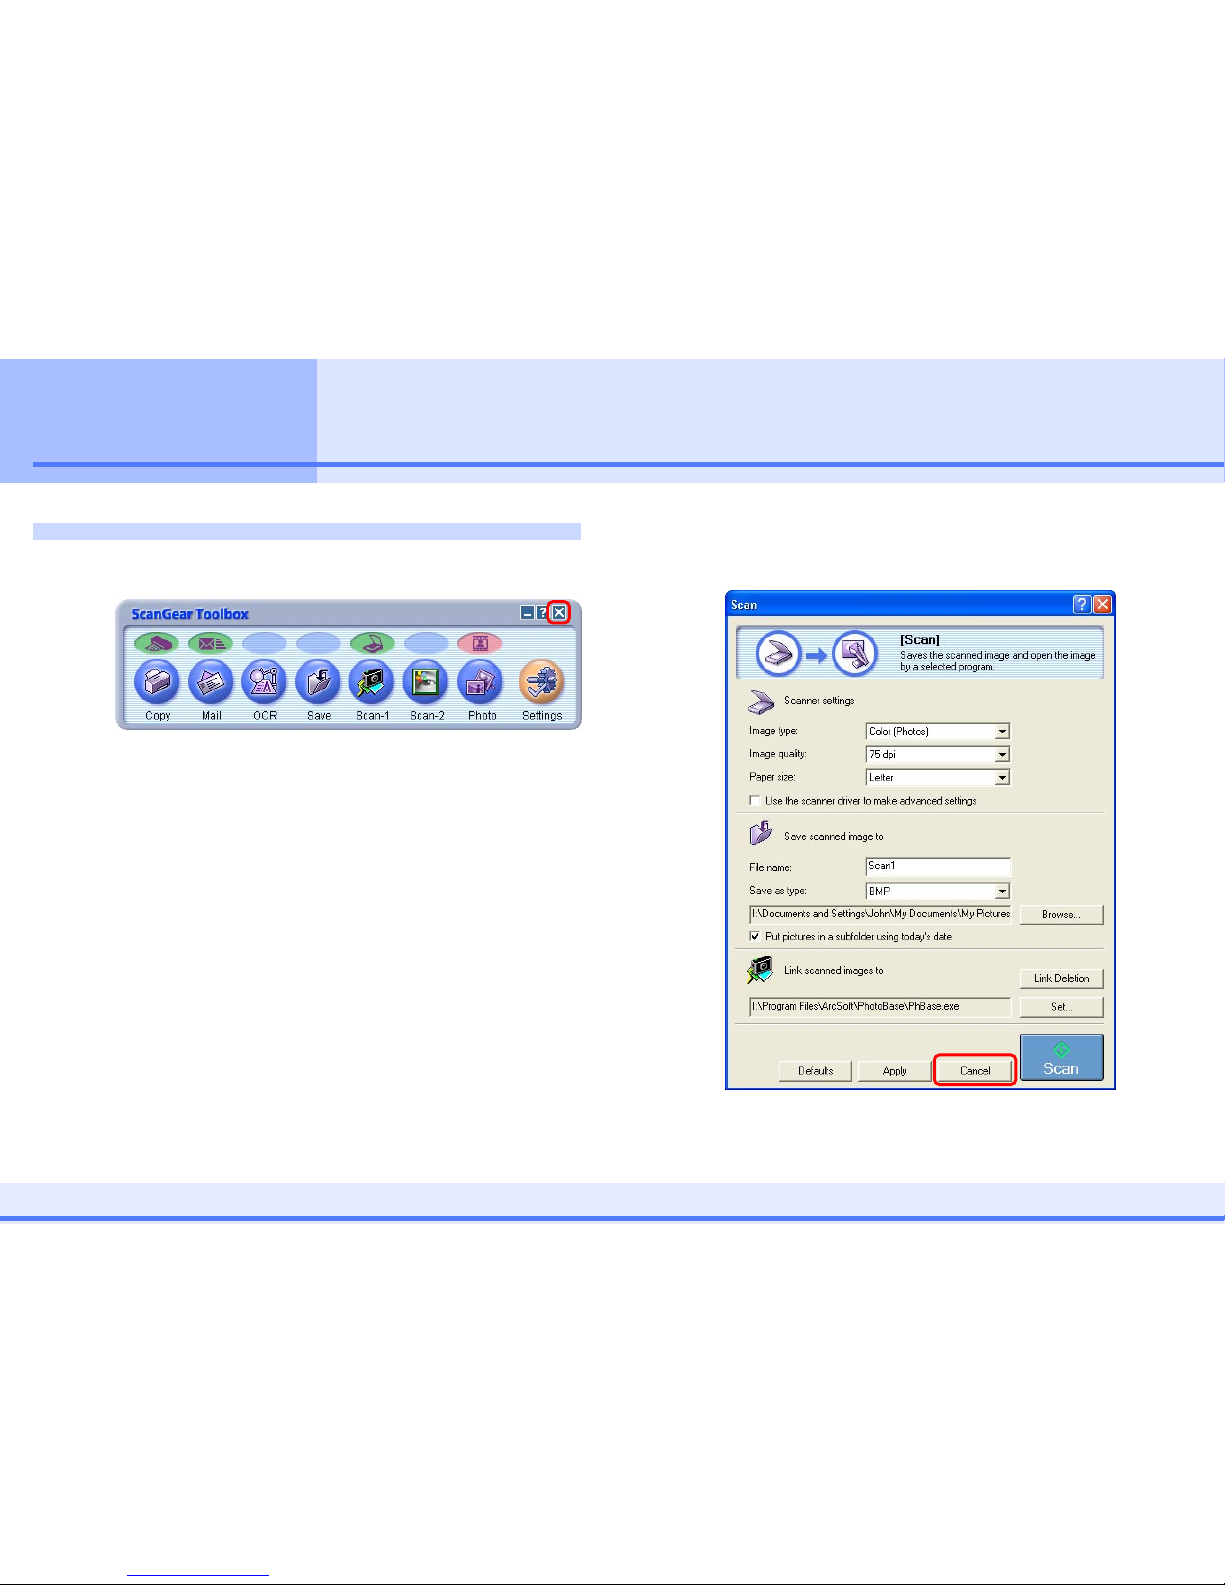
Closing the Toolbox
To close the Toolbox, click the close box on the main
window.
To close the program when you have opened a settings
dialog, click the dialog’s [Cancel] button or close box,
and then click the main window’s close box.
Starting/Closing the Toolbox (2/2)
ww
Contents Index Previous View Next View Previous Page Next Page
10
Chapter 1
Toolbox Basics
Toolbox Buttons (1/2)
This topic introduces the buttons contained in the Toolbox’s main
window. See
j
Chapter 2 “Using the Toolbox” for the
instructions to adjust each button’s settings.
Copy
After scanning, it prints the
image on a printer.
Mail
After scanning, it starts
a linked mail program
and creates a new
message with the image
file attached.
OCR
After scanning a document,
it starts a linked OCR
program (an image-to-text
converter) and opens the
image file. If you installed
the OCR program from the
CanoScan Setup CD-ROM, it
will already be linked.
Save
After scanning, it saves
the image file to disk.
Photo
After scanning, it starts a linked
program and transfers the
image to it. See jthe next
page for details.
Scan-1 and Scan-2
After scanning, it starts a
linked program and transfers
the image to it. See jthe
next page for details.
Click here to minimize
the window.
Click here and click an
object to open its help
topic.
Click here to close the
Toolbox.
Settings
The Settings button can
be used to set the
functions performed by
the scanner buttons on
the scanner’s front panel.
It can also be used to
select the scanner if more
than one is connected to
your computer.

ww
Contents Index Previous View Next View Previous Page Next Page
11
Chapter 1
Toolbox Basics
■ Scan-1 and Scan-2 Buttons
The Scan-1 button will be linked to PhotoBase and the
Scan-2 button to Photoshop Elements (or PhotoStudio
2000) if you installed all the software according to the
“Install the Software” section of the Quick Start Guide.
The respective program icons will appear as the button
icons.
If you click any one of these buttons, the Toolbox will
scan the item, start the linked application program and
transfer the image file to that application.
f
Note
•You can link other programs to the Scan-1 and Scan-2
buttons. See the j“Linking to Other Application
Programs” topic in Chapter 4.
■ Photo Button
With CanoScan D1250U2F, the Photo button will be
linked to PhotoRecord if you installed all the software
according to the “Install the Software” section of the
Quick Start Guide. When you click this button, the
Toolbox will scan the item, start PhotoRecord and
transfer the image file to it.
With CanoScan D1250U2F, the Photo button is the only
one that can be used to start scanning a film directly
without adjusting settings.
f
Note
• The Photo button can also be linked to other
application programs. The method is described in the
j
“Linking to Other Application Programs” topic in
Chapter 4.
• To scan a film with the other buttons, you have to place
a check mark beside the [Use the scanner driver to make
advanced settings] option and use the ScanGear CS-U
window to set up the scan. See j“Settings Common to
the Dialogs”.
Toolbox Buttons (2/2)
ww
Contents Index Previous View Next View Previous Page Next Page
12
Chapter 2
Using the Toolbox
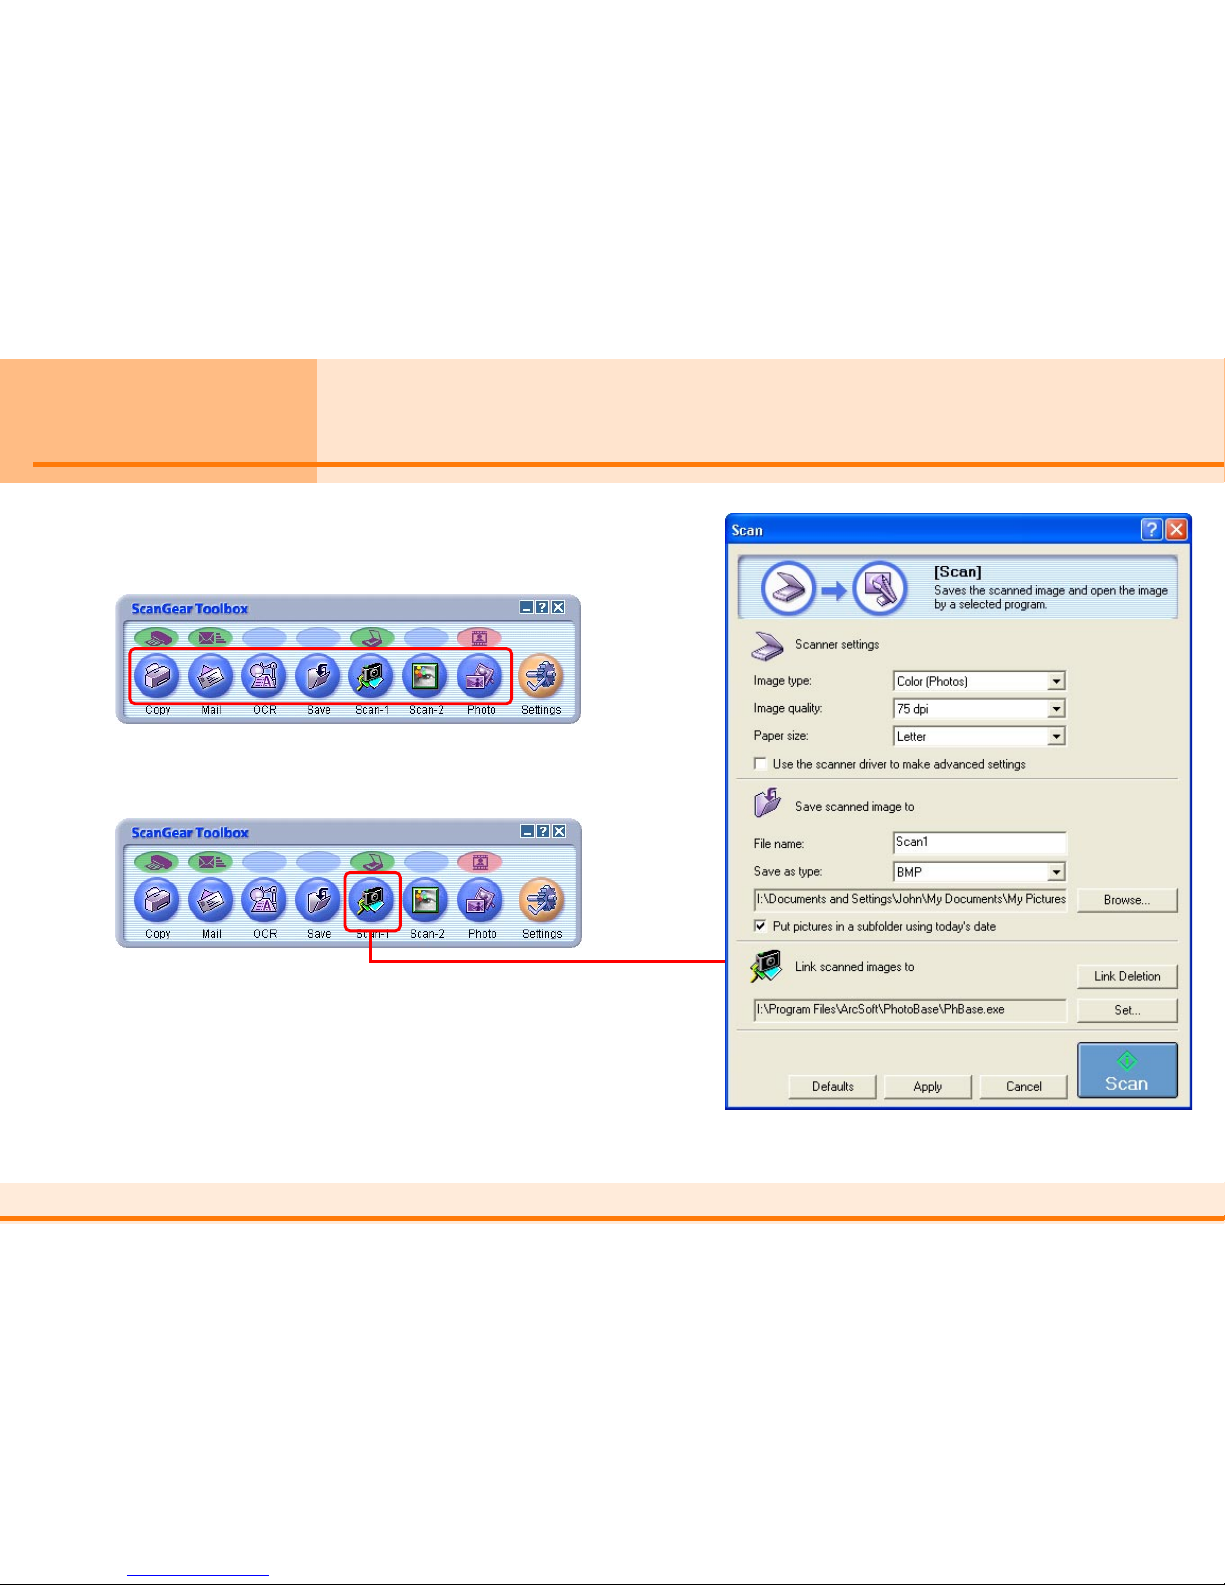
Clicking a Button to Start an Action
To start a Toolbox function, click the button in the
main window. When you click the button, the
corresponding settings dialog appears.
The explanation starting on the next page discusses the
settings common to each dialog. The unique features
of each dialog are then explained in the following
section.
For example, when you click the Scan-1 button, a Scan
settings dialog appears.
 Loading...