


azur 540A/640A V2.0
Integrated amplifier
User’s manual

CONTENTS |
|
Introduction ................................................................................................. |
3 |
Safety precautions...................................................................................... |
4 |
Important safety instructions..................................................................... |
5 |
Rear panel connections.............................................................................. |
6 |
Connecting................................................................................................... |
8 |
Front panel controls.................................................................................. |
10 |
Remote control.......................................................................................... |
12 |
Custom installation use ........................................................................... |
12 |
Multi-Room................................................................................................ |
13 |
CAP5 protection system ........................................................................... |
14 |
Troubleshooting......................................................................................... |
16 |
Technical specifications ........................................................................... |
17 |
Limited warranty ....................................................................................... |
18 |
2 Azur integrated amplifier

540A/640A V2.0 Integrated amplifier
INTRODUCTION
Thank you for purchasing this Cambridge Audio Azur range amplifier. These version 2 models are part of our commitment to the on-going development of the Azur range. We hope that you will appreciate the results and enjoy many years of listening pleasure from them.
For these version 2 models we have been able to further improve the audio quality and make them more powerful through many detailed changes and enhancements developed as a result of our on-going research programme. We have also added some new features, including support for Multi-Room use. All this proprietary engineering is housed within our low resonance, acoustically damped chassis. An Azur Navigator remote control is also provided, giving full remote control of your amplifier in an attractive and easy to use handset.
About the 540A V2.0
The 540A V2.0 features a new preamp stage with buffered inputs for lower crosstalk and improved stereo imaging, whilst the headphone output is now provided be a separate Class A headphone driver circuit. The amplifier stage has been revised with new low-noise input transistors, special driver stage PSU regulation, a new voltage amplifier topology and separate current sources for the voltage amplifier and predriver stages. These enhancements to the original circuits all work to elevate the sound quality to a new level. A new heatsink and transformer are employed and the power output is now 60 watts per channel (from 50 wpc on the V1 model).
About the 640A V2.0
Featuring all of the above enhancements, the 640A V2.0 also features separate transformer secondaries for left and right channels, twin rectifiers and separate PSU's for dual mono operation of the left and right power amplifiers. An even larger heatsink and transformer are employed and power output is now 75 watts per channel (from 65wpc on the V1 model).
Incognito Ready / Custom Install Use
Both the 540A V2.0 and 640A V2.0 now feature outputs for the new Cambridge Audio Incognito system. By plugging in one or two external Incognito Keypads and a power supply unit your V2.0 amplifier can become the hub of a simple multi-room system. In addition, Control Bus Input/Output and IR Emitter Input are provided to make it easy to integrate these units into Custom Installation systems.
Your V2.0 amplifier can only be as good as the system it is connected to. Please do not compromise on your source equipment, speakers or cabling. Naturally we particularly recommend models from the Cambridge Audio Azur range, which have been designed to the same exacting standards as our amplifiers. Your dealer can also supply excellent quality Cambridge Audio interconnects to ensure your system realises its full potential.
Thanks for taking the time to read this manual, we do recommend you keep it for future reference.
Matthew Bramble
Technical Director
Azur integrated amplifier 3
SAFETY PRECAUTIONS
Checking the Power Supply Rating
For your own safety please read the following instructions carefully before attempting to connect this unit to the mains.
Check that the rear of your unit indicates the correct supply voltage. If your mains supply voltage is different, consult your dealer.
This unit is designed to operate only on the supply voltage and type that is indicated on the rear panel of the unit. Connecting to other power sources may damage the unit.
This equipment must be switched off when not in use and must not be used unless correctly earthed. To reduce the risk of electric shock, do not remove the unit's cover (or back). There are no user serviceable parts inside. Refer servicing to qualified service personnel. If the power cord is fitted with a moulded mains plug the unit must not be used if the plastic fuse carrier is not in place. Should you lose the fuse carrier the correct part must be reordered from your Cambridge Audio dealer.
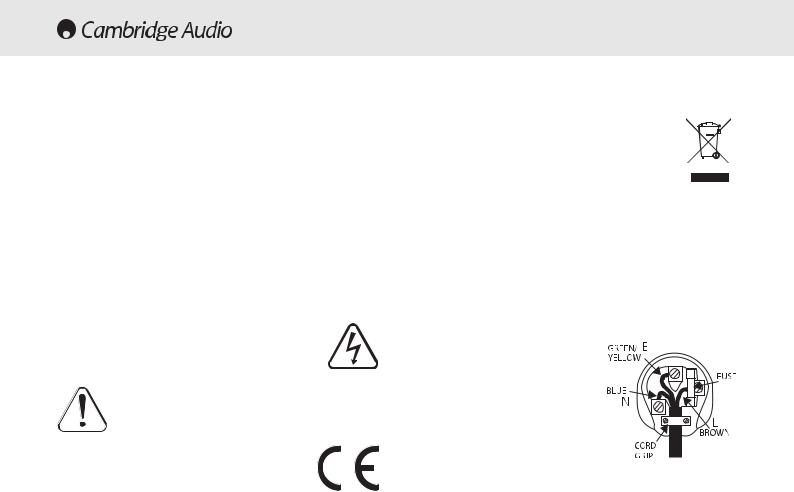
The lightning flash with the arrowhead symbol within an triangle is intended to alert the user to the presence of un- ‘dangerous voltage’ within the product’s enclosure that may be sufficient magnitude to constitute a risk of electric shock persons.
exclamation point within an equilateral triangle is intended to alert user to the presence of important operating and maintenance
instructions in the service literature relevant to this appliance.
This product complies with European Low Voltage (73/23/EEC) and Electromagnetic Compatibility (89/336/EEC) Directives when used and installed according to this instruction manual. For continued compliance only Cambridge Audio accessories should be used with this product and servicing must be referred to qualified service personnel.
The crossed-out wheeled bin is the European Union symbol for indicating separate collection for electrical and electronic equipment. This product contains electrical and electronic equipment which should be reused, recycled or recovered and should not be disposed of with unsorted regular waste. Please return the unit or contact the authorised dealer from whom you purchased this product for more information.
Plug Fitting Instructions (UK Only)
The cord supplied with this appliance is factory fitted with a 13 amp mains plug fitted with a 3 amp fuse inside. If it is necessary to change the fuse, it is important that a 3 amp one is used. If the plug needs to be changed because it is not suitable for your socket, or becomes damaged, it should be cut off and an appropriate plug fitted following the wiring instructions below. The plug must then be disposed of safely, as insertion into a 13 amp socket is likely to cause an electrical hazard. Should it be necessary to fit a 3-pin BS mains plug to the power cord the wires should be fitted as shown in this diagram. The colours of the wires in the mains lead of this appliance may not correspond with the coloured markings identifying the terminals in your plug. Connect them as follows:
The wire which is coloured BLUE must be connected to the terminal which is marked with the letter ‘N’ or coloured BLACK.
The wire which is coloured BROWN must be connected to the terminal which is marked with the letter ‘L’ or coloured RED.
The wire which is coloured GREEN/YELLOW must be connected to the terminal which is marked with the letter ‘E’ or coloured GREEN.
If your model does not have an earth wire, then disregard this instruction.
If a 13amp (BS 1363) plug is used, a 3amp fuse must be fitted, or if any other type of plug is used a 3amp or 5amp fuse must be fitted, either in the plug or adaptor, or on the distribution board.
4 Azur integrated amplifier

540A/640A V2.0 Integrated amplifier
IMPORTANT SAFETY INSTRUCTIONS
Please take a moment to read these notes before installing your Azur amplifier, they will enable you to get the best performance and prolong the life of the product. We advise you follow all instructions, heed all warnings and keep the instructions for future reference.
The unit is of Class 1 construction and must be connected to a Mains socket outlet with a protective earthing connection.
The unit requires ventilation above and below. Do not situate it on a rug or other soft surface and do not obstruct any air inlet or outlet grilles on the underside and top cover. Do not place in an enclosed area such as a bookcase or in the cabinet.
Do not install near any heat sources such as radiators, heat register, stove, or other apparatus (including amplifiers) that produce heat.
Do not defeat the safety purpose of the polarized or grounding type plug. A polarized plug has two blades with one wider than the other. A grounding type plug has two blades and a third grounding prong. The wide blade or third prong are provided for your safety. If the provided plug does not fit your outlet, consult an electrician for replacement of the obsolete outlet.
WARNING - To reduce the risk of fire or electric shock, do not expose this unit to rain or moisture. This unit must not be exposed to dripping or splashing water or other liquids. No objects filled with liquid, such as vases, shall be placed on the unit. In the event, switch off immediately, disconnect from the mains supply and contact your dealer for advice.
Ensure that small objects do not fall through any ventilation grille. If this happens, switch off immediately, disconnect from the mains supply and contact your dealer for advice.
Do not route the power cable so that it can be walked upon or damaged by other items near it.
It is recommended that when bi-amping, the same type power amplifiers are used.
This unit must be disconnected from the mains socket to be turned off completely. If you do not intend to use this unit for a long period of time, unplug it from the mains socket. Unplug this unit during lightning storms.
To clean the unit, wipe its case with a moist, lint-free cloth. Do not use any cleaning fluids containing alcohol, ammonia or abrasives. Do not spray an aerosol at or near the amplifier.
This unit is not user serviceable, never attempt to repair, disassemble or reconstruct the unit if there seems to be a problem. Servicing is required when the unit has been damaged in any way, such as power-supply cord or plug is damaged, liquid has been spilled or objects have fallen into it, the unit has been exposed to rain or moisture, does not operate normally or has been dropped. A serious electric shock could result if this precautionary measure is ignored.
This unit should be installed on a sturdy, level surface. Due to stray magnetic fields turntables should not be located nearby due to interference.
Azur integrated amplifier 5

REAR PANEL CONNECTIONS
|
|
|
|
|
|
Power |
|
|
CAP5 |
Designed in London, England |
|
|
|
|
|
|
|
Protection LED |
|
|
|
1 |
On |
|
|
|
Off |
indicators: |
|
|
|
|
|
|
|
||||
|
|
|
|
|
|
|
|
|
Fault requiring |
|
|
|
|
Mains Voltage Selector Switch |
service (DC) |
||||
|
|
|
|
|
|||||
|
|
|
|
115V/230V AC~50/60Hz |
|
||||
|
|
|
|
|
|
|
|
|
Over temperature |
Caution |
|
2 |
|
|
|
|
|
|
|
Risk of electric shock. Do not |
|
|
|
|
|
|
|
|
|
Avis |
|
|
|
|
|
|
|
|
|
de choc electrique. Ne pas |
|
|
|
|
Power AC |
|
|
|
|
Achtung |
|
|
|
|
|
|
Loudspeaker short |
||
|
|
|
|
|
|
|
|||
öffnen des gerätes. Netzstecker
|
|
|
|
|
|
|
|
|
your User's Manual |
|
|
|
|
|
|
|
|
|
|
|
|
|
|
|
|
|
|
|
|
Manufactured in |
|
|
for more information |
||||||
|
|
|
|||||||
ISO9002 approved |
|
|
|
||||||
N1863
|
|
8ohms |
Impedance4- |
|
|
|
Right |
A |
Left |
|
Right |
B |
Left |
|
|
|
|
|
|
|
|
|
|
4 |
|
|
|
Right |
A |
Left |
|
Right |
B |
Left |
|
|
Impedance 4 - 8 ohms |
|
|
||
Left
|
|
|
|
|
Multi-Room |
6 |
|
|
|
|
Amplifier V2.0 |
|
|
|
|
|
|
|
|
|
|
|
|
|
|
|
|
IR Emitter |
PSU |
Keypad 1 |
Keypad 2 |
|
|
|
|
|
|
|
|
|
In |
In |
|
|
|
|
|
In |
Out |
||
|
|
|
|
|
|
|
|
|
|
|
|
|
5 |
|
|
|
|
|
|
|
|
|
|
7 |
|
|
|
|
|
International Patent Pending LeisureTech Electronics Pty Ltd |
IR2 |
IR4 |
|
|
|
|
||
Pre |
TapeIn |
RecOut1 |
RecOut2 |
DMP/MP3 |
DVD |
Tuner/DAB |
CD |
Aux |
||||
Left
8
Right
Loudspeaker Terminals |
-Out |
Tape In |
Rec Out 1 |
Rec Out 2 |
DMP / MP3 |
DVD |
Tuner / DAB |
CD |
Aux |
|
Important |
|
|
|
|
|
|
|
|
|
|
Please ensure that loudspeaker terminals are fully tightened |
|
|
|
|
|
|
|
|
|
|
Veuillez s'assurer que les bornes de l'enceinte sont entièrement serrées |
Risk of electric shock. Do not open. Avis |
Risque de choc electrique. Ne pas ouvrir. |
Vorm öffnen des gërates. Netzstecker ziehen. |
|||||||
|
|
|
|
|
|
|
|
|
|
|
|
|
|
|
|
|
|
|
|
|
|
|
|
|
|
|
|
|
|
|
|
|
|
|
|
|
Switches the |
on and off. |
|||
|
Mains voltage selector switch |
|||
|
||||
Switches |
mains voltage between 115V and 230V. For use by |
|||
|
|
|
only. |
|
|
AC |
socket |
||
|
||||
|
|
|
|
|
Once you have completed all connections to the amplifier, plug the AC power cable into an appropriate mains socket. Your amplifier is now ready for use.
4
Two sets of loudspeaker terminals are available, A (main loudspeaker terminals) and B (secondary switchable loudspeaker terminals).
6 Azur integrated amplifier
Connect the wires from your left |
loudspeaker to the LEFT + & - |
terminals, and the wires from the |
channel loudspeaker to the |
RIGHT + & - terminals. In each case, |
red terminal is the positive |
output and the black terminal is the negative output.
Careshouldbetakentoensure nostraystrandsofwireareshortingspeaker outputs together. Please ensure that the loudspeaker terminals have been tightened adequately to provide a good electrical connection. It is possible sound quality to be affected if the screw terminals are loose.
Note: When using one pair of |
speakers with a nominal |
|
impedance of between 4-8 ohms. |
using two pairs of speakers, |
|
use speakers with a nominal impedance |
between 6-8 ohms each. |
|
|
|
|
5 |
|
|
|
|
|
Allows modulated IR commands from multi-room systems to be received by the amplifier. Commands received here are not looped out of the Control Bus. Refer to the ‘Custom Installation’ section for more information.
 Loading...